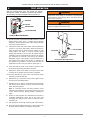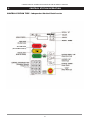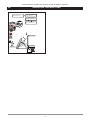
1
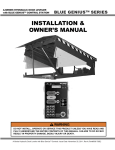
U-SERIES VERTICAL STORING DOCK LEVELER with BLUE GENIUSTM CONTROLS BLUE GENIUSTM SERIES INSTALLATION & OWNER’S MANUAL WARNING DO NOT INSTALL, OPERATE OR SERVICE THIS PRODUCT UNLESS YOU HAVE READ AND FULLY UNDERSTOOD THE ENTIRE CONTENTS OF THIS MANUAL. FAILURE TO DO SO MAY RESULT IN PROPERTY DAMAGE, BODILY INJURY OR DEATH. U-Series Vertical Storing Dock Leveler with Blue Genius™ Controls Issue Date: October 30, 2012. REV.3 (Part# 038-722E) TABLE OF CONTENTS 1. 2. 3. 4. 5. 6. 7. 8. 9. 10. 11. 12. 13. 14. 15. 16. 17. ABOUT THE VERTICAL STORING DOCK LEVELER.................................................................................................. 1.1 Owner’s Purchase Record........................................................................................................................................ INTRODUCTION............................................................................................................................................................. 2.1 Warranty Information................................................................................................................................................ 2.2 Exclusion of Liability................................................................................................................................................. 2.3 Manufacturer’s Note................................................................................................................................................. OPERATOR’S MANUAL SAFETY MESSAGE COLOR IDENTIFICATION................................................................... 3.1 Operational Safety Warnings.................................................................................................................................... LOCKOUT / TAGOUT PROCEDURE AND RULES....................................................................................................... MAINTENANCE STRUT SETUP.................................................................................................................................... 5.1 Engaging the Maintenance Strut.............................................................................................................................. 5.2 Disengaging the Maintenance Strut......................................................................................................................... STANDALONE VS DOCK ARRANGEMENT (Installation Pictorial)........................................................................... INSTALLATION INSTRUCTIONS................................................................................................................................... 7.1 Rear Curb Channel and Frame Installation.............................................................................................................. 7.2 Hydraulic Power Pack and Hose Installation............................................................................................................ 7.3 Electrical and Hydraulic Dock Installation................................................................................................................ 7.4 Deck Installation....................................................................................................................................................... 7.5 Cylinder Installation.................................................................................................................................................. TEST OPERATION......................................................................................................................................................... CONTROL STATION OPERATION................................................................................................................................. OPERATING INSTRUCTIONS........................................................................................................................................ 10.1 Functional Description............................................................................................................................................ 10.2 Stop Button Function.............................................................................................................................................. 10.3 Starting Procedure.................................................................................................................................................. 10.4 Deploying the Dock Leveler- Above Level.............................................................................................................. 10.5 Returning Dock Leveler to the Stored Position....................................................................................................... 10.6 Deploying the Dock Leveler- Below Level............................................................................................................... 10.7 Returning to Normal Lip-on-Load Bed Operation.................................................................................................... MAINTENANCE.............................................................................................................................................................. 11.1 Planned Maintenance............................................................................................................................................. 11.2 Operator Daily Inspection...................................................................................................................................... 11.3 Routine Servicing and Maintenance...................................................................................................................... 11.4 Planned Maintenance Intervals.............................................................................................................................. 11.5 Maintenance Sequence.......................................................................................................................................... 11.6 Recommended Hydraulic Fluids............................................................................................................................ 11.7 PM Checklist- Dock Equipment.............................................................................................................................. PARTS ILLUSTRATION- VERTICAL LOADING DOCK................................................................................................ COMPONENT LIST- VERTICAL LOADING DOCK....................................................................................................... RECOMMENDED SPARE PARTS................................................................................................................................. VERTICAL STORING DOCK LEVELER POWER PACK............................................................................................... SHIPMENT KIT- VERTICAL STORING DOCK............................................................................................................. TROUBLESHOOTING.................................................................................................................................................... 1 1 2 2 2 2 3 3 4 5 5 5 6 7 7 7 7 8 8 9 10 11 11 11 11 11 12 12 12 14 14 14 14 14 14 14 15 16 17 18 19 20 21 U-SERIES VERTICAL STORING DOCK LEVELER WITH BLUE GENIUS™ CONTROLS 1. ABOUT THE VERTICAL STORING DOCK LEVELER The Blue Giant U-Series Vertical Storing Dock Leveler provides a complete energy efficient seal. The dock is stored in the vertical position inside the building, allowing the overhead door to close completely, which reduces door damage, prevents energy loss and debris entry, and improves security levels. It is the perfect loading dock solution for facilities that must maintain strict temperature or humidity controls. The Blue Genius™ Touch Control Panel with advanced microprocessor technology controls the operation of the dock leveler and alerts both the driver and dock attendants of safe/unsafe conditions. Its onboard diagnostics and communications feature a user-friendly, multi-language LCD intelligent text display and keypad with supervisory override. 1. 1 OWNER’S PURCHASE RECORD OWNER’S PURCHASE RECORD Dealer: Serial Number(s): Please record information for future inquiries Date in Service: Number of Units: Door # : The manufacturer offers a full line of dock levelers, dock safety equipment, accessories, ergonomic and scissor lift equipment, and industrial trucks. Concurrent with a continuing product improvement program, specifications are subject to change without notice. Please contact the manufacturer for latest information. Some features illustrated may be optional in certain market areas. 1 U-SERIES VERTICAL STORING DOCK LEVELER WITH BLUE GENIUS™ CONTROLS 2. INTRODUCTION The following is a quick reference to important procedures that must be followed while using the Dock Leveler System. It is not intended to cover, or suggest that it does cover, all procedures necessary to ensure safe operation. All operators should be aware of and abide by all workplace safety regulations applicable to the operation of the Dock Leveler System. These laws and regulations include but are not limited to: • The Occupational Safety and Health Act (USA) • Occupational Safety and Health Acts for Individual States (USA) • Canadian Material Handling Regulations For additional information on these regulations as well as industry standards that may apply to this product, please contact: American National Standards Institute (ANSI) 1430 Broadway New York, NY 10018 (212) 642-4900 ALSO MEMBERS OF : LOADING DOCK EQUIPMENT MANUFACTURERS Loading Dock Equipment Manufacturers A Product Section of Material Handling Industry of America, A Division of Material Handling Industry 8720 Red Oak Blvd., Suite 201, Charlotte, NC, 28217-3992 Telephone: (704) 676-1190 Fax: (704) 676-1199 2.1 WARRANTY INFORMATION Thank you for purchasing Blue Giant products. We appreciate your business, and are confident that our product will serve you for many years to come. In the event that you experience a problem with our product, our Warranty Center is here to support the Blue Giant Product(s) that you have purchased. To validate warranty on recently purchased equipment, please complete and submit your information with our on-line Warranty Registration at www.BlueGiant.com. For more information about Blue Giant's Warranty Support, please contact your local Blue Giant Equipment dealer, representative or authorized partner near you. You may also visit www.BlueGiant.com or phone 1-905-457-3900. * Note that failure to validate warranty at the time of receipt can seriously affect the outcome of any claim. 2.2 EXCLUSION OF LIABILITY The manufacturer assumes no liability for damage or injury to persons or property which occur as a result of defects or faults in or incorrect use of Dock Leveler System. The manufacturer also assumes no liability for lost profits, operating downtimes, or similar indirect losses incurred by the purchaser. Injury to third parties, irrespective of its nature, is not subject to compensation. The manufacturer reserves the right to make changes at any time to the modules, components, and accessories, concurrent with its continuing product development program. Specifications, operating instructions, and illustrations included in this manual are subject to change without notice. Please contact manufacturer for the latest information. MANUFACTURER’S NOTE 2.3 MANUFACTURER’S NOTE The Dock Leveler has been carefully inspected and tested at the manufacturer’s plant prior to shipment, but should be checked upon receipt for transport damage. Any observed transport damage is to be listed on the signed copy of the freight document. Notify the freight forwarder of any damage WITHIN 48 HOURS. 2 U-SERIES VERTICAL STORING DOCK LEVELER WITH BLUE GENIUS™ CONTROLS 3. OPERATOR’S MANUAL SAFETY MESSAGE COLOR IDENTIFICATION Safety signs and messages are inserted in this manual to identify specific areas where potential hazards exist and advise when special precautions should be taken. To safeguard against personal injury (possibly leading to death) and equipment damage, know and understand the meaning of these instructions, signs, and messages. If warning decals are damaged, they must be replaced. Contact your distributor for replacements. Improper operation can cause accidents. Don’t take chances with incorrect or damaged equipment. Read and understand the procedures for safe operation and maintenance outlined in this manual. Avoid accidents by recognizing dangerous procedures or situations before they occur. This is the highest level statement. Failure to follow the listed instructions will most likely result in severe injury or death. IMPORTANT is used to draw attention to a procedure that needs to be followed to prevent machine damage. This is a statement of serious hazard. Failure to follow the listed instructions could place the individual at risk of serious injury or death. The statements used with this level of warning deal with a safe operating procedure. If the procedure is ignored the possibility of personal injury may exist. 3.1 OPERATIONAL SAFETY WARNINGS • DO NOT operate leveler with anyone standing in its path. • DO NOT service leveler unless the maintenance stand is properly engaged. See SECTION: ENGAGING MAINTENANCE STRUT • BEFORE BEGINNING ANY SERVICE PROCEDURES: – Position the dock leveler in the vertically stored position. – Disconnect the power and follow all LOCKOUT / TAGOUT procedures in this manual • DO NOT operate leveler without following the procedure below if the leveler has not been in service for an extended period of time. CRUSH HAZARD. • PROCEDURE FOR FILLING CYLINDER: – Touch and hold the ‘UP’ button (Run Pump) to operate for (35) seconds • DO NOT ground welding equipment to any hydraulic cylinder or electrical components. • DO NOT attach welder as ground to leveler platform when welding on base frame assembly. Attach welder ground to base frame assembly only. Damage to bearings or hydraulic equipment will occur. • DO NOT allow the drill to go too deeply into the box when drilling holes in the control box. Damage to the control systems may occur. • NEVER use air to blow debris from control box. Use a vacuum to remove debris from control box. • DO NOT connect green ground lead into control box or junction box until all welding has been completed. • CHECK HYDRAULIC FLUID LEVEL. Deck mounted power unit has been filled with fluid but cylinders, hoses and manifold are shipped dry. • NOTE - check motor rotation. Jog the motor until rotation has been determined. DO NOT allow the motor to run in reverse for more than a couple of seconds, because this will damage the power unit. • DO NOT force valve adjustment screws against internal stops. Damage will occur to the valve/seat. • If a procedure is not clearly defined in this manual, contact your authorized service representative. • Keep away from hinge when operating leveler. • POST SAFETY WARNINGS AND BARRICADE WORKING AREA at dock level and at ground level to prevent unauthorized use of the dock leveler during maintenance/service. • During installation, anchors must be properly torqued to obtain the necessary anchoring strength. DO NOT USE IMPACT DRIVERS. • DO NOT drive or walk onto truck/trailer until the truck/trailer is parked against the dock bumpers and the wheels are chocked or the vehicle restraint has been fully engaged and the lights have changed to GREEN inside and RED outside. • NEVER attempt to lift the lip or hold the lip out by hand. Serious personal injury could occur. • DO NOT remove lifting equipment until: a) the main cylinder has been filled. b) the maintenance stand has been installed and engaged. • ALWAYS check the rigging to make sure that it is secure before attempting to lift the unit. Never stand under any unit being lifted. • NEVER remove the wheel chocks until loading/ unloading is finished and the truck driver has been given permission to drive away from the dock. • ONLY TRAINED PERSONNEL should operate or service this equipment. • DO NOT operate leveler until truck/trailer is parked against the dock bumpers and the truck/trailer has been secured. • ALWAYS return the leveler platform to the proper stored position. • ALWAYS conduct routine inspections and maintenance. Failure to conduct could cause personal injury or damage to equipment. • ALWAYS call your authorized service representative or manufacturer immediately if a malfunction occurs. 3 U-SERIES VERTICAL STORING DOCK LEVELER WITH BLUE GENIUS™ CONTROLS 4. LOCKOUT / TAGOUT PROCEDURE and RULES ! In accordance with the rules and regulations of the Occupational Safety and Health Administration (OSHA), all affected employees must be notified that the machine or equipment will be shut down and locked out to perform repair or maintenance work. The work area must be checked to ensure that all personnel have been removed or safely repositioned. The machine or equipment power supply shall be locked in the OFF position or disconnected from the energy source. Blue Giant® strongly recommends that only OSHA-approved lockout devices be utilized. Always lockout and tagout any power source before performing any work on any electrical devices or electrical controls according to OSHA regulations and approved local electrical codes. The energy isolating device must bear a prominent warning tag indicating that work is being done on the equipment and the name of the authorized employee responsible for the lockout. It is mandatory that tagout notices not be susceptible to deterioration or illegibility due to weather conditions or exposure to chemicals and moisture. D OP O N ER OT AT E XX XX XXX XX XX XX XX XX XX XX X X ABOVE: APPROVED WAY TO LOCKOUT / TAGOUT 4 U-SERIES VERTICAL STORING DOCK LEVELER WITH BLUE GENIUS™ CONTROLS 5. MAINTENANCE STRUT SETUP Never work in the path of the dock leveler platform without engaging the maintenance strut. If you are unable to successfully engage the device, contact your authorized service representative or the manufacturer. Post safety warnings and barricade work area at dock level and at ground level to prevent unauthorized use of the dock leveler during maintenance/service. 5.1 Engaging the Maintenance Strut : 1. Touch the ‘Deck’ button until the platform stops moving. 2. Remove the linchpin and locking pin from the bracket on the platform. 5.2 Disengaging the Maintenance Strut : 3. Move the maintenance strut from the stored position to the engaged position. (See diagram below.) When maintenance has been completed, perform the previously outlined steps in reverse and return to the stored position. 4. Insert the locking pin through the maintenance strut and lock it with the linchpin. 5. Swing the maintenance strut into the maintenance bracket. (See Diagram at top right of this page.) 6. Insert the locking pin into the maintenance strut as shown. Failure to lock the pin in correctly could cause the dock leveler to collapse. Correct way to LOCK IN Maintenance Strut. Move Maintenance Strut From Stored Position to Engaged Position. 5 U-SERIES VERTICAL STORING DOCK LEVELER WITH BLUE GENIUS™ CONTROLS 6. STANDALONE VS DOCK ARRANGEMENT NEW CONSTRUCTION (VS DOCK): 1 DRILL ONE HOLE THROUGH THE WALL TO THE OUTSIDE FOR THE L.E.D OUTSIDE TRAFFIC LIGHTS (OPTIONAL). 2 RUN ONE 1 1/2” I.D. CONDUIT FROM CONTROL STATION TO THE I/O BOX (ABOVE THE POWER PACK) FOR THE COMMUNICATION CABLES, OUTSIDE TRAFFIC LIGHTS & DOOR SENSOR CABLE (OPTIONAL). 3 RUN ONE 1-1/2” I.D. CONDUIT FROM THE CONTROL STATION POWER LINE CONNECTION TO THE DOCKS POWER PACK MOTOR JUCTION BOX. 4 RUN ONE 3” I.D. CONDUIT FROM THE POWER PACK TO THE BACK OF THE DOCK PIT FOR THE HYDRAULIC LINES, HOME POSITION SENSOR & RANGE SENSOR. REMOTE I/O BOX SOLENOID VALVE WIRING POWER PACK BLUE GENIUS CONTROL STATION (MOUNTED & WIRED BY OTHERS) MOTOR WIRING (to Blue Genius control station) 2 NOTE: FUSED DISCONNECT BY OTHERS MINIMUM CONCRETE STRENGTH 3,000 P.S.I. CABLES OVERHEAD DOOR SENSOR (OPTIONAL) POWER WIRING HYDRAULIC HOSE LINES COMMUNICATION CABLES MAIN POWER (TO CONTROL STATION) 66” 3 SENSOR 1 30mm CLOSED PIT LAYOUT TRAFFIC LIGHTS (MOUNTED & WIRED BY OTHERS) 84” 4 RUN 3 CONDUITS. ONE FOR THE COMMUNICATION CABLE,ONE FOR THE POWER WIRING TO THE POWER PACK AND ONE TO THE BACK OF THE DOCK FOR THE HYDRAULIC LINES AND SENSORS. DOCK HYDRAULIC LINES , HOME POSITON SENSOR AND RANGE SENSOR 1/4’’ SENSOR 18mm !!! DO NOT WIRE HIGH AND LOW VOLTAGES IN THE SAME CONDUIT. High voltage range is 115V and up. Lower voltages include the communication and solenoid wiring as well as the I/O. 1/8’’ ELECTRICAL REQUIREMENTS• MOUNT CONTROL BOX STATION TO WALL, SIGNAL LIGHTS AND DRIVER WARNING SIGNS • FUSED DISCONNECT PROVIDED BY OTHERS AND WIRING BY OTHERS • INSTALL CABLE FROM CONTROL BOX STATION TO POWER PACK • INSTALL CABLE FROM CONTROL BOX STATION TO POWER SUPPLY DRIVER WARNING SIGN (MOUNTED DRIVERS SIDE) PART #038-225 DO NOT RUN MAIN POWER WIRING THROUGH TOP OF CONTROL STATION CONTROL STATION (MOUNTED ON DRIVERS SIDE) ! CAUTION > MOV E O N GREEN ONLY NOITUAC ESC > N O E VOM YLNO NEERG Do Not Enter Leveler Deck LIP 22 33 4 55 66 7 7 8 9 ## 11 00 * ! SEL Do Not Enter Enter On Green STOP ! CAUTION TRAFFIC LIGHTS (MOUNTED DRIVERS SIDE) PART #032-461 Disconnect power before opening pan www.BlueGiant.com 66” DOOR SENSOR (optional) NOTE: ALL CONDUIT ENTRY INTO CONTROL PANEL FROM BOTTOM. ARRANGE WIRING TO AVOID HIGH & LOW VOLTAGE CROSSING OVER INSIDE CONTROL BOX. MAIN POWER (from fused disconnect) & MOTOR WIRING (to hyd. Power Pack) CL 84” COMM CABLE TO REMOTE I/O TRAFFIC LIGHT CABLE (to the outside) GROUND LEVEL FRONT ELEVATION VIEW* INSIDE BUILDING VIEW* NOTE: *DRAWINGS NOT TO SCALE 6 U-SERIES VERTICAL STORING DOCK LEVELER WITH BLUE GENIUS™ CONTROLS 7. INSTALLATION INSTRUCTIONS The rear frame assembly must be separated from the dock leveler deck and must be poured into place when the floor slab concrete is poured. Concrete strength is to be a minimum of 3,000 PSI, poured to a minimum thickness of 12” in all areas adjacent to the rear frame assembly. The front face of the curb channel must be retained in a true vertical position during pour, and the finished floor must be flush with the upper surface of the curb channel, along the full width of the frame. 3” x 3” x 1/4” CURB ANGLE (supplied by others) 3” x 3” x 1/4” CURB ANGLE (supplied by others) CONDUIT ACCESS HOLE CONDUIT ACCESS HOLE REAR CURB CHANNEL AND FRAME ASSEMBLY (to be poured in place when floor slab is poured) REAR CURB CHANNEL AND FRAME ASSEMBLY (to be welded and anchored in place) FIGURE 2: RETROFIT FIGURE 1: NEW INSTALL 7.1 6. Complete the electrical hookup between the exterior traffic lights and control panel. Rear Curb Channel Back Frame Installation 1. Pour pit floor concrete into place. Allow to set. 7. Run hydraulic hoses (for lip and deck) from the power pack to the dock leveler. 2. Locate the back frame and position it relative to the door frame. 8. Run control cable via conduit from the remote I/O to the dock leveler. 3. Install reinforcement bars as required to support concrete. 7.2 For a pictorial of this procedure, see Section 6. Figure 1: Blue GeniusTM control station dimensions and conduit install area Hydraulic Power Pack and Hose Installation 1/4" 6 5/32" 1. Install remote power pack in a suitable location on the wall, at least 8’ (2438mm) above floor level. 7.3 Electrical and Hydraulic Dock Installation 1. Mount Blue Genius Control Station assembly on the left side of the door’s interior frame, at least 66 inches (1676mm) above floor level (measure from the top of the control box to the floor). 11 29/32" 12 17/32" 2. Securely mount the exterior traffic lights and signs on the exterior wall adjacent to the doorway (on the driver’s side), at approximately 7 feet (2134mm) above ground level. 3. Drill one hole through the wall to the outside for the L.E.D control cable. Run cable through to the control box. Install cable gland, run cable through, and tighten it. 8 3/32" CONDUIT INSTALL AREA 1 9/32" 4. Run one 1/2” I.D. conduit from control station to the hydraulic power pack remote I/O for the shielded communication cable. 1 1/2" 5. Run one 1/2” I.D. conduit from the control station to the dock’s hydraulic power pack motor junction box. 1 1/2" 5" 7 NOTE: INSTALL HIGH POWER CONDUIT FROM BOTTOM OF PANEL. U-SERIES VERTICAL STORING DOCK LEVELER WITH BLUE GENIUS™ CONTROLS 7. INSTALLATION INSTRUCTIONS Deck Installation 7. Line the rod eye up with the clevis holes in the rear frame. 1. Using slings rated for a minimum capacity of 3000 lbs, (1500 kg), sling the deck assembly into place directly above the previously poured-in rear frame. 9. Securely and permanently tighten the set-screw to lock the adjusting block in position. 7.4 8. Secure the cylinder pin with split pins. 10. Turn off and lockout the electrical supply to the touch button station to prevent accidental operation of the dock leveler. 2. Lower the deck assembly gently and guide it to line up the bottom clevis holes to the pivot hinges on the rear frame. 11. Place shims between the pit floor and the underside of the rear frame cylinder. Locate, position, and weld into place. Adequate shims (not supplied) are required to ensure that brackets will not deflect downward under load pressure. 3. Install the deck pivot pins and secure with split pins. 4. Put maintenance stand securely in place. 5. Install the home position and range sensors. Adjust the proximity switch by loosening the holding nuts and setting the gap. Once the desired adjustment has been made, re-tighten the holding nuts. Ensure that the detected object can never physically come in contact with the sensor end; otherwise the switch will be damaged. Complete wiring to the remote I/O. 7.5 12. Install the specified dock bumpers and risers as required on the dock area’s outside wall. 13. Locate and securely mount the operations placard to the inside wall, close to the Blue Genius control station, and in clear view of the dock leveler operator. Cylinder Installation 1. After ensuring that the cylinder is at its shortest extension, fill the hydraulic reservoir of the power unit with hydraulic fluid. (Fluid level should reach approximately ½” below the bottom of the filler neck. Attach two hydraulic hoses to the deck cylinder and a third to the lip cylinder. 2. Connect all three hoses to the hydraulic power pack. NOTE: If the hydraulic hose lines are not pre-filled with oil, air purging is required. Activate the electrical power supply to enable the control box, and place the end of the DECK hose into an appropriate container. Touch and hold the ‘Deck’ button. Run the power unit air free oil flows from the hose, and then securely attach the fully loaded hose to the deck cylinder’s base-end fitting. Place the LIP hose end into an appropriate container, and then touch and hold the ‘Lip’ button to run the power unit until clear oil flows from the hose. Attach the loaded hose securely to the lip cylinder’s base. 3. Power on the control panel and activate the deck and lip. 4. Refill the hydraulic reservoir to approximately ½” below the base of the filler neck. 5. Hold the rod end of the deck cylinder slightly away from the deck and frame. Touching the ‘Deck’ button, extend the deck cylinder to its maximum length. 6. Loosen the locking-set screw. Then turn the threaded adjusting block clockwise around the cylinder rod to shorten it or counter-clockwise to lengthen it as required in order to allow a tap-in-fit installation of the lower cylinder pin through the clevis holes of the rear frame brackets. The deck must remain upright when the cylinder is fully extended. Failure to prime with hydraulic fluid and bleed all air out of the hydraulic system as instructed will cause the dock leveler deck to fall abruptly and possibly result in serious injury or death. 8 U-SERIES VERTICAL STORING DOCK LEVELER WITH BLUE GENIUS™ CONTROLS 8. TEST OPERATION With the overhead door open, test operate the Vertical Storing Dock Leveler as follows to ensure that all functions are operating correctly and adjustments are properly set. Never allow a transporter vehicle to depart when the deck is fully deployed with the lip resting on the surface of the transporter vehicle load bed. Serious damage to the dock leveler and / or personal injury could occur. R enius Blue G T o u C o n t r o ESC TM l SEL h c Do Not Enter h ceed Wit Pro Enter On D O C K Green 1 3 4 5 6 7 8 9 STOP POWER NECT G. OPENIN E ND BEFOR UNDERSTA BEFORE FULLY AND MANUAL READ PRODUCT. THE OWNER’S G THIS OPERATIN Never enter the pit area without locking out the electrical power supply and engaging the maintenance strut. DECK DOWN L E V E L E R DISCON 0 LIP OUT Caution 2 DECK UP nt.com lueGia www.B 4E #038-24 STOP FUNCTION Gold Series Control Box Illustration 1. Shut off the power to the dock and the Blue GeniusTM control station. Using a crane, boom, or similar type of lowering equipment, carefully lower the deck until it is fully horizontal. Then turn the power back on. 2. After both the dock and control station have completed the ‘power on’ cycle, touch and hold the ’Deck’ touch button to raise the deck and lip. When the deck reaches its fully raised position and stops, it must be properly upright (slightly past vertical). If not, the deck lift cylinder requires readjusting. This is accomplished by removing the cylinder pin, loosening the setscrew and turning the threaded adjustable rod eye of the cylinder: counterclockwise out of the cylinder rod to lengthen the cylinder, or clockwise into the cylinder rod to shorten it. The set screw must then be tightened to lock the rod eye in position. (See Figure 1) LENGTHEN Figure 1 : Lift Cylinder Rod Adjustment 3. Touch and hold the ‘Down’ touch button to allow the dock leveler deck, with the lip extended, to descend. 4. Release the ‘Down’ touch button. The motion of the deck must stop at any position when the button is released. 5. Touch and hold the ‘Lip’ touch button. The deck will remain stationary and the lip will lower. 6. Release the ‘Lip’ touch button, then press it again. The lip will resume the extended position. 7. SET SCREW SHORTEN Operate the ‘Down’ button. The deck and the extended lip will descend to the bottom of the pit and stop at the fully below dock level position. Note: If a transport vehicle had been parked in place against the dock bumpers, the lip would have come to rest on the vehicle load bed, allowing loading / unloading to begin. 8. Perform a final inspection and determine that all work is completed satisfactorily. Clean the pit and work area thoroughly and apply touch-up paint to weld burn areas, scratches, etc. 9. Test operate the unit through several cycles of all functions. 10. Mount the Owner’s Manual securely in a place where it can be easily and immediately accessed by the operator. 9 U-SERIES VERTICAL STORING DOCK LEVELER WITH BLUE GENIUS™ CONTROLS 9. CONTROL STATION OPERATION CONTROL STATION TYPE - Independent Vertical Dock Leveler YELLOW LIGHT (Proceed With Caution) Caution 10 U-SERIES VERTICAL STORING DOCK LEVELER WITH BLUE GENIUS™ CONTROLS 10. OPERATING INSTRUCTIONS 10.3 WARNING Do not install, operate and/or service this leveler unless you have been trained and authorized to do so, and have read and understood all of the safety information and instructions contained herein and on the leveler. Do not operate the dock leveler beyond its rated capacity. Starting Procedure The operating instructions in this manual include references to the advanced communication lights package (control station and traffic lights.) This is an optional feature and may not be included with your dock leveler. 1. The truck reverses into position against the dock leveler bumpers. Outside traffic light (optional) is GREEN and control station light (optional) remains RED. Do not operate this leveler until you have checked its condition. Report the need for leveler repairs to your supervisor immediately and do not operate leveler until repairs are made. 10.4 Never try to lift or move any part of the dock leveler manually. Deploying The Dock Leveler Above Level 1. After the truck is parked and chocked /restrained in place, touch and hold the ‘Down’ button. The LCD screen will read ‘Deck Lowering’. The control panel light is RED and the traffic light changes from GREEN to RED. Keep holding the ‘Deck’ button until the lip makes full contact with the truck bed. Release the button. The onscreen message will change to ‘Deck Deployed’. The control panel light will turn GREEN while the outside traffic light remains RED. Keep hands and feet clear of pinch points at all times. Secure the transport vehicle with wheel chocks or a vehicle restraint before commencing loading / unloading. Do not drive on leveler unless lip is securely on the transport vehicle load bed and has a minimum of 4” (100mm) projection on truck bed. Do not exceed 4 mph when driving over dock leveler. MENU DISPLAY SCREEN: Do not drive over edges of the leveler and / or dock bumper blocks (bumpers blocks are not structural). Deck Lowering Deck Deployed R 10.1 Blue G Functional Description T o u c enius C Do Not The dock leveler is stored in the vertical position behind the overhead door, allowing for a complete energy efficient seal. The vertical storing dock includes a “controlled lowering” hydraulic system, meaning that the dock attendant must hold the touch button to lower the unit. o n t r o ESC TM l SEL h Proceed With Enter On Caution D O C K Green 1 2 3 4 5 6 7 8 9 0 R E S T R A I N T Enter L E V E L E R 4 7 POWER NECT G. DISCON OPENIN ND BEFORE UNDERSTA BEFORE FULLY AND MANUAL READ PRODUCT. THIS THE OWNER’S OPERATING STOP nt.com #038-244 E lueGia www.B Gold Series Key features include: high tensile steel, U-beam deck construction, hydraulic fall-safe, maintenance strut and a self-locking device. 10.2 Stop Button Function R Blue Genius ESC TM C T o u c o n t r o l SEL h Do Not Proceed 4 7 Enter With Caution Enter On 1 D O C K L E V E L E R Green 2 3 5 6 8 9 0 STOP POWER OPENING. DISCONNECT FULLY BEFORE AND READ UNDERSTAND THE OWNER’S #038-244E www.BlueGiant.com Gold Series Should the dock leveler need to be stopped immediately, or left in a certain position because of an unexpected interference or a potentially dangerous situation, the Blue GeniusTM control station has a temporary ‘STOP’ button. Touching the ‘STOP’ button during dock operation will cause the unit to stop in mid motion while the internal alarm (optional) will beep until the stop function is exited. 2. Perform and complete the loading / unloading operation. To exit the ‘STOP’ mode touch ‘ESC’. NOTE: Ensure that the full width of the lip overlaps the truck bed by a minimum of 4” (102mm) to provide full dock leveler support. NOTE: While in use, the dock leveler raises and lowers automatically in conjunction with the movement of the truck load bed. R nius Blue Ge T o u c C ESC TM control SEL h Do Not Enter With Proceed Caution L E V E L E R Ente 1 2 3 5 6 8 9 0 STOP D O C K n r On Gree Optional Alarm ALARM WILL BEEP UNTIL THE STOP MODE IS EXITED 4 7 STOP ECT POWER . DISCONN OPENING D BEFORE UNDERSTAN BEFORE FULLY AND MANUAL READ PRODUCT. THIS THE OWNER’S OPERATING t.com E #038-244 lueGian www.B Gold Series 11 U-SERIES VERTICAL STORING DOCK LEVELER WITH BLUE GENIUS™ CONTROLS 10. OPERATING INSTRUCTIONS WARNING MENU DISPLAY SCREEN: R Blue G C T o u c enius ESC TM o n t r o Do Not SEL Enter d With Procee Caution 2 L E V E L E R 3 4 5 6 7 8 9 NECT POWER G. E OPENINAND BEFOR UNDERST BEFORE FULLY AND . MANUAL READ PRODUCT THE OWNER’S G THIS OPERATIN iant.com #038-24 4E www.BlueG Gold Series 1. After the vehicle has been restrained, hold the ‘Deck’ button to lower the deck. When the deck is halfway down, release the button. The LCD screen will read ‘Ready to Lower Deck’. Touch and hold the ‘Lip’ button. The LCD message will change to ‘Lip Lowering’. When the lip lowers, touch and hold the ‘Down’ button. The LCD message will change to ‘Deck Lowering’. When the deck has fully deployed, the LCD screen will read ‘Deck Deployed’. R BlueGenius ESC TM C T o u c o n t r o l SEL h Do Not Proceed 4 7 Enter With Caution Enter On 1 D O C K L E V E L E R Green 2 3 5 6 8 9 0 STOP POWER OPENING. DISCONNECT FULLY BEFORE AND READ UNDERSTAND THE OWNER’S Deploying the Dock Leveler: Below Level / End Loading This section outlines dock leveler operation in situations where contact of the dock leveler lip plate with the transport vehicle load bed is not possible (e.g. loading/unloading the first skid or pallet from the load bed, where there is insufficient surface area to extend the dock leveler lip plate). STOP DISCON 0 10.6 D O C K en Gre Enter On 1 The transport vehicle should never be allowed to depart with the lip plate resting on the load bed. Deck Deployed l h #038-244E www.BlueGiant.com Gold Series MENU DISPLAY SCREEN: 10.5 Deck Lowering Returning Dock Leveler To The Stored Position Ready to Lower Deck Lip Lowering 1. Touch and hold the ‘Deck’ button. The control panel light turns RED. The deck will rise. The LCD screen will read ‘Deck Moving’ and the deck will rise to the stored position. Hold the button until the lip is in the upright (parked) position. The message will change to ‘Dock Leveler Restored’. nius Blue Ge C T o u c o n t r o R ESC TM l SEL h Deck Lowering Do Not Enter Enter On Green D O C K 1 4 7 2 3 5 6 8 9 0 Gold Series L E V E L E R STOP POWER DISCONNECT OPENING. BEFORE UNDERSTAND BEFORE FULLY AND MANUAL READ PRODUCT. THIS THE OWNER’S OPERATING www.BlueGia nt.com #038-244E Deck Deployed MENU DISPLAY SCREEN: Deck Raising Deck Moving Dock Leveler Restored R Blue Genius ESC TM T o u c h l r o n t C o 4 T u c n o C o t D O C K L E V E L E R Green 2 3 5 6 8 9 0 ESC STOP POWER OPENING. DISCONNECT BEFORE #038-244E www.BlueGiant.com Gold Series TM l o r With Caution Enter On 1 7 nius Blue Ge SEL Enter Do Not Proceed R SEL h Enter Do Not D O C K Green Enter On 1 L E V E L E R 3 2 4 6 4 5 9 7 8 STOP ECT POWER . DISCONN OPENING D BEFORE UNDERSTAN BEFORE 0 FULLY AND MANUAL READ PRODUCT. THIS THE OWNER’S OPERATING E t.com #038-244 ueGian www.Bl Gold Series 10.7 1. R Blue Genius ESC TM C T o u c o n t r o l SEL h Do Not Proceed 4 7 Enter With Caution Enter On 1 D O C K L E V E L E R Green 2 3 5 6 8 9 0 STOP POWER OPENING. DISCONNECT BEFORE #038-244E www.BlueGiant.com Gold Series 12 Returning To Normal Lip-on Load Bed Operation After below level / end loading and unloading has been completed, touch and hold the ‘Deck’ button until the deck is high enough for the lip to deploy safely onto the truck bed. The LCD screen will read ‘Deck Raising’. Release the ‘Deck’ button and touch and hold the ‘Lip’ button until the lip is fully raised. The LCD message will change to ‘Lip Raising’. Release the ‘Lip’ button and touch and hold the ‘Down’ button until the deck is fully deployed onto the truck bed. The LCD message will change to ‘Deck Deployed’. U-SERIES VERTICAL STORING DOCK LEVELER WITH BLUE GENIUS™ CONTROLS 10. OPERATING INSTRUCTIONS MENU DISPLAY SCREEN: Deck Raising Lip Raising Deck Lowering R ius Blue Gen C T o u c o n t r o ESC Deck Deployed TM l SEL h Do Not Enter Enter On Green D O C K 1 2 3 4 5 6 9 7 8 0 L E V E L E R 4 STOP T POWER DISCONNEC OPENING. BEFORE UNDERSTAND BEFORE FULLY AND MANUAL READ PRODUCT. THIS THE OWNER’S OPERATING Giant.com #038-244E www.Blue Gold Series R Blue Genius ESC TM o C T o u c n t r o l SEL h Enter Do Not Proceed With Caution Enter On 1 4 7 D O C K L E V E L E R Green 2 3 5 6 8 9 0 STOP POWER OPENING. DISCONNECT BEFORE #038-244E www.BlueGiant.com Gold Series 13 U-SERIES VERTICAL STORING DOCK LEVELER WITH BLUE GENIUS™ CONTROLS 11. MAINTENANCE ! ! Do not operate and/or service this dock leveler until you have read and understood all of the safety information and instructions contained herein and on the dock leveler. Do not work under or around dock leveler without first placing adequate barriers to positively prevent vehicle traffic from entering the work area. Follow proper lock-out/tag-out procedures. Keep hands and feet clear of dock leveler pinch points and wear appropriate safety attire - glasses, gloves and work boots. 11.1 Planned Maintenance In addition to the daily operator inspection, the manufacturer recommends (and local government regulations may require) that a planned maintenance (PM) and safety inspection program be performed by a trained and authorized service technician on a regular basis to maintain the equipment is in safe operating condition. The PM will provide an opportunity to make a thorough inspection of the safety and operating condition of the dock leveler. Necessary adjustments and repairs can be done during the PM, which will increase the life of components and reduce unscheduled downtime. Recommended procedures for a periodic planned maintenance program that covers inspections, operational checks, cleaning, lubrication, and minor adjustments are outlined in this manual. An authorized dealer or distributor is prepared to assist with a planned maintenance program by offering trained service personnel with expertise in dock leveler maintenance requirements. 11.2 The Maintenance strut must be in place maintenance procedures. 11.3 Routine Servicing and Maintenance Failure to properly maintain or operate the dock leveler within its rated capacity can void the manufacturer warranty. 11.4 Planned Maintenance Intervals Arrange for a qualified dock leveler repair technician to perform regularly scheduled planned maintenance on your dock leveler every 3 months for single shift operations or monthly for multi-shift operations. Call your authorized manufacturer/ dealer for further details. 11.5 Maintenance Sequence 1. Cleaning, including pit area. 2. Visual inspection of all components. 3. Lubrication, as required. (by a trained service technician only) 4. Test operate all functions. 5. Adjustments, if required. (by a trained service technician only) 6. Check for missing or damaged dock bumpers. 7. Record inspection details and findings for owners’ files. 11.6 The manufacturer recommends making multiple photocopies of the Operator’s Daily Checklist. The operator should fill out this form to keep a daily record of operation and maintenance issues. before commencing Regular maintenance and care of the dock leveler is very important for cost and operation efficiency and more importantly; operator safety. A faulty dock leveler is a potential source of danger to the operator, and to other personnel working near it. As with all quality equipment, keep the dock leveler in good operating condition by following the recommended schedule of maintenance. Operator Daily Inspection The dock leveler should always be examined by the operator PRIOR TO ANY USE to verify that it is safe to operate. Recommended Hydraulic Fluids Normal, All Season Weather Conditions: - Valvoline All Weather 36 or equivalent. Note: Dextron II Automatic Transmission Fluid may be used if other suitable oils are not available. Extreme Low Temperature Conditions: - Esso Univis N15 or Gulf Harmony Arctic 15 or suitable equivalent. MAINTENANCE & SERVICE TIME INTERVALS FOR SPECIFIC DOCK COMPONENTS CHART DECK CYLINDER DECK ASSEMBLY MAINTENANCE STAND LIP HINGE ASSEMBLY LIP CYLINDER HYDRAULIC OIL RESERVOIR ALL THE ABOVE EVERY 90 DAYS INSPECT (for multi-shift operations every 30 days is required) ALL THE ABOVE EVERY 90 DAYS CLEAN Clean Lip As Required (for multi-shift operations every 30 days is required) LUBRICATE As Needed ADJUST As Needed Every 90 Days Pivot Points (Light Oil) Not Required Not Required Every 90 Days (Grease) Every 90 Days (Light Oil) Drain, Flush & Change Once Per Year Not Required Not Required As Needed Fill As Needed Note : In many localities, all lifting devices must be inspected a minimum once per year. 14 U-SERIES VERTICAL STORING DOCK LEVELER WITH BLUE GENIUS™ CONTROLS 11.7 PM CHECK LIST - DOCK EQUIPMENT P M C H E C K L I S T – DOCK EQUIPMENT Customer Location Date Tel Cust. Contact Inspected By SWO# Pit Area Deck Hinge Lip Hinge Barricade Work Area Repairs? O K C H E C K / A D J U S T / L U B E Check Main Lift Cylinder Check Lip Lift Cylinder Check Clevis Pins & Lubricate Check Push-Button Station CHECK Repairs? CLEAN Check F u l l O p e r a t i n g C y c l e Check Instruction, Caution, Danger Labels Check Welds On Dock Leveler Check Maintenance Strut / Lip Latch Check Ramp Rear Hinges Check Dock Leveler Structure, Sub Frame, Shim Lubricate Rear Hinges & Pins Lubricate Dock Leveler Lip Hinge Structural Damage Check Lip Crown Dock Bumpers / Extensions Overhead Door OK Check Wiring Harness Check Oil Level (Top off as needed) Check Automatic Return To Dock Check Dock Bumpers Check Weather Seals Check Dock Seal/Dock Shelter Check For Proper Operation Curb Angle Place Updated Service Sticker On Equipment S afety S ki rts Clean Up Of Dock Leveler Area COMMENTS REPAIRS RECOMMENDED ! WARNING Do not install this leveler, operate and/or service unless you have been trained and authorized to do so. 15 Repairs? OK U-SERIES VERTICAL STORING DOCK LEVELER WITH BLUE GENIUS™ CONTROLS 12. PARTS ILLUSTRATION - VERTICAL STORING DOCK 21 22 23 6 13 14 5 11 21 22 13 23 14 4 12 19 20 18 28 10 9 3 2 7 8 1 27 24 25 26 15 17 3 16 6A 6C 16" 6B 20" 18" 16 U-SERIES VERTICAL STORING DOCK LEVELER WITH BLUE GENIUS™ CONTROLS 13. COMPONENT LIST - VERTICAL STORING DOCK ITEM QTY. PART NO. DESCRIPTION 6A 1 200-02545 16" Lip Weld 6B 1 200-02545-1 18" Lip Weld 6C 1 200-02545-2 20" Lip Weld ITEM QTY. PART NO. DESCRIPTION ITEM QTY. PART NO. DESCRIPTION 1 1 23-003600 Back Frame Weld 15 1 23-003336-O 2 3 23-004069 Pivot Pin 16 1 23-003569 3 8 013-127 3/16 Dia. Spring Pin X 1.50 17 1 200-02704-1 4 1 23-005213 Deck Weld 18 2 23-003568 5 1 111-595 Lip Shaft 19 4 010-048 6 1 See Below Lip Weld 20 4 012-220 Regular Spring Lock Washers (U.S.) 7 1 23-003585 Service Stand 21 2 010-006 Cap Screw 5/16-18 X 1 Hh Gr. 5 Zc 8 1 23-003570 Swivel Leveling Mtg 22 2 012-200 Regular Spring Lock Washers 5/16” (U.S.) 9 1 23-003586 Pin (Sevice Stand) 23 2 011-502 Hex Nuts (U.S.) 10 1 013-029 Hairpin Cotter 24 1 034-599 Fitting 90 6Mp-4Mp Cylinder Assy. Pin Pin, Cylinder Clevis Plate HHCS 11 1 788-599 Lip Cylinder 25 1 033-661 Velocity Fuse 12 1 034-601 Fitting 26 1 034-500 Fitting 13 2 107-196 Clevis Pin 27 2 028-199 Sensor Xs2 30Blpal2 - Telemec 14 2 013-010 1/4 Dia. Spring Pin 1.25 Lg. 28 1 028-206 Sensor Xs2 30Blpal2 - Telemec 5 Motor 17 U-SERIES VERTICAL STORING DOCK LEVELER WITH BLUE GENIUS™ CONTROLS 14. RECOMMENDED SPARE PARTS **HARDWARE REQ'D:** Part # Description 23-003585 SERVICE STAND Qty Req'd 23-003586 PIVOT PIN (FORSERVICE STAND) 1 013-029 LOCK PIN (FOR PIVOT PIN) 1 23-003570 23-003324 SWIVEL LEVELING MTG PIVOT PIN, (DECK) BOTTOM 1 3 1 QTY: 6 Spring Pin, Part # 013-127 * Complements for Hydraulics (Lip Cylinder) * **HARDWARE REQ'D:** Part # Description 788-599-1 CYLINDER-LIP ASS'Y Qty Req'd 036-204 SEAL, KIT FOR LIP CYLINDER 1 018-001 BUSHING FOR # 109-918 BAR 1 034-601 112-740 FITTING (FOR LIP CYLINDER) CLEVIS PIN (LIP) TOP 2 1 107-196 PIN, CYLINDER (LIP) BOTTOM 1 1 QTY: X 1 Part # 011-530 Nut **HARDWARE REQ'D:** QTY: 1 Part # 013-010 Spring Pin * Complements for Hydraulics (Main Cylinder) * **HARDWARE REQ'D:** Part # Description 23-003336-1 CYLINDER ASS'Y WITH SENSOR BRACKET Qty Req'd 1 SEAL, KIT FOR DECK CYLINDER 1 034-599 FITTING (FOR DECK CYLINDER) TOP 1 034-601 FITTING (FOR DECK CYLINDER) BOTTOM 1 033-661 VELOCITY FUSE 1 23-003569 200-02704-1 PIN, CYLINDER (DECK) TOP PIN, CYLINDER (DECK) BOTTOM 1 1 23-003568 CYLINDER PIVOT TOP PLATE 1 QTY: X 2 Sping Pin, Part # 013-127 **HARDWARE REQ'D:** QTY: X 4 Bolt, Part # 010-042 & QTY: X 4 Reg. Spring Lock Washer (U.S.), Part # 012-220 028-199 PROXIMITY SENSOR (30MM) - For Cylinder 1 028-200 PROXIMITY SENSOR (18MM) 1 18 U-SERIES VERTICAL STORING DOCK LEVELER WITH BLUE GENIUS™ CONTROLS 15. VERTICAL STORING DOCK LEVELER POWER PACK LIP SOLENOID (Hydraulic Connection) LIP (Hydraulic Connection) DECK UP (Hydraulic Connection) VIEW SHOWN WITHOUT BRACKET TOP VIEW DECK DOWN (Hydraulic Connection) DECK SOLENOID BLUE GIANT MODEL NO. PART NO. SERIAL NO. SIDE LEFT VIEW BLUEGIANT.COM MOTOR WIRING RELIEF VALVE 484 19 1/16" LIP SOLENOID DECK SOLENOID MOTOR END VIEW 197 7 3/4" VIEW "A" 215 8 15/32" 329 12 15/16" 5/8" DIA, 2 PLACES VIEW "A" MOUNTING HOLE LOCATIONS 37 1 7/16" 76 3" 19 78 3 3/32" U-SERIES VERTICAL STORING DOCK LEVELER WITH BLUE GENIUS™ CONTROLS 16. SHIPMENT KIT - VERTICAL STORING DOCK # on Diagram 1 2 3 4 5 6 7 Part Name 3/16 DIA. SPRING PIN X 1.50 SERVICE STAND PIVOT PIN CYLINDER PIN SWIVEL LEVELING MTG. PIN (SERVICE STAND) LOCK PIN Part Number 013-027 23-003585 23-003324 200-02704-1 23-003570 23-003586 013-029 7 6 2 5 1 3 1 4 20 U-SERIES VERTICAL STORING DOCK LEVELER WITH BLUE GENIUS™ CONTROLS 17. TROUBLESHOOTING PROBLEM Deck will not raise when the ‘DECK’ touch button is operated. Motor starts and runs. Only a trained and authorized service technician should perform repairs and adjustments. Contact your local dealer or distributor for assistance. PROBLEM CAUSE 1. Incorrect motor rotation A. Three Phase or Single Phase - See motor data plate for motor rotation 2. Low or no hydraulic oil in reservoir. - Check Hydraulic Fluid Level 3. Pump faulty in power pack. - Replace Pump 4. Coupling between pump and motor broken / worn out. - Replace coupling 5. Pressure Relief Valve out of adjustment. - Remove cap and turn adjustment screw clockwise until deck begins to lift. Deck will not raise when the ‘DECK’ touch button is operated. Motor does not attempt to run. No sound is heard, main power supply is present. 1. Motor Thermal overload tripped (usually caused by holding button too long and control station overheats) - Shut off main power from fused disconnect and turn back on. 2. Jumper removed from overhead terminal block. 3. Overhead door sensor (optional). - Ensure that overhead door is completely open. - Check overhead door sensor for any interference and if faulty, repair or replace. 4. Vehicle Restraint (optional) not engaged. 5. Faulty contactor coil. - Replace 6. Control Fuse Blown - Locate faulty fuse. Repair then replace Deck will not raise when the ‘DECK’ touch button is operated. Motor attempts to run, but the power supply circuit breaker / fuses trips / blows and the motor stops. Deck does not begin to rise immediately when motor runs. Deck rises in delayed action. 1. Faulty Power Pack Motor. 2. Faulty Wiring. 3. Fuse / Circuit Breaker sized too low. 1. Air is trapped in the deck lifting cylinder. - Bleed the system. See step 3 below. 2. Pressure Relief Valve set too low on power pack. - Refer to Power Pack Adjustment 3. Hydraulic hose was not pre-filled with fluid prior to installation. To bleed air from the hydraulic system: - Operate the dock leveler and place the deck in its fully lowered, below level position. - Maintain pressure on the ‘DOWN’ touch button for 2 minutes after the deck has reached its lowest position and the lip has fully descended. R Blue Genius T o u Do Not 7 D O C K L E V E L E R Green 2 3 5 6 8 9 0 SEL Enter With Caution Enter On 4 ESC TM o l n t r C o h c Proceed 1 STOP POWER OPENING. BEFORE AND DISCONNECT READ FULLY UNDER- #038-244E www.BlueGiant.com Gold Series PRESSURE RELIEF VALVE VIEW FROM RESERVOIR SIDE 21 U-SERIES VERTICAL STORING DOCK LEVELER WITH BLUE GENIUS™ CONTROLS 17. TROUBLESHOOTING PROBLEM Deck rises partially and then stops. Motor continues to run and makes more noise than usual. Deck lowers partially and then stops for no apparent reason. Only a trained and authorized service technician should perform repairs and adjustments. Contact your local dealer or distributor for assistance. PROBLEM CAUSE 1. Low hydraulic oil in reservoir. - Possible fluid leak. Repair as required. - Fill hydraulic reservoir with clean, new hydraulic fluid. - Correct oil level is 1/2” below the bottom of the filler neck of the reservoir when the deck and lip are in their fully lowered, below level position. 1. Lowering speed is set too fast. - Adjustment is required to slow down the lowering. Refer to power pack valve section. - Fall-safe velocity fuse will lock closed if lowering speed is too fast, and the deck will not lower any further. FLOW CONTROL (LOWERING SPEED) VELOCITY FUSE VIEW FROM RESERVOIR SIDE Deck will not lower from the fully raised, lip extended position. 1. The velocity fuse located at the top of the deck cylinder is in the locked closed position. - Consult Factory. NOTE: To open a locked velocity fuse : “Jog” DECK the cylinder - Raise the deck to its fully vertical position using brief intermittent pressing of the ‘DECK’ touch button. 2. Solenoid error. - Investigate and correct. 22 U-SERIES VERTICAL STORING DOCK LEVELER WITH BLUE GENIUS™ CONTROLS NOTES 23 U-SERIES VERTICAL STORING DOCK LEVELER WITH BLUE GENIUS™ CONTROLS NOTES 24 U-SERIES VERTICAL STORING DOCK LEVELER WITH BLUE GENIUS™ CONTROLS NOTES 25 85 Heart Lake Road South Brampton, Ontario, Canada L6W 3K2 Phone : 905-457-3900 Fax : 905-457-2313 www.BlueGiant.com B L U E G I A N T E Q U I P M E N T C O R P O R AT I O N © 2012 Blue Giant Equipment Corporation if calling within North America: Phone: 1-800-668-7078 Fax: 1-888-378-5781