1
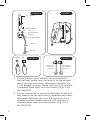
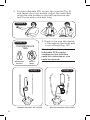
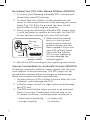
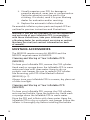
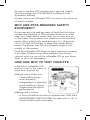
INFLATABLE PFDs
MD2010
Manual Inflation Model
USCG APPROVALS:
RECREATIONAL: TYPE V WITH
TYPE III PERFORMANCE
Approved only when worn,
special use device
MD2012
Manual with Automatic
Backup Inflation Model
USCG APPROVALS:
RECREATIONAL: TYPE V WITH
TYPE III PERFORMANCE
Approved only when worn,
special use device
DO NOT remove prior to sale.
DO NOT CONVERT OR ALTER THIS PFD.
The MD2010 device will not inflate automatically upon immersion.
Tab must be pulled to activate inflation mechanism.
HT-1101 (Rev 09Aug2011)
Contents
Approval Conditions and Carriage Regulations.. . . . . . . . . . . . 1
Mandatory Carriage Requirements. . . . . . . . . . . . . . . . . . . . . . . . . . . . . . . 1
What is an Inflatable PFD?. . . . . . . . . . . . . . . . . . . . . . . . . . . . . . . . . . . . . . . . . . 2
INSTRUCTIONS FOR USE. . . . . . . . . . . . . . . . . . . . . . . . . . . . . . . . . . . . . . . . . . . . . . . . . . 2
Check Your Inflatable PFD Before Using It. . . . . . . . . . . . . . . . . . . . . . . . . 2
Sizing and Fit. . . . . . . . . . . . . . . . . . . . . . . . . . . . . . . . . . . . . . . . . . . . . . . . . . . . . . . . . . . 4
Donning Instructions.. . . . . . . . . . . . . . . . . . . . . . . . . . . . . . . . . . . . . . . . . . . . . . . . . . 4
Inflating Your Inflatable PFD . . . . . . . . . . . . . . . . . . . . . . . . . . . . . . . . . . . . . . . . . 6
Re-arming Your PFD After Manual Inflation (MD2010) . . . . . . . . . . 7
Special Consideration for Automatic Devices (MD2012) .. . . . . . . . 7
Re-arming Your PFD as Manual with Automatic
Backup (MD2012) . . . . . . . . . . . . . . . . . . . . . . . . . . . . . . . . . . . . . . . . . . . . . . . . . . . . . . 8
Deflating the Inflatable PFD . . . . . . . . . . . . . . . . . . . . . . . . . . . . . . . . . . . . . . . . 10
Repacking .. . . . . . . . . . . . . . . . . . . . . . . . . . . . . . . . . . . . . . . . . . . . . . . . . . . . . . . . . . . . . . 11
Usage Below Freezing .. . . . . . . . . . . . . . . . . . . . . . . . . . . . . . . . . . . . . . . . . . . . . . . . 11
IS YOUR PFD IN GOOD AND SERVICEABLE CONDITION? . . . . . . . . . . . 11
CARE AND MAINTENANCE INSTRUCTIONS .. . . . . . . . . . . . . . . . . . . . . . . . . . 12
Mustang Accessories. . . . . . . . . . . . . . . . . . . . . . . . . . . . . . . . . . . . . . . . . . . . . . . . . 13
Cleaning and Storing of your Inflatable PFD
(MD2010) . . . . . . . . . . . . . . . . . . . . . . . . . . . . . . . . . . . . . . . . . . . . . . . . . . . . . . . . . . . . . . . . . . . 13
Cleaning and Storing of Your Inflatable PFD
(MD2012) . . . . . . . . . . . . . . . . . . . . . . . . . . . . . . . . . . . . . . . . . . . . . . . . . . . . . . . . . . . . . . . . . . . 13
WHY ARE PFDS REQUIRED SAFETY EQUIPMENT?.. . . . . . . . . . . . . . . . . . 14
HOW AND WHY TO TEST YOUR PFD. . . . . . . . . . . . . . . . . . . . . . . . . . . . . . . . . . . 14
(MD2010) .. . . . . . . . . . . . . . . . . . . . . . . . . . . . . . . . . . . . . . . . . . . . . . . . . . . . . . . . . . . . . . 15
(MD2012) . . . . . . . . . . . . . . . . . . . . . . . . . . . . . . . . . . . . . . . . . . . . . . . . . . . . . . . . . . . . . . . 15
HOW DO YOU TEST YOUR PFD USING THE MANUAL
INFLATOR?. . . . . . . . . . . . . . . . . . . . . . . . . . . . . . . . . . . . . . . . . . . . . . . . . . . . . . . . . . . . . . . . . 15
HOW DO YOU TEST YOUR PFD USING THE AUTOMATIC
INFLATOR? (MD2012) . . . . . . . . . . . . . . . . . . . . . . . . . . . . . . . . . . . . . . . . . . . . . . . . . . . . 16
HOW DO YOU TEST YOUR PFD USING THE ORAL INFLATOR?. . . . . 17
WEAR YOUR PFD. . . . . . . . . . . . . . . . . . . . . . . . . . . . . . . . . . . . . . . . . . . . . . . . . . . . . . . . . . 17
HYPOTHERMIA. . . . . . . . . . . . . . . . . . . . . . . . . . . . . . . . . . . . . . . . . . . . . . . . . . . . . . . . . . . . . 18
EACH OF THESE DEVICES IS INTENDED TO HELP YOU
SAVE YOUR OWN LIFE . . . . . . . . . . . . . . . . . . . . . . . . . . . . . . . . . . . . . . . . . . . . . . . . . . . 19
ADDITIONAL INformation. . . . . . . . . . . . . . . . . . . . . . . . . . . . . . . . . . . . . . . . . . . . . 20
DO NOT ATTACH PFD’S TO YOUR BOAT. . . . . . . . . . . . . . . . . . . . . . . . . . . . . . . 20
Airline Operator Policy on Carriage of Inflatable
PDF’s and CO2 cartridges. . . . . . . . . . . . . . . . . . . . . . . . . . . . . . . . . . . . . . . . . . . . 20
Approval Conditions and Carriage
Regulations
This inflatable PFD is approved by the U.S. Coast Guard
for use as a Type V Personal Flotation Device (PFD). It
is not approved for water skiing or other high impact,
high speed activities. This inflatable PFD was designed
to be more comfortable and less restrictive to wear
than inherently buoyant PFDs. When worn, used, and
serviced according to this owner’s manual, this PFD can
greatly increase your chances of survival in the water.
Not recommended for non-swimmers or weak swimmers.
Users of inflatable PFDs must be at least 16 years old.
A Type V PFD must be worn to count as an approved PFD.
Mandatory Carriage Requirements
Federal regulations in 33 CFR 175-1993 require you to
carry Coast Guard approved personal flotation devices
(PFDs) legibly marked with the Coast Guard approval
number which are in good and serviceable condition
and are the correct size for each person on board. To
be considered serviceable, this Inflatable PFD shall not
exhibit deterioration that could diminish its performance
such as broken or deformed hardware, detached
webbing, rotted structural components, air leaks, or
nonfunctional oral inflation tube. Unless worn inflated,
this Inflatable PFD must also be
Figure 1
properly armed with a full CO2
cylinder, inflation system status
indicator, and an accessible
manual inflation lanyard. A
PFD which is “approved only
when worn” or “required to be
worn” must be worn under the
specified conditions.
1
What is an Inflatable PFD?
While traditional PFDs are inherently buoyant, inflatable
PFDs rely entirely on inflation for buoyancy. Uninflated,
the Inflatable PFD is a comfortable slim collar that can be
inflated at any time with a 20 gram CO2 gas cylinder. The
Inflatable PFD is designed to offer maximum mobility
with minimum bulk. The Inflatable PFD (MD2010) can
be inflated either manually by jerking a pull-tab, or
orally (by mouth). The Inflatable PFD (MD2012) can be
inflated either automatically during water immersion,
manually by jerking a pull-tab, or orally by mouth. It
is recommended that you familiarize yourself with the
procedures outlined in INSTRUCTIONS FOR USE (p. 2).
INSTRUCTIONS FOR USE
This manual supplies instructional, maintenance and
safety information for both models (MD2010 and
MD2012) unless specified otherwise. The model
number is listed on the back of the inflatable PFD.
Check Your Inflatable PFD Before Using It
After purchasing your Inflatable PFD, make sure
it has an unused 20 gram cylinder attached to
the inflator mechanism (Fig. 2 for the MD2010)
(Fig. 6 for the MD2012).
Check the components and how to assemble the inflator
by following these steps:
1. Undo the Velcro™ tabs on the wearer’s right-hand
side of the collar to expose the inflator (Fig. 3).
2. Unscrew and remove the CO2 gas cylinder from
the inflator and inspect its small end. If it is pierced
(Fig. 4), replace it!
For the MD2012 only – Examine the auto cap. Ensure
that the cap is screwed hand tight onto the inflator.
If the auto cap indicator (Fig. 8) shows red, the auto
capsule mechanism has been fired or is incorrectly
screwed on. If spent, replace the bobbin before
proceeding (Fig. 6). If either of these conditions
exist, the auto cap must be re-screwed or the
bobbin replaced!
2
Figure 2
Figure 3
CO2 Cylinder
Manual Inflator
Lever In
Up-and-Ready
Position
Cap
CapInInDeflate
Deflate
Position
Position
Green
GreenIndicator
Indicato
Green Indicator Pin
Lanyard
Piercing
Piercin
Green
Green
Pull Tab
Pierced
OK
Figure 4
Figure 5
Cap
CapInInInflation
Inflation
Position
Position
Dust Cap
in stowed
position
Cap
CapInInDeflation
Deflation
Position
Position
Dust Cap
in deflation
position
3. If your inflator has a metallic lever attached to
the pull tab, make sure the lever is in the up-andready position and insert the green indicator pin
if not already in place. Make sure the CO2 cylinder
is screwed hand tight into the inflator (Fig. 2 for
the MD2010)
4. If your inflator has a red lever attached to the pull
tab, make sure the red lever is retracted and insert
the green indicator clip over the red lever if not
already in place. Make sure the CO2 cylinder is
screwed hand tight into the inflator (Fig. 6 for
the MD2012).
3
Pull
Pull
Down
Down
Manual/AutomaticMo
Manual/AutomaticM
IMPORTANT! Ensure the PFD is properly armed with all
indicators showing green.
5. Check that the oral-inflation dust cap is properly in
the stowed position (Fig. 5).
6. Refold the front flap and fasten with Velcro™. Refer
to the Repacking instructions (p. 11). If everything
checks out, your Inflatable PFD is ready for use.
Figure 6
Figure 7
Piercing Pin
CO2 Cylinder
Green
Indicator Clip
Auto/Manual
Inflator Housing
Lever In
Retracted & Ready
Position
Pull Down
Lanyard
Bobbin
Auto
Capsule
Figure 8
Spring Loaded
Plunger
Pull Tab
Green
Indicator
Red
Indicator
Sizing and Fit
The PFD provides a minimum of 22.5 lbs of buoyancy
and is designed for wearers with a chest range of 30-52
inches weighing over 80 pounds.
Donning Instructions
It is important that the PFD is properly adjusted to fit the
person wearing it. An incorrect fit or improper fastening
of attachments could impede its effectiveness.
1. All belts and straps are already threaded correctly
and only need to be adjusted for fit. The waist belt
should fit securely.
4
A A
2. Put the Inflatable PFD on just like a jacket (Fig. 9)
C
B
C
and fasten the front Bbuckle.
Adjust the waist belt
using the side buckle on the belt and secure the
belt’s loose end in the belt loop.
Figure 9
Cap In
Deflate
Cap In
Position
Deflate
Position
Figure 10
PUT ME ON LIKE
THIS:
BACKSTRAP
A
A
AT BACK
3. Check to be sure the device
is flat against the body and
is not twisted (Fig. 10).
Warning: Do not wear
Inflatable PFDs under
clothing as the inflation
could be restricted or you
could be injured.
DO NOT
TWIST
B
CB
C
Figure 11
Figure 12
Pull Down
MD2010 Manual Inflation
MD2012 Manual Inflation
5
etalfeD nI paC
noitisoP
gnirpS deR
rotacidnI neerG
Inflating Your
Inflatable PFD
Figure 13
Practice inflating the device.
It is recommended that the
following procedures are
followed to inflate your
inflatable PFD:
1. Manual inflation
Actuate the inflation
system by jerking firmly
downward on the pull tab.
The PFD should fully inflate
within 5 seconds (Fig. 11 for
the MD2010, Fig. 12 for the MD2012)
2. Oral inflation
Properly armed and inspected, manual Inflatable
PFD models will inflate. However, should inflation
not occur, or in a non-emergency situation, you can
fully inflate the PFD by mouth (Fig. 13). To orally
inflate the PFD, first locate the oral inflation tube
by opening the wearer’s left front panel of the
PFD. Then remove the dust cap from the end of
the oral tube and blow into the tube until the PFD
is fully inflated.
3. Automatic backup inflation (MD2012 only)
Inflation will occur automatically within seconds
after the inflator is immersed in water. The
water-sensing bobbin will disintegrate, triggering
a spring-loaded plunger, which punctures the CO2
cylinder to inflate the cell (Fig. 4).
Information for both models: The carbon dioxide
used to inflate PFDs will slowly permeate through
the fabric cell over time. A slight reduction of
pressure will be observed after several hours
of inflation. Topping up by oral inflation may be
required in the event of very prolonged immersion.
6
Re-arming Your PFD After Manual Inflation (MD2010)
1. To re-arm your Mustang Inflatable PFD, unscrew and
discard the used CO2 cylinder.
2. To check that the inflator is fully operational, pull
down on the lanyard and see if the piercing pin travels
freely (Fig. 14). Both the pin and the lever should
easily return to their original position.
3. After using your Mustang Inflatable PFD, always rinse
it with tap water to remove dirt and salt. Let the PFD
air-dry before re-arming with new CO2 cylinder.
Lever
4. Make sure the manual
lever is in the up-andPiercing
ready position and the
Pin
green indicator pin has
Green
Indicator
been replaced. Screw the
Pin
new CO2 cylinder hand
tight into the inflator.
Figure 14
Do not over-tighten as
this can damage the
Manual Model
internal gasket.
5. Refold the PFD according to the repacking instructions.
Special Consideration for Automatic Devices (MD2012)
Premature automatic inflation causes several risks that you
must address to avoid drowning. The PFD might not be
armed when needed, either knowingly or unknowingly.
Much less common but also important are:
1. Double inflation (CO2 cylinder inflation after full oral
inflation) could damage the PFD,
2. Inflation when stored in a tight space could damage
the PFD, and
3. The PFD could inflate when you are in an awkward
place or position. Inadvertant inflation may occur
in certain conditions, including when the device is:
• Subjected to splashing
• In high humidity
7
• In heavy fog
• In the rain
Care and attention should be taken to ensure that
when the device is used in these types of conditions,
auto-inflation does not occur inadvertantly.
If this Inflatable PFD (MD2012) should inflate prematurely,
a re-arm kit (MA2012) is required to re-arm the device.
Important: The Inflatable PFD should be re-armed
according to the instructions (Re-arming Your PFD as
Manual with Automatic Backup (MD2012).
The automatic inflator bobbin should be replaced at
least once every twelve months.
Re-arming Your PFD as Manual with Automatic
Backup (MD2012)
See Fig. 15 for referenced parts in each step.
Step 1: Unpack or open the life vest so that the automatic
inflator is visible.
Step 2: Remove empty gas CO2 cylinder by firmly
rotating cylinder counterclockwise. Discard cylinder.
Step 3: Remove clear cap by turning counterclockwise.
Step 4: Remove bobbin (yellow) from cap or housing
unit. If the bobbin is used, damaged, or more than 4
years old, discard it. Store unused bobbins in a cool dry
area when not in use. Check the housing to be sure it is
clear and dry.
Note: The bobbin (yellow) body may remain in the
housing or in the cap assembly when you remove the
cap. The bobbin body must be removed prior to assembly.
Step 5: Check the date on the bobbin in the rearm
kit. The date should not be over four (4) years from
today’s date.
Step 6: IMPORTANT! Bobbin (yellow) must be installed
into the Housing (see Fig 15), white side down facing
away from the inflator towards the cap (clear), aligning
the slots on the bobbin with the ridges inside the
threaded housing. The bobbin will slide in easily if
installed correctly.
8
Figure 15
CO2 Cylinder
Step 2
Step 9
HOUSING
Step 6
INDICATOR
CLIP (GREEN)
Step 8
RED LEVER
BOBBIN
(YELLOW)
Step 8
Step 4
Step 5
Step 6
CAP (CLEAR)
Step 3
Step 7
Step 10
9
Step 7: Install clear cap by screwing clockwise until it
meets the housing shoulder.
Note: No gap.
Step 8: Place the green indicator clip over the red lever
by aligning the arms on the clip with the slots in the
inflator (see Fig 15). Push firmly in the middle of the clip
to snap in place.
Step 9: Install an unused cylinder by rotating clockwise
into inflator until cylinder is secured firmly in inflator.
Step 10: Check to be sure service indicator is green and
green indicator clip is firmly attached.
YOUR PFD IS NOW READY FOR MANUAL USE WITH
AUTOMATIC BACKUP
Deflating the Inflatable PFD
1. To deflate the Inflatable PFD, reverse the oralinflation tube dust cap and insert it into the valve or
depress valve with fingertip. The dust cap will not
lock in the deflate position so it is necessary to hold
it in place (Fig. 16).
2. Gently squeeze
the Inflatable
Figure 16
PFD until all air
or gas has been
expelled. To avoid
damage, do not
wring or twist the
Inflatable PFD.
3. Put the inflation
tube dust cap
Cap In
Deflate
back in its stowed
Position
position on the
oral inflation tube
(Fig. 5).
4. Your device
is ready to be
repacked (see
Repacking p. 11).
10
Repacking
Before repacking, completely deflate the inflation cell.
Force excess air out through the inflation tube (Fig. 16).
Do not wring cell. Put the inflation tube cap back in the
stowed position (Fig. 5).
Note: Before following the repacking sequence, be sure
to properly re-arm your Inflatable PFD.
1. Fold lapel (A) back along the dotted line (Fig. 17).
Figure 17
Figure 18
Figure 19
A
B
C
2. Fold sides (B) and (C) outward along dotted lines.
Secure with Velcro™.
3. Make sure the inflator pull-tab is on the outside
of the folded PFD. Fig. 19 depicts a correctly
folded PFD.
Usage Below Freezing
When the temperature is below freezing, a fully
discharged cylinder may not adequately inflate your
Inflatable PFD. Under these conditions use the oral
inflator to adequately top-up the PFD.
Warning: CO2 inflation could over-pressurize and
damage your Inflatable PFD if already orally inflated.
IS YOUR PFD IN GOOD AND
SERVICEABLE CONDITION?
Check your PFD between outings to be sure that it is
properly armed; that it is free of rips, tears or holes; that
all seams are securely sewn; and that the fabric, straps
and hardware are still strong. Inspect the inflatable
11
portion of the PFD in accordance with the CARE AND
MAINTENANCE INSTRUCTIONS (p. 12).
CARE AND MAINTENANCE
INSTRUCTIONS
Check the following at the intervals listed below.
1. Each Use: Remove and inspect the CO2 cylinder from
the inflator. For the MD2012 – Also remove the clear
auto cap and bobbin from the inflator.
i. Check all components for dirt or corrosion.
Clean or replace.
ii. Check that the CO2 cylinder has not been
pierced. Replace with Inflatable PFD 20 gram
CO2 cylinder if necessary. The cylinder for the
MD2010 is contained in accessory pack MA2010.
The cylinder for the MD2012 is contained in
accessory pack MA2012.
iii. If your PFD has a metal lever attached to the
pull tab, check the lever to ensure it is in the up
and ready position with the green indicator pin
properly installed.
iv. If your PFD has a red lever attached to the pull
tab, check the lever to ensure it is retracted with
the green indicator clip properly installed.
2. Every Three (3) Months: Leak Test the Inflatable PFD
every three months.
i. Orally inflate your Inflatable PFD until firm and
let stand overnight. A leaking Inflatable PFD will
not hold its firmness and should be replaced.
If your Inflatable PFD leaks, take it to your
Mustang dealer for evaluation and/or servicing.
Repack the Inflatable PFD as outlined in the
Repacking section (p. 11).
3.Annually:
i. To check the oral inflation valve, fully inflate PFD
and hold valve under water. If bubbles appear,
deflate and reinflate to test again. Should the
leak persist, take your Inflatable PFD to your
dealer for proper servicing.
12
ii. Visually examine your PFD for damage or
excessive abrasion, wear, tear or contamination.
Particular attention must be paid to the
stitching. If in doubt, send it to your Mustang
dealer for evaluation and/or servicing.
iii. Replace the automatic inflator bobbin.
Re-assemble inflation system parts and repack PFD as
outlined in previous instructions and illustrations.
Warning: If you are not confident in the self inspection
and servicing of your Inflatable PFD, in accordance
with these instructions, take your Inflatable PFD to
a Mustang dealer for professional servicing or contact
Mustang Survival (see contact information on back
of manual).
Mustang Accessories
The MD2010 requires re-arm kit MA2010 and the
MD2012 requires rearm kit MA2012.
Cleaning and Storing of Your Inflatable PFD
(MD2010)
To clean your Inflatable PFD, remove the CO2 cylinder.
Hand wash or sponge down the Inflatable PFD in warm
water and rinse with clean water. Hang to dry on
a plastic coat hanger. Be sure to replace CO2 cylinder.
See Re-arming your PFD After Manual Inflation
(MD2010) (p. 7).
Always store your Inflatable PFD in a warm, dry place out
of direct sunlight.
Cleaning and Storing of Your Inflatable PFD
(MD2012)
To clean your Inflatable PFD, remove the CO2 cylinder,
auto-cap and bobbin. Keep the bobbin dry. Hand wash
or sponge down the Inflatable PFD in warm water.
Rinse the PFD and inflator with clean water. Hang the
Inflatable PFD to dry on a plastic coat hanger. Ensure the
inflator is thoroughly dry before installing the bobbin.
13
Be sure to replace CO2 cylinder, auto-cap and bobbin
(see Re-arming your PFD (MD2012) as Manual with
Automatic Backup).
Always store your Inflatable PFD in a warm, dry place out
of direct sunlight.
WHY ARE PFDS REQUIRED SAFETY
EQUIPMENT?
Drownings are the leading cause of fatalities involving
recreational boating. A PFD provides flotation to help
keep your head above water, help you to stay face up
in the water, and increase your chances for survival and
rescue. Most adults only need an extra 7 to 12 pounds
(3.2 to 5.5 kg) of flotation to keep their heads above
water. The proper size PFD will properly support the
weight of the wearer.
Since this Inflatable PFD does not have inherent buoyancy,
it provides flotation only when inflated. Familiarize
yourself with the use of this Inflatable PFD so you know
what to do in an emergency.
HOW AND WHY TO TEST YOUR PFD
Inflate your Inflatable PFD
and try it out in the water to
learn how it works by:
Figure 20
Making sure it floats you:
• Comfortably
(when
worn properly)
• Adequately for expected
wave conditions (body
shapes/densities affect
performance)
Making sure it works:
• A
flow of bubbles should not appear (see CARE AND
MAINTENANCE INSTRUCTIONS for leak tests p. 12). It
should inflate quick and easily.
14
• Activating
the CO2 inflation system
the CO2 inflation system
• Using the oral inflator tube
• Re-arming
To check the manual inflation system (with CO2 cylinder
removed and green pin or clip removed); determine that
the CO2 cylinder piercing pin and arm moves freely when
moving the lever (attached to the pull-tab) several times
down and up for the MD2010 (Fig. 14) and for MD2012,
several times in and out (Fig. 7). Repeat this several times
to check the manual inflation system.
MODEL MD2010
The U.S. Coast Guard recommends that you purchase
two re-arming kits (MA2010). One kit is to be used
immediately in testing the inflation system (see HOW DO
YOU TEST YOUR PFD USING THE MANUAL INFLATOR?,
(p. 16) and the other to carry on board as a spare.
MODEL MD2012
The U.S. Coast Guard recommends that you purchase
two automatic re-arming kits (MA2012). One kit is to
be used immediately in testing the automatic inflation
system (see HOW DO YOU TEST YOUR PFD USING THE
AUTOMATIC INFLATOR?, p. 16) and the other to carry on
board as a spare.
The U.S. Coast Guard recommends you test the automatic
inflation system in the water at the beginning of each
boating season. By doing this, you demonstrate that
the automatic inflation system is still working properly
and reduce the likelihood of premature inflation and its
associated dangers.
HOW DO YOU TEST YOUR PFD USING
THE MANUAL INFLATOR?
1. To test your Inflatable PFD, you will need your fully
armed Inflatable PFD, and re-arming kit approved
for your Inflatable PFD: MA2010 for model MD2010
and MA2012 for model MD2012.
2. Put on the Inflatable PFD.
15
3. Actuate the inflation system by jerking firmly
downward on the pull-tab. The Inflatable PFD
should fully inflate within 5 seconds.
4. Get into shallow water, just deep enough that you
can stand with your head above the surface.
5.See if the Inflatable PFD will float you on your back
or just slightly back of vertical. In a relaxed floating
position, verify that your mouth is well above the
water’s surface. Note the effect of where you hold
your legs on how you float.
6. Get out of the water and remove the Inflatable PFD.
Completely deflate the Inflatable PFD using the
oral inflator (see Deflating the Inflatable PFD p. 10).
Remove the CO2 cylinder from the inflator.
7. Let the Inflatable PFD dry thoroughly. Re-arm
(for your model) and Repack (p. 11) the PFD.
HOW DO YOU TEST YOUR PFD USING
THE AUTOMATIC INFLATOR? (MD2012)
1. To test your Inflatable PFD, you will need your fully
armed Inflatable PFD, and re-arming kit (MA2012)
approved for your Inflatable PFD
2. Put on the Inflatable PFD.
3. Get into shallow water, just deep enough that you
can stand with your head above the surface. Once
the inflator is underwater the Inflatable PFD should
fully inflate automatically within 10 seconds.
4.See if the Inflatable PFD will float you on your back
or just slightly back of vertical. In a relaxed floating
position, verify that your mouth is well above the
water’s surface. Note the effect of where you hold
your legs on how you float.
5. Get out of the water and remove the Inflatable PFD.
Remove the used CO2 cylinder and the used bobbin
from the Inflatable PFD inflator.
Deflate the Inflatable PFD (see Deflating the Inflatable
PFD p. 10).
6. Let the Inflatable PFD dry thoroughly. Re-arm (for
your model) and Repack the PFD (p. 11).
16
HOW DO YOU TEST YOUR PFD USING
THE ORAL INFLATOR?
1. No spare parts or re-arming kits are needed to test
your Inflatable PFD, using the oral inflator.
2. Remove the CO2 cylinder to prevent inadvertent
inflation, which could potentially damage the
Inflatable PFD. Inspect the cylinder to confirm it
is unused (Fig. 4). Unscrew the clear auto cap and
remove the bobbin (MD2012). Otherwise the bobbin
will disintegrate during water immersion.
3. Put on the Inflatable PFD.
4. Get into shallow water, just deep enough that you
can stand with your head above the surface.
5. If you are a weak swimmer or non-swimmer, orally
inflate the Inflatable PFD partially so that you are
supported well enough to be able to complete
inflation without touching bottom. Note this level of
inflation because it is the minimum needed for you
to safely use this Inflatable PFD.
6. Fully inflate the Inflatable PFD using the oral inflator.
7.See if the Inflatable PFD will float you on your back
or just slightly back of vertical. In a relaxed floating
position, verify that your mouth is well above the
water’s surface. Note the effect of where you hold
your legs on how you float.
8. Get out of the water and remove the Inflatable PFD.
Completely deflate the Inflatable PFD (see Deflating
the Inflatable PFD p. 10).
9. Let the Inflatable PFD dry thoroughly. Re-arm (for
your model) and Repack the PFD (p. 11).
WEAR YOUR PFD
In approximately 80 percent of all boating fatalities, the
victims were not wearing a PFD. Most fatal accidents
happen on calm sunny days. This Inflatable PFD is much
more comfortable to wear than other PFD types. Get
into the habit of wearing this Inflatable PFD.
17
Non-swimmers and children especially should wear a
hybrid or non-Inflatable PFD at all times when on or near
the water.
HYPOTHERMIA
Prolonged exposure to cold water causes a condition
known as hypothermia — a substantial loss of body heat,
which leads to exhaustion and unconsciousness. Most
drowning victims first suffer from hypothermia. The
following chart shows the effects of hypothermia: how
hypothermia affects most adults.
How hypothermia affects most adults
Water Temperature
˚C (˚F)
0.3
(32.5)
0.3–4
(32.5–40)
4–10
(40–50)
10–16
(50–60)
16–21
(60–70)
21–27
(70–80)
over 27
(over 80)
Exhaustion or
Unconsciousness
Under 15 min.
15–30 min.
30–60 min.
1–2 hrs.
2–7 hrs.
2–12 hrs.
Indefinite
Expected Time
of Survival
Under 15–45 min.
30–90 min.
1–3 hrs
1–6 hrs.
2–40 hrs.
3 hrs. to Indefinite
Indefinite
PFDs can increase survival time because they allow
you to float without using energy treading water and
because of their insulating properties. Naturally, the
warmer the water, the less insulation you will require.
When operating in cold waters [below 60°F (15.6°C)]
you should consider using a coat or jacket style PFD or
a Type V Thermal Protective PFD as they cover more of
the body than the vest or belt style PFDs. Some Points to
Remember About Hypothermia Protection:
1. Always wear your Inflatable PFD. Even if you become
incapacitated due to hypothermia, the Inflatable
PFD will keep you afloat and greatly improve your
chances of rescue.
2.Do not attempt to swim unless it is to reach a nearby
craft, fellow survivor, or a floating object on which
you can lean or climb. Swimming increases the rate
of body heat loss. In cold water, drown- proofing
methods that require putting your head in the water
are not recommended. Keep your head out of the
water. This will greatly lessen heat loss and increase
your survival time.
18
3.Use the standard H.E.L.P.
Figure 21
position when wearing an
Inflatable PFD, drawing the legs
up to a seated position, because
doing so will help you conserve
body heat (Fig. 21).
4. Keep a positive attitude about
your survival and rescue. This
will improve your chances of
extending your survival time
Example of
HELP position
until rescued. Your will-to-live
does make a difference!
5. If there is more than one person in the water,
huddling is recommended while waiting to be
rescued. This action tends to reduce the rate of heat
loss and thus increase the survival time.
EACH OF THESE DEVICES IS INTENDED
TO HELP YOU SAVE YOUR OWN LIFE
For your Inflatable PFD to function properly, follow these
suggestions to verify that it fits, floats, and remains in
good condition.
1. Check the inflation mechanism status indicators
before each use.
2. Get in the habit of re-arming the inflation
mechanism right after each inflation.
3. Try your wearable Inflatable PFD on and adjust it
until it fits comfortably in and out of the water.
4. Mark your Inflatable PFD with your name if you are
the only wearer.
5. Do not alter your Inflatable PFD. If it doesn’t fit
properly, get one that does. An altered device is no
longer Coast Guard approved.
6. Your Inflatable PFD is not intended for use as a
fender or kneeling pad.
7. If your Inflatable PFD is wet, allow it to dry
thoroughly before storing it. Store it in a wellventilated area.
19
8. Do not dry your Inflatable PFD in front of a radiator
or other source of direct heat.
ADDITIONAL INFORMATION
If you need more information about PFDs and safe
boating, contact your state boating authority, U.S. Coast
Guard Auxiliary, U.S. Power Squadron, Red Cross, or your
nearest unit of the U.S. Coast Guard. To find out about
free boating courses in your area call 1-800-336-BOAT (in
Virginia, call 1-800-245-BOAT).
DO NOT ATTACH PFD’S TO YOUR BOAT
Each PFD has straps, hooks, buckles, or other means for
securing the device in place on the wearer. Some PFDs
also incorporate decorative d-rings or tabs. Such items
are not to be used to attach the device to the boat.
Attaching the device to the boat will not permit it to
perform as intended.
AIRLINE OPERATOR POLICY ON
CARRIAGE OF INFLATABLE PFDS
AND CO2 CARTRIDGES
Please be aware that the following regulations apply to
the air transport of this product. According to
U.S. Research and Special Programs Administration
Regulations Title 49 CFR 75.10(a)(25): With the approval
of the aircraft operator, one small carbon dioxide
cylinder fitted into a self-inflating jacket, plus one spare
cartridge, may be carried by a passenger or crew in
checked or carry-on baggage.
Please refer to the governing body’s documentation,
found online at http://hazmat.dot.gov.
20
we save lives for a living
mustangsurvival.com
TOLL FREE 1.800.526.0532
|
EMAIL [email protected]
Mustang Survival and seahorse design is a registered trademark of Mustang Survival Corp.
Our commitment to quality has earned our Burnaby facilities ISO 9001 registration, the
highest of all international standards. This is our guarantee you’re receiving the ultimate in
design and manufacturing.