1
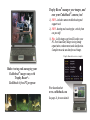
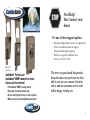
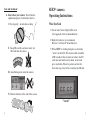
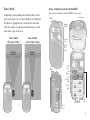
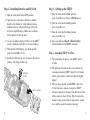
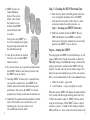
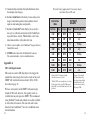
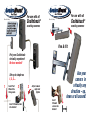
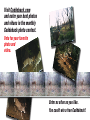
FREE
Extended Warranty
with online registration!
Extend the warranty on your
SEEN® camera to
18 months by registering
your purchase at
About batteries
A. Cuddeback recommends Rayovac®, Duracell®,
and Energizer® alkaline batteries only. Lesser
batteries may not perform as required, especially
in cold temperatures.
I. Change all batteries at the same time.
Never mix old and new batteries.
II. Do not mix standard, alkaline,
or rechargeable batteries.
III. Remove all batteries when the camera will
not be used for an extended period of time.
www.cuddeback.com.
Click “Support” then
“Product Registration”.
Activation required within
2 weeks of registration.
Please get the latest camera firmware
Before using this camera we recommend you visit
www.cuddeback.com to get the latest firmware.
Latest firmware can improve camera performance.
Trophy Room® manages your images, and
now your Cuddeback® camera, too!
1) NEW – includes camera troubleshooting and
support tools.
2) NEW - hunting and scouting tips; articles from
our pro staff.
3) Plus: 1-click image copy from SD card to your
PC. Fast Guard Duty image viewing. Image
organization, enhancement, and classification.
Complete moon & sun data for each image.
Trophy Room data screen example
Make viewing and managing your
Cuddeback® images easy with
Trophy Room® –
Cuddeback’s free PC program
Free download at
www.cuddeback.com
See page 21 for more details
STOP
Need Help?
Don’t contact your
dealer.
Use one of these support options:
s Download Trophy Room® and use its support tools
s 6ISITWWWCUDDEBACKCOMFORSUPPORT
help and troubleshooting options
s %MAILUSATSUPPORT CUDDEBACKCOM
s #ALLUSAT
Ambush® IR
model shown
CuddeSafe® Protects your
Cuddeback ® SEEN® camera from bears,
thieves and the elements!
tFits Cuddeback® SEEN® scouting cameras
t)FBWZEVUZCFBSQSPPGNFUBMEFTJHO
t&BTZUPJOTUBMMMBHCPMUTUPUSFF
BDDFQUTBQBEMPDL
t.BLFTGPSFBTJFSDBSEDIFDLJOHCBUUFSZSFQMBDFNFOU
The store you purchased this product
from does not carry parts nor are they
able to service your camera. Email or
call us and our customer service staff
will be happy to help you.
Care and treatment
A. Don’t abuse your camera. Treat it like the
sophisticated piece of electronics that it is.
I. Treat it gently – do not abuse or drop
SEEN® camera
Operating Instructions
What You Need
/NEORMORE3ECURE$IGITAL3$CARDS
3EE!PPENDIX!FORRECOMMENDATIONS
%IGHT!!BATTERIESWERECOMMEND
Rayovac® or Duracell®BRANDBATTERIES
II. Keep SD card dry and never insert wet
SD cards into the camera
7HEN3%%.® is working it displays an electronic
“worm” on the LCD. This worm scrolls around the
LCD to indicate that you must not remove the SD
card, must not turn the rotary knob, or must not
press any button. Please be patient and wait for
the worm to go away before removing the SD card.
III. Avoid letting water enter the camera
)62EMOVEBATTERIESATTHEENDOFTHESEASON
“worm”
Zone Control
Step 1 – Familiarize yourself with the SEEN®
Cuddeback’s patent pending Zone Control allows you to
select wide angle view or Centered Subject view. Position
the shutter as appropriate for your needs. Be aware that
wide view mode can generate more blank images as deer
move at the edges of the view.
Zone Control
Wide Angle Setting
Take a moment to familiarize yourself with 3%%.® camera’s parts.
Front
User Interface
Door
Infrared
LEDs
Zone Control
Center Subject Setting
Camera
Lens
MotionHeat
Sensor
Front Open
LCD
Screen
Back
A/B
Buttons
User
Interface
LED
Mount
Bracket
Rotary
Knob
Battery Tray
SD Card
Socket
Strap
Slots
5
Step 2 – Installing Batteries and SD Card
Step 3 – Setting up the SEEN®
4URNTHEROTARYKNOBTOTHEOFF position.
4URNTHEROTARYKNOBTOTime position,
press A and B to set. Time is AM/PM format.
/PENTHECOVERANDREMOVETHEBATTERYHOLDER
)NSTALL!!ALKALINEOR!!LITHIUMBATTERIES
Lithium batteries will provide longer battery life
and better night IR images. Make sure to observe
correct polarity. Close the door.
4URNTHEROTARYKNOBTODate position,
press A and B to set.
4URNTHEROTARYKNOBTOYear position,
press A and B to set.
!SERIESOFNUMBERSDISPLAYED4HESEARETHE3%%.®
camera’s hardware and software version numbers.
,ATERYOUWILLREADStep 8 – More Features
FORINFORMATIONONTHE-%.5POSITIONS
7AITUNTILTHE,#$DISPLAYGOESBLANKANDTHE
GREENANDRED,%$SAREOFF
Step 4 – Attaching SEEN® to a Tree
)NSTALLYOUR3$CARD"ESURETOOBSERVETHECORRECT
polarity with clipped corner up.
7ERECOMMENDYOUlRSTTRYYOUR3%%.® camera
at home.
&OROPTIMUMDETECTIONOFDEERSIZEDANIMALSWE
RECOMMENDMOUNTING3%%.® aboutTOINCHES
OFFTHEGROUNDTHISISABOUTWAISTHIGHTOSLIGHTLY
HIGHER
SD Card
Install
Battery Install
&ORBESTIMAGEQUALITYINSTALL3%%.®ABOUTTO
FEETFROMWHEREANIMALSAREEXPECTED. 3%%.®
will detect animals at distances from directly in front
OFTHECAMERATOABOUTFEETNote that detection
distance varies greatly with air temperature, animal
size, and the speed the animal is moving.
3%%.® features our
Genius Mounting
System. This system
allows you to attach
the bracket to a tree
and then slide 3%%.®
on and off the bracket
as needed.
You can also strap 3%%.® to a
tree. We recommend you replace
the plastic clip on the back with
the included metal clip.
/NCETHETREEBRACKETISATTACHED
to the tree, you can slide 3%%.®
onto the bracket.
)TISBESTTOREMOVEANYVEGETATIONANDOBSTRUCTIONS
from 3%%.SlELDOFVIEWTHATMAYinterfere with
THE3%%.® sensor or camera.
!IMALIGN3%%.® to make sure it is pointed where
you expect the animals to be. Aim 3%%.® level
with the ground to maximize detection range and
performance. You can use the 3%%.® test feature
EXPLAINEDNEXTTOHELPYOUDETERMINETHEDETECTIONAREA
Cuddeback® has optional mounting methods available,
SUCHASTILTBRACKETSBEARRESISTANTBOXESAND
mounting posts. See your retailer or visit
www.cuddeback.com for details.
Step 5 – Checking the SEEN® Detection Zone
4URNTHEROTARYKNOBTOTHETest position. Close the
cover and tighten the thumb screw. Put 3%%.®
BACKONTOTHETREEBRACKET.OTETHEREISAMORE
convenient method to enable test mode, see
Step 7 - Checking your SEEN® for details).
7ALKBACKANDFORTHINFRONTOF3%%.®. The red
,%$WILLILLUMINATEWHEN3%%.SSENSORHAS
DETECTEDYOU5SINGTHISMETHODYOUCANACCURATELY
POSITIONYOUR3%%.® series as desired.
Step 6 – Arming the SEEN®
9OUCANPROGRAMTHE3%%.® to record still images, or still
images AND videos. Turn the rotary knob to either the
Video Off setting or the Video On setting as desired. The
settings represent the amount of time 3%%.® will wait
before it is armed and ready to take another image. This
delay time prevents multiple images of the same animal.
Here is our recommendation for the various ArmedSETTINGS
A 5NDERSECONDSnGAMETRAILS
B ANDMINUTESnSCRAPESFOODPLOTSORFEEDERS
7HENlRSTARMED3%%.® will display the indicated delay
FORSECONDSANDTHENBEGINCOUNTINGDOWNFROMTO
7HENTHECOUNTERREACHES3%%.® will arm and be
READYTORECORDIMAGES7HEN3%%.® detects a subject,
and takes a picture, a “worm” will be displayed and the
,%$WILLmASHREDnDONOTREMOVETHE3$CARDUNTILISOFF
After the image is saved to the SD card, the LCD will dis
PLAYTHEDELAYSETTINGANDBEGINCOUNTINGDOWN/NCEthe
COUNTERREACHES3%%.® is ready to record the next image.
Step 7 – Checking SEEN®
When you check 3%%.® it is not necessary to turn the
rotary knob. Instead, press the A or B button to temporarily
suspend Armed mode and view pertinent information,
such as the number of images on the SD card and battery
LEVEL%ACHTIMEYOUPRESSTHE!OR"BUTTONNEW
information will be displayed. Here is the sequence of
information that is displayed each time the A or B button
is pressed.
)MAGESON3$CARD.OTETHE!2-%$$7%,,
AND)-!'%3ICONSAREDISPLAYED
&REE3PACEON3$CARDIN-".OTETHAT!2-%$
AND$7%,,ICONSAREDISPLAYED
"ATTERY,EVELASAPERCENTAGE&OREXAMPLE
bt:99MEANSTHEREISBATTERYPOWERLEFT
4IME
Step 8 – More Features
Menu Position
4URNTHEROTARYKNOBTOTHE-%.5POSITIONTOPERFORM
various activities. Press A to advance to the next menu
item, press B to activate the displayed menu action.
Battery Level – the battery level is displayed in the
format bt:99, which is a percentage of remaining
battery power. Press the A button to advance to the
next menu item.
CLr#LEAR3$CARDn4HISMENUALLOWSYOUTO
clear all images and content on the SD card. Press
and hold B to clear the card. The worm will appear
ANDTHE,%$SWILLmASH2%$ When finished, the
LCD will display the amount of space on the SD
card in MBs. Press A to advance to the next menu item.
Pic – Lets you take a test picture. Press B to take
a picture. Press A to advance to the next menu item.
$ATE
9EAR
Test indicates 3%%. is in Test mode and will
ILLUMINATETHERED4EST,%$WHENACTIVITYISSENSED
®
0RESSING!OR"AGAINWILL!RMTHECAMERAAND
the current delay setting will be displayed.
You can leave 3%%.® INANYOFTHESTATESTHRUAND
3%%.® WILLAUTOMATICALLYREARMINABOUTlVEMINUTES
This allows you to close the cover and leave the area
without triggering an image.
SEEN®: LEd3%%.® ,%$Sn4HISMENUALLOWS
YOUTOTEST3%%.S,%$SANDMEASURETHEBATTERY
strength. Press B to TEST3%%.SINFRARED,%$S
4HE,%$SWILLBEDRIVENFROMMAXIMUMPOWER
TOMAXIMUMPOWER4HETESTWILLSTOPWHENTHE
batteries do not have sufficient power to drive the
,%$SORAT)FTHEBATTERIESAREDEPLETED&!),
WILLBEDISPLAYED)FTHEREADINGISBELOWYOU
may want to change the batteries to maximize the
illumination range.
StAt3TATISTICAL$ATAn0RESS"TODISPLAY!CTIVATION
Date, Armed Days, and Image Counter. Activation
Date is the first day you used the camera. Armed
Days is how many days the camera has been used.
Image Counter is the total number of images taken
with the camera.
LOAd – Lets you to install new firmware. We
may update the 3%%.® firmware to improve its
performance. If a firmware update is required you
will need to download a firmware file from our
website. Instructions will be provided with the firmware.
Please see www.cuddeback.com for details. We
recommend you check our website for updates at
the beginning of your scouting season.
Firmware VersionnNUMBERSWILLBEDISPLAYED
SUCHAS4HISISTHElRMWAREVERSION4URNTHE
rotary knob to a new setting or press A to return to
the battery level display.
Setting SEEN® Parameters
3OME3%%.® features can be changed by the user.
3%%.® can also be programmed to become a time lapse
camera. (Note - In the text that follows the underlined
items are default settings. For most users these settings
are not required and you can leave PO set to 0).
Step 0: Enable or disable parameters OR select
Time Lapse Operation
&IRSTYOUMUSTENABLEPARAMETERS4HISISDONEBY
2OTATEKNOBTO-%.5
0RESS!UNTIL0ISDISPLAYED0INDICATES
Parameter Zero, which is the parameter on/off control.
7HEN0ISDISPLAYEDPRESSTHE"KEYTOSELECT
FROMTHESEOPTIONS
P0:0PARAMETERSARE/&&ANDSETTODEFAULTS
RECOMMENDEDFORMOSTUSERS
P0:1PARAMETERSARE/.ANDCANBECHANGED
as desired
P0:tL = time lapse mode. Attack is put into time
lapse mode as explained later.
Step 1: Press the A key to display P1 (strobe flash power)
0CONTROLSmASHPOWER(This setting is ignored on the
SEEN® and will be displayed as P1:--)
4HEAVAILABLESETTINGSARESELECTEDBYPRESSINGTHE"KEY
P1:1 = FOOTmASHRANGEBESTSETTINGFORINDOORUSE
P1:2FOOTmASHRANGE
P1:3 = FOOTmASHRANGEBESTSETTINGFORGENERALUSE
P1:4FOOTmASHRANGEBESTSETTINGFORlELDS
Step 2: Press the A key to display P2 (video length)
0CONTROLSTHE3%%.® video length.
4HEAVAILABLESETTINGSARESELECTEDBYPRESSINGTHE"KEY
P2:1SECONDVIDEO
P2:2SECONDVIDEO
P2:3SECONDVIDEO
Step 3: Press the A key to display P3 (video operating time)
0CONTROLSTHE3%%.® video operating time
(This setting is ignored on the SEEN® and will be displayed as P3:--)
4HEAVAILABLESETTINGSARESELECTEDBYPRESSINGTHE"KEY
P3:1 = record videos only at night
P3:2 = record videos only during the day
P3:3 = record videos during day & night
Step 4: Press the A key to display P4 (operating time)
0CONTROLSTHETIME3%%.® will take pictures.
4HEAVAILABLESETTINGSARESELECTEDBYPRESSINGTHE"KEY
P4:1 = operate only at night
P4:2 = operate only during the day
P4:3 = operate during day & night
Step 5: Press the A key to display P5 (quality)
0CONTROLSTHE3%%.® image and video quality.
4HEAVAILABLESETTINGSARESELECTEDBYPRESSINGTHE"KEY
P5:1 = standard resolution 5MP SMALLlLE images/video
P5:2 = high quality 5MP LARGElLE images/video
Note – image quality is improved by optimizing the
*0'AND6)$%/COMPRESSIONALGORITHM)MAGESWILL
be clearer when zooming, but file size is significantly
increased. Most users will not benefit from this feature,
which is mainly intended for research professionals that
require the best image quality possible.
Step 6: Press the A key to display P6 (camera ID)
0ISACAMERAIDENTIlCATIONNUMBERTHATISPRINTEDONTO
THEIMAGE5SETHE"KEYTOSETAVALUEFROMTHRU
)FISSELECTEDTHE)$NUMBERWILLNOTBEPRINTED
Step 7: Press the A key to display P7 (FAP Mode)
0ENABLESORDISABLESASUPERFASTCAMERADELAYCALLED
&ASTAS0OSSIBLEOR&!07HEN0ISONTHECAMERAWILL
rearm immediately after the image or video is saved to the
3$CARD4HISCANRESULTINACAMERADELAYINTHETO
SECONDRANGE7HEN0ISONTHESECONDCAMERADELAY
POSITIONBECOMES&!04HEREMAININGDIALPOSITIONSARE
not affected. Note – using FAP mode can result in
blank images.
0RESS"TOENABLEORDISABLE&!0
P7:0&!0MODEDISABLED
P7:1&!0MODEENABLED
Time Lapse / Guard Duty Mode (P0= tL)
Time Lapse/Guard Duty mode is enabled when Parameter
ISSETTOT,7HEN0ISSETTOT,THEROTARYDIALENABLES
time lapse or Guard Duty.
Guard Duty
Guard Duty allows you to continuously monitor a field
or other location by continuously taking pictures at a
SELECTEDINTERVALOFTOIMAGESPERMINUTE
s 4OENABLE'UARD$UTYSET0TOT,ANDSETTHE
ROTARYDIALTOONEOFTHELEFTVIDEOOFFPOSITIONS
3ETTINGSARETOIMAGESPERMINUTESEC
SECSECSECSEC
s 'UARD$UTYWILLONLYTAKEIMAGESDURINGDAYLIGHT
s !TNIGHT3%%.® will function as a normal taking
pictures when animals are detected. The camera
DELAYWILLBESETTOSECONDS
s 'UARD$UTYIMAGESARE-0ANDARESAVEDIN
the folder $#)-<#5$$9
s 'UARD$UTYWILLRECORDTHOUSANDSOFIMAGESPER
DAY7ERECOMMEND'"3$CARDSORBIGGER
SEE!PPENDIX!
s "ATTERYLIFEUSING'UARD$UTYWILLBELESSTHAN
INOTHERMODES0ERHAPSASLOWASWEEKIF
IMAGESAMINUTEISSELECTED5SINGFEWERIMAGES
per minute will extend operating time.
s We recommend you use our Trophy Room PC
program to view Guard Duty images. Available for
free at www.cuddeback.com
Time Lapse Mode
4IME,APSEMODERECORDSIMAGESHOURSADAYATA
PRESETINTERVALFROMHOURTOHOURS
s 4OENABLE4IME,APSESET0TOT,ANDSETTHE
ROTARYDIALTOONEOFTHERIGHTVIDEOONPOSITIONS
3ETTINGSAREANDHOURS
s 4IMELAPSEWILLRECORDIMAGESHOURSADAY
!TNIGHTILLUMINATIONmASHOR,%$SAREUSED
s Motion sensing is disabled when time lapse is enabled.
4ODISABLE4IME,APSE-ODESET0TO0OR0
No Card Mode - Using SEEN® Without an SD Card
Battery Life and Battery Low Warning
7HEN3%%.® is used without an SD card, images are
STOREDIN3%%.SINTERNALIMAGEMEMORY3%%.® features
an internalMEMORYOFABOUT-"4HISWILLallow
STORAGEOFUPTOIMAGES)MAGESCANBETRANSFERRED from
internal memory to an SD card.
Battery life in 3%%.® will vary depending upon battery
quality, ambient temperature, the number of images
TAKENHOWLONG3%%.® has been operating, and other
factors. Battery life you get may be more or less than
these numbers depending on the circumstances.
Transfer to SD card:)FYOUUSE3%%.® without an SD
card, follow these steps to transfer the images from the
internal memory to an SD card.
)F3%%.® is not armed, turn the rotary knob to
any of the Armed positions.
)F3%%.® is armed, press A to display the number
of images in internal memory.
)NSERTYOUR3$CARDINTO3%%.®.
0RESS!4HEAMOUNTOFFREESPACEONTHE3$CARD
will be displayed.
0RESS"TOINITIATETHETRANSFER)MAGESSAVEDIN
internal memory will be copied to the SD card.
The LCD will display the worm on the left, and the
percentage of files copied on the right. Please wait
while images are being copied.
7HENTHE,#$DISPLAYSTHEBATTERYLEVELTHETRANSFER
is complete and all the images on the internal memory
have been erased.
4OSTOPTHETRANSFERBEFOREITHASlNISHED
press and hold B.
SEEN®nSOFIMAGESORMONTHSDEPENDING
on usage.
Replace SEEN® batteries when:
4HEBLOW icon appears on the LCD.
7HENBATTERIESAREBELOWTHEBATTERYLEVELWILL
mASHUNTILYOUPRESSTHE!OR"KEYTOCONTINUE
When 3%%.® does not appear to operate correctly.
In some cases the batteries may be too low to turn
ONTHE,#$OR",/7ICON
Battery Squeeze
3%%.® will attempt to use every amount of power from
THEBATTERIES3%%.® will alter its performance to prevent
erroneous operation when battery voltage is very low.
"ATTERY3QUEEZEISENABLEDWHENBATTERYVOLTAGEIS
or less. Battery Squeeze will disable videos and extend
THECAMERADELAYTOMINUTEATNIGHTANDSECONDSFOR
day. This allows the batteries to recover and will extend
OPERATINGTIME.OTEnmASHCAMERASEXTENDTHENIGHT
DELAYTOMINUTESTOPROVIDESUFlCIENTTIMEFORTHEmASH
TOCHARGE
Viewing Images
You will need an external viewing device or computer to
VIEWIMAGES&IRSTREMOVETHE3$CARDFROMTHECAMERA
Make sure to only remove the SD card when the worm is
not visible. Here is a list of some viewing options.
9OUCANVIEWTHEIMAGESWITHANOPTIONALVIEWER
ORAPOINTANDSHOOTCAMERATHATISABLETOREAD
3%%.SIMAGES(Note: not all SD based cameras
can view SEEN’s images, please test any
camera before purchasing).
2EPLACETHE3$CARDWITHAFRESH3$CARDANDTAKE
the original SD card with you to view on your PC
or other device.
#UDDEBACKS#UDDE6IEW® viewer will allow you to
view the images, copy the images to a second SD
card and erase the images from the SD card. You
can then put the original SD card back into your
3%%.®CAMERA#UDDE6IEW® allows you to
transfer images from multiple cameras to a single
SD card. Go to www.cuddeback.com for more
INFORMATIONON#UDDE6IEW®.OTE#UDDE6IEW®
may not be able to copy all the images taken in
Guard Duty mode. If you are using Guard Duty we
RECOMMENDYOUVIEWTHEIMAGESONACOMPUTER
Use Windows PC to Manage Cuddeback® Images
with Trophy Room®
Trophy Room® software makes it easy to manage your
Cuddeback® images.
Trophy Room®
!UTOMATICALLYCOPIESIMAGESFROMYOUR3$CARD
to your PC and organizes them by year and date.
!LLOWSYOUTORENAMEEACHFOLDERMAKINGITEASY
to find your images.
Displays sun and moon data for each image, including
moon phase, moon rise and set, sunrise and set, and
moon and sun position in the sky at the time the
image was taken.
Trophy Room® data screen example
#ATEGORIZESIMAGESASBUCKDOEFAWNBEARETC
4HEREARECATEGORIESTOSELECTFROM&ORWHITETAIL
deer you can enter point count and give deer a name
to allow easy monitoring of trophy animals.
!UTOMATICALLYCALCULATESTHEBUCKDOEFAWNRATIOS
based upon your images.
Includes CuddeCharts with which you can analyze your
images to determine peak movement patterns based
upon sun and moon phase and position.
Includes Crystal Ball with which you can use the
data you’ve collected and analyzed with CuddeCharts
to PREDICTFUTUREACTIVITY4HINKOFTHISASTHETRADI
tional moon tables, only tailored to you.
®
!LLOWSYOUTORAPIDLYVIEW#UDDEBACK images taken in
Guard Duty mode.
®
)SFREE and works with all Cuddeback® cameras.
You can download it at www.cuddeback.com.
Appendix A
SD Card Requirements
3$CARDSARESIZEDIN'"'IGABYTESTHEBIGGERTHE
number the more images that can be saved on the card.
3%%.® WILLWORKWITHCARDSIZESFROM'"TO'"
3EETABLEONPAGE
7EHAVEEXTENSIVELYTESTED3%%.® with most major
brands of SD cards, however, low quality cards are
AVAILABLETHATMAYNOTOPERATEIN3%%.®. We recommend
using SanDisk® brand cards which are readily available
at stores that sell cameras. You can also order cards
directly from Cuddeback®. See www.cuddeback.com
for information.
This table shows approximately how many images
and videos fit on a SD card:
SEEN®
Card & Video
Mode
Card Size
Video
2 GB
Off
Images Videos** Guard Duty Mode On
2000
0
2 GB
On
400
400
n/a
4 GB
Off
4000
0
10 days
5 days
4 GB
On
800
800
n/a
8 GB
Off
8000
0
20 days
8 GB
On
1600
1600
n/a
16 GB
Off
16000
0
40 days
16 GB
On
3200
3200
*Assumes that 75% of images are at night
when the videos are not recorded.
**With the SEEN® every image will also record a video.
For this chart we assume each JPG is 1MB and each
video is 4MB. Your actual JPG and video file sizes will
be different.
n/a
Assumes a 12 hour day with
3600 images taken per day.
Video mode is always disabled
in Guard Duty mode. For this
chart we assume each Guard
Duty image is 100KB.
For use with all
Cuddeback®
Patents Pending
For use with all
Cuddeback®
Patents Pending
scouting cameras
scouting cameras
Pan & tilt
Put your Cuddeback
virtually anywhere!
No tree needed!
Set-up is simple as
I, 2, 3...
1
Insert Post
Mount into
firm ground.
2
Insert 2 thumb screws
into bracket
3
Adjust camera
angle and
tighten
Insert
2 thumb
screws into
bracket
Aim your
camera in
virtually any
direction – up,
down or all around!
Patents Pending
Patents Pending
For use with all
Genius Combo Kit – includes 2 mounts!
Cuddeback®
-
scouting cameras
Pan & Tilt Mount
Tilt Mount
Lock Clip
Universal Plate (works with all cameras)
Mounting Screws
Slide
on/off
Tilt
adjust
Put a Genius Tilt
Mount bracket in
all your favorite
hunting spots!
Genius Pan & Tilt Mount
Genius Tilt Mount
Visit Cuddeback.com
and enter your best photos
and videos in the monthly
Cuddeback photo contest.
Vote for your favorite
photo and
video.
Enter as often as you like.
You could win a free Cuddeback!
www.cuddeback.com
Non Typical, Inc., P.O. Box 10447, Green Bay, WI 54307-0447
920-347-3810