1
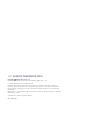
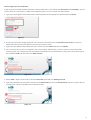
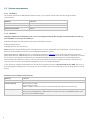
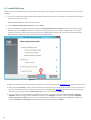
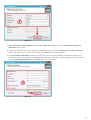
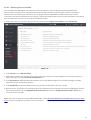
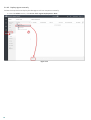
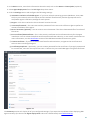
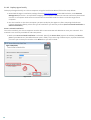
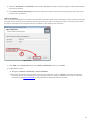
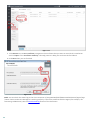
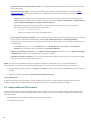
ESET
REMOTE
ADMINISTRATOR 6
Installation and Basic Setup Guide
Click here to navigate to the most recent version of this document
ESET REMOTE ADMINISTRATOR 6
Copyright
2014 by ESET, spol. s r.o.
ESET Remote Admi ni s tra tor 6 wa s devel oped by ESET, s pol . s r.o.
For more i nforma ti on vi s i t www.es et.com.
Al l ri ghts res erved. No pa rt of thi s documenta ti on ma y be reproduced, s tored i n a
retri eva l s ys tem or tra ns mi tted i n a ny form or by a ny mea ns , el ectroni c, mecha ni ca l ,
photocopyi ng, recordi ng, s ca nni ng, or otherwi s e wi thout permi s s i on i n wri ti ng from
the a uthor.
ESET, s pol . s r.o. res erves the ri ght to cha nge a ny of the des cri bed a ppl i ca ti on s oftwa re
wi thout pri or noti ce.
Cus tomer Ca re: www.es et.com/s upport
REV. 12/9/2014
Contents
1. Introducing
.......................................................4
ESET Remote Administrator 6
1.1 ESET
....................................................................................................4
License Administrator
1.2 System
....................................................................................................6
requirements
1.2.1
Hardware
..............................................................................6
1.2.2
Database
..............................................................................6
1.2.3
Supported
..............................................................................7
Operating Systems - Windows
1.2.4
Prerequisites
..............................................................................8
1.2.5
Ports used
..............................................................................8
1.3 Install
....................................................................................................10
ERA Server
2. Deploy
.......................................................13
the ERA Agent
2.1 Add
....................................................................................................13
client computer to ERA structure
2.1.1
Using..............................................................................13
Active Directory synchronization
2.1.2
Manually
..............................................................................14
typing name/IP
2.1.3
Using..............................................................................15
Rogue Detection Sensor
2.1.4
Agent..............................................................................16
deployment
2.1.4.1
Deploy
..................................................................................17
Agent Live Installer
2.1.4.2
Deploy
..................................................................................18
Agent remotely
2.1.4.3
Deploy
..................................................................................20
Agent locally
2.1.4.4
Troubleshooting
..................................................................................23
2.2 Deploy
....................................................................................................24
additional ESET products
1. Introducing ESET Remote Administrator 6
Welcome to ESET Remote Administrator (ERA) version 6. ERA 6 allows you to manage ESET products on
workstations, servers and mobile devices in a networked environment from one central location. Using the ERA
Web Console, you can deploy ESET solutions, manage tasks, enforce security policies, monitor system status and
quickly respond to problems or threats on remote computers.
What's new in ERA 6?
A number of new features introduced in ERA 6 replicate and expand on the capabilities that existing ERA users are
already familiar with. Important new components in the ERA solution are ESET Remote Administrator Web Console,
ESET Remote Administrator Proxy, ESET Remote Administrator Rogue Detection Sensor and ESET Remote
Administrator Agent.
o Web Console—ERA Web Console replaces ERA Console in older versions, and is the primary interface that
allows you to manage client computers in your environment. It displays an overview of the status of clients on
your network and allows you to deploy ESET solutions to unmanaged computers remotely. After you install
ESET Remote Administrator Server, you can access the Web Console using your web browser. If you choose to
make the web server available via the Internet, you can use ERA from any place and/or device with an internet
connection.
o Agent—The ERA Agent facilitates communication between the ERA Server and client computers. You must
install the Agent on any client computer to establish communication between that computer and the ERA
Server. Because it is located on the client computer and can store multiple security scenarios, use of the ERA
Agent significantly lowers reaction time to new threats. Using Web Console, you can deploy the Agent to
unmanaged computers that have been recognized via your Active Directory or using ESET Rogue Detection
Sensor. You can also manually install the Agent on client computers if necessary.
o Proxy—While it is not required for the deployment of your ESET solution, the ERA Proxy provides scalability.
You can deploy the Proxy server on large networks to optimize database queries, improve overall network
performance, and distribute load on the ERA Server. The ERA Proxy is also responsible for distributing
configuration data to client Agents. You must install the ERA Agent on the same computer as the ERA Proxy
Server to facilitate communication between the ERA Server and the Proxy.
o Rogue Detection Sensor—ERA Rogue Detection Sensor (RD Sensor) detects unmanaged computers present on
your network and sends their information to the ERA Server. This allows you to easily add new client computers
to your secured network. RD Sensor remembers computers that have been discovered and will not send the
same information twice.
o ESET License Administrator—ESET License Administrator, a new licensing portal for ESET products, allows you to
manage licenses as a license owner or security admin and observe license events such as expiration, usage, and
authorization. See the ESET License Administrator section of this document for instructions to activate your
product, or see the ESET License Administrator User Guide for more information about using the ESET License
Administrator. If you already have an ESET-issued Username and Password that you want to convert to a License
Key, see the Convert legacy license credentials section.
1.1 ESET License Administrator
ESET Remote Administrator 6 uses a completely new licensing system.
A License Key and Public ID have replaced the Username and Password from previous versions. The License Key is a
unique 20-character string used to identify the license owner and the activation itself. The Public ID is a short string
used to identify the license by a third-party (for example, the Security Admin responsible for the Unit/Seat
distribution).
You can manage licenses from the License management section of the ERA Web Console or by using the ESET
License Administrator web interface (see the Security Admin section).
4
Convert legacy license credentials
If you currently use ESET products and have license credentials in the old format (Username and Password), you can
convert them to a license key in ESET License Administrator. To do so, follow the steps below:
1. Type your existing ESET-issued Username and Password into the appropriate fields and click Convert.
Figure 1-1
2. A new license key will be generated for you. Select the check box next to Resend license email to have your
credentials sent to the email address you used to buy the license.
3. Type the email address associated with your license into the Email field and click Submit.
4. Your new License Key will be provided in the next window. Additionally, you will receive an email from ESET
containing the new License Key and a Password associated with your ELA account. Copy your new License Key to
the clipboard (CTRL + C) and then click Back to home.
Figure 1-2
5. Paste (CTRL + V) your License Key into the License Key field and click Manage License.
6. Type the password you received in step 4 into the Password field and click Authenticate. You will now be able to
manage your license using ESET License Administrator.
Figure 1-3
5
1.2 System requirements
1.2.1 Hardware
For smooth operation of ESET Remote Administrator, your system should meet the following hardware
requirements:
Memory
Hard Drive
Processor
Network connection
4 GB RAM
At least 20 GB of free space
Dual-Core, 2.0 GHz or faster
1 Gbit/s
1.2.2 Database
Important: ERA Server and ERA Proxy do not use an integrated backup. We strongly recommend that you back up
your database server to prevent data loss.
ESET Remote Administrator supports two types of database servers:
Microsoft SQL Server
MySQL (version 5.5 and newer)
Note: Microsoft Access databases are not supported. If you use a Microsoft Access database, you must copy your
data into an acceptable format for use with ESET Remote Administrator.
Microsoft SQL Server 2008 R2 Express is a part of the installation package and is installed by default. Note that
Microsoft SQL Server 2008 R2 Express has a 10 GB database size limit and cannot be installed on a Domain Controller,
for example, if you use Microsoft SBS. If you use Microsoft SBS, we recommend that you install ESET Remote
Administrator on a different server, or do not select the SQL Server Express component during installation (this
requires you to use your existing SQL or MySQL Server to run the ERA database).
If you decide to use Microsoft SQL Server, the earliest supported version is Microsoft SQL Server 2008. You can use
an existing Microsoft SQL Server running in your environment, but it must meet the minimum requirements listed
below.
Database server hardware requirements:
6
Memory
1 GB RAM
Hard Drive
At least 10 GB of free space
Processor Speed
x86 Processor: 1.0 GHz
x64 Processor: 1.4 GHz
Note: A 2.0 GHz or faster processor is recommended for optimum performance.
Processor Type
x86 Processor: Pentium III-compatible processor or faster
x64 Processor: AMD Opteron, AMD Athlon 64, Intel Xeon with Intel EM64T support, Intel
Pentium IV with EM64T support
1.2.3 Supported Operating Systems - Windows
Operating System
Server
Agent
Proxy
RD Sensor
Windows XP x86 SP3
X
X
Windows XP x64 SP2
X
X
Windows Vista x86 SP2
X
X
Windows Vista x64 SP2
X
X
Windows 7 x86 SP1
X
X
Windows 7 x64 SP1
X
X
Windows 8 x86
X
X
Windows 8 x64
X
X
Windows 8.1 x86
X
X
Windows 8.1 x64
X
X
Windows HomeServer 2003 SP2
X
X
Windows HomeServer 2011 x64
X
X
Windows Server 2003 x86 SP2
Windows Server 2003 x64 SP2
Windows Server 2003 x86 R2 SP2
Windows Server 2003 x64 R2 SP2
X
X
X
X
X
X
X
X
X
X
X
X
X
X
X
X
Windows Server 2008 x64 R2 SP1
Windows Server 2008 x64 R2 CORE
Windows Server 2008 x86 SP2
Windows Server 2008 x64 SP2
X
X
X
X
X
X
X
X
X
X
X
X
X
X
X
X
Windows Server 2012 x64
Windows Server 2012 x64 CORE
Windows Server 2012 x64 R2
Windows Server 2012 x64 R2 CORE
X
X
X
X
X
X
X
X
X
X
X
X
X
X
X
X
Microsoft SBS 2003 x86
Microsoft SBS 2003 x86 R2
Microsoft SBS 2008 x64
Microsoft SBS 2011 x64 Standard
Microsoft SBS 2011 x64 Essential
X
X
X
X
X
X
X
X
X
X
X
X
X
X
X
X
X
X
X
X
Older systems, such as Windows Server 2003, may not fully support protocol encryption on the operating system
side. In such a cases, TLSv1.0 will be used instead of TLSv1.2 (TLSv1.0 is considered less secure than more recent
versions). This can also occur when the operating system supports TLSv1.2 but the client does not. We suggest that
you use more recent operating systems and clients (Windows Server 2008 R2 and later for servers, Windows Vista
and later for clients) to ensure the most secure communications.
Supported Linux operating systems are listed here.
7
1.2.4 Prerequisites
Ensure that you have met the following requirements before you install ESET Remote Administrator:
o You must have a valid license for your ESET products, which you will receive via email following your purchase.
o Required ports must be open and available (see the complete list of required ports here).
o Java Runtime Environment (JRE) version 7 or later must be installed on the server where you will install ERA
Server. Click the following link to download the JRE installer http://java.com/en/download/
o Microsoft .NET Framework 3.5 must be installed on the server where you will install ERA Server. If you are
running Windows Server 2008 or 2012 you can install it using the Roles and Features Wizard (as shown below); if
you are using Windows Server 2003, click the following link to download the .NET Framework installer: http://
www.microsoft.com/en-us/download/details.aspx?id=21
Figure 1-4
1.2.5 Ports used
The charts below list all possible network communication ports used by ESET Remote Administrator with default
settings in place. Other communication occurs via the native operating system processes (for example, NetBIOS
over TCP/IP).
ERA Server:
8
Protocol
Port
Usage
Descriptions
TCP
2222
ERAS listening
Communication between clients and ERAS
TCP
2223
ERAS listening
Communication between ERAC and ERAS, used for
Assisted installation.
UDP
1237
Broadcast
Wakeup call
ERA Web Console:
Protocol
Port
Usage
Descriptions
TCP
2223
Web Console
TCP
443
HTTP SSL Web Console
ERA Proxy:
Protocol
Port
Usage
Descriptions
TCP
3128
HTTP Proxy (update caching)
TCP
2222
Proxy
ERA Agent:
Protocol
Port
Usage
Descriptions
TCP
139
target port from ERAS
Using the share ADMIN$
TCP
445
target port from ERAS
Direct access to shared resources using TCP/IP during
remote installation (an alternative to TCP 139)
UDP
UDP
137
138
target port from ERAS
target port from ERAS
Name resolution during remote install
Browse during remote install
You can change the predefined ports 2222 and 2233 if other applications are already using them.
NOTE: To avoid conflicts, make sure that other programs are not using any of the ports listed above.
9
1.3 Install ERA Server
After you have verified that your system meets the system requirements, follow the steps below to run the ERA
installer:
1. Click the link below to download the ESET Remote Administrator Server installer file. Extract the file using a
program like Winzip or 7zip.
Download ESET Remote Administrator Server
2. Select Remote Administrator Server and click Next.
3. Leave the default components selected (deselect Microsoft SQL Server Express if you are using an existing
database) and click Install. Installation time will vary depending on your system configuration. If the ERA
installer finds errors during the prerequisite check, download and install the necessary (recommended by
ESET) software. Make sure your system meets all prerequisites.
Figure 1-5
4. When the prerequisite check completes and your environment meets all requirements, installation will start.
5. Enter a valid License key, which you should have received when you purchased your ESET security solution. If
you are using legacy license credentials (Username and Password), convert the credentials to a license key.
Alternatively, you can choose Activate later. When you are finished, click Next.
6. If you installed the included Microsoft SQL Express Server, continue to step 8. Users with a pre-existing
database: Select the appropriate database type from the Database drop-down menu. Type the Database
name, Hostname and Port (you can find this information in SQL Server Configuration Manager), Database
admin Username and Password into the appropriate fields and then click Next.
10
Figure 1-6
7. Users with a pre-existing database: Select Use existing user and then enter the Database username and
Password if one is used.
8. Type the password you will use to log into the ERA Web Console into the Password and Confirm password
fields, and make sure to record it for use later. Click Next when you are finished.
9. In the Certificate information window, you have the option to specify additional information about your
certificate (this is not mandatory). To password protect your certificates, type the password you want to use
into the Authority password field. Click Next when you are finished.
Figure 1-7
11
10. When you are finished, "ESET Remote Administrator Server installation was successful" will be displayed
with your Web Console URL address. Click the URL address to open Web Console. Bookmark the URL in your
browser for easy access later and then click Finish.
Note: If you close your browser window without saving the URL for Web Console, navigate to https://%Your IP
Address%/era
Figure 1-8
12
2. Deploy the ERA Agent
After successful installation of ESET Remote Administrator, it is necessary to deploy the ERA Agent to the computers
on your network and connect it to the ERA Server. Deploying the ERA Agent to workstations includes the following
steps:
1. Add client computers to ERA structure.
2. Send Agent Live installer to clients.
Once the Agent is deployed, you can perform remote installation of other ESET products on your client computers.
2.1 Add client computer to ERA structure
Before you can manage computers in your network, you need to add them to ESET Remote Administrator. There are
three ways to add a client computer to ESET Remote Administrator:
Active Directory synchronization
Manual entry of computer name/IP address
Using ESET Rogue Detection Sensor
2.1.1 Using Active Directory synchronization
If you have an existing Active Directory (AD) in place, ESET Remote Administrator may have added the computers
from your AD during installation. To view computers from your AD that are already added in ESET Remote
Administrator, click the Computers tab > All. If members of your AD are not shown, follow the steps below to run
the Static Group Synchronization task:
1. Click Admin > Server Tasks.
2. Click Static Group Synchronization > Run Now.
If you need to create a new AD synchronization task, click New. Select a group to which you want to add new
computers from the AD, select objects in the AD you want to synchronize from, and then select what to do with
duplicates. Enter your AD server connection settings and set the Synchronization mode to Active Directory/Open
Directory/LDAP. For more details about custom Static Group Synchronization server task, visit ERA online help.
13
Figure 1-9
2.1.2 Manually typing name/IP
To add a new computer to ESET Remote Administrator manually, follow the steps below:
1. Click the Computers tab, select the group where you want to add the new computer(s) and then click New
Computers.
2. Type the IP address or hostname of the computer you want to add and click Add.
14
2.1.3 Using Rogue Detection Sensor
If you are not using AD synchronization, the easiest way to add a computer into the ERA structure is using Rogue
Detection Sensor (RD Sensor). If you followed the instructions from the Install ERA Server section of this guide, RD
Sensor is already installed. Follow the instructions below to find new computers on your network using RD Sensor:
1. Click the Dashboard tab and then click +.
Figure 1-10
15
2. Enter a name for your new Dashboard and click OK. A new Dashboard with empty tiles will be created.
3. Click one of the tiles and a pop-up screen with Report Templates will be displayed. Select the Rogue
computers report and click Add.
4. The Rogue computers report on the Dashboard lists computers found by the RD Sensor. Click the red area of
the graph to select unmanaged computers and then click Detailed information.
Note: If you use Add all displayed items, click X next to the name of a specific computer if you do not want to
include it in your ERA directory at this time.
5. When you are finished removing computers from the list, click Add > OK.
Figure 1-11
2.1.4 Agent deployment
The ERA Agent facilitates communication between the ERA Server and ESET products, and must be installed on all
client computers for ESET Endpoint and Server products to function properly with ESET Remote Administrator. There
are three ways to deploy the ERA Agent to client computers:
Agent Live Installer—This is the preferred method for this guide, and simplest way to install ERA Agent on most
networks.
Remotely—Using a Server task, which is the best option when deploying the ERA Agent in an enterprise setting.
See our Knowledgebase article for step-by-step instructions.
Locally—If other methods fail, or if your client computers cannot connect to the ERA Server, you can export a
certificate file from ERA Web Console and install the ERA Agent manually on client workstations. See our
Knowledgebase article for step-by-step instructions.
NOTE: If you experience problems when deploying ERA Agent Remotely (for example, the Server task Agent
deployment fails), see the troubleshooting section of this document.
16
2.1.4.1 Deploy Agent Live Installer
You can deploy the ERA Agent Live Installer to client computers using a script generated by ESET Remote
Administrator as long as client computers have access to the Internet and do not require a direct connection
between the server and client computers. The script generated in ESET Remote Administrator will include
instructions to use the certificate that you specify. Follow the steps below to create a new installation script which
you can distribute via email, file sharing, or removable media.
1. Place your cursor on the left to bring up the menu bar and click Agent Live Installers under Quick Links.
Figure 1-12
2. Click Choose next to ERA Certificate.
3. Select the certificate you want to use for the target client computers and click OK. If this certificate requires a
password, type it into the Certificate Passphrase field.
4. Click Get Installers. ESET Remote Administrator will list the different Agent Live Installer packages available
organized by type of operating system.
5. Click Download next to the installer file(s) that you want to distribute. Save the .zip file.
6. Distribute the .zip file that you created to the client computers where you want to install the ERA Agent. Extract
the compressed file and run EraAgentOnlineInstaller.bat (Windows) or EraAgentOnlineInstaller.sh (Mac and
Linux) to run the installer.
Note: If you are running the script on Windows XP SP2, install Microsoft Windows Server 2003 Administration Tools
Pack to ensure that Agent Live installer will run properly.
17
2.1.4.2 Deploy Agent remotely
Follow the steps below to deploy the ERA Agent to client computers remotely:
1. From the Admin section, click Server Task > Agent Deployment > New.
Figure 1-13
18
2. In the Basic section, enter basic information about the task, such as the Name and Description (optional).
3. Select Agent Deployment from the Task Type drop-down menu.
4. Click the Settings section and configure the following settings:
a) Automatic resolution of suitable Agent—If you have multiple operating systems (Windows, Linux, Mac
OS X) in your network, select this option and this task will automatically find the appropriate servercompatible Agent installation package for each system.
b) Targets—Click this to select the clients that will receive this task.
c) Username/Password—The username and the password for the user with sufficient rights to perform a
remote installation of the agent.
d) Server hostname (optional)—You can enter a server hostname if the client hostname differs from that of
the server.
e) Peer certificate/ERA Certificate—This is the security certificate and certificate authority for the agent
installation. You can select the default certificate and certificate authority, or use custom certificates. For
more information, see the Certificates section of the ESET Remote Administrator user guide.
f) Custom certificate—If you use a custom certificate for authentication, navigate to the certificate and
select it when installing the Agent.
g) Certificate passphrase—Optionally, you can create a password for the certificate. If you apply a password
for a certificate, users will be required to enter it before they can install ERA Agent using that certificate.
Figure 1-14
The Summary section will display all of your configured settings. If you experience problems when deploying ERA
Agent remotely (the Server task Agent deployment ends with a failed status) see troubleshooting.
19
2.1.4.3 Deploy Agent locally
To deploy the Agent locally on a client computer using the installation Wizard, follow the steps below:
1. Download the Agent installation package from the download section of the ESET website, under Remote
Management (click the + to expand the category). For computers without an Internet connection, download
this file on a computer with Internet access and use removable media to share it with the target client
computer.
2. Run the installer on the client computer you want to deploy the Agent to. After accepting the End-User
License Agreement (EULA), select the type of installation you want to perform (Server assisted installation or
Offline installation).
Server-assisted installation:
To use this method, your client computer must be able to communicate with ERA Server over your network. This
method is not currently available for OS X computers.
1. Make sure Server assisted installation is selected. Specify the Server host (name or IP address) and Server
port of your ERA Server (the Default Server port is 2222). If you are using a different port, replace the default
port with your custom port number. Click Next when you are finished.
Figure 1-15
20
2. Enter the Username and Password used to access ERA Web Console to allow the agent to download updates
and new certificates.
3. Click Choose custom static group and use the drop-down menu to select the static group to which the client
computer will be added.
Offline installation:
This is the recommended local installation method for situations where client computers cannot communicate with
your ERA Server, and for OS X computers. Before performing an offline installation, make sure that you have both
the agent certificate and certificate authority available on the target client computer.
Figure 1-16
1. Enter 2222 in the Server port field, select Offline installation and then click Next.
2. In ERA Web Console:
a) Navigate to Admin > Certificates > Peer Certificates.
b) Select the certificate that you want to use for this installation and click Export. Transfer the exported
certificate to the client computer using removable media or another method of your choice. For more
information see Peer Certificates in the ESET Remote Administrator User Guide.
21
Figure 1-17
3. Click Browse next to Peer certificate, navigate to the certificate that you want to use with this installation
and click Open. If the Certificate authority is already present in ERA, you can leave this field blank.
4. Click Next when you are finished.
Figure 1-18
NOTE: You can check the status log on the client computer C:\ProgramData\ESET\RemoteAdministrator\Agent\Logs
\status.html to make sure ERA Agent is working properly. If there are problems with the Agent (for example, not
connecting to ERA Server) see the troubleshooting section of this document.
22
2.1.4.4 Troubleshooting
If Agent deployment fails, follow the instructions below to troubleshoot your issue:
Look for any error messages associated with your failed install
Check for possible causes of failure using the table below
Perform the steps in the resolution column for each possible cause
Windows
1. To find out why the Agent deployment failed go to Reports > Automation, select Agent Deployment tasks
information in last 30 days and then click Generate now. The report table will display the deployment
information. Check the Progress column for error messages explaining why the Agent deployment failed.
2. If you need more details, you can change the verbosity of the ERA Server trace log. Navigate to Admin >
Server Settings > Advanced Settings > Logging and select Error from the drop-down menu. Run the Agent
deployment again and when it fails, check the ERA Server trace log file for the latest log entries (at the
bottom of the file) to see why the deployment failed. You'll also find suggestions to resolve the error. By
default, log files are saved to: C:\Users\All Users\ESET\RemoteAdministrator\Server\Logs\trace.log
3. Verify that you have completed all requirements from the ESET Remote Administrator Push Installation
Requirements Checklist.
4. Check the following table for possible causes of failed installation:
Error message
Could not connect
Access denied
Package not found in
repository
Possible cause
Client is not reachable on the network
Client's host name could not be resolved
Firewall blocks communication
Ports 2222 and 2223 are not open in firewall (on both client and server side)
No password set for administrator account
Insufficient access rights
ADMIN$ administrative share is not available
IPC$ administrative share is not available
Use simple file sharing is enabled
Link to the repository is incorrect
Repository is unavailable
Repository doesn’t contain required package
4. Follow troubleshooting recommendations below for the corresponding possible cause:
Client is not reachable on the network—ping the client from the ERA Server. If you do get a response, try
to log on to the client computer remotely (for example, via Remote Desktop).
Client's host name could not be resolved—possible solutions to DNS issues can include but are not
limited to:
o Using the nslookup command of the IP address and hostname of the server and/or the clients having
Agent deployment issues. The results should match the information from the computer. For instance,
if you perform an nslookup of a hostname, that hostname should resolve to the IP address that is
displayed when you perform an ipconfig command. You will need to run the nslookup command
on the clients and the server.
o Manually examine DNS records for duplicates.
Firewall blocks communication—check the firewall settings on both the server and the client, as well as
any other firewall that exists between these two computers (if applicable).
Ports 2222 and 2223 are not open in firewall—same as above, make sure that these ports are open on all
firewalls between the two computers (client and server)
23
No password set for administrator account—set proper password for administrator account (do not use a
blank password)
Insufficient access rights—try using the Domain Administrator's credentials when creating the Agent
deployment task. If the client computer is in a Workgroup, use the local Administrator account on that
particular computer.
o ADMIN$ administrative share is not available—the client computer must have the shared resource
ADMIN$ activated. Make sure it is present among other Shares (Start > Control Panel > Administrative
Tools > Computer Management > Shared Folders > Shares).
o IPC$ administrative share is not available—verify that the client can access IPC by issuing the
following from the Command Prompt on the client:
net use \\servername\IPC$
where servername is the name of the ERA Server
Use simple file sharing is enabled—if you are getting Access denied error messages and you have a mixed
environment of Domain and Workgroup, disable Use simple file sharing or Use Sharing Wizard
functionality on all computers that are having problems with deployment. For example, in Windows 7 do
the following:
o Click Start and type folder in the Search box. Click Folder Options > View tab. In the Advanced
settings box, scroll down the list and deselect Use Sharing Wizard.
Link to the repository is incorrect—go to Admin > Server Settings in Web Console, click Advanced settings
> Repository and make sure the URL of the repository is correct.
Package not found in repository—this error message usually appears when there is no connection to ERA
repository. Check your Internet connection.
NOTE: For more recent Windows operating systems (Windows 7, Windows 8, etc.) you must activate the
Administrator user account to run the Agent deployment task. To activate the Administrator user account:
1. Using an Administrator account, click Start, type CMD into the search bar and press Enter to open a command
prompt
2. Enter the following command: net user administrator /active:yes
Linux and Mac OS X
If Agent deployment does not work on Linux or Mac OS X, the issue is usually related to SSH. Check the client
computer and make sure SSH daemon is running. Once fixed, run the Agent deployment again.
2.2 Deploy additional ESET products
After you finish deployment of the ESET Agent to your target clients, you are ready to begin installing other ESET
products. Click the appropriate link(s) below for step-by-step instructions to install the appropriate software for
your application:
Install ESET Endpoint products for Windows on client computers
Install ESET Proxy Server
24