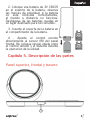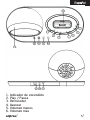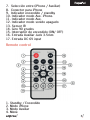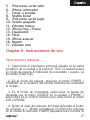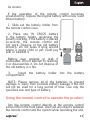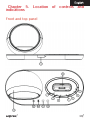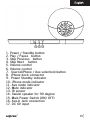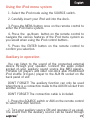
1
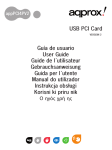
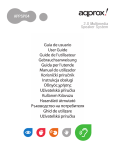
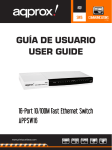
appSP06X
Speaker System with
Docking for iPod or iPhone
Capítulo 1. Introducción
Gracias por elegir el altavoz portátil para iPod y iPhone
APPSP06X.
Descripción del producto
El altavoz portátil APPSP06X de Approx te permite
disfrutar de una potencia de 6 vatios para tu iPhone o
iPod. El APPSP06X se adapta a todas sus necesidades ya
que está dotado de numerosas funciones y de mando a
distancia.
¡Disfruta del mejor sonido allá donde vayas!
Capítulo 2. Contenido del embalaje
• Guía de usuario
• Cable auxiliar de audio
• Adaptador de corriente
• Control remoto
Asegúrese de que su embalaje contiene los elementos descritos
arriba. Si encuentra que falta algún elemento o está dañado, por
favor, contacte con su distribuidor.
Capítulo 3. Requisitos del sistema
• Una toma de corriente
• iPod/iPhone o dispositivo multimedia con salida auxiliar
de audio
2
Chapter 4. Preparación para su uso
Conexión de la fuente de alimentación
Esta unidad se ha diseñado para funcionar con el
adaptador de corriente suministrado. La conexión de este
sistema a cualquier otro adaptador de corriente puede
causar daños en el sistema. Siga los siguientes pasos para
utilizar el adaptador. Desenrolle el cable de alimentación
del adaptador en toda su longitud. Conecte el conector a
la toma DC IN de la parte trasera de la unidad. Asegúrese
de que el adaptador de CA esté totalmente insertado
en la toma de corriente eléctrica. Para apagar la unidad
completamente, desenchufe el adaptador de alimentación
de la toma de pared.
1. No conecte o desconecte el cable de alimentación en
las manos mojadas
2. Por favor, desconecte el enchufe de la toma de
corriente si el aparato no va a ser utilizado durante un largo
periodo de tiempo.
Instalación y cambio de la pila del control remoto
El mando a distancia requiere una “pila del tipo CR2025”
de 3 voltios, litio (incluida). Para extender la vida útil de la
batería original que hemos insertado una pequeña pestaña
trasparente separadora de plástico entre la batería de litio y
la terminal de la batería. Usted debe quitar este separador
antes de utilizar el mando a distancia.
Para sustituir la pila, haga lo siguiente:
1. Deslice el soporte de la pila del control remoto.
3
2. Coloque una batería de 3V CR205
en el soporte de la batería, observe
las marcas de polaridad, si la batería
no está colocada correctamente,
el mando a distancia no funciona.
Deshágase de las baterías usadas en
un lugar destinado para tal cometido.
3 . Inserte el soporte de la batería en
el compartimento de la batería.
4 . Apunte el control remoto
directamente al sensor (IR) del panel
frontal. No coloque ningún objeto entre
el control remoto y el sistema durante
la operación de la unidad.
Capítulo 5. Descripción de las partes
Panel superior, frontal y trasero
4
1.
2.
3.
4.
5.
6.
Indicador de encendido
Play / Pausa
Retroceder
Avanzar
Volumen menos
Volumen más
5
7. Selección entre (iPhone / Auxiliar)
8. Conector para iPhone
9. Indicador encendido / standby
10. Indicador modo Aux. iPhone.
11. Indicador modo Aux.
12. Indicador modo sonido apagado
13. Sensor IR
14. Giro 90 grados
15. Interruptor de encendido (ON/ OFF)
16. Entrada Auxiliar Jack 3.5mm
17. Entrada DC 6V input
Remote control
1.
2.
3.
4.
Standby / Encendido
Modo iPhone
Modo Auxiliar
Menú
6
5.
6.
7.
8.
9.
10.
11.
12.
13.
14.
15.
16.
17.
iPod menu scroll subir
iPhone retroceder
Entrar o aceptar
Shuffle boton
iPod menu scroll bajar
Sonido apagado
Volumen menos
iPhone Play / Pausa
Equalizador
Parar
iPhone avanzar
Repetir
Volumen más
Chapter 6. Instrucciones de uso
Operaciones básicas
1. Seleccione el interruptor principal situado en la parte
posterior de la unidad a la posición “ON”, la unidad estará
en modo de espera. El indicador de encendido / espera, se
enciende (color rojo).
2. En el modo de espera, presione el botón POWER /
STANDBY en la unidad o del control remoto para encender
la unidad.
3. En el modo de encendido, seleccionar la fuente de
deseada con el botón SOURCE en la unidad o IPHONE /
botón AUX en el control remoto para seleccionar el modo
AUX y IPHONE.
4. Ajuste el nivel de volumen principal pulsando el botón
de volumen + / -. Botón o mantener el control de volumen
en la unidad El indicador POWER parpadea para mostrar el
7
volumen es bajo el ajuste.
5. Pulse el botón MUTE en el mando a distancia para
interrumpir el sonido inmediatamente. La reproducción
continuará sin sonido. Para activar la reproducción de
sonido, puede pulsar el botón MUTE o ajustar los controles
de volumen para continuar.
Funcionamiento con iPhone / iPod
Esta unidad es compatible con el iPhone 4, iPhone 3G y
el iPod touch, y los tipos más diferentes de iPod que tiene
30 pines, etc
Usted puede escuchar la música del iPod conectado a
través del potente altavoz del reproductor. También actúa
como un cargador de batería del iPhone / iPod. Mientras
tu iPhone / iPod dock esté conectado a la unidad, que
recargará automáticamente la batería hasta que esté
completamente cargada. Esta unidad está diseñada una
estación de acoplamiento universal para iPod inserta
propia cuna.
Pulse el botón STANDBY para encender la unidad, a
continuación, pulse el botón SOURCE para seleccionar
el modo iPod (el iPod no debe estar en una funda para
el iPod) El iPod se reproducirá de forma automática e
iniciará la carga inmediatamente una vez que el iPod está
conectado. Pulse el botón de PLAY / PAUSE para pausar la
reproducción durante la reproducción. Pulse el botón otra
vez para reanudar la reproducción.
Seleccione la música deseada, fotos o video, etc, como
de costumbre. También puede pulsar el botón Siguiente o
Anterior en la unidad o del control remoto para saltar a la
canción siguiente o anterior.
8
Usando el sistema de menú del iPod
1. Seleccione el modo de iPod presionando el botón
SOURCE.
2. Con cuidado, inserte la unidad de iPod en el dock.
3. Pulse el botón MENU una vez en el mando a distancia
para entrar en el sistema de menú del iPod.
4. Pulse el botón arriba/abajo del mando a distancia
para navegar por las diversas características del sistema
de menú del iPod como lo haría al utilizar los botones de
control del iPod.
5. Pulse el botón ENTER en el mando a distancia para
confirmar su selección.
Modo auxiliar
Usted puede escuchar el sonido de un dispositivo externo
conectado a este dispositivo a través del altavoz interno.
Conecte su dispositivo a la entrada auxiliar, como
reproductores MP3, reproductores portátiles de CD,
móviles.
La función auxiliar sólo se puede utilizar cuando hay una
conexión hecha a la entrada AUX IN.
Pulse el interruptor de AUX en el dispositivo o en el control
remoto para seleccionar la fuente auxiliar.
9
Capítulo 4. Instalación
• Coloque su altavoz APPSP06X sobre una superficie
estable
• Conecte el cable de corriente
• Coloque el interruptor en la posición ON
• Coloque con cuidado su iPhone o iPod sobre la ranura
central
Capítulo 5. Soporte técnico
Para más información sobre la instalación y configuración de
este producto diríjase a nuestra web www.approx.es (sección
soporte).
10
Chapter 1. Introduction
Thank you for choosing the Ipod and Iphone portable
speaker APPSP06X.
Product description.
The Approx speaker APPSP06X lets you enjoy 6 watts of
power for your iPhone or iPod. The APPSP06X suits your
needs because it is equipped with numerous features and
remote control.
Enjoy great sound wherever you go!
Chapter 2. Package contents
• User Guide
• Auxiliary audio cable
• Power adapter
• Remote control
Make sure your package contains the elements described above.
If you find something is missing or damaged, please contact your
dealer.
Chapter 3. System requirements
• One power socket
• iPod / iPhone or multimedia device with auxiliary audio
11
Chapter 4. Preparation for use
Connecting power source
This unit was designed to operate with AC adaptor.
Connecting this system to any other power source may
cause damage to the system. Take the following steps to
use the adaptor. Unwind the power cord of the adaptor to
its full length. Connect the DC plug to the DC in socket on
the rear of the unit, and then pug the adaptor to the AC
outlet (100-240V~50/60Hz). Make sure the AC adaptor is
fully inserted into the mains power outlet. The set is now
connected and ready to use.
To switch the unit off completely, withdraw the power
adaptor from the wall outlet.
1. Do not plug or unplug the power cable in wet hands
2. Please disconnect the mains plug from the AC outlet
if the appliance is not going to be used for a long period
of time.
Installing and replacing the battery of the remote
control
The remote control requires one”CR2025 type” 3-Volt
lithium battery (included). To extend the life of the original
battery we have inserted a small clear plastic spacer tab
between the lithium battery and the battery terminal. You
must remove this battery spacer tab before you use the
remote control. To remote the table, pull it in the direction
of the arrow in the illustration,
12
As shown:
If the operation of the remote control becomes
unsatisfactory, replace the original battery with a new 3-volt
lithium battery.
1. Slide out the battery holder from
the remote control case.
2. Place one 3V CR205 battery
in the battery holder, observing the
polarity marking, if the battery is placed
incorrectly, the remote control will
not work. Dispose of the old battery
properly. Do not leave it lying around
where a young child or pet could pay
with or swallow it.
Battery may explode or leak if
mistreated, Do not attempt to reaching
it or disassemble it, Do not dispose of
the old battery in a fire.
3.
Insert the battery holder into the battery
compartment.
NOTE: Please remove all of the batteries to prevent
damage or injury from possible battery leakage if the unit
will not be used for a long period of time. Use only the
specified size and type of battery.
Using the remote control to operate the product:
Aim the remote control directly at the remote control
sensor (IR) on the front panel. Don’t put any objects between
the remote control and the system while operating the unit.
13
Chapter 5. Location of controls and
indications
Front and top panel
14
1. Power / Standby button
2. Play / Pause button
3. Skip Previous button
4. Skip Next button
5. Volume control
6. Volume control
7. Source(iPhone / Aux selection) button
8. iPhone dock connector
9. Power Standby indicator
10. iPhone mode indicator
11. Aux mode indicator
12. Mute indicator
13. IR sensor
14. Swivel speaker for 90 degree
15. Main Power Switch (ON/ OFF)
16. Aux-in Jack connection
17. DC 6V input
15
Remote control
1. Standby / ON button
2. iPhone mode button
3. Aux mode button
4. MENU button
5. iPod menu scroll up button
6. iPhone Skip previous button
7. Enter button
8. Shuffle button(Random)
9. iPod menu scroll down button
10. Mute button
11. Volume button
12. iPhone Play / Pause button
13. EQ button
14. STOP button
15. iPhone Skip Next button
16
16. Repeat button
17. Volume button
Chapter 6. Operating instructions
Basic operations
1. Select the main power switch located at the back of the
unit to “ON” position, the unit will be in Standby mode. The
Power / Standby indicator will light up (red color).
2. In the Standby mode, press the POWER / Standby
button on the unit or the remote control to turn on the unit.
3. In Power ON mode, select sound source by SOURCE
button on the unit or IPHONE / AUX button on the remote
control to select IPHONE and AUX mode.
4. Adjust the main volume level by pressing the Volume +/button or hold the volume control on the unit .The POWER
indicator will flash to show the volume is under adjustment.
5. Press the MUTE button on the remote control to
interrupt sound reproduction instantly. The playback will
continue without sound. To activate sound reproduction,
you can press the mute button again or adjust the volume
controls to resume.
Operating the iPhone
This unit is compatible with iPhone 4, iPhone 3G and iPod
touch, and most different kinds of iPod which has 30 pin
connector, etc. You can listen to the music of the docked
iPod through the powerful speaker of the player. It also acts
as an iPhone / iPod battery charger. While your iPhone /
17
iPod dock to the unit, it will automatically recharge until
fully charged.
This unit is designed a universal docking station for iPod
own cradle inserts. Before plugging your iPod into the dock,
snap the suitable dock adaptor int the dock to the product,
All iPod model with 30-pin dock connector as below: Nano
1/2/3/4th and iPod 5th generation (Video) 6th generation,
iPod touch and iPod classic.
1. In power on mode, press the STANDBY button to switch
on the unit, then press the SOURCE button to select iPod
mode.
2. Carefully insert you iPod into the iPod dock well. (The
iPod must not be in a iPod case) The iPod will start playing
automatically and starting charging immediately once the
iPod is connected. Press the PLAY/PAUSE button to pause
playback during the playback. Press this button again to
resume playback.
3. Select your desired music, photos or video, etc and lay
the connected iPod as usual. You can also press the NEXT
or Previous button on the unit or remote control to skip to
the next or previous music, or press and hold the button
to search within a playing track at high speed to locate a
specific musical passage.
4. In power on mode, the iPod could be charged in all
modes if it is docked.
1. Use the correct iPod dock adaptor for your model, taking care
not to damage the connecting pins.
2. Always ensure care is taken when inserting or removing your
iPod from the connector.
18
Using the iPod menu system
1. Select the iPod mode using the SOURCE switch.
2. Carefully insert your iPod unit into the dock.
3. Press the MENU button once on the remote control to
enter the iPod menu system.
4. Press the up/down button on the remote control to
navigate the various features of the iPod menu system as
you would when using the iPod control buttons.
5. Press the ENTER button on the remote control to
confirm you selection.
Auxiliary in operation
You can listen to the sound of the connected external
device through your speaker. Connect the audio output
socket of your auxiliary sound source like MP3 players,
Portable CD players and older non-dock able iPod(Except
iPod shuffle 3rd gen.) player to the AUX IN socket on the
back panel of unit
DON’T FORGET! The auxiliary function can only be used
when there is a connection made to the AUX IN socket from
another source.
DON’T FORGET! The connection cable is included.
1. Press the SOURCE switch or AUX on the remote control
to select the AUX function.
2. Turn your auxiliary source ON and operates it as usual.
The sound from the auxiliary source can be heard through
19
the speakers.
3. Adjust the volume level to your desired listening level.
Chapter 7. Installation
• Place your APPSP06X speaker on a stable surface
• Connect the power cord
• Turn the switch on the ON position
• Carefully place your iPhone or iPod on the central slot
Chapter 8.Technical support
For more information on installing and configuring this product go
to our website www.approx.es (support section).
20
Importado por / Imported by:
APPROX IBERIA S. L.
CIF: B-91202499
Soporte técnico / Technical support:
[email protected]
MADE IN CHINA
El contenido de esta guía está
sujeto a errores tipográficos
The content of this guide is
subject to typographical errors
www.printyourideas.com