1
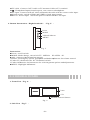
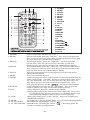
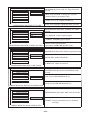
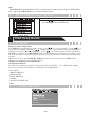
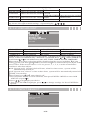
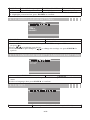
OPERATION INSTRUCTIONS
10.4 PORTABLE TV with built-in multimedia Card Player
Dear Customer:
Welcome to the splendid Portable TV. Now you may enjoy new visual experiences
and surprises from the marriage of advanced digital technology and new life philosophy.
To fully apply the product, please read the manual carefully and keep it for later reference.
Table of Contents
Check List
1. Introduction
1
2. Safety Precautions
1
3. Installation Instructions
1-4
3.1 Single Frame
1-3
3.2 Double Frame
3-4
4. Remote Control Guide
4-6
5. Setup Menu
6-11
5.1 SETUP MENU - MAIN PAGE
6-7
5.2 SETUP MENU - PHOTO
7
5.3 SETUP MENU - MUSIC
8
5.4 SETUP MENU - SLIDE SHOW
8-9
5.5 SETUP MENU - MOVIE
9
5.6 SETUP MENU - PREFERENCES PAGE
9-11
5.7 SETUP MENU - EXIT SETUP
11
6. OSD Setup Guide
6.1 AV Mode
11-15
11-13
6.1.1 VIDEO ADJUST
11-12
6.1.2 OSD ADJUST
12
6.1.3 INPUT SELECT
12-13
6.1.4 AUDIO
13
6.1.5 LANGUAGE SELECT
13
6.1.6 EXIT
13
6.2 TV Mode Settings
14-15
6.2.1 TV FUNCTION
14
6.2.2 TV MODE
15
7. TV Operation
15-16
7.1 AUTO CHANNEL SEARCH
15
7.2 CHANNEL SELECTION
15
7.3 DISPLAY CHANNEL
16
7.4 CHANNEL RECALL
16
8. AV Input/Output User Instruction
16
9. Product Specifications
17
Check List
When you open the box, make sure the following components are not missing.
1)Portable TV (1)
2)TVStand (1)
3)Remote Control (1)
4) AV Cable (1)
5) CATV Cable (1)
6)Headphone (1)
7)Power Supply (1)
8) Warranty Card (1)
9) User Manual (1)
If you have any questions, please contact the retailer.
Introduction
10.4 Portable TV supports:
JPEG picture file.
WMA, MP3 sound files.
MPEG1, MPEG2 video files.
Background sound playing
13 different picture playing Modes.
CF, SM, MS, MS PRO, SD, MMC, IBM MICRODRIVE seven types of memory cards.
AV Input/Output
TV
Remote control support.
Safety Precautions
Please be aware of the following precautions.
1.Handle it carefully. Place machine on a soft cloth or surface before installation in order to
prevent for scratches.
2.Spray a little of cleaner on soft cloth and wipe the panel.
3.Do not block the vent to prevent overheating.
4.Never disassemble or perform self-maintenance and repair, since opening or removing
cover plate may cause high-voltage electric shock or other dangers. Have a qualified
technician perform all product maintenance.
Installation Instructions
3.1 SINGLE FRAME
-1-
1. Front View(Fig. 1):
Remote Sensor
Fig. 1
2. Top View(Fig. 2):
Fig. 2
Two slots for CF, SM, MS, MS PRO, SD, MMC, IBM MICRODRIVE: 7 types of memory
cards supports.
3. Back View(Fig. 3):
Wall Hanging: can install onto the surface of a wall. Table Stand: use the stand to support
the Portable TV for weight support.
Hanging Hole
Stand
Fig. 3
Input/output Introduction(Fig. 4):
DC 12V
TV
Signal Switch
AV Connector
Fig. 4
-2-
lTV cable : Connect CATV cable or TV Antenna Cable to TV terminal.
l
: Headphone Input (Sound export),can connect to headphone.
lAV input: Connects with AV cable and match the cable with the correct color input.
lSignal switch: switch AUDIO and VIDEO signal input/output.
lDC12V: Power input,install the power cord into the DC12V input.
4. Button Instructions(Right-hand side)(Fig. 5):
Power
MODE
Add and Subtract
MENU
Fig. 5
Instruction:
lPower: on/off switch.
lMODE: Mode change, can switch TV、MEDIA PLAYER、AV.
lAdd、Subtract: Multifunction support
1.Before selecting any option, press Add and Subtrac buttons for volume control
2.Under TV, the buttons are for TV channel switch.
3.Under OSD menu, the buttons are for selecting menu options and adjustments.
lMENU: Highlight OSD menu.
3.2 DOUBLE FRAME
1. Front View(Fig. 6):
Frame
LCD
Remote Control Sensor
Fig. 6
2. Side View(Fig.7):
-3-
MENU
Add/Subract
MODE
Power
Fig. 7
Two slots for CF, SM, MS, MS PRO, SD, MMC, IBM MICRODRIVE: 7 types of memory
cards supports.
Buttons instruction please go back to Single Frame Album instruction.
3.Digital Album display setup: (Review Single Frame Album for installation
instruction)
lWall setup:(hang horizontally)Able to hang on the wall
lTable setup: same as the Single Frame Album.
4. Back View(Fig.8):
Hanging Hole
AV Connector
DC 12V
Signal Switch
TV
Fig. 8
:Headphone Input (Sound export), can connect to headphone.
lAV input: Connects with AV cable and match the cable with the correct color input.
lSignal Switch: switch AUDIO and VIDEO signal input/output.
lDC12V: Power input,install the power cord into the DC12V input.
lTV cable: Connect CATV cable or TV Antenna Cable to TV terminal.
Remote Control Guide
-4-
1
2
3
4
5
6
7
8
9
10
11
12
13
14
15
16
17
18
19
20
21
22
23
24
1 POWER
2 MUSIC
POWER
MUSIC
PHOTO
MOVIE
SETUP
MENU
ZOOM
ROTATE
PLAY
UP
STOP
MODE
LEFT
ENTER
RIGHT
MUTE
0
DOWN
VOLUME
VOLUME
NUMBER KEY
REPEAT
DISPLAY
GOTO
Press it to turn the machine on or off
In selection menu, press the“MUSIC” key will select the music
files. If do not select any files, then system will automatically play
the first music file. (Media Player Mode)
3 PHOTO
In selection menu,press the“PHOTO” key will select the
picture files. If do not select any files, then the system will
automatically play the first picture file. (Media Player Mode)
4 MOVIE
In selection menu, press the“ MOVIE”key will select the movie
files. If do not select any files, then the system will automatically
play the first movie file. (Media Player Mode)
5 SETUP
Press for setup menu. Press setup again to exit the setup menu.
(Media Player Mode)
6 MENU
Press it to setup the System.
7 ZOOM
Under the play selection, if the picture size does not match with the
frame, then use the “ZOOM” button to enlarge the picture. Press
once for double the size, twice for triple the size, three times for
four times the size, and four times for the original size. After
enlarging the picture, use the“
”for surface adjustments.
8 ROTATE
Under the play selection, use the “ROTATE” key for picture
rotation. Rotate key only works under PHOTO menu.
9 PLAY
1.Play and pause function. (Media Player Mode)
2.When playing a picture and a music at the same time. Press once
to stop playing the picture, press twice to stop both picture and
music playing, and press three times to restore playing.
11 STOP
Under play mode, press on the“STOP” button to stop playing.
(Media Player Mode)
12 MODE
Switch Picture display modes. There are 13 different display modes.
10/18 UP/DOWN
In OSD menu, up and down switch.( )
13/15 LEFT/RIGHT In OSD menu, left and right switch. (
), In setting, press for
increase and decrease adjustment.
-5-
14 ENTER
16 MUTE
19/20 VOLUME
17/21 NUMBER
22REPEAT
23DISPLAY
24GOTO
Select an option from a menu.
Mute (Sound off).
Volume control.
Numbers: from 0 to 9.
Under media play selection, can press the number to select
files, such as MP3, JPEG, WMA, MPEG files.
Under TV mode, use the numbers for channel selection.
Press Enter for instant channel change. (Or wait 2 seconds
for auto channel change)
Under media play selection, press REPEAT to have MP3,
MPEG or picture files repeat its play function.
Under media play selection, use the DISPLAY key to have
picture and music to play at the same time (Background
music).
In Photo, music, video, or file, user can switch between these
4 modes. As shown under the picture below.
Fig. 9
5
Setup Menu
Playing multimedia Files
1.Go back to product description for instruction on how to insert memory card onto the
slots.
Reminder:Support CF, SM, MS, MS PRO, SD, MMC, IBM MICRODRIVE: 7 different
types of memory cards.
/2
SM
CF
IBM MICRODRIVE
SD、MMC、MS
MS PRO
2.display photo:press PHOTO key,and enter the photo menu. Use number keys (1-9)
for photo selection and press ENTER to select the photo.
3.display music:press MUSIC key, and enter music menu. Controlling instruction is the
same as above.
4.display movie:press MOVIE key,and enter movie menu. Controlling instruction is
the same as above.
5.When playing the above media, press PLAY to pause and press again to continue. Press
STOP to stop playing.
6.Background music(Can play music and photo at the same time):
1)Under PHOTO menu display mode, press DISPLAY can play photo and music at the
same time. The first music and the first picture will be played at the same time.
2)Under MUSIC menu display mode, press DISPLAY and same instruction as above.
3)When music and photo is playing at the same time. Press PLAY once to stop playing
photo, twice for both music and photo, and three to continue playing both.
7.For other user instruction please go to Remote Control instruction.
5.1 SETUP MENU-MAIN PAGE
-6-
SETUP MENU-MAIN PAGE
PHOTO SETUP (Change Photo settings)
MUSIC SETUP (Change Music settings)
SLIDESHOW SETUP (Change Slideshow
settings)
MOVIE SETUP (Change Movie settings)
PREFERENCES (Change Menu settings)
EXIT SETUP (Exit MAIN PAGE)
Press SETUP key on remote control to open
SETUP MENU.
GENERAL SETUP
MAIN PAGE
5.2 SETUP MENU-PHOTO
PHOTO Thumbnail Digest Function Setup
ON: Turn the function on OFF: Turn this function off
THUMBNAIL DIGEST
TRANSITION MODE
ORIENTATION
MAIN PAGE
SETUP MENU--PHOTO
PHOTO-THUMBNAIL DIGEST
1.Enter MAIN PAGE.
2.Press ENTER key to enter submenu PHOTO
3.Press ( , ) to highlight item to change, press
to highlight your choice, press ENTER to save.
4.Press ( ) to go back to upper menu. then
highlight MAIN PAGE to go back to previous menu.
PHOTO transition mode function setup
THUMBNAIL DIGEST
TRANSITION MODE
ORIENTATION
FAST
NORMAL
SLOW
MAIN PAGE
TRANSITION MODE
PHOTO-TRANSITION MODE
FAST
NORMAL
SLOW
1.Enter PHOTO SETUP menu.
2.Press ( 、 ) to highlight ORIENTATION,press
( )to show submenu on the right. Press( 、)to
select desired item. Press (ENTER)to save.
3.Press( ) to return to previous menu. Select
MAIN PAGE then press(ENTER)to return to
previous menu.
PHOTO Orientation Function Setup
THUMBNAIL DIGEST
TRANSITION MODE
ORIENTATION
DEFAULTS
IGNORE
MAIN PAGE
ORIENTATION
PHOTO-ORIENTATION
DEFAULTS
IGNORE
1. Enter PHOTO SETUP menu.
2. Press( 、)to highlight ORIENTATION,press
( )to show submenu on the right. Press( 、 )
to select desired item. Press (ENTER)to save.
3. Press( ) to return to previous menu. Select
MAIN PAGE then press(ENTER)to return to
previous menu.
-7-
5.3 SETUP MENU-MUSIC
SETUP MENU--MUSIC
REPEAT MODE
MAIN PAGE
MUSIC Repeat Function Setup
ONE
ALL
OFF
ONE: Repeat one music file.(MP3)
ALL: Repeat all music files.
SETUP MENU--MUSIC
MUSIC-REPEAT MODE
OFF: Turn Repeat function off.
Instruction same as above
5.4 SETUP MENU-SLIDE SHOW
SETUP MENU--SLIDE SHOW
SLIDESHOW MODE
FOLDER REPEAT
INTERVAL TIME
TRANSITION
AUTO START
MANUAL
AUTO
SLIDE SHOW Playing Function Setup
MANUAL: Slide show plays manually.
AUTO: Slide show plays automatically.
MAIN PAGE
SLIDESHOW MODE
SLIDE SHOW-SLIDE SHOW MODE
Instruction same as above
SETUP MENU--SLIDE SHOW
SLIDESHOW MODE
FOLDER REPEAT
INTERVAL TIME
TRANSITION
AUTO START
SLIDE SHOW Folder Repeat Function Setup
ON
OFF
ON: Turn Folder Repeat function on.
MAIN PAGE
FOLDER REPEAT
OFF: Turn Folder Repeat function off.
SLIDE SHOW-FOLDER REPEAT
SETUP MENU--SLIDE SHOW
SLIDESHOW MODE
FOLDER REPEAT
INTERVAL TIME
TRANSITION
AUTO START
ONE SECOND
THREE SECONDS
FIVE SECONDS
TEN SECONDS
MAIN PAGE
SLIDE SHOW Interval Time Setup
ONE SECOND
THREE SECONDS
FIVE SECONDS
INTERVAL TIME
SLIDE SHOW-INTERVAL TIME
TEN SECONDS
-8-
SETUP MENU--SLIDE SHOW
SLIDESHOW MODE
FOLDER REPEAT
INTERVAL TIME
TRANSITION
AUTO START
MAIN PAGE
TRANSITION
FULL SCREEN
TOP->BOTTOM
BOTTOM->TOP
T/B->CENTER
CENTER->T/B
BLIND: T/B
LEFT->RIGHT
RIGHT->LERT
L/R->CENTER
SLIDE SHOW-TRANSITION
SLIDE SHOW Transition function Setup
FULL SCREEN
TOP->BOTTOM
BOTTOM->TOP
T/B->CENTER
CENTER->T/B
BLIND:T/B
LEFT->RIGHT
RIGHT->LEFT
L/R->CENTER
From top to bottom
From bottom to top
From top/bottom to center
From Center to Top/bottom.
Blinder
From left to right
From right to left
From left/right to center
SETUP MENU--SLIDE SHOW
SLIDE SHOW Auto Start Function Setup
SLIDESHOW MODE
FOLDER REPEAT
INTERVAL TIME
TRANSITION
AUTO START
ON: Turn AUTO START on.
ON
OFF
MAIN PAGE
OFF: Turn AUTO START off.
AUTO START
SLIDE SHOW-AUTO START
5.5 SETUP MENU-MOVIE
SETUP MENU--MOVIE
INTERVAL TIME
REPEAT MODE
MOVIE INTERVAL Time Function Setup
FAST
NORMAL
FAST
MAIN PAGE
INTERVAL TIME
NORMAL
MOVIE-INTERVAL TIME
SETUP MENU--MOVIE
INTERVAL TIME
REPEAT MODE
MAIN PAGE
MOVIE Repeat Mode Setup
OFF: Turn Repeat function off.
OFF
ONE
ALL
ONE: Repeat one movie file.
REPEAT MODE
ALL: Repeat all movie file.
MOVIE-REPEAT MODE
5.6 SETUP MENU-PREFERENCES PAGE
-9-
PREFERENCES PAGE
TV TYPE
VIDEO OUTPUT
OSD LANG
OSD MESSAGE
DEFAULTS
PREFERENCES PAGE TV Type function
Setup
MULTI SYSTEM
NTSC
PAL
MULTI.SYSTEM: Change TV system
(Media Player) automatically.
NTSC: For U.S., Japan and Korea
MAIN PAGE
SET TV TYPE
PAL: For countries adopting PAL system.
PREFERENCES PAGE-TV TYPE
PREFERENCES PAGE
TV TYPE
VIDEO OUTPUT
OSD LANG
OSD MESSAGE
DEFAULTS
PREFERENCES PAGE VIDEO OUTPUT
Setup
S-VIDEO
YPBPR
RGB
S-VIDEO:S-Video signal output.
YPBPR: YPBPR signal output.
MAIN PAGE
SET VIDEO OUTPUT
RGB: RGB signal output.
PREFERENCES PAGE-VIDEO OUTPUT Attention: Don t change this item.
PREFERENCES PAGE
TV TYPE
VIDEO OUTPUT
OSD LANG
OSD MESSAGE
DEFAULTS
PREFERENCES PAGE OSD Language Setup
ENGLISH
CHINESE
ENGLISH: OSD in English.
MAIN PAGE
SET OSD LANGUAGE
CHINESE: OSD in Chinese.
PREFERENCES PAGE-OSD LANG
PREFERENCES PAGE
TV TYPE
VIDEO OUTPUT
OSD LANG
OSD MESSAGE
DEFAULTS
PREFERENCES PAGE OSD MESSAGE
Setup
ON
OFF
ON: Turn OSD MESSAGE on.
MAIN PAGE
OSD MESSAGE
OFF: Turn OSD MESSAGE off.
PREFERENCES PAGE-OSD MESSAGE
PREFERENCES PAGE
TV TYPE
VIDEO OUTPUT
OSD LANG
OSD MESSAGE
DEFAULTS
PREFERENCES PAGE DEFAULTS Setup
RESET
MAIN PAGE
OSD DEFAULTS
RESET: Restore manufacturer's defaults
settings.
PREFERENCES PAGE-DEFAULTS
- 10 -
Note:
PREFERENCES PAGE DEFAULTS is active only in initial status by press SETUP key.
If not, please press GOTO key to return to initial status.
5.7 SETUP MENU-EXIT SETUP
MAIN PAGE EXIT SETUP
Press( 、 )to highlight EXIT SETUP
Press ENTER to exit OSD menu.
GENERAL SETUP
MAIN PAGE
6
OSD Setup Guide
6.1 AV Mode
Remote Control Operation
Press MENU to highlight the OSD setting, press
,to select submenu, press
,to
select aimed variable, then press
to adjust numerical variable; If the variable is not
numerical ( such as TV , VIDEO ), press
to select aimed variable, then press
ENTER to confirm. Press RETURN button at the submenu to return till exit OSD, or you
can wait for OSD exit automatically (please reference the detail OSD menu closing time
setting).
Tips: You can also press ENTER、MENU buttons on remote control or OSD on the
machine to return till exit the OSD setting.
VIDEO and MEDIA PLAYER Mode
The Specific Menus:
The specific of Menus are different for each mode of VIDEO、TV、MEDIA PLAYER,
However, the same for VIDEO and MEDIA PLAYER Menus.
Select Menu:
VIDEO ADJUST
OSD ADJUST
INPUT SELECT
AUDIO
LANGUAGE SELECT
EXIT
6.1.1 VIDEO ADJUST
COLOUR TEMPERATURE
RESET
RETURN
- 11 -
Operation under highlighting the variable
reduce/increase the variable
BRIGHTNESS reduce/increase the variable HUE
CONTRAST reduce/increase the variable COLOR
TEMPERATURERreduce/increase the variable
defaults recall
SHARPNESS reduce/increase the variable RESET
return to Menu
SATURATION reduce/increase the variable RETURN
Note: To ease the operation, the second function of multifunction buttons will be used
(up, down, left, right at menu setting),representing by : 、 、 、
6.1.2 OSD ADJUST
TIMER SET
RETURN
H-POSITION
Move horizontally OSD-OFF TIME
OSD auto off time setup
OSD-TRANSPARENT OSD Transparency
V-POSITION
Move vertically
RETURN
TIMER SET
Timer function
Return to Menu
TIMER SET is to set up the clock's On/Off time. It appears in the upper right corner of the
screen. Timer is in function only "Timer On" is selected. Press
or
to turn TIMER on
or off. Press or to switch between ON, OFF, TIME, TIMER ON and TIMER OFF.
When timer is on, three selections will be displayed on the screen, including ON (On
Time) 、OFF (Off Time) and TIME(Current Time). Press numbered keys to adjust to the
correct time. If the current time is 13:15:41, press 1, 3, 1, 5, 4, 1 as the arrow flashes.
Confirm it after time adjust.
ON: System is off, internal clock still runs, when it's time to start, system will be
automatically turned on
Off: System is on, when it's time to shut down, system will be automatically turned off.
TIME: Current time
When Timer is set to NO , auto-timer is off.
1.Press ENTER / MENU to enter submenu, then press ENTER / MENU to enter OSD
ADJUST (or press )
2.Press 、 to highlight your choice.
3.Then press ENTER to highlight, press 、 to change settings. Or Press ENTER for
options
6.1.3 INPUT SELECT
VIDEO
TV
MEDIA PLAYER
RETURN
- 12 -
For VIDEO input signal
For Media Player
MEDIA PLAYER
VIDEO
For TV signal
Return to menu
RETURN
TV
1. Press MENU to enter submenu, then press ENTER to enter INPUT SELECT .
2. Highlight your selection, press ENTER to confirm.
6.1.4 AUDIO (AUDIO SETTING)
RETURN
VOLUME
TREBLE
BASS
BALANCE
1.Press MENU to enter submenu, then press ENTER to open AUDIO menu .
(Or press
)
2.Press
、 to highlight your choice.
3.Press ENTER to open and press 、 to change the settings. Or press ENTER for
options
6.1.5 LANGUAGE SELECT (LANGUAGE SETTING)
ENGLISH
CHINESE
RETURN
ENGLISH
CHINESE
1.Press MENU to enter submenu, then press ENTER to open LANGUAGE SELECT
menu
2.Select a language, then press ENTER to confirm.
6.1.6 EXIT
press ENTER/MENU to quit OSD adjust.
- 13 -
6.2 TV MODE SETTINGS
Menu:
VIDEO ADJUST
OSD ADJUST
INPUT SELECT
TV FUNCTION
TV MODE
AUDIO
LANGUAGE SELECT
EXIT
The Operation for VIDEO ADJUST、OSD ADJUST、INPUT SELECT、AUDIO、
LANGUAGE SELECT、EXIT are the same for VIDEO、MEDIA PLAYER mode are
same, here are the details of TV function and TV mode setting.
6.2.1 TV FUNCTION
AUTO SCAN
MANU SCAN
FINE TUNE
PRESET PROGRAMS
SKIP PROGRAMS
SELECT PROGRAMS
TV Function Menu
AUTO SCAN
Auto search channels
MANU SCAN
Manual search channels
FINE TUNE
Covering manually full channel width, to the highest level of
performance.
PRESET PROGRAMS Able to change channels' sequence.
SKIP PROGRAMS
This function for skip a channel,
a skip channel.
on remote control to select
This function for select channel on the machine buttons,
SELECT PROGRAMS machine to select channels.
on
1.Press remote control direction key to select, and press ENTER / MENU to confirm
2.Select PRESET PROGRAMS setup selection, press
to adjust the aimed channel
in the mid-bottom of OSD menu, press ENTER /MENU to realize preset function
- 14 -
6.2.2 TV MODE
TV MODE
NTSC
PAL B/G
PAL I
PAL D/K
RETURN
TV MODE
NTSC
US, Japan, South Korea
PAL B/G
Germany, Italy, Spain, Saudi Arabia and
other countries adopting PAL B/G
PAL I
Hong Kong, UK.
PAL D/K
China
1. Select ENTER / MENU to enter submenu, press
2.Then press ENTER / MENU to confirm.
7
button on remote control.
TV Mode Control Menu
7.1 AUTO CHANNEL SEARCH
First time use or TV moved to new area, needs to process auto channel search.
1.In TV Playing mode, press MENU to enter submenu.(Please compare system setting
part in the front page.)
2.Press
on the remote control to TV Menu, then press ENTER to enter setting.
3.Press
on the remote control to Auto Channel Scan, press ENTER to enter Auto
Channel Scan . After auto scan finished, there will be auto play first channel, and
channels can be watch normally.
4.To stop Auto Scan, press ENTER Key to quit.
7.2 CHANNEL SELECTION
To select channels, press
or enter number of a channel on the remote control, then
press ENTER to confirm. Also Channel Selection can be found in the submenu for select
channels.
- 15 -
7.3 DISPLAY CHANNEL
While TV is in playing mode,press DISPLAY to shown channel number on the top right
corner screen.
7.4 CHANNEL RECALL
While TV is in playing mode, press ENTER to go back previous channel.
8
AV Input/Output User Instruction
This product has AV Connection. AV Device can directly connect with DVD, VCD player
(PS. AV M status needs to change to, which AV input turns on)
User Instruction below:
AV Input & Output can be control by the switch.
AV Input: VIDEO Input (Connect DVD/VCD AV Output), AUDIO Input (Connect DVD
/VCD Audio Output) , needs to switch status to IN, then digital frame playing mode switch
to Video mode, then AV signal can be play.
Instruction:
First Thing AV Signal Cable connected follow by color:
1.Take DVD, VCD's VIDEO(Yellow)Connect to Album TV's VIDEO AV.
2.Take DVD, VCD's AUDIO(Red、White)Connect to Album TV's AUDIO AV.
Then switch Digital frame's mode to VIDEO:
1. Press MENU into OSD system menu.
2. Press
switch to INPUT SELECT screen.
3. Select VIDEO input mode, ENTER to confirm VIDEO input mode.
Finished Instruction above will be able to watching DVD,VCD.
AV Output Status Description: System AV Signal can be output, need to connect AV input,
then can play media from Album TV. Let Video Input/output switch to Out, also digital
frame playing mode change to MEDIA PLAYER, then it will be able to play.
- 16 -
9
Specifications
Panel: 10.4 TFT LCD
Active Area: 211.2 mm(H)*158.4(V)mm
Resolution: 640(W)* 480(H)
Horizontal frequency (H): 30-80KHZ
Vetical frequency (V): 60/75HZ
Lamp Lifetime: 50,000Hours
Brightness: 330cd/m 2
Contract Ratio: 250 : 1
View Angle: Vertical 110 / Horizontal 140
Input Power: DC 12V, 1.5A
Power Consumption: 25W
Supported Multimedia File: MPEG 1, MPEG 2
MP3, WMA
JPEG
Supported Memory card: CF, SM, SD, MMC, MS, MS PRO, IBM MICRODRIVE
- 17 -
Shanghai Visart Technologies Co., Ltd.
Room 906 Hongcao Building, 421 Hongcao Road
Shanghai, China, P. R.
200233
Tel: 86-21-64955920
Fax: 86-21-64955921
VISART USA Corporation
1211 John Reed Court,
City of Industry, CA 91745
Tel: 1-626-855-3486
Fax:1-626-855-1145
Toll free: 1-866-4-VISART Http://www.visart.com