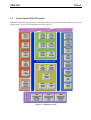
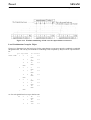
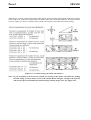
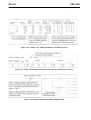
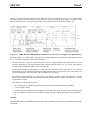
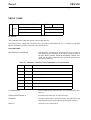
1
SESAM
USER MANUAL
Presel
Preprocessor for Assembling
Superelements
DET NORSKE VERITAS
SESAM
User Manual
Presel
Preprocessor for Assembling
Superelements
October 1st, 2004
Valid from program version 7.3
Developed and marketed by
DET NORSKE VERITAS
DNV Software Report No.: 82-6113 / Revision 8, October 1st, 2004
Copyright © 2004 Det Norske Veritas
All rights reserved. No part of this book may be reproduced, in any form or by any means, without permission in
writing from the publisher.
Published by:
Det Norske Veritas
Veritasveien 1
N-1322 Høvik
Norway
Telephone:
Facsimile:
E-mail, sales:
E-mail, support:
Website:
+47 67 57 99 00
+47 67 57 72 72
[email protected]
[email protected]
www.dnvsoftware.com
If any person suffers loss or damage which is proved to have been caused by any negligent act or omission of Det Norske Veritas, then Det Norske Veritas shall pay compensation to such person for his proved
direct loss or damage. However, the compensation shall not exceed an amount equal to ten times the fee charged for the service in question, provided that the maximum compensation shall never exceed USD
2 millions. In this provision “Det Norske Veritas” shall mean the Foundation Det Norske Veritas as well as all its subsidiaries, directors, officers, employees, agents and any other acting on behalf of Det Norske
Veritas.
Table of Contents
1
INTRODUCTION ............................................................................................................1-1
1.1
Presel — Preprocessor for Assembling Superelements................................................................... 1-1
1.2
Presel in the SESAM System........................................................................................................... 1-3
1.3
How to read the Manual................................................................................................................... 1-4
1.4
Status List ........................................................................................................................................ 1-4
2
FEATURES OF PRESEL ................................................................................................2-1
2.1
Basic Features and Principles .......................................................................................................... 2-1
2.2
Short Description of Commands...................................................................................................... 2-2
2.3
Transfer of the Model through the Input Interface File ................................................................... 2-3
3
USER’S GUIDE TO PRESEL.........................................................................................3-1
3.1
Getting Started — the Graphical User Interface.............................................................................. 3-2
3.2
Assemble Superelements ................................................................................................................. 3-5
3.2.1
Basic Procedure................................................................................................................. 3-5
3.2.2
Tutorial in Assembling Superelements ............................................................................. 3-6
3.2.3
Auxiliary Commands ...................................................................................................... 3-10
3.2.4
Identifying Superelement Occurrences ........................................................................... 3-10
3.2.5
Identifying Nodes in a Superelement Model................................................................... 3-12
3.2.6
More About Nodes .......................................................................................................... 3-12
3.3
Combine Loads .............................................................................................................................. 3-13
3.3.1
Why Combine Loads....................................................................................................... 3-13
3.3.2
Tutorial in Combining Loads One-by-One ..................................................................... 3-13
3.3.3
Effect on Loads of Rotating and Mirroring Superelements ............................................ 3-16
3.3.4
Combining Wave Loads by the Group Method .............................................................. 3-17
3.3.5
Load Combinations when Higher Level Superelements are Repeated ........................... 3-20
3.3.6
Requirement to Assembling Process when Wave Loads are Computed......................... 3-21
3.4
Assemble Loads............................................................................................................................. 3-23
3.4.1
Principles of Uniquely Identifying Superelement Occurrences ...................................... 3-24
3.4.2
3.4.3
3.4.4
Tutorial in Assigning Unique Identifications for Superelement Occurrences ................ 3-24
Tutorial in Using the LOAD ASSEMBLY Command.................................................... 3-31
Advice on Giving Unique Identifications to Superelement Occurrences ....................... 3-33
3.5
Boundary Conditions ..................................................................................................................... 3-35
3.6
Linear Dependency ........................................................................................................................ 3-36
3.7
Sets................................................................................................................................................. 3-37
3.8
Display and Print............................................................................................................................ 3-38
3.9
Practical and Efficient Application of the Superelement Technique............................................. 3-41
3.10 Node Numbering Optimization to Minimise the Bandwidth......................................................... 3-43
4
EXECUTION OF PRESEL............................................................................................. 4-1
4.1
Program Environment...................................................................................................................... 4-1
4.1.1
Starting Presel from Manager............................................................................................ 4-1
4.1.2
Line-Mode Input of Commands and Arguments............................................................... 4-1
4.1.3
Files used by Presel ........................................................................................................... 4-3
4.1.4
Creating Plots for Reports ................................................................................................. 4-4
4.1.5
Command Line Arguments ............................................................................................... 4-4
4.2
Program Requirements..................................................................................................................... 4-6
4.2.1
Execution Time ................................................................................................................. 4-6
4.2.2
Storage Space .................................................................................................................... 4-6
4.3
Program Limitations ........................................................................................................................ 4-6
5
COMMAND DESCRIPTION ......................................................................................... 5-1
5.1
Node Select Features........................................................................................................................ 5-2
5.1.1
Line-mode Selection.......................................................................................................... 5-2
5.1.2
Graphical Selection ........................................................................................................... 5-2
5.1.3
Command Syntax for Node Selection ............................................................................... 5-3
5.2
Detailed Description of Commands................................................................................................. 5-6
ASSEMBLY .................................................................................................................................... 5-8
BOUNDARY................................................................................................................................... 5-9
CHANGE....................................................................................................................................... 5-11
CHANGE LINEAR-DEPENDENCY ........................................................................................... 5-12
CHANGE LOAD........................................................................................................................... 5-13
COORDINATE-SYSTEM ............................................................................................................ 5-14
DEFINE SET ................................................................................................................................. 5-16
DELETE ........................................................................................................................................ 5-17
DELETE LOAD NODE ................................................................................................................ 5-19
DISPLAY....................................................................................................................................... 5-21
EXIT .............................................................................................................................................. 5-23
HELP.............................................................................................................................................. 5-24
INCLUDE...................................................................................................................................... 5-25
INCLUDE supno CHECK-INCLUDE.......................................................................................... 5-26
INCLUDE supno DECODE-T-MATRIX ..................................................................................... 5-29
INCLUDE supno DISPLAY ......................................................................................................... 5-30
INCLUDE supno DISTANCE-CHECK........................................................................................ 5-31
INCLUDE supno END-DO-NOT-INCLUDE............................................................................... 5-32
INCLUDE supno LOCATION...................................................................................................... 5-33
INCLUDE supno MIRROR........................................................................................................... 5-35
INCLUDE supno NOPRINT-CHECK-INCLUDE ....................................................................... 5-36
INCLUDE supno PERFORM-INCLUDE..................................................................................... 5-37
INCLUDE supno POSITION ........................................................................................................ 5-38
INCLUDE supno PRINT-T-MATRIX / PRINT-INV-T-MATRIX.............................................. 5-39
INCLUDE supno RESET-T-MATRIX ......................................................................................... 5-40
INCLUDE supno ROTATE........................................................................................................... 5-41
INCLUDE supno TRANSLATE ................................................................................................... 5-43
LABEL........................................................................................................................................... 5-44
LINEAR-DEPENDENCY............................................................................................................. 5-46
LINEAR-DEPENDENCY GENERAL-NODE-DEPENDENCY................................................. 5-48
LINEAR-DEPENDENCY TWO-NODE-DEPENDENCY .......................................................... 5-49
LOAD ............................................................................................................................................ 5-50
LOAD ASSEMBLY ...................................................................................................................... 5-51
LOAD COMBINATION............................................................................................................... 5-52
LOAD NODE ................................................................................................................................ 5-54
NAME............................................................................................................................................ 5-56
OPTIMIZE..................................................................................................................................... 5-57
PLOT ............................................................................................................................................. 5-58
PRINT............................................................................................................................................ 5-60
PRINT LOAD................................................................................................................................ 5-62
PRINT NODE................................................................................................................................ 5-64
READ............................................................................................................................................. 5-66
ROTATE........................................................................................................................................ 5-67
SET ................................................................................................................................................ 5-68
SET GRAPHICS............................................................................................................................ 5-70
SET PLOT ..................................................................................................................................... 5-74
SET PRINT.................................................................................................................................... 5-76
TAG ............................................................................................................................................... 5-78
TASK ............................................................................................................................................. 5-79
TRANSFORMATION................................................................................................................... 5-80
UNTAG ......................................................................................................................................... 5-81
WRITE........................................................................................................................................... 5-82
ZOOM............................................................................................................................................ 5-83
# ..................................................................................................................................................... 5-84
APPENDIX A TUTORIAL EXAMPLES................................................................................ 1
A1
The Tutorials in Assembling Superelements and Combining Loads ............................................. A-1
A 1.1 Superelement 5 ................................................................................................................. A-1
A 1.2
A2
Superelement 6 ................................................................................................................. A-2
The Tutorial in Assembling Loads ................................................................................................. A-3
A 2.1 Superelement 1 ................................................................................................................. A-4
A 2.2 Superelement 2 ................................................................................................................. A-4
A 2.3 Superelement 3 ................................................................................................................. A-5
A 2.4 Superelement 4 ................................................................................................................. A-6
A 2.5 Superelement 5 ................................................................................................................. A-6
APPENDIX B
B1
THEORY........................................................................................................... 1
Mathematical Foundation for Superelement Technique................................................................. B-1
B 1.1 Direct Analysis ................................................................................................................. B-1
B 1.2 Superelement Analysis ..................................................................................................... B-2
B 1.3 Rotating and Mirroring a Superelement ........................................................................... B-4
SESAM
Program version 7.3
Presel
01-OCT-2004
1
INTRODUCTION
1.1
Presel — Preprocessor for Assembling Superelements
1-1
To use Presel you should know some terms. These are highlighted by italic text first time they appear.
Presel is SESAM’s preprocessor for assembling superelements. A superelement is basically a finite element
(FE) model of a part of the complete structure. The SESAM preprocessors Preframe (for frame modelling)
and Prefem (for general FE modelling) are used for creating first level superelements, i.e. part models comprised of finite elements like beams, shells, etc. adjoined in nodes.
Presel is used to put these parts together to form superelement assemblies. First level superelements are typically assembled to form second level superelement assemblies, these are in turn assembled to form third
level superelement assemblies, and so on until the complete model — the top level superelement assembly
— is formed. Note that a superelement assembly is referred to as a superelement when itself is included in
an assembly. Superelements on levels higher than 1, i.e. superelements created by Presel rather than by Preframe/Prefem, are often referred to as higher level superelements.
A superelement hierarchy showing the assembly process from bottom to top can be sketched as illustrated
for the two examples in Figure 1.1.
An unlimited number of superelements can be included in a superelement assembly. Furthermore, there is
no limit to the number of levels of a superelement hierarchy.
A superelement model may be used for linear structural analysis using Sestra, or hydrodynamic analysis
(wave loading and motion) of frame structures using Wajac and of general structures using Wadam.
First level superelements created by SESAM’s preprocessor for tubular joint modelling, Pretube, may also
be assembled by Presel. The same goes for superelements created by any FE preprocessor as long as they
are defined according to the SESAM Input Interface File format.
To fully appreciate the purpose and use of Presel an understanding of the mathematical foundation of the
superelement technique is required; see Appendix B THEORY. Also a basic understanding of a first level
superelement as modelled by e.g. Preframe and Prefem is required.
Presel
1-2
SESAM
01-OCT-2004
1.1
Figure 1.1 Illustration of superelement hierarchies
Program version 7.3
SESAM
Program version 7.3
1.2
Presel
01-OCT-2004
1-3
Presel in the SESAM System
SESAM is comprised of preprocessors, environmental analysis programs, structural analysis programs and
postprocessors. An overview of SESAM is shown in Figure 1.2.
1.2
Figure 1.2 SESAM overview
Presel
1-4
1.3
SESAM
01-OCT-2004
Program version 7.3
How to read the Manual
If you are a new user then first read the introduction in Section 1.1. Continue with Section 2.1 (and skim
through Section 2.2) to learn about basic features and principles of assembling superelements.
If you already have a basic understanding of SESAM and the superelement technique then proceed as follows:
• Read Section 3.1 to learn how to start Presel and use the graphical user interface.
• Read Section 3.2.1 to learn about the basic procedure of assembling superelements.
• Study the tutorial in assembling superelements of Section 3.2.2.
• Read Section 3.2.3, Section 3.2.4 and Section 3.2.5 to learn how to identify superelements and nodes.
Note two important rules mentioned in Section 3.2.6.
• Read Section 3.3.1 and study the tutorial in combining loads in Section 3.3.2.
• Conclude by looking into Section 3.3.3, Section 3.5, Section 3.8 and Section 3.9.
Chapter 4 EXECUTION OF PRESEL contains more special information not intended for the new user
using Manager to control his SESAM analysis. The chapter explains how to start Presel outside Manager
and operate it in line-mode (not using the graphical user interface). The files used by Presel are also
explained. Practical information is provided on how to operate Presel and manipulate its files in various
ways. Built-in and hardware dependent requirements and limitations are also described.
Chapter 5 COMMAND DESCRIPTION explains in detail all commands of Presel. The commands and subcommands are sorted alphabetically.
Appendix A TUTORIAL EXAMPLES provides input (to Prefem) for creating the first level superelements
used in the tutorials of Chapter 3 USER’S GUIDE TO PRESEL.
Appendix B THEORY explains the mathematical foundation of the superelement technique.
1.4
Status List
There exists for Presel as for all other SESAM programs a Status List providing additional information. This
may be:
• Reasons for update (new version)
• New features
• Errors found and corrected
• Etc.
To look up information in the most updated version of the Status List go to the support page of our website,
click the SESAM Status Lists link and log into this service. Contact us for log-in information.
SESAM
Program version 7.3
2
Presel
01-OCT-2004
2-1
FEATURES OF PRESEL
Presel is a program for assembling superelements (part models) to form the complete model to be analysed.
2.1
Basic Features and Principles
Presel reads the first level superelements from the Input Interface Files. These files are named T#.FEM
where # is the superelement number, an identification of the superelement.
The first level superelements may be displayed and given names but not modified in any way. If a first level
superelement need to be modified you have to revert to the preprocessor that created it, e.g. Prefem or Preframe. A first level superelement cannot be modified once it has been read into Presel.
Higher level superelements are created in Presel. A higher level superelement contains no nodes and elements until one or more superelements have been included into it. A higher level superelement is given contents by including first level superelements and/or previously created higher level superelements. There are
no restrictions as to the number of superelements that may be included in an assembly. Superelements at any
level may be included in the same assembly. The assembly will implicitly be assigned a superelement level
equal to the highest level among its included superelements plus one. For example, if the highest level
among the included superelements is three then the assembly will be a level four superelement.
Boundary conditions like supernodes and fixations as well as loads are defined for higher level superelements (assemblies). The loads will normally be combinations of loads previously defined for the included
superelements but nodal forces may also be defined.
Once a higher level superelement is included in yet a higher level superelement it can no longer be modified
in any way, for example by including more superelements or defining boundary conditions and loads.
The top (highest) level superelement is complete when the whole model to be analysed has been formed
including all its loads and boundary conditions. There is no limit to at which level this top level is. The top
level number is simply a result of the hierarchical assembling of superelements from bottom to top.
The final task of Presel is to produce (write) the Input Interface Files (T#.FEM, the T-files) for all higher
level superelements that has been created.
Presel
2-2
2.2
SESAM
01-OCT-2004
Program version 7.3
Short Description of Commands
A short description of each main command in Presel is given below.
ASSEMBLY
creates a new higher level superelement or opens an old one.
This is then the current superelement. The current superelement is displayed by the DISPLAY command and superelements may be included into it using the INCLUDE command.
BOUNDARY
defines boundary conditions for the current superelement.
CHANGE
changes loads, transformations and linear dependencies.
COORDINATE-SYSTEM
defines a coordinate system that can be referred to when defining boundary conditions and when selecting nodes (presently
limited to cylindrical).
DEFINE
defines sets.
DISPLAY
displays superelements and contributions to load combinations.
HELP
provides information on the command syntax and how to get
technical support. The command also launches the Status program providing access to the Status List of Presel.
INCLUDE
includes a superelement in the current higher level superelement assembly.
LABEL
annotates node symbols, node numbers etc. to the displayed superelement.
LINEAR-DEPENDENCY
makes one or more degrees of freedom (d.o.f.s) linearly dependent on one or more other (independent) d.o.f.s.
LOAD
defines nodal loads and load combinations.
NAME
gives a name to a superelement. This is only relevant in connection with the LOAD ASSEMBLY command.
OPTIMIZE
optimises the node numbering in order to minimise the bandwidth of the stiffness matrix of higher level superelements.
PLOT
generates a plot file of the current display. The plot file may be
printed or imported in a word processor. In a MS Windows environment the plot may also be directed to an on-line printer.
PRINT
prints tables over model data. The tables may be directed to the
screen or to a file by the SET PRINT command.
READ
reads Input Interface Files containing descriptions of first level
superelements.
SESAM
Program version 7.3
Presel
01-OCT-2004
2-3
ROTATE
rotates the display of the superelement.
SET
sets and defines various control parameters.
TAG
tags selected nodes. These may subsequently be referred to as
TAGGED within, for example, the BOUNDARY command.
TASK
switches to input mode for Submod; see the Submod User
Manual. (In most cases you will find it more convenient to access Submod directly rather than through Presel.)
TRANSFORMATION
defines transformations that can be referred to when defining
loads and boundary conditions.
UNTAG
resets node tags.
WRITE
writes Input Interface Files for higher level superelements. See
Section 2.3 on this.
ZOOM
increases or decreases the scale of the display.
#
reads commands from a command input file defined by the
SET COMMAND-INPUT-FILE command.
DELETE
deletes data.
EXIT
exits from Presel. The model and log files are saved and closed.
2.3
Transfer of the Model through the Input Interface File
As is the case for all SESAM preprocessors, the model created by Presel is transferred to the hydrodynamic
and/or structural analysis programs via the Input Interface File which forms a part of the SESAM Interface
File system. Figure 2.1 illustrates this transfer of models between the preprocessors and the analysis programs.
The Input Interface File, the T-file, is a sequential ASCII character file with 80 character long records. The
straightforward definition of the file enables external programs to be connected to the SESAM system with
comparative ease.
One interface file will be created for each superelement. The name of the file will be:
prefixT#.FEM
where:
• ‘prefix’ is an optional character string that may and may not include a directory specification, the string
is given when entering Presel and is common for all superelements in the model.
• ‘T’ is a mandatory character identifying this as an Input Interface File, a T-file, as opposed to a Loads
Interface File, L-file, which uses character L and a Results Interface File, R-file, which uses character R.
• ‘#’ is the superelement number, the identifier of the superelement.
Presel
SESAM
2-4
01-OCT-2004
Program version 7.3
• ‘FEM’ is a mandatory file extension.
Normally, the user may find it convenient to leave the prefix void. This is also the default condition.
An example of a name of an Input Interface File with prefix is:
ABCT5.FEM
Note that Presel both reads first level superelements and writes higher level superelements and all must have
the same prefix. If the above file — superelement 5 — is one of several files of a superelement model then
all Input Interface Files should be named ABCT#.FEM, where # is the superelement number.
2.1
Prefem
general
structures
Preframe
frame
structures
Presel
superelement
assembly
1
1
1
2+
INPUT INTERFACE FILE
PREPROCESSING
ENVIRONMENTAL
ANALYSIS
LOADS INTERFACE FILE
STRUCTURAL
ANALYSIS
Legend for arrows:
1 first level superelement
2+ second and higher level superelement
As indicated by the illustration:
Prefem and Preframe write first level
superelements to the Input Interface File
Presel reads first level superelements
from the Input Interface File and writes
higher level superelements to the same.
Figure 2.1 Interface between SESAM preprocessors and analysis programs
Presel produces Input Interface Files for all higher level superelements by the command WRITE:
WRITE top#
where top# is the number of the top level superelement. All higher level superelements are implicitly and
automatically written when this command is given. Note that when the SESAM Manager is employed the
writing of the top and higher level superelements is normally controlled by Manager thus making the
WRITE command superfluous.
Note: If you on MS Windows close the Presel window by the X in the upper right corner (or by the
Close (Alt+F4) command of the window menu) then the Input Interface Files will not be written even though you have requested this when starting Presel. This feature may be used if you
change your mind and decide not to write the file after having started Presel.
SESAM
Program version 7.3
3
Presel
01-OCT-2004
3-1
USER’S GUIDE TO PRESEL
The purpose of Presel is to assemble (put together) part models, so-called first level superelements, to form
the complete analysis model. This is done through the following steps:
• Read files of first level superelements (this is normally done automatically).
• Create a second level superelement assembly and include first level superelements into it. The inclusion
process comprises positioning the first level superelements and coupling matching supernodes.
• Combine loads for the assembly by referring to loads of the first level superelements. Possibly also
define some boundary conditions.
• Create higher level superelement assemblies, combine loads and define boundary conditions in the same
way as explained above only now include previously created superelement assemblies. Repeat this process until the complete analysis model has been created.
• Store all superlement assemblies (the whole superelement hierarchy) on file and exit Presel (the storing
is normally done automatically when exiting Presel).
This user’s guide explains how to:
• Get started using the graphical user interface. See Section 3.1.
• Create the complete model by assembling superelements. See Section 3.2.
• Establish the loads for the complete model by combining loads on superelements. See Section 3.3.
• Assemble loads, an alternative and advanced way of establishing the loads. See Section 3.4.
• Define boundary conditions. See Section 3.5.
• Define linear dependencies. See Section 3.6.
• Display and print data. See Section 3.8.
Presel
SESAM
3-2
01-OCT-2004
Program version 7.3
• Use the superelement technique in a practical way to efficiently solve problems. See Section 3.9.
• Optimise node numbering (reduce bandwidth of the stiffness matrix) and when to do it. See Section 3.10.
3.1
Getting Started — the Graphical User Interface
Assuming you have started the SESAM Manager and that first level superelements have already been created then do as follows:
• Click Options | Superelement and within the window appearing set your analysis to be superelement
analysis (as opposed to direct analysis) and specify top level superelement number (any number may be
used).
• Start Presel by clicking Model | Superelement Handling Presel and click OK in the window then
appearing.
The main part of the graphical user interface is the graphic-mode window. There are also a print window
and a message window. Print requested by the user appears in the print window whereas various program
messages appear in the message window. Figure 3.1 illustrates the three Presel windows.
3.1
Graphic-mode window
Print window
Message window
Figure 3.1 The Presel windows
Presel offers two modes of input and both are available in the graphic-mode window:
• Line-mode input, i.e. typing commands and data using the keyboard
• Graphic-mode input, i.e. selecting commands by clicking the left mouse button (LMB)
A sketch of the graphic-mode window is shown in Figure 3.2 together with explanations of the six different
areas. How to use the areas is explained in more detail in the following.
SESAM
Presel
Program version 7.3
01-OCT-2004
3-3
3.2
click left mouse button (LMB) to select command or action
Graphic display area
View:
Pan
Rotate
X axis
Direct
access
buttons
<last given input>
<prompt> <echo>
Label:
Node Sym
Supn Sym
Node Tri
Assembly
Boundary
Change
Coordinate system
Shortcut
commands
Command
menu
Line-mode input Cursor position feedback
prompt for information
node number at cursor position shown here
typed commands and data are echoed (appear) here
Figure 3.2 The graphic-mode window is composed of six different areas
You may at this stage decide to go through a Presel tutorial. Go then to Section 3.2.2 and use the explanations below of the areas of the graphic-mode window for reference.
The six different areas of the graphic-mode window are used as follows:
• Graphic display area
— The model (current or selected superelement) is displayed here.
— Within some commands (e.g. the BOUNDARY command) there is a need for selecting nodes. Alternatively to keying in the nodes as explained in Section 5.1 you may select nodes by clicking or dragging a rubberband in the graphic display area. The availability of graphical selection is subject to that
node selection has been switched on by the SET GRAPHICS NODE-SELECTION command or by
the ‘Sel Node’ shortcut command button. By default this is switched on.
• Command menu
— The at any time allowable commands plus default values for numerical data are listed here as buttons.
— Commands and values are selected by clicking the left mouse button (LMB).
— Slanted text signifies default choices that are accepted by either:
• Hitting the Return key
Presel
3-4
SESAM
01-OCT-2004
Program version 7.3
• Clicking either of the Direct access buttons ‘;’ (semicolon) and ‘/ /’ (double slash). The former
accepts all subsequent default values (see Section 4.1.2) while the latter accepts a single default
value, i.e. the one shown in slanted font.
• Shortcut commands
These provide one-click access to commonly used compound commands. A Shortcut command is logged
as its equivalent full standard commands.
• Direct access buttons
These buttons are accessible at any time. I.e. when you are in the middle of a command (by clicking a
command or a shortcut command or by typing a line-mode command) you may rotate and zoom to get a
better view. The buttons ‘;’ and ‘/ /’ are logged with the default values they accept. The button ‘..’ is logged
as is. The other buttons are not logged (see Section 4.1.3 on logging commands).
— The Pan button allows panning (shifting) the display. Click the button, then press and hold the LMB
within the Graphic display area and a bounding box of the displayed model appears. Move the mouse
and release the LMB and the model will be displayed in its new position.
— The Rotate button allows interactive rotation of the display. Click the button, then press and hold the
LMB within the Graphic display area and a bounding box of the displayed model appears. Move the
mouse up and down to rotate the model about a screen horizontal axis and move left and right to
rotate about a screen vertical axis. A circular motion will rotate the model about an axis normal to the
screen in the opposite direction of the circular motion. When the LMB is released the model is displayed in its new position.
— The X axis, Y axis and Z axis buttons display the model as seen along the model’s X-, Y- and Z-axis,
respectively.
— The Default button switches back to the default viewing position (optionally set in Manager) and redisplays the model.
— The Zoom In button zooms in by either clicking twice and diagonally or by pressing the LMB and
dragging it to form a zoom area (rubberband box).
— The Zoom Fr button re-displays the model so that it fits within the display area.
— The Learn button offers making a new Shortcut command. Click the button and enter a maximum
eight character string being the name of the new Shortcut command and hit Return. Now give any
sequence of commands. Several complete commands may be given, the last of which may be incomplete (i.e. more data is required to make it complete). Clicking the Learn button once more completes
the process and the new Shortcut command appears as a new button.
— The ‘;’ button accepts all available default commands and parameters.
— The ‘..’ button aborts the current command.
— The ‘/ /’ button accepts a single default value, i.e. the one shown in slanted font.
— The Node button (under heading Select) is merely a consequence of GUI consistency with other
SESAM preprocessors and has little relevance for Presel. It must be depressed (the default condition)
to allow graphical selection (clicking and rubberband) of nodes.
— The Set button (under heading Select) is merely a consequence of GUI consistency with other
SESAM preprocessors and has little relevance for Presel.
• Line-mode input
— The upper line presents the last given input.
SESAM
Program version 7.3
Presel
01-OCT-2004
3-5
— The lower line includes the prompt for input and data entered in line-mode.
— You may paste (Ctrl+V) text into the line-mode input area.
• Cursor position feedback
— The node number triplet of the node at or close to the cursor position is listed here. If more than one
node is within the tolerance of the cursor position then the triplets of all these nodes will be listed.
Note: While entering a command by the keyboard it is not possible to click buttons or commands
until hitting the Return key or deleting all data typed. This involves that if you (inadvertently)
have entered a ‘space character’ (which you may overlook as you cannot see it) clicking commands as well as selecting nodes and elements by clicking will not work. Use the backspace to
delete the ‘space character(s)’.
3.2
Assemble Superelements
This section explains how to assemble superelements to form the complete model. The basic procedure is
first briefly explained, thereafter a small example (tutorial) is used to illustrate the procedure.
3.2.1
Basic Procedure
1 Store all first level superelements in the Presel database by reading the SESAM Input Interface Files (Tfiles named T#.FEM). Use the command READ. This is optionally done automatically when starting
Presel from the SESAM Manager (select default Command input file).
2 Create a new superelement assembly. Use the command ASSEMBLY NEW. This superelement is initially empty but it will become a second level superelement once a first level superelement has been
included.
a Include a first level superelement in the new superelement assembly by the following process:
1 Start the inclusion process by the command INCLUDE.
2 If necessary, translate, rotate and mirror the first level superelement to its proper position in the
assembly. See the INCLUDE command for the alternative positioning commands.
3 Verify graphically its position by the command DISPLAY.
4 Check that the supernodes of the first level superelement match the nodes of the already included
superelements, if any. Use the command NOPRINT-CHECK-INCLUDE.
5 Complete the inclusion process by the command PERFORM-INCLUDE.
6 Verify the inclusion by the LABEL COUPLED-NODES and other commands.
b Include other first level superelements by repeating the process above (item a).
c When the assembly, which has now become a second level superelement, is complete then give
appropriate boundary conditions. This may be fixations and/or supernodes for coupling with other
superelements. Use the command BOUNDARY.
Presel
3-6
SESAM
01-OCT-2004
Program version 7.3
d At this stage you may define load cases for the assembly. This task may, however, also be postponed
to after the complete model has been assembled. See Section 3.3 on this.
3 Create new second level superelements by repeating the process above (item 2).
4 Create new superelements at level three and higher levels by repeating the process above (item 2). The
only difference from creating second level superelements is that not only first level superelements are
included. Any mixture of first and higher level superelements may be included in the same new superelement. The level of the new superelement will be equal to the level of the highest level of the included
superelements plus one.
5 The assembly process is concluded when the top level superelement representing the complete model
has been created. Supernodes cannot be defined for the top level superelement.
6 You should now define the loads for the various higher level superelements (ref. item 2 d above). See
Section 3.3 on this.
3.2.2
Tutorial in Assembling Superelements
The tutorial below illustrates how two first level superelements may be assembled to form a second level
superelement. Figure 3.3 shows the two first level superelements as well as the complete model. For each
first level superelement the dimensions, the origin, the free (internal) nodes and the supernodes are given.
As can be seen, superelement 5 is used once and superelement 6 is used twice to form the complete model.
If you only want to read this section, i.e. you do not intend to perform the tutorial, then you may skip the
four-item list of required actions below.
If you want to perform the tutorial and run Presel for this example, you first need to do the following:
• Start the SESAM Manager and open a new project. When doing so click Structure Type and choose
General. (You may also select type of structure after opening the new project by Options | Structure
Type.)
• In Manager click Options | Superelement and within the window appearing set your analysis to be
Superelement analysis (as opposed to Direct analysis) and set Top level superelement number to 7.
• Create the two first level superelements 5 and 6 by running Prefem twice. Remember to set the superelement number before starting Prefem. The input for the two superelements is provided in Appendix A
TUTORIAL EXAMPLES, Section A 1. Rather than clicking/typing the commands you may want to create two command input files using an editor. Note that node numbers in a FE model are automatically
generated by Prefem and may with a new program version deviate from the numbers shown in Figure
3.3.
• Start Presel as follows: Click Model | Superelement Handling Presel to open the Superelement handling window. Make sure the Command input file selected is Default and click OK. This default Command input file reads the T#.FEM files located in the project area. (Optionally, you may read the
superelements 5 and 6 using the READ command.)
SESAM
Presel
Program version 7.3
01-OCT-2004
3-7
3.3
Figure 3.3 The two first level superelements and desired complete model
Figure 3.4 and Figure 3.5 take you step-by-step through the procedure and commands for assembling
superelements 5 and 6 to form the complete model, superelement 7.
Presel
3-8
SESAM
01-OCT-2004
3.4
Figure 3.4 The commands and resulting superelements
Program version 7.3
SESAM
Presel
Program version 7.3
01-OCT-2004
3.5
Figure 3.5 The commands and resulting superelements, continued
3-9
Presel
SESAM
3-10
3.2.3
01-OCT-2004
Program version 7.3
Auxiliary Commands
You may verify the superelement assembly by various auxiliary commands.
The LABEL COUPLED-NODES command used in Figure 3.4 and Figure 3.5 verifies that the appropriate
number of first level superelements are indeed coupled. This is an important check because a minor coordinate difference, for example due to a modelling error, may involve that some nodes are not coupled even
though they appear to be so in the display. A coordinate tolerance determines whether nodes are coupled or
not. You can set this tolerance by the SET COORDINATE-TOLERANCE command. The LABEL NONCOUPLED-NODES is the complementary command labelling nodes adjoined by a single first level
superelement by the digit 1. The node in the lower right corner of superelement 7 is such a node.
The command PRINT OVERVIEW-OF-SUPER-ELEMENTS produces a table over all first and higher
level superelements. A double plus in the left margin of the table indicates which superelement is the current one. The DISPLAY command displays the current superelement, the INCLUDE command includes
superelements into the current superelement, etc. For the example above the table looks like this:
SUPER EL.
TYPE
--------5
6
++
7
LEVEL
--------1
1
2
NODES
--------16
10
10
ELEMENTS
--------9
4
3
LOADCASES
--------3
2
0
The command PRINT SUPER-ELEMENT-HIERARCHY produces a table illustrating the hierarchy. For
the current example the table will be as shown below. It is common practice to manually sketch the
superelement hierarchy as shown in Figure 3.4.
SUPER ELEMENT LEVEL
2
1
-----1:7.1-----------1:5.1
!
!-----2:6.1
!
!-----3:6.2
3.6
7
5
6
6
Figure 3.6 Sketch of superelement hierarchy
Also see Section 3.8 on display and print commands for verifying the model.
3.2.4
Identifying Superelement Occurrences
Since a superelement may be included any number of times in a model, each occurrence of the superelement
is assigned a unique identification.
SESAM
Program version 7.3
Presel
01-OCT-2004
3-11
Within Presel there are two ways of uniquely identifying an occurrence of a superelement:
• By referring to its superelement number plus superelement index. The superelement index is the number
in sequence in which the superelement was included; see below for a more complete explanation. In the
LOAD COMBINATION command you need to refer to superelements in this way; see Section 3.3.2.
• By referring to name and location string as used in the LOAD ASSEMBLY command; see Section 3.4.
Yet another way is employed in Sestra for determining selective retracking (the SELID parameters on the
RETR command in the Sestra input):
• By referring to the string of hierarchy branch numbers from the top level superelement and down to the
superelement in question.
The hierarchy branch numbers, superelement numbers and superelement indexes are all given in the
superelement hierarchy printed by Presel as shown in Section 3.2.3. Each superelement is identified by three
numbers:
• Branch number within the superelement assembly.
• Superelement number.
• Superelement index — The first time a superelement number is included in an assembly it is assigned
index 1. The second time it is included it is given index 2, and so on. When a higher level superelement
is repeatedly included in an assembly the indexes of its included superelements will also be incremented.
If, for instance, the second level superelement 7 in the current example were to be included twice in a
third level superelement 9 then a superelement 5 with index 2 would appear, also two new occurrences of
superelement 6 would appear, namely indexes 3 and 4; this is illustrated in Figure 3.7.
3.7
Figure 3.7 Superelement hierarchy — second level superelement 7 included twice in third level 9
Presel
3-12
3.2.5
SESAM
01-OCT-2004
Program version 7.3
Identifying Nodes in a Superelement Model
In a superelement model it is easily recognised that the node number itself is not enough information to
uniquely identify a node. In particular, when a superelement is included several times a particular node will
appear in several positions. Therefore, additional information is required to identify a specific node in the
complete model.
A specific node in a superelement model is uniquely identified by so-called node number triplets:
i.j.k
where i is superelement number, j is superelement index, and k is node number.
Figure 3.5 includes a sketch of a model showing node number triplets for a couple of nodes.
3.2.6
More About Nodes
Nodes in a superelement hierarchy have the following characteristics:
• Nodes of a higher level superelement are the union of the supernodes of the included superelements.
• Nodes of a superelement not defined as super will not exist in a higher level assembly into which the
superelement is included. Therefore, nodes not defined as super for the first level superelements (in
Prefem or Preframe) will not exist as far as Presel is concerned.
• Nodes may be defined as super or given any other boundary condition only for the current higher level
superelement.
• Nodes are identified by node number triplets: ‘superelement.index.node’. See Section 3.2.5.
• A node has as many triplets as there are first level superelements coupled to the node. Any of these triplets are unique identifications of the node.
• Any selection of the six degrees of freedom (d.o.f.) of a node may be defined as super d.o.f. (the solid
and membrane elements have only three d.o.f.).
Note: If a superelement is to be rotated or mirrored then either all three translational d.o.f.s, or all
three rotational d.o.f.s, or all six d.o.f.s must be super. (The reason for this is explained in
Appendix B THEORY, Section B 1.3.)
Note: Nodes to couple must have equal sets of super d.o.f. For example, both may have all 6 d.o.f. as
super, which is the most common case, or both may have the translations in x and y and rotation about z as super, etc.
In Presel commands like BOUNDARY, LOAD, PRINT and TAG you need to select nodes. Section 5.1
explains how this is done.
SESAM
Program version 7.3
3.3
Presel
01-OCT-2004
3-13
Combine Loads
This section explains how to establish the loads for the complete model by combining loads for higher level
superelements. The motivation for combining loads is first explained in Section 3.3.1 and thereafter exemplified in Section 3.3.2 employing the tutorial of Section 3.2.2.
There are three alternative methods for combining loads:
• LOAD COMBINATION — ‘one-by-one’
This is the basic and explicit method for combining loads, it is exemplified in Section 3.3.2.
• LOAD COMBINATION GROUP — ‘group of loads’
For models comprised of several superelements and a number of load cases the ‘one-by-one’ method will
involve a considerable amount of input. If all superelement occurrences have the same number of loads
numbered from 1 and up — as is the case e.g. for an offshore structure subjected to wave loads — the
‘group of loads’ method reduces the amount of input. Section 3.3.4 explains this.
• LOAD ASSEMBLY
This is an even more advanced method for combining loads. Section 3.4 explains this.
3.3.1
Why Combine Loads
Since superelements may be used repeatedly to establish the complete model a certain superelement number
may be found in several different locations in the model, each location termed a superelement occurrence
and identified by an index number. These different superelement occurrences will typically be subjected to
different loads. For example, for a model submerged in water two occurrences of the same superelement
will, due to their different positions, be subjected to different water pressures. To account for this one loading condition is represented by two different load cases when modelling the superelement in Prefem or Preframe. These two load cases then need to be put together, i.e. combined, when the superelements are
assembled.
Combining loads is in effect assigning the proper load to the proper superelement occurrence. In this process the different superelement occurrences need to be identified. This is done by referring to two numbers:
the superelement number and the superelement index. Section 3.2.4 explains the superelement index.
Note: Only the load combinations made for the top level superelement are the loads analysed in Sestra and available for postprocessing. I.e. a load case that not directly or through intermediate
combinations contributes to a top level load combination has no effect.
3.3.2
Tutorial in Combining Loads One-by-One
This tutorial is based on the same example as the tutorial in assembling superelements, Section 3.2.2. You
should do the tutorial in assembling superelements first. You should also read Section 3.3 and Section 3.3.1.
The loads for the example of Section 3.2.2 are shown in Figure 3.8. Both the local loads for the two first
level superelements (loads defined in e.g. Prefem) and the desired global loads for the complete model are
shown.
Presel
3-14
SESAM
01-OCT-2004
Program version 7.3
As you will see this tutorial does not have loads numbered from 1 and up. This will result in zero loads filling in the gaps in the load numbering thereby consuming some additional computational time and disk
space. This is, therefore, in conflict with normal and advisable practice. The reason for numbering the loads
like this is merely to avoid confusion in the tutorial between loads, superelement numbers and superelement
indexes.
Note: Number the load cases and combinations from 1 and up to avoid zero load cases which would
result in waste of computational time and disk space.
3.8
Figure 3.8 Loads modelled for the first level superelements and desired loads for the complete model
Figure 3.9 takes you step-by-step through the commands for establishing the desired global loads. Notes
explaining the data to enter are also provided.
SESAM
Program version 7.3
Presel
01-OCT-2004
3-15
3.9
Figure 3.9 The commands and resulting loads
If you at this stage want to continue the exercise by running the model through a structural analysis in Sestra
you need to fix the model in space. You may for example fix the two nodes along the X-axis (see the sketch
in Figure 3.9) by giving the command:
BOUNDARY FIX FIX FIX FIX FIX FIX GLOBAL
SELECT LINE INFINITE COORDINATE 0 0 0 COORDINATE 1 0 0 END
Then leave Presel by clicking EXIT. (If you do not use Manager you must give the command WRITE 7
before exiting Presel to produce the T7.FEM file for top level superelement 7. If you do use Manager you
must have checked Write top level superelement on exit when starting Presel.) The model is now complete and may be analysed using Sestra and the results may be presented by Xtract.
If you are a new user you may at this stage want to learn about the effect on loads of rotating and mirroring
superelements by reading Section 3.3.3. Other sections of interest to the new user are Section 3.5 Boundary
Presel
3-16
SESAM
01-OCT-2004
Program version 7.3
Conditions, Section 3.8 Display and Print and Section 3.9 Practical and Efficient Application of the
Superelement Technique.
3.3.3
Effect on Loads of Rotating and Mirroring Superelements
If a superelement is rotated and/or mirrored when being included in a superelement assembly, its loads are
rotated and/or mirrored too. This is exemplified in Section 3.3.2 where load 3 on superelement 6, see Figure
3.8, is rotated (and multiplied by 2) when being combined into global load 2 of top level superelement 7; see
Figure 3.9. A mathematical explanation of this is found in Appendix B THEORY, Section B 1.3.
Figure 3.10 illustrates this. A, B and C are loads that rotate or mirror with the superelement to new positions
A', B' and C'.
3.10
Figure 3.10 Loads are rotated and mirrored along with the superelement
SESAM
Program version 7.3
3.3.4
Presel
01-OCT-2004
3-17
Combining Wave Loads by the Group Method
This method for combining loads is quite general. Nevertheless, it is explained below with reference to a
structure subjected to wave loads (an offshore or a ship structure) as this is the typical example in SESAM.
A model is typically comprised of several superelements. Wajac or Wadam are employed for computing a
number of wave loads, e.g. 8 wave directions and 12 wave frequencies for each direction, altogether 96 load
cases for each occurrence of all superelements. Combining all these load cases for all these superelements
through all the superelement levels to the top will require a considerable amount of input. The LOAD COMBINATION GROUP command reduces this input to a manageable amount.
Note: Wave loads computed by Wajac and Wadam are stored on Loads Interface Files, the L#.FEM
files. These files are not read by Presel. This means that the load combination — whether this
is done by the one-by-one, group or assembly method — is performed without the program
having knowledge about the existence of the wave loads. Therefore, when referring to a wave
load in the load combination a warning is issued saying that the load case is accepted but it
must be computed by a load program prior to performing the analysis.
The LOAD COMBINATION GROUP command is explained below referring to the model of Section 3.2.2.
We assume that the model is subjected to wave loading from 8 directions and 12 frequencies, altogether 96
global load cases. As there are two occurrences of superelement 6, indexes 1 and 2, there will be a double
set of loads computed by the wave loading program for superelement 6. This means that the L5.FEM file
will contain 96 loads whereas the L6.FEM file will contain 192 loads.
Note: There is a difference between Wajac and Wadam in the way they number the wave load cases
when there are two or more occurrences of a superelement. Their numbering systems are as
follows (in parentheses are given the numbering applicable to the current example). In Wajac
all wave loads for the first occurrence come first (load cases 1, 2, 3, ... 96), thereafter follows all
wave loads for the second occurrence (load cases 97, 98, 99, ... 192) and so on. See Figure 3.11.
In Wadam the first wave load for all occurrences comes first (load cases 1 and 2), thereafter
follows the second wave load for all occurrences (load cases 3 and 4), then the third wave load
for all occurrences (load cases 5 and 6) and so on. See Figure 3.12
3.11
Figure 3.11 Wajac’s numbering of load cases for superelement occurrences
Presel
SESAM
3-18
01-OCT-2004
Program version 7.3
3.12
Figure 3.12 Wadam’s numbering of load cases for superelement occurrences
Load Combination Group for Wajac
Figure 3.11 illustrates how the load cases for the superelement occurrences must be combined to establish
the global loads. The one-by-one method for combining loads computed by Wajac will for superelement 7
be:
%
glc sup indx
LOAD COMB
1
5
1
2
3
6
1
6
2
END
5
1
6
1
6
2
END
5
1
6
1
6
2
llc factor
1
1.0
END
1
1.0
END
97
1.0
END
2
END
2
END
98
END
1.0
3
END
3
END
99
END
1.0
1.0
1.0
1.0
1.0
END
:
etc. for each global load case up to the last one:
96
5
1
6
1
6
2
96
END
96
END
192
1.0
1.0
1.0
SESAM
Presel
Program version 7.3
01-OCT-2004
3-19
END
END
END END
As can be seen the one-by-one method involves a lot of input (24 times the amount given above) even for
such a small superelement hierarchy. For a large superelement hierarchy the amount of input will increase
many times.
The group method involves considerably less input:
%
lowglc higlc step sup indx lowllc factor
LOAD COMB GROUP
1
96
1
5
1
1
1.0
6
1
1
1.0
6
2
97
1.0
END
END END
This command says that global load cases 1 to 96 with step 1 will be created. The superelement occurrences
(‘sup indx’) 5 1, 6 1 and 6 2 will contribute to these global load cases. For each occurrence only the local
load case (‘lowllc’) corresponding to the first global load case is given, i.e. 1, 1 and 97 for the three occurrences, respectively. Implicitly, the command says that the global load cases 2, 3, etc. are defined by incrementing the local load cases in parallel. Also see the description of the LOAD COMBINATION command
in Chapter 5.
The LOAD COMBINATION GROUP command must be given for each higher level superelement. Still,
the amount of input is manageable.
Load Combination Group for Wadam
Figure 3.12 illustrates how the load cases for the superelement occurrences must be combined to establish
the global loads. The one-by-one method for combining loads computed by Wadam will for superelement 7
be:
%
glc sup indx
LOAD COMB
1
5
1
2
3
6
1
6
2
END
5
1
6
1
6
2
END
5
1
6
1
6
2
llc factor
1
1.0
END
1
1.0
END
2
1.0
END
2
END
3
END
4
END
1.0
3
END
5
END
6
1.0
*
1.0
*
1.0
*
1.0
*
1.0
*
Presel
SESAM
3-20
01-OCT-2004
Program version 7.3
END
END
:
etc. for each global load case up to the last one:
96
5
1
6
1
6
2
96
END
191
END
192
END
1.0
1.0
*
1.0
END
END END
Note: The asterisk above indicates lines of input deviating from the corresponding Wajac input.
As can be seen the one-by-one method involves a lot of input (24 times the amount given above) even for
such a small superelement hierarchy. For a large superelement hierarchy the amount of input will increase
many times.
The group method involves considerably less input:
%
lowglc higlc step sup indx
LOAD COMB GROUP
1
96
1
5
1
6
1
6
2
END
END END
lowllc incr factor
1
1.0
STEP
1
2
1.0
STEP
2
2
1.0
This command says that global load cases 1 to 96 with step 1 will be created. The superelement occurrences
(‘sup indx’) 5 1, 6 1 and 6 2 will contribute to these global load cases. For each occurrence only the local
load case (‘lowllc’) corresponding to the first global load case is given, i.e. 1, 1 and 2 for the three occurrences, respectively. The command STEP given prior to the ‘lowllc’ for occurrences 6 1 and 6 2 means that
the local load case is incremented by the value ‘incr’ = 2 for each increment of 1 of the global load case.
Notice that STEP is not given for occurrence 5 1 and neither is an ‘incr’ value, this is because superelement
5 occurs only once.
Note: The STEP command is used for Wadam and not for Wajac.
The LOAD COMBINATION GROUP command must be given for each higher level superelement. Still,
the amount of input is manageable.
Note: There is a requirement to the way the superelements are assembled to get a proper numbering
of the wave loads computed by Wajac and Wadam. Section 3.3.6 explains this.
3.3.5
Load Combinations when Higher Level Superelements are Repeated
Figure 3.13 shows a superelement hierarchy in which superelements 11 and 12 are included in a superelement 21. And superelement 21 is included twice in superelement 31. As seen in the table printed by Presel
superelement 11 appears in the final assembly with indexes 1 and 2. Index 2 comes into being when
SESAM
Program version 7.3
Presel
01-OCT-2004
3-21
superelement 21 is included in 31 the second time. Superelement 12 also appears with indexes 1 and 2 for
the same reason.
3.13
Figure 3.13 Superelement hierarchy with repeated higher level superelement
In the load combination, however, there will only be references to index 1 for superelements 11 and 12. This
is because the higher level superelement 21 only recognises index 1 of superelements 11 and 12. It ‘doesn’t
know’ that itself is going to be included twice in superelement 31.
Let us assume that we have 8 wave load cases computed by Wadam. As both 11 and 12 are used twice
Wadam will compute 16 loads for each superelement. When combining loads for superelement 21 we must,
therefore, create 16 load combinations. Using the LOAD COMBINATION GROUP command the input will
be:
%
lowglc higlc step sup indx
LOAD COMB GROUP
1
16
1 11
1
12
1
END
END END
lowllc
1
1
factor
1.0
1.0
The load combination for superelement 31 will be:
%
lowglc higlc step sup indx
LOAD COMB GROUP
1
8
1 21
1
21
2
END
END END
3.3.6
STEP
STEP
lowllc incr factor
1
2
1.0
2
2
1.0
Requirement to Assembling Process when Wave Loads are Computed
Note: Wajac and Wadam are based on the assumption that for all superelements the indexes are
numbered consecutively (1, 2, 3, ...) when counting the individual superelements numbers
from top to bottom in the table printed by Presel.
It is possible to assemble the superelements in such a way that the combination of wave loads computed by
Wajac and Wadam will fail! A description follows below of (1) an awkward superelement hierarchy, (2) a
hierarchy that fails in combination with Wajac and Wadam and (3) a proper hierarchy.
Presel
SESAM
3-22
01-OCT-2004
Program version 7.3
(1) Awkward Superelement Hierarchy
Consider the example of Figure 3.14. Superelement 11 is included in superelement 31 prior to superelement
21, i.e. 11 is found in branch 1 while 21 is found in branches 2 (and 3). Superelement 21 also includes 11.
For this superelement hierarchy to be correct superelement 31 must be created (by ASSEMBLY NEW 31)
and 11 included in 31 prior to including 11 in 21. 21 can of course not yet be included in 31 because it does
not yet exist! Superelement 31 is therefore temporarily left incomplete and superelement 21 is created and
completed by including 11 and 12. Then superelement 31 is completed by the commands ASSEMBLY OLD
31 and INCLUDE 21 twice. This ensures that the occurrence of superelement 11 at the top of the table
printed by Presel is assigned index 1.
3.14
Figure 3.14 Awkward, though correct superelement hierarchy
(2) Incorrect Superelement Hierarchy
If you were to create superelement 21 and include 11 and 12 first and thereafter create 31 and include 11, 21
and 21 in that order the superelement hierarchy tabulated by Presel would be as shown in Figure 3.15. As
seen, index 2 of superelement 11 comes before index 1 when counting superelement 11 from top and down.
Note: If you establish your load combination input based on these indexes then you will get wrong
results for wave loads computed by Wajac and Wadam! More specifically, the load case numbering will not correspond to the indexes as described in Section 3.3.4.
SESAM
Presel
Program version 7.3
01-OCT-2004
3-23
3.15
Figure 3.15 Incorrect superelement hierarchy
(3) Proper Superelement Hierarchy
Figure 3.16 shows a superelement hierarchy avoiding the problem described above. Superelement 21 is created first. Thereafter superelement 31 is created including superelements in the following order: 21, 21 and
11 at the end.
3.16
Figure 3.16 Proper superelement hierarchy
3.4
Assemble Loads
When using the LOAD COMBINATION command explained in Section 3.3 you need to combine loads for
all higher level superelements at all levels. For large superelement hierarchies with many loads this procedure involves a large amount of input. Load combination by the group method explained in Section 3.3.4
reduces the amount of input considerably compared to the one-by-one method explained in Section 3.3.2
but combinations must still be made for all superelements at all levels. A more advanced method is offered
by the LOAD ASSEMBLY command. This involves making the load combinations directly for the top level
superelement — the complete model — regardless of how many intermediate superelement levels there are.
Presel
3-24
SESAM
01-OCT-2004
Program version 7.3
To be able to use the LOAD ASSEMBLY command, unique identifications must be given for all occurrences of first level superelements for which loads exist. Giving such unique identifications makes the task
of assembling the superelements more complex. But, as shown by the example below, defining the loads
requires considerably less input.
There is another advantage of the load assembly method: The LOAD ASSEMBLY command will not be
affected by changes to the superelement hierarchy. This is because the principle of this method is to give
identifications for superelement occurrences depending on their final location in the complete model. The
order in which the superelements are assembled is of no consequence.
3.4.1
Principles of Uniquely Identifying Superelement Occurrences
When a superelement is created by Prefem or Preframe it can be viewed as a building brick with no specific
location in the complete model. The same can be said about any higher level superelement created in Presel.
Only when the top level superelement is created then all lower level superelement occurrences, including
the first level superelement occurrences, will have determined locations.
Note the terminology:
• Superelement is a building brick with no specific location.
• Superelement occurrence represents an actual part of a higher level superelement, it will have an exact
location in that higher level superelement. If the higher level superelement is the top level superelement
— the complete model — then the superelement occurrence also represents an actual part of the real
structure.
It follows that only when the complete model is assembled the superelement occurrences may be given their
final identifications. However, rather than assembling the whole model including the top level superelement
before introducing the identifications a dynamic way of giving identifications is available. By ‘dynamic’ is
meant that preliminary identifications are introduced and thereafter modified during the assembly process
until the final identifications are determined when the complete model — the top level superelement — is
created.
The identification of a superelement occurrence is composed of a name and a location string as follows:
name.location
The name is given to a superelement when it is created and is not changed during the assembly process. The
location string is given when a superelement is included in a superelement assembly. The superelement has
then become a superelement occurrence in that specific assembly. The location string is modified during the
assembly process.
3.4.2
Tutorial in Assigning Unique Identifications for Superelement Occurrences
This tutorial takes you step-by-step through the procedure and commands for assigning unique identifications of superelement occurrences. If you want to run this example through Presel you first need to create
the first level superelements employed. Appendix A TUTORIAL EXAMPLES, Section A 2, provides the
input for these first level superelements. Refer to Section 3.2.2 for how to start Presel. In this case set top
level superelement to 100.
In this tutorial five first level superelements shall be assembled to form a house as illustrated by Figure 3.17.
SESAM
Presel
Program version 7.3
01-OCT-2004
3-25
3.17
Figure 3.17 First, second and top (third) level superelements
After reading the first level superelements into Presel the first task is to assign names by the commands:
ASSEMBLY OLD 1
NAME CREATE FNDT
ASSEMBLY OLD 2
NAME CREATE LWALL
ASSEMBLY OLD 3
NAME CREATE SWALL
Presel
3-26
SESAM
01-OCT-2004
Program version 7.3
ASSEMBLY OLD 4
NAME CREATE FLOOR
ASSEMBLY OLD 5
NAME CREATE ROOF
Then the second level superelement 10 is created and given its name (names for higher level superelements
are normally not required but included here for completeness):
ASSEMBLY NEW 10
NAME CREATE STOREY
When including superelements 2 (long wall) and 3 (short wall), twice each, and superelement 4 (floor) these
are assigned location strings. The LOCATION CREATE command is used:
INCLUDE 2 NOPRINT-CHECK-INCLUDE
LOCATION CREATE SOUTH
PERFORM-INCLUDE
%
3 NOPRINT-CHECK-INCLUDE
LOCATION CREATE SOUTH
PERFORM-INCLUDE
%
2 TRANSLATE 0 4 0
NOPRINT-CHECK-INCLUDE
LOCATION CREATE NORTH
PERFORM-INCLUDE
%
3 TRANSLATE 7 0 0
NOPRINT-CHECK-INCLUDE
LOCATION CREATE NORTH
PERFORM-INCLUDE
%
4 TRANSLATE 0 0 0.8
NOPRINT-CHECK-INCLUDE
LOCATION CREATE BASIC
PERFORM-INCLUDE
END
Figure 3.18 shows the current identifications of the superelement occurrences included in superelement 10,
STOREY. The short and long walls are given location strings corresponding to their southerly and northerly
positions. The four wall superelements now have unique identifications in terms of names plus location
strings. The floor is given the location string BASIC; it is neither southerly nor northerly.
Note: The LOAD ASSEMBLY command can only refer to superelement occurrences having location strings. Even a superelement not repeated and therefore having a unique name must be
given a location string. The location string may be skipped for a superelement without loads.
SESAM
Program version 7.3
Presel
01-OCT-2004
3-27
3.18
Figure 3.18 Identifications of superelement occurrences included in superelement 10, STOREY
Supernodes are then defined at the bottom and top planes for superelement 10, STOREY:
BOUNDARY SUPER SUPER SUPER SUPER SUPER SUPER GLOBAL
SELECT PLANE 2-PLANE COORDINATE 0 0 0.8 COORDINATE 0 0 0
PLANE 2-PLANE COORDINATE 0 0 3.8 COORDINATE 0 0 0
END
Then the top level superelement 100 is created and given its name:
ASSEMBLY NEW 100
NAME CREATE HOUSE
Now, when including superelement 10 twice to make the two storeys of the house the location strings of the
first level superelements included in 10 are assigned new location strings. The current strings are modified
by the LOCATION USE command. The new location strings are more specific reflecting that the positions
of the superelements in the complete model are more specific. The first inclusion of 10 is the ground floor,
GRD is therefore added to the location strings. The second inclusion is the first floor, 1ST is therefore added
to the location strings.
INCLUDE
1 NOPRINT-CHECK-INCLUDE
LOCATION CREATE BASIC
PERFORM-INCLUDE
%
%
%
%
10 NOPRINT-CHECK-INCLUDE
Modify location for the south walls:
LOCATION USE SOUTH SOUTHGRD
Modify location for the north walls:
LOCATION USE NORTH NORTHGRD
Modify location for the floor:
LOCATION USE BASIC BASICGRD
PERFORM-INCLUDE
%
%
10 TRANSLATE 0 0 3
NOPRINT-CHECK-INCLUDE
Modify locations for all using wild-card:
LOCATION USE * *1ST
Presel
SESAM
3-28
01-OCT-2004
Program version 7.3
PERFORM-INCLUDE
%
5 TRANSLATE 0 0 6.8
NOPRINT-CHECK-INCLUDE
LOCATION CREATE BASIC
PERFORM-INCLUDE
END
For the first inclusion of superelement 10 the location strings are modified one-by-one: The two superelement occurrences (LWALL and SWALL) having location string SOUTH get the new string SOUTHGRD,
the two occurrences having location string NORTH get the new string NORTHGRD and the single occurrence having location string BASIC gets the new string BASICGRD.
But when all superelement occurrences shall have the same string added to their locations, as in this case, a
wild-card notation can be used as shown for the second inclusion of superelement 10.
The foundation (1) and roof (5) superelements are included for the first time, the LOCATION CREATE
command is used for these. They are given location strings BASIC as no specific identifications are
required.
Note: If you give location strings also for higher level superelements then a wild-card reference in
the LOAD ASSEMBLY command matching the higher level superelements will pick up loads
from this superelement directly in addition to loads picked up from first level.
Therefore, LOCATION CREATE is not used when including 10 (STOREY) in the HOUSE below or else
the wild-card *.* when defining load 1 (gravity) — see Section 3.4.3 — will pick up gravity loads from 10
in addition to gravity loads directly from first level. Gravity for parts of the model will erroneously contribute twice!
Figure 3.19 illustrates the final identifications of the superelement occurrences of superelement 100,
HOUSE.
SESAM
Program version 7.3
Presel
01-OCT-2004
3-29
3.19
Figure 3.19 Identifications of superelement occurrences within superelement 100, HOUSE
Now the assembling of superelements including assigning of occurrence identifications is complete. Their
identifications have become more specific in parallel with knowing more about their final positions. Figure
3.20 shows the superelement hierarchy with superelement numbers, indexes, names and location strings.
Presel
3-30
SESAM
01-OCT-2004
3.20
Figure 3.20 Superelement hierarchy for the house model
Program version 7.3
SESAM
Program version 7.3
3.4.3
Presel
01-OCT-2004
3-31
Tutorial in Using the LOAD ASSEMBLY Command
The tutorial below takes you step-by-step through the commands for assembling the loads for the example
of Section 3.4.2. The loads are illustrated in Figure 3.21.
3.21
Figure 3.21 Loads on the house model
The five loads to be created for the house are:
Load case 1: Self weight (gravity) of the house
Load case 2: Wind pressure on south walls (both long and short walls)
Load case 3: Wind pressure on south long walls and north short walls
Presel
3-32
SESAM
01-OCT-2004
Program version 7.3
Load case 4: Weight of snow on roof (this is a house in Norway)
Load case 5: Weight of people and furniture on floors
In the input for assembling the loads you refer to a single first level superelement occurrence by giving its
name and location string and to several occurrences by using wild-card notation (*):
ASSEMBLY OLD 100
LOAD ASSEMBLY
% --- Load 1 is self weight (gravity)
1 INCLUDE-LOAD *.* 1 1.0
END
% --- Load 2 is wind pressure on south walls (both long and short walls)
2 INCLUDE-LOAD *WALL.SOUTH* 2 1.0
END
% --- Load 3 is wind pressure on south long wall and north short wall
3 INCLUDE-LOAD LWALL.SOUTH* 2 1.0
INCLUDE-LOAD SWALL.NORTH* 2 -1.0
END
% --- Load 4 is weight of snow on roof
4 INCLUDE-LOAD ROOF.BASIC 2 1.0
END
% --- Load 5 is weight of people and furniture on floors, there are
%
50% more people and furniture in ground floor than in first floor
5 INCLUDE-LOAD FLOOR.BASICGRD 2 1.5
INCLUDE-LOAD FLOOR.BASIC1ST 2 1.0
END
END END
• Global load case 1 (gravity) will include local load case 1 from all (*.*) first level superelements.
• Global load case 2 (wind pressure on south walls) will include local load case 2 from the superelements
long and short walls (*WALL), located to the south and including both storeys (SOUTH*).
• Etc.
The command will establish the load combinations required on all levels from the second level and to the
top. This can be verified by printing the load combinations for the various higher level superelements.
Note: The LOAD ASSEMBLY command will typically create more load combinations for intermediate level superelements (between first and top level) than you normally will create by the
more manual one-by-one and group methods. Such extra load combinations for intermediate
level superelements will not make any difference except for spending somewhat more computer time and disk space.
Note: In the above example location strings are only given for first level superelements and loads are
assembled from first level directly to the top level. You may also assemble loads to intermediate level superelements. You then need to combine loads from these intermediate level
superelements to the top by either the assembly or one-by-one method.
SESAM
Program version 7.3
3.4.4
Presel
01-OCT-2004
3-33
Advice on Giving Unique Identifications to Superelement Occurrences
The house example of Section 3.4.2 and Section 3.4.3 illustrates how name and location strings uniquely
identify superelement occurrences. The LOCATION CREATE command assigns location strings to first
level superelements when these are included into second level. Thereafter the LOCATION USE command
modifies these location strings of first level superelements during the assembling of third and higher level
superelements. The wild-card notation allows the location strings of several first level superelements to be
modified by a single LOCATION USE command by appending characters to the strings.
You need to determine a convention for location strings for your model. You also have to device a scheme
for how to arrive at this convention, i.e. how to employ the LOCATION CREATE and LOCATION USE
commands during the assembly process. The scheme will depend on how the superelement hierarchy is
organised. To be able to determine a practical convention and a scheme you should be familiar with the possibilities and limitations of the LOCATION USE command; see Chapter 5 for this. You may find that
assigning name and location strings to your superelement occurrences will influence the organisation of the
superelement hierarchy. In the house example of Section 3.4.2 and Section 3.4.3 we were able to merely
append characters to the location strings assigned the first time. For example, when the long wall (LWALL)
was included in the second level superelement STOREY the first time it was assigned location string
SOUTH. Later in the assembly process the location string was merely appended by GRD and 1ST because
these occurrences were all located in a southerly direction. This may not always be possible.
Consider the example of Figure 3.22. A single superelement 10 is used nine times to establish the complete
model 40 at fourth level. When being included into the second level superelement 20, we may decide to give
superelement 10 the location strings A and B. Thereafter we may choose to merely append a character to the
location strings each time superelement 10 is repeated by repeating higher level superelements. We will end
up with location strings as shown. However, this may not be a very logical convention for location strings.
3.22
Figure 3.22 Location string convention, alternative 1
Presel
3-34
SESAM
01-OCT-2004
Program version 7.3
Alternatively, we may want location strings reflecting the positions of the superelement occurrences relative
to the north, west, south and east directions. EN means east-north, NE means north-east, NW means northwest, etc. Figure 3.23 shows a scheme arriving at this more logical convention for location strings.
3.23
Figure 3.23 Location string convention, alternative 2
Note: If you are unable to device an easy scheme for arriving at the chosen convention for naming
location strings you may always resort to the scheme shown in Figure 3.22 up to the top level
and for the top level substitute the location strings with the proper ones. See Figure 3.24.
SESAM
Presel
Program version 7.3
01-OCT-2004
3-35
3.24
Figure 3.24 Location string convention, alternative 3
3.5
Boundary Conditions
Boundary conditions are defined for the six degrees of freedom (d.o.f.s) of a node individually. Using the
BOUNDARY command you can define the following boundary conditions:
• Free — the d.o.f. is free to displace, this is the default boundary condition for all d.o.f.s of all nodes
• Fixed — the d.o.f. is fixed at zero displacement
• Prescribed — the d.o.f. is fixed at a given displacement given by the LOAD NODE command
• Super
A superelement can only be included in a superelement assembly if one or more of its nodes (or d.o.f.s) are
defined as super. If one or more of the nodes (d.o.f.s) of a superelement are super the superelement cannot
be the top level superelement (the complete model). It must be included in a higher level assembly.
In the BOUNDARY command you need to select nodes. This may be done inside the BOUNDARY command by the SELECT option. Or you may pre-select the relevant nodes by the TAG command in which case
you refer to these pre-selected nodes by the TAGGED option inside the BOUNDARY command.
(TAGGED is in effect a set with pre-defined name, you may also use the SET command to define sets.) In
either case you need to select nodes using the node select features described in Section 5.1.
As explained in Section 5.1, alternatively to selecting nodes directly by giving their triplets you may select a
line, plane or volume through or enclosing the desired nodes. And these lines, planes and volumes may be
defined referring to nodes or to coordinates. Moreover, the coordinates may be given in the cartesian system
or in a pre-defined cylindrical system.
For example, if you want to select all nodes in a plane you may find that the so-called 2-PLANE option and
giving two sets of cartesian coordinates is the quickest alternative. First give a point in the plane and then a
point defining together with the first point a normal to the plane. All nodes on a cylindrical surface are easily
Presel
SESAM
3-36
01-OCT-2004
Program version 7.3
selected by the 2-PLANE option referring to a cylindrical system; the first point is positioned in the desired
cylindrical plane and the second point on a line through the first point and normal to the cylindrical axis.
By default the boundary conditions given refer to the global cartesian system. Alternatively, you may give
the boundary conditions in a pre-defined cylindrical system (defined by the COORDINATE-SYSTEM command) or with pre-defined transformations (a cartesian system with rotation compared to the global system
defined by the TRANSFORMATION command). This may for example be used to introduce a sloping slip
surface: rotate to a system having one of its axes normal to the slip surface and fix the translational d.o.f.
corresponding to this axis while letting the other two translational d.o.f.s be free.
3.6
Linear Dependency
The LINEAR-DEPENDENCY command offers two alternative types of linear dependency:
• General node dependency
• Two node dependency
Using the ‘general node dependency’ any d.o.f. of a node may be made linearly dependent on any other
d.o.f.s of any other nodes. The user explicitly specifies the linear dependency factor for all the independent
d.o.f.s. The displacement of the dependent d.o.f. will then be:
r d = r i1 ⋅ β 1 + r i2 ⋅ β 2 + r i3 ⋅ β 3 + …
where r represents the displacements, subscripts d and i represent the dependent and independent d.o.f.s
respectively, and β is the given dependency factors.
With the ‘two node dependency’ all d.o.f.s of a given node are made linearly dependent on the corresponding d.o.f.s of two other nodes. The displacement of the dependent d.o.f.s will be:
r d = r i1 ⋅ β + r i2 ⋅ ( 1 – β )
where β is a dependency factor given by the user. Presel will compute a default value for β as explained in
Figure 3.25. β is computed based on the projection of the dependent node onto the line between the two
independent nodes.
Normally, the ‘two node dependency’ has physical meaning only when the dependent and the two independent nodes all lie on a straight line.
3.25
Figure 3.25 Two node linear dependency — the dependency factor ß
SESAM
Program version 7.3
Presel
01-OCT-2004
3-37
Note: Dependent nodes are indicated by blue triangles in the model display.
Note: Independent nodes = supernodes are indicated by blue octagons (will look like circles).
All independent d.o.f.s must be super d.o.f.s, i.e. they are defined with boundary condition code ‘super’
using the BOUNDARY command prior to giving the LINEAR-DEPENDENCY command. The ‘two node
dependency’ alternative also allows the user to define the independent nodes as super within the command
by the FORCE-INTO-SUPER alternative. This implies that introducing linear dependency for a superelement involves that the superelement must be included in yet a higher level superelement.
The requirement that the independent d.o.f.s must be super only concerns second and higher level superelements as created by Presel. In the case of first level superelements created by Preframe and Prefem the independent d.o.f.s need not be super provided that the Multifront equation solver is used in Sestra.
Linear dependencies in a transformed coordinate system may be specified by first assigning a transformation to the dependent and independent nodes using the BOUNDARY command.
3.7
Sets
The command TAG may be used to define a set of nodes that may be referred to by the option TAGGED in,
for example, the BOUNDARY command; see Section 3.5. In effect, this is therefore a set of nodes with the
pre-defined name TAGGED. When you create a new higher level superelement (by the ASSEMBLY NEW
command) the set TAGGED is empty until you put nodes into it. The set will not be changed by moving
between the superelements (by the ASSEMBLY OLD command) or by exiting and re-entering Presel. You
may refer to the complementary set of nodes by the pre-defined name UNTAGGED. The command
UNTAG is used to remove nodes from the set TAGGED.
In addition to the set TAGGED you may define any number of named sets of nodes by the DEFINE SET
command. The standard set operators UNION-WITH, SUBTRACT-BY and INTERSECTION-WITH are
used to define the sets.
A set that contains supernodes will be available also within an assembly into which the superelement is
included. This is provided that the set was defined prior to including the superelement. A set containing
supernodes defined for a first level superelement (in Prefem and Preframe) will also be available in assemblies. Note that if a set contains both supernodes and other (free or fixed) nodes then the set at assembly
level will only contain the supernodes (and these will be free nodes at assembly level).
Moreover, if any of the nodes of the set are given the boundary condition super (re-defined as supernodes)
for the superelement assembly then the set, containing these nodes, will be available for yet a higher level
superelement assembly.
Finally, if two or more superelements have sets of supernodes with the same name then these will be merged
at assembly level.
Note: Sets defined in Prefem or Preframe containing only elements or geometry (Prefem only) will
not be available in Presel as only nodes are relevant here.
Note: The transfer and merging of sets of supernodes from superelements to superelement assemblies is only avaialble for named sets and not the predefined set TAGGED (and UNTAGGED).
Presel
SESAM
3-38
3.8
01-OCT-2004
Program version 7.3
Display and Print
The DISPLAY CURRENT-SUPERELEMENT command will display the current superelement. This display may be refined by the SET GRAPHICS HIDDEN command plus two options under the SET GRAPHICS PRESENTATION command: FILLED-ELEMENT and COLOUR-SUPERELEMENTS. All these three
display modes may be used simultaneously. Figure 3.26 shows an example of a display using the hidden
option.
In addition to displaying the current superelement any superelement may be displayed without changing
current superelement by the DISPLAY SPECIFIED-SUPERELEMENT command. This command is practical when you are working with assembling superelements in an assembly and only want to make a quick
check of the appearance of a certain superelement.
Furthermore, the DISPLAY LOCATE-SUPERELEMENT command allows highlighting (by a different colour) a given first level superelement in an assembly.
Note: There are shortcut command buttons under the headings ‘DispMod’ and ‘Display’ for all display alternatives explained above.
3.26
Figure 3.26 Display of a superelement using the hidden option
The LABEL command may be used to add information to the displayed superelement.
You may also use the DISPLAY option during the inclusion of a superelement to see the current position of
the superelement being included, i.e. to check its position before you complete the inclusion. The tutorial of
Section 3.2.2 illustrates this and the description of the INCLUDE supno DISPLAY command in Chapter 5
shows an example. This display cannot be annotated by the LABEL command.
You may also verify the load combinations for an assembly using the DISPLAY LOAD command. There
are two ways of doing this:
SESAM
Program version 7.3
Presel
01-OCT-2004
3-39
• You may determine how many load cases each included superelement contributes with to a given load
combination. This is available through the DISPLAY LOAD LOADED-SUPERELEMENT command.
Colour coding of the superelements indicates which of them contribute with no load cases, which contribute with one, which contribute with two, and so on.
• You may determine which load cases with what factor each included superelement contributes with to a
given load combination. This is available through the two commands DISPLAY LOAD FIRST-CONTRIBUTING-LOAD and DISPLAY LOAD NEXT-CONTRIBUTING-LOAD. The FIRST-CONTRIBUTING-LOAD option colour codes superelements contributing with their load case number ‘i’ where ‘i’
is the lowest contributing load case number over all superelements. Thereafter you should use the
NEXT-CONTRIBUTING-LOAD option which colour codes superelements contributing with their load
case number ‘j’ where ‘j’ is the second lowest contributing load case number. Repeating the NEXTCONTRIBUTING-LOAD option will loop through all contributing load cases. The load factors are for
each display printed on top of the colour coded superelements.
Note: The loads values defined in Prefem/Preframe and computed in Wajac/Wadam cannot be displayed in Presel as it has no knowledge of the contents of these loads.
In addition to displaying the model the PRINT command is useful for verification purposes. Various PRINT
commands are exemplified in Figure 3.27, Figure 3.28, Figure 3.29, Figure 3.30 and Figure 3.31.
3.27
Figure 3.27 PRINT OVERVIEW-OF-SUPER-ELEMENTS
Presel
3-40
SESAM
01-OCT-2004
Program version 7.3
3.28
Figure 3.28 PRINT CPU-TIME-ESTIMATES-IN-REDUCTION
3.29
Figure 3.29 PRINT ELEMENT tabulates information on included superelements
3.30
Figure 3.30 PRINT SUPER-ELEMENT-HIERARCHY
SESAM
Program version 7.3
Presel
01-OCT-2004
3-41
3.31
Figure 3.31 PRINT NODE COORDINATES
3.9
Practical and Efficient Application of the Superelement Technique
The theoretical foundation for the superelement technique puts few, if any, limitations on how to split the
structure into superelements and how to put these together to form the complete model. However, the
numerical accuracy of the results and above all the consumption of computational time and disk space are
influenced by such choices.
There are several aspects of how to apply the superelement technique in an optimal way and an in-depth discussion cannot be provided here. Efficient application of the technique rely on a combination of an understanding of the theoretical foundation, consideration of the hardware being used and practical experience.
Discussing with experienced users and taking heed of the following advice will enable you to take advantage of the superelement technique in an efficient way while building up your own practical experience.
Some of the items below contradict each other to some extent, this only underlines the fact that you often
have to balance between conflicting considerations. Also see Figure 3.32 for illustrations of some of the
items below.
• How to split the structure into superelements?
— Utilise the possibility to repeat superelements. Both first and higher level superelements may be
repeated. Repetition is possible whenever two or more parts of the structure are geometrically equal.
Remember that superelements may also be mirrored.
— Make first level superelements as large as possible, limited though by the capacity of your computer.
— The two items above combined implies that there is a limit to how small the superelements should be
to enable repetition before the gain is outweighed by loss in other ways, e.g. administration of many
superelements and heavy higher level superelements.
Presel
3-42
SESAM
01-OCT-2004
Program version 7.3
— Very small superelements will often be a disadvantage in the postprocessing.
— The ratio between supernodes and internal (free) nodes should be as small as possible. In practical
terms this may be seen as making the superelements as compact in shape as possible.
• How to assemble the superelements to form the complete model (some of the advice below will have
bearing on how to split the structure into superelements)?
— Limit the number of higher level superelements and the number of levels. Few and moderately large
higher level superelements are better than many smaller ones. For a large model this implies that the
second level superelements will include many first level superelements, the third level superelements
will include many second level superelements, and so on.
— Be aware of that reduction of higher level superelements is time consuming. A higher level superelement will normally be much more time consuming than a first level superelement with the same
number of internal and super nodes. This is because the stiffness matrix of a higher level superelement has few zeros and a large bandwidth.
— Assemble superelements in an order corresponding to their topological sequence and not in a haphazard way. (Assemble superelements in the way Lego bricks are put together.)
— Avoid coupling one superelement with many other superelements.
— Do not assemble superelements not geometrically coupled. This concerns superelements belonging to
the same structure, i.e. their stiffnesses are coupled through other superelements. On the other hand, if
you want to analyse several non-coupled models — for example to test various meshes or designs for
the same structure — you may find it convenient to make a single model comprised of non-coupled
superelements and analyse all these in one operation (one Sestra run). (This approach should not be
employed for large models.)
• You also need to consider which load cases to create for the first level superelements and how to combine these through the higher level superelements to create the final loads for the top level superelement.
SESAM
Program version 7.3
Presel
01-OCT-2004
3-43
3.32
Figure 3.32 ‘Good’ and ‘bad’ superelements
3.10
Node Numbering Optimization to Minimise the Bandwidth
Sestra offers two equation solvers, the traditional Supermatrix solver and the Multifront solver, a more
recent and highly efficient solver. The Multifront solver is not influenced by whether the node numbering
has been optimised to reduce the bandwidth of the stiffness matrix.
For the traditional Supermatrix solver, however, it is absolutely essential to minimise the bandwidth of the
first level superelements’ stiffness matrices by optimising or re-numbering their internal node numbering.
The auxiliary program Bpopt is used for this purpose (in the case of Preframe the optimization is normally
done inside the program). When using the SESAM Manager optimization of first level superelements is
controlled by Manager.
Note: The optimization should be performed prior to reading the superelements into Presel.
Optimising higher level superelements may be done inside Presel using the command OPTIMIZE. Note that
a higher level superelement can only be optimised when it is complete, i.e. when all relevant superelements
have been included into it and before it is included in new higher level superelements. The top level
superelement may, however, be optimised after concluding the Presel session using the auxiliary program
Bpopt.
Presel
3-44
SESAM
01-OCT-2004
Program version 7.3
Provided the superelements are assembled into a higher level superelement (an assembly) in a logical brickon-brick way as advised in Section 3.9 there is very little, if anything, to gain in terms of CPU reduction by
optimising higher level superelements. Using the OPTIMIZE command is therefore normally not necessary.
See Section 3.9 on practical and efficient use of the superelement technique.
On the other hand, if a higher level superelement is created by assembling superelements in a haphazard
way (in effect, this is the way the automatic assembling of superelements in Pretube works) optimising the
higher level superelements may be important.
SESAM
Program version 7.3
4
Presel
01-OCT-2004
4-1
EXECUTION OF PRESEL
This section provides information on:
• How to start Presel
• Line-mode input syntax
• Files used
• Creating plots for reports
• Alternative execution modes
• Program requirements
• Program limitations
4.1
Program Environment
Presel is available on Microsoft Windows.
4.1.1
Starting Presel from Manager
Presel is started from Manager by first setting the type of analysis to be superelement analysis, click
Options | Superelement, and then clicking Model | Superelement handling Presel. The graphical user
interface of Presel is explained in Section 3.1.
4.1.2
Line-Mode Input of Commands and Arguments
The syntax and characteristics of line-mode input are as follows:
Presel
4-2
SESAM
01-OCT-2004
Program version 7.3
• The parameters (commands, sub-commands and data) are separated by one or more blank characters (or
a comma) and may be entered one by one or with two or more entries on a single line of input. For example:
COMMAND
SUB-COMMAND
SUB-SUB-COMMAND
data ...
is equivalent to:
COMMAND SUB-COMMAND SUB-SUB-COMMAND data ...
Note, however, that data belonging to different data sets cannot be entered on a single line.
• UPPER CASE = lower case (all commands will be logged on a ‘command log file’ in UPPER case).
• Commands and sub-commands may be abbreviated as long as they are unique. In a command consisting
of words separated by hyphens, each word may be abbreviated or completely left out. Examples:
NODE-NUMBERS = N-N
COMMAND-INPUT-FILE = C-I
• Default values are provided between slashes, ‘/default/’. The defaults are accepted by hitting Return.
• Real or integer input may be entered irrespective of type of numerical data, use ‘E’ for exponent.
• ‘?’ will list all legal commands and data options. (This command is irrelevant for the graphical user interface where all legal commands and data options are at any time given in the command column of the
graphic-mode window.)
• ‘P?’ will list all legal commands starting with P.
• ‘..’ (two dots) will execute the input data before ‘..’ and subsequently abort the current command. The
program is thereafter ready for more commands. If the data before the ‘..’ is incomplete it will be discarded.
• ‘,,’ (two commas) will cause one default parameter to be accepted. (May be useful when editing a ‘command input file’.)
• ‘;’ (semicolon) will cause default parameters to be accepted until the end of the parameter group or until
there is no default provided.
• Text containing blank characters has to be enclosed within single quotes: 'this is a text'.
• ‘%’ (percentage sign) at the beginning of a line is used for entering a comment. Comments will be
logged together with commands on the ‘command log file’ (see Section 4.1.3). Note that the program
will occasionally log information on the ‘command log file’, this will appear as comments in between
data and comments entered by the user. The program information is preceded by ‘%%’ (two percentage
signs) to distinguish it from the user’s own comments. This makes it easy to strip a ‘command log file’
for program information in connection with creating a ‘command input file’ (any fairly good editor will
have a macro-functionality or similar enabling you to locate and remove all lines with ‘%%’). Moreover,
comments preceded by ‘%%’ will not be logged on the ‘command log file’ to avoid irrelevant logging of
program information when using an unedited ‘command log file’ as a ‘command input file’.
SESAM
Presel
Program version 7.3
4.1.3
01-OCT-2004
4-3
Files used by Presel
The file environment of Presel is illustrated in Figure 4.1. The file extensions (.MOD, .JNL, etc.) are given
together with file descriptions.
4.1
Figure 4.1 The file environment of Presel
The files are:
• The ‘command log (journal) file’ (.JNL) is an ASCII file on which all commands and data given to the
program are logged. This means that both data typed (or clicked) by the user and data read by the program from a ‘command input file’ will be logged. However, commands not changing the model (and
data base), e.g. a command displaying data, will not be logged. The time of opening and closing the
‘model file’ is also logged. The file is very useful as a backup file both for verification purposes and for
later use as a ‘command input file’. The ‘command log file’ can be read and modified by a text editor.
• The ‘command input file’ (.JNL) is an ASCII file which may be read into the program. The commands
contained on this file will have the same effect as if they where given by the user directly. The file is
processed by using the command ‘SET COMMAND-INPUT-FILE ...’ followed by ‘# ALL’ (the
latter command means: read all commands found on the file). Alternatively, you may specify a ‘command input file’ when starting Presel from Manager.
• The ‘model file’ (.MOD) is the binary data base containing all model data. The file cannot be read by a
text editor.
• The ‘print file’ (.LIS) is an ASCII file which contains tables over data requested for printing by the
PRINT command.
Presel
4-4
SESAM
01-OCT-2004
Program version 7.3
• The ‘plot file’ contains graphic information produced by the PLOT command. The file extension will
depend on the plot format chosen (see the SET PLOT FORMAT command). See Section 4.1.4 for advice
on using the CGM format to include plots in reports.
• The ‘Input Interface File’ (.FEM) — termed T-files for short — is comprised of:
— First level superelements (created by Prefem or Preframe) which are read by Presel, and
— Higher level superelements which are written by Presel.
Presel has been designed to protect the user against loss of valuable data. However, accidental loss of data
may occur. This may be caused by the user by for example inadvertently deleting the ‘model file’ or it may
be due to an inconsistency in the data model. Such inconsistency may occur for several reasons:
• The computer goes down.
• The disk is full, the disk quota is exhausted or user privileges are inadequate.
• There is an error in the program.
If Presel discovers an inconsistency in the data model the program will normally close all files opened and
abort the execution. Presel may then be restarted using the ‘model file’. In some cases, however, it will not
be possible to resume normal execution due to an irrecoverable inconsistency.
If the ‘model file’ is lost it can be reconstructed by re-executing the program and reading input from the
‘command log file’, i.e. using it as a ‘command input file’.
Note: The ‘model file’ will normally not be compatible between different versions of Presel. The
‘command log file’ may, however, be used as input to a new version.
4.1.4
Creating Plots for Reports
The CGM plot format (see the SET PLOT FORMAT command) is well suited for importing SESAM plots
into reports produced by MS Word and other word processors. You may also transfer CGM files from one
operating system to another, just make sure to use the ‘binary’ option when transferring the file with FTP (or
another protocol).
Depending on the capabilities of your word processor the PostScript plot format may also be used for the
purpose of importing SESAM plots into reports. Contrary to CGM, PostScript is an ASCII formatted file
and is therefore more easily transferred from one computer make to another.
Note that a word processor will normally recognise only one picture (display) on each file. You should,
therefore, specify a new file name for each plot command using the SET PLOT FILE command.
4.1.5
Command Line Arguments
It is possible to specify command line arguments when starting Presel. A command line argument will influence the program execution in various ways.
The command line arguments are:
/PREFIX=text
General file name prefix
SESAM
Program version 7.3
Presel
01-OCT-2004
4-5
/NAME=text
General file name
/STATUS=text
Data base / journal file status
/INTERFACE=LINE
Start the program in line-mode.
/INTERFACE=PICK
Start the program in graphical user interface mode.
/HEADER=NONE
Do not show the program header.
/NOHEADER
Do not show the program header.
/HEADER=SHORT
Show the standard program header.
/WRITE-SUPERELEMENT=number
Write an Input Interface File with the given (top level) superelement number (plus all lower level superelements) when
exiting the program.
/NOWRITE-SUPERELEMENT
Do not write an Input Interface File.
/COMMAND-FILE=filename
Read the specified command input file after the model/journal
file has been accepted.
/NOCOMMAND-FILE
Do not read a command input file.
/FORCED-EXIT
Force EXIT after initialisation and after processing of the file
defined by the /COMMAND-FILE argument.
/NOFORCED-EXIT
Disable FORCED-EXIT.
/EYEDIR-X=value
Set initial eye direction X-value.
/EYEDIR-Y=value
Set initial eye direction Y-value.
/EYEDIR-Z=value
Set initial eye direction Z-value.
/WINDOW-SIZE=value
Set height of the graphic-mode window (width is determined
based on height). The value 100 corresponds to full height of
the screen. Default value is 90.
Note the following about how to enter the command line arguments:
• Command line arguments and values can be abbreviated.
• Each argument name must begin with a slash (/) and each argument value must be preceded by an equal
sign (=). Spaces can freely be distributed around the equal sign and before each slash.
• Texts with blank spaces and special characters (e.g. file names) must be enclosed in quotes. Note that
some operating systems change the case of the input text if it is not enclosed in quotes.
• Slanted arguments or values indicate that these are defaults.
Presel
4-6
SESAM
01-OCT-2004
Program version 7.3
• If at least one of the arguments /PREFIX, /NAME and /STATUS is specified then the prompt for data
base and journal file name is skipped and defaults are used for any unspecified values.
• The values given to the /EYEDIR are real values. The default is the Presel default values. If one of the
three are given the other two are set to 0.0 unless specified.
• In some cases a virtual screen larger than the real screen is used. In such cases reduce the /WINDOWSIZE argument value.
4.2
Program Requirements
4.2.1
Execution Time
The execution time required is negligible for most commands. A few commands, however, will require
some CPU and should be used with care on low capacity computers. An example of this is a display with
hidden option.
4.2.2
Storage Space
The initial size of the data base (prior to any modelling) is less than 2 MB. 10-20 MB will be sufficient for
most models.
4.3
Program Limitations
Graphics Devices
The graphical user interface is implemented on Microsoft Windows. Other devices are currently not used.
Memory
Presel allocates memory buffers for access to data of the data base file. When using the graphical user interface Presel will allocate memory for the display.
• File access buffer
The memory is allocated when Presel is started and the amount is fixed until exiting the program. The
amount of memory allocated can be changed by editing the configuration (password) file. To change the
amount insert (or modify) the line:
MSIZE-PRESEL-BUFFER buffer-bytes
where buffer-bytes represents the amount of memory Presel will allocate in bytes. The default value is
2457600 (2.4576 millions) representing 150 buffers of 16384 bytes each. The buffer should be changed
if, for example, there is not enough memory to use the graphical user interface. Note, however, that increasing the memory for buffers will not improve performance much.
• Working array for node number optimization
SESAM
Program version 7.3
Presel
01-OCT-2004
4-7
You may limit the size of the working array used for optimising the node numbering of a higher level superelement by defining the parameter MSIZE-PRESEL-OPTIMIZE in the configuration (password) file.
If you do not give any value for this parameter then as much memory as needed will be allocated.
• Memory for graphical user interface
The graphic-mode window will use memory and allocate it when needed. Large displays will need more
memory than small displays.
Typing
While typing a command using the keyboard you cannot click commands in menus or select nodes by clicking or use the mouse in any other way until the Return key has been hit or until the typed text has been
deleted by backspace.
Presel
4-8
SESAM
01-OCT-2004
Program version 7.3
SESAM
Program version 7.3
5
Presel
01-OCT-2004
5-1
COMMAND DESCRIPTION
The hierarchical structure of the commands and numerical data is documented in this chapter by use of
tables. How to interpret these tables is explained below. Examples are used to illustrate how the command
structure may diverge into multiple choices and converge to a single choice.
In the example below command A is followed by either of the commands B and C. Thereafter command D
is given. Legal alternatives are, therefore, A B D and A C D.
B
A
D
C
In the example below command A is followed by three selections of either of commands B and C as indicated by *3. For example: A B B B, or: A B B C, or A C B C, etc.
B
A
*3
C
In the example below the three dots in the left-most column indicate that the command sequence is a continuation of a preceding command sequence. The single asterisk indicate that B and C may be given any
number of times. Conclude this sequence by the command END. The three dots in the right-most column
indicate that the command sequence is to be continued by another command sequence.
B
*
... A C
...
END
In the example below command A is followed by any number of repetitions of either of the sequences B D
and C D. Note that a pair of braces ({ }) is used here merely to define a sequence that may be repeated. The
braces are not commands themselves.
B
A {
D }*
C
The characters A, B, C and D in the examples above represent parameters being COMMANDS (written in
upper case) and numbers (written in lower case). All numbers may be entered as real or integer values.
Brackets ([ ]) are used to enclose optional parameters.
Presel
5-2
SESAM
01-OCT-2004
Program version 7.3
Note: The command END is generally used to end repetitive entering of data. Using double dot (..)
rather than END to terminate a command will, depending on at which level in the command it
is given, save or discard the data entered. Generally, if the data entered up to the double dot is
complete and self-contained the double dot will save the data. If in doubt, it is always safest to
leave a command by entering the required number of END commands.
5.1
Node Select Features
Selection of nodes is required in several commands, e.g. in the BOUNDARY and TAG commands. Nodes
may be selected by line-mode commands as well as by graphical means.
5.1.1
Line-mode Selection
You may by line-mode commands select:
• Several nodes by referring to their node number triplets and enclosing them in parentheses.
• A SINGLE node by referring to its node number triplet. This option is less relevant after introduction of
the previous option of enclosing node number triplets in parentheses.
• A GROUP of nodes by referring to the triplet of the first node plus the last node number and the step
(increment) in node numbering.
• All nodes on a straight LINE (infinite or a segment) by referring to two points.
• All nodes in an infinite PLANE by referring to either:
— three points in the plane (3-PLANE option), or
— one point in the plane and one point on a vector perpendicular to the plane (2-PLANE option).
• All nodes inside a VOLUME by referring to two points being the diagonally opposite corners of a box
with side surfaces parallel with the coordinate system planes XY, YZ and ZX (or parallel interpreted in
the space of the named coordinate system if the USE-COORDINATE option has been chosen).
• All nodes belonging to a previously defined set.
• Several nodes by repeatedly using any of the above selection methods (stop selection by END).
• ALL nodes.
Whether a certain node lies on the given straight line, or lies in the given plane, or is located within the
given volume is decided by a coordinate tolerance; see the SET COORDINATE-TOLERANCE command.
5.1.2
Graphical Selection
In addition to the above line-mode commands you may select nodes graphically by clicking or dragging a
rubberband. Such graphical selection is logged as the line-mode command by which you enclose the triplets
of several nodes in parentheses. When dragging a rubberband you do not even need to type in the enclosing
parentheses as these are filled in by the dragging operation.
SESAM
Presel
Program version 7.3
01-OCT-2004
5-3
Also, whenever a single node is to be selected, either after the line-mode option SINGLE or inside any of
the other options the node may be clicked as an alternative to typing in the node number triplet.
5.1.3
Command Syntax for Node Selection
Whenever selecting nodes is required the command syntax is:
[ GLOBAL-COORDINATES ]
[ USE-COORDINATE-SYSTEM
coord-name ]
(
)
{ supno index nodeno }*
SINGLE
supno
index
nodeno*
GROUP
supno
index
node1
point
*2
3-PLANE
point
*3
2-PLANE
point
*2
point
*2
SEGMENT
LINE
INFINITE
PLANE
VOLUME
SET
node2 nstep
*
setname
ALL
END
Where ‘point’ in the command syntax above represents specifying a point as follows:
NODE
supno index nodeno
COORDINATE
x
y
z
LOCAL-COORDINATE
r
phi
z
The LINE, PLANE and VOLUME alternatives offer selection by referring to points in space. These lines,
planes and volumes may be interpreted in the cartesian coordinate space of the superelement — the GLOBAL-COORDINATES option — or in a cylindrical coordinate space — the USE-COORDINATE-SYSTEM option. Figure 5.1 illustrates this. Such a cylindrical coordinate system must previously have been
defined by the COORDINATE-SYSTEM command. You may switch back and forth between these two
spaces within the same selection sequence, i.e. before giving END. The space chosen last is valid for the
subsequent LINE, PLANE and VOLUME commands. If neither the GLOBAL-COORDINATES nor the
USE-COORDINATE-SYSTEM space is given the former is valid.
The points defining the lines, planes and volumes may, as shown by the table explaining ‘point’ above,
either be nodes (selected by giving node number triplets) or specified by coordinates.
When a cylindrical coordinate space has been referred to (by USE-COORDINATE-SYSTEM) in a selection
sequence the point coordinates may optionally be given in this cylindrical coordinate system (the LOCALCOORDINATE option). Note that the choice between COORDINATE and LOCAL-COORDINATE is
merely for giving the point coordinates. The line, plane or volume is still interpreted in the global cartesian
or given cylindrical space according to the choice between GLOBAL-COORDINATES and USE-COORDI-
Presel
5-4
SESAM
01-OCT-2004
Program version 7.3
NATE-SYSTEM. Normally though, you want to use the LOCAL-COORDINATE option when the line,
plane or volume is interpreted in a cylindrical coordinate space and the COORDINATE option when they
are interpreted in the cartesian space.
Note: You may also use the TAG command to pre-select nodes and refer to these TAGGED nodes
rather than selecting nodes directly within the command in question.
5.1
Figure 5.1 Node select alternatives
PARAMETERS:
GLOBAL-COORDINATES
The lines, planes and volumes subsequently given are to be interpreted in the cartesian coordinate space of the superelement
in question.
USE-COORDINATE-SYSTEM
The lines, planes and volumes subsequently given are to be interpreted in the subsequently named cylindrical coordinate
space.
coord-name
Name of a previously defined cylindrical coordinate system.
SESAM
Program version 7.3
Presel
01-OCT-2004
5-5
()
Parentheses enclose one or several node number triplets.
supno
First level superelement number to which the node belongs.
index
First level superelement index to which the node belongs.
nodeno
Node number.
SINGLE
A single node is to be selected.
GROUP
A group of nodes are to be selected.
node1
The first node number.
node2
The last node number.
nstep
The step (increment) in node numbering between node1 and
node2.
LINE
All nodes on a straight line (or ‘straight’ in a specified cylindrical coordinate system) defined by two points are selected. The
tolerance or ‘thickness’ of the line is defined by the SET COORDINATE-TOLERANCE command.
SEGMENT
Only the nodes on the line between the two points are selected.
INFINITE
All nodes on the infinite line are selected.
NODE
The point is the subsequently given node.
COORDINATE
The point is defined by the subsequently given cartesian coordinates.
xyz
Coordinates referring to the cartesian system of the superelement.
LOCAL-COORDINATE
The point is defined by the subsequently given coordinates referring to the cylindrical coordinate system coord-name. This
option will only appear if the command USE-COORDINATESYSTEM has previously been given within the current selection sequence.
r phi z
Coordinates referring to the cylindrical coordinate system coord-name.
PLANE
All nodes in an infinite plane defined by two or three points are
selected. The tolerance or ‘thickness’ of the plane is defined by
the SET COORDINATE-TOLERANCE command.
3-PLANE
The plane is defined by three points; see Figure 5.1.
2-PLANE
The plane is defined by two points; see Figure 5.1.
Presel
5-6
SESAM
01-OCT-2004
Program version 7.3
VOLUME
All nodes inside a box-shaped volume are selected; see Figure
5.1.
SET
Select all nodes of a given set.
setname
Name of a previously defined set.
ALL
Select all nodes of the current superelement.
END
Stop selecting more nodes.
Note: Use the command END to conclude a node selection sequence. Do not use the ‘..’ command as
that will involve termination of the current command with no nodes selected.
5.2
Detailed Description of Commands
The input commands are described in the following. The commands and sub-commands are described in
alphabetic order. Below is a list of all main (basic level) commands.
ASSEMBLY
See page 5-8.
BOUNDARY
See page 5-9.
CHANGE
See page 5-11.
COORDINATE-SYSTEM
See page 5-14.
DEFINE
See page 5-16.
DELETE
See page 5-17.
DISPLAY
See page 5-21.
EXIT
See page 5-23.
HELP
See page 5-24.
INCLUDE
See page 5-25.
LABEL
See page 5-44.
LINEAR-DEPENDENCY
See page 5-46.
LOAD
See page 5-50.
NAME
See page 5-56.
OPTIMIZE
See page 5-57.
PLOT
See page 5-58.
PRINT
See page 5-60.
SESAM
Program version 7.3
Presel
01-OCT-2004
READ
See page 5-66.
ROTATE
See page 5-67.
SET
See page 5-68.
TAG
See page 5-78.
TASK
See page 5-79.
TRANSFORMATION
See page 5-80.
UNTAG
See page 5-81.
WRITE
See page 5-82.
ZOOM
See page 5-83.
#
See page 5-84.
5-7
Presel
SESAM
5-8
01-OCT-2004
Program version 7.3
ASSEMBLY
ASSEMBLY
NEW
OLD
supno
PURPOSE:
This command creates a new superelement and makes it the current one — the NEW option — or an existing superelement is made the current one — the OLD option.
A NEW superelement will be empty until one or more superelements are included into it. It will then
become a second or higher level superelement.
On OLD superelement is either:
• A first level superelement, typically created by Preframe or Prefem, and already read into Presel.
• A higher level superelement previously created by Presel.
The current superelement is the one:
• Displayed when issuing the DISPLAY CURRENT-SUPERELEMENT command.
• For which boundary conditions are given when issuing the BOUNDARY command.
• Into which superelements are included when issuing the INCLUDE command.
• For which load combinations are given when issuing the LOAD command.
• Etc.
PARAMETERS:
supno
The superelement number. A vacant superelement number for the NEW option, an
existing one for the OLD option.
SESAM
Presel
Program version 7.3
01-OCT-2004
5-9
BOUNDARY
FREE
GLOBAL
FIXED
LOCAL-COORDINATE-SYSTEM
BOUNDARY PRESCRIBED
SUPER
coord-name
*6 [
] ...
TRANSFORMATION
trano
fixcode
SELECT select-nodes
...
TAGGED
UNTAGGED
END
PURPOSE:
The command defines boundary conditions for the current superelement which must be a higher level
superelement, i.e. boundary conditions cannot be defined within Presel for first level superelements. The
following boundary conditions may be defined for each individual degree of freedom (d.o.f.) of the nodes:
FREE
= Free to move
FIXED
=
Fixed at zero displacement
PRESCRIBED
=
Prescribed displacement or acceleration (value is given by the LOAD command)
SUPER
=
Super d.o.f.
In addition, the boundary conditions LINEAR and SUPERL are defined using the LINEAR-DEPENDENCY command. SUPERL has exactly the same effect as SUPER, only that it was defined within the LINEAR-DEPENDENCY command.
Note that only supernodes (or super d.o.f.s) will appear as nodes (or d.o.f.s) in the higher level superelements into which this superelement is included. All other boundary conditions involve that the node (or
d.o.f.) will not exist at higher level superelements. See Section 3.2.6 for more information on this.
Nodes for which no boundary conditions are given will by default have all its d.o.f.s as FREE.
A node may have less that six d.o.f.s. This will for example be the case for membrane models in which the
nodes have three d.o.f.s. Another example is when not all six d.o.f.s were defined as super for the included
lower level superelement(s). When boundary conditions are given for such nodes the boundary conditions
for non-existent d.o.f.s will be ignored. If for example only the translations in X and Y and the rotation
about Z exist the node is fixed by the sequence:
FIX FIX * * * FIX
where * means that any legal boundary condition may be given, it will be ignored anyway.
Presel
5-10
SESAM
01-OCT-2004
Program version 7.3
A node for which boundary conditions previously has been given will not be affected by a new boundary
command (that includes the node in question). I.e. boundary conditions are neither overwritten nor
‘accummulated’. The only way to given a node new boundary conditions is to delete the current conditions
(using the DELETE command) and then redefine them.
The boundary conditions may be given both in a rotated cartesian coordinate system (the TRANSFORMATION option) and a cylindrical coordinate system (the LOCAL-COORDINATE-SYSTEM option). Both
these systems must previously have been defined by the TRANSFORMATION and COORDINATE-SYSTEM commands respectively.
The boundary conditions may be verified by the LABEL BOUNDARY-CONDITION-SYMBOL and the
PRINT NODE BOUNDARY-CONDITIONS commands. Boundary conditions are deleted by the DELETE
BOUNDARY command.
PARAMETERS:
fixcode
0 = FREE, 1 = FIXED, 3 = PRESCRIBED and 4 = SUPER.
GLOBAL
The boundary conditions are specified in the global coordinate
system.
LOCAL-COORDINATE-SYSTEM
The boundary conditions are specified in a cylindrical coordinate system.
coord-name
The name of the cylindrical coordinate system previously defined by the COORDINATE-SYSTEM command.
TRANSFORMATION
The boundary conditions are specified in a rotated coordinate
system.
trano
Transformation reference number previously defined by the
TRANSFORMATION command.
SELECT
Nodes are to be selected now.
select-nodes
Select nodes; see Section 5.1.
TAGGED
Refers to previously selected (tagged) nodes; see the TAG/UNTAG commands.
UNTAGGED
Refers to all but the previously selected (tagged) nodes; see the
TAG/UNTAG commands.
NOTES:
The brackets denote optional parameters. I.e. if you do not specify any coordinate system then the global
system is used by default.
SESAM
Presel
Program version 7.3
01-OCT-2004
5-11
CHANGE
LINEAR-DEPENDENCY
CHANGE
LOAD
SET
...
TRANSFORMATION
PURPOSE:
The command changes data previously defined.
The CHANGE LINEAR-DEPENDENCY and CHANGE LOAD commands are described in more detail in
the following.
The CHANGE SET and CHANGE TRANSFORMATION commands, however, have identical syntax with
the commands defining the data. Refer to the DEFINE SET and TRANSFORMATION commands for
details.
Presel
SESAM
5-12
01-OCT-2004
Program version 7.3
CHANGE LINEAR-DEPENDENCY
...
LINEAR-DEPENDENCY ...
...
{ dep-node-triplet
dep-dof { indep-node-triplet
indep-dof
beta }* }*
PURPOSE:
The command changes linear dependencies between nodes. Only the linear dependency factor beta may be
changed. The linear dependency may originally have been defined by either the GENERAL-NODEDEPENDENCY or the TWO-NODE-DEPENDENCY option; see the LINEAR-DEPENDENCY command.
PARAMETERS:
dep-node-triplet
Node number triplet (supno index nodeno) previously defined as dependent.
dep-dof
D.o.f. previously defined as dependent of the indep-dof of the indep-node-triplet,
choose either:
X, Y or Z: Translations in X-, Y- or Z-directions
R-X, R-Y or R-Z: Rotations about the X-, Y- or Z-directions
indep-node-triplet
Node number triplet (supno index nodeno) previously defined as independent, the
one being supernode.
indep-dof
D.o.f. previously defined as independent, choose either:
X, Y or Z: Translations in X-, Y- or Z-directions
R-X, R-Y or R-Z: Rotations about the X-, Y- or Z-directions
beta
New linear dependency factor.
SESAM
Presel
Program version 7.3
01-OCT-2004
5-13
CHANGE LOAD
...
LOAD
NODE
END
lc
...
PURPOSE:
The command changes nodal loads previously defined by the LOAD NODE command.
Changing a nodal load is done in the same way as it was defined with one exception: a load index has to be
given. The load index is used to distinguish between different nodal loads for the same node for the same
load case. For example, a nodal force defined for the second time for the same node for the same load case
is given index 2.
The PRINT LOAD command gives an overview of the loads including the automatically assigned load
indexes, refer to this table when a nodal load is to be changed.
Rather than describing the CHANGE LOAD NODE command in detail reference is made to the LOAD
NODE command.
Load combinations cannot be changed, rather they must be deleted (DELETE LOAD COMBINATION) and
redefined.
Presel
SESAM
5-14
01-OCT-2004
Program version 7.3
COORDINATE-SYSTEM
COORDINATE-SYSTEM
...
coord-name
COORDINATE
x
y
NODE
supno index
CYLINDRICAL ...
z
nodeno
*3
PURPOSE:
The command defines a cylindrical coordinate system. This coordinate system may conveniently be used
for selecting nodes (see Section 5.1) and for defining boundary conditions.
A cylindrical coordinate system is defined by three points: its origin, a point defining its z-axis and a point
defining its φ=0 plane (which determines the r-axis). See Figure 5.2. The three points may be defined by
giving coordinates in the cartesian system of the superelement or nodes may be referred to.
PARAMETERS:
coord-name
User-given name of the coordinate system.
CYLINDRICAL
A cylindrical coordinate system is defined.
COORDINATE
Define point by giving its coordinates.
xyz
Coordinates in the superelement’s cartesian system.
NODE
Refer to nodes.
supno index nodeno
The node number triplet.
5.2
Figure 5.2 Cylindrical and spherical coordinate systems
SESAM
Program version 7.3
Presel
01-OCT-2004
5-15
NOTES:
Note that the coordinate system is only defined for, and therefore available to, the current superelement.
Coordinate systems defined are printed by the PRINT TRANSFORMATION command. The coordinate
system name (coord-name) is not given in the printout but rather an internally assigned number.
Presel
SESAM
5-16
01-OCT-2004
Program version 7.3
DEFINE SET
intersection-with
DEFINE
SET setname
SUBTRACT-BY
NODE
select-nodes
UNION-WITH
END
PURPOSE:
The command defines a set of nodes that may be referred to in commands where selecting nodes is required.
DEFINE SET creates a new set while CHANGE SET changes an existing set. The command syntaxes of
these two commands are identical and based on standard set operators.
Initially, after giving the command DEFINE SET and entering a name the set is empty. The first operation to
do will therefore be to add to the set by the UNION-WITH command. Thereafter, repetitive set operations
may be performed until the content of the set is as desired. The operations are executed consecutively, the
order of the operations are therefore of consequence. Conclude the definition (or changing) of the set by
entering END.
PARAMETERS:
setname
User-given name of the set to define (maximum 8 characters
and starting with a letter).
INTERSECTION-WITH
All nodes except those subsequently selected will be removed
from the set. I.e. the new contents will be the intersection between the current contents and the subsequent selection.
SUBTRACT-BY
The subsequently selected nodes will be removed from the set.
UNION-WITH
The subsequently selected nodes will be added to the set.
NODE
Nodes are to be selected (the only choice).
select-nodes
Select nodes; see Section 5.1.
SESAM
Program version 7.3
Presel
01-OCT-2004
5-17
DELETE
ASSEMBLY
supno
SELECT
BOUNDARY
select-nodes
TAGGED
UNTAGGED
END
INCLUDED
DELETE
supno
END
SELECT
LINEAR-DEPENDENCY
index
select-nodes
TAGGED
UNTAGGED
END
LOAD
COMBINATION
glc
NODE
...
END
TRANSFORMATION
trano
PURPOSE:
The command deletes data previously defined. Only the DELETE LOAD NODE command is described in
detail in the following. Notes are given below for the other alternatives. Otherwise see the commands defining the data.
PARAMETERS:
ASSEMBLY
Delete an assembly, normally a higher level superelement. A
first level superelement may, however, also be deleted with the
effect that it will be as if the superelement had not been read
into Presel. All data relating to the superelement are deleted.
The superelement to delete cannot be part of a higher level superelement, i.e. it cannot have been included in any assembly.
supno
Superelement number to be deleted.
BOUNDARY
Delete boundary conditions for the current superelement which
must be a higher level superelement, i.e. boundary conditions
cannot be deleted for first level superelements. The selected
nodes will then be FREE for all d.o.f.s. Note that the boundary
conditions LINEAR and SUPERL (see the LINEAR-DE-
Presel
5-18
SESAM
01-OCT-2004
Program version 7.3
PENDENCY command) can only be deleted using the DELETE LINEAR-DEPENDENCY command.
SELECT
Nodes are to be selected now.
select-nodes
Select nodes; see Section 5.1.
TAGGED
Refers to previously selected (tagged) nodes; see the TAG/UNTAG commands.
UNTAGGED
Refers to all but the previously selected (tagged) nodes; see the
TAG/UNTAG commands.
INCLUDED
Delete a lower level superelement that previously has been included in the current higher level superelement. The current superelement cannot itself be part of an assembly.
supno index
The superelement number and index to be deleted.
LINEAR-DEPENDENCY
Delete linear dependencies between nodes. The linear dependencies of all selected dependent nodes are deleted. Note that the
dependent nodes and not the independent nodes are to be selected. Also note that this command will delete the LINEAR
boundary condition of the dependent node. It will also delete
the SUPERL (or SUPER) boundary condition of the independent nodes unless other nodes still are linearly dependent on
them.
LOAD
Delete a load.
COMBINATION
Delete a load combination for a higher level superelement.
NODE
Delete a nodal load for a higher level superelement. See a specific description for this alternative below.
TRANSFORMATION
Delete a previously defined transformation.
trano
The transformation number to be deleted.
SESAM
Presel
Program version 7.3
01-OCT-2004
5-19
DELETE LOAD NODE
... LOAD
NODE
lc
...
SELECT
ALL
select-nodes
TAGGED
YES
UNTAGGED
END
...
NO
FORCE
PRESCRIBED-DISPLACEMENT
PRESCRIBED-ACCELERATION
SELECT
...
select-nodes
TAGGED
UNTAGGED
index
END
END
PURPOSE:
The command deletes loads. See the LOAD command for a more detailed explanation of the load types.
This command differs from the command defining the load in that a load index must be given. The load
index is used to distinguish between individual loads of the same type for the same node for the same load
case. For example, a nodal force defined for the second time for the same node for the same load case is
given index 2. Note that load indexes may change after deleting a load as the index always goes from 1 to N
where N is the number of loads of the same type for that particular node.
PARAMETERS:
lc
Load case number.
ALL
Delete all loads.
YES/NO
Confirm deletion.
SELECT
Nodes are to be selected now.
select-nodes
Select nodes; see Section 5.1.
TAGGED
Refers to previously selected (tagged) nodes; see the TAG/UNTAG commands.
UNTAGGED
Refers to all but the previously selected (tagged) nodes; see the
TAG/UNTAG commands.
FORCE
Delete nodal force loads.
Presel
5-20
SESAM
01-OCT-2004
Program version 7.3
PRESCRIBED-ACCELERATION
Delete nodal acceleration loads.
PRESCRIBED-DISPLACEMENT
Delete nodal displacement loads.
index
Load index, either select one index or all by entering the text
ALL.
SESAM
Presel
Program version 7.3
01-OCT-2004
5-21
DISPLAY
CURRENT-SUPERELEMENT
DISPLAY
LOAD
LOADED-SUPERELEMENT
glc
FIRST-CONTRIBUTING-LOAD
glc
NEXT-CONTRIBUTING-LOAD
END
LOCATE-SUPERELEMENT
supno
SPECIFIED-SUPERELEMENT
supno
PURPOSE:
The command displays superelements, optionally with information about loads. The nodes of the superelement are shown by small coloured dots (yellow for free nodes and blue for supernodes). These node symbols may be switched off (and on again) by SET GRAPHICS NODE-SELECTION.
Node symbols, node numbers and boundary conditions may be added by the LABEL command.
Note that there is also a DISPLAY command within the command sequence for including a superelement in
an assembly. The purposes of these two DISPLAY commands are different and should not be confused. See
the INCLUDE supno DISPLAY command.
PARAMETERS:
CURRENT-SUPERELEMENT
Display the current superelement. The current superelement is
set by the ASSEMBLY command.
LOAD
Display the current superelement with information verifying
the load combination. The current superelement must be a
higher level superelement.
Note that loads defined for first level superelements cannot be
displayed or verified in Presel.
LOADED-SUPERELEMENT
Colour code first level superelement occurrences according to
how many local load cases each contributes with to the given
global loadcase.
glc
Global loadcase, i.e. a load combination of the current higher
level superelement.
FIRST-CONTRIBUTING-LOAD
This option is used in combination with the option NEXTCONTRIBUTING-LOAD. Combined the two options colour
code first level superelement occurrences according to which
loadcases they contribute with to a given global loadcase.
FIRST-CONTRIBUTING-LOAD displays with a separate colour the first level superelements that contribute with their load-
Presel
5-22
SESAM
01-OCT-2004
Program version 7.3
case 1. If no superelements contribute with their loadcase 1
then the lowest contributing loadcase — when accounting for
all first level superelements — is shown instead.
Thereafter, repetitive use of NEXT-CONTRIBUTING-LOAD
steps through all contributing loadcases from first level superelements. For each loadcase the contributing superelements
are displayed with a separate colour.
The load factors are for each display printed on top of the colour coded superelements.
NEXT-CONTRIBUTING-LOAD
See explanation of FIRST-CONTRIBUTING-LOAD above.
LOCATE-SUPERELEMENT
Display the specified first level superelement with a separate
colour in a display of the current higher level superelement. See
also the command SET GRAPHICS PRESENTATION COLOUR-SUPERELEMENTS.
supno
Superelement number.
SPECIFIED-SUPERELEMENT
Display the specified superelement alone. Note that the current
superelement is not changed by this option, i.e. DISPLAY
CURRENT-SUPERELEMENT will revert to displaying the
current superelement.
This option differs from LOCATE-SUPERELEMENT in that
only the specified superelement is displayed and it need not be
a first level superelement.
SESAM
Program version 7.3
Presel
01-OCT-2004
5-23
EXIT
EXIT
PURPOSE:
The command interrupts the program execution. All files opened are properly saved and closed. The user
may resume the superelement assembling at a later stage by referring to the model file and command log file
as ‘old’ when re-entering Presel.
Presel
SESAM
5-24
01-OCT-2004
Program version 7.3
HELP
GENERAL-SYNTAX
HELP
SPECIAL-KEYS
STATUS-LIST
SUPPORT
PURPOSE:
The command provides information on various subjects. Except for the STATUS-LIST option the information is printed in the message window.
PARAMETERS:
GENERAL-SYNTAX
Information on how to enter commands and text is provided.
SPECIAL-KEYS
Information on some special keys is provided.
STATUS-LIST
This command is obsolete. See Section 1.4 for looking up information in the Status
List.
SUPPORT
The telephone and facsimile numbers and the Internet address for requesting support is printed together with detailed information on the program version used. This
information is of importance in connection with support requests.
SESAM
Presel
Program version 7.3
01-OCT-2004
5-25
INCLUDE
CHECK-INCLUDE
DECODE-T-MATRIX
DISPLAY
DISTANCE-CHECK
END-DO-NOT-INCLUDE
LOCATION
MIRROR
INCLUDE
supno
NOPRINT-CHECK-INCLUDE ...
PERFORM-INCLUDE
POSITION
PRINT-INV-T-MATRIX
PRINT-T-MATRIX
RESET-T-MATRIX
ROTATE
TRANSLATE
PURPOSE:
The command starts the process of including a superelement in the current superelement assembly. See Section 3.2.2 for a tutorial in how to use the INCLUDE command.
Initially, the superelement being included will be position with its coordinate system overlapping the coordinate system of the superelement assembly. It may then be moved by repetitive use of the sub-commands
TRANSLATE, ROTATE, MIRROR and POSITION until it is properly positioned. The sub-command DISPLAY will at any time show the current position of the superelement being included.
NOPRINT-CHECK-INCLUDE checks and tabulates the match of the nodes of the superelement being
included and the current superelement. (CHECK-INCLUDE does the same but produces more output.) It is
mandatory to perform this check.
PERFORM-INCLUDE performs and concludes the inclusion of the superelement in the current superelement assembly.
The various INCLUDE sub-commands listed above are explained in the following.
PARAMETERS:
supno
Superelement number being included in the current higher level superelement.
Presel
5-26
SESAM
01-OCT-2004
Program version 7.3
INCLUDE supno CHECK-INCLUDE
... CHECK-INCLUDE
PURPOSE:
The sub-command compares and tabulates the match between supernodes of the superelement being
included and the nodes of the current superelement assembly. The typical appearance of the table is shown
in Figure 5.3.
5.3
Figure 5.3 CHECK-INCLUDE tabulates match between nodes, here for first level superelements
The table header contains information about including a superelement in the second level superelement
assembly 21. The coordinate tolerance is 0.1 (see the SET COORDINATE-TOLERANCE command). The
table contains the following information:
• The first line, marked A, says that the node 11 1 101 (a triplet) of the superelement being included
matches node 11 2 103 (a triplet) of the superelement assembly. And the coordinates of these nodes are
(20,20,0).
• The fourth line, marked B, says that node 11 1 303 of the superelement being included does not match
any node of the assembly. Its coordinates are (2,18,20).
• The summary at the bottom says that:
— the assembly has 1 node not matched by any node of the superelement being included,
— 3 pairs of nodes match,
— 3 nodes of the superelement being included does not match any of the assembly nodes and
— the total number of nodes in the assembly, counting the ones of the superelement being included, is 7.
SESAM
Program version 7.3
Presel
01-OCT-2004
5-27
Higher level superelements will have nodes with more than one triplet (see Section 3.2.6). When higher
level superelements are assembled into even higher level superelements all these triplets will appear in the
table of matching nodes. The typical appearance of the table will then be as shown in Figure 5.4
5.4
Figure 5.4 CHECK-INCLUDE tabulates match between nodes, here for higher level superelements
The table header now informs that a superelement is being included in the third level superelement assembly 31. The table contains the following information:
• The two first lines, marked A, says that the node 11 2 103 (a triplet) which is the same node as 11 3 101
and both belonging to the superelement being included matches node 12 1 703 of the superelement
assembly. The coordinates of these nodes are (20,20,0).
• The third and fourth lines, marked B, says that node 11 2 303 which is the same node as 11 3 303 and
both belonging to the superelement being included matches node 12 1 803 which is the same node as 12
2 801 both belonging to the assembly. The coordinates are (18,18,20).
• The asterisk signals that there is a discrepancy in boundary condition of the matching pair of nodes
marked B. This means that the superelement cannot be included in the assembly. See Section 3.2.6 about
requirements to nodes.
• The summary at the bottom says that:
— the assembly has 12 nodes not matched by any nodes of the superelement being included,
— 2 pairs of nodes match,
— 0 nodes of the superelement being included does not match any of the assembly nodes (all match) and
— the total number of nodes in the assembly, counting the ones of the superelement being included, is
14.
NOTES:
CHECK-INCLUDE or NOPRINT-CHECK-INCLUDE is mandatory and must be given before PERFORMINCLUDE.
Presel
5-28
SESAM
01-OCT-2004
Program version 7.3
The DISTANCE-CHECK sub-command can be used to find the distance between the two nodes. If this distance is greater than the coordinate tolerance printed in the heading of the tables the nodes will not match.
Assuming that the superelement being included has been positioned correctly there are only two ways to get
non-matching nodes to match: you must either correct the first level superelements (leave Presel and re-run
after the correction) or increase the coordinate tolerance (see the SET COORDINATE-TOLERANCE command).
SESAM
Program version 7.3
Presel
01-OCT-2004
5-29
INCLUDE supno DECODE-T-MATRIX
... DECODE-T-MATRIX
PURPOSE:
The sub-command prints the transformation matrix containing the accumulated translations, rotations and
mirrorings of the superelement being included. Also see the PRINT-T-MATRIX sub-command. The table
looks like this:
MIRROR ABOUT XY-PLANE:
ROTATION ABOUT GLOBAL X-AXIS:
ROTATION ABOUT GLOBAL Y-AXIS:
ROTATION ABOUT GLOBAL Z-AXIS:
TRANSLATION IN X-DIRECTION:
TRANSLATION IN Y-DIRECTION:
TRANSLATION IN Z-DIRECTION:
NO
0.0000
0.0000
90.0000
20.0000
0.0000
0.0000
NOTES:
The translations and rotations refer to the coordinate system of the superelement assembly.
Starting from the initial position of the superelement being included (for example after RESET-T-MATRIX)
the translations and rotations must be made in the given sequence (first mirror about the XY-plane if relevant, then rotate about X, etc.) in order to yield the position resulting from the accumulated transformations.
Presel
SESAM
5-30
01-OCT-2004
Program version 7.3
INCLUDE supno DISPLAY
... DISPLAY
PURPOSE:
The sub-command displays the current position of the superelement being included on top of the superelement assembly.
5.5
Figure 5.5 DISPLAY sub-command within the INCLUDE command
SESAM
Presel
Program version 7.3
01-OCT-2004
5-31
INCLUDE supno DISTANCE-CHECK
...
DISTANCE-CHEKC
NODE
supno
index
nodeno
COORDINATE
x
y
z
*2
PURPOSE:
The sub-command computes and prints the distance between a node or point in the superelement assembly
and the corresponding node or point in the superelement being included. The node/point of the superelement
assembly is given first.
If the COORDINATE alternative is chosen the point does not have to correspond to a node. The coordinates
are given in the coordinate systems of the assembly and superelement being included, respectively.
PARAMETERS:
NODE
Refer to a node triplet.
supno index nodeno
The node number triplet.
COORDINATE
Refer to a point by using coordinates.
xyz
The point coordinates.
Presel
5-32
SESAM
01-OCT-2004
Program version 7.3
INCLUDE supno END-DO-NOT-INCLUDE
... END-DO-NOT-INCLUDE
PURPOSE:
The sub-command aborts the inclusion process of the superelement and prepares for including another
superelement.
To merely discard the given transformations of the superelement currently being included use the RESET-TMATRIX command.
SESAM
Presel
Program version 7.3
01-OCT-2004
5-33
INCLUDE supno LOCATION
...
LOCATION
CHANGE
oldloc
CREATE
loc
USE
refloc
DELETE
oldloc
newloc
modloc
PURPOSE:
The sub-command is used in connection with the LOAD ASSEMBLY command. It creates and modifies
location strings for superelements being included. See Section 3.4 for an explanation of assembling loads.
PARAMETERS:
CHANGE
Changes a previously created location string for the superelement being included.
Not to be confused with the USE command; see below.
CREATE
Creates a location string for the superelement being included.
USE
Modifies location strings for superelements forming the superelement being included. For example, if the current superelement assembly is a fourth level superelement and the superelement being included is a third level superelement, then
the command modifies location strings for the second and first level superelements
forming the third level superelement.
DELETE
Deletes a location string for the superelement being included.
oldloc
Previously created location string to be changed or deleted.
newloc
New location string replacing the previous one.
loc
Location string assigned to the superelement being included.
refloc
Location string(s) to be modified. Wild-cards may be used; see notes below.
modloc
The modified location string(s). Wild-cards may be used; see notes below.
NOTES:
The location strings are limited to eight characters.
The LOCATION USE command allows modifying location strings by use of wild-cards. The following
modifications are allowed (interpret the single characters in the examples as several characters):
modloc
refloc
*
X
replaces all strings by X
*A
X
replaces all strings ending with A by X
A*
X
replaces all strings beginning with A by X
Presel
SESAM
5-34
01-OCT-2004
A*
*A
*A*
*
A*
*A
X*
*X
*X*
*X
A*X
*AX
A*B*C
X*Y*Z
Program version 7.3
replaces A by X in all strings beginning with A
replaces A by X in all strings ending with A
replaces A by X in any string containing A
appends X to all strings
appends X to all strings beginning with A
appends X to all strings ending with A
replaces the characters A, B and C in strings containing these characters (e.g. ABC, AB1C, A12B34C) by X, Y and Z, respectively.
SESAM
Presel
Program version 7.3
01-OCT-2004
5-35
INCLUDE supno MIRROR
YZ-PLANE
...
MIRROR
ZX-PLANE
XY-PLANE
PURPOSE:
The sub-command mirrors the superelement being included about one of the three planes defined by the
axes of the superelement assembly.
5.6
Figure 5.6 MIRROR about ZX-PLANE
NOTES:
It is the current position of the superelement being included that is mirrored.
Mirroring a superelement involves that the superelement occurrence gets a left-handed coordinate system.
The results must then be interpreted in such a coordinate system.
Mirroring a superelement twice (e.g. by also mirroring the superelement assembly when this in turn is
included in yet a higher level superelement) involves that the superelement occurrence regains a righthanded coordinate system.
Presel
5-36
SESAM
01-OCT-2004
Program version 7.3
INCLUDE supno NOPRINT-CHECK-INCLUDE
... NOPRINT-CHECK-INCLUDE
PURPOSE:
The sub-command compares the supernodes of the superelement being included and the nodes of the current
superelement assembly. It has the same purpose and functionality as the NOPRINT-CHECK-INCLUDE
sub-command except for that the table over matching nodes is omitted. Only the summary information is
given; see Figure 5.3.
SESAM
Program version 7.3
Presel
01-OCT-2004
5-37
INCLUDE supno PERFORM-INCLUDE
... PERFORM-INCLUDE
PURPOSE:
The sub-command concludes the process of including a superelement in an assembly. It is given subsequently to the sub-command NOPRINT-CHECK-INCLUDE (or CHECK-INCLUDE).
The following table is produced:
SUPER ELEMENT INCLUDED
SUPER ELEMENT TYPE:
SUPER ELEMENT INDEX:
LEVEL:
NO. OF INTERNAL NODES:
NO. OF SUPER NODES MATCHING:
NO. OF SUPER NODES NOT MATCHING:
NO. OF NODES:
INTO SUPER ELEMENT ASSEMBLY
SUPER ELEMENT TYPE:
SUPER ELEMENT INDEX:
LEVEL:
NO. OF OLD NODES:
NO. OF NEW NODES:
NO. OF NODES:
11
3
1
2
3
3
8
21
1
2
9
3
12
NOTES:
The command is the mandatory final step in including a superelement in an assembly.
Presel
SESAM
5-38
01-OCT-2004
Program version 7.3
INCLUDE supno POSITION
...
POSITION
NODE
supno
index
nodeno
COORDINATES
x
y
z
*6
PURPOSE:
The sub-command positions the superelement by referring to three points or nodes of the superelement
assembly and the corresponding three points or nodes of the superelement being included. The three points/
nodes of the assembly are given first. The two sets of three points/nodes must form a triangle and they must
be congruent.
If the COORDINATE alternative is chosen the point does not have to correspond to a node. The coordinates
are given in the coordinate systems of the assembly and superelement being included, respectively.
The POSITION sub-command cannot be used if transformations have already been specified for the
superelement being included. Use the RESET-T-MATRIX sub-command in such case.
5.7
Figure 5.7 POSITION by two sets of three nodes or points
PARAMETERS:
NODE
Refer to a node triplet.
supno index nodeno
The node number triplet.
COORDINATE
Refer to a point by using coordinates.
xyz
The point coordinates.
SESAM
Presel
Program version 7.3
01-OCT-2004
5-39
INCLUDE supno PRINT-T-MATRIX / PRINT-INV-T-MATRIX
...
PRINT-T-MATRIX
PRINT-INV-T-MATRIX
PURPOSE:
The sub-commands print the transformation matrix of the superelement being included. This 3 by 4 matrix
is an accumulation of all translations, rotations and mirrorings given for the superelement.
The first three columns of the transformation matrix (a 3 by 3 matrix) constitute the cosine matrix (rotations) between the coordinate systems of the superelement being included and the superelement assembly.
The fourth column describe the translations between the systems. The conversion of coordinates from one
system to the other is done by adding a row of zeros to the transformation matrix to make it a 4 by 4 matrix
and adding a fourth term being equal to 1 to the coordinate vectors as follows:
T 11
x
y = T 21
z
T 31
1
0
T 12 T 13 T 14 x'
T 22 T 23 T 24 y'
T 32 T 33 T 34 z'
0 0 0 1
PARAMETERS:
PRINT-T-MATRIX
The transformation matrix is printed. The relation between the
coordinate systems of the superelement being included and the
superelement assembly is:
C = T × C´
Where:
C is the coordinates in the assembly coordinate system and
C´ is the coordinates in the superelement’s coordinate system.
PRINT-INV-T-MATRIX
The inverted transformation matrix (T-1) is printed.
Presel
5-40
SESAM
01-OCT-2004
Program version 7.3
INCLUDE supno RESET-T-MATRIX
... RESET-T-MATRIX
PURPOSE:
The sub-command resets the transformation matrix containing the accumulated translations, rotations and
mirrorings of the superelement being included. This means that the superelement being included is brought
back to its original position with its coordinate system overlapping the coordinate system of the superelement assembly. It is then ready for new transformations.
SESAM
Presel
Program version 7.3
01-OCT-2004
5-41
INCLUDE supno ROTATE
X-AXIS
GLOBAL-AXIS
Y-AXIS
degrees
Z-AXIS
...
ROTATE
X-AXIS
OBJECT-AXIS
Y-AXIS
degrees
Z-AXIS
ARBITRARY-AXIS
NODE
supno index
nodeno
COORDINATES
x
z
y
*2 degrees
PURPOSE:
The sub-command rotates the superelement being included an angle about a specified axis.
A positive angle is defined by the right hand rule.
5.8
Figure 5.8 ROTATE about global axes
PARAMETERS:
GLOBAL-AXIS
The superelement being included rotates about one of the coordinate axes of the superelement assembly.
OBJECT-AXIS
The superelement being included rotates about one of the coordinate axes of the superelement itself.
Presel
5-42
SESAM
01-OCT-2004
Program version 7.3
X-AXIS
The axis of rotation.
Y-AXIS
The axis of rotation.
Z-AXIS
The axis of rotation.
ARBITRARY-AXIS
The superelement being included rotates about an axis defined by two points. The
axis points from the first to the second point which then determines the positive direction of rotation (the right hand rule). The points are given by referring to nodes
or by giving coordinates in the coordinate system of the superelement assembly.
NODE
Refer to a node triplet.
supno index nodeno
The node number triplet. This node must be a part of the current assembly, i.e. belong to a superelement that has previously been included.
COORDINATE
Refer to a point by using coordinates.
xyz
The point coordinates.
degrees
Rotation given in degrees.
SESAM
Presel
Program version 7.3
01-OCT-2004
5-43
INCLUDE supno TRANSLATE
...
TRANSLATE
dx dy dz
PURPOSE:
The sub-command translates the superelement being included along the axes of the superelement assembly.
PARAMETERS:
dx dy dz
The translations in X, Y and Z.
Presel
SESAM
5-44
01-OCT-2004
Program version 7.3
LABEL
BOUNDARY-CONDITION-SYMBOLS
COUPLED-NODES
EXTERNAL-NODE-NUMBER
supno
index
supno
index
INTERNAL-NODE-NUMBER
NODE-NUMBERS
LABEL
NODE-NUMBER-TRIPLET
ONE-NODE-NUMBER-TRIPLET
ALL-NODE-NUMBER-TRIPLETS
NODE SYMBOLS
ALL-NODES
SUPER-NODES-ONLY
NON-COUPLED-NODES
ORIGIN-SYMBOL
PURPOSE:
The command adds (labels) boundary condition symbols, node numbers, etc. to the display. The labels are
shown until a new display is made; the label command may then be re-entered. The size of the symbols are
adjusted by the SET GRAPHICS SIZE-SYMBOLS command. The symbols used are shown in Figure 5.9.
PARAMETERS:
BOUNDARY-CONDITION-SYMBOLS
Add symbols showing fixations of d.o.f.s.
COUPLED-NODES
Add numbers to the display telling how many first level superelements there are coupled to each node. The numbers are
only given for nodes where two or more first level superelements are coupled, i.e. the number will always be ≥2. Also see
the NON-COUPLED-NODES alternative.
NODE-NUMBERS
Add node numbers. A choice must be made between various alternatives. To understand these alternatives; see Section 3.2.6
about node numbers.
EXTERNAL-NODE-NUMBER
Add only the node number of a given first level superelement.
supno index
Superelement number and index of a first level superelement.
INTERNAL-NODE-NUMBER
Add only the internal number of the current superelement assembly (normally, this is of little interest to the user).
NODE-NUMBER-TRIPLET
Add one or all node number triplets — the full and unique references to nodes (see Section 3.2.5 about triplets).
SESAM
Presel
Program version 7.3
01-OCT-2004
5-45
supno index
Select one of the possibly several triplets by giving superelement number and index.
ONE-NODE-NUMBER-TRIPLET
Only one of the possibly several triplets is shown. The program
automatically selects which of the triplets to show.
ALL-NODE-NUMBER-TRIPLETS
All triplets are shown reflecting the fact that the nodes have one
triplet for each first level superelement connected.
NODE-SYMBOLS
Add node symbols.
ALL-NODES
All node symbols are shown.
SUPER-NODES-ONLY
Only supernode symbols are shown.
NON-COUPLED-NODES
Add the number 1 to the display for all nodes to which only a
single first level superelement is coupled. There will be no label
for nodes where two or more first level superelements are coupled. This alternative is the complement to COUPLEDNODES.
ORIGIN-SYMBOL
Add a symbol showing where the origin is located.
5.9
Figure 5.9 Symbols produced by the LABEL command
Presel
SESAM
5-46
01-OCT-2004
Program version 7.3
LINEAR-DEPENDENCY
GENERAL-NODE-DEPENDENCY
LINEAR-DEPENDENCY
TWO-NODE-DEPENDENCY
...
END
PURPOSE:
The command defines the displacements of selected nodes to be linearly dependent of displacements of
other selected nodes. See also Section 3.6.
The GENERAL-NODE-DEPENDENCY option couples any d.o.f. of a node (the dependent d.o.f.) to any
other d.o.f.s of any other nodes (the independent d.o.f.s). The TWO-NODE-DEPENDENCY option couples
all d.o.f.s of a given node to the corresponding d.o.f.s of two other nodes.
Linear dependencies involves that the dependent d.o.f.s get the boundary condition LINEAR and the independent d.o.f.s get the boundary condition SUPERL (super due to linear dependency). (A SUPERL d.o.f.
will appear in the next level superelement in the same way as a SUPER d.o.f.) There are certain rules as concerns the boundary condition of a d.o.f. before and after the definition of a linear dependency and whether
the linear dependency can at all be defined. Table 5.1 describes these rules for the dependent d.o.f. and Table
5.2 for the independent d.o.f. A violation of the rules involves that the linear dependency is not accepted.
Table 5.1 Rules for boundary condition of a dependent d.o.f.
Boundary cond. before
Boundary cond. after
Comment
FREE
LINEAR
OK
FIXED
LINEAR
Warning: the boundary condition is changed
PRESC.
-
Illegal, a prescribed cannot be made dependent
LINEAR
LINEAR
OK (implies adding dependency of new d.o.f.s)
SUPER
LINEAR
Warning: the boundary condition is changed
SUPERL
-
Illegal, linear dependency cannot propagate
Table 5.2 Rules for boundary condition of an independent d.o.f.
Boundary cond. before
Boundary cond. after
Comment
FREE
SUPERL
OK if FORCE-INTO-SUPER is used
FIXED
SUPERL
OK if FORCE-INTO-SUPER is used
PRESC.
-
Illegal, cannot be changed to super
LINEAR
-
Illegal, d.o.f. is not independent
SESAM
Presel
Program version 7.3
01-OCT-2004
Table 5.2 Rules for boundary condition of an independent d.o.f.
SUPER
SUPERL
OK
SUPERL
SUPERL
OK
5-47
Presel
SESAM
5-48
01-OCT-2004
Program version 7.3
LINEAR-DEPENDENCY GENERAL-NODE-DEPENDENCY
...
GENERAL-NODE-DEPENDENCY
dep-node-triplet
...
{ dep-dof
{ indep-dof
{
indep-node-triplet
...
beta
}* }* }*
PURPOSE:
The command defines general linear dependency between nodes. See also Section 3.6.
The dependency is defined by selecting a single d.o.f. of a node to be dependent of any other d.o.f.s of any
other nodes. You may keep defining several d.o.f.s of a given node to be dependent. And for each of these
dependent d.o.f. you may keep selecting independent (governing) nodes. And, finally, for each of these
independent nodes you may keep selecting d.o.f.s to govern, with a factor, the displacement of the dependent d.o.f.
Note: Alternatively to defining the independent d.o.f. as super prior to this command it may be made
super within this command by the FORCE-...-INTO-SUPER option. Using this option for a
d.o.f. that is already super has no consequence.
PARAMETERS:
dep-node-triplet
Node number triplet (supno index nodeno) of the dependent node.
dep-dof
D.o.f. to be dependent, legal specifications are:
X, Y and Z: Translations in X-, Y- and Z-directions
R-X, R-Y and R-Z: Rotations about the X-, Y- and Z-directions
indep-node-triplet
Node number triplet (supno index nodeno) of an independent node.
indep-dof
The independent d.o.f., legal specifications are:
X, Y and Z: Translations in X-, Y- and Z-directions
R-X, R-Y and R-Z: Rotations about the X-, Y- and Z-directions
FORCE-X-INTO-SUPER and similar for Y and Z
FORCE-R-X-INTO-SUPER and similar for R-Y and R-Z
If the independent d.o.f. has not previously been defined as SUPERL (or SUPER)
then use the appropriate of the FORCE-...-INTO-SUPER alternatives to force it
into being SUPERL.
beta
Linear dependency factor.
SESAM
Presel
Program version 7.3
01-OCT-2004
5-49
LINEAR-DEPENDENCY TWO-NODE-DEPENDENCY
...
...
...
TWO-NODE-DEPENDENCY
{
dep-node-triplet
indep-node1-triplet
FORCE-INTO-SUPER
indep-node1-triplet
indep-node2-triplet
FORCE-INTO-SUPER
indep-node2-triplet
...
...
beta
}*
PURPOSE:
The command defines linear dependency for a node on two other nodes. All d.o.f.s of the dependent node
are dependent of the corresponding d.o.f.s of the first independent node by the factor beta and the second
independent node by the factor (1 - beta). See also Section 3.6.
Note that alternatively to defining the independent node as super prior to this command it may be made
super within this command by the FORCE-INTO-SUPER option. Using this option for a node already being
super has no consequence.
PARAMETERS:
dep-node-triplet
Node number triplet (supno index nodeno) of the dependent node.
indep-node1-triplet
Node number triplet (supno index nodeno) of the first independent node.
FORCE-INTO-SUPER Using this option implies that the d.o.f.s of the independent nodes are forced into
SUPERL if they are not SUPER or SUPERL already.
indep-node2-triplet
Node number triplet (supno index nodeno) of the second independent node.
beta
Linear dependency factor.
Presel
SESAM
5-50
01-OCT-2004
Program version 7.3
LOAD
ASSEMBLY
LOAD
COMBINATION
...
NODE
PURPOSE:
The command defines loads for the current superelement which must be a second or higher level superelement.
The three alternatives are described in more detail in the following.
PARAMETERS:
ASSEMBLY
This option allows assembling loads directly to the top level. See Section 3.4 for
more information on this.
COMBINATION
This option creates a load for a superelement assembly by combining loads of its
included superelements.
NODE
This option creates nodal loads.
SESAM
Presel
Program version 7.3
01-OCT-2004
5-51
LOAD ASSEMBLY
...
ASSEMBLY
glc-top
INCLUDE-LOAD
refname.refloc
local-load-case
factor
END
PURPOSE:
The command defines loads for the current superelement assembly (normally the top level superelement) by
combining loads of lower level superelements (normally 1st level superelements). The lower level superelements are referred to by names and location strings. Load combinations are automatically created for all
intermediate level superelements. The use of the command is explained in Section 3.4.
The load combinations created for the current superelement assembly and all intermediate level superelements may be verified by the PRINT LOAD command.
PARAMETERS:
glc-top
Global load case number of the superelement assembly.
INCLUDE-LOAD
Include in the global load case the following lower level superelement loads.
refname.refloc
Refers to superelement occurrences. refname is the name of the lower level superelement. refloc is the location string of the superelement occurrence. refname
and refloc are given as indicated: separated by a punctuation mark only. The asterisk (*) may be used as wild-card.
In the following examples the characters A, B, X and Y should be interpreted as
any number of characters (names and location strings are both limited to 8 characters):
*.* are all lower level superelements and all location strings of these. I.e. absolutely
all superelement occurrences at any level for which names and location strings
have been defined.
*A.*X are all lower level superelements with names ending with A and all location
strings of these ending with X.
A*.X* are all lower level superelements with names beginning with A and all location strings of these beginning with X.
A*B*.*X*Y are all lower level superelements with names beginning with A and
containing B and all location strings of these containing X and ending with Y.
llc
(Local) load case number of the lower level superelements being referred to.
factor
Factor to apply to the (local) load case.
Presel
SESAM
5-52
01-OCT-2004
Program version 7.3
LOAD COMBINATION
...
COMBINATION
...
{ supno
glc
index
{ llc
factor
}*
lowllc
[incr]
END
}*
END
...
GROUP
lowglc
higlc
step
{ supno
index
[STEP]
factor
}*
END
END
PURPOSE:
The command defines loads for the current superelement by combining loads of the included superelements.
The current superelement must be a second or higher level superelement. The loads may be combined oneby-one (explicitly) or a group of loads may be combined. See Section 3.3 for an explanation of the principles of combining loads.
Several superelement occurrences (superelement number and index) and several (local) load cases belonging to the superelement occurrences may contribute to a single (global) load case of the current superelement.
The (local) load cases (llc) of included first level superelements need not exist prior to giving this command,
warnings are then given saying that the input is accepted even though the local load cases are unknown.
Prior to running the analysis, however, the local load cases must have been created. Read the note in Section
3.3.4 on this.
The load combinations may be verified by the PRINT LOAD command.
PARAMETERS:
glc
A single (global) load case number to be defined for the current superelement.
supno index
Superelement number and index of an included superelement.
llc
(Local) load case number of the included superelement contributing to glc.
factor
Factor to apply to the (local) load case.
GROUP
A group of (global) load cases is to be defined.
lowglc higlc step
The lowest and highest (global) load case numbers and the step (increment) in
numbering. An example: 1 5 2 will define loads 1, 3 and 5.
STEP
A step (increment) in numbering of the (local) load cases of the included superelements is to be given; see incr below. If this command is omitted then incr is omitted
as well.
SESAM
Program version 7.3
Presel
01-OCT-2004
5-53
lowllc
The lowest (local) load case number of the included superelement contributing to
glc.
incr
The step (increment) in (local) load case numbering.
Presel
SESAM
5-54
01-OCT-2004
Program version 7.3
LOAD NODE
FORCE
...
NODE
lc
PRESCRIBED-ACCELLERATION
...
PRESCRIBED-DISPLACEMENT
SELECT
...
select-nodes
TAGGED
...
UNTAGGED
END
...
...
GLOBAL
fx
fy
fz
mx
my
mz
IMAGINARY-COMPLEX
ifx
ify
ifz
imx
imy
imz
PHASE-COMPLEX
pfx
pfy
pfz
pmx
pmy
pmz
TRANSFORMTAION
trano
...
END
PURPOSE:
The command defines nodal loads for the current superelement. The current superelement must be a second
or higher level superelement.
The nodal loads are of the following types:
• Forces and moments, the FORCE alternative
• Prescribed displacements
• Prescribed acceleration (relevant for dynamic analysis only)
Prior to giving prescribed displacements and accelerations the corresponding nodes must previously have
been given the PRESCRIBED boundary condition; see the BOUNDARY command. Alternatively to all six
only selected d.o.f.s may be given prescribed displacements/accelerations. The PRESCRIBED boundary
condition must then have been defined only for the relevant d.o.f.s. Note that even if only selected d.o.f.s
have prescribed boundary condition values must be entered in the LOAD NODE command for all six
d.o.f.s. The values given for the non-prescribed d.o.f.s are discarded.
The nodal loads may be verified by the PRINT LOAD command.
PARAMETERS:
lc
A single load case number to be defined for the current superelement.
SESAM
Program version 7.3
Presel
01-OCT-2004
5-55
FORCE
The load is a force and/or moment.
PRESCRIBED-ACCELERATION
The load is a prescribed acceleration.
PRESCRIBED-DISPLACEMENT
The load is a prescribed displacement.
SELECT
Nodes are to be selected now.
select-nodes
Select nodes; see Section 5.1.
TAGGED
Refers to previously selected (tagged) nodes; see the TAG/UNTAG commands.
UNTAGGED
Refers to all but the previously selected (tagged) nodes; see the
TAG/UNTAG commands.
GLOBAL
The load is specified in the coordinate system of the superelement.
TRANSFORMATION
The load is specified in a rotated coordinate system.
trano
Transformation reference number previously defined by the
TRANSFORMATION command.
fx fy fz mx my mz
Real components of the forces/moments or prescribed displacements/accelerations.
IMAGINARY-COMPLEX
The load is complex and the imaginary components are to be
given.
ifx ify ifz imx imy imz
Imaginary components of the forces/moments or prescribed
displacements/accelerations. Prescribed rotations are given in
radians.
PHASE-COMPLEX
The load is complex and the phase angle components are to be
given.
pfx pfy pfz pmx pmy pmz
Phase angle components in degrees of the forces/moments or
prescribed displacements/accelerations.
END
Give END rather IMAGINARY-COMPLEX or PHASE-COMPLEX to conclude the command and make the load non-complex.
Presel
SESAM
5-56
01-OCT-2004
Program version 7.3
NAME
NAME CREATE
name
PURPOSE:
The command creates a name for a superelement. It is used in connection with the LOAD ASSEMBLY
command. See Section 3.4 for an explanation of assembling loads.
PARAMETERS:
name
Name given to the current first or higher level superelement. It is a string of maximum 8 characters.
SESAM
Presel
Program version 7.3
01-OCT-2004
5-57
OPTIMIZE
BANDWIDTH
OPTIMIZE
supno
OPTIONS
PROFILE
PURPOSE:
The command optimises (rearranges) the internal node numbering of a higher level superelement. The
objective of this is to reduce the bandwidth or profile of the stiffness matrix of the superelement thereby
reducing the time required to solve the equation system of the superelement (this is done in the analysis program, e.g. Sestra).
Note: The node numbers seen by the user, the node number triplets, are not affected by this operation.
The superelement cannot be a first level superelement. First level superelements must be optimised prior to
being read into Presel. See Prefem or Preframe on this.
If a superelement is to be optimised it must be done prior to being included in a higher level superelement
assembly.
See Section 3.10 for more information.
PARAMETERS:
supno
Superelement number.
BANDWIDTH
The internal node numbering is optimised to reduce the bandwidth of the stiffness
matrix. This is the preferred option for Sestra.
OPTIONS
This alternative is currently irrelevant.
PROFILE
The internal node numbering is optimised to reduce the profile of the stiffness matrix. This alternative is currently irrelevant.
Presel
SESAM
5-58
01-OCT-2004
Program version 7.3
PLOT
PLOT
AS-LAST-DISPLAY
choices
text
*4 page-size
Where ‘choices’ in the command syntax above represents all of the following:
ALL-NODES
Mesh on plot? Origin symbol? Boundary conditions?
...
SUPER-NODES-ONLY
YES or NO
YES or NO
YES or NO
NONE
...
COUPLED-NODES
NON-COUPLED-NODES
EXTERNAL-NODE-NUMBER
...
supno
index
supno
index
INTERNAL-NODE-NUMBER
NODE-NUMBER-TRIPLET
...
ONE-NODE-NUMBER-TRIPLET
ALL-NODE-NUMBER-TRIPLETS
NONE
PURPOSE:
The command reproduces the display on a plot file (or sends it directly to the printer in case of WINDOWSPRINTER format of the plot file).
Unless the AS-LAST-DISPLAY option is chosen the command poses the following questions:
• Include the mesh on the plot? Answer YES or No.
• Include a symbol for the origin of the superelement coordinate system? Answer YES or NO.
• Include the boundary conditions on the plot? Answer YES or NO.
• Include node symbols on the plot? Answer ALL-NODES, SUPER-NODES-ONLY or NONE.
• Include node numbers on the plot? Choose between COUPLED-NODES, NON-COUPLED-NODES,
EXTERNAL-NODE-NUMBER, INTERNAL-NODE-NUMBER, NODE-NUMBER-TRIPLET and
NONE. See explanations below.
Whether the AS-LAST-DISPLAY option is chosen or not the PLOT command is concluded by:
• Enter four lines of text. Each text line is limited to 24 characters and must be enclosed in apostrophes if
containing blanks. For example: 'THIS IS A TEXT'. These lines are reproduced on the plot.
SESAM
Program version 7.3
Presel
01-OCT-2004
5-59
• Finally the page size is given. This is only relevant for the SESAM-NEUTRAL plot format; see the SET
PLOT command. For other plot formats give any parameter, e.g. the default A4.
The date and time is also reproduced on the plot together with scale, superelement number and the superelement level. The scale is based on the assumption that metres are used as unit for the coordinates.
PARAMETERS:
AS-LAST-DISPLAY
The screen display with current labelling and other display information is plotted.
text
The screen display with current labelling and other display information is plotted.
page-size
The page size. Choose between A1, A2, A3, A4 and A5. A4 is
the default choice.
ALL-NODES
All node symbols are shown.
SUPER-NODES-ONLY
Only supernode symbols are shown.
COUPLED-NODES
Add numbers to the plot telling how many first level superelements there are coupled to each node. The numbers are only
given for nodes where to or more first level superelements are
coupled, i.e. the number will always be ≥2. Also see the NONCOUPLED-NODES alternative.
NON-COUPLED-NODES
Add the number 1 to the plot for all nodes to which only a single
first level superelement is coupled. There will be no label for
nodes where two or more first level superelements are coupled.
This alternative is the complement to COUPLED-NODES.
EXTERNAL-NODE-NUMBER
Add only the node number of a given first level superelement.
supno index
Superelement number and index of a first level superelement.
INTERNAL-NODE-NUMBER
Add only the internal number of the current superelement assembly (normally, this is of little interest to the user).
NODE-NUMBER-TRIPLET
Add one or all node number triplets — the full and unique references to nodes (see Section 3.2.5 about triplets).
ONE-NODE-NUMBER-TRIPLET
Only one of possibly several triplets is shown. The program automatically selects which of the triplets to show.
ALL-NODE-NUMBER-TRIPLETS
All triplets are shown reflecting the fact that the nodes have one
triplet for each first level superelement connected.
Presel
SESAM
5-60
01-OCT-2004
Program version 7.3
PRINT
supno
ALL
CPU-TIME-ESTIMATES-IN-REDUCTION
supno
ALL
ELEMENT
PRINT
LOAD
...
NODE
...
OVERVIEW-OF-SUPER-ELEMENTS
STATUS
SUPER-ELEMENT-HIERARCHY
supno
index
trano
TRANSFORMATION
ALL
END
END
PURPOSE:
The command prints data in tables on screen and to file. The destination depends on what to print: e.g.
PRINT ALL goes to file whereas PRINT STATUS goes to the screen. The SET PRINT DESTINATION
command overrules these default destinations. Long prints are broken into several sub-tables, each limited
to a certain number of lines. When printing to screen in interactive mode enter CONTINUE to print the next
sub-table (or END to stop). The SET PRINT PAGESIZE command changes the number of lines contained
in each sub-table.
PARAMETERS:
supno
Print to file all data for the superelement supno.
ALL
Print to file all data for all superelements.
CPU-TIME-ESTIMATES-IN-REDUCTION
Print on screen CPU time estimates for the reduction. Select a single or all superelements. See example print in Section 3.8.
ELEMENT
Print on screen information on superelements included in the current superelement. See example
print in Section 3.8.
LOAD
Print on screen information on loads. The command is described in detail in the following.
SESAM
Program version 7.3
Presel
01-OCT-2004
5-61
NODE
Print on screen information on nodes. The command is described in detail in the following.
OVERVIEW-OF-SUPER-ELEMENTS
Print on screen an overview of all superelements.
See example print in Section 3.8.
STATUS
Print on screen model and log file names and current tolerances.
SUPER-ELEMENT-HIERARCHY
Print on screen the superelement hierarchy up to
the given superelement (supno index). See example in Section 3.8.
TRANSFORMATION
Print on screen information transformations defined for the current superelement. Select one or
all transformations. Give END to stop printing
transformations.
Presel
SESAM
5-62
01-OCT-2004
Program version 7.3
PRINT LOAD
ALL-TYPES-NODES-COMBINATIONS
COMBINATIONS
lc
NODE-FORCE
NODE-PRESCRIBED
...
LOAD
...
END
ALL-LOADCASES
lc
OVERVIEW
ALL-LOADCASES
END
SELECT
...
select-nodes
TAGGED
UNTAGGED
END
PURPOSE:
The command prints loads defined for the current superelement.
PARAMETERS:
lc
Load case number.
ALL-TYPES-NODES-COMBINATIONS
Print all types of loads for the selected load case number.
COMBINATIONS
Print only the load combinations belonging to the selected load
case number.
NODE-FORCE
Print only the nodal forces, for selected nodes, belonging to the
selected load case number.
NODE-PRESCRIBED
Print only the nodal prescribed displacements and accelerations, for selected nodes, belonging to the selected load case
number.
SELECT
Nodes are to be selected now.
select-nodes
Select nodes; see Section 5.1.
TAGGED
Refers to previously selected (tagged) nodes; see the TAG/UNTAG commands.
SESAM
Program version 7.3
Presel
01-OCT-2004
5-63
UNTAGGED
Refers to all but the previously selected (tagged) nodes; see the
TAG/UNTAG commands.
ALL-LOADCASES
Print all information for all load cases.
OVERVIEW
Print an overview for a selected load case or for all load cases.
Presel
SESAM
5-64
01-OCT-2004
Program version 7.3
PRINT NODE
BOUNDARY-CONDITIONS
...
NODE
COORDINATES
SELECT
...
LINEAR-DEPENDENCY
NUMBER
select-nodes
TAGGED
UNTAGGED
END
PURPOSE:
The command prints nodal data for the current superelement.
Note that you may change the print format for real numbers (FORTRAN E, F or G formats) by the SET
PRINT FORMAT command. E-format is the default choice.
PARAMETERS:
BOUNDARY-CONDITIONS
Print boundary conditions for selected nodes. It is possible to
switch between text and digits for boundary condition codes by
the SET PRINT TABLE NODE-BOUNDARY-TABLE command. The boundary condition codes used in the print table are
described in Table 5.3.
Table 5.3 Boundary condition codes of individual d.o.f. in print table
Digit
Text
Boundary condition of d.o.f.
-1
X
d.o.f. does not exist (node has reduced number of d.o.f.s.)
0
(blank)
free
1
FIXED
fixed at zero displacement
2
PRESC.
prescribed displacement
3
LINEAR
linearly dependent of some other d.o.f.(s)
4
SUPER
super d.o.f.
100
SUPERL
super d.o.f. due to linear dependency
COORDINATES
Print coordinates for selected nodes. See example print in Section 3.8.
LINEAR-DEPENDENCY
Print linear dependencies for selected nodes.
NUMBER
Print the node numbers of selected nodes. The table shows the
node number triplets along with the internal node numbers.
SELECT
Nodes are to be selected now.
SESAM
Program version 7.3
Presel
01-OCT-2004
5-65
select-nodes
Select nodes; see Section 5.1.
TAGGED
Refers to previously selected (tagged) nodes; see the TAG/UNTAG commands.
UNTAGGED
Refers to all but the previously selected (tagged) nodes; see the
TAG/UNTAG commands.
Presel
SESAM
5-66
01-OCT-2004
Program version 7.3
READ
READ
supno
SHOW-PROGRESS
supno
PURPOSE:
The command reads a first level superelement into Presel’s database. That is, the Input Interface File of the
superelement is read. The Input Interface File must have the following name, also see Section 2.3:
prefixTsupno.FEM
Note: When using the SESAM Manager to control your analysis the prefix will normally be void.
Note: The prefix is given when starting Presel. This means that if the Input Interface File has a prefix then this prefix must be given at start-up. Also note that the Input Interface File names of
all first level superelements must have the same prefix.
PARAMETERS:
supno
Number (identification) of a first level superelement.
SHOW-PROGRESS
This option causes feedback to be given on how many cards (records) are read. The
feedback looks like this:
400 CARDS READ
800 CARDS READ
etc.
By default no such feedback is given. (In previous versions of Presel such feedback
was by default given.)
SESAM
Presel
Program version 7.3
01-OCT-2004
5-67
ROTATE
X-AXIS
ROTATE
Y-AXIS
degrees
Z-AXIS
PURPOSE:
The command rotates the display about the coordinate axes of the current superelement.
The SET GRAPHICS EYE-DIRECTION and the interactive rotations provide alternative ways of rotating
the display. See the ‘direct access buttons’ described in Section 3.1 about interactive rotation.
PARAMETERS:
X-AXIS
Rotate about the X-axis.
Y-AXIS
Rotate about the Y-axis.
Z-AXIS
Rotate about the Z-axis.
degrees
Angle in degrees.
Presel
5-68
SESAM
01-OCT-2004
Program version 7.3
SET
SET
ANGLE-TOLERANCE
angtol
COMMAND-INPUT-FILE
comfilnam
COORDINATE-TOLERANCE
cotol
GRAPHICS
...
JOURNALLING
GRAPHICS
PRINT
MODEL-FILE
prefix
PLOT
...
PRINT
...
UNIT-VECTOR-TOLERANCE
uvtol
...
filnam
ON
OFF
NEW
OLD
PURPOSE:
The command sets different parameters for controlling the execution of other commands.
PARAMETERS:
ANGLE-TOLERANCE
Specify the angle tolerance used for determining whether an
angle is 90 degrees or not.
angtol
The angle tolerance in degrees, the default value is 0.001.
COMMAND-INPUT-FILE
Specify a command input file. The file is opened and is ready
for reading using the # command. The command input file cannot have the same name as the Presel command log file.
Note that specifying and reading a command input file is normally more conveniently done through Manager.
comfilnam
Name of the command input file. The file extension must be
JNL and shall not be given.
COORDINATE-TOLERANCE
Specify the coordinate tolerance used for deciding whether two
points (nodes) have the same geometrical position and for deciding whether a node lies in a plane or on a line.
cotol
The coordinate tolerance given in the same unit as the coordinates. The default value is 0.1.
GRAPHICS
Set various parameters controlling the display and plot. The
command is described in detail in the following.
SESAM
Program version 7.3
Presel
01-OCT-2004
5-69
JOURNALLING
Switch on or off journalling of the selected set of commands,
i.e. either GRAPHICS or PRINT commands. Journalling is off
when the program is started, even if journalling was switched
on in a previous session with the same model file.
MODEL-FILE
Close the current model file and open another without exiting
and re-entering the program.
When accessing Presel through Manager you should not use
this command.
prefix
The prefix of the new model file.
filnam
The file name of the new model file.
NEW OLD
NEW means that the model file will be created (starting a new
session from scratch), OLD means that it exists already (continuing an earlier session).
PLOT
Set various parameters controlling the plot. The command is
described in detail in the following.
PRINT
Set various parameters controlling the print. The command is
described in detail in the following.
UNIT-VECTOR-TOLERANCE
Specify a unit vector tolerance used for deciding whether two
vectors span a plane and whether a matrix is orthonormal.
uvtol
The unit vector tolerance (without unit) has default value 0.001.
Presel
SESAM
5-70
01-OCT-2004
Program version 7.3
SET GRAPHICS
ALTERNATIVE-SCREEN-DEVICE
AUTO
BASIC-ELEMENT-MODE
CHARACTER-TYPE
SOFTWARE
HARDWARE
BOUNDARY-CONDITION
ELEMENT-LINES
COLOUR
INCLUDED-SUPERELEM
NODE-NUMBER
colour
tone
NODE-SYMBOL
SUPER-NODES
DEVICE
device-name
EYE-DIRECTION
eyex
HIDDEN
...
GRAPHICS
INPUT
NODE-SELECTION
PLOT-FILE
eyey
ON
OFF
ON
OFF
ON
OFF
prefix
filnam
COLOUR-SUPERELEMENTS
PRESENTATION
FILLED-ELEMENT
SCALING-AUTOMATIC
SHRINK-FACTOR
eyez
ON
OFF
ON
OFF
ON
OFF
shrinkfac
BOUNDARY-CONDITION-SYMBOLS
LOAD-NUMBERS
SIZE-SYMBOLS
NODE-NUMBERS
NODE-SYMBOLS
ONE-NODED-ELEMENT-SYMBOLS
ORIGIN-SYMBOL
size
SESAM
Program version 7.3
Presel
01-OCT-2004
5-71
PURPOSE:
The command sets different parameters for controlling the DISPLAY, PLOT and LABEL commands.
PARAMETERS:
ALTERNATIVE-SCREEN-DEVICE
This option is presently not in use.
AUTO
This option has presently no function in Presel.
BASIC-ELEMENT-MODE
This option is presently not in use.
CHARACTER-TYPE
Choose how characters are displayed. Device generated
(HARDWARE) characters are faster but there may be restrictions on the character size and orientation.
SOFTWARE
Drawn characters are used, this is the default choice.
HARDWARE
Device generated characters are used.
COLOUR
Change the colour used for displaying a certain item.
BOUNDARY-CONDITION
Change the colour of boundary conditions, default is medium
blue.
ELEMENT-LINES
Change the colour of element lines, default is medium red.
INCLUDED-SUPERELEM
Change the colour of superelement being included, default is
medium yellow.
NODE-NUMBER
Change the colour of node numbers, default is medium green.
NODE-SYMBOL
Change the colour of node symbols, default is medium yellow.
SUPER-NODES
Change the colour of supernodes, default is medium blue.
colour
Choose between the following colours: WHITE, GRAY,
BLACK, BLUE, GREEN, ORANGE, RED, VIOLET and
YELLOW.
tone
Choose between LIGHT, MEDIUM and DARK.
DEVICE
Choose the appropriate type of graphics device.
device-name
Type of graphics device. WINDOWS is the default choice in a
Microsoft Windows environment. The command is currently of
minor importance.
EYE-DIRECTION
Set the viewpoint for the display. Note that the default viewpoint is set through command line arguments, see Section 4.1.5,
and these may in turn be set by Manager. You can also use the
ROTATE command or the interactive rotations using the ‘direct
access buttons’ described in Section 3.1.
Presel
5-72
SESAM
01-OCT-2004
Program version 7.3
eyex eyey eyez
X-, Y- and Z-coordinates of the viewpoint (the eye).
HIDDEN
Switch hidden display mode ON and OFF. The default is OFF.
INPUT
Switch between graphical user interface (ON) and line-mode
(OFF).
This command is currently irrelevant as the graphical user interface is the only option for interactive execution of the program.
NODE-SELECTION
Switch ON and OFF the possibility to select nodes graphically.
The nodes will be displayed as small dots (yellow dots for free
nodes and blue dots for supernodes). The default is ON.
PLOT-FILE
Set the name of the plot file. By default it is the same as the
model and command log files. The extension of the plot file depends on the plot format; see the SET PLOT FORMAT command. This command has the same functionality as the SET
PLOT FILE command. You may want to use the latter as it is
more consistent with the other SET PLOT commands. Note
that the command closes the current plot file (if such exists) enabling this to be sent to a laser printer without having to exit
Presel.
prefix
Prefix of the plot file.
filnam
Name of the plot file.
PRESENTATION
Set the draw mode for elements and superelements.
COLOUR-SUPERELEMENTS
Switch colouring of superelements ON and OFF. Note that different occurrences of the same superelement number will have
the same colour. The default is OFF.
FILLED-ELEMENT
Switch filling of elements (with a light blue colour) ON and
OFF. The default is OFF.
SCALING-AUTOMATIC
Switch ON and OFF automatic scaling of the displayed superelement to fit the graphic display area. The default is ON.
SHRINK-FACTOR
Shrink the display of the basic elements.
shrinkfac
Shrink factor
SIZE-SYMBOLS
Specify the sizes of the symbols appearing on the displayed
picture and the plot. The symbol sizes are given in mm.
BOUNDARY-CONDITION-SYMBOLS
Symbols for boundary conditions will be re-sized to the given
value.
LOAD-NUMBERS
Load factors printed on top of the colour coded superelements
by the DISPLAY LOAD FIRST-CONTRIBUTING-LOAD/
SESAM
Program version 7.3
Presel
01-OCT-2004
5-73
NEXT-CONTRIBUTING-LOAD commands will be re-sized
to the given value.
NODE-NUMBERS
Node number triplets will be re-sized to the given value.
NODE-SYMBOLS
Symbols for the nodes will be re-sized to the given value.
ONE-NODED-ELEMENT-SYMBOLS
Symbols for one node elements will be re-sized to the given
value. These are the elements connected to only one node, i.e.
SPRING-TO-GROUND and DAMPER-TO-GROUND.
ORIGIN-SYMBOLS
The symbol for the origin will be re-sized to the given value.
size
Symbol size in mm.
Presel
SESAM
5-74
01-OCT-2004
Program version 7.3
SET PLOT
ON
COLOUR
OFF
FILE
prefix
filnam
number
CGM-BINARY
HPGL-2
HPGL-7550
FORMAT
...
POSTSCRIPT
PLOT
SESAM-NEUTRAL
WINDOWS-PRINTER
ORIENTATION
PORTRAIT
A1
A2
PAGE-SIZE
A3
A4
A5
PURPOSE:
The command sets parameters for plotting. The settings must be done prior to giving the PLOT command.
PARAMETERS:
COLOUR
Switch ON or OFF colours. The default is OFF. Colours are supported by the formats PostScript, HPGL-2 and CGM. Give this command after the SET PLOT
FILE/FORMAT commands and prior to the PLOT command.
FILE
Set the name of the plot file. By default it is the same as the model and command
log files. The extension of the plot file depends on the plot format; see the SET
PLOT FORMAT command. Note that the command closes the current plot file (if
such exists) enabling this to be sent to a laser printer without having to exit Presel.
prefix
Prefix of the plot file.
filnam
Name of the plot file.
FORMAT
Set the plot format.
SESAM
Program version 7.3
Presel
01-OCT-2004
5-75
number
The plotter number may alternatively be given. However, you will normally not
know this.
CGM-BINARY
The ISO 8632-3 Computer Graphics Metafile (CGM) plot format (binary encoding). File extension is .CGM. This format is convenient for including plots in reports; see more information on this in Section 4.1.4.
HPGL-2
A Hewlett Packard plot format. File extension is .HPG2.
HPGL-7550
A Hewlett Packard plot format. File extension is .HP70.
POSTSCRIPT
The PostScript plot format. File extension is .PS.
SESAM-NEUTRAL
A plot format of the SESAM system. This is the default format on most computers.
File extension is .PLO. The SESAM auxiliary program Pltcnv is required to reproduce the plot on paper.
WINDOWS-PRINTER A plot file will not be created rather the plot will be sent directly to an on-line printer.
ORIENTATION
Set the page orientation. This command is presently redundant as portrait is the
only choice.
PORTRAIT
Portrait orientation.
PAGE-SIZE
Set the plot page size. All sizes are not available for all plot formats. For SESAMNEUTRAL this setting is irrelevant as the page size is set within the PLOT command. Give this command after the SET PLOT FILE/FORMAT commands and
prior to the PLOT command.
A1 A2 A3 A4 A5
European standard page sizes (paper formats). See explanation for the PLOT command. A4 is the default choice.
NOTES:
For PostScript and HPGL-2 the size specification in the PLOT command is dummy. It will not change the
plot size. The specification has not been removed to ensure compatibility with old input files.
For SESAM-NEUTRAL format the SET PLOT PAGE-SIZE has no effect as the size specification within
the PLOT command is used.
Presel
SESAM
5-76
01-OCT-2004
Program version 7.3
SET PRINT
DESTINATION
FILE
FILE
SCREEN
LINEPRINTER
NAME
filnam
E
...
PRINT
FORMAT
F
G
PAGESIZE
TABLE
FILE
SCREEN
NODE-BOUNDARY-TABLE
SUPER-ELEMENT-HIERARCHY
nlines
DIGITS
TEXT
width
PURPOSE:
The command sets different parameters controlling the execution of the PRINT command.
PARAMETERS:
DESTINATION
Destination of print is set to FILE or SCREEN. This setting
overrules the default destination which varies depending on
what to print. However, the commands PRINT ALL and
PRINT supno will always send their output to file (because of
the anticipated large amount of output).
FILE
Decide the name of the print file. The default name is the same
as the model (and command log) file name. The file extension
is .LIS.
LINEPRINTER
This option has presently no function.
NAME filnam
Set the print file name to filnam.
FORMAT
Select between E, F and G FORTRAN format for printing real
numbers. F is the default selection. Very large real numbers
cannot be printed in F format; the user may in such cases select
E or G.
PAGESIZE
Decide number of lines printed for each ‘page’. The table heading is repeated for each page.
SESAM
Program version 7.3
Presel
01-OCT-2004
5-77
FILE
Decide number of lines printed for each ‘page’ on file.
SCREEN
Decide number of lines printed for each ‘page’ on screen. After
each page give CONTINUE to print the next page and END to
quit printing. Note that the default command at this stage is
CONTINUE. Therefore, giving the command ‘;’ (semicolon)
— which accepts all subsequent defaults — will print all pages.
nlines
Number of lines printed for each ‘page’.
TABLE
Control appearance of selected tables.
NODE-BOUNDARY-TABLE
Switch between TEXT (which is default) and DIGITS representation of the boundary condition codes. See the PRINT
NODE BOUNDARY command.
SUPER-ELEMENT-HIERARCHY
Set the number of character positions used for each level in the
table showing the superelement hierarchy which is printed by
the PRINT SUPER-ELEMENT-HIERARCHY command. See
the example print in Figure 3.3.
width
Number of character positions. The default value is 16. For a
superelement hierarchy with many levels (e.g. 6 or more) a
smaller value may allow the table to be produced correctly. A
value less than 8 will normally not be meaningful.
Presel
5-78
SESAM
01-OCT-2004
Program version 7.3
TAG
TAG
select-nodes
PURPOSE:
The command tags (in effect: puts into a set) some or all nodes for the purpose of referring to these nodes
(the TAGGED), or to all other nodes (the UNTAGGED), in subsequent commands (e.g. for defining boundary conditions). Initially, no nodes are tagged.
Tagged nodes are untagged by the UNTAG command.
PARAMETERS:
select-nodes
Select nodes; see Section 5.1.
SESAM
Program version 7.3
Presel
01-OCT-2004
5-79
TASK
TASK
ASSEMBLY
SUB-MODELLING
PURPOSE:
The command switches between the modes ASSEMBLY which is the normal way of using Presel as
explained in this manual and SUB-MODELLING which is for sub-modelling as explained in the Submod
User Manual.
As it is normally more convenient to access Submod directly rather than through Presel the TASK command
has little relevance.
Presel
SESAM
5-80
01-OCT-2004
Program version 7.3
TRANSFORMATION
TRANSFORMATION
trano
spx
spy
spz
gpx
gpy
gpz
PURPOSE:
The command defines a rotated coordinate system. A transformation matrix is established that transforms
coordinates from a rotated coordinate system to the global coordinate system. The purpose of the command
is:
• For specifying a fixation or a prescribed displacement in a rotated (transformed) coordinate system. See
the BOUNDARY command.
• For specifying nodal loads in a rotated (transformed) coordinate system. See the LOAD NODE command.
The transformation matrix is defined by giving the global coordinates of a second point (SP) and a guiding
point (GP). The x-axis of the transformed coordinate system, XT, goes from the origin to SP. The transformed z-axis, ZT, is perpendicular to XT so that GP lies in the XT-ZT plane on the positive ZT side. YT is
perpendicular to XT and ZT. See Figure 5.10.
PARAMETERS:
trano
Transformation reference number.
spx spy spz
Second point global coordinates.
gpx gpy gpz
Guiding point global coordinates.
5.10
Figure 5.10 Definition of a transformed coordinate system
SESAM
Presel
Program version 7.3
01-OCT-2004
5-81
UNTAG
UNTAG
select-nodes
PURPOSE:
The command untags (in effect: removes from a set) some or all nodes for the purpose of referring to these
nodes (the UNTAGGED), or to all other nodes (the TAGGED), in subsequent commands (e.g. for defining
boundary conditions). Initially, all nodes are untagged.
Nodes are tagged by the TAG command.
PARAMETERS:
select-nodes
Select nodes; see Section 5.1.
Presel
5-82
SESAM
01-OCT-2004
Program version 7.3
WRITE
WRITE supno
PURPOSE:
The command writes Input Interface Files for the given superelement supno and all superelements in the
hierarchy below supno except for the first level superelements (which exist before the execution of Presel).
See Section 2.3 for information on the Input Interface Files.
SESAM
Presel
Program version 7.3
01-OCT-2004
5-83
ZOOM
FRAME
ZOOM
IN
OUT
...
PURPOSE:
The command zooms in or out on the displayed picture.
The zoom buttons of the ‘direct access button area’ have the same effect and are quicker in use; see Section
3.1. However, the ZOOM command differs from the ‘direct access buttons’ in that they are for command
logging and input purposes. Logging is subject to use of the SET JOURNALLING GRAPHICS command.
The FRAME option makes the displayed model fill the graphic area.
For the IN and OUT options use the mouse (left mouse button) to give the zoom area. You may either:
• press and hold while dragging to the opposite corner of a rectangle and then release, or
• click first one corner of a rectangle and then click the diagonally opposite corner.
The actual zoom area is the smallest square containing the rectangle.
ZOOM IN will magnify the part of the picture that is inside the zoom area.
ZOOM OUT will fit the picture into the zoom area.
Presel
SESAM
5-84
01-OCT-2004
Program version 7.3
#
#
ncomnd
ALL
PURPOSE:
The command reads commands from the command input file. The command input file is opened by the
command SET COMMAND-INPUT-FILE. The command input file may be a command log file from a previous run or a file prepared by a text editor.
The program will execute commands from the command input file until:
• an end-of-file is detected,
• a # is found on the file,
• ncomnd number of commands have been read, or
• an erroneous command sequence is found.
PARAMETERS:
ncomnd
Number of commands to be read from the command input file.
ALL
All commands are read from the command input file.
SESAM
Presel
Program version 7.3
APPENDIX A
01-OCT-2004
APPENDIX A-1
TUTORIAL EXAMPLES
In order to perform the tutorial examples of Chapter 3 some superelements created by Prefem are required.
The inputs for these are presented in the following.
A1
The Tutorials in Assembling Superelements and Combining Loads
In the tutorial example of Section 3.2.2 and Section 3.3.2 the two first level superelements 5 and 6 are
assembled into the second (and top) level superelement 7. The Prefem inputs required for creating superelements 5 and 6 are provided below. Having created these two superelements you will be able to perform the
Presel tutorials.
A.1
Figure A.1 The two first level superelements 5 and 6 created by Prefem
A 1.1
Superelement 5
%=============================================================================
%
% Prefem input for creating superelement number 5.
Presel
APPENDIX A-2
SESAM
01-OCT-2004
Program version 7.3
% Semicolons (;) are used to accept default values.
%
%=============================================================================
% --- First create geometry:
GENERATE SURFACE A 1 2 1 4 1 2 1 2 END
CARTESIAN 0 0 0
4 0 0 END 0 3 0 END
% --- Adjust number of elements to be created along lines:
SET NUMBEROF-ELEMENTS ( AI11 AJ21 ) 3
..
% --- Then select 4 node shell element to be used:
SET ELEMENT-TYPE SURFACE ALL-SURFACES-INCLUDED SHELL-4NODES
..
% --- Define supernodes on two lines:
PROPERTY BOUNDARY-CONDITION ( AI12 AJ21 )
SUPERNODE SUPERNODE SUPERNODE SUPERNODE SUPERNODE SUPERNODE
GLOBAL
..
% --- Define thickness:
PROPERTY THICKNESS ALL-SURFACES-INCLUDED .01
..
% --- Define and connect material:
PROPERTY MATERIAL STEEL ELASTIC ;
..
CONNECT MATERIAL STEEL ALL-SURFACES-INCLUDED END
% --- Define line load:
PROPERTY LOAD 8 LINE-LOAD AJ11 GLOBAL 1.5 0 0 ;
;
% --- Create mesh
MESH ALL
% --- The model is now complete. Exit Prefem.
%=============================================================================
A 1.2
Superelement 6
%=============================================================================
%
% Prefem input for creating superelement number 6.
% Semicolons (;) are used to accept default values.
%
%=============================================================================
% --- First create geometry:
GENERATE SURFACE A 1 2 1 4 1 2 1 1 END
CARTESIAN 0 0 0
4 0 0 END 0 1 0 END
% --- Then select 4 node shell element to be used:
SET ELEMENT-TYPE SURFACE ALL-SURFACES-INCLUDED SHELL-4NODES
..
% --- Define supernodes on two lines:
PROPERTY BOUNDARY-CONDITION ( AI11 AJ21 )
SUPERNODE SUPERNODE SUPERNODE SUPERNODE SUPERNODE SUPERNODE
GLOBAL
SESAM
Presel
Program version 7.3
01-OCT-2004
APPENDIX A-3
..
% --- Define thickness:
PROPERTY THICKNESS ALL-SURFACES-INCLUDED .01
..
% --- Define and connect material:
PROPERTY MATERIAL STEEL ELASTIC ;
..
CONNECT MATERIAL STEEL ALL-SURFACES-INCLUDED END
% --- Define line loads:
PROPERTY LOAD 3 LINE-LOAD AJ11 GLOBAL 1.5 0 0 ;
;
PROPERTY LOAD 4 LINE-LOAD AI12 GLOBAL 0 -3.0 0 ;
;
% --- Create mesh
MESH ALL
% --- The model is now complete. Exit Prefem.
%=============================================================================
A2
The Tutorial in Assembling Loads
In the tutorial example of Section 3.4.2 and Section 3.4.3 the five first level superelements 1 through 5 are
assembled to form the top level superelement 100. The Prefem inputs required for creating these first level
superelements are provided below. Having created these superelements you will be able to perform the Presel tutorials.
A.2
Figure A.2 The first level superelements 1, 2, 3, 4 and 5 created by Prefem
Presel
APPENDIX A-4
A 2.1
SESAM
01-OCT-2004
Program version 7.3
Superelement 1
%=============================================================================
%
% Prefem input for creating superelement number 1, the foundation.
%
%=============================================================================
% --- First create geometry:
GENERATE SURFACE A 1 2 1 4 1 2 1 2 1 2 1 1
CARTESIAN 0 0 0
7 0 0 END 0 4 0 END 0 0 0.8 END
DELETE GEOMETRY AU*
..
% --- Then select 8 node shell element to be used:
SET ELEMENT-TYPE SURFACE ALL-SURFACES-INCLUDED SHELL-8NODES
..
% --- Define fixations and supernodes:
PROPERTY BOUNDARY-CONDITION
( AJ&&1 AI&&1 )
FIX FIX FIX FIX FIX FIX
GLOBAL
( AJ&&2 AI&&2 )
SUPERNODE SUPERNODE SUPERNODE SUPERNODE SUPERNODE SUPERNODE
GLOBAL
..
% --- Define thickness:
PROPERTY THICKNESS ALL-SURFACES-INCLUDED 0.1
..
% --- Define and connect material:
PROPERTY MATERIAL CONCR ELASTIC 0.3E11 0.25 2500 0 0
..
CONNECT MATERIAL CONCR ALL-SURFACES-INCLUDED END
% --- Define line load:
PROPERTY LOAD 1 GRAVITY GLOBAL FLEXIBLE-PART-CONTRIBUTION 0 0 -9.81
END
..
% --- Create mesh
MESH ALL
% --- The model is now complete. Exit Prefem.
%=============================================================================
A 2.2
Superelement 2
%=============================================================================
%
% Prefem input for creating superelement number 2, the long wall.
%
%=============================================================================
% --- First create geometry:
GENERATE SURFACE A 1 2 1 4 1 2 1 2 END
CARTESIAN 0 0 0.8
7 0 0 END 0 0 3 END
SESAM
Program version 7.3
Presel
01-OCT-2004
APPENDIX A-5
% --- Then select 8 node shell element to be used:
SET ELEMENT-TYPE SURFACE ALL-SURFACES-INCLUDED SHELL-8NODES
..
% --- Define supernodes:
PROPERTY BOUNDARY-CONDITION ALL-LINES-INCLUDED
SUPERNODE SUPERNODE SUPERNODE SUPERNODE SUPERNODE SUPERNODE
GLOBAL
..
% --- Define thickness:
PROPERTY THICKNESS ALL-SURFACES-INCLUDED 0.05
..
% --- Define and connect material:
PROPERTY MATERIAL CONCR ELASTIC 0.3E11 0.25 2500 0 0
..
CONNECT MATERIAL CONCR ALL-SURFACES-INCLUDED END
% --- Define loads:
PROPERTY LOAD 1 GRAVITY GLOBAL FLEXIBLE-PART-CONTRIBUTION 0 0 -9.81
END
LOAD 2 NORMAL-PRESSURE ALL-SURFACES-INCLUDED 1500 END MIDDLE-SURFACE
END
..
% --- Create mesh
MESH ALL
% --- The model is now complete. Exit Prefem.
%=============================================================================
A 2.3
Superelement 3
%=============================================================================
%
% Prefem input for creating superelement number 3, the short wall.
%
%=============================================================================
% --- First create geometry:
GENERATE SURFACE A 1 2 1 2 1 2 1 2 END
CARTESIAN 0 0 0.8
0 4 0 END 0 0 3 END
% --- Then select 8 node shell element to be used:
SET ELEMENT-TYPE SURFACE ALL-SURFACES-INCLUDED SHELL-8NODES
..
% --- Define supernodes:
PROPERTY BOUNDARY-CONDITION ALL-LINES-INCLUDED
SUPERNODE SUPERNODE SUPERNODE SUPERNODE SUPERNODE SUPERNODE
GLOBAL
..
% --- Define thickness:
PROPERTY THICKNESS ALL-SURFACES-INCLUDED 0.04
..
% --- Define and connect material:
PROPERTY MATERIAL CONCR ELASTIC 0.3E11 0.25 2500 0 0
..
CONNECT MATERIAL CONCR ALL-SURFACES-INCLUDED END
Presel
APPENDIX A-6
SESAM
01-OCT-2004
Program version 7.3
% --- Define loads:
PROPERTY LOAD 1 GRAVITY GLOBAL FLEXIBLE-PART-CONTRIBUTION 0 0 -9.81
END
LOAD 2 NORMAL-PRESSURE ALL-SURFACES-INCLUDED -1500 END MIDDLE-SURFACE
END
..
% --- Create mesh
MESH ALL
% --- The model is now complete. Exit Prefem.
%=============================================================================
A 2.4
Superelement 4
%=============================================================================
%
% Prefem input for creating superelement number 4, the floor.
%
%=============================================================================
% --- First create geometry:
GENERATE SURFACE A 1 2 1 4 1 2 1 2 END
CARTESIAN 0 0 0
7 0 0 END 0 4 0 END
% --- Then select 8 node shell element to be used:
SET ELEMENT-TYPE SURFACE ALL-SURFACES-INCLUDED SHELL-8NODES
..
% --- Define supernodes:
PROPERTY BOUNDARY-CONDITION ALL-LINES-INCLUDED
SUPERNODE SUPERNODE SUPERNODE SUPERNODE SUPERNODE SUPERNODE
GLOBAL
..
% --- Define thickness:
PROPERTY THICKNESS ALL-SURFACES-INCLUDED 0.05
..
% --- Define and connect material:
PROPERTY MATERIAL CONCR ELASTIC 0.3E11 0.25 2500 0 0
..
CONNECT MATERIAL CONCR ALL-SURFACES-INCLUDED END
% --- Define loads:
PROPERTY LOAD 1 GRAVITY GLOBAL FLEXIBLE-PART-CONTRIBUTION 0 0 -9.81
END
LOAD 2 NORMAL-PRESSURE ALL-SURFACES-INCLUDED 3000 END MIDDLE-SURFACE
END
..
% --- Create mesh
MESH ALL
% --- The model is now complete. Exit Prefem.
%=============================================================================
A 2.5
Superelement 5
%=============================================================================
%
SESAM
Program version 7.3
Presel
01-OCT-2004
APPENDIX A-7
% Prefem input for creating superelement number 5, the roof.
%
%=============================================================================
% --- First create geometry:
GENERATE SURFACE A 1 2 1 4 1 2 1 2 1 2 1 2
CARTESIAN 0 0 0
7 0 0 END 0 4 0 END 0 2 0.9 END
DELETE GEOMETRY ( AU* AS* AT121 AI122 AJ112 AJ212 )
..
CHANGE LINE AK121 AP121 AP112 2
AK221 AP221 AP212 2
..
DELETE GEOMETRY ( AP122 AP222 )
..
DEFINE SURFACE AS111 AK111 AK121 AJ111
AS211 AK211 AK221 AJ211
AT121 AI121 AK121 AI112 AK221
..
% --- Then select 8 node shell element to be used:
SET ELEMENT-TYPE SURFACE ALL-SURFACES-INCLUDED SHELL-8NODES
..
% --- Define supernodes:
PROPERTY BOUNDARY-CONDITION ( AJ&&1 AI&&1 )
SUPERNODE SUPERNODE SUPERNODE SUPERNODE SUPERNODE SUPERNODE
GLOBAL
..
% --- Define thickness:
PROPERTY THICKNESS ALL-SURFACES-INCLUDED 0.03
..
% --- Define and connect material:
PROPERTY MATERIAL CONCR ELASTIC 0.3E11 0.25 2500 0 0
..
CONNECT MATERIAL CONCR ALL-SURFACES-INCLUDED END
% --- Define loads:
PROPERTY LOAD 1 GRAVITY GLOBAL FLEXIBLE-PART-CONTRIBUTION 0 0 -9.81
END
LOAD 2 COMPONENT-PRESSURE AT* GLOBAL 0 0 -2500 END MIDDLE-SURFACE
END
..
% --- Create mesh
MESH ALL
% --- The model is now complete. Exit Prefem.
%=============================================================================
Presel
APPENDIX A-8
SESAM
01-OCT-2004
Program version 7.3
SESAM
Presel
Program version 7.3
01-OCT-2004
APPENDIX B
B1
APPENDIX B-1
THEORY
Mathematical Foundation for Superelement Technique
The superelement technique is based on the principle of static condensation (reduction) of the equation system of part models (superelements). This involves eliminating the internal (free) nodes (or d.o.f.s) from the
equation system thereby achieving a reduced equation system containing only the supernodes (or super
d.o.f.s) of the part model. The mathematical foundation for the superelement technique is explained in the
following by comparing it with a direct analysis (i.e. not using the superelement technique). The superelement technique is only applicable for linear static analysis.
B 1.1
Direct Analysis
B.1
Figure B.1 Direct Analysis — a Single Superelement
Figure B.1 shows a very simple plate model. The equation of equilibrium for the single superelement, which
constitute the whole model, is:
Kr = R
(B.1)
where K is the stiffness matrix, r is the displacement (d.o.f.) vector and R is the load vector. Solving this
equation system in one operation yields the displacements for the whole model:
–1
r = K R
(B.2)
Presel
SESAM
APPENDIX B-2
B 1.2
01-OCT-2004
Program version 7.3
Superelement Analysis
B.2
internal nodes rBi
B
supernodes rBs
rB
B
C
supernodes rAs
rA
A
A
internal nodes rAi
First level superelements A and B
Complete model,
superelement C
A
B
Superelement
hierarchy
Figure B.2 Superelement Analysis
Figure B.2 shows the same model as in the previous section but now it is divided into two superelements
(part models) A and B which assembled constitute the complete model C.
Stiffness matrix, displacement vector and load vector for each superelement are established:
KA, rA, RA for superelement A
KB, rB, RB for superelement B
We now want to perform a reduction to eliminate the internal d.o.f.s for both superelements (rAi and rBi).
Let the following equation system be the equation of equilibrium of one of superelements A and B (subscripts A/B are skipped):
Kr = R
(B.3)
This can be written in a partitioned form by sorting the d.o.f.s of r so that all internal d.o.f.s come first, ‘i’
denotes internal d.o.f.s and ‘s’ denotes super d.o.f.s:
K ii K is r i
T
K is K ss r s
=
Ri
Rs
(B.4)
Equation (B.4) may be written as two separate equations:
K ii r i + K is r s = R i
T
K is r i + K ss r s = R s
Equation (B.5) may be solved with respect to ri:
(B.5)
(B.6)
SESAM
Presel
Program version 7.3
01-OCT-2004
–1
–1
r i = – K ii K is r s + K ii R i
APPENDIX B-3
(B.7)
This inserted in Equation (B.6) yields:
T
–1
T
–1
( K ss – K is K ii K is )r s = R s – K is K ii R i
(B.8)
kr s = F
(B.9)
or:
where:
T
–1
k = K ss – K is K ii K is
T
(B.10)
–1
(B.11)
F = R s – K is K ii R i
When this operation is performed for both superelements A and B their matrices are reduced as follows:
KA → kA
r A → r As
RA → FA
KB → kB
r B → r Bs
RB → FB
When superelements A and B are coupled it follows that:
(B.12)
r As = r Bs = r s
What this means is that both superelements A and B contribute with stiffness and loads to the supernodes.
The reduced stiffness and loads may consequently be added:
( k A + k B )r s = ( F A + F B )
(B.13)
This is the equation of equilibrium for the complete model expressed in the d.o.f.s of the top level superelement. Solving this equation yields rs.
When rs is known the internal displacements of A and B, rAi and rBi respectively, are found by inserting rs
in Equation (B.7) (the matrices of this equation are saved during reduction of each superelement). This
operation is termed retracking:
–1
–1
(B.14)
–1
–1
(B.15)
r Ai = – K Aii K Ais r s + K Aii R Ai
r Bi = – K Bii K Bis r s + K Bii R Bi
Presel
SESAM
APPENDIX B-4
01-OCT-2004
Program version 7.3
The terms reduction, solving and retracking are highlighted above as these are three major phases of a
superelement analysis (sequential processes automatically executed by the analysis program Sestra).
B 1.3
Rotating and Mirroring a Superelement
In the example of Section B 1.2 none of the superelements are rotated or mirrored. However, if a superelement is rotated (as is the case for the second inclusion of superelement 6 in the example of Section 3.2.2)
then the reduced matrices must be transformed before being added to the stiffness and load matrices of the
superelement assembly.
When translating, rotating and mirroring a superelement to include it in a superelement assembly a transformation matrix is established; see the ‘INCLUDE supno PRINT-T-MATRIX’ command. The three by three
cosine matrix part of this three by four transformation matrix constitute the required transformation for the
reduced matrices. If T is the name of this three by three cosine matrix the d.o.f. vector of the reduced
superelement after the transformation is:
T
r Ts = T r s
(B.16)
The stiffness and load matrices are transformed as follows (note that for the orthogonal three by three transformation matrix T the inverse matrix is equal to the transformed matrix):
T
(B.17)
T
(B.18)
k T = T kT
FT = T F
It follows from the last equation that the loads of a superelement are rotated and mirrored along with the
superelement when this is being included in a superelement assembly. Translations of the superelement has
no effect on the loads.
This is exemplified in Section 3.3.2 where load 3 on superelement 6, see Figure 3.8, is rotated (and multiplied by 2) when combined into global load 2 of top level superelement 7; see note 6 of Figure 3.9.
Also note that to allow the stiffness, k, and load, F, matrices to be multiplied by a three by three transformation matrix these matrices must for all nodes include either all three translational d.o.f.s, or all three rotational d.o.f.s, or all six d.o.f.s. In other words, to rotate or mirror a superelement only these three alternative
selections of super d.o.f.s for a node are allowed. Any other selection of the six d.o.f.s of a node to be super
will only allow the superelement to be translated when being included in an assembly.
For more information on the superelement technique see the Sestra documentation.