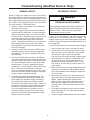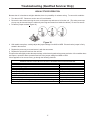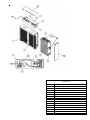
1
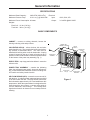
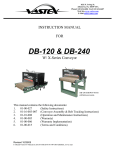
Heating & Air Conditioning ® C om fort. Q uality. Tru st. DUCT MOUNT Electronic Air Cleaner Manual •Installation •Operation •Service •Maintenance ATTENTION INSTALLING PERSONNEL As a professional installer you have an obligation to know the product better than the customer. This includes all safety precautions and related items. Remember, it is your responsibility to install the product safely and to know it well enough to be able to instruct a customer in its safe use. Prior to actual installation, thoroughly familiarize yourself with this Instruction Manual. Pay special attention to all safety warnings. Often during installation or repair it is possible to place yourself in a position which is more hazardous than when the unit is in operation. Safety is a matter of common sense...a matter of thinking before acting. Most dealers have a list of specific good safety practices...follow them. November 2002 The precautions listed in this Installation Manual are intended as supplemental to existing practices. However, if there is a direct conflict between existing practices and the content of this manual, the precautions listed here take precedence. Amana 1810 Wilson Parkway • Fayetteville, TN 37334 10026805 Important Information Great pride and workmanship go into every Amana product to provide our Customers with the highest possible quality. We realize, however, that during its lifetime the product may require service. The information contained in this manual is intended for use by a qualified Amana Service Technician who is familiar with the safety procedures required in the repair and who is equipped with the proper tools and testing instruments. WARNING Repairs covered in this manual that are made by unqualified persons can result in hazards due to improper assembly or adjustments subjecting inexperienced persons making such repairs to the risk of injury or electrical shock which can be serious or even fatal. IMPORTANT NOTE TO CUSTOMER CAUTION If you perform service on your own Amana product, you must assume responsibility for any personal injury or property damage that may result. Amana will not be responsible for any injury or property damage arising from improper service and/or service procedures. In order to locate an authorized Amana service agency, please consult your telephone book or the dealer from whom you purchased this product. If you require further assistance, please contact: CONSUMER INFORMATION LINE AMANA TOLL FREE 1-877-254-4729 (U.S. only) email us at: [email protected] fax us at: (931) 438- 4362 (Not a technical assistance line for dealers.) Outside the U.S., call 1-931-433-6101. (Not a technical assistance line for dealers.) Your telephone company will bill you for the call. SHIPPING AND HANDLING Units are securely packed in shipping containers approved by the International Safe Transit Association. Check the carton upon arrival for external damage. If damage is found, file a request in writing for inspection by the carrier agent immediately. The carrier is responsible for making prompt inspection of damage and for a thorough investigation of each claim. The distributor or manufacturer will not accept claims from dealers for transportation damage. If no damage is found, carefully remove all shipping material and properly dispose of it. Keep the unit as upright as possible. Laying the unit on its side or top could cause equipment damage. TO THE INSTALLER Before installing this unit please read this manual and the Specification Sheet to familiarize yourself on the specific items which must be adhered to such as maximum external static pressure to unit, air temperature rise, minimum or maximum CFM and motor speed connections. TO THE OWNER It is important to complete the owner registration card and mail it immediately. This will assist us in contacting you if any service or warranty information should change in the future. When completing the registration card, be sure to include the Model, Manufacturing and Serial Numbers, plus the installation date. The warranty certificate is also supplied with the unit. Read the warranty carefully and note what is covered. Keep the warranty certificate in a safe place so you can find it if necessary. If additional operating instructions are required, call the dealer where the purchase was made. Keep this literature in a safe place for future reference. 2 General Information SPECIFICATIONS Electrical Maximum Rated Capacity: 2000 CFM (3400 m3/hr.) Maximum Pressure Drop: 0.14 in. w.g. @ 2000 CFM Maximum Power Consumption: 48 watts Input: 120V, 60Hz, 1Ph Output: 3.2 mADC @6200 kVDC Weights Each Cell: 12 lbs. (5.45 kg) Total Unit: 36 lbs. (16.4 kg) BASIC COMPONENTS CABINET – mounts to existing ductwork; houses the ionizing collecting cells and pre-filters. POWER TRAY ASSEMBLY COVER ON-OFF SWITCH COLLECTING CELLS – collect the dust, dirt and other particulate in the air. They contain the ionizing and collecting sections as described above. The cells must be installed with ionizing wires on the air intake side. A spring contact is located on the top of each cell and must be in position to make contact with the contact board assemblies on the bottom of the power tray assembly (Fig. 1). INDICATING LIGHTS CELL CONTACT POWER TRAY ASSEMBLY PRE-FILTERS – trap large particulate before it enters the collector cells. CABINET POWER TRAY ASSEMBLY – contains the indicating lights, the solid-state power supply, electronic airflow sensor, contact boards and electrical controls including ON/ OFF switch and safety interlock switch. PRE-FILTER(S) COLLECTING CELL(S) AIR FLOW SENSOR (AFS) – senses the movement of air with the duct. It reduces power usage and prevents build up of ozone within the duct. The AFS utilizes a thermistor that is heated to approximately 130°F and stabilizes at this temperature. When the system blower is energized and air flows through the duct system, a vacuum affect pulls air over the thermistor, thus cooling it. This cooling effect signals the electronic air cleaner to turn on and provide air cleaning. Figure 1 3 FRONT PANEL ASSEMBLY General Information breaking in period of ownership and the issue is selfcorrecting. Also, high altitude locations can be more susceptible to noticing the presence of ozone. DUSTING AND “WHITE DUST” Your new Electronic Air Cleaner (EAC6) will efficiently clean and filter your household air. Unfortunately, it will not eliminate the need for regular dusting of your furniture and belongings. Due to the design of all duct-mounted air cleaners, they can only clean the air that reaches the air cleaner. Therefore, if the particulates are not being carried to the air cleaner in the air stream, the air cleaner cannot remove them from your home. An ionizing-collecting cell that has been damaged or bent (the designed spacing between electrically charged and ground components has been decreased) may also produce an abnormal amount of ozone. OPERATION Occasionally a “white dust” may be noticed in bedrooms or newly furnished rooms. This is mainly composed of lint that because it is heavier than other particulates, settles before it reaches your unit. This “white dust” is not mixed with airborne dirt particles; therefore, it is clean and has no staining or soiling properties. However, running the furnace blower continuously, day and night, will help reduce this from occurring. This electronic air cleaner (technically known as a twostage electrostatic precipitator) is designed to remove airborne particulates – dust, dirt, smoke, pollen, virus, spores, bacteria, mold – from indoor air. It is used in forced air heating, cooling and ventilating systems. As dirty air enters the air cleaner, the air passes through a metal mesh pre-filter. The pre-filter prevents lint, pet hair and other large particulates from entering the air cleaner by impingement. It is important that these filters be in place to prevent excessive dirt loading of the air cleaner collector cells. These filters extend the time between maintenance of the air cleaner collector cells. This allows the collector cells to provide clean air for a longer period between washings. OZONE Under normal operating conditions all Electronic Air Cleaners produce minute quantities of ozone as an incidental byproduct. In fact, all electronic products, such as televisions, cordless phones and refrigerators, produce some amount of ozone. The average homeowner can detect the smell of ozone concentrations as low as 25 to 100 ppb (parts per billion). The design of this unit has been tested and ozone production is approximately half of the published permissible limits established by the Environmental Protection Agency. These limits recommend that the concentration of indoor ozone not exceed 50 ppb. Ozone is not harmful in these concentrations. In fact, the ozone level in major cities can sometimes reach as high as 100 ppb on a summer day. The addition of optional charcoal after-filters can help reduce this. The pre-filtered air then passes through a two-stage electronic air cleaner. In the first stage all airborne particulate, even the submicron sized, are electrically charged (positive) as they pass through the ionizer. The ionizer field is set up by a corona discharge emanating from the fine tightly strung wires suspended between two adjacent flat plates. In the second stage, the charged particulate pass into an intense electrical field established between alternately charged and grounded parallel plates. Here the positively charged particulate is attracted to the ground plates and is precipitated out of the air stream. Because of a built-in electronic air flow sensor; the air cleaner operates automatically with the system blower. The air cleaner should be installed in the system so that all the system air is circulated through the air cleaner. The EAC6 will only remove the airborne contaminants delivered to it. Maximum performance is obtained when the system blower is set for continuous operation. For high altitude applications, see Troubleshooting (Qualified Servicer Only) section. Normally, a new unit will produce more ozone than one that has been in operation for several weeks. This is due to sharp corners or manufacturing burrs on the ionizingcollecting cell(s) and is normal. As the Electronic Air Cleaner arcs and zaps, the voltage is vaporizing these areas and tends to round them off. This is a part of the 4 General Information PRE-INSTALLATION CONSIDERATIONS AND REQUIREMENTS CAUTION Read rules and instructions carefully for safe operation. Failure to follow them could damage your unit or cause a hazardous condition. Check your unit ratings given on the cleaner to ensure it is suitable for your application. PLACEMENT OUTDOOR AIR The best location for the air cleaner is in the return air duct next to the blower compartment. In this location, the blower motor and cooling coils will be kept the cleanest. When outdoor air is added to the return air duct, sufficient heat should be added to maintain the return air temperature of 40°F (4°C) minimum. Lower temperatures can cause ionizer wire failure. DO NOT INSTALL THE AIR CLEANER IN THE DISCHARGE AIR DUCT. Before installing the air cleaner, consider the application (see Figures 3 to 8). If a transition is required, refer to section entitled “Transitions”. The unit must be readily accessible for periodic inspection and cleaning of the pre-filters and electronic cells to maintain maximum efficiency and trouble-free operation. SHEET METAL INSTALLATION The electronic air cleaner is adaptable to all new or existing residential forced air furnace and cooling systems. TRANSITIONS If the air duct does not fit the air cleaner cabinet opening, gradual transitions are recommended to reduce air turbulence through the air cleaner and maximize efficiency. Not more than 20° (about 4” per running foot) of expansion should be used on each side of the transition fitting (see Figure 2). AIR CONDITIONING The air cleaner should be installed upstream of the cooling coil. This will keep the coil clean and reduce air conditioning coil maintenance. Improved cooling efficiency is the result that directly affects energy costs. A clean coil will reduce utility costs. If the air cleaner is downstream of the cooling coil, condensation will form on the cooled collector plates when the air conditioner cycles. This will allow water droplets to form on the collector plates and cause nuisance arcing. Arcing will reduce air cleaner efficiency and reduce the life of the high voltage power supply. MAXIMUM 4" DROP PER LINEAL FOOT AIRFLOW HUMIDIFIERS AIR CLEANER OPENING FURNACE OPENING AIRFLOW An evaporative humidifier can be mounted upstream of the air cleaner. It is best to install an atomizing humidifier downstream of the air cleaner because hard water salt deposits and water droplets may damage the air cleaner. If an atomizing humidifier must be mounted upstream of the air cleaner: 1. Mount it as far upstream as possible. (Recommend at least 10 feet.) 2. Install a standard disposable furnace filter between the humidifier and the air cleaner to trap water droplets and hard water deposits. AIR CLEANER 3. Clean the air cleaner more frequently to prevent hard water deposit buildup. TRANSITION SECTION Figure 2 5 FURNACE General Information The air cleaner can be in any position, except with the access door facing down. The figures below show the various positions the air cleaner can be mounted. AIR FLOW AIR FLOW SHEET METAL TRANSITIONS AIR FLOW AIR CLEANER AIR CLEANER SHEET METAL TRANSITIONS AIR CLEANER Figure 5 Figure 3 BASEMENT FURNACE (LOW BOY) Figure 4 Mounted horizontally in return plenum just above the furnace. COUNTERFLOW FURNACE Mounted horizontally in return duct or plenum, just above the furnace. SPACE SAVER FURNACE (HIGHBOY) Side installation. Cleaner is mounted vertically, where return air enters side inlet of furnace. AIR FLOW AIR FLOW BE FO RE AFT E R AIR CLEANER Figure 6 OFFSET INSTALLATION Mounted between the duct and furnace. If there is less than 7in. between the duct and the furnace, move the return air drop then install the cleaner between them. AIR CLEANER Figure 7 SPACE SAVER (HIGHBOY) Mounted horizontally beneath the furnace. Raise furnace using a suitable wood structure and install cleaner. AIR FLOW SHEET METAL TRANSITIONS Figure 8 HORIZONTAL FURNACE Mounted vertically in the return duct as close to the furnace as possible. AIR FLOW AIR CLEANER BLOWER DOOR 6 General Information TURNING VANES If the air cleaner is installed adjacent to a 90° duct elbow, add turning vanes inside the duct to improve the air distribution across the face of the air cleaner (Figure 9). Failure to follow this recommendation can reduce the efficiency of the electronic air cleaner. Figure 9 LOCATION Select a location that is readily accessible for periodic inspection and cleaning. Allow a minimum of 24” clearance in front of the access panel and 12” clearance above the power tray for component removal and service space ( Figure 10). 24 7/8 [632] 24 1/4 18 [457] 24 [610] 7 1/4 [184] 9/16 [14mm] FRONT SERVICE ACCESS 22 1/2 [572] 25 [572] Figure 10 DIRECTING AIRFLOW THROUGH THE CLEANER The air cleaner is set up for a left to right airflow, when facing the access door. For a right to left airflow, follow these directions: 1. Remove the pre-filter and cells from the cabinet. A plastic positioning spacer is located inside the bottom of the cabinet (Figure 11) to allow installation of the cells in the proper position with respect to airflow. 2. Remove the screw securing the spacer to the cabinet. 3. Reposition the spacer in the alternate hole at the bottom of the cabinet closest to the airflow exit side of the cabinet. Secure with the screw removed in step 2. 4. Seal the unused hole with duct tape. 5. Remove the cell handle and reattach to the opposite end of the cell. Turn cells around, replace in cabinet. Figure 11 6. Replace pre-filters on the airflow entrance side of the cabinet. NOTE: The directional arrows on the cell end plates must point in the direction of airflow. 7 Installation WARNING Personal Injury Hazard To avoid the possibility of property damage, personal injury, or death, a trained, experienced servicer should install this electronic air cleaner. Power supply must be disconnected before installation, and a thorough checkout of the unit installation must be completed before unit operation. THIS AIR CLEANER SHOULD NOT BE INSTALLED ON THE HOT AIR SIDE OF DUCT-TYPE SYSTEMS. NOTE: The following is a typical installation of the air cleaner on a highboy furnace (Figure 5). You may have to alter the installation to fit your application. ATTENTION: Be especially careful not to cover the airflow sensor orifice when sealing the air cleaner and ductwork. This hole is located on the right hand side of the cabinet that holds the power tray assembly (when facing the unit). The hole is 3/16” in diameter and is located on the front of the power tray assembly (see Figure 1). In applications with minimum airflow, it is helpful to seal any openings on the power tray assembly or cabinet. This will increase the velocity of air flowing over the airflow sensor, enabling the airflow sensor to turn the electronic air cleaner on and off. The only opening required for actuation of the airflow sensor is the 3/16” diameter hole previously described. 1. Remove the old furnace filter and discard. 2. Remove any existing dirt from the blower and ducts. The air cleaner cannot remove existing dirt. The area must be thoroughly clean before you begin. 3. Remove unit access panel, and slide the pre-filters and ionizing-collecting cells out of the cabinet. Place them safely aside with the warranty registration card. 4. Locate the cabinet in the cold air return duct so that all of the return air flows through the unit (Figure 11). If the furnace and air cleaner openings are different, use a transition refer to page 4, Figure 2. 5. Mounting holes are provided for ductwork attachment (Figure 12). The 0.140” holes are sized for #8 sheet metal screws, or 1/8” rivets. If the adjoining ductwork is flanged, install the screws so that the screw heads are inside the cabinet. This will prevent damage to pre-filters and optional charcoal after-filter during removal and installation after cleaning 7. Set airflow direction (see “Directing Airflow Through the Cleaner” section for the correct setup). 8. Install pre-filters and ionizer-collector cells. 9. Reinstall sliding power tray assembly into the cabinet. 10. Reinstall cabinet access panel. CAUTION SCREW Only a trained, experienced serviceman should install this electronic air cleaner. The power tray assembly should be removed before installation. To remove the power tray assembly, remove the two (2) screws (see Figure 12) in the top front of the cabinet. Remember to keep this hardware for reinstallation of the power supply when the air cleaner installation is complete. A thorough checkout of the unit installation should be completed before unit operation. BLOWER COMPARTMENT MOUNTING HOLES Figure 12 Read these instructions carefully before attempting to install or operate the air cleaner. Failure to follow could result in improper installation and a voided warranty. This electronic air cleaner has a BUILT-IN automatic air flow sensor (AFS) that senses the air movement within the duct and turns the electronic air cleaner on and off accordingly. 6. After the unit has been secured, seal seams air tight with duct tape or caulking. 8 Electrical Connections The EAC6 Air Cleaner is designed to take advantage of the integrated accessory control panel available on most furnaces. The 120V electronic air cleaner tap on the furnace will provide power to the air cleaner only when the circulating air blower is in operation. WARNING To avoid the risk of electrical shock, wiring to the unit must be properly polarized and grounded. WARNING To avoid electrical shock, injury or death, disconnect electrical power before servicing or changing any electrical wiring. CAUTION If the electronic air cleaner is wired directly to the integrated accessory control on the furnace, it is imperative that the ampere rating of the control is sufficient to handle the current required by the air cleaner. All wire shall be in accordance with the National Electrical Code. CAUTION Do not wire directly to a multiple speed blower motor. Wiring to a multiple speed blower motor will damage the power supply and void the warranty. CAUTION Label all wires prior to disconnection when servicing controls. Wiring errors can cause improper and dangerous operation. Verify proper operation after servicing. Power can be supplied to the EAC6 by one of two methods: By connecting the supplied power cord directly to a standard 120 VAC, 60Hz, single-phase receptacle, or by connecting the unit permanently to a power source. Follow the steps below to permanently connect the electronic air cleaner to a power source. 1. Remove the power tray assembly cover plate by removing two screws at the front of the electronic air cleaner. GREEN TO GREEN 2. Remove the wire nuts from the black and white wires. Remove the green ground wire from under the green ground screw. Remove the power cord. BLACK TO BLACK WHITE TO WHITE 3. Wire unit to 120 volt, 60 Hz, 1 phase supply. A fieldwiring compartment with knockout holes is located at the rear of the power tray assembly (Figure 14). The electronic airflow sensor will automatically cycle your EAC6 Electronic Air Cleaner with the blower system. The sensor is activated when the fan is on and airflow is present in the duct. It is pre-set at the factory and needs no adjustment (Figure 13). Figure 13 9 Startup, Adjustments, and Checks Indicator Light Inspection WARNING The following procedure should be conducted by a qualified HVAC contractor or repair person ONLY. These procedures will expose hazardous electrically energized components. Disconnect power between checks and proceed carefully. 1. Turn the HVAC system blower OFF. 2. Switch the ON/OFF rocker switch to the ON position.Both the green input power light and red cell energized light should be visible. 3. Both lights should go out in approximately 20 to 60 seconds. This is the normal time for the electronic airflow sensor to complete its stabilization period. 3. Wait approximately one minute and turn the HVAC system blower to the ON position. Both lights should illuminate. 4. Perform the following checks to see if the red energizer light goes out. • Cell access panel is removed. • Rocker switch is switched to the OFF position. • HVAC system is not running. NOTE: The airflow sensor must go through its normal stabilization period when power is disconnected from the input to the air cleaner. This includes opening the access door on the cabinet, switching the ON/OFF rocker switch to the OFF position and any interruption of input power from the main power source. (A current breaker trip, fuse open, electrical power is interrupted). 10 Maintenance CAUTION PERSONAL INJURY HAZARD Sharp Edges. Handle the cells carefully to avoid cuts from the sharp metal edges. CAUTION To avoid possible damage to the air cleaner, do not use laundry detergent to clean the cells or pre-filters. CAUTION Do not drop the ionizing collector cells. Damaged cell plates or ionizing wires can cause excessive arcing and noise. Cells and Pre-filter Cleaning Regular washing is necessary to ensure proper performance. A thorough washing once every two months will be adequate for most installations. More frequent washings (once a month) may be necessary on some installations (new homes for example) where there is new carpeting, plaster dust, or excessive cigarette smoke. CELLS AND PRE-FILTER REMOVAL: cloth or sandpaper (not emery cloth) along the ionizing wires. 1. Push air cleaner switch to OFF. Wait 15 seconds. Open access door. 6. Stand cells and pre-filter up to drain. Drain for two hours. 2. Carefully remove the pre-filter and each cell. Set aside in a safe place. NOTE: The aluminum collector cells may be slightly discolored after washing. This is a normal chemical reaction and will not harm your unit or affect its performance. CLEANING NOTE: Wash cells one at a time. 1. Place enough hot water in a utility tub to cover a cell. Dissolve 2 to 4 oz. of granulated automatic dishwater detergent (not laundry detergent) in the water. CELL AND PRE-FILTER REINSTALLATION 1. Replace pre-filter and cells in cabinet. Ensure the arrows on the cells point in same direction as airflows through the duct. If you have to force it past positioning spacer on bottom it is probably in a wrong position. 2. Allow cell to soak for 30 minutes then agitate up and down until it appears clean. Remove cell from tub. 3. Repeat with second cell. 4. Next clean the pre-filter. Place pre-filter in tub and agitate the pre-filter up and down in the solution until it appears clean. Drain dirty water. 2. Reposition access door (engage tabs on lower edge of door into slots in cabinet.). Carefully close door. 5. With a hose held approximately 10” above, rinse the cells and pre-filters. Do not spray the ionizing wires directly as they may snap and/or break. Be sure to rinse the edges of the cell frame thoroughly to dislodge any trapped lint or dirt. Carefully wipe a damp 3. Turn air cleaner switch to ON. 4. Remember the airflow sensor must go through its stabilization period. See NOTE in the “System Checkout” section. 11 Quick Reference Troubleshooting SYMPTOM Rapid arcing or zapping. Excessive ozone smell. Excessive ozone smell Hissing or sizzling noise Green LED light is not ON Red LED light is not ON POSSIBLE CAUSES CORRECTIVE ACTION Broken or loose ionizing wire(s) Remove broken or loose wire and replace with new. Dirty ionizing-collector cell Wash per instructions Damaged or bent collector plates Straighten plates with needle nose pliers or replace entire ionizing-collector cell. Dirty insulator caps on ionizing-collector cell Clean with warm soapy water and rinse well Air cleaner is wired directly to a 120V power source Qualified HVAC contractor must install air flow sensor (AFS) or rewire air cleaner to the HVAC system blower. Loose high voltage connections Repair or replace the component. Radio or television interference Uncommon occurrence --Check for good common ground for air cleaner. Poor electrical contact Ensure that there is a good connection between the top of the ionizing-collector cell and the bottom of the ocntact board assembly. Contact HVAC contractor. No power available Reset circuit breaker. Replace fuse. Loose wiring at ON/OFF switch Check for secure connection. Defective ON/OFF switch Replace ON/OFF switch. ON/OFF switch not in the "ON" position Turn the unit ON. Loose wiring within power tray assembly Check for secure connections. Contact HVAC contractor. Broken or shorted electrical component Remove broken wire and replace with new wire. Excessive dirt buildup on ionizing wires Clean wires with alcohol and allow to dry thoroughly before turning the unit ON. Contact board assemblies are corroded or carbonized Replace contact board assembly. Broken ionizing wire Remove broken wire and replace with new wire. Dirty ionizing-collector cell Clean per instructions. Foreign object located between collector plates Remove object from ionizing-collector cell Damaged or bent collector plates Straighten with a pair of needle nose pliers or replace cell. Insulators are corroded or carbonized Replace insulators or ionizing-collector cell. RADIO AND/OR TELEVISION INTERFERENCE This trouble is not common, but when it occurs it is usually due to either continuous high voltage leak or discharge, or due to the absence of a good common electrical ground. Refer to conditions listed under “Arcing Noise” and “Hissing Noise” in the Quick Reference Troubleshooting Chart to determine a fix for this problem. 12 The following section is to be used by a qualified contractor or installer only. These procedures are not to be attempted by any person who is not qualified to work with high voltage or who is not familiar with this type of air cleaner. Amana cannot be held responsible for any injury or damage by any person not qualified to install this product. 13 Troubleshooting (Qualified Servicer Only) WARNING PERSONAL INJURY HAZARD The following procedures will expose hazardous live parts. Disconnect power before proceeding and between checks. Failure to do so could result in severe personal injury or death. Exercise the usual precautions when working with high voltage. When the circuit has been de-energized, always discharge any residual current in the secondary with an insulated handle screwdriver. Always ground power supply and ionizing-collecting cell when bench testing. RECOMMENDED SERVICE TOOLS 8” Screwdriver with insulated handle. Phillips #1 and #2 screwdriver Needle nose pliers. Fluke #8021B multimeter or equivalent Fluke #80k-40 high voltage probe or equivalent LED Readings The EAC6 is equipped with an input LED light (green) and a cell energized LED light (red) for indicating proper unit operation. When the unit is in normal operation (system fan running, access door in place, control switch in the “ON” position), and the green light is not lit, there is a problem in the primary circuit. If the red light is not lit, then the problem is a shorted secondary. Although failure of the indicating lights should not be overlooked, these conditions are unusual and rather remote. The lights are LED (Light Emitting Diodes) and are very reliable. BL W 1. 2. 3. 4. 5. 6. 7. Safety Interlock Switch ON/OFF Rocker Switch 50 VA Stepdown Transformer High Frequency Power Supply Electronic Air Flow Sensor Ionizing-Collector Cells Contact Board Assembly 3 2 1 R 4 7 5 6 Figure 16 14 7 6 Troubleshooting (Qualified Servicer Only) PRIMARY CIRCUIT SECONDARY CIRCUIT If there is supply line voltage at the service connections and no input voltage to the power supply (green light out), the outage can be located by checking operation of the safety switch and the interconnecting wiring with a multimeter. Refer to circuit diagram (Figure 16) to check operation of the switches. Follow these steps: WARNING PERSONAL INJURY HAZARD 1. Ensure air cleaner circuit breaker is in the ON position and fuse is not open. The following procedures will expose hazardous live parts. Disconnect power before proceeding and between checks. Failure to do so could result in severe personal injury or death. 2. The power supply board has a built-in internal fuse to protect the 24V transformer. It can be checked visually by inspecting the fuse. If the fine wire inside the fuse is broken, a problem exists in the 24V circuit of the power supply board. Do NOT replace this fuse. The entire power supply board must be replaced. The purpose of the fuse is not to protect the power supply board, but to function as a troubleshooting feature of the product to protect the transformer from damage. A short circuit can develop if the space between the conductive or semi-conductive material is bridged. The bridging or short may be caused by damaged components, improper voltage or foreign material lodged between or on the components. 3. If the fuse is NOT blown, check the ON/OFF switch and safety interlock switch for proper engagement and operation. This can be completed using a voltohm multimeter. 2. Visually inspect. Ensure the system blower is operating, the control switch is ON and, using a multimeter and probe, input voltage is as specified. To check the secondary circuit for proper output voltages: 1. Remove power tray access cover and door panel. Also check the cell contacts and high voltage contact board assembly for corrosion, excessive dirt build up, and electrical arc tracking (carbon path from stainless steel spring to grounded metal). If corrosion, build up, and or arcing is present, clean or replace contact. 4. Check the ON/OFF switch and wiring. Disconnect wire between ON/OFF switch and power supply from the power supply. Disconnect wire between the ON/ OFF switch and safety interlock switch at the safety interlock switch. Connect a multimeter to disconnected wires. Turn the ON/OFF switch to the ON position. The meter should indicate a continuous circuit. If multimeter indicates an open circuit, check each wire and switch to determine which component is open. Repair or replace as needed. 3. Make connections from the high voltage probe to the multimeter in accordance to the operator’s manual. The meter should be set for reading DC voltage at a 20-volt full scale. 4. Remove the cell access door. Attach the high voltage ground lead from the high voltage probe to the cabinet. While depressing the safety interlock switch, touch the ionizer wire support bar with the end of the high voltage probe (see Cell Troubleshooting Chart). The meter should read 6.2 kVDC ±0.2 kVDC. 5. Check the safety interlock switch and wiring. Disconnect wire between safety interlock switch and power supply from the power supply. Disconnect wire between the safety interlock switch and ON/ OFF switch at the safety interlock switch. Connect a multimeter to the safety interlock switch and disconnected wire. Depress the safety interlock switch. The meter should indicate a continuous circuit. If multimeter indicates an open circuit, check wiring and switch to determine which component is open. Repair or replace as needed. 5. If no voltage is measured, remove the first cell and check the second cell. The meter should read 6.2 kVDC ± 0.2 kVDC. 6. If proper voltage is measured, the first cell is shorted 15 Troubleshooting (Qualified Servicer Only) an electrical short exists in one or both of the electronic cells. Replace cells in the unit, one at a time, to determine which cell is shorted. (see Cell Troubleshooting Chart). 7. If no voltage is present, remove the second cell. Install cell number one and measure voltage as described above. If voltage is present, the second cell, which is now out of the cabinet, is shorted (see Cell Troubleshooting Chart). Most troubles in the cell can be visually detected and corrected (reference the Troubleshooting Chart for diagnostic information). NOTE: The ionizer-collector cells are NOT designed for field repair. Only the ionizing wires and insulators can be field replaced. It is not recommended to attempt to replace other cell components, i.e. collector plates, ionizer supports. 8. If no voltage is present, remove both cells and measure the power supply output. While depressing the safety switch, touch the end of the high voltage probe to either the front or rear contact board assembly (Figure 17). The meter should read 6.2 kVDC ± 0.2 kVDC. POWER SUPPLY If the output light remains out with the cells removed the trouble is in the power supply. Using a multimeter and high voltage probe to check for proper output voltages can isolate specific problems in the power tray assembly. To properly check the power supply, follow these steps: 1. Remove power tray access cover. Figure 17 2. Ensure the system blower is operating, the control switch is on and input voltage is as specified. NOTE: The cell contacts should be visually checked for corrosion, excessive dirt build up, and electrical arc tracking (carbon path from stainless steel spring to grounded metal). 3. Set the multimeter for reading AC voltage at a 200volt full scale. With test leads attached to the multimeter, touch the two transformer output lead junctions to the printed circuit board and read the meter. 9. If no voltage is measured, refer to the Power Supply Troubleshooting section. 4. If there is a no output voltage from the 24-volt transformer, replace the 24-volt transformer and power supply. IONIZING-COLLECTING CELL The cell is electrically energized through a contact terminal located at the top center of the cell. The ionizing wires and every other collector plate are electrically charged while each interleaving plate is grounded. AIR SENSOR If the air cleaner is installed in a location that is dusty and dirty, the sensor on the AFS can become coated with dirt and lint. This coating can insulate the AFS and keep it from operating properly. To clean the thermistor, take a cotton swab dipped in rubbing alcohol and carefully insert it into the hole located on the right hand side of the power pack assembly (when facing the unit). The hole is 3/16” in diameter and is located on the front of the power tray assembly. Carefully twirl the cotton swab between your fingers, making sure the tip is lightly in contact with the gray disc, cleaning the coating from the thermistor. If the space between the conductive or semi-conductive material is bridged, a short circuit develops. The bridging or short may be caused by damaged components or foreign material lodged between or on the components. Since the cell is removed from the unit periodically to wash away collected dirt, it is susceptible to physical damage. Also, the cell contains one component, the ionizing wires, which due to their function have to be designed with a minimum structural support and are therefore susceptible to breakage. However, trouble related to a shorted collector cell is readily shown by the output indicating light and can be quickly isolated by this simple procedure. To determine if a short exists in one or both of the collector cells, turn the electronic air cleaner off and remove both electronic cells from the cabinet. Shut the door and repower the unit. If the red “cell-energized” light comes on, 16 Troubleshooting (Qualified Servicer Only) HIGH ALTITUDE OPERATION Because the air is less dense at higher altitudes, there is a possibility of nuisance arcing. To correct this condition: 1. Turn the unit OFF. Disconnect cord or turn off circuit breaker. 2. Remove the two screws securing the cover to the power tray and remove it from the unit. (The entire power supply tray may be removed from the cabinet by removing two screws from inside the cabinet.) Do not lose screws. 3. Locate the jumper terminal (Figure 18). Figure 18 4. With needle nose pliers, carefully adjust the jumper settings from HIGH to MED. Ensure that the jumper is firmly seated in the terminal. 5. Replace the power tray cover and secure it with the two screws. 6. Replace the access door and turn the unit ON. This procedure will slightly reduce the output voltage, minimize arcing and reduce ozone production. If the condition does not improve, repeat the above procedure and move the jumper setting from MED to LOW. If there appears to be excess ozone, go through the following checklist: IONIZING-COLLECTING CELLECTOR CELL TROUBLE SHOOTING PROCEDURE Cause Loose ionizing wire(s) Excessively Dirty Cell Damaged (bent) plates Improper ground Large pieces of foreign matter lodged bgetween plates Very dirty insulators Broken ionizing wires Excessively bent or misaligned components due to mishandling Externally broken or cracked insulators 17 Correction Replace loose wires Clean as outlined in Maintenance Straighten or replace collector cell Check ground. Remove Clean as outlined in Maintenance Remove all pieces of broken wire(s) Straighten or replace collector cells Replace insulator Troubleshooting (Qualified Servicer Only) SYMPTOM Green indicator LED out; Unit not operating Green indicator LED out; Unit operating Red output voltage LED out PROBABLE CAUSE CORRECTIVE ACTION Input AC power not available Replace any blown fuses and reset tripped breakers. Repair or replace any loose wires or bad connections. Inspect Air Flow Sensor (AFS) for proper location and operation. If not ok, replace AFS. Defective Safety Interlock system Check that access door is not open or ajar. Repair or replace any loose wires or bad connections. Replace defective momentary contact switch. Inspect AFS for proper location and operation. If not ok, replace AFS. Defective ON/OFF switch Ensure ON/OFF switch is turned "ON". Repair or replace any loose wires or bad connections. Replace defective ON/OFF switch. Inspect AFS for proper location and operation. If not ok, replace AFS. LED blown Replace power supply. Dirty or defective cell Wash dirty cell. Remove any objects between adjacent collector plates. Replace corroded or carbonized insulators. Replace any broken ionizing wires. Corroded or carbonized contacts Replace contact board if contacts are corroded or on contact board carbonized. Replace any defective wires. Using alcohol, clean dirt buildup on contacts and let dry thoroughly. Loose wires or bad power supply Repair or replace any loose wires or bad connections. connections Defective Transformer Replace transformer and power supply board. Replace power supply board. Defective component or poor solder connection on Power Supply Board Objectionable noise, Arcing in collector cell Wash dirty cell. crackling/snapping sounds Remove any objects between adjacent collector plates. Wash dirty cell, including any powder buildup on ionizing wires. Straighten any bent plates Poor electrical contact betweeen Replace contact board. Sizzling or hissing noise top collector cell contact and eminating from collector spring contact on contact board. cell Abnormal ozone smell* Damaged ionizing-collector cell See Ionizing-Collector Cell Troubleshooting Procedure. * It is normal for a new unit to produce more ozone than one that has been in operation for several weeks. The problem is self-correcting. If the odor still lingers or increases, please follow this troubleshooting guide's recommendation. 18 10 12 11 PARTS LIST Ref. No. 1 2 3 4 5 6 7 8 9 10 11 12 13 14 15 Description Power Tray Assembly (120 Volt) High Frequency Power Supply Electronic Air Flow Sensor Kit ON/OFF Switch Safety Interlock Switch Cabinet Assembly Pre-Filter (2 required) Ionizing-Collector Cell Ionizing Wire Assembly (1 wire) Handle Access Door Contact Board Assembly (qty. 2) Step Down Transformer (120 Volt to 24 Volt) Insulator Plastic Positioning Spacer (not shown) Heating & Air Conditioning ® Com fort. Q uality. Trust. TM ELECTRONIC AIR CLEANER AND MEDIA AIR CLEANER LIMITED ONE YEAR WARRANTY Applies to EAC6 and MAC1 Models RESIDENTIAL INSTALLATION LIMITED FIRST YEAR We will provide a free replacement part, f.o.b. Fayetteville, Tennessee, for any part which proves to be defective due to workmanship or material. WARRANTY LIMITATIONS: • Begins at date of original purchase. • Applies only to original installation and normal use and service within the United States and Canada. • Excludes door latch, disposable media cartridge, charcoal filter accessories, duct work, and installation. • Applies to service performed by an authorized Amana® brand servicer. • Excludes non-residential installations. WARRANTY IS VOID IF: • Serial plate is defaced or removed. • Product has defect or damage due to product alteration, shipping and handling, accident, fire, flood, lightning or other conditions beyond our control. • Product is not installed according to our instructions and specifications. • Product is operated in a corrosive environment containing concentrations of corrosive agents causing deterioration of metal components. OWNER'S RESPONSIBILITIES: • Provide proof of purchase (sales receipt). • Provide normal care and maintenance. • Make product reasonably accessible for service. • Pay for freight, labor and travel. • Pay for service costs for service outside servicer's normal business hours. • Pay for service calls related to product installation. IN NO EVENT SHALL WE BE LIABLE FOR INCIDENTAL OR CONSEQUENTIAL DAMAGES* *This warranty gives you specific legal rights and you may have others which vary from state to state. For example, some states do not allow the exclusion or limitation of incidental or consequential damages so this exclusion may not apply to you. For answers to questions regarding the above or to locate an authorized servicer, contact: Part No. 20182103S Printed in U.S.A. Applies to Consumer Affairs Department 1810 Wilson Parkway Fayetteville, Tennessee 37334 1-877-254-4729 inside U.S.A. 1-931-433-6101 outside U.S.A. EAC6 and MAC1 Models ® is a trademark of Maytag Worldwide N.V. and is used under license to Goodman Company, L.P. All rights reserved. 5/2002 Goodman Company, L.P. Fayetteville, TN 37334