1
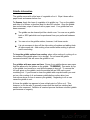
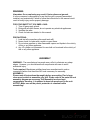
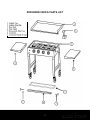
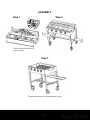
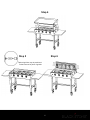
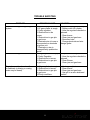
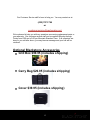
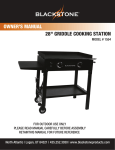
OWNER’S MANUAL
COMMERCIAL GRIDDLE
FOR OUTDOOR USE ONLY
PLEASE READ MANUAL CAREFULLY BEFORE ASSEMBLY
RETAIN THIS MANUAL FOR FUTURE REFERENCE
Griddle Information
The griddle comes with a thin layer of vegetable oil on it. Wipe it down with a
paper towel and season before use.
To Season: Apply thin layer of vegetable oil to griddle top. Turn on the griddle
and allow it to simmer on medium heat for about 45 minutes. Once the griddle
has cooled down, wipe off extra oil with a paper towel. Your griddle has now
been seasoned.
The griddle can be cleaned just like a dutch oven. You can use a griddle
brick or SOS pad which can be purchased from your preferred hardware
store.
You can cut on the griddle surface; however, it will leave marks.
It is not necessary to burn off the old cooking oil residue and adding fresh
oil before each use. Add cooking oil as needed while cooking to prevent
food from sticking.
To keep the griddle surface from rusting: place a thin coating of cooking oil on
the surface of the griddle when it is in storage. Do not leave the griddle
uncovered outside, this will cause the griddle to rust.
For griddles with wax paper on them: Some of our griddles have a wax paper
that has adhered to the grease on the griddle. TO REMOVE: Pour water on top
of the griddle, turn burners on, and allow the paper to burn off. To remove the
left over grime on the griddle, scrub the surface with an SOS pad or good
scrubbing tool. If you choose to clean the griddle with soap and water you must
put on a thin coating of oil and season griddle before surface dries (see
instructions above on how to season your griddle). Neglecting to do so can
cause the griddle to rust.
At times the griddle top appears to have a black paint or Teflon on it. This,
however, is not the case. It generally means that the steel has oxidized and
needs to be seasoned. Oxidation is a natural process that does not affect griddle
performance or longevity.
2
WARNING:
Hazardous fire or explosion may result if instructions are ignored.
It is the consumer’s responsibility to see that the grill is properly assembled,
installed, and maintained. Failure to follow the instructions in this manual could
result in bodily injury and/or property damage.
FOR YOUR SAFETY IF YOU SMELL GAS:
1. Turn off gas supply at tank.
2. Extinguish all open flames; do not operate any electrical appliances.
3. Ventilate the area.
4. Check for leaks as detailed in this manual.
PRECAUTIONS:
1. Leak test all connections after each tank refill.
2. Never check for leaks with a match or open flame.
3. Do not store gasoline or other flammable vapors and liquids in the vicinity
of this or any other appliance.
4. Any LP cylinder not connected for use shall not be stored in the vicinity of
this or any other appliance.
ASSEMBLY
WARNING: The manufacturer has made every effort to eliminate any sharp
edges. However, you should handle all components with care to avoid
accidental injury.
Tools required: Blackstone griddles have been manufactured in such a
convenient fashion that there are NO tools necessary for assembly.
ASSEMBLY:
Please read all instructions thoroughly before proceeding. Find a large,
clean area in which to assemble your grill. Please refer to the parts list and
assembly diagram as necessary. Grill assembly involves large
components; therefore, it is advised to have two people set up the unit.
NOTICE: Make sure all the plastic protection is removed before
assembling!
3
EXPANDED VIEW & PARTS LIST
4
ASSEMBLY
Step 1
Step 2
*Actual locking mechanism may
vary from picture
Step 3
*Removable grease tray should already be in place
5
Step 4
Step 5
Step 6
*Optional grill box may be positioned
on the base unit in place of griddle
6
IMPORTANT INFORMATION
Please read these instructions carefully before assembly and use.
Retain these instructions for future reference.
For outdoors only-do not use indoors.
For use with LPG bottled gas only.
Do not use in an area with flammable objects, structures, or surfaces.
LPG gas cylinders must not be stored or used in the horizontal position.
Laying the cylinder horizontally could allow liquid to enter the gas line,
which could result in bodily and/or damage.
Do not move the griddle while unit is on.
This grill must not be left unattended when it is being used.
Parts of this grill become very hot. Care must be taken when children,
elderly people, and animals are present.
Always turn off the gas bottle when the grill is not in use.
Never cover a grill until it has completely cooled.
Leak test annually and whenever the gas bottle is removed or replaced.
Do not store flammable materials near this grill.
Do not use aerosols near this grill.
Failure to follow these instructions could result in serious injury and/or
damage.
If you have any queries regarding these instructions, contact customer
service.
GAS AND REGULATOR:
This grill can use either propane or butane LPG bottle gas. You must have the
proper regulator and bottle in order for the grill to operate safely and efficiently.
Use of an incorrect or defective regulator is dangerous and will invalidate any
warranty. Please consult your local gas dealer for the most suitable gas bottles
and regulators.
INSTALLATION
LOCATION:
This grill is for outdoor use only and should be placed in a well-ventilated area.
Take care to ensure that it is not placed under any combustible surface. The
sides of the grill should NEVER be closer than two feet from any combustible
surface. Keep this grill away from any flammable materials!
PRECAUTIONS:
Do not obstruct any ventilation openings in the body of the grill. Position the gas
supply bottle on level ground next to the grill and safely away from any source of
heat. Should you need to change the gas bottle, confirm that the grill is turned off
and that there are no sources of ignition (cigarettes, open flames, sparks, etc)
7
nearby. Before proceeding, inspect the gas hose to ensure it is free of any
twisting or tension.
The hose should hang freely with no bends, folds, or kinks that could obstruct
free flow of gas. Apart from the connection point, no part of the hose should
touch any hot grill parts. Always inspect the hose for use with LPG and make
sure it meets the national standards for the country of use. The length of the
hose should not exceed 1.5 meters.
FIXING THE REGULATOR TO THE GAS BOTTLE:
Confirm all grill control knobs are in the off position. Connect the regulator to the
gas bottle according to your regulator and bottle dealer’s instructions.
Leak testing
Confirm that you are in a well-ventilated area and that all grill control knobs are in
the off position. Open the gas control valve on the bottle or regulator. Check for
leaks by brushing a solution of ½ water and ½ soap over all gas system joints,
including all valve connections, hose connections and regulator connections.
NEVER USE AN OPEN FLAME to test for leaks at anytime. If bubbles form over
any of the joints, there is a leak. Turn off the gas supply and retighten all joints
and repeat test. If bubbles form again, do not use the grill and contact customer
service for assistance. Leak test annually, and whenever the gas bottle is
removed or replaced. Always remember that before use, take care to ensure
that no bubbles have formed over any of the joints.
OPERATION
WARNINGS:
Before proceeding, make certain that you understand the IMPORTANT
INFORMATION section of this manual.
Preparation before cooking:
To prevent foods from sticking to the cooking grill, please use a long handled
brush to apply a light coat of cooking or vegetable oil before each grilling session.
(*Note: when cooking for the first time, colors may change slightly as a result.
This is normal and should be expected.)
Lighting the grill:
1. In order for the igniter switch to work, please make sure the battery is
properly installed.
2. Ensure all knobs are in the “OFF” position.
3. Open the gas control valve at the cylinder.
4. From “OFF” position, push down the front left control knob and keep
pressing while turning counter clockwise to the “HIGH” position and
pressing the ignition button (you will hear a clicking sound), this will light
the left hand burner.
5. If burner fails to light, turn to “OFF” position and wait five minutes. Then
begin again with step 3.
8
If burner still fails to light after several attempts, try the manual
ignition procedure below.
6. When the left hand burner is lit repeat step 4 with the adjacent burner until
desired burner(s) are lit.
7. To preheat the grill, place the knob in “HIGH” position for 3-5 minutes.
8. After use, turn all control knobs to the “OFF” position and turn off the gas
control valve at the cylinder.
MANUAL IGNITION PROCEDURE:
1. Take out removable grease drip tray.
2. Open the gas control valve at the cylinder.
3. Insert lit match through the space vacated by grease drip tray on the left
side of the burner.
4. Push and turn the knob closest to the piazzo lighter counter clockwise to
the “HIGH” position and light with match.
5. If the burner fails to light after 5 seconds, turn to “OFF” position and wait 5
minutes. Then begin again from step 2. If the burner fails to light after
several attempts, go to step 6, and call customer service.
6. After successfully lighting the first burner, turn next control knob to the
“HIGH” position. The gas will ignite from lit burner on the left. Follow the
same procedure for each successive burner. Ensure burner is lit before
opening control valve on next burner. Light the remaining burners from left
to right.
7. After use, turn all control knobs to the “OFF” position and turn off the gas
control valve at the cylinder. NOTE: If the flame of the burner has a
yellow hue, adjust the aeration screw located on the neck of the burner.
The burner flame should be blue. Blue hued flames are confirmation that
the burner is burning properly. Turning the screw counter clockwise will
increase the amount of blue and clockwise will increase the amount of
yellow.
End of cooking session:
Do not allow your grill to overheat. After each cooking session, turn the grill
burners to the “HIGH” position and burn for 5 minutes. This procedure will
burn off cooking residue, thus making cleaning easier.
Turning off your grill:
When you have finished using your grill, turn all of the control valves fully
clockwise to the “OFF” position, then turn off the gas at the bottle. Wait until
the grill is sufficiently cool before storing.
9
CARE AND MAINTENANCE
Regularly clean your grill between uses and especially after extended
periods of storage. Ensure that the grill and its components are sufficiently
cool before cleaning.
Never handle hot parts with unprotected hands.
In order to extend and maintain the life and condition of your grill, we
strongly recommend that the unit be covered when left outside for any length of
time, especially during the winter months.
Care and Cleaning:
1. A good grill scrapper is essential for easy clean up.
2. Most foods can be cleaned up by scraping and wiping down the griddle
with a paper towel and cooking oil to prevent rust.
3. To remove tough food residue you can use a mild cream cleaner and pad.
You can also use soapy water or a paper towel and ¼ cup of table salt as
another method of cleaning your griddle. Rinse well and dry to prevent
rusting. Since the griddle surface is steel, you should protect it from
moisture. To do this, spray the griddle with a light coating of vegetable oil
and store in a dry area.
4. Periodically, griddle should be cleaned with a griddle brick or SOS pad.
Burner maintenance:
In most circumstances, burning off the residue after cooking will keep the burner
clean. The burner should be removed and cleaned annually or whenever heavy
build-up is found in order to ensure that there is no blockage (debris, insects) in
either the burner portholes or venture tubes. Use pipe cleaner to clear
obstructions. A wire brush can be used to remove corrosion from the burner
surfaces. When refitting the burner, be careful to check that the venture tubes of
the burner fit over the valve outlets.
Grill body:
Regularly remove excess grease or fat from the grill body with a soft plastic or
wood scraper. It is not necessary to remove all of the grease from the body. For
a deeper clean, use only hot soapy water and a cloth or nylon-bristled brush.
Remove cooking surfaces and burners before cleaning. Do not immerse the gas
controls or manifold in water. Check burner operation after carefully refitting into
the body.
Fittings and Storage:
Annual checking and tightening of metal fittings is recommended. Store the grill
in a cool dry place. Cover the burners with aluminum foil in order to prevent
insects or other debris from collecting in the burner holes. If the grill is to be
stored indoors, the gas bottle must be disconnected and left outside. The gas
bottle should always be stored outside, out of reach of children, and in a dry,
well-ventilated area away from any sources of heat or ignition.
10
TROUBLE SHOOTING
PROBLEM
POSSIBLE CAUSE
Burner will not light using the ignition
system.
1. Check battery.
2. LP gas cylinder is empty.
3. Faulty regulator.
4. Obstructions in the
burner.
5. Obstructions in gas jets
or gas hose.
6. Electrode wire is loose or
disconnected on electrode
or ignition unit.
7. Electrode or wire is
damaged/faulty pushbutton
igniter.
1. LG gas cylinder is empty.
2. Faulty Regulator.
3. Obstructions in burner.
4. Obstructions in gas jets
or gas hose.
1. Replace with a good battery.
2. Replace with full cylinder.
3. Have the regulator checked or
replaced.
4. Clean burner.
5. Clean jets and gas hose.
6. Reconnect wire.
7. Change electrode and wire
change igniter.
1. LP gas cylinder is empty.
2. Obstructions in burner.
3. Obstructions in gas jets
or gas hose.
4. Windy conditions.
1. Use larger cylinder.
2. Clean burner.
3. Clean jets and gas hose.
4. Use grill in a more sheltered
position.
Burner will not light with a match.
Fire in burner tube has a low flame
or flashback (a hissing or roaring
noise may be heard)
11
SOLUTION
1. Replace with full cylinder.
2. Have the regulator checked or
replaced.
3. Clean Burner.
4. Clean jets and gas hose.
Cache Sales
90-Day Warranty
Cache Sales the manufacturer, will warranty for 90 days from purchase all parts, workmanship,
and finishes (against rust).
It will be the manufacturer’s option as to whether to repair or replace any of the above items.
All warranties are limited to the original purchaser only. This warranty does not cover any liability
on the part of Cache Sales., its agents or employees, for any indirect or consequential damages
for breach of warranty.
The purchaser must follow the manufacturer’s usage instructions.
Under no circumstances is the manufacturer responsible for damages from the failure to operate
the grill/griddle properly.
It is the responsibility of the purchaser to establish the warranty period by verifying the original
purchase date with original sales receipt.
For more detailed explanation of the warranty, read below:
Cache Sales warrants to the owner that the product covered by this agreement is free from
defects in material and workmanship under normal use and service for which it was intended if,
but only if, it has been operated in accordance with Cache Sales instructions exclusively for
domestic use, and not for private or public club, institutional, or commercial purposes. Cache
Sales obligation under this warranty is limited to replacing or repairing, free of charge, any part or
parts that may prove, to the satisfaction in Cache Sales, to be defective under normal home use
and service within the following stated periods of time from the date of purchase; a) for ninety (90)
days from purchase, all parts, finish, and workmanship. Should any failure to conform to this
warranty become apparent during applicable warranty periods stated above, the original
purchaser must notify Cache Sales of breach or warranty within the applicable warranty period.
Cache Sales shall upon notice and compliance by the original purchaser with such instructions,
correct such nonconformity by repair or replacement of the defective part or parts. Correction in
the manner provided above shall constitute a fulfillment of all obligations of Cache Sales with
respect to the quality if the product.
Cache Sales does not warrant this equipment to meet the requirement of any safety code of any
state, municipality or other jurisdiction, and the original purchaser assumes all risk and liability
whatsoever resulting from the use thereof, whether used in accordance with Cache Sales
instructions or otherwise. This warranty does not cover and is intended to exclude any liability on
the part of Cache Sales its agents, servants or employees whether under this warranty or implied
by law for any indirect or consequential damages for breach on any warranty. The purchaser
must establish all applicable warranty periods pursuant to this warranty by verifying the original
purchase date by producing the dated sales receipt. This warranty shall not apply to this product
or any other part thereof which has been subject to accident, negligence, alteration, abuse, or
misuse or which as been repaired or altered without Cache Sales written consent, outside of
Cache Sales factory. Cache Sales makes no warranty whatsoever in respect to accessories or
parts not supplied with it. This warranty shall apply only within the boundaries of the Unites
States of America. This warranty gives the original purchaser specific rights, and the original
purchaser may also have other rights, which vary from state to state.
12
Our Customer Service staff is here to help you. You may contact us at:
(435) 787-1794
or
[email protected]
We’re pleased to help you with any questions concerning replacement parts or
your warranty. Our customer service staff can be reached Monday through
Friday from 8:00 am to 5:00 pm Mountain Standard Time. If all operators are
busy or you call after hours, you may leave a message and your call will be
returned.
Optional Blackstone Accessories
Grill Box $99.95 (includes shipping)
Carry Bag $29.95 (includes shipping)
Cover $39.95 (includes shipping)
13