1
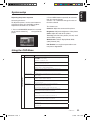
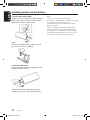
English
OHM107VD
10.2” TFT LCD Roof Mount Monitor with DVD Player
OHM107VD v2.indd 1
OHM107VD
5/12/06 4:27:51 PM
English
1 . CONTENTS
1. 2.
3.
4.
5.
6.
Key Product Features................................................................................................................ 2
Safety Information........................................................................................................................ 3
DVD Video Features................................................................................................................... 4
Controls and Functions................................................................................................................ 5
Controls and Functions : Remote Unit.......................................................................................... 6
Operations.................................................................................................................................. 8
System Setup............................................................................................................................... 11
Using the OSD Menu................................................................................................................... 11
Customising DVD Settings........................................................................................................... 12
Maintenance................................................................................................................................. 13
Troubleshooting......................................................................................................................... 14
Specifications............................................................................................................................. 15
Installation.................................................................................................................................. 16
Wiring and connections................................................................................................................ 16
Installing the player...................................................................................................................... 17
Installing the remote control battery............................................................................................. 18
Notes............................................................................................................................................ 19
Welcome
Thank you for buying the Clarion OHM107VD Roof Mount LCD Monitor with DVD player. Please read
this manual carefully before using this product in order to get the most out the features and functions.
We suggest you keep this manual in a safe place, as it can be a valuable tool in helping you to
understand all of the features and functions of your multimedia system.
Key Product Features
The OHM107VD is a Roof Mounted 10.2" TFT-LCD Monitor and DVD player that can be used
stand-alone or integrated into a mobile multimedia system.
The OHM107VD has the following features:
• 10.2" TFT-LCD color monitor (16:9)
• Roof Mounting Application
• Pixel(dots):800RGB(W)x480(H)
• Wide Viewing angle(up/down/left/right):45/55/65/65
• NTSC and PAL Compatible
• Adjustable Color/Contrast/Brightness/Tint
• Manual Viewing Angle Adjustment
• Vertical Adjustable: Up/Down >150
• White LED Dome Light
• Automotive Startup Protection
• Built-in IR Transmitter for IR Wireless Headphone
• IR Remote Control
• On Screen Display
• 2 x AV Input
• 1 x AV Output
• Slot-in DVD mechanism
• Capability to read:
DVD Format: DVD±R/DVD±RW and
CD Format: CD-DA/CD-RW/MP3/VCD/SVCD
Note: Multi-session CDs and 320kbps WMA files cannot be played on this player.
OHM107VD
OHM107VD v2.indd 2
5/12/06 4:27:51 PM
!
English
Safety Information
CAUTION
• Do not operate this product in any way other than described within this Owners Manual. Failure to
follow the instructions within it will invalidate your warranty.
• SAFETY FIRST! Do not install the display where it may (i) obstruct the driver’s vision, (ii) impair
the performance of any of the vehicle’s operating systems or safety features, including airbags, or (iii)
impair the driver’s ability to safely operate the vehicle.
• When using the system, make sure you are firmly secured by your seat belt to ensure you do not
accidentally hit your head on the screen during sudden braking or other incidents. If you are ever in an
accident, injuries can be more severe if the seat belt is not properly buckled.
• Installation or servicing of this product by persons without training and experience in electronic
equipment and automotive accessories may be dangerous. Visit www.clarion.com.au for your nearest
Authorised Clarion Dealer for professional installation.
• To avoid draining the battery it is suggested that you not use this product for extended periods
without the vehicle engine running.
• Do not disassemble or alter this product in any way. Failure to observe this warning can cause
damage to the unit and void the warranty.
• Never clean the surface of the screen with a chemical solvent or a corrosive detergent. Doing so
may cause permanent damage to the TFT LCD screen.
• Avoid installing this product under direct sunlight or near a hot air vent. Please note that its normal
working temperature is from -5°C to +50°C. If the internal temperature of the vehicle is extremely high,
a short cooling down period is necessary before operating the product.
• If the temperature inside the car is very low and the monitor is used soon after switching on the
heater, moisture may form on the TFT LCD panel. Turn off the unit immediately! Failure to do so may
cause the internal components to short. Allow the unit to rest to allow the condensation to disappear
before you continue operation.
• In extremely cold temperatures, the movement of the picture may be slow and the image may
appear dark. This is not a malfunction and normal function will resume once the TFT LCD reaches its
operating temperature range.
• Do not drop or hit the TFT LCD panel with a hard object, as it may cause permanent damage.
Should the TFT LCD panel break, avoid touching the glass and/or fluid. If you injure yourself as a
result of such contact clean the wound with plenty of water and seek immediate medical attention.
• Due to different vehicle specifications, please kindly ensure that the display monitor is properly
located and not obstructing the air-conditioning vent.
• Avoid inserting any foreign objects into the slot of the disc player. Failure to observe this may void
your warranty and cause damage to the mechanism of this unit.
• Protect your disc!. When you leave the car, be sure to eject any disc from this unit and store it away
from direct sun light.
• Heat and humidity may warp, damage or erase your discs and you may not be able to play
them again.
• Use the supplied screws to fix the OHM107VD Metal Mounting Plate.
OHM107VD v2.indd 3
OHM107VD
5/12/06 4:27:51 PM
English
2 . DVD VIDEO FEATURES
This unit provides the following functions in
addition to high image quality and sound quality
of DVD video:
Multi-sound Function
DVD audio can store up to 8 languages for one
film. This allows for the selection of language of
ones preference.
Multi-angle Function
A DVD video that is filmed from multiple angles
and offers you the choice to select whichever
one you wish, to view a scene from different
perspectives.
Subtitle Function
A DVD video can offer you a choice of up to 32
subtitles languages.
Disc Playback
This DVD player can play the following formats.
DVD's
12cm
VCD's
12cm
Audio CD'S
12cm
MP3 CD'S
12cm
About CD Extra discs
A CD Extra disc is a disc in which a total of two
sessions have been recorded. The first session
is Audio session and the second session is the
Data session. Your personally-created CDs with
more than 2 data sessions recorded cannot be
played on this DVD Video Player.
MP3 Playback
This unit can play back CD-R/CD-RW discs on
which MP3 music data have been recorded.
Region Numbers
The DVD Video System assigns a region
number to DVD video player and DVD disk by
Sales area. The DVD video region number is
marked on the disk Jacket as shown below.
Example :
OHM107VD
OHM107VD v2.indd 4
5/12/06 4:27:53 PM
Item
Name
English
Controls and Functions
Function or Control
1
Dome Light
Provides an interior light for the vehicle.
2
Reset Button
Press with a pencil or other narrow-tipped tool to rest the player.
3
Power Button
Press to turn on or turn off the player
4
Menu Button
Press to open the Display menu. Press again to sequentially select each menu item.
5
AV Input Source Button
Press to select the desired Video Input Mode. (DVD-IN, AV IN1 and AV IN2).
6
(VOL-) Button
Press to reduce a value in the menu
7
(VOL+) Button
Press to increase a value in the menu
8
Dome Light switch
Slide the switch to select the light ON, OFF or DOOR activated. See note below.
9
Panel Open Button
Press to open the LCD panel.
(such as increasing the volume).
10
11
12
Item
Name
1
Power
2
Setup
3
Mute
Button
Button
4
5
Stop button
13
Play or Pause
14
Eject button
7
Function or control
!
Press to turn the OHM107VD On or Off.
Press to skip the previous chapter on DVD or track on CD; Press and hold it to fast
Press to access the setup menu to modify the DVD player settings.
reverse playback at 2x, 4x, 8x, 16x and 32x speeds.
Press to turn the Sound On or Off.
Eject
Press
to skip the next chapter on DVD or track on CD; Press and hold it to fast forward
Press to Eject the disc.
playback
2x, Track
4x, 8x,
16x and
32x or
speeds
Press toatenter
Numbers
directly
0-9
Press
to stop playback,
press [PLAY] or [ENTER] button to start playing at the last
for changing
some settings.
6
Previous
Pause
Play or
position;
Press
button
twiceontoDVD
fully stop playback, Press [PLAY] or [ENTER] button
Press to
go to [STOP]
the Previous
Chapter
or Track
on CD.
to start
playing
at the beginning of DVD.
Press
PlayororPause
Pause the
CD or DVD.
Press
to to
Play
a disc.
Press to Eject the disc.
DVD: Press to change the Audio Language during DVD playback.
8
Audio
9
Arrows and ENTERheadphone.
Press to navigate in a DVD Menu and change setting values in the Display Menu.
buttons
15
IR window
16
Fixing holes
10
17
Random
LCD Shut11Off switch
18
Disc slot 12
REMOTE CONTROL FUNCTIONS
DVD PLAYER CONTROLS & FUNCTIONS
(such as decreasing the volume).
Receives
IRPress
signals
from the
control(Left,
andRight,
sends
IR signals
IR/wireless
VCD/CD:
to change
theremote
Audio Channel
Stereo)
during to
VCD
CD playback.
Skip back
A-B
Connect
the
player
to the
mounting
withand
screws
inserted into these holes.
Press to
Fast
Reverse
playback
at 2x, plate
4x, 8x,16x
32x speeds.
Press
to to
turn
the LCD
screen
Press
playoff
chapters
or tracks
in random order.
Press
repeat
playback
from point A to point B.
Insert
thetodisc
into
this slot.
! This function can be operational
when the green wirePress
of the
is connected
to the
door(DVD-IN,
sensor AV
andIN1
theand
polarity
switch is set to the
13onlySRC
todome
select light
the desired
Video Input
Mode
AV IN2).
correct position (Refer Page 16). Please refer to the vehicle’s wiring manual for the correct connection details.
Return
14
Press to return the main menu, press again to return the last position of playback.
OHM107VD v2.indd 5
15
Angle
16
Zoom
17
Repeat
18
Title
Press to select a different filming Angle.
OHM107VD
Please note that this feature only works if the DVD is recorded with multiple angles.
Press to set the Zoom for movie viewing.
DVD Repeat: Press 1x Chapter, 2x Title, 3x All.
CD Repeat: Press 1x Track, 2x All.
Press to view the DVD disc’s Title Menu.
5/12/06 4:28:0 PM
English
Controls and Functions : Remote Unit
Item
Name
1
Power
Press to turn the OHM107VD On or Off.
2
Setup
Press to access the setup menu to modify the DVD player settings.
3
Mute
Press to turn the Sound On or Off.
4
5
Eject
REMOTE CONTROL FUNCTIONS
Press to Eject the disc.
Press to enter Track Numbers directly or
0-9
for changing some settings.
6
Previous
7
Play or
Pause
Press to go to the Previous Chapter on DVD
or Track on CD.
Press to Play or Pause the CD or DVD.
DVD: Press to change the Audio Language during DVD playback.
8
Audio
9
Arrows and ENTER
buttons
VCD/CD: Press to change the Audio Channel (Left, Right, Stereo) during VCD / CD playback.
10
Function or control
Skip back
Press to navigate in a DVD Menu and change setting values in the Display Menu.
Press to Fast Reverse playback at 2x, 4x, 8x,16x and 32x speeds.
11
Random
Press to play chapters or tracks in random order.
12
A-B
Press to repeat playback from point A to point B.
13
SRC
Press to select the desired Video Input Mode (DVD-IN, AV IN1 and AV IN2).
14
Return
Press to return the main menu, press again to return the last position of playback.
15
16
Angle
OHM107VD
Zoom
OHM107VD v2.indd 6
17
Repeat
Press to select a different filming Angle.
Please note that this feature only works if the DVD is recorded with multiple angles.
Press to set the Zoom for movie viewing.
DVD Repeat: Press 1x Chapter, 2x Title, 3x All.
CD Repeat: Press 1x Track, 2x All.
5/12/06 4:28:2 PM
Audio
9
Arrows and ENTER
buttons
VCD/CD: Press to change the Audio Channel (Left, Right, Stereo) during VCD / CD playback.
10
Skip back
Press to navigate in a DVD Menu and change setting values in the Display Menu.
Press to Fast Reverse playback at 2x, 4x, 8x,16x and 32x speeds.
11
Random
Press to play chapters or tracks in random order.
13
Controls
and Functions
: Remote Unit
A-B
12
Press to repeat playback from point A to point B.
SRC
Press to select the desired Video Input Mode (DVD-IN, AV IN1 and AV IN2).
Item
14
Return
Name
Function
or control
Press to return the main menu, press
again to return
the last position of playback.
1
15
2
Power
Angle
Setup
turn the
OnAngle.
or Off.
Press to select
a OHM107VD
different filming
16
3
Zoom
Mute
Press to set
movie
viewing.
turnthe
theZoom
SoundforOn
or Off.
4
17
Eject
Repeat
DVD
1x Chapter, 2x Title, 3x All.
PressRepeat:
to EjectPress
the disc.
5
18
0-9
Title
Please
that the
this setup
feature
only to
works
if the
recorded
with multiple angles.
Press tonote
access
menu
modify
theDVD
DVDisplayer
settings.
CD
Repeat:
Press
1xNumbers
Track, 2xdirectly
All.
Press
to enter
Track
or
Press
to viewsome
the DVD
disc’s Title Menu.
for changing
settings.
19
6
REMOTE CONTROL FUNCTIONS
English
REMOTE CONTROL FUNCTIONS
DVD: Press to change the Audio Language during DVD playback.
8
Skip forward
Previous
20
Subtitle
7
21
Pause
Menu
8
22
Audio
VOL - / VOL+
23
9
ArrowsNext
and ENTER
buttons
10
24
11
Skip back
Stop
Random
12
A-B
13
25
SRC
Display
14
26
Return
Go To
15
Angle
16
Zoom
17
Repeat
18
Title
Play or
Press to Fast
playback
at 2x,
8x,16x and 32x speeds.
go toForward
the Previous
Chapter
on4x,
DVD
or Track on CD.
Press to select and turn on DVD Subtitles during playback.
Press to Play or Pause the CD or DVD.
Press to view the DVD Main Menu.
Press
and hold
it to display
the Display
Menu.
DVD: Press
to change
the Audio
Language
during DVD playback.
Press
to Decrease
/ Increase
volume.
VCD/CD:
Press to change
thethe
Audio
Channel (Left, Right, Stereo) during VCD / CD playback.
Press
to theinnext
Chapter
DVD
or Track
on CD.
Press to
to go
navigate
a DVD
Menuon
and
change
setting
values in the Display Menu.
Press to stop playback, press [PLAY] or [ENTER] button to start playing at the last position;
Press to Fast Reverse playback at 2x, 4x, 8x,16x and 32x speeds.
Press [STOP] button twice to fully stop playback, Press [PLAY] or [ENTER] button to start
Press to play chapters or tracks in random order.
playing at the beginning of DVD.
Press to repeat playback from point A to point B.
Press to Display the Playback InformationPress to select the desired Video Input Mode (DVD-IN, AV IN1 and AV IN2).
(Title, Chapter, Track and Time).
Press to return the main menu, press again to return the last position of playback.
Press to Start Playback at a selected Chapter, Track or Time.
Press to select a different filming Angle.
Please note that this feature only works if the DVD is recorded with multiple angles.
Press to set the Zoom for movie viewing.
DVD Repeat: Press 1x Chapter, 2x Title, 3x All.
CD Repeat: Press 1x Track, 2x All.
Press to view the DVD disc’s Title Menu.
19
Skip forward
20
Subtitle
21
Menu
22
VOL - / VOL+
Press to Fast Forward playback at 2x, 4x, 8x,16x and 32x speeds.
Press to select and turn on DVD Subtitles during playback.
Press to view the DVD Main Menu.
Press and hold it to display the Display Menu.
23
Next
Press to Decrease / Increase the volume.
Press to go to the next Chapter on DVD or Track on CD.
Press to stop playback, press [PLAY] or [ENTER] button to start playing at the last position;
24
Stop
Press [STOP] button twice to fully stop playback, Press [PLAY] or [ENTER] button to start
playing at the beginning of DVD.
25
Display
26
Go To
Press to Display the Playback Information(Title, Chapter, Track and Time).
OHM107VD v2.indd 7
Press to Start Playback at a selected Chapter, Track or Time.
OHM107VD
5/12/06 4:28:3 PM
CLOCK ..... AM 10: 00
(Folder)
∗ Refer to “Title display mode”
..... FOLDER
input source and format are displayed in the top
left hand corner of the screen:
• Input source name
• The input source is
detected automatically
(NTSC or PAL)
TITLE
P
DC
MAIN-2 ..... F03 T05
To open the DVD player
1. Press Open Button to unlock the LCD panel.
(Folder No., track No.)
(Track No., Play time)
Basic DVD1.Operation
MAIN-1 ..... T02 02 : 18
English
3 . OPERATIONS
DVD-IN
PAL
2.
1.
2. Swing the monitor downward to the desired
angle. Note : The LCD display opens to a maximum angle of 150° degrees. Do not attempt to
open it further.
1.
DCP
Selecting the Input Source
1. When power is ON, press SRC button to
switch from one mode to another.
2. The operating modes changes in the following
order : DVD-IN > AV1 > AV2 > DVD-IN
Note: DVD disc cannot be inserted if product
switched to AV mode.
Turning Off The Player
2.
DCP
2.
150°
Notes: 1. The default source is DVD-IN.
2. If the message “NO DISC” is displayed on
the screen, insert disc media or press SRC
button to change input source.
1.
To close the DVD player, swing the LCD panel
upward until you hear the lock click.
1.
DCP
lortnoc ro noitcnuF
Press the [
] button again to turn the player
off. If there is a disc media in the player, it will
continue playback from last position the next
time you turn the player on. Note: Disc cannot
be ejected if player is switched off.
Playing a Disc
1. If the input source isn’t already set to DVD-IN,
Item Name
press SRC button to change the input source to
Power
1
Press to turn the OHM107VD
DVD-IN
metI
Setup
2
emaN
Press to access the setup m
Item
Function
Name
rewDVD
oP into
a disc
to
1 the disc slot on the
Mute seconds, thePress to turn the Sound On o
2.
3
Power
right of the player.
After
several
1 puteS
Press to turn the OHM107VD On or Off.
.sgnittes reyalp DVD eht yfidom ot unem putes eht ssecca ot sserP
2
screen displays
a "loading"
message.
Setup4
Press
to Eject
thetodisc.
2
Press to access
the setup
menu
modify the
DCP
2.
.ffO ro nO DV701MHO eht nrut ot ss2.
erPInsert
etuM
.ffO ro nO dnuoS eht nrut ot sserP
3
Mute
3
Eject
Press to turn the
Sound
On or Track
Off. Numbe
Press
to enter
3. Press Play/Pause button
or ENTER
button.
5 4 0-9
tcejE
4
Press to Eject for
the changing
disc.
• To stop playback,
press
Eject STOP button.
some settings.
ro yltcerid srebmuN kcarT retne ot ss•
erPTo play the previous track or chapter, press
Press to enter Press
Track Numbers
directly
or
9-0
5
to go to the
Previous
C
! Make sure that cords and other items do
0-9
5
Chapter"
button
.sgnittes emos gnignahc"Previous
rof
6
Previous
for changing some settings.
not get caught in the panel when you close it.
or Track on CD.
• To play the next track or chapter, press "Next
D nclose
o retpathe
hC sLCD
uoiverPpanel
eht ot og ot sserP
For your safety, be sureDVto
Press to go to the Previous Chapter on DVD
Chapter"
Item Name
Function
or control
6
sbutton
uoiver6P
Press
to Play
or Pause the C
Play or
when not use it.
7Previous
.DC no kcarT
or Trackthe
on CD.
• roTo pause
or
resume
playback,
press
Pause
Power
1
Press to turn the OHM107VD On or Off.
button
Press to Play or Pause the CD or DVD.
.DVD ro DC eht esuaP ro yalP ot ssPlay/Pause
erP
Play or
.csid eht tcejE ot sserP
2
Setupro yal7P
to change
the Au
7 toAudio
Press
access the setup menu toDVD:
modifyPress
the DVD
player settings.
esuPause
aP 8
.sdeOHM107VD
eps x23 dna x61,x8 ,x4 ,x2 ta kcabyalp esreveR tsaF ot sserP
.redro modnar ni skcart ro sretpahc yalp ot sserP
OHM107VD v2.indd 8
.B tniop ot A tniop morf kcabyalp taeper ot sserP7
.)2NI VA dna 1NI VA ,NI-DVD( edoM tupnI oediV derised eht tceles ot sserP
8
10
kcab pikS
Random Press to Fast Reverse
at 2x, 4x,
11
Press toplayback
play chapters
or 8x,1
tra
Skip back
Press
01to go to the Previous Chapter on DVD
Random
12
A-B
Press to play chapters
tracksplayback
in randomfrom
ord
Press toorrepeat
on CD.
modnaR or Track
11
A-B
Press
to
repeat
playback
from
point
A
to
poin
SRC
13 to Play or Pause the CD or DVD.
Press to select the desired V
Press
Play or
B-A
SRC 21
5/12/06the9:00:17
Pause
13
desiredPM
Video Input Mode
Return Press to selectPress
14
to return the main men
CReturn
RS DVD:
the Audio Language during DVD playback.
31Press to change
14
Press to return the main menu, press again to
Audio
Press to select a different film
Previous
11
12
SNOITCNUF
6
ROL FUNCTIONS
NTROL FUNCTIONS
Mute
VCD/CD: Press to change th
3
Press
to turnthe
the Sound
On or Off.
4. Press
Eject button to
eject
disc
DVD:from
Press the
to change the Audio Language du
.kcabyalp DVD gnirud egaugnaL oiduA eht egnahc ot sserP :DVD
Arrows and ENTER
8 oidAudio
uA Press
player
4
Eject the disc.
Press
to navigate
in aChannel
DVD M
Eject
9 8 tobuttons
Turning on the player
VCD/CD: Press
to change
the Audio
.kcabyalp DC / DCV gnirud )oeretS ,thgiR ,tfeL( lennahC oiduA eht egnahc ot sserP :DC/DCV
Press the [
] button on the remote control or
Arrows
andtoENTER
Press
enter Track Numbers directly or
Fast
Reverse
playba
Press
to navigate
in] ato
DVD
Menu
and change
ETNE dna9 sbutton
wobuttons
rrA 10
back
5 R0-9
to9turn offSkip
the
player
[ Press
.uneM yon
alpsthe
iD ehfront
t ni sepanel.
ulav gnitThe
tes egplayer
nahc dnturns
a uneMon
DVD
a nithe
etagivan ot ss5.
erPPress Powersn
and
some settings.
ottub for changing
Playing a Disc (Notes)
• When DVD Playback is interrupted by switching the product OFF; when it is switched ON
again the DVD commences playback from the
start of the disc.
• If during DVD playback, the STOP button is
pressed and then the PLAY button is pressed,
the DVD will recommence playback from the
beginning of the last chapter played.
Muting the sound
1. Press MUTE button to mute the sound during
disc playback.
2. Press MUTE button again to enable sound.
Playing DVD's
Accessing the DVD root menu
• Press MENU button during playback to display
the menu. A DVD is divided into sections called
titles and chapters. When you play a DVD, a root
menu of the disc appears on the screen of your
Monitor. The contents of the menu vary from
disc to disc. Press MENU during playback to
display the menu again. Some DVDs only allow
you to select disc playback options using the
DVD root menu.
Displaying Playback Information
During the playback, press DISPLAY button
continuously to show the following:
Changing the audio language during
Playback (Multi Audio)
1. Press AUDIO button to change audio track
during DVD playback. The current audio
language number, the total number of available
audio channels (languages) and current
language are displayed.
2. If there are multiple languages are available,
press the AUDIO button again to cycle through
the available languages. The audio display
disappears automatically if AUDIO button is not
pressed again within 3 seconds.
Note: Some DVDs only allow access to this
function through the DVD menu.
OHM107VD v2.indd 9
English
Basic DVD Operation
Turning the subtitles and changing the
subtitle language on :
1. Press SUBTITLE button to change the subtitle language you want during DVD Playback.
The current language number, the total number
of the subtitle languages and current language
are displayed.
2. If multiple languages are available, press
SUBTITLE button again to cycle through the
available languages.
3. To turn subtitles off, Press SUBTITLE button
until “subtitle off” appears on the screen. The
subtitle display disappears automatically if
SUBTITLE button is not pressed again within 3
seconds.
Note: Some DVDs only allow access to this
function through the DVD menu.
Using Repeat Playback
To repeat a chapter, a title, or both:
During playback, press REPEAT repeatedly to
cycle through the available settings:
• Chapter---Repeats the current chapter.
• Title---Repeats the current title.
• All---Repeats all chapters and titles.
• Off---Resumes normal playback
To repeat a custom segment:
1. During playback, press A-B to set the starting point “A”.
2. Press A-B again to set the ending point “B”. The player plays the segment between point A and point B repeatedly.
3. To cancel the repeat playback and resume normal playback, press A-B again.
Changing viewing angle during playback
(Multi-Angle)
To change viewing angle:
1. Press ANGLE button to cycle through available viewing angles during DVD play
back. The current angle number and the total number of angles available appear on the screen.
2. Press ANGLE button again to select a different angle, then press it again to exit and return to normal viewing angle.
OHM107VD
5/12/06 4:28:8 PM
English
Basic DVD Operation
Changing viewing angle during playback
(Multi-Angle)
3. The angle display disappears
automatically if the ANGLE button is not pressed again within 3 seconds.
Note: Viewing angles are available for a DVD if
the back of the DVD jacket contains a multiple
angles icon.
Using Zoom
To ZOOM the image:
During disc playback, press ZOOM to switch
through the available zoom settings. (2x, 3x, 4x,
1/2x,1/3x,1/4x and normal)
To select the folders and tracks you want:
1. Press DISPLAY to list all the folders, then press up or down button on the remote control to choose a folder from the folder list.
Note: If it is JPEG disc, press ZOOM, then
press FF or FR to select settings.
Playing Audio CD's
To display playing time and the current track:
During CD playback, press DISPLAY button
to display, the disc type, current time, current
track number and total number of the tracks are
displayed on the screen.
2. Press ENTER button on the remote control, the screen will display the files list of the folder your selected.
lortnoc ro noitcnuF
emaN metI
To repeat a track
or the entire CD:
Item Name
Fun
rewoP
During playback, press REPEAT
.ffO ro nrepeatedly
O DV701MHOtoeht nrut ot sserP
1
cycle through the available settings:
1 pPower
Press
to
turn
the
OHM107VD
On
or
Off
uteS
.sgnittes reyalp DVD eht yfidom ot unem putes eht ssecca ot sserP
2
• Track---Repeats the current track.
Setup
2
Press to access the setup menu to mod
etuM
.ffO ro nO dnuoS eht nrut ot s serP 3. Press up or
• All---Repeats the entire CD.
down 3button on the remote Mute
Press to turn the Sound On or Off.
• Off--- Resume normal playback. .csid eht tcejE ot s serP control to3 choose
a file
4 from the files list.
tcejE
4
Press to Eject the disc.
Eject
10
OHM107VD
.gniweiv eivom rof mooZ eht tes ot sserP
.llA x3 ,eltiT x2 ,retpahC x1 sserP :taepeR DVD
OHM107VD v2.indd 10
.llA x2 ,kcarT x1 sserP :taepeR DC
.uneM eltiT s’csid DVD eht weiv ot sserP
REMOTE CONTROL FUNCTIONS
.selgna elpitlum htiw dedrocer si DVD eht fi skrow ylno erutaef siht taht eton esaelP
15
Angle
16
mooZ
Zoom
61
taepeR
71
Repeat
17
eltiT
81
SNOITCNUF LORTNOC ETOMER
ro yltcerid srebmuN kcarT retne ot s serP 4. Press ENTER button on the remote To repeat a custom segment:
9-0
5
Press to enter Track Numbers directly o
1. During playback, press A-B to.sset
os gnignah c rof control to play0-9this file.
gnittthe
es em
5
starting point “A”.
for changing some settings.
DVD no retpahC suoiverP eht ot og ot sserP
2. Press A-B again to set the ending point 5. Press
to move
to the next file.
6
suoivthe
erP
Press to go to the Previous Chapter on
.DC
“B”. The player plays the segment between
no kcarT ro Or press6the
to
move to the previous Previous
or Track on CD.
point A and point B repeatedly.
.DVD ro DC eht esuaP ro yalP ot s serP audio file.
ro yalP
7
3. To cancel and resume normal playback, esuaP Play or
Press to Play or Pause the CD or DVD.
press A-B again.
To repeat a file7 or folder
Pause of an MP3 disc:
.kcabyalp DVD gnirud egaugnaL oiduA eht egnahc ot sserP :DVD
oiduA press
During MP3 playback,
button
8 the REPEAT
DVD: Press to change the Audio Langu
.kcabyalp DC / DCPlaying
V gnirud )oMP3
eretS ,CD's
thgiR ,tfeL( lennahC oiduA eht egnahc ot sserP :DCto
/DCcycle
V
Audio
through
settings:
8 the
RETNE dna sworrA
VCD/CD: Press to change the Audio Ch
iseahtformat
audio.
.uneMMP3
yalpsiD
ni seulavfor
gnitstoring
tes egnahdigital
c dna un
eM DVDAn
a ni etagivan ot s serP • Repeat single---repeats
the current
file.
9
snoArrows
ttub and
ENTER
audio track is compressed into the MP3 format
Pressof
to navigate in a DVD Menu and c
• Repeat9all---repeats
the
contents
buttons 01
.
s
d
e
e
p
s
x
2
3
d
n
a
x
6
1
,
x
8
,
x
4
,
x
2
t
a
k
c
a
b
y
a
l
p
e
s
r
e
v
e
R
t
s
a
F
o
t
s
s
e
r
P
kcab pikS
with little loss of audio quality, while taking up
current
folder.
Press to Fast Reverse playback at 2x, 4
10modnaR Skip back
much less disc space.
.redThis
ro moplayer
dnar ni scan
kcartplay
ro sreCDtpahc yalp ot s serP • Repeat off---turns
1off
1 repeat and Random
R/RW disc that contain music MP3 files.
11normal
Press to play chapters or tracks in rand
resumes
playback.
B-A
.B tniop ot A tniop morf kcabyalp taeper ot sserP
21
When a MP3 disc is inserted into the player, the
A-B
12
Press to repeat playback from point A t
CRS
.menu
)2NI VA screen
dna 1NI Vappears
A ,NI-DVD(automatically.
edoM tupnI oediVYou
deriscan
ed eht tceles ot sMP3
serP Icons
31
SRC
13 nruoftean
Press to select the desired Video Input
use the menu screen to select the folders and
R item
.kcabyalp fo noitisop tsal eht nruter ot niaga sserp ,unem niam eht nruter ot sserP This icon in front
41indicates it’s a folder.
tracks you want, or the player plays the tracks in
Return
14
Press to return the main menu, press ag
elgnA the
gnimdisc.
lif tnereffid a tceles ot sserP This icon in front of an item indicates it’s an MP3 file.
the order they were burned .onto
elgnA
51
Press to select a different filming Angle.
Please note that this feature only works
Press to set the Zoom for movie viewing
4:28:111xPM
DVD 5/12/06
Repeat: Press
Chapter, 2x Title
CD Repeat: Press 1x Track, 2x All.
Adjusting the picture response
English
System setup
2. Press MENU button repeatedly to select the
item you want to change.
3. Press < or > buttons to change the value of
the item selected.
Accessing the menu :
To adjust the picture, use the menu button to
select the features you would like to adjust.
Adjustment selections are as follows.
The features are:
Contrast: Adjust the contrast of the picture
Brightness: Adjust the brightness of the picture
Color: Adjust the color of the picture
Tint: Adjust the tint of the picture (it is only available in NTSC system)
Wide Screen: Selects display Mode: Wide
(16:9)/ Normal (4:3)
LAC Enable: Low angle compensation to correct picture degradation.
1. Press and hold MENU button for 3 seconds
on the remote control or [ ]the keypad of the
player.
Using the OSD Menu
Press SETUP on the remote control and the OSD menu opens.
Description
Menu
General setup page
TV DISPLAY: modifies the display if it doesn’t match the width to height ratio the DVD uses.
You can select from the following:
·NORMAL/PS ·NORMAL/LB ·WIDE
ANGLE MARK: Selects a different angle if the back of the DVD jacket contains a multiple
angles icon. You can select ON or OFF.
OSD LANG: Selects a language for DVD play menu. You can select from following:
·ENGLISH ·FRENCH ·SPANISH·GERMAN·ITALIAN
CAPTIONS: Selects the caption for DVD play. You can select ON or OFF.
SCREEN SAVER: Protects the screen if it paused about 5 minutes. You can select ON or
OFF.
Speaker setup page
DOWNMIX: Applies to Dolby digital sound. You can select from following:
PACKAGE CONTENTS
·LT/RT ·STEREO
Speaker setup page
DUAL MONO: Selects the different channels of sound. You can select from following:
·STEREO ·L-MONO ·R-MONO ·MIX-MONO
DYNAMIC: Selects the different rating level of dB. Select from:
·Off ·2/8 ·4/8 ·6/8 ·FULL
Preference page
TV TYPE: Selects the TV system .You can select from following:
·PAL (Europe and Asia) ·NTSC (United States)
Note: Altering this setting will also change the RCA AV Output.
AUDIO: Selects the audio track language. You can select from following:
·ENGLISH·FRENCH·SPANISH·CHINESE ·RUSSIAN·THAI
SUBTITLE: Selects the language of the subtitles displayed on the screen. You can select
from following:
·ENGLISH·FRENCH·SPANISH·CHINESE ·RUSSIAN·THAI ·OFF
DISC MENU: Selects the language of the current disc. You can select from following:
·ENGLISH·FRENCH·SPANISH·CHINESE ·RUSSIAN·THAI
PARENTAL: Restricts the viewing of movies to children of appropriate age levels only. You
can select 1 to 8.
PASSWORD: Uses the number key”0” to “9” to input 4-digit password. The default
password is 3308.
DEFAULT: Resets all settings to the factory defaults.
OHM107VD v2.indd 11
OHM107VD
11
5/12/06 4:28:13 PM
English
Customizing DVD settings
Using the general setup page:
1. Press SETUP button on the remote control. The DVD setup menu opens.
2. Press or to select general setup page, then the list opens.
3. Press the or to select the desired setting item. The items include TV DISPLAY, ANGLE
MARK, OSD LANG, CAPTIONS and SCREEN SAVER.
4. Press ENTER to open the list, then press
or to choose the setting.
5. Press ENTER to confirm.
6. Press SETUP to exit the setup menu.
Using the speaker setup page:
1. Press SETUP button on the remote control. The DVD setup menu opens.
2. Press or to select speaker setup page, then the list opens.
3. Press or to select the desired setting.
The items include DOWNMIX, DUAL MONO and DYNAMIC.
4. Press ENTER to open the list, then press
or to choose the values.
5. Press ENTER to confirm.
6. Press SETUP to exit the setup menu.
Using the preference page:
1. This setting is only available in stop mode or when no disc in the player.
2. Press SETUP button on the remote control. The DVD setup menu opens.
3. Press or to select preference page, then the list opens.
4. Press or to select the desired setting item. The items include TV TYPE, AUDIO, SUBTITLE, DISC MENU, PARENTAL, PASS
WORD and DEFAULT.
5. Press ENTER to open the list, then press
or to choose the setting.
6. Press ENTER to confirm.
7. Press SETUP to exit the setup menu.
Note:
This icon indicates that it is locked. You can
not change the rating (parental control level)
This icon indicates that it is unlocked. You
can change the rating (parental control level)
12
OHM107VD
OHM107VD v2.indd 12
5/12/06 4:28:15 PM
Use only compact discs bearing the
mark.
Do not play heart-shaped, octagonal, or other
specially shaped compact discs.
Some CDs recorded in CD-R/CD-RW mode
may not be usable.
Handling
• Compared to ordinary music CDs, CD-R and
CD-RW discs are both easily affected by high
temperature and humidity and some of CD-R
and CD-RW discs may not be played.
Therefore, do not leave them for a long time in
the car.
• New discs may have some roughness around
the edges. If such discs are used, the player
may not work or the sound may skip. Use
a ball-point pen or the like to remove any
roughness from the edge of the disc.
English
Maintenance
Storage
• Do not expose compact discs to direct
sunlight or any heat source.
• Do not expose compact discs to excess
humidity or dust.
• Do not expose compact discs to direct heat
from heaters.
Cleaning
• To remove fingermarks and dust, use a
soft cloth and wipe in a straight line from
the center of the compact disc to the
circumference.
• Do not use any solvents, such as
commercially available cleaners, anti-static
spray, or thinner to clean compact discs.
• After using special compact disc cleaner, let
the compact disc dry off well before playing it.
Ball-point pen
Roughness
• Never stick labels on the surface of the
compact disc or mark the surface with a pencil
or pen.
• Never play a compact disc with any
cellophane tape or other glue on it or with
peeling off marks. If you try to play such a
compact disc, you may not be able to get it
back out of the CD player or it may damage
the CD player.
• Do not use compact discs that have large
scratches, are misshapen, cracked, etc. Use
of such discs may cause misoperation or
damage.
• To remove a compact disc from its storage
case, press down on the center of the case
and lift the disc out, holding it carefully by the
edges.
• Do not use commercially available CD
protection sheets or discs equipped with
stabilizers, etc. These may damage the disc or
cause breakdown of the internal mechanism.
OHM107VD v2.indd 13
LCD Panel Maintenance
• Wipe off any dust gently with a soft, dry cloth.
• The surface is easily scratched; do not rub it
with hard objects.
Do not use any chemical solvent, cleaning agent
or corrosive detergent to clean away dirt on the
surface of the screen.
OHM107VD
13
5/12/06 4:28:16 PM
English
4 . TROUBLESHOOTING
If operation freezes, the screen goes black or the unit should otherwise not function properly, try turning the unit OFF and back ON. If the unit does not respond, press the reset switch (see page 9) .
Problem
Cause
Disc inserted incorrectly
Player does not play disc
The player suddenly stopped
working or the screen went black
Player doesn’t turn ON
Player operates erratically
Picture Skips
Intermittently
Occasions
Blurred picture
No sound can be heard from the IR
wireless headphones.
Disc cannot be inserted or ejected
ceiling).
Check the disc format.
Disc is dirty or scratched
Clean or replace the disc.
Player error
Try turning the player off and on. If the player still
doesn’t respond, press the reset button.
The car ignition (or
Insert the key into the ignition and turn it to
ACC/Accessory) is off
ACC/Accessory.
Condensation in the player
Wait for about one hour or until condensation
evaporates.
Battery needs replacing
Replace the battery.
Dirty IR window on the Player or
remote control
Clean the player’s and the remote control’s IR
windows.
Loose connections
Check and tighten all connections.
Disc is dirty or scratched
Clean or replace the disc.
Possible interference.
(E.g. high voltage wire,
transformer or aircraft etc…)
Move the vehicle away from the interference.
temperature area.
This is a characteristic of LCD displays in low
temperature, it will restore to normal brightness after
starting the display for few minutes.
Picture is dull / not bright enough
Adjust the brightness setting.
Headphones are switched off.
Turn on the headphones.
The battery in the headphone is
low.
Replace or recharge the batteries.
There is object blocking the
transmitting module or beyond
the effective receiving area.
Player must not be in AV1 or AV2
mode. Discs are only accepted or
ejected in DVD mode.
The Car ACC or IGN is OFF.
14
Reinsert the disc with the label side up (facing the
Disc format is not supported
The equipment locates at a low
The picture on the screen is dark
Solution
Remove the blocking object or move back to the
receiving area.
Press the SRC button to select DVD mode.
Turn the IGN key to ACC
OHM107VD
OHM107VD v2.indd 14
5/12/06 4:28:16 PM
SPECIFICATIONS
English
5 . SPECIFICATIONS
Item
Specification
Power Source
Vehicle battery (DC +10V ~ +16V)
Operating Voltage
DC +14V
Mechanism
Manual Open / Close
Display Angle
Vertical Adjustable: Up/Down > 150°
Pixels
800RGB(W)x480(H)
Viewing angle (up/down/left/right)
45/55/65/65
Operating Current / Voltage
<2000mA / Typical VDD=14V
Dome Light
2W
Operation Temperature
-5°C to +50°C
Storage Temperature
-20°C to +70°C
Note : Specifications and design are subject to change without notice
for further improvement.
Package Contents
PACKAGE CONTENTS
Name of parts
Quantity
Player
1
IR remote control with battery
1
IR wireless headphones
2
AV cable
1
AAA batteries for IR
headphones
4
ST4.2x16 screw
6
CM 4x10 screw
4
Metal mounting plate
1
User’s manual
1
Rubber gasket
1
Use only the contents of this package to
install and use this player. Use of any accessories not provided may result in damage.
!
OHM107VD v2.indd 15
OHM107VD
15
5/12/06 4:28:17 PM
English
6 . INSTALLATION
Note: Do not attempt to install or service your player by yourself. Installation or servicing of the player
by persons without training and experience in electronic equipment and automotive accessories may
be dangerous and could expose you to the risk of electric shock or product failure.
Wiring and connections
bare metal and is securely fastened using the
sheet metal screw provided.
4. Door Lead (Green)
This wire connects the door sensor of car. Then
the dome light can be switched by opening or
closing door.
5. TFT LCD Panel
Leave protective film on TFT LCD screen until
installation is complete.
6. AUX A/V, Input 1
7. AUX A/V, Input 2
8. AUX A/V, Output
An auxiliary A/V output is provided to drive an
external monitor. This signal mirrors what’s being shown on this player. The volume function
does not affect the Auxiliary A/V Output.
5 TFT LCD Panel
9. Polarity switch: Dome Light
Please slide to “-” at the left position if your
vehicle’s power supply system is
negative; Please slide to “+” at the right position
if your vehicle’s power supply system is positive.
Notes:
1. Please slide it fully to the correct polarity side
2. Do not slide this switch while your player is
ON. This may result in damage.
1. Battery + lead (Yellow)
To connect the positive terminal of the car
battery.
2. ACC Power Lead (Red)
To ACC power lead powered when engine key
position is ACC.
3. Ground Lead (Black)
Connect the lead to a good chassis ground on
the car. Make sure the connection is made to
16
OHM107VD
OHM107VD v2.indd 16
5/12/06 4:28:31 PM
1. Identify what the polarity the vehicle Dome
Light circuit is. * Refer to section 6 : "9. Polarity
Switch" on Page 16 and set this switch correctly.
9. Attach the DVD player to the metal mounting
plate using the CM 4x10 screws.
English
Installing the player
2. To prevent short circuits, remove the key
from the ignition and disconnect he terminal of
battery.
3. Disconnect the original dome light.
4. Attach the metal mounting plate to the roof
Using the ST4.2*16 screws.
Note: Do not to cover the original dome light
opening.
10. Reconnect the terminal of the battery.
5. Pull out the original dome light Power wire
and signal/power cable through the original
dome light opening.
6. Place the rubber on the player surround
7. Connect input and output cables.
Notes:
• Remember to connect the red wire to the ACC
of the ignition switch. Or the battery charge
might be drained prematurely.
• If the fuse is opened, first make sure that the
cables have not caused a short circuit, and
then replace the old fuse with a new one of the
same ratings.
• Do not have unconnected cables or terminals touch the metal on the car or any other
conducting material.
• To prevent short circuits, do not remove the
caps from unused terminals or from the ends of
the unconnected cables.
• After the display unit is installed, check and
make sure the brake lights, blinkers, wiper, etc.
on the vehicle are working properly.
• Insulate unconnected wires with vinyl tape or
other similar material.
• Make sure that cords and other items do not
get caught in the panel when you close it.
For your safety, be sure to close the LCD panel
when not use it.
8. Connect the wire harness in the following order: Ground wire (Black), Battery wire (Yellow),
+ACC wire (Red) and Door wire (Green).
OHM107VD v2.indd 17
OHM107VD
17
5/12/06 4:28:32 PM
English
Installing remote control battery
1. Pull out the battery holder.
Follow the arrow 1 slide it to the right toward the
battery while at the same time pull the battery
holder away from the remote control.
Notes:
• Use the remote control only inside
the vehicle. Tinted windows will effect the signal
of the remote controls transmission.
• Useable range of the IR Remote Control is
approx. 3 meters.
• Direct sunlight or very bright light reduces
sensitivity of the remote control receiver. Be
sure the player is not located in direct sunlight.
• Any obstruction between the remote sensor
and remote control may disrupt reception.
2. Place the battery.
Place the new lithium battery with the (+) side
up. (The type of battery: CR2025)
3. Push the holder back.
Using the finger to push in the holder back until
the locking sound is heard.
4. Aim the IR Remote Control directly at the
DVD player, then press any button to operate.
18
OHM107VD
OHM107VD v2.indd 18
5/12/06 4:28:33 PM
OHM107VD v2.indd 19
English
Notes
OHM107VD
19
5/12/06 4:28:33 PM
English
Clarion Co., Ltd.
All Rights Reserved. Copyright 2007: Clarion Co., Ltd.
Printed in China / www.clarion.com
OHM107VD v2.indd 1
OHM107VD
5/12/06 4:28:33 PM