1
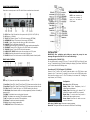
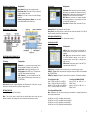
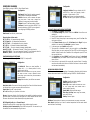
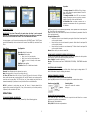
CONTENTS GENERAL SAFETY REQUIREMENTS CONNECTORS AND DEFINITION FRONT PANEL CONTROLS REMOTE CONTROL FUNCTIONS INSTALLATION SELECTING OUTPUT SIGNAL TO TV SETTING THE TIME ANTENNA CONFIGURATION SEARCHING CHANNELS CONFIGURING DiSEqC POSITIONER AUTOMATIC SEARCH USING BLIND SEARCH FEATURE USING EVENT TIMER TO CHANGE CHANNEL OR SATELLITE SELECTING RADIO CHANNELS VIEWING SCRAMBLED CHANNELS 2 3 3 4 4 5 5 6 7 7 8 8 9 9 10 10 ELECTRONIC PROGRAM GUIDE TO DISPLAY SUBTITLES TO SELECT AUDIO LANGUAGE TO DISPLAY TELE-TEXT CREATING FAVORITE CHANNELS EDITING CHANNELS EDITING SATELLITE AND TP EDITING CHANNEL PIDS TO SET PARENTAL LOCK TO RESET YOUR STB TO UPGRADE SOFTWARE STB TO STB COPY FUNCTION TO UPGRADE SOFTWARE VIA PC EDITING TP IN CHANNEL SEARCH TROUBLE SHOOTING GUIDE GENERAL SPECIFICATIONS 11 11 11 11 11 12 12 13 13 14 14 14 14 15 15 15 INTRODUCTION Welcome to the world of Manhattan digital satellite receivers. Please read this manual and the following general safety requirements carefully before installing your STB. The Plaza XT is a high performance digital satellite receiver, supporting many different requirements of broadcast standards worldwide. This STB includes the best possible features as well as Blind Search together with the most up-to-date electronics hardware and easy to use on-screen menu. GENERAL SAFETY REQUIREMENTS Digital Satellite Receiver Owner’s Manual 1. 2. 3. 4. Free To Air / Common Interface / Go To X / USALS WARNING: Do not install this equipment in a confined space such as a bookcase or similar unit. Covering the ventilation openings with items such as newspapers, tablecloths, curtains etc should not impede the ventilation. WARNING: To reduce the risk of fire or electric shock, do not expose this apparatus to rain or moisture. The apparatus shall not be exposed to dripping or splashing and that no objects filled with liquids, such as vases, are placed on apparatus. WARNING: The mains plug is used as disconnect device, the disconnect device shall remain readily operable. Correct disposal of this product: This marking indicates that this product should not be disposed with other household wastes throughout the EU. To prevent possible harm to the environment or human health from uncontrolled waste disposal, recycle it responsibly to promote the sustainable reuse of material resources. To return your used device, please use the return and collection systems or contact the retailer where the product was purchased. They can take this product for environmental safe recycling. 2 CONNECTORS AND DEFINITIONS Please do not connect power to the STB until all other connections have been made. REMOTE CONTROL FUNCTIONS NOTE: POS Positioner key is active only in DiSEqC 1.2 mode. It is not active in USALS mode. C1: AC IN (Power Cord) Connect this to the power outlet (100-240 V AC 50/60 Hz) C2: ON Power on / off switch C3: TV OUT (UHF Output) Connect TV or VCR to this connector (OPTIONAL) C4: ANTENNA IN Connect TV antenna to this connector (OPTIONAL) C5: LNB IN (IF Input) Connect the cable from your LNB to this connector. C6: LOOP OUT IF out to LNB input of another STB. C7: S/P DIF Digital audio output for connecting to a digital audio decoder/amplifier. C8: VCR SCART Connect VCR or DVD player via a SCART cable to this connector. C9: TV SCART Connect TV via a SCART cable to this connector. C10: AUDIO LEFT / RIGHT Audio outputs for connecting to a Hi-Fi System. C11: VIDEO Composite video output to connect an AV monitor etc. C12: RS-232 Connect PC to this connector. Use NULL MODEM (female to female) cable. INSTALLATION IMPORTANT: After configuring and exiting any menu, the prompt to save message will appear. Press OK on ‘Yes’ to save the settings. FRONT PANEL CONTROLS Connecting via the TV SCART (C9) For clear picture quality, connect STB to your TV with a full SCART lead. Select AV input on your TV and switch on the STB. After initializing the display (F4) will show “NOCH” and your TV should show the OSD Setting menu. Connecting via TO TV (UHF output C3) OPTIONAL Connect to your TV with a UHF (co-axial) lead and switch on the STB. Select a spare channel on your TV and tune it to channel 64 or until you see the OSD Setting menu. Finally store the setting on your TV. The STB is factory set to channel 64. To change the output channel, see TV Setting. Open flap (F10) from catch on left side to reveal the CA slots. OSD Setting F1: Card Slot 1 (Plaza XT.M, Plaza XT.C and Plaza XT.CM) Insert smart card into this slot. F2: Card Slot 2 (Plaza XT.M, Plaza XT.C and Plaza XT.CM) Insert smart card into this slot. F3: CI Slot (Plaza XT.C) Insert CAM (type 1 or 2 PCMCIA modules) into this slot. F4: LED Display Shows channel number or certain programming functions. In standby, it shows the time. F5: SIGNAL This indicator turns on when signal is present. F6: STBY This indicator turns on when STB is switched to standby. F7: ON This indicator turns on when STB is switched on. F8: CH Down To step down channels sequentially. F9: CH Up To step up channels sequentially. F11: STBY/ON To switch STB to standby or on. 3 Configuration Menu Lang: Select OSD language. Display Level: Select transparency level of channel banner and browser. Display Time: Select time out for banner. If ‘On’ is selected, it remains until EXIT key is pressed. Signal Beep: To control audio beep sound in channel search when signal is present Screen Saver: Select time to switch on screen saver for radio mode. Audio Lang / Subtitle Lang: Select default channel language. Menu Color: Configure different color themes for OSD menus. See following. 4 OSD Setting – Menu Color Configuration Time Setting Configuration Menu Items: Select an item to change its color. Red, Green, Blue: Enter with 0-9 keys or press left / right to change color value Default: If you wish to return to default settings, press OK Summer, Spring, Autumn, Winter: You can select other default themes with colored keys. Time Mode: Select Manual to set the time manually. Auto mode is only possible after channels are tuned. Region/City: For Auto mode, select your location. If your location is not listed, select User Defined. GMT Offset: For Auto mode it is already calculated for the listed locations. For User Defined, enter with 0~9 and PAGE Up/Down keys Time, Date: For Manual mode, enter with 0~9 keys Identification of Menu items Summer Time: On will advance the time by 1Hour. Sleep Timer: Press left/right keys to switch on and select timer duration. The STB will switch to standby after the set time has lapsed. ANTENNA CONFIGURATION Press MENU key and go to INSTALL. Select Antenna setting. Configuring the LNB Antenna Setting Configuration LNB No: LNB 1-16 are factory set to Universal. To allocate satellite to LNB, press OK and select the satellites. LNB Type: Select LNB and press OK to configure LO (Local Oscillator) settings on the right. LO figures are preset for each type. To change, enter with 0~9 keys. LNB Power: Select power output to the LNB. V/H represents both 14V and 18V. SELECTING OUTPUT SIGNAL TO TV Press MENU key and select TV Setting. TV Setting Configuration Standard: If TV is connected via UHF lead, select relevant standard. Example; for UK select PAL I Aspect Ratio: Select picture format for your TV. Video Output: Select RGB if your TV supports this via SCART input otherwise select Comp. UHF Channel: If you have interference on UHF output, select a different channel and re-tune your TV (OPTIONAL) 22KHz Tone: If using other than Universal type, you can select the tone control. DiSEqC T…(Type): Select an option when using more than one LNB for fixed installation with a DiSEqC switch. DiSEqC In…(Input): Configure the input ports for the switch. See following examples. Video Level: Press OK to adjust Brightness and Contrast levels of the picture. Use up / down keys to navigate and left / right keys to adjust the level. SETTING THE TIME Press MENU key and select Time Setting. To configure four LNB Astra 2 (28.2E) set LNB No 1 to DiSEqC 1 Astra 1 (19.2E) set LNB No 2 to DiSEqC 2 Hotbird 1-6 (13E) set LNB No 3 to DiSEqC 3 Thor 2, 3 (1W) set LNB No 4 to DiSEqC 4 To configure MONOBLOCK LNB Astra 1(19.2E) set LNB No 1 to DiSEqC Mini-A Hotbird 1-6(13E) set LNB No 2 to DiSEqC Mini-B To configure Wide Band LNB Note: Adjustments for the polarity employing a mechanical or magnetic polarizer are achieved by external means. Note: Time in Auto mode is derived from the satellite signal and it may vary from satellite to satellite. Auto settings can only be done after the channels are tuned. 5 Set Set Set Set LNB LNB LNB LNB No No No No 1 2 3 4 to to to to 14V 14V 18V 18V (for (for (for (for Low Band vertical polarity) Low Band horizontal polarity) High Band vertical polarity) High Band horizontal polarity) 6 Positioner --- USALS SEARCHING CHANNELS Press MENU key and go to INSTALL. Select Channel Search. Channel Search Configuration Longitude, Latitude: Enter your location with 0-9 and PAGE up / down keys. Example; London – Longitude = 0 and Latitude = 51.5N USALS: Press OK to go to position automatically. Go To 0: Press OK to go to 0 position on the motor Sat Search: Select Single if searching manually. Select Multiple if searching all automatically. Satellite: Press OK, select a satellite then press right and select a scan mode. Configure all satellites in the same way for multiple search. TP Data: Select a TP that has presence of signal. Positioner: If motor is used, select DiSEqC 1.2 for manual positioning or USALS if motor supports it. See configuring the DiSEqC positioner. AUTOMATIC SEARCH WITH DiSEqC POSITIONER 1. Press MENU, go to INSTALL and press OK. 2. Go to Antenna Setting and press OK. Press OK on LNB No. Focus will move to satellite list. 3. Press OK on the satellites you wish to tune. 4. Press EXIT twice. When prompt to save message comes, press OK on Yes. After storing menu will close. 5. Go to Channel Search and press OK. On Sat Search select Single if only one satellite is to be searched. Select Multiple to search all at once. 6. In the same menu go to Satellite and press OK. 7. Then press OK on a satellite to select it, then, press right to go to Scan Mode. Select the option you require and press OK. Press EXIT focus will move back to satellite. Repeat the same for all satellites. After configuration press EXIT and the menu should close. 8. Go to Positioner and select USALS. Press OK menu will open. On Longitude and Latitude enter your location. Press EXIT and save the settings. After storing menu will close. 9. Press blue key to start search. After moving dish, search will start. If searching more than one satellite, after first one is finished it will move to the next satellite and start search automatically. Start Search: Press blue key to start search. Channel options in Scan mode All TP / All Ch --- All transponders and channels All TP / Data Ch --- All transponders Data channels. All TP / FTA Ch --- All transponders free to air channels. NIT / All Ch --- All channels in Network identified table. NIT / FTA Ch --- Free to air channels in Network identified table. Select TP / All Ch --- All channels in Selected TP. Press OK to select from list. Select TP / FTA Ch --- Free to air channels in Selected TP. Press OK to select from list. Manual TP / All Ch --- Press OK for Single TP search and select the TP. CONFIGURING DiSEqC POSITIONER Positioning the dish manually. Select DiSEqC 1.2 and press OK. Positioner --- DiSEqC 1.2 Configuration Configuration 1. Hotbird1-6: Shows pre stored satellites. A number with ---- is a vacant position for other satellites not in this list. Move: Press and release left or right key to move few steps at a time or keep it pressed to move continuously. Move the dish until you find maximum signal and quality. Nudge: Same as above, but with finer movements. USING BLIND SEARCH FEATURE This feature is used for automatic searching of transponders. Searching with this feature is slower than normal search. Press MENU key and go to INSTALL. Select Blind Search. Blind Search East, West Limits: First erase the limits by pressing OK on ‘Erase Limits’ then determine the furthest limits your motor can move and enter these here. Erase Limits: Press OK To clear the limits. Go To 0: Press OK to go to 0 position on the motor Re-sync: Using move function, first find position of one satellite by obtaining maximum signal and quality. Then select Re-sync and press OK. All other satellites that are listed in this menu can now also be found automatically during channel search. NOTE: Signal & Quality bars in Channel Search Red indicates noise only with no actual signal. Green indicates signal is present. Positioning the dish automatically. Select USALS and press OK. You can search up to 40 satellites at a time automatically using this menu. 7 Configuration Satellite: Press OK and select a satellite. Search Type: Select an option. Scan Freq: Select an option. All scans from 10700 to 12750 (whole band). User Defined scans a desired range of frequency. Symbol Rate: Select symbol rate range. Start Freq, End Freq: When using User Defined, enter with 0~9 keys. Polarity: Select an option. Positioner: Select positioner if required. See CONFIGURING THE DiSEqC POSITIONER Start Search: Press blue key to start. It searches transponders first then main channel search will start. See following. 8 Blind Search – Transponders Channel Search Channel Browser Operation To change channel: Use PAGE and CH up / down keys. Press OK on the required channel. Press OK again or press EXIT. To change satellite: Use SAT key and select satellite. Alternatively use left / right keys to select satellite. Press OK on the required channel. All Satellites list: To display collective list of channels for all satellites. Use left / right and select All Satellites. USING EVENT TIMER IMPORTANT: The Event Timer will only work when the time is set to manual mode. In Time Setting menu select Manual and set the time. Also the event timer will not turn on if the STB lock is set to ‘On’ in the Parental Lock menu. You can program up to 20 events for recording via the VCR SCART output. The STB turns on and off automatically at the set times for the events. Press MENU key and select Event Timer. Event Timer Configuration Event No: Select Event number. Timer Mode: Select option. Once, to turn ‘on’ one time only. Daily, to turn ‘on’ daily at the same time. Weekly, to turn ‘on’ weekly at the same time. Satellite: Select satellite. TV/Radio: Select TV or Radio channel mode. A-Z: Press green key to sort channels alphabetically. Select alphabet on the left and press OK. Press OK on the required channel. F/S: Press yellow key to sort channels by free to air first followed by scrambled. Press OK on the required channel. Encryption/Network/TP: Press blue key once to sort channels by encryption. Select from list and press OK on the required channel. Press blue key twice to sort channels by network. Select from list and press OK on the required channel. Press blue key three times to sort channels by TP. Select from list and press OK on the required channel. Normal: Press red key to return to normal list. USING POS KEY ON REMOTE CONTROL WITH DiSEqC 1.2 This key is used when after Channel Search you wish to re optimize the dish position. Press POS key, the menu will open for adjusting the position. Move / Nudge: Press left or right key. Re-sync: This function is same as in CONFIGURING THE DiSEqC POSITIONER described earlier. Channel: Press OK and select the channel you require. Date: Enter date with 0~9 keys, of the event to turn ‘on’. On Time, Off Time: Enter with 0~9 keys ‘On’ and ‘Off’ times for the event. Configure other events the same way, ensuring that the ‘On’ and ‘Off’ times do not overlap previous event time on the same date. The STB will turn ‘on’ (from standby) and select the set channel automatically. If positioner is used, the dish will move to that satellite. SELECTING RADIO CHANNELS Press TV / RAD key once to change to Radio Mode. Press it again to change back to TV Mode. Follow above steps for changing the channel. VIEWING SCRAMBLED CHANNELS For models with Common Interface and Card Slots Open flap (F10) and insert CAM in the slot together with a card as shown below. Inserting card and CAM NOTE: If positioner is used, please set event ‘On’ time to 3 minutes ahead of the program. After an event has turned ‘On’, if any of the remote key or the front panel key is pressed, it will override the ‘Off’ time. Inserting Cards Insert the cards with contacts facing up. OPERATIONAL Checking CAM and card parameters Press MENU and go to CA SETUP. Select the required slot and follow the on screen instructions for checking any parameters. CI: Shows the CAM parameters. CAS 1, CAS 2: Shows the card parameters. TO CHANGE CHANNEL OR SATELLITE Press OK to display the channel browser (channel list). Select following options. 9 10 ELECTRONIC PROGRAM GUIDE (EPG) To display correct EPG it is important to set the time first. Press red key, the following menu will open. TV EPG Guide Favorite Ch Add: Press green key on the required channel. Favorite icon will appear against the name. Delete: Press red key on the channel to be deleted. Favorite icon will be removed. Rename: Press yellow key to display keyboard. Select and press OK on the letters to rename. Press EXIT after naming. Change Group: Press blue key. To change satellite: Press SAT key. Operation Channel List: Select channel and press OK. Focus will move to right. Highlighted Events: Select event and press OK for details. Use PAGE up / down for next page. Note: If EPG is not transmitted, it displays ‘ NO EVENT’. After changing channel, please allow few seconds before you press EPG key. Configuration Viewing favorite channels Press FAV key and select the channel. Press left / right key to change favorite list. To return to normal channel list, press SAT key, select the satellite and channel from its list and press OK. To display subtitles Press SUB.T (blue) key. Select required language and press OK. The subtitles will appear after a few seconds. If not transmitted, it will state ‘No Subtitle Language’. Press EXIT to cancel subtitles. EDITING CHANNELS Press MENU key and go to EDIT. Select Channel Edit. Channel Edit To select audio language Press LANG key. Select required language and press OK. Press AUDIO key (repeatedly) to select Left, Right, Mono or Stereo. To display Tele-Text Press T. TEXT (green) key. Use 0-9 keys to call a page. To change pages sequentially, use PAGE up / down keys. Press EXIT to cancel Tele-Text. To use Zoom function Press ZOOM key a rectangular window will appear on the screen. Press left / right to move this window to desired position. Press page up / down to select the level of zoom. Finally press OK. Press EXIT to cancel zoom. To use Freeze function Press FREEZE key. Press it again to cancel freeze. To use Mosaic function Press MOSAIC key, the screen will change to 9 screens and it will tune these to display still pictures for the first 8 and live picture on the 9th screen. At this point you can use page up / down to display the next 9 screens. Alternatively press left / right to highlight a screen then press OK to select the channel you require. EDIT FUNCTIONS CREATING FAVORITE CHANNELS There are 11 TV and Radio lists you can create and rename the list headings to your preference. Press MENU key and go to EDIT. Select Favorite Ch. 11 Configuration Lock: Press green key on the channel. Lock icon appears against the name. To unlock, press green key again. See Parental Lock section to activate lock. Delete: Single Ch --- Scroll to required channel and press OK then press red key. Multi Ch --Scroll to first channel in the batch and press OK once. Scroll down to the last channel in batch, it will highlight these. Press OK on last channel then press red key. Move: Single Ch --- Scroll to required channel and press OK twice. Scroll to required position or key in the position with 0~9 keys then press blue key. Multi Ch --- Scroll to first channel in the batch and press OK once. Scroll down to the last channel in batch, it will highlight these. Press OK on last channel. Then scroll or key in required position and press blue key. Rename: Press yellow key to display keyboard. Select and press OK on the letters to rename. To change satellite list: Press SAT key followed by up or down key, the antenna will move to the selected satellite. EDITING SATELLITE AND TP Press MENU key and go to EDIT. Select Sat/TP Edit. When, in Sat/TP Edit menu, press left / right to select satellite or TP. 12 Sat/TP Edit --- Satellite Configuration Note: After ‘Lock’ is turned ‘On’, channels locked in edit menu will require a password to open. If STB lock is on, a password is required to operate any function. After applying new password, the default password is no longer operative. If you loose or forget your password, apply the master password given on page 16. Add: Press green key to display keyboard. Select and press OK on letters to name the satellite and press EXIT. Name is added at end of satellite list. Enter position with 0~9, PAGE up / down keys. Delete: Scroll to required satellite and press red key. Sort: Press blue key to sort the list by position. Rename: Press yellow key to display keyboard. Select and press OK on the letters to rename. Sat/TP Edit --- TP TO RESET YOUR STB Press MENU, select Master Reset and enter your password. Default password is ‘0000’. Master Reset Factory Reset: Press OK to erase all settings. Erase Radio Channels: Press OK to erase radio channels only. Erase Scrambled Channels: Press OK to erase scrambled channels only. Erase All Channels: Press OK to erase all channels but keep other user settings. Configuration Add: Press green key to display keyboard. Name the TP and press EXIT. Name is added at end of TP list and focus moves to TP Data. Enter data and press EXIT. Delete: Scroll to required TP and press red key. Sort: Press blue key to sort the list by frequency. Rename: Press yellow key to display keyboard. Select and press OK on the letters to rename. TO UPGRADE SOFTWARE OR TRANSFER DATA Press MENU, go to INSTALL, select Data Download and enter your password. Default password is ‘0000’. Edit: Scroll to required TP and press white key. Focus will move to TP Data for editing. Data Download EDITING CHANNEL PIDS Press MENU key and go to EDIT. Select PID Edit PID Edit Configuration Configuration STB To PC Download: Press OK to transfer user settings to PC for using with PC Edit software. STB To STB Download: Press OK to transfer user settings to another STB of same model. System Information: Press OK to display software version. Press EXIT to close. OTA Upgrade: To upgrade software via satellite. Press OK to open upgrade menu. Menu is preconfigured therefore press blue key to start. Scroll to required channel and press OK. Focus will move to PID Data. Enter new PID with 0~9 keys. After configuration press EXIT and save the settings. Note: To upgrade software via satellite, your dish must be positioned to HotBird 1-6 (13.0E). This satellite provides the OTA Upgrade. The STB will check for any available upgrade and start download. If the software in STB is same as in OTA Upgrade, it will display ’Latest Software Already Installed’. After upgrading software, it may be necessary to Master Reset the STB. TO SET PARENTAL LOCK Press MENU, select Parental Lock and enter your password. Default password is ‘0000’. Parental Lock Configuration STB TO STB COPY FUNCTION 1. Connect download cable to ‘RS232’ connectors (C12) on both STB. 2. Connect power to master STB and switch it on. Go to INSTALL menu and select Data Download and enter your password. Select STB to STB Download and press OK. Select option and press OK. ‘Downloading’ message will appear. 3. Connect power to slave STB. After initialising it will start download. 4. When finished, the slave STB will re-initialise. Configuration Lock: Press left / right and select ‘On’. STB Lock: To lock the full operation of the STB select ‘On’ Old Password: With 0~9 keys enter your password. Default is ‘0000’. New Password: With 0~9 keys enter your new password when you wish to change it. Confirm: With 0~9 keys enter your new password again. TO UPGRADE SOFTWARE VIA PC Connect NUL MODEM cable (see below) to RS232 connector C12. The software is available on our website http://www.plaza-xt.com Follow instructions contained within the zipped file. 13 14 LNB Power & Polarization 22KHz Tone DiSEqC Control Demodulation Input Symbol Rate FEC Decoder EDITING TP IN CHANNEL SEARCH MENU Press MENU, go to INSTALL and select Channel Search. Configure following items. Adding TP Satellite: Press OK and select satellite. Press right key and go to Scan Mode and select Manual TP / All Ch. TP Data will open. Press left / right and select User TP 1. Enter, Frequency, Polarity and S/R. Press EXIT and TP Data will close. Added TP is already selected for channel search. Press blue key. After tuning it will store the TP. To add another TP select User TP 2. Editing TP Same as adding but select the required TP and edit its data. TROUBLE SHOOTING GUIDE If you suspect there is a problem with your STB, please check the following. WARNING! Do not attempt to repair the STB yourself. Tampering with the receiver may result in fatal electric shock and will invalidate your warranty. Front display not lit --- Check power lead is connected and the power is on. No picture or sound --- Check TV is tuned for correct UHF channel or is switched to correct AV input. Channel is scrambled. No signal --- Check antenna position. Check LNB wire is not damaged or shorting. Check LNB may be faulty. Unplug receiver from power socket and retry. Interference, on picture, using UHF output --- Local terrestrial channel interference. Change UHF output channel to different one and re-tune your TV. Select the appropriate ‘TV Standard’ using TV Settings menu. Picture with blocking or frozen --- Signal is weak. Check signal & quality in Channel Search menu. Check antenna position. Remote control not working --- Check the batteries and replace with new. Check front panel of STB is not obstructed. You have lost or forgotten your password --- Apply master password or contact your Manhattan dealer. GENERAL SPECIFICATIONS Conditional Access Interface Smart Card Reader 2 Embedded Card Slots PCMCIA 1 Common Interface (CI) Slot Digital Tuner & Demodulator Input Connector Input Frequency & Loop through range Input Impedance Signal Level F-Type, IEC, 169-24, Female 950 MHz to 2150 MHz 75 ohm unbalanced -25 to –65 dBm 15 System Memory Main Core Processor Flash Memory SDRAM EEPROM Channel Memory Language Menu Vertical + 13V, Horizontal + 18V, Max Current 500 mA, Short Circuit Protection Frequency 22 KHz +/- 2 KHz, Amplitude 0.7 +/- 0.2V Version 1.0, 1.2 & USALS QPSK 1-45 Ms/s, SCPC & MCPC Convolutional Code Rate, 1/2, 2/3, 3/4, 5/6 and 7/8 with constraint length K=7 ST-5119 @ 200 MHz 2MB 16MB 8KB 6000 Channels English, French, German, Spanish, Italian, Portuguese, Danish, Swedish, Norwegian, Finish, Polish, Russian, Greek, Turkish, Farsi & Arabic MPEG Transport Stream, A/V Decoding Transport Stream MPEG-2 ISO/IEC 13818 Profile Level Transport Stream Specification MPEG-2 MP@ML Input Rate Max. 90 Mbit/s Aspect Ratio 4:3 Letter Box, 4:3 Pan & Scan, 16:9 Wide Video Resolution 720X576 @ 25Hz, 720X480 @ 30Hz Audio Decoding MPEG/Musicam Layer I & II Audio Mode Single Channel, Dual Channel, Joint Stereo & Stereo Sampling Rate 16, 22.05, 24, 32, 44.1 and 48 KHz Digital Audio S/PDIF A/V & Data In / Out TV SCART Video Audio R/L S/PDIF RS-232 Video Output (CVBS, RGB). Audio output with Volume Control (Resolution: 20 bits DAC, Max 2Vrms) Video Output (CVBS) Video Input (CVBS) Audio Output (Resolution: 20bits DAC Max.1Vrms) RCA / Cinch, Video Output (CVBS) RCA/Cinch Volume & Mute Control Digital audio Output, RCA (Resolution: 20 bits) Transfer rate 115.2 Kbps 9 Pin D-sub type RF-Modulator (OPTIONAL) RF-Connector Frequency Output Channel Multi TV Standards Preset Channel 75 Ohm, IEC 169-2 Male/Female 470 to 850 MHz CH 21 – 69 for the re-modulator PAL G, I, K, M & NTSC M CH 64 (software changeable by Menu) Power Supply Input Voltage Type Power Consumption Standby 90 to 240 VAC, 50/60 Hz SMPS Max 25W 7.2W VCR SCART 16 Physical Specifications Size (W X H X D) Weight (Net) W 280 mm, H 48 mm, D 218 mm Waste electrical products should not be disposed of with household waste. Please recycle where facilities exist. Check with your Local Authority or retailer for recycling advice -------------------------------------------------------------------------------------------------MASTER PASSWORD 6699 This is the master password for your STB. Cut this section out and keep it in a safe place. It will be useful later if you forget or lose your password. 17 18