1
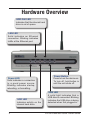
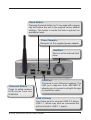
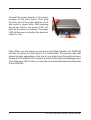
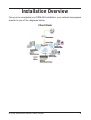
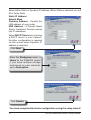
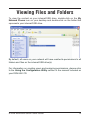
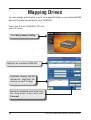
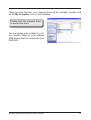
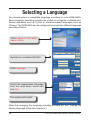
System Requirements
• Internet Explorer 6.x or Netscape® Navigator 7.0 and above
• Windows® 2000 or XP
• Internal 3.5” PATA/IDE Hard Drive and/or External USB Hard Drive(s)
• An available Ethernet port on the network*
* It is required that an Ethernet cable is used during initial setup.
Package Contents
D-Link DSM-600
Storage Enclosure
CD-ROM Manual
and Installation Wizard
CAT5 Ethernet Cable
12V 3A Power Supply
Screw
Rubber Feet
If any of the above items are missing, please contact your reseller.
D-Link DSM-600 Quick Install Guide
Hardware Overview
HDD-Full LED
Indicates that the internal hard
drive is out of space.
LAN LED
Solid indicates an Ethernet
connection. Blinking indicates
traffic at the Ethernet port.
Power LED
Solid indicates a connection
to a good power source.
Blinking indicates startup,
rebooting, or formatting.
HDD LED
Indicates activity on the
internal hard drive.
Power Button
Press to turn the device on.
To turn off, hold button in
until the unit shuts off.
USB LED
A solid light indicates that a
USB drive is connected. Blinking
indicates the USB drive is being
detected when first plugged in.
D-Link DSM-600 Quick Install Guide
Reset Button
Pressing the reset button for 10 seconds with a paper
clip will restore the unit to the original factory default
settings. The button is inside the hole to prevent an
accidental reset.
Power Receptor
Receptor for the supplied power adapter.
Fan/Vent
Fan to cool the internal hard
drive.
Dismount Button
Press to safely remove
USB drives from the
DSM-600.
LAN Port
Connects to your Ethernet network. The
LAN port supports Auto MDI/MDI-X,
allowing you to connect a straight-through
or crossover cable.
USB 2.0 Ports
Use these ports to connect USB 2.0 drives.
USB 1.1 drives may also be connected but
will be limited to USB 1.1 speed.
D-Link DSM-600 Quick Install Guide
Hardware Installation
Unscrew the two screws on the back panel
of the DSM-600 to remove the cover.
Connect the IDE cable to the IDE cable
connector on your hard drive.
Note: Make sure the jumper setting on
your hard drive is set to Master or Cable
Select.
Connect the power cable to the power
connector on your hard drive.
D-Link DSM-600 Quick Install Guide
While facing the back of the DSM-600,
insert the right side of the hard drive into
the case. Once in place, snap down the
left side.
Use the mounting screw to secure the
hard drive to the DSM-600. Replace the
cover and screw the two screws on the
back panel of the DSM-600.
Connect an Ethernet cable to the Ethernet
port located on the back of the DSM-600.
Note: It is required that an Ethernet cable is used during initial setup.
D-Link DSM-600 Quick Install Guide
Connect the power adapter to the power
receptor on the back panel. Then plug
the other end of the power adapter into a
wall outlet or power strip. After pressing
the power button, the power LED will
blink as the device is starting. The power
LED will become solid when the device is
ready for use.
Note: When you first power on and access the Web-Interface, the DSM-600
will offer to format your hard drive if it is unformatted. This process may take
several minutes depending on the size of your hard drive. During this process,
the power LED will blink. Do not power the unit off during the formatting process.
Once the power LED is solid, you may then access the web based configuration
of the DSM-600.
D-Link DSM-600 Quick Install Guide
Installation Overview
Once you’ve completed your DSM-600 installation, your network may appear
simular to one of the diagrams below.
Client Mode
D-Link DSM-600 Quick Install Guide
Configuration
To access the web-based configuration, insert the DSM-600 CD into your
CD-ROM drive.
Click Easy Search Utility.
Highlight an available
DSM-600 and click
Configuration to access
the web-based utility.
Type admin for the user name and
leave the password field blank.
Click Config
D-Link DSM-600 Quick Install Guide
Click Run Wizard.
Click Next.
Enter and confirm a new
Password
Click Next.
Select the appropriate Time
Zone in the pulldown menu.
Click Next.
D-Link DSM-600 Quick Install Guide
10
Select either Static or Dynamic IP address. When Static is selected, you will
fill in these fields:
Static IP Address
Subnet Mask
Gateway Address - Usually the
LAN address of your router.
DNS Address - A Domain Name
Server translates Domain names
into IP addresses.
Select DHCP Client when you have
a DHCP server in your network.
No other configuration is required
on this screen when Dynamic IP
address is selected.
Click Next
Enter the Workgroup name, a
Name for the DSM-600 (useful
if you have multiple storage
enclosures on your network),
and a Description.
Click Restart
You have completed the basic configuration using the setup wizard!
11
D-Link DSM-600 Quick Install Guide
Viewing Files and Folders
To view the content on your internal/USB drive, double-click on the My
Network Places icon on your desktop and double-click on the folder that
represents your internal/USB drive.
By default, all users on your network will have read/write permissions to all
folders and files on the internal/USB drive(s).
For information on creating users and assigning permissions, please refer
to the Using the Configuration Utility section in the manual included on
your DSM-600 CD.
D-Link DSM-600 Quick Install Guide
12
Mapping Drives
You can assign a drive letter (e.g. E:) to a specific folder on your internal/USB
drive(s) that are connected to your DSM-600.
Insert the D-Link DSM-600 CD into
your CD drive.
Click Easy Search Utility.
Highlight an available DSM-600
Available shares will be
displayed. Highlight the
share you want to map.
Select an available drive letter from
the drop-down menu and click
Connect.
13
D-Link DSM-600 Quick Install Guide
Once you click Connect, your mapped drive will be available. Double-click
on the My Computer icon on your desktop.
Double-click the mapped drive
to access the drive.
You can assign a drive letter (e.g. E:)
to a specific folder on your internal/
USB drive(s) that is connected to your
DSM-600.
D-Link DSM-600 Quick Install Guide
14
Selecting a Language
You should select a compatible language encoding for your DSM-G600.
Some computer operating systems are unable to recognize or display nonRoman alphabets such as Cyrillic or character-based languages such as
Chinese. The DSM-G600 can be configured to recognize a different language
encoding scheme.
Click Launch D-Link Easy
Search Utility.
Highlight an available DSM-600
Click Language.
Select the appropriate language
from the drop-down menu and
click OK.
The system will restart.
(Note that changing the language encoding scheme will NOT change the
display language of the user interface.)
15
D-Link DSM-600 Quick Install Guide
Technical Support
You can find software updates and user documentation on the
D-Link website.
Tech Support for customers within Australia:
D-Link Technical Support over the Telephone:
1300-766-868
Monday to Friday 8:00am to 8:00pm EST
Saturday 9:00am to 1:00pm EST
D-Link Technical Support over the Internet:
http://www.dlink.com.au
email:[email protected]
Tech Support for customers within New
Zealand:
D-Link Technical Support over the Telephone:
0800-900-900
Monday to Friday 8:30am to 8:30pm
Saturday 9:00am to 5:00pm
D-Link Technical Support over the Internet:
http://www.dlink.co.nz
email:[email protected]
Technical Support
You can find software updates and user documentation on the
D-Link website.
Tech Support for customers within South
Eastern Asia and Korea:
D-Link South Eastern Asia and Korea Technical Support
over the Telephone:
+65-6895-5355
Monday to Friday 9:00am to 12:30pm, 2:00pm-6:00pm
Singapore Time
D-Link Technical Support over the Internet:
email:[email protected]
Technical Support
You can find software updates and user documentation on the
D-Link website.
Tech Support for customers within India
D-Link Technical Support over the Telephone:
+91-22-26526741
+91-22-26526696 –ext 161 to 167
Monday to Friday 9:30am to 7:00pm
D-Link Technical Support over the Internet:
http://ww.dlink.co.in
http://www.dlink.co.in/dlink/drivers/support.asp
ftp://support.dlink.co.in
email: [email protected]
Technical Support
You can find software updates and user documentation on the
D-Link website.
D-Link provides free technical support for customers for the
duration of the warranty period on this product.
Customers can contact D-Link technical support through our web
site or by phone.
Tech Support for customers within the Russia
D-Link Technical Support over the Telephone:
(495) 744-00-99
Monday to Friday 10:00am to 6:30pm
D-Link Technical Support over the Internet:
http://www.dlink.ru
email: [email protected]
Technical Support
You can find software updates and user documentation on the D-Link website.
Tech Support for customers within the U.A.E & North Africa:
D-Link Technical Support over the Telephone:
(971) 4-391-6480 (U.A.E)
Sunday to Wednesday 9:00am to 6:00pm GMT+4
Thursday 9:00am to 1:00pm GMT+4
D-Link Middle East & North Africa
D-Link Technical Support over the Internet:
http://support.dlink-me.com
email:[email protected]
Tech Support for customers within Israel:
D-Link Technical Support over the Telephone:
(972) 9-9715701
Sunday to Thursday 9:00am to 5:00pm
D-Link Technical Support over the Internet:
http://www.dlink.co.il/support/
e-mail: [email protected]
Tech Support for customers within Turkey:
D-Link Technical Support over the Telephone:
0090 312 473 40 55
Monday to Friday 9:00am to 6:00pm
D-Link Technical Support over the Internet:
http://www.dlink.com.tr
e-mail: [email protected]
Tech Support for customers within Egypt:
D-Link Technical Support over the Telephone:
+202-2919035, +202-2919047
Sunday to Thursday 9:00am to 5:00pm
D-Link Technical Support over the Internet:
http://support.dlink-me.com
e-mail: [email protected]
Technical Support
You can find software updates and user documentation on the
D-Link website.
Tech Support for customers within South Africa
and Sub Sahara Region:
D-Link South Africa and Sub Sahara Technical Support
over the Telephone:
+27-12-665-2165
08600 DLINK ( For South Africa only )
Monday to Friday 8:30am to 9:00pm South Africa Time
D-Link Technical Support over the Internet:
http://www.d-link.co.za
email:[email protected]
Technical Support
You can find software updates and user documentation on the D-Link website.
Tech Support for Latin America customers:
D-Link Technical Support over the followings Telephones:
Argentina: 0800-666 1442
Chile: 800-214 422 Colombia: 01800-700 1588 Ecuador: 1800-777 711 El Salvador: 800-6137 Guatemala:1800-300 0017 Panama: 0800-560 0193 Peru: 0800-52049 Venezuela: 0800-100 3470 Monday to Friday 09:00am to 22:00pm
Monday to Friday 08:00am to 21:00pm
Monday to Friday 07:00am to 20:00pm
Monday to Friday 07:00am to 20:00pm
Monday to Friday 06:00am to 19:00pm
Monday to Friday 06:00am to 19:00pm
Monday to Friday 07:00am to 20:00pm
Monday to Friday 07:00am to 20:00pm
Monday to Friday 08:00am to 21:00pm
D-Link Technical Support over the Internet:
www.dlinkla.com
www.dlinklatinamerica.com
email:[email protected]
Tech Support for customers within Brazil:
D-Link Technical Support over the Telephone:
0800-7014104
Monday to Friday 8:30am to 18:30pm
D-Link Technical Support over the Internet:
www.dlinkbrasil.com.br
email:[email protected]