1
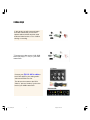
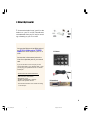
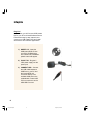
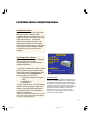
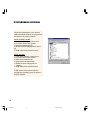
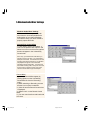
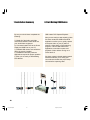
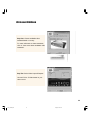
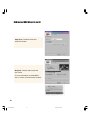
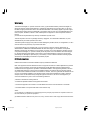
Table Of Contents
System Requirements..................................................................................................2
USB Instant DVD Installation Guide..............................................................................2
1. Check USB Instant DVD package contents...........................................................2
2. Wire It Up!......................................................................................................3
3. Plug It In!........................................................................................................6
4. Install Device Drivers and Application Software...................................................7
5. Verify Hardware Installation..............................................................................8
6. Set Windows Audio Mixer..................................................................................9
7. Installation Summary and Diagram...................................................................10
8. Start Making DVD Movies................................................................................10
USB Instant DVD Wizard.............................................................................................12
Service and Warranty................................................................................................13
FCC Information..........................................................................................................14
© 2001 ADS Technologies. All Rights Reserved
First Edition: Revision 1.0 October, 2001
Microsoft, Windows, and Windows 98 are registered trademarks of Microsoft Corporation. IBM is a registered
trademark of the International Business Machines, Inc.
ADS is a registered trademark of ADS Technologies Inc.
ADS Technologies (ADS) makes no warranty of any kind with regard to this material, including but not limited to,
the implied warranties of merchantability and fitness for a particular purpose. The information furnished within
this written document is for information purposes only and is subject to change without notice. ADS Technologies assumes no responsibility or liability for any errors or inaccuracies that may appear herein. ADS makes no
commitment to update or to keep current information contained within this document.
uvs5_1edited.p65
1
12/5/01, 10:47 AM
USB Instant DVD Installation Guide
Getting Started
System Requirements
The basic steps are:
1. Check USB Instant DVD
package contents
2. Wire it Up!- audio and video connectors
3. Plug it In!- Power and USB connection
4. Install Device Drivers & Application
software
5. Verify Hardware Installation
6. Set Windows Audio Mixer
7. Installation Summary & Diagram
8. Start Making DVD Movies!
- Intel Celeron 400 MHz or AMD K6-400 or better
- Windows 98, Win98SE, WinME, Win2000 or WinXP
- 64 MB (128 MB recommended)
- Sound Card (full duplex)
- 16 MB AGP video card
- CD-ROM Drive
- 150 MB hard disk space for capture/editing
applications
- Disk space for video captures; Video captured at
4 Mb/sec will use 1.8 GB per hour
- CD-R drive & software required for saving movie
files onto a CD
1. Check USB Instant DVD Contents
Hardware:
(A) USB Instant DVD device
(B) 5 VDC Power supply
(C) 6 ft. USB Cable
(D) 6 ft. A/V In cable (RCA video and Audio
to RCA video and 3.5 mm stereo)
(E) 6 ft. 3.5 mm male to 3.5 mm male stereo
audio cable
(F) 9 ft. Audio out to TV/VCR cable (3.5 mm
stereo w/female 3.5mm Y to R+L RCA audio)
(G) 9 ft. RCA Video cable
Instant DVD CD containing:
- Instant DVD Capture & Export utility
- Instant DVD device drivers
- Video Studio 5 – Special full version
customized for Instant DVD
- MyDVD 3.0
- Cyberlink PowerDVD 3.0
- Sound Forge XP 4.5
- Acid Style 2.0 with 100 audio loops
- Microsoft Media Player 7
- Quick Time player
2
uvs5_1edited.p65
2
12/5/01, 10:47 AM
2. Wire It Up!
In this section we will connect all audio
and video cables that you will use to
capture audio and video and then send
audio and video back to a TV or VCR for
viewing or recording.
1. Connect your video source (VHS, DVD,
Laser Disc Player, TV. etc.) to your USB
Instant DVD.
A/V Source
Connect your (D) 6 ft. A/V In cable to
the 3 RCA jacks to your analog audio/
video source RCA Line Out.
The other end connects to the “RCA
Video In” jack and “Audio In” jack on the
back of your USB Instant DVD.
USB Instant DVD
uvs5_1edited.p65
3
12/5/01, 10:47 AM
2. Wire It Up! (cont’d)
2. Connect your USB Instant DVD Audio to
the Sound Card on your PC. This will send
Audio from your USB Instant DVD to your
PC.
Connect one end of your (E) 6 ft.
male to male stereo audio cable
USB Instant DVD
to the Audio Out jack at the back of
your USB Instant DVD.
Connect the other end to the Line In
jack on your sound card of your PC.
Check your diagram of connectors on
your Sound Card
PC Sound Card
4. Connect your USB Instant DVD to your TV
or VCR. This will send captured or edited
video back to your TV or VCR for viewing or
recording.
USB Instant DVD
Connect (G) RCA cable to “Video
Out” on Instant DVD
Connect other end to Video IN on your
TV or VCR.
A/V Source
4
uvs5_1edited.p65
4
12/5/01, 10:47 AM
2. Wire It Up! (cont’d)
3. Connect the Audio Out of your PC to the
Audio In on your TV or VCR. This will send
recorded audio from your PC out for recording or listening on your TV or VCR.
Connect the Right and Left RCA jacks of
the (F) 9 ft. Audio out to TV/VCR
cable to the Audio Inputs on your TV or
VCR.
A/V Source
Connect the 3.5mm stereo jack to the
Line Out or Speaker jack on your sound
card.
If you do not have a “Line Out” jack you can
connect this cable to your “Speaker Jack”. Then
you can plug your speakers into the “Y” female
3.5mm jack
Sound Card Color Coded Connectors:
Audio Line-In = Light Blue
Audio Line-Out = Lime Green
Microphone = Pink
Speaker Out/Subwoofer = Orange
Right to Left Speaker = Brown
PC Sound Card
*Sound Card Connector color codes according
to PC-99 spec.
5
uvs5_1edited.p65
5
12/5/01, 10:47 AM
3. Plug It In
Plug it In!
In this section you will Connect USB Instant
DVD to your PC and Install Software Drivers.
Follow these step by step instructions to
connect your USB Instant DVD and install
device drivers and software applications:
1.) INSERT CD - Insert the
USB Instant DVD CD into
your PC’s CD-ROM drive.
The Instant DVD Installation
splash screen will appear.
2.) PLUG IT IN - Plug the 5
VDC power supply into the
power jack.
3.) CONNECT USB – Connect
the USB cable between a
USB Port on your PC and
the Instant DVD unit.
Cconnect directly to an
available USB port on the
motherboard or extra USB
PCI host card such as the
ADS USB Port card.
6
uvs5_1edited.p65
6
12/5/01, 10:47 AM
4. Install Device Drivers and Application Software
Install Device Drivers
Windows will detect the device and install
the device drivers. Follow the “New
Hardware Wizard” to install the drivers. The
device drivers are located at the root of the
USB Instant DVD CD. Let Windows
Search for the appropriate drivers. Windows will find the drivers on the Instant
DVD CD and load them for you. Follow the
instructions on the New Hardware Wizard
and click “Finish” once the drivers are
installed.
Install Application Software
The USB Instant DVD AutoRun installation
menu should be on the screen.
Follow these steps to install necessary
software applications:
1.) Click the “Install Drivers” button to install
the all necessary drivers install the USB
Instant DVD capture and export utility and
other software that is NECESSARY for
proper installation of the device.
a. Instant DVD Capture and Export
utility
b. PowerDVD 3.0
c. DirectX 8.0a
3.) Click Video Studio 5. The Video Studio 5
AutoRun screen will appear. Install Video
Studio 5 and all associated applications.
4.) Click MyDVD 3.0. This will install the
MyDVD 3.0 application.
Installation notes:
During the Instant DVD application installation we will
prompt you to enable “DMA” on your IDE hard drives.
We do this to optimize video capture. When DMA is
not enabled you will likely drop video frames resulting
in jerky video captures. We will also set your VGA
resolution to 1024 x 768. This is the optimal resolution
for viewing video at full resolution. DVD video is
captured at 704 x 480 (704 x 576) PAL. If your
resolution is not high enough you will not be able to
view the video at full resolution.
Install all the other bundled software now or at a later
time by inserting the Instant DVD CD and selecting
the desired software application.]
7
uvs5_1edited.p65
7
12/5/01, 10:47 AM
5. Verify Hardware Installation
Check Device Manager to verify that the
USB Instant DVD hardware is recognized by
Windows and is properly installed.
Win98, Win98SE, WinME:
1.) Click Start, Settings, Control Panel.
2.) In Control Panel, click System.
3.) Click Device Manager tab.
4.) Double click the Imaging Device heading.
5.) USB Instant DVD should be listed.
WinXP, Win2000:
1.) Click Start, Settings, Control Panel.
2.) In Control Panel, click System.
3.) Click on the Hardware Tab.
3.) Click Device Manager Button.
4.) Double click the Imaging Device
heading.
5.) USB Instant DVD should be listed.
If USB Instant DVD is listed under the
Imaging Device heading, then the device is
properly installed.
8
uvs5_1edited.p65
8
12/5/01, 10:47 AM
5. Windows Audio Mixer Settings
Windows Audio Mixer Settings
USB Instant DVD uses your computer
sound card to record and playback the
audio portion of your video recordings.
You need to set up your audio mixers to
properly capture the audio.
Volume/ Play Control Mixer
1.) Click “Mute” on the Line-In Mixer. If
Line-In is not present click “Options” and
select Line-In as one of the mixer options
that should appear in the Volume/Play
Control mixer.
Don’t worry, you’ll still hear the audio when you
preview or record your video. You should have a
full duplex sound card. This means that it records
and play’s back at the same time so you will hear
the playback through the sound card while
previewing and recording video. If you hear and
echo while recording video, check your mixer and
be sure Line-In is muted or check your sound
card to be certain that it supports full duplex.
Record Mixer
1.) Make the Record Mixer appear by
Clicking Options on the Volume/Play
Control Mixer & click the “Recording”
option.
2.) When switching to Recording, be sure
that the Line-In option is selected.
3.) Click OK and the Record Control mixer
is displayed.
4.) Select Line-In on the Record Control
Mixer.
5.) You can control audio record levels with
this mixer.
9
uvs5_1edited.p65
9
12/5/01, 10:47 AM
7. Installation Summary
By now you should have completed the
following:
1.) Made all of the Audio and Video
connections between Instant DVD and
your Audio/Video equipment.
2.) Connected Instant DVD to the Power
Supply and USB Port on your PC.
3.) Installed USB drivers and verified the
device is properly installed
4.) Installed all necessary software
applications required for proper operation.
5.) Now you are ready to Start Making
DVD Movies.
8. Start Making DVD Movies
USB Instant DVD Capture/Playback
Now you are ready to start capturing video.
We have created the USB Instant DVD
application to allow you to quickly capture
and export video on your PC without
starting a video editor or DVD Authoring
program. Use the USB Instant DVD
application to test video capture and
playback of video before moving on to
Video Studio 5.
We have created a simple getting started
Wizard that allows you to verify your
connections and make the proper setup
choices before capturing video.
10
uvs5_1edited.p65
10
12/5/01, 10:47 AM
USB Instant DVD Wizard
Step One: Choose worldwide video
standard based on country
For more information on these standards,
click on “Learn more about worldwide video
standards”
Step Two: Select Video Inputs &Outputs
Choose RCA or S-Video based on your
video source
11
uvs5_1edited.p65
11
12/5/01, 10:47 AM
USB Instant DVD Wizard (cont’d)
Step Three: Create file name and
select file location
Step Four: Choose video format and
click Finish.
For more information on these MPEG,
click on “Learn more about video formats”
12
uvs5_1edited.p65
12
12/5/01, 10:47 AM
Service and Warranty:
Service:
If you require assistance with the installation, operation, or application of your ADS Technologies, Inc. product
there are several options available to you as described in the technical support section of this manual. Your
primary source for information and assistance is always your computer store or computer parts dealer. If your
ADS product needs repair or replacement, contact your dealer for on-site repair service.
The ADS Technologies technical support and customer service staff can aid in solving many problems. Our
technical support department is available to repair any ADS Technologies product. You or your dealer must
return products to our factory for repair or warranty replacement.
Return/Replacement:
If you need to return your ADS Technologies product you should return the product directly to the dealer or
store where you purchased the product. Each individual computer store or dealer sets product returns policies
for their customers. ADS Technologies, Inc. cannot be responsible for the actions or policies set by our dealers.
If you desire to return the product for a refund, you must get the refund from the dealer or store you purchased
the product from. If you purchased the product directly from ADS please see the “Terms and Conditions of
Sale” on the reverse side of your sales invoice.
Returns to ADS Technologies, Inc. are for repair or warranty replacement only. If you need to return product to
ADS Technologies, Inc. for repair or replacement you must follow these steps:
1. Call our Technical Support department at (562) 926-4338 to obtain a Return Merchandise Authorization
(RMA) number.
2. The RMA number is valid for 30 days.
3. Ship the product to the ADS factory with the RMA number marked on the inside and outside of the package.
If there is no RMA number on the package or the RMA number has expired, the shipment will be refused. ADS
will not be liable for lost or mis-shipped products.
4. Replacement product cannot be shipped to you until the defective product has been
received by ADS.
5. Once the product is received at the factory it will be tested and then repaired or replaced.
6. Turn around time is approximately one week. A repaired or replacement product will be shipped back to you.
13
uvs5_1edited.p65
13
12/5/01, 10:47 AM
Warranty:
This ADS Technologies, Inc. product comes with a One (1) year hardware warranty. ADS Technologies, Inc.
(ADS) warrants this product against defects in material and workmanship for a period of One (1) year from
the date of original purchase from ADS or an authorized ADS dealer. This warranty applies only to the original
purchase of the product and is not transferable. This warranty does not cover any incompatibilities due to the
user’s computer, hardware, software or other related system configuration in which the product interfaces.
Proof of
purchase will be required before any warranty consideration by ADS occurs.
This warranty does not cover any damage caused by negligence, non-authorized modifications, or parts
installed without prior written permission from ADS.
This warranty does not apply if the product has been damaged by accident, abuse, or misapplication, nor as a
result of service to the product by anyone other than ADS.
If your ADS product is not in working order, your only recourse is repair or warranty replacement, as
described above. UNDER NO CIRCUMSTANCES will ADS Technologies, Inc. be liable for consequential
damages, including but not limited to any lost savings, lost profits, or any other damages, caused by the use
of any ADS Technologies, Inc. product or inability to use the product, even if the dealer or ADS Technologies,
Inc. has been advised of such liability or other claims. This includes damage to property and, to the extent
permitted by law, damages for personal injury. This warranty is in lieu of all other warranties including implied
warranties of merchantability and fitness for a particular purpose.
FCC Information
Federal communications Commission Radio Frequency Interference Statement
Note: This equipment has been tested and found to comply with the limits for a class B digital device, pursuant
to Part 15 of the FCC Rules. These limits are designed to provide reasonable protection against harmful
interference when the equipment is operated in a residential installation. This equipment generates, uses and
can radiate radio frequency energy and if not installed and used in accordance with the instruction manual
may cause harmful interference to radio communications. However, there is no guarantee that interference will
not occur in a particular installation. If this equipment does cause harmful interference to radio or television
reception, which can be determined by turning the equipment off and on, the user is encouraged to try to
correct the interference by one or more of the following measures:
* Reorient or relocate the receiving antenna
.
* Increase the separation between the equipment and receiver.
* Connect the equipment into an outlet on a circuit different from that to which the receiver is connected.
* Consult the dealer or an experienced radio TV technician for help.
Notice:
(1) The changes or modifications not expressly approved by the party responsible for compliance could void
the user’s authority to operate the equipment.
(2) Shielded interface cables and AC power cord, if any, must be used in order comply with the emission limits.
14
uvs5_1edited.p65
14
12/5/01, 10:47 AM