1
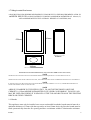
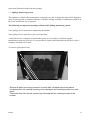
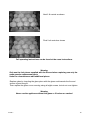
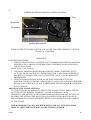
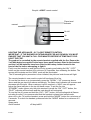
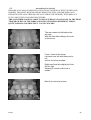
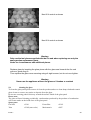
Cf2 MONTANA
COAL EFFECT GAS FIRE
Installation,maintenance & user instructions
Hand these instructions to the user
Natural gas (G20) at a supply pressure of 20mbar in G.B./ I.E
Issue 1!
1
Contents
Section 1
1.0
1.1
1.2
1.3
1.4
1.5! !
1.6
1.7
1.8
1.9
2.0
Section 2
2.1
2.2
2.3
2.4
information and requirements
appliance information !
conditions of installation
flue and chimney suitability
fireplace / surround suitability
shelf position !
!!
!
!
!
chimney inspection
fireplace opening /catchment space
fitting to metal flue boxes
hearths
spillage monitoring system
remove glass and fire tray
installing the fire
installing the fire box
Gas supply
secure to fireplace
gas tightness and inlet pressure
Fitting fuel bed and commissioning
assembling the fuel bed
checking for spillage
Maintenance
servicing
cleaning
installer spare parts
troubleshooting pilot problems
Users instructions
installation information
manual users
mertik remote control
bray/sit remote control
assembling the fuel bed
cleaning glass
troubleshooting help
3.1
3.2
4.1
4.2
4.3
4.4
5.1
5.2
5.3
5.4
5.5
5.6
5.7
!!
Issue 1!
!
!
!
!
!
!
!
!
page
3
4
4
5
5
5-6
6
7
7
8
8
9
9
9-10
10
11-12
13
14-15
15
15
15
16
18
19
21
22
23
24
!
2
Section 1
Information and requirements
1.0 appliance information
Model
cf2 montana HE
Gas type
G20 natural gas
Injector
340
Pilot type:
SIT
Max gross heat input :
5.2 kW
Min gross heat input :
2.6 kW
Cold pressure:
20.0 +/- 1.0 mbar
Gas
G20
:
natural gas / cat I2H
Firebox dimensions (including trim )
Width
Height
Depth
Gas connection :
8mm compression at test elbow on fire supplied
This appliance is manufactured by:
crystal fires limited aintree racecourse business park aintree l9 5ay
Issue 1!
3
Installation requirements
1.1 conditions of installation
It is the law that all gas appliances are installed only by a competent person
Ie:a registered installer in accordance with the current edition of the gas safety(installation
and use )regulations or the rules in force.failure to do so could lead to prosecution
The installer must be gas safe registered .
The installation must also be in accordance with all relevant parts of the local and national
building regulations where appropriate,the building regulations (scotland consolidation)
issued by the scottish development department,and all applicable requirements of the
following british standard codes of practice.
1. Bs 5871 part 2 installation of inset fuel effect fires
2. Bs 6891 installation of gas pipework
3. Bs 5440 parts 1 & 2 installation of flues and ventilation
4. Bs 1251 open fire place components
5. Bs 715 / BS EN 1856-2 metal flue pipes for gas appliances
6. Bs 8303 installation of domestic heating appliances
7. Is 813 domestic gas installation (republic of ireland )
No purpose made additional ventilation is normally required for this
appliance ,when installed in G.B.when installing in I.E.please consult document
I.s 813 domestic gas installation,which is issued by the national standards authority
of ireland.if installing in northern ireland please consult local building regulations
In scotland ,please consult the current edition of the building standards
regulations,issued by the scottish executive.any purpose made ventilation must be
checked periodically to ensure that it is free from obstruction.
1.2 Flue & chimney suitability
This appliance is designed for use with conventional brick built or lined chimneys and and
fabricated flues and metal flue boxes conforming to BS 715 /BS EN 1856-2
All flues must conform to the following minimum dimensions
Minimum dimension of circular flues
Minimum effective height of all flue types
125 mm
3 meters
This product is not suitable for pre cast flues
Issue 1!
4
1.3 Fireplace / surround suitability
The fire must only be installed on a hearth it must not be installed directly on to a carpet or
other combustible floor materials.
(this appliance may be installed without a hearth when fitted as a hole in the wall and is
fitted so the bottom of the appliance is installed a minimum of 300mm from floor level)
This fire is suitable for fitting to a non combustible fire place surrounds and proprietary
fireplace surrounds with a temperature rating of at least 150º C (class “o”)
If this appliance is fitted directly against a wall without the use of a fire surround or
fireplace all combustible materials must be removed from behind the trim .soft wall
coverings such as blown vinyl ,wall paper etc, could be affected by the rising hot air
scorching and /or discoloration may result ,due consideration should be made to
this when installing or decorating.
1.4 Shelf position
The fire may be fitted below a combustible shelf providing there is a minimum distance of
200mm above the top of the fire and the shelf does not project more than 150mm.if the
shelf overhangs more than 150mm the distance between the fire and the shelf must be
increased by 15mm for every 25mm of additional overhang over 150mm
1.5
Flue / Chimney inspection
Before commencing installation ,a flue or chimney should be inspected to ensure that all of
the following conditions are satisfied.
1.check that the chimney / flue only serves one fireplace and is clear of any
obstruction .any dampers or register plates must be removed or securely locked in the
open position
2.brick/stone built chimneys or any chimney or flue which has been used for an appliance
burning fuel other than gas must be thoroughly swept .the base of the chimney /flue must
also be cleared of debris etc
3.any under floor air supply to the fireplace must be completely sealed off
4.ensure that the inside of the chimney / flue is in good condition along its length and
check that there is no leakage of smoke through the structure of the chimney / flue during
and after the smoke pellet test
5.using a smoke pellet check there is an updraft in the chimney / flue and that the smoke
can be seen coming from the terminal/ pot outside
There must be no leakage of smoke through the structure of the chimney during or after
the smoke pellet test and it is important to check the inside upstairs rooms adjacent to the
chimney / flue
Check the chimney pot / terminal and general condition of the brickwork and masonry.if the
chimney / flue is in poor condition or if there is no up-draught do not proceed with the
installation,if there is a history of down draught conditions with the chimney / flue,
A tested and certificated flue terminal or cowl suitable for the relevant flue type should be
considered
6.a spillage test must always be carried out during commissioning of this appliance
Issue 1!
5
1.6 Fireplace opening and chimney catchment space
The front opening of the fireplace must be between 400mm and 425mm wide and between
560mm and 570mm high.if the opening exceeds these dimensions then a surround must
be constructed from suitable non - combustible material to produce correct size
opening .any surround must be suitably sealed to the fireplace to prevent leakage
See below fig 1
!
!
!
!
Fig 1
445 minimum
590mm minimum
570mm min
580mm max
410mm min
425mm max
When installing into a brick built chimney,you must ensure that there is sufficient depth to
accommodate any debris which may fall from the chimney ,this depth must be sufficient to
accommodate 12 litres of volumetric space,minimum of 310mm
Min depth required
310mm
Void for flue debris
appliance
Issue 1!
6
1.7 fitting to metal flue boxes
A DOUBLE WALLED SELKIRK RECESSED FLUE BOX BUILT TO THE REQUIREMENTS OF BS 715
OR BS EN 1856 WITH AN INSULATED FLUE HAVING A MINIMUM DIAMETER OF 125mm (5”)
AND A MINIMUM EFFECTIVE OVERALL HEIGHT OF 3 METERS (10ft)
610mm
570mm
310mm
410mm
RECESSED GAS FLUE BOX DIMENSIONS (NOT INCLUDING FIBRE GLASS INSULATION)
NOTE
THE METAL FLUE BOX MUST BE INSULATED WITH FIBRE GLASS OR EQUIVALENT TO A THICKNESS OF 50 mm.
NOTE
WHERE INSTALLATION IS FOR A METAL FLUE BOX, THE SURROUND MUST HAVE A TEMPERATURE RATING OF 150 DEGREES C .
NOTE
IF THE FLUE BOX IS TO BE USED WITH AN EXISTING BRICK OR STONE CHIMNEY A 125 mm (5”) MINIMUM DIAMETER FLUE
LINER CONFORMING TO BS 715 MAY BE USED.
NOTE
A BRICK CHAMBER TO THE SIZES IN FIG 2 IN AN EXISTING BRICK OR STONE
CHIMNEY A 125mm MINIMUM DIAMETER FLUE LINER CONFORMING TO BS EN 1856
MAY BE USED, PROVIDING IT IS SEALED AT THE TOP AND BOTTOM OF THE EXISTING
BRICK OR STONE CHIMNEY.
1.8 Hearths
This appliance must only be installed on to a non combustible hearth,the hearth material must be a
minimum thickness of 12mm with the top surface at least 50mm above the floor,the hearth must be
fitted symmetrically about the fire opening and have a minimum width of 760mm and a minimum
Issue 1!
7
projection 300mm forwards from the opening
1.9 Spillage monitoring system
This appliance is fitted with an atmosphere sensing device ,this is designed to shut off the appliance
in the event of partial or complete blockage of the flue causing a build up of combustion products in
the room in which the fire is operated
The following are important warnings related to this spillage monitoring system
1.the spillage device must not be adjusted by the installer
2.the spillage device must not be put out of operation
3.when this device is changed (recommended yearly at service)only a complete original
manufacturers part may be used ,it is not possible to replace individual parts on this device only a
complete assembly can be used
2.0 remove glass and fire tray
Remove 8 glass cover fixing screws 4 on each side ,left hand side shown above
Lift glass panel out carefully ensuring not to damage it and carefully position in a safe
place,
The burner tray can now be removed by removing the two retaining screws at the
bottom.
Issue 1!
8
Section 2 installation of the fire
2.1
installing the firebox
Check that the chimney / flue conforms to the required specifications as previously stated.
If this is so continue with the installation
2.2 Gas supply
It is recommended a concealed connection is made using semi rigid tubing on the rear left side of
the appliance taking into account the requirements of B.S 6891 1988 dealing with enclosed pipes
An isolating valve is built in to the appliance as part of the pressure test point elbow
2.3secure to fireplace
The preferred method of fixing is cable fixing which is described in the following section
Proceed as follows :
Mark out and drill 4 off holes in the back face of the fire opening in the positions shown below fig 2
Fig 2
250mm
Fireplace opening
500mm
250 mm
30mm
Fit the wall
plugs
provided and screw the fixing eyes securely into the rear of the fire opening
Uncoil the two fire fixing cables and thread one of each of the cables through the small
holes either side of the top of the fire
Position the fire carefully on the hearth ensuring the hearth is protected not to scratch any
decorative surfaces ,thread each of the cables vertically downwards through the pair of
fixing eyes on the same side of the fire ,then thread the free end of the cable through the
hole at the bottom rear of the appliance (the fire tray will have to be removed to do this if
not already) then carefully slide the fire into the fire opening and pull the cables tight
Thread a tensioning screw over each of the cables and ensure that the tensioning nut is
screwed fully up against the hexagon shoulder of the tensioning screw
(this allows for maximum adjustment)
Issue 1!
9
Fit a screwed nipple on to each of the cables and pull hand tight up against the tensioning
screw then secure each nipple with a screwdriver
Evenly tighten the tensioning nuts to tension both cables and pull the fire snugly to the wall
Do not over tighten ,it is only necessary to pull the seal against the wall and make an air
tight seal ,check there are no gaps behind the seal
With the fire securely in place the gas pipe can now be purged ensuring
no debris are in the pipework,otherwise serious damage can be done to
the gas control valve on the fire.
2.4 gas tightness and inlet pressure
Refit gas fire tray into fire box and screw it secure using two screws at bottom .
Connect the gas supply to the inlet elbow and carry out a gas soundness test
After ensuring gas soundness test remove the pressure test point from the inlet elbow and
connect a manometer
Turn on the appliance and turn to the full position
Check that the gas pressure is 20.0 mbar +/- 1 mbar (8” water gauge +/- 0.4 in w.g.)
Turn off the appliance remove the manometer and refit the pressure test point screw.
Check the test point screw for gas tightness using a suitable leak detection fluid .
Issue 1!
10
Section 3
Fitting fuel bed and commissioning
3.1 assembling the fuel bed
PERIODICALLY SMALL DEPOSITS OF SOOT MAY GATHER ON THE FUEL BED AND
BURNER, THIS MUST BE REMOVED BY REMOVING FUEL AND BRUSHING ANY
DEPOSITS WITH A SOFT BRUSH AND VACUUMING THE BURNER, THEN REPLACE
FUEL USING THE FOLLOWING PROCEDURE.
THE MAIN FIBRE BASE IS LIABLE TO HAVE SURFACE CRACKS DUE TO THE HIGH
TEMPERATURES OF THE FIBRE AND THE PAINT BEING DIFFERENT THIS IS
QUITE NORMAL AND SHOULDN’T CAUSE CONCERN
The rear matrix sits flat behind the
two lugs
With the front fibre sitting in the well
of the burner
Front 4 coals sit as shown
Left hand coal sits with fatter end to
left
and as far left as possible
Right hand coal sits slightly left from
the far right
Allowing 2 central coals to sit in
middle
Next 3 sit central as shown
Issue 1!
11
Next 2 fit central as shown
Final 3 sit central as shown
Full operating instructions can be found at the users instructions
Warning
Only use the fuel pieces supplied with the fire and when replacing use only the
same genuine replacement parts
Under no circumstances add additional pieces
Replace glass by inserting the glass piece with the glass seal towards the fire and
ensure a good snug fit.
Then replace the glass cover securing using all eight screws ,but do not over tighten.
Warning
Never use the appliance without the glass or if broken or cracked
Issue 1!
12
3.2 Checking for spillage
Checking for clearance of combustion products
Close all doors and windows in room
Light the fire and allow to run for approximately 5 minutes on high position
After approximately 5 minutes hold a smoke match inside the diverter as shown below
,(it is recommended that a suitable smoke match holder is used when checking for
clearance of combustion )most of the smoke must be drawn into the flue
If in doubt repeat the test after the fire has been burning for 10 minutes
If spillage persists ,the flue is not functioning correctly and a fault exists ,if after
investigation the fault cannot be traced and rectified,the fire must be disconnected from
the gas supply and expert advise obtained
If there is an extractor fan fitted any where in the vicinity of the appliance ,the spillage
test should be repeated with the fan running on maximum and all interconnecting doors
open
After ensuring that the fire is safe to use it should be left on high position to fully warm up
during this time a slight odor may be noticed this is due to the newness of the fire and will
soon disappear
Fit trim and using 4 magnets on vertical flanges on fire box and fit fret centrally in front of
fire
Finally hand the installation and maintenance instructions to the user and explain the
operation of the fire in detail
Insert smoke match into
Diverter as shown just
Above glass cover
Issue 1!
13
Section 4
Maintenance
Servicing should be carried out annually by a competent person ,(gas safe engineer )
The service should include changing the oxypilot and visually checking the chimney and
fire opening for debris,also carry out a smoke test to check for positive up draught in the
chimney
Check condition of coals and ceramics and if necessary replace the full set with genuine
replacement parts
After servicing a soundness test must be carried out and a working pressure test.
1 REMOVAL OF FUEL PIECES
REMOVE LOOSE FUEL PIECES
REMOVE FRONT FIBRE BASE
REMOVE MAIN FIBRE BASE
2 REPLACEMENT OF GAS CONTROL
REMOVE FUEL SET AS 1
DISCONNECT FIRE AT INLET ELBOW
REMOVE FIRE TRAY BY UNSCREWING TWO SCREWS AT FRONT BOTTOM SECTION OF
FIRE TRAY
REMOVE CONTRO KNOB,DISCONNECT GAS CONNECTIONS TO VALVE INCLUDING
PILOT CONNECTION AND THERMOCOUPLE CONNECTION
REMOVE LOCKNUT HOLDING GAS CONTROL TO FRONT BOTTOM SECTION .
RE ASSEMBLE IN REVERSE ORDER
TURN ON GAS SUPPLY.CHECK FOR SOUNDNESS AND RE COMMISSION APPLIANCE
3 REPLACEMENT OF INJECTOR
REMOVE FUEL PIECES SEE 1
REPEAT 2 REMOVE GAS CONTROL
DISCONNECT GAS CONNECTION TO INJECTOR
UNSCREW INJECTOR “B” WHILST AT THE SAME TIME HOLDING LOCKNUT WITH A
SPANNER AND CLEAN OR REPLACE.
SEE DIAGRAM BELOW.
RE ASSEMBLE IN REVERSE ORDER
TURN ON GAS SUPPLY. CHECK FOR SOUNDNESS AND RECOMMISION THE FIRE.
REPLACEMENT OXY PILOT ASSEMBLY
DISCONNECT FIRE AT INLET ELBOW
REMOVE FIRE TRAY
DISCONNECT THERMOCOUPLE AT GAS VALVE
DISCONNECT GAS CONNECTION FROM PILOT ASSEMBLY
Issue 1!
14
REMOVE IGNITOR LEAD FROM PILOT ASSEMBLY
UNDO SCREWS SECURING OXY PILOT TO FIRE TRAY
RE-ASSEMBLE IN REVERSE ORDER
TURN ON GAS SUPPLY,CHECK FOR SOUNDNESS AND RECOMMISION APPLIANCE
4.2 Cleaning
Before cleaning any part of the appliance ensure the gas is turned off and the fire is not hot
Remove trims from appliance before cleaning by pulling it free from magnets
Brass/chrome trim can be cleaned with brasso or other brass cleaner
Colored finishes need wiping with a damp cloth
Coals and ceramics : if for any reason it is necessary to remove coals or ceramics then before
replacement the burner should be checked that no particles have deposited on to the burner and if
necessary remove and refer to instructions to replace
Ceramics should be cleaned by shaking any debris from them under no circumstances brush them or
vacuum as this can be detrimental to them
4.3 installer spare parts
Fuel bed
Front fibre
Trim
Gas valve
Gas valve mertik
Gas valve bray
Main matrix
cf2 01
cf2 02
cf2 03(state color)
cf204 (manual)
cf205(mertik)
cf206(bray)
cf207
Other parts are available on request
4.4
trouble
problems
oxypilot manual cf208
oxypilot mertik cf209
oxypilot bray cf210
shooting pilot
Troubleshooting pilot light
Left above a correct blue flame
right above a incorrect yellow flame
With a strong flame not small
aeration hole needs cleaning
It is important the pilot flame stays strong and blue as on the left as it
creates good cross lighting and no build up of gas then ignition which can
be dangerous
Issue 1!
15
Section 5
Users instructions
5.1 installation information
1.1 conditions of installation
It is the law that all gas appliances are installed only by a competent person
Ie:a registered installer in accordance with the current edition of the gas safety(installation
and use )regulations or the rules in force.failure to do so could lead to prosecution
The installer must be gas safe registered .
The fire may be fitted below a combustible shelf provided that the shelf is at least 200mm
above the top of the appliance and the depth of the shelf does not exceed 150mm
The fire may be installed below combustible shelves which exceed 150mm deep providing
that the clearance above the fire is increased by 15mm for each 25mm of additional
overhang in excess of 150mm
No purpose made additional ventilation is normally required for this appliance ,when
installed in G.B.when installing in I.E.please consult document
I.s 813 domestic gas installation,which is issued by the national standards authority of
ireland.if installing in northern ireland please consult local building regulations
In scotland ,please consult the current edition of the building standards regulations,issued
by the scottish executive.any purpose made ventilation must be checked periodically to
ensure that it is free from obstruction.
If this appliance is fitted directly against a wall without the use of a fire surround or
fireplace all combustible materials must be removed from behind the trim .soft wall
coverings such as blown vinyl ,wall paper etc, could be affected by the rising hot air
scorching and /or discoloration may result ,due consideration should be made to this when
installing or decorating.
If the chimney or flue has been used previously by appliances burning fuels other than gas
they must be thoroughly swept prior to installation of this fire
The fire must be registered by your installer to gas safe
Please take time to read these instructions as you will be able to obtain the most effective
and safe operation of this appliance
Important safety information
Warning
This appliance has a naked flame and as with all heating appliances a fireguard
should be used for the protection of children,the elderly and infirm.fireguards
should conform to B.S. 8423 :2002 (fireguards for use with gas heating appliances )
It is important that this appliance is serviced at least once a year by a gas safe registered
installer and that during the service the fire is removed from the fire opening and visually
Issue 1!
16
checked for debris or blockages,the chimney should be checked for the clearance of flue
products and the oxypilot replaced
After installation or during a service a spillage test must always be carried out
Rubbish of any type must never be thrown on to the fuel bed ,this could affect safe
operation and damage the fire
Any deposits and debris should be removed from the fuel bed periodically this may be
carried out by referring to section 4.2 cleaning.
Only the correct number of coals may be used and genuine replacement parts used
Always keep furniture and combustible materials well clear of the fire and never dry
clothing or items either on or near to the fire,never use aerosols or flammable cleaning
products near to the fire when it is in use
The ceramics and coals and glass remains hot for a considerable time after the
appliance has been switched off so sufficient time should always be allowed for the
fire to cool before cleaning etc
Warning if the fire goes out or is turned off and it is necessary to relight the fire it is
important to allow 3 minutes before attempting to relight it
Issue 1!
17
5.2
OPERATING INSTRUCTIONS.
MANUAL OPERATION
THE APPLIANCE DATA BADGE IS POSITIONED ON THE FRONT BOTTOM SECTION OF
THE APPLIANCE AND CARIES THE CONTROL KNOB POSITIONS.THE FULL LIGHTING
PROCEDURE IS AS FOLLOWS.
1.PUSH CONTROL KNOB IN AS FAR AS POSSIBLE ON GAS CONTROL
2.TURN KNOB ANTI-CLOCKWISE TO IGNITION POSITION STILL KEEPING KNOB IN AS
FAR AS POSSIBLE.
3.THE IGNITION BUTTON WILL IGNITE THE PILOT WITH THIS OPERATION KEEP THE
KNOB PRESSED IN FOR 15 SECONDS.IF THE PILOT FAILS TO LIGHT TURN THE
CONTROL KNOB CLOCKWISE TO THE OFF POSITION, WAIT 3 MINUTES AND REPEAT
THE PROCEDURE
4.WHEN THE PILOT FLAME IS ALIGHT THE CONTROL KNOB SHOULD BE ALLOWED
TO SPRING OUT SLIGHTLY.TURN THE KNOB FULLY ANTI-CLOCKWISE TO THE HIGH
POSITION.THE PILOT FLAME WILL THEN IGNITE THE MAIN BURNER.THE PILOT
FLAME CAN BE VIEWED TO THE RIGHT OF THE FIRE JUST BEHIND THE FRONT LOG
SET
5.THE APPLIANCE CAN BE ADJUSTED BETWEEN HIGH AND LOW BY MOVING THE
CONTROL KNOB TO SUIT,THE KNOB WILL NEED TO BE DEPRESSED SLIGHTLY TO
MOVE FROM LOW HIGH AND IGNITION.
6.TO TURN THE FIRE OFF,DEPRESS THE KNOB SLIGHTLY AND TURN IT TO PILOT
POSITION.
7.TO COMPLETELY EXTINGUISH THE FIRE DEPRESS THE KNOB SLIGHTLY AND TURN
TO OFF POSITION.
8.SHOULD THE SPARK IGNITION FAIL TO OPERATE.TURN THE CONTROL KNOB TO
THE OFF POSITION AND WAIT 3 MINUTES.TURN THE KNOB TO THE IGNITION
POSITION AND THEN LIGHT THE PILOT WITH A TAPER.”LIGHTING THE PILOT WITH A
TAPER IS AN EMERGENCY MEASURE ONLY AND THE APPLIANCE SHOULD BE
SERVICED AS SOON AS POSSIBLE”.AND THEN PROCEED AS STATED IN PARAGRAPHS
2/7.
IMPORTANT .THIS APPLIANCE IS FITTED WITH AN OXYGEN DEPLETION SENSOR
INCORPORATED INTO THE PILOT BODY.SHOULD THE FIRE REPEATEDLY
EXTINGUISH ITSELF THEN SPECIALIST ADVISE SHOULD BE SOUGHT,AS THIS MAY
INDICATE SPILLAGE INTO THE ROOM OF COMBUSTION PRODUCTS.
Issue 1!
18
5.3
MERTIK MAXITROL REMOTE CONTROL SYSTEM
Fig 1
Off position
A
B
On position
Ignition /pilot position
THESE INSTRUCTIONS ARE FOR THE USE ON CRYSTAL FIRES REMOTE CONTROL
RANGE OF GAS FIRES
OPERATION
LIGHTING PROCEDURE
1. TURN KNOB A (FIGURE 1) SLIGHTLY LEFT TOWARDS THE IGNITION POSITION
(SHOWN IN FIG 1 ABOVE) UNTIL REACHING STOP,PRESS DOWN AND HOLD
FOR FIVE SECONDS
(ONLY PILOT GAS FLOWS)
2. CONTINUE PRESSING DOWN KNOB A WHILE TURNING FURTHER LEFT TO
ACTIVATE PIEZO,CONTINUE TO HOLD DOWN FOR 10 SECONDS AFTER PILOT
HAS BEEN LIT,IF PILOT DOES NOT LIGHT,STEPS 1 AND 2 CAN BE REPEATED
IMMEDIATELY.
3. UPON LIGHTING,RELEASE KNOB A AND TURN FURTHER LEFT TO ON
POSITION (SHOWN IN FIGURE 1 ABOVE)PILOT GAS FLOWS AND MAIN BURNER
FLOWS IN ACCORDANCE TO THE TEMPERATURE SETTING(KNOB B AS SHOWN
IN FIG 1 ABOVE)
ADJUSTING THE FLAME SETTINGS
TO TURN THE FIRE ON AND/OR TO ADJUST THE FLAME STTING, PRESS THE ON
BUTTONS ON THE REMOTE HANDSET.CONTINUE PRESSING UNTIL
DESIRED FLAME SETTING IS OBTAINED.PRESS AND HOLD THE OFF BUTTON TO
REVERSE THE SETTING.THE RECEIVER IS EQUIPPED WITH ABUILT IN DELAY,
RECOGNISABLE BY THE FLICKERING LIGHT,TO FACILITATE FINE ADJUSTMENT
OF THE FLAME
THE MOTORISED VALVE IS EQUIPPED WITH A SLIP CLUTCH ,ALLOWING
MANUAL ADJUSTMENT OF MAIN GAS BY TURNING KNOB B
Issue 1!
19
ON
TO PRESS ON
YOU MUST PRESS TOP
BUTTON AND SMALL
BUTTON ON LEFT
SIMULTANEOUSLY
LOW AND OFF
BATTERY BOX
SHUT OFF PROCEDURE
1.TURN KNOB A RIGHT UNTIL REACHING
STOP. IN THIS POSITION ONLY PILOT GAS
FLOWS
2.TO SHUT OFF VALVE COMPLETELY,PRESS
DOWN SLIGHTLY AND CONTINUE TURNING
RIGHT FROM PILOT POSITION TO THE OFF
POSITION.THE SAFETY INTERLOCK PREVENTS RE-IGNITION OF THE PILOT FLAME
UNTIL THERMOCOUPLE HAS COOLED DOWN SUFFICIENTLY(ELAPSED TIME WILL
VARY BASED ON THERMOCOUPLE TYPE)
3.SWITCHING OFF THE REMOTE IS NOT NECESSARY.
THE SENSOR AND BATTERY HOLDER A INSERTED BENEATH THE RIGHT SIDE OF THE
FIRE.TO REPLACE BATTERIES ALLOW FIRE TO COOL FOR AT LEAST 30 MINUTES
THEN PULL OUT BATTERY HOLDER, THE COVER CAN SLIDE OFF AS ABOVE AND THE
BATTERIES CAN BE REPLACED.(USE ONLY LIKE FOR LIKE ALKALINE AA
BATTERIES)
REPLACEMENT PARTS
BATTERY HOLDER AND SENSOR
REMOTE HANDSET
Issue 1!
CF2MERTIKHOLDER
CF2MERTIKHANDSET
20
5.4
Bray/sit ACS2T remote control
manual
Flame level
indicator
On /off
Up
Down
LIGHTING THE APPLIANCE - S.I.T. ACS2T REMOTE CONTROL
IMPORTANT : IF THE BURNER IS EXTINGUISHED FOR ANY REASON YOU MUST
ENSURE THAT YOU WAIT A FULL FIVE MINUTES BEFORE ATTEMPTING TO RELIGHT THE FIRE.
The product is controlled by the remote handset supplied with the fire. Ensure the
3 off AAA batteries supplied in the loose items pack has been fitted to the handset
and the 6 off AA batteries have been fitted to the battery holder located in the
front of the fire before attempting to light it.
Firstly turn the handset on and light the fire by pressing and holding the“ON” / “OFF”
button on the remote handset for a minimum of 2 seconds, then releasing the button. The
screen will illuminate and the “MAN” mode will be illuminated
The 20 second ignition procedure is then initiated, the pilot and main burner will light.
The remote handset is now used to control all functions of the fire.
To turn the fire down or up incrementally, press the “DOWN” / “UP” arrows as shown
above and the gas input will reduce accordingly. The flame level indicator will increase and
decrease with the input. When maximum input is reached, a “MAX” icon will appear
below the flame indicator in the top left hand corner. To put the fire into
“STANDBY” mode (where only the pilot remains lit) press the “ON” /“OFF” button, the
“PILOT” indicator will be shown and the main burner will extinguish.
To turn the fire off, press and hold the “ON” / “OFF” button, this will extinguish all flames
including the pilot. It is recommended that the handset is placed into locked mode
when not in use. To lock the handset, press and hold the “MODE” button for a minimum of
5 seconds. To unlock the handset, press and hold the “MODE” button for a minimum of 5
seconds.
Spare parts
Acs2t handset
cf2 bray/sit001
Issue 1!
21
5.5
assembling the fuel bed
PERIODICALLY SMALL DEPOSITS OF SOOT MAY GATHER ON THE FUEL BED AND
BURNER, THIS MUST BE REMOVED BY REMOVING FUEL AND BRUSHING ANY
DEPOSITS WITH A SOFT BRUSH AND VACUUMING THE BURNER, THEN REPLACE
FUEL USING THE FOLLOWING PROCEDURE.
THE MAIN FIBRE BASE IS LIABLE TO HAVE SURFACE CRACKS DUE TO THE HIGH
TEMPERATURES OF THE FIBRE AND THE PAINT BEING DIFFERENT THIS IS
QUITE NORMAL AND SHOULDN’T CAUSE CONCERN
The rear matrix sits flat behind the
two lugs
With the front fibre sitting in the well
of the burner
Front 4 coals sit as shown
Left hand coal sits with fatter end to
left
and as far left as possible
Right hand coal sits slightly left from
the far right
Allowing 2 central coals to sit in
middle
Next 3 sit central as shown
Issue 1!
22
Next 2 fit central as shown
Next 3 fit central as shown
Warning
Only use the fuel pieces supplied with the fire and when replacing use only the
same genuine replacement parts
Under no circumstances add additional pieces
Replace glass by inserting the glass piece with the glass seal towards the fire and
ensure a good snug fit.
Then replace the glass cover securing using all eight screws ,but do not over tighten.
Warning
Never use the appliance without the glass or if broken or cracked
5.6
cleaning the glass
To clean the glass panel,please remove it from the product,and use a clean damp cloth and ceramic
glass cleaner to remove any stains or deposits from the glass
Do not use scouring pads as this may scratch the surface finish of the glass panel
Please note:
The glass will need cleaning periodically ,condensation produced by the products of combustion
will create marks on the inside face of the glass panel
Spare parts
Fuel bed
cf2 01
Front fibre
cf2 02
Trim
cf2 03(state color)
Main matrix
cf207
Issue 1!
23
5.7
Troubleshooting help
With todays homes having wooden floors dust can cause problems with gas fires please use your
vacuum regular to keep your pilot light clean from dust,it is fitted with a gauze filter but if you can
keep it clean it will assist with the long life of your fire
Troubleshooting pilot light
Left above a correct blue flame
right above a incorrect yellow flame
With a strong flame not small
aeration hole needs cleaning
It is important the pilot flame stays strong and blue as on the left as it creates good
cross lighting and no build up of gas then ignition which can be dangerous
Issue 1!
24