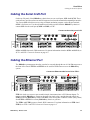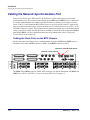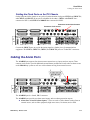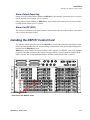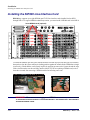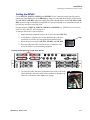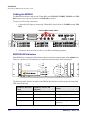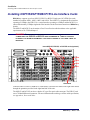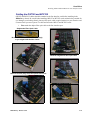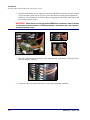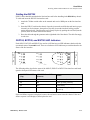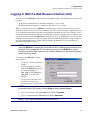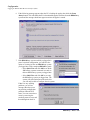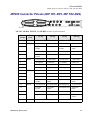
1
BROADway
INSTALLATION MANUAL
Part Number: 770-0125-AB
Product Release: 4.00
March 2004
Copyright© 2004 Carrier Access Corporation. All rights reserved.
The information presented in this manual is subject to change without notice and does not represent a commitment on the
part of Carrier Access Corporation. The hardware and software described herein are furnished under a license or nondisclosure agreement. The hardware, software, and manual may be used or copied only in accordance with the terms of this
agreement. It is against the law to reproduce, transmit, transcribe, store in a retrieval system, or translate into any medium
- electronic, mechanical, magnetic, optical, chemical, manual, or otherwise - any part of this manual or software supplied
with BROADway for any purpose other than the purchaser’s personal use without the express written permission of Carrier
Access Corporation.
BROADway, solve for x, and the Carrier Access Logo are registered trademarks of Carrier Access Corporation. All other
brand or product names are trademarks or registration trademarks of their respective companies or organizations.
Contact Information:
Carrier Access Corporation
5395 Pearl Parkway
Boulder, CO 80301-2490
Corporate Phone: (800) 495-5455
Fax: (303) 443-5908
www.carrieraccess.com
Customer Support Direct: (800) 786-9929
E-mail: [email protected]
PREFACE
Preface
Compliance
Safety of Information Technology Equipment
BROADway is safety certified by an independent laboratory and is compliant with the following safety
standards:
!
UL1950, 3rd Edition
! CSA No. 22.2 / cUL60950, 3rd Edition
FCC Requirements, Part 15
This device complies with Part 15 of the FCC Rules. Operation is subject to the following two
conditions:
! This device may not cause harmful interference, and
! This device must accept any interference received, including interference that may cause
undesired operation
This equipment has been tested and found to comply with the limits for a Class A digital device pursuant
to Part 15 of the Federal Communications Rules. These limits are designed to provide reasonable
protection against harmful interference when equipment is operated in a commercial environment. This
equipment generates, uses, and can radiate radio frequency energy and, if not installed and used in
accordance with the instruction manual, may cause harmful interference to radio communications.
Operation of this equipment in a residential area is likely to cause harmful interference, in which case
the user will be required to correct the interference at the user’s own expense.
NOTE: Changes or modifications to any unit not expressly approved by the party responsible for
compliance may cause damage to the equipment and could void your authority to operate the
equipment.
Preface
Compliance
FCC Requirements, Part 68
The following instructions are provided to ensure compliance with the Federal Communications
Commission (FCC) Rules, Part 68.
1. This equipment complies with Part 68 of the FCC rules. This unit bears a label which contains
the FCC registration number. If requested, this information must be provided to the telephone
company.
2. This equipment uses the following standard jack types for network connection:
Card
Type
Service
Type
Framing
Coding
REN/
SOC
FIC
Network
Jack
NHP160
1.544 Mbps
D4 (superframe)
AMI
6.0N
04DU9-BN
Hardwired
1.544 Mbps
D4 (superframe)
B8ZS
6.0N
04DU9-DN
Hardwired
1.544 Mbps
ESF (extended
superframe)
AMI
6.0N
04DU9-1KN
Hardwired
1.544 Mbps
ESF (extended
superframe)
B8ZS
6.0N
04DU9-1SN
Hardwired
1.544 Mbps
D4 (superframe)
AMI
6.0N
04DU9-BN
Hardwired
1.544 Mbps
D4 (superframe)
B8ZS
6.0N
04DU9-DN
Hardwired
1.544 Mbps
ESF (extended
superframe)
AMI
6.0N
04DU9-1KN
Hardwired
1.544 Mbps
ESF (extended
superframe)
B8ZS
6.0N
04DU9-1SN
Hardwired
NIP400
3. This equipment is designed to be connected to the telephone network or premises wiring using
cabling that complies with the requirements of FCC Part 68 rules.
4. In the unlikely event that this equipment causes harm to the telephone network, the telephone
company can temporarily disconnect your service. The telephone company will try to warn you
in advance of any such disconnection, but if advance notice isn't practical, it may disconnect
the service first and notify you as soon as possible afterwards. In the event such a disconnection
is deemed necessary, you will be advised of your right to file a complaint with the FCC.
5. From time to time, the telephone company may make changes in its facilities, equipment, or
operations which could affect the operation of this equipment. If this occurs, the telephone
company is required to provide you with advance notice so you can make the modifications
necessary to maintain uninterrupted service.
6. Repair service and warranty information can be obtained from:
Carrier Access Corporation
5395 Pearl Parkway
Boulder, CO 80301-2490
(800) 786-9929 or (303) 442-5455
7. All repairs should be performed by Carrier Access or an authorized agent. It is the responsibility
of the users requiring service to report the need for service to Carrier Access or an authorized
agent.
iv
BROADway - Release 4.00
Preface
Compliance
Industry Canada ICES-003
English
This class A digital apparatus complies with Canadian ICES-003.
French
Cet appareil numérique de la classe A est conforme à la norme NMB-003 du Canada.
Industry Canada CS-03
This equipment meets the applicable Industry Canada Terminal Equipment Technical
Specifications. This is confirmed by the registration number. The abbreviation, IC, before the
registration number signifies that registration was performed based on a Declaration of Conformity
indicating that Industry Canada technical specifications were met. It does not imply that Industry
Canada approved the equipment.
Before installing this equipment, users should ensure that it is permissible to be connected to the
facilities of the local telephone company. The equipment must also be installed using an acceptable
method of connection. The customer should be aware that compliance with the above conditions
may not prevent degradation of service in some situations.
Repairs to certified equipment should be coordinated by a representative designated by the supplier.
Any repairs or alternations made by the user to this equipment, or equipment malfunctions, may
give the telecommunications company cause to request the user to disconnect the equipment.
Users should ensure for their own protection that the electrical ground connections of the power
utility, telephone lines and internal metallic water pipe system, if present, are connected together.
This precaution may be particularly important in rural areas.
CAUTION! USERS SHOULD NOT ATTEMPT TO MAKE SUCH CONNECTIONS THEMSELVES,
BUT SHOULD CONTACT THE APPROPRIATE ELECTRIC INSPECTION AUTHORITY, OR
ELECTRICIAN, AS APPROPRIATE.
BROADway - Release 4.00
v
Preface
Safety Information
Safety Information
CAUTION! ALWAYS USE CAUTION WHEN INSTALLING TELEPHONE LINES. READ THE
CAUTIONS BELOW FOR DETAILS ON SAFETY GUIDELINES TO PREVENT INJURY.
! Never touch uninsulated telephone wires and terminals unless the telephone line has been
disconnected at the Network Interface (NI) as voltage potentials as high as 300 VAC may be
present across the transmit and receive pairs.
! Only use No. 26 AWG or larger telecommunication line cord, to reduce the risk of fire.
! Never install telephone wiring during a lightning storm.
! Never install telephone jacks in wet locations unless the jack is specifically designed for wet
locations.
! Refer to the installation section of this manual for a safe and proper installation procedure. All
wiring external to this equipment should follow the current provision of the National Electrical
Code.
Notices
This manual contains important information and warnings that must be followed to ensure safe
operation of the equipment.
DANGER! A DANGER NOTICE INDICATES THE PRESENCE OF A HAZARD THAT CAN OR WILL
CAUSE DEATH OR SEVERE PERSONAL INJURY IF THE HAZARD IS NOT AVOIDED.
CAUTION! A CAUTION NOTICE INDICATES THE POSSIBILITY OF INTERRUPTING NETWORK
SERVICE IF THE HAZARD IS NOT AVOIDED.
WARNING! A WARNING NOTICE INDICATES THE POSSIBILITY OF EQUIPMENT DAMAGE IF THE
HAZARD IS NOT AVOIDED.
NOTE: A Note indicates information to help you understand how to perform a procedure or how
the system works. Notes should be read before performing the required action.
vi
BROADway - Release 4.00
Preface
Electrostatic Discharge (ESD) Precautions
Electrostatic Discharge (ESD) Precautions
ESD can damage processors, circuit cards, and other electronic components. Always observe the
following precautions before installing a system component.
1. Do not remove a component from its protective packaging until ready to install.
2. Wear a wrist grounding strap and attach it to a metal part of the system unit before handling
components. If a wrist strap is not available, maintain contact with the system unit
throughout any procedure requiring ESD protection.
WARNING! INTEGRATED CIRCUITS (ICS) ARE EXTREMELY SUSCEPTIBLE TO
ELECTROSTATIC DISCHARGE. UNLESS YOU ARE A QUALIFIED SERVICE TECHNICIAN WHO
USES TOOLS AND TECHNIQUES THAT CONFORM TO ACCEPTED INDUSTRY PRACTICES, DO
NOT HANDLE ICS.
The ESD warning label appears on packages and storage bags that contain
static-sensitive products and components.
BROADway - Release 4.00
vii
Preface
Warranty
Warranty
Carrier Access warrants to BUYER that Products are free from substantial defect in material and workmanship under
normal use given proper installation and maintenance for a period of two (2) years from the date of shipment by Carrier
Access. This warranty shall not apply to Products that have been either resold or transferred from BUYER to any other
party. Any such transfer shall void the above warranty.
BUYER will promptly notify Carrier Access of any defect in the Product. Carrier Access or its agent will have the right
to inspect the Product or workmanship on BUYER’s premises. Carrier Access has the option to: (a) repair, replace, or
service at its factory or on the premises the Product or workmanship was found to be defective; or (b) credit BUYER for
the Product in accordance with Carrier Access’ depreciation policy. Refurbished material may be used to repair or replace
the Product. Products returned to Carrier Access for repair, replacement, or service will be shipped prepaid to BUYER.
Limitation of Warranty & Limitation of Remedies
Correction of defects by repair, replacement, or service will be at Carrier Access’ option and constitute fulfillment of all
obligations to BUYER for breach of warranty.
Carrier Access assumes no warranty liability with respect to defects in the Product caused by:
a.
modification, repair, installation, operation, or maintenance of the Product by anyone other than
Carrier Access or its agent, except as described in Carrier Access’ documentation; or
b.
the negligent or other improper use of the Product; or
c.
handling or transportation after title of the Product passes to BUYER.
Other manufacturer’s equipment purchased by Carrier Access and resold to BUYER will be limited to that manufacturer’s
warranty. Carrier Access assumes no warranty liability for other manufacturer’s equipment furnished by BUYER.
BUYER understands and agrees as follows: THE WARRANTIES IN THIS AGREEMENT REPLACE ALL OTHER
WARRANTIES, EXPRESSED OR IMPLIED, AND ALL OTHER OBLIGATIONS OR LIABILITIES OF CARRIER
ACCESS, INCLUDING ANY WARRANTIES OF MERCHANTABILITY AND FITNESS FOR A PARTICULAR
PURPOSE. ALL OTHER WARRANTIES ARE DISCLAIMED AND EXCLUDED BY CARRIER ACCESS.
THE REMEDIES CONTAINED IN THIS AGREEMENT WILL BE THE SOLE AND EXCLUSIVE REMEDIES
WHETHER IN CONTRACT, TORT, OR OTHERWISE, AND CARRIER ACCESS WILL NOT BE LIABLE FOR
INJURIES OR DAMAGES TO PERSONS OR PROPERTY RESULTING FROM ANY CAUSE WHATSOEVER,
WITH THE EXCEPTION OF INJURIES OR DAMAGES CAUSED BY THE GROSS NEGLIGENCE OF CARRIER
ACCESS.
THIS LIMITATION APPLIES TO ALL SERVICES, SOFTWARE, AND PRODUCTS DURING AND AFTER THE
WARRANTY PERIOD. IN NO EVENT WILL CARRIER ACCESS BE LIABLE FOR ANY SPECIAL, INCIDENTAL,
OR CONSEQUENTIAL DAMAGES OR COMMERCIAL LOSSES EVEN IF CARRIER ACCESS HAS BEEN
ADVISED THEREOF.
No agent, distributor, or representative is authorized to make any warranties on behalf of Carrier Access or to assume for
Carrier Access any other liability in connection with any of Carrier Access’ Products, software, or services.
Warranty Product Returns
Before returning any equipment to Carrier Access Corporation, first contact the distributor or dealer from which you
purchased the product.
A Return Material Authorization (RMA) number is required for all equipment returned to Carrier Access Corporation.
Call Carrier Access Corporation Customer Support at (800) 786-9929 or (303) 442-5455 for RMA number, repair/
warranty information and shipping instructions. Be prepared to provide the following information:
viii
!
Carrier Access Corporation serial number(s) from the system chassis or circuit card(s)
!
Name of distributor or dealer from which you purchased the product
!
Description of defect
BROADway - Release 4.00
Preface
Third-Party Software Notices
Third-Party Software Notices
Sun Microsystems, Inc., Software Notice
Use of the Sun Microsystems, Inc., software included in this release is governed by the Sun Microsystems, Inc.,
terms and conditions stated below:
Copyright 1994-2004 Sun Microsystems, Inc. All Rights Reserved.
Redistribution and use in source and binary forms, with or without modification, are permitted provided that the
following conditions are met:
!
Redistribution of source code must retain the above copyright notice, this list of conditions, and the following
disclaimer.
!
Redistribution in binary form must reproduce the above copyright notice, this list of conditions, and the
following disclaimer in the documentation and/or other materials provided with the distribution.
Neither the name of Sun Microsystems, Inc., or the names of the contributors may be used to endorse or promote
products derived from this software without specific prior written permission.
This software is provided “AS IS,” without a warranty of any kind. ALL EXPRESS OR IMPLIED CONDITIONS,
REPRESENTATIONS AND WARRANTIES, INCLUDING ANY IMPLIED WARRANTY OF
MERCHANTABILITY, FITNESS FOR A PARTICULAR PURPOSE OR NON-INFRINGEMENT, ARE
HEREBY EXCLUDED. SUN MICROSYSTEMS, INC. (“SUN”) AND ITS LICENSORS SHALL NOT BE
LIABLE FOR ANY DAMAGES SUFFERED BY LICENSEE AS A RESULT OF USING, MODIFYING OR
DISTRIBUTING THIS SOFTWARE OR ITS DERIVATIVES. IN NO EVENT WILL SUN OR ITS LICENSORS
BE LIABLE FOR ANY LOST REVENUE, PROFIT OR DATA, OR FOR DIRECT, INDIRECT, SPECIAL,
CONSEQUENTIAL, INCIDENTAL OR PUNITIVE DAMAGES, HOWEVER CAUSED AND REGARDLESS
OF THE THEORY OF LIABILITY, ARISING OUT OF THE USE OF OR INABILITY TO USE THIS
SOFTWARE, EVEN IF SUN HAS BEEN ADVISED OF THE POSSIBILITY OF SUCH DAMAGES.
You acknowledge that this software is not designed, licensed or intended for use in the design, construction,
operation or maintenance of any nuclear facility.
BROADway - Release 4.00
ix
Preface
Third-Party Software Notices
x
BROADway - Release 4.00
TABLE OF CONTENTS
Table of Contents
Preface
Compliance . . . . . . . . . . . . . . . . . . . . . . . . . . . . . . . . . . . . . . . . . . . . . . . . . iii
Safety Information . . . . . . . . . . . . . . . . . . . . . . . . . . . . . . . . . . . . . . . . . . . vi
Notices . . . . . . . . . . . . . . . . . . . . . . . . . . . . . . . . . . . . . . . . . . . . . . . . . . . . vi
Electrostatic Discharge (ESD) Precautions . . . . . . . . . . . . . . . . . . . . . . . . .vii
Warranty . . . . . . . . . . . . . . . . . . . . . . . . . . . . . . . . . . . . . . . . . . . . . . . . . . viii
Third-Party Software Notices . . . . . . . . . . . . . . . . . . . . . . . . . . . . . . . . . . . ix
1
Introduction
Overview . . . . . . . . . . . . . . . . . . . . . . . . . . . . . . . . . . . . . . . . . . . . . . . . . . 1-2
2
Installation
Overview . . . . . . . . . . . . . . . . . . . . . . . . . . . . . . . . . . . . . . . . . . . . . . . . . . 2-2
Chassis Overview. . . . . . . . . . . . . . . . . . . . . . . . . . . . . . . . . . . . . . . . . . . . 2-2
Mounting the Chassis in a Rack. . . . . . . . . . . . . . . . . . . . . . . . . . . . . . . . . 2-4
Cabling Power and Ground . . . . . . . . . . . . . . . . . . . . . . . . . . . . . . . . . . . . 2-6
Cabling the Serial Craft Port . . . . . . . . . . . . . . . . . . . . . . . . . . . . . . . . . . . 2-9
Cabling the Ethernet Port. . . . . . . . . . . . . . . . . . . . . . . . . . . . . . . . . . . . . . 2-9
Cabling the Network Synchronization Port . . . . . . . . . . . . . . . . . . . . . . . 2-10
Cabling the Clock Ports on the BITS Chassis . . . . . . . . . . . . . . . . . 2-10
Cabling the Clock Ports on the ITU Chassis . . . . . . . . . . . . . . . . . . 2-11
Cabling the Alarm Ports. . . . . . . . . . . . . . . . . . . . . . . . . . . . . . . . . . . . . . 2-11
Alarm Input Sensing . . . . . . . . . . . . . . . . . . . . . . . . . . . . . . . . . . . . . 2-12
Alarm Output Reporting . . . . . . . . . . . . . . . . . . . . . . . . . . . . . . . . . . 2-13
Alarm Cut Off (ACO). . . . . . . . . . . . . . . . . . . . . . . . . . . . . . . . . . . . 2-13
Installing the NSP101 Control Card . . . . . . . . . . . . . . . . . . . . . . . . . . . . 2-13
Installing the NIP400 Line Interface Card . . . . . . . . . . . . . . . . . . . . . . . . 2-16
Cabling the NIP400 . . . . . . . . . . . . . . . . . . . . . . . . . . . . . . . . . . . . . 2-17
NIP400 LED Indicators . . . . . . . . . . . . . . . . . . . . . . . . . . . . . . . . . . 2-18
Installing the NHP160 Line Interface Card . . . . . . . . . . . . . . . . . . . . . . . 2-19
Cabling and Inserting the NHP160 Line Interface Card. . . . . . . . . . 2-19
NHP160 LED Indicators. . . . . . . . . . . . . . . . . . . . . . . . . . . . . . . . . . 2-20
Installing the BSP200 Line Interface Card . . . . . . . . . . . . . . . . . . . . . . . 2-21
Cabling the BSP200 . . . . . . . . . . . . . . . . . . . . . . . . . . . . . . . . . . . . . 2-22
BSP200 LED Indicators . . . . . . . . . . . . . . . . . . . . . . . . . . . . . . . . . . 2-22
Installing OSP155/ESP155/BCP155 Line Interface Cards . . . . . . . . . . . 2-24
Cabling the OSP155 and BCP155 . . . . . . . . . . . . . . . . . . . . . . . . . . 2-25
Cabling the ESP155 . . . . . . . . . . . . . . . . . . . . . . . . . . . . . . . . . . . . . 2-27
OSP155, BCP155, and ESP155 LED Indicators . . . . . . . . . . . . . . . 2-27
Attaching the Front Panel . . . . . . . . . . . . . . . . . . . . . . . . . . . . . . . . . . . . 2-28
Table of Contents
Applying Power to the Chassis . . . . . . . . . . . . . . . . . . . . . . . . . . . . . . . .
Maintaining BROADway Hardware . . . . . . . . . . . . . . . . . . . . . . . . . . . .
Installing New Cards . . . . . . . . . . . . . . . . . . . . . . . . . . . . . . . . . . . .
Replacing Failed Cards . . . . . . . . . . . . . . . . . . . . . . . . . . . . . . . . . .
Maintaining the Fan Tray. . . . . . . . . . . . . . . . . . . . . . . . . . . . . . . . .
3
2-29
2-30
2-30
2-31
2-32
Configuration
Overview . . . . . . . . . . . . . . . . . . . . . . . . . . . . . . . . . . . . . . . . . . . . . . . . . . 3-2
Assigning an IP Address to the BROADway System . . . . . . . . . . . . . . . . 3-3
Default BROADway IP Address . . . . . . . . . . . . . . . . . . . . . . . . . . . . 3-3
Assigning a Different IP Address . . . . . . . . . . . . . . . . . . . . . . . . . . . 3-4
Management Access to the BROADway System . . . . . . . . . . . . . . . . . . . 3-7
Viewing Serial Craft Port Settings With the GUI . . . . . . . . . . . . . . . 3-7
Local SCP-1 Serial Craft Port Access . . . . . . . . . . . . . . . . . . . . . . . . 3-7
Remote Modem SCP-1 Serial Craft Port Access. . . . . . . . . . . . . . . . 3-7
Ethernet Port Command Line Access . . . . . . . . . . . . . . . . . . . . . . . . 3-8
Ethernet Port Web Browser GUI Access . . . . . . . . . . . . . . . . . . . . . . 3-8
Logging In With the Web Browser Interface (GUI) . . . . . . . . . . . . . . . . . 3-9
Logging In With the Command Line Interface (CLI). . . . . . . . . . . . . . . 3-13
Setting Up User Accounts . . . . . . . . . . . . . . . . . . . . . . . . . . . . . . . . . . . . 3-14
User Account Management Using the GUI . . . . . . . . . . . . . . . . . . . 3-15
User Account Management Using TL1 . . . . . . . . . . . . . . . . . . . . . . 3-16
Changing Your Password . . . . . . . . . . . . . . . . . . . . . . . . . . . . . . . . . . . . 3-18
Changing Your Password Using the GUI . . . . . . . . . . . . . . . . . . . . 3-18
Changing Your Password Using TL1 . . . . . . . . . . . . . . . . . . . . . . . 3-18
Setting the System Date and Time . . . . . . . . . . . . . . . . . . . . . . . . . . . . . 3-19
Setting the Date and Time Using the GUI . . . . . . . . . . . . . . . . . . . . 3-19
Setting the Date and Time Using TL1 . . . . . . . . . . . . . . . . . . . . . . . 3-19
Setting System Node Parameters . . . . . . . . . . . . . . . . . . . . . . . . . . . . . . 3-20
Setting System Node Parameters Using the GUI. . . . . . . . . . . . . . . 3-20
Setting System Node Parameters Using TL1. . . . . . . . . . . . . . . . . . 3-21
Managing the BROADway Configuration Database . . . . . . . . . . . . . . . 3-23
Managing the Database Using the GUI . . . . . . . . . . . . . . . . . . . . . . 3-24
Managing the Database Using TL1 . . . . . . . . . . . . . . . . . . . . . . . . . 3-25
Exporting the BROADway Database to a TL1 Script . . . . . . . . . . . 3-26
Copying Files Between NSP101 Controllers. . . . . . . . . . . . . . . . . . 3-27
Re-Starting the BROADway System Using TL1. . . . . . . . . . . . . . . 3-27
Using FTP with the BROADway System . . . . . . . . . . . . . . . . . . . . . . . . 3-28
Upgrading System Software . . . . . . . . . . . . . . . . . . . . . . . . . . . . . . . . . . 3-29
Rolling Back a Software Update . . . . . . . . . . . . . . . . . . . . . . . . . . . 3-32
Upgrading the Boot ROM . . . . . . . . . . . . . . . . . . . . . . . . . . . . . . . . 3-32
TL1 Software Upgrade Commands . . . . . . . . . . . . . . . . . . . . . . . . . 3-34
xii
BROADway - Release 4.00
Table of Contents
A
Ports and Cables
Overview . . . . . . . . . . . . . . . . . . . . . . . . . . . . . . . . . . . . . . . . . . . . . . . . . .A-2
SCP-1 and SCP-2 Connector Pinouts . . . . . . . . . . . . . . . . . . . . . . . . . . . .A-2
ETH-1 and ETH-2 Connector Pinouts . . . . . . . . . . . . . . . . . . . . . . . . . . . .A-3
CKIN-1 and CKIN-2 Connector Pinouts (BITS Only) . . . . . . . . . . . . . . .A-4
NIP400 Connector Pinouts (NIP TX1–RX1, NIP TX2–RX2) . . . . . . . . .A-5
ALARMS Connector Pinouts . . . . . . . . . . . . . . . . . . . . . . . . . . . . . . . . . .A-7
NHP160 Connector Pinouts . . . . . . . . . . . . . . . . . . . . . . . . . . . . . . . . . . . .A-8
Index
BROADway - Release 4.00
xiii
Table of Contents
xiv
BROADway - Release 4.00
CHAPTER
1
Introduction
In This Chapter
#
Overview
Introduction
Overview
Overview
Congratulations on your purchase of the Carrier Access BROADway system, a single platform
supporting a variety of applications at the edge of the broadband network for electrical and optical,
circuit-switched and packet-based networking.
This manual describes what you need to know to install your BROADway system hardware and perform
the initial configuration. Complete details about how to configure and maintain your BROADway
system, set up packet services, perform diagnostics, and all TL1 commands are included in the online
help system on the BROADway software CD.
BROADway Release 4.00 includes the following new features:
! Stacking of BROADway Systems (Up to Five Nodes or Systems)—BROADway Release
4.00 supports stacking of BROADway chassis, where you can connect up to five systems, or
nodes. The stacked systems are connected using the BCP155 cards, and configured using the
GUI. Refer to the online help system on the CD.
! FAC1/FAC2 In-band Loopup Codes—BROADway Release 4.00 supports FAC1/FAC2 in-
band loopup codes. There are new parameters in the GUI and the command line interface to
support this. Refer to the online help system on the CD.
! Multi-frame Alignment Support—BROADway Release 4.00 supports multi-frame
alignment on T1 and E1 interfaces. There is a new parameter in the GUI and the command line
interface to support this. Refer to the online help system on the CD.
! Additional Options Available With the Ping Command—In Release 4.00, the ping
command supported with the packet services command line interface has been extended to
allow you to specify the source IP address, interval between ping packets, number of timeouts
on ping responses, and the length of the ping packet. Refer to the online help system on the CD.
1-2
BROADway - Release 4.00
CHAPTER
2
Installation
In This Chapter
#
Overview
#
Chassis Overview
#
Mounting the Chassis in a Rack
#
Cabling Power and Ground
#
Cabling the Serial Craft Port
#
Cabling the Ethernet Port
#
Cabling the Network Synchronization Port
#
Cabling the Alarm Ports
#
Installing the NSP101 Control Card
#
Installing the NIP400 Line Interface Card
#
Installing the NHP160 Line Interface Card
#
Installing the BSP200 Line Interface Card
#
Installing OSP155/ESP155/BCP155 Line Interface
Cards
#
Attaching the Front Panel
#
Applying Power to the Chassis
#
Maintaining BROADway Hardware
Installation
Overview
Overview
The BROADway system is composed of a chassis, control cards, and various line interface card options.
This chapter provides the following information:
! An overview of each of the two BROADway chassis styles
! How to install the BROADway chassis, system control cards, and line interface hardware
! A guide to cabling the various chassis and line card options
! A description of the LED indicator status for each card
! How to maintain the BROADway system in good working order
WARNING! WHEN INSTALLING OR REPLACING BROADWAY HARDWARE, ALWAYS ADHERE
TO GOOD PRACTICE WITH RESPECT TO ESD PROCEDURES—USE A REGULARLY AND PROPERLY
TESTED GROUNDING STRAP.
Chassis Overview
There are two versions of the BROADway chassis: BITS and ITU. The only difference between the two
chassis is the number and type of the external clock synchronization ports available at the front panel,
as shown in the following figure. In all other respects the chassis are equivalent and the same mounting
and installation instructions should be used for each.
Top I/O Panel
2-2
Front View of the BITS Chassis
NIP RX1
NIP RX2
NIP TX1
NIP TX2
RX1
TX1
RX3
RX2
TX2
TX3
RX4
TX4
CKIN-1 CKIN-2
ETH-1 ETH-2
ALARMS
ACO
SCP-1
SCP-2
BROADway - Release 4.00
Installation
Chassis Overview
Top I/O Panel
Front View of the ITU Chassis
NIP RX1
NIP RX2
NIP TX1
NIP TX2
RX1
TX1
RX2
TX2
RX3
TX3
RX4
TX4
CKIN-1
CKOUT-1
CKIN-2
CKOUT-2
ETH-1 ETH-2
ALARMS
ACO
SCP-1
SCP-2
Some line interface cards are cabled directly at the card while others are accessed and cabled through
the top I/O panel of the BROADway system.
Each chassis provides the following top I/O front panel connectors:
! NIP RX1/NIP RX2/NIP TX1/NIP TX2—50 pin T1/E1 interfaces to the NIP slots
! RX1/TX1/RX2/TX2/RX3/TX3/RX4/TX4—75 ohm BNC coaxial interfaces to the BSP slots
! CKIN-1/CKIN-2/CKOUT-1/CKOUT-2—(CKOUT on ITU chassis only) Timing interfaces
! ETH-1/ETH-2—RJ45 Ethernet interfaces
! SCP-1/SCP-2—RS232 serial craft (administration) port interfaces (note that SCP2 is not active
in this software release)
! ALARMS—Wiring interface for alarm input and outputs
In total, the chassis supports twenty card slots assigned as follows:
! NSP-1—The primary slot for the NSP101 system control card
! NSP-2—The secondary (backup) slot for the NSP101 system control card
! NIP-1/NIP-2/NIP-3/NIP-4/NIP-5/NIP-6/NIP-7/NIP-8—For the NIP400 Quad T1/E1
interface cards
! UIP-1/UIP-2—Universal interface card slots for the NHP160 16-port T1/E1 interface cards
! BSP-1/BSP-2/BSP-3/BSP-4—For BSP200 DS3 interface cards
! OSP-1/OSP-2/OSP-3/OSP-4—For OSP155/ESP155 and BCP155 interface cards
BROADway - Release 4.00
2-3
Installation
Mounting the Chassis in a Rack
NIP RX1
NIP RX2
NIP TX1
NIP TX2
RX1
TX1
RX2
TX2
RX3
TX3
RX4
TX4
CKIN-1 CKIN-2
ETH-1 ETH-2
ALARMS
ACO
SCP-1
SCP-2
NIP-4
NIP-8
OSP-4
NIP-3
NIP-7
OSP-3
NIP-2
NIP-6
OSP-2
NIP-1
NIP-5
OSP-1
NSP-2
BSP-4
NSP-1
BSP-3
UIP-2
BSP-2
UIP-1
BSP-1
All configurable items in the BROADway chassis are managed through the software interface. The
backplane of the BROADway chassis is keyed to prevent you from inserting a card in the incorrect slot.
All BROADway control and line cards are hot-swappable, you can insert cards into systems that are
either not powered, or systems that are powered.
Mounting the Chassis in a Rack
Typically, the BROADway chassis will be mounted within a rack or bay. The BROADway chassis can
be installed in either a standard 19- or 23-inch rack. A mounting kit included with the chassis provides
the means to support installation in both types of rack.
WARNING! WHEN INSTALLING THE CHASSIS IN A RACK, BE CAREFUL TO TRY TO MINIMIZE
THE AMOUNT OF BLOCKAGE OVER THE AIR INTAKE AND EXTRACTION PANELS TO THE LEFT AND
RIGHT OF THE CHASSIS.
As when installing any additional equipment within an existing or planned rack environment, consider
how powering the BROADway chassis will impact the overall loading of the branch circuit used at the
rack. A fully loaded BROADway chassis requires approximately 160W to power the system. When
installing in a rack, make sure that a reliable ground (earth) path is maintained; the BROADway chassis
is intended to be connected to a good earth ground.
2-4
BROADway - Release 4.00
Installation
Mounting the Chassis in a Rack
The BROADway chassis can be installed within a rack in two different ways:
! Front-mounted (flush with the front of the rack)—This is the most commonly used
mounting option when the rack is sturdily mounted to a wall.
! Center of gravity mounted (mid-mounted)—This mounting option is used when the rack is
not sturdily constructed or only attached at the floor. This mounting option centers the chassis
over the rails so there is less chance for the rack to tip. This is the most commonly used
mounting option.
When determining which way you want to mount the chassis, use the option that will keep the rack
stable and unlikely to tip over.
To prevent potential damage to interface and control cards, wait until the chassis is properly mounted
before installing any control or line card options.
NOTE: It is recommended that you leave 1 rack unit (RU) of space above and below the
BROADway chassis within the rack for ease of accessibility.
To mount the chassis:
1. Determine whether your rack is a 19- or 23-inch rack.
2. Determine how you want to mount the chassis: front-mounted or center of gravity mounted. If
you want to mount using the center of gravity position, you must move the mounting ear on
each side of the chassis as shown in the following figure:
a. Unscrew the four screws holding the mounting ear on one side of the chassis, rotate the
mounting ear 180º, move the mounting ear to the next set of holes, and re-insert the four
screws.
b. Repeat on the other side of the chassis.
Side View of the Chassis
BEFORE
AFTER
For mid-mount, unscrew four screws and move mounting bracket on each side
BROADway - Release 4.00
2-5
Installation
Cabling Power and Ground
3. If you are mounting the chassis in a 23-inch rack, use the four screws that
come with each extension bracket (provided with the chassis) to attach
the brackets to the mounting ears.
Extension Plate
4. Attach the chassis to the rack by inserting four screws on each side of the
chassis through both the mounting ears or extensions on the side of the
chassis and the rack rails.
NIP RX
NIP TX
NIP-4
NIP-3
NIP-2
NIP-1
M
LE
U
D
O
IN
Cabling Power and Ground
The BROADway chassis accepts a DC power feed directly into the chassis.
NOTE: To power the BROADway system from an AC supply (110–230 VAC), you must
use an external AC-to-DC converter.
As when installing any additional equipment within an existing or planned rack environment, consider
how powering the BROADway chassis will impact the overall loading of the branch circuit used at the
rack. A fully loaded BROADway chassis requires approximately 160W to power the system. When
installing in a rack, make sure that a reliable ground (earth) path is maintained; the BROADway chassis
is intended to be connected to a good Earth ground such as that provided by building steel, a cold water
pipe or, preferably, a properly constructed ground plate or bonding network.
To connect power and ground to the BROADway chassis:
1. Verify that the ON/OFF (O/I) switch on the back of the chassis is set to OFF (O).
2. Connect the Earth ground stud on the back of the chassis to a suitable Earth ground as
previously described.
2-6
BROADway - Release 4.00
Installation
Cabling Power and Ground
3. On the back of the chassis are two separate DC feeds (FEED A and FEED B).
BROADway Chassis Rear Panel View
OFF
O
FEED A
FEED B
OFF
O
ON
I
POWER A
ON
I
POWER B
+24/-48 VDC, 10 A
CONNECTION INFORMATION
FOR +24VDC: 24V to +, RTN to FOR -48VDC: RTN to +, -48V to -
Connect to +24VDC or -48VDC power source
CAUTION: THIS UNIT HAS MORE THAN ONE POWER SUPPLY CONNECTION.
DISCONNECT BOTH POWER SUPPLY CONNECTIONS BEFORE SERVICING TO
AVOID ELECTRIC SHOCK.
Connect to Earth ground
THIS UNIT MAY CONTAIN A CLASS 1 LASER PRODUCT WHICH
CONFORMS TO THE APPLICABLE REQUIREMENTS OF 21 CFR
SUBCHAPTER J. REFER TO THE INSTALLATION MANUAL.
Remove the green connector from the FEED A plug.
4. Attach the appropriate leads to the connector. Your power wires will originate from your DC
power source.
How you attach the leads varies based on whether you are using a -48 V DC ground referenced
power source, or a +24 V DC ground referenced power source.
Using a -48 VDC Power Source
-48 VDC Feed
RETURN
+
Ground at power source
-48 VDC
BROADway - Release 4.00
BROADway
-
2-7
Installation
Cabling Power and Ground
Using a +24 VDC Power Source
+24 VDC Feed
BROADway
+24 VDC
+
RETURN
Ground at power source
-
WARNING! THE BROADWAY CHASSIS DOES NOT PROVIDE AUTOMATIC POLARITY
CORRECTION. THAT IS, IF YOU ATTACH THE SUPPLY WIRES IN THE WRONG ORDER, THE INPUT
POWER FUSE WILL BLOW. SPARE FUSES ARE ENCLOSED WITH EACH BROADWAY CHASSIS TO
HANDLE THIS SITUATION.
5. After wiring the green FEED A connector, reconnect it to the back of the BROADway chassis.
6. For power redundancy, use an alternate DC power source, and wire FEED B in the same
manner as FEED A.
DANGER! THIS CHASSIS HAS TWO POWER SUPPLY CONNECTIONS. DISCONNECT BOTH
BEFORE SERVICING TO AVOID ELECTRIC SHOCK.
2-8
BROADway - Release 4.00
Installation
Cabling the Serial Craft Port
Cabling the Serial Craft Port
On the top I/O panel of the BROADway chassis there are two serial ports: SCP-1 and SCP-2. These
serial ports are used for craft access and will support a local or modem attached command line interface.
You can use SCP-1 for direct access using a terminal emulation program, such as HyperTerminal;
SCP-2 is for future use. Use the null-modem serial cable provided with the BROADway chassis to
connect SCP-1 to the serial port (COM1 or COM2) of a PC.
Connect to the serial port of a PC
NIP RX1
NIP RX2
NIP TX1
NIP TX2
RX1
TX1
RX2
TX2
RX3
TX3
RX4
CKIN-1 CKIN-2
TX4
ETH-1 ETH-2
ALARMS
ACO
SCP-1
SCP-2
SCP-1 and SCP-2 are male, DB9 connectors. For pinout information related to SCP-1 and SCP-2, see
SCP-1 and SCP-2 Connector Pinouts on page A-2.
Cabling the Ethernet Port
The BROADway management interface can also be accessed through the two 10/100 Ethernet ports at
the front of the chassis: ETH-1 and ETH-2 can be used for IP/Ethernet access to the BROADway
system.
Connect an Ethernet cable from a PC to ETH-1.
NIP RX1
NIP RX2
NIP TX1
NIP TX2
RX1
TX1
RX2
TX2
RX3
TX3
RX4
TX4
CKIN-1 CKIN-2
ETH-1 ETH-2
ALARMS
ACO
SCP-1
SCP-2
ETH-1 is wired as a crossover port to enable simple interconnection to a PC Ethernet adaptor. To
manage multiple BROADway systems at the same site simply plug a straight-through cable from
ETH-2 of the first BROADway chassis to ETH-1 of the next system. Continue to cable (daisy-chain)
from ETH-2 to ETH-1 for as many BROADway chassis as you have.
The ETH-1 and ETH-2 ports are female, RJ45 connectors. For pinout information on ETH-1 and
ETH-2, see ETH-1 and ETH-2 Connector Pinouts on page A-3.
BROADway - Release 4.00
2-9
Installation
Cabling the Network Synchronization Port
Cabling the Network Synchronization Port
There are two chassis types, BITS and ITU; the difference is in the number and type of network
synchronization ports. The network synchronization ports (CKIN-1 and CKIN-2) can be connected to
an external synchronization source that is typically traceable to a Stratum 1 level primary reference
source. In the U.S. and Canada the BITS chassis expects to see a D4 or ESF framed T1 signal at this
input. In countries that utilize an E1 network hierarchy, the ITU chassis expects to see a ITU-T G.703
2.048 MHz square wave signal. These connections are optional and should only be used when external
timing is required. If a single external input only is available, it should always be connected to CKIN-1
rather than CKIN-2. For more information about network synchronization, refer to Timing and
Synchronization in the online help.
Cabling the Clock Ports on the BITS Chassis
On the front panel of the chassis are two synchronization clock ports: CKIN-1 and CKIN-2 (one is
redundant for the other). CKIN-1 connects to NSP-1, and CKIN-2 connects to NSP-2.
Connect a second clock source
Connect a clock source
NIP RX1
NIP RX2
NIP TX1
NIP TX2
RX1
TX1
RX2
TX2
RX3
TX3
RX4
TX4
CKIN-1 CKIN-2
ETH-1 ETH-2
ALARMS
ACO
SCP-1
SCP-2
The CKIN-1 and CKIN-2 ports are female, RJ45 connectors. For pinout information on CKIN-1 and
CKIN-2, see CKIN-1 and CKIN-2 Connector Pinouts (BITS Only) on page A-4.
2-10
BROADway - Release 4.00
Installation
Cabling the Alarm Ports
Cabling the Clock Ports on the ITU Chassis
On the front panel of the chassis are two pairs of synchronization clock ports: CKIN-1 and CKOUT-1,
and CKIN-2 and CKOUT-2 (one pair is redundant for the other). CKIN-1 and CKOUT-1 are
connected to NSP-1, and CKIN-2 and CKOUT-2 are connected to NSP-2.
Connect a second clock source
Connect a clock source
NIP RX1
NIP RX2
NIP TX1
NIP TX2
RX1
TX1
RX3
RX2
TX3
TX2
RX4
TX4
CKIN-1
CKOUT-1
CKIN-2
CKOUT-2
ETH-1 ETH-2
ALARMS
ACO
SCP-1
SCP-2
Connect the CKOUT ports to provide the timing signal to a further piece of communications
equipment. The CKIN-1, CKOUT-1, CKIN-2, and CKOUT-2 ports are 75ohm BNC connectors.
Cabling the Alarm Ports
The ALARMS port supports four alarm contact connections: two inputs and two outputs. These
contacts can be used to provide additional external alarms (audible and visual) when an alarm occurs
on the BROADway system as well as to collect alarms arriving from external sources.
NIP RX1
NIP RX2
NIP TX1
NIP TX2
RX1
TX1
RX2
TX2
RX3
TX3
RX4
TX4
CKIN-1 CKIN-2
ETH-1 ETH-2
ALARMS
ACO
SCP-1
SCP-2
The ALARMS port is a female, DB15 connector.
The ALARMS port provides two alarm sense inputs, and two alarm generation outputs.
! Alarm sense #1 and #2 (alarm inputs)—These are used to collect alarms coming from an
external source, such as other equipment, high water sensor, fire alarms, and so forth.
BROADway - Release 4.00
2-11
Installation
Cabling the Alarm Ports
! Alarm generation #1 and #2 (alarm outputs)—These are used to generate an alarm from the
BROADway chassis to an external unit, such as an alarm siren, aisle alarm lights, alarm
telemetry systems, and so forth.
The ALARMS port is a female DB15 port. The following table describes the pinout of the ALARMS
port. The contacts closures for alarm output ports are in the normal state when no alarm is present in the
system.
Pin
Name
1
normally open
2
common
3
normally closed
4
normally open
5
common
6
normally closed
7, 8
not used
9
ALMSNS2N
10
ALMSNS2P
11
ALMSNS1N
12
ALMSNS1P
13
Ground
14
not used
15
+5V DC reference voltage
alarm generation #1
(interpreted as a Critical/Major alarm)
alarm generation #2
(interpreted as a Minor alarm)
alarm sense #2
(can be configured for Critical, Major, or MInor)
alarm sense #1
(can be configured for Critical, Major, or MInor)
Using the ALARMS port, you can do either or both:
! Connect none, one, or two external sources to alarm sense #1 and #2 to indicate when an alarm
is coming from the external source.
! Connect none, one, or two external units to the alarm generation #1 and #2 to tell the external
units when an alarm has occurred on the BROADway system.
Alarm Input Sensing
The ALARMS port provides two separate circuits to detect when an alarm is generated from an external
source. The circuit will sense an alarm condition when an external +5V potential is placed across pins
11 and 12 (ALMSNS1) or pins 9 and 10 (ALMSNS2). These pins are isolated from the BROADway
chassis. If an external voltage is not readily available, a 5V reference and ground are supplied on pins
13 and 15 and can be looped back onto pins 9 and 10 or 11 and 12, respectively, using the relay contacts.
2-12
BROADway - Release 4.00
Installation
Installing the NSP101 Control Card
Alarm Output Reporting
During a Critical or Major alarm condition on BROADway, the normally open contact (pin 1) is closed,
and the normally closed contact (pin 3) is opened.
During a Minor alarm condition on BROADway, the normally open contact (pin 4) is closed, and the
normally closed contact (pin 6) is opened.
Alarm Cut Off (ACO)
The Alarm Cut Off button on the front I/O panel is used to silence the current alarm output. A new alarm
will re-activate the alarm closures.
Installing the NSP101 Control Card
The NSP101 control card is the heart of the BROADway system and contains the narrowband switch
matrix, the integrated IP router, the network timing synchronization subsystem and the management
interface into the BROADway node.
BROADway always requires at least one NSP101 card to operate. Two NSP101 cards can be installed
to provide redundant operation of the system. If a single NSP101 is used it should be installed in the
NSP-1 card slot. The second, redundant NSP101 should be installed in the NSP-2 card slot.
NIP RX1
NIP RX2
NIP TX1
NIP TX2
RX1
TX1
RX2
TX2
RX3
TX3
RX4
TX4
CKIN-1 CKIN-2
ETH-1 ETH-2
ALARMS
ACO
SCP-1
SCP-2
NSP-2
NSP-1
Insert one or two NSP101 cards
BROADway - Release 4.00
2-13
Installation
Installing the NSP101 Control Card
To install the NSP101, open the ejector tabs and slide the card into its proper slot until you feel
resistance, then push to close the ejector tabs into their locking position against the metal rails. Verify
that the card is firmly placed by applying pressure to the ejector tabs to seat the card fully in the chassis.
WARNING! WHEN INSTALLING OR REPLACING BROADWAY HARDWARE, ALWAYS ADHERE
TO GOOD PRACTICE WITH RESPECT TO ESD PROCEDURES—USE A REGULARLY AND PROPERLY
TESTED GROUNDING STRAP.
Each NSP101 has eight front panel LED indicators. From left to right, the two rows of indicators on
each NSP101 indicate NSP101 module operating status (common indicators to all control and line
interface cards), active card, power input status and Ethernet line activity.
OSP-1
1 3
INTERFACE
2
1
NSP-2
2
1
ACTIVE
NSP-1
BSP-4
ETH
NIP-5
PWR
1 3
INTERFACE
ALARM
SUM
M
LE
U
D
O
ACTIVE
NIP-1
LE
U
1 3 5 7 9 11 13 15
BSP-3
UIP-2
BSP-2
UIP-1
BSP-1
LE
U
E
AC
A
D
w
a
y
TM
The following tables describe the status of the NSP101 control card based upon the front panel LED
status of the card.
MODULE Red LED
(Top)
MODULE Green LED
(Bottom)
Status
Off
Off
No power to the card
Off
On
Card operating normally
On
Off
Card failure
On
On
Card initializing during system
power up
Active or standby NSP101:
ACTIVE Green LED
Status
On
This is the Active NSP101
Blinking Slow
This is the Standby NSP101
Blinking Fast
The NSP101s are synchronizing databases
CAUTION! WHEN BROADWAY DATABASES ARE SYNCHRONIZING BETWEEN THE ACTIVE
AND STANDBY BROADWAY SYSTEMS, THE ACTIVE LEDS ON THE NSP101S BLINK RAPIDLY
TO SIGNIFY A FILE TRANSFER IS IN PROGRESS. YOU MUST WAIT UNTIL THESE LEDS HAVE
STOPPED FLASHING BEFORE YOU PERFORM ANY OPERATION TO RE-INITIALIZE THE BROADWAY
SYSTEM EITHER THROUGH A REBOOT OR FORCED NSP101 PROTECTION SWITCHOVER.
2-14
BROADway - Release 4.00
Installation
Installing the NSP101 Control Card
Alarm present:
ALARM SUM Red LED
Status
Off
No alarm is present
On
Indicates there is at least one critical, major or minor
active alarm in the chassis
Power input status:
PWR Red LED #2
(Top)
PWR Red LED #1
(Bottom)
Status
Off
Off
Both power feeds present; operating normally
Off
On
Power FEED A is not operating
On
Off
Power FEED B is not operating
By default, BROADway is software configured to expect redundant power (using FEED A and
FEED B). If you do not wire one of these inputs, the PWR LEDs will lamp as if there was an alarm
condition. For more information about how to wire FEED A and FEED B, see Cabling Power and
Ground on page 2-6.
If you are only using FEED A (not FEED B), you can configure the BROADway software to disable
power input redundancy and disable the appropriate red LED. For information about how to configure
your system to disable power input redundancy, refer to the online help.
Ethernet port activity:
ETH Green LED #2
(Top)
ETH Yellow LED
#1 (Bottom)
Status
Off
Off
ETH-1 or ETH-2 not connected (link down)
Off
On
ETH-1 or ETH-2 connected (link up)
Flashing
On
Network activity on ETH-1 or ETH-2
BROADway - Release 4.00
2-15
Installation
Installing the NIP400 Line Interface Card
Installing the NIP400 Line Interface Card
BROADway supports up to eight NIP400 quad T1/E1 line interface cards installed in slots NIP-1
through NIP-8. To support NIP400 redundant operation, you must install a NIP400 card in slot NIP-8.
Insert NIP400 cards (optional)
NIP RX1
NIP RX2
NIP TX1
NIP TX2
RX1
TX1
RX2
TX2
RX3
TX3
RX4
TX4
NIP-4
NIP-8
NIP-3
NIP-7
NIP-2
NIP-6
NIP-1
NIP-5
CKIN-1 CKIN-2
ETH-1 ETH-2
ALARMS
ACO
SCP-1
SCP-2
To install the NIP400, open the ejector tab and slide the card into its proper slot until you feel resistance,
then push to close the ejector tab into its locking position against the metal rail (the NIP400 has a single
ejector only). Check that the card is firmly in place by applying pressure to the ejector tab and the edge
of the circuit board to seat the card fully into the chassis. If you are replacing a NIP400 card, wait at
least three seconds after removing a NIP400 card before inserting a new one.
WARNING! WHEN INSTALLING OR REPLACING BROADWAY HARDWARE, ALWAYS ADHERE
TO GOOD PRACTICE WITH RESPECT TO ESD PROCEDURES—USE A REGULARLY AND PROPERLY
TESTED GROUNDING STRAP.
2-16
BROADway - Release 4.00
Installation
Installing the NIP400 Line Interface Card
Cabling the NIP400
Use the NIP TX1, NIP TX2, NIP RX1, and NIP RX2 25 pair connectors on the front I/O panel to
connect the eight NIP400 slots in the BROADway chassis to your punch down blocks or DSX panels.
The NIP TX1 and NIP RX1 connectors support slots NIP-1 through NIP-4, and the NIP TX2 and NIP
RX2 connectors support slots NIP-5 through NIP-8. If you are using NIP-8 as a redundant card slot, do
not cable any interfaces to the NIP-8 slot.
For cable pinouts of NIP TX1, NIP TX2, NIP RX1, and NIP RX2, see NIP400 Connector Pinouts
(NIP TX1–RX1, NIP TX2–RX2) on page A-5.
To attach a cable to the 25 pair connectors:
1. Plug in the female amphenol cable to the 25 pair connection NIP TX1.
2. Verify that the c-clips that slip over the right hand side of the four
connectors are closed to prevent against accidental disconnect.
c-clip
3. Repeat the previous step for NIP TX2, NIP RX1, and NIP RX2.
4. Dress the cables out to the left of the chassis. Connect the other
end of the cables to your terminating equipment.
Connect to DSX panels or punch down blocks
NIP RX1
NIP RX2
NIP TX1
NIP TX2
RX1
TX1
RX2
TX2
RX3
TX3
RX4
CKIN-1 CKIN-2
TX4
ETH-1 ETH-2
ALARMS
ACO
SCP-1
SCP-2
5. To remove the cable, slide the top right hand corner of the c-clip to the
left to enable the cable to be easily removed otherwise damage to the
cable can result and the cable might not re-engage.
BROADway - Release 4.00
2-17
Installation
Installing the NIP400 Line Interface Card
NIP400 LED Indicators
Each NIP400 line card has two LED indicators that describe the operational status of the module itself.
There is a further single LED indicator per physical interface that describes the status of the modules
four line interfaces.
NIP TX1
TX1
NIP TX2
TX2
TX3
TX4
ALARMS
NIP-4
NIP-8
OSP-4
NIP-3
NIP-7
OSP-3
NIP-2
NIP-6
OSP-2
NIP-1
D
O
LE
U
NIP-5
1 3
INTERFACE
ACO
SCP-2
B
R
O
A
OSP-1
1 3
INTERFACE
The following tables describe the LED status of the NIP400 line interface card.
MODULE Red LED
(Top)
MODULE Green LED
(Bottom)
Status
Off
Off
No power to the card
Off
On
Card operating normally
On
Off
Card failure
On
On
Card initializing during system
power up
If the card failure sequence is displayed, remove the card and re-insert it into the chassis. If the card
failure sequence is still displayed, then replace the card.
Line status (per port):
2-18
Port LED
Port State
off
The card is not configured, or alarm reporting is disabled on the
interface
green
Interface operating normally
blinking green
Interface performing a diagnostic test
blinking red
Yellow alarm (RAI)
red
Interface failure (LOS, OOF, AIS)
BROADway - Release 4.00
Installation
Installing the NHP160 Line Interface Card
Installing the NHP160 Line Interface Card
BROADway supports up to two NHP160 sixteen port T1/E1 line interface cards installed in slots UIP1 and UIP-2. If you plan to support NHP160 redundant operation, you must install an NHP160 card in
slot UIP-2, even if there is no NHP160 card installed in slot UIP-1 (the last four ports on the NHP160
in UIP-2 are designated the protection ports for both slots).
Cabling and Inserting the NHP160 Line Interface Card
Before inserting the NHP160 line cards into the BROADway system, you must seat the NHP160 cable
into its SCSI connector on the card. The NHP160 cards are cabled directly from a port on the line card
itself. The electrical cables are dressed to the left hand side of the chassis.
To cable and insert the NHP160 cards:
1. Attach the NHP160 cables to each NHP160 card.
NIP RX1
NIP RX2
NIP TX1
NIP TX2
RX1
TX1
RX2
TX2
RX3
TX3
RX4
TX4
CKIN-1 CKIN-2
ETH-1 ETH-2
ALARMS
ACO
SCP-1
SCP-2
UIP-2
UIP-1
Grommets
Insert NHP160 cards (optional)
2. Insert the NHP160 card into the chassis. Open the ejector tabs and slide the card into its proper
slot until you feel resistance, then push to close the ejector tabs into their locking position
against the metal rails. Check that the card is firmly in place by applying pressure to the ejector
tabs to seat the card fully into the chassis.
WARNING! WHEN INSTALLING OR REPLACING BROADWAY HARDWARE, ALWAYS ADHERE
TO GOOD PRACTICE WITH RESPECT TO ESD PROCEDURES—USE A REGULARLY AND PROPERLY
TESTED GROUNDING STRAP.
3. Dress the cables through the cut-outs in the metal chassis on the left hand side of the system.
Ensure that you leave enough slack in the NHP160 cable to enable the fan tray to be removed
without interference.
BROADway - Release 4.00
2-19
Installation
Installing the NHP160 Line Interface Card
4. Connect the other end of the cables to your terminating equipment.
For cable pinouts of the NHP160 SCSI port connector, see NHP160 Connector Pinouts on page A-8.
NHP160 LED Indicators
Each NHP160 line card in a UIP slot has two LED indicators that describe the operational status of the
module itself. There is a further single LED indicator per physical interface that describes the status of
the line interface. The active LED position is not used on the NHP160.
NSP 2
ETH
PWR
ALARM
SUM
ACTIVE
ACTIVE
NSP-1
M
LE
U
D
O
D
w
a
y
BSP 4
1
2
1
1 3 5 7 9 11 13 15
BSP-3
UIP-2
BSP-2
UIP-1
BSP-1
M
C
LE
U
FA
D
ER
O
NT
E
TM
I
The following tables describe the status of the NHP160 line interface card based upon the front panel
LED status of the card.
MODULE Red LED
(Top)
MODULE Green LED
(Bottom)
Status
Off
Off
No power to the card
Off
On
Card operating normally
On
Off
Card failure
On
On
Card initializing during system
power up
If the card failure sequence is displayed, remove the card and re-insert it into the chassis. If the card
failure sequence is still displayed, then replace the card.
Line status (per port):
2-20
Port LED
Port State
off
The card is not configured, or alarm reporting is disabled on the
interface
green
Interface operating normally
blinking green
Interface performing a diagnostic test
blinking red
Yellow alarm (RAI)
red
Interface failure (LOS, OOF, AIS)
BROADway - Release 4.00
Installation
Installing the BSP200 Line Interface Card
Installing the BSP200 Line Interface Card
BROADway supports up to four BSP200 single port DS3/mapper line interface cards installed in
positions BSP-1, BSP-2, BSP-3 and BSP-4. If you plan to support redundant BSP operation, you should
preferably install the redundant BSP module in BSP-4. When cabling to other DS3 equipment in an
office environment. Follow the design rules for the distance between DS3 terminal equipment and
DSX-3 bays and inter-bay patch panels; DS3 signals can be very sensitive to incorrectly wired
segments.
BSP200 line terminations
NIP RX1
NIP RX2
NIP TX1
NIP TX2
RX1
TX1
RX2
TX2
RX3
TX3
RX4
TX4
CKIN-1 CKIN-2
ETH-1 ETH-2
ALARMS
ACO
SCP-1
SCP-2
BSP-4
BSP-3
BSP-2
BSP-1
Insert the BSP200 card into the chassis. Open the ejector tabs and slide the card into its proper slot until
you feel resistance, then push to close the ejector tabs into their locking position against the metal rails.
Check that the card is firmly in place by applying pressure to the ejector tabs to seat the card fully into
the chassis.
WARNING! WHEN INSTALLING OR REPLACING BROADWAY HARDWARE, ALWAYS ADHERE
TO GOOD PRACTICE WITH RESPECT TO ESD PROCEDURES—USE A REGULARLY AND PROPERLY
TESTED GROUNDING STRAP.
BROADway - Release 4.00
2-21
Installation
Installing the BSP200 Line Interface Card
Cabling the BSP200
The BSP200 line interface cards use the 75Ohm BNC ports TX1/RX1, TX2/RX2, TX3/RX3, and TX4/
RX4 respectively on the top I/O panel of the BROADway chassis.
To make your DS3 cable connections:
1. Connect the DS3 inputs by connecting 75Ohm BNC coaxial cables to TX1/RX1 through TX4/
RX4.
Connect BNC coaxial cables
NIP RX1
NIP RX2
NIP TX1
NIP TX2
RX1
TX1
RX2
TX2
RX3
TX3
RX4
CKIN-1 CKIN-2
TX4
ETH-1 ETH-2
ACO
ALARMS
SCP-1
SCP-2
2. Connect the other end of these cables to your DS3 terminating equipment.
BSP200 LED Indicators
Each BSP200 line card has two LED indicators that describe the operational status of the module itself.
There are a further two LED indicators per card that describe the status of the line interface.
2
1
BSP-4
2
1
ACTIVE
NSP-1
M
LE
U
D
O
A
D
w
a
y
OSP-1
1 3
INTERFACE
NSP-2
ETH
NIP-5
1 3
INTERFACE
PWR
LE
U
D
O
ALARM
SUM
M
ACTIVE
NIP-1
1 3 5 7 9 11 13 15
BSP-3
UIP-2
BSP-2
UIP-1
BSP-1
M
C
LE
U
FA
D
ER
O
NT
E
TM
I
The following tables describe the status of the BSP200 line interface card based upon the front panel
LED status of the card.
2-22
MODULE Red LED
(Top)
MODULE Green LED
(Bottom)
Status
Off
Off
No power to the card
Off
On
Card operating normally
On
Off
Card failure
On
On
Card initializing during system
power up
BROADway - Release 4.00
Installation
Installing the BSP200 Line Interface Card
If the card failure sequence is displayed, remove the card and re-insert it into the chassis. If the card
failure sequence is still displayed, then replace the card.
Line status (per port):
INTERFACE Red LED
(Bottom)
INTERFACE Green
LED (Top)
Off
Off
The card is not configured, or
alarm reporting is disabled on the
interface
Off
On
Interface operating normally
Off
Blinking
Interface performing a diagnostic
test
On
Off
Interface failure (LOS, OOF, AIS)
Blinking
Off
Yellow alarm (RAI)
On
On
Interface initializing during system
power up
BROADway - Release 4.00
Status
2-23
Installation
Installing OSP155/ESP155/BCP155 Line Interface Cards
Installing OSP155/ESP155/BCP155 Line Interface Cards
BROADway supports up to four OSP155, ESP155 or BCP155 single port OC3/STM1 line cards
installed in positions OSP-1, OSP-2, OSP-3 and OSP-4. The OSP155 is a singlemode fiber interface
operating at 155Mbps, the ESP155 is a coaxial interface operating at 155Mbps and the BCP155 is a
reduced functionality 155Mbps singlemode fiber interface for the direct interconnection of BROADway
chassis.
The OSP155 and BCP155 cards contain a Class I Laser Product which conforms to the applicable
requirements of 21 CFR Subchapter J.
DANGER! DO NOT UNPLUG THE FIBER OPTIC CABLES OR LOOK DIRECTLY INTO THE END OF
A FIBER WHEN THE OSP155 OR BCP155 CARD IS POWERED UP. THERE IS A STRONG
POSSIBILITY OF SEVERE EYE DAMAGE IF YOU LOOK IN THE END OF A LIT FIBER CABLE OR
INTERFACE.
Insert OSP155, ESP155, or BCP155 cards (optional)
NIP RX1
NIP RX2
NIP TX1
NIP TX2
RX1
TX1
RX3
RX2
TX2
TX3
RX4
TX4
CKIN-1 CKIN-2
ETH-1 ETH-2
ALARMS
ACO
SCP-1
SCP-2
OSP-4
OSP-3
OSP-2
OSP-1
Grommets
Cable the OSP155, ESP155, and BCP155 cards directly. Dress the fiber cables to the right of the chassis
through the grommets provided in the right hand side of the unit.
The OSP155 and BCP155 cards use a duplex SC-type fiber optic cable connector. The ESP155 card
uses a 75Ohm SMB coaxial connector. For more information about this type of fiber cable specification,
see Appendix A, Ports and Cables.
2-24
BROADway - Release 4.00
Installation
Installing OSP155/ESP155/BCP155 Line Interface Cards
Cabling the OSP155 and BCP155
OSP155 and BCP155 cables should be attached to the line interface card before installing in the
BROADway chassis. Be careful when installing OSP155 or BCP155 cards; minimize the potential for
eye damage by not looking directly into any fiber optic cable or optical transceiver port when the card
is inserted into a powered system. To cable and insert the OSP155 and BCP155 cards:
1. First attach the duplex fiber optic cable to the line interface port:
Singlemode Fiber Optic Cable
Be careful not to bend the cable too sharply,
or you might break the fiber inside
Insert the singlemode fiber optic cable
Remove the dust plugs from the optical transceiver
BROADway - Release 4.00
2-25
Installation
Installing OSP155/ESP155/BCP155 Line Interface Cards
2. Insert the cards into the chassis. Open the ejector tabs and slide the card into its proper slot until
you feel resistance, then push to close the ejector tabs into their locking position against the
metal rails. Verify that the card is firmly in place by applying pressure to the ejector tabs to seat
the card fully into the chassis.
WARNING! WHEN INSTALLING OR REPLACING BROADWAY HARDWARE, ALWAYS ADHERE
TO GOOD PRACTICE WITH RESPECT TO ESD PROCEDURES—USE A REGULARLY AND PROPERLY
TESTED GROUNDING STRAP.
3. Dress the cables through the grommets at the right hand side of the chassis. The duplex fiber
cable fits snugly in each slot.
4. Connect the other end of the fiber cables to your fiber terminating equipment.
2-26
BROADway - Release 4.00
Installation
Installing OSP155/ESP155/BCP155 Line Interface Cards
Cabling the ESP155
ESP155 cables should be attached to the line interface card before installing in the BROADway chassis.
To cable and insert the ESP155 line interface card:
1. Attach the 75Ohm coaxial cables to the transmit and receive SMB ports on the line interface
card.
2. Insert the ESP155 card into the chassis. Open the ejector tabs and slide the card into its proper
slot until you feel resistance, then push to close the ejector tabs into their locking position
against the metal rails. Check that the card is firmly in place by pushing the card itself (not the
ejectors) back one further time into the chassis.
3. Dress the cables through the grommets at the right hand side of the chassis. The cable fits snugly
in each slot.
OSP155, BCP155, and ESP155 LED Indicators
Each OSP155, BCP155 and ESP155 line card in a OSP slot has two LED indicators that describe the
operational status of the module itself. There are a further two LED indicators per card that describe the
status of the line interface.
NIP TX1
TX1
NIP TX2
TX2
TX3
TX4
ALARMS
NIP-4
NIP-8
OSP-4
NIP-3
NIP-7
OSP-3
NIP-2
NIP-6
OSP-2
NIP-1
M
D
O
LE
U
NIP-5
1 3
INTERFACE
OSP-1
1 3
INTERFACE
2
ACO
SCP 2
B
R
O
A
D
The following tables describe the status of the OSP155, ESP155 or BCP155 line interface card based
upon the front panel LED status of the card.
MODULE Red LED
(Top)
MODULE Green LED
(Bottom)
Status
Off
Off
No power to the card
Off
On
Card operating normally
On
Off
Card failure
On
On
Card initializing during system
power up
If the card failure sequence is displayed, remove the card and re-insert it into the chassis. If the card
failure sequence is still displayed, then replace the card.
BROADway - Release 4.00
2-27
Installation
Attaching the Front Panel
Line status (per port):
INTERFACE Red LED
(Bottom)
INTERFACE Green
LED (Top)
Off
Off
The card is not configured, or
alarm reporting is disabled on the
interface
Off
On
Interface operating normally
Off
Blinking
Interface performing a diagnostics
test
On
Off
Interface failure (LOS, OOF, AIS)
Blinking
Off
Yellow alarm (RAI)
On
On
Interface initializing during system
power up
Status
Attaching the Front Panel
After inserting the cards and cabling the BROADway you must secure the front panel to the
BROADway chassis.
To attach the front panel:
1. Place the front panel on the front of the chassis,
hooking the slots into the bottom and lining up
the four screws.
2. Flip up the front panel to close it securely
against the front of the chassis.
3. Screw in the four screws to properly secure the
front panel to the chassis.
2-28
BROADway - Release 4.00
Installation
Applying Power to the Chassis
Applying Power to the Chassis
Locate the power switches on the rear of the chassis (O/I) and turn them on (I). After powering up the
BROADway chassis, all the LEDs will go through an initialization process where they all light. After
the cards have initialized, only the top left (MODULE) green LED on each card and one of the NSP101
ACTIVE LEDs will lamp as shown in the following figure. After the standby NSP101 has
synchronized its database with the active NSP101, its ACTIVE LED will link green slowly. These
LEDs remain lit during normal operation.
NIP RX1
NIP RX2
NIP TX1
NIP TX2
RX1
RX2
TX1
RX3
TX2
RX4
TX3
SCP-1
TX4
ALARMS
NIP-4
NIP-8
OSP-4
NIP-3
NIP-7
OSP-3
NIP-2
NIP-6
OSP-2
OSP-1
1 3
INTERFACE
2
1
NSP-2
2
1
ACTIVE
NSP-1
BSP-4
ETH
NIP-5
PWR
1 3
INTERFACE
ALARM
SUM
M
LE
U
D
O
ACTIVE
NIP-1
M
LE
U
D
O
1 3 5 7 9 11 13 15
BSP-3
UIP-2
BSP-2
UIP-1
BSP-1
M
C
LE
U
FA
D
ER
O
NT
E
RESET
SCP-2
B
R
O
A
D
w
a
y
TM
I
Slots that have no cards installed will remain unlit.
DANGER! THIS SYSTEM HAS TWO POWER INPUT CONNECTIONS. DISCONNECT BOTH BEFORE
SERVICING TO AVOID ELECTRIC SHOCK.
SEE CABLING POWER AND GROUND ON PAGE 2-6.
Should you need to power cycle the BROADway system then power down the chassis using the power
switches at the rear of the chassis (O/I) and wait at least five seconds before powering it back on.
BROADway - Release 4.00
2-29
Installation
Maintaining BROADway Hardware
Maintaining BROADway Hardware
To maintain your BROADway hardware you might need to:
! Install new cards to increase capacity or gain new functionality
! Replace failed cards with new cards
! Clean the fan filter, and replace it when needed
Installing New Cards
If you have a previously installed and partially populated BROADway chassis and you need to add more
cards to increase capacity, you can install those cards using the same methods described earlier in this
chapter. BROADway cards are hot swappable and can be removed and re-inserted while the chassis is
powered.
WARNING! WHEN INSTALLING OR REPLACING BROADWAY HARDWARE, ALWAYS ADHERE
TO GOOD PRACTICE WITH RESPECT TO ESD PROCEDURES—USE A REGULARLY AND PROPERLY
TESTED GROUNDING STRAP.
Installing a Redundant NSP101 Card
To install a redundant NSP card, install the NSP card as described in Installing the NSP101 Control
Card on page 2-13. When a redundant NSP card, its MODULE LED flashes green to indicate it is
in an active standby mode.
Installing Additional NIP400 Cards
To install an additional NIP400 card, install the NIP400 cards as described in Installing the NIP400
Line Interface Card on page 2-16.
NOTE: You might need to cable additional NIP connectors. For example, if the original
system had only four NIP400 cards, you might have only cabled NIP RX1 and NIP TX1. If
you are now adding one, two, three, or four additional NIP400 cards, you will need to cable
NIP RX2 and NIP TX2 as described in Cabling the NIP400 on page 2-17.
Installing Additional NHP160 Cards
To install an additional NHP160 card, install the NHP160 card as described in Installing the
NHP160 Line Interface Card on page 2-19.
Installing Additional BSP200 Cards
To install additional BSP200 cards, install the BSP200 cards as described in Installing the BSP200
Line Interface Card on page 2-21.
NOTE: You might need to cable additional TX and RX connectors. For example, if the
original system had only three BSP200 cards, you might have only cabled TX1/RX1, TX2/
RX2 and TX4/RX4. If you are now adding a BSP card in BSP-3, you will need to cable TX3/
RX3 as described in Cabling the BSP200 on page 2-22.
2-30
BROADway - Release 4.00
Installation
Maintaining BROADway Hardware
Installing Additional OSP155, ESP155 or BCP155 Cards
To install an additional OSP155, ESP155, or BCP155 card, install the card as described in Installing
OSP155/ESP155/BCP155 Line Interface Cards on page 2-24.
DANGER! DO NOT UNPLUG THE FIBER OPTIC CABLES TO THE OSP155 OR BCP155 CARDS
WHEN THE MODULE IS POWERED UP. THERE IS A STRONG POSSIBILITY OF SEVERE EYE DAMAGE
IF YOU LOOK IN THE END OF A LIT FIBER CABLE OR INTERFACE.
Replacing Failed Cards
All BROADway control and line interface cards are hot swappable. If an in-service card fails you can
replace it while the system remains operational.
WARNING! WHEN HOT SWAPPING CARDS, BE SURE TO INSTALL THE NEW CARDS SLOWLY
AND CAREFULLY. PREFERABLY, ALLOW AT LEAST 30 SECONDS BETWEEN ANY CARD REMOVALS
AND RE-INSERTIONS.
To Replace an NSP101 Card
1. Remove the NSP101 card by opening the ejector tabs and sliding out the card.
2. Insert a new NSP101 card as described in Installing the NSP101 Control Card on page
2-13.
To Replace a NIP400 Card
1. Remove the NIP400 card by opening the ejector tab and sliding out the card.
2. After at least three seconds, insert a new NIP400 card as described in Installing the NIP400
Line Interface Card on page 2-16.
To Replace an NHP160 Card
1. Remove the cable from the grommet so that you can easily slide the card out.
2. Remove the NHP160 card by opening the ejector tabs and sliding out the card.
3. Detach the NHP160 cable from the card.
4. Reattach the NHP160 cable to the new NHP160 card.
5. Insert the new NHP160 card as described in Installing the NHP160 Line Interface Card on
page 2-19.
To Replace a BSP200 Card
1. Remove the BSP200 card by opening the ejector tabs and sliding out the card.
2. Insert the BSP200 card as described in Installing the BSP200 Line Interface Card on page
2-21.
BROADway - Release 4.00
2-31
Installation
Maintaining BROADway Hardware
To Replace a BCP155, OSP155, or ESP155 Card
1. Remove the cable of the card from the grommet so that you can easily slide the card out.
2. Remove the card by opening the ejector and sliding out the card.
3. Detach the cable from the card.
4. Reattach the cable to the new card.
5. Insert the new card as described in Installing OSP155/ESP155/BCP155 Line Interface
Cards on page 2-24.
DANGER! DO NOT UNPLUG THE FIBER OPTIC CABLES TO THE BCP155 OR OSP155 CARDS
WHEN THE MODULE IS POWERED ON. THERE IS A STRONG POSSIBILITY OF SEVERE EYE DAMAGE
IF YOU LOOK IN THE END OF A LIT FIBER CABLE OR INTERFACE.
Maintaining the Fan Tray
The chassis comes installed with a fan tray. Periodically, you must clean or replace the fan tray filter.
You should plan to replace the fan filter at least once per year. New filters can be obtained directly from
Carrier Access. To replace the fan filter:
1. Open the front panel of the BROADway chassis. The fan board is located on the left hand side
of the chassis. You will remove the fan board, replace its fan filter, and re-insert the fan board.
WARNING! IT IS IMPORTANT THAT YOU REPLACE THE FAN BOARD WITHIN 30 MINUTES TO
PREVENT THE SYSTEM FROM OVERHEATING. MAKE SURE YOU HAVE THE NEW FAN FILTER ON
HAND BEFORE YOU REMOVE THE FAN BOARD.
2. Remove the fan board using the attached small plastic handle. The fan filter is located on the
left hand side of the fan board.
3. Remove the fan filter (it is attached with Velcro.
Fan Board
Fan Filter
4. Attach the new fan filter.
5. Re-insert the fan board.
6. Close the front panel.
2-32
BROADway - Release 4.00
CHAPTER
3
Configuration
In This Chapter
#
Overview
#
Assigning an IP Address to the BROADway System
#
Management Access to the BROADway System
#
Logging In With the Web Browser Interface (GUI)
#
Logging In With the Command Line Interface (CLI)
#
Setting Up User Accounts
#
Changing Your Password
#
Setting the System Date and Time
#
Setting System Node Parameters
#
Managing the BROADway Configuration Database
#
Using FTP with the BROADway System
#
Upgrading System Software
Configuration
Overview
Overview
At this point, the BROADway hardware should have been planned, mounted and cabled as described in
Chapter 2, Installation.
Now, you must begin to configure the BROADway system software for your application. There are two
basic methods that can be used to configure the BROADway system software. These are:
! Using the web browser graphical user interface (GUI)
! Using the command line interfaces (CLI) locally or from a Telnet session using TL1 and/or
Packet Services (PS) commands
Most of your configuration work can be performed using either method of configuration (GUI or CLI)
with the following exceptions:
! The initial IP address of the BROADway system Ethernet interface must be configured through
the CLI.
! Stacking of multiple systems can only be configured through the GUI.
You might find it easier to perform configuration work using the GUI. However, there are cases when
you might prefer to use CLI:
! When you do not have access to a web browser
! When you need to write CLI scripts to interface the BROADway management system to
another machine
! When you want to perform network management using a CLI because your overall network
management system operates under a CLI-based system.
To successfully configure your BROADway system you must, at a minimum, follow these steps:
! Assign an IP address to the system
! Log into the system
! Assign line interface cards within the system
! Configure line interface parameters
! Make cross-connects through the system
! Configure packet services support
This chapter describes how to perform the initial configuration of the BROADway system. For
complete details about configuration, packet services, and diagnostics, refer to the online help.
3-2
BROADway - Release 4.00
Configuration
Assigning an IP Address to the BROADway System
Assigning an IP Address to the BROADway System
Should you decide to access the BROADway system remotely through a Telnet or web browser
interface, you must either use the default BROADway IP address, or use the TL1 and PS CLI to
configure a new IP address for the node.
Default BROADway IP Address
All BROADway systems are configured from the factory with a default IP address of 169.254.0.1 and
a subnet mask of 255.255.0.0. This default scheme makes it easy for technicians with a standard DHCP
client configured to attach to the unit for configuration purposes, however it also means that two
BROADway systems should not be connected to the same network unless at least one of their IP
addresses is first changed to avoid conflict.
NOTE: Users with PCs configured with static IP addresses will have to either change the
IP address of their PC or of the BROADway system to enable IP communications. For
more information, see Assigning a Different IP Address on page 3-4.
To manage the BROADway system using its default IP address, ensure that the PC that will be running
the web browser GUI interface is directly attached to the BROADway Ethernet port using either a
straight-through Ethernet patch cable (in which case it should be plugged into the port marked with an
‘X’) or a cross-over Ethernet cable (in which case it should be plugged into the other Ethernet port).
Start the BROADway system and then restart the PC.
Microsoft Windows will default the IP address of a PC to an address in the range 169.254.0.1 to
169.254.255.255 should no DHCP server be available for certifying a DHCP client. This is known as
Automatic Private IP Addressing (APIPA) and is intended to make it easy for home network users to
construct small LAN’s. For our purposes, the connection between the BROADway and the PC is a small
LAN.
The following procedures are to be used for different Windows Operating System versions - note that
these procedures will not upset the IT configuration of the PC; when you reboot the PC on the corporate
network it will automatically re-acquire a proper IP address from the corporate DHCP server.
Windows 98 and Windows NT: Click the Start button, then Run, then type winipcfg and click OK.
From the drop-down list select your network interface card and then click Release, then Renew. The
NIC will be assigned a new address in the 169.254.X.X range.
Windows 2000, XP: Reboot the PC and wait approximately 60 seconds for the DHCP client to timeout
- the DHCP client will then default the IP address to the correct range.
To verify that the PC has an IP address in the correct range click the Start button, then Run, then type
command and click OK. At the prompt, type IPCONFIG and press ENTER. The IP address of your
LAN interface should begin with 169.254.X.X and the subnet mask should be 255.255.0.0. Type exit
to exit the command shell. You can verify connectivity with the BROADway system by using the PING
169.254.0.1 command from the Windows command shell prompt.
You are now ready to configure the BROADway system through the GUI as described in Logging In
With the Web Browser Interface (GUI) on page 3-9, or by using a Telnet program as described on
Ethernet Port Command Line Access on page 3-8.
BROADway - Release 4.00
3-3
Configuration
Assigning an IP Address to the BROADway System
Assigning a Different IP Address
If you plan to use network interface bridging support in your BROADway system, you must create a
bridge virtual interface (BVI) to create the IP address for management access, as described in Creating
a Bridge Virtual Interface (BVI) on page 3-5. Otherwise, perform the following procedure.
To assign a different IP address to the BROADway system:
1. Connect your PC to the serial port SCP-1 on the BROADway chassis using a null modem cable
provided with the chassis (note SCP-2 is for future use).
2. On your PC open a terminal emulation window, for example, HyperTerminal. The terminal
emulation software should be set to VT100 emulation, 9600 baud, 8 data bits, no parity and 1
stop bit. Both hardware and software flow control options are disabled.
NOTE: If your terminal emulation software has the ability to configure a delay before
sending information, make sure this is set for 10 ms.
3. In your terminal emulation window, press ENTER, and you should see the prompt NSP1> or
NSP2>, depending upon which NSP101 card is currently active.
4. Log in to the BROADway system using the following TL1 command:
ACT-USER::NSP:1234::CUSTOMER,BROADWAY;
NOTE: The initial BROADway system has one default user account that is an
administrative account. The case-sensitive user name of this default account is
CUSTOMER, and the case-sensitive password of this default account is BROADWAY.
You can use this default account to assign an IP address to the BROADway system.
5. Switch to the Packet Services command line interface by typing ps and pressing ENTER. You
will see the PS# prompt.
6. Type configure and press ENTER. This enables a configuration mode; your prompt will
change to PS(config)#.
7. Type interface ethernet 0 and press ENTER.
8. Type ip address <address> <mask> and press ENTER, where <address> is the IP
address of the system, and <mask> is the appropriate subnet mask (typically 255.255.255.0 for
a standard class C subnet).
9. Type exit and press ENTER (to the PS(config)# prompt).
10. Type exit and press ENTER (to the PS# prompt).
11. Type save running-config and press ENTER to save the changes you made.
12. Type exit and press ENTER to leave the PS prompt and return to the NSP prompt.
13. Close your terminal emulation window.
After assigning an IP address to your system, you can use either Ethernet port (ETH-1 and/or ETH-2)
for network connectivity (as described in Cabling the Ethernet Port on page 2-9).
If at any point you need to change the initial IP address assigned to the BROADway system, you can do
so as described in the online help.
3-4
BROADway - Release 4.00
Configuration
Assigning an IP Address to the BROADway System
Creating a Bridge Virtual Interface (BVI)
Before you can add an interface to a bridge group, you should first create the bridge virtual interface
(BVI) which attaches the bridge-group to the IP router. There is a one-to-one mapping between a
BVI and a bridge-group; each BVI supports a single bridge-group. The BVI has an IP address which
it utilizes to route its bridged traffic into the IP router and which can also be used to manage the
BROADway system by performing the manage-intf enable command on the BVI.
You can enable and configure both Network Address Translation (NAT) and the DHCP relay agent
on a BVI interface.
To create a BVI, use the following PS commands:
PS#configure
PS(NSP-config)#interface bvi <bvi number>
PS(NSP-config-bvi)#ip address <address> <mask>
<bvi number>—The number of the bridge virtual interface. You should use the same number
that was configured for the bridge group.
<address>—The IP address of the interface.
<mask>—The network mask for the interface.
NOTE: You must create a bridge group before creating the BVI.
For example, to create a bridge group, map the Ethernet interface to the bridge group, associate the
bridge group with a BVI, assign an IP address to the BVI and enable the BVI IP address as a
management interface for the system:
NSP1>ps
PS#configure
PS(NSP-config)#bridge addgroup 1
PS(NSP-config)#interface ethernet 0
PS(NSP-config-if)#bridge-group 1
PS(NSP-config-if)#exit
PS(NSP-config)#interface bvi 1
PS(NSP-config-bvi)#ip address 192.9.200.1 255.255.255.0
PS(NSP-config-bvi)#manage-intf enable
To delete a BVI use the following PS commands:
PS#configure
PS(NSP-config)#no interface bvi 1
To change the state of the BVI to “down”, use the following PS commands:
PS#configure
PS(NSP-config)#interface bvi 1
PS(NSP-config-bvi)#shutdown
BROADway - Release 4.00
3-5
Configuration
Assigning an IP Address to the BROADway System
To change the state of the BVI to “up”, use the following PS commands:
PS#configure
PS(NSP-config)#interface bvi 1
PS(NSP-config-bvi)#no shutdown
To display the status of the BVI, use the following PS command:
PS#show BVI status [bridge-group number]
If you specify an optional [bridge-group number], only the BVI associated with the
[bridge-group number] will be displayed. If you leave the [bridge-group number]
field blank, all of the configured BVIs will be displayed.
The following sample output shows the show BVI status command results:
PS#show bvi status
BVI is configured for this bridge group
BVI is administratively enabled
MAC address of BVI is 00-02-35-00-ca-e8
3-6
BROADway - Release 4.00
Configuration
Management Access to the BROADway System
Management Access to the BROADway System
To further configure the BROADway system, you can access the unit through:
! A local connection to the serial port SCP-1 using a command line interface
! A remote modem connection to the serial port SCP-1 using a command line interface
! Either Ethernet interface ETH-1 or ETH-2 using Telnet and a command line interface
! Either Ethernet interface ETH-1 or ETH-2 using a web browser GUI interface
Viewing Serial Craft Port Settings With the GUI
To view the configuration of the Serial Craft Port
(SCP):
1. In the navigation tree, select either the SCP-1
or SCP-2 interface on an NSP card.
2. In the menu bar, click Config, then Interface.
3. Use the SCP-1 RS232 Configuration window
to view the parameters for the SCP port. These
fields are fixed and cannot be edited.
4. Click Close to close this window.
Local SCP-1 Serial Craft Port
Access
1. Connect to the SCP-1 port directly and open a VT100 terminal emulation program. (For cabling
information, see Cabling the Serial Craft Port on page 2-9.)
2. Press ENTER, and you should see the NSP1> or NSP2> prompt. Follow the instructions on
page 3-13 to log into the system.
Remote Modem SCP-1 Serial Craft Port Access
1. Connect a modem to the SCP-1 directly using a modem cable and configure the modem
appropriately. Follow the modem manufacturers instructions to set the modem for connection
via RS232 at 9600bps, 8 data bits, no parity and one stop bit at the DTE port. The modem should
be set to auto-answer incoming calls and local echo options should be disabled.
NOTE: It is particularly important to ensure that all local CONNECT messages and
terminal echo options are disabled on the modem as these messages arriving at the
BROADway system from a modem port can be interpreted as command line interface
strings.
2. Dial in to the modem using a VT100 terminal emulation program and, once the modem has
trained and answered you should be presented with the NSP1> or NSP2> prompt. Follow the
instructions on page 3-13 to log into the system.
BROADway - Release 4.00
3-7
Configuration
Management Access to the BROADway System
Ethernet Port Command Line Access
1. Connect your PC or workstation to one of the Ethernet ports (see Cabling the Ethernet Port on
page 2-9) and open a Telnet session to the IP address of the BROADway system (e.g.
169.254.0.1).
2. You should be presented with the LOGIN> prompt. Use CUSTOMER for the user name and
BROADWAY as the password.
3. If you are successfully logged in, you will be presented with the NSP1> or NSP2> prompt.
4. You can now configure the BROADway system using the CLI interface. Follow the instructions
in Logging In With the Command Line Interface (CLI) on page 3-13 to learn how to log in and
out of the system using the CLI or in Setting Up User Accounts on page 3-13.
NOTE: The BROADway system supports up to three simultaneous Telnet client
sessions.
Ethernet Port Web Browser GUI Access
Connect your PC or workstation to one of the Ethernet ports on the BROADway and then follow the
instructions found at Logging In With the Web Browser Interface (GUI) on page 3-9.
3-8
BROADway - Release 4.00
Configuration
Logging In With the Web Browser Interface (GUI)
Logging In With the Web Browser Interface (GUI)
You can access the BROADway GUI using these minimum versions of the Microsoft or Netscape web
browsers:
! Netscape Communicator 4.6 and above with Java 1.3.0_01 or later
! Microsoft Internet Explorer 5.0 and above with Java 1.3.0_01 or later
When you initially connect to the BROADway system using the web browser interface, the system
determines which version of Java you are running. If your Java software needs to be upgraded and your
PC is connected to the Internet, the applet will download an updated version of Java software. If you
are not connected to the Internet and you are notified that you need to upgrade your Java software, you
can access and install it from the BROADway software CD. The U.S. English only version of the Java
software is located on the CD in the /java/english directory, and the international version is located in
the /java/international directory. Double-click the appropriate installer file (.exe) and follow the
instructions the installer provides.
NOTE: The GUI interface is designed to operate as a Java applet that is self-contained
within the BROADway system and downloaded to the PC-based browser interface when
accessed. If the management PC is connected remotely to the BROADway system
through a low-speed WAN connection (for example 64Kbps), then the applet might take
several minutes to install.
To connect to the BROADway system
using the GUI:
1. On your PC, open a web browser
window.
2. Type the IP address or domain
name of the BROADway system
(for example, http://
192.168.5.10, or http://
169.254.0.1) and press
ENTER.
3. To save time in the future, store
the URL as an entry in the
Favorites section of your browser.
NOTE: If you are using Internet Explorer, the Site shown in the login window comes from
the domain name of the system, and the Realm is always Carrier Access.
4. Type your user name in the User Name field, initially CUSTOMER.
5. Type your password in the Password field, initially BROADWAY.
NOTE: User names and passwords are case sensitive.
BROADway - Release 4.00
3-9
Configuration
Logging In With the Web Browser Interface (GUI)
6. If the following message appears when the PC is loading the applet, then click the Grant
Always button. This will enable the PC to download the applet certificate from the BROADway
system and the message should not appear next time the applet is started.
7. If the BROADway system to which you logged in is
part of a stacked configuration, you will have the
option of viewing just the one BROADway system
you logged into, or the complete BROADway stack.
- Select Stack View and click OK to see all the
BROADway systems connected in a stack to
this one BROADway system you logged into.
- Select Shelf View and click OK to see only
the BROADway system you logged into. The
system will still remain part of the stack; but
you will only be able to configure the one system.
If there are any stacking
problems, you will see
messages that alert you to
any stacking configuration
problems when the GUI
starts. You can correct these
errors by removing the
stacked systems in error, and
then adding them back in.
3-10
BROADway - Release 4.00
Configuration
Logging In With the Web Browser Interface (GUI)
BROADway - Release 4.00
3-11
Configuration
Logging In With the Web Browser Interface (GUI)
8. The browser window will change to reflect the BROADway configuration applet loader, and
then you will be presented with the BROADway applet window as shown in the following
figure.
Click here to minimize this window
This window must remain running in the background
Click here to close the window and log off
Node Name
or
IP address
The BROADway applet window will show the name BROADway and then the system node name will
be shown in parentheses. If you have not yet assigned a system node name or you kept the default
system node name BROADway, the system IP address will be displayed.
You must leave the main browser window running in the background while the applet is operational.
You can, however, minimize the window. Closing the main browser window will log you out and
disconnect you from the BROADway system. You will have to log back in and restart the applet to
continue managing the system.
NOTE: Up to three GUI sessions can be running on any single BROADway system. If a
fourth client session attempts to connect to the system, the login will not complete and you
will be presented with an error message.
To log out, click the Close button on the main browser window. If you accidentally close the applet
window and the browser window is still open or minimized, you should close this window and restart
the browser to log back into the BROADway system. Even though use of the Refresh button will appear
to open up a new GUI window, problems can occur later on during the same session.
3-12
BROADway - Release 4.00
Configuration
Logging In With the Command Line Interface (CLI)
Logging In With the Command Line Interface (CLI)
Once you have command line management access to the BROADway system (you are at the NSP1> or
NSP2> prompt), you can log in.
To log in to the BROADway system using the command line interface use the following TL1 command:
ACT-USER::NSP:1234::<username>,<password>;
<username>—The name of the user account (default is CUSTOMER).
<password>—The account’s password (default is BROADWAY).
NOTE: User names and passwords are case sensitive.
For example:
ACT-USER::NSP:1234::CUSTOMER,BROADWAY;
Alternatively, the following form of the ACT-USER command can be used:
ACT-USER::NSP:1234;
This version presents the user with a LOGIN: and PASSWORD: prompt, much like a Telnet login
prompt. At the PASSWORD: prompt, the typed information is not echoed back to the screen for security
purposes.
When you first log in to the BROADway system, you will default to the TL1 command line interface.
When you create and edit user accounts using TL1 commands you can specify the default command line
interface (see User Account Management Using TL1 on page 3-16).
Some configuration steps might only be performed with TL1 and some might only be performed with
the packet services (PS) command line interface. Therefore, when performing configuration work using
a CLI you might need to switch back and forth between TL1 and PS command shells.
You can tell which CLI you are currently using by looking at the terminal prompt. TL1 uses the NSP1>
or NSP2> prompt. Packet services uses the PS# or PS> prompt (depending on your user permission
level).
To switch to the PS> prompt from the NSP> prompt, type ps and press ENTER. To switch from the
PS> prompt back to the TL1 NSP> prompt, type exit repeatedly until the NSP> prompt is displayed.
To log out from the BROADway system using TL1, use the CANC-USER command:
CANC-USER::NSP:1234;
If you are accessing the BROADway system from a Telnet client and your Telnet session times out, you
will need to re-login using the ACT-USER command. Your Telnet session times out after approximately
10 minutes of no activity. If you log out using the CANC-USER command, you will need to use the
ACT-USER command to log back in.
BROADway - Release 4.00
3-13
Configuration
Setting Up User Accounts
Setting Up User Accounts
Some of the procedures described in this manual require a minimum permission level. All permission
levels can view information associated with the BROADway unit, but your permission level determines
whether or not you can edit or change the configuration database for the system. The following table
lists the permission levels that user accounts can be configured for and which commands that
permission level can execute (in addition to just viewing current settings).
Permission
Level
Description
GUI Menu Commands the
Permission Level Can Execute Fully
Administrator
The administrative user level can
execute all user commands. This
is the only permission level that
can add, edit and delete user
accounts.
Every command under every menu
Configuration
The configuration level has
access to all commands except
adding, editing, or deleting users.
Config, (all)
Alarms, (all)
Diag, Interface
Statistics, (all)
Admin, Database
Admin, Password
Help, (all)
Maintenance
The maintenance level has
execution permission on
diagnostic and retrieve
commands.
Alarms, (all)
Diag, Interface
Statistics, (all)
Admin, Password
Help, (all)
Reader
The reader level cannot execute
any command except for viewing
commands.
Alarms, (all)
Statistics, (all)
Admin, Password
Help, (all)
Permission levels are cumulative. For example, users with Administrator security can perform all
actions that users with Configuration security can. Users with Configuration security can perform all
actions that users with Maintenance security can and users with Maintenance security can perform all
actions that users with Reader security can.
Only a user with Administrator security level can add, edit, or delete user accounts.
To manage user accounts with the GUI, see User Account Management Using the GUI on page 3-15.
To manage user accounts from the CLI, see User Account Management Using TL1 on page 3-16.
3-14
BROADway - Release 4.00
Configuration
Setting Up User Accounts
User Account Management Using the GUI
To manage user accounts:
1. In the menu bar, click
Admin, then Accounts.
2. The Accounts window
displays a list of users that
have access to the
BROADway system and
what their permission
levels are. Review the
user names and their
security levels.
3. The first time you log into
the BROADway system,
you should create a new
user account with an
Administrator security
level. Creating a new
Administrator account will automatically delete the default user account: CUSTOMER.
4. Only Administrator level users can add, edit or delete user accounts. To add a new user:
- Click Add.
- In the New User Account window,
type a new username up to 20
characters in the User Name field.
This field is case sensitive. The
system prevents you from creating
two user accounts with the same user
name.
- Type a password of up to 10
characters in the Password field.
This field is case sensitive. A user
can change his own password later.
See Changing Your Password on
page 3-18.
- In the Confirm field, re-type the password.
- In the Security field, select the level of security you want this user to have (see page
3-14).
- Click OK to close the User Account window.
5. To edit a user profile, select the user and click Edit.
6. To delete a user profile, select the user and click Remove.
7. Click OK to close the window.
BROADway - Release 4.00
3-15
Configuration
Setting Up User Accounts
User Account Management Using TL1
Viewing Existing User Accounts
To show all users that have accounts on the BROADway system, use the following TL1 command:
RTRV-USER::NSP:1234::ALL;
To show all currently logged in users, use the following TL1 command:
RTRV-USER::NSP:1234::ACTIVE;
To show the name of the currently logged in user, use the following TL1 command:
RTRV-USER::NSP:1234::ME;
To show a particular user account, use this TL1 command:
RTRV-USER::NSP:1234::<username>;
Creating New User Accounts
To create a new user, use the ENT-USER TL1 command:
ENT-USER::NSP:1234::<username>,<password>,<security>,<shell>;
<username>—The name of the user account (no longer than 20 characters).
<password>—The account’s password.
NOTE: User names and passwords are case sensitive.
<security>—the security level to assign to this account, either ADMIN, CONFIG, MAINT, or
READER.
ADMIN—The administrative user level can execute every TL1 command and PS command.
CONFIG—The configuration level has access to all commands except add, edit, or delete users.
MAINT—The maintenance level has execution permission on diagnostic and retrieve
commands, as well as the ability to clear packet services table information.
READER—The reader level cannot execute any command except for retrieve and show
commands.
<shell>—Indicates what the default command shell prompt is for this account, either TL1 or
IPCLI (for packet services).
NOTE: Regardless of what the default shell is for a user, the user can still switch between
the TL1 prompt and the packet services (PS) prompt once the user logs in.
3-16
BROADway - Release 4.00
Configuration
Setting Up User Accounts
For example:
ENT-USER::NSP:1234::joetech,mypassword,ADMIN,TL1;
This command adds an account to the system where the username is joetech, the password is
mypassword, the security level is ADMIN and the default shell is TL1.
For all TL1 commands, after performing an ENT or ED command (to add or edit information), you
should always use the corresponding RTRV command to verify that your additions or changes were
made correctly.
For example, after using the ENT-USER command to add users, use the
RTRV-USER::NSP:1234::ALL; command to view all user accounts.
Editing User Accounts
To edit a user’s user name, password, and security level, use the ED-USER TL1 command:
ED-USER::NSP:1234::<username>,<password>,<security>,<shell>;
<username>—The name of the user account.
<password>—The account's password.
<security>—The security level to assign to this account, either ADMIN, CONFIG, MAINT, or
READER.
<shell>—Indicates what the default command shell prompt is for this account, either TL1 or
IPCLI (for packet services).
Deleting User Accounts
To delete a user, use the DLT-USER TL1 command:
DLT-USER::NSP:1234::<username>;
<username>—The name of the user account.
BROADway - Release 4.00
3-17
Configuration
Changing Your Password
Changing Your Password
A user can change his or her own password. Only users with Administrator privileges can change other
users passwords.
NOTE: Passwords are case sensitive.
Changing Your Password Using the GUI
To change your password from the GUI:
1. In the menu bar, click Admin, then
Password. The Change Password
screen shows your User Name.
2. In the Current Password field, type
your current password.
3. In the New Password and Confirm
Password fields, type your new
password. Passwords are case sensitive
and can be up to 10 characters.
4. Click OK. The next time you log in to
the BROADway system, use your new
password.
Changing Your Password Using TL1
To change your password from the command line, use the ED-PID TL1 command:
ED-PID::NSP:1234::<oldpassword>,<newpassword>;
<oldpassword>—your old password
<newpassword>—that new password
The next time you log in to the BROADway system, use your new password.
3-18
BROADway - Release 4.00
Configuration
Setting the System Date and Time
Setting the System Date and Time
The BROADway system maintains a real-time clock to assist in ensuring event and alarm times are
properly recorded in the system. This section describes how to set the real-time clock from the GUI and
command line interfaces.
Setting the Date and Time Using the GUI
To set the date and time on the BROADway system:
1. In the menu bar, click Config, then Date &
Time.
2. In the Date & Time window, enter the date
and time.
- To set the BROADway system to the
same date and time as your workstation,
click Set to Today.
- Alternately, enter the date and time you
require using the Year, Month, Day,
Hour, and Minute fields.
3. Click OK.
Setting the Date and Time Using TL1
To view the system date and time, use the RTRV-DAT TL1 command:
RTRV-DAT::NSP:1234::;
To change the system date and time, use the ED-DAT command:
ED-DAT::NSP:1234::YY-MM-DD,HH-MM-SS;
YY-MM-DD—The two-digit year, month, and day of the system date.
HH-MM-SS—The time (24-hour clock) of the system.
For example:
ED-DAT::NSP:1234::03-07-01,15-35-00;
This command changes the date to July 1, 2003 and the time to 3:35 PM.
BROADway - Release 4.00
3-19
Configuration
Setting System Node Parameters
Setting System Node Parameters
System node parameters are system wide settings that enable the operator to configure various options
such as: BROADway location, the contact information of the system administrator and whether or not
power redundancy is enabled.
Setting System Node Parameters Using the GUI
1. In the menu
bar, click
Config, then
Node ID.
NOTE: If this is a stacked configuration, you must select a node or shelf name in the
navigation tree before clicking Node ID; otherwise Node ID will be grayed out.
2. In the Node ID window, type a name for this site in the Node Name field.
3. In the Node Location field, type the location of this site.
4. In the System Mode field, select either U.S. or International, depending on where this site is
located (for Canada, use the U.S. setting). This setting will determine your default interfaces
(T1/SONET for U.S. and E1/SDH for International) for the various cards.
NOTE: If this system is participating in a stack, the system mode of each system in the
stack should be the same.
5. In the Admin Name field, type the name of the administrator at this site.
6. In the Phone Number field, type the phone number of the administrator.
7. In the Email Address field, type the email address of the administrator.
8. The Power Supply Redundancy check box enables and disables power supply redundancy
alarm reporting. If you have installed two separate power sources to the BROADway chassis
(both FEED A and FEED B on the back of the chassis), you should enable power supply
redundancy by checking this check box. For information about connecting these power feeds,
see Cabling Power and Ground on page 2-6. If you do not have two separate power sources
connected to the chassis, you should disable power supply redundancy by clearing the check
box; otherwise, the NSP PWR alarm LED will lamp red (as described in the online help).
9. Click OK.
3-20
BROADway - Release 4.00
Configuration
Setting System Node Parameters
Setting System Node Parameters Using TL1
To view system data (such as system name and system location), use the RTRV-UDATA TL1 command:
RTRV-UDATA::NSP:1234;
To edit system node parameters, use the ED-UDATA TL1 command:
ED-UDATA::NSP:1234::NODE_NAME,<anystring>;
ED-UDATA::NSP:1234::NODE_LOCATION,<anystring>;
ED-UDATA::NSP:1234::ADMIN_NAME,<anystring>;
ED-UDATA::NSP:1234::PHONE_NUMBER,<anystring>;
ED-UDATA::NSP:1234::EMAIL_ADDRESS,<anystring>;
ED-UDATA::NSP:1234::<system_mode>;
<anystring>—alphanumeric string of up to 20 characters that does not start with a number and
contains no spaces or special characters
<system_mode>—US or INT (for international)
Examples:
Name the BROADway node systemOne:
ED-UDATA::NSP:1234::NODE_NAME,systemOne;
Set the node location to Brookfield:
ED-UDATA::NSP:1234::NODE_LOCATION,Brookfield;
Set the administrator name to JoeTech:
ED-UDATA::NSP:1234::ADMIN_NAME,JoeTech;
Set the phone number of the administrator to phone2037403650:
ED-UDATA::NSP:1234::PHONE_NUMBER,phone2037403650
Set the email address of the administrator to [email protected]:
ED-UDATA::NSP:1234::EMAIL_ADDRESS,[email protected];
Set the system mode to U.S./Canada:
ED-UDATA::NSP:1234::US;
NOTE: When you configure cards that can be T1 or E1, the interfaces on those cards will
be set to T1 by default. Those that can be SONET or SDH will default to SONET.
Set the system mode to International:
ED-UDATA::NSP:1234::INT;
NOTE: When you configure cards that can be T1 or E1, the interfaces on those cards will
be set to E1 by default, those that can be SONET or SDH will default to SDH.
After performing a TL1 ENT or ED command (to add or edit information), you should become used to
using the corresponding RTRV command to verify that the changes were made correctly. For example,
after using the ED-UDATA command to edit system data, use the RTRV-UDATA::NSP:1234;
command to view system data.
BROADway - Release 4.00
3-21
Configuration
Setting System Node Parameters
To view the power input redundancy status of the system, use the RTRV-EQPT TL1 command:
RTRV-EQPT::NSP-x.PWR-1:1234;
To enable or disable power input redundancy, use the ED-EQPT TL1 command:
ED-EQPT::NSP:1234::<setting>;
<setting>—ENA, ENABLE, ENABLED, DIS, DISABLE, or DISABLED.
Examples:
Enable power supply input redundancy (assuming NSP-1 is the active NSP):
ED-EQPT::NSP:1234::ENA;
Disable power supply input redundancy (assuming NSP-1 is the active NSP):
ED-EQPT::NSP:1234::DIS;
If you have installed two separate power sources to the BROADway chassis (both FEED A and
FEED B on the back of the chassis), you should enable power input supply redundancy. (For
information about connecting these power feeds, see Cabling Power and Ground on page 2-6.) If you
do not have two separate power sources connected to the chassis, you should disable power supply
redundancy; otherwise, the NSP PWR alarm LED will lamp red (as described in the online help).
3-22
BROADway - Release 4.00
Configuration
Managing the BROADway Configuration Database
Managing the BROADway Configuration Database
BROADway stores all configuration information in a database located in the non-volatile (flash)
memory-based file system in both the primary and backup (if installed) NSP101 cards. Changes made
to the database on the primary (in-service) NSP101 card are automatically copied and synchronized
with the database on the backup (out-of-service) NSP101 card.
BROADway’s flash file system has approximately 30 MB available for system and user data, including
databases and code images. You can have as many database configurations stored as allowed up to the
limit of the BROADway file system storage space. If you use up all the available flash file system
memory, then when you attempt to save or copy a database the operation will fail.
NOTE: If your flash file system begins to run out of space, the ALARM SUM LED on the
NSP101 will light. To recover from the alarm condition, delete any unneeded files. If you
ignore the alarm, the BROADway system will degrade in management access
performance.
Each of the configuration databases stored in the BROADway system will fall into one of the following
three categories:
RUNNING—The “running” database is the one that the BROADway system is currently executing
and running. Only one database can be “running” at any one time in the BROADway system.
SAVED—The “saved” database is the one that will come into effect when you reboot the
BROADway system. Only one database can be a “saved” database.
OFFLINE—All other databases that were ever named and stored but are not either RUNNING or
SAVED are off-line databases. You can have as many off-line databases as your BROADway
system’s memory allows. If you use up all memory then when you attempt to store or copy a new
database, the operation will fail.
NOTE: It is important to note that configuration changes made in the course of normal
operation to the RUNNING database will not be automatically saved unless a command is
performed to save the current configuration to the SAVED or other offline database. If you
reboot the BROADway system without saving any configuration changes made to the
RUNNING configuration then BROADway will revert to the previously SAVED database.
The BROADway management interface will enable you to:
! Load and execute a different database than the one currently running
! Make a backup copy of a database
! Delete a database
! Rename a database
BROADway - Release 4.00
3-23
Configuration
Managing the BROADway Configuration Database
Managing the Database Using the GUI
To modify the configuration database
status using the GUI interface:
1. In the menu bar, click Admin, then
Database.
2. The Database Management
window will appear. Review
which databases are currently in
the RUNNING, SAVED, and
OFFLINE states.
NOTE: To change the currently
RUNNING database to a
previously stored configuration,
you must reboot the BROADway
system. You cannot move a
database directly into the Running
folder. You can only move a
database into the Saved folder.
When you reboot the BROADway
system, the database in the Saved
folder becomes the RUNNING
database.
3. To select the current RUNNING database or an OFFLINE database as the SAVED database:
- Select the database that you want to move to SAVED. Click Copy.
- In the To field, select Saved.
- If you want to change the name of the
database (from that shown in the From
field), type a new name in the box under
the Saved field.
- Click OK.
NOTE: Database names are limited to 19
characters and must not begin with a numeric
character.
3-24
BROADway - Release 4.00
Configuration
Managing the BROADway Configuration Database
4. To delete a database, select it under Offline and
click Delete. You cannot delete the database that is
either RUNNING or SAVED. To delete a
database that is RUNNING or SAVED, you must
copy an alternative database file to SAVED.
5. To rename a database, select it and click Rename.
6. Click Close to close the Database Management
window.
To re-initialize the database system to a default factory
condition, follow the instructions found in Managing the
Database Using TL1 on page 3-25.
Managing the Database Using TL1
To view the databases currently stored on the BROADway system, use the RTRV-DB TL1 command:
RTRV-DB::NSP:1::;
To copy the RUNNING, SAVED, or an OFFLINE configuration database to the SAVED, or an
alternative OFFLINE database, use the CPY-DB TL1 command:
CPY-DB::NSP:1::<fromname>,<toname>,<newname>;
<fromname>—RUNNING, SAVED, or user-defined OFFLINE name.
<toname>—SAVED, or user-defined OFFLINE name.
<newname>—User-defined saved name. This field is optional and should only be specified when
<fromname> is RUNNING and <toname> is SAVED.
NOTE: Database names are limited to 19 characters and must not begin with a numeric
character.
Examples:
Save the running database to the SAVED database as the filename newdbname:
CPY-DB::NSP:1::RUNNING,SAVED,newdbname;
The next time you reboot the BROADway system, this database will become the RUNNING database.
Create an OFFLINE copy of the saved database under the filename offlinename:
CPY-DB::NSP:1::SAVED,offlinename;
Copy the database named offlinename as the SAVED database:
CPY-DB::NSP:1::offlinename,SAVED;
The next time you reboot the BROADway system, this database will become the RUNNING database.
NOTE: To change the currently running configuration, you must reboot the BROADway
system. You cannot move a database directly to RUNNING. You can only move a
database to SAVED. When you reboot the BROADway system, the database in SAVED
becomes the RUNNING database.
BROADway - Release 4.00
3-25
Configuration
Managing the BROADway Configuration Database
To delete an OFFLINE database, use the DLT-DB TL1 command:
DLT-DB::NSP:1234::<name>;
<name>—User defined OFFLINE database name.
Examples:
Delete the database called offlinename from the active NSP:
DLT-DB::NSP:1234::offlinename;
Delete the database called offlinename from NSP-1:
DLT-DB::NSP-1:1234::offlinename;
Deletes the database called offlinename from NSP-2:
DLT-DB::NSP-2:1234::offlinename;
You cannot delete the database that is either currently stored as RUNNING or SAVED.
To initialize the database system to its factory default, use the INIT-DB TL1 command:
INIT-DB::NSP:1234;
After you initialize the database, reboot the BROADway system using the INIT-SYS TL1 command
(see page 3-27).
CAUTION! USE THE INIT-DB COMMAND WITH EXTREME CARE AS IT WILL RESET THE
SAVED CONFIGURATION DATABASE TO A FACTORY DEFAULT STATE. ENSURE YOU HAVE A
BACKUP OF ANY PREVIOUS SAVED CONFIGURATION BEFORE YOU EXECUTE THIS COMMAND.
Exporting the BROADway Database to a TL1 Script
The BROADway embedded database is designed to offer fast access to each configuration element of
the BROADway switch. However, it is not stored in a simple human-readable format. To dump the
contents of the database to a TL1 script format, the following TL1 commands can be used:
EXEC-SYS::NSP:1234::cfgDumpTL1;
EXEC-SYS::NSP:1234::cfgDumpTL1verbose;
The EXEC-SYS command accesses each element configuration table within the database in turn and
converts the contents to a series of TL1 commands. The first variant of the command will only print
information that is changed from the default switch settings. The second variant of the command will
print the entire database as a series of TL1 commands.
In this release of the system software, the output is sent to the console from which the command was
executed, i.e. the serial craft port or a Telnet session. An operator using a terminal emulation program
such as Hyperstream can capture the output from the switch to a file on the local PC, and replay it back
to the switch to configure the product.
It is also possible to capture the output, modify certain script parameters and then play it back to
replicate a single configuration easily on multiple BROADway switches.
3-26
BROADway - Release 4.00
Configuration
Managing the BROADway Configuration Database
Copying Files Between NSP101 Controllers
On some occasions, it might be useful to copy files from the working NSP101 controller to the
protection, or backup, controller (for example, to copy scripts for Node Level APS support). Copying
files between NSP101 modules is accomplished using the file-sync TL1 command:
NSP1> file-sync::nsp:1234::/FLASH/SCRIPTS/t1switch.scp;
Sending file /FLASH/SCRIPTS/t1switch.scp to peer NSP
2003-04-10 08:05:32
M 1234
COMPLD
NSP-1,
;
Re-Starting the BROADway System Using TL1
You can restart one or both of the NSP101 control cards in a BROADway system using the INIT-SYS
TL1 command:
INIT-SYS::<aid>:1234::{FORCE|ALL};
<aid>—One of the following:
NSP-1—Resets the NSP101 in slot NSP-1, regardless of whether or not it is the active NSP101.
NSP-2—Resets the NSP101 in slot NSP-2, regardless of whether or not it is the active NSP101.
NSP—Resets the active NSP101.
NSP-P—Resets the non-active (protection) NSP101.
FORCE—Forces a reboot of the specified NSP card.
ALL—Resets both NSP101s.
CAUTION! USE THE INIT-SYS COMMANDS WITH EXTREME CARE AS THESE COMMANDS
WILL POTENTIALLY PERFORM A SERVICE-AFFECTING RESTART OF THE
BROADWAY SYSTEM.
Examples:
Restart the working NSP (switches BROADway to redundant NSP only if installed):
INIT-SYS::NSP:1234::FORCE;
Restart the working NSP (switches BROADway to redundant NSP only if installed):
INIT-SYS::NSP-1:1234::FORCE;
Restart the protection NSP if installed:
INIT-SYS::NSP-2:1234::FORCE;
Restart the protection NSP if installed:
INIT-SYS::NSP-P:1234::FORCE;
BROADway - Release 4.00
3-27
Configuration
Using FTP with the BROADway System
Restart both NSP101 control cards in a redundant configuration. (This is a service affecting reboot.)
INIT-SYS::NSP:1234::ALL;
CAUTION! WHEN BROADWAY DATABASES ARE SYNCHRONIZING BETWEEN THE ACTIVE
AND STANDBY NSP101 CARDS, YOU WILL NOTICE THAT THE ACTIVE LEDS ON THE NSP101S
WILL BLINK RAPIDLY TO SIGNIFY A FILE TRANSFER IS IN PROGRESS. YOU MUST WAIT UNTIL
THESE LEDS HAVE STOPPED FLASHING BEFORE YOU PERFORM ANY OPERATION TO REINITIALIZE THE BROADWAY SYSTEM EITHER THROUGH A REBOOT OR FORCED NSP101
PROTECTION SWITCHOVER.
Using FTP with the BROADway System
The BROADway system operates an FTP server for the purpose of quickly uploading and downloading
files to and from the node. Information such as system software updates, system and alarm logs and the
node database can be transferred using the FTP protocol.
BROADway has two disks mounted that can be accessed with FTP, these are /FLASH and /VDISK.
The former is a silicon disk mounted in non-volatile memory, while the latter is a silicon disk mounted
temporarily in working RAM. Information stored in /FLASH will be saved over a reboot of the system
while that in /VDISK will be lost once the BROADway unit is restarted. /FLASH is the default folder
for an FTP session.
The following log is an example of an FTP session that logs into a BROADway system, changes folder
to the System Logs folder on the /FLASH disk and copies the SYSLOG binary file to the local PC.
ftp> open 192.168.5.60
Connected to 192.168.5.60.
220 VxWorks (5.4.2) FTP server ready
User (192.168.5.60:(none)): ADMIN
331 Password required
Password:
230 User logged in
ftp> cd /FLASH/logfiles
250 Changed directory to "/FLASH/logfiles"
ftp> bin
200 Type set to I, binary mode
ftp> get SYSLOG c:\syslog
200 Port set okay
150 Opening BINARY mode data connection
226 Transfer complete
ftp: 120240 bytes received in 0.52Seconds 230.79Kbytes/sec.
ftp> disconnect
221 Bye...see you later
3-28
BROADway - Release 4.00
Configuration
Upgrading System Software
FTP can be used to retrieve information that can be useful to Carrier Access in debugging problems that
have been experienced on the system, or for uploading new system software releases to the BROADway
system. Remember that all filenames are case sensitive in the FTP protocol.
Upgrading System Software
Periodically, Carrier Access releases new versions of the software that operates the BROADway
system. When you receive the software, you must FTP the system files to the BROADway NSP101
which implies that you must have an IP address configured for the Ethernet interface of the system (see
Assigning an IP Address to the BROADway System on page 3-3). When FTPing files to the BROADway
system, you are required to enter a username and password with either Configuration or Administrator
privileges.
For specific details on how to upgrade the system software using FTP, refer to the official Release Notes
for that software release. The following procedure might be superseded by the system Release Notes.
Upgrading system software tasks can only be performed through the TL1 command line interface.
To upgrade the system software to release 3.08 from an earlier software release, follow these
instructions:
1. Verify the release of software currently running on your BROADway system by executing the
following TL1 command:
rtrv-sw-ver::nsp:1234::all;
Both NSP101 modules should be running the same version of BROADway system code:
NSP1> rtrv-sw-ver::nsp:1234::all;
2003-04-08 10:43:20
M 99
COMPLD
NSP-1,
Working NSP BROADway SW Version: 3.04
Protection NSP BROADway SW Version: 3.04
2. Copy the new software release to the PC from which you will be running the FTP upload
session. For this example, we assume the file, bw308.zip, has been copied to the C:\TEMP
folder.
BROADway - Release 4.00
3-29
Configuration
Upgrading System Software
3. Use an FTP client program to open an FTP session to the BROADway node and upload the
system software file to the /FLASH folder. This example shows the standard Microsoft
Windows FTP client. The upload time might be more than several minutes if the IP connection
to the BROADway node is over a low-speed WAN link:
c:\>ftp 192.168.5.60
Connected to 192.168.5.60.
220 VxWorks (5.4.2) FTP server ready
User (192.168.5.60:(none)): ADMIN
331 Password required
Password:
230 User logged in
ftp> cd /FLASH
250 Changed directory to "/FLASH"
ftp> bin
200 Type set to I, binary mode
ftp> put c:\temp\bw308.zip
200 Port set okay
150 Opening BINARY mode data connection
226 Transfer complete
ftp: 4664234 bytes sent in 124.73Seconds 37.40Kbytes/sec.
ftp> bye
221 Bye...see you later
3-30
BROADway - Release 4.00
Configuration
Upgrading System Software
4. To complete the software upgrade, use the set-upgrade command to decompress the
software image, copy it to the backup NSP101 and reboot the BROADway system:
NSP1> set-upgrade::nsp:1234::bw308,all;
Sending file /FLASH/bw308.zip to peer
NSP.....................
SET-BOOT bw308 command executing in peer
NSP..................
SET-BOOT bw308 command executing in local NSP
INIT-SYS command executing in peer NSP
/* LOCAL SYSTEM REBOOTING */
2003-04-08 12:58:42
M 99
COMPLD
NSP-1,
;
CAUTION! THE SET-UPGRADE COMMAND CAUSES THE SYSTEM TO AUTOMATICALLY
REBOOT FROM THE SOFTWARE IMAGE SPECIFIED IN THE COMMAND LINE. THIS IMAGE MUST
HAVE PREVIOUSLY BEEN DOWNLOADED USING FTP TO THE FLASH MEMORY ON THE
BROADWAY SYSTEM. SET-UPGRADE AUTOMATICALLY UNZIPS THE SOFTWARE IMAGE INTO
THE EXECUTABLE APPLICATION FILES THAT THE BROADWAY SYSTEM WILL USE TO OPERATE.
To upgrade a BROADway system with a single NSP only, use the following format for the
set-upgrade command:
NSP1> set-upgrade::nsp:1234::bw308;
SET-BOOT bw308 command executing in local NSP
/* LOCAL SYSTEM REBOOTING */
2003-04-08 10:52:29
M 99
COMPLD
NSP-1,
CAUTION! THE SET-UPGRADE COMMAND CAUSES THE SYSTEM TO AUTOMATICALLY
REBOOT FROM THE SOFTWARE IMAGE SPECIFIED IN THE COMMAND LINE. THIS IMAGE MUST
HAVE PREVIOUSLY BEEN DOWNLOADED USING FTP TO THE FLASH MEMORY ON THE
BROADWAY SYSTEM. SET-UPGRADE AUTOMATICALLY UNZIPS THE SOFTWARE IMAGE INTO
THE EXECUTABLE APPLICATION FILES THAT THE BROADWAY SYSTEM WILL USE TO OPERATE.
BROADway - Release 4.00
3-31
Configuration
Upgrading System Software
Rolling Back a Software Update
Should you want to reload a previous software version into the BROADway system, the process is the
same as the one previously outlined, but with one exception. When FTPing the system software file to
the BROADway unit, save the file to the /VDISK folder rather than the /FLASH folder. From release
3.08 onwards, software upgrades operate out of working RAM rather than Flash memory. For example:
c:\>ftp 192.168.5.60
Connected to 192.168.5.60.
220 VxWorks (5.4.2) FTP server ready
User (192.168.5.60:(none)): ADMIN
331 Password required
Password:
230 User logged in
ftp> cd /VDISK
250 Changed directory to "/VDISK"
ftp> bin
200 Type set to I, binary mode
ftp> put c:\temp\bw304.zip
200 Port set okay
150 Opening BINARY mode data connection
226 Transfer complete
ftp: 4664234 bytes sent in 124.73Seconds 37.40Kbytes/sec.
ftp> bye
221 Bye...see you later
Upgrading the Boot ROM
Occasionally, system software releases will be accompanied by a firmware update to the Boot ROM on
the NSP101 module. The minimum boot ROM revision required for system release 3.08 is version 1.6.
The current revision number is available on the startup screen during the BROADway boot cycle or
through the use of the exec-sys TL1 command:
NSP1> exec-sys::nsp:1234::vers;
BROADway version:
3.04
PS
version:
3.04
DATABASE version:
2.1
BSP Version
:
1.60
value = 26 = 0x1a
2003-04-24 10:19:56
M 1234
COMPLD
NSP-1,
;
3-32
BROADway - Release 4.00
Configuration
Upgrading System Software
1. Once the new system software has been loaded and the BROADway units have rebooted and
synchronized (see Upgrading System Software on page 3-29), use the exec-sys TL1
command to update the Boot ROM on the working NSP:
NSP1> exec-sys::nsp:1234::bootUpdate;
Starting to program bootrom...done
value = 0 = 0x0
2003-04-08 11:06:21
M 1
COMPLD
NSP-1,
2. Next, reboot the working NSP101 using the init-sys command. If only a single NSP101 is
present this will reboot the BROADway system, if two are present then the BROADway will
switch to the protection NSP101 module:
NSP1> init-sys::nsp:1234::FORCE;
/* LOCAL SYSTEM REBOOTING */
2003-04-08 11:08:16
M 1234
COMPLD
NSP-1,
3. Verify that, in a protected system, the backup NSP101 is in-service and synchronized, then
perform a similar Boot ROM upgrade and reboot on the backup card:
NSP1> exec-sys::nsp:1234::bootUpdate;
Starting to program bootrom...done
value = 0 = 0x0
2003-04-08 11:06:21
M 1
COMPLD
NSP-1,
NSP1> init-sys::nsp:1234::FORCE;
/* LOCAL SYSTEM REBOOTING */
2003-04-08 11:08:16
M 1234
COMPLD
NSP-1,
4. Ensure that the NSP101 switched back to the original working card. Both NSP101’s are now
upgraded to the new Boot ROM firmware version.
BROADway - Release 4.00
3-33
Configuration
Upgrading System Software
TL1 Software Upgrade Commands
To display the version of system software running on your BROADway, use the RTRV-SW-VER TL1
command:
RTRV-SW-VER::<aid>:1234::ALL;
<aid>—NSP-1, NSP-2, or NSP (for both NSPs).
Examples:
Display the BROADway software version loaded on NSP-1:
RTRV-SW-VER::NSP-1:1234::;
Display the BROADway software version number loaded on both NSPs:
RTRV-SW-VER::NSP:1234::ALL;
To change the executable system software image on the BROADway system, use the SET-UPGRADE
TL1 command:
SET-UPGRADE::<aid>:1234::<filename>,ALL;
<aid>—NSP-1, NSP-2, or NSP (for both NSPs).
<filename>—The name of the new system software image file.
Examples:
Load the BROADway software on NSP-1 with the file bw308 (Release 3.08):
SET-UPGRADE::NSP-1:1234::bw308;
Load the BROADway software on both NSPs with the file bw308 (Release 3.08):
SET-UPGRADE::NSP:1234::bw308,ALL;
CAUTION! THE SET-UPGRADE COMMAND CAUSES THE SYSTEM TO AUTOMATICALLY
REBOOT FROM THE SOFTWARE IMAGE SPECIFIED IN THE COMMAND LINE. THIS IMAGE MUST
HAVE PREVIOUSLY BEEN DOWNLOADED USING FTP TO THE FLASH MEMORY ON THE
BROADWAY SYSTEM. SET-UPGRADE AUTOMATICALLY UNZIPS THE SOFTWARE IMAGE INTO
THE EXECUTABLE APPLICATION FILES THAT THE BROADWAY SYSTEM WILL USE TO OPERATE.
3-34
BROADway - Release 4.00
APPENDIX
A
Ports and Cables
In This Appendix
#
Overview
#
SCP-1 and SCP-2 Connector Pinouts
#
ETH-1 and ETH-2 Connector Pinouts
#
CKIN-1 and CKIN-2 Connector Pinouts (BITS Only)
#
NIP400 Connector Pinouts (NIP TX1–RX1, NIP TX2–
RX2)
#
ALARMS Connector Pinouts
#
NHP160 Connector Pinouts
Ports and Cables
Overview
Overview
This appendix contains information about the ports on the BROADway chassis and the cables used with
the BROADway chassis.
SCP-1 and SCP-2 Connector Pinouts
NIP RX1
NIP RX2
NIP TX1
NIP TX2
RX1
TX1
RX2
TX2
RX3
TX3
RX4
CKIN-1 CKIN-2
TX4
ETH-1 ETH-2
ALARMS
ACO
SCP-1
SCP-2
SCP-1 and SCP-2 are male, DB9 ports. These ports are asynchronous RS232 craft ports operating at
9.6 Kbps (EIA RS232 compliant). You use SCP-1 for direct access using a terminal emulation program,
such as HyperTerminal; SCP-2 is for future use.
These are the pinouts for the SCP-1 and SCP-2 ports.
SCP-1
Pin
Signal
SCP-2 (future use)
Name
1
Signal
Name
1
CD
Carrier Detect
2
RD
Receive Data
2
RD
Receive Data
3
TD
Transmit Data
3
TD
Transmit Data
Data Terminal
Ready
4
DTR
Data Terminal
Ready
5
GND
4
5
A-2
Pin
GND
6
Data Set Ready
6
DSR
Data Set Ready
7
Request to Send
7
RTS
Request to Send
8
Clear to Send
8
CTS
Clear to Send
9
Ring Indicator
9
RI
Ring Indicator
BROADway - Release 4.00
Ports and Cables
ETH-1 and ETH-2 Connector Pinouts
ETH-1 and ETH-2 Connector Pinouts
NIP RX1
NIP RX2
NIP TX1
NIP TX2
RX1
TX1
RX2
TX2
RX3
TX3
RX4
CKIN-1 CKIN-2
TX4
ETH-1 ETH-2
ALARMS
ACO
SCP-1
SCP-2
ETH-1 and ETH-2 are female, 10-BaseT, RJ45 ports (IEEE 802.3 compliant). They are identical,
except that their transmit and receive pairs are reversed. These are the pinouts for the ETH-1 and
ETH-2 ports.
ETH-1
ETH-2
Pin
Signal
Pin
Signal
1
Receive +
1
Transmit +
2
Receive -
2
Transmit -
3
Transmit +
3
Receive +
4
nc
4
nc
5
nc
5
nc
6
Transmit -
6
Receive -
7
nc
7
nc
8
nc
8
nc
BROADway - Release 4.00
A-3
Ports and Cables
CKIN-1 and CKIN-2 Connector Pinouts (BITS Only)
CKIN-1 and CKIN-2 Connector Pinouts (BITS Only)
NIP RX1
NIP RX2
NIP TX1
NIP TX2
RX1
TX1
RX2
TX2
RX3
TX3
RX4
TX4
CKIN-1 CKIN-2
ETH-1 ETH-2
ALARMS
ACO
SCP-1
SCP-2
On the BITS version of the chassis, CKIN-1 and CKIN-2 are female, RJ45 ports (Bellcore specification
GR-1244). These are the pinouts for the CKIN-1 and CKIN-2 ports.
CKIN-1
A-4
CKIN-2
Pin
Signal
Pin
Signal
1
Receive -
1
Receive -
2
Receive +
2
Receive +
3
nc
3
nc
4
nc
4
nc
5
nc
5
nc
6
nc
6
nc
7
nc
7
nc
8
nc
8
nc
BROADway - Release 4.00
Ports and Cables
NIP400 Connector Pinouts (NIP TX1–RX1, NIP TX2–RX2)
NIP400 Connector Pinouts (NIP TX1–RX1, NIP TX2–RX2)
NIP RX1
NIP RX2
NIP TX1
NIP TX2
RX1
TX1
RX2
TX2
RX3
TX3
RX4
CKIN-1 CKIN-2
TX4
ETH-1 ETH-2
ALARMS
ACO
SCP-1
SCP-2
NIP TX1, NIP RX1, NIP TX2, and NIP RX2 are male 25 pair connections.
T1/E1
Circuit
NIP400
Card
TX tip
TX ring
RX tip
NIP TX1
1
NIP RX1
26 white/blue
1 blue/white
26 white/blue
1 blue/white
2
27 white/
orange
2 orange/white
27 white/
orange
2 orange/
white
3
28 white/green
3 green/white
28 white/green
3 green/white
4
29 white/
brown
4 brown/white
29 white/brown
4 brown/white
30 white/slate
5 slate/white
30 white/slate
5 slate/white
6
31 red/blue
6 blue/red
31 red/blue
6 blue/red
7
32 red/orange
7 orange/red
32 red/orange
7 orange/red
8
33 red/green
8 green/red
33 red/green
8 green/red
34 red/brown
9 brown/red
34 red/brown
9 brown/red
10
35 red/slate
10 slate/red
35 red/slate
10 slate/red
11
36 black/blue
11 blue/black
36 black/blue
11 blue/black
12
37 black/
orange
12 orange/
black
37 black/orange
12 orange/
black
38 black/green
13 green/black
38 black/green
13 green/black
14
39 black/
brown
14 brown/
black
39 black/brown
14 brown/
black
15
40 black/slate
15 slate/black
40 black/slate
15 slate/black
16
41 yellow/blue
16 blue/yellow
41 yellow/blue
16 blue/
yellow
5
9
13
NIP-1
RX ring
NIP-2
NIP-3
NIP-4
NIP TX2
BROADway - Release 4.00
NIP RX2
A-5
Ports and Cables
NIP400 Connector Pinouts (NIP TX1–RX1, NIP TX2–RX2)
T1/E1
Circuit
17
NIP400
Card
TX ring
RX tip
RX ring
26 white/blue
1 blue/white
26 white/blue
1 blue/white
18
27 white/
orange
2 orange/white
27 white/
orange
2 orange/
white
19
28 white/green
3 green/white
28 white/green
3 green/white
20
29 white/
brown
4 brown/white
29 white/brown
4 brown/white
30 white/slate
5 slate/white
30 white/slate
5 slate/white
22
31 red/blue
6 blue/red
31 red/blue
6 blue/red
23
32 red/orange
7 orange/red
32 red/orange
7 orange/red
24
33 red/green
8 green/red
33 red/green
8 green/red
34 red/brown
9 brown/red
34 red/brown
9 brown/red
26
35 red/slate
10 slate/red
35 red/slate
10 slate/red
27
36 black/blue
11 blue/black
36 black/blue
11 blue/black
28
37 black/
orange
12 orange/
black
37 black/orange
12 orange/
black
38 black/green
13 green/black
38 black/green
13 green/black
30
39 black/
brown
14 brown/
black
39 black/brown
14 brown/
black
31
40 black/slate
15 slate/black
40 black/slate
15 slate/black
32
41 yellow/blue
16 blue/yellow
41 yellow/blue
16 blue/
yellow
21
25
29
NIP-5
TX tip
NIP-6
NIP-7
NIP-8
Pin 50 on connectors #1, #2, #3, and #4 is a drain wire connected to chassis ground.
As the pinouts show, if you are not installing NIP400 cards in NIP-5 through NIP-8, you do not need to
connect the ports NIP TX2 and NIP RX2. Likewise, if you are not installing NIP400 cards in NIP-1
through NIP-4, you do not need to connect the ports NIP TX1 and NIP RX1.
A-6
BROADway - Release 4.00
Ports and Cables
ALARMS Connector Pinouts
ALARMS Connector Pinouts
NIP RX1
NIP RX2
NIP TX1
NIP TX2
RX1
TX1
RX2
TX2
RX3
TX3
RX4
CKIN-1 CKIN-2
TX4
ETH-1 ETH-2
ALARMS
ACO
SCP-1
SCP-2
The ALARMS port is a female, DB15 port. These are the pinouts of the ALARMS port.
Pin
Color
Name
Signal
1
white/blue
normally open, NO
alarm generation #1
2
white/orange
common, C
3
white/green
normally closed,
NC
4
white/brown
normally open, NO
5
white/slate
common, C
6
red/blue
normally closed,
NC
7
red/orange
N/A
8
red/green
N/A
9
blue/white
ALMSNS2N
10
orange/white
ALMSNS2P
11
green/white
ALMSNS1N
12
brown/white
ALMSNS1P
13
slate/white
ground
14
blue/red
15
orange/red
alarm generation #2
alarm sense #2
alarm sense #1
N/A
VCC (voltage)
For the relay contacts on this port, the maximum ratings are 200V DC, or 2 amps, or 30 watts.
BROADway - Release 4.00
A-7
Ports and Cables
NHP160 Connector Pinouts
NHP160 Connector Pinouts
There are several cables you can use to connect the NHP160 cards. These are the pinouts for the unterminated SCSI cable (at any length).
A-8
SCSI Pin
Color
Signal
1
white/blue
T1E1_RxTIP15
2
white/orange
T1E1_TxTIP15
3
white/green
T1E1_TxTIP14
4
white/brown
T1E1_RxTIP14
5
white/gray
T1E1_RxTIP13
6
red/blue
T1E1_TxTIP13
7
red/orange
T1E1_TxTIP12
8
red/green
T1E1_RxTIP12
9
red/brown
T1E1_TxTIP7
10
red/gray
T1E1_RxTIP7
11
black/blue
T1E1_TxTIP11
12
black/orange
T1E1_RxTIP11
13
black/green
T1E1_TxTIP10
14
black/brown
T1E1_RxTIP10
15
black/gray
T1E1_TxTIP6
16
yellow/blue
T1E1_RxTIP6
17
yellow/orange
NO CONNECT
18
yellow/green
T1E1_TxTIP5
19
yellow/brown
T1E1_RxTIP5
20
yellow/gray
T1E1_TxTIP4
21
purple/blue
T1E1_RxTIP4
22
purple/orange
T1E1_TxTIP9
23
purple/green
T1E1_RxTIP9
24
purple/brown
T1E1_RxTIP8
25
purple/gray
T1E1_TxTIP8
26
white/blue band
T1E1_TxTIP1
27
white/orange band
T1E1_RxTIP1
BROADway - Release 4.00
Ports and Cables
NHP160 Connector Pinouts
SCSI Pin
Color
Signal
28
white/green band
T1E1_RxTIP0
29
white/brown band
T1E1_TxTIP0
30
white/gray band
T1E1_TxTIP3
31
red/blue band
T1E1_RxTIP3
32
red/orange band
T1E1_RxTIP2
33
red/green band
T1E1_TxTIP2
34
red/brown band
NO CONNECT
35
blue/white
T1E1_RxRNG15
36
orange/white
T1E1_TxRNG15
37
green/white
T1E1_TxRNG14
38
brown/white
T1E1_RxRNG14
39
gray/white
T1E1_RxRNG13
40
blue/red
T1E1_TxRNG13
41
orange/red
T1E1_TxRNG12
42
green/red
T1E1_RxRNG12
43
brown/red
T1E1_TxRNG7
44
gray/red
T1E1_RxRNG7
45
blue/black
T1E1_TxRNG11
46
orange/black
T1E1_RxRNG11
47
green/black
T1E1_TxRNG10
48
brown/black
T1E1_RxRNG10
49
gray/black
T1E1_TxRNG6
50
blue/yellow
T1E1_RxRNG6
51
orange/yellow
NO CONNECT
52
green/yellow
T1E1_TxRNG5
53
brown/yellow
T1E1_RxRNG5
54
gray/yellow
T1E1_TxRNG4
55
blue/purple
T1E1_RxRNG4
56
orange/purple
T1E1_TxRNG9
57
green/purple
T1E1_RxRNG9
58
brown/purple
T1E1_RxRNG8
BROADway - Release 4.00
A-9
Ports and Cables
NHP160 Connector Pinouts
A-10
SCSI Pin
Color
Signal
59
gray/purple
T1E1_TxRNG8
60
blue/white band
T1E1_TxRNG1
61
orange/white band
T1E1_RxRNG1
62
green/white band
T1E1_RxRNG0
63
brown/white band
T1E1_TxRNG0
64
gray/white band
T1E1_TxRNG3
65
blue/red band
T1E1_RxRNG3
66
orange/red band
T1E1_RxRNG2
67
green/red band
T1E1_TxRNG2
68
brown/red band
NO CONNECT
BROADway - Release 4.00
INDEX
Index
A
CLI
Accounts
GUI . . . . . . . . . . . . . . . . . . . . . . . . . . . 3-14
TL1 . . . . . . . . . . . . . . . . . . . . . . . . . . . 3-16
Alarm reporting . . . . . . . . . . . . . . . . . . . . . . 2-13
Alarm sense . . . . . . . . . . . . . . . . . . . . . . . . . 2-12
Alarms
cabling . . . . . . . . . . . . . . . . . . . . . . . . . 2-11
ALARMS port . . . . . . . . . . . . . . . . . . 2-11, A-7
Assigning an IP address . . . . . . . . . . . . . . . . 3-3
Attaching the front panel . . . . . . . . . . . . . . 2-28
logging in . . . . . . . . . . . . . . . . . . . . . . . 3-13
managing databases . . . . . . . . . . . . . . . 3-25
upgrading software . . . . . . . . . . . . . . . . 3-34
Clock
GUI . . . . . . . . . . . . . . . . . . . . . . . . . . . . 3-19
Clock port. See CKIN-1 and CKIN-2
Configuration
databases . . . . . . . . . . . . . . . . . . . . . . . . 3-23
methods . . . . . . . . . . . . . . . . . . . . . . . . . . 3-1
Creating users
GUI . . . . . . . . . . . . . . . . . . . . . . . . . . . . 3-14
TL1 . . . . . . . . . . . . . . . . . . . . . . . . . . . . 3-16
B
BCP155 cards
inserting . . . . . . . . . . . . . . . . . . . . . . . . 2-24
BROADway
IP address . . . . . . . . . . . . . . . . . . . . . . . . 3-3
C
Cable definitions . . . . . . . . . . . . . . . . . . . . . . A-1
Cabling . . . . . . . . . . . . . . . . . . . . . . . . . . . . 2-24
alarms . . . . . . . . . . . . . . . . . . . . . . . . . . 2-11
BCP155 cards . . . . . . . . . . . . . . . . . . . 2-24
E1 . . . . . . . . . . . . . . . . . . . . . . . . . . . . . 2-17
Ethernet port . . . . . . . . . . . . . . . . . . . . . 2-9
ground . . . . . . . . . . . . . . . . . . . . . . . . . . 2-6
hardware . . . . . . . . . . . . . . . . . . . . . . . . 2-1
network synchronization clock port . . . 2-10
NHP160 cards . . . . . . . . . . . . . . . . . . . 2-19
OSP155 cards . . . . . . . . . . . . . . . . . . . . 2-24
power . . . . . . . . . . . . . . . . . . . . . . . . . . . 2-6
serial craft port . . . . . . . . . . . . . . . . . . . . 2-9
T1 . . . . . . . . . . . . . . . . . . . . . . . . . . . . . 2-17
Cards
installing . . . . . . . . . . . . . . . . . . . . . . . 2-30
replacing . . . . . . . . . . . . . . . . . . . . . . . 2-31
Changing your password
GUI . . . . . . . . . . . . . . . . . . . . . . . . . . . 3-18
TL1 . . . . . . . . . . . . . . . . . . . . . . . . . . . 3-18
Chassis
mounting . . . . . . . . . . . . . . . . . . . . . . . . 2-4
powering . . . . . . . . . . . . . . . . . . . . . . . 2-29
CKIN-1 . . . . . . . . . . . . . . . . . . . . . . . . 2-10, A-4
CKIN-2 . . . . . . . . . . . . . . . . . . . . . . . . 2-10, A-4
D
Databases . . . . . . . . . . . . . . . . . . . . . . . . . . . 3-25
Deleting users
GUI . . . . . . . . . . . . . . . . . . . . . . . . . . . . 3-14
TL1 . . . . . . . . . . . . . . . . . . . . . . . . . . . . 3-17
E
E1
cabling . . . . . . . . . . . . . . . . . . . . . . . . . . 2-17
Editing users
GUI . . . . . . . . . . . . . . . . . . . . . . . . . . . . 3-14
TL1 . . . . . . . . . . . . . . . . . . . . . . . . . . . . 3-17
ETH-1 . . . . . . . . . . . . . . . . . . . . . . . . . . 2-9, A-3
logging in . . . . . . . . . . . . . . . . . . . . . . . . 3-8
ETH-2 . . . . . . . . . . . . . . . . . . . . . . . . . . 2-9, A-3
logging in . . . . . . . . . . . . . . . . . . . . . . . . 3-8
Ethernet port settings . . . . . . . . . . . . . . . . . . . 3-8
Ethernet port. See ETH-1 and ETH-2
F
Fan filter . . . . . . . . . . . . . . . . . . . . . . . . . . . . 2-32
Front panel . . . . . . . . . . . . . . . . . . . . . . . . . . 2-28
G
Grounding . . . . . . . . . . . . . . . . . . . . . . . . . . . 2-6
GUI . . . . . . . . . . . . . . . . . . . . . . . . . . . . . . . . . 3-9
logging in . . . . . . . . . . . . . . . . . . . . . . . . 3-9
H
Hardware . . . . . . . . . . . . . . . . . . . . . . . . . . . . 2-1
overview . . . . . . . . . . . . . . . . . . . . . . . . . 2-2
Index
I
I
P
Inserting
BCP155 cards . . . . . . . . . . . . . . . . . . . . 2-24
NHP160 card . . . . . . . . . . . . . . . . . . . . . 2-19
OSP155 cards . . . . . . . . . . . . . . . . . . . . 2-24
Installing
BCP155 cards . . . . . . . . . . . . . . . . . . . . 2-24
chassis . . . . . . . . . . . . . . . . . . . . . . . . . . . 2-4
hardware . . . . . . . . . . . . . . . . . . . . . . . . . 2-1
new cards . . . . . . . . . . . . . . . . . . . . . . . 2-30
NHP160 cards . . . . . . . . . . . . . . . . . . . . 2-19
OSP155 cards . . . . . . . . . . . . . . . . . . . . 2-24
power . . . . . . . . . . . . . . . . . . . . . . . . . . . 2-6
Introduction . . . . . . . . . . . . . . . . . . . . . . . . . . 1-1
IP address . . . . . . . . . . . . . . . . . . . . . . . . . . . . 3-3
Passwords
GUI . . . . . . . . . . . . . . . . . . . . . . . . . . . . 3-18
TL1 . . . . . . . . . . . . . . . . . . . . . . . . . . . . 3-18
Pinouts . . . . . . . . . . . . . . . . . . . . . . . . . . . . . . A-1
ALARMS . . . . . . . . . . . . . . . . . . . . . . . . A-7
CKIN-1 and CKIN-2 . . . . . . . . . . . . . . . A-4
ETH-1 and ETH-2 . . . . . . . . . . . . . . . . . A-3
NIP400 . . . . . . . . . . . . . . . . . . . . . . . . . . A-5
SCP-1 and SCP-2 . . . . . . . . . . . . . . . . . . A-2
Ports . . . . . . . . . . . . . . . . . . . . . . . . . . . . . . . . A-1
Powering . . . . . . . . . . . . . . . . . . . . . . . . . . . . 2-6
chassis . . . . . . . . . . . . . . . . . . . . . . . . . 2-29
R
Logging in . . . . . . . . . . . . . . 3-7, 3-8, 3-9, 3-13
Replacing
failed cards . . . . . . . . . . . . . . . . . . . . . . 2-31
fan filter . . . . . . . . . . . . . . . . . . . . . . . . 2-32
M
S
Managing configuration databases
CLI . . . . . . . . . . . . . . . . . . . . . . . . . . . . 3-25
GUI . . . . . . . . . . . . . . . . . . . . . . . . . . . . 3-23
Manual
introduction . . . . . . . . . . . . . . . . . . . . . . . 1-1
Memory . . . . . . . . . . . . . . . . . . . . . . . . . . . . 3-24
Mounting
center of gravity . . . . . . . . . . . . . . . . . . . 2-5
chassis . . . . . . . . . . . . . . . . . . . . . . . . . . . 2-4
front-mounted . . . . . . . . . . . . . . . . . . . . . 2-5
mid-mounted . . . . . . . . . . . . . . . . . . . . . . 2-5
SCP-1 . . . . . . . . . . . . . . . . . . . . . . . . . . 2-9, A-2
logging in . . . . . . . . . . . . . . . . . . . . . . . . 3-7
SCP-2 . . . . . . . . . . . . . . . . . . . . . . . . . . 2-9, A-2
Serial craft port . . . . . . . . . . . . . . . . . . . . . . . 3-7
GUI . . . . . . . . . . . . . . . . . . . . . . . . . . . . . 3-7
Setting
system clock
GUI . . . . . . . . . . . . . . . . . . . . . . . . 3-19
system node parameters
GUI . . . . . . . . . . . . . . . . . . . . . . . . 3-20
TL1 . . . . . . . . . . . . . . . . . . . . . . . . 3-21
user accounts
GUI . . . . . . . . . . . . . . . . . . . . . . . . 3-14
TL1 . . . . . . . . . . . . . . . . . . . . . . . . 3-16
Software . . . . . . . . . . . . . . . . . . . . . . . . . . . 3-34
Software configuration methods . . . . . . . . . . 3-1
Software upgrades . . . . . . . . . . . . . . . . . . . . 3-29
Stacking . . . . . . . . . . . . . . . .1-2, 3-2, 3-10, 3-20
System clock
GUI . . . . . . . . . . . . . . . . . . . . . . . . . . . . 3-19
System memory . . . . . . . . . . . . . . . . . . . . . . 3-24
System node parameters
GUI . . . . . . . . . . . . . . . . . . . . . . . . . . . . 3-20
TL1 . . . . . . . . . . . . . . . . . . . . . . . . . . . . 3-21
L
N
Network synchronization port. See CKIN-1 or CKIN-2
NHP160 cards
cabling . . . . . . . . . . . . . . . . . . . . . . . . . . 2-19
inserting . . . . . . . . . . . . . . . . . . . . . . . . 2-19
NIP RX1 . . . . . . . . . . . . . . . . . . . . . . . 2-17, A-5
NIP RX2 . . . . . . . . . . . . . . . . . . . . . . . 2-17, A-5
NIP TX1 . . . . . . . . . . . . . . . . . . . . . . . 2-17, A-5
NIP TX2 . . . . . . . . . . . . . . . . . . . . . . . 2-17, A-5
NIP400 cards
pinouts . . . . . . . . . . . . . . . . . . . . . . . . . . A-5
O
OSP155
inserting . . . . . . . . . . . . . . . . . . . . . . . . 2-24
OSP155 cards
BCP155 cards . . . . . . . . . . . . . . . . . . . . 2-24
Overview
BROADway hardware . . . . . . . . . . . . . . 2-2
Index - 2
T
T1
cabling . . . . . . . . . . . . . . . . . . . . . . . . . 2-17
BROADway - Release 4.00
Index
U
U
Upgrading software
CLI . . . . . . . . . . . . . . . . . . . . . . . . . . . .
GUI . . . . . . . . . . . . . . . . . . . . . . . . . . .
User accounts
GUI . . . . . . . . . . . . . . . . . . . . . . . . . . .
TL1 . . . . . . . . . . . . . . . . . . . . . . . . . . .
3-34
3-29
3-14
3-16
V
Viewing users
GUI . . . . . . . . . . . . . . . . . . . . . . . . . . . 3-14
BROADway - Release 4.00
Index - 3
Index
V
Index - 4
BROADway - Release 4.00