1
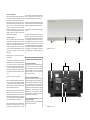
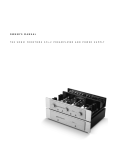
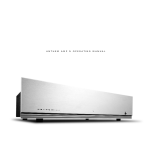
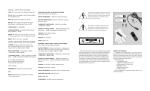
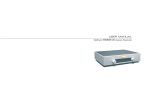
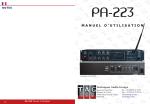
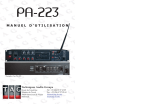
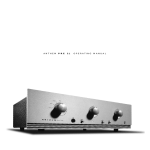
CONTENTS
page
Parts List ..................................................................................................................1
Front & Rear Panels ................................................................................................2
Control Functions ....................................................................................................3
Connection Functions..............................................................................................3
Setting Up................................................................................................................4
Bridged Mono Operation ........................................................................................5
Tube Insertion..........................................................................................................6
Operation ................................................................................................................6
Troubleshooting........................................................................................................7
Safety Instructions ..................................................................................................8
Disclaimer of Liability................................................................................................8
Warranty..................................................................................................................9
Technical Specifications..........................................................................................10
TECHNICAL
We at Sonic Frontiers International hope you will derive
many years of listening pleasure with your new Anthem
Amp 2. This Operating Manual contains important information
regarding the operation and care of the Amp 2. Be sure to
read this manual carefully and follow these instructions in
order to keep your unit performing and sounding its best.
Please contact Sonic Frontiers if you have any questions, a
Customer Service Representative will be pleased to assist
you.
WHAT’S IN THE BOX?
In addition to the Amp 2, it’s cover, and the operating
manual you are presently reading (with associated inserts
and warranty card), there are a few more items to take
inventory of before steps are taken to make the Anthem
Amp 2 operational.
These items are:
• 2 6DJ8/6922 tubes
• a glove for handling the tubes
• a detachable AC power cord
• a handful of phillips screws
• a phillips screwdriver
After completing an inventory of these items, proceed to
the next steps.
SPECIFICATIONS
INPUTS (2)
line level inputs, are unbalanced gold plated RCA jacks
OUTPUTS (2)
Main Power Amp outputs are IEC approved binding posts
spaced on 1” centers for easy installation of large gauge speaker cables
SWITCHES (2)
Front panel main power switch
Rear panel mounted Stereo/Bridged Mono switch
TUBE COMPLEMENT
(2) 6DJ8/6922
POWER REQUIREMENTS
120VAC 60Hz (Domestic)
220-240VAC 50/60Hz (Export)
100VAC 50/60Hz (Japan)
POWER CONSUMPTION
1550VA
DIMENSIONS
19” (48cm) W x 5.25” (13.5cm) H x 16” (50cm) D
NET WEIGHT
45lbs (20.5kg) unpacked
RATED POWER
200 Watts per channel continuous into 8 Ohms or
300 Watts per channel continuous into 4 Ohms
both channels driven, from 20Hz to 20kHz with ≤ 0.1% THD+N
FREQUENCY RESPONSE
+0.0 -0.5 dB 2Hz to 140kHz (1W)
POWER BANDWIDTH
<1Hz to >180kHz -3dB
SIGNAL TO NOISE RATIO
≤ -90 dB, IEC A weighted ref 1W
≤ -100 dB, IEC A weighted ref 200W
THD+N
≤ 0.1% 20Hz to 20kHz at rated power
IMD
≤ 0.05% SMPTE method at rated power
RISE TIME
< 2µSec
SLEW RATE
100VµSec
PHASE POLARITY
Non Inverting
INPUT IMPEDANCE
100k Ohms
OUTPUT IMPEDANCE
≤ 80 mOhms
DAMPING FACTOR
≥ 90 at 8 Ohms
VOLTAGE GAIN
24dB (16x)
INPUT SENSITIVITY
2.5V for rated output into 8 Ohms
All tests were performed with the Audio Precision System Two.
WARRANTY
LIMITED FIVE YEAR WARRANTY
Sonic Frontiers International warrants to the purchaser that
each component is free of manufacturing defects for a period
of five (5) years from the date of purchase. This five (5) year
limited warranty excludes all vacuum tubes and CD
Transport mechanisms, which are warranted for a period of
twelve (12) months. To receive this warranty, the original
purchaser must complete and mail to Sonic Frontiers
International, within thirty (30) days from the date of
purchase, the enclosed Warranty Registration Card which
validates the warranty. This warranty is subject to the
following conditions and limitations:
DISCLAIMER OF LIABILITY
Under no circumstances does Sonic Frontiers International
assume liability or responsibility for injury or damages
sustained in the use or operation of this equipment or for
damages to any other equipment connected to it. Sonic
Frontiers International reserves the right to make design
changes or improvements without the obligation to revise
prior versions. All specifications are subject to change
without notice.
product should be accompanied by a written description of
the defect. Repaired units will be returned by Sonic
Frontiers International shipping and insurance prepaid.
Units shipped to us without a Return Authorization Number
or without a visible RA Number on the exterior of the shipping
containers will be returned to the sender, freight collect.
All other warranties or conditions either written or implied
are void.
Sonic Frontiers International reserves the right to improve
the design of any product without assuming any obligation
to modify any product previously manufactured. This warranty
is in lieu of all other warranties expressed or implied, of
merchantability, fitness for any particular purpose and may
not be extended or enlarged by anyone. In no event shall
Sonic Frontiers International, their agents or representatives
be responsible for any incidental or consequential damages.
Some jurisdictions do not allow limitations of incidental or
consequential damages, so this exclusion may not apply to
you.
A
B
D
C
F I G U R E 1 Amp 2 front panel.
Warranty applies only to the original purchaser and is
non-transferable.
FREQUENTLY ASKED WARRANTY QUESTIONS
This warranty is void and inapplicable if the product has
been handled other than in accordance with the instructions
of our Owner's Manual, abuse or misused, damaged by
accident or neglect or in being transported, or the defect is
due to the product being tampered with, modified or
repaired by anyone other than Sonic Frontiers International,
or an authorized Sonic Frontiers International repair service
center.
Warranty does not cover normal maintenance.
Sonic Frontiers International shall not be responsible in any
way for consequential or indirect damages or liabilities
resulting from the use and operation of the product covered
herein or resulting from any breach of this warranty or any
implied warranty relating to said product.
During this period, Sonic Frontiers International will repair or
replace any defective components free of charge. A Return
Authorization Number (RA number) is required before any
product is returned to our factory for any reason. This number
must be visible on the exterior of the shipping containers for
Sonic Frontiers International to accept the return.
Units to be repaired by Sonic Frontiers International must be
sent shipping and insurance prepaid by the original
purchaser in the original packing material. A returned
C
WHAT IS THE DISPLAY WARRANTY?
Display equipment sold by an authorized dealer has a full
5 year Parts & Labor and 30 day Tube & Transport
Mechanism warranty (as of the date of the customers
invoice) or the balance of the 1 year Tube & Transport
Mechanism warranty (as of the date of the dealer
invoice) - which ever is longer.
WHAT IS THE USED EQUIPMENT WARRANTY?
The balance of the 5 year Parts & Labor and 1 year Tube
& Transport Mechanism warranty can be transferred on
used equipment only IF the unit is traded in to an authorized
Sonic Frontiers/Anthem Dealer. An authorized SF/
Anthem dealer can resell the unit with the remaining
warranty if it is cosmetically acceptable, in perfect working
condition, and has not been internally or externally
altered in any way. We ask that the dealers call the
factory and advise us of the serial number of the unit to
register the warranty of the new owner.
WHAT IS THE USED EQUIPMENT WARRANTY - FROM A
NON-AUTHORIZED DEALER?
Used equipment purchased from a non-authorized dealer
or private sale has no SFI warranty.
E
F I G U R E 2 Amp 2 rear panel.
F
CONTROL
A
FUNCTIONS
LED
CONNECTION
C
ON- OF F BUTTON
When in the ON position (button depressed), high
voltage power is received by the Amp 2 circuitry from
the power source. Due to the warm up characteristics
of tubes, it will take 30 seconds for the tubes to pass
full signal. It is suggested that the Amp 2 remain muted
or the Volume turned down for this first minute. When
in the OFF position (not depressed), the Amp 2 is not
receiving power and is not operational.
SPE AKER CONNECTION PO ST S
These 5 way binding posts accept a connection from
one pair of speakers. The negative connections are to
be made to the black connectors; left speaker to the
terminals marked left and right to the terminal marked
right. The positive connections are determined by the
speakers.
When the LED is lighted the Amp 2 is “ON”, receiving
power from the power supply.
B
FUNCTIONS
D
PREAMPLIFIE R I NPUT
This input accepts RCA input connections from an
external preamp or crossover; connect left channel to
left channel and right channel to right channel.
E
STEREO/BR IDG ED MO NO SWITC H
This switch will allow you to reconfigure your amplifier
from Stereo mode to Bridged Mono mode. This also
requires a minor speaker reconfiguration (described in
the BRIDGED MONO OPERATION SECTION on pg.5).
When operated in the Bridged Mono configuration, the
amplifier is capable of providing up to 600 watts in to a
8 ohm monophonic load.
F
D E TACH AB LE AC POWER CO RD SOC KET
Plug the Detachable Power Cord into this socket (see
Figure 2). The Amp 2 is factory set for the correct
operating voltage for the area in which it is sold (see
shipping box for voltage setting). If a different operating
voltage is required, please contact an authorized Sonic
Frontiers or Anthem dealer, distributor or the factory
directly.
WARNING-DISCONNECT THE AC
DETACHABLE POWERCORDFROM THE
AMP 2 AND WAIT 5 MINUTES BEFORE
REMOVING COVER, TUBES OR FUSE.
BR EAK- IN TIM E
PAC KING MAT E R I A L S
As with all audio electronic products, the ultimate sonic character
of the Amp 2 will not be realized until and unless the unit
receives a minimum of approximately 70 hours of signal
break-in time (i.e. the Amp 2 is on and outputting a signal).
Please retain all of the packing material and shipping boxes
for your Amp 2. They are custom designed to prevent shipping
damage from occurring. Sonic Frontiers Int’l will accept no
responsibility for any damage occurring to an Amp 2 that is
shipped in packing material other than the original Sonic
Frontiers packing material.
PLAC EM ENT FOR PROPE R VE NTILAT I O N
The Amp 2 requires a minimum of 12” (30cm) above and 6”
(15cm) at each side, of unobstructed air space. Make sure
that the ventilation slots on the top, sides and bottom and
the heatsinks on the sides remain unobstructed by any
object. Do not stack any other component on top of the
Amp 2 or block the ventilation slots in any way. Also, be sure
that the Amp 2 is placed on a secure, hard and level surface,
NOT on carpet.
SAF ET Y INSTRUCTIONS
1. Ventilation - Your Amp 2 generates moderate heat in use, be
sure that the ventilation slots and heatsinks in the top cover
have at least 12” of unobstructed air space above and around
them.
2. Water and Moisture - This product should not be used near
water. To prevent fire or shock hazard, do not expose this
product to rain or moisture.
3. Heat - This product should be situated away from heat
sources such as radiators, heat registers, stoves, or other
appliances which produce heat.
4. Power Sources - This product should be connected to an
AC power source of the proper rated voltage. The original
shipping container will stipulate the AC voltage this unit can
operate with correctly.
5. Cleaning - A regular dusting with a soft, non-abrasive cloth
will generally keep the finish of the faceplate and chassis looking
like new. At no time should you allow any liquid to come in
contact with the Amp 2; it may run into the electronic circuitry
and cause damage which will not be covered under your
warranty.
6. Servicing - Do not open this product. No user serviceable parts
inside. Refer servicing to an authorized service technician.
7. Non-Use Periods - The power cord of this product should
be unplugged from the outlet when left unused for an extended
period of time.
8. Do not remove the Amp 2 covers while the unit is “on”, or
connected to an AC power source. Cover screws could fall
through the ventilation slots and cause electrical damage to
the Amp 2.
DIS CLAIMER OF LIAB ILITY
Under no circumstances does Sonic Frontiers Int’l assume
liability or responsibility for injury or damages sustained in
the use or operation of this equipment or for damages to
any other equipment connected to it.
Sonic Frontiers Int’l reserves the right to make design
changes or improvements without the obligation to revise
prior versions. All specifications are subject to change
without notice.
This symbol is intended to alert the user to the
presence of uninsulated “dangerous voltage”
within the product’s enclosure that may be of
sufficient magnitude to constitute a risk of electric
shock to persons.
This symbol is intended to alert the user to
the
presence
maintenance
of
important
(servicing)
operating
instructions
literature accompanying the appliance.
in
and
the
SETTING UP
The Amp 2 comes with two (2) tubes, as follows:
TROUBLESHOOTING
If at any time the Amp 2 fails to work properly, consult this
checklist:
1. Check that the AC Detachable Power Cord is plugged
into the Amp 2 Detachable Power Cord Socket (F) and is
connected to a live source of AC power. For instance, if using
a power bar, check that the bar is turned on.
2. Ensure that all Input and Output connections are secure for
a proper electrical contact.
4. Be sure the rest of the system is functioning properly (i.e.
source unit, power amplifiers, cables and connections, etc.).
5. With tubes, fuses, covers and power cords in place, check
that the LED (A) is lighted (glowing light green). If all of the
above troubleshooting steps have been followed and the LED
is not lighted (remains dark green), contact your dealer or
distributor for assistance.
6DJ 8/6 922 (V1) PH ASE IN VER TE R AND BUF FER
This amplification stage is switched into the circuit path
for both channels of the amplifier during bridged/mono
operation.
6DJ 8/6922 (V2) FIRST STAGE AMPLIFI CATI ON TU BE
The first stage of amplification in the Amp 2 is achieved
through the use of this dual triode, amplifying both channels,
one per triode section.
WARNING: Tube replacement and bias
adjustment involves working with the
covers off and power applied, around
hazardous and potentially lethal voltages,
and should be performed only by qualified
personnel with the proper equipment and
training.
FIGURE 5
Alignment of the AC power connector and detachable cord.
3. DISCONNECT THE AC POWER CORD, wait 5 minutes and
check that:
• A slow-blo fuse (5 x 20mm fuse type), with a rating of 10
Amp/125V (5 Amp/250V for European and Asian versions), is
installed in the fuse holder.
• The AC power fuse is intact and has not blown. If the fuse has
blown, the thin metal conductor will have melted and the glass
may appear “smoked”. If the fuse has blown, replace with a
fuse of the same rating (10 Amp/125V slow-blo for 100 to 120
volt countries and 5 Amp/250V slow-blo for 220 to 240 volt
countries). (See Figure 6)
NOTE: Under no circumstances should you replace the AC
power fuse with one of a higher current rating! Doing so may
cause further damage to the Amp 2 and will also void the
warranty. In addition, your continued protection from risk of fire
or shock would be seriously compromised.
• Ensure the tubes are plugged firmly into their sockets as
described in “INSERTION OF THE TUBES”.
F IG U RE 6
Removal of the fuse holder.
V1
WARNING-DISCONNECT THE AC
DETACHABLEPOWERCORD FROM THE
AMP 2 AND WAIT 5 MINUTES BEFORE
REMOVING COVER, TUBES OR FUSE.
V2
BRIDGED
MONO
OPERATION
This Amp 2 provides convenient means to operate the
amplifier in Bridged Mono mode. This is achieved via a rear
panel mounted switch and minor reconfiguration of your
speaker connections.
When operated in the Bridged Mono configuration, the
amplifier is capable of providing up to 600 watts into a 8
ohm monophonic load.
For Bridged Mono operation, place the Stereo/Bridged
Mono switch in the bridged mono position. Connect the
signal source to the Left (Mono) input jack. Connect the
SPEAKER + terminal TO the Amp 2’s LEFT + output binding
post. Connect the SPEAKER – terminal TO the Amp 2’s
RIGHT + output binding post. Refer to fig. 4.
Next, a single conductor of speaker wire, preferably of the
same wire type as the speaker cable used, is conected
from the Amp 2’s LEFT – binding post to the RIGHT –
binding post. No other connections are made to the black
LEFT and RIGHT – binding posts.
INSERTION O F THE TUBES
1. Using the screwdriver supplied, remove the cover of the
Amp 2. For your convenience, only two of the screws are
installed at the factory.
2. When handling the tubes, it is recommended that the
cotton gloves provided be worn to prevent skin oils from
depositing on the glass surface and possibly causing the
tube to become prematurely “gassy”, thereby shortening
the tube’s useful operating life.
3. Noting the location of the tube sockets in the top view
photo, inspect the tubes for corresponding labels and
markings. Once locations are mapped, take a tube and
inspect the pins, noting the larger space between two of
the pins (see Figure 2). This space will match with the socket.
Insert each tube into the appropriate tube socket, making
sure all pins and pin holes are aligned. Do not force the
tubes into the sockets. “Rock” the tubes gently while pushing
slowly until each tube is firmly seated.
OPERATION
Before plugging in the Amp 2, check to see that the unit is
configured for the correct AC line voltage for country of use.
The operating AC line voltage is indicated on the side of the
shipping box. If the Amp 2 is set incorrectly for the country
in which it is to be operated, contact the dealer or distributor
in your area. If the unit is configured properly, continue with
operation.
Connect the Detachable Power Cord to the Amp 2 AC
Power Cord Socket (C) (see Figure 4). Plug your Amp 2 into
the AC power source.
Connect loudspeakers to the appropriate post as described
in the connection section of this manual.
The two remaining connections are made with co-axial
cable and RCA connectors to a suitable Preamplifier such
as the Anthem Pre 2L.
Connect the pre amp to the Amp 2 Inputs (E); left channel
to left channel and right channel to right channel.
F I G U R E 4 Bridged Mono wiring diagram.
Note the larger space
between two of the pins and
holes for proper alignment
of tube and socket.
F I G UR E 4
The Amp 2 is now ready for operation. Power the Amp 2 by
placing the On-Off button (B) in the ON position. The tubes
will take approximately 30 seconds to warm up and then
the Amp 2 is functional.
It is recommended that you shut OFF the main power via
the Power Switch (B) when not listening.
AMP
OPERAT I NG MA NU AL
D E S I G N E D
A N D
M A N U F A C T U R E D
B Y
2 79 0 BRIG HT ON ROAD , O AKV IL LE, ONTA R IO , CANA DA
S onic
Fron t ie r s
c a n
be
r e a c h e d
9 : 0 0
a m
t o
S O N I C
L6H 5T4
5 : 0 0
p m
F R O N T I E R S
I N T E R N A T I O N A L
TE L: ( 90 5) 829 -3 838
( E . S . T. )
or
2 4
h o u r s
FAX : (9 05) 82 9- 30 33
a
d a y
b y
f a c s i mi le
2