1
®
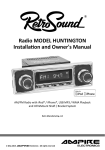
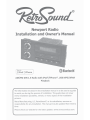
Newport Radio
Installation and Owner's Manual
Made for
~ iPod
UiPhone
0 Bluetooth·
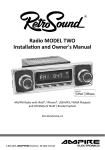
AM/FM DIN 1.5 Radio with iPod®/ iPhone®, USB MP3/WMA
Playback
,. The information enclosed in this installation manual is to be used as a guide ""'
to assist you during the process of installation. This guide does not cover
every installation possibility, vehicle, or every aspect of the installation
process.
Retro Manufacturing, LLC, RetroSound 00 , or its subsidiaries, assume no
responsibility for any installation. This manual may be updated from time to
time.
Please check our website for the latest updates: www.retrosoundusa.com.
Newport Owner's Manual
NOTES:
Copyright 2014 © Retro Manufacturing, LLC
No text, illustrations, or format of this manual in printed or electronic form may be copied without
written permission from Retro Manufacturing, LLC or any of its subsidiaries. All Rights Reserved.
Copyright 2014 © Retro Manufacturing, LLC
Newport Owner's Manual
Table of Contents
Licensing ......................................................................................... 2
Welcome! ....................................................................................... 3
What's in the Box ........................................................................... 4
Warnings and Precautions .............................................................. 5
Installation Warnings ...................................................................... 8
About the Newport ........................................................................ 9
Wiring Instructions ....................................................................... 10
Using Your Radio (Basic Operation) .............................................. 13
Adjusting Sound Properties .......................................................... 17
Sub-Menu System ........................................................................ 21
Bluetooth Instructions .................................................................. 27
USB Device Instructions ................................................................ 29
Troubleshooting ........................................................................... 31
Frequently Asked Questions ......................................................... 32
Specifications ................................................................................ 34
Limited Warranty ..................................._. ...................................... 35
Copyright 2014 © Retro Manufacturing, LLC
Newport Owner's Manual
Licensing
"Made for iPod®" and "Made for iPhone®" mean that an electronics accessory
has bee~ designed to connect specifically to iPod® or iPhone® respectively, and
has been certified by the developer to meet Apple performance standards.
Apple is not responsible the operation of this device or its compliance with
safety and regulatory standards. Please note that the use of this accessory with
iPod or iPhone may affect wireless performance. Apple is not responsible for
the operation of the device or its compliance with safety and regulatory standards.
iPod and iPhone are trademarks of Apple Inc., registered in the U.S. and other
countries.
Windows Media® and the windows logo are trademarks, or registered trademarks of Microsoft Corporation in the United States and/or other countries.
The Bluetooth® word mark and logos are owned by the Bluetooth SIG, Inc.,
and any use of such marks by Retro Manufacturing, LLC is under license. Other
trademarks and trade names are those of their respective owners.
Made for iPod
(Correct function of earlier versions cannot be guaranteed.)
•
•
•
•
•
•
•
•
•
•
iPod touch (4th generation}: Ver. 5.1.1
iPod touch (2nd generation}: Ver. 4.2.1
iPod touch (3rd generation}: Ver. 5.1
iPod nano (6th generation}: Ver. 1.1
iPod nano (5th generation}: Ver. 1.0.2
iPod nano (4th generation}: Ver. 1.0.4
iPod nano (3rd generation}: Ver. 1.1.3
iPod classic (160GB} (Late 2009}: Ver. 2.0.4
iPod classic (120GB}: Ver. 2.0.1
iPod classic {80GB, 160GB}: Ver. 1.1.2
Made for iPhone
(Correct function of earlier versions cannot be guaranteed.)
•
•
•
•
iPhone 4s: Ver. 5.1.1
iPhone 4: Ver. 5.1.1
iPhone 3GS: Ver. 5.1.1
iPhone 3G: Ver. 4.2.1
For clarity in identifying your model of iPod, please see Apple's document
"Identifying iPod models" at http://support.apple.com/kb/ HT1353.
Copyright 2014 © Retro Manufacturin
Newport Owner's Manual
Welcome!
The Newport radio combines classic styling with the advanced features you
expect from a modern car stereo.
General Features
•
Compatible with iPod® and iPhone®
•
Built-in Bluetooth® for hands-free calling and audio streaming
•
Plays MP3 and WMA files via front or rear USB inputs
•
Dual Green or amber illumination with adjustable High/Low Dimmer
•
AM/FM tuner with 30 presets and RDS
•
Selectable USA/EU/Japan tuner frequencies
•
Built-in amplifier {25 watts RMS/45 watts peak x 4 channel)
•
Two sets of RCA low level outputs
•
Warranty: 2 Year parts and labor
•
•
DIN 1.5 dash compatibility
One pair of subwoofer outputs w/ adjustable level and crossover control
Copyright 2014 © Retro Manufacturing, LLC
Newport Owner's Manual
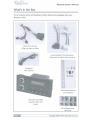
What's in the Box
=-~~~~~~~~~~~==
The accessory items and hardware shown below are packaged with your
Newport radio.
Main Wire Harness
(Pfug into back of radio)
Power/Speaker Wire Harnesses
(Plug both into Main Wire Harness)
Bluetooth
Microphone
~ It
<~~~~~~~~~~
?3
000
I
c::,
0
2
3
4
s
Mounting Backstrap
and Hardware
One fully assembled
newport radio with
knobs
Kit hardware nuts
and bolts
Copyright 2014 © Retro Manufacturing, LLC
Newport Owner's Manual
Warni
and Precautions
This equipment has been tested and found to comply with the limits for a Class
B device, pursuant to Part 15 of the FCC Rules. These limits are designed to provide reasonable protection against harmful interference in a residential installation. This equipment generates, uses and can radiate radio frequency energy,
and, if not installed and used in accordance with instructions, may cause harmful interference with radio communications. However, there is no guarantee
that radio interference will not occur in a particular installation. If this equipment does cause harmful interference to radio or television reception, which
can be determined by turning the equipment off and on, the user is encouraged
to consult the dealer or an experienced radio/TV technician for help. You are
cautioned that any changes or modifications not expressly approved in this
manual could void your authority to operate this equipment.
Observe these warnings and precautions when using this unit:
•
Carefully read this manual before using the unit. If you encounter any
problems that are not covered in this manual, please consult the dealer
from which you purchased the unit or the dealer nearest you. You may also
email us at support@retros oundusa.com.
•
Do not turn the unit on if the temperature inside the car is very high.
Always allow the unit to cool down before usage.
•
The driver should neither watch the display nor operate the system while
driving. Watching the display or operating the system will distract the
driver from driving safely and can cause accidents. Always stop the vehicle
in a safe location and use the parking brake before watching the display or
operating the system.
•
Use the proper power supply. This product is designed for operation with
a negative ground 12V DC battery system. Never operate this product with
other battery systems, especially a 18/24V DC battery or positive ground
system.
•
Do not disassemble or modify the unit. Do not disassemble, modify the
unit or attempt to repair the product yourself. If the product needs to be
repaired, consult your dealer or Retro Manufacturing directly.
•
Do not use the unit when it is out of order. If the unit is out of order (no
power, no sound} or in an abnormal state (has foreign objects in it, is exposed to water, is smoking, or smells}, turn it off immediately and consult
your dealer.
t 2014 © Retro Manufacturing, LLC
Newport Owner's Manual
•
Refer fuse replacement to qualified service personnel. When the fuse
blows out, eliminate the cause and have it replaced with the fuse prescribed for this unit by a qualified service technician. Incorrect replacement
of the fuse may lead to smoke, fire, and damage to the product.
•
If the unit does not turn on, check the connections first. Then check
whether the fuse in your vehicle's fuse box is blown and check the fuse at
the unit's wiring harness.
Observe these warnings and precautions during installation:
•
Do not expose the unit to direct sunlight or excessive heat. Excessive heat
will raise the interior temperature of the unit, which may damage the unit.
•
Do not use the product where it is exposed to water, moisture, or dust.
Exposure of the unit to water, moisture, or dust may lead to smoke, fire, or
other damage to the unit and void your warranty. Make sure that the unit
does not get wet in car washes or on rainy days.
•
Refer wiring and installation to qualified service personnel. Installation of
this unit requires special skills and experience. For maximum safety, have it
installed by your dealer. Retro Manufacturing is not liable for any problems
resulting from your installation of the unit. Please be sure to follow our
instructions carefully before attempting installation.
•
Follow the instructions to install and wire the product. Not following the
instructions to properly install and wire the product could damage the unit
or cause an accident or fire.
•
Disconnect the lead from the negative (-) battery terminal before installation. Wiring and installation with the negative (-) battery terminal connected may cause electrical. shock and injury due to a short circuit. Some
cars equipped with an electrical safety system have specific procedures
for battery terminal disconnection. FAILURE TO FOLLOW THIS PROCEDURE
MAY LEAD TO THE UNINTENDED ACTIVATION OF THE ELECTRICAL SAFETY
SYSTEM RESULTING IN DAMAGE TO THE VEHICLE AND PERSONAL INJURY
OR DEATH.
•
Take care not to damage the leads. When wiring, take care not to damage
the leads. Prevent them from getting caught in the vehicle chassis, or
from being damaged by screws or moving parts, such as seat rails. Do not
scratch, pull, bend or twist the leads. Do not run them near heat sources or
place heavy objects on them. If leads must be routed around sharp metal
edges, protect the leads by winding them with vinyl tape or similar protection.
Copyright 2014 © Retro Manufacturing, L
Newport Owner's Manual
•
Use the designated parts and tools for installation. Use the supplied or
designated parts and appropriate tools to install the product. The use
of parts other than those supplied or designated may result in internal
damage to the unit. Faulty installation may lead to an accident, malfunction
or fire.
•
Do not use safety-related vehicle components Be careful not to wire or
affix this product to the following parts of the vehicle: fuel tank, brake,
suspension, steering wheel, pedals, airbag, etc.
•
In the case of installation to an airbag-equipped car, confirm warnings
and cautions of the vehicle manufacturer before installation.
•
Check for piping, gasoline tank, electric wiring, and other items before
installing the product. If you need to open a hole in the vehicle chassis to
attach or wire the product, first check where the wire harness, gasoline
tank, and electric wiring are located. Then open the hole from outside if
possible.
•
Never install the product in a location where it interferes with your field
of vision.
•
Never splice into the power cord to supply other equipment with power.
•
After installation and wiring, you should check the normal operation of
other electrical equipment. The continuation of their use in abnormal
conditions may cause fire, electrical shock or a traffic accident.
•
Make sure the leads do not interfere with driving or getting in and out of
the vehicle.
•
Insulate all exposed wires to prevent short circuiting.
•
Do not operate the unit for a prolonged period with the engine turned
off. Operating the audio system for a long period of time with the engine
turned off will drain the battery.
Copyright 2014 © Retro Manufacturing, LLC
Newport Owner's Manual
Installation Warni
I
•
To ensure proper operation of this RetroSound product, please
read these instructions carefully before installing and using this
equipment.
This owner's manual does not cover all possible installation scenarios. If you
feel you can't install this product yourself, please take it to a local car audio
professional, or contact us at support@retrosoundusa .com or call
702-483-2222 1 888-325-1555.
I
•
I
•
I
•
IMPORTANT! PLEASE NOTE THAT THIS UNIT REQUIRES +12V TO
BOTH THE RED & YELLOW WIRES, OTHERWISE THE UNIT WILL
NOT OPERATE. CONTACT US IF YOU HAVE QUESTIONS.
Disconnect the negative (-) battery cable before beginning installation. Verify the battery ground by checking that one wire is connected to the starter mounting bolt or engine block and another to the
vehicle chassis using at least #8 gauge wire. Make sure the alternator connections are secure and free from corrosion, rust or dirt.
WARNING! To prevent damage to the unit, do not connect the
power connector until you have completed the wiring process.
This is a 12 volt negative-ground ONLY radio. If you have a positive
ground system, or a 6-volt system, you need to either convert to 12
volts or purchase a separate inverter that would step up the voltage to 12 volts. Please note that the inverter needs to be rated at 8
amps or higher in order for the Newport to operate properly.
Copyright 2014 © Retro Manufacturing, LLC
Newport Owner's Manual
The Newport Radio comes pre-assembled in the box, no assembly of knobs or
shafts is needed.
NOTE: Your box may be marked with 11GM", 11 FORD" OR /{CHRYSLER" which
means you will have a separate plastic installation kit, vehicle specific harness
and possibly an antenna adapter (if for some GM vehicles) included. Please
note that installation instructions for these kits can be found in those respective
GM, Ford or Chrysler kits found in your box. Please contact our support team
at: support@retrosoundusa .com for any questions you have.
Final installation shown in a 2000 Dodge Truck
Copyright 2014 © Retro Manufacturing, LLC
Newport Owner's Manual
PLEASE NOTE THAT THIS UNIT REQUIRES +12V TO BOTH THE RED
AND YELLOW WIRES, OTHERWISE THE UNIT WILL NOT OPERATE.
CONTACT US IF YOU HAVE QUESTIONS.
support@retr osoundusa.c om or 702-483-2222
Wiring Diagram (Figure 9)
Locate the three wire harnesses: Main Wire Harness, Power Wire Harness
and Speaker Wire Harness (see "What's in the Box" on page 4). First connect the Main Wire Harness to the back of the radio. Then connect both the
Power and Speaker Wire harnesses to the black female plug of the Main Wire
Harness( do not connect to power until all connections are completed.
After doing this, connect the bare wire ends of your power and speaker wires
to the appropriate power and speaker locations in your vehicle. (see Figure 9,
"Wiring Diagram" on page 14) Please contact us if you have questions or have
your radio installed by a professional if this part of the install is too difficult.
Installation Notes
•
To prevent damage to the unit, do not connect the power connector until
you have completed the wiring process.
•
This is a 12 volt negative-ground ONLY radio. If you have a positive ground,
or a 6-volt system, you need to either convert to 12 volts or purchase a
separate inverter that would step up the voltage to 12 volts.
•
Please note that the inverter must be rated at 8 amps or higher in order for
the radio to operate properly.
Front & Rear AUX Inputs
Two (front & rear) auxiliary inputs all low you to listen to any portable device
with standard headphone outputs. An example of an external source would be
a portable CD player, mini disc player, portable cassette recorder, iPod or MP3
player. Select an auxiliary input mode by turning the top top rear knob clockwise until you see RU>< IN I or RU>< IN 2 on the Newport's screen.
USB Extension Cable
Two USB connector inputs are located at the front & rear of the Newport radio.
During installation, you must route the rear cable to a convenient and accessible location for plugging in USB devices. If the cable provided is not long
enough {40 inches), you may plug in optional USB extensions during installation.
Copyright 2014 © Retro Manufacturing,
Newport Owner's Manual
New ort AMJFM RADio w1 uss INPuT
Frequency Range:
FM 87.5-107.9 MHZ
AM 530-1710 KHz
AUX INPUT2
NOTE: You can plug your flash drive or iPod/
iPhone into either the front or rear USB input(s).
USB INPUT 2
ANTENNA
BLUETOOTH
MICROPHONE INPUT
~~l!m!l-=~ SUBWOOFER LINE
(Blue Wire)
Connect Power Wire Harness+
and Speaker Wire Harness
CONSTANT +12V
NOTE: Yellow
and Red wires
must be
connected to
+12V for radio
to operate.
IGNITION/ACC (connect to +12V)
(Red Wire)
GROUND
REAR RCA LINE OUT
(Grey Wire)
(Black Wire)
POWER ANTENNA
NOTE: This radio
is designed for
use in vehicles
with a 12 volt
negative ground
system.
(Blue Wire)
REMOTE/AMP TURN-ON LEAD
(Blue/White Wire)
White/Black
Stripe
(-)
FRONT RCA LINE OUT
(Black Wire)
Purple/Black
Stripe
(+)
(-)
(+)
0 0
Left Speaker
(Front)
Right Speaker
(Front)
(-)
40HM
(+)
(-)
(+)
0 0
Left Speaker
(Rear)
Right Speaker
(Rear)
NOTE: Maximum operational distance of a USB cable is 16 feet. For optimum data
transfer, we recommend no more than 12 feet of total cable length.
Figure 9 - Wiring Diagram
Newport Owner's Manual
Usin Your Radio Basic 0 eration
Front Panel Controls
Note: Both sets of knobs have both front and
rear knob functionality. Use the "Operation
Table" on page 13 to determine how to use
the knobs to acheive the desired response
from your Newport radio.
Copyright 2014 © Retro Manufacturing, LLC
Newport Owner's Manual
,~.~!.~~g·~ r2. ~~. ~.~"9l~9_lf.Q_Q!~"~"~~9.1~~-~~~-~~·u··,· · · · . ·-·-·- "· -· · · ·. -~-M·~ · ·-· · "·. ·-~---·-=-··-·---·-·
Operation Table
Function
#
Radio Mode
Power
On/Off
2
Press the top front knob to turn the unit on. Look for
RETROSOUNO on power up.
USB Mode
Press and hold the top front knob for 3 seconds to turn the
unit off. The LCD display will show GOOOB'::IE for your confirmation.
Volume
2
Turn the top front knob to adjust the volume attenuation
between 0-46 (Min/Max}. 17 is the default turn-on volume
level.
Audio
Adjust
2
Press the top front knob to activate the SEL (Select} function. Press repeatedly to cycle through the DSP (Digital Signal
Processing} EQ, Bass, Mid, Treble, Balance, Fader, XBAS,
Subwoofer and Subwoofer specific adjustments (when SUB
ON is selected}. Turn the top front knob to select a value.
See "Adjusting Sound Properties" on page 17 for detailed
instructions.
Mode
1
Turn the top rear knob clockwise to select from an available listening source: RADIO, USB-1, USB-2, AUX-1, AUX-2,
BT AUDIO. Two sets of AUX inputs are located at the rear
of the radio. To utilize these inputs, AUX cables must be
routed to an accessible area during installation. See "Wiring
Instructions" on page 10.
NOTE: The USB option will not appear unless media is
plugged into the USB connector.
Clock On
1
Turn the top rear knob
counter-clockwise to activate
the clock on-screen feature.
5
Press to select the #1 radio
preset.
View
Song
Info/
Clock
Preset 1
Recall/
Store
Play/
Pause
Press and hold to store
preset 1 into memory.
Copyright 2014 © Retro Manufacturing, LLC
Turn the top rear knob
counter-clockwise to toggle
and view artist, album, title
information, clock.
Press to play/pause file playback.
Newport Owner's Manual
Using Your Radio (Continued)
Function
#
Radio Mode
USB Mode
Preset 2
Recall/
Store
6
Press to select the #2 radio
preset.
Press to play 10 seconds of
each track on the flash drive.
Press again to cancel the
preview scan function. The
song name appears as it plays.
lNT ON appears on the screen
during intra scan mode.
Press and hold to store
preset 2 into memory.
Preview
Scan
Preset 3
Recall/
Store
7
Press and hold to store
preset 3 into memory.
Random
Preset 4
Recall/
Store
Press to select the #3 radio
preset.
8
Press to select the #4 radio
preset.
Press and hold to store
preset 4 into memory.
Select
Folder
Preset 5
Recall/
Store
9
Press and hold to store
preset 5 into memory.
Select
Folder
Next/
Previous
Press to select the #5 radio
preset.
3
Turn the bottom front
knob to tune to the next or
previous AM/FM frequency.
Note: When the radio is
tuned into a strong station
(in FM only), the FM indicator will show on the upper
bottom side of the LCD
display (2 oval circles). This
indicator will only light up in
FM mode and ONLY when a
strong station is selected.
Press and hold to randomly
play all digital tracks in the
current folder on your flash
drive. Press and release
to activate SHUFFLE RLL OR
SHUFFLE OFF function(s).
Press to move UP through
folders on your drive. The first
file in the selected folder will
play. The screen will display
OlR 00:, OlR 002, etc.
Press to move DOWN through
folders on your drive. The first
file in the selected folder will
play. The screen will display
OlR 00:, OlR 002, etc.
Turn the bottom front knob to
change to the next/previous
track.
This function also applies to
Bluetooth audio mode.
Newport Owner's Manual
·~-~!~~,yo~-·~-~~.9J_Q,~.L<;;Q~~-!.~~.~~Q)_.____· · "'"···~~~--···--~--· -· -m-,.---··-· ·- -· · ·-· · ·--~~·-----·····
Function
#
Radio Mode
System
Menu
3
Press and hold the bottom front knob for 3 seconds to access
the sub-menu system where you can adjust: Auto/Manual
tuning, RDS, Clock or Frequency Priority, Beep ON/OFF,
AREA USA/EU/Japan/AUS/RUS tuning, Local/OX (distant)
tuning, Vol Adjust/Val Last and volume default level. Toggle
the selection by turning the bottom front knob and pressing
the bottom front knob to go to the next mode. See "SubMenu System" on page 21 for detailed instructions. Press
USB Mode
and release the bottom front knob to activate the MUTE
function.
Preset 6
Recall/
Store
4
Repeat
Play
Band
Track/
Directory
Search
Turn the bottom rear knob
clockwise to select the #6
radio preset.
Turn and hold the bottom
rear knob clockwise to store
preset 6 into memory.
4
Turn the bottom rear knob
counter-clockwis e to toggle
through 5 radio bands {2
AM and 3 FM). Note: When
tuning to a stereo FM station, a stereo indicator (two
ovals) will show in the upper
bottom side of the radio's
LCD screen. If there is no
stereo icon seen, the station
is in mono.
Copyright 2014 © Retro Manufacturing, LLC
Turn and release the bottom
rear knob clockwise to repeat
the current track {RPT TR!tl)
or repeat all tracks {RPT RLL).
Turn and hold, then release
the bottom rear knob clockwise to repeat the playback of
songs in that folder {RPT FLO).
Turn the bottom rear knob
counter-clockwis e once to
select "FOLDER" search mode,
turn the front bottom knob
clockwise or counter-clockwise to select folders {directories) on the usb drive. Press
and release the front bottom
knob to select the folder, the
first song in that directory will
be heard. Turning the bottom
rear knob counter-clockwis e
twice will select the "MUSIC"
search mode. Turn the front
bottom knob clockwise or
counter-clockwis e to select
songs within that selected
folder. Press and release the
front bottom knob to select
the desired song within the
folder.
Newport Owner's Manual
Function
#
iPod/
iPhone
Playlist/
Search
4
Radio Mode
USB Mode
While in USB-1/USB-2 mode
with an iPod/ iPhone connected to one of the USB
inputs, turn the bottom rear
knob counter-clockwise to
select the PLR':ILIST. Turn the
front bottom knob clockwise
to choose from PLR'=ILIST,
ARTIST, RLBUrl, GENRE, SONGS,
COrlPOSER, RUOIO BOOK or
PODCRST. Press and release
the front bottom knob to
access one of the selected
items, then turn clockwise
to select items within the
list. Press and release the
front bottom knob again to
listen to the selected item. To
repeat the song or songs on
the album, turn the bottom
rear knob clockwise to select
Repeat one or Repeat all.
See "8/uetooth Instructions~~ on page 27 for specific instructions
for using a connected 8/uetooth device with the Newport.
Copyright 2014 © Retro Manufacturing, LLC
Newport Owner's Manual
Sound Pro erties
Adjusting the sound properties:
1.
Press the top front knob, then release, to access the sound properties
menu.
2.
Repeatedly press and release the front top knob to scroll through the available menu options.
3.
Turn the top front knob bottom or top to select a value for the chosen
menu option.
4.
Press and release the top front knob repeatedly to move to the next function desired, or do nothing and the menu will revert to the current source
display.
DSP OFF
When you first access the top front
knob menu, DSP is set to OFF. Turn
the top front knob bottom to view
and select the 3 preset equalizer options.
CLASSIC
The CLASSIC setting offers sonic
adjustments that lend themselves to
classical music.
POP
The POP setting accentuates the bass
and treble settings. This is suitable for
bass heavy popular music.
ht 2014 © Retro Manufacturing, LLC
Newport Owner's Manual
ROCK
The ROCK setting accentuates the
treble settings. This is suitable for
rock music.
BASS
The bass adjustment function allows
you to boost or cut the low frequencies from -7 to +7.
m I r1
~
~I
I I Ll
n
u
m~~
m~~
I~ ~I
._. r1 r
I
I
r1
~-~'~
mQtdUI
MID
The mid-range adjustment function
allows you to adjust the middle frequencies -7 to +7.
~~ rn
TREBLE
The treble adjustment function
allows you to boost or cut the high
frequencies from -7 to +7.
n
u
I~ ~I
I~ ~I
nn
uu
I~
BALANCE
The balance adjustment function
allows you to adjust or pan the stereo
sound from the top or bottom. This
is helpful to compensate for the
position of the driver in relation to
the speakers. Adjustment range is
0-12 between the top and bottom
speakers.
Copyright 2014 © Retro Manufac
·
Newport Owner's Manual
Sound Properties continued
nn
uu
FADER
The fader control allows you to fade
the sound from the front pair of
speakers to the rear pair of speakers.
Adjustment range is 0-12 between
front and rear speakers.
XBAS
This function boosts bass and treble
at low listening volume and should be
turned off at higher volumes. You will
know this function is active when you
see "XBAS" on your display. Adjusting
your Bass, Mid or Treble settings will
override the XBAS function.
SUB ON/OFF
Turn the subwoofer RCA output ON
to activate this feature.
SUB VOL
When SUB ON is selected and a
subwoofer is attached to the unit, use
this function to increase or decrease
the volume level of the subwoofer
outputs from 0-12.
SUB
When SUB ON is selected and a
subwoofer is attached to the unit, use
this function to adjust the subwoofer
crossover point to 80HZ, 120HZ or
160HZ.
Copyright 2014 © Retro Manufacturing, LLC
Newport Owner's Manual
BAS
Use this function to make a more
detailed boost or cut adjustment of
bass (low) frequencies as follows:
60/80/100/200Hz. This is a very
useful mode for making very specific
tonal adjustments. When selecting one of these 60/80/100/200Hz
points, any changes to the prior BAS
menu settings on page 21 (-7 to +7)
will boost or cut at the selected frequency setting chosen in this menu.
rani--
CI ~_.,=I
m I ra
~
[I
'
n'/
t
'.u~-,
ILl
1a u1
I~ ~I
,
m u1
m u1
__r tn n'/
._. rt
'u.u~-,
I ~'L
I~
MID
Use this function to make a more
detailed boost or cut adjustment
of midrange (vocal) frequencies as
follows: O.SK/1.0K/1.5K/2.5KHz.
Default setting is 1.0KHz. This is
a very useful mode for making
very specific tonal adjustments.
When selecting one of these
O.SK/1.0K/1.5K/2.5KHz points, any
changes to the prior MID menu settings on page 21 (-7 to +7) will boost
or cut at the selected frequency setting chosen in this menu.
TRE
Use this function to make a detailed boost or cut adjustment
of treble frequencies as follows:
10.0K/12.5 K/1S.OK/17 .5KHz.
Default setting is 10.0KHz.
When selecting one of these
10.0K/12.5K/1S.OK/17 .5KHz points,
any changes to the prior TRE menu
settings on page 21 (-7 to +7) will
boost or cut at the selected frequency setting chosen in this menu. This
is a very useful mode for making very
specific tonal adjustments.
Copyright 2014 © Retro Manufacturing, L
Newport Owner's Manual
Sub-Menu System ,_(Bot!Qm ·. Fro~t ~~ob)
Accessing the sub-menu system menu:
1.
Press and hold the bottom front knob for 3 seconds, then release, to access
the sub-menu system.
2.
Repeatedly press and release the bottom front knob to scroll through the
available menu options.
3.
Turn the bottom front knob clockwise or counter-clockwise to select a
value for the chosen menu option.
4.
Press and release the bottom front knob repeatedly to move to the next
function desired, or do nothing and the menu will revert to the current
source display.
Sub-Menu Options
AUTO SEEK
Thrs function allows you to select
auto seek tuning or manual tuning
when you turn the bottom front knob
to the bottom or top when listening to the radio. The factory default
setting is RUTO SEEI'i. Turn the bottom
front knob clockwise or counterclockwise to select manual or auto.
A STORE
n-
~ ~
~-
._.. ,--, r1 r
-- II 1__1~'
L
_I
This function will automatically fill FM
presets on all 3 banks of 6 FM presets
with the strongest stations. Push the TOP
front knob to activate this feature. You
will see "STORE" show up on the screen.
This process can take up to one minute.
LOCAL/DISTANT
When listening to the FM tuner, you
can access the LOCAL or DISTANT
{default) option. Selecting between
the local and distant settings can aid
in listening to weak FM radio stations
or compensate for stations that have
too strong of a signa I.
Copyright 2014 © Retro Manufacturing, LLC
Newport Owner's Manual
~uq-,~~,!"lU Syst~m
rem
'
,-' t t
~I
I~ ~I
,c
I~ ~I
•
•
I~ Ul
(continued)
~~-''
L
I~ ~I
I~
,' c
I/
'~ L f-t t
~-~
~I
I~ ~I
I~ ~I
I~ ~I
m~~
I~
CLOCK
Choose the clock function to adjust
the clock hours and minutes.
Adjusting past 12 will toggle the AM/
PM indication. Pressing the front
bottom knob after adjusting the time
will take you to the CLK 12/24 menu.
CLK 12/24
Adjust this function to choose
between the 12 and 24 hour clock
mode. The factory default setting is
CLK 12.
DISP FREQ/CLK
The unit default setting displays
frequency on the screen. Select DISP
CLK to show the clock as the priority
screen view. Turn bottom front knob
either clockwise or counter-clockwise
to select OISP CLK or OISP FRED.
BEEP ON/OFF
This function controls the audible
beep confirmation that sounds during
radio operation. With the beep function displayed, turn the bottom frontknob to select BEEP ON or BEEP OFF.
GREEN
Select the desired color preset (Green
or Amber). By default, the LCD lighting defaults as GREEN.
Copyright 2014 © Retro Manufacturin
Newport Owner's Manual
Sub-Menu System (continued)
DIMMER
Use this menu option to switch the
LCD bbottomness between high
(DIMMER HIGH) and low (DIMMER
LOW) Turn the bottom front knob
clockwise or counter-clockwise to
make your selection.
r1 ......
1~1 ~'~
I
1-1
~I
~I
I~ ~I
1~1
m01
f ~
I~ ~I
I~ ~I
I~
BT
Adjust this feature to turn the
Bluetooth function ON/OFF. Turn the
bottom front knob clockwise or cou nter- clockwise to make your selection.
BT DISCON/CONNEC
Turn the bottom front knob clockwise to select "CONNEC" to enable
the Bluetooth function and search
for "RETROSOUND" in your phone's
Bluetooth device list. Enter password
{0000} if prompted. Turn counterclockwise to select "DISCON" and
disconnect a Bluetooth device.
RDS ON/OFF
RDS stands for Radio Data System.
This function allows you to turn off
the RDS function if you do not want
to see the RDS information. The factory default setting is RDS ON.
RDS tuners can automatically tune in stations according to the style of music
(or talk) they broadcast. Some RDS tuners can even break in with traffic alerts
or emergency broadcasts.
RDS enables your receiver to display text messages (usually call letters and
format info) that many FM stations include on a subcarrier signal within their
normal broadcast signal.
The RDS function is always active, and if the FM station you are listening to is
broadcasting RDS information, the radio station call letters, song info, artist
info and other messages will appear. Please note that not all FM stations use
RDS nor will all RDS functions work in the US.
opyright 2014 © Retro Manufacturing, LLC
----
Newport Owner's Manual
Sub-Menu System continued
I~
PROGRAM TYPE {PTY)
RDS has a function called PTY
{Program Type). Note: This mode
works in AREA EUR only. This coding
of up to 31 pre-defined program
types allow you to find similar programming by genre.
When using this function, you can select the desired station genre from the
list below to find stations with the same programming genre in this area.
Once the program type has been selected, the tuner will search all available
FM stations for a station broadcasting the selected program category.
To search for your desired Program Type:
1. Make sure that the tuner is in 11AREA EUR". When you see PT'=I on-screen,
press and release the top front knob, then turn the bottom front knob clockwise or counter-clockwise to select from the Program Type list.
2. Press and release the bottom front knob to select the desired Program
Type.
3. Once the desired Program Type is selected, you will see PT'=I SEE~ show onscreen, this indicates that the radio is searching the entire FM band for radio
stations with the selected Program Type. After making the selection, the
radio will find the strongest stations with the selected program type, if none
are found, you will see NONE FOUND on-screen and the unit will revert back to
the last radio station selected.
Program Type list (in order of appearance when selecting them).
NEtJS, RFFRIRS, INFO, SPORT, EDUCATE, DRRrlA, CULTURE, SCIENCE, IJARIED, POP,
ROC~. EAS'=I, LIGHT, CLASSICS, OTHER, lJERTHER, FINANCE, CHILDREN, SOCIAL,
RELIGION, PHONE IN, TRAIJEL, LEISURE, JRZZ, COUI'ITR'=I, NATION, OLDIES, FOL~.
OOCUrlENT,A-TEST,ALRRrl.
Copyright 2014 © Retro Manufacturing, L
Newport Owner's Manual
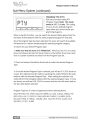
AF ON/OFF
nr
~-t,-
~I
I~ ~I
1_.1rr
AF
1_.1 ,- ,I~ ~I
m u1
mm
I~
When the RDS AF function is active
(AF will blink on-screen), and the station supports this mode, the unit will
search for the next strongest station
when the one you're listening to gets
weak (FM only).
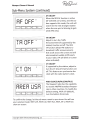
TA ON/OFF
Adjust to turn the Traffic
Announcement (if supported by the
station) function on/off. The RDS
TA function allows FM stations to
broadcast traffic announcements
' - - - - - - - - - - - - - - - - ' that scroll across the screen and will
also broadcast audible traffic alerts
to your radio. (TA will blink on-screen
when activated}
CT ON/OFF
,~T
,_.,
1-. I
1_.1 ~
,,~
CT
t
I~C:nl~l
~~ m
I~
If supported by the station, adjust to
turn the CT (Clock Time} function on/
off. This feature can synchronize the
clock with the radio station's clock.
AREA (USA/EUR/AUS/JAP/RUS)
The Newport radio has the capability
to receive AM/FM broadcast frequencies in other countries. To modify the
default setting, RRER USR (default},
turn the bottom front knob.
To confirm the change, let the sub-menu revert to your tuner. You will see
your selected mode: RRER USA, RRER EUR, RRER RUS, RRER JRP or RRER RUS
show on-screen.
right 2014 © Retro Manufacturing, LLC
Newport Owner's Manual
Sub-Menu System (continued)
~ ~~--~~
I/ 1....1L
nr1
~-~
Ll U
~
VOL ADJUST/LAST
Factory default for this menu option
is I)OL LRST, which maintains the last
volume the radio was at when you
turned it off. When you select I)OL
ROJ, you can set the default turn-on
volume at any level (AD VAL 00-46},
regardless of what the volume level
was when you last turned off the
unit.
.. ··-·- ·-- ·
--~--~--~
··- ·.. .. .
<-=-·=·~.
.
. -. ·· - ·-~
.. ~,
Copyright 2014 © Retro Manufacturing, LLC
1
Newport Owner's Manual
Bluetooth Instructions
Bluetooth Hands-Free and A2DP Streaming Operation
You can make or receive phone calls using a Bluetooth enabled phone connected to the Newport, controlling basic functions via the radio interface. During a
call, the radio music source will be muted and the call broadcast through your
car speaker system. You can also listen to music stored on a A2DP enabled
Bluetooth device.
Pairing a Bluetooth Device
When connecting a Bluetooth device for the first time, you must first pair the
device with the unit.
For most devices, pairing only needs to be done once.
Please follow these steps:
1.
Make sure the BT (Biuetooth) function is turned "ON" in the radio SubMenu. See "Sub-Menu System" on page 21.
2.
Change the "BT DISCON" function to "BT CONNEC".
3.
Ensure Bluetooth is enabled on the phone to be connected to the unit.
4.
Search for a new Bluetooth device from the phone (this may take up to 30
seconds).
5.
Select "RETROSOUND" from the Bluetooth device list.
6.
Some devices may require you to enter a PIN. If prompted, enter "0000"
for the PIN.
7.
"PAIRING OK" will be displayed on the LCD display if pairing is successful.
The paired device will then connect to the Newport automatically.
On some phones, you may need to select "SET AS AUTHORIZED" or similar to
ensure the Newport will automatically pair on subsequent usage.
PAIRED NOTIFICATION DISPLAY: When the 8luetooth device is paired with the
Newport, the 8luetooth icon will appear on the LCD display. This should occur
whenever you use the system while the paired device is in range.
ICopyright 2014 © Retro Manufacturi~LLC=~·.~--···. ,~~=·-------~--
Newport Owner's Manual
Making a Call
1.
Dial the desired number on the paired mobile phone.
2.
Once dialing is in progress, CALLING" will be displayed on the LCD.
3.
When the call is in progress, TALK" will be displayed on the LCD, along
with the elapsed call time (TALK 00:00).
11
11
Receiving a Call
1.
If a call comes in, audio playback from the current source will either be
muted or paused (depending on the source) and PHONE IN" will be shown
on the display, along with the Caller ID, if it is enabled by the phone/carrier.
11
2.
Turn the top rear knob counter-clockwise to accept the call.
Ending a Call
To end the call, turn the top rear knob counter-clockwise to end the call.
NOTE: Regarding placement of the included Bluetooth microphone, we
suggest mounting the microphone on the sun visor, A-pillar or steering column
inside the vehicle, closest to the driver. The microphone is very sensitive and
you may speak at a normal volume when using hands-free operation.
Streaming music from your device
The Newport radio is capable of wireless music playback using the built in
Bluetooth technology. Once your device is paired with the radio, you may
stream music by selecting your desired playback source on your device and
starting the application (ex: Pandora, Slacker) or by selecting music stored
on your device. Make sure that the Newport radio is in BT AUDIO mode (See
0peration Table" on Page 13) to check how to switch to this source mode.
Please note that Bluetooth wireless technology has a maximum range of 30 feet
from the radio. Some devices may allow our radio the ability to skip songs/
tracks/selections via the bottom front shaft knob.
11
Newport Owner's Manual
USB Device Instructions
Attaching a USB Device
USB 1 and USB 2 inputs are located at the front & rear of the Newport radio.
During installation, you may route the rear USB cable to a convenient and accessible location for plugging in USB devices or USB extension devices.
Once you've turned on the Newport and connected your flash drive to the USB
input, the radio will find your songs and automatically begin playing them from
any mode.
The
IJSB•s icon appears on the LCD during USB playback.
To change songs, turn the bottom front knob to the bottom or top to access the
next or previous song. Please note that the preset buttons on the front of the
radio's control face will allow you to play/pause, listen to 10 seconds of each
song (I NT) or repeat the track you're listening to (RPT} or randomly select from
all songs on the attached thumb/flash drive (RDM}.
NOTE: The unit MUST be in USB mode for it to read the USB files on your
flash/thumb drive. See "Operation Table" on page 13.
About MP3/WMA Files
MP3 (MPEG Audio Layer-3} and WMA (Windows Media Audio) is a format for
compressed audio files. When the Newport radio is in USB mode (USB 1 or USB
2}, you can play MP3 and unprotected (no DRM) WMA files off the flash drive.
Common facts about these compressed-sound formats:
•
High bit rate and high sampling frequencies are recommended for high
sound quality.
•
Selecting VBR (Variable Bit Rate) is not recommended because playing time
is not displayed properly and there may be some audible skipping artifacts.
The playback sound quality differs depending on the encoding circumstances. For details, refer to the user manual of your own encoding software.
•
When adding MP3 files to your flash drive, it is recommended to set the bit
rate to 11 128 kbps or more" and 11fixed".
•
When adding WMA files to your flash drive, it is recommended to set the
bit rate to 64 kbps or more" and 11 fixed". Do not set the copy protect attribute on the WMA file or you will not be able to play the track.
11
t 2014 © Retro Manufacturing, LLC
Newport Owner's Manual
USB Device Instructions (continued)
•
The Newport will read only FAT or FAT32 formatted flash drives. This radio
will NOT read NTFS formatted drives.
•
The Newport will read files placed in the root directory first before playing
files in the folder structure of the drive. Please note that files are read in
order of creation NOT alphabetically or numerically. Older files will get read
first in a folder.
Caution! Except for private use1 duplicating audio data (including MP3/WMA)
or distributing~ transferring or copying it1 whether free or paid for without
permission of the original copybottom holder is strictly prohibited by the
Copybottom Act and international treaty.
Viewing MP3/WMA Song Information
When playing MP3/WMA files from the USB source, the Newport allows you to
view the track name, album, artist info (ID-3) information automatically from
these files. Once the USB drive is inserted, the following info will scroll across
the screen in the following order: F-DIR (folder directory), MP3 FILE (file name
of song), ALBUM (name of album) ARTIST (name of artist), SONG (name of
song).
NOTE: To access the clock when in USB mode1 repeatedly turn the top rear
knob counter-clockwise to activate the clock on screen feature. The clock will
display until you turn the top rear knob counter-clockwise again or leave it
alone and it will revert to viewing the ID-3 information on-screen.
USB Playback Mode
The preset buttons on the front of the radio's control face (1-5) will allow you
to play/pause, listen to 10 seconds of each song (I NT), repeat the track you're
listening to (RPT), randomly select from all songs from a USB thumb/flash drive
(ROM), and navigate folders. See "Operation Table" on page 13
Newport Owner's Manual
Troubleshooting
Problem
Possible Cause
Action to Solve Problem
Radio will not
turn on (no
lights, no sound)
12 volt Batt+ wire not connected or incorrect voltage
Check all connections for
proper voltage with a volt
meter. Voltage range: 12-15
volts
+12 volt accessory wire
not connected or incorrect
voltage
Check +12 volt accessory
wire connection
Ground wire not connected
Check ground connection
Fuse on Batt+ is blown
Replace blown fuse
Volume turned all the way
down
Increase radio volume
Internal amp in protection
mode
Check speaker leads for any
grounded or shorted wires
Make sure the unit is in
the desired source mode
(AUX,BT Audio, etc)
Check to make sure that unit
is in desired source mode
Possible short in wiring
Incorrect fuse used, make
sure only fuses with correct
15 amp ratings are used I
Check all wiring connections
for possible short
Battery hooked up backwards
Make sure battery is properly connected
Invalid media/device type
Please review page 29 to
learn which formats and
devices are acceptable for
playback in this unit
No sound heard
from unit but
unit lights up
Unit blows fuses
USB ERR
System Reset
To restore/reset the unit to factory defaults, remove all power from the unit,
wait 2 minutes and then reconnect power.
~ht 2014 ©
Retro
Manufacturi~g,
LLC
Newport Owner's Manual
Do your radios work on 6 volt systems or on positive ground systems?
No. Our radios are 12 volt, negative ground only. After-market converters and
inverters are available, but must have at least 8 amps of continuous output.
I have your radio and cim having problems getting it to turn on.
RetroSound radios require 12 volts to both power leads. The red lead {+12V
accessory) goes to a switched power source, and the yellow to constant 12 volt
{+ 12 V) power source. Using a volt meter, check the voltage when the key is
turned from "off" to "on". If there is a significant drop in the voltage, the circuit
to which you have the yellow lead attached cannot handle the additional draw
of the radio. You will need to find another circuit that can handle the additional
draw of the radio, or you will need to go directly to the battery.
What speaker wire do you recommend I use?
We recommend using 16 or 18 gauge wire for the speakers. If it is a longer run,
we recommend using 16 gauge only.
I have all 4 speakers connected to your radio and the display is lit up like it is
working, but there's no sound coming out.
This usually indicates one of two things:
1.
Speaker wires touching each other or the vehicle chassis at some point.
Check each speaker lead from radio to speaker.
2.
Speaker impedance below 4 Ohms. Older speakers are usually not compatible with modern electronics.
My car originally came with a switch to control my automatic antenna. Can I
use the RetroSound radio's remote antenna wire to do this?
No you cannot, your factory antenna is known as "semi-automatic." It requires
a switch to either extend or retract the antenna. You must retain this switch to
control your antenna; the RetroSound radio's power antenna wire is for more
modern "fully-automatic" antennas not requiring a separate switch.
The sound output is all mid-range, with very little bass and a strangled-sounding upper range. What is wrong?
One of your speaker wires is connected backwards. This is called being "out of
phase." Check to make sure positive is wired to positive and negative to negative on all your speakers.
Newport Owner's Manual
I have your radio with an amp connected, but hear a whining/buzzing sound
through the speakers when I step on the accelerator.
If you have an external amplifier installed and experience a high-pitched noise
that varies with the engine's RPM, there are many possible solutions:
1.
Make sure the amplifier's gain controls are not turned all the way up.
Amplifiers amplify everything, including noise.
2.
Make sure to run the amplifier's low level input cables (RCA's) separately
from the amplifier's power wire.
3.
Try grounding the amplifier near where it is installed.
4.
A low level (RCA) noise filter, known as a "ground loop isolator," is often
effective at removing engine or alternator noise.
5.
Try a filter on the amplifier's 12 volt power lead. Make sure to use a filter
that includes a ground wire.
6.
On rare occasions, noise can be introduced through the antenna lead. If
disconnecting the antenna makes the noise go away, you need to replace
or repair the antenna plug where it goes into the radio.
When I plug in my flash drive, the screen says "USB ERR" and it won't play the
files I placed on the drive.
1.
Make sure the files on the drive are .mp3 or unprotected .wma (Windows
Media Audio) files. iTunes files are .m4a format and need to be converted
to .mp3 format, which can easily be done using iTunes.
2.
Verify the capacity of the flash drive. The Newport will play 1 gig up to 32
gig size flash drives.
3.
Make sure the flash drive is not NTFS formatted. Always use the FAT32
format (most drives are formatted with FAT32 from the factory). Be sure
to do a full format rather than a quick format, and check that none of the
files or folders have names longer than 64 characters. It is very important
that none of the audio files have DRM. Use only MP3 files or unprotected
Windows Media format files.
·
t 2014 © Retro Manufacturing, LLC
Newport Owner's Manual
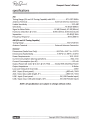
specifications
FM
Tuning Range (EU and US Tuning Capable) with RDS .................... 87.5-107.9MHz
Antenna Terminal ..................................................... External Antenna Connector
Usable Sensitivity ...................................................................................... 12.5 dBf
Selectivity ..................................................................................... 75 dB @ 400kHz
Signal to Noise Ratio ................................................ 62 dB (Stereo), 67 dB (Mono)
Harmonic Distortion@ 1kHz ............................... 0.8% (stereo), 0.5% (monaural)
Separation ........................................................................................ 32 dB@ 1kHz
Frequency Response ......................................................................... 30-16,000 Hz
AM (EU and US Tuning Capable)
Tuning Range .................................................................................... 530-1710 kHz
Antenna Terminal ..................................................... External Antenna Connector
General
Dimensions (Radio Face Only) ...................................... 8.10"W x 3.61" H x 1.29"D
Dimensions (Radio Body) ............................................. 3.96"W x 1.98"H x 4.30"D
Power Requirements ............................................................................ 10.5-14.4V
Current Consumption (during operation) ................................................ Max. 15A
Current Consumption (car off) .................................................................. <3.5 mA
Output Power(@ 14.4V@ 4 ohm @ 1% THD) ....... 25x4w RMS 45x4 Max Power
Output Impedance .................................................................................... 4-8ohm
Low Level Output (4 Channels) ...................................................................... 2.85V
AUX llnput (Front panel) .............................................................. ~300 mV I 6 kO
AUX 2 Input (Aux cable length, 8") ................................................ ~300 mV I 6 kO
USB 1 Input (Front panel .................................................... 5V (USB Female Input)
USB 2 Input (rear, USB cable length, 40") ........................... 5V (USB Female Input)
NOTE: All specifications are subject to change without notice.
Copyright 2014 © Retro Manufacturing,
Newport Owner's Manual
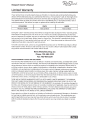
Limited Warran
If your product does not work properly because of defects in materials and workmanship RetroSound, a
division of Retro Manufacturing, LLC (collectively referred to as "the warrantor") will, for the length of the
period indicated in the chart below, which starts with the date of original purchase ("warranty period"),
at its option either (a) repair your product with new or refurbished parts, or (b) replace it with a new or
refurbished product. The decision to repair or replace will be made by the warrantor.
CATEGORIES
PARTS
LABOR
Newport Radio
Two (2) Years
Two (2) Years
During the "Labor" warranty period, there will be no charge for labor. During the "Parts" warranty period,
there will be no charge for parts. You must carry in or mail in your product prepaid during the warranty
period. If batteries are included, they are not warranted. This warranty only applies to products purchased
and serviced in the United States, Alaska, Hawaii or Puerto Rico. This warranty is extended only to the
original purchaser of a new product which was not sold "as is". A purchase receipt or other proof of the
original purchase date is required for warranty service.
To handle a warranty issue, contact us at [email protected] or 702-483-2222 and get a Return
Authorization number. All returns and warranty issues must receive a Return Authorization (RA) number.
Any product received without a RA number will be refused.
Retro Manufacturing, LLC
Phone: 702-483-2222
Fax: 702-483-2229
LIMITED WARRANTY-LIMITS AND EXCLUSIONS
This warranty ONLY COVERS failures due to defects in materials and workmanship, and DOES NOT COVER
normal wear and tear or cosmetic damage. The warranty ALSO DOES NOT COVER damages which occurred
during shipment, failures which are caused by products not supplied by the warrantor, failures which result from accident, misuse, abuse, neglect, bug infestation, mishandling, misapplication, alteration, faulty
installation, set-up adjustment, maladjustment of consumer control, improper maintenance, improper
antenna, inadequate signal reception or pickup, power line surge, improper voltage supply, lightning,
modification, commercial use (such as use in hotels, offices, restaurants, or other business uses) or rental
use of the product, or service by anyone other than the technician from the factory service center or other
authorized service centers, or damage that is attributable to acts of God.
THERE ARE NO EXPRESS WARRANTIES EXCEPT AS LISTED UNDER "LIMITED WARRANTY". THE WARRANTOR IS NOT LIABLE FOR INCIDENTAL OR CONSEQUENTIAL DAMAGES RESULTING FROM THE USE OF THIS
PRODUCT, OR ARISING OUT OF ANY BREACH OF THIS WARRANTY. (As examples, this excludes damages for
lost time, cost of having someone remove or re-install an installed unit if applicable, travel to and from the
sevicer, and loss of media, data or other memory contents. The items listed are not exclusive, but are for
illustration only.) ALL EXPRESS AND IMPLIED WARRANTIES, INCLUDING THE WARRANTY OF MERCHANTABILITY, ARE LIMITED TO THE PERIOD OF THE LIMITED WARRANTY.
Some states do not allow the exclusion or limitation of incidental or consequential damages, or limitations
on how long an implied warranty lasts, so the exclusions may not apply to you. This warranty gives you
specific legal bottoms and you may also have other bottoms which vary from state to state. If a problem
with this product develops during or after the warranty period, you may contact your dealer or service
center.
pyright 2014 © Retro Manufacturing, LLC
®
Modern Sound for your Classic
Retro Manufacturing
7390 Eastgate Road, Suite 140
Henderson, Nevada 89011
Phone: 702-483-2222
Fax: 702-483-2229
retrosound.com