1
VTech LS6245_HK version_IFU_EN.book
Page 30
Friday, September 23, 2011
1:01 PM
User’s manual
w w w. v t e c h . c o m / h k / t e l
Model: LS6245
DECT
VTech LS6245_HK version_IFU_EN.book
Page 1
Friday, September 23, 2011
1:01 PM
Table of contents
1. IMPORTANT SAFETY INSTRUCTIONS .......................1
2. SETTING UP THE TELEPHONE ...................................2
2.1
2.2
2.3
2.4
Package contents ..............................................................2
Location .............................................................................2
Connecting the telephone..................................................2
Installing and charging the battery pack ............................3
4.8
4.9
5. USING YOUR PHONE .................................................22
5.1
3. GETTING TO KNOW YOUR PHONE ............................4
3.1
3.2
3.3
3.4
3.5
3.6
3.7
Overview of your handset ..................................................4
Handset LCD display .........................................................5
Handset menu structure ....................................................6
Overview of the base ........................................................7
Base LCD display ..............................................................9
Base Menu Structure .......................................................10
Text and Digit Entry Table ...............................................10
5.2
5.3
5.4
5.5
4. BLUETOOTH® .............................................................12
4.1
4.2
4.3
4.4
4.5
4.6
4.7
Introducing Bluetooth .....................................................12
Glossary of terms ............................................................13
Bluetooth at a glance .....................................................14
Pair and connect a cell phone .........................................14
Pair and connect a headset .............................................15
Paired Devices ................................................................16
4.6.1
Rename a paired device..................................16
4.6.2
Remove a paired device..................................16
4.6.3
View information of a paired device.................17
Active devices..................................................................17
4.7.1
Review the active devices list..........................17
4.7.2
Connect/disconnect an active device ..............17
4.7.3
Replace an active device.................................18
4.7.4
Add an active device .......................................18
4.7.5
Remove an active device ................................18
4.7.6
View information of an active device ...............19
Change PIN .................................................................... 19
Download phonebook ..................................................... 19
5.6
5.7
5.8
5.9
5.10
5.11
5.12
5.13
5.14
Make a Home Call .......................................................... 22
5.1.1
Preparatory Dialing ......................................... 22
5.1.2
Direct Dialing................................................... 22
5.1.3
Call from the phonebook................................. 23
5.1.4
Call from the Call Log ..................................... 23
5.1.5
Call from the redial list .................................... 24
Answer a Home Call ....................................................... 25
End a Home Call............................................................. 25
Call waiting on the home line .......................................... 25
Make a Cell Call.............................................................. 26
5.5.1
Preparatory Dialing ......................................... 26
5.5.2
Direct Dialing................................................... 26
5.5.3
Call from the phonebook................................. 27
5.5.4
Call from the Call Log ..................................... 27
5.5.5
Call from the redial list .................................... 28
Answer a Cell Call........................................................... 28
End a Cell Call ................................................................ 28
Call waiting on the cell line.............................................. 29
Answer a cell call while on a home call........................... 29
Answer a home call while on a cell call........................... 30
Conference home and cell calls...................................... 30
Chain Dialing................................................................... 31
5.12.1
Access a Number in the Phonebook on a
Home Call ....................................................... 31
5.12.2
Access a Number in the Call Log on a
Home Call ....................................................... 32
5.12.3
Access the Last Number Redial on a
Home Call ....................................................... 32
Adjust Earpiece and Handsfree Volume ......................... 33
Mute a Call...................................................................... 33
1
VTech LS6245_HK version_IFU_EN.book
Page 2
Friday, September 23, 2011
1:01 PM
Table of contents
5.15
5.16
5.17
5.18
5.19
Infrared sensor ................................................................34
Hold a Call .......................................................................34
Set the Silent Mode .........................................................35
Keypad Lock/Unlock ........................................................35
Redial the last number.....................................................35
5.19.1
Redial a Number from the Redial List..............35
5.19.2
Store a Redial Number into the Phonebook ....36
5.19.3
Delete a Redial Number ..................................37
5.20 Find the Handset .............................................................38
5.21 Intercom and Conference Call .........................................38
5.21.1
Intercom...........................................................38
5.21.2
Transfer an External Call.................................39
5.21.3
Make a 3-way Conference Call .......................40
5.21.4
Switch between internal call and external call .41
6. PRIVATE PHONEBOOK..............................................42
6.1
6.2
6.3
6.4
6.5
6.6
Add a New Phonebook Entry ..........................................42
View a Phonebook Entry .................................................43
Edit a Phonebook Entry ...................................................44
Delete a Phonebook Entry...............................................45
Remove a downloaded phonebook (for downloaded
phonebook only) ........................................................46
Security PIN for downloaded phonebook ........................47
7. CALLER DISPLAY (NETWORK DEPENDENT) .........49
7.1
7.2
7.3
7.4
View the Call Log.............................................................49
Store a Call Log Number into the Phonebook .................49
Delete an entry in the Call Log ........................................50
Delete the entire list of the Call Log.................................51
8. PHONE SETTINGS ......................................................52
Using a handset:
8.1 Set the Audio ...................................................................52
8.1.1
Set the Ringer Volume ....................................52
2
8.1.2
Set the Ringer Tone........................................ 52
8.1.3
Set the Key Tone ............................................ 53
8.1.4
Set the Low battery tone ................................. 53
8.1.5
Set the No Coverage Tone ............................. 53
8.2 Set the Date and Time .................................................... 54
8.2.1
Change the Date Format ................................ 54
8.2.2
Change the Time Format ................................ 54
8.2.3
Set Date/Time ................................................. 54
8.3 Set the Auto Keylock....................................................... 55
8.4 De-register ...................................................................... 55
8.5 Set the Dial Mode ........................................................... 56
8.6 Set the Flash Time.......................................................... 56
8.7 Set the ECO Mode Range .............................................. 56
8.8 Change the System PIN ................................................. 57
8.9 Reset the handset........................................................... 57
Using the base:
8.10 Set the Audio .................................................................. 58
8.10.1
Set the Ringer Volume.................................... 58
8.10.2
Set the Ringer Tone........................................ 58
8.10.3
Set the Key Tone ............................................ 59
8.11 Set the Date and Time .................................................... 59
8.11.1
Change the Date Format ................................ 59
8.11.2
Change the Time Format ................................ 59
8.11.3
Set Date/Time ................................................. 60
8.12 De-register ...................................................................... 60
8.13 Set the Dial Mode ........................................................... 61
8.14 Set the Flash Time.......................................................... 61
8.15 Set the ECO Mode Range .............................................. 61
8.16 Change the System PIN ................................................. 61
8.17 Reset the base................................................................ 62
9. REGISTRATION...........................................................63
VTech LS6245_HK version_IFU_EN.book
Page 3
Friday, September 23, 2011
1:01 PM
Table of contents
10.ANSWERING MACHINE..............................................64
Using a handset:
10.1 Switching Answering Machine On/Off .............................64
10.2 Announcement ................................................................65
10.2.1
Record your own announcement.....................65
10.2.2
Playback the announcement ...........................65
10.2.3
Delete the recorded announcement ................66
10.3 Answering machine message..........................................66
10.3.1
Play messages ................................................66
10.3.2
Delete a message............................................67
10.3.3
Delete all old messages ..................................67
10.4 Record a memo ...............................................................67
10.5 Incoming Call Messages (ICM)........................................68
10.6 Answering Machine Settings ...........................................68
10.6.1
Set answer mode.............................................68
10.6.2
Set number of rings to answer.........................68
10.6.3
Set the recording time of message..................69
10.6.4
Set call screening on or off ..............................69
10.6.5
Set answering machine message alert on
or off ................................................................69
10.7 Remote Operations .........................................................70
Using the base:
10.8 Switching Answering Machine On/Off .............................71
10.9 Announcement ................................................................71
10.9.1
Record your own announcement.....................71
10.9.2
Playback the announcement ...........................72
10.9.3
Delete the recorded announcement ................72
10.10 Answering machine message..........................................72
10.10.1 Play messages ................................................73
10.10.2 Delete a message............................................73
10.10.3 Delete all old messages ..................................74
10.11 Record a memo ...............................................................74
10.12 Incoming Call Messages (ICM)........................................75
10.13 Answering Machine Settings ...........................................75
10.13.1 Set answer mode.............................................75
10.13.2 Set number of rings to answer.........................75
10.13.3
10.13.4
10.13.5
Set the recording time of message ................. 76
Set call screening on or off ............................. 76
Set answering machine message alert on
or off................................................................ 76
10.14 Remote Operations......................................................... 77
11.DEFAULT SETTINGS ..................................................78
12.TROUBLESHOOTING .................................................81
13.TECHNICAL SPECIFICATIONS..................................86
3
VTech LS6245_HK version_IFU_EN.book
1.
Page 1
Friday, September 23, 2011
1:01 PM
IMPORTANT SAFETY INSTRUCTIONS
When using your telephone equipment, basic safety precautions should always be followed to reduce the risk of fire, electric shock and injury,
including the following:
1. Read and understand all the instructions.
2. Follow all warnings and instructions marked on the product.
3. Unplug this product from the wall outlet before cleaning. Do not use liquid cleaners or aerosol cleaners. Use a damp cloth for cleaning.
4. Do not use this product near water (for example, near a bath tub, kitchen sink, swimming pool).
5. Do not overload wall outlets and extension cords as this can result in the risk of fire or electric shock.
6. Unplug this product from the wall outlet and refer servicing to VTech under the following conditions:
• When the power adapter or plug is damaged or frayed.
• If the product does not operate normally by following the operating instructions.
• If the product has been dropped and the cabinet has been damaged.
• If the product exhibits a distinct change in performance.
7. Avoid using corded telephone (other than a cordless type) during an electrical storm. There may be a remote risk of electric shock from
lightning.
8. Do not use the telephone to report a gas leak in the vicinity of the leak.
9. Use only the supplied NiMH (Nickel Metal Hydride) battery pack! The operation periods for the handsets are only applicable with the default
battery pack capacities.
10. The use of other battery pack types or non-rechargeable battery packs/primary cells can be dangerous. These may cause interference and/
or unit damages. The manufacturer will not be held liable for damage arising from such non-compliance.
11. Do not use third party charging bays. The battery pack may be damaged.
12. Please note the correct polarity while inserting the battery pack.
13. Do not immerse battery pack in water, do not place in fire.
If you have questions about this product, or having difficulty with setup or operation, call our Customer Service Centre.
Customer Service Hotline: (852) 2666 5558
Technical Inquiry Hotline: (852) 2667 7433
1
VTech LS6245_HK version_IFU_EN.book
Page 2
Friday, September 23, 2011
2.
SETTING UP THE TELEPHONE
2.1
Package contents
2.2
・
・
・
1 Rechargeable battery pack
1 Chinese operation manual
1 English operation manual
Location
For maximum coverage and reduce the interference, here are some guidelines you should consider when you place the base unit,
- place it at a convenient, high, and central location with no obstructions between the handset and base unit in an indoor environment.
- place it away from electronic appliances such as televisions, microwave ovens, radios, personal computers, wireless devices or other
cordless phones.
- avoid facing radio frequency transmitters, such as external antennas of mobile phone cell stations.
- avoid plugging it into the same circuit as other major household electrical appliances because of the potential for interference. Try moving
the appliance or the base unit to another power outlet.
If the reception for a base unit location is not satisfactory, move it to another location for better reception. Depending on the surrounding
conditions as well as spatial and structural factors, the range may be reduced. The range indoors is normally less than outdoors.
2.3
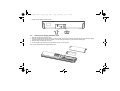
Connecting the telephone
Before you can start using your telephone you must plug in the telephone connection cords and the mains cable.
Connecting the base station:
1. Plug the power supply & telephone line cord into the base station.
2. Plug the power supply cord into the wall outlet not controlled by a wall switch.
3. Plug the telephone line cord into the wall jack. If you have DSL high speed internet service, a DSL filter (not included) is required.
2
Setting up the telephone
The package contains the following items:
・ 1 Handset
・ 1 Base station
・ 1 AC power adapter
・ 2 Telephone line cords
1:01 PM
VTech LS6245_HK version_IFU_EN.book
Page 3
Friday, September 23, 2011
1:01 PM
4. Always use the cables provided in the box.
2.4
Installing and charging the battery pack
1. Slide out the battery compartment cover.
2. Place the supplied battery pack as indicated. Locate the battery pack lead and connector and plug it into the socket inside the battery
compartment (the red wire should be on the left). Tuck the battery pack leads in the space above the battery pack.
3. Slide the battery compartment cover back.
4. Put the handset on the base and charge the battery pack for 16 hours first time.
Use only the supplied NiMH rechargeable battery pack.
3
VTech LS6245_HK version_IFU_EN.book
Page 4
Friday, September 23, 2011
1:01 PM
3.
GETTING TO KNOW YOUR PHONE
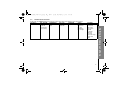
3.1
Overview of your handset
9. Home/Flash
In idle mode: Press to make a home call.
In ringing mode: Press to answer a home call.
Flashes quickly when there is an incoming
home call.
Flashes slowly when a home call is on hold.
10. Alphanumeric keypad, *, #
In idle/pre-dial/editing mode/during a call:
Press to enter characters/ numbers.
#
In idle/pre-dial/during a call mode: Press to
insert a "#".
*
In idle/pre-dial/during a call mode: Press to
insert a "*".
In phonebook entry name editing mode:
Press to toggle between upper case and
lower case.
During a call: Press to turn to tone
temporarily when in pulse dialing mode.
11. Speakerphone
In idle mode: Press to make a home call.
In ringing mode: Press to answer a home or
cell call.
During a call: Press to switch between
speakerphone and handset.
12. Hold
During a call: Press to put a call on hold.
4
Getting to know your phone
1. Infrared sensor
When the infrared sensor is covered during a
call, all keys on the dial pad are disabled.
2. Right soft key
Press to select a menu item displayed above
the key.
3. Scroll down/Volume down/Call log
In idle mode: Press to review the call log.
During a call: Press to decrease the listening
volume.
In menu mode: Press to scroll down.
4. Talk off/Clear
During a call: Press to hang up.
In ringing mode: Press to silence the ringer
temporarily.
In menu mode: Press to exit without making
changes. Press and hold to return to idle
mode.
In editing mode: Press to erase a digit or
character.
5. Cell
In idle mode: Press to make a cell call.
In ringing mode: Press to answer a cell call.
Flashes quickly when there is an incoming
cell call.
Flashes slowly when a cell call is on hold.
6. Charging LED
Steadily on when in charging.
7. Left soft key
Press to select a menu item displayed above
the key.
8. Scroll up/Volume up/Phonebook
In menu mode: Press to scroll up.
During a call: Press to increase the listening
volume.
In idle mode: Press to enter the phonebook.
VTech LS6245_HK version_IFU_EN.book
3.2
Friday, September 23, 2011
1:01 PM
Handset LCD display
1 21 2
Home line - on steadily when the home line is
in use or there is an incoming home call.
Speakerphone - the speakerphone is in use.
CELL line - on steadily when the cell line is in
use or there is an incoming cell call.
New answering system message - indicates
you have a new answering system
message(s).
12
Bluetooth connected device(s) - indicates
that there are Bluetooth connected devices on
the active devices list.
12
Bluetooth disconnected device(s) - indicates
that there are Bluetooth disconnected devices
on the active devices list.
1 or2 1 2
5
Page 5
Battery status - animates when the battery is
charging. Becomes solid when the battery is
fully charged.
Battery status - flashes when the battery is
low and needs charging.
Bluetooth wireless headset - on steadily
when a Bluetooth wireless headset is in use
on the home line.
Answering system on - indicates that the
answering system is turned on to answer
incoming home calls.
Ringer off - on steadily when all the ringers of
Home, Cellular 1 and Cellular 2 are turned
off. Flashes when only one or two of the ringers
are turned off.
New call log - indicates that the missed call is
new.
Mute - the microphone is muted.
VTech LS6245_HK version_IFU_EN.book
3.3
Page 6
Friday, September 23, 2011
1:01 PM
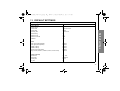
Handset menu structure
In idle mode, press MENU will firstly access the Ans. system menu. Refer to the following for the menu structure.
ANS. SYSTEM
PHONEBOOK
CALL LOG
Sub Menu
Play msgs
Del all old
Record memo
Ans sys setup
Review
Store
Review
Del all calls
INTERCOM
AUDIO
SETTINGS
Ringer volume
Ringer tone
Key tone
Low battery
No coverage
Set date/time
Time format
Date format
Auto keylock
Register
De-register
Dial mode
Flash time
ECO mode range
System PIN
Reset
Getting to know your phone
Main Menu
6
VTech LS6245_HK version_IFU_EN.book
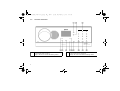
3.4
1
7
Page 7
Friday, September 23, 2011
1:01 PM
Overview of the base
Scroll up/Volume up
In menu mode: Press to scroll up.
During a call: Press to increase the listening volume.
2
Scroll down/Volume down
In menu mode: Press to scroll down.
During a call: Press to decrease the listening volume.
VTech LS6245_HK version_IFU_EN.book
3
5
6
7
Friday, September 23, 2011
Alphanumeric keypad , *, #
In idle/pre-dial/editing mode/during a call: Press to enter
characters/numbers.
#
In idle/pre-dial/during a call mode: Press to insert a "#".
*
In idle/pre-dial/during a call mode: Press to insert a "*".
In phonebook entry name editing mode: Press to toggle
between upper case and lower case.
During a call: Press to turn to tone temporarily when in
pulse dialing mode.
Left soft key
Press to select a menu item displayed above the key.
Flash/Delete
In message playing mode: Press to delete the message
currently playing.
Skip backward/Clear/Cancel
In ringing mode: Press to silence the ringer temporarily.
In menu mode: Press to exit without making changes.
Press and hold to return to idle mode.
In message playing mode: Press to repeat a message or
press twice to play the previous message.
Skip forward
In message playing mode: Press to skip to the next
message.
1:01 PM
8
9
10
11
12
Right soft key
Press to select a menu item displayed above the key.
Play/Stop
In idle mode: Press to play messages.
In message playing mode: Press to stop message
playback.
Home
In idle mode: Press to make a home call.
In ringing mode: Press to answer a home call.
Flashes quickly when there is an incoming home call.
Flashes slowly when a home call is on hold.
Hold
During a call: Press to put a call on hold.
Cell
In idle mode: Press to make a cell call.
In ringing mode: Press to answer a cell call.
Flashes quickly when there is an incoming cell call.
Flashes slowly when a cell call is on hold.
Getting to know your phone
4
Page 8
8
VTech LS6245_HK version_IFU_EN.book
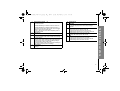
3.5
Page 9
Friday, September 23, 2011
Base LCD display
Home line - on steadily when the home line is
in use or there is an incoming home call.
1 21 2
CELL line - on steadily when the cell line is in
use or there is an incoming cell call.
12
Bluetooth connected device(s) - indicates
that there are Bluetooth connected devices on
the active devices list.
12
Bluetooth disconnected device(s) - indicates
that there are Bluetooth disconnected devices
on the active devices list.
1 or2 1 2
9
1:01 PM
Bluetooth wireless headset - on steadily
when a Bluetooth wireless headset is in use
on the home line.
Ringer off - on steadily when all the ringers of
Home, Cellular 1 and Cellular 2 are turned
off. Flashes when only one or two of the ringers
are turned off.
New answering system message - indicates
you have a new answering system
message(s).
Answering system on - indicates that the
answering system is turned on to answer
incoming home calls.
New call log - indicates that the missed call is
new.
Mute - the microphone is muted.
VTech LS6245_HK version_IFU_EN.book
3.6
Page 10
Friday, September 23, 2011
1:01 PM
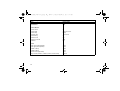
Base Menu Structure
In idle mode, press MENU will firstly access the Ans. system menu. Refer to the following for the menu structure.
Main Menu ANS. SYSTEM PHONEBOOK CALL LOG PAGE ALL HS INTERCOM BLUETOOTH
Sub Menu
Review
Home
Cellular 1/2/3/4 Del all calls
(If you have
downloaded
phonebook from
cell phones.)
Download PB
Setup cell
Setup headset
Active devices
Paired devices
Change PIN
AUDIO
SETTINGS
Ringer volume Set date/time
Ringer tone
Time format
Key tone
Date format
De-register
Dial mode
Flash time
ECO mode range
System PIN
Reset
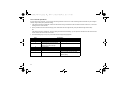
Text and Digit Entry Table
The following tables show you where each letter and punctuation character can be found. This will be helpful when storing a name in the
phonebook and renaming your handset.
In editing mode, a cursor is displayed to indicate the current text entry position. It is positioned at the right of the last character entered.
Writing Tips:
1. Once a character is selected, the characters will move forward and leave the cursor at the right.
U/D on the handset or </> on the base to amend the text entry.
F on the handset or c on the base to delete the last character.
Press and hold F on the handset or c on the base to delete the entire text string.
2. You can move the cursor within the text by
3. Press
4.
10
Getting to know your phone
3.7
Play msgs
Del all old
Record memo
Ans sys setup
VTech LS6245_HK version_IFU_EN.book
Page 11
Friday, September 23, 2011
Upper case
1
Space 1 @ _ # = < > ( ) & £ $ ¥ € [ ] { } ¤ §
2
ABC2ÄÀÁÂÃÅÆÇ
3
DEF3ÈÉËÊ∆Φ
4
GHI4ĞÌÍÎÏİΓ
5
JKL5Λ
6
MNO6ÖÒÓÔÕØÑ
7
PQRS7βŞΠΘΣ
8
TUV8ÜÙÚÛ
9
WXYZ9ÝΫΩΞΨ
0
.0,/:;"'!¡?¿*+-%\^~|
Lower case
11
1
Space 1 @ _ # = < > ( ) & £ $ ¥ € [ ] { } ¤ §
2
abc2äàáâãåæç
3
def3èéëê∆Φ
4
ghi4ğìíîïõΓ
5
jkl5Λ
6
mno6öòóôõøñ
7
pqrs7βşΠΘΣ
8
tuv8üùúû
9
wxyz9ýÿΩΞΨ
0
.0,/:;"'!¡?¿*+-%\^~|
1:01 PM
VTech LS6245_HK version_IFU_EN.book
Page 12
4.
BLUETOOTH®
4.1
Introducing Bluetooth
Friday, September 23, 2011
1:01 PM
Your new VTech LS6245 telephone system with Bluetooth wireless technology has the following features:
• Pair up to four Bluetooth wireless technology enabled cell phones with the telephone base.
• Connect a maximum of two cell phones to make and receive cell calls. Only one cell phone can be active on a call at a time.
• Connect a Bluetooth wireless technology enabled headset for making and receiving home calls.
• Conference cell and home calls.
• Make and receive calls using your cell phone plan while utilizing the ease and comfort of your home telephone system.
The Bluetooth® word mark and logos are owned by Bluetooth SIG, Inc. and any use of such marks by VTech Holdings Limited is under license.
VTech Holdings Limited is a member of Bluetooth SIG, Inc. Other trademarks and trade names are those of their respective owners.
12
Bluetooth
IMPORTANT INFORMATION
• After plugging in the telephone base, wait at least 20 seconds before connecting a Bluetooth wireless technology enabled device. The
screen shows “BLUETOOTH SYSTEM BUSY” if you try to connect too soon.
• Refer to the user's manual of your cell phone or headset for more information about its Bluetooth function.
• Bluetooth wireless technology operates within a short range (about 30 feet). When using a cell phone with the VTech LS6245, it is best to
place your cell phone between one and fifteen feet from the telephone base. When using a Bluetooth wireless technology enabled headset
with the VTech LS6245, you are limited to the range of your headset (see the user's manual of your headset for more information).
• Make sure that your cell phone has sufficient signal strength. You may need to move the cell phone and telephone base to a location where
the cell phone signal strength is stronger.
• Charge your Bluetooth wireless technology enabled cell phone while it is connected to the telephone base. Your cell phone's battery
discharges faster while it is connected to the telephone base via Bluetooth wireless technology.
• Monitor your cell phone's usage because airtime is deducted from your cellular plan for the duration of all cell calls.
VTech LS6245_HK version_IFU_EN.book
4.2
Page 13
Friday, September 23, 2011
1:01 PM
Glossary of terms
Below are some terms used in this user's manual to help you become familiar with using your Bluetooth wireless technology enabled devices
and your new VTech LS6245 telephone system.
Active devices
A maximum of two paired devices (two cell phones, or one cell phone and one headset) on the active devices list
can be connected to the telephone base, but only one cell phone or headset can be on a call at a time.
Bluetooth wireless
technology enabled
cell phone
Refers to a Bluetooth wireless technology enabled cell telephone.
Cell line
The communication service provided through your Bluetooth wireless technology enabled cell telephone.
Connected
A Bluetooth wireless technology enabled device can only be used when it is connected to the telephone base.
When a Bluetooth wireless technology enabled device is connected to the telephone base and active on the active
devices list, it is ready for use.
Disconnected
A diagonal line appears across devices 1 and/or 2 when the corresponding Bluetooth wireless technology enabled
device is disconnected from the telephone base.
Discoverable mode
Before a Bluetooth wireless technology enabled device can be paired, it must be set in this mode. When pairing
your cell phone, the telephone base is set in this mode. When pairing a headset, the headset must be set in this
mode. Depending on the manufacturer, this mode is sometimes referred to as FIND ME or VISIBILITY.
Home line
Your conventional telephone land line.
Paired devices
Once Bluetooth wireless technology enabled devices have been paired with the telephone base, they appear on
the paired devices list. A maximum of four devices can be paired with the telephone base, but only two can be on
the active devices list.
Pairing
This refers to the process of Bluetooth wireless technology enabled device registering device information with each
other. The telephone base must be paired with a Bluetooth wireless technology enabled cell phone or headset
before the Bluetooth wireless technology enabled device can be used. Depending on the manufacturer, this is also
referred to as BONDING.
PIN
By default, the PIN is 0000 for the telephone base and for most Bluetooth wireless technology enabled devices.
PIN information must be exchanged between Bluetooth wireless technology enabled devices before they can be
used. This is also known as a PASSKEY or PASSCODE.
13
VTech LS6245_HK version_IFU_EN.book
4.3
Page 14
Friday, September 23, 2011
1:01 PM
Bluetooth at a glance
The telephone base allows you to pair up to four Bluetooth wireless technology enabled devices. You can have a maximum of two paired
devices connected at any time (two cell phones, or one cell phone and one headset), but only one cell phone or headset can be on a call at
a time.
Once you have paired a device with the telephone base, the pairing information is stored on the paired devices list. To use a paired device,
it must be connected and on the active devices list.
IMPORTANT INFORMATION
• Once you have paired a device with the telephone base, you do not have to repeat the pairing procedure again, unless you delete the
device from the paired devices list.
• When adding, removing, or replacing a Bluetooth wireless technology enabled device on the active devices list, all connected devices are
temporarily disconnected until the procedure is complete. It may take up to two minutes to reconnect.
Pair and connect a cell phone
Before you begin, make sure that your Bluetooth wireless technology enabled cell phone is not connected to any other Bluetooth wireless
technology enabled device. Refer to your cell phone user's manual to learn how to search for or add new Bluetooth wireless technology
enabled devices.
1. Press MENU and
</> on the base to select BLUETOOTH.
</> to select SETUP CELL, and then press SELECT.
2. Press SELECT and
Note:
If a device is already connected to the telephone base, "CONNECTED DEVS WILL BE TEMP. DISCONNECTED" displays. Press OK to
temporarily disconnect the device and continue the pairing process.
3. Press NEXT to set the telephone base to discoverable mode.
4. Turn on the Bluetooth feature of your cell phone and search for or add new devices.
5. Once your cell phone finds LS6245, select it.
6. Enter the PIN of the telephone base (the default PIN is 0000) into your cell phone to continue the pairing process.
7. When a device is successfully connected, “DEVICE CONNECTED TO BASE”, and
1
and/or
2 displays.
14
Bluetooth
4.4
VTech LS6245_HK version_IFU_EN.book
Page 15
Friday, September 23, 2011
1:01 PM
Note:
When you already have two devices on the active devices list, press YES to connect to your paired cell phone. You are prompted to replace an
existing device on the active devices list.
The pairing process may take up to one minute. If the pairing process fails, try again.
4.5
Pair and connect a headset
Before you begin, make sure that your Bluetooth wireless technology enabled headset is not connected to any other Bluetooth wireless
technology enabled device. Refer to your headset user's manual to learn how to search for or add new Bluetooth wireless technology
enabled devices.
</> on the base to select BLUETOOTH.
Press SELECT and </> to select SETUP HEADSET, and then press SELECT.
1. Press MENU and
2.
Note:
If a device is already connected to the telephone base, "CONNECTED DEVS WILL BE TEMP. DISCONNECTED" displays. Press OK to
temporarily disconnect the device and continue the pairing process.
3. Set your headset to discoverable mode.
4. Press NEXT on the base to search for your headset.
5. Once the telephone base finds your headset, press SELECT.
6. Enter the PIN of your headset (the PIN for most Bluetooth wireless technology enabled devices is 0000), then press SELECT. The screen
displays "HEADSET SETUP COMPLETE" and then "CONNECT HEADSET TO BASE?"
7. Press YES. When a device is successfully connected, "DEVICE CONNECTED TO BASE", and
1
and/or
2 displays.
Note:
When you already have two devices on the active devices list, press YES to connect to your paired headset. You are prompted to replace an
existing device on the active devices list.
The pairing process may take up to one minute. If the pairing process fails, try again.
15
VTech LS6245_HK version_IFU_EN.book
4.6
Page 16
Friday, September 23, 2011
1:01 PM
Paired Devices
All paired devices are stored on the paired devices list. Up to four devices (one headset only) can be paired with the telephone base.
To use a paired device, it must be connected and on the active devices list.
Note:
Only 15 characters of the device name can be stored on the paired devices list.
4.6.1
Rename a paired device
You can change the name of a paired device on the paired devices list.
</> on the base to select BLUETOOTH.
Press SELECT and </> to select PAIRED DEVICES.
Press SELECT and </> to select the desired device.
Press OPTION and </> to select RENAME.
1. Press MENU and
2.
4.
Bluetooth
3.
5. Press SELECT to edit the name.
6. Press SAVE to confirm.
4.6.2
Remove a paired device
If you already have the maximum of four paired devices on the paired devices list and you want to add another device, you must first delete a
paired device from the paired devices list.
</> on the base to select BLUETOOTH.
</> to select PAIRED DEVICES.
Press SELECT and </> to select the desired device.
Press OPTION and </> to select REMOVE PAIRED.
1. Press MENU and
2. Press SELECT and
3.
4.
5. Press SELECT to confirm.
6. Press YES to reconfirm, or press NO to cancel.
16
VTech LS6245_HK version_IFU_EN.book
4.6.3
Page 17
Friday, September 23, 2011
1:01 PM
View information of a paired device
</> on the base to select BLUETOOTH.
Press SELECT and </> to select PAIRED DEVICES.
Press SELECT and </> to select the desired device.
1. Press MENU and
2.
3.
4. Press INFO to view the information.
5. Press OK to return to the previous menu.
4.7
Active devices
Only devices on the active devices list can establish a Bluetooth connection with the telephone base. Although two paired devices can be
connected to the telephone base, only one Bluetooth wireless technology enabled cell phone or headset can be on a call at a time.
4.7.1
Review the active devices list
</> on the base to select BLUETOOTH.
Press SELECT and </> to select ACTIVE DEVICES.
Press SELECT and </> to view the active devices list.
1. Press MENU and
2.
3.
4.7.2
Connect/disconnect an active device
While in the active devices menu, you can connect or disconnect your active device.
</> on the base to select BLUETOOTH.
</> to select ACTIVE DEVICES.
Press SELECT and </> to view the desired device.
1. Press MENU and
2. Press SELECT and
3.
4. Press OPTION to select CONNECT/DISCONNECT.
5. Press SELECT to confirm.
Note:
When your active device is connected, you are prompted to select DISCONNECT. When your active device is disconnected, you are prompted
to select CONNECT.
17
VTech LS6245_HK version_IFU_EN.book
4.7.3
Page 18
Friday, September 23, 2011
1:01 PM
Replace an active device
When you already have two devices on the active devices list, you can replace an active device with a device on the paired devices list.
</> on the base to select BLUETOOTH.
</> to select PAIRED DEVICES.
Press SELECT and </> to view the desired device.
1. Press MENU and
2. Press SELECT and
3.
4. Press OPTION to select REPLACE ACTIVE.
5. Press SELECT and
</> to select the device to be replaced.
6. Press SELECT to confirm.
4.7.4
Add an active device
Bluetooth
You can have a maximum of two devices on the active devices list.
</> on the base to select BLUETOOTH.
</> to select ACTIVE DEVICES.
Press SELECT and </> to select EMPTY.
Press ADD and </> to select the desired device from the paired devices list.
1. Press MENU and
2. Press SELECT and
3.
4.
5. Press ADD to confirm.
4.7.5
Remove an active device
You can remove an active device from the active devices list.
</> on the base to select BLUETOOTH.
Press SELECT and </> to select ACTIVE DEVICES.
Press SELECT and </> to select the desired device.
Press OPTION and </> to select REMOVE ACTIVE.
1. Press MENU and
2.
3.
4.
5. Press SELECT to confirm.
18
VTech LS6245_HK version_IFU_EN.book
4.7.6
Page 19
Friday, September 23, 2011
1:01 PM
View information of an active device
</> on the base to select BLUETOOTH.
Press SELECT and </> to select ACTIVE DEVICES.
Press SELECT and </> to select the desired device.
1. Press MENU and
2.
3.
4. Press INFO to view the information.
5. Press OK to return to the previous menu.
4.8
Change PIN
You are required to enter a PIN when establishing a Bluetooth connection. The default PIN of your telephone base is 0000.
</> on the base to select BLUETOOTH.
Press SELECT and </> to select CHANGE PIN.
1. Press MENU and
2.
3. Press SELECT to enter a new four-digit PIN code.
4. Press SAVE to confirm.
4.9
Download phonebook
You can download up to four cell phone phonebooks to your LS6245 telephone system via Bluetooth wireless technology.
Each downloaded phonebook can store up to 1,500 entries with up to 30 digits for each phone number and 15 characters for each name.
Before downloading the phonebook, make sure the mobile phone is paired to your LS6245 and on the active devices list.
Place your mobile phone next to the telephone base when you download a mobile phone phonebook to your LS6245.
To download a mobile phone phonebook
1. Press MENU and
</> on the base to select BLUETOOTH.
2. Press SELECT to select DOWNLOAD PB.
3. Press SELECT.
4. Press
19
</> to select a desired device, then press SELECT.
VTech LS6245_HK version_IFU_EN.book
•
•
•
•
Page 20
Friday, September 23, 2011
1:01 PM
If the selected device is on the paired devices list but not on the active devices list, the handset displays NO CELL PHONE ON ACTIVE
DEVICES LIST. and then ADD?
If the selected device is on the active devices list but disconnected, the handset displays NOT CONNECTED. PLACE CELL NEXT TO
THE BASE.
If the selected device’s phonebook has already been downloaded to LS6245 before, the handset displays LAST UPDATE ON: MM/DD/
YY and then OVERWRITE?. If you press SELECT to continue the download process, the stored phonebook for that particular mobile
phone will be erased and replaced with the current mobile phone phonebook. The handset then displays PHONEBOOK WILL BE
ERASED. DOWNLOAD?. Press SELECT to confirm. If you have edited the downloaded entries (page 44), those changes will be lost.
If you already have four downloaded phonebooks, the handset displays MEMORY IS FULL. REPLACE CURRENT PHONEBOOK?
when you try to download another mobile phone phonebook. Press SELECT and the system prompt you to replace an existing
phonebook.
<>
6. Press SELECT. During the download, the handset displays the progress. All system handsets display DOWNLOADING PB.
7. When the downloading process is complete, the handset displays DOWNLOAD ENDED TOTAL #XXXX ENTRIES SAVED. Press SELECT
to return to the download phonebook menu.
Note:
Only English characters are supported. If any Chinese characters are included in the phonebook entries, they may not be displayed normally.
Certain mobile phones do not support SIM card download. If this is the case, try transferring the contacts from your SIM card to your mobile
phone memory first, then download from your mobile phone memory. For more information on how to transfer contacts from your SIM card to
your mobile phone memory, see the User Manual of your mobile phone.
When downloading the phonebook from your Bluetooth wireless technology enabled mobile phone, some data may not transfer. For example,
if you have home, mobile and work numbers for a particular contact, the three categories may not transfer to your LS6245.
For certain mobile phones, you may need to press a key to confirm the phonebook download.
Interruption to phonebook download
If you are downloading a phonebook from a mobile phone and the mobile phone receives a call, the download process stops and all handsets
display DOWNLOAD PHONEBOOK ABORTED. You need to download the phonebook again.
If you are downloading a phonebook from a mobile phone and the telephone base loses power, the download process stops. You need to
download the phonebook again.
20
Bluetooth
5. Press
/
to select one of the following options:
• PHONE MEMORY - download all contacts stored in your phone memory.
• SIM CARD ONLY - download all contacts stored in your SIM card.
• PHONE AND SIM - download all contacts stored in both your phone memory and SIM card.
VTech LS6245_HK version_IFU_EN.book
Page 21
Friday, September 23, 2011
1:01 PM
The download progress screen may be replaced with CELL LINE IN USE. To return to the downloading progress screen, do steps one through
three on page 19. The download process continues even if any of the followings occur.
• You receive or make calls on the home line.
• You place the handset in the telephone base or charger.
• You access your mobile phone menu features.
• The handset battery pack becomes depleted or the handset loses connection with the telephone base.
Note:
During the download process, do not attempt to make changes to your mobile phone phonebook.
21
VTech LS6245_HK version_IFU_EN.book
5
Page 22
Friday, September 23, 2011
1:01 PM
USING YOUR PHONE
5.1
Make a Home Call
5.1.1
Preparatory Dialing
Using a handset:
1. Enter the phone number. Press
2. Press
T or S to dial the number.
Using the base:
h to dial the number.
c to clear the entry.
Using your phone
1. Enter the phone number. Press
2. Press
F to clear the entry.
Using a Bluetooth wireless technology enabled headset:
1. Enter the phone number on the base. Press
2. Press
h on the base to dial the number.
c to clear the entry.
3. Press OPTION on the base to select USE HEADSET, and then press SELECT.
Note:
To switch back to the base, press OPTION on the base to select USE SPEAKER, and then press SELECT.
5.1.2
Direct Dialing
Using a handset:
Press
T or S to take the line and enter the phone number.
Using the base:
Press
h to take the line and enter the phone number.
22
VTech LS6245_HK version_IFU_EN.book
Page 23
Friday, September 23, 2011
1:01 PM
Using a Bluetooth wireless technology enabled headset:
1. Press
h on the base to take the line and enter the phone number.
2. Press OPTION on the base to select USE HEADSET, and then press SELECT.
Note:
To switch back to the base, press OPTION on the base to select USE SPEAKER, and then press SELECT.
5.1.3
Call from the phonebook
Using a handset:
U to access the phonebook list.
Press U/D to select the desired phonebook entry.
Press T or S to dial out to the selected phonebook entry.
1. Press
2.
3.
Using the base:
1. Press MENU and
</> to select PHONEBOOK.
2. Press SELECT to select REVIEW, and then press SELECT.
</> to select the desired phonebook entry.
Press h to dial out to the selected phonebook entry.
3. Press
4.
5.1.4
Call from the Call Log
Using a handset:
D to access the call log.
Press U/D to select the desired call log entry.
Press T or S to dial out to the selected call log entry.
1. Press
2.
3.
23
VTech LS6245_HK version_IFU_EN.book
Using the base:
1. Press MENU and
Page 24
Friday, September 23, 2011
1:01 PM
</> to select CALL LOG.
2. Press SELECT to select REVIEW, and then press SELECT.
</> to select the desired call log entry.
Press h to dial out to the selected call log entry.
3. Press
4.
5.1.5
Call from the redial list
Using a handset:
2. Press
3. Press
U/D to select the desired redial entry.
T or S to dial out to the selected redial entry.
Using the base:
1. Press REDIAL to access the redial list.
2. Press
3. Press
</> to select the desired redial entry.
h to dial out to the selected redial entry.
Note:
Your handset or base automatically times the duration of every call. The call timer will display a few seconds after the call has been made. It is
shown in hours, minutes and seconds format (HH:MM:SS).
24
Using your phone
1. Press REDIAL to access the redial list.
VTech LS6245_HK version_IFU_EN.book
5.2
Page 25
Friday, September 23, 2011
1:01 PM
Answer a Home Call
Using a handset:
When the phone rings, press
Using the base:
When the phone rings, press
T or S to answer a call.
h to answer a call.
Using a Bluetooth wireless technology enabled headset:
When the phone rings, press the call button on your headset.
5.3
End a Home Call
Using a handset:
During a call connection, press
Using the base:
During a call connection, press
F or put the handset on the base to end the call.
h to end the call.
Using a Bluetooth wireless technology enabled headset:
During a call connection, press the call button on your headset to end the call.
5.4
Call waiting on the home line
If you subscribe to call waiting service with your telephone service provider, you hear a beep if someone calls while you are already on a call.
T on the handset or f on the telephone base to put your current call on hold and take the new call.
Press T on the handset or f on the telephone base at any time to switch back and forth between calls.
1. Press
2.
25
VTech LS6245_HK version_IFU_EN.book
5.5
Page 26
Friday, September 23, 2011
1:01 PM
Make a Cell Call
You can make cell calls using a handset or the telephone base.
You can connect a maximum of two Bluetooth wireless technology enabled cell phones to the telephone base, but only one cell phone can be
used on a cell call at a time.
If you only have one cell phone connected to the telephone base, it is automatically selected to make or answer cell calls. If you have two cell
phones connected to the telephone base and on the active device list, the handset or telephone base prompts you to select a cell phone before
you make a cell call.
Preparatory Dialing
Using a handset:
1. Enter the phone number. Press
2. Press
C to dial the number.
Using the base:
1. Enter the phone number. Press
2. Press
5.5.2
C to dial the number.
Using your phone
5.5.1
F to clear the entry.
c to clear the entry.
Direct Dialing
Using a handset:
1. Press
C to take the line and enter the phone number.
2. Press DIAL to dial out.
Using the base:
1. Press
C to take the line and enter the phone number.
2. Press DIAL to dial out.
26
VTech LS6245_HK version_IFU_EN.book
5.5.3
Page 27
Friday, September 23, 2011
Call from the phonebook
Using a handset:
U to access the phonebook list.
U/D to select the desired phonebook entry.
Press C to dial out to the selected phonebook entry.
1. Press
2. Press
3.
Using the base:
1. Press MENU and
</> to select PHONEBOOK.
2. Press SELECT to select REVIEW, and then press SELECT.
3. Press
4. Press
5.5.4
</> to select the desired phonebook entry.
C to dial out to the selected phonebook entry.
Call from the Call Log
Using a handset:
D to access the call log.
U/D to select the desired call log entry.
Press C to dial out to the selected call log entry.
1. Press
2. Press
3.
Using the base:
1. Press MENU and
</> to select CALL LOG.
2. Press SELECT to select REVIEW, and then press SELECT.
3. Press
4. Press
27
</> to select the desired call log entry.
C to dial out to the selected call log entry.
1:01 PM
VTech LS6245_HK version_IFU_EN.book
5.5.5
Page 28
Friday, September 23, 2011
1:01 PM
Call from the redial list
Using a handset:
1. Press REDIAL to access the redial list.
U/D to select the desired redial entry.
Press C to dial out to the selected redial entry.
2. Press
3.
Using the base:
1. Press REDIAL to access the redial list.
3.
Note:
Your handset or base automatically times the duration of every call. The call timer will display a few seconds after the call has been made. It is
shown in hours, minutes and seconds format (HH:MM:SS).
5.6
Answer a Cell Call
Using a handset:
When the phone rings, press
Using the base:
When the phone rings, press
5.7
C or S to answer a call.
C to answer a call.
End a Cell Call
Using a handset:
During a call connection, press
C or put the handset on the base to end the call.
Using the base:
During a call connection, press
C to end the call.
28
Using your phone
</> to select the desired redial entry.
Press C to dial out to the selected redial entry.
2. Press
VTech LS6245_HK version_IFU_EN.book
5.8
Page 29
Friday, September 23, 2011
1:01 PM
Call waiting on the cell line
If you subscribe to call waiting service with your cell phone service provider, you hear a beep if someone calls while you are already on a call.
1. Press the SWAP on the handset or base.
2. Press the OPTION and then the SWAP to switch back and forth between calls.
5.9
Answer a cell call while on a home call
While you are on a home call and there is an incoming cell call,
rings.
Using a handset:
1. To answer the incoming cell call, press
appears on the handset.
1 or2 1 2
displays on the handset and telephone base and the telephone
C on the handset. The home call is automatically placed on hold and "HOME CALL ON HOLD"
F on the handset. The home line is still on hold.
To resume the home call on hold, press T on the handset.
2. To end the cell call, press
3.
Using the base:
1. To answer the incoming cell call, press
appears on the base.
2. To end the cell call, press
C on the base. The home call is automatically placed on hold and "HOME CALL ON HOLD"
C on the base. The home line is still on hold.
h on the base
3. To resume the home call on hold, press
29
VTech LS6245_HK version_IFU_EN.book
5.10
Page 30
Friday, September 23, 2011
1:01 PM
Answer a home call while on a cell call
While you are on a cell call and there is an incoming home call,
Using a handset:
1. To answer the incoming home call, press
appears on the handset.
appears on the handset and telephone base and the telephone rings.
T on the handset. The cell call is automatically placed on hold and "CELL CALL ON HOLD"
F on the handset. The cell line is still on hold.
To resume the cell call on hold, press C on the handset.
2. To end the home call, press
3.
1. To answer the incoming home call, press
appears on the base.
Using your phone
Using the base:
h on the base. The cell call is automatically placed on hold and "CELL CALL ON HOLD"
h on the base. The cell line is still on hold.
To resume the cell call on hold, press C on the base.
2. To end the home call, press
3.
5.11
Conference home and cell calls
When you have calls established on the home and cell lines, you can create a 3-way conference using the handset or telephone base.
Using a handset:
During a home call or cell call:
1. Press OPTION on the handset.
2. Press
U/D to select CONF. WITH HOME or CONF. WITH CELL.
3. Press SELECT to establish the conference call.
4. Press
F on the handset to end the call.
30
VTech LS6245_HK version_IFU_EN.book
Page 31
Friday, September 23, 2011
1:01 PM
During a conference call:
1. Press OPTION on the handset.
2. Press
U/D to select END HOME CALL or END CELL CALL
3. Press SELECT to go back to a home call or cell call.
Using the base:
During a home call or cell call:
1. Press OPTION on the base.
2. Press
</> to select CONF. WITH HOME or CONF. WITH CELL.
3. Press SELECT to establish the conference call.
4. Press
h or C on the base to end the call.
During a conference call:
1. Press OPTION on the base.
2. Press
</> to select END HOME CALL or END CELL CALL.
3. Press SELECT to go back to a home call or cell call.
5.12
Chain Dialing
Use this feature to initiate a dialing sequence from numbers stored in the phonebook, call log or redial while you are on a home call. This
feature is available only for home calls.
Chain dialing can be useful if you wish to access other numbers (such as bank account numbers or access codes) from the phonebook, call log
or redial list.
5.12.1 Access a Number in the Phonebook on a Home Call
Using a handset:
1. Press OPTION and
31
U/D to select PHONEBOOK.
VTech LS6245_HK version_IFU_EN.book
2. Press SELECT and
Page 32
Friday, September 23, 2011
1:01 PM
U/D to select the desired entry.
3. Press DIAL to dial the selected number.
Using the base:
</> to select PHONEBOOK.
Press SELECT and </> to select the desired entry.
1. Press OPTION and
2.
3. Press DIAL to dial the selected number.
Using a handset:
1. Press OPTION and
2. Press SELECT and
Using your phone
5.12.2 Access a Number in the Call Log on a Home Call
U/D to select CALL LOG.
U/D to select the desired entry.
3. Press DIAL to dial the selected number.
Using the base:
1. Press OPTION and
2. Press SELECT and
</> to select CALL LOG.
</> to select the desired entry.
3. Press DIAL to dial the selected number.
5.12.3 Access the Last Number Redial on a Home Call
Using a handset:
1. Press OPTION and
U/D to select REDIAL LAST #.
2. Press SELECT to select the last redial entry.
3. Press DIAL to dial the number.
32
VTech LS6245_HK version_IFU_EN.book
Using the base:
1. Press OPTION and
Page 33
Friday, September 23, 2011
1:01 PM
</> to select REDIAL LAST #.
2. Press SELECT to select the last redial entry.
3. Press DIAL to dial the number.
5.13
Adjust Earpiece and Handsfree Volume
There are 5 levels (VOLUME 1 to VOLUME 5) to choose from for each of earpiece and handsfree volume in the handset, while there are 8
levels (VOLUME 1 to VOLUME 8) to choose for handsfree volume in the base.
Using a handset:
During a call:
Press
U/D to select volume 1-5. The current setting is shown. When you end the call, the setting will remain at the last selected level.
Using the base:
During a call:
Press
5.14
</> to select volume 1-8. The current setting is shown. When you end the call, the setting will remain at the last selected level.
Mute a Call
You can talk to someone nearby without letting the caller hear you during a call.
Using a handset:
During a call:
Press MUTE to mute the microphone and "MUTED" will display on the LCD. Your caller cannot hear you. Press UNMUTE to unmute the
microphone.
Using the base:
During a call:
Press MUTE to mute the microphone and "MUTED" will display on the LCD. Your caller cannot hear you. Press UNMUTE to unmute the
microphone.
33
VTech LS6245_HK version_IFU_EN.book
5.15
Page 34
Friday, September 23, 2011
1:01 PM
Infrared sensor
This feature prevents you from pressing the keys accidentally while you are using the handset during a call.
When you put the earpiece of the handset next to your ear or the infrared sensor is covered during a call, all keys on the dial pad are disabled.
5.16
Hold a Call
You can place a home or cell call on hold. You will hear an alert tone if you have not taken the call off of hold after 14 minutes. You will hear
another alert tone 30 seconds later. At 15 minutes on hold, the call on hold automatically disconnects.
1. Press
Using your phone
Using a handset:
During a home call:
H on the handset. "HOME CALL ON HOLD" appears, T on the handset flashes.
T on the handset.
2. To resume a home call on hold, press
During a cell call:
H on the handset. "CELL CALL ON HOLD" appears, C on the handset flashes.
To resume a cell call on hold, press C on the handset.
1. Press
2.
Using the base:
During a home call:
H on the base. "HOME CALL ON HOLD" appears, h on the base flashes.
To resume a home call on hold, press h on the base.
1. Press
2.
During a cell call:
1. Press
H on the handset. "CELL CALL ON HOLD" appears, C on the base flashes.
C on the base.
2. To resume a cell call on hold, press
34
VTech LS6245_HK version_IFU_EN.book
5.17
Page 35
1:01 PM
Set the Silent Mode
Using a handset:
When the handset rings, press SILENCE or
Using the base:
When the base rings, press SILENCE or
5.18
Friday, September 23, 2011
F to turn off the handset ringer. The
c to turn off the handset ringer. The
icon is displayed on the LCD.
icon is displayed on the LCD.
Keypad Lock/Unlock
You can turn on the keypad lock of a handset.
In idle mode, press
* and then LOCK to turn on the keypad lock. "PRESS UNLOCK TO USE KEYS" is displayed on the LCD.
In keypad lock mode, press UNLOCK to turn off the keypad lock.
5.19
Redial the last number
You can redial up to 20 of the last numbers called. The most recent last number will display at the top of the redial list.
5.19.1 Redial a Number from the Redial List
Using a handset:
1. Press REDIAL to access the redial list.
2. Press
3. Press
OR
Press
35
U/D to select the desired entry.
T or S to dial the number using the home line.
C to dial the number using the cell line.
VTech LS6245_HK version_IFU_EN.book
Page 36
Friday, September 23, 2011
1:01 PM
Using the base:
1. Press REDIAL to access the redial list.
2. Press
3. Press
OR
Press
</> to select the desired entry.
h to dial the number using the home line.
C to dial the number using the cell line.
Using your phone
5.19.2 Store a Redial Number into the Phonebook
Using a handset:
1. Press REDIAL to access the redial list.
U/D to select the desired entry.
Press OPTION and U/D to select STORE.
2. Press
3.
4. Press SELECT to edit the number.
Note:
You can press PAUSE to insert a pause.
5. Press NEXT to enter the name.
Note:
You can press
* to toggle between upper and lower case.
6. Press SAVE to confirm.
36
VTech LS6245_HK version_IFU_EN.book
Page 37
Friday, September 23, 2011
Using the base:
1. Press REDIAL to access the redial list.
2. Press
</> to select the desired entry.
</> to select STORE.
3. Press OPTION and
4. Press SELECT to edit the number.
Note:
You can press PAUSE to insert a pause.
5. Press NEXT to enter the name.
Note:
You can press
* to toggle between upper and lower case.
6. Press SAVE to confirm.
5.19.3 Delete a Redial Number
Using a handset:
1. Press REDIAL to access the redial list.
U/D to select the desired entry.
Press OPTION and U/D to select DELETE.
2. Press
3.
4. Press SELECT to delete.
Using the base:
1. Press REDIAL to access the redial list.
2. Press
</> to select the desired entry.
</> to select DELETE.
3. Press OPTION and
4. Press SELECT to delete.
37
1:01 PM
VTech LS6245_HK version_IFU_EN.book
5.20
Page 38
Friday, September 23, 2011
1:01 PM
Find the Handset
This feature helps you find a misplaced handset.
1. Press MENU and
U/D on the base to select PAGE ALL HS.
2. Press SELECT to page and all handsets registered to the base will ring.
3. Press any dialing key,
5.21
T or S on the handset or STOP on the base to stop paging.
Intercom and Conference Call
This feature allows you to make internal calls, transfer external calls and make conference calls.
Using your phone
5.21.1 Intercom
Using a handset:
U/D on the handset to select INTERCOM.
Press SELECT and U/D to select the base or the desired handset you want to intercom with.
1. Press MENU and
2.
3. Press SELECT, and the called base or handset will ring.
4. Press
OR
Press
h on the called base to answer the call.
T or S on the called handset to answer the call.
Using the base:
</> on the base to select INTERCOM.
Press SELECT and </> to select the desired handset you want to intercom with.
1. Press MENU and
2.
3. Press SELECT, and the called handset will ring.
4. Press
T or S on the called handset to answer the call.
38
VTech LS6245_HK version_IFU_EN.book
Page 39
Friday, September 23, 2011
1:01 PM
5.21.2 Transfer an External Call
Using a handset:
During an external call:
1. Press OPTION to select INTERCOM.
2. Press SELECT and
U/D to select the base or the desired handset you want to intercom with.
3. Press SELECT. The external call is put on hold automatically and the called base or handset rings.
4. Press
OR
Press
5. Press
T or S on the called handset to answer the call.
h on the called base to answer the call.
F on the calling handset to end the call, and the external call will be transferred to the called base or handset automatically.
Using the base:
During an external call:
1. Press OPTION to select INTERCOM.
2. Press SELECT and
</> to select the desired handset you want to intercom with.
3. Press SELECT. The external call is put on hold automatically and the called handset rings.
4. Press
5. Press
39
T or S on the called handset to answer the call.
h on the calling base to end the call, and the external call will be transferred to the called handset automatically.
VTech LS6245_HK version_IFU_EN.book
Page 40
Friday, September 23, 2011
1:01 PM
5.21.3 Make a 3-way Conference Call
The conference call feature allows one external call to be shared with two internal parties (in intercom). The three parties can share the
conversation and no network subscription is required.
Using a handset:
During an external call:
1. Follow steps from 1 to 4 in Section 5.21.2.
2. Press OPTION on the calling handset to select CONFERENCE.
Note:
During the conference call, any internal party hangs up to leave the conference, it will leave the other one still in connection with the external call.
Using the base:
1. Follow steps from 1 to 4 in Section 5.21.2.
2. Press OPTION on the calling base to select CONFERENCE.
3. Press SELECT to initiate the 3-way conference call.
Note:
During the conference call, any internal party hangs up to leave the conference, it will leave the other one still in connection with the external call.
40
Using your phone
3. Press SELECT to initiate the 3-way conference call.
VTech LS6245_HK version_IFU_EN.book
Page 41
Friday, September 23, 2011
1:01 PM
5.21.4 Switch between internal call and external call
Using a handset:
During a conference call:
1. Press OPTION on the calling handset to select SINGLE, and then press SELECT. The calling handset will connect to the external call and
the internal call is put on hold.
2. To switch to the internal call, press OPTION and
U/D on the calling handset to select BROKERING, and then press SELECT.
U/D on the calling handset to select BROKERING again, and then press SELECT.
3. To switch back to the external call, press OPTION and
Note:
Any time when you on an internal call or external call switched from a conference call, you can press OPTION on the calling handset to select
CONFERENCE and then press SELECT to establish the conference call again.
Using the base:
During a conference call:
1. Press OPTION on the calling base to select SINGLE, and then press SELECT. The calling base will connect to the external call and the
internal call is put on hold.
</> on the calling base to select BROKERING, and then press SELECT.
To switch back to the external call, press OPTION and </> on the calling base to select BROKERING again, and then press SELECT.
2. To switch to the internal call, press OPTION and
3.
Note:
Any time when you on an internal call or external call switched from a conference call, you can press OPTION on the calling base to select
CONFERENCE and then press SELECT to establish the conference call again.
41
VTech LS6245_HK version_IFU_EN.book
6
Page 42
Friday, September 23, 2011
1:01 PM
PRIVATE PHONEBOOK
Your phone phonebook consists of a home phonebook and up to four downloaded phonebooks. The home phonebook stores up to 100 private
entries with up to 30 digits for each phone number and 15 characters for each name. Each of the downloaded phonebook stores up to 1,500
entries with up to 30 digits for each phone number and 15 characters for each name. Phonebook entries are stored alphabetically by name.
6.1
Add a New Phonebook Entry
Using a handset:
1. Press MENU and
U/D to select PHONEBOOK.
Private phonebook
2. Press SELECT to select HOME.
3. Press SELECT and
U/D to select STORE.
4. Press SELECT to enter the number.
Note:
You can press PAUSE to insert a pause.
5. Press NEXT to enter the name.
Note:
You can press
* to toggle between upper and lower case.
6. Press SAVE to save the entry.
Using the base:
1. Press MENU and
</> to select PHONEBOOK.
2. Press SELECT to select HOME.
3. Press SELECT and
</> to select STORE.
4. Press SELECT to enter the number.
Note:
You can press PAUSE to insert a pause.
42
VTech LS6245_HK version_IFU_EN.book
Page 43
Friday, September 23, 2011
1:01 PM
5. Press NEXT to enter the name.
Note:
You can press
* to toggle between upper and lower case.
6. Press SAVE to save the entry.
6.2
View a Phonebook Entry
Using a handset:
U to access the phonebook.
Press U/D to select HOME phonebook or a downloaded phonebook.
Press SELECT and U/D to browse the entries. You can also enter the first character of your desired name of the phonebook entry by
1. Press
2.
3.
multi-tap to search the entry.
OR
U/D to select PHONEBOOK.
Press SELECT and U/D to select HOME phonebook or a downloaded phonebook.
1. Press MENU and
2.
3. Press SELECT to select REVIEW.
UD
/
to browse the entries. You can also enter the first character of your desired name of the phonebook entry by
4. Press SELECT and
multi-tap to search the entry.
Using the base:
1. Press MENU and
</> to select PHONEBOOK.
</> to select HOME phonebook or a downloaded phonebook.
2. Press SELECT and
3. Press SELECT to select REVIEW.
< > to browse the entries. You can also enter the first character of your desired name of the phonebook entry by
/
4. Press SELECT and
multi-tap to search the entry.
43
VTech LS6245_HK version_IFU_EN.book
Page 44
Friday, September 23, 2011
1:01 PM
Note:
You will be requested to enter the PIN code to access the PIN-protected downloaded phonebook.
6.3
Edit a Phonebook Entry
You may edit any phonebook entry. However, be aware that if you download from a mobile phone again, the phonebook will be erased and
replaced with the current mobile phone phonebook. If you have edited the downloaded entries on LS6245, those changes will be lost. To avoid
losing changes made to the downloaded phonebook, we suggest you edit the number in your mobile phone, then download the phonebook.
Using a handset:
2.
3.
multi-tap to search the entry.
4. Press EDIT to edit the number.
5. 5. Press NEXT to edit the name.
6. 6. Press SAVE to confirm.
OR
1. Press MENU and
U/D to select PHONEBOOK.
U/D to select HOME phonebook or a downloaded phonebook.
2. Press SELECT and
3. Press SELECT to select REVIEW.
UD
4. Press SELECT and
/
to browse the entries. You can also enter the first character of your desired name of the phonebook entry by
multi-tap to search the entry.
5. Press EDIT to edit the number.
6. Press NEXT to edit the name.
7. Press SAVE to confirm.
44
Private phonebook
U to access the phonebook.
Press U/D to select HOME phonebook or a downloaded phonebook.
Press SELECT and U/D to browse the entries. You can also enter the first character of your desired name of the phonebook entry by
1. Press
VTech LS6245_HK version_IFU_EN.book
Note:
You can press
Page 45
Friday, September 23, 2011
1:01 PM
* to toggle between upper and lower case.
Using the base:
1. Press MENU and
</> to select PHONEBOOK.
</> to select HOME phonebook or a downloaded phonebook.
2. Press SELECT and
3. Press SELECT to select REVIEW.
< > to browse the entries. You can also enter the first character of your desired name of the phonebook entry by
4. Press SELECT and
/
multi-tap to search the entry.
5. Press EDIT to edit the number.
6. Press NEXT to edit the name.
7. Press SAVE to confirm.
Note:
You can press
6.4
* to toggle between upper and lower case.
Delete a Phonebook Entry
Using a handset:
U to access the phonebook.
Press U/D to select HOME phonebook or a downloaded phonebook.
Press SELECT and U/D to browse the entries. You can also enter the first character of your desired name of the phonebook entry by
1. Press
2.
3.
multi-tap to search the entry.
4. Press DELETE to delete the entry.
OR
1. Press MENU and
U/D to select PHONEBOOK.
U/D to select HOME phonebook or a downloaded phonebook.
2. Press SELECT and
45
VTech LS6245_HK version_IFU_EN.book
Page 46
Friday, September 23, 2011
1:01 PM
3. Press SELECT to select REVIEW.
UD
4. Press SELECT and
/
to browse the entries. You can also enter the first character of your desired name of the phonebook entry by
multi-tap to search the entry.
5. Press DELETE to delete the entry.
Using the base:
1. Press MENU and
</> to select PHONEBOOK.
</> to select HOME phonebook or a downloaded phonebook.
2. Press SELECT and
< > to browse the entries. You can also enter the first character of your desired name of the phonebook entry by
5. Press DELETE to delete the entry.
Note:
Once a phonebook entry is deleted, it cannot be retrieved.
6.5
Remove a downloaded phonebook (for downloaded phonebook only)
Using the handset:
U/D to select PHONEBOOK.
Press SELECT and U/D to select the desired downloaded phonebook.
Press SELECT and U/D to select REMOVE PB.
1. Press MENU and
2.
3.
4. Press SELECT.
5. Press SELECT to confirm.
46
Private phonebook
3. Press SELECT to select REVIEW.
4. Press SELECT and
/
multi-tap to search the entry.
VTech LS6245_HK version_IFU_EN.book
Page 47
Friday, September 23, 2011
1:01 PM
Using the base:
</> to select PHONEBOOK.
Press SELECT and </> to select the desired downloaded phonebook.
Press SELECT and </> to select REMOVE PB.
1. Press MENU and
2.
3.
4. Press SELECT.
5. Press SELECT to confirm.
Note:
You will be requested to enter the PIN code to access the PIN-protected downloaded phonebook.
6.6
Security PIN for downloaded phonebook
This feature allows you to set your security PIN to protect your downloaded phonebooks, if you set the Security ON, you must enter the correct
4-digit PIN when you want to access your downloaded phonebooks.
Using the handset:
U/D to select PHONEBOOK.
U/D to select the desired downloaded phonebook.
Press SELECT and U/D to select SECURITY.
Press SELECT and U/D to select ON or OFF.
1. Press MENU and
2. Press SELECT and
3.
4.
5. Press SELECT and then use the keypad to enter 4-digit PIN if you select ON.
6. Repeat step 5 to enter the 4-digit PIN again.
7. Press SELECT to confirm.
Using the base:
1. Press MENU and
</> to select PHONEBOOK.
</> to select the desired downloaded phonebook.
2. Press SELECT and
47
VTech LS6245_HK version_IFU_EN.book
3. Press SELECT and
4. Press SELECT and
Page 48
Friday, September 23, 2011
1:01 PM
</> to select SECURITY.
</> to select ON or OFF.
5. Press SELECT and then use the keypad to enter 4-digit PIN if you select ON.
6. Repeat step 5 to enter the 4-digit PIN again.
7. Press SELECT to confirm.
Private phonebook
Note:
Each mobile downloaded phonebook can be protected by a separate PIN. After setting the security PIN, you will be requested to enter the
correct PIN to access the protected downloaded phonebook.
48
VTech LS6245_HK version_IFU_EN.book
7.
Page 49
Friday, September 23, 2011
1:01 PM
CALLER DISPLAY (NETWORK DEPENDENT)
This feature is available if you have subscribed to the Caller Line Identification service with your network service provider. Your phone can store up
to 100 received calls with date/time information in the Call Log. The number will be shown on the LCD when the phone is ringing. If the number
matches with one of the entries in your Private Phonebook, the caller's name stored in the private phonebook will be displayed with the number.
If the caller number is disabled to send caller information, "WITHHELD" will display.
If the caller number is not provided, "OUT OF AREA" will display.
In standby, if three unanswered calls are received, "3 NEW CALLS" will be displayed.
7.1
View the Call Log
All received calls are saved in Call Log with the latest call putting at the top of the list. When the call list is full, the oldest call will be replaced by
a new call.
Using a handset:
1. Press
D to access the call log.
OR
Press MENU and
2. Press
U/D to select CALL LOG, and then press SELECT to select REVIEW. Press SELECT to access the call log.
U/D to view the entry.
Using the base:
</> to select CALL LOG, and then press SELECT to select REVIEW. Press SELECT to access the call log.
</> to view the entry.
1. Press MENU and
2. Press
7.2
Store a Call Log Number into the Phonebook
Using a handset:
1. Press
D to access the call log.
OR
Press MENU and
49
U/D to select CALL LOG, and then press SELECT to select REVIEW. Press SELECT to access the call log.
VTech LS6245_HK version_IFU_EN.book
2. Press
Page 50
Friday, September 23, 2011
1:01 PM
U/D to select the desired entry.
3. Press SAVE to edit the number.
4. Press NEXT to enter the name.
Note:
You can press
* to toggle between upper and lower case.
5. Press SAVE to confirm.
Using the base:
</> to select CALL LOG, and then press SELECT to select REVIEW. Press SELECT to access the call log.
</> to select the desired entry.
1. Press MENU and
Caller display
2. Press
3. Press SAVE to edit the number.
4. Press NEXT to enter the name.
Note:
You can press
* to toggle between upper and lower case.
5. Press SAVE to confirm.
7.3
Delete an entry in the Call Log
Using a handset:
1. Press
OR
D to access the call log.
U/D to select CALL LOG, and then press SELECT to select REVIEW. Press SELECT to access the call log.
U/D to select the desired entry.
Press MENU and
2. Press
3. Press DELETE to delete the entry.
50
VTech LS6245_HK version_IFU_EN.book
Using the base:
1. Press MENU and
2. Press
Page 51
Friday, September 23, 2011
</> to select CALL LOG, and then press SELECT to select REVIEW. Press SELECT to access the call log.
</> to select the desired entry.
3. Press DELETE to delete the entry.
7.4
Delete the entire list of the Call Log
Using a handset:
U/D to select CALL LOG.
Press SELECT and U/D to select DEL ALL CALLS.
1. Press MENU and
2.
3. Press SELECT to confirm.
4. Press YES to reconfirm, or press NO to cancel.
Using the base:
1. Press MENU and
</> to select CALL LOG.
</> to select DEL ALL CALLS.
2. Press SELECT and
3. Press SELECT to confirm.
4. Press YES to reconfirm, or press NO to cancel.
51
1:01 PM
VTech LS6245_HK version_IFU_EN.book
8.
Page 52
Friday, September 23, 2011
1:01 PM
PHONE SETTINGS
Your phone comes with a selection of settings that you can change to personalize your phone the way you like it to work.
Using a handset:
8.1
Set the Audio
In the ringers menu, you can select the ringer tones and adjust the ringer volume for incoming calls to the home and cell lines.
8.1.1
Set the Ringer Volume
1. Press MENU and
U/D to select AUDIO.
3. Press SELECT and
4. Press SELECT and
U/D to select HOME, CELLULAR 1, CELLULAR 2 or ALL HOME & CELL.
U/D to select the desired volume level (a total of 6 ringer volume levels), or press OFF to turn the ringer off.
Note:
The respective ringer volume will be played during your selection.
5. Press OK to confirm.
Note:
When the ringer volumes for all are set to off or the lowest level, a ringer off icon
or set to the lowest level, a ringer off icon
flashes.
8.1.2
appears. When only one or two of the ringer volume is off
Set the Ringer Tone
U/D to select AUDIO.
U/D to select RINGER TONE.
Press SELECT and U/D to select HOME, CELLULAR 1, CELLULAR 2 or ALL HOME & CELL.
If you selected HOME, press SELECT and U/D to select EXTERNAL or INTERNAL.
Press SELECT and U/D to select the desired melody.
1. Press MENU and
2. Press SELECT and
3.
4.
5.
52
Phone settings
2. Press SELECT to select RINGER VOLUME.
VTech LS6245_HK version_IFU_EN.book
Page 53
Friday, September 23, 2011
1:01 PM
6. Press OK to confirm.
Note:
The respective ringer melody will be played while browsing the melody list.
8.1.3
Set the Key Tone
A single beep is emitted when you press a key. You can turn on or off the key tone.
U/D to select AUDIO.
U/D to select KEY TONE.
Press SELECT and U/D to select ON or OFF.
1. Press MENU and
2. Press SELECT and
3.
4. Press OK to confirm.
8.1.4
Set the Low battery tone
U/D to select AUDIO.
U/D to select LOW BATTERY.
Press SELECT and U/D to select ON or OFF.
1. Press MENU and
2. Press SELECT and
3.
4. Press OK to confirm.
8.1.5
Set the No Coverage Tone
U/D to select AUDIO.
Press SELECT and U/D to select NO COVERAGE.
Press SELECT and U/D to select ON or OFF.
1. Press MENU and
2.
3.
4. Press OK to confirm.
53
VTech LS6245_HK version_IFU_EN.book
8.2
Page 54
Friday, September 23, 2011
1:01 PM
Set the Date and Time
You will need to set the correct time and date so that you know when you received call log entries.
8.2.1
Change the Date Format
U/D to select SETTINGS.
Press SELECT and U/D to select DATE FORMAT.
Press SELECT and U/D to select DD/MM/YY or MM/DD/YY.
1. Press MENU and
2.
3.
4. Press OK to confirm.
Change the Time Format
Phone settings
8.2.2
U/D to select SETTINGS.
U/D to select TIME FORMAT.
Press SELECT and U/D to select 12 - HOUR or 24 - HOUR.
1. Press MENU and
2. Press SELECT and
3.
4. Press OK to confirm.
8.2.3
Set Date/Time
1. Press MENU and
U/D to select SETTINGS.
2. Press SELECT to select SET DATE/TIME, and then press SELECT.
3. Enter the date by the keypad, using the date format you set in Section 8.2.1.
OR
Press
U/D until the screen displays the correct value. Press OK to advance.
54
VTech LS6245_HK version_IFU_EN.book
Page 55
Friday, September 23, 2011
1:01 PM
4. Press OK to enter the time by the keypad, using the time format you set in Section 8.2.2.
OR
Press
U/D until the screen displays the correct value. Press OK to advance.
5. Press OK to confirm.
8.3
Set the Auto Keylock
U/D to select SETTINGS.
Press SELECT and U/D to select AUTO KEYLOCK.
Press SELECT and U/D to select the desired item.
1. Press MENU and
2.
3.
4. Press OK to confirm.
8.4
De-register
U/D to select SETTINGS.
Press SELECT and U/D to select DE-REGISTER.
1. Press MENU and
2.
3. Press SELECT to enter the system PIN. (Default is 0000)
4. Press OK and a list of registered handsets is displayed.
5. Press
U/D and SELECT to de-register a handset.
6. Press YES to reconfirm or NO to cancel.
Note:
You cannot de-register the handset that you are currently using.
55
VTech LS6245_HK version_IFU_EN.book
8.5
Page 56
Friday, September 23, 2011
1:01 PM
Set the Dial Mode
U/D to select SETTINGS.
U/D to select DIAL MODE.
Press SELECT and U/D to select TONE or PULSE.
1. Press MENU and
2. Press SELECT and
3.
4. Press OK to confirm.
8.6
Set the Flash Time
The flash time settings is country dependent. Please contact your local service provider for the correct settings.
U/D to select SETTINGS.
Press SELECT and U/D to select FLASH TIME.
Press SELECT and U/D to select the desired item.
2.
3.
Phone settings
1. Press MENU and
4. Press OK to confirm.
8.7
Set the ECO Mode Range
U/D to select SETTINGS.
U/D to select ECO MODE RANGE.
Press SELECT and U/D to select HALF RANGE or FULL RANGE.
1. Press MENU and
2. Press SELECT and
3.
4. Press OK to confirm.
56
VTech LS6245_HK version_IFU_EN.book
8.8
Page 57
Friday, September 23, 2011
1:01 PM
Change the System PIN
1. Press MENU and
U/D to select SETTINGS.
U/D to select SYSTEM PIN.
2. Press SELECT and
3. Press SELECT to enter the old system PIN. (Default is 0000)
Note:
If the old system PIN is wrong, you will hear an error tone and be asked to enter it again.
4. Press OK to enter the four-digit new system PIN.
5. Press OK to enter the four-digit new system PIN again.
6. Press OK to confirm.
Note:
If the new PIN entered in Step 5 is not matched with the new system PIN entered in Step 4, user is requested to enter the old system PIN again in Step 3.
8.9
Reset the handset
U/D to select SETTINGS.
Press SELECT and U/D to select RESET.
1. Press MENU and
2.
3. Press SELECT to enter the four-digit system PIN. (Default is 0000)
4. Press OK to confirm.
5. Press YES to reconfirm, or press NO to cancel.
57
VTech LS6245_HK version_IFU_EN.book
Page 58
Friday, September 23, 2011
1:01 PM
Using the base:
8.10
Set the Audio
In the ringers menu, you can select the ringer tones and adjust the ringer volume for incoming calls to the home and cell lines.
8.10.1 Set the Ringer Volume
1. Press MENU and
</> to select AUDIO.
2. Press SELECT to select RINGER VOLUME.
</> to select HOME, CELLULAR 1, CELLULAR 2 or ALL HOME & CELL.
Press SELECT and </> to select the desired volume level (a total of 6 ringer volume levels), or press OFF to turn the ringer off.
3. Press SELECT and
4.
5. Press OK to confirm.
Note:
When the ringer volumes for all are set to off or the lowest level, a ringer off icon
or set to the lowest level, a ringer off icon
flashes.
appears. When only one or two of the ringer volume is off
8.10.2 Set the Ringer Tone
</> to select AUDIO.
</> to select RINGER TONE.
Press SELECT and </> to select HOME, CELLULAR 1, CELLULAR 2 or ALL HOME & CELL.
If you selected HOME, press SELECT and </> to select EXTERNAL or INTERNAL.
Press SELECT and </> to select the desired melody.
1. Press MENU and
2. Press SELECT and
3.
4.
5.
6. Press OK to confirm.
Note:
The respective ringer melody will be played while browsing the melody list.
58
Phone settings
Note:
The respective ringer volume will be played during your selection.
VTech LS6245_HK version_IFU_EN.book
Page 59
Friday, September 23, 2011
1:01 PM
8.10.3 Set the Key Tone
A single beep is emitted when you press a key. You can turn on or off the key tone.
</> to select AUDIO.
</> to select KEY TONE.
Press SELECT and </> to select ON or OFF.
1. Press MENU and
2. Press SELECT and
3.
4. Press OK to confirm.
8.11
Set the Date and Time
You will need to set the correct time and date so that you know when you received call log entries.
8.11.1
Change the Date Format
</> to select SETTINGS.
Press SELECT and </> to select DATE FORMAT.
Press SELECT and </> to select DD/MM/YY or MM/DD/YY.
1. Press MENU and
2.
3.
4. Press OK to confirm.
8.11.2
Change the Time Format
</> to select SETTINGS.
</> to select TIME FORMAT.
Press SELECT and </> to select 12 - HOUR or 24 - HOUR.
1. Press MENU and
2. Press SELECT and
3.
4. Press OK to confirm.
59
VTech LS6245_HK version_IFU_EN.book
8.11.3
Page 60
Friday, September 23, 2011
1:01 PM
Set Date/Time
1. Press MENU and
</> to select SETTINGS.
2. Press SELECT to select SET DATE/TIME, and then press SELECT.
3. Enter the date by the keypad, using the date format you set in Section 8.11.1.
OR
Press
</> until the screen displays the correct value. Press OK to advance.
4. Press OK to enter the time by the keypad, using the time format you set in Section 8.11.2.
OR
</> until the screen displays the correct value. Press OK to advance.
Phone settings
Press
5. Press OK to confirm.
8.12
De-register
</> to select SETTINGS.
Press SELECT and </> to select DE-REGISTER.
1. Press MENU and
2.
3. Press SELECT to enter the system PIN. (Default is 0000)
4. Press OK and a list of registered handsets is displayed.
5. Press
</> and SELECT to de-register a handset.
6. Press YES to reconfirm or NO to cancel.
60
VTech LS6245_HK version_IFU_EN.book
8.13
Page 61
Friday, September 23, 2011
1:01 PM
Set the Dial Mode
</> to select SETTINGS.
</> to select DIAL MODE.
Press SELECT and </> to select TONE or PULSE.
1. Press MENU and
2. Press SELECT and
3.
4. Press OK to confirm.
8.14
Set the Flash Time
The flash time settings is country dependent. Please contact your local service provider for the correct settings.
</> to select SETTINGS.
</> to select FLASH TIME.
Press SELECT and </> to select the desired item.
1. Press MENU and
2. Press SELECT and
3.
4. Press OK to confirm.
8.15
Set the ECO Mode Range
</> to select SETTINGS.
</> to select ECO MODE RANGE.
Press SELECT and </> to select HALF RANGE or FULL RANGE.
1. Press MENU and
2. Press SELECT and
3.
4. Press OK to confirm.
8.16
Change the System PIN
1. Press MENU and
</> to select SETTINGS.
</> to select SYSTEM PIN.
2. Press SELECT and
3. Press SELECT to enter the old system PIN. (Default is 0000)
61
VTech LS6245_HK version_IFU_EN.book
Page 62
Friday, September 23, 2011
1:01 PM
Note:
If the old system PIN is wrong, you will hear an error tone and be asked to enter it again.
4. Press OK to enter the four-digit new system PIN.
5. Press OK to enter the four-digit new system PIN again.
6. Press OK to confirm.
Note:
If the new PIN entered in Step 5 is not matched with the new system PIN entered in Step 4, user is requested to enter the old system PIN again
in Step 3.
Reset the base
1. Press MENU and
Phone settings
8.17
</> to select SETTINGS.
</> to select RESET.
2. Press SELECT and
3. Press SELECT to enter the four-digit system PIN. (Default is 0000)
4. Press OK to confirm.
5. Press YES to reconfirm, or press NO to cancel.
62
VTech LS6245_HK version_IFU_EN.book
9.
Page 63
Friday, September 23, 2011
1:01 PM
REGISTRATION
Your handset and base station is pre-registered. Up to five handsets can be registered to a single base station.
If for some reason, the handset is not registered to the base station ("NOT REGISTERED" displays in the handset screen), register your
handset according to the following procedures.
Using a handset:
1. Put the handset on the base, "PRESS HOLD ON BASE FOR 4 SEC" will display in the handset screen.
Or use your handset menu.
1. Press MENU and
U/D on the handset to select SETTINGS.
U/D to select REGISTER.
2. Press SELECT and
3. Press SELECT to enter the system PIN. (Default is 0000)
4. Press OK and go ahead with the following procedures using the base.
Using the base:
H
5. Press and hold
on the base for about four seconds until the telephone base displays “REGISTERING HANDSET...”. The handset
shows “HANDSET X REGISTERED” (X represents the handset number assigned) and you hear a beep when the registration completes.
Note:
If the registration fails, "NO BASE FOUND" displays in the handset screen and then "TO REGISTER, PICK UP HANDSET FROM CHARGER"
displays. Try the registration process again.
You cannot register a handset if any other system handset is in use.
63
VTech LS6245_HK version_IFU_EN.book
Page 64
Friday, September 23, 2011
1:01 PM
10. ANSWERING MACHINE
The answering system can record and store up to 99 messages. You can set a desired recording time for messages. The total storage capacity for
the announcements, messages and memos is approximately 25 minutes. The actual recording time depends on individual message
characteristics.
You can switch the answering machine ON or OFF. When it is ON, select between ANSWER & RECORD mode or ANSWER ONLY mode.
The Answer and Record mode allows a caller to leave a message, and is set when ANSWER & RECORD is selected.
The answering machine is supplied with pre-recorded announcements for ANSWER & RECORD mode and ANSWER ONLY mode, but you
can record your own personal announcements if you wish.
When the answering machine is ON, it will answer after a set number of rings (default is 6 Rings).
When the answering machine is OFF, or if the memory is full, it will answer after 10 rings, which allows remote access if required.
Using a handset:
10.1
Switching Answering Machine On/Off
When you turn the answering machine ON, the
will display in handset and base screen.
1. Press MENU to select ANS. SYSTEM.
2. Press SELECT and
U/D to select ANS SYS SETUP.
3. Press SELECT to select ANSWER ON / OFF.
4. Press SELECT and
U/D to select ON or OFF.
5. Press OK to confirm.
Note:
If you select OFF to switch the Answering Machine off. The
icon will disappear.
64
Answering machine
The Answer Only mode does not allow a caller to leave a message, and is set when ANSWER ONLY is selected.
VTech LS6245_HK version_IFU_EN.book
10.2
Page 65
Friday, September 23, 2011
1:01 PM
Announcement
This is the message your callers hearing on the answering machine. There are two pre-recorded outgoing messages, or you can record your
own.
10.2.1 Record your own announcement
1. Press MENU to select ANS. SYSTEM.
U/D to select ANS SYS SETUP
Press SELECT and U/D to select ANNOUNCEMENT.
Press SELECT and U/D to select RECORD
Press SELECT and U/D to select ANSWER & RECORD or ANSWER ONLY.
2. Press SELECT and
3.
4.
5.
6. Press SELECT, then the system will prompt you to start record your announcement after a beep.
7. Press SAVE to save and the recorded announcement will automatically play.
8. Press STOP to stop the playback. Or press DELETE to delete your recorded announcement.
10.2.2 Playback the announcement
You can play the announcement in the handset or base.
1. Press MENU to select ANS. SYSTEM.
2. Press SELECT and
3. Press SELECT and
U/D to select ANS SYS SETUP
U/D to select ANNOUNCEMENT.
4. Press SELECT to select PLAY.
5. Press SELECT and
U/D to select ANSWER & RECORD or ANSWER ONLY.
6. Press SELECT to confirm and the announcement will automatically play.
65
VTech LS6245_HK version_IFU_EN.book
Page 66
Friday, September 23, 2011
1:01 PM
10.2.3 Delete the recorded announcement
You can delete the recorded announcement message to set the default announcement message back through your handset as below.
1. Follow steps from 1 to 6 in Section 10.2.2.
2. Press DELETE to delete the recorded announcement. And the announcement message will be reset to default.
Note:
You can't delete the default announcement.
Answering machine message
If you have new messages, the base screen light will turn on and e.g. "3 NEW MESSAGES" will flash in base screen, which means you have 3
new messages in your answering machine. And the
will display on your base and handset screen. You can press OFF on the base to turn
off the base screen light. When the answering machine is playing message, the base screen will display "PLAYING MESSAGE MESSAGE [X /
Y]" which prompts you which message is playing and how many messages in your answering machine.
10.3.1 Play messages
1. Press MENU to select ANS. SYSTEM.
2. Press SELECT to select PLAY MSGS.
3. Press SELECT to play messages.
Options during playback:
•
U/D to adjust the speaker volume.
Press 6 to skip to next message.
Press 4 to repeat the message currently playing. Press 4 twice to listen to the previous message.
Press 2 to stop the message playback and return to the previous menu.
Press 5 to delete the current message. The system advances to the next message.
•
Press BACK to exit and return to the previous menu.
•
•
•
•
Press
66
Answering machine
10.3
VTech LS6245_HK version_IFU_EN.book
Page 67
Friday, September 23, 2011
1:01 PM
Note:
• The first received new message will be played first and then the second received new message will be played and so on (if more than one
new message is received).
• Old messages will be played automatically after all new messages are played.
• When all messages are played, it will go back to the previous screen.
10.3.2 Delete a message
When your handset is playing a message, you can press
5 to delete the current message.
10.3.3 Delete all old messages
1. Press MENU to select ANS. SYSTEM.
2. Press SELECT and
U/D to select DEL ALL OLD.
3. Press SELECT to confirm.
4. Press YES to reconfirm. Or press NO to return to previous screen.
Note:
You cannot delete the new messages, so you will have to review them before trying to delete them.
10.4
Record a memo
This allows users to record a memo. Newly recorded memos are counted as new messages.
1. Press MENU to select ANS. SYSTEM.
2. Press SELECT and
U/D to select RECORD MEMO.
3. Press SELECT to start to record your memos after you heard a beep.
4. Press SAVE to save it. And the recorded memo is automatically playing,
5. Press DELETE to delete the memo. Or press STOP to stop the memo playback.
67
VTech LS6245_HK version_IFU_EN.book
10.5
Page 68
Friday, September 23, 2011
1:01 PM
Incoming Call Messages (ICM)
If the answering machine is ON and set for ANSWER & RECORD, when there is an incoming call, the answering machine will answer it and
play the pre-set announcement message, followed by a beep sound. The caller can then leave a message. The caller's voice will also be
played through the loudspeaker to allow you to screen the call and decide if you want to leave the answering machine to record the message,
or if you want to talk to the caller directly.
T S
h
At any time if you want to pick up the call, you can press
or
on the handset or press
on the base to intercept the call and talk to
the caller directly. The message recording will be stopped automatically. If the answering machine is in the process of recording, the message
already recorded will be saved.
Answering Machine Settings
10.6.1 Set answer mode
1. Press MENU to select ANS. SYSTEM.
U/D to select ANS SYS SETUP.
Press SELECT and U/D to select ANSWER MODE.
Press SELECT and U/D to select ANSWER & RECORD or ANSWER ONLY.
2. Press SELECT and
3.
4.
5. Press OK to confirm.
10.6.2 Set number of rings to answer
You can set the answer delay to 2 RINGS, 4 RINGS, 6 RINGS, 8 RINGS or TIME SAVER, e.g. if you set the answer delay to 2 RINGS, your
answering machine will answer the call after the caller hearing two rings.
1. Press MENU to select ANS. SYSTEM.
U/D to select ANS SYS SETUP.
Press SELECT and U/D to select ANSWER DELAY.
Press SELECT and U/D to select 2 RINGS, 4 RINGS, 6 RINGS, 8 RINGS or TIME SAVER.
2. Press SELECT and
3.
4.
5. Press OK to confirm.
Note:
If the Time Saver setting is selected, the answering machine will pick up the call after two rings if there are new messages and after four rings if
there is no new message.
68
Answering machine
10.6
VTech LS6245_HK version_IFU_EN.book
Page 69
Friday, September 23, 2011
1:01 PM
10.6.3 Set the recording time of message
1. Press MENU to select ANS. SYSTEM.
U/D to select ANS SYS SETUP
U/D to select RECORDING TIME.
Press SELECT and U/D to select 30 SECONDS, 60 SECONDS, 120 SECONDS or UNLIMITED.
2. Press SELECT and
3. Press SELECT and
4.
5. Press OK to confirm.
10.6.4 Set call screening on or off
The call screening feature lets you listen to a caller leaving a message at the telephone base. You can turn this feature on or off with your
handset.
1. Press MENU to select ANS. SYSTEM.
U/D to select ANS SYS SETUP.
U/D to select CALL SCREENING.
Press SELECT and U/D to select ON or OFF.
2. Press SELECT and
3. Press SELECT and
4.
5. Press OK to confirm
10.6.5 Set answering machine message alert on or off
When the tone is turned on, you will hear this audible warning tone every 10 seconds if you have new messages.
1. Press MENU to select ANS. SYSTEM.
U/D to select ANS SYS SETUP.
Press SELECT and U/D to select MSG ALERT TONE.
Press SELECT and U/D to select ON or OFF.
2. Press SELECT and
3.
4.
5. Press OK to confirm.
69
VTech LS6245_HK version_IFU_EN.book
10.7
Page 70
Friday, September 23, 2011
1:01 PM
Remote Operations
If you are away from your home, you can call your answering machine to switch on or off the answering machine and listen to your messages
remotely using another phone (with tone dialing).
1. If the answer machine is switched off, it will answer the call after 10 rings and allow the caller to switch the answer machine on, or check the
messages from a remote location.
2. When you hear the announcement message, press
* and then enter the 4-digit security code (The default 4-digit code is 0000)
OR
* and then enter the correct remote
3. Press the following keys to carry out your desired function during message playback:
Keys
Description
During Message Playback
1
2
4
5
6
7
9
*
Stop Message
Repeat playing the current message
from the beginning. Press twice to skip
backward to previous message.
Delete Message
Skip forward
Message is not playing
Play remote access menu
Play message
Turn answering machine on
Turn answering machine off
Enter the remote access code if the
answering machine is on and during
OGM is playing.
70
Answering machine
If the answer machine is switched on, when it is playing the announcement message, you can press
access code to enter the remote access mode.
VTech LS6245_HK version_IFU_EN.book
Page 71
Friday, September 23, 2011
1:01 PM
Using the base:
10.8
Switching Answering Machine On/Off
When you turn the answering machine ON, the
will display in handset and base screen.
1. Press MENU to select ANS. SYSTEM.
2. Press SELECT and
</> to select ANS SYS SETUP.
3. Press SELECT to select ANSWER ON / OFF.
4. Press SELECT and
</> to select ON or OFF.
5. Press OK to confirm.
Note:
If you select OFF to switch the Answering Machine off. The
10.9
icon will disappear.
Announcement
This is the message your callers hearing on the answering machine. There are two pre-recorded outgoing messages, or you can record your
own.
10.9.1 Record your own announcement
1. Press MENU to select ANS. SYSTEM.
</> to select ANS SYS SETUP.
Press SELECT and </> to select ANNOUNCEMENT.
Press SELECT and </> to select RECORD.
Press SELECT and </> to select ANSWER & RECORD or ANSWER ONLY.
2. Press SELECT and
3.
4.
5.
6. Press SELECT, the system will prompt you to start record your announcement after a beep.
7. Press SAVE to save and the recorded announcement will automatically play.
8. Press
71
p to stop the playback. Or press f to delete your recorded announcement.
VTech LS6245_HK version_IFU_EN.book
Page 72
Friday, September 23, 2011
1:01 PM
10.9.2 Playback the announcement
You can play the announcement in the handset or base.
1. Press MENU to select ANS. SYSTEM.
</> to select ANS SYS SETUP.
Press SELECT and </> to select ANNOUNCEMENT.
2. Press SELECT and
3.
4. Press SELECT to select PLAY.
5. Press SELECT and
10.9.3 Delete the recorded announcement
You can delete the recorded announcement message to set the default announcement message back through your base as below.
1. Follow steps from 1 to 6 in Section 10.9.2.
2. Press
f to delete the recorded announcement. And the announcement message will be reset to default.
Note:
You can't delete the default announcement.
10.10 Answering machine message
If you have new messages, the base screen light will turn on and e.g. “3 NEW MESSAGES” will flash in base screen, which means you have 3
new messages in your answering machine. And the
will display on your base and handset screen. You can press OFF on the base to turn
off the base screen light. When the answering machine is playing message, the base screen will display “PLAYING MESSAGE MESSAGE [X /
Y]” which prompts you which message is playing and how many messages in your answering machine.
72
Answering machine
</> to select ANSWER & RECORD or ANSWER ONLY.
6. Press SELECT to confirm and the announcement will automatically play.
VTech LS6245_HK version_IFU_EN.book
Page 73
Friday, September 23, 2011
1:01 PM
10.10.1 Play messages
1. In idle, press
p on the base to listen to messages.
Or using your base menu
1. Press MENU to select ANS. SYSTEM.
2. Press SELECT to select PLAY MSGS.
3. Press SELECT to start playing back the messages from speakerphone.
Options during playback:
•
•
•
•
•
</> to adjust the speaker volume.
Press c if you want to skip back to the previous message during message playback.
Press d if you want to skip forward to the next message during message playback.
Press p if you want to stop the message playback.
Press f to delete the currently playing message.
Press
Note:
• The first received new message will be played first and then the second received new message will be played and so on (if more than one
new message is received).
• Old messages will be played automatically after all new messages are played.
• When all messages are played, it will go back to the previous screen.
10.10.2 Delete a message
1. Press
f on the base while a message is playing.
2. The current message or memo playing will be deleted. If there are more messages, the next message will start to play.
73
VTech LS6245_HK version_IFU_EN.book
Page 74
Friday, September 23, 2011
1:01 PM
10.10.3 Delete all old messages
1. Press MENU to select ANS. SYSTEM.
2. Press SELECT and
</> to select DEL ALL OLD.
3. Press SELECT to confirm.
4. Press YES to confirm. Or press NO to return to previous screen.
10.11 Record a memo
This allows users to record a memo. Newly recorded memos are counted as new messages.
1. Press MENU to select ANS. SYSTEM.
2. Press SELECT and
</> to select RECORD MEMO.
3. Press SELECT to start to record your memos after you heard a beep.
4. Press SAVE to save it. And the recorded memo is automatically playing,
5. Press
f to delete the memo. Or press p to stop the memo playback.
Note:
If your recorded memo is saved in your answering machine, the base screen light will turn on and e.g. “1 NEW MESSAGE” flashing to prompt
that you have 1 new message. Press OFF to turn off the base screen light.
74
Answering machine
Note:
You cannot delete the new messages, so you will have to review them before trying to delete them.
VTech LS6245_HK version_IFU_EN.book
Page 75
Friday, September 23, 2011
1:01 PM
10.12 Incoming Call Messages (ICM)
If the answering machine is ON and set for ANSWER & RECORD, when there is an incoming call, the answering machine will answer it and
play the pre-set announcement message, followed by a beep sound. The caller can then leave a message. The caller's voice will also be
played through the loudspeaker to allow you to screen the call and decide if you want to leave the answering machine to record the message,
or if you want to talk to the caller directly.
T S
h
At any time if you want to pick up the call, you can press
or
on the handset or press
on the base to intercept the call and talk to
the caller directly. The message recording will be stopped automatically. If the answering machine is in the process of recording, the message
already recorded will be saved.
10.13 Answering Machine Settings
10.13.1 Set answer mode
1. Press MENU to select ANS. SYSTEM.
</> to select ANS SYS SETUP
Press SELECT and </> to select ANSWER MODE.
Press SELECT and </> to select ANSWER & RECORD or ANSWER ONLY.
2. Press SELECT and
3.
4.
5. Press OK to confirm.
10.13.2 Set number of rings to answer
You can set the answer delay to 2 RINGS, 4 RINGS, 6 RINGS, 8 RINGS or TIME SAVER, e.g. if you set the answer delay to 2 RINGS, your
answering machine will answer the call after the caller hearing two rings.
1. Press MENU to select ANS. SYSTEM.
</> to select ANS SYS SETUP.
Press SELECT and </> to select ANSWER DELAY.
Press SELECT and </> to select 2 RINGS, 4 RINGS, 6 RINGS, 8 RINGS, and TIME SAVER.
2. Press SELECT and
3.
4.
5. Press OK to confirm.
Note:
If the Time Saver setting is selected, the answering machine will pick up the call after two rings if there are new messages, and after four rings
if there is no new message.
75
VTech LS6245_HK version_IFU_EN.book
Page 76
Friday, September 23, 2011
1:01 PM
10.13.3 Set the recording time of message
1. Press MENU to select ANS. SYSTEM.
</> to select ANS SYS SETUP.
</> to select RECORDING TIME.
Press SELECT and </> to select 30 SECONDS, 60 SECONDS, 120 SECONDS and UNLIMITED.
2. Press SELECT and
3. Press SELECT and
4.
5. Press OK to confirm.
Answering machine
10.13.4 Set call screening on or off
The call screening feature lets you listen to a caller leaving a message at the telephone base. You can turn this feature on or off with your
telephone base.
1. Press MENU to select ANS. SYSTEM.
</> to select ANS SYS SETUP.
</> to select CALL SCREENING.
Press SELECT and </> to select ON or OFF.
2. Press SELECT and
3. Press SELECT and
4.
5. Press OK to confirm
10.13.5 Set answering machine message alert on or off
When the tone is turned on, you will hear this audible warning tone every 10 seconds if you have new messages.
1. Press MENU to select ANS. SYSTEM.
</> to select ANS SYS SETUP
</> to select MSG ALERT TONE.
Press SELECT and </> to select ON or OFF.
2. Press SELECT and
3. Press SELECT and
4.
5. Press OK to confirm.
76
VTech LS6245_HK version_IFU_EN.book
Page 77
Friday, September 23, 2011
1:01 PM
10.14 Remote Operations
If you are away from your home, you can call your answering machine to switch on or off the answering machine and listen to your messages
remotely using another phone (with tone dialing).
1. If the answer machine is switched off, it will answer the call after 10 rings and allow the caller to switch the answer machine on, or check the
messages from a remote location.
2. When you hear the announcement message, press
+and then enter the 4-digit security code (The default 4-digit code is 0000)
OR
If the answer machine is switched on, when it is playing the announcement message, you can pressc
access code to enter the remote access mode.
3. Press the following keys to carry out your desired function during message playback:
Keys
Description
During Message Playback
1
2
4
5
6
7
9
*
77
Stop Message
Repeat playing the current message
from the beginning. Press twice to skip
backward to previous message.
Delete Message
Skip forward
Message is not playing
Play remote access menu
Play message
Turn answering machine on
Turn answering machine off
Enter the remote access code if the
answering machine is on and during
OGM is playing.
+and then enter the correct remote
VTech LS6245_HK version_IFU_EN.book
Page 78
Friday, September 23, 2011
1:01 PM
11. DEFAULT SETTINGS
Default settings of handset
Items
Default Values
Answer Machine
Answer On/Off
On
Answer Mode
Answer & Record
Answer Delay
6 rings
Recording Time
120 seconds
On
Remote Access
Off
Remote Access PIN
0000
TAM Alert
Off
Default settings
Call Screening
Sound
Home Type (External) Melody
Melody 1
Home Type (Internal) Melody
Melody 1
Cellular 1 Melody
Melody 1
Cellular 2 Melody
Melody 1
All home & cell Type Melody
Melody 1
Ringer volume (Cellular 1, Cellular 2, Home, All home & cell)
Volume 4
Settings (Handset)
Time Format
24 - Hour
Date Format
DD/MM/YY
Auto Keylock
Never
Key Tone
On
78
VTech LS6245_HK version_IFU_EN.book
Page 79
Friday, September 23, 2011
1:01 PM
Default settings of base
Items
Default Values
Bluetooth
Bluetooth PIN
0000
Answer Machine
Answer On/Off
On
Answer Mode
Answer & Record
Answer Delay
6 rings
Recording Time
120 seconds
Call Screening
On
Remote Access
Off
Remote Access PIN
0000
TAM Alert
Off
Sound
Home Type (External) Melody
Tone 2
Home Type (Internal) Melody
Tone 2
Cellular 1 Melody
Tone 2
Cellular 2 Melody
Tone 2
All home & cell Type Melody
Tone 2
Ringer volume (Cellular 1, Cellular 2, Home, All home & cell)
Volume 4
79
VTech LS6245_HK version_IFU_EN.book
Page 80
Friday, September 23, 2011
1:01 PM
Settings
Time Format
24 - Hour
Date Format
DD/MM/YY
Dial Mode
Tone
Flash Time
600ms
ECO Mode Range
Full range
System PIN
0000
Key Tone
On
Default settings
80
VTech LS6245_HK version_IFU_EN.book
Page 81
Friday, September 23, 2011
1:01 PM
12. TROUBLESHOOTING
If you have difficulty with your phone, please try the suggestions listed below.
Problem
Solutions
•
•
•
I cannot pair my cell phone to the
telephone base.
•
•
•
•
I cannot pair my headset to the
telephone base.
•
•
•
•
I cannot connect my cell phone with the •
telephone base.
•
•
•
81
Make sure you have cellular coverage.
Make sure the Bluetooth function of your cell phone is turned on. See the user's manual of
your cell phone for more information.
Remove VTech LS6245 from your cell phone's handsfree device history list (see the user's
manual of your cell phone for more information).
Carefully follow the pairing instructions on page 14 and make sure that your cell phone is not
connected to any other Bluetooth wireless technology enabled device.
Turn off your cell phone, and then turn it on again.
Reset the telephone base. Unplug the unit's electrical power. Wait for approximately 15
seconds, then plug it back in. Repeat the above suggestions.
Make sure that your Bluetooth wireless technology enabled headset is in discoverable mode
when pairing with the telephone base. See the user's manual of your headset for more
information on how to set your headset in discoverable mode.
Carefully follow the pairing instructions on page 15 and make sure that your headset is not
connected to any other Bluetooth wireless technology enabled device.
Reset the telephone base. Unplug the unit's electrical power. Wait for approximately 15
seconds, then plug it back in. Repeat the above suggestions.
Make sure that the Bluetooth function of your cell phone is turned on. See the user's manual
of your cell phone for more information.
Make sure that your Bluetooth wireless technology enabled cell phone is not connected to
any other Bluetooth wireless technology enabled device.
Turn off your cell phone, and then turn it on again.
Make sure that your cell phone is connected and on the active devices list.
For some cell phones, you must authorize VTech LS6245 device in your cell phone's
Bluetooth feature. See the user's manual of your cell phone for more information.
Manually connect your cell phone to VTech LS6245. Refer to the user's manual of your cell
phone for more information.
VTech LS6245_HK version_IFU_EN.book
Page 82
I cannot connect my headset with the
telephone base.
My cell phone is connected to the
telephone base, but I cannot make a
cell call.
I cannot hear any audio on my
telephone system when on a cell call.
•
•
•
•
•
Make sure that your cell phone is not in use when you are trying to make a cell call.
Make sure that your cell phone is compatible.
For some smartphones, make sure that the cellular function is turned on.
•
Reset the telephone base. Unplug the unit's electrical power. Wait for approximately 15
seconds, then plug it back in.
Turn off your cell phone, and then turn it on again.
•
•
•
•
•
•
•
•
Make sure the battery pack is installed and charged correctly. For optimum daily performance,
return the handset to the telephone base or charger after use.
Make sure the power adapter is securely plugged into an outlet not controlled by a wall switch.
Make sure the telephone line cord is plugged firmly into the telephone base and the telephone
wall jack.
Unplug the electrical power to the telephone base. Wait for approximately 15 seconds, then
plug it back in. Allow up to one minute for the handset and telephone base to synchronize.
Charge the battery in the handset for up to 16 hours.
If the battery is completely depleted, it can take up to 10 minutes to charge the handset before
HANDSET X appears on the screen.
Remove and re-insert the battery pack. If that still does not work, it might be necessary to
purchase a new battery pack.
Disconnect the telephone base from the telephone wall jack and plug in a working telephone.
If the other telephone does not work, the problem is probably in the wiring or the telephone
service. Call your telephone service provider.
Place the handset in the telephone base for recharging.
Remove and re-install the battery pack and use it until fully depleted, then recharge the
handset in the telephone base for up to 16 hours.
If the above measures do not correct the problem, replace the battery pack.
82
Troubleshooting
•
•
Low battery shows on screen.
1:01 PM
Make sure that your Bluetooth wireless technology enabled headset is not connected to any
other Bluetooth wireless technology enabled device.
Make sure that your headset is connected and on the active devices list.
•
My telephone does not work at all.
Friday, September 23, 2011
VTech LS6245_HK version_IFU_EN.book
Page 83
•
The battery does not charge in the
handset or the handset battery does
not accept charge.
•
•
•
•
The CHARGE light is off.
83
•
•
Friday, September 23, 2011
1:01 PM
Make sure the handset is placed in the telephone base correctly. The charge light on the
handset should be on.
Remove and reinstall the battery pack, then charge for up to 16 hours.
If the handset is in the telephone base but the charge light on the handset is not on, refer to
The CHARGE light is off in this section.
If the battery is completely depleted, it can take up to 10 minutes to charge the handset before
HANDSET X appears on the screen.
Purchase a new battery pack.
Clean the charging contacts on the handset and telephone base each month with a pencil
eraser or a dry non-abrasive fabric.
Make sure the power adapter and telephone line cord are plugged in correctly and securely.
Unplug the power adapter. Wait for 15 seconds before plugging it back in. Allow up to one
minute for the handset and telephone base to reset.
VTech LS6245_HK version_IFU_EN.book
Page 84
•
•
•
•
•
•
•
•
•
REGISTRATION FAILED appears on the
•
handset.
•
1:01 PM
The handset may be out of range. Move it closer to the telephone base.
If you subscribe to high-speed Internet service (digital subscriber line - DSL) through your
telephone line, you must install a DSL filter between the telephone base and the telephone
wall jack. The filter prevents noise and caller ID problems caused by DSL interference. Please
contact your DSL service provider for more information about DSL filters.
Appliances or other cordless telephones plugged into the same circuit as the telephone base
can cause interference. Try moving the appliance or telephone base to another outlet.
Other electronic products may cause interference to your cordless telephone. Install your
telephone as far away as possible from the following electronic devices: wireless routers,
radios, radio towers, pager towers, cellular telephones, digital telephones, intercoms, room
monitors, televisions, VCRs, personal computers, kitchen appliances, and other cordless
telephones.
If your telephone is plugged in with a modem or a surge protector, plug the telephone (or
modem/surge protector) into a different location. If this doesn't solve the problem, re-locate
your telephone or modem farther apart from each other, or use a different surge protector.
The location of your telephone base can impact the performance of your cordless phone. For
better reception, install the telephone base in a centralized location within your home or office,
away from walls or other obstructions. In many environments, elevating the telephone base
improves overall performance.
Disconnect the telephone base from the telephone wall jack and plug in a corded telephone. If
calls are still not clear, the problem is probably in the wiring or telephone service. Contact your
telephone service provider (charges might apply).
If the other telephones in your home are having the same problem, the problem is in the wiring
or telephone service. Contact your telephone service provider (charges may apply).
Only one handset can be registered at a time. If you have multiple handsets to register, please
follow the instructions on page 63 for the first handset. Once a handset has been successfully
registered, repeat the steps for each handset that needs to be registered.
Make sure that the telephone base and handset(s) are in idle mode when registering a
handset.
Follow the steps on page 85 for the common cure for electronic equipment, then try again to
register a handset.
84
Troubleshooting
There is interference during a
telephone conversation.
My calls fade out when I am using the
handset.
Friday, September 23, 2011
VTech LS6245_HK version_IFU_EN.book
Page 85
•
•
The answering system does not record
•
messages.
•
•
The answering system does not
respond to remote commands.
•
•
•
Common cure for electronic
equipment.
•
•
•
•
•
Friday, September 23, 2011
1:01 PM
Make sure the answering system is on.
When the answering machine memory is full, it does not record new messages until some old
messages are deleted.
If there is a fax machine connected to the same telephone line, try disconnecting the fax
machine. It that solves the problem, consult your fax machine documentation for information
on compatibility with answering systems.
Make sure your remote access code is correct.
Make sure you are calling from a touch-tone telephone. When dialing a number, there should
be tones. If there are clicks, then it is not a touch-tone telephone and cannot activate the
answering system.
The answering system may not detect the remote access code when your announcement is
playing. Wait until the announcement is over before entering the code.
There may be interference on the telephone line you are using. Press the dial pad keys firmly
when dialing.
If the telephone is not responding normally, put the handset in the telephone base. If it does
not respond, try the following (in the order listed):
Disconnect the power to the telephone base.
Disconnect the battery pack on the handset.
Wait a few minutes before connecting power to the telephone base.
Re-install the battery pack and place the handset in the telephone base.
Wait for the handset to synchronize with the telephone base. Allow up to one minute for this to
take place.
Please contact the technical support of the network provider for further information.
This telephone is not equipped with a grounding function! Therefore some of the functions may be limited when used in PBX systems.
For technical support, please call VTech Technical Inquiry Hotline 852-2667 7433.
85
VTech LS6245_HK version_IFU_EN.book
Page 86
Friday, September 23, 2011
1:01 PM
13. TECHNICAL SPECIFICATIONS
Basic Information
Dimensions
Handset: L250 X W90.40 X H51.75mm
Base: L203.65 X W42.00 X H21.5mm
Weight
Handset: 310g
Base: 142.5g (include battery pack: 21g)
Base: 1.5w
Valid range
Indoor: 50m
Outdoor: 300m
Handset Operating Time
Standby time: 100 Hours
Talk time: 10 Hours
Telephone settings
Power consumption
RF Parameter
Transmission Power
Base: +24dBm
Handset: +24dBm
Frequency
Cordless system: 1881.792~1897.344MHz
Bluetooth system: 2.400~2.4835GHz
Number of Channels
DECT: 10 Channels
Bluetooth: 79 Channels
Supply Power
Base
DC6.0V/450mA
Handset
DC2.6V/750mA
86
VTech LS6245_HK version_IFU_EN.book
Page 30
Friday, September 23, 2011
1:01 PM
Customer Service Centre
Suite 1601, Lever Tech Centre, 69-71 King Yip Street,
Kwun Tong, Kowloon, Hong Kong.
Customer Service Hotline: (852) 2666 5558
Technical Inquiry Hotline: (852) 2667 7433
Distributed in Hong Kong by: VTech Telecommunications Ltd.
91-003886-020-100