1
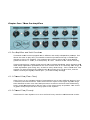
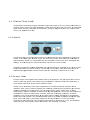
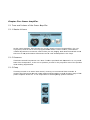
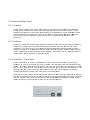
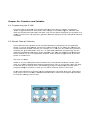
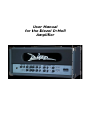
Use
er Ma
anua
al
for tthe D
Diez
zel D--Molll
Am
mpliffier
Table of Contents
Chapter One: Safety and Warranty
1.1 Safety Warnings
1.2 Warranty Information
Chapter Two: Using Your D-Moll
2.1 Mains Connections, Power and Standby
2.1.1 Mains/connect to power outlet
2.1.2 Power up, Warm up, Standby off
2.1.3 Power tube caution
2.1.4 Operating Temperature
2.1.5 Power Tube Information
Chapter Three: Peripheral Connections
3.1 Front Panel Connections
3.1.1 Signal In
3.1.2 Connection Information
3.1.3 Cable Selection
3.2 Rear Panel Connections
3.2.1 Send/Return Loop
3.2.2 Parallel and Serial Return
3.2.3 Compensated Out
3.2.4 Speaker Connections
3.3 MIDI Connections
3.3.1 MIDI In
3.3.2 MIDI Thru
Chapter Four: The Three Pre-Amplifiers
4.1 Pre-Amplifier Duties
4.1.1 Channel One
4.1.2 Channel Two
4.1.3 Channel Three
4.2 Pre-Amplifier Tubes
Chapter Five: Power Amplifier
5.1 Tone and Volume of the Power Amplifier
5.1.1 Master Volume
5.1.2 Presence
5.1.3 Deep
5.2 Power Amplifier Tubes
5.2.1 Function
5.2.2 Selection
5.2.3 Life Span – Tube Fuses
Chapter Six: Functions and Switches
6.1
6.2
6.3
6.4
6.5
6.6
6.7
Programming D-Moll
Manual Channel Selection
Mid Cut on/off
Loop on/off
Mute on/off
Master 2
Store
Chapter Seven: Midi
7.1 MIDI
7.2 MIDI In
7.3 MIDI Thru
7.4 MIDI Communication
7.4.1 Omni Mode
7.4.2 Single Channel Mode – automatic Channel Recognition
7.4.3 Single Channel Mode – manual Channel selection
7.5 Program Information
7.6 Phantom Power
Chapter Eight: Remote Switch
Chapter Nine: Maintenance and Cleaning
9.1 Cleaning
9.2 Care
9.3 Tube Change
Chapter One: Safety and Warranty
1.1 Safety Warnings
We would like to stress the importance of the following points, for reasons of your
personal safety, product longevity and product liability.
Do not use the amplifier in or near wet locations
Do not store the amplifier in damp or wet locations
Do not operate the Amplifier on voltages other than those designated on the rear panel of
the amplifier.
Do not open the panels of the amplifier. No user serviceable parts inside.
Your D-Moll operates on very high internal voltages, which may still be present after the
Amplifier has been turned off and disconnected for a while.
Do not use the Amplifier for anything other than its design purpose: To Amplify Electric
Guitar Signals!
Do not use fuses other than those intended and specified for the amplifier
Do not use 2-conductor extension cords or anything other than 3-pole g rounded outlets for
this Appliance. Your life may depend on it!
Please observe the following points when transporting your D-Moll:
D-Moll is a Tube Powered Amplifier; therefore it is sensitive to shock, especially after
playing the amplifier for a while. Please store and transport your amplifier gently, and try
and avoid temperature extremes in storage, which might cause condensation resulting in
moisture on internal components. Usually a 60 Minute acclimatization period is sufficient to
ensure safe operation.
The Amplifier should be stored in a controlled environment, and it should be transported in
a suitable flight case. Make sure the Amplifier gets transported in its normal operating
position, not upside down or on its side.
The D-Moll’s Design incorporates a very potent power amplifier. It is configured to deliver
satisfying guitar tone at most volume levels, from a small bedroom to a large arena. In its
normal operational volume level (75-80dB) it will provide beautiful tones with very little
coloration. For reasons of your own personal health, please do not run the amplifier above
these levels for extended periods of time without wearing hearing protection. Hearing Loss
is a long -term problem, and is normally not curable.
1.2 Warranty
5 years to the original owner with proof of purchase. Power Tubes and Pre Amp tubes are
covered for 3 months to the original owner.
ALL REPAIR WORK MUST BE DONE BY A DIEZEL CERTIFIED TECHNICIAN. Not following this
procedure will VOID WARRANTY. This will ensure the original owner and us at Diezel
Amplification that the work is done correctly and that there is knowledge of what is going on
out there with each amp. To any second owners or more, there is no warranty coverage nor
is a warranty transferable. Of course we at Diezel are happy to serve people who purchase
their amplifier on the used market should your amp ever need servicing. Parts and labour
charges will occur for our work on your amplifier as usual.
Chapterr Two: Us
sing You
ur D-Moll
2.1 Mains
s Connec
ctions, Pow
wer and S
Standby
2.1.1 Ma
ains/Connection to Power Ou
utlet
Plea
ase make s
sure that bo
oth switches
s (Power an
nd Standby
y) are in the
e off positio
on before
con
nnecting to the Mains c
circuit. Verify line volta
age before connecting
g the powerr cord.
Nev
ver start D--Moll withou
ut speakers
s being conn
nected to th
he proper terminals.
t
((See 3.2.8)
2.1.2 Pow
wer up, W
Warm up, Standby off
Firs
st turn the Power
P
switc
ch to on (fa
acing up). T
The indicato
or will light up. This sta
arts the tub
be
hea
ating proces
ss. After ab
bout 40 seco
onds, the tu
ubes have s
sufficiently heated for normal
ope
eration. You
ur D-Moll is now ready
y for operation and the
e standby sw
witch can b
be turned to
o
“run
n” (also fac
cing up). Prremature ac
ctivation of the standb
by switch will lead to unnecessary
u
y
tube stress and subseque
ent reductio
on of the po
ower tube’s
s life span.
2.1.3 P
Power Tub
be Caution
Tub
bes are elec
ctronic components that only func
ction with v
vacuum inta
act and und
der very hig
gh
ope
erating temperatures. Each tube has one or more heatiing filaments, much lik
ke a light
bulb. These filaments hea
at up the Anode of the
e tube. If yo
ou switch th
he standby switch
before these A
Anodes have
e reached ttheir operatting temperrature then the Anode
e surfaces are
nott heated eve
enly yet; th
he “operatin
ng tempera
ature” of the
e tube is no
ot reached y
yet. This
cau
uses undue stress on the tubes an
nd their rela
ated compo
onents insid
de the amp. One should
therefore alwa
ays give the
e amp it’s m
much neede
ed warm-up
p time, even
n if musicall inspiration
n
hits
s with full fo
orce.
2.1.4 Operating Temperature
It will take a little more time after warm-up until everything inside the amp is working in
sync and to its fullest potential. A trained ear will notice a slightly warmer tone and better
complexity in tone after playing the amp for a short while. It’s like warming up before
running a marathon. Get it?
2.1.5 Power Tube Life
The power tubes of your amplifier are subject to a certain aging process. Once one of the
tubes shows signs of aging, unreliability or unusual noise, then we suggest that you
replace all power tubes. Matched tube sets wear relatively even, or so our experience
suggests. This means if one goes, the others are not far from meeting the same fate.
The aging process manifests itself by a depletion of a thin layer of Wolfram on the Anodes.
This can take anywhere from 6 month to 3 years, depending on the amount of use of the
amplifier. The amount of wear is determined by the amount of performance that is asked
from the tube.
Chapterr Three: P
Peripherral Conne
ections
3.1 Frontt Panel Co
onnection
ns
3.1.1 The
e input ja
ack (“IN”)
The
e input jack
k receives your Electric
c Guitar signal by mea
ans of a shie
elded guitar cord with
1/4
4” mono sty
yle plug.
You
ur guitar cord is an imp
portant parrt of your siignal chain and its qua
ality and co
onstruction
type clearly afffect the overall tone o
of your rig. Try and bu
uy the best quality guittar cord
or want to afford.
a
Call us if you ha
ave doubts and need recommend
r
dations.
that you can o
s is where the
t
smart “weak
“
link” comment c
comes in. G
Get it?
This
3.1.2 Cab
ble ABC
Som
me cords an
nd cables so
ound very neutral;
n
oth
hers color tthe sound s
spectrum an
nd/or
atte
enuate high
h frequencie
es due to ca
apacitance inside the w
wire and sh
hield. What are we
talk
king about?
? OK. A capa
acitor is use
ed in electrronic crosso
overs, amon
ngst other things,
t
to
diviide low and
d high frequ
uencies. Cap
pacitance in
n a cable th
herefore cutts your guittar’s high e
end
to a certain de
egree. Gene
erally, the longer of a cord you us
se, the morre of the co
ords inheren
nt
cha
aracteristics
s will be aud
dible.
ble Selecttion
3.1.3 Cab
In c
certain insta
ances it is desirable
d
to
o match a g
guitar cord to a specific instrumen
nt. One can
n
use
e the otherw
wise undesirable qualitties of a corrd to one’s advantage, if one has
s the time
and
d patience tto experime
ent with diffferent cords and guita
ars. You sho
ould do this
s when
play
ying with a band or wh
hen you are
e recording. Sometime
es it is diffic
cult to tell a
com
mponent’s ttrue advanttages until iit is used in
n the right c
context. A g
guitar that has very
pierrcing highs could theo
oretically be
e tamed dow
wn somewh
hat by the use
u of a lon
ng guitar co
ord
that offers som
me high-end
d attenuation. The loo
ops of your Diezel D-Moll send sig
gnals at
higher levels and
a
impeda
ances, which
h makes this section o
of wiring les
ss sensitive
e. You should
stilll use reliablle and good
d quality wiring for all loops and inserts.
i
3.2 Rearr Panel Co
onnections
s
3.2.1 Sen
nd/Return
n Loop
The
e System co
onsists of 2 separate L
Loops. It alllows creatio
on of effectts path in eiither serial,,
or p
parallel con
nfigurations. The indiviidual chann
nel volume controls
c
determine the
e signal
stre
ength at the
e send jack
ks. The rang
ge is - ... to
o +10dB. Th
he output impedance is 4.7
kOh
hm. If you w
want to use
e the loops,, then conn
nect the “Se
end” to the input of the Effects
unitt. Be sure a
and adjust tthe input le
evel of the effects
e
unitt to the amp
plifiers leve
el. Most
effe
ects units have led barr or other le
evel control devices. T
The Output of the effec
cts unit
must be conne
ected to one of the retturn jacks, parallel, sw
witched, or serial. If yo
ou use the
s
can b
be mixed to
o the original signal via
a the rear p
panel
parrallel return, then the signal
mounted “Volu
ume” contro
ol.
Serial
3.2.2 Parrallel or S
Which is bette
er for you? R
Read on.
ere are 2 wa
ays to hand
dle effects s
signals. If y
you use the
e serial return, then the signal path
The
of your
y
D-Moll is interrup
pted, the sig
gnal is sentt to the proc
cessor, gets more or less
processed, the
en sent bac
ck to the serial return into
i
the pow
wer amp. D
Digital effec
cts units oftten
gnal, then p
process it, then
t
convert it back to
o analog, th
hen send it to the amp
p.
digiitize this sig
This
s is called A
ADA converrsion. It is necessary
n
for digital efffects units to do this to your
guittar signal, s
so that it be
ecomes a d
digital code,, which the processor can read an
nd
und
derstand. Yo
our tubes, however, n
need an old fashioned analog sign
nal, so the processor
p
ert the sign
nee
eds to conve
nal back to analog befo
ore it goes back to the
e amp. Gen
nerally, even
in h
highest quality effects processors
s, this cause
es a change
e in the orig
ginal signal, typically a
loss
s of tonality
y and warm
mth, also no
oticeable as a “harder”” sound.
When you use
e the serial loop for an effects unit like this, tthen your s
signal will h
have been
ADA
A converted
d at least once. Tone jjunkies and
d vintage fre
eaks alike w
will more th
han likely
hav
ve hives dev
veloping by
y now. But, as always,, there is a better way. Using the Parallel loo
op
and
d the mix (labeled “Volume”) control on the back deterrmines how much effec
ct signal is
bein
ng added to
o the origin
nal signal, w
which now s
still flows th
hrough the amplifier. T
There is
alw
ways an ana
alog connection betwee
en the send
d and return
n jacks: a p
parallel loop
p!
Imp
portant: You must set the mix co
ontrol on the
e effects un
nit to 100%
% wet when using the
parrallel loop. O
Otherwise there
t
will be
e nasty pha
asing proble
ems resultin
ng in unsattisfactory
tone. The sign
nal portion tthat is unafffected by the mix control in the effects
e
unitt would
reach the amp
plifier at a d
different tim
me due to th
he cabling, and cause phasing ca
ancellations.
ompensatted Out
3.2.3 Co
A frrequency co
orrected sig
gnal will lea
ave this jack
k if you con
nnect it to a mixer or rrecording
dev
vice. Use it to quietly compose
c
orr send an au
uxiliary sign
nal to a con
nsole etc. A
Always make
sure that yourr amp is con
nnected to either a lou
udspeaker o
or a load (i..e. THD HottPlate).
3.2.4 Spe
eaker Con
nnections
s
D-M
Moll has 5 s
speaker jack
ks: 1 for a 16-Ohm loa
ad, 2 for 2 16-Ohm loads or 1 8O
Ohm load,
and
d 2 for 2 8-O
Ohm loads or 1 4-Ohm
m load.
Exa
amples:
-
Using two 8 Ohm cabs: each cab
b goes into the 4 Ohm
m outs (beca
ause 2x8Oh
hm results
4 Ohm)
-
Unsing two
o 16 Ohm c
cabs: each cab
c
goes in
nto the 8 Oh
hm outs (be
ecause 2x16 Ohm
results 8 O
Ohm)
3.3 MIDII Connecti
tions
3.3.1 MID
DI In
Mid
di in receive
es “program
m change” o
orders from commonly
y available m
midi pedals
s and contro
ol
systems. The D-Moll is ab
ble to supply phantom
m power to y
your midi pedal
p
via a 7-prong
7
DIN
mid
di cable. This can help unclutter your
y
stage system
s
and
d rids the arrtist of thes
se pesky
pow
wer supplies
s.
Pin 1 and 6 is ground (-) Pin 3 and 7 is hot (+))
The
e voltage is 9-12V AC or DC, whic
ch is accepttable for 98
8% of all midi pedals. Maximum
pow
wer usage of
o the pedal cannot ex
xceed 800m
mA (0.8A) Pllease obserrve proper polarity
p
to
avo
oid damage to the MID
DI pedal.
3.3.2 MID
DI Thru
This
s jack route
es the midi signal to o
other midi partners.
p
MIIDI data no
ot addressed
d to the DMolll gets loope
ed through this jack.
See
e chapter 7 for MIDI programming instructio
ons
Chapterr Four: Th
hree Pre
e-Amplifiiers
4.1 Pre-A
Amplifiers
s and theiir Function
ns
The
e Diezel D-M
Moll comes equipped with
w
3 differrent and totally indepe
endent prea
amps. This
allo
ows the artist to play e
every conce
eivable mus
sical style without
w
having to make
e major
cha
anges to his
s or her amplifier. The preamps a
are voiced tto deliver th
he 3 most w
wanted
guittar tone flavors: 1-Cle
ean, 2-Crun
nch/Heavy 3
3- Lead. C
Channel 2 a
and 3 share their EQ.
This
s concept d
delivers 3 sttellar guitarr sounds wiith excellen
nt playability
y, warm dy
ynamics and
d
razo
or sharp eq
qualization possibilities
s. The tone controls work in an unusually wiide range, s
so
a litttle adjustm
ment goes a long way. As with so
o many othe
er things - less is often
n more. We
e
sug
ggest you sttart exploring the chan
nnels with all
a controls set to 12:0
00 o’clock, and the
master volume
e just slighttly cracked open. (To avoid heariing damage
e)
4.1.1 Cha
annel One
e (Clean Tone)
Clean Tone is a very sens
sitive subje
ect, because
e there are so many different ideas on how
a cllean amp should sound like. Clea
an tonal tex
xtures requiire much higher dynam
mic range
than distorted sounds. Frrom hard an
nd percussiive sounds too soft and warm blo
ossoming
tones. D-Moll w
was designed to offer as many of the clean variety as possible. Yo
our choice
of guitars
g
and pickups will have a large part in this equatiion.
4.1.2 Cha
annel Two
o (Crunch
h)
This
s channel’s main objec
ctive is to cover
c
soft a
and heavy o
overdrive an
nd distortio
on sounds.
4.1.3 Ch
hannel Th
hree (Lead
d)
This
s channel is
s voiced forr highly artiiculate sing
gle note line
es or for very heavy an
nd massive
e
s
rhy
ythm guitar. Due to its slight midrrange accen
nt and very
y high gain structure, it
i possesses
goo
od punch an
nd will, with
h ease and authority, rule any sta
age or stud
dio. The “les
ss is often
more” rule app
plies here a
also.
d Cut
4.1.4 Mid
The
e section Miid Cut incorrporates controls for In
ntensity and Level. De
esigned for friends of
Hea
avy or Nu-M
Metal type m
musical styles, the Inttensity conttrol attenua
ates low mid
drange at
app
proximately
y 400Hz. To
o compensate for the inevitable volume loss when activ
vating this
featture, one ca
an bring the volume le
evel back up with the Level Contrrol.
This
s Mid Cut fu
unction is M
MIDI assign
nable and ca
an therefore be assign
ned to any o
or all of the
e
thre
ee channels
s. If you do
on’t want to
o use the Miid Cut functtion, then itt can be us
sed as an
add
ditional prog
grammable
e volume co
ontrol with tthe Intensitty control set to 0 or o
off.
4.2 Pre--amp Tube
es
The
e pre-amps are equipp
ped with 12AX7 tubes in all positions. The prre-amp tub
bes are not
use
ed to make big power, but merely
y as pre-am
mplifiers. Th
herefore the
eir life expe
ectancy is
much higher than that off the power amplifier tubes.
s is not to u
undermine their utter importance
e in overall sound and response of
o the
This
amplifier. Also
o, many nuisance defects like crac
ckling noise
es and low dynamics are
a directly
ated to defe
ective pre-a
amp tubes. Like all oth
her tubes, 12AX7
1
tube
es come in m
many
rela
diffferent gain stages, and
d offer a wide variety o
of tonal beh
havior. Ourr choice for production
n
was
s made to e
ensure a wide variety of tones, w
with low nois
se and, hop
pefully, excellent
reliability. The
e overall performance o
of pre-amp
p tubes is ea
asily influen
nced by me
echanical
facttors from th
he outside. This would
d manifest itself by a s
sudden feed
dback sound
d with high
pitc
ch. The inpu
ut stage is especially s
suspect to tthis phenom
menon. If one encountters
mic
crophonic tu
ube behavio
or, then the
e first tube should be checked
c
as a rule. Pre
e-Amplifier
tubes can also
o cause hum
m or other b
bad noises, like crackling or tickin
ng.
Chapterr Five: Po
ower Am
mplifier
5.1 Tone
e and Volu
ume of the Power A
Amplifier
5.1.1 Ma
aster Volume
As tthe name s
suggests, th
his controls the overall, global volume of the
e amplifier. For your
enjoyment, there is also a second programmab
ble master volume con
ntrol, which
h allows
volu
ume adjusttments via remote
r
con
ntrol while you
y
are play
ying. Both c
controls are
e laid out so
o
that even a low
w-performa
ance effects
s unit can b
be used and
d amplified in the loops.
5.1.2 Pre
esence
This
s knob conttrols freque
encies over 3KHz. Treb
ble is produ
uced and dis
spersed in a very sma
all
bea
am from the
e speaker, so be sure to position yourself in the projec
ction area of the speak
ker
whe
en making adjustmentts.
5.1.3 Deep
The
e Deep conttrol is an ac
ctive bass c
control, con
ntrary to conventional bass contro
ols. It
con
ntrols the frrequencies around
a
120
0Hz withoutt influencing
g the overa
all dynamic range of th
he
pow
wer amplifie
er. Diezel C
Co. is not re
esponsible for
f disintegrrating speaker cabinetts.
5.2 Powe
er Amplifie
er Tubes
5.2.1 Fun
nction
As tthe name s
suggests, th
he power am
mp section is the part of the amp
plifier that p
produces
outtput power, measured in watts. P
Preamp sign
nals are sen
nt to the po
ower amp(s), which
amplifies this s
signal to a level that is
s acceptable for loudspeakers. Guitar ampliffiers utilize
veral differe
ent types off power amps, which d
differ in output power a
and tone. W
We chose
sev
the tube type power amp
plifier for its
s tried-and true perforrmance and
d familiar to
onal
haviour.
beh
5.2.2 Sellection
Diezel Co. insttalls the mo
ost reliable and best so
ounding tub
bes that are
e currently available in
n
suffficient quan
ntities. So itt is possible
e that tube brand and tube type will
w change during
production. Yo
ou can fine--tune your D
D-Moll by h
having different type and brands of tubes
insttalled, howe
ever, it is im
mperative tthat the am
mp is biased properly. D
D-Moll utiliz
zes 4 power
tubes, organiz
zed in 2 pairrs with dual bias possiibility. This allows use of 2 differe
ent pairs off
pow
wer tubes, e
either the s
same or diffferent types
s.
e Span – Tube Fus
ses
5.2.3 Life
Pow
wer tubes la
ast 1 to 3 years, depen
nding on ca
are, volume
e and freque
ency of use
e of the
amp
plifier. If yo
ou use yourr amp only once a mon
nth, then th
he tubes wiill obviously
y last longer.
Rea
ally… We ha
ave heard tubes that a
are over 10 years old, but it was not a good thing. Tube
es
age
e in a very s
slow manne
er, slow eno
ough for the artist to g
get used to the changiing tone. To
o
kee
ep things fre
esh and to keep your ttube dealerr in busines
ss, we recom
mmend re-tubing,
clea
aning and b
biasing once
e a year if tthe amp is used freque
ently.
Eac
ch pair of D-Moll’s pow
wer tubes ha
as its own ttube fuse. O
Once a pow
wer tube ma
ay be broke
en,
the LED on the
e back will lit and in many
m
cases also the corresponding
g fuse is blown. Replace
the fuse (20mm, 500mA)) and tubes
s in this cas
se. Replacem
ment of the
e power tub
bes needs
rebias of the a
amp, which should be done by an
n experience
ed tech.
Chapterr Six: Fun
nctions and
a
Switc
ches
6.1 Progrramming the D-Mo
oll
It is
s quite easy
y to program
m your Diezel D-Moll a
and, also, easy
e
to explain. Pushin
ng the
“Sto
ore” toggle switch twic
ce must follow each ch
hange in the MIDI prog
gram. Afterr the first
click
k, the selec
cted blue LE
ED lights will blink. Click on the s
switch again
n and your program is in
mem
mory. Each
h of the 128
8 programs (patches, p
program ch
hanges) can
n be change
ed as often as
is desired.
6.2 Manu
ual Chann
nel Selecti
tion
The
e 3 channels of the D-Moll can be
e selected m
manually by
y activating the corresponding
switch, or can be program
mmed via the midi con
ntrol system
m. If you as
ssign the Ch
hannel one
n to a MIDII program (for
(
example “01”), the
en you can initiate this channel’s
s
switch function
your MIDI p
pedal. Push
h “01” on yo
our MIDI pe
edal after programmin
ng and the
switching via y
dal will send
d digital info
ormation to
o the ampliffier. The am
mp will read
d this inform
mation and
ped
dec
cide whethe
er or not it is
i supposed
d to respond. When prroperly prog
grammed, iit will then
switch on chan
nnel one.
OK,, here it is again:
a
Sele
ect 01 on y
your MIDI p
pedal. Selec
ct channel one
o
of the D-Moll.
D
Now
w push “Sto
ore” twice.
Voila, it’s a MIIDI program
m! Now sele
ect program
m change “0
02” on yourr pedal, switch the amp
channel two
o, hit “Store
e” twice, an
nd suddenly
y you have a MIDI ped
dal controlle
er with 2
to c
program chang
ges. Contin
nue on untill you run ou
ut of channels, about 1 more time.
unctions of the amp ca
an be progrrammed in the same e
exact way. Rememberr:
All tthe other fu
pus
sh “Store” twice
t
to fina
alize a MIDII program p
procedure. Select the program on
n the pedal
to rrecall the se
etting from the amp.
6.3 Mid Cut On/Off
The switching function “Mid Cut” is applicable to all channels. The Mid Cut is active when
the corresponding LED is lit.
6.4 Loop On/Off
This function activates a device that is connected to the switch-able loop.
6.5 Mute On/Off
“Mute” silences the beast. “Tuner Out” stays active. Makes sense, no?
6.6 Master 2 On/Off
Master 2 can be used for all channels, much like the Mid Cut function.
6.7 Store
As discussed earlier, this is the universal programming button. Activating this button twice
will verify an intended program procedure. In case you have pushed this button once by
accident, or if you have started to program and don’t want to anymore for whatever reason,
then you can push any other switch (any switch but the “Store” switch) to cancel the
programming procedure. The previously established program will be preserved. On models
equipped with GPS, this will call out the quickest way to a nearby music store.
Chapter Seven: MIDI
7.1 MIDI
MIDI is an acronym for Musical Instruments Digital Interface and is an internationally
accepted communications system between musical instruments (and processors and
computers) of all kinds. We will only need to learn a small portion of this “language” to use
the D-Moll and its peripheral MIDI partners. We are going to learn only about “program
change”.
7.2 MIDI In
MIDI In is a 7-pole DIN jack. It must be connected to the MIDI Out jack of your foot
controller (or MIDI pedal), or the MIDI Out of any effects unit connected to the pedal
directly.
7.3 MIDI Thru
Connect this port to the midi in of other units to continue the MIDI chain
7.4 MIDI Communication
7.4.1 Omni Mode
The Omni mode will allow reading of MIDI information on all 7 channels. It is an easy way
to get into the MIDI system but it is not advisable if more MIDI partners on different
channels are in the same system. Then a certain MIDI channel should be assigned to the DMoll and its program changes should be restricted to this channel (See 7.4.2). To put the
amp into the Omni mode, hold the “Mute” switch down and activate the “Master 2” switch
quickly and then release the mute switch. The Mid Cut, Master 2, Loop and Store LED’s will
now blink to verify that the Omni mode is being accepted. This function needs to be
disabled under some circumstances in order to use single mode automatic or single mode
manual.
7.4.2 Single Channel Mode – Automatic Channel Recognition
Your D-Moll can automatically recognize the pedal’s send/receive channel. To get your amp
into the mood (or mode) for this, push and hold “Mute” and then activate any program
change button on your MIDI pedal. The amp will look for a program change and recognize
the channel it is being sent on. Then it will switch to this channel and stay there as soon as
you let go of “Mute”.
7.4.3 Single Channel Mode – Manual Channel Selection
If you would like to have your D-Moll on a certain MIDI channel, then we can
accommodate you here as well. Here is how this works:
Push and hold “Mute” and then turn on the preamp channels in the order that corresponds
to your midi channel preference. For example: if you want to have your D-Moll to respond
only to MIDI information that is being sent on channel 7, then you must hold the “Mute”
button down and turn the Preamp channel one selector off, channel two selector on,
channel 3 selector on. If you let go of “Mute” now, then your D-Moll is set to respond to
MIDI channel 7 only. Get it? The table below gives you the sequence for all 7 MIDI
channels.
Midi Channel Ch1
Ch2
Ch3
1
off
off
off
2
on
off
off
3
off
on
off
4
on
on
off
5
off
off
on
6
on
off
on
7
off
on
on
7.5 Program Information
D-Moll can remember up to 128 program changes.
7.6 Phantom Power
Several of the pins in the MIDI jack can supply phantom power to your MIDI pedal, as
explained in chapter 3.3.1
Chapter Eight: Footswitch
The optional Columbus footswitch can be connected via the rear panel mounted XLR jack.
The Columbus will not recognize functions selected from the front panel.
Chapter Nine: Maintenance and Cleaning
9.1 Cleaning
Never use a wet method of cleaning the amplifier, i.e. any amplifier. Usually it is sufficient
to wipe down the outside of the amp with a slightly moist cleaning rag. Do not use abrasive
cleaning chemicals. Sometimes a vacuum cleaner can be used to remove dust and dirt from
nooks and crevices. Do not remove the chassis from the housing to clean the amp. The
inside of your amp carries dangerous voltages.
9.2 Care
Be gentle with this amplifier. Any mechanical shocks and wide temperature changes,
moisture-rich environments and extreme conditions (dust, wind, heat, cold and moisture)
can substantially shorten tube life, in some cases, even amplifier life.
Do not block the air circulation grilles in the front and in the back of the amp. Do not push
the amp right up against objects that would interfere with its normal airflow. The top of the
amplifier might get warm after prolonged use, this is normal, but will melt your ice cream
and definitely ruin your beer. Never put beverages on top of the amp where they could spill
and flow inside the amplifier. You’ll hate it if this happens, guaranteed!
9.3 Tube Change
Tube changes are only to be undertaken by authorized service personnel. If power tubes
with different values then the original ones are to be installed, then the amplifier must be
re-biased before operation can be resumed. The amplifier uses a three circuit bias
system. It is quick and easy to accomplish biasing, but involves removing the chassis and
use of specialized equipment for measuring currents inside the amplifier. Only trained
professionals should attempt this procedure.