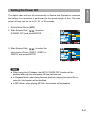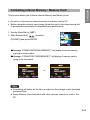
1
Digital Video Camera Safety Precautions 4 Specifications 5 Name of Parts and Buttons 8 LCD Monitor and LED Displays 12 Before Using the Digital Video (DV) 15 Powering the Digital Video 16 How to recharge the battery 16 Using the AC adapter 17 Setting the date and time 17 Setting the storage media 18 1.Basic Recording 20 Motion Picture Recording Still Picture Recording 20 21 2.Advance Recording 22 Menu Function (Resolution / Self-Timer / White Balance / Effect / Strobe) 22 Selector Dial Function (Digital Zoom / Scene Mode) 26 3.Voice Recording 28 Record ENGLISH Contents 28 E1 4.Playback Mode 29 Playing Files on a TV 29 Motion File / Voice File Playback 30 31 Still Single File Playback Slide Show Thumbnail Playback Protect (One File / All Files / Cancel All) 32 34 Print (One File / All Files / Cancel All) 36 Delete (One File / All Files) 5.MP3 Play Music 6. Changing the DV Setting Setting the Beep Sound Setting the Power Off Setting the LCD Confirmation Time Formatting the Internal Memory / Memory Card Adjusting the LCD Brightness Setting the Frequency Setting the Date Imprint 39 39 40 40 41 42 43 44 44 45 Changing the Video Out Signal Method 46 47 Setting the Date and Time 47 Setting the Language 7. Others E2 31 32 Recording Capacities 48 48 Warning Message 50 Computer System Requirements Introduction to Software Applications Installing Software Applications Important Note for Viewing Video Clips Sent via E-mail 51 ENGLISH 8. SOFTWARE INSTALLATION GUIDE 51 51 52 53 9.CONNECTING THE CAMERA TO THE COMPUTER Connect the camera to a USB port on the computer via the supplied USB cable 54 10. DOWNLOADING PICTURES / VIDEO CLIPS / MUSIC ONTO YOUR COMPUTER For Windows Users (Windows 98SE/ME/2000/XP) 58 58 For Macintosh Users (Mac OS 9.0 or higher) 58 11. USING ARCSOFT PHOTOIMPRESSION 60 12. USING ARCSOFT VIDEOIMPRESSION (WEB MODE) 61 13. TROUBLESHOOTING 63 14. GETTING HELP 66 15. REGULATORY INFORMATION 67 E3 Safety Precautions Do not attempt to disassemble, repair or alter the equipment yourself. The high-voltage circuitry in the equipment poses significant electrical hazard. Do not attempt to disassemble, alter or directly solder the battery. Do not put the battery in a fire, attempt to heat it, use it in high temperature environment such as next to a fire or inside a car. Do not put it into water or allow it to get wet. Do not use this DV in the bathroom. Do not use batteries that are significantly damaged or deformed. Turn off the power immediately in the event of irregularity, such as the equipment emitting smoke or a strange smell. Remove the battery as soon as possible, being careful to avoid electric shocks or burns. Keep the battery and Memory Card used in this DV out of the reach of children to prevent accidental ingestion. E4 ENGLISH Specifications General Power Source Rechargeable Lithium-Ion Battery 3.7V AC Adapter 5.0V Dimensions (WxHxD) 94.3 x 63.3 x 34.6 mm Weight Approx. 157.8g (with battery 184.5g) Operating Conditions Temperature: 0°C to 40°C (32°F to 104°F) Humidity: 85% or less Storage Temperature -20°C ~ 60°C (-4°F to 140°F) Memory Media Internal Memory 16 MB Memory Card Secure Digital Card Slot E5 Digital Video (DV) CMOS 1/2” 2.0 mega pixels Lens Fix Lens F = 2.8 Focal Length f = 8.64 mm Shooting Range Approx. 1.0 m ~ Infinity Digital Zoom Motion Picture: 4X Still Picture: 2X Monitor 1.5” Low –Temperature Polysilicon TFT Color LCD White Balance Auto / Manual (Sunny, Cloudy, Tungsten, Fluorescent) Exposure Compensation Shutter Speed Exposure compensation: Auto Metering: TTL CMOS Motion Picture: 1 / 30 ~ 1 / 4000 seconds Still Picture: 1 / 8 ~ 1 / 4000 seconds ISO Sensitivity Auto (ISO 100 equivalent) Built-in Flash Set by manually Modes: Auto, Flash Off, Red-eye Reduction Image Resolution z (Quality) Motion Picture: 320 x 240F(17 FPS), 320 x 240N (15FPS), 320 x 240E (10FPS), z 160 x 120F (10FPS), 160 x 120N (10FPS) Still Picture: 2048 x 1536F, 1600 x 1200F, 1600 x 1200N, 800 x 600F, 800 x 600N File Format Still Picture: JPEG (Exif2.2) , DCF Motion Picture: AVI File Voice: WAV File E6 PC Platforms Windows 98SE / ME / 2000 / XP Macintosh Mac OS 9.x ENGLISH System Requirements of PC Windows Macintosh z Windows 98SE or higher z Pentium II 450 Processor or equivalent z z 64MB or more of RAM Media Player 7 or later version z Mac OS 9.x z 400 MHz G3 or faster QuickTime 6 or later version z E7 Name of Parts and Buttons DV Body Strobe Microphone Photo Sensor Lens Self-Timer Indicator Battery Cover Power Button Menu Button Power / Strobe Indicator Mode Dial Shutter Button Voice Motion Selector Dial Set Up Playback ENTER E8 MP3 Wrist Strap Eyelet Still ENGLISH Reset Button DC IN USB Terminal LCD Monitor (270° Rotation) AV Out / Earphone Card Cover Battery Cover Tripod Screw Hole z Reset Button: When an error happens to your DV, please press the Reset Button with the tip of a pencil or similar object to turn off the DV, then turn on again. All DV setting will keep as what you set before turning the DV off. E9 Buttons Keys includes Power, Shutter, Mode Dial, Menu, and Selector Dial ( / / ENTER). Power Button You turn the DV on and off using the Power Button, located on the top of the DV. Shutter Button Mode Shutter Button Function Motion record motion picture stop recording record still picture record voice file Still Voice stop recording play motion picture file play voice file Playback MP3 stop playing play music data Mode Dial Icon SET Mode Name Description Set Up This mode is used for changing and confirming the DV settings. Still This mode is used for still picture shooting. Playback This mode is used for playing recording file. (Motion, Still, and Audio) Motion This mode is used for recording motion picture with sound. MP3 E10 Audio This mode is used for recording voice. MP3 This mode is used for playing music. n Motion and Still ENGLISH MENU Button In Motion, Still, and Playback Mode, press the MENU button to enter into the menu which displays the modes to set up different functions. The display is as below, for example: Note: Strobe setting is not available in the Motion Mode. n Playback Selector Dial ENTER n Digital Zoom Control in Motion and Still Mode. n Function Selection in Menu (under any modes). n FF/REW function in Motion, and Audio during playing. n Volume Control in Motion, Audio, and MP3 during playing. E11 LCD minitor and LED Displays LCD Monitor Displays n Recording In preview mode, on-screen information will display as below if functions has been previously set: n Still and Motion Mode 1. Strobe (OFF: / AUTO: no icon / Red-eye: ). Note: Strobe setting is not available in the Motion Mode. 2. Scene Mode (Normal : no icon / Backlight Snow& Beach / Spotlight 3. White Balance Fluorescent 4. Effect Mode: / Lowlight / ). (Auto: no icon / Sunny / Cloudy / Tungsten ). (Normal: no icon / B&W 5. Recording Mode (Motion: / Still: / Sepia ). ). 6. Recording Data: displays the remaining number of still pictures or time for motion image. 7. Resolution n Motion (320F / 320N / 320E / 160F / 160N) n Still (2048F / 1600F / 1600N / 800F / 800N) 8. Storage Media (Internal: E12 9. Battery Icon. / Card: ). / ENGLISH 10. Date and Time. 11. Self-Timer Icon. Voice Mode In Preview 1. Voice Mode Icon ( ). 1 2 2. Recording Data: displays the remaining time for voice. In Record 1. The Recording Time displays 1 after pressing Shutter Button. MP3 Mode 1. Track number and music title. 2. Playback Mode ( 2 ). 1 Playback Motion Picture 1. Motion Picture Recording Time. 2. Motion Icon. 1 2 E13 Still Picture 1. Print Icon. 2. Protect Icon. 3. Playback Icon. 4. Recording Data (for playback): Displays the number of the image file being played and total number of file recorded. Audio 1. Voice Recording Time. 2. Voice Icon. 1 2 LED Displays Location Front (Blue) Status Blink z Lit z z z Green LED: Flash is recharging. Red LED: Data recording to Storage Media, MP3 is Lit z playing. Green LED: Power on. z Red LED: Battery recharge. (Green/Red) E14 Mass Storage Mode. PC Camera. Blink z Back Description Self-Timer (count down), Data recording to Storage Media. ENGLISH Before Using the Digital Video Package Contents Check that your digital video comes complete with all the accessories listed below. l l l l l l l l l l Items Digital Video Battery (3.7V Rechargeable Lithium-Ion) Wrist Strap Soft Case CD-ROM (Drivers, User’s Manual, Software, and Acrobat Reader) User Guide / Quick Start Guide Earphone USB Cable AV Cable AC Adapter Qty 1 1 1 1 1 1 1 1 1 1 Getting Started This section includes Attaching the Strap, Powering the Camera, Setting the Date and Time, and setting the storage media. n Attaching the Strap Pass the end of the strap through the wrist strap eyelet on the Digital Video. E15 Powering the Digital Video Loading the Battery 3.7V Rechargeable Lithium-ion Battery. 1. Open the battery cover by sliding it in the direction shown. 2. Load the battery and close the battery cover. How to recharge the battery z Use the AC Adapter to recharge the battery. Turn off the Digital Video, then connect the AC Adapter cable to (DC IN) jack of the DV, and insert the power plug into a power outlet. The battery will be recharged through AC Adapter. z Use the USB to recharge the battery. Turn off the Digital Video, then connect the Digital Video to PC, the battery will be recharged through the USB cable. Note z Use only specified 3.7V rechargeable Lithium-Ion battery for this camera. z When the battery symbol is (near end), it indicates that the batteries are nearly exhausted. Be sure to have spare batteries on hand. NOT ALL BATTERIES ARE THE SAME! Battery life depends significantly z on battery age, usage conditions, type, and brand. z Battery performance is reduced at temperatures below 41 °F (5 °C). Note for Recharging Battery 1. LED Status: (A)during recharging, the LED is red, (B) LED is not lit when charging has been completed, (C) if under voltage, the LED is green, (D) if the battery temperature is abnormal the LED is orange (if, without battery, use the AC Adapter as the power source , the LED is also orange, but it is normal). 2. For LED status (C), please change the battery. E16 3. For LED status (D), please disconnect the AC Adaptor and remove the battery, wait until the battery cools down and try again. Using the AC Adapter 1. Connect the power cord to the AC Adapter. ENGLISH 2. Connect the AC Adapter cable to the (DC IN) jack of the DV, and insert the power plug into a power outlet. Note z z The battery icon will not display on the LCD monitor when using AC Adapter. When using the AC Adapter, the AUTO POWER OFF function will be disabled although the auto power off time has been set. Setting the date and time You will need to adjust the date and time when you first use the digital video and each time you change time zones on trips. Date format can be set to: Y / M / D, M / D / Y, and D / M / Y. Time is displayed in the 24-hour clock format. Setting is possible from [2003/01/01 00:00] to [2099/12/31 23:59]. 1. Turn on the DV and set the Mode Dial to [ SET ]. 2. Slide Selector Dial ( ) to select [CLOCK] and press ENTER to confirm. E17 3. Slide Selector Dial ( ) to select Year, Month, Day, Time, or Date Format, then press ENTER. After selecting an item, press [ : +1 ] / [ to adjust the item. If you keep pressing or : -1 ] , the number will advance or recede continuously. Each time you set an item you must press ENTER to confirm the setting. If you want to return to menu screen, press MENU. Setting the storage media This digital video uses internal memory and Secure Digital Memory Card as storage media to record data. It is not necessary to choose internal memory or memory card to record data, because if you insert a memory card to DV, the memory card will take priority. Important z If you want to use Internal Memory as the storage media, you must remove the Memory Card from the card slot first. z Note The icon of the memory media will display on the LCD monitor. Internal Memory The size of the internal memory is 16MB. E18 ENGLISH n Secure Digital Memory Card (SD Card) Insert the SD Card 1. Check that the DV is turned off. 2. Gently flip open the monitor, then open the card compartment cover. 3. Insert the card (position it with the metalic slots facing towards the card cover and the cut-corner being near the side of the wrist-strap eyelet). 4. Close the card cover. Remove the SD Card 1. Check that the DV is turned off. 2. Gently lift up the monitor, then open the card compartment cover. 3. Press the edge of the card so that a small part of it slides out. 4. Carefully pull out the card and close the card compartment cover. Note The memory card has a limited service life, so, please check your memory card before using it. Incorrect handling of a memory card may cause the loss of data. Before using the memory card, please format the card in the video camera first to attain the best compatibility and performance. Before inserting or removing the memory card, be sure to turn off the Digital Video first. E19 Basic Recording This section includes Still and Motion Picture recording Motion Picture Recording The possible recording time is displayed according to the remaining space in the recording destination. Sound is incorporated in the recording. 1. Turn on the DV and set the Mode Dial to [ ]. 2. Check the position of the subject on the LCD monitor. 3. Press Shutter Button and the recording time will display. z Shooting will start. z Press the Shutter Button again to stop shooting. Important z While recording, do not try to turn off the power of digital video (or disconnect the AC Adapter), turn the mode dial, or take out the memory card, as this could result in loss or damage of data stored on the internal memory / memory card, or malfunction of the digital video. z E20 Wait until recording has finished before changing the mode to another setting or turning the DV off. 1. Turn on the DV and set the Mode Dial to [ ENGLISH Still Picture Recording ]. 2. Check the position of the subject on the LCD monitor. 3. Press Shutter Button to record image. z Important While recording, do not try to turn off the power of digital video (or disconnect the AC Adapter), turn the mode dial, or take out the memory card, as this could result in loss or damage of data stored on the internal memory / z memory card, or malfunction of the digital video. Wait until recording has finished before changing the mode to another setting or turning the DV off. E21 Advance Recording In this section, there are two parts: MENU Function and SELECTOR DIAL Function In Menu, user can customize the settings for the following functions: Resolution, Self Timer, White Balance, Effect, and Strobe. Selector Dial, user can set Digital Zoom and Scene Mode. MENU Function RESOLUTION In Motion Picture Mode, the digital video offers five image quality modes: 320X240F, 320X240N, 320X240E, 160X120F, and 160X120N. In Still Picture Mode, the digital video offers five image quality modes: 2048X1536F, 1600X1200F, 1600X1200N, 800X600F, and 800X600N. Motion Picture Mode 1. Set the Mode Dial to [ ]. 2. Press MENU. 3. Slide Selector Dial ( ) to select [RESOLUTION] and press ENTER. 4. Slide Selector Dial ( ) to select an image quality and press ENTER. E22 The display will return to preview screen. 1. Set the Mode Dial to [ ENGLISH Still Picture Mode ]. 2. Press MENU. 3. Slide Selector Dial ( ) to select [RESOLUTION] and press ENTER. ) to select an 4. Slide Selector Dial ( image quality and press ENTER . The display will return to preview screen. SELF TIMER The self-timer offers a convenient way to take group pictures with the photographer included. Mount the digital video on a tripod or a flat, secure surface to shoot pictures with the self-timer. 1. Set the Mode Dial to [ / ]. 2. Press MENU. 3. Slide Selector Dial ( ) to select [SELF TIMER] and press ENTER. 4. Slide Selector Dial ( ) select the setting (10SEC) and press ENTER. The SELF TIMER icon will display. The display will return to preview screen. E23 5. Press Shutter Button to activate the self-timer of a still picture or motion picture. The Self-timer LED will start flashing and the Shutter will be released with approximate delay of 10 seconds. For more details about motion picture recording, please see page 20. Note z z After taking the picture, the self-timer function will disable. The self-timer setting will be disabled if turning the mode dial. WHITE BALANCE The white balance can be adjusted so that images can be recorded in natural colors no matter what light source the subject is exposed to. There are five modes available: AUTO (default and no display), SUNNY ( ), CLOUDY ( ), TUNGSTEN LIGHT ( ). 1. Set the Mode Dial to [ ), and FLUORESCENT LIGHT ( / ]. 2. Press MENU. 3. Slide Selector Dial ( ) to select [WHITE BALANCE] and press ENTER. 4. Slide Selector Dial ( ) to select a white balance mode and press ENTER. E24 The selected white balance mode icon will be displayed. The display will return to preview screen. EFFECT Images can be recorded in NORMAL (no icon displays), B & W ( 1. Set the Mode Dial to [ / ), SEPIA ( ENGLISH ). ]. 2. Press MENU. 3. Slide Selector Dial ( ) to select [EFFECT] and press ENTER. 4. Slide Selector Dial ( ) to select the effect mode (NORMAL, B & W, and SEPIA) and press ENTER. The selected effect mode icon will be displayed. z The display will return to preview screen. Note Effect Mode setting will override White Balance setting. STROBE This digital video offers three types of strobe modes: OFF ( AUTO (no icon display), and RED EYE ( ). z Strobe can not be set in Motion Mode. z OFF: The flash will not fire, even in dark places. z z ), AUTO: The flash will fire automatically in dark places and when there is black light. RED EYE (Red-eye Reduction): Using the flash to record at night or in a room with dim lighting can cause recorded images to show red spots on the eyes of people. This is due to light emitted from the flash reflecting off of the retina of the eye. When red-eye reduction is selected as the flash mode, the flash will fire before the Shutter releases to lessen the red-eye effect. E25 1. Set the Mode Dial to [ ]. 2. Press MENU. 3. Slide Selector Dial ( ) to select [STROBE] and press ENTER. 4. Slide Selector Dial ( ) to select a strobe mode and press ENTER. The selected strobe mode icon will display. The display will return to preview screen. Selector Dial Function DIGITAL ZOOM The size of the subject can be changed without changing the distance from the DV camera to the subject by sliding the Selector Dial ( z The digital zoom is 4X in motion picture mode. z The digital zoom is 2X in still picture mode. Digital Zoom does not work in 2048X1536. z 1. Slide Selector Dial ( E26 ). ) to perform digital zoom function. Slide to enlarge the size of the subject. Slide and the subject will return to the standard size. ENGLISH SCENE MODE This function allows the user to use the correct scene mode to capture an image. There are five modes: NORMAL (no icon displays), BACKLIGHT ( LIGHT ( ), SNOW & BEACH( ), and SPOTLIGHT ( ), LOW- ). When previewing in Motion or Still modes, press ENTER and the Scene Mode menu displays. BACKLIGHT : Used when light is coming from behind the subject. LOWLIGHT : Used to make subject brighter in insufficient lighting environment. SNOW & BEACH : Used for bright situations such as snowfields and beaches. SPOTLIGHT : shooting subjects that are lit by strong light. E27 Follow the procedures below to record sound. The possible recording time is displayed according to the remaining space in the recording destination. Recording Mode 1. Set the Mode Dial to [ ]. 2. Press Shutter Button to start recording and the recording time will display (see picture 2). 1 2 3. Press Shutter Button again to stop recording. z Note During recording, the Auto Power Off function will be disabled, even though z the auto power off time has been set. The LED (above the MENU button) will blink red while recording. z While recording, do not try to turn off the power of digital video (or disconnect the AC Adapter), turn the mode dial, nor take out the memory card, as any of these actions could result in loss or damage of data stored in the internal memory / memory card, or malfunction of the DV camera. E28 z Wait until recording has finished before changing the mode to another setting or turning the DV off. z The LCD will turn off automatically in 30 seconds after pressing Shutter Button. Press any Button to turn on the LCD if you needed. ENGLISH Playback Files, including Motion Picture, Voice File, and Still Picture, can be played. Important l In some cases, images recorded with the digital video of other companies or those that have been altered by Application Software cannot be played back in this digital video camera. Playing File on a TV n Connecting By connecting the digital video to a TV by AV Out Cable supplied with the digital video, you can play recorded files on the TV. 1. Open the AV OUT Terminal cover and connect the AV Out Cable to the AV OUT Terminal. 2. Connect the other end of the AV Out Cable to AV IN Terminal of the TV. 3. Play back the files. n Set the Mode Dial to Playback Mode [ l l ]. Note The LCD Monitor will be off when the AV Out Cable is connected to the digital video camera. While playing the AVI file, there will be no on-screen information displayed on the TV screen. Please press MENU to turn on the onscreen information and press again to turn it off. E29 l On TV, the AVI file of 320 x 240 is displayed in standard size of 640 x 480 and the AVI file of 160 x 120 is displayed in the size of 320 x 240. Motion File / Voice File Playback Files containing motion pictures and voice files can be played back. 1. Set the Mode Dial to [ ]. 2. Plug the supplied earphone to the AV Out terminal located on the camera. (page 9) 3. Press ENTER button to select “ EARPHONE” displayed on the LCD. 4. Press Shutter Button to start playing motion picture file./ Voice File n While playing, press MENU, then Slide Selector Dial ( ) to adjust the volume. n To pause, press ENTER during playback; to resume, press ENTER again. n When playing back Motion Picture File or Voice File, to Fast Forward, Press to fast forward. To return to normal speed, press again. n When playing back Motion Picture File or Voice File, to Rewind, Press to rewind. To return to normal speed, press Motion Picture file l l E30 again. Voice File Note In Playback Mode, when playing the motion file or voice file, the auto power off function will be disabled. To playback motion file (AVI file) on a computer, install “Video Impression (or DivX Codec) (page 53)” first. ENGLISH Still Single File Playback Files containing still pictures can be played back. 1. Set the Mode Dial to [ ]. ) to select the file to be played back. 2. Slide Selector Dial ( When is pressed, the previous file will be played. When is pressed, the next file will be displayed. Slide Show This function automatically plays all the files stored in the Internal Memory or on the Memory Card. Slide show time interval can be set to 2, 3, 5, or 7 seconds. 1. Set the Mode Dial to [ ]. 2. Press MENU. 3. Slide Selector Dial ( ) to select SLIDE SHOW] and press ENTER. 4. Slide Selector Dial ( ) to select the playback time (2SEC, 3SEC, 5SEC, 7SEC), then press ENTER. When ENTER is pressed, slide show starts at the set time interval. z To cancel the slide show During playback, press Shutter Button to cancel slide show. Note z Files containing only motion pictures, still pictures, and Audio files can be played back in slide show. E31 Thumbnail Playback (Index Screen) Thumbnail play back allows the user to view nine images at once on the LCD monitor for quick searching. 1. Set the Mode Dial to [ ]. 2. Press ENTER to display files. Display 9-file at one time. 3. Slide Selector Dial ( ) to select file you want to play. Press to move to previous file. Press to move to next file. After a file has been selected, you may press ENTER again to return it to single display. Delete This section explains how to delete recorded files. There are two ways to delete files: One File Delete and All Files Delete. Delete One File 1. Set the Mode Dial to [ ]. 2. Press MENU. 3. Slide Selector Dial ( ) to select [DELETE] and press ENTER. E32 ) to select ENGLISH 4. Slide Selector Dial ( [ ONE FILE ] and press ENTER. Message “DELETE?” displays. How to select file to delete z When the message “DELETE?” is displayed, you may press ENTER to confirm the deletion of current displayed file. the message “DELETE?” is displayed, you may slide Selector z When Dial ( ) to select the image you want to delete. 5. Press ENTER, the file will be delete. z Note The protected file cannot be deleted. Delete All Files 1. Set the Mode Dial to [ ]. 2. Press MENU. 3. Slide Selector Dial ( ) to select [DELETE] and press ENTER. 4. Slide Selector Dial ( ) to select [ALL FILES] and press ENTER. Message “DELETE ALL FILES?” displays. 5. Press ENTER, all files will be deleted. E33 Important z Files may take time to delete, depending on the capacity of the memory card mounted and the file type. z If files have been set in Protect mode, they cannot be deleted until they are unprotected. Protect This function allows you to protect valuable files from being erased accidentally. Protect One 1. Set the Mode Dial to [ ]. 2. Press MENU. 3. Slide Selector Dial ( ) to select [PROTECT] and press ENTER. 4. Slide Selector Dial ( ) to select [ONE FILE] and press ENTER. Message “PROTECT?” is displayed. How to select file to protect z When the message “PROTECT?” is displayed, you may press ENTER to confirm the protection of current displayed file. z When the message “PROTECT?” is displayed, you may slide Selector Dial ( ) to select the image you want to protect. 5. Press ENTER to protect the file. The protect icon will be displayed. E34 z ENGLISH z How to cancel the Protect z Follow the steps (Protect One) above to remove the protect setting. If an image has been set to protect, the “UNPROTECT?” message will display on screen. Press ENTER the protect setting of this image will be removed. Protect All 1. Set the Mode Dial to [ ]. 2. Press MENU. 3. Slide Selector Dial ( ) to select [PROTECT] and press ENTER. 4. Slide Selector Dial ( ) to select [ ALL FILES] and press ENTER. Message “PROTECT ALL?” is displayed. 5. Press ENTER to complete the Protect All setting. The protect icon will be displayed. The display will return to preview screen. E35 Cancel All 1. Set the Mode Dial to [ ]. 2. Press MENU. 3. Slide Selector Dial ( ) to select [PROTECT] and press ENTER. 4. Slide Selector Dial ( ) to select [CANCEL ALL] and press ENTER. Message “UNPROTECT ALL?” is displayed. 5. Press ENTER to complete the Unprotect All setting. The display will return to preview screen. Print This function allows you to select certain (JPEG) files or set all (JPEG) files to print out. Print One File 1. Set the Mode Dial to [ ]. 2. Press MENU. 3. Slide Selector Dial ( ) to select [PRINT] and press ENTER. 4. Slide Selector Dial ( ) to select [ONE FILE] and press ENTER. Message “PRINT?” is displayed. E36 ENGLISH How to select file to print z When the message “PRINT?” is displayed, you may press ENTER to confirm the printing of current displayed file. z When ( the message “PRINT?” is displayed, you may slide Selector Dial ) to select the image you want to print. 5. Press ENTER to set the file to print. z How to cancel the Print One z Follow the steps above (Print One) to remove the print setting. z If an image has been set to print, the “CANCEL PRINT?” message will display on screen, press ENTER the print setting of this image will be removed. Print All 1. Set the Mode Dial to [ ]. 2. Press MENU. 3. Slide Selector Dial ( ) to select [PRINT] and press ENTER. 4. Slide Selector Dial ( ) to select [ALL FILES] and press ENTER. Message “PRINT ALL?" displays. E37 5. Press ENTER to set all files to print. The print icon will display. The display will return to preview screen. Cancel All Files 1. Set the Mode Dial to [ ]. 2. Press MENU. 3. Slide Selector Dial ( ) to select [PRINT] and press ENTER. 4. Slide Selector Dial ( ) to select [CANCEL ALL] and press ENTER. Message “CANCEL ALL PRINT?” is displayed. 5. Press ENTER to complete the Cancel All Print setting. The display will return to preview screen. E38 This function allows user to use this DV as an MP3 player for playing music data. ENGLISH MP3 1. Set the Mode Dial to [ MP3 ]. 2. Plug the supplied earphone to the AV Out terminal located on the camera. (page 9) 3. Press ENTER button to select “ EARPHONE” displayed on the LCD. 4. Slide Selector Dial ( ) to select the music you want to play. n In playback menu, you may press MENU to change the playback mode as you like: : All tracks are repeated. 1. : All tracks are played. 2. : Selected track is repeated. 3. : Selected track is played. 4. n During playing, slide Selector Dial ( ) to adjust the volume. 5. Press Shutter Button. n The music will play. This DV camera plays MP3-based music only. Note l The LCD monitor will close in 30 seconds and you can turn it on by pressing any Button. l The LCD Monitor can only display 8 letters’ music title in English alphabet (including number), for example, ABCDEF12. Please change the music title to English or number for display. l In the following situations, the music title will be displayed as TRACK001, TRACK002…etc: 1. The unidentifiable music title. 2. Music title over 8 letters (including number). 3. Music title with space, for example, ABCDE2. How to download the music data to video camera Use the Mass Storage Function to download the music data to the “AUDIO” folder (page 57). How to enjoy the music data Connect the earphone to the earphone jack in the DV and use the earphone to enjoy music data . E39 Changing the Digital Video Setting This section explains how to change settings for the camera.There are 10 items: Setting the Beep Sound Setting the Power Off Setting the LCD Confirmation Time Formatting Internal Memory / Memory Card Adjusting the LCD Brightness Setting the Frequency Setting the Date Imprint Setting the Language Changing the Video Out Signal Method Setting the Date and Time Setting the Beep Sound The DV beeps to alert you when you press a button. You can change the setting depending on whether you want the beep to sound or not. 1. Set the Mode Dial to [ SET ]. 2. Slide Selector Dial ( ) to select [BEEP SOUND] and press ENTER. 3. Slide Selector Dial ( ) to select the setting (ON or OFF) and press ENTER. z E40 Note If you select [OFF], the beep sound will be disabled. ENGLISH Setting the Power Off The digital video will turn off automatically in Record and Playback to conserve the battery if no operation is performed for the preset length of time. The auto power off time can be set in 30, 60, or 90 seconds. 1. Set the Mode Dial to [ SET ]. 2. Slide Selector Dial ( ) to select [POWER OFF] and press ENTER. 3. Slide Selector Dial ( ) to select the auto power off time (30SEC, 60SEC or 90SEC) and press ENTER. Note z When using the AC Adapter, the AUTO POWER OFF function will be z disabled although the auto power off time has been set. In Playback Mode, when doing the auto playback, playing the motion file, or z voice file, this function will be disabled. In MP3 Mode, when playing MP3 file, this function will be disabled. E41 Setting the LCD Confirmation When you press Shutter Button to take a still image, the image will be displayed on the LCD monitor. The confirmation time can be set in 1, 3, or 5 seconds. 1. Set the Mode Dial to [ SET ]. 2. Slide Selector Dial ( ) to select [LCD CONFIRM] and press ENTER. 3. Slide Selector Dial ( ) to select the confirmation time (1SEC, 3SEC, or 5SEC) and press ENTER. Note E42 z The image will be played right after capturing for the preset time for confirmation. z Images are not displayed when the LCD Confirmation Time is set to OFF. The images are recorded immediately after taking. ENGLISH Formatting Internal Memory / Memory Card This function allows you to format Internal Memory and Memory Card. z Do not try to format your internal memory or memory card by PC. z Before using the memory card, please format the card in the video camera first to guarantee to have the best compatibility and performance. 1. Set the Mode Dial to [ SET ]. 2. Slide Selector Dial ( ) to select [FORMAT] and press ENTER. Message “FORMAT INTERNAL MEMORY?’ will display if internal memory is going to be formatted. Message “FORMAT SD CARD MEMORY?” will display if memory card is going to be formatted. or Note z Formatting will delete all the files recorded on the storage media (included protected files). z Some Memory Card formatted with other devices cannot be used in this DV. E43 Adjusting the LCD Brightness The function allows user to adjust the brightness of the LCD monitor when it is hard to see, such as in strong sunlight. It can be adjusted as below: SMALL ( ), MIDDLE ( ), or LARGE ( ). 1. Set the Mode Dial to [ SET ]. 2. Slide Selector Dial ( ) to select [BRIGHTNESS] and press ENTER. 3. Slide Selector Dial ( ) to select the brightness (SMALL, MIDDLE, or LARGE) and press ENTER. E44 ENGLISH Setting the Frequency This function allows you to set the frequency usage for the DV. You may have the option to choose between 50HZ and 60HZ. 1. Set the Mode Dial to [ SET ]. 2. Slide Selector Dial ( ) to select [FREQUENCY] and press ENTER. 3. Slide Selector Dial ( ) to select the Frequency (60HZ or 50HZ) you need to use in this DV and press ENTER. Setting the Date Imprint This function allows the user to record images imprinted with the date. 1. Set the Mode Dial to [ SET ]. 2. Slide Selector Dial ( ) to select [DATE IMPRINT] and press ENTER. 3. Slide Selector Dial ( ) to select the setting (ON or OFF) and press ENTER. E45 Setting the Language This function allows user to set the language to be displayed on the LCD monitor. Language can be set as below: ENGLISH, FRANÇAIS, DEUTSCH, ESPAÑOL, ITALIANO, NEDERLANDS, PORTUGUÉS, . 1. Set the Mode Dial to [SET]. 2. Slide Selector Dial ( ) to select [LANGUAGE] and press ENTER. 3. Slide Selector Dial ( ) to select the language you want to use in this DV and press ENTER. E46 If you wish to play records files on a TV when you are abroad, change the Video Out Signal Method according to the video system used in the country where you are. USA, Canada, Japan, etc. use NTSC system, while France, German, Italian, Dutch, etc. use PAL system. ENGLISH Changing the Video Out Signal method 1. Set the Mode Dial to [ SET ]. 2. Slide Selector Dial ( ) to select [VIDEO OUT] and press ENTER. 3. Slide Selector Dial ( ) to select Video Out Signal (NTSC or PAL) you want to use in this DV and press ENTER. Setting the Date and Time Please check page 17 for how to set the date and time. E47 Others Recording Capacities The table below gives only an approximate recording time (Motion Picture / Voice) and picture counts (Still Picture) available by memory media capacity. Internal Memory Mode Resolution 16MB 320 x 240 F N 00:01 00:02 160 x 120 E F 00:05 00:06 N 00:09 00:59 2048 x 1536 1600 x 1200 F F 17 22 800 x 600 N F 38 58 N 96 Motion (HH:MM) Voice (HH:MM) Still E48 Memory Card Mode Motion (HH:MM) Resolution F 16MB 00:01 32MB 00:02 64MB 00:05 128MB 00:11 320 x 240 N E 00:02 00:05 00:04 00:10 00:09 00:22 00:19 00:45 160 x 120 F N 00:06 00:09 00:13 00:20 00:29 00:42 00:58 01:24 02:03 36 04:17 75 08:31 151 Voice (HH:MM) 2048 x 1536 F 00:59 17 1600 x 1200 F N 21 38 46 80 96 168 192 335 800 x 600 F N 58 96 122 202 256 423 509 844 Still (pic) ENGLISH Important z Because there are numerous types of Secure Digital Memory Cards, thus, before using a commercially available memory card, check with its manufacture to be certain it is compatible with your digital video. z NOT ALL MEMORY CARDS ARE CREATED EQUAL! Recording capacities depends on brand and shooting subjects. E49 Warning Message If the warning message is displayed on the LCD monitor, follow the procedures below. Message Remedy FILE NUMBER OVER!! No more file numbers can bee added. Insert a UNMATCHED FILE!! new memory card to continue recording. Unplayable file selected. PROTECTED FILE!! THE CARD IS LOCKED!! File is protected. Unprotect file before deleting. Card write protect is set to [LOCK]. Release lock. MEMORY FULL!! Print set up has exceeded the limit. Select some images and remove them from print setting. CARD ERROR!! Format card again. If warning message is still displayed, there is problem with card. Use another card. E50 Note ENGLISH SOFTWARE INSTALLATION GUIDE Do not connect the camera to your computer via the supplied USB cable BEFORE successfully installing the camera’s drivers from the supplied CD-ROM. Computer System Requirements Please see page 7 for details. Introduction to Software Applications Option Description Camera Drivers The drivers enable the camera to become an external removable drive on your computer so that still pictures and video clips can be downloaded to your computer from the camera. Note: Drivers installation is necessary for any of the required DivX operating systems. This software enables you to play back video clips downloaded from the camera. Note: Both Windows and Macintosh users must install DivX so as to view video clips on your computer. AcrSoft VideoImpression This software enables you to take video clips on your computer. AcrSoft PhotoImpression Adobe Acrobat Reader This software enables you to edit and enhance pictures. This software enables you to view the electronic ver sion of the User’s Guide. E51 n Installing Software Applications Step 1 Make sure that your camera is NOT connected to the computer. Step 2 Insert the supplied CD-ROM into the CD-ROM drive. Step 3 The installer would pop up automatically. Note: If the installer doesn’t appear automatically, then double click the ‘CD-ROM drive’ icon after locating the CD-ROM drive under “My Computer” on the desktop. Step 4 Click the application items listed in the installer to begin installation. Note: 1. Remember to install the camera drivers for any of the required operating systems. 2. For any certified operating systems, DivX installation is necessary for playing back video clips downloaded from the camera. Step 5 E52 Follow the on-screen instructions to complete the installation of the camera’s drivers and software application. Note: 1. Make sure you select Yes option each time message pops up for yes-or-no decision to continue installation, otherwise setup will exit without complet ing the installation. 2. Message for DirectX installation would pop up as soon as ArcSoft VideoImpression installation is completed, and follow the on-screen instructions to complete the DirectX setup, then restart your com puter after the installation. (Direct X installation is not required under Windows XP.) 3. After the installation of DivX, message for registering Div X would pop up, click Cancel to close the message. To view e-mailed video clips captured with the DV2020 camera on your computer, both Windows and Macintosh users must install DivX software. You may install DivX on your computer from the supplied CD-ROM, or you may download DivX from website and install it onto your computer instructed by the followings: Step 1 Visit http://download.divx.com/divx, and then click Standard DivX Codec (FREE) to free download DivX511.exe. Step 2 The file download messgae would pop up, click Save to save the file into the specified folder on your computer. Then double click on the downloaded DivX511.exe file. Step 3 Click Next. Step 4 Check the licensing agreement, and click Next. Step 5 Check the DivX 5.1.1 option only, and click Next. ENGLISH n Important Note for Viewing Video Clips Sent via E-mail E53 Step 6 Click Install. Step 7 Click Finish. Step 8 To play back video file, simply double click on the desired video file. For some operating system, such as Windows 98SE, to ensure playback, you may open up Windows Media Player first by going to Start – Programs – Accessories – Entertainment – Windows Media Player, then either drag the video file into the window player, or locate and select the video file by going to File – Open – Browse for playing back the file. CONNECTING THE CAMERA TO THE COMPUTER Note DO NOT connect the camera to your computer via the USB cable BEFORE successful installation of the camera’s drivers. (page 51 ) n Connect the camera to a USB port on the computer via the supplied USB cable 1. Plug one end of the USB cable into your camera and the other end into the USB port of your computer (located either at the back or front of your computer). 2. Set the Mode Dial either to the SET position or to the Motion ( ) position. l Do not set the Mode Dial to the other mode positions. 3. Power on the camera. E54 ENGLISH Important! When the camera is connected to your computer for the first time after the installation of the camera drivers from the supplied CD-ROM, either of the 2 following situations would occur. 1. If the Mode Dial is set to the SET position, the computer will recognize the cam era and automatically complete the installation of the camera onto the computer. 2. If the Mode Dial is set to the ( ) position, the computer will recognize and install the camera onto the computer, and messages prompting you to select may occur under Windows 98SE, Windows 2000 and Windows XP operating systems. n Under Windows 98SE 1 The following message will pop up, indicating that the Windows system recognizes a new device and is searching for the driver. 2 The following message will pop up to ask for insertion of Windows 98SE CD-ROM. Insert the Windows 98SE CD-ROM into the CD-ROM drive, then click “OK”. 3 Click “Browse” to find the driver. 4 Locate and double click Windows 98 folder, then click “OK” . E55 5 Click “OK” to continue and complete the installation. 6 Click “Start > Setting > Control Panel > System > Device Manager > Imaging Devices” to check if Concord DV2020 appears under “Imaging Devices”. If not, please re-install the drivers or re-connect the camera. Note: Ensure that the camera is still connected to the computer while checking. n Under Windows 2000 Operating System E56 1 The following message will pop up, indicating that the Windows system recognizes the new device and is searching for the driver. 2 The warning message of “Digital Signature Not Found” will pop up. Click ‘Yes’ to continue. If ‘No’ is clicked, you’d be asked to exit setup without completing the installation. 3 Click ‘Start > Setting > Control Panel > System > Hardware > Device Manager > Imaging Devices’ to check if DV2020 appears under “Imaging Devices”. If not, please re-install the driver or re-connect the camera. Note: Ensure that the camera is still connected to the computer while checking. 1 The Windows system will recognize the new device and the message of driver search appears. Click ‘Next’ to continue installation. 2 The “Windows Logo Testing” warning appears; click ‘Continue Anyway’ to proceed. Note: The computer will prompt you to install software for the camera,please follow on-screen instructions to complete installation. 3 Click ‘Start > Control Panel > Performance and Maintenance > System > Hardware > Device Manager > Imaging Devices’ (if the panel is not already displaying the classic view, click ‘Switch to Classic View’) to check if DV2020 appears under ‘Imaging Devices’. If not, please re-install the driver or re-connect the camera. Note: Ensure that the camera is still connected to the computer while checking. ENGLISH n Under Windows XP Operating System Note 1. For Windows 2000/ME/XP operating systems, if the Mode Dial is accidentally rotated from the SET position or the ( ) position to the other mode positions, the message about unsafe removal of device would pop up, close the mes sage by clicking the OK button from the message window, then rotate the Mode Dial back to the SET position or the ( ) position. 2. For Windows 2000 operating system, if the Mode Dial is accidentally rotated from the SET position or the ( ) position to the other mode positions, the error message of installation may pop up, close the message by clicking the Finish button from the message window, then rotate the Mode Dial back to the SET position or the ( ) position. E57 DOWNLOADING PICTURES /VIDEO CLIPS/ MUSIC ONTO YOUR COMPUTER Note 1. Do not connect the camera to the computer before successful installation of the camera’s drivers and software. (page 51) 2. For any required operating systems, Div X player must be installed so as to view video clips on your computer. For Windows Users (Windows 98SE/ME/2000/XP) 1. Connect the camera to the computer. (page 54) 2. Set the Mode Dial to the SET position. 3. Turn on the camera. z Mass Storage Device” will display on the camera LCD. 4. Double click My Computer. 5. Double click Removable Disk. 6. To access pictures and video clips, double click DCIM. To download MP3 data to the camera, double click AUDIO and save MP3 data into its folder. For Macintosh Users (Mac OS 9.X) 1. Connect the camera to the computer. (page 54) 2. Set the Mode Dial to the SET position. 3. Turn on the camera. z After a few moments, the external hard drive will appear on the desktop. 4. Double click the “untitled” removable drive that is on your desktop. 5. For pictures and video clips, double click DCIM. To download MP3 data to the camera, double click AUDIO and save MP3 data into its folder. Note z E58 z DCIM folder is for image files. AUDIO folder is for MP3 files. when connecting to the computer with the camera on, otherwise the hard disk of the camera installed on your computer might be damaged. 2. If the Removable Disk can not be found in your computer, please re-install the camera drivers from the supplied CD-ROM (page 51) and re-connect the cam ENGLISH Attention 1. Do not rotate the Mode Dial to the other mode positions from the SET position era to the computer (page 54), and/or format the storage media (page 43). 3. Do not turn off the camera or disconnect the USB cable when using the Mass Storage Function (SET mode) to copy or delete files. E59 USING ARCSOFT PHOTOIMPRESSION Windows only Step 1 Do not connect the camera to the computer before successful in stallation of the camera’s drivers. (page 51 ). 1. Connect the camera to the computer. (page 54) 2. Set the Mode Dial to the SET position. 3. Power on the camera. Note: Do not rotate the Mode Dial to the other mode positions. Step 2 Launch ArcSoft PhotoImpression software by double clicking the PhotoImpression icon on the desktop, or via Start > Programs > ArcSoft PhotoImpression > PhotoImpression from the application list on your screen. The application screen would show. Step 3 Click on [From Folder] at the lower left hand corner, and click [Browse…], then browse will open, then locate and select the Removable Disk and DCIM and 100DCIM folder, then click OK, the pictures will then be added to your album at the bottom of the application. Double click the desired thumbnail to open. Note: Only still pictures can be trnsferred to PhotoImpression. Step 4 You are now ready to print, store or further enhance your pictures. Please refer to ArcSoft’s Software help section for a tutorial on all the features PhotoImpression offers. E60 Windows only ENGLISH USING ARCSOFT VIDEOIMPRESSION You can record live video clips on your computer by using the ArcSoft VedeoImpression software. Step 1 Do not connect the camera to the computer before successful installa tion of the camera’s drivers. (page 51 ). 1. Connect the camera to the computer. (page 54) 2. Set the Mode Dial to the ( ) position. 3. Power on the camera. Note: 1. If you connect the camera to the computer for the first time after the installatin of the camera drivers from the supplied CD-ROM, see more information about it on page 54. 2. Do not rotate the Mode Dial to the other mode positions. Step 2 Launch ArcSoft VideoImpression software by double clicking the VideoImpression icon on the desktop, or via Start > Programs > ArcSoft VideoImpression > VideoImpression from the application list on your screen. The application screen would show. Step 3 Click “ Create a New Video” . Step 4 Click “ Capture from Device” . E61 Step 5 Click the RECORD button to record video. To stop recording, click the STOP button, then the recorded video clips will be then added to the album at the bottom of the screen as listed in step 4. To view, save and edit your video clips using all the features that VideoImpression offers, refer to ArcSoft’s help section for a tutorial. Note: Make sure the driver of DV2020 camera is selected from the source driver list on this screen. Important: During Previewing and Capturing, do not attempt to turn off the camera or disconnect the USB cable as this could result in malfunction of the camera and your computer. Please turn off the Software Application first before powering off the camera or disconnecting the USB cable. E62 The troubleshooting guide is designed to help you solve common problems. If the problem encountered is not included in this section, please contact your local customer support hotline. SYMPTOM I cannot upload PROBLEM Connection failure. images to the PC, or the Removable Disk ENGLISH TROUBLESHOOTING SOLUTION Check to make sure all cable connections are properly and securely plugged in. for DV2020 camera is not shown up in my a. The camera’s drivers from the computer. supplied CD-ROM computer.(See page 51) are not installed b. See page 55 to install the camera on your computer. device onto your computer. b. The camera device You may check whether the camera a. Install the camera’s drivers from the supplied CD-ROM onto your is not installed on device has been installed on your your computer comuter successfully or when connecting not by doing the followings: the camera to your 1. Connect the camera to your computer for the first time after the 2. installation of the 3. camera drivers. 4. computer. Set the Mode Dial to SET postion. Power on the Camera. Go to My Computer – Properties – Hardware – Device Manager – Hard Drives, then click Hard Drives to check whether Con cord DV2020 is shown under it. If not, or the itme of DV2020 is marked with the exclamation mark, re-install the camera drivers from the supplied CD-ROM, then do the steps from 1 to 3 listed above to install the camera onto your computer. E63 T h e d o w n l o a d e d The Div X player from Install the Div X player from the video clips cannot be the supplied CD- supplied CD-ROM. (page 51) played back. ROM is not installed on your computer. I cannot use ArcSoft Connection failure VideoImpression to capture live video clips by showing Check to make sure all cable connections are properly and securely plugged in. message “ cannot connect to device”. The imaging device 1. Install the camera drivers from the for DV2020 camera is supplied CD-ROM onto your not installed in your computer. (page 51) computer. 2. Connect the camera to the computer. 3. Set the Mode Dial to the ( position. ) 4. Power on the camera. You may check whether the imaging device has been installed on your comuter successfully or not by going to My Computer – Properties – Hardware – Device Manager – Imaging Device, then click Imaging Device to check whether DV2020 is shown under it. If not, or the itme of DV2020 is marked with the exclamation mark, re-install the camera drivers from the supplied CD-ROM, then do the steps from 2 to 4 listed above to install the imaging device onto your computer. E64 Hardware – Device Manager – Other devices, then right click on “ Concord DV2020 Camera” with exclamation mark under Other ENGLISH Note: If the problem persists, go to My Computer – Properties – devices, click “Remove (Uninstall) to delete the device driver from the computer. After that, re-install and re-connect based on the steps listed above. Driver for DV2020 Select the driver of DV2020 camera camera is not from the drop-down list in step 5 page selected. 62. My friend cannot play Div X has not been Install Div X onto the computer from back the video clips I installed on the the supplied CD-ROM (page 52). Or sent via e-mail on his/ computer yet. download Div X from website, then her computer. install it onto the computer (page 53). Note: Depending on the version of your operating system, some of the procedures described above might not exactly match the windows/dialog boxes that appear on your screen. When in doubt, follow on-screen instructions and/or refer to the user documentation that comes with your operating system. E65 GETTING HELP You can get help from our troubleshooting section, FAQ on our website or by contacting a customer support representative. Website Customer Support/FAQ Please visit our customer support website at www.concord-camera.com to view the Frequently Asked Questions (FAQ) by clicking the appropriate camera model picture in the “Camera Support “ Section. Most support issues are answered in the FAQ section. You can also E-mail us by clicking the E-mail address link to the customer support center in the “Camera Support” Section. For Camera Support please contact: Toll Free in the US and Canada: • (866) 522-6372 Toll Free in Europe: • UK: 0800-1696482 Monday – Friday 8:00am – 8:00pm Saturday: 9am – 5pm Sunday: 12pm – 4pm • Spain: 900-973195 • Germany: 0800-1800563 • Italy: 800-781883 Web:www.concord-camera.com Email: For Camera Support via E-mail, please • France: 0800-917599 contact us at www.concord-camera.com. Toll: • +31-53-4829779 Monday – Friday 09:00 – 18:00 Saturday & Sunday: closed (Central European Time) Note: Working hours are subject to change without prior notice. E66 REGULATORY INFORMATION ENGLISH REGULATORY INFORMATION FCC INFORMATION FCC WARNING: This equipment meets the limits for a Class B digital device, pursuant to Part 15 of FCC rules. Only the cable supplied with the camera should be used. Operation with other cables is likely to result in interference to radio and TV reception and could void the user’s authorization to operate this equipment. This device complies with Part 15 of the FCC Rules. Operation is subject to the following two conditions: • This device may not cause harmful interference. • This device must accept any interference received, including interference that may cause undesired operation. Tested to comply with FCC standards for HOME OR OFFICE USE Changes or modifications not expressly approved by the manufacturer may void the user’s authority to operate this equipment. USER INFORMATION NOTE: This equipment has been tested and found to comply with the limits for a class B digital device, pursuant to Part 15 of the FCC Rules. These limits are designed to provide reasonable protection against harmful interference in a residential installation. This equipment generates, uses and can radiate radio frequency energy and, if not installed and used in accordance with the instructions, may cause harmful interference to radio communications. However, there is no guarantee that interference will not occur in a particular installation. If this equipment does cause harmful interference to radio or television reception, which can be determined by turning the equipment on and off, the user is encouraged to try to correct the interference by one or more of the following measures: • Reorient or relocate the receiving antenna. E67 • Increase the separation between the equipment and receiver. • Connect the equipment into an outlet on a circuit different from that to which the receiver is connected. • Consult the dealer or an experienced radio/TV technician for help. - This product is in conformity with Directive 89/336/EEC. Concord, Concord Eye-Q and the Concord Eye-Q logo are registered trademarks or trademarks of Concord Camera Corp., in the United States and/or other countries. Microsoft and Windows are either registered trademarks or trademarks of Microsoft Corporation in the United States and/or other countries. Mac and Macintosh are registered trademarks or trademarks of Apple Computer, Inc. in the U.S. and other countries. All other brands and product names are either registered trade- E68 marks or trademarks of their respective owners.