1
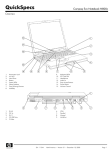
Copyright / Disclaimer / FCC Statement AOpen Cobra AW-870LP Sound Card User’s Guide Copyright Copyright 2003, all rights reserved. No part of this publication may be reproduced, transmitted, transcribed, stored in a retrieval system, or translated into any language or computer language, in any form or by any means, electronic, mechanical, magnetic, optical, chemical, manual or otherwise, without the prior written permission of this company, Disclaimer We makes no representations or warranties, either expressed or implied, with respect to the contents hereof and specifically disclaims any warranties, merchantability or fitness for any particular purpose. Any software described in this manual is sold or licensed "as is". Should the programs prove defective following their purchase, the buyer (and not this company, its distributor, or its dealer) assumes the entire cost of all necessary servicing, repair, and any incidental or consequential damages resulting from any defect in the software. Further, this company reserves the right to revise this publication and to make changes from time to time in the contents hereof without obligation to notify any person of such revision or change. All brands or product names mentioned in this manual are trademarks or registered trademarks of their respective companies. FCC and CE Radiation Norm FCC: This equipment has been tested and found to comply with limits for a Class B digital device pursuant to Part 15 of Federal Communication Commission (FCC) rules. CE: This equipment has been tested and found to comply with the limits of the European Council Directive on the approximation of the law of the member states relating to electromagnetic compatibility (89/336/EEC) according to EN 55022 class B. These limits are designed to provide reasonable protection against frequency interface in residential installation. This equipment generates, uses and can radiate radio frequency energy, and if not installed or used in accordance with the instructions, may cause harmful interference to radio communication. However, there is no guarantee that interference will not occur in a television reception, which can be determined by turning the equipment off and on, the user is encouraged to try and correct the interference by one or more of the following measures: I Table of Contents . Reorient or relocate the receiving antenna . Increase the separation between the equipment and the receiver . Connect the equipment into an outlet on a circuit different from that to which the receiver is connected to CAUTION !!! The Federal Communication Commission warns the user that changes or modifications to the unit not expressly approved by the party responsible for compliance could void the user’s authority to operate the equipment. Table of Contents Chapter 1 – Cobra AW-870LP Introduction ............................................................................................. - 1 1.1 - Overview .......................................................................................................................... - 1 1.2 - Features ........................................................................................................................... - 1 1.3 - System Requirements........................................................................................................ - 1 1.4 –Software Boundle .............................................................................................................. - 2 Chapter 2 – Hardware Installation ......................................................................................................... - 2 Chapter 3 – Driver Installation............................................................................................................... - 3 3.1 – Auto Run for Windows® XP/2000/Me/98SE ......................................................................... - 3 3.2 - Installing the Sound Card Driver under Windows® XP/2000/Me ............................................ - 3 3.3 - Installing the Sound Card Driver under Windows® 98SE....................................................... - 3 3.4 - Uninstalling the Sound Card Driver under Windows® XP/2000/Me/98SE ................................ - 3 Chapter 4 – Xear 3D™ Introduction ....................................................................................................... - 4 4.1 – “Main Setting” in C-Media’s 3D audio control panel ............................................................. - 5 4.2 - “Mixer” in C-Media’s 3D audio control panel ........................................................................ - 6 4.3 - “Sound Effects” in C-Media’s 3D audio control panel ............................................................ - 8 4.4 - “Magic Voice™ and Karaoke” in C-Media’s 3D audio control panel......................................... - 9 Chapter 5 – FAQ & Trouble Shooting.....................................................................................................- 10 - II Chapter 1 – Cobra AW-870LP Introduction Chapter 1 – Cobra AW-870LP Introduction 1.1 - Overview AOpen Cobra AW-870LP 7.1 Channel Sound Card is designed delicately for gamers, DVD movie fans, music enthusiasts, DJs, and even professional musicians. This sound card allows digital/analog recording with 48K/16bit and playback with 96K/24bit parameters at a low signal-to-noise ratio (-100dB). Through S/PDIF output, it can deliver 24bit/96K high-definition 5.1 Dolby® Digital/DTS®, or 6.1/7.1 Dolby® Digital Surround EX/DTS ES DVD soundtracks and audio stream to external receiver satisfying audio enthusiasts and pioneers. Being compatible with various industrial standards for gaming such as EAX™ 1.0&2.0, A3D™ 1.0, Direct Sound™ 3D powered by Sensaura® CRL3D HRTF 3D engine, AOpen Cobra AW-870LP can provide enthusiastic gamers breathtaking sound experience in gaming. 1.2 - Features - - C-Meida CMI8768 7.1 Channel Integrated Sound Chip Support Sound Output to 7.1 / 5.1 / 4 / 2 Speakers Support 96K/24bit Playback; 48K/16bit Recording Support One Optial S/PDIF Output Bundled with Low_Profile Bracket 32bit PCI Bus Master, PCI 2.2 compliant DirectSound™ 3D HW Acceleration Support most industrial standards of PC 3D sound for gaming, including EAX™1.0&2.0, A3D™ 1.0, and DirectSound™ 3D SW Support the latest Dolby® Digital EX and DTS® ES 6.1/7.1CH DVD soundtrack playback Sensaura® CRL3D HRTF 3D Positional Sound Enhancement with Multi-Drive 7.1, EnvironmentFX, ZoomFX, MacroFX, etc. Unique Karaoke Functionality: Mic Echo, Key-Shifting, Vocal Cencellation Interesting Magic Voice™ Feature to Change Users’ Voice Tone for IP Phone, Online Games, and Messenger Applications C-Media Xear 3D™ 7.1 Virtual Speaker SHIFTER Technology Support 10-Band Equalizer with 12 Preset Models; 27 Global Environment Effects 1.3 - System Requirements - One free PCI 2.1 or 2.2 compatible slot on MB - Intel Pentium® II 266MHz or AMD K6 500MHz or higher CPU - 64MB System Memory - 20MB Free HDD Space - Microsoft® Windows XP / 2000 / Me / 98SE (Microsoft DirectX 9.0 or above is requried in ME for 7.1CH support) - CD-ROM Drive (or DVD-ROM Drive Recommended) -1- Chapter 2 – Hardware Installation 1.4 –Software Bundle - CyberLink PowerDVD 5 for 7.1CH support - Media Rack Player, Play 3D Demo and Rockwar Game bundled with C-Media Driver Chapter 2 – Hardware Installation AOpen Cobra AW-870LP 7.1 Channel Sound Card is shipped in an anti-static plastic pouch to protect it from static electricity. Please do not open the pouch before you install the card. Before you start, please make sure that Windows XP/2000/Me or 98SE has been installed in your system and running properly. Please follow the following steps carefully while installing your sound card. Step 01: Turn off the computer power and disconnect all power cords. Step 02: Refer to your computer user’s manual and remove the computer cover. Step 03: Plug the Sound Card into any free 32-bit expansion PCI slot of the computer. Step 04: Connect the audio cable to your CD-ROM or DVD-ROM drive. Step 05: Put the computer cover on and reconnect all power cords. You can connect various types of audio equipment, such as speakers, headphones, CD player and so on, to the sound card through its back panel jacks. The following figure shows the port design of the sound card bracket and also illustrate how to connecting your audio devices to the sound card. -2- Chapter 3 – Driver Installation Chapter 3 – Driver Installation 3.1 – Auto Run for Windows® XP/2000/Me/98SE Step 01: Insert the Multimedia Software CD-ROM into your CD-ROM drive. Step 02: Follow the on-screen instructions to finish the installation. If Auto Run can’t be used with your computer, please refer to each Windows as follows…… 3.2 - Installing the Sound Card Driver under Windows® XP/2000/Me We recommend you to install Microsoft® Windows® Me/2000/XP before you install this PCI sound card, and ensure you didn’t install any other sound card device drivers in your current system. Step 01: After hardware installation has been finished, power up your computer and wait for Windows® Me/2000 /XP to boot up. Step 02: The message box will show “Found New Hardware Wizard” Click “Cancel”. Step 03: Insert the Multimedia Software into your CD-ROM drive or DVD-ROM drive. Step 04: Click “Start” at Windows bottom left corner. Step 05: Select “Run”. Step 06: Key in the drive and path for driver installation program; for example, “D:\ SETUP.EXE”. (If Drive D is your CD-ROM drive or DVD-ROM drive). Step 07: Click “OK” to start the driver installation procedure, and follow the on-screen instructions to finish the installation. Step 08: When the driver has been installed, please restart your computer. 3.3 - Installing the Sound Card Driver under Windows® 98SE Step 01: After hardware installation has been finished, power up your computer and wait for Windows® 98SE to boot up. Step 02: The message box will show “Add New Hardware Wizard” and “This Wizard searches for new Step Step Step Step 03: 04: 05: 06: Step 07: Step 08: Step 09: drivers for PCI Multimedia Audio Device”. Click “Cancel”. Insert the Multimedia Software CD-ROM into your CD-ROM drive or DVD-ROM drive. Click “Start” at Windows bottom left corner. Select “Run”. Key in the drive and path for driver installation program; for example, “D:\ SETUP.EXE”. (If your CD-ROM drive or DVD-ROM drive is D) Click “OK” to start the driver installation procedure When the screen will show “System Files Requirement” message box, Please Key in the path for Windows 98SE CD, Click “Continue” and follow the on-screen instructions to finish the installation. When the driver has been installed, please restart your computer. 3.4 - Uninstalling the Sound Card Driver under Windows® XP/2000/Me/98SE Step 01: Click “Start”. Step 02: Select “Settings”. -3- Chapter 4 – Xear 3D Introduction Step 03: Select “Control Panel” and click “Add/Remove Programs”. Step 04: Select “C-Media PCI Audio ” and than click “Change/Remove or Add/Remove”. Step 05: Follow the on-screen instructions to finish the uninstall , than reboot your system. Chapter 4 – Xear 3D™ Introduction “Xear 3D™” is C-Media’s 3D audio control panel with that you can control all audio configuration. Through C-Media proprietary Xear 3D™ sound technology, users can optimize the personal sound field and enjoy the following functions. > 7.1 Virtual Speaker Shifter can deliver up-to-7.1 channel surround sounds over only 2 physical speakers or headphones. > Magic Voice™ functionality can reform your microphone voice through the recording process delivering amazing disguise effects for fun in many applications, such as Internet phone, messenger, online games. Microphone echo and key-shifting features are well designed for Karaoke application. > Sound Effects like 10-band Equalizer and 27 environment effects can enrich users audio experience and enjoyment. After finishing the installation of the driver and rebooting the system, you can find the panel from two places: (1) Left-Click the icon in the system tray in the right-bottom of your screen. You can also click right button of the mouse on it to get an audio-related menu as the following left figure. (2) Double-click “CMI Audio Config” icon in Windows “Control Panel” as the following right figure. [ StartSettingControl Panel ] -4- Chapter 4 – Xear 3D Introduction 4.1 – “Main Setting” in C-Media’s 3D audio control panel > Using Analog Output or Digital S/PDIF_Out Step Step Step Step 01: 02: 03: 04: Turn on Analog Output and select Speaker Type, or turn on Digital S/PDIF Output Check the connection is consistent with the audio jack configuration information Do Speaker Test/3D Sound/Multi-channel Music Demo if you want You can click “Digital Volume” button to fine-tune the volume for each speaker. > Using Xear 3D™ – 7.1 Virtual Speaker Shifter Step 01: Select Xear 3D in DSP Mode Step 02: Click the “7.1 Virtual Speaker Shifter” button. Step 03: Each virtual speaker represents the specified channel sound. You can move each Step 04: virtual speaker to anywhere you want to optimize the sound field when you are running any application. You can even move the place of the virtual listener. You can reset the placement, manual shifting, group-rotate, auto-rotate and increase/decrease the volume of the virtual speakers -5- Chapter 4 – Xear 3D Introduction 4.2 - “Mixer” in C-Media’s 3D audio control panel > Playback Volume Step 01: Check that the playback devices/sources you want are turned on (in blue color). You can turn others off (it means to mute them). There might be some hided sources that cannot be showed in the block. Please click the arrow to move to the rest items. Step 02: In general cases, you can adjust “Master Volume Control” knob (just using the mouse) to change the volume level for all sources. Step 03: If you want to change the volume for a specific device/source, please fine-tune the correspondent scroll bar. > Recording Gain Step 04: Select the recording source you want (one for once). The following picture will show the related sign for the source you have selected. Step 05: If you want to change the volume for a specific device/source, please fine-tune the correspondent scroll bar. In general cases, you don’t have to make slider higher than half of the scroll bar in case the signal will be scaled too much and will be distorted. -6- Chapter 4 – Xear 3D Introduction > Advanced Setting Step 01: You can click the checkbox to mute the microphone. Normally open. Step 02: If you feel the mic sound is too quiet, there are +20dB boost option. Click the checkbox of “Boost” to enable it. It’s nature that you will also get the background noise louder certainly. -7- Chapter 4 – Xear 3D Introduction 4.3 - “Sound Effects” in C-Media’s 3D audio control panel > Environment Emulation Step 01: Select an “Environment” button for emulation that is implemented by producing the sound reflection and reverberation. Step 02: You can change the “Environment Size” to Large or Small (pre-setting is Medium). You will hear the different feeling about the environment space. > 10-Band Equalizer Step 03: Select a pre-set mode for equalizer that is actually frequency response modeling. There are 12 preset modes such as Bass, Treble, Live, Rock, Jazz, etc.. Step 04: You can change the gain setting for each band and then give it a name in the following blank. Click “+” to add your personal setting into the “User Defined” list. Click “-“ is to delete current setting record. -8- Chapter 4 – Xear 3D Introduction 4.4 - “Magic Voice™ and Karaoke”” in C-Media’s 3D audio control panel Step 01: Click “On” to turn on the Karaoke function (that button will be blue.) Step 02: When singing a song, you may need the Voice Echo to make the singing more euphonious. You can select “Microphone Echo” to get the effect and adjust the volume of the echo sound to optimize it. When you are talking to other people over the network like messenger, VOIP, online game applications, you can also choose Magic VoiceTM effect in the pull-down menu to disguise your identification or just for fun. Just select one kind of the voice type. (These two features require real-time Microphone recording. You should suspend other recording application.) Step 03: You can enable Key-Shifting for the Karaoke VCD or the music to make it suitable for your voice pitch. The range is -4b to +4#. Step 04: If the music source includes original singer’s voice, you may try “Vocal Cancellation” function to cancel it (0~100). But the effect doesn’t always work well and it depends on the recording method of the source. It’s usually not needed for Karaoke VCD or CD, which do not have voice inside generally. -9- Chapter 5– FAQ & Trouble Shooting Chapter 5 – FAQ & Trouble Shooting Q1:Why no 7.1 channel sounds on Windows ME ? Windows ME requires to update DirectX 9.0 or above to support 7.1 channel surround sound. Please download “DirectX 9.0b End-User Runtime” from http://www.microsoft.com/downloads/search.aspx?displaylang=en&categoryid=2 Q2:Why don’t I hear sound while playing CD? Most cases are because the OS is set in analog CD mode and you didn’t connect CD cable from the back panel of the CD-ROM to CD-In header on your sound card. Please open “Device Manager”, select “DVD/CD ROM drives” and open it. Then switch to “properties” page and enable digital CD audio. Windows XP default setting is digital CD enabled. You need to also check Media Player setting is in digital playback mode. Go to [ ToolsOptionsDevicesDVD-ROM or CD-ROM ]. You will see the following window Q3:Xear 3D™ Sound technology provides amazing function in 7.1 Virtual Speaker Shifter. How to use this function in different applications? 7.1 Virtual Speaker Shifter can be utilized for 2CH, 4CH, 5.1CH, or 7.1CH audio source over any kind of output device (even your earphone, stereo speakers). Each virtual speaker represents a source channel. You can move each virtual speaker anywhere you want to get the best sound field. If you want to enjoy real 5.1/7.1CH DVD surround sound, you should buy a software DVD player with Dolby Digital EX or DTS ES 7.1CH decoding function such as WinDVD or Power DVD. With Xear 3D Virtual Speaker Shifter DSP mode, you should always set the maximum output channel from the players to get best sound effects. Virtual Speaker SHIFTER engine can deliver the multi-channel sound sources over your real speakers (it should be corresponding to the speaker mode in “Main Setting” of C-Media 3D Audio configuration panel). - 10 - Chapter 5 – FAQ & Trouble Shooting 1. 2. 3. 4. 5. 6. Open Software DVD Player Click display windows Click right key of mouse Select “Configuration” or “Setup” Choice “Audio” function setting page Check “Audio Output”→If you can see or select speaker from 2 to 8 ch that mean this version was supported 7.1CH decoding capability. Please choose 7.1 speakers mode no matter what kind of speakers you really use. Otherwise, you should select the max. output capability. - 11 - Chapter 5 – FAQ & Trouble Shooting Q4:What is 7.1CH listening environment and what difference with 5.1CH ? 1. 2. 3. The 7.1 channel mode is newest multi-channel audio format and technology in the market. It includes center, subwoofer, front left, front right, left surround, right surround, left back surround, and right back surround according to Dolby Digital and DTS ES standards. The 7.1CH content was naming Dolby Digital EX by Dolby Lab. and DTS was naming DTS-ES (Extended Surround). The difference of 5.1CH and 7.1CH is additional 2CH. This extra 2 speakers were placed on rear side to enrich back sound sources for entire enveloping surround feeling. - 12 -