1
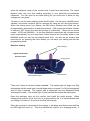
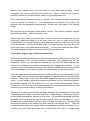
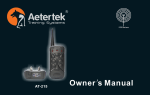
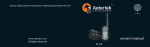
INSTRUCTION MANUAL FOR THE MGG AETERTEK WIRELESS DOG/CAT
CONTAINMENT SYSTEM MODEL AT-216F
Antenna
Vibrate On/Off
Power Input Socket
Beep On/Off
Diameter Level
Shock Auto/Manual
Boundary Distance
Icon Flashes when
transmitting
Increase/decrease
Boundary Diameter
Control Collar functions
Beep, vibrate on/off and
shock correction levels
Mode selection
TRANSMITTER SETTING
Open the package, take out the transmitter, align the RF antenna at the RF
connector, rotate clockwise and tighten the nut.
Charge up the power bank according to the instructions enclosed with it. This power
bank will power the transmitter for 50+ hours use. Please get into the habit of
charging it up as soon as it is down to two lights showing or at least twice a week
and turn off the transmitter when not in use by unplugging it from the power bank.
Once the power bank is charged, connect it to the DC jack of the transmitter and the
transmitter will go into standby mode. The antenna symbol in the display will start
flashing indicating that the transmitter is ready. The lower right corner shows the
current power.
The transmitter coverage distance can be adjusted via the up and down buttons from
one to fifty metres. The centre of the display shows the approximate current
distance between the transmitter and the boundary limit set. Adjust the level
according to your needs. Level 00-10 is a gauge for setting the boundary distance.
The higher the value the further the coverage distance. The centre of the display will
1
show the distance range of the current level in both feet and metres. The actual
distance may vary from the reading according to your particular environmental
influences. You will need to do some testing so you know how to allow for any
changes at “your place”.
To enter or exit the menu setting, press the M button. On the menu, the BB sound,
vibration and shock functions can be selected by using the left and right buttons.
When the setting menu icon flashes, the BB sound, vibration and shock can be
programmed by pressing the up and down buttons. (ON means the relevant function
is selected, OFF means the relevant function is unselected). There are two shock
modes: AUTO and MANUAL. In the Auto Mode the transmitter will increase shock
levels automatically as your dog strays further beyond the boundary whilst in the
MANUAL mode you can set the desired shock level. As soon as the function and
level are set, by pressing the menu button you can save your setting and exit the
programming mode.
Receiver setting
Metal Prongs
Regular Submersible
Receiver-Collar
Charging Port
On/Off Switch
Red and Blue Lights
There are 2 types of receiver collars available. The regular type for dogs over 5Kg
bodyweight and the small type for small dogs down to around 2 to 3Kg in bodyweight
and for cats if required. The regular type is waterproof and can withstand being
submerged in water. The smaller type is rain-resistant but cannot be submerged.
Open the package, take out the receiver and install the metal prongs. When
charging the receiver for its first use, to prolong battery life, it is recommended that
you charge it for about 3-5 hours for the first few charges.
When the receiver is connected to the charger, it will beep and vibrate once and the
red LED light will come on. This is to indicate the receiver is in charging mode. It
2
will be fully charged after 3-4 hours with the blue LED light showing. When
unplugged, the receiver will beep and vibrate once. (Note: please do not forget to
carefully replace the charging socket rubber bung to keep water out).
Press and hold the Power button for 3 seconds. The receiver will beep and vibrate
once to indicate it is turned on. If the transmitter is on standby, the receiver will
pair/sync with the transmitter automatically. At this point, the system is in working
mode.
Do a self-test by pressing the power button 3 times. The receiver will beep, vibrate
and discharge shock. Now it is ready for use.
Thread the collar strap around the back of the receiver and through the eyes at
either side, adjust the length to fit the dog’s neck so it will not make the dog feel
uncomfortable. The lug on the back of the receiver should be located into one of the
collar strap holes. You should be able to get one finger between the collar and your
dog’s neck when it has been adjusted correctly. To ensure the ideal stimulus effect,
the collar’s prongs need to have direct contact with your dog’s skin.
Training the dogs to stay inside the control zone:
Firstly test the distances holding the collar yourself without it being on your dog. Set
the transmission level, test the receiver based upon the distance set on the
transmitter. When you are near the distance set, the red LED starts flashing, the
closer to the periphery, the faster it beeps and then triggers the vibration. If you
continue to get closer, taking no notice of the beep or vibration then the static shock
will be discharged. If you return to within the control zone, corrections will stop.
Place the flags where the warning beep is heard, which will set the boundary of the
control zone with all the warning spots flagged. Dogs will learn to respond after
training. Please bear in mind that the actual range may differ from the theoretical
range. You will need to adjust the emission level based on your actual environment
as wireless signals may be affected by your own unique environmental factors.
Therefore it is not unusual if the displayed distance on the transmitter differs to some
extent from the actual distance in some surroundings.
The idea is to show your dog that the flags represent the boundary and when the
collar beeps at the flags, to run back from them. (Nasty Flags!). Praise your dog for
running back and keep the exercise fun for them. If a permanent boundary you may
gradually remove the flags as your dog gets used to where the boundary is. If you
are using the system away from home then the flags will show your dog where the
temporary boundary is but he/she may well respond to the beeps alone. They will
soon learn that to ignore the beeps means an unpleasant vibrating sensation occurs
on their neck and if they ignore that then a static shock will result in an unpleasant
3
prickly sensation to their neck. That will persist until they return to within the learned
or temporarily flagged area.
Additional Information for Terms of Use and Limitation of Liability
1. Terms of Use
This product is offered to you conditional upon your acceptance without modification
of the terms, conditions and notices contained herein. Use of this product implies
acceptance of all such terms, conditions and notices.
2. Proper Use
This product is designed for use with dogs where training is desired. The specific
temperament of your dog may not work with this product. We recommend that you
not use this product if your dog is less than 3 Kg in bodyweight or if your dog is
aggressive. If you are unsure whether this is appropriate for your dog, please
consult your veterinarian or certified trainer.
3. No Unlawful or Prohibited Use
This product is designed for use with dogs or cats only.
4. Limitation of Liability
In no event shall MGG be liable for any direct, indirect, punitive, incidental, special or
consequential damages or any damages whatsoever arising out of or connected with
the use or misuse of this product. The buyer assumes all risks and liability from the
use of this product.
5. Modification of Terms and Conditions
MGG reserves the right to change the terms, conditions, and notices under which
this product is offered.
www.mggproducts.co.nz
For parts and service please email: [email protected]
4