1
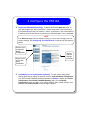
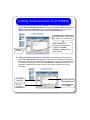
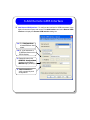
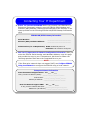
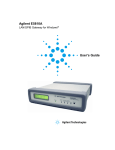
Agilent E5810A LAN/GPIB Gateway for Windows® Getting Started 1 Before You Connect the E5810A Using This Poster. Use Step 1 through Step 4 to install and configure the E5810A LAN/GPIB Gateway for Windows. If you want to program GPIB and/or RS-232 instruments using your PC or you want to use the Agilent IO Libraries (VISA, VISA COM, and SICL), also do Step 5 through Step 8. NOTE If you have difficulty installing the E5810A, see Troubleshooting Information on the back of this poster. For additional information on any of the steps on this poster, see the E5810A LAN/GPIB Gateway for Windows User's Guide. Check Your Shipment Items. In addition to this poster, your E5810A LAN/GPIB Gateway shipment should include the items listed. If items are missing or damaged, contact Agilent Technologies. See E5810A General Information on the back of this poster for addresses. • • • • • • Agilent E5810A LAN/GPIB Gateway for Windows E5810A Power Cord Agilent Automation-Ready CD with IO Libraries Suite E5810A LAN/GPIB Gateway for Windows User's Guide E5810A Warranty Statement Software License Agreement Check Your PC/Web Browser. The E5810A LAN/GPIB Gateway is supported ONLY on Windows XP/Vista/7/8/Server 2008 R2. To communicate with the E5810A from your Web Browser, you will need Internet Explorer 5.01 or higher (Microsoft Internet Explorer 7 or higher recommended for Vista). Rack-Mount the E5810A (Optional). As desired, you can mount the E5810A in a standard EIA rack using the E5810-00100 Rack Mount Kit (or equivalent). The E5810A is one standard half-rack unit wide and one standard rack unit high. See the E5810-00100 Rack Mount Kit for instructions. 2 Install the E5810A Connect the E5810A to the Network and to Instruments. This figure shows typical network and instrument connections for the E5810A. Make connections as required for your application. See the E5810A LAN/GPIB Gateway for Windows User's Guide for detailed connections. IMPORTANT BEFORE making any Enterprise (corporate) network connections, contact your Information Technology (IT) department for policies concerning user connections, IP addresses, etc. See Contacting Your IT Department on the back of this poster for suggested actions. To AC Power To Enterprise Network To RS-232 Instrument Typically Hub or Switch GPIB Instruments E5810A OR POWER Tx LAN GP IB RS232 Ln ! GPIB LAN GPIB GPIB GPIB Apply Power to the E5810A. Plug the E5810A power cord into the E5810A POWER socket. Then, plug the cord into an AC outlet and observe the E5810A display. After an initial setup period, the E5810A IP address and hostname (if recognized) should appear on the display. If the IP address does not appear, see Troubleshooting Information on the back of this poster. 3 Configure the E5810A Display the E5810A Welcome Page. To display the E5810A Welcome page, on your web browser type 'http://<hostname>', where <hostname> is the Hostname of the E5810A OR type 'http://<IP address>', where <IP address> is the current E5810A IP address (such as 169.254.58.10) shown on the E5810A display. Then, press Enter. NOTE If the Welcome page does not display correctly, you may need to change your web browser settings. See Configuring Your Web Browser on the back of this poster for details. Click this icon to View and Modify Configuration Click this icon to Find and Query Instruments Current E5810A Settings on Display View/Modify Current Configuration (Optional). To view current configuration settings (and change settings as desired), click the View and Modify Configuration icon and enter the password (the default password is E5810) to display the Current Configuration of the E5810 LAN/GPIB Gateway page. Click the Modify Configuration button to enable you to change settings. After making changes, click Save and then Reboot E5810 to make changes effective. 4 Verify Communication From E5810A Verifying Communication from the E5810A. From the E5810A Welcome page, click the Find & Query Instruments icon and enter the password (default password is E5810) to display the Instrument page. See the following figure for ways to verify communication with instruments using the E5810A Instrument page. Click Device Clear, *IDN?, Read STB, systerr?, or Clear History OR Selected Instrument Enter command on Instrument Command line and then click Send, Receive, or Query (sends and receives) Send Commands and Queries to Instruments. To interact with instruments from the E5810A Instrument page, highlight the instrument to be addressed and type an instrument command on the Instrument Command line. (See your instrument manual for instrument commands.) Then, click Send, Receive, or Query as applicable. The following example shows one way to return a DC voltage measurement from an instrument. 1. Highlight Instrument 4. Read Response 2. Type Command 3. Click Query 5 Install Agilent IO Libraries Suite The following steps describe installing the Agilent IO Libraries Suite, using default settings, including: z Checking for Installed Agilent IO Libraries or Agilent IO Libraries Suite z Installing Agilent IO Libraries Suite ngbbgbInsert the CD. NOTE See the Agilent IO Libraries Connectivity Guide on your Automation-Ready CD for a full description of installation options and installation troubleshooting information. You MUST have Administrator priviledges to install the Agilent IO Libraries Suite. N NNNNNNN Checking for Installed Agilent IO Libraries. Before you begin installation, check for previously installed Agilent IO Libraries software. If a version of the Agilent IO Libraries Suite is installed on your PC, an IO icon may be displayed on the Windows taskbar notification area. NOTE PCs installed with Windows Vista/7/8 MUST upgrade to Agilent IO Libraries v15.0 or above. 5 Install Agilent IO Libraries Suite (cont.) 1. If the IO icon is displayed, click the icon and click About Agilent IO Control to display the version. The version must be 15.0 or greater. 2. If the IO icon is not displayed, a version may still be installed. To check this, click Start >Programs and look for the Agilent IO Libraries or Agilent IO Libraries Suite program group. 3. If this group is displayed, click Agilent IO Libraries > Utilities > IO Control to display the IO icon. Then, click the icon and click About Agilent IO Libraries Control to display the installed version (must be 15.0 or greater). 4. If neither the IO icon nor the Agilent IO Libraries program group is displayed, Agilent IO Libraries is not installed. Locate the Automation-Ready CD and install Agilent IO Libraries. 5. If the Agilent IO Libraries Suite version is less than 15.0, install the newer version included on your Automation-Ready CD to support the E5810A. 6. If your version of the Agilent IO Libraries Suite is at least 15.0, but less than the version on your Automation-Ready CD, you may want to install the newer version to take advantage of new features and greater ease of use. Installing Agilent IO Libraries Suite . First, disconnect any USB instruments, USB/ GPIB converters, and FireWire-VXI interfaces that are connected to your PC. Insert the Automation-Ready CD into your CD-ROM drive. Wait for a few seconds until the auto-run window appears. If the auto-run window does not appear automatically, Click Start > Run then type <x>:autorun\auto.exe where <x> is your CD drive letter. When the auto-run window appears, follow the directions on that window to install the Agilent IO Libraries Suite. (See Agilent IO Libraries Connectivity Guide on your Automation-Ready CD for a full description of installation options and installation troubleshooting information). NOTE If possible, always use the current version of the Agilent IO Libraries Suite. This version supports the newest interfaces and operating systems. 6 Add Remote GPIB Interface Add Remote GPIB Interface. To configure the interface for GPIB instruments, in the Agilent Connection Expert main screen click Add Interface and select Remote GPIB interface to display the Remote GPIB Interface dialog box. 1a. Click Find Interfaces... to locate E5810s on local subnet. 1b. Or, type hostname or IP address shown on the E5810 display. 2. Change this value to the GPIB SICL Interface Name displayed on the E5810A Welcome Page (see Step 3). 3. Test Connection to verify connectivity and configuration. 7 Add Remote RS-232 Serial Interface Add Remote Serial Interface. To configure the interface for RS-232 serial instruments, in the Agilent Connection Expert main screen click Add Interface and select Remote RS-232 serial interface to display the Remote RS-232 Serial Interface dialog box. 1a. Click Find Interfaces... to locate E5810s on local subnet. 1b. Or, type hostname or IP address shown on the E5810 display. 2. Change this value to the RS-232 SICL Interface Name displayed on the E5810A Welcome Page (see Step 3). 3. Test Connection to verify connectivity and configuration. 8 Verify Communication From PC Use Interactive IO to Communicate with Instruments. After you have configured remote GPIB and/or remote serial interfaces, you can use Interactive IO to establish communication between your PC and your GPIB or RS-232 instruments. To run Interactive IO for an IEEE-488.2 compliant instrument: 1. Click the instrument's icon in the Connection Expert window. 2. Click Send Commands To This Instrument to display Interactive IO. 3. With the default command, *IDN?, displayed in the text box, click the Send & Read button. 4. The instrument identification string should appear. 5. Repeat Steps 1 - 4 for the next instrument. Program Instruments (Optional). After communication has been established, you can program your GPIB and RS-232 instruments using VISA, VISA COM, or SICL. See E5810A Documentation/Support on the back of this poster for applicable documentation. Contacting Your IT Department Before You Connect the E5810A. Before you connect your E5810A to an Enterprise (Corporate) network, copy the E5810A Serial Number and Ethernet (MAC) address (located on the underside of the E5810A) in the space provided on the following E5810A LAN/GPIB Gateway Information card. E5810A LAN/GPIB Gateway Information Serial Number: ____________________________ Ethernet (MAC) Hardware Address: ____________________________ Default Values (for IT Department): DHCP: Enabled at power-on Hostname: No hostname configured Ask Your IT Department for Network Configuration Information. After you enter the E5810A Serial Number and Hardware Address, copy this page and provide the copy to your IT department. Ask them to answer the following questions and return the completed form to you. NOTE If the Enterprise network does not support DHCP, see Configure E5810A Using Local Network to configure the E5810A using a Local network. Enterprise Network Information Does the Network Support DHCP? Yes ___ No ___ If No, provide: IP Address (Static): ______.______.______.______ Subnet Mask: ______.______.______.______ Gateway IP Address: ______.______.______.______ Does the Network Support DNS? Yes ___ No ____ If Yes, provide: E5810A Hostname: __________________________ DNS Server (IP Address): ______.______.______.______ Configure E5810A Using Local Network Introduction. If your Enterprise (corporate) network does not support DHCP, when the E5810A is connected to the network the E5810A will use its default static IP address (169.254.58.10), which may not be valid on the network. In this case, you must use a Local network (Isolated LAN) to configure the E5810A for correct operation on the Enterprise network. Setting Up a Local Network. A Local network consists of a computer with an Ethernet port and an E5810A. Two example configurations follow. Local Network Using Hub or Switch Local Network Using Crossover Cable LAN "Patch" Cables Ethernet Hub/Switch LAN Crossover Cable E5810A PC w/Ethernet E5810A PC w/Ethernet Configuring the E5810A. To configure the E5810 using your web browser: 1. Start your web browser and type in the E5810A IP Address. 2. Click the View and Modify Configuration icon to display the Current Configuration of the E5810 LAN/GPIB Gateway page. 3. Click Modify Configuration, enter the E5810A password (default is E5810) and click Submit to show the Configuring your E5810 LAN/GPIB Gateway page. 4. Set DHCP OFF and update the static IP address, subnet mask, and default gateway parameters provided by your System Administrator. 5. If you are using DNS, enter the IP Address of the Domain Name Server and hostname provided by your System Administrator. 6. Click Save to save changes and then click Reboot E5810 to reboot the E5810 and have the changes take effect. 7. Disconnect the E5810A from the Local network and connect the E5810A to the Enterprise network. Configuring Your Web Browser Introduction. The E5810A Internet interface generates web pages that depend on Javascript and Frames. For best results, you may need to configure the Enable Javascript, Cache and Page Refresh, and Proxies options on your web browser. Some guidelines follow. See the E5810A LAN/GPIB Gateway for Windows User's Guide for steps to set your web browser. Enabling Javascript. If the E5810A detects that Javascript is not enabled, a dialog box appears on the E5810A Welcome page that displays instructions to enable Javascript for Internet Explorer and Netscape Navigator. Fix: Follow the instructions to enable Javascript. If Javascript is not enabled, you will not be able to use the View and Modify Configurations page or the Find and Query Instruments page of the interface. Cache and Page Refresh. Typically, web browsers cache web pages to store an image of the web page locally. When you navigate to an already viewed page, the page is loaded from cache rather than from the network. This is acceptable for "static" web pages in which information does not change. However, the E5810A uses "dynamic" web pages in which information can quickly change. Fix: To avoid displaying outdated information on the web pages, the "Check for newer versions of stored pages" (or equivalent) option on your web browser should be set for "Every visit to the page" (or equivalent). Proxies. If you are using a proxy server, the web page may time out, even though the correct IP address or hostname is entered into the web browser. Fix: To correct this problem, the browser must be informed that any requests to the E5810A should not use a proxy. To do this, add the IP address of the E5810A to the list box "Do not use proxy server for addresses beginning with:" (or equivalent). Troubleshooting Information Introduction. If you have communication or operation problems with the E5810A LAN/GPIB Gateway, you can use this information to help you identify the problem and take corrective action. See the E5810A LAN/GPIB Gateway for Windows User's Guide for further troubleshooting information. Check Display/LEDs. Check front panel display/LEDs and back panel Ln LED. Status Possible Cause(s) Corrective Action(s) All LEDs OFF NO AC power to E5810A Check AC power connections Only POWER and FAULT ON If FAULT is ON after 10 sec, suspect hardware failure Contact Agilent for instructions to return E5810A POWER ON, Back Panel Ln LED OFF Indicates no communication from PC to E5810A via LAN Check LAN connection to E5810A POWER and LAN ON, GPIB and/ or RS-232 OFF Indicates communication via LAN to E5810A, but not to GPIB and/or RS-232 instr Check GPIB and/or RS-232 connections and configuration Network Configuration. Check the network for configuration problems. Status Possible Cause(s) Corrective Action(s) Cannot access E5810A Internet Interface Improper network installation Check network installation or contact System Administrator Missing/improper web addresses See “Contacting Your IT Dept” Improper Web Server settings See “Configuring Your Web Browser” Unknown or forgotten password Use Preset button to reset to factory default (E5810) No password Troubleshooting Information Instrument Configuration. Check GPIB/RS-232 Instrument setups. Symptom Possible Cause(s) Corrective Action(s) Cannot send commands to one or more GPIB instruments Intermittent or missing GPIB connection Check network installation or contact System Administrator GPIB device power not ON or defective GPIB device See “Contacting Your IT Dept” No instrument communication See “Configuring Your Web Browser” VISA/SICL not configured Cannot communicate with RS-232 instrument Intermittent or missing RS-232 connection Check RS-232 connections and configuration RS-232 device power not ON or defective RS-232 device Make sure RS-232 device power is ON and device is operating properly No RS-232 device communication Try to communicate with device (see Step 4) RS-232 interface not configured for attached device Change E5810A RS-232 interface attributes to match RS-232 device attributes (baud rate, parity, etc.) VISA/SICL not configured Configure remote serial interface (Steps 5 through 8) E5810A Documentation/Support E5810A Related Documentation. See the following documents for information related to the E5810A. When the Agilent IO Libraries Suite is installed, all documents are available in electronic format by clicking the IO icon on the Windows taskbar notification area and selecting Documentation. - Agilent E5810A LAN/GPIB Gateway for Windows User's Guide describes the E5810A and provides installation and troubleshooting information. - Agilent IO Libraries Suite Getting Started Guide provides a description of the Agilent IO Libraries Suite. - Agilent IO Libraries Suite Online Help provides detailed usage information on the Agilent IO Libraries Suite. - Agilent VISA User's Guide describes the Agilent Virtual Instrument Software Architecture (VISA) library. - Agilent SICL User's Guide describes the Agilent Standard Instrument Control Library (SICL) for Windows. E5810A Support Information. See the following Web sites or contact Agilent at the number shown. Agilent Technologies Telephone Number (Americas Call Center) Americas Call Center: 1-800-829-4444 World Wide Web Sites www.agilent.com/find/assist Contact information for your country www.agilent.com/find/e5810a For E5810A info/firmware updates www.agilent.com/find/iolib To download Agilent IO Libraries Suite www.agilent.com/find/manuals To access manuals and app notes www.agilent.com/find/connectivity Connectivity products and resources Part Number: E5810-90101 Printed in Malaysia September 24, 2012 INSTALLING AND CONFIGURING THE E5810A INSTALLING AND CONFIGURING IO LIBRARIES SUITE E5810A GENERAL INFORMATION TROUBLESHOOTING DOCUMENTATION