1
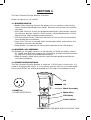
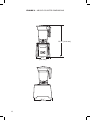
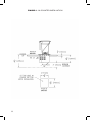
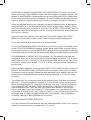
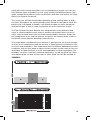
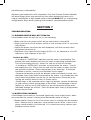
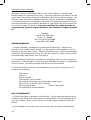
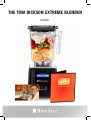
THE TOM DICKSON EXTREME BLENDER
MANUAL
TABLE OF CONTENTS
SECTION
PAGE #
SECTION 1: IMPORTANT SAFEGUARDS
1
SECTION 2: UNPACKING
3
SECTION 3: BLENDER OVERVIEW
4
SECTION 4: INSTALLATION
5
SECTION 5: CARE AND CLEANING
9
SECTION 6: OPERATIONAL OVERVIEW
9
SECTION 7: TROUBLESHOOTING
14
SECTION 8: WARRANTY
15
II
SECTION 1
IMPORTANT SAFEGUARDS
READ ALL INSTRUCTIONS CAREFULLY BEFORE USING YOUR The Tom Dickson Extreme
Blender™
1.1 SAFETY CERTIFICATION
The Tom Dickson Extreme Blender is certified by ETL (Report
No. 3018204-4, 3018204-2 & 3018204-3) to comply with UL
standard 982 4th ed. 11-29-2001, and to CSA standard C22.2
No. 195-m 1987, Nov. 1990, R 1994 as model ICB7.
1.2 BLENDER CERTIFICATION
The blender and its accessories are certified by NSF International (NSF) under Blendtec in the NSF Official Listing. The model number for
this blender is ICB7.
1.3 AVOID CONTACT WITH MOVING PARTS
• Keep fingers, hands, hair, and clothing away from all moving parts.
• Keep all utensils away from the drive socket and blender jar blades during
operation. Metal utensils may damage blades.
• NEVER put hands into the blender jar or add substances by hand when the
blender jar is on the motor base.
• NEVER touch the blade with your fingers whether it is on or off the motor
base.
• NEVER place jar into drive socket if blender motor is operating.
• DO NOT rock the blender jar during operation.
These precautions will prevent personal injury and/or damage to the blender.
1.4 NEVER OPERATE THE BLENDER IF IT APPEARS DAMAGED
If the blender malfunctions call your service agent first. If it is dropped or damaged in any way, return the blender to a Blendtec service agent immediately for
examination, repair, electrical or mechanical adjustment, or possible replacement.
1.5 NEVER OPERATE BLENDER IN LIQUID
To protect against the risk of electrical shock do not put the motor base in
water or other liquid. Do not use the blender outdoors where it is subject to
precipitation.
1.6 NEVER PUT NON-FOOD ITEMS INTO JAR
Metal utensils, rocks, and glass are dangerous if placed in jar. Damage caused
by such foreign objects will void the warranty. Keep hands and utensils out of
jar while blending to reduce the risk of severe injury to persons or damage to
the blender. Utensils may only be used when the blender is not running.
1
1.7 NEVER OPERATE THE BLENDER WITHOUT THE LID IN PLACE
1.8 NEVER OPERATE THE BLENDER USING ATTACHMENTS NOT SOLD
BY BLENDTEC
The use of any unauthorized attachments may cause fire, electric shock, and/or
injury and will void the warranty.
1.9 CONTAINER MUST BE PROPERLY IN PLACE WHILE APPLIANCE IS
OPERATING
1.10 BLADES ARE SHARP! HANDLE CAREFULLY!
1.11 WHEN BLENDING HOT LIQUIDS, THE VENTED LID WILL ALLOW
PRESSURE RELIEF. BE CAREFUL NOT TO COME IN CONTACT WITH ANY
STEAM COMING FROM THE CLEAR CENTER LID.
1.12 POWER CORD PRECAUTIONS
• NEVER operate with a damaged cord or plug. (If the supply cord is damaged it must be replaced by the manufacturer or authorized service agent
to avoid a hazard.)
• DO NOT permit the cord to hang over the edge of the work surface.
• NEVER use an extension cord with the unit.
• Unplug the blender motor when not in use, before changing blender locations, or cleaning.
1.13 NEVER ATTEMPT TO REPAIR THE POWER UNIT
Never remove the blender motor cover. The blender motor does not contain
self-adjustable or serviceable parts. A qualified service agent must make all
service adjustments. Removing the cover or attempting to service the blender
will void the warranty.
1.14 TURN THE POWER SWITCH OFF WHEN NOT IN USE
The Power Switch (ON/OFF switch) is located on the front of the blender.
1.15 AVOID TOUCHING THE BLENDER DRIVE SOCKET AFTER EXTENSIVE
USE The blender drive socket may become hot after numerous cycles.
1.16 CLOSE SUPERVISION IS NECESSARY WHEN APPLIANCE IS USED
BY OR NEAR CHILDREN AND PERSONS WITH REDUCED CAPABILITIES. Further, children and persons with reduced capabilities should not play with the
appliance at any time.
1.17 THE TOM DICKSON EXTREME BLENDER™ IS INTENDED FOR HOME
USE ONLY! ANY USE OF THE BLENDER FOR COMMERCIAL PURPOSES
VOIDS ALL WARRANTIES.
SAVE THESE INSTRUCTIONS
2
SECTION 2
SAVE ALL PACKAGING MATERIALS AND INSTRUCTIONS FOR FUTURE
USE.
2.1 UNPACKING YOUR BLENDER
You should have received the following items:
• The Tom Dickson Extreme Blender™ motor base
• Black motor stand
• Standard blender jar with lid
• WILD SIDE™ blender jar with lid
• Recipe book
1.
2.
3.
4.
5.
Remove blender motor, blender jar, and lid from packaging.
Unwind the power cord.
Check for any packing material that may have blocked ventilation holes in
the blender motor.
Inspect all items to ensure no damage occurred in shipment.
If any damage has occurred contact your Blendtec service agent
immediately.
2.2 RECORDING YOUR SERIAL NUMBER AND DATE OF PURCHASE
Record your blender motor serial number and date of purchase in the space
below. You will need these when contacting Blendtec for service or questions.
Motor Serial #:
____________________________________________________
(Found on bottom of motor base)
Date of Purchase:
____________________________________________________
Purchased From:
____________________________________________________
2.3 REGISTRATION OF YOUR BLENDER
Register online at www.blendtec.com (select “Product Registration”
under the ‘Service’ tab).
3
SECTION 3
The Tom Dickson Extreme Blender Overview
(Refer to Figures 1a, 1b, and 2)
3.1 BLENDER MOTOR
• Blender Base Housing: Houses the power unit in a stainless steel casing.
Never remove the blender base cover. Removal of the cover will void the
warranty.
• Touch Pad: Consists of four pre-programmed buttons that contain settings
for selective blender control, a Pulse button, a Start/Stop button, a Cycle
Menu button, and two Speed control buttons.
• LCD Information Center: Indicates the status of unit as well as overload or
over-temperature conditions.
• Power Unit: This unit is located within the blender motor and contains the
machinery that runs the blender.
• Power Switch: Located on the front panel underneath the LCD display.
3.2 BLENDER JAR ASSEMBLY
The blender jar assembly consists of the blender jar, blade assembly, and lid.
• Jar: Made from BPA-free copolyester material to provide maximum efficiency and clear visibility of blender performance.
• Blade Assembly: Made from stainless steel and designed to provide fast,
consistent blending.
3.3 POWER SPECIFICATIONS
The Tom Dickson Extreme Blender is made for 110/120 volts circuits only. It is
rated at 20 amps/2400 watts. It is necessary that this unit use a 20 amp receptacle (see FIGURE 1b) and be protected by a 20 amp circuit breaker or fuse.
Lid
Jar
FIGURE 1b
20 AMP RECEPTACLE
Blade Assembly
Motor Base
LCD Diplay
Power Switch
FIGURE 1a MOTOR BASE AND JAR FRONT VIEW
4
FIGURE 2 - MOTOR BASE - TOP VIEW
Drive Socket
Touchpad
SECTION 4
INSTALLATION
It is recommended that surge protection be placed between the receptacle and
the blender motor.
4.1 ABOVE COUNTER INSTALLATION (Refer to FIGURE 3)
1. Place motor into base unit.
2. Place blender on a flat, clean, and dry surface.
3. Make sure a plug outlet is available within four feet of the blender motor.
4. Ensure that the unit is turned off before plugging it into a separate 120-volt
receptacle.
5
FIGURE 3 - ABOVE-COUNTER DIMENSIONS
16 1/8” (410 mm)
6 3/8”
(162 mm)
8 1/4”
(210 mm)
6
5. Ensure that blender vents are unobstructed to allow proper cooling during
use.
4.2 The Tom Dickson Extreme Blender IN-COUNTER INSTALLATION
Preparation
1. Identify desired blender location. Consider preferences such as proximity to
ingredients, available counter space, and access to a power source.
(A licensed electrician may need to install appropriate power source for
the blender.)
2. Ensure potential site meets all dimensional requirements (see Figure 4).
• Countertop can be no thicker than 3/4 inch (19 mm). A countertop thicker
than 3/4 inch (19 mm) will obstruct ventilation louvers on the upper sides
of the blender base.
NOTE: The blender unit draws ambient air into the louvers located on the bottom of the blender base. It then evacuates hot air through the louvers located
on the upper sides of the blender base. Ensure a sufficient amount of air circulates beneath the blender base to allow cooling. Hot air should not be trapped
beneath the counter top. Nothing should be stored closer than 3 inches (76
mm) from the bottom of the blender motor.
3. Cut a hole in the counter top 4 3/8 inches (111 mm) wide and 5 7/8 inches
(149 mm) long with the shorter side facing the operator (see FIGURE 4). Make
sure all space requirements and measurements are correct BEFORE
cutting. Depending on the type and style of your counter top, different
types of equipment may be needed to cut the appropriate hole. It is
always recommended to consult with a professional before cutting.
Installation In Counter
1. Ensure that an electrical receptacle is readily accessible when you locate the
equipment.
2. Slide the blender base into the hole cut in your counter top (per instructions
above) with the LCD indicator and touchpad facing the operator side of the
counter top. The formed rubber gasket on the rim of the motor base should fit
into the hole and rest lightly on the counter top.
3. Make sure the power switch is off before plugging the unit into the wall. Plug
the unit into a separate 120 volt, 20 amp receptacle with 20 amp protection.
7
FIGURE 4 - IN-COUNTER INSTALLATION
8
SECTION 5
CARE AND CLEANING
5.1 AFTER USE CLEANING
1. Add 1 cup of hot water and a drop of liquid dishwashing soap to the
blender jar.
2. Place the lid tightly onto the jar. Place the blender jar on the blender base,
and with your hand placed on top of the lid, press the PULSE button for
five seconds.
3. Rinse with clear water until all soap is rinsed from jar and lid.
4. Clean the blender base by simply wiping the base and touchpad with a
damp rag and water.
5.2 LONG-TERM SANITATION
1. For long-term sanitation, occasionally fill the blender jar with hot water.
2. Add one teaspoon of liquid chlorine bleach.
3. Stir for 10 seconds to mix water and bleach. Let mixture stand in blender
jar for five minutes.
4. Empty water/bleach mixture. Turn jar RIGHT SIDE UP on dish rack until dry.
5.3 CLEANING TIPS AND CAUTIONS
• Do not use abrasives or stiff brushes to clean the blender base or jar as this
will dull or scratch the surface. Cosmetic damage is not covered by warranty.
• NEVER submerge the blender motor in water. Avoid submerging blender
jars for more than five minutes. Water penetration through the lower jar
seals will reduce the life of the jar. After cleaning, we recommend the
blender jar be stored upright.
• BLENDER JAR IS DISHWASHER SAFE - TOP RACK ONLY! Extreme temperatures can damage the lower seal to the jar.
SECTION 6
Your blender has 30+ pre-programmed blend cycles for your convenience, as
well as optional manual controls. A representation of the touchpad controls is
found below.
9
6.1 BEFORE YOU BEGIN OPERATION
1. Turn on the main power switch located on the front of the blender motor
base.
2. Place ingredients in jar.
3. Place the blender jar on the base, making sure the jar is secure.
4. Attach the blender jar lid.
6.2 MANUAL CONTROLS
START/STOP: The START/STOP button can be pressed at any time to stop the
current blender function.
PULSE: To use the high–speed pulse, simply hold the PULSE button for the
desired amount of time. The blender will stop when you release the button. The
pulse function can also be activated during a blend cycle. When the PULSE
button is pressed the current cycle pauses and the pulse begins. When the
PULSE button is released, the selected cycle resumes. The PULSE button is
used when you want to chop, mince, whip, or do other momentary tasks which
do not require a long blend cycle. When the PULSE button is pushed the motor will run only as long as the button is held down. As soon as the button is
released the motor will shut off.
SPEED UP/SPEED DOWN: Pressing the UP button will start a speed cycle for
50 seconds. During this time press or hold down the UP/DOWN arrows to control up to 10 speeds at which the blender can operate. The speed buttons allow
you to manually control the blender and choose any of the available 10 speed
settings. Simply press the SPEED UP button and the motor will begin. Continue
pressing the SPEED UP key to increase the speed, or press the SPEED DOWN
key at any time to decrease speed. After you have reached the desired speed
release the button. Once you press a speed button, the blender will begin to
run at the selected speed, and then shut off automatically after 50 seconds. To
stop the cycle before the 50 seconds, press any button on the lower row.
6.3 AUTOMATIC AND CUSTOM CONTROL PRESETS
BUTTONS – 1, 2, 3, 4: The four numbered buttons on the left side of the touchpad operate four customizable pre-selected blend cycles. To select one of
these presets, simply press the designated button. The buttons are set at the
factory to the following blend cycles:
10
Preset Button
Blend Cycle
1
Low Energy
2
Smoothie
3
Mixed Drinks
4
Whole Juice
SELECTING A BLEND CYCLE FROM THE CYCLE MENU: To access the Cycle
Menu, press the CYCLE MENU button. The first category to appear on the LCD
display is BEVERAGES. Continue pressing or hold down the CYCLE MENU button to scroll through the cycle categories. A chart showing the blend cycle categories, and each specific blend cycle within a category is found in FIGURE 5.
Once the desired blend cycle category has been reached, press or hold down
the arrow keys to scroll through the blend cycles listed in that category. When
you find a blend cycle you want to use, press the START/ STOP button. The LCD
display will show the cycle name and the time remaining will be displayed while
the cycle is running.
After you have run a blend cycle, while still in the Menu Mode, the CYCLE
MENU and UP/DOWN arrows can be used to select another blend cycle.
Press the PULSE button to exit the Cycle Menu mode.
FOOD PROCESSING BLEND CYCLES: Unlike the other cycles, the blend cycles
in the FOOD PROCESSING category (Chop, Whip, and Puree) function similar
to the pulse function. Use the START/STOP button as you would the PULSE button by pressing the button for the desired duration and releasing when finished.
PROGRAMMING A PRESET BUTTON (Button 1-4): For blend cycles you use
frequently, there are 4 preset buttons on the touchpad numbered 1, 2, 3, and 4,
which you can use to save any of the pre-programmed blend cycles. This will allow you to simply press button 1, 2, 3, or 4, when you want to use that specific
blend cycle.
Enter the Menu Mode by pressing the SELECT CYCLE MENU button. Using the
SELECT CYCLE MENU and UP/DOWN arrows, navigate to the cycle you wish
to program onto the preset. When the desired blend cycle appears on the LED
display, press and hold the desired preset button (button 1, 2, 3 or 4) for two
seconds.
The display will first show the name of the existing cycle, and then the display
will read - “ProgrammingBttnX”, where “X” is the number of the preset button.
When the programming is complete, the display will read “Program Complete”.
The blender will exit the Menu Mode automatically, and the preset button is
now available for use. The next time you choose that button, it will run the
blend cycle which you have saved to it. If the blender fails to program the preset button, the display will read, “Program Failed”. If you continue to receive this
message after multiple attempts to program your blender, contact Blendtec
customer service at 800-253-6383 for assistance.
6.4 RESTORING FACTORY DEFAULTS
The Tom Dickson Extreme Blender has the following blend cycles set as factory
defaults for preset buttons numbered 1, 2, 3, and 4:
11
Preset Button
Category
Blend Cycle
1
Multi-Use
Low Energy
2
Beverages
Smoothie
3
Drinks/Ice Cream
Mixed Drinks
4
Whole Foods
Whole Juice
To restore your blender to these settings, press and hold preset button 4 and
the START/STOP button. The display will read, “Restoring Defaults”. When the
programming is complete, the display will read, “Restore complete” and the
blender will be ready for use.
FIGURE 5 - BLEND CYCLES*
CATEGORIES
Beverages
Drinks/Ice
Cream
Whole Foods
Food
Processing
Multi-Use
Smoothie
Ice
Cappuccino
Light Juice
*Chop
Low Energy
XL Smoothie
Ice Cream
Whole Juice
*Whip
Medium
Energy
Milkshake, Ice
Mixed Drinks
Frozen Fruit/
Yogurt
*Puree
Speed 6
Full Strength
Fruit Drinks
Sauces, Dips
Knead Dough
Medium
Energy Up/
Down
Hot Chocolate
Granita
Soups
Grind Grain
High Energy
Up/Down
*Chop, Whip, and Puree function as pulse cycles; see pulse instructions for
details.
Why Blend Cycles?
In the world of professional blending, there are many factors which go into
making a delicious and consistent blended product. It is from that world of
professional results that Blendtec derives its heritage. In order to blend many
different things consistently, Blendtec developed blend cycles to match the
blending needs of the type of product being made (see FIGURE 6 for two examples of blend cycles.)
Because different ingredients have different blending characteristics, each
ingredient needs to be considered. Some things which are thicker or more
fibrous will take longer to blend and need to be blended at higher speeds. For
instance, think of the difference in thickness between strawberry juice, strawberry syrup, and a strawberry puree with lots of pulp and seeds. The first two
will be on the thinner side, the puree on the thicker side. Now play the same
12
game with fruits having more fiber such as pineapple or mango. You can see
that different types of products (juice, syrup, puree) and different flavors (e.g.,
apple, mango) have different levels of thickness and fiber; the thicker the ingredients, the tougher the blend!
This is why you will hear the blender speeding up and slowing down at different times throughout the various blend cycles. Based on the type of foods the
blend cycle is designed to handle, it will blend at higher or lower speeds for
different lengths of time in order to produce the most consistent results.
The Tom Dickson Extreme Blender was designed with many different food
items in mind and blend cycles make it produce consistent results across a
wider range of food items than any other home blender. However, things like
the temperature of ice and the amount of liquid in the various foods used in a
recipe will create different blending characteristics.
The recipe book included with your machine is designed for an overall average
in terms of ice temperature and the amount of liquid typically contained in various fruits and vegetables. Your experience may be different depending on local
conditions and you may need to adjust certain recipes to have more or less ice,
and higher or lower portions of fruits and vegetables or other ingredients. For
example, if a drink is too thick to blend adequately, try reducing the ice a little
and replacing the ice with a little water or other liquid. You will be amazed at
FIGURE 6
13
the difference in blendability.
Whatever your experience with ingredients, the Tom Dickson Extreme Blender
will blend things faster and more easily than other blenders because of its
unique combination of high speed motor, patented WILDSIDE jar, single prong
wingtip blade, direct drive coupling, and computer controlled blend cycles.
SECTION 7
TROUBLESHOOTING
7.1 BLENDER MOTOR WILL NOT TURN ON
If the blender motor will not turn on, try the following:
• Make sure the main power switch on the front panel is turned ON.
• Check your house circuit breaker switch or fuse to make sure it is set to the
ON position.
• Unplug the power cord from the wall receptacle, wait five seconds, then
plug power cord back in.
• Determine if the Liquid Crystal Display (LCD) is lit. An absence of a lit LCD
indicates a lack of power to the unit.
Look at the LCD:
• A reading of “OVERTEMP” indicates that the motor is overheating. The
blender has been disabled until the unit cools to operating temperatures.
Turn off and unplug the unit. Allow it to cool for at least 20 minutes.
• A reading of “OVERLOAD” indicates an overload on the motor. Turn off
and unplug the unit. Plug in the unit and turn the motor on again to clear
the overload condition. Check the blender jar for blockage. If overload
condition re-occurs, contact your Blendtec service agent.
• Remove the blender jar from the blender motor and check to make sure
the blade turns freely while unattached to the motor. If the blade does not
move freely the problem may be the jar, not the motor. Check the jar by
turning the shaft by hand to see if it rotates easily.
• Blade stops: If the overload switch stops the blender, remove the blender
jar and carefully check for blockage of the blade. If no blockage is found,
replace jar and use the PULSE button on the touch pad to quickly pulse
the blade through the mixture. Once the blade spins freely a programmed
button may be used.
7.2 NOISE LEVEL CHANGES
If the blender noise level has increased significantly from original levels, determine whether the sound is coming from the blender motor or the jar.
• Blender Motor: Check to see if the excess noise is coming from the blender
base. Remove the jar and press cycle number two or three. Listen to the
motor sound without a jar attached. If it is excessively noisy contact your
Blendtec service center.
14
• Jar: Check to see if the excess noise is coming from the jar. Place the jar
back on the motor. Run the motor for a few seconds using the PULSE
button. If you have more than one jar, test a different jar to determine
whether the sound changes as different jars are used. If a jar is excessively noisy, or if the blade assembly seems loose or sounds “gravelly”
when turned by hand, contact your Blendtec service center.
7.3 BLENDED TEXTURE UNSATISFACTORY
If the blended texture of product is lumpy or uneven, do the following:
• Ensure the mixture is not cavitating during the cycle. Cavitation is a condition in which the blender blade spins freely in an air pocket within the
drink mix because the mixture is too cold or too solid. This problem can
be corrected by increasing the mix temperature by reducing ice, increasing liquid and/or ensuring that the frozen ingredients used in the recipe
are never colder than 10 degrees Fahrenheit (-12 degrees Celsius).
• Increase cycle time if the drink is mixing well but has not had enough time
for complete blending hold the PULSE button for required extra blending
time.
• TRIED EVERYTHING? If none of the preceding suggestions work, contact your Blendtec service agent for further assistance. Call toll free (800)
253-6383.
WARRANTY
SECTION 8
WARRANTY DESCRIPTION (US Domestic and Canada)
The Tom Dickson Extreme Blender motor is warranted for ten years. The jar
assembly, including all moving jar parts, is covered against leaking or breakage for three years. Warranties begin from date of purchase.
The quality of Blendtec blenders is unsurpassed. And we expect you will
enjoy years of wonderful and reliable service from the Tom Dickson Extreme
Blender.
Warranties begin from the date of purchase. Cosmetic damage, product
abuse, unreasonable use, damage resulting from an accident, product tampering, servicing performed or attempted by unauthorized service agencies, units
that have modifications, or have been or used for commercial purposes are
not included under this warranty.
THIS WARRANTY APPLIES ONLY TO PRODUCTS SOLD BY
BLENDTEC OR ITS AUTHORIZED DEALERS
15
Limited Ten Year Warranty
Blendtec warrants the blender motor to be free of defect in material and
workmanship for a period of ten years. During this period, such defects will be
repaired or the product replaced, at Blendtec’s discretion, without charge. This
warranty does not cover damage caused by misuse, accident, or negligence.
All implied warranties, including but not limited to implied warranties of fitness
and merchantability are limited in duration to a period of ten years on the motor and three years on the jars. Any unit submitted for repair must be accompanied by proof of original purchase and should be shipped prepaid
to:
UNDER WARRANTY
Blendtec
1206 South 1680 West
Orem, UT 84058
Toll Free: (800) 253-6383
Local: (801) 222-0888
1. Contact Blendtec immediately to diagnose the difficulty. Please have
blender serial number ready as well as a description of the problem. Do not
attempt to do your own repairs. Repairs made by persons other than Blendtec
authorized service representatives will void the warranty. Many issues can be
resolved simply and quickly over the phone.
2. If the difficulty cannot be resolved over the phone, your unit may require replacement. If the blender is under warranty, Blendtec will repair or replace the
unit at no cost. Cosmetic damage and abuse are not included.
3. Upon receiving instructions from Blendtec, box up your existing unit and
enclose the following:
Your name:
Address:
Phone number:
The blender serial number:
(located on the bottom of the blender motor base)
Cycle Count (from the LCD indicator):
Your purchase date:
Place of purchase:
An explanation of the problem:
OUT OF WARRANTY
1. Contact Blendtec to diagnose the difficulty. Please have the blender serial
number ready along with a description of the problem. Do not attempt to do
your own repairs. Many issues can be resolved simply and quickly over the
phone.
2. If the blender is not under warranty and you wish to have it repaired, box
16
up the blender motor and ship it to Blendtec. You will be billed for services
rendered.
3. When you ship your unit please enclose the following:
Your name:
Address:
Phone number:
The blender serial number:
(located on the bottom of the blender base)
Cycle Count (from the LCD indicator):
Your purchase date:
Place of purchase:
An explanation of the problem:
FOR QUESTIONS REGARDING THIS WARRANTY
CONTACT CUSTOMER SERVICE AT
(800) 253-6383 OR (801) 222-0888.
M-F from 8:00 am - 5:30 pm Mountain Time.
INSTRUCTIONS THAT APPEAR IN THIS USER
GUIDE ARE NOT MEANT TO COVER EVERY
POSSIBLE CONDITION OR SITUATION THAT
MAY OCCUR. GOOD JUDGMENT MUST
BE USED WHEN OPERATING THIS OR ANY
OTHER MACHINERY.
17
1206 South 1680 West
Orem, UT 84058
801-222-0888
www. blendtec.com
OWN-RD-041 Manual, The Tom Dickson Extreme Blender v1 May 10