1
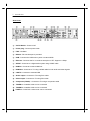
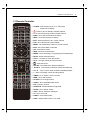
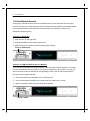
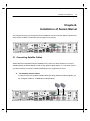
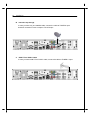
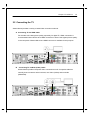
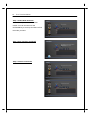
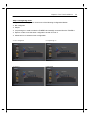
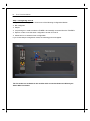
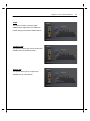
Marvel Instruction Manual High Definition Personal Video Recorder Digital Satellite Receiver The Sezam Marvel digital receiver is fully compliant with the international Digital Video Broad-casting (DVB) standard, and thus is able to receive digital broadcasts of that standard. 1. Contents Contents 1 2 3 Introduction .......................................................................................................................... 5 1.1 Main Features ............................................................................................................ 5 1.2 Product Descriptions ................................................................................................... 6 1.3 Remote Controller ..................................................................................................... 8 1.4 Conditional Access ...................................................................................................... 9 1.5 Technical Specifications ............................................................................................ 10 Installation of Sezam Marvel ............................................................................................ 12 2.1 Connecting Satellite Cable ........................................................................................ 12 2.2 Connecting the TV ..................................................................................................... 14 2.3 Connecting Power ..................................................................................................... 16 2.4 Power On/Off ............................................................................................................. 17 First Time Installation........................................................................................................ 18 Safety Instructions ii Safety Precautions This product has been manufactured to act in accordance with the international safety standards. Please read through the safety instructions carefully before using this product as the manufacturer takes no responsibility for any damages due to the consumer’s misuse of the product. 1. Power Supply • Use this product with the type of power supply that is indicated on the marking label. Its operating range is AC 90V~250V and 50/60Hz. • Use an outlet that has surge suppression or ground fault protection. • Do not overload a wall outlet, extension cord or adapter as this may result in electric fire or shock. • Do not alter, bend, or twist the power cord or plug. • Be sure to route the power supply cords so that they won’t be walked on or pinched by items around it. • Keep the power cord away from any heating appliances to avoid melting the cover vinyl. • If the cord is damaged, do not plug in the product and be sure to get the cord replaced. • When unplugging, grip the power plug, not the cord. • If any of the following occur, unplug the product from the outlet and contact authorized service personnel: • o The power cord or supply is damaged o Liquids of any kind have been exposed to the product o The product has been dropped or the casing has been damaged o The product is not performing as it should If the product won’t be used for a long period of time, unplug it iii Safety Instructions 2. Exposure and Placement • Only operate the product in moderate temperatures. • Place the product indoors to avoid exposing it to lightening, rain or direct sunlight. • Do not expose any liquids or sources of open flame (such as candle flame) to the product. • Do not place the product near any heat emitting appliances. This may cause impairment in cooling. • Do not place the product on any unstable surface because it may fall and cause serious personal injuries and/or damage the product. • Always make sure the product has enough space around it for ample ventilation and heat transfer. • Do not place the product in a closed space (such as a cabinet) without suitable ventilation. • Be sure to place the product approximately 10 cm away from any appliances that are exposed to electromagnetic influences, such as a TV. • Do not use any attachments or accessories that are not recommended by the manufacturer. This may cause hazards to the product, and will void the warranty.. 3. Installation and Maintenance • Before connecting or disconnecting the satellite cable to the product, be sure that the product is unplugged. Failure to do so may cause damage to the LNB. • The LNB cable must be earthed to the system earth for the satellite dish. • Before connecting or disconnecting the cable from the TV, be sure that the product is unplugged. Failure to do so may cause damage to the TV. • Before cleaning the product, be sure that the product is unplugged. • Use a damp cloth (do not use any solvents) to clean the exterior of the product. Safety Instructions iv 4. Warnings • Do not use this product near any flammable or explosive gases as this increases the risk of explosions. • • Do not use the product if any liquids or foreign objects come in contact with it. o Turn the product off, disconnect the power cord, and contact your dealer. o Do not use the product since this could cause a fire or electric shock. Do not operate this product or hold the power cord with wet hands as the risk of getting electronic shock is very high. • Unplug the product and disconnect the LNB cable during a thunderstorm or when left unattended and unused for long periods of time. This will prevent damage to the product due to lightening and power-surges. • Do not use this product when it is out of order. Continued use when defective can cause serious damage to it and you. • Do not put any alien items into or block the slots or ventilation openings of the product. This can cause damage to the product and reduce the life span. 5. Warranty Be aware that any adjustments or handling (such as, but not limited to opening the casing) other than what is specified here will void your warranty. Attempting to modify the product may result in fire, injury, electric shock, or other severe damage to you or the product. • Do not remove the cover, as there is risk of electric shock. o • If it is absolutely necessary, please contact a trained professional. Do not try to modify the product as this may cause fires, injuries, electronic shocks or other severe damage to you or the product. 5. Introduction Chapter1. Introduction The Sezam Marvel digital receiver is fully compliant with the international Digital Video Broadcasting (DVB) standard, and thus is able to receive digital broadcasts of that standard. For its operation you need an antenna, which must be installed appropriately. 1.1 Main Features ● 1.3GHz Dual threaded MIPS Processor ● 1 e-SATA support ● Linux Operating System ● Support of internal SATA HDD ● Media Player ● 2 x USB 2.0 Rear, 1 x USB 2.0 Front ● Downloadable Plug-ins supported ● RS-232 ● 2 x Smartcard Readers ● HDMI Input / Output ● 2 x Common Interface ● Real time HD stream Transcoding audio / ● MPEG2 / H.264 Hardware Decoding video data ● Accelerated 2D/3D Graphics processing ● 2HD PIP function support ● 2 x DVB-S2 Tuners fix ● RCA Composite ● 2 x Detachable Tuners ● YPbPr Component ● 256 x 64 OLED ● S/PDIF for digital bit stream out (optical) ● 2GB NAND Flash ● EPG supported ● 2GB DDR SDRAM ● Automatic & Manual Service Scan ● 10/100/1000Mb Ethernet Interface ● WiFi 2.4GHz up to 300Mbps supported ● Multiple LNB control (DiSEqC) supported ● Skin change supported Chapter1. Introduction 1.2 Product Descriptions Front Panel ① Smartcard reader slot ② CI Module slot ③ USB: Connect a USB storage device ④ Display :256 x 64 OLEDDisplays ⑤ CH ▼ : Switches channel ⑥ CH▲ : Switches channel ⑦ Power : Power On 6. 7. Introduction Rear Panel ① On/Off Switch : Power on/off ② Power plug : Connect power cable ③ FAN : Ventilator ④ RS-232 : RS-232 data port is provided ⑤ USB : Connects the USB memory stick or external HDD ⑥ Ethernet : Connects the PC or another set top box of ET. Support to 1Gbps ⑦ S/PDIF : Connects to a digital audio system using S/PDIF cable ⑧ HDMI In : Connects to others HDMI out ⑨ HDMI Out : Connects to TV using a HDMI cable for both audio and video signals ⑩ e-SATA : Connects to external HDD ⑪ Audio output : Connects to TV using RCA cable ⑫ Video output : Connects to TV using RCA cable ⑬ Component (YPbPr) : Connects to TV using a component cable ⑭ TUNER A : A satellite cable can be connected ⑮ TUNER B : A satellite cable can be connected 16 TUNER C : DVB-T2/C combo tuner can be connected Chapter1. Introduction 1.3 Remote Controller TV/STB : Puts the Remote in TV or STB mode. (Reserved TV Mode) : Press to go into Standby / Standby options. 0 - 9 : Used for entering channel number and text. PREV : Go to Previous Channel in History. NEXT : Go to Next Channel in History. EPG : Shows the EPG for all / current channel. FAV : Show the Favorite Lists available. MENU : Go to Main Menu / Menu for current function. EXIT : Exit current Menu or Window. OK : Confirms the option. INFO : Shows more information. MEDIA : Show recordings. Long press goes to Media player BACK : Shows Channel History. VOL+/- : Increase or Lower the Volume. CH+/- : Change channel to Next / Previous. : Mute the sound. COLOR : Color buttons for different operations. ◀◀/▶▶ : Fast Forward / Rewind. (x2/4/8/16/32/64/128) ▶ll / ■ : Play / Pause / Stop Timeshift or Media playback ● : Start a recording / Show recording options. TIMER : Go to Timers / Timer overview. WEB : Go to Web browser. PLUGIN : Go to Plugins menu. AUDIO : Show available Audio tracks. PiP : Picture in Picture. SUBTITLE : Shows subtitles if supported. SLEEP : Go to Power Timers. TEXT : Shows Teletext if supported. TV : Go to TV mode. RADIO : Go to Radio mode. HELP : Shows HELP menu in TV mode. 8. 9. Introduction 1.4 Conditional Access Amongst the channels that are scanned via Sezam Marvel, some channels can be properly tuned in only with the corresponding Smartcard. Sezam Marvel provides two Smartcard Reader slots and users need to purchase those Smartcards that are required for viewing such subscription based services. Insertion of Smartcard ① Open the door on the right side. ② Insert Smartcard as in the following instruction. ③ Make sure that the Smartcard remain inserted while viewing. Insert a Smartcard Insertion of CAM (Conditional Access Module) There are several Conditional Access Systems (CAS) that Sezam Marvel supports. To be able to watch channels that are encrypted in such CAS as Nagravision, NDS, Irdeto, Viaccess, etc, users need to purchase a CAM that is corresponding to each CAS, as well as Smartcard to decrypt those encrypted channels. ① Insert a Smartcard into the CAM as in the below picture. ② Once the Smartcard inserted into the CAM, insert the CAM into the CI slot. ③ Make sure that the CAM remains inserted while viewing. Insert a CAM Chapter1. Introduction 1.5 Technical Specifications Front Panel Display: 256 x 64 OLED display (Displaying channel names, icons and program information) Smartcard Reader Slot: 2 Common Interface: 2 USB: 1 x USB 2.0 Buttons: 3 (Power,Channel Up/Down) Rear Panel Power Switch: 1 Power plug 1 Sat-IF input/output: 2 x F-type socket fix 2 x detachable tuner Connection TV/VCR: 1 x RCA 1 x YPbPr Video/Audio output (digital): 1 x HDMI Video/Audio input (digital): 1 x HDMI Audio output (digital): Standard optical (S/PDIF) USB: 2 x USB 2.0 Ethernet: 1 RS-232: 1 e-SATA 1 (for external HDD) Mains voltage: 95~250 / 50~60 V/Hz Power consumption: 65/40/1 W Power (Max./typ. operation/stand-by) 10. 11. Introduction RF RF range: 950~2,150 MHz (for DVB-S) 104~862 MHz (for DVB-T2/C) Modulation, FEC, de-multiplexer: DVB-S/DVB-S2/DVB-T2/DVB-C standard Video resolution: 1920x1080 interlaced, progressive Video 1080p@60,1080i and other size Video decoding: H.264, MPEG-2, MPEG-4 compatible Input data rate: 2~45 MSymb/s S/N: > 53 dB Decoding: AC3, MPEG-4(AAC-HE), MPEG-1 Layer1, 2 and 3 Sampling rate: 32 / 44.1 / 48 KHz S/N: > 65 dB LNB supply (horiz/vert): 14 / 18 ; Max. 400mA Control signal: 22 KHz ; ToneBurst ; DiSEqCTM1.0 / 1.1 / 1.2 Dimensions (W x H x D): 380 x 67 x 240 mm Weight (without HDD): App. 4 KG Audio LNB General Chapter2. Installation 12. Chapter2. Installation of Sezam Marvel This chapter will guide you through the whole installation process of Sezam Marvel. Please read each section carefully to make sure that the system runs properly. 2.1 Connecting Satellite Cables Sezam Marvel is integrated with triple satellite tuners, and one of the first steps is to connect satellite cable(s) to Sezam Marvel in order to gain optimal signal quality. You can either choose one of the following connection methods depending on the equipment you have. A. Two Separate Satellite Cables In case you have two separate satellite cables providing different broadcast signals, you can configure TUNER A, TUNER Binput independently. 13. Installation B. Internal Loop-through In case you have only one satellite cable, connect the cable to TUNER A Input. And then connection Tuner A output to Tuner B input. C. DVB-T/T2 or DVB-C Cable In case you have DVB-T/T2 or DVB-C cable, connect the cable to TUNER C Input. Chapter2. Installation 14. 2.2 Connecting the TV Sezam Marvel provides a variety of audio/video connection methods. A. Connecting TV via HDMI Cable For the sake of the best picture quality, especially for digital TV, HDMI connection is recommended. Most HDTVs have HDMI connectors to ensure the highest picture quality. In the rear panel of Sezam Marvel one HDMI connector is available for this purpose. B. Connecting TV via RCA (Video) Cable Sezam Marvel provides Composite video connection as well. Composite cable has normally three connectors at the both end; one Video (Yellow) and two Audio (White/Red). 15. Installation C. Connecting TV via Component Cable The secondly recommend TV connection for digital TV is via component cable (YPbPr). However, unlike the HDMI connection which delivers audio and video signal at the same time, YPbPr connection requires additional audio connection either via RCA cable (Stereo L/R) or S/PDIF. NOTE: When you have an A/V receiver with S/PDIF digital audio input, this connection is recommended to enjoy the best audio quality, especially for the Dolby Digital sound. D. Connecting HMDI Input from other Video Sezam Marvel provides HDMI Input signal for PIP function and Network share after transcoding Chapter2. Installation 2.3 Connecting Power A power unit is provided as one of the basic accessories of Sezam Marvel. ● Connect the power unit to the connector at the rear panel of Sezam Marvel. Turn on the power switch at the rear panel. ● Support to 90 ~ 265 VAC, 50/60Hz. 16. 17. Installation 2.4 Power ON/OFF [Press ‘Standby/Restart’] There are several ways to turn your Sezam Marvel ON or OFF ● Complete Power Shutdown There is a Power Switch in the rear panel and once it is ON, you do not need to turn it on or off each time. It takes a longer time to boot the system if you turned it off by this switch. ● Standby Mode POWER key is normally used to turn the power of Sezam Marvel on or off. If you press POWER, it instantly switches your Sezam Marvel off or on. In this mode, the system is not completely shut down and thus it takes a shorter time to turn it on and off. ● Deep Standby Mode Deep Standby is used to reduce the standby power consumption. Sezam Marvel is designed to be energy efficient and to guarantee the power consumption to be under 1W in the deep standby mode. Chapter3. First Time Installation 18. Chapter3. First Time Installation When you turn on Sezam Marvel for the first time after purchase, an installation wizard will begin step by step. NOTE: ‘OK’ key is used for confirmation and turns to the next step. Press ‘EXIT’ key to return to the previous page. Step 1. Language Selection Sezam Marvel provides various languages and here you can choose the main language for your Sezam Marvel. Use UP/DOWN key to scroll up and down to find the language you want. Step 2. Video Input Selection Sezam Marvel will automatically probe the video input port. Press OK if you can see this page on your TV. Or you can select a different input port (HDMI, SCART, or YPbPr). Use UP/DOWN key to scroll up and down to find the input port you want. 19. First Time Installation Step 3. Video Mode Selection Sezam Marvel provides various video modes. You can choose one. Use UP/DOWN key to scroll up and down to find the mode you want. Step 4. User interface and DHCP Step 5. Internet connection Chapter3. First Time Installation Step 6. Configuring mode Using LEFT/RIGHT key, you can choose one of the following Configuration Modes: ● Not configured. ● Simple ● Loop-through to: mode to make the TUNER B be internally connected from the TUNER A. ● Equal to: mode to use the same configuration as that of Tuner A. ● Advanced: for an advanced user configuration. Not configured loopthough to equal to Advanced 20. 21. First Time Installation Step 7. Configuring Tuner A Using LEFT/RIGHT key, you can choose one of the following Configuration Modes: ● Not configured ● Simple ● Loop-through to: mode to make the TUNER A be internally connected from the TUNER B ● Equal to: mode to use the same configuration as that of Tuner B. ● Advanced: for an advanced user configuration If you choose Simple configuration mode, the following picture will appear The five modes are available for the satellite cable connection between LNB and your Sezam Marvel as below: Chapter3. First Time Installation Single This option is used to receive a single satellite with a single LNB. The cable from LNB is directly connected to Sezam Marvel. ToneBurst A/B This option is used if you want to receive two satellites using a ToneBurst switch. DiSEqC A/B This option allows you to configure two satellites in Port A and Port B. 22. 23. First Time Installation DiSEqC A/B/C/D This option allows you to configure four satellites in Port A, Port B, Port C, and Port D. Positioner This option is used when you have a motorized satellite antenna. Step 8. Configuring Tuner B This step is for the configuration of TUNER B Input and the process is same as that of Tuner A. For further information please refer to the above “Step 7. Configuring Tuner A” section.