1
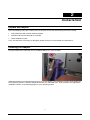
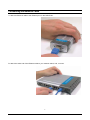
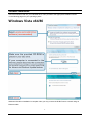
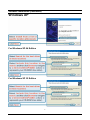
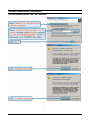
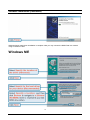
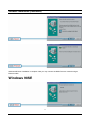
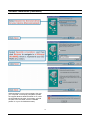
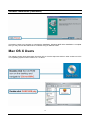
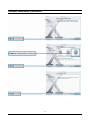
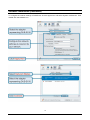
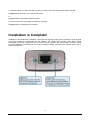
D-Link™ DUB-E100 USB 2.0 Fast Ethernet Adapter Manual First Edition (June 2007) Printed in Taiwan RECYCLABLE Table of Contents INTRODUCTION..............................................................3 System Requirements ......................................................3 Features ...........................................................................3 INSTALLATION ...............................................................4 Unpack and Inspect..........................................................4 Installing the Adapter........................................................4 connecting the network cable………………………………3 software installation………………………………………….4 TROUBLESHOOTING...................................................19 SPECIFICATIONS .........................................................23 1 Introduction Thank you for choosing the D-Link DUB-E100. The D-Link DUB-E100 is a Hi-Speed USB 2.0 10/100Mbps Fast Ethernet Adapter specifically designed to plug into an available Universal Serial Bus (USB) port on a desktop or laptop PC running Microsoft Windows Vista, XP, Server 2003, 2000,ME 98SE ,Mac OS X, and Linux. Based on USB 2.0, the DUB-E100 extends the transfer speed of earlier USB Fast Ethernet adapters to true 10/100Mbps connectivity. Power for the DUB-E100 is provided directly by the USB bus, eliminating the need for an external power adapter. It also supports USB's energy saving suspend and resume functions to minimize power consumption, which is especially useful for laptop/notebook users. System Requirements Before installing the DUB-E100, check your system for the following minimum configuration requirements. 200MHz or above based computer with a minimum of 32MB RAM One available USB port Windows Vista x64/86, XP x32/x64 Edition, Server 2003 x32/x64 Edition, 2000, Me, 98SE, Linux or Mac OS X Features Designed for versatility and performance, the DUB-E100 USB 2.0 Fast Ethernet Adapter provides the following: • Compliant with USB 2.0 and USB 1.1 specifications • Universal Bus support 3.3V • Compliance with IEEE 802.3u Fast Ethernet standards and IEEE 802.3 Ethernet standards. • Plug-and-Play installation • Supports half and full duplex at 10Mbps, half and full-duplex at 100Mbps. • One built-in RJ-45 connector • Auto-negotiation to the highest available speed • Two LED indicators: Link/ TX/RX • Driver support: √ Microsoft Windows Vista (x86 ,x64) √ Linux (kernel 2.6.9~13) √ Microsoft Windows XP (x32/x64 Edition) √ Linux (kernel 2.6.14 & above) √ Microsoft Windows Server 2003 (x32/x64 Edition) √ Microsoft Windows 2000 √ Macintosh OSX (10.x) √ Windows 98SE/ME 1 2 Installation Unpack and Inspect Open the shipping carton and carefully remove all items. Ensure that the following items are included: • One DUB-E100 USB 2.0 Fast Ethernet Adapter • DUB-E100 Drivers and Manual on CD-ROM • Quick Installation Guide If any of these items are missing or damaged, please contact your local reseller for replacement. Installing the Adapter Plug the DUB-E100’s USB cable into an available USB port on your computer. Windows will detect new hardware and prompt you for the drivers. The installation process varies slightly for each operating system. Insert the DUB-E100 CD into your CD-ROM drive. Then proceed to the appropriate installation section on the following pages for your operating system. 2 Connecting the Network Cable A. Attach an Ethernet cable to the Ethernet port on the DUB-E100. B. Attach the other end of the Ethernet cable to your network switch, hub, or router. 3 Software Installation Insert the DUB-E100 CD into your CD-ROM drive. Then proceed to the appropriate installation section on the following pages for your operating system. Windows Vista x64/86 Windows Vista driver installation is complete. Now you may connect the DUB-E100 to a network using an Ethernet cable. 4 Software Installation (continued) Windows XP For Windows XP 64 Edition For Windows XP 32 Edition 5 Software Installation (continued) Windows XP driver installation is complete. Now you may connect the DUB-E100 to a network using an Ethernet cable. Windows 2000 6 Software Installation (continued) 7 Software Installation (continued) Windows 2000 driver installation is complete. Now you may connect the DUB-E100 to a network using an Ethernet cable. Windows 2003 For Windows Server 2003 x64 Edition 8 Software Installation (continued) For Windows Server 2003 x32 Edition 9 Software Installation (continued) Windows Server 2003 driver installation is complete. Now you may connect the DUB-E100 to a network using an Ethernet cable. Windows ME 10 Software Installation (continued) Windows ME driver installation is complete. Now you may connect the DUB-E100 to a network using an Ethernet cable. Windows 98SE 11 Software Installation (continued) Windows begins copying the necessary files onto your computer. You may be prompted to provide the original Windows 98SE CD-ROM. If so, insert the CD-ROM and click OK. If necessary, provide the path to the CD-ROM, such as D:\WIN98 (where D: is your CD-ROM drive letter). 12 Software Installation (continued) If prompted, restart your computer to complete the installation. Windows 98SE driver installation is complete. Now you may connect the DUB-E100 to a network using an Ethernet cable. Mac OS X Users The following screen shots were taken from Mac OS 10.3 but the steps are similar in other versions of OS X. Your operating system must be version 10.1 or above. 13 Software Installation (continued) 14 Software Installation (continued) After the restart, plug the DUB-E100’s USB cable into an available USB port on your computer. Then attach one end of an Ethernet cable to the Ethernet port on the DUB-E100 and the other end to your network switch, hub or router. Mac system will detect the new hardware and show the name of the adapter, e.g. Ethernet Adapter (en1) in the example below. 15 Software Installation (continued) To configure the network settings of DUB-E100, click the Apple icon and select System Preferences. Then double-click the Network icon. 16 Software Installation (continued) Linux 2.6.14 This driver is designed for Kernel 2.6.14.x or above. To compile the provided Linux driver, you need the Linux 2.6 Kernel source. Also, please make sure the kernel is built with “Support for Host-side, EHCI, OHCI, and UHCI” option. 1.Insert the driver CD-ROM into the CD-ROM drive of your computer and go to the Drivers\Linux\ directory. 2.Copy the LINUX2.6.14_REV101 folder to your temporary directory. 3.Go to the LINUX2.6.14_REV101 folder and execute the following command to compile the driver. [root@localhost linux2.6.14_rev101]# make 4.If compiling without errors, asix.ko will be created under the current directory. 5.If you want to use modprobe command to mount the driver, execute the following command to install the driver on your Linux. [root@localhost linux2.6.14_rev101]# make install To mount the driver, go to the LINUX2.6.14_REV101 directory and executing the following command: [root@localhost linux2.6.14_rev101]# insmod usbnet [root@localhost linux2.6.14_rev101]# insmod asix.ko or [root@localhost anywhere]# modprobe asix To unmount the driver, just typing the following command: [root@localhost anywhere]# rmmod asix [root@localhost anywhere]# rmmod usbnet Software Installation (continued) Linux 2.6.9 This driver is designed for Kernel 2.6.x to 2.6.13. To compile the provided Linux driver, you need the Linux 2.6 Kernel source. Also, please make sure the kernel is built with “Support for Host-side, EHCI, OHCI, and UHCI” option. Insert the driver CD-ROM into the CD-ROM drive of your computer and go to the Drivers\Linux\ directory. Copy the LINUX2.6.9_REV111 folder to your temporary directory. Go to the LINUX2.6.9_REV111 folder and execute the following command to compile the driver. [root@localhost linux2.6.9_rev111]# make If compiling without errors, usbnet.ko will be created under the current directory. If you want to use modprobe command to mount the driver, execute the following command to install the driver on your Linux. [root@localhost linux2.6.9_rev111]# make install 17 To mount the driver, go to the LINUX2.6.9_REV111 directory and executing the following command: [root@localhost linux2.6.9_rev111]# insmod usbnet or [root@localhost anywhere]# modprobe usbnet To unmount the driver, just typing the following command: [root@localhost anywhere]# rmmod usbnet Installation is Complete! Installation of the DUB-E100 is complete. The LINK LED should be solid green, indicating a good physical connection between the DUB-E100 and the network. The TX/RX LED indicates when data is being transmitted or received. If both LEDs are unlit, there may be a problem with the physical connection. Check the cables between your DUB-E100, the computer, and the network. Verify that your network switch, hub, or router is powered on. 18 3 Troubleshooting 1. Can I use my DUB-E100 on a USB 1.1 port? The DUB-E100 will work on a USB 1.1 port but the transfer speeds will be limited to the limitations of USB 1.1. If your computer does not have USB 2.0 ports, you can purchase an add-in USB 2.0 adapter to add USB 2.0 functionality to your computer. D-Link offers the following USB 2.0 adapters: • DU-520 (5 Port USB 2.0 PCI Adapter) for desktop computers. • DUB-A2 (2-Port USB 2.0 PCI Adapter) for desktop computers. • DUB-C2 (2-Port USB 2.0 Cardbus Adapter) for laptops computers. 2. Do I need to use a crossover cable or straight-through cable? With most of D-Link’s switches/routers, the Ethernet ports are Auto MDI-II/MDI-X. This means the port will auto-sense the cable type. Auto MDI-II/MDI-X ports may react differently if the Ethernet cable is not properly pinned. If you make your own cables, it is very important that they follow the industry standard pin-out (568A and 568B). Computer connections to a hub, switch, or router typically use a straight-through cable. When connecting a computer to another computer or to an uplink port then a cross-over cable is typically required. Rule of Thumb: ”If there is a link light, the cable is right.” 3. How do I verify that my DUB-E100 is properly installed? Windows You can verify that the adapter has been properly installed in Device Manager: • Right click on the My Computer icon and select Properties. • For Windows 98SE and ME: Go to the Device Manager tab. • For Windows XP, 2000, and Server 2003: Go to the Hardware tab and click on the Device Manager button • For Windows Vista: Click on the Device Manager item under the Tasks group. • Expand the Network Adapters heading by clicking on the plus (+) sign next to Network Adapters. • Right click on the My Computer icon and select Properties. • The D-Link USB DUB-E100 should appear with a green and gold network adapter symbol. If the D-Link USB DUB-E100 in device manager appears with a bright yellow exclamation mark or a red x, please contact D-Link Technical Support. Mac 1. Click the Apple icon on the task bar, select System Preferences and then click the Network icon. 2. You will find that a new Ethernet network interface is available. It’s usually named Ethernet Adapter (en1) or Ethernet Adapter (en2). 19 Linux 2.6.x To verify if the DUB-E100 driver is properly installed: 1. Load the DUB-E100 module by the following command: [root@localhost linux2.6.14_rev101]# modprobe asix 2. List the loaded modules with the specified pattern “asix”: [root@localhost linux2.6.14_rev101]# lsmod | grep asix Then you should get the reply similar to the following lines: asix 26880 0 usbnet 20616 1 asix mii 9600 2 asix,e100 usbcore 114896 5 asix,usbnet,usb_storage,echi_hcd,uhci_hcd If you still have problem on installing the D-Link USB DUB-E100 driver, please contact D-Link Technical Support. 20 4 Specifications EMC And Safety Certifications: • FCC Class B • CE Class B Network Interface: Female RJ45 jack Data Bus: USB 2.0 (1.1 compliant) Network Standards: IEEE 802.3: 10Base-T IEEE 802.3u: 100Base-T Data Transfer Rates: Ethernet: 10Mbps/20Mbps (Half/Full Duplex) Fast Ethernet: 100Mbps/200Mbps (Half/Full Duplex) Physical Dimensions: 3.15 inches(L) x 2.05 inches (W) x 0.98 inches (H) [80mm(L) x 5.2mm(W) x 25mm(H)] Environment: • • • • Storage: −20° to 70°C (-4° to 158° F) Operating: 0° to 55° C (32° to 131° F) Humidity: 5% to 95% non-condensing Power Consumption: 850mW 21 Technical Support You can find software updates and user documentation on the D-Link websites. If you require product support, we encourage you to browse our FAQ section on the Web Site before contacting the Support line. We have many FAQ’s which we hope will provide you a speedy resolution for your problem. For Customers within The United Kingdom & Ireland: D-Link UK & Ireland Technical Support over the Internet: http://www.dlink.co.uk ftp://ftp.dlink.co.uk D-Link UK & Ireland Technical Support over the Telephone: 08456 12 0003 (United Kingdom) +1890 886 899 (Ireland) Lines Open 8.00am-10.00pm Mon-Fri 10.00am-7.00pm Sat & Sun 22