1
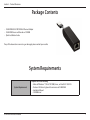
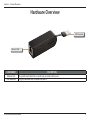
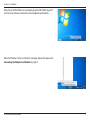
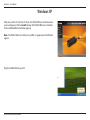
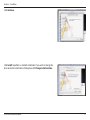
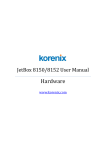
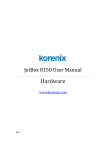
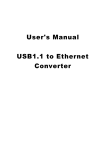
Version 4.10 | 04/05/2012
Table of Contents
Manual Overview
D-Link reserves the right to revise this publication and to make changes in the content hereof without obligation to notify any
person or organization of such revisions or changes. Information in this document may become obsolete as our services and
websites develop and change. Please refer to the www.mydlink.com website for the most current information.
Trademarks
D-Link and the D-Link logo are trademarks or registered trademarks of D-Link Corporation or its subsidiaries in the United
States or other countries. All other company or product names mentioned herein are trademarks or registered trademarks of
their respective companies.
Copyright © 2012 by D-Link Corporation.
All rights reserved. This publication may not be reproduced, in whole or in part, without prior expressed written permission
from D-Link Corporation.
D-Link DUB-E100 User Manual
i
Table of Contents
Table of Contents
Package Contents...........................................................................................................................................................................................................1
System Requirements...................................................................................................................................................................................................1
Introduction.....................................................................................................................................................................................................................2
Features..............................................................................................................................................................................................................................2
Hardware Overview.......................................................................................................................................................................................................3
Software Installation.....................................................................................................................................................................................................4
Windows 7.................................................................................................................................................................................................................4
Windows Vista..........................................................................................................................................................................................................6
Windows XP..............................................................................................................................................................................................................7
Mac OS X................................................................................................................................................................................................................. 10
Linux 2.6.14............................................................................................................................................................................................................ 13
Connecting the Adapter to a Network................................................................................................................................................................ 14
Completing the Installation..................................................................................................................................................................................... 15
Troubleshooting.......................................................................................................................................................................................16
Technical Specifications..........................................................................................................................................................................18
D-Link DUB-E100 User Manual
ii
Section 1 - Product Overview
Package Contents
• DUB-E100 USB 2.0 10/100 Fast Ethernet Adapter
• DUB-E100 Drivers and Manual on CD-ROM
• Quick Installation Guide
If any of the above items are missing or damaged, please contact your reseller.
System Requirements
System Requirements
D-Link DUB-E100 User Manual
Computer with the following:
• Microsoft Windows® 7/Vista®/XP/2000, Linux, or Mac OS X 10.4/10.5
• Pentium 2.0 GHz or higher with a minimum of 32 MB RAM
• Available USB port
• CD-ROM drive
1
Section 1 - Product Overview
Introduction
Thank you for choosing the D-Link DUB-E100 USB 2.0 10/100 Fast Ethernet Adapter. The DUB-E100 USB 2.0 10/100 Mbps Fast
Ethernet Adapter is specifically designed to plug into an available Universal Serial Bus (USB) port on a desktop or laptop PC
running Microsoft Windows 7/Vista/XP/2000, Mac OS X, or Linux. Based on USB 2.0, the DUB-E100 extends the transfer speed
of earlier USB Fast Ethernet adapters to true 10/100 Mbps connectivity. Power for the DUB-E100 is provided directly by the USB
bus, eliminating the need for an external power adapter. It also supports USB energy-saving suspend and resume functions
to minimize power consumption, which is especially useful for laptop/notebook users.
Features
Designed for versatility and performance, the DUB-E100 USB 2.0 10/100 Fast Ethernet Adapter provides the following:
•
Compliant with USB 2.0 and USB 1.1 specifications
•
True 10/100 Mbps network connectivity
•
Compliance with IEEE 802.3u Fast Ethernet standards and IEEE 802.3 Ethernet standards
•
Plug-and-Play installation
•
Auto 10/100 Mbps speed detection
•
Supports half and full-duplex at 10 Mbps, half and full-duplex at 100 Mbps
•
One built-in RJ-45 connector
•
Auto-negotiation to the highest available speed
•
Two LED indicators: Link, TX/RX
•
Driver support:
• Microsoft Windows 7 (x86, x64)
• Microsoft Windows Vista (x86, x64)
• Microsoft Windows XP (x86/x64 Edition)
• Linux (kernel 2.6.14 & above)
• Macintosh OS X (10.4, 10.5)
• Microsoft Windows 2000
D-Link DUB-E100 User Manual
2
Section 1 - Product Overview
Hardware Overview
USB Connector
Ethernet Port
COMPONENT
Ethernet Port
USB Connector
DESCRIPTION
Plug an Ethernet cable from a switch, hub, or router into this port.
Plug this connector into a USB port on your PC.
D-Link DUB-E100 User Manual
3
Section 2 - Installation
Software Installation
Insert the DUB-E100 CD into your computer’s DVD or CD drive, then proceed to the appropriate installation section on the
following pages for your operating system.
Note: If the user interface does not start up, please go to the Autorun folder in your PC’s CD drive and open Autorun manually.
Windows 7
After you put the CD into the CD drive, the DUB-E100 user interface menu
screen will appear. Click on Install to begin the DUB-E100 driver installation.
The InstallShield Wizard will then pop up and run automatically.
Note: The DUB-E100 user interface may differ in appearance for different
regions.
D-Link DUB-E100 User Manual
4
Section 2 - Installation
When the InstallShield Wizard is completed, plug the DUB-E100 into your PC
and the driver software installation will be completed automatically.
When the Windows 7 driver installation is complete, please then proceed to
Connecting the Adapter to a Network on page 14.
D-Link DUB-E100 User Manual
5
Section 2 - Installation
Windows Vista
After you put the CD into the CD drive, the DUB-E100 user interface menu
screen will appear. Click on Install to begin the DUB-E100 driver installation.
The InstallShield Wizard will then pop up.
Note: The DUB-E100 user interface may differ in appearance for different
regions.
Plug the DUB-E100 into your PC and the driver software installation will be
completed automatically.
When the Windows Vista driver installation is complete, you can connect
the DUB-E100 to a USB port on your computer. Please then proceed to
Connecting the Adapter to a Network on page 14.
D-Link DUB-E100 User Manual
6
Section 2 - Installation
Windows XP
After you put the CD into the CD drive, the DUB-E100 user interface menu
screen will appear. Click on Install to begin the DUB-E100 driver installation.
The InstallShield Wizard will then pop up.
Note: The DUB-E100 user interface may differ in appearance for different
regions.
Plug the DUB-E100 into your PC.
D-Link DUB-E100 User Manual
7
Section 2 - Installation
The Found New Hardware box will appear. Select Yes, this time only and
click Next to continue.
Choose Install the software automatically and click Next to continue.
D-Link DUB-E100 User Manual
8
Section 2 - Installation
When the Windows XP driver installation is complete, you can connect
the DUB-E100 to a USB port on your computer. Please then proceed to
Connecting the Adapter to a Network on page 14.
D-Link DUB-E100 User Manual
9
Section 2 - Installation
Mac OS X
The following screenshots were taken from Mac OS X 10.5, but the steps are similar in other versions of OS X. Your operating
system must be version 10.4 or above.
Please insert the DUB-E100 CD into your computer’s DVD or CD drive, then
go to the DUB-E100 folder and navigate to \Drivers\MAC.
Double-click DUB-E100_v3.5.0.
D-Link DUB-E100 User Manual
10
Section 2 - Installation
Click Continue.
Click Install to perform a standard installation. If you wish to change the
drive where the installation will take place, click Change Install Location.
D-Link DUB-E100 User Manual
11
Section 2 - Installation
If you clicked Change Install Location, you will see the Destination Select
screen. Select a Destination Volume, then click Continue.
Enter the name and password of a user with administrative rights.
Click OK.
Click Continue Installation. The computer will then restart itself after the
installation is complete. Please then proceed to Connecting the Adapter
to a Network on page 14.
D-Link DUB-E100 User Manual
12
Section 2 - Installation
Linux 2.6.14
This driver is designed for Kernel 2.6.14.x or above. To compile the provided Linux driver, you need the Linux 2.6 Kernel source.
Also, please make sure the kernel is built with “Support for Host-side, EHCI, OHCI, and UHCI” option. Please follow these steps.
1. Insert the CD into the CD drive of your computer and go to the Drivers\Linux\ directory.
2. Copy the LINUX2.6.14_REV101 folder to your temporary directory.
3. Go to the LINUX2.6.14_REV101 folder and execute the following command to compile the driver.
[root@localhost linux2.6.14_rev101]# make
4. If compiling without errors, asix.ko will be created under the current directory.
5. If you want to use modprobe command to mount the driver, execute the following command to install the driver
on your Linux.
[root@localhost linux2.6.14_rev101]# make install
To mount the driver, go to the LINUX2.6.14_REV101 directory and executing the following command:
[root@localhost linux2.6.14_rev101]# insmod usbnet
[root@localhost linux2.6.14_rev101]# insmod asix.ko
or
[root@localhost anywhere]# modprobe asix
To unmount the driver, just typing the following command:
[root@localhost anywhere]# rmmod asix
[root@localhost anywhere]# rmmod usbnet
Please then proceed to Connecting the Adapter to a Network on page 14.
D-Link DUB-E100 User Manual
13
Section 2 - Installation
Connecting the Adapter to a Network
Attach an Ethernet cable to the Ethernet port on the DUB-E100.
Attach the other end of the Ethernet cable to your network switch, hub, or router.
D-Link DUB-E100 User Manual
14
Section 2 - Installation
Completing the Installation
When the installation of the DUB-E100 is complete, the Speed LED will illuminate solid green when the DUB-E100 is connected
to a 100 Mbps network and remains off when connected to a 10 Mbps network. The Tx/Rx LED will flash amber when data is
being transmitted or received. If both LEDs are unlit, there may be a problem with the physical connection. Check the cables
between your DUB-E100 and your switch or router. Verify that your network switch or router is powered on.
Speed LED
Lights solid green when the
network connection is at 100
Mbps and remains off when
connected to a 10 Mbps network.
D-Link DUB-E100 User Manual
TX/RX LED
Flashes amber when data is being
transmitted or received.
15
Section 3 - Troubleshooting
Troubleshooting
Do I need to use a crossover cable or straight-through cable?
With most of D-Link’s switches/routers, the Ethernet ports are Auto MDI-II/MDI-X. This means the port will auto-sense the cable
type. Auto MDI-II/MDI-X ports may react differently if the Ethernet cable is not properly pinned. If you make your own cables,
it is very important that they follow the industry standard pin-out (568A and 568B).
Computer connections to a hub, switch, or router typically use a straight-through cable. When connecting a computer to
another computer or to an uplink port then a cross-over cable is typically required. Rule of Thumb: ”If there is a link light, the
cable is right.”
How do I verify that my DUB-E100 is properly installed?
Windows
You can verify that the adapter has been properly installed in Device Manager by following these steps:
• Right-click on the My Computer icon and select Properties.
• For Windows XP, 2000, and Server 2003: Go to the Hardware tab and click on the Device Manager button
• For Windows Vista: Click on the Device Manager item under the Tasks group.
• Expand the Network Adapters heading by clicking on the plus (+) sign next to Network Adapters.
• Right-click on the My Computer icon and select Properties.
• The D-Link USB DUB-E100 should appear with a green and gold network adapter symbol.
If the D-Link USB DUB-E100 in Device Manager appears with a bright yellow exclamation mark or a red x, please
contact D-Link Technical Support.
Mac
• Click the Apple icon on the task bar, select System Preferences, and then click the Network icon.
• You will find that a new Ethernet network interface is available. It is usually named Ethernet Adapter (en1) or Ethernet
Adapter (en2).
D-Link DUB-E100 User Manual
16
Section 3 - Troubleshooting
Linux 2.6.x
To verify if the DUB-E100 driver is properly installed:
• Load the DUB-E100 module by the following command:
[root@localhost linux2.6.14_rev101]# modprobe asix
• List the loaded modules with the specified pattern “asix”:
[root@localhost linux2.6.14_rev101]# lsmod | grep asix
Then you should get the reply similar to the following lines:
asix
26880 0
usbnet 20616 1 asix
mii
9600 2 asix,e100
usbcore 114896 5 asix,usbnet,usb_storage,echi_hcd,uhci_hcd
If you still have a problem installing the D-Link DUB-E100 USB driver, please contact D-Link Technical Support.
D-Link DUB-E100 User Manual
17
Appendix A - Technical Specifications
Technical Specifications
Firmware Specifications
OS
+ Microsoft Windows 7/Vista/XP/2000
+ Mac OS X 10.4/10.5
+ Linux
Hardware Specifications
PACKAGE CONTENTS
+ DUB-E100 USB 2.0 Fast Ethernet Adapter
+ Quick Installation Guide
+ CD-ROM with:
- Drivers
- Manual
STANDARDS
+ USB Specification Version 2.0
+ USB Specification Version 1.1
+ USB Specification Version 1.0
+ OHCI (Open Host Controller Interface)
+ EHCI (Enhanced Host Controller Interface)
+ IEEE 802.3 Ethernet
+ IEEE 802.3u 100BASE-T, TX and T4 compatible
+ Supports suspended mode and remote wakeup
+ Supports full and half duplex in Fast Ethernet
POWER
+ Bus powered 2.5 W, 0.5 A@5 V DC
DIMENSIONS (W x D x H)
+ 73 x 21.3 x 20 mm (2.87 x 0.84 x 0.79 inches)
WEIGHT
+ 22 g (0.05 pounds)
OPERATING TEMPERATURE
+ Operating: 0 ˚ to 40 ˚C (32 ˚ to 104 ˚F)
+ Storage: -10 ˚ to 70 ˚C (14 ˚ to 158 ˚F)
HUMIDITY
+ Operating: 5% to 95% (non-condensing)
+ Non-operating: 0% to 95% (non-condensing)
CERTIFICATIONS
+ CE
+ C-Tick
+ FCC
PORTS/CONNECTORS
+ USB Type A
+ RJ-45 (10/100 Mbps Dual-Speed)
DIAGNOSTIC LEDS
+ Speed
+ Tx/Rx Traffic
D-Link DUB-E100 User Manual
18