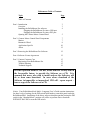
1
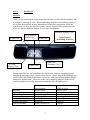
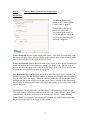
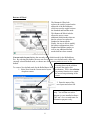
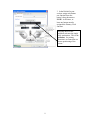
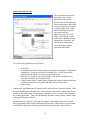
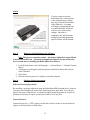
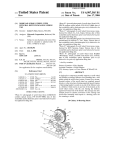
Rollermouse Table of Contents
Topic
Page
Table of Contents
2
Part 1: Introduction
Overview
Installing the RollerMouse Pro software
Plugging the RollerMouse Pro into a USB port
Plugging the RollerMouse Pro into a PS2 port
Opening the Contour Mouse Control Panel
3
3
4
5
Part 2: Contour Mouse Control Panel Components
Motion
Buttons & Wheel
Application Specific
About
7
7
8
10
12
Part 3: Removing the RollerMouse Pro Software
12
Part 4: Software License Agreement
12
Part 5: Contour Customer Care
Registering Your RollerMouse Pro
Trouble Shooting
Technical Support
15
15
15
16
It is the expressed intent of CDI not, at this time nor for any time in
the foreseeable future, to provide the Software on a CD, It is
assumed that users, who wish to install and use the Software, will
do so from some download. In cases where download of the
Software in impossible or impractical, CDI will – upon request –
issue a copy of the Software on a CD.
Notice: Your RollerMousePro® Multi—Language User’s Guide contains instructions
for three levels of settings for the DIP switch found under a removable panel under the
RollerMousePRO. Installation of the driver software should mean that leaving the DIP
switch in the “Standard Mode” position will suffice to perform Driver functions
WITHOUT HAVING to reset the DIP switch.
2
Part 1:
Introduction
Overview
Thank you for purchasing the RollerMouse Pro, the latest version of the RollerMouse line
of computer “mousing” devices. While maintaining all of the award winning features of
the original RollerMouse, the new RollerMouse Pro has been upgraded to an 800 dpi
optical sensor for more precise cursor control, greater exposure of the rollerbar for ease
of access, and two additional buttons for even more functionality.
Fourth Click
Scroll Wheel &
Middle Click
Left Click
(Primary Click)
Rollerbar (Primary Click)
* * *
Controls cursor
positioning on screen
Fifth Click
Right Click
(Secondary Click)
Double Click
Straight out of the box, the RollerMouse Pro can be used with most operating systems,
utilizing the operating system’s default mouse drivers. Simply plug the RollerMouse into
a USB or PS2 port and the RollerMouse will use one of the two included default settings:
Standard or Internet mode. These two modes can be manually adjusted via the switch
located beneath the removable panel on the underside of the RollerMouse Pro.
Rollerbar
Left Gray Button
Middle Gray Button
Right Gray Button
Scroll Wheel Button
Fourth Click Button
Fifth Click Button
Standard Mode (switch in
down position)
Primary Click
Primary Click
Double Primary Click
Secondary Click
Middle Click (Autoscroll)
Autoscroll
Primary Click Lock
3
Internet Mode (switch in
middle position)
Primary Click
Primary Click
Autoscroll
Secondary Click
Middle Click (Autoscroll)
Backward
Forward
In addition to the two default settings, the RollerMouse Pro also includes software that
allows the user to create custom button configurations. The configurations can then be
assigned to the default setting the RollerMouse Pro uses, or associated with specific
applications. In this regard, the RollerMouse Pro would use a different button
configuration depending on the application that is currently being used.
WARNING: Please keep in mind the RollerMouse Pro software is purely
supplemental. If your RollerMouse Pro is not functioning properly with the
operating system’s standard mouse drivers, you will need to consult the Trouble
Shooting section at the end of this User’s Guide or contact Contour Design’s
customer service department. The RollerMouse Pro software should only be
installed if the RollerMouse Pro is functioning properly in either the Standard or
Internet mode. If for some reason the RollerMouse Pro does not function when
plugged into the computer, please see the Trouble Shooting section at the end of this
User’s Guide. For more information on specific operating system compatibility,
please refer to the compatibility chart in the appendix.
Installing the RollerMouse Pro
Plugging the RollerMouse Pro into a USB port (recommended when available)
Connect the RollerMouse Pro to any available USB port, and allow Windows to install
the default driver.
Windows 98 displays the Add New Hardware Wizard, which asks you where to look for
the driver. Accept the standard search without options (no floppy driver, CD-ROM, or
user specified location). In some cases, it may be necessary to insert the Windows 98
CD-ROM for necessary system files.
Windows Me, 2000, and XP automatically installs the necessary USB drivers.
Windows 95 and NT 4.0 do not support USB. Please refer to the next topic for plugging
the RollerMouse Pro into a PS2 port.
After Windows installs the default USB driver, the RollerMouse Pro should be operation.
If the RollerMouse Pro is not functioning properly, please consult the Trouble Shooting
section at the end of the User’s Guide or contact Contour Design’s customer service
department.
Plugging the RollerMouse Pro into a PS2 port with the provided adaptor
Turn the computer off before plugging in the RollerMouse Pro.
Plug in your RollerMouse Pro, turn the computer on and wait for either the log in or
desktop to appear on the screen, after which the RollerMouse Pro should be operational.
4
If the RollerMouse Pro is not functioning properly, please consult the Trouble Shooting
section at the end of the User’s Guide or contact Contour Design’s customer service
department.
Installing the Software
NOTE: The RollerMouse Pro software is only compatible when plugged into a USB port
using Windows 2000, XP, or 2003.
WARNING: Other mouse software can interfere with the installation or use of the
RollerMouse Pro software. Please remove all other mouse software before installing the
RollerMouse Pro software.
1. From the Start menu, select Settings->Control Panel-> Add/Remove
Programs.
2. Select any mouse software that appears on the list.
3. Select Change/Remove to remove the selected mouse software.
4. Repeat if necessary to remove all mouse software.
5. Restart Windows and confirm that only the standard Mouse Properties Tabs,
in the Windows Control Panel, are present (standard tabs include Buttons,
Pointers, Motion, and Hardware). If other tabs still remain, check your
existing mouse documentation for further removal instructions.
Notes for Windows 2000 and XP users:
1. Installing the RollerMouse Pro software requires system-administrator
security privileges.
2. The RollerMouse Pro software has not been assigned a digital signature from
Microsoft. If a warning message appears indicating the lack of digital
signature, select OK to proceed with the installation. There are no adverse
effects to using this software without the digital signature.
Software Installation:
From a download:
1.
2.
3.
4.
Via the Internet, go to http://www.contourdesign.com/gen_drivers.htm
Click on the image of the RollerMousePRO.
Follow the on-screen instructions for downloading and installing.
Restart your computer once you have successfully installed the software.
From a CD:
1. Put the CD in the computer CD-ROM drive.
2. The computer should launch the CD and bring up the initial menu. (If the CD
menu does not appear, click Start -> Run -> Browse -> Select the CD -> Select
Setup.exe -> Select OK.)
3. Follow the prompts to install the software.
4. Restart the computer once the installation is complete.
5
Opening the RollerMouse Pro Control Panel
You can gain access to the RollerMouse Control Panel by using any of the following
methods:
1. From the Start menu, select Programs -> Contour Mouse -> Contour Mouse
Configuration.
2. From the Start menu, select Control Panel then double click on the Contour
Mouse icon.
3. Double click the Contour Mouse icon in the taskbar tray (located in the bottom
right hand corner of your monitor, near the system clock)
6
Part 2:
Contour Mouse Control Panel Components
Motion Tab
The Motion Tab displays
whenever the Contour Mouse
Control Panel is opened.
This tab allows the user to
modify the speed and
acceleration of the cursor, as
well as the speed at which the
cursor moves when then end
detection is triggered.
Cursor sensitivity sets the overall speed of the cursor. If the slide is moved to the right,
the cursor will move faster and travel farther with each movement of the rollerbar. If the
slide is moved to the left, the cursor will travel slower.
Cursor acceleration controls the acceleration of the cursor, or how quickly it reaches the
speed indicated by the Cursor Sensitivity setting. The further to the right the slide is
moved, the faster the cursor will accelerate to top speed. If the slide if moved to the Off
position, the cursor will always move at top speed.
End Detection Cursor Drift adjusts the speed at which the cursor travels when the end
detection triggers. The end detection sensors are buttons located inside the RollerMouse
Pro, on either end of the device. When the rollerbar reaches the left or right side of the
RollerMouse Pro, it can lo longer move, but if more force is exerted in that direction on
the rollerbar, the end detection button will trigger and continue to move the cursor in the
desired direction.
Modifications will only take effect once the Apply or OK buttons have been selected.
The Apply button will accept modifications but leave the Contour Mouse Control Panel
open while the OK button will accept modifications and close the Contour Mouse
Control Panel. Selecting the Cancel button will abandon any modifications made after
the previous application of the Apply or OK buttons.
7
Buttons & Wheel
The Buttons & Wheel tab
replaces the switch, located on the
underside of the RollerMouse,
which was used to toggle between
the Standard and Internet mode.
This Buttons & Wheel tab also
allows the user to create
additional default modes that can
then be selected to replace the
Standard or Internet mode.
Finally, the user is able to modify
the button configurations of the
Standard and Internet modes, as
well as any additional default
modes that have been created.
Current active layout displays the currently select default mode for the RollerMouse
Pro. By selecting this button, the user can elect to create a new default mode, delete the
currently selected default mode, or choose one of the existing modes to serve as the
default.
Pressing down on the rollerbar
activates the single click
To create a New default mode for the RollerMouse Pro:
mechanism. This is the rollerbar.
1. Select New from the Current active layout
Its primary function is to control
drop-down menu.
the on-screen positioning of the
cursor.
2. Enter the name of the
new layout and select OK.
Note: This diagram is an example
only. You will not see such a
diagram in your installed software.
The “test” was a created name for
illustration purposes only.
8
3. In the Default Layout
section, assign each button
one function from the
button’s drop-down men.
NOTE: At all times, at
least one button must be
assigned the Primary Click
function.
Pressing down on the
rollerbar activates the single
click mechanism. This is the
rollerbar. Its primary
function is to control the onscreen positioning of the
cursor.
9
Application Specific Tab
The Application Specific tab
allows the user to create
RollerMouse Pro button
layouts that will automatically
activate and replace the default
layout any time the user opens
a specific application. While
these custom layouts can be
associated with any
application, only the scroll
wheel, scroll button, fourth
button, and fifth button can be
assigned new functions. All
other buttons maintain the
layout from the currently
selected default mode.
To create a new application specific layout:
1. Select New
2. A dialogue box labeled Target Application Selection will appear. Within this
dialogue box, locate and select the executable file (.exe file) that runs the
application with which you wish to associate the layout.
3. Once the .exe file has been located, double click on the executable file or
select the executable file and select Open.
4. In the Contour Mouse Control Panel, program the assign the desired functions
to the three buttons (scroll, fourth, and fifth) and the scroll wheel.
5. Select Apply.
Additionally, application specific layouts can be created directly from the desktop. With
the desired application open and active on the desktop, click on the Contour Mouse icon
located on the taskbar tray. A small menu will appear. Select “Create a new setting for
the current application.” This will automatically open the Contour Mouse Control Panel
to the Application Specific tab.
Modifications will only take effect once the Apply or OK buttons have been selected.
The Apply button will accept modifications but leave the Contour Mouse Control Panel
open while the OK button will accept modifications and close the Contour Mouse
10
Control Panel. Selecting the Cancel button will abandon any modifications made after
the previous application of the Apply or OK buttons.
[This portion of this page is intentionally blank]
11
About
If a user wishes to reset the
RollerMouse Pro software back
to the original factory settings,
they may select the Reset button
in the Other tab. A warning
will display, prompting the user
to confirm that they do indeed
wish to revert to the factory
settings. Once this is
confirmed, any and all custom
default layouts and application
specific layouts will be deleted.
Part 3:
Removing the RollerMouse Pro software
Note: This process cannot be undone. All settings within the Contour Mouse
Control Panel will be lost. All default and application specific layouts will need to
be re-created after re-installing the RollerMouse Pro software.
1. From the Start menu, select All Programs -> Contour Mouse -> Uninstall Contour
Mouse.
2. A dialogue box will appear with the option to Uninstall or Repair the software.
Select Uninstall.
3. Select Next.
4. Once the removal process is complete, restart the computer.
Part 4:
Software License Agreement
Software Licensing Agreement
By installing, copying or otherwise using the RollerMousePRO pointing device software
you agree to be bound by the terms of the following license agreement. If you do not
agree to the terms of this license, you should promptly return the product to its place of
purchase and destroy all copies you may have made of it in any form.
Grant of License:
Contour Design, Inc. (“CDI”) grants you this non-exclusive license to use the Software
subject to the restrictions set forth below.
12
Definitions:
“The Software” means the RollerMousePro pointing device Software, its components or
derivative modules, and documentation along with any upgrades, enhancements,
connections, or modifications provided by DCI in any form.
Restrictions on Use:
You may install and use one copy of the Software on a single computer. You may not
lend, rent, lease, or transfer this software to another party at any time. Installation on a
computer that may be concurrently accessed by more than one user requires a separate
license for each active user connected to a computer on which the software is installed.
You may not modify, reverse engineer, decompile, or disassemble the Software.
Copyright:
Under this license, you own the CD-ROM or other physical media on which the Software
is furnished, recorded, or fixed. Except for any rights of any third parties named in the
copyright notices included with the Software, the Software is owned by CDI or its
suppliers and is protected by copyright laws and international treaties. CDI owns all
right, title, and interest in and to the Software. You agree to keep the Software
confidential and to prevent its contents from unauthorized disclosure.
Term:
This license is effective until terminated. You may terminate it at any time by destroying
the Software together with all copies in any form. It will also terminate if you fail
to comply with any term or condition of this Agreement. You agree upon such
termination to destroy the Software together with all copies in any form.
Limited Warranty:
CDI warrants to you that the physical media containing the Software will be free from
defects in materials and workmanship under normal use and under normal use and
service for a period of two (2) years from the date of your purchase of the Software.
It is the expressed intent of CDI not, at this time nor for any time in the foreseeable
future, to provide the Software on a CD, It is assumed that users, who wish to
install and use the Software, will do so from some download. In cases where
download of the Software in impossible or impractical, CDI will – upon request –
issue a copy of the Software on a CD.
In the case of upgrades, enhancements, corrections, or modifications received via the
Internet, CDI assumes responsibility and warranty only for the shape of the Software
when transferred by CDI to the Internet. All faults occurring as a consequential result of
Internet dissemination and the process of downloading are at Customer’s own risk. In
13
either form of transferal to you, the Software is provided “as is” and without any
warranty and liability whatsoever. CDI does not warrant that the functions contained in
the Software will meet your requirements or that the operation of the Software will be
uninterrupted or error free. You assume responsibility for operation of the Software to
achieve your intended results, and for the installation, use, and results obtained from the
Software. Subject to any applicable legislation that prohibits the following exclusions,
CDI MAKES NO OTHER WARRANTIES OF ANY KIND, EITHER EXPRESSED OR
IMPLIES, INCLUDING, WITHOUT LIMITATION, ANY IMPLIED WARRANTIES
OF FITNESS FOR A PARTICULAR PURPOSE, MERCHANTABILITY,
MERCHANTABLE QUALI TY, OR NONINFRINGEMENT OF THIRD PARTY
RIGHTS. To the extent permissible, any implied warranties that cannot be excluded as a
matter of law are limited to ninety (90) days from the date of your purchase of the
Software.
Limitation of Remedies:
Subject to any applicable legislation that prohibits the following limitations, CDI’s entire
liability and your exclusive remedy shall be, at CDI’s option, the repair or replacement of
the Software not meeting CDI’s “Limited Warranty.” This remedy is not available if
failure of the Software is the result of misuse, abuse, or a failure to follow the operating
instructions in the accompanying written materials. IN NO EVENT WILL CDI OR ITS
SUPPLIERS OR DEALERS BE LIABLE TO YOU FOR ANY INCIDENTAL OR
CONSEQUENTIAL DAMAGES, INCLUDING ANY LOST PROFITS, LOST
SAVINGS, OR OTHER DAMAGES ARISING OUT OF THE USE OR INABILITY TO
USE THE SOFTWARE. EVEN IF ADVISED OF THE POSSIBILITY OF SUCH
DAMAGES. Some states or jurisdictions do not allow the exclusion of implied
warranties so the above limitations may not apply to you.
General:
If the Software was installed or downloaded in the United States, this Agreement is
governed by the laws of the State of New Hampshire. If downloaded outside the United
States, this Agreement is governed by the laws of the country in which it was installed or
downloaded.
U.S. Government Restricted Rights:
The Software and documentation are provided with RESTRICTED RIGHTS. Use,
duplication, or disclosure by the Government is subject to restrictions as set forth in
subdeivision (b)(3)(ii) of The Rights in Technical Data and Computer Software clause
252.227-7013. Contractor/manufacturer is Contour Design, Inc., 10 Industrial Drive,
Windham, NH 03087.
14
European Community Provisions:
If this Software is used within a country of the European Community, nothing in this
Agreement shall be construed as restricting any rights available under the European
Community Software Directive, O. J. Eur. Com (no. L. 122) 42 (1991).
Part 5:
Contour Customer Care
Registering your RollerMouse Pro
1. Log on to http://www.contourdesign.com/register_products.htm and select the
desired product.
2. Please enter the requested information in the fields provided.
Privacy Statement: Contour Design, Inc. strict policy is NOT to sell, rent, or
otherwise make available to anyone outside of Contour Design, any information
regarding our Customers. We can use the data you provide, however, to announce
future Contour products, including information on subsequent releases of the driver
and/or upgrades.
Trouble Shooting
Q: Using the supplied USB to PS2 adaptor, I’ve plugged the RollerMouse Pro
into the PS2 port, but the RollerMouse Pro does not function.
A: Check to make sure the RollerMouse Pro is fully inserted into the converter
and that the converter is fully inserted into the PS2 port. If this does not fix the problem,
plug the RollerMouse Pro into a USB port directly on the computer.
Q: I’ve plugged my RollerMouse Pro into a docking station or hub, but the
RollerMouse Pro does not function.
A: Plug the RollerMouse Pro directly into the computer to determine if there is a
compatibility issue with the hub or docking station. If the RollerMouse Pro functions
normally when plugged directly into the computer, it may be a compatibility issue with
the hub or docking station.
Q: I’ve plugged my RollerMouse Pro into a USB port directly on the computer,
but the RollerMouse Pro does not function.
A: Plug the RollerMouse Pro into a different USB port to see if the problem
persists. Additionally, test the RollerMouse Pro on a different computer to see if the
problem carries over. If the problem carries over, it is a good indication there is
something wrong with the RollerMouse Pro. If the RollerMouse Pro functions on one
computer but not another, there may be a problem with one computer’s ports or the
settings on each computer may be different.
15
Q: The rollerbar moves the mouse cursor, but it will not produce a click event.
A: Check the orange circular tension knob on the underside of the RollerMouse
Pro to make sure it is fully inserted. The tension knob can sometimes partially dislodge
and needs to be pushed back in. Also, make sure the switch is in the down position
(Standard mode) if the RollerMouse Pro software is not being used.
Q: At times, I can’t move the rollerbar even though the cursor is not at the edge of
the screen then all of a sudden, the cursor shoots off toward the edge of the screen.
A: The sudden cursor movement is caused by the triggering of the end detection
sensor. These sensors are buttons that are located inside the RollerMouse Pro on either
side of the device. When the rollerbar reaches the edge of the RollerMouse Pro and can
no longer move, the end detection sensor triggers and continues moving the cursor in the
desired direction.
Keep in mind the position of the rollerbar has no correlation to the position of the
cursor on the screen. The rollerbar is only used for translating movement to the mouse
cursor. While the rollerbar may be centered on the RollerMouse Pro, this does not mean
the mouse cursor will be centered on the screen. In this way, the rollerbar is similar to a
conventional mouse in that the position of a conventional mouse on a mouse pad has no
correlation to where the mouse cursor is on the screen, only that when the conventional
mouse moves, the mouse cursor moves as well.
Technical Support
Before contact us, please check the support pages on our website. If the problem
persists:
Send an e-mail to [email protected]
Call Contour Design between the hours of 9 am and 6 pm EST, Monday through
Friday: 1-800-462-6678, Voicemail option 2
International callers, please use 603-893-4556, Voicemail option 2
Appendix A – RollerMouse Pro compatibility
Windows XP
Windows 2003
Windows 2000
Windows Me
Windows NT 4.0
Windows 98
Windows 95
USB
X
X
X
X
X
-
PS2
X
X
X
X
X
X
X
Software
X
X
X
-
Note: Although the RollerMousePRO is compatible with Mac OS/X and OS 8.6 or
later, this driver software is not.
16