1
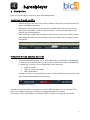
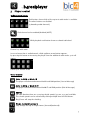
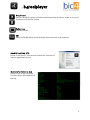
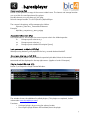
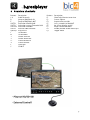
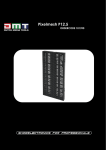
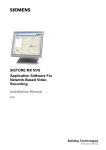
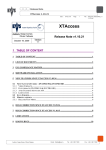
Usermanual Contents Recommendation of System .............................................................................................................. 2 1 Player overview............................................................................................................................ 2 2 Load a Clip ..................................................................................................................................... 3 3 Export of Marks ........................................................................................................................... 3 4 Navigation ..................................................................................................................................... 4 5 Player control ................................................................................................................................ 5 6 Overview shortcuts ...................................................................................................................... 9 7 External controller ...................................................................................................................... 10 8 SDI option .................................................................................................................................... 10 9 Player configuration ....................................................................................................................12 10 Appendix ................................................................................................................................... 13 Recommendation of System Minimum requirement for software: § § § § Dual-Core PC min. 2GHz 2GB RAM Windows XP/Vista/Windows 7 .Net Framework V4.0 Note: The size and configuration for the systems depends much on the material resolution (quality) for playback. 1 Player overview 2 2 Load a Clip Attention: Currently only MXF and MOV Container are supported. Clip loading choices: § Double-click the clip (a linked file extension is required) § Double-click a *.b4p Playlistfile (a linked file extension is required) § Drag&drop the clip on top of the player surface § Commandline: “c:\...\bic4 GmbH\b4Reel Player\b4Playr.exe“ Clipfilename [/MI:"MARKIN"] [/MO:"MARKOUT"] [/AR:"ASPECTRATIOOVERWRITE"] [/MIO:MARKINOFFSET] [/MOO:MARKOUTOFFSET] [/RK:"RECONCYLEKEY"] [/LP:"LOOPPLAY"] § Clipfilename: incl. path § /MI: MARKIN optional format HH:MM:SS:FF § /MO: MARKOUT optional format HH:MM:SS:FF § /AR: ASPECTRATIOOVERWRITE optional format 4:3 or 16:9 § /MIO: Markin-Offset optional integer value § /MOO: Markout-Offset optional integer value § /RK: ReconcyleKey optional identification value for export § /LP: Loop optional string values: All – whole clip in loop Mark – loop between the marks No – no looping Example: “C:\Program Files\bic4 GmbH\b4reelplayer\b4Playr.exe” "D:\Videos\Sample.mxf" /MI:"20:14:30:00" /MO:"20:15:00:00" /AR:"16:9" /RK:"3909B734-‐044A-‐4E16-‐BB07-‐ E0FCA73F54DB" /LP:"All" Note: In order for successful playback it is required that the clips reside locally (hard disk) or in case of an external storage that this storage is mounted as a drive. 3 Export of Marks When the player is closed or Markin/Out has been pressed the following values are written to clip clipboard. "b4reelplayr: "[/FN:"FILENAME"] [/MI:"MARKIN"] [/MO:"MARKOUT"] [/MD:"MARKDURATION"] [/MIO:MARKINOFFSET] [/MDO:MARKDUROFFSET] [/MOO:MARKOUTOFFSET] [/FPS:FRAMERATE] [/RK:"RECONCYLEKEY"] 3 4 Navigation There are several ways to get to a given timecode position: Navigation through scrollbar • • • While moving the mouse on top of the scrollbar and pressing a mouse button the picture will follow constantly. While only moving the mouse on top of the scrollbar then the cursor position is displayed as timecode. If then the mouse button + shift is pressed, picture will jump on the desired position. While scrolling through weel the picture will move frame by frame. While scolling and holding the right mous button down the picture will move by second. (faster navigation) Navigation through entering tim ecode • A desired timecode position can be entered directly on the fields for MarkIN/OUT as well for the current position. For activation on those fields either a DoubleClick is required or a shortcut on the keyboard must be executed. § SHIFT+I: MarkIN § SHIFT+C: Current Timecode § SHIFt+O: MarkOUT In order to enter a new timecode the current values need to be removed first and then the desired timecode can be entered. Example on Current-TC In addition to that the player is possible to read the GOP timecode if it was encoded. Thus there is the opportunity given, to display a jumping timecode for example. This feature can be activated by the shortcut SHIFT+T and/or in the b4playr.exe.config. 4 5 Player control Audio-Control-Area Each buttons show which of the up to 16 audio tracks is available. The other buttons are disabled. (4 decoding audio channels) Each channel can be enabled/disabled (MUTE) While playback each button shows a colored audio level. Channel 1-4 with audio In case of more then 8 audiochannels a little up/down arrow button appears. By pressing this button or increasing the player form the additional audio tracks 9-16 will appear. Cannel 9-16 without audio Video Control Jum p to SOM or M ark-IN The player will alternate between MarkIN and SOM position (Start of Message) Jum p to EOM or M ark-OUT The player will alternate between MarkOUT and EOM position (End of Message) Shuttle For each direction there are 4 varying shuttle speeds (3x; 10x; 25x; 50x) available. This shuttle speeds can be activated by clicking multiple times on the buttons. Play/Pause will stop the shuttling. Fram e forward/backward Step through the clip on single frames (forward/backward) 5 Play/Pause With this button the player will alternate between Play and Pause mode or in case of shuttling it will stop the shuttle. Fullscreen Fullscreen mode SDI Video and Audio will be shown through the external SDI-card (Decklink) About Short Help (F1) Button F1 will show a short overview about the shortcuts as well the application version. M edia Inform ation’s (F2) Button F2 will show a detailed overview about the properties of the clip. 6 Screencapture (F3) Button F3 will generate a copy of the current video frame. The format and storage location are set within the configuration of the player. Possible formats are: png, bmp, gif, tiff, jpeg Default storage location: %user%\Pictures\b4ReelPlayer The name of the picture will be composed as follow: Clipname_DateTime_Timcecode.Fileformat Example: MyVideo_12032602123_00123310.jpg AspectRatioOverride (F4) Pressing button F4 will change the current aspect ratio in the following order: 1x: Change aspect ratio to 16:9. 2x: Change aspect ratio to 4:3. 3x: Change aspect ratio back to original [none] Last 5 seconds to M ark-OUT (F5) When pressing button F5 will playback the last 5 seconds before MarkOUT. On screen display on/off (F6) On screen display option will be enabled respectively disabled. Most of the control commands will be displayed in the top right corner. (Applies also for SDI-output) Plugin Control W indow (F7) Button F7 will open the PlugIn Control Window: The window shows the additional installed plugins. (This plugins are optional, further information www.b4reelplayer.com) Functions: • Sorting of plugins by pressing the column header • Pressing the plugin button will load load/show the plugin 7 • With enabling the option “Auto” the plugin will be shown on player startup. Disable AudioVideoSync (F8) Button F8 will enable/disable the Audio Video synchronization. In case the option is enabled then the AV-Synch will be executed on each play. This option can be set to a default value within the player configuration. (Not every video format needs this option enabled. Therefore it is recommended to start with a disabled AV-Synch. In case of AV-Synch problems enable this option or F9 will temporarily restore AV-Synch) Toggle Video (F9) In case of AV-Synch problems the Button F9 will toggle the video, which will temporality restore Audio Video synchronization. Loop (F10) With button F10 the following loop modes can be activated: Press 1x: Loop All – looping of the whole clip Press 2x: Loop Mark – looping between Mark-IN and Mark-OUT Press 3x: disable des loop modes Deinterlace (F11) The following deinterlacing options are available: • Auto, Swap and Down, Swap and Up, Swap, Top Field, Buttom Field, None Note: Deinterlacing is not possible if Interlacing is set to progressive. Deinterlacing is only during playback available. Interlace – Field order (F12) The following interlacing options are available: • Field1First – first field will be shown first within the field order • Field2First – second field will be shown first within the field order • Progressive – progressive field order 8 6 Overview shortcuts Buttons 1-8 B E SHIFT+I SHIFT+C SHIFT+O SHIFT+T Space/P I O ↑ ↓ ← → F S Description Audio channels Jump to SOM/Mark-IN Jump to EOM/Mark-OUT Activation MarkIN field Activation current Timecode field Activation MarkOUT Activate GOP timecode Play/Pause set MarkIN set MarkOUT Shuttle forward Shuttle backward Frame backward Frame forward Fullscreen SDI OUT Buttons F1 F3 F4 F5 F6 F7 F8 F9 Description Short help/shortcut overview Screen capture Aspect ratio override Last 5 seconds to MarkOUT On screen display on/off Plugin Control Windows Enable/Disable Audio Video Sync Toggle Video 9 7 External controller External control of player is supported with two of the following controllers: • ShuttleXpress from Contour • ShuttleProV2 from Contour Both are connected via USB to the client PC. The matching configuration for these controllers can be found at: …\bic4 GmbH\b4Reel Player\Contour\ • ContourShuttleProV2_b4Playr.pref • ContourShuttleXpress_b4Playr.pref Further info: http://shuttle.contourdesign.com 8 SDI option This optional package includes two components: • SDI license • Decklink SDI hardware card incl. drivers This package is optional available. For further info contact www.b4reelplayer.com In case the card has been successfully installed and a valid license is present then the SDI button will available/displayed. (In case of an Initialization issue of the card then the button will be shown as disabled; contact support www.b4reelplayer.com) The output of the audio video signal can be controlled via the SDI Button or shortcut “s”. The format of the output is set within the configuration of the player. (Chapter 9) If the configuration of the card format differentiates from the currently played format then an up/down conversion is made. Otherwise it shows the same format as the currently paying format. Note: Currently the following cards are available: 10 DeckLink SDI Intensity Pro (HDM I) M ini-M onitor (HDM I-SDI) 11 9 Player configuration Various pre configurations for playback can be setup within the player configuration file „b4Playr.exe.config“. The file is located in the application directory. Setting Licensefile_Path Decklink_Output_Format Description path for the license file. Output format on the SDI-Option § Auto = the output format is the same then the format on playback. (eventually combine with CroppingSettings) § Example: 720x576 PAL 4:3 = SD PAL by 4:3 aspect ratio § See appendix Decklink Resolution Formats AVSync OSD AspectRatioOverwrite Audio video Synchronization on/off on player start On Screen Display on/off on player start Aspect ratio on player start § None,16:9,4:3 § MXFAR = AR identification from MXF Header (if existing) Storage location of screenshot (if empty then „enviroment\pictures\b4reelplayer”) Format of screenshot § Png,Bmp,Gif,Tiff,Jpeg field order § Default ,Field1First,Field2First,Progressive deinterlacing option § None,Auto,SwapAndDown,SwapAndUp, Swap,TopField,BottomField In case of a certain vertical Resolution certain Columns and Rows can be cropped. There are any numbers of cropping items possible. Automatic playback when the player starts. Activation of the SDI output when the player starts. Picture follow on scroll Path for log file Startup position for player (maxim. or left,right,width,height) The player is possible to read the GOP timecode, if it was encoded. Thus there is the opportunity given, to display a jumping timecode for example. Screencapture_Path Screencapture_Extention Interlacing Deinterlacing CroppingSettings APOS ESOS PFOS LogFilePath Startup_Pos GOPTimecode 12 10 Appendix Decklink Resolution Formats (more formats www.b4reelplayer.com) "320x240 QVGA" "640x480 VGA" "800x600 SVGA" "800x600 XGA" "720x576 PAL 4:3" "720x576 PAL 16:9" "720x480 NTSC (Digital) 4:3" "720x480 NTSC (Digital) 16:9" "720x486 NTSC (Analog) 4:3" "720x486 NTSC (Analog) 16:9" "1280x1080 HD720 23.98p" "1280x1080 HD720 24p" "1280x720 HD720 25p" "1280x720 HD720 29.97p" "1280x720 HD720 30p" "1280x720 HD720 50p" "1280x720 HD720 59.94p" "1280x720 HD720 60p" "1440x1080 HD1080 (HDV)" "1920x1080 HD1080 23.98p" "1920x1080 HD1080 24p" "1920x1080 HD1080 50i" "1920x1080 HD1080 59.94i" "1920x1080 HD1080 60i" "1920x1080 HD1080 25p" "1920x1080 HD1080 50p" "1920x1080 HD1080 59.94p" "1920x1080 HD1080 60p" Format of Playlistfile *.b4p <?xml version="1.0" encoding="utf-‐8" ?> <Links> <Link HighResFileName="C:\... \Clip.mxf" MarkIn="10:01:00:00" MarkOut="10:15:00:00" AspectRatio="16:9" MarkInOffset="0" MarkOutOffset="0" ReconcyleKey=""/> </Links> 13