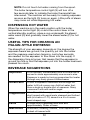
1
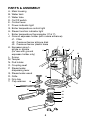
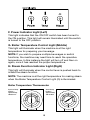
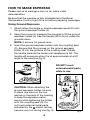
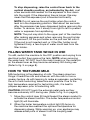
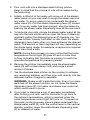
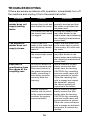
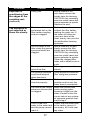
PROFESSIONAL
ESPRESSO MAKER
ES1500
Vero Barista®
For your safety and continued enjoyment of this product,
always read the instruction book carefully before using.
IMPORTANT SAFEGUARDS
When using any electrical appliance, basic safety precautions
should always be taken, including the following:
1. READ
ALL INSTRUCTIONS.
2. Unplug from outlet when not in use, before putting
on or taking off parts and before any cleaning or
maintenance operations.
3. This appliance is designed for indoor household use only.
Do not use this appliance for other than intended use.
4. Do not operate any appliance with a damaged cord or plug,
after the appliance malfunctions or if it has been dropped
or damaged in any manner. Return appliance to the nearest
Authorized Service Center for examination, repair or
adjustment.
5. Place the espresso maker on a stable surface where it
cannot be knocked over.
6. Do not let power cord hang over the edge of a table or
countertop. Arrange the power cord away from an area
where it may be tripped over.
7. Do not touch hot surfaces. Use handles or knobs.
8. Do not put the appliance in or near fire, near hot surfaces,
near hot gas or electric burners or in a heated oven.
9. The use of accessory attachments not recommended by
the appliance manufacturer may result in fire, electrical
shock or injury.
10. Do not operate your appliance in an appliance garage
or under a wall cabinet. When storing in an appliance
garage, always unplug the unit from the electrical
outlet. Not doing so could create a risk of fire, especially if
the appliance touches the walls of the garage or the door
touches the unit as it closes.
11. Extreme care should be taken when any product is used
near children and individuals with certain disabilities. Keep
out of reach of children when not in use.
2
12. Children must be supervised at all times to ensure they do
not play with the appliance. Do not allow children access to
the plastic packaging bags.
13. DO NOT IMMERSE THE APPLIANCE IN WATER OR
OTHER LIQUIDS.
14. Before filling the tank with water, ALWAYS disconnect the
appliance from the electrical outlet.
15. Never direct steam/water wand toward parts of the body;
handle the steam/water wand with care.
16. The external metallic parts must not be touched during
operation as it could cause burns.
17. Never use the machine without water because the pump
may burn out.
18. Never fill the water tank with hot or boiling water.
19. Do not use sparkling water (with added carbon dioxide) to
fill the water tank.
20. Never put substances other than ground espresso into
the filter holder. They could cause serious damage to the
appliance.
21. Do not leave the appliance at a room temperature below
32˚F (0˚C) because the water remaining in the boiler could
freeze and cause damage.
SAVE THESE INSTRUCTIONS
FOR HOUSEHOLD USE ONLY
3
CONTENTS
Important Safeguards.................................................................. 2
Parts & Assembly......................................................................... 5
Before First Use............................................................................ 7
Ground Espresso Instructions...................................................... 8
Pod Holder Instructions............................................................... 9
How to Texturize Milk................................................................. 10
Dispensing Hot Water................................................................ 12
Beverage Suggestions............................................................... 12
Cleaning & Maintenance............................................................ 13
Troubleshooting.......................................................................... 16
POWER CORD INSTRUCTIONS
This appliance has a polarized plug (one blade is wider than
the other). To reduce the risk of electric shock, this plug is
intended to fit into a polarized outlet only one way. If the plug
does not fit fully into the outlet, reverse the plug. If it still does
not fit, contact a qualified electrician. Do not attempt to modify
the plug in any way.
This appliance is for 120 volt use only and should not be used
with a converter.
4
PARTS & ASSEMBLY
A. Main housing
B. Water tank
C. Water tube
D. On/Off switch
E. Control lever
F. Power indicator light
G.Boiler temperature control light
H.Steam function indicator light
I.Boiler temperature thermometer (˚C & ˚F)
J.Ground espresso holder (with crema enhancer)
J1.Filter
J2. Crema enhancer silicone disk
J3. Crema enhancer plastic base
I
K.Espresso spout –
T
single or double
E
(for use with ground
espresso holder only)
L.Scoop
M.Tamper
N. Pod holder
O. Coupling seat
F G
H
P.Steam/water
dispensing lever
Q. Steam/water wand
R.Grille
D
S. Drip tray
T. Cup warmer
M
P
Q
O
S
J1
J2
J3
J
K
5
B
C
L
N
A
R
F. Power Indicator Light (Left)
This light indicates that the ON/OFF switch has been turned to
the ON position. This light will remain illuminated until the switch
is turned to the OFF position.
G. Boiler Temperature Control Light (Middle)
This light will illuminate when the machine is at the right
temperature for preparing your beverage.
NOTE: If you wish to prepare multiple beverages or switch
functions, the machine may need time to reach the operative
temperature. In this instance the light will turn off and then on
again, once it has reached the proper temperature.
H. Steam Function Indicator Light (Right)
This light will illuminate when the control lever is pushed back to
initiate the steam function.
NOTE: The machine is at the right temperature for making steam
when the Boiler Temperature Control Light (G) is illuminated.
Boiler Temperature Thermometer
Steam Ready
Position –
approximately
150°C/300°F
Espresso Ready
Position –
approximately
100°C/212°F
6
BEFORE FIRST USE
1.Check that the household voltage is the same as that
indicated on the technical plate.
2.Place the espresso maker on a flat and stable surface
where it will not be knocked over.
3.Wash the water tank and fill it with cool tap water up to the
line marked MAX. Place the water tube into the water-filled
tank. Line the water tank up with the grooves on the bottom
and slide it into place.
4. Insert the plug into the electrical outlet.
5.Be sure that the control lever (E) is in the vertical standby
position indicated by the dot. Also, make sure that the
steam/water dispensing lever (P) is pushed all the way
back.
6.Switch the machine to the ON position using the ON/
OFF switch (D). The power indicator light (F) will turn on,
indicating that the machine is on.
7.Let the machine warm up for approximately 5 minutes.
When warming up, your appliance may release small puffs
of steam from the coupling seat.
NOTE: Let water pass through the boiler when the
appliance is turned on for the first time or after it has not
been used for a period of time. To do so, place a container
under the coupling seat (O) and pull the control lever (E)
forward/toward the espresso cup symbol.
As water empties into the cup from the boiler, the boiler
begins to fill with fresh water. During this time you will
notice that the boiler temperature indicator light (G) will turn
on and then off again, indicating that the boiler is working
to get the water to the proper temperature.
Allow the boiler temperature control light (G) to turn off
and on again for two cycles. This will ensure the boiler has
reached its optimum temperature for preparing espresso.
To stop the water from dispensing, push the control lever
back to the vertical standby position.
7
HOW TO MAKE ESPRESSO
Please visit us at waringpro.com for an online video
demonstration.
Be sure that the machine is fully preheated and the Boiler
Temperature Control Light (G) is on before preparing beverages.
Using Ground Espresso
1.Attach either the single or double espresso spout (K) onto
the ground espresso holder (J).
2.Using the scoop (L) measure the grounds to fill the ground
espresso holder (J). Use the tamper (M) to firmly press the
grounds down.
NOTE: 2 scoops (14 grams) max.
3.Insert the ground espresso holder onto the coupling seat
(O). Be sure that the grooves on the ground espresso
holder fit into the grooves of the coupling seat. Rotate
the handle towards the center until resistance is felt. The
handle will be secure when it is at approximately at a 90°
angle to the machine (fig. 2).
DO NOT touch
external metal parts
while in use.
X
fig. 2
X
X
CAUTION: When attaching the
ground espresso holder, be sure
to place one hand on the cup
warmer or the back of the housing
to keep the espresso maker
secure while tightening the holder
onto the coupling seat (O). Do
not touch external metal parts
indicated by the X marks, as they
become very hot during use (fig. 3).
8
X
X
X
X
X
X
fig. 3
4.Depending on the espresso spout used, place one or two
cups underneath the espresso spout and pull the control
lever (E) forward/towards the espresso cup symbol. Allow
espresso to dispense to the desired level (a standard shot
of espresso is approximately 1 ounce in size).
To stop dispensing, raise the control lever back to the
vertical standby position, as indicated by the dot. Just
a few seconds are needed for the espresso to flow down
into the cup(s). If the dispensing time is longer, this may
mean that the espresso is ground too fine or has been
pressed too much.
NOTE: Do not remove the ground espresso holder when
the control lever is in the dispensing position. Wait about
10 seconds after the espresso has been dispensed before
removing the holder. To remove, turn it slowly from right to
left to prevent water or espresso from splattering. DO NOT
reuse grounds.
Using a Pod
NOTE: Use with espresso pods only. DO NOT use with
single-serve coffee pods/cups.
To make espresso using pods, you must use the pod holder (N).
1.The pod must be centered and placed inside the pod filter.
It is recommended that you fold the corner inward.
2.Insert the pod holder onto the coupling seat (O). Be sure
that the grooves on the pod holder fit into the grooves of
the coupling seat. Rotate the handle towards the center
until resistance is felt. The handle will be secure when it is
at approximately at a 90° angle to the machine.
CAUTION: When attaching the pod holder, be sure to place
one hand on the cup warmer or the back of the housing to
keep the espresso maker secure while tightening the holder
onto the coupling seat (O). Do not touch external metal
parts indicated by the X marks, as they become very hot
during use (fig. 3).
3.Place one cup underneath the pod and pull the control
lever (E) forward/towards the coffee cup symbol. Allow
espresso to dispense to the desired level (a standard shot
of espresso is approximately 1 ounce in size).
9
To stop dispensing, raise the control lever back to the
vertical standby position, as indicated by the dot. Just
a few seconds are needed for the espresso to flow down
into the cup(s). If the dispensing time is longer, this may
mean that the espresso pod is inserted incorrectly.
NOTE: Do not remove the pod holder when the control
level is in the dispensing position. Wait about ten seconds
after the espresso has been dispensed before removing the
holder. To remove, turn it slowly from right to left to prevent
water or espresso from splattering.
NOTE: The pod may stick to the upper part of the machine
after making espresso and when removing the pod holder.
To remove it, tilt the pod holder so the pod can fall onto it.
If the pod is not inserted well, or if the filter holder is not
tightened firmly, a few drops of water could leak from the
filter holder.
FILLING WATER TANK WHILE IN USE
To refill, switch the machine to the OFF position and unplug from
electrical outlet, then remove the tank. NOTE: when removing
the water tank, DO NOT touch the main housing or the metal pin
on the steam lever as they become extremely hot during use.
(Refer to fig. 3 on page 8).
HOW TO TEXTURIZE MILK
Milk texturizing is the steaming of milk. The steam does two
things: it heats the milk and mixes air with the milk to form a
creamy texture. As with learning to make an espresso, perfecting
the art of milk texturizing takes time and practice. Due to the
high temperature required for texturizing milk, it is best to
prepare espresso prior to texturizing milk.
CAUTION: DO NOT touch the external metal parts as they
become extremely HOT during use. (Refer to fig. 3 on page 8).
1.Move the control lever (E) back/toward the steam symbol to
activate the steam function. The boiler temperature control
light (G) will illuminate.
2.When the boiler temperature control light (G) turns on,
the machine has reached the optimum temperature for
dispensing steam. While warming up, your appliance may
release small puffs of steam from the coupling seat.
10
3.Pour cold milk into a stainless steel frothing pitcher.
Keep in mind that the volume of milk will increase during
the texturizing.
4.Initially, a little bit of hot water will come out of the steam/
water wand, so you may wish to purge the steam wand of
any water. To do so, place a cup underneath the steam/
water wand (Q). Pull the steam dispensing lever (P) toward
you. Once any water has been purged, stop the steam by
pushing the steam/water dispensing lever all the way back.
5.To texturize your milk, plunge the steam/water wand all the
way into the milk pitcher and re-open the flow of steam by
gradually pulling the dispensing lever (P) towards you. You
will see a thick, creamy froth start to rise. Push the steam
dispensing lever back when you have achieved the desired
result. The amount of foam required will vary depending on
the drinks being made; for example, a cappuccino requires
more foam than a latte.
NOTE: During this process you may notice that the boiler
temperature control light (G) goes off and on from time
to time, indicating that the boiler is working to reach the
operative temperature for preparing steam.
6.Remove the pitcher. Immediately wipe the steam/water
wand (Q) with a clean damp cloth and purge a small
amount of steam.
7.Tap the stainless steel pitcher on the counter to collapse
any remaining bubbles, and then pour milk directly into the
espresso before it begins to separate.
WARNING: Steam is still inside the boiler. Even if you have
switched off the steam function, do not lower the steam
dispensing lever (P). Hot water and steam may come out,
which could result in burns.
8.If you wish to dispense a cup of espresso immediately
after frothing your milk, wait for the boiler to go back to
the optimum temperature, which is reached when the
boiler temperature control light (G) turns on. To speed up
the boiler cooling process, place a glass underneath the
steam/water wand (Q); with the control lever in the vertical
standby position, lower the water/steam dispensing lever
(P) to release hot water.
11
NOTE: Do not touch hot water coming from the spout.
The boiler temperature control light (G) will turn off a
few seconds later to indicate the boiler thermostat has
intervened. The machine will be ready for making espresso
as soon as the light (G) turns on again. Little puffs of steam
may come out while dispensing hot water.
DISPENSING HOT WATER
When the machine is in the ready position with the boiler
temperature control light (G) on and the control lever in the
vertical standby position, place a cup underneath the steam/
water wand (Q) and gradually lower the steam/water (P) for hot
water.
USEFUL TIPS FOR CREATING AN
ITALIAN-STYLE ESPRESSO
The strength of your espresso depends on: the degree the
espresso beans are ground, the quantity put into the holder
and the pressure used when tamping. Just a few seconds
are needed for the espresso to flow down into the cup(s). If
the dispensing time is longer, that means that the espresso is
ground too fine or that the espresso put into the holder has been
pressed too much.
BEVERAGE SUGGESTIONS
Espresso
A full-flavored, concentrated form of coffee that is
served in shots approximately one ounce in size.
Espresso is made by forcing pressurized hot water
through very finely ground coffee beans.
Americano
A shot of espresso combined with enough hot
water to fill a 6-ounce cup. Add hot water first,
then a single or double shot of espresso. Many
consume it with milk and/or sugar.
Cappuccino A traditional Italian cappuccino is a single espresso
shot topped with equal parts steamed and frothed
milk (in a ratio of 1:1:1) served in a 4 to 6 ounce
bowl-shaped cup.
Latte
A single shot of espresso with milk and
approximately 10mm of foam.
Macchiato
Macchiato, meaning ‘stained’, is an espresso with
a dash of foamed milk.
12
CLEANING & MAINTENANCE
Parts are not dishwasher safe; hand-wash only.
Cleaning the ground espresso holder (J)
Turn the filter counterclockwise and lift to remove it. Underneath
is the two-part crema enhancer silicone disk and plastic base.
Wash the silicone disk under running water, bending it slightly on
the side in order to free-up any residue. Wash the plastic base
under running water in order to free-up any residue. Wash and
remove any residue from the filter with a toothpick or sponge.
Be sure that all parts are dry before reassembling.
To reassemble, fit the silicone disk on top of the black base.
Place the crema enhancer into the ground espresso holder with
the black base on the bottom. Place the filter on top, fitting it into
the grooves of the ground espresso holder.
Cleaning the steam/water wand (Q)
With the machine in the ON and steam ready position, place the
wand in a pitcher of clean water and put the control lever into
steam mode. Pull the steam/water dispensing lever forward and
allow hot steam to dispense for a few seconds.
After the machine is completely cool, you can remove the end
of the steam/water wand. Turn it counterclockwise and pull
down. Run it through hot water, clearing it of any residue. Dry
thoroughly with a non-abrasive cloth before replacing.
Clean the outside of the steam/water wand with a sponge or
damp non-abrasive cloth after each use.
Cleaning the water tank (B)
Remove the water tank and wash it with cool water. Dry
thoroughly with a non-abrasive cloth before replacing.
Cleaning the grille and drip tray (R & S)
Remove the grille and drip tray from the machine and wash them
under running water, clearing any residue. Dry thoroughly with a
non-abrasive cloth before replacing.
13
Cleaning the internal boiler
It is recommended to thoroughly clean the boiler about every
three months, using a dishwasher detergent tab (without added
rinse aid or other chemical additives) as follows:
1. Put a dishwasher detergent tab into the pod holder (without
espresso) when the machine is hot (after heating for at least
five minutes).
2. Connect the pod holder to the machine and put a container
underneath.
3. Pull the control lever forward toward the coffee cup symbol,
and dispense water for 15–20 seconds.
4. Stop the water supply and let the tab act for at least 15
minutes while keeping the holder coupled on the machine.
5. Repeat the water dispensing operation by operating the
pump for about 15–20 seconds, and then letting it rest for
another 15–20 seconds, until two tanks of water are used
up.
6. Remove the pod holder from the machine and rinse it under
running water.
7. Turn off the machine, disconnect the power cable from
outlet and clean the coupling seat with a sponge to remove
any detergent residue.
8. Turn the machine back on, insert the pod holder once again
and dispense at least 2 cups of water to complete the
rinsing.
NOTE: If machine is used daily, it is advisable to carry out the
cleaning operation at least every three months.
Cleaning the housing
Clean the housing using a damp, non-abrasive cloth.
Decalcification
Decalcification refers to the removal of calcium deposits that
form over time on the metal parts of the espresso maker. The
frequency with which you need to decalcify will depend on the
hardness of your tap water and how often you use the machine.
To ensure optimum performance, decalcify the machine after
approximately 200 coffees.
14
1. Be sure the machine is unplugged and in the OFF position.
2.Remove the water tank and fill it to capacity with a mixture
of ¹/³ white vinegar and ²/³ water. Place the water tank back
into place.
3. Plug the machine in and turn it to the ON position.
4.Place a large container under the coupling seat. When
temperature is reached, the boiler temperature control light
(G) will turn on.
5.Pull the control lever (E) forward towards the coffee cup
symbol and let half of the solution run through the boiler
and into the container. Push the lever back to the standby
position to stop the solution from dispensing.
6.Push the control lever back to activate the steam function.
Place a container underneath the steam/water wand (Q)
and pull the steam/water dispensing lever (P) forward and
allow the remaining solution to run through the steam/
water wand (Q). When the solution is almost gone, push
the steam/water dispensing lever all the way back to stop
dispensing.
7.After decalcifying with the solution, clean the water tank
thoroughly and fill with cool, clean tap water. Let one cycle
of water run through the boiler by putting a container under
the coupling seat and pulling the control lever forward.
Any other servicing should be performed by an Authorized
Service Representative.
15
TROUBLESHOOTING
If there are severe problems with operation, immediately turn off
the machine and unplug it from the electrical outlet.
Problem:
Cause:
Solution:
The espresso
maker does not
supply boiling
water.
ir has probably
A
Make sure the water tank is
entered the circuit and properly inserted and that
deactivated the pump. the water is not below the
minimum level.
The espresso
maker does not
supply steam.
There is too little
water in the water tank
and the pump cannot
reach it.
he steam exit hole on Unclog any deposits that
T
the steam/water wand may have formed in the
is clogged.
steam/water wand following
the cleaning & maintenance
instructions.
heck that the water level
C
in the water tank is correct.
If necessary, fill it with cool
tap water.
The steam exit hole on U
nclog any deposits that
the steam/water wand may have formed in the
is clogged.
steam/water wand following
the cleaning & maintenance
instructions.
Espresso is
overflowing from
the edges of the
coupling seat.
An excess amount of
ground espresso may
have been placed in
the ground espresso
holder, preventing it
from being inserted
correctly onto the
housing.
Wait a minute or so and
slowly remove the filter
holder from the housing.
CAUTION: Any remaining
pressure could cause hot
espresso/water to splash.
Clean the coupling seat
with a sponge and repeat
the operation, placing
the correct quantity of
espresso in the holder.
Ground espresso
residue may be stuck
in the crema enhancer
inside of the ground
espresso holder.
Wait a minute or so and
slowly remove the filter
holder from the housing.
CAUTION: Any remaining
pressure could cause hot
espresso/water to splash.
Clean the crema enhancer
with a sponge or toothpick,
being sure to release any
residue.
16
Problem:
Espresso is
overflowing from
the edges of the
coupling seat.
Cause:
ait a minute or so
W
and slowly remove the
holder from the housing.
CAUTION: Any remaining
pressure could cause hot
espresso/water to splash.
Replace the pod.
The holes of the
perforated disk in the
filter holder coupling
seal are clogged.
Turn on the machine
without the filter holder,
making the water run. If
the water still does not
come out from all the
holes evenly, carry out the
decalcification cleaning
operation.
The exit holes of the
filter inside the ground
espresso holder are
clogged.
Wait a minute or so and
slowly remove the filter
holder from the housing.
CAUTION: Any remaining
pressure could cause hot
espresso/water to splash.
Clean the clogged filter
holes with a small brush or
a pin.
The espresso is
ground too fine.
Try using coarser coffee
blends.
The ground espresso
is pressed/tamped
down too much.
Tamp espresso inside the
filter using less pressure.
The water tank is not
inserted properly.
Fit the tank securely into
position and be sure the
water hose is connected.
The hole of the crema
enhancer silicone disk
is clogged.
Wash the silicone disk
under running water,
bending it slightly on the
sides in order to free the
center hole of any residue
of espresso grounds that
could clog it.
There is too little
water in the water tank
and the pump cannot
reach it.
Check that the water level
in the tank is correct. If
necessary, fill it with cool
tap water.
(continued)
The espresso is
not supplied or
flows too slowly.
Solution:
Faulty pod
17
Problem:
Cause:
B
roken
pod.
The espresso is
not supplied or
flows too slowly.
(continued)
The espresso is
too watery and
cold.
The blend has been
ground too coarsely.
18
Solution:
Remove the pod filter
holder, clean the coupling
seat with a sponge, and put
a new pod inside.
A more finely ground blend
must be used to obtain a
more concentrated and
hotter espresso.
NOTES
19
Trademarks or service marks of third parties used herein are
the trademarks or service marks of their respective owners.
©2014 Waring Consumer Products
150 Milford Road
East Windsor, NJ 08520
www.waringpro.com
Printed in China
ES1500 IB
13WR000858
IB-11226B