1
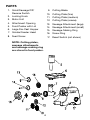
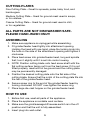
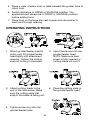
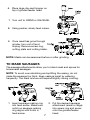
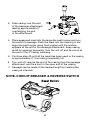
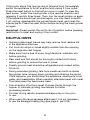
Professional
MEAT GRINDER
MG1200
For your safety and continued enjoyment of this product,
always read the instruction book carefully before using.
IMPORTANT SAFEGUARDS
When using electrical appliances, basic safety precautions should
always be followed, including the following:
1.READ
ALL INSTRUCTIONS.
2.
Unplug from outlet when not in use, before putting on or
taking off parts, and before cleaning.
3.To protect against risk of electrical shock, do not immerse
main unit or power cord in water or other liquid.
4.Close supervision is necessary when any appliance is used by
or near children. This appliance is not recommended for use by
children.
5.Avoid contact with moving parts. Wait until moving parts have
stopped running before you remove the parts of the appliance.
6.Never put the unit on or near a hot burner, in an oven, or in a
dishwasher.
7.Do not operate the appliance, or any other electrical
equipment, with a damaged cord or plug or after the appliance
malfunctions, or is dropped or damaged in any manner. Return
to the nearest authorized service center for examination, repair,
or adjustment.
8.Never feed food by hand; always use the food pusher. Keep
hands, hair, clothing and utensils away from moving discs
during operation to reduce the risk of personal injury and/or
damage to the appliance.
9.Do not use outdoors, or use for other than intended use.
10.Warning: the cutting blade is sharp; handle with care both
when using and when cleaning.
11.Do not let cord hang over edge of table or counter, contact
sharp edges, or touch hot surfaces.
12. Do not pull on the power cord to disconnect.
13.Never plug in the appliance where water may flood the area.
14.Place the appliance on a firm and stable surface.
15.NEVER PUT YOUR FINGERS NEAR THE FOOD CHUTE WHILE
GRINDER IS IN OPERATION.
16.Ensure that the appliance is not placed close to the edge of the
table, worktop, etc. where it can be pushed off or fall.
2
17.The use of attachments not recommended or sold by the
manufacturer may cause fire, electric shock or injury.
18.Never use abrasive cleaning agents or abrasive cloths when
cleaning the unit.
19.Do not use fingers to scrape food away from cutting blade
while appliance is in operation. Cut-type injury may result.
20. Use the unit only when completely assembled.
21. Do not leave the appliance unattended while it is running.
22.Before using for the first time, remove all packaging and wash
parts.
23.This appliance has a polarized plug (one blade is wider than
the other). To reduce the risk of electric shock, this plug will fit
in a polarized outlet only one way. If the plug does not fit the
outlet perfectly, reverse the plug. If it should still not fit, contact
a qualified electrician. Do not modify the plug in any way.
24.Check that the control is OFF before plugging the cord into
wall outlet. To disconnect, turn the control to OFF, then remove
plug from wall outlet.
25.Do not operate your appliance in an appliance garage or
under a wall cabinet. When storing in an appliance garage,
always unplug the unit from the electrical outlet. Not
doing so could create a risk of fire, especially if the appliance
touches the walls of the garage or the door touches the unit as
it closes.
26. DO NOT operate the grinder without the hopper in place.
27. DO NOT attempt to grind bones, nuts, or other hard items.
This appliance is for 120 volts only and should not be used
with a converter.
SAVE THESE INSTRUCTIONS
For Household Use Only
3
PARTS
1.Grind/Sausage/Off/
Reverse Switch
2. Locking Knob
3. Motor Unit
4. Attachment Opening
5. Food Pusher with Lid
6. Large Die-Cast Hopper
7. Grinder/Feeder Head
8.Feed Screw
9.Cutting Blade
10. Cutting Plate (fine)
11. Cutting Plate (medium)
12. Cutting Plate (coarse)
13. Sausage Attachment (large)
14. Sausage Attachment (small)
15. Sausage-Making Ring
16. Screw Ring
17. Reset Switch (not shown)
NOTE: Cutting plates,
sausage attachments
and sausage-making ring
are stored in food pusher.
4
CUTTING PLATES
Fine Cutting Plate – Great for spreads, pates, baby food, and
hamburgers.
Medium Cutting Plate – Great for ground meat used in soups,
or for relishes.
Coarse Cutting Plate – Great for ground meat used in chili,
or for vegetables.
all parts are not DISHWASHER SAFE.
PLEASE HAND-WASH ONLY!
ASSEMBLING
1. Make sure appliance is unplugged while assembling.
2.Fit grinder/feeder head tightly into attachment opening.
Holding the head with one hand, place the locking knob into
the hole on the side of the attachment opening and tighten it
clockwise.
3.Place feed screw into grinder/feeder head, long end spindle
first; turn it slightly until it is set into motor housing.
4.NOTE: Position cutting blade onto feed screw shaft with the
flat cutting surface facing out from the feed screw. If it is not
fitted properly, meat will not be ground and the cutting plate
may be permanently damaged.
5.Position the desired cutting plate onto the flat side of the
cutting blade. Ensure that the notch of the cutting plate fits into
the tab of the grinder/feeder head.
6.Secure screw ring to the end of the grinder/feeder head by
turning clockwise. DO NOT over-tighten the screw ring.
7. Place large die-cast hopper on the grinder/feeder head.
How to use
1. Before first use, wash all parts of the appliance.
2. Place the appliance on a stable work surface.
3.Make sure the grind/sausage/off/reverse switch is in the off
position and that the unit is fully assembled.
4. Insert plug into wall outlet.
5
5.Place a wide, shallow bowl or plate beneath the grinder tube to
catch food.
6.Switch appliance to GRIND or Sausage position. The
appliance must always be in GRIND or Sausage position
before adding food.
7.Place food on the large die-cast hopper and use pusher to
feed food through opening.
Operating Instructions
2.Insert feed screw into the
grinder/feeder head.
NOTE: Make sure feed
screw is fully inserted or
cutting blade will not fit.
1.Attach grinder/feeder head to
motor unit. Fit grinder/feeder
head tightly into attachment
opening. Tighten the locking
knob by turning it clockwise.
3.Attach cutting blade to the
4.Place the cutting plate in
end of the feed screw. Make
the grinder/feeder head.
sure the cutting edge (flat
side) of the blade is facing out.
5.Tighten screw ring onto the
grinder/feeder head.
6
6.Place large die-cast hopper on
top of grinder/feeder head.
7. Turn unit to GRIND or SAUSAGE.
8.Using pusher, slowly feed cubes.
9.Once meat has gone through
grinder, turn unit off and
unplug. Remove screw ring,
cutting plate and cutting blade.
NOTE: Meats can be seasoned before or after grinding.
TO MAKE SAUSAGES
The sausage attachments allow you to blend meat and spices for
homemade sausages.
NOTE: To avoid over-stretching and splitting the casing, do not
make the sausage too thick. Keep casings moist by watering
frequently. The meat mixture will expand slightly during cooking.
1.Insert sausage making ring
into feed screw. Make sure
notch on sausage making
ring aligns with notch in
feed screw.
7
2.Put the desired sausage
attachment (small or large)
into screw ring and screw
onto the grinder/feeder
head.
3.Slide casing over the end
of the sausage attachment,
leaving approximately 2"
overhanging the end
of the attachment.
4.Place seasoned meat into the large die-cast hopper and turn
the switch to sausage. Push the meat into the opening in the
large die-cast hopper using food pusher until the mixture
appears at the end of the sausage attachment. Keep casing
moist by watering frequently. Turn the unit off and tie a knot at
the end of the 2" casing overhang.
5.Continue step #3 until all the meat has been used or the casing
is approximately 2" from being completely full.
6.Turn unit off, remove the end of the casing from the sausage
attachment, and tie a knot in the open end of the casing.
7.Sausage can be made to the desired length by twisting the
casing at intervals.
NOTE-CIRCUIT BREAKER & REVERSE SWITCH
8
If the motor stops, this may be due to jammed food. Immediately
switch the appliance to its off position and unplug it from outlet.
Press the reset button on the bottom cover to reset. To clear the
feed screw, “pulse” the meat grinder in the reverse direction and
releasing it quickly three times. Then, turn the meat grinder on again.
If the appliance should get jammed again, you may need to switch
it off, unplug, disassemble the grinder/feeder head, and clean the
internal parts. Press the reset button before turning the meat grinder
on again.
Important: Always switch the unit to its off position before pressing
reset button to reset and unplug it from outlet.
HELPFUL HINTS
• G
rinding stale bread pieces may help remove food residue left
in the appliance after use.
• C
ut food into strips or cubes slightly smaller than the opening
on the large die-cast hopper.
• M
ake sure food is free of bone, tough tendons, nutshells, etc.
before grinding.
• R
aw meat and fish should be thoroughly chilled (not frozen)
before grinding to reduce the loss of juices.
• F
reshly ground meat should be refrigerated and cooked within
24 hours.
• D
uring extended grinding, fats from meats can build up inside
the grinder tube, slowing down grinding and straining the motor.
If this happens, you should stop the appliance, wash parts in hot
water, and reassemble. When possible, alternate bread with meat.
This helps keep the feed screw clean.
• T
rim a handful of fat from meat. Process the fat through the
hopper to lubricate grinding mechanism for better
processing results.
• F
or best drying results, prepare sausage a day or two prior
to use.
• W
hen using the large sausage attachment, it is not necessary
to use the sausage-making ring (see page 4, part #15).
9
CLEANing and maintenance
• A
lways unplug motor unit when not in use, before inserting or
removing parts, and before cleaning.
• Never immerse motor unit in water or other liquid.
• W
ash all parts except motor unit by hand in hot soapy water,
using care when handling the sharp blades.
• R
inse these parts with clear hot water, then dry.
REMOVABLE PARTS ARE NOT DISHWASHER SAFE!
• W
ipe motor unit with a damp cloth. Do not use harsh or abrasive
cleaners.
• C
utting blade and cutting plates should be coated with cooking
oil after washing and then wrapped in grease-proof paper to keep
them lubricated and rust-free.
• N
OTE – Pusher has a lid. Inside you can store sausage
attachments, sausage-making ring and cutting plates.
Any other servicing should be provided by an authorized service
representative.
10
Notes
11
Trademarks or service marks of third parties used herein are
the trademarks or service marks of their respective owners.
©2012 Waring Consumer Products
150 Milford Road
East Windsor, NJ 08520
www.waringpro.com
Printed in China
MG1200 IB
12WR132358
IB-11461