1
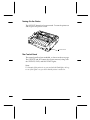
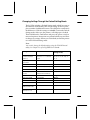
Read This First
What’s new about the EPSON ® LQ-570e? It’s faster, more
durable, and handles more parts per form. But don’t worry; it
works the same way as the EPSON LQ-570+. Take a few minutes
to read this booklet so you can get up and running quickly.
Here’s what you’ll find inside this booklet:
New Specifications . . . . . . . . . . . . . . . . . . . . . . . . . . . . . . . . . . . 3
Printer Software . . . . . . . . . . . . . . . . . . . . . . . . . . . . . . . . . . . . . 4
Turning On the Printer . . . . . . . . . . . . . . . . . . . . . . . . . . . . . . . 5
The Control Panel . . . . . . . . . . . . . . . . . . . . . . . . . . . . . . . . . . . . 5
Location of the Knob . . . . . . . . . . . . . . . . . . . . . . . . . . . . . . . . . 7
Paper Handling. . . . . . . . . . . . . . . . . . . . . . . . . . . . . . . . . . . . . . 7
Selecting Fonts . . . . . . . . . . . . . . . . . . . . . . . . . . . . . . . . . . . . . . 7
Adjusting for Different Top and Bottom Margins. . . . . . . . . 8
Adjusting the Loading (Top-of-Form) and Tear-off
Positions with Micro Adjust. . . . . . . . . . . . . . . . . . . . . . . . . 8
No More DIP Switches. . . . . . . . . . . . . . . . . . . . . . . . . . . . . . . . 8
Changing Settings Through the Default Setting Mode. . . . . 9
Clearing the Input Buffer . . . . . . . . . . . . . . . . . . . . . . . . . . . . . 10
Printing a Self Test . . . . . . . . . . . . . . . . . . . . . . . . . . . . . . . . . . . 11
New Options . . . . . . . . . . . . . . . . . . . . . . . . . . . . . . . . . . . . . . . . 11
2
About Your EPSON LQ-570e
This booklet briefly describes the new features provided by the
EPSON LQ-570e. It is intended for LQ-570+ users who are
upgrading to the LQ-570e. If you are not familiar with the
LQ-570+, please see the LQ-570e User’s Guide for detailed
instructions on using the printer.
Your new LQ-570e printer is very similar to the LQ-570+,
only better. It’s faster, more reliable, and accommodates more
copies per multi-part form (4 plus 1 original). It is backwardcompatible with the LQ-570+, so you should not have any
problems matching the software settings you’re already using.
Be sure to consult the LQ-570e User’s Guide for setup instructions
and detailed information about your printer.
New Specifications
This table summarizes the basic specification differences for the
two models.
Function
Printing speed
LQ-570+
LQ-570e
LQ: 75 cps
LQ (10 cpi): 100 cps
Draft: 225 cps
Draft (10 cpi): 300 cps
High speed draft
(10 cpi): not available
High speed draft
(10 cpi): 400 cps
Top margin
5.3 mm (.2 in)
4.2 mm (.17 in)
Bottom margin
9 mm (.35 in)
4.2 mm (.17 in)
Input buffer
8 Kb
64 Kb
MVBF
3 million lines
19 million lines
(except print head)
MTBF (power-on
hours), 25% duty cycle
4,000 hours
10,000 hours
Printable area
Reliability
3
Function
LQ-570+
LQ-570e
Interface
Parallel
Type B
IEEE 1284 parallel
Type B level 2
Copy capability
1+3
1+4
Bar code fonts
none
8 fonts
Character set tables
6
13
Printer Software
The LQ-570e comes with printer software on a CD-ROM which
includes a printer driver for Microsoft® Windows® and some
helpful utilities. You do not need to install this driver if you are
happy with the driver(s) you are currently using for your
LQ-570+. The LQ-570e printer hardware is backward-compatible
with ESC/P2 software drivers.
If you decide to install the software, you can take advantage of
the following features:
❏ A printer driver which lets you control printing.
❏ The EPSON Status Monitor 3 utility for Windows versions 95,
98, and NT 4.0 (or later). The Status Monitor displays
information about the printer’s status and lets you know if
there is a problem with a print job.
❏ The EPSON Remote! utility, a DOS-based printer setup utility
that lets you change printer default settings from your
monitor screen. (This provides an alternative way to change
the default settings as described on page 9.)
See the LQ-570e User’s Guide for instructions on installing and
using the printer software.
4
Turning On the Printer
The OPERATE button has been removed. To turn the printer on
and off, press the power switch.
power switch
The Control Panel
The control panel has been modified, as shown on the next page.
The OPERATE and ALT buttons have been removed, along with
the OPERATE, DATA, and MULTI-PART lights.
Note:
To determine if the printer is on, you can check the Font lights. As long
as one of the lights is on, you know that the printer is turned on.
5
Control Panel
Font lights (3 LEDs)
Indicate which
font is selected. If
all lights are on,
one of the
“Others” fonts is
selected. See
page 7.
LF/FF button
Paper Out light
Feeds paper line by line
when pressed once.
On when no paper is
loaded in the selected
paper source or paper is
not loaded correctly.
Ejects a single sheet or
advances continuous
paper to the next
top-of-form position
when held down.
Condensed light
On when condensed
mode is on.
Font button
Condensed button
Selects the font.
Turns condensed
mode on and off.
Tear Off/Bin button
Load/Eject button
Advances continuous paper to the
tear-off position.
Loads a single sheet of
paper.
Feeds continuous paper backward
from the tear-off position to the
top-of-form position.
Ejects a single sheet of
paper if a sheet is loaded.
Selects a cut-sheet feeder bin when
the cut-sheet feeder is installed.
Turns on Card mode to print on
postcards and envelopes.
Loads continuous paper
from the standby position.
Feeds continuous paper
backward to the standby
position.
Flashes when paper has
not been fully ejected or
a paper jam has
occurred.
Pause button
Stops printing temporarily,
and resumes printing
when pressed again.
When pressed for 3
seconds, turns on the
Micro Adjust mode.* To
turn off, press again.
Pause light
On when the printer is
paused.
Flashes when the printer is
in the Micro Adjust mode.*
Flashes when the print
head has overheated.
Tear Off/Bin lights
f f when continuous paper is in the
tear-off position.
o n when bin 1 of the optional
cut-sheet feeder is selected.
n o when bin 2 of the optional
cut-sheet feeder is selected.
n n when the printer is in Card
mode.
n = On
f = Flashing
o = Off
6
*Micro Adjust mode
When you hold down the Pause button for 3 seconds,
the printer enters the Micro Adjust mode. (Make sure
the Pause light is flashing.) In this mode, you can press
the LF/FFD and Load/EjectU buttons to adjust the
top-of-form or tear-off position.
Location of the Knob
The knob (for clearing paper jams) is located on the left side of the
LQ-570e. Use this knob only when the printer is off. Otherwise,
you may damage the printer or lose the top-of-form or tear-off
position.
Paper Handling
While the LQ-570e handles paper much like the LQ-570+, there
are certain differences. Be sure to consult your LQ-570e User’s
Guide for instructions on loading and removing paper, changing
the tractor position, and switching between continuous and single
sheets.
Selecting Fonts
On the LQ-570e, you can select from 12 fonts, 6 of which are
available through the Font button. To choose one of the other 6
fonts, you need to change the default setting by assigning the
desired font as “Others.” (See “Changing Settings Through the
Default Setting Mode” on page 9 for more information.)
The 6 fonts available through the Font button are Draft, Roman,
Sans Serif, Courier, Prestige, and Script. The 6 fonts available
through the default setting mode are OCR-B, Orator, Orator-S,
Script-C, Roman-T, and Sans Serif H.
7
Adjusting for Different Top and Bottom Margins
The LQ-570e allows for smaller top and bottom margins—4.2 mm
(.17 inch) for both—increasing the maximum printable area on the
page. You will not notice any difference in printing unless you
have specified margins in your software applications that are less
than the minimum allowed by the LQ-570+ (5.3 mm [.2 inch] for
the top and 9 mm [.35 inch] for the bottom). In this case you may
need to adjust your top and bottom margin settings through your
software or by adjusting the top-of-form position. See your
LQ-570e User’s Guide.
Adjusting the Loading (Top-of-Form) and Tear-off
Positions with Micro Adjust
The LQ-570+ micro-feed feature is now called the Micro Adjust
mode on the LQ-570e. To adjust the top-of-form or tear-off
position, make sure paper is loaded in the printer. Then hold
down the Pause button for 3 seconds to enter Micro Adjust
mode. Make sure the Pause light is flashing. Then press the
Load/Eject U or LF/FF D button to adjust the position. When you
are done, press Pause again.
No More DIP Switches
The LQ 570e has no DIP switches. The functions defined by DIP
switch settings on the LQ-570+ are now selected through the
Default Setting Mode on the LQ-570e. See the following section.
8
Changing Settings Through the Default Setting Mode
The LQ-570e includes a Default Setting mode which lets you set
the functions controlled by DIP switch settings on the LQ-570+,
plus a number of additional features. The table below summarizes
the differences. (Default settings are in bold.) To enter the Default
Setting mode, make sure the printer is off and paper is loaded.
Then hold down the Font button and press the power switch to
turn on the printer. Instructions are printed which you can follow
to change any settings. When you are finished, turn off the printer
to exit the Default Setting mode.
Note:
You can also change the default settings using the EPSON Remote!
utility. See Chapter 5 in your LQ-570e User’s Guide.
Setting
LQ-570+
LQ-570e (Default
Setting mode)
Page length for
continuous paper
(tractor)
DIP switches 2-1 and 2-2
select 8.5, 11, 11.7, and 12
inches
Length in inches: 3, 3.5, 4,
5.5, 6, 7, 8, 8.5, 11, 70/6, 12,
14, 17
Skip over
perforation
DIP switch 1-8 (On, Off)
On, Off
Auto tear-off
DIP switch 2-3 (On, Off)
On, Off
Auto line feed
DIP switch 2-4 (On, Off)
On, Off
Print direction
DIP switch 1-5 (Bi-D, Uni-D)
Auto, Bi-D, Uni-D
Software (printer
mode)
DIP switch 1-6
(ESC/P2, IBM emulation)
ESC/P 2, IBM® 2390 Plus
0 slash
not available
On: 0 , Off: 0
High speed draft
not available
On, Off
I/F mode
not available
Auto, Parallel, Optional
Auto I/F wait time
not available
10 seconds, 30 seconds
Parallel I/F
bidirectional mode
not available
On, Off
Packet mode (IEEE
1284.4 protocol)
not available
Auto, Off
9
Setting
LQ-570+
LQ-570e (Default
Setting mode)
Auto CR
(IBM 2390 Plus)*
not available
On, Off
A.G.M.
(IBM 2390 Plus)*
not available
On, Off
Character table
DIP switches 1-1 — 1-4
(PC 437, PC 850, PC 860,
PC 863, PC 685, Brascii (or
PC 437 Greek), Abicomp
[or PC 853], PC 437 [or
PC 852])
Standard model:
Italic, PC 437, PC 850,
PC 860, PC 863, PC 865,
PC 861, BRASCII,
Abicomp, Roman 8,
ISO Latin 1, PC 858,
ISO 8859-15,
International
character set for
Italic table
DIP switches 1-1 — 1-4
(USA, France, Germany,
UK, Denmark I, Sweden,
Italy, Spain 1)
Italic U.S.A., Italic France,
Italic Germany, Italic U.K.,
Italic Denmark1, Italic
Sweden, Italic Italy,
Italic Spain1
Font
not available
OCR-B, Orator, Orator-S,
Script C, Roman T, Sans
Serif H
Manual feed wait
time
Fixed
1 second, 1.5 seconds,
2 seconds, 3 seconds
2 seconds front normal/
copy, rear normal)
3 seconds (rear copy)
Buzzer
not available
On, Off
Roll paper
not available
On, Off
* These settings take effect only when IBM 2390 Plus emulation is selected.
See Chapter 5 in your LQ-570e User’s Guide for instructions on
using the default setting mode.
Clearing the Input Buffer
On the LQ-570+, you cleared the input buffer by pressing the ALT
and PAUSE buttons. On the LQ-570e, press the Font and
Condensed buttons together. (Hold them down for 3 to 4
seconds, until the printer beeps.)
10
Printing a Self Test
To print a self test on the LQ-570+, you held down either the
LF/FF or Load/Eject button and then pressed the OPERATE
button to turn on the printer. Here is how to print the self test on
the LQ-570e:
❏ For draft mode, hold down the LF/FF button and then press
the power switch to turn on the printer.
❏ For letter quality mode, hold down the Load/Eject button
and then turn on the printer.
New Options
The following two new options are available for the LQ-570e:
❏ Front sheet guide (C814231)
❏ Roll paper holder (#8310).
11
All rights reserved. No part of this publication may be reproduced, stored in a retrieval
system, or transmitted in any form or by any means, electronic, mechanical, photocopying,
recording, or otherwise, without the prior written permission of SEIKO EPSON
CORPORATION. The information contained herein is designed only for use with this EPSON
printer. EPSON is not responsible for any use of this information as applied to other printers.
Trademarks
EPSON is a registered trademark of SEIKO EPSON CORPORATION.
General Notice: Other product names used herein are for identification purposes only and
may be trademarks of their respective owners. EPSON disclaims any and all rights in those
marks.
Copyright © 2000 by Epson America, Inc.
1/00
CPD 9812