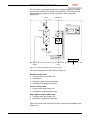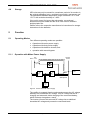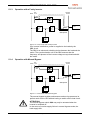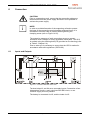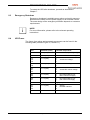
1
Uninterruptible
Power Supply UPS
Protect 5.31/xxx-480-220-120
10 kVA - 120 kVA
AEG Power Supply Systems GmbH
Department: PSS TED
Name:
Schenuit/Bögge
Revision:
02
Date:
09.05.2008
Operating Instructions
8000020680 BAL, en
Protect 5.31/xxx-480-220-120 10 kVA - 120 kVA
Notes on these Operating Instructions
Duty to provide information
These operating instructions must be read carefully by all persons
working with or on the UPS prior to installation and initial start-up.
These operating instructions are a composite part of the UPS.
The owner of this unit is obliged to communicate the full content of
these operating instructions to all personnel transporting or starting
the UPS or performing maintenance or any other work on this unit.
Validity
These operating instructions comply with the current technical
specifications of the UPS at the time of publication. The contents do
not constitute a subject matter of the contract, but serve for
information purposes only.
AEG Power Supply Systems GmbH reserves the right to make
modifications with regard to the content and technical data in these
operating instructions without prior notice. AEG Power Supply
Systems GmbH cannot be held liable for any inaccuracies or
inapplicable information in these operating instructions, as no
obligation to continuously update the data and maintain their validity
has been entered into.
Warranty
Our goods and services are subject to the general conditions of
supply for products of the electrical industry, and our general sales
conditions. We reserve the right to alter any specifications given in
these operating instructions, especially with regard to technical data,
operation, dimensions and weights. Claims in connection with
supplied goods must be submitted within one week of receipt, along
with the packing slip. Subsequent claims cannot be considered.
AEG Power Supply Systems GmbH will rescind all obligations such
as warranty agreements, service contracts, etc. entered into by AEG
Power Supply Systems GmbH or its representatives without prior
notice if maintenance and repair work is carried out using anything
other than original AEG Power Supply Systems GmbH spare parts or
spare parts purchased from AEG Power Supply Systems GmbH.
Handling
These operating instructions for the UPS are structured so that all
work necessary for start-up, maintenance and repair of the unit can
be performed by qualified personnel.
Illustrations are provided to clarify and facilitate certain steps.
If danger to personnel and equipment cannot be ruled out in the case
of certain work, it is highlighted accordingly by pictograms explained
in Chapter 1, Safety Regulations.
Page 2 of 56
8000020680 BAL, en
Protect 5.31/xxx-480-220-120 10 kVA - 120 kVA
Abbreviations
The following abbreviations are used in these instructions:
DOU =
Graphical Display and Operation Unit
SBS =
Static Bypass Switch
REC =
Rectifier
INV
=
Inverter
Hotline
Do you have any suggestions for improving these operating
instructions?
Do you have any questions on any of the subjects dealt with in these
operating instructions?
Our service department is available on the hotline number given
below:
AEG Power Supply Systems GmbH
Emil-Siepmann-Straße 32
D-59581 Warstein
Germany
+49 (2902) 763 100
FAX:
+49 (2902) 763 645
E-mail: [email protected]
http://www.aegpss.de
Copyright
No part of these operating instructions may be transmitted,
reproduced and/or copied by any electronic or mechanical means
without the express prior written permission of AEG Power Supply
Systems GmbH.
©
Copyright AEG Power Supply Systems GmbH 2007. All rights
reserved.
Page 3 of 56
8000020680 BAL, en
Protect 5.31/xxx-480-220-120 10 kVA - 120 kVA
Table of Contents
Notes on these Operating Instructions ...........................................2
1
1.1
1.2
1.3
1.4
1.5
1.6
1.7
1.8
1.9
Safety Regulations.................................................................6
Important Instructions and Explanations ..................................6
Accident Prevention Regulations .............................................6
Danger during Maintenance and Repair Work.........................7
Fire Protection..........................................................................7
Qualified Personnel..................................................................7
Safety Awareness ....................................................................8
Application ...............................................................................8
Liability .....................................................................................9
Directives .................................................................................9
2
Technical Data......................................................................10
3
3.1
3.2
General Information .............................................................11
Technology ............................................................................11
Operating Elements of the UPS .............................................13
4
4.1
4.2
4.3
4.4
4.5
4.6
Transport, Storage and Installation....................................14
Packing ..................................................................................14
Crane Transport .....................................................................14
Transporting the Unit using a Forklift or Lowlift Truck............15
Site Requirements..................................................................16
Floor Mounting .......................................................................17
Storage ..................................................................................18
5
5.1
5.1.1
5.1.2
5.1.3
5.1.4
5.2
5.3
5.4
5.5
5.6
5.6.1
5.6.2
Function ................................................................................18
Operating Modes ...................................................................18
Operation with Mains Power Supply ......................................18
Operation with Faulty Mains Supply.......................................19
Operation with a Faulty Inverter .............................................20
Operation with Manual Bypass ..............................................20
Function of the Circuit Breakers.............................................21
Static Bypass Switch (SBS) ...................................................22
Charging the Battery ..............................................................23
Manual Characteristic Curve Switchover ...............................23
Battery Tests ..........................................................................23
Capacity Check ......................................................................24
Capacity Test .........................................................................25
6
6.1
6.2
6.3
6.4
Connection ...........................................................................26
Inputs and Outputs.................................................................26
Connection of the Mains, Load and Battery Cables...............27
Connection of the Control and Signal Lines...........................28
Connection Cross Sections and Fuse Protection...................29
7
7.1
7.2
Start-Up .................................................................................30
Preparing Start-up of the UPS (Individual Unit) .....................30
Starting up the UPS (Individual Unit) .....................................31
Page 4 of 56
8000020680 BAL, en
Protect 5.31/xxx-480-220-120 10 kVA - 120 kVA
8
8.1
8.1.1
8.2
8.3
8.4
Operation ..............................................................................32
Disconnecting the UPS (Individual Unit) ................................32
Restarting after Disconnection (Individual Unit) .....................33
Shutting Down the UPS .........................................................33
Emergency Shutdown ............................................................34
UPS Fuses .............................................................................34
9
9.1
9.1.1
9.1.2
9.2
9.3
9.3.1
9.3.2
9.3.3
9.3.4
9.3.5
9.3.6
9.3.7
9.3.8
9.3.9
9.3.10
Graphical Display and Operation Unit ...............................35
General Information ...............................................................35
Signalling ...............................................................................35
Keyboard Operation ...............................................................36
Start-Up..................................................................................38
Menu Structure.......................................................................38
Menu Tree..............................................................................38
Main Menu .............................................................................39
Operating Display...................................................................39
Status/Measured Values ........................................................40
Blocking .................................................................................41
Fault History ...........................................................................41
Settings ..................................................................................41
Information .............................................................................41
Service ...................................................................................41
Help........................................................................................42
10
10.1
10.1.1
10.1.2
10.1.3
10.1.4
Annex ....................................................................................43
Battery Handling using the Graphical DOU............................43
Charging the Battery ..............................................................43
Battery Data ...........................................................................44
Battery Tests ..........................................................................45
Possible Battery Tests ...........................................................46
11
11.1
11.2
Interfaces ..............................................................................47
Remote Signalling ..................................................................47
Serial Interface .......................................................................48
12
12.1
12.2
12.2.1
12.2.2
12.3
12.3.1
12.3.2
12.3.3
Maintenance and Repairs....................................................49
Diagnostic Functions..............................................................49
Repairs...................................................................................49
Fault Table .............................................................................50
Removing and Installing the Fan............................................51
Maintenance ..........................................................................51
Visual Checks ........................................................................52
Functional Test ......................................................................52
Checking the Battery..............................................................53
13
Spare Parts and Customer Service ....................................54
14
Annex ....................................................................................55
Page 5 of 56
8000020680 BAL, en
Protect 5.31/xxx-480-220-120 10 kVA - 120 kVA
1
Safety Regulations
1.1
Important Instructions and Explanations
The instructions for operation and maintenance, as well as the
following safety regulations must be complied with to ensure the
safety of personnel as well as the continued availability of the unit.
All personnel installing/dismantling, starting up, operating or servicing
the units must be familiar with and observe these safety regulations.
Only trained and qualified personnel may perform the work described,
using tools, equipment, test equipment and materials intended for the
purpose and in perfect working condition.
Important instructions are highlighted by "CAUTION:",
"ATTENTION:", "NOTE:" and indented text.
CAUTION:
This symbol identifies all working and operational procedures
requiring absolute compliance to avoid any danger to persons.
ATTENTION:
This symbol identifies all working and operational procedures
requiring absolute compliance to prevent any damage, irreparable
or otherwise, to the UPS or its components.
i
NOTE:
This symbol identifies technical requirements and additional
information requiring the operator's attention.
This document includes brief instructions which describe the function
and start-up of the UPS.
These instructions must be glued to the free area on the inside of the
unit door.
1.2
Accident Prevention Regulations
Compliance with the accident prevention regulations valid in the
respective country of use and the general safety regulations in
accordance with IEC 364 is mandatory.
The following safety instructions must be observed prior to any work
on the UPS:
•
•
•
•
•
Disconnect the unit from the power supply.
Secure against reclosing.
Verify that the unit is disconnected from the power supply.
Earth and short circuit the unit.
Provide protection by covers or barriers for any
neighbouring live parts.
Page 6 of 56
8000020680 BAL, en
Protect 5.31/xxx-480-220-120 10 kVA - 120 kVA
1.3
Danger during Maintenance and Repair Work
CAUTION:
The voltage applied to the UPS can be fatal. Prior to start-up
and/or maintenance work always disconnect the UPS from the
power supply and secure the unit against reclosing. The
capacitors must be discharged. Free-standing and movable
components can protrude into the work area and cause injuries.
ATTENTION:
Considerable damage can be caused to equipment if unsuitable
spare parts are used during repair work, if work is carried out by
unauthorised personnel, or the safety regulations are not
observed.
i
1.4
NOTE:
Only trained and qualified personnel (refer to Chapter 1.5) may
work on or around the UPS while strictly observing the safety
regulations.
Fire Protection
Structure of fireproof enclosures (EN 60950)
If uninterruptible power supply units are installed in rooms with
inflammable floors (e.g. textile, wood, PVC) or in computer centres,
the floor plate must always be installed. The assembler is responsible
for proper installation.
CAUTION:
If smoke is detected or a fire breaks out, immediately disconnect
the UPS from the power supply and inform the maintenance
personnel.
1.5
Qualified Personnel
The UPS may only be transported, installed, connected, started,
serviced and operated by qualified personnel who are familiar with
the pertinent safety and installation regulations. All work performed
must be inspected by responsible experts.
The qualified personnel must be authorised by the responsible safety
officer of the installation to perform the work required.
Qualified personnel is defined as personnel
• having completed training and gained experience in the
respective field,
• familiar with the pertinent standards, rules and regulations and
accident prevention regulations,
• having received instruction on the mode of operation and
operating conditions of the UPS,
• capable of recognising and preventing dangers.
Regulations and definitions for qualified personnel can be found in
DIN 57105/VDE 0105, Part 1.
Page 7 of 56
8000020680 BAL, en
Protect 5.31/xxx-480-220-120 10 kVA - 120 kVA
1.6
Safety Awareness
The personnel defined in chapter 1.5 are responsible for safety. They
must also ensure that only suitably qualified persons are permitted
access to the UPS or the safety area.
The following points must be observed:
All such working procedures are prohibited which are detrimental to
the safety of persons and the operation of the UPS in any way.
The UPS may only be operated in perfect working condition.
Never remove or render inoperable any safety devices.
All necessary operational measures must be initiated prior to
deactivating any safety device in order to perform maintenance,
repair or any other work on the unit.
Safety awareness also entails informing colleagues of any unsuitable
behaviour and reporting any faults detected to the respective
authority or person.
1.7
Application
The UPS may only be used for uninterrupted power supply in the
described installation position and operating mode while observing
the maximum permissible connection values as specified in these
operating instructions. The unit may only be used for this intended
purpose. It is not permitted to make any unauthorised modifications to
the UPS or to use any spare parts and replacement parts not
approved by AEG Power Supply Systems GmbH or to use the UPS
for any other purpose.
The person responsible for the installation must ensure that
• the safety instructions and operating instructions are readily
available and are complied with,
• the operating conditions and technical data are observed,
• safety devices are used,
• the prescribed maintenance work is performed,
• maintenance personnel is informed without delay or that the UPS
is shut down immediately in the event of abnormal voltages or
noise, high temperatures, vibrations or any similar effects in order
to detect the cause.
These operating instructions contain all information required by
qualified personnel for operation of the UPS. Additional information
and explanations for unqualified persons and for the use of the UPS
in non-industrial applications are not included in these operating
instructions.
The warranty obligations of the manufacturer are only applicable if
these operating instructions are observed and complied with.
Page 8 of 56
8000020680 BAL, en
Protect 5.31/xxx-480-220-120 10 kVA - 120 kVA
1.8
Liability
No liability is accepted if the UPS is used for applications not intended
by the manufacturer. Any measures necessary for the prevention of
injury or damage to equipment are the responsibility of the owner or
user. In the event of any claims in connection with the UPS, please
contact us immediately quoting:
• Type designation
• Works number
• Reason for claim
• Period of use
• Ambient conditions
• Operating mode
1.9
Directives
The Protect 5. 31/xxx units comply with the currently applicable
DIN and VDE regulations. VBG4 is met on the basis of compliance
with VDE 0106, Part 100.
The requirements of VDE 0100, Part 410, "Functional extra-low
voltage with safe isolation", have been complied with where
applicable.
The CE sign on the unit confirms compliance with the EC outline
directives for 72/23 EEC – Low voltage and for 89/339 EEC –
Electromagnetic compatibility if the installation and start-up
instructions described in these operating instructions are observed.
Page 9 of 56
8000020680 BAL, en
Protect 5.31/xxx-480-220-120 10 kVA - 120 kVA
2
Technical Data
Please refer to the enclosed technical data sheet for optional and unit-specific setting
values.
Type
kVA
10
20
30
40
60
80
100
120
3 x 480 V ± 15 %
Rated connection voltages
Voltage range in V
Frequency on rectifier input in Hz
45 - 66
Current consumption at
max. battery charge in A
19
36
54
72
110
147
181
216
Current consumption at trickle
charge in A
13
29
47
57
83
112
139
167
Rectifier output current IAGR
in A
50
95
143
190
280
370
460
550
Intermediate circuit voltage in V
(rated voltage)
216 bei 108 Lead acid cells
voltage range 173 bis 260
Output voltage in V, neutral
conductor under full load
Output current in A
120 V
optional adjustable from 110 V - 127 V
83
167
250
Overload capacity
75 % Load
Efficiency in %
Power loss in W
667
833
1000
≤3%
THD factor in % at rated load
Efficiency in %
Power loss in W
500
50 Hz ± 1 %
optional 60 Hz ± 1 %
Output frequency in Hz
50 % Load
333
1,5 x Inom for 1 minute
1,25 x Inom for 10 minutes
Ishort circuit (max) = 3 x Inom
100 % Loadt Efficiency in %
Power loss in W
Outer dimensions in mm
without transport eyelets (IP20)
Height
Width
Depth
1810
600
850
1810
900
850
1810
1200
850
1810
1200
850
1810
1200
850
1810
2100
850
1810
2100
850
1810
2100
850
Weight in kg (approx.)
350
520
800
800
780
a/A*
a/A*
a/A*
Table 1 Technical data of the UPS
75
Page 10 of 56
8000020680 BAL, en
Protect 5.31/xxx-480-220-120 10 kVA - 120 kVA
3
General Information
One application of Protect 5. 31/xxx systems is to ensure an
uninterruptible power supply to computers, IT systems, process
control systems and their periphery in production and administration
systems.
The Protect 5. 31/xxx range covers a power range of 10 kVA to
80 kVA.
Figure 1
1
2
3.1
Example model 60 kVA (refer to Chapter 2, Table 1 for dimensions)
DOU – display and operation unit
Ventilation grids (4x) for each control cabinet
Technology
Due to the utilisation of electronic high-performance components, the
Protect 5. 31/xxx series is suitable for universal applications and has
a very high degree of operational reliability as well as optimum
efficiency and communication capability with other systems due to
integrated interfaces.
The entire control electronics of the UPS is based on the utilisation of
state-of-the-art microcomputer assemblies. Logical integration and
linking of the various assemblies in the overall system permits
specification of the unit properties by unit-related software parameter
settings.
Page 11 of 56
8000020680 BAL, en
Protect 5.31/xxx-480-220-120 10 kVA - 120 kVA
The information exchange between the individual modules is carried
out using the CAN bus (Controller Area Network). This CAN bus has
high interference immunity and is frequently used for industrial
applications.
Mains
- X1
SBS-Mains
U, V, W, PE
- X4 U, N, PE
- Q1
- A18 DOU
- T40
Display
Rectifier
Inverter
SBS
- T1
- F1
optional
- K7
- Q29
optional
- X2 L-, L+, PE
Signalling
- X3
U, N, PE
Load
Battery
Figure 2 Functional principles of the Protect5.xxx/31
The main components of the UPS are (Figure 2):
Rectifier section with:
• Thyristor stack and control unit
• Transformer
• Smoothing device for the batteries
• Interference suppression devices
Inverter section with:
• Inverter stack and control unit
• Interference suppression devices
Static bypass switch (SBS) with:
• Thyristor stack and control unit
• Interference suppression devices
Figure 2 illustrates the functional principle of the uninterruptible power
supply unit.
Page 12 of 56
8000020680 BAL, en
Protect 5.31/xxx-480-220-120 10 kVA - 120 kVA
The rectifier (REC) supplies the inverter and the battery with
DC voltage. The inverter (INV) converts this DC voltage into a
1-phase AC voltage.
In the event of a mains fault (such as a power failure), the power
supply to the load is maintained from the battery without any
interruption.
The supply reliability is further increased by the static bypass
switch (SBS), which in the event of an INV fault switches the
SBS circuit over to the load circuit without any interruption.
3.2
Operating Elements of the UPS
1
12
2
3
4
11
5
6
OFF
10
X1 X2 X3 X4
9
7, 8
Figure 3 Arrangement of the operating elements, components and individual PCBs
with open door
1
2
3
4
5
6
7, 8
9
10
11
12
Fans
Optional PCBs on the control unit pivot plate
Remote signalling (master board and expansion board)
CAN-COM controller (CCC)
Terminal strip X12 (remote signals and options)
Q29, manual bypass switch
Ventilation grids
Terminals for rectifier and SBS circuits, battery and loads
Q1, load interrupter switch for the rectifier circuit
Internal fuses for control unit and fan (A91)
DOU display and operation unit
Page 13 of 56
8000020680 BAL, en
Protect 5.31/xxx-480-220-120 10 kVA - 120 kVA
4
Transport, Storage and Installation
4.1
Packing
The UPS units are packed at the works to withstand both rail and
road transport. The housing is fixed to the transport pallet using four
bolts. The unit is packed in plastic film to prevent any damage to the
surface paint and protect the unit against moisture.
i
NOTE:
To prevent damage only remove the protective film from the UPS
immediately prior to installation.
The four fixing bolts on the base frame can then be removed using a
spanner.
4.2
Crane Transport
CAUTION:
Do not walk under suspended loads!
Always wear protective clothing such as a helmet, safety shoes
and work gloves!
Transport the unit with due care and observe the safety
regulations!
ATTENTION:
Only transport the UPS in an upright position!
Never tilt or cant it, avoid displacing the centre of gravity!
Figure 4 Transporting by crane
Page 14 of 56
8000020680 BAL, en
Protect 5.31/xxx-480-220-120 10 kVA - 120 kVA
The length of the ropes is calculated so that an angle of 45° is given
between the rope and the top edge of the cabinet (DIN 580). The
minimum load capacity of each rope must be ≥ 0.5 times the weight
of the cabinet (DIN 580). The weight of each UPS can be found in
Table 1, Chapter 2. One rope must be used for each transport eyelet.
Proceed as follows to transport the unit by crane (Figure 4):
• Insert and tighten the four transport eyelets (not supplied) in the
threaded bores provided on top of the cabinet.
• Hook in the four ropes.
• Carefully lift the UPS and transport it to its intended location.
• Lower the UPS carefully without jolting it.
• Remove the ropes and transport eyelets.
4.3
Transporting the Unit using a Forklift or Lowlift Truck
ATTENTION:
Prior to transport with a forklift or lowlift truck, always ensure that
the transport devices used for the UPS are designed for the
respective weight (refer to Table 1, Chapter 2).
i
NOTE:
Transport with a forklift or lowlift truck should be avoided
whenever possible, especially on construction sites and/or uneven
ground.
Always transport by crane when possible!
Fixing bolts for ventilation grids
Figure 5 Ventilation grid
Page 15 of 56
8000020680 BAL, en
Protect 5.31/xxx-480-220-120 10 kVA - 120 kVA
Preparation:
Leave the UPS on the transport pallet.
Transport with lowlift truck
Transport with forklift truck
Figure 6 Transport with lowlift and forklift truck
ATTENTION:
Observe the centre of gravity of the unit!
The lifting arms must be
- sufficiently long and
- sufficiently far apart.
Transport the unit as follows:
• Insert the lifting arms between the transport pallet and the UPS.
• Carefully lift the UPS and transport it to its intended location.
• Lower the UPS carefully without jolting it.
• Retract the forklift or lowlift truck.
• Refit the ventilation grids on the UPS using the corresponding
fixing bolts.
4.4
Site Requirements
Suitable floor surfaces for installation of the UPS are:
• Double floors
• Above cable ducts or
• directly on a level surface.
Ensure that the weight of the UPS units does not exceed the
maximum floor bearing capacity (refer to Table 1, Chapter 2).
The site must also meet the following requirements:
• be free of conductive dust,
• be free of corrosive or acid fumes,
• the intake air temperature of the unit must not exceed 35 °C, and
• the air vents of the UPS must not be obstructed by any
constructional features or other measures.
UPS units are suitable for installation in confined spaces. Ensure that
a min. space of 1000 mm is provided in front of the unit to ensure an
escape route, and a space of 400 mm above the unit to guarantee
unobstructed air venting.
Page 16 of 56
8000020680 BAL, en
Protect 5.31/xxx-480-220-120 10 kVA - 120 kVA
ATTENTION:
The waste heat of the UPS must be dissipated!
The ventilation of the battery compartments must be carried out in
accordance with DIN/VDE 0510, Part 2. The following general rule is
applicable for ventilation requirements (for lead-acid batteries):
Q = 0.05 x n x I / 2
with: Q = air volume in m3/h
n = number of lead-acid cells
I = amperage
The ambient temperature in the battery compartment should not
exceed 20 °C, as the service life of the batteries is otherwise
considerably reduced.
4.5
Floor Mounting
Four holes are provided in the base frame of the UPS for the fixing
bolts. The spacing and diameter of the bores can be found in the
table below.
Before securing the UPS to the floor, ensure that it is vertically
aligned, and compensate for any unevenness (e.g. using metal
wedges).
Wall
ø20
0
5
7
0
5
8
Detail "A":
"A"
ø20
5
2
0
5
a
5
2
b
50
75
Load introduction area
Type rating
in kVA
10
20
30/40
a in mm
450
750
1050
1050
750
1050
b in mm
600
900
1200
1200
900
1200
Figure 7
60
80/100/120
Cubicle 1
Cubicle 2
Dimensions for floor mounting
Page 17 of 56
8000020680 BAL, en
Protect 5.31/xxx-480-220-120 10 kVA - 120 kVA
4.6
Storage
UPS units may only be stored for a maximum period of six months in
the original packaging in dry, ventilated rooms with a permanent roof.
The permissible ambient temperature range is between -35 °C and
+70 °C with a relative humidity of ≤ 85%.
If the unit is stored for longer than six months, conventional
desiccants must be added and the UPS units must be sealed in
airtight plastic film.
Please refer to the respective manufacturer's instructions for storage
instructions for the batteries.
5
Function
5.1
Operating Modes
Four different operating modes are possible:
• Operation with mains power supply
• Operation with faulty mains supply
• Operation with defective inverter, and
• operation with manual bypass.
5.1.1
Operation with Mains Power Supply
Secured
busbar
SBS
Mains circuit
Q29
_
~ _
Loads
~
Q29
Q29 option
Figure 8 Power circuit with mains supply
The rectifier is powered from the mains and converts the AC voltage
statically into a stabilised DC voltage. This DC voltage serves for
charging and automatic trickle charging of the connected battery,
which is always charged as a result.
The inverter converts this secured DC voltage into a stabilised
sinusoidal AC voltage and powers the connected loads.
Page 18 of 56
8000020680 BAL, en
Protect 5.31/xxx-480-220-120 10 kVA - 120 kVA
5.1.2
Operation with Faulty Mains Supply
SBS
Secured
busbar
Mains circuit
Q29
_
~ _
Loads
~
Q29
Q29 option
Figure 9 Power circuit with a faulty mains supply
The mains does not sufficiently maintain the supply of the rectifier of
the UPS system. In this case, power is supplied to the inverter from
the charged battery without interruption. The power supply to the
loads is therefore also ensured in the event of a mains failure.
The standby time is limited by the extent to which the batteries are
discharged and is primarily determined by the battery capacity.
The inverter only switches off when the battery voltage drops below
the permissible value.
When the voltage and frequency are within the tolerance range once
more after the mains supply has been restored, the rectifier switches
back on automatically. It then resumes the voltage supply to the
inverter and the charging of the battery.
Page 19 of 56
8000020680 BAL, en
Protect 5.31/xxx-480-220-120 10 kVA - 120 kVA
5.1.3
Operation with a Faulty Inverter
Secured
busbar
SBS
Mains circuit
Q29
_
~ _
Loads
~
Q29
Q29 option
Figure 10 Power circuit with a faulty inverter
If an inverter is defective, power is supplied to the loads by the
SBS circuit.
The SBS is an electronic switching device between the load and the
mains. The synchronisation unit in the SBS ensures that the
frequency and phases of the inverter voltage are synchronised with
the mains.
5.1.4
Operation with Manual Bypass
Secured
busbar
SBS
Mains circuit
Q29
_
~ _
Loads
~
Q29
Q29 option
Figure 11 Power circuit with manual bypass
The manual bypass enables maintenance and service personnel to
perform work on the UPS without having to switch off the load circuit.
ATTENTION:
The manual bypass switch Q29 may only be actuated when the
inverter is switched off.
In the event of a mains supply failure in manual bypass mode, the
load supply fails.
Page 20 of 56
8000020680 BAL, en
Protect 5.31/xxx-480-220-120 10 kVA - 120 kVA
5.2
Function of the Circuit Breakers
Load interrupter switch Q1:
The rectifier is switched over to the REC circuit using load interrupter
switch Q1 (Figure 2). The open-circuit shunt release of Q1 reacts in
the event of a fault (e.g. short circuit) so that the rectifier is isolated
from the REC circuit.
In the event of maintenance and/or service work, the rectifier can be
disconnected from the power supply with Q1 and by opening the
battery isolator (external).
Manual bypass switch Q29
Switch Q29 (Figure 2) is located externally to fully disconnect the
UPS. It can, however, also be installed in the unit as an alternative. It
permits switchover of the loads to the mains input of the SBS without
interruption. This switchover is only permitted if the inverter has been
switched off and the SBS activated
(see also Chapter 5.1.4 Operation with Manual Bypass).
i
NOTE:
The Protect 5. 31/xxx works setting of Q29 is "1", i.e. not
activated. This setting is for normal UPS operation.
Inverter output contactor K7:
Inverter output contactor K7 (Figure 2) switches the output voltage of
the inverter to the load output.
Page 21 of 56
8000020680 BAL, en
Protect 5.31/xxx-480-220-120 10 kVA - 120 kVA
5.3
Static Bypass Switch (SBS)
SBS circuit
Loads
SBS trigger circuit
SBS interface
SBS control unit
Figure 12 Functional principle of the SBS control unit
The SBS control unit monitors the voltages of the load circuit and the
SBS incoming mains and, in the event of an overload or inverter fault,
initiates switchover of the load to the SBS circuit without interruption
(providing the SBS circuit is in the permitted tolerance range). The
load circuit is then supplied via the thyristor contactor. As soon as the
output voltage of the inverter returns to the permitted tolerance range,
the load circuit is automatically switched back to the inverter (INV),
also without any interruption.
Switchover from the INV to the SBS circuit and back can also be carried
out by the UPS operator by manually switching the INV OFF or ON.
The SBS control unit initiates and monitors synchronisation of the
INV voltage with the SBS circuit. If these two circuits are not
synchronised, the DOU displays "phase deviation".
i
NOTE:
If during "phase deviation" it is necessary to switch the loads over
from the INV to the SBS circuit or if the INV is switched off,
switchover to the SBS circuit takes place with a voltage gap.
Depending upon customer requirements, the switchover can be
blocked if there is a "phase deviation". This operating mode
becomes necessary if the connected loads could not withstand
such a voltage gap without suffering damage.
The SBS circuit voltage at terminal X4 is monitored by the SBS
control unit. If the SBS circuit voltage is not within the permitted
tolerance range, the SBS is blocked!
Page 22 of 56
8000020680 BAL, en
Protect 5.31/xxx-480-220-120 10 kVA - 120 kVA
ATTENTION:
If the SBS is blocked, there is no switchover to the SBS circuit!
This means that if the INV fails or is switched off by the operator,
the load circuit is no longer connected to the power supply. The
loads must then be manually reconnected by switching the INV
back on or activating the SBS (switch Q28 off and back on).
5.4
Charging the Battery
The battery is charged according to DIN 41772 in accordance with a
CVCC curve. This ensures that the battery is charged in the shortest
possible time and also prevents overcharging.
Battery charging is electronically controlled and monitored. Operating
faults are registered, causing the charging process to be interrupted.
Charging:
After a mains failure, for example, the battery is charged with a
constant current (e.g. 10 A/100 Ah). When the charging voltage is
reached (e.g. 2.35 V/cell for lead-acid cells), the control electronics
maintains this voltage constant at ±1% with decreasing current. When
the calculated charging time has elapsed, the battery is switched over
to trickle charging.
Trickle charging:
When the electronically controlled charging has been carried out, the
control unit switches over to trickle charge voltage (e.g. 2.27 V/cell).
5.5
Manual Characteristic Curve Switchover
Additional operating modes are available for special treatment of the
battery. These can be manually activated via the DOU using the
"SERVICE / REC OP. MODE" menu.
The works setting of the characteristic values can be changed via the
DOU in the menu "SERVICE / BATTERY VALUES". This allows ideal
adaptation to the existing battery.
Equalising charging:
Equalising charging is carried out in accordance with a CVCC curve,
including automatic switchover back to trickle charging after 8 hours.
As standard, the characteristic curve values correspond to the
charging values. The charging voltage can be adjusted separately.
Start-up charging:
Start-up charging is carried out in accordance with a CVCC curve,
including automatic switchover back to trickle charging after 8 hours.
The charging current and charging voltage can be adjusted
separately from the other characteristic curves.
5.6
Battery Tests
The implemented battery tests can be started via the DOU in the
menu "SERVICE / BATTERY TEST", if they are enabled. The yellow
LED on the DOU signals an ongoing test. Status messages and
measured values of the battery tests are shown on the display.
Page 23 of 56
8000020680 BAL, en
Protect 5.31/xxx-480-220-120 10 kVA - 120 kVA
Test of the battery charging circuit:
This brief test checks the connected battery by lowering the voltage
and carrying out a current analysis. Line interruptions or defective
fuses in the battery circuit are also detected. With a battery present,
the test takes approx. 1 second. It is carried out automatically each
week by the rectifier control unit.
5.6.1
Capacity Check
This operating mode allows a check of the battery status by drawing
constant current from the battery. In this process, the regulator
lowers the DC voltage until the desired discharge current flows from
the battery. The inverter load must be larger than the discharge
current.
The following characteristic curve values can be preselected
using the DOU:
• Discharge current
• Discharge time
• Final discharge voltage
The test can be started under the following conditions:
• Operating mode: charging or trickle charging
• Battery voltage > 2.2 V/cell (for lead-acid cells)
• Rectifier current < 90% of Inom
• Rectifier current > Battery discharge current setpoint + 5%
• At least 1 min must have elapsed since the last test
Values displayed on the DOU:
Before the test:
• Date and time of the last test
During the test:
• Battery voltage, battery current, test duration, capacity drawn from
the battery
After the test:
• Battery voltage, battery current, test duration, capacity drawn from
the battery at end of test
The capacity check is finished when the final discharge voltage or the
max. discharge time is reached. It is interrupted if the inverter load
becomes too low. The test can also be interrupted manually using the
DOU. After the test, the system automatically switches back to battery
charging.
ATTENTION:
As the battery is partly or completely discharged, the full standby
time of the UPS is not available in the event of a mains failure.
i
NOTE:
In the event of a battery fault, the system must be switched over
to the SBS (capacity check / capacity test).
Page 24 of 56
8000020680 BAL, en
Protect 5.31/xxx-480-220-120 10 kVA - 120 kVA
5.6.2
Capacity Test
The capacity test allows the availability of the battery to be tested
using the currently available inverter load. In this process, the
regulator lowers the DC voltage setpoint to approx. 1.9 V/cell.
Generally, the battery backs up the DC voltage and supplies the
entire current to the inverter. This simulates a rectifier circuit failure. In
the event of a battery fault, the inverter continues to be supplied by
the rectifier.
The following parameters can be set using the DOU:
• Discharge time
• Final discharge voltage
The test can be started under the following conditions:
• Operating mode: Trickle charging
• At least 1 min must have elapsed since the last test
Values displayed on the DOU:
Before the test:
• Date and time of the last test
During the test:
• Battery voltage, battery current, test duration, capacity drawn from
the battery
After the test:
• Battery voltage, battery current, test duration, capacity drawn from
the battery at end of test
The capacity test is finished when the final discharge voltage or the
max. discharge time is reached. It can be interrupted using the DOU.
After the test, the system automatically switches back to battery
charging.
ATTENTION:
As the battery is partly or completely discharged, the full standby
time of the UPS is not available in the event of a mains failure.
i
NOTE:
In the event of a battery fault, the system must be switched over
to the SBS (capacity check / capacity test).
Page 25 of 56
8000020680 BAL, en
Protect 5.31/xxx-480-220-120 10 kVA - 120 kVA
6
Connection
CAUTION:
Prior to commencing work, ensure that the connection cables are
disconnected from the power supply and that it is not possible to
activate the power supply.
i
NOTE:
In order to avoid deformation of the supporting rail and to protect
the base of the connection terminal against torsional forces, it is
advisable to hold the cable in position when tightening the
clamping screw (refer to Figure 14/15).
The protective measure of earth connection serves to prevent
excessive touch voltages on freely accessible metal parts. The UPS
is earthed using the earthing bolts (PE) provided on the housing (refer
to Table 2, Chapter 6.4).
Prior to start-up it is necessary to ensure that the UPS is earthed in
accordance with valid regulations (VDE 0100).
6.1
Inputs and Outputs
Figure 13 Connection elements of the UPS
Terminal strips X1 and X4 serve as supply inputs. Connection of two
independent circuits, a main circuit and an SBS circuit, or one
common supply circuit is possible.
The battery is connected via X2, and the loads via X3.
Page 26 of 56
8000020680 BAL, en
Protect 5.31/xxx-480-220-120 10 kVA - 120 kVA
6.2
Connection of the Mains, Load and Battery Cables
X1
U
V
X2
W
L-
X3
L+
U
X4
N
U
N
PE
PE
Figure 14 Connection panel of the Protect 5. 31/10-40 kVA
X1
X2
X3
U V W L- L+ U N
X4
U N
Figure 15 Connection panel of the Protect 5. 31/60-120 kVA
ATTENTION:
Ensure correct polarity when connecting the cables!
The following general rules apply:
Terminal X1 = connection of the rectifier circuit
Terminal X2 = connection of battery
Terminal X3 = connection of the load circuit
Terminal X4 = connection of the SBS circuit
Page 27 of 56
8000020680 BAL, en
Protect 5.31/xxx-480-220-120 10 kVA - 120 kVA
The cables are connected as follows:
• Open the control cabinet door.
• Remove the connection cover from the terminals.
• Insert the cables to be connected into the UPS from below or from
the rear. Cables coming from above are routed down next to the
UPS.
• Secure the cables to the respective copper rails by securing the
cable lugs (refer to Figure 14 and 15) using a spanner.
• Secure the protective earth conductors (PE) to the designated
unit frames.
• A shielded battery line may have a favourable effect on the EMC.
For this purpose, connect the shield of the battery line to the
PE connection next to terminal strip X2 using the shortest
possible route.
• Secure the cables for strain relief on the cable clamp rail.
• Check to ensure that the cables are secured correctly and tighten
the fixing bolts if necessary.
• Check the cables for correct polarity and correct phase sequence.
• Remove any cable debris, tools, bolts, etc. from the connection
panel.
• Replace the connection cover.
6.3
Connection of the Control and Signal Lines
The control and signal lines for the remote signalling PCB are
connected to the terminals using a 3 mm screwdriver. Refer to Figure
21 for the connection.
Shielded control and signal lines may have a favourable effect on
the EMC. For this purpose, connect the shield of the lines to the
terminal unit. Additionally, the screen can also be connected to the
PE connection provided on the control unit pivot plate.
Page 28 of 56
8000020680 BAL, en
Protect 5.31/xxx-480-220-120 10 kVA - 120 kVA
6.4
Connection Cross Sections and Fuse Protection
Layout of cross sections in acc. with
DIN 0298, Part 4, Table 3
Laying type B1/B2
1
Rectifiers, input
Rectifier fusing in A
X1
2
Cross section in mm²/pole *1
min.
max
3
SBS circuit input
SBS fusing in A
X4
4
Cross section in mm²/pole *1
min.
max
5
Load output
Load output fusing in A
X3
max.
6
Cross section in mm²/pole
min.
max.
7
Remote signalling
X12
Cross section of the signal line
in mm²/pole
max..
Type rating in kVA
10
20
30
40
60
80
100
120
20
40
63
80
125
160
200
250
10
2x95
10
2x95
16
2x95
25
2x95
50
2x95
125
250
315
400
630
35
2x95
70
2x95
2x50
2x95
2x70
2x95
4x50
4x95
40
63
100
125
200
35
2x95
95
2x95
2x70
2x95
2x95
2x95
70
95
2x50
2x240 2x185 2x185
800
1000
3x120 4x150 4x240
3x240
250
315
9
Battery connection
Battery fusing in A
X2
Cross section in mm²/pole
min.
max.
Table 2
0,2 - 2,5
50
100
160
200
315
400
10
2x95
25
2x95
50
2x95
95
2x95
2x50
2x95
2x95
2x240
Connection cross sections and fuse protection
*1
i
Laying of the PE conductor in accordance with VDE 0100 T540,
Table 6
NOTE:
The cable clamp rail is located 185 mm above the ground.
Observe the bending radius!
(With one bend: radius = 10 x diameter)
Page 29 of 56
400
2x150 3x120 4x150 4x240
4x95 3x240
Battery
8
1250
8000020680 BAL, en
Protect 5.31/xxx-480-220-120 10 kVA - 120 kVA
7
Start-Up
The start-up procedure is the same for the various UPS versions from
10 kVA to 80 kVA. Prior to start-up, ensure that the preset unit
specifications match the battery specifications.
For parallel systems, see description of "Parallel Operation"!
i
NOTE:
The start-up instructions of the battery manufacturer must be
complied with. Any necessary parameter modifications must be
made by our service personnel or via the DOU.
A phase-rotation indicator and a voltmeter are required for the work
that follows.
CAUTION:
When the mains is connected, potentially fatal voltages are
applied to the terminals.
Always observe the safety regulations!
Starting the UPS (see also Figure 3)
7.1
Preparing Start-up of the UPS (Individual Unit)
Step
Action
1
Q1 and battery isolator (external) to the "OFF" position.
2*
Q29 internal option set to position "2" manual bypass.
3
Remove connection cover.
4
Connect the mains voltage for the rectifier circuit and SBS circuit.
5
Measure the mains voltage at terminal X1 (outer conductor/outer
conductor). The voltage should be 400 V.
Measure the mains voltage at terminal X4 (outer
conductor/neutral conductor). The voltage should be 230 V.
6
Check the rotating field on terminal X1. L1, L2 and L3 clockwise
rotation.
7
Switch off the mains voltage for the rectifier circuit and
SBS circuit.
8
Eliminate any errors if necessary and repeat the steps.
9
Replace the connection cover.
* Step only required when Q29 is installed
Table 3 Preparing start-up of the Protect
Page 30 of 56
8000020680 BAL, en
Protect 5.31/xxx-480-220-120 10 kVA - 120 kVA
7.2
Starting up the UPS (Individual Unit)
Step
Action
DOU
LED
Display
1
Q1 and battery isolator (external) to the "OFF" position.
2*
Q29 (internal option) to position "2" service mode.
3
Switch on mains voltage for rectifier and SBS circuits. Wait Red/yellow/green Self-test
until the self-test finishes.
continuously
4*
Q29 (internal option) to position "1" inverter operation.
5
The loads are supplied by the SBS.
6
When starting up the unit for the first time, select the dialog
language of the DOU.
7
Q1 to the "ON" position. The rectifier starts automatically.
The DC voltage increases.
8
The DC voltage reaches its final value and the inverter is
supplied with power.
9
Check voltage values and polarity at the battery isolator.
10
Battery isolator (external) set to "ON".
The batteries are charged.
11
Switch on the inverter using the "∼I" key on the DOU.
12
The AC voltage reaches its final value.
13
Following synchronisation with the SBS circuit, the system
is switched over from SBS operation to inverter operation
and the loads are supplied with power.
14
Connect the loads.
Green and yellow
flash
Main menu operating display
Yellow OFF
DC symbols OK
INV symbol
flashes
Green ON
Power flow
display via
the INV
* Step only required when Q29 is installed
Table 4 Starting up the Protect
Page 31 of 56
8000020680 BAL, en
Protect 5.31/xxx-480-220-120 10 kVA - 120 kVA
8
Operation
8.1
Disconnecting the UPS (Individual Unit)
ATTENTION:
Only switch off the UPS in an absolute emergency by switching
off the rectifier circuit and SBS circuit in their distribution! In
addition, the inverter must be switched off using the remote OFF
contact. The external battery isolator must be opened to
completely disconnect the unit from the power supply.
To restart the system, proceed as described in Chapter 7.
Proceed as described below to disconnect the UPS from the power
supply (see also Figure 3).
Step
Action
DOU
LED
1
Switch off the INV using the "∼0" button on the DOU and
confirm. The SBS circuit is automatically activated.
Green flashes
2
Switch off the REC using the "=0" button on the DOU and
confirm.
Green and yellow
flash
3*
Q29 (internal option) to position "2" service mode.
Manual bypass is activated. The SBS is still connected to
mains voltage.
4
Battery isolator (external) set to "OFF".
5
Q1 to the "OFF" position. The REC circuit is switched off.
6
Q29 (internal option) to position "3" manual bypass.
SBS mains is switched off.
Display
Manual bypass
symbol
Red, green and
yellow flash
* Step only required when Q29 is installed
Table 5 Disconnecting the Protect
CAUTION:
Even if disconnected, the UPS can still be live due to charged
capacitors and connected remote signals.
Observe the safety instructions!
Page 32 of 56
8000020680 BAL, en
Protect 5.31/xxx-480-220-120 10 kVA - 120 kVA
8.1.1
Restarting after Disconnection (Individual Unit)
Proceed as described in the following table to restart the UPS after it
has been disconnected from the power supply.
Step
Action
DOU
LED
Display
1
Q1 and battery isolator (external) set to "OFF" position.
2*
Q29 (internal option) set to "3" manual bypass
(load supply via manual bypass).
3
Connect the mains voltage for the rectifier circuit and
SBS circuit.
4*
Q29 (internal option) set to position "2".
Red/yellow/
green
continuously
5
The SBS is starting up.
Green and yellow Main menu flash
operating display
6*
Only if green LED flashes and SBS symbol is OK, Q29
(internal option) in position "1" inverter operation.
The loads are supplied by the SBS.
7
Q1 to the "ON" position. The rectifier starts automatically.
The DC voltage increases.
8
The DC voltage reaches its final value and the inverter is
supplied with power.
9
Battery isolator (external) set to "ON".
The batteries are charged.
10
Switch on the inverter using the "∼I" key on the DOU.
11
The AC voltage reaches its final value.
12
Following synchronisation with the SBS circuit, the system
is switched over from SBS operation to inverter operation.
13
The loads are supplied by the INV.
Yellow ON
Self-test
DC symbol OK
INV symbol
flashes
Green ON
Power circuit
display via INV
* Step only required when Q29 is installed
Table 6 Restarting after disconnection
8.2
Shutting Down the UPS
If it is necessary to shut down the UPS, the system must be
disconnected from the power supply as described in Chapter 8.1.
In addition, the mains supply must be disconnected from the
REC circuit and the SBS circuit.
CAUTION:
Even when shut down, the UPS can still be live due to charged
capacitors. Discharge the capacitors.
Observe the safety instructions!
Page 33 of 56
8000020680 BAL, en
Protect 5.31/xxx-480-220-120 10 kVA - 120 kVA
To restart the UPS after shutdown, proceed as described in
Chapter 7.
8.3
Emergency Shutdown
Emergency shutdown is available as an option and mainly serves to
disconnect the loads from the power supply via an external contact.
The exact design of the emergency shutdown depends on customer
requirements.
i
8.4
NOTE:
For more information, please refer to the relevant operating
instructions.
UPS Fuses
The fuses, fuse ratings and protected components can be found in the
following table (see also Figure 3, Position 11).
Item
10-40 kVA (value)
Protected components
F1 to F10
0.4 A (fast)
Fans M1 to M10, depending on type
F13
1 x 5 A (fast)
L1
Actual SBS mains voltage
F14
F15
F16
3 x 5 A (fast)
L1
L1
L1
Actual load voltage
F17
F18
2 x 5 A (fast)
L1
L1
F20
F21
F22
3 x 5 A (fast)
L1
L2
L3
Actual REC mains voltage
F24
F25
2 x 2 A (fast)
(+)
(–)
DC intermediate circuit
REC control unit supply
F26
F27
2 x 2 A (fast)
(–)
(+)
DC intermediate circuit
INV control unit supply
F28
2 A (fast)
Supply to options
F31
F32
F33
3 x 5 A (fast)
L1
L2
L3
Actual INV voltage
Supply
Rectifier interface
Table 7 Fuses in the Protect 5. 31/xxx
Page 34 of 56
8000020680 BAL, en
Protect 5.31/xxx-480-220-120 10 kVA - 120 kVA
9
Graphical Display and Operation Unit
9.1
General Information
The graphical display and operation unit (DOU) is integrated in the
front of the UPS housing. It serves to signal and display UPS unit
data and to control and parameterise the UPS system. The DOU
consists of a display unit with 3 LEDs, a graphical LCD and an
operating panel with 5 keys.
The global unit status can be read from the 3 LEDs. An acoustic
signal generator stresses the urgency of critical system statuses.
The graphical LCD shows system statuses and measured values
using symbols and plain language. The unit can be controlled and
parameterised using menus which are protected by a password.
The DOU is operated using 4 display keys, to which several functions
are assigned, and one ENTER key. The currently active key functions
are shown on the LCD as symbols.
2
1
3
4
Figure 16 DOU
1
2
3
4
9.1.1
LEDs: Red, yellow, green (from top to bottom)
Graphical display (LCD)
4 general function keys
ENTER key
Signalling
LEDs:
Red, flashing:
Yellow, flashing:
System fault => Service required
Self-acknowledging faults/messages,
extraordinary system statuses
Green, flashing:
The load is supplied by the bypass
circuit
Green, permanently ON: The load is supplied by the inverter
Acoustic signal generator:
Signal generator ON:
Urgent messages and system faults
Page 35 of 56
8000020680 BAL, en
Protect 5.31/xxx-480-220-120 10 kVA - 120 kVA
9.1.2
Keyboard Operation
You can use the ENTER key to open and close submenus and to
acknowledge control functions and parameters.
The 4 display keys are assigned to different functions. The current
key functions are represented as symbols which can be found in a
small framed area on the right-hand side of the LCD.
In the “operating display” and in the “system”, you can switch the
converters on and off using the general keys. The key symbols in
the menu indicate the control functions which are currently available.
You can only switch off the rectifier in the “operating display” when
the inverter is switched off and while a general control is enabled in
the “system”. If a switch-off procedure has been initiated, you must
confirm it in the safety routine, so that the unit cannot be inadvertently
switched off. The general control of the power converters can be
blocked and protected with a password.
If a unit fault occurs, you must refer to the “system” where the
cause is specified. After eliminating the cause, you must
acknowledge the fault in the menu. You can then switch the
individual power converters back on.
You can acknowledge the acoustic signal generator using the
keyboard. On the LCD operating display you will find a special
acknowledgement key represented by the symbol of a loudspeaker.
In all other menus, press any key (even a key without function) to
acknowledge. If the number of messages or faults increases, the
acknowledgement is cancelled. You can generally block both the
acoustic signal generator from notifying you of faults and the clicking
sound when you press a key.
Page 36 of 56
8000020680 BAL, en
Protect 5.31/xxx-480-220-120 10 kVA - 120 kVA
Possible symbol keys and their function:
Switch off inverter
Switch on inverter
Switch off rectifier
Switch on rectifier
Switch off booster
Switch on booster
Switch off charger
Switch on charger
Acknowledge acoustic signal generator
Cursor / Value / Scroll upwards
Cursor / Value / Scroll downwards
Cursor to the right
Cursor to the left
Status / Measured values menu
System is blocked
Acknowledge fault
Module selection
Help menu
No function
Page 37 of 56
8000020680 BAL, en
Protect 5.31/xxx-480-220-120 10 kVA - 120 kVA
9.2
Start-Up
Following the power-up reset, the DOU performs a self-test. Data is
loaded from the power converters after the test has been completed
successfully. The LEDs light up sequentially during this phase. A start
screen appears on the LCD, and a status bar indicates the duration of
the start-up process.
When you start up the DOU for the first time (commissioning),
you must select the menu language using the general keys "<" and
">". The available languages are indicated using their respective
country-specific abbreviation (car number plate). The language
currently selected is displayed on a black background. You activate
the selected language by pressing the ENTER key, and the next
menu opens. In order to comply with international requirements, all
menus up to the language selection are displayed in English.
When you start up the UPS for the first time (commissioning),
depending on the UPS type, the language selection menu is followed
by several other menus where you have to set parameters for the
UPS circuit and the installed battery. Step-by-step, you are prompted
to parameterise the unit and carry out switching operations until the
system is in normal operation.
During subsequent UPS start-ups, you can initiate the procedure
used for the first start-up (commissioning) manually to modify the set
parameters. Otherwise, the start-up process is shortened.
9.3
Menu Structure
9.3.1
Menu Tree
Figure 17 Menu tree
Page 38 of 56
8000020680 BAL, en
Protect 5.31/xxx-480-220-120 10 kVA - 120 kVA
9.3.2
Main Menu
Current cursor position
Operating display
Settings
Information
Service
Thu 01-Jan-04
Fig. 18
Blocking
Fault history
00:00
Main menu
After start-up, the “main menu” represents the highest menu level,
which means that you can open further submenus from here, and you
can always return to this level.
The “main menu” has the typical menu structure.
Additional submenus are displayed on the left-hand side. All
selectable submenus are displayed in a frame. A black background
indicates the current cursor position. The bottom line displays the
current real time, which can be adjusted using the "Settings" menu.
On the right-hand side, the current key function is represented as a
symbol which is displayed in a small framed area. You can move the
cursor using the "<" and ">" keys to select the corresponding
submenu. Use the ENTER key to activate a selected submenu.
Using the "?" key, you can call up the “Help” menu, which
describes the various keyboard symbols.
9.3.3
Operating Display
You can call up the operating display from the “main menu”. If the
DOU is not used for a certain period of time, the system
automatically switches back to the operating display and the LCD
background illumination is switched off. If you have started specific
processes, such as a battery test, in a menu, this menu remains
active until the process has been completed.
Load L1-L3
[%]
110 100
10
Batt.
[min]
10
Figure 19 UPS operating display (normal operation)
Page 39 of 56
8000020680 BAL, en
Protect 5.31/xxx-480-220-120 10 kVA - 120 kVA
The operating display consists of 3 parts:
On the left-hand side, the unit status is shown in a pictogram. The
individual components of the unit are represented here as symbols.
The respective symbol flashes in the event of messages or faults in a
component. In addition, the current power circuit is indicated via a bar
diagram.
The centre part displays the most important measured values of
the unit in a digital as well as an analogue format. These values differ,
depending on the unit type. In this example, the capacity utilisation of
the individual phases (in this case, 3 phases) in percent and the
standby time are displayed as the most important measured values of
the unit.
The current display key assignment is displayed on the righthand side. Here you can switch the power converters on or off
depending on the unit status, as long as the operation has not been
blocked. You can also acknowledge the acoustic signal generator in
this area in the event of messages or faults. Use the bottom key with
the measuring device icon to call up menus with detailed information
on status and measured values.
Load L1-L3
[%]
0
0
0
Batt.
[min]
10
Figure 20 Operating display of the UPS with activated manual bypass
Using the manual bypass switch (option), you can disconnect the
unit from the load. The load is then supplied directly by the mains.
This state is shown on the display.
9.3.4
Status/Measured Values
You can access the Status/Measured values menu from the
operating display using the bottom key with the measuring device
icon. In this menu, you can select the statuses and measured values
of the circuits, battery, loads or communication options. The
"System" submenu displays the status of the UPS and the
individual components. If a fault occurs in a UPS component, you
can call up a detailed fault description in a submenu. After the
fault has been rectified, you must acknowledge the fault in this
menu.
If optional communication PCBs are installed in the unit, the "COM
interface" or "Remote signals" submenu displays the status of the
individual interfaces. Press the ENTER key in the respective
submenu to return to the “selection” menu.
Page 40 of 56
8000020680 BAL, en
Protect 5.31/xxx-480-220-120 10 kVA - 120 kVA
9.3.5
Blocking
You can call up the “Blocking” menu from the “main menu”. After
you have entered the current password, you can “block operation”
of the control systems (switching on/off and fault
acknowledgement). The password must be entered digit by digit and
then acknowledged using the ENTER key.
The password set ex works is: 1201.
In menus where switching operations are normally possible, blocking
is indicated by a key.
9.3.6
Fault History
You can call up the “Fault history” menu from the “main menu”.
The UPS has an integrated data logger that records the fault history
of the circuits, the battery and the UPS system. You can display
the 20 most recent faults as of the current date or as of a specific
date.
9.3.7
Settings
You can call up the “Settings” menu from the “main menu”. Here
you can set the parameters
•
•
•
•
LCD contrast
Language
Real time
Acoustic signal generator for fault signalling and keyboard
operation
in the respective submenus.
9.3.8
Information
You can call up the “Information” menu from the “main menu”.
Using this menu, you can call up information about the unit type, the
firmware versions and the available communication options.
9.3.9
Service
You can call up the “Service” menu from the “main menu”. After
you have entered the current password, you can select submenus
where you can set parameters for the UPS and for the battery as well
as manipulate the system's operating statuses. The password must
be entered digit by digit and then acknowledged using the ENTER
key.
The password set ex works is: 1201.
The following abbreviations are used in the menus:
Tri
=
Trickle charging
Equ =
Equalising charging
Cha =
Charging
DGS =
Diesel Generator Set charging
Sta
=
Start-up charging
Page 41 of 56
8000020680 BAL, en
Protect 5.31/xxx-480-220-120 10 kVA - 120 kVA
Menus for changing the operating statuses:
• In the “Rectifier operating mode” menu, you can change the
charge status of the rectifier (charger). The current charge status
is displayed.
• In the “Battery test” menu, you can initiate different battery tests,
depending on the test implemented. The status and measured
values of the battery are displayed during the test.
See Appendix, Battery Tests.
• In the “Maintenance” (with parallel systems) menu, you can
disconnect units from the complete interconnection of a parallel
system for repair or maintenance purposes without causing the
remaining units to shut down due to fault.
See separate operating instructions for parallel operation.
Menus for setting parameters:
• In the “Battery values” menu, you can set the parameters of
your battery for the charging procedure and for tests.
See Appendix, Battery Data.
• In the “BTD values” menu, you can set the Battery - Time of
Discharge parameters of your battery.
See Appendix, Battery Data.
• In the “Password” menu, you can set the password for blocking
operation and for setting parameters. A range of 0000 to 9999 is
possible.
ATTENTION:
Keep the password in a safe place! If you have forgotten the
password, the DOU must be reset at the customer's expense!
•
In the “Remote signals” menu (option), you can program up to 3
general signals (IN1-3) for the max. 4 optocoupler inputs of the
remote signalling expansion boards, if included. The signal name
(IN1-3) cannot be changed. The DOU displays the signal status
below the Status/Measured values menu. An active signal is also
indicated via the yellow LED, the acoustic signal generator, and
communicated to the connected IT system.
9.3.10 Help
You can call up the “Help” menu from the “main menu” using the
"?" key. This enables you to look up the meaning of the keyboard
symbols.
Page 42 of 56
8000020680 BAL, en
Protect 5.31/xxx-480-220-120 10 kVA - 120 kVA
10
Annex
10.1
Battery Handling using the Graphical DOU
10.1.1 Charging the Battery
The battery is charged according to DIN 41772 in accordance with a
CVCC curve. This ensures that the battery is charged in the shortest
possible time and also prevents overcharging.
Battery charging is electronically controlled and monitored. Operating
faults are registered, causing the charging process to be interrupted.
Charging:
After a mains failure, for example, the battery is charged with a
constant current (e.g. 20 A/100 Ah). When the charging voltage is
reached (e.g. 2.35 V/cell for lead-acid cells), the control electronics
maintains this voltage constant at ± 1% with decreasing current.
When the calculated charging time has elapsed, the battery is
switched over to trickle charging.
Trickle charging:
When the electronically controlled charging has been carried out, the
control unit switches over to trickle charge voltage (e.g. 2.27 V/cell).
Further operating modes are available for special treatment of the
battery, providing they are implemented in the UPS. These can be
manually activated via the graphical DOU in the "SERVICE / REC
OPERATING MODE" menu.
The works setting of the characteristic values can be changed via the
DOU in the menu "SERVICE / BATTERY VALUES". This allows ideal
adaptation to the existing battery.
Equalising charging:
Equalising charging is carried out in accordance with a CVCC curve
and is automatically switched back to trickle charging after 8 hours,
for example. As a standard, the characteristic curve values
correspond to the charge values. The charging voltage can be
adjusted separately.
Start-up charging:
Start-up charging is carried out in accordance with a CVCC curve and
is automatically switched back to trickle charging after 8 hours, for
example. Charging current and charging voltage can be adjusted
separately from the other characteristic curves.
Page 43 of 56
8000020680 BAL, en
Protect 5.31/xxx-480-220-120 10 kVA - 120 kVA
10.1.2 Battery Data
Depending on the system configuration, different battery parameters
can be set in the "SERVICE / BATTERY VALUES" menu. The
parameters for the individual battery tests are also set in this menu.
Please refer to the data sheets of the battery manufacturer for the
individual values to be set.
The following abbreviations are used in the menus:
Tri
=
Trickle charging
Equ =
Equalising charging
Cha =
Charging
EPS =
Charging with emergency power supply operation
Sta
=
Start-up charging
The parameters can be set within restricted ranges. This range
depends on the unit type. The unit type can be displayed on the DOU
in the "Information" menu.
The max. values for the number of cells and the voltages can differ
from the values mentioned above because a max. total battery
voltage must not be exceeded. Parameters "Final disch. voltage/cell",
"Max. disch. time" and "Disch. current" refer to the battery tests.
The "Disch. time" depends on the battery test.
List of all possible parameters and their setting ranges:
Protect-5:
Type
(Number of) cells
Cap(acity)
U Tri/cell
U Cha/cell
U Equ/cell
U EPS/cell
U Sta/cell
I(bat) limit(ation)
Tri/Cha/Equ of Inom
I(bat) limit(ation) Sta
of Inom
(Charging) time Equ
(Charging) time Sta
Final disch. voltage/cell
(max. bat. test) time
Disch. current [%] of xA
Pb
90 – 120
NiCd
155 – 190
0 – 9999 Ah
2.13 – 2.32 V/cell
1.33 – 1.50 V/cell
2.23 – 2.43 V/cell
1.37 – 1.70 V/cell
2.23 – 2.58 V/cell
1.37 – 1.75 V/cell
1.90 – 2.32 V/cell
1.10 – 1.50 V/cell
1.00 – 2.86 V/cell
0.50 – 1.95 V/cell
1 – 110% of Inom
1 – 110% of Inom
1 – 1999 min
1 – 1999 min
1.6 – 2.0 V/cell
0.65 – 1.20 V/cell
1 – 1200 min
5 – 90% of Inom
The Battery Time of Discharge parameters can be set using the
"SERVICE / BTD VALUES" menu.
Please refer to the data sheets of the battery manufacturer for the
individual values to be set.
Using the battery table, the discharge powers or discharge currents of
two different standby times are determined for a final discharge
voltage of approx. 80% of the nominal battery voltage (1.6 V/cell for
lead-acid batteries) depending on the unit type. To do this, it is best to
select the following values:
One pair of values lies in the range of the nominal standby time of the
system, and another at a standby time which is three times the
nominal standby time.
Page 44 of 56
8000020680 BAL, en
Protect 5.31/xxx-480-220-120 10 kVA - 120 kVA
Protect-5:
The standby time is determined by calculating the balance of the
battery currents.
Parameters to be set and their setting ranges:
Discharge currents
Corresponding discharge times
I1: 1 – 9999 A
t1: 1 – 999 min
I2: 1 – 9999 A
t2: 1 – 999 min
Moreover, the set values must fulfil the following conditions:
t2 / I1
t2
I1
>
>
>
t1 / I2
t1
I2
ATTENTION:
If a communication error with the respective control system occurs
during the saving process, the setting procedure must be repeated.
10.1.3 Battery Tests
The implemented battery tests depend on the unit type and can be
started and cancelled via the "SERVICE / BATTERY TEST" menu of
the DOU. Status messages and measured values of the battery
branches are shown in the display. The yellow LED signals an
ongoing test. The tests are either completed successfully, completed
with an error or cancelled manually.
The test parameters are set using the "SERVICE / BATTERY
VALUES" menu. This menu allows the operator to set the discharge
current, the maximum discharge time and the minimum battery
voltage for each type of test.
Prerequisites for initiating the tests:
The UPS is in normal operation (no fault is present)
• The rectifier is switched on.
Note/Connection is possible using the DOU
• The battery charger is running in trickle charge mode.
Note/Switchover is possible using the DOU
• The INV is running.
Note/Connection is possible using the DOU
• The battery is installed.
• The last test was conducted at least 1 minute previously
Page 45 of 56
8000020680 BAL, en
Protect 5.31/xxx-480-220-120 10 kVA - 120 kVA
10.1.4 Possible Battery Tests
Test of the battery charging circuit:
This brief test checks the connected battery by lowering the voltage
and carrying out a current analysis. Line interruptions or defective
fuses in the battery circuit are also detected. With a battery present,
the test takes approx. 1 second. It is carried out automatically each
week by the rectifier control unit.
Capacity check
This operating mode allows a check of the battery status by drawing
constant current from the battery. For this, it is necessary to have an
inverter load that is larger than the discharge current.
Before the test, the data of the last test is displayed together with the
date and time. The values at the end of the test are retained after a
current test.
ATTENTION:
As the battery is partly or completely discharged, the full standby
time of the UPS is not available in the event of a mains failure.
Capacity test
The capacity test allows the availability of the battery to be tested
using the currently available inverter load. This involves reducing the
DC voltage of the rectifier, so the voltage should be supported by the
battery voltage. The battery supplies the full current into the inverter.
This simulates a rectifier circuit failure. In the event of a battery fault,
the inverter continues to be supplied by the rectifier.
Before the test, the data of the last test is displayed together with the
date and time. The values at the end of the test are retained after a
current test.
ATTENTION:
As the battery is partly discharged, the full standby time of the
UPS is not available in the event of a mains failure.
Page 46 of 56
8000020680 BAL, en
Protect 5.31/xxx-480-220-120 10 kVA - 120 kVA
11
Interfaces
11.1
Remote Signalling
The remote signalling PCB consists of a remote signalling master
board A12 and an expansion board A13, the contacts of which are
connected to terminal block X12.
The remote signalling boards have the following inputs and outputs:
Inputs (via optocoupler):
• INV remote shutdown
Outputs (via relay contacts):
• Inverter operation
• Mains operation
• Rectifier fault (REC or REC circuit fault)
• Battery undervoltage
• Collective fault (REC, INV, SBS or battery fault)
• SBS blocked
• Fan fault
• REC circuit fault
i
NOTE:
The maximum load for the relay contacts is 250 V / 8°A AC.
Assign.
A12-X3 X12
1
2
19
20
3
21
4
5
22
23
6
7
8
24
25
26
9
27
10
11
12
28
29
30
Meaning
Assign.
A12-X4 X12 Meaning
1
2
3
Inverter
operation
16
17
18
Collective
fault
Mains
operation
Rectifier
fault
Battery
undervoltage
Assign.
A12-X5 X12 Meaning
1
52
2
53
Inverter
remote
h td
Figure 21 Terminal assignment of the remote signalling master board A12
i
NOTE:
The A13 and A14 expansion board can be programmed. See the
technical data sheet for terminal assignment.
The maximum input voltage for terminal X5 is 24 V AC/DC.
When a signal is received, the contacts on X3 close on the two
contact points with the lower numbers on the connection terminal.
The contacts on X4 close on the two connection terminals with the
higher numbers (fail-safe principle).
The control and message lines are routed to the bottom using the
cable duct in the centre of the unit.
Page 47 of 56
8000020680 BAL, en
Protect 5.31/xxx-480-220-120 10 kVA - 120 kVA
Terminal
strip X12
from
Designation
Remark
1
L1 load
A37 -> option
2
L2 load
A37 -> option
3
L3 load
A37 -> option
4
DC voltage (+)
A38 -> option
5
DC voltage (-)
A38 -> option
6
Neutral conductor
A37 -> option
7, 8, 9
A16-X10:2,3
PE conductor (9) feedback
A37 -> option
10, 11, 12
A50-X8:1,3
PE conductor (12) feedback
A38 -> option
13, 14, 15
Q29
Manual bypass activated (13,14)
Standard A12
16, 17, 18
A12-X4:1,2,3
UPS fault
Standard A12
19, 20, 21
A12-X3:1,2,3
INV operation
Standard A12
22, 23, 24
A12-X3:4,5,6
Mains operation
Standard A12
25, 26, 27
A12-X3:7,8,9
REC fault
Standard A12
28, 29, 30
A12-X3:10,11,12
Battery undervoltage
Standard A12
31, 32, 33
A13-X3:1,2,3
Signal – K26
A13 -> option
34, 35, 36
A13-X3:4,5,6
Signal – K27
A13 -> option
37, 38, 39
A13-X3:7,8,9
Signal – K28
A13 -> option
40, 41, 42
A14-X3:1,2,3
Signal – K29
A14 -> option
43, 44, 45
A14-X3:4,5,6
Signal – K30
A14 -> option
46, 47, 48
A14-X3:7,8,9
Signal – K31
A14 -> option
49, 50, 51
A23-X1:1; X1:2
24 V AC (49,51)
A23 -> OPTION
52, 53, 54
A12-X5:1,2; A13-X4:1
INV remote shutdown (52,53); OPT2 (54)
Standard A12, A13
55, 56, 57
A13-X4:2; A13-X4:3,4
Signal – OPT2 (55); OPT3 (56,57)
A13
58, 59, 60
A14-X4:1,2; A14-X4:3
Signal – OPT4 (58,59); OPT5 (60)
A14 -> option
61, 62, 63
A14-X4:4
Signal – OPT5 (61); NC (62,63)
A14 -> option
Table 8 Assignment of terminal strip X12
11.2
Serial Interface
Two separate potential-free serial interfaces are provided to establish
IT connections.
These are occupied with the AEG protocol CBSER. Optionally,
various protocols can be selected for the second interface. These are
enabled upon purchase of a licence. A selection of the available
protocols can be obtained from your UPS supplier.
The interface is a separate PCB and is located on the outside of the
pivot plate next to the remote signalling unit.
For the implementation of special customer software as well as for
integration into special bus systems for visualisation using protocol
converters, a detailed protocol description is available from
AEG Power Supply Systems GmbH.
Page 48 of 56
8000020680 BAL, en
Protect 5.31/xxx-480-220-120 10 kVA - 120 kVA
12
Maintenance and Repairs
12.1
Diagnostic Functions
The comprehensive diagnostic functions implemented in the UPS not
only increase its operational reliability considerably, but also reduce
the time required for maintenance work and troubleshooting to a
minimum.
The UPS is equipped with the following diagnostic functions, some of
which are optional:
Self-diagnosis:
This is activated when the system is switched on. Internal auxiliary
programs monitor and signal faults, including those from the bus
system, the control PCBs or the sensors.
Data logger:
Specified measuring data and parameters from the REC, INV and
SBS are stored in the event of a fault. This data is read out and
evaluated as required.
12.2
Repairs
CAUTION:
Some repair work, e.g. replacing a fan fuse, can also be
performed when the system is in operation and live.
Always observe the safety regulations!
ATTENTION:
Do not switch the battery under load!
Page 49 of 56
8000020680 BAL, en
Protect 5.31/xxx-480-220-120 10 kVA - 120 kVA
12.2.1 Fault Table
Faults that occur are displayed on the DOU in plain text. Some faults can be
located and eliminated quickly using the following table.
Fault
Q1 triggered.
Possible cause
Earth fault or short circuit
on the battery side.
REC does not work.
Q1 not in "ON" position.
F20 to F22 defective
F31 to F33 defective.
Fault in the SBS circuit.
SBS does not work.
INV does not work.
No load voltage.
Faulty connection to
battery.
Fan does not work.
F13 to F16 faulty.
INV is not switched on.
F26 and F27 faulty and/or
F17 to F18 faulty.
No supply to INV
Battery voltage is outside
the tolerance range.
Load fuse faulty.
Battery isolator (external)
in the "OFF" position.
F24 to F25 faulty.
Fan fuse faulty.
Loose contact in the plug
connection.
Fan faulty.
UPS overload.
Load consumption too
high. System automatically
switches over to the SBS
circuit after one minute.
Remedy
Repair the system (renew
defective fuse) and restart it as
described in Chapter 7.
If Q1 triggers again, contact the
AEG service department.
Switch on Q1.
Replace the faulty fuses.
Replace the faulty fuses.
Check the SBS circuit.
Replace the faulty fuses.
Switch on the INV with S1 on
DOU.
Replace the faulty fuses.
Check whether Q1 is in the "ON"
position.
Check voltage at X2.
Measure output voltage at X3.
Check external load fuses.
Switch on battery isolator
(external) (refer to start-up), renew
defective fuses.
Renew the respective fuse in acc.
with Chapter 8.
Unlock and relock the respective
fan connector on top of the
cabinet several times.
Renew the fan in accordance with
chapter 12.
Reduce the load.
Table 9 Fault table
i
NOTE:
If the rectifier is faulty and the inverter is switched off, the battery
continues to be discharged by the internal power supply for the
REC and INV section which is connected to DC voltage
(approx. 50 W). The battery must be disconnected by opening the
battery isolator to prevent it from becoming fully discharged
(exhaustive discharge).
Page 50 of 56
8000020680 BAL, en
Protect 5.31/xxx-480-220-120 10 kVA - 120 kVA
12.2.2 Removing and Installing the Fan
CAUTION:
The fan can only be removed and installed by trained and
qualified personnel when the UPS is switched on.
Always observe the safety regulations!
Figure 22 Installing and removing the fan (sample model 60 kVA)
Figure 23 Fan distribution (example model 60 kVA) – (top view from front)
The defective fan is removed as follows (see Figure 23):
• Remove the corresponding fuse in acc. with Table 7.
• Unscrew the two fixing bolts on the fan cover grid and remove the
grid. Lift the fan until the fan connector is accessible.
• Unlock and disconnect the fan connector.
• Remove the fan.
Installing the fan:
• Fit the fan connector onto the appropriate connector section on
the UPS so that both connectors engage in place.
• Insert the fan, refit the fan cover grid and tighten the fixing bolts
using a torque spanner, 1.3 Nm.
• Reinsert the respective fuse.
• Check the correct functioning of the fan.
• The fault message disappears.
12.3
Maintenance
The Protect 5. 31/xxx is made up of state-of-the-art components
which are almost non-wearing. We do, however, recommend regular
Page 51 of 56
8000020680 BAL, en
Protect 5.31/xxx-480-220-120 10 kVA - 120 kVA
visual checks and functional tests of the unit to maintain its high
availability and operational reliability and also to check the battery
charge.
It is only possible for the UPS to reach its high degree of availability of
approx. 99.99% if any unit fault is eliminated within 24 hours. This
must be ensured by providing the necessary service work
(e.g. through maintenance contracts).
CAUTION:
Maintenance work must sometimes be performed when the UPS
is connected to the power supply. Ensure that the work area is
cordoned off and always observe the safety instructions!
The following maintenance work must be performed if no other
instructions are given by the battery manufacturer:
Task
Interval
Described in
Visual check
6 months
Chapter 12.3.1
Functional test
6 months
Chapter 12.3.2
Electrolyte level of the
batteries
3 months
Chapter 12.3.3
Battery compartment
Annually
Chapter 12.3.3
Fan replacement*
40,000 hours
Chapter 12.2.2
Table 10 Checklist for maintenance work
* Depends on the ambient conditions (observe the instructions of the
fan manufacturer).
12.3.1 Visual Checks
When visually inspecting the unit, check whether:
• there is any mechanical damage or whether foreign bodies can be
found in the system,
• any conductive dirt or dust has accumulated in the unit,
• accumulation of dust affects heat dissipation.
CAUTION:
The UPS must be disconnected from the power supply in
accordance with Chapter 8 and charged capacitors must be
discharged prior to carrying out the following work.
Always observe the safety regulations!
If large quantities of dust have accumulated, the unit should, as a
precaution, be cleaned using dry compressed air, in order to ensure
better heat dissipation.
The intervals at which visual checks should be performed are largely
determined by the site conditions.
12.3.2 Functional Test
The functional test of the UPS should be performed every six months
and include the following tasks:
Page 52 of 56
8000020680 BAL, en
Protect 5.31/xxx-480-220-120 10 kVA - 120 kVA
• Activate the manual bypass via Q29 in accordance with Chapter 8
Disconnect the UPS in accordance with Chapter 8 and check the
following functions when restarting the system:
• LEDs of the DOU
• Correct start-up of the rectifier and the inverter
• Functioning of the SBS control
• Check the output voltages of the rectifier and the inverter as well
as of the SBS and the battery charging voltage.
12.3.3 Checking the Battery
The battery charge is checked automatically once a week.
If the UPS is out of operation for a prolonged period, maintenancefree batteries, for example, must be recharged at three-monthly
intervals. Observe the instructions of the battery manufacturer!
Check the batteries in the battery compartment
CAUTION:
Acid fumes leaking from batteries in the battery compartment are
corrosive and can cause injury upon contact with the skin and
when inhaled.
The applicable protective measures must be observed in
accordance with the safety regulations of VDE 0510, Part 2.
If the electrolyte level of open batteries has dropped to the minimum
mark, the level must be topped up with distilled water in accordance
with DIN 43530, Part 4.
The battery must be kept clean and dry in order to prevent creepage
currents.
Only use pure water without additives for cleaning the plastic battery
components, especially the cell compartments.
The following values should be measured and recorded at threemonthly intervals:
• battery voltage,
• voltage of block batteries, and
• electrolyte temperature with open batteries.
The electrolyte density (only with open batteries) and voltage of all
block batteries must be measured and recorded annually. Screw
connections must be examined annually for tightness.
Checks must be carried out in accordance with DIN 43539 Part 1.
Special checks, e.g. in accordance with DIN VDE 0108, must also be
observed. Additional checks using automatic test equipment are not
permitted. These require the written approval of the battery
manufacturer.
i
NOTE:
If the battery voltage does not comply with the specifications and
the battery cannot be recharged satisfactorily, please contact the
AEG service department.
Page 53 of 56
8000020680 BAL, en
Protect 5.31/xxx-480-220-120 10 kVA - 120 kVA
13
Spare Parts and Customer Service
Despite using non-wearing components, we recommend stocking the
spare parts listed in Table 10. This will help to ensure permanent
operational availability of your UPS.
Item
Component
F1 to F10
Fuse, 2 A, slow-blow
F13 to F22
Fuse, 5 A, fast
F24 to F27
Fuse, 2 A, fast
F28
Fuse, 2 A, slow-blow
F31 to F33
Fuse, 5 A, fast
M1 to M10
Fans
K7
Contactor
Q1
Load interrupter switch
Q29
Uninterruptible changeover switch
Table 11 Spare part stocks
i
NOTE:
When ordering spare parts, please always state the designation
(item / component) and the unit number.
If the battery for the UPS system has been supplied by AEG Power
Supply Systems GmbH, the battery has been specially designed for
the Protect model. Use a comparable battery type when replacing the
battery!
We would like to draw your attention to the fact that spare parts not
supplied by us have neither been tested nor approved. Installation of
such spare parts can therefore have a detrimental effect on the
functional capability and passive safety of the system. We do not
accept any liability for any resulting damage.
Our customer service department will be pleased to send you a
complete spare parts list for your UPS.
Please contact the following address for help in this matter or if you
have any further questions or suggestions:
AEG Power Supply Systems GmbH
Emil-Siepmann-Straße 32
D-59581 Warstein
Germany
+49 (2902) 763 100
FAX:
+49 (2902) 763 645
E-mail: [email protected]
Page 54 of 56
8000020680 BAL, en
Protect 5.31/xxx-480-220-120 10 kVA - 120 kVA
14
Annex
Optional equipment is available for the Protect 5. 31/xxx:
OFF
X1 X2 X3 X4
Figure 24 PCBs on the control unit pivot plate (sample model 40 kVA)
Options:
Slot
Designation
A13
Remote signalling expansion board 1
A14
Remote signalling expansion board 2
A20
Parallel operation adapter
A23
Power supply unit 24 V AC
A25
SNMP adapter (RFC1628)
A30
Modem UPS
A28
Power supply unit 12 V DC
A54
Measuring amplifier for temperature-dependent charging
Standard scope of supply:
Slot
Designation
A12
Remote signalling master board
A29
CAN COM controller (CCC)
Table 12 Legend for Figure 24
Please see the enclosed technical data sheet for the optional printed
circuit boards and activated options installed in your unit.
Page 55 of 56
8000020680 BAL, en
Protect 5.31/xxx-480-220-120 10 kVA - 120 kVA
Figure 25 shows all the PCBs included in the scope of supply. These
are mounted on the control unit pivot plate behind a cover which can
be opened by loosening the fixing bolts.
When closing this pivot plate, ensure that no cables are pinched.
8
1
2
3
4
7
5
6
Figure 25 PCBs in the control unit pivot plate (sample model 40 kVA)
Item
Slot
Designation
1
A1-A80
Rectifier triggering
2
A1-A1
Inverter triggering
3
C42
Capacitor (number depending on capacity)
4
A17
A17-A1
Inverter interface
Inverter control
5
A50
A50-A1
Rectifier interface
Rectifier control
6
A16
A16-A1
SBS interface
SBS control
7
A91
Fuse protection and fan monitoring (front)
8
A1-A36
SBS triggering
Table 13 Legend for Figure 25
Page 56 of 56
8000020680 BAL, en