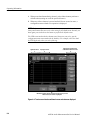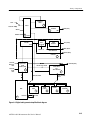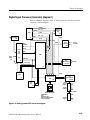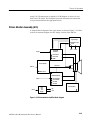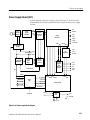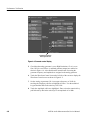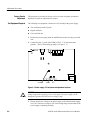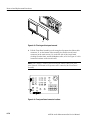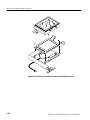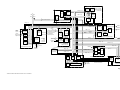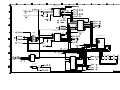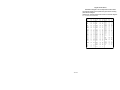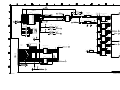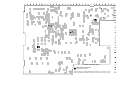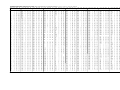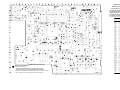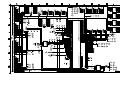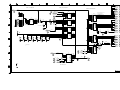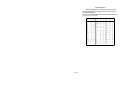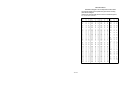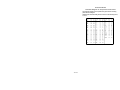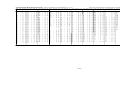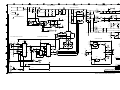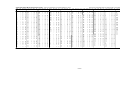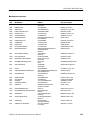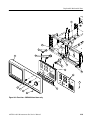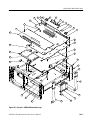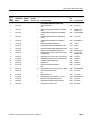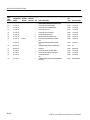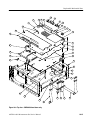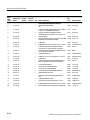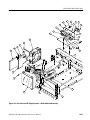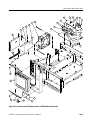
1
Service Manual AM700 Audio Measurement Set 070-9055-00 Warning The servicing instructions are for use by qualified personnel only. To avoid personal injury, do not perform any servicing unless you are qualified to do so. Refer to the Safety Summary prior to performing service. Copyright © Tektronix, Inc. All rights reserved. Tektronix products are covered by U.S. and foreign patents, issued and pending. Information in this publication supercedes that in all previously published material. Specifications and price change privileges reserved. Printed in the U.S.A. Tektronix, Inc., P.O. Box 1000, Wilsonville, OR 97070–1000 TEKTRONIX and TEK are registered trademarks of Tektronix, Inc. WARRANTY Tektronix warrants that this product will be free from defects in materials and workmanship for a period of one (1) year from the date of shipment. If any such product proves defective during this warranty period, Tektronix, at its option, either will repair the defective product without charge for parts and labor, or will provide a replacement in exchange for the defective product. In order to obtain service under this warranty, Customer must notify Tektronix of the defect before the expiration of the warranty period and make suitable arrangements for the performance of service. Customer shall be responsible for packaging and shipping the defective product to the service center designated by Tektronix, with shipping charges prepaid. Tektronix shall pay for the return of the product to Customer if the shipment is to a location within the country in which the Tektronix service center is located. Customer shall be responsible for paying all shipping charges, duties, taxes, and any other charges for products returned to any other locations. This warranty shall not apply to any defect, failure or damage caused by improper use or improper or inadequate maintenance and care. Tektronix shall not be obligated to furnish service under this warranty a) to repair damage resulting from attempts by personnel other than Tektronix representatives to install, repair or service the product; b) to repair damage resulting from improper use or connection to incompatible equipment; c) to repair any damage or malfunction caused by the use of non-Tektronix supplies; or d) to service a product that has been modified or integrated with other products when the effect of such modification or integration increases the time or difficulty of servicing the product. THIS WARRANTY IS GIVEN BY TEKTRONIX WITH RESPECT TO THIS PRODUCT IN LIEU OF ANY OTHER WARRANTIES, EXPRESSED OR IMPLIED. TEKTRONIX AND ITS VENDORS DISCLAIM ANY IMPLIED WARRANTIES OF MERCHANTABILITY OR FITNESS FOR A PARTICULAR PURPOSE. TEKTRONIX’ RESPONSIBILITY TO REPAIR OR REPLACE DEFECTIVE PRODUCTS IS THE SOLE AND EXCLUSIVE REMEDY PROVIDED TO THE CUSTOMER FOR BREACH OF THIS WARRANTY. TEKTRONIX AND ITS VENDORS WILL NOT BE LIABLE FOR ANY INDIRECT, SPECIAL, INCIDENTAL, OR CONSEQUENTIAL DAMAGES IRRESPECTIVE OF WHETHER TEKTRONIX OR THE VENDOR HAS ADVANCE NOTICE OF THE POSSIBILITY OF SUCH DAMAGES. Service Assurance If you have not already purchased Service Assurance for this product, you may do so at any time during the product’s warranty period. Service Assurance provides Repair Protection and Calibration Services to meet your needs. Repair Protection extends priority repair services beyond the product’s warranty period; you may purchase up to three years of Repair Protection. Calibration Services provide annual calibration of your product, standards compliance and required audit documentation, recall assurance, and reminder notification of scheduled calibration. Coverage begins upon registration; you may purchase up to five years of Calibration Services. Service Assurance Advantages H Priced well below the cost of a single repair or calibration H Avoid delays for service by eliminating the need for separate purchase authorizations from your company H Eliminates unexpected service expenses For Information and Ordering For more information or to order Service Assurance, contact your Tektronix representative and provide the information below. Service Assurance may not be available in locations outside the United States of America. Name Company Address City, State, Postal code Country Phone VISA or Master Card number and expiration date or purchase order number Repair Protection (1,2, or 3 years) Calibration Services (1,2,3,4, or 5 years) Instrument model and serial number Instrument purchase date Table of Contents General Safety Summary . . . . . . . . . . . . . . . . . . . . . . . . . . . . . . . . . . . . Service Safety Summary . . . . . . . . . . . . . . . . . . . . . . . . . . . . . . . . . . . . . Preface . . . . . . . . . . . . . . . . . . . . . . . . . . . . . . . . . . . . . . . . . . . . . . . . . . . xix xxi xxiii Key Features of the AM700 . . . . . . . . . . . . . . . . . . . . . . . . . . . . . . . . . . . . . . . . . Options . . . . . . . . . . . . . . . . . . . . . . . . . . . . . . . . . . . . . . . . . . . . . . . . . . . . . . . . . Standard Accessories . . . . . . . . . . . . . . . . . . . . . . . . . . . . . . . . . . . . . . . . . . . . . . Optional Accessories . . . . . . . . . . . . . . . . . . . . . . . . . . . . . . . . . . . . . . . . . . . . . . User-supplied Accessories . . . . . . . . . . . . . . . . . . . . . . . . . . . . . . . . . . . . . . . . . . Power Cord Options . . . . . . . . . . . . . . . . . . . . . . . . . . . . . . . . . . . . . . . . . . . . . . . Characteristics . . . . . . . . . . . . . . . . . . . . . . . . . . . . . . . . . . . . . . . . . . . . . . . . . . . 1–1 1–2 1–2 1–2 1–3 1–3 1–4 Power Requirements and Power On . . . . . . . . . . . . . . . . . . . . . . . . . . . . . . . . . . Changing Line Voltage Range and Fuse . . . . . . . . . . . . . . . . . . . . . . . . . . . . Power Cord . . . . . . . . . . . . . . . . . . . . . . . . . . . . . . . . . . . . . . . . . . . . . . . . . . Power-on Procedure . . . . . . . . . . . . . . . . . . . . . . . . . . . . . . . . . . . . . . . . . . . Basic Operation Information . . . . . . . . . . . . . . . . . . . . . . . . . . . . . . . . . . . . . . . . Touch Screen . . . . . . . . . . . . . . . . . . . . . . . . . . . . . . . . . . . . . . . . . . . . . . . . . Front Panel Controls and Touch Screen Interface . . . . . . . . . . . . . . . . . . . . Display Icons . . . . . . . . . . . . . . . . . . . . . . . . . . . . . . . . . . . . . . . . . . . . . . . . Calibrating the Touch Screen . . . . . . . . . . . . . . . . . . . . . . . . . . . . . . . . . . . . Setting the AM700 Clock . . . . . . . . . . . . . . . . . . . . . . . . . . . . . . . . . . . . . . . Backup Battery . . . . . . . . . . . . . . . . . . . . . . . . . . . . . . . . . . . . . . . . . . . . . . . AM700 Setup for Operation . . . . . . . . . . . . . . . . . . . . . . . . . . . . . . . . . . . . . . . . Bypassing Diagnostics . . . . . . . . . . . . . . . . . . . . . . . . . . . . . . . . . . . . . . . . . Configuration . . . . . . . . . . . . . . . . . . . . . . . . . . . . . . . . . . . . . . . . . . . . . . . . Configuration Summary . . . . . . . . . . . . . . . . . . . . . . . . . . . . . . . . . . . . . . . . Input Selection . . . . . . . . . . . . . . . . . . . . . . . . . . . . . . . . . . . . . . . . . . . . . . . View Setup . . . . . . . . . . . . . . . . . . . . . . . . . . . . . . . . . . . . . . . . . . . . . . . . . . Measurement Setup Menu . . . . . . . . . . . . . . . . . . . . . . . . . . . . . . . . . . . . . . System Setup Menu . . . . . . . . . . . . . . . . . . . . . . . . . . . . . . . . . . . . . . . . . . . System Communication Menu . . . . . . . . . . . . . . . . . . . . . . . . . . . . . . . . . . . System Calibration Menu . . . . . . . . . . . . . . . . . . . . . . . . . . . . . . . . . . . . . . . System Conversion Standards Menu . . . . . . . . . . . . . . . . . . . . . . . . . . . . . . Quick Setup . . . . . . . . . . . . . . . . . . . . . . . . . . . . . . . . . . . . . . . . . . . . . . . . . . . . . 2–1 2–2 2–2 2–3 2–3 2–3 2–3 2–5 2–6 2–7 2–9 2–9 2–9 2–10 2–11 2–12 2–15 2–19 2–21 2–23 2–24 2–25 2–28 Block Circuit Description . . . . . . . . . . . . . . . . . . . . . . . . . . . . . . . . . . . . . . . . . . CPU . . . . . . . . . . . . . . . . . . . . . . . . . . . . . . . . . . . . . . . . . . . . . . . . . . . . . . . . DSP . . . . . . . . . . . . . . . . . . . . . . . . . . . . . . . . . . . . . . . . . . . . . . . . . . . . . . . . Analog Acquisition . . . . . . . . . . . . . . . . . . . . . . . . . . . . . . . . . . . . . . . . . . . . Digital Audio . . . . . . . . . . . . . . . . . . . . . . . . . . . . . . . . . . . . . . . . . . . . . . . . Audio Generator . . . . . . . . . . . . . . . . . . . . . . . . . . . . . . . . . . . . . . . . . . . . . . 3–2 3–2 3–2 3–2 3–2 3–3 Specifications Operating Information Theory of Operation AM700 Audio Measurement Set Service Manual i Table of Contents Front Panel . . . . . . . . . . . . . . . . . . . . . . . . . . . . . . . . . . . . . . . . . . . . . . . . . . Picture Monitor . . . . . . . . . . . . . . . . . . . . . . . . . . . . . . . . . . . . . . . . . . . . . . . Floppy Disk Drive . . . . . . . . . . . . . . . . . . . . . . . . . . . . . . . . . . . . . . . . . . . . . Power Supply (A12) . . . . . . . . . . . . . . . . . . . . . . . . . . . . . . . . . . . . . . . . . . . AM700 Circuit Description . . . . . . . . . . . . . . . . . . . . . . . . . . . . . . . . . . . . . . . . . Analog Acquisition Board (A1A1) . . . . . . . . . . . . . . . . . . . . . . . . . . . . . . . . . . . CHA and CHB Input and Attenuator Boards (diagrams 1 and 2) . . . . . . . . . . . . Analog Inputs . . . . . . . . . . . . . . . . . . . . . . . . . . . . . . . . . . . . . . . . . . . . . . . . Attenuators . . . . . . . . . . . . . . . . . . . . . . . . . . . . . . . . . . . . . . . . . . . . . . . . . . Differential-to-Single-Ended Amplifier . . . . . . . . . . . . . . . . . . . . . . . . . . . . Tunable Notch Filters (diagram 3) . . . . . . . . . . . . . . . . . . . . . . . . . . . . . . . . . . . . Notch Selection . . . . . . . . . . . . . . . . . . . . . . . . . . . . . . . . . . . . . . . . . . . . . . . Multiplying DAC . . . . . . . . . . . . . . . . . . . . . . . . . . . . . . . . . . . . . . . . . . . . . A/D Converters (diagram 4) . . . . . . . . . . . . . . . . . . . . . . . . . . . . . . . . . . . . . . . . Input Buffer and 5 V Clamp . . . . . . . . . . . . . . . . . . . . . . . . . . . . . . . . . . . . . Anti-Aliasing Low Pass Filter . . . . . . . . . . . . . . . . . . . . . . . . . . . . . . . . . . . Single-ended to Differential Converter . . . . . . . . . . . . . . . . . . . . . . . . . . . . . High Resolution A/D Converter . . . . . . . . . . . . . . . . . . . . . . . . . . . . . . . . . . Offset DAC . . . . . . . . . . . . . . . . . . . . . . . . . . . . . . . . . . . . . . . . . . . . . . . . . . 80 kHz Low Pass Filter . . . . . . . . . . . . . . . . . . . . . . . . . . . . . . . . . . . . . . . . . High Bandwidth A/D Converter . . . . . . . . . . . . . . . . . . . . . . . . . . . . . . . . . . Decimating Filter . . . . . . . . . . . . . . . . . . . . . . . . . . . . . . . . . . . . . . . . . . . . . Sample Transmitter (diagram 5) . . . . . . . . . . . . . . . . . . . . . . . . . . . . . . . . . . . . . Format PALS . . . . . . . . . . . . . . . . . . . . . . . . . . . . . . . . . . . . . . . . . . . . . . . . . Sample Transmitter . . . . . . . . . . . . . . . . . . . . . . . . . . . . . . . . . . . . . . . . . . . . Diagnostics . . . . . . . . . . . . . . . . . . . . . . . . . . . . . . . . . . . . . . . . . . . . . . . . . . Calibration, Control Registers, Interface, and Power Supplies (diagram 6) . . . . Calibration Signal Source . . . . . . . . . . . . . . . . . . . . . . . . . . . . . . . . . . . . . . . Serial Control Register . . . . . . . . . . . . . . . . . . . . . . . . . . . . . . . . . . . . . . . . . Isolated Power Supply . . . . . . . . . . . . . . . . . . . . . . . . . . . . . . . . . . . . . . . . . Interface Status Read-back Register . . . . . . . . . . . . . . . . . . . . . . . . . . . . . . . TTL Trigger Input . . . . . . . . . . . . . . . . . . . . . . . . . . . . . . . . . . . . . . . . . . . . . Over/Under Range Board (A1A7) . . . . . . . . . . . . . . . . . . . . . . . . . . . . . . . . . . . . XLR Connector Board (A2) . . . . . . . . . . . . . . . . . . . . . . . . . . . . . . . . . . . . . . . . . Digital Audio Board (A3) . . . . . . . . . . . . . . . . . . . . . . . . . . . . . . . . . . . . . . . . . . Digital Audio Board Functional Description . . . . . . . . . . . . . . . . . . . . . . . . Digital Interface Tester Measurement Functions . . . . . . . . . . . . . . . . . . . . . Digital Signal Processor (diagram 1) . . . . . . . . . . . . . . . . . . . . . . . . . . . . . . . . . . Digital Audio Board DSP . . . . . . . . . . . . . . . . . . . . . . . . . . . . . . . . . . . . . . . Host Interface Buffers . . . . . . . . . . . . . . . . . . . . . . . . . . . . . . . . . . . . . . . . . . DSP RAM . . . . . . . . . . . . . . . . . . . . . . . . . . . . . . . . . . . . . . . . . . . . . . . . . . . Address Decoder . . . . . . . . . . . . . . . . . . . . . . . . . . . . . . . . . . . . . . . . . . . . . . DSP Clock . . . . . . . . . . . . . . . . . . . . . . . . . . . . . . . . . . . . . . . . . . . . . . . . . . . Jitter Interrupt . . . . . . . . . . . . . . . . . . . . . . . . . . . . . . . . . . . . . . . . . . . . . . . . Synchronous Serial Interface (SSI) (diagram 2) . . . . . . . . . . . . . . . . . . . . . . . . . Sample Transmitter (diagram 3) . . . . . . . . . . . . . . . . . . . . . . . . . . . . . . . . . . . . . Sample Transmitter . . . . . . . . . . . . . . . . . . . . . . . . . . . . . . . . . . . . . . . . . . . . Phase Offset and Jitter Generator (diagram 4) . . . . . . . . . . . . . . . . . . . . . . . . . . . Jitter DAC . . . . . . . . . . . . . . . . . . . . . . . . . . . . . . . . . . . . . . . . . . . . . . . . . . . Phase Shift PAL . . . . . . . . . . . . . . . . . . . . . . . . . . . . . . . . . . . . . . . . . . . . . . Phase-Locked Loop . . . . . . . . . . . . . . . . . . . . . . . . . . . . . . . . . . . . . . . . . . . Generator (diagram 5) . . . . . . . . . . . . . . . . . . . . . . . . . . . . . . . . . . . . . . . . . . . . . Encoder PAL . . . . . . . . . . . . . . . . . . . . . . . . . . . . . . . . . . . . . . . . . . . . . . . . . ii 3–3 3–3 3–3 3–3 3–4 3–5 3–5 3–5 3–6 3–7 3–7 3–7 3–7 3–8 3–8 3–8 3–8 3–8 3–8 3–9 3–10 3–10 3–10 3–10 3–10 3–11 3–12 3–12 3–12 3–12 3–12 3–13 3–13 3–13 3–14 3–14 3–20 3–21 3–21 3–22 3–22 3–23 3–23 3–23 3–23 3–23 3–23 3–24 3–24 3–24 3–24 3–24 3–24 AM700 Audio Measurement Set Service Manual Table of Contents Programmable Gain . . . . . . . . . . . . . . . . . . . . . . . . . . . . . . . . . . . . . . . . . . . Cable Simulation Filter . . . . . . . . . . . . . . . . . . . . . . . . . . . . . . . . . . . . . . . . . Unity Gain Output Amplifier . . . . . . . . . . . . . . . . . . . . . . . . . . . . . . . . . . . . Digital Receiver Input (diagram 6) . . . . . . . . . . . . . . . . . . . . . . . . . . . . . . . . . . . Input . . . . . . . . . . . . . . . . . . . . . . . . . . . . . . . . . . . . . . . . . . . . . . . . . . . . . . . Frequency Offset (diagram 7) . . . . . . . . . . . . . . . . . . . . . . . . . . . . . . . . . . . . . . . A/D, Frequency/Phase Counter, and Power Distribution (diagram 8) . . . . . . . . . Frequency/Phase Counters . . . . . . . . . . . . . . . . . . . . . . . . . . . . . . . . . . . . . . Power Distribution . . . . . . . . . . . . . . . . . . . . . . . . . . . . . . . . . . . . . . . . . . . . Decoders (diagram 9) . . . . . . . . . . . . . . . . . . . . . . . . . . . . . . . . . . . . . . . . . . . . . . Serial Control (diagram 10) . . . . . . . . . . . . . . . . . . . . . . . . . . . . . . . . . . . . . . . . . Eye Sampler (diagram 11) . . . . . . . . . . . . . . . . . . . . . . . . . . . . . . . . . . . . . . . . . . Auto Equalization (diagram 12) . . . . . . . . . . . . . . . . . . . . . . . . . . . . . . . . . . . . . . Rear Panel Board (A4) . . . . . . . . . . . . . . . . . . . . . . . . . . . . . . . . . . . . . . . . . . . . . AES REF Connectors . . . . . . . . . . . . . . . . . . . . . . . . . . . . . . . . . . . . . . . . . . DSP PORT . . . . . . . . . . . . . . . . . . . . . . . . . . . . . . . . . . . . . . . . . . . . . . . . . . Analog Generator Board (A5) . . . . . . . . . . . . . . . . . . . . . . . . . . . . . . . . . . . . . . . Block Diagram Description of the Analog Audio Generators . . . . . . . . . . . Digital Signal Processor (Generator) (diagram 1) . . . . . . . . . . . . . . . . . . . . . . . . DSP . . . . . . . . . . . . . . . . . . . . . . . . . . . . . . . . . . . . . . . . . . . . . . . . . . . . . . . . Reset and SSI Clock Pal . . . . . . . . . . . . . . . . . . . . . . . . . . . . . . . . . . . . . . . . Address Decoder . . . . . . . . . . . . . . . . . . . . . . . . . . . . . . . . . . . . . . . . . . . . . . RAM . . . . . . . . . . . . . . . . . . . . . . . . . . . . . . . . . . . . . . . . . . . . . . . . . . . . . . . Control and I/O (diagram 2) . . . . . . . . . . . . . . . . . . . . . . . . . . . . . . . . . . . . . . . . . Serial Control PAL . . . . . . . . . . . . . . . . . . . . . . . . . . . . . . . . . . . . . . . . . . . . Host Port . . . . . . . . . . . . . . . . . . . . . . . . . . . . . . . . . . . . . . . . . . . . . . . . . . . . Serial Control Register . . . . . . . . . . . . . . . . . . . . . . . . . . . . . . . . . . . . . . . . . DACs and Current to Voltage Converters (diagram 3) . . . . . . . . . . . . . . . . . . . . Data and Clock Isolators . . . . . . . . . . . . . . . . . . . . . . . . . . . . . . . . . . . . . . . . Oversampling Filter . . . . . . . . . . . . . . . . . . . . . . . . . . . . . . . . . . . . . . . . . . . Data Shifter . . . . . . . . . . . . . . . . . . . . . . . . . . . . . . . . . . . . . . . . . . . . . . . . . . Data Selectors . . . . . . . . . . . . . . . . . . . . . . . . . . . . . . . . . . . . . . . . . . . . . . . . DACs . . . . . . . . . . . . . . . . . . . . . . . . . . . . . . . . . . . . . . . . . . . . . . . . . . . . . . . Current to Voltage Converters . . . . . . . . . . . . . . . . . . . . . . . . . . . . . . . . . . . DAC Low-Pass Filters (diagram 4) . . . . . . . . . . . . . . . . . . . . . . . . . . . . . . . . . . . Filter Paths . . . . . . . . . . . . . . . . . . . . . . . . . . . . . . . . . . . . . . . . . . . . . . . . . . 20 kHz Low Pass Filter . . . . . . . . . . . . . . . . . . . . . . . . . . . . . . . . . . . . . . . . . 80 kHz Low Pass Filter . . . . . . . . . . . . . . . . . . . . . . . . . . . . . . . . . . . . . . . . . Tunable Bandpass Filters (diagram 5) . . . . . . . . . . . . . . . . . . . . . . . . . . . . . . . . . Filter Paths . . . . . . . . . . . . . . . . . . . . . . . . . . . . . . . . . . . . . . . . . . . . . . . . . . Tunable Bandpass Filter . . . . . . . . . . . . . . . . . . . . . . . . . . . . . . . . . . . . . . . . A Channel and B Channel Gain/Attenuators (Generator Output) (diagram 6) . . Relay Control Latches . . . . . . . . . . . . . . . . . . . . . . . . . . . . . . . . . . . . . . . . . . Data Selector . . . . . . . . . . . . . . . . . . . . . . . . . . . . . . . . . . . . . . . . . . . . . . . . . A and B Channel Step Attenuators . . . . . . . . . . . . . . . . . . . . . . . . . . . . . . . . A and B Channel Buffers . . . . . . . . . . . . . . . . . . . . . . . . . . . . . . . . . . . . . . . A and B Output Amplifiers and Output Z Selectors (diagrams 7 and 8) . . . . . . . A and B Output Amplifiers . . . . . . . . . . . . . . . . . . . . . . . . . . . . . . . . . . . . . . Output Impedance Selectors . . . . . . . . . . . . . . . . . . . . . . . . . . . . . . . . . . . . . Power and Floating Power Supply (diagram 9) . . . . . . . . . . . . . . . . . . . . . . . . . . Power Distribution . . . . . . . . . . . . . . . . . . . . . . . . . . . . . . . . . . . . . . . . . . . . Floating Power Supplies . . . . . . . . . . . . . . . . . . . . . . . . . . . . . . . . . . . . . . . . AM700 Audio Measurement Set Service Manual 3–25 3–25 3–25 3–25 3–25 3–26 3–26 3–26 3–26 3–27 3–27 3–28 3–28 3–29 3–29 3–29 3–32 3–32 3–35 3–36 3–36 3–36 3–36 3–38 3–38 3–38 3–39 3–39 3–39 3–39 3–39 3–39 3–39 3–40 3–40 3–40 3–40 3–40 3–40 3–40 3–41 3–41 3–41 3–41 3–41 3–42 3–42 3–42 3–43 3–43 3–43 3–43 iii Table of Contents Main/CPU Board (A6) . . . . . . . . . . . . . . . . . . . . . . . . . . . . . . . . . . . . . . . . . . . . . CPU and DSP Bus Interface (diagram 1) . . . . . . . . . . . . . . . . . . . . . . . . . . . . . . . CPU . . . . . . . . . . . . . . . . . . . . . . . . . . . . . . . . . . . . . . . . . . . . . . . . . . . . . . . . Interrupt Control . . . . . . . . . . . . . . . . . . . . . . . . . . . . . . . . . . . . . . . . . . . . . . CPU Board Memory Map . . . . . . . . . . . . . . . . . . . . . . . . . . . . . . . . . . . . . . . CPU/DSP Host Interface . . . . . . . . . . . . . . . . . . . . . . . . . . . . . . . . . . . . . . . . System Clock and Resets, Counter, and Address Decoder (diagram 2) . . . . . . . System Clock . . . . . . . . . . . . . . . . . . . . . . . . . . . . . . . . . . . . . . . . . . . . . . . . Reset . . . . . . . . . . . . . . . . . . . . . . . . . . . . . . . . . . . . . . . . . . . . . . . . . . . . . . . Bus Halt Indicator . . . . . . . . . . . . . . . . . . . . . . . . . . . . . . . . . . . . . . . . . . . . . Host CPU Reset Functional Description . . . . . . . . . . . . . . . . . . . . . . . . . . . . Manual System Reset . . . . . . . . . . . . . . . . . . . . . . . . . . . . . . . . . . . . . . . . . . Counter . . . . . . . . . . . . . . . . . . . . . . . . . . . . . . . . . . . . . . . . . . . . . . . . . . . . . Address Decoder . . . . . . . . . . . . . . . . . . . . . . . . . . . . . . . . . . . . . . . . . . . . . . Memory Controller, EPROM, FEPROM, and NVRAM (diagram 3) . . . . . . . . . EPROM . . . . . . . . . . . . . . . . . . . . . . . . . . . . . . . . . . . . . . . . . . . . . . . . . . . . . NVRAM . . . . . . . . . . . . . . . . . . . . . . . . . . . . . . . . . . . . . . . . . . . . . . . . . . . . Flash EPROM (FEPROM) . . . . . . . . . . . . . . . . . . . . . . . . . . . . . . . . . . . . . . Battery Backup . . . . . . . . . . . . . . . . . . . . . . . . . . . . . . . . . . . . . . . . . . . . . . . DRAM and Diagnostic Display (diagram 4) . . . . . . . . . . . . . . . . . . . . . . . . . . . . Dynamic RAM Controller . . . . . . . . . . . . . . . . . . . . . . . . . . . . . . . . . . . . . . Board Status Register . . . . . . . . . . . . . . . . . . . . . . . . . . . . . . . . . . . . . . . . . . Diagnostic Displays . . . . . . . . . . . . . . . . . . . . . . . . . . . . . . . . . . . . . . . . . . . LED Display Register . . . . . . . . . . . . . . . . . . . . . . . . . . . . . . . . . . . . . . . . . . Watchdog Timer . . . . . . . . . . . . . . . . . . . . . . . . . . . . . . . . . . . . . . . . . . . . . . Bus Arbitration and Interrupt Encoder (diagram 5) . . . . . . . . . . . . . . . . . . . . . . . Interrupt Encoder . . . . . . . . . . . . . . . . . . . . . . . . . . . . . . . . . . . . . . . . . . . . . Board Registers and Timer (diagram 6) . . . . . . . . . . . . . . . . . . . . . . . . . . . . . . . . Board Status Register (BSR) . . . . . . . . . . . . . . . . . . . . . . . . . . . . . . . . . . . . Board Program Register (BPR) . . . . . . . . . . . . . . . . . . . . . . . . . . . . . . . . . . Board Code Register . . . . . . . . . . . . . . . . . . . . . . . . . . . . . . . . . . . . . . . . . . . Real Time Clock . . . . . . . . . . . . . . . . . . . . . . . . . . . . . . . . . . . . . . . . . . . . . . I/0 Processor (diagram 7) . . . . . . . . . . . . . . . . . . . . . . . . . . . . . . . . . . . . . . . . . . . Front Panel Processor . . . . . . . . . . . . . . . . . . . . . . . . . . . . . . . . . . . . . . . . . . Front Panel Processor RAM . . . . . . . . . . . . . . . . . . . . . . . . . . . . . . . . . . . . . CPU to Front Panel Interface Buffers . . . . . . . . . . . . . . . . . . . . . . . . . . . . . . Front Panel PAL . . . . . . . . . . . . . . . . . . . . . . . . . . . . . . . . . . . . . . . . . . . . . . Video ASIC and VRAM (diagram 8) . . . . . . . . . . . . . . . . . . . . . . . . . . . . . . . . . . Video RAM . . . . . . . . . . . . . . . . . . . . . . . . . . . . . . . . . . . . . . . . . . . . . . . . . . Video ASIC . . . . . . . . . . . . . . . . . . . . . . . . . . . . . . . . . . . . . . . . . . . . . . . . . . Troubleshooting Hint . . . . . . . . . . . . . . . . . . . . . . . . . . . . . . . . . . . . . . . . . . VRAMDAC and Floppy Drive Interface (diagram 9) . . . . . . . . . . . . . . . . . . . . . Video RAM/DAC . . . . . . . . . . . . . . . . . . . . . . . . . . . . . . . . . . . . . . . . . . . . . Floppy Drive Controller . . . . . . . . . . . . . . . . . . . . . . . . . . . . . . . . . . . . . . . . RS232C Interface (diagram 10) . . . . . . . . . . . . . . . . . . . . . . . . . . . . . . . . . . . . . . General Description . . . . . . . . . . . . . . . . . . . . . . . . . . . . . . . . . . . . . . . . . . . GPIB Controller and Host Interface (diagram 11) . . . . . . . . . . . . . . . . . . . . . . . . General Purpose Interface Bus (GPIB) Controller . . . . . . . . . . . . . . . . . . . . DSP Board (A7) . . . . . . . . . . . . . . . . . . . . . . . . . . . . . . . . . . . . . . . . . . . . . . . . . . Bus Buffers and Connectors (diagram 1) . . . . . . . . . . . . . . . . . . . . . . . . . . . . . . . Reset and Clocks (diagram 2) . . . . . . . . . . . . . . . . . . . . . . . . . . . . . . . . . . . . . . . System Reset . . . . . . . . . . . . . . . . . . . . . . . . . . . . . . . . . . . . . . . . . . . . . . . . . DSP Reset Functional Description . . . . . . . . . . . . . . . . . . . . . . . . . . . . . . . . iv 3–44 3–44 3–44 3–46 3–46 3–46 3–47 3–47 3–47 3–47 3–47 3–48 3–48 3–48 3–49 3–49 3–49 3–49 3–50 3–50 3–50 3–50 3–50 3–51 3–51 3–51 3–51 3–51 3–51 3–52 3–52 3–52 3–52 3–52 3–52 3–52 3–53 3–53 3–53 3–53 3–53 3–54 3–54 3–54 3–55 3–55 3–55 3–55 3–56 3–57 3–57 3–57 3–57 AM700 Audio Measurement Set Service Manual Table of Contents Clock Generator . . . . . . . . . . . . . . . . . . . . . . . . . . . . . . . . . . . . . . . . . . . . . . Sample Receivers (diagram 3) . . . . . . . . . . . . . . . . . . . . . . . . . . . . . . . . . . . . . . . A Memory (diagram 4) . . . . . . . . . . . . . . . . . . . . . . . . . . . . . . . . . . . . . . . . . . . . B Memory (diagram 5) . . . . . . . . . . . . . . . . . . . . . . . . . . . . . . . . . . . . . . . . . . . . . DSP/CPU Interface ASIC (diagram 6) . . . . . . . . . . . . . . . . . . . . . . . . . . . . . . . . Board Registers, Bus Arbitrator and Audio Serializer (diagram 7) . . . . . . . . . . . DMA Process Reset Register (PRR) . . . . . . . . . . . . . . . . . . . . . . . . . . . . . . . Register Definition . . . . . . . . . . . . . . . . . . . . . . . . . . . . . . . . . . . . . . . . . . . . Serializer . . . . . . . . . . . . . . . . . . . . . . . . . . . . . . . . . . . . . . . . . . . . . . . . . . . . Bus Timer . . . . . . . . . . . . . . . . . . . . . . . . . . . . . . . . . . . . . . . . . . . . . . . . . . . Version Number Pal . . . . . . . . . . . . . . . . . . . . . . . . . . . . . . . . . . . . . . . . . . . Digital Signal Processor (diagram 8) . . . . . . . . . . . . . . . . . . . . . . . . . . . . . . . . . . DSP Interrupts Inputs Functional Description . . . . . . . . . . . . . . . . . . . . . . . Front Panel Board (A9) . . . . . . . . . . . . . . . . . . . . . . . . . . . . . . . . . . . . . . . . . . . . Control Register, Knobs, Beeper, and Resistive Touch Panel (diagram 1) . . . . . Control Register . . . . . . . . . . . . . . . . . . . . . . . . . . . . . . . . . . . . . . . . . . . . . . Front Panel Knobs . . . . . . . . . . . . . . . . . . . . . . . . . . . . . . . . . . . . . . . . . . . . . Beeper . . . . . . . . . . . . . . . . . . . . . . . . . . . . . . . . . . . . . . . . . . . . . . . . . . . . . . Touch Panel . . . . . . . . . . . . . . . . . . . . . . . . . . . . . . . . . . . . . . . . . . . . . . . . . . Headphone Amplifier and Speaker (diagram 2) . . . . . . . . . . . . . . . . . . . . . . . . . Front-Panel LED Indicators (diagram 3) . . . . . . . . . . . . . . . . . . . . . . . . . . . . . . . Front-Panel Push Buttons (diagram 4) . . . . . . . . . . . . . . . . . . . . . . . . . . . . . . . . . Picture Monitor Assembly (A10) . . . . . . . . . . . . . . . . . . . . . . . . . . . . . . . . . . . . . Video Amplifier . . . . . . . . . . . . . . . . . . . . . . . . . . . . . . . . . . . . . . . . . . . . . . +12 V and +5 V Supply . . . . . . . . . . . . . . . . . . . . . . . . . . . . . . . . . . . . . . . . Vertical Deflection . . . . . . . . . . . . . . . . . . . . . . . . . . . . . . . . . . . . . . . . . . . . Horizontal Deflection . . . . . . . . . . . . . . . . . . . . . . . . . . . . . . . . . . . . . . . . . . High Voltage . . . . . . . . . . . . . . . . . . . . . . . . . . . . . . . . . . . . . . . . . . . . . . . . . Trace Rotation . . . . . . . . . . . . . . . . . . . . . . . . . . . . . . . . . . . . . . . . . . . . . . . . Power Supply Board (A11) . . . . . . . . . . . . . . . . . . . . . . . . . . . . . . . . . . . . . . . . . Power Supply Functional Block Description . . . . . . . . . . . . . . . . . . . . . . . . Input, Inverter, and Regulators (diagram 1) . . . . . . . . . . . . . . . . . . . . . . . . . . . . . Input Power . . . . . . . . . . . . . . . . . . . . . . . . . . . . . . . . . . . . . . . . . . . . . . . . . . 115 V/230 V Input Switching . . . . . . . . . . . . . . . . . . . . . . . . . . . . . . . . . . . . Pulse-Width Modulator and Control Circuits . . . . . . . . . . . . . . . . . . . . . . . . Power Switch Driver . . . . . . . . . . . . . . . . . . . . . . . . . . . . . . . . . . . . . . . . . . . Preregulator . . . . . . . . . . . . . . . . . . . . . . . . . . . . . . . . . . . . . . . . . . . . . . . . . . Current Sensing . . . . . . . . . . . . . . . . . . . . . . . . . . . . . . . . . . . . . . . . . . . . . . . Inverter . . . . . . . . . . . . . . . . . . . . . . . . . . . . . . . . . . . . . . . . . . . . . . . . . . . . . Output Rectifiers and Filtering . . . . . . . . . . . . . . . . . . . . . . . . . . . . . . . . . . . +15 V Regulators . . . . . . . . . . . . . . . . . . . . . . . . . . . . . . . . . . . . . . . . . . . . . Alarm Circuitry and Fan Drive (diagram 2) . . . . . . . . . . . . . . . . . . . . . . . . . . . . Alarm Sensing . . . . . . . . . . . . . . . . . . . . . . . . . . . . . . . . . . . . . . . . . . . . . . . . Overcurrent Sensing . . . . . . . . . . . . . . . . . . . . . . . . . . . . . . . . . . . . . . . . . . . Alarm Logic . . . . . . . . . . . . . . . . . . . . . . . . . . . . . . . . . . . . . . . . . . . . . . . . . Fan Drive . . . . . . . . . . . . . . . . . . . . . . . . . . . . . . . . . . . . . . . . . . . . . . . . . . . STBY/ON Switch Circuit . . . . . . . . . . . . . . . . . . . . . . . . . . . . . . . . . . . . . . . Disk Drive Assembly (A12) . . . . . . . . . . . . . . . . . . . . . . . . . . . . . . . . . . . . . . . . . LCD Driver Board (A13) . . . . . . . . . . . . . . . . . . . . . . . . . . . . . . . . . . . . . . . . . . . Color A/D Converters . . . . . . . . . . . . . . . . . . . . . . . . . . . . . . . . . . . . . . . . . . Digital Color Data Latches . . . . . . . . . . . . . . . . . . . . . . . . . . . . . . . . . . . . . . LCD Brightness Control . . . . . . . . . . . . . . . . . . . . . . . . . . . . . . . . . . . . . . . . AM700 Audio Measurement Set Service Manual 3–57 3–58 3–58 3–58 3–58 3–59 3–59 3–59 3–60 3–60 3–60 3–60 3–60 3–61 3–61 3–61 3–61 3–61 3–62 3–62 3–62 3–62 3–63 3–64 3–64 3–64 3–65 3–65 3–66 3–67 3–68 3–70 3–70 3–70 3–70 3–72 3–72 3–72 3–72 3–72 3–73 3–74 3–74 3–75 3–76 3–78 3–79 3–79 3–80 3–80 3–80 3–80 v Table of Contents LCD Flat Panel Display (A14) . . . . . . . . . . . . . . . . . . . . . . . . . . . . . . . . . . . . . . . LCD Backlight . . . . . . . . . . . . . . . . . . . . . . . . . . . . . . . . . . . . . . . . . . . . . . . LCD Backlight Inverters . . . . . . . . . . . . . . . . . . . . . . . . . . . . . . . . . . . . . . . . 3–82 3–82 3–82 Performance Verification Test Equipment Required . . . . . . . . . . . . . . . . . . . . . . . . . . . . . . . . . . . . . . . . . . . Fabricated Test Cables . . . . . . . . . . . . . . . . . . . . . . . . . . . . . . . . . . . . . . . . . . . . . Verify Power Supply Operation . . . . . . . . . . . . . . . . . . . . . . . . . . . . . . . . . . . . . . Check 115 V Power Supply Operation . . . . . . . . . . . . . . . . . . . . . . . . . . . . . Check 230 V Power Supply Operation . . . . . . . . . . . . . . . . . . . . . . . . . . . . . Power On Diagnostics . . . . . . . . . . . . . . . . . . . . . . . . . . . . . . . . . . . . . . . . . . . . . Analog Generator Checks . . . . . . . . . . . . . . . . . . . . . . . . . . . . . . . . . . . . . . . . . . Analog Generator High Resolution and High Bandwidth Mode Operation . . . . . . . . . . . . . . . . . . . . . . . . . . . . . . . . . . . . . . . Analog Generator Outputs . . . . . . . . . . . . . . . . . . . . . . . . . . . . . . . . . . . . . . Analog Generator Check . . . . . . . . . . . . . . . . . . . . . . . . . . . . . . . . . . . . . . . . Check Low Distortion Mode . . . . . . . . . . . . . . . . . . . . . . . . . . . . . . . . . . . . Check High Bandwidth Generator . . . . . . . . . . . . . . . . . . . . . . . . . . . . . . . . Check Generator Noise Floor . . . . . . . . . . . . . . . . . . . . . . . . . . . . . . . . . . . . Check Analog Generator Output Impedance . . . . . . . . . . . . . . . . . . . . . . . . Check Follow Mode . . . . . . . . . . . . . . . . . . . . . . . . . . . . . . . . . . . . . . . . . . . Check Generator Float . . . . . . . . . . . . . . . . . . . . . . . . . . . . . . . . . . . . . . . . . Check Audio Analyzer Operation . . . . . . . . . . . . . . . . . . . . . . . . . . . . . . . . . . . . Check High Res Mode . . . . . . . . . . . . . . . . . . . . . . . . . . . . . . . . . . . . . . . . . Check High BW Mode . . . . . . . . . . . . . . . . . . . . . . . . . . . . . . . . . . . . . . . . . Check FFT Analyzer Operation . . . . . . . . . . . . . . . . . . . . . . . . . . . . . . . . . . . . . . Check FFT Analyzer . . . . . . . . . . . . . . . . . . . . . . . . . . . . . . . . . . . . . . . . . . . Check Harmonic Content . . . . . . . . . . . . . . . . . . . . . . . . . . . . . . . . . . . . . . . Check Acquisition Noise Floor . . . . . . . . . . . . . . . . . . . . . . . . . . . . . . . . . . . Check Autorange Function . . . . . . . . . . . . . . . . . . . . . . . . . . . . . . . . . . . . . . Check Analog Acquisition Noise Floor . . . . . . . . . . . . . . . . . . . . . . . . . . . . Input Impedance Verification . . . . . . . . . . . . . . . . . . . . . . . . . . . . . . . . . . . . . . . . Set Up the Generator . . . . . . . . . . . . . . . . . . . . . . . . . . . . . . . . . . . . . . . . . . . Set Up the AM700 Audio Analyzer . . . . . . . . . . . . . . . . . . . . . . . . . . . . . . . Verify Ch B and Ch B Input Impedance . . . . . . . . . . . . . . . . . . . . . . . . . . . . Verify CRT Display Operation . . . . . . . . . . . . . . . . . . . . . . . . . . . . . . . . . . . . . . . AM700 Setup . . . . . . . . . . . . . . . . . . . . . . . . . . . . . . . . . . . . . . . . . . . . . . . . Check Display Focus . . . . . . . . . . . . . . . . . . . . . . . . . . . . . . . . . . . . . . . . . . Check Size, Linearity, Trace Rotation, and Centering . . . . . . . . . . . . . . . . . Check Display Intensity Control . . . . . . . . . . . . . . . . . . . . . . . . . . . . . . . . . . Verify Flat Panel Display Operation . . . . . . . . . . . . . . . . . . . . . . . . . . . . . . . . . . Verify Digital Generator . . . . . . . . . . . . . . . . . . . . . . . . . . . . . . . . . . . . . . . . . . . . Clock Rate Range and Accuracy . . . . . . . . . . . . . . . . . . . . . . . . . . . . . . . . . . Check Main Output Residual Jitter . . . . . . . . . . . . . . . . . . . . . . . . . . . . . . . . Ref Output Residual Jitter . . . . . . . . . . . . . . . . . . . . . . . . . . . . . . . . . . . . . . . Check High Frequency Jitter Tolerance . . . . . . . . . . . . . . . . . . . . . . . . . . . . Static Phase Difference . . . . . . . . . . . . . . . . . . . . . . . . . . . . . . . . . . . . . . . . . Output Level . . . . . . . . . . . . . . . . . . . . . . . . . . . . . . . . . . . . . . . . . . . . . . . . . Phase Jitter Generation . . . . . . . . . . . . . . . . . . . . . . . . . . . . . . . . . . . . . . . . . Digital Receiver . . . . . . . . . . . . . . . . . . . . . . . . . . . . . . . . . . . . . . . . . . . . . . . . . . Receiver Interface Parameter Measurements . . . . . . . . . . . . . . . . . . . . . . . . Check Clock Rate . . . . . . . . . . . . . . . . . . . . . . . . . . . . . . . . . . . . . . . . . . . . . vi 4–1 4–2 4–5 4–5 4–5 4–5 4–6 4–6 4–10 4–12 4–14 4–15 4–16 4–17 4–19 4–19 4–20 4–20 4–26 4–28 4–28 4–29 4–29 4–30 4–31 4–32 4–32 4–32 4–32 4–33 4–33 4–33 4–33 4–33 4–35 4–36 4–36 4–37 4–37 4–38 4–38 4–39 4–40 4–41 4–41 4–42 AM700 Audio Measurement Set Service Manual Table of Contents Check Static Phase Difference . . . . . . . . . . . . . . . . . . . . . . . . . . . . . . . . . . . Check Phase Jitter (Jitter spectrum flatness) . . . . . . . . . . . . . . . . . . . . . . . . Check Jitter Spectrum Noise Floor . . . . . . . . . . . . . . . . . . . . . . . . . . . . . . . . Check Peak-to-Peak Jitter Measurement Accuracy . . . . . . . . . . . . . . . . . . . Check Eye Diagram Residual Jitter . . . . . . . . . . . . . . . . . . . . . . . . . . . . . . . Check Input and Output Impedance . . . . . . . . . . . . . . . . . . . . . . . . . . . . . . . Check the DSP Port . . . . . . . . . . . . . . . . . . . . . . . . . . . . . . . . . . . . . . . . . . . . . . . DSP Port Test . . . . . . . . . . . . . . . . . . . . . . . . . . . . . . . . . . . . . . . . . . . . . . . . Check Digital Interface Tester (DIT) Functionality . . . . . . . . . . . . . . . . . . . . . . . Check Disk Drive and File Transfer Operation . . . . . . . . . . . . . . . . . . . . . . . . . . Alternate Disk Drive Verification V1.02 Firmware . . . . . . . . . . . . . . . . . . . Check Headphones, GPIB, and Hardcopy . . . . . . . . . . . . . . . . . . . . . . . . . . . . . . DUT Under Test Setup . . . . . . . . . . . . . . . . . . . . . . . . . . . . . . . . . . . . . . . . . Check Headphone Function . . . . . . . . . . . . . . . . . . . . . . . . . . . . . . . . . . . . . Check GPIB Remote Control Operation . . . . . . . . . . . . . . . . . . . . . . . . . . . . Check Hardcopy Operation . . . . . . . . . . . . . . . . . . . . . . . . . . . . . . . . . . . . . . 4–42 4–43 4–44 4–45 4–46 4–47 4–50 4–50 4–53 4–54 4–55 4–59 4–59 4–59 4–59 4–60 Adjustment Procedures Test Equipment Required . . . . . . . . . . . . . . . . . . . . . . . . . . . . . . . . . . . . . . . . . . . Preparation for Adjustment . . . . . . . . . . . . . . . . . . . . . . . . . . . . . . . . . . . . . . . . . Power Supply Verification . . . . . . . . . . . . . . . . . . . . . . . . . . . . . . . . . . . . . . . . . . Test Equipment Required . . . . . . . . . . . . . . . . . . . . . . . . . . . . . . . . . . . . . . . Verification Procedure . . . . . . . . . . . . . . . . . . . . . . . . . . . . . . . . . . . . . . . . . Factory Service Adjustment . . . . . . . . . . . . . . . . . . . . . . . . . . . . . . . . . . . . . Test Equipment Required . . . . . . . . . . . . . . . . . . . . . . . . . . . . . . . . . . . . . . . Acquisition Board Adjustment . . . . . . . . . . . . . . . . . . . . . . . . . . . . . . . . . . . . . . . Test Equipment Required . . . . . . . . . . . . . . . . . . . . . . . . . . . . . . . . . . . . . . . Test Assembly . . . . . . . . . . . . . . . . . . . . . . . . . . . . . . . . . . . . . . . . . . . . . . . . Adjust the High Bandwidth A/D MSB for Channels A and B . . . . . . . . . . . Adjust the Attenuator Compensation for Channels A and B . . . . . . . . . . . . Sample Clock Adjustment . . . . . . . . . . . . . . . . . . . . . . . . . . . . . . . . . . . . . . Display Monitor Adjustment (for CRT display monitor) . . . . . . . . . . . . . . . . . . Test Equipment Required . . . . . . . . . . . . . . . . . . . . . . . . . . . . . . . . . . . . . . . Preparation to Align . . . . . . . . . . . . . . . . . . . . . . . . . . . . . . . . . . . . . . . . . . . Turn on Procedure After a Repair . . . . . . . . . . . . . . . . . . . . . . . . . . . . . . . . . Yoke Alignment . . . . . . . . . . . . . . . . . . . . . . . . . . . . . . . . . . . . . . . . . . . . . . Check and Adjust Free-running Display . . . . . . . . . . . . . . . . . . . . . . . . . . . . Adjust the CRT Display with a Test Pattern VGA Signal Applied . . . . . . . Factory Service Geometry Fine Adjustment . . . . . . . . . . . . . . . . . . . . . . . . CRT Display Adjustment . . . . . . . . . . . . . . . . . . . . . . . . . . . . . . . . . . . . . . . LCD Driver Board Adjustment (for LCD flat panel display) . . . . . . . . . . . . . . . Test Equipment Needed . . . . . . . . . . . . . . . . . . . . . . . . . . . . . . . . . . . . . . . . Preparation for the LCD Driver Adjustments . . . . . . . . . . . . . . . . . . . . . . . . Adjust ADC Gain . . . . . . . . . . . . . . . . . . . . . . . . . . . . . . . . . . . . . . . . . . . . . Fine Adjustment of the ADC Gain . . . . . . . . . . . . . . . . . . . . . . . . . . . . . . . . Verify the Gain and Offset Adjustments . . . . . . . . . . . . . . . . . . . . . . . . . . . . Adjust Brightness . . . . . . . . . . . . . . . . . . . . . . . . . . . . . . . . . . . . . . . . . . . . . Analog Generator Board Adjustment . . . . . . . . . . . . . . . . . . . . . . . . . . . . . . . . . . Test Equipment Required . . . . . . . . . . . . . . . . . . . . . . . . . . . . . . . . . . . . . . . Set up Test Equipment and the AM700 . . . . . . . . . . . . . . . . . . . . . . . . . . . . Digital Audio Board Adjustments . . . . . . . . . . . . . . . . . . . . . . . . . . . . . . . . . . . . Test Equipment Required . . . . . . . . . . . . . . . . . . . . . . . . . . . . . . . . . . . . . . . AM700 Audio Measurement Set Service Manual 5–1 5–4 5–5 5–5 5–5 5–6 5–6 5–7 5–7 5–7 5–7 5–9 5–10 5–11 5–11 5–12 5–13 5–13 5–14 5–15 5–17 5–18 5–20 5–20 5–20 5–20 5–22 5–22 5–22 5–23 5–23 5–23 5–26 5–26 vii Table of Contents Mechanical Setup . . . . . . . . . . . . . . . . . . . . . . . . . . . . . . . . . . . . . . . . . . . . . Set up the AM700 . . . . . . . . . . . . . . . . . . . . . . . . . . . . . . . . . . . . . . . . . . . . . Adjusting the Phase-Locked Loops . . . . . . . . . . . . . . . . . . . . . . . . . . . . . . . Adjusting the Digital Generator Level . . . . . . . . . . . . . . . . . . . . . . . . . . . . . User Calibration . . . . . . . . . . . . . . . . . . . . . . . . . . . . . . . . . . . . . . . . . . . . . . . . . . Calibrate the Touch Screen . . . . . . . . . . . . . . . . . . . . . . . . . . . . . . . . . . . . . . Analog Calibration . . . . . . . . . . . . . . . . . . . . . . . . . . . . . . . . . . . . . . . . . . . . Digital Calibration . . . . . . . . . . . . . . . . . . . . . . . . . . . . . . . . . . . . . . . . . . . . Functional Check . . . . . . . . . . . . . . . . . . . . . . . . . . . . . . . . . . . . . . . . . . . . . . . . . 5–26 5–27 5–27 5–30 5–30 5–30 5–30 5–31 5–31 Service Options . . . . . . . . . . . . . . . . . . . . . . . . . . . . . . . . . . . . . . . . . . . . . . . . . . Repackaging . . . . . . . . . . . . . . . . . . . . . . . . . . . . . . . . . . . . . . . . . . . . . . . . . . . . . Static-Sensitive Components . . . . . . . . . . . . . . . . . . . . . . . . . . . . . . . . . . . . . . . . AC Mains Voltage Selection Procedure . . . . . . . . . . . . . . . . . . . . . . . . . . . . . . . . Preventive Maintenance . . . . . . . . . . . . . . . . . . . . . . . . . . . . . . . . . . . . . . . . . . . . Tools Required . . . . . . . . . . . . . . . . . . . . . . . . . . . . . . . . . . . . . . . . . . . . . . . Cleaning . . . . . . . . . . . . . . . . . . . . . . . . . . . . . . . . . . . . . . . . . . . . . . . . . . . . Visual Inspection . . . . . . . . . . . . . . . . . . . . . . . . . . . . . . . . . . . . . . . . . . . . . . Determining the Software Version . . . . . . . . . . . . . . . . . . . . . . . . . . . . . . . . Performance Checks and Readjustments . . . . . . . . . . . . . . . . . . . . . . . . . . . Major Assembly Interconnection . . . . . . . . . . . . . . . . . . . . . . . . . . . . . . . . . Corrective Maintenance . . . . . . . . . . . . . . . . . . . . . . . . . . . . . . . . . . . . . . . . . . . . NVRAM State Clearing . . . . . . . . . . . . . . . . . . . . . . . . . . . . . . . . . . . . . . . . Power Supply Status Indicators . . . . . . . . . . . . . . . . . . . . . . . . . . . . . . . . . . 6–1 6–1 6–2 6–3 6–5 6–5 6–5 6–6 6–6 6–6 6–7 6–7 6–8 6–11 Diagnostics . . . . . . . . . . . . . . . . . . . . . . . . . . . . . . . . . . . . . . . . . . . . . . . . 6–13 Accessing the Diagnostics Menus . . . . . . . . . . . . . . . . . . . . . . . . . . . . . . . . . . . . Low Level Diagnostic Interface . . . . . . . . . . . . . . . . . . . . . . . . . . . . . . . . . . . . . . Selecting an Overall Run Mode . . . . . . . . . . . . . . . . . . . . . . . . . . . . . . . . . . . . . . Custom Run Mode Choices . . . . . . . . . . . . . . . . . . . . . . . . . . . . . . . . . . . . . Using a Keyboard to Run Diagnostics . . . . . . . . . . . . . . . . . . . . . . . . . . . . . . . . . Diagnostic Keystrokes . . . . . . . . . . . . . . . . . . . . . . . . . . . . . . . . . . . . . . . . . Diagnostic Help Menu . . . . . . . . . . . . . . . . . . . . . . . . . . . . . . . . . . . . . . . . . Backdoor Boot Modes . . . . . . . . . . . . . . . . . . . . . . . . . . . . . . . . . . . . . . . . . Viewing Diagnostics on a Remote Terminal . . . . . . . . . . . . . . . . . . . . . . . . . . . . Baud Rate Selection . . . . . . . . . . . . . . . . . . . . . . . . . . . . . . . . . . . . . . . . . . . BOOT UP Diagnostics . . . . . . . . . . . . . . . . . . . . . . . . . . . . . . . . . . . . . . . . . . . . . Bus Probe Table . . . . . . . . . . . . . . . . . . . . . . . . . . . . . . . . . . . . . . . . . . . . . . . . . . Diagnostic Displays . . . . . . . . . . . . . . . . . . . . . . . . . . . . . . . . . . . . . . . . . . . LED Display Register . . . . . . . . . . . . . . . . . . . . . . . . . . . . . . . . . . . . . . . . . . BOOT Steps . . . . . . . . . . . . . . . . . . . . . . . . . . . . . . . . . . . . . . . . . . . . . . . . . Digital Audio Board Semiautomated Testing . . . . . . . . . . . . . . . . . . . . . . . . . . . 6–15 6–20 6–23 6–24 6–27 6–27 6–28 6–28 6–30 6–30 6–30 6–32 6–33 6–33 6–34 6–41 Board Exchange Program . . . . . . . . . . . . . . . . . . . . . . . . . . . . . . . . . . . 6–49 Exchange Procedure . . . . . . . . . . . . . . . . . . . . . . . . . . . . . . . . . . . . . . . . . . . . . . . Locating Exchange Information . . . . . . . . . . . . . . . . . . . . . . . . . . . . . . . . . . . . . . Circuit Board Assemblies . . . . . . . . . . . . . . . . . . . . . . . . . . . . . . . . . . . . . . . Tektronix Service Offerings . . . . . . . . . . . . . . . . . . . . . . . . . . . . . . . . . . . . . . . . . Service Training . . . . . . . . . . . . . . . . . . . . . . . . . . . . . . . . . . . . . . . . . . . . . . Field Service Centers . . . . . . . . . . . . . . . . . . . . . . . . . . . . . . . . . . . . . . . . . . 6–49 6–50 6–50 6–53 6–53 6–53 Removal and Replacement Procedures . . . . . . . . . . . . . . . . . . . . . . . . . 6–55 Maintenance Tools Required . . . . . . . . . . . . . . . . . . . . . . . . . . . . . . . . . . . . . . . . . . . . . . . viii 6–55 AM700 Audio Measurement Set Service Manual Table of Contents Cover Removal and Replacement . . . . . . . . . . . . . . . . . . . . . . . . . . . . . . . . . . . . Instrument Cover Removal . . . . . . . . . . . . . . . . . . . . . . . . . . . . . . . . . . . . . . Instrument Cover Replacement . . . . . . . . . . . . . . . . . . . . . . . . . . . . . . . . . . . Assembly Removal/Replacement Procedures . . . . . . . . . . . . . . . . . . . . . . . . . . . Major Assembly Interconnection . . . . . . . . . . . . . . . . . . . . . . . . . . . . . . . . . Major Modules (Circuit Board Assemblies) . . . . . . . . . . . . . . . . . . . . . . . . . Analog Acquisition (A1) Removal/Replacement . . . . . . . . . . . . . . . . . . . . . XLR Connector (A2) Removal/Replacement . . . . . . . . . . . . . . . . . . . . . . . . Digital Audio (A3) Removal/Replacement . . . . . . . . . . . . . . . . . . . . . . . . . Rear Panel (A4) Removal/Replacement . . . . . . . . . . . . . . . . . . . . . . . . . . . . Analog Audio Generator Board (A5) Removal/Replacement . . . . . . . . . . . LCD Display Driver (A13) Removal/Replacement (Flat Panel Display Version) . . . . . . . . . . . . . . . . . . . . . . . . . . . . . . . . . . . . . . . Main/CPU (A6) Removal/Replacement . . . . . . . . . . . . . . . . . . . . . . . . . . . . DSP (A7) Removal/Replacement . . . . . . . . . . . . . . . . . . . . . . . . . . . . . . . . . Front Panel (A9) Removal/Replacement . . . . . . . . . . . . . . . . . . . . . . . . . . . Disk Drive (A12) Removal/Replacement . . . . . . . . . . . . . . . . . . . . . . . . . . . Touch Screen Removal/Replacement for CRT Display Instruments . . . . . . CRT Picture Monitor Assembly (A10) Removal/Replacement . . . . . . . . . . LCD Flat Panel Display Assembly (A14) Removal/Replacement . . . . . . . Replacing the LCD Assembly . . . . . . . . . . . . . . . . . . . . . . . . . . . . . . . . . . . LCD Backlight and Backlight Inverter Removal/Replacement . . . . . . . . . . Power Supply (A11) Removal/Replacement . . . . . . . . . . . . . . . . . . . . . . . . Replacing the NVRAM Backup Battery . . . . . . . . . . . . . . . . . . . . . . . . . . . . 6–55 6–55 6–55 6–56 6–56 6–57 6–58 6–60 6–63 6–64 6–64 6–65 6–66 6–69 6–69 6–72 6–73 6–73 6–76 6–82 6–83 6–86 6–88 Firmware Upgrade Procedure . . . . . . . . . . . . . . . . . . . . . . . . . . . . . . . . 6–91 Reprogramming Procedure . . . . . . . . . . . . . . . . . . . . . . . . . . . . . . . . . . . . . . . . . 6–91 Rack Adapter Instructions . . . . . . . . . . . . . . . . . . . . . . . . . . . . . . . . . . . 6–93 Slide-out Tracks . . . . . . . . . . . . . . . . . . . . . . . . . . . . . . . . . . . . . . . . . . . . . . . . . . Installation Procedure . . . . . . . . . . . . . . . . . . . . . . . . . . . . . . . . . . . . . . . . . . Slide-Out Track Lubrication . . . . . . . . . . . . . . . . . . . . . . . . . . . . . . . . . . . . . Mounting the AM700 in the Adapter . . . . . . . . . . . . . . . . . . . . . . . . . . . . . . . . . . Removing the Measurement Set from the Rack . . . . . . . . . . . . . . . . . . . . . . . . . 6–93 6–95 6–97 6–97 6–101 Options Replaceable Electrical Parts Parts Ordering Information . . . . . . . . . . . . . . . . . . . . . . . . . . . . . . . . . . . . . . . . . Using the Replaceable Electrical Parts List . . . . . . . . . . . . . . . . . . . . . . . . . . . . . 8–1 8–1 Block Diagrams . . . . . . . . . . . . . . . . . . . . . . . . . . . . . . . . . . . . . . . . . . . . . . . . . . Diagram Symbols . . . . . . . . . . . . . . . . . . . . . . . . . . . . . . . . . . . . . . . . . . . . . . . . . Component Values . . . . . . . . . . . . . . . . . . . . . . . . . . . . . . . . . . . . . . . . . . . . . . . . Assembly Numbers . . . . . . . . . . . . . . . . . . . . . . . . . . . . . . . . . . . . . . . . . . . . . . . Grid Coordinates . . . . . . . . . . . . . . . . . . . . . . . . . . . . . . . . . . . . . . . . . . . . . . . . . 9–1 9–1 9–1 9–2 9–2 Diagrams Replaceable Mechanical Part Parts Ordering Information . . . . . . . . . . . . . . . . . . . . . . . . . . . . . . . . . . . . . . . . . Using the Replaceable Parts List . . . . . . . . . . . . . . . . . . . . . . . . . . . . . . . . . . . . . AM700 Audio Measurement Set Service Manual 10–1 10–2 ix Table of Contents Appendix Appendix A: Memory and Register Mapping . . . . . . . . . . . . . . . . . . . System Memory Map . . . . . . . . . . . . . . . . . . . . . . . . . . . . . . . . . . . . . . . . . . CPU/DSP Interface Address Map . . . . . . . . . . . . . . . . . . . . . . . . . . . . . . . . . DRAM Address Map . . . . . . . . . . . . . . . . . . . . . . . . . . . . . . . . . . . . . . . . . . Diagnostic LED Displays . . . . . . . . . . . . . . . . . . . . . . . . . . . . . . . . . . . . . . . S3 Diagnostic Switch Settings . . . . . . . . . . . . . . . . . . . . . . . . . . . . . . . . . . . DMA Read Procedure . . . . . . . . . . . . . . . . . . . . . . . . . . . . . . . . . . . . . . . . . . DMA WRITE Procedure . . . . . . . . . . . . . . . . . . . . . . . . . . . . . . . . . . . . . . . Translation Examples . . . . . . . . . . . . . . . . . . . . . . . . . . . . . . . . . . . . . . . . . . x A-1 A-1 A-2 A-4 A-5 A-5 A-16 A-18 A-20 AM700 Audio Measurement Set Service Manual Table of Contents List of Figures Figure 2–1: Rear panel fuse, power connector, On/Off Switch, and line selector . . . . . . . . . . . . . . . . . . . . . . . . . . . . . . . . . . . . . . . . . Figure 2–2: Touch screen interface with main menu and submenu displayed . . . . . . . . . . . . . . . . . . . . . . . . . . . . . . . . . . . . . . . . . . . . . . . Figure 2–3: Representative icons and arrows seen in the display . . . . . . . Figure 2–4: Application selection menu under the other button . . . . . . . . Figure 2–5: Touch screen calibration . . . . . . . . . . . . . . . . . . . . . . . . . . . . Figure 2–6: AM700 Audio Measurement Set system clock . . . . . . . . . . . Figure 2–7: Applications selection buttons . . . . . . . . . . . . . . . . . . . . . . . . Figure 2–8: Configure button in the utilities selection block . . . . . . . . . . Figure 2–9: Configuration menu initial selection screen . . . . . . . . . . . . . Figure 2–10: System status display . . . . . . . . . . . . . . . . . . . . . . . . . . . . . . Figure 2–11: Input selection control panel . . . . . . . . . . . . . . . . . . . . . . . . Figure 2–12: Measurement channel assignment pull-down menu . . . . . . Figure 2–13: A typical view setup control menu . . . . . . . . . . . . . . . . . . . Figure 2–14: FFT Analyzer view options in the view setup controls . . . . Figure 2–15: Four different measurements in four views of the Audio Analyzer . . . . . . . . . . . . . . . . . . . . . . . . . . . . . . . . . . . . . . . . . . Figure 2–16: Configure measurement screens for FFT Analyzer for FFT and for multitone . . . . . . . . . . . . . . . . . . . . . . . . . . . . . . . . . . . . . . . . . Figure 2–17: The copy configuration menu . . . . . . . . . . . . . . . . . . . . . . . Figure 2–18: Hard copy output file selector . . . . . . . . . . . . . . . . . . . . . . . Figure 2–19: Configure system setup communicate menu . . . . . . . . . . . . Figure 2–20: Configure system setup conversion standards menu . . . . . . Figure 2–21: Generator output voltage divider for dBm calculations . . . . Figure 2–22: Input circuit for dBm calculations . . . . . . . . . . . . . . . . . . . . Figure 2–23: Quick setup selections for the Audio Analyzer . . . . . . . . . . Figure 3–1: Simplified block diagram of the AM700 Audio Measurement Set . . . . . . . . . . . . . . . . . . . . . . . . . . . . . . . . . . . . . . . . . Figure 3–2: Simplified block diagram of one channel of the analog input circuitry . . . . . . . . . . . . . . . . . . . . . . . . . . . . . . . . . . . . . . . . . . . Figure 3–3: Simplified block diagram of the high resolution analog to digital converter . . . . . . . . . . . . . . . . . . . . . . . . . . . . . . . . . . . . . . . Figure 3–4: Sample transmitter block diagram . . . . . . . . . . . . . . . . . . . . . Figure 3–5: Digital audio generator simplified block diagram . . . . . . . . . Figure 3–6: Digital audio board DSP section block diagram . . . . . . . . . . AM700 Audio Measurement Set Service Manual 2–1 2–4 2–5 2–6 2–7 2–8 2–9 2–10 2–10 2–12 2–13 2–15 2–16 2–17 2–19 2–20 2–21 2–23 2–24 2–25 2–26 2–26 2–28 3–1 3–6 3–9 3–11 3–15 3–17 xi Table of Contents Figure 3–7: Digital audio receiver simplified block diagram . . . . . . . . . . Figure 3–8: Digital audio connectors . . . . . . . . . . . . . . . . . . . . . . . . . . . . Figure 3–9: Digital signal processor port connector . . . . . . . . . . . . . . . . . Figure 3–10: DSP port timing diagram . . . . . . . . . . . . . . . . . . . . . . . . . . . Figure 3–11: Analog generator simplified block diagram . . . . . . . . . . . . . Figure 3–12: Analog generator DSP section block diagram . . . . . . . . . . . Figure 3–13: S-Clock disable used for DSP mode control . . . . . . . . . . . . Figure 3–14: SSI clock, frame, B clock, and serial data waveform for High Res and High BW modes . . . . . . . . . . . . . . . . . . . . . . . . . . . . . . Figure 3–15: Switching waveform for –15 V floating power supply . . . . Figure 3–16: Simplified block diagram of the A6 CPU board . . . . . . . . . Figure 3–17: DSP board simplified block diagram . . . . . . . . . . . . . . . . . . Figure 3–18: DSP/CPU host port interface . . . . . . . . . . . . . . . . . . . . . . . . Figure 3–19: Picture monitor simplified block diagram . . . . . . . . . . . . . . Figure 3–20: Power supply block diagram . . . . . . . . . . . . . . . . . . . . . . . . Figure 3–21: LCD driver board block diagram . . . . . . . . . . . . . . . . . . . . . Figure 4–1: Interconnection cables . . . . . . . . . . . . . . . . . . . . . . . . . . . . . . Figure 4–2: Input configuration control panel . . . . . . . . . . . . . . . . . . . . . Figure 4–3: Audio generator controls . . . . . . . . . . . . . . . . . . . . . . . . . . . . Figure 4–4: Generator control display . . . . . . . . . . . . . . . . . . . . . . . . . . . . Figure 4–5: Waveform control display . . . . . . . . . . . . . . . . . . . . . . . . . . . Figure 4–6: View window icons . . . . . . . . . . . . . . . . . . . . . . . . . . . . . . . . Figure 4–7: Cable for generator output level check . . . . . . . . . . . . . . . . . Figure 4–8: Advanced analog controls display . . . . . . . . . . . . . . . . . . . . . Figure 4–9: Generator frequency check cable . . . . . . . . . . . . . . . . . . . . . . Figure 4–10: Keypad entry buttons . . . . . . . . . . . . . . . . . . . . . . . . . . . . . . Figure 4–11: Impedance check adapter cables . . . . . . . . . . . . . . . . . . . . . Figure 4–12: Applications buttons . . . . . . . . . . . . . . . . . . . . . . . . . . . . . . Figure 4–13: Input Configuration control panel . . . . . . . . . . . . . . . . . . . . Figure 4–14: Audio Analyzer graphical display with real time (RT) view visible . . . . . . . . . . . . . . . . . . . . . . . . . . . . . . . . . . . . . . . . . . . . . Figure 4–15: Keypad entry buttons . . . . . . . . . . . . . . . . . . . . . . . . . . . . . . Figure 4–16: Audio Analyzer main menu with input range and input select submenus . . . . . . . . . . . . . . . . . . . . . . . . . . . . . . . . . . . . . . . . . Figure 4–17: FFT Analyzer Window menu display . . . . . . . . . . . . . . . . . Figure 4–18: Dual BNC to 110 W XLR adapter cable . . . . . . . . . . . . . . . Figure 4–19: Dual BNC to dual XLR cable adapter . . . . . . . . . . . . . . . . . Figure 4–20: Dual BNC to 110 XLR female adapter cable . . . . . . . . . . . xii 3–19 3–29 3–30 3–31 3–33 3–35 3–37 3–38 3–44 3–45 3–56 3–59 3–63 3–67 3–81 4–3 4–6 4–7 4–8 4–9 4–9 4–11 4–13 4–13 4–17 4–19 4–20 4–21 4–22 4–22 4–24 4–29 4–38 4–47 4–48 AM700 Audio Measurement Set Service Manual Table of Contents Figure 4–21: Storage manager control screen . . . . . . . . . . . . . . . . . . . . . . Figure 4–22: AM700 startup menu . . . . . . . . . . . . . . . . . . . . . . . . . . . . . . Figure 4–23: Low level diagnostics menu V1.02 firmware . . . . . . . . . . . Figure 4–24: Low level diagnostic OVERALL RUN MODE menu . . . . Figure 4–25: Build CUSTOM TEST SEQUENCE menu for disk drive test . . . . . . . . . . . . . . . . . . . . . . . . . . . . . . . . . . . . . . . . . . . Figure 4–26: Floppy diagnostic drive stress test results . . . . . . . . . . . . . . Figure 4–27: GPIB setup in the communications configuration screen . . Figure 4–28: Copy configuration menu . . . . . . . . . . . . . . . . . . . . . . . . . . 4–54 4–56 4–56 4–57 Figure 5–1: Power supply +5 V test points and adjustment locations . . . Figure 5–2: Acquisition board test points and adjustment locations . . . . . Figure 5–3: Disk drive flexible circuit board connector operation . . . . . . Figure 5–4: CRT display monitor board adjustment locations . . . . . . . . . Figure 5–5: LCD display driver test points and adjustment locations . . . Figure 5–6: Generator board adjustment locations . . . . . . . . . . . . . . . . . . Figure 5–7: Pin arrangement for J33, the PLL voltage test points . . . . . . Figure 5–8: Digital audio board test points and adjustment locations . . . 5–6 5–8 5–12 5–15 5–21 5–25 5–27 5–29 Figure 6–1: Rear panel Fuse, Power connector, On/Off Switch and Line Selector . . . . . . . . . . . . . . . . . . . . . . . . . . . . . . . . . . . . . . . . . . . . Figure 6–2: Power supply status indicators for the CRT display power supply . . . . . . . . . . . . . . . . . . . . . . . . . . . . . . . . . . . . . . . . . . . . Figure 6–3: Power supply status indicators for the flat panel display power supply . . . . . . . . . . . . . . . . . . . . . . . . . . . . . . . . . . . . . . . . . . . . Figure 6–4: Entering the user-interface diagnostics . . . . . . . . . . . . . . . . . Figure 6–5: AM700 diagnostics menus overview . . . . . . . . . . . . . . . . . . . Figure 6–6: High level diagnostics main menu . . . . . . . . . . . . . . . . . . . . . Figure 6–7: Instrument run modes in V1.02 firmware . . . . . . . . . . . . . . . Figure 6–8: Instrument run modes in V1.0/V1.01 firmware . . . . . . . . . . . Figure 6–9: AM700 startup menu . . . . . . . . . . . . . . . . . . . . . . . . . . . . . . . Figure 6–10: Low level diagnostics menu V1.02 firmware . . . . . . . . . . . Figure 6–11: Low level diagnostics menu for V1.0/V1.01 firmware . . . . Figure 6–12: Low level diagnostic OVERALL RUN MODE menu . . . . Figure 6–13: Custom run mode menu V1.02 firmware . . . . . . . . . . . . . . Figure 6–14: Custom run mode menu V1.0/V1.01 firmware . . . . . . . . . . Figure 6–15: Build CUSTOM TEST SEQUENCE menu for display . . . Figure 6–16: Front panel diagnostic selection buttons . . . . . . . . . . . . . . . Figure 6–17: Special power up boot modes for V1.02 firmware . . . . . . . Figure 6–18: Special power up boot modes for V1.0/V1.01 firmware . . . AM700 Audio Measurement Set Service Manual 4–57 4–58 4–60 4–61 6–3 6–11 6–11 6–15 6–16 6–18 6–18 6–19 6–19 6–20 6–20 6–24 6–24 6–25 6–26 6–27 6–28 6–29 xiii Table of Contents Figure 6–19: Circuit board assemblies for CRT display version . . . . . . . Figure 6–20: Circuit board assemblies for flat panel color display . . . . . Figure 6–21: Multiple-pin connectors . . . . . . . . . . . . . . . . . . . . . . . . . . . . Figure 6–22: Major module locations for the CRT display . . . . . . . . . . . . Figure 6–23: Major module locations for the LCD flat panel display . . . Figure 6–24: Bottom view showing the connections to the Analog Acquisition board . . . . . . . . . . . . . . . . . . . . . . . . . . . . . . . . . . . . . . . . Figure 6–25: XLR connectors . . . . . . . . . . . . . . . . . . . . . . . . . . . . . . . . . . Figure 6–26: Bottom view showing the XLR connector board cable connections . . . . . . . . . . . . . . . . . . . . . . . . . . . . . . . . . . . . . . . . Figure 6–27: Digital audio board connector locations . . . . . . . . . . . . . . . Figure 6–28: Bottom view showing the Analog Audio Generator cabling . . . . . . . . . . . . . . . . . . . . . . . . . . . . . . . . . . . . . . . . . . . . . . . . . Figure 6–29: LCD Display Driver board with connector locations . . . . . Figure 6–30: CPU board retaining screws and disk drive cable release . . Figure 6–31: Rear panel screws holding the CPU board in place . . . . . . Figure 6–32: Retaining screw locations for DSP (A7) circuit board . . . . Figure 6–33: Trim ring and front panel removal . . . . . . . . . . . . . . . . . . . . Figure 6–34: Front panel board connector locations . . . . . . . . . . . . . . . . . Figure 6–35: Touch screen gasket precaution areas when Installing the trim ring . . . . . . . . . . . . . . . . . . . . . . . . . . . . . . . . . . . . . . . . . . . . . . . Figure 6–36: Disk drive flexible circuit board connector operation . . . . . Figure 6–37: Power supply and monitor board cover plate screws and cables (CRT display version) . . . . . . . . . . . . . . . . . . . . . . . . . . . . . . . Figure 6–38: Trim ring and LCD flat panel display retaining screws . . . . Figure 6–39: Touch screen assembly removal B020253 to B020692 . . . . Figure 6–40: Touch screen removal for serial number B020633 and above . . . . . . . . . . . . . . . . . . . . . . . . . . . . . . . . . . . . . . . . . . . . . . Figure 6–41: LCD assembly exploded view serial number B020100 to B020632 . . . . . . . . . . . . . . . . . . . . . . . . . . . . . . . . . . . . . . . . . . . . . Figure 6–42: Backlight removal . . . . . . . . . . . . . . . . . . . . . . . . . . . . . . . . Figure 6–43: Touch panel reinstallation . . . . . . . . . . . . . . . . . . . . . . . . . . Figure 6–44: Power supply connector locations . . . . . . . . . . . . . . . . . . . . Figure 6–45: Location of the backup battery in the AM700 . . . . . . . . . . . Figure 6–46: Partial CPU board showing location of BT1, the backup battery . . . . . . . . . . . . . . . . . . . . . . . . . . . . . . . . . . . . . . . . . . . Figure 6–47: Exploded view of the slide-out track assembly . . . . . . . . . . Figure 6–48: Locating mounting holes on front Rrails of equipment rack Figure 6–49: Mounting the slide to the front rail . . . . . . . . . . . . . . . . . . . Figure 6–50: Installing bracket extensions . . . . . . . . . . . . . . . . . . . . . . . . xiv 6–51 6–52 6–56 6–57 6–58 6–59 6–61 6–62 6–63 6–65 6–66 6–67 6–68 6–69 6–70 6–70 6–71 6–72 6–74 6–77 6–79 6–80 6–81 6–84 6–86 6–87 6–89 6–89 6–94 6–95 6–96 6–96 AM700 Audio Measurement Set Service Manual Table of Contents Figure 6–51: Removing the plastic handle screw cover . . . . . . . . . . . . . . Figure 6–52: Removing the thumb release button from the swing arm . . Figure 6–53: Removing the retaining screws holding the swing arms to the cabinet . . . . . . . . . . . . . . . . . . . . . . . . . . . . . . . . . . . . . . . . . . . . Figure 6–54: Installing and removing the AM700 Audio Measurement Set from the rack . . . . . . . . . . . . . . . . . . . . . . . . . . . . . . . . . . . . . . . . . Figure 6–55: Exploded view of the rack adapter assembly . . . . . . . . . . . . Figure 9–1: AM700 overall block diagram . . . . . . . . . . . . . . . . . . . . . . . . Figure 9–2: Analog Acquisition Channel A input section (Channel B in parentheses) . . . . . . . . . . . . . . . . . . . . . . . . . . . . . . . . . . . . . . . . . . . . . Figure 9–3: Analog Acquisition input section CH A notch filter . . . . . . . Figure 9–4: Analog Acquisition A/D section CH 1 (CH 2) . . . . . . . . . . . Figure 9–5: Analog acquisition, part 1 of data formatter PAL . . . . . . . . . Figure 9–6: Analog acquisition, part 2 of the data formatter PAL . . . . . . Figure 9–7: Analog acquisition board cal circuitry, control registers, power decoupling, and trigger input . . . . . . . . . . . . . . . . . . . . . . . . . . Figure 9–8: Analog generator simplified block diagram . . . . . . . . . . . . . . Figure 9–9: Analog generator, DSP section . . . . . . . . . . . . . . . . . . . . . . . Figure 9–10: Analog generator DAC and current-to-voltage converters . Figure 9–11: Analog Generator, analog filters block diagram . . . . . . . . . Figure 9–12: Analog Generator output section, attenuators and gain, detailed block diagram . . . . . . . . . . . . . . . . . . . . . . . . . . . . . . . . . . . . Figure 9–13: CPU block diagram . . . . . . . . . . . . . . . . . . . . . . . . . . . . . . . Figure 9–14: DSP block diagram . . . . . . . . . . . . . . . . . . . . . . . . . . . . . . . Figure 10–1: Front view – SN B019999 and below only . . . . . . . . . . . . . Figure 10–2: Front view – SN B020100 and above only . . . . . . . . . . . . . Figure 10–3: Top view – SN B019999 and below only . . . . . . . . . . . . . . Figure 10–4: Top view – SN B020100 and above only . . . . . . . . . . . . . . Figure 10–5: Left side view CRT Display version – SN B019999 and below only . . . . . . . . . . . . . . . . . . . . . . . . . . . . . . . . . . . . . . . . . . Figure 10–6: Left side view LCD Display version – SN B020100 and above only . . . . . . . . . . . . . . . . . . . . . . . . . . . . . . . . . . . . . . . . . . Figure 10–7: LCD display assembly subparts – SN B020100 and above . . . . . . . . . . . . . . . . . . . . . . . . . . . . . . . . . . . . . . . . . . . . . . Figure 10–8: Chassis and bottom view – SN B019999 and below only . . Figure 10–9: Chassis and bottom view – SN B020100 and above only . . Figure 10–10: Cabinet . . . . . . . . . . . . . . . . . . . . . . . . . . . . . . . . . . . . . . . . Figure 10–11: Standard and optional accessories . . . . . . . . . . . . . . . . . . . AM700 Audio Measurement Set Service Manual 6–98 6–99 6–100 6–101 6–103 9–5 9–6 9–7 9–8 9–9 9–10 9–11 9–12 9–13 9–14 9–15 9–16 9–17 9–18 10–7 10–9 10–11 10–15 10–17 10–19 10–21 10–23 10–25 10–27 10–29 xv Table of Contents List of Tables xvi Table 1–1: Power cord identification . . . . . . . . . . . . . . . . . . . . . . . . . . . . Table 1–2: Analog analyzer specifications . . . . . . . . . . . . . . . . . . . . . . . . Table 1–3: Electronic trigger specification . . . . . . . . . . . . . . . . . . . . . . . Table 1–4: Analog generator specifications . . . . . . . . . . . . . . . . . . . . . . . Table 1–5: Digital audio unit specifications . . . . . . . . . . . . . . . . . . . . . . . Table 1–6: Display system specifications . . . . . . . . . . . . . . . . . . . . . . . . . Table 1–7: Nonvolatile memory . . . . . . . . . . . . . . . . . . . . . . . . . . . . . . . . Table 1–8: Software update procedure . . . . . . . . . . . . . . . . . . . . . . . . . . . Table 1–9: Floppy disk drive . . . . . . . . . . . . . . . . . . . . . . . . . . . . . . . . . . Table 1–10: Front panel hardware . . . . . . . . . . . . . . . . . . . . . . . . . . . . . . Table 1–11: Rear panel hardware . . . . . . . . . . . . . . . . . . . . . . . . . . . . . . . Table 1–12: Power distribution system . . . . . . . . . . . . . . . . . . . . . . . . . . Table 1–13: Safety standards . . . . . . . . . . . . . . . . . . . . . . . . . . . . . . . . . . Table 1–14: Safety standards compliance . . . . . . . . . . . . . . . . . . . . . . . . Table 1–15: Environmental characteristics . . . . . . . . . . . . . . . . . . . . . . . Table 1–16: Dynamic characteristics . . . . . . . . . . . . . . . . . . . . . . . . . . . . Table 1–17: Electromagnetic compatibility . . . . . . . . . . . . . . . . . . . . . . . Table 1–18: Mechanical characteristics . . . . . . . . . . . . . . . . . . . . . . . . . . Table 1–19: Remote control protocol . . . . . . . . . . . . . . . . . . . . . . . . . . . . Table 1–20: Generator control . . . . . . . . . . . . . . . . . . . . . . . . . . . . . . . . . Table 1–21: Generator signals . . . . . . . . . . . . . . . . . . . . . . . . . . . . . . . . . Table 1–22: Audio analyzer application . . . . . . . . . . . . . . . . . . . . . . . . . . Table 1–23: FFT analyzer . . . . . . . . . . . . . . . . . . . . . . . . . . . . . . . . . . . . . Table 1–24: Audio monitor . . . . . . . . . . . . . . . . . . . . . . . . . . . . . . . . . . . . Table 1–25: Digital interface tester . . . . . . . . . . . . . . . . . . . . . . . . . . . . . Table 1–26: Software update procedure . . . . . . . . . . . . . . . . . . . . . . . . . . 1–3 1–4 1–9 1–10 1–14 1–19 1–21 1–21 1–21 1–22 1–22 1–23 1–23 1–23 1–24 1–24 1–25 1–26 1–28 1–28 1–30 1–31 1–33 1–36 1–38 1–39 Table 2–1: Quick setups by application . . . . . . . . . . . . . . . . . . . . . . . . . . 2–28 Table 3–1: Interrupt level encoding . . . . . . . . . . . . . . . . . . . . . . . . . . . . . Table 3–2: Diagnostic LED Definitions . . . . . . . . . . . . . . . . . . . . . . . . . . Table 3–3: Interrupt inputs and sources . . . . . . . . . . . . . . . . . . . . . . . . . . 3–46 3–51 3–60 Table 4–1: Required test equipment . . . . . . . . . . . . . . . . . . . . . . . . . . . . . Table 4–2: Generator test voltages at 120 Hz . . . . . . . . . . . . . . . . . . . . . . Table 4–3: High resolution generator checks . . . . . . . . . . . . . . . . . . . . . . 4–1 4–11 4–14 AM700 Audio Measurement Set Service Manual Table of Contents Table 4–4: High bandwidth generator checks . . . . . . . . . . . . . . . . . . . . . Table 4–5: High resolution analyzer checks . . . . . . . . . . . . . . . . . . . . . . . Table 4–6: High bandwidth analyzer checks . . . . . . . . . . . . . . . . . . . . . . Table 4–7: Main output and XLR output test . . . . . . . . . . . . . . . . . . . . . . Table 4–8: BNC output and main output test . . . . . . . . . . . . . . . . . . . . . . Table 4–9: Phase Jitter 1 . . . . . . . . . . . . . . . . . . . . . . . . . . . . . . . . . . . . . . Table 4–10: Phase Jitter 2 . . . . . . . . . . . . . . . . . . . . . . . . . . . . . . . . . . . . . Table 4–11: Test AM700 jitter measurement accuracy . . . . . . . . . . . . . . 4–16 4–24 4–26 4–41 4–42 4–44 4–44 4–46 Table 5–1: Equipment required list . . . . . . . . . . . . . . . . . . . . . . . . . . . . . Table 5–2: AM700 adjustments . . . . . . . . . . . . . . . . . . . . . . . . . . . . . . . . Table 5–3: Power supply voltages and ripple tolerances . . . . . . . . . . . . . 5–1 5–3 5–5 Table 6–1: Static susceptibility . . . . . . . . . . . . . . . . . . . . . . . . . . . . . . . . . Table 6–2: CPU diagnostic (LL) . . . . . . . . . . . . . . . . . . . . . . . . . . . . . . . Table 6–3: Display diagnostic (LL) . . . . . . . . . . . . . . . . . . . . . . . . . . . . . Table 6–4: DSP diagnostic (LL) . . . . . . . . . . . . . . . . . . . . . . . . . . . . . . . . Table 6–5: Digital audio diagnostic (LL) . . . . . . . . . . . . . . . . . . . . . . . . . Table 6–6: Generator diagnostic (LL) . . . . . . . . . . . . . . . . . . . . . . . . . . . Table 6–7: Floppy diagnostic (LL) . . . . . . . . . . . . . . . . . . . . . . . . . . . . . . Table 6–8: Baud rate setting for diagnostic output to the serial ports . . . Table 6–9: Bus probe checks . . . . . . . . . . . . . . . . . . . . . . . . . . . . . . . . . . Table 6–10: Diagnostic LED definitions . . . . . . . . . . . . . . . . . . . . . . . . . Table 6–11: Digital audio circuit board testing . . . . . . . . . . . . . . . . . . . . 6–2 6–21 6–22 6–22 6–22 6–22 6–23 6–30 6–32 6–33 6–42 Table A-1: Interrupt level encoding . . . . . . . . . . . . . . . . . . . . . . . . . . . . . Table A-2: System memory map summary (host CPU side) . . . . . . . . . . Table A-3: CPU/DSP interface address map . . . . . . . . . . . . . . . . . . . . . . Table A-4: EPROM address space . . . . . . . . . . . . . . . . . . . . . . . . . . . . . . Table A-5: NVRAM address space . . . . . . . . . . . . . . . . . . . . . . . . . . . . . Table A-6: Mapping access by the MC68040 . . . . . . . . . . . . . . . . . . . . . Table A-7: Flash SIMM module capacity identification . . . . . . . . . . . . . Table A-8: DRAM address map (68040 access) . . . . . . . . . . . . . . . . . . . Table A-9: DRAM address map (96002 DMA access) . . . . . . . . . . . . . . Table A-10: Diagnostic LED definitions . . . . . . . . . . . . . . . . . . . . . . . . . Table A-11: Dip switch S3 functional specification . . . . . . . . . . . . . . . . . Table A-12: CPU MC68040 interrupts priority table . . . . . . . . . . . . . . . . Table A-13: Board status register address: 12000000 Operation: read only . . . . . . . . . . . . . . . . . . . . . . . . . . . . . . . . . . . . . . . . . . . . . . . A-1 A-1 A-2 A-3 A-3 A-4 A-4 A-4 A-5 A-5 A-6 A-6 AM700 Audio Measurement Set Service Manual A-6 xvii Table of Contents Table A-14: Board program register address: 13000000 . . . . . . . . . . . . . Table A-15: Timer registers and addresses . . . . . . . . . . . . . . . . . . . . . . . . Table A-16: Interrupt inputs and sources . . . . . . . . . . . . . . . . . . . . . . . . . Table A-17: DUARTA register addresses . . . . . . . . . . . . . . . . . . . . . . . . Table A-18: DUARTB register addresses . . . . . . . . . . . . . . . . . . . . . . . . Table A-19: UART port B output port register . . . . . . . . . . . . . . . . . . . . Table A-20: GPIB controller read registers . . . . . . . . . . . . . . . . . . . . . . . Table A-21: GPIB controller write registers . . . . . . . . . . . . . . . . . . . . . . Table A-22: Port A memory map summary (DSP side) . . . . . . . . . . . . . . Table A-23: Port B memory map summary (DSP side) . . . . . . . . . . . . . Table A-24: AHR address (CPU side): $1900 0000 . . . . . . . . . . . . . . . . Table A-25: Status register (SR), U52 and U53, address: $4000 0000 . . Table A-26: Program register, U54 and U62, address: $4100 0000 . . . . Table A-27: SMOD1 and SMOD0 bit settings . . . . . . . . . . . . . . . . . . . . . Table A-28: Host interface bootstrap operating mode . . . . . . . . . . . . . . . Table A-29: DMA interface address translation . . . . . . . . . . . . . . . . . . . . Table A-30: Host/DMA address translation examples . . . . . . . . . . . . . . xviii A-7 A-10 A-10 A-11 A-12 A-12 A-13 A-13 A-13 A-14 A-14 A-14 A-15 A-15 A-16 A-20 A-20 AM700 Audio Measurement Set Service Manual General Safety Summary Review the following safety precautions to avoid injury and prevent damage to this product or any products connected to it. To avoid potential hazards, use this product only as specified. Only qualified personnel should perform service procedures. To avoid potential hazards, use this product only as specified. To Avoid Fire or Personal Injury Use Proper Power Cord. Use only the power cord specified for this product and certified for the country of use. Use Proper Voltage Setting. Before applying power, ensure that the line selector is in the proper position for the power source being used. Ground the Product. This product is grounded through the grounding conductor of the power cord. To avoid electric shock, the grounding conductor must be connected to earth ground. Before making connections to the input or output terminals of the product, ensure that the product is properly grounded. Observe All Terminal Ratings. To avoid fire or shock hazard, observe all ratings and markings on the product. Consult the product manual for further ratings information before making connections to the product. Do Not Operate Without Covers. Do not operate this product with covers or panels removed. Use Proper Fuse. Use only the fuse type and rating specified for this product. Avoid Exposed Circuitry. Do not touch exposed connections and components when power is present. Do Not Operate With Suspected Failures. If you suspect there is damage to this product, have it inspected by qualified service personnel. Do Not Operate in Wet/Damp Conditions. Do Not Operate in an Explosive Atmosphere. Keep Product Surfaces Clean and Dry. Provide Proper Ventilation. Refer to the manual’s installation instructions for details on installing the product so it has proper ventilation. AM700 Audio Measurement Set Service Manual xix General Safety Summary Symbols and Terms Terms in this Manual. These terms may appear in this manual: WARNING. Warning statements identify conditions or practices that could result in injury or loss of life. CAUTION. Caution statements identify conditions or practices that could result in damage to this product or other property. Terms on the Product. These terms may appear on the product: DANGER indicates an injury hazard immediately accessible as you read the marking. WARNING indicates an injury hazard not immediately accessible as you read the marking. CAUTION indicates a hazard to property including the product. Symbols on the Product. The following symbols may appear on the product: WARNING High Voltage xx Protective Ground (Earth) Terminal CAUTION Refer to Manual Double Insulated AM700 Audio Measurement Set Service Manual Service Safety Summary Only qualified personnel should perform service procedures. Read this Service Safety Summary and the General Safety Summary before performing any service procedures. Do Not Service Alone. Do not perform internal service or adjustments of this product unless another person capable of rendering first aid and resuscitation is present. Disconnect Power. To avoid electric shock, disconnect the main power by means of the power cord or, if provided, the power switch. Use Caution When Servicing the CRT. To avoid electric shock or injury, use extreme caution when handling the CRT. Only qualified personnel familiar with CRT servicing procedures and precautions should remove or install the CRT. CRTs retain hazardous voltages for long periods of time after power is turned off. Before attempting any servicing, discharge the CRT by shorting the anode to chassis ground. When discharging the CRT, connect the discharge path to ground and then the anode. Rough handling may cause the CRT to implode. Do not nick or scratch the glass or subject it to undue pressure when removing or installing it. When handling the CRT, wear safety goggles and heavy gloves for protection. Use Care When Servicing With Power On. Dangerous voltages or currents may exist in this product. Disconnect power, remove battery (if applicable), and disconnect test leads before removing protective panels, soldering, or replacing components. To avoid electric shock, do not touch exposed connections. X-Radiation. To avoid x-radiation exposure, do not modify or otherwise alter the high-voltage circuitry or the CRT enclosure. X-ray emissions generated within this product have been sufficiently shielded. AM700 Audio Measurement Set Service Manual xxi Service Safety xxii AM700 Audio Measurement Set Service Manual Preface This AM700 Audio Measurement Set Service Manual is intended for use by qualified service personnel as a tool for troubleshooting, repair, and understanding of the AM700. No servicing of circuit boards should be attempted during the Warranty period of the instrument. Repair of the instrument when a defective circuit board is determined to be the cause of a failure is by board exchange. Both the CRT display and the flat-panel color display versions of the AM700 are covered in this service manual. Specifications This section provides a brief description of the features of the AM700 Audio Measurement Set, a list of the options and accessories available for use with the AM700. That is followed by the specification for the AM700 in tabular form. These tables provide numerical values for measurement accuracies for those characteristics that may be measured and functional descriptions for those functions that require a definition of their operation. Operating Information An introduction to how the AM700 operates is provided in this section to assist a service person in becoming familiar with the user interface and accessing the many application menus. A description of the power requirements and main fuse location is also found at the beginning of the section. Theory of Operation A quick overview of the functional blocks of the AM700 introduces the service person to the basic architecture of the circuit boards in the Block Circuit Description. That is followed by a more detailed description of the circuitry of the AM700 with block diagrams and references to the schematic diagrams to assist in obtaining a more indepth understanding of the functional blocks of the AM700. The circuit descriptions are mainly to assist the service person in narrowing the number of choices of circuit boards that may require swapping to effect repairs to a malfunctioning instrument. AM700 Audio Measurement Set Service Manual xxiii Preface Verification Procedure Test procedures to verify the functional performance of the AM700 are found in this section. A list of test equipment needed to perform the procedures precedes the test procedures. These verification procedures require test equipment and automated testing software that is not readily available to most service departments. Adjustment Procedure The adjustment procedures are shorter that the verification procedures. While there are many parameters of the AM700 that require specification and verification, there are relatively few adjustments. A list of test equipment need to perform the adjustments of the AM700 is provide, and, as with the verification procedure, some of the equipment may not be readily available to the service person. Some the adjustments can be made only with the circuit board on extender cables to be able to access the adjustable controls. Maintenance Maintenance of the AM700 is described in this section. General maintenance procedures for external and internal cleaning and static protection precautions are followed by some specific maintenance procedures for the AM700. Also in this section is a description of the internal self-diagnostics that the AM700 runs, information on the board exchange program, the removal and replacement steps to remove the assemblies from the AM700, and the rack adapter instructions. Options The available options for the AM700 are very briefly discussed. Option information is incorporated in the appropriate location throughout the manual, but this space is provided to summarize the options and add information for future options as they are developed. Replaceable Electrical Parts The parts list of modules and replaceable electrical parts is supplied in this section. Attempts to repair a circuit board by a non-Tektronix approved service person during the warranty period of the instrument will void the warranty, and credit for a damaged board will not be given for an exchange if the module is included in the board exchange program. xxiv AM700 Audio Measurement Set Service Manual Preface Diagrams Detailed block diagrams and circuit diagrams are found in this section. The block diagrams are provided to assist in determining board functions and functionality in the event of a circuit board failure. Schematic circuit diagrams are provided to assist in locating components and troubleshooting for circuit board repairs. Replaceable Mechanical Parts Part numbers for the replaceable mechanical parts and a mechanical exploded view of the AM700 are found in this section. Appendix A Memory and register mapping tables are provided to assist in signal tracing and troubleshooting. Related Manuals The AM700 Audio Measurement Set User Manual and the AM700 Audio Measurement Set with Color Display User Manual can be referred to for additional operating information. Programming information for the standard GPIB interface is found in the AM700 Programmer Manual and the AM700 Programmer Reference Manual. AM700 Audio Measurement Set Service Manual xxv Preface xxvi AM700 Audio Measurement Set Service Manual Specifications The Tektronix AM700 Audio Measurement System is a programmable highperformance, mixed signal audio analyzer designed for use in product design, characterization, quality control, manufacturing test, and servicing. It is also a valuable tool for monitoring and testing of signal distribution systems used in broadcasting and related applications. The AM700 Audio Measurement System is an advanced audio test set combining the signal generating capability of a two-channel analog and digital audio generator with the measurement / analysis capability of a two-channel analog and digital audio analyzer using digital signal processing. All hardware control, instrument configuration, data storage and I/O operations may be accomplished with the front-panel interface. The AM700 can be operated remotely through its GPIB port. Timed functions may be programmed using remote control. Key Features of the AM700 H The AM700 is compact, light weight, and self contained making it suitable for both bench and portable audio testing applications. H The AM700 is the first advanced audio analyzer to employ the proven touch/turn/zoom interface consisting of hard keys, knobs, and touch screen soft key controls. H The AM700 provides manual, semiautomatic, and fully automatic testing operation. H Graphical and text displays of measurements on early versions of the AM700 are displayed on a 7-inch monochrome raster-scan CRT. Later versions use a flat-panel LCD color display. A touch screen and soft key menu structure provides the user interface to the extensive applications of the AM700. Larger, external color displays of the AM700 screens are supported with a VGA port and user-supplied VGA monitor. H Printed copies of screens of the AM700 may be output to printers connected to RS-232C or GPIB ports. In addition, you may store the information on a 1.44 Mbyte, 3.5-inch floppy disk, using the internal disk drive, for later use or analysis. H LISTEN mode on all applications (except Digital Interface Tester) allows monitoring of signals through headphones. H The physical size of the AM700 is approximately 7.7 inches high, 18.2 inches wide (with handle), 18.8 inches deep, and it weighs about 31 pounds. This size allows the instrument to fit laboratory bench space and enhances AM700 Audio Measurement Set Service Manual 1–1 Specifications portability. The standard accessory front cover provides extra protection to the face of the AM700 when used as a portable instrument or when stored. The AM700 may also be rackmounted in a standard 19-inch rack using the optional rackmounting accessory kit. Options The following options are available for use with the AM700: H Options A1 through A5 substitute an appropriate power cord for the country of use (see Table 1–1). H Remedial Service Support Option M2 H Repair Protection Option M9 H AM700 Audio Measurement Set User Manual H AM700 Programmer Manual H AM700 Programmer Quick Reference Manual H Standard power cord (optional power cord substituted when ordered) H Protective Front Cover Standard Accessories Optional Accessories Accessories may be used for remote control, signal interfacing, and rackmounting. They are: H 1–2 GPIB Cable: double shielded in various lengths H 1 meter Tektronix part number 012-0991-01 H 2 meter Tektronix part number 012-0991-00 H 4 meter Tektronix part number 012-0991-02 H Tektronix ASW 100F Input Signal Switcher H Tektronix ASW 100M Output Signal Switcher H Rackmounting kit Tektronix part number AM7FR1 AM700 Audio Measurement Set Service Manual Specifications User-supplied Accessories H Standard VGA monitor (for viewing the AM700 display in color) H Ariel digital microphone (for direct audio input to the DSP input port) H XLR interconnection audio cables H BNC to XLR adapters H RCA Phono to XLR adapters H AT compatible keyboard Power Cord Options Table 1–1: Power cord identification Plug configuration AM700 Audio Measurement Set Service Manual Normal usage Option number North America 125 V/15A Plug NEMA 5-15P Standard Europe 230 V A1 United Kingdom 230 V A2 Australia 230 V A3 Switzerland 230 V A5 1–3 Specifications Characteristics The performance limits in this specification are valid with the following conditions: H This instrument must have been calibrated/adjusted at an ambient temperature between +20° C and +30° C. H The instrument must be in an environment with temperature, altitude, humidity, and vibration within the operating limits described in Table 1–15 on page 1–24. H The instrument must have had a warm-up period of at least 20 minutes. H The instrument must have had its signal-path-compensation routine last executed after at least a 20 minute warm-up period at an ambient temperature within ±5° C of the current ambient temperature. Any conditions that are unique to a particular characteristic are expressly stated as part of that characteristic. Table 1–2: Analog analyzer specifications Capabilities Description Input characteristics Number of Input Channels Two channels: A and B Input Type Balanced, differential Input Impedance 100 kW per side in parallel with ≈ 300 pF (with no internal loads) Internal Load Impedance 600 W, 150 W or 200 kW, software selectable Vmax Internal Load Approximately 34.65 V peak or 24.5 VRMS (sinusoidal) at 600 W (+30 dBm) Overload exerted for inputs peaks greater than +35 V Maximum Input Voltage 176 V (DC + peak AC) NOTE: Installation Category I – Signals must be isolated from the mains. DO NOT CONNECT TO MAINS VOLTAGES. Full Scale Input Ranges From –22 dBu (62.5 mVRMS) to +44 dBu (125 VRMS) in 12 6-dB steps Input gain ranges are in 6 dB steps from –22 dBu to +8 dBu and in 12 dB attenuator steps (with intermediate 6 dB gain steps) from +8 dBu to +44 dBu. Autoranging can be selected to switch the gain appropriately on the level of the input signal. Auto Ranging Input level sensing circuitry exists which allows software control of the input gain and attenuation, automatically selecting the optimum dynamic range for the current input level. Minimum Input for ±1 dB Accuracy 1 mV (–57.8 dBu) (–36 dB on 62.5 mV scale) in “high resolution mode.” 1–4 AM700 Audio Measurement Set Service Manual Specifications Table 1–2: Analog analyzer specifications (cont.) Capabilities Description Input characteristics Maximum Resolution 96 dB below 62.5 mV = 0.9875 mV Maximum Useable Bandwidth High Bandwidth Mode 80 kHz High Resolution Mode 24 kHz Common-Mode Rejection At 50 or 60 Hz ≥50 dB At 1 kHz ≥50 dB. Typically 80 dB on +8 dBu scale, 60 dB on +14 dBu and up, and typically > 80 dB on less than +8 dBu scale At 10 kHz ≥45 dB. Typically 80 dB on +8 dBu scale, 45 dB on +14 dBu and up, and typically > 80 dB on less than +8 dBu scale At 20 kHz ≥40 dB. Typically 80 dB on +8 dBu scale, 45 dB on +14 dBu and up, and typically > 80 dB on less than +8 dBu scale Load R = 200 kW Load R = 600 W 10 Hz to 1 kHz ≥90 dB ≥140 dB >1 kHz to 80 kHz ≥80 dB ≥100 dB Isolation, Generator to Analog Acquisition Crosstalk +Noise, Channel-to-Channel This is a wideband measurement of the level difference between the undriven channel and the driven channel. Driven channel input is a +8 dBu sine wave. Undriven input terminated in ≤600 W Both Channel Input Ranges Set to +8 dBu High Resolution Mode 15 Hz to 20 kHz ≤–88 dB, typically ≤–100 dB (noise-limited). Typically ≤–100 dB at full scale on the +2, +8, +14, +20, and +26 dBu ranges from 10 Hz to 20 kHz. High Bandwidth Mode 70 Hz to 80 kHz ≤–65 dB, typically ≤–70 dB (noise-limited) Undriven Channel Set to Autorange (Set driven channel input range to FS value indicated below.) High Resolution Mode 15 Hz to 20 kHz Input (FS) +8 dBu +14 dBu +20 dBu ≤–100 dB, typically ≤–115 dB (noise-limited) Typically ≤–120 dB Typically ≤–125 dB High Bandwidth Mode 70 Hz to 80 kHz Input (FS) +8 dBu AM700 Audio Measurement Set Service Manual ≤–95 dB, typically ≤–100 dB, 70 Hz to 40 kHz (noise-limited) 1–5 Specifications Table 1–2: Analog analyzer specifications (cont.) Capabilities Description Input characteristics Channel Separation (High Resolution Mode) This is a measurement of the level of the driven channel with respect to the undriven channel with a bandpass filter centered on the driven channel frequency. The measurement is primarily noise-limited, therefore, measured values improve as input amplitude increases. Channels A and B Equal Gain Settings (both channel input ranges at +8 dBu) Typically ≥110 dB, 20 Hz to 5 kHz, from +2 dBu on the +2 dBu input range through +30 dBu on the +32 dBu input range. 10 Hz to 5 kHz ≥100 dB >5 kHz to 20 kHz ≥90 dB Undriven Channel Set to Auto Range 15 Hz to 5 kHz ≥120 dB (noise-limited) >5 kHz to 20 kHz ≥110 dB Channel Separation (High Bandwidth Mode) Channels A and B Equal Input range Settings (driven input = +8 dBu on +8 dBu input range) CH A into CH B 70 Hz to 5 kHz ≥85 dB >5 kHz to 40 kHz ≥75 dB >40 kHz to 80 kHz ≥65 dB CH B into CH A 70 Hz to 5 kHz ≥85 dB >5 kHz to 40 kHz ≥80 dB >40 kHz to 80 kHz ≥70 dB (typically ≥85 dB) Undriven Channel Set to Autorange (driven input = +8 dBu on +8 dBu input range) CH A into CH B 70 Hz to 5 kHz ≥115 dB >5 kHz to 40 kHz ≥105 dB >40 kHz to 80 kHz ≥ 95 dB CH B into CH A 1–6 70 Hz to 5 kHz ≥112 dB >5 kHz to 40 kHz ≥110 dB >40 kHz to 80 kHz ≥108 dB AM700 Audio Measurement Set Service Manual Specifications Table 1–2: Analog analyzer specifications (cont.) Capabilities Description Amplitude measurement Amplitude Accuracy at CAL Frequency +8 dBu FS ±0.1 dB at 120 Hz Other gain steps FS ±0.15 dB at 120 Hz Amplitude Accuracy (relative to Accuracy at CAL Frequency) (High Resolution Mode) 10 Hz to 20 kHz Inputs >1 mV (–57.8dBu) to10mV (–37.8dBu) ±1.0 dB Input >10 mV (–37.8 dBu) to 1.946 V (+8 dBu) ±0.1 dB, typically ±0.05 dB, 50 Hz to 10 kHz Input >1.946 V (+8 dBu) to <64 V (+36 dBu) for input frequency below 20 kHz and to <16 V (+26 dBu) for input frequencies from 20 to 80 kHz ±0.15 dB, typically ±0.05 dB, 50 Hz to10 kHz Amplitude Accuracy (relative to Accuracy at CAL Frequency) (High Bandwidth Mode) 10 Hz to 20 kHz 20 to 70 kHz 70 to 80 kHz Inputs >1 mV (–57.8dBu) to10mV (–37.8dBu) ±1.0 dB ±1.0 dB ±2.0 dB Input >10 mV (–37.8 dBu) to 1.946 V (+8 dBu) ±0.15 dB (Typically ±0.05 dB from 50 Hz to10 kHz) ±0.2 dB ±1.0 dB Input >1.946 V (+8 dBu) to < 64 V (+36 dBu) for input frequency below 20 kHz and to <16 V (+26 dBu) for input frequencies from 20 to 80 kHz ±0.20 dB (Typically ±0.05 dB from 50 Hz to10 kHz) ±0.25 dB ±1.0 dB Interchannel Amplitude Accuracy at 120 Hz High Resolution Mode At +8 dBu FS ±0.1 dB, typically ±0.05 dB At other gain steps FS ±0.15 dB High Bandwidth Mode At +8 dBu FS ±0.2 dB, typically ±0.05 dB At other gain steps FS ≥62.5 mV (–22 dBu) ±0.25 dB Interchannel Amplitude Flatness Relative to Interchannel Amplitude Accuracy at 120 Hz High Resolution Mode (10 Hz to 20 kHz) At +8 dBu FS ±0.1 dB, typically ±0.05 dB At other gain steps FS ±0.15 dB, typically ±0.05 dB AM700 Audio Measurement Set Service Manual 1–7 Specifications Table 1–2: Analog analyzer specifications (cont.) Capabilities Description Amplitude measurement High Bandwidth Mode 10 Hz to 20 kHz 20 to 70 kHz 70 to 80 kHz At +8 dBu FS ±0.2 dB (Typically ±0.05 dB from 50 Hz to 10 kHz ±0.35 dB ±1.0 dB At other gain steps FS ≥62.5 mV (–22 dBu) ±0.25 dB ±0.35 dB ±1.0 dB The accuracy of the measurement may be noise-limited for amplitudes below 62.5 mV (–22 dBu). Interchannel Phase Difference High Resolution Mode ±1 degree from 100 Hz to 20 kHz ADC Sampling Rate High Resolution Mode 6.144 MHz, decimated to 48 kHz (two channels, 64 times oversampling on each channel) High Bandwidth Mode 192 kHz THD + N measurement High Bandwidth Mode Residual THD + N THD + N measured using the high bandwidth ADC over an 80 kHz BW. The measurement is noise-limited for amplitudes below 125 mV (–16 dBu). Input > 125 mV (–16 dBu); frequency ≤20 kHz to ≥72 Hz. Typically ≤0.03%, maximum 0.05%. High Resolution Mode Residual THD + N Measurement bandwidth = 20 kHz Input Amplitude > 62.5 mV (≈–21.9 dBu) ≤0.015%, noise-limited for amplitudes <250 mV (≈–10 dBu) Input Amplitude Between 250 mV (≈–10 dBu) and 16 V (≈+26 dBu) and frequencies between 20 Hz and 6.6 kHz On +2, +8, +14, +20, and +26 dBu Input Ranges 1–8 At Full Scale At Full Scale –6 dB 400 Hz to 6.6 kHz ≤0.003%, typ. ≤0.0015% ≤0.003%, typ. ≤0.002% 100 Hz to <400 Hz ≤0.005%, typ. ≤0.0025% ≤0.003% typ. ≤0.0025% 20 Hz to <100 Hz ≤0.011% ≤0.005%, typ.≤0.003% at 20 Hz AM700 Audio Measurement Set Service Manual Specifications Table 1–2: Analog analyzer specifications (cont.) Capabilities Description THD + N measurement On –4 dBu Input Range At Full Scale At Full Scale –6 dB 400 Hz to 6.6 kHz ≤0.003% ≤0.006% 100 Hz to <400 Hz ≤0.0075% ≤0.006% 20 Hz to <100 Hz ≤0.0125% ≤0.0075% 400 Hz to 6.6 kHz ≤0.005% ≤0.010% 100 Hz to <400 Hz ≤0.0075% ≤0.010% 20 Hz to <100 Hz ≤0.015% ≤0.011% On –10 dBu Input Range THD + N is limited by the A/D distortion (primarily 3rd harmonic) near full-scale at frequencies below 200 Hz. At –6 dB relative to FS, the increase in distortion at low frequencies is much less, typically 0.003% versus 0.0075% (FS) at 20 Hz. Under some conditions (measurements below 200 Hz), it may be desirable to manually set the input range one setting higher, sacrificing 6 dB of noise floor for better distortion readings. The auto-range circuitry optimizes dynamic range, somewhat compromising distortion near full-scale. Table 1–3: Electronic trigger specification Capabilities Description Trigger input Number of Trigger Inputs One input located on the rear panel. Electrical Characteristics TTL-level, Schmitt-trigger input. Connector Type BNC female Psuedo triggers Trigger Events AM700 Audio Measurement Set Service Manual Two trigger events may be generated by remote control using the commands in the SCPI TRIGger subsystem: STARt starts the sweep running and STOP ends the sweep. 1–9 Specifications Table 1–4: Analog generator specifications Capabilities Description Output characteristics Number of Output Channels Two, labeled A and B Signal Format Switchable between balanced and unbalanced. Source Impedance Selectable between: 600 W, 150 W, and 10 W. Minimum Typical Maximum 600 W 594 600 608 150 W 148.5 150 155 10 W (nominal) 9.5 11.8 13.5 A user-defined impedance may be used in place of either the 600 W or the 150 W source impedance. (Internal modification is required.) Output Control Enable Switchable on-off, with terminating resistance remaining as selected. Output Float Enable Switchable floating/grounded output. Floating Mode R to Ground ≈1 kW Capacitance to Ground ≈1 nF (@ 1 kHz) Maximum Float Voltage ±25 V peak Channel Separation High Resolution Mode ≥100 dB for frequencies ≥20 Hz High Bandwidth Mode ≥70 dB for frequencies ≥70 Hz Signals and control All signals are generated digitally using software running on a DSP56002 digital-signal processor, driving audio digital-to-analog converters. Types of Signals Supported by Hardware Signals that are band limited to 80 kHz. Independence of Generated Signal Outputs The hardware allows either stereo or mono mode generation. In stereo mode, each channel is generated from a separate DAC, while for mono mode, a signal DAC is used, followed by separate output drivers for each channel (A and B). The AM700 does not support stereo mode with the high bandwidth generator. Frequency related characteristics Sine Wave Frequency Range High Resolution Mode 10 Hz to 20 kHz High Bandwidth Mode 11.719 Hz to 79992.188 kHz Sine Wave Frequency Resolution 1–10 High Resolution Mode 0.1 Hz High Bandwidth Mode 11.719 Hz AM700 Audio Measurement Set Service Manual Specifications Table 1–4: Analog generator specifications (cont.) Capabilities Description Frequency related characteristics Sine Wave Frequency Accuracy ±0.01% Interchannel Phase Difference These specifications apply only if generator channels are set to Follow A. When channels are not in follow, their relative phases are arbitrary. High Resolution Mode ±1 degree at 1 kHz Typically ±1 degree, 100 Hz to 20 kHz High Bandwidth Mode Typically ±1 degree at 1 kHz; ±2 degrees at 20 kHz Amplitude related characteristics Full Scale Output Amplitude Ranges (Balanced outputs with source R = 10 W nominal) Measured into a high impedance load. Amplitudes will be approximately 0.14 dB lower if measured across a 600 W load when the source R = 10 W nominal. Every 6 dB from –22.1 dBu (60.8 mVRMS) to +13.9 dBu (3.84 VRMS) plus +20 dBu (7.75 VRMS), +26.0 dBu (15.45 VRMS), and +30 dBu (24.5 VRMS) for frequencies up to 20 kHz. Maximum output is limited to +28 dBu from 20 kHz to 80 kHz. For 600 W source impedance, all amplitudes are 6 dB lower if measured across a 600 W load. Maximum Generator Output Amplitude into a 600 W Load 10 Hz to 20 kHz Source Impedance = 10 W +28 dBu Source Impedance = 600 W +24 dBu Minimum Output Amplitude for ±1 dB Accuracy 1 mV Maximum Resolution High Resolution Mode 10 Hz to 20 kHz 1 mV High Bandwidth Mode 11.7 Hz to 80 kHz 3 mV Amplitude Accuracy at 120 Hz, High Resolution Generator Normal Mode At +13.9 dBu ±0.1 dB, typically ±0.05 dB –16.1 dBu to +30 dBu ±0.1 dB –34.1 dBu to <–16.1 dBu ±0.15 dB, typically ±0.1 dB –52.1 dBu to <–34.1 dBu ±0.25 dB Low Distortion Mode AM700 Audio Measurement Set Service Manual +0.2 dB to –0.0 dB relative to Normal Mode 1–11 Specifications Table 1–4: Analog generator specifications (cont.) Capabilities Description Amplitude related characteristics Amplitude Accuracy at 120 Hz, High Bandwidth Generator At +13.9 dBu ±0.15 dB, typically 0.1 dB –16.1 dBu to +30 dBu 0.15 dB, typically 0.1 dB –34.1 dBu to <–16.1 dBu 0.15 dB, typically 0.1 dB –52.1 dBu to <–34.1 dBu ±0.25 dB Amplitude Flatness, High Resolution Generator Relative to 120 Hz Levels from –22.1 dBu to +30 dBu Normal Mode 10 Hz to 10 kHz ±0.1 dB >10 kHz to 20 kHz +0.1 / –0.2 dB Low Distortion Mode 10 Hz to 1 kHz +0.1 / –0.25 dB >1 kHz to 10 kHz +0.1 / –0.6 dB Amplitude Flatness, High Bandwidth Generator Relative to 120 Hz Level from –22.1 dBu to +30 dBu 11.7 Hz to 20 kHz ± 0.1 dB >20 kHz to <70 kHz +0.1 / –0.5 dB 70 kHz >70 kHz to <80 kHz 80 kHz Typically ≤–0.3 dB +0.5 / –1.0 dB Typically ≤–0.5 dB Interchannel Amplitude Accuracy at 120 Hz High Resolution Mode At +13.9 dBu ±0.2 dB; with respect to amplitude accuracy at 120 Hz and 13.9 dBu, typically ±0.05 dB –22.1 dBu to +30 dBu ±0.3 dB High Bandwidth Mode At +13.9 dBu ±0.2 dB with respect to amplitude accuracy at 120 Hz and 13.9 dBu –22.1 dBu to +30 dBu ±0.3 dB Interchannel Amplitude Flatness Relative to 120 Hz Levels from –22.1 dBu to +30 dBu High Resolution Generator Normal Mode 1–12 10 Hz to 10 kHz ±0.2 dB >10 kHz to 20 kHz ±0.4 dB AM700 Audio Measurement Set Service Manual Specifications Table 1–4: Analog generator specifications (cont.) Capabilities Description Amplitude related characteristics Low Distortion Mode 10 Hz to 1 kHz ±0.5 dB >1 kHz to 10 kHz ±1.0 dB High Bandwidth Generator 11.7 Hz to 20 kHz ±0.2 dB >20 kHz to 70 kHz ±1.0 dB >70 kHz to 80 kHz ±1.0 dB THD + N High Resolution Generator Residual THD + N (Normal Mode) Measurements over 80 kHz BW are noise limited below –4 dBu. Measurements over 22 kHz BW are noise limited below –10 dBu. Residual THD+N of the high resolution generator without the bandpass filter in place. These specifications are baseline for nonsine-wave signals and for sine-wave signals not generated in the low-distortion mode. Load R ≥ 600 W. 10 Hz to 5 kHz Amplitude ≥–10 dBu Over 22 kHz BW ≤0.01% (–80 dB) typ. ≤0.008% (–82 dB) ≤0.0175% (–75 dB) typ. ≤ 0.011% (–79 dB) 10 Hz to 20 kHz Amplitude ≥+8 dBu Amplitude ≥–4 dBu Residual THD + N (Low Distortion Mode) Over 80 kHz BW ≤0.025% (–72 dB) Amplitudes less than –16 dBu are noise limited (22 kHz BW). Residual THD+N with the bandpass filter in place. These specifications are baseline for sine waves generated in the low-distortion mode. Load resistance ≥ 600 W 100 Hz to 749 Hz Amplitudes ≥+4 dBu to ≤+26 dBu Over 22 kHz BW Typ. ≤0.001% (–100 dB) 20 Hz to 749 Hz Amplitudes ≥+8 dBu ≤0.005% (–86 dB) Amplitudes ≥0 dBu ≤0.0025% (–92 dB), typ. ≤ 0.0015% (–96.5 dB) Amplitudes ≥–4 dBu ≤0.0025% (–92 dB) Amplitudes ≥–10 dBu ≤0.005% (–86 dB) Amplitudes ≥–16 dBu ≤0.0075% (–82.5 dB) AM700 Audio Measurement Set Service Manual Over 80 kHz BW ≤0.0075% (–82.5 dB) 1–13 Specifications Table 1–4: Analog generator specifications (cont.) Capabilities Description THD + N 750 Hz to 7.3 kHz Amplitudes ≥+8 dBu ≤0.005% (–86 dB) Amplitudes ≥0 dBu ≤0.005% (–86 dB), typ. ≤ 0.003% (–90.5 dB) Amplitudes ≥–4 dBu ≤0.005% (–86 dB) Amplitudes ≥–10 dBu ≤0.005% (–86 dB) Amplitudes ≥–16 dBu ≤0.0075% (–82.5 dB) ≤0.0075% (–82.5 dB) High Bandwidth Generator Residual THD+N Residual THD+N of the high bandwidth generator. Load resistance ≥ 600 W outputs ≥–4.0 dBu Over 22 kHz BW Over 80 kHz BW 11.7 Hz to 5 kHz ≤0.015% (–76.5 dB) typ. ≤0.01% (–80 dB) ≤0.018% (–75 dB) >5 kHz to 20 kHz Not applicable ≤0.025% (–72 dB) >20 kHz to 40 kHz Not applicable ≤0.03% (–70.5 dB) >40 kHz Not applicable Not applicable Table 1–5: Digital audio unit specifications Capabilities Description The Digital Audio Unit includes a generator, a reference generator, a main receiver, and a reference receiver. These four sections can operate simultaneously, each at its own sample rate. Interface Characteristics The generator always drives the Digital Out XLR, Unbalanced Out BNC, and Optical Out connectors. The main receiver selects one of: Digital XLR, Unbalanced In BNC, Optical In, or AES generator as its source. The reference receiver normally selects the Digital Ref In XLR as its source, except when the AES generator is selected as the main input, the reference receiver input switches to the reference generator. Connector Types Front Panel Digital In, Digital Out Balanced XLR, conforms to AES3-1992 and EBU 3250-E Rear Panel 1–14 Unbalanced In, Unbalanced Out BNC Optical In, Optical Out F05 snap-in type, 10 meter capability using APF (980/1000 mm [micrometer]) optical fiber Digital Reference In, Digital Reference Out Balanced XLR, conforms to AES3-1992 and EBU 3250-E AM700 Audio Measurement Set Service Manual Specifications Table 1–5: Digital audio unit specifications (cont.) Capabilities DSP Description 15-pin D, TTL/CMOS compatible. Pinout is compatible with Ariel Digital Microphone. Input and Output Impedances Digital In, Digital Out, Digital Reference In, Digital Reference Out 110 W ±10%, 0.1 MHz to 6 MHz Unbalanced In, Unbalanced Out 75 W ±5%, 0.1 MHz to 6 MHz Input and output levels AES/EBU I/O Levels Input levels required for normal operation and the output levels available. For details on measured or programmable parameters, see either Main Receiver Interface Parameter Measurements or Generator Variable Parameters. Digital In 0.15 V to 10 V peak-to-peak Unbalanced In 30 mV to 2 V peak-to-peak Digital Reference In 0.2 V peak-to-peak minimum eye opening. 10 V peak-to-peak maximum amplitude, 20% minimum eye height Digital Out Programmable from 0.2 V to 8 V peak-to-peak into 110 W Unbalanced Out Programmable from 50 mV to 2 V peak-to-peak into 75 W Digital Reference Out Fixed at 5.4 ±0.5 V peak-to-peak into 110 W DSP I/O Levels DSP Inputs Vil = 0.8 V, Vih = 2 V, Iil = 4 mA, Iih = 0 (CMOS with 1.2 kW pull-up) DSP Outputs Iol = 4 mA, Ioh = –5.3 mA, Vol = 0.6 V, Voh = 2.4 V Optical I/O Levels Conforms to TOSLINK parameters Receiver interface parameter measurements Main Input Level This is the level in Volts peak-to-peak being applied to the selected digital input (the front-panel Digital In or rear-panel Unbalanced In). Measurement Range XLR: 0.15 V to 8.0 V peak-to-peak BNC: 30 mV to 2.0 V peak-to-peak Accuracy with Factory Calibration Factors XLR: ±(30 mV + 15% of reading) BNC: ±(15 mV + 15% of reading) Clock Rate Range All inputs: 30 kHz to 52 kHz. Accuracy ±10 ppm AM700 Audio Measurement Set Service Manual 1–15 Specifications Table 1–5: Digital audio unit specifications (cont.) Capabilities Description Receiver interface parameter measurements Input Equalization The Main Input includes automatic line equalization to measure and correct roll-off due to typical 110 W digital audio cable. Range 0 to 20 dB loss at 10 MHz Accuracy ±2 dB Static Phase Difference This is the phase difference between the selected main input and the reference input. The primary function of the measurement is to check compliance with AES11-1991 section 5.3. Range +49.6% to –50.0% of the digital audio frame Accuracy ±1% of the digital audio frame Eye Diagram This is the data source for the eye diagram display and its accompanying peak-to-peak jitter measurement. It is the equivalent-time sample points of the selected main input. Time-base PLL Bandwidth 120 Hz or 1.2 kHz, user selectable Bandwidth Accuracy ±10% Amplitude Accuracy ±10% with calibration, ±20% with factory calibration factors Eye Diagram Peak-to-Peak Jitter Range 0 to 0.8 UI peak-to-peak jitter Accuracy LF Reject = 120 Hz. (Response falls 6 dB per octave below about 100 Hz.) ±(0.02 UI + 5%) for sinusoidal jitter above 500 Hz LF Reject = 1200 Hz. (Response falls 6 dB per octave below about 1000 Hz.) ±(0.02 UI + 5%) for sinusoidal jitter above 30 kHz Eye Diagram Residual Jitter 1–16 0.03 UI (combined residual jitter of reference generator and main receiver, with 120 Hz time-base bandwidth) AM700 Audio Measurement Set Service Manual Specifications Table 1–5: Digital audio unit specifications (cont.) Capabilities Description Receiver interface parameter measurements Phase Jitter This is the jitter amplitude in unit intervals (UI) as a function of jitter frequency. Range 10 UI p-p from 20 Hz to 500 Hz, decreasing proportionally to 0.5 UI p-p from 10 kHz to 50 kHz. Accuracy For sinusoidal jitter greater than –20 dBUI (0.1 UI p-p) at jitter gain = 1, or greater than –40 dBUI (0.01 UI p-p) at jitter gain = 8. Jitter Gain = X1 or X8 50 Hz to 500 Hz ±2 dB 500 Hz to 10 kHz ±1 dB Jitter Gain = X8 10 kHz to 50 kHz ±2 dB Spurious Response Jitter Gain = X1 50 Hz to 100 Hz –20 dBUI 100 Hz to 50 kHz –30 dBUI Jitter Gain = X8 50 Hz to 100 Hz –30 dBUI 100 Hz to 50 kHz –40 dBUI Reference input parameter measurements Clock Rate Range 30 kHz to 52 kHz Accuracy ±10 ppm Generator variable parameters Clock Rate Range All Inputs and Outputs 27.2 kHz to 55.2 kHz (32 kHz –15% to 48 kHz +15%) Clock Rate Accuracy The primary clock rates (32, 44.1, and 48 kHz) are synthesized exactly, so accuracy depends solely on the accuracy of the reference used (internal or external). Internal Ref Accuracy AM700 Audio Measurement Set Service Manual ±10 ppm 1–17 Specifications Table 1–5: Digital audio unit specifications (cont.) Capabilities Description Generator variable parameters Static Phase Difference This is the phase difference between the generator output and the selected reference (input or output). The primary function of the measurement is to check compliance with AES11-1991 section 5.3. Range –64 to 63.5 UI (Unit Intervals) Resolution 0.5 UI Accuracy Offset <50 ns, nonlinearity <5 ns Phase Jitter Generation Range 0 to 10 UI p-p from DC to 500 Hz, decreasing proportionally to 0.5 UI p-p from 10 kHz to 50 kHz. Resolution 0.02 UI p-p Accuracy DC to 20 kHz ±(10% of value + 0.02 UI) 20 kHz to 50 kHz ±(20% of value + 0.02 UI) Cable Simulator Simulated Cable Response A selectable cable simulator inserts the response of a long, typical digital audio cable in the front-panel Digital Out signal. 125 ns to 175 ns rise time measured at the second transition of the preamble of subframe 1. Output Level Range XLR: 0 to 8.0 V p-p into 110 W BNC: 0 to 2.04 V p-p into 75 W Resolution XLR: 10 mV BNC: 2 mV Accuracy XLR: ±(10 mV + 5% of setting) BNC: ±(2 mV + 2% of setting) Main Output Residual Jitter Clock Source From Audio Frequency Offset = 0 0.05 UI p-p maximum Frequency Offset < > 0 or Clock Source is Variable 0.08 UI p-p maximum Clock Source From Ref (0.08 UI p-p + reference jitter) maximum Reference signal jitter up to 15 kHz adds directly to output jitter. Reference input jitter above 15 kHz is attenuated by 6 dB per octave. 1–18 AM700 Audio Measurement Set Service Manual Specifications Table 1–5: Digital audio unit specifications (cont.) Capabilities Description Reference output variable parameters Clock Rate Range The reference output can be driven from the same clock that drives the main output, in which case the specifications of the main clock apply. Alternately, the reference output can be timed from the internal 48 kHz clock, or from the clock applied to the Digital Reference In connector. Clock Rate Accuracy Same as Internal clock rate accuracy. Reference Output Residual Jitter Clock Source From Audio Frequency Offset = 0 0.03 UI p-p maximum Frequency Offset < > 0 or Clock Source is Variable 0.08 UI p-p maximum Clock Source From Reference (external reference is required) (0.08 UI p-p + reference jitter) maximum Table 1–6: Display system specifications Capabilities Description CRT display Display Type Monochrome CRT; magnetic deflection; raster scan Display Size 7 inches diagonal Phosphor P4 White LCD flat panel display Display Type Color LCD flat panel; backlighted Display Size 6.4 inches (162.6 mm) diagonal Display Resolution 640 (H) × 480 (V) pixels (VGA) Touch panel Description Analog resistive touch screen Size Width 6.615 inches (168 mm) Height 5.33 inches (134.5 mm) AM700 Audio Measurement Set Service Manual 1–19 Specifications Table 1–6: Display system specifications (cont.) Capabilities Description VGA output Resolution 640 × 480 VGA Signal Levels Level Voltage White Level Black Level Blanking Horizontal Sync Vertical Sync 0.7 V 0V 0V TTL, low true TTL, low true Signal Load Impedance Red Green Blue Horizontal Sync Vertical Sync 75 ohms 75 ohms 75 ohms TTL compatible TTL compatible Signal Time/Frequency Dot Clock Horizontal Rate Vertical Rate 25.175 MHz 31.469 kHz 59.940 Hz Pin Number Description 1 2 3 4 5 6 7 8 9 10 11 12 13 14 15 Red Green Blue NC Ground Red Ground Green Ground Blue Ground NC Ground NC NC Horizontal Sync Vertical Sync NC Load Impedance Timing Pin Out 1–20 AM700 Audio Measurement Set Service Manual Specifications Table 1–7: Nonvolatile memory Capabilities Description Battery-backed SRAM Storage Capacity 1 Mbyte Retention Time (The length of time that stored waveforms and setups are retained without power to the instrument) Internal batteries, installed at the time of manufacture, have a life of greater than 10 years when operated and stored at an ambient temperature from 0_ C to 50_ C. Retention time of the nonvolatile memories is equal to the remaining life of the batteries. Battery life can be reduced when stored for extended time above 50_C. Retained data may be lost when stored for extended time below 0_ C. Backup Battery Rated Voltage Lithium inorganic 3.0 V Flash EPROM Storage Capacity 8 Mbyte Retention Time (The length of time that data stored in flash memory will remain useable) 10 years (minimum) Maximum Rewrites 100,000 Table 1–8: Software update procedure Capabilities Description Update Procedure AM700 firmware may be updated from a 1.44 Mbyte diskette. Table 1–9: Floppy disk drive Capabilities Description Mechanical Size of Floppy Disk 3.5 inches, 1.44 Mbytes, DSHD Mounting Location and Orientation of Disk Drive Left side of CRT, vertically oriented Disk drive must not be operated when it is upside down (with the left side of the AM700 down). Ejection Tab Orientation Toward the bottom of the cabinet Logical User File Format AM700 Audio Measurement Set Service Manual MS-DOS 1–21 Specifications Table 1–10: Front panel hardware Capabilities Description Analog Audio Standard XLR female. Pin 1 shield, pin 2 is +, pin 3 is – Digital Audio Input: XLR female, Output: XLR male Headphone Jack Standard 1/4 inch, stereo; channel A is left, channel B is right Headphone Nominal Impedance 8 to 2000 W Output Power to Headphones 20 mW minimum into 8 to 2000 W headphones at full volume Table 1–11: Rear panel hardware Capabilities Description Remote Connector Female DB9 Normally Open Contact, Pin 3 to Pin 9 Maximum Voltage 28 VDC Maximum Current 500 mA Maximum Power 14 W Relay Closure Input Pin 1 Pulled to +5 V ≤100 mA; input is protected Ground Pins 2, 4, 6, and 8 Normally Closed Contact, Pin 5 to Pin 9 Maximum Voltage 28 VDC Maximum Current 500 mA Maximum Power 14 W +5 V Output, Pin 7 + 5 V @ 5 mA Use ground pins 2, 4, or 6 to pull the relay-closure input low through an external contact-closure relay. The +5 V output is provided to drive the relay-closure input pin through an external contact-closure relay. GPIB Connector Meets electrical specifications described in IEEE–488 COM1 and COM2 Connectors DB9 male, configured as RS–232C, DTE; provides connection for serial printers VGA Connector DB15 female; supports external VGA monitor Keyboard Connector Supports AT-type keyboard 1–22 AM700 Audio Measurement Set Service Manual Specifications Table 1–12: Power distribution system Capabilities Description AC power source Source Voltage Low Range (115 V nominal) 90 to 132 VACRMS High Range (230 V nominal) 180 to 253 VACRMS Source Frequency 50 or 60 Hz Fuse Rating Low Range 4 A, 3AG, slow-blow High Range 2 A, 3AG, slow-blow Power Consumption Maximum 185 watts (240 VA) Typical 180 watts Table 1–13: Safety standards Capabilities Description U.S. Nationally Recognized Testing Laboratory Listing ANSI/ISA S82.01 – Safety Standard for Electrical and Electronic Test, Measuring, Controlling, and Related Equipment, 1994 Canadian Certification CAN/CSA C22.2 No. 1010.1 – Safety Requirements for Electrical Equipment for Measurement, Control and Laboratory Use European Union Compliance Low Voltage Directive 73/23/EEC, Amended by 93/768/EEC. EN601010-1 – Safety Requirements for Electrical Equipment for Measurement, Control. and Laboratory Use Additional Compliance UL3111-1 – Standard for Electrical Measuring and Test Equipment IEC1010-1 – Safety Requirements for Electrical Equipment for Measurement, Control, and Laboratory Use Table 1–14: Safety standards compliance Capabilities Description Temperature (operating) +5_ C to +40_ C Altitude (maximum operating) 2000 Meters Equipment Type Test and Measuring Safety Class Class I (as defined in IEC 1010-1, Annex H) – grounded product AM700 Audio Measurement Set Service Manual 1–23 Specifications Table 1–14: Safety standards compliance (cont.) Capabilities Description Overvoltage Category Mains – Overvoltage Category II (as defined in IEC 1010-1, Annex J) Analog Input – Overvoltage Category I Pollution Degree Pollution Degree 2 (as defined in IEC 1010-1) Note – Rated for indoor use only Table 1–15: Environmental characteristics Capabilities Description Atmospherics Temperature Operating –10_ C to +50_ C, Class 5 Nonoperating (storage) –51_ C to +71_ C. Class 3 Humidity To 95% relative humidity at or below +55_ C Altitude Operating To 15,000 feet (4572 meters) Maximum operating temperature to be decreased 1d C per 1000 feet (305 meters) above 5000 feet (1524 meters). Nonoperating (storage) To 50,000 feet (15240 meters) Table 1–16: Dynamic characteristics Capabilities Description Vibration Random Vibration Class 3 levels Sinusoidal Vibration MIL-T-28800E, para. 4.5.5.3.1, Sinusoidal Vibration test, 5 Hz to 55 Hz. Shock Functional Shock 30 g, 11 ms, half-sine input Transit Drop Nonoperating Transit Drop with 8-inch drops, front cover installed. Bench Handling MIL-T-28800E, para. 4.5.5.4.3, Bench Handling test, with cabinet on and instrument operating. Each edge lifted four inches and allowed to free fall onto a solid wooden surface. Packaged Product Drop Drop of 18 inches on each edge, face, and corner of packaged product; additional drop of 36 inches on bottom face. Warehouse Stacking Up to five units high 1–24 AM700 Audio Measurement Set Service Manual Specifications Table 1–16: Dynamic characteristics (cont.) Capabilities Description Shock Loose Load Vibration 1 inch p-p sinusoidal at approximately 4.5 Hz with at least 1/16 inch peak separation between the packaged product and the surface. Thirty minutes in normal shipping orientation, 30 minutes split between other possible shipping orientations. Vehicle Vibration 1.33 gRMS, random vibration, from 5 to 500 Hz, 60 minutes on each axis. Storage Shelf-Life (uncontrolled warehouse climate) Six months or more if desiccant is included inside normal package, and normal package is placed inside a vacuum sealed bag with additional outer package. Table 1–17: Electromagnetic compatibility Capabilities Description EMC requirements Emissions Emissions shall be within the limits specified by the following requirements. Enclosure EN55022 Class B limits for radiated emissions AC Mains EN55022 Class B limits for conducted emissions To ensure compliance with the above requirements, only high-quality shielded interface cable should be attached to this instrument. High-quality cables have a reliable, continuous outer shield (braid and foil) that has low impedance connections to shielded connector housings at both ends. The shield of the cable used to connect to the DSP must be clamped by the housing where the cable enters the connector. The cables used for the front panel Digital Out and the rear panel AES REF OUT must be wired with the cable shield connected to both pin 1 and to the shell of the female XLR connector (sometimes labeled “G” within the connector). Both of these connections should be as short as possible, less than 0.25 inch (0.1 cm). Immunity, Enclosure, Electrostatic Discharge IEC 801-2 1984 Up to 8 kV with no loss of stored data, change to control settings, degradation of performance, or temporary loss of function. Immunity, Enclosure, Radio Frequency Electromagnetic Field AM700 Audio Measurement Set Service Manual IEC 801-3 1984 No degradation of performance when the instrument is subjected to a 3 V/M electromagnetic field over the frequency range of 27 MHz to 500 MHz. 1–25 Specifications Table 1–17: Electromagnetic compatibility (cont.) Capabilities Description EMC requirements Immunity, Fast Transients, Common Mode IEC 801-4 1988 No loss of stored data, change to control settings, degradation of performance, or temporary loss of function will occur when the instrument is subjected to transients as described below. FCC Port Peak (kV) Tr/Th (ns) Rep Frequency (kHz) Signal & Control 0.5 5/50 5 DC Power 0.5 5/50 5 AC Power 1.0 5/50 5 The instrument complies with the radiated and conducted emissions requirements of FCC 47 CFR, Part 15, Subpart B, for Class A equipment. To ensure compliance with the above requirements, only high-quality shielded interface cable should be attached to this instrument. High quality cable is described in the Emissions Specification. Table 1–18: Mechanical characteristics Capabilities Description Standard instrument Weight (nominal) CRT Display Instrument Instrument by Itself 32.25 lbs (14.66 kg) With Front Cover and Accessories 34 lbs (15.45 kg) Domestic Shipping Weight (with shipping box, including instrument, manuals, foam, and snap-on cover. Optional service manual not included.) 45 lbs (20.454 kg) LCD Flat Panel Display Instrument Instrument by Itself 30.62 lbs (13.92 kg) With Front Cover and Accessories 32.38 lbs (14.72 kg) Domestic Shipping Weight (with shipping box, including instrument, manuals, foam, and snap-on cover. Optional service manual not included.) 43.37 lbs (19.71 kg) Shipping Box 1–26 Length 28 in (711.2 mm) Width 23 in (584.2 mm) Height 19.5 in (495.3 mm) Volume 7.3 cubic feet (0.207m3) AM700 Audio Measurement Set Service Manual Specifications Table 1–18: Mechanical characteristics (cont.) Capabilities Description Standard instrument Overall Dimensions Height (with feet installed) Without Optional Front Cover 7.7 in (195.6 mm) With the Optional Front Cover 8.0 in (203.2 mm) Width Without the Handle 16.6 in (422 mm) With Handle 18.2 in (462.3 mm) Depth Instrument Alone 18.8 in (477.5 mm) With Optional Front Cover 19.0 in (482.6 mm) With Handle Fully Extended 23 in (584 mm) Cooling Method Forced-air circulation with no air filter Finish Type Gray paint finish on aluminum cabinet Construction Material Chassis parts constructed of aluminum alloy; front panel constructed of plastic laminate; circuit boards constructed of glass-laminate; plastic parts are polycarbonate Rackmounted instrument Weight of Rackmounted Instrument, and the Rackmount Conversion Kit The handle of the AM700 must be removed to mount it in the rackmount adapter. Kit Weight 3.5 lbs (1.6 kg) Domestic Shipping Weight 6 lbs (2.73 kg) Weight of Rackmounted Instrument 30 lbs (13.64 kg) plus the weight of rackmount parts for the rackmounted instrument Domestic Shipping Weight 45 lbs (20.5 kg) plus the weight of rackmount parts Overall Dimensions of the Cradle Rackmount Adapter Height 8.75 in (222.3 mm) Width 19 in (482.6 mm) Depth 20 in (508 mm) AM700 Audio Measurement Set Service Manual 1–27 Specifications Table 1–19: Remote control protocol Capabilities Description Remote Control Protocol SCPI (Standard Commands for Programmable Instruments) 1994 External Keyboard Keyboard Operation The external keyboard is used to enter text and numbers into those portions of the user interface that accept such input. The front-panel keypad may also be used for numeric entry. In the absence of an external keyboard, a keyboard that is operated using the touch-screen interface appears on the AM700 display when character input is permitted. Table 1–20: Generator control Capabilities Description Generator Capabilities The analog and digital generators calculate signals in real time. The analog signals are derived digitally, providing a great deal of flexibility, but the output signals are restricted to those that can be realized with digital-toanalog converters and standardized sampling rates. Sine wave test signals may be swept in amplitude and frequency. The test signals may also be driven from a sequence within the capability of SCPI lists. More complicated modes may be created using the AM700 function capability as required by the user. There are some differences in the signal set and specifications between analog and digital generators, and the analog generator capabilities differ between high bandwidth and high resolution. Analog Signal Generation Several predefined signals or arbitrary user-defined signals. Mono and Stereo Signals Monophonic and stereophonic test signals. Each channel of a stereo pair is treated as a separate entity in SCPI and the AM700. This permits a great deal of flexibility in providing test signals to the outputs of the AM700. It is possible, for example, to have completely separate signals and sweeps at the A and B outputs. The same signal may be applied to both channel outputs. This mode is often needed for testing with the AM700. From a remote controller the SOURce:FOLLow command causes one channel to track the other. The high bandwidth generator outputs only monophonic signals (the same signal on both the A output and the B output). User-Defined Signals User-defined signals may be generated. User-defined signals may be loaded to the AM700 from a file in the internal file system or from a DOS formatted 1.44 Mbyte diskette. 1–28 AM700 Audio Measurement Set Service Manual Specifications Table 1–20: Generator control (cont.) Capabilities Description Time-Dependent Signals Simple user-defined audio sweeps and tone sequences are permitted. The sweep feature permits sweeping frequency and amplitude separately, or both simultaneously if necessary. The sweep test signal is a set of discrete test frequencies, not a linear sweep of frequencies from start to stop. Digital Signal Generation Digital signal generation is similar to analog signal generation. This includes the ability to generate the same signal simultaneously on the analog and digital outputs. In order to operate analog and digital generators from the same controlling parameters, it is necessary for the user to supply a conversion factor between generator voltage and full-scale digital amplitude. This conversion factor may be entered from the user interface under System Setup Conversion Factors. Generator Signals Table 1–21 describes each signal that may be generated in the AM700. Some signals cannot be generated by every generator. Please refer to the following table for each generator signal output capability. ÁÁÁÁÁÁÁÁ ÁÁÁÁÁÁÁÁÁ ÁÁÁÁÁÁÁÁÁ ÁÁÁÁÁÁ ÁÁÁÁÁÁ ÁÁÁÁÁÁÁÁÁÁÁÁÁÁÁÁÁ ÁÁÁÁÁÁÁÁÁÁÁÁÁÁÁÁÁÁ ÁÁÁÁÁÁÁÁÁÁÁÁÁÁÁ ÁÁÁÁÁÁÁÁÁÁÁÁ ÁÁÁÁÁÁ ÁÁÁÁÁÁÁÁ ÁÁÁÁÁÁÁÁÁÁÁÁÁÁÁÁÁÁÁÁÁÁÁÁÁÁÁÁÁÁÁÁÁÁÁÁÁÁ ÁÁÁÁÁÁÁÁÁÁÁÁÁÁÁÁÁÁÁÁÁÁÁÁÁÁÁÁÁÁÁÁÁÁÁÁÁÁ ÁÁÁÁÁÁÁÁÁÁÁÁÁÁÁÁÁÁÁÁÁÁÁÁÁÁÁÁÁÁÁÁÁÁÁÁÁÁ ÁÁÁÁÁÁÁÁÁÁÁÁÁÁÁÁÁÁÁÁÁÁÁÁÁÁÁÁÁÁÁÁÁÁÁÁÁÁ ÁÁÁÁÁÁÁÁÁÁÁÁÁÁÁÁÁÁÁÁÁÁÁÁÁÁÁÁÁÁÁÁÁÁÁÁÁÁ ÁÁÁÁÁÁÁÁÁÁÁÁÁÁÁÁÁÁÁÁÁÁÁÁÁÁÁÁÁÁÁÁÁÁÁÁÁÁ ÁÁÁÁÁÁÁÁÁÁÁÁÁÁÁÁÁÁÁÁÁÁÁÁÁÁÁÁÁÁÁÁÁÁÁÁÁÁ ÁÁÁÁÁÁÁÁÁÁÁÁÁÁÁÁÁÁÁÁÁÁÁÁÁÁÁÁÁÁÁÁÁÁÁÁÁÁ ÁÁÁÁÁÁÁÁÁÁÁÁÁÁÁÁÁÁÁÁÁÁÁÁÁÁÁÁÁÁÁÁÁÁÁÁÁÁ ÁÁÁÁÁÁÁÁÁÁÁÁÁÁÁÁÁÁÁÁÁÁÁÁÁÁÁÁÁÁÁÁÁÁÁÁÁÁ ÁÁÁÁÁÁÁÁÁÁÁÁÁÁÁÁÁÁÁÁÁÁÁÁÁÁÁÁÁÁÁÁÁÁÁÁÁÁ Signal Analog high resolution generator Analog high bandwidth generator Digital AES Digital DSP sine Yes Yes Yes Yes tone burst Yes Yes Yes Yes smpte imd Yes No Yes Yes ccif imd Yes No Yes Yes shaped noise Yes No Yes Yes chirp Yes Yes Yes Yes polarity Yes No Yes Yes tek polarity Yes Yes Yes Yes user Yes Yes Yes Yes multitone Yes Yes Yes Yes jittered sine No No Yes No AM700 Audio Measurement Set Service Manual 1–29 Specifications Table 1–21: Generator signals Capabilities Description Generated signals Sine A single sine-wave tone with variable amplitude and frequency. The amplitude or frequency or both may be swept or stepped to provide a wide range of sinusoidal test signals. Tone Burst A sine-wave burst tone with variable amplitude, frequency, burst width, and burst period Width 10 to 100000 cycles, resolution 1 Period 64 to 100064 cycles, resolution 1 The generator converts the width time parameter into the nearest number of cycles of sine wave to generate. SMPTE/DIN type IMD A two-tone intermodulation signal with one tone variable in frequency Amplitude Ratio 0.01 to 8 Variable Frequency 3 kHz to 18 kHz, resolution 0.1 Fixed Frequency 40 Hz and 500 Hz With appropriate parameter choices this signal can be used in a SMPTE or DIN intermodulation distortion test. CCIF type IMD A two-tone intermodulation signal. Both tones are typically swept in tandem with a constant frequency separation. Amplitude Ratio 0.01, 100 Center Frequency 2.5 kHz, 19 kHz Frequency Spacing 80 Hz, 1000 Hz With appropriate parameter choices this signal can be used in a CCIF intermodulation distortion test. Shaped Noise A periodic pseudo-random noise signal with a specified spectral distribution The available colors of the noise are white and pink. Chirp A periodic sine sweep with a flat spectral distribution (equal energy per Hz of bandwidth). The chirp may optionally be restricted in bandwidth, with parameters for the lower and upper band edges. Polarity An IEC-type polarity test signal. The signal resembles a half-wave rectified sine wave with the negative values removed. Tek Polarity A Tektronix ASG100-style polarity test signal. The signal consists of a sine wave and its second harmonic added together. Arbitrary Waveform A user-defined waveform of up to 176,384 samples is repeatedly played. The waveform is provided by the user in a file loaded from a DOS formatted 1.44 Mbyte diskette. 1–30 AM700 Audio Measurement Set Service Manual Specifications Table 1–21: Generator signals (cont.) Capabilities Description Generated signals Multitone A multitone test signal with variable amplitude. This signal consists of multiple simultaneously generated sine waves. The multitone may be specified in either of two ways: file mode or list mode. File Mode: A user-provided file contains the description (frequency and amplitude) of each tone included in the multitone signal and the buffer size to use for the fft-based generation of the multitone. Up to 128 tones may be generated, in buffer sizes from 512 to 8192 bytes. List Mode: The multitone is generated using the same frequencies and amplitudes as used when making sweeps in list mode. The built-in list editor may be used to enter this information. The buffer size is fixed at 1024. Jittered Sine This is a jittered sine wave with user-controlled jitter frequency and amplitude. Table 1–22: Audio analyzer application Capabilities Description Human interface The analyzer has a touch and zoom interface. Number of Display Screens 1 Number of Measurements per Screen Up to 4 measurements at once Analysis modes Major Modes of Operation Open Loop Acquisitions are controlled by the received signal. Measurements (except for the real-time readouts) are subject to settling criteria, and no special knowledge of the generated signal may be assumed by the analyzer. Closed Loop The local generator is coupled to the analyzer. This can be signalled by the user to enable the analyzer to optimize its behavior (only plotting points during generator sweeps, for example). Minor Modes of Operation Regulation Mode The analyzer controls the generator amplitude or frequency to get a desired reading. When the reading is obtained a measurement is triggered. This may be used to produce amplitude versus frequency plots at a constant distortion level, for example. Relative to Reference All measurements may be made relative to a previous measurement. This reference measurement may be recalled from a file or loaded with GPIB. AM700 Audio Measurement Set Service Manual 1–31 Specifications Table 1–22: Audio analyzer application (cont.) Capabilities Description Analysis modes Major Acquisition Modes An acquisition may take one of the following forms: Automatic Whenever trigger conditions are met, and the measurement can be made, a new reading is taken. Track Generator Sweeps Acquisition does not occur except when the internal generator is producing a sweep. Automatic sweep detection will be present for detecting the beginning of sweeps. The user may indicate whether sweeps are rising or falling, and data plotting will not commence until the appropriate sweep direction is detected. Measurements Y-Axis Measurements The analyzer is capable of measuring the following and displaying them on the Y-axis: Received level Stereo phase difference THD THD+N IMD Received frequency Crosstalk + noise Channel separation Received level difference In addition, a Wow and Flutter measurement is made and displayed in the Real Time measurements only. Sweep signals generated by the Tektronix ASG100 and ASG140 can be used as stimulus signals for making the above measurements (except IMD, THD, THD+N, and Wow and Flutter). These signal generators produce ‘stepped sweeps’ as opposed to continuous frequency sweeps. Frequency content and dwell time for each step are described in the relevant user manual for each model. X-Axis Measurements Types of measurements that may control the X-axis Frequency (received or generated) Level 1–32 AM700 Audio Measurement Set Service Manual Specifications Table 1–22: Audio analyzer application (cont.) Capabilities Description Filters This application gives the user a choice of several predefined filters. Supplied Filters Low Pass Filter 15 kHz, 20 kHz, 22 kHz High Pass Filter 400 Hz Weighting Filters A-weighting, CCIR-468-3 (required by AES 17-1993), C-messaging, B-weighting, F-weighting, CCIR-ARM Table 1–23: FFT analyzer Capabilities Description Frequency related characteristics Span (the bandwidth of the displayed data) AM700 Audio Measurement Set Service Manual Span is dependent on the input and Zoom as shown in the following table for typical inputs and sampling rates. Input Sampling rate Width Zoom factor High Res 48 kHz 200.156 400.312 800.624 1000.78 2000.56 4003.12 5003.9 10007.8 20015.6 100 50 25 20 10 5 4 2 1 (full) High Bw 192 kHz 16012.5 20015.6 40031.2 80062.5 5 4 2 1 (full) AES 48 kHz Same as High Res AES 44.1 kHz 183.894 367.787 35.574 918.468 1838.94 3677.87 4597.34 9194.69 18389.4 100 50 25 20 10 5 4 2 1 (full) 1–33 Specifications Table 1–23: FFT analyzer (cont.) Capabilities Description Frequency related characteristics Span (the bandwidth of the displayed data) (cont.) Input Sampling rate Width Zoom factor AES 32 kHz 133.438 266.875 533.75 667.187 1334.38 2668.75 3335.94 6671.82 13343.8 100 50 25 20 10 5 4 2 1 (full) Measurement Range High Resolution Mode DC to 20 kHz High Bandwidth Mode DC to 80 kHz Displayed Bins Zoomed 16 Unzoomed 428 Bin Width 0.781 Hz (min. span) to 156.3 Hz (max. span); calculated as span divided by 512. FFT Record Length 1024 data points Window Parameters Window Functions Weighting Functions Hann Kaiser-Bessel Blackman-Harris Flat-top Uniform Saramaki-Rajan User-defined Amplitude Related Characteristics Amplitude Resolution 0.1 dB with a flat-top window Absolute Amplitude Accuracy ±0.15 dB at 120 Hz Full Span FFT Noise Floor Input terminated with 600 W or less, auto range and averaging ON. High Resolution Mode 1–34 170 Hz to 1000 Hz <–120 dBu 1 kHz to 20 kHz <–140 dBu AM700 Audio Measurement Set Service Manual Specifications Table 1–23: FFT analyzer (cont.) Capabilities Description Amplitude Related Characteristics High Bandwidth Mode >400 Hz Residual DC Response <–120 dBu <–60 dBFS within two hours of offset calibration FFT dynamic range Spurious Free Dynamic Range >105 dB Phase FFT Cross-Channel Phase Accuracy ±1 degree Display related characteristics Displays Available Spectral Display (amplitude versus frequency for A and B) Spectrogram (time versus frequency with amplitude color/gray coded) Display Update Rate >10 updates per second at full span Frequency Axis Linear or Log Averaging Displays The following average displays are available: Max Hold Min Hold Average Type of Averaging Exponential only Cursor functions Number of Cursors One or Two Cursor Modes The following cursor modes are provided: Continuously displayed amplitude and frequency at each cursor Peak locator function Multitone Multitone analyzer is a measurement that may be run in the FFT application. When the user turns on the multitone analysis mode, the AM700 starts looking for a multitone signal. When it detects the specified multitone, it starts making the user-selected measurements, as long as the multitone is present. Multitone Measurements The following measurements may be made in Multitone analysis: 1. 2. 3. 4. 5. Multitone Graphical Displays AM700 Audio Measurement Set Service Manual Level versus frequency: A, B Stereo interchannel level difference Stereo interchannel phase difference Stereo crosstalk versus frequency Distortion + Noise (with FFT-like display) Graphical display will be available for each of the multitone measurements. 1–35 Specifications Table 1–23: FFT analyzer (cont.) Capabilities Description Multitone Multitone Record Size 16 Kbytes or less for detecting multitones Multitone Detection Each channel may be set to recognize one multitone, which can either be the current tone in one of the generator channels or a multitone described in a file. Files are provided in the AM700 file system that contain multitone specifications for the Tektronix ASG 100/140 audio generators. Minimum Multitone Detection Level –60 dBu The minimum detection level is for individual tones that make up the multitone signal. The generator amplitude readings are 0.707 × peak voltage, which is RMS voltage for sine waves only. The level of transmitted multitones depend on the crest factor of the signal, which varies each time the multitone signal is computed (unless in file mode with absolute phases provided). In both file mode and list mode, the amplitude parameters for individual tones are only used to control the relative amplitude of the tone with respect to the other tones. The only way you can determine the received level of each tone is to work backwards from the peak level of the complex waveform, with knowledge of the crest factor. Table 1–24: Audio monitor Capabilities Description Human interface This application has the primary use of verifying the presence of audio and making simple time-domain measurements of the signal amplitude. Primary Display Oscilloscope (voltage versus time) Signal acquisition Input Channels High Resolution analog inputs High Bandwidth analog inputs Digital audio inputs Inputs from the DSP connector This application follows the <primary input> global SCPI parameter to determine which input to display. Oscilloscope display This display emulates a traditional digitizing oscilloscope, but with a ‘touch-and-zoom’ touch screen human interface. Measurement Range 1–36 Depends on the analog performance and digital input word lengths AM700 Audio Measurement Set Service Manual Specifications Table 1–24: Audio monitor (cont.) Capabilities Description Oscilloscope display Display Appearance The display is similar to the ones used in the VM700A audio option. Both channels may be overlaid or put in a ‘split window’ mode. Touch-and-zoom affects both channels in a window, and graticules track their signals. Waveform Display Resolution Nominal 400 pixels vertical × 500 pixels horizontal The reserved pixels for display will shrink during generator control and programmed text display. Display Update Rate Minimum of 15 screen updates per second with proper triggering and time base conditions Digitized Record Length Amount of data in a waveform record obtainable without missing samples. Inputs with Sample Rates up to 48 kHz Continuously variable from 32 to 48000 samples per channel Inputs with Sample Rates Above 48 kHz Continuously variable from 32 samples to 4 milliseconds. All samples returned must be in the vicinity of the trigger. Time Base Range Four samples per screen to 48000 samples per screen, continuously variable with touch-and- zoom Trigger Sources Channel 1 (A channel) Channel 2 (B channel) External (rear-panel TTL input trigger) Trigger Modes Auto New data is displayed in the absence of an edge trigger being detected. Normal New data is displayed only following detection of a trigger. Trace is erased if no trigger occurs. Trigger Slope Rising or Falling edge Trigger Level Adjustable Trigger Position The trigger may be positioned anywhere in the digitized record, with all samples valid. Pretrigger samples and post-trigger samples must fit within one record. Trigger position is determined automatically from the views being displayed. There is no direct control for selecting trigger position in the record. Trigger position is at the 0 horizontal graticule marking. Cursors AM700 Audio Measurement Set Service Manual Cursors can measure time difference and level difference on a waveform. Cursor position difference for both amplitude and time is displayed in the cursor readout line above the view. Position difference is obtained by subtracting the readings obtained from cursor 2 (the dashed cursor) from the readings obtained from cursor 1 (the solid cursor). The time reading of the cursor position displayed above the cursor is with respect to the trigger point in the waveform. 1–37 Specifications Table 1–24: Audio monitor (cont.) Capabilities Description Listen capability LISTEN A user can listen to input channels. Table 1–25: Digital interface tester Capabilities Description Intended Use The digital interface tester application is used to monitor and troubleshoot the digital audio interface. It allows you to view incoming data streams at the logical (bit), or electrical interface level, and to create special signals to probe the interface. Number of Primary Modes There are four major modes of operation. Bit Activity Displays instantaneous bit probability (with no history or averaging) of each bit of each subframe. The four preamble bits are not available to be displayed, and are grayed out in the display. Channel Status Displays the current contents of the 192 channel status bits in both subframes of the digital input stream. The data can be displayed in four styles: Binary (most-significant-bit or MSB on the left) Transmission order (MSB on right) Hex (same bit order as binary, displayed in base 16) Decoded (raw data translated into words) In the raw and decoded styles, the user can optionally underline data elements which differ between the two subframes. This allows a quick visual check for identical subframe information. The user can choose to display either the subframe 1 data, the subframe 2 data, or both subframes. Eye Diagram Displays a “cloud of dots” representing an equivalent-time sampled time-domain graph of the digital main inputs. In addition, the following seven numeric readouts are displayed above the diagram in a real-time readout box (when measurements are available for the category): Measured sample frequency on the main input Measured sample frequency on the reference input Measured ratio between the main and reference sample frequencies Phase difference between the main and reference Voltage level of the main input Equalization applied to the main input Peak-to-peak jitter of the interface 1–38 AM700 Audio Measurement Set Service Manual Specifications Table 1–25: Digital interface tester (cont.) Capabilities Description Jitter Spectrum Displays the energy spectrum of the jitter on the digital main input signal. Like FFT, this spectrum can be viewed as an interpolated graph, a bar graph, or a spectrogram. Averaging is available (exponential averaging, min hold, and max hold) in the jitter spectrum display. Averaging is not available in the other displays. Enhanced Stimuli Within this application, the DIT menu choices provide extra features for controlling the digital generator. Electrical interface modifications include: Cable Simulator Jitter Generation with Controlled Frequency and Amplitude Table 1–26: Software update procedure Capabilities Description Update Procedure AM700 firmware may be updated from a 1.44 Mbyte diskette. (Update procedure is given in the Maintenance Section of this manual.) AM700 Audio Measurement Set Service Manual 1–39 Specifications 1–40 AM700 Audio Measurement Set Service Manual Operating Information This section provides the installation information needed for the AM700 Audio Measurement Set and the basic operating information that a service person might need to check for proper operations of the instrument. Power Requirements and Power On The AM700 operates with line frequencies of 50 or 60 Hz over two line voltage ranges. The nominal setting of the low voltage range is 115 VAC. The nominal setting of the high voltage range is 230 VAC. The AM700 power requirement is 185 watts or 230 volt-amperes at maximum power consumption. There are two power switches on the AM700. They are the main power switch, a push button switch on the rear panel above the power cord receptacle, and the Stby/On button on the front panel. Both must be on to operate the instrument. WARNING. Dangerous voltages are present within the Power Supply module when the rear-panel power switch is on, regardless of the position of the front-panel power switch. Do not operate the AM700 with any covers removed. Refer all servicing of the instrument to a qualified service person. Figure 2–1: Rear panel fuse, power connector, On/Off Switch, and line selector AM700 Audio Measurement Set Service Manual 2–1 Operating Information Changing Line Voltage Range and Fuse The voltage range selection switch and fuse holder are located in the lower left corner of the AM700 rear panel (see Figure 2–1). The AM700 is shipped from the factory set for the operating voltage of the destination nation (115 VAC or 230 VAC). If the setting is not correct, it must be changed before connecting the power cord to the power source. 1. Turn off the rear-panel power switch and disconnect the power cord from the mains supply. 2. Set the voltage range selection switch (located on the rear panel of the AM700) to the correct position for operation. Instruments are shipped with the power cord most appropriate for the country of destination. Available power-cord option information is given in the Options section. Contact your Tektronix representative or local Tektronix field office for additional power-cord information. CAUTION. When changing the line voltage selector switch you must also change the fuse to provide proper protection for the operating voltage in use. The mains fuse provides protection in the event of a major failure of the AM700 power supply. Two sizes of fuses are specified, one for 115 V operation and the other for 230 V operation. See the Fuse specification in Appendix A for the correct fuse rating to use for each voltage range. 3. Replace the fuse with the correct one, as indicated on the rear panel, for the new mains voltage selection. CAUTION. Use only the power cord and connector specified for your product. Use only a power cord that is in good condition with a proper safety ground connector. 4. Replace the power cord with the correct one for use with the local mains outlets. 5. Turn on the rear power switch, then the front power switch to operate the AM700. Power Cord 2–2 A detachable three-wire power cord with a three-contact plug is provided with each instrument for connecting to both the power source and protective ground. The protective-ground connector in the plug connects (through the protectiveground conductor) to the accessible metal parts of the instrument. For electricalshock protection, insert this plug only into a power-source outlet that has a properly grounded protective-ground contact. The voltage to ground from either pole of the power source must not exceed 250 VRMS. For electric-shock protec- AM700 Audio Measurement Set Service Manual Operating Information tion, the grounding connection must be made before making connections to the instrument input or output terminals. Power-on Procedure Starting with Version 1.02 firmware, the power-up diagnostics are normally bypassed, and the measurement set initializes with the FFT application running. You can start an application other than FFT by pressing and holding in the front-panel button for the application you want to start as you turn on the front panel power switch. The AM700 will beep twice, and you can then release the application front-panel button. To run the power-up diagnostics, press and hold in the front-panel Limits button as you press the front-panel power button. The AM700 beeps twice, displays the message ‘Start mode “RUN DIAGNOSTICS” recognized,’ and then runs the diagnostics before initialization. Before Version 1.02 firmware, at power up the AM700 normally performs the power-up diagnostics before initializing. To bypass these diagnostics, press and hold the front-panel button of the application you wish to start as you press the front-panel power button. The AM700 will beep twice and flash a message about which start up was recognized, and then initialize without running the diagnostics. Should a power-up diagnostic fail, the measurement set should be referred to your local Tektronix representative for servicing. You may bypass the diagnostic routines and check to see if you can still make the measurements you require as some diagnostic failures may not affect all the applications. Basic Operation Information Touch Screen The AM700 Audio Measurement Set is controlled by selecting from measurement parameters and menus on the instrument display. A touch screen detects the user’s selections. Many operations are started by selecting soft keys using the touch screen (touching the display in the right place to invoke some function) as shown in Figure 2–2. In some menus, numerical values are entered either from the keypad or with the control knob. Front Panel Controls and Touch Screen Interface Buttons with gold outlines (Copy, Average, Cursor, Sound, Filter, Sound On, User, and Units) have two possible behaviors, depending on how you use them. and the application or display that is running. If an application does use a button, no action is produced when the button is pressed.1 1 An example is the Filter menu. Filters are only available in Audio Analyzer, so when the Digital Interface Tester or the FFT analyzer is running, pressing the Filter button has no effect. AM700 Audio Measurement Set Service Manual 2–3 Operating Information 1. When pressed and immediately released, each of these buttons performs a default action (turning on or off the specified feature). 2. When any of these buttons is pressed and held for one second or more, a configuration menu related to its operation is displayed. NOTE. The button default action (selected when you press and release the front-panel button) does not occur when exiting a press/hold menu. Instead, you must again press and release the button to perform the default action. The LEDs associated with these buttons track the action you select, not the configuration menu associated with the hard key. For example, the Filter hard key LED lights only when you select filtering. Application name Input signal source Submenu bar appears when a Main Menu selection is made. Main Menus appear when the front-panel menu button is pressed. When selected, the button is highlighted. Figure 2–2: Touch screen interface with main menu and submenu displayed 2–4 AM700 Audio Measurement Set Service Manual Operating Information During operation of the AM700 the following objects may appear on the screen: Display Icons H One to four measurement view windows H Generator Status area H Generator Control Panel H Menu and Soft Keys selections H Operational status and Real Time measurement displays H Notifier messages The AM700 uses icons in its menus and control panels to represent actions or available choices. Some of these icons are displayed in Figure 2–3. DISPLAY VIEW GENERATOR STATUS READOUT REAL TIME MEASUREMENTS TWO OR MORE CHOICES ARE TOGGLED A LIST OF CHOICES IS AVAILABLE CHOICE IS SELECTED CHOICE IS NOT SELECTED SELECTION IS ENABLED SELECTION IS NOT ENABLED MOVE OR EXPAND HORIZONTALLY MOVE OR EXPAND VERTICALLY HORIZONTAL ZOOM POINT VERTICAL ZOOM POINT LARGE CONTROL KNOB GENERATOR KNOBS ASSIGNED Figure 2–3: Representative icons and arrows seen in the display AM700 Audio Measurement Set Service Manual 2–5 Operating Information Calibrating the Touch Screen The measurement set is shipped from the factory with its touch screen fully calibrated. Although it will seldom be necessary, the touch screen can easily be recalibrated. To calibrate the touch screen: H Press the front-panel button labeled Other. H Use the large control knob to scroll through the menu choices and select the touch screen calibration choice from the menu that appears (see Figure 2–4). Press Enter on the keypad to activate the selection. The choice may also be made by touching the selection directly on the touch screen interface, however, the above procedure can be used if the touch screen should ever become uncalibrated. Figure 2–4: Application selection menu under the other button Full instructions for calibration are given on the screen when the calibration display appears (see Figure 2–5). A small circle with a dot is highlighted in succession in each of three corners. View the screen directly on to avoid parallax errors and use a small blunt pointed scribe, such as a pencil eraser tip, to produce the best accuracy for the calibration. Touch the screen directly over the first dot. The dot in the next corner then lights. Touch the second dot, then the third dot to finish the calibration. 2–6 AM700 Audio Measurement Set Service Manual Operating Information After calibration, the screen will display the Paint screen. You can test areas of the screen for activity by touching the screen at various points. The touch point will become highlighted. The Clear soft key on the touch screen erases the highlighted areas of the Paint screen. Press any application front-panel button to exit the paint screen and start the application. Figure 2–5: Touch screen calibration Setting the AM700 Clock The AM700 has a system clock with an internal backup battery. After setting for your local time, it is ready to use. Performing this exercise for the first time will also introduce you to the Configure menus that you will use as you set up the AM700. To set the clock use the following procedure: 1. Press the Configure button on the front panel. This displays the choices for configuring the various user selections of the AM700. Clock setting is done in the System Setup option. AM700 Audio Measurement Set Service Manual 2–7 Operating Information 2. Touch the System Setup selection to display the setup menu choices. Setting the clock is the default selection, and the clock face appears as seen in Figure 2–6. 3. Check the date and time settings. If any are not correct, they may be selected and adjusted to the correct setting. A selected choice changes intensity to show that editing of that setting is active. Figure 2–6: AM700 Audio Measurement Set system clock 4. Setting may be done by rotating the large control knob or by making a direct keypad entry of the new value and pressing the Enter button. Changes made to the time are shown in the clock as they are entered, but those changes are not permanent until the Accept Changes soft key is touched. 5. When the date and time are correct, touch the Accept Changes soft key. This changes the time to the new values and returns to the previous application. 2–8 AM700 Audio Measurement Set Service Manual Operating Information Backup Battery The nonvolatile memory of the AM700 is maintained by an internal backup battery. Stored data will be retained for the life of the battery. A fresh battery installed at the factory has a life of greater than 10 years when operated and stored at an ambient temperature between 0° C and 50° C. NOTE. The backup battery used to retain stored data has an operating life of greater than 10 years when operating between 0° and 50° C. If operating out of that range for extended periods of time the battery life may be reduced or stored data may be lost. AM700 Setup for Operation Turn the AM700 on. Unless otherwise directed, it runs the power-up diagnostics and loads the FFT Analyzer application. After completing the power up diagnostics and loading of the FFT application, you may select any of the applications you wish to use from the Applications section of the front panel buttons (see Figure 2–7). After making another application request, you should wait until that application is running before making another choice or button press. It takes some 30 seconds to load an application, during which time the action of other button presses will not be seen, but they will be answered after the application is running. Figure 2–7: Applications selection buttons Bypassing Diagnostics To bypass the power-up diagnostics and go directly an application other than FFT, press and hold the application button in when turning on the power to the AM700. Hold the button in until a double beep is heard; then it may be released. The AM700 starts up in quick start mode with the selected application loaded. AM700 Audio Measurement Set Service Manual 2–9 Operating Information Configuration Press the Configuration button (shown in Figure 2–8) to display the Configuration options menu. There are seven selection choices displayed in the Configuration menu shown in Figure 2–9. The summary of the configuration choices is followed by a more detailed explanation of the configuration menus for operation of the AM700. Figure 2–8: Configure button in the utilities selection block Figure 2–9: Configuration menu initial selection screen 2–10 AM700 Audio Measurement Set Service Manual Operating Information Configuration Summary Quick Setup. Touch this soft key to display a menu of template selections. These selections save time by providing one-touch instrument configuration for some common AM700 measurements. See Quick Setup at the end of this section for information on the quick setup templates and the measurements that are available with the quick setups. Input Selection. Touch this soft key to display the Input Configuration menu. From this menu you can select the type of input and front panel connection, input impedance and whether the instrument is to auto range on the input signal, and the type of signal source that is applied to the input channels. Measurement Setup. Touch this soft key to display the Measurement Configuration menu. From this display other soft keys display various measurement configuration options in various categories. The contents of the menus are application specific and change by application. System Setup. Touch this soft key to display the System Setup menu. Soft keys in this display allow you to set the date and time, configure the serial and GPIB communications parameters, select copy format and destination for display captures, activate calibration, and specify the external input and output resistance values to be used for units conversions between volts, dBu, and dBm, and the specify the conversion factor to dBFS. View Setup. Touch this soft key to display the View Setup menu. Here is where you select the measurements to be displayed and the type of view in which the selected measurement is displayed. In this menu you can also touch the View Options soft key to display a menu where you may configure the type of display axes and waveform, whether cursors are enabled (turned on or not), and whether the cursors will be constrained to the trace data (Snap to Data) or will permitted to be positioned anywhere in the display window. System Status. Touch this soft key to display a summary of the AM700 system configuration selections as seen in Figure 2–10. This display is useful for quickly determining what measurement the views in the running application are set up to display, how the trace data is displayed (interpolator, point plot, tabular, etc.), the measurement channel input selection, and the generator signal type choices for the analog and digital generators. State Saving. This selection provides two choices: one saves the present state of instrument settings that can be saved, and the other restores the factory default settings. If you want to save a particular setup state for an application, it should be done immediately before turning off the AM700. Settings for many of the controls are saved each time an application is changed. Any settings that are saved when State Save is used are overwritten if further changes are made and AM700 Audio Measurement Set Service Manual 2–11 Operating Information another application is started prior to power off. State Save does not return the application that was running at power off when power is again turned on, but the user selections for an application that were saved will be restored. Also, refer to the Save AM700 State function discussion in the AM700 Audio Measurement Set User Manual. The Save AM700 State function generates new functions that store customized application setups. These application setup functions are then used in making repetitive tests and for building a standardized set of application setups that can be transferred to other AM700 Audio Measurement Sets. Figure 2–10: System status display Input Selection From the Configure screen, first select Input Selection. In here are the choices you need to make for input connector selection for the digital and analog signals, the input impedance and gain range of the analog inputs, and the signal selections to apply to the two measurement channels of the AM700. Alternately, you may wish to select a Quick Setup. In the Quick Setup choices you will find setup templates for often-used measurements. Those are given in the Quick Setup discussion at the end of this section. The Input Selection block diagram shown in Figure 2–11 graphically shows the input section of the AM700. Touch screen selections allow the user to choose a wide variety of signal sources and paths. 2–12 AM700 Audio Measurement Set Service Manual Operating Information Figure 2–11: Input selection control panel Analog Input Connections. Touch the select soft key associated with the Analog A and Analog B input connections to toggle between the front-panel XLR connector and the internal Generator routing. The front-panel XLR inputs are the default choice for signal input to the AM700. Selecting the internal generator routing permits testing of the generator/analyzer pair without using interconnecting cables. Input Impedance. Analog Input Impedance is selected from a three-choice pull-down menu. The choices are 150 W, 600 W, and 200 kW (high). The 200 kW choice is the default selection. Perform the following steps to change input impedance: 1. Touch the Impedance soft key to display the pull-down menu choices. 2. Rotate the large control knob to select the proper choice for your measurement. 3. Touch the Impedance soft key a second time to make the assignment and clear the menu. The Input Impedance choice is not available for an internally connected generator. AM700 Audio Measurement Set Service Manual 2–13 Operating Information Input Range and Auto. The gain range for the analog inputs defaults to Auto enabled to provide auto ranging on the applied signal. This avoids possible overloading of the A/D converters and is the recommended setting for normal operation. When you know the amplitude of the signal being measured, you may choose to make a manual gain setting. Follow these steps when changing the input range setting: 1. Turn off the Auto enabling (check goes away) by touching the Auto soft key. 2. Make the new gain range setting by either rotating the large control knob to the new setting and again touching the soft key or make a direct keypad entry of the new number and press enter. The gain range steps of the AM700 have fixed upper limits for each range, therefore when a number is entered that is not exactly one of the available range numbers, the gain switches to the next highest valid setting above the number you entered. Input gain range settings are also available as menu choices from within the applications that make measurements on analog signals. From within a running application you may make the change and observe the effects on the signal. Digital Input Connector Selection. The Digital Main Input connector selection choices are: Front-panel XLR connector (the most common selection and made by default), the Rear-panel BNC, and the Rear-panel Optical connector. An internal connection to the AES generator is also available. Touching the selection soft key associated with the digital generator choices advances the selection box through the list. Measurement Channel Assignment. A pull-down menu (see Figure 2–12) is used to individually assign the signal to the two measurement channels of the AM700. The same range of signals input choices is available for both Channel 1 and Channel 2, and the channels may have the same signal applied to each as well. If you wish both inputs to be obtained from the same type of generator (High Resolution, High Bandwidth, or Digital Main), the fast selection soft keys along the lower right of the screen may be used (see Figure 2–12). (These choices are also available within the Main menu for the applications with the Input menu displayed.) With a single touch of the choice both measurement channels may be set simultaneously to the A and B High Resolution generator, the A and B High Bandwidth generator, or the Digital Main Inputs. If you want to use the digital generator or the digital reference signal as inputs to the measurement channels, select the appropriate one instead of the analog high bandwidth or analog high resolution route. The most common selections (and the default connections) are the Analog A high resolution input connected to measurement Channel 1 and the Analog B high resolution input connected to measurement Channel 2. 2–14 AM700 Audio Measurement Set Service Manual Operating Information When finished making your selections, press Clear Menu to exit the Input Selections menu. Touch the measurement channel soft key to display the pull-down menu. Pull-down Input Selection Menu. Use the large knob to move the selection box to the signal you want. Touch the measurement channel soft key a second time to assign the input to the channel and clear the pull-down menu. Use the quick select soft keys to set both channels to the same generator type. Figure 2–12: Measurement channel assignment pull-down menu View Setup The View Setup menu permits AM700 users to specify how measurement results should be displayed on the screen. Contents of this menu vary depending upon the current application. In the follow description, the FFT application is active. View Selection Bar. The top line in the View Setup screen is a view selection bar as shown in Figure 2–13. The selections that are made in the remaining portion of the View Setup window apply only to the selected view. The view choices in the view selection bar include an icon that indicates the type of view that is selected. For example, the possible choices for FFT Analyzer in FFT mode are Interpolator, Bar Graph, and Spectrogram. View Setup choices are illustrated in each of the applications in Section 4 of this manual. For each type of view, the AM700 also offers options that allow you to configure the display for your viewing requirements. You may configure the display in the View Setup menu (see Figure 2–13). AM700 Audio Measurement Set Service Manual 2–15 Operating Information Figure 2–13: A typical view setup control menu To select a view type and define the view options: 1. Press the Configure button and touch the View Setup soft key to enter the View Setup menu. 2. Select the desired view type by touching the icon on the display. 3. If desired, touch the View Options icon to display available options for the view you have selected. 4. Select the desired view options (a checked box indicates that an option is selected). 5. Save your selections and return to the main display by touching the Accept Changes soft key or cancel your changes and return to the main display by touching the Cancel soft key. 2–16 AM700 Audio Measurement Set Service Manual Operating Information View Types. The View Types column in the figure shows the icons for these view types. Each view may be a different view type. Selecting a particular view type of a view is done by first selecting the view you wish to change in the View Selection bar. Only the selected view is affected by a change in the choices. The Measurement column shows the measurement types that are available for viewing in a view window. Altering those choices is done in the Measurements Setup menu that will be discussed later. You may set up a view to display FFT measurements or Multitone measurements but not both. The View Types that are available also depend on the measurement selected as they are different for FFT and Multitone. The applicable choices will be displayed for the Measurement Type selected for a view. Notice that both FFT traces may be displayed in the same view window. View Options. The View Options menu permit selection of axis types, display persistence, and cursor actions as shown in Figure 2–14. When selected by touching the enable soft key, a check mark appears in the soft key to show that it is enabled. Touch the enable soft key again to remove the check mark and return to the alternate choice. Figure 2–14: FFT Analyzer view options in the view setup controls AM700 Audio Measurement Set Service Manual 2–17 Operating Information The choices in the Axes column allow the linear/log selection for the x- and y-axes and a choice of Dual Y Axis. Dual Y-Axis displays are permitted when more than one trace is displayed in a single view. In Dual Y-Axis displays, the vertical or y-axis scale of the front trace is seen on the left side of the graticule and y-axis scale for the back trace is seen on the right side of the graticule. Other axes choices are determined by the view type. When persistent is enabled, trace data is accumulated and held in the display in a continuous storage mode. This feature is very useful for gathering history of waveform changes and showing the bounds of varying signals in either frequency, voltage, or both. Turning persistent off restores the trace to showing data for a single acquisition only. Cursor controls for enabling the cursors and holding the cursors to the displayed data are found in the Cursors column. Enabling or disabling cursors is the same as turning them on or off using the Cursor button on the front panel. Selecting Snap to Data is used to hold the cursors on actual data points in the trace display. NOTE. When cursors are viewed on a Dual Y-Axis display, they are associated only with the front trace. The amplitude readouts accompanying the cursors reflect the amplitude at the cursor positions in the front trace. Saving Changes and Exiting the Input Selections Menu. Soft keys to exit the input selection menu are located at the bottom of the screen. When Accept Changes is touched, any selections made are entered. If Cancel is touched, all changes are deleted before returning to the current application. Pressing Clear Menu also exits back to the application. 2–18 AM700 Audio Measurement Set Service Manual Operating Information Measurement Setup Menu The Measurement Setup menu permits AM700 users to define which measurements are to be performed and displayed by the current application. An example of setting up different measurements in the four measurement views of Audio Analyzer is shown in Figure 2–15. Figure 2–16 shows the FFT and Multitone Measurement Setup controls. See the specific application in Section 4 for information on setting up the measurements for the applications. Figure 2–15: Four different measurements in four views of the Audio Analyzer AM700 Audio Measurement Set Service Manual 2–19 Operating Information FFT Configure Measurements FFT Multitone Configure Measurements Figure 2–16: Configure measurement screens for FFT Analyzer for FFT and for multitone 2–20 AM700 Audio Measurement Set Service Manual Operating Information System Setup Menu The System Setup menu is used to set the system clock, the serial and GPIB communication parameters, the hard copy output format, run the AM700 calibration routine, and set the input, output, and dBFS conversion factors. System Copy. The control screen display for setting the Copy parameters is reached either through the Configure System Setup menu or directly by pressing and holding the Copy front-panel button to bring up the same menu. Press and hold the Copy button to display the Copy Configuration screen see Figure 2–17. NOTE. Pressing and holding the Copy button immediately brings up the Configure menu, with the System Setup choices for Copy displayed. This is the same screen that is displayed by pressing the Configure button, then System Setup. In this screen you may set the following copy functions: H copy output format H copy destination H file name when File is the selected copy destination Figure 2–17: The copy configuration menu AM700 Audio Measurement Set Service Manual 2–21 Operating Information After setting copy options, touch the Accept Changes soft key to save your selections, exit the Copy Configuration screen, and return to the measurement display. To delete all copies from the spooler, press and hold the copy button to display the Copy Configuration menu. Touch the Cancel Pending Hardcopy soft key to delete all the spooled hard copies. Screen dumps print when you press the Copy button. The image currently on the screen is printed. Graphic displays are printed only when the printer port is formatted for a graphics printer. Copy Formats. The AM700 supports the following printer and hard-copy types: H PostScript Image H HP DeskJet H Epson (24 pin) H Tag Image File Format (TIFF) H Interleaf Image When the Copy Format is either PostScript or TIFF the Copy Style may be set to Color. Copy Destination. Printouts are spooled to the currently selected printer port, which may be one of the following: H GPIB H Serial Port 1 (COM 1) or Serial Port 2 (COM 2) (RS-232) H File on floppy disk H File in internal nonvolatile file system H None (This choice disables hard copy output.) When the Copy Destination is set to File, the Output File selection is active. This choice brings up a file browser, shown in Figure 2–18, to let you select or name the output file name for the hard copy. You may name a file by touching the Filename soft key. This displays a keyboard to type in the new file name. Hard copy files may be sent directly to the floppy disk for later printing. A limited number of screen dumps may be stored in NVRAM for later transfer to a floppy disk. The available memory in the internal NVRAM of the AM700 depends on how much of the memory is used for other user files. 2–22 AM700 Audio Measurement Set Service Manual Operating Information Figure 2–18: Hard copy output file selector Copy Styles. Sets the choice of the color output for PostScript and TIFF formatted files. When set to Color, printer output will be color formatted. If a copy format other than PostScript or TIFF is used, the Color state is ignored, and the file is output as monochrome (gray scale) only. System Communication Menu The Communicate Configuration menu (shown in Figure 2–19) is used to define the serial communication parameters for serial ports 1 and 2, and the GPIB port. GPIB choices permit you to select the mode of operation and the GPIB address of the AM700. GPIB modes of operation are Talk/Listen, Hardcopy, and Off Bus. Talk/Listen mode is used for remote control of the AM700 via the GPIB port. Hardcopy is the talk only mode and is used to output screens and data to a GPIB printer. Off Bus turns of the GPIB interface, and the AM700 will not communicate with any other device on the bus. Saving Changes and Exiting the Input Selections Menu. Soft keys to exit the input selection menu are located at the bottom of the screen. When the Accept Changes soft key is touched, any selections made are entered. If the Cancel soft key is touched, all changes are deleted before returning to the current application. Pressing Clear Menu also exits back to the application. AM700 Audio Measurement Set Service Manual 2–23 Operating Information Figure 2–19: Configure system setup communicate menu System Calibration Menu The Calibrate menu provides a soft key to start calibration. Calibration of the analog acquisition system is done after touching the Calibrate Now soft key. Offset changes that occur with temperature will be removed. If operating the AM700 in conditions that permit large ambient temperature changes, a calibration of the analog system improves the accuracy of the measurements. If ambient temperatures are stable, a calibration done infrequently is adequate to compensate for component aging. A calibration should be done at the ambient operating temperature to produce the best accuracy. When Audio Analyzer, FFT Analyzer, or Monitor is the running application, calibration switches the analog acquisition system to a known test signal (a 120 Hz symmetrical square wave) to acquire the positive and negative peak values seen at the output of the A and B high resolution A/D converters and at the output of the A and B high bandwidth A/D converters. The values obtained are used to determine the DC offset of the acquisition system at the time of calibration and the calibration factor needed to remove the offset from the converted data values. The calibration constants obtained are stored and used until a subsequent calibration is done. If the Digital Interface Tester application is running when calibration is performed, the digital acquisition system offset is calculated and the calibration factor obtained is used to remove the offset from the peak-to-peak jitter measurements. 2–24 AM700 Audio Measurement Set Service Manual Operating Information NOTE. Calibrate does not perform an analog acquisition system calibration when Digital Interface Tester is the running application. System Conversion Standards Menu The Conversion Standards menu shown in Figure 2–20 permits you to define certain values to be used in deriving measurement results. Output dBm. This setting defines the value of the external load resistor. The divider formed by load resistance and the internal series resistance selected for use (10, 150, or 600 W) is taken into account for the calculation (see Figure 2–21). Thus, generator signal level can be specified in dBm, and the correct power will be delivered to the load. NOTE. This is calculated dBm, so if the external load is not as stated in the Output dBm box, the output value stated in dBm will not be correct. Figure 2–20: Configure system setup conversion standards menu AM700 Audio Measurement Set Service Manual 2–25 Operating Information When the generator is driving an output load of 600 W, and the internal series resistor is also set for 600 W, the generator dBm reading will be correct. This also true when driving a 150 W load with the internal 150 W series resistor selected. Since half the voltage is dropped across the internal resistor and half across the external resistor, the dBu (voltage across the load) output will be 6 dBu down from the output value in dBm for these matching conditions. Internal series resistor User load resistance Eout Figure 2–21: Generator output voltage divider for dBm calculations Input dBm. This setting defines the external resistance on the input of the AM700 and is used for calculating the input signal amplitude in terms of dBm. Since the AM700 is measuring voltage, the internal termination load of the AM700, which is in parallel with the external load, has no effect on the calculation as the applied voltage is dropped across both in parallel (see Figure 2–22). NOTE. This is calculated dBm, so if the external load is not as stated in the Input dBm box, the measured value stated in dBm will not be correct. To acquisition Ein User’s external parallel resistor AM700 internal load resistance Figure 2–22: Input circuit for dBm calculations Analog to Digital Conversion Factor. This selection permits measurement results obtained from digital audio sources to be represented as analog values as if they were produced by a D/A converter. The scale factor of a hypothetical D/A converter is specified in this entry. 2–26 AM700 Audio Measurement Set Service Manual Operating Information Digital Audio Sampling Rate. In certain situations, the actual sample rate of a digital audio signal may differ from the value contained in the channel status bits. When digital audio is a source of input signals, the frequency measurements of the AM700 can be referred to the actual sample rate or the sample rate obtained from the channel status byte. Selection of the choice depends on whether the user wishes the calculation to reflect frequencies present in the original sampled data, or those which will result from a playback at the actual sample rate. The user must make the appropriate choice. NOTE. When actual sample rate and channel status content match, either setting produces identical measurement results. Saving Changes and Exiting the Input Selections Menu. Soft keys to exit the menu are located at the bottom of the screen. When Accept Changes is touched, any selections made are entered. If Cancel is touched, all changes are deleted before returning to the current application. Pressing Clear Menu also exits back to the application. AM700 Audio Measurement Set Service Manual 2–27 Operating Information Quick Setup One of the configuration choices is the Quick Setup selection. Under this selection is a set of application specific setups that can be used to quickly make the needed instrument configuration changes for an often used measurement setup. Figure 2–23 shows the selection screen with the Audio Analyzer selections; Table 2–1 gives the application-specific choices and the views that the selection produces. In the table, those views in parentheses are available but not displayed. To do a quick setup, touch the measurement you want to make. When the setup has finished, the selection screen is exited. If you want to exit the screen without making a selection, press the Clear Menu button. Figure 2–23: Quick setup selections for the Audio Analyzer Table 2–1: Quick setups by application Application Measurements Views displayed (views available but not displayed) FFT Analyzer FFT Analysis FFT1: Channel 1 FFT2: Channel 2 Multitone Level Measurements Meas1: Level Ch1 Meas2: Level Ch2 Meas3: Level Diff Ch1 –> Ch2 2–28 AM700 Audio Measurement Set Service Manual Operating Information Table 2–1: Quick setups by application (cont.) Application Measurements Views displayed (views available but not displayed) FFT Analyzer FFT Analysis FFT1: Channel 1 FFT2: Channel 2 Multitone Level Measurements Meas1: Level Ch1 Meas2: Level Ch2 Meas3: Level Diff Ch1 –> Ch2 Digital Interface Tester View Enables Jitter Spectrum Eye Height Bit Activity Channel Status Audio Analyzer THD and THD+N Meas1: Ch1 THD+N versus Frequency Meas2: Ch2 THD+N vs. Freq. (Meas3: Ch1 THD vs. Freq.) (Meas4: Ch2 THD vs. Freq.) Crosstalk and Separation Meas1: Ch1 Crosstalk 1–>2 Meas2: Ch2 Crosstalk 2–>1 (Meas3:Ch1 Separation 1–>2) (Meas4: Ch2 Separation 2–>1) Frequency Response Meas1: Ch1 Level vs. Freq. Meas2: Ch2 Level vs. Freq. (Meas3: Level Difference) (Meas4: Phase Difference) Linearity Meas1: Ch1 Level versus Gen A Level Meas2: Ch2 Level versus Gen A Level (Meas3: Not defined) (Meas4: Not defined) Stereo Differences (Meas1: Ch1 Level vs. Freq.) (Meas2: Ch2 Level vs. Freq.) Meas3: Level Difference Meas4: Phase Difference Monitor Single Trace View 1 – Meas1 on View 1 (View 2 – Meas 2 on View 2) Dual Trace AM700 Audio Measurement Set Service Manual View 2 – Meas2 and Meas1 on View 2 2–29 Operating Information 2–30 AM700 Audio Measurement Set Service Manual Theory of Operation Digital Audio Rear Panel Digital Audio In Out In AES Ref Out Optical In Out In Unbal DSP Digital Out A3 Sample Analog Acquisition Sample XLR CH A Audio In A1 CH B Analog Control Port CH A CH B Serializer Audio Generator Audio Out A2 DSP A5 A7 DMA Remote DMA Front Panel Keyboard 4–Wire Interface COM 2 Rear Panel Host Interface Main/CPU PC Keyboard Interface At Keyboard (optional) Option Board Sound Headphones A8 A9 Touch Screen CRT GPIB GPIB Touch Panel Á Á COM 1 Serial Interface VGA Video 68340 Front Panel mP Picture Monitor A10 Display A6 To All Blocks LCD Display A11 Display Drive Floppy Disk Drive 1.44 MbyteA12 Power Supply AC Mains A4 A13 Touch Screen Backlight Inverter Figure 3–1: Simplified block diagram of the AM700 Audio Measurement Set AM700 Audio Measurement Set Service Manual 3–1 Theory of Operation Block Circuit Description A simplified board-level block diagram of the AM700 is shown in Figure 3–1. Only the main signal paths are shown. More detailed block diagrams of the circuitry are shown with the detailed circuit descriptions and in the diagrams section of this manual. CPU The CPU (central processing unit) controls the operation of the AM700 using the programming contained in the flash EPROM (electrically programmable read-only memory). That memory is programmed at the time of manufacture with the standard programming plus any optional programming purchased. The CPU has access to all the devices on the busses for either reading of the ROM programming or reading and writing to the other devices for either memory storage (to the NVRAM or other RAM) or controlling the activity of other devices (output to the VGA connector for example). DSP The DSP (digital signal processor) accepts digital analog signal inputs from either the Digital or the Analog input boards through sample transmitter/receiver ASICs. Communication with the Main/CPU is through a DMA ASIC. The digitized audio signal is serialized and converted to analog signals for driving the front panel headphone circuit. Control circuitry on the DSP circuit board provides signals to set up the acquisition gain, bandwidth, filters, etc., on the Analog Acquisition board. The DSP has port A and port B memories to handle the processed data and commands. Instructions to the DSP are written to the Port B memory by the CPU. The DSP then runs the programmed instructions for the Port B memory. Analog Acquisition Analog audio signals applied to the CHA and CHB XLR connectors are digitized for application to the DSP for processing. A small over/underrange circuit board assembly, which is physically attached to the Analog Acquisition board, determines if the applied analog input signal is overrange (signal too big for application to the A/D converter) or underrange (signal amplitude that is small enough that a higher gain step or less attenuation should be used to provide a better dynamic range signal to the A/D converter). The gain or attenuation of the input circuitry is set to optimize the signal amplitude to the A/D converter. Selectable filtering conditions the applied signal for either high resolution or high bandwidth measurements depending on the selections made from within a measurement application. The digitized input signals are formatted by the Sample Transmitter for application to the DSP (digital signal processor). Digital Audio 3–2 Digital audio signals from the front panel XLR connectors or the rear panel connectors (BNC, optical, or, XLR) are processed for application to the DSP. The digital audio generator is also located on the Digital Audio board. AM700 Audio Measurement Set Service Manual Theory of Operation Audio Generator There are two analog generators: High Resolution and High Bandwidth. Each generator has two channels of output. The High Resolution generator output channels are independent (output completely different signals on either channel). The High Bandwidth Generator outputs the same signal on both channels. There also two digital audio generators: AES/EBU and the DSP (digital signal processor). Either of these generators may be used to produce the same signals capable of being produced by the High Resolution analog generator. In addition, the AES/EBU digital generator has the added signal of jittered sine which is used to jitter modulate the digital signal to test for jitter immunity of a circuit or device under test. Front Panel The Front Panel contains the touch screen circuitry, the front panel key pad circuitry, and the sound circuitry. Inputs from the analog resistive touch screen and the key pad are processed by the Front Panel mP, located on the Main/CPU board. Communication between the Front Panel and the Front Panel mP is done on a special 4-wire interface circuit. The touch screen consists of two opposing transparent resistive layers made of 7 mil polyester coated with indium tin oxide. The two layers are joined together around the perimeter, but they are kept apart by insulating spacers in the middle. The two layers are laminated to a chemically strengthened glass backing panel using a special optical adhesive. The touch screen may be activated by a press of a finger tip or stylus. Picture Monitor Floppy Disk Drive Power Supply (A12) Vertical, horizontal, and video circuitry to display the AM700 visual interface are contained in the Picture Monitor. The 7-inch (diagonal) display is non-interlaced raster scan, operating at 31.469 kHz horizontal deflection rate and 59.940 Hz vertical deflection rate. The monochrome CRT uses P4 white phosphor. The 1.4 Meg floppy disk is on the Front Panel mP bus. Waveforms, files, and programming data may be uploaded and downloaded through the floppy disk drive. The power supply is an pre-regulator inverter switching supply composed of a primary rectifier, a housekeeping supply, pre-regulator, the inverter switching circuit, output rectifiers, 15 V regulators, an alarm sensing circuitry that monitors for overvoltage, overcurrent, and over temperature conditions, and the alarm logic circuitry that shuts down the inverter switching circuitry in the event of a problem. The mains AC voltage is rectified to provide the drive power to the pre-regulator switching circuitry. A line voltage switch sets the supply to operate on a nominal voltage of either 115 VAC or 230 VAC. On 230 V operation, the primary AM700 Audio Measurement Set Service Manual 3–3 Theory of Operation rectifier acts as a full-wave bridge rectifier; for 115 V operation, the primary rectifier is configured as a full-wave voltage doubler. The primary bridge rectifier is protected by the mains line fuse and surge suppressors. A mains line filter at the input of the power supply reduces conducted and radiated EMI from and to the AM700. Additional components in the rectifier output provide line filtering and common-mode noise rejection for further reduction of conducted electromagnetic interference. Input surge current and overvoltage protection components are included in the input rectifier circuit to prevent major component damage in the event that incorrect line voltage is applied to the AC input. Housekeeping Supply. A second power supply provides the housekeeping (or keep-alive) power source. This supply provides power to the logic circuitry that controls the power supply STBY/ON logic circuitry. It is supplied through a transformer that is wired with the power line switch to provide the correct voltage to the primary for either line voltage. The rectifiers for the + and –14.5 V housekeeping supply are full-wave with capacitive filtering of the rectified voltages. The filtered voltages are regulated by 3-terminal regulators. Both sides of the transformer secondary are fused with self-healing fusing devices. One of the sensing signals (LINE SENSE) to the power supply logic circuitry is developed from the secondary of the housekeeping supply transformer. Floating Power Supply. In CRT display instruments, these supplies are located on the Generator board (A5). In LCD flat panel display instruments, the floating supplies are part of the power supply board. The floating power supply provides the isolated voltages to power the analog audio generator. This isolation permits the generator outputs to float with respect to chassis ground. The +22 V and –22 V outputs of the power supply power a set of 3-terminal regulators that provide the +15 V, +5 V, and –15 V to the Generator board. Those voltages, along with the +22 V and –22 V voltages and the floating return line are connected to the Generator board through J12 on the power supply board. AM700 Circuit Description The remainder of this section provides more information regarding circuit operation of the AM700. It is arranged by assembly (board number) and follows the schematic diagram in order. Refer to the appropriate schematic diagram in the diagrams section to follow the circuit descriptions. Simplified block diagrams are provided in the circuit descriptions. Diamond symbols in the blocks indicate the schematic diagram or diagrams associated with that functional block. More detailed block diagrams are also included in the diagrams section of this manual. 3–4 AM700 Audio Measurement Set Service Manual Theory of Operation Schematic diagrams are numbered sequentially by circuit board, for example, A5 diagram 3 and A6 diagram 3. Analog Acquisition Board (A1A1) Analog audio signals applied to the CHA and CHB XLR connectors are digitized for application to the DSP for processing. A small over/underrange circuit board assembly, that is physically attached to the Analog Acquisition board, determines if the applied analog input signal is overrange (signal too big for application to the A/D converter) or underrange (signal amplitude that is small enough that a higher gain step or less attenuation should be used to provide a better dynamic range signal to the A/D converter). The gain or attenuation of the input circuitry is set to optimize the signal amplitude to the A/D converter. Selectable filtering conditions the applied signal for either high resolution or high bandwidth measurements depending on the selections made from within a measurement application. The digitized input signals are formatted by the Sample Transmitter for application to the DSP (digital signal processor). CHA and CHB Input and Attenuator Boards (diagrams 1 and 2) Refer to schematic diagrams 1 and 2 of the A1A1 circuit board for the following circuit description. Analog Inputs The Channel A and Channel B Input circuitry are identical in operation. The Channel A circuitry is described. Like components in Channel B perform the same function. A simplified block diagram of the analog input circuitry is shown in Figure 3–2. AM700 Audio Measurement Set Service Manual 3–5 Theory of Operation EMI Filter XLR Input Input Attenuator CAL In Termination Select Differential Input Amplifier and Gain Select Underrange Overrange Protection Clamp To High Bandwidth A/D Tunable Notch Filter To High Resolution A/D Auto Range Figure 3–2: Simplified block diagram of one channel of the analog input circuitry Differential analog audio signals are applied to the front panel XLR connectors on the XLR board, A2 and passed to the CHA input through EMI filters. The CHA input provides a selection of terminations of 150 W, 600 W, or 200,000 W. Relays are switched to make the selection under firmware control. There is also a selection of signal source. Either the front-panel XLR connector or the AM700 generator may be selected, also using relays. If an excessive amplitude signal is applied while one of the termination resistors is being used, an overload sense circuit causes a relay to open the circuit path to the termination resistors. The generator input is used during auto-calibration of the input circuitry to check for amplitude flatness and for measurements of the generator without using an external cable. Attenuators 3–6 Attenuation is actually a combination of attenuator and gain stages that provide a wide dynamic operating range for the input signal from –22 dBu (62.5 mVRMS) to +44 dBu (125 VRMS) in 12, 6-dB steps. Input gain ranges are in 6 dB steps from –22 dBu to +8 dBu and in 12 dB attenuator steps (with intermediate 6 dB gain steps) from +8 dBu to +44 dBu. Autoranging is normally selected to automatically switch the gain based on the level of the input signal, however, manual range setting is available to the user. Relay switching and solid-state relays are used to select the various attenuation and gain settings. Control signals for the relays are applied through the Control Register, U103. AM700 Audio Measurement Set Service Manual Theory of Operation At the output of the Attenuator a clamp circuit across the two sides of the differential signal prevents the signal from exceeding + or –10 V. This clamp protects the Input Amplifier from the accidental application of excessive signal amplitudes that would damage it. If the autorange function is enabled, the attenuator will be switched to the appropriate range for the applied signal. Gain Selection. Both sides of the differential input signal are handled on different paths through the attenuator and gain stages. The positive phase of the signal is applied to U3A, and the negative side is amplified through U3B. These gain stages may be set for unity gain, 6 dB gain, or 12 dB gain. The separate outputs are then applied to the Combining Amplifier, U4. Differential-to-SingleEnded Amplifier Amplifier U4 converts the differential audio signal into a single-ended signal. This stage may be set for either unity gain or 18 dB gain. The overall gain is the sum of the gain from the previous amplifiers and the input amplifier in dB. The output of U4 may be viewed with an oscilloscope at TP6 for troubleshooting the input circuitry. With an input signal applied, the output at TP6 should range between 1 and 2 VRMS, with 2 VRMS being full scale to the A/D converter. Tunable Notch Filters (diagram 3) Refer to schematic diagram 3 of the A1A1 circuit board for the following circuit description. Notch Selection At the input to the Notch Filter, a solid-state relay, U35, either selects the notch filter or permits the audio signal to bypass the filter completely. At the output of the notch filter, another solid-state relay, U36 selects either the output of the notch filter or the bypass signal to be applied to the A/D Converters. When in use, the notch filter is tuned to the fundamental frequency so that it is notched by 20 dB. The notched signal is then amplified by 20 dB. This increases the amplitude of the harmonic content in the signal so that harmonic distortion measurements may more easily be made. The 20 dB gain is later removed from the measurement readouts of harmonic distortion. Multiplying DAC The center frequency of the notch is determined by the DSP. Binary data applied to U29 determines the gain that is applied to the state variable notch, thus setting its center frequency. At the notch frequency, the amount of signal passed is reduced by greater than 20 dB. The current output steps from U29 are converted to voltage by U33A, and the steps are reintegrated by U33B. The reintegrated and out-of-phase signal is fed back to the input minus pin of U31A where it is summed with the incoming analog signal. That output signal is also summed with the input signal and the minus input of operational amplifier U31B where it subtracts from the output of the operational amplifier at the notch AM700 Audio Measurement Set Service Manual 3–7 Theory of Operation frequency. The notch has a Q of 2.7 and a depth of greater than 20 dB throughout its 20 kHz tuning range. Test points, TP11 for CHB and TP12 for CHA, are provided for viewing the signal at the output of the notch filter. Analog ground is available at TP10. A/D Converters (diagram 4) Channel A and Channel B of the High Resolution A/D Converter are identical in operation as are Channel A and Channel B of the High Bandwidth A/D Converter. Figure 3–3 is a simplified diagram of the Channel A A/D Converter. Refer to schematic diagram 4 of the A1A1 circuit board for the following circuit description. Input Buffer and 5 V Clamp Anti-Aliasing Low Pass Filter 3–8 In the input to the High Resolution A/D Converter, a unity-gain buffer, U45A and + and –5 V clamp isolates the input of the A/D converter from the output of the Input Amplifier (or notch filter) and prevents overload of the A/D Converter IC. The anti-aliasing low pass filter, U60B, is a 3-pole, bessel filter. The 3 dB rolloff point is at 150 kHz so within the 24 kHz bandwidth of interest there is minimal phase shift. Single-ended to Differential Converter The output of U60B is fed to the plus input of U58, the High Resolution A/D Converter. It is also fed to the inverting (minus) input of U60A, a unity-gain inverting buffer. The output of this state provides the negative differential side of the input signal to the A/D Converter. High Resolution A/D Converter The High Resolution A/D Converter, U58, is a two-channel delta-sigma converter. Both Channel A and Channel B differential signals are applied to the converter inputs. The analog input signal is converted to a serial digital data stream with a L/R output signal provided to indicate to following devices when the data applies to the left channel and when it applies to the right channel. The A/D Converter also outputs a serial clock (1SCLK) used to synchronize the High Resolution output data into the Sample Transmitter (diagram 5). The High Resolution analog data is 64 times oversampled. Offset DAC The Offset DAC, U81, converts serial digital data to analog output voltages on its outputs. During calibration, the amount of offset seen in the analog channels is measured. That measurement determines a calibration constant used to derive the offset correction voltages to the A/D Converters. In the High Resolution A/D Converters, that offset is applied to the 150 kHz anti-aliasing filters. The offset corrections for the High Bandwidth A/D Converter are applied to the A/D AM700 Audio Measurement Set Service Manual Theory of Operation Converter offset inputs. The high resolution A/D Converter also contains circuitry to measure and store DC offset and subtract that value form all readings. This offset value is updated each time a different measurement application is selected or when requested through the calibration menu. CH A HBW Low-Pass Filter High BW A/D Clamp CH B HBW R Data L Data Convert CLK R Offset L Offset Low-Pass Filter 12.288 MHz CH A HIRES Unity-Gain Buffer R Offset Low-Pass Filter Clamp L Offset CH B HIRES Unity-Gain Buffer Low-Pass Filter Differential Converter Differential Converter 20 Bit / 18 Bit A/D Converter 12.288 MHz Control In Control CLK Control DAC Load R Offset L Offset R Offset L Offset High Res A/D 12.288 MHz Xtal Oscillator L/R Serial Data L/R SCLK CAL-Busy Offset CAL 12.288 MHz Divide by 4 3.072 MHz Figure 3–3: Simplified block diagram of the high resolution analog to digital converter 80 kHz Low Pass Filter The analog bandwidth of the Input Amplifier is approximately 300 kHz. The operating bandwidth of the High Bandwidth A/D Converter is approximately 96 kHz. The 80 kHz low-pass filter, FL10, is an 11-pole filter hybrid circuit that sharply limits the bandwidth of the signal applied to the A/D Converter. At AM700 Audio Measurement Set Service Manual 3–9 Theory of Operation 96 kHz, the roll off is better than 90 dB. A servo circuit following the filter (U122 and associated components), looks at the DC offset of the output and feeds back an offsetting signal to the filter. At the output of the filter, the DC offset is reduced to a few millivolts. High Bandwidth A/D Converter Decimating Filter In the High Bandwidth A/D Converters, the left and right signals are applied single-ended. Both channels also have separate serial data outputs instead of being interleaved as in the High Resolution A/D Converter. This device provides the clocking signals to the High Bandwidth A/D Converter. Although the decimated data from the A/D is derived, it is not currently used by the AM700 software. Sample Transmitter (diagram 5) A simplified block diagram of the Sample Transmitter is shown in Figure 3–4. The Sample Transmitter formats data from the A/D Converters into a form that can be applied to the DSP. Data from the A/D Converters does not follow a standard format, and both A/D Converters, High Resolution and High Bandwidth, output data in different formats. This means that each data stream must be reformatted into a pattern that the Sample Transmitter ASIC, U120, can use. Both transmit and receive capabilities are included in the Sample Transmitter ASIC. A single bit is set to switch between using the device as a transmitter or as a receiver. Refer to schematic diagram 5 of the A1A1 circuit board for the following circuit description. 3–10 Format PALS These PALs, U117, U118, and U119, accept data from the A/D Converters and format it into data streams that contain a Start bit, a Stop bit, and the appropriate number of bits between that are the digitized audio signal. A second job of these PALs is to accept the eight bits that define the gain and attenuation settings and encode them into a four-bit signal that tells the Sample Transmitter ASIC how much shift is needed to restore the actual input audio signal level. Sample Transmitter The formatted serial data is received from the Format PALS and shifted as necessary to remove the gain and attenuation from the signal that was applied prior to being digitized by the A/D Converters. That data is then arranged into eight-bit data bytes to be sent to the DSP. A block of nine bytes is sent to the DSP. The first byte defines the channel source of the data; the remaining eight bytes are 32 bits of left data followed by 32 bits of right data. A Start bit, TIDENT, goes high at the first byte, then low for the remaining bytes of the data block. The data is clocked into the DSP by the TCLK signal. (In the block diagram of Figure 3–4, this is block labeled Transfer Control.) Those signals are applied to the DSP board through connector J26, shown on diagram 6. A trigger AM700 Audio Measurement Set Service Manual Theory of Operation bit is included as the LSB bit of the data. That bit is set high or low depending on the state of the output of the trigger circuitry. Data (24 Bits) Control (6 Bits) Eye Data In Eye Data Start Parallel Input from DSP Serial Input from Eye Sample Eye Data Clock Left Data In Left Data Start Left Data End Right Data In Right Data Start Right Data End Bit Clock Control (10 Bits) Serial Input from ADCs or AES/EBU Receiver Left Data In Left Data Start Left Data End Right Data In Right Data Start Right Data End Bit Clock Control (10 Bits) Serial Input from ADCs or AES/EBU Receiver Master Control (5 Bits) Master Clock Transfer Control Transfer Clock Start Flag Data (8 Bits) Master Control and Global Signal Distribution Figure 3–4: Sample transmitter block diagram Diagnostics As the normal data through the Sample Transmitter is highly uncorrelated, it is difficult to troubleshoot the logic circuitry. To overcome this problem, the diagnostic routine at power up uses known test patterns to check that the various sections of the formatting logic are working properly and bits are not being missed or dropped. AM700 Audio Measurement Set Service Manual 3–11 Theory of Operation Calibration, Control Registers, Interface, and Power Supplies (diagram 6) Refer to schematic diagram 6 of the A1A1 circuit board for the following circuit description. The circuitry shown on this diagrams is composed of unrelated circuitry that includes the calibration test signal generator, the TTL trigger input circuit, the isolated power supplies for the A/D Converters, and a 72-bit serial control register used to store the controlling signals for switching the attenuators, gain settings, and input terminations. Other control bits determine the setting of the notch filter frequency and control the calibration sine-wave oscillator and square-wave chopper. Calibration Signal Source Two calibration signals to the analog acquisition circuitry are provided. One is a 5 V, 120 Hz, symmetrical square-wave signal. The other is a highly accurate ±2.5 V sine wave. The square-wave signal is produced by chopping between a precision 5 V voltage reference and ground. When this precise duty-cycle square wave is AC-coupled, it provides a ±2.5 V reference used to calibrate the gain of the A/D Convertors and signal path. A test point, TP31, is provided to check this signal using an oscilloscope. Test points are also provided to check the precision 5 V reference and the output of the sine-wave oscillator. Switching relays under control of signals from the Serial Control Register are applied to a relay driver, U82, to select the calibration signals and direct them to the channel being calibrated. During calibration, offset and gain calibration constants are derived. These are used to correct offset and gain shifts due to thermal effects and component aging. Maximum accuracy for measurements is obtained immediately after a calibration cycle. Serial Control Register The Control Register, U116, is a 72 bit serial register. It is formed by a series of registers mounted on a SIMM chip. Serial control data bits are loaded from the DSP. When any control bit is changed, all 72 bits must be re-sent to the register, but when the data is latched, only those bits that have changed are written to the register output pins. Isolated Power Supply Power to the isolated power supply is provided from the + and –15 V sources. Test points are provided to check these inputs. These inputs are also separately fused on the board by 5 A fuses, F3 and F4. Additional filtering is done on each side of these sources before being applied to three-terminal regulators. There are two three-terminal regulators with + 5 V output and two more with –5 V output. Test points are provided on each of these outputs to verify the voltage levels. The isolated supplies are used to provide power to the A/D Converters to limit the introduction of noise to the converters. Interface Status Read-back Register 3–12 Interface status reports under- and over-range conditions, CAL BUSY, and input overload conditions. The status bits are parallel loaded in read-back register U109 and clocked out serially. There is also a read-back signal that is serially AM700 Audio Measurement Set Service Manual Theory of Operation loaded. That path permits a diagnostic routine to write serial data on the CONTROLAIN data line and read it back to determine if the control path is functioning correctly. The CAL BUSY signal tells the DSP that a calibration is in progress. TTL Trigger Input A TTL trigger signal input is applied to a Schmitt trigger device, U111D. The output of the Schmitt trigger is buffered by U121C. When U121C is enabled, a trigger event is output to the Sample Transmitter where it is included as the LSB bit of the digitized audio data. Over/Under Range Board (A1A7) This assembly is a small circuit board that is physically attached to the A1A1 Analog Acquisition board. Its circuitry is composed of comparators used to determine if the applied analog input signal is overrange (signal too big for application to the A/D converter) or underrange (signal amplitude that is small enough that a higher gain step or less attenuation should be used to provide a better dynamic range signal to the A/D converter). The fixed input of the comparators is supplied through a voltage divider circuit. One output of the divider is the voltage that is the overrange level and the other is the underrange level. The analog signal from the A and B Input Attenuators (after the gain and attenuation stages) is applied to the comparators. The output of each comparator is applied to a latch circuit that holds the state of the comparison. A (CLRORANGE) (clear overrange) signal is applied to the latches to clear the states in preparation for a new comparison. Those states are applied to a data selector, U5, that is checked to determine if over- or under-range conditions exist. If either condition is found, the control signals to the Channel A or Channel B Input Attenuator boards are modified to change the gain or attenuation as needed to adjust the input signal level to the A/D converters. The CHA/(CHB) SEL signal switches the data selector between the Channel A and Channel B range states so each channel can be checked separately. XLR Connector Board (A2) The XLR connector board interfaces between the input and output XLR connectors and the Analog Acquisition, Analog Audio Generator, and Digital Audio circuit boards. Each of the XLR connector signal lines is fed through EMI filters to reduce the affects of external electromagnetic pickup through the connectors and attached cabling. The Digital Audio Output connector includes transformer T1 to couple the digital audio signal, as required by the AES standard for digital audio signals. AM700 Audio Measurement Set Service Manual 3–13 Theory of Operation Digital Audio Board (A3) The information for the A3 digital audio board is provided in two manners. First is a discussion of the digital audio board functions as related to the user interface. The first discussion follows the functional operation of the board. The second part of the discussion more closely follows the schematic layout for the digital audio board. Digital Audio Board Functional Description Digital audio signals from the front panel XLR connectors or the rear panel connectors (BNC, optical, or, XLR) are processed for application to the DSP (Digital Signal Processor) circuit board. The Digital Audio board is composed its own DSP, the Digital Generator, and the Digital Receiver. Digital Audio Board Terminology. The following terms are used in the discussion of the functions of the digital audio board. H Interface Signal. This is the voltage versus time waveform present on the AES interface cable. The voltage changes represent a serial bit stream of 1’s and 0’s. It is characterized by digital waveform parameters including: amplitude, clock frequency, jitter, phase (relative to another interface signal), and eye opening. H Audio Data. This is the digital data conveyed by the interface signal. It can be characterized by audio signal measurements such as level, distortion, frequency, channel separation, and so on. Main Audio Data Generation. Main Audio data generation includes both the AES and the DSP generator modes. A simplified block diagram of the digital generator is shown in Figure 3–5. Either of these generators may be used to produce the same signals capable of being produced by the High Resolution analog generator. In addition, the AES/EBU digital generator has a jittered sine wave that is used to jitter modulate the digital signal to test for jitter immunity of a circuit or device under test. 3–14 AM700 Audio Measurement Set Service Manual Theory of Operation Frequency Offset XTAL 7 Select INT ACQ CLK Reference Generator AES IN 9 DARS IN 9 XLR (Rear) U88 U145 PRGM Gain U107,Q7,Q8 Encoder U108 Cable Simulator XLR (Front) BNC (Rear0 AMPL 0 – 9 AES3 Waveform Generator Received Reference Data 5 DSP Port (Rear) Synchronous Serial Interface (SSI) Received Audio Data Optical (Rear) Bit and Frame Clocks Phase Offset and Jitter Generator 2 4 Phase and Jitter Values VUCP, Block Start SSI,SCI DSP Serial Control RAM 1 1 Host Port 10 Counter 8 Sample Transmitter 3 To CPU Figure 3–5: Digital audio generator simplified block diagram AM700 Audio Measurement Set Service Manual 3–15 Theory of Operation User Controlled Audio Data Parameters. The user can set the following software controlled audio data parameters for the digital signal generator: waveform, frequency, amplitude, audio sample rate, number of bits, dither, channel status, and user bits. Changes to these signal parameters involve no hardware beyond that required to communicate from the CPU to the Digital Audio Board. The hardware supporting the normal operation of these functions consist of the following circuitry blocks: H Power Input. Power to the digital audio board is supplied through the cable connected to J30. The +5 V source is protected by an on-board 2 A fuse. H DSP Core. The DSP core circuitry is composed of the DSP chip, and address decoder, a random-access memory SIMM, and the host interface buffers. A simplified block diagram of the DSP core is shown is Figure 3–6. H Clock Sources. There are two clock sources to the DSP. A crystal clock circuit supplies a 12.288 MHz OSC signal to the timing generator PAL circuit that produces the DSP clock signal. That clock signal is multiplied by the DSP to provide an internal DSP clock of 39.74 MHz. The second clock is a differential clock signal from the Analog Acquisition circuit board on J31 pins 39 and 40. It is a more accurate 12.288 MHz clock that provides the digital generator output timing. H DSP Resets. The reset to the DSP is a combined reset signal: the power-on reset and a reset from the CPU. At power up, the DSP is held in reset until the power and PLL has stabilized. The active low reset from the CPU is applied to the Digital Audio board on J31 pin 33. When the reset (DSPRST) is asserted (low), the DSP is initialized and held in the reset state until the reset line goes high. This reset signal is widespread on the Digital Audio board. 3–16 H Host Port. The CPU and the DSP communicate through the host interface on J31. Two buffers between the CPU and the DSP isolate the two devices from each other when they are not communicating. One buffer isolates the control signal and the second is a bidirectional parallel data buffer. H Interconnection Cables. The power cable on J30, the host port cable on J31, the rear panel cable on J27, the sample transmitter cable on J32, and the front panel cable on J29 provide the interconnections to and from the Digital Audio Board. Check that they are properly seated and securely connected. H Variable interface clock phase. Main output phase changes with respect to Ref output phase. AM700 Audio Measurement Set Service Manual Theory of Operation RAM_CE Address Decoder A(0 –15) Address RAM Control 1 D(0 – 23) 12.288 MHz Oscillator (STX_CE) (PHASE_CE) (ENCJIT_CE) (COUNT_CE) Data 1 Control 9 A(0 –15) Address Timing Generator Address DSPCLK D(0 – 23) Data 9 To/From Sample Transmitter Phase Shift Control AES Encoder Control Jitter Control Frequency/Phase Counter DSP SSI Reset Control (DSPRST) 2 3 Generator Clock Generator Data DSP Port 1 8 (RST) SSI Interface and Sample Transmitter Host Reset ONCE Port 1 Serial Control 10 Host Port 1 Serial Control of Frequency Synthesizer and ADC Serial Control Registers Control Functions 10 Host Cable to CPU Board Decimal Point is Power ON Indicator Figure 3–6: Digital audio board DSP section block diagram H Interface jitter generation. Works only with the jittered sine-wave waveform. H Cable simulator. Rolls off the digital waveform to the front panel XLR output connector. AM700 Audio Measurement Set Service Manual 3–17 Theory of Operation H Variable interface amplitude. Controls both the XLR and BNC output signal amplitude in a 5:1 XLR to BNC ratio. User Controlled Interface Parameters. The user can make the following parameter changes to control the generated digital audio interface signal. Control of these parameters depends on correct operation of specific hardware circuitry on the Digital Audio board. H Interface clock source selection. These selections are: Follow Audio, Variable, or Ref In. H Variable interface clock frequency. Available for use at sample frequencies other than 48 kHz. The second synthesizer circuit is similar to the first with a loop filter and amplifier that drives a varactor in the second oscillator. This oscillator has an output that is fed to a current-to-ttl converter to produces complementary OFFSET and (OFFSET). Reference Output Generation. The AES Reference output signal is present when the AM700 is on. The reference clock frequency is the same as the main output clock frequency. The variable main output parameters (jitter, amplitude, cable simulator) do not affect Ref output. The audio data and channel status of the Reference signal is fixed. Digital Receiver. A simplified block diagram of the digital receiver is shown in Figure 3–7. The following functional blocks receive the digital audio signal. H Source selection. A solid-state FET switch selects the source of the digital audio signal. H AGC. The input signal is applied to the AGC circuit to provide about a 5 V peak-to-peak signal at TP3 for any of the selected inputs. H Auto-equalizer. Compensates for rolloff of the digital waveform from the AGC output at TP3. The compensated waveform is on TP19. The Auto Equalization circuitry provides a controllable amount of peaking to the leading edge (or top) of the digital square-wave signal. Rolled off signals are peaked to produce a flatter top signal while peaked signals are rolled off to produce a flatter top signal. With AGC and auto equalization, the AM700 is able to lock on to a wide dynamic range of input signals that may be applied from external sources. H 3–18 AES decoder. The AES decoder decodes the serial data stream and outputs data and clock signals to the Sample Transmitter. AM700 Audio Measurement Set Service Manual Theory of Operation H Data formatter. The Data Formatter creates the start and stop bits for the serial data from the AES Decoder. These bits control the formatting of the serial data into parallel data bytes in the Sample Transmitter. H Sample transmitter. The sample transmitter arranges the serial data into eight-bit data bytes to be sent to the DSP circuit board. Input 6 11 Eye Sampler Source Select From Generator XLR (Front) BNC (Rear) Optical (Rear) AGC U110A, U111, U112A Eye Source Eye/Jitter Sampler U109 U130 Gain Phase Error EQ In Auto Equalization EQ Out 3 Sample PLL U113A,U122, U123,Q16,Q17 Eye 3 Eye Source 12 Sample Transmitter To DSP U101 AES1 In Source AES2 9 Sample Transmitter Main Decoder U86 XLR (Rear) Reference Decoder EQ Level 3 U87 ADC Gain 8 Data Formatter U102 TRI SRD To Serial Control U137 Figure 3–7: Digital audio receiver simplified block diagram AM700 Audio Measurement Set Service Manual 3–19 Theory of Operation Digital Interface Tester Measurement Functions The digital audio board has circuitry that supports the following interface measurements. These are the qualities of the serial data waveform itself and not the coded audio data. H Amplitude. A DC level from the AGC circuit provides a measure of the input signal level. H Cable loss. A DC level from the auto equalization circuit provides a measure of the signal degradation (rolloff) caused by the transmission path. H Clock frequency and relative phase. A digital counter cycles through a series of measurements. These measurements provide the numbers for the Main Sample Frequency, the Reference Sample Frequency, and the Phase Difference (Main versus Ref) readouts in the Eye Diagram display. H Eye diagram. Data for the eye diagram is generated by an equivalent-time sampling circuit. The eye diagram display will not appear if the eye/jitter phase-lock-loop circuit is not locked to a valid input signal (such as when the signal is too noisy, has too much jitter, or is outside the sample frequency range). The output of the sampler is sent to the DSP by the Sample Transmitter. The DSP plots the eye diagram and derives the Peak-to-Peak Jitter readout in the Eye Diagram display. H Jitter spectrum. Data for the jitter spectrum display is generated by real-time sampling of eye/jitter phase-lock-loop phase error signal. The output of the sampler is sent to the DSP by the Sample Transmitter. The DSP performs a FFT on the data to produce the jitter spectrum display. H LF Rejection 120 Hz/1200 Hz. The low frequency rejection of the eye/jitter phase-lock-loop circuit is selectable between 120 Hz and 1200 Hz. For the Eye diagram jitter components below the selected cutoff frequency are reduced. In Jitter Spectrum display, this filtering effect is compensated out by software to maintain the jitter spectrum flatness. H X1/X8 Jitter Gain. With a low-jitter signal, the amplifier gain for the jitter spectrum display may be switched from unity to X8 gain to increase the jitter amplitude for better digitization thereby decreasing the noise floor. The X8 gain is compensated out by the software to maintain constant reference level in the jitter spectrum display. H Equalization Bypass. In Jitter Spectrum mode only, the auto-equalization circuitry is bypassed. This provides a truer representation of the effects of transmission path induced jitter on an unequalized receiver. Reference Receiver. The Reference Receiver, also shown as part of Figure 3–7, decodes the reference input digital audio signal and supplies timing signals for relative timing measurements. The Reference Receiver depends on the following circuitry for proper operation. 3–20 AM700 Audio Measurement Set Service Manual Theory of Operation H Source Selection. A solid-state FET switch selects the source of the AES reference signal from either the AES Ref input or, when the main input selection is From Generator, the Reference output. H The decoded data is applied to the DSP through the Data Formatter and Sample Transmitter just as for the main audio signal. DSP Mode. The DSP Mode overrides the normal (AES) mode generator. Control of the main output is disabled. DSP mode provides a direct I/O path to the Digital Audio board DSP through the DSP port connector. The DSP mode requires an external clock. If an external clock is not present in DSP mode, then all control and measurement of the interface parameters is suspended until returning to the AES mode. Digital Signal Processor (diagram 1) The following portion of the Digital Audio board circuit descriptions follows the layout of the schematic diagrams. Some information will be duplicated from the previous discussion, but is included again with references to the circuit schematic diagrams.. The Digital Audio board is composed of the Digital Signal Processor, the Digital Generator, and the Digital Receiver. A simplified block diagram of the DSP part of the digital audio board was shown previously in Figure 3–6. In the DSP board circuitry, there are local registers, an analog interface port, a DMA interface, and fast static memories that reside on the port A and port B processor buses. Refer to schematic diagram 1 of the A3 circuit board for the following DSP circuit description. Digital Audio Board DSP The DSP circuitry on diagram 1 is composed of the DSP chip, U4, address decoder U5, random-access memory SIMM U98, and the host interface buffers, U99 and U100. The DSP chip, U4, is a 24-bit general purpose digital signal processor. Physically, it is a 132 pin flat-pack integrated circuit. It has a host interface for communications with the CPU of the AM700, a synchronous serial interface, a 24-pin data bus, a 16-pin address bus, and control pins for handling bus control and interrupts. The DSP also has an on-board phase-lock loop (PLL) circuit. DSP Data and Address Buses. The data and address buses of the DSP provide access to external memory and other devices on the DSP bus. The address decoder, U5, provides the required chip selects so the DSP can address individual devices on the common bus. There are no other controlling devices on the data bus of the DSP so no provisions are needed to grant bus control away from the DSP. AM700 Audio Measurement Set Service Manual 3–21 Theory of Operation DSP RESET. At power up, the DSP is held in reset until the power and PLL has stabilized. The RESET input is a Schmitt trigger. When (DSPRST) is asserted (low), the DSP is initialized and placed into the reset state. The DSPRST signal is widespread throughout the Digital Audio board. Mode/(IRO) Lines. After the DSP leaves the reset state, the mode setting input pins are switched to interrupt request inputs (IRQA, IRQB, and NMI). IRQA and IRQB can be programmed to be level sensitive or negative edge triggered. NMI (non-maskable interrupt) is negative edge triggered and triggering occurs at a voltage level. Analog PLL Pins. The DSP PLL has dedicated power and ground pins. These pins are connected to the common +5 V supply and the common digital ground for the DSP chip. The PLL output clock, CKOUT is a 50% duty cycle clock that is synchronized to the internal processor clock when the PLL is enabled and locked. The CKOUT polarity control pin (CKP) is strapped to ground through R7 to make the CKOUT polarity the same as the EXTAL DSPCLK signal. The PLL initialization input, PINIT, is pulled up to +5 V through R6 to permanently enable the PLL. During hardware reset, the high value of the PINIT pin causes the internal clocks to be derived from the PLL VCO output. After hardware reset, the state of the PINIT pin is ignored. When the PLL is locked to the proper phase and frequency of the EXTAL input clock, the PLOCK signal is asserted and the PLL Locked LED, DS1, will be on. This is a reliable indication of lock only after the hardware reset is exited. Host Interface Buffers DSP RAM 3–22 The CPU and the DSP communicate through the host interface. Two buffers between the CPU and the DSP isolate the two devices from each other when they are not communicating. Data is passed both ways by U99, a bidirectional octal buffer. Control signals and addresses from the CPU are buffered by U100. The control signals and the addresses are separately enabled in U100. The control signals are permanently enabled, but the address bits are not enabled through U100 until the CPU places addresses on the address inputs pins and issues the (SBIT) signal. That same signal also enables the data buffer, U99, to pass data in the direction selected by the HR/(W) control bit from U100. The DSP RAM, a SIMM device, U98, provides the memory storage space needed for holding the processed digital data. Read and write control signals from the DSP control the direction of data flow. The RAM is enabled by the (RAM CE) signal from address decoder U5. The RAM chip is a 32 bit device, but only 24 data bits are used. The remaining bits are pulled up to +5 V through a pull-up resistor pack, R223. AM700 Audio Measurement Set Service Manual Theory of Operation Address Decoder DSP Clock Jitter Interrupt The DSP Address Decoder, U5, is a PAL device. It looks at nine selected DSP address lines and three of the Data and Address bus control pins, (DPS), (DDS), and X/Y, and decodes them to produce chip enable control signals: (RAM_CE), (SID_CE), (STX_CE), (PHASE_CE), (ENCJIT_CE), and (COUNT_CE). DSP RAM address lines RA15 and RA16 are also decoded here. A crystal clock circuit, Y1, supplies a 12.288 MHz OSC signal to the timing generator PAL circuit that produces the DSPCLK signal. That clock signal is multiplied by the DSP to provide an internal DSP clock of 39.74 MHz. There is a interrupt to the DSP that is used when jittering the digital output signal. This interrupt comes at a constant rate to add jitter to the digital output signal for testing the jitter immunity of a device under test. Synchronous Serial Interface (SSI) (diagram 2) Interfacing the serial DSP port on the rear panel to the DSP SSI is done by U59, the SSI control PAL. The audio sample bits are generated directly at the DSP, and the control PAL outputs the digital signals with the surrounding bits that are required for digital signal formats. The control PAL selects whether the clocks are derived from the generator or the external port. When receiving or sending digital data through the DSP port, the clock to the SSI shift register is supplied by the external device. Sample Transmitter (diagram 3) The Sample Transmitter formats data from the Main and Reference receivers into a form that can be applied to the DSP. Sample Transmitter A simplified block diagram of the Sample Transmitter was shown previously in Figure 3–4. The formatted serial data is received from the Format PAL. That data is then arranged into eight-bit data bytes to be sent to the DSP. A block of nine bytes is sent to the DSP. The first byte defines the channel source of the data; the remaining eight bytes are 32 bits of left data followed by 32 bits of right data. A Start bit, TIDENT, goes high at the first byte, then low for the remaining bytes of the data block. The data is clocked into the DSP by the TCLK signal. AM700 Audio Measurement Set Service Manual 3–23 Theory of Operation Phase Offset and Jitter Generator (diagram 4) Refer to schematic diagram 4 of the A3 Digital Audio circuit board for the following discussion. Jitter DAC The Jitter DAC, U103, converts a jitter data byte into an analog signal for insertion into the Phase-Locked Loop. The effect of the insertion produces a high speed phase modulation of the digital signal that carries the digitized audio information. Phase Shift PAL The phase of the digital signal is another parameter of the digital signal that may also be adjusted by the user. A PAL, U104, supplies the data and clocks to the generator encoder PAL, U108. When a phase shift is added, U104 adjust the amount of phase shift that is applied to the digital signal. This is a fixed phase shift as opposed to the rapid shifting that is applied to jitter the signal. Phase-Locked Loop The phase-locked loop is composed of a phase comparator, loop filter, integrating amplifier, and a voltage-controlled oscillator. The output of the oscillator, U64, is converted to a TTL signal by the circuit formed by Q12 and Q13, and applied back to the Clock 0 input of the phase shift PAL, U104. Generator (diagram 5) A simplified block diagram of the Digital Audio Generator was shown previously in Figure 3–5. Refer to that illustration and to schematic diagram 5 of the A3 circuit board for the following generator circuit description. Encoder PAL 3–24 The Encoder PAL, U108, generates the digital audio word and the VUCP (validity, user, channel status, and parity) bits that make the AES format signal. The AES formatted signal is used directly to drive the optical output circuit, but additional processing of the signal is needed to drive the XLR and Unbalanced output connectors. The Left and Right frames are interlaced in the serial digital stream. When jitter is applied, the Encoder PAL outputs the jitter signal data to the Jitter DAC, U104 (diagram 4), to add the programmed amount of shifting to the signal to produce the jitter effect. AM700 Audio Measurement Set Service Manual Theory of Operation Programmable Gain Digital signal gain is controlled using a programmable current source to a differential amplifier circuit formed by Q7 and Q8. The programmable current source DAC, U107, receives 10-bit wide word that is the digital value of the output current needed for the gain wanted. The converted signal is the current source for the differential amplifier. The output of the amplifier if fed through a 20 MHz low-pass filter to operational amplifier U72. This filter provides a smooth transition (15 ns rise and fall time) that reduces a possible EMI source and preconditions the signal for better transmission characteristics through an audio cable. The signal for the Unbalanced output connector is taken from the output of U72, prior to the cable simulation filter. Cable Simulation Filter The cable simulator filter is a switchable low-pass filter that produces an effect simulating distortion of the signal that is inherent in cable transmission. It is a simple RC roll-off filter. When the filter is not in use, it is bypassed around the filter by U71, a solid-state switch. Unity Gain Output Amplifier The switched output of U71 is applied to a unity-gain amplifier, U106. This amplifier buffers the signal that is AC-coupled to the front-panel XLR connector through A2, the XLR board. A second output of the amplifier is the LOOPBK signal, a selectable input source to the digital circuitry. This loop-back path is used to directly apply the digital generator signal to the input of the digital audio board for testing purposes. Digital Receiver Input (diagram 6) A simplified block diagram of the Digital Audio Receiver was previously shown in Figure 3–7. Refer to that illustration and to schematic diagram 6 of the A3 circuit board for the following digital receiver circuit description. Input A solid-state FET switch, U109, is switched to select the source of the digital audio signal. The input signals are applied to the AGC circuit to provide about a 5 V peak-to-peak signal at the output of U111 (TP3) for any of the selected inputs. With AGC and auto equalization, the AM700 is able to lock on to a wide dynamic range of input signals that may be applied from external sources. AM700 Audio Measurement Set Service Manual 3–25 Theory of Operation Frequency Offset (diagram 7) The circuitry on this diagram allows tuning of the sample rate frequency. There are two synthesizers in series to produce a wide range of frequencies with fine resolution. The first synthesizer, U82, receives a clock frequency of approximately 8 to 12 MHz (12.228 MHz for a sample rate of 48 kHz). The synthesizer devices have a built in phase comparator. A loop filter and following amplifier, U39B, smooths the output of the synthesizer and drives the tuning varactor of the oscillator, U78. The oscillator output is fed back to the phase comparator of the first synthesizer and to an inverting amplifier, Q4. This amplifier converts the ECL level of the oscillator to a level of approximately 1.5 V p-p to drive the second synthesizer, U82. The second synthesizer circuit is similar to the first with a loop filter and amplifier that drives a varactor in the second oscillator, U79. That oscillator output is fed to a current-to-ttl converter, Q14 and Q15, which produces complementary OFFSET and (OFFSET) output signals used for interface clock generation. A/D, Frequency/Phase Counter, and Power Distribution (diagram 8) The circuitry on this diagram covers several unrelated areas of the Digital Audio board. The A/D Converter, U137, is used to provide the values of equalization level and the AGC gain level back to the Serial Control PAL. From there, these values are read back to the DSP for use in the various measurements that require them for making calculations, one of those being the peak-to-peak amplitude of the input signal, for example. Frequency/Phase Counters These programmable counters, U139 and U140, are usually programmed to count the number of master clocks during a given interval. They may be used to provide a number for measuring the absolute frequency of the master clocks or the relative frequency difference between a reference and the master clock. These PALs also generate the SLOW CLOCK signal and the (DSPRST) signal. Power Distribution Several voltage regulators are shown in this diagram. They are the on-board regulators for the +12 V, –12 V, +5 V, –5 V, and –8 V sources. The input power for these regulators is obtained from the +15 V and –15 V sources which are also supplied to the Digital Audio board. A +5 V reference source is developed by U138. This reference is used to produce two difference reference levels to the A/D converter, U124, that is part of the Eye Sampler circuit, shown in diagram 11. 3–26 AM700 Audio Measurement Set Service Manual Theory of Operation The decoupling capacitors associated with the +5 V power to the various devices on the Digital Audio board are also shown in this diagram. The +5 V power to this board is fused by F3, a 2 A fuse. All of the input power lines are provided with additional decoupling circuits (LC filters) near the power supply connector, J30. Decoders (diagram 9) The Decoder circuitry contain the Main and Reference Decoders, the AES Reference Generator, and the Timing Generator. The Main and Reference Decoders accept the serial data streams and decode the preambles to output the clock signals used to clock the serial data through the Sample Transmitter. The left and right data samples are both on the serial data line to the DSP. The word clock is a square-wave signal that is high for left channel data and low for right channel data. The data is separated later by the DSP. The Reference Generator receives timing signals and produces an output that is encoded as a valid AES Reference signal. The + and – AES REF OUT signals are available at the rear panel AES REF connectors. A separate Timing Generator circuit is a PAL that accepts various inputs including the ACQ clock, a TTL-level clock signal, and generates various timing signal to other portions of the Digital Audio board. Serial Control (diagram 10) Control signals throughout the Digital Audio board are developed in the Serial Control circuitry. The DSP writes control data to the Serial ID PAL. This PAL outputs a stream of serial data that defines the control states to be set. This data loaded into a chain of serial in/parallel out registers that hold the control data bits between updates. The last carry out of the register is applied to the Serial Status registers which provide read back path. Also applied to these Serial Status registers is the status outputs of both the Main and the Reference Decoders. The status of the decoders then may be read back for input to the DSP through the Serial ID PAL. AM700 Audio Measurement Set Service Manual 3–27 Theory of Operation Eye Sampler (diagram 11) The circuitry of the Eye Sampler is an equivalent time sampler used in the generation of the eye pattern and measurement of the jitter waveform. Either the incoming Eye Source or the phase error signal is selected for application to an A/D converter. The 8-bit parallel output of the A/D converter is applied to the Eye Sampler PAL where the equivalent time samples are chosen as 1 of 27 input samples. The samples are taken at 127 different phases of the input data to provide an envelope of samples that describe the incoming waveform when reconstructed. The outputs of the Eye Sampler are applied to the data formatter PAL (diagram 3) for formatting before being sent to the DSP by the Sample Transmitter. A phase-lock loop (PLL) circuit generates the clock signal for the Eye Sampler. The INMCK signal (Input Master Clock) at 256 times the sample rate is applied to the phase comparator of the PLL. The PLL track the slow rate changes of the master clock. The faster changes that occur in the master clock (derived from the applied audio signal) is jitter. The control voltage to the VCO is filtered by an active low-pass filter circuit and buffered by a operational amplifier for application to the A/D converter when measuring jitter. With a low-jitter waveform, the amplifier gain may be switched from unity to X8 gain to increase the jitter amplitude for better digitization. Auto Equalization (diagram 12) The Auto Equalization circuitry provides a controllable amount of peaking to the leading edge (or top) of the digital square-wave signal. Rolled off signals are peaked to produce a flatter top signal while peaked signals are rolled off to produce a flatter top signal. The input signal is applied to a low-pass filter circuit to remove the high frequency components. This removes any noise glitches from the signal and provides a uniform rolled off signal for processing. There are two variable gain stages used in the circuitry. The first is part of an AGC circuit to maintain a controlled signal amplitude. The second variable gain stage provides the gain versus frequency characteristics that are used to flatten the digital square-wave signals. The peaking amplifier adds its output to the signal based on the amount of roll-off or peaking of the input signal. If the input signal is a very good flat signal, no added roll-off or peaking is added by the variable gain stage. 3–28 AM700 Audio Measurement Set Service Manual Theory of Operation Rear Panel Board (A4) PUSH Figure 3–8: Digital audio connectors The Rear Panel board seen in Figure 3–8 is schematically shown in a single diagram (A4, diagram 1). All the digital audio rear panel connectors interface to a single 32 pin connector and cable to the Digital Audio board. AES REF Connectors The rear panel board provides the interconnections for the various methods of connecting digital signals in and out of the AM700. These are: OPTICAL IN and OPTICAL OUT, AES REF IN and AES REF OUT, UNBAL AES IN and UNBAL AES REF OUT, and the DSP I/O port connector. The TOSLINK optical connectors contain transducers to convert light to a TTL-level electrical signal and electrical to light for the in and out connectors respectively. The AES REF IN and OUT are standard XLR connectors, fed through isolation transformers. For the UNBAL AES REF IN and OUT, the connectors are BNC. All the input and output lines are filtered to reduce EMI effects on the signal lines. DSP PORT The user may connect a compatible digital microphone or other compatible digital signal source directly to the DSP for processing through the DSP Port connector (pinout shown in Figure 3–9). When the AM700 is receiving data, the external device supplies the Bit Clock, Frame Clock, and Receive Data. When sending data, the AM700 supplies Transmit Data that is synchronized with Bit and Frame Clocks of the external device. Rate 0, Rate 1, Rate 2, Flag 0, and Flag 1 are reserved for future use. The external device may be powered by the + and –12 V sources provided from the DSP Port connector. These sources are current AM700 Audio Measurement Set Service Manual 3–29 Theory of Operation limited to about 150 mA. Digital devices requiring more power than available from these sources may be powered by an external power source. The DSP port timing diagram is shown in Figure 3–9. The external device determines the sampling rate. The sampling rate to the AM700 must be no greater than 48 kHz, and the data must be 16-bit. Bit and Frame Clocks must always be “clean,” with no extra transitions, while the AM700 is in DSP mode. For this reason, the AM700 should be set to AES mode when switching the sample rate of any external device attached to the DSP port. The maximum input voltage for the DSP port is –0.5 V to +5.5 V. For good noise immunity, the rise and fall time of the transitions should be less than 100 ns. NOTE. The DSP generator must also be selected to permit the DSP to acquire input from the DSP port. DSP Port 8 7 6 5 4 3 2 15 14 13 12 11 10 1 9 DB-15 FEMALE CONNECTOR Pin 1 Pin 2 Pin 3 Pin 4 Pin 5 Pin 6 Pin 7 Pin 8 Bit Clock Receive Data Transmit Data Rate 2 Rate 1 Rate 0 +12V –12V Pin 9 Pin 10 Pin 11 Pin 12 Pin 13 Pin 14 Pin 15 Chassis Ground Chassis Ground Chassis Ground Frame Sync Flag 1 Flag 0 Chassis Ground Figure 3–9: Digital signal processor port connector NOTE. In order to meet radiated EMI regulations, the cable used to connect to the DSP port must be well shielded, and the connector housing must be conductive. The cable shield must be clamped by the housing where the cable enters the connector. 3–30 AM700 Audio Measurement Set Service Manual Theory of Operation Bit Clock Frame Sync Receive Data MSB, SF1 LSB, SF1 MSB, SF2 LSB, SF2 MSB, SF1 LSB, SF1 MSB, SF2 LSB, SF2 Transmit Data NOTE: All Data is sampled on the FALLING edge of Bit Clock. Receive Data and Frame Setup Time Before Falling Bit Clock Edge = 25 ns Receive Data and Frame Sync Hold Time After Falling Bit Clock Edge = 40 ns Signal Level –0.5 V to +5.5 V Rise and Fall Time < 100 ns Max Sample Rate = 48 KHz Data Bits = 16 Figure 3–10: DSP port timing diagram AM700 Audio Measurement Set Service Manual 3–31 Theory of Operation Analog Generator Board (A5) A simplified block diagram of the analog generators is shown in Figure 3–11. The following block diagram description explains the blocks from a functional point of view. The schematic diagram description is given later. Block Diagram Description of the Analog Audio Generators There are two analog generators: High Resolution and High Bandwidth. The simplified block diagram is shown in Figure 3–11. An expanded block diagram of the DSP section of the generator is shown in Figure 3–12. Each generator has two channels of output. The High Resolution generator output channels are independent and can output completely different signals on either channel. The High Bandwidth Generator outputs the same signal on both channels. Portions of the analog generator circuitry are floating and require a floating power supply to provide the operating voltages. Floating the generator helps break ground loops in a system composed of the generator, a device under test, and the analyzer. Prior to the flat panel display version of the AM700, the floating power supply was located on the generator board. With the flat panel display circuitry installed, the floating power supply is on the power supply board. Data and control signals between the floating and nonfloating portions of the circuitry are passed through opto-isolators. DAC and Filtering Circuits. The high resolution data is 8 X oversampled before being applied to the right and left DAC for Ch A and Ch B analog signal conversion. The high bandwidth data passes through a sync and delay circuit to properly align the data for conversion. The DAC current output signal is converted to an analog voltage signal and filtered by the appropriate filter circuit. The high resolution signal path also contains a Low Distortion Mode filter that is selectable for use when lower signal distortion is needed from the analog generator. Output Amplifiers. The output amplifiers have a positive and a negative amplifier section to produce the differential audio output signal. Each channel amplifier has an overload detector that senses an overload condition. If an overload occurs, and OVLD signal automatically switches in additional attenuation to protect the output amplifiers. The OVLD signal is also applied back to the DSP section for processing. The outputs of the amplifiers are protected by a clamp circuit that prevents an external voltage condition from damaging the output amplifiers. 3–32 AM700 Audio Measurement Set Service Manual Theory of Operation +22 V From Power Supply +22 V –22 V +15 V –15 V +5 V Floating Power Supply –22 V 9 +5 V Serial Control Hi Res Opto-Iso. Opto-Iso. U9,U10 To CPU Host Bus To Generator Floating Circuits (The floating power supply in on the analog generator board in the CRT display instruments. It is on the power supply board in the flat-panel display instruments) Hi Res 8X Oversampling Hi BW Clocks Clocks 12.228 MHz 1 Sync and Delay Opto-Iso. U20,U21 Std BClk Opto-Iso. U94 Frame 12.228 MHz DSP Section 2 4 5 Right and Left Digital Audio Data Floating Ground Referenced Ground ONCE Port 2 3 OVLD From Output Amplifiers Hi BW Hi Res Right & Left 20-bit/18-bit DAC (Development) Low Distortion On/Off Hi Res Low-Pass 2 Filter Hi BW Ch A Output Ampl. Hi Res Ch B Channel A and Channel B Gain/ Attenuator Output Selector Ch A Ch B 6 To Output Data Selector Ch B To Front Panel Ch A + Output Z Selector and Post Attenuator Output Clamp Ch A – Ch A 8 OVLD Ch B To Acquisition Ch B+ Ch B OVLD 2 Ch A – Ch B Ch A OVLD Output Ampl. Opto-Iso. 7 Ch A + Ch A To DSP Ch B Ch A HiRes Low Distortion Mode Filter Hi BW Low-Pass 2 Filter Hi Res/Hi BW Hi BW Ch A Ch B– Output Clamp Output Z Selector and Post Attenuator Ch B+ Ch B– Figure 3–11: Analog generator simplified block diagram Post Attenuator and Output Z Selector. The output impedance at this point is 5 W per side for a 10 W output source impedance. A post amplification attenuator providing 42 dB of attenuation is switched in when low amplitude signals are generated. This attenuator reduces the level of noise associated with the output amplifier so that the signal to noise ratio remains high at low output amplitudes. Direct application of the generator signals to the Acquisition board is taken from the circuitry at this low impedance point. AM700 Audio Measurement Set Service Manual 3–33 Theory of Operation In the flat panel display version of the AM700, two small relay boards are used to completely isolate the internal generator signal from the cable to the Acquisition board when it is not being sent to the acquisition. This reduces the generator-to-acquisition crosstalk to –140 dB or below. Earlier versions of the AM700 used a relay T-switch on the Acquisition board to shut off the signal when it was not needed. The other output impedance choices of either 150 W or 600 W are switched into the output path as selected by the user. Half of the output impedance minus the fixed 5 W per side is added to produce the total. For example, for a total of 150 W output impedance, 70 W additional impedance is added to each side. 3–34 AM700 Audio Measurement Set Service Manual Theory of Operation Digital Signal Processor (Generator) (diagram 1) Refer to schematic diagram 2 of the A5 analog generator circuit board for the following circuit description. CERAM A(0 –15) Address Decoder PAL Address Control RAM U5 D(0 – 23) 12.288 MHz U6 U2 Data CEPO BCLK OVLD 2 SCK Disable Address Output Overload Opto– Isolators U94 BCLK Reset and SSI Clock Reset Select SCK DSP PAL J15 DSPreset Clock and Data Isolators U20,U21 U7 Reset_Gen RST SSI To DACs U4 CEPO Once Serial Control Output and ID PAL U87 J4 Clock and Data Isolators U9,U10 Serial Control Register Host Port J17 Control Latches Decimal Point is Power ON Indicator CONTROLS: Gain Bandpass Filter High Res/High BW Mode Source Impedance To Controls Control Latches Figure 3–12: Analog generator DSP section block diagram AM700 Audio Measurement Set Service Manual 3–35 Theory of Operation DSP The generator DSP, U4, develops the digital data that represents the audio test signal to output from the front panel Analog Generator XLR connectors. It is programmed by the host CPU via the host interface. The data is clocked out serially to the generator DACs through the SSI (synchronous serial interface) of the DSP. Reset and SSI Clock Pal The Reset and SSI Clock Pal, U7, allows the output data to be clocked either directly from the DSP or from a divided version of the 12.288 MHz clock frequency. These two types of operation are the High Resolution mode and the High Bandwidth mode. The SCK DISABLE signal controls switching between the states as shown in Figure 3–13. The resulting waveforms of the clocks and data stream for the two modes is shown in Figure 3–14. The High Resolution mode sample rate is 48 kbits per second, and the High Bandwidth mode sample rate is 192 kbits per second. Address Decoder RAM 3–36 There are two chip enables and some memory addressing bits decoded by U5, the Address Decoder. The chip enable signals are used to enable the Serial Control Pal and the RAM, U2. The addressing bits (RA15, RA16, and RA17) are applied to the RAM to control the upper three bits of the RAM addresses. The RAM, U2, holds the programming for the test signals. The data is loaded from the CPU through the DSP. Read and write control is provided from the DSP RD and WR outputs. The chip enable signal (CERAM) is developed from the Address Decoder, U5. AM700 Audio Measurement Set Service Manual Theory of Operation High Resolution SCK Disable Reset and SSI Clock BCLK SCK_DISABLE = Low To DAC Opto–Isolators PAL SCK To DSP U7 High Resolution Waveforms: SCK BCLK High Bandwidth SCK Disable SCK_DISABLE = High Reset and SSI Clock BCLK To DAC Opto–Isolators PAL SCK From DSP U7 High Bandwidth Waveforms: SCK BCLK Figure 3–13: S-Clock disable used for DSP mode control AM700 Audio Measurement Set Service Manual 3–37 Theory of Operation High Resolution mode SSI Clock Frame BCLK STD Channel A Data Channel B Data Channel A Data Channel B Data High Bandwidth mode SSI Clock Frame BCLK STD Figure 3–14: SSI clock, frame, B clock, and serial data waveform for High Res and High BW modes Control and I/O (diagram 2) Refer to schematic diagram 2 of the A5 analog generator circuit board for the following circuit description. Serial Control PAL The Serial Control PAL, U87, develops the controlling signals as a stream of control bits. The control bits are loaded into the Serial Control Register and latched to the outputs of the register for application to the various devices under control of the DSP. The serial data stream is buffered by U8 and isolated by U9. The clocking signal to the Serial Control Register is also isolated, but by U10. Whenever any control bit changes, the entire register is reloaded. 7-Segment LED. The Serial Control PAL also develops the segment-drive signals to DS2. This device is available as a diagnostic tool. 3–38 AM700 Audio Measurement Set Service Manual Theory of Operation Host Port Serial Control Register Communication between the CPU and DSP is done through the host port, J17. A bidirectional buffer, U86, isolates the CPU and DSP busses from each other and controls the direction of data transfer. The Serial Control Register receives control bits in a serial data stream from the Serial Control PAL. The register is composed of six, 8-bit serial input shift registers, for a total of 48 control signal outputs. These bits are used to control the switching for the Tunable Bandpass Filter, the A Channel and B Channel Gain/Attenuator selections, the generator output impedance choices, and also to provide control signals to other devices on the Analog Generator circuit board. DACs and Current to Voltage Converters (diagram 3) Refer to schematic diagram 3 of the A5 analog generator circuit board for the following circuit description. Data and Clock Isolators The clocks and serial data from the Generator DSP are buffered by U24 to provide drive the the Clock and Data Isolators, U20 and U21. These isolators maintain the floating capability of the Analog Generator. Oversampling Filter In High Resolution mode, this oversampling filter has interleaved left/right 16-bit serial data at 48 kilosamples/second applied. The filter deinterleaves the data into left and right 20-bit serial data outputs at 384 kilosamples/second. The data bits are clocked into the left and right DACs simultaneously by the bit clock signal, BCKO, at 12.288 MHz. When the complete frame has been received, the word clock signal, WCKO, tells the DACs to latch the word data and convert. Data Shifter In High Bandwidth mode, the interleaved serial data is received at 192 kilosamples/second. There are two paths for the data, a left data path through a 24-bit data shifter, and an undelayed right data path through U96B. The data shifter is formed by three, 8-bit serial-in, parallel-out, registers. The eighth bit of each is the only output used so the left channel data is delayed by 24 bit clocks from the right channel data to deinterleave the left and right data to the DACs. Data Selectors DACs The Data Selectors, U39 on the left channel and U38 on the right channel, are driven to select data and clocks for the High Resolution mode or the High Bandwidth mode of generator operation. Left and Right DACs are serially loaded with a 20-bit word by the bit clock signal. At the word clock, the data is converted to a current output that represents the value of the data word. AM700 Audio Measurement Set Service Manual 3–39 Theory of Operation Current to Voltage Converters The current output of the DACs is converted to a voltage level by the Current to Voltage (I-to-E) converter circuits, U19B on the left channel, and U13B on the right channel. The components on the minus inputs of the I-to-E converters filter conversion glitches from the DACs. The output voltage of these devices is applied to the DAC Low-Pass Filter circuitry for smoothing. DAC Low-Pass Filters (diagram 4) Refer to schematic diagram 4 of the A5 analog generator circuit board for the following circuit description. Filter Paths The low-pass filter for the A and B DACs (left and right) have two filter paths: a 20 kHz low-pass filter path and a 80 kHz low-pass filter path. These two paths are in the circuit all the time. The path selection is made at the input to the Gain/Attenuator circuitry (diagram 6). 20 kHz Low Pass Filter The 20 kHz low-pass filter is used for the High Resolution mode generators. The generator output is up to 20 kHz. For high resolution signals, the filter is a 5-pole, linear-phase filter circuit. This means that the active devices serve to preserve the phase of the signal through the filter to 20 kHz. Output from the Low Pass Filter is applied to the Tunable Bandpass Filters (diagram 5). 80 kHz Low Pass Filter Filtering for the High Bandwidth signal, which goes up to 80 kHz, is done by a hybrid, 11-pole elliptical filter. This filter introduces some DC offset, so the output is AC coupled to the next stage to eliminate any DC components from the filtered signal. Output from the 80 kHz low-pass filters is applied directly to the data selector in the Gain/Attenuator circuitry (diagram 6). Tunable Bandpass Filters (diagram 5) Refer to schematic diagram 5 of the A5 analog generator circuit board for the following circuit description. Filter Paths 3–40 There are two paths for the left and right High Resolution generator signals relative to the Tunable Bandpass Filters. These are the bypass path and the path through the tunable filters. The choice is user selectable in the generator Advanced Analog Controls and is called “Low Distortion” mode when the bandpass filter is inserted. Either high resolution generator signal or both may be routed through the tunable filters. AM700 Audio Measurement Set Service Manual Theory of Operation Tunable Bandpass Filter The Tunable Bandpass Filter is designed to attenuate the second and third harmonic distortion products from the DACs to improve the already low distortion characteristics of the high resolution generator signals. Filters are tunable in two bands for improved noise characteristics. The bands of filter operation are from 20 Hz to 750 Hz and from 750 Hz to 10 kHz. The filters are constant-Q filters with a Q of 2.7. A constant-Q filter maintains a bandwidth that is a constant percentage of the center frequency of the filter. Second harmonics of the fundamental frequency are attenuated by 10 or more dB. Any third harmonic products are attenuated by 15 dB or more to attain the lower distortion output signal. Filter tuning tracks the generator fundamental frequency. When operating in Low Distortion mode, the filter components add slightly to the noise floor so that small amplitude output signals will become noise limited sooner than operating in the bypassed mode. A Channel and B Channel Gain/Attenuators (Generator Output) (diagram 6) Refer to schematic diagram 6 of the A5 analog generator circuit board for the following circuit description. Relay Control Latches Data Selector A and B Channel Step Attenuators Control signals for setting the state of the A and B Channel step attenuators, and the gain of the A and B Channel Amplifiers comes from the Serial Control Register (diagram 2). Those control signals used to drive relays are latched into two 8-bit registers, U25 and U75. The control signals used to set the attenuators are applied directly to those devices. The selection between High Resolution data or High Bandwidth data is made by data selector U100 in the A Channel and U43 in the B Channel. The data selectors require a high output impedance to reduce distortion, so the outputs are buffered by U27B and U28B before being applied to the stepped attenuators. The buffer outputs are AC coupled to the stepped attenuators to eliminate any DC components that may have been introduced by various offsets in the preceding stages. The attenuation selectors are U26 the A Channel and U31 in the B Channel. Attenuation settings are in 6 dB steps from 0 (no attenuation of the input signal) to 36 dB. Control signals for switching are applied from the serial control register (diagram 2). An additional control signal is applied through the logic circuitry on the A2 input of the data selectors. That is the overload indication signal, OVLD. When an overload condition on an output amplifier occurs, the stepped attenuator for the overload channel is switched to immediately add 16 dB of attenuation to the input signal. AM700 Audio Measurement Set Service Manual 3–41 Theory of Operation A and B Channel Buffers A Channel and B Channel signals from the stepped attenuators are applied to buffer amplifiers U27A (A Channel) and 28A (B Channel) to isolate the stepped attenuator stage from the output amplifiers and provide three gain ranges. The gain of these amplifiers is separately controlled by more 1-of-8 data selectors in the inverting input of the amplifiers (U29 in A Channel and U30 in B Channel). The input resistance and feedback resistance is selectable to provide unity, +6 dB, or +12 dB of gain for the amplifier in each channel. A and B Output Amplifiers and Output Z Selectors (diagrams 7 and 8) Refer to schematic diagram 7 and schematic diagram 8 of the A5 analog generator circuit board for the following circuit description. A and B Output Amplifiers The A and B Channel output amplifiers are identical in circuitry and operation. The single-ended channel signal is applied to the inverting input of the buffer amplifiers in the A and B Output Amplifiers (U49A and U55A respectively) circuitry. This inversion in the operational amplifier makes the overall amplifier be noninverting. The feedback signal is applied to the noninverting input of the input buffer amplifiers. A selectable feedback resistance is used to provide two overall gain settings for the output amplifier: unity and +6 dB. Each of the output amplifiers has a complementary-symmetry circuit arrangement to form a push-pull amplifier stage. The differential output signal from the analog generator is produced by applying the output of noninverting half of the output amplifiers to a second, almost identical, unity-gain inverting amplifier whose output is the differential signal to the output of the noninverting half of the amplifier. In the flat panel display version of the AM700, two small relay boards are used to completely isolate the internal generator signal from the cable to the Acquisition board when it is not being sent to the acquisition. This reduces the generator-to-acquisition crosstalk to –140 dB or below. Earlier versions of the AM700 used a relay T-switch on the Acquisition board to shut off the signal when it was not needed. Overload Protection. If the output of either half of any output amplifier becomes overloaded, the voltage across the resistor in the output transistor of the amplifier increases to a level that turns on the LED of the Overload Indicator opto-isolator. The output of an active opto-isolator triggers a one-shot multivibrator. An overload indication will usually occur at the peak of the signal for a short duration of time. The one-shot is used to lengthen the output pulse to permit time for the overload condition to be sensed by the processor. There are two outputs from the one-shot. One sets an Enable flag that is sensed by the processor. When the flag is set, a warning indication is displayed to warn the user that an overload condition exist. 3–42 AM700 Audio Measurement Set Service Manual Theory of Operation The second output is the Overload signal that is applied to the attenuator setting selector of the overloaded channel. This immediately adds a factor of 16 attenuation to protect the output amplifiers in that channel from damage. Output Impedance Selectors The output impedance selection for the audio analog generator is done with solid-state relays using control signal from the serial control register (diagram 2). One-half of the total output impedance is in each side of the differential output. The straight-through path of the impedance selectors produces an output impedance of 10 W with 5 W in each side. The other choices are 600 W and 150 W. The resistance values that make up the 600 W and 150 W source impedances are selected to account for the 10 W in each side that is not able to be switched out of the output path. Either the 10 W or the 42 dB attenuator remains in the generator output path to protect it from a short circuit on the output. Power and Floating Power Supply (diagram 9) Refer to schematic diagram 9 of the A5 analog generator circuit board for the following circuit description. Power Distribution The incoming power to the A5 audio generator board is applied through J16. The fusing and decoupling circuitry for the various supplies to the board are shown in this diagram. Floating Power Supplies In LCD color flat panel display instruments, these supplies are located on the Power Supply board (A11), and the Generator board components for the floating supply, if present, will not be in use. The floating power supply provides the isolated voltages to power the audio generator. This isolation permits the generator outputs to float with respect to chassis ground. A +22 V supply line provides power to the inputs of three switching power supplies, U81 (+15 V), U82 (+5 V), and U83 (–15 V). On the output of the switchers, the filter circuitry is referenced to the analog ground of the floating audio generator circuitry. To provide the –15 V output, the circuitry on the output of U83 is arranged in a buck-boost configuration that outputs negative voltage. The switching waveform is shown in Figure 3–15. The –15 V switching supply circuit provides approximately 150 mA to the load. The remaining load current, about 200 mA, is provided from the –22 V source through R359. AM700 Audio Measurement Set Service Manual 3–43 Theory of Operation [50 kHz +22 V A Gnd –16 V Figure 3–15: Switching waveform for –15 V floating power supply Main/CPU Board (A6) In the host CPU (simplified block diagram shown in Figure 3–16) there are two RS-232 ports, generator interface port, keyboard interface port, GPIB interface, free running counter, Host Interface, board registers, bus interface and memories for data and program storage. CPU and DSP Bus Interface (diagram 1) Refer to schematic diagram 1 of the A6 CPU board for the following discussion. CPU 3–44 The CPU, U64, has a 32 bit data bus and a 32 bit address bus. The address bus lines to the majority of the devices on the bus are buffered by four octal bus buffers, U80 through U83. The address bus to the front panel processor shared RAM is buffered by bidirectional data buffers on diagram 7. The disk drive addresses are also obtained from these address buffers. Both the data bus and the address bus are also connected to the DSP board for communication between the CPU and the DSP. AM700 Audio Measurement Set Service Manual Theory of Operation Memery Controller IRQ To DSP DMA and Host Interface CPU and DSP Bus Interface 3 NVRAM Flash EPROM EPROM 1 DRAM and Diagnostic Display Bus Arbitration and Interrupt Encoder Board Registers and Timer 6 5 3 4 System Clock and Resets, Counter and Address Decoder Option Board 2 A8 25 Interrupt Request Board Register Bits Bus Arbitration Control Signals RS232 Serial Interface GPIB I/O Processor 7 4–Wire Interface ÎÎÎÎ ÎÎÎÎ ÎÎÎÎ Latch Control Signal To Front Panel Board VRAM DAC and Floppy Drive Interface ÎÎ ÎÎ 10 11 Video ASIC and VRAM ÎÎ ÎÎ ÎÎ ÎÎ To RS232 Connectors To Keyboard Connector To GPIB Port Connector 8 RGB & SYNC To LCD Driver To VGA Monitor To Internal Monitor (CRT) RGB & SYNC 9 To Floppy Disk Drive Figure 3–16: Simplified block diagram of the A6 CPU board AM700 Audio Measurement Set Service Manual 3–45 Theory of Operation Interrupt Control Interrupts to the CPU are multiplexed with the reset levels by U65. The three interrupt lines provide an indication of an interrupt condition. The states of the interrupt signals provide an encoding of the interrupt level as seen in Table 3–1. While the RST040L line to U65 is low, the interrupt lines are connected to all low inputs. At power up, after the power on reset is removed, all the interrupts are enabled. As the system operates, various interrupt masks are set to prevent higher priority activities of the CPU from being interrupted until they are finished. The sources of interrupts are discussed in the description of U51, the Interrupt Encoder, shown in schematic diagram 5. When an interrupt is recognized, the CPU vectors to the appropriate address for the interrupt level that occurred and processes the interrupt handling routine found at that address. Table 3–1: Interrupt level encoding Requested interrupt level Control line status IPL2 IPL1 IPL0 Interrupt mask level required for recognition 0 High High High N/A 1 High High Low 0 2 High Low High 0-1 3 High Low Low 0-2 4 Low High High 0-3 5 Low High Low 0-4 6 Low Low High 0-5 7 Low Low Low 0-7 CPU Board Memory Map The system memory mapping of the CPU board is shown in Table A-2 of Appendix A. CPU/DSP Host Interface The Host Interface (HI) provides the communication path between the CPU and the DSP. The interface handles the following functions: 3–46 H Permits the CPU to transfer data to and from the DSP (there is no DMA access through the Host Interface). H Provides the path for the CPU to bootstrap the DSP. H Allows the DSP to interrupt the CPU using the Host Interrupt pin. H Enables the CPU to interrupt the DSP by setting the appropriate bits in the Interface Control Status register. AM700 Audio Measurement Set Service Manual Theory of Operation System Clock and Resets, Counter, and Address Decoder (diagram 2) Refer to schematic diagram 2 of the A6 CPU board for the following discussion. System Clock Three clock drivers, U47, U49, and U135, generate the various 25 MHz clocks used throughout the CPU. These clock drivers are synchronized by the output of Y2, a 12 MHz oscillator. Reset The power supply reset signal (PWRDY) is ANDed with the +5 V voltage, and the RST line from U20 by AND-gate U59A. When any of those lines is low, the CPU is reset. The output of U59A is applied to a clock driver, U47, to obtain added time on the actual reset to the CPU to make sure a reset is completed before the reset is released from the CPU. Assertion of the reset is the highest priority interrupt to the CPU. The power on reset is used to prevent the CPU from random activity while the power is coming up to the correcting operating level. A manual reset caused by pressing the reset button may be used to reinitialize the CPU to recover from a failure. A manual reset is may be used in troubleshooting the AM700, and is not a normal operating control. A reset aborts any processing in progress when it is recognized. That processing is not recoverable. When the reset is removed from the CPU, instructions are fetched from predetermined vectors to begin the reinitialization of the CPU. After these initial instructions are fetched, the program begins execution. If an access fault or address error occurs during this reset processing sequence, a double bus fault is generated, and the CPU halts operation. Bus Halt Indicator Host CPU Reset Functional Description If the host CPU (MC68040) indicates that a double bus fault condition has occurred, LED (DS9) will light up. Hardware reset is required to restart the host CPU. There are five input sources that can assert the RESET pin of MC68040 and DSP96002 and resetting its interface circuitry. They are the following: H PowerUp Reset Controller H Hardware Reset Dip Switch S6 SW3 H Host Processor Instruction Reset CMD H Power Supply Ready Input H Manual System Reset Button AM700 Audio Measurement Set Service Manual 3–47 Theory of Operation Circuit blocks affected by the power up reset or manual reset are: Manual System Reset Counter Address Decoder 3–48 H DRAM error detection outputs are masked during and after the reset is deasserted, H DRAM parity is set to even during and after the reset is deasserted, NVRAM is write protected during and after the reset is deasserted, H FEPROM is write protected during and after the reset is deasserted, H All interrupt signals (level 7 – level 1) are masked during and after the reset is deasserted, DSP96002 is in reset state during and after the reset is deasserted, H MC68040 is in reset state during the time reset is active low, Broad Program Register(BPR) is reset during and after the reset is deasserted, H Time-Out status bit is masked during and after the reset is deasserted. Circuit blocks affected by the Host CPU software reset are: DRAM error detection outputs are masked during and after the reset is deasserted, H DRAM parity is set to even during and after the reset is deasserted, .NVRAM is write protected during and after the reset is deasserted, H FEPROM is write protected during and after the reset is deasserted, H All interrupt signals (level 7 – level 1) are masked during and after the reset is deasserted. The DSP (96002) is in reset state during and after the reset is deasserted and the Broad Program Register (BPR) is reset during and after the reset is deasserted. Pressing the reset button resets both processors and their peripherals. There is a free running 32-bit counter resident in the host CPU bus. It is a read only counter. The wrap around time is approx. 19.4 min. The address to the counter is $50000000. Four address lines, QADS24 through QADS27, are applied to U79, a 4-to-16 line decoder/demultiplexor, for decoding. Twelve outputs are used as chip selects and read or write enables. The remaining four outputs are not used. Those same address lines plus QADS28 through QADS31 are applied to U128 for decoding into additional chip selects and control signals. AM700 Audio Measurement Set Service Manual Theory of Operation Memory Controller, EPROM, FEPROM, and NVRAM (diagram 3) Refer to schematic diagram 3 of the A6 CPU board for the following discussion. EPROM The EPROM is a 32-bit wide device, and the maximum memory allowed on board is 1 Mbyte. This memory is where the system boot-up code is loaded. It is read only memory, and data transfer type can be byte, word, or long word. The EPROM Address space for the possible memory sizes is shown in Table A-4 in Appendix A. NVRAM The NVRAM consists of a 32-bit wide static memory divided into two banks. Each bank consists of 512 Kbytes of memory. The maximum memory residing on board is 1 Mbyte. The memory interface allows either normal mode or burst mode access. The data transfer type can be byte, word, or long word. The power to the NVRAM is backed up by the on-board battery, so memory content is protected against power failure and saved during power off. The memory interface monitors the battery supply voltage. In the event the battery voltage falls below the specified value for safe backup, a NMI interrupt in generated to interrupt the CPU. After power up or any CPU reset, the NVRAM devices are write protected. Bit 0 of the Board Program Register must be set to a zero before storing data to NVRAM. If not, a write to these locations will not be stored. Table A-5 in Appendix A gives the NVRAM address mapping access by the CPU. Flash EPROM (FEPROM) There are two SIMM (single-inline memory module) sockets on the CPU board for Flash EPROM. The maximum memory permitted is 16 Mbytes. Data transfer type for read access to the FEPROM can be byte, word, or long word. The FEPROM memory is write protected. Memory mapping of the Flash EPROM accessed by the CPU is given in Table A-6 of Appendix A. The amount of flash memory available is identified by as shown in Table A-7 of Appendix A. Writes to Flash EPROM. When the Flash EPROM is written to, it is set up for long word writes only. The steps that occur for a write (during programming of the FEPROM only) are the following: BPR bit 1 is set to 0 The FEPROM is ready to program when BPR bit 13 becomes set to 1. If these bits are not set correctly, a write to the FEPROM will have no effect. AM700 Audio Measurement Set Service Manual 3–49 Theory of Operation Battery Backup The +5 V source to the NVRAM is monitored by U57. A backup battery is used to maintain the stored memory of the NVRAM when the AM700 is powered off. That battery is monitored for a low voltage condition so that a low battery warning may be issued. When the battery is low, the NVBF interrupt is applied to the Interrupt Encoder. That is a level 7 interrupt, and while the instrument is running, it is masked to permit the CPU to maintain normal operation. At power up, all the interrupt levels are enabled, so a low-battery interrupt will be seen and the low-battery warning issued. The back-up battery must be replaced to prevent loss of stored information in the NVRAM during power off. A replacement battery may be installed using the pins on the CPU board placed there for that purpose. After the replacement battery is installed, the lead to the on board battery must be immediately cut to prevent it from drawing current from the new battery. DRAM and Diagnostic Display (diagram 4) Refer to schematic diagram 4 of the A6 CPU board for the following discussion. Dynamic RAM Controller Board Status Register The Dynamic RAM Controller (DRC), U33, provides most of the logic for controlling the DRAM devices. The DRC requires initialization before it can function normally. The DRC must be programmed during the first write cycle that the CPU performs after reset. An Error Detection Circuit detects parity error during every read access by the host CPU. If an error is detected, the transfer error acknowledgement signal (TEA) goes active and terminates a bus cycle, and the CPU may enter access error exception. Both a DRAM parity check error and an illegal access will cause TEA to be active. If any one of the BSR bits (bit 0 – bit 3) is asserted low, it indicates a parity check error is detected. If illegal access occurred, BSR bit 16 will be asserted low. After reset, BPR8 and BPR13 both are active low (‘0’). BPR7 sets even parity or odd parity. After reset, even parity is set. Table A-8 in Appendix A lists the address mapping accessed by the host CPU. Table A-9 in Appendix A list the DMA mapping accessed by the DSP. Diagnostic Displays 3–50 The diagnostic displays are used to troubleshoot CPU kernel problems when the AM700 fails to boot. The segments of the diagnostic LED are turned on to indicate the failed area as indicated in Table 3–2. AM700 Audio Measurement Set Service Manual Theory of Operation Table 3–2: Diagnostic LED Definitions LED Display Register Watchdog Timer LED Description 0 reserved 1 reserved 2 on : Flash EPROM (bank 0) not found 3 on : Flash EPROM (bank 1) not found 4 on : Flash EPROM (bank 2) not found 5 on : DRAM not found 6 on : battery supply failure 7 on : hardware reset active This register is a write only octal latch which can be programmed to turn on or off the diagnostic 7-segment LED on the CPU board. A monitor chip, a DS1232, is used monitor software execution on the host bus. The monitor chip has an interval timer that forces the time-out signal to active state if the strobe input is not driven low prior to time-out. The watchdog timer is set to operate on time-out settings of approximately 600 ms. If the watchdog timer is allowed to time-out, then the TEA signal is driven to active state which signals the CPU that a bus error has occurred. Bus Arbitration and Interrupt Encoder (diagram 5) Refer to schematic diagram 5 of the A6 CPU board for the following discussion. Interrupt Encoder All levels of interrupts are applied to the Interrupt Encoder, U51. When an interrupt occurs, U51 determines the level of interrupt and encodes the interrupt signals to the CPU (IPL0 – IPL2) appropriately. The source of the interrupts and their level is shown in Table A-12 of Appendix A. Board Registers and Timer (diagram 6) Refer to schematic diagram 6 of the A6 CPU board for the following discussion. Board Status Register (BSR) The Board Status Register (BSR) is one of the two hardware registers used to indicate hardware status. It is a 32-bit read-only register composed of U85, U87, U90, and U126. The register outputs are on the CPU data bus and can only be read by the CPU. Bit assignments for the register are given in Table A-13 in Appendix A. AM700 Audio Measurement Set Service Manual 3–51 Theory of Operation Board Program Register (BPR) Board Code Register Real Time Clock This Register is composed of four 8-bit registers, U86, U88, U92, and U125. The register bit states indicate various board status and control various board operations on the HOST CPU side. Its contents can be written and read. A bit mapping of the registers with signal names and descriptions of bit values is given in Table A-14 in Appendix A. This register, U78, holds the switch settings of dip switch S2. The DS1286 device is a real time clock is used to keep track of the ‘real time’ and time-related activities. It comes with 50 bytes of user NVRAM. It contains an embedded lithium cell that can maintain data and real time for over ten years in the absence of Vcc. Refer to the manufacturer’s data book for detailed information on this device. Timer Registers and Addresses. Table A-15 of Appendix A lists the cross references of the Timer Registers and their addresses. I/0 Processor (diagram 7) Refer to schematic diagram 7 of the A6 CPU board for the following discussion. Front Panel Processor The Front Panel Processor, U110, handles all of the front panel controls, and through the Floppy Disk Controller, U105 (diagram 9), the data transfers to and from the floppy disk drive. Two clock signals are applied to the Front Panel Processor: the serial port clock, 3.6864 MHz, and the processor clock, 16.667 MHz. The processor clock must have a 4 V swing and a 50% duty cycle. A flip-flop, U121A, divides the 33.3333 MHz output of Y7 by two and buffers the signal. The output of the flip-flop has a nearly 50% duty cycle as needed by the processor. Front Panel Processor RAM The Front Panel RAM, U108 and U109, store the operating instructions for the I/0 Processor. These instructions are downloaded from the CPU at power up and whenever a new front-panel description is needed. Access to this shared memory is handled through a Bus Request/Bus Grant routine. CPU to Front Panel Interface Buffers 3–52 The bus interface between the 16-bit Front Panel Processor data bus and the 32-bit CPU data bus is handled by buffers U94, U95 ,U96, and U97. Data is transferred between the two busses in 16-bit words. The two sets of buffers are enabled to select which 16-bits of the CPU long word are selected for transfer. AM700 Audio Measurement Set Service Manual Theory of Operation Front Panel PAL Controlling signals for the operation of the Front Panel logic are produced by U106, a PAL (programmable array logic) device. Video ASIC and VRAM (diagram 8) Refer to schematic diagram 8 of the A6 CPU board for the following discussion. Video RAM The Video RAM is composed of four, 512 × 512, 8-bit memory devices, U117, U118, U119, and U120. Each memory has a 2 Mbit capacity, and the total memory provides for two pages of display. The CPU writes new information to one page of display while the other is being processed by the video ASIC (application specific integrated circuit), U103. The CPU reads or writes to the Video RAM through four, 8-bit bus buffers, U111, U112, U113, and U114. There are two modes of writing to the memory. One mode takes 20 writes to transfer enough data to display one line on the CRT, the other mode is a flash write used to rapidly clear the display. The Video RAM is partitioned in eight bit planes, and the bits of the display data from the CPU are stored interleaved across the eight bit planes. Video ASIC The Video ASIC, U103, processes the display data written to the Video RAM by the CPU. When the Video ASIC is reading data from the Video RAM, it gets the interleaved bits sequentially from each of the eight bit planes. The Video ASIC reformats the data to deinterleave the bits, and places the bits in a long, 64-bit FIFO (first in, first out) data pipeline. Pixel data bytes are then taken out of the FIFO in parallel and applied to the Video RAM/DAC, U37 and U15 (diagram 9), for conversion to analog display signals in the correct order for the raster display. Horizontal and Vertical Sync signals and Blanking are also produced by the Video ASIC. Troubleshooting Hint If a repeating bad pattern appears in the display, one of the Video RAM devices or one of the bus buffers to the CPU data bus may be defective. Missing pixels in the display may also be the result of a defective memory or buffer. A totally wrong display may be the result of a Video ASIC failure. The data bits for a pixel to the Video RAM are interleaved across the eight bit planes of the memory, so the data bytes that are being written to memory have no correlation with the data bytes being sent to the Video DAC/RAM. AM700 Audio Measurement Set Service Manual 3–53 Theory of Operation VRAMDAC and Floppy Drive Interface (diagram 9) Refer to schematic diagram 9 of the A6 CPU board for the following discussion. Video RAM/DAC There are two identical Video RAM/DAC devices, U37 and U15. One, U37, produces the monochrome drive to the internal display monitor. The second, U15, provides RGB output to drive an external VGA monitor. Pixel data bytes from the Video ASIC are converted to analog at the IOR, IOG, and IOB outputs of the Video RAM/DAC. For CRT display systems, the Red and Blue outputs of U37 are terminated, and only the Green output is used to drive the monochrome display. That signal is sent to the Display Monitor board along with the Horizontal and Vertical Sync signals through connector J2. Test points (TP13, TP14, and TP15) are provided for checking these signals. In U15, all three color outputs plus the Horizontal and Vertical Sync signals are connected through EMI filters to the rear-panel VGA connector, J3. A single test point (TP16) is provided for checking the Green drive signal. The Video RAM/DAC provides the RGB and sync signals to the LDC Driver for AM700 Audio Measurement Sets that have the LCD color flat panel display system. CRT Display Brightness. The brightness of the internal display monitor and the external display monitor are controlled separately through the current references to the Video RAM/DAC devices. A digital to analog converter, U28, get brightness information from the CPU data bus. One output of U28 provides drive to the reference current source of U37 through U4A, and the other output provides drive to the reference current source of U15 through U4B. The internal display monitor brightness is adjustable from the front panel of the AM700. A suitable level is set for the external VGA monitor output, and the controls of the external monitor may be used to set it for the desired viewing brightness. LCD Display Brightness. When the LCD flat panel display is installed, the brightness is a function of the backlight intensity. The display brightness is adjustable from the front panel control as is the CRT brightness, but the brightness level signal line is applied to the backlight inverter power control circuit on the LCD driver board. The control circuit has a brightness level adjustment that sets the extinguish level (no visible display) of the LCD display. Floppy Drive Controller 3–54 The interface between the I/O processor, U110 (diagram 7), and the floppy drive is provided by U105, a single-chip controller. The controller handles the data transfers to and from a floppy disk using DMA after requesting access to memory from the I/O Processor. This allows the I/O Processor to continue its other tasks without further interruption for the data transfer. AM700 Audio Measurement Set Service Manual Theory of Operation RS232C Interface (diagram 10) Refer to schematic diagram 10 of the A6 CPU board for the following discussion. General Description Two dual universal asynchronous receiver/transmitter (DUART) are used in this design. UARTA (U29) is used for the RS232 serial ports. UARTB (U39) channel A is setup for interfacing with the Audio Generator and channel B is used as keyboard interface. The DUARTs themselves consist of eight major sections: internal control logic, timing logic, interrupt control logic, a bidirectional 8-bit data bus buffer, two independent communication channels, a 6-bit parallel input port, and a 8-bit parallel output port. The operation of the DUARTs are programmed by writing control words into the appropriate registers. Operational feedback is provided by the status registers which are then read by the CPU. Keyboard Interface. UART port B of U39 is configured as an interface for an AT type keyboard. XT type keyboard protocols are not supported. The protocol for serial data transmission is an 11-bit data stream composed of 1 start bit, 8 data bits, 1 odd parity bit, and 1 stop bit. When troubleshooting the keyboard interface, activity on the keyboard may be checked by observing the keyboard serial line at TP5 with an oscilloscope to check the data stream. Keyboard Interface Register Setup. The register setup for interfacing with the keyboard is as follows: H Clock-Select Register B Both receiver-clock and transmitter-clock selects External Clock Inputs. H Output Port Register (OPR) Bits OP1, OP4, and OP6 are setup as general purpose outputs. A description of the port signals is given in Table A-19. GPIB Controller and Host Interface (diagram 11) Refer to schematic diagram 11 of the A6 CPU board for the following discussion. General Purpose Interface Bus (GPIB) Controller The GPIB interface provides a standard interface for communication between instruments and remote control of the AM700. Table A-20 provides the address information to the GPIB controller. Refer to the TMS9914A GPIB Controller Data Book for detailed information on the controller device. AM700 Audio Measurement Set Service Manual 3–55 Theory of Operation DSP Board (A7) In the DSP board circuitry, there are local registers, an analog interface port, a DMA interface, and fast static memories that reside in the processor’s port A and port B buses. A simplified block diagram is shown in Figure 3–17. The DSP (digital signal processor) accepts digital data (the digitized analog signal inputs) from either the Digital or the Analog input boards through sample transmitter/receiver ASICs. Communication with the Main/CPU is through a DMA ASIC. The digitized audio signal is serialized and converted to analog signals for driving the front panel headphone circuit. Control circuitry on the DSP circuit board provides signals to set up the acquisition gain, bandwidth, filters, etc., on the Analog Acquisition board. The DSP has port A and port B memories to handle the processed data and commands. Instructions to the DSP are written to the Port B memory by the CPU. The DSP then runs the programmed instructions from the Port B memory. LADR[0 – 31] DA(0 – 31) BA[0 – 31] Port A Memory 4 ADRA (0 – 31) Port B Memory 5 BD[0 – 31] DSP Board Registers Bus Arbitrator 7 Digital Data Audio Serializer 8 RX ASIC Analog Data CPU DMA ASIC RX ASIC Sample Receiver RSTH DSP/CPU Interface ASIC 6 3 ANI(0 – 3) AN0[0 – 3] Serializer Front Panel Sound Analog Acquisition Analog Port Control Bus Buffer and Connectors Reset and Clocks 7 2 RST40 1 Figure 3–17: DSP board simplified block diagram 3–56 AM700 Audio Measurement Set Service Manual Theory of Operation The DSP clock generator has 33.333 MHz applied as the reference frequency. The clock generator develops the various clock signals used throughout the DSP board. Bus Buffers and Connectors (diagram 1) The bus buffers handle the 32 bit data and address busses between the DSP and the main CPU. Reset and Clocks (diagram 2) Refer to schematic diagram 2 of the A7 DSP board for the following discussion. System Reset DSP Reset Functional Description The System Reset logic circuitry has inputs of CPU RST, RSTON, RST, and input from the Master Reset switch S1, to develop the DSPRST signal to the DSP. A power-on monitor, U17, holds the RST signal low until the +5 V has stabilized. This hold the DSP in the reset condition until all the circuitry is ready to operate correctly. The Master Reset switch, S1, may be pressed to cause the DSP circuitry to be reset. Pressing the reset button, resets the DSP and its peripherals. The host CPU and its related circuitry are not affected by this reset. There are five input sources that can assert the RESET pin of DSP and reset its interface circuitry. They are as follows: H ONCE Interface reset (not used), H Board Program Register BPR (bit 5), H Power-Up Reset Controller, H DSP Reset button, H Port B host port reset. The DSP is placed in the reset state upon initial application of power and will remain in this state until the CPU deasserts the reset pin of the DSP by writing a ‘1’ to bit 5 of the Board Program Register. Upon leaving the reset state, the processor bootstraps through Port B, the Host Interface. Clock Generator The DSP clock generator, U19, has 33.333 MHz from a divide-by-two circuit applied as the reference frequency. The clock generator develops the various clock signals used throughout the DSP board. AM700 Audio Measurement Set Service Manual 3–57 Theory of Operation Sample Receivers (diagram 3) Refer to schematic diagram 3 of the A7 DSP board for the following discussion. There are two sample receivers, U10 and U11. One handles the analog samples and the other handles the digital signal. These sample receivers are identical to the sample transmitters. A single control bit, TX/RX, defines the operating mode of the ASICs. In the sample receivers, this bit is wired low. The sample receivers accept 8-bit data from the acquisition system and formats it into 32-bit long words for application to the DSP. Each sample receiver handles two channels of input data. Output data is written to the shared RAM on Port A of the DSP. The DSP handles the signal processing and transfer of the processed data to the CPU for display in the running application. A Memory (diagram 4) Refer to schematic diagram 4 of the A7 DSP board for the following discussion. The local memory residing on the Port A bus is organized in one bank of 128K × 32 of fast static memory. It can be expanded to 256K × 32. This memory is shared between the DSP and the sample receivers for transfer of the incoming data to the DSP for processing. The processed data is then transferred to the CPU through the host interface for display in the running application. Reads and writes to this memory is controlled by the bus arbitration control PAL, U55 (shown on diagram 7). B Memory (diagram 5) Refer to schematic diagram 5 of the A7 DSP board for the following discussion. The local memory residing on the Port B bus is organized in one bank of 128K × 32 of fast static memory. It can be expanded to 256K × 32. Reads and writes to the B Port RAM are controlled by the B Port Memory Controller, U32. This memory is shared between the DSP and the CPU and is used for data transfers between the two through the DSP/CPU interface ASIC, U15 (shown on diagram 6). DSP/CPU Interface ASIC (diagram 6) Refer to schematic diagram 6 of the A7 DSP board for the following discussion. The ASIC consists of the three functional blocks shown in Figure 3–18. They are the following: DMA interface, DSP Host Port interface, and local memory controller. There is a built-in 32-bit Address Holding Register (AHR) in the ASIC to set up various base addresses of the controlled functional blocks. The default value (after power up/during reset is active) is $010560CC. The AHR is a write-once/read-many register. It allows one write after reset. 3–58 AM700 Audio Measurement Set Service Manual Theory of Operation The primary purposes of the host port bus interface is to allow the DSP to access the main memory (DRAM) resident on the CPU bus. Two types of access can be performed by the DSP processor: DMA access and Host Interface access. The interface circuitry is implemented on Port B of the DSP processor. A simplified block diagram of the functions is shown in Figure 3–18. DSP BG DSP BB DSP Port B Bus Arbitration Block Bus Ready DSP R/W DSP TS DSP HEN Host Interface Logic Block Addresss CPU Decoder Hi Ready TS Figure 3–18: DSP/CPU host port interface Board Registers, Bus Arbitrator and Audio Serializer (diagram 7) Refer to schematic diagram 7 of the A7 DSP board for the following discussion. DMA Process Reset Register (PRR) Register Definition This is an address trigger register. It resets the ASIC internal hardware interface and sets up for the next DMA transfer. The PRR is accessed at the beginning of each DMA transfer. Its default address is 5xxxxxxx (hex). Both the DSP Status Register and the DSP Program Register reside in Port A. Their functional definitions are described as follows. Status Register (SR). This is one of the two hardware register implemented to indicate various hardware status on the DSP side. This read-only register, U52 and U53, can only be read by the DSP. The register addresses are shown in Table A-25. AM700 Audio Measurement Set Service Manual 3–59 Theory of Operation Program Register (DPR). The program register, U54 and U62, indicates various board status and control various board operations on the DSP side. Its contents can be written and read. It must be initialized by writing FFFFFFFF (hex) to the DPR after power-up or after a system reset has been active high. The register bits are defined in Table A-26. Serializer The function of the audio serializer, U49, is to provide two 16-bin serial data streams to drive the DAC that resides on the front-panel board. It is dual 16-bit parallel to serial converter. There is a 32-bit data register that can be accessed by the DSP to read (for diagnostic purposes only) or write the channel DACs. The upper 16 bits [bits(31 .. 16)] of data drive the right channel DAC. The lower 16 bits [bits(15 .. 0)] of data drive the left channel DAC. To read back the data stored in the register by the DSP, SMOD1 and SMOD0 must be set to 1 prior to a read access by the DSP. Bus Timer Version Number Pal This circuitry times the access to Port A and outputs the AFAULT IN flags as a 0 if an access fault is detected. This register, U56, decodes the inputs to provide the hardware level version number. This PAL also outputs a level trigger (IRQC) to the interrupt register. The possible conditions that initiate the IRQC interrupt are shown in Table 3–3. Digital Signal Processor (diagram 8) DSP Interrupts Inputs Functional Description The Interrupt Inputs and their respective sources are given in Table 3–3. Table 3–3: Interrupt inputs and sources 3–60 Interrupt input Type of interrupt Interrupt source IRQA edge Speaker Signal Interrupt IRQB edge DMA Trigger IRQC level Port A Bus Error Interrupt level Port B Bus Error Interrupt level Sample Receiver 0 Interrupt level Sample Receiver 1 Interrupt AM700 Audio Measurement Set Service Manual Theory of Operation Front Panel Board (A9) The Front Panel board has the user interface buttons and touch screen circuitry. Control Register, Knobs, Beeper, and Resistive Touch Panel (diagram 1) Diagram 1 shows the control register, the knob control circuitry, the beeper, and the resistive touch panel. Control Register The control register is formed by a series of shift registers that hold a total of 128 bits. These bits are loaded from the front-panel processor through U11A, The serial data, clock, and latch signals are all generated by the front-panel processor. When bit value changes are made by the front panel processor, the entire 128 bits are reloaded serially into the register string. The register string holds the control and readout bits of the touch panel, the large and small rotary knobs, the panel LED indicators, and all the front-panel buttons. A change in state of the bits from the initial state caused by a front-panel control change (knob, touch panel, button press, etc.) is determined when the 128 bits are read back to the front panel processor through U11B. To increase throughput, the new data bits are loaded into the registers as the stored data bits are read out. The location of specific bits in the serial stream is fixed by the clock and latch signals generated by the front-panel processor. Not all 128 bits are used in the data stream. Unused bits are “don’t care” and ignored by the front panel processor. Front Panel Knobs The three rotating control knobs are continuous rotation, 2-bit rotary encoders. Their position and rotation information is grey-scale encoded. The A and B outputs of the encoders are square waves that are 90° phase shifted from each other. In the clockwise direction of rotation, the A output positive transitions leads the B output positive transitions. For counterclockwise rotation, the B output leads the A output. An internal circuit in the PALs counts the number of transitions to determine the amount of rotation of the knobs, and the relative phase relationship between the A and B outputs indicates the direction of rotation. The Rotary Encoder PALs decode the information from the knobs into an 8-bit parallel data word. That data is applied to the parallel inputs of the serial shift registers in the PALs to become part of the 128 bit serial data stream. Beeper The 2.2 kHz beeper is controlled by a signal from the front panel processor. That signal, TOUT1, is turned on for a short length of time to indicate a touch (a short click) or a longer time to produce a warning alarm. AM700 Audio Measurement Set Service Manual 3–61 Theory of Operation Touch Panel The resistive touch panel provides much of the interface between the user and the applications. Front panel buttons are used to select applications and make numerical entries, but the menus that control much of the operation are accessed through the touch panel. The X and Y-axis coordinates of a touch on the panel provide specific voltage level outputs from multiplexer U29. Those voltage are digitized by A/D Converter U17. The 8-bit data word is applied to the parallel input pins of registers U14 and U15 to form part of the 128-bit serial data stream. Headphone Amplifier and Speaker (diagram 2) The Speaker is not enabled for the current version of firmware for the AM700. Audio signal monitoring is available using the headphone jack of the front panel. While monitoring the incoming audio signal, all measurements are suspended. Left and right channel serial digital data is converted to left and right channel analog signals by a dual 16-bit D/A converter, U19. The analog audio is amplified by the Left and Right Channel amplifiers, U25A and U25B respectively. A further amplifier stage on both channels provides the volume control function for the stereo headphone output signal. Voltage followers on each channel isolate the headphone amplifiers from the external headphones. The voltage followers allow a wide range of headphone impedance to be tolerated. Front-Panel LED Indicators (diagram 3) There are four banks of LED indicators associated with the front panel. The indicators are behind the front panel labels and are turned to indicate an active front-panel button selection. Serial data to define the state of the LEDs is loaded into a series four of 8-bit registers, U33 – U36. The output bits of registers U34 U36 are applied to line drivers U43 – U45 to drive the LEDs that are arranged in pairs. Only two, single LEDs are connected to U33, so a line driver is not used on its outputs. During power-on, the registers are reset. This reset turns on all the front-panel LEDs so that is a good point to check that all the LEDs are functional. Front-Panel Push Buttons (diagram 4) Each of the front-panel buttons is connected to one input of a bank of six, parallel/serial in – serial output shift registers, U37 through U42. The parallel inputs of the shift registers are normally high through pull-up resistors to +5 V. When a button is pressed, the associated input is pulled low. Periodically, at a rate fast enough to catch a button press, the data is latched (all the registers in the 128 bit shift register are latched at the same time). The entire serial data stream is then clocked through the registers to the Data Out port on the last register in the 3–62 AM700 Audio Measurement Set Service Manual Theory of Operation string, U40. The data stream is applied to U11B (diagram 1) where it is read back to the CPU board. The front-panel processor determines the buttons that were pressed and initiates the appropriate action. Picture Monitor Assembly (A10) A simplified block diagram of the video monitor is shown in Figure 3–19. Refer to the A10 schematic diagram for CRT display versions of the AM700. High Voltage Dynamic Focus Focus Horizontal Deflection H Sync Horiz Phase Horiz Hold Width Video Amplifier Video Out Video In White Level Black Level Vertical Deflection V Sync +16.5V +55V –110V ÎÎÎÎÎÎÎ ÎÎÎÎÎÎÎ ÎÎÎÎÎÎÎ ÎÎÎ ÎÎÎÎÎÎÎ ÎÎÎ Î ÎÎÎÎÎÎÎ ÎÎÎ Î ÎÎÎÎÎÎÎ ÎÎÎ ÎÎÎÎÎÎÎ Vert Centering Vert Linearity Vert Hold Vert Size +12V and +5V Supply Trace Rotation +5V +12V Figure 3–19: Picture monitor simplified block diagram AM700 Audio Measurement Set Service Manual 3–63 Theory of Operation Video Amplifier +12 V and +5 V Supply Vertical Deflection The Video Amplifier amplifies the incoming video signal to levels necessary to drive the crt. A cathode follower input circuit formed by Q1 and its associated biasing circuit provides impedance matching and current drive to the output video amplifier. In the output video amplifier (a cascode circuit), the video signal is inverted by Q2, a common emitter circuit. Its output current directly drives a common base amplifier, Q3, whose output drives the crt cathode. As the input video signal is increasing in amplitude, the inverted video signal drives the cathode negative with respect to its +50 V reference level thereby causing the beam current to increase. The incoming +16.5 V is applied to a 3-terminal regulator, U2, where it is converted to +12 V. A tap on the +12 V source supplies a +5 V Zener diode voltage regulator composed of VR1 and R1 to supply the +5 V source. The vertical deflection circuit provides the drive current to the vertical deflection yoke. A free-running oscillator circuit, U3, produce a ramp signal, and an amplified vertical deflection signal. The basic frequency of the oscillator is set to 60 Hz by the adjustment of R45, the Vert Hold potentiometer. The length of the ramp signal, and consequently the vertical synchronization, is set by the V Sync signal. When the V Sync is received, the vertical ramp is terminated, and a new one begins. The RAMP OUT, pin 1, signal is applied to the AMP IN, pin 10, for amplification to drive the vertical deflection yoke. The output of U3 at pin 10 is inverted from the original ramp. The ramp retrace level is amplified to produce large amplitude pulses for retrace of the beam. The ramp between pulses is nearly flat, and the constant level voltage produces a ramp of current through the vertical deflection yoke. The vertical height of the display is set by the adjustment of R42, the Vert Size potentiometer. A portion of the RAMP OUT signal from pin 1 is fed back through a shaping circuit to the RAMP GEN input on pin 12. The shape of the ramp fed back is adjustable by R48, the Vert Lin potentiometer, to set the vertical linearity of the raster. Vertical position is set with R57 which adjust the DC level on the vertical deflection yoke. Blanking Amplifier. Blanking between vertical sweeps is produce by the blanking amplifier, Q6. In the interval between ramps, the level of the vertical deflection signal from U3, pin 4, rapidly rises toward +30 V to retrace the beam back to the vertical starting point. That rise is seen by Q6 via C41, and the transistor quickly saturates. The negative pulse at the collector of Q6 is AC coupled via C42 to the control grid of the crt to cutoff the beam current between vertical deflection ramps. In the output of the blanking amplifier, R64, the BLACK LEVEL adjustment, sets the black level of beam current between blanking pulses. 3–64 AM700 Audio Measurement Set Service Manual Theory of Operation Spot Eliminator. An additional circuit formed by CR11, CR12, C44, and R66, produces an extra bias to the control grid to positively cut off beam current during turn on and turn off of the AM700. These pulses at turn on and turn off are transitory as the power supplies turn on and off. As the +55 V and –110 V voltage supplies come up, the voltage at the junction of C44 and R66 spikes negative to bias on CR12 and add a negative biasing pulse to the control grid. At the voltages stabilize, CR12 become reversed biased, and the extra circuitry is switched out of the control grid circuit. At turn off, the junction of C44 and R66 is setting at +55 V. Diode CR11 becomes biased on as the +55 V supply falls, and this negative pulse also biases on CR12 to pass the extra biasing pulse to the control grid. Horizontal Deflection The horizontal deflection circuit provides the drive current to the deflection yoke. A PLL (phase-locked loop) circuit, U1, produces the horizontal deflection signal. The frequency of the loop is synchronized to the incoming H Sync signal after setting the correct frequency with the Horiz Hold control, R20. Further amplification of the signal is done by Q4 and Q5 to provide the necessary levels to drive the horizontal deflection yoke. The other side of the horizontal deflection yoke is AC referenced to ground through L3 (a saturable reactor), L4 (the horizontal WIDTH control), and C17. Diode CR9 catches negative overshoots of the horizontal deflection signal. A circuit from the output of Q5 to the SAW IN input of U1, pin 4, provides feedback to the PLL circuit. The Horiz Phase control, R15, in the feedback path, is adjustable to fine position the active picture area within the raster scanned width. +20 V Boost Supply. A circuit composed of CR2, CR3, C18, C19, C20, R31, and a winding (pin7 to pin3) of T2 (in the high voltage supply) boosts the +12 V source to +20 V to supply the collector voltage for Q4. At the collector of Q5, the horizontal retrace pulses have a amplitude of approximately 320 V. The nearly constant voltage level between the retrace pulses produces a ramp of current to the horizontal deflection yoke. High Voltage The high voltage supply provides the crt anode voltage, the focus voltage, and the +55 V and –110 V sources. Drive to T2, the high voltage transformer, is provided through a set of taps on the multitap primary winding. The crt anode voltage and the –110 V supply are taken from separate secondary windings in the transformer. A diode internal to the transformer module rectifies the high voltage for the crt. That voltage is also referenced to ground internally in the transformer module. The –110 V winding is rectified by CR7 and capacitively filtered by C24. AM700 Audio Measurement Set Service Manual 3–65 Theory of Operation Focus Voltage and Dynamic Focus. The output of the focus voltage winding of T2 is rectified by CR6 and filtered by an RC π filter composed of C26, C27, and R33. The main focus voltage of about +600 V is set by FOCUS pot R36 via a DC restorer circuit composed of C28, CR8, and R38. Dynamic focusing, to optimize edge focusing of the crt, is applied from a series resonant LC circuit formed by L5 and C23 off the +55 V winding of T2. The dynamic focusing waveform approximates a negative-going parabola between the positive pulses of the winding output voltage. That waveform is AC coupled through C25 to the focus voltage. The dynamic focusing waveform is shaped by the adjustment of L5 to produce the best edge focus in conjunction with the setting of the FOCUS pot for best overall focus. Trace Rotation The Trace Rotation circuit drives a separate deflection coil on the neck of the crt. That winding produces a magnetic field that permits adjustment to horizontally level the raster. Differential deflection voltage is produced by the circuit formed by U5A, U5B, and U4. A voltage reference of +6 V is provided by U4, a precision voltage divider. That reference is applied to the non-inverting input of U5A. On U5B, the adjustable voltage from the Trace Rot potentiometer, R67, is applied to the non-inverting input of U5B. When the amplifiers are balanced, no current flows through the trace rotation coil. When the Trace Rot pot is adjusted to unbalance the two amplifiers, the output of U5B at pin 2, is driven to return the balance to that amplifier. That change is coupled through R70 to the inverting input of U5A to produce an equal change in the opposite direction at pin 10, thereby producing a current through the trace rotation coil. Reversing the position R67 causes current in the opposite direction in the trace rotation coil. The overall adjustment range for trace rotation is approximately ±3.4_. 3–66 AM700 Audio Measurement Set Service Manual Theory of Operation Power Supply Board (A11) A block diagram of the power supply is shown in Figure 3–20. Refer to the illustration for the following functional block description of the power supply circuitry. ÎÎÎÎÎ ÎÎÎÎÎ ÎÎÎ ÎÎÎÎÎÎÎÎ ÎÎÎÎÎÎÎÎ Line Voltage Switch Input Power Rectifier ÎÎÎÎÎÎÎÎÎÎÎ ÎÎÎÎÎÎÎÎÎÎÎ Î ÎÎÎÎÎÎÎÎÎÎÎÎ ÎÎÎÎÎÎÎÎÎÎÎ ÎÎÎÎÎÎÎÎÎÎÎ ÎÎÎÎÎÎÎÎÎÎÎ ÎÎÎÎÎÎÎÎÎÎÎÎ ÎÎÎÎÎÎÎÎÎÎÎ +5V +5V Ret +Vp –Vp Inverter Switching Circuit ÎÎÎÎÎÎ ÎÎÎÎÎÎ ÎÎÎÎÎÎ –14.4V Housekeeping +14.4V ÎÎÎÎÎÎÎÎÎÎ ÎÎÎÎÎ ÎÎÎÎÎ ÎÎÎÎÎÎÎÎÎÎ ÎÎÎÎÎÎÎÎÎÎ Power Switch Driver +15V –15V 15V Regulators Î 15V Ret Primary Current Sensing Floating Supplies (LCD Flat Panel Display) Current Sense SD +16.5V –16.5V +16.5V Ret +22V –16.5V –22V +16.5V Housekeeping Supply Pulse Width Modulator +22V –22V Output Rectifiers +15V –15V +5V –22V +22V OVSD SD /Undervolts PS Fail LED Overcurrent Alarm Logic +22VI +5VI –22VI +16.5VI /Overvolts /Undervolts /Power Fail Overtemp LED +15VI –15VI Alarm Sensing Line Sense Power Off +14.4V +12V ÎÎÎÎ ÎÎÎÎ ÎÎÎÎ ÎÎ ÎÎ Fan Drive Î Fan+ Fan Ret t _ T1 T2 Figure 3–20: Power supply block diagram AM700 Audio Measurement Set Service Manual 3–67 Theory of Operation Power Supply Functional Block Description The power supply is an pre-regulator inverter switching supply composed of a primary rectifier, a housekeeping supply, the inverter switching circuit, output rectifiers, 15 V regulators, an alarm sensing circuitry that monitors for overvoltage, overcurrent, and over temperature conditions, and the alarm logic circuitry that shuts down the inverter switching circuitry in the event of a problem. Use diagrams 1 and 2 for assembly A11 to follow the descriptions of the block circuitry. Input Power Rectifier. The Input Power Rectifier receives the mains AC voltage and rectifies it to provide the drive power to the inverter switching circuitry. A line voltage switch sets the supply to operate on a nominal voltage of either 115 VAC or 230 VAC. On 230 V operation, the primary rectifier acts as a full-wave bridge rectifier; for 115 V operation, the primary rectifier is configured as a full-wave voltage doubler. The primary bridge rectifier is protected by the mains line fuse and surge suppressors. A mains line filter at the input of the power supply reduces conducted and radiated EMI from and to the AM700. Additional components in the rectifier output provide line filtering and common-mode noise rejection for further reduction of conducted electromagnetic interference. Input surge current and overvoltage protection components are included in the input rectifier circuit to prevent major component damage in the event that incorrect line voltage is applied to the AC input. Housekeeping Power Supply. A second power supply provides the housekeeping (or keep-alive) power source. This supply provides power to the logic circuitry that controls the power supply STBY/ON logic circuitry. It is supplied via a transformer that is wired with the power line switch to provide the correct voltage to the primary for either line voltage. The rectifiers for the + and –14.5 V housekeeping supply are full-wave with capacitive filtering of the rectified voltages. The filtered voltages are regulated by 3-terminal regulators. Both sides of the transformer secondary are fused with self-healing fusing devices. One of the sensing signals (LINE SENSE) to the power supply logic circuitry is developed from the secondary of the housekeeping supply transformer. Inverter Switching Circuit. This circuitry comprises the Pulse Width Modulator, the Power Switching Transistor Drivers, and the Inverter Switching FET that drive the power transformer. Output Rectifiers. Secondary outputs of the power transformer are full-wave rectified and filtered to provide +5 V, +16.5 V, –16.5 V, +22 V, and –22 V. The +16.5 V and –16.5 V are further regulated to produce the +15 V and –15 V supplies to the AM700. The source voltage for the Fan Drive circuit is also provided by the +16.5 V supply. 3–68 AM700 Audio Measurement Set Service Manual Theory of Operation ±15 V Regulators. The + and –15 V regulators are similar in operation. Each regulator is a combined operational amplifier and FET current pass element with a feedback loop to the operational amplifier from the output voltage. Alarm Sensing. The Alarm Sensing circuitry looks at the various supply voltages to check for undervoltage, overvoltage, overcurrent, and power fail conditions. The status of these conditions are the signals fed to the Alarm Logic circuitry. Alarm Logic. Each of the Alarm Sensing outputs is monitored by the Alarm Logic circuitry. That circuitry also monitors the temperature sense signals. Depending on the state of the sense signals, the Alarm Logic circuitry can issue a shutdown signal (SD) to the Pulse Width Modulator to stop the power supply from operating. The Alarm Logic circuitry also drives the Over Temp LED and PS Fail LED front-panel indicators as feedback to the user of the existing problem. Fan Drive. A separate Fan Drive circuit provides a temperature related drive voltage to the Fan. As the temperature rises, the fan is driven faster to compensate for the rise. The temperature sensing element for the voltage control is mounted on the 5 V power supply heat sink. Floating Power Supply. In CRT display instruments, these supplies are located on the Generator board (A5). In LCD flat panel display instruments, the floating supplies are part of the power supply board. The floating power supply provides the isolated voltages to power the analog audio generator. This isolation permits the generator outputs to float with respect to chassis ground. The +22 V and –22 V outputs of the power supply power a set of 3-terminal regulators that provide the +15 V, +5 V, and –15 V to the Generator board. Those voltages, along with the +22 V and –22 V voltages and the floating return line are connected to the Generator board through J12 on the power supply board. AM700 Audio Measurement Set Service Manual 3–69 Theory of Operation Input, Inverter, and Regulators (diagram 1) The following circuit descriptions follow the schematic diagrams and indicate the circuit components of the circuitry. Refer to schematic diagram 1 of the A11 power supply board for the following description. Input Power The AC mains voltage is applied to the preregulator power rectifier through a Line Filter (FL1), Fuse F1, and the Master Power Switch (S1) on the rear panel of the instrument. A bleeder resistor, R3, is placed across the input filter to discharge the filter capacitors when AC power is removed. The inrush of turn-on current is controlled by surge suppressor RT1. MOV RV1 and RV2 reduce noise spikes and help protect the input circuitry from a major overload in the event that an incorrect mains voltage is applied when the power supply is set to operate on 115 Vac. A spark gap device, E1, also acts to protect the circuitry that follows it by firing and causing the input fuse to open in the event of a major overvoltage. As a warning, neon indicator DS1 blinks when the primary power is up. Common-mode EMI filtering of the rectified voltage is provided by L3, C10, C11, C12, C13, and C14. Resistors R7 and R8 provide damping for the inductance of L3. 115 V/230 V Input Switching The Line Selector switch, S2, converts the power supply from a bridge rectifier for 230 V operation to full-wave doubler for 115 V operation. When the Line Selector is set for 230 VAC operation, diode bridge CR1 is a conventional bridge rectifier. For 115 VAC operation, the top two diodes of CR1 and filter capacitors C7 and C8 act as a full-wave voltage doubling circuit. The rectified voltage is applied across both C7 and C8 on alternate half cycles of the input voltage. The output voltage is then taken across them in series so the output voltage is the sum of the voltages across each capacitor. The output voltage for either 115 V or 230 V operation is approximately 300 VDC. Bleeder resistor R5, across the filter capacitors, drains the capacitor charge when power is removed. The switching action of S2 also switches the primary winding of T1 to produce the same voltage output from the secondary winding for either line voltage position to the housekeeping supply. For 115 V operation, the two primary windings are in parallel, and for 230 V operation the two windings are in series. Jumper J2 is for testing purposes only. Troubleshooting should be attempted only by an experienced service person. Jumper J2 may be pulled to disconnect the input rectifier from the switching power supply. This permits a service person to determine if the input rectifier and regulator circuitry are functioning correctly without the load. Pulse-Width Modulator and Control Circuits 3–70 PWM U1 is a pulse-width modulated, current-mode controller that drives the preregulator stage. The preregulator is controlled by the output of the +5 V supply. This makes +5 V the regulated output; the other voltages (–16.5 V, +16.5 V, –22 V, and +22 V) are set by the turns ratio of T5. The PWM uses the AM700 Audio Measurement Set Service Manual Theory of Operation +5 V output voltage and information about the current in L4 to control pulsewidth modulation of the preregulator. On pins 8 and 9 of U1, C20 and R12 set the frequency of operation at approximately 100 kHz. Pin 2 of U1 is a +5 V, ±5 mV voltage reference. The +5 V output of the supply is divided to 2.5 V by R21 and R22 and applied to the error amplifier that is internal to U1 at pin 6 (– pin). Pin 5, the + pin of the error amplifier, is the reference voltage for the error amplifier. The regulating point for the +5 V output is set by R14, a variable potentiometer that adjusts the reference voltage on pin 5. Compensation and feedback for the error amplifier is provided by C23. Comp Out, pin 7, is also used for regulation sensing. That level is compared by U48 with a divided down Vref. The Comp Out level on the inverting input of U48 is normally higher than the input on the non-inverting input, so RDETECT will be low during normal operation. When the PWM reaches its drive limit, the output state of U48 switches to high. That high biases on CR32 to pass the RDETECT signal to the Power Supply Supervisor, U9. That device then issues a POWER FAIL signal to the CPU so that writing to the NVRAM is halted before the power supply goes out of regulation. The current information of L4 from the Current Sensing circuit is applied as a trapezoidal-type waveform to U1 at pin 4. Transistor Q1 adds a small portion of the timing ramp on pin 8 to the current signal at pin 4 to improve noise immunity and to set the PWM correctly for current-mode operation. Both these signals, the +5 V feedback at pin 6 and the current signal with the added ramp at pin 4, must be present for U1 to work properly. A shutdown signal, OVSD OR’ed with SD and applied to pin 16 of U1, is used to turn off the Pulse-Width Modulator. The SD signal is developed by the Shutdown Gate, U18B, in the Alarm Logic circuitry. The SD signal is high when the power STBY/ON switch is in STBY and for a number of irregular conditions of the power supply (overvoltage, over temperature, or overcurrent). The OVSD (overvoltage shutdown) signal is developed by VR2, Q11, and U15B. The OVSD signal is low through inverter U16B unless the +5 V becomes high enough to fire Q11 (about 6 V) and remove the low from the OVSD signal line. The two signals are diode-OR’ed to provide the shutdown signal to U1. When neither the OVSD nor the SD signal is high, the shutdown inhibit is removed from U1 to permit the PWM to begin operation. If either signal is high, the associated diode (CR12 or CR13) conducts to bias on CR14. This pulls pin 16 of U1 high to inhibit it from running, shutting down the power supply. Jumper J3 is for testing purposes only. It may be pulled to eliminate the SD signal for testing of the PWM during troubleshooting, but this also eliminates all the shutdown control by the control logic circuitry except for the overvoltage shutdown. Troubleshooting should be attempted only by an experienced service person. AM700 Audio Measurement Set Service Manual 3–71 Theory of Operation By design, the voltage level required to shut off the PWM is low compared to the high logic level from the Shutdown gate. A diode clamping circuit formed by R24 and CR14 prevents the SD level from exceeding the forward bias drop of the diode, about 0.6 V. Capacitor C25 bypasses fast transients from the SD input. Power Switch Driver The pulse-width modulated outputs of PWM U1 are at pins 11 and 14. The output pulses are buffered by the high-current FET driver device, U6, whose output pins 12 and 13 drive the primary of T2. The secondaries of transformer T2 drive the gates of the pulse-width modulated switching FET, Q2 and Q3. The leading edges of the pulses from U1, pins 11 and 14, are also used to trigger comparator U4A. The comparator output clocks U5A, a D-type flip-flop configured as a toggling circuit that changes state with clock. This circuit is used to derive the 50% duty cycle pulses which are also buffered by U6. These outputs drive the primary of T3 which, in turn, drives the gates of inverter switching FET Q6 and Q7. Preregulator The preregulator consists of T2, Q2, Q3, L4, CR23, C31, and C32. Parallel FET transistors, Q2 and Q3 are driven alternately, each at a 50 kHz rate. The gates of Q2 and Q3 are driven by the Pulse-Width Modulator (PWM), U1, through FET driver U6 and pulse transformer T2. Current Sensing Transformer T4 and transistors Q4 and Q5 form a current sense circuit that functions to sense the current in the step-down inductor L4. This circuit provides a scaled-down replica of the switching FET current to pin 4 of PWM U1. Inverter The inverter consists of T5, Q6, and Q7. FET transistors Q6 and Q7 are also driven alternately, each at 50 kHz, and provide a 50 kHz switching rate to the primary of T5. They are not pulse-width modulated, but driven at a 50% duty cycle, through pulse transformer T3. Drive to the pulse transformers, T2 and T3, is supplied by U6, a high-current FET driver device. The inverter is driven in a one-half bridge configuration. Capacitors C31 and C32 divide the full voltage at L4 by 1/2, and the voltage across each capacitor is alternately applied to the primary winding of transformer T5 through the switching action of Q6 and Q7. This configuration produces a self-correcting circuit action that equalizes the positive and negative voltage swings seen by the primary of T5 and keeps it out of saturation. Output Rectifiers and Filtering 3–72 The approximately 180 V, square-wave voltage across the primary winding of switching transformer T5 is stepped down in two center-tapped secondaries to provide drive to the +5 V, ±16.5 V, and ±22 V rectifier and filter circuits. The 16.5 V secondary voltage supplies the +15 V Series-Pass Regulator. AM700 Audio Measurement Set Service Manual Theory of Operation Each of the secondary output voltages is full-wave rectified and filtered using choke input filter sections. The +5 V output uses two L-sections; the others use a single L-section filter. ±15 V Regulators The + and –15 V regulator pass elements, Q8 and Q9, are complementary, with Q8 being a P-channel FET and Q9 an N-channel FET. In the +15 V regulator,U8A is referenced to the +5 V developed by U5. Operational amplifier U8B is referenced to ground. In both, the feedback signal from the output voltage is still applied to the non-inverting input of the amplifiers. With reduced loading of the supply, an increasing voltage (more positive on the +15 V or more negative on the –15 V) decreases the conduction of the pass elements thereby reducing the voltage. With more loading, the output voltage would tend to decrease and the operational amplifier output will cause the pass elements to increase conduction to counter the decreasing output voltage. This complete linear regulator circuit, operational amplifier U8A and series-pass element Q8, may be viewed as an operational amplifier circuit with R45 acting as the feedback resistor and R46 as RIN. The closed loop gain of the circuit is then set by the ratio of the resistor values. Operational amplifier U8A has its non-inverting input pin supplied via the feedback resistor from the output of the series-pass element (the regulated +15 V). A 5 V reference voltage developed by U7, a band-gap reference device, is applied to the inverting input of U8A, pin 2. The output level of U8A then follows the feedback voltage and is non-inverted at this point. The inversion occurs in the series-pass element, a P-channel FET. With reduced loading of the supply, an increasing voltage from U8A decreases the conduction of the pass element, Q8, thereby reducing the output voltage. With more loading, the output voltage would tend to decrease, and the operational amplifier output also decreases. This increases conduction in the series-pass element to counter the decreasing output voltage by suppling more current to the load. From pin 1 of U8A there is a frequency response limiting feedback circuit formed by C49 and R47 back to the inverting input of the operational amplifier, pin 2. AM700 Audio Measurement Set Service Manual 3–73 Theory of Operation Alarm Circuitry and Fan Drive (diagram 2) This circuitry includes the out-of-limit sensing components, the shutdown logic circuitry, and fan speed control components. Refer to schematic diagram 2 of the A11 power supply board for the following circuit description. Alarm Sensing LED Indicators. LED indicators (DS2 through DS8 and DS13) are placed on the input voltage side of the Power Supply Supervisor, U9. These indicators provide a quick visual check to see if the expected input voltages to U9 are present if troubleshooting of the power supply ever becomes necessary. Power Supply Supervisor. The Power Supply Supervisor, U9, monitors the +5 V, +15 V, and –15 V power supply voltages and the LINE SENSE input. If any of the voltages do not meet the expected level (over or under), the Power Supply Supervisor outputs the appropriate alarm signal (/OVERVOLTS, /PWR FAIL, and /UNDERVOLTS). Each of the positive voltages is monitored on a separate input. A resistive voltage divider sets the input voltage at 2.5 volts. The –15 V supply is monitored at pin 14 of U9. The LS input of U9, pin 5, monitors the LINE SENSE signal from the housekeeping supply. That line also has diode-OR’ed signals from the Shutdown Logic Gate input and the PWM regulation detector. Any of those signals going low causes the Power Supply Supervisor to output the /PWR FAIL signal to the main instrument to warn it that power failure is imminent. The supervisor also develops a voltage reference from pin 3. That voltage is used for the reference voltage in the overcurrent comparators and the power reset comparator. The width of the valid range (tolerance) of input voltages is set by the voltage on pin 1 (LTH) to be 8%. Power Reset Comparator. When the power supply is going down, it is important that the memory devices in the AM700 are not written with random data as the voltage decreases. There are two signals generated from the Alarm Sensing circuitry to aid in producing an orderly shutdown of the processor and memory devices. These two signals are /PWR FAIL, a warning that the power supply is going down, and /PWR RESET, a signal that prevents further writing as the voltage continues falling to the off state. The /PWR FAIL signal is developed by the Power Supply Supervisor, U16, immediately as the power is turned off. The /PWR RESET signal is developed by comparator U20B as the voltage decreases to the point that an /UNDERVOLTS signal is generated by the Power Supply Supervisor. The time delay between the two events permits the processor to shutdown while the voltage level is still high enough to permit proper operation. 3–74 AM700 Audio Measurement Set Service Manual Theory of Operation When the voltage is coming up, it is also important that the memory devices in the instrument are not written to randomly. The Power Reset Comparator has an RC timing circuit on its non-inverting input that prevents the /PWR RESET from going high for a period of time after the undervoltage condition is removed (see Figure 3–15). The delay permits the power supply voltage to stabilize before the processor is permitted to start operating. Overcurrent Sensing Each of the voltage outputs has a current sensing resistor of low ohmic value to provide overcurrent information to the Alarm Sensing circuitry. In the +5 V regulator, that resistor is R39. The total current to the +5 V load passes through R39. The +5 VI (current sense) level is compared to the +5 V (output) level by the +5 V overcurrent comparator, U11A, in the Alarm Sensing circuit. The other supplies have similar sensing resistors in their load current paths. The current sense voltage of each supply is compared against its output voltage to the load by individual comparators in the Alarm Sensing circuit. A marked difference between the two levels causes the associated comparator output to switch low to indicate an overcurrent condition. Overcurrent Sense Comparators. Individual comparators for each of the power supply outputs monitor both the output voltage to the load and the voltage developed across a current sense resistor in each load path. If the difference between the two levels increases beyond design levels, the associated comparator switches states from a normal high to low. The low forward biases a diode in the OR’ed output line of the comparators to pass the overcurrent condition signal to the Alarm Logic circuit to cause the power supply to shutdown. All the comparator circuits are the same with the exception of the +5 V comparator. The exceptions to that circuit will be discussed after the general description for the remaining comparators. The +22 V circuit is used as the example. In that circuit, U12B is the comparator. On the + (non-inverting) input, a voltage divider circuit formed by R93 and R96, has a divide ratio that produces approximately 8.32 V at pin 9 between the +22 V output and the –14.4 V housekeeping supply. (Notice that in the negative voltage supplies, the +14.4 V housekeeping supply is the reference.) On the – (inverting) input, a voltage divider formed by R94 and R95 has a divide ratio that produces approximately 8.07 V at pin 10 between the +22 VI current sense voltage and the –14.4 V housekeeping supply. If the current in the +22 V load increases to the point that the +22 VI level rises to the point that the voltage on pin 10 exceeds the voltage on pin 9 of U12B, the comparator changes states, and the output on pin 7 goes to ground level. That ground level signal forward biases CR38 and pulls the common diode-OR’ed anode line to ground. That line is connected to the Overcurrent Comparator U17A. In the +5 VI comparator, the voltage swing across the current sense resistor is very small. To improve the sensitivity of the comparator, VR1 holds a voltage drop of 5.6 V across a divider formed by R78 and R80. In the anode circuit of AM700 Audio Measurement Set Service Manual 3–75 Theory of Operation VR1, resistor R79 provides the necessary drop to keep VR1 properly biased within its current limits. The result this circuit arrangement produces is that while the voltage divider sets the proper level on pin 5 of the comparator, any change in the +5 VI current sense level is transferred fully to the comparator; the junction of R78 and R80 follows the full voltage change because that is what the voltage drop across R79 is doing. Another difference is that the + input of U11A is connected to the +5 V supply through a single resistor rather than a voltage divider circuit as in the other overcurrent sense comparators. Alarm Logic The temperature sensing elements also provide input to the Over Temp Indicator Comparator, U10B, the Over Temp LED comparator, U10A, and the Over Temp Shutdown Comparator, U17B. The over temperature indicator circuit provides an advance warning that the temperature is too high, in advance of an actual over temperature shutdown. Over Temperature Comparators. Resistors R118, R117, and R116 set up slightly different references to the comparators with the same reference applied to both U10A and U10B. When the voltage at the common inputs to the comparators drops to about 5.4 V, the output pin of comparators U10A and U10B will drop and DS10, the internal over temp LED, is turned on. That low is inverted by U28E and applied to the Over Temp LED signal line. That signal is read by the CPU and an over temperature warning message will be displayed. The user will then have a visual indication that an over temperature condition exists. The output of U13B is the /OVERTEMP signal that provides the CPU with an over temperature warning that causes a warning message to be shown in the display. If the temperature continues to rise, the comparator input voltage continues to decrease. At about 4.4 V, the power supply temperature is high enough that a shutdown is necessary. At that point the output of U17B goes low and sends the over temperature alarm to U18A in the shutdown logic circuitry. Negative-logic NOR gate U18A (any low in gives a high out) also has the /OVERVOLTS signal from the Power Monitor, U9, as an input. Shutdown Logic. A high output from U18A due to either an over voltage condition or an excessive over temperature condition fires SCR Q13 and applies a low to the shutdown gate U18B and the PS FAIL LED gate U18C. Once fired, the SCR latches the circuit in the shutdown state until the power supply is completely turned off to remove the housekeeping supply voltages. The Shutdown Logic gate, U18B, has an input from U18A that is the combined over voltage and over temperature shutdown signal; an input from U17A that is the over current shutdown signal, combined from all the over current sensing circuits; and an input from U16D from the front panel STBY/ON switch. Any of these inputs going low generates a high SD (shutdown) signal to the Pulse-Width Modulator to turn off the switching signals to the Inverter FET. 3–76 AM700 Audio Measurement Set Service Manual Theory of Operation Over Voltage Indicator. If an over voltage condition exists, the /OVERVOLTS signal from U9 is applied to both U18A as input to the shutdown logic circuit and to an over voltage indicator circuit. The /OVERVOLTS signal is inverted by U16A to fire SCR Q12. When that device fires, the over voltage indicator LED, DS10 turns on to assist in troubleshooting an error condition in event of a power supply over voltage problem. The SCR ensures that the indicator will remain on until the power supply is completely turned off to remove the +14.4 housekeeping supply voltage. Overcurrent Comparator. The over current comparator, U17A, is referenced at 2.5 V from U9, pin 3. That reference is applied to the inverting input of U17A. Under normal conditions, the outputs from the overcurrent sensing comparators will not be active and VR3 will be conducting through CR43 and R133 to the +14.4 supply. This will hold the noninverting input of U17A at 6.2 V and the output of U17A will be high. The /OVERCURRENT signal is therefore high, and the overcurrent LED will be off. Both the PS FAIL LED gate, U18C, and Shutdown gate, U18B, will have a high signal on the over current input pins. The over current signal input to U17A is formed by combining the outputs of the individual power supply over current comparators. When an over current condition on any power supply is detected, the common anode side of diodes CR35 through CR38 or CR46 is pulled low, but the + input of U17A remains higher than the – input until the voltage on C81 falls enough to cause the voltage at the junction of CR43 and VR3 to fall below the reference input voltage on the – input of U17A. The delay provided by the time constant of C81-R132 prevents an over current condition from being generated by the current inrush when the power supply first turns on. The output of comparator U17A then goes down to ground level, and the over current indicator, DS12, turns on. That low from U17A also causes a shutdown (SD) to be generated from U18B to turn off the PWM, U1, and a high output from U18C, the PS FAIL LED gate. The high from U18C biases on Q14 to cause the PS FAIL LED signal to switch high. When the PWM shuts down, the over current signal from the individual power supplies will be removed, but the shut down signal must not be removed from the PWM for a short period of time. This is done by the time it takes C81 to change it charge state through R133. While C81 changes charge level rapidly through R132 for an over current condition, that path is not connected when the power supply shuts down and the over current condition goes away. Through R133, the voltage across C81 rises more slowly to a level that causes the comparator to again switch its output high. That delay is how long the PWM remains off before it tries to restart. The difference between the two times (run to off) is about 1:5 and the over current indicator LED, DS12, will blink. AM700 Audio Measurement Set Service Manual 3–77 Theory of Operation Fan Drive The variable-speed fan is powered from a thermally controlled +16 to +28 V supply. A graph of the fan drive voltage versus the temperature is shown in Figure . Temperature sensing is done by RT2, a thermistor mounted on the 5 V heat sink. There are provisions for two additional temperature sensing elements in the main instrument, one of which is connected to the Main CPU heat sink. Thermistor RT2 has a negative temperature coefficient, so as the temperature rises, the voltage at the junction of R97 and RT2 decreases. When the temperature gets high enough that the voltage biases on CR39, the input to U14A begins to follow the temperature changes. The three temperature sense inputs are diode-OR’ed at the non-inverting input of U14A, a voltage follower operational amplifier. The highest sensed temperature controls the input to U14A by biasing off the diodes that have a higher voltage on their cathodes. The output of U14A is summed with the voltage feedback from the output of the fan power supply. The feedback signal varies the output switching signal from U15, a Pulse-Width Modulator. Without the temperature feedback through R101, the feedback through R102 sets the output voltage to minimum, at about +16.5 V. The added temperature feedback modifies that provided from the fan drive circuit to vary the duty cycle of the drive signals to Q10 in proportion to the temperature. The output of U14A decreases as the temperature increases, so the feedback voltage at pin 2 of U15 decreases. This makes the Pulse-Width Modulator output turn Q10 on for longer periods of time to increase the drive voltage to the fan. The Fan Drive circuit, composed of Q10, L10, CR42, and C75, is a boosted power supply to produce the variable drive voltage to the fan. The pulse width modulator and Q24 are powered from the +16.5 V supply, but the boosted voltage to the fan can be up to 28 VDC. When Q10 conducts, energy is stored in the magnetic field of L10. As Q10 shuts down, the energy must be returned to the circuit. The voltage on the anode of CR42 increases due to the inductive rise and the diode is biased on. The energy is rapidly transferred to C75 and CR42 becomes reverse biased to remove the inductor from the circuit. Until the next pulse of energy from L10, the stored charge of C75 supplies the drive voltage to the fan. The Pulse-Width Modulator and feedback circuit controls the fan drive voltage within a range of +16 to +28 VDC. If Q10 remains off, the voltage on C75 will reduce to below the +16.5 V supply and CR42 will again become forward biased through L10, so the minimum output drive voltage to the fan is approximately +16 VDC. Jumper J4 is a servicing jumper. When it is removed, the ground reference to the feedback input is removed, and the PWM shuts off. The fan drive then reduces to minimum. Jumper J4 is for testing purposes only. It may be pulled to eliminate the feedback signals from the input of U15. Troubleshooting should be attempted only by an experienced service person. 3–78 AM700 Audio Measurement Set Service Manual Theory of Operation STBY/ON Switch Circuit The front-panel STBY/ON switch controls the POWER OFF logic signal to the shutdown circuitry. The master power ON/OFF switch to the power supply is located on the rear panel of the instrument. When the front-panel STBY/ON switch is in the ON position, the POWER OFF signal line is pulled low. This low is inverted by U16D and applied to the Shutdown Logic Gate, U18B, to allow the PWM to start operating if no other shutdown condition exists. With the STBY/ON switch is in the STBY position, the POWER OFF control line is pulled high by R120 back to the +14.4 V supply. This high is inverted by U16D, and U18B applies a SD signal to the PWM that prevents it from outputting drive signals to the inverter switching FET. Also, with the POWER OFF control line high, diode CR45 is forward biased by the high POWER OFF signal. This removes the /UV LED signal as a control signal from the PS FAIL LED gate so the PS FAIL LED signal does not go high with the STBY/ON switch in the STBY position. Power Supply Failure Warning. A second output developed from U18D is the /POFF signal. A low /POFF signal forward biases CR31 in the LINE SENSE input signal line to the Power Supply Supervisor, U9, to pull the line sense input (pin 5) of that device low. The Power Supply Supervisor then outputs the /PWR FAIL signal to the main instrument to provide immediate warning that the power supply is going down. Another input to this same signal line is the RDETECT signal through CR32 from the PWM, U1. This signal detects when the PWM is out of regulation and also causes the Power Supply Supervisor to issue the power failure imminent signal to the main instrument. This warning to the main instrument also occurs when the master power ON/OFF switch is turned off. Disk Drive Assembly (A12) The disk drive of the AM700 is a purchased assembly. It is interfaced to the AM700 by the Front Panel Processor, U110, and a dedicated floppy disk controller device, U105, located on diagram 9 of the A6 MAIN/CPU Board. When reading and writing data to a floppy disk, the floppy disk controller handles the transfer using DMA after requesting memory access from the Front Panel Controller. A schematic diagram is not provided for the disk drive assembly. AM700 Audio Measurement Set Service Manual 3–79 Theory of Operation LCD Driver Board (A13) The LCD Driver board (block diagram shown in Figure 3–21) digitizes the analog RGB output signals from the video display circuit into the correct digital drive signals for the LCD display. The pixel format of the display is standard VGA: 640 (H) × 480 (V). Signals output to the display are the following: 4-bits each of R,G,B (red, green, and blue), vertical sync, horizontal sync, sampling clock, enable signal, and two +5 V supply voltages. The horizontal display start is delayed to meet the required timing for the LCD display. Both the horizontal and vertical sync signals are negative sync. Color A/D Converters Each analog signal (R, G, and B) is processed identically. The three signals are applied to separate analog-to-digital converters (U9 Red, U10 Green, and U11 Blue). An operational amplifier associated with each ADC provides for color gain and offset control. The analog signal is sampled by the ADC at the 25 MHz delayed clock rate. The four bits just below the MSB (most-significant bit) of the 8-bit ADC are used for the digital data to the LCD, effectively providing a gain of two for the color signals. Digital Color Data Latches The digital data bits are clocked through two 8-bit latches, with the green and blue data using all 8-bits of latch U13. The four bits of the red data are clocked through latch U12. The remaining four bits of latch U12 and PAL U1 are used to process the horizontal and vertical sync signals to provide delayed sync signals. These signals are synchronized with the digital color information. Data is clocked through the latches by a delayed 25 MHz clock signal. LCD Brightness Control The brightness control signal from the CPU board (derived from the setting of the front-panel brightness control) is applied to the backlight inverter power control circuit. A two-stage amplifier circuit (U4A and U4B) sets the intensity of the LCD display by controlling the backlight inverter output voltage to the backlight lamps. The second stage of the amplifier also provides a gain adjustment (BRT R24) to set the level that turns off the backlight (no display). A diode network on the output of the second stage shapes the slope of the BRT control to be more exponential. The +13 VLCD power source is obtained from the +15 V supply through two diode drops and some additional LC filtering. 3–80 AM700 Audio Measurement Set Service Manual Theory of Operation Clock Delay U8 25 MHz Clock HSYNC VSYNC DLYD25MCLK DLYDHSYNC PAL HSYNC DLYDHSYNC VSYNC +5V V Ref U3 +1.235V U1 Latch Gain Adjust DLYD25MCLK R0 R1 R2 R3 U5 Feedback R00 R01 R02 R03 Red ADC U12 DLYD25MCLK DLYD25MCLK Offset Red +5LCD To NBH LCD ENAB NBV U9 DLYD25MCLK Gain Adjust U6 Green ADC G0 G1 G2 G3 Latch G00 G01 G02 G03 Feedback Offset Green DLYD25MCLK U10 Gain Adjust U7 Blue ADC B0 B1 B2 B3 U13 Feedback DLYD25MCLK Offset Blue B00 B01 B02 B03 U11 DLYD25MCLK +15V Inverter Power Supply +13VLCD LCD Backlight Brightness Control U4 Power to LCD Backlight Inverter Figure 3–21: LCD driver board block diagram AM700 Audio Measurement Set Service Manual 3–81 Theory of Operation LCD Flat Panel Display (A14) The flat-panel display is a thin-film transistor device. Drive signals to the display are the 12-bit data (4 bits per color), four timing signals, and the +5 VDC supply voltage for the transistor array. LCD Backlight Backlighting for the LCD display is provided by two cold cathode florescent tubes. The two tubes, one at the top and one at the bottom, are arranged to provide edge lighting to the LDC display. The lamps require a kickoff voltage of 800 to 900 VRMS to turn on. They draw about 4 mA and have a power consumption of approximately 1.6 W. Tube life is approximately 10,000 hours, and the end of life (time for a replacement) is defined as the point when the maximum brightness reduces to 50% of the original value or when the kickoff voltage (voltage needed to turn on the lamps) exceeds a maximum of 900 VRMS at 0° C. Replacement backlight tube sets can be ordered from Tektronix. See the replaceable electrical parts list section for the part number and ordering information. LCD Backlight Inverters The backlight inverters are small switching supplies that provides the high voltage level AC required to power the two LCD display back lights. One version of display has both inverters on a single circuit board; a newer version uses two separate circuit boards for the two inverters. The maximum voltage output from an inverter is approximately 800 to 900 VRMS at a typical frequency of 35 kHz. Backlight brightness is controlled by a control circuit on the LCD driver board. The control circuit uses the brightness control level from the CPU (derived from the front panel brightness control) to adjust the brightness of the backlight tubes. The backlight extinguish level is set by an adjustment in the backlight inverter control circuit (BRT R25) to turn off at about the 8 to 10% brightness setting. 3–82 AM700 Audio Measurement Set Service Manual Performance Verification These functional checks are used to validate that the AM700 Audio Measurement Set is operating normally. They do not check each of the performance requirement given in the Specification section of this manual. As part of these procedures you will run the diagnostics procedures to ensure those portions of the instrument tested by the diagnostics routines are performing correctly. Test Equipment Required The test equipment needed to perform the verification procedures is listed in Table 4–1. Use the test equipment shown or an equivalent to do the verification. If the example test equipment is not available, check the Minimum Specification column to determine if you can use another piece of test equipment. If you use other test equipment, the controls and connectors for that equipment may be different from those called out for the example test equipment. Refer to the appropriate operator’s manuals for operation of the test equipment. Table 4–1: Required test equipment ÁÁÁÁÁÁÁÁÁ ÁÁÁÁÁÁÁÁÁ ÁÁÁÁÁÁÁÁÁÁ ÁÁÁÁÁÁÁÁÁ ÁÁÁÁÁÁÁÁÁÁÁÁÁÁÁÁÁÁ ÁÁÁÁÁÁÁÁÁÁÁÁÁÁÁÁÁÁÁ ÁÁÁÁÁÁÁÁÁÁÁÁÁÁÁÁÁÁÁ ÁÁÁÁÁÁÁÁÁ ÁÁÁÁÁÁÁÁÁ ÁÁÁ ÁÁÁÁÁÁÁ ÁÁÁ ÁÁÁÁÁÁÁ ÁÁÁÁÁÁÁÁÁ ÁÁÁÁÁÁÁÁÁÁ ÁÁÁÁÁÁÁÁÁ ÁÁÁ ÁÁÁÁÁÁÁ ÁÁÁÁÁÁÁÁÁ ÁÁÁÁÁÁÁÁÁÁ ÁÁÁÁÁÁÁÁÁ ÁÁÁ ÁÁÁÁÁÁÁ ÁÁÁÁÁÁÁÁÁ ÁÁÁÁÁÁÁÁÁÁ ÁÁÁÁÁÁÁÁÁ ÁÁÁ ÁÁÁÁÁÁÁ ÁÁÁÁÁÁÁÁÁ ÁÁÁÁÁÁÁÁÁÁ ÁÁÁÁÁÁÁÁÁ ÁÁÁ ÁÁÁÁÁÁÁÁÁÁÁÁÁÁÁÁÁÁÁÁÁÁÁÁÁÁÁÁÁÁÁÁÁÁÁ ÁÁÁ ÁÁÁÁÁÁÁ ÁÁÁÁÁÁÁÁÁ ÁÁÁÁÁÁÁÁÁÁ ÁÁÁÁÁÁÁÁÁ ÁÁÁ ÁÁÁÁÁÁÁ ÁÁÁÁÁÁÁÁÁ ÁÁÁÁÁÁÁÁÁÁ ÁÁÁÁÁÁÁÁÁ ÁÁÁ ÁÁÁÁÁÁÁÁÁÁÁÁÁÁÁÁÁÁÁÁÁÁÁÁÁÁÁÁÁÁÁÁÁÁÁ ÁÁÁÁÁÁÁÁÁ ÁÁÁÁÁÁÁÁÁ ÁÁÁÁÁÁÁÁÁ ÁÁÁÁÁÁÁÁÁÁ ÁÁÁÁÁÁÁÁÁ ÁÁÁÁÁÁÁÁÁ ÁÁÁÁÁÁÁÁÁ ÁÁÁÁÁÁÁÁÁÁ ÁÁÁÁÁÁÁÁÁ ÁÁÁÁÁÁÁÁÁ ÁÁÁÁÁÁÁÁÁ ÁÁÁÁÁÁÁÁÁÁ ÁÁÁÁÁÁÁÁÁ ÁÁÁÁÁÁÁÁÁ ÁÁÁÁÁÁÁÁÁ ÁÁÁÁÁÁÁÁÁÁ ÁÁÁÁÁÁÁÁÁ ÁÁÁÁÁÁÁÁÁÁÁÁÁÁÁÁÁÁÁÁÁÁÁÁÁÁÁÁÁÁÁÁÁÁÁÁÁ ÁÁÁÁÁÁÁÁÁ ÁÁÁÁÁÁÁÁÁ ÁÁÁÁÁÁÁÁÁÁ ÁÁÁÁÁÁÁÁÁ ÁÁÁÁÁÁÁÁÁÁÁÁÁÁÁÁÁÁÁÁÁÁÁÁÁÁÁÁÁÁÁÁÁÁÁÁÁ Equipment required Minimum specification Precision Audio Analyzer Purpose Example Precision audio signal measurements and signal generation for verification procedures ShibaSoku AM51A Audio Analyzer NOTE: The Tegam SG5010 1 may be used as a signal source for functional checks. Sine-wave Generator Frequency Accuracy: ±0.01%; level flatness: (20 Hz to 80 kHz): ≤0.05 dB; level accuracy (20 Hz to 80 kHz): ≤ 0.02 dB; residual distortion: 0.0010% (–100 dB) Distortion Analyzer Balanced input, THD residual typically 0.002%, 22 Hz to 80 kHz bandpass Check generator signal distortion Frequency Counter Accuracy and resolution to 8 decimal places, or used with an external reference (WWV, Loran C, or GPS) that will improve the accuracy to 8 decimal places. 20 Hz to 80 kHz range. Check generator frequency accuracy Tegam DC503A1 or equivalent RMS Meter Accuracy 1%, resolution 5 digits; balanced input Check generator amplitude accuracy and flatness Fluke 8506A or 8505A–09 AM700 Audio Measurement Set Service Manual ShibaSoku AM51A Audio Analyzer. Tegam AA5001A1 or AA501A1 4–1 Performance Verification Table 4–1: Required test equipment (cont.) ÁÁÁÁÁÁÁÁ ÁÁÁÁÁÁÁÁÁ ÁÁÁÁÁÁÁÁÁÁ ÁÁÁÁÁÁÁÁÁ ÁÁÁÁÁÁÁÁ ÁÁÁÁÁÁÁÁÁ ÁÁÁÁÁÁÁÁÁÁ ÁÁÁÁÁÁÁÁÁ ÁÁÁÁÁÁÁÁ ÁÁÁÁÁÁÁÁÁÁÁÁÁÁÁÁÁ ÁÁÁÁÁÁÁÁÁÁÁÁÁÁÁÁÁÁÁ ÁÁÁÁÁÁÁÁÁÁÁÁÁÁÁÁÁÁÁ ÁÁÁÁÁÁÁÁÁ ÁÁÁÁÁÁÁÁ ÁÁÁÁÁÁÁÁÁ ÁÁÁÁÁÁÁÁÁÁ ÁÁÁÁÁÁÁÁÁ ÁÁÁÁÁÁÁÁ ÁÁÁÁÁÁÁÁÁ ÁÁÁÁÁÁÁÁÁÁ ÁÁÁÁÁÁÁÁÁ ÁÁÁÁÁÁÁÁ ÁÁÁÁÁÁÁÁÁ ÁÁÁÁÁÁÁÁÁÁ ÁÁÁÁÁÁÁÁÁ ÁÁÁÁÁÁÁÁÁÁÁÁÁÁÁÁÁÁÁÁÁÁÁÁÁÁÁÁÁÁÁÁÁÁÁÁ ÁÁÁÁÁÁÁÁÁÁÁÁÁÁÁÁÁÁÁÁÁÁÁÁÁÁÁÁÁÁÁÁÁÁÁÁ ÁÁÁÁÁÁÁÁ ÁÁÁÁÁÁÁÁÁ ÁÁÁÁÁÁÁÁÁÁ ÁÁÁÁÁÁÁÁÁ ÁÁÁÁÁÁÁÁÁÁÁÁÁÁÁÁÁÁÁÁÁÁÁÁÁÁÁÁÁÁÁÁÁÁÁÁ Equipment required Minimum specification Purpose Example Digital Audio Measurement Set Tektronix AM700 Provide digital audio test signals and measure digital audio test signals Tektronix AM700 Audio Measurement Set Personal Computer PC-DOS or MS-DOS 3.0 or higher, 386, 3.5 inch disk drive. Serial RS-232 port. Provide for remote control of the AM700. Serial printer with RS–232C interconnection cable 24-pin dot matrix with RS-232C serial interface Check RS–232C operation serial printer output Epson LQ series serial printer or Hewlett-Packard LaserJet with serial input. Check GPIB remote operation Guru II+ Tektronix product number S3FG100 GPIB controller with standard GPIB cable Interconnection audio cables for test equipment. XLR to XLR Signal interconnection Supplied with test equipment Impedance Transformer 110 W to 75 W impedance matching Match AES ref out to 75 W system Canare 110 W to 75 W matching transformer. Part number BCJ– XJ–TRA Interconnection Cables See Figure 4–1 Connect AM700 inputs and outputs to various test equipment. Customer fabricated. See Figure 4–1 for diagram. Audio Cables (2) Standard XLR female to XLR male Signal Interconnection Customer provided Attenuator 10X 75 W BNC Signal attenuation for digital signal connection to oscilloscope Tektronix part number 011-0061-00 Termination Feed through 75 W BNC Signal termination for digital signal connection to oscilloscope Tektronix part number 011-0103-02 Termination 75 W BNC, 0.025% Signal termination Tektronix part number 011-0102-01 Signal interconnection Tektronix part number 103-0030-00 BNC T connector 1 A Tegam TM500 or TM5000 power supply is required to power the plug-in module. Fabricated Test Cables Several of the test cables to make the connections from the XLR connectors of the AM700 to the different connectors of various test equipment are fabricated specifically the AM700 verification and adjustment procedures. If the verification procedures you want to perform call for one of these cables, you must fabricate it or a similar cable to make the connections. Figure provides a guide for use in making the special connector cables. 4–2 AM700 Audio Measurement Set Service Manual Performance Verification Banana plug to phone plug ground 1/4I Phone plug. Connect to sleeve only. Banana plug, black Banana plug to XLR pin 1 + 2 1 XLR Female. Connect to pin 1. 3 Banana plug, red Common mode cable XLR Female 2 XLR Male 1 1 3 2 3 Wire used is about 1 ft., insulated XLR to BNC cable XLR Female 2 1 3 BNC BNC shield Center conductor Use a BNC coaxial cable. Cut off one end and connect to the XLR female. 3-way XLR cable 1 2 3 XLR Male 1 Cable used is shielded twisted pair. The shield connects to pin 1 and the XLR shell on all connectors. 2 1 3 XLR Female 2 3 Figure 4–1: Interconnection cables AM700 Audio Measurement Set Service Manual 4–3 Performance Verification Triple Banana to XLR cable Dual-banana plug XLR Female internal connections Red + + 2 1 3 – Black – Shield Banana plug, black Dual BNC to Dual XLR cable XLR Female 1 2 3 BNC Female Cable used is insulated coax. 1 2 3 XLR Male Dual BNC to 110 W XLR female BNC Female Cable used is insulated coax. 1 3 2 XLR Female 110W Figure 4–1: Interconnection cables (cont.) 4–4 AM700 Audio Measurement Set Service Manual Performance Verification Verify Power Supply Operation Check the power supply at the appropriate line voltage setting for its normal use. Check 115 V Power Supply Operation 1. Check that the Line Selector switch is set for 115 V operation. 2. Connect a 115 V power source. 3. Set the rear panel supply push button on/off switch S1 to the on position. 4. Press the Stby/On switch to turn on the AM700 (Green Indicator seen in switch). 5. Check that the instrument powers up normally and that the fan is exhausting air. Check 230 V Power Supply Operation 1. Check that the Line Selector switch is set for 230 V operation. 2. Connect a 220 V power source. 3. Set the rear panel supply push button on/off switch S1 to the on position. 4. Press the Stby/On switch to turn on the AM700 (Green Indicator seen in switch). 5. Check that the instrument powers up normally and that the fan is exhausting air. If the power supply does not come up normally, refer the AM700 to a qualified service person for corrective maintenance. A troubleshooting and checkout procedure for the power supply is given in the Maintenance section of this manual. If the fan is not exhausting air, do not continue to operate the AM700 until it has been repaired. Power On Diagnostics 1. On power on, press and hold in the Limits button. 2. Release the Limits button after the AM700 beeps twice. The AM700 will now run a suite of diagnostic tests before it loads an application. 3. Check that the power-on diagnostics pass as the tests run. AM700 Audio Measurement Set Service Manual 4–5 Performance Verification Analog Generator Checks Initial checks list actual button presses and screen touches (soft keys) in detail to assist you in becoming familiar with the user interface operation of the AM700. As you progress through this procedure, some assumptions about your familiarity are made to reduce the instructions. As an example you may see the instruction to “make sure the generator is in High Bandwidth mode” where it is assumed that you know how to do that without explicit instructions. Analog Generator High Resolution and High Bandwidth Mode Operation 1. If the AM700 is not on, turn it on and wait until it initializes with the FFT application running. If already on, skip to step 2. 2. Press the Configure button and touch the Input Selection soft key to display the Input Configuration control panel as shown in Figure 4–2. Figure 4–2: Input configuration control panel NOTE. Ch 1 and Ch 2 are measurement channels of the AM700. Any of the input channels of the AM700 may be connected to either or both measurement channels using the Input Selection controls. 4–6 AM700 Audio Measurement Set Service Manual Performance Verification 3. Select the generator as the acquisition input source for CH A and CH B (normal default is FP A and FP B) by touching the double arrow symbol next to the generator choice. This control toggles the generator selection between the two available choices: connection to the front panel XLR connectors or direct connection from the A and B analog generators. Press the Clear Menu button. 4. Press the Control button in the Generator section of the control panel (see Figure 4–3) to display the generator selection screen as shown in Figure 4–4. Figure 4–3: Audio generator controls AM700 Audio Measurement Set Service Manual 4–7 Performance Verification Amplitude and frequency knob assignment icons Figure 4–4: Generator control display 5. Check that the analog generator is set to High Resolution, Ch A is set to Sine, Ch B is set to Follow A, and both generator outputs are enabled as shown in Figure 4–4. Also check that the control knobs for setting the generator frequency and amplitude are assigned to the analog generator. 6. Touch the Waveform Control icon on the left side of the screen to display the Waveform Control screen as shown in Figure 4–5. 7. Set the Analog A generator (Ch A) to output a frequency of 1 kHz by touching the Frequency edit box to highlight it. Enter a 1 on the numerical key pad and then kHz in the units keys for 1 kHz. 8. Touch the Amplitude edit box to highlight it. Enter a 0 on the numerical key pad followed by dBu in the units keys for an amplitude of 0.0 dBu. 4–8 AM700 Audio Measurement Set Service Manual Performance Verification Figure 4–5: Waveform control display 9. Press the On button in the Generator controls section (see Figure 4–3) to turn on the generator. The On label is backlighted when the generator output is on. Press Clear Menu to return to the FFT Analyzer display. 10. Touch the second view window icon is the upper left hand corner of the screen (see Figure 4–6) to turn on both FFT display windows. Figure 4–6: View window icons 11. Check the FFT display to see that the generator is producing a signal from the Analog A and the Analog B outputs and check that the noise floor is –100 dB or lower. Push and hold the Rescale button on the front panel to rescale the FFT display to fill the view window. (A quick press and release of the Rescale button rescales the active view only. Holding down the Rescale button rescales all the view windows.) 12. In the Generator controls section of the front panel (see Figure 4–3), press the Control button. AM700 Audio Measurement Set Service Manual 4–9 Performance Verification 13. In the Generator Control menu (see Figure 4–4), select the High Bandwidth generator mode. The Analog B generator is automatically set to Follow A. 14. Touch the Waveform Control icon (on the left side of the screen), and set the generator for a frequency of 10 kHz at an amplitude of 0.0 dBu. Press the Clear Menu button. 15. Check the FFT display to see that the generator is producing a signal on Ch 1 and Ch 2, and check that the noise floor is –100 dB or lower. Analog Generator Outputs 1. In the Generator controls section, press the Control button to display the generator selection menu as shown in Figure 4–4. 2. Set the analog generator to High Resolution. 3. Touch the Waveform Control icon to display the waveform controls menu shown in Figure 4–5. Make sure Analog A is the selected generator. Select Analog A if it is not the selected generator. 4. Touch the Amplitude readout box, and press the Units button in the key pad area to change from dBu to V. Each press of the Units button steps to the next available units choice; step as needed to get the units set to V. 5. Set the Analog A generator for a sine wave output at a voltage of 3.5 V and a frequency of a 120 Hz. 6. Set Analog B to Sine by touching the Waveform edit box (now reading “Follow A”) and turning the large control knob until Sine has the box around it. Make the selection either by touching Sine or pressing the Enter key in the key pad area. 7. Make Analog B the selected generator and set Ch B for same initial settings of frequency and voltage so the Analog A and Analog B generators have the same signal output. Reselect Analog A as the controlled generator. 8. Connect the Analog A output of the generator to the input of the external RMS meter. Use the dual banana to XLR connector to connect to the RMS meter + and – connectors. Use the single banana connector to connect to the RMS meter ground connection. The adapter cable wiring is shown in Figure 4–7. 4–10 AM700 Audio Measurement Set Service Manual Performance Verification Dual-banana plug Red + XLR Female internal connections + 2 1 3 – Black – Shield Banana plug, black Figure 4–7: Cable for generator output level check 9. Set the external RMS meter as follows: Measure mode to LEVEL Measurement units to voltage (V) Input impedance 200 kW or greater 10. Check that the Level reading is 3.5 V ±1.0% (3.465 V to 3.535 V). 11. Set the generator voltage to the settings given in Table 4–2 and check the Level reading for ±1.0% accuracy at each generator setting. Table 4–2: Generator test voltages at 120 Hz Generator voltage setting RMS meter reading (Ch A) RMS meter reading (Ch B) 24.5 V 16 V 8V 4V 2V 1V 0.5 V 0.25 V 0.125 V 62.5 mV 12. Disconnect the Analog A generator and connect the Analog B generator output to the input of the RMS meter. AM700 Audio Measurement Set Service Manual 4–11 Performance Verification 13. Repeat the checks of step 10 and step 11 for the Analog B generator. To change the frequency and amplitude of the Analog B generator, press the Control button in the Generator front-panel control section. Touch the Waveform Controls icon; then Touch the Analog B soft key. The Amplitude and Frequency edit boxes will now control the Analog B generator output. Analog Generator Check These checks verify the functionality of the analog generator at a low, a mid, and a high frequency at each attenuator step. 1. Make the analog generator initial settings. a. Set Units to volts to match the digital voltage meter. b. Voltage settings 2.000 V rms c. Initial Frequency setting 120 Hz d. Make sure the generator is still in High Res Mode. e. Set the signal to sine wave. f. Set the Ch B generator to Sine (not Follow A) so Ch A and Ch B are checked independently. g. Touch the Advanced Analog Controls icon and set the output impedance to 10 W (see Figure 4–8). Set the output impedance by touching the Output Impedance edit box to display a popup menu of the choice. Turn the main control knob to select 10 W and touch the edit box again or press the Enter key in the key pad to make the selection. 2. Check the RMS voltage with the RMS meter at 120 Hz. These are the reference values. RMS amplitude accuracies at other frequencies are measured with respect to those measured at 120 Hz. The specification for amplitude accuracy at 120 Hz with signal amplitudes from +13.9 dBu to –16.1 dBu is ±0.1 dB (typically within ±0.05 dB). From less than –16.1 dBu to –34.1 dBu it is ±0.15 dB (typically within ±0.1 dB). For signal input amplitudes less that –34.1 dBu down to –52.1 dBu, the amplitude accuracy is ±0.25 dB 3. Disconnect the test cable from the Analog A generator output and connect the BNC to XLR female adapter cable between the Analog A output and the frequency counter. The cable wiring is shown in Figure 4–9. 4–12 AM700 Audio Measurement Set Service Manual Performance Verification Figure 4–8: Advanced analog controls display XLR Female + 2 1 3 BNC BNC shield Center conductor Use a BNC coaxial cable. Cut off one end and connect to the XLR female. Figure 4–9: Generator frequency check cable 4. Set the generator frequency to 10 kHz and check the AM700 generator frequency accuracy is within ±0.01% (9999 to 10001) using the frequency counter. 5. Disconnect the frequency counter and reconnect the RMS meter test cable to the Analog A generator output. 6. Set the frequency and amplitude to the values shown in Table 4–3 and check the amplitude accuracy with the RMS meter. Ch A and Ch B (Analog A and Analog B) amplitude reading should be within ±0.3 dB (≈3%) of each other. AM700 Audio Measurement Set Service Manual 4–13 Performance Verification The measured RMS voltage should be within 0.1 dB (≈1%) of the generator setting at 120 Hz (the reference frequency). The measured RMS voltage at 10 Hz and 1 kHz should be within ±0.1 dB (≈1%) of the measured RMS voltage at 120 Hz. At 20 kHz, the measured RMS should be within +0.1 to –0.2 dB (≈+1% to –2%) of the measured RMS voltage at 120 Hz. ÁÁÁÁ ÁÁÁÁÁ ÁÁÁÁÁÁÁÁ ÁÁÁÁÁÁÁ ÁÁÁÁÁÁÁ ÁÁÁÁÁÁÁ ÁÁÁÁ ÁÁÁÁÁ ÁÁÁÁÁÁÁÁ ÁÁÁÁÁÁÁ ÁÁÁÁÁÁÁ ÁÁÁÁÁÁÁ ÁÁÁÁÁÁÁÁÁÁÁÁÁÁÁÁÁÁÁÁÁÁÁÁÁÁÁÁÁÁÁÁÁÁÁÁÁÁ ÁÁÁÁÁÁÁÁÁÁÁÁÁÁÁÁÁÁÁÁÁÁÁÁÁÁÁÁÁÁÁÁÁÁÁÁÁÁ ÁÁÁÁÁÁÁÁÁÁÁÁÁÁÁÁÁÁÁÁÁÁÁÁÁÁÁÁÁÁÁÁÁÁÁÁÁÁ ÁÁÁÁÁÁÁÁÁÁÁÁÁÁÁÁÁÁÁÁÁÁÁÁÁÁÁÁÁÁÁÁÁÁÁÁÁÁ ÁÁÁÁ ÁÁÁÁÁ ÁÁÁÁÁÁÁÁ ÁÁÁÁÁÁÁ ÁÁÁÁÁÁÁ ÁÁÁÁÁÁÁ ÁÁÁÁ ÁÁÁÁÁ ÁÁÁÁÁÁÁÁ ÁÁÁÁÁÁÁ ÁÁÁÁÁÁÁ ÁÁÁÁÁÁÁ ÁÁÁÁÁÁÁÁÁÁÁÁÁÁÁÁÁÁÁÁÁÁÁÁÁÁÁÁÁÁÁÁÁÁÁÁÁÁ ÁÁÁÁÁÁÁÁÁÁÁÁÁÁÁÁÁÁÁÁÁÁÁÁÁÁÁÁÁÁÁÁÁÁÁÁÁÁ ÁÁÁÁÁÁÁÁÁÁÁÁÁÁÁÁÁÁÁÁÁÁÁÁÁÁÁÁÁÁÁÁÁÁÁÁÁÁ ÁÁÁÁÁÁÁÁÁÁÁÁÁÁÁÁÁÁÁÁÁÁÁÁÁÁÁÁÁÁÁÁÁÁÁÁÁÁ ÁÁÁÁÁÁÁÁÁÁÁÁÁÁÁÁÁÁÁÁÁÁÁÁÁÁÁÁÁÁÁÁÁÁÁÁÁÁ ÁÁÁÁÁÁÁÁÁÁÁÁÁÁÁÁÁÁÁÁÁÁÁÁÁÁÁÁÁÁÁÁÁÁÁÁÁÁ ÁÁÁÁÁÁÁÁÁÁÁÁÁÁÁÁÁÁÁÁÁÁÁÁÁÁÁÁÁÁÁÁÁÁÁÁÁÁ ÁÁÁÁÁÁÁÁÁÁÁÁÁÁÁÁÁÁÁÁÁÁÁÁÁÁÁÁÁÁÁÁÁÁÁÁÁÁ ÁÁÁÁÁÁÁÁÁÁÁÁÁÁÁÁÁÁÁÁÁÁÁÁÁÁÁÁÁÁÁÁÁÁÁÁÁÁ ÁÁÁÁÁÁÁÁÁÁÁÁÁÁÁÁÁÁÁÁÁÁÁÁÁÁÁÁÁÁÁÁÁÁÁÁÁÁ ÁÁÁÁÁÁÁÁÁÁÁÁÁÁÁÁÁÁÁÁÁÁÁÁÁÁÁÁÁÁÁÁÁÁÁÁÁÁ ÁÁÁÁÁÁÁÁÁÁÁÁÁÁÁÁÁÁÁÁÁÁÁÁÁÁÁÁÁÁÁÁÁÁÁÁÁÁ ÁÁÁÁ ÁÁÁÁÁ ÁÁÁÁÁÁÁÁ ÁÁÁÁÁÁÁ ÁÁÁÁÁÁÁ ÁÁÁÁÁÁÁ ÁÁÁÁÁÁÁÁÁÁÁÁÁÁÁÁÁÁÁÁÁÁÁÁÁÁÁÁÁÁÁÁÁÁÁÁÁÁ Table 4–3: High resolution generator checks Voltage Channel 24.5 V Ch A Voltage 120 Hz (reference frequency) 10 Hz 1 kHz 20 kHz Ch B Voltage 8V Ch A Voltage Ch B Voltage 4V Ch A Voltage Ch B Voltage 2V Ch A Voltage Ch B Voltage 1V Ch A Voltage Ch B Voltage 0.5 V Ch A Voltage Ch B Voltage 0.25 V Ch A Voltage Ch B Voltage 125 mV Ch A Voltage Ch B Voltage 62.5 mV Ch A Voltage Ch B Voltage Check Low Distortion Mode 1. In the Generator Controls, set the generator to High Resolution Mode if not already in that mode. 2. Use the Frequency and Amplitude edit boxes in the Waveform Control screen to set the Ch A and Ch B frequency to 1 kHz at 3.5 V. 3. Set the external distortion analyzer measurement bandwidth to Audio or 22 kHz. Check the THD + N using the external distortion analyzer. (It should be about 0.005%.) 4. Press the Control button in the generator section if the Generator Control panel is not still displayed. 4–14 AM700 Audio Measurement Set Service Manual Performance Verification 5. Touch the Advanced Analog Controls icon to display the screen shown previously in Figure 4–8. 6. Select High Resolution Distortion Reduction mode for Channel A and Channel B. The selection indicator box is checked when selected. 7. Check that the Channel A and Channel B THD + N reduces to approximately 0.0025%. 8. Turn off Low Distortion Mode for Ch A and Ch B. Check High Bandwidth Generator 1. Press the Generator Control button. 2. Touch the High Bandwidth box under Generator selection (see Figure 4–4 on page 4–8. 3. Touch Waveform Control. 4. Select the Analog A generator for edit if not already selected. Set Analog A to Sine, Frequency to 1 kHz (you will see 0.996 kHz), and Amplitude to 3.5 V. Make sure that the Analog A Generator output is on. 5. Check the RMS amplitude at 1 kHz with the RMS meter. 6. Check the THD + N at 1 kHz for a reading of 0.01% or less using the distortion analyzer. 7. Set the generator frequency to 9 kHz. 8. Check the frequency accuracy is within 0.01% (8999.1 to 9000.9) with the frequency counter. 9. Set the frequency and amplitude to the values shown in Table 4–4 and check the amplitude accuracy with the external RMS meter. At 117.1 Hz (this is as close to 120 Hz as the setting resolution of the high bandwidth generator permits), the measured values should not differ by more than approximately 1.5% (approximately 0.15 dB) from the set value at signal input levels from +13.9 dBu down to –34.1 dBu. At input signal levels from less than –34.1 dBu to –52.1 dBu, the amplitude accuracy at 120 Hz should be within ±0.25 dB (approximately ±2.5%). At 11.719 Hz and 20 kHz, the measured amplitude values should not deviate from the 117.1 Hz measured values by more than +1%. At 80 kHz the measured amplitude values should not deviate from the 117.1 Hz measured values by more than +5% to –10% (typically this will be near –5%). At 70 kHz, the typical amplitude accuracy is near –3%. AM700 Audio Measurement Set Service Manual 4–15 Performance Verification ÁÁÁÁ ÁÁÁÁÁ ÁÁÁÁÁÁÁÁ ÁÁÁÁÁÁÁ ÁÁÁÁÁÁÁ ÁÁÁÁÁÁÁ ÁÁÁÁ ÁÁÁÁÁ ÁÁÁÁÁÁÁÁ ÁÁÁÁÁÁÁ ÁÁÁÁÁÁÁ ÁÁÁÁÁÁÁ ÁÁÁÁÁÁÁÁÁÁÁÁÁÁÁÁÁÁÁÁÁÁÁÁÁÁÁÁÁÁÁÁÁÁÁÁÁÁ ÁÁÁÁÁÁÁÁÁÁÁÁÁÁÁÁÁÁÁÁÁÁÁÁÁÁÁÁÁÁÁÁÁÁÁÁÁÁ ÁÁÁÁÁÁÁÁÁÁÁÁÁÁÁÁÁÁÁÁÁÁÁÁÁÁÁÁÁÁÁÁÁÁÁÁÁÁ ÁÁÁÁÁÁÁÁÁÁÁÁÁÁÁÁÁÁÁÁÁÁÁÁÁÁÁÁÁÁÁÁÁÁÁÁÁÁ ÁÁÁÁÁÁÁÁÁÁÁÁÁÁÁÁÁÁÁÁÁÁÁÁÁÁÁÁÁÁÁÁÁÁÁÁÁÁ ÁÁÁÁÁÁÁÁÁÁÁÁÁÁÁÁÁÁÁÁÁÁÁÁÁÁÁÁÁÁÁÁÁÁÁÁÁÁ ÁÁÁÁÁÁÁÁÁÁÁÁÁÁÁÁÁÁÁÁÁÁÁÁÁÁÁÁÁÁÁÁÁÁÁÁÁÁ ÁÁÁÁÁÁÁÁÁÁÁÁÁÁÁÁÁÁÁÁÁÁÁÁÁÁÁÁÁÁÁÁÁÁÁÁÁÁ ÁÁÁÁÁÁÁÁÁÁÁÁÁÁÁÁÁÁÁÁÁÁÁÁÁÁÁÁÁÁÁÁÁÁÁÁÁÁ ÁÁÁÁÁÁÁÁÁÁÁÁÁÁÁÁÁÁÁÁÁÁÁÁÁÁÁÁÁÁÁÁÁÁÁÁÁÁ ÁÁÁÁÁÁÁÁÁÁÁÁÁÁÁÁÁÁÁÁÁÁÁÁÁÁÁÁÁÁÁÁÁÁÁÁÁÁ ÁÁÁÁ ÁÁÁÁÁ ÁÁÁÁÁÁÁÁ ÁÁÁÁÁÁÁ ÁÁÁÁÁÁÁ ÁÁÁÁÁÁÁ ÁÁÁÁÁÁÁÁÁÁÁÁÁÁÁÁÁÁÁÁÁÁÁÁÁÁÁÁÁÁÁÁÁÁÁÁÁÁ ÁÁÁÁÁÁÁÁÁÁÁÁÁÁÁÁÁÁÁÁÁÁÁÁÁÁÁÁÁÁÁÁÁÁÁÁÁÁ ÁÁÁÁÁÁÁÁÁÁÁÁÁÁÁÁÁÁÁÁÁÁÁÁÁÁÁÁÁÁÁÁÁÁÁÁÁÁ ÁÁÁÁÁÁÁÁÁÁÁÁÁÁÁÁÁÁÁÁÁÁÁÁÁÁÁÁÁÁÁÁÁÁÁÁÁÁ ÁÁÁÁÁÁÁÁÁÁÁÁÁÁÁÁÁÁÁÁÁÁÁÁÁÁÁÁÁÁÁÁÁÁÁÁÁÁ ÁÁÁÁÁÁÁÁÁÁÁÁÁÁÁÁÁÁÁÁÁÁÁÁÁÁÁÁÁÁÁÁÁÁÁÁÁÁ ÁÁÁÁ ÁÁÁÁÁ ÁÁÁÁÁÁÁÁ ÁÁÁÁÁÁÁ ÁÁÁÁÁÁÁ ÁÁÁÁÁÁÁ ÁÁÁÁÁÁÁÁÁÁÁÁÁÁÁÁÁÁÁÁÁÁÁÁÁÁÁÁÁÁÁÁÁÁÁÁÁÁ Table 4–4: High bandwidth generator checks Voltage Channel 24 V Ch A Voltage 117.1 Hz (reference frequency) 11.719 Hz 20 kHz Do not check 80 kHz at 24 volts. Ch B Voltage 8V 80 kHz Ch A Voltage Ch B Voltage 4V Ch A Voltage Ch B Voltage 2V Ch A Voltage Ch B Voltage 1V Ch A Voltage Ch B Voltage 0.5 V Ch A Voltage Ch B Voltage 0.25 V Ch A Voltage Ch B Voltage 125 mV Ch A Voltage Ch B Voltage 62.5 mV Ch A Voltage Ch B Voltage 10. Repeat step 9 for Analog B if you want. For a simplified test you can check the Analog B output at 80 kHz only. This works because the output amplifier for Analog B is independently checked to 20 kHz in the High Resolution generator check procedure. Check Generator Noise Floor NOTE. The generator noise floor is difficult to measure accurately under most conditions. The following method is an approximate measurement method. 1. Set the generator to High Resolution Mode if not already selected. 2. Check that the generator source resistance is set for 10 W. 3. Set the generator output amplitude to 0.0 Volts. 4. Measure the residual noise floor using a 400 Hz to 22 kHz measurement bandwidth or A weighting. 4–16 AM700 Audio Measurement Set Service Manual Performance Verification 5. Check that the RMS level is equal to or less than –115 dBu (or –115 dBm without a 600 W load). 6. Set the generator to High BW mode. Make sure the output amplitude is still at 0.0 Volts. 7. Check that the RMS level is equal to or less than –95 dBu (or –95 dBm without a 600 W load. Check Analog Generator Output Impedance 1. Press the Analyzer Application button. It takes about 20 seconds for the Analyzer mode to be loaded and calibrated. 2. If not connected, connect the front panel Analog Out A and B XLR connectors to the Analog In A and B XLR connectors. 3. Touch the RT icon soft key to display the real-time measurements, if not already selected. NOTE. Ch 1 and Ch 2 are measurement channels of the AM700. Any of the input channels of the AM700 may be connected to either or both measurement channels using the Input Selection controls. 4. Touch the Ch 1 Level soft key. A box appears around the reading in the display. 5. Press the mV/kHz button in the keypad (see Figure 4–10) to change the units to mV and press Enter. Figure 4–10: Keypad entry buttons 6. Press Ch 2 Level soft key. A box appears around the reading in the display. If the Ch 2 readings are not displayed, push the Menu button, and touch Ch 2 in the Enables menu to enable the Ch 2 measurements. Press Clear Menu. AM700 Audio Measurement Set Service Manual 4–17 Performance Verification 7. Press the mV/kHz button in the keypad to change the units to mV and press Enter. 8. Press the Configure button. 9. Touch the Input Selection soft key. 10. Make sure the input selection for Ch A and Ch B are set to FP A and FP B, not Gen A and Gen B. 11. Set the Impedance for FP A and FP B to 600 W by touching the Impedance edit box and turning the control knob to scroll through the impedance choices until 600 W is displayed in the edit box. (This test assumes that the input resistors are within tolerance.) 12. Press the Clear Menu button. 13. Press the Control button in the Generator controls. Check that the generator is set to High Resolution mode. 14. Touch Waveform Control and make sure both Analog A and Analog B generators are set to 1 kHz. 15. Set the Amplitude of both analog generators to 1.015 V. 16. Touch the Advanced Analog Controls soft key. 17. Touch Output Impedance soft key. 18. Ensure that the generator source impedance is set to 10 W. Press the Clear Menu button. 19. Touch the generator status icon. 20. Touch A:Sine Level. Press and release the Units button until the units change to V. Turn the main control knob to set generator amplitude for a RT level readout of approximately 1 V. 21. Press the Control button in the Generator section of the front panel. 22. Touch Advanced Analog Controls soft key and set the output impedance to 150 W. Press the Enter button. 23. Press the Clear Menu button. 24. Check to see that the Level reading dropped to approximately 800 mV (816.8 mV) (within a few percent). 25. Press the Control button in the Generator controls. 4–18 AM700 Audio Measurement Set Service Manual Performance Verification 26. Touch the Advanced Analog Controls soft key. 27. Touch the Output Impedance soft key. 28. Select 600 W and press the Enter button. 29. Press Clear Menu button. 30. Check to see that the Level reading dropped to approximately 500 mV (509.9 mV) (within a few percent). Check Follow Mode 1. Set the B analog generator to follow mode. 2. Set the A analog generator to 5 V at 8 kHz. 3. Check the B generator output for 5 V at 8 kHz Check Generator Float 1. Press the Control button in the generator section. 2. Touch Waveform Control and set the generator output to 0.0 Volt. 3. Touch the Advanced Analog Controls icon. 4. Check that the Output Common is set to ground. (Touching the Output Common selection area toggles between Ground and Floating.) 5. Connect the ohmmeter ground to the AM700 chassis ground through the special banana plug to phone plug adapter cable shown in Figure 4–11. Banana plug, black 1/4I Phone plug. Connect to sleeve only. 2 1 XLR Female. Connect to pin 1. 3 Banana plug, red Figure 4–11: Impedance check adapter cables 6. Connect the ohmmeter + lead to the XLR output through the banana plug to XLR female adapter cable shown in Figure 4–11. It is only necessary to check one output; ground and float are the same for both. 7. Use an ohmmeter to check that pin 1 of the XLR output is approximately 0 W to 10 W to ground (typically less than 5 W). AM700 Audio Measurement Set Service Manual 4–19 Performance Verification 8. Set the generator output to Floating. NOTE. There is a difference in the floating impedance between the CRT version instrument and the flat panel display instrument. 9. Flat panel display version: Check that pin 1 of the XLR output is approximately 825 W to ground. 10. CRT display version: a. Turn the power off. b. Check that pin 1 of the XLR output is approximately 1 kW to ground. 11. Disconnect the test equipment from the AM700. 12. Turn the power back on. Check Audio Analyzer Operation These checks verify the operation of the Audio Analyzer attenuator and gain stages using 120 Hz (the reference frequency) plus a low, a medium, and a high frequency. This is done in both the High Res mode and the High BW mode. Check High Res Mode 1. If not already in Audio Analyzer mode, push the Analyzer button in the Applications grouping of buttons (see Figure 4–12). Figure 4–12: Applications buttons 2. Press the Configure button, and then touch the Input Selection soft key in the screen display. 3. Set the generator to analyzer connection to internal (Gen A and Gen B) and select the High Res A/D Converter as shown in Figure 4–13. 4–20 AM700 Audio Measurement Set Service Manual Performance Verification Figure 4–13: Input Configuration control panel 4. Press the Clear Menu button. 5. Press the Control button in the Generator section of the front panel. 6. Set the A analog generator to High Res mode, with a sine-wave signal output as shown in Figure 4–4 on page 4–8. 7. Set the B analog generator to Follow A mode. Touch the Waveform Control soft key and set Analog A Frequency to 1.00 kHz and Amplitude to 3.50 V. Press the Clear Menu button. 8. Turn on the RT display window and turn off the other display windows as shown in Figure 4–14. 9. Set the Level Units to Volts to match the generator units for amplitude settings. 10. Press the Menu button, and touch the Input soft key to display the Input Configuration menu. 11. In the Input Configuration menu, set the input ranges to manual for Ch A and Ch B by deselecting the Auto range in the Input Configuration control panel (shown in Figure 4–13). (The check mark is removed from the ✓ Auto choice, and the manual Range edit fields are not grayed out.) AM700 Audio Measurement Set Service Manual 4–21 Performance Verification Figure 4–14: Audio Analyzer graphical display with real time (RT) view visible 12. Touch the number area in the Range edit field of Ch A, press the Units button in the keypad (see Figure 4–15), and press the V/Hz button to select V as the units for the input range. Figure 4–15: Keypad entry buttons 13. Use the key pad to set the input range to 3.88 V. 14. Repeat step 12 and step 13 for Ch B. 4–22 AM700 Audio Measurement Set Service Manual Performance Verification 15. Press the Menu button, touch Enables, and enable the THD measurement. Channel 1 and Channel 2 must also both be enabled. Deselect any of the other enables that may be selected. Press Clear Menu. 16. Check the frequency measurement and THD + N at 3.5 V and 1 kHz for both Ch A and Ch B in the RT display window. The THD + N reading should be approximately 0.005%. 17. Set the frequency and amplitude to the values shown in Table 4–5 and check the amplitude reading in the RT display window. For inputs greater than 1 mV (–57.8dBu) to10mV (–37.8dBu) the accuracy with respect to 120 Hz should be within ±1 dB. From greater than 10 mV (–37.8 dBu) to 1.946 V (_8 dBu), the accuracy with respect to 120 Hz is ±0.1 dB, typically ±0.05 dB from 50 Hz to 10 kHz. For input amplitudes greater that 1.946 V (+8 dBu) to less than 64 V (+36 dBu) for input frequency below 20 kHz and to less than 16 V (+26 dBu) for input frequencies from 20 to 80 kHz, the amplitude accuracy with respect to 120 Hz is ±0.15 dB (typically ±0.05 dB from 50 Hz to 10 kHz). Manually change the Analyzer input range as you change the generator amplitude at 1 kHz or 120 Hz to verify manual ranging. Otherwise, leave Auto Range on. The easiest way to manually change the range is to push the Menu button to display the Analyzer menus. Then touch Input under the Main Menu pop-up. This puts Input Range controls on the right hand side of the display as shown in Figure 4–16. If you touch the ✓ Auto graphic, the check mark disappears, and the max full-scale value of the selected range appears. For either Ch A or Ch B, if you touch the range value (for example 8.00 dBu), if becomes highlighted, and the main control knob will then change it in 6 dB steps. The units can be changed to Volts by pushing the Units button in the key pad area. AM700 Audio Measurement Set Service Manual 4–23 Performance Verification Figure 4–16: Audio Analyzer main menu with input range and input select submenus Table 4–5: High resolution analyzer checks ÁÁÁÁÁÁÁÁÁ ÁÁÁÁÁÁÁÁÁ ÁÁÁÁÁÁÁÁÁ ÁÁÁÁÁÁÁÁÁ ÁÁÁÁÁÁÁÁÁÁÁÁÁÁÁÁÁÁÁÁÁÁÁÁÁÁÁÁÁÁÁÁÁÁÁÁ ÁÁÁÁÁÁÁÁÁÁÁÁÁÁÁÁÁÁÁÁÁÁÁÁÁÁÁ ÁÁÁÁÁÁÁÁÁÁÁÁÁÁÁÁÁÁÁÁÁÁÁÁÁÁÁÁÁÁÁÁÁÁÁÁ ÁÁÁÁÁÁÁÁÁÁÁÁÁÁÁÁÁÁÁÁÁÁÁÁÁÁÁÁÁÁÁÁÁÁÁÁ ÁÁÁÁÁÁÁÁÁÁÁÁÁÁÁÁÁÁÁÁÁÁÁÁÁÁÁÁÁÁÁÁÁÁÁÁ ÁÁÁÁÁÁÁÁÁÁÁÁÁÁÁÁÁÁÁÁÁÁÁÁÁÁÁÁÁÁÁÁÁÁÁÁ ÁÁÁÁÁÁÁÁÁÁÁÁÁÁÁÁÁÁÁÁÁÁÁÁÁÁÁÁÁÁÁÁÁÁÁÁ ÁÁÁÁÁÁÁÁÁ ÁÁÁÁÁÁÁÁÁ ÁÁÁÁÁÁÁÁÁ ÁÁÁÁÁÁÁÁÁ ÁÁÁÁÁÁÁÁÁÁÁÁÁÁÁÁÁÁÁÁÁÁÁÁÁÁÁÁÁÁÁÁÁÁÁÁ ÁÁÁÁÁÁÁÁÁÁÁÁÁÁÁÁÁÁÁÁÁÁÁÁÁÁÁÁÁÁÁÁÁÁÁÁ ÁÁÁÁÁÁÁÁÁÁÁÁÁÁÁÁÁÁÁÁÁÁÁÁÁÁÁÁÁÁÁÁÁÁÁÁ ÁÁÁÁÁÁÁÁÁÁÁÁÁÁÁÁÁÁÁÁÁÁÁÁÁÁÁÁÁÁÁÁÁÁÁÁ ÁÁÁÁÁÁÁÁÁ ÁÁÁÁÁÁÁÁÁÁÁÁÁÁÁÁÁÁ ÁÁÁÁÁÁÁÁÁÁÁÁÁÁÁÁÁÁ ÁÁÁÁÁÁÁÁÁÁÁÁÁÁÁÁÁÁ ÁÁÁÁÁÁÁÁÁ Range Voltage applied Manual Range At 120 Hz (reference 122.75 V (+44 dBu) (24.5 V) 61.52 (+38 dBu) (24.5 V) 30.83 V (+32 dBu) (24.5 V) 15.45 V (+26 dBu) 15. V 7.74 V (+20 dBu) 7.5 V 3.88 V (+14 dBu) 3.75 V 1.95 V (+8 dBu) 1.875 V 974.95 mV (+2 dBu) 0.9375 V 488.54 mV (–4 dBu) 0.469 V 244.62 mV (–10 dBu) 0.234 V 123.02 mV (–16 dBu) 117 mV 61.51 mV (–22 dBu) 58 mV 4–24 CH 1 amplitude reading CH 2 amplitude reading AM700 Audio Measurement Set Service Manual Performance Verification ÁÁÁÁÁÁÁÁÁÁÁÁÁÁÁÁÁÁÁÁÁÁÁÁÁÁÁÁÁÁÁÁÁÁÁÁÁ ÁÁÁÁÁÁÁÁÁÁÁÁÁÁÁÁÁÁÁÁÁÁÁÁÁÁÁÁÁÁÁÁÁÁÁÁÁ ÁÁÁÁÁÁÁÁÁÁÁÁÁÁÁÁÁÁÁÁÁÁÁÁÁÁÁÁÁÁÁÁÁÁÁÁÁ ÁÁÁÁÁÁÁÁÁÁÁÁÁÁÁÁÁÁÁÁÁÁÁÁÁÁÁÁÁÁÁÁÁÁÁÁÁ ÁÁÁÁÁÁÁÁÁÁÁÁÁÁÁÁÁÁÁÁÁÁÁÁÁÁÁÁÁÁÁÁÁÁÁÁÁ ÁÁÁÁÁÁÁÁÁÁÁÁÁÁÁÁÁÁÁÁÁÁÁÁÁÁÁÁÁÁÁÁÁÁÁÁÁ ÁÁÁÁÁÁÁÁÁÁ ÁÁÁÁÁÁÁÁÁ ÁÁÁÁÁÁÁÁÁ ÁÁÁÁÁÁÁÁÁ ÁÁÁÁÁÁÁÁÁÁ ÁÁÁÁÁÁÁÁÁ ÁÁÁÁÁÁÁÁÁ ÁÁÁÁÁÁÁÁÁ ÁÁÁÁÁÁÁÁÁÁÁÁÁÁÁÁÁÁÁÁÁÁÁÁÁÁÁÁÁÁÁÁÁÁÁÁÁ ÁÁÁÁÁÁÁÁÁÁÁÁÁÁÁÁÁÁÁÁÁÁÁÁÁÁÁÁÁÁÁÁÁÁÁÁÁ ÁÁÁÁÁÁÁÁÁÁÁÁÁÁÁÁÁÁÁÁÁÁÁÁÁÁÁÁÁÁÁÁÁÁÁÁÁ ÁÁÁÁÁÁÁÁÁÁÁÁÁÁÁÁÁÁÁÁÁÁÁÁÁÁÁÁÁÁÁÁÁÁÁÁÁ ÁÁÁÁÁÁÁÁÁÁÁÁÁÁÁÁÁÁÁÁÁÁÁÁÁÁÁÁÁÁÁÁÁÁÁÁÁ ÁÁÁÁÁÁÁÁÁÁÁÁÁÁÁÁÁÁÁÁÁÁÁÁÁÁÁÁÁÁÁÁÁÁÁÁÁ ÁÁÁÁÁÁÁÁÁÁÁÁÁÁÁÁÁÁÁÁÁÁÁÁÁÁÁÁÁÁÁÁÁÁÁÁÁ ÁÁÁÁÁÁÁÁÁÁÁÁÁÁÁÁÁÁÁÁÁÁÁÁÁÁÁÁÁÁÁÁÁÁÁÁÁ ÁÁÁÁÁÁÁÁÁÁÁÁÁÁÁÁÁÁÁÁÁÁÁÁÁÁÁÁÁÁÁÁÁÁÁÁÁ ÁÁÁÁÁÁÁÁÁÁÁÁÁÁÁÁÁÁÁÁÁÁÁÁÁÁÁÁÁÁÁÁÁÁÁÁÁ ÁÁÁÁÁÁÁÁÁÁÁÁÁÁÁÁÁÁÁÁÁÁÁÁÁÁÁÁÁÁÁÁÁÁÁÁÁ ÁÁÁÁÁÁÁÁÁÁÁÁÁÁÁÁÁÁÁÁÁÁÁÁÁÁÁÁÁÁÁÁÁÁÁÁÁ ÁÁÁÁÁÁÁÁÁÁÁÁÁÁÁÁÁÁÁÁÁÁÁÁÁÁÁÁÁÁÁÁÁÁÁÁÁ ÁÁÁÁÁÁÁÁÁÁÁÁÁÁÁÁÁÁÁÁÁÁÁÁÁÁÁÁÁÁÁÁÁÁÁÁÁ ÁÁÁÁÁÁÁÁÁÁÁÁÁÁÁÁÁÁÁÁÁÁÁÁÁÁÁÁÁÁÁÁÁÁÁÁÁ ÁÁÁÁÁÁÁÁÁÁ ÁÁÁÁÁÁÁÁÁ ÁÁÁÁÁÁÁÁÁ ÁÁÁÁÁÁÁÁÁ ÁÁÁÁÁÁÁÁÁÁ ÁÁÁÁÁÁÁÁÁ ÁÁÁÁÁÁÁÁÁ ÁÁÁÁÁÁÁÁÁ ÁÁÁÁÁÁÁÁÁÁÁÁÁÁÁÁÁÁÁÁÁÁÁÁÁÁÁÁÁÁÁÁÁÁÁÁÁ ÁÁÁÁÁÁÁÁÁÁÁÁÁÁÁÁÁÁÁÁÁÁÁÁÁÁÁÁÁÁÁÁÁÁÁÁÁ ÁÁÁÁÁÁÁÁÁÁÁÁÁÁÁÁÁÁÁÁÁÁÁÁÁÁÁÁÁÁÁÁÁÁÁÁÁ ÁÁÁÁÁÁÁÁÁÁÁÁÁÁÁÁÁÁÁÁÁÁÁÁÁÁÁÁÁÁÁÁÁÁÁÁÁ ÁÁÁÁÁÁÁÁÁÁÁÁÁÁÁÁÁÁÁÁÁÁÁÁÁÁÁÁÁÁÁÁÁÁÁÁÁ ÁÁÁÁÁÁÁÁÁÁÁÁÁÁÁÁÁÁÁÁÁÁÁÁÁÁÁÁÁÁÁÁÁÁÁÁÁ ÁÁÁÁÁÁÁÁÁÁÁÁÁÁÁÁÁÁÁÁÁÁÁÁÁÁÁÁÁÁÁÁÁÁÁÁÁ ÁÁÁÁÁÁÁÁÁÁÁÁÁÁÁÁÁÁÁÁÁÁÁÁÁÁÁÁÁÁÁÁÁÁÁÁÁ ÁÁÁÁÁÁÁÁÁÁÁÁÁÁÁÁÁÁÁÁÁÁÁÁÁÁÁÁÁÁÁÁÁÁÁÁÁ ÁÁÁÁÁÁÁÁÁÁÁÁÁÁÁÁÁÁÁÁÁÁÁÁÁÁÁÁÁÁÁÁÁÁÁÁÁ ÁÁÁÁÁÁÁÁÁÁ ÁÁÁÁÁÁÁÁÁÁÁÁÁÁÁÁÁÁÁ ÁÁÁÁÁÁÁÁÁÁÁÁÁÁÁÁÁÁ ÁÁÁÁÁÁÁÁÁÁÁÁÁÁÁÁÁÁ ÁÁÁÁÁÁÁÁÁ Table 4–5: High resolution analyzer checks (cont.) Range Voltage applied Auto Range (CH A and CH B) At 10 Hz CH 1 amplitude reading CH 2 amplitude reading 24 V 14.8 V 7.4 V 3.7 V 1.8 V 0.9 V 0.45 V 0.225 V 110 mV 55 mV Auto Range (CH A and CH B) At 1 kHz 24 V 14.8 V 7.4 V 3.7 V 1.8 V 0.9 V 0.45 V 0.225 V 110 mV 55 mV Auto Range (CH A and CH B) At 20 kHz 24 14.8 V 7.4 V 3.7 V 1.8 V 0.9 V 0.45 V 0.225 V 110 mV 55 mV AM700 Audio Measurement Set Service Manual 4–25 Performance Verification Check High BW Mode 1. Press the Menu button and touch Input Selection soft key. 2. If not already done, in the Input Configuration control panel, set the generator to analyzer connection to internal. Set the Ch 1 and Ch 2 analyzer inputs to High BW mode by touching the Analog HBW Inputs soft key. 3. Set the CH A and CH B input ranges to manual (Auto unchecked). 4. Set the analog generator to High BW mode (this automatically sets the B generator to follow mode). 5. Check the frequency measurement and THD + N at 3.5 V and 1 kHz for both CH 1 and CH 2 in the RT display window. THD + N should be less than or equal to 0.003%, typically less than or equal to 0.0015%. 6. Set the frequency and amplitude to the values shown in Table 4–6 and check the amplitude reading in the RT display window. Manually change the analyzer input range as you change the generator voltages until you are satisfied that the manual ranging works. You can select Auto Range at any time to finish the checks. The amplitude measurement accuracy with respect to 120 Hz is are defined in the Specification section. NOTE. Keep in mind that the analog generator you are using may have some high frequency rolloff (verified earlier in this procedure for the AM700 generator). This step checks the analyzer functionality and is not a check of its specified measurement accuracy to determine if readjustment is required. The specified accuracy for 80 kHz is ±1 dB or ≈ 10% relative to the 120 Hz level measurement. ÁÁÁÁ ÁÁÁÁÁ ÁÁÁÁÁÁÁ ÁÁÁÁÁÁÁÁ ÁÁÁÁÁÁÁ ÁÁÁÁÁÁÁ ÁÁÁÁÁÁÁÁÁÁÁÁÁÁ ÁÁÁÁ ÁÁÁÁÁ ÁÁÁÁÁÁÁ ÁÁÁÁÁÁÁÁ ÁÁÁÁÁÁÁÁÁÁÁÁÁÁÁÁÁÁÁÁÁÁÁÁÁÁÁÁÁÁÁÁÁÁÁÁÁÁ ÁÁÁÁÁÁÁÁÁÁÁÁÁÁ ÁÁÁÁ ÁÁÁÁÁ ÁÁÁÁÁÁÁ ÁÁÁÁÁÁÁÁ ÁÁÁÁÁÁÁÁÁÁÁÁÁÁÁÁÁÁÁÁÁÁÁÁÁÁÁÁÁÁÁÁÁÁÁÁÁÁ ÁÁÁÁÁÁÁÁÁÁÁÁÁÁ ÁÁÁÁ ÁÁÁÁÁ ÁÁÁÁÁÁÁ ÁÁÁÁÁÁÁÁ ÁÁÁÁÁÁÁÁÁÁÁÁÁÁÁÁÁÁÁÁÁÁÁÁÁÁÁÁÁÁÁÁÁÁÁÁÁÁ ÁÁÁÁÁÁÁÁÁÁÁÁÁÁÁÁÁÁÁÁÁÁÁÁÁÁÁÁÁÁÁÁÁÁÁÁÁÁ ÁÁÁÁÁÁÁÁÁÁÁÁÁÁÁÁÁÁÁÁÁÁÁÁÁÁÁÁÁÁÁÁÁÁÁÁÁÁ ÁÁÁÁ ÁÁÁÁÁ ÁÁÁÁÁÁÁ ÁÁÁÁÁÁÁÁ ÁÁÁÁÁÁÁ ÁÁÁÁÁÁÁ ÁÁÁÁÁÁÁ ÁÁÁÁÁÁÁÁÁ ÁÁÁÁÁÁÁÁÁÁÁÁ ÁÁÁÁÁÁÁÁÁÁÁÁÁÁÁ ÁÁÁÁÁÁÁÁÁÁÁÁÁÁÁÁÁÁÁÁÁÁ ÁÁÁÁÁÁÁ ÁÁÁÁ ÁÁÁÁÁÁÁÁÁÁÁÁÁÁÁÁÁÁÁÁÁÁÁÁÁÁÁÁÁÁÁÁÁÁÁÁÁÁ Table 4–6: High bandwidth analyzer checks Voltage Channel 24 V Ch 1 Level Ch 2 Level 15.2 V 120 Hz (reference frequency) (117.19 Hz) 11.719 Hz 20 kHz 80 kHz (79.993 kHz) Do not check 80 kHz at 24 volts. The AM700 generator is specified to a maximum of 19.45 V at 80 kHz. Ch 1 Level Ch 2 Level 7.6 V Ch 1 Level Ch 2 Level 3.8 V Ch 1 Level Ch 2 Level 4–26 AM700 Audio Measurement Set Service Manual Performance Verification ÁÁÁÁÁ ÁÁÁÁÁ ÁÁÁÁÁÁÁ ÁÁÁÁÁÁÁ ÁÁÁÁÁÁÁÁ ÁÁÁÁÁÁÁ ÁÁÁÁÁÁÁÁÁÁÁÁÁÁÁÁÁÁÁÁÁÁÁÁÁÁÁÁÁÁÁÁÁÁÁÁÁÁÁ ÁÁÁÁÁÁÁÁÁÁÁÁÁÁÁÁÁÁÁÁÁÁÁÁÁÁÁÁÁÁÁÁÁÁÁÁÁÁÁ ÁÁÁÁÁÁÁÁÁÁÁÁÁÁÁÁÁÁÁÁÁÁÁÁÁÁÁÁÁÁÁÁÁÁÁÁÁÁÁ ÁÁÁÁÁÁÁÁÁÁÁÁÁÁÁÁÁÁÁÁÁÁÁÁÁÁÁÁÁÁÁÁÁÁÁÁÁÁÁ ÁÁÁÁÁÁÁÁÁÁÁÁÁÁÁÁÁÁÁÁÁÁÁÁÁÁÁÁÁÁÁÁÁÁÁÁÁÁÁ ÁÁÁÁÁÁÁÁÁÁÁÁÁÁÁÁÁÁÁÁÁÁÁÁÁÁÁÁÁÁÁÁÁÁÁÁÁÁÁ ÁÁÁÁÁÁÁÁÁÁÁÁÁÁÁÁÁÁÁÁÁÁÁÁÁÁÁÁÁÁÁÁÁÁÁÁÁÁÁ ÁÁÁÁÁÁÁÁÁÁÁÁÁÁÁÁÁÁÁÁÁÁÁÁÁÁÁÁÁÁÁÁÁÁÁÁÁÁÁ ÁÁÁÁÁÁÁÁÁÁÁÁÁÁÁÁÁÁÁÁÁÁÁÁÁÁÁÁÁÁÁÁÁÁÁÁÁÁÁ ÁÁÁÁÁÁÁÁÁÁÁÁÁÁÁÁÁÁÁÁÁÁÁÁÁÁÁÁÁÁÁÁÁÁÁÁÁÁÁ ÁÁÁÁÁ ÁÁÁÁÁ ÁÁÁÁÁÁÁ ÁÁÁÁÁÁÁ ÁÁÁÁÁÁÁÁ ÁÁÁÁÁÁÁ ÁÁÁÁÁ ÁÁÁÁÁ ÁÁÁÁÁÁÁ ÁÁÁÁÁÁÁ ÁÁÁÁÁÁÁÁ ÁÁÁÁÁÁÁ ÁÁÁÁÁÁÁÁÁÁÁÁÁÁÁÁÁÁÁÁÁÁÁÁÁÁÁÁÁÁÁÁÁÁÁÁÁÁÁ ÁÁÁÁÁ ÁÁÁÁÁ ÁÁÁÁÁÁÁ ÁÁÁÁÁÁÁ ÁÁÁÁÁÁÁÁ ÁÁÁÁÁÁÁ ÁÁÁÁÁÁÁÁÁÁÁÁÁÁÁÁÁÁÁÁÁÁÁÁÁÁÁÁÁÁÁÁÁÁÁÁÁÁÁ Table 4–6: High bandwidth analyzer checks (cont.) Voltage Channel 1.9 V Ch 1 Level 120 Hz (reference frequency) (117.19 Hz) 11.719 Hz 20 kHz 80 kHz (79.993 kHz) Ch 2 Level 0.95 V Ch 1 Level Ch 2 Level 0.475 V Ch 1 Level Ch 2 Level 0.238 V Ch 1 Level Ch 2 Level 120 mV Ch 1 Level Ch 2 Level 60 mV Ch 1 Level Ch 2 Level AM700 Audio Measurement Set Service Manual 4–27 Performance Verification Check FFT Analyzer Operation This operational check of the FFT Analyzer checks: Check FFT Analyzer H Averaging H Noise Floor H High Resolution BW (20 kHz) H High BW (80 kHz) 1. Select the FFT Analyzer if it is not already selected. 2. Set the High Resolution generator for 5 kHz at –50 dBu. 3. In the Input Configuration menu, select the generator as the acquisition input source for CH A and CH B (normal default is FP A and FP B) by touching the double arrow symbol next to the generator choice. 4. Set the Input Select to High Resolution Analog Inputs. 5. Set Average on. 6. Touch the Menu soft key; then touch the Windows soft key. Select the Kaiser Bessel FFT window. 7. Check that the display is as shown in Figure 4–17. If you push, or have already pushed, Rescale, the –50 dBu amplitude will be set to the top of the FFT display screen and the bottom of the trace will be set to the bottom of the FFT display screen. 4–28 AM700 Audio Measurement Set Service Manual Performance Verification Figure 4–17: FFT Analyzer Window menu display 8. Check that the noise floor is below –120 dBu. Check Harmonic Content 1. Set the High Resolution generator to an amplitude of 0 dBu and a frequency of 1 kHz. 2. Looking at the generator output with the High Resolution FFT, check to see that any harmonics of the fundamental are –85 dB or lower relative to the fundamental. The third harmonic may be worse than the second harmonic, but it is typically –90 dBu or lower relative to the fundamental. 3. Press the Control button in the Generator controls area of the front panel. Touch the Advanced Analog Controls soft key. 4. Turn on the High Resolution Distortion Reduction mode of the generator and observe that the distortion products and the noise floor diminish. 5. Turn off the High Resolution Distortion Reduction mode. Check Acquisition Noise Floor 1. Disconnect the generator from the inputs to the measurement channels. 2. Set the input impedance for 600 W. 3. Check that the noise floor of the FFT display is always below –120 dBu and mostly below –130 dBu. AM700 Audio Measurement Set Service Manual 4–29 Performance Verification Check Autorange Function 1. Press the FFT Application button (if the FFT Analyzer is not already operating). 2. Connect the A and B Analog generator outputs to the Ch A and Ch B input connectors. 3. Press the Configure button. a. Touch the Input Selection soft key. b. Touch the source “toggle” icon soft key to select FP A and FP B. 4. Set the Ch A and Ch B Input ranges to Auto. Press Clear Menu 5. Press the Control button in the Generator controls. a. Press the Ch A Waveform soft key. b. Select the Multitone signal and press the Enter button. Multitone signals are used for this test because they are the most difficult for the autorange circuitry to process. c. Set the generator output amplitude to 0 dBu. d. Press the Clear Menu button. 6. Touch the Generator icon soft key (at the top of the display area). This displays the Generator status view window. NOTE. The 0 dBu amplitude of the multitone signal applies to the RMS sum of the tones, not to the individual tone amplitudes. 7. Using the Amplitude knob, slowly increase the generator output amplitude (seen in the Generator status view window) until the auto range detects an over-range condition (the word “clip” should appear momentarily in the top right section of the display). This should occur at about + 2 dBu and again between +7.9 and +8.1 dBu. 8. Decrease the amplitude from +8.1. The auto range should down range between +7.1 to +7.3 dBu. Auto ranging is accompanied by the sound of relays clicking inside the AM700. 9. Check to see that the auto range does not “hunt” for an acceptable range when auto ranging occurs. 4–30 AM700 Audio Measurement Set Service Manual Performance Verification Check Analog Acquisition Noise Floor 1. Press the Menu button. a. Touch the Analog HRes Inputs soft key (if the FFT Analyzer is not presently in High Resolution mode). 2. Press the Configure button. a. Touch the Input Selection soft key. b. Touch the source “toggle” icon soft key to select Gen A and Gen B. c. Press the Clear Menu button. 3. Press and hold the Average button. a. Touch the Processing soft key. b. Select Hold Maximum and press the Processing soft key to enter your selection. c. Press the Average button to activate Hold Maximum (Averaging). d. Press the Rescale button. 4. Touch the View 2 icon soft key to display the second view. a. Touch the view 2 screen area to change active window to view 2. 5. Press and hold the Average button. a. Touch the Processing soft key. b. Select Hold Maximum and touch the Processing soft key. c. Press the Average button to turn on averaging in view 2. d. Press the Clear Menu button. e. Press the Rescale button. 6. Check the generator output amplitude to ensure that it is still at +7.1 dBu from the previous procedure. Set the generator output amplitude for +7.1 dBu if it is not. 7. Check to see that the average noise floor is –90 dBu or lower. The noise floor is limited by the generator. 8. Check that there are no harmonics or noise spurs greater than –80 dBu. 9. Turn the generator off and press the Average button to clear the Hold Maximum trace. Then, press the Average button again to start a new Hold Maximum trace. 10. Observe that the Hold Maximum noise floor is below –120 dBu. AM700 Audio Measurement Set Service Manual 4–31 Performance Verification 11. Press the Average button to turn off Hold Maximum in the active view. 12. Touch the view 1 screen area and and press the Average button. Observe that the noise floor with no averaging is less than –130 dBu. Input Impedance Verification These checks verify the input impedances of the Audio Analyzer on channel A and channel B. Set Up the Generator 1. Set the external generator to output a 1 kHz sine wave, and set the generator output to 0.775 V. 2. Set the source resistance of the generator to 600 W. Set Up the AM700 Audio Analyzer 1. If not already in the Audio Analyzer application, start the Audio Analyzer application. 2. Make sure that the input configuration is using High Resolution mode. 3. Set the AM700 input configuration for Front panel A and B. 4. Set the input range for channels A and B to +2 dBu (0.95 V). 5. Set the Input Impedance for channels A and B to 200 kW. Verify Ch B and Ch B Input Impedance 1. Connect the output of the external generator to the Channel A input of the AM700. 2. The input should read approximately 0 dBu. 3. On the AM700, set the Input Impedance to 600 W. 4. Check to see that the measured level has dropped to approximately –6 dBu. 5. On the AM700, set the Input Impedance to 150 W. 6. Check to see that the measured level has dropped to approximately –14 dBu. 7. Verify Channel B is the same manner as Channel A. 4–32 AM700 Audio Measurement Set Service Manual Performance Verification Verify CRT Display Operation AM700 Setup Check Display Focus 1. Press Analyzer. When the Analyzer application has loaded, select all four graph view windows for display. Do not select the RT view window. 1. Check the focus in the center of the screen. 2. Check the focus at the corners of the screen. The focus should not be objectionable in any area of the screen. Check Size, Linearity, Trace Rotation, and Centering 1. Check that the display width in the center is approximately 5 inches (12.8 cm). 2. Check that the display height in the center is approximately 3.75 inches (9.52 cm). 3. Check that the view windows for the four views are the same size vertically. 4. Check that the display is vertically centered with approximately the same spacing at the top and bottom of the viewing area. 5. Check that the display is horizontally centered with approximately the same spacing at the left and right sides of the viewing area. 6. Check that the display is aligned so the four graph view windows are approximately square and the horizontal border lines of the view windows are parallel to the top and bottom of the AM700 bezel. a. Straight edges should be relatively straight with minimal bowing. b. Boxes should have relatively square corners. Check Display Intensity Control 1. Press and hold in the Display button. 2. Check that the display brightness is set for 70% (this is the power on default brightness level setting). AM700 Audio Measurement Set Service Manual 4–33 Performance Verification 3. Rotate the large control knob counterclockwise to decrease the display intensity to 0%. 4. Check that the display is completely dimmed. 5. Release the Display button then press and hold it in again. 6. Check that the display brightness is now set for 90%. 7. Rotate the large control knob clockwise to increase the brightness to 100%, then release the Display button. 8. Select the FFT Analyzer. 9. As the FFT Analyzer application is loading, check the application name display for even illumination and for phosphor burns. 10. Check that there are no retrace lines visible. 11. Return the display brightness level to 70%. NOTE. Minor deviations of the display from exact alignment do not affect the accuracy of the measurements. Readjustment of the display monitor should not be attempted for any minor deviations. They should be noted for the next regular scheduled alignment. Major deviation from alignment indicates a display monitor problem and should be referred to a qualified repair facility for corrective action. 4–34 AM700 Audio Measurement Set Service Manual Performance Verification Verify Flat Panel Display Operation 1. Press FFT. When the FFT application has loaded, touch View Setup, select the Spectrogram display, and then touch the Accept Changes soft key. 2. Check that there are no streaks or color smears of red, green, or blue. 3. In the UTILITIES front panel selections, press the Configure button. 4. Verify that the Configuration options: display has no streaks or color smears. If there are any color streaks or smears, the ADC gain for the associated color may need adjustment. 5. In the UTILITIES front panel selections press and hold in the Display button. 6. Use the large control knob to set the Adjust brightness: level to 10%. 7. Check that the backlight for the LCD display just turns off (no visible display at 10% brightness). If there is a visible display or if the display is dimmed at too high a percentage of brightness, the internal BRT level may need adjustment. NOTE. The backlight display brightness decreases slowly with use. At an average of four hours of use per day, the display brightness decreases to about 50% of the original brightness after 3.5 years or about 5000 hours of total use time. If the brightness level become too dim, it is time for a backlight replacement. 8. Release the Display button, and then press it again to return to the default brightness level. AM700 Audio Measurement Set Service Manual 4–35 Performance Verification Verify Digital Generator These checks are done using one AM700 Audio Measurement Set (the test AM700) as a signal source or measurement instrument for the AM700 being tested (the DUT). Clock Rate Range and Accuracy 1. Turn power on both AM700 Audio Measurement Sets. 2. After FFT application is initialized, make the following choices for both measurement sets: a. Press the Configure button. b. In the Configure menu, touch the State Saving soft key. c. Touch the Factory Default soft key and select Factory Defaults. 3. Set the DUT and the test AM700 as follows: Press Touch Press Touch Set Touch Set Digital button Eye Diagram icon Menu button Digital Audio soft key Sample Rate = 48 kHz Interface Timing soft key Mode = From Audio 4. Connect the DUT Digital Out to the test AM700 Digital In. 5. Check that the test AM700 Main Sample Freq. = 47999.76 to 48000.24 Hz. 6. Check that the test AM700 Peak to Peak Jitter reading is 0.05 UIp-p or less. 7. Set the DUT: Interface Timing as follows: Mode = Variable Var Freq = 30 kHz to 52 kHz 8. Check that the test AM700 eye diagram stabilizes, and the Main Sample frequency follows the variable frequency of the DUT as it is changed in step 7. 9. Check that the test AM700 has a Peak to Peak Jitter reading of 0.08 UIp-p or less when the DUT Var Freq = 52 kHz. 10. Set the DUT as follows: Touch Set Jitter Generation soft key Long Cable Simulation = ON 11. Check that the test AM700 Main Channel Equalization reads 5 or 6 dB. 4–36 AM700 Audio Measurement Set Service Manual Performance Verification 12. Set DUT as follows: Set Long Cable Simulation = OFF 13. Connect the DUT to the test AM700 as follows: DUT Digital Out signal to the test AM700 Digital In connector DUT AES REF OUT to the test AM700 AES REF IN connector 14. Touch the Interface Timing soft key, and then touch the Clock Phase Offset soft key. Press the Units button until the units are set to UI. 15. Set the DUT Clock Phase Offset to: –1, +1, –64, and +63.5. Check that the test AM700 Phase Diff. reads the same as the DUT. (Note that –64 yields +64.) Check Main Output Residual Jitter 1. Connect the DUT the the test AM700 as follows: DUT Digital Out to the test AM700 Digital in Test AM700 AES REF OUT to DUT AES REF IN 2. Set the DUT as follows: Touch Select Interface Timing soft key Mode = From Ref 3. Set the test AM700 as follows: Mode = From Audio 4. Check that the test AM700 has a Peak to Peak Jitter reading of 0.08 UIp-p or less. If reading is >0.09, check again with the test AM700 sample rate at 44.1 kHz. Ref Output Residual Jitter 1. Connect DUT AES REF OUT to the test AM700 Digital In. Set DUT: Mode = From Audio 2. Check that the test AM700 Peak to Peak Jitter reading is 0.03 UIp-p or less. 3. Set DUT: Mode = Variable Var Freq = 52 kHz 4. Check that the test AM700 Peak to Peak Jitter reading is 0.08 UIp-p or less. AM700 Audio Measurement Set Service Manual 4–37 Performance Verification Check High Frequency Jitter Tolerance 1. Connect the test equipment as follows: DUT Digital Out to the test AM700 Digital In. DUT BNC OUT to DUT BNC IN. Test AM700 Digital Out to DUT AES REF IN. 2. Set DUT: Input = RP BNC; Mode = From Ref. 3. Set the test AM700: Press Select Touch Set Press Set Jitter Generation soft key Generate Jitter Sine soft key Jitter Ampl Jitter Ampl = 0.12 UIp-p Jitter Freq Jitter Freq = 30 kHz 4. Increase the test AM700 Jitter Ampl in steps of 0.01 UI until the test AM700 Eye Diagram looses lock. Check that Jitter Ampl is at least 0.17 UI. (spec is 0.12, typical is 0.3 UI). Static Phase Difference 1. Connect DUT Digital Out to a dual channel oscilloscope through the special adapter cable shown in Figure 4–18. Dual BNC to 110 W XLR female BNC Male Cable used is insulated coaxial cable 1 3 2 XLR Female 110W Figure 4–18: Dual BNC to 110 W XLR adapter cable 2. Connect the AES REF OUT of the DUT to the CH 3 (or trigger input) through a 110 W impedance transformer; a 10X, 75 W attenuator; and 75 W BNC feed through termination. 3. Press Interface Timing soft key. Set Set 4–38 Mode = From Audio Clock Phase Offset to 0.00 UI (Unit Interval) AM700 Audio Measurement Set Service Manual Performance Verification 4. Setup the oscilloscope to view the signal. Typical settings are as follows: Time/Div Volts/Div Trigger Trigger Source Trigger Level CH 1 and CH 2 50 ns/div 1 V/div Normal CH 3 (trigger input) Auto On 5. Check on the oscilloscope, that the time from REF zero crossing to Main zero crossing is less than 50 ns. Output Level 1. Connect DUT Digital Out to a differential oscilloscope inputs using the 110 W XLR to dual BNC adapter cable shown in Figure 4–18. 2. Set the oscilloscope controls for ADD, INVERT ON, and set CH 1 and CH 2 OFF. 3. Set DUT: Touch Set Interface Amplitude soft key XLR Output for the following: 0.01 Vp-p 0.1 Vp-p 1 Vp-p 5 Vp-p 8 Vp-p 10 Vp-p 4. At each setting, check that the oscilloscope reads the same (±10 mV ±5%). 5. Disconnect the Digital Out signal from the oscilloscope. 6. Connect DUT Unbalanced Out to the oscilloscope input using a 75 W BNC coaxial cable and a 75 W feed through termination. On the oscilloscope, turn off ADD and INVERT. 7. Set the DUT as follows: Touch Set Interface Amplitude soft key BNC Output for the following: 0.02 Vp-p 0.2 Vp-p 1 Vp-p 2 Vp-p 8. For each voltage setting in step 7, check that the oscilloscope reads the same (±2 mV ±2%). AM700 Audio Measurement Set Service Manual 4–39 Performance Verification 9. Connect DUT AES REF OUT to the differential oscilloscope inputs using the 110 W XLR-to-dual-BNC adapter. 10. Check for 4.9 to 5.9 Vp-p. Phase Jitter Generation 1. Connect the DUT as follows: AES REF OUT XLR connector to the oscilloscope CH 3 trigger input using 110 W to 75 W impedance matching transformer. 2. Connect DUT Unbalanced Out BNC to the oscilloscope CH 1 input using a 75 W coaxial cable and a 75 W feed through termination. 3. Set the DUT controls as follows: Touch Select Touch Select Set Set Press Interface Timing soft key Mode = From Audio Jitter Generation Generate Jittered Sine Jitter Ampl = 0.5 UIp-p Jitter Freq. = 1 kHz Generator On button to Off 4. Set scope with delay or mag for 20 ns/div and measure width of jitter using delta-delay or cursors. It should be 81 ns ±8 ns. (73 to 89 ns). 5. Set DUT Jitter Freq = 10 kHz 6. Check for a jitter width of 81 ns ± 8 ns. (73 to 89 ns). 7. Set DUT Jitter Freq = 20 kHz 8. Check for a jitter width of 81 ns ± 8 ns. (73 to 89 ns) 9. Set DUT Jitter Freq = 30 kHz 10. Check for a jitter width of 81 ns ± 16 ns. (65 to 97 ns) 11. Set DUT Jitter Freq = 50 kHz 12. Check for a jitter width of 81 ns ± 16 ns. (65 to 97 ns) 13. Set DUT Jitter Ampl = 0.09 UIpp, Jitter Freq = 1 kHz 14. Check for a jitter width of 14.6 ns ± 1.5 ns. (13.1 to 16.1 ns) 4–40 AM700 Audio Measurement Set Service Manual Performance Verification Digital Receiver The following check verify the operation of the Digital Receiver hardware. Receiver Interface Parameter Measurements 1. Connect the DUT as follows: Digital Out to Digital In UNBALANCE OUT to UNBALANCE IN 2. Set DUT controls as follows: Press Touch Press Touch Select Press Touch Select Digital button Icon Eye Diagram soft key Configure button Input Selection soft key FP XLR, Clear Menu button Menu button Interface Ampl soft key XLR Output = 0.15 Vp-p 3. Check that the Main Channel Level follows the XLR Output as shown in Table 4–7. ÁÁÁÁÁÁÁÁÁÁÁÁÁÁÁÁÁÁÁÁÁÁÁÁÁ ÁÁÁÁÁÁÁÁÁÁÁÁÁÁÁÁ ÁÁÁÁÁÁÁÁÁÁÁÁÁÁÁÁÁ ÁÁÁÁÁÁÁÁÁ ÁÁÁÁÁÁÁÁÁ ÁÁÁÁÁÁÁÁ ÁÁÁÁÁÁÁÁÁ ÁÁÁÁÁÁÁÁÁÁÁÁÁÁÁÁÁÁÁÁÁÁÁÁÁÁ ÁÁÁÁÁÁÁÁÁÁÁÁÁÁÁÁÁÁÁÁÁÁÁÁÁÁ ÁÁÁÁÁÁÁÁÁÁÁÁÁÁÁÁÁÁÁÁÁÁÁÁÁÁ ÁÁÁÁÁÁÁÁÁÁÁÁÁÁÁÁÁÁÁÁÁÁÁÁÁÁ ÁÁÁÁÁÁÁÁÁÁÁÁÁÁÁÁÁÁÁÁÁÁÁÁÁÁ ÁÁÁÁÁÁÁÁÁÁÁÁÁÁÁÁÁÁÁÁÁÁÁÁÁÁ ÁÁÁÁÁÁÁÁÁÁÁÁÁÁÁÁÁÁÁÁÁÁÁÁÁÁ Table 4–7: Main output and XLR output test Main channel level measurement XLR output V Minimum V Maximum V 0.15 0.102 0.207 0.50 0.400 0.610 2.00 1.67 2.33 5.00 4.22 5.78 7.25 6.14 8.37 8.00 6.77 8.50 4. Select DUT Rear Panel BNC Connector as follows: Press Touch Select Press Set AM700 Audio Measurement Set Service Manual Configure button Input Selection soft key RP BNC Clear Menu BNC Output = 0.03 Vp-p 4–41 Performance Verification 5. Check the Main Channel Level as indicated in Table 4–8. ÁÁÁÁÁÁÁÁÁÁÁÁÁÁÁÁÁÁÁÁÁÁÁÁÁ ÁÁÁÁÁÁÁÁÁÁÁÁÁÁÁÁ ÁÁÁÁÁÁÁÁÁÁÁÁÁÁÁÁÁÁ ÁÁÁÁÁÁÁÁ ÁÁÁÁÁÁÁÁÁÁÁÁÁÁÁÁÁÁÁÁÁÁÁÁÁÁ ÁÁÁÁÁÁÁÁÁÁÁÁÁÁÁÁÁÁÁÁÁÁÁÁÁÁ ÁÁÁÁÁÁÁÁÁÁÁÁÁÁÁÁÁÁÁÁÁÁÁÁÁÁ ÁÁÁÁÁÁÁÁÁ ÁÁÁÁÁÁÁÁÁ ÁÁÁÁÁÁÁÁ ÁÁÁÁÁÁÁÁÁ ÁÁÁÁÁÁÁÁÁ ÁÁÁÁÁÁÁÁ ÁÁÁÁÁÁÁÁÁÁÁÁÁÁÁÁÁÁÁÁÁÁÁÁÁÁ ÁÁÁÁÁÁÁÁÁÁÁÁÁÁÁÁÁÁÁÁÁÁÁÁÁÁ Table 4–8: BNC output and main output test Main channel level Check Clock Rate BNC output Min Max 0.03 0.013 0.052 0.10 0.072 0.132 0.50 0.412 0.592 1.00 0.837 1.17 2.00 1.69 2.32 1. Set DUT controls as follows: Press Set Press Set Digital Audio soft key Sample Rate = 48 kHz Interface Timing soft key Mode = From Audio 2. Check that Main Sample Freq is 47999.760 to 48000.240 Hz. 3. Set the DUT as follows: Mode = Variable Var Freq = 30 kHz 4. Check that eye diagram stabilizes. 5. Set the DUT as follows: Var Freq = 52 kHz 6. Check the that eye diagram stabilizes. Check Static Phase Difference 1. Set the DUT as follows: a. Press the Configure button, touch the Input Selection soft key, and select the AES Gen. b. Touch the Eye Diagram icon, press the Menu button, touch the Digital Audio soft key, and make the following selection: Sample Rate = 48 kHz c. Touch the Interface Timing soft key and make the following selection: Mode = From Audio 4–42 AM700 Audio Measurement Set Service Manual Performance Verification d. Set the Clock Phase Offset to the following values: 0, 0.5 UI, –0.5 UI, 63.5 UI, and –64 UI 2. Check that the Phase Diff. on the test AM700 reads the same as the values in step 1, part d ±1 UI. NOTE. 64 UI = –64 UI just as 180° = –180°) Check Phase Jitter (Jitter spectrum flatness) 1. Connect the test AM700 as follows: Test AM700 Digital Out to DUT Digital In 2. Set the AM700 as follows: Touch Touch Set Set Jitter Generation soft key Generate Jittered Sine soft key Jitter Ampl = 10 UI Jitter Freq = 50 Hz 3. Setup controls for DUT as follows: Press Touch Select Press Touch Touch Select Select Press Touch Select Press and hold Set Release Press Configure button Input Selection soft key FP XLR Clear Menu button Icon Jitter Spectrum Eye/Jitter Detection soft key 120 Hz Gain = x1 Configure button Input Selection soft key FP XLR Average button Avg. Count = 8 Average button Average button on 4. Zoom in and use the cursor to measure the spectrum at the generated frequency (47 Hz). a. Check for a reading in the range from 18 to 22 dBUI. b. Repeat the measurements as indicated in Table 4–9. AM700 Audio Measurement Set Service Manual 4–43 Performance Verification Table 4–9: Phase Jitter 1 Test AM700: Jitter freq = ÁÁÁÁÁÁÁÁÁÁÁÁÁÁÁÁÁÁÁÁÁÁÁÁÁÁÁÁÁÁÁÁÁÁÁÁÁ ÁÁÁÁÁÁÁÁÁÁÁÁÁÁÁÁÁÁÁÁÁÁÁÁÁÁÁÁÁÁÁÁÁÁÁÁÁ ÁÁÁÁÁÁÁ ÁÁÁÁÁÁÁÁ ÁÁÁÁÁÁÁ ÁÁÁÁÁÁÁÁ ÁÁÁÁÁÁÁ ÁÁÁÁÁÁÁ ÁÁÁÁÁÁÁÁ ÁÁÁÁÁÁÁ ÁÁÁÁÁÁÁÁ ÁÁÁÁÁÁÁ ÁÁÁÁÁÁÁÁÁÁÁÁÁÁÁÁÁÁÁÁÁÁÁÁÁÁÁÁÁÁÁÁÁÁÁÁÁ Jitter ampl = 10 UI Test AM00 50 Hz 200 Hz 1 kHz D 1x, 120 Hz 18 – 22 18 – 22 19 – 21 U 1x, 1200 Hz 18 – 22 18 – 22 19 – 21 T 8x, 1200 Hz 18 – 22 18 – 22 N/A c. Set the test AM700 Jitter Amplitude = 0.32 UI, and use the cursor to measure as indicated in Table 4–10. ÁÁÁÁÁÁÁÁÁÁÁÁÁÁÁÁÁÁÁÁÁÁÁÁÁÁÁÁÁÁÁÁÁÁ ÁÁÁÁÁÁÁÁÁÁÁÁÁÁÁÁÁÁÁÁÁÁÁÁÁÁ ÁÁÁÁÁÁÁÁÁÁÁÁÁ ÁÁÁÁÁÁÁÁÁÁÁÁÁÁÁÁÁÁÁÁÁÁÁÁÁÁ ÁÁÁÁÁÁÁÁ ÁÁÁÁÁ ÁÁÁÁÁ ÁÁÁÁÁÁ ÁÁÁÁÁ ÁÁÁÁÁ ÁÁÁÁÁ ÁÁÁÁÁÁÁÁÁÁÁÁÁÁÁÁÁÁÁÁÁÁÁÁÁÁÁÁÁÁÁÁÁÁÁÁÁÁÁ ÁÁÁÁÁÁÁÁÁÁÁÁÁÁÁÁÁÁÁÁÁÁÁÁÁÁÁÁÁÁÁÁÁÁÁÁÁÁÁ ÁÁÁÁÁÁÁÁÁÁÁÁÁÁÁÁÁÁÁÁÁÁÁÁÁÁÁÁÁÁÁÁÁÁÁÁÁÁÁ ÁÁÁÁÁÁÁÁ ÁÁÁÁÁ ÁÁÁÁÁ ÁÁÁÁÁÁ ÁÁÁÁÁ ÁÁÁÁÁ ÁÁÁÁÁ ÁÁÁÁÁÁÁÁÁÁÁÁÁÁÁÁÁÁÁÁÁÁÁÁÁÁÁÁÁÁÁÁÁÁÁÁÁÁÁ Table 4–10: Phase Jitter 2 Test AM700 Test AM700: Jitter freq. = Jitter ampl =0.32 UI 50 Hz 200 Hz 1 kHz 10 kHz 30 kHz 50 kHz 1 x, 120 Hz –12 to –8 –12 to –8 –11 to –9 –12 to –8 N/A N/A 1x, 1200 Hz N/A N/A –11 to –9 –12 to –8 N/A N/A 8x, 120 Hz –12 to –8 –12 to –8 –11 to –9 –12 to –8 –12 to –8 –12 to –8 8x, 1200 Hz –12 to –8 –12 to –8 –11 to –9 –12 to –8 –12 to –8 –12 to –8 Check Jitter Spectrum Noise Floor 1. Connect the test AM700 as follows: Test AM700 AES REF OUT to DUT Digital In. 2. Calibrate the DUT as follows: Press: Touch Touch Touch Touch Configure button System Setup soft key Calibrate soft key Calibrate Now soft key Accept Changes soft key 3. Set the DUT as follows: LF Rej = 120 Hz Jitter Gain = x8 Avg. = 8 4. Zoom in and use the cursor to measure the spectrum at 50 Hz. 5. Check that the reading is below –40 dBUI. 6. Scroll through spectrum up to 1 kHz. 7. Check that any spurs found are below –40 dBUI. 4–44 AM700 Audio Measurement Set Service Manual Performance Verification 8. Press the Rescale button and check that any other spurs found are below –40 dBUI. Check Peak-to-Peak Jitter Measurement Accuracy 1. Connect the test AM700 as follows: Test AM700 Digital Out to DUT Digital In (XLR) 2. Set the DUT controls as follows: Press Touch Press Touch Select Select Digital button icon Eye Diagram soft key Menu button Eye/Jitter Detection soft key LF Rejection = 120 Hz Jitter Gain = x1 3. Do a calibration of the DUT as follows: Press Touch Touch Touch Touch Configure button System Setup soft key Calibrate soft key Calibrate Now soft key Accept Changes soft key 4. Set the test AM700 controls as follows: Press Select Set Press Jitter Generation soft key Generate Jitter Sine Jitter Ampl = 0 UIpp GENERATOR On button 5. Record the peak-to-peak jitter from the DUT. This is “120 Hz residual” (0.03–0.05 UI). The specification is 120 Hz residual: 0.03 – 0.045 UI (p-p jitter). 6. Set the DUT LF Rejection to 1200 Hz, “1200 Hz residual” The specification is 1200 Hz residual: 0.03 – 0.045 UI (p-p jitter). NOTE. If the residual peak-to-peak jitter exceeds 0.05 UI, change the sample frequency on the test AM700 to 44.1 kHz as follows: press the Menu button, touch the Digital Audio soft key, touch the Sample Rate soft key; rotate the large knob to select 44.1 kHz, and press enter to make the change. Reset the sample rate to 48 kHz when you are done with the checks. 7. Set the Test AM jitter amplitudes and frequencies and DUT LF Rejection as indicated in Table 4–11, and check that the Jitter measurement is within the measurement accuracy range shown. Record the measurements in the table. AM700 Audio Measurement Set Service Manual 4–45 Performance Verification a. Do the checks for 120 Hz LF Rej at a jitter amplitude of 0.2 UI first from 500 Hz to 30 kHz; then make the 1200 Hz Lf Rej check at 30 kHz (1200 Hz LF Rej is only checked at 30 kHz). b. Set the jitter amplitude to 0.65 UI and make the 1200 Hz LF Rej check; then switch the LF Rej to 120 Hz to make the check from 30 kHz down to 500 Hz jitter frequency. Table 4–11: Test AM700 jitter measurement accuracy Test settings Measurement accuracy range Test AM jitter frequency 500 Hz 2 kHz 5 kHz Not checked Not checked Not checked Not checked Not checked Not checked 30 kHz Test AM Jitter Ampl = 0.2 UI DUT LF Rej: 120 Hz 0.17 UI to 0.32 UI LF Rej 1200 Hz 0.17 UI to 0.32 UI Test AM Jitter Ampl = 0.65 UI DUT LF Rej = 120 Hz 0.6 UI to 0.7 UI LF Rej = 1200 Hz 0.6 UI to 0.7 UI Check Eye Diagram Residual Jitter 1. Set the DUT as follows: a. Touch the Eye Diagram soft key (Icon). Press Touch Select Configure Input Selection FP XLR b. Touch the Digital Audio soft key. Set Sample rate = 48 kHz c. Touch the Interface Timing soft key. Set Set Mode = From Audio Offset = 0 d. Touch the Eye/Jitter Detection soft key. Select 120 Hz 2. Connect the DUT as follows: DUT AES REF OUT to DUT Digital In 3. Check that the peak-to-peak jitter is 0.03 UIp-p max. 4–46 AM700 Audio Measurement Set Service Manual Performance Verification NOTE. If the residual peak-to-peak jitter exceeds 0.05 UI, change the sample frequency on the test AM700 to 44.1 kHz as follows: press the Menu button, touch the Digital Audio soft key, touch the Sample Rate soft key; rotate the large knob to select 44.1 kHz, and press enter to make the change. Remake the check. of step 3. Reset the sample rate to 48 kHz when you are done with the checks. Check Input and Output Impedance Check the Digital Out and AES REF Out as follows: 1. Set the DUT as follows: a. Touch Interface Ampl soft key. Set XLR Output = 5.00 Vp-p 2. Connect the AES REF OUT to the differential oscilloscope input using an unterminated dual BNC to dual XLR cable adapter (shown in Figure 4–19). XLR Female 2 1 3 BNC Female Cable used is insulated coax. 1 2 3 XLR Male Figure 4–19: Dual BNC to dual XLR cable adapter 3. Record the open-circuit output level as measured from the oscilloscope. Ignore the overshoot caused by the cable, and measure at the center of tilt (if tilt is present in the signal display). 4. Connect a precision 110 W resistor between pin 2 and pin 3 of the open end of the dual XLR adapter cable or use the 110 W XLR to BNC cable adapter AM700 Audio Measurement Set Service Manual 4–47 Performance Verification shown in Figure 4–20 to make the connection from the XLR connector to the oscilloscope inputs. 5. Measure the terminated-output level using the oscilloscope. 6. Calculate the ratio of the input-terminated level to open-circuit level. 7. Check that this ratio is in the range of 0.45 to 0.55. BNC Female Cable used is insulated coax. 1 XLR Female 2 3 110W Figure 4–20: Dual BNC to 110 XLR female adapter cable 8. Measure the terminated-output level. 9. Calculate the ratio of the input-terminated level to open-circuit level. 10. Check that this ratio is in the range of 0.45 to 0.55. 11. Connect the front panel Digital Out signal to the differential oscilloscope input using a non-terminating adapter. 12. Repeat step 3 through step 10 for the Digital Out signal. Check the Digital In and AES REF In impedance as follows: 1. Record the terminated Digital Out signal level measured by the oscilloscope. 2. Remove the precision termination and connect the free end of adapter to the Digital In connector. 3. Measure the signal level with the oscilloscope. 4. Calculate the ratio of the input-terminated level to the precision-terminated level. 5. Check that this ratio is in the range of 0.95 to 1.05. 6. Repeat the check for the AES REF In connector. 4–48 AM700 Audio Measurement Set Service Manual Performance Verification Check the UNBALANCE OUT AND IN impedance as follows: 1. Connect the UNBALANCE OUT connector to the oscilloscope with 48 inch or shorter 75 W cable. 2. Record the open circuit output level as measured with the oscilloscope. 3. Terminate the cable at the oscilloscope using BNC tee connector and 0.025%, 75 W termination. 4. Record the terminated output level. 5. Calculate the ratio of the input-terminated level to open-circuit level. 6. Check that this ratio is in the range of 0.48 to 0.52. 7. Remove the precision termination and connect the open end of the tee to the UNBALANCED IN connector with a 75 W cable. 8. Calculate the ratio of the input-terminated level to the precision-terminated level. 9. Check that this ratio is in the range of 0.98 to 1.02. Check the OPTICAL IN and OPTICAL OUT as follows: 1. Set the DUT for as follows: a. Touch the Icon Eye Diagram soft key. b. Set the Eye/Jitter Detection to 120 Hz. c. Press the Configure button. d. Touch the Input Selection soft key. e. Select RP Optical. f. Press the Clear Menu button. 2. Connect a 1-meter plastic optical fiber cable from the OPTICAL OUT connector to the OPTICAL IN connector. 3. Check for normal eye with 0.08 UIp-p or less jitter with a Main Channel Level in the range of 2 V to 3 Vp-p. NOTE. If the residual peak-to-peak jitter exceeds 0.08 UI, change the sample frequency on the test AM700 to 44.1 kHz as follows: press the Menu button, touch the Digital Audio soft key, touch the Sample Rate soft key; rotate the large knob to select 44.1 kHz, and press enter to make the change. Remake the check of step 3. Reset the sample rate to 48 kHz when you are done with the checks. AM700 Audio Measurement Set Service Manual 4–49 Performance Verification Check the DSP Port The following procedure checks that the DSP port functions to provide direct input and output of digital signals to and from the DSP. DSP Port Test 1. Connect a DSP PORT test cable on the rear panel from the test AM700 to DUT. 2. On a PC, use Edit to make a file called dport.on" which contains the following command line to switch the DSP to the transmit mode: scpi INT: SOUR:DSP:TMODE on NOTE. This has to be an ASCII text file, so use EDIT instead of a word processor that may add formatting or control characters. You can also use a Windows tool such as Note Pad to write this file. There is no front panel control to make this switch. 3. Save the file to a 3.5 inch floppy disk labeled “dtest” and remove it from the PC disk drive. 4. Insert the 3.5 inch floppy disk labeled “dtest” into the the test AM700. 5. Setup the the test AM700 using the following procedure: a. Press the Storage button, and touch the left Drive soft key to switch to dos. (This should display the files in the floppy disk.) b. If not already done, touch the right Drive soft key to select nvram. c. Touch function/ (on the right side); then touch Change Directory. d. In the DOS directory list, touch the dport.on file name. e. Press the Copy soft key, then OK. Wait for about 1 second, and then press the Clear Menu button. f. Press the GENERATOR Control button, touch the AES soft key in the menu, and then press the Clear Menu button. g. Press the Function button, and select the dport.on function name. h. Touch the Run Function soft key, and wait for 1 sec. i. 4–50 Select the FFT application. AM700 Audio Measurement Set Service Manual Performance Verification 6. Set the AM700 (DUT) under test as follows: a. Press the GENERATOR/Control button, touch the DSP soft key, and then touch the Waveform Control soft key. Make the following selections: Select Digital SF 1 Sine Frequency = 1 kHz Amplitude = 0 dBu Select Digital SF 2 Sine Frequency = 5 kHz Amplitude = 0 dBu b. Press the Clear Menu button. c. In the GENERATOR control panel, press the Generator On button. d. Press the FFT button, and then press the Configure button. e. Touch the System Setup soft key, and then touch the Conversion Standards soft key. Make the following selection: Digital Audio Sampling Rate = Interface Clock f. Touch the Accept Changes soft key. 7. Set the the test AM700 as follows: a. Press Touch Touch GENERATOR/Control button DSP soft key Waveform Control soft key b. Select Digital SF 1 Sine Frequency = 10 kHz Amplitude =0 dBu c. Select Digital SF 2 Sine Frequency = 15 kHz Amplitude = 0 dBu d. Press Clear Menu button e. Press GENERATOR On button AM700 Audio Measurement Set Service Manual 4–51 Performance Verification f. Press the FFT button, and then the Configure button. Touch the System Setup soft key; then touch the Input Selection soft key. Make the following selections: Channel 1 = DSP A Channel 2 = DSP B g. Press the Clear Menu button, and then the Configure button. Touch the System Setup soft key, and then the Conversion Standards soft key. Make the following selection: Digital Audio Sampling Rate = Interface Clock h. Touch the Accept Changes soft key. i. Turn on Channel 2 on the test AM700 (press icon Channel 2). 8. Set the DUT as follows: a. Press the Configure button, and then touch the Input Selection soft key. Make the following selections: Channel 1 = DSP A Channel 2 = DSP B b. Press the Clear Menu button. c. Turn on Channel 2 on the DUT (press icon Channel 2). d. Check that the DUT FFT shows the following displays: Channel 1 displays 10 kHz signal Channel 2 displays 15 kHz signal e. Check that the test AM700 FFT shows the following displays: Channel 1 displays 1 kHz signal Channel 2 displays 5 kHz signal 4–52 AM700 Audio Measurement Set Service Manual Performance Verification Check Digital Interface Tester (DIT) Functionality 1. Reset the AM700 setting to Factory Default as follows: a. Press the Configure button. b. Touch the State Saving soft key, and then touch Factory Defaults. 2. Press Configure button. a. Press the Input Selection soft key. b. Press the source “toggle” icon soft key to select AES Gen for DigMain SF1 and SF2. c. Press Clear Menu button. 3. Press MENU button. a. Press Digital Main Inputs soft key to select DigMain SF1 &SF2 acquisition inputs. b. Press Clear Menu button. 4. Press ON button in the Generator control panel. a. Press the Rescale button. b. Check to see that the FFT shows a sine wave being generated. 5. Press the Digital Application button. a. When the Digital Application starts, check to see that the bit activity display is active on bits 4 through 27 and 30 through 31. b. Touch the 1/0 icon soft key. c. Check to see that the Channel Status Data is displayed. d. Press the eye height icon soft key. e. Check to see that the eye height diagram is displayed on the screen. f. Press jitter spectrum icon soft key. g. Check to see that the jitter spectrum is displayed. h. Press the Menu button. i. Touch the Jitter Generation soft key. j. Touch the Generate Sine soft key. k. Touch the Eye/Jitter Detection soft key. AM700 Audio Measurement Set Service Manual 4–53 Performance Verification l. Touch the Jitter Gain soft key to select X8 gain. m. Press the Average button. n. Press the Rescale button. o. Check to see that the largest spike in the jitter spectrum is lower than –45 dBUI. Check Disk Drive and File Transfer Operation This procedure checks that the disks drive functions for file transfers. 1. Insert a blank MS DOS formatted, 1.44 Meg disk in the AM700 disk drive. 2. Press the Storage button on the front panel to display the Storage Manager control screen shown in Figure 4–21. Figure 4–21: Storage manager control screen 4–54 AM700 Audio Measurement Set Service Manual Performance Verification 3. Touch Drive on the right side of the Storage Manager screen to select the nvram:.directory. 4. On the right side of the Storage Manager screen select the function directory. This done by first touching the directory name to shift the knob focus to that side. Once the focus is shifted, you can use the large knob to make further selections by scrolling through the list. 5. With the function/directory highlighted, touch the Change Directory soft key to go into that directory. You will then see a list of files if any are stored there. 6. Touch a file name in the function files display area to make sure the knob focus is on the right side, and use the large control knob to select a file to be transferred to the disk. 7. Touch Drive on the left side of the Storage Manager to select dos: A list of the directories and files at the top level of the disk directory will be displayed. 8. Touch Copy to copy the file from nvram:/function to dos. 9. Check that the name of the file you copied appears in the dos: directory. 10. Touch the file name in the dos: directory file list. 11. Touch the Delete soft key. You will get a notifier asking if you really want to delete the selected file. Touch OK to delete the file. Check that the file is deleted from the dos: directory. Alternate Disk Drive Verification V1.02 Firmware A more intensive check of the disk drive can be done using the low level diagnostics function when the AM700 has V1.02 or above firmware installed. Use the following procedure to perform the disk drive stress test. 1. Turn the AM700 off. 2. Hold in the Menu button and turn the AM700 back on. 3. When the AM700 beeps twice, the low-level diagnostic start up mode has been recognized. Release the Menu button. AM700 Audio Measurement Set Service Manual 4–55 Performance Verification The AM700 then resets and displays the AM700 STARTUP MENU choices shown in Figure 4–22. Low Level Diagnostic Interface --- AM700 STARTUP MENU --Key Selection __________________________________ H R D U ... ... ... ... Diagnostics -HELP- Menu Instrument -RUN MODES- Menu Low Level -DIAGNOSTICS- Menu -UTILITIES- Menu F ... -FIRMWARE- Date Codes __________________________________ = ... Reprint @ ... Abort Menu __________________________________ Input your selection: Figure 4–22: AM700 startup menu 4. In this menu, select “D” (Low Level Diagnostics Menu) and press select to access the Low Level Diagnostics menu shown in Figure 4–23. Low Level Diagnostic Interface --- LOW LEVEL DIAGNOSTICS--Select a diagnostic to execute from the list below: Key Selection __________________________________ A ... CPU Diagnostic B ... Digital Audio Diagnostic C ... Display Diagnostic D ... DSP Diagnostic E ... Generator Diagnostics F ... Floppy Diagnostic __________________________________ = ... Reprint @ ... Abort Menu __________________________________ Input your selection: Figure 4–23: Low level diagnostics menu V1.02 firmware 5. Select F “Floppy Diagnostic” and press the Select button to display the Floppy Diagnostic choices shown in Figure 4–24. 4–56 AM700 Audio Measurement Set Service Manual Performance Verification --- FLOPPY DIAGNOSTIC --Configure CUSTOM RUN MODE parameters and the test sequence as desired. Key Selection ____________________________________ S ... -Sequence- Type (CUSTOM) 1 ... Advance Mode (MANUAL) 2 ... Result Display Mode (SHOW ALL) 3 ... Result Logging Mode (DISABLED) B____________________________________ ... -BUILD- New Test Sequence = ... Reprint @ ... Abort Menu ____________________________________ Input your selection: Figure 4–24: Low level diagnostic OVERALL RUN MODE menu 6. Select “B” Build a New Test Sequence and press the Select button to display the floppy drive test choices available in the diagnostic as shown in Figure 4–25. Low Level Diagnostic Interface --- Floppy Diagnostic --Build a new CUSTOM TEST SEQUENCE by selecting test from those listed. (Tests prefaced with "UI:" require USER INTERACTION) Key Selects/Unselects __________________________________ A ... UI: Disk Status Query B ... UI: Disk Format C ... UI: Drive Stress Test __________________________________ = ... Reprint @ ... Abort Menu + ... Select All - ... Un-Sel All ! ... Done Selecting __________________________________ Selection(s): *** NONE *** Figure 4–25: Build CUSTOM TEST SEQUENCE menu for disk drive test AM700 Audio Measurement Set Service Manual 4–57 Performance Verification 7. Select “C” Drive Stress Test and press the Select button. 8. After you have made the test selections you want in the custom list, highlight the ! (Done Selecting) and press Select. This returns to the next higher level menu where the choice to run the tests in the custom list you have just made becomes available. 9. Select “R” Run Test Sequence and press the Select button to begin the drive stress test. You have to insert a MS DOS formatted 1.4 Meg diskette into the AM700 disk drive to do this test. The drive stress test take some time to do as it writes to the 80 tracks and verifies the test. The track being written is indicated in the display. When the testing is complete, the test results are displayed. A passing test result is shown in Figure 4–26. Floppy Diagnostic Test measmt unit min max result Drive Stress Test Track Write ĆĆĆĆ 0 errors ĆĆĆĆĆĆ 0 - Pass Track Read ĆĆĆĆĆ 0 errors ĆĆĆĆĆĆ 0 - Pass Track Seek ĆĆĆĆĆ 0 errors ĆĆĆĆĆĆ 0 - Pass Data Verify ĆĆĆ 0 errors ĆĆĆĆĆĆ 0 - Pass ====================================================== ==>> CURRENT TEST SEQUENCE COMPLETED <<== ==>> Press any key to Continue <<== - Figure 4–26: Floppy diagnostic drive stress test results 4–58 AM700 Audio Measurement Set Service Manual Performance Verification Check Headphones, GPIB, and Hardcopy These final checks verify the head phone audio output and volume control, the operation of the GPIB interface for remote control, and the hard copy function to print to an external printer. DUT Under Test Setup Check Headphone Function In the Input Configuration menu select GEN A and GEN B input sources and press the Generator On button to turn both generators on. 1. Press the Control button in the Generator control panel area. a. Touch the Knobs icon soft key for Ch A to attach the generator knobs to controlling the A channel of the generator. b. Press the Clear Menu button. 2. Press and hold the ON button in Sound controls. a. Touch the Listen to: soft key to select the Analog input signal. b. Turn the Volume (knob) fully counterclockwise. c. Press the ON button in the Sound controls. 3. Adjust the Amplitude knob for maximum generator output. 4. Listen to the head phones and adjust Volume. 5. Check to see that there is sound on both channels. 6. Adjust the Frequency knob and listen for the frequency to change. 7. Press the ON button in Sound to turn the listen mode off. 8. Press the Clear Menu button. Check GPIB Remote Control Operation 1. Turn off the AM700. 2. Connect the GPIB port to an appropriate GPIB controller. 3. Configure the GPIB controller to talk to the AM700 at address 1 (this is the default address selection for the AM700). 4. Power on the AM700. 5. Press the Configure button on the front panel and touch the System Setup choice. AM700 Audio Measurement Set Service Manual 4–59 Performance Verification 6. Configure the GPIB address for address 1 and the GPIB mode for Talk/ Listen as shown in Figure 4–27, if it is not already setup that way. 7. Touch Accept Changes to apply the change and exit back to the application. 8. From the GPIB controller, send the *ID? command to check for proper configuration. If the AM700 responds with its identification, the GPIB interface is operational. 9. Send several more commands and change applications to exercise the interface enough to confirm operation. Figure 4–27: GPIB setup in the communications configuration screen Check Hardcopy Operation 1. Connect a Epson or Epson-compatible 24-pin serial printer to COM 1 and a PostScript compatible laser printer to COM 2. 2. Configure the AM700 Serial 1 and Serial 2 ports as needed for the connected printer. This includes the baud rate, stop bits, parity, and flow control (CTS/RTS and XON/XOFF) (see Figure 4–27). 3. Configure the Copy Format for an Epson (24-pin) printer and set the Copy Destination to the Serial Port 1 (the one that has the Epson printer connected to it). 4. Press Accept Changes to clear the menu (this activates the changes you have just made). 4–60 AM700 Audio Measurement Set Service Manual Performance Verification 5. Press and release the Copy front panel button to send a hard copy to the printer. 6. Press and Hold the Copy front panel button to display the Copy Configuration menu (see Figure 4–28). Figure 4–28: Copy configuration menu 7. Configure the Copy Format to PostScript Image and the Copy Style to Gray Scale. 8. Configure the Copy Destination for Serial Port 2 for the laser printer. 9. Touch the Accept Changes soft key to make the selections and clear the menu. 10. Press and release the Copy front panel button to send a hard copy to the laser printer. NOTE. You may make further checks such as printing to a color printer or sending a file to disk and printing from the disk file, to more fully exercise the hard copy function. AM700 Audio Measurement Set Service Manual 4–61 Performance Verification 4–62 AM700 Audio Measurement Set Service Manual Adjustment Procedures The procedures in this section are designed to adjust the circuitry of the AM700 Audio Measurement Set to return it to specified accuracy. Test Equipment Required The test equipment needed to perform the adjustment procedures is listed in Table 5–1. Use the test equipment shown or an equivalent to do the adjustments. If the example test equipment is not available, check the Minimum Specification column to determine if you can use another piece of test equipment. If you use other test equipment, the controls and connectors for that equipment may be different from those called out for the example test equipment. Refer to the appropriate operator’s manuals for operation of the test equipment. Table 5–1: Equipment required list Equipment Minimum specification Purpose Example Analog oscilloscope Dual Channel, 50 W input termination, 300 MHz BW, external triggering Viewing video signals Tektronix 2465 ÁÁÁÁÁÁÁÁÁÁ ÁÁÁÁÁÁÁÁÁ ÁÁÁÁÁÁÁÁÁ ÁÁÁÁÁÁÁÁÁ ÁÁÁÁÁÁÁÁÁÁÁÁÁÁÁÁÁÁÁ ÁÁÁÁÁÁÁÁÁÁÁÁÁÁÁÁÁÁ ÁÁÁÁÁÁÁÁÁÁÁÁÁÁÁÁÁÁ ÁÁÁÁÁÁÁÁÁ ÁÁÁÁÁÁÁÁÁÁ ÁÁÁÁÁÁÁÁÁÁ ÁÁÁÁÁÁÁÁÁ ÁÁÁÁÁÁÁÁÁ ÁÁÁÁÁÁÁÁÁ ÁÁÁÁÁÁÁÁÁÁÁÁÁÁÁÁÁÁÁÁÁÁÁÁÁÁÁÁÁÁÁÁÁÁÁÁÁ Digital audio signal measurement set Digital audio signal source and digital audio signal analyzer Provide digital audio signals to the AM700 being adjusted. Tektronix AM700 (Test AM) Digitizing oscilloscope Make voltage and frequency adjustments Tektronix TDS540 Digital multimeter Make voltage adjustments Tektronix Digital Multimeter DM25101 RMS meter Accuracy 1%, resolution 5 digits; balanced input Making generator output adjustments Hewlett-Packard HP3458A or Fluke 8506A or 8505A–09 Precision Audio Analyzer Frequency Accuracy: ±0.01%; level flatness: (20 Hz to 80 kHz): ≤ 0.05 dB; level accuracy (20 Hz to 80 kHz): ≤ 0.02 dB; residual distortion: 0.0010% (–100 dB) Provide precision audio signals and make precision audio measurements. ShibaSoku AM51A Audio Analyzer Photometer Visible light level up to 300 fl. Adjust brightness level of the CRT display. Adjustment tool Flat-tip screwdriver, 3/16 inch tip. Adjust variable adjustment controls Interconnection cable XLR female to dual-banana Signal interconnection ÁÁÁÁÁÁÁÁÁÁ ÁÁÁÁÁÁÁÁÁ ÁÁÁÁÁÁÁÁÁ ÁÁÁÁÁÁÁÁÁ ÁÁÁÁÁÁÁÁÁÁ ÁÁÁÁÁÁÁÁÁ ÁÁÁÁÁÁÁÁÁ ÁÁÁÁÁÁÁÁÁ ÁÁÁÁÁÁÁÁÁÁ ÁÁÁÁÁÁÁÁÁ ÁÁÁÁÁÁÁÁÁ ÁÁÁÁÁÁÁÁÁ ÁÁÁÁÁÁÁÁÁÁÁÁÁÁÁÁÁÁÁÁÁÁÁÁÁÁÁÁÁÁÁÁÁÁÁÁÁ AM700 Audio Measurement Set Service Manual Tektronix J17 Lumacolor meter with Tektronix J1803 Luminance Head Customer fabricated 5–1 Adjustment Procedures Table 5–1: Equipment required list (cont.) Equipment Minimum specification Purpose Example Interconnection cable Coaxial cable, 50 W, 42 inches, BNC connectors Signal interconnection Tektronix part number 012–0057–01 Adapter connector Female BNC to hook clip connectors. Signal interconnection: acquisition board test points to audio analyzer inputs Tektronix part number 013–0076–00 WWV Receiver or precision frequency standard Accuracy 1 × 10–12 Provides accurate frequency reference for the digital frequency counter HP105B Quartz Frequency Standard Digital frequency counter Accuracy and resolution to 8 Adjust sample clock frequency decimal places, or used with an external reference (WWV, Loran C, or GPS) that will improve the accuracy to 8 decimal places. 20 Hz to 20 MHz range. Rubidium oscillator frequency standard Tektronix DC50101 ÁÁÁÁÁÁÁÁÁ ÁÁÁÁÁÁÁÁÁ ÁÁÁÁÁÁÁÁÁ ÁÁÁÁÁÁÁÁÁ ÁÁÁÁÁÁÁÁÁ ÁÁÁÁÁÁÁÁÁ ÁÁÁÁÁÁÁÁÁ ÁÁÁÁÁÁÁÁÁ ÁÁÁÁÁÁÁÁÁÁÁÁÁÁÁÁÁÁÁÁÁÁÁÁÁÁÁÁÁÁÁÁÁÁÁÁ Test probes and meter cables for test equipment Supplied with test equipment Extender cable set Tektronix fabricated extender cables Universal Load Unit For troubleshooting and adjustments with the circuit boards removed from the AM700 Tektronix part numbers not available as of this printing Provide power supply load for factory service adjustment and repairs ÁÁÁÁÁÁÁÁÁ ÁÁÁÁÁÁÁÁÁ ÁÁÁÁÁÁÁÁÁ ÁÁÁÁÁÁÁÁÁ ÁÁÁÁÁÁÁÁÁÁÁÁÁÁÁÁÁÁ ÁÁÁÁÁÁÁÁÁÁÁÁÁÁÁÁÁÁ ÁÁÁÁÁÁÁÁÁÁÁÁÁÁÁÁÁÁ ÁÁÁÁÁÁÁÁÁ ÁÁÁÁÁÁÁÁÁ ÁÁÁÁÁÁÁÁÁ ÁÁÁÁÁÁÁÁÁ ÁÁÁÁÁÁÁÁÁ ÁÁÁÁÁÁÁÁÁ ÁÁÁÁÁÁÁÁÁ ÁÁÁÁÁÁÁÁÁ ÁÁÁÁÁÁÁÁÁ ÁÁÁÁÁÁÁÁÁ ÁÁÁÁÁÁÁÁÁÁÁÁÁÁÁÁÁÁÁÁÁÁÁÁÁÁÁÁÁÁÁÁÁÁÁÁ Monitor Test Fixture Tektronix fabricated fixture Provides mounting attachments for aligning the CRT display monitor out of the instrument Not available to customers VGA Distribution Amplifier VGA signal splitter with at least two VGA outputs VGA signal source for CRT monitor alignment Communications Specialties Inc., Quadsplit VGA Distribution Amplifier Video source interconnection cable VGA connector to J2 connector Connects the VGA video output from the PC to J2 on the CRT display module Tektronix part number not available as of this printing Test Jumper Jumper wire with square pin connectors, 0.1 in spacing Connects power supply temperature sense pins for CRT alignment procedure Customer supplied Tektronix test program Provides test patterns for CRT alignment Tektronix part number not available as of this printing Provides alignment points for CRT alignment patterns Tektronix part number not available as of this printing ÁÁÁÁÁÁÁÁÁ ÁÁÁÁÁÁÁÁÁ ÁÁÁÁÁÁÁÁÁ ÁÁÁÁÁÁÁÁÁ ÁÁÁÁÁÁÁÁÁ ÁÁÁÁÁÁÁÁÁ ÁÁÁÁÁÁÁÁÁ ÁÁÁÁÁÁÁÁÁ ÁÁÁÁÁÁÁÁÁÁÁÁÁÁÁÁÁÁÁÁÁÁÁÁÁÁÁÁÁÁÁÁÁÁÁÁ ÁÁÁÁÁÁÁÁÁ ÁÁÁÁÁÁÁÁÁ ÁÁÁÁÁÁÁÁÁ ÁÁÁÁÁÁÁÁÁ ÁÁÁÁÁÁÁÁÁÁÁÁÁÁÁÁÁÁ ÁÁÁÁÁÁÁÁÁÁÁÁÁÁÁÁÁÁ ÁÁÁÁÁÁÁÁÁÁÁÁÁÁÁÁÁÁ ÁÁÁÁÁÁÁÁÁ ÁÁÁÁÁÁÁÁÁ AM700 crt_test program CRT Test Graticules Computer IBM Compatible Computer–486DX 33 MHz Run test programs Adhesive Clear RTV silicone compound For attaching CRT geometry alignment magnets 5–2 AM700 Audio Measurement Set Service Manual Adjustment Procedures Table 5–1: Equipment required list (cont.) Equipment Minimum specification Purpose Example Set of geometry correction magnets Tektronix adjustment magnets Geometry alignment for the CRT monitor Blue (strongest); Tektronix part number 119–1616–00 Green; Tektronix part number 119–1863–00 Red; Tektronix part number 119–1615–00 Yellow; Tektronix part number 119–4341–00 1 A Tegam TM500 or TM5000 power supply is required to power the plug-in module. Table 5–2: AM700 adjustments Board name Circuit board Analog Acquisition board A1A1 Circuit no. CHA Input & A1A4 & A1A5 Attenuator Boards A Compensation C335 CHB Input & A1A2 & A1A3 Attenuator Boards B Compensation C333 Frequency Adjust R340 A MSB R252 B MSB R245 Digital Audio Board A3 Generator PLL Freq Adjustment L1 Frequency Offset Frequency Adjustment L5 Frequency Offset Frequency Adjustment L7 Eye Sampler Frequency Adjustment L16 Generator Level R483 Generator Board A5 A DAC Gain (Left) R24 B DAC Gain (Right) R18 Display Monitor A10A1 Focus R36 White Level R4 Black Level R64 Vertical Position R57 Vertical Hold R45 Vertical Linearity R48 AM700 Audio Measurement Set Service Manual 5–3 Adjustment Procedures Table 5–2: AM700 adjustments (cont.) Board name Circuit board Circuit no. Vertical Size R45 Horizontal Hold R20 Horizontal Phase (centering) R15 Trace Rotation R67 Power Supply A11 +5 V Adjust R14 LCD Driver Board A13 Red Offset (omitted) R37 Green Offset (omitted) R39 Blue Offset (omitted) R41 Red Gain F6 Green Gain R7 Blue Gain R9 BRT R24 Preparation for Adjustment 1. Turn off the AM700 using the rear power power switch. Disconnect the power cord from the AC mains connector, and remove the cabinet from the AM700. See the Remove and Replacement Procedures in the Maintenance section for cabinet removal instructions. 2. For the LCD flat panel display versions of the AM700, it may be necessary to remove two shield from the Analog Acquisition board to make measurements. Do this while the power is off. CAUTION. Dangerous voltages exist in the power supply. Observe the proper safety precautions when servicing the power supply. Read the Servicing Safety Summary for general safety precautions. 3. Reconnect the power cord to the AC mains. 5–4 AM700 Audio Measurement Set Service Manual Adjustment Procedures Power Supply Verification The power supply adjustment is not accessible when the supply is installed in the AM700. The power supply is adjusted either using a load unit (in manufacturing) or during servicing using the correct extender cables. It is not a normal customer adjustment. Under normal conditions, the power supply should not require adjustment. The verification procedure determines if there is a problem with the power supply that requires servicing. Test Equipment Required Verification Procedure The following test equipment is needed to verify and adjust the power supply: H Test oscilloscope with 1X probe H Digital voltmeter 1. Turn on the AM700 and wait for the initialization to finish. 2. Use an oscilloscope with a 1X probe to check the power supply voltages and ripple as shown in Table 5–3. a. Input Coupling Trigger Volts/Div AC Auto 50 mV Table 5–3: Power supply voltages and ripple tolerances Voltage Tolerance Range Max Load Ripple (mV) Noise (mV) +5 V 0 to +2% 5.0 to 5.1 V 20 A 50 100 +15 V 2% 14.70 to 15.3 V 3A 20 100 –15 V 2% –15.3 to 14.7 V 2A 20 100 –16.5 V 5% –17.33 to –15.68 V 2A 50 100 b. Check the +5 V on the main CPU board at J33 pin 1. Pin 2 is ground. c. Check the +15 V on the main CPU board at J33 pin 3. Pin 4 is ground. d. Check the –15 V on the main CPU board at J33 pin 5. Pin 4 is ground. The –16.5 V source is not accessible with the instrument assembled. If any of the supplies are out of tolerance, the power supply may have a problem and should be replaced. See the Remove and Replacement Procedures in the Maintenance section to remove the power supply from the AM700. You can also contact your nearest Tektronix representative to arrange for your AM700 to be returned to Tektronix Factory Service for repair. AM700 Audio Measurement Set Service Manual 5–5 Adjustment Procedures Factory Service Adjustment This procedure is provided for factory service to check for proper operation to determine if repairs or adjustment are needed. Test Equipment Required The following test equipment is needed to verify and adjust the power supply: H Test oscilloscope with 1X probe H Digital voltmeter H Universal load unit 1. Remove the power supply from the AM700 and connect it to the power load unit. 2. Connect the plus (+) lead of the DVM to TP25, +5 V, and connect the ground (–) lead to TP4 (analog ground) (see Figure 5–1). J10 J6 J5 J11 CR26 Q7 Q6 J9 +5 V Adjust J8 A GND Q3 Q2 J7 FL1 +5 V Figure 5–1: Power supply +5 V test points and adjustment locations CAUTION. Make sure the Line Selector switch is set to the correct operating voltage range before applying power to the supply. The power supply can be damaged if operated with the incorrect voltage range. 3. Slowly increase the voltage to the power supply to the nominal mains supply level (115 Vrms on low range or 230 Vrms on high range) to determine if the power supply is operating normally. 5–6 AM700 Audio Measurement Set Service Manual Adjustment Procedures 4. Do the power supply verification procedure using the oscilloscope to check for proper power supply operation. 5. Adjust R15 (+5 V adjust) for 5.05 V on the DVM. 6. Vary the input voltage from 90 Vrms to 132 Vrms on low range or 180 Vrms to 253 Vrms on high range to verify normal power supply operation over the specified input voltage range. Acquisition Board Adjustment A pair of shields over portions of the acquisition board circuitry may have to be removed to make the necessary measurements. Test Equipment Required The following test equipment is needed to make the adjustment to the acquisition board: H Precision audio analyzer with XLR interconnection cables H Alignment tool H Male to male BNC coaxial cable, 50 W, 42 inches long H BNC to hook clip adapter Test Assembly 1. Connect one generator output of the precision audio analyzer to the Ch A XLR input of the AM700. Adjust the High Bandwidth A/D MSB for Channels A and B 1. Set the generator output of the precision audio analyzer for a 20 kHz sine wave at an amplitude of 15 V. See Figure 5–2 for the test point and adjustment locations. 2. Set the AM700 input configuration for Front Panel Channel A and Channel B. 3. Set the input configuration for the High Bandwidth acquisition channel. 4. If not already in the FFT application, start the FFT application and select View 1 for display. 5. Set the AM700 for 15 averages for each of the two channels. AM700 Audio Measurement Set Service Manual 5–7 Adjustment Procedures A MSB B MSB Freq. Adj Sample CLK D GND A GND SAMPLE CLK Ch A Out A GND Ch B Out A GND A Comp B Comp Figure 5–2: Acquisition board test points and adjustment locations 5–8 AM700 Audio Measurement Set Service Manual Adjustment Procedures 6. Press Rescale in the System Control front panel selections. 7. While observing the FFT, adjust R252 until the null point is reached for the second and third harmonics. 8. Move the test signal from the Channel A input to the Channel B input and select View 2 for display. 9. Press Rescale in the System Control front panel selections. 10. While observing the FFT, adjust R245 until the null point is reached for the second and third harmonics. Adjust the Attenuator Compensation for Channels A and B 1. Set up AM700 as follows: a. Press the Configure button. b. Touch the Input Selection soft key. c. Use the source “toggle” icon to set the AM700 input source for FP A and B. d. Set the input attenuation for Ch A and Ch B to +14 dBu (3.88 V). e. Connect the output of the audio analyzer to the Channel A XLR analog input of the AM700. f. Using 50 W coaxial cable and a BNC to hook clip adapter, connect INPUT A of the audio analyzer to TP8 (Ch A OUT) and TP9 (AGND) of the AM700 analog acquisition board. 2. Set up the precision audio analyzer as follows: a. Set the generator output of the audio analyzer for a 1 kHz sine wave at an amplitude of 1 V. b. Set the audio analyzer input mode to A UNBAL and the input termination to A 600 W OUT. 3. On the audio analyzer, press the MEAS key, and then the RELATIVE LEVEL key to set the reference to 0.00 dB. 4. Set the generator output of the audio analyzer for a 80 kHz sine wave at an amplitude of 1V. 5. Adjust compensation capacitor C335 so that the relative level on the audio analyzer reads 0.08 dB ±0.01 dB. 6. Connect the output of the audio analyzer to the Channel B input of the AM700. AM700 Audio Measurement Set Service Manual 5–9 Adjustment Procedures 7. Using 50 W coaxial cable, connect the INPUT A of the audio analyzer to TP4 (CHB OUT) and TP10 (AGND) of the AM700 analog acquisition board. 8. Set the generator output of the audio analyzer for a 1 kHz sine wave at an amplitude of 1 V. 9. On the audio analyzer, press the RELATIVE LEVEL key to set the reference to 0.00 dB. 10. Set the generator output of the audio analyzer for a 80 kHz sine wave at an amplitude of 1 V. 11. Adjust compensation capacitor C333 so that the relative level on the audio analyzer reads 0.08 dB ±0.01 dB. Sample Clock Adjustment 1. Using the 50 W coaxial cable and a BNC to hook clip adapter, connect input B of the digital frequency counter to TP23 (DGND) and TP57 (SAMPLE CLK) of the AM700. 2. Connect the WWV reference to input A of the digital frequency counter. 3. Adjust R340 (Sample Clock Adj) until the sample clock frequency readout bounces between 12.28801 MHz and 12.28802 MHz. NOTE. The WWV reference is used as an external clock to the digital frequency counter to adjust the sample clock frequency. 5–10 AM700 Audio Measurement Set Service Manual Adjustment Procedures Display Monitor Adjustment (for CRT display monitor) The following adjustment steps are used to align the CRT display. These adjustments include those needed for factory service alignment after repairs to the display monitor module and a shorter procedure for alignment of the installed display monitor. Use the procedures in the Remove and Replacement Procedures in the Maintenance section beginning on page 6–73 to remove the display monitor assembly for repair and reinstallation. Use the long adjustment procedure after the repaired display monitor is reinstalled, especially for a replacement of the CRT or deflection yoke. For a normally operating installed display monitor assembly, perform the verification procedure of the CRT display (Verify CRT Display Operation on page 4–33) to determine the extent of adjustment needed, if any. Use the shorter adjustment procedure on page 5–18 to make minor adjustments to the CRT after a verification check indicates the need for adjustment. Make only those adjustment needed to align the display monitor assembly. Test Equipment Required 4. The following tools are required during the CRT display adjustment for a complete CRT alignment after changing the CRT, the deflection yoke, or the display monitor circuit board. H Video source interconnection cable H VGA Distribution amplifier. H Photometer H CRT test graticule H Geometry correction magnets Blue Green Red Yellow 119–1616–00 (strongest) 119–1863–00 119–1615–00 119–4341–00 H Clear RTV silicone adhesive (for magnet attachment) H 0.1 inch spacing shorting jumper H Test oscilloscope H Small flat head screw driver for adjustments H 3.5 inch diskette with the Tektronix CRT test pattern file. H Personal computer with 3.5 inch floppy disk drive. AM700 Audio Measurement Set Service Manual 5–11 Adjustment Procedures Preparation to Align The following procedure requires removal of the instrument cabinet and some of the circuit board assemblies to remove and replace the CRT display monitor assembly. The procedure assumes that a part of the CRT display monitor assembly is being replaced for a factory service repair. Refer to the Remove and Replacement Procedures in the Maintenance section of this manual and the exploded views given in the Replaceable Mechanical Parts section to assist you if necessary. When replacing the entire CRT display monitor assembly with a prealigned exchange assembly, make only those adjustments needed to satisfy the requirement of the verification procedure referred to in the preceding paragraphs. 1. Remove the CPU, the DSP, the Digital audio board, and the power supply shield a. Disconnect the flexible floppy disk drive cable on from J42 on the CPU board by lifting the side latches on the housing first (see Figure 5–3). Lift the connector release bar from its ends to loosen the cable. Press the release bar down to lock the cable to the connector. Figure 5–3: Disk drive flexible circuit board connector operation NOTE. Do not pull on the cable to force it out of the connector. This will weaken the connection. b. Remove the three circuit board mounting screws around the fan and flexible cable connector and the rear panel screws holding the CPU board. Note: there is one screw in the rear panel that is different from other screws; it has a built-in (captive) washer. Use the correct screw at this location when reassembling the CPU board. c. Disconnect all the cables attached to CPU, DSP, and Digital Audio circuit boards that come from the other circuit boards. d. Pull the CPU and DSP assembly forward gently about 1/4 inch. The boards should come out as a single assembled unit. Set them aside on an 5–12 AM700 Audio Measurement Set Service Manual Adjustment Procedures ESD free table or work station so they will be safe from ESD (electrostatic discharge) damage. CAUTION. The back-up battery on the CPU needs to be protected from being accidentally shorted. e. Remove the two screws from Digital Audio board, and then lift the circuit board gently away from the plastic posts. Put this board on an ESD free table to protect it from damage until it is ready to be reinstalled. f. Turn on Procedure After a Repair Remove all the screws holding the power supply shield, (that is the large shield between the Digital audio board and the power supply board). The front of the shield is pushed into the groove in the front casting. Use a flat head screwdriver to aid in loosening the shield from the groove. Lift the shield out and put it aside. After replacing the CRT, the deflection yoke, or the display monitor circuit board, use the following procedure to start up the display monitor for alignment. 1. Insert a shorting jumper on pins 9 and 10 of J5 of the power supply. (This jumper enables the power supply to operate without the normal cable attached to this connector.) 2. Leave the power supply cables on J7 and J9 (power to Acquisition and Generator boards) on the power supply connected. (This provides enough loading for proper regulation of the power supply.) 3. Disconnect the trace rotation coil on the display monitor circuit board at J7. 4. Apply power to the AM700 and verify that the fan blows air out of chassis. Yoke Alignment The following procedure for yoke alignment should be required only if the CRT or deflection yoke has been changed in a repair. CAUTION. High voltages are present on the display monitor circuit board and around the CRT. Use extreme caution not to contact the high voltage anode lead, the high voltage transformer, or the anode connection to the CRT while the power is applied to the AM700. 1. Install the test graticule on the front of the CRT. 2. Check that a free-running raster is present on the display. 3. Adjust the raster size to fill the display area (Width L4, Vert. Size R43) AM700 Audio Measurement Set Service Manual 5–13 Adjustment Procedures 4. Center the display using the beam centering rings. NOTE. The centering rings cause some distortion to the display. Adjust the centering rings for the least amount of distortion and the best centering. 5. Repeat step 3 and step 4 until the full screen display is correctly centered. 6. Loosen the yoke retaining screw and rotate the deflection yoke so that the raster is parallel to the bottom of the front chassis casting. 7. Tighten the screw on the retaining ring, making sure the yoke is all the way up against the CRT. 8. Adjust R64 (BLACK) until the raster just disappears from screen. 9. Fine adjustment of the CRT geometry may require several correction magnets. Use of the magnets for adjustment is given in the Factory Service Geometry Fine Adjustment procedure on page 5–17. Check and Adjust Free-running Display 1. Adjust horizontal and vertical scan rates. a. Connect the CH1 oscilloscope probe to TP1 (horizontal retrace). See Figure 5–4 for test point and adjustment locations. b. Adjust R20 (H HOLD) for 31.469 kHz at TP1–31.78 ms. Within the range of 31.68 kHz to 31.88 kHz is acceptable. c. Connect the CH1 oscilloscope probe to TP2 (vertical retrace). d. Adjust R45 (V HOLD) for 55 Hz at TP2–18.2 ms. Within the range of 18.1 ms to 18.3 ms is acceptable. 5–14 AM700 Audio Measurement Set Service Manual Adjustment Procedures Horiz Width Focus Horiz Phase White Level Black Level Horiz Retrace Vert Retrace Vert Pos Trace Rotation VGA Input Horiz Hold Vert Hold Vert Size Vert Lin Figure 5–4: CRT display monitor board adjustment locations Adjust the CRT Display with a Test Pattern VGA Signal Applied Adjust the size and linearity of the CRT display using the following procedure. 1. Connect a video source cable to J2 on monitor board and install the test CRT graticule. 2. Connect the other end of the video source cable to the VGA output connector of the VGA signal distribution amplifier. 3. Connect the VGA output of the PC to the input of the VGA distribution amplifier, and connect one output of the distribution amplifier to the VGA display monitor. AM700 Audio Measurement Set Service Manual 5–15 Adjustment Procedures 4. Insert the Monitor adjustment disk to in the PC, and run the program to display cross hatch pattern. 5. Make the display monitor size and linearity adjustments. a. Adjust L4 (HORIZ WIDTH) so that the width of the test pattern is as wide as the test graticule. b. Adjust R43 (V SIZE) so that the height of the test pattern is as tall as the test graticule. c. Adjust R57 (V CENTER) to center the test pattern vertically in the test graticule. d. Adjust R15 (H PHASE) to center the test pattern horizontally in the test graticule. e. Adjust R48 (V LIN), if needed, so that the squares of the test pattern are all the same size and that the circle is round not squashed. NOTE. Magnets are added to yoke assembly at the factory to square up the corners of the display. The magnets are secured with RTV silicone adhesive and should not require replacement or relocation under normal operation. In the event that a new CRT is installed, some adjustment to the magnets may be required for the best adjustment of the corners. f. Interaction between these adjustments requires a recheck of part a through part e for best size and linearity. g. Remove the test graticule. 6. Adjust black and white levels a. Adjust R64 (BLACK), if needed, until the retrace lines just disappear (second box on upper left just turns invisible). b. Display the full-white test pattern. c. Adjust R4 (WHITE), if needed, for 95 to 105 fl at 70% brightness with the touch screen removed. d. Check for approximately 190 to 260 fl at 100% brightness. 7. Adjust focus a. Display the full screen of the “small e” test pattern. b. Adjust R36 (FOCUS) if needed, for the best focus possible in the center of the screen. 5–16 AM700 Audio Measurement Set Service Manual Adjustment Procedures c. Adjust L5 (Dynamic Focus) for best possible focus at the corners of the display. d. Recheck the white level adjustment. 8. Adjust trace rotation a. Install the crt test graticule. b. Display the crosshatch test pattern. c. Connect the trace rotation coil from the yoke to J7 on the display monitor circuit board. d. Adjust R67 (TRACE ROT) as needed, to square the test pattern with the test graticule. Factory Service Geometry Fine Adjustment The following procedure requires the placement and positioning of the geometry adjustment magnets around the crt yoke and instrument chassis. 1. Display the crosshatch test pattern. WARNING. The CRT anode voltage is a potential shock hazard. Use extreme care when working near the anode connection and any of the high voltage leads to the anode. 2. Position the correction magnets on the yoke coil and on the CRT along the front edge and middle section for the best linearity. Some trial and error positioning and placement of the magnets may be necessary until the absolute errors are less than 1.5% or 0.075 inch horizontally and 0.06 inch vertically. Because the placement and rotation of the magnets in combination pulls or diverts the electron beam in a manner that is not entirely predictable, noting the effect produced by the different strength of magnet used or location and polarity of the magnet may help reaching the best combination for good overall linearity. Magnets specified to use are listed in Table 5–1 at the beginning of the procedure. 3. Use clear silicone adhesive to hold magnets permanently, It may take 30 minutes to few hours depending on the type of silicone adhesive being used. 4. This completes the alignment of the CRT display assembly. Turn off power and disconnect any equipment connected to monitor board. AM700 Audio Measurement Set Service Manual 5–17 Adjustment Procedures CRT Display Adjustment The following procedure is used to make the CRT alignment adjustments on an installed display monitor. It is used to compensate for the minor changes that can affect the CRT adjustments over time. 1. Perform the verification procedure of the CRT display (Verify CRT Display Operation on page 4–33) to determine the extend of adjustment needed. Make only the adjustments needed as indicated from the verification procedure. 2. It may be necessary to remove the disk drive assembly if the adjustments located beneath it have to be accessed. Remove the disk drive assembly. Leave it off until after the CRT adjustments are checked for centering, height, width, and linearity. 3. Make the following display monitor adjustments as determined in step 1. a. Adjust L4 (WIDTH) so that the width of the Analyzer display at the center is 5.04 inches (12.80 cm). b. Adjust R43 (V SIZE) so that the height of the Analyzer display at the center is 3.78 inches (9.60 cm). c. Adjust R57 (V CENTER) to center the display vertically in the between the top and bottom edges of the CRT opening in the bezel. d. Adjust R15 (H PHASE) to center the display horizontally between the left and right edges of the CRT opening in the bezel. e. Adjust R48 (V LIN), if needed, so that the two top view window squares and the two bottom view window squares are the same size vertically. f. Interaction between these adjustments requires a recheck of part a through part e for best size and linearity. g. Adjust R36 (FOCUS) if needed, for the best focus possible in the center of the screen. h. Adjust R67 (TRACE ROT) as needed, to make the top and bottom edges of the display parallel to the top and bottom edges of the CRT opening in the bezel. 4. Turn off the power to the AM700 and reinstall the disk drive assembly if it was removed. 5. Restore power to the AM700 and select the Analyzer application. 6. Examine the top, bottom, and sides of the display to determine if there is excessive bowing or wowing of the edges. 5–18 AM700 Audio Measurement Set Service Manual Adjustment Procedures NOTE. Magnets added to yoke assembly and around the CRT at the factory are used to square up the corners of the display. The magnets are secured with silicone adhesive and should not require replacement or relocation under normal operation. Some careful repositioning of the magnets around the front edge of the CRT may be required for the best adjustment of the corners of the display. 7. If the edges are not flat, observe where geometry adjustment magnets, if any, are installed on the AM700 chassis around the face of the CRT. 8. Remove any magnet nearest an area that bowing or wowing is excessive. Try placing a new magnet in the same location with different strength, rotation or position to improve the geometry. Some trial and error positioning and placement of the magnets is necessary to reduce the absolute geometry error (variations in straightness of the sides and corners of the display) to less than 1.5% or 0.075 inch (1.9 mm) horizontally and 0.06 inch (1.52 mm) vertically. Because the placement and rotation of the magnets in combination pulls or diverts the electron beam in a manner that is not entirely predictable, noting the effect produced by the different strength of magnet used or location and polarity of the magnet may help reaching the best combination for good overall geometry. Magnets specified to use are listed in Table 5–1 at the beginning of this section. 9. Use clear RTV silicone adhesive to hold magnets permanently. It may take 30 minutes to few hours to set depending on the type of silicone adhesive being used. 10. This completes the alignment of the replacement display monitor assembly. Turn off the power and reinstall the equipment cabinet. See the Cover Removal and Replacement procedure beginning on page 6–55 in the Maintenance section of this manual for the cover replacement steps. AM700 Audio Measurement Set Service Manual 5–19 Adjustment Procedures LCD Driver Board Adjustment (for LCD flat panel display) The following adjustment steps set up the offset and gain for the red, green, and blue analog to digital converters; and adjust the brightness level of the LCD panel backlighting. Test Equipment Needed Preparation for the LCD Driver Adjustments The following test equipment is needed: H Test oscilloscope with probes H Adjustment tool 1. On the LCD Driver board, set the Offset potentiometers, R37, R39 and R41, to fully clockwise (CW). (Note: these adjustment may be absent from your circuit board.) 2. Center the settings all the Gain potentiometers (R6, R7 and R9). 3. Center the BRT potentiometer (R24). 4. Disconnect the cable from J8 (VGA cable). 5. Turn on the AM700. The AM700 initializes and starts the FFT application. Adjust ADC Gain 1. Set the test oscilloscope Vert Mode CH 1 Volts/Div CH 1 Input Coupling A Sec/Div A Trig Mode A Trig Source Slope Vertical Position CH 1 On 1V DC 400 ns Auto Lvl CH 1 + (plus) Trace on center horizontal graticule 2. Touch View Setup in the FFT application. 3. Touch Spectrogram in the View Types choices. 4. Touch Accept Changes 5. Connect the oscilloscope probe tip to the MSB of the Red ADC at TP6. See Figure 5–5 for test point and adjustment locations. 6. Adjust the Red Gain potentiometer, R6, until the trace goes high with pulse trains. 7. Back off the adjustment of R6 to the point the trace stays at a constant low level. (Voltage at TP2 will be ≈ +1.4 V). 5–20 AM700 Audio Measurement Set Service Manual Adjustment Procedures 8. Move the oscilloscope probe tip to the MSB of the Green ADC at TP7. B Offset TP4 P4 C1 TP1 TP1 CR10 CR11 C30 C26 L3 CR12 R18 R23 R28 C11 TP4 P5 C31 B Gain J8 R50 TP7 C21 C32 CR6 CR7 C18 U1 TP6 TP7 R16 R21 R26 TP2 R Offset R Gain R29 U5 R1 G Gain C15 R37 R6 C2 R46 TP2 R36 R30 R13 U9 G Offset R31 C3 U12 C13 U3 R49 R39 U6 U13 U8 C10 R7 C33 P3 C8 TP3 R38 R32 R14 TP3 C14 U10 L2 P2 C20 R44 C28 R47 R17 R22 R27 CR8 CR9 TP5 TP5 C17 C4 TP8 C9 TP10 TP8 C12 TP10 C16 U7 R24 CR2 CR4 R33 C7 R45 CR5 R8 C22 C5 R43 R20 R51 R40 R34 R15 C6 P1 R48 TP9 U4 R19 R42 R25 CR3 R35 C19 TP9 R3 R12 U11 C24 R52 BRT CR13 C25 R41 R2 R9 CR1 R11 R10 R5 R4 L1 TP6 F2 C27 C29 C23 F1 F3 Figure 5–5: LCD display driver test points and adjustment locations 9. Repeat the adjustments of step 6 and step 7 using the Green Gain potentiometer, R7. (Voltage at TP3 will be ≈ +1.4 V.) 10. Move the oscilloscope probe tip to the MSB of the Blue ADC at TP8. 11. Repeat the adjustments of step 6 and step 7 using the Blue Gain potentiometer, R9. (Voltage at TP4 will be ≈ +1.4 V.) AM700 Audio Measurement Set Service Manual 5–21 Adjustment Procedures Fine Adjustment of the ADC Gain Verify the Gain and Offset Adjustments 1. Observe the Spectrogram display. There should be no streaks or color smears in the Spectrogram color legend. If there are any streaks or color smears, adjust the associated color offset potentiometer slightly (R6 for Red, R7 for Green, and R8 for Blue) to eliminate them. 1. In the UTILITIES front panel selections, press the Configure button. 2. Verify that the Configuration options: display has no streaks or color smears. If any are present repeat the Fine Adjustment of the ADC Gain procedure. 3. Press the Clear Menu button to remove the Configuration options: display. Adjust Brightness 1. In the UTILITIES front panel selections press and hold in the Display button. 2. Use the large control knob to set the Adjust brightness: level to 10%. 3. Adjust the BRT potentiometer, R24, so the backlight for the LCD display just turns off (no visible display). (The voltage at TP1 BRIGHTNESS will be approximately 3.5 V). 4. This completes the adjustments of the LCD Driver board. 5–22 AM700 Audio Measurement Set Service Manual Adjustment Procedures Analog Generator Board Adjustment These adjustment steps set the DAC gain for the correct level of output signal for Channel A and Channel B of the analog generator. Test Equipment Required Set up Test Equipment and the AM700 The following test equipment is needed: H Precision digital multimeter or RMS meter H XLR to banana connector adaptor cables H Adjustment tool 1. Set up the precision digital multimeter. a. Set the AC frequency band of the digital multimeter for 20 Hz for the lowest expected frequency and 10 kHz for the highest expected frequency. b. Set the digital multimeter for ACV auto ranging. c. Set the Terminals switch on the front panel to Front. d. Using the XLR-to-banana interconnection cable, connect the banana connector to the front terminals of the precision multimeter: HI-to-HI, LOW-to-LOW, and GND-to-GUARD. e. Set the Guard switch on the front panel to OPEN. f. Connect the female XLR connector to Ch A OUT of the AM700 to the input of the precision multimeter. 2. Set up AM700 Analog Generators a. In the Generator Control Panel, press the Control button. This displays the Generator Control menu screen. b. Check that the Analog Generator is set for High Resolution mode. If not, touch the High Resolution soft key to select it. c. Set the CH A Waveform for Sine if it is not. Do this by touching the Waveform soft key to display a pop-up list of available generator signals. Use the large control knob to highlight Sine, then touch the pop-up list or press Enter, in the keypad area, to select that choice. NOTE. Both channels A and B must be set for sine. Channel B must not be set for follow A. AM700 Audio Measurement Set Service Manual 5–23 Adjustment Procedures d. Set the CH B Waveform for Sine as well. Touch the CH B Waveform soft key and use the large control knob to highlight Sine, the touch the pop-up list as before to accept that choice. (Do not use Follow A. This will make the B generator signal the same as generator A, but it will not fully exercise the B generator signal generation path.) e. Check that both Ch A and Ch B are enabled (a check mark in both Enabled soft keys). If not, enable them. f. Touch the Waveform Control soft key (located on the left side of the screen) to display the Waveform menu choices. g. Select Generator A by touching the Analog A soft key. h. Touch the Frequency soft key to select that parameter for editing. Use the keypad to enter 1000 Hz (or 1 kHz). Press enter or touch the Frequency soft key to accept this value. i. Touch the Amplitude soft key to select that parameter for editing. Use the key pad units keys to select V (volts) as the unit for the amplitude. j. Set the Amplitude to 1.0 V using the key pad, the touch the Amplitude soft key or press enter to accept this value. k. Select Generator B by touching the Analog B soft key and repeats parts h through j to set Generator B for a 1 kHz, 1 V sine-wave signal. l. Press the Control button to turn off the Generator Control Menu screen display. m. In the Generator Control panel, press the ON button to turn the generators on. 5–24 AM700 Audio Measurement Set Service Manual Adjustment Procedures 3. Adjust the A DAC GAIN, R24, of the Analog Generator for an amplitude of 1.000V ± 0.0001V. See Figure 5–6 for the adjustment locations. 4. Move the XLR connector from Ch A OUT to Ch B OUT. 5. Adjust the B DAC GAIN, R18, of the Analog Generator for an amplitude of 1.000V ± 0.0001V. 6. Disconnect the test equipment from the AM700. B DAC Gain (Right) B DAC Gain (Right) Figure 5–6: Generator board adjustment locations AM700 Audio Measurement Set Service Manual 5–25 Adjustment Procedures Digital Audio Board Adjustments The following adjustments set the control voltage of the phase-lock-loop circuits and sets the digital generator amplitude. Test Equipment Required Mechanical Setup The following test equipment is needed: H Digital voltmeter H Test oscilloscope H BNC cable, 75 W H BNC termination, 75 W H Alignment tool H Extender cables for Digital Audio circuit board H Insulated work surface 1. The PLL adjustments can be checked with the Digital Audio board installed. Test points pins are accessible from the side of the instrument with the cabinet removed. Adjustment of the PLL frequency control coils would not normally be required unless a repair affecting the frequency determining components of the oscillators is made. CAUTION. The following Digital Audio Board adjustment procedure should only be done by a qualified service person working in an approved anti-static work station. Adjustments require the removal of the Digital Audio board from the instrument, and operation with extender cables installed to make the signal and power interconnections to the AM700. 2. With the Digital Audio board removed from the AM700, place the board on an insulated surface and connect it to the AM700 using extender cables. The remove and replace instructions are provided in the Maintenance section of this manual. 5–26 AM700 Audio Measurement Set Service Manual Adjustment Procedures Set up the AM700 1. Press the Digital front panel button and power on the AM700 to start it with the Digital application running. 2. Press the Configure button. 3. Touch the Save State soft key. 4. Touch the Set Factory Defaults soft key. 5. Verify that you want to restore the factory defaults. 6. Press Configure again. Touch the Input Select soft key. 7. Set the Input for AES generator. 8. Press Clear Menu. 9. Select the Eye Diagram icon. 10. Press the Menu button. 11. Touch the Interface Timing softkey. 12. Set the Clock Frequency Offset to 10 ppm. Adjusting the Phase-Locked Loops 1. Set the DVM to measure DC voltage. 2. Connect the + lead of the DVM to pin 4 of J33. Connect the – lead to pin 1 or pin 10 of J33 (ground) (see Figure 5–7). Check for a voltage of 7 V to 8 V. 9 7 5 3 1 10 8 6 4 2 J33 Digital Audio board A3 Figure 5–7: Pin arrangement for J33, the PLL voltage test points 3. Adjust L5, Frequency control for U78 in the Frequency Offset circuit, for a voltage of 7 to 8 V. See Figure 5–8 for the adjustment locations. 4. Connect the + lead of the DVM to pin 5 of J33. Check for a voltage of 7 V to 8 V. 5. Adjust L7, Frequency control for U79 in the Frequency Offset circuit, for a voltage of 7 V to 8 V. 6. Connect the + lead of the DVM to pin 2. Check for a voltage of 7 V to 8 V. AM700 Audio Measurement Set Service Manual 5–27 Adjustment Procedures 7. Adjust L1, Frequency control for U64 in the Generator PLL circuit, for a voltage of 7 V to 8 V. 8. Connect the + lead of the DVM to pin 6 of J33. Check for a voltage of 7 V to 8 V. 9. Adjust L16, Frequency control for U123 in the Eye Sampler circuit, for a voltage of 7 V to 8 V. 10. Turn off the power to the AM700, disconnect the power cord from the AC source, and disconnect the test leads and extender cables from the Digital Audio board. 5–28 AM700 Audio Measurement Set Service Manual Adjustment Procedures Freq Offset Freq Adj Freq Offset Freq Adj Eye Sampler Freq Adj PLL Test J33 GEN PLL Adj Freq Gen Level Figure 5–8: Digital audio board test points and adjustment locations AM700 Audio Measurement Set Service Manual 5–29 Adjustment Procedures Adjusting the Digital Generator Level 1. Connect the AES Unbalanced Out signal to Ch 1 input of the test oscilloscope through a 75 W BNC coaxial cable and a 75 W BNC termination. 2. Set the oscilloscope for 0.2 V/div to view a 1 V p-p square wave signal and auto trigger on the input signal. 3. Adjust R483, Generator Level, for a 1 V p-p square wave (5 div ±0.25 div). 4. Disconnect the test equipment from the AM700. This completes the internal adjustment procedure of the AM700. Reinstall all boards and install the cabinet. User Calibration After the AM700 is completely assembled, do the following user calibration steps. Calibrate the Touch Screen 1. Power on the AM700, if it is not already on, and run the FFT application (the default startup application). 2. After the AM700 has booted and the FFT application is running, press the OTHER front panel button, in the applications selection. 3. Using the large knob on front panel, highlight PanelCal Touch Panel Calibration. 4. To start application, press the Enter key pad button, and follow the instructions on the AM700 monitor. 5. After you finish the touch screen calibration procedure, the screen displays the paint screen. You can touch the screen at various points and the screen will highlight where touched. You can use this screen to check any suspected inoperative locations on the touch screen. 6. When the calibration has been completed, select the FFT application by pressing the FFT application front panel button. Analog Calibration 1. If the AM700 is on and warmed up you may do this procedure now; otherwise turn on the AM700 and permit it to warm-up for 15 to 20 minutes. 2. Select either FFT or Audio Analyzer to do the analog calibration. 3. Press the Configure front panel button after the application is loaded. 4. Touch the System Setup soft key and select Calibrate. 5. Touch the Calibrate Now soft key. 5–30 AM700 Audio Measurement Set Service Manual Adjustment Procedures 6. After the calibration has finished, press Clear Menu. Then, select Digital as the application to load. Digital Calibration 1. With the Digital Application running, press the Configure front panel button and again touch the System Setup soft key. 2. Select Calibrate and touch the Calibrate Now soft key. 3. After the calibration has finished, press Clear Menu. This completes the adjustment procedure for the AM700. Functional Check You can perform the functional checks in the Verification Procedure to verify the operation of the instrument. AM700 Audio Measurement Set Service Manual 5–31 Adjustment Procedures 5–32 AM700 Audio Measurement Set Service Manual Maintenance This section discusses the various options available for servicing the Tektronix AM700 Audio Measurement Set. It also contains instructions for preventive maintenance, general troubleshooting, and corrective maintenance. If the instrument does not function properly, troubleshooting and corrective measures should be taken immediately to circumvent additional problems. Service Options A number of servicing options are available. These servicing options should be investigated as to which will be the most time efficient and cost effective. The instrument may be returned to Tektronix for repair and/or recalibration. Certain modules are available on an exchange basis. If an exchange module for a module needing repair is available, repairs can be made at the customer’s repair facility. See the Board Exchange Program section beginning on page 6–49 for information on the exchange program. Repair of the modules in the AM700 can require a highly skilled technician with the proper test equipment. Component level servicing by the customer is not recommended while the instrument is under warranty. Tektronix maintains service centers around the world to provide quick turnaround repair and recalibration services. When this service is used, the instrument should be tagged and repackaged according to the following instructions. Repackaging If the instrument is to be shipped to a Tektronix Service Center for service or repair, attach a tag to the instrument showing: 1. Owner (with complete address) and the name of the person at your firm that can be contacted. 2. Instrument serial number and a description of the service required. Repackage the instrument in the original manner to provide adequate protection. If the original packaging is not available or is unfit for use, repackage the instrument as follows: 1. Obtain a corrugated cardboard carton whose inside dimensions are at least six inches greater than the dimensions of the instrument to allow room for cushioning. The shipping carton should have a test strength of at least 275 pounds. AM700 Audio Measurement Set Service Manual 6–1 Maintainence 2. Surround the instrument with polyethylene sheeting to protect the finish. 3. Cushion the instrument on all sides by tightly packing dunnage or urethane foam between the carton and the instrument. Allow three inches on all sides for cushioning. 4. Seal the carton with shipping tape or an industrial stapler. Static-Sensitive Components This instrument contains electrical components that are susceptible to damage from static discharge. Static voltages of 1 kV to 30 kV are common in unprotected environments. Table 6–1 shows the relative static discharge susceptibility of various semiconductor classes. ÁÁÁÁÁÁÁÁÁÁÁÁÁÁÁÁÁÁÁÁÁÁÁÁ ÁÁÁÁÁÁÁÁÁÁÁÁÁÁÁÁÁÁÁÁÁÁÁÁ ÁÁÁÁÁÁÁÁÁÁÁÁÁ ÁÁÁÁÁÁÁÁÁÁÁÁ ÁÁÁÁÁÁÁÁÁÁÁÁÁÁÁÁÁÁÁÁÁÁÁÁÁ ÁÁÁÁÁÁÁÁÁÁÁÁÁÁÁÁÁÁÁÁÁÁÁÁÁ ÁÁÁÁÁÁÁÁÁÁÁÁÁÁÁÁÁÁÁÁÁÁÁÁÁ ÁÁÁÁÁÁÁÁÁÁÁÁÁÁÁÁÁÁÁÁÁÁÁÁÁ ÁÁÁÁÁÁÁÁÁÁÁÁÁÁÁÁÁÁÁÁÁÁÁÁÁ ÁÁÁÁÁÁÁÁÁÁÁÁÁÁÁÁÁÁÁÁÁÁÁÁÁ ÁÁÁÁÁÁÁÁÁÁÁÁÁ ÁÁÁÁÁÁÁÁÁÁÁÁ ÁÁÁÁÁÁÁÁÁÁÁÁÁÁÁÁÁÁÁÁÁÁÁÁÁ ÁÁÁÁÁÁÁÁÁÁÁÁÁÁÁÁÁÁÁÁÁÁÁÁÁ ÁÁÁÁÁÁÁÁÁÁÁÁÁ ÁÁÁÁÁÁÁÁÁÁÁÁ ÁÁÁÁÁÁÁÁÁÁÁÁÁÁÁÁÁÁÁÁÁÁÁÁÁ ÁÁÁÁÁÁÁÁÁÁÁÁÁÁÁÁÁÁÁÁÁÁÁÁ ÁÁÁÁÁÁÁÁÁÁÁÁÁÁÁÁÁÁÁÁÁÁÁÁ ÁÁÁÁÁÁÁÁÁÁÁÁÁÁÁÁÁÁÁÁÁÁÁÁ Table 6–1: Static susceptibility Relative Susceptibility Levels1 Voltage MOS and CMOS 100 – 500 V ECL 200 – 500 V Schottky Signal Diodes 250 V Schottky TTL 500 V HF Bipolar Transistors 400 – 600 V JFETs 600 – 800 V Linear microcircuits 400 – 1,000 V (est.) Low-Power Schottky TTL 900 V TTL 1,200 V 1 Voltage equivalent for levels (voltage discharged from a 100 pF capacitor through a 100 W resistance). Observe the following precautions to avoid damage: 6–2 H Minimize handling of static-sensitive components. H Transport and store static-sensitive components or assemblies in their original containers, on a metal rail, or on conductive foam. Label any package that contains static-sensitive components or assemblies. H Discharge the static voltage from your body by wearing a wrist grounding strap while handling these components. Servicing static-sensitive assemblies or components should be done only at a static-free work station by qualified personnel. H Nothing capable of generating or holding a static charge should be allowed on the work station surface. AM700 Audio Measurement Set Service Manual Maintainence H Keep the component leads shorted together whenever possible. H Pick up the components by the body, never by the leads. H Do not slide the components over any surface. H Avoid handling components in areas that have a floor or work surface covering capable of generating a static charge. H Use a soldering iron that is connected to earth ground. NOTE. A 2% RMA flux content solder is recommended for making repairs in this instrument. Cleaning of rosin residue is not recommended. Most cleaning solvents tend to reactivate the rosin and spread it under components where it may cause corrosion under humid conditions. The rosin residue, if left alone, does not exhibit these corrosive properties. H Use only special antistatic, suction, or wick-type desoldering tools. CAUTION. Any repair procedures should be performed only by qualified service personnel. Performing these procedures incorrectly could damage the instrument. Refer all repair and replacement procedures to a qualified service technician. AC Mains Voltage Selection Procedure Figure 6–1: Rear panel Fuse, Power connector, On/Off Switch and Line Selector AM700 Audio Measurement Set Service Manual 6–3 Maintainence The voltage range selection switch and fuse holder are located in the lower left corner of the AM700 rear panel (see Figure 6–1). The AM700 is shipped from the factory set for the operating voltage of the destination nation (115 VAC or 230 VAC). If the setting is not correct, it must be changed before connecting the power cord to the power source. 1. Turn off the rear-panel power switch and disconnect the power cord from the mains supply. 2. Set the voltage range selection switch (located on the rear panel of the AM700) to the correct position for operation. Instruments are shipped with the power cord most appropriate for the country of destination. Available power-cord option information is given in Table 1–1 in the Specifications section on page 1–3. Contact your Tektronix representative or local Tektronix field office for additional power-cord information. CAUTION. When changing the line voltage selector switch you must also change the fuse to provide proper protection for the operating voltage in use. The mains fuse provides protection in the event of a major failure of the AM700 power supply. Two sizes of fuses are specified, one for 115 V operation and the other for 230 V operation. See the Fuse specification in the Specification section for the correct fuse rating to use for each voltage range. 3. Replace the fuse with the correct one, as indicated on the rear panel, for the new mains voltage selection. CAUTION. Use only the power cord and connector specified for your product. Use only a power cord that is in good condition with a proper safety ground connector. 4. Replace the power cord with the correct one for use with the local mains outlets. 5. Turn on the rear power switch, then the front power switch to operate the AM700. 6–4 AM700 Audio Measurement Set Service Manual Maintainence Preventive Maintenance Preventive maintenance consists of cleaning, visual inspection, performance checking, and, if needed, readjustment. The preventive maintenance schedule established for the instrument should be based on the environment in which it is operated and the amount of use. Under average conditions, scheduled preventive maintenance should be performed every 2000 hours of operation. Tools Required H Clean, non-abrasive cloth. H Non-abrasive liquid glass cleaner. H Isopropyl alcohol. H Static-free vacuum cleaner with small brush attachment. CAUTION. Cleaning and general care of the AM700 should be performed only when the instrument is powered off and the power cord removed from electrical mains. Cleaning The instrument should be cleaned often enough to prevent dust or dirt from accumulating. Dirt acts as a thermal insulating blanket that prevents effective heat dissipation, and can provide high-resistance electrical leakage paths between conductors or components in a humid environment. Exterior. Clean the dust from the outside of the instrument by wiping with a soft cloth or small brush. A brush is especially useful to remove dust from around the selector buttons, knobs, and connectors. Hardened dirt may be removed with a cloth dampened in water that contains a mild detergent. Abrasive cleaners should not be used. Touch Screen. Clean the touch screen with a soft, lint-free cloth dampened in denatured alcohol. Interior. Clean the interior of the instrument by loosening the accumulated dust with a dry, soft brush. Once the dirt is loosened remove it with low-pressure air (high-velocity air can damage some parts). Hardened dirt or grease may be removed with a cotton-tipped applicator dampened with a solution of mild detergent and water. Abrasive cleaners should not be used. If the circuit board assemblies must be removed for cleaning, follow the instructions for removal/replacement under the heading of Corrective Maintenance. AM700 Audio Measurement Set Service Manual 6–5 Maintainence After cleaning, allow the interior to thoroughly dry before applying power to the instrument. CAUTION. Do not allow water to get inside any enclosed assembly or component. Do not clean any plastic materials with organic cleaning solvents, such as benzene, toluene, xylene, acetone, or similar compounds, because they may damage the plastic. Visual Inspection Determining the Software Version After cleaning, carefully check the instrument for defective connections, damaged parts, and improperly seated transistors or integrated circuits. The remedy for most visible defects is obvious; however, if heat-damaged parts are discovered, extensive repairs requiring a board exchange may be necessary to restore the equipment to normal operation. Operation of this instrument is dependent on the software, which is loaded in Flash EPROM. It is possible that an instrument may contain older software and therefore not be performing up to the level expected. It may save considerable time and troubleshooting effort to determine which software version the instrument contains. The User Manual that was shipped with the instrument contains the software version level when the instrument was first delivered. However, it is possible that the instrument was upgraded, or possibly a particular instrument was missed for a field upgrade and therefore does not perform up to expectation. Prior to servicing it is wise to determine that the instrument has software that matches the level specified at the front of the User Manual. Finding the Version Number. The version number and release date for the software contained in the instrument’s Flash EPROM is displayed on the CRT every time a new application is started. Updating Operating Firmware. Firmware upgrades to the operating system of the AM700 may be made from time to time. To update the firmware loaded in the instrument, see the instructions later in this section of the manual or the instructions that are provided with the upgrade materials. Performance Checks and Readjustments 6–6 Instrument performance should be checked after each 2000 hours of operation, or every 12 months. This will help to ensure maximum performance and assist in locating defects that may not be apparent during regular operation. The Verification and Adjustment Procedures are included in this manual. AM700 Audio Measurement Set Service Manual Maintainence Major Assembly Interconnection Signals and power supply voltages are passed through the instrument by a system of interconnecting cables. The connector holders and cables are keyed to prevent incorrect installation in most cases. A triangular key symbol is used to identify pin 1 on the circuit board to assist in aligning the correct pins on the mating connector. Corrective Maintenance The following procedure is designed to assist in isolating problems, which in turn expedites repairs and minimizes down time. 1. Ensure that the malfunction exists in the instrument. This is done by making sure that the instrument is operating as intended by Tektronix (see the Operating Instructions) and by checking that all connected signal sources are actually providing a signal. Use the generator to analyzer internal routing capability of the AM700 to verify that the AM700 is operating correctly. 2. Determine the nature of the problem. Attempt to make the determination of whether the instrument is out of calibration or if there has been a component failure. Once the type of failure has been determined, proceed on to identify the functional area most likely at fault. 3. Visually inspect the suspect assembly for obvious defects. Check for broken or loose components, improperly seated components or cable connections, overheated or burned components, chafed insulation, and other visible defects. Reseat any obvious loose components or connectors and replace or repair defective cables. Overheated components indicate a serious problem. A defective assembly requiring repairs should be repaired using the Board Exchange Program (if the assembly is available in the exchange program). 4. Repair to some defective assemblies is supported by a board exchange procedure. Component-level repairs should not be attempted by the user as damage to an assembly by a non-Tektronix service person will void the warranty. The result is full board cost for repairs instead of the more economical board exchange. The circuit board assemblies are assigned assembly numbers for identification in the instrument and for ordering replacement assemblies. Removal and replacement procedures for the assemblies are found later in this section of the service manual. Refer to Board Exchange Program on page 6–49 for information of the exchange program. AM700 Audio Measurement Set Service Manual 6–7 Maintainence NVRAM State Clearing In the event that the AM700 should ever go into continuous reset mode or lockup, it may be caused by an invalid instrument state that is stored in NVRAM. If this is the case, the problem is cleared by removing the stored states from NVRAM; restoring factory defaults does not clear the problem. To clear the NVRAM, use the following procedure to enter the diagnostics mode and run the utility provided for this task. NOTE. Clearing the NVRAM also deletes all user-saved files. If you have control of the AM700 enough to use the memory manager, you may transfer those user files to DOS for later restoration to the AM700. This may not be possible if the AM700 is constantly resetting. 1. Turn off the AM700. 2. Press the MENU front-panel button and hold it in while turning on the power to the AM700. Continue holding in the MENU button until the AM700 beeps twice. You may release the MENU button after the beeps. The AM700 then starts up in the low-level diagnostics mode with the following menu displayed: --- AM700 STARTUP MENU --Key Selection --------------------------------H ... Diagnostics -HELP- Menu R ... Instrument -RUN MODES- Menu D ... Low Level -DIAGNOSTICS- Menu U ... -UTILITIES- Menu F ... -FIRMWARE- Date Codes -------------------------------------= ... Reprint @ ... Abort Menu -------------------------------------Input your selection: 3. Use the large knob to select U, then press the Select front-panel button to enter the choice. This brings up the Utilities Menu. There is a difference between the menus for V1.0/V1.01 firmware and V1.2 firmware. The first Utilities menu shown is for V1.2 firmware. It has more choices than the V1.0/V1.01 firmware Utilities menu, shown second. 6–8 AM700 Audio Measurement Set Service Manual Maintainence --- UTILITIES MENU --Key Selection --------------------------------------E ... - ERROR LOG - utilities N ... - NVRAM - utilities I ... - Change Display - F ... Reprogram INTENSITY - Flash EEPROMS - D ... Calibrate - LCD DISPLAY -------------------------------------= ... Reprint @ ... Abort Menu -------------------------------------Input your selection: --- UTILITIES MENU --Key Selection --------------------------------------E ... - ZERO - System NVRAM F ... Reprogram - Flash EEPROMS - I ... - Change Display - INTENSITY -------------------------------------= ... Reprint @ ... Abort Menu -------------------------------------Input your selection: 4. Use the large control knob to select N (Z for V1.0 and V.01 firmware), then press the Select front-panel button to enter your selection. This brings up the NVRAM Utility. --- NVRAM UTILITIES MENU --Key Selection --------------------------------------C ... - CLEAR - System NVRAM -------------------------------------= ... Reprint @ ... Abort Menu -------------------------------------Input your selection: AM700 Audio Measurement Set Service Manual 6–9 Maintainence 5. Use the large control knob to select C, then press the Select front-panel button to enter your selection. This brings up the CLEAR SYSTEM NVRAM Utility. CLEAR SYSTEM NVRAM UTILITY ========================= ### WARNING -- Zeroing system NVRAM will destroy: ### --- All user files: setups, functions, GPIB addr, COMM port settings, etc --- Instrument saved state settings --- Instrument console info --- Diagnostics Error log --- Custom Diagnostic sequences After NVRAM has the Diagnostics re-initialized. factory default run. been cleared, the instrument will be reset to Startup Menu, and Diagnostics NVRAM will be The instrument's NVRAM will be reset to its configuration when the instrument itself is ### Press - MENU BUTTON - to zero NVRAM, any other to abort ### 6. After the NVRAM is zeroed, you may use the menu choices and Select button to back out of the menu and select an application to start from the Instrument – RUN MODES – Menu (a choice in the AM700 STARTUP MENU) or you may turn the AM700 off and back on again to restart the applications. 6–10 AM700 Audio Measurement Set Service Manual Maintainence Power Supply Status Indicators The voltages produced by the main power supply are monitored by LED indicators as shown in Figure 6–2 or Figure 6–3. During normal operation all the green LED indicators should be on. Error conditions (over temperature, over voltage, under voltage, and over current) are indicated by red LED indicators. These indicators may be seen through the ventilation holes in the side of the power supply housing when the cover of the AM700 is removed. When only the rear power switch is on, the AM700 is in standby mode; and only the +14.4 and –14.4 green indicators are on (these are the housekeeping supplies). The red UV (undervolts) LED is also on in the standby state. Green LED normal voltage indicators Red LED error indication DS7 DS4 DS3 DS8 DS5 DS2 DS6 DS13 +22 +16.5 +15 +14.4 +5 -14.4 -15 -22 DS9 DS10 DS11 DS12 OT OV UV OI Figure 6–2: Power supply status indicators for the CRT display power supply Green LED normal voltage indicators Red LED error indication DS4 DS3 DS8 DS5 DS2 DS6 DS9 DS10 DS11 DS12 +16.5 +15 +14.4 +5 -14.4 -15 OT OV UV OI Figure 6–3: Power supply status indicators for the flat panel display power supply AM700 Audio Measurement Set Service Manual 6–11 Maintainence 6–12 AM700 Audio Measurement Set Service Manual Diagnostics Diagnostics in the AM700 are divided into two sets, low level and high level. The distinction between the two types is based upon the operating system; those diagnostics that run before the instrument’s operating system is booted are referred to as low level; those that run as applications executed by the operating system are referred to as high level. The instrument pauses noticeably when the operating system is booting, so messages are displayed indicating when this boot is occurring to aid the user in differentiating between high- and low-level diagnostics. Grouping of diagnostics within the two sets is by circuit board. Within a circuit board diagnostic are one or more tests; associated with each test is a main pass/fail result and, where applicable, one or more sub-results. The purpose of this format is to present all the information used within a test to determine its ultimate pass/fail status. There is another diagnostic tests grouping, the Overall Run mode. The three choices are: Power Up mode, Auto Reset mode, and User-Interactive mode. These are discussed later in this section in Selecting an Overall Run Mode. Starting at firmware version 1.02, the normal powerup skips all diagnostics for a quick start up of operation. Diagnostics can be configured to run automatically during a normal instrument powerup, or you can access the diagnostics to run at power on. All the low-level and high-level diagnostics can be forced to run at power up by holding in the Limits button while turning on the power. Certain power-up modes can be selected by pressing and holding certain front-panel buttons during power up (referred to as ‘backdoor boot modes’). For example, holding the Menu button in while turning on the power causes the AM700 to enter the low-level diagnostic interface. Another example is that holding one of the application buttons in while turning on the power starts up the selected application. Interactive diagnostics provide the service person choices to control the tests that run and the manner in which they run. In the user interactive mode, any or all tests within a group of tests can be selected for execution. From the front panel, choices are made in the displayed menu by highlighting the choice with the control knob and then pressing the Select button to actually make a change to the highlighted selection. The diagnostic menu choices will not respond to presses to the touch screen. Diagnostics displays can be routed to one of the instrument serial ports for viewing on a terminal. This is useful if a malfunction does not permit the testing progress and results to be displayed on the AM700 CRT. A special setting of the boot switch is used to route the diagnostic test displays to the serial ports. AM700 Audio Measurement Set Service Manual 6–13 Diagnostics NOTE. Diagnostics can also be controlled and executed remotely through the serial port. This method is most useful if the display system is inoperative or in a service environment for programmed troubleshooting of the AM700. During execution, diagnostics give positive feedback of progress, indicating results as they are gathered. During power-up execution, these results are presented in minimal fashion; a test which passes shows only its main result, whereas one that fails also shows the sub-results that caused the failure. During looping and user-interactive modes, results display options are available to either show only the main test results or all the test results. To facilitate quick appraisal of diagnostics results, the information is presented in a uniform format. Each line consist of fields arranged under a heading shown at the top of the instrument/terminal screen. The heading line looks something like the following: Test____measmt____unit____min_____max____result". A brief description of the content of each field follows: Field Description Test In a main result, the name of the test. In a sub-result, noted by an indentation from the associated main result, a description of what was evaluated to determine the main result. measmt A measured value, presented in integer, hexadecimal, or engineering scientific notation. If a value is not appropriate, the field is filled with one of the following: -" no value <" underrange indicator >" overrange indicator unit Where appropriate, a description of the units of the measured value; otherwise, filler chars. min The minimum acceptable value for a passing result. max The maximum acceptable value for a passing result result In general, –Pass– or *FAIL*. can also be one of: ĆĆNAĆĆ not applicable *??*not tested 6–14 AM700 Audio Measurement Set Service Manual Diagnostics Because a rigidly formatted output excludes much useful information, any main or sub-result line can have associated with it one or more lines of indented commentary. Whereas sub-result lines are indented one level of indentation from their associated main results, comments will be indented two levels from their associated main results, whether they are actually associated with the main result or the sub-result. Accessing the Diagnostics Menus Figure 6–4: Entering the user-interface diagnostics An overview of the AM700 Diagnostics Menus is shown in Figure 6–5. As previously mentioned, there are two ways to access the Low Level diagnostics menu. With the AM700 running, the diagnostic menu is displayed through the Other Applications menus. Press the Other front-panel button to display the application selection menu shown in Figure 6–4. Use the large control knob to highlight the Diagnostics application; then, touch the Run Application soft key. The diagnostic operation begins with the High Level Diagnostic Interface Main Menu shown in Figure 6–6. In this menu, use large control knob to highlight the “R” (Instrument Run Modes menu) and press the Select button. AM700 Audio Measurement Set Service Manual 6–15 Diagnostics Entry to high level diagnostics menu from other Diagnostics High level diagnostic interface main menu Backdoor entry to high level diagnostics menu Instrument run modes High level diagnostics Powerup AutoReset Quick Start Analog acq diags (HL) Low level menu Reset to low level diagnostics mode Low level diagnostics AM700 start up menu Backdoor entry to low level diagnostics menu Instrument run modes Diagnostics help menu Instrument powerup modes list Diagnostic front panel buttons Normal AutoReset Quick Start High level menu To low level diagnostics Firmware date codes Change diagnostic intensity Utilities Zero NVRAM Reprogram flash EEPROMs Reset to high level diagnostics mode Figure 6–5: AM700 diagnostics menus overview 6–16 AM700 Audio Measurement Set Service Manual Diagnostics From low level diagnostics AM700 start up menu Low level diagnostics CPU Diagnostics (LL) Display diagnostics (LL) DSP Diagnostics (LL) Overall run mode Power up Auto reset Overall run mode Power up Auto reset Overall run mode Power up Auto reset Custom Custom Custom Sequence Advance mode Result display mode Build a sequence Run the sequence Sequence Advance mode Result display mode Build a sequence Run the sequence Sequence Advance mode Result display mode Build a sequence Run the sequence CPU Diagnostic test list Display Diagnostic test list DSP Diagnostic test list Figure 6–5: AM700 diagnostic menus overview (cont.) AM700 Audio Measurement Set Service Manual 6–17 Diagnostics High Level Diagnostic Interface --- MAIN MENU --Key Selection __________________________________ R ... Instrument -RUN MODESD ... High Level -DIAGNOSTICS- Menu __________________________________ = ... Reprint @ ... Abort Menu __________________________________ Input your selection: Figure 6–6: High level diagnostics main menu In the Instrument Run Modes menu (shown in Figure 6–7 for V1.02 firmware and in Figure 6–8 for V1.0/V1.01 firmware) highlight the “L” (Low Level Menu) and press the Select button again. High Level Diagnostic Interface --- INSTRUMENT RUN MODES --NOTE: Modes marked (R) will RESET the instrument. Key Selection __________________________________________________________ D ... -DIAGNOSICS- ....... (R) run powerup diagnostics A ... -AUTORESET- ........ (R) run all diagnostics Q ... -QUICK START- ...... (R) skip all diagnostics L ... -LOW LEVEL MENU- ... (R) run Low Level Diags Infc --------------------------------------------------------= ... Reprint @ ... Abort Menu --------------------------------------------------------Input your selection: Figure 6–7: Instrument run modes in V1.02 firmware 6–18 AM700 Audio Measurement Set Service Manual Diagnostics High Level Diagnostic Interface --- INSTRUMENT RUN MODES --NOTE: Modes marked (R) will RESET the instrument. Key Selection __________________________________________________________ N ... -NORMAL- ........... (R) run powerup diagnostics A ... -AUTORESET- ........ (R) run all diagnostics Q ... -QUICK START- ...... (R) skip all diagnostics L ... -LOW LEVEL MENU- ... (R) run Low Level Diags Infc --------------------------------------------------------= ... Reprint @ ... Abort Menu --------------------------------------------------------Input your selection: Figure 6–8: Instrument run modes in V1.0/V1.01 firmware The AM700 then resets and displays the AM700 STARTUP MENU choices shown in Figure 6–9. Low Level Diagnostic Interface --- AM700 STARTUP MENU --Key Selection __________________________________ H R D U ... ... ... ... Diagnostics -HELP- Menu Instrument -RUN MODES- Menu Low Level -DIAGNOSTICS- Menu -UTILITIES- Menu F ... -FIRMWARE- Date Codes __________________________________ = ... Reprint @ ... Abort Menu __________________________________ Input your selection: Figure 6–9: AM700 startup menu The second method of accessing the Low Level diagnostics menu starts with the power off. This method is referred to as the “backdoor boot modes.” Press and hold the Menu button while turning on the power. After the AM700 beeps twice to acknowledge the startup mode, release the Menu button. The AM700 then initializes directly into the Low Level diagnostics mode as shown in Figure 6–9. AM700 Audio Measurement Set Service Manual 6–19 Diagnostics In this menu, select “D” (Low Level Diagnostics Menu) and press select to access the Low Level Diagnostics menu shown in Figure 6–10 (V1.02) or Figure 6–11 (V1.00/1.01). Low Level Diagnostic Interface The Low Level Diagnostics menu changed between V1.0/V1.01 firmware and V1.02 firmware. The V1.02 firmware menu adds more diagnostic choices shown in the menu in Figure 6–10. The V1.0/V1.01 Low Level Diagnostic menu choices are shown following the V1.02 menu in Figure 6–11. Low Level Diagnostic Interface --- LOW LEVEL DIAGNOSTICS--Select a diagnostic to execute from the list below: Key Selection __________________________________ A ... CPU Diagnostic B ... Digital Audio Diagnostic C ... Display Diagnostic D ... DSP Diagnostic E ... Generator Diagnostics F ... Floppy Diagnostic __________________________________ = ... Reprint @ ... Abort Menu __________________________________ Input your selection: Figure 6–10: Low level diagnostics menu V1.02 firmware Low Level Diagnostic Interface --- LOW LEVEL DIAGNOSTICS--Select a diagnostic to execute from the list below: Key Selection __________________________________ A ... CPU Diagnostic (LL) B ... Display Diagnostic (LL) C ... DSP Diagnostic (LL) __________________________________ = ... Reprint @ ... Abort Menu __________________________________ Input your selection: Figure 6–11: Low level diagnostics menu for V1.0/V1.01 firmware 6–20 AM700 Audio Measurement Set Service Manual Diagnostics The low-level diagnostics consists of sets of tests that check the CPU (central processing unit), the Display system, and the DSP (digital signal processor) circuitry. The tests made in each of the circuits are shown in Tables 6–2, 6–3, and 6–4. These tests are all run at power-on in V1.0/V1.01 firmware unless they are intentionally bypassed by the user. They are skipped in V1.02 firmware unless they are specifically selected by the user. Additionally, diagnostics tests for the Digital Audio board, the Generator board, and the Floppy disk controller are provided in V1.02 firmware. The tests shown in the tables are the main test heading only. Each of the tests has additional subtest that are used by servicing to further narrow the suspected failure error if a diagnostic failure occurs during testing. Usually, this power up running of diagnostics will be the only use of diagnostics for the user. A service person can use the diagnostics to assist in determining if a board or board set is faulty before doing a board swap to effect repairs to the AM700. The normal use of the diagnostic tests is for factory testing prior to shipment to the customer and repair testing of the boards returned in the board exchange program. Table 6–2: CPU diagnostic (LL) Test measmt unit min max result Board Program Reg –Pass– Board Status Reg –Pass– Spurious Interrupts –Pass– Bus Error Detect –Pass– Dynamic RAM –Pass– Parity Detect NA Can’t test parity on 32-bit DRAM NVRAM (read only) Flash EEPROM –Pass– Real Time Clock –Pass– RTC Interrupt –Pass– FP Ct’l ID Reg –Pass– FP RAM: CPU side –Pass– GPIB Controller –Pass– GPIB Interrupt –Pass– Serial Interrupt –Pass– Timer Interrupt –Pass– DUART 1 (serial) –Pass– DUART 2 (kybd) –Pass– AM700 Audio Measurement Set Service Manual 6–21 Diagnostics Table 6–3: Display diagnostic (LL) Test measmt unit min max result Video ASIC –Pass– Video RAM –Pass– Video Interrupt –Pass– Int’l Brite DAC –Pass– Ext’l Brite DAC –Pass– Int’l RAM DAC –Pass– Ext’l RAM DAC –Pass– Table 6–4: DSP diagnostic (LL) Test measmt unit min max result DSP Addr Hold Reg - –Pass– DSP Host Interface –Pass– DSP Host Interrupt –Pass– DSP Internal RAM –Pass– Table 6–5: Digital audio diagnostic (LL) Test measmt unit min max result Host Interface –Pass– HW Version –Pass– Internal Ram –Pass– External Ram –Pass– Table 6–6: Generator diagnostic (LL) Test measmt unit min max result Host Interface –Pass– HW Version –Pass– Internal Ram –Pass– External Ram –Pass– 6–22 AM700 Audio Measurement Set Service Manual Diagnostics The tests for the floppy drive require user interaction. A 3 1/2 inch diskette must be inserted to perform the testing done. As the Table 6–7 indicates, a formatted disk can be queried to check its status. The status query returns the number of heads, the number of tracks, the sectors per track, the bytes per track, the number of sectors, and the bytes per sector for the disk. You can also format a diskette for MS DOS 1.44 Mbytes and perform a disk stress test to check for read and write errors to the diskette. Table 6–7: Floppy diagnostic (LL) Test measmt unit min max result Disk Status Query –Pass– Disk Format –Pass– Disk Stress Test –Pass– Selecting an Overall Run Mode After you select one of the diagnostics to execute, you get a further choice of how you want to run it. The choices are shown in Figure 6–12 as P, A, or C, (power up, auto reset, or custom mode respectively). The menu for each of the diagnostics: CPU, Generator, Digital Audio, Display, DSP, and Floppy Disk are all the same at this point. The diagnostic selected determines which is to be interactively run. Power Up mode runs the power-up diagnostics as at normal power on with an abbreviated go/no-go test of the circuitry. Auto Reset Mode runs all the power up diagnostic tests plus any “AutoReset” tests available for the given diagnostic. No additional auto reset test are available as of this printing. The Custom choice permits you to select a single diagnostic test or build a selected set of diagnostic tests to run. This mode allows access to any or all of the available diagnostic tests and any User-Interactive diagnostic tests. AM700 Audio Measurement Set Service Manual 6–23 Diagnostics Low Level Diagnostic Interface --- LOW LEVEL DIAGNOSTICS--Select an OVERALL RUN MODE from the list below: Key Selection __________________________________ P ... -POWER-UP- Mode A ... -AUTO-RESET- Mode C ... -CUSTOM- Mode __________________________________ = ... Reprint @ ... Abort Menu __________________________________ Input your selection: Figure 6–12: Low level diagnostic OVERALL RUN MODE menu Custom Run Mode Choices The Custom Run Mode menu shown in Figure 6–13 or Figure 6–14 permits configuration of the diagnostic testing sequence. You can select the Power Up, the Auto Reset, or a Custom run mode. Low Level Diagnostic Interface --- CPU Diagnostic (LL) --Configure CUSTOM RUN MODE parameters as desired, build/edit sequence, then select RUN" to begin execution Key Selection __________________________________ S ... -SEQUENCE- Type (CUSTOM) 1 ... Advance Mode (MANUAL) 2 ... Result Display Mode (SHOW ALL) 3 ... Result Logging Mode (DISABLED) B ... -BUILD- New Test Sequence __________________________________ = ... Reprint @ ... Abort Menu __________________________________ Input your selection: Figure 6–13: Custom run mode menu V1.02 firmware 6–24 AM700 Audio Measurement Set Service Manual Diagnostics Low Level Diagnostic Interface --- CPU Diagnostic (LL) --Configure CUSTOM RUN MODE parameters as desired, build/edit sequence, then select RUN" to begin execution Key Selection __________________________________ S ... -SEQUENCE- Type (CUSTOM) 1 ... Advance Mode (MANUAL) 2 ... Result Display Mode (SHOW ALL) B ... -BUILD- New Test Sequence R ... -RUN- Test Sequence __________________________________ = ... Reprint @ ... Abort Menu __________________________________ Input your selection: Figure 6–14: Custom run mode menu V1.0/V1.01 firmware You can select how the diagnostic advances to the next test as Automatically, Advance on Pass, Advance on Fail, or Manually. You can select how the results are displayed from the choices of Show All, Show Main Results, or Show Minimum Required Results. In V1.02 firmware, how the results are logged is also selectable from a choice of Log the Main Results, Log all the Test Results, Log the Minimum Required Results, and Disable Results Logging. To build a custom testing sequence, select B (Build) to display the entire list of diagnostics for the selected board. In Figure 6–15, Display Diagnostics was the selected set of tests. NOTE. After you finish making the selections for a test sequence to perform and make the choice of Done Selecting, the display returns to the next higher selection window. Two new lines are added to the choices: E . . . Edit Test Sequence and R. . . Run Test Sequence. AM700 Audio Measurement Set Service Manual 6–25 Diagnostics Low Level Diagnostic Interface --- Display Diagnostic (LL) --Build a new CUSTOM TEST SEQUENCE by selecting test from those listed. Key Selects/Unselects __________________________________ A ... Video ASIC B ... Video RAM C ... Video Interrupt D ... Int'l Brite DAC E ... Ext'l Brite DAC F ... Int'l RAM DAC G ... Ext'l RAM DAC __________________________________ = ... Reprint @ ... Abort Menu + ... Select All - ... Un-Sel All ! ... Done Selecting __________________________________ Selection(s): *** NONE *** Figure 6–15: Build CUSTOM TEST SEQUENCE menu for display When the menu first appears, there are no selections made as indicated in the figure. To add a test to the list, rotate the large control knob to highlight the choice, then press the Select button. The selected choices are indicated by opening and closing angle brackets around the key letter and shown in the selections list. You can select all the choices in the list by highlighting the + and selecting it. All the choices can be unselected by highlighting the – and selecting it. After you have made the test selections you want in the custom list, highlight the ! and press Select. This also returns to the next higher level menu where the choice to run the tests in the custom list you have just made is available. When you run the tests, all the selected major test headings and the test results are shown along with the sub-test that run as part of the diagnostics. NOTE. The Custom selections are not remembered when exiting the Custom Run Mode menu and returning. You will have to remake any custom selections you previously made if you want to build the same testing sequence again. 6–26 AM700 Audio Measurement Set Service Manual Diagnostics Using a Keyboard to Run Diagnostics The AM700 supports the use of AT-type keyboard as an input device for making any inputs normally accepted from the front panel keypad. For diagnostics, the keyboard is used together with exporting the diagnostic output messages to an external terminal. This permits the diagnostic tests to be run and the results viewed either when there has been a major failure of the AM700 display system or in the production area of manufacturing for automated testing prior to shipment of the product. Diagnostic Keystrokes In the diagnostic menus that are displayed, the controlling keys are given in the column labeled “Key.” Other controlling keys are the =, used to reprint the screen, and the @ key, used to abort the menu and return to the next higher level in the menu tree. Another is the ! key, used in the Custom Run Mode menu to report that the editing is done. When the AM700 display is operational, menu selections are made by rotating the large control knob to highlight the choice to make, then pressing the Select button to actually make the choice. The control knob rotates through the menu choices in either direction. Some Front Panel buttons can be used to make the selections directly as shown in Figure 6–16. Low Level Diagnostic Interface DIAGNOSTIC FRONT PANEL BUTTON USES ================================== Some Front Panel buttons may be used in place of moving the hilight cursor and pressing the <Select> button. Below are some common diagnostic menu selections and their Front Panel button equivalents. Key FR-PNL BUTTON __________________________________ SPC (Pause) ........... Freeze RET (Continue) ........ Enter '@' (Abort) ........... Clear Menu '=' (Reprint) ......... Menu '+' (Select All) ...... Units '-' (Un-Sel All) ...... CLR '!' (Done Selecting)... Enter '0' -- '9' ............ "0" thru "9" -#- Press Any Key to Continue -#- Figure 6–16: Front panel diagnostic selection buttons AM700 Audio Measurement Set Service Manual 6–27 Diagnostics Diagnostic Help Menu One of the menu choices in the AM700 START UP MENU is the diagnostic help menu. The help menu has two choices: List special instrument power up modes and list diagnostic front panel button uses. Figure 6–16 lists the front panel buttons that can be used directly to make menu selections. These keystrokes are in lieu of highlighting the menu choice and pressing the Select button when one of the listed key choices is available in a menu. Backdoor Boot Modes The other choice in the diagnostic help menu provides a list of the special power up modes that are accessible through pressing and holding certain of the front panel buttons at power on. These are referred to as the “backdoor boot modes.” The choices are shown in Figure 6–17 or Figure 6–18 depending on the firmware version in your AM700. Low Level Diagnostic Interface SPECIAL INSTRUMENT POWER-UP MODES ================================== These modes are accessed by powering up the instrument with the indicated button(s) held in. The instrument will beep twice and recognize the mode about 5 seconds after power-up, after which the buttons must be released. The Boot Switches MUST be set to default (all closed) to access these modes. POWER-UP MODES BUTTON(S) TO HOLD IN ------------------------------------------DIAGNOSTIC HELP .......... 1 & 2 & 3 SET DISPLAY INTENSITY .... Display LOW LEVEL DIAGS INFC ..... Menu HIGH LEVEL DIAGS INFC .... Menu & Rescale LOW LEVEL LOOP ........... Freeze RUN DIAGNOSTICS .......... Limits QUICK START FFT .......... FFT QUICK START ANALYZER ..... Analyzer QUICK START DIGITAL ...... Digital QUICK START MONITOR ...... Monitor UPDATE FIRMWARE .......... Configure and Storage -#- Press Any Key to Continue -#- Figure 6–17: Special power up boot modes for V1.02 firmware 6–28 AM700 Audio Measurement Set Service Manual Diagnostics Low Level Diagnostic Interface SPECIAL INSTRUMENT POWER-UP MODES ================================== These modes are accessed by powering up the instrument with the indicated button(s) held in. The instrument will beep twice and recognize the mode about 5 seconds after power-up, after which the buttons must be released. The Boot Switches MUST be set to default (all closed) to access these modes. POWER-UP MODES BUTTON(S) TO HOLD IN ------------------------------------------DIAGNOSTIC HELP .......... 1 & 2 & 3 SET DISPLAY INTENSITY .... Display POWERUP DIAGNOSTICS ...... Limits LOW LEVEL DIAGS INFC ..... Menu LOW LEVEL DIAGS LOOP ..... Freeze HIGH LEVEL DIAGS INFC .... Menu & Rescale QUICK START FFT .......... FFT QUICK START ANALYZER ..... Analyzer QUICK START DIGITAL ...... Digital QUICK START MONITOR ...... Monitor UPDATE FIRMWARE .......... Configure and Storage -#- Press Any Key to Continue -#- Figure 6–18: Special power up boot modes for V1.0/V1.01 firmware AM700 Audio Measurement Set Service Manual 6–29 Diagnostics Viewing Diagnostics on a Remote Terminal To view the diagnostics results on an external terminal, section 3 of switch S2 on the CPU board, must be in the open position. This routes the diagnostic output to the serial ports. A terminal or PC with terminal emulation must be connected to either COM1 (serial port 0) or COM2 (serial port 1), and the baud rate of the AM700 must be set to match that of the terminal (see Table 6–8). Baud Rate Selection The baud rate selection as controlled by AM700 Boot Code is determined by the setting of a pair of jumpers, J11 and J13, located on the CPU board. The jumper settings are shown in Table 6–8. Serial ports are configured for 8-bits data, with no parity, 1 stop bit, and Xon/Xoff flow control when transmitting (control_S to stop, control_Q to continue). Both ports will be initialized to run at the selected baud rate. Table 6–8: Baud rate setting for diagnostic output to the serial ports RATE J11 J13 38400 (factory setting) off off 9600 off ON 1200 ON off 19200 (default baud rate) ON ON BOOT UP Diagnostics The following information is a description of the Power-up Diagnostics and is provided to aid in troubleshooting a power-up diagnostic failure. Boot steps signal their starting by writing the indicated signal value to the Diagnostic LED display. NOTE. Switch segment 2 of switch S3 on the CPU board must be in the UP (OPEN) position to see these values on the Diagnostic LED display. Signal values are: All LED segments on for step 0, just after CPU reset instruction. “1” through “F” for steps 1–15. “0” through “.F” for steps 16–31 (currently ends at 19). 6–30 AM700 Audio Measurement Set Service Manual Diagnostics Exception errors occurring during step 1 (Address space probe) will: Display an error message sequence on the Diagnostic LED display,decoded as follows: An “E” will precede the exception number (0–255). A “P” will precede the Probe step number (see Table 6–9). Numbers are shown as a sequence of decimal digits, separated by decimal points (to allow detecting repetition of digits), most significant digit to least significant. For example, a bus error (exception 2) occurring during probe step 15 would display the following sequence: E", 2", P", 1", .", 5". If the error is considered critical: Jump to the startup code (warm reboot). Otherwise: Continue testing Exception errors occurring during steps 2 through 16 will: Display an error message sequence on the Diagnostic LED display, 2 times through. The error message is decoded as follows: An “E” precedes the exception number (0–255). A dash/minus sign precedes the boot step number. Numbers are shown as a sequence of decimal digits, separated by decimal points (to allow detecting repetition of digits), most significant digit to least significant. For example, a divide by zero error (exception 5) occurring during boot step 15 would display the following sequence twice through. E", 5", Ć", 1", .", 5" Jump to the startup code (warm reboot). Exception errors occurring after step 16 will: Display an error message on the instrument screen (or to the serial port). Wait for user acknowledgement. AM700 Audio Measurement Set Service Manual 6–31 Diagnostics Do a warm, quick reboot (skips RAM and ROM tests). Bus Probe Table Table 6–9: Bus probe checks Probe Step Probe Address Data to Write Access Size Access Type Critical Error? 0xffffffff 32-bit write Yes 32-bit read Yes 0x12000000 32-bit read Yes 0x14000000 32-bilt read Yes 0x04000000 32-bit read No 32-bit write No 32-bit read No 32-bit write No 32-bit read No 16-bit write No 16-bit read No 8-bit write No 8-bit read No 8-bit write Yes 8-bit read Yes 8-bit write No 8-bit read No 8-bit write No 8-bit read No Board Program Register: 1 0x13000000 2 0x13000000 Board Status Register 3 Boot Switches 4 NVRAM 5 Video RAM 6 0x0c000000 7 0x0c000000 0x00000000 Video ASIC 8 0x0c800000 9 0x0c800000 0x00000000 Front Panel Shared RAM: 10 0x0e000000 11 0x0e000000 0x0000 Front Panel Control Register: 12 0x0e800000 13 0x0e800000 0x00 DUART 1 (RS-232 infc): 14 0x10000000 15 0x10000000 0x00 DUART 2 (keyboard infc): 16 0x11000000 17 0x11000000 0x00 GPIB Infc: 18 0x15000000 19 0x15000000 6–32 0x00 AM700 Audio Measurement Set Service Manual Diagnostics Table 6–9: Bus probe checks (cont.) Probe Step Probe Address Data to Write Access Size Access Type Critical Error? 20 0x17000030 0x00 8-bit write No 21 0x17000030 8-bit read No 32-bit write No Real Time Clock: DSP-CPU Infc ASIC (Address Holding Register) 22 0x19000000 0x010560cc 23 0x19000000 32-bit read No 0x1a000000 32-bit read No 32-bit read No 32-bit write No 32-bit read No 32-bit Counter 24 Flash EEPROM Base Address: 25 0x20000000 96k Host Infc: 26 0x60000000 27 0x60000000 Diagnostic Displays 0x00000000 The diagnostic displays are used to troubleshoot CPU kernel problems when the AM700 fails to boot. The segments of the diagnostic LED are turned on to indicate the failed area as indicated in Table 6–10. NOTE. Switch segment 2 of switch S3 on the CPU board must be in the DOWN (Closed) position to see these values on the Diagnostic LED display. Table 6–10: Diagnostic LED definitions LED Display Register LED Description 0 reserved 1 reserved 2 on : Flash EPROM (bank 0) not found 3 on : Flash EPROM (bank 1) not found 4 on : Flash EPROM (bank 2) not found 5 on : DRAM not found 6 on : battery supply failure 7 on : hardware reset active This register is a write only octal latch which can be programmed to turn on or off the diagnostic 7-segment LED on the CPU board. AM700 Audio Measurement Set Service Manual 6–33 Diagnostics BOOT Steps The following is a description of the boot diagnostic steps that are performed at power up. In normal operation, these steps happen very rapidly, and the step numbers will not be in the LED long enough to determine the boot step that is occurring. If the boot steps hang so that a number is visible, that number indicates the boot step that hung the processor. That information may be used to provide information on what steps and hardware correctly passed and where to start looking for a problem. NOTE. The numbers are 1–9, A–F, and then repeat 1–3, for the boot steps. 1. Reset the CPU. a. Use the CPU reset instruction to reset the microprocessor and all hardware resettable from the CPU’s reset line. b. Flash ALL diagnostic LED segments on and off-twice. c. Set the CPU status register to 0x2700, to run in Supervisor mode with all interrupts masked (except NMI’s). d. Write 0x00000000 to the Main CPU’s vector base register e. Read the initial stack pointer value from address 0 and set the CPU stack pointer (sp) and frame pointer (a6) registers to this value f. The DRAM is not set up until later, so the initial stack pointer is set to a non-existent DTACK’d location 1K above the Diagnostic LED register. The exception stack frames can be “safely” written there until the DRAM is tested. g. Supervisor mode is always running, so the USP register is available to pass the boot step number to the “core” exception handler. h. Later, when enough DRAM is verified, the stack is moved to the DRAM, and the Access Error vector is redirected to a more informative handler (see step 8). i. Write 0 to the CPU Cache Control Register (cacr) to disable the cache. j. Invalidate the cache entries and flush all ATC entries. k. Probe the CPU address space for bus errors. i. Encode the 8-bit boot step number into the USP LSByte. ii. Write “1” on the diagnostic LED display. iii. Step through the Bus Probe table (see Table 6–9) and probe for access errors. 6–34 AM700 Audio Measurement Set Service Manual Diagnostics l. If any “critical” errors occur, jump back to the startup code. 2. Read the DRAM size bits from the Board Status Register (BSR). a. Encode the 8-bit boot step number into the USP LSByte. b. Write “2” on the diagnostic LED display. c. Read the DRAM size bits from the Board Status Register. 3. Initialize the DRAM controller. a. Encode the 8-bit boot step number into the USP LSByte. b. Write “3” on the diagnostic LED display. c. If DRAM status bits indicate 16 Meg is present: Write 0 to address 0x42b20980 to initialize the DRAM Controller for 16 MW. Else (assume 8 Meg present): Write 0 to address 0x40b20980 to initialize the DRAM Controller for 8 MW. d. Test for presence of the DRAM. Do a 32-bit read at address 0x30000100. Write back the inverse of what was read. Precharge the bus by writing what was read to the diagnostic LED address, 0x18000000, and waiting a while. Do another 32-bit read at address 0x30000100. If the same data as the first read is returned, no DRAM was found. Flash “3” on the diagnostic LED display –several– times. Jump back to the startup code. Since a location that may not yet have been written is being read, there can be a parity induced access error (exception 2) here if the Board Program Register fails to mask parity exceptions. There may also be a bus error induced access error from the reads or writes to DRAM. It will be necessary to physically probe the hardware to determine the actual cause. AM700 Audio Measurement Set Service Manual 6–35 Diagnostics 4. Read boot diagnostic status from the DRAM. a. Encode the 8-bit boot step number into the USP LSByte. b. Write “4” on the diagnostic LED display. c. Read the boot diagnostics status from DRAM. Since a location that may not yet have been written is being read, we could get a parity induced access error (exception 2) here if the Board Program Register fails to mask parity exceptions. There may also be a bus error induced access error on the read. It will be necessary to physically probe the hardware to determine the actual cause. 5. Test the DRAM data bus. a. Encode the 8-bit boot step number into the USP LSByte. b. Write “5” on the diagnostic LED display. c. For each of the 32 data lines, 0–31: Write a test pattern with just that line HIGH to 0x30000100: 0x00000001, 00000002, 00000004, 00000008, 00000010, 0x00000020, 00000040, 00000080, 00000100, 00000200, 0x00000400, 00000800, 00001000, 00002000, 00004000, 0x00008000, 00010000, 00020000, 00040000, 00080000, 0x00100000, 00200000, 00400000, 00800000, 01000000, 0x02000000, 04000000, 08000000, 10000000, 20000000, 0x40000000, 80000000 Write the inverse pattern to the diagnostic LED register, to precharge the data bus with the opposite of what expect to read back. Verify that we read back the test pattern from 0x30000100. d. If that pattern test passes, do the test again using a pattern with just the data line under test LOW: 0xfffffffe, fffffffd, fffffffb, fffffff7, ffffffef, 0xffffffdf, ffffffbf, ffffff7f, fffffeff, fffffdff, 0xfffffbff, fffff7ff, ffffefff, ffffdfff, ffffbfff, 0xffff7fff, fffeffff, fffdffff, fffbffff, fff7ffff, 0xffefffff, ffdfffff, ffbfffff, ff7fffff, feffffff, 0xfdffffff, fbffffff, f7ffffff, efffffff, dfffffff, 0xbfffffff, 7fffffff e. If either test fails, indicate the bad line (d0–d31) by showing a “d” and then the hex char “0”–”.F” (0–31) on the diagnostic LED display. 6–36 AM700 Audio Measurement Set Service Manual Diagnostics f. If any bad data lines were found, jump back to the startup code. If there is an access error on this step, it will likely be caused by a write access; it is also possible to get parity induced access errors here, if the Board Program Register fails to mask them. 6. Test the DRAM address bus. a. Encode the 8-bit boot step number into the USP LSByte. b. Write “6” on the diagnostic LED display. c. Copy all BootInfo info from start of DRAM to a region that should not get corrupted if the Address Bus is working, for later restoration. The storage region is from 0x30000204 to 0x300003fc. This will work as long as the BootInfo structure is less than or equal to 504 bytes in length. d. Zero each DRAM location whose address has one address line high and the others low, or one address line low and the others high: 0x30000004, 30000008, 30000010, 30000020, 30000040, 30000080, 0x30000100, 30000200, 30000400, 30000800, 30001000, 30002000, 0x30004000, 30008000, 30010000, 30020000, 30040000, 30080000, 0x30100000, 30200000, 30400000 (stop here if 8 Meg) ( 0x30800000 if 16Meg ), (0x31000000 if 32 Meg) 0x3XXffff8, 3XXffff4, 3XXfffec, 3XXfffdc, 3XXfffbc, 3XXfff7c 0x3XXffefc, 3XXffdfc, 3XXffbfc, 3XXff7fc, 3XXfeffc, 3XXfdffc, 0x3XXfbffc, 3XXf7ffc, 3XXefffc, 3XXdfffc, 3XXbfffc, 3XX7fffc If 8 Meg: XX is 07 0x306ffffc, 305ffffc, 303ffffc. If 16 Meg: XX is 0f 0x300efffc, 30dffffc, 30bffffc, 307ffffc. If 32 Meg: XX is 1f 0x31effffc, 31dffffc, 31bffffc, 317ffffc, 30fffffc. AM700 Audio Measurement Set Service Manual 6–37 Diagnostics e. Write 0xFFFFFFFF to the first and last DRAM location. 0x30000000 is first 0x3XXffffc is last, where: XX is 07 if 8 Meg XX is 0f if 16 Meg XX is 1f if 32 Meg f. Check each of the zeroed locations for non-zero content. A non-zero content indicates a misdirected write. g. Indicate bad address lines by showing “A” and then the hex char “0”–”F” (0–31) on the diagnostic LED display. h. After all lines have been tested, if any of address A2 through A20 failed, jump back to the startup code. i. Otherwise, restore BootInfo and continue testing. 7. If not skipping, test the boot RAM, the malloc pool RAM, and the “FLASH COPY” RAM. a. Encode the 8-bit boot step number into the USP LSByte. b. Write “7” on the diagnostic LED display. c. Copy the first two long words of DRAM into registers. NOTE. Parity error detection must be disabled during the previous Copy, because locations which may not have been written yet are being read. d. Enable Parity Error Exceptions via the Board Program Register (BPR) (unless a 32-bit DRAM is being used). e. Using registers only: Write each long word’s address into its own location. Read back and verify each, aborting test if error occurs. Write the inverse of each long word’s address into its own location. Read back and verify each, aborting test if error occurs. f. Disable Parity Error Exceptions through the BPR (unless a 32-bit DRAM is being used). g. If an error occurred during read back, flash “7” on the Diagnostic LED display –several– times and jump to the startup code. h. Otherwise, restore the first two long words in the DRAM and continue testing. 6–38 AM700 Audio Measurement Set Service Manual Diagnostics 8. Move stack and frame pointers to the DRAM. a. Encode the 8-bit boot step number into the USP LSByte. b. Write “8” on the diagnostic LED display. c. Set registers SP and a6 to the BOOT STACK PTR in DRAM (0x3015fffc if DL’d code; else 0x301fffc). 9. If not skipping, test Boot ROM CRC. a. Encode the 8-bit boot step number into the USP LSByte. b. Write “9” on the diagnostic LED display. c. Calculate a 32-bit CRC for all but the last long word of Boot ROM and compare the value to the last word. d. If CRC’s don’t match, flash 9 on the Diagnostic LED display several times. 10. Copy data segment from ROM to DRAM. a. Encode the 8-bit boot step number into the USP LSByte. b. Write “A” on the diagnostic LED display. c. Call the C startup routine to do the copy. 11. Upgrade the exception handler. a. Encode the 8-bit boot step number into the USP LSByte. b. Write “B” on the diagnostic LED display. c. Write 11 to step code (in Boot RAM). d. Copy the reset vectors from the ROM table to the RAM and one set of the rest of the RAM vectors. e. Change the VBR (Vector Base Register) to use the RAM vector table for use with the “dumb” exception handler. 12. Initialize linkage to external libraries. a. Write “C” on the diagnostic LED display. b. Write 12 to step code (in Boot RAM). c. Call the application-specific initialization routine. AM700 Audio Measurement Set Service Manual 6–39 Diagnostics 13. Boot according to application-specific modes. a. Write “D” on the diagnostic LED display. b. Write 13 to step code (in Boot RAM). c. If BootInfo–>flashStat says to try starting upgraded code from flash: If the upgraded code starts up, it will do boot steps 14 through 19. If it fails to startup because the flash was bad, it will signal by flashing the step code (“D”) twice on the diagnostic LED display. If it fails to startup because the target DRAM is bad, it will signal by flashing the step code (“D”) several times on the diagnostic LED display. If upgraded code from the flash is not used, continue booting from Boot ROM; call DctlStart(), to do boot steps 14 through 19. 14. Determine Boot mode. a. Write “E” on the diagnostic LED display. b. Write 14 to step code (in Boot RAM). c. If starting in “cold” or “warm” start mode: Read the boot switch settings. Try to match setting to a boot mode in the application-supplied Boot table, or use default mode. d. If starting in “hot” start mode, try to find given boot mode in the application-supplied boot table. If not found, use the default mode. 15. Determine Boot function and I/O mode. a. Write “F” on the diagnostic LED display. b. Write 15 to step code (in Boot RAM). c. Based on the boot mode found in step 14 part c, scan the applicationsupplied boot table for the appropriate boot function and I/O mode. If no match is found, use defaults. 6–40 AM700 Audio Measurement Set Service Manual Diagnostics 16. Set I/O mode and initialize the I/O interface hardware. a. Write “.0” on the diagnostic LED display. b. Write 16 to step code (in Boot RAM). c. Set the Dio Infc to use the appropriate I/O mode. d. Call the Dio Infc initialization function to setup the I/O hardware. 17. Initialize the smart exception handler. a. Write “.1” on the diagnostic LED display. b. Write 17 to step code (in Boot RAM). c. Switch exception vector handling from the dumb handler to the smart one. d. Set handler modes to generate long exception reports and terminate. 18. Do application-specific hardware initialization. a. Write “.2” on the diagnostic LED display. b. Write 18 to step code (in Boot RAM). c. Call an application hardware initialization routine, which will: Disable bus error reporting. Write the default value (0x010560cc) to the DSP ASIC. Address Holding Register, so it can’t be accidently changed. Setup the Video ASIC for the AM configuration. If using serial I/O, clear the instrument screen memory. Restore bus error reporting. 19. Do an application-specific boot. a. Write “.3” on the diagnostic LED display. b. Write 19 to step code (in Boot RAM). c. Call the boot function found in step 15. Digital Audio Board Semiautomated Testing This information describes a set of tests used to perform a semiautomated test of the digital audio board. These test, shown in Table 6–11, are done at the factory or customer service using an AM700 work station with the proper test equipment and test programs to run the checks on the AM700. AM700 Audio Measurement Set Service Manual 6–41 Diagnostics Table 6–11: Digital audio circuit board testing Test name Test description Test Group 0 Check power supplies (three terminal regulator outputs) and adjust 12.288 MHz crystal oscillator Y1. Test Group 1 These are low level tests, mostly read and write tests of all writeable registers. 1.1 host_com Downloads tap 6.56k. Requires functioning dsp kernel and host port Dsp kernel includes: +5 V through fuse F3 DSPCLK 3.072 MHz from U115 pin 19 U115 pin 13 12.288 MHz from Y1 (DSPRST) J2 pin 11 high from U140 pin 18 U140 pin 27, pin 42, and 43 or’ed resets all high U5 Address Decoder pal, U98 SIMM Most of the resistors and capacitors Host port includes: U99, U100, U144. Host cable 1.2 board_id Reads board ID from pal U117. Board ID may change with future board versions. 1.4 bbang_rw Writes then reads the trigger bit in U117 1.5 flags_rw Reads the flag bits which are pulled low if XLR and rear panel cables are plugged in. Prompts operator to remove and attach cables. 1.6 stx_rw Writes then reads all r/w registers in the sample transmitter U101 with several bit patterns. 1.7 stx_eye_pattern Puts eye sampler U130 in test mode to generate a fixed data pattern which is connected serially to Sample Transmitter U101. The DSP board receives the data, and it is checked for the correct pattern. 1.8 pshift_r/w Writes then reads the phase shift register in U104 with several bit patterns. 1.9 counter_rw Writes then reads the two bit control register in Counter U139 and U140 with a few bit patterns. 1.10 serial_chain Shifts a 32 bit pattern through the serial control/status chain and checks that the pattern doesn’t change. Requires U117 for control. U95, U96, U97, U142, U141, U93, and U94 form the chain. 1.11 dsp_channel Sends a sequence of bit patterns from the 56k dsp, through the sample transmitter, out the sample cable to the DSP board. Checks that received bits are same as sent bits. Sample transmitter U101 is put into dsp mode by STX/DSP line from U141 pin 2. 1.12 led_w Writes an dynamic pattern to the LED display. Requires U116, R299, DS2. 6–42 AM700 Audio Measurement Set Service Manual Diagnostics Table 6–11: Digital audio circuit board testing (cont.) Test name Test description Test group 2 Generator adjustments and functional checks. 2.1 adj_synth_1 Locks pll 1 to 12.288 MHz. Operator adjusts L5 to give correct vco control voltage. Pll 1 consists of programmable synthesizer U81, error amplifier U39B, resonant tank CR16/L5, and oscillator IC U78. This is the first pll of the frequency offset circuit. OFFSET_IN is 12.288 MHz from Y1, through U115 pin 5 and U114 pin 36. Serial control lines OFFSET_SEL0 and OFFSET_SEL1 (U96 pins 7 and 6) – must both be low to route this clock through U114 and U115. 2.2 adj_synth_2 This is the second pll of the frequency offset circuit Pll 2 locks to pll 1, so pll 1 should be verified first with test 2.1. Adjust L7 to give correct vco control voltage. Pll 2 consists of programmable synthesizer U82, error amp U39A, resonant tank CR18/L7, oscillator IC U79. Buffer Q4 amplifies the signal from pll 1. 2.3 freq_offset_response This test alternately programs plls 1 and 2 to generate 8.192 MHz and 12.288 MHz. (These are master clock frequencies for 32 and 48 kHz sample rates.) The operator observes the changing vco control voltages on an oscilloscope to check for expected settling time of a few ms. Settling time depends on the R’s and C’s around U39A and U39B. If pll 1 is out of spec, pll 2 can appear to be bad until pll 1 is fixed. The plls are programmed serially through U117. 2.4 freq_offset_unlock_flag This test checks that the out-of-lock flags for pll 1 and pll 2 are operational. Pll’s 1 and 2 are programmed for 48 kHz, allowed to settle, and the unlock flag cleared. The unlock flag then is checked to verify initial lock. The pll’s are re-programmed for 32 kHz, which causes them to momentarily loose lock. The unlock flag is read to verify that the out of lock condition was latched, and then cleared and re-read to verify that lock has been re-established. The flags, LD0 and LD1, originate at U81 pin11 and U82 pin 11. They are latched in U102 where the two are combined into one output, SYNTH_UNLOCK, which the 56k reads serially through U94 pin 4. SYNTH_UNLOCK from U102 pin16 is cleared under software control by ER_CLEAR from U96 pin15. 2.5 freq_offset_range This test checks that the VCOs in pll’s 1 and 2 can be tuned to the minimum and maximum required frequencies. The default clock (12.288 MHz) drives pll 1, which is programmed to generate 6.39 MHz. Pll 2 is programmed to multiply the output of pll 1 by one, so it generates 6.39 MHz also. This is the lowest frequency that the VCO’s are expected to generate, and corresponds to a sample rate of 25 ks/s. The out-of-lock flags are checked to see that the plls are locked. The test is then repeated with pll 1 programmed for 14.87 MHz, which is the highest frequency the VCO’s must generate, and corresponds to a sample rate of 58 ks/s. The frequency of pll 1 VCO is set by CR16 and L5. Coil L5 was adjusted in step 2.1. The capacitance of CR16 depends on the output voltage of U39B. At 25 ks/s, U39 pin 7 should measure about –1 to 0 volts. At 58 ks/s, U39 pin 7 should measure about 9 to 10 volts. Pll 2 VCO is identical and its frequency is set by CR18, L7, and the output of U39A. Note that the minus supply for dual op-amp U39 comes from a resistive divider and is about –3 volts. AM700 Audio Measurement Set Service Manual 6–43 Diagnostics Table 6–11: Digital audio circuit board testing (cont.) Test name Test description Test group 2 Generator adjustments and functional checks. 2.6 adj_gen_pll The generator pll consists of a phase comparator contained in U105, error amp U21B, integrator U21A, resonant tank Cr9/L1 and oscillator IC U64. Jitter dac U103 changes the lock phase by injecting an analog offset into the error amp input. Phase-shift PAL U104 changes the lock phase by putting a programmable digital phase shift in the feedback loop divider. This is the pll that does jitter generation and phase shift of the generator output. This test locks the pll to 12.288 MHz. The operator adjusts L5 to give correct vco control voltage. U105 (pcomp) output signals at pins 25 and 26 should be narrow pulses (less than 20 ns) with a 1.3 ms period. Pin 17, “slow”, should be low, saturating Q18. U105 (pcomp) input signals PHMCK, PHWCK should be square waves at 12.288 MHz and 48 kHz, respectively. PHCBL should be a narrow pulse (barely visible on a scope) with a 40 msec period. The output of U103, the jitter dac, should be dc at mid-scale, not contributing to any offset. U104 (pshift) pin 13 should be a legal ttl clock signal at the VCO frequency (12.288 MHz if this test passes). Pins 14 and 15 are outputs of U104 and should be pulses at the frequency of pin 13 divided by 256 and 16, respectively. 2.7 gen_pll_response U105 pin 17, “slow”, should be low, saturating Q18. This test slowly toggles the frequency of Other components which affect the settling time include the error integrator capacitor, the input clocks to the generator pll C28, varactor CR9, and all of the resistors which affect the analog loop gain (all those between 32kHz and 48kHz sample rates. around U21A and U21B). The operator checks the vco control voltage at the output of U21 to see that the loop re-locks at 48 kHz within 8 msec. 2.8 gen_pll_unlock_flag This test checks operation of the unlock flag for the generator pll. It first checks that the flag indicates lock at 48 kHz. Then it switches the generator frequency to 32 kHz and back to 48 kHz. The (latched) flag is then checked for unlock. The command to clear the flag is then sent, and the flag is checked for re-lock. The signal being tested (PH_UNLOCK) comes from U105 (pcomp) pin 6. Whenever U105 thinks it’s unlocked, it sets pin 6 high. The high level persists until pin 16 (ER_CLEAR) is brought high momentarily to clear it. PH_UNLOCK is read serially by the 56k through U94.3. ER_CLEAR comes from U96.15. 2.9 gen_pll_range This test checks the locking frequency range of the generator pll. It locks the pll to 25 kHz first, then to 58 kHz. The PH_UNLOCK flag is read in each case to verify locking. The lock range depends on the correct setting of L1 in step 2.6, and on the characteristics of varactor CR9. The voltage at the output of error integrator U211 needs to be able to swing from around –9 to +9 volts. “Slow” should be off (Q18 saturated). 6–44 AM700 Audio Measurement Set Service Manual Diagnostics Table 6–11: Digital audio circuit board testing (cont.) Test name Test description Test group 2 Generator adjustments and functional checks. 2.10 adj_gen_lvl This test sets the generator for normal operation while the operator adjusts R483, GEN LEVEL for 1 Vpp output into 75 ohms. R483 sets the reference level on gain dac U107. This sets the current in the Q7/Q8 switch and thus the voltage swing on R246. The ttl AES_OUT signal from U108 pins 36 and 39 steers the current through either Q7 or Q8. The signal on R246 is then amplified by U72 and scaled by R150 and R461. It is sent as UNBAL_OUT to the rear panel board, where it is further scaled by fixed resistors. 2.11 cable_simulator This test switches on the cable simulator so the operator can check for rise time of 100 ns to 200 ns at TP18. The cable simulator consists of R152, R156, C42, C34. It is switched into the circuit by U71 when pin 6, RED_BW_SEL is low. RED_BW_SEL is controlled by the 56k through the serial control output, U141 pin 3. 2.12 phase_shift_range This test exercises the phase shifter part of the generator pll. While the operator watches to see that phase shift is actually occurring, the test checks that the pll stays locked as the phase is shifted. Most of the functionality for this test is contained in U104. When the 56k writes a phase shift value to U104, it signals U105 through pll_setl (U104) to put the loop into “slow” mode by switching off Q18 and Q19. The new phase value is then applied to the counters internal to U104 and the loop “slowly” shifts to the new phase. Since the step in phase is kept small, the loop stays locked. When the loop settles at the new phase value, it returns to non-slow mode. Test group 3 Receiver tests, Generator tests which require the receiver. 3.1 adc_zero This checks operation of the slow adc U137 by programming it to measure one of its grounded inputs, and checking that the returned value is within 5mV of ground. U137 gets its reference from U138. It requires a continuous clock which it gets through CLK1536 from U115 pin 14. It communicates serially with the 56k through three control lines, (ADC), SCCLK, and SCTD which come from U117 pins 26, 14, and 31, respectively. 3.2 input_level_cal This test internally connects the generator to the receiver and varies the generator output level to check that the input level measurement is within range. The input level is determined by measuring the control voltage in the agc loop. U109 selects the LOOPBK input which is buffered by U75, amplified by variable-gain amp U110A, and amplified more by U111. The output of U11 is peak-detected by CR22 and CR23, and the resulting dc level is balanced against the –12 V supply by divider R259 and R260. If the peak value exceeds about +2.5 V, integrator U112’s output moves downward reducing the gain of U110A. In this way, the voltage at U112 output represents the gain needed to keep the peak of the agc’d signal at 2.5 V. This voltage is measured by the slow adc. Input selector U109 is controlled by four outputs from the serial control chain. AM700 Audio Measurement Set Service Manual 6–45 Diagnostics Table 6–11: Digital audio circuit board testing (cont.) Test name Test description Test group 3 Receiver tests, Generator tests which require the receiver. 3.3 input_level_linearity This test checks the accuracy of the input level measurement circuit described in 3.2 above for all external inputs, and at several amplitude levels. Same description as 3.2 above. These considerations apply to 3.2, too: Since the measurement involves a peak detector, this test is sensitive to overshoot on the signal being measured. This test is also sensitive to square-wave symmetry of the signal. Since all inputs are ac-coupled, an a-symmetry in time (duty factor other than 50%) will cause the peak value of the waveform to change. 3.4 agc_response This test connects the generator internally to the receiver and steps the generator level back and forth between two levels as the operator observes the acg loop’s transient response. This time constant is determined by all the gain setting parts in the agc loop: R259, R260, R268, R257, and C161. 3.5 opto_level This test measures the receiver signal level from the optical input by measuring the agc control voltage. The operator connects the optical output to the optical input. The optical input to the agc loop is selected by U109 under control of the OPTO_EN signal from the serial control chain. The agc loop operates as described in input_level_cal, 3.2, above. OPTO_IN is the signal from the optical receiver on the rear panel board. The optical receiver’s ttl output is either high or low depending on whether the light level crosses a threshold. This means that this test should always measure the same amplitude regardless of source intensity or cable length, as long as the light level crosses the receiver threshold. On the generator side, the rear panel optical transmitter is driven by the OPTO_OUT signal from U108 pin 39. 3.6 adj_ej_pll This test internally connects the generator to the receiver so the operator can adjust the center frequency of the eye sampler pll. The pll consists of programmable synthesizer U122, phase error amp U113A and B, resonant tank CR24/L16, and oscillator IC U123. The oscillator’s 12.288 MHz ecl level output is fed back to U122 pin 4. The pll locks to the INMCK input at U122 pin 1. This is 12.288 MHz ttl from the main decoder, U86 pin 19. U86 pin 9 requires an AES signal, which comes from U129 pin 3. U129 selects EYE_SOURCE, U129 pin 2, which comes from TP3. 6–46 AM700 Audio Measurement Set Service Manual Diagnostics Table 6–11: Digital audio circuit board testing (cont.) Test name Test description Test group 3 Receiver tests, Generator tests which require the receiver. 3.7 eq_level_test This test internally connects the generator to the receiver and checks static operation of the equalizer with the generator’s cable simulator off and then on. The equalizer’s input is the agc’d input signal from TP3. If the input signal resembles a square wave with a flat top, then the equalizer does nothing to it and it is reproduced at TP19 with an amplitude of about 4 Vp-p. If the input signal, TP3, is rolled off in the way the cable simulator does, then the equalizer applies peaking to keep the output (TP1) square. The amount of equalization applied is represented by the voltage EQ_LEVEL from U3A pin 1, which is read by the slow adc U137. The only other input to the equalizer is GAIN from TP1. If the input signal level is below minimum spec, then this level rises enough to cause VR1 to conduct, which then disables the equalizer by pulling U132B pin 5 above approximately 2 V. This is to prevent large noise at the equalizer output when there is no input. 3.8 eq_response This test internally connects the generator to the receiver and checks dynamic operation of the equalizer by continuously toggling the generator’s cable simulator off and on. EQ_LEVEL, U3A pin 1, is monitored at J33 pin 8 for correct transient response. See test 3.7 above for a description of static operation of the equalizer. The dynamic time constants are set by any of the gain-setting resistors in the control loop, and by C211 and C11 on U3A and U3B. 3.9 main_lock This test internally connects the generator to the receiver and checks the locking operation of the main decoder U86. It checks for lock, then pulses MAIN_RELOCK to force U86 out of lock. It then waits 0.5 sec to check that the receiver has re-locked. If it hasn’t, it pulses MAIN_RELOCK again. The cycle repeats up to 3 times. The test fails after the 3rd unsuccessful try. U86 pin 9 should be an AES signal. Lock status is encoded in the state of U86 pins 4, 5, and 6 which go to the DSP through the serial control chain. MAIN_RELOCK and ER_CLEAR come from the serial control chain. 3.10 jitter_dc_test This test internally connects the generator to the receiver and checks operation of the receiver phase counter U139 and U140. Phase of the main input is measured with respect to the phase of the reference input. The generator phase is set to 0, +5 UI, and –5 UI with respect to the reference generator. The test checks that the same value is measured by the receiver phase counter. Inputs to the counter in U139 and U140 are INMCK, INCBL, REFMCK, and REFCBL. They come directly from the main and reference decoders. Each decoder must be operating normally to generate these signals. They should AES signal inputs,* _RELOCK signals should be low. *MCK is 12.288 MHz ttl clock signal, *_CBL is a pulse with a 40 msec period. AM700 Audio Measurement Set Service Manual 6–47 Diagnostics Table 6–11: Digital audio circuit board testing (cont.) Test name Test description Test group 3 Receiver tests, Generator tests which require the receiver. 3.11 ej_path_test This test internally connects the generator to the receiver and checks that a fixed level of generated jitter is detected by the receiver’s eye/jitter loop. A large jitter level is checked with jitter gain set to 1, and a smaller level is checked with jitter gain set to 8. The operator measures the detected jitter at U124 pin 9. This test checks operation of the low-pass filter, U126A/B and U127A/B, the switched gain amplifier, U128B and U125, and the signal selector, U129. It also exercises the jitter generator part of the generator pll, U103 and inductors L14/19. 3.11.1 js_lf_test This test internally connects the generator to the receiver and applies a self-calibrated amplitude of low frequency jitter. The operator adjusts the center frequency of the eye/jitter loop to set the varactor operating point for correct loop gain. Test group 4 Reference input tests. 4.1 ref_lock This test internally connects the generator to the receiver and checks the locking operation of the reference decoder, U87. It checks for lock, then pulses REF_RELOCK to force U87 out of lock. It then waits 0.5 sec to check that the receiver has re-locked. If it hasn’t, it pulses REF_RELOCK again. The cycle repeats up to three times. The test fails after the third unsuccessful try. U87 pins 9 and10 should be an AES signal. Lock status is encoded in the state of U87 pins 4, 5, and 6 which go to the 56k through the serial control chain. REF_RELOCK and ER_CLEAR come from the serial control chain. Test group 5 System data path tests. 5.1 cs_checksums This test internally connects the generator to the receiver and checks the data path all the way to the DSP board by looking for the correct channel status checksum in the acquired data record. Test 1.7, stx_eye_pattern, has already checked operation of the data path from U102 to the DSP board which is connected to J12. This test exercises the AES data path into U102 for the first time. Inputs to U102 for the main aes path begin with “IN” on the schematic. Inputs to U102 for the reference aes data path begin with “REF”. Each path has bit clock (BCK), word clock (WCK), and data (DATA) signals. Bit clocks should be 3.072 MHz, word clocks should be 48 kHz, data should show some activity synchronized to word clock. Like test 1.7, this test is easily disturbed by ethernet conditions. 6–48 AM700 Audio Measurement Set Service Manual Board Exchange Program For service, parts, module exchange, returns, or technical support, customers with 1-800 dialing access can call Tektronix Customer Service between 8:00 AM and 5:00 PM Pacific Time (west coast, USA), Monday through Friday at the following telephone number: 1-800-TEK-WIDE Customer Service personnel will direct your inquiry to the proper support group. Customers without 1-800 dialing access should contact their local Tektronix sales subsidiary or distributor for details on servicing the AM700. Exchange Procedure If you call for an AM700 circuit board exchange or purchase, you must supply the serial number of the AM700, the firmware version, the installed options, and the complete part number of the module to make sure the correct replacement is supplied. If the circuit board you need is in stock, it will usually be sent to you the same or next working day. After you receive an exchange replacement module (a module that you obtained as an exchange part, not a new module purchase), the faulty module must be returned immediately to Tektronix using prepaid common-carrier freight. Use the packaging material from the replacement module and the furnished shipping label to prepare the faulty module for shipment. Ship the faulty module to: Tektronix Inc. Measurement Business Division Module Exchange Center M/S 78-593 PO Box 500 Beaverton, Oregon 97077-0500 Tektronix charges a standard fee for each out-of-warranty module exchange. This fee will be quoted when you request the exchange module. If the faulty module is not received at the above address within 30 days of your request of an operating exchange module, the full catalog price of the module will be invoiced. NOTE. Do not attempt repair to the circuit boards during the warranty period. Your module is not eligible for exchange for any of the following reasons: 1. The module is damaged during repair attempts by personnel other than Tektronix representatives. 2. The module is damaged through improper use or connection to incompatible equipment. AM700 Audio Measurement Set Service Manual 6–49 Board Exchange Program 3. The module has been modified by the customer. 4. The module has been custom modified to the customer’s specification by Tektronix. 5. The module requested in not in the module exchange program. In any of these cases, you will have to order a new replacement module at the full catalog price. Call your local Tektronix field office for further information. Locating Exchange Information The following paragraphs are intended to assist in ordering the exact circuit board replacement. Note that this information is important whether you are ordering a circuit board from the Module Exchange Center or as a new replacement part from Tektronix. Circuit Board Assemblies All of the circuit boards are designated as assemblies (modules). Each assembly has an alphanumeric designation (A1, A2, etc.). These assembles are listed in the Replaceable Electrical Parts list of this manual for quick reference to the replaceable modules. They are also listed in the Replaceable Mechanical Parts list with the mechanical parts that can be ordered for replacement in the AM700. Figure 6–19 shows the locations of the circuit board assemblies for the CRT display version of the AM700 Audio Measurement Set and Figure 6–20 shows the locations of the circuit board assemblies for the color flat panel display version. Assembly Name. This is the name of the circuit board assembly (module). Its name is usually related to the function of the assembly in the instrument. Assembly Number. This is the module identifying number used to find the Tektronix part number in the Replaceable Electrical Parts list. Tektronix Part Number. The nine-digit Tektronix part number is found in the Replaceable Electrical Parts list of this manual. The first seven digits make up the general part number. They are often the same for several members of the same instrument family. The last two digits of the part number often varies between members of the same family to denote various types or because the circuit board contains factory-modified circuitry. Be sure that it is for the serial number of your instrument. See the Replaceable Electrical Parts list Serial Number/Assembly Effective/Discontinued column for the range in which your instrument serial number falls in cases of multiple assembly number listings. 6–50 AM700 Audio Measurement Set Service Manual Board Exchange Program A7 DSP board A6 Main/CPU board A12 Disk Drive A4 Rear Panel board A10 Picture Monitor board A3 Digital Audio board A5 Generator board A11 Power Supply board A1 Analog Acquisition board A9 Front Panel board A2 XLR Connector board Figure 6–19: Circuit board assemblies for CRT display version AM700 Audio Measurement Set Service Manual 6–51 Board Exchange Program A13 LCD Display Driver board A7 DSP board A6 Main/CPU board A12 Disk Drive A14 Flat Panel Display assembly A4 Rear Panel board A3 Digital Audio board A5 Generator board A11 Power Supply board A9 Front Panel board A2 XLR Connector board A1 Analog Acquisition board Figure 6–20: Circuit board assemblies for flat panel color display 6–52 AM700 Audio Measurement Set Service Manual Board Exchange Program Having the correct assembly name, number, and Tektronix part number information plus the instrument type, installed options, serial number, and software version number (if known) ensures that you will receive the correct replacement module for your instrument. Tektronix Service Offerings Tektronix maintains a service organization that can provide a number of services to assist in maintaining the instrument’s operation at its specified levels. They range from complete repair and adjustment, at a convenient location, to supplying replacement parts. In addition, there are training programs that are available for service technicians. NOTE. When considering which service offerings best suit the current need, remember that Tektronix provides a limited parts and service warranty for all its products. No customer repairs should be attempted during the warranty period for this instrument. Service Training Tektronix provides service training in a number of programs. In addition to classes held at our Beaverton Oregon campus, special classes at convenient locations can be arranged. To find out more about service training programs contact your local Tektronix field office or representative. US customers can call our service organization directly using 1 (800) TEK WIDE [835-9433]; ask for “Service Training.” The 800 number is a 24-hour service, but service training specialists are only available between 8 AM and 4 PM Pacific coast time. Field Service Centers Tektronix maintains service centers world wide. These centers provide repair and calibration services for Tektronix instruments. They can be contacted through your Tektronix field office or representative. In addition, US and Canadian customers can call 1 (800) TEK WIDE [835-9433] for assistance in contacting their nearest service center. Not all service centers are equipped to repair or calibrate all of our instruments; be ready to give the operator the instrument type and operating options when calling for assistance. AM700 Audio Measurement Set Service Manual 6–53 Board Exchange Program 6–54 AM700 Audio Measurement Set Service Manual Removal and Replacement Procedures This section provides a tool list and instructions required to remove modules within the instrument. All module and board removal procedures assume that the instrument cover has been removed. All work should be done at an approved work bench for static-damage prevention. Tools Required Posidrive screwdriver, 2X Crosstip screwdriver, P1 Torx screwdriver, T-15 and T-10 Flat-bit screwdriver, 3/32-inch (filed down for a blunter point and narrower tip) Nut driver, 1/4-inch and 5/16-inch Hex wrench, 1/16-inch (for knob removal only) Needle-nose pliers Cover Removal and Replacement Instrument Cover Removal 1. Install the protective front panel cover on the instrument. 2. Turn off the Power switch on the rear panel and disconnect the AC Mains power cable. 3. Set the instrument so that the protective front panel cover is sitting on your work surface. NOTE. If you do not have the protective front panel cover you may set the instrument on a cushioned surface. The surface should be stable so that the instrument does not tip over. 4. On the rear of the instrument you will find a black “foot” in each of the four corners, remove the screws that secure the feet with a 2X Posidrive screwdriver. 5. Pull the instrument cover up and off of the instrument. Instrument Cover Replacement 1. Install the protective front panel cover on the instrument. 2. Check that all cables are lying as flat against the instrument as possible. 3. Set the instrument so that the protective front panel cover is sitting on your work surface. AM700 Audio Measurement Set Service Manual 6–55 Removal and Replacement Procedures CAUTION. In step 4, when the instrument cover is replaced it can cause damage to both cables and components. To avoid damaging parts, replace the cover slowly and without force, making sure all cables and components are cleared as the cover is lowered into place. Keep the cover evenly aligned with the chassis as it goes on. 4. Start the cover evenly on all sides of the rear panel. Slide the instrument cover onto the measurement set; as you do so, be careful that the cover does not catch on any cables or components. Check on all sides as the cover is sliding into place taking special precautions with the ribbon cables along the right side of the AM700. 5. Replace the four feet on the rear of the instrument. Assembly Removal/Replacement Procedures The following removal/replacement procedures assume the power has been disconnected and the instrument cover has been removed. (Refer to the Cover Removal instructions on page 6–55.) Removal of some assemblies also requires the removal of one or more other assemblies to gain access for removal. Major Assembly Interconnection Signals and power supply voltages are passed through the instrument with a system of interconnecting cables. A triangular key symbol is used to identify pin 1 on the circuit board and the connector housing to assist in aligning the connector with correct pins. Figure 6–21 shows the location of pin 1 (and the triangular marking) on the connector housing of the clamping interconnections used in the AM700. Release the holding catches by pressing each outward, as shown in Figure 6–21. Pin 1 indicator Figure 6–21: Multiple-pin connectors 6–56 AM700 Audio Measurement Set Service Manual Removal and Replacement Procedures The catches are also extracting levers, and they disengage the connector from the pins in the connector housing. To reconnect, align the connector with the pins in the housing and press firmly to seat the connector. The catches should snap into place when the connector is fully inserted. Press the catches together to ensure that they are completely engaged over the top of the connector. Power cables are heavier gauge ribbon cable and use large in-line square-pin connectors to handle the current required to power the assemblies. Major Modules (Circuit Board Assemblies) Figure 6–22 shows the locations of the major modules in the CRT display measurement set. The LCD flat panel display measurement set modules are very similar, and are shown in Figure 6–23. A6 Main/CPU A7 DSP A4 Rear panel A10 Monitor A12 Disk drive A3 Digital audio A11 Power supply A9 Front panel A5 Audio generator A1 Analog acquisition A2 XLR Connector Figure 6–22: Major module locations for the CRT display AM700 Audio Measurement Set Service Manual 6–57 Removal and Replacement Procedures A13 LCD Display Driver A6 Main/CPU A7 DSP A4 Rear panel A12 Disk drive A3 Digital audio A11 Power supply A14 Flat panel display assembly A5 Audio generator A1 Analog acquisition A9 Front panel A2 XLR Connector Figure 6–23: Major module locations for the LCD flat panel display Analog Acquisition (A1) Removal/Replacement 6–58 1. Place the AM700 top down. 2. On the Audio Generator board, disconnect the power cable at J16 and the ribbon cable at J17 so that the Analog Acquisition board may be removed. AM700 Audio Measurement Set Service Manual Removal and Replacement Procedures J13 Analog Audio Generator J17 J14 J16 J1 XLR Connector J29 Analog Acquisition Hybrid retaining clip J2 J27 J10 J30 J25 Trigger Input Connector J28 J26 J11 Remove this standoff post Figure 6–24: Bottom view showing the connections to the Analog Acquisition board 3. Disconnect all cables connected to the Analog Acquisition board. CABLE CONNECTIONS: Analog Audio Generator to Analog Acquisition J13 to J29 J14 to J30 Analog Acquisition to XLR Connector J1 CHB (the shorter cable) J2 CHA (the longer cable) Analog Acquisition to Trigger Input Connector J28 (a white cable) Power and Signal Interconnections J25 Power cable connector J27 Ribbon cable connector near rear of board J26 Ribbon cable connector near front of board. AM700 Audio Measurement Set Service Manual 6–59 Removal and Replacement Procedures 4. Remove one screw and the five standoffs securing the board. (Note: The CRT display instruments have six screws and no standoffs holding the board in place.) 5. Remove the screw from the metal standoff post holding the hybrid retaining clip. Remove the metal standoff post using a 5/16-inch nutdriver and remove the plastic screws and shoulder washer from the metal standoff post near TP28. Do not remove the standoff post. 6. Lift the Analog Acquisition board away from the chassis. Reverse the procedure to reinstall the Analog Acquisition board. 7. Position the Analog Acquisition board to align the screw holes in the board with the threaded holes on the chassis. 8. Reinstall the T15 Torx retaining screws and the metal standoff post for the hybrids. 9. Reinstall the hybrid retaining clip and screw. 10. Reinstall the plastic screw and shoulder washer. Do not substitute a metal screw for the plastic one. 11. Reconnect the cables to the Analog Acquisition board disconnected in step 3. 12. Reconnect the cables to the Audio Generator board disconnected in step 2. XLR Connector (A2) Removal/Replacement 1. Place the AM700 top down. 2. Remove the Analog Acquisition board (A1) to provide clearance to remove and replace the XLR board. (See the Analog Acquisition board removal/replacement procedure.) 3. Disconnect the grey ribbon cable from the XLR board. 4. To release the XLR connectors from their housings on the front panel, insert a filed down 3/32-inch flat-bit screwdriver into the small slot in the center of each XLR connector. Press and turn counterclockwise (less than 1/4 turn required). See Figure 6–25. 6–60 AM700 Audio Measurement Set Service Manual Removal and Replacement Procedures Slot PUSH Figure 6–25: XLR connectors 5. Gently pull the XLR board away from the front panel to extract the connectors from the connector housings. 6. Disconnect the Analog Audio Generator interconnection cables to the XLR connector board at J8 CH B and J9 CH A. Reverse the procedure to install the XLR Connector board. CAUTION. When reinstalling the XLR Connector board do not allow the wires to the STBY/ON switch to be captured between the XLR connectors and the XLR connector housings. 7. Reconnect the XLR to Analog Audio Generator connectors. XLR Board to Analog Audio Generator Board J9 B OUT to J8 J8 A OUT to J9 8. Reposition the XLR board with the connectors through the XLR connector housings. 9. Reengage the XLR connector locks by inserting the screwdriver in the slot on the lock and rotating it clockwise (less than 1/4 turn is sufficient). Press on the back of the connector you are locking to permit the lock to engage easily. AM700 Audio Measurement Set Service Manual 6–61 Removal and Replacement Procedures J8 J9 Analog Audio Generator J1 J7 XLR Connector J8 Analog Acquisition J2 J9 J10 J11 Figure 6–26: Bottom view showing the XLR connector board cable connections Hint: Move the rear of the XLR board up and down slightly and visually verify that the connector being locked does not move. (It is locked to the connector housing when it no longer moves with the circuit board.) 10. Reconnect the XLR to Digital Audio board connector. XLR Board to Digital Audio Board J7 (Grey ribbon cable) 11. Reinstall the Analog Acquisition board. (See the Analog Acquisition board removal/replacement instructions.) 12. Reconnect the XLR to Analog Acquisition board connectors. XLR Board to Analog Acquisition Board J11 B IN to J1 CHB J10 A IN to J2 CHA 6–62 AM700 Audio Measurement Set Service Manual Removal and Replacement Procedures Digital Audio (A3) Removal/Replacement 1. Remove the DSP (A7) and CPU (A6) boards. 2. Disconnect all cables connected to the Digital Audio board. CONNECTORS: J31 Ribbon cable connector at right side near rear of board J30 Power connector at right side of board J32 Ribbon cable connector at right side near front of board J27 Ribbon cable connector at left side near rear of board J29 Ribbon cable connector at left side of board J27 J29 J32 J30 J31 Figure 6–27: Digital audio board connector locations 3. Two screws located near the rear panel hold the board down. Remove the screws. 4. Slide the board approximately 1/8-inch towards the front of the instrument, and lift it up and over the plastic latches. Reverse the procedure to install the board. 5. Position the Digital Audio board to align the holes in the board with the plastic board latches. 6. Lower the board to the bottom of the latches and slide the board back toward the rear of the AM700 to catch the board in the slots on the bottom of the plastic board latches. 7. Reinstall the two hold down screws in the rear of the circuit board. 8. Reconnect the connectors that were disconnected in step 2. AM700 Audio Measurement Set Service Manual 6–63 Removal and Replacement Procedures Rear Panel (A4) Removal/Replacement 1. Remove the four T15 Torx screws the hold the rear panel assembly to the main chassis. 2. Pull the rear panel assembly out of the recess far enough to disconnect the ribbon cable from the rear panel connector, J2, and extract the assembly. 3. Reverse the procedure to reinstall the Rear Panel assembly. Analog Audio Generator Board (A5) Removal/Replacement 1. Place the AM700 top down. 2. Disconnect all cables connected to the Analog Audio Generator board. The cable locations are shown in Figure 6–28. CABLE CONNECTIONS: Analog Acquisition to Analog Audio Generator J30 to J14 J29 to J13 Analog Audio Generator to XLR Connector J8 to J9 J9 to J8 Analog Audio Generator to CPU board J17 to J53 Analog Audio Generator to Power Supply J16 to J7 The LCD Display version of the AM700 has a additional interconnection cable from the floating power supply (now in the power supply module) to the Analog Generator board. Disconnect the floating power supply cable connector. 3. Remove the eight screws securing the board with a T-15 Torx screwdriver. 6–64 AM700 Audio Measurement Set Service Manual Removal and Replacement Procedures J30 J9 J27 Analog Acquisition J8 XLR Connector J29 J16 J14 J17 Analog Audio Generator J9 J8 J13 Figure 6–28: Bottom view showing the Analog Audio Generator cabling Reverse the procedure to reinstall the Audio Generator Board. 4. Position the Audio Generator board and replace the screws that hold the board to the chassis. 5. Reconnect the cables disconnected in step 2. LCD Display Driver (A13) Removal/Replacement (Flat Panel Display Version) 1. Disconnect the five multiconductor cables from the LCD flat panel display assembly at the front of the LCD Display Driver board at P1 (two connectors on P1), P2, P3, and P5. The connector locations are shown in Figure 6–29. 2. Disconnect the multiconductor ribbon cable from the CPU board to the LCD Display Driver board at J8. 3. Disconnect the single conductor BRT IN cable at P4. 4. Remove the two screws holding the LCD Display Driver board to the CPU board. 5. Lift the LCD Display Driver board straight up to disengage the 120 pin interboard connector (J23) between the LCD Display Driver board and the CPU board. AM700 Audio Measurement Set Service Manual 6–65 Removal and Replacement Procedures Reverse the procedure to reinstall the LCD Display Driver board. 6. Position the LCD Display Driver board carefully over the standoffs for the retaining screws. 7. Align the pins of the interboard connector between the LCD Display Driver and the CPU board. 8. Carefully push the LCD Display Driver down to fully engage the connector pins. 9. Reinstall the two screws that hold the LCD Display Driver board to the standoffs on the CPU board. 10. Reconnect the cable from the CPU board to the LCD Display Driver board at J8. 11. Reconnect the single conductor BRT IN connector at P4. 12. Reconnect the five connectors of the multiconductor cables from the LCD flat panel display assembly at P1 (two connectors on P1), P2, P3, and P5. J8 J23 P4 P5 P1 P2 P3 Figure 6–29: LCD Display Driver board with connector locations Main/CPU (A6) Removal/Replacement 1. Remove the DSP (A7) board (see the DSP removal procedure). 2. Remove the LCD Display Driver (A13) board (see the LCD Display Driver removal procedure). 3. Disconnect all cables connected to the CPU board. See Figure 6–30 for the cable connector locations. 6–66 AM700 Audio Measurement Set Service Manual Removal and Replacement Procedures CABLE CONNECTORS: J42 Disk drive flexible circuit board cable (see Figure 6–36 on page 6–72) J8 Ribbon cable connector at rear of board J48 Small ribbon cable connector at front of board J50 Large ribbon cable connector at front of board J53 Ribbon cable connector at right rear of board J31 and J33 Power connectors at right side of board Release bar Remove these screws. J42 J8 J48 J50 J33 J31 J53 Figure 6–30: CPU board retaining screws and disk drive cable release AM700 Audio Measurement Set Service Manual 6–67 Removal and Replacement Procedures 4. A total of eight screws need to be removed. Five screws are found on the rear panel; see Figure 6–31. The remaining three screws are on the board in close proximity to the fan. CPU Screws Figure 6–31: Rear panel screws holding the CPU board in place 5. Slide the board approximately 1/8-inch towards the front of the instrument so that it clears the six plastic latches. Lift the board off of the instrument. Reverse the procedure to install the board. 6. Align the CPU board latch holes with the plastic latches and lower the board to align it with the slots in the top of the latches. 7. Slide the board back about 1/4-inch to catch the circuit board in the slots of the plastic latches. NOTE. The disk drive interconnection cable is easy to capture underneath the CPU when reinstalling the board. Make sure it is positioned above the board edge so that it may be reconnected when the CPU board is in place. 8. Reconnect the connectors disconnected in step 3. It is easier to leave the hold down screws out until the cable are all connected to ease board placement. This holds the cables in position and prevents them from interfering with board alignment with the screw holes. 9. Reinstall the CPU board hold down screws in the board and rear panel of the AM700. 6–68 AM700 Audio Measurement Set Service Manual Removal and Replacement Procedures DSP (A7) Removal/Replacement 1. Place the AM700 bottom down. 2. Disconnect the ribbon cable (at J1) from the DSP board. 3. Remove the seven screws securing the board with a T-15 Torx screwdriver. See Figure 6–32 for screw locations. J300 J1 Figure 6–32: Retaining screw locations for DSP (A7) circuit board 4. Lift the DSP board away from the the CPU board to disconnect the interboard connector, J300, from J36 on the CPU board. Reverse the procedure to install the DSP board. Front Panel (A9) Removal/Replacement 1. Remove the two screws holding front-panel trim ring to the instrument using a crosstip, P1 tip, screwdriver. CAUTION. Use care not to damage the door to the disk drive when removing the trim ring. Make sure the disk drive door is not caught in the slot in the trim ring for the disk drive as you remove the trim ring. 2. Pull the bottom of the ring out away from the face of the instrument. Then lift it slightly to clear the top of the chassis casting and remove the ring from the instrument. 3. Push out on the top of the Front Panel assembly to release it from the chassis casting. AM700 Audio Measurement Set Service Manual 6–69 Removal and Replacement Procedures Figure 6–33: Trim ring and front panel removal 4. Pull the Front Panel assembly out far enough to disconnect the ribbon cable connector, J1, on the bottom of the assembly; the flexible circuit board connector (to the touch screen), J4, on the left side of the circuit board (looking from the front); and the headphone cable, at J6. See Figure 6–34 for connector locations on the circuit board. NOTE. If the cabinet is removed, disconnecting the ribbon cable to the front panel from the CPU board at J50 permits easier removal of the Front Panel assembly. J4 J6 J1 Figure 6–34: Front panel board connector locations 6–70 AM700 Audio Measurement Set Service Manual Removal and Replacement Procedures Reverse the procedure to reinstall the Front Panel assembly. 5. Position the Front Panel assembly in the front-panel casting and reconnect the touch screen connector at J4 on the Front Panel board, the Front Panel ribbon cable connector to J50 on the CPU board, and the headphone cable connector at J6. 6. After reinstalling the Front Panel assembly into the front-panel casting, reinstall the XLR bezel. Do this by tipping the XLR bezel up to slip it over the PUSH release levers on the XLR connectors. Then rotate the XLR bezel downward to snap it gently into place with the top edge grips under the edge of the Front Panel. 7. Place the top of trim ring over the top of the front-panel casting, align it with the disk drive housing, and press the trim ring into place so that it snaps into place on the top of the front-panel casting. Install the two crosstip P1 screws that hold it on to the front-panel casting. NOTE. Make sure the gasket around the Touch Screen is not captured beneath the edges of the display area opening in the trim ring. Use a blunt plastic tool to gently push back any area of the gasket that may be caught under the edges of the front-panel trim ring (see Figure 6–35). Figure 6–35: Touch screen gasket precaution areas when Installing the trim ring AM700 Audio Measurement Set Service Manual 6–71 Removal and Replacement Procedures Disk Drive (A12) Removal/Replacement 1. Release the disk drive flexible circuit board connector on the CPU board. See Figure 6–36 for the connector operation. NOTE. Do not pull on the cable to force it out of the connector. This will weaken the connection. Lift the connector release bar from its ends to loosen the cable. Press the release bar down to lock the cable to the connector. Figure 6–36: Disk drive flexible circuit board connector operation 2. Remove the T15 Torx screws holding the disk drive mounting bracket to the chassis. 3. Slide the disk drive and mounting bracket toward the rear of the AM700 to clear the front of the disk drive from the front panel casting. 4. When the disk drive is clear separate it from the AM700. 5. Separate the disk drive from the mounting bracket by removing the crosstip screws that hold the disk drive to the mounting bracket using a P1 crosstip screwdriver. The disk drive unit may have either two or four mounting screws, depending on the vendor. Reverse the procedure to reinstall the disk drive. NOTE. The disk drive housing must be well centered in the front casting to allow the trim ring to fit properly. 6–72 AM700 Audio Measurement Set Service Manual Removal and Replacement Procedures Touch Screen Removal/Replacement for CRT Display Instruments 1. Remove the front panel trim ring and the Front-Panel assembly. See the previous Front Panel Removal/Replacement procedure for those instructions. 2. Remove the four T-10 Posidrive screws holding the touch screen to the mounting brackets that are attached to the front casting. 3. Do not touch the rear surface of the touch screen. Keep it clean of fingerprints and dirt for reinstallation. 4. To reinstall the Touch Screen, line up the screw holes in the Touch Screen mounting bracket with the holes in the mounting brackets on the front-panel casting. 5. Loosely install all four T-10 Posidrive screws, then press firmly on each corner of the Touch Screen and tighten each screw so that the Touch Screen is firmly against the back of the slotted alignment holes in the mounting bracket. Then tighten each screw snugly. 6. Reinstall the Front Panel, XLR bezel, and trim ring. Refer to the Front Panel Removal/Replacement procedure to complete the installation. CRT Picture Monitor Assembly (A10) Removal/Replacement 1. Remove the DSP board (A7), the Main/CPU board (A6), and the Digital Audio board (A3) (see the removal procedures for each of those boards). 2. Twelve T-15 screws hold the cover plate to the top of the power supply compartment and the display monitor as shown in Figure 6–37. Remove these screws. 3. Slide the cover back a little and lift it away from the instrument. Thread the ribbon cable from the display monitor through the access hole as the cover is separated from the chassis. 4. Remove the Front Panel board (A9), and the touch screen (see the removal procedures for this board and the touch screen). 5. Disconnect the Fan lead, J11, from the Power Supply board and pull the lead out of the way for the remainder of the removal process. 6. Disconnect the CRT socket connector, the four-wire deflection yoke connector (P4), and the two-wire Trace Rotation coil connector (P7). 7. Remove the four T15 Torx screws holding the CRT in the front-panel casting. AM700 Audio Measurement Set Service Manual 6–73 Removal and Replacement Procedures Figure 6–37: Power supply and monitor board cover plate screws and cables (CRT display version) WARNING. The CRT is fragile and is under a high vacuum. Use a protective face mask for safety when removing the CRT from the instrument. Place the CRT face down on a soft surface in a protected area to prevent accidental breaking of the CRT. CAUTION. Be careful not to bump the connector end of the CRT against the front casting when removing it from the instrument. The evacuation nipple is fragile and very exposed to breaking it accidently. 8. Pull the CRT from the AM700 and set the CRT face down in front of the instrument to allow room to disconnect the high voltage lead from the CRT. 6–74 AM700 Audio Measurement Set Service Manual Removal and Replacement Procedures CAUTION. The CRT can retain a high-voltage charge for a period of time after operation of the instrument. Use a grounding probe to discharge the highvoltage contact of the CRT before attempting to disconnect it. 9. Ground the lead of a grounding probe to the chassis of the AM700. Slide the probe tip beneath the rubber insulation cup of the high-voltage lead on the CRT. Hold the probe in contact with the high-voltage wire for 10 to 15 seconds, remove the probe tip, then reground the high-voltage wire with the probe for 10 to 15 second more. 10. Use a pair of needle-nose pliers to release one side of the high-voltage connector spring clip from the CRT. Use care not to break the CRT. Then release the second side of the spring clip from the CRT. 11. Place the CRT face down in a protected area to prevent accidental breakage. 12. Disconnect the grounding lug from the rear chassis connector. 13. Disconnect J1 (from the power supply). 14. Remove the six T15 Posidrive screws holding the circuit board to the chassis. 15. Tilt the board left side up to allow the board to clear the chassis edges and lift the board out of the chassis. Reverse the procedure to reinstall the Display Monitor board and the CRT. 1. Position the CRT so that the high-voltage lead may be reconnected to the CRT. The connection belongs on the left side of the CRT when inserting the CRT into the front-panel casting. CAUTION. Reground the high-voltage lead and the CRT anode connector to chassis ground for safety. 2. Reconnect the anode lead to the CRT. Hook one end of the spring clip in the contact hole of the CRT. Use a pair of needle-nose pliers to compress the spring to permit the other end of the spring connector to enter the contact hole and release the spring. Make sure the anode connection is secure. 3. Align the four screw holes in the CRT mounting frame with the holes in the front-panel casting and install the four T15 Posidrive screws to hold the CRT in place. Leave all the screws loose until they are all in, then tighten each snugly. 4. Reconnect all the connectors to the circuit board and the CRT socket to the CRT. These are the deflection yoke connector, J4, the Trace Rotation yoke connector, J7, the power supply connector, J1, and the ground lug connection AM700 Audio Measurement Set Service Manual 6–75 Removal and Replacement Procedures on the rear panel of the chassis. The ribbon cable at J2 will have to be reconnected if installing a new Display Monitor board. Otherwise it may remain in place throughout the procedure. 5. Reroute and connect the Fan power wires to the Power Supply board at J11. 6. Reinstall the Touch Screen assembly. Do not touch the rear surface of the touch screen. Keep it clean of fingerprints and dirt for reinstallation. 7. Line up the screw holes in the Touch Screen mounting bracket with the holes in the mounting brackets on the front-panel casting. 8. Loosely install all four T-10 Posidrive screws, then press firmly on each corner of the Touch Screen and tighten each screw so that the Touch Screen is firmly against the back of the slotted alignment holes in the mounting bracket. Then tighten each screw snugly. 9. Reinstall the Front Panel board, XLR bezel, and front-panel trim ring. 10. When reinstalling the front-panel trim ring, make sure the gasket around the Touch Screen is not captured beneath the edges of the display area opening. Use a blunt plastic tool to push back any area of the gasket that may be under the edges of the front-panel trim ring. LCD Flat Panel Display Assembly (A14) Removal/Replacement 1. Remove the cover. Refer to Cover Removal and Replacement on page 6–55 for more information. 2. Remove the DSP board. Refer to DSP Board Removal/Replacement on page 6–69 for more information. Removing this circuit board eases the removal and rerouting of the cables between the LCD flat panel and the display driver board. 3. Take the protective front cover off and remove the two screws holding front-panel trim ring to the instrument using a crosstip, P1 tip, screwdriver. See Figure 6–38 for screw locations. CAUTION. Use care not to damage the door to the disk drive when removing the trim ring. Make sure the disk drive door is not caught in the slot in the trim ring for the disk drive as you remove the trim ring. 4. Pull the bottom of the ring out away from the face of the instrument. Then lift it slightly to clear the disk drive front and the top of the chassis casting and remove the trim ring from the instrument. 5. Push out on the top of the Front Panel assembly from the inside of the AM700 to release it from the chassis casting. 6–76 AM700 Audio Measurement Set Service Manual Removal and Replacement Procedures Cable retaining bracket Figure 6–38: Trim ring and LCD flat panel display retaining screws 6. Pull the Front Panel assembly out far enough to disconnect the ribbon cable connector, J1, on the bottom of the assembly; the flexible circuit board connector, J4, on the left side of the circuit board (looking from the front); and the headphone cable, at J6. 7. Use a T-15 Torx tip to remove the two screws holding the display driver cable retaining bracket, and remove the bracket from the chassis. NOTE. With the cabinet is removed, disconnecting the ribbon cable to the front panel from the CPU board at J50 permits easier removal of the Front Panel assembly. 8. Remove the screws holding the LCD assembly to to the front casting (four screws holding the touch screen and four screws holding the LCD assembly rear shield). AM700 Audio Measurement Set Service Manual 6–77 Removal and Replacement Procedures 9. Disconnect the cables to the LCD assembly from the display driver board, and remove the LCD assembly from the chassis. Note the dress and routing of the cables for reinstallation. 10. Lift the touch screen with metal frame from the LCD assembly (see Figure 6–39 or Figure 6–40). The touch screen cable is routed under the LCD flat panel and out the side of the shield box. Note the cable routing for reassembly. LCD Flat Panel Handling Precautions. 6–78 H The LCD panel contain LSI CMOS devices. Use static-sensitive handling precautions at grounded work stations when handling the LCD panel. H Make certain the power is off before connecting or disconnecting the interconnection cable to the panel. H The panel is made of glass and can break or crack if dropped or bumped on a hard surface. Handle it with care. H Do not press hard on the surface of the panel. The liquid-crystal layer is packed in the LCD panel. This layer is very thin and may be disturbed by pressing on the surface with excessive force. Such a disturbance may cause a transient display non-uniformity. H When installing the LCD panel ensure that it is not warped or twisted. The added stress can damage the panel. H Be careful not to scratch the front polarizer; it is easily damaged. H Wipe off any water drops immediately. Long contact with water can cause discoloration or spots. H If the LCD panel surface is dirty, wipe it with absorbent cotton or other soft cloth. Blow off any dust accumulation on the polarizer using an ionized nitrogen gas gun. AM700 Audio Measurement Set Service Manual Removal and Replacement Procedures Figure 6–39: Touch screen assembly removal B020253 to B020692 11. Remove the four screws holding the LCD flat panel to rear shield. The AM700 was manufacuted with two versions of the LCD assembly. See Figure 6–40 for the exploded view of the new version or see Figure 6–41 for the exploded view previous assembly. Note that a ground wire is connected with one of the screws. The newer version flat panel display assembly has several notable differences. The touch screen lead comes out at a different location (the side rather than the top) and there are two separate LCD backlight inverters as opposed to one for the earlier version. The major difference is the display brightness of the newer version flat panel display. The mechanical changes to the assembly also simplify assembling the display module. AM700 Audio Measurement Set Service Manual 6–79 Removal and Replacement Procedures Figure 6–40: Touch screen removal for serial number B020633 and above 6–80 AM700 Audio Measurement Set Service Manual Removal and Replacement Procedures Figure 6–41: LCD assembly exploded view serial number B020100 to B020632 AM700 Audio Measurement Set Service Manual 6–81 Removal and Replacement Procedures Replacing the LCD Assembly 1. Place the LCD assembly on the rear shield and align the holes at the corners with the standoffs on the rear shield. Note that the touch screen cable is routed beneath the flat panel display. 2. Reinstall the four screws at the corners and evenly tighten them. 3. Replace the touch screen with metal frame over the LCD panel. On the earlier versions of the touch screen, use care to keep the touch screen cable in the slot in the metal frame so as not to pinch it between the metal frame and the rear shield. For the later version display assemblies, make sure the backlight leads do not get pinched by the touch screen metal frame when you reinstall it. 4. Guide the cables of the LCD assembly through the housing and align mounting holes of the replacement LCD assembly with the screw holes in the front casting. 5. Attach the LCD assembly to the front casting using four screws. Align the assembly parallel with the top and bottom of the front casting and tighten the screws evenly. 6. Route the cables to the display driver board as noted in step 9 of the preceding procedure, and reconnect them to the Display Driver board. 7. Replace the cable retaining bracket using two screws. 8. Position the front panel assembly in the front-panel casting and reconnect the touch screen connector at J4 on the front panel board, the front panel ribbon cable connector to J50 on the CPU board, and the headphone cable connector at J6. 9. Press the front panel assembly into the chassis casting to firmly seat it in the grounding fingers around the edge. 10. After reinstalling the Front Panel assembly into the front-panel casting, if you have removed the XLR bezel reinstall it now. Do this by tipping the XLR bezel up to slip it over the PUSH release levers on the XLR connectors. Then rotate the XLR bezel downward to snap it gently into place with the top edge grips under the edge of the Front Panel. 11. Place the top of trim ring over the top of the front-panel casting, align it with the disk drive housing, and press the trim ring into place so that it snaps into place on the top of the front-panel casting. Install the two crosstip P1 screws that hold it on to the front-panel casting. 12. Place the AM700 bottom down. 13. Replace the DSP board. 14. Reconnect the ribbon cable (at J1) to the DSP board. 6–82 AM700 Audio Measurement Set Service Manual Removal and Replacement Procedures 15. Recheck all the cable connectors for a tight connection. NOTE. You may want to run the instrument at this point to make certain the installation went well, before you put on the cover. 16. Replace the cabinet of the AM700. Refer to Cabinet Removal and Replacement on page 6–55 for more information. LCD Backlight and Backlight Inverter Removal/Replacement 1. Remove the LCD assembly from the instrument and dissasemble the assembly to gain access to the LCD backlights and backlight inverter board. Refer to the LCD Flat Panel Display Assembly Remove and Replace procedure on page 6–76 for directions. NOTE. The next two steps are not needed for the newer version of LCD flat panel display assembly. The LCD backlight cables can be easily disconnected from the invertor boards. If you have the newer assembly with two inverter boards, go to step 4. 2. Slide the LCD assembly to the side enough to gain access to the screws holding down the backlight inverter board on the rear metal shield. 3. Remove the two screws holding the backlight inverter board to the LCD assembly rear shield. Note orientation of the board on the shield for reinstallation. 4. Disconnect the backlight connectors from the inverter board(s). 5. Turn the LCD flat panel over to gain access to the backlights. 6. Remove the small screw holding the backlight assembly to the LCD flat panel (see Figure 6–42 for the location). CAUTION. The backlights are easily broken if they are twisted or warped. 7. Gently push up on both ends of the plastic backlight assembly and rotate it as shown in Figure 6–42 to unsnap the backlight from the LCD flat panel. 8. Repeat for the other backlight. 9. Place the retainers on the bottom edge of the new backlight assembly in the holes in the LCD flat panel and press gently on both ends of the top edge of the plastic backlight assembly to snap it into place. AM700 Audio Measurement Set Service Manual 6–83 Removal and Replacement Procedures 1 Remove screw. 2 Grasp backlight assembly at both ends. 3 Slide in direction of arrow to release locking tab, then rotate this edge upward. Figure 6–42: Backlight removal 6–84 AM700 Audio Measurement Set Service Manual Removal and Replacement Procedures 10. Repeat for the other backlight. 11. Connect the backlight connectors to the inverter boards (or board for the earlier version). NOTE. Step 12 is not needed for the newer assemblies because it is not necessary to remove the inverter boards to disconnect and reconnect the backlight connectors. Go to step 13. 12. Align the inverter board with the standoffs on the rear shield and install the two screws to reattach the inverter board to the shield. 13. Position the LCD flat panel back in place and align the four corner holes with the standoff on the rear shield. 14. Reroute the touch screen cable under the LCD flat panel and install the four screws to hold the flat panel to the rear shield. Reconnect the grounding wire at the screw shown in Figure 6–43. 15. Replace the touch screen with metal frame over the LCD panel as shown in Figure 6–43. Use care to keep the touch screen cable in the slot in the metal frame (as shown for the early versions of touch screen) so as not to pinch it between the metal frame and the rear shield. Use the end of the touch screen cable coming from underneath the LCD flat panel as a guide to assist you to keep the cable in the slot as you place the touch screen over the LCD flat panel. 16. Reinstall the LCD assembly into the instrument. Refer to the LCD Assembly Remove and Replace procedure on page 6–76 for directions. AM700 Audio Measurement Set Service Manual 6–85 Removal and Replacement Procedures Grounding wire Slot Note: The touch screen cable comes out the side of the new version of touch screen. Figure 6–43: Touch panel reinstallation Power Supply (A11) Removal/Replacement 1. Remove the DSP board (A7), the Main/CPU board (A6), and the Digital Audio board (A3) (see the removal procedures for each of those boards). 2. Disconnect the Power connectors at the right side of the power supply board. 3. Twelve T-15 screws hold the cover plate to the top of the power supply compartment and the display monitor. Remove these screws. 4. Slide the cover back a little and lift it away from the instrument. Thread the ribbon cable from the display monitor through the access hole as the cover is separated from the chassis. 6–86 AM700 Audio Measurement Set Service Manual Removal and Replacement Procedures 5. Disconnect the four connectors at the left front of the power supply board. CONNECTORS: J11 A two-wire connector to the fan. J5 Ribbon cable to J48 on the CPU board. J10 A two-wire connector to the display monitor board J6 A two-wire connector to the Stby/On switch. 6. Use a T-10 Torx screwdriver to remove the five screws holding transistors Q2, Q3, Q6, Q7, and rectifier CR26 to the heat sink on the left side of the power supply board. Do not remove the screws at either end of the heat sink as these hold the heat sink bar to the circuit board (see Figure 6–44). Do not remove these screws. J10 J5 J11 J6 CR26 Q7 Q6 Power connectors Q3 Q2 EMI Line filter Figure 6–44: Power supply connector locations 7. Remove the two P1 cross-tip screws that hold the EMI line filter to the rear chassis. AM700 Audio Measurement Set Service Manual 6–87 Removal and Replacement Procedures NOTE. The EMI line filter is mounted on the power supply board in early versions of the measurement set. The EMI line filter in later versions of the power supply is mounted to the rear panel. 8. Remove the green ground wire attached to the chanssis. 9. Use a 1/4-inch nut driver to remove the two standoff posts in the center area of the board. Hint: for reassembly, look for the hex outline that is silk-screened on the circuit board to locate where the standoff post are to be reinstalled. 10. Use the Torx screwdriver with T15 tip to remove the remaining screws holding the power supply board to the chassis. 11. Lift the left side of board first to clear the connector pins on the right side of the board, then lift the power supply board clear of the chassis. 12. Reverse the procedure to reinstall the power supply. When reinstalling the screws that hold Q2, Q3, Q6, and CR26, they must be tightened to 8 inchpounds of torque. Replacing the NVRAM Backup Battery At power up, all the interrupt levels are enabled, so a low-battery interrupt will be seen and the low-battery warning issued if the backup battery is low. The back-up battery must be replaced to prevent loss of stored information in the NVRAM during power off. The life of a newly installed fresh battery is 10 years or more unless stored in higher than normal temperatures for long periods of time. 1. Disconnect power from the AM700 and remove the cover. Refer to Cover Removal and Replacement on page 6–55 for more information. 2. Locate the battery pins on the CPU board. See Figure 6–45 and Figure 6–46 for the location of the battery. 3. Solder the battery leads to the + and – battery pins on the CPU board. 4. Immediately cut the positive lead of the old battery to prevent reverse current through the old battery from the new battery. 5. Secure the replacement battery to the old battery using a cable tie to hold it in place. If the old battery has discharged too low, stored data in the NVRAM may be corrupted. In this case, you may have to use the NVRAM clearning process (see NVRAM State Clearing on page 6–8) to remove corrupted data to permit the AM700 to boot up for a normal turn on. 6–88 AM700 Audio Measurement Set Service Manual Removal and Replacement Procedures Backup battery Figure 6–45: Location of the backup battery in the AM700 Figure 6–46: Partial CPU board showing location of BT1, the backup battery AM700 Audio Measurement Set Service Manual 6–89 Removal and Replacement Procedures 6–90 AM700 Audio Measurement Set Service Manual Firmware Upgrade Procedure These instructions are used to upgrade the operating firmware stored in EEPROM through the AM700 disk drive when new upgrades are provided. Upgrading takes approximately 15 minutes to complete. The upgrade firmware is provided on three 3 1/2 inch diskettes. These disks are the AM700 Firmware Reprogrammer disk containing the Flash Burn Program reprogramming instructions and two AM700 Program Data disks (Disk #1 and Disk #2) containing the binary programming data that is uploaded to the EEPROM. The AM700 boot ROM contains the routines that allow binary code to be executed from a diskette through the disk drive. These boot ROM routines are used execute the binary formatted files stored on the upgrade diskettes. Reprogramming Procedure 1. Set the AM700 on a flat surface, feet side down, to run the upgrade procedure. This assures that the disk drive is properly positioned to prevent it from being damaged. 2. Turn the AM700 off to start the procedure steps. 3. Press and hold the Menu button in and turn on the power. 4. After the AM700 beeps twice, release the Menu button. The boot up procedure continues to initialize in low-level diagnostics mode. 5. When the diagnostics Startup Menu appears, turn the large control knob to highlight the U... Ć UTILITIES Ć Menu choice. 6. Press the Select button (located next to the large control knob) to display the Utilities Menu. 7. With the Utilities Menu displayed, use the large control knob to highlight the F... Reprogram ć FLASH EEPROMS ć selection. 8. Press the Select button, then follow the instruction that appears on the screen to insert the Flash Burn Program disk (AM700 Firmware Reprogrammer). The disk must be inserted with the label facing the screen. The AM700 begins reading the disk immediately. 9. After the Firmware Reprogrammer disk is read, the upgrade program begins running. AM700 Audio Measurement Set Service Manual 6–91 Firmware Upgrade Procedure 10. Follow the instructions that appear on the AM700 screen to complete the reprogramming procedure. 11. Press Enter or Sweep/Run to continue, or press Clear Menu to stop the upgrade procedure. You will need Disk #1 and Disk #2 ready to insert when asked to do so. Each disk is read and verified before the firmware is upgraded. If an error occurs while reading the upgrade data disks, the upgrade procedure is terminated without changing the loaded firmware. 12. When both data disk have loaded the upgrade data a CRC is calculated, and you will be given the choice of programming the Flash EEPROM or aborting without affecting the stored data. 13. Press Sweep/Run to continue programming the Flash EEPROM. The old code is erased and the new code is uploaded. Loading time is approximately seven minutes. 14. Press Sweep/Run or Clear Menu to reboot the AM700 and run the upgraded firmware. 15. After the AM700 has rebooted and is running, press the Configure button. 16. Touch the State Saving soft key to display the menu used to either save state or to restore factory defaults. 17. Select Restore Factory defaults and confirm that you want to restore the factory defaults. This loads the new factory defaults that are modified in the new firmware. 6–92 AM700 Audio Measurement Set Service Manual Rack Adapter Instructions The AM7FR1 Rackmounting adapter enables mounting the Tektronix AM700 Audio Measurement Set in a standard 19-inch (483 mm) rack with an 8.75 inch vertical opening (five rack units). The adapter consists of a folded metal tray with attached front panel and slide-out assemblies. CAUTION. To prevent static discharge damage, service the measurement set only in an antistatic work station. Observe standard handling precautions for static-sensitive devices while installing this kit. Always wear a grounded wrist strap, grounded foot strap, and static resistant apparel while installing this kit. Slide-out Tracks The slide-out tracks consist of a complete assembly for the left and right sides of the rackmounting adapter. Each assembly consists of three sections: the stationary section, the chassis section, and the intermediate section. The stationary section of each assembly attaches to the front and rear rails of the cabinet rack. The chassis sections are attached to the adapter at the factory. The intermediate sections slide between the stationary and chassis sections and allow the instrument to be extended out of the rack. When the rackmounting adapter is shipped, the stationary and intermediate sections of the tracks are packaged as matched sets and should not be separated. When mounted in the cabinet rack, the automatic latch should be at the top of both assemblies. The rackmount adapter and one slide-out track assembly are illustrated in Figure 6–47. WARNING. If the left and right slide-out tracks are reversed, the safety latch can be defeated, allowing the instrument to be pulled out of the rack. There are green labels on each track near the mounting flange that are stamped with LH or RH to indicate left- hand and right-hand tracks, respectively. Be sure to mount the tracks on the correct sides, and only as directed in these instructions. AM700 Audio Measurement Set Service Manual 6–93 Rack Adapter Instructions Extra hardware is provided with the slide-out track assemblies. Since the hardware is intended to make the tracks compatible with a variety of cabinet racks and installation methods, not all of the hardware will be used for any installation procedure. Rackmount cradle Chassis section Automatic latch 10-32 PHS screws 10-32 PHS screws Rear mounting Retaining screw Bar nuts 10-32 PHS screws Stationary section Stop latch hole Automatic latch Bar nut Intermediate section NOTE: Right-hand and left-hand stationary sections are designated by the RH and the LH marked on the rails. Stop latch holes should be towards the bottom when slides are in place. (The right hand rail is shown above.) Figure 6–47: Exploded view of the slide-out track assembly 6–94 AM700 Audio Measurement Set Service Manual Rack Adapter Instructions Installation Procedure The following procedure describes how to attach the stationary section to untapped rack rails using the hardware provided, adjust the slide-out track alignment, and mount the rack-adapted instrument in the cabinet rack. If the rack rails are tapped for 10-32 screws, the slide-out tracks can be mounted in front of the front rails and in back of the rear rack rails using pan head screws. The flat bar nuts are not needed. 0.500 in. 1.75 in. Adjacent equipment Figure 6–48: Locating mounting holes on front Rrails of equipment rack 1. Select appropriate mounting holes in the front rails of the equipment rack, observing the clearance measurements shown in Figure 6–48. The front of the rack adapter is designed to fit in a 8.75-inch high opening. 2. Mount the stationary sections (with the bracket extensions) to the untapped front rack rails using either of the following methods as shown in Figure 6–49. a. If the front rails are not countersunk, use the truss head screws and bar nuts. b. If the front rails are countersunk, use the flat head screws and bar nuts. AM700 Audio Measurement Set Service Manual 6–95 Rack Adapter Instructions Front rack rail Bar nut (use if front rack rail is not tapped) 10-32 PHS screws Figure 6–49: Mounting the slide to the front rail 3. Mount the stationary sections to the rear rails on the equipment rack using mounting holes in the rear rails that correspond to the same level as the front rail holes selected in step 1. If the rear-rail mounting holes are tapped, the bar nut is not used to attach the extensions. If the rear-rail mounting holes are not tapped, use the bar nut on the inside of the rail, as show in Figure 6–50, or suitable captive nut clips (not supplied). Rear rack rail 10-32 PHS screws 10-32 PHS screws Bar nut (use if rear rail is not tapped) Bar nut Figure 6–50: Installing bracket extensions 4. Pull the extension sections of each slide-out track out to its fully extended position. 6–96 AM700 Audio Measurement Set Service Manual Rack Adapter Instructions 5. Insert the chassis sections attached to the AM7FR1 rack adapter into the intermediate sections. 6. Press both stop latches, and push the adapter into the cabinet rack until the latches snap into the stop latch holes. 7. Adjust the alignment of the stationary sections according to the following procedure. a. Loosen the mounting screws at the front of both stationary sections. b. Allow the tracks to seek their normal positions with the adapter centered in the rack. c. Tighten the mounting screws. d. If the tracks do not slide smoothly, check for correct spacing between the rear supports. e. Check the vertical positioning of the instrument front panel with respect to adjacent instruments or panels and the alignment of the thumb screw. If not correct, reposition as necessary. f. Slide-Out Track Lubrication When the track operates smoothly, install the measurement set into the AM7FR1 rack adapter. The special finish on the sliding surfaces of the tracks provides permanent lubrication. However, if the tracks do not slide smoothly even after proper adjustment, a thin coating of paraffin rubbed onto the sliding surfaces may improve the slides operations. Mounting the AM700 in the Adapter The following steps describe how to remove the handle of the AM700 to install the AM700 in the rackmount adapter. Place all the small parts in a container for safekeeping in case the handle is reinstalled at a later time. 1. Disconnect the power cord from the AM700. 2. Place the handle so that it is in a forward position. 3. Place the measurement set, bottom down, on a secure flat work surface. 4. Using a 1/16 inch or smaller, flat-bit screwdriver, insert the tip of the blade under the edge of the plastic cover over the handle screws, as shown in Figure 6–51, and gently pry the cover off to expose the handle screw. Either cover is okay; only one of the handle screws must be loosened to permit the handle swing arms to be removed from the measurement set. AM700 Audio Measurement Set Service Manual 6–97 Rack Adapter Instructions Figure 6–51: Removing the plastic handle screw cover NOTE. If reinstalling the handle to the AM700, this screw must be firmly tightened to prevent the handle crosspiece from rotating with respect to the handle swing arm. 5. Using either a PoziDriveR screwdriver with P2 cross-tip bit or a 3 mm hexagonal wrench, as necessary, loosen several turns, but do not remove the screw that holds the handle to the swing arm. This permits the swing arms to easily clear the cabinet of the measurement set for removal. 6. Using the small screwdriver again, locate one of the four slots on the thumb release button, and insert the tip in the slot as shown in Figure 6–52. Gently pry up on the thumb release button to remove it from the swing arm. Put the thumb release button and the spring in the container for safekeeping. CAUTION. The thumb release button is under spring tension and the spring may jump out when the button is detached. 7. Repeat step 6 to remove the thumb release button from the other side arm. 6–98 AM700 Audio Measurement Set Service Manual Rack Adapter Instructions Figure 6–52: Removing the thumb release button from the swing arm CAUTION. Do not reinsert the swing handle screws in the cabinet screw holes; they are too long and will damage internal components. 8. Using a TorxR screwdriver with T15 bit, remove the screws and washers, as shown in Figure 6–53, that hold both swing arms to the cabinet of the measurement set. 9. Insert the blade of the 1/16 inch screwdriver about 3/4 inch into the center screw hole of the plastic holder for the star sprocket. Pry gently forward and then backward to detach the holder from the cabinet. Repeat for the other side. 10. Put the screws, handle, and other hardware away for safekeeping for possible future reassembling. The removed screws will not be used in mounting the measurement set to the adapter. AM700 Audio Measurement Set Service Manual 6–99 Rack Adapter Instructions Figure 6–53: Removing the retaining screws holding the swing arms to the cabinet 11. Pull the rack adapter to its full extension. 12. Place the AM700 into the adapter and position it fully forward to align the holes in the sides of the adapter with the handle holes of the measurement set. CAUTION. Do not use the long screws removed from the measurement set to attach the adapter. The long screws can damage the internal components. 13. Install the short Torx head screws supplied with the rack adapter kit to hold the AM700 to the adapter using a Torx screwdriver with a T15 tip. 14. Release the stop latches on the rack slides and push the instrument all the way into the rack. 15. At the rear of the rack, install the instrument power cord and any other cabling required, such as printer cables, GPIB remote control cable, or VGA monitor cable. This may be done from the front with the measurement set fully extended on the tracks to make sure all the cables will be long enough to permit full extension of the rackmounted AM700. 6–100 AM700 Audio Measurement Set Service Manual Rack Adapter Instructions Removing the Measurement Set from the Rack The rackmounted measurement set and adapter may be easily removed from the rack. The slide-out tracks permit the rack-adapted AM700 to be extended out of the rack for access to the rear-panel connectors. Before attempting to operate the instrument in the extended position, be sure the power cord and any other connected cabling is long enough to permit full extension. 1. Loosen the front-panel thumb screw that secures the rackmounted measurement set into the rack. 2. Extend the tracks to the stops and disconnect all the rear-panel cabling from the measuerment set. 3. Press both stop latch releases and pull the adapter out of the slide tracks. The procedure is illustrated in Figure 6–54. TO INSTALL: 1. Pull the slide-out track section to the fully extended position. 2. Insert the instrument chassis sections into the slide-out sections. 3. Press the stop latches and push the instrument toward the rack until the latches snap into their holes. 4. Again press the stop latches and push the instrument fully into the rack. 5. Tighten the front-panel thumb screw. TO REMOVE: 1. Loosen retaining screw and pull instrument outward until the stop latches snap into the holes. 2. Disconnect the rear-panel cables. 3. Press stop latches and remove instrument. Figure 6–54: Installing and removing the AM700 Audio Measurement Set from the rack AM700 Audio Measurement Set Service Manual 6–101 Rack Adapter Instructions Manufacturers cross index Mfr. code Manufacturer Address City, state, zip code TK0435 LEWIS SCREW CO 4300 S RACINE AVE CHICAGO IL 60609-3320 TK0941 BEARINGS INC (DIST) 2720 NW 29TH PO BOX 3005 PORTLAND OR 97210-1702 0KB01 STAUFFER SUPPLY 810 SE SHERMAN PORTLAND OR 97214 06666 GENERAL DEVICES CO INC 1410 S POST RD PO BOX 39100 INDIANAPOLIS IN 46239-9632 09422 PLASTIC STAMPING CORP 2216 W ARMITAGE AVE CHICAGO IL 60647-4461 80009 TEKTRONIX INC 14150 SW KARL BRAUN DR PO BOX 500 BEAVERTON OR 97077-0001 Replaceable parts list Fig. & index number Tektronix part number 6–55 Qty Name & description Mfr. code Mfr. part number 016-1343-00 1 RACKMOUNT KIT:AM700 CRADLE MOUNT 80009 016134300 1 407-4353-00 1 .BRACKET,STIFFENER: *MOUNTING PARTS* 80009 407435300 2 210-0457-00 3 .NUT,PL,ASSEM WA:6-32 X 0.312,STL CD PL *END MOUNTING PARTS* TK0435 ORDER BY DESC 3 436-0291-00 1 .TRAY,RACKMOUNT:AM700 RACK ADAPTER KIT OPT1R 80009 436029100 4 351-0104-03 1 .SL SECT,DWR EXT:12.625 L,W/O HARDWARE *MOUNTING PARTS* 06666 C-720-3 5 210-0458-00 8 .NUT,PL,ASSEM WA:8-32 X 0.344,STL CD PL *END MOUNTING PARTS* 0KB01 210-0458-00 6 210-0457-00 5 .NUT,PL,ASSEM WA:6-32 X 0.312,STL CD PL *END MOUNTING PART* TK0435 ORDER BY DESC 7 354-0025-00 1 .RING,RETAINING:EXTERNAL,U/O 0.187 DIA SFT *END MOUNTING PARTS* TK0941 555-18MI 8 210-0894-00 1 .WASHER,FLAT:0.19 ID X 0.438 OD X 0.031 POLTHN 09422 ORDER BY DESC 9 212-0506-00 4 .SCREW,MACHINE:10-32 X 0.375,FLH,100 DEG,STL *END MOUNTING PARTS* TK0435 ORDER BY DESC 10 333-4149-00 1 .PANEL,FRONT:AM700 RACK ADAPTER,ALUM,OPT1R *MOUNTING PARTS* 80009 333414900 11 213-0940-00 1 .THUMBSCREW:10-32 X 1.15,0.375 OD,SST *MOUNTING PARTS* 80009 213094000 12 367-0366-00 2 .HANDLE,CARRYING:AM700 *MOUNTING PARTS* 80009 367036600 211-0721-00 351-0636-00 063-1830-00 2 1 1 0KB01 06666 80009 ORDER BY DESC C-1252 063183000 6–102 Serial no. effective Serial no. discont’d STANDARD ACCESSORIES .SCREW,MACH:6-32 X 0.375,PNH,STL,CDPL,T-1.5 TORX DR .SLIDE,DWR,EXT:20.0 X 1.69,PAIR,R&L .SHEET,TECH:AM7FR1,INSTRUCTIONS AM700 Audio Measurement Set Service Manual Rack Adapter Instructions 3 2 1 4 5 6 7 8 9 10 11 12 Figure 6–55: Exploded view of the rack adapter assembly AM700 Audio Measurement Set Service Manual 6–103 Rack Adapter Instructions 6–104 AM700 Audio Measurement Set Service Manual Options The current options for the AM700 consist of the power cord options: A1, A2, A3, and A5 plus two servicing options: M2 and M9. The power cord options are described in Table 1–1 of the Specification section. Servicing option M2 provides for remedial service support and Servicing option M9 is a repair protection plan. For those owners that want to change from the CRT display to the flat-panel color display, there is a option to purchase a factory upgrade to install the color display. Contact your nearest Tektronix representative for more information on this upgrade. AM700 Audio Measurement Set Service Manual 7–1 Options 7–2 AM700 Audio Measurement Set Service Manual Replaceable Electrical Parts This section contains a list of the electrical components for the <instrument>. Use this list to identify and order replacement parts. Parts Ordering Information Replacement parts are available through your local Tektronix field office or representative. Changes to Tektronix products are sometimes made to accommodate improved components as they become available and to give you the benefit of the latest improvements. Therefore, when ordering parts, it is important to include the following information in your order: H Part number H Instrument type or model number H Instrument serial number H Instrument modification number, if applicable If you order a part that has been replaced with a different or improved part, your local Tektronix field office or representative will contact you concerning any change in part number. Change information, if any, is located at the rear of this manual. Using the Replaceable Electrical Parts List The tabular information in the Replaceable Electrical Parts List is arranged for quick retrieval. Understanding the structure and features of the list will help you find all of the information you need for ordering replacement parts. The following table describes each column of the electrical parts list. AM700 Audio Measurement Set Service Manual 8–1 Replaceable Electrical Parts Parts list column descriptions Column Column name Description 1 Component number The component number appears on diagrams and circuit board illustrations, located in the diagrams section. Assembly numbers are clearly marked on each diagram and circuit board illustration in the Diagrams section, and on the mechanical exploded views in the Replaceable Mechanical Parts list section. The component number is obtained by adding the assembly number prefix to the circuit number (see Component Number illustration following this table). The electrical parts list is arranged by assemblies in numerical sequence (A1, with its subassemblies and parts, precedes A2, with its subassemblies and parts). Chassis-mounted parts have no assembly number prefix, and they are located at the end of the electrical parts list. 2 Tektronix part number Use this part number when ordering replacement parts from Tektronix. 3 and 4 Serial number Column three indicates the serial number at which the part was first effective. Column four indicates the serial number at which the part was discontinued. No entry indicates the part is good for all serial numbers. 5 Name & description An item name is separated from the description by a colon (:). Because of space limitations, an item name may sometimes appear as incomplete. Use the U.S. Federal Catalog handbook H6-1 for further item name identification. 6 Mfr. code This indicates the code number of the actual manufacturer of the part. 7 Mfr. part number This indicates the actual manufacturer’s or vendor’s part number. Abbreviations Abbreviations conform to American National Standard ANSI Y1.1–1972. Component Number Component Number A23A2R1234 A23 Assembly number A2 R1234 Subassembly Number (optional) Circuit Number Read: Resistor 1234 (of Subassembly 2) of Assembly 23 List of Assemblies Chassis Parts Mfr. Code to Manufacturer Cross Index 8–2 A list of assemblies is located at the beginning of the electrical parts list. The assemblies are listed in numerical order. When a part’s complete component number is known, this list will identify the assembly in which the part is located. Chassis-mounted parts and cable assemblies are located at the end of the Replaceable Electrical Parts List. The table titled Manufacturers Cross Index shows codes, names, and addresses of manufacturers or vendors of components listed in the parts list. AM700 Audio Measurement Set Service Manual Replaceable Electrical Parts Manufacturers cross index Mfr. code Manufacturer Address City, state, zip code 00213 MSD INC 700 ORANGE ST DARLINGTON, SC 29532 00779 AMP INC 2800 FULLING MILL PO BOX 3608 HARRISBURG PA 17105 01295 TEXAS INSTRUMENTS INC SEMICONDUCTOR GROUP 13500 N CENTRAL EXPY PO BOX 655303 DALLAS TX 75262–5303 02113 COILCRAFT INC 1102 SILVER LAKE RD CARY IL 60013–1658 02660 AMPHENOL CORP INDUSTRIAL TECHNOLOGY DIVISION (ITD) 720 SHERMAN AVENUE HAMDEN CT 06514 04222 AVX/KYOCERA DIV OF AVX CORP 19TH AVE SOUTH P O BOX 867 MYRTLE BEACH SC 29577 04426 ITW SWITCHES DIV OF ILLINOIS TOOL WORKS INC 6615 W IRVING PARK RD CHICAGO IL 60634–2410 04713 MOTOROLA INC SEMICONDUCTOR PRODUCTS SECTOR 5005 E MCDOWELL RD PHOENIX AZ 85008–4229 05245 CORCOM INC 1600 WINCHESTER RD LIBERTYVILLE IL 60048–1267 05292 ITT COMPONENTS DIV 05820 EG AND G WAKEFIELD ENGINEERING 60 AUDUBON RD WAKEFIELD MA 01880–1203 06090 RAYCHEM CORP 300 CONSTITUTION DRIVE MENLO PARK CA 94025–1111 06383 PANDUIT CORP 17303 RIDGELAND AVE TINLEY PARK, IL 60477–3048 07933 RAYTHEON CO SEMICONDUCTOR DIV HQ 350 ELLIS ST MOUNTAIN VIEW CA 94042 09023 CORNELL–DUBILIER ELECTRONICS DIV FEDERAL PACIFIC ELECTRIC CO 2652 DALRYMPLE ST SANFORD NC 27330 09922 BURNDY CORP 1 RICHARDS AVE NORWALK CT 06856 09969 DALE ELECTRONICS INC EAST HIGHWAY 50 P O BOX 180 YANKTON SD 57078 0AGS1 MICRO LINEAR CORPORATION 2092 CONCOURSE DRIVE SAN JOSE CA 95131 0A384 CRYSTAL SEMICONDUCTOR CORP 4210 S INDUSTRIAL DR PO BOX 17847 AUSTIN TX 78760 0BYG1 TADIRAN ELECTRONIC IND INC 40 SEAVIEW BLVD PORT WASHINGTON NY 11050 0B0A9 DALLAS SEMICONDUCTOR CORP 4350 BELTWOOD PKWY SOUTH DALLAS TX 75244 0CVK3 ALLEGRO MICROSYSTEMS INC INTEGRATED CIRCUITS DIV 115 NE CUTOFF PO BOX 2036 WORCHESTER MA 01613–2036 0FMA6 NEUTRIK USA INC 195–3 LEHIGH AVE LAKEWOOD NJ 08701–4527 0H1N5 TOSHIBA MARCON ELECTRONICS AMERICA CORPORATION 998 FIRST EDGE DRIVE VERNON HILLS IL 60061 0JR03 ZMAN MAGNETICS INC 7633 S 180th KENT WA 98032 0JR04 TOSHIBA AMERICA INC ELECTRONICS COMPONENTS DIV 9775 TOLEDO WAY IRVINE CA 92718 0J9R2 HARISON ELECTRIC CO LTD ASAHIMACHI 5–CHOME IMABARI EHIME JAPAN 0KB01 STAUFFER SUPPLY 810 SE SHERMAN PORTLAND OR 97214 0LUA3 PHILIPS COMPONENTS 100 PROVIDENCE PIKE SLATERSVILLE, RI 02876 0LXM2 LZR ELECTRONICS INC 8051 CESSNA AVENUE GAITHERSBURG MD 20879 CLIFTON NJ AM700 Audio Measurement Set Service Manual 8–3 Replaceable Electrical Parts Manufacturers cross index (cont.) Mfr. code Manufacturer Address City, state, zip code 0MS63 QUALITY TECHNOLOGIES CORP 610 N MARY AVENUE SUNNYVALE CA 94086 0TJ19 QUALITY SEMICONDUCTOR INC 851 MARTIN AVENUE SANTA CLARA CA 95050–2903 11236 CTS CORPORATION RESISTOR NETWORKS DIVISION 406 PARR ROAD BERNE IN 46711–9506 11502 IRC, INC BOONE NC 28607–1860 PO BOX 1860 12954 MICROSEMI CORP – SCOTTSDALE 8700 E THOMAS RD P O BOX 1390 SCOTTSDALE AZ 85252 13103 THERMALLOY CO INC 2021 W VALLEY VIEW LN PO BOX 810839 DALLAS TX 75381 13919 BURR–BROWN RESEARCH CORP 6730 S TUCSON BLVD P O BOX 11400 TUCSON AZ 85734 14301 ANDERSON ELECTRONICS INC HOLLIDAYSBURG PA 16648–0089 PO BOX 89 14552 MICROSEMI CORP 2830 S FAIRVIEW ST SANTA ANA CA 92704–5948 14752 ELECTRO CUBE INC 1710 S DEL MAR AVE SAN GABRIEL CA 91776–3825 14936 GENERAL INSTRUMENT CORP POWER SEMICONDUCTOR DIV 600 W JOHN ST HICKSVILLE NY 11802–0709 15454 KETEMA RODAN DIVISION 2900 BLUE STAR STREET ANAHEIM CA 92806–2591 15542 MINI–CIRCUITS LABORATORY 2625 E 14TH ST BROOKLYN NY 11235–3915 15912 THOMAS AND BETTS CORP ELECTRONICS GROUP 76 FAIRBANKS IRVINE CA 92718 16237 CONNECTOR CORP 4720 Y ENDER RD LISLE, IL 60532 16546 PHILIPS COMPONENTS CHIP CAP/CHIP RES FACILITY 4561 COLORADO BLVD LOS ANGELES, CA 90039–1103 17856 SILICONIX INC 2201 LAURELWOOD RD SANTA CLARA CA 95054–1516 19701 PHILIPS COMPONENTS DISCRETE PRODUCTS DIV RESISTIVE PRODUCTS FACILITY AIRPORT ROAD PO BOX 760 MINERAL WELLS TX 76067–0760 1CH66 PHILIPS SEMICONDUCTORS 811 E ARQUES AVENUE PO BOX 3409 SUNNYVALE CA 94088–3409 1ES66 MAXIM INTEGRATED PRODUCTS INC 120 SAN GABRIEL DRIVE SUNNYVALE CA 94086 21022 CONNOR–WINFIELD CORP 2111 COMPREHENSIVE DRIVE AURORA, IL 60505 22526 BERG ELECTRONICS INC (DUPONT) 857 OLD TRAIL RD ETTERS PA 17319 22929 DALE ELECTRONICS CORP FREQUENCY CONTROL GROUP 1155 W 23RD ST TEMPE AZ 85282–1822 23875 M–TRON INDUSTRIES INC PO BOX 630 100 DOUGLAS ST YANKTON SD 57078–0630 24226 GOWANDA ELECTRONICS CORP NO 1 INDUSTRIAL PL GOWANDA NY 14070–1409 24355 ANALOG DEVICES INC 1 TECHNOLOGY DRIVE NORWOOD MA 02062 24546 DALE ELECTRONICS A VISHAY INTERTECHNOLOGY INC CO 550 HIGH ST BRADFORD PA 16701–3737 8–4 AM700 Audio Measurement Set Service Manual Replaceable Electrical Parts Manufacturers cross index (cont.) Mfr. code Manufacturer Address City, state, zip code 25088 SIEMENS CORP 186 WOOD AVE S ISELIN NJ 08830–2704 26364 COMPONENTS CORP 6 KINSEY PLACE DENVILLE NJ 07834–2611 26742 METHODE ELECTRONICS INC 7447 W WILSON AVE CHICAGO IL 60656–4548 27014 NATIONAL SEMICONDUCTOR CORP 2900 SEMICONDUCTOR DR SANTA CLARA CA 95051–0606 27264 MOLEX INC 2222 WELLINGTON COURT LISLE IL 60532–1613 28733 CERAMIC MAGNETICS INC 16 LAW DR FAIRFIELD NJ 07006 2K262 BOYD CORP 6136 NE 87th AVE PO BOX 20038 PORTLAND OR 97220 2N936 VISHAY ELECTRONIC COMPONENTS 1122 23RD STREET COLUMBUS, NE 68601 30161 AAVID ENGINEERING INC ONE KOOL PATH PO BOX 400 LACONIA NH 03247 30983 PHILIPS COMPONENTS 1440 W INDIANTOWN ROAD PO BOX 689605 JUPITER, FL 33468–9605 31433 KEMET ELECTRONICS CORP NATIONAL SALES HEADQUARTERS PO BOX 5928 GREENVILLE SC 29606 31918 ITT SCHADOW INC 8081 WALLACE RD EDEN PRAIRIE MN 55344–2224 34371 HARRIS CORP HARRIS SEMICONDUCTOR PRODUCTS GROUP 200 PALM BAY BLVD PO BOX 883 MELBOURNE FL 32919 34899 FAIR RITE PRODUCTS CORP. 1 COMMERCIAL ROW PO BOX J WALLKILL, NY 12589 48726 UNITRODE INTEGRATED CIRCUITS CORP (UICC) 7 CONTINENTAL BLVD PO BOX 399 MERRIMACK NH 03054–0399 49588 S B ELECTRONICS INC 131 S MAIN ST BARRE VT 05641 50139 ALLEN–BRADLEY CO ELECTRONIC COMPONENTS 1414 ALLEN BRADLEY DR EL PASO TX 79936 50356 TEAC AMERICA INC 7733 TELEGRAPH RD PO BOX 750 MONTEBELLO, CA 90640–6537 50434 HEWLETT–PACKARD CO OPTOELECTRONICS DIV 370 W TRIMBLE RD SAN JOSE CA 95131–1008 50558 ELECTRONIC CONCEPTS INC 526 INDUSTRIAL WAY W EATONTOWN NJ 07724–2212 50579 SIEMENS COMPONENTS INC OPTOELECTRONICS DIV 19000 HOMESTEAD RD CUPERTINO CA 95014–0712 50783 WINTRON INC (FORMERLY: PENN–TRAN CORP) 250 RUNVILLE ROAD BELLEFONTE, PA 16823 53387 3M COMPANY ELECTRONIC PRODUCTS DIV 3M AUSTIN CENTER AUSTIN TX 78769–2963 54893 HEWLETT PACKARD MICROWAVE SEMICONDUCTOR DIVISION 350 TRIMBLE SAN JOSE CA 95131–1008 54972 CLINTON ELECTRONICS 6701 CLINTON ROAD ROCKFORD, IL 61111 55680 NICHICON /AMERICA/ CORP 927 E STATE PKY SCHAUMBURG IL 60195–4526 56427 CALIFORNIA MICRO DEVICES CORP 215 TOPAZ ST MILPITAS CA 95035–5430 56845 DALE ELECTRONICS INC 2300 RIVERSIDE BLVD PO BOX 74 NORFOLK NE 68701–2242 AM700 Audio Measurement Set Service Manual 8–5 Replaceable Electrical Parts Manufacturers cross index (cont.) Mfr. code Manufacturer Address City, state, zip code 57027 INTERNATIONAL RESISTIVE PRODUCTS INC 4222 S STAPLES CORPUS CHRISTI TX 78411–2702 57668 ROHM CORPORATION 15375 BARRANCA PARKWAY SUITE B207 IRVINE CA 92718 57924 BOURNS INC INTEGRATED TECHNOLOGY DIVISION 1400 NORTH 1000 WEST LOGAN UT 84321 58050 TEKA PRODUCTS INC 45 SALEM ST PROVIDENCE RI 02907 53279 XENTEK INC 1770 LA COSTA MEADOW DR SAN MARCOS, CA 92069 57668 ROHM CORPORATION 15375 BARRANCA PARKWAY SUITE B207 IRVINE, CA 92718 59640 SUPERTEX INC 1225 BORDEAUX DR SUNNYVALE, CA 94086 59660 TUSONIX INC 7741 N BUSINESS PARK DR PO BOX 37144 TUCSON AZ 85740–7144 60211 VOLTAGE MULTIPLIERS INC 8711 W ROOSEVELT VISALIA CA 93291–9458 61429 FOX ELECTRONICS DIV OF FOX ELECTRONICS INC 5842 CORPORATION CIRCLE FOR MEYERS FL 33905 61529 AROMAT CORP 629 CENTRAL AVE NEW PROVIDENCE NJ 07974 61857 SAN–0 INDUSTRIAL CORP 91–3 COLIN DRIVE HOLBROOK NY 11741 61935 SCHURTER INC 1016 CLEGG COURT PETALUMA CA 94952–1152 62643 UNITED CHEMICON INC 9801 W HIGGINS ST SUITE 430 ROSEMONT, IL 60018–4771 63791 STAR MICRONICS INC 200 PARK AVE SUITE 2308 NEW YORK NY 10166–0001 64155 LINEAR TECHNOLOGY CORP 1630 MCCARTHY BLVD MILPITAS CA 95035–7417 64762 ELANTEC INC 1996 TAROB COURT MILPITAS CA 95035–6824 65238 NOVACAP 25111 ANZA DRIVE VALENCIA CA 91335 65786 CYPRESS SEMICONDUCTOR CORP 3901 N 1ST ST SAN JOSE CA 95134–1506 66958 SGS THOMSON MICROELECTRONICS 1000 E BELL RD PHOENIX AZ 85022–2649 6Y440 MICRON TECHNOLOGY INC 2805 E COLUMBIA ROAD BOISE ID 83706 71279 INTERCONNECTION PRODUCTS INC C/O ELECTRONIC ENGINEERING SALES PO BOX 231149 PORTLAND, OR 97223 71400 BUSSMANN DIV OF COOPER INDUSTRIES INC 114 OLD STATE RD PO BOX 14460 ST LOUIS MO 63178 74594 COMPONENT RESOURCES INC (DIST) DIV OF CPI INTERNATIONAL CORP 14525 SW WALKER ROAD BEAVERTON OR 97006 75042 IRC ELECTRONIC COMPONENTS PHILADELPHIA DIV TRW FIXED RESISTORS 401 N BROAD ST PHILADELPHIA PA 19108–1001 75378 CTS KNIGHTS INC 400 REIMANN AVE SANDWICH IL 60548–1846 75915 LITTELFUSE TRACOR INC SUB OF TRACOR INC 800 E NORTHWEST HWY DES PLAINES IL 60016–3049 80009 TEKTRONIX INC 14150 SW KARL BRAUN DR PO BOX 500 BEAVERTON OR 97077–0001 8–6 AM700 Audio Measurement Set Service Manual Replaceable Electrical Parts Manufacturers cross index (cont.) Mfr. code Manufacturer Address City, state, zip code 81073 GRAYHILL INC 561 HILLGROVE AVE PO BOX 10373 LA GRANGE IL 60525–5914 91637 DALE ELECTRONICS INC 2064 12TH AVE PO BOX 609 COLUMBUS NE 68601–3632 98978 INTERNATIONAL ELECTRONIC RESEARCH CORP 135 W MAGNOLIA BLVD PO BOX 7704 BURBANK CA 91502 D5243 ROEDERSTEIN ERNST GMBH LUDMILLASTRASSE 23 8300 LANDSHUT GERMANY K1072 GREENPAR CONNECTORS LTD PO BOX 15 HARLOW ESSEX, CM20 2ER UK S4206 TOYO COMMUNICATIONS EQUIPMENT TORANOMON BLDG 15 SHIBA TORANO MINATO KU TOKYO, JAPAN TK0AY JAPAN SOLDERLESS TERMINAL MFG CO LTD 1–4–1 HIGASH I–MACHI SHINSENRI TOYONAKA–CITY OSAKA JAPAN TK0IR MONITRONICS INC TAIWAN 8 SOUTH 6TH ROAD KEPZ KAOHSIUNG TAIWAN TK0198 HAMILTON HALLMARK 9750 SW NIMBUS AVE BEAVERTON, OR 97005 TK0435 LEWIS SCREW CO 4300 S RACINE AVE CHICAGO IL 60609–3320 TK0515 EVOX–RIFA INC 100 TRI–STATE INTERNATIONAL SUITE 290 LINCOLNSHIRE IL 60015 TK0875 MATSUO ELECTRONICS INC 831 S DOUBLAS ST EL SEGUNDO CA 92641 TK0891 MICONICS 1 FAIRCHILD AVE PLAINVIEW NY 11803 TK0977 ELECTRICAL INSULATION SUPPLIERS, INC –(DIST) 3549 N W YEON PORTLAND OR 97210 TK1124 LUMEX OPTO/COMPONENTS INC 292 E HELLEN RD PALATINE IL 60067–6955 TK1158 POWEL AND ASSOCIATES 111 S FINDLAY ST SEATTLE WA 98108–2427 TK1177 BELL INDUSTRIES (DIST) 6024 SW JEAN ROAD LAKE OSWEGO OR 97034 TK1326 NORTHWEST FOURSLIDE INC 18224 SW 100TH CT TUALATIN OR 97062 TK1416 SHARP CORP 22–22 NAGAIKE–CHO ABENO–KU OSAKA, JAPAN, TK1441 GFS MANUFACTURING INC 6 PROGRESS DR PO BOX 1409 DOVER NH 03820 TK1462 YAMAICHI ELECTRONICS CO LTD 2ND FLOOR NEW KYOEI BLDG 17–11 3–CHROME SHIBAURA MINATO–KU TOKYO JAPAN TK1499 AMLAN INC 97 THORNWOOD RD STAMFORD CT 06903–2617 TK1601 PULSE ENGINEERING INC 2801 MOORPARK AVE SUITE 7 SAN JOSE CA 95128 TK1719 NEDELCO BV (THOMAS & BETTS) POSTBUS 6431 3002 AK ROTTERDAM THE NETHERLANDS TK1727 PHILIPS NEDERLAND BV AFD ELONCO POSTBUS 90050 5600 PB EINDHOVEN THE NETHERLANDS TK1743 UNITRODE (UK) LTD 6 CRESSWELL PARK BLACKHEATH LONDON SE 3 9RD ENGLAND TK1913 WIMA THE INTER–TECHNICAL GROUP IND 2269 SAW MILL RIVER ROAD PO BOX 127 ELMSFORD NY 10523 TK2058 TDK CORPORATION OF AMERICA 1600 FEEHANVILLE DRIVE MOUNT PROSPECT, IL 60056 TK2073 TOKYO AMERICA INC 565 W GULF ROAD ARLINGTON HEIGHTS IL 60005 AM700 Audio Measurement Set Service Manual 8–7 Replaceable Electrical Parts Manufacturers cross index (cont.) Mfr. code Manufacturer Address City, state, zip code TK2096 KELVIN ASSOCIATES 14724 VENTURA BLVD SUITE 1003 SHERMAN OAKS CA 91403–3501 TK2248 WESTERN MICRO TECHNOLOGY 1800 NW 169TH PL SUITE B–300 BEAVERTON OR 97006 TK2262 RPM ENTERPRISES SUB OF MICROSEMI CORP 3305 W CASTOR ST SANTA ANA CA 92704 TK2319 COLLMER 14368 PROTON RD DALLAS TX 75244 TK2501 K–TRONICS INC PO BOX 4398 BISBEE AZ 85603–5603 TK2520 NEC WORLD PRODUCTS 19654 8TH STREET PO BOX 517 SONOMA CA 95476 TK2538 UNITED SILICON STRUCTURES INC 1971 CONCOURSE DRIVE SAN JOSE CA 95131 TK2569 SHARP CORPORATION C/O TJBO LIAISON M/S 78–210 BEAVERTON, OR 97077 TK2611 STACKPOLE CORPORATION PO BOX 14466 RALEIGH, NC 27610 TK6138 VANTIS CORPORATION C/O DELTA TECHNICAL SALES INC 15050 SW KOLL PKWY, SUITE 2D BEAVERTON, OR 97006 8–8 AM700 Audio Measurement Set Service Manual Replaceable Electrical Parts Replaceable Electrical Parts List Component number Tektronix part number A1A1 Serial no. effective Serial no. discont’d Name & description Mfr. code Mfr. part number 671–2897–00 CIRCUIT BD ASSY:ACQUISITION 80009 671–2897–00 A1A1 671–2897–01 CIRCUIT BD ASSY:ACQUISITION 80009 671–2897–01 A1A2 671–2989–00 CIRCUIT BD ASSY:INPUT ATTN 80009 671–2989–00 A1A3 671–2989–00 CIRCUIT BD ASSY:INPUT ATTN 80009 671–2989–00 A1A4 671–2989–00 CIRCUIT BD ASSY:INPUT ATTN 80009 671–2989–00 A1A5 A1A6 671–2989–00 ––––––––––– CIRCUIT BD ASSY:INPUT ATTN CIRCUIT BD SUBASSY:CONTROL SHIFT REGISTER 80009 671–2989–00 A1A7 671–2801–00 CIRCUIT BD ASSY:OVER/UNDER RANGE 80009 671–2801–00 A2 671–2917–00 CIRCUIT BD ASSY:XLR 80009 671–2917–00 A2 671–2917–01 CIRCUIT BD ASSY:XLR 80009 671–2917–01 A3 671–2915–00 CIRCUIT BD ASSY:DIGITAL AUDIO 80009 671–2915–00 11/18/94 B010248 A3 671–2915–01 B010249 A3 671–2915–02 B010422 A4 671–2916–00 A5 671–2797–00 A5 671–2797–01 B010330 A5 671–2797–02 A5A3 671-3873-00 A5A4 B010421 CIRCUIT BD ASSY:DIGITAL AUDIO 80009 671–2915–01 CIRCUIT BD ASSY:DIGITAL AUDIO 80009 671–2915–02 CIRCUIT BD ASSY:REAR PANEL 80009 671–2916–00 B010329 CIRCUIT BD ASSY:AUDIO GENERATOR 80009 671–2797–00 B019999 CIRCUIT BD ASSY:AUDIO GENERATOR 80009 671–2797–01 B020100 CIRCUIT BD ASSY:AUDIO GENERATOR 80009 671–2797–01 B020100 CIRCUIT BD ASSY:RELAY 80009 671-3873-00 671-3873-00 B020100 CIRCUIT BD ASSY:RELAY 80009 671-3873-00 A6 671–2666–00 B010100 B010324 CIRCUIT BD ASSY:CPU 80009 671–2666–00 A6 671–2666–01 B010325 B010348 CIRCUIT BD ASSY:CPU 80009 671–2666–01 A6 671–2666–02 B010349 B019999 CIRCUIT BD ASSY:CPU 80009 671–2666–02 A6 671–2666–03 B020100 7/28/97 CIRCUIT BD ASSY:CPU 80009 671–2666–03 A6 671–2666–04 7/28/97 CIRCUIT BD ASSY:CPU 80009 671–2666–04 A7 671–2900–00 B010100 B010140 CIRCUIT BD ASSY:DSP 80009 671–2900–00 A7 671–2900–01 B010141 B019999 CIRCUIT BD ASSY:DSP 80009 671–2900–01 A7 671–2900–02 B020633 A9 671–2798–00 A9 671–2798–01 6/15/95 A10 672–0338–00 B010100 A10 672–0338–01 B010284 A10A1 CIRCUIT BD ASSY:DSP 80009 671–2900–02 CIRCUIT BD ASSY:FRONT PANEL 80009 671–2798–00 CIRCUIT BD ASSY:FRONT PANEL 80009 671–2798–01 B010283 CIRCUIT BD ASSY:MONITOR 80009 672–0338–00 B020100 CIRCUIT BD ASSY:MONITOR (W XFMR) 80009 672–0338–01 671–2843–01 B020100 CIRCUIT BD ASSY:MONITOR (WO XFMR) 80009 671–2843–01 A10A2 671–2869–00 B020100 A11 671–2841–00 A11 671–2841–01 A11 671–3891–00 B020100 A11 671–3891–01 6/18/97 A12 119–4547–01 A12 119–5413–01 B019999 B020100 CIRCUIT BD ASSY:TRANSFORMER 80009 671–2869–00 CIRCUIT BD ASSY: POWER SUPPLY 80009 671–2841–00 CIRCUIT BD ASSY: POWER SUPPLY 80009 671–2841–01 CIRCUIT BD ASSY: POWER SUPPLY 80009 671–3891–00 CIRCUIT BD ASSY: POWER SUPPLY 80009 671–3891–01 DISK DRIVE:FLOPPY,3.5 INCH,2MB,0.5 INCH,DSDD 50356 FD–05HF–BLACK DISK DRIVE:FLOPPY,3.5 INCH,2MB,0.5 INCH,DSDD 50356 119–5413–01 AM700 Audio Measurement Set Service Manual 8–9 Replaceable Electrical Parts Replaceable Electrical Parts List (cont.) Component number Tektronix part number Serial no. effective Serial no. discont’d Name & description Mfr. code Mfr. part number A13 671-3872-00 B020100 B020632 CIRCUIT BD ASSY:DISPLAY DRIVER BOARD 80009 671-3872-00 A13 671-3872-01 B020633 CIRCUIT BD ASSY:DISPLAY DRIVER BOARD 80009 671-3872-01 A14 440–4145–00 B020100 B020632 DISPLAY ASSY:FLAT PANEL DISPLAY 80009 440–4145–00 A14 440–4145–01 B020633 DISPLAY ASSY:FLAT PANEL DISPLAY 80009 440–4145–01 8–10 AM700 Audio Measurement Set Service Manual Replaceable Electrical Parts Replaceable electrical parts list Component number Tektronix part number A1A1 671–2897–00 A1A1 671–2897–01 Serial no. effective B020100 Serial no. discont’d Name & description Mfr. code Mfr. part number B019999 CIRCUIT BD ASSY:ACQUISITION 80009 671289700 CIRCUIT BD ASSY:ACQUISITION 80009 671289701 *ATTACHED PARTS* 129–0565–00 SPACER,POST:1.281 L,6–32,AL,0.312 HEX (QUANTITY 2) 80009 129056500 162–0532–00 INSUL SLVG,ELEC:HT SHRINK,0.375 IDPOLYOLEFIN, BLK,0.022 THK W 06090 VERSAFIT 210–0457–00 NUT,PL,ASSEM WA:6–32 X 0.312,STL CD PL (QUANTITY 2) TK0435 ORDER BY DESC 210–0967–00 WASHER,SHLDR:0.156 ID X 0.375 OD X 0.094 THK,NYL 0KB01 ORDER BY DESC 211–0558–00 SCREW,MACHINE:6–32 X 0.25,BDGH,NYL (QUANTITY 2) TK1158 ORDER BY DESC 211–0722–00 SCREW,MACH:6–32 X 0.250,PNH,STL,CDPL,T–15 TORX DR (QUANTITY 2) 0KB01 ORDER BY DESC 337–4026–00 SHIELD,ELECT:BRASS,AM700 80009 337402600 385–0018–00 SPACER,POST:1.25 L W/6–32 THD EA END,NYL 74594 1763–632–N–0 A1A1C1 290–1311–00 CAP,FXD,ALUM:10UF,20%,50V,ESR=1.4 OHM(100KHZ,20C) 55680 UPL1H100MDH1TD A1A1C2 281–0775–02 CAP,FXD,CERAMIC:MLC;0.1UF,20%,50V,X7R,0.265 04222 SA205C104MAA A1A1C3 281–0775–02 CAP,FXD,CERAMIC:MLC;0.1UF,20%,50V,X7R,0.265 04222 SA205C104MAA A1A1C4 281–0775–02 CAP,FXD,CERAMIC:MLC;0.1UF,20%,50V,X7R,0.265 04222 SA205C104MAA A1A1C5 281–0775–02 CAP,FXD,CERAMIC:MLC;0.1UF,20%,50V,X7R,0.265 04222 SA205C104MAA A1A1C6 281–0775–02 CAP,FXD,CERAMIC:MLC;0.1UF,20%,50V,X7R,0.265 04222 SA205C104MAA A1A1C7 281–0775–02 CAP,FXD,CERAMIC:MLC;0.1UF,20%,50V,X7R,0.265 04222 SA205C104MAA A1A1C8 281–0775–02 CAP,FXD,CERAMIC:MLC;0.1UF,20%,50V,X7R,0.265 04222 SA205C104MAA A1A1C9 281–0775–02 CAP,FXD,CERAMIC:MLC;0.1UF,20%,50V,X7R,0.265 04222 SA205C104MAA A1A1C18 281–0775–02 CAP,FXD,CERAMIC:MLC;0.1UF,20%,50V,X7R,0.265 04222 SA205C104MAA A1A1C20 283–0665–01 CAP,FXD,MICA DI:190PF,1%,100V 09023 CDA15FD191F03 *END ATTACHED PARTS* A1A1C21 283–0665–01 CAP,FXD,MICA DI:190PF,1%,100V 09023 CDA15FD191F03 A1A1C22 295–0203–00 CAP SET,MATCHED:2.2UF MATCHED TO 1% OF EACH 80009 295020300 A1A1C23 295–0203–00 CAP SET,MATCHED:2.2UF MATCHED TO 1% OF EACH 80009 295020300 A1A1C24 283–0642–01 CAP,FXD,MICA DI:33PF,2%,500V 09023 CDA10ED330G03 A1A1C25 281–0775–02 CAP,FXD,CERAMIC:MLC;0.1UF,20%,50V,X7R,0.265 04222 SA205C104MAA A1A1C26 283–0620–01 CAP,FXD,MICA DI:470PF,1%,500V 09023 CDA15FD471F03 A1A1C27 283–0620–01 CAP,FXD,MICA DI:470PF,1%,500V 09023 CDA15FD471F03 A1A1C29 283–0642–01 CAP,FXD,MICA DI:33PF,2%,500V 09023 CDA10ED330G03 A1A1C30 281–0775–02 CAP,FXD,CERAMIC:MLC;0.1UF,20%,50V,X7R,0.265 04222 SA205C104MAA A1A1C32 283–0620–01 CAP,FXD,MICA DI:470PF,1%,500V 09023 CDA15FD471F03 A1A1C106 281–0707–00 CAP,FXD,CER DI:15000PF,10%,200V 04222 MA302C153KAA A1A1C107 281–0707–00 CAP,FXD,CER DI:15000PF,10%,200V 04222 MA302C153KAA AM700 Audio Measurement Set Service Manual 8–11 Replaceable Electrical Parts Replaceable electrical parts list (cont.) Component number Tektronix part number A1A1C108 283–0642–01 A1A1C109 A1A1C110 Serial no. effective Serial no. discont’d Name & description Mfr. code Mfr. part number CAP,FXD,MICA DI:33PF,2%,500V 09023 CDA10ED330G03 283–0642–01 CAP,FXD,MICA DI:33PF,2%,500V 09023 CDA10ED330G03 283–0642–01 CAP,FXD,MICA DI:33PF,2%,500V 09023 CDA10ED330G03 A1A1C111 283–0642–01 CAP,FXD,MICA DI:33PF,2%,500V 09023 CDA10ED330G03 A1A1C112 295–0203–00 CAP SET,MATCHED:2.2UF MATCHED TO 1% OF EACH 80009 295020300 A1A1C113 283–0665–01 CAP,FXD,MICA DI:190PF,1%,100V 09023 CDA15FD191F03 A1A1C114 283–0620–01 CAP,FXD,MICA DI:470PF,1%,500V 09023 CDA15FD471F03 A1A1C118 281–0775–02 CAP,FXD,CERAMIC:MLC;0.1UF,20%,50V,X7R,0.265 04222 SA205C104MAA A1A1C119 283–0642–01 CAP,FXD,MICA DI:33PF,2%,500V 09023 CDA10ED330G03 A1A1C120 281–0775–02 CAP,FXD,CERAMIC:MLC;0.1UF,20%,50V,X7R,0.265 04222 SA205C104MAA A1A1C121 281–0775–02 CAP,FXD,CERAMIC:MLC;0.1UF,20%,50V,X7R,0.265 04222 SA205C104MAA A1A1C122 283–0642–01 CAP,FXD,MICA DI:33PF,2%,500V 09023 CDA10ED330G03 A1A1C123 283–0620–01 CAP,FXD,MICA DI:470PF,1%,500V 09023 CDA15FD471F03 A1A1C124 295–0203–00 CAP SET,MATCHED:2.2UF MATCHED TO 1% OF EACH 80009 295020300 A1A1C125 283–0665–01 CAP,FXD,MICA DI:190PF,1%,100V 09023 CDA15FD191F03 A1A1C126 283–0620–01 CAP,FXD,MICA DI:470PF,1%,500V 09023 CDA15FD471F03 A1A1C127 285–1305–00 CAP,FXD,PLASTIC:0.1UF,1%,50V 14752 (D) 650D1A104F A1A1C129 281–0775–02 CAP,FXD,CERAMIC:MLC;0.1UF,20%,50V,X7R,0.265 04222 SA205C104MAA A1A1C130 281–0775–02 CAP,FXD,CERAMIC:MLC;0.1UF,20%,50V,X7R,0.265 04222 SA205C104MAA A1A1C131 290–1311–00 CAP,FXD,ALUM:10UF,20%,50V,ESR=1.4 OHM(100KHZ,20C) 55680 UPL1H100MDH1TD A1A1C132 290–1311–00 CAP,FXD,ALUM:10UF,20%,50V,ESR=1.4 OHM(100KHZ,20C) 55680 UPL1H100MDH1TD A1A1C133 285–1305–00 CAP,FXD,PLASTIC:0.1UF,1%,50V 14752 (D) 650D1A104F A1A1C138 281–0775–02 CAP,FXD,CERAMIC:MLC;0.1UF,20%,50V,X7R,0.265 04222 SA205C104MAA A1A1C139 281–0775–02 CAP,FXD,CERAMIC:MLC;0.1UF,20%,50V,X7R,0.265 04222 SA205C104MAA A1A1C140 285–1503–00 CAP,FXD:3900 PF WIMA TK1913 FKP 2 3900 1%/6 A1A1C141 281–0775–02 CAP,FXD,CERAMIC:MLC;0.1UF,20%,50V,X7R,0.265 04222 A1A1C142 281–0775–02 CAP,FXD,CERAMIC:MLC;0.1UF,20%,50V,X7R,0.265 04222 SA205C104MAA A1A1C143 281–0775–02 CAP,FXD,CERAMIC:MLC;0.1UF,20%,50V,X7R,0.265 04222 SA205C104MAA A1A1C144 290–1311–00 CAP,FXD,ALUM:10UF,20%,50V,ESR=1.4 OHM(100KHZ,20C) 55680 UPL1H100MDH1TD UPL1H100MDH1TD SA205C104MAA A1A1C145 290–1311–00 CAP,FXD,ALUM:10UF,20%,50V,ESR=1.4 OHM(100KHZ,20C) 55680 A1A1C146 285–1503–00 CAP,FXD:3900 PF WIMA TK1913 FKP 2 3900 1%/6 A1A1C151 281–0775–02 CAP,FXD,CERAMIC:MLC;0.1UF,20%,50V,X7R,0.265 04222 SA205C104MAA A1A1C152 281–0775–02 CAP,FXD,CERAMIC:MLC;0.1UF,20%,50V,X7R,0.265 04222 SA205C104MAA A1A1C201 281–0775–02 CAP,FXD,CERAMIC:MLC;0.1UF,20%,50V,X7R,0.265 04222 SA205C104MAA A1A1C202 281–0775–02 CAP,FXD,CERAMIC:MLC;0.1UF,20%,50V,X7R,0.265 04222 SA205C104MAA A1A1C203 283–0680–00 CAP,FXD,MICA DI:330PF,1%,500V TK0891 RDM15FD331F03 A1A1C204 283–0605–01 CAP,FXD,MICA DI:678PF,1%,300V 09023 CDA15FC(678)F03 A1A1C205 281–0775–02 CAP,FXD,CERAMIC:MLC;0.1UF,20%,50V,X7R,0.265 04222 SA205C104MAA 8–12 AM700 Audio Measurement Set Service Manual Replaceable Electrical Parts Replaceable electrical parts list (cont.) Component number Tektronix part number A1A1C206 281–0775–02 A1A1C207 A1A1C208 A1A1C209 Serial no. effective Serial no. discont’d Name & description Mfr. code Mfr. part number CAP,FXD,CERAMIC:MLC;0.1UF,20%,50V,X7R,0.265 04222 SA205C104MAA 283–0680–00 CAP,FXD,MICA DI:330PF,1%,500V TK0891 RDM15FD331F03 283–0605–01 CAP,FXD,MICA DI:678PF,1%,300V 09023 CDA15FC(678)F03 281–0775–02 CAP,FXD,CERAMIC:MLC;0.1UF,20%,50V,X7R,0.265 04222 SA205C104MAA A1A1C210 281–0775–02 CAP,FXD,CERAMIC:MLC;0.1UF,20%,50V,X7R,0.265 04222 SA205C104MAA A1A1C211 281–0775–02 CAP,FXD,CERAMIC:MLC;0.1UF,20%,50V,X7R,0.265 04222 SA205C104MAA A1A1C212 281–0775–02 CAP,FXD,CERAMIC:MLC;0.1UF,20%,50V,X7R,0.265 04222 SA205C104MAA A1A1C213 281–0775–02 CAP,FXD,CERAMIC:MLC;0.1UF,20%,50V,X7R,0.265 04222 SA205C104MAA A1A1C214 281–0775–02 CAP,FXD,CERAMIC:MLC;0.1UF,20%,50V,X7R,0.265 04222 SA205C104MAA A1A1C215 281–0775–02 CAP,FXD,CERAMIC:MLC;0.1UF,20%,50V,X7R,0.265 04222 SA205C104MAA A1A1C216 281–0775–02 CAP,FXD,CERAMIC:MLC;0.1UF,20%,50V,X7R,0.265 04222 SA205C104MAA A1A1C217 290–1311–00 CAP,FXD,ALUM:10UF,20%,50V,ESR=1.4 OHM(100KHZ,20C) 55680 UPL1H100MDH1TD A1A1C218 290–1311–00 CAP,FXD,ALUM:10UF,20%,50V,ESR=1.4 OHM(100KHZ,20C) 55680 UPL1H100MDH1TD A1A1C219 290–1311–00 CAP,FXD,ALUM:10UF,20%,50V,ESR=1.4 OHM(100KHZ,20C) 55680 UPL1H100MDH1TD A1A1C220 290–1311–00 CAP,FXD,ALUM:10UF,20%,50V,ESR=1.4 OHM(100KHZ,20C) 55680 UPL1H100MDH1TD A1A1C221 290–1311–00 CAP,FXD,ALUM:10UF,20%,50V,ESR=1.4 OHM(100KHZ,20C) 55680 UPL1H100MDH1TD A1A1C222 290–1311–00 CAP,FXD,ALUM:10UF,20%,50V,ESR=1.4 OHM(100KHZ,20C) 55680 UPL1H100MDH1TD A1A1C223 290–1311–00 CAP,FXD,ALUM:10UF,20%,50V,ESR=1.4 OHM(100KHZ,20C) 55680 UPL1H100MDH1TD A1A1C224 281–0775–02 CAP,FXD,CERAMIC:MLC;0.1UF,20%,50V,X7R,0.265 04222 SA205C104MAA A1A1C225 290–1311–00 CAP,FXD,ALUM:10UF,20%,50V,ESR=1.4 OHM(100KHZ,20C) 55680 UPL1H100MDH1TD A1A1C228 281–0775–02 CAP,FXD,CERAMIC:MLC;0.1UF,20%,50V,X7R,0.265 04222 SA205C104MAA A1A1C229 281–0775–02 CAP,FXD,CERAMIC:MLC;0.1UF,20%,50V,X7R,0.265 04222 SA205C104MAA A1A1C230 281–0775–02 CAP,FXD,CERAMIC:MLC;0.1UF,20%,50V,X7R,0.265 04222 SA205C104MAA A1A1C231 281–0775–02 CAP,FXD,CERAMIC:MLC;0.1UF,20%,50V,X7R,0.265 04222 SA205C104MAA A1A1C232 290–0973–00 CAP,FXD,ELCTLT:100UF,20%,25VDC 0H1N5 CEUSM1E101 A1A1C233 281–0775–02 CAP,FXD,CERAMIC:MLC;0.1UF,20%,50V,X7R,0.265 04222 SA205C104MAA A1A1C235 281–0775–02 CAP,FXD,CERAMIC:MLC;0.1UF,20%,50V,X7R,0.265 04222 SA205C104MAA A1A1C236 281–0775–02 CAP,FXD,CERAMIC:MLC;0.1UF,20%,50V,X7R,0.265 04222 SA205C104MAA A1A1C237 285–1504–00 CAP,FXD:6800 PF WIMA TK1913 FKP 2 6800 5%/6 A1A1C238 285–1504–00 CAP,FXD:6800 PF WIMA TK1913 FKP 2 6800 5%/6 A1A1C239 285–1344–00 CAP,FXD,PLASTIC:1000PF,100V,5% TK1913 FKP2 1000 PF 5 A1A1C240 285–1344–00 CAP,FXD,PLASTIC:1000PF,100V,5% TK1913 FKP2 1000 PF 5 A1A1C241 285–1344–00 CAP,FXD,PLASTIC:1000PF,100V,5% TK1913 FKP2 1000 PF 5 A1A1C242 285–1344–00 CAP,FXD,PLASTIC:1000PF,100V,5% TK1913 FKP2 1000 PF 5 A1A1C243 281–0775–02 CAP,FXD,CERAMIC:MLC;0.1UF,20%,50V,X7R,0.265 04222 SA205C104MAA A1A1C244 281–0775–02 CAP,FXD,CERAMIC:MLC;0.1UF,20%,50V,X7R,0.265 04222 SA205C104MAA A1A1C245 285–1342–00 CAP,FXD,PLASTIC:FILM & FOIL;220PF,5%,100V, 7.2 X 7MM TK1913 FKP2 220 PF 5 P A1A1C246 290–1311–00 CAP,FXD,ALUM:10UF,20%,50V,ESR=1.4 OHM(100KHZ,20C) 55680 AM700 Audio Measurement Set Service Manual UPL1H100MDH1TD 8–13 Replaceable Electrical Parts Replaceable electrical parts list (cont.) Component number Tektronix part number A1A1C247 281–0775–02 Serial no. effective Serial no. discont’d Name & description Mfr. code Mfr. part number CAP,FXD,CERAMIC:MLC;0.1UF,20%,50V,X7R,0.265 04222 SA205C104MAA UPL1H100MDH1TD A1A1C248 290–1311–00 CAP,FXD,ALUM:10UF,20%,50V,ESR=1.4 OHM(100KHZ,20C) 55680 A1A1C249 285–1342–00 CAP,FXD,PLASTIC:FILM & FOIL;220PF,5%,100V,7.2 X 7MM TK1913 FKP2 220 PF 5 P A1A1C250 281–0775–02 CAP,FXD,CERAMIC:MLC;0.1UF,20%,50V,X7R,0.265 04222 SA205C104MAA A1A1C251 281–0775–02 CAP,FXD,CERAMIC:MLC;0.1UF,20%,50V,X7R,0.265 04222 SA205C104MAA A1A1C252 281–0775–02 CAP,FXD,CERAMIC:MLC;0.1UF,20%,50V,X7R,0.265 04222 SA205C104MAA A1A1C253 290–1311–00 CAP,FXD,ALUM:10UF,20%,50V,ESR=1.4 OHM(100KHZ,20C) 55680 UPL1H100MDH1TD A1A1C254 290–1311–00 CAP,FXD,ALUM:10UF,20%,50V,ESR=1.4 OHM(100KHZ,20C) 55680 UPL1H100MDH1TD A1A1C255 281–0775–02 CAP,FXD,CERAMIC:MLC;0.1UF,20%,50V,X7R,0.265 04222 SA205C104MAA A1A1C256 281–0775–02 CAP,FXD,CERAMIC:MLC;0.1UF,20%,50V,X7R,0.265 04222 SA205C104MAA A1A1C257 281–0775–02 CAP,FXD,CERAMIC:MLC;0.1UF,20%,50V,X7R,0.265 04222 SA205C104MAA A1A1C258 281–0775–02 CAP,FXD,CERAMIC:MLC;0.1UF,20%,50V,X7R,0.265 04222 SA205C104MAA A1A1C259 281–0775–02 CAP,FXD,CERAMIC:MLC;0.1UF,20%,50V,X7R,0.265 04222 SA205C104MAA A1A1C260 285–1349–00 CAP,FXD,MTLZD:0.1UF,5%,63VDC TK1913 MKS2 .1/63/5 A1A1C261 281–0773–00 CAP,FXD,CERAMIC:MLC;0.01UF,10%,100V TK1743 CGB103KEX A1A1C262 281–0775–02 CAP,FXD,CERAMIC:MLC;0.1UF,20%,50V,X7R,0.265 04222 SA205C104MAA A1A1C263 290–1311–00 CAP,FXD,ALUM:10UF,20%,50V,ESR=1.4 OHM(100KHZ,20C) 55680 UPL1H100MDH1TD A1A1C264 281–0775–02 CAP,FXD,CERAMIC:MLC;0.1UF,20%,50V,X7R,0.265 04222 SA205C104MAA A1A1C265 281–0775–02 CAP,FXD,CERAMIC:MLC;0.1UF,20%,50V,X7R,0.265 04222 SA205C104MAA A1A1C266 281–0775–02 CAP,FXD,CERAMIC:MLC;0.1UF,20%,50V,X7R,0.265 04222 SA205C104MAA A1A1C267 281–0775–02 CAP,FXD,CERAMIC:MLC;0.1UF,20%,50V,X7R,0.265 04222 SA205C104MAA A1A1C268 281–0775–02 CAP,FXD,CERAMIC:MLC;0.1UF,20%,50V,X7R,0.265 04222 SA205C104MAA A1A1C269 281–0775–02 CAP,FXD,CERAMIC:MLC;0.1UF,20%,50V,X7R,0.265 04222 SA205C104MAA A1A1C274 281–0775–02 CAP,FXD,CERAMIC:MLC;0.1UF,20%,50V,X7R,0.265 04222 SA205C104MAA A1A1C277 290–0831–00 CAP,FXD,ELCTLT:470UF,+50–20%,50V 55680 UVX1H471MHA A1A1C278 290–0831–00 CAP,FXD,ELCTLT:470UF,+50–20%,50V 55680 UVX1H471MHA A1A1C279 281–0775–02 CAP,FXD,CERAMIC:MLC;0.1UF,20%,50V,X7R,0.265 04222 SA205C104MAA A1A1C280 281–0775–02 CAP,FXD,CERAMIC:MLC;0.1UF,20%,50V,X7R,0.265 04222 SA205C104MAA A1A1C281 290–1108–00 CAP,FXD,ALUM:1000UF,20%,25V,ESR=0.034 OHMS 62643 LXF25VB102M12X2 A1A1C283 281–0775–02 CAP,FXD,CERAMIC:MLC;0.1UF,20%,50V,X7R,0.265 04222 SA205C104MAA A1A1C284 281–0775–02 CAP,FXD,CERAMIC:MLC;0.1UF,20%,50V,X7R,0.265 04222 SA205C104MAA A1A1C287 290–1311–00 CAP,FXD,ALUM:10UF,20%,50V,ESR=1.4 OHM(100KHZ,20C) 55680 UPL1H100MDH1TD A1A1C288 290–1311–00 CAP,FXD,ALUM:10UF,20%,50V,ESR=1.4 OHM(100KHZ,20C) 55680 UPL1H100MDH1TD A1A1C290 281–0775–02 CAP,FXD,CERAMIC:MLC;0.1UF,20%,50V,X7R,0.265 04222 SA205C104MAA A1A1C291 281–0775–02 CAP,FXD,CERAMIC:MLC;0.1UF,20%,50V,X7R,0.265 04222 SA205C104MAA A1A1C292 281–0775–02 CAP,FXD,CERAMIC:MLC;0.1UF,20%,50V,X7R,0.265 04222 SA205C104MAA A1A1C293 281–0775–02 CAP,FXD,CERAMIC:MLC;0.1UF,20%,50V,X7R,0.265 04222 SA205C104MAA A1A1C294 281–0775–02 CAP,FXD,CERAMIC:MLC;0.1UF,20%,50V,X7R,0.265 04222 SA205C104MAA 8–14 AM700 Audio Measurement Set Service Manual Replaceable Electrical Parts Replaceable electrical parts list (cont.) Component number Tektronix part number Serial no. effective Serial no. discont’d Name & description Mfr. code A1A1C295 290–1311–00 Mfr. part number CAP,FXD,ALUM:10UF,20%,50V,ESR=1.4 OHM(100KHZ,20C) 55680 UPL1H100MDH1TD A1A1C296 290–1311–00 CAP,FXD,ALUM:10UF,20%,50V,ESR=1.4 OHM(100KHZ,20C) 55680 UPL1H100MDH1TD A1A1C297 281–0775–02 CAP,FXD,CERAMIC:MLC;0.1UF,20%,50V,X7R,0.265 04222 SA205C104MAA A1A1C298 283–0642–01 CAP,FXD,MICA DI:33PF,2%,500V 09023 CDA10ED330G03 A1A1C299 283–0642–01 CAP,FXD,MICA DI:33PF,2%,500V 09023 CDA10ED330G03 A1A1C300 281–0775–02 CAP,FXD,CERAMIC:MLC;0.1UF,20%,50V,X7R,0.265 04222 SA205C104MAA A1A1C301 283–0642–01 CAP,FXD,MICA DI:33PF,2%,500V 09023 CDA10ED330G03 A1A1C302 283–0642–01 CAP,FXD,MICA DI:33PF,2%,500V 09023 CDA10ED330G03 A1A1C303 283–0601–00 CAP,FXD,MICA DI:22PF,10%,300V TK0891 RDM15ED220K03 A1A1C304 281–0775–02 CAP,FXD,CERAMIC:MLC;0.1UF,20%,50V,X7R,0.265 04222 SA205C104MAA A1A1C305 281–0775–02 CAP,FXD,CERAMIC:MLC;0.1UF,20%,50V,X7R,0.265 04222 SA205C104MAA A1A1C306 283–0601–00 CAP,FXD,MICA DI:22PF,10%,300V TK0891 RDM15ED220K03 A1A1C307 281–0775–02 CAP,FXD,CERAMIC:MLC;0.1UF,20%,50V,X7R,0.265 04222 SA205C104MAA A1A1C308 281–0775–02 CAP,FXD,CERAMIC:MLC;0.1UF,20%,50V,X7R,0.265 04222 SA205C104MAA A1A1C309 281–0775–02 CAP,FXD,CERAMIC:MLC;0.1UF,20%,50V,X7R,0.265 04222 SA205C104MAA A1A1C310 283–0601–00 CAP,FXD,MICA DI:22PF,10%,300V TK0891 RDM15ED220K03 A1A1C311 281–0775–02 CAP,FXD,CERAMIC:MLC;0.1UF,20%,50V,X7R,0.265 04222 SA205C104MAA A1A1C312 281–0775–02 CAP,FXD,CERAMIC:MLC;0.1UF,20%,50V,X7R,0.265 04222 SA205C104MAA A1A1C313 285–1305–00 CAP,FXD,PLASTIC:0.1UF,1%,50V 14752 (D) 650D1A104F A1A1C314 283–0601–00 CAP,FXD,MICA DI:22PF,10%,300V TK0891 RDM15ED220K03 A1A1C315 281–0775–02 CAP,FXD,CERAMIC:MLC;0.1UF,20%,50V,X7R,0.265 04222 A1A1C316 281–0775–02 CAP,FXD,CERAMIC:MLC;0.1UF,20%,50V,X7R,0.265 04222 SA205C104MAA A1A1C317 285–1305–00 CAP,FXD,PLASTIC:0.1UF,1%,50V 14752 (D) 650D1A104F A1A1C318 285–1503–00 CAP,FXD:3900 PF WIMA TK1913 FKP 2 3900 1%/6 A1A1C319 285–1503–00 CAP,FXD:3900 PF WIMA TK1913 FKP 2 3900 1%/6 A1A1C320 281–0819–00 CAP,FXD,CERAMIC:MLC;33 PF,5%,50V,0.100 X 0.170 04222 A1A1C321 283–0648–01 CAP,FXD,MICA DI:10PF,5%,500V,TAPED & REELED TK0891 RDM15CD100D03 A1A1C322 283–0648–01 CAP,FXD,MICA DI:10PF,5%,500V,TAPED & REELED TK0891 RDM15CD100D03 A1A1C323 283–0648–01 CAP,FXD,MICA DI:10PF,5%,500V,TAPED & REELED TK0891 RDM15CD100D03 A1A1C324 283–0648–01 CAP,FXD,MICA DI:10PF,5%,500V,TAPED & REELED TK0891 RDM15CD100D03 A1A1C325 283–0772–01 CAP,FXD,MICA DI:497PF,1%,500V 09023 CDA15FD(497)F03 A1A1C326 283–0634–01 CAP,FXD,MICA DI:65PF,1%,500V 09023 CDA15ED650F03 A1A1C327 283–0772–01 CAP,FXD,MICA DI:497PF,1%,500V 09023 CDA15FD(497)F03 A1A1C328 283–0634–01 CAP,FXD,MICA DI:65PF,1%,500V 09023 CDA15ED650F03 A1A1C329 281–0775–02 CAP,FXD,CERAMIC:MLC;0.1UF,20%,50V,X7R,0.265 04222 SA205C104MAA A1A1C330 281–0775–02 CAP,FXD,CERAMIC:MLC;0.1UF,20%,50V,X7R,0.265 04222 SA205C104MAA A1A1C331 281–0775–02 CAP,FXD,CERAMIC:MLC;0.1UF,20%,50V,X7R,0.265 04222 SA205C104MAA A1A1C332 281–0775–02 CAP,FXD,CERAMIC:MLC;0.1UF,20%,50V,X7R,0.265 04222 SA205C104MAA AM700 Audio Measurement Set Service Manual SA205C104MAA SA102A330JAA 8–15 Replaceable Electrical Parts Replaceable electrical parts list (cont.) Component number Tektronix part number A1A1C333 281–0158–00 Serial no. effective Serial no. discont’d Name & description Mfr. code Mfr. part number CAP,VAR,CER DI:7–45PF,100WVDC 59660 518–006 G 7–45 A1A1C334 283–0635–01 CAP,FXD,MICA DI:51PF,1%,500V 09023 CDA15ED510F03 A1A1C335 281–0158–00 CAP,VAR,CER DI:7–45PF,100WVDC 59660 518–006 G 7–45 A1A1C336 283–0635–01 CAP,FXD,MICA DI:51PF,1%,500V 09023 CDA15ED510F03 A1A1C337 290–1313–00 CAP,FXD,ALUM:10UF,20%,50V,8 X 11MM;105 DEG,RDL 55680 UET1H100MPH1TA A1A1C338 290–1313–00 CAP,FXD,ALUM:10UF,20%,50V,8 X 11MM;105 DEG,RDL 55680 UET1H100MPH1TA A1A1C339 290–1313–00 CAP,FXD,ALUM:10UF,20%,50V,8 X 11MM;105 DEG,RDL 55680 UET1H100MPH1TA A1A1C340 290–1313–00 CAP,FXD,ALUM:10UF,20%,50V,8 X 11MM;105 DEG,RDL 55680 UET1H100MPH1TA A1A1C342 281–0775–02 CAP,FXD,CERAMIC:MLC;0.1UF,20%,50V,X7R,0.265 04222 SA205C104MAA A1A1C343 290–0973–01 CAP,FXD,ALUM:100UF,20%,25VDC 55680 UVX1E101MEA1TA A1A1C344 290–1311–00 CAP,FXD,ALUM:10UF,20%,50V,ESR=1.4 OHM(100KHZ,20C) 55680 UPL1H100MDH1TD A1A1C345 281–0775–02 CAP,FXD,CERAMIC:MLC;0.1UF,20%,50V,X7R,0.265 04222 SA205C104MAA A1A1CR9 152–0141–02 DIODE,SIG:ULTRA FAST;40V,150MA,4NS,2PF 27014 FDH9427 A1A1CR10 152–0141–02 DIODE,SIG:ULTRA FAST;40V,150MA,4NS,2PF 27014 FDH9427 A1A1CR11 152–0141–02 DIODE,SIG:ULTRA FAST;40V,150MA,4NS,2PF 27014 FDH9427 A1A1CR12 152–0141–02 DIODE,SIG:ULTRA FAST;40V,150MA,4NS,2PF 27014 FDH9427 A1A1CR13 152–0141–02 DIODE,SIG:ULTRA FAST;40V,150MA,4NS,2PF 27014 FDH9427 A1A1CR14 152–0141–02 DIODE,SIG:ULTRA FAST;40V,150MA,4NS,2PF 27014 FDH9427 A1A1CR15 152–0141–02 DIODE,SIG:ULTRA FAST;40V,150MA,4NS,2PF 27014 FDH9427 A1A1CR16 152–0141–02 DIODE,SIG:ULTRA FAST;40V,150MA,4NS,2PF 27014 FDH9427 A1A1CR17 152–0141–02 DIODE,SIG:ULTRA FAST;40V,150MA,4NS,2PF 27014 FDH9427 A1A1CR18 152–0141–02 DIODE,SIG:ULTRA FAST;40V,150MA,4NS,2PF 27014 FDH9427 A1A1CR19 152–0141–02 DIODE,SIG:ULTRA FAST;40V,150MA,4NS,2PF 27014 FDH9427 A1A1CR20 152–0141–02 DIODE,SIG:ULTRA FAST;40V,150MA,4NS,2PF 27014 FDH9427 A1A1CR21 152–0141–02 DIODE,SIG:ULTRA FAST;40V,150MA,4NS,2PF 27014 FDH9427 A1A1CR22 152–0141–02 DIODE,SIG:ULTRA FAST;40V,150MA,4NS,2PF 27014 FDH9427 A1A1CR23 152–0141–02 DIODE,SIG:ULTRA FAST;40V,150MA,4NS,2PF 27014 FDH9427 A1A1CR24 152–0141–02 DIODE,SIG:ULTRA FAST;40V,150MA,4NS,2PF 27014 FDH9427 A1A1CR25 152–0141–02 DIODE,SIG:ULTRA FAST;40V,150MA,4NS,2PF 27014 FDH9427 A1A1CR26 152–0141–02 DIODE,SIG:ULTRA FAST;40V,150MA,4NS,2PF 27014 FDH9427 A1A1CR27 152–0141–02 DIODE,SIG:ULTRA FAST;40V,150MA,4NS,2PF 27014 FDH9427 A1A1CR28 152–0141–02 DIODE,SIG:ULTRA FAST;40V,150MA,4NS,2PF 27014 FDH9427 A1A1CR29 152–0141–02 DIODE,SIG:ULTRA FAST;40V,150MA,4NS,2PF 27014 FDH9427 A1A1CR30 152–0141–02 DIODE,SIG:ULTRA FAST;40V,150MA,4NS,2PF 27014 FDH9427 A1A1CR31 152–0322–00 DIODE,SIG:SCHTKY;15V,410MVF AT 1MA,1.2PF 50434 5082–2672–T25 A1A1CR32 152–0322–00 DIODE,SIG:SCHTKY;15V,410MVF AT 1MA,1.2PF 50434 5082–2672–T25 A1A1CR33 152–0141–02 DIODE,SIG:ULTRA FAST;40V,150MA,4NS,2PF 27014 FDH9427 A1A1CR34 152–0141–02 DIODE,SIG:ULTRA FAST;40V,150MA,4NS,2PF 27014 FDH9427 8–16 AM700 Audio Measurement Set Service Manual Replaceable Electrical Parts Replaceable electrical parts list (cont.) Component number Tektronix part number A1A1CR35 152–0141–02 A1A1CR36 A1A1CR39 Serial no. effective Serial no. discont’d Name & description Mfr. code Mfr. part number DIODE,SIG:ULTRA FAST;40V,150MA,4NS,2PF 27014 FDH9427 152–0141–02 DIODE,SIG:ULTRA FAST;40V,150MA,4NS,2PF 27014 FDH9427 152–0141–02 DIODE,SIG:ULTRA FAST;40V,150MA,4NS,2PF 27014 FDH9427 A1A1CR40 152–0141–02 DIODE,SIG:ULTRA FAST;40V,150MA,4NS,2PF 27014 FDH9427 A1A1CR41 152–0141–02 DIODE,SIG:ULTRA FAST;40V,150MA,4NS,2PF 27014 FDH9427 A1A1CR42 152–0141–02 DIODE,SIG:ULTRA FAST;40V,150MA,4NS,2PF 27014 FDH9427 A1A1CR43 152–0141–02 DIODE,SIG:ULTRA FAST;40V,150MA,4NS,2PF 27014 FDH9427 A1A1CR44 152–0141–02 DIODE,SIG:ULTRA FAST;40V,150MA,4NS,2PF 27014 FDH9427 A1A1CR45 152–0141–02 DIODE,SIG:ULTRA FAST;40V,150MA,4NS,2PF 27014 FDH9427 A1A1CR46 152–0141–02 DIODE,SIG:ULTRA FAST;40V,150MA,4NS,2PF 27014 FDH9427 A1A1DS1 150–0169–00 LAMP,INCAND:120V,0.025A WIRE LEAD TK1124 IFL–LX120PS–185 A1A1DS2 150–0169–00 LAMP,INCAND:120V,0.025A WIRE LEAD TK1124 IFL–LX120PS–185 A1A1DS3 150–0169–00 LAMP,INCAND:120V,0.025A WIRE LEAD TK1124 IFL–LX120PS–185 A1A1DS4 150–0169–00 LAMP,INCAND:120V,0.025A WIRE LEAD TK1124 IFL–LX120PS–185 A1A1F2 159–0195–00 FUSE,RADIAL LD:7A,125V,0.125 SEC 61857 SP7–7A A1A1F3 159–0194–00 FUSE,WIRE LEAD:5A,125V,0.125 SEC 61857 SP5–5A LEAD TAP A1A1F4 159–0194–00 FUSE,WIRE LEAD:5A,125V,0.125 SEC 61857 SP5–5A LEAD TAP A1A1FL1 131–0566–00 BUS,CNDCT:DUMMY RES,0.094 OD X 0.225L 24546 OMA0207 A1A1FL2 131–0566–00 BUS,CNDCT:DUMMY RES,0.094 OD X 0.225L 24546 OMA0207 A1A1FL3 131–0566–00 BUS,CNDCT:DUMMY RES,0.094 OD X 0.225L 24546 OMA0207 A1A1FL4 131–0566–00 BUS,CNDCT:DUMMY RES,0.094 OD X 0.225L 24546 OMA0207 A1A1FL5 131–0566–00 BUS,CNDCT:DUMMY RES,0.094 OD X 0.225L 24546 OMA0207 A1A1FL6 131–0566–00 BUS,CNDCT:DUMMY RES,0.094 OD X 0.225L 24546 OMA0207 A1A1FL10 119–4641–00 FILTER:AM700,80 KHZ LPF 80009 119464100 A1A1FL11 119–4641–00 FILTER:AM700,80 KHZ LPF 80009 119464100 A1A1J1 131–2919–01 CONN,HDR:PCB;MALE,STR,1 X 4,0.1 CTR 53387 2404–6112TB A1A1J2 131–2919–01 CONN,HDR:PCB;MALE,STR,1 X 4,0.1 CTR 53387 2404–6112TB A1A1J25 131–5675–00 CONN,HDR PWR:PCB;MALE,RTANG,1 X 5,0.1 CTR 27264 26–65–5050 A1A1J26 131–5672–00 CONN,HDR:PCB,MALE,STR,2 X 20,0.05 X 0.1 CTR TK1462 NFP–040A–0114–A A1A1J27 131–5672–00 CONN,HDR:PCB,MALE,STR,2 X 20,0.05 X 0.1 CTR TK1462 NFP–040A–0114–A A1A1J28 131–4530–00 CONN,HDR:PCB;MALE,STR,1 X 3,0.1 CTR 00779 104344–1 A1A1J29 131–2919–01 CONN,HDR:PCB;MALE,STR,1 X 4,0.1 CTR 53387 2404–6112TB A1A1J30 131–2919–01 CONN,HDR:PCB;MALE,STR,1 X 4,0.1 CTR 53387 2404–6112TB A1A1K1 148–0235–00 RELAY,ARM:2 FORM C;5VDC 312 OHM COIL,GOLD CLAD SIL 61529 TF2E–5V A1A1K2 148–0235–00 RELAY,ARM:2 FORM C;5VDC 312 OHM COIL,GOLD CLAD SIL 61529 TF2E–5V A1A1K4 148–0235–00 RELAY,ARM:2 FORM C;5VDC 312 OHM COIL,GOLD CLAD SIL 61529 TF2E–5V A1A1K5 148–0235–00 RELAY,ARM:2 FORM C;5VDC 312 OHM COIL,GOLD CLAD SIL 61529 TF2E–5V A1A1K6 148–0235–00 RELAY,ARM:2 FORM C;5VDC 312 OHM COIL,GOLD CLAD SIL 61529 TF2E–5V AM700 Audio Measurement Set Service Manual 8–17 Replaceable Electrical Parts Replaceable electrical parts list (cont.) Component number Tektronix part number A1A1K7 148–0235–00 Serial no. effective Serial no. discont’d Name & description Mfr. code Mfr. part number RELAY,ARM:2 FORM C;5VDC 312 OHM COIL,GOLD CLAD SIL 61529 TF2E–5V A1A1K8 148–0235–00 RELAY,ARM:2 FORM C;5VDC 312 OHM COIL,GOLD CLAD SIL 61529 TF2E–5V A1A1K10 148–0235–00 RELAY,ARM:2 FORM C;5VDC 312 OHM COIL,GOLD CLAD SIL 61529 TF2E–5V A1A1K11 148–0235–00 RELAY,ARM:2 FORM C;5VDC 312 OHM COIL,GOLD CLAD SIL, 61529 TF2E–5V A1A1K12 148–0235–00 RELAY,ARM:2 FORM C;5VDC 312 OHM COIL,GOLD CLAD SIL 61529 TF2E–5V A1A1K13 148–0235–00 RELAY,ARM:2 FORM C;5VDC 312 OHM COIL,GOLD CLAD SIL 61529 TF2E–5V A1A1K20 148–0235–00 RELAY,ARM:2 FORM C;5VDC 312 OHM COIL,GOLD CLAD SIL 61529 TF2E–5V A1A1K21 148–0235–00 RELAY,ARM:2 FORM C;5VDC 312 OHM COIL,GOLD CLAD SIL 61529 TF2E–5V A1A1K22 148–0235–00 RELAY,ARM:2 FORM C;5VDC 312 OHM COIL,GOLD CLAD SIL 61529 TF2E–5V A1A1K23 148–0235–00 RELAY,ARM:2 FORM C;5VDC 312 OHM COIL,GOLD CLAD SIL 61529 TF2E–5V A1A1K24 148–0235–00 RELAY,ARM:2 FORM C;5VDC 312 OHM COIL,GOLD CLAD SIL 61529 TF2E–5V A1A1K25 148–0235–00 RELAY,ARM:2 FORM C;5VDC 312 OHM COIL,GOLD CLAD SIL 61529 TF2E–5V A1A1K26 148–0235–00 RELAY,ARM:2 FORM C;5VDC 312 OHM COIL,GOLD CLAD SIL 61529 TF2E–5V A1A1K27 148–0235–00 RELAY,ARM:2 FORM C;5VDC 312 OHM COIL,GOLD CLAD SIL 61529 TF2E–5V A1A1K28 148–0235–00 RELAY,ARM:2 FORM C;5VDC 312 OHM COIL,GOLD CLAD SIL 61529 TF2E–5V A1A1K29 148–0235–00 RELAY,ARM:2 FORM C;5VDC 312 OHM COIL,GOLD CLAD SIL 61529 TF2E–5V A1A1K30 148–0235–00 RELAY,ARM:2 FORM C;5VDC 312 OHM COIL,GOLD CLAD SIL 61529 TF2E–5V A1A1K31 148–0235–00 RELAY,ARM:2 FORM C;5VDC 312 OHM COIL,GOLD CLAD SIL 61529 TF2E–5V A1A1L1 108–0554–00 INDUCTOR,FXD:CUSTOM,POWER;5UH,20%,I<10 A 0JR03 108–0554–00 A1A1L2 108–0422–00 INDUCTOR,FXD:CUSTOM,POWER;80UH,20%,IDC<2 A 0JR03 108–O422–00 A1A1L3 108–0422–00 INDUCTOR,FXD:CUSTOM,POWER;80UH,20%,IDC<2 A 0JR03 108–O422–00 A1A1Q1 151–0254–03 TRANSISTOR,SIG:BIPOLAR,NPN;30V,500MA,125MHZ 0JR04 MPSA14, TPE2 98978 7–363–BA 0JR04 MPSA14, TPE2 98978 7–363–BA 0JR04 MPSA14, TPE2 98978 7–363–BA 09969 CCF502G47R50F *ATTACHED PARTS* 214–3036–00 HEAT SINK,SEMIC:TRANSISTOR,TO–220;ALUMINUM 151–0254–03 TRANSISTOR,SIG:BIPOLAR,NPN;30V,500MA,125MHZ 214–3036–00 HEAT SINK,SEMIC:TRANSISTOR,TO–220;ALUMINUM *END ATTACHED PARTS* A1A1Q2 *ATTACHED PARTS* *END ATTACHED PARTS* A1A1Q3 151–0254–03 TRANSISTOR,SIG:BIPOLAR,NPN;30V,500MA,125MHZ *ATTACHED PARTS* 214–3036–00 HEAT SINK,SEMIC:TRANSISTOR,TO–220;ALUMINUM *END ATTACHED PARTS* A1A1R24 322–3066–00 RES,FXD:METAL FILM;47.5 OHM,1%,0.2W,TC=100 PPM A1A1R25 322–3066–00 RES,FXD:METAL FILM;47.5 OHM,1%,0.2W,TC=100 PPM 09969 CCF502G47R50F A1A1R29 321–0042–00 RES,FXD,FILM:26.7 OHM,1%,0.125W,TC=T0MI 57668 CRB14 FXE 26.7 A1A1R30 322–3114–00 RES,FXD:METAL FILM;150 OHM,1%,0.2W,TC=100 PPM 91637 CCF50–2–G1500F A1A1R32 321–0222–07 RES,FXD,FILM:2.0K OHM,0.1%,0.125W,TC=T9 MI 19701 5033RE2K000B 8–18 AM700 Audio Measurement Set Service Manual Replaceable Electrical Parts Replaceable electrical parts list (cont.) Component number Tektronix part number A1A1R33 321–0603–07 A1A1R34 A1A1R35 Serial no. effective Serial no. discont’d Name & description Mfr. code Mfr. part number RES,FXD,FILM:15K OHM,0.1%,0.125W,TC=T9MI 19701 5033RE15K00B 321–0603–07 RES,FXD,FILM:15K OHM,0.1%,0.125W,TC=T9MI 19701 5033RE15K00B 321–0222–07 RES,FXD,FILM:2.0K OHM,0.1%,0.125W,TC=T9 MI 19701 5033RE2K000B A1A1R39 322–3193–00 RES,FXD:METAL FILM;1K OHM,1%,0.2W,TC=100 PPM 91637 CCF501G10000F A1A1R40 322–3193–00 RES,FXD:METAL FILM;1K OHM,1%,0.2W,TC=100 PPM 91637 CCF501G10000F A1A1R61 321–0222–07 RES,FXD,FILM:2.0K OHM,0.1%,0.125W,TC=T9 MI 19701 5033RE2K000B A1A1R62 321–0193–07 RES,FXD,FILM:1K OHM,0.1%,0.125W,TC=T9MI 19701 5033RE1K000B A1A1R63 321–0193–07 RES,FXD,FILM:1K OHM,0.1%,0.125W,TC=T9MI 19701 5033RE1K000B A1A1R64 321–1684–07 RES,FXD,FILM:2.162K OHM,0.1%,0.125W,TC=T9 19701 5033RE2K162B A1A1R65 321–0106–00 RES,FXD,FILM:124 OHM 1%,0.125W,TC=T0 TK1727 MR25 2322–151–1 A1A1R66 321–0193–07 RES,FXD,FILM:1K OHM,0.1%,0.125W,TC=T9MI 19701 A1A1R67 321–1684–07 RES,FXD,FILM:2.162K OHM,0.1%,0.125W,TC=T9 19701 5033RE2K162B A1A1R68 321–0222–07 RES,FXD,FILM:2.0K OHM,0.1%,0.125W,TC=T9 MI 19701 5033RE2K000B A1A1R70 321–0222–07 RES,FXD,FILM:2.0K OHM,0.1%,0.125W,TC=T9 MI 19701 5033RE2K000B A1A1R71 321–0193–07 RES,FXD,FILM:1K OHM,0.1%,0.125W,TC=T9MI 19701 5033RE1K000B A1A1R75 321–0106–00 RES,FXD,FILM:124 OHM 1%,0.125W,TC=T0 TK1727 MR25 2322–151–1 A1A1R94 321–0222–07 RES,FXD,FILM:2.0K OHM,0.1%,0.125W,TC=T9 MI 19701 5033RE2K000B A1A1R95 321–0193–07 RES,FXD,FILM:1K OHM,0.1%,0.125W,TC=T9MI 19701 5033RE1K000B A1A1R96 321–0193–07 RES,FXD,FILM:1K OHM,0.1%,0.125W,TC=T9MI 19701 5033RE1K000B A1A1R97 321–1684–07 RES,FXD,FILM:2.162K OHM,0.1%,0.125W,TC=T9 19701 5033RE2K162B A1A1R98 321–0106–00 RES,FXD,FILM:124 OHM 1%,0.125W,TC=T0 TK1727 MR25 2322–151–1 A1A1R99 321–0193–07 RES,FXD,FILM:1K OHM,0.1%,0.125W,TC=T9MI 19701 5033RE1K000B A1A1R100 321–1684–07 RES,FXD,FILM:2.162K OHM,0.1%,0.125W,TC=T9 19701 5033RE2K162B A1A1R101 321–0222–07 RES,FXD,FILM:2.0K OHM,0.1%,0.125W,TC=T9 MI 19701 5033RE2K000B A1A1R102 321–0106–00 RES,FXD,FILM:124 OHM 1%,0.125W,TC=T0 TK1727 MR25 2322–151–1 A1A1R103 321–0222–07 RES,FXD,FILM:2.0K OHM,0.1%,0.125W,TC=T9 MI 19701 5033RE2K000B A1A1R104 321–0193–07 RES,FXD,FILM:1K OHM,0.1%,0.125W,TC=T9MI 19701 5033RE1K000B A1A1R120 322–3066–00 RES,FXD:METAL FILM;47.5 OHM,1%,0.2W,TC=100 PPM 09969 CCF502G47R50F A1A1R122 322–3193–00 RES,FXD:METAL FILM;1K OHM,1%,0.2W,TC=100 PPM 91637 CCF501G10000F A1A1R123 322–3193–00 RES,FXD:METAL FILM;1K OHM,1%,0.2W,TC=100 PPM 91637 CCF501G10000F A1A1R124 322–3066–00 RES,FXD:METAL FILM;47.5 OHM,1%,0.2W,TC=100 PPM 09969 CCF502G47R50F A1A1R127 321–0222–07 RES,FXD,FILM:2.0K OHM,0.1%,0.125W,TC=T9 MI 19701 5033RE2K000B A1A1R128 321–0603–07 RES,FXD,FILM:15K OHM,0.1%,0.125W,TC=T9MI 19701 5033RE15K00B A1A1R129 322–3114–00 RES,FXD:METAL FILM;150 OHM,1%,0.2W,TC=100 PPM 91637 CCF50–2–G1500F A1A1R130 321–0603–07 RES,FXD,FILM:15K OHM,0.1%,0.125W,TC=T9MI 19701 5033RE15K00B A1A1R131 321–0042–00 RES,FXD,FILM:26.7 OHM,1%,0.125W,TC=T0MI 57668 CRB14 FXE 26.7 A1A1R136 321–0222–07 RES,FXD,FILM:2.0K OHM,0.1%,0.125W,TC=T9 MI 19701 5033RE2K000B A1A1R137 321–0222–07 RES,FXD,FILM:2.0K OHM,0.1%,0.125W,TC=T9 MI 19701 5033RE2K000B AM700 Audio Measurement Set Service Manual 5033RE1K000B 8–19 Replaceable Electrical Parts Replaceable electrical parts list (cont.) Component number Tektronix part number A1A1R138 321–0222–07 A1A1R139 A1A1R140 Serial no. effective Serial no. discont’d Name & description Mfr. code Mfr. part number RES,FXD,FILM:2.0K OHM,0.1%,0.125W,TC=T9 MI 19701 5033RE2K000B 321–0222–07 RES,FXD,FILM:2.0K OHM,0.1%,0.125W,TC=T9 MI 19701 5033RE2K000B 321–0263–00 RES,FXD,FILM:5.36K OHM,1%,0.125W,TC=T0MI 19701 5043ED5K360F A1A1R141 321–0222–07 RES,FXD,FILM:2.0K OHM,0.1%,0.125W,TC=T9 MI 19701 5033RE2K000B A1A1R142 321–1701–04 RES,FXD,FILM:5.22K OHM,0.1%,0.125W,TC=T2 19701 5033RC5K220B A1A1R143 321–0318–07 RES,FXD,FILM:20.0K OHM,0.1%,0.125W,TC=T9 19701 5033RE20K00BCM A1A1R144 321–0222–07 RES,FXD,FILM:2.0K OHM,0.1%,0.125W,TC=T9 MI 19701 5033RE2K000B A1A1R145 321–0222–07 RES,FXD,FILM:2.0K OHM,0.1%,0.125W,TC=T9 MI 19701 5033RE2K000B A1A1R146 321–0222–07 RES,FXD,FILM:2.0K OHM,0.1%,0.125W,TC=T9 MI 19701 5033RE2K000B A1A1R147 321–0222–07 RES,FXD,FILM:2.0K OHM,0.1%,0.125W,TC=T9 MI 19701 5033RE2K000B A1A1R148 321–0222–07 RES,FXD,FILM:2.0K OHM,0.1%,0.125W,TC=T9 MI 19701 5033RE2K000B A1A1R149 321–0263–00 RES,FXD,FILM:5.36K OHM,1%,0.125W,TC=T0MI 19701 5043ED5K360F A1A1R150 321–0222–07 RES,FXD,FILM:2.0K OHM,0.1%,0.125W,TC=T9 MI 19701 5033RE2K000B A1A1R151 321–1701–04 RES,FXD,FILM:5.22K OHM,0.1%,0.125W,TC=T2 19701 5033RC5K220B A1A1R152 321–0318–07 RES,FXD,FILM:20.0K OHM,0.1%,0.125W,TC=T9 19701 5033RE20K00BCM A1A1R153 321–0222–07 RES,FXD,FILM:2.0K OHM,0.1%,0.125W,TC=T9 MI 19701 5033RE2K000B A1A1R154 321–0222–07 RES,FXD,FILM:2.0K OHM,0.1%,0.125W,TC=T9 MI 19701 5033RE2K000B A1A1R215 131–4566–00 BUS,CNDCT:0 OHM,300 SPACING,SM BODYMI,DUMMY RES 91637 FRJ–50 A1A1R216 322–3164–00 RES,FXD,FILM:499 OHM,1%,0.2W,TC=T0MI,SMALL BODY 91637 CCF501G499ROF A1A1R217 322–3177–00 RES,FXD:METAL FILM;681 OHM,1%,0.2W,TC=100 PPM 91637 CCF50–2G681R0F A1A1R218 322–3222–07 RES,FXD,FILM:2K OHM,0.1%,0.2W TC=T9,SMALL BODY 91637 CCF501C20000B A1A1R219 322–3241–00 RES,FXD,FILM:3.16K OHM,1%,0.2W,TC=T0MI,SMALL BODY 91637 CCF502G3161FT A1A1R220 322–3308–00 RES,FXD,FILM:15.8K OHM,1%,0.2W,TC=T0MI,SMALL BODY 91637 CCF501G15801F A1A1R221 131–4566–00 BUS,CNDCT:0 OHM,300 SPACING,SM BODYMI,DUMMY RES 91637 FRJ–50 A1A1R222 322–3164–00 RES,FXD,FILM:499 OHM,1%,0.2W,TC=T0MI,SMALL BODY 91637 CCF501G499ROF A1A1R223 322–3177–00 RES,FXD:METAL FILM;681 OHM,1%,0.2W,TC=100 PPM 91637 CCF50–2G681R0F A1A1R224 322–3222–07 RES,FXD,FILM:2K OHM,0.1%,0.2W TC=T9,SMALL BODY 91637 CCF501C20000B A1A1R225 322–3241–00 RES,FXD,FILM:3.16K OHM,1%,0.2W,TC=T0MI,SMALL BODY 91637 CCF502G3161FT A1A1R226 322–3308–00 RES,FXD,FILM:15.8K OHM,1%,0.2W,TC=T0MI,SMALL BODY 91637 CCF501G15801F A1A1R227 322–3226–00 RES,FXD:METAL FILM;2.21K OHM,1%,0.2W,TC=100 91637 CCF501G22100F A1A1R228 322–3226–00 RES,FXD:METAL FILM;2.21K OHM,1%,0.2W,TC=100 91637 CCF501G22100F A1A1R229 322–3222–07 RES,FXD,FILM:2K OHM,0.1%,0.2W TC=T9,SMALL BODY 91637 CCF501C20000B A1A1R230 322–3222–07 RES,FXD,FILM:2K OHM,0.1%,0.2W TC=T9,SMALL BODY 91637 CCF501C20000B A1A1R231 322–3222–07 RES,FXD,FILM:2K OHM,0.1%,0.2W TC=T9,SMALL BODY 91637 CCF501C20000B A1A1R232 322–3222–07 RES,FXD,FILM:2K OHM,0.1%,0.2W TC=T9,SMALL BODY 91637 CCF501C20000B A1A1R239 322–3058–00 RES,FXD:METAL FILM;39.2 OHM,1%,0.2W,TC=100 PPM 91637 CCF50–1G39R20F A1A1R240 322–3058–00 RES,FXD:METAL FILM;39.2 OHM,1%,0.2W,TC=100 PPM 91637 CCF50–1G39R20F A1A1R241 322–3058–00 RES,FXD:METAL FILM;39.2 OHM,1%,0.2W,TC=100 PPM 91637 CCF50–1G39R20F 8–20 AM700 Audio Measurement Set Service Manual Replaceable Electrical Parts Replaceable electrical parts list (cont.) Component number Tektronix part number A1A1R242 322–3058–00 A1A1R243 A1A1R244 Serial no. effective Serial no. discont’d Name & description Mfr. code Mfr. part number RES,FXD:METAL FILM;39.2 OHM,1%,0.2W,TC=100 PPM 91637 CCF50–1G39R20F 322–3322–00 RES,FXD:METAL FILM;22.1K OHM,1%,0.2W,TC=100 91637 CCF501G22101F 322–3402–00 RES,FXD:METAL FILM;150K OHM,1%,0.2W,TC=100 PPM 91637 CCF50G15002F A1A1R245 311–2237–00 RES,VAR,TRMR:CERMET;25K OHM,20%,0.5W,0.197 SQ TK2073 GF06UT2 253 M L A1A1R246 322–3354–00 RES,FXD:METAL FILM;47.5K OHM,1%,0.2W,TC=100 91637 CCF501G47501F A1A1R247 322–3114–00 RES,FXD:METAL FILM;150 OHM,1%,0.2W,TC=100 PPM 91637 CCF50–2–G1500F A1A1R248 322–3114–00 RES,FXD:METAL FILM;150 OHM,1%,0.2W,TC=100 PPM 91637 CCF50–2–G1500F A1A1R249 322–3354–00 RES,FXD:METAL FILM;47.5K OHM,1%,0.2W,TC=100 91637 CCF501G47501F A1A1R250 322–3402–00 RES,FXD:METAL FILM;150K OHM,1%,0.2W,TC=100 PPM 91637 CCF50G15002F A1A1R251 322–3322–00 RES,FXD:METAL FILM;22.1K OHM,1%,0.2W,TC=100 91637 CCF501G22101F A1A1R252 311–2237–00 RES,VAR,TRMR:CERMET;25K OHM,20%,0.5W,0.197 SQ TK2073 GF06UT2 253 M L A1A1R253 322–3001–00 RES,FXD:METAL FILM;10 OHM,1%,0.2W,TC=100 PPM 91637 CCF501G10R00F A1A1R254 322–3001–00 RES,FXD:METAL FILM;10 OHM,1%,0.2W,TC=100 PPM 91637 CCF501G10R00F A1A1R255 322–3326–00 RES,FXD,FILM:24.3K OHM,1%,0.2W,TC–T0MI,SMALL BODY 91637 CCF50–2F24301F A1A1R256 322–3314–00 RES,FXD:METAL FILM;18.2K OHM,1%,0.2W,TC=100 91637 CCF501G18201F A1A1R257 322–3235–00 RES,FXD:METAL FILM;2.74K OHM,1%,0.2W,TC=100 91637 CCF501G27400F A1A1R258 322–3261–00 RES,FXD,FILM:5.11K OHM,1%,0.2W,TC=T0MI,SMALL BODY 91637 CCF50G5111FT A1A1R259 322–3154–00 RES,FXD:METAL FILM;392 OHM,1%,0.2W,TC=100 PPM 91637 CCF501G392R0F A1A1R274 322–3097–00 RES,FXD:METAL FILM;100 OHM,1%,0.2W,TC=100 PPM 91637 CCF501G100R0F A1A1R275 322–3097–00 RES,FXD:METAL FILM;100 OHM,1%,0.2W,TC=100 PPM 91637 CCF501G100R0F A1A1R276 322–3097–00 RES,FXD:METAL FILM;100 OHM,1%,0.2W,TC=100 PPM 91637 CCF501G100R0F A1A1R277 308–0299–00 RES,FXD,WW:300 OHM,1%,3W 91637 RS2B–300ROF A1A1R278 308–0299–00 RES,FXD,WW:300 OHM,1%,3W 91637 RS2B–300ROF A1A1R283 308–0299–00 RES,FXD,WW:300 OHM,1%,3W 91637 RS2B–300ROF A1A1R284 308–0299–00 RES,FXD,WW:300 OHM,1%,3W 91637 RS2B–300ROF A1A1R289 322–3097–00 RES,FXD:METAL FILM;100 OHM,1%,0.2W,TC=100 PPM 91637 CCF501G100R0F A1A1R290 322–3289–00 RES,FXD:METAL FILM;10K OHM,1%,0.2W,TC=100 PPM 91637 CCF50G10001F A1A1R291 322–3319–02 RES,FXD,FILM:20.5K OHM,0.5%,0.2W,TC=T2 91637 CCF501D20501D A1A1R292 321–0026–00 RES,FXD,FILM:18.2 OHM,1%,0.125W,TC=T0MI TK1727 MR25 2322–151–0 A1A1R293 322–3289–00 RES,FXD:METAL FILM;10K OHM,1%,0.2W,TC=100 PPM 91637 CCF50G10001F A1A1R294 322–3261–00 RES,FXD,FILM:5.11K OHM,1%,0.2W,TC=T0MI,SMALL BODY 91637 CCF50G5111FT A1A1R295 322–3235–00 RES,FXD:METAL FILM;2.74K OHM,1%,0.2W,TC=100 91637 CCF501G27400F A1A1R296 321–0026–00 RES,FXD,FILM:18.2 OHM,1%,0.125W,TC=T0MI TK1727 MR25 2322–151–0 A1A1R297 322–3319–02 RES,FXD,FILM:20.5K OHM,0.5%,0.2W,TC=T2 91637 CCF501D20501D A1A1R298 322–3289–00 RES,FXD:METAL FILM;10K OHM,1%,0.2W,TC=100 PPM 91637 CCF50G10001F A1A1R299 322–3261–00 RES,FXD,FILM:5.11K OHM,1%,0.2W,TC=T0MI,SMALL BODY 91637 CCF50G5111FT A1A1R300 322–3235–00 RES,FXD:METAL FILM;2.74K OHM,1%,0.2W,TC=100 91637 CCF501G27400F A1A1R301 322–3097–00 RES,FXD:METAL FILM;100 OHM,1%,0.2W,TC=100 PPM 91637 CCF501G100R0F AM700 Audio Measurement Set Service Manual 8–21 Replaceable Electrical Parts Replaceable electrical parts list (cont.) Component number Tektronix part number Serial no. effective Serial no. discont’d Name & description Mfr. code A1A1R302 308–0736–00 Mfr. part number RES,FXD,WW:200 OHM,1%,3W 91637 RS2B–B200R0F T/ A1A1R303 322–3097–00 RES,FXD:METAL FILM;100 OHM,1%,0.2W,TC=100 PPM 91637 CCF501G100R0F A1A1R304 322–3423–00 RES,FXD,FILM:249K OHM,1%,0.2W,TC=T0MI,SMALL 91637 CCF501G24902F A1A1R305 322–3097–00 RES,FXD:METAL FILM;100 OHM,1%,0.2W,TC=100 PPM 91637 CCF501G100R0F A1A1R306 308–0736–00 RES,FXD,WW:200 OHM,1%,3W 91637 RS2B–B200R0F T/ A1A1R307 322–3423–00 RES,FXD,FILM:249K OHM,1%,0.2W,TC=T0MI,SMALL 91637 CCF501G24902F A1A1R308 322–3354–00 RES,FXD:METAL FILM;47.5K OHM,1%,0.2W,TC=100 91637 CCF501G47501F A1A1R309 322–3354–00 RES,FXD:METAL FILM;47.5K OHM,1%,0.2W,TC=100 91637 CCF501G47501F A1A1R310 322–3097–00 RES,FXD:METAL FILM;100 OHM,1%,0.2W,TC=100 PPM 91637 CCF501G100R0F A1A1R311 322–3097–00 RES,FXD:METAL FILM;100 OHM,1%,0.2W,TC=100 PPM 91637 CCF501G100R0F A1A1R312 322–3385–00 RES,FXD:METAL FILM;100K OHM,1%,0.2W,TC=100PPM 91637 CCF501G10002F A1A1R313 322–3385–00 RES,FXD:METAL FILM;100K OHM,1%,0.2W,TC=100PPM 91637 CCF501G10002F A1A1R314 322–3385–00 RES,FXD:METAL FILM;100K OHM,1%,0.2W,TC=100PPM 91637 CCF501G10002F A1A1R315 322–3385–00 RES,FXD:METAL FILM;100K OHM,1%,0.2W,TC=100PPM 91637 CCF501G10002F A1A1R316 322–3385–00 RES,FXD:METAL FILM;100K OHM,1%,0.2W,TC=100PPM 91637 CCF501G10002F A1A1R317 322–3385–00 RES,FXD:METAL FILM;100K OHM,1%,0.2W,TC=100PPM 91637 CCF501G10002F A1A1R318 322–3385–00 RES,FXD:METAL FILM;100K OHM,1%,0.2W,TC=100PPM 91637 CCF501G10002F A1A1R319 322–3385–00 RES,FXD:METAL FILM;100K OHM,1%,0.2W,TC=100PPM 91637 CCF501G10002F A1A1R320 322–3251–00 RES,FXD,FILM:4.02K OHM,1%,0.2W,TC=T0 91637 CCF501G40200F A1A1R321 322–3251–00 RES,FXD,FILM:4.02K OHM,1%,0.2W,TC=T0 91637 CCF501G40200F A1A1R322 322–3139–00 RES,FXD:METAL FILM;274 OHM,1%,0.2W,TC=100 PPM 91637 CCF501G274ROF A1A1R323 322–3139–00 RES,FXD:METAL FILM;274 OHM,1%,0.2W,TC=100 PPM 91637 CCF501G274ROF A1A1R326 322–3231–00 RES,FXD,FILM:2.49K OHM,1%,0.2W,TC=T0MI,SMALL BODY 91637 CCF50–1G24900F A1A1R327 322–3231–00 RES,FXD,FILM:2.49K OHM,1%,0.2W,TC=T0MI,SMALL BODY 91637 CCF50–1G24900F A1A1R329 322–3097–00 RES,FXD:METAL FILM;100 OHM,1%,0.2W,TC=100 PPM 91637 CCF501G100R0F A1A1R330 322–3097–00 RES,FXD:METAL FILM;100 OHM,1%,0.2W,TC=100 PPM 91637 CCF501G100R0F A1A1R331 322–3097–00 RES,FXD:METAL FILM;100 OHM,1%,0.2W,TC=100 PPM 91637 CCF501G100R0F A1A1R332 322–3097–00 RES,FXD:METAL FILM;100 OHM,1%,0.2W,TC=100 PPM 91637 CCF501G100R0F A1A1R333 307–0648–00 RES NTWK,FXD,FI:8,100 OHM,2%,0.125 W 11236 761–3–R100 A1A1R334 322–3155–00 RES,FXD,FILM:402 OHM,1%,0.2W,TC=T0MI,SMALL BODY 91637 CCF501G402ROF A1A1R335 322–3155–00 RES,FXD,FILM:402 OHM,1%,0.2W,TC=T0MI,SMALL BODY 91637 CCF501G402ROF A1A1R336 322–3193–00 RES,FXD:METAL FILM;1K OHM,1%,0.2W,TC=100 PPM 91637 CCF501G10000F A1A1R337 322–3193–00 RES,FXD:METAL FILM;1K OHM,1%,0.2W,TC=100 PPM 91637 CCF501G10000F A1A1R338 322–3289–00 RES,FXD:METAL FILM;10K OHM,1%,0.2W,TC=100 PPM 91637 CCF50G10001F A1A1R339 322–3193–00 RES,FXD:METAL FILM;1K OHM,1%,0.2W,TC=100 PPM 91637 CCF501G10000F A1A1R339 322–3289–00 RES,FXD:METAL FILM;10K OHM,1%,0.2W,TC=100 PPM 91637 CCF50G10001F A1A1R340 311–2234–00 RES,VAR,TRMR:CERMET;5K OHM,20%,0.5W,0.197 SQ TK2073 GF06UT2 502 M L A1A1R340 322–3206–00 RES,FXD,FILM:1.37K OHM,1%,0.2W,TC=T0MI,SMALL BODY 91637 8–22 CCF501G13700F AM700 Audio Measurement Set Service Manual Replaceable Electrical Parts Replaceable electrical parts list (cont.) Component number Tektronix part number A1A1R341 322–3193–00 Serial no. effective Serial no. discont’d Name & description Mfr. code Mfr. part number RES,FXD:METAL FILM;1K OHM,1%,0.2W,TC=100 PPM 91637 CCF501G10000F A1A1R342 322–3206–00 RES,FXD,FILM:1.37K OHM,1%,0.2W,TC=T0MI,SMALL BODY 91637 CCF501G13700F A1A1TP2 214–4085–00 TERM,TEST POINT:0.070 ID,0.220 H,0.063 DIAPCB 26364 104–01–02 A1A1TP3 214–4085–00 TERM,TEST POINT:0.070 ID,0.220 H,0.063 DIAPCB 26364 104–01–02 A1A1TP4 214–4085–00 TERM,TEST POINT:0.070 ID,0.220 H,0.063 DIAPCB 26364 104–01–02 A1A1TP5 214–4085–00 TERM,TEST POINT:0.070 ID,0.220 H,0.063 DIAPCB 26364 104–01–02 A1A1TP6 214–4085–00 TERM,TEST POINT:0.070 ID,0.220 H,0.063 DIAPCB 26364 104–01–02 A1A1TP7 214–4085–00 TERM,TEST POINT:0.070 ID,0.220 H,0.063 DIAPCB 26364 104–01–02 A1A1TP8 214–4085–00 TERM,TEST POINT:0.070 ID,0.220 H,0.063 DIAPCB 26364 104–01–02 A1A1TP9 214–4085–00 TERM,TEST POINT:0.070 ID,0.220 H,0.063 DIAPCB 26364 104–01–02 A1A1TP10 214–4085–00 TERM,TEST POINT:0.070 ID,0.220 H,0.063 DIAPCB 26364 104–01–02 A1A1TP11 214–4085–00 TERM,TEST POINT:0.070 ID,0.220 H,0.063 DIAPCB 26364 104–01–02 A1A1TP12 214–4085–00 TERM,TEST POINT:0.070 ID,0.220 H,0.063 DIAPCB 26364 104–01–02 A1A1TP18 214–4085–00 TERM,TEST POINT:0.070 ID,0.220 H,0.063 DIAPCB 26364 104–01–02 A1A1TP19 214–4085–00 TERM,TEST POINT:0.070 ID,0.220 H,0.063 DIAPCB 26364 104–01–02 A1A1TP20 214–4085–00 TERM,TEST POINT:0.070 ID,0.220 H,0.063 DIAPCB 26364 104–01–02 A1A1TP21 214–4085–00 TERM,TEST POINT:0.070 ID,0.220 H,0.063 DIAPCB 26364 104–01–02 A1A1TP22 214–4085–00 TERM,TEST POINT:0.070 ID,0.220 H,0.063 DIAPCB 26364 104–01–02 A1A1TP23 214–4085–00 TERM,TEST POINT:0.070 ID,0.220 H,0.063 DIAPCB 26364 104–01–02 A1A1TP25 214–4085–00 TERM,TEST POINT:0.070 ID,0.220 H,0.063 DIAPCB 26364 104–01–02 A1A1TP26 214–4085–00 TERM,TEST POINT:0.070 ID,0.220 H,0.063 DIAPCB 26364 104–01–02 A1A1TP27 214–4085–00 TERM,TEST POINT:0.070 ID,0.220 H,0.063 DIAPCB 26364 104–01–02 A1A1TP28 214–4085–00 TERM,TEST POINT:0.070 ID,0.220 H,0.063 DIAPCB 26364 104–01–02 A1A1TP29 214–4085–00 TERM,TEST POINT:0.070 ID,0.220 H,0.063 DIAPCB 26364 104–01–02 A1A1TP30 214–4085–00 TERM,TEST POINT:0.070 ID,0.220 H,0.063 DIAPCB 26364 104–01–02 A1A1TP31 214–4085–00 TERM,TEST POINT:0.070 ID,0.220 H,0.063 DIAPCB 26364 104–01–02 A1A1TP32 214–4085–00 TERM,TEST POINT:0.070 ID,0.220 H,0.063 DIAPCB 26364 104–01–02 A1A1TP33 214–4085–00 TERM,TEST POINT:0.070 ID,0.220 H,0.063 DIAPCB 26364 104–01–02 A1A1TP34 214–4085–00 TERM,TEST POINT:0.070 ID,0.220 H,0.063 DIAPCB 26364 104–01–02 A1A1TP35 214–4085–00 TERM,TEST POINT:0.070 ID,0.220 H,0.063 DIAPCB 26364 104–01–02 A1A1TP36 214–4085–00 TERM,TEST POINT:0.070 ID,0.220 H,0.063 DIAPCB 26364 104–01–02 A1A1TP37 214–4085–00 TERM,TEST POINT:0.070 ID,0.220 H,0.063 DIAPCB 26364 104–01–02 A1A1TP38 214–4085–00 TERM,TEST POINT:0.070 ID,0.220 H,0.063 DIAPCB 26364 104–01–02 A1A1TP39 214–4085–00 TERM,TEST POINT:0.070 ID,0.220 H,0.063 DIAPCB 26364 104–01–02 A1A1TP40 214–4085–00 TERM,TEST POINT:0.070 ID,0.220 H,0.063 DIAPCB 26364 104–01–02 A1A1TP41 214–4085–00 TERM,TEST POINT:0.070 ID,0.220 H,0.063 DIAPCB 26364 104–01–02 A1A1TP42 214–4085–00 TERM,TEST POINT:0.070 ID,0.220 H,0.063 DIAPCB 26364 104–01–02 A1A1TP43 214–4085–00 TERM,TEST POINT:0.070 ID,0.220 H,0.063 DIAPCB 26364 104–01–02 AM700 Audio Measurement Set Service Manual 8–23 Replaceable Electrical Parts Replaceable electrical parts list (cont.) Component number Tektronix part number A1A1TP45 214–4085–00 Serial no. effective Serial no. discont’d Name & description Mfr. code Mfr. part number TERM,TEST POINT:0.070 ID,0.220 H,0.063 DIAPCB 26364 104–01–02 A1A1TP46 214–4085–00 TERM,TEST POINT:0.070 ID,0.220 H,0.063 DIAPCB 26364 104–01–02 A1A1TP47 214–4085–00 TERM,TEST POINT:0.070 ID,0.220 H,0.063 DIAPCB 26364 104–01–02 A1A1TP48 214–4085–00 TERM,TEST POINT:0.070 ID,0.220 H,0.063 DIAPCB 26364 104–01–02 A1A1TP49 214–4085–00 TERM,TEST POINT:0.070 ID,0.220 H,0.063 DIAPCB 26364 104–01–02 A1A1TP50 214–4085–00 TERM,TEST POINT:0.070 ID,0.220 H,0.063 DIAPCB 26364 104–01–02 A1A1TP51 214–4085–00 TERM,TEST POINT:0.070 ID,0.220 H,0.063 DIAPCB 26364 104–01–02 A1A1TP52 214–4085–00 TERM,TEST POINT:0.070 ID,0.220 H,0.063 DIAPCB 26364 104–01–02 A1A1TP53 214–4085–00 TERM,TEST POINT:0.070 ID,0.220 H,0.063 DIAPCB 26364 104–01–02 A1A1TP54 214–4085–00 TERM,TEST POINT:0.070 ID,0.220 H,0.063 DIAPCB 26364 104–01–02 A1A1TP55 214–4085–00 TERM,TEST POINT:0.070 ID,0.220 H,0.063 DIAPCB 26364 104–01–02 A1A1TP56 214–4085–00 TERM,TEST POINT:0.070 ID,0.220 H,0.063 DIAPCB 26364 104–01–02 A1A1U1 156–4411–00 IC,LINEAR:BIPOLAR,OP–AMP;DUAL,140UV VOS,8.0MHZ 64155 LT1124CN8 A1A1U2 156–1338–01 IC,LINEAR:BIPOLAR,OP–AMP;HIGH OUTPUT DRIVE 01295 NE5534AP A1A1U3 156–4411–00 IC,LINEAR:BIPOLAR,OP–AMP;DUAL,140UV VOS,8.0MHZ 64155 LT1124CN8 A1A1U4 156–1338–01 IC,LINEAR:BIPOLAR,OP–AMP;HIGH OUTPUT DRIVE 01295 NE5534AP A1A1U5 156–4412–00 IC,MISC:CMOS,ANALOG SWITCH;QUAD,SPST NO,+/–15V 1ES66 DG412DJ A1A1U8 156–4412–00 IC,MISC:CMOS,ANALOG SWITCH;QUAD,SPST NO,+/–15V 1ES66 DG412DJ A1A1U17 156–4412–00 IC,MISC:CMOS,ANALOG SWITCH;QUAD,SPST NO,+/–15V 1ES66 DG412DJ A1A1U20 156–4412–00 IC,MISC:CMOS,ANALOG SWITCH;QUAD,SPST NO,+/–15V 1ES66 DG412DJ A1A1U29 156–2400–00 IC,CONVERTER:CMOS,D/A;12 BIT,CURRENT OUT,MULTIPLYING 24355 AD7541ABQ A1A1U30 156–2400–00 IC,CONVERTER:CMOS,D/A;12 BIT,CURRENT OUT,MULTIPLYING 24355 AD7541ABQ A1A1U31 156–1272–00 IC,LINEAR:BIPOLAR,OP–AMP;DUAL,HIGH OUTPUT DRIVE 01295 NE5532P A1A1U32 156–1272–00 IC,LINEAR:BIPOLAR,OP–AMP;DUAL,HIGH OUTPUT DRIVE 01295 NE5532P A1A1U33 156–1272–00 IC,LINEAR:BIPOLAR,OP–AMP;DUAL,HIGH OUTPUT DRIVE 01295 NE5532P A1A1U34 156–4412–00 IC,MISC:CMOS,ANALOG SWITCH;QUAD,SPST NO,+/–15V 1ES66 DG412DJ A1A1U35 156–3166–00 IC,MISC:CMOS,ANALOG SWITCH;DUAL DPST,55 OHM,+/–15V 1ES66 DG405DJ/C30251 A1A1U36 156–4038–00 IC,MISC:CMOS,ANALOG SWITCH;DUAL SPDT,45 OHM 1ES66 DG403DJ/C30244 A1A1U37 156–2400–00 IC,CONVERTER:CMOS,D/A;12 BIT,CURRENT OUT,MULTIPLYING 24355 AD7541ABQ A1A1U38 156–2400–00 IC,CONVERTER:CMOS,D/A;12 BIT,CURRENT OUT,MULTIPLYING 24355 AD7541ABQ A1A1U39 156–1272–00 IC,LINEAR:BIPOLAR,OP–AMP;DUAL,HIGH OUTPUT DRIVE 01295 NE5532P A1A1U40 156–1272–00 IC,LINEAR:BIPOLAR,OP–AMP;DUAL,HIGH OUTPUT DRIVE 01295 NE5532P A1A1U41 156–1272–00 IC,LINEAR:BIPOLAR,OP–AMP;DUAL,HIGH OUTPUT DRIVE 01295 NE5532P A1A1U42 156–4412–00 IC,MISC:CMOS,ANALOG SWITCH;QUAD,SPST NO,+/–15V 1ES66 DG412DJ A1A1U43 156–4038–00 IC,MISC:CMOS,ANALOG SWITCH;DUAL SPDT,45 OHM 1ES66 DG403DJ/C30244 A1A1U44 156–2093–00 IC,DIGITAL:ALSTTL,GATE;QUAD 2–INPUT 01295 SN74ALS32N A1A1U45 156–1688–00 IC,LINEAR:BIFET,OP–AMP;DUAL,LOW OFFSET,LOW DRIFT 01295 TL287CP A1A1U57 156–1688–00 IC,LINEAR:BIFET,OP–AMP;DUAL,LOW OFFSET,LOW DRIFT 01295 TL287CP 8–24 AM700 Audio Measurement Set Service Manual Replaceable Electrical Parts Replaceable electrical parts list (cont.) Component number Tektronix part number A1A1U58 156–4413–00 A1A1U59 A1A1U60 Serial no. effective Serial no. discont’d Name & description Mfr. code Mfr. part number IC,CONVERTER:CMOS,A/D;18–BIT,50 KHZ,DUAL,DELTA SIGMA 0A384 CS5389KP 156–1272–00 IC,LINEAR:BIPOLAR,OP–AMP;DUAL,HIGH OUTPUT DRIVE 01295 NE5532P 156–1272–00 IC,LINEAR:BIPOLAR,OP–AMP;DUAL,HIGH OUTPUT DRIVE 01295 NE5532P A1A1U61 156–0277–00 IC,LINEAR:BIPOLAR,VR;POSITIVE,5.0V,1.0A,4% 01295 UA7805CKC A1A1U62 156–0846–00 IC,LINEAR:BIPOLAR,VR;NEGATIVE,–5.0V,1.0A,4.0% 27014 LM320T–5.0 A1A1U67 156–4414–00 IC,CONVERTER:CMOS,A/D;18–BIT,DUAL,INT REF 13919 PCM1750P A1A1U75 156–4415–00 IC,MISC:CMOS,FILTER;1/4 RO 1/2 DECIMATING DIGITAL FILTER 13919 DF1750P A1A1U76 156–3608–00 IC,LINEAR:BIPOLAR,V REF;POS,5.0V,0.05%,20PPM,SERIES 64155 LT1021CCN8–5 A1A1U77 156–0402–00 IC,MISC:BIPOLAR,TIMER 27014 LM555CN A1A1U78 156–4038–00 IC,MISC:CMOS,ANALOG SWITCH;DUAL SPDT,45 OHM 1ES66 DG403DJ/C30244 A1A1U79 156–1756–00 IC,DIGITAL:ALSTTL,FLIP FLOP;DUAL D–TYPE W/CLEAR 01295 SN74ALS74AN A1A1U80 156–4416–00 IC,MISC:CMOS,WAVEFORM GENERATOR 0AGS1 ML2036CP A1A1U81 156–4417–00 IC,CONVERTER:CMOS,D/A;8–BIT,OCTAL 24355 DAC8840FP A1A1U82 156–1245–00 IC,LINEAR:BIPOLAR,TRANSISTOR ARRAY;7,NPN,DARLINGTON 0CVK3 ULN2003A A1A1U98 156–0277–00 IC,LINEAR:BIPOLAR,VR;POSITIVE,5.0V,1.0A,4% 01295 UA7805CKC A1A1U101 156–1150–01 IC,LINEAR:BIPOLAR,VR;NEGATIVE,–5.0V,100MA,4% 27014 LM79L05ACZ/T4 A1A1U102 156–1245–00 IC,LINEAR:BIPOLAR,TRANSISTOR ARRAY;7,NPN,DARLINGTON 0CVK3 ULN2003A A1A1U103 156–1245–00 IC,LINEAR:BIPOLAR,TRANSISTOR ARRAY;7,NPN, DARLINGTON,COMMON EMITTER,OC W/CLAMP DIODES 0CVK3 ULN2003A A1A1U104 156–2110–00 IC,DIGITAL:ALSTTL,SHIFT RGTR;8–BIT 01295 SN74ALS164AN A1A1U105 156–2110–00 IC,DIGITAL:ALSTTL,SHIFT RGTR;8–BIT 01295 SN74ALS164AN A1A1U106 156–2094–00 IC,DIGITAL:ALSTTL,GATE;HEX INV 01295 SN74ALS04BN A1A1U109 156–4418–00 IC,DIGITAL:ALSTTL,SHIFT RGTR;8–BIT SI/PISO WITH CLEAR 01295 SN74ALS166N A1A1U110 156–3314–00 IC,MISC:TTL,INTERFACE;DIFFERENTIALLINE DRVR/RCVR PAIR 27014 DS8921A A1A1U111 156–3435–00 IC,DIGITAL:HCTCMOS,SHMITT TRIG;HEX INV 04713 MC74HCT14AN A1A1U112 156–4419–00 IC,OPTO:ISOLATOR;INFRARED LED,AC INPUT,60MA,XSTR OUT 04713 H11AA1 A1A1U113 156–1756–00 IC,DIGITAL:ALSTTL,FLIP FLOP;DUAL D–TYPE W/CLEAR 01295 SN74ALS74AN A1A1U114 156–4419–00 IC,OPTO:ISOLATOR;INFRARED LED,AC INPUT,60MA,XSTR OUT 04713 H11AA1 A1A1U115 156–1756–00 IC,DIGITAL:ALSTTL,FLIP FLOP;DUAL D–TYPE W/CLEAR 01295 SN74ALS74AN A1A1U117 160–9912–00 IC,DIGITAL:CMOS,PLD;OPT,5032,32 MACROCELL,20NS 80009 160–9912–00 A1A1U118 160–9914–00 IC,DIGITAL:CMOS,PLD;OPT,ATV2500,24 MACROCELL,14 INP 80009 160–9914–00 A1A1U119 160–9913–00 IC,DIGITAL:CMOS,PLD;EEPLD,22V10,25NS,33.3MHZ,130MA 80009 160–9913–00 00779 2–641932–3 80009 156669802 *MOUNTING PARTS* 136–0925–00 SOCKET,DIP:PCB;24 POS,2 X 12,0.1 X 0.3 CTR *END MOUNTING PARTS* A1A1U120 156–6698–02 IC,ASIC:CMOS,CUSTOM;TRANSMITTER/RECEIVER,ADG312C A1A1U121 156–2707–00 IC,DIGITAL:HCMOS,BUFFER;QUAD BUFFER, /OE, 3–STATE 01295 SN74HC125N A1A1U122 156–1191–00 IC,LINEAR:BIFET,OP–AMP;DUAL 01295 TL072CP A1A1U123 156–4521–00 IC,MISC:CMOS,PWR SUPPLY SUPERVISOR;MPU RESET GEN 0B0A9 DS1233–10 AM700 Audio Measurement Set Service Manual 8–25 Replaceable Electrical Parts Replaceable electrical parts list (cont.) Component number Tektronix part number A1A1VR1 152–0514–00 A1A1VR2 A1A1VR3 Serial no. effective Serial no. discont’d Name & description Mfr. code Mfr. part number DIODE,ZENER:10V,1%,0.4W 04713 MZ4104D 152–0514–00 DIODE,ZENER:10V,1%,0.4W 04713 MZ4104D 152–0514–00 DIODE,ZENER:10V,1%,0.4W 04713 MZ4104D A1A1VR4 152–0514–00 DIODE,ZENER:10V,1%,0.4W 04713 MZ4104D A1A1VR5 152–0395–00 DIODE,ZENER:4.3V,5%,0.4W 04713 1N749ARL A1A1VR6 152–0395–00 DIODE,ZENER:4.3V,5%,0.4W 04713 1N749ARL A1A1VR7 152–0744–00 DIODE,ZENER:3.6V,5%,0.4W 04713 1N747ARL A1A1VR8 152–0744–00 DIODE,ZENER:3.6V,5%,0.4W 04713 1N747ARL A1A1VR9 152–0278–00 DIODE,ZENER:3V,5%,0.4W 04713 1N4372ARL A1A1XU116 136–1230–00 SOCKET,SIMM:PCB,SIMM II,FEMALE,STR,1 X80,0.05 CTR 80009 136123000 A1A1Y1 119–4698–00 OSCILLATOR:VCXO;12.288MHZ,5PPM,0.5 TO4.5VDC 21022 H10BV–12.288MHZ A1A2 671–2989–00 CIRCUIT BD ASSY:INPUT ATTN 80009 671298900 A1A2J1 131–1425–00 CONN,HDR:PCB;MALE,RTANG,1 X 36,0.1CTR 22526 65521–136 A1A2R28 321–0986–07 RES,FXD,FILM:25K OHM,0.1%,0.125W,TC=T9MI TK1727 MPR24–2322–141– A1A2R41 321–1296–07 RES,FXD,FILM:12.0K OHM,0.1%,0.125W,TC=T9 TK1727 MPR24–2322–141– A1A2R42 321–0612–07 RES,FXD,FILM:500 OHM,0.1%,0.125W,TC=T9MI TK1727 MPR24–2322–141– A1A2R46 321–0756–04 RES,FXD,FILM:50K OHM,0.1%,0.125W,TC=T2MI 19701 5033RE50K00B A1A2R49 321–1696–07 RES,FXD,FILM:6K OHM,0.1%,0.125W,TC=T9MI 19701 5033RE6K00B A1A2R50 321–0928–07 RES,FXD,FILM:250 OHM,0.1%,0.125W,TC=T9MI TK1727 MPR24–2322–141– A1A2R51 321–0239–07 RES,FXD,FILM:3.01K OHM,0.1%,0.125W,TC=T9MI 19701 5033RE3K010B A1A2R52 321–0103–00 RES,FXD,FILM:115 OHM,1%,0.125W,TC=T0 19701 5043ED115R0F A1A2R53 321–0210–07 RES,FXD:METAL FILM;1.5K OHM,0.1%,0.125W,TC=25 PPM 91637 CMF55116C15000B A1A2R54 321–0077–00 RES,FXD,FILM:61.9 OHM,1%,0.125W,TC=T0MI 57668 CRRB14 FXE 61.9 A1A2R281 321–0210–07 RES,FXD:METAL FILM;1.5K OHM,0.1%,0.125W,TC=25 PPM 91637 CMF55116C15000B A1A2R282 321–0077–00 RES,FXD,FILM:61.9 OHM,1%,0.125W,TC=T0MI 57668 CRRB14 FXE 61.9 A1A3 671–2989–00 CIRCUIT BD ASSY:INPUT ATTN 80009 671298900 A1A3J1 131–1425–00 CONN,HDR:PCB;MALE,RTANG,1 X 36,0.1CTR 22526 65521–136 A1A3R28 321–0986–07 RES,FXD,FILM:25K OHM,0.1%,0.125W,TC=T9MI TK1727 MPR24–2322–141– A1A3R41 321–1296–07 RES,FXD,FILM:12.0K OHM,0.1%,0.125W,TC=T9 TK1727 MPR24–2322–141– A1A3R42 321–0612–07 RES,FXD,FILM:500 OHM,0.1%,0.125W,TC=T9MI TK1727 MPR24–2322–141– A1A3R46 321–0756–04 RES,FXD,FILM:50K OHM,0.1%,0.125W,TC=T2MI 19701 5033RE50K00B A1A3R49 321–1696–07 RES,FXD,FILM:6K OHM,0.1%,0.125W,TC=T9MI 19701 5033RE6K00B A1A3R50 321–0928–07 RES,FXD,FILM:250 OHM,0.1%,0.125W,TC=T9MI TK1727 MPR24–2322–141– A1A3R51 321–0239–07 RES,FXD,FILM:3.01K OHM,0.1%,0.125W,TC=T9MI 19701 5033RE3K010B A1A3R52 321–0103–00 RES,FXD,FILM:115 OHM,1%,0.125W,TC=T0 19701 5043ED115R0F A1A3R53 321–0210–07 RES,FXD:METAL FILM;1.5K OHM,0.1%,0.125W,TC=25 PPM 91637 CMF55116C15000B 8–26 AM700 Audio Measurement Set Service Manual Replaceable Electrical Parts Replaceable electrical parts list (cont.) Component number Tektronix part number Serial no. effective Serial no. discont’d Name & description Mfr. code A1A3R54 321–0077–00 Mfr. part number RES,FXD,FILM:61.9 OHM,1%,0.125W,TC=T0MI 57668 CRRB14 FXE 61.9 A1A3R281 321–0210–07 RES,FXD:METAL FILM;1.5K OHM,0.1%,0.125W,TC=25 PPM 91637 CMF55116C15000B A1A3R282 321–0077–00 RES,FXD,FILM:61.9 OHM,1%,0.125W,TC=T0MI 57668 CRRB14 FXE 61.9 A1A4 671–2989–00 CIRCUIT BD ASSY:INPUT ATTN 80009 671298900 A1A4J1 131–1425–00 CONN,HDR:PCB;MALE,RTANG,1 X 36,0.1CTR 22526 65521–136 A1A4R28 321–0986–07 RES,FXD,FILM:25K OHM,0.1%,0.125W,TC=T9MI TK1727 MPR24–2322–141– A1A4R41 321–1296–07 RES,FXD,FILM:12.0K OHM,0.1%,0.125W,TC=T9 TK1727 MPR24–2322–141– A1A4R42 321–0612–07 RES,FXD,FILM:500 OHM,0.1%,0.125W,TC=T9MI TK1727 MPR24–2322–141– A1A4R46 321–0756–04 RES,FXD,FILM:50K OHM,0.1%,0.125W,TC=T2MI 19701 5033RE50K00B A1A4R49 321–1696–07 RES,FXD,FILM:6K OHM,0.1%,0.125W,TC=T9MI 19701 5033RE6K00B A1A4R50 321–0928–07 RES,FXD,FILM:250 OHM,0.1%,0.125W,TC=T9MI TK1727 MPR24–2322–141– A1A4R51 321–0239–07 RES,FXD,FILM:3.01K OHM,0.1%,0.125W,TC=T9MI 19701 5033RE3K010B A1A4R52 321–0103–00 RES,FXD,FILM:115 OHM,1%,0.125W,TC=T0 19701 5043ED115R0F A1A4R53 321–0210–07 RES,FXD:METAL FILM;1.5K OHM,0.1%,0.125W,TC=25 PPM 91637 CMF55116C15000B A1A4R54 321–0077–00 RES,FXD,FILM:61.9 OHM,1%,0.125W,TC=T0MI 57668 CRRB14 FXE 61.9 A1A4R281 321–0210–07 RES,FXD:METAL FILM;1.5K OHM,0.1%,0.125W,TC=25 PPM 91637 CMF55116C15000B A1A4R282 321–0077–00 RES,FXD,FILM:61.9 OHM,1%,0.125W,TC=T0MI 57668 CRRB14 FXE 61.9 A1A5 671–2989–00 CIRCUIT BD ASSY:INPUT ATTN 80009 671298900 A1A5J1 131–1425–00 CONN,HDR:PCB;MALE,RTANG,1 X 36,0.1CTR 22526 65521–136 A1A5R28 321–0986–07 RES,FXD,FILM:25K OHM,0.1%,0.125W,TC=T9MI TK1727 MPR24–2322–141– A1A5R41 321–1296–07 RES,FXD,FILM:12.0K OHM,0.1%,0.125W,TC=T9 TK1727 MPR24–2322–141– A1A5R42 321–0612–07 RES,FXD,FILM:500 OHM,0.1%,0.125W,TC=T9MI TK1727 MPR24–2322–141– A1A5R46 321–0756–04 RES,FXD,FILM:50K OHM,0.1%,0.125W,TC=T2MI 19701 5033RE50K00B A1A5R49 321–1696–07 RES,FXD,FILM:6K OHM,0.1%,0.125W,TC=T9MI 19701 5033RE6K00B A1A5R50 321–0928–07 RES,FXD,FILM:250 OHM,0.1%,0.125W,TC=T9MI TK1727 MPR24–2322–141– A1A5R51 321–0239–07 RES,FXD,FILM:3.01K OHM,0.1%,0.125W,TC=T9MI 19701 5033RE3K010B A1A5R52 321–0103–00 RES,FXD,FILM:115 OHM,1%,0.125W,TC=T0 19701 5043ED115R0F A1A5R53 321–0210–07 RES,FXD:METAL FILM;1.5K OHM,0.1%,0.125W,TC=25 PPM 91637 CMF55116C15000B A1A5R54 321–0077–00 RES,FXD,FILM:61.9 OHM,1%,0.125W,TC=T0MI 57668 CRRB14 FXE 61.9 A1A5R281 321–0210–07 RES,FXD:METAL FILM;1.5K OHM,0.1%,0.125W,TC=25 PPM 91637 CMF55116C15000B A1A5R282 321–0077–00 RES,FXD,FILM:61.9 OHM,1%,0.125W,TC=T0MI 57668 CRRB14 FXE 61.9 A1A6 –––––––––– CIRCUIT BD SUBASSY:CONTROL SHIFT REGISTER A1A6C290 283–5004–00 CAP,FXD,CERAMIC:MLC;0.1UF,10%,25V,X7R,1206 TK2058 C3216X7R1E104K– A1A6C291 283–5004–00 CAP,FXD,CERAMIC:MLC;0.1UF,10%,25V,X7R,1206 TK2058 C3216X7R1E104K– A1A6C292 283–5004–00 CAP,FXD,CERAMIC:MLC;0.1UF,10%,25V,X7R,1206 TK2058 C3216X7R1E104K– AM700 Audio Measurement Set Service Manual 8–27 Replaceable Electrical Parts Replaceable electrical parts list (cont.) Component number Tektronix part number Serial no. effective Serial no. discont’d Name & description Mfr. code A1A6C293 283–5004–00 CAP,FXD,CERAMIC:MLC;0.1UF,10%,25V,X7R,1206 TK2058 C3216X7R1E104K– A1A6U83 156–5480–01 IC,DIGITAL:HCMOS,RGTR;8–BIT SHIFT RGTR 0JR04 TC74HC595AFN(EL A1A6U84 156–5480–01 IC,DIGITAL:HCMOS,RGTR;8–BIT SHIFT RGTR 0JR04 TC74HC595AFN(EL A1A6U85 156–5480–01 IC,DIGITAL:HCMOS,RGTR;8–BIT SHIFT RGTR 0JR04 TC74HC595AFN(EL A1A6U86 156–5480–01 IC,DIGITAL:HCMOS,RGTR;8–BIT SHIFT RGTR 0JR04 TC74HC595AFN(EL A1A6U87 156–5480–01 IC,DIGITAL:HCMOS,RGTR;8–BIT SHIFT RGTR 0JR04 TC74HC595AFN(EL A1A6U88 156–5480–01 IC,DIGITAL:HCMOS,RGTR;8–BIT SHIFT RGTR 0JR04 TC74HC595AFN(EL A1A6U89 156–5480–01 IC,DIGITAL:HCMOS,RGTR;8–BIT SHIFT RGTR 0JR04 TC74HC595AFN(EL A1A6U90 156–5480–01 IC,DIGITAL:HCMOS,RGTR;8–BIT SHIFT RGTR 0JR04 TC74HC595AFN(EL A1A6U91 156–5480–01 IC,DIGITAL:HCMOS,RGTR;8–BIT SHIFT RGTR 0JR04 TC74HC595AFN(EL A1A7 671–2801–00 CIRCUIT BD ASSY:OVER/UNDER RANGE 80009 671280100 A1A7C5 283–5003–00 CAP,FXD,CERAMIC:MLC;0.01UF,10%,50V,X7R,1206 TK2058 C3216X7R1H103K– A1A7C6 283–5003–00 CAP,FXD,CERAMIC:MLC;0.01UF,10%,50V,X7R,1206 TK2058 C3216X7R1H103K– Mfr. part number A1A7C7 283–5003–00 CAP,FXD,CERAMIC:MLC;0.01UF,10%,50V,X7R,1206 TK2058 C3216X7R1H103K– A1A7C8 283–5003–00 CAP,FXD,CERAMIC:MLC;0.01UF,10%,50V,X7R,1206 TK2058 C3216X7R1H103K– A1A7C9 290–5037–01 CAP,FXD,ALUM:10UF,20%,35V,5.7 H X 5 DIA MM 62643 MVK35VC10RME60 T A1A7C10 283–5197–00 CAP,FXD,CERAMIC:MLC;330PF,5%,100V,NPO,1206 04222 12061A331JAT1A A1A7C11 283–5197–00 CAP,FXD,CERAMIC:MLC;330PF,5%,100V,NPO,1206 04222 12061A331JAT1A A1A7J1 131–1425–00 CONN,HDR:PCB;MALE,RTANG,1 X 36,0.1CTR 22526 65521–136 A1A7J2 131–1425–00 CONN,HDR:PCB;MALE,RTANG,1 X 36,0.1CTR 22526 65521–136 A1A7Q1 151–5001–00 TRANSISTOR,SIG:BIPOLAR,NPN;40V,200MA,300MHZ,AMPL 04713 MMBT3904LT1 A1A7Q2 151–5001–00 TRANSISTOR,SIG:BIPOLAR,NPN;40V,200MA,300MHZ,AMPL 04713 MMBT3904LT1 A1A7Q3 151–5001–00 TRANSISTOR,SIG:BIPOLAR,NPN;40V,200MA,300MHZ,AMPL 04713 MMBT3904LT1 A1A7Q4 151–5001–00 TRANSISTOR,SIG:BIPOLAR,NPN;40V,200MA,300MHZ,AMPL 04713 MMBT3904LT1 A1A7R1 321–5024–00 RES,FXD:THICK FILM;3.32K OHM,1%,0.125W,TC=100 PPM 50139 BCK3321FT A1A7R2 321–5013–00 RES,FXD:THICK FILM;392 OHM,1%,0.125W,TC=100 50139 BCK3920FT A1A7R3 321–5012–00 RES,FXD:THICK FILM;332 OHM,1%,0.125W,TC=100 50139 BCK3320FT A1A7R4 321–5012–00 RES,FXD:THICK FILM;332 OHM,1%,0.125W,TC=100 50139 BCK3320FT A1A7R5 321–5013–00 RES,FXD:THICK FILM;392 OHM,1%,0.125W,TC=100 50139 BCK3920FT A1A7R6 321–5024–00 RES,FXD:THICK FILM;3.32K OHM,1%,0.125W,TC=100 PPM 50139 BCK3321FT A1A7R15 321–5032–00 RES,FXD:THICK FILM;15.0K OHM,1%,0.125W,TC=100 PPM 50139 BCK1502FT A1A7R16 321–5032–00 RES,FXD:THICK FILM;15.0K OHM,1%,0.125W,TC=100 PPM 50139 BCK1502FT A1A7R17 321–5032–00 RES,FXD:THICK FILM;15.0K OHM,1%,0.125W,TC=100 PPM 50139 BCK1502FT A1A7R18 321–5032–00 RES,FXD:THICK FILM;15.0K OHM,1%,0.125W,TC=100 PPM 50139 BCK1502FT A1A7R19 321–5032–00 RES,FXD:THICK FILM;15.0K OHM,1%,0.125W,TC=100 PPM 50139 BCK1502FT A1A7R20 321–5032–00 RES,FXD:THICK FILM;15.0K OHM,1%,0.125W,TC=100 PPM 50139 BCK1502FT A1A7R21 321–5032–00 RES,FXD:THICK FILM;15.0K OHM,1%,0.125W,TC=100 PPM 50139 BCK1502FT 8–28 AM700 Audio Measurement Set Service Manual Replaceable Electrical Parts Replaceable electrical parts list (cont.) Component number Tektronix part number A1A7R22 321–5032–00 A1A7R23 A1A7R24 Serial no. effective Serial no. discont’d Name & description Mfr. code Mfr. part number RES,FXD:THICK FILM;15.0K OHM,1%,0.125W,TC=100 PPM 50139 BCK1502FT 321–5032–00 RES,FXD:THICK FILM;15.0K OHM,1%,0.125W,TC=100 PPM 50139 BCK1502FT 321–5032–00 RES,FXD:THICK FILM;15.0K OHM,1%,0.125W,TC=100 PPM 50139 BCK1502FT A1A7R25 321–5032–00 RES,FXD:THICK FILM;15.0K OHM,1%,0.125W,TC=100 PPM 50139 BCK1502FT A1A7R26 321–5032–00 RES,FXD:THICK FILM;15.0K OHM,1%,0.125W,TC=100 PPM 50139 BCK1502FT A1A7R27 321–5018–00 RES,FXD:THICK FILM;1.0K OHM,1%,0.125W,TC=100 PPM 50139 BCK1001FT A1A7U1 156–5262–01 IC,LINEAR:BIPOLAR,COMPARATOR;QUAD,SINGLE SUPPLY 01295 LM339DR A1A7U2 156–5262–01 IC,LINEAR:BIPOLAR,COMPARATOR;QUAD,SINGLE SUPPLY 01295 LM339DR A1A7U3 156–5145–01 IC,DIGITAL:HCTCMOS,FLIP FLOP;DUAL D–TYPE 01295 SN74HCT74D A1A7U4 156–5145–01 IC,DIGITAL:HCTCMOS,FLIP FLOP;DUAL D–TYPE 01295 SN74HCT74D A1A7U5 156–5309–00 IC,DIGITAL:HCTCMOS,MUX;QUAD 2–TO–1 DATA SELECTOR 01295 SN74HCT157D A1A7VR1 152–5023–00 DIODE,ZENER:5.1V,5%,225MW 04713 MMBZ5231BLT1 AM700 Audio Measurement Set Service Manual 8–29 Replaceable Electrical Parts Replaceable electrical parts list Component number Tektronix part number A2 671–2917–00 A2 671–2917–01 Serial no. effective 11/18/94 Serial no. discont’d Name & description Mfr. code Mfr. part number CIRCUIT BD ASSY:XLR 80009 671–2917–00 CIRCUIT BD ASSY:XLR 80009 671–2917–01 337310400 *ATTACHED PARTS* 337–3104–00 SHIELD,ELEC:CKT BD (QUANTITY 3) 80009 343–0549–00 STRAP,TIEDOWN,E:0.098 W X 4.0 L,ZYTEL (QUANTITY 5) TK1499 HW–047 A2C5 281–0819–00 CAP,FXD,CERAMIC:MLC;33 PF,5%,50V,0.100 X 0.170 04222 SA102A330JAA A2C6 281–0819–00 CAP,FXD,CERAMIC:MLC;33 PF,5%,50V,0.100 X 0.170 04222 SA102A330JAA A2C7 281–0819–00 CAP,FXD,CERAMIC:MLC;33 PF,5%,50V,0.100 X 0.170 04222 SA102A330JAA A2C8 285–1338–00 CAP,FXD,MTLZD:1.0UF,10%,50V,TAPE & AMMO PACK TK1913 MKS 2 1.0/63/10 A2C9 281–0819–00 CAP,FXD,CERAMIC:MLC;33 PF,5%,50V,0.100 X 0.170 04222 A2C10 285–1338–00 CAP,FXD,MTLZD:1.0UF,10%,50V,TAPE & AMMO PACK TK1913 MKS 2 1.0/63/10 A2C11 283–0060–00 CAP,FXD,CER DI:100PF,5%,200V 59660 855–535U2J101J A2C12 283–0060–00 CAP,FXD,CER DI:100PF,5%,200V 59660 855–535U2J101J A2C13 283–0211–02 CAP,FXD,CER DI:0.1UF,10%,200WVDC,X7R,T&A 04222 SR302C104KAAAP1 *END ATTACHED PARTS* SA102A330JAA A2C14 283–0060–00 CAP,FXD,CER DI:100PF,5%,200V 59660 855–535U2J101J A2C15 283–0060–00 CAP,FXD,CER DI:100PF,5%,200V 59660 855–535U2J101J A2C16 283–0211–02 CAP,FXD,CER DI:0.1UF,10%,200WVDC,X7R,T&A 04222 SR302C104KAAAP1 A2C17 281–0788–00 CAP,FXD,CERAMIC:MLC;470PF,10%,100V,0.100 X0.170 04222 SA102C471KAA A2C18 281–0788–00 CAP,FXD,CERAMIC:MLC;470PF,10%,100V,0.100 X0.170 04222 SA102C471KAA A2C19 281–0814–00 CAP,FXD,CERAMIC:MLC;100 PF,10%,100V,0.100 X TK1743 CGB101KEN A2C20 281–0814–00 CAP,FXD,CERAMIC:MLC;100 PF,10%,100V,0.100 X TK1743 CGB101KEN A2C21 281–0814–00 CAP,FXD,CERAMIC:MLC;100 PF,10%,100V,0.100 X TK1743 CGB101KEN A2C22 281–0814–00 CAP,FXD,CERAMIC:MLC;100 PF,10%,100V,0.100 X TK1743 CGB101KEN A2J1 131–3987–00 CONN,CIRC:PCB,AUDIO;MALE,RTANG,3 POS,1.22H X 1.024 W 0FMA6 NC3MD–H A2J2 131–5230–00 CONN,CIRC:PCB/PNL,AUDIO;FEMALE,RTANG,3 POS 0FMA6 NC3FDH A2J3 131–3987–00 CONN,CIRC:PCB,AUDIO,;MALE,RTANG,3 POS,1.22H X 1.024 W 0FMA6 NC3MD–H A2J4 131–3987–00 CONN,CIRC:PCB,AUDIO,;MALE,RTANG,3 POS,1.22H X 1.024 W 0FMA6 NC3MD–H A2J5 131–5230–00 CONN,CIRC:PCB/PNL,AUDIO;FEMALE,RTANG,3 POS 0FMA6 NC3FDH A2J6 131–5230–00 CONN,CIRC:PCB/PNL,AUDIO;FEMALE,RTANG,3 POS 0FMA6 NC3FDH A2J7 131–3358–00 CONN,HDR:PCB,;MALE,RTANG,2 X 5,0.1 CTR 53387 2510–5002UB A2J8 131–2919–01 CONN,HDR:PCB,;MALE,STR,1 X 4,0.1 CTR 53387 2404–6112TB A2J9 131–2919–01 CONN,HDR:PCB,;MALE,STR,1 X 4,0.1 CTR 53387 2404–6112TB A2J10 131–2919–01 CONN,HDR:PCB,;MALE,STR,1 X 4,0.1 CTR 53387 2404–6112TB A2J11 131–2919–01 CONN,HDR:PCB,;MALE,STR,1 X 4,0.1 CTR 53387 2404–6112TB A2R1 322–3050–00 RES,FXD,FILM:32.4 OHM,1%,0.2W,TC=T0MI,SMALL 91637 CCF501G32R40F A2R2 322–3050–00 RES,FXD,FILM:32.4 OHM,1%,0.2W,TC=T0MI,SMALL 91637 CCF501G32R40F 8–30 AM700 Audio Measurement Set Service Manual Replaceable Electrical Parts Replaceable electrical parts list (cont.) Component number Tektronix part number A2R3 322–3050–00 Serial no. effective Serial no. discont’d Name & description Mfr. code Mfr. part number RES,FXD,FILM:32.4 OHM,1%,0.2W,TC=T0MI,SMALL 91637 CCF501G32R40F A2R4 322–3050–00 RES,FXD,FILM:32.4 OHM,1%,0.2W,TC=T0MI,SMALL 91637 CCF501G32R40F A2T1 120–1933–00 TRANSFORMER,SIG:WIDEBAND;0.02–100MHZ,INSERT 15542 T 1.5–6 X65 A2T2 120–1959–00 XFMR,TOROID:AM700 XLR 80009 120-1959-00 A2T2 120–1860–00 A2T4 120–1959–00 A2T4 120–1860–00 A2T5 120–1860–00 A2T6 120–1959–00 A2T6 120–1860–00 A2T7 120–1860–00 A2T8 120–1959–00 A2T8 120–1860–00 A2T9 120–1959–00 A2T10 120–1959–00 A2T10 120–1860–00 A2T11 120–1959–00 A2T11 120–1860–00 11/18/94 11/18/94 11/18/94 11/18/94 11/18/94 11/18/94 11/18/94 11/18/94 11/18/94 11/18/94 11/18/94 11/18/94 TRANSFORMER,SIG:TOROID;1:1,22UH/WINDING 0JR03 Z–93145B XFMR,TOROID:AM700 XLR 80009 120-1959-00 TRANSFORMER,SIG:TOROID;1:1,22UH/WINDING 0JR03 Z–93145B TRANSFORMER,SIG:TOROID;1:1,22UH/WINDING 0JR03 Z–93145B XFMR,TOROID:AM700 XLR 80009 120-1959-00 TRANSFORMER,SIG:TOROID;1:1,22UH/WINDING 0JR03 Z–93145B TRANSFORMER,SIG:TOROID;1:1,22UH/WINDING 0JR03 Z–93145B XFMR,TOROID:AM700 XLR 80009 120-1959-00 TRANSFORMER,SIG:TOROID;1:1,22UH/WINDING 80009 Z–93145B XFMR,TOROID:AM700 XLR 80009 120-1959-00 XFMR,TOROID:AM700 XLR 80009 120-1959-00 TRANSFORMER,SIG:TOROID;1:1,22UH/WINDING 80009 Z–93145B XFMR,TOROID:AM700 XLR 80009 120-1959-00 TRANSFORMER,SIG:TOROID;1:1,22UH/WINDING 80009 Z–93145B AM700 Audio Measurement Set Service Manual 8–31 Replaceable electrical parts list Component number Tektronix part number A3 671–2915–00 Serial no. effective A3 671–2915–01 B010249 A3 671–2915–02 B010422 Serial no. discont’d Name & description Mfr. code Mfr. part number B010248 CIRCUIT BD ASSY:DIGITAL AUDIO 80009 671–2915–00 B010432 CIRCUIT BD ASSY:DIGITAL AUDIO 80009 671–2915–01 CIRCUIT BD ASSY:DIGITAL AUDIO 80009 671–2915–02 80009 337–4002–00 *ATTACHED PARTS* 337–4002–00 SHIELD,ELEC:AM700 (DIGITAL AUDIO),AM700 (QUANTITY 4) *END ATTACHED PARTS* A3C1 281–0772–00 CAP,FXD,CERAMIC:MLC;4700PF,10%,100V 04222 SA101C472KAA A3C5 281–0765–00 CAP,FXD,CER DI:100PF,5%,100V 04222 SA102A101JAA A3C6 281–0765–00 CAP,FXD,CER DI:100PF,5%,100V 04222 SA102A101JAA A3C7 281–0775–01 CAP,FXD,CERAMIC:MCL;0.1UF,20%,50V,Z5U,0.170 04222 SA105E104MAA A3C8 281–0775–01 CAP,FXD,CERAMIC:MCL;0.1UF,20%,50V,Z5U,0.170 04222 SA105E104MAA A3C9 281–0775–01 CAP,FXD,CERAMIC:MCL;0.1UF,20%,50V,Z5U,0.170 04222 SA105E104MAA A3C10 281–0775–01 CAP,FXD,CERAMIC:MCL;0.1UF,20%,50V,Z5U,0.170 04222 SA105E104MAA A3C11 281–0775–01 CAP,FXD,CERAMIC:MCL;0.1UF,20%,50V,Z5U,0.170 04222 SA105E104MAA A3C21 281–0775–01 CAP,FXD,CERAMIC:MCL;0.1UF,20%,50V,Z5U,0.170 04222 SA105E104MAA A3C23 281–0775–01 CAP,FXD,CERAMIC:MCL;0.1UF,20%,50V,Z5U,0.170 04222 SA105E104MAA A3C24 281–0775–01 CAP,FXD,CERAMIC:MCL;0.1UF,20%,50V,Z5U,0.170 04222 SA105E104MAA A3C25 281–0775–01 CAP,FXD,CERAMIC:MCL;0.1UF,20%,50V,Z5U,0.170 04222 SA105E104MAA A3C26 281–0775–01 CAP,FXD,CERAMIC:MCL;0.1UF,20%,50V,Z5U,0.170 04222 SA105E104MAA A3C27 281–0775–01 CAP,FXD,CERAMIC:MCL;0.1UF,20%,50V,Z5U,0.170 04222 SA105E104MAA A3C28 285–1338–00 CAP,FXD,MTLZD:1.0UF,10%,50V,TAPE & AMMO PACK TK1913 MKS 2 1.0/63/10 A3C29 283–0142–00 CAP,FXD,CER DI:0.0027UF,5%,200V TK2058 CK45YE2D272J–A A3C31 281–0812–00 CAP,FXD,CERAMIC:MLC;1000PF,10%,100V 04222 A3C32 283–0142–00 CAP,FXD,CER DI:0.0027UF,5%,200V TK2058 CK45YE2D272J–A A3C33 281–0775–01 CAP,FXD,CERAMIC:MCL;0.1UF,20%,50V,Z5U,0.170 04222 A3C33 283–0142–00 CAP,FXD,CER DI:0.0027UF,5%,200V TK2058 CK45YE2D272J–A A3C34 281–0765–00 CAP,FXD,CER DI:100PF,5%,100V 04222 SA102A101JAA A3C35 281–0775–01 CAP,FXD,CERAMIC:MCL;0.1UF,20%,50V,Z5U,0.170 04222 SA105E104MAA A3C37 281–0775–01 CAP,FXD,CERAMIC:MCL;0.1UF,20%,50V,Z5U,0.170 04222 SA105E104MAA A3C40 281–0775–01 CAP,FXD,CERAMIC:MCL;0.1UF,20%,50V,Z5U,0.170 04222 SA105E104MAA A3C42 281–0791–00 CAP,FXD,CERAMIC:MLC;270PF,10%,100V,0.100 X0.170 04222 SA102C271KAA A3C44 281–0775–01 CAP,FXD,CERAMIC:MCL;0.1UF,20%,50V,Z5U,0.170 04222 SA105E104MAA A3C47 281–0775–01 CAP,FXD,CERAMIC:MCL;0.1UF,20%,50V,Z5U,0.170 04222 SA105E104MAA A3C48 281–0775–01 CAP,FXD,CERAMIC:MCL;0.1UF,20%,50V,Z5U,0.170 04222 SA105E104MAA A3C49 281–0775–01 CAP,FXD,CERAMIC:MCL;0.1UF,20%,50V,Z5U,0.170 04222 SA105E104MAA A3C50 281–0775–01 CAP,FXD,CERAMIC:MCL;0.1UF,20%,50V,Z5U,0.170 04222 SA105E104MAA A3C51 281–0775–01 CAP,FXD,CERAMIC:MCL;0.1UF,20%,50V,Z5U,0.170 04222 SA105E104MAA A3C53 281–0775–01 CAP,FXD,CERAMIC:MCL;0.1UF,20%,50V,Z5U,0.170 04222 SA105E104MAA 8–32 SA101C102KAA SA105E104MAA AM700 Audio Measurement Set Service Manual Replaceable Electrical Parts Replaceable electrical parts list (cont.) Component number Tektronix part number A3C56 281–0775–01 A3C57 A3C61 Serial no. effective Serial no. discont’d Name & description Mfr. code Mfr. part number CAP,FXD,CERAMIC:MCL;0.1UF,20%,50V,Z5U,0.170 04222 SA105E104MAA 281–0775–01 CAP,FXD,CERAMIC:MCL;0.1UF,20%,50V,Z5U,0.170 04222 SA105E104MAA 281–0775–01 CAP,FXD,CERAMIC:MCL;0.1UF,20%,50V,Z5U,0.170 04222 SA105E104MAA A3C62 281–0775–01 CAP,FXD,CERAMIC:MCL;0.1UF,20%,50V,Z5U,0.170 04222 SA105E104MAA A3C63 281–0775–01 CAP,FXD,CERAMIC:MCL;0.1UF,20%,50V,Z5U,0.170 04222 SA105E104MAA A3C64 281–0775–01 CAP,FXD,CERAMIC:MCL;0.1UF,20%,50V,Z5U,0.170 04222 SA105E104MAA A3C65 281–0775–01 CAP,FXD,CERAMIC:MCL;0.1UF,20%,50V,Z5U,0.170 04222 SA105E104MAA A3C66 281–0775–01 CAP,FXD,CERAMIC:MCL;0.1UF,20%,50V,Z5U,0.170 04222 SA105E104MAA A3C67 281–0775–01 CAP,FXD,CERAMIC:MCL;0.1UF,20%,50V,Z5U,0.170 04222 SA105E104MAA A3C68 281–0775–01 CAP,FXD,CERAMIC:MCL;0.1UF,20%,50V,Z5U,0.170 04222 SA105E104MAA A3C69 281–0775–01 CAP,FXD,CERAMIC:MCL;0.1UF,20%,50V,Z5U,0.170 04222 SA105E104MAA A3C70 281–0775–01 CAP,FXD,CERAMIC:MCL;0.1UF,20%,50V,Z5U,0.170 04222 SA105E104MAA A3C71 281–0775–01 CAP,FXD,CERAMIC:MCL;0.1UF,20%,50V,Z5U,0.170 04222 SA105E104MAA A3C75 281–0775–01 CAP,FXD,CERAMIC:MCL;0.1UF,20%,50V,Z5U,0.170 04222 SA105E104MAA A3C76 281–0775–01 CAP,FXD,CERAMIC:MCL;0.1UF,20%,50V,Z5U,0.170 04222 SA105E104MAA A3C78 281–0775–01 CAP,FXD,CERAMIC:MCL;0.1UF,20%,50V,Z5U,0.170 04222 SA105E104MAA A3C81 285–1340–00 CAP,FXD,PLSTC:MTLZD FILM;0.01UF,10%,63V,POLYEST TK1913 MKS2 .01/63/10 A3C84 285–1340–00 CAP,FXD,PLSTC:MTLZD FILM;0.01UF,10%,63V,POLYEST TK1913 MKS2 .01/63/10 A3C85 281–0775–01 CAP,FXD,CERAMIC:MCL;0.1UF,20%,50V,Z5U,0.170 04222 A3C86 281–0775–01 CAP,FXD,CERAMIC:MCL;0.1UF,20%,50V,Z5U,0.170 04222 SA105E104MAA A3C87 281–0775–01 CAP,FXD,CERAMIC:MCL;0.1UF,20%,50V,Z5U,0.170 04222 SA105E104MAA A3C89 281–0775–01 CAP,FXD,CERAMIC:MCL;0.1UF,20%,50V,Z5U,0.170 04222 SA105E104MAA A3C90 281–0775–01 CAP,FXD,CERAMIC:MCL;0.1UF,20%,50V,Z5U,0.170 04222 SA105E104MAA A3C91 281–0775–01 CAP,FXD,CERAMIC:MCL;0.1UF,20%,50V,Z5U,0.170 04222 SA105E104MAA A3C92 281–0775–01 CAP,FXD,CERAMIC:MCL;0.1UF,20%,50V,Z5U,0.170 04222 SA105E104MAA A3C93 281–0775–01 CAP,FXD,CERAMIC:MCL;0.1UF,20%,50V,Z5U,0.170 04222 SA105E104MAA A3C94 281–0775–01 CAP,FXD,CERAMIC:MCL;0.1UF,20%,50V,Z5U,0.170 04222 SA105E104MAA A3C95 281–0775–01 CAP,FXD,CERAMIC:MCL;0.1UF,20%,50V,Z5U,0.170 04222 SA105E104MAA A3C96 281–0775–01 CAP,FXD,CERAMIC:MCL;0.1UF,20%,50V,Z5U,0.170 04222 SA105E104MAA A3C97 281–0775–01 CAP,FXD,CERAMIC:MCL;0.1UF,20%,50V,Z5U,0.170 04222 SA105E104MAA A3C98 281–0775–01 CAP,FXD,CERAMIC:MCL;0.1UF,20%,50V,Z5U,0.170 04222 SA105E104MAA A3C99 281–0775–01 CAP,FXD,CERAMIC:MCL;0.1UF,20%,50V,Z5U,0.170 04222 SA105E104MAA A3C100 281–0775–01 CAP,FXD,CERAMIC:MCL;0.1UF,20%,50V,Z5U,0.170 04222 SA105E104MAA A3C101 281–0775–01 CAP,FXD,CERAMIC:MCL;0.1UF,20%,50V,Z5U,0.170 04222 SA105E104MAA A3C102 281–0775–01 CAP,FXD,CERAMIC:MCL;0.1UF,20%,50V,Z5U,0.170 04222 SA105E104MAA A3C103 281–0775–01 CAP,FXD,CERAMIC:MCL;0.1UF,20%,50V,Z5U,0.170 04222 SA105E104MAA A3C104 281–0775–01 CAP,FXD,CERAMIC:MCL;0.1UF,20%,50V,Z5U,0.170 04222 SA105E104MAA A3C105 281–0775–01 CAP,FXD,CERAMIC:MCL;0.1UF,20%,50V,Z5U,0.170 04222 SA105E104MAA AM700 Audio Measurement Set Service Manual SA105E104MAA 8–33 Replaceable Electrical Parts Replaceable electrical parts list (cont.) Component number Tektronix part number A3C106 281–0775–01 A3C107 A3C108 Serial no. effective Serial no. discont’d Name & description Mfr. code Mfr. part number CAP,FXD,CERAMIC:MCL;0.1UF,20%,50V,Z5U,0.170 04222 SA105E104MAA 281–0775–01 CAP,FXD,CERAMIC:MCL;0.1UF,20%,50V,Z5U,0.170 04222 SA105E104MAA 281–0775–01 CAP,FXD,CERAMIC:MCL;0.1UF,20%,50V,Z5U,0.170 04222 SA105E104MAA A3C109 281–0775–01 CAP,FXD,CERAMIC:MCL;0.1UF,20%,50V,Z5U,0.170 04222 SA105E104MAA A3C110 281–0775–01 CAP,FXD,CERAMIC:MCL;0.1UF,20%,50V,Z5U,0.170 04222 SA105E104MAA A3C111 281–0775–01 CAP,FXD,CERAMIC:MCL;0.1UF,20%,50V,Z5U,0.170 04222 SA105E104MAA A3C112 281–0775–01 CAP,FXD,CERAMIC:MCL;0.1UF,20%,50V,Z5U,0.170 04222 SA105E104MAA A3C113 281–0775–01 CAP,FXD,CERAMIC:MCL;0.1UF,20%,50V,Z5U,0.170 04222 SA105E104MAA A3C114 281–0775–01 CAP,FXD,CERAMIC:MCL;0.1UF,20%,50V,Z5U,0.170 04222 SA105E104MAA A3C115 281–0775–01 CAP,FXD,CERAMIC:MCL;0.1UF,20%,50V,Z5U,0.170 04222 SA105E104MAA A3C116 281–0775–01 CAP,FXD,CERAMIC:MCL;0.1UF,20%,50V,Z5U,0.170 04222 SA105E104MAA A3C117 281–0775–01 CAP,FXD,CERAMIC:MCL;0.1UF,20%,50V,Z5U,0.170 04222 SA105E104MAA A3C118 281–0775–01 CAP,FXD,CERAMIC:MCL;0.1UF,20%,50V,Z5U,0.170 04222 SA105E104MAA A3C119 281–0775–01 CAP,FXD,CERAMIC:MCL;0.1UF,20%,50V,Z5U,0.170 04222 SA105E104MAA A3C120 281–0775–01 CAP,FXD,CERAMIC:MCL;0.1UF,20%,50V,Z5U,0.170 04222 SA105E104MAA A3C121 281–0775–01 CAP,FXD,CERAMIC:MCL;0.1UF,20%,50V,Z5U,0.170 04222 SA105E104MAA A3C122 290–1296–01 CAP,FXD,ALUM:100UF,20%,25V,8 X 9MM;105 DEG,RDL,T&A 55680 URT1E101MNH1TA A3C123 290–1296–01 CAP,FXD,ALUM:100UF,20%,25V,8 X 9MM;105 DEG,RDL,T&A 55680 URT1E101MNH1TA A3C124 290–1296–01 CAP,FXD,ALUM:100UF,20%,25V,8 X 9MM;105 DEG,RDL,T&A 55680 URT1E101MNH1TA A3C125 290–1296–01 CAP,FXD,ALUM:100UF,20%,25V,8 X 9MM;105 DEG,RDL,T&A 55680 URT1E101MNH1TA A3C126 290–1296–01 CAP,FXD,ALUM:100UF,20%,25V,8 X 9MM;105 DEG,RDL,T&A 55680 URT1E101MNH1TA A3C127 290–1296–01 CAP,FXD,ALUM:100UF,20%,25V,8 X 9MM;105 DEG,RDL,T&A 55680 URT1E101MNH1TA A3C129 281–0775–01 CAP,FXD,CERAMIC:MCL;0.1UF,20%,50V,Z5U,0.170 04222 SA105E104MAA A3C130 281–0775–01 CAP,FXD,CERAMIC:MCL;0.1UF,20%,50V,Z5U,0.170 04222 SA105E104MAA A3C131 281–0916–00 CAP,FXD,CER DI:0.047UF,+/–10%,50V,AXIAL,0.120 INCH DIA 04222 SA115C473KAA A3C132 290–1296–01 CAP,FXD,ALUM:100UF,20%,25V,8 X 9MM;105 DEG,RDL,T&A 55680 URT1E101MNH1TA A3C133 281–0916–00 CAP,FXD,CER DI:0.047UF,+/–10%,50V,AXIAL,0.120 INCH DIA 04222 SA115C473KAA A3C134 290–1296–01 CAP,FXD,ALUM:100UF,20%,25V,8 X 9MM;105 DEG,RDL,T&A 55680 URT1E101MNH1TA A3C135 281–0775–01 CAP,FXD,CERAMIC:MCL;0.1UF,20%,50V,Z5U,0.170 04222 SA105E104MAA A3C136 281–0775–01 CAP,FXD,CERAMIC:MCL;0.1UF,20%,50V,Z5U,0.170 04222 SA105E104MAA A3C137 281–0775–01 CAP,FXD,CERAMIC:MCL;0.1UF,20%,50V,Z5U,0.170 04222 SA105E104MAA A3C138 281–0775–01 CAP,FXD,CERAMIC:MCL;0.1UF,20%,50V,Z5U,0.170 04222 SA105E104MAA A3C139 281–0775–01 CAP,FXD,CERAMIC:MCL;0.1UF,20%,50V,Z5U,0.170 04222 SA105E104MAA A3C140 281–0775–01 CAP,FXD,CERAMIC:MCL;0.1UF,20%,50V,Z5U,0.170 04222 SA105E104MAA A3C141 281–0775–01 CAP,FXD,CERAMIC:MCL;0.1UF,20%,50V,Z5U,0.170 04222 SA105E104MAA A3C142 281–0773–00 CAP,FXD,CERAMIC:MLC;0.01UF,10%,100V TK1743 CGB103KEX A3C143 281–0775–01 CAP,FXD,CERAMIC:MCL;0.1UF,20%,50V,Z5U,0.170 04222 SA105E104MAA A3C144 281–0775–01 CAP,FXD,CERAMIC:MCL;0.1UF,20%,50V,Z5U,0.170 04222 SA105E104MAA 8–34 AM700 Audio Measurement Set Service Manual Replaceable Electrical Parts Replaceable electrical parts list (cont.) Component number Tektronix part number A3C147 281–0775–01 A3C148 A3C149 Serial no. effective Serial no. discont’d Name & description Mfr. code Mfr. part number CAP,FXD,CERAMIC:MCL;0.1UF,20%,50V,Z5U,0.170 04222 SA105E104MAA 281–0775–01 CAP,FXD,CERAMIC:MCL;0.1UF,20%,50V,Z5U,0.170 04222 SA105E104MAA 281–0775–01 CAP,FXD,CERAMIC:MCL;0.1UF,20%,50V,Z5U,0.170 04222 SA105E104MAA A3C150 285–1338–00 CAP,FXD,MTLZD:1.0UF,10%,50V,TAPE & AMMO PACK TK1913 MKS 2 1.0/63/10 A3C151 290–1296–01 CAP,FXD,ALUM:100UF,20%,25V,8 X 9MM;105 DEG,RDL,T&A 55680 URT1E101MNH1TA A3C152 290–1296–01 CAP,FXD,ALUM:100UF,20%,25V,8 X 9MM;105 DEG,RDL,T&A 55680 URT1E101MNH1TA A3C153 281–0773–00 CAP,FXD,CERAMIC:MLC;0.01UF,10%,100V TK1743 CGB103KEX A3C154 281–0775–01 CAP,FXD,CERAMIC:MCL;0.1UF,20%,50V,Z5U,0.170 04222 SA105E104MAA A3C155 281–0775–01 CAP,FXD,CERAMIC:MCL;0.1UF,20%,50V,Z5U,0.170 04222 SA105E104MAA A3C157 281–0819–00 CAP,FXD,CERAMIC:MLC;33 PF,5%,50V,0.100 X 0.170 04222 SA102A330JAA A3C158 281–0775–01 CAP,FXD,CERAMIC:MCL;0.1UF,20%,50V,Z5U,0.170 04222 SA105E104MAA A3C160 285–1338–00 CAP,FXD,MTLZD:1.0UF,10%,50V,TAPE & AMMO PACK TK1913 MKS 2 1.0/63/10 A3C161 281–0775–01 CAP,FXD,CERAMIC:MCL;0.1UF,20%,50V,Z5U,0.170 04222 SA105E104MAA A3C162 281–0775–01 CAP,FXD,CERAMIC:MCL;0.1UF,20%,50V,Z5U,0.170 04222 SA105E104MAA A3C163 281–0775–01 CAP,FXD,CERAMIC:MCL;0.1UF,20%,50V,Z5U,0.170 04222 SA105E104MAA A3C164 281–0775–01 CAP,FXD,CERAMIC:MCL;0.1UF,20%,50V,Z5U,0.170 04222 SA105E104MAA A3C165 281–0775–01 CAP,FXD,CERAMIC:MCL;0.1UF,20%,50V,Z5U,0.170 04222 SA105E104MAA A3C166 281–0775–01 CAP,FXD,CERAMIC:MCL;0.1UF,20%,50V,Z5U,0.170 04222 SA105E104MAA A3C167 281–0775–01 CAP,FXD,CERAMIC:MCL;0.1UF,20%,50V,Z5U,0.170 04222 SA105E104MAA A3C168 281–0775–01 CAP,FXD,CERAMIC:MCL;0.1UF,20%,50V,Z5U,0.170 04222 SA105E104MAA A3C170 281–0775–01 CAP,FXD,CERAMIC:MCL;0.1UF,20%,50V,Z5U,0.170 04222 SA105E104MAA A3C171 281–0775–01 CAP,FXD,CERAMIC:MCL;0.1UF,20%,50V,Z5U,0.170 04222 SA105E104MAA A3C172 290–1296–01 CAP,FXD,ALUM:100UF,20%,25V,8 X 9MM;105 DEG,RDL,T&A 55680 URT1E101MNH1TA A3C173 290–1296–01 CAP,FXD,ALUM:100UF,20%,25V,8 X 9MM;105 DEG,RDL,T&A 55680 URT1E101MNH1TA A3C174 281–0775–01 CAP,FXD,CERAMIC:MCL;0.1UF,20%,50V,Z5U,0.170 04222 SA105E104MAA A3C175 281–0775–01 CAP,FXD,CERAMIC:MCL;0.1UF,20%,50V,Z5U,0.170 04222 SA105E104MAA A3C177 281–0775–01 CAP,FXD,CERAMIC:MCL;0.1UF,20%,50V,Z5U,0.170 04222 SA105E104MAA A3C179 281–0775–01 CAP,FXD,CERAMIC:MCL;0.1UF,20%,50V,Z5U,0.170 04222 SA105E104MAA A3C180 281–0775–01 CAP,FXD,CERAMIC:MCL;0.1UF,20%,50V,Z5U,0.170 04222 SA105E104MAA A3C181 281–0775–01 CAP,FXD,CERAMIC:MCL;0.1UF,20%,50V,Z5U,0.170 04222 SA105E104MAA A3C182 281–0775–01 CAP,FXD,CERAMIC:MCL;0.1UF,20%,50V,Z5U,0.170 04222 SA105E104MAA A3C183 281–0775–01 CAP,FXD,CERAMIC:MCL;0.1UF,20%,50V,Z5U,0.170 04222 SA105E104MAA A3C184 285–1345–00 CAP,FXD,PLSTC:FILM & FOIL;2200PF,5%,100V,POLYESTER TK1913 2200 PF 5 PERCE A3C185 281–0775–01 CAP,FXD,CERAMIC:MCL;0.1UF,20%,50V,Z5U,0.170 04222 A3C186 283–0594–02 CAP,FXD,MICA DI:1000PF,1%,100V,T&A 09023 CDA15FA102F03 A3C187 283–0594–02 CAP,FXD,MICA DI:1000PF,1%,100V,T&A 09023 CDA15FA102F03 A3C188 281–0775–01 CAP,FXD,CERAMIC:MCL;0.1UF,20%,50V,Z5U,0.170 04222 SA105E104MAA A3C189 281–0775–01 CAP,FXD,CERAMIC:MCL;0.1UF,20%,50V,Z5U,0.170 04222 SA105E104MAA B010248 AM700 Audio Measurement Set Service Manual SA105E104MAA 8–35 Replaceable Electrical Parts Replaceable electrical parts list (cont.) Component number Tektronix part number A3C190 283–0594–02 A3C191 A3C192 Name & description Mfr. code Mfr. part number CAP,FXD,MICA DI:1000PF,1%,100V,T&A 09023 CDA15FA102F03 283–0594–02 CAP,FXD,MICA DI:1000PF,1%,100V,T&A 09023 CDA15FA102F03 281–0775–01 CAP,FXD,CERAMIC:MCL;0.1UF,20%,50V,Z5U,0.170 04222 SA105E104MAA A3C193 281–0775–01 CAP,FXD,CERAMIC:MCL;0.1UF,20%,50V,Z5U,0.170 04222 SA105E104MAA A3C194 283–0594–02 CAP,FXD,MICA DI:1000PF,1%,100V,T&A 09023 CDA15FA102F03 A3C195 290–1296–01 CAP,FXD,ALUM:100UF,20%,25V,8 X 9MM;105 DEG,RDL,T&A 55680 URT1E101MNH1TA A3C196 281–0775–01 CAP,FXD,CERAMIC:MCL;0.1UF,20%,50V,Z5U,0.170 04222 SA105E104MAA A3C197 281–0775–01 CAP,FXD,CERAMIC:MCL;0.1UF,20%,50V,Z5U,0.170 04222 SA105E104MAA A3C199 281–0811–00 CAP,FXD,CERAMIC:MLC;10PF,10%,200V,0.100 X 0.170 04222 SA102A100KAA A3C202 285–1338–00 CAP,FXD,MTLZD:1.0UF,10%,50V,TAPE & AMMO PACK TK1913 MKS 2 1.0/63/10 A3C203 281–0791–00 CAP,FXD,CERAMIC:MLC;270PF,10%,100V,0.100 X 0.170 04222 A3C204 281–0791–00 CAP,FXD,CERAMIC:MLC;270PF,10%,100V,0.100 X 0.170 04222 SA102C271KAA A3C205 281–0775–01 CAP,FXD,CERAMIC:MCL;0.1UF,20%,50V,Z5U,0.170 04222 SA105E104MAA A3C206 281–0775–01 CAP,FXD,CERAMIC:MCL;0.1UF,20%,50V,Z5U,0.170 04222 SA105E104MAA A3C207 281–0775–01 CAP,FXD,CERAMIC:MCL;0.1UF,20%,50V,Z5U,0.170 04222 SA105E104MAA A3C208 281–0775–01 CAP,FXD,CERAMIC:MCL;0.1UF,20%,50V,Z5U,0.170 04222 SA105E104MAA A3C209 281–0775–01 CAP,FXD,CERAMIC:MCL;0.1UF,20%,50V,Z5U,0.170 04222 SA105E104MAA A3C210 281–0775–01 CAP,FXD,CERAMIC:MCL;0.1UF,20%,50V,Z5U,0.170 04222 SA105E104MAA A3C211 281–0775–01 CAP,FXD,CERAMIC:MCL;0.1UF,20%,50V,Z5U,0.170 04222 SA105E104MAA A3C212 281–0775–01 CAP,FXD,CERAMIC:MCL;0.1UF,20%,50V,Z5U,0.170 04222 SA105E104MAA A3C213 281–0775–01 CAP,FXD,CERAMIC:MCL;0.1UF,20%,50V,Z5U,0.170 04222 SA105E104MAA A3C214 281–0775–01 CAP,FXD,CERAMIC:MCL;0.1UF,20%,50V,Z5U,0.170 04222 SA105E104MAA A3C215 281–0775–01 CAP,FXD,CERAMIC:MCL;0.1UF,20%,50V,Z5U,0.170 04222 SA105E104MAA A3C216 281–0775–01 CAP,FXD,CERAMIC:MCL;0.1UF,20%,50V,Z5U,0.170 04222 SA105E104MAA A3C217 281–0816–00 CAP,FXD,CERAMIC:MLC;82 PF,5%,100V,0.100 X 0.170 TK1743 CGB820JEN A3C218 281–0864–00 CAP,FXD,CERAMIC:MLC;430PF,5%,100V,0.100 X 0.170 04222 SA101A431JAA A3C219 281–0851–00 CAP,FXD,CERAMIC:MLC;180PF,5%,100VDC 04222 SA101A181JAA A3C220 281–0788–00 CAP,FXD,CERAMIC:MLC;470PF,10%,100V,0.100 X 0.170 04222 SA102C471KAA A3C221 281–0765–00 CAP,FXD,CER DI:100PF,5%,100V 04222 SA102A101JAA A3C222 281–0791–00 CAP,FXD,CERAMIC:MLC;270PF,10%,100V,0.100 X 0.170 04222 SA102C271KAA A3C223 290–0524–01 CAP,FXD,ELCTLT:4.7UF,20%,10V 31433 T350A475M010AS A3C224 290–0512–00 CAP,FXD,ELCTLT:22UF,20%,15V 2N936 199D226X0015DA1 A3C226 281–0775–01 CAP,FXD,CERAMIC:MCL;0.1UF,20%,50V,Z5U,0.170 04222 SA105E104MAA A3C227 281–0775–01 CAP,FXD,CERAMIC:MCL;0.1UF,20%,50V,Z5U,0.170 04222 SA105E104MAA A3C230 281–0775–01 CAP,FXD,CERAMIC:MCL;0.1UF,20%,50V,Z5U,0.170 04222 SA105E104MAA A3C232 290–1296–01 CAP,FXD,ALUM:100UF,20%,25V,8 X 9MM;105 DEG,RDL,T&A 55680 URT1E101MNH1TA A3C234 285–1378–01 CAP,FXD,PLSTC:MTLZD FILM;0.1UF,20%,63V, POLYESTER,0.394 X 0.098 TK1913 MKS33 0.1/63/20 A3C235 281–0791–00 CAP,FXD,CERAMIC:MLC;270PF,10%,100V,0.100 X0.170 04222 8–36 Serial no. effective Serial no. discont’d SA102C271KAA SA102C271KAA AM700 Audio Measurement Set Service Manual Replaceable Electrical Parts Replaceable electrical parts list (cont.) Component number Tektronix part number A3C236 281–0791–00 A3C237 A3C238 Serial no. effective Serial no. discont’d Name & description Mfr. code Mfr. part number CAP,FXD,CERAMIC:MLC;270PF,10%,100V,0.100 X0.170 04222 SA102C271KAA 285–1378–01 CAP,FXD,PLSTC:MTLZD FILM;0.1UF,20%,63V,POLYESTER TK1913 MKS33 0.1/63/20 285–1378–01 CAP,FXD,PLSTC:MTLZD FILM;0.1UF,20%,63V,POLYESTER TK1913 MKS33 0.1/63/20 A3C239 281–0791–00 CAP,FXD,CERAMIC:MLC;270PF,10%,100V,0.100 X 0.170 04222 SA102C271KAA A3C240 281–0791–00 CAP,FXD,CERAMIC:MLC;270PF,10%,100V,0.100 X 0.170 04222 SA102C271KAA A3C241 285–1378–01 CAP,FXD,PLSTC:MTLZD FILM;0.1UF,20%,63V,POLYESTER TK1913 MKS33 0.1/63/20 A3C242 281–0775–01 CAP,FXD,CERAMIC:MCL;0.1UF,20%,50V,Z5U,0.170 04222 SA105E104MAA A3C243 281–0775–01 CAP,FXD,CERAMIC:MCL;0.1UF,20%,50V,Z5U,0.170 04222 SA105E104MAA A3C244 281–0775–01 CAP,FXD,CERAMIC:MCL;0.1UF,20%,50V,Z5U,0.170 04222 SA105E104MAA A3C245 281–0775–01 CAP,FXD,CERAMIC:MCL;0.1UF,20%,50V,Z5U,0.170 04222 SA105E104MAA A3C246 290–1311–00 CAP,FXD,ALUM:10UF,20%,50V,ESR=1.4 OHM(100KHZ,20C) 55680 UPL1H100MDH1TD A3C247 290–1311–00 CAP,FXD,ALUM:10UF,20%,50V,ESR=1.4 OHM(100KHZ,20C) 55680 UPL1H100MDH1TD A3C248 290–1311–00 CAP,FXD,ALUM:10UF,20%,50V,ESR=1.4 OHM(100KHZ,20C) 55680 UPL1H100MDH1TD A3C250 281–0775–01 CAP,FXD,CERAMIC:MCL;0.1UF,20%,50V,Z5U,0.170 04222 SA105E104MAA A3C251 281–0775–01 CAP,FXD,CERAMIC:MCL;0.1UF,20%,50V,Z5U,0.170 04222 SA105E104MAA A3C252 281–0775–01 CAP,FXD,CERAMIC:MCL;0.1UF,20%,50V,Z5U,0.170 04222 SA105E104MAA A3C253 281–0775–01 CAP,FXD,CERAMIC:MCL;0.1UF,20%,50V,Z5U,0.170 04222 SA105E104MAA A3C254 281–0775–01 CAP,FXD,CERAMIC:MCL;0.1UF,20%,50V,Z5U,0.170 04222 SA105E104MAA A3C255 290–1311–00 CAP,FXD,ALUM:10UF,20%,50V,ESR=1.4 OHM(100KHZ,20C) 55680 UPL1H100MDH1TD A3C256 281–0819–00 CAP,FXD,CERAMIC:MLC;33 PF,5%,50V,0.100 X 0.170 04222 SA102A330JAA A3C257 281–0775–01 CAP,FXD,CERAMIC:MCL;0.1UF,20%,50V,Z5U,0.170 04222 SA105E104MAA A3C258 281–0775–01 CAP,FXD,CERAMIC:MCL;0.1UF,20%,50V,Z5U,0.170 04222 SA105E104MAA A3C259 281–0775–01 CAP,FXD,CERAMIC:MCL;0.1UF,20%,50V,Z5U,0.170 04222 SA105E104MAA A3C260 281–0775–01 CAP,FXD,CERAMIC:MCL;0.1UF,20%,50V,Z5U,0.170 04222 SA105E104MAA A3C261 281–0775–01 CAP,FXD,CERAMIC:MCL;0.1UF,20%,50V,Z5U,0.170 04222 SA105E104MAA A3C262 281–0791–00 CAP,FXD,CERAMIC:MLC;270PF,10%,100V,0.100 X 0.170 04222 SA102C271KAA A3C263 281–0819–00 CAP,FXD,CERAMIC:MLC;33 PF,5%,50V,0.100 X 0.170 04222 SA102A330JAA A3C264 281–0819–00 CAP,FXD,CERAMIC:MLC;33 PF,5%,50V,0.100 X 0.170 04222 SA102A330JAA A3C265 281–0819–00 CAP,FXD,CERAMIC:MLC;33 PF,5%,50V,0.100 X 0.170 04222 SA102A330JAA CAP,FXD,CERAMIC:MLC;33 PF,5%,50V,0.100 X 0.170 04222 SA102A330JAA A3C266 281–0819–00 A3C267 281–2515–00 A3C267 281–0812–00 CAP,FXD,CERAMIC:MLC,1000PF,10%,100V,0.100 X 0.170 04222 SA101C102KAA A3C268 283–0193–00 CAP,FXD,CER DI:510PF,2%,100V 04222 SR201A511GAA A3C269 283–0193–00 CAP,FXD,CER DI:510PF,2%,100V 04222 SR201A511GAA A3C270 281–0791–00 CAP,FXD,CERAMIC:MLC;270PF,10%,100V,0.100 X 0.170 04222 SA102C271KAA A3C271 281–0816–00 CAP,FXD,CERAMIC:MLC;82 PF,5%,100V,0.100 X 0.170 TK1743 CGB820JEN A3C272 281–0785–00 CAP,FXD,CERAMIC:MLC;68PF,10%,100V,0.100 X 0.170 04222 SA102A680KAA A3C273 281–0812–00 CAP,FXD,CERAMIC:MLC,1000PF,10%,100V,0.100 X 0.170 04222 SA101C102KAA B010248 B010249 B010248 B010248 B010249 AM700 Audio Measurement Set Service Manual 8–37 Replaceable Electrical Parts Replaceable electrical parts list (cont.) Component number Tektronix part number Serial no. effective A3C274 290–0524–01 B010249 A3CR3 A3CR7 Serial no. discont’d Name & description Mfr. code Mfr. part number CAP,FXD,TANT:4.7UF,20%,10V, RADIAL 2N936 199D475X0010AB1 152–0951–00 DIODE,SIG:SCHTKY;60V,2.25PF 66958 1N6263 152–0964–00 DIODE,SIG:ULTRA FAST;ARRAY,6 COM CATH/COMANODE PAIR TK2262 DM 308BT100SP–4 A3CR8 152–0964–00 DIODE,SIG:ULTRA FAST;ARRAY,6 COM CATH/COMANODE PAIR TK2262 DM 308BT100SP–4 A3CR9 152–0673–00 DIODE,SIG:VVC;18V,500PF,12%,C1/C15=15,Q=150 04713 MVAM115 A3CR16 152–0673–00 DIODE,SIG:VVC;18V,500PF,12%,C1/C15=15,Q=150 04713 MVAM115 A3CR18 152–0673–00 DIODE,SIG:VVC;18V,500PF,12%,C1/C15=15,Q=150 04713 MVAM115 A3CR19 152–0951–00 DIODE,SIG:SCHTKY;60V,2.25PF 66958 1N6263 A3CR21 152–0951–00 DIODE,SIG:SCHTKY;60V,2.25PF 66958 1N6263 A3CR22 152–0141–02 DIODE,SIG:ULTRA FAST;40V,150MA,4NS,2PF 27014 FDH9427 A3CR23 152–0141–02 DIODE,SIG:ULTRA FAST;40V,150MA,4NS,2PF 27014 FDH9427 A3CR24 152–0673–00 DIODE,SIG:VVC;18V,500PF,12%,C1/C15=15,Q=150 04713 MVAM115 A3CR25 152–0141–02 DIODE,SIG:ULTRA FAST;40V,150MA,4NS,2PF 27014 FDH9427 A3CR27 152–0951–00 DIODE,SIG:SCHTKY;60V,2.25PF 66958 1N6263 A3CR30 152–0951–00 DIODE,SIG:SCHTKY;60V,2.25PF 66958 1N6263 A3CR31 152–0141–02 DIODE,SIG:ULTRA FAST;40V,150MA,4NS,2PF 27014 FDH9427 A3CR32 152–0951–00 DIODE,SIG:SCHTKY;60V,2.25PF 66958 1N6263 A3CR33 152–0951–00 DIODE,SIG:SCHTKY;60V,2.25PF 66958 1N6263 A3CR34 152–0951–00 DIODE,SIG:SCHTKY;60V,2.25PF 66958 1N6263 A3CR35 152–0951–00 DIODE,SIG:SCHTKY;60V,2.25PF 66958 1N6263 A3CR36 152–0141–02 DIODE,SIG:ULTRA FAST;40V,150MA,4NS,2PF 27014 FDH9427 A3DS1 150–1160–00 DIODE,OPTO:LED;GRN,569NM,4,2MCD AT 10MA 50434 QLMP–1587 A3DS2 150–1022–00 LAMP,LED RDOUT:7 SEG NUMERIC,LH DEC ORANGE 0MS63 MAN72A A3F1 307–1593–00 RES,THERMAL:CIRCUIT PROTECTOR,0.2 AMP 06090 RXE–020 A3F2 307–1593–00 RES,THERMAL:CIRCUIT PROTECTOR,0.2 AMP 06090 RXE–020 A3F3 159–0208–02 FUSE,WIRE LEAD:2A,125V AC/DC,5 SEC,AXIAL LEAD,T & R 75915 R251 002–T1 A3J1 131–1857–00 CONN,HDR:PCB;MALE,STR,1 X 36,0.1 CTR,0.230 58050 082–3644–SS10 A3J2 131–4751–00 CONN,HDR:PCB;MALE,STR,1 X 16,0.1 CTR,0.235 53387 2416–6132–TB A3J4 131–3520–00 CONN,HDR:PCB;MALE,STR,2 X 5,0.1 CTR,0.365H X 0.112 TAIL 53387 2510–6002UB A3J27 131–4048–00 CONN,HDR:PCB;MALE,RTANG,2 X 17,0.05 X 0.1CTR TK1462 NFP–34A–0112A A3J29 131–3520–00 CONN,HDR:PCB;MALE,STR,2 X 5,0.1 CTR,0.365H X 0.112 TAIL 53387 2510–6002UB 26–65–5080 A3J30 131–5674–00 CONN,HDR PWR:PCB;MALE,RTANG,1 X 8,0.156 CTR 27264 A3J31 131–5630–00 CONN,HDR:PCB;MALE,RTANG,2 X 20,0.05 X 0.1CTR TK1462 NFP–040A–112–AF A3J32 131–5630–00 CONN,HDR:PCB;MALE,RTANG,2 X 20,0.05 X 0.1CTR TK1462 NFP–040A–112–AF A3J33 131–3358–00 CONN,HDR:PCB;MALE,RTANG,2 X 5,0.1 CTR 53387 2510–5002UB A3L1 114–0494–00 INDUCTOR,VAR:SIGNAL,SHIELDED;2.2–3.2UH,RDC<0.466 OHM 02113 7M3–272 A3L2 108–1243–00 INDUCTOR,FXD:SIGNAL;27UH,2%,IDC<135 MA,RDC<3.5 OHM 24226 ML10–272G A3L5 114–0494–00 INDUCTOR,VAR:SIGNAL,SHIELDED;2.2–3.2UH,RDC<0.466 OHM 02113 7M3–272 8–38 AM700 Audio Measurement Set Service Manual Replaceable Electrical Parts Replaceable electrical parts list (cont.) Component number Tektronix part number A3L6 108–1243–00 A3L7 114–0494–00 A3L8 108–1243–00 A3L10 108–1263–00 A3L11 108–1263–00 A3L13 108–1263–00 Serial no. effective Serial no. discont’d B010248 B010248 Name & description Mfr. code Mfr. part number INDUCTOR,FXD:SIGNAL;27UH,2%,IDC<135 MA,RDC<3.5 OHM 24226 ML10–272G INDUCTOR,VAR:SIGNAL,SHIELDED;2.2–3.2UH,RDC<0.466 OHM 02113 7M3–272 INDUCTOR,FXD:SIGNAL;27UH,2%,IDC<135 MA,RDC<3.5 OHM 24226 ML10–272G INDUCTOR,FXD:POWER;10UH,10%,I<2.1A,RDC<0.043 OHM TK2058 TSL0707–100K1R9 INDUCTOR,FXD:POWER;10UH,10%,I<2.1A,RDC<0.043 OHM TK2058 TSL0707–100K1R9 B010248 INDUCTOR,FXD:POWER;10UH,10%,I<2.1A,RDC<0.043 OHM TK2058 TSL0707–100K1R9 INDUCTOR,FXD:SIGNAL;2.2MH,5%,IDC<75 MA,RDC<45.6 OHM TK1177 ORDER BY DESC B010248 INDUCTOR,FXD:SIGNAL;1.8UH,10%,ON FORM 276–0153–00 0JR03 108–0345–00 INDUCTOR,FXD:CUSTOM,POWER,3.9UH,10%,IDC<800 MA,RDC<0.264 OHM,Q>[email protected],SRF>61MHZ,AXIAL 0JR03 108–0245–01 7M3–272 A3L14 108–0654–00 A3L15 108–0345–00 A3L15 108–0245–01 A3L16 114–0494–00 INDUCTOR,VAR:SIGNAL,SHIELDED;2.2–3.2UH,RDC<0.466 OHM 02113 A3L18 108–1281–00 INDUCTOR,FXD:POWER;2.2UH,10%,IDC<630 MA TK2058 SPT03O5–2R2K A3L19 108–0654–00 INDUCTOR,FXD:SIGNAL;2.2MH,5%,IDC<75 MA,RDC<45.6 OHM TK1177 A3L20 108–1263–00 INDUCTOR,FXD:POWER;10UH,10%,I<2.1A,RDC<0.043 OHM,Q>20,SRF>19MHZ,BOBBIN TK2058 TSL0707–100K1R9 A3L21 108–0436–00 INDUCTOR,FXD:CUSTOM,SIGNAL;240UH,Q>54@25MHZ 0JR03 108–0436–00 A3L22 108–0182–00 INDUCTOR,FXD:CUSTOM,SIGNAL;293NH,10%,Q>59@25MHZ 0JR03 108–0182–00 A3L23 108–0182–00 INDUCTOR,FXD:CUSTOM,SIGNAL;293NH,10%,Q>59@25MHZ 0JR03 108–0182–00 B010249 ORDER BY DESC A3L24 108–0436–00 INDUCTOR,FXD:CUSTOM,SIGNAL;240UH,Q>54@25MHZ 0JR03 108–0436–00 A3Q4 151–0188–05 TRANSISTOR,SIG:BIPOLAR,PNP;40V,200MA,250MHZ,AMPL 04713 2N3906RLRP A3Q7 151–0711–02 TRANSISTOR,SIG:BIPOLAR,NPN;25V,50MA,650MHZ,AMPL 04713 MPSH10RLRP A3Q8 151–0711–02 TRANSISTOR,SIG:BIPOLAR,NPN;25V,50MA,650MHZ,AMPL 04713 MPSH10RLRP A3Q10 151–0188–05 TRANSISTOR,SIG:BIPOLAR,PNP;40V,200MA,250MHZ,AMPL 04713 2N3906RLRP A3Q11 151–0188–05 TRANSISTOR,SIG:BIPOLAR,PNP;40V,200MA,250MHZ,AMPL 04713 2N3906RLRP A3Q12 151–0190–09 TRANSISTOR,SIG:BIPOLAR,NPN;40V,200MA,300MHZ,AMPL 04713 2N3904RLRP A3Q13 151–0190–09 TRANSISTOR,SIG:BIPOLAR,NPN;40V,200MA,300MHZ,AMPL 04713 2N3904RLRP A3Q14 151–0190–09 TRANSISTOR,SIG:BIPOLAR,NPN;40V,200MA,300MHZ,AMPL 04713 2N3904RLRP A3Q15 151–0190–09 TRANSISTOR,SIG:BIPOLAR,NPN;40V,200MA,300MHZ,AMPL 04713 2N3904RLRP A3Q16 151–0190–09 TRANSISTOR,SIG:BIPOLAR,NPN;40V,200MA,300MHZ,AMPL 04713 2N3904RLRP A3Q17 151–0190–09 TRANSISTOR,SIG:BIPOLAR,NPN;40V,200MA,300MHZ,AMPL 04713 2N3904RLRP A3Q18 151–0188–05 TRANSISTOR,SIG:BIPOLAR,PNP;40V,200MA,250MHZ,AMPL 04713 2N3906RLRP A3Q19 151–1025–03 TRANSISTOR,SIG:JFET,N–CH;6V,15MA,4.5MS,AMPL 17856 J304TA A3Q20 151–1121–01 TRANSISTOR,PWR:MOS,N–CH;60V,0.5A,3.0 OHM 17856 VN0606L–TA A3Q21 151–1121–01 TRANSISTOR,PWR:MOS,N–CH;60V,0.5A,3.0 OHM 17856 VN0606L–TA A3Q22 151–0190–09 B010249 TRANSISTOR,SIG:BIPOLAR,NPN,40V,200MA,300MHZ, AMPLIFIER,2N3904,TO–92 EBC 04713 2N3904RLRA A3Q23 151–0188–05 B010249 TRANSISTOR,SIG:BIPOLAR,PNP,40V,200MA,250MHZ,AMPLIFIE R,2N3906,TO–92 EBC,T&A 04713 2N3906RLRA A3R1 307–0383–00 RES NTWK,FXD,FI:13,4.7K OHM,2%,0.25W 91637 MDP14–01–472G A3R2 307–0383–00 RES NTWK,FXD,FI:13,4.7K OHM,2%,0.25W 91637 MDP14–01–472G B010248 AM700 Audio Measurement Set Service Manual 8–39 Replaceable Electrical Parts Replaceable electrical parts list (cont.) Component number Tektronix part number A3R3 307–0383–00 A3R5 A3R6 Serial no. effective Serial no. discont’d Name & description Mfr. code Mfr. part number RES NTWK,FXD,FI:13,4.7K OHM,2%,0.25W 91637 MDP14–01–472G 322–3201–00 RES,FXD:METAL FILM;1.21K OHM,1%,0.2W,TC=100 91637 CCF501G12100F 322–3201–00 RES,FXD:METAL FILM;1.21K OHM,1%,0.2W,TC=100 91637 CCF501G12100F A3R7 322–3201–00 RES,FXD:METAL FILM;1.21K OHM,1%,0.2W,TC=100 91637 CCF501G12100F A3R8 322–3162–00 RES,FXD:METAL FILM;475 OHM,1%,0.2W,TC=100 PPM 91637 CCF50G475R0F A3R17 322–3097–00 RES,FXD:METAL FILM;100 OHM,1%,0.2W,TC=100 PPM 91637 CCF501G100R0F A3R19 322–3097–00 RES,FXD:METAL FILM;100 OHM,1%,0.2W,TC=100 PPM 91637 CCF501G100R0F A3R21 322–3126–00 RES,FXD,FILM:200 OHM,1%,0.2W,TC=T0MI,SMALL BODY 91637 CCF501G200ROF A3R22 322–3289–00 RES,FXD:METAL FILM;10K OHM,1%,0.2W,TC=100 PPM 91637 CCF50G10001F A3R107 322–3289–00 RES,FXD:METAL FILM;10K OHM,1%,0.2W,TC=100 PPM 91637 CCF50G10001F A3R108 322–3001–00 RES,FXD:METAL FILM;10 OHM,1%,0.2W,TC=100 PPM 91637 CCF501G10R00F A3R109 322–3289–00 RES,FXD:METAL FILM;10K OHM,1%,0.2W,TC=100 PPM 91637 CCF50G10001F A3R110 322–3258–00 RES,FXD:METAL FILM;4.75K OHM,1%,0.2W,TC=100 56845 CCF50–2–G4751FT A3R111 307–0649–00 RES NTWK,FXD,FI:8,33 OHM,2%,0.125W 11236 761–3–R33 OHM A3R112 307–0649–00 RES NTWK,FXD,FI:8,33 OHM,2%,0.125W 11236 761–3–R33 OHM A3R113 322–3068–00 RES,FXD:METAL FILM;49.9 OHM,1%,0.2W,TC=100 PPM 91637 CCF501G49R90F A3R122 322–3051–00 RES,FXD:METAL FILM;33.2 OHM,1%,0.2W,TC=100 PPM 57668 CRB20FXE33E2 A3R123 307–0649–00 RES NTWK,FXD,FI:8,33 OHM,2%,0.125W 11236 761–3–R33 OHM A3R124 307–1267–00 RES NTWK,FXD,FI:9,1.2K OHM,2% 11236 750–101–R1.2K O A3R128 322–3226–00 RES,FXD:METAL FILM;2.21K OHM,1%,0.2W,TC=100 91637 CCF501G22100F A3R129 321–0318–07 RES,FXD,FILM:20.0K OHM,0.1%,0.125W,TC=T9 19701 5033RE20K00BCM A3R131 321–0318–07 RES,FXD,FILM:20.0K OHM,0.1%,0.125W,TC=T9 19701 5033RE20K00BCM A3R132 322–3414–00 RES,FXD:METAL FILM;200K OHM,1%,0.2W,TC=100 PPM 91637 CCF501G20002F A3R136 321–0193–07 RES,FXD,FILM:1K OHM,0.1%,0.125W,TC=T9MI 19701 5033RE1K000B A3R137 321–0193–07 RES,FXD,FILM:1K OHM,0.1%,0.125W,TC=T9MI 19701 5033RE1K000B A3R138 321–0289–07 RES,FXD,FILM:10.0K OHM,0.1%,0.125W,TC=T9 19701 5033RE10K00B A3R139 321–0289–07 RES,FXD,FILM:10.0K OHM,0.1%,0.125W,TC=T9 19701 5033RE10K00B A3R140 322–3226–00 RES,FXD:METAL FILM;2.21K OHM,1%,0.2W,TC=100 91637 CCF501G22100F A3R144 322–3218–00 RES,FXD:METAL FILM;1.82K OHM,1%,0.2W,TC=100 91637 CCF501G18200F A3R145 322–3097–00 RES,FXD:METAL FILM;100 OHM,1%,0.2W,TC=100 PPM 91637 CCF501G100R0F A3R146 322–3218–00 RES,FXD:METAL FILM;1.82K OHM,1%,0.2W,TC=100 91637 CCF501G18200F A3R148 322–3186–00 RES,FXD,FILM:845 OHM,1%,0.2W,TC=T0MI,SMALL BODY 91637 CCF50–2–G845ROF A3R150 322–3128–00 RES,FXD,FILM:210 OHM,1%,0.2W,TC=T0MI,SMALL BODY 91637 CCF50–2–G210R0F A3R151 322–3089–00 RES,FXD:METAL FILM;82.5 OHM,1%.0.2W,TC=100 PPM 57668 CRB20 FXE 82E5 A3R152 322–3110–00 RES,FXD,FILM:137 OHM,1%,0.2W,TC=T0MI,SMALL BODY 91637 CCF50–137R0F A3R153 322–3154–00 RES,FXD:METAL FILM;392 OHM,1%,0.2W,TC=100 PPM 91637 CCF501G392R0F A3R156 322–3154–00 RES,FXD:METAL FILM;392 OHM,1%,0.2W,TC=100 PPM 91637 CCF501G392R0F A3R158 322–3034–00 RES,FXD:METAL FILM;22.1 OHM,1%,0.2W,TC=100 PPM 91637 CCF50–2–G22R10F 8–40 AM700 Audio Measurement Set Service Manual Replaceable Electrical Parts Replaceable electrical parts list (cont.) Component number Tektronix part number A3R162 322–3051–00 A3R165 A3R166 Serial no. effective Serial no. discont’d Name & description Mfr. code Mfr. part number RES,FXD:METAL FILM;33.2 OHM,1%,0.2W,TC=100 PPM 57668 CRB20FXE33E2 321–0185–07 RES,FXD,FILM:825 OHM,0.1%,0.125W,TC=T9 57027 RC55–D–825R0–B– 321–0126–07 RES,FXD,FILM:200 OHM,0.1%,0.125W,TC=T9MI 19701 5033RE200R0B A3R170 322–3165–00 RES,FXD,FILM:511 OHM,1%,0.2W,TC=T0MI,SMALL BODY 91637 CCF501G511R0F A3R173 322–3001–00 RES,FXD:METAL FILM;10 OHM,1%,0.2W,TC=100 PPM 91637 CCF501G10R00F A3R174 322–3034–00 RES,FXD:METAL FILM;22.1 OHM,1%,0.2W,TC=100PPM 91637 CCF50–2–G22R10F A3R175 322–3039–00 RES,FXD,FILM:24.9 OHM,1%,0.2W,TC=T0,SMALL BODY 91637 CCF50–2–G24R90F A3R176 322–3165–00 RES,FXD,FILM:511 OHM,1%,0.2W,TC=T0MI,SMALL BODY 91637 CCF501G511R0F A3R177 322–3274–00 RES,FXD,FILM:6.98K OHM,1%,0.2W,TC=T0MI,SMALL BODY 91637 CCF50–2–G–69800 A3R178 322–3274–00 RES,FXD,FILM:6.98K OHM,1%,0.2W,TC=T0MI,SMALL BODY 91637 CCF50–2–G–69800 A3R179 322–3065–00 RES,FXD,FILM:46.4 OHM,1%,0.2W,TC=T0MI,SMALL 91637 CCF50–2F46R40F A3R181 322–3001–00 RES,FXD:METAL FILM;10 OHM,1%,0.2W,TC=100 PPM 91637 CCF501G10R00F A3R182 322–3109–00 RES,FXD,FILM:133 OHM,1%,0.2W,TC=T0MI,SMALL BODY 91637 CCF50–2F133R0F A3R183 322–3181–00 RES,FXD,FILM:750 OHM,1%,0.2W,TC=T0MI,SMALL BODY 91637 CCF501G750ROF A3R185 322–3039–00 RES,FXD,FILM:24.9 OHM,1%,0.2W,TC=T0,SMALL BODY 91637 CCF50–2–G24R90F A3R186 322–3177–00 RES,FXD:METAL FILM;681 OHM,1%,0.2W,TC=100 PPM 91637 CCF50–2G681R0F A3R187 322–3197–00 RES,FXD,FILM:1.1K OHM,1%,0.2W,TC=T0MI,SMALL 91637 CCF501G11000F A3R188 322–3126–00 RES,FXD,FILM:200 OHM,1%,0.2W,TC=T0MI,SMALL BODY 91637 CCF501G200ROF A3R193 322–3165–00 RES,FXD,FILM:511 OHM,1%,0.2W,TC=T0MI,SMALL BODY 91637 CCF501G511R0F A3R197 322–3181–00 RES,FXD,FILM:750 OHM,1%,0.2W,TC=T0MI,SMALL BODY 91637 CCF501G750ROF A3R198 322–3039–00 RES,FXD,FILM:24.9 OHM,1%,0.2W,TC=T0,SMALL BODY 91637 CCF50–2–G24R90F A3R199 322–3130–00 RES,FXD:METAL FILM;221 OHM,1%,0.2W,TC=100 PPM 57668 RB20FX221E A3R213 322–3485–00 RES,FXD,FILM:5.0K OHM,1%,0.2W,TC=TO,SMALL BODY 91637 CCF501G50000F A3R214 322–3485–00 RES,FXD,FILM:5.0K OHM,1%,0.2W,TC=TO,SMALL BODY 91637 CCF501G50000F A3R216 322–3112–00 RES,FXD,FILM:143 OHM,1%,0.2W,TC=T0MI,SMALL BODY 91637 CCF501G143R0F A3R218 322–3193–00 RES,FXD:METAL FILM;1K OHM,1%,0.2W,TC=100 PPM 91637 CCF501G10000F A3R219 322–3193–00 RES,FXD:METAL FILM;1K OHM,1%,0.2W,TC=100 PPM 91637 CCF501G10000F A3R221 322–3306–00 RES,FXD:METAL FILM;15K OHM,1%,0.2W,TC=100 PPM 91637 CCF50–2–G1502F A3R222 322–3306–00 RES,FXD:METAL FILM;15K OHM,1%,0.2W,TC=100 PPM 91637 CCF50–2–G1502F A3R224 322–3097–00 RES,FXD:METAL FILM;100 OHM,1%,0.2W,TC=100 PPM 91637 CCF501G100R0F A3R225 322–3289–00 RES,FXD:METAL FILM;10K OHM,1%,0.2W,TC=100 PPM 91637 CCF50G10001F A3R227 322–3289–00 RES,FXD:METAL FILM;10K OHM,1%,0.2W,TC=100 PPM 91637 CCF50G10001F A3R228 322–3289–00 RES,FXD:METAL FILM;10K OHM,1%,0.2W,TC=100 PPM 91637 CCF50G10001F A3R229 307–0649–00 RES NTWK,FXD,FI:8,33 OHM,2%,0.125 W 11236 761–3–R33 OHM A3R231 307–0648–00 RES NTWK,FXD,FI:8,100 OHM,2%,0.125 W 11236 761–3–R100 A3R232 322–3097–00 RES,FXD:METAL FILM;100 OHM,1%,0.2W,TC=100 PPM 91637 CCF501G100R0F A3R233 322–3097–00 RES,FXD:METAL FILM;100 OHM,1%,0.2W,TC=100 PPM 91637 CCF501G100R0F A3R234 322–3130–00 RES,FXD:METAL FILM;221 OHM,1%,0.2W,TC=100 PPM 57668 RB20FX221E AM700 Audio Measurement Set Service Manual 8–41 Replaceable Electrical Parts Replaceable electrical parts list (cont.) Component number Tektronix part number A3R235 322–3097–00 A3R236 A3R238 Serial no. effective Serial no. discont’d Name & description Mfr. code Mfr. part number RES,FXD:METAL FILM;100 OHM,1%,0.2W,TC=100 PPM 91637 CCF501G100R0F 322–3114–00 RES,FXD:METAL FILM;150 OHM,1%,0.2W,TC=100 PPM 91637 CCF50–2–G1500F 322–3193–00 RES,FXD:METAL FILM;1K OHM,1%,0.2W,TC=100 PPM 91637 CCF501G10000F A3R240 322–3130–00 RES,FXD:METAL FILM;221 OHM,1%,0.2W,TC=100 PPM 57668 RB20FX221E A3R241 322–3130–00 RES,FXD:METAL FILM;221 OHM,1%,0.2W,TC=100 PPM 57668 RB20FX221E A3R244 322–3240–00 RES,FXD,FILM:3.09K OHM,1%,0.2W,TC=T0MI,SMALL BODY 91637 CCF50–2G30900F A3R245 322–3249–00 RES,FXD,FILM:3.83K OHM,1%,0.2W,TC=T0MI,SMALL BODY 56845 CCF50–2–G3831FT A3R246 322–3184–00 RES,FXD,FILM:806 OHM,1%,0.2W,TC=T0,SMALL BODY 91637 CCF501G806FOR A3R247 322–3130–00 RES,FXD:METAL FILM;221 OHM,1%,0.2W,TC=100 PPM 57668 RB20FX221E A3R248 322–3184–00 RES,FXD,FILM:806 OHM,1%,0.2W,TC=T0,SMALL BODY 91637 CCF501G806FOR A3R249 322–3089–00 RES,FXD:METAL FILM;82.5 OHM,1%.0.2W,TC=100 PPM 57668 CRB20 FXE 82E5 A3R250 322–3097–00 RES,FXD:METAL FILM;100 OHM,1%,0.2W,TC=100 PPM 91637 CCF501G100R0F A3R251 322–3097–00 RES,FXD:METAL FILM;100 OHM,1%,0.2W,TC=100 PPM 91637 CCF501G100R0F A3R252 322–3235–00 RES,FXD:METAL FILM;2.74K OHM,1%,0.2W,TC=100 91637 CCF501G27400F A3R253 322–3235–00 RES,FXD:METAL FILM;2.74K OHM,1%,0.2W,TC=100 91637 CCF501G27400F A3R256 322–3097–00 RES,FXD:METAL FILM;100 OHM,1%,0.2W,TC=100 PPM 91637 CCF501G100R0F A3R257 322–3306–00 RES,FXD:METAL FILM;15K OHM,1%,0.2W,TC=100 PPM 91637 CCF50–2–G1502F A3R258 322–3226–00 RES,FXD:METAL FILM;2.21K OHM,1%,0.2W,TC=100 91637 CCF501G22100F A3R259 322–3418–00 RES,FXD:METAL FILM;221K OHM,1%,0.2W,TC=100 PPM 91637 CCF501G22102F A3R260 322–3481–00 RES,FXD,FILM:1M OHM.1%,0.2W,TC=T0MI,SMALL BODY 91637 CCF501G10003F A3R266 322–3147–00 RES,FXD:METAL FILM;332 OHM,1%,0.2W,TC=100 PPM 91637 CCF501G332R0F A3R267 322–3165–00 RES,FXD,FILM:511 OHM,1%,0.2W,TC=T0MI,SMALL BODY 91637 CCF501G511R0F A3R268 322–3226–00 RES,FXD:METAL FILM;2.21K OHM,1%,0.2W,TC=100 91637 CCF501G22100F A3R269 322–3226–00 RES,FXD:METAL FILM;2.21K OHM,1%,0.2W,TC=100 91637 CCF501G22100F A3R273 322–3097–00 RES,FXD:METAL FILM;100 OHM,1%,0.2W,TC=100 PPM 91637 CCF501G100R0F A3R274 322–0139–00 RES,FXD:METAL FILM;274 OHM,1%,0.2W,TC=100 PPM 91637 CCF501G100R0F A3R284 322–3155–00 RES,FXD,FILM:402 OHM,1%,0.2W,TC=T0MI,SMALL BODY 91637 CCF501G402ROF A3R285 322–3210–00 RES,FXD:METAL FILM;1.5K OHM,1%,0.2W,TC=100 PPM 91637 CCF501G15000F A3R286 322–3481–00 RES,FXD,FILM:1M OHM.1%,0.2W,TC=T0MI,SMALL BODY 91637 CCF501G10003F A3R287 322–3181–00 RES,FXD,FILM:750 OHM,1%,0.2W,TC=T0MI,SMALL BODY 91637 CCF501G750ROF A3R290 322–3105–00 RES,FXD:METAL FILM;121 OHM,1%,0.2W,TC=100 PPM 91637 CCF501G121ROF A3R292 322–3105–00 RES,FXD:METAL FILM;121 OHM,1%,0.2W,TC=100 PPM 91637 CCF501G121ROF A3R293 322–3481–00 RES,FXD,FILM:1M OHM.1%,0.2W,TC=T0MI,SMALL BODY 91637 CCF501G10003F A3R294 308–0142–00 RES,FXD,WW:30 OHM,5%,3W TK2096 KM300 30 OHM 1 A3R297 322–3201–00 B010248 RES,FXD:METAL FILM;1.21K OHM,1%,0.2W,TC=100 91637 A3R298 311–2271–00 B010248 RES,VAR,TRMR:CERMET;5K OHM,20%,0.5W,0.197 SQ TK2073 GF06VT2 502 M L B010248 CCF501G12100F A3R299 307–0636–00 RES NTWK,FXD,FI:8,330 OHM,2%,0.125 W 11236 761–3–R330OHM A3R304 322–3114–00 RES,FXD:METAL FILM;150 OHM,1%,0.2W,TC=100 PPM 91637 CCF50–2–G1500F 8–42 AM700 Audio Measurement Set Service Manual Replaceable Electrical Parts Replaceable electrical parts list (cont.) Component number Tektronix part number A3R307 322–3485–00 A3R315 A3R316 Serial no. effective Serial no. discont’d Name & description Mfr. code Mfr. part number RES,FXD,FILM:5.0K OHM,1%,0.2W,TC=TO,SMALL BODY 91637 CCF501G50000F 322–3485–00 RES,FXD,FILM:5.0K OHM,1%,0.2W,TC=TO,SMALL BODY 91637 CCF501G50000F 322–3485–00 RES,FXD,FILM:5.0K OHM,1%,0.2W,TC=TO,SMALL BODY 91637 CCF501G50000F A3R317 322–3485–00 RES,FXD,FILM:5.0K OHM,1%,0.2W,TC=TO,SMALL BODY 91637 CCF501G50000F A3R318 322–3485–00 RES,FXD,FILM:5.0K OHM,1%,0.2W,TC=TO,SMALL BODY 91637 CCF501G50000F A3R319 322–3001–00 RES,FXD:METAL FILM;10 OHM,1%,0.2W,TC=100 PPM 91637 CCF501G10R00F A3R320 322–3001–00 RES,FXD:METAL FILM;10 OHM,1%,0.2W,TC=100 PPM 91637 CCF501G10R00F A3R323 322–3281–00 RES,FXD:METAL FILM;8.25K OHM,1%,0.2W,TC=100 91637 CCF501G82500F A3R324 322–3228–00 RES,FXD,FILM:2.32K OHM,1%,0.2W,TC=T0MI,SMALL BODY 91637 CCF50–1G2320F A3R325 322–3280–00 RES,FXD,FILM:8.06K OHM,1%,0.2W,TC=T0MI,SMALL BODY 91637 CCF501G80600F A3R326 322–3235–00 RES,FXD:METAL FILM;2.74K OHM,1%,0.2W,TC=100 91637 CCF501G27400F A3R327 322–3177–00 RES,FXD:METAL FILM;681 OHM,1%,0.2W,TC=100 PPM 91637 CCF50–2G681R0F A3R328 322–3147–00 RES,FXD:METAL FILM;332 OHM,1%,0.2W,TC=100 PPM 91637 CCF501G332R0F A3R329 322–3218–00 RES,FXD:METAL FILM;1.82K OHM,1%,0.2W,TC=100 91637 CCF501G18200F A3R330 322–3138–00 RES,FXD,FILM:267 OHM,1%,0.2W,TC=T0MI,SMALL BODY 91637 CCF501G267R0F A3R331 322–3257–00 RES,FXD,FILM:4.64K OHM,1%,0.2W,TC=T0MI,SMALL BODY 91637 CCF50–2–G46400F A3R332 322–3252–00 RES,FXD,FILM:4.12K OHM,1%,0.2W,TC=T0 91637 CCF501G41200F A3R333 322–3169–00 RES,FXD:METAL FILM;562 OHM,1%,0.2W,TC=100 PPM 91637 CCF50–2F562R0F A3R334 322–3254–00 RES,FXD,FILM:4.32K OHM,1%,0.2W,TC=T0MI,SMALL BODY 91637 CCF502G4321FT A3R335 322–3249–00 A3R338 322–3354–00 A3R338 322–3331–00 RES,FXD:METAL FILM,27.4K OHM,1%,0.2W,TC=100 PPM 57668 CRB20 FXE 27K4 A3R339 322–3318–00 RES,FXD:METAL FILM;20K OHM,1%,0.2W,TC=100 PPM 91637 CCF501G20001F A3R340 322–3289–00 RES,FXD:METAL FILM;10K OHM,1%,0.2W,TC=100 PPM 91637 CCF50G10001F A3R341 322–3289–00 RES,FXD:METAL FILM;10K OHM,1%,0.2W,TC=100 PPM 91637 CCF50G10001F A3R342 322–3289–00 RES,FXD:METAL FILM;10K OHM,1%,0.2W,TC=100 PPM 91637 CCF50G10001F A3R343 322–3289–00 RES,FXD:METAL FILM;10K OHM,1%,0.2W,TC=100 PPM 91637 CCF50G10001F A3R344 322–3318–00 RES,FXD:METAL FILM;20K OHM,1%,0.2W,TC=100 PPM 91637 CCF501G20001F A3R346 322–3193–00 RES,FXD:METAL FILM;1K OHM,1%,0.2W,TC=100 PPM 91637 CCF501G10000F A3R347 322–3191–00 RES,FXD,FILM:953 OHM,1%,0.2W,TC=T0MI,SMALL BODY 91637 CCF501G953ROF A3R348 322–3177–02 RES,FXD,FILM:681 OHM,0.5%,0.2W,TC=T2 91637 CMF501D681ROD A3R350 322–3162–00 RES,FXD:METAL FILM;475 OHM,1%,0.2W,TC=100 PPM 91637 CCF50G475R0F A3R351 322–3001–00 RES,FXD:METAL FILM;10 OHM,1%,0.2W,TC=100 PPM 91637 CCF501G10R00F A3R352 322–3154–00 RES,FXD:METAL FILM;392 OHM,1%,0.2W,TC=100 PPM 91637 CCF501G392R0F A3R353 322–3162–00 RES,FXD:METAL FILM;475 OHM,1%,0.2W,TC=100 PPM 91637 CCF50G475R0F A3R355 322–3139–00 RES,FXD:METAL FILM;274 OHM,1%,0.2W,TC=100 PPM 91637 CCF501G274ROF A3R356 322–3001–00 RES,FXD:METAL FILM;10 OHM,1%,0.2W,TC=100 PPM 91637 CCF501G10R00F A3R357 322–3132–00 RES,FXD,FILM:232 OHM,1%,0.2W,TC=T0MI,SMALL BODY 91637 CCF50–2–G232ROF B010421 B010422 RES,FXD,FILM:3.83K OHM,1%,0.2W,TC=T0MI,SMALL BODY 56845 CCF50–2–G3831FT RES,FXD:METAL FILM;47.5K OHM,1%,0.2W,TC=100 91637 CCF501G47501F AM700 Audio Measurement Set Service Manual 8–43 Replaceable Electrical Parts Replaceable electrical parts list (cont.) Component number Tektronix part number A3R358 322–3154–00 A3R361 A3R362 Serial no. effective Serial no. discont’d Name & description Mfr. code Mfr. part number RES,FXD:METAL FILM;392 OHM,1%,0.2W,TC=100 PPM 91637 CCF501G392R0F 322–3154–00 RES,FXD:METAL FILM;392 OHM,1%,0.2W,TC=100 PPM 91637 CCF501G392R0F 322–3154–00 RES,FXD:METAL FILM;392 OHM,1%,0.2W,TC=100 PPM 91637 CCF501G392R0F A3R364 322–3201–00 RES,FXD:METAL FILM;1.21K OHM,1%,0.2W,TC=100 91637 CCF501G12100F A3R365 322–3201–00 RES,FXD:METAL FILM;1.21K OHM,1%,0.2W,TC=100 91637 CCF501G12100F A3R366 322–3217–00 RES,FXD,FILM:1.78K OHM,1%,0.2W,TC=T0 91637 CCF501G17800F A3R367 322–3193–00 RES,FXD:METAL FILM;1K OHM,1%,0.2W,TC=100 PPM 91637 CCF501G10000F A3R370 322–3181–00 RES,FXD,FILM:750 OHM,1%,0.2W,TC=T0MI,SMALL BODY 91637 CCF501G750ROF A3R371 322–3181–00 RES,FXD,FILM:750 OHM,1%,0.2W,TC=T0MI,SMALL BODY 91637 CCF501G750ROF A3R373 322–3201–00 RES,FXD:METAL FILM;1.21K OHM,1%,0.2W,TC=100 91637 CCF501G12100F A3R374 322–3201–00 RES,FXD:METAL FILM;1.21K OHM,1%,0.2W,TC=100 91637 CCF501G12100F A3R375 322–3126–00 RES,FXD,FILM:200 OHM,1%,0.2W,TC=T0MI,SMALL BODY 91637 CCF501G200ROF A3R376 322–3126–00 RES,FXD,FILM:200 OHM,1%,0.2W,TC=T0MI,SMALL BODY 91637 CCF501G200ROF A3R377 322–3130–00 RES,FXD:METAL FILM;221 OHM,1%,0.2W,TC=100 PPM 57668 RB20FX221E A3R378 322–3306–00 RES,FXD:METAL FILM;15K OHM,1%,0.2W,TC=100 PPM 91637 CCF50–2–G1502F A3R379 322–3226–00 RES,FXD:METAL FILM;2.21K OHM,1%,0.2W,TC=100 91637 CCF501G22100F A3R380 322–3130–00 RES,FXD:METAL FILM;221 OHM,1%,0.2W,TC=100 PPM 57668 RB20FX221E A3R381 322–3306–00 RES,FXD:METAL FILM;15K OHM,1%,0.2W,TC=100 PPM 91637 CCF50–2–G1502F A3R382 322–3385–00 RES,FXD:METAL FILM;100K OHM,1%,0.2W,TC=100 PPM 91637 CCF501G10002F A3R383 322–3385–00 RES,FXD:METAL FILM;100K OHM,1%,0.2W,TC=100 PPM 91637 CCF501G10002F A3R384 322–3346–00 RES,FXD:METAL FILM;39.2K OHM,1%,0.2W,TC=100 91637 CCF50–2–G39201F A3R385 322–3351–00 RES,FXD:METAL FILM;44.2K OHM,1%,0.2W,TC=100 91637 CCF501G4422FT A3R386 322–3051–00 RES,FXD:METAL FILM;33.2 OHM,1%,0.2W,TC=100 PPM 57668 CRB20FXE33E2 A3R387 322–3043–00 RES,FXD:METAL FILM; 27.4 OHM, 1%, 0.2W, TC=100 PPM 57668 CRB20FXE27E4 A3R388 322–3001–00 RES,FXD:METAL FILM;10 OHM,1%,0.2W,TC=100 PPM 91637 CCF501G10R00F A3R390 322–3222–00 RES,FXD:METAL FILM;2K OHM,1%,0.2W,TC=100 PPM 91637 CCF501G20000F A3R391 322–3222–00 RES,FXD:METAL FILM;2K OHM,1%,0.2W,TC=100 PPM 91637 CCF501G20000F A3R394 322–3201–00 RES,FXD:METAL FILM;1.21K OHM,1%,0.2W,TC=100 91637 CCF501G12100F A3R395 322–3126–00 RES,FXD,FILM:200 OHM,1%,0.2W,TC=T0MI,SMALL BODY 91637 CCF501G200ROF A3R396 322–3097–00 RES,FXD:METAL FILM;100 OHM,1%,0.2W,TC=100 PPM 91637 CCF501G100R0F A3R397 322–3201–00 RES,FXD:METAL FILM;1.21K OHM,1%,0.2W,TC=100 91637 CCF501G12100F A3R398 322–3252–00 RES,FXD,FILM:4.12K OHM,1%,0.2W,TC=T0 91637 CCF501G41200F A3R399 308–0142–00 RES,FXD,WW:30 OHM,5%,3W TK2096 KM300 30 OHM 1 A3R400 322–3218–00 RES,FXD:METAL FILM;1.82K OHM,1%,0.2W,TC=100 91637 CCF501G18200F A3R401 322–3218–00 RES,FXD:METAL FILM;1.82K OHM,1%,0.2W,TC=100 91637 CCF501G18200F A3R402 322–3252–00 RES,FXD,FILM:4.12K OHM,1%,0.2W,TC=T0 91637 CCF501G41200F A3R403 322–3252–00 RES,FXD,FILM:4.12K OHM,1%,0.2W,TC=T0 91637 CCF501G41200F A3R404 322–3252–00 RES,FXD,FILM:4.12K OHM,1%,0.2W,TC=T0 91637 CCF501G41200F 8–44 B010248 AM700 Audio Measurement Set Service Manual Replaceable Electrical Parts Replaceable electrical parts list (cont.) Component number Tektronix part number A3R409 322–3066–00 A3R411 A3R412 Serial no. effective Serial no. discont’d Name & description Mfr. code Mfr. part number RES,FXD:METAL FILM;47.5 OHM,1%,0.2W,TC=100 PPM 09969 CCF502G47R50F 322–3051–00 RES,FXD:METAL FILM;33.2 OHM,1%,0.2W,TC=100 PPM 57668 CRB20FXE33E2 322–3289–00 RES,FXD:METAL FILM;10K OHM,1%,0.2W,TC=100 PPM 91637 CCF50G10001F A3R415 322–3154–00 RES,FXD:METAL FILM;392 OHM,1%,0.2W,TC=100 PPM 91637 CCF501G392R0F A3R416 322–3105–00 RES,FXD:METAL FILM;121 OHM,1%,0.2W,TC=100 PPM 91637 CCF501G121ROF A3R417 322–3105–00 RES,FXD:METAL FILM;121 OHM,1%,0.2W,TC=100 PPM 91637 CCF501G121ROF A3R418 322–3318–00 RES,FXD:METAL FILM;20K OHM,1%,0.2W,TC=100 PPM 91637 CCF501G20001F A3R419 322–3318–00 RES,FXD:METAL FILM;20K OHM,1%,0.2W,TC=100 PPM 91637 CCF501G20001F A3R420 322–3354–00 RES,FXD:METAL FILM;47.5K OHM,1%,0.2W,TC=100 91637 CCF501G47501F A3R421 322–3318–00 RES,FXD:METAL FILM;20K OHM,1%,0.2W,TC=100 PPM 91637 CCF501G20001F A3R422 322–3318–00 RES,FXD:METAL FILM;20K OHM,1%,0.2W,TC=100 PPM 91637 CCF501G20001F A3R423 322–3354–00 RES,FXD:METAL FILM;47.5K OHM,1%,0.2W,TC=100 91637 CCF501G47501F A3R424 322–3318–00 RES,FXD:METAL FILM;20K OHM,1%,0.2W,TC=100 PPM 91637 CCF501G20001F A3R425 322–3318–00 RES,FXD:METAL FILM;20K OHM,1%,0.2W,TC=100 PPM 91637 CCF501G20001F A3R426 322–3354–00 RES,FXD:METAL FILM;47.5K OHM,1%,0.2W,TC=100 91637 CCF501G47501F A3R427 322–3318–00 RES,FXD:METAL FILM;20K OHM,1%,0.2W,TC=100 PPM 91637 CCF501G20001F A3R428 322–3318–00 RES,FXD:METAL FILM;20K OHM,1%,0.2W,TC=100 PPM 91637 CCF501G20001F A3R429 322–3354–00 RES,FXD:METAL FILM;47.5K OHM,1%,0.2W,TC=100 91637 CCF501G47501F A3R430 322–3193–00 RES,FXD:METAL FILM;1K OHM,1%,0.2W,TC=100 PPM 91637 CCF501G10000F A3R431 322–3210–00 RES,FXD:METAL FILM;1.5K OHM,1%,0.2W,TC=100 PPM 91637 CCF501G15000F A3R432 322–3193–00 RES,FXD:METAL FILM;1K OHM,1%,0.2W,TC=100 PPM 91637 CCF501G10000F A3R434 322–3105–00 RES,FXD:METAL FILM;121 OHM,1%,0.2W,TC=100 PPM 91637 CCF501G121ROF A3R435 322–3105–00 RES,FXD:METAL FILM;121 OHM,1%,0.2W,TC=100 PPM 91637 CCF501G121ROF A3R436 322–3105–00 RES,FXD:METAL FILM;121 OHM,1%,0.2W,TC=100 PPM 91637 CCF501G121ROF A3R437 322–3130–00 RES,FXD:METAL FILM;221 OHM,1%,0.2W,TC=100 PPM 57668 RB20FX221E A3R438 322–3130–00 RES,FXD:METAL FILM;221 OHM,1%,0.2W,TC=100 PPM 57668 RB20FX221E A3R441 322–3193–00 RES,FXD:METAL FILM;1K OHM,1%,0.2W,TC=100 PPM 91637 CCF501G10000F A3R442 322–3154–00 RES,FXD:METAL FILM;392 OHM,1%,0.2W,TC=100 PPM 91637 CCF501G392R0F A3R443 322–3105–00 RES,FXD:METAL FILM;121 OHM,1%,0.2W,TC=100 PPM 91637 CCF501G121ROF A3R444 322–3051–00 RES,FXD:METAL FILM;33.2 OHM,1%,0.2W,TC=100 PPM 57668 CRB20FXE33E2 A3R445 322–3226–00 RES,FXD:METAL FILM;2.21K OHM,1%,0.2W,TC=100 91637 CCF501G22100F A3R446 322–3226–00 RES,FXD:METAL FILM;2.21K OHM,1%,0.2W,TC=100 91637 CCF501G22100F A3R447 322–3226–00 RES,FXD:METAL FILM;2.21K OHM,1%,0.2W,TC=100 91637 CCF501G22100F A3R448 322–3226–00 RES,FXD:METAL FILM;2.21K OHM,1%,0.2W,TC=100 91637 CCF501G22100F A3R449 322–3114–00 RES,FXD:METAL FILM;150 OHM,1%,0.2W,TC=100 PPM 91637 CCF50–2–G1500F A3R450 322–3226–00 RES,FXD:METAL FILM;2.21K OHM,1%,0.2W,TC=100 91637 CCF501G22100F A3R451 322–3226–00 RES,FXD:METAL FILM;2.21K OHM,1%,0.2W,TC=100 91637 CCF501G22100F A3R452 322–3226–00 RES,FXD:METAL FILM;2.21K OHM,1%,0.2W,TC=100 91637 CCF501G22100F AM700 Audio Measurement Set Service Manual 8–45 Replaceable Electrical Parts Replaceable electrical parts list (cont.) Component number Tektronix part number A3R453 322–3051–00 A3R454 A3R455 Serial no. effective Serial no. discont’d Name & description Mfr. code Mfr. part number RES,FXD:METAL FILM;33.2 OHM,1%,0.2W,TC=100 PPM 57668 CRB20FXE33E2 322–3193–00 RES,FXD:METAL FILM;1K OHM,1%,0.2W,TC=100 PPM 91637 CCF501G10000F 322–3485–00 RES,FXD,FILM:5.0K OHM,1%,0.2W,TC=TO,SMALL BODY 91637 CCF501G50000F A3R456 322–3318–00 RES,FXD:METAL FILM;20K OHM,1%,0.2W,TC=100 PPM 91637 CCF501G20001F A3R457 322–3485–00 RES,FXD,FILM:5.0K OHM,1%,0.2W,TC=TO,SMALL BODY 91637 CCF501G50000F A3R458 322–3318–00 RES,FXD:METAL FILM;20K OHM,1%,0.2W,TC=100 PPM 91637 CCF501G20001F A3R459 322–3222–00 RES,FXD:METAL FILM;2K OHM,1%,0.2W,TC=100 PPM 91637 CCF501G20000F A3R460 322–3243–00 RES,FXD:METAL FILM;3.32K OHM,1%,0.2W,TC=100 91637 CCF50–1–G33200F A3R461 322–3254–00 RES,FXD,FILM:4.32K OHM,1%,0.2W,TC=T0MI,SMALL BODY 91637 CCF502G4321FT A3R462 322–3193–00 RES,FXD:METAL FILM;1K OHM,1%,0.2W,TC=100 PPM 91637 CCF501G10000F A3R464 322–3034–00 RES,FXD:METAL FILM;22.1 OHM,1%,0.2W,TC=100 PPM 91637 CCF50–2–G22R10F A3R465 322–3034–00 RES,FXD:METAL FILM;22.1 OHM,1%,0.2W,TC=100 PPM 91637 CCF50–2–G22R10F A3R466 322–3289–00 RES,FXD:METAL FILM;10K OHM,1%,0.2W,TC=100 PPM 91637 CCF50G10001F A3R467 322–3289–00 RES,FXD:METAL FILM;10K OHM,1%,0.2W,TC=100 PPM 91637 CCF50G10001F A3R468 322–3485–00 RES,FXD,FILM:5.0K OHM,1%,0.2W,TC=TO,SMALL BODY 91637 CCF501G50000F A3R469 322–3485–00 RES,FXD,FILM:5.0K OHM,1%,0.2W,TC=TO,SMALL BODY 91637 CCF501G50000F A3R470 322–3147–00 RES,FXD:METAL FILM;332 OHM,1%,0.2W,TC=100 PPM 91637 CCF501G332R0F A3R471 322–3222–00 RES,FXD:METAL FILM;2K OHM,1%,0.2W,TC=100 PPM 91637 CCF501G20000F A3R472 322–3226–00 RES,FXD:METAL FILM;2.21K OHM,1%,0.2W,TC=100 91637 CCF501G22100F A3R473 322–3185–00 RES,FXD:METAL FILM;825 OHM,1%,0.2W,TC=100 PPM 91637 CCF501G825ROF A3R474 322–3126–00 RES,FXD,FILM:200 OHM,1%,0.2W,TC=T0MI,SMALL BODY 91637 CCF501G200ROF A3R475 322–3222–00 RES,FXD:METAL FILM;2K OHM,1%,0.2W,TC=100 PPM 91637 CCF501G20000F A3R476 322–3222–00 RES,FXD:METAL FILM;2K OHM,1%,0.2W,TC=100 PPM 91637 CCF501G20000F A3R477 322–3147–00 RES,FXD:METAL FILM;332 OHM,1%,0.2W,TC=100 PPM 91637 CCF501G332R0F A3R478 322–3335–00 A3R478 322–3361–00 A3R479 322–3222–00 RES,FXD:METAL FILM;2K OHM,1%,0.2W,TC=100 PPM 91637 CCF501G20000F A3R480 322–3201–00 RES,FXD:METAL FILM;1.21K OHM,1%,0.2W,TC=100 91637 CCF501G12100F A3R482 322–3147–00 RES,FXD:METAL FILM;332 OHM,1%,0.2W,TC=100 PPM 91637 CCF501G332R0F A3R483 311–2271–00 RES,VAR,TRMR:CERMET;5K OHM,20%,0.5W,0.197 SQ TK2073 GF06VT2 502 M L A3R484 322–3339–00 RES,FXD:METAL FILM;33.2K OHM,1%,0.2W,TC=100 91637 CCF50–2–G3322FT A3R485 322–3193–00 RES,FXD:METAL FILM;1K OHM,1%,0.2W,TC=100 PPM 91637 CCF501G10000F A3R486 322–3139–00 RES,FXD:METAL FILM;274 OHM,1%,0.2W,TC=100 PPM 91637 CCF501G274ROF A3R487 322–3481–00 RES,FXD,FILM:1M OHM.1%,0.2W,TC=T0MI,SMALL BODY 91637 CCF501G10003F A3R488 322–3066–00 RES,FXD:METAL FILM;47.5 OHM,1%,0.2W,TC=100 PPM 09969 CCF502G47R50F A3R489 322–3066–00 RES,FXD:METAL FILM;47.5 OHM,1%,0.2W,TC=100 PPM 09969 CCF502G47R50F A3R490 322–3066–00 RES,FXD:METAL FILM;47.5 OHM,1%,0.2W,TC=100 PPM 09969 CCF502G47R50F A3R491 322–3218–00 RES,FXD:METAL FILM;1.82K OHM,1%,0.2W,TC=100 91637 CCF501G18200F 8–46 B010421 B010422 RES,FXD,FILM:30.1K OHM,1%,0.2W,TC=T0MI,SMALL BODY 91637 CCF501G30101F RES,FXD:METAL FILM,56.2K OHM,1%,0.2W,TC=100 PPM 91637 CCF50–2F56201F AM700 Audio Measurement Set Service Manual Replaceable Electrical Parts Replaceable electrical parts list (cont.) Component number Tektronix part number A3R492 322–3154–00 A3R493 A3R494 Serial no. effective Serial no. discont’d Name & description Mfr. code Mfr. part number RES,FXD:METAL FILM;392 OHM,1%,0.2W,TC=100 PPM 91637 CCF501G392R0F 322–3218–00 RES,FXD:METAL FILM;1.82K OHM,1%,0.2W,TC=100 91637 CCF501G18200F 322–3030–00 RES,FXD:METAL FILM;20 OHM,1%,0.2W,TC=100 PPM 91637 CCF50G20R00F A3R495 322–3030–00 RES,FXD:METAL FILM;20 OHM,1%,0.2W,TC=100 PPM 91637 CCF50G20R00F A3R496 322–3034–00 RES,FXD:METAL FILM;22.1 OHM,1%,0.2W,TC=100 PPM 91637 CCF50–2–G22R10F A3R497 322–3289–00 RES,FXD:METAL FILM,10K OHM,1%,0.2W,TC=100 PPM 57668 CRB20T29EFX1002 A3R497 322–3331–00 B010249 RES,FXD:METAL FILM,27.4K OHM,1%,0.2W,TC=100 PPM 57668 CRB20 FXE 27K4 A3R498 322–3414–00 B010249 RES,FXD:METAL FILM,200K OHM,1%,0.2W,TC=100 PPM 57668 CRB 20 FXE A3R498 322–3361–00 B010422 RES,FXD:METAL FILM,56.2K OHM,1%,0.2W,TC=100 PPM 91637 CCF50–2F56201F A3R499 322–3339–00 B010249 RES,FXD:METAL FILM,33.2K OHM,1%,0.2W,TC=100 PPM,AXIAL 91637 CCF50–2–G3322FT A3R500 322–3089–00 B010249 RES,FXD:METAL FILM,82.5 OHM,1%.0.2W,TC=100 PPM,AXIAL 57668 CRB20 FXE 82E5 A3R501 322–3258–00 B010249 RES,FXD:METAL FILM,4.75K OHM,1%,0.2W,TC=100 PPM,AXIAL 56845 CCF50–2–G4751FT A3R502 322–3034–00 B010249 RES,FXD:METAL FILM,22.1 OHM,1%,0.2W,TC=100 PPM,AXIAL 91637 CCF50–2–G22R10F A3R510 322–3258–00 B010249 RES,FXD:METAL FILM,4.75K OHM,1%,0.2W,TC=100 PPM 56845 CCF50–4751F–R36 A3RC1 307–1587–00 RES NTWK,FXD,FI:TERMN NTWK 91637 CSRC–09C30–101J A3RC2 307–1587–00 RES NTWK,FXD,FI:TERMN NTWK 91637 CSRC–09C30–101J B010248 B010421 A3RC3 307–1587–00 RES NTWK,FXD,FI:TERMN NTWK 91637 CSRC–09C30–101J A3TP1 214–4085–00 TERM,TEST POINT:0.070 ID,0.220 H,0.063 DIAPCB 26364 104–01–02 A3TP3 214–4085–00 TERM,TEST POINT:0.070 ID,0.220 H,0.063 DIAPCB 26364 104–01–02 A3TP4 214–4085–00 TERM,TEST POINT:0.070 ID,0.220 H,0.063 DIAPCB 26364 104–01–02 A3TP5 214–4085–00 TERM,TEST POINT:0.070 ID,0.220 H,0.063 DIAPCB 26364 104–01–02 A3TP8 214–4085–00 TERM,TEST POINT:0.070 ID,0.220 H,0.063 DIAPCB 26364 104–01–02 A3TP10 214–4085–00 TERM,TEST POINT:0.070 ID,0.220 H,0.063 DIAPCB 26364 104–01–02 A3TP11 214–4085–00 TERM,TEST POINT:0.070 ID,0.220 H,0.063 DIAPCB 26364 104–01–02 A3TP12 214–4085–00 TERM,TEST POINT:0.070 ID,0.220 H,0.063 DIAPCB 26364 104–01–02 A3TP13 214–4085–00 TERM,TEST POINT:0.070 ID,0.220 H,0.063 DIAPCB 26364 104–01–02 A3TP14 214–4085–00 TERM,TEST POINT:0.070 ID,0.220 H,0.063 DIAPCB 26364 104–01–02 A3TP15 214–4085–00 TERM,TEST POINT:0.070 ID,0.220 H,0.063 DIAPCB 26364 104–01–02 A3TP16 214–4085–00 TERM,TEST POINT:0.070 ID,0.220 H,0.063 DIAPCB 26364 104–01–02 A3TP17 214–4085–00 TERM,TEST POINT:0.070 ID,0.220 H,0.063 DIAPCB 26364 104–01–02 A3TP18 214–4085–00 TERM,TEST POINT:0.070 ID,0.220 H,0.063 DIAPCB 26364 104–01–02 A3TP19 214–4085–00 TERM,TEST POINT:0.070 ID,0.220 H,0.063 DIAPCB 26364 104–01–02 A3U2 156–4229–00 IC,LIN:BIPOLAR,OP–AMP;120MHZ,UNCOMPENSATED 24355 AD829AQ A3U3 156–2873–00 IC,LINEAR:BIFET,OP–AMP;DUAL 04713 MC34082P A3U4 156–6708–01 IC,PROCESSOR:CMOS,DSP;24 BITS,40MHZ,PLL 80009 156670801 A3U5 160–9862–00 IC,DIGITAL:CMOS,PLD;EEPLD,22V10,7.5NS,140MA 80009 160–9862–00 136–0925–00 SOCKET,DIP:PCB;24 POS,2 X 12,0.1 X 0.3 CTR 00779 2–641932–3 *MOUNTING PARTS* AM700 Audio Measurement Set Service Manual 8–47 Replaceable Electrical Parts Replaceable electrical parts list (cont.) Component number Tektronix part number Serial no. effective Serial no. discont’d Mfr. code Name & description Mfr. part number *END MOUNTING PARTS* A3U21 156–2873–00 IC,LINEAR:BIFET,OP–AMP;DUAL 04713 MC34082P A3U39 156–3095–00 IC,LINEAR:BIPOLAR,OP–AMP;DUAL,0.8MV VOS,30NA IB 64155 LT1013CN8 A3U59 160–9863–00 IC,DIGITAL:CMOS,PLD;EEPLD,26V12,20NS,105MA 80009 160–9863–00 136–1038–00 SOCKET,DIP:PCB;STR,28 POS,2 X 14,0.1X 0.3CTR 00779 2–382571–1 A3U64 156–0266–00 IC,LINEAR:ECL,MISC;VCO,200MHZ 04713 MC1648P A3U71 156–4038–00 IC,MISC:CMOS,ANALOG SWITCH;DUAL SPDT,45 OHM 1ES66 DG403DJ/C30244 A3U72 156–4273–00 IC,LINEAR:BIPOLAR,OP–AMP;CURRENT FEEDBACK,100MHZ 64762 EL2120CN A3U74 156–4408–00 IC,LINEAR:BIPOLAR,AMPLIFIER;DIFFERENCE AMPL,35MHZ 64155 LT1194CN8 *MOUNTING PARTS* *END MOUNTING PARTS* A3U75 156–4273–00 IC,LINEAR:BIPOLAR,OP–AMP;CURRENT FEEDBACK,100MHZ 64762 EL2120CN A3U76 156–4273–00 IC,LINEAR:BIPOLAR,OP–AMP;CURRENT FEEDBACK,100MHZ 64762 EL2120CN A3U78 156–0266–00 IC,LINEAR:ECL,MISC;VCO,200MHZ 04713 MC1648P A3U79 156–0266–00 IC,LINEAR:ECL,MISC;VCO,200MHZ 04713 MC1648P A3U81 156–4274–00 IC,MISC:CMOS,FREQ SYNTH;W/PLL,SERIAL DATA INPUT 04713 MC145170P A3U82 156–4274–00 IC,MISC:CMOS,FREQ SYNTH;W/PLL,SERIAL DATA INPUT 04713 MC145170P A3U83 156–0846–00 IC,LINEAR:BIPOLAR,VR;NEGATIVE,–5.0V,1.0A,4.0% 27014 LM320T–5.0 A3U84 156–2559–00 IC,LINEAR:BIPOLAR,VR;NEGATIVE,–12V,1.5A,2% 48726 UC7912ACT A3U85 156–2558–00 IC,LINEAR:BIPOLAR,VR;POSITIVE,12V,1.5A,2% 01295 TL780–12CKC A3U86 156–4409–00 IC,DIGITAL:CMOS,MISC;DIGITAL AUDIO INTER RECEIVER 0A384 CS8412–CP A3U87 156–4409–00 IC,DIGITAL:CMOS,MISC;DIGITAL AUDIO INTER RECEIVER 0A384 CS8412–CP A3U88 156–4410–00 IC,DIGITAL:CMOS,MISC;DIGITAL AUDIO INTERACE 0A384 CS8402A–CP A3U89 156–1315–00 IC,MISC:LSTTL,INTERFACE;QUAD DIFFERENTIAL LINE RECVR 27014 DS26LS32N A3U93 156–2834–00 IC,DIGITAL:HCMOS,REGISTER;8–BIT PISO,WITH CLEAR 01295 SN74HC166N A3U94 156–2834–00 IC,DIGITAL:HCMOS,REGISTER;8–BIT PISO,WITH CLEAR 01295 SN74HC166N A3U95 156–2349–00 IC,DIGITAL:HCMOS,RGTR;8–BIT SIPO,LATCHED 3–STATE 0JR04 TC74HC595AP A3U96 156–2349–00 IC,DIGITAL:HCMOS,RGTR;8–BIT SIPO,LATCHED 3–STATE 0JR04 TC74HC595AP A3U97 156–2349–00 IC,DIGITAL:HCMOS,RGTR;8–BIT SIPO,LATCHED 3–STATE 0JR04 TC74HC595AP A3U98 156–4443–00 IC,MEMORY:CMOS,SRAM;128K X 32 MODULE,25NS 6Y440 MT4S12832M–25 00779 91–1744–14–64 *MOUNTING PARTS* 136–1235–00 SOCKET,SIMM:PCB,SIMM II;FEMALE,22.5 DEG,1 XLZ *END MOUNTING PARTS* A3U99 156–4519–00 IC,DIGITAL:FCTCMOS,TRANSCEIVER;OCTAL 0TJ19 QS74FCT2245TP A3U100 156–4387–00 IC,DIGITAL:FCTCMOS,BUFFER;OCTAL 0TJ19 QS74FCT2244TP A3U101 156–6698–02 IC,ASIC:CMOS,CUSTOM;TRANSMITTER/RCVR,ADG312C 80009 156669802 A3U102 160–9864–00 IC,DIGITAL:CMOS,PLD;OTP,ATV2500,24 M/C,14 IN,24 I/O 80009 160–9864–00 *MOUNTING PARTS* 8–48 AM700 Audio Measurement Set Service Manual Replaceable Electrical Parts Replaceable electrical parts list (cont.) Component number Tektronix part number Serial no. effective Serial no. discont’d Name & description Mfr. code 136–1047–00 SKT,PLCC:PCB;44 POS,0.05 CTR,0.360H X 0.125 TAIL,TIN 00779 821575–1 A3U103 156–1638–00 IC,CONVERTER:BIPOLAR,D/A;10 BIT,150NS,CURRENT OUT 24355 DAC10GP A3U104 160–9866–00 IC,DIGITAL:CMOS,PLD;EEPLD,MACH 210,64 M/C,32 I/O,6 IN 80009 160–9866–00 136–1047–00 SOCKET,PLCC:PCB;44 POS,0.05 CTR,0.360H X 0.125 TAIL,TIN 00779 821575–1 160–9868–00 IC,DIGITAL:CMOS,PLD;OTP,5032,32 MACROCELL,20NS 80009 160–9868–00 00779 2–382571–1 Mfr. part number *END MOUNTING PARTS* *MOUNTING PARTS* *END MOUNTING PARTS* A3U105 *MOUNTING PARTS* 136–1038–00 SOCKET,DIP:PCB;STR,28 POS,2 X 14,0.1X 0.3CTR *END MOUNTING PARTS* A3U106 156–3750–00 IC,LINEAR:BIPOLAR,AMPL;UNITY GAIN BUFFER,100MHZ 64762 EL2003CN A3U107 156–1638–00 IC,CONVERTER:BIPOLAR,D/A;10 BIT,150NS,CURRENT OUT 24355 DAC10GP A3U108 160–9869–00 B010100 IC,DIGITAL:CMOS,PLD;EEPLD,MACH 220,96 M/C,48 I/O,8 IN 80009 160–9869–00 A3U108 160–9869–01 B010249 IC,DIGITAL:CMOS,PLD;EEPLD,MACH 220,96 M/C,48 I/O,8 IN 80009 160–9869–00 00779 3–821574–1 17856 DG444DJ B010248 *MOUNTING PARTS* 136–0871–00 SOCKET,PLCC:PCB;68 POS,0.05 CTR,0.360H X0.125 TAIL,TIN *END MOUNTING PARTS* A3U109 156–3972–00 IC,MISC:CMOS,ANALOG SWITCH;QUAD SPST,100 OHM,400NS A3U110 156–4275–00 IC,LINEAR:BIPOLAR,AMPLIFIER;DUAL,VARIABLE GAIN 24355 AD602JN A3U111 156–4273–00 IC,LINEAR:BIPOLAR,OP–AMP;CURRENT FEEDBACK,100MHZ 64762 EL2120CN A3U112 156–1191–00 IC,LINEAR:BIFET,OP–AMP;DUAL 01295 TL072CP A3U113 156–2873–00 IC,LINEAR:BIFET,OP–AMP;DUAL 04713 MC34082P A3U114 160–9867–00 IC,DIGITAL:CMOS,PLD;EEPLD,MACH210,64 M/C,32 80009 160–9867–00 136–1047–00 SKT,PLCC:PCB;44 POS,0.05 CTR,0.360H X 0.125 TAIL,TIN 00779 821575–1 IC,DIGITAL:CMOS,PLD;EEPLD,MACH 110,32 M/C,32 I/O,6 IN 80009 160–9871–00 IC,DIGITAL:CMOS,PLD;OPT,ATV2500,24 MACROCELL, 14 INPUTS, 24 I/O,48 FLIP FLOPS,35NS;ATV2500H–35 80009 160–9871–01 00779 821575–1 *MOUNTING PARTS* *END MOUNTING PARTS* A3U115 160–9871–00 B010100 A3U115 160–9871–01 B010249 B010248 *MOUNTING PARTS* 136–1047–00 SKT,PLCC:PCB;44 POS,0.05 CTR,0.360H X 0.125 TAIL,TIN *END MOUNTING PARTS* A3U116 156–2584–00 A3U117 160–9872–00 B010100 A3U117 160–9872–01 B010249 B010248 IC,DIGITAL:HCMOS,FLIP FLOP;OCTAL D–TYPE, CLEAR 0JR04 TC74HC273AP IC,DIGITAL:CMOS,PLD;EEPLD,MACH 110,32 M/C,32 I/O,6 IN 80009 160–9872–00 IC,DIGITAL:CMOS,PLD;EEPLD,MACH 110,32 M/C,32 I/O,6 IN 80009 160–9872–01 00779 821575–1 *MOUNTING PARTS* 136–1047–00 SKT,PLCC:PCB;44 POS,0.05 CTR,0.360H X 0.125 TAIL,TIN *END MOUNTING PARTS* AM700 Audio Measurement Set Service Manual 8–49 Replaceable Electrical Parts Replaceable electrical parts list (cont.) Component number Tektronix part number Serial no. effective Serial no. discont’d Name & description Mfr. code A3U118 156–3063–00 Mfr. part number IC,DIGITAL:HCMOS,DEMUX/DECODER;2–TO–4 01295 SN74HC139N A3U122 156–4274–00 IC,MISC:CMOS,FREQ SYNTH;W/PLL,SERIAL DATA INPUT 04713 MC145170P A3U123 156–0266–00 IC,LINEAR:ECL,MISC;VCO,200MHZ 04713 MC1648P A3U124 156–4171–00 IC,CONVERTER:CMOS,A/D;8–BIT,30MSPS,2–STEP FLASH 07933 TMC1175N2C30 A3U125 156–0858–00 IC,MISC:CMOS,ANALOG SWITCH;QUAD SPST 1ES66 DG201ACJ/C30248 A3U126 156–1191–00 IC,LINEAR:BIFET,OP–AMP;DUAL 01295 TL072CP A3U127 156–1191–00 IC,LINEAR:BIFET,OP–AMP;DUAL 01295 TL072CP A3U128 156–1191–00 IC,LINEAR:BIFET,OP–AMP;DUAL 01295 TL072CP A3U129 156–3972–00 IC,MISC:CMOS,ANALOG SWITCH;QUAD SPST,100 OHM,400NS 17856 DG444DJ A3U130 160–9865–00 IC,DIGITAL:CMOS,PLD;OTP,ATV2500,24 M/C,14 IN,24 I/O,48 FLIP FLOPS,35NS 80009 160–9865–00 136–1047–00 SKT,PLCC:PCB;44 POS,0.05 CTR,0.360H X 0.125 TAIL,TIN 00779 821575–1 A3U132 156–4275–00 IC,LINEAR:BIPOLAR,AMPLIFIER;DUAL,VARIABLE GAIN 24355 AD602JN A3U133 156–4273–00 IC,LINEAR:BIPOLAR,OP–AMP;CURRENT FEEDBACK,100MHZ 64762 EL2120CN *MOUNTING PARTS* *END MOUNTING PARTS* A3U134 156–4273–00 IC,LINEAR:BIPOLAR,OP–AMP;CURRENT FEEDBACK,100MHZ 64762 EL2120CN A3U135 156–4273–00 IC,LINEAR:BIPOLAR,OP–AMP;CURRENT FEEDBACK,100MHZ 64762 EL2120CN A3U136 156–2460–00 IC,MISC:BIPOLAR,MOD/DEMOD;BALANCED 04713 MC1496P A3U137 156–3905–00 IC,CONVERTER:CMOS,A/D;12–BIT,13US,SAR,8CHAN 64155 LTC1290 (DCN OR A3U138 156–3608–00 IC,LINEAR:BIPOLAR,V REF;POS,5.0V,0.05%,20PPM,SER 64155 LT1021CCN8–5 A3U139 160–9873–00 IC.DIGITAL:CMOS,PLD;EEPLD,MACH 110,32 M/C,32 I/O,6 IN 80009 160–9873–00 00779 821575–1 80009 160–9870–00 00779 821575–1 *MOUNTING PARTS* 136–1047–00 SKT,PLCC:PCB;44 POS,0.05 CTR,0.360H X 0.125 TAIL,TIN *END MOUNTING PARTS* A3U140 160–9870–00 IC,DIGITAL:CMOS,PLD;EEPLD,MACH 110,32 M/C,32 I/O,6 IN 136–1047–00 SKT,PLCC:PCB;44 POS,0.05 CTR,0.360H X 0.125 TAIL,TIN A3U141 156–2349–00 IC,DIGITAL:HCMOS,RGTR;8–BIT SIPO,LATCHED 3–STATE 0JR04 TC74HC595AP A3U142 156–2349–00 IC,DIGITAL:HCMOS,RGTR;8–BIT SIPO,LATCHED 3–STATE 0JR04 TC74HC595AP *MOUNTING PARTS* *END MOUNTING PARTS* A3U143 156–2698–00 IC,LINEAR:BIPOLAR,VR;POSITIVE,5.0V,1.0A,2% 01295 TL780–05CKC A3U144 156–1722–00 IC,DIGITAL:FTTL,GATE;HEX INV 04713 MC74F04N A3U145 156–4038–00 IC,MISC:CMOS,ANALOG SWITCH;DUAL SPDT,45 OHM 1ES66 DG403DJ/C30244 A3U146 156–1191–00 IC,LINEAR:BIFET,OP–AMP;DUAL 01295 TL072CP A3U148 156–4521–00 IC,MISC:CMOS,PWR SUPPLY SUPERVISOR;MPU RESET GEN 0B0A9 DS1233–10 A3U149 156–1150–01 IC,LINEAR:BIPOLAR,VOLTAGE REGULATOR,NEGATIVE,–5.0V,100MA,4%,MC79L05ACP,TO–92 04713 MC79L05ACPRP 8–50 B010249 AM700 Audio Measurement Set Service Manual Replaceable Electrical Parts Replaceable electrical parts list (cont.) Component number Tektronix part number Serial no. effective A3U150 156–1150–01 B010249 A3VR1 152–0166–00 Serial no. discont’d Mfr. code Mfr. part number IC,LINEAR:BIPOLAR,VOLTAGE REGULATOR,NEGATIVE,–5.0V,100MA,4%,MC79L05ACP,TO–92 04713 MC79L05ACPRP DIODE,ZENER:6.2V,5%,0.4W 04713 1N5995BRL Name & description A3VR2 152–0226–00 B010248 DIODE,ZENER:5.1V,5%,0.4W 14552 TD3810980 A3Y1 119–4698–00 B010248 OSCILLATOR:VCXO;12.288MHZ,5PPM,0.5 TO4.5VDC 21022 H10BV–12.288MHZ A3Y1 119–4642–00 OSCILLATOR:CRYSTAL CONTROLLED,12.288000 MHZ,100 PPM,HCMOS,4 PIN DIP,14 PIN DIP COMPATIBLE 14301 012–401–01525 B010248 AM700 Audio Measurement Set Service Manual 8–51 Replaceable Electrical Parts Replaceable electrical parts list Component number Tektronix part number A4 Serial no. effective Serial no. discont’d Name & description Mfr. code Mfr. part number 671–2916–00 CIRCUIT BD ASSY:REAR PANEL 80009 671291600 333–4109–00 PANEL,REAR:AES,AM700 80009 333410900 A4C1 281–0775–01 CAP,FXD,CERAMIC:MCL;0.1UF,20%,50V,Z5U,0.170 04222 SA105E104MAA A4C2 281–0775–01 CAP,FXD,CERAMIC:MCL;0.1UF,20%,50V,Z5U,0.170 04222 SA105E104MAA A4C3 281–0775–01 CAP,FXD,CERAMIC:MCL;0.1UF,20%,50V,Z5U,0.170 04222 SA105E104MAA A4C4 281–0775–01 CAP,FXD,CERAMIC:MCL;0.1UF,20%,50V,Z5U,0.170 04222 SA105E104MAA A4C5 285–1338–00 CAP,FXD,MTLZD:1.0UF,10%,50VTAPE & AMMO PACK TK1913 MKS 2 1.0/63/10 A4C6 285–1338–00 CAP,FXD,MTLZD:1.0UF,10%,50VTAPE & AMMO PACK TK1913 MKS 2 1.0/63/10 A4C7 285–1338–00 CAP,FXD,MTLZD:1.0UF,10%,50VTAPE & AMMO PACK TK1913 MKS 2 1.0/63/10 A4C8 285–1338–00 CAP,FXD,MTLZD:1.0UF,10%,50VTAPE & AMMO PACK TK1913 MKS 2 1.0/63/10 A4C9 281–0797–00 CAP,FXD,CERAMIC:MLC;15PF,10%,100V 04222 SA102A150KAA A4C10 281–0797–00 CAP,FXD,CERAMIC:MLC;15PF,10%,100V 04222 SA102A150KAA A4C11 281–0797–00 CAP,FXD,CERAMIC:MLC;15PF,10%,100V 04222 SA102A150KAA A4C12 281–0797–00 CAP,FXD,CERAMIC:MLC;15PF,10%,100V 04222 SA102A150KAA A4C13 281–0819–00 CAP,FXD,CERAMIC:MLC;33 PF,5%,50V,0.100 X 0.170 04222 SA102A330JAA A4C14 281–0819–00 CAP,FXD,CERAMIC:MLC;33 PF,5%,50V,0.100 X 0.170 04222 SA102A330JAA A4C15 281–0819–00 CAP,FXD,CERAMIC:MLC;33 PF,5%,50V,0.100 X 0.170 04222 SA102A330JAA A4C16 281–0819–00 CAP,FXD,CERAMIC:MLC;33 PF,5%,50V,0.100 X 0.170 04222 SA102A330JAA A4FL1 119–4472–00 FILTER,RF:EMI/RFI;50V,500MA,0.12 OHMS MAX DCR,200 OHMS IMPEADANCE AT 20–300MHZ,4 COMMON MODE CHOKE COILS TK2058 ZJY51R5–8PA A4FL2 119–4472–00 FILTER,RF:EMI/RFI;50V,500MA,0.12 OHMS MAX DCR,200 OHMS IMPEADANCE AT 20–300MHZ,4 COMMON MODE CHOKE COILS TK2058 ZJY51R5–8PA A4FL3 119–4472–00 FILTER,RF:EMI/RFI;50V,500MA,0.12 OHMS MAX DCR,200 OHMS IMPEADANCE AT 20–300MHZ,4 COMMON MODE CHOKE COILS TK2058 ZJY51R5–8PA A4J1 131–4046–00 CONN,DSUB:PCB/PNL;FEMALE,RTANG,15 POS,0.318 MLG X 0.125 TAIL,4–40 THD INSERTS,BD RETENTION 00779 A4J2 131–4048–00 CONN,HDR:PCB;MALE,RTANG,2 X 17,0.05 X 0.1CTR,0.326 H X 0.106TAIL,0.075 STAGGERED PCB,W/EJECTOR LATCH TK1462 NFP–34A–0112A A4J3 131–5230–00 CONN,CIRC:PCB/PNL,AUDIO;FEMALE,RTANG,3 POS,0.984 H X 0.16 TAIL,0.492 MATING CL,LATCHING 0FMA6 NC3FDH A4J4 131–3987–00 CONN,CIRC:PCB,AUDIO;MALE,RTANG,3 POS,1.22H X 1.024 W,CTR PLZ,LATCHING 0FMA6 NC3MD–H A4J5 131–0955–00 CONN,RF JACK:BNC;50 OHM,FEMALE,STR,SLDR CUP/FRONT PNL,GOLD,0.520 MLG X 0.490 TAIL,0.092 L SLDR CUP,0.375–32/D/1 FLAT (QUANTITY 2) K1072 G35152BN 80009 196341100 *ATTACHED PARTS* *END ATTACHED PARTS* 747845–4 *ATTACHED PARTS* 196–3411–00 LEAD,ELECTRICAL:FLAT FLEX;FLX,27 AWG,3.0 L,PCB TERM BOTH ENDS,STR,(STRAIN RELIEF TERMS) (QUANTITY 2) *END ATTACHED PARTS* 8–52 AM700 Audio Measurement Set Service Manual Replaceable Electrical Parts Replaceable electrical parts list (cont.) Component number Tektronix part number A4J6 131–5678–00 A4J7 131–5679–00 A4L1 108–1263–00 A4L2 Serial no. effective Serial no. discont’d Name & description Mfr. code Mfr. part number CONN:TORX176 80009 131567800 CONN:TOTX176 80009 131567900 INDUCTOR,FXD:POWER;10UH,10%,I<2.1A,RDC<0.043 OHM,Q>20,SRF>19MHZ,BOBBIN TK2058 TSL0707–100K1R9 108–1263–00 INDUCTOR,FXD:POWER;10UH,10%,I<2.1A,RDC<0.043 OHM,Q>20,SRF>19MHZ,BOBBIN TK2058 TSL0707–100K1R9 A4L3 108–1243–00 INDUCTOR,FXD:SIGNAL;27UH,2%,IDC<135 MA,RDC<3.5 OHM,Q>50 (2.5MHZ),SRF>20 MHZ 24226 ML10–272G A4L4 108–1243–00 INDUCTOR,FXD:SIGNAL;27UH,2%,IDC<135 MA,RDC<3.5 OHM,Q>50 (2.5MHZ),SRF>20 MHZ 24226 ML10–272G A4R1 322–3069–00 RES,FXD,FILM:51.1 OHM,1%,0.2W,TC=T0MI,SMALL 91637 CCF501G51R10F A4R2 322–3165–00 RES,FXD,FILM:511 OHM,1%,0.2W,TC=T0MI,SMALL BODY 91637 CCF501G511R0F A4R3 322–3281–00 RES,FXD:METAL FILM;8.25K OHM,1%,0.2W,TC=100 91637 CCF501G82500F A4R4 321–0097–07 RES,FXD,FILM:100 OHM,0.1%,0.125W,TC=T9MI 57668 CRB14 BZE 100 O A4R5 321–0097–07 RES,FXD,FILM:100 OHM,0.1%,0.125W,TC=T9MI 57668 CRB14 BZE 100 O A4R6 321–0097–07 RES,FXD,FILM:100 OHM,0.1%,0.125W,TC=T9MI 57668 CRB14 BZE 100 O A4R7 321–0097–07 RES,FXD,FILM:100 OHM,0.1%,0.125W,TC=T9MI 57668 CRB14 BZE 100 O A4R8 322–3001–00 RES,FXD:METAL FILM;10 OHM,1%,0.2W,TC=100 PPM 91637 CCF501G10R00F A4R9 322–3001–00 RES,FXD:METAL FILM;10 OHM,1%,0.2W,TC=100 PPM 91637 CCF501G10R00F A4R10 322–3001–00 RES,FXD:METAL FILM;10 OHM,1%,0.2W,TC=100 PPM 91637 CCF501G10R00F A4R11 322–3001–00 RES,FXD:METAL FILM;10 OHM,1%,0.2W,TC=100 PPM 91637 CCF501G10R00F A4T1 120–1933–00 TRANSFORMER,SIG:WIDEBAND;0.02–100MHZ,INSERT 15542 T 1.5–6 X65 A4T2 120–1933–00 TRANSFORMER,SIG:WIDEBAND;0.02–100MHZ,INSERT 15542 T 1.5–6 X65 AM700 Audio Measurement Set Service Manual 8–53 Replaceable Electrical Parts Replaceable electrical parts list Component number Tektronix part number A5 671–2797–00 Serial no. effective A5 671–2797–01 B010330 A5 671–2797–02 B020100 Serial no. discont’d Name & description Mfr. code Mfr. part number B010329 CIRCUIT BD ASSY:AUDIO GENERATOR 80009 671–2797–00 B019999 CIRCUIT BD ASSY:AUDIO GENERATOR 80009 671–2797–01 CIRCUIT BD ASSY:AUDIO GENERATOR 80009 671–2797–02 *ATTACHED PARTS* 148–1023–00 RELAY,ARM:2 FORM C;220V, 1A, 30W, COIL 5V,178 OHM (QUANTITY 9) TK2520 EB2–5NUL 211–0722–00 SCREW,MACH:6–32 X 0.250,PNH,STL,CDPL,T–15 TORX DR 0KB01 ORDER BY DESC 337–4005–00 SHIELD.ELEC:GENERATOR CROSS TALK,AM700 80009 337-4005-00 385–0018–00 SPACER,POST:1.25 L W/6–32 THD EA END,NYL 74594 1763–632–N–0 *END ATTACHED PARTS* A5C1 283–5211–00 CAP,FXD,CERA C:MLC,4700PF,10%,50V,X7R,1206,8MM 04222 12065C472KAT2A A5C2 283–5004–00 CAP,FXD,CERA C:MLC,0.1UF,10%,25V,X7R,8MM 04222 12063C104KAT3A A5C3 283–5001–00 CAP,FXD,CERA C:MLC,100PF,5%,50V,NPO,8MM 04222 12065A101JAT1A A5C6 283–0594–00 CAP,FXD, CA DI:0.001UF,1%,100V 09023 CD15FA102F03 A5C7 283–5004–00 CAP,FXD,CERA C:MLC,0.1UF,10%,25V,X7R,8MM 04222 12063C104KAT3A A5C8 283–5004–00 CAP,FXD,CERA C:MLC,0.1UF,10%,25V,X7R,8MM 04222 12063C104KAT3A A5C9 283–5004–00 CAP,FXD,CERA C:MLC,0.1UF,10%,25V,X7R,8MM 04222 12063C104KAT3A A5C10 283–5004–00 CAP,FXD,CERA C:MLC,0.1UF,10%,25V,X7R,8MM 04222 12063C104KAT3A A5C11 283–5185–00 CAP,FXD,CERA C:MLC,1000PF,5%,50V,NPO,8MM 04222 12065A102JAT1A A5C12 290–5039–00 CAP,FXD,ALUM:10UF,20%,50V,6.3MM,SMD,16MM 62643 MVK50VC10RMF60TPX A5C13 283–5004–00 CAP,FXD,CERA C:MLC,0.1UF,10%,25V,X7R,8MM 04222 12063C104KAT3A A5C14 283–5004–00 CAP,FXD,CERA C:MLC,0.1UF,10%,25V,X7R,8MM 04222 12063C104KAT3A A5C15 283–5004–00 CAP,FXD,CERA C:MLC,0.1UF,10%,25V,X7R,8MM 04222 12063C104KAT3A A5C16 283–5004–00 CAP,FXD,CERA C:MLC,0.1UF,10%,25V,X7R,8MM 04222 12063C104KAT3A A5C17 283–5004–00 CAP,FXD,CERA C:MLC,0.1UF,10%,25V,X7R,8MM 04222 12063C104KAT3A A5C18 283–5004–00 CAP,FXD,CERA C:MLC,0.1UF,10%,25V,X7R,8MM 04222 12063C104KAT3A A5C19 283–5004–00 CAP,FXD,CERA C:MLC,0.1UF,10%,25V,X7R,8MM 04222 12063C104KAT3A A5C20 283–5004–00 CAP,FXD,CERA C:MLC,0.1UF,10%,25V,X7R,8MM 04222 12063C104KAT3A A5C21 283–5004–00 CAP,FXD,CERA C:MLC,0.1UF,10%,25V,X7R,8MM 04222 12063C104KAT3A A5C22 283–5001–00 CAP,FXD,CERA C:MLC,100PF,5%,50V,NPO,8MM 04222 12065A101JAT1A A5C23 290–5039–00 CAP,FXD,ALUM:10UF,20%,50V,6.3MM,SMD,16MM 62643 MVK50VC10RMF60TPX A5C24 283–0594–00 CAP,FXD, CA DI:0.001UF,1%,100V 09023 CD15FA102F03 A5C25 283–0594–00 CAP,FXD, CA DI:0.001UF,1%,100V 09023 CD15FA102F03 A5C26 283–0594–00 CAP,FXD, CA DI:0.001UF,1%,100V 09023 CD15FA102F03 A5C27 283–5004–00 CAP,FXD,CERA C:MLC,0.1UF,10%,25V,X7R,8MM 04222 12063C104KAT3A A5C28 283–5004–00 CAP,FXD,CERA C:MLC,0.1UF,10%,25V,X7R,8MM 04222 12063C104KAT3A A5C29 283–5004–00 CAP,FXD,CERA C:MLC,0.1UF,10%,25V,X7R,8MM 04222 12063C104KAT3A A5C30 283–5004–00 CAP,FXD,CERA C:MLC,0.1UF,10%,25V,X7R,8MM 04222 12063C104KAT3A A5C31 283–5185–00 CAP,FXD,CERA C:MLC,1000PF,5%,50V,NPO,8MM 04222 12065A102JAT1A 8–54 AM700 Audio Measurement Set Service Manual Replaceable Electrical Parts Replaceable electrical parts list (cont.) Component number Tektronix part number A5C32 290–5039–00 A5C33 A5C34 Serial no. effective Serial no. discont’d Name & description Mfr. code Mfr. part number CAP,FXD,ALUM:10UF,20%,50V,6.3MM,SMD,16MM 62643 MVK50VC10RMF60TPX 283–5004–00 CAP,FXD,CERA C:MLC,0.1UF,10%,25V,X7R,8MM 04222 12063C104KAT3A 283–5004–00 CAP,FXD,CERA C:MLC,0.1UF,10%,25V,X7R,8MM 04222 12063C104KAT3A A5C35 283–5004–00 CAP,FXD,CERA C:MLC,0.1UF,10%,25V,X7R,8MM 04222 12063C104KAT3A A5C36 283–5004–00 CAP,FXD,CERA C:MLC,0.1UF,10%,25V,X7R,8MM 04222 12063C104KAT3A A5C37 283–5004–00 CAP,FXD,CERA C:MLC,0.1UF,10%,25V,X7R,8MM 04222 12063C104KAT3A A5C38 283–5004–00 CAP,FXD,CERA C:MLC,0.1UF,10%,25V,X7R,8MM 04222 12063C104KAT3A A5C39 283–5004–00 CAP,FXD,CERA C:MLC,0.1UF,10%,25V,X7R,8MM 04222 12063C104KAT3A A5C40 283–5004–00 CAP,FXD,CERA C:MLC,0.1UF,10%,25V,X7R,8MM 04222 12063C104KAT3A A5C41 290–5039–00 CAP,FXD,ALUM:10UF,20%,50V,6.3MM,SMD,16MM 62643 MVK50VC10RMF60TPX A5C42 290–5039–00 CAP,FXD,ALUM:10UF,20%,50V,6.3MM,SMD,16MM 62643 MVK50VC10RMF60TPX A5C43 290–5039–00 CAP,FXD,ALUM:10UF,20%,50V,6.3MM,SMD,16MM 62643 MVK50VC10RMF60TPX A5C44 290–5039–00 CAP,FXD,ALUM:10UF,20%,50V,6.3MM,SMD,16MM 62643 MVK50VC10RMF60TPX A5C45 283–5004–00 CAP,FXD,CERA C:MLC,0.1UF,10%,25V,X7R,8MM 04222 12063C104KAT3A A5C46 283–5004–00 CAP,FXD,CERA C:MLC,0.1UF,10%,25V,X7R,8MM 04222 12063C104KAT3A A5C47 283–5004–00 CAP,FXD,CERA C:MLC,0.1UF,10%,25V,X7R,8MM 04222 12063C104KAT3A A5C48 283–5004–00 CAP,FXD,CERA C:MLC,0.1UF,10%,25V,X7R,8MM 04222 12063C104KAT3A A5C49 283–5004–00 CAP,FXD,CERA C:MLC,0.1UF,10%,25V,X7R,8MM 04222 12063C104KAT3A A5C50 283–5004–00 CAP,FXD,CERA C:MLC,0.1UF,10%,25V,X7R,8MM 04222 12063C104KAT3A A5C51 283–5004–00 CAP,FXD,CERA C:MLC,0.1UF,10%,25V,X7R,8MM 04222 12063C104KAT3A A5C52 290–0848–00 CAP,FXD,ALUM:47UF,20%,16V,ESR=7.05 OHM(120HZ,25C),10X12MM,RADIAL. 62643 CEBPM1E470M A5C53 290–0848–00 CAP,FXD,ALUM:47UF,20%,16V,ESR=7.05 OHM(120HZ,25C),10X12MM,RADIAL. 62643 CEBPM1E470M A5C53 290–5039–00 CAP,FXD,ALUM:10UF,20%,50V,6.3MM,SMD,16MM 62643 MVK50VC10RMF60TPX A5C54 283–5004–00 CAP,FXD,CERA C:MLC,0.1UF,10%,25V,X7R,8MM 04222 12063C104KAT3A A5C55 283–5004–00 CAP,FXD,CERA C:MLC,0.1UF,10%,25V,X7R,8MM 04222 12063C104KAT3A A5C56 283–5004–00 CAP,FXD,CERA C:MLC,0.1UF,10%,25V,X7R,8MM 04222 12063C104KAT3A A5C57 283–5004–00 CAP,FXD,CERA C:MLC,0.1UF,10%,25V,X7R,8MM 04222 12063C104KAT3A A5C58 283–5004–00 CAP,FXD,CERA C:MLC,0.1UF,10%,25V,X7R,8MM 04222 12063C104KAT3A A5C59 283–5004–00 CAP,FXD,CERA C:MLC,0.1UF,10%,25V,X7R,8MM 04222 12063C104KAT3A A5C60 283–5001–00 CAP,FXD,CERA C:MLC,100PF,5%,50V,NPO,8MM 04222 12065A101JAT1A A5C61 283–5001–00 CAP,FXD,CERA C:MLC,100PF,5%,50V,NPO,8MM 04222 12065A101JAT1A A5C62 283–5001–00 CAP,FXD,CERA C:MLC,100PF,5%,50V,NPO,8MM 04222 12065A101JAT1A A5C63 283–5001–00 CAP,FXD,CERA C:MLC,100PF,5%,50V,NPO,8MM 04222 12065A101JAT1A A5C64 283–5004–00 CAP,FXD,CERA C:MLC,0.1UF,10%,25V,X7R,8MM 04222 12063C104KAT3A A5C65 283–5004–00 CAP,FXD,CERA C:MLC,0.1UF,10%,25V,X7R,8MM 04222 12063C104KAT3A A5C66 283–5004–00 CAP,FXD,CERA C:MLC,0.1UF,10%,25V,X7R,8MM 04222 12063C104KAT3A A5C67 283–5004–00 CAP,FXD,CERA C:MLC,0.1UF,10%,25V,X7R,8MM 04222 12063C104KAT3A AM700 Audio Measurement Set Service Manual 8–55 Replaceable Electrical Parts Replaceable electrical parts list (cont.) Component number Tektronix part number A5C68 283–5004–00 A5C69 A5C70 Name & description Mfr. code Mfr. part number CAP,FXD,CERA C:MLC,0.1UF,10%,25V,X7R,8MM 04222 12063C104KAT3A 283–5004–00 CAP,FXD,CERA C:MLC,0.1UF,10%,25V,X7R,8MM 04222 12063C104KAT3A 283–5004–00 CAP,FXD,CERA C:MLC,0.1UF,10%,25V,X7R,8MM 04222 12063C104KAT3A A5C71 283–5004–00 CAP,FXD,CERA C:MLC,0.1UF,10%,25V,X7R,8MM 04222 12063C104KAT3A A5C72 283–5004–00 CAP,FXD,CERA C:MLC,0.1UF,10%,25V,X7R,8MM 04222 12063C104KAT3A A5C73 283–5004–00 CAP,FXD,CERA C:MLC,0.1UF,10%,25V,X7R,8MM 04222 12063C104KAT3A A5C74 283–5004–00 CAP,FXD,CERA C:MLC,0.1UF,10%,25V,X7R,8MM 04222 12063C104KAT3A A5C75 283–5004–00 CAP,FXD,CERA C:MLC,0.1UF,10%,25V,X7R,8MM 04222 12063C104KAT3A A5C76 283–5004–00 CAP,FXD,CERA C:MLC,0.1UF,10%,25V,X7R,8MM 04222 12063C104KAT3A A5C77 283–5004–00 CAP,FXD,CERA C:MLC,0.1UF,10%,25V,X7R,8MM 04222 12063C104KAT3A A5C78 283–5004–00 CAP,FXD,CERA C:MLC,0.1UF,10%,25V,X7R,8MM 04222 12063C104KAT3A A5C79 283–5004–00 CAP,FXD,CERA C:MLC,0.1UF,10%,25V,X7R,8MM 04222 12063C104KAT3A A5C80 283–5004–00 CAP,FXD,CERA C:MLC,0.1UF,10%,25V,X7R,8MM 04222 12063C104KAT3A A5C81 283–5004–00 CAP,FXD,CERA C:MLC,0.1UF,10%,25V,X7R,8MM 04222 12063C104KAT3A A5C82 283–5004–00 CAP,FXD,CERA C:MLC,0.1UF,10%,25V,X7R,8MM 04222 12063C104KAT3A A5C83 283–5004–00 CAP,FXD,CERA C:MLC,0.1UF,10%,25V,X7R,8MM 04222 12063C104KAT3A A5C99 290–0973–00 CAP,FXD,ELCTLT:100UF,20%,25VDC ALU NUM 55680 UVX1V101MPA A5C102 283–5001–00 CAP,FXD,CERA C:MLC,100PF,5%,50V,NPO,8MM 04222 12065A101JAT1A A5C103 283–5001–00 CAP,FXD,CERA C:MLC,100PF,5%,50V,NPO,8MM 04222 12065A101JAT1A A5C104 283–5004–00 CAP,FXD,CERA C:MLC,0.1UF,10%,25V,X7R,8MM 04222 12063C104KAT3A A5C105 283–5004–00 CAP,FXD,CERA C:MLC,0.1UF,10%,25V,X7R,8MM 04222 12063C104KAT3A A5C127 285–1305–00 CAP,FXD,PLASTIC:0.1UF,1%,50V 14752 (D) 650D1A104F A5C129 283–5004–00 CAP,FXD,CERA C:MLC,0.1UF,10%,25V,X7R,8MM 04222 12063C104KAT3A A5C130 283–5004–00 CAP,FXD,CERA C:MLC,0.1UF,10%,25V,X7R,8MM 04222 12063C104KAT3A A5C131 290–0974–00 CAP,FXD,ALUM:10UF,20%,50V,ESR=16.58 OHM (120HZ,20C),RADIAL 55680 UVX1H100MDA A5C132 290–0974–00 CAP,FXD,ALUM:10UF,20%,50V,ESR=16.58 OHM (120HZ,20C),RADIAL 55680 UVX1H100MDA A5C133 285–1305–00 CAP,FXD,PLASTIC:0.1UF,1%,50V 14752 (D) 650D1A104F A5C138 283–5004–00 CAP,FXD,CERA C:MLC,0.1UF,10%,25V,X7R,8MM 04222 12063C104KAT3A A5C139 283–5004–00 CAP,FXD,CERA C:MLC,0.1UF,10%,25V,X7R,8MM 04222 12063C104KAT3A A5C140 285–1503–00 CAP,FXD,FILM:3900 PF,1%,63V TK1913 FKP 2 3900 1%/63V A5C141 283–5004–00 CAP,FXD,CERA C:MLC,0.1UF,10%,25V,X7R,8MM 04222 12063C104KAT3A A5C142 283–5004–00 CAP,FXD,CERA C:MLC,0.1UF,10%,25V,X7R,8MM 04222 12063C104KAT3A A5C143 283–5004–00 CAP,FXD,CERA C:MLC,0.1UF,10%,25V,X7R,8MM 04222 12063C104KAT3A A5C144 290–0974–00 CAP,FXD,ALUM:10UF,20%,50V,ESR=16.58 OHM (120HZ,20C),RADIAL 55680 UVX1H100MDA A5C145 290–0974–00 CAP,FXD,ALUM:10UF,20%,50V,ESR=16.58 OHM (120HZ,20C),RADIAL 55680 UVX1H100MDA A5C146 285–1503–00 CAP,FXD,FILM:3900 PF,1%,63V TK1913 FKP 2 3900 1%/63V 8–56 Serial no. effective Serial no. discont’d AM700 Audio Measurement Set Service Manual Replaceable Electrical Parts Replaceable electrical parts list (cont.) Component number Tektronix part number Serial no. effective Serial no. discont’d Name & description Mfr. code A5C151 283–5004–00 Mfr. part number CAP,FXD,CERA C:MLC,0.1UF,10%,25V,X7R,8MM 04222 12063C104KAT3A A5C152 283–5004–00 CAP,FXD,CERA C:MLC,0.1UF,10%,25V,X7R,8MM 04222 12063C104KAT3A A5C300 290–1069–00 B020100 CAP,FXD,ALUM:1000UF,20%, 25V,ESR=0.23 OHM (120HZ,20C),12.5 X 25MM,RADIAL 62643 CEUFM0J102–E A5C301 290–1069–00 B020100 CAP,FXD,ALUM:1000UF,20%, 25V,ESR=0.23 OHM (120HZ,20C),12.5 X 25MM,RADIAL 62643 CEUFM0J102–E A5C303 283–5107–00 CAP,FXD,CERA C:MLC,22PF,5%,200V,NPO,8MM 04222 12062A220JAT2A A5C304 283–5004–00 CAP,FXD,CERA C:MLC,0.1UF,10%,25V,X7R,8MM 04222 12063C104KAT3A A5C305 283–5004–00 CAP,FXD,CERA C:MLC,0.1UF,10%,25V,X7R,8MM 04222 12063C104KAT3A A5C306 283–5107–00 CAP,FXD,CERA C:MLC,22PF,5%,200V,NPO,8MM 04222 12062A220JAT2A A5C307 283–5004–00 CAP,FXD,CERA C:MLC,0.1UF,10%,25V,X7R,8MM 04222 12063C104KAT3A A5C308 283–5004–00 CAP,FXD,CERA C:MLC,0.1UF,10%,25V,X7R,8MM 04222 12063C104KAT3A A5C309 283–5004–00 CAP,FXD,CERA C:MLC,0.1UF,10%,25V,X7R,8MM 04222 12063C104KAT3A A5C310 283–5107–00 CAP,FXD,CERA C:MLC,22PF,5%,200V,NPO,8MM 04222 12062A220JAT2A A5C311 283–5004–00 CAP,FXD,CERA C:MLC,0.1UF,10%,25V,X7R,8MM 04222 12063C104KAT3A A5C312 283–5004–00 CAP,FXD,CERA C:MLC,0.1UF,10%,25V,X7R,8MM 04222 12063C104KAT3A A5C313 285–1305–00 CAP,FXD,PLASTIC:0.1UF,1%,50V 14752 (D) 650D1A104F A5C314 283–5107–00 CAP,FXD,CERA C:MLC,22PF,5%,200V,NPO,8MM 04222 12062A220JAT2A A5C315 283–5004–00 CAP,FXD,CERA C:MLC,0.1UF,10%,25V,X7R,8MM 04222 12063C104KAT3A A5C316 283–5004–00 CAP,FXD,CERA C:MLC,0.1UF,10%,25V,X7R,8MM 04222 12063C104KAT3A A5C317 285–1305–00 CAP,FXD,PLASTIC:0.1UF,1%,50V 14752 (D) 650D1A104F A5C318 285–1503–00 CAP,FXD,FILM:3900 PF,1%,63V TK1913 FKP 2 3900 1%/63V A5C319 285–1503–00 CAP,FXD,FILM:3900 PF,1%,63V TK1913 FKP 2 3900 1%/63V A5C325 283–0772–00 CAP,FXD, CA DI:497 PF,1%,500V 09023 CD15FD(497)F03 A5C326 283–0634–00 CAP,FXD, CA DI:65PF,1%,100V 09023 CD15ED650F03 A5C327 283–0772–00 CAP,FXD, CA DI:497 PF,1%,500V 09023 CD15FD(497)F03 A5C328 283–0634–00 CAP,FXD, CA DI:65PF,1%,100V 09023 CD15ED650F03 A5C329 283–0594–00 CAP,FXD, CA DI:0.001UF,1%,100V 09023 CD15FA102F03 A5C330 283–0594–00 CAP,FXD, CA DI:0.001UF,1%,100V 09023 CD15FA102F03 A5C331 283–0594–00 CAP,FXD, CA DI:0.001UF,1%,100V 09023 CD15FA102F03 A5C332 283–0594–00 CAP,FXD, CA DI:0.001UF,1%,100V 09023 CD15FA102F03 A5C333 283–5004–00 CAP,FXD,CERA C:MLC,0.1UF,10%,25V,X7R,8MM 04222 12063C104KAT3A A5C334 283–5004–00 CAP,FXD,CERA C:MLC,0.1UF,10%,25V,X7R,8MM 04222 12063C104KAT3A A5C335 283–0594–00 CAP,FXD, CA DI:0.001UF,1%,100V 09023 CD15FA102F03 A5C336 283–0594–00 CAP,FXD, CA DI:0.001UF,1%,100V 09023 CD15FA102F03 A5C337 283–0594–00 CAP,FXD, CA DI:0.001UF,1%,100V 09023 CD15FA102F03 A5C338 283–0594–00 CAP,FXD, CA DI:0.001UF,1%,100V 09023 CD15FA102F03 A5C339 283–5004–00 CAP,FXD,CERA C:MLC,0.1UF,10%,25V,X7R,8MM 04222 12063C104KAT3A A5C340 283–5004–00 CAP,FXD,CERA C:MLC,0.1UF,10%,25V,X7R,8MM 04222 12063C104KAT3A AM700 Audio Measurement Set Service Manual 8–57 Replaceable Electrical Parts Replaceable electrical parts list (cont.) Component number Tektronix part number A5C341 283–5004–00 A5C342 A5C343 Serial no. effective Serial no. discont’d Name & description Mfr. code Mfr. part number CAP,FXD,CERA C:MLC,0.1UF,10%,25V,X7R,8MM 04222 12063C104KAT3A 283–5004–00 CAP,FXD,CERA C:MLC,0.1UF,10%,25V,X7R,8MM 04222 12063C104KAT3A 283–5004–00 CAP,FXD,CERA C:MLC,0.1UF,10%,25V,X7R,8MM 04222 12063C104KAT3A A5C344 283–5004–00 CAP,FXD,CERA C:MLC,0.1UF,10%,25V,X7R,8MM 04222 12063C104KAT3A A5C345 283–5004–00 CAP,FXD,CERA C:MLC,0.1UF,10%,25V,X7R,8MM 04222 12063C104KAT3A A5C346 283–5004–00 CAP,FXD,CERA C:MLC,0.1UF,10%,25V,X7R,8MM 04222 12063C104KAT3A A5C347 290–5034–01 CAP,FXD,ALUM:33UF,20%,10V,5.7MM(0.224),SMD, 62643 MVK10VC33RME60TPX A5C348 283–5004–00 CAP,FXD,CERA C:MLC,0.1UF,10%,25V,X7R,8MM 04222 12063C104KAT3A A5C349 283–5004–00 CAP,FXD,CERA C:MLC,0.1UF,10%,25V,X7R,8MM 04222 12063C104KAT3A A5C350 283–5217–00 CAP,FXD,CER,DI:2.2UF,10%,50V,Z5U,2221 PKG 65238 2221Z225K500NXT A5C351 283–5003–00 CAP,FXD,CERA C:MLC,0.01UF,10%,50V,X7R,8MM 04222 12065C103KAT060R A5C352 283–5003–00 CAP,FXD,CERA C:MLC,0.01UF,10%,50V,X7R,8MM 04222 12065C103KAT060R A5C353 283–5217–00 CAP,FXD,CER,DI:2.2UF,10%,50V,Z5U,2221 PKG 65238 2221Z225K500NXT A5C354 283–5004–00 CAP,FXD,CERA C:MLC,0.1UF,10%,25V,X7R,8MM 04222 12063C104KAT3A A5C356 283–5004–00 CAP,FXD,CERA C:MLC,0.1UF,10%,25V,X7R,8MM 04222 12063C104KAT3A A5C359 283–5217–00 CAP,FXD,CER,DI:2.2UF,10%,50V,Z5U,2221 PKG 65238 2221Z225K500NXT A5C360 283–5003–00 CAP,FXD,CERA C:MLC,0.01UF,10%,50V,X7R,8MM 04222 12065C103KAT060R A5C361 283–5003–00 CAP,FXD,CERA C:MLC,0.01UF,10%,50V,X7R,8MM 04222 12065C103KAT060R A5C362 283–5217–00 CAP,FXD,CER,DI:2.2UF,10%,50V,Z5U,2221 PKG 65238 2221Z225K500NXT A5C363 283–5004–00 CAP,FXD,CERA C:MLC,0.1UF,10%,25V,X7R,8MM 04222 12063C104KAT3A A5C364 283–5004–00 CAP,FXD,CERA C:MLC,0.1UF,10%,25V,X7R,8MM 04222 12063C104KAT3A A5C365 283–5004–00 CAP,FXD,CERA C:MLC,0.1UF,10%,25V,X7R,8MM 04222 12063C104KAT3A A5C366 283–5004–00 CAP,FXD,CERA C:MLC,0.1UF,10%,25V,X7R,8MM 04222 12063C104KAT3A A5C367 283–5004–00 CAP,FXD,CERA C:MLC,0.1UF,10%,25V,X7R,8MM 04222 12063C104KAT3A A5C368 283–5004–00 CAP,FXD,CERA C:MLC,0.1UF,10%,25V,X7R,8MM 04222 12063C104KAT3A A5C369 283–5004–00 CAP,FXD,CERA C:MLC,0.1UF,10%,25V,X7R,8MM 04222 12063C104KAT3A A5C370 283–5004–00 CAP,FXD,CERA C:MLC,0.1UF,10%,25V,X7R,8MM 04222 12063C104KAT3A A5C371 290–5034–01 CAP,FXD,ALUM:33UF,20%,10V,5.7MM(0.224),SMD, 62643 MVK10VC33RME60TPX A5C372 283–5004–00 CAP,FXD,CERA C:MLC,0.1UF,10%,25V,X7R,8MM 04222 12063C104KAT3A A5C373 283–5004–00 CAP,FXD,CERA C:MLC,0.1UF,10%,25V,X7R,8MM 04222 12063C104KAT3A A5C374 283–5217–00 CAP,FXD,CER,DI:2.2UF,10%,50V,Z5U,2221 PKG 65238 2221Z225K500NXT A5C375 283–5003–00 CAP,FXD,CERA C:MLC,0.01UF,10%,50V,X7R,8MM 04222 12065C103KAT060R A5C376 283–5003–00 CAP,FXD,CERA C:MLC,0.01UF,10%,50V,X7R,8MM 04222 12065C103KAT060R A5C377 283–5217–00 CAP,FXD,CER,DI:2.2UF,10%,50V,Z5U,2221 PKG 65238 2221Z225K500NXT A5C378 283–5004–00 CAP,FXD,CERA C:MLC,0.1UF,10%,25V,X7R,8MM 04222 12063C104KAT3A A5C380 283–5004–00 CAP,FXD,CERA C:MLC,0.1UF,10%,25V,X7R,8MM 04222 12063C104KAT3A A5C381 283–0108–00 04222 SR152A221KAA *TEST SELECTABLE COMPONENTS* 8–58 B020642 CAP,FXD,CER DI:220PF,10%,200V SQUARE AM700 Audio Measurement Set Service Manual Replaceable Electrical Parts Replaceable electrical parts list (cont.) Component number Tektronix part number Serial no. effective A5C381 283–0139–00 B020642 A5C381 283–0330–00 A5C382 Serial no. discont’d Mfr. code Mfr. part number CAP,FXD,CERAMIC:MLC,150PF,10%,50V,COG,0.138 X 0.120,RADIAL,BULK 04222 SR15A151KAT B020642 CAP,FXD,CERAMIC:100PF,5%,50V,0.200 X 0.200,0.1LS,RADIAL (NOMINAL CHOICE IF NEEDED) 16546 CN15C101J 283–0108–00 B020642 CAP,FXD,CER DI:220PF,10%,200V SQUARE 04222 SR152A221KAA A5C382 283–0139–00 B020642 CAP,FXD,CERAMIC:MLC,150PF,10%,50V,COG,0.138 X 0.120,RADIAL,BULK 04222 SR15A151KAT A5C382 283–0330–00 B020642 CAP,FXD,CERAMIC:100PF,5%,50V,0.200 X 0.200,0.1LS,RADIAL (NOMINAL CHOICE IF NEEDED) 16546 CN15C101J A5C383 283–5217–00 CAP,FXD,CER,DI:2.2UF,10%,50V,Z5U,2221 PKG 65238 2221Z225K500NXT A5C384 283–5003–00 CAP,FXD,CERA C:MLC,0.01UF,10%,50V,X7R,8MM 04222 12065C103KAT060R A5C385 283–5003–00 CAP,FXD,CERA C:MLC,0.01UF,10%,50V,X7R,8MM 04222 12065C103KAT060R A5C386 283–5217–00 CAP,FXD,CER,DI:2.2UF,10%,50V,Z5U,2221 PKG 65238 2221Z225K500NXT A5C387 283–5004–00 CAP,FXD,CERA C:MLC,0.1UF,10%,25V,X7R,8MM 04222 12063C104KAT3A A5C388 283–5004–00 CAP,FXD,CERA C:MLC,0.1UF,10%,25V,X7R,8MM 04222 12063C104KAT3A A5C389 283–5004–00 CAP,FXD,CERA C:MLC,0.1UF,10%,25V,X7R,8MM 04222 12063C104KAT3A A5C390 283–5004–00 CAP,FXD,CERA C:MLC,0.1UF,10%,25V,X7R,8MM 04222 12063C104KAT3A A5C391 283–5004–00 CAP,FXD,CERA C:MLC,0.1UF,10%,25V,X7R,8MM 04222 12063C104KAT3A A5C392 283–5004–00 CAP,FXD,CERA C:MLC,0.1UF,10%,25V,X7R,8MM 04222 12063C104KAT3A A5C393 283–5004–00 CAP,FXD,CERA C:MLC,0.1UF,10%,25V,X7R,8MM 04222 12063C104KAT3A A5C394 290–0942–00 CAP,FXD,ELCTLT:100UF,+100–10%,25V, ALUNUM 62643 CEUFM1E101 A5C395 283–5016–00 CAP,FXD,CERA C:MLC,1UF,10%,50V,X7R,0.225 X 0.250,2225,SMD,12MM 04222 22255C105KAT1A Name & description *END OF SELECTABLE COMPONENTS* A5C396 290–1235–00 CAP,FXD,ALUM:1000UF,20%,35V RADIAL LEAD 55680 UVZ1V102MRH A5C397 290–0919–00 CAP,FXD,ALUM:470UF,+50–20%,35V,10 X 20MM,RADIAL 61058 ECEA1VFS471 A5C398 283–5016–00 CAP,FXD,CERA C:MLC,1UF,10%,50V,X7R,0.225 X 0.250,2225,SMD,12MM 04222 22255C105KAT1A A5C399 283–5016–00 CAP,FXD,CERA C:MLC,1UF,10%,50V,X7R,0.225 X 0.250,2225,SMD,12MM 04222 22255C105KAT1A A5C400 290–0942–00 CAP,FXD,ELCTLT:100UF,+100–10%,25V 62643 CEUFM1E101 A5C401 290–0919–00 CAP,FXD,ALUM:470UF,+50–20%,35V,10 X 20MM,RADIAL 61058 ECEA1VFS471 A5C402 283–5016–00 CAP,FXD,CERA C:MLC,1UF,10%,50V,X7R,0.225 X 0.250,2225,SMD,12MM 04222 22255C105KAT1A A5C403 283–5016–00 CAP,FXD,CERA C:MLC,1UF,10%,50V,X7R,0.225 X 0.250,2225,SMD,12MM 04222 22255C105KAT1A A5C404 290–1235–00 CAP,FXD,ALUM:1000UF,20%,35V RADIAL LEAD 55680 UVZ1V102MRH A5C405 290–1235–00 CAP,FXD,ALUM:1000UF,20%,35V RADIAL LEAD 55680 UVZ1V102MRH A5C406 283–5016–00 CAP,FXD,CERA C:MLC,1UF,10%,50V,X7R,0.225 X 0.250,2225,SMD,12MM 04222 22255C105KAT1A A5C407 290–0942–00 CAP,FXD,ELCTLT:100UF,+100–10%,25V 62643 CEUFM1E101 A5C409 283–5004–00 CAP,FXD,CERA C:MLC,0.1UF,10%,25V,X7R,8MM 04222 12063C104KAT3A AM700 Audio Measurement Set Service Manual ,ALU NUM ,ALU NUM 8–59 Replaceable Electrical Parts Replaceable electrical parts list (cont.) Component number Tektronix part number A5C410 283–5004–00 A5C412 A5C415 Name & description Mfr. code Mfr. part number CAP,FXD,CERA C:MLC,0.1UF,10%,25V,X7R,8MM 04222 12063C104KAT3A 283–5004–00 CAP,FXD,CERA C:MLC,0.1UF,10%,25V,X7R,8MM 04222 12063C104KAT3A 283–5004–00 CAP,FXD,CERA C:MLC,0.1UF,10%,25V,X7R,8MM 04222 12063C104KAT3A A5C416 283–5004–00 CAP,FXD,CERA C:MLC,0.1UF,10%,25V,X7R,8MM 04222 12063C104KAT3A A5C417 283–5004–00 CAP,FXD,CERA C:MLC,0.1UF,10%,25V,X7R,8MM 04222 12063C104KAT3A A5C418 283–5004–00 CAP,FXD,CERA C:MLC,0.1UF,10%,25V,X7R,8MM 04222 12063C104KAT3A A5C419 283–5004–00 CAP,FXD,CERA C:MLC,0.1UF,10%,25V,X7R,8MM 04222 12063C104KAT3A A5C420 283–5009–00 CAP,FXD,CERA C:MLC,15PF,5%,50V,NPO,0.126 X 0.063,8MM 04222 12065A150JAT1A A5C421 283–5009–00 CAP,FXD,CERA C:MLC,15PF,5%,50V,NPO,0.126 X 0.063,8MM 04222 12065A150JAT1A A5C422 283–5009–00 CAP,FXD,CERA C:MLC,15PF,5%,50V,NPO,0.126 X 0.063,8MM 04222 12065A150JAT1A A5C423 283–5009–00 CAP,FXD,CERA C:MLC,15PF,5%,50V,NPO,0.126 X 0.063,8MM 04222 12065A150JAT1A A5C424 283–5004–00 CAP,FXD,CERA C:MLC,0.1UF,10%,25V,X7R,8MM 04222 12063C104KAT3A A5C425 283–5004–00 CAP,FXD,CERA C:MLC,0.1UF,10%,25V,X7R,8MM 04222 12063C104KAT3A A5C426 283–5004–00 CAP,FXD,CERA C:MLC,0.1UF,10%,25V,X7R,8MM 04222 12063C104KAT3A A5C427 283–5004–00 CAP,FXD,CERA C:MLC,0.1UF,10%,25V,X7R,8MM 04222 12063C104KAT3A A5C428 283–5004–00 CAP,FXD,CERA C:MLC,0.1UF,10%,25V,X7R,8MM 04222 12063C104KAT3A A5C429 283–5004–00 CAP,FXD,CERA C:MLC,0.1UF,10%,25V,X7R,8MM 04222 12063C104KAT3A A5C430 283–5004–00 CAP,FXD,CERA C:MLC,0.1UF,10%,25V,X7R,8MM 04222 12063C104KAT3A A5C431 283–5004–00 CAP,FXD,CERA C:MLC,0.1UF,10%,25V,X7R,8MM 04222 12063C104KAT3A A5C432 283–5004–00 CAP,FXD,CERA C:MLC,0.1UF,10%,25V,X7R,8MM 04222 12063C104KAT3A A5C433 283–5004–00 CAP,FXD,CERA C:MLC,0.1UF,10%,25V,X7R,8MM 04222 12063C104KAT3A A5C434 283–5196–00 CAP,FXD,CERA C:MLC,47PF,5%,100V,NPO,8MM 04222 12061A470JAT1A A5C435 283–5196–00 CAP,FXD,CERA C:MLC,47PF,5%,100V,NPO,8MM 04222 12061A470JAT1A A5C436 290–0848–00 CAP,FXD,ALUM:47UF,20%,16V,ESR=7.05 OHM(120HZ,25C),10X12MM,RADIAL. 62643 CEBPM1E470M A5C437 290–0848–00 CAP,FXD,ALUM:47UF,20%,16V,ESR=7.05 OHM(120HZ,25C),10X12MM,RADIAL. 62643 CEBPM1E470M A5C438 283–5107–00 CAP,FXD,CERA C:MLC,22PF,5%,200V,NPO,8MM 04222 12062A220JAT2A A5C439 283–5107–00 CAP,FXD,CERA C:MLC,22PF,5%,200V,NPO,8MM 04222 12062A220JAT2A A5C440 283–5107–00 CAP,FXD,CERA C:MLC,22PF,5%,200V,NPO,8MM 04222 12062A220JAT2A A5C441 283–5107–00 CAP,FXD,CERA C:MLC,22PF,5%,200V,NPO,8MM 04222 12062A220JAT2A A5C443 283–5004–00 CAP,FXD,CERA C:MLC,0.1UF,10%,25V,X7R,8MM 04222 12063C104KAT3A A5C444 283–5107–00 CAP,FXD,CERA C:MLC,22PF,5%,200V,NPO,8MM 04222 12062A220JAT2A A5C445 283–5107–00 CAP,FXD,CERA C:MLC,22PF,5%,200V,NPO,8MM 04222 12062A220JAT2A A5C446 283–5004–00 CAP,FXD,CERA C:MLC,0.1UF,10%,25V,X7R,8MM 04222 12063C104KAT3A A5C447 283–5107–00 CAP,FXD,CERA C:MLC,22PF,5%,200V,NPO,8MM 04222 12062A220JAT2A A5C448 283–5107–00 CAP,FXD,CERA C:MLC,22PF,5%,200V,NPO,8MM 04222 12062A220JAT2A A5C449 283–5025–00 CAP,FXD,CERA C:MLC,220PF,5%,50V,NPO,8MM 04222 12065A221JAT1A A5C450 283–5025–00 CAP,FXD,CERA C:MLC,220PF,5%,50V,NPO,8MM 04222 12065A221JAT1A 8–60 Serial no. effective Serial no. discont’d AM700 Audio Measurement Set Service Manual Replaceable Electrical Parts Replaceable electrical parts list (cont.) Component number Tektronix part number A5C451 283–5025–00 Serial no. effective Serial no. discont’d Name & description Mfr. code Mfr. part number CAP,FXD,CERA C:MLC,220PF,5%,50V,NPO,8MM 04222 12065A221JAT1A A5C452 283–5025–00 CAP,FXD,CERA C:MLC,220PF,5%,50V,NPO,8MM 04222 12065A221JAT1A A5C453 283–5098–00 CAP,FXD,CERA C:MLC,0.1UF,+80%–20%,50V,Z5U,8MM 04222 12065E104ZAT3A A5C454 283–5098–00 CAP,FXD,CERA C:MLC,0.1UF,+80%–20%,50V,Z5U,8MM 04222 12065E104ZAT3A A5C455 283–5203–00 CAP,FXD,CERA C:MLC,1000PF,10%,100V,X7R,8MM 04222 12061C102KAT1A A5C456 290–0942–00 CAP,FXD,ELCTLT:100UF,+100–10%,25V ,ALU NUM 62643 CEUFM1E101 A5C457 290–0942–00 CAP,FXD,ELCTLT:100UF,+100–10%,25V ,ALU NUM 62643 CEUFM1E101 A5C458 283–0059–00 B020100 CAP,FXD,CER DI:1UF,+80–20%,50V SQUARE 04222 SR305C105MAA A5C459 283–0059–00 B020100 CAP,FXD,CER DI:1UF,+80–20%,50V SQUARE 04222 SR305C105MAA A5CR1 152–5010–00 DIODE,SIG:VVC,30V,29PF,C3/25=5.75,MMBV109L,TO–236/SO T–23,8MM 04713 MMBV109LT1 A5CR2 152–5073–00 DIODE,RECT:BRIDGE,600V,1A,1.1VF,DF06S, 14936 DF06S–TR A5CR4 152–5010–00 DIODE,SIG:VVC,30V,29PF,C3/25=5.75,MMBV109L,TO–236/SO T–23,8MM 04713 MMBV109LT1 A5CR5 152–5073–00 DIODE,RECT:BRIDGE,600V,1A,1.1VF,DF06S, 14936 DF06S–TR A5CR10 152–5027–00 DIODE,RECT:SCHOTTKY,40V,1.0A,40A IFSM,MBRS140,DO–214AA/SMB,12MM 04713 MBRS140T3 A5CR11 152–5027–00 DIODE,RECT:SCHOTTKY,40V,1.0A,40A IFSM,MBRS140,DO–214AA/SMB,12MM 04713 MBRS140T3 A5CR12 152–5027–00 DIODE,RECT:SCHOTTKY,40V,1.0A,40A IFSM,MBRS140,DO–214AA/SMB,12MM 04713 MBRS140T3 A5CR14 152–0843–00 DIODE,SIG:SCHTKY,SER–PAIR,20V,410MV,1.3PF,HSMS–281, SOT–23, 50434 HSMS–2812–T31 A5CR15 152–0843–00 DIODE,SIG:SCHTKY,SER–PAIR,20V,410MV,1.3PF,HSMS–281, SOT–23, 50434 HSMS–2812–T31 A5CR16 152–5000–00 DIODE,SIG:ULTRA FAST,70V,0.15A,6NS,COM–CATH,BAV70,TO–236/SOT–23,8M M 04713 BAV70LT1 A5CR17 152–5047–00 DIODE,SIG:ULTRA FAST,DUAL,COMMON CATHODE,100V,0.74VF,4NS,2.0PF,MMBD1204,TO–236/SOT–2 3,8MM 07263 MMBD1204 A5CR18 152–5047–00 DIODE,SIG:ULTRA FAST,DUAL,COMMON CATHODE,100V,0.74VF,4NS,2.0PF,MMBD1204, TO–236/SOT–23, 8MM 07263 MMBD1204 A5DS1 150–1132–00 DIODE,OPTO:LED,GRN,569MCD,10.6MCD AT 10MA,40 DEG VIEW ANGL,HLMP–3568,T–1 3/4,LOW PROFILE 50434 HLMP–3568 A5DS2 150–1022–00 DISPLAY,OPTO:LED,RED,660NM,7SEG,0.3” DISPLAY,125UCD PER SEGMENT AT10MA,COMMON ANODE,LEFT HAN 0MS63 MAN72A A5E12 276–0614–00 CORE,EM:TOROID,FERRITE 0.375 OD X 0.125 X 0.21 28733 ORDER BY DESCRIPTION A5E15 276–0614–00 CORE,EM:TOROID,FERRITE 0.375 OD X 0.125 X 0.21 28733 ORDER BY DESCRIPTION A5F1 159–5000–00 FUSE,SMD:2.5A,125V,FAST,SMD,R459 02.5, , 75915 R459 02.5 A5F12 159–0363–00 FUSE,WIRE LEAD:4A,125V,FAST BLOW,ULREC,CSA CERT, 75915 251004 129–0222–00 SPACER,POST:0.27 L,4–40 THRU,PLSTC,0.25 OD 80009 129022200 *ATTACHED PARTS* AM700 Audio Measurement Set Service Manual 8–61 Replaceable Electrical Parts Replaceable electrical parts list (cont.) Component number Tektronix part number Serial no. effective Serial no. discont’d Name & description Mfr. code Mfr. part number 75915 251004 80009 129022200 75915 251004 80009 129022200 *END ATTACHED PARTS* A5F13 159–0363–00 FUSE,WIRE LEAD:4A,125V,FAST BLOW,ULREC,CSA CERT, *ATTACHED PARTS* 129–0222–00 SPACER,POST:0.27 L,4–40 THRU,PLSTC,0.25 OD 159–0363–00 FUSE,WIRE LEAD:4A,125V,FAST BLOW,ULREC,CSA CERT, 129–0222–00 SPACER,POST:0.27 L,4–40 THRU,PLSTC,0.25 OD *END ATTACHED PARTS* A5F15 *ATTACHED PARTS* *END ATTACHED PARTS* A5FL1 119–4641–00 FILTER:AM700,80 KHZ LPF 1P546 80KHZ LOW PASS FIL A5FL2 119–4641–00 FILTER:AM700,80 KHZ LPF 1P546 80KHZ LOW PASS FIL A5J1 131–1857–00 CONN,HDR:PCB,MALE,STR,1 X 36,0.1 CTR,0.230 MLG X 0.100 TAIL,GOLD, 22526 65507–136 A5J2 131–1857–00 CONN,HDR:PCB,MALE,STR,1 X 36,0.1 CTR,0.230 MLG X 0.100 TAIL,GOLD, 22526 65507–136 A5J4 131–4529–00 CONN,HDR:PCB,MALE,STR,2 X 5,0.1 CTR,0.365 H X 0.112 TAIL,SHRD/4 SIDES,CTR PLZ, 53387 2510–6002UB A5J5 131–4530–00 CONN,HDR:PCB,MALE,STR,1 X 3,0.1 CTR,0.230 MLG X 0.120 TAIL,30 GOLD,BD RETENTION, 00779 104344–1 A5J8 131–2919–01 CONN,HDR:PCB,MALE,STR,1 X 4,0.1 CTR,0.235 MLG X 0.112 TAIL,30 GOLD,0.035 DIA PCB,SAFETY 53387 2404–6112TB A5J9 131–2919–01 CONN,HDR:PCB,MALE,STR,1 X 4,0.1 CTR,0.235 MLG X 0.112 TAIL,30 GOLD,0.035 DIA PCB,SAFETY 53387 2404–6112TB A5J13 131–2919–01 CONN,HDR:PCB,MALE,STR,1 X 4,0.1 CTR,0.235 MLG X 0.112 TAIL,30 GOLD,0.035 DIA PCB,SAFETY 53387 2404–6112TB A5J14 131–2919–01 CONN,HDR:PCB,MALE,STR,1 X 4,0.1 CTR,0.235 MLG X 0.112 TAIL,30 GOLD,0.035 DIA PCB,SAFETY 53387 2404–6112TB A5J15 131–4794–00 CONN,HDR:PCB,MALE,STR,1 X 2,0.1 CTR,0.235 MLG X 0.112 TAIL,30GOLD,0.035 DIA PCB,W/BD RET 53387 2402–6112 UB A5J16 131–3945–00 CONN,HDR PWR::PCB,MALE,STR,1 X 8,0.156 CTR,0.450 MLG X 0.172 TAIL,PLZ WALL,W/FRICTION LOCK,20 27264 26–48–2085 A5J17 131–5672–00 CONN,HDR:PCB,MALE,STR,2 X 20,0.05 X 0.1 CTR,0.933 H X 0.106 TAIL,SHRD/4 SIDES,CTR PLZ,30 TK1462 NFP–040A–0114–AF A5J30 131–2919–00 CONN,HDR:PCB,MALE,RTANG,1 X 4,0.1 CTR,0.318 MLG X 0.110 TAIL,30 GOLD,0.035 DIA PCB, 00779 87232–4 A5J31 131–5228–00 CONN,DIN:PCB,MALE,STR,2 X 32,0.1 CTR,0.457 H X 0.114 TAIL,ROWS A & C LOADED, 56501 211–66430–6008 OR MQ064–021–2 A5J31 131–2919–00 CONN,HDR:PCB,MALE,RTANG,1 X 4,0.1 CTR,0.318 MLG X 0.110 TAIL,30 GOLD,0.035 DIA PCB, 00779 87232–4 A5J32 131–4794–00 CONN,HDR:PCB,MALE,STR,1 X 2,0.1 CTR,0.235 MLG X 0.112 TAIL,30GOLD,0.035 DIA PCB,W/BD RET 53387 2402–6112 UB A5K1 148–1023–00 RELAY,ARM:2 FORM C,220V, 1A, 30W, COIL 5V, 178 OHM, .30H X .37W X .56L, SMD, EB2–5NUL TK2601 148–1023–00 8–62 B010329 B020100 B019999 B020100 AM700 Audio Measurement Set Service Manual Replaceable Electrical Parts Replaceable electrical parts list (cont.) Component number Tektronix part number A5K2 148–1023–00 A5K3 Serial no. effective Serial no. discont’d Mfr. code Mfr. part number RELAY,ARM:2 FORM C,220V, 1A, 30W, COIL 5V, 178 OHM, .30H X .37W X .56L, SMD, EB2–5NUL TK2601 148–1023–00 148–1023–00 RELAY,ARM:2 FORM C,220V, 1A, 30W, COIL 5V, 178 OHM, .30H X .37W X .56L, SMD, EB2–5NUL TK2601 148–1023–00 A5K4 148–1023–00 RELAY,ARM:2 FORM C,220V, 1A, 30W, COIL 5V, 178 OHM, .30H X .37W X .56L, SMD, EB2–5NUL TK2601 148–1023–00 A5K7 148–1023–00 RELAY,ARM:2 FORM C,220V, 1A, 30W, COIL 5V, 178 OHM, .30H X .37W X .56L, SMD, EB2–5NUL TK2601 148–1023–00 A5K8 148–1023–00 RELAY,ARM:2 FORM C,220V, 1A, 30W, COIL 5V, 178 OHM, .30H X .37W X .56L, SMD, EB2–5NUL TK2601 148–1023–00 A5K9 148–1023–00 RELAY,ARM:2 FORM C,220V, 1A, 30W, COIL 5V, 178 OHM, .30H X .37W X .56L, SMD, EB2–5NUL TK2601 148–1023–00 A5K10 148–1023–00 RELAY,ARM:2 FORM C,220V, 1A, 30W, COIL 5V, 178 OHM, .30H X .37W X .56L, SMD, EB2–5NUL TK2601 148–1023–00 A5K11 148–1023–00 RELAY,ARM:2 FORM C,220V, 1A, 30W, COIL 5V, 178 OHM, .30H X .37W X .56L, SMD, EB2–5NUL TK2601 148–1023–00 A5K30 148–0235–00 B020100 RELAY,ARMATURE:2 FORM C,5VDC 312 OHM COIL,GOLD CLAD SILVER,MAX SW AT 110VDC,125VAC,30W,1A,INITI 61529 TF2E–5V A5K31 148–0235–00 B020100 RELAY,ARMATURE:2 FORM C,5VDC 312 OHM COIL,GOLD CLAD SILVER,MAX SW AT 110VDC,125VAC,30W,1A,INITI 61529 TF2E–5V A5L1 108–1570–00 INDUCTOR,FXD:POWER,10UH,20%,I<2.0A,RDC<0.02 OHM, Z–94114B,POWDERED IRON TOROID,VERT MOUNT 0JR03 108–1570–00 A5L2 108–1570–00 INDUCTOR,FXD:POWER,10UH,20%,I<2.0A,RDC<0.02 OHM, Z–94114B,POWDERED IRON TOROID,VERT MOUNT 0JR03 108–1570–00 A5L3 108–1570–00 INDUCTOR,FXD:POWER,10UH,20%,I<2.0A,RDC<0.02 OHM, Z–94114B,POWDERED IRON TOROID,VERT MOUNT 0JR03 108–1570–00 A5L4 108–1570–00 INDUCTOR,FXD:POWER,10UH,20%,I<2.0A,RDC<0.02 OHM, Z–94114B,POWDERED IRON TOROID,VERT MOUNT 0JR03 108–1570–00 A5L5 108–1571–00 INDUCTOR,FXD:POWER,720UH,11%,I<0.6A,RDC<0.5 OHM, Z–93092D,FERRITE TORROID W/HOLDER,VERTICAL MO 0JR03 Z–93092D A5L6 108–1262–00 INDUCTOR,FXD:POWER,100UH,10%,I<0.75A,RDC<0.23 OHM, Q>15,SRF>5.4MHZ,BOBBIN CORE,TSL0807–101K,RA TK2058 TSL0807–101KR75 A5L7 108–1262–00 INDUCTOR,FXD:POWER,100UH,10%,I<0.75A,RDC<0.23 OHM, Q>15,SRF>5.4MHZ,BOBBIN CORE,TSL0807–101K,RA TK2058 TSL0807–101KR75 A5L8 108–1571–00 INDUCTOR,FXD:POWER,720UH,11%,I<0.6A,RDC<0.5 OHM, Z–93092D,FERRITE TORROID W/HOLDER,VERTICAL MO 0JR03 Z–93092D A5L9 108–1262–00 INDUCTOR,FXD:POWER,100UH,10%,I<0.75A,RDC<0.23 OHM, Q>15,SRF>5.4MHZ,BOBBIN CORE,TSL0807–101K,RA TK2058 TSL0807–101KR75 A5L10 108–1571–00 INDUCTOR,FXD:POWER,720UH,11%,I<0.6A,RDC<0.5 OHM, Z–93092D,FERRITE TORROID W/HOLDER,VERTICAL MO 0JR03 Z–93092D A5L11 108–1263–00 INDUCTOR,FXD:POWER,10UH,10%,I<2.1A,RDC<0.043 OHM, Q>20,SRF>19MHZ,BOBBIN,RADIAL TK2058 TSL0707–100K1R9 A5L14 108–1263–00 INDUCTOR,FXD:POWER,10UH,10%,I<2.1A,RDC<0.043 OHM, Q>20,SRF>19MHZ,BOBBIN,RADIAL TK2058 TSL0707–100K1R9 A5P5 131–0993–00 CONN,BOX:SHUNT,FEMALE,STR,1 X 2,0.1 CTR,0.385 H,30 GOLD,BLACK,JUMPER, 00779 530153–2 Name & description AM700 Audio Measurement Set Service Manual 8–63 Replaceable Electrical Parts Replaceable electrical parts list (cont.) Component number Tektronix part number A5Q1 151–5001–00 A5Q2 Serial no. effective Serial no. discont’d Mfr. code Mfr. part number TRANSISTOR,SIG:BIPOLAR,NPN,40V,200MA,300MHZ,AMPL, MMBT3904L,TO–236/SOT–23,8MM 04713 MMBT3904LT1 151–0188–00 TRANSISTOR,SIG:BIPOLAR,PNP,40V,200MA,250MHZ,AMPL, 2N3906,TO–92 EBC 04713 2N3906 A5Q3 151–5001–00 TRANSISTOR,SIG:BIPOLAR,NPN,40V,200MA,300MHZ,AMPL, MMBT3904L,TO–236/SOT–23,8MM 04713 MMBT3904LT1 A5Q4 151–5000–00 TRANSISTOR,SIG:BIPOLAR,PNP,40V,200MA,250MHZ,AMPL, MMBT3906L,TO–236/SOT–23,8MM 04713 MMBT3906LT1 A5Q5 151–5001–00 TRANSISTOR,SIG:BIPOLAR,NPN,40V,200MA,300MHZ,AMPL, MMBT3904L,TO–236/SOT–23,8MM 04713 MMBT3904LT1 A5Q6 151–5000–00 TRANSISTOR,SIG:BIPOLAR,PNP,40V,200MA,250MHZ,AMPL, MMBT3906L,TO–236/SOT–23,8MM 04713 MMBT3906LT1 A5Q7 151–5000–00 TRANSISTOR,SIG:BIPOLAR,PNP,40V,200MA,250MHZ,AMPL, MMBT3906L,TO–236/SOT–23,8MM 04713 MMBT3906LT1 A5Q8 151–0190–00 TRANSISTOR,SIG:BIPOLAR,NPN,40V,200MA,300MHZ,AMPL, 2N3904,TO–92 EBC 04713 2N3904 A5Q9 151–0590–00 TRANSISTOR,SIG:BIPOLAR,NPN,80V,500MA,50MHZ,AMPL, MPSW06,TO–226AE EBC 04713 MPSW06 TK1326 214–0973–00 Name & description *ATTACHED PARTS* 214–0973–00 HEAT SINK,XSTR:TO–92,CU BE CD PL (USED WITH A5Q11) A5Q10 151–0590–00 TRANSISTOR,SIG:BIPOLAR,NPN,80V,500MA,50MHZ,AMPL, MPSW06,TO–226AE EBC 04713 MPSW06 A5Q11 151–0590–00 TRANSISTOR,SIG:BIPOLAR,NPN,80V,500MA,50MHZ,AMPL, MPSW06,TO–226AE EBC (SEE A5Q9) 04713 MPSW06 A5Q12 151–0591–00 TRANSISTOR,SIG:BIPOLAR,PNP,80V,500MA,50MHZ,AMPL, MPSW56,TO–226AE EBC 04713 MPSW56 TK1326 214–0973–00 *END ATTACHED PARTS* *ATTACHED PARTS* 214–0973–00 HEAT SINK,XSTR:TO–92,CU BE CD PL (USED WITH A5Q13) *END ATTACHED PARTS* A5Q13 151–0591–00 TRANSISTOR,SIG:BIPOLAR,PNP,80V,500MA,50MHZ,AMPL, MPSW56,TO–226AE EBC (SEE A5Q12) 04713 MPSW56 A5Q14 151–0591–00 TRANSISTOR,SIG:BIPOLAR,PNP,80V,500MA,50MHZ,AMPL, MPSW56,TO–226AE EBC 04713 MPSW56 A5Q15 151–5001–00 TRANSISTOR,SIG:BIPOLAR,NPN,40V,200MA,300MHZ,AMPL, MMBT3904L,TO–236/SOT–23,8MM 04713 MMBT3904LT1 A5Q16 151–0188–00 TRANSISTOR,SIG:BIPOLAR,PNP,40V,200MA,250MHZ,AMPL, 2N3906,TO–92 EBC 04713 2N3906 A5Q17 151–5001–00 TRANSISTOR,SIG:BIPOLAR,NPN,40V,200MA,300MHZ,AMPL, MMBT3904L,TO–236/SOT–23,8MM 04713 MMBT3904LT1 A5Q18 151–5000–00 TRANSISTOR,SIG:BIPOLAR,PNP,40V,200MA,250MHZ,AMPL, MMBT3906L,TO–236/SOT–23,8MM 04713 MMBT3906LT1 8–64 AM700 Audio Measurement Set Service Manual Replaceable Electrical Parts Replaceable electrical parts list (cont.) Component number Tektronix part number A5Q19 151–5001–00 A5Q20 Serial no. effective Serial no. discont’d Mfr. code Mfr. part number TRANSISTOR,SIG:BIPOLAR,NPN,40V,200MA,300MHZ,AMPL, MMBT3904L,TO–236/SOT–23,8MM 04713 MMBT3904LT1 151–5000–00 TRANSISTOR,SIG:BIPOLAR,PNP,40V,200MA,250MHZ,AMPL, MMBT3906L,TO–236/SOT–23,8MM 04713 MMBT3906LT1 A5Q21 151–5000–00 TRANSISTOR,SIG:BIPOLAR,PNP,40V,200MA,250MHZ,AMPL, MMBT3906L,TO–236/SOT–23,8MM 04713 MMBT3906LT1 A5Q22 151–0190–00 TRANSISTOR,SIG:BIPOLAR,NPN,40V,200MA,300MHZ,AMPL, 2N3904,TO–92 EBC 04713 2N3904 A5Q23 151–0590–00 TRANSISTOR,SIG:BIPOLAR,NPN,80V,500MA,50MHZ,AMPL, MPSW06,TO–226AE EBC 04713 MPSW06 TK1326 214–0973–00 Name & description *ATTACHED PARTS* 214–0973–00 HEAT SINK,XSTR:TO–92,CU BE CD PL (USED WITH A5Q25) A5Q24 151–0590–00 TRANSISTOR,SIG:BIPOLAR,NPN,80V,500MA,50MHZ,AMPL, MPSW06,TO–226AE EBC 04713 MPSW06 A5Q25 151–0590–00 TRANSISTOR,SIG:BIPOLAR,NPN,80V,500MA,50MHZ,AMPL, MPSW06,TO–226AE EBC (SEE A5Q23) 04713 MPSW06 A5Q26 151–0591–00 TRANSISTOR,SIG:BIPOLAR,PNP,80V,500MA,50MHZ,AMPL, MPSW56,TO–226AE EBC 04713 MPSW56 TK1326 214–0973–00 *END ATTACHED PARTS* *ATTACHED PARTS* 214–0973–00 HEAT SINK,XSTR:TO–92,CU BE CD PL (USED WITH A5Q27) *END ATTACHED PARTS* A5Q27 151–0591–00 TRANSISTOR,SIG:BIPOLAR,PNP,80V,500MA,50MHZ,AMPL, MPSW56,TO–226AE EBC (SEE A5Q26) 04713 MPSW56 A5Q28 151–0591–00 TRANSISTOR,SIG:BIPOLAR,PNP,80V,500MA,50MHZ,AMPL, MPSW56,TO–226AE EBC 04713 MPSW56 A5Q29 151–5001–00 TRANSISTOR,SIG:BIPOLAR,NPN,40V,200MA,300MHZ,AMPL, MMBT3904L,TO–236/SOT–23,8MM 04713 MMBT3904LT1 A5Q30 151–0188–00 TRANSISTOR,SIG:BIPOLAR,PNP,40V,200MA,250MHZ,AMPL, 2N3906,TO–92 EBC 04713 2N3906 A5Q31 151–5001–00 TRANSISTOR,SIG:BIPOLAR,NPN,40V,200MA,300MHZ,AMPL, MMBT3904L,TO–236/SOT–23,8MM 04713 MMBT3904LT1 A5Q32 151–5000–00 TRANSISTOR,SIG:BIPOLAR,PNP,40V,200MA,250MHZ,AMPL, MMBT3906L,TO–236/SOT–23,8MM 04713 MMBT3906LT1 A5Q33 151–5001–00 TRANSISTOR,SIG:BIPOLAR,NPN,40V,200MA,300MHZ,AMPL, MMBT3904L,TO–236/SOT–23,8MM 04713 MMBT3904LT1 A5Q34 151–5000–00 TRANSISTOR,SIG:BIPOLAR,PNP,40V,200MA,250MHZ,AMPL, MMBT3906L,TO–236/SOT–23,8MM 04713 MMBT3906LT1 A5Q35 151–5000–00 TRANSISTOR,SIG:BIPOLAR,PNP,40V,200MA,250MHZ,AMPL, MMBT3906L,TO–236/SOT–23,8MM 04713 MMBT3906LT1 A5Q36 151–0190–00 TRANSISTOR,SIG:BIPOLAR,NPN,40V,200MA,300MHZ,AMPL, 2N3904,TO–92 EBC 04713 2N3904 AM700 Audio Measurement Set Service Manual 8–65 Replaceable Electrical Parts Replaceable electrical parts list (cont.) Component number Tektronix part number A5Q37 151–0590–00 Serial no. effective Serial no. discont’d Name & description TRANSISTOR,SIG:BIPOLAR,NPN,80V,500MA,50MHZ,AMPL, MPSW06,TO–226AE EBC Mfr. code Mfr. part number 04713 MPSW06 TK1326 214–0973–00 *ATTACHED PARTS* 214–0973–00 HEAT SINK,XSTR:TO–92,CU BE CD PL (USED WITH A5Q39) A5Q38 151–0590–00 TRANSISTOR,SIG:BIPOLAR,NPN,80V,500MA,50MHZ,AMPL, MPSW06,TO–226AE EBC 04713 MPSW06 A5Q39 151–0590–00 TRANSISTOR,SIG:BIPOLAR,NPN,80V,500MA,50MHZ,AMPL, MPSW06,TO–226AE EBC (SEE A5Q37) 04713 MPSW06 A5Q40 151–0591–00 TRANSISTOR,SIG:BIPOLAR,PNP,80V,500MA,50MHZ,AMPL, MPSW56,TO–226AE EBC 04713 MPSW56 TK1326 214–0973–00 *END ATTACHED PARTS* *ATTACHED PARTS* 214–0973–00 HEAT SINK,XSTR:TO–92,CU BE CD PL (USED WITH A5Q41) *END ATTACHED PARTS* A5Q41 151–0591–00 TRANSISTOR,SIG:BIPOLAR,PNP,80V,500MA,50MHZ,AMPL, MPSW56,TO–226AE EBC (SEE A5Q40) 04713 MPSW56 A5Q42 151–0591–00 TRANSISTOR,SIG:BIPOLAR,PNP,80V,500MA,50MHZ,AMPL, MPSW56,TO–226AE EBC 04713 MPSW56 A5Q43 151–5001–00 TRANSISTOR,SIG:BIPOLAR,NPN,40V,200MA,300MHZ,AMPL, MMBT3904L,TO–236/SOT–23,8MM 04713 MMBT3904LT1 A5Q44 151–0188–00 TRANSISTOR,SIG:BIPOLAR,PNP,40V,200MA,250MHZ,AMPL, 2N3906,TO–92 EBC 04713 2N3906 A5Q45 151–5001–00 TRANSISTOR,SIG:BIPOLAR,NPN,40V,200MA,300MHZ,AMPL, MMBT3904L,TO–236/SOT–23,8MM 04713 MMBT3904LT1 A5Q46 151–5000–00 TRANSISTOR,SIG:BIPOLAR,PNP,40V,200MA,250MHZ,AMPL, MMBT3906L,TO–236/SOT–23,8MM 04713 MMBT3906LT1 A5Q47 151–5001–00 TRANSISTOR,SIG:BIPOLAR,NPN,40V,200MA,300MHZ,AMPL, MMBT3904L,TO–236/SOT–23,8MM 04713 MMBT3904LT1 A5Q48 151–5000–00 TRANSISTOR,SIG:BIPOLAR,PNP,40V,200MA,250MHZ,AMPL, MMBT3906L,TO–236/SOT–23,8MM 04713 MMBT3906LT1 A5Q49 151–5000–00 TRANSISTOR,SIG:BIPOLAR,PNP,40V,200MA,250MHZ,AMPL, MMBT3906L,TO–236/SOT–23,8MM 04713 MMBT3906LT1 A5Q50 151–0190–00 TRANSISTOR,SIG:BIPOLAR,NPN,40V,200MA,300MHZ,AMPL, 2N3904,TO–92 EBC 04713 2N3904 A5Q51 151–0590–00 TRANSISTOR,SIG:BIPOLAR,NPN,80V,500MA,50MHZ,AMPL, MPSW06,TO–226AE EBC 04713 MPSW06 214–0973–00 HEAT SINK,XSTR:TO–92,CU BE CD PL (USED WITH A5Q53) TK1326 214–0973–00 04713 MPSW06 *ATTACHED PARTS* *END ATTACHED PARTS* A5Q52 8–66 151–0590–00 TRANSISTOR,SIG:BIPOLAR,NPN,80V,500MA,50MHZ,AMPL, MPSW06,TO–226AE EBC AM700 Audio Measurement Set Service Manual Replaceable Electrical Parts Replaceable electrical parts list (cont.) Component number Tektronix part number A5Q53 151–0590–00 A5Q54 151–0591–00 Serial no. effective Serial no. discont’d Mfr. code Mfr. part number TRANSISTOR,SIG:BIPOLAR,NPN,80V,500MA,50MHZ,AMPL, MPSW06,TO–226AE EBC (SEE A5Q51) 04713 MPSW06 TRANSISTOR,SIG:BIPOLAR,PNP,80V,500MA,50MHZ,AMPL, MPSW56,TO–226AE EBC 04713 MPSW56 TK1326 214–0973–00 Name & description *ATTACHED PARTS* 214–0973–00 HEAT SINK,XSTR:TO–92,CU BE CD PL (USED WITH A5Q55) A5Q55 151–0591–00 TRANSISTOR,SIG:BIPOLAR,PNP,80V,500MA,50MHZ,AMPL, MPSW56,TO–226AE EBC (SEE A5Q54) 04713 MPSW56 A5Q56 151–0591–00 TRANSISTOR,SIG:BIPOLAR,PNP,80V,500MA,50MHZ,AMPL, MPSW56,TO–226AE EBC 04713 MPSW56 A5R4 321–5008–00 RES,FXD,FILM:THICK FILM,150 OHM, 1%,0.125W,TC=100 PPM,1206 50139 BCK1500FT A5R5 321–5205–00 RES,FXD,FILM:1.33K OHM, 1%,0.125,1206,8MM 91637 CRCW1206–1331F–RT1 A5R6 321–5026–00 RES,FXD:THICK FILM,4.75K OHM, 1%,0.125W,TC=100 PPM,1206 50139 BCK4751FT A5R7 321–5026–00 RES,FXD:THICK FILM,4.75K OHM, 1%,0.125W,TC=100 PPM,1206 50139 BCK4751FT A5R10 321–5012–00 RES,FXD:THICK FILM,332 OHM, 1%,0.125W,TC=100 PPM,1206 50139 BCK3320FT A5R11 321–5012–00 RES,FXD:THICK FILM,332 OHM, 1%,0.125W,TC=100 PPM,1206 50139 BCK3320FT A5R12 321–5012–00 RES,FXD:THICK FILM,332 OHM, 1%,0.125W,TC=100 PPM,1206 50139 BCK3320FT A5R13 321–5014–00 RES,FXD:THICK FILM,475 OHM, 1%,0.125W,TC=100 PPM,1206 50139 BCK4750FT A5R14 321–5014–00 RES,FXD:THICK FILM,475 OHM, 1%,0.125W,TC=100 PPM,1206 50139 BCK4750FT A5R15 321–5014–00 RES,FXD:THICK FILM,475 OHM, 1%,0.125W,TC=100 PPM,1206 50139 BCK4750FT A5R16 301–0202–00 RES,FXD,FILM:2K OHM, 5%,0.5W 19701 5053CX2K000J 162–0026–00 INSUL SLVG,ELEC:0.059 ID,PTFE,CLEAR TK0977 TFEX20(TW)–NAT A5R17 321–5194–00 RES,FXD:THICK FILM,49.9 OHM, 1%,0.125W,TC=100 PPM,1206 59124 RK73H2B49R9FT A5R18 311–5033–00 RES,VAR,TRMR:CERMET,500 OHM, 25%,0.1W,4MM SQ,TOP ADJ,SMD 32997 3314J–1–501G A5R24 311–5033–00 RES,VAR,TRMR:CERMET,500 OHM, 25%,0.1W,4MM SQ,TOP ADJ,SMD 32997 3314J–1–501G A5R30 321–5122–00 RES,FXD,FILM:499 OHM, 1%,0.125W,1206,8MM 91637 CRCW1206–4990F–RT1 A5R31 321–5122–00 RES,FXD,FILM:499 OHM, 1%,0.125W,1206,8MM 91637 CRCW1206–4990F–RT1 A5R32 321–5122–00 RES,FXD,FILM:499 OHM, 1%,0.125W,1206,8MM 91637 CRCW1206–4990F–RT1 *END ATTACHED PARTS* *ATTACHED PARTS* *END ATTACHED PARTS* AM700 Audio Measurement Set Service Manual 8–67 Replaceable Electrical Parts Replaceable electrical parts list (cont.) Component number Tektronix part number A5R33 321–5122–00 A5R38 A5R43 Name & description Mfr. code Mfr. part number RES,FXD,FILM:499 OHM, 1%,0.125W,1206,8MM 91637 CRCW1206–4990F–RT1 321–0193–07 RES,FXD,FILM:1K OHM, 0.1%,0.125W,TC=T9 07716 CEAE10000B 321–5305–00 RES,FXD,FILM:2K OHM, 0.1%,25PPM,0.125W,1206 PKG 91637 TNPW1206–2001B–RT1 A5R46 321–5305–00 RES,FXD,FILM:2K OHM, 0.1%,25PPM,0.125W,1206 PKG 91637 TNPW1206–2001B–RT1 A5R47 321–5305–00 RES,FXD,FILM:2K OHM, 0.1%,25PPM,0.125W,1206 PKG 91637 TNPW1206–2001B–RT1 A5R50 321–5305–00 RES,FXD,FILM:2K OHM, 0.1%,25PPM,0.125W,1206 PKG 91637 TNPW1206–2001B–RT1 A5R60 321–0612–07 RES,FXD,FILM:500 OHM, 0.1%,0.125W,TC=T9 07716 CEAE500R0B A5R62 321–0926–07 RES,FXD,FILM:4K OHM, 0.1%,0.125W,TC=T9 07716 CEAE40000B A5R63 321–0222–07 RES,FXD,FILM:2.0K OHM, 0.1%,0.125W,TC=T9 07716 CEAE20000B A5R64 321–0193–07 RES,FXD,FILM:1K OHM, 0.1%,0.125W,TC=T9 07716 CEAE10000B A5R65 321–0612–07 RES,FXD,FILM:500 OHM, 0.1%,0.125W,TC=T9 07716 CEAE500R0B A5R66 321–0928–07 RES,FXD,FILM:250 OHM, 0.1%,0.125W,TC=T9 50139 ADVISE A5R67 321–0926–07 RES,FXD,FILM:4K OHM, 0.1%,0.125W,TC=T9 07716 CEAE40000B A5R68 321–0222–07 RES,FXD,FILM:2.0K OHM, 0.1%,0.125W,TC=T9 07716 CEAE20000B A5R69 321–0193–07 RES,FXD,FILM:1K OHM, 0.1%,0.125W,TC=T9 07716 CEAE10000B A5R70 321–0612–07 RES,FXD,FILM:500 OHM, 0.1%,0.125W,TC=T9 07716 CEAE500R0B A5R71 321–0928–07 RES,FXD,FILM:250 OHM, 0.1%,0.125W,TC=T9 50139 ADVISE A5R72 321–0193–07 RES,FXD,FILM:1K OHM, 0.1%,0.125W,TC=T9 07716 CEAE10000B A5R73 321–0612–07 RES,FXD,FILM:500 OHM, 0.1%,0.125W,TC=T9 07716 CEAE500R0B A5R74 321–0612–07 RES,FXD,FILM:500 OHM, 0.1%,0.125W,TC=T9 07716 CEAE500R0B A5R76 321–0612–07 RES,FXD,FILM:500 OHM, 0.1%,0.125W,TC=T9 07716 CEAE500R0B A5R77 321–0927–07 RES,FXD,FILM:125 OHM, 0.1%,0.125W,TC=T9 50139 ADVISE A5R78 321–0927–07 RES,FXD,FILM:125 OHM, 0.1%,0.125W,TC=T9 50139 ADVISE A5R79 321–0927–07 RES,FXD,FILM:125 OHM, 0.1%,0.125W,TC=T9 50139 ADVISE A5R80 321–0927–07 RES,FXD,FILM:125 OHM, 0.1%,0.125W,TC=T9 50139 ADVISE A5R81 321–1765–07 RES,FXD,FILM:720 OHM, 0.1%,0.125W,TC=T9 57027 720 OHM CM55 T9 .1% A5R82 321–0054–00 RES,FXD,FILM:35.7 OHM, 0.5%,0.125W,TC=T0 50139 NOT AVAILABLE A5R83 321–1008–04 RES,FXD,FILM:12.0 OHM, 0.1%,0.125W,TC=T2 50139 ADVISE A5R84 321–1008–04 RES,FXD,FILM:12.0 OHM, 0.1%,0.125W,TC=T2 50139 ADVISE A5R85 321–1765–07 RES,FXD,FILM:720 OHM, 0.1%,0.125W,TC=T9 57027 720 OHM CM55 T9 .1% A5R86 321–0054–00 RES,FXD,FILM:35.7 OHM, 0.5%,0.125W,TC=T0 50139 NOT AVAILABLE A5R87 321–1008–04 RES,FXD,FILM:12.0 OHM, 0.1%,0.125W,TC=T2 50139 ADVISE A5R88 321–1008–04 RES,FXD,FILM:12.0 OHM, 0.1%,0.125W,TC=T2 50139 ADVISE A5R89 321–1765–07 RES,FXD,FILM:720 OHM, 0.1%,0.125W,TC=T9 57027 720 OHM CM55 T9 .1% A5R90 321–0054–00 RES,FXD,FILM:35.7 OHM, 0.5%,0.125W,TC=T0 50139 NOT AVAILABLE A5R91 321–1008–04 RES,FXD,FILM:12.0 OHM, 0.1%,0.125W,TC=T2 50139 ADVISE A5R92 321–1008–04 RES,FXD,FILM:12.0 OHM, 0.1%,0.125W,TC=T2 50139 ADVISE A5R93 321–1765–07 RES,FXD,FILM:720 OHM, 0.1%,0.125W,TC=T9 57027 720 OHM CM55 T9 .1% 8–68 Serial no. effective Serial no. discont’d AM700 Audio Measurement Set Service Manual Replaceable Electrical Parts Replaceable electrical parts list (cont.) Component number Tektronix part number A5R94 321–0054–00 A5R95 A5R96 Serial no. effective Serial no. discont’d Name & description Mfr. code Mfr. part number RES,FXD,FILM:35.7 OHM, 0.5%,0.125W,TC=T0 50139 NOT AVAILABLE 321–1008–04 RES,FXD,FILM:12.0 OHM, 0.1%,0.125W,TC=T2 50139 ADVISE 321–1008–04 RES,FXD,FILM:12.0 OHM, 0.1%,0.125W,TC=T2 50139 ADVISE A5R97 321–0095–00 RES,FXD,FILM:95.3 OHM, 1%,0.125W,TC=T0 50139 ADVISE A5R98 322–0126–00 RES,FXD,FILM:200 OHM, 1%,0.25W,TC=T0, 19701 5043RD200R0F A5R99 321–0095–00 RES,FXD,FILM:95.3 OHM, 1%,0.125W,TC=T0 50139 ADVISE A5R100 322–0126–00 RES,FXD,FILM:200 OHM, 1%,0.25W,TC=T0, 19701 5043RD200R0F A5R101 321–0095–00 RES,FXD,FILM:95.3 OHM, 1%,0.125W,TC=T0 50139 ADVISE A5R102 322–0126–00 RES,FXD,FILM:200 OHM, 1%,0.25W,TC=T0, 19701 5043RD200R0F A5R103 321–0095–00 RES,FXD,FILM:95.3 OHM, 1%,0.125W,TC=T0 50139 ADVISE A5R104 322–0126–00 RES,FXD,FILM:200 OHM, 1%,0.25W,TC=T0, 19701 5043RD200R0F A5R107 321–5030–00 RES,FXD:THICK FILM,10.0K OHM, 1%,0.125W,TC=100 PPM,1206 50139 BCK1002FT A5R108 321–5000–00 RES,FXD,FILM:10 OHM, 1%,0.125W,TC=100 PPM,100V,1206,SMD 50139 BCD10R0FT A5R109 321–5030–00 RES,FXD:THICK FILM,10.0K OHM, 1%,0.125W,TC=100 PPM,1206 50139 BCK1002FT A5R110 321–5026–00 RES,FXD:THICK FILM,4.75K OHM, 1%,0.125W,TC=100 PPM,1206 50139 BCK4751FT A5R111 321–5012–00 RES,FXD:THICK FILM,332 OHM, 1%,0.125W,TC=100 PPM,1206 50139 BCK3320FT A5R112 321–5012–00 RES,FXD:THICK FILM,332 OHM, 1%,0.125W,TC=100 PPM,1206 50139 BCK3320FT A5R113 321–5018–00 RES,FXD:THICK FILM,1.0K OHM, 1%,0.125W,TC=100 PPM,1206 50139 BCK1001FT A5R114 321–5018–00 RES,FXD:THICK FILM,1.0K OHM, 1%,0.125W,TC=100 PPM,1206 50139 BCK1001FT A5R115 321–5018–00 RES,FXD:THICK FILM,1.0K OHM, 1%,0.125W,TC=100 PPM,1206 50139 BCK1001FT A5R116 321–5018–00 RES,FXD:THICK FILM,1.0K OHM, 1%,0.125W,TC=100 PPM,1206 50139 BCK1001FT A5R117 321–5018–00 RES,FXD:THICK FILM,1.0K OHM, 1%,0.125W,TC=100 PPM,1206 50139 BCK1001FT A5R118 321–5018–00 RES,FXD:THICK FILM,1.0K OHM, 1%,0.125W,TC=100 PPM,1206 50139 BCK1001FT A5R119 321–5305–00 RES,FXD,FILM:2K OHM, 0.1%,25PPM,0.125W,1206 PKG 91637 TNPW1206–2001B–RT1 A5R120 321–5305–00 RES,FXD,FILM:2K OHM, 0.1%,25PPM,0.125W,1206 PKG 91637 TNPW1206–2001B–RT1 A5R121 321–5305–00 RES,FXD,FILM:2K OHM, 0.1%,25PPM,0.125W,1206 PKG 91637 TNPW1206–2001B–RT1 A5R137 321–0222–07 RES,FXD,FILM:2.0K OHM, 0.1%,0.125W,TC=T9 07716 CEAE20000B A5R138 321–0222–07 RES,FXD,FILM:2.0K OHM, 0.1%,0.125W,TC=T9 07716 CEAE20000B A5R139 321–1701–04 RES,FXD,FILM:5.22K OHM, 0.1%,0.125W,TC=T2 07716 CEAC52200B A5R140 321–0263–00 RES,FXD,FILM:5.36K OHM, 1%,0.125W,TC=T0 50139 NOT AVAILABLE AM700 Audio Measurement Set Service Manual 8–69 Replaceable Electrical Parts Replaceable electrical parts list (cont.) Component number Tektronix part number A5R144 321–0222–07 A5R145 A5R146 Serial no. effective Serial no. discont’d Name & description Mfr. code Mfr. part number RES,FXD,FILM:2.0K OHM, 0.1%,0.125W,TC=T9 07716 CEAE20000B 321–0222–07 RES,FXD,FILM:2.0K OHM, 0.1%,0.125W,TC=T9 07716 CEAE20000B 321–0222–07 RES,FXD,FILM:2.0K OHM, 0.1%,0.125W,TC=T9 07716 CEAE20000B A5R147 321–0222–07 RES,FXD,FILM:2.0K OHM, 0.1%,0.125W,TC=T9 07716 CEAE20000B A5R148 321–1701–04 RES,FXD,FILM:5.22K OHM, 0.1%,0.125W,TC=T2 07716 CEAC52200B A5R149 321–0263–00 RES,FXD,FILM:5.36K OHM, 1%,0.125W,TC=T0 50139 NOT AVAILABLE A5R153 321–0222–07 RES,FXD,FILM:2.0K OHM, 0.1%,0.125W,TC=T9 07716 CEAE20000B A5R154 321–0222–07 RES,FXD,FILM:2.0K OHM, 0.1%,0.125W,TC=T9 07716 CEAE20000B A5R155 321–0222–07 RES,FXD,FILM:2.0K OHM, 0.1%,0.125W,TC=T9 07716 CEAE20000B A5R156 321–0222–07 RES,FXD,FILM:2.0K OHM, 0.1%,0.125W,TC=T9 07716 CEAE20000B A5R157 321–0222–07 RES,FXD,FILM:2.0K OHM, 0.1%,0.125W,TC=T9 07716 CEAE20000B A5R158 321–0222–07 RES,FXD,FILM:2.0K OHM, 0.1%,0.125W,TC=T9 07716 CEAE20000B A5R159 321–5049–00 RES,FXD:THICK FILM,1M OHM, 1%,0.125W,TC=100 PPM,1206 50139 BCA1004FT A5R160 321–5049–00 RES,FXD:THICK FILM,1M OHM, 1%,0.125W,TC=100 PPM,1206 50139 BCA1004FT A5R161 321–5049–00 RES,FXD:THICK FILM,1M OHM, 1%,0.125W,TC=100 PPM,1206 50139 BCA1004FT A5R162 321–5049–00 RES,FXD:THICK FILM,1M OHM, 1%,0.125W,TC=100 PPM,1206 50139 BCA1004FT A5R163 321–1746–07 RES,FXD,FILM:1.13K OHM, 0.1%,0.125W,TC=T9 56845 CMF55116C11300B–BULK A5R164 321–1789–07 RES,FXD,FILM:5.05K,0.1%,T9 91637 CMF55116C50500B–R36 A5R165 321–1790–07 RES,FXD,FILM:2.37K,0.1%,T9 91637 CMF55116C23700B–R36 A5R166 321–1790–07 RES,FXD,FILM:2.37K,0.1%,T9 91637 CMF55116C23700B–R36 A5R167 321–1790–07 RES,FXD,FILM:2.37K,0.1%,T9 91637 CMF55116C23700B–R36 A5R168 321–1790–07 RES,FXD,FILM:2.37K,0.1%,T9 91637 CMF55116C23700B–R36 A5R169 321–0239–07 RES,FXD,FILM:3.01K OHM, 0.1%,0.125W,TC=T9 07716 CEAE30100B A5R170 321–0239–07 RES,FXD,FILM:3.01K OHM, 0.1%,0.125W,TC=T9 07716 CEAE30100B A5R171 321–1789–07 RES,FXD,FILM:5.05K,0.1%,T9 91637 CMF55116C50500B–R36 A5R172 321–1746–07 RES,FXD,FILM:1.13K OHM, 0.1%,0.125W,TC=T9 56845 CMF55116C11300B–BULK A5R173 321–1790–07 RES,FXD,FILM:2.37K,0.1%,T9 91637 CMF55116C23700B–R36 A5R174 321–1790–07 RES,FXD,FILM:2.37K,0.1%,T9 91637 CMF55116C23700B–R36 A5R175 321–1790–07 RES,FXD,FILM:2.37K,0.1%,T9 91637 CMF55116C23700B–R36 A5R176 321–1790–07 RES,FXD,FILM:2.37K,0.1%,T9 91637 CMF55116C23700B–R36 A5R177 321–1792–07 RES,FXD,FILM:1.47K,0.1%,T9 91637 CMF55116C14700B–R36 A5R178 321–1793–07 RES,FXD,FILM:2.43K,0.1%,T9 91637 CMF55116C24300B–R36 A5R179 321–1792–07 RES,FXD,FILM:1.47K,0.1%,T9 91637 CMF55116C14700B–R36 A5R180 321–1793–07 RES,FXD,FILM:2.43K,0.1%,T9 91637 CMF55116C24300B–R36 A5R181 321–5018–00 RES,FXD:THICK FILM,1.0K OHM, 1%,0.125W,TC=100 PPM,1206 50139 BCK1001FT 8–70 AM700 Audio Measurement Set Service Manual Replaceable Electrical Parts Replaceable electrical parts list (cont.) Component number Tektronix part number Serial no. effective Serial no. discont’d Name & description Mfr. code A5R182 321–5281–00 Mfr. part number RES,FXD:THICK FILM,2K OHM, 1%,0.125W,TC=100 PPM,1206 59124 RK73H2B2001FT A5R183 321–5090–00 RES,FXD:THICK FILM,20.0K OHM, 1%,0.125W,100 PPM,1206 50139 BCK2002FT A5R184 321–5018–00 RES,FXD:THICK FILM,1.0K OHM, 1%,0.125W,TC=100 PPM,1206 50139 BCK1001FT A5R185 321–5298–00 RES,FXD,FILM:60.4 OHM, +/–1%,0.125W,TC=100 PPM,SMD 91637 CRCW1206–60R4F–RT1 A5R186 321–5018–00 RES,FXD:THICK FILM,1.0K OHM, 1%,0.125W,TC=100 PPM,1206 50139 BCK1001FT A5R187 321–5176–00 RES,FXD,FILM:3.01K,1%,0.125W,1206,SMD 91637 CRCW1206–3011F–RT1 A5R188 321–5018–00 RES,FXD:THICK FILM,1.0K OHM, 1%,0.125W,TC=100 PPM,1206 50139 BCK1001FT A5R189 321–5281–00 RES,FXD:THICK FILM,2K OHM, 1%,0.125W,TC=100 PPM,1206 59124 RK73H2B2001FT A5R190 321–5090–00 RES,FXD:THICK FILM,20.0K OHM, 1%,0.125W,100 PPM,1206 50139 BCK2002FT A5R191 321–5018–00 RES,FXD:THICK FILM,1.0K OHM, 1%,0.125W,TC=100 PPM,1206 50139 BCK1001FT A5R192 321–5298–00 RES,FXD,FILM:60.4 OHM, +/–1%,0.125W,TC=100 PPM,SMD 91637 CRCW1206–60R4F–RT1 A5R193 321–5281–00 RES,FXD:THICK FILM,2K OHM, 1%,0.125W,TC=100 PPM,1206 59124 RK73H2B2001FT A5R194 321–5281–00 RES,FXD:THICK FILM,2K OHM, 1%,0.125W,TC=100 PPM,1206 59124 RK73H2B2001FT A5R195 321–5026–00 RES,FXD:THICK FILM,4.75K OHM, 1%,0.125W,TC=100 PPM,1206 50139 BCK4751FT A5R196 321–5388–00 RES,FXD,FILM:16.2 OHM, 1%,0.125W,1206,8MM 91637 CRCW1206–16R2F–RT1 A5R197 321–5388–00 RES,FXD,FILM:16.2 OHM, 1%,0.125W,1206,8MM 91637 CRCW1206–16R2F–RT1 A5R198 321–5388–00 RES,FXD,FILM:16.2 OHM, 1%,0.125W,1206,8MM 91637 CRCW1206–16R2F–RT1 A5R199 321–5388–00 RES,FXD,FILM:16.2 OHM, 1%,0.125W,1206,8MM 91637 CRCW1206–16R2F–RT1 A5R200 321–5018–00 RES,FXD:THICK FILM,1.0K OHM, 1%,0.125W,TC=100 PPM,1206 50139 BCK1001FT A5R201 321–5281–00 RES,FXD:THICK FILM,2K OHM, 1%,0.125W,TC=100 PPM,1206 59124 RK73H2B2001FT A5R202 321–5090–00 RES,FXD:THICK FILM,20.0K OHM, 1%,0.125W,100 PPM,1206 50139 BCK2002FT A5R203 321–5018–00 RES,FXD:THICK FILM,1.0K OHM, 1%,0.125W,TC=100 PPM,1206 50139 BCK1001FT A5R204 321–5298–00 RES,FXD,FILM:60.4 OHM, +/–1%,0.125W,TC=100 PPM,SMD 91637 CRCW1206–60R4F–RT1 A5R205 321–5018–00 RES,FXD:THICK FILM,1.0K OHM, 1%,0.125W,TC=100 PPM,1206 50139 BCK1001FT A5R206 321–5176–00 RES,FXD,FILM:3.01K,1%,0.125W,1206,SMD 91637 CRCW1206–3011F–RT1 A5R207 321–5018–00 RES,FXD:THICK FILM,1.0K OHM, 1%,0.125W,TC=100 PPM,1206 50139 BCK1001FT A5R208 321–5281–00 RES,FXD:THICK FILM,2K OHM, 1%,0.125W,TC=100 PPM,1206 59124 RK73H2B2001FT A5R209 321–5090–00 RES,FXD:THICK FILM,20.0K OHM, 1%,0.125W,100 PPM,1206 50139 BCK2002FT A5R210 321–5018–00 RES,FXD:THICK FILM,1.0K OHM, 1%,0.125W,TC=100 PPM,1206 50139 BCK1001FT A5R211 321–5298–00 RES,FXD,FILM:60.4 OHM, +/–1%,0.125W,TC=100 PPM,SMD 91637 CRCW1206–60R4F–RT1 A5R212 321–5281–00 RES,FXD:THICK FILM,2K OHM, 1%,0.125W,TC=100 PPM,1206 59124 RK73H2B2001FT A5R213 321–5281–00 RES,FXD:THICK FILM,2K OHM, 1%,0.125W,TC=100 PPM,1206 59124 RK73H2B2001FT AM700 Audio Measurement Set Service Manual 8–71 Replaceable Electrical Parts Replaceable electrical parts list (cont.) Component number Tektronix part number A5R214 321–5026–00 A5R215 Serial no. effective Serial no. discont’d Mfr. code Mfr. part number RES,FXD:THICK FILM,4.75K OHM, 1%,0.125W,TC=100 PPM,1206 50139 BCK4751FT 321–5388–00 RES,FXD,FILM:16.2 OHM, 1%,0.125W,1206,8MM 91637 CRCW1206–16R2F–RT1 A5R216 321–5388–00 RES,FXD,FILM:16.2 OHM, 1%,0.125W,1206,8MM 91637 CRCW1206–16R2F–RT1 A5R217 321–5388–00 RES,FXD,FILM:16.2 OHM, 1%,0.125W,1206,8MM 91637 CRCW1206–16R2F–RT1 A5R218 321–5388–00 RES,FXD,FILM:16.2 OHM, 1%,0.125W,1206,8MM 91637 CRCW1206–16R2F–RT1 A5R219 321–5018–00 RES,FXD:THICK FILM,1.0K OHM, 1%,0.125W,TC=100 PPM,1206 50139 BCK1001FT A5R220 321–5018–00 RES,FXD:THICK FILM,1.0K OHM, 1%,0.125W,TC=100 PPM,1206 50139 BCK1001FT A5R221 321–5018–00 RES,FXD:THICK FILM,1.0K OHM, 1%,0.125W,TC=100 PPM,1206 50139 BCK1001FT A5R222 321–5018–00 RES,FXD:THICK FILM,1.0K OHM, 1%,0.125W,TC=100 PPM,1206 50139 BCK1001FT A5R223 321–5064–00 RES,FXD:THICK FILM,200K OHM, 1%,0.125W,TC=100 PPM,1206 59124 RK73H2B2003FT A5R224 321–5018–00 RES,FXD:THICK FILM,1.0K OHM, 1%,0.125W,TC=100 PPM,1206 50139 BCK1001FT A5R225 321–5281–00 RES,FXD:THICK FILM,2K OHM, 1%,0.125W,TC=100 PPM,1206 59124 RK73H2B2001FT A5R226 321–5090–00 RES,FXD:THICK FILM,20.0K OHM, 1%,0.125W,100 PPM,1206 50139 BCK2002FT A5R227 321–5018–00 RES,FXD:THICK FILM,1.0K OHM, 1%,0.125W,TC=100 PPM,1206 50139 BCK1001FT Name & description A5R228 321–5298–00 RES,FXD,FILM:60.4 OHM, +/–1%,0.125W,TC=100 PPM,SMD 91637 CRCW1206–60R4F–RT1 A5R229 321–5018–00 RES,FXD:THICK FILM,1.0K OHM, 1%,0.125W,TC=100 PPM,1206 50139 BCK1001FT A5R230 321–5176–00 RES,FXD,FILM:3.01K,1%,0.125W,1206,SMD 91637 CRCW1206–3011F–RT1 A5R231 321–5018–00 RES,FXD:THICK FILM,1.0K OHM, 1%,0.125W,TC=100 PPM,1206 50139 BCK1001FT A5R232 321–5281–00 RES,FXD:THICK FILM,2K OHM, 1%,0.125W,TC=100 PPM,1206 59124 RK73H2B2001FT A5R233 321–5090–00 RES,FXD:THICK FILM,20.0K OHM, 1%,0.125W,100 PPM,1206 50139 BCK2002FT A5R234 321–5018–00 RES,FXD:THICK FILM,1.0K OHM, 1%,0.125W,TC=100 PPM,1206 50139 BCK1001FT A5R235 321–5298–00 RES,FXD,FILM:60.4 OHM, +/–1%,0.125W,TC=100 PPM,SMD 91637 CRCW1206–60R4F–RT1 A5R236 321–5281–00 RES,FXD:THICK FILM,2K OHM, 1%,0.125W,TC=100 PPM,1206 59124 RK73H2B2001FT A5R237 321–5281–00 RES,FXD:THICK FILM,2K OHM, 1%,0.125W,TC=100 PPM,1206 59124 RK73H2B2001FT A5R238 321–5026–00 RES,FXD:THICK FILM,4.75K OHM, 1%,0.125W,TC=100 PPM,1206 50139 BCK4751FT A5R239 321–5388–00 RES,FXD,FILM:16.2 OHM, 1%,0.125W,1206,8MM 91637 CRCW1206–16R2F–RT1 A5R240 321–5388–00 RES,FXD,FILM:16.2 OHM, 1%,0.125W,1206,8MM 91637 CRCW1206–16R2F–RT1 A5R241 321–5388–00 RES,FXD,FILM:16.2 OHM, 1%,0.125W,1206,8MM 91637 CRCW1206–16R2F–RT1 A5R242 321–5388–00 RES,FXD,FILM:16.2 OHM, 1%,0.125W,1206,8MM 91637 CRCW1206–16R2F–RT1 A5R243 321–5018–00 RES,FXD:THICK FILM,1.0K OHM, 1%,0.125W,TC=100 PPM,1206 50139 BCK1001FT 8–72 AM700 Audio Measurement Set Service Manual Replaceable Electrical Parts Replaceable electrical parts list (cont.) Component number Tektronix part number Serial no. effective Serial no. discont’d Name & description Mfr. code A5R244 321–5281–00 Mfr. part number RES,FXD:THICK FILM,2K OHM, 1%,0.125W,TC=100 PPM,1206 59124 RK73H2B2001FT A5R245 321–5090–00 RES,FXD:THICK FILM,20.0K OHM, 1%,0.125W,100 PPM,1206 50139 BCK2002FT A5R246 321–5018–00 RES,FXD:THICK FILM,1.0K OHM, 1%,0.125W,TC=100 PPM,1206 50139 BCK1001FT A5R247 321–5298–00 RES,FXD,FILM:60.4 OHM, +/–1%,0.125W,TC=100 PPM,SMD 91637 CRCW1206–60R4F–RT1 A5R248 321–5018–00 RES,FXD:THICK FILM,1.0K OHM, 1%,0.125W,TC=100 PPM,1206 50139 BCK1001FT A5R249 321–5176–00 RES,FXD,FILM:3.01K,1%,0.125W,1206,SMD 91637 CRCW1206–3011F–RT1 A5R250 321–5018–00 RES,FXD:THICK FILM,1.0K OHM, 1%,0.125W,TC=100 PPM,1206 50139 BCK1001FT A5R251 321–5281–00 RES,FXD:THICK FILM,2K OHM, 1%,0.125W,TC=100 PPM,1206 59124 RK73H2B2001FT A5R252 321–5090–00 RES,FXD:THICK FILM,20.0K OHM, 1%,0.125W,100 PPM,1206 50139 BCK2002FT A5R253 321–5018–00 RES,FXD:THICK FILM,1.0K OHM, 1%,0.125W,TC=100 PPM,1206 50139 BCK1001FT A5R254 321–5298–00 RES,FXD,FILM:60.4 OHM, +/–1%,0.125W,TC=100 PPM,SMD 91637 CRCW1206–60R4F–RT1 A5R255 321–5281–00 RES,FXD:THICK FILM,2K OHM, 1%,0.125W,TC=100 PPM,1206 59124 RK73H2B2001FT A5R256 321–5281–00 RES,FXD:THICK FILM,2K OHM, 1%,0.125W,TC=100 PPM,1206 59124 RK73H2B2001FT A5R257 321–5026–00 RES,FXD:THICK FILM,4.75K OHM, 1%,0.125W,TC=100 PPM,1206 50139 BCK4751FT A5R258 321–5388–00 RES,FXD,FILM:16.2 OHM, 1%,0.125W,1206,8MM 91637 CRCW1206–16R2F–RT1 A5R259 321–5388–00 RES,FXD,FILM:16.2 OHM, 1%,0.125W,1206,8MM 91637 CRCW1206–16R2F–RT1 A5R260 321–5388–00 RES,FXD,FILM:16.2 OHM, 1%,0.125W,1206,8MM 91637 CRCW1206–16R2F–RT1 A5R261 321–5388–00 RES,FXD,FILM:16.2 OHM, 1%,0.125W,1206,8MM 91637 CRCW1206–16R2F–RT1 A5R262 321–5018–00 RES,FXD:THICK FILM,1.0K OHM, 1%,0.125W,TC=100 PPM,1206 50139 BCK1001FT A5R263 321–5018–00 RES,FXD:THICK FILM,1.0K OHM, 1%,0.125W,TC=100 PPM,1206 50139 BCK1001FT A5R264 321–5018–00 RES,FXD:THICK FILM,1.0K OHM, 1%,0.125W,TC=100 PPM,1206 50139 BCK1001FT A5R265 321–5018–00 RES,FXD:THICK FILM,1.0K OHM, 1%,0.125W,TC=100 PPM,1206 50139 BCK1001FT A5R266 321–5064–00 RES,FXD:THICK FILM,200K OHM, 1%,0.125W,TC=100 PPM,1206 59124 RK73H2B2003FT A5R267 308–0450–00 RES,FXD,WW:70 OHM, 1%,3W AXIAL LEADS 24165 242EX70R00FQ18 A5R268 308–0450–00 RES,FXD,WW:70 OHM, 1%,3W AXIAL LEADS 24165 242EX70R00FQ18 A5R269 308–0450–00 RES,FXD,WW:70 OHM, 1%,3W AXIAL LEADS 24165 242EX70R00FQ18 A5R270 308–0450–00 RES,FXD,WW:70 OHM, 1%,3W AXIAL LEADS 24165 242EX70R00FQ18 A5R272 307–5040–01 RES,NTWK:THICK FILM,(8)33 OHM, 2%,0.16W EACH,TC=100 PPM,SO16.220 ,ISOLATED 57924 4816P–001–330 A5R273 307–5040–01 RES,NTWK:THICK FILM,(8)33 OHM, 2%,0.16W EACH,TC=100 PPM,SO16.220 ,ISOLATED 57924 4816P–001–330 A5R274 307–5040–01 RES,NTWK:THICK FILM,(8)33 OHM, 2%,0.16W EACH,TC=100 PPM,SO16.220 ,ISOLATED 57924 4816P–001–330 AM700 Audio Measurement Set Service Manual 8–73 Replaceable Electrical Parts Replaceable electrical parts list (cont.) Component number Tektronix part number A5R275 307–5040–01 A5R276 307–5040–01 A5R277 307–5040–01 A5R277 325–0483–00 B020100 A5R278 325–0483–00 B020100 RES,FXD,FILM:300 OHM, 1%, 3 W, 500V,0.515 X 0.225, AXIAL 24546 FP69 300 OHM 1% A5R279 321–5030–00 RES,FXD:THICK FILM,10.0K OHM, 1%,0.125W,TC=100 PPM,1206 50139 BCK1002FT A5R280 321–5030–00 RES,FXD:THICK FILM,10.0K OHM, 1%,0.125W,TC=100 PPM,1206 50139 BCK1002FT A5R283 321–5205–00 RES,FXD,FILM:1.33K OHM, 1%,0.125,1206,8MM 91637 CRCW1206–1331F–RT1 A5R283 325–0483–00 RES,FXD,FILM:300 OHM, 1%, 3 W, 500V,0.515 X 0.225, AXIAL 24546 FP69 300 OHM 1% (BULK) A5R284 321–5205–00 RES,FXD,FILM:1.33K OHM, 1%,0.125,1206,8MM 91637 CRCW1206–1331F–RT1 A5R284 325–0483–00 RES,FXD,FILM:300 OHM, 1%, 3 W, 500V,0.515 X 0.225, AXIAL 24546 FP69 300 OHM 1% (BULK) A5R285 321–5205–00 RES,FXD,FILM:1.33K OHM, 1%,0.125,1206,8MM 91637 CRCW1206–1331F–RT1 A5R286 321–5205–00 RES,FXD,FILM:1.33K OHM, 1%,0.125,1206,8MM 91637 CRCW1206–1331F–RT1 A5R287 321–5030–00 RES,FXD:THICK FILM,10.0K OHM, 1%,0.125W,TC=100 PPM,1206 50139 BCK1002FT A5R288 321–5006–00 RES,FXD,FILM:THICK FILM,100 OHM, 1%,0.125W,TC=100 PPM,1206 50139 BCK1000FT A5R290 321–5026–00 RES,FXD:THICK FILM,4.75K OHM, 1%,0.125W,TC=100 PPM,1206 50139 BCK4751FT A5R291 321–5026–00 RES,FXD:THICK FILM,4.75K OHM, 1%,0.125W,TC=100 PPM,1206 50139 BCK4751FT A5R292 321–5026–00 RES,FXD:THICK FILM,4.75K OHM, 1%,0.125W,TC=100 PPM,1206 50139 BCK4751FT A5R293 321–5026–00 RES,FXD:THICK FILM,4.75K OHM, 1%,0.125W,TC=100 PPM,1206 50139 BCK4751FT A5R294 321–5026–00 RES,FXD:THICK FILM,4.75K OHM, 1%,0.125W,TC=100 PPM,1206 50139 BCK4751FT A5R295 321–5026–00 RES,FXD:THICK FILM,4.75K OHM, 1%,0.125W,TC=100 PPM,1206 50139 BCK4751FT A5R296 321–5026–00 RES,FXD:THICK FILM,4.75K OHM, 1%,0.125W,TC=100 PPM,1206 50139 BCK4751FT A5R297 321–5026–00 RES,FXD:THICK FILM,4.75K OHM, 1%,0.125W,TC=100 PPM,1206 50139 BCK4751FT A5R298 321–5026–00 RES,FXD:THICK FILM,4.75K OHM, 1%,0.125W,TC=100 PPM,1206 50139 BCK4751FT A5R299 321–5026–00 RES,FXD:THICK FILM,4.75K OHM, 1%,0.125W,TC=100 PPM,1206 50139 BCK4751FT A5R300 321–5026–00 RES,FXD:THICK FILM,4.75K OHM, 1%,0.125W,TC=100 PPM,1206 50139 BCK4751FT 8–74 Serial no. effective Serial no. discont’d B019999 B019999 B020100 B019999 B020100 Mfr. code Mfr. part number RES,NTWK:THICK FILM,(8)33 OHM, 2%,0.16W EACH,TC=100 PPM,SO16.220 ,ISOLATED 57924 4816P–001–330 RES,NTWK:THICK FILM,(8)33 OHM, 2%,0.16W EACH,TC=100 PPM,SO16.220 ,ISOLATED 57924 4816P–001–330 RES,NTWK:THICK FILM,(8)33 OHM, 2%,0.16W EACH,TC=100 PPM,SO16.220 ,ISOLATED 57924 4816P–001–330 RES,FXD,FILM:300 OHM, 1%, 3 W, 500V,0.515 X 0.225, AXIAL 24546 FP69 300 OHM 1% Name & description AM700 Audio Measurement Set Service Manual Replaceable Electrical Parts Replaceable electrical parts list (cont.) Component number Tektronix part number A5R301 321–5026–00 A5R302 Serial no. effective Serial no. discont’d Mfr. code Mfr. part number RES,FXD:THICK FILM,4.75K OHM, 1%,0.125W,TC=100 PPM,1206 50139 BCK4751FT 321–5026–00 RES,FXD:THICK FILM,4.75K OHM, 1%,0.125W,TC=100 PPM,1206 50139 BCK4751FT A5R303 321–5026–00 RES,FXD:THICK FILM,4.75K OHM, 1%,0.125W,TC=100 PPM,1206 50139 BCK4751FT A5R304 321–5026–00 RES,FXD:THICK FILM,4.75K OHM, 1%,0.125W,TC=100 PPM,1206 50139 BCK4751FT A5R305 321–5026–00 RES,FXD:THICK FILM,4.75K OHM, 1%,0.125W,TC=100 PPM,1206 50139 BCK4751FT A5R306 321–5026–00 RES,FXD:THICK FILM,4.75K OHM, 1%,0.125W,TC=100 PPM,1206 50139 BCK4751FT A5R307 321–5026–00 RES,FXD:THICK FILM,4.75K OHM, 1%,0.125W,TC=100 PPM,1206 50139 BCK4751FT A5R308 321–5026–00 RES,FXD:THICK FILM,4.75K OHM, 1%,0.125W,TC=100 PPM,1206 50139 BCK4751FT A5R309 321–5026–00 RES,FXD:THICK FILM,4.75K OHM, 1%,0.125W,TC=100 PPM,1206 50139 BCK4751FT A5R310 321–5026–00 RES,FXD:THICK FILM,4.75K OHM, 1%,0.125W,TC=100 PPM,1206 50139 BCK4751FT A5R311 321–5026–00 RES,FXD:THICK FILM,4.75K OHM, 1%,0.125W,TC=100 PPM,1206 50139 BCK4751FT A5R312 321–5026–00 RES,FXD:THICK FILM,4.75K OHM, 1%,0.125W,TC=100 PPM,1206 50139 BCK4751FT A5R313 321–5026–00 RES,FXD:THICK FILM,4.75K OHM, 1%,0.125W,TC=100 PPM,1206 50139 BCK4751FT A5R314 321–5026–00 RES,FXD:THICK FILM,4.75K OHM, 1%,0.125W,TC=100 PPM,1206 50139 BCK4751FT A5R315 321–5026–00 RES,FXD:THICK FILM,4.75K OHM, 1%,0.125W,TC=100 PPM,1206 50139 BCK4751FT A5R316 321–5026–00 RES,FXD:THICK FILM,4.75K OHM, 1%,0.125W,TC=100 PPM,1206 50139 BCK4751FT A5R317 321–5026–00 RES,FXD:THICK FILM,4.75K OHM, 1%,0.125W,TC=100 PPM,1206 50139 BCK4751FT A5R318 321–5026–00 RES,FXD:THICK FILM,4.75K OHM, 1%,0.125W,TC=100 PPM,1206 50139 BCK4751FT A5R319 321–5026–00 RES,FXD:THICK FILM,4.75K OHM, 1%,0.125W,TC=100 PPM,1206 50139 BCK4751FT A5R320 321–5026–00 RES,FXD:THICK FILM,4.75K OHM, 1%,0.125W,TC=100 PPM,1206 50139 BCK4751FT A5R321 321–5026–00 RES,FXD:THICK FILM,4.75K OHM, 1%,0.125W,TC=100 PPM,1206 50139 BCK4751FT A5R322 321–5026–00 RES,FXD:THICK FILM,4.75K OHM, 1%,0.125W,TC=100 PPM,1206 50139 BCK4751FT A5R323 321–5026–00 RES,FXD:THICK FILM,4.75K OHM, 1%,0.125W,TC=100 PPM,1206 50139 BCK4751FT Name & description AM700 Audio Measurement Set Service Manual 8–75 Replaceable Electrical Parts Replaceable electrical parts list (cont.) Component number Tektronix part number A5R324 321–5026–00 A5R325 Mfr. code Mfr. part number RES,FXD:THICK FILM,4.75K OHM, 1%,0.125W,TC=100 PPM,1206 50139 BCK4751FT 321–5388–00 RES,FXD,FILM:16.2 OHM, 1%,0.125W,1206,8MM 91637 CRCW1206–16R2F–RT1 A5R326 321–5388–00 RES,FXD,FILM:16.2 OHM, 1%,0.125W,1206,8MM 91637 CRCW1206–16R2F–RT1 A5R327 321–5388–00 RES,FXD,FILM:16.2 OHM, 1%,0.125W,1206,8MM 91637 CRCW1206–16R2F–RT1 A5R328 321–5388–00 RES,FXD,FILM:16.2 OHM, 1%,0.125W,1206,8MM 91637 CRCW1206–16R2F–RT1 A5R329 321–5388–00 RES,FXD,FILM:16.2 OHM, 1%,0.125W,1206,8MM 91637 CRCW1206–16R2F–RT1 A5R330 321–5388–00 RES,FXD,FILM:16.2 OHM, 1%,0.125W,1206,8MM 91637 CRCW1206–16R2F–RT1 A5R331 321–5388–00 RES,FXD,FILM:16.2 OHM, 1%,0.125W,1206,8MM 91637 CRCW1206–16R2F–RT1 A5R332 321–5388–00 RES,FXD,FILM:16.2 OHM, 1%,0.125W,1206,8MM 91637 CRCW1206–16R2F–RT1 A5R333 321–5030–00 RES,FXD:THICK FILM,10.0K OHM, 1%,0.125W,TC=100 PPM,1206 50139 BCK1002FT A5R334 321–5194–00 RES,FXD:THICK FILM,49.9 OHM, 1%,0.125W,TC=100 PPM,1206 59124 RK73H2B49R9FT A5R334 322–3155–00 RES,FXD,FILM:402 OHM,1%,0.2W,TC=T0 57668 CRB20 FXE 402E A5R335 321–5306–00 RES,FXD,FILM:330 OHM, +/–5%,0.125W,TC=200PPM,1206 PKG,SMD 91637 CRCW1206–331J–RT1 A5R336 321–5306–00 RES,FXD,FILM:330 OHM, +/–5%,0.125W,TC=200PPM,1206 PKG,SMD 91637 CRCW1206–331J–RT1 A5R337 321–5306–00 RES,FXD,FILM:330 OHM, +/–5%,0.125W,TC=200PPM,1206 PKG,SMD 91637 CRCW1206–331J–RT1 A5R338 321–5306–00 RES,FXD,FILM:330 OHM, +/–5%,0.125W,TC=200PPM,1206 PKG,SMD 91637 CRCW1206–331J–RT1 A5R339 321–5306–00 RES,FXD,FILM:330 OHM, +/–5%,0.125W,TC=200PPM,1206 PKG,SMD 91637 CRCW1206–331J–RT1 A5R340 321–5306–00 RES,FXD,FILM:330 OHM, +/–5%,0.125W,TC=200PPM,1206 PKG,SMD 91637 CRCW1206–331J–RT1 A5R341 321–5306–00 RES,FXD,FILM:330 OHM, +/–5%,0.125W,TC=200PPM,1206 PKG,SMD 91637 CRCW1206–331J–RT1 A5R342 321–5306–00 RES,FXD,FILM:330 OHM, +/–5%,0.125W,TC=200PPM,1206 PKG,SMD 91637 CRCW1206–331J–RT1 A5R343 321–5026–00 RES,FXD:THICK FILM,4.75K OHM, 1%,0.125W,TC=100 PPM,1206 50139 BCK4751FT A5R344 321–5194–00 RES,FXD:THICK FILM,49.9 OHM, 1%,0.125W,TC=100 PPM,1206 59124 RK73H2B49R9FT A5R344 322–3155–00 RES,FXD,FILM:402 OHM,1%,0.2W,TC=T0 57668 CRB20 FXE 402E A5R345 321–5030–00 RES,FXD:THICK FILM,10.0K OHM, 1%,0.125W,TC=100 PPM,1206 50139 BCK1002FT A5R346 321–5038–00 RES,FXD:THICK FILM,47.5K OHM, 1%,0.125W,TC=100 PPM,1206 50139 BCK4752FT A5R347 321–5038–00 RES,FXD:THICK FILM,47.5K OHM, 1%,0.125W,TC=100 PPM,1206 50139 BCK4752FT A5R348 321–5030–00 RES,FXD:THICK FILM,10.0K OHM, 1%,0.125W,TC=100 PPM,1206 50139 BCK1002FT 8–76 Serial no. effective Serial no. discont’d B019999 B020100 B019999 B020100 Name & description MI,SMALL BODY MI,SMALL BODY AM700 Audio Measurement Set Service Manual Replaceable Electrical Parts Replaceable electrical parts list (cont.) Component number Tektronix part number A5R350 321–5030–00 A5R351 Serial no. effective Serial no. discont’d Mfr. code Mfr. part number RES,FXD:THICK FILM,10.0K OHM, 1%,0.125W,TC=100 PPM,1206 50139 BCK1002FT 321–5006–00 RES,FXD,FILM:THICK FILM,100 OHM, 1%,0.125W,TC=100 PPM,1206 50139 BCK1000FT A5R352 321–5006–00 RES,FXD,FILM:THICK FILM,100 OHM, 1%,0.125W,TC=100 PPM,1206 50139 BCK1000FT A5R353 321–5006–00 RES,FXD,FILM:THICK FILM,100 OHM, 1%,0.125W,TC=100 PPM,1206 50139 BCK1000FT A5R354 321–5006–00 RES,FXD,FILM:THICK FILM,100 OHM, 1%,0.125W,TC=100 PPM,1206 50139 BCK1000FT A5R355 321–5006–00 RES,FXD,FILM:THICK FILM,100 OHM, 1%,0.125W,TC=100 PPM,1206 50139 BCK1000FT A5R356 321–5006–00 RES,FXD,FILM:THICK FILM,100 OHM, 1%,0.125W,TC=100 PPM,1206 50139 BCK1000FT A5R357 321–5006–00 RES,FXD,FILM:THICK FILM,100 OHM, 1%,0.125W,TC=100 PPM,1206 50139 BCK1000FT A5R358 321–5006–00 RES,FXD,FILM:THICK FILM,100 OHM, 1%,0.125W,TC=100 PPM,1206 50139 BCK1000FT A5R359 308–0388–00 RES,FXD,WW:47 OHM, 5%,3W AXIAL LEADS 05347 CS4 47 OHM 5 PERCENT A5R360 321–5000–00 RES,FXD,FILM:10 OHM, 1%,0.125W,TC=100 PPM,100V,1206,SMD 50139 BCD10R0FT A5R361 321–5000–00 RES,FXD,FILM:10 OHM, 1%,0.125W,TC=100 PPM,100V,1206,SMD 50139 BCD10R0FT A5R362 321–5000–00 RES,FXD,FILM:10 OHM, 1%,0.125W,TC=100 PPM,100V,1206,SMD 50139 BCD10R0FT A5R363 321–5000–00 RES,FXD,FILM:10 OHM, 1%,0.125W,TC=100 PPM,100V,1206,SMD 50139 BCD10R0FT A5R364 321–5047–00 RES,FXD:THICK FILM,100K OHM, 1%,0.125W,TC=100 PPM,1206 50139 BCK1003FT A5R365 321–5047–00 RES,FXD:THICK FILM,100K OHM, 1%,0.125W,TC=100 PPM,1206 50139 BCK1003FT A5R366 321–5018–00 RES,FXD:THICK FILM,1.0K OHM, 1%,0.125W,TC=100 PPM,1206 50139 BCK1001FT A5R367 321–5018–00 RES,FXD:THICK FILM,1.0K OHM, 1%,0.125W,TC=100 PPM,1206 50139 BCK1001FT A5R368 321–5030–00 RES,FXD:THICK FILM,10.0K OHM, 1%,0.125W,TC=100 PPM,1206 50139 BCK1002FT A5R369 321–5030–00 RES,FXD:THICK FILM,10.0K OHM, 1%,0.125W,TC=100 PPM,1206 50139 BCK1002FT A5R370 321–5006–00 RES,FXD,FILM:THICK FILM,100 OHM, 1%,0.125W,TC=100 PPM,1206 50139 BCK1000FT A5R372 321–5006–00 RES,FXD,FILM:THICK FILM,100 OHM, 1%,0.125W,TC=100 PPM,1206 50139 BCK1000FT A5R374 321–5047–00 RES,FXD:THICK FILM,100K OHM, 1%,0.125W,TC=100 PPM,1206 50139 BCK1003FT Name & description AM700 Audio Measurement Set Service Manual 8–77 Replaceable Electrical Parts Replaceable electrical parts list (cont.) Component number Tektronix part number A5R375 321–5047–00 A5R376 Mfr. code Mfr. part number RES,FXD:THICK FILM,100K OHM, 1%,0.125W,TC=100 PPM,1206 50139 BCK1003FT 321–5030–00 RES,FXD:THICK FILM,10.0K OHM, 1%,0.125W,TC=100 PPM,1206 50139 BCK1002FT A5R377 321–5000–00 RES,FXD,FILM:10 OHM, 1%,0.125W,TC=100 PPM,100V,1206,SMD 50139 BCD10R0FT A5R378 321–5000–00 RES,FXD,FILM:10 OHM, 1%,0.125W,TC=100 PPM,100V,1206,SMD 50139 BCD10R0FT A5R379 321–5000–00 RES,FXD,FILM:10 OHM, 1%,0.125W,TC=100 PPM,100V,1206,SMD 50139 BCD10R0FT A5R380 321–5000–00 RES,FXD,FILM:10 OHM, 1%,0.125W,TC=100 PPM,100V,1206,SMD 50139 BCD10R0FT A5R381 321–5000–00 RES,FXD,FILM:10 OHM, 1%,0.125W,TC=100 PPM,100V,1206,SMD 50139 BCD10R0FT A5R382 321–5000–00 RES,FXD,FILM:10 OHM, 1%,0.125W,TC=100 PPM,100V,1206,SMD 50139 BCD10R0FT A5R383 321–5000–00 RES,FXD,FILM:10 OHM, 1%,0.125W,TC=100 PPM,100V,1206,SMD 50139 BCD10R0FT A5R384 321–5000–00 RES,FXD,FILM:10 OHM, 1%,0.125W,TC=100 PPM,100V,1206,SMD 50139 BCD10R0FT A5R385 321–5012–00 RES,FXD:THICK FILM,332 OHM, 1%,0.125W,TC=100 PPM,1206 50139 BCK3320FT A5R390 321–5014–00 RES,FXD:THICK FILM,475 OHM, 1%,0.125W,TC=100 PPM,1206 50139 BCK4750FT A5R391 321–5014–00 RES,FXD:THICK FILM,475 OHM, 1%,0.125W,TC=100 PPM,1206 50139 BCK4750FT A5R392 321–5014–00 RES,FXD:THICK FILM,475 OHM, 1%,0.125W,TC=100 PPM,1206 50139 BCK4750FT A5R393 321–5014–00 RES,FXD:THICK FILM,475 OHM, 1%,0.125W,TC=100 PPM,1206 50139 BCK4750FT A5R395 308–0388–00 RES,FXD,WW:47 OHM, 5%,3W AXIAL LEADS 05347 CS4 47 OHM 5 PERCENT A5R396 321–5051–00 RES,FXD:THICK FILM,0 OHM, 1%,0.125W,TC=100 PPM,1206 50139 BCD0JUMPERT A5R397 321–5051–00 RES,FXD:THICK FILM,0 OHM, 1%,0.125W,TC=100 PPM,1206 50139 BCD0JUMPERT A5R398 321–5051–00 RES,FXD:THICK FILM,0 OHM, 1%,0.125W,TC=100 PPM,1206 50139 BCD0JUMPERT A5R399 321–5051–00 RES,FXD:THICK FILM,0 OHM, 1%,0.125W,TC=100 PPM,1206 50139 BCD0JUMPERT A5R400 321–5051–00 RES,FXD:THICK FILM,0 OHM, 1%,0.125W,TC=100 PPM,1206 50139 BCD0JUMPERT A5R401 321–5051–00 RES,FXD:THICK FILM,0 OHM, 1%,0.125W,TC=100 PPM,1206 50139 BCD0JUMPERT A5R402 321–5051–00 RES,FXD:THICK FILM,0 OHM, 1%,0.125W,TC=100 PPM,1206 50139 BCD0JUMPERT A5R403 321–5051–00 RES,FXD:THICK FILM,0 OHM, 1%,0.125W,TC=100 PPM,1206 50139 BCD0JUMPERT A5R404 321–5006–00 RES,FXD,FILM:THICK FILM,100 OHM, 1%,0.125W,TC=100 PPM,1206 50139 BCK1000FT A5R405 321–5006–00 RES,FXD,FILM:THICK FILM,100 OHM, 1%,0.125W,TC=100 PPM,1206 50139 BCK1000FT 8–78 Serial no. effective Serial no. discont’d Name & description AM700 Audio Measurement Set Service Manual Replaceable Electrical Parts Replaceable electrical parts list (cont.) Component number Tektronix part number Serial no. effective Serial no. discont’d Name & description Mfr. code A5RC1 307–5101–00 RCD,NTWK:16,47 OHM, 33 PF,SCHOTTKE DIODE, SOIC–20 56427 PRCD001470M330M OR PRN244 A5RC2 307–5101–00 RCD,NTWK:16,47 OHM, 33 PF,SCHOTTKE DIODE, SOIC–20 56427 PRCD001470M330M OR PRN244 A5RC3 307–5101–00 RCD,NTWK:16,47 OHM, 33 PF,SCHOTTKE DIODE, SOIC–20 56427 PRCD001470M330M OR PRN244 A5S1 260–1965–00 SWITCH,ROCKER:DIP,RAISED ROCKER,4 POSITION,TOP SEALED,150MA 30VDC,76SBO4S 00779 435166–2 A5TP3 214–4085–00 TERM,TEST POINT:0.070 ID,0.220 H,0.063 DIA PCB,0.015 X 0.032 BRASS,W/ RED NYLON COLLAR 26364 TP104–01–02 A5TP4 214–4085–00 TERM,TEST POINT:0.070 ID,0.220 H,0.063 DIA PCB,0.015 X 0.032 BRASS,W/ RED NYLON COLLAR 26364 TP104–01–02 A5TP5 214–4085–00 TERM,TEST POINT:0.070 ID,0.220 H,0.063 DIA PCB,0.015 X 0.032 BRASS,W/ RED NYLON COLLAR 26364 TP104–01–02 A5TP6 214–4085–00 TERM,TEST POINT:0.070 ID,0.220 H,0.063 DIA PCB,0.015 X 0.032 BRASS,W/ RED NYLON COLLAR 26364 TP104–01–02 A5TP7 214–4085–00 TERM,TEST POINT:0.070 ID,0.220 H,0.063 DIA PCB,0.015 X 0.032 BRASS,W/ RED NYLON COLLAR 26364 TP104–01–02 A5TP8 214–4085–00 TERM,TEST POINT:0.070 ID,0.220 H,0.063 DIA PCB,0.015 X 0.032 BRASS,W/ RED NYLON COLLAR 26364 TP104–01–02 A5TP9 214–4085–00 TERM,TEST POINT:0.070 ID,0.220 H,0.063 DIA PCB,0.015 X 0.032 BRASS,W/ RED NYLON COLLAR 26364 TP104–01–02 A5TP12 214–4085–00 TERM,TEST POINT:0.070 ID,0.220 H,0.063 DIA PCB,0.015 X 0.032 BRASS,W/ RED NYLON COLLAR 26364 TP104–01–02 A5TP13 214–4085–00 TERM,TEST POINT:0.070 ID,0.220 H,0.063 DIA PCB,0.015 X 0.032 BRASS,W/ RED NYLON COLLAR 26364 TP104–01–02 A5TP14 214–4085–00 TERM,TEST POINT:0.070 ID,0.220 H,0.063 DIA PCB,0.015 X 0.032 BRASS,W/ RED NYLON COLLAR 26364 TP104–01–02 A5TP15 214–4085–00 TERM,TEST POINT:0.070 ID,0.220 H,0.063 DIA PCB,0.015 X 0.032 BRASS,W/ RED NYLON COLLAR 26364 TP104–01–02 A5TP16 214–4085–00 TERM,TEST POINT:0.070 ID,0.220 H,0.063 DIA PCB,0.015 X 0.032 BRASS,W/ RED NYLON COLLAR 26364 TP104–01–02 A5TP17 214–4085–00 TERM,TEST POINT:0.070 ID,0.220 H,0.063 DIA PCB,0.015 X 0.032 BRASS,W/ RED NYLON COLLAR 26364 TP104–01–02 A5TP18 214–4085–00 TERM,TEST POINT:0.070 ID,0.220 H,0.063 DIA PCB,0.015 X 0.032 BRASS,W/ RED NYLON COLLAR 26364 TP104–01–02 A5TP19 214–4085–00 TERM,TEST POINT:0.070 ID,0.220 H,0.063 DIA PCB,0.015 X 0.032 BRASS,W/ RED NYLON COLLAR 26364 TP104–01–02 A5TP20 214–4085–00 TERM,TEST POINT:0.070 ID,0.220 H,0.063 DIA PCB,0.015 X 0.032 BRASS,W/ RED NYLON COLLAR 26364 TP104–01–02 A5TP21 214–4085–00 TERM,TEST POINT:0.070 ID,0.220 H,0.063 DIA PCB,0.015 X 0.032 BRASS,W/ RED NYLON COLLAR 26364 TP104–01–02 A5TP22 214–4085–00 TERM,TEST POINT:0.070 ID,0.220 H,0.063 DIA PCB,0.015 X 0.032 BRASS,W/ RED NYLON COLLAR 26364 TP104–01–02 A5TP23 214–4085–00 TERM,TEST POINT:0.070 ID,0.220 H,0.063 DIA PCB,0.015 X 0.032 BRASS,W/ RED NYLON COLLAR 26364 TP104–01–02 AM700 Audio Measurement Set Service Manual Mfr. part number 8–79 Replaceable Electrical Parts Replaceable electrical parts list (cont.) Component number Tektronix part number A5TP24 214–4085–00 A5TP25 Serial no. effective Serial no. discont’d Mfr. code Mfr. part number TERM,TEST POINT:0.070 ID,0.220 H,0.063 DIA PCB,0.015 X 0.032 BRASS,W/ RED NYLON COLLAR 26364 TP104–01–02 214–4085–00 TERM,TEST POINT:0.070 ID,0.220 H,0.063 DIA PCB,0.015 X 0.032 BRASS,W/ RED NYLON COLLAR 26364 TP104–01–02 A5TP26 214–4085–00 TERM,TEST POINT:0.070 ID,0.220 H,0.063 DIA PCB,0.015 X 0.032 BRASS,W/ RED NYLON COLLAR 26364 TP104–01–02 A5TP28 214–4085–00 TERM,TEST POINT:0.070 ID,0.220 H,0.063 DIA PCB,0.015 X 0.032 BRASS,W/ RED NYLON COLLAR 26364 TP104–01–02 A5TP31 214–4085–00 TERM,TEST POINT:0.070 ID,0.220 H,0.063 DIA PCB,0.015 X 0.032 BRASS,W/ RED NYLON COLLAR 26364 TP104–01–02 A5TP32 214–4085–00 TERM,TEST POINT:0.070 ID,0.220 H,0.063 DIA PCB,0.015 X 0.032 BRASS,W/ RED NYLON COLLAR 26364 TP104–01–02 A5TP33 214–4085–00 TERM,TEST POINT:0.070 ID,0.220 H,0.063 DIA PCB,0.015 X 0.032 BRASS,W/ RED NYLON COLLAR 26364 TP104–01–02 A5TP34 214–4085–00 TERM,TEST POINT:0.070 ID,0.220 H,0.063 DIA PCB,0.015 X 0.032 BRASS,W/ RED NYLON COLLAR 26364 TP104–01–02 A5TP35 214–4085–00 TERM,TEST POINT:0.070 ID,0.220 H,0.063 DIA PCB,0.015 X 0.032 BRASS,W/ RED NYLON COLLAR 26364 TP104–01–02 A5U2 156–4443–00 IC,MEMORY:CMOS,SRAM,128K X 32 MODULE,25NS,4A12832M–25,SIMM64 6Y440 MT4S12832M–25 00779 91–1744–14–64 Name & description *MOUNTING PARTS* 136–1235–00 SOCKET,SIMM:PCB,SIMM II;FEMALE,22.5 DEG,1 XLZ *END MOUNTING PARTS* A5U4 156–6708–01 IC,PROCESSOR:CMOS,DSP,24 BITS,40MHZ,PLL,DSP56002,132 PIN THRU–HOLEADAPTER TK2651 SAMTEC–DSP:24BIT A5U5 160–9909–00 IC,DIGITAL:CMOS,PLD,OTP,22V10,7.5NS,111MHZ,190MA,22V 10–7,PRGM 156–6516–00,PLCC28–1,TUBE 80009 160–9909–00 A5U6 156–3314–00 IC, SC:TTL,INTERFACE,DIFFERENTIAL LINE DRIVER/RECEIVER PAIR,MEETS RS–422 STANDARD,DS892 27014 DS8921AN 09922 DILB8P–108 *MOUNTING PARTS* 136–0727–00 SKT,PL–IN ELEK: CROCKT,8 CONTACT *END MOUNTING PARTS* A5U7 160–9908–00 IC,DIGITAL:CMOS,PLD,EEPLD,22V10,130MA,15NS,22V10–15, PRGM 156–3923–00,DIP24.3,TUBE 80009 160–9908–00 A5U8 156–6711–00 IC,DIGITAL:ALSTTL,BUFFER,OCTAL,3–STATE,74ALS244,SO2 0.300,TUBE 01295 SN74ALS244BDW A5U9 156–4039–00 IC,OPTO:COUPLER, DUAL CH,I OUT 16MA/CH, VCEO 7V/CH,10MBD,ISOL 2500V,CMR 1000V/US,TTL/LST 50434 HCPL–2631 136–0727–00 SKT,PL–IN ELEK: CROCKT,8 CONTACT 09922 DILB8P–108 50434 HCPL–2631 *MOUNTING PARTS* *END MOUNTING PARTS* A5U10 156–4039–00 IC,OPTO:COUPLER, DUAL CH,I OUT 16MA/CH, VCEO 7V/CH,10MBD,ISOL 2500V,CMR 1000V/US,TTL/LST *MOUNTING PARTS* 8–80 AM700 Audio Measurement Set Service Manual Replaceable Electrical Parts Replaceable electrical parts list (cont.) Component number Tektronix part number Serial no. effective Serial no. discont’d Name & description Mfr. code 136–0727–00 SKT,PL–IN ELEK: CROCKT,8 CONTACT 09922 DILB8P–108 A5U11 156–6769–00 IC,DIGITAL:HCMOS,REGISTER,8–BIT SIPO SHIFT,WITH STORAGE,CLEAR,74HC594 01295 SN74HC594DW A5U12 156–6769–00 IC,DIGITAL:HCMOS,REGISTER,8–BIT SIPO SHIFT,WITH STORAGE,CLEAR,74HC594 01295 SN74HC594DW A5U13 156–6706–00 IC,LINEAR:BIPOLAR,OP–AMP,DUAL,HIGH OUTPUT DRIVE,LOW NOISE,NE5532D,SO16.300 1CH66 NE5532D A5U15 156–4407–00 IC,CONVERTER:CMOS,D/A,20BIT,–90DB,SERIAL,200NS SETTLING TIME,PCM63 P–K,DIP28.6 13919 PCM63P–K 09922 DILB28P–108 Mfr. part number *END MOUNTING PARTS* *MOUNTING PARTS* 136–0755–00 SKT,DIP:PCB;FEM,STR,2 X 14,28 POS,0.1 X 0.6 CTR,0.175 H X0.130 TAIL,BECU,TIN,ACCOM 0.008–0.0015 X 0.014–0.022 *END MOUNTING PARTS* A5U16 156–6710–00 IC,DIGITAL:CMOS,ARITH FUNCT,8X OVERSAMPLING, DUAL CHANNEL DIGITAL INTERPOLATION FILTER,DF17 13919 DF1700U A5U18 156–4407–00 IC,CONVERTER:CMOS,D/A,20BIT,–90DB,SERIAL,200NS SETTLING TIME,PCM63 P–K,DIP28.6 13919 PCM63P–K 136–0755–00 SKT,DIP:PCB;FEM,STR,2 X 14,28 POS,0.1 X 0.6 CTR,0.175 H X0.130 TAIL,BECU,TIN,ACCOM 0.008–0.0015 X 0.014–0.022 09922 DILB28P–108 *MOUNTING PARTS* *END MOUNTING PARTS* A5U19 156–6706–00 IC,LINEAR:BIPOLAR,OP–AMP,DUAL,HIGH OUTPUT DRIVE,LOW NOISE,NE5532D,SO16.300 1CH66 NE5532D A5U20 156–4423–00 IC,OPTO:COUPLER, DUAL CH,I OUT 25MA,VCEO 10V, ISOL 2500V,20MBDCMR 1000V/US, DIP08.3, HCP 54893 HCPL–2430 136–0727–00 SKT,PL–IN ELEK: CROCKT,8 CONTACT 09922 DILB8P–108 *MOUNTING PARTS* *END MOUNTING PARTS* A5U21 156–4423–00 IC,OPTO:COUPLER, DUAL CH,I OUT 25MA,VCEO 10V, ISOL 2500V,20MBDCMR 1000V/US, DIP08.3, HCP 54893 HCPL–2430 A5U22 156–0277–00 IC,LINEAR:BIPOLAR,VOLTAGE REGULATOR,POSITIVE,5.0V,1.0A,4%,MC7805CT,TO–220 01295 UA7805CKC 210–0586–00 NUT,PL,ASSEM WA:4–40 X 0.25,STL CD PL TK0435 ORDER BY DESC 211–0008–00 SCREW,MACHINE:4–40 X 0.25,PNH,STL TK0435 ORDER BY DESC 214–3036–00 HEAT SINK,SE C:XSTR,TO–220;ALUM,BLACK ANODIZE 98978 7–363–BA 342–0355–00 INSULATOR,PLATE:TRANSISTOR,SILICONE RUBBER 2K262 CHR–1869 156–0846–00 IC,LINEAR:BIPOLAR,VOLTAGE REGULATOR,NEGATIVE,–5.0V,1.0A,4.0%,MC7905CT,TO–220 01295 UA7905CKC TK0435 ORDER BY DESC *ATTACHED PARTS* *END ATTACHED PARTS* A5U23 *ATTACHED PARTS* 210–0586–00 NUT,PL,ASSEM WA:4–40 X 0.25,STL CD PL AM700 Audio Measurement Set Service Manual 8–81 Replaceable Electrical Parts Replaceable electrical parts list (cont.) Component number Tektronix part number Serial no. effective Serial no. discont’d Name & description Mfr. code 211–0008–00 SCREW,MACHINE:4–40 X 0.25,PNH,STL TK0435 ORDER BY DESC 214–3036–00 HEAT SINK,SE C:XSTR,TO–220;ALUM,BLACK ANODIZE 98978 7–363–BA 342–0355–00 INSULATOR,PLATE:TRANSISTOR,SILICONE RUBBER 2K262 CHR–1869 Mfr. part number *END ATTACHED PARTS* A5U24 156–6711–00 IC,DIGITAL:ALSTTL,BUFFER,OCTAL,3–STATE,74ALS244 01295 SN74ALS244BDW A5U25 156–5291–00 IC,LINEAR:BIPOLAR,TRANSISTOR ARRAY,(7)NPN,50V,500MA,DARLINGTON,COMMON E TTER,W/CLAMP DIOD 01295 ULN2003AD A5U26 156–6311–00 IC, SC:CMOS,ANALOG MUX,8 CHANNEL,100 OHM, 250NS,DG408DY,SO16.150,TUBE 17856 DG408DY A5U27 156–6706–00 IC,LINEAR:BIPOLAR,OP–AMP,DUAL,HIGH OUTPUT DRIVE,LOW NOISE,NE5532D,SO16.300 1CH66 NE5532D A5U28 156–6706–00 IC,LINEAR:BIPOLAR,OP–AMP,DUAL,HIGH OUTPUT DRIVE,LOW NOISE,NE5532D,SO16.300 1CH66 NE5532D A5U29 156–6311–00 IC, SC:CMOS,ANALOG MUX,8 CHANNEL,100 OHM, 250NS,DG408DY 17856 DG408DY A5U30 156–6311–00 IC, SC:CMOS,ANALOG MUX,8 CHANNEL,100 OHM, 250NS,DG408DY 17856 DG408DY A5U31 156–6311–00 IC, SC:CMOS,ANALOG MUX,8 CHANNEL,100 OHM, 250NS,DG408DY 17856 DG408DY A5U32 156–6769–00 IC,DIGITAL:HCMOS,REGISTER,8–BIT SIPO SHIFT,WITH STORAGE,CLEAR,74HC594 01295 SN74HC594DW A5U33 156–6769–00 IC,DIGITAL:HCMOS,REGISTER,8–BIT SIPO SHIFT,WITH STORAGE,CLEAR,74HC594 01295 SN74HC594DW A5U34 156–6769–00 IC,DIGITAL:HCMOS,REGISTER,8–BIT SIPO SHIFT,WITH STORAGE,CLEAR,74HC594 01295 SN74HC594DW A5U35 156–6769–00 IC,DIGITAL:HCMOS,REGISTER,8–BIT SIPO SHIFT,WITH STORAGE,CLEAR,74HC594 01295 SN74HC594DW A5U38 156–5456–01 IC,DIGITAL:HCMOS,MUX,QUAD 2–TO–1,ENABLE,74HC157,SO16.150,16MM T&R 04713 MC74HC157DR2 A5U39 156–5456–01 IC,DIGITAL:HCMOS,MUX,QUAD 2–TO–1,ENABLE,74HC157,SO16.150,16MM T&R 04713 MC74HC157DR2 A5U40 156–5356–01 IC,DIGITAL:HCMOS,REGISTER,8–BIT SIPO SHIFT,74HC164,SO14.150,16MM T&R 01295 SN74HC164DR A5U41 156–5356–01 IC,DIGITAL:HCMOS,REGISTER,8–BIT SIPO SHIFT,74HC164,SO14.150,16MM T&R 01295 SN74HC164DR A5U42 156–5356–01 IC,DIGITAL:HCMOS,REGISTER,8–BIT SIPO SHIFT,74HC164,SO14.150,16MM T&R 01295 SN74HC164DR A5U43 156–6707–00 IC, SC:CMOS,ANALOG SWITCH,DUAL SPDT,45 OHM, DG403DY,SO16.150 17856 DG403DY A5U44 156–6706–00 IC,LINEAR:BIPOLAR,OP–AMP,DUAL,HIGH OUTPUT DRIVE,LOW NOISE,NE5532D,SO16.300 1CH66 NE5532D A5U45 156–6706–00 IC,LINEAR:BIPOLAR,OP–AMP,DUAL,HIGH OUTPUT DRIVE,LOW NOISE,NE5532D,SO16.300 1CH66 NE5532D 8–82 AM700 Audio Measurement Set Service Manual Replaceable Electrical Parts Replaceable electrical parts list (cont.) Component number Tektronix part number A5U46 156–6706–00 A5U47 Serial no. effective Mfr. code Mfr. part number IC,LINEAR:BIPOLAR,OP–AMP,DUAL,HIGH OUTPUT DRIVE,LOW NOISE,NE5532D,SO16.300 1CH66 NE5532D 156–6706–00 IC,LINEAR:BIPOLAR,OP–AMP,DUAL,HIGH OUTPUT DRIVE,LOW NOISE,NE5532D,SO16.300 1CH66 NE5532D A5U48 156–5888–01 IC,DIGITAL:HCTCMOS,MULTIVIBRATOR,DUAL NON–RETRIG MONOSTABLE,74HCT221,SO16.150,16MM 1CH66 74HCT221DT A5U49 156–6706–00 IC,LINEAR:BIPOLAR,OP–AMP,DUAL,HIGH OUTPUT DRIVE,LOW NOISE,NE5532D,SO16.300 1CH66 NE5532D A5U54 156–5888–01 IC,DIGITAL:HCTCMOS,MULTIVIBRATOR,DUAL NON–RETRIG MONOSTABLE,74HCT221,SO16.150,16MM T&R 1CH66 74HCT221DT A5U55 156–6706–00 IC,LINEAR:BIPOLAR,OP–AMP,DUAL,HIGH OUTPUT DRIVE,LOW NOISE,NE5532D,SO16.300 1CH66 NE5532D A5U58 156–4538–00 IC,CONVERTER:20100–07135,A–D CONVERTER 4ICL7135CPI 80009 156–4538–00 A5U60 156–6715–00 IC, SC:CMOS,ANALOG SWITCH,DUAL,DPST NC,+/–15V,35 OHM, 100NS,DG405DY,SO16.150 17856 DG405DY A5U61 156–6706–00 IC,LINEAR:BIPOLAR,OP–AMP,DUAL,HIGH OUTPUT DRIVE,LOW NOISE,NE5532D,SO16.300 1CH66 NE5532D A5U62 156–6709–00 IC,CONVERTER:CMOS,D/A,12 BIT,CURRENT OUT,MULTIPLYING,AD7541AKR,SO18.300 24355 AD7541AKR A5U63 156–6706–00 IC,LINEAR:BIPOLAR,OP–AMP,DUAL,HIGH OUTPUT DRIVE,LOW NOISE,NE5532D,SO16.300 1CH66 NE5532D A5U64 156–6699–00 IC, SC:CMOS,ANALOG SWITCH,QUAD,SPST NC,+/–15V,35 OHM, 145NS,DG412DY,SO16.150 17856 DG412DY A5U65 156–6709–00 IC,CONVERTER:CMOS,D/A,12 BIT,CURRENT OUT,MULTIPLYING,AD7541AKR,SO18.300 24355 AD7541AKR A5U66 156–6706–00 IC,LINEAR:BIPOLAR,OP–AMP,DUAL,HIGH OUTPUT DRIVE,LOW NOISE,NE5532D,SO16.300 1CH66 NE5532D A5U67 156–6707–00 IC, SC:CMOS,ANALOG SWITCH,DUAL SPDT,45 OHM, DG403DY,SO16.150 17856 DG403DY A5U68 156–6706–00 IC,LINEAR:BIPOLAR,OP–AMP,DUAL,HIGH OUTPUT DRIVE,LOW NOISE,NE5532D,SO16.300 1CH66 NE5532D A5U69 156–6709–00 IC,CONVERTER:CMOS,D/A,12 BIT,CURRENT OUT,MULTIPLYING,AD7541AKR,SO18.300 24355 AD7541AKR A5U70 156–6706–00 IC,LINEAR:BIPOLAR,OP–AMP,DUAL,HIGH OUTPUT DRIVE,LOW NOISE,NE5532D,SO16.300 1CH66 NE5532D A5U71 156–6699–00 IC, SC:CMOS,ANALOG SWITCH,QUAD,SPST NC,+/–15V,35 OHM, 145NS,DG412DY,SO16.150 17856 DG412DY A5U72 156–6709–00 IC,CONVERTER:CMOS,D/A,12 BIT,CURRENT OUT,MULTIPLYING,AD7541AKR,SO18.300 24355 AD7541AKR A5U73 156–6706–00 IC,LINEAR:BIPOLAR,OP–AMP,DUAL,HIGH OUTPUT DRIVE,LOW NOISE,NE5532D,SO16.300 1CH66 NE5532D A5U74 156–6707–00 IC, SC:CMOS,ANALOG SWITCH,DUAL SPDT,45 OHM, DG403DY,SO16.150 17856 DG403DY A5U75 156–5291–00 IC,LINEAR:BIPOLAR,TRANSISTOR ARRAY,NPN,50V,500MA, DARLINGTON, COMMON EMITTER,W/ CLAMP DIODE 01295 ULN2003AD B020100 Serial no. discont’d Name & description AM700 Audio Measurement Set Service Manual 8–83 Replaceable Electrical Parts Replaceable electrical parts list (cont.) Component number Tektronix part number A5U81 156–6713–00 A5U82 Serial no. effective Serial no. discont’d Mfr. code Mfr. part number IC,LINEAR:BIPOLAR,SW–REGULATOR,STEP–DOWN/BUCK,1 5V,500MA,4%,SHUTDOWN,LM2574M–15,SO14.300 27014 LM2574M–15 156–6714–00 IC,LINEAR:BIPOLAR,SW–REGULATOR,STEP–DOWN/BUCK,5. 0V,500MA,4%,SHUTDOWN,LM2574M–5.0,SO14.300 27014 LM2574M–5.0 A5U83 156–6713–00 IC,LINEAR:BIPOLAR,SW–REGULATOR,STEP–DOWN/BUCK,1 5V,500MA,4%,SHUTDOWN,LM2574M–15,SO14.300 27014 LM2574M–15 A5U85 156–6775–00 IC,DIGITAL:FCTCMOS,BUFFER,OCTAL,RESISTOR TER NATED OUTPUTS,3–STATE,74FCT2244AT,SO20.300,TU 0TJ19 QS74FCT2244ATSO A5U86 156–6774–00 IC,DIGITAL:FCTCMOS,TRANSCEIVER,OCTAL,RESISTOR TER NATED OUTPUTS,3–STATE,74FCT2245AT,SO20.3 0TJ19 QS74FCT2245ATSO A5U87 160–9910–00 IC,DIGITAL:CMOS.PLD,EEPLD,MACH 210,64 MACROCELL,32 I/O,6–INPUTS,2 CLOCK INPUTS,15NS,PRGM 15 80009 160–9910–00 00779 821575–1 Name & description *MOUNTING PARTS* 136–1047–00 SKT,PLCC:PCB;44 POS,0.05 CTR,0.360H X 0.125 TAIL,TIN *END MOUNTING PARTS* A5U90 156–6712–01 IC,OPTO:COUPLER, VCEO 70V, ISOL 2500V, CTR 100%, SO8 SMD, ILD213T 50579 ILD213T A5U91 156–6712–01 IC,OPTO:COUPLER, VCEO 70V, ISOL 2500V, CTR 100%, SO8 SMD, ILD213T 50579 ILD213T A5U92 156–6712–01 IC,OPTO:COUPLER, VCEO 70V, ISOL 2500V, CTR 100%, SO8 SMD, ILD213T 50579 ILD213T A5U93 156–6712–01 IC,OPTO:COUPLER, VCEO 70V, ISOL 2500V, CTR 100%, SO8 SMD, ILD213T 50579 ILD213T A5U94 156–6712–01 IC,OPTO:COUPLER, VCEO 70V, ISOL 2500V, CTR 100%, SO8 SMD, ILD213T 50579 ILD213T A5U95 156–5357–01 IC,DIGITAL:HCMOS,GATE,QUAD 2–INPUT NOR,74HC02,SO14.150,16MM T&R 01295 SN74HC02DR A5U96 156–5455–01 IC,DIGITAL:HCMOS,GATE,QUAD 2–INPUT XOR,74HC86,SO14.150,16MM T&R 01295 SN74HC86D A5U99 156–6481–01 IC, SC:CMOS,PWR SUPPLY SUPERVISOR,MPU RESET GEN,5V SUPPLY SENSING,10%,350MS RESET TIME, 0B0A9 DS1233Z–10/TR A5U100 156–6707–00 IC, SC:CMOS,ANALOG SWITCH,DUAL SPDT,45 OHM, DG403DY,SO16.150 17856 DG403DY A5U101 156–6481–01 IC, SC:CMOS,PWR SUPPLY SUPERVISOR,MPU RESET GEN,5V SUPPLY SENSING,10%,350MS RESET TIME, 0B0A9 DS1233Z–10/TR A5U117 160–9912–01 B020100 IC, DIGITAL:CMOS,PLD,OTP,5032,32 M/C,16 I/O,8 IN,20NS,PRGM 156–3825–01,5032–20,DIP28.3,TUBE 80009 160–9912–01 A5U118 160–9914–00 B020100 IC,DIGITAL:CMOS,PLD,OTP,ATV2500,24 M/C,14 IN,24 I/O,48 F/F,35NS,PRGM 156–6700–00,ATV2500H–3 80009 160–9914–00 A5U119 160–9913–01 B020100 IC, DIGITAL:CMOS,PLD,OPT,5032,32 M/C,16 I/O,8 IN,20NS,PRGM 156–3825–01,5032–20,DIP28.3 80009 160–9913–01 A5VR1 152–0756–00 DIODE,ZENER:47V,5%,1W,1N4756A,DO–41,TR 04713 1N4756ARL A5VR1 152–0756–00 A5Y1 119–4642–00 8–84 B010329 DIODE,ZENER:47V,5%,1W,1N4756A,DO–41,TR 04713 1N4756ARL OSCILLATOR:CRYSTAL CONTROLLED,12.288000 MHZ,100 PPM,HCMOS,4 PIN DIP,14 PIN DIP COMPATIBLE 14301 012–401–01525 AM700 Audio Measurement Set Service Manual Replaceable Electrical Parts Replaceable electrical parts list (cont.) Component number Tektronix part number Serial no. effective A5A3 671–3873–00 B020100 A5A3CR1 152–0141–02 A5A3J1 131–2919–00 A5A3J2 Name & description Mfr. code Mfr. part number CIRCUIT BD ASSY:DRIVER 80009 671–3873–00 DIODE,SIG:ULTRA FAST,40V,150MA,4NS,2PF,1N4152,DO–35 01295 1N4152R CONN,HDR:PCB,MALE,RTANG,1 X 4,0.1 CTR,0.318 MLG X 0.110 TAIL,30 GOLD,0.035 DIA PCB, 00779 87232–4 131–2919–00 CONN,HDR:PCB,MALE,RTANG,1 X 4,0.1 CTR,0.318 MLG X 0.110 TAIL,30 GOLD,0.035 DIA PCB, 00779 87232–4 A5A3J3 131–1425–00 CONN,HDR:PCB,MALE,RTANG,1 X 36,0.1 CTR,0.230 MLG X 0.090 TAIL,30 GOLD,STACKABLE, 22526 65521–136 A5A3K1 148–0235–00 RELAY,ARMATURE:2 FORM C,5VDC 312 OHM COIL,GOLD CLAD SILVER,MAX SW AT 110VDC,125VAC,30W,1A,INITI 61529 TF2E–5V A5A4 671–3873–00 CIRCUIT BD ASSY:DRIVER 80009 671–3873–00 A5A4CR1 152–0141–02 DIODE,SIG:ULTRA FAST,40V,150MA,4NS,2PF,1N4152,DO–35 01295 1N4152R A5A4J1 131–2919–00 CONN,HDR:PCB,MALE,RTANG,1 X 4,0.1 CTR,0.318 MLG X 0.110 TAIL,30 GOLD,0.035 DIA PCB, 00779 87232–4 A5A4J2 131–2919–00 CONN,HDR:PCB,MALE,RTANG,1 X 4,0.1 CTR,0.318 MLG X 0.110 TAIL,30 GOLD,0.035 DIA PCB, 00779 87232–4 A5A4J3 131–1425–00 CONN,HDR:PCB,MALE,RTANG,1 X 36,0.1 CTR,0.230 MLG X 0.090 TAIL,30 GOLD,STACKABLE, 22526 65521–136 A5A4K1 148–0235–00 RELAY,ARMATURE:2 FORM C,5VDC 312 OHM COIL,GOLD CLAD SILVER,MAX SW AT 110VDC,125VAC,30W,1A,INITI 61529 TF2E–5V B020100 Serial no. discont’d AM700 Audio Measurement Set Service Manual 8–85 Replaceable Electrical Parts Replaceable electrical parts list Component number Tektronix part number Serial no. effective Serial no. discont’d Name & description Mfr. code Mfr. part number A6 671–2666–00 B010100 B010324 CIRCUIT BD ASSY:CPU 80009 671–2666–00 A6 671–2666–01 B010325 B010348 CIRCUIT BD ASSY:CPU 80009 671–2666–01 A6 671–2666–02 B010349 B010999 CIRCUIT BD ASSY:CPU 80009 671–2666–02 4/25/97 A6 671–2666–03 B020100 A6 671–2666–04 4/25/97 A6BT1 146–0104–00 B010100 B010325 B010324 CIRCUIT BD ASSY:CPU 80009 671–2666–03 CIRCUIT BD ASSY:CPU 80009 671–2666–04 BATTERY,DRY:3.6V,LITHIUM,0.85AH,0.5AA,TL–5101 0BYG1 TL–5101 A6BT1 146–0116–00 BATTERY,DRY:3.0V,850MAH,LITHIUM,0.57X1,CR14250SE–T S4091 CR14250SE–SP1-1 A6C1 290–1157–00 CAP,FXD,ALUM:220UF,20%,25V,0.532 X 0.410,RADIAL 62643 CEAFM1E221M–T4 A6C2 290–5037–01 CAP,FXD,ALUM:10UF,20%,35V,5.7 H X 5 DIA MM 62643 MVK35VC10RME60 TPX A6C3 290–1157–00 CAP,FXD,ALUM:220UF,20%,25V,0.532 X 0.410,RADIAL 62643 CEAFM1E221M–T4 A6C6 290–5003–00 CAP,FXD,TANT:47UF,20%,10V,0.287 X 0.169,7343,SMD,13MM,T&R 04222 TAJD476M010 A6C7 290–5008–00 CAP,FXD,TANT:1UF,20%,35V,0.138 X 0.110,3528 04222 TAJB105M035 A6C8 290–5008–00 CAP,FXD,TANT:1UF,20%,35V,0.138 X 0.110,3528 04222 TAJB105M035 A6C9 290–5008–00 CAP,FXD,TANT:1UF,20%,35V,0.138 X 0.110,3528 04222 TAJB105M035 A6C10 290–5008–00 CAP,FXD,TANT:1UF,20%,35V,0.138 X 0.110,3528 04222 TAJB105M035 A6C11 290–5008–00 CAP,FXD,TANT:1UF,20%,35V,0.138 X 0.110,3528 04222 TAJB105M035 A6C12 290–5008–00 CAP,FXD,TANT:1UF,20%,35V,0.138 X 0.110,3528 04222 TAJB105M035 A6C13 290–5008–00 CAP,FXD,TANT:1UF,20%,35V,0.138 X 0.110,3528 04222 TAJB105M035 A6C14 290–5008–00 CAP,FXD,TANT:1UF,20%,35V,0.138 X 0.110,3528 04222 TAJB105M035 A6C15 290–5004–00 CAP,FXD,TANT:22UF,10%,20V,0.287 X 0.169,7343 04222 TAJD226K020R A6C16 290–5035–01 CAP,FXD,ALUM:3.3UF,20%,50V,5.7MM(0.224) 62643 MVK50VC3R3MD60 TPX A6C17 290–5037–01 CAP,FXD,ALUM:10UF,20%,35V,5.7 H X 5 DIA MM 62643 MVK35VC10RME60 TPX A6C18 290–5003–00 CAP,FXD,TANT:47UF,20%,10V,0.287 X 0.169,7343,SMD,13MM,T&R 04222 TAJD476M010 A6C19 290–5035–01 CAP,FXD,ALUM:3.3UF,20%,50V,5.7MM(0.224) 62643 MVK50VC3R3MD60 TPX A6C20 290–5035–01 CAP,FXD,ALUM:3.3UF,20%,50V,5.7MM(0.224) 62643 MVK50VC3R3MD60 TPX A6C21 290–5037–01 CAP,FXD,ALUM:10UF,20%,35V,5.7 H X 5 DIA MM 62643 MVK35VC10RME60 TPX A6C22 290–5037–01 CAP,FXD,ALUM:10UF,20%,35V,5.7 H X 5 DIA MM 62643 MVK35VC10RME60 TPX A6C23 290–5037–01 CAP,FXD,ALUM:10UF,20%,35V,5.7 H X 5 DIA MM 62643 MVK35VC10RME60 TPX A6C24 290–5037–01 CAP,FXD,ALUM:10UF,20%,35V,5.7 H X 5 DIA MM 62643 MVK35VC10RME60 TPX A6C25 290–5037–01 CAP,FXD,ALUM:10UF,20%,35V,5.7 H X 5 DIA MM 62643 MVK35VC10RME60 TPX 8–86 AM700 Audio Measurement Set Service Manual Replaceable Electrical Parts Replaceable electrical parts list (cont.) Component number Tektronix part number Serial no. effective Serial no. discont’d Name & description Mfr. code A6C26 290–5035–01 CAP,FXD,ALUM:3.3UF,20%,50V,5.7MM(0.224) 62643 MVK50VC3R3MD60 TPX A6C27 290–0963–00 CAP,FXD,ALUM:220UF,20%,35WVDC,10 X 12MM,RADIAL 55680 UVX1V221MPA A6C28 290–5037–01 CAP,FXD,ALUM:10UF,20%,35V,5.7 H X 5 DIA MM 62643 MVK35VC10RME60 TPX A6C29 290–0963–00 CAP,FXD,ALUM:220UF,20%,35WVDC,10 X 12MM,RADIAL 55680 UVX1V221MPA A6C30 290–5003–00 CAP,FXD,TANT:47UF,20%,10V,0.287 X 0.169,7343,SMD,13MM,T&R 04222 TAJD476M010 A6C31 290–0950–00 CAP,FXD,ALUM:100UF,+50–20%,50V,10 X 12 MM,RADIAL 55680 UVX1J101MPA A6C32 290–5037–01 CAP,FXD,ALUM:10UF,20%,35V,5.7 H X 5 DIA MM 62643 MVK35VC10RME60 TPX A6C33 290–5037–01 CAP,FXD,ALUM:10UF,20%,35V,5.7 H X 5 DIA MM 62643 MVK35VC10RME60 TPX A6C34 283–5279–00 CAP,FXD,CERAMIC:MLC,0.47UF,10%,50V,X7R,.180X.250,CC1825 ,SMD,12MM T/R 04222 18255C474KAT1A A6C35 283–5279–00 CAP,FXD,CERAMIC:MLC,0.47UF,10%,50V,X7R,.180X.250,CC1825 ,SMD,12MM T/R 04222 18255C474KAT1A A6C36 283–5279–00 CAP,FXD,CERAMIC:MLC,0.47UF,10%,50V,X7R,.180X.250,CC1825 ,SMD,12MM T/R 04222 18255C474KAT1A A6C37 283–5279–00 CAP,FXD,CERAMIC:MLC,0.47UF,10%,50V,X7R,.180X.250,CC1825 ,SMD,12MM T/R 04222 18255C474KAT1A A6C38 290–5037–01 CAP,FXD,ALUM:10UF,20%,35V,5.7 H X 5 DIA MM 62643 MVK35VC10RME60 TPX A6C39 283–5218–00 CAP,FXD,CERAMIC:MLC,4.7PF,+–0.5PF,50V,NPO,0805,SMD,8MM 04222 08055A4R7DAT2A A6C40 290–5037–01 CAP,FXD,ALUM:10UF,20%,35V,5.7 H X 5 DIA MM 62643 MVK35VC10RME60 TPX A6C41 283–5106–00 CAP,FXD,CERAMIC:MLC,470PF,5%,100V,NPO 04222 12061A471JAT1A A6C42 283–5003–00 CAP,FXD,CERAMIC:MLC,0.01UF,10%,50V,X7R 04222 12065C103KAT060R A6C43 283–5003–00 CAP,FXD,CERAMIC:MLC,0.01UF,10%,50V,X7R 04222 12065C103KAT060R A6C44 283–5003–00 CAP,FXD,CERAMIC:MLC,0.01UF,10%,50V,X7R 04222 12065C103KAT060R A6C45 283–5003–00 CAP,FXD,CERAMIC:MLC,0.01UF,10%,50V,X7R 04222 12065C103KAT060R A6C46 283–5022–00 CAP,FXD,CER DI:47PF,5%,50V NPO 04222 12065A470JAT1A A6C47 283–5022–00 CAP,FXD,CER DI:47PF,5%,50V NPO 04222 12065A470JAT1A A6C48 283–5004–00 CAP,FXD,CERAMIC:MLC,0.1UF,10%,25V,X7R 04222 12063C104KAT3A A6C49 283–5003–00 CAP,FXD,CERAMIC:MLC,0.01UF,10%,50V,X7R 04222 12065C103KAT060R A6C50 283–5185–00 CAP,FXD,CERAMIC:MLC,1000PF,5%,50V,NPO 04222 12065A102JAT1A A6C51 283–5185–00 CAP,FXD,CERAMIC:MLC,1000PF,5%,50V,NPO 04222 12065A102JAT1A A6C52 283–5022–00 CAP,FXD,CER DI:47PF,5%,50V NPO 04222 12065A470JAT1A A6C53 283–5003–00 CAP,FXD,CERAMIC:MLC,0.01UF,10%,50V,X7R 04222 12065C103KAT060R A6C54 283–5003–00 CAP,FXD,CERAMIC:MLC,0.01UF,10%,50V,X7R 04222 12065C103KAT060R A6C55 283–5185–00 CAP,FXD,CERAMIC:MLC,1000PF,5%,50V,NPO 04222 12065A102JAT1A A6C56 283–5185–00 CAP,FXD,CERAMIC:MLC,1000PF,5%,50V,NPO 04222 12065A102JAT1A AM700 Audio Measurement Set Service Manual Mfr. part number 8–87 Replaceable Electrical Parts Replaceable electrical parts list (cont.) Component number Tektronix part number A6C57 283–5185–00 A6C58 A6C59 Name & description Mfr. code Mfr. part number CAP,FXD,CERAMIC:MLC,1000PF,5%,50V,NPO 04222 12065A102JAT1A 283–5185–00 CAP,FXD,CERAMIC:MLC,1000PF,5%,50V,NPO 04222 12065A102JAT1A 283–5185–00 CAP,FXD,CERAMIC:MLC,1000PF,5%,50V,NPO 04222 12065A102JAT1A A6C60 283–5185–00 CAP,FXD,CERAMIC:MLC,1000PF,5%,50V,NPO 04222 12065A102JAT1A A6C61 283–5185–00 CAP,FXD,CERAMIC:MLC,1000PF,5%,50V,NPO 04222 12065A102JAT1A A6C62 283–5185–00 CAP,FXD,CERAMIC:MLC,1000PF,5%,50V,NPO 04222 12065A102JAT1A A6C63 283–5185–00 CAP,FXD,CERAMIC:MLC,1000PF,5%,50V,NPO 04222 12065A102JAT1A A6C64 283–5185–00 CAP,FXD,CERAMIC:MLC,1000PF,5%,50V,NPO 04222 12065A102JAT1A A6C67 283–5185–00 CAP,FXD,CERAMIC:MLC,1000PF,5%,50V,NPO 04222 12065A102JAT1A A6C68 283–5185–00 CAP,FXD,CERAMIC:MLC,1000PF,5%,50V,NPO 04222 12065A102JAT1A A6C71 283–5003–00 CAP,FXD,CERAMIC:MLC,0.01UF,10%,50V,X7R 04222 12065C103KAT060R A6C72 283–5004–00 CAP,FXD,CERAMIC:MLC,0.1UF,10%,25V,X7R 04222 12063C104KAT3A A6C73 283–5003–00 CAP,FXD,CERAMIC:MLC,0.01UF,10%,50V,X7R 04222 12065C103KAT060R A6C74 283–5004–00 CAP,FXD,CERAMIC:MLC,0.1UF,10%,25V,X7R 04222 12063C104KAT3A A6C75 283–5004–00 CAP,FXD,CERAMIC:MLC,0.1UF,10%,25V,X7R 04222 12063C104KAT3A A6C76 283–5003–00 CAP,FXD,CERAMIC:MLC,0.01UF,10%,50V,X7R 04222 12065C103KAT060R A6C77 283–5003–00 CAP,FXD,CERAMIC:MLC,0.01UF,10%,50V,X7R 04222 12065C103KAT060R A6C78 283–5003–00 CAP,FXD,CERAMIC:MLC,0.01UF,10%,50V,X7R 04222 12065C103KAT060R A6C79 283–5003–00 CAP,FXD,CERAMIC:MLC,0.01UF,10%,50V,X7R 04222 12065C103KAT060R A6C80 283–5188–00 CAP,FXD,CERAMIC:MLC,100PF,5%,100V,NPO 04222 12061A101JAT1A A6C81 283–5188–00 CAP,FXD,CERAMIC:MLC,100PF,5%,100V,NPO 04222 12061A101JAT1A A6C82 283–5188–00 CAP,FXD,CERAMIC:MLC,100PF,5%,100V,NPO 04222 12061A101JAT1A A6C83 283–5003–00 CAP,FXD,CERAMIC:MLC,0.01UF,10%,50V,X7R 04222 12065C103KAT060R A6C84 283–5003–00 CAP,FXD,CERAMIC:MLC,0.01UF,10%,50V,X7R 04222 12065C103KAT060R A6C85 283–5003–00 CAP,FXD,CERAMIC:MLC,0.01UF,10%,50V,X7R 04222 12065C103KAT060R A6C86 283–5004–00 CAP,FXD,CERAMIC:MLC,0.1UF,10%,25V,X7R 04222 12063C104KAT3A A6C88 283–5004–00 CAP,FXD,CERAMIC:MLC,0.1UF,10%,25V,X7R 04222 12063C104KAT3A A6C89 283–5004–00 CAP,FXD,CERAMIC:MLC,0.1UF,10%,25V,X7R 04222 12063C104KAT3A A6C90 283–5004–00 CAP,FXD,CERAMIC:MLC,0.1UF,10%,25V,X7R 04222 12063C104KAT3A A6C92 283–5003–00 CAP,FXD,CERAMIC:MLC,0.01UF,10%,50V,X7R 04222 12065C103KAT060R A6C93 283–5003–00 CAP,FXD,CERAMIC:MLC,0.01UF,10%,50V,X7R 04222 12065C103KAT060R A6C96 283–5003–00 CAP,FXD,CERAMIC:MLC,0.01UF,10%,50V,X7R 04222 12065C103KAT060R A6C97 283–5025–00 CAP,FXD,CERAMIC:MLC,220PF,5%,50V,NPO 04222 12065A221JAT1A A6C98 283–5025–00 CAP,FXD,CERAMIC:MLC,220PF,5%,50V,NPO 04222 12065A221JAT1A A6C99 283–5003–00 CAP,FXD,CERAMIC:MLC,0.01UF,10%,50V,X7R 04222 12065C103KAT060R A6C100 283–5003–00 CAP,FXD,CERAMIC:MLC,0.01UF,10%,50V,X7R 04222 12065C103KAT060R A6C101 283–5004–00 CAP,FXD,CERAMIC:MLC,0.1UF,10%,25V,X7R 04222 12063C104KAT3A A6C102 283–5068–00 CAP,FXD,CERAMIC:MLC,2200PF,10%,50V,X7R 04222 12065C222KAT1A 8–88 Serial no. effective Serial no. discont’d AM700 Audio Measurement Set Service Manual Replaceable Electrical Parts Replaceable electrical parts list (cont.) Component number Tektronix part number A6C103 283–5004–00 A6C104 A6C105 Serial no. effective Serial no. discont’d Name & description Mfr. code Mfr. part number CAP,FXD,CERAMIC:MLC,0.1UF,10%,25V,X7R 04222 12063C104KAT3A 283–5003–00 CAP,FXD,CERAMIC:MLC,0.01UF,10%,50V,X7R 04222 12065C103KAT060R 283–5003–00 CAP,FXD,CERAMIC:MLC,0.01UF,10%,50V,X7R 04222 12065C103KAT060R A6C106 283–5025–00 CAP,FXD,CERAMIC:MLC,220PF,5%,50V,NPO 04222 12065A221JAT1A A6C107 283–5003–00 CAP,FXD,CERAMIC:MLC,0.01UF,10%,50V,X7R 04222 12065C103KAT060R A6C108 283–5003–00 CAP,FXD,CERAMIC:MLC,0.01UF,10%,50V,X7R 04222 12065C103KAT060R A6C109 283–5003–00 CAP,FXD,CERAMIC:MLC,0.01UF,10%,50V,X7R 04222 12065C103KAT060R A6C110 283–5003–00 CAP,FXD,CERAMIC:MLC,0.01UF,10%,50V,X7R 04222 12065C103KAT060R A6C111 283–5003–00 CAP,FXD,CERAMIC:MLC,0.01UF,10%,50V,X7R 04222 12065C103KAT060R A6C112 283–5003–00 CAP,FXD,CERAMIC:MLC,0.01UF,10%,50V,X7R 04222 12065C103KAT060R A6C113 283–5003–00 CAP,FXD,CERAMIC:MLC,0.01UF,10%,50V,X7R 04222 12065C103KAT060R A6C114 283–5003–00 CAP,FXD,CERAMIC:MLC,0.01UF,10%,50V,X7R 04222 12065C103KAT060R A6C115 283–5003–00 CAP,FXD,CERAMIC:MLC,0.01UF,10%,50V,X7R 04222 12065C103KAT060R A6C116 283–5004–00 CAP,FXD,CERAMIC:MLC,0.1UF,10%,25V,X7R 04222 12063C104KAT3A A6C117 283–5004–00 CAP,FXD,CERAMIC:MLC,0.1UF,10%,25V,X7R 04222 12063C104KAT3A A6C118 283–5004–00 CAP,FXD,CERAMIC:MLC,0.1UF,10%,25V,X7R 04222 12063C104KAT3A A6C120 283–5003–00 CAP,FXD,CERAMIC:MLC,0.01UF,10%,50V,X7R 04222 12065C103KAT060R A6C121 283–5004–00 CAP,FXD,CERAMIC:MLC,0.1UF,10%,25V,X7R 04222 12063C104KAT3A A6C122 283–5003–00 CAP,FXD,CERAMIC:MLC,0.01UF,10%,50V,X7R 04222 12065C103KAT060R A6C123 283–5025–00 CAP,FXD,CERAMIC:MLC,220PF,5%,50V,NPO 04222 12065A221JAT1A A6C124 283–5003–00 CAP,FXD,CERAMIC:MLC,0.01UF,10%,50V,X7R 04222 12065C103KAT060R A6C125 283–5025–00 CAP,FXD,CERAMIC:MLC,220PF,5%,50V,NPO 04222 12065A221JAT1A A6C126 283–5003–00 CAP,FXD,CERAMIC:MLC,0.01UF,10%,50V,X7R 04222 12065C103KAT060R A6C127 283–5003–00 CAP,FXD,CERAMIC:MLC,0.01UF,10%,50V,X7R 04222 12065C103KAT060R A6C128 283–5003–00 CAP,FXD,CERAMIC:MLC,0.01UF,10%,50V,X7R 04222 12065C103KAT060R A6C129 283–5003–00 CAP,FXD,CERAMIC:MLC,0.01UF,10%,50V,X7R 04222 12065C103KAT060R A6C130 283–5003–00 CAP,FXD,CERAMIC:MLC,0.01UF,10%,50V,X7R 04222 12065C103KAT060R A6C131 283–5003–00 CAP,FXD,CERAMIC:MLC,0.01UF,10%,50V,X7R 04222 12065C103KAT060R A6C132 283–5003–00 CAP,FXD,CERAMIC:MLC,0.01UF,10%,50V,X7R 04222 12065C103KAT060R A6C133 283–5004–00 CAP,FXD,CERAMIC:MLC,0.1UF,10%,25V,X7R 04222 12063C104KAT3A A6C134 283–5004–00 CAP,FXD,CERAMIC:MLC,0.1UF,10%,25V,X7R 04222 12063C104KAT3A A6C135 283–5004–00 CAP,FXD,CERAMIC:MLC,0.1UF,10%,25V,X7R 04222 12063C104KAT3A A6C136 283–5004–00 CAP,FXD,CERAMIC:MLC,0.1UF,10%,25V,X7R 04222 12063C104KAT3A A6C137 283–5004–00 CAP,FXD,CERAMIC:MLC,0.1UF,10%,25V,X7R 04222 12063C104KAT3A A6C138 283–5004–00 CAP,FXD,CERAMIC:MLC,0.1UF,10%,25V,X7R 04222 12063C104KAT3A A6C140 283–5004–00 CAP,FXD,CERAMIC:MLC,0.1UF,10%,25V,X7R 04222 12063C104KAT3A A6C141 283–5004–00 CAP,FXD,CERAMIC:MLC,0.1UF,10%,25V,X7R 04222 12063C104KAT3A A6C142 283–5003–00 CAP,FXD,CERAMIC:MLC,0.01UF,10%,50V,X7R 04222 12065C103KAT060R AM700 Audio Measurement Set Service Manual 8–89 Replaceable Electrical Parts Replaceable electrical parts list (cont.) Component number Tektronix part number A6C143 283–5003–00 A6C144 A6C145 Name & description Mfr. code Mfr. part number CAP,FXD,CERAMIC:MLC,0.01UF,10%,50V,X7R 04222 12065C103KAT060R 283–5003–00 CAP,FXD,CERAMIC:MLC,0.01UF,10%,50V,X7R 04222 12065C103KAT060R 283–5003–00 CAP,FXD,CERAMIC:MLC,0.01UF,10%,50V,X7R 04222 12065C103KAT060R A6C146 283–5003–00 CAP,FXD,CERAMIC:MLC,0.01UF,10%,50V,X7R 04222 12065C103KAT060R A6C147 283–5003–00 CAP,FXD,CERAMIC:MLC,0.01UF,10%,50V,X7R 04222 12065C103KAT060R A6C148 283–5025–00 CAP,FXD,CERAMIC:MLC,220PF,5%,50V,NPO 04222 12065A221JAT1A A6C149 283–5004–00 CAP,FXD,CERAMIC:MLC,0.1UF,10%,25V,X7R 04222 12063C104KAT3A A6C150 283–5003–00 CAP,FXD,CERAMIC:MLC,0.01UF,10%,50V,X7R 04222 12065C103KAT060R A6C151 283–5003–00 CAP,FXD,CERAMIC:MLC,0.01UF,10%,50V,X7R 04222 12065C103KAT060R A6C152 283–5022–00 CAP,FXD,CER DI:47PF,5%,50V NPO 04222 12065A470JAT1A A6C153 283–5003–00 CAP,FXD,CERAMIC:MLC,0.01UF,10%,50V,X7R 04222 12065C103KAT060R A6C154 283–5003–00 CAP,FXD,CERAMIC:MLC,0.01UF,10%,50V,X7R 04222 12065C103KAT060R A6C155 283–5003–00 CAP,FXD,CERAMIC:MLC,0.01UF,10%,50V,X7R 04222 12065C103KAT060R A6C156 283–5003–00 CAP,FXD,CERAMIC:MLC,0.01UF,10%,50V,X7R 04222 12065C103KAT060R A6C157 283–5003–00 CAP,FXD,CERAMIC:MLC,0.01UF,10%,50V,X7R 04222 12065C103KAT060R A6C158 283–5003–00 CAP,FXD,CERAMIC:MLC,0.01UF,10%,50V,X7R 04222 12065C103KAT060R A6C159 283–5025–00 CAP,FXD,CERAMIC:MLC,220PF,5%,50V,NPO 04222 12065A221JAT1A A6C160 283–5003–00 CAP,FXD,CERAMIC:MLC,0.01UF,10%,50V,X7R 04222 12065C103KAT060R A6C161 283–5003–00 CAP,FXD,CERAMIC:MLC,0.01UF,10%,50V,X7R 04222 12065C103KAT060R A6C162 283–5003–00 CAP,FXD,CERAMIC:MLC,0.01UF,10%,50V,X7R 04222 12065C103KAT060R A6C163 283–5025–00 CAP,FXD,CERAMIC:MLC,220PF,5%,50V,NPO 04222 12065A221JAT1A A6C165 283–5004–00 CAP,FXD,CERAMIC:MLC,0.1UF,10%,25V,X7R 04222 12063C104KAT3A A6C166 283–5003–00 CAP,FXD,CERAMIC:MLC,0.01UF,10%,50V,X7R 04222 12065C103KAT060R A6C167 283–5003–00 CAP,FXD,CERAMIC:MLC,0.01UF,10%,50V,X7R 04222 12065C103KAT060R A6C168 283–5003–00 CAP,FXD,CERAMIC:MLC,0.01UF,10%,50V,X7R 04222 12065C103KAT060R A6C169 283–5003–00 CAP,FXD,CERAMIC:MLC,0.01UF,10%,50V,X7R 04222 12065C103KAT060R A6C170 283–5025–00 CAP,FXD,CERAMIC:MLC,220PF,5%,50V,NPO 04222 12065A221JAT1A A6C171 283–5003–00 CAP,FXD,CERAMIC:MLC,0.01UF,10%,50V,X7R 04222 12065C103KAT060R A6C172 283–5003–00 CAP,FXD,CERAMIC:MLC,0.01UF,10%,50V,X7R 04222 12065C103KAT060R A6C173 283–5025–00 CAP,FXD,CERAMIC:MLC,220PF,5%,50V,NPO 04222 12065A221JAT1A A6C174 283–5003–00 CAP,FXD,CERAMIC:MLC,0.01UF,10%,50V,X7R 04222 12065C103KAT060R A6C175 283–5003–00 CAP,FXD,CERAMIC:MLC,0.01UF,10%,50V,X7R 04222 12065C103KAT060R A6C176 283–5003–00 CAP,FXD,CERAMIC:MLC,0.01UF,10%,50V,X7R 04222 12065C103KAT060R A6C177 283–5003–00 CAP,FXD,CERAMIC:MLC,0.01UF,10%,50V,X7R 04222 12065C103KAT060R A6C178 283–5003–00 CAP,FXD,CERAMIC:MLC,0.01UF,10%,50V,X7R 04222 12065C103KAT060R A6C179 283–5003–00 CAP,FXD,CERAMIC:MLC,0.01UF,10%,50V,X7R 04222 12065C103KAT060R A6C180 283–5003–00 CAP,FXD,CERAMIC:MLC,0.01UF,10%,50V,X7R 04222 12065C103KAT060R A6C181 283–5025–00 CAP,FXD,CERAMIC:MLC,220PF,5%,50V,NPO 04222 12065A221JAT1A 8–90 Serial no. effective Serial no. discont’d AM700 Audio Measurement Set Service Manual Replaceable Electrical Parts Replaceable electrical parts list (cont.) Component number Tektronix part number A6C182 283–5003–00 A6C183 A6C184 Serial no. effective Serial no. discont’d Name & description Mfr. code Mfr. part number CAP,FXD,CERAMIC:MLC,0.01UF,10%,50V,X7R 04222 12065C103KAT060R 283–5003–00 CAP,FXD,CERAMIC:MLC,0.01UF,10%,50V,X7R 04222 12065C103KAT060R 283–5003–00 CAP,FXD,CERAMIC:MLC,0.01UF,10%,50V,X7R 04222 12065C103KAT060R A6C185 283–5003–00 CAP,FXD,CERAMIC:MLC,0.01UF,10%,50V,X7R 04222 12065C103KAT060R A6C186 283–5003–00 CAP,FXD,CERAMIC:MLC,0.01UF,10%,50V,X7R 04222 12065C103KAT060R A6C187 283–5003–00 CAP,FXD,CERAMIC:MLC,0.01UF,10%,50V,X7R 04222 12065C103KAT060R A6C188 283–5003–00 CAP,FXD,CERAMIC:MLC,0.01UF,10%,50V,X7R 04222 12065C103KAT060R A6C189 283–5003–00 CAP,FXD,CERAMIC:MLC,0.01UF,10%,50V,X7R 04222 12065C103KAT060R A6C190 283–5003–00 CAP,FXD,CERAMIC:MLC,0.01UF,10%,50V,X7R 04222 12065C103KAT060R A6C191 283–5003–00 CAP,FXD,CERAMIC:MLC,0.01UF,10%,50V,X7R 04222 12065C103KAT060R A6C192 283–5025–00 CAP,FXD,CERAMIC:MLC,220PF,5%,50V,NPO 04222 12065A221JAT1A A6C193 283–5003–00 CAP,FXD,CERAMIC:MLC,0.01UF,10%,50V,X7R 04222 12065C103KAT060R A6C194 283–5003–00 CAP,FXD,CERAMIC:MLC,0.01UF,10%,50V,X7R 04222 12065C103KAT060R A6C195 283–5003–00 CAP,FXD,CERAMIC:MLC,0.01UF,10%,50V,X7R 04222 12065C103KAT060R A6C196 283–5003–00 CAP,FXD,CERAMIC:MLC,0.01UF,10%,50V,X7R 04222 12065C103KAT060R A6C197 283–5003–00 CAP,FXD,CERAMIC:MLC,0.01UF,10%,50V,X7R 04222 12065C103KAT060R A6C198 283–5003–00 CAP,FXD,CERAMIC:MLC,0.01UF,10%,50V,X7R 04222 12065C103KAT060R A6C199 283–5025–00 CAP,FXD,CERAMIC:MLC,220PF,5%,50V,NPO 04222 12065A221JAT1A A6C200 283–5025–00 CAP,FXD,CERAMIC:MLC,220PF,5%,50V,NPO 04222 12065A221JAT1A A6C201 283–5003–00 CAP,FXD,CERAMIC:MLC,0.01UF,10%,50V,X7R 04222 12065C103KAT060R A6C202 283–5003–00 CAP,FXD,CERAMIC:MLC,0.01UF,10%,50V,X7R 04222 12065C103KAT060R A6C203 283–5003–00 CAP,FXD,CERAMIC:MLC,0.01UF,10%,50V,X7R 04222 12065C103KAT060R A6C204 283–5003–00 CAP,FXD,CERAMIC:MLC,0.01UF,10%,50V,X7R 04222 12065C103KAT060R A6C205 283–5025–00 CAP,FXD,CERAMIC:MLC,220PF,5%,50V,NPO 04222 12065A221JAT1A A6C206 283–5004–00 CAP,FXD,CERAMIC:MLC,0.1UF,10%,25V,X7R 04222 12063C104KAT3A A6C207 283–5003–00 CAP,FXD,CERAMIC:MLC,0.01UF,10%,50V,X7R 04222 12065C103KAT060R A6C208 283–5003–00 CAP,FXD,CERAMIC:MLC,0.01UF,10%,50V,X7R 04222 12065C103KAT060R A6C209 283–5003–00 CAP,FXD,CERAMIC:MLC,0.01UF,10%,50V,X7R 04222 12065C103KAT060R A6C210 283–5003–00 CAP,FXD,CERAMIC:MLC,0.01UF,10%,50V,X7R 04222 12065C103KAT060R A6C211 283–5003–00 CAP,FXD,CERAMIC:MLC,0.01UF,10%,50V,X7R 04222 12065C103KAT060R A6C212 283–5003–00 CAP,FXD,CERAMIC:MLC,0.01UF,10%,50V,X7R 04222 12065C103KAT060R A6C213 283–5003–00 CAP,FXD,CERAMIC:MLC,0.01UF,10%,50V,X7R 04222 12065C103KAT060R A6C214 283–5003–00 CAP,FXD,CERAMIC:MLC,0.01UF,10%,50V,X7R 04222 12065C103KAT060R A6C215 283–5003–00 CAP,FXD,CERAMIC:MLC,0.01UF,10%,50V,X7R 04222 12065C103KAT060R A6C216 283–5004–00 CAP,FXD,CERAMIC:MLC,0.1UF,10%,25V,X7R 04222 12063C104KAT3A A6C217 283–5004–00 CAP,FXD,CERAMIC:MLC,0.1UF,10%,25V,X7R 04222 12063C104KAT3A A6C218 283–5003–00 CAP,FXD,CERAMIC:MLC,0.01UF,10%,50V,X7R 04222 12065C103KAT060R A6C219 283–5025–00 CAP,FXD,CERAMIC:MLC,220PF,5%,50V,NPO 04222 12065A221JAT1A AM700 Audio Measurement Set Service Manual 8–91 Replaceable Electrical Parts Replaceable electrical parts list (cont.) Component number Tektronix part number A6C220 283–5003–00 A6C221 A6C222 Name & description Mfr. code Mfr. part number CAP,FXD,CERAMIC:MLC,0.01UF,10%,50V,X7R 04222 12065C103KAT060R 283–5004–00 CAP,FXD,CERAMIC:MLC,0.1UF,10%,25V,X7R 04222 12063C104KAT3A 283–5004–00 CAP,FXD,CERAMIC:MLC,0.1UF,10%,25V,X7R 04222 12063C104KAT3A A6C223 283–5025–00 CAP,FXD,CERAMIC:MLC,220PF,5%,50V,NPO 04222 12065A221JAT1A A6C224 283–5004–00 CAP,FXD,CERAMIC:MLC,0.1UF,10%,25V,X7R 04222 12063C104KAT3A A6C225 283–5003–00 CAP,FXD,CERAMIC:MLC,0.01UF,10%,50V,X7R 04222 12065C103KAT060R A6C226 283–5003–00 CAP,FXD,CERAMIC:MLC,0.01UF,10%,50V,X7R 04222 12065C103KAT060R A6C227 283–5003–00 CAP,FXD,CERAMIC:MLC,0.01UF,10%,50V,X7R 04222 12065C103KAT060R A6C228 283–5003–00 CAP,FXD,CERAMIC:MLC,0.01UF,10%,50V,X7R 04222 12065C103KAT060R A6C229 283–5003–00 CAP,FXD,CERAMIC:MLC,0.01UF,10%,50V,X7R 04222 12065C103KAT060R A6C230 283–5003–00 CAP,FXD,CERAMIC:MLC,0.01UF,10%,50V,X7R 04222 12065C103KAT060R A6C231 283–5003–00 CAP,FXD,CERAMIC:MLC,0.01UF,10%,50V,X7R 04222 12065C103KAT060R A6C232 283–5003–00 CAP,FXD,CERAMIC:MLC,0.01UF,10%,50V,X7R 04222 12065C103KAT060R A6C233 283–5003–00 CAP,FXD,CERAMIC:MLC,0.01UF,10%,50V,X7R 04222 12065C103KAT060R A6C234 283–5003–00 CAP,FXD,CERAMIC:MLC,0.01UF,10%,50V,X7R 04222 12065C103KAT060R A6C235 283–5025–00 CAP,FXD,CERAMIC:MLC,220PF,5%,50V,NPO 04222 12065A221JAT1A A6C236 283–5003–00 CAP,FXD,CERAMIC:MLC,0.01UF,10%,50V,X7R 04222 12065C103KAT060R A6C237 283–5003–00 CAP,FXD,CERAMIC:MLC,0.01UF,10%,50V,X7R 04222 12065C103KAT060R A6C238 283–5003–00 CAP,FXD,CERAMIC:MLC,0.01UF,10%,50V,X7R 04222 12065C103KAT060R A6C239 283–5003–00 CAP,FXD,CERAMIC:MLC,0.01UF,10%,50V,X7R 04222 12065C103KAT060R A6C241 283–5003–00 CAP,FXD,CERAMIC:MLC,0.01UF,10%,50V,X7R 04222 12065C103KAT060R A6C242 283–5003–00 CAP,FXD,CERAMIC:MLC,0.01UF,10%,50V,X7R 04222 12065C103KAT060R A6C244 283–5003–00 CAP,FXD,CERAMIC:MLC,0.01UF,10%,50V,X7R 04222 12065C103KAT060R A6C245 283–5003–00 CAP,FXD,CERAMIC:MLC,0.01UF,10%,50V,X7R 04222 12065C103KAT060R A6C246 283–5195–00 CAP,FXD,CERAMIC:MLC,10PF,5%,100V, NPO 04222 12061A100JAT1A A6C247 283–5003–00 CAP,FXD,CERAMIC:MLC,0.01UF,10%,50V,X7R 04222 12065C103KAT060R A6C248 283–5003–00 CAP,FXD,CERAMIC:MLC,0.01UF,10%,50V,X7R 04222 12065C103KAT060R A6C249 283–5003–00 CAP,FXD,CERAMIC:MLC,0.01UF,10%,50V,X7R 04222 12065C103KAT060R A6C250 283–5003–00 CAP,FXD,CERAMIC:MLC,0.01UF,10%,50V,X7R 04222 12065C103KAT060R A6C251 283–5003–00 CAP,FXD,CERAMIC:MLC,0.01UF,10%,50V,X7R 04222 12065C103KAT060R A6C252 283–5195–00 CAP,FXD,CERAMIC:MLC,10PF,5%,100V, NPO 04222 12061A100JAT1A A6C253 283–5195–00 CAP,FXD,CERAMIC:MLC,10PF,5%,100V, NPO 04222 12061A100JAT1A A6C254 283–5003–00 CAP,FXD,CERAMIC:MLC,0.01UF,10%,50V,X7R 04222 12065C103KAT060R A6C255 283–5003–00 CAP,FXD,CERAMIC:MLC,0.01UF,10%,50V,X7R 04222 12065C103KAT060R A6C256 283–5003–00 CAP,FXD,CERAMIC:MLC,0.01UF,10%,50V,X7R 04222 12065C103KAT060R A6C257 283–5003–00 CAP,FXD,CERAMIC:MLC,0.01UF,10%,50V,X7R 04222 12065C103KAT060R A6C258 283–5003–00 CAP,FXD,CERAMIC:MLC,0.01UF,10%,50V,X7R 04222 12065C103KAT060R A6C259 283–5004–00 CAP,FXD,CERAMIC:MLC,0.1UF,10%,25V,X7R 04222 12063C104KAT3A 8–92 Serial no. effective Serial no. discont’d AM700 Audio Measurement Set Service Manual Replaceable Electrical Parts Replaceable electrical parts list (cont.) Component number Tektronix part number A6C260 283–5003–00 A6C261 A6C262 Serial no. effective Serial no. discont’d Name & description Mfr. code Mfr. part number CAP,FXD,CERAMIC:MLC,0.01UF,10%,50V,X7R 04222 12065C103KAT060R 283–5003–00 CAP,FXD,CERAMIC:MLC,0.01UF,10%,50V,X7R 04222 12065C103KAT060R 283–5003–00 CAP,FXD,CERAMIC:MLC,0.01UF,10%,50V,X7R 04222 12065C103KAT060R A6C263 283–5003–00 CAP,FXD,CERAMIC:MLC,0.01UF,10%,50V,X7R 04222 12065C103KAT060R A6C264 283–5003–00 CAP,FXD,CERAMIC:MLC,0.01UF,10%,50V,X7R 04222 12065C103KAT060R A6C265 283–5003–00 CAP,FXD,CERAMIC:MLC,0.01UF,10%,50V,X7R 04222 12065C103KAT060R A6C266 283–5003–00 CAP,FXD,CERAMIC:MLC,0.01UF,10%,50V,X7R 04222 12065C103KAT060R A6C267 283–5004–00 CAP,FXD,CERAMIC:MLC,0.1UF,10%,25V,X7R 04222 12063C104KAT3A A6C268 283–5004–00 CAP,FXD,CERAMIC:MLC,0.1UF,10%,25V,X7R 04222 12063C104KAT3A A6C269 283–5003–00 CAP,FXD,CERAMIC:MLC,0.01UF,10%,50V,X7R 04222 12065C103KAT060R A6C270 283–5003–00 CAP,FXD,CERAMIC:MLC,0.01UF,10%,50V,X7R 04222 12065C103KAT060R A6C271 283–5003–00 CAP,FXD,CERAMIC:MLC,0.01UF,10%,50V,X7R 04222 12065C103KAT060R A6C272 283–5185–00 CAP,FXD,CERAMIC:MLC,1000PF,5%,50V,NPO 04222 12065A102JAT1A A6C273 283–5003–00 CAP,FXD,CERAMIC:MLC,0.01UF,10%,50V,X7R 04222 12065C103KAT060R A6C282 283–5003–00 CAP,FXD,CERAMIC:MLC,0.01UF,10%,50V,X7R 04222 12065C103KAT060R A6C284 283–5003–00 CAP,FXD,CERAMIC:MLC,0.01UF,10%,50V,X7R 04222 12065C103KAT060R A6C285 290–5037–01 CAP,FXD,ALUM:10UF,20%,35V,5.7 H X 5 DIA MM 62643 MVK35VC10RME60 TPX A6C286 283–5004–00 CAP,FXD,CERAMIC:MLC,0.1UF,10%,25V,X7R 04222 12063C104KAT3A A6C287 283–5004–00 CAP,FXD,CERAMIC:MLC,0.1UF,10%,25V,X7R 04222 12063C104KAT3A A6C289 283–5003–00 CAP,FXD,CERAMIC:MLC,0.01UF,10%,50V,X7R 04222 12065C103KAT060R A6C290 283–5003–00 CAP,FXD,CERAMIC:MLC,0.01UF,10%,50V,X7R 04222 12065C103KAT060R A6C291 283–5003–00 CAP,FXD,CERAMIC:MLC,0.01UF,10%,50V,X7R 04222 12065C103KAT060R A6C293 283–5003–00 CAP,FXD,CERAMIC:MLC,0.01UF,10%,50V,X7R 04222 12065C103KAT060R A6C294 283–5188–00 CAP,FXD,CERAMIC:MLC,100PF,5%,100V,NPO 04222 12061A101JAT1A A6C295 283–5188–00 CAP,FXD,CERAMIC:MLC,100PF,5%,100V,NPO 04222 12061A101JAT1A A6C296 283–5188–00 CAP,FXD,CERAMIC:MLC,100PF,5%,100V,NPO 04222 12061A101JAT1A A6C297 283–5022–00 CAP,FXD,CER DI:47PF,5%,50V NPO,1206 PKG, SMD,8MM 04222 12065A470JAT1A A6C298 283–5022–00 CAP,FXD,CER DI:47PF,5%,50V NPO,1206 PKG, SMD,8MM 04222 12065A470JAT1A A6C299 283–5022–00 CAP,FXD,CER DI:47PF,5%,50V NPO,1206 PKG, SMD,8MM 04222 12065A470JAT1A A6C300 283–5022–00 CAP,FXD,CER DI:47PF,5%,50V NPO,1206 PKG, SMD,8MM 04222 12065A470JAT1A A6C301 283–5025–00 CAP,FXD,CERAMIC:MLC,220PF,5%,50V,NPO 04222 12065A221JAT1A A6C302 283–5025–00 CAP,FXD,CERAMIC:MLC,220PF,5%,50V,NPO 04222 12065A221JAT1A A6C303 283–5185–00 CAP,FXD,CERAMIC:MLC,1000PF,5%,50V,NPO 04222 12065A102JAT1A A6C304 283–5185–00 CAP,FXD,CERAMIC:MLC,1000PF,5%,50V,NPO 04222 12065A102JAT1A A6C305 283–5185–00 CAP,FXD,CERAMIC:MLC,1000PF,5%,50V,NPO 04222 12065A102JAT1A A6C306 283–5185–00 CAP,FXD,CERAMIC:MLC,1000PF,5%,50V,NPO 04222 12065A102JAT1A A6C307 283–5022–00 CAP,FXD,CER DI:47PF,5%,50V NPO,1206 PKG, SMD,8MM 04222 12065A470JAT1A A6C308 283–5022–00 CAP,FXD,CER DI:47PF,5%,50V NPO,1206 PKG, SMD,8MM 04222 12065A470JAT1A AM700 Audio Measurement Set Service Manual 8–93 Replaceable Electrical Parts Replaceable electrical parts list (cont.) Component number Tektronix part number Serial no. effective Serial no. discont’d Name & description Mfr. code A6C309 283–5022–00 Mfr. part number CAP,FXD,CER DI:47PF,5%,50V NPO,1206 PKG, SMD,8MM 04222 12065A470JAT1A A6C310 283–5022–00 CAP,FXD,CER DI:47PF,5%,50V NPO,1206 PKG, SMD,8MM 04222 12065A470JAT1A A6C311 283–5022–00 CAP,FXD,CER DI:47PF,5%,50V NPO,1206 PKG, SMD,8MM 04222 12065A470JAT1A A6C312 283–5022–00 CAP,FXD,CER DI:47PF,5%,50V NPO,1206 PKG, SMD,8MM 04222 12065A470JAT1A A6C313 283–5003–00 CAP,FXD,CERAMIC:MLC,0.01UF,10%,50V,X7R 04222 12065C103KAT060R A6C314 283–5022–00 CAP,FXD,CER DI:47PF,5%,50V NPO,1206 PKG, SMD,8MM 04222 12065A470JAT1A A6C315 283–5022–00 CAP,FXD,CER DI:47PF,5%,50V NPO,1206 PKG, SMD,8MM 04222 12065A470JAT1A A6CR1 152–0141–02 DIODE,SIG:ULTRA FAST,40V,150MA,4NS,2PF,1N4152,DO–35,T&R 01295 1N4152R A6CR4 152–0581–04 DIODE,RECT:SCHTKY,20V,1A,.450VF,25A IFSM,1N5817,T&R 04713 1N5817RL (TAPE & REEL PACKAGE) A6CR5 152–0601–01 DIODE,RECT:ULTRA FAST,150V,25NS,35A IFSM,MUR120,T&R 12969 UES1103 A6CR6 152–0601–01 DIODE,RECT:ULTRA FAST,150V,25NS,35A IFSM,MUR120,T&R 12969 UES1103 A6CR7 152–0141–02 DIODE,SIG:ULTRA FAST,40V,150MA,4NS,2PF,1N4152,DO–35,T&R 01295 1N4152R A6CR8 152–0141–02 DIODE,SIG:ULTRA FAST,40V,150MA,4NS,2PF,1N4152,DO–35,T&R 01295 1N4152R A6DS1 150–1037–00 DISPLAY,OPTO:LED,ORN,630NM,7 SEG,0.3” DISPLAY,COM ANODE,RIGHT HANDDECIMAL,MAN3620A.3409 50579 DL307 A6DS2 150–1031–00 DIODE,OPTO:LED,RED,648NM,1MCD AT 20MA,70 DEG VIEW ANGL,HLMP–1002,T1 01295 TIL 209A A6E8 276–0850–00 BEAD: 80009 276–0850–00 A6E9 276–0850–00 BEAD: 80009 276–0850–00 A6E10 276–0850–00 BEAD: 80009 276–0850–00 A6E14 276–0850–00 BEAD: 80009 276–0850–00 A6F1 159–0145–00 FUSE,WIRE LEAD:15A,32V,10 SECONDS 61857 SP7–15A 61857 SP5–3A 61857 SP5–2A A6F2 159–0220–00 FUSE,WIRE LEAD:3A,125V,FAST A6F3 159–0208–00 FUSE,WIRE LEAD:2A,125V,5 SEC,SAFETY A6FL1 119–4472–00 FILTER,RF:EMI/RFI,50V,500MA,0.12 OHMS MAX DCR,200 OHMS IMPEADANCE AT 20–300MHZ,4 COMMON MO TK2058 ZJY51R5–8PA A6FL2 119–3580–00 FILTER,EMI:T–CIRCUIT,140MHZ MAX,INS LOSS 15DB@30–800MHZ,25DB @70–200MHZ,1A,50V,1000PF,.094T TK2058 ZJSR–5101–102TA A6FL3 119–3580–00 FILTER,EMI:T–CIRCUIT,140MHZ MAX,INS LOSS 15DB@30–800MHZ,25DB @70–200MHZ,1A,50V,1000PF,.094T TK2058 ZJSR–5101–102TA A6FL8 119–4472–00 FILTER,RF:EMI/RFI,50V,500MA,0.12 OHMS MAX DCR,200 OHMS IMPEADANCE AT 20–300MHZ,4 COMMON MO TK2058 ZJY51R5–8PA A6FL9 119–4472–00 FILTER,RF:EMI/RFI,50V,500MA,0.12 OHMS MAX DCR,200 OHMS IMPEADANCE AT 20–300MHZ,4 COMMON MO TK2058 ZJY51R5–8PA A6FL10 119–4472–00 FILTER,RF:EMI/RFI,50V,500MA,0.12 OHMS MAX DCR,200 OHMS IMPEADANCE AT 20–300MHZ,4 COMMON MO TK2058 ZJY51R5–8PA A6FL11 119–4472–00 FILTER,RF:EMI/RFI,50V,500MA,0.12 OHMS MAX DCR,200 OHMS IMPEADANCE AT 20–300MHZ,4 COMMON MO TK2058 ZJY51R5–8PA 8–94 CONTROLLED AM700 Audio Measurement Set Service Manual Replaceable Electrical Parts Replaceable electrical parts list (cont.) Component number Tektronix part number Serial no. effective Serial no. discont’d A6FL12 119–4472–00 FILTER,RF:EMI/RFI,50V,500MA,0.12 OHMS MAX DCR,200 OHMS IMPEADANCE AT 20–300MHZ,4 COMMON MO TK2058 ZJY51R5–8PA A6FL13 119–3580–00 FILTER,EMI:T–CIRCUIT,140MHZ MAX,INS LOSS 15DB@30–800MHZ,25DB @70–200MHZ,1A,50V,1000PF,.094T TK2058 ZJSR–5101–102TA A6FL14 119–3580–00 FILTER,EMI:T–CIRCUIT,140MHZ MAX,INS LOSS 15DB@30–800MHZ,25DB @70–200MHZ,1A,50V,1000PF,.094T TK2058 ZJSR–5101–102TA A6FL15 119–3580–00 FILTER,EMI:T–CIRCUIT,140MHZ MAX,INS LOSS 15DB@30–800MHZ,25DB @70–200MHZ,1A,50V,1000PF,.094T TK2058 ZJSR–5101–102TA A6FL16 119–3580–00 FILTER,EMI:T–CIRCUIT,140MHZ MAX,INS LOSS 15DB@30–800MHZ,25DB @70–200MHZ,1A,50V,1000PF,.094T TK2058 ZJSR–5101–102TA A6FL17 119–3580–00 FILTER,EMI:T–CIRCUIT,140MHZ MAX,INS LOSS 15DB@30–800MHZ,25DB @70–200MHZ,1A,50V,1000PF,.094T TK2058 ZJSR–5101–102TA A6FL18 119–3580–00 FILTER,EMI:T–CIRCUIT,140MHZ MAX,INS LOSS 15DB@30–800MHZ,25DB @70–200MHZ,1A,50V,1000PF,.094T TK2058 ZJSR–5101–102TA A6FL19 119–3580–00 FILTER,EMI:T–CIRCUIT,140MHZ MAX,INS LOSS 15DB@30–800MHZ,25DB @70–200MHZ,1A,50V,1000PF,.094T TK2058 ZJSR–5101–102TA A6FL20 119–3580–00 FILTER,EMI:T–CIRCUIT,140MHZ MAX,INS LOSS 15DB@30–800MHZ,25DB @70–200MHZ,1A,50V,1000PF,.094T TK2058 ZJSR–5101–102TA A6FL21 119–3580–00 FILTER,EMI:T–CIRCUIT,140MHZ MAX,INS LOSS 15DB@30–800MHZ,25DB @70–200MHZ,1A,50V,1000PF,.094T TK2058 ZJSR–5101–102TA A6FL22 119–3580–00 FILTER,EMI:T–CIRCUIT,140MHZ MAX,INS LOSS 15DB@30–800MHZ,25DB @70–200MHZ,1A,50V,1000PF,.094T TK2058 ZJSR–5101–102TA A6FL23 119–3580–00 FILTER,EMI:T–CIRCUIT,140MHZ MAX,INS LOSS 15DB@30–800MHZ,25DB @70–200MHZ,1A,50V,1000PF,.094T TK2058 ZJSR–5101–102TA A6FL24 119–3580–00 FILTER,EMI:T–CIRCUIT,140MHZ MAX,INS LOSS 15DB@30–800MHZ,25DB @70–200MHZ,1A,50V,1000PF,.094T TK2058 ZJSR–5101–102TA A6FL25 119–3580–00 FILTER,EMI:T–CIRCUIT,140MHZ MAX,INS LOSS 15DB@30–800MHZ,25DB @70–200MHZ,1A,50V,1000PF,.094T TK2058 ZJSR–5101–102TA A6FL26 119–3580–00 FILTER,EMI:T–CIRCUIT,140MHZ MAX,INS LOSS 15DB@30–800MHZ,25DB @70–200MHZ,1A,50V,1000PF,.094T TK2058 ZJSR–5101–102TA A6FL27 119–3580–00 FILTER,EMI:T–CIRCUIT,140MHZ MAX,INS LOSS 15DB@30–800MHZ,25DB @70–200MHZ,1A,50V,1000PF,.094T TK2058 ZJSR–5101–102TA A6J1 131–3925–00 CONN,DSUB:PCB,FEMALE,RTANG,9 POS,0.112 CTR,0.318 MLG X 0.125 TAIL,4–40 THD INSERT,BD RETE 00779 747844–4 A6J2 131–5357–00 CONN,RIBBON:PCB/PNL,GPIB,FEMALE,RTANG 24 POS,0.085 CTR,0.469 MLG X 0.157 TAIL,6–32 INSERT W/ 00779 554923–2 02660 57–1912–01 EA B 00779 748390–5 0KB01 214–3903–01 Name & description Mfr. code Mfr. part number *ATTACHED PARTS* 129–0887–02 SPCR,POST:0.531 L,M3.5 X 0.6 INT/6–32 EXT,STL,0.312 HEX (QUANTITY 2) 131–5450–00 CONN,DSUB:PCB,HIGH DENSITY,FEMALE,RTANG,15 POS,0.078 CTR,0.350 MLG X 0.125 TAIL,4–40 THD I *END ATTACHED PARTS* A6J3 *MOUNTING PARTS* 214–3903–01 SCREW,JACK:4–40 X 0.312 EXT THD,4–40 INT THD,0.188 HEX,STEEL,CADPLATE (QUANTITY 2) AM700 Audio Measurement Set Service Manual 8–95 Replaceable Electrical Parts Replaceable electrical parts list (cont.) Component number Tektronix part number Serial no. effective Serial no. discont’d Mfr. code Name & description Mfr. part number *END MOUNTING PARTS* A6J4 131–5269–00 CONN,CIRC:PCB,MINI DIN,FEMALE,RTANG,6 POS,0.787 H X 0.137 TAIL,TIN OR SILVER,PNL MTG, TK0AY MD–S6350–N14S–1 4 A6J5 131–3926–00 CONN,DSUB:PCB,MALE,RTANG,9 POS,0.112 CTR,0.318 MLG X 0.125 TAIL,4–40 THD INSERT,BD RETENT 00779 747840–4 214–3903–01 SCREW,JACK:4–40 X 0.312 EXT THD,4–40 INT THD,0.188 HEX,STEEL,CADPLATE (QUANTITY 2) 0KB01 214–3903–01 131–3926–00 CONN,DSUB:PCB,MALE,RTANG,9 POS,0.112 CTR,0.318 MLG X 0.125 TAIL,4–40 THD INSERT,BD RETENT 00779 747840–4 0KB01 214–3903–01 *MOUNTING PARTS* *END MOUNTING PARTS* A6J6 *MOUNTING PARTS* 214–3903–01 SCREW,JACK:4–40 X 0.312 EXT THD,4–40 INT THD,0.188 HEX,STEEL,CADPLATE (QUANTITY 2) *END MOUNTING PARTS* A6J7 131–2919–01 CONN,HDR:PCB,MALE,STR,1 X 4,0.1 CTR,0.235 MLG X 0.112 TAIL,30 GOLD,0.035 DIA PCB,SAFETY 53387 2404–6112TB A6J8 131–3520–00 CONN,HDR:PCB,MALE,STR,2 X 5,0.1 CTR,0.365 H X 0.112 TAIL,SHRD/4 SIDES,MIL PLZ,30 GOLD 53387 2510–6002UB A6J10 131–3213–00 CONN,HDR:PCB,MALE,STR,2 X 6,0.1 CTR,0.318 MLG X 0.100 TAIL,30 GOLD 58050 182–0644–SD11 A6J11 131–4917–00 CONN,HDR:PCB,MALE,STR,1 X 2,0.1 CTR,0.235 MLG X 0.110 TAIL,30 GOLD, HIGH TEMP, 00779 104350–1 A6J13 131–4917–00 CONN,HDR:PCB,MALE,STR,1 X 2,0.1 CTR,0.235 MLG X 0.110 TAIL,30 GOLD, HIGH TEMP, 00779 104350–1 A6J14 131–4917–00 CONN,HDR:PCB,MALE,STR,1 X 2,0.1 CTR,0.235 MLG X 0.110 TAIL,30 GOLD, HIGH TEMP, 00779 104350–1 A6J17 131–2919–01 CONN,HDR:PCB,MALE,STR,1 X 4,0.1 CTR,0.235 MLG X 0.112 TAIL,30 GOLD,0.035 DIA PCB,SAFETY 53387 2404–6112TB A6J21 131–3364–00 CONN,HDR:PCB,MALE,STR,2 X 17,0.1 CTR,0.365 H X 0.112 TAIL,SHRD/4 SIDES,CTR PLZ,30 GOLD, 53387 N2534–6002UB A6J22 131–3364–00 CONN,HDR:PCB,MALE,STR,2 X 17,0.1 CTR,0.365 H X 0.112 TAIL,SHRD/4 SIDES,CTR PLZ,30 GOLD, 53387 N2534–6002UB A6J23 131–4443–00 CONN,HDI:PCB,MALE,STR,4 X 30,0.1 CTR 22526 50015–5120A A6J29 131–4917–00 CONN,HDR:PCB,MALE,STR,1 X 2,0.1 CTR,0.235 MLG X 0.110 TAIL,30 GOLD, HIGH TEMP, 00779 104350–1 A6J30 131–4917–00 CONN,HDR:PCB,MALE,STR,1 X 2,0.1 CTR,0.235 MLG X 0.110 TAIL,30 GOLD, HIGH TEMP, 00779 104350–1 A6J31 131–5677–00 CONN,HDR PWR:PCB,MALE,RTANG,1 X 10,0.156 CTR,0.450 MLG X 0.140 TAIL,PLZ WALL,FRICTION LOCK,2 27264 26–65–5100 A6J32 131–3392–00 CONN,HDR:PCB,MALE,STR,1 X 10,0.1 CTR,0.230 MLG X 0.120 TAIL,30 GOLD,BD RETENTION, 00779 1–102844–1 A6J33 131–5675–00 CONN,HDR PWR:PCB,MALE,RTANG,1 X 5,0.156 CTR,0.45 MLG X 0.14 TAIL,PLZ WALL,FRICTION LOCK,20 G 27264 26–65–5050 8–96 AM700 Audio Measurement Set Service Manual Replaceable Electrical Parts Replaceable electrical parts list (cont.) Component number Tektronix part number A6J34 131–1857–00 A6J36 Serial no. effective Serial no. discont’d Mfr. code Mfr. part number CONN,HDR:PCB,MALE,STR,1 X 36,0.1 CTR,0.230 MLG X 0.100 TAIL,GOLD, 22526 65507–136 131–5670–00 CONN,HDI:PCB,MALE STR,4 X 35,140 POS,0.1 CTR,0.462 H X 0.177 TAIL,30 GXT, 22526 50015–5140A A6J40 131–1857–00 CONN,HDR:PCB,MALE,STR,1 X 36,0.1 CTR,0.230 MLG X 0.100 TAIL,GOLD, 22526 65507–136 A6J41 131–3358–00 CONN,HDR:PCB,MALE,RTANG,2 X 5,0.1 CTR,0.390 MLG X 0.112 TAIL,0.33 H,SHRD/4 SIDES,MIL PLZ 53387 2510–5002UB A6J42 131–5501–00 CONN,BOX:PCB,FFC/ZIF,FEMALE,STR,1 X 26,0.039 CTR,0.396 H X 0.138 TAIL,TIN,ACCOM 0.012 THK 27264 52030–2610 A6J43 131–3364–00 CONN,HDR:PCB,MALE,STR,2 X 17,0.1 CTR,0.365 H X 0.112 TAIL,SHRD/4 SIDES,CTR PLZ,30 GOLD, 53387 N2534–6002UB A6J44 131–1857–00 CONN,HDR:PCB,MALE,STR,1 X 36,0.1 CTR,0.230 MLG X 0.100 TAIL,GOLD, 22526 65507–136 A6J45 131–4751–00 CONN,HDR:PCB,MALE,STR,1 X 16,0.1 CTR,0.235 MLG X 0.112 TAIL,30 GOLD, 58050 082–1643–SS10 A6J46 131–3358–00 CONN,HDR:PCB,MALE,RTANG,2 X 5,0.1 CTR,0.390 MLG X 0.112 TAIL,0.33 H,SHRD/4 SIDES,MIL PLZ 53387 2510–5002UB A6J48 131–3520–00 CONN,HDR:PCB,MALE,STR,2 X 5,0.1 CTR,0.365 H X 0.112 TAIL,SHRD/4 SIDES,MIL PLZ,30 GOLD, 53387 2510–6002UB A6J49 131–3520–00 CONN,HDR:PCB,MALE,STR,2 X 5,0.1 CTR,0.365 H X 0.112 TAIL,SHRD/4 SIDES,MIL PLZ,30 GOLD, 53387 2510–6002UB A6J52 131–1425–00 CONN,HDR:PCB,MALE,RTANG,1 X 36,0.1 CTR,0.230 MLG X 0.090 TAIL,30 GOLD,STACKABLE, 22526 65521–136 A6J53 131–4048–00 CONN,HDR:PCB,MALE,RTANG,2 X 17,0.05 X 0.1 CTR,0.326 H X 0.106TAIL,0.075 STAGGERED PCB,W/ TK1462 NFP–34A–0112A A6J54 131–4363–00 CONN,HDR PWR:PCB,MALE,STR,1 X 2,0.156 CTR,0.450 MLG X 0.172 TAIL,PLZ WALL,W/FRICTION LOCK,20 27264 26–48–2025 A6J55 131–4917–00 CONN,HDR:PCB,MALE,STR,1 X 2,0.1 CTR,0.235 MLG X 0.110 TAIL,30 GOLD, HIGH TEMP, 00779 104350–1 A6K1 148–0148–00 RELAY,ARMATURE:2 FORM C,COIL 5 VDC 62.5 OHM,CONTACT 220 VDC 2A 60W, PKG 0.787 X 0.39, 0.366 HI 61529 DS2E–M–DC5V A6L3 108–5126–00 INDUCTOR,FXD:POWER,1.0UH,20%,IDC<2.56 A,RDC<0.0487 OHM,SRF>113.8 MHZ,CD43–1R0MC 0TZP6 CD43–1R0MC A6L4 108–5127–00 INDUCTOR,FXD:POWER,3.3 UH,20%,RDC=0.013 OHM,ISAT=6.4A,IRMS=5.4 A RMS,D03316P–332 02113 DO3316P–332 A6L5 108–5018–00 INDUCTOR,FXD:POWER,4.7UH,5%,I<0.315 A,RDC<1 OHM,Q>50,SRF>45 MHZ,NL453232T–4R7,1812,12MM TK2058 NL453232T–4R7J A6L6 108–5018–00 INDUCTOR,FXD:POWER,4.7UH,5%,I<0.315 A,RDC<1 OHM,Q>50,SRF>45 MHZ,NL453232T–4R7,1812,12MM TK2058 NL453232T–4R7J A6L11 108–5115–00 INDUCTOR,FXD:SIGNAL,330NH,5%,IDC<450 MA,RDC<0.4 OHM,Q>30,SRF>300 MHZ,NL322522T–R33,1210,10MM 24226 SML32–330J A6L12 108–5115–00 INDUCTOR,FXD:SIGNAL,330NH,5%,IDC<450 MA,RDC<0.4 OHM,Q>30,SRF>300 MHZ,NL322522T–R33,1210,10MM 24226 SML32–330J A6L13 108–5115–00 INDUCTOR,FXD:SIGNAL,330NH,5%,IDC<450 MA,RDC<0.4 OHM,Q>30,SRF>300 MHZ,NL322522T–R33,1210,10MM 24226 SML32–330J Name & description AM700 Audio Measurement Set Service Manual 8–97 Replaceable Electrical Parts Replaceable electrical parts list (cont.) Component number Tektronix part number A6L15 108–1477–00 A6Q1 Serial no. effective Serial no. discont’d Mfr. code Mfr. part number INDUCTOR,FXD:CUSTOM,SIGNAL,400NH,10%,IDC<17 A,RDC<0.3 OHM,Q>[email protected],AIR CORE,AXIAL 0JR03 108–1477–00 151–0736–00 TRANSISTOR,SIG:BIPOLAR,NPN,40V,600MA,250MHZ,AMPLIFIE R,2N4401,TO–92 EBC 01295 TIS111 A6Q2 151–0190–00 TRANSISTOR,SIG:BIPOLAR,NPN,40V,200MA,300MHZ,AMPLIFIE R,2N3904,TO–92 EBC 04713 2N3904 A6Q3 151–0190–00 TRANSISTOR,SIG:BIPOLAR,NPN,40V,200MA,300MHZ,AMPLIFIE R,2N3904,TO–92 EBC 04713 2N3904 A6R1 307–1629–00 RES NTWK,FXD,FI:8,4.7K OHM,2% 91637 CSC09A–01–472G Name & description A6R2 323–0042–00 RES,FXD,FILM:26.7 OHM,1%,0.5W,TC=T0 19701 MFCT0–26R70F A6R3 323–0193–00 RES,FXD,FILM:1K OHM,1%,0.5W,TC=T0 64537 PME70 A6R4 307–0446–00 RES NTWK,FXD,FI:(9) RES,10K OHM,20%,100PPM,100V 11236 750–101–R10K A6R5 307–0446–00 RES NTWK,FXD,FI:(9) RES,10K OHM,20%,100PPM,100V 11236 750–101–R10K A6R6 307–1630–00 RES NTWK,FXD,FM:4,4700 OHM,2% 91637 CSC05A–01–472G A6R7 307–0992–00 RES NTWK,FXD,FI:8,330 OHM,5% 09969 CSC08A03–331G A6R8 307–0992–00 RES NTWK,FXD,FI:8,330 OHM,5% 09969 CSC08A03–331G A6R10 307–1630–00 RES NTWK,FXD,FM:4,4700 OHM,2% 91637 CSC05A–01–472G A6R11 307–0828–00 RES NTWK,FXD,FI:4,33 OHM,2%,0.30W 50139 108B330 OR 708B330 A6R12 307–0828–00 RES NTWK,FXD,FI:4,33 OHM,2%,0.30W 50139 108B330 OR 708B330 A6R13 307–0828–00 RES NTWK,FXD,FI:4,33 OHM,2%,0.30W 50139 108B330 OR 708B330 A6R14 307–1630–00 RES NTWK,FXD,FM:4,4700 OHM,2% 91637 CSC05A–01–472G A6R15 307–1630–00 RES NTWK,FXD,FM:4,4700 OHM,2% 91637 CSC05A–01–472G A6R16 307–1630–00 RES NTWK,FXD,FM:4,4700 OHM,2% 91637 CSC05A–01–472G A6R17 307–0445–00 RES,NTWK:THICK FILM,(9) 4.7K OHM,2%,0.2W EACH,TC=100 PPM,SIP10,PIN 1 COMMON 11236 750–101–R4.7 K TUBE PACKED A6R18 307–0828–00 RES NTWK,FXD,FI:4,33 OHM,2%,0.30W 50139 108B330 OR 708B330 A6R19 307–0828–00 RES NTWK,FXD,FI:4,33 OHM,2%,0.30W 50139 108B330 OR 708B330 A6R20 307–0828–00 RES NTWK,FXD,FI:4,33 OHM,2%,0.30W 50139 108B330 OR 708B330 A6R21 307–0445–00 RES,NTWK:THICK FILM,(9) 4.7K OHM,2%,0.2W EACH,TC=100 PPM,SIP10,PIN 1 COMMON 11236 750–101–R4.7 K TUBE PACKED A6R22 307–0828–00 RES NTWK,FXD,FI:4,33 OHM,2%,0.30W 50139 108B330 OR 708B330 A6R23 307–0828–00 RES NTWK,FXD,FI:4,33 OHM,2%,0.30W 50139 108B330 OR 708B330 A6R24 307–0445–00 RES,NTWK:THICK FILM,(9) 4.7K OHM,2%,0.2W EACH,TC=100 PPM,SIP10,PIN 1 COMMON 11236 750–101–R4.7 K TUBE PACKED A6R25 307–0828–00 RES NTWK,FXD,FI:4,33 OHM,2%,0.30W 50139 108B330 OR 708B330 8–98 AM700 Audio Measurement Set Service Manual Replaceable Electrical Parts Replaceable electrical parts list (cont.) Component number Tektronix part number Serial no. effective Serial no. discont’d Name & description Mfr. code A6R26 307–0828–00 RES NTWK,FXD,FI:4,33 OHM,2%,0.30W 50139 108B330 OR 708B330 A6R27 307–0445–00 RES,NTWK:THICK FILM,(9) 4.7K OHM,2%,0.2W EACH,TC=100 PPM,SIP10,PIN 1 COMMON 11236 750–101–R4.7 K TUBE PACKED A6R28 307–0828–00 RES NTWK,FXD,FI:4,33 OHM,2%,0.30W 50139 108B330 OR 708B330 A6R29 307–0828–00 RES NTWK,FXD,FI:4,33 OHM,2%,0.30W 50139 108B330 OR 708B330 A6R30 307–1630–00 RES NTWK,FXD,FM:4,4700 OHM,2% 91637 CSC05A–01–472G A6R31 307–1629–00 RES NTWK,FXD,FI:8,4.7K OHM,2% 91637 CSC09A–01–472G A6R32 307–0828–00 RES NTWK,FXD,FI:4,33 OHM,2%,0.30W 50139 108B330 OR 708B330 A6R33 307–0828–00 RES NTWK,FXD,FI:4,33 OHM,2%,0.30W 50139 108B330 OR 708B330 A6R34 307–0651–00 RES NTWK,FXD,FI:5,3.3K OHM,5%,0.150W 11236 750–61–R3.3K OHM OR 770–61–R3 A6R35 307–0651–00 RES NTWK,FXD,FI:5,3.3K OHM,5%,0.150W 11236 750–61–R3.3K OHM OR 770–61–R3 A6R37 307–0828–00 RES NTWK,FXD,FI:4,33 OHM,2%,0.30W 50139 108B330 OR 708B330 A6R38 307–0828–00 RES NTWK,FXD,FI:4,33 OHM,2%,0.30W 50139 108B330 OR 708B330 A6R39 307–1630–00 RES NTWK,FXD,FM:4,4700 OHM,2% 91637 CSC05A–01–472G A6R40 307–0828–00 RES NTWK,FXD,FI:4,33 OHM,2%,0.30W 50139 108B330 OR 708B330 A6R41 307–1630–00 RES NTWK,FXD,FM:4,4700 OHM,2% 91637 CSC05A–01–472G A6R42 307–0651–00 RES NTWK,FXD,FI:5,3.3K OHM,5%,0.150W 11236 750–61–R3.3K OHM OR 770–61–R3 A6R43 307–0651–00 RES NTWK,FXD,FI:5,3.3K OHM,5%,0.150W 11236 750–61–R3.3K OHM OR 770–61–R3 A6R44 307–0828–00 RES NTWK,FXD,FI:4,33 OHM,2%,0.30W 50139 108B330 OR 708B330 A6R45 307–1630–00 RES NTWK,FXD,FM:4,4700 OHM,2% 91637 CSC05A–01–472G A6R46 307–0828–00 RES NTWK,FXD,FI:4,33 OHM,2%,0.30W 50139 108B330 OR 708B330 A6R47 307–0828–00 RES NTWK,FXD,FI:4,33 OHM,2%,0.30W 50139 108B330 OR 708B330 A6R48 307–0828–00 RES NTWK,FXD,FI:4,33 OHM,2%,0.30W 50139 108B330 OR 708B330 A6R49 307–0828–00 RES NTWK,FXD,FI:4,33 OHM,2%,0.30W 50139 108B330 OR 708B330 A6R50 307–0828–00 RES NTWK,FXD,FI:4,33 OHM,2%,0.30W 50139 108B330 OR 708B330 A6R51 307–0828–00 RES NTWK,FXD,FI:4,33 OHM,2%,0.30W 50139 108B330 OR 708B330 AM700 Audio Measurement Set Service Manual Mfr. part number 8–99 Replaceable Electrical Parts Replaceable electrical parts list (cont.) Component number Tektronix part number Serial no. effective Serial no. discont’d Name & description Mfr. code A6R52 307–0828–00 RES NTWK,FXD,FI:4,33 OHM,2%,0.30W 50139 108B330 OR 708B330 A6R53 307–0828–00 RES NTWK,FXD,FI:4,33 OHM,2%,0.30W 50139 108B330 OR 708B330 A6R54 307–0828–00 RES NTWK,FXD,FI:4,33 OHM,2%,0.30W 50139 108B330 OR 708B330 A6R55 307–0828–00 RES NTWK,FXD,FI:4,33 OHM,2%,0.30W 50139 108B330 OR 708B330 A6R56 307–0828–00 RES NTWK,FXD,FI:4,33 OHM,2%,0.30W 50139 108B330 OR 708B330 A6R57 307–1630–00 RES NTWK,FXD,FM:4,4700 OHM,2% 91637 CSC05A–01–472G Mfr. part number A6R58 307–0446–00 RES NTWK,FXD,FI:(9) RES,10K OHM,20%,100PPM,100V 11236 750–101–R10K A6R59 307–0446–00 RES NTWK,FXD,FI:(9) RES,10K OHM,20%,100PPM,100V 11236 750–101–R10K A6R60 307–0446–00 RES NTWK,FXD,FI:(9) RES,10K OHM,20%,100PPM,100V 11236 750–101–R10K A6R61 307–0446–00 RES NTWK,FXD,FI:(9) RES,10K OHM,20%,100PPM,100V 11236 750–101–R10K A6R62 307–0542–00 RES NTWK,FXD,FI:(5)10K OHM,5%,0.125W 11236 750–61–R10K OR 770–61–R10K A6R63 307–0446–00 RES NTWK,FXD,FI:(9) RES,10K OHM,20%,100PPM,100V 11236 750–101–R10K A6R64 307–0446–00 RES NTWK,FXD,FI:(9) RES,10K OHM,20%,100PPM,100V 11236 750–101–R10K A6R65 307–0446–00 RES NTWK,FXD,FI:(9) RES,10K OHM,20%,100PPM,100V 11236 750–101–R10K A6R66 307–0446–00 RES NTWK,FXD,FI:(9) RES,10K OHM,20%,100PPM,100V 11236 750–101–R10K A6R67 307–0445–00 RES,NTWK:THICK FILM,(9) 4.7K OHM,2%,0.2W EACH,TC=100 PPM,SIP10,PIN 1 COMMON 11236 750–101–R4.7 K TUBE PACKED A6R68 321–5208–00 RES,FXD,FILM:THICK FILM,10M OHM,5%,0.125W,TC=100 PPM 91637 CRCW1206–106JT A6R69 307–0828–00 RES NTWK,FXD,FI:4,33 OHM,2%,0.30W 50139 108B330 OR 708B330 A6R70 307–0828–00 RES NTWK,FXD,FI:4,33 OHM,2%,0.30W 50139 108B330 OR 708B330 A6R71 307–0828–00 RES NTWK,FXD,FI:4,33 OHM,2%,0.30W 50139 108B330 OR 708B330 A6R72 307–0445–00 RES,NTWK:THICK FILM,(9) 4.7K OHM,2%,0.2W EACH,TC=100 PPM,SIP10,PIN 1 COMMON 11236 750–101–R4.7 K TUBE PACKED A6R73 321–5208–00 RES,FXD,FILM:THICK FILM,10M OHM,5%,0.125W,TC=100 PPM 91637 CRCW1206–106JT A6R74 307–1630–00 RES NTWK,FXD,FM:4,4700 OHM,2% 91637 CSC05A–01–472G A6R75 307–0445–00 RES,NTWK:THICK FILM,(9) 4.7K OHM,2%,0.2W EACH,TC=100 PPM,SIP10,PIN 1 COMMON 11236 750–101–R4.7 K TUBE PACKED A6R76 307–0445–00 RES,NTWK:THICK FILM,(9) 4.7K OHM,2%,0.2W EACH,TC=100 PPM,SIP10,PIN 1 COMMON 11236 750–101–R4.7 K TUBE PACKED A6R77 307–0828–00 RES NTWK,FXD,FI:4,33 OHM,2%,0.30W 50139 108B330 OR 708B330 A6R78 307–0828–00 RES NTWK,FXD,FI:4,33 OHM,2%,0.30W 50139 108B330 OR 708B330 A6R79 307–0828–00 RES NTWK,FXD,FI:4,33 OHM,2%,0.30W 50139 108B330 OR 708B330 8–100 AM700 Audio Measurement Set Service Manual Replaceable Electrical Parts Replaceable electrical parts list (cont.) Component number Tektronix part number Serial no. effective Serial no. discont’d Name & description Mfr. code A6R80 307–0828–00 RES NTWK,FXD,FI:4,33 OHM,2%,0.30W 50139 108B330 OR 708B330 A6R81 307–0828–00 RES NTWK,FXD,FI:4,33 OHM,2%,0.30W 50139 108B330 OR 708B330 A6R82 307–0828–00 RES NTWK,FXD,FI:4,33 OHM,2%,0.30W 50139 108B330 OR 708B330 A6R83 307–0828–00 RES NTWK,FXD,FI:4,33 OHM,2%,0.30W 50139 108B330 OR 708B330 A6R84 307–0445–00 RES,NTWK:THICK FILM,(9) 4.7K OHM,2%,0.2W EACH,TC=100 PPM,SIP10,PIN 1 COMMON 11236 750–101–R4.7 K TUBE PACKED A6R85 307–0445–00 RES,NTWK:THICK FILM,(9) 4.7K OHM,2%,0.2W EACH,TC=100 PPM,SIP10,PIN 1 COMMON 11236 750–101–R4.7 K TUBE PACKED A6R86 307–0445–00 RES,NTWK:THICK FILM,(9) 4.7K OHM,2%,0.2W EACH,TC=100 PPM,SIP10,PIN 1 COMMON 11236 750–101–R4.7 K TUBE PACKED A6R87 307–0445–00 RES,NTWK:THICK FILM,(9) 4.7K OHM,2%,0.2W EACH,TC=100 PPM,SIP10,PIN 1 COMMON 11236 750–101–R4.7 K TUBE PACKED A6R88 307–0445–00 RES,NTWK:THICK FILM,(9) 4.7K OHM,2%,0.2W EACH,TC=100 PPM,SIP10,PIN 1 COMMON 11236 750–101–R4.7 K TUBE PACKED A6R89 307–0445–00 RES,NTWK:THICK FILM,(9) 4.7K OHM,2%,0.2W EACH,TC=100 PPM,SIP10,PIN 1 COMMON 11236 750–101–R4.7 K TUBE PACKED A6R90 307–0445–00 RES,NTWK:THICK FILM,(9) 4.7K OHM,2%,0.2W EACH,TC=100 PPM,SIP10,PIN 1 COMMON 11236 750–101–R4.7 K TUBE PACKED A6R91 307–0828–00 RES NTWK,FXD,FI:4,33 OHM,2%,0.30W 50139 108B330 OR 708B330 A6R92 307–0828–00 RES NTWK,FXD,FI:4,33 OHM,2%,0.30W 50139 108B330 OR 708B330 A6R93 307–0445–00 RES,NTWK:THICK FILM,(9) 4.7K OHM,2%,0.2W EACH,TC=100 PPM,SIP10,PIN 1 COMMON 11236 750–101–R4.7 K TUBE PACKED A6R94 307–0445–00 RES,NTWK:THICK FILM,(9) 4.7K OHM,2%,0.2W EACH,TC=100 PPM,SIP10,PIN 1 COMMON 11236 750–101–R4.7 K TUBE PACKED A6R95 307–0445–00 RES,NTWK:THICK FILM,(9) 4.7K OHM,2%,0.2W EACH,TC=100 PPM,SIP10,PIN 1 COMMON 11236 750–101–R4.7 K TUBE PACKED A6R97 321–5026–00 RES,FXD:THICK FILM,4.75K OHM,1%,0.125W,TC=100 PPM 50139 BCK4751FT A6R98 321–5026–00 RES,FXD:THICK FILM,4.75K OHM,1%,0.125W,TC=100 PPM 50139 BCK4751FT A6R99 321–5020–00 RES,FXD:THICK FILM,1.5K OHM,1%,0.125W,TC=100 PPM 50139 BCK1501FT A6R100 321–5012–00 RES,FXD:THICK FILM,332 OHM,1%,0.125W,TC=100 PPM 50139 BCK3320FT A6R101 321–5014–00 RES,FXD:THICK FILM,475 OHM,1%,0.125W,TC=100 PPM 50139 BCK4750FT A6R102 321–5014–00 RES,FXD:THICK FILM,475 OHM,1%,0.125W,TC=100 PPM 50139 BCK4750FT A6R103 321–5408–00 RES,FXD:THICK FILM,432 OHM,1%,0.125W,TC=100 PPM 91637 CRCW1206 4320FT A6R104 321–5408–00 RES,FXD:THICK FILM,432 OHM,1%,0.125W,TC=100 PPM 91637 CRCW1206 4320FT A6R106 321–5030–00 RES,FXD:THICK FILM,10.0K OHM,1%,0.125W,TC=100 PPM 50139 BCK1002FT A6R107 321–5019–00 RES,FXD:THICK FILM,1.21K OHM,1%,0.125W,TC=100 PPM 50139 BCK1211FT A6R108 321–5019–00 RES,FXD:THICK FILM,1.21K OHM,1%,0.125W,TC=100 PPM 50139 BCK1211FT A6R109 321–5019–00 RES,FXD:THICK FILM,1.21K OHM,1%,0.125W,TC=100 PPM 50139 BCK1211FT AM700 Audio Measurement Set Service Manual Mfr. part number 8–101 Replaceable Electrical Parts Replaceable electrical parts list (cont.) Component number Tektronix part number A6R110 321–5019–00 A6R111 A6R112 Name & description Mfr. code Mfr. part number RES,FXD:THICK FILM,1.21K OHM,1%,0.125W,TC=100 PPM 50139 BCK1211FT 321–5019–00 RES,FXD:THICK FILM,1.21K OHM,1%,0.125W,TC=100 PPM 50139 BCK1211FT 321–5030–00 RES,FXD:THICK FILM,10.0K OHM,1%,0.125W,TC=100 PPM 50139 BCK1002FT A6R113 321–5012–00 RES,FXD:THICK FILM,332 OHM,1%,0.125W,TC=100 PPM 50139 BCK3320FT A6R119 321–5113–00 RES,FXD:THICK FILM,75 OHM,1%,0.125W,TC=100 PPM 59124 RK73H2B75R0FT A6R120 321–5113–00 RES,FXD:THICK FILM,75 OHM,1%,0.125W,TC=100 PPM 59124 RK73H2B75R0FT A6R121 321–5113–00 RES,FXD:THICK FILM,75 OHM,1%,0.125W,TC=100 PPM 59124 RK73H2B75R0FT A6R122 321–5043–00 RES,FXD:THICK FILM,47.5 OHM,1%,0.125W,TC=100 PPM 50139 BCD47R5FT A6R126 321–5043–00 RES,FXD:THICK FILM,47.5 OHM,1%,0.125W,TC=100 PPM 50139 BCD47R5FT A6R127 321–5026–00 RES,FXD:THICK FILM,4.75K OHM,1%,0.125W,TC=100 PPM 50139 BCK4751FT A6R128 321–5026–00 RES,FXD:THICK FILM,4.75K OHM,1%,0.125W,TC=100 PPM 50139 BCK4751FT A6R129 321–5030–00 RES,FXD:THICK FILM,10.0K OHM,1%,0.125W,TC=100 PPM 50139 BCK1002FT A6R130 321–5043–00 RES,FXD:THICK FILM,47.5 OHM,1%,0.125W,TC=100 PPM 50139 BCD47R5FT A6R131 321–5000–00 RES,FXD,FILM:10 OHM,1%,0.125W,TC=100 PPM,100V,1206 50139 BCD10R0FT A6R132 321–5050–00 RES,FXD:THICK FILM,33.2 OHM,1%,0.125W,TC=100 PPM 50139 BCD33R2FT A6R133 321–5019–00 RES,FXD:THICK FILM,1.21K OHM,1%,0.125W,TC=100 PPM 50139 BCK1211FT A6R134 321–5019–00 RES,FXD:THICK FILM,1.21K OHM,1%,0.125W,TC=100 PPM 50139 BCK1211FT A6R135 321–5019–00 RES,FXD:THICK FILM,1.21K OHM,1%,0.125W,TC=100 PPM 50139 BCK1211FT A6R136 321–5113–00 RES,FXD:THICK FILM,75 OHM,1%,0.125W,TC=100 PPM 59124 RK73H2B75R0FT A6R137 321–5113–00 RES,FXD:THICK FILM,75 OHM,1%,0.125W,TC=100 PPM 59124 RK73H2B75R0FT A6R138 321–5113–00 RES,FXD:THICK FILM,75 OHM,1%,0.125W,TC=100 PPM 59124 RK73H2B75R0FT A6R139 321–5024–00 RES,FXD:THICK FILM,3.32K OHM,1%,0.125W,TC=100 PPM 50139 BCK3321FT A6R140 321–5030–00 RES,FXD:THICK FILM,10.0K OHM,1%,0.125W,TC=100 PPM 50139 BCK1002FT A6R142 321–5024–00 RES,FXD:THICK FILM,3.32K OHM,1%,0.125W,TC=100 PPM 50139 BCK3321FT A6R143 321–5024–00 RES,FXD:THICK FILM,3.32K OHM,1%,0.125W,TC=100 PPM 50139 BCK3321FT A6R144 321–5024–00 RES,FXD:THICK FILM,3.32K OHM,1%,0.125W,TC=100 PPM 50139 BCK3321FT A6R145 321–5014–00 RES,FXD:THICK FILM,475 OHM,1%,0.125W,TC=100 PPM 50139 BCK4750FT A6R146 321–5014–00 RES,FXD:THICK FILM,475 OHM,1%,0.125W,TC=100 PPM 50139 BCK4750FT A6R147 321–5043–00 RES,FXD:THICK FILM,47.5 OHM,1%,0.125W,TC=100 PPM 50139 BCD47R5FT A6R148 321–5014–00 RES,FXD:THICK FILM,475 OHM,1%,0.125W,TC=100 PPM 50139 BCK4750FT A6R149 321–5014–00 RES,FXD:THICK FILM,475 OHM,1%,0.125W,TC=100 PPM 50139 BCK4750FT A6R150 321–5043–00 RES,FXD:THICK FILM,47.5 OHM,1%,0.125W,TC=100 PPM 50139 BCD47R5FT A6R151 321–5050–00 RES,FXD:THICK FILM,33.2 OHM,1%,0.125W,TC=100 PPM 50139 BCD33R2FT A6R152 321–5050–00 RES,FXD:THICK FILM,33.2 OHM,1%,0.125W,TC=100 PPM 50139 BCD33R2FT A6R153 321–5050–00 RES,FXD:THICK FILM,33.2 OHM,1%,0.125W,TC=100 PPM 50139 BCD33R2FT A6R154 321–5026–00 RES,FXD:THICK FILM,4.75K OHM,1%,0.125W,TC=100 PPM 50139 BCK4751FT A6R156 321–5018–00 RES,FXD:THICK FILM,1.0K OHM,1%,0.125W,TC=100 PPM 50139 BCK1001FT A6R157 321–5018–00 RES,FXD:THICK FILM,1.0K OHM,1%,0.125W,TC=100 PPM 50139 BCK1001FT 8–102 Serial no. effective Serial no. discont’d AM700 Audio Measurement Set Service Manual Replaceable Electrical Parts Replaceable electrical parts list (cont.) Component number Tektronix part number A6R158 321–5018–00 A6R164 A6R165 Serial no. effective Serial no. discont’d Name & description Mfr. code Mfr. part number RES,FXD:THICK FILM,1.0K OHM,1%,0.125W,TC=100 PPM 50139 BCK1001FT 321–5043–00 RES,FXD:THICK FILM,47.5 OHM,1%,0.125W,TC=100 PPM 50139 BCD47R5FT 321–5043–00 RES,FXD:THICK FILM,47.5 OHM,1%,0.125W,TC=100 PPM 50139 BCD47R5FT A6R166 321–5012–00 RES,FXD:THICK FILM,332 OHM,1%,0.125W,TC=100 PPM 50139 BCK3320FT A6R167 321–5169–00 RES,FXD:THICK FILM,475K OHM,1%,0.125W,TC=100 PPM 59124 RK73H2B4753FT A6R168 321–5043–00 RES,FXD:THICK FILM,47.5 OHM,1%,0.125W,TC=100 PPM 50139 BCD47R5FT A6R169 321–5043–00 RES,FXD:THICK FILM,47.5 OHM,1%,0.125W,TC=100 PPM 50139 BCD47R5FT A6R170 321–5012–00 RES,FXD:THICK FILM,332 OHM,1%,0.125W,TC=100 PPM 50139 BCK3320FT A6R171 321–5169–00 RES,FXD:THICK FILM,475K OHM,1%,0.125W,TC=100 PPM 59124 RK73H2B4753FT A6R172 321–5024–00 RES,FXD:THICK FILM,3.32K OHM,1%,0.125W,TC=100 PPM 50139 BCK3321FT A6R173 321–5050–00 RES,FXD:THICK FILM,33.2 OHM,1%,0.125W,TC=100 PPM 50139 BCD33R2FT A6R174 321–5024–00 RES,FXD:THICK FILM,3.32K OHM,1%,0.125W,TC=100 PPM 50139 BCK3321FT A6R175 321–5024–00 RES,FXD:THICK FILM,3.32K OHM,1%,0.125W,TC=100 PPM 50139 BCK3321FT A6R177 321–5043–00 RES,FXD:THICK FILM,47.5 OHM,1%,0.125W,TC=100 PPM 50139 BCD47R5FT A6R178 321–5018–00 RES,FXD:THICK FILM,1.0K OHM,1%,0.125W,TC=100 PPM 50139 BCK1001FT A6R179 321–5018–00 RES,FXD:THICK FILM,1.0K OHM,1%,0.125W,TC=100 PPM 50139 BCK1001FT A6R180 321–5018–00 RES,FXD:THICK FILM,1.0K OHM,1%,0.125W,TC=100 PPM 50139 BCK1001FT A6R181 321–5018–00 RES,FXD:THICK FILM,1.0K OHM,1%,0.125W,TC=100 PPM 50139 BCK1001FT A6R182 321–5018–00 RES,FXD:THICK FILM,1.0K OHM,1%,0.125W,TC=100 PPM 50139 BCK1001FT A6R183 321–5298–00 RES,FXD,FILM:60.4 OHM,+/–1%,0.125W,TC=100 PPM 91637 CRCW1206–60R4F –RT1 A6R184 321–5018–00 RES,FXD:THICK FILM,1.0K OHM,1%,0.125W,TC=100 PPM 50139 BCK1001FT A6R185 321–5050–00 RES,FXD:THICK FILM,33.2 OHM,1%,0.125W,TC=100 PPM 50139 BCD33R2FT A6R186 321–5050–00 RES,FXD:THICK FILM,33.2 OHM,1%,0.125W,TC=100 PPM 50139 BCD33R2FT A6R187 321–5043–00 RES,FXD:THICK FILM,47.5 OHM,1%,0.125W,TC=100 PPM 50139 BCD47R5FT A6R188 321–5043–00 RES,FXD:THICK FILM,47.5 OHM,1%,0.125W,TC=100 PPM 50139 BCD47R5FT A6R189 321–5014–00 RES,FXD:THICK FILM,475 OHM,1%,0.125W,TC=100 PPM 50139 BCK4750FT A6R190 321–5018–00 RES,FXD:THICK FILM,1.0K OHM,1%,0.125W,TC=100 PPM 50139 BCK1001FT A6R192 321–5050–00 RES,FXD:THICK FILM,33.2 OHM,1%,0.125W,TC=100 PPM 50139 BCD33R2FT A6R193 321–5018–00 RES,FXD:THICK FILM,1.0K OHM,1%,0.125W,TC=100 PPM 50139 BCK1001FT A6R194 321–5018–00 RES,FXD:THICK FILM,1.0K OHM,1%,0.125W,TC=100 PPM 50139 BCK1001FT A6R195 321–5018–00 RES,FXD:THICK FILM,1.0K OHM,1%,0.125W,TC=100 PPM 50139 BCK1001FT A6R196 321–5018–00 RES,FXD:THICK FILM,1.0K OHM,1%,0.125W,TC=100 PPM 50139 BCK1001FT A6R197 321–5018–00 RES,FXD:THICK FILM,1.0K OHM,1%,0.125W,TC=100 PPM 50139 BCK1001FT A6R198 321–5018–00 RES,FXD:THICK FILM,1.0K OHM,1%,0.125W,TC=100 PPM 50139 BCK1001FT A6R199 321–5018–00 RES,FXD:THICK FILM,1.0K OHM,1%,0.125W,TC=100 PPM 50139 BCK1001FT A6R200 321–5018–00 RES,FXD:THICK FILM,1.0K OHM,1%,0.125W,TC=100 PPM 50139 BCK1001FT A6R201 321–5018–00 RES,FXD:THICK FILM,1.0K OHM,1%,0.125W,TC=100 PPM 50139 BCK1001FT A6R202 321–5018–00 RES,FXD:THICK FILM,1.0K OHM,1%,0.125W,TC=100 PPM 50139 BCK1001FT AM700 Audio Measurement Set Service Manual 8–103 Replaceable Electrical Parts Replaceable electrical parts list (cont.) Component number Tektronix part number A6R203 321–5018–00 A6R204 A6R205 Name & description Mfr. code Mfr. part number RES,FXD:THICK FILM,1.0K OHM,1%,0.125W,TC=100 PPM 50139 BCK1001FT 321–5043–00 RES,FXD:THICK FILM,47.5 OHM,1%,0.125W,TC=100 PPM 50139 BCD47R5FT 321–5050–00 RES,FXD:THICK FILM,33.2 OHM,1%,0.125W,TC=100 PPM 50139 BCD33R2FT A6R206 321–5043–00 RES,FXD:THICK FILM,47.5 OHM,1%,0.125W,TC=100 PPM 50139 BCD47R5FT A6R207 321–5050–00 RES,FXD:THICK FILM,33.2 OHM,1%,0.125W,TC=100 PPM 50139 BCD33R2FT A6R208 321–5050–00 RES,FXD:THICK FILM,33.2 OHM,1%,0.125W,TC=100 PPM 50139 BCD33R2FT A6R209 321–5050–00 RES,FXD:THICK FILM,33.2 OHM,1%,0.125W,TC=100 PPM 50139 BCD33R2FT A6R210 321–5050–00 RES,FXD:THICK FILM,33.2 OHM,1%,0.125W,TC=100 PPM 50139 BCD33R2FT A6R213 321–5051–00 RES,FXD:THICK FILM,0 OHM,1%,0.125W,TC=100 PPM 50139 BCD0JUMPERT A6R214 321–5051–00 RES,FXD:THICK FILM,0 OHM,1%,0.125W,TC=100 PPM 50139 BCD0JUMPERT A6R215 321–5050–00 RES,FXD:THICK FILM,33.2 OHM,1%,0.125W,TC=100 PPM 50139 BCD33R2FT A6R216 321–5043–00 RES,FXD:THICK FILM,47.5 OHM,1%,0.125W,TC=100 PPM 50139 BCD47R5FT A6R217 321–5050–00 RES,FXD:THICK FILM,33.2 OHM,1%,0.125W,TC=100 PPM 50139 BCD33R2FT A6R218 321–5050–00 RES,FXD:THICK FILM,33.2 OHM,1%,0.125W,TC=100 PPM 50139 BCD33R2FT A6R219 321–5050–00 RES,FXD:THICK FILM,33.2 OHM,1%,0.125W,TC=100 PPM 50139 BCD33R2FT A6R220 321–5050–00 RES,FXD:THICK FILM,33.2 OHM,1%,0.125W,TC=100 PPM 50139 BCD33R2FT A6R221 321–5043–00 RES,FXD:THICK FILM,47.5 OHM,1%,0.125W,TC=100 PPM 50139 BCD47R5FT A6R222 321–5050–00 RES,FXD:THICK FILM,33.2 OHM,1%,0.125W,TC=100 PPM 50139 BCD33R2FT A6R223 321–5043–00 RES,FXD:THICK FILM,47.5 OHM,1%,0.125W,TC=100 PPM 50139 BCD47R5FT A6R224 321–5043–00 RES,FXD:THICK FILM,47.5 OHM,1%,0.125W,TC=100 PPM 50139 BCD47R5FT A6R225 321–5043–00 RES,FXD:THICK FILM,47.5 OHM,1%,0.125W,TC=100 PPM 50139 BCD47R5FT A6R226 321–5051–00 RES,FXD:THICK FILM,0 OHM,1%,0.125W,TC=100 PPM 50139 BCD0JUMPERT A6R227 321–5050–00 RES,FXD:THICK FILM,33.2 OHM,1%,0.125W,TC=100 PPM 50139 BCD33R2FT A6R228 321–5050–00 RES,FXD:THICK FILM,33.2 OHM,1%,0.125W,TC=100 PPM 50139 BCD33R2FT A6R229 321–5043–00 RES,FXD:THICK FILM,47.5 OHM,1%,0.125W,TC=100 PPM 50139 BCD47R5FT A6R230 321–5018–00 RES,FXD:THICK FILM,1.0K OHM,1%,0.125W,TC=100 PPM 50139 BCK1001FT A6R231 321–5018–00 RES,FXD:THICK FILM,1.0K OHM,1%,0.125W,TC=100 PPM 50139 BCK1001FT A6R232 321–5043–00 RES,FXD:THICK FILM,47.5 OHM,1%,0.125W,TC=100 PPM 50139 BCD47R5FT A6R233 321–5018–00 RES,FXD:THICK FILM,1.0K OHM,1%,0.125W,TC=100 PPM 50139 BCK1001FT A6R234 321–5024–00 RES,FXD:THICK FILM,3.32K OHM,1%,0.125W,TC=100 PPM 50139 BCK3321FT A6R235 321–5043–00 RES,FXD:THICK FILM,47.5 OHM,1%,0.125W,TC=100 PPM 50139 BCD47R5FT A6R236 321–5026–00 RES,FXD:THICK FILM,4.75K OHM,1%,0.125W,TC=100 PPM 50139 BCK4751FT A6R237 321–5050–00 RES,FXD:THICK FILM,33.2 OHM,1%,0.125W,TC=100 PPM 50139 BCD33R2FT A6R238 321–5050–00 RES,FXD:THICK FILM,33.2 OHM,1%,0.125W,TC=100 PPM 50139 BCD33R2FT A6R239 321–5050–00 RES,FXD:THICK FILM,33.2 OHM,1%,0.125W,TC=100 PPM 50139 BCD33R2FT A6R240 321–5050–00 RES,FXD:THICK FILM,33.2 OHM,1%,0.125W,TC=100 PPM 50139 BCD33R2FT A6R242 321–5050–00 RES,FXD:THICK FILM,33.2 OHM,1%,0.125W,TC=100 PPM 50139 BCD33R2FT A6R243 321–5050–00 RES,FXD:THICK FILM,33.2 OHM,1%,0.125W,TC=100 PPM 50139 BCD33R2FT 8–104 Serial no. effective Serial no. discont’d AM700 Audio Measurement Set Service Manual Replaceable Electrical Parts Replaceable electrical parts list (cont.) Component number Tektronix part number A6R244 321–5050–00 A6R245 A6R246 Serial no. effective Serial no. discont’d Name & description Mfr. code Mfr. part number RES,FXD:THICK FILM,33.2 OHM,1%,0.125W,TC=100 PPM 50139 BCD33R2FT 321–5050–00 RES,FXD:THICK FILM,33.2 OHM,1%,0.125W,TC=100 PPM 50139 BCD33R2FT 321–5050–00 RES,FXD:THICK FILM,33.2 OHM,1%,0.125W,TC=100 PPM 50139 BCD33R2FT A6R247 321–5050–00 RES,FXD:THICK FILM,33.2 OHM,1%,0.125W,TC=100 PPM 50139 BCD33R2FT A6R248 321–5014–00 RES,FXD:THICK FILM,475 OHM,1%,0.125W,TC=100 PPM 50139 BCK4750FT A6R249 321–5018–00 RES,FXD:THICK FILM,1.0K OHM,1%,0.125W,TC=100 PPM 50139 BCK1001FT A6R250 321–5018–00 RES,FXD:THICK FILM,1.0K OHM,1%,0.125W,TC=100 PPM 50139 BCK1001FT A6R251 321–5026–00 RES,FXD:THICK FILM,4.75K OHM,1%,0.125W,TC=100 PPM 50139 BCK4751FT A6R252 321–5024–00 RES,FXD:THICK FILM,3.32K OHM,1%,0.125W,TC=100 PPM 50139 BCK3321FT A6R253 321–5026–00 RES,FXD:THICK FILM,4.75K OHM,1%,0.125W,TC=100 PPM 50139 BCK4751FT A6R254 321–5006–00 RES,FXD,FILM:THICK FILM,100 OHM,1%,0.125W,TC=100 PPM 50139 BCK1000FT A6R255 321–5030–00 RES,FXD:THICK FILM,10.0K OHM,1%,0.125W,TC=100 PPM 50139 BCK1002FT A6R262 321–5050–00 RES,FXD:THICK FILM,33.2 OHM,1%,0.125W,TC=100 PPM 50139 BCD33R2FT A6R263 321–5026–00 RES,FXD:THICK FILM,4.75K OHM,1%,0.125W,TC=100 PPM 50139 BCK4751FT A6R264 321–5026–00 RES,FXD:THICK FILM,4.75K OHM,1%,0.125W,TC=100 PPM 50139 BCK4751FT A6R265 321–5026–00 RES,FXD:THICK FILM,4.75K OHM,1%,0.125W,TC=100 PPM 50139 BCK4751FT A6R266 321–5050–00 RES,FXD:THICK FILM,33.2 OHM,1%,0.125W,TC=100 PPM 50139 BCD33R2FT A6R267 321–5026–00 RES,FXD:THICK FILM,4.75K OHM,1%,0.125W,TC=100 PPM 50139 BCK4751FT A6R268 321–5026–00 RES,FXD:THICK FILM,4.75K OHM,1%,0.125W,TC=100 PPM 50139 BCK4751FT A6R269 307–0828–00 RES NTWK,FXD,FI:4,33 OHM,2%,0.30W 50139 108B330 OR 708B330 A6R270 307–0828–00 RES NTWK,FXD,FI:4,33 OHM,2%,0.30W 50139 108B330 OR 708B330 A6R271 307–0828–00 RES NTWK,FXD,FI:4,33 OHM,2%,0.30W 50139 108B330 OR 708B330 A6R272 321–5051–00 RES,FXD:THICK FILM,0 OHM,1%,0.125W,TC=100 PPM 50139 BCD0JUMPERT A6R274 321–5051–00 RES,FXD:THICK FILM,0 OHM,1%,0.125W,TC=100 PPM 50139 BCD0JUMPERT A6R276 321–5051–00 RES,FXD:THICK FILM,0 OHM,1%,0.125W,TC=100 PPM 50139 BCD0JUMPERT A6R278 321–5051–00 RES,FXD:THICK FILM,0 OHM,1%,0.125W,TC=100 PPM 50139 BCD0JUMPERT A6R280 321–5050–00 RES,FXD:THICK FILM,33.2 OHM,1%,0.125W,TC=100 PPM 50139 BCD33R2FT A6R281 321–5050–00 RES,FXD:THICK FILM,33.2 OHM,1%,0.125W,TC=100 PPM 50139 BCD33R2FT A6R282 307–0445–00 RES,NTWK:THICK FILM,(9) 4.7K OHM,2%,0.2W EACH,TC=100 PPM,SIP10,PIN 1 COMMON 11236 750–101–R4.7 K TUBE PACKED A6R283 307–0828–00 RES NTWK,FXD,FI:4,33 OHM,2%,0.30W 50139 108B330 OR 708B330 A6R284 307–0828–00 RES NTWK,FXD,FI:4,33 OHM,2%,0.30W 50139 108B330 OR 708B330 A6R285 307–0828–00 RES NTWK,FXD,FI:4,33 OHM,2%,0.30W 50139 108B330 OR 708B330 A6R286 307–0828–00 RES NTWK,FXD,FI:4,33 OHM,2%,0.30W 50139 108B330 OR 708B330 AM700 Audio Measurement Set Service Manual 8–105 Replaceable Electrical Parts Replaceable electrical parts list (cont.) Component number Tektronix part number Name & description Mfr. code A6R287 307–0828–00 RES NTWK,FXD,FI:4,33 OHM,2%,0.30W 50139 108B330 OR 708B330 A6R288 307–0828–00 RES NTWK,FXD,FI:4,33 OHM,2%,0.30W 50139 108B330 OR 708B330 A6R289 307–0828–00 RES NTWK,FXD,FI:4,33 OHM,2%,0.30W 50139 108B330 OR 708B330 A6R290 307–0828–00 RES NTWK,FXD,FI:4,33 OHM,2%,0.30W 50139 108B330 OR 708B330 A6R291 307–0828–00 RES NTWK,FXD,FI:4,33 OHM,2%,0.30W 50139 108B330 OR 708B330 A6R292 321–5026–00 RES,FXD:THICK FILM,4.75K OHM,1%,0.125W,TC=100 PPM 50139 BCK4751FT A6R293 321–5026–00 RES,FXD:THICK FILM,4.75K OHM,1%,0.125W,TC=100 PPM 50139 BCK4751FT A6R294 321–5026–00 RES,FXD:THICK FILM,4.75K OHM,1%,0.125W,TC=100 PPM 50139 BCK4751FT A6R295 321–5026–00 RES,FXD:THICK FILM,4.75K OHM,1%,0.125W,TC=100 PPM 50139 BCK4751FT A6R296 321–5026–00 RES,FXD:THICK FILM,4.75K OHM,1%,0.125W,TC=100 PPM 50139 BCK4751FT A6R297 321–5026–00 RES,FXD:THICK FILM,4.75K OHM,1%,0.125W,TC=100 PPM 50139 BCK4751FT A6R298 321–5043–00 RES,FXD:THICK FILM,47.5 OHM,1%,0.125W,TC=100 PPM 50139 BCD47R5FT A6R299 321–5169–00 RES,FXD:THICK FILM,475K OHM,1%,0.125W,TC=100 PPM 59124 RK73H2B4753FT A6R300 321–5043–00 RES,FXD:THICK FILM,47.5 OHM,1%,0.125W,TC=100 PPM 50139 BCD47R5FT A6R301 321–5012–00 RES,FXD:THICK FILM,332 OHM,1%,0.125W,TC=100 PPM 50139 BCK3320FT A6R307 321–5051–00 RES,FXD:THICK FILM,0 OHM,1%,0.125W,TC=100 PPM 50139 BCD0JUMPERT A6R308 321–5051–00 RES,FXD:THICK FILM,0 OHM,1%,0.125W,TC=100 PPM 50139 BCD0JUMPERT A6R309 321–5051–00 RES,FXD:THICK FILM,0 OHM,1%,0.125W,TC=100 PPM 50139 BCD0JUMPERT A6R310 321–5051–00 RES,FXD:THICK FILM,0 OHM,1%,0.125W,TC=100 PPM 50139 BCD0JUMPERT A6R311 321–5051–00 RES,FXD:THICK FILM,0 OHM,1%,0.125W,TC=100 PPM 50139 BCD0JUMPERT A6R313 321–5051–00 RES,FXD:THICK FILM,0 OHM,1%,0.125W,TC=100 PPM 50139 BCD0JUMPERT A6R314 321–5051–00 RES,FXD:THICK FILM,0 OHM,1%,0.125W,TC=100 PPM 50139 BCD0JUMPERT A6R315 321–5026–00 RES,FXD:THICK FILM,4.75K OHM,1%,0.125W,TC=100 PPM 50139 BCK4751FT A6R316 321–5026–00 RES,FXD:THICK FILM,4.75K OHM,1%,0.125W,TC=100 PPM 50139 BCK4751FT A6R319 321–5050–00 RES,FXD:THICK FILM,33.2 OHM,1%,0.125W,TC=100 PPM 50139 BCD33R2FT A6R320 321–5050–00 RES,FXD:THICK FILM,33.2 OHM,1%,0.125W,TC=100 PPM 50139 BCD33R2FT A6R321 321–5043–00 RES,FXD:THICK FILM,47.5 OHM,1%,0.125W,TC=100 PPM 50139 BCD47R5FT A6R322 321–5043–00 RES,FXD:THICK FILM,47.5 OHM,1%,0.125W,TC=100 PPM 50139 BCD47R5FT A6R323 321–5043–00 RES,FXD:THICK FILM,47.5 OHM,1%,0.125W,TC=100 PPM 50139 BCD47R5FT A6R324 321–5043–00 RES,FXD:THICK FILM,47.5 OHM,1%,0.125W,TC=100 PPM 50139 BCD47R5FT A6R325 321–5043–00 RES,FXD:THICK FILM,47.5 OHM,1%,0.125W,TC=100 PPM 50139 BCD47R5FT A6R326 321–5043–00 RES,FXD:THICK FILM,47.5 OHM,1%,0.125W,TC=100 PPM 50139 BCD47R5FT A6R327 321–5050–00 RES,FXD:THICK FILM,33.2 OHM,1%,0.125W,TC=100 PPM 50139 BCD33R2FT A6R328 307–0445–00 RES,NTWK:THICK FILM,(9) 4.7K OHM,2%,0.2W EACH,TC=100 PPM,SIP10,PIN 1 COMMON 11236 750–101–R4.7 K 8–106 Serial no. effective Serial no. discont’d B020100 B019999 Mfr. part number AM700 Audio Measurement Set Service Manual Replaceable Electrical Parts Replaceable electrical parts list (cont.) Component number Tektronix part number Serial no. effective A6R338 321–5051–00 B020100 A6R329 A6R330 Serial no. discont’d Name & description Mfr. code Mfr. part number RES,FXD:THICK FILM,0 OHM,1%,0.125W,TC=100 PPM 50139 BCD0JUMPERT 321–5043–00 RES,FXD:THICK FILM,47.5 OHM,1%,0.125W,TC=100 PPM 50139 BCD47R5FT 321–5043–00 RES,FXD:THICK FILM,47.5 OHM,1%,0.125W,TC=100 PPM 50139 BCD47R5FT A6R331 321–5043–00 RES,FXD:THICK FILM,47.5 OHM,1%,0.125W,TC=100 PPM 50139 BCD47R5FT A6R332 321–5043–00 RES,FXD:THICK FILM,47.5 OHM,1%,0.125W,TC=100 PPM 50139 BCD47R5FT A6R333 321–5043–00 RES,FXD:THICK FILM,47.5 OHM,1%,0.125W,TC=100 PPM 50139 BCD47R5FT A6R334 321–5043–00 RES,FXD:THICK FILM,47.5 OHM,1%,0.125W,TC=100 PPM 50139 BCD47R5FT A6R335 321–5026–00 RES,FXD:THICK FILM,4.75K OHM,1%,0.125W,TC=100 PPM 50139 BCK4751FT A6R336 321–5043–00 RES,FXD:THICK FILM,47.5 OHM,1%,0.125W,TC=100 PPM 50139 BCD47R5FT A6R337 321–5043–00 RES,FXD:THICK FILM,47.5 OHM,1%,0.125W,TC=100 PPM 50139 BCD47R5FT A6R338 321–5344–00 RES,FXD,FILM:80.6 OHM,1%,0.125 W,1206 PKG 91637 CRCW1206–80R6F –RT1 A6R339 321–5016–00 RES,FXD:THICK FILM,681 OHM,1%,0.125W,TC=100 PPM 50139 BCK6810FT A6R340 322–3193–00 B010325 RES,FXD:METAL FILM,1K OHM,1%,0.2W,TC=100 PPM,AXIAL,T&R,SMALL BODY 57668 CRB20T68EFX1001 A6R341 322–3089–00 B020100 RES,FXD,FILM:82.5 OHM,1%.0.2W,TC=100 PPM,AXIAL,SMALL BODY 57668 CRB20 FXE 82E5 A6RC4 307–1585–00 RES NTWK,FXD,FI:TERMINATION NETWORK,8,50 OHM RESISTORS AND 8, 220PF CAPS IN SERIES,9 PIN SIP,P 91637 CSRC–09C30–500J/ 221K A6RC6 307–1585–00 RES NTWK,FXD,FI:TERMINATION NETWORK,8,50 OHM RESISTORS AND 8, 220PF CAPS IN SERIES,9 PIN SIP 91637 CSRC–09C30–500J/ 221K A6RC7 307–1585–00 RES NTWK,FXD,FI:TERMINATION NETWORK,8,50 OHM RESISTORS AND 8, 220PF CAPS IN SERIES,9 PIN SIP 91637 CSRC–09C30–500J/ 221K A6RC8 307–1585–00 RES NTWK,FXD,FI:TERMINATION NETWORK,8,50 OHM RESISTORS AND 8, 220PF CAPS IN SERIES,9 PIN SIP 91637 CSRC–09C30–500J/ 221K A6RC9 307–1585–00 RES NTWK,FXD,FI:TERMINATION NETWORK,8,50 OHM RESISTORS AND 8, 220PF CAPS IN SERIES,9 PIN SIP 91637 CSRC–09C30–500J/ 221K A6RC10 307–5101–00 RCD,NTWK:16,47 OHM,33 PF,SCHOTTKE DIODE, SOIC–20 56427 PRCD001470M330 M OR PRN244 A6RC11 307–5101–00 RCD,NTWK:16,47 OHM,33 PF,SCHOTTKE DIODE, SOIC–20 56427 PRCD001470M330 M OR PRN244 A6RC12 307–5101–00 RCD,NTWK:16,47 OHM,33 PF,SCHOTTKE DIODE, SOIC–20 56427 PRCD001470M330 M OR PRN244 A6RC13 307–5101–00 RCD,NTWK:16,47 OHM,33 PF,SCHOTTKE DIODE, SOIC–20 56427 PRCD001470M330 M OR PRN244 A6RC14 307–5101–00 RCD,NTWK:16,47 OHM,33 PF,SCHOTTKE DIODE, SOIC–20 56427 PRCD001470M330 M OR PRN244 A6RC15 307–5101–00 RCD,NTWK:16,47 OHM,33 PF,SCHOTTKE DIODE, SOIC–20 56427 PRCD001470M330 M OR PRN244 A6S1 260–2549–00 SWITCH,PUSH:SPST,MOM,NO,300 GRM FRC,GOLD CONTACTS,RIGHT ANGLE,TOP SEALED,SHORT ACTUATOR,KSA0 31918 KSA0V431 A6S2 260–1721–00 SWITCH,ROCKER:SPST,8 POS DIP,125MA,30VDC,PROCESS SEALED, 00779 5–435166–3 AM700 Audio Measurement Set Service Manual 8–107 Replaceable Electrical Parts Replaceable electrical parts list (cont.) Component number Tektronix part number A6S3 260–2174–00 A6TP1 Mfr. code Mfr. part number SWITCH,ROCKER:SPST,4 POS DIP,SIDE ACTUATED PIANO TYPE,UP IS OPEN,TOPSEALED,76PSB04S 81073 76PSB04S 214–4085–00 TERM,TEST POINT:0.070 ID,0.220 H,0.063 DIA PCB,0.015 X 0.032 BRASS,W/ RED NYLON COLLAR 26364 TP104–01–02 A6TP2 214–4085–00 TERM,TEST POINT:0.070 ID,0.220 H,0.063 DIA PCB,0.015 X 0.032 BRASS,W/ RED NYLON COLLAR 26364 TP104–01–02 A6TP3 214–4085–00 TERM,TEST POINT:0.070 ID,0.220 H,0.063 DIA PCB,0.015 X 0.032 BRASS,W/ RED NYLON COLLAR 26364 TP104–01–02 A6TP4 214–4085–00 TERM,TEST POINT:0.070 ID,0.220 H,0.063 DIA PCB,0.015 X 0.032 BRASS,W/ RED NYLON COLLAR 26364 TP104–01–02 A6TP5 214–4085–00 TERM,TEST POINT:0.070 ID,0.220 H,0.063 DIA PCB,0.015 X 0.032 BRASS,W/ RED NYLON COLLAR 26364 TP104–01–02 A6TP6 214–4085–00 TERM,TEST POINT:0.070 ID,0.220 H,0.063 DIA PCB,0.015 X 0.032 BRASS,W/ RED NYLON COLLAR 26364 TP104–01–02 A6TP7 214–4085–00 TERM,TEST POINT:0.070 ID,0.220 H,0.063 DIA PCB,0.015 X 0.032 BRASS,W/ RED NYLON COLLAR 26364 TP104–01–02 A6TP9 214–4085–00 TERM,TEST POINT:0.070 ID,0.220 H,0.063 DIA PCB,0.015 X 0.032 BRASS,W/ RED NYLON COLLAR 26364 TP104–01–02 A6TP10 214–4085–00 TERM,TEST POINT:0.070 ID,0.220 H,0.063 DIA PCB,0.015 X 0.032 BRASS,W/ RED NYLON COLLAR 26364 TP104–01–02 A6TP11 214–4085–00 TERM,TEST POINT:0.070 ID,0.220 H,0.063 DIA PCB,0.015 X 0.032 BRASS,W/ RED NYLON COLLAR 26364 TP104–01–02 A6TP12 214–4085–00 TERM,TEST POINT:0.070 ID,0.220 H,0.063 DIA PCB,0.015 X 0.032 BRASS,W/ RED NYLON COLLAR 26364 TP104–01–02 A6TP13 214–4085–00 TERM,TEST POINT:0.070 ID,0.220 H,0.063 DIA PCB,0.015 X 0.032 BRASS,W/ RED NYLON COLLAR 26364 TP104–01–02 A6TP14 214–4085–00 TERM,TEST POINT:0.070 ID,0.220 H,0.063 DIA PCB,0.015 X 0.032 BRASS,W/ RED NYLON COLLAR 26364 TP104–01–02 A6TP15 214–4085–00 TERM,TEST POINT:0.070 ID,0.220 H,0.063 DIA PCB,0.015 X 0.032 BRASS,W/ RED NYLON COLLAR 26364 TP104–01–02 A6TP16 214–4085–00 TERM,TEST POINT:0.070 ID,0.220 H,0.063 DIA PCB,0.015 X 0.032 BRASS,W/ RED NYLON COLLAR 26364 TP104–01–02 A6U1 156–5580–01 IC,DIGITAL:TTL,OCTAL GPIB TRANSCEIVER,DATA BUS,75160,SO20.300,24MM 01295 SN75160BDWR A6U2 156–5054–00 IC,DIGITAL:FTTL,GATE,QUAD 2–INPUT OR,74F32,SO14.150 01295 SN74F32D A6U4 156–5138–01 IC,LINEAR:BIFET,OP–AMP,DUAL,MC34002/TL072,SO8.150,12MM 01295 TL072CDR A6U5 156–6676–00 IC,LINEAR:CMOS,SW–REGULATOR,STEP UP,4.0–9.3V IN,+12V 200MA OUT,SHUTDOWN,FLASH EPROM PROGRA 1ES66 MAX732CWE A6U6 156–6677–00 IC,MISC:LSTTL,INTERFACE,OCTAL IEEE–488 GPIB TRANSCEIVER,75162,SO24.300 01295 SN75162BDW A6U7 156–4383–00 IC,MEMORY:CMOS,DRAM,2MEG X 32,70NS,MODULE,422000A32,SIMM72 0JR04 THM322020AS–70 A6U8 156–5054–00 IC,DIGITAL:FTTL,GATE,QUAD 2–INPUT OR,74F32,SO14.150 01295 SN74F32D A6U9 156–5555–00 IC,DIGITAL:FTTL,TRANSCEIVER,OCTAL,PARITY CHECKER,3–STATE,74F657,SO24.300 04713 MC74F657ADW 8–108 Serial no. effective Serial no. discont’d Name & description AM700 Audio Measurement Set Service Manual Replaceable Electrical Parts Replaceable electrical parts list (cont.) Component number Tektronix part number A6U10 156–5055–00 A6U11 Serial no. effective Serial no. discont’d Mfr. code Mfr. part number IC,DIGITAL:FTTL,FLIP FLOP,DUAL D–TYPE,SET,CLEAR,74F74,SO14.150 01295 SN74F74D 156–5555–00 IC,DIGITAL:FTTL,TRANSCEIVER,OCTAL,PARITY CHECKER,3–STATE,74F657,SO24.300 04713 MC74F657ADW A6U12 156–5055–00 IC,DIGITAL:FTTL,FLIP FLOP,DUAL D–TYPE,SET,CLEAR,74F74,SO14.150 01295 SN74F74D A6U13 156–5555–00 IC,DIGITAL:FTTL,TRANSCEIVER,OCTAL,PARITY CHECKER,3–STATE,74F657,SO24.300 04713 MC74F657ADW A6U14 156–5555–00 IC,DIGITAL:FTTL,TRANSCEIVER,OCTAL,PARITY CHECKER,3–STATE,74F657,SO24.300 04713 MC74F657ADW A6U15 156–6678–00 IC,CONVERTER:CMOS,D/A,DUPLICATE OF 156–6259–00,DO NOT USE,ADV478KP80,PLCC44 24355 ADV478KP80 A6U16 156–5299–01 IC,LINEAR:BIPOLAR,VOLTAGE REGULATOR,NEGATIVE,–5V,100MA,5%,MC79L05ACD,SO8.150, 12MM 01295 MC79L05ACDR A6U17 156–6423–00 IC,MISC:CMOS,INTERFACE,QUAD RS–232 LINE DRIVER/RECEIVER,+5V VCC,EXTERNAL CAPS REQUIRED 1ES66 MAX238CWG A6U18 156–6423–00 IC,MISC:CMOS,INTERFACE,QUAD RS–232 LINE DRIVER/RECEIVER,+5V VCC,EXTERNAL CAPS REQUIRED 1ES66 MAX238CWG A6U20 156–6481–01 IC,MISC:CMOS,PWR SUPPLY SUPERVISOR,MPU RESET GEN,5V SUPPLY SENSING,10%,350MS RESET TIME, 0B0A9 DS1233Z–10/TR A6U22 156–6765–00 IC,MISC:BIPOLAR,PWR SUPPLY SUPERVISOR,MPU RESET GENERATOR,12V SUPPLY SENSING,TL7712ACD 01295 TL7712ACD A6U24 156–6223–00 IC,PROCESSOR:NMOS,PERIPHERAL,GPIB CONTROLLER,TEXAS INSTR PINOUT,9914A,PLCC44 01295 TMS9914AFNL A6U25 156–4445–00 IC,MEMORY:CMOS,FLASH,2MEG X 32, 200NS,BUILT WITH 28F008SA,SIMM80 34649 TO BE DETERMINE 80009 136123000 34649 TO BE DETERMINE 80009 136123000 Name & description *MOUNTING PARTS* 136–1230–00 SOCKET,SIMM:PCB,SIMM II,FEMALE,STR,1 X80,0.05 CTR,0.607 H X 0.095TAIL,TIN,LEFT PLZ *END MOUNTING PARTS* A6U26 156–4445–00 IC,MEMORY:CMOS,FLASH,2MEG X 32, 200NS,BUILT WITH 28F008SA,SIMM80 136–1230–00 SOCKET,SIMM:PCB,SIMM II,FEMALE,STR,1 X80,0.05 CTR,0.607 H X 0.095TAIL,TIN,LEFT PLZ *MOUNTING PARTS* *END MOUNTING PARTS* A6U27 156–5053–00 IC,DIGITAL:FTTL,GATE,QUAD 2–INPUT AND,74F08,SO14.150 01295 SN74F08D A6U28 156–5435–01 IC,CONVERTER:CMOS,D/A,DUAL,8 BIT,200NS,CURRENT OUT MPU COMPATIBLE, MULTIPLYING,AD7528JP,PLCC2 24355 AD7528JP–REEL A6U29 156–6031–00 IC,PROCESSOR:NMOS,PERIPHERAL,DUAL ASYNCH RECEIVER/TRANSMITTER, DUART,68681,PLCC44 04713 MC68681FN A6U30 156–5908–00 IC,DIGITAL:FTTL,FLIP FLOP,DUAL D–TYPE,METASTABLE IMMUNITY,74F5074,SO14.150, SELECTED VE 1CH66 N74F5074D AM700 Audio Measurement Set Service Manual 8–109 Replaceable Electrical Parts Replaceable electrical parts list (cont.) Component number Tektronix part number A6U31 156–6235–00 A6U32 Serial no. effective Serial no. discont’d Mfr. code Mfr. part number IC,DIGITAL:FTTL,BUFFER,HEX INVERT,OPEN–COLLECTOR,74F06,SO14.150 80009 156–6235–00 156–5052–00 IC,DIGITAL:FTTL,GATE,HEX INVERTER, 74F04,SO14.150 01295 SN74F04D A6U33 156–6679–00 IC,PROCESSOR:CMOS,CONTROLLER,DRAM 16MB,40MHZ,84C32,PLCC84 44648 KS84C32PLCC A6U34 156–4446–00 IC,MEMORY:CMOS,SRAM,128K X 32 MODULE,100NS,TEK MADE,SIMM 80 80009 156–4446–00 136–1230–00 SOCKET,SIMM:PCB,SIMM II,FEMALE,STR,1 X80,0.05 CTR,0.607 H X 0.095TAIL,TIN,LEFT PLZ 80009 136123000 Name & description *MOUNTING PARTS* *END MOUNTING PARTS* A6U35 156–5058–00 IC,DIGITAL:FTTL,TRANSCEIVER,OCTAL,3–STATE,74F245,SO20. 300 01295 SN74F245DW A6U36 156–5058–00 IC,DIGITAL:FTTL,TRANSCEIVER,OCTAL,3–STATE,74F245,SO20. 300 01295 SN74F245DW A6U37 156–6678–00 IC,CONVERTER:CMOS,D/A,DUPLICATE OF 156–6259–00,DO NOT USE,ADV478KP80,PLCC44 24355 ADV478KP80 A6U39 156–6031–00 IC,PROCESSOR:NMOS,PERIPHERAL,DUAL ASYNCH RECEIVER/TRANSMITTER, DUART,68681,PLCC44 04713 MC68681FN A6U40 160–9903–00 IC,DIGITAL:CMOS,PLD,EEPLD,MACH 210,64 MACROCELL,32 I/O,6–INPUTS,2 CLOCK INPUTS,15NS,PRGM 15 TK0198 160990300 *MOUNTING PARTS* 136–1047–00 SKT,PLCC:PCB;44 POS,0.05 CTR,0.360H X 0.125 TAIL,TIN 00779 821575–1 80009 160–9897–00 00779 2–641932–3 *END MOUNTING PARTS* A6U41 160–9897–00 IC,DIGITAL:CMOS,PLD,EEPLD,MACH 110,32 MACROCELL,32 I/O,6 INPUTS,2 CLOCK INPUTS,15NS,PRGM 15 136–0925–00 SOCKET,DIP:PCB;24 POS,2 X 12,0.1 X 0.3 CTR,0.196 H X 0.130 TAIL,BECU,TIN,ACCOM 0.008–0.015THRU 0.014 X 0.022 LEADS *MOUNTING PARTS* *END MOUNTING PARTS* A6U42 156–5058–00 IC,DIGITAL:FTTL,TRANSCEIVER,OCTAL,3–STATE,74F245,SO20. 300 01295 SN74F245DW A6U43 156–5058–00 IC,DIGITAL:FTTL,TRANSCEIVER,OCTAL,3–STATE,74F245,SO20. 300 01295 SN74F245DW A6U44 160–9907–00 IC,MEMORY:CMOS,EPROM,256K X 16,150NS,PRGM 156–6766–00,7C4096,PLCC44 80009 160–9907–00 00779 821575–1 01295 SN74F38D *MOUNTING PARTS* 136–1047–00 SKT,PLCC:PCB;44 POS,0.05 CTR,0.360H X 0.125 TAIL,TIN *END MOUNTING PARTS* A6U45 156–5164–00 IC,DIGITAL:FTTL,GATE,QUAD 2–INPUT NAND,OPEN–COLLECTOR,74F38,SO14.150 A6U46 156–5500–00 IC,DIGITAL:FTTL,GATE,8–INPUT NAND,74F30,SO14.150 01295 SN74F30D A6U47 156–6681–00 IC,DIGITAL:CMOS,CLOCK FUNCTIONS,LOW SKEW PLL CLOCK DRIVER WITH PROCESSOR RESET,70MHZ,MC8891 04713 MC88916DW70 8–110 AM700 Audio Measurement Set Service Manual Replaceable Electrical Parts Replaceable electrical parts list (cont.) Component number Tektronix part number A6U49 156–6681–00 A6U50 A6U51 Serial no. effective Serial no. discont’d Mfr. code Mfr. part number IC,DIGITAL:CMOS,CLOCK FUNCTIONS,LOW SKEW PLL CLOCK DRIVER WITH PROCESSOR RESET, 70MHZ,MC8891 04713 MC88916DW70 156–5908–00 IC,DIGITAL:FTTL,FLIP FLOP,DUAL D–TYPE,METASTABLE IMMUNITY,74F5074,SO14.150, SELECTED VE 1CH66 N74F5074D 160–9902–00 IC,DIGITAL:CMOS,PLD,EEPLD,MACH 210,64 MACROCELL,32 I/O,6–INPUTS,2 CLOCK INPUTS,15NS,MACH210 80009 160–9902–00 00779 821575–1 80009 160–9917–00 00779 821575–1 Name & description *MOUNTING PARTS* 136–1047–00 SKT,PLCC:PCB;44 POS,0.05 CTR,0.360H X 0.125 TAIL,TIN *END MOUNTING PARTS* A6U53 160–9917–00 IC,MEMORY:CMOS,EPROM,256K X 16,150NS,PRGM 156–6766–00,7C4096, PLCC44 *MOUNTING PARTS* 136–1047–00 SKT,PLCC:PCB;44 POS,0.05 CTR,0.360H X 0.125 TAIL,TIN *END MOUNTING PARTS* A6U54 156–5052–00 IC,DIGITAL:FTTL,GATE,HEX INVERTER,74F04,SO14.150 01295 SN74F04D A6U55 156–5908–00 IC,DIGITAL:FTTL,FLIP FLOP,DUAL D–TYPE,METASTABLE IMMUNITY,74F5074,SO14.150, SELECTED VE 1CH66 N74F5074D A6U56 156–5908–00 IC,DIGITAL:FTTL,FLIP FLOP,DUAL D–TYPE,METASTABLE IMMUNITY,74F5074,SO14.150, SELECTED VE 1CH66 N74F5074D A6U57 156–6152–00 IC,MISC:CMOS,PWR SUPPLY SUPERVISOR,BATTERY BACKUP MANAGEMENT SYSTEM,DS1259S,SO16.300,TUB 0B0A9 DS1259S A6U59 156–5247–01 IC,DIGITAL:FTTL,GATE,TRIPLE 3–INPUT AND,74F11,SO14.150,16MM 01295 SN74F11DR A6U60 156–5057–00 IC,DIGITAL:FTTL,BUFFER,OCTAL,3–STATE,74F244,SO20.300 01295 SN74F244DW A6U61 156–6683–00 IC,MISC:CMOS,PWR SUPPLY SUPERVISOR,NONVOLATILE CMOS RAM BATTERY BACKUP,W/2–4 DECODER,DS1 0B0A9 DS1221S A6U63 156–5057–00 IC,DIGITAL:FTTL,BUFFER,OCTAL,3–STATE,74F244,SO20.300 01295 SN74F244DW A6U64 156–3966–00 IC,PROCESSOR:CMOS,MICROPROCESSOR,32–BIT,25MHZ,MC6 8040RC25,PGA179 04713 MC68040RC25 136–1249–00 SOCKET,PGA:PCB,LIF;FEMALE,STR,179 POS,18 X 18,0.1 CTR,0.25 H X 0.140 TAIL,ACCOM HEAT SINK 00779 916435–1 214–4594–00 MONITOR,HT SK:AM700 80009 214459400 A6U65 156–5057–00 IC,DIGITAL:FTTL,BUFFER,OCTAL,3–STATE,74F244,SO20.300 01295 SN74F244DW A6U66 156–5468–01 IC,DIGITAL:FTTL,COUNTER,SYNCH 4 BIT BINARY,PRESET,ASYNCH CLEAR,74F161,SO16.150,16MM 01295 SN74F161ADR A6U67 156–5908–00 IC,DIGITAL:FTTL,FLIP FLOP,DUAL D–TYPE,METASTABLE IMMUNITY,74F5074,SO14.150, SELECTED VE 1CH66 N74F5074D A6U68 156–5468–01 IC,DIGITAL:FTTL,COUNTER,SYNCH 4 BIT BINARY,PRESET,ASYNCH CLEAR,74F161,SO16.150,16MM 01295 SN74F161ADR A6U69 156–5247–01 IC,DIGITAL:FTTL,GATE,TRIPLE 3–INPUT AND,74F11,SO14.150,16MM 01295 SN74F11DR *ATTACHED PARTS* *END ATTACHED PARTS* AM700 Audio Measurement Set Service Manual 8–111 Replaceable Electrical Parts Replaceable electrical parts list (cont.) Component number Tektronix part number A6U71 156–5619–00 A6U72 Serial no. effective Serial no. discont’d Mfr. code Mfr. part number IC,DIGITAL:FTTL,REGISTER,8–BIT SIPO SHIFT,RESET,74F164,SO14.150 04713 MC74F164D 156–5055–00 IC,DIGITAL:FTTL,FLIP FLOP,DUAL D–TYPE,SET,CLEAR,74F74,SO14.150 01295 SN74F74D A6U73 156–5055–00 IC,DIGITAL:FTTL,FLIP FLOP,DUAL D–TYPE,SET,CLEAR,74F74,SO14.150 01295 SN74F74D A6U74 156–5769–00 IC,DIGITAL:FTTL,COUNTER,SYNCH 8–BIT UP/DOWN BINARY, 3–STATE,74F1779,SO16.300 1CH66 N74F1779D A6U75 156–5769–00 IC,DIGITAL:FTTL,COUNTER,SYNCH 8–BIT UP/DOWN BINARY, 3–STATE,74F1779,SO16.300 1CH66 N74F1779D A6U76 156–5769–00 IC,DIGITAL:FTTL,COUNTER,SYNCH 8–BIT UP/DOWN BINARY, 3–STATE,74F1779,SO16.300 1CH66 N74F1779D A6U77 156–5504–00 IC,DIGITAL:FTTL,GATE,DUAL 4–INPUT NAND,74F20,SO14.150 01295 SN74F20D Name & description A6U78 156–5057–00 IC,DIGITAL:FTTL,BUFFER,OCTAL,3–STATE,74F244,SO20.300 01295 SN74F244DW A6U79 156–6684–00 IC,DIGITAL:FTTL,DECODER,1–OF–16,ACTIVE LOW,74F154,SO24.300 1CH66 N74F154D A6U80 156–5057–00 IC,DIGITAL:FTTL,BUFFER,OCTAL,3–STATE,74F244,SO20.300 01295 SN74F244DW A6U81 156–5057–00 IC,DIGITAL:FTTL,BUFFER,OCTAL,3–STATE,74F244,SO20.300 01295 SN74F244DW A6U82 156–5057–00 IC,DIGITAL:FTTL,BUFFER,OCTAL,3–STATE,74F244,SO20.300 01295 SN74F244DW A6U83 156–5057–00 IC,DIGITAL:FTTL,BUFFER,OCTAL,3–STATE,74F244,SO20.300 01295 SN74F244DW A6U85 156–5057–00 IC,DIGITAL:FTTL,BUFFER,OCTAL,3–STATE,74F244,SO20.300 01295 SN74F244DW A6U86 156–6767–00 IC,DIGITAL:FTTL,TRANSCEIVER,OCTAL INVERT REGISTERED,3–STATE,74F651A,SO24.300 1CH66 N74F651AD A6U87 156–5057–00 IC,DIGITAL:FTTL,BUFFER,OCTAL,3–STATE,74F244,SO20.300 01295 SN74F244DW A6U88 156–6767–00 IC,DIGITAL:FTTL,TRANSCEIVER,OCTAL INVERT REGISTERED,3–STATE,74F651A,SO24.300 1CH66 N74F651AD A6U89 156–5769–00 IC,DIGITAL:FTTL,COUNTER,SYNCH 8–BIT UP/DOWN BINARY, 3–STATE,74F1779,SO16.300 1CH66 N74F1779D A6U90 156–5057–00 IC,DIGITAL:FTTL,BUFFER,OCTAL,3–STATE,74F244,SO20.300 01295 SN74F244DW A6U92 156–6767–00 IC,DIGITAL:FTTL,TRANSCEIVER,OCTAL INVERT REGISTERED,3–STATE,74F651A,SO24.300 1CH66 N74F651AD A6U93 156–4345–00 IC,PROCESSOR:CMOS,PERIPHERAL,RTC,CLOCK CALENDAR,INTERNAL BATTERY,DS1286,DIP28.6 0B0A9 DS1286 136–0755–00 SKT,DIP:PCB;FEM,STR,2 X 14,28 POS,0.1 X 0.6 CTR,0.175 H X0.130 TAIL,BECU,TIN,ACCOM 0.008–0.0015 X 0.014–0.022 09922 DILB28P–108 *MOUNTING PARTS* *END MOUNTING PARTS* A6U94 156–5058–00 IC,DIGITAL:FTTL,TRANSCEIVER,OCTAL,3–STATE,74F245,SO20. 300 01295 SN74F245DW A6U95 156–5058–00 IC,DIGITAL:FTTL,TRANSCEIVER,OCTAL,3–STATE,74F245,SO20. 300 01295 SN74F245DW A6U96 156–5058–00 IC,DIGITAL:FTTL,TRANSCEIVER,OCTAL,3–STATE,74F245,SO20. 300 01295 SN74F245DW 8–112 AM700 Audio Measurement Set Service Manual Replaceable Electrical Parts Replaceable electrical parts list (cont.) Component number Tektronix part number A6U97 156–5058–00 A6U98 Serial no. effective Serial no. discont’d Mfr. code Mfr. part number IC,DIGITAL:FTTL,TRANSCEIVER,OCTAL,3–STATE,74F245,SO20. 300 01295 SN74F245DW 156–5057–00 IC,DIGITAL:FTTL,BUFFER,OCTAL,3–STATE,74F244,SO20.300 01295 SN74F244DW A6U99 156–5057–00 IC,DIGITAL:FTTL,BUFFER,OCTAL,3–STATE,74F244,SO20.300 01295 SN74F244DW A6U100 156–5452–01 IC,DIGITAL:FTTL,BUFFER,OCTAL,FLOW THRU,3–STATE,74F541,SO20.300,24MM 01295 SN74F541DWR A6U101 156–5452–01 IC,DIGITAL:FTTL,BUFFER,OCTAL,FLOW THRU,3–STATE,74F541,SO20.300,24MM 01295 SN74F541DWR A6U102 156–5452–01 IC,DIGITAL:FTTL,BUFFER,OCTAL,FLOW THRU,3–STATE,74F541,SO20.300,24MM 01295 SN74F541DWR A6U103 156–6685–00 IC,ASIC:CMOS,CUSTOM,VIDEO CONTROLLER FOR AM7––,ADG311B,MM9390–VF8,PQFP132 27014 MM9390–VF8 A6U105 156–6686–00 IC,PROCESSOR:CMOS,CONTROLLER,FLOPPYDISK,3201,PLCC 68 04713 MC3201 A6U106 160–9916–00 IC,DIGITAL:CMOS,PLD,EEPLD,MACH210,64 M/C,32 I/O,6 IN,2 CLK IN,15NS,PRGM 156–6680–00,MACH210 80009 160–9916–00 00779 3–821574–1 Name & description *MOUNTING PARTS* 136–0871–00 SOCKET,PLCC:PCB;68 POS,0.05 CTR,0.360H X0.125 TAIL,TIN,0.1 CTRPCB,0.060 SHOULDER HEIGHT *END MOUNTING PARTS* A6U108 156–6688–00 IC,MEMORY:CMOS,SRAM,128K X 8,70NS,551001–70,SO32.525 0JR04 TC551001BFL–70EL A6U109 156–6688–00 IC,MEMORY:CMOS,SRAM,128K X 8,70NS,551001–70,SO32.525 0JR04 TC551001BFL–70EL A6U110 156–4422–00 IC,PROCESSOR:HCMOS, MICROCONTROLLER,32 BIT,16MHZ,MC68340,PGA145 04713 MC68340RP16B OR C 00779 916225–3 IC,PROCESSOR:CMOS,MICROCONTROLLER,32 BIT, 25MHZ, WITH SOCKET,MC68340V25C,PGA144 71279 A68340–2 (MC68340PV25C) 4/25/97 *MOUNTING PARTS* 136–0906–00 SOCKET,PGA:PCB;145 POS,15 X 15,0.1 X0.1 CTR,0.250 H X 0.125 TAIL,TIN,NON–SYMMETRICAL,LIF,PAT 1521 *END MOUNTING PARTS* A6U110 156–7547–00 4/25/97 A6U111 156–5058–00 IC,DIGITAL:FTTL,TRANSCEIVER,OCTAL,3–STATE,74F245,SO20. 300 01295 SN74F245DW A6U112 156–5058–00 IC,DIGITAL:FTTL,TRANSCEIVER,OCTAL,3–STATE,74F245,SO20. 300 01295 SN74F245DW A6U113 156–5058–00 IC,DIGITAL:FTTL,TRANSCEIVER,OCTAL,3–STATE,74F245,SO20. 300 01295 SN74F245DW A6U114 156–5058–00 IC,DIGITAL:FTTL,TRANSCEIVER,OCTAL,3–STATE,74F245,SO20. 300 01295 SN74F245DW A6U115 156–5052–00 IC,DIGITAL:FTTL,GATE,HEX INVERTER,74F04,SO14.150 01295 SN74F04D A6U116 156–5053–00 IC,DIGITAL:FTTL,GATE,QUAD 2–INPUT AND,74F08,SO14.150 01295 SN74F08D A6U117 156–6689–00 IC,MEMORY:CMOS,VDRAM,256K X 8,80NS,DUAL PORTS,TC528257,SOJ40.400 0JR04 TC528257J–80 A6U118 156–6689–00 IC,MEMORY:CMOS,VDRAM,256K X 8,80NS,DUAL PORTS,TC528257,SOJ40.400 0JR04 TC528257J–80 AM700 Audio Measurement Set Service Manual 8–113 Replaceable Electrical Parts Replaceable electrical parts list (cont.) Component number Tektronix part number A6U119 156–6689–00 A6U120 Serial no. effective Serial no. discont’d Mfr. code Mfr. part number IC,MEMORY:CMOS,VDRAM,256K X 8,80NS,DUAL PORTS,TC528257,SOJ40.400 0JR04 TC528257J–80 156–6689–00 IC,MEMORY:CMOS,VDRAM,256K X 8,80NS,DUAL PORTS,TC528257,SOJ40.400 0JR04 TC528257J–80 A6U121 156–5908–00 IC,DIGITAL:FTTL,FLIP FLOP,DUAL D–TYPE,METASTABLE IMMUNITY,74F5074,SO14.150, SELECTED VE 1CH66 N74F5074D A6U122 156–6550–00 IC,DIGITAL:FCTCMOS,TRANSCEIVER,OCTAL,RESISTOR TERMINATED OUTPUTS,3–STATE,74FCT2245T,QSOP20. 0TJ19 QS74FCT2245TQ A6U123 156–6695–00 IC,DIGITAL:ABTCMOS,BUFFER,OCTAL,RESISTOR TERMINATED OUTPUTS,3–STATE,74ABT2244,SO20.300 01295 SN74ABT2244DW A6U124 156–5052–00 IC,DIGITAL:FTTL,GATE,HEX INVERTER,74F04,SO14.150 01295 SN74F04D A6U125 156–6767–00 IC,DIGITAL:FTTL,TRANSCEIVER,OCTAL INVERT REGISTERED,3–STATE,74F651A,SO24.300 1CH66 N74F651AD Name & description A6U126 156–5057–00 IC,DIGITAL:FTTL,BUFFER,OCTAL,3–STATE,74F244,SO20.300 01295 SN74F244DW A6U127 156–6768–00 IC,MEMORY:CMOS,ROM,64–BIT,SILICON SERIAL NUMBER,DS2401,TO–92 0B0A9 DS2401 A6U128 160–9899–00 IC,DIGITAL:CMOS,PLD,EEPLD,MACH 110, 32 MACROCELL,32 I/O,6 INPUTS,2 CLOCK INPUTS, 15NS,MACH1 80009 160–9899–00 00779 821575–1 *MOUNTING PARTS* 136–1047–00 SKT,PLCC:PCB;44 POS,0.05 CTR,0.360H X 0.125 TAIL,TIN A6U129 156–5195–01 IC,DIGITAL:FTTL,FLIP FLOP,OCTAL D–TYPE,CLEAR,74F273,SO20.300,24MM 01295 SN74F273DR A6U130 160–9898–00 IC,DIGITAL:CMOS,PLD,EEPLD,MACH 210,64 MACROCILL,32 I/O,6 INPUTS,2CLK INPUTS,20NS,PRGM 156–6 80009 160–9898–00 00779 821575–1 80009 160–9900–00 00779 821575–1 *END MOUNTING PARTS* *MOUNTING PARTS* 136–1047–00 SKT,PLCC:PCB;44 POS,0.05 CTR,0.360H X 0.125 TAIL,TIN *END MOUNTING PARTS* A6U131 160–9900–00 IC,DIGITAL:CMOS,PLD,EEPLD,MACH 210,64 MACROCELL,32 I/O,6–INPUTS,2 CLOCK INPUTS,15NS,MACH210 *MOUNTING PARTS* 136–1047–00 SKT,PLCC:PCB;44 POS,0.05 CTR,0.360H X 0.125 TAIL,TIN *END MOUNTING PARTS* A6U131 160–9900–01 IC, DIGITAL:CMOS,PLD,EEPLD,MACH 210,64 MACROCELL,32 I/O,6–INPUTS,2 CLOCK INPUTS,15NS,MACH210 TK0198 160990001 A6U132 160–9901–00 IC,DIGITAL:CMOS,PLD,EEPLD,MACH 210,64 MARCOCELL,32 I/O,6–INPUTS,2 CLOCK INPUTS,15NS,MACH210 80009 160–9901–00 A6U133 160–9915–00 IC,DIGITAL:CMOS,PLD,EEPLD,MACH210,64 M/C,32 I/O,6 IN,2 CLK IN,15NS,PRGM 156–6680–00,MACH210 80009 160–9915–00 136–1047–00 SKT,PLCC:PCB;44 POS,0.05 CTR,0.360H X 0.125 TAIL,TIN 00779 821575–1 *MOUNTING PARTS* *END MOUNTING PARTS* 8–114 AM700 Audio Measurement Set Service Manual Replaceable Electrical Parts Replaceable electrical parts list (cont.) Component number Tektronix part number A6U136 156–6550–00 A6Y1 Serial no. effective Serial no. discont’d Mfr. code Mfr. part number IC,DIGITAL:FCTCMOS,TRANSCEIVER,OCTAL,RESISTOR TERMINATED OUTPUTS,3–STATE,74FCT2245T,QSOP20. 0TJ19 QS74FCT2245TQ 119–4640–00 OSCILLATOR:CRYSTAL CONTROLLED,25.175 MHZ,100PPM,TTL,F1100,4 PIN DIP,14 PIN COMPATIBLE 61429 F1100E 25.175MHZ A6Y2 119–1842–00 OSC,XTAL CLOCK:12MHZ,+/–0.05%,TTL,4 PIN 14 PIN DIP COMPATIBLE 22929 XO–43C 12 A6Y3 119–2042–00 OSC,XTAL CLOCK:3.6864 MHZ,0.01%,TTL,4 PIN, 14 PIN DIP COMPATIBLE PKG 82567 03–02181–3.6864 A6Y4 119–3120–00 OSCILLATOR,RF:XTAL CLOCK,36MHZ,0.01%,TTL,4 PIN 14 PIN DIP COMPATIBLE PKG 23875 MTO13FAD 36.00 A6Y5 158–0244–00 XTAL UNIT,QTZ:24MHZ 0.01%,SERIES RESONANT 33096 CCAT101405 A6Y6 158–0271–00 XTAL UNIT,QTZ:3.6864MHZ, 50PPM,SERIES,ESR 120 OHMS,HC–18/U OR HC–49UPKG 5W664 NDK–037 A6Y7 119–2624–00 OSCILLATOR,RF:33.333MHZ, +/– 0.005%,TTL, 4 PIN 14 PIN DIP COMPATIBLE 14301 012–405–02183 Name & description AM700 Audio Measurement Set Service Manual 8–115 Replaceable Electrical Parts Replaceable electrical parts list Component number Tektronix part number Serial no. effective Serial no. discont’d Name & description Mfr. code Mfr. part number A7 671–2900–00 B010100 B010140 CIRCUIT BD ASSY:DSP,389–1672–XX WIRED 80009 671–2900–00 B020632 A7 671–2900–01 B010141 A7 671–2900–02 B020633 CKT BD ASSY:DSP,389–1672–XX WIRED,AM700 80009 671–2900–01 CKT BD ASSY:DSP,389–1672–XX WIRED,AM700 80009 671–2900–02 A7C1 A7C2 283–5003–00 CAP,FXD,CERAMIC:MLC,0.01UF,10%,50V,X7R 04222 12065C103KAT060R 283–5004–00 CAP,FXD,CERAMIC:MLC,0.1UF,10%,25V,X7R 04222 12063C104KAT3A A7C3 283–5003–00 CAP,FXD,CERAMIC:MLC,0.01UF,10%,50V,X7R 04222 12065C103KAT060R A7C4 283–5004–00 CAP,FXD,CERAMIC:MLC,0.1UF,10%,25V,X7R 04222 12063C104KAT3A A7C5 283–5003–00 CAP,FXD,CERAMIC:MLC,0.01UF,10%,50V,X7R 04222 12065C103KAT060R A7C6 283–5004–00 CAP,FXD,CERAMIC:MLC,0.1UF,10%,25V,X7R 04222 12063C104KAT3A A7C7 283–5003–00 CAP,FXD,CERAMIC:MLC,0.01UF,10%,50V,X7R 04222 12065C103KAT060R A7C8 283–5004–00 CAP,FXD,CERAMIC:MLC,0.1UF,10%,25V,X7R 04222 12063C104KAT3A A7C9 283–5003–00 CAP,FXD,CERAMIC:MLC,0.01UF,10%,50V,X7R 04222 12065C103KAT060R A7C10 283–5004–00 CAP,FXD,CERAMIC:MLC,0.1UF,10%,25V,X7R 04222 12063C104KAT3A A7C11 283–5003–00 CAP,FXD,CERAMIC:MLC,0.01UF,10%,50V,X7R 04222 12065C103KAT060R A7C12 283–5004–00 CAP,FXD,CERAMIC:MLC,0.1UF,10%,25V,X7R 04222 12063C104KAT3A A7C13 283–5003–00 CAP,FXD,CERAMIC:MLC,0.01UF,10%,50V,X7R 04222 12065C103KAT060R A7C14 283–5004–00 CAP,FXD,CERAMIC:MLC,0.1UF,10%,25V,X7R 04222 12063C104KAT3A A7C15 283–5003–00 CAP,FXD,CERAMIC:MLC,0.01UF,10%,50V,X7R 04222 12065C103KAT060R A7C16 283–5004–00 CAP,FXD,CERAMIC:MLC,0.1UF,10%,25V,X7R 04222 12063C104KAT3A A7C17 283–5003–00 CAP,FXD,CERAMIC:MLC,0.01UF,10%,50V,X7R 04222 12065C103KAT060R A7C18 283–5004–00 CAP,FXD,CERAMIC:MLC,0.1UF,10%,25V,X7R 04222 12063C104KAT3A A7C19 283–5003–00 CAP,FXD,CERAMIC:MLC,0.01UF,10%,50V,X7R 04222 12065C103KAT060R A7C20 283–5004–00 CAP,FXD,CERAMIC:MLC,0.1UF,10%,25V,X7R 04222 12063C104KAT3A A7C21 283–5003–00 CAP,FXD,CERAMIC:MLC,0.01UF,10%,50V,X7R 04222 12065C103KAT060R A7C22 283–5004–00 CAP,FXD,CERAMIC:MLC,0.1UF,10%,25V,X7R 04222 12063C104KAT3A A7C23 283–5003–00 CAP,FXD,CERAMIC:MLC,0.01UF,10%,50V,X7R 04222 12065C103KAT060R A7C24 283–5004–00 CAP,FXD,CERAMIC:MLC,0.1UF,10%,25V,X7R 04222 12063C104KAT3A A7C25 283–5003–00 CAP,FXD,CERAMIC:MLC,0.01UF,10%,50V,X7R 04222 12065C103KAT060R A7C26 283–5004–00 CAP,FXD,CERAMIC:MLC,0.1UF,10%,25V,X7R 04222 12063C104KAT3A A7C27 283–5003–00 CAP,FXD,CERAMIC:MLC,0.01UF,10%,50V,X7R 04222 12065C103KAT060R A7C28 283–5004–00 CAP,FXD,CERAMIC:MLC,0.1UF,10%,25V,X7R 04222 12063C104KAT3A A7C29 283–5003–00 CAP,FXD,CERAMIC:MLC,0.01UF,10%,50V,X7R 04222 12065C103KAT060R A7C30 283–5004–00 CAP,FXD,CERAMIC:MLC,0.1UF,10%,25V,X7R 04222 12063C104KAT3A A7C31 283–5003–00 CAP,FXD,CERAMIC:MLC,0.01UF,10%,50V,X7R 04222 12065C103KAT060R A7C32 283–5004–00 CAP,FXD,CERAMIC:MLC,0.1UF,10%,25V,X7R 04222 12063C104KAT3A A7C33 283–5003–00 CAP,FXD,CERAMIC:MLC,0.01UF,10%,50V,X7R 04222 12065C103KAT060R A7C34 283–5004–00 CAP,FXD,CERAMIC:MLC,0.1UF,10%,25V,X7R 04222 12063C104KAT3A A7C35 283–5003–00 CAP,FXD,CERAMIC:MLC,0.01UF,10%,50V,X7R 04222 12065C103KAT060R 8–116 AM700 Audio Measurement Set Service Manual Replaceable Electrical Parts Replaceable electrical parts list (cont.) Component number Tektronix part number Serial no. effective Serial no. discont’d Name & description Mfr. code Mfr. part number A7C36 283–5004–00 CAP,FXD,CERAMIC:MLC,0.1UF,10%,25V,X7R 04222 12063C104KAT3A A7C37 283–5003–00 CAP,FXD,CERAMIC:MLC,0.01UF,10%,50V,X7R 04222 12065C103KAT060R A7C38 283–5004–00 CAP,FXD,CERAMIC:MLC,0.1UF,10%,25V,X7R 04222 12063C104KAT3A A7C39 283–5003–00 CAP,FXD,CERAMIC:MLC,0.01UF,10%,50V,X7R 04222 12065C103KAT060R A7C40 283–5004–00 CAP,FXD,CERAMIC:MLC,0.1UF,10%,25V,X7R 04222 12063C104KAT3A A7C41 283–5003–00 CAP,FXD,CERAMIC:MLC,0.01UF,10%,50V,X7R 04222 12065C103KAT060R A7C42 283–5004–00 CAP,FXD,CERAMIC:MLC,0.1UF,10%,25V,X7R 04222 12063C104KAT3A A7C43 283–5003–00 CAP,FXD,CERAMIC:MLC,0.01UF,10%,50V,X7R 04222 12065C103KAT060R A7C44 283–5004–00 CAP,FXD,CERAMIC:MLC,0.1UF,10%,25V,X7R 04222 12063C104KAT3A A7C45 283–5003–00 CAP,FXD,CERAMIC:MLC,0.01UF,10%,50V,X7R 04222 12065C103KAT060R A7C46 283–5004–00 CAP,FXD,CERAMIC:MLC,0.1UF,10%,25V,X7R 04222 12063C104KAT3A A7C47 283–5003–00 CAP,FXD,CERAMIC:MLC,0.01UF,10%,50V,X7R 04222 12065C103KAT060R A7C48 283–5004–00 CAP,FXD,CERAMIC:MLC,0.1UF,10%,25V,X7R 04222 12063C104KAT3A A7C49 283–5003–00 CAP,FXD,CERAMIC:MLC,0.01UF,10%,50V,X7R 04222 12065C103KAT060R A7C50 283–5004–00 CAP,FXD,CERAMIC:MLC,0.1UF,10%,25V,X7R 04222 12063C104KAT3A A7C51 283–5003–00 CAP,FXD,CERAMIC:MLC,0.01UF,10%,50V,X7R 04222 12065C103KAT060R A7C52 283–5004–00 CAP,FXD,CERAMIC:MLC,0.1UF,10%,25V,X7R 04222 12063C104KAT3A A7C53 283–5003–00 CAP,FXD,CERAMIC:MLC,0.01UF,10%,50V,X7R 04222 12065C103KAT060R A7C54 283–5004–00 CAP,FXD,CERAMIC:MLC,0.1UF,10%,25V,X7R 04222 12063C104KAT3A A7C55 283–5003–00 CAP,FXD,CERAMIC:MLC,0.01UF,10%,50V,X7R 04222 12065C103KAT060R A7C56 283–5004–00 CAP,FXD,CERAMIC:MLC,0.1UF,10%,25V,X7R 04222 12063C104KAT3A A7C57 283–5003–00 CAP,FXD,CERAMIC:MLC,0.01UF,10%,50V,X7R 04222 12065C103KAT060R A7C58 283–5004–00 CAP,FXD,CERAMIC:MLC,0.1UF,10%,25V,X7R 04222 12063C104KAT3A A7C59 283–5003–00 CAP,FXD,CERAMIC:MLC,0.01UF,10%,50V,X7R 04222 12065C103KAT060R A7C60 283–5004–00 CAP,FXD,CERAMIC:MLC,0.1UF,10%,25V,X7R 04222 12063C104KAT3A A7C61 283–5003–00 CAP,FXD,CERAMIC:MLC,0.01UF,10%,50V,X7R 04222 12065C103KAT060R A7C62 283–5004–00 CAP,FXD,CERAMIC:MLC,0.1UF,10%,25V,X7R 04222 12063C104KAT3A A7C63 283–5003–00 CAP,FXD,CERAMIC:MLC,0.01UF,10%,50V,X7R 04222 12065C103KAT060R A7C64 283–5004–00 CAP,FXD,CERAMIC:MLC,0.1UF,10%,25V,X7R 04222 12063C104KAT3A A7C65 283–5003–00 CAP,FXD,CERAMIC:MLC,0.01UF,10%,50V,X7R 04222 12065C103KAT060R A7C66 283–5004–00 CAP,FXD,CERAMIC:MLC,0.1UF,10%,25V,X7R 04222 12063C104KAT3A A7C67 283–5003–00 CAP,FXD,CERAMIC:MLC,0.01UF,10%,50V,X7R 04222 12065C103KAT060R A7C68 283–5004–00 CAP,FXD,CERAMIC:MLC,0.1UF,10%,25V,X7R 04222 12063C104KAT3A A7C69 283–5003–00 CAP,FXD,CERAMIC:MLC,0.01UF,10%,50V,X7R 04222 12065C103KAT060R A7C70 283–5004–00 CAP,FXD,CERAMIC:MLC,0.1UF,10%,25V,X7R 04222 12063C104KAT3A A7C71 283–5003–00 CAP,FXD,CERAMIC:MLC,0.01UF,10%,50V,X7R 04222 12065C103KAT060R A7C72 283–5004–00 CAP,FXD,CERAMIC:MLC,0.1UF,10%,25V,X7R 04222 12063C104KAT3A A7C73 283–5003–00 CAP,FXD,CERAMIC:MLC,0.01UF,10%,50V,X7R 04222 12065C103KAT060R AM700 Audio Measurement Set Service Manual 8–117 Replaceable Electrical Parts Replaceable electrical parts list (cont.) Component number Tektronix part number Serial no. effective Serial no. discont’d Name & description Mfr. code Mfr. part number A7C74 283–5004–00 CAP,FXD,CERAMIC:MLC,0.1UF,10%,25V,X7R 04222 12063C104KAT3A A7C75 283–5003–00 CAP,FXD,CERAMIC:MLC,0.01UF,10%,50V,X7R 04222 12065C103KAT060R A7C76 283–5004–00 CAP,FXD,CERAMIC:MLC,0.1UF,10%,25V,X7R 04222 12063C104KAT3A A7C77 283–5003–00 CAP,FXD,CERAMIC:MLC,0.01UF,10%,50V,X7R 04222 12065C103KAT060R A7C78 283–5004–00 CAP,FXD,CERAMIC:MLC,0.1UF,10%,25V,X7R 04222 12063C104KAT3A A7C79 283–5003–00 CAP,FXD,CERAMIC:MLC,0.01UF,10%,50V,X7R 04222 12065C103KAT060R A7C80 283–5004–00 CAP,FXD,CERAMIC:MLC,0.1UF,10%,25V,X7R 04222 12063C104KAT3A A7C81 283–5003–00 CAP,FXD,CERAMIC:MLC,0.01UF,10%,50V,X7R 04222 12065C103KAT060R A7C82 283–5004–00 CAP,FXD,CERAMIC:MLC,0.1UF,10%,25V,X7R 04222 12063C104KAT3A A7C83 283–5003–00 CAP,FXD,CERAMIC:MLC,0.01UF,10%,50V,X7R 04222 12065C103KAT060R A7C84 283–5004–00 CAP,FXD,CERAMIC:MLC,0.1UF,10%,25V,X7R 04222 12063C104KAT3A A7C85 290–1157–00 CAP,FXD,ALUM:220UF,20%,25V,0.532 X 0.410,RADIAL 62643 CEAFM1E221M–T4 A7C86 290–5037–01 CAP,FXD,ALUM:10UF,20%,35V,5.7 H X 5 DIA MM 62643 MVK35VC10RME60T PX A7C87 290–5037–01 CAP,FXD,ALUM:10UF,20%,35V,5.7 H X 5 DIA MM 62643 MVK35VC10RME60T PX A7C88 290–5037–01 CAP,FXD,ALUM:10UF,20%,35V,5.7 H X 5 DIA MM 62643 MVK35VC10RME60T PX A7C89 290–5037–01 CAP,FXD,ALUM:10UF,20%,35V,5.7 H X 5 DIA MM 62643 MVK35VC10RME60T PX A7C90 290–5037–01 CAP,FXD,ALUM:10UF,20%,35V,5.7 H X 5 DIA MM 62643 MVK35VC10RME60T PX A7C91 283–5025–00 CAP,FXD,CERAMIC:MLC,220PF,5%,50V,NPO 04222 12065A221JAT1A A7C92 283–5025–00 CAP,FXD,CERAMIC:MLC,220PF,5%,50V,NPO 04222 12065A221JAT1A A7C93 283–5025–00 CAP,FXD,CERAMIC:MLC,220PF,5%,50V,NPO 04222 12065A221JAT1A A7C94 283–5025–00 CAP,FXD,CERAMIC:MLC,220PF,5%,50V,NPO 04222 12065A221JAT1A A7C98 283–5011–00 CAP,FXD,CERAMIC:MLC,33PF,5%,50V,NPO ,SMD,8MM 04222 12065A330JAT1A A7C99 283–5196–00 CAP,FXD,CERAMIC:MLC,47PF,5%,100V,NPO 04222 12061A470JAT1A A7C100 283–5025–00 CAP,FXD,CERAMIC:MLC,220PF,5%,50V,NPO 04222 12065A221JAT1A A7C102 283–5025–00 CAP,FXD,CERAMIC:MLC,220PF,5%,50V,NPO 04222 12065A221JAT1A A7C103 283–5025–00 CAP,FXD,CERAMIC:MLC,220PF,5%,50V,NPO 04222 12065A221JAT1A A7C104 283–5106–00 CAP,FXD,CERAMIC:MLC,470PF,5%,100V,NPO 04222 12061A471JAT1A A7C105 283–5025–00 CAP,FXD,CERAMIC:MLC,220PF,5%,50V,NPO 04222 12065A221JAT1A A7C106 283–5025–00 CAP,FXD,CERAMIC:MLC,220PF,5%,50V,NPO 04222 12065A221JAT1A A7C108 283–5025–00 CAP,FXD,CERAMIC:MLC,220PF,5%,50V,NPO 04222 12065A221JAT1A A7C110 283–5196–00 CAP,FXD,CERAMIC:MLC,47PF,5%,100V,NPO 04222 12061A470JAT1A A7C111 283–5196–00 CAP,FXD,CERAMIC:MLC,47PF,5%,100V,NPO 04222 12061A470JAT1A A7C112 283–5196–00 CAP,FXD,CERAMIC:MLC,47PF,5%,100V,NPO 04222 12061A470JAT1A A7C113 283–5025–00 CAP,FXD,CERAMIC:MLC,220PF,5%,50V,NPO 04222 12065A221JAT1A A7C114 283–5196–00 CAP,FXD,CERAMIC:MLC,47PF,5%,100V,NPO 04222 12061A470JAT1A 8–118 AM700 Audio Measurement Set Service Manual Replaceable Electrical Parts Replaceable electrical parts list (cont.) Component number Tektronix part number Serial no. effective Serial no. discont’d Name & description Mfr. code Mfr. part number A7C115 283–5025–00 CAP,FXD,CERAMIC:MLC,220PF,5%,50V,NPO 04222 12065A221JAT1A A7C116 283–5025–00 CAP,FXD,CERAMIC:MLC,220PF,5%,50V,NPO 04222 12065A221JAT1A A7C117 283–5025–00 CAP,FXD,CERAMIC:MLC,220PF,5%,50V,NPO 04222 12065A221JAT1A A7C121 283–1037–00 CAP,FXD,CERAMIC:MLC,0.1UF,10%,50V,Z5V,0.745 X 0.745,FOR USE UNDER ASICS,LEADED,BULK 65026 104ADC A7C122 283–5025–00 CAP,FXD,CERAMIC:MLC,220PF,5%,50V,NPO 04222 12065A221JAT1A A7C123 283–5011–00 CAP,FXD,CERAMIC:MLC,33PF,5%,50V,NPO 04222 12065A330JAT1A A7C124 283–5011–00 CAP,FXD,CERAMIC:MLC,33PF,5%,50V,NPO 04222 12065A330JAT1A A7C125 283–5025–00 CAP,FXD,CERAMIC:MLC,220PF,5%,50V,NPO 04222 12065A221JAT1A A7C126 283–5025–00 CAP,FXD,CERAMIC:MLC,220PF,5%,50V,NPO 04222 12065A221JAT1A A7C127 283–5196–00 CAP,FXD,CERAMIC:MLC,47PF,5%,100V,NPO 04222 12061A470JAT1A A7C129 283–5025–00 CAP,FXD,CERAMIC:MLC,220PF,5%,50V,NPO 04222 12065A221JAT1A A7C130 283–5011–00 CAP,FXD,CERAMIC:MLC,33PF,5%,50V,NPO 04222 12065A330JAT1A A7C131 283–5011–00 CAP,FXD,CERAMIC:MLC,33PF,5%,50V,NPO 04222 12065A330JAT1A A7C132 283–5011–00 CAP,FXD,CERAMIC:MLC,33PF,5%,50V,NPO 04222 12065A330JAT1A A7C133 283–5003–00 CAP,FXD,CERAMIC:MLC,0.01UF,10%,50V,X7R 04222 12065C103KAT060R A7C134 283–5106–00 CAP,FXD,CERAMIC:MLC,470PF,5%,100V,NPO 04222 12061A471JAT1A A7C135 283–5004–00 CAP,FXD,CERAMIC:MLC,0.1UF,10%,25V,X7R 04222 12063C104KAT3A A7C136 283–5004–00 CAP,FXD,CERAMIC:MLC,0.1UF,10%,25V,X7R 04222 12063C104KAT3A A7C137 283–5196–00 CAP,FXD,CERAMIC:MLC,47PF,5%,100V,NPO 04222 12061A470JAT1A A7C138 283–5025–00 CAP,FXD,CERAMIC:MLC,220PF,5%,50V,NPO 04222 12065A221JAT1A A7C139 290–5037–01 CAP,FXD,ALUM:10UF,20%,35V,5.7 H X 5 DIA MM 62643 MVK35VC10RME60T PX A7C140 283–5025–00 CAP,FXD,CERAMIC:MLC,220PF,5%,50V,NPO 04222 12065A221JAT1A A7C141 283–5025–00 CAP,FXD,CERAMIC:MLC,220PF,5%,50V,NPO 04222 12065A221JAT1A A7C142 283–5025–00 CAP,FXD,CERAMIC:MLC,220PF,5%,50V,NPO 04222 12065A221JAT1A A7C143 283–5025–00 CAP,FXD,CERAMIC:MLC,220PF,5%,50V,NPO 04222 12065A221JAT1A A7C144 283–5025–00 CAP,FXD,CERAMIC:MLC,220PF,5%,50V,NPO 04222 12065A221JAT1A A7C145 283–5025–00 CAP,FXD,CERAMIC:MLC,220PF,5%,50V,NPO 04222 12065A221JAT1A A7C146 283–5025–00 CAP,FXD,CERAMIC:MLC,220PF,5%,50V,NPO 04222 12065A221JAT1A A7C147 283–5025–00 CAP,FXD,CERAMIC:MLC,220PF,5%,50V,NPO 04222 12065A221JAT1A A7C148 283–5025–00 CAP,FXD,CERAMIC:MLC,220PF,5%,50V,NPO 04222 12065A221JAT1A A7C149 283–5025–00 CAP,FXD,CERAMIC:MLC,220PF,5%,50V,NPO 04222 12065A221JAT1A A7C150 283–5025–00 CAP,FXD,CERAMIC:MLC,220PF,5%,50V,NPO 04222 12065A221JAT1A A7C151 283–5003–00 CAP,FXD,CERAMIC:MLC,0.01UF,10%,50V,X7R 04222 12065C103KAT060R A7C152 283–5004–00 CAP,FXD,CERAMIC:MLC,0.1UF,10%,25V,X7R 04222 12063C104KAT3A A7C153 283–5196–00 CAP,FXD,CERAMIC:MLC,47PF,5%,100V,NPO 04222 12061A470JAT1A A7DS1 150–1033–00 DIODE,OPTO:LED,AMBER,585NM,2MCD AT 10MA,HLMP–1401,T–1 01295 TIL212 AM700 Audio Measurement Set Service Manual 8–119 Replaceable Electrical Parts Replaceable electrical parts list (cont.) Component number Tektronix part number Name & description Mfr. code Mfr. part number A7DS2 150–1033–00 DIODE,OPTO:LED,AMBER,585NM,2MCD AT 10MA,HLMP–1401,T–1 01295 TIL212 A7F1 159–0194–00 FUSE,WIRE LEAD:5A,125V,0.125 SEC 61857 SP5–5A LEAD TAPE REEL A7J1 131–5630–00 CONN,HDR:PCB,MALE,RTANG,2 X 20,0.05 X 0.1 CTR,0.326 H X 0.106 TAIL,SHRD/4 SIDES,CTR PLZ, TK1462 NFP–040A–112–AF A7J2 131–4529–00 CONN,HDR:PCB,MALE,STR,2 X 5,0.1 CTR,0.365 H X 0.112 TAIL,SHRD/4 SIDES,CTR PLZ, 53387 2510–6002UB A7J4 131–2919–01 CONN,HDR:PCB,MALE,STR,1 X 4,0.1 CTR,0.235 MLG X 0.112 TAIL,30 GOLD,0.035 DIA PCB,SAFETY 53387 2404–6112TB A7J6 131–2919–01 CONN,HDR:PCB,MALE,STR,1 X 4,0.1 CTR,0.235 MLG X 0.112 TAIL,30 GOLD,0.035 DIA PCB,SAFETY 53387 2404–6112TB A7J7 131–4798–00 CONN,HDR:PCB,MALE,STR,1 X 5,0.1 CTR,0.295 MLG X 0.210 TAIL,TIN,PLZ WALL,W/FRICTION LOCK 00779 640456–5 A7J300 131–5673–00 CONN,HDI:PCB,FEMALE,STR,4 X 35,140 POS,0.1 CTR,0.5 H X 0.180 TAIL,30GXT 22526 50388–5140H A7LS1 119–2520–00 TRANSDUCER:AUDIO,2.2KHZ,5V,SOLID STATE,WASHABLE,W/DRIVE CKT 63791 HMB–06 A7LS2 119–4697–00 SPEAKER:DYNAMIC,23MM DIA X 10MM H,0.100W MAX POWER INPUT,8.0 OHM,89DB @ 0.001W INPUT,800 0LXM2 23RPC01 A7Q1 151–5000–00 TRANSISTOR,SIG:BIPOLAR,PNP,40V,200MA,250MHZ,A MPLIFIER,MMBT3906L,TO–236/SOT–23 04713 MMBT3906LT1 A7Q2 151–5001–00 TRANSISTOR,SIG:BIPOLAR,NPN,40V,200MA,300MHZ,A MPLIFIER,MMBT3904L,TO–236/SOT–23 04713 MMBT3904LT1 A7Q3 151–5001–00 TRANSISTOR,SIG:BIPOLAR,NPN,40V,200MA,300MHZ,A MPLIFIER,MMBT3904L,TO–236/SOT–23 04713 MMBT3904LT1 A7Q4 151–5000–00 TRANSISTOR,SIG:BIPOLAR,PNP,40V,200MA,250MHZ,A MPLIFIER,MMBT3906L,TO–236/SOT–23 04713 MMBT3906LT1 A7Q5 151–5001–00 TRANSISTOR,SIG:BIPOLAR,NPN,40V,200MA,300MHZ,A MPLIFIER,MMBT3904L,TO–236/SOT–23 04713 MMBT3904LT1 A7R1 321–5026–00 RES,FXD:THICKFILM, 4.75K OHM,1%,0.125W,TC=100 PPM 50139 BCK4751FT A7R1 321–5212–00 RES,FXD,FILM:4.99K OHM,1%,0.125W,TC=100 PPM 91637 CRCW–1206–4991FR T1 A7R2 321–5026–00 RES,FXD:THICKFILM, 4.75K OHM,1%,0.125W,TC=100 PPM 50139 BCK4751FT A7R3 321–5194–00 RES,FXD:THICKFILM, 49.9 OHM,1%,0.125W,TC=100 PPM 59124 RK73H2B49R9FT A7R4 321–5194–00 RES,FXD:THICKFILM, 49.9 OHM,1%,0.125W,TC=100 PPM 59124 RK73H2B49R9FT A7R5 321–5194–00 RES,FXD:THICKFILM, 49.9 OHM,1%,0.125W,TC=100 PPM 59124 RK73H2B49R9FT A7R6 321–5194–00 RES,FXD:THICKFILM, 49.9 OHM,1%,0.125W,TC=100 PPM 59124 RK73H2B49R9FT A7R7 321–5018–00 RES,FXD:THICKFILM, 1.0K OHM,1%,0.125W,TC=100 PPM 50139 BCK1001FT 8–120 Serial no. effective Serial no. discont’d AM700 Audio Measurement Set Service Manual Replaceable Electrical Parts Replaceable electrical parts list (cont.) Component number Tektronix part number Serial no. effective Serial no. discont’d Name & description Mfr. code Mfr. part number A7R8 321–5018–00 RES,FXD:THICKFILM, 1.0K OHM,1%,0.125W,TC=100 PPM 50139 BCK1001FT A7R9 321–5018–00 RES,FXD:THICKFILM, 1.0K OHM,1%,0.125W,TC=100 PPM 50139 BCK1001FT A7R10 321–5026–00 RES,FXD:THICKFILM, 4.75K OHM,1%,0.125W,TC=100 PPM 50139 BCK4751FT A7R11 321–5026–00 RES,FXD:THICKFILM, 4.75K OHM,1%,0.125W,TC=100 PPM 50139 BCK4751FT A7R12 321–5050–00 RES,FXD:THICKFILM, 33.2 OHM,1%,0.125W,TC=100 PPM 50139 BCD33R2FT A7R13 321–5050–00 RES,FXD:THICKFILM, 33.2 OHM,1%,0.125W,TC=100 PPM 50139 BCD33R2FT A7R14 321–5050–00 RES,FXD:THICKFILM, 33.2 OHM,1%,0.125W,TC=100 PPM 50139 BCD33R2FT A7R15 321–5018–00 RES,FXD:THICKFILM, 1.0K OHM,1%,0.125W,TC=100 PPM 50139 BCK1001FT A7R16 321–5194–00 RES,FXD:THICKFILM, 49.9 OHM,1%,0.125W,TC=100 PPM 59124 RK73H2B49R9FT A7R17 321–5194–00 RES,FXD:THICKFILM, 49.9 OHM,1%,0.125W,TC=100 PPM 59124 RK73H2B49R9FT A7R18 321–5194–00 RES,FXD:THICKFILM, 49.9 OHM,1%,0.125W,TC=100 PPM 59124 RK73H2B49R9FT A7R20 321–5194–00 RES,FXD:THICKFILM, 49.9 OHM,1%,0.125W,TC=100 PPM 59124 RK73H2B49R9FT A7R21 321–5194–00 RES,FXD:THICKFILM, 49.9 OHM,1%,0.125W,TC=100 PPM 59124 RK73H2B49R9FT A7R22 321–5194–00 RES,FXD:THICKFILM, 49.9 OHM,1%,0.125W,TC=100 PPM 59124 RK73H2B49R9FT A7R23 321–5194–00 RES,FXD:THICKFILM, 49.9 OHM,1%,0.125W,TC=100 PPM 59124 RK73H2B49R9FT A7R25 321–5194–00 RES,FXD:THICKFILM, 49.9 OHM,1%,0.125W,TC=100 PPM 59124 RK73H2B49R9FT A7R27 321–5024–00 RES,FXD:THICKFILM, 3.32K OHM,1%,0.125W,TC=100 PPM 50139 BCK3321FT A7R28 321–5024–00 RES,FXD:THICKFILM, 3.32K OHM,1%,0.125W,TC=100 PPM 50139 BCK3321FT A7R29 321–5024–00 RES,FXD:THICKFILM, 3.32K OHM,1%,0.125W,TC=100 PPM 50139 BCK3321FT A7R30 321–5024–00 RES,FXD:THICKFILM, 3.32K OHM,1%,0.125W,TC=100 PPM 50139 BCK3321FT A7R31 321–5024–00 RES,FXD:THICKFILM, 3.32K OHM,1%,0.125W,TC=100 PPM 50139 BCK3321FT A7R32 321–5024–00 RES,FXD:THICKFILM, 3.32K OHM,1%,0.125W,TC=100 PPM 50139 BCK3321FT A7R33 321–5020–00 RES,FXD:THICKFILM, 1.5K OHM,1%,0.125W,TC=100 PPM 50139 BCK1501FT AM700 Audio Measurement Set Service Manual 8–121 Replaceable Electrical Parts Replaceable electrical parts list (cont.) Component number Tektronix part number Name & description Mfr. code Mfr. part number A7R34 321–5020–00 RES,FXD:THICKFILM, 1.5K OHM,1%,0.125W,TC=100 PPM 50139 BCK1501FT A7R35 321–5020–00 RES,FXD:THICKFILM, 1.5K OHM,1%,0.125W,TC=100 PPM 50139 BCK1501FT A7R36 321–5026–00 RES,FXD:THICKFILM, 4.75K OHM,1%,0.125W,TC=100 PPM 50139 BCK4751FT A7R37 321–5026–00 RES,FXD:THICKFILM, 4.75K OHM,1%,0.125W,TC=100 PPM 50139 BCK4751FT A7R38 321–5024–00 RES,FXD:THICKFILM, 3.32K OHM,1%,0.125W,TC=100 PPM 50139 BCK3321FT A7R39 321–5024–00 RES,FXD:THICKFILM, 3.32K OHM,1%,0.125W,TC=100 PPM 50139 BCK3321FT A7R40 321–5024–00 RES,FXD:THICKFILM, 3.32K OHM,1%,0.125W,TC=100 PPM 50139 BCK3321FT A7R41 321–5030–00 RES,FXD:THICKFILM, 10.0K OHM,1%,0.125W,TC=100 PPM 50139 BCK1002FT A7R42 321–5030–00 RES,FXD:THICKFILM, 10.0K OHM,1%,0.125W,TC=100 PPM 50139 BCK1002FT A7R43 321–5026–00 RES,FXD:THICKFILM, 4.75K OHM,1%,0.125W,TC=100 PPM 50139 BCK4751FT A7R44 321–5000–00 RES,FXD,FILM:10 OHM,1%,0.125W,TC=100 PPM,100V 50139 BCD10R0FT A7R45 321–5018–00 RES,FXD:THICKFILM, 1.0K OHM,1%,0.125W,TC=100 PPM 50139 BCK1001FT A7R46 321–5194–00 RES,FXD:THICKFILM, 49.9 OHM,1%,0.125W,TC=100 PPM 59124 RK73H2B49R9FT A7R47 321–5194–00 RES,FXD:THICKFILM, 49.9 OHM,1%,0.125W,TC=100 PPM 59124 RK73H2B49R9FT A7R48 321–5194–00 RES,FXD:THICKFILM, 49.9 OHM,1%,0.125W,TC=100 PPM 59124 RK73H2B49R9FT A7R49 321–5194–00 RES,FXD:THICKFILM, 49.9 OHM,1%,0.125W,TC=100 PPM 59124 RK73H2B49R9FT A7R50 321–5194–00 RES,FXD:THICKFILM, 49.9 OHM,1%,0.125W,TC=100 PPM 59124 RK73H2B49R9FT A7R51 321–5194–00 RES,FXD:THICKFILM, 49.9 OHM,1%,0.125W,TC=100 PPM 59124 RK73H2B49R9FT A7R52 321–5194–00 RES,FXD:THICKFILM, 49.9 OHM,1%,0.125W,TC=100 PPM 59124 RK73H2B49R9FT A7R53 321–5194–00 RES,FXD:THICKFILM, 49.9 OHM,1%,0.125W,TC=100 PPM 59124 RK73H2B49R9FT A7R54 321–5050–00 RES,FXD:THICKFILM, 33.2 OHM,1%,0.125W,TC=100 PPM 50139 BCD33R2FT A7R55 321–5194–00 RES,FXD:THICKFILM, 49.9 OHM,1%,0.125W,TC=100 PPM 59124 RK73H2B49R9FT A7R56 321–5194–00 RES,FXD:THICKFILM, 49.9 OHM,1%,0.125W,TC=100 PPM 59124 RK73H2B49R9FT 8–122 Serial no. effective Serial no. discont’d AM700 Audio Measurement Set Service Manual Replaceable Electrical Parts Replaceable electrical parts list (cont.) Component number Tektronix part number Serial no. effective Serial no. discont’d Name & description Mfr. code Mfr. part number A7R57 321–5194–00 RES,FXD:THICKFILM, 49.9 OHM,1%,0.125W,TC=100 PPM 59124 RK73H2B49R9FT A7R58 321–5026–00 RES,FXD:THICKFILM, 4.75K OHM,1%,0.125W,TC=100 PPM 50139 BCK4751FT A7R59 321–5026–00 RES,FXD:THICKFILM, 4.75K OHM,1%,0.125W,TC=100 PPM 50139 BCK4751FT A7R60 321–5026–00 RES,FXD:THICKFILM, 4.75K OHM,1%,0.125W,TC=100 PPM 50139 BCK4751FT A7R61 321–5026–00 RES,FXD:THICKFILM, 4.75K OHM,1%,0.125W,TC=100 PPM 50139 BCK4751FT A7R62 321–5026–00 RES,FXD:THICKFILM, 4.75K OHM,1%,0.125W,TC=100 PPM 50139 BCK4751FT A7R63 321–5026–00 RES,FXD:THICKFILM, 4.75K OHM,1%,0.125W,TC=100 PPM 50139 BCK4751FT A7R64 321–5026–00 RES,FXD:THICKFILM, 4.75K OHM,1%,0.125W,TC=100 PPM 50139 BCK4751FT A7R65 321–5026–00 RES,FXD:THICKFILM, 4.75K OHM,1%,0.125W,TC=100 PPM 50139 BCK4751FT A7R66 307–5041–01 RES,NTWK,FXD,FI:15,4.7K OHM,2%,PIN 16 COMMON,0.08W EA,1.2W PKG,50PPM,SMD,SO16.200 57924 4816P–002–472 A7R67 307–5041–01 RES,NTWK,FXD,FI:15,4.7K OHM,2%,PIN 16 COMMON,0.08W EA,1.2W PKG,50PPM,SMD,SO16.200 57924 4816P–002–472 A7R68 307–5041–01 RES,NTWK,FXD,FI:15,4.7K OHM,2%,PIN 16 COMMON,0.08W EA,1.2W PKG,50PPM,SMD,SO16.200 57924 4816P–002–472 A7R69 307–5041–01 RES,NTWK,FXD,FI:15,4.7K OHM,2%,PIN 16 COMMON,0.08W EA,1.2W PKG,50PPM,SMD,SO16.200 57924 4816P–002–472 A7R70 307–5041–01 RES,NTWK,FXD,FI:15,4.7K OHM,2%,PIN 16 COMMON,0.08W EA,1.2W PKG,50PPM,SMD,SO16.200 57924 4816P–002–472 A7R71 307–5041–01 RES,NTWK,FXD,FI:15,4.7K OHM,2%,PIN 16 COMMON,0.08W EA,1.2W PKG,50PPM,SMD,SO16.200 57924 4816P–002–472 A7R72 307–5041–01 RES,NTWK,FXD,FI:15,4.7K OHM,2%,PIN 16 COMMON,0.08W EA,1.2W PKG,50PPM,SMD,SO16.200 57924 4816P–002–472 A7R73 307–5041–01 RES,NTWK,FXD,FI:15,4.7K OHM,2%,PIN 16 COMMON,0.08W EA,1.2W PKG,50PPM,SMD,SO16.200 57924 4816P–002–472 A7R74 321–5026–00 RES,FXD:THICKFILM, 4.75K OHM,1%,0.125W,TC=100 PPM 50139 BCK4751FT A7R75 321–5194–00 RES,FXD:THICKFILM, 49.9 OHM,1%,0.125W,TC=100 PPM 59124 RK73H2B49R9FT A7R76 321–5194–00 RES,FXD:THICKFILM, 49.9 OHM,1%,0.125W,TC=100 PPM 59124 RK73H2B49R9FT A7R77 321–5194–00 RES,FXD:THICKFILM, 49.9 OHM,1%,0.125W,TC=100 PPM 59124 RK73H2B49R9FT A7R78 321–5194–00 RES,FXD:THICKFILM, 49.9 OHM,1%,0.125W,TC=100 PPM 59124 RK73H2B49R9FT A7R79 321–5194–00 RES,FXD:THICKFILM, 49.9 OHM,1%,0.125W,TC=100 PPM 59124 RK73H2B49R9FT AM700 Audio Measurement Set Service Manual 8–123 Replaceable Electrical Parts Replaceable electrical parts list (cont.) Component number Tektronix part number Name & description Mfr. code Mfr. part number A7R80 321–5194–00 RES,FXD:THICKFILM, 49.9 OHM,1%,0.125W,TC=100 PPM 59124 RK73H2B49R9FT A7R81 321–5194–00 RES,FXD:THICKFILM, 49.9 OHM,1%,0.125W,TC=100 PPM 59124 RK73H2B49R9FT A7R82 321–5026–00 RES,FXD:THICKFILM, 4.75K OHM,1%,0.125W,TC=100 PPM 50139 BCK4751FT A7R83 321–5026–00 RES,FXD:THICKFILM, 4.75K OHM,1%,0.125W,TC=100 PPM 50139 BCK4751FT A7R84 321–5026–00 RES,FXD:THICKFILM, 4.75K OHM,1%,0.125W,TC=100 PPM 50139 BCK4751FT A7R85 321–5026–00 RES,FXD:THICKFILM, 4.75K OHM,1%,0.125W,TC=100 PPM 50139 BCK4751FT A7R86 321–5012–00 RES,FXD:THICKFILM, 332 OHM,1%,0.125W,TC=100 PPM 50139 BCK3320FT A7R87 321–5012–00 RES,FXD:THICKFILM, 332 OHM,1%,0.125W,TC=100 PPM 50139 BCK3320FT A7R88 321–5194–00 RES,FXD:THICKFILM, 49.9 OHM,1%,0.125W,TC=100 PPM 59124 RK73H2B49R9FT A7R89 321–5026–00 RES,FXD:THICKFILM, 4.75K OHM,1%,0.125W,TC=100 PPM 50139 BCK4751FT A7R90 321–5026–00 RES,FXD:THICKFILM, 4.75K OHM,1%,0.125W,TC=100 PPM 50139 BCK4751FT A7R91 321–5194–00 RES,FXD:THICKFILM, 49.9 OHM,1%,0.125W,TC=100 PPM 59124 RK73H2B49R9FT A7R92 321–5194–00 RES,FXD:THICKFILM, 49.9 OHM,1%,0.125W,TC=100 PPM 59124 RK73H2B49R9FT A7R93 321–5194–00 RES,FXD:THICKFILM, 49.9 OHM,1%,0.125W,TC=100 PPM 59124 RK73H2B49R9FT A7R94 321–5050–00 RES,FXD:THICKFILM, 33.2 OHM,1%,0.125W,TC=100 PPM 50139 BCD33R2FT A7R95 321–5026–00 RES,FXD:THICKFILM, 4.75K OHM,1%,0.125W,TC=100 PPM 50139 BCK4751FT A7R96 321–5012–00 RES,FXD:THICKFILM, 332 OHM,1%,0.125W,TC=100 PPM 50139 BCK3320FT A7R97 321–5169–00 RES,FXD:THICKFILM, 475K OHM,1%,0.125W,TC=100 PPM 59124 RK73H2B4753FT A7R98 321–5018–00 RES,FXD:THICKFILM, 1.0K OHM,1%,0.125W,TC=100 PPM 50139 BCK1001FT A7R99 321–5194–00 RES,FXD:THICKFILM, 49.9 OHM,1%,0.125W,TC=100 PPM 59124 RK73H2B49R9FT A7R100 321–5194–00 RES,FXD:THICKFILM, 49.9 OHM,1%,0.125W,TC=100 PPM 59124 RK73H2B49R9FT A7R101 321–5026–00 RES,FXD:THICKFILM, 4.75K OHM,1%,0.125W,TC=100 PPM 50139 BCK4751FT A7R102 321–5026–00 RES,FXD:THICKFILM, 4.75K OHM,1%,0.125W,TC=100 PPM 50139 BCK4751FT 8–124 Serial no. effective Serial no. discont’d AM700 Audio Measurement Set Service Manual Replaceable Electrical Parts Replaceable electrical parts list (cont.) Component number Tektronix part number Serial no. effective Serial no. discont’d Name & description Mfr. code Mfr. part number A7R103 307–5041–01 RES,NTWK,FXD,FI:15,4.7K OHM,2%,PIN 16 COMMON,0.08W EA,1.2W PKG,50PPM,SMD,SO16.200 57924 4816P–002–472 A7R104 307–5041–01 RES,NTWK,FXD,FI:15,4.7K OHM,2%,PIN 16 COMMON,0.08W EA,1.2W PKG,50PPM,SMD,SO16.200 57924 4816P–002–472 A7R105 307–5041–01 RES,NTWK,FXD,FI:15,4.7K OHM,2%,PIN 16 COMMON,0.08W EA,1.2W PKG,50PPM,SMD,SO16.200 57924 4816P–002–472 A7R106 321–5043–00 RES,FXD:THICKFILM, 47.5 OHM,1%,0.125W,TC=100 PPM 50139 BCD47R5FT A7R107 321–5043–00 RES,FXD:THICKFILM, 47.5 OHM,1%,0.125W,TC=100 PPM 50139 BCD47R5FT A7R108 321–5026–00 RES,FXD:THICKFILM, 4.75K OHM,1%,0.125W,TC=100 PPM 50139 BCK4751FT A7R109 321–5026–00 RES,FXD:THICKFILM, 4.75K OHM,1%,0.125W,TC=100 PPM 50139 BCK4751FT A7R110 321–5026–00 RES,FXD:THICKFILM, 4.75K OHM,1%,0.125W,TC=100 PPM 50139 BCK4751FT A7R111 321–5026–00 RES,FXD:THICKFILM, 4.75K OHM,1%,0.125W,TC=100 PPM 50139 BCK4751FT A7R112 321–5050–00 RES,FXD:THICKFILM, 33.2 OHM,1%,0.125W,TC=100 PPM 50139 BCD33R2FT A7R113 321–5050–00 RES,FXD:THICKFILM, 33.2 OHM,1%,0.125W,TC=100 PPM 50139 BCD33R2FT A7R114 321–5050–00 RES,FXD:THICKFILM, 33.2 OHM,1%,0.125W,TC=100 PPM 50139 BCD33R2FT A7R115 321–5050–00 RES,FXD:THICKFILM, 33.2 OHM,1%,0.125W,TC=100 PPM 50139 BCD33R2FT A7R116 321–5050–00 RES,FXD:THICKFILM, 33.2 OHM,1%,0.125W,TC=100 PPM 50139 BCD33R2FT A7R117 321–5050–00 RES,FXD:THICKFILM, 33.2 OHM,1%,0.125W,TC=100 PPM 50139 BCD33R2FT A7R118 321–5050–00 RES,FXD:THICKFILM, 33.2 OHM,1%,0.125W,TC=100 PPM 50139 BCD33R2FT A7R119 321–5050–00 RES,FXD:THICKFILM, 33.2 OHM,1%,0.125W,TC=100 PPM 50139 BCD33R2FT A7R120 321–5194–00 RES,FXD:THICKFILM, 49.9 OHM,1%,0.125W,TC=100 PPM 59124 RK73H2B49R9FT A7R121 321–5194–00 RES,FXD:THICKFILM, 49.9 OHM,1%,0.125W,TC=100 PPM 59124 RK73H2B49R9FT A7R122 321–5194–00 RES,FXD:THICKFILM, 49.9 OHM,1%,0.125W,TC=100 PPM 59124 RK73H2B49R9FT A7R123 321–5194–00 RES,FXD:THICKFILM, 49.9 OHM,1%,0.125W,TC=100 PPM 59124 RK73H2B49R9FT A7R124 321–5050–00 RES,FXD:THICKFILM, 33.2 OHM,1%,0.125W,TC=100 PPM 50139 BCD33R2FT A7R125 321–5194–00 RES,FXD:THICKFILM, 49.9 OHM,1%,0.125W,TC=100 PPM 59124 RK73H2B49R9FT AM700 Audio Measurement Set Service Manual 8–125 Replaceable Electrical Parts Replaceable electrical parts list (cont.) Component number Tektronix part number Name & description Mfr. code Mfr. part number A7R126 321–5194–00 RES,FXD:THICKFILM, 49.9 OHM,1%,0.125W,TC=100 PPM 59124 RK73H2B49R9FT A7R127 321–5050–00 RES,FXD:THICKFILM, 33.2 OHM,1%,0.125W,TC=100 PPM 50139 BCD33R2FT A7R128 321–5050–00 RES,FXD:THICKFILM, 33.2 OHM,1%,0.125W,TC=100 PPM 50139 BCD33R2FT A7R129 321–5050–00 RES,FXD:THICKFILM, 33.2 OHM,1%,0.125W,TC=100 PPM 50139 BCD33R2FT A7R130 321–5050–00 RES,FXD:THICKFILM, 33.2 OHM,1%,0.125W,TC=100 PPM 50139 BCD33R2FT A7R131 321–5050–00 RES,FXD:THICKFILM, 33.2 OHM,1%,0.125W,TC=100 PPM 50139 BCD33R2FT A7R132 321–5050–00 RES,FXD:THICKFILM, 33.2 OHM,1%,0.125W,TC=100 PPM 50139 BCD33R2FT A7R133 321–5050–00 RES,FXD:THICKFILM, 33.2 OHM,1%,0.125W,TC=100 PPM 50139 BCD33R2FT A7R134 321–5050–00 RES,FXD:THICKFILM, 33.2 OHM,1%,0.125W,TC=100 PPM 50139 BCD33R2FT A7R135 321–5194–00 RES,FXD:THICKFILM, 49.9 OHM,1%,0.125W,TC=100 PPM 59124 RK73H2B49R9FT A7R136 321–5194–00 RES,FXD:THICKFILM, 49.9 OHM,1%,0.125W,TC=100 PPM 59124 RK73H2B49R9FT A7R137 321–5194–00 RES,FXD:THICKFILM, 49.9 OHM,1%,0.125W,TC=100 PPM 59124 RK73H2B49R9FT A7R138 321–5194–00 RES,FXD:THICKFILM, 49.9 OHM,1%,0.125W,TC=100 PPM 59124 RK73H2B49R9FT A7R139 321–5194–00 RES,FXD:THICKFILM, 49.9 OHM,1%,0.125W,TC=100 PPM 59124 RK73H2B49R9FT A7R141 321–5030–00 RES,FXD:THICKFILM, 10.0K OHM,1%,0.125W,TC=100 PPM 50139 BCK1002FT A7R144 321–5026–00 RES,FXD:THICKFILM, 4.75K OHM,1%,0.125W,TC=100 PPM 50139 BCK4751FT A7R151 321–5005–00 RES,FXD,FILM:THICKFILM, 27.4 OHM,1%,0.125W, TC=100 PPM 50139 BCD27R4JT A7R152 321–5194–00 RES,FXD:THICKFILM, 49.9 OHM,1%,0.125W,TC=100 PPM 59124 RK73H2B49R9FT A7R160 321–5212–00 RES,FXD,FILM:4.99K OHM,1%,0.125W,TC=100 PPM 91637 CRCW–1206–4991FR T1 A7R162 321–5212–00 RES,FXD,FILM:4.99K OHM,1%,0.125W,TC=100 PPM 91637 CRCW–1206–4991FR T1 A7R163 321–5212–00 RES,FXD,FILM:4.99K OHM,1%,0.125W,TC=100 PPM 91637 CRCW–1206–4991FR T1 A7R164 321–5212–00 RES,FXD,FILM:4.99K OHM,1%,0.125W,TC=100 PPM 91637 CRCW–1206–4991FR T1 A7RC1 307–5101–00 RCD,NTWK:16,47 OHM,33 PF,SCHOTTKE DIODE, SOIC–20 56427 PRCD001470M330M OR PRN244 8–126 Serial no. effective Serial no. discont’d AM700 Audio Measurement Set Service Manual Replaceable Electrical Parts Replaceable electrical parts list (cont.) Component number Tektronix part number Serial no. effective Serial no. discont’d Name & description Mfr. code Mfr. part number A7RC2 307–5101–00 RCD,NTWK:16,47 OHM,33 PF,SCHOTTKE DIODE, SOIC–20 56427 PRCD001470M330M OR PRN244 A7RC3 307–5101–00 RCD,NTWK:16,47 OHM,33 PF,SCHOTTKE DIODE, SOIC–20 56427 PRCD001470M330M OR PRN244 A7RC4 307–5101–00 RCD,NTWK:16,47 OHM,33 PF,SCHOTTKE DIODE, SOIC–20 56427 PRCD001470M330M OR PRN244 A7RC5 307–5101–00 RCD,NTWK:16,47 OHM,33 PF,SCHOTTKE DIODE, SOIC–20 56427 PRCD001470M330M OR PRN244 A7RC6 307–5101–00 RCD,NTWK:16,47 OHM,33 PF,SCHOTTKE DIODE, SOIC–20 56427 PRCD001470M330M OR PRN244 A7RC11 307–5101–00 RCD,NTWK:16,47 OHM,33 PF,SCHOTTKE DIODE, SOIC–20 56427 PRCD001470M330M OR PRN244 A7RC12 307–5101–00 RCD,NTWK:16,47 OHM,33 PF,SCHOTTKE DIODE, SOIC–20 56427 PRCD001470M330M OR PRN244 A7RC111 307–1585–00 RES NTWK,FXD,FI:TERMINATION NETWORK,8,50 OHM RESISTORS AND 8 ,220PF CAPS IN SERIES,9 PIN SIP,P 91637 CSRC–09C30–500J/2 21K–BULK A7S1 260–2549–00 SWITCH,PUSH:SPST,MOM,NO,300 GRM FRC,GOLD CONTACTS,RIGHT ANGLE,TOP SEALED,SHORT ACTUATOR,KSA0 31918 KSA0V431 A7TP2 214–4085–00 TERM,TEST POINT:0.070 ID,0.220 H,0.063 DIA PCB,0.015 X 0.032 BRASS,W/ RED NYLON COLLAR 26364 TP104–01–02 A7TP3 214–4085–00 TERM,TEST POINT:0.070 ID,0.220 H,0.063 DIA PCB,0.015 X 0.032 BRASS,W/ RED NYLON COLLAR 26364 TP104–01–02 A7TP4 214–4085–00 TERM,TEST POINT:0.070 ID,0.220 H,0.063 DIA PCB,0.015 X 0.032 BRASS,W/ RED NYLON COLLAR 26364 TP104–01–02 A7TP5 214–4085–00 TERM,TEST POINT:0.070 ID,0.220 H,0.063 DIA PCB,0.015 X 0.032 BRASS,W/ RED NYLON COLLAR 26364 TP104–01–02 A7U1 156–4443–00 IC,MEMORY:CMOS,SRAM,128K X 32 MODULE,25NS,4A12832M–25,SIMM64 6Y440 MT4S12832M–25 136–1235–00 SOCKET,SIMM:PCB,SIMM II;FEMALE,22.5 DEG,1 XLZ 00779 91–1744–14–64 A7U2 156–6695–00 IC,DIGITAL:ABTCMOS,BUFFER,OCTAL,RESISTOR TERMINATED OUTPUTS,3–STATE,74ABT2244 01295 SN74ABT2244DW A7U3 156–6695–00 IC,DIGITAL:ABTCMOS,BUFFER,OCTAL,RESISTOR TERMINATED OUTPUTS,3–STATE,74ABT2244 01295 SN74ABT2244DW A7U4 156–6695–00 IC,DIGITAL:ABTCMOS,BUFFER,OCTAL,RESISTOR TERMINATED OUTPUTS,3–STATE,74ABT2244 01295 SN74ABT2244DW A7U5 156–6695–00 IC,DIGITAL:ABTCMOS,BUFFER,OCTAL,RESISTOR TERMINATED OUTPUTS,3–STATE,74ABT2244 01295 SN74ABT2244DW A7U6 156–6550–00 IC,DIGITAL:FCTCMOS,TRANSCEIVER,OCTAL,RESISTO R TERMINATED OUTPUTS,3–STATE,74FCT2245T 0TJ19 QS74FCT2245TQ A7U7 156–6550–00 IC,DIGITAL:FCTCMOS,TRANSCEIVER,OCTAL,RESISTO R TERMINATED OUTPUTS,3–STATE,74FCT2245T 0TJ19 QS74FCT2245TQ *MOUNTING PARTS* *END MOUNTING PARTS* AM700 Audio Measurement Set Service Manual 8–127 Replaceable Electrical Parts Replaceable electrical parts list (cont.) Component number Tektronix part number Serial no. effective Serial no. discont’d Name & description Mfr. code Mfr. part number A7U8 156–6550–00 IC,DIGITAL:FCTCMOS,TRANSCEIVER,OCTAL,RESISTO R TERMINATED OUTPUTS,3–STATE,74FCT2245T 0TJ19 QS74FCT2245TQ A7U9 156–6550–00 IC,DIGITAL:FCTCMOS,TRANSCEIVER,OCTAL,RESISTO R TERMINATED OUTPUTS,3–STATE,74FCT2245T 0TJ19 QS74FCT2245TQ A7U10 156–6698–01 IC,ASIC:CMOS,CUSTOM,TRANSMITTER/RECEIVER,AD G312C,MM9409B,PQFP132 27014 MM9409–VF8 A7U11 156–6698–01 IC,ASIC:CMOS,CUSTOM,TRANSMITTER/RECEIVER,AD G312C,MM9409B,PQFP132 27014 MM9409–VF8 A7U12 156–6695–00 IC,DIGITAL:ABTCMOS,BUFFER,OCTAL,RESISTOR TERMINATED OUTPUTS,3–STATE,74ABT2244 01295 SN74ABT2244DW A7U13 156–6695–00 IC,DIGITAL:ABTCMOS,BUFFER,OCTAL,RESISTOR TERMINATED OUTPUTS,3–STATE,74ABT2244 01295 SN74ABT2244DW A7U14 156–6695–00 IC,DIGITAL:ABTCMOS,BUFFER,OCTAL,RESISTOR TERMINATED OUTPUTS,3–STATE,74ABT2244 01295 SN74ABT2244DW A7U15 156–6701–00 IC,ASIC:CMOS,CUSTOM,DSP INTERFACE FOR AM700,ADG314,PQFP160 1FN41 10227 A7U16 156–5908–00 IC,DIGITAL:FTTL,FLIP FLOP,DUAL D–TYPE,METASTABLE IMMUNITY,74F5074 1CH66 N74F5074D A7U17 156–6481–01 IC,MISC:CMOS,PWR SUPPLY SUPRVSOR, MPU RST GEN,5V SUPPLY SENSING,10%,350MS RST TIME, 0B0A9 DS1233Z–10/TR A7U18 156–5053–01 IC,DIGITAL:FTTL,GATE,QUAD 2–INPUT AND,74F08,SO14.150 01295 SN74F08DR A7U19 156–6773–00 IC,DIGITAL:CMOS,MISC,PROGRAMMABLE SKEW CLOCK BUFFER,CMOS LEVEL,7B992–7,PLCC32 65786 CY7B992–7JC A7U20 156–6695–00 IC,DIGITAL:ABTCMOS,BUFFER,OCTAL,RESISTOR TERMINATED OUTPUTS,3–STATE, 74ABT2244 01295 SN74ABT2244DW A7U21 156–4400–00 IC,PROCESSOR:CMOS,DSP,32BIT,33MHZ,FLOATING POINT,DSP96002,PGA223 04713 XC96002RC33 00779 916228–4 *MOUNTING PARTS* 136–1261–00 SOCKET,PGA:PCB;223 POS,18 X 18,0.1 CTR,0.25 H X 0.125 TAIL A7U22 156–5247–01 IC,DIGITAL:FTTL,GATE,TRIPLE 3–INPUT AND,74F11,SO14.150,16MM T&R 01295 SN74F11DR A7U23 156–4443–00 IC,MEMORY:CMOS,SRAM,128K X 32 MODULE,25NS,4A12832M–25,SIMM64 6Y440 MT4S12832M–25 00779 91–1744–14–64 *END MOUNTING PARTS* *MOUNTING PARTS* 136–1235–00 SOCKET,SIMM:PCB,SIMM II;FEMALE,22.5 DEG,1 XLZ A7U24 156–6550–00 IC,DIGITAL:FCTCMOS,TRANSCEIVER,OCTAL,RESISTO R TERMINATED OUTPUTS,3–STATE,74FCT2245T,QSOP20. 0TJ19 QS74FCT2245TQ A7U25 156–6550–00 IC,DIGITAL:FCTCMOS,TRANSCEIVER,OCTAL,RESISTO R TERMINATED OUTPUTS,3–STATE,74FCT2245T 0TJ19 QS74FCT2245TQ *END MOUNTING PARTS* 8–128 AM700 Audio Measurement Set Service Manual Replaceable Electrical Parts Replaceable electrical parts list (cont.) Component number Tektronix part number Serial no. effective Serial no. discont’d Name & description Mfr. code Mfr. part number A7U26 156–6550–00 IC,DIGITAL:FCTCMOS,TRANSCEIVER,OCTAL,RESISTO R TERMINATED OUTPUTS,3–STATE,74FCT2245T 0TJ19 QS74FCT2245TQ A7U27 156–6550–00 IC,DIGITAL:FCTCMOS,TRANSCEIVER,OCTAL,RESISTO R TERMINATED OUTPUTS,3–STATE,74FCT2245T 0TJ19 QS74FCT2245TQ A7U28 156–6695–00 IC,DIGITAL:ABTCMOS,BUFFER,OCTAL,RESISTOR TERMINATED OUTPUTS,3–STATE,74ABT2244 01295 SN74ABT2244DW A7U29 156–6695–00 IC,DIGITAL:ABTCMOS,BUFFER,OCTAL,RESISTOR TERMINATED OUTPUTS,3–STATE,74ABT2244 01295 SN74ABT2244DW A7U30 156–6695–00 IC,DIGITAL:ABTCMOS,BUFFER,OCTAL,RESISTOR TERMINATED OUTPUTS,3–STATE,74ABT2244 01295 SN74ABT2244DW A7U31 156–6695–00 IC,DIGITAL:ABTCMOS,BUFFER,OCTAL,RESISTOR TERMINATED OUTPUTS,3–STATE,74ABT2244 01295 SN74ABT2244DW A7U32 160–9895–00 IC,DIGITAL:156–6748–00,22V10–7 TK0198 160989500 A7U33 156–5188–01 IC,DIGITAL:FTTL,GATE,QUAD 2–INPUT XOR,74F86,SO14.150,16MM 01295 SN74F86DR A7U34 156–6681–00 IC,DIGITAL:CMOS,CLOCK FUNCTIONS, CLOCK DRIVER WITH PROCESSOR RESET,70MHZ,MC8891 04713 MC88916DW70 A7U36 156–5058–01 B010100 IC,DIGITAL:FTTL,TRANSCEIVER,OCTAL,3–STATE,74F2 45,SO20.300,24MM 1CH66 N74F245D A7U36 156–6942–01 B010141 IC,DIGITAL:FCTCMOS,TRANSCEIVER,OCTAL,3–STATE, 74FCT245AT,SO20.300,24MM 0TJ19 QS74FCT245ATSO A7U37 156–6695–00 IC,DIGITAL:ABTCMOS,BUFFER,OCTAL,RESISTOR TERMINATED OUTPUTS,3–STATE,74ABT2244 01295 SN74ABT2244DW A7U47 156–6695–00 IC,DIGITAL:ABTCMOS,BUFFER,OCTAL,RESISTOR TERMINATED OUTPUTS,3–STATE,74ABT2244 01295 SN74ABT2244DW A7U48 156–6771–00 IC,DIGITAL:FCTCMOS,FLIP FLOP,OCTAL,RESISTOR TERMINATED OUTPUTS,3–STATE,74FCT2374T 0TJ19 QS74FCT2374TSO A7U49 160–9911–00 IC,DIGITAL:CMOS,PLD,EEPLD,MACH435,128 MACROCELL,64 I/O,6 INPUT,15NS,PRGM 156–6777–00,MACH43 80009 160–9911–00 22526 69802–084 B010140 *MOUNTING PARTS* 136–5010–00 SOCKET,PLCC:SMD;84 POS,0.05 CTR,0.186H,TIN,W/PLZ POST A7U50 156–5167–00 IC,DIGITAL:FTTL,COUNTER,8–BIT BIDIRECTIONAL BINARY,74F269 04713 MC74F269DW A7U51 156–5908–00 IC,DIGITAL:FTTL,FLIP FLOP,DUAL D–TYPE,METASTABLE IMMUNITY,74F5074 1CH66 N74F5074D A7U52 156–6695–00 IC,DIGITAL:ABTCMOS,BUFFER,OCTAL,RESISTOR TERMINATED OUTPUTS,3–STATE,74ABT2244 01295 SN74ABT2244DW A7U53 156–6695–00 IC,DIGITAL:ABTCMOS,BUFFER,OCTAL,RESISTOR TERMINATED OUTPUTS,3–STATE,74ABT2244 01295 SN74ABT2244DW A7U54 156–6772–00 IC,DIGITAL:FCTCMOS,TRANSCEIVER,OCTAL REGISTERED,WITH RESISTOR TERMINATED OUTPUTS,3–STATE,74 0TJ19 QS74FCT2652TSO *END MOUNTING PARTS* AM700 Audio Measurement Set Service Manual 8–129 Replaceable Electrical Parts Replaceable electrical parts list (cont.) Component number Tektronix part number Name & description Mfr. code Mfr. part number A7U55 160–9896–00 IC,DIGITAL:CMOS,PLD,EEPLD,MACH 210A,64 M/C,32 I/O,6 INPUTS,2 CLK INPUT,10NS,PRGM 156–6776–0 80009 160–9896–00 A7U56 160–9894–00 IC,DIGITAL:156–5925–00,22V10–15 TK0198 160989400 A7U57 156–6694–00 IC,DIGITAL:ABTCMOS,FLIP FLOP,16–BIT D–TYPE,3–STATE,74ABT16374,SSOP48.300,TUBE 01295 SN74ABT16374ADL A7U58 156–6694–00 IC,DIGITAL:ABTCMOS,FLIP FLOP,16–BIT D–TYPE,3–STATE,74ABT16374,SSOP48.300 01295 SN74ABT16374ADL A7U59 156–6693–00 IC,DIGITAL:ABTCMOS,TRANSCEIVER,16–BIT,3–STATE, 74ABT16245A,SSOP48.300 01295 SN74ABT16245ADL A7U60 156–6693–00 IC,DIGITAL:ABTCMOS,TRANSCEIVER,16–BIT,3–STATE, 74ABT16245A,SSOP48.300 01295 SN74ABT16245ADL A7U61 156–6691–00 IC,DIGITAL:ABTCMOS,BUFFER,16–BIT,RESISTOR TERMINATED OUTPUTS,3–STATE,74ABT162244 01295 SN74ABT162244DL A7U62 156–6772–00 IC,DIGITAL:FCTCMOS,TRANSCEIVER,OCTAL REGISTERED,WITH RESISTOR TERMINATED OUTPUTS,3–STATE 0TJ19 QS74FCT2652TSO A7U63 156–5908–00 IC,DIGITAL:FTTL,FLIP FLOP,DUAL D–TYPE,METASTABLE IMMUNITY, 74F5074 1CH66 N74F5074D A7Y1 119–4691–00 OSCILLATOR,RF:66.666MHZ TK2424 K1100BA 66.666M 8–130 Serial no. effective Serial no. discont’d AM700 Audio Measurement Set Service Manual Replaceable Electrical Parts Replaceable electrical parts list Component number Tektronix part number A9 671–2798–00 A9 671–2798–01 A9C2 290–5039–00 A9C3 Serial no. effective Serial no. discont’d Name & description Mfr. code Mfr. part number CIRCUIT BD ASSY:FRONT PANEL,389–1617–XX WIRED 80009 671–2798–00 CIRCUIT BD ASSY:FRONT PANEL,389–1617–XX WIRED 80009 671–2798–01 CAP,FXD,ALUM:10UF,20%,50V,6.3MM, SMD,16MM 62643 MVK50VC10RMF60T PX 283–5004–00 CAP,FXD,CERAMIC:MLC,0.1UF,10%,25V,X7R,1206, SMD,8MM 04222 12063C104KAT3A A9C4 283–5004–00 CAP,FXD,CERAMIC:MLC,0.1UF,10%,25V,X7R,1206, SMD,8MM 04222 12063C104KAT3A A9C5 283–5004–00 CAP,FXD,CERAMIC:MLC,0.1UF,10%,25V,X7R,1206, SMD,8MM 04222 12063C104KAT3A A9C6 283–5004–00 CAP,FXD,CERAMIC:MLC,0.1UF,10%,25V,X7R,1206, SMD,8MM 04222 12063C104KAT3A A9C7 283–5004–00 CAP,FXD,CERAMIC:MLC,0.1UF,10%,25V,X7R,1206, SMD,8MM 04222 12063C104KAT3A A9C8 283–5004–00 CAP,FXD,CERAMIC:MLC,0.1UF,10%,25V,X7R,1206, SMD,8MM 04222 12063C104KAT3A A9C9 283–5004–00 CAP,FXD,CERAMIC:MLC,0.1UF,10%,25V,X7R,1206, SMD,8MM 04222 12063C104KAT3A A9C10 283–5004–00 CAP,FXD,CERAMIC:MLC,0.1UF,10%,25V,X7R,1206, SMD,8MM 04222 12063C104KAT3A A9C11 283–5004–00 CAP,FXD,CERAMIC:MLC,0.1UF,10%,25V,X7R,1206, SMD,8MM 04222 12063C104KAT3A A9C12 283–5004–00 CAP,FXD,CERAMIC:MLC,0.1UF,10%,25V,X7R,1206, SMD,8MM 04222 12063C104KAT3A A9C13 283–5004–00 CAP,FXD,CERAMIC:MLC,0.1UF,10%,25V,X7R,1206, SMD,8MM 04222 12063C104KAT3A A9C14 283–5004–00 CAP,FXD,CERAMIC:MLC,0.1UF,10%,25V,X7R,1206, SMD,8MM 04222 12063C104KAT3A A9C17 290–5039–00 CAP,FXD,ALUM:10UF,20%,50V,6.3MM, SMD,16MM 62643 MVK50VC10RMF60T PX A9C18 283–5004–00 CAP,FXD,CERAMIC:MLC,0.1UF,10%,25V,X7R,1206, SMD,8MM 04222 12063C104KAT3A A9C19 283–5004–00 CAP,FXD,CERAMIC:MLC,0.1UF,10%,25V,X7R,1206, SMD,8MM 04222 12063C104KAT3A A9C21 290–5039–00 CAP,FXD,ALUM:10UF,20%,50V,6.3MM, SMD,16MM 62643 MVK50VC10RMF60T PX A9C22 283–5188–00 CAP,FXD,CERAMIC:MLC,100PF,5%,100V,NPO,1206, SMD,8MM 04222 12061A101JAT1A A9C23 283–5003–00 CAP,FXD,CERAMIC:MLC,0.01UF,10%,50V,X7R,1206, SMD,8MM 04222 12065C103KAT060R A9C24 290–5039–00 CAP,FXD,ALUM:10UF,20%,50V,6.3MM, SMD,16MM 62643 MVK50VC10RMF60T PX A9C26 283–5004–00 CAP,FXD,CERAMIC:MLC,0.1UF,10%,25V,X7R,1206, SMD,8MM 04222 12063C104KAT3A A9C27 283–5004–00 CAP,FXD,CERAMIC:MLC,0.1UF,10%,25V,X7R,1206, SMD,8MM 04222 12063C104KAT3A 6/15/95 AM700 Audio Measurement Set Service Manual 8–131 Replaceable Electrical Parts Replaceable electrical parts list (cont.) Component number Tektronix part number Name & description Mfr. code Mfr. part number A9C28 283–5004–00 CAP,FXD,CERAMIC:MLC,0.1UF,10%,25V,X7R,1206, SMD,8MM 04222 12063C104KAT3A A9C30 283–5016–00 CAP,FXD,CERAMIC:MLC,1UF,10%,50V,X7R,0.225 X 0.250,2225, SMD,12MM 04222 22255C105KAT1A A9C31 283–5004–00 CAP,FXD,CERAMIC:MLC,0.1UF,10%,25V,X7R,1206, SMD,8MM 04222 12063C104KAT3A A9C33 283–5185–00 CAP,FXD,CERAMIC:MLC,1000PF,5%,50V,NPO,1206, SMD,8MM 04222 12065A102JAT1A A9C34 283–5014–00 CAP,FXD,CERAMIC:MLC,330PF,5%,50V,NPO,1206, SMD,8MM 04222 12065A331JAT1A A9C35 290–5039–00 CAP,FXD,ALUM:10UF,20%,50V,6.3MM, SMD,16MM 62643 MVK50VC10RMF60T PX A9C36 290–5034–01 CAP,FXD,ALUM:33UF,20%,10V,5.7MM(0.224), SMD 62643 MVK10VC33RME60T PX A9C37 290–5039–00 CAP,FXD,ALUM:10UF,20%,50V,6.3MM, SMD,16MM 62643 MVK50VC10RMF60T PX A9C38 283–5113–00 CAP,FXD,CERAMIC:MLC,0.047UF,10%,50V,X7R,1206, SMD,8MM 04222 12065C473KAT1A A9C39 283–5004–00 CAP,FXD,CERAMIC:MLC,0.1UF,10%,25V,X7R,1206, SMD,8MM 04222 12063C104KAT3A A9C40 283–5004–00 CAP,FXD,CERAMIC:MLC,0.1UF,10%,25V,X7R,1206, SMD,8MM 04222 12063C104KAT3A A9C41 283–5004–00 CAP,FXD,CERAMIC:MLC,0.1UF,10%,25V,X7R,1206, SMD,8MM 04222 12063C104KAT3A A9C42 283–5004–00 CAP,FXD,CERAMIC:MLC,0.1UF,10%,25V,X7R,1206, SMD,8MM 04222 12063C104KAT3A A9C43 283–5004–00 CAP,FXD,CERAMIC:MLC,0.1UF,10%,25V,X7R,1206, SMD,8MM 04222 12063C104KAT3A A9C44 283–5004–00 CAP,FXD,CERAMIC:MLC,0.1UF,10%,25V,X7R,1206, SMD,8MM 04222 12063C104KAT3A A9C45 290–5039–00 CAP,FXD,ALUM:10UF,20%,50V,6.3MM, SMD,16MM 62643 MVK50VC10RMF60T PX A9C46 283–5185–00 CAP,FXD,CERAMIC:MLC,1000PF,5%,50V,NPO,1206, SMD,8MM 04222 12065A102JAT1A A9C47 283–5014–00 CAP,FXD,CERAMIC:MLC,330PF,5%,50V,NPO,1206, SMD,8MM 04222 12065A331JAT1A A9C56 283–5015–00 CAP,FXD,CERAMIC:MLC,3300PF,10%,50V,X7R,1206, SMD,8MM 04222 12065C332KAT1A A9C58 283–5004–00 CAP,FXD,CERAMIC:MLC,0.1UF,10%,25V,X7R,1206, SMD,8MM 04222 12063C104KAT3A A9C59 283–5004–00 CAP,FXD,CERAMIC:MLC,0.1UF,10%,25V,X7R,1206, SMD,8MM 04222 12063C104KAT3A A9C60 283–5004–00 CAP,FXD,CERAMIC:MLC,0.1UF,10%,25V,X7R,1206, SMD,8MM 04222 12063C104KAT3A A9C61 283–5004–00 CAP,FXD,CERAMIC:MLC,0.1UF,10%,25V,X7R,1206, SMD,8MM 04222 12063C104KAT3A 8–132 Serial no. effective Serial no. discont’d AM700 Audio Measurement Set Service Manual Replaceable Electrical Parts Replaceable electrical parts list (cont.) Component number Tektronix part number Serial no. effective Serial no. discont’d Name & description Mfr. code Mfr. part number A9C62 283–5004–00 CAP,FXD,CERAMIC:MLC,0.1UF,10%,25V,X7R,1206, SMD,8MM 04222 12063C104KAT3A A9C67 283–5185–00 CAP,FXD,CERAMIC:MLC,1000PF,5%,50V,NPO,1206, SMD,8MM 04222 12065A102JAT1A A9C68 283–5185–00 CAP,FXD,CERAMIC:MLC,1000PF,5%,50V,NPO,1206, SMD,8MM 04222 12065A102JAT1A A9C69 283–5185–00 CAP,FXD,CERAMIC:MLC,1000PF,5%,50V,NPO,1206, SMD,8MM 04222 12065A102JAT1A A9C70 283–5185–00 CAP,FXD,CERAMIC:MLC,1000PF,5%,50V,NPO,1206, SMD,8MM 04222 12065A102JAT1A A9C71 283–5016–00 CAP,FXD,CERAMIC:MLC,1UF,10%,50V,X7R,0.225 X 0.250,2225, SMD,12MM 04222 22255C105KAT1A A9C72 283–5016–00 CAP,FXD,CERAMIC:MLC,1UF,10%,50V,X7R,0.225 X 0.250,2225, SMD,12MM 04222 22255C105KAT1A A9C73 283–5016–00 CAP,FXD,CERAMIC:MLC,1UF,10%,50V,X7R,0.225 X 0.250,2225, SMD,12MM 04222 22255C105KAT1A A9C74 283–5016–00 CAP,FXD,CERAMIC:MLC,1UF,10%,50V,X7R,0.225 X 0.250,2225, SMD,12MM 04222 22255C105KAT1A A9C75 290–5039–00 CAP,FXD,ALUM:10UF,20%,50V,6.3MM, SMD,16MM 62643 MVK50VC10RMF60T PX A9C76 283–5196–00 CAP,FXD,CERAMIC:MLC,47PF,5%,100V,NPO,1206, SMD,8MM 04222 12061A470JAT1A A9C77 283–5196–00 CAP,FXD,CERAMIC:MLC,47PF,5%,100V,NPO,1206, SMD,8MM 04222 12061A470JAT1A A9C78 283–5011–00 CAP,FXD,CERAMIC:MLC,33PF,5%,50V,NPO,1206, SMD,8MM,T&R 04222 12065A330JAT1A A9C79 283–5011–00 CAP,FXD,CERAMIC:MLC,33PF,5%,50V,NPO,1206, SMD,8MM,T&R 04222 12065A330JAT1A A9C80 283–5004–00 CAP,FXD,CERAMIC:MLC,0.1UF,10%,25V,X7R,1206, SMD,8MM 04222 12063C104KAT3A A9C81 283–5004–00 CAP,FXD,CERAMIC:MLC,0.1UF,10%,25V,X7R,1206, SMD,8MM 04222 12063C104KAT3A A9C82 283–5004–00 CAP,FXD,CERAMIC:MLC,0.1UF,10%,25V,X7R,1206, SMD,8MM 04222 12063C104KAT3A A9C83 283–5004–00 CAP,FXD,CERAMIC:MLC,0.1UF,10%,25V,X7R,1206, SMD,8MM 04222 12063C104KAT3A A9C84 283–5004–00 CAP,FXD,CERAMIC:MLC,0.1UF,10%,25V,X7R,1206, SMD,8MM 04222 12063C104KAT3A A9C85 283–5004–00 CAP,FXD,CERAMIC:MLC,0.1UF,10%,25V,X7R,1206, SMD,8MM 04222 12063C104KAT3A A9C86 283–5004–00 CAP,FXD,CERAMIC:MLC,0.1UF,10%,25V,X7R,1206, SMD,8MM 04222 12063C104KAT3A A9C87 283–5004–00 CAP,FXD,CERAMIC:MLC,0.1UF,10%,25V,X7R,1206, SMD,8MM 04222 12063C104KAT3A A9C88 283–5004–00 CAP,FXD,CERAMIC:MLC,0.1UF,10%,25V,X7R,1206, SMD,8MM 04222 12063C104KAT3A AM700 Audio Measurement Set Service Manual 8–133 Replaceable Electrical Parts Replaceable electrical parts list (cont.) Component number Tektronix part number Name & description Mfr. code Mfr. part number A9CR1 152–5018–00 DIODE,SIG:ULTRA FAST,100V,0.74VF,4NS,2.0PF, SER–PAIR, MMBD1203,TO–236/SOT–23,8MM 07263 MMBD1203 A9CR2 152–5018–00 DIODE,SIG:ULTRA FAST,100V,0.74VF,4NS,2.0PF, SER–PAIR,MMBD1203,TO–236/SOT–23,8MM 07263 MMBD1203 A9CR3 152–5018–00 DIODE,SIG:ULTRA FAST,100V,0.74VF,4NS,2.0PF ,SER–PAIR,MMBD1203,TO–236/SOT–23,8MM 07263 MMBD1203 A9CR4 152–5018–00 DIODE,SIG:ULTRA FAST,100V,0.74VF,4NS,2.0PF, SER–PAIR,MMBD1203,TO–236/SOT–23,8MM 07263 MMBD1203 A9CR5 152–5031–00 DIODE,SIG:ULTRA FAST,70V,0.2A,2.5PF,4NS, MMBD6050L/MMBD914L,TO–236/SOT–23,8MM 04713 MMBD6050LT1 A9DS1 150–5008–00 DIODE,OPTO:LED,GRN,569NM,4.2MCD AT 10MA,28 DEG VIEW ANGL,YOKE LEAD BEND, HLMP–6505–021,12MM 50434 HLMP–6505–021 A9DS2 150–5008–00 DIODE,OPTO:LED,GRN,569NM,4.2MCD AT 10MA,28 DEG VIEW ANGL,YOKE LEAD BEND, HLMP–6505–021,12MM 50434 HLMP–6505–021 A9DS3 150–5008–00 DIODE,OPTO:LED,GRN,569NM,4.2MCD AT 10MA,28 DEG VIEW ANGL,YOKE LEAD BEND, HLMP–6505–021,12MM 50434 HLMP–6505–021 A9DS4 150–5008–00 DIODE,OPTO:LED,GRN,569NM,4.2MCD AT 10MA,28 DEG VIEW ANGL,YOKE LEAD BEND, HLMP–6505–021,12MM 50434 HLMP–6505–021 A9DS5 150–5008–00 DIODE,OPTO:LED,GRN,569NM,4.2MCD AT 10MA,28 DEG VIEW ANGL,YOKE LEAD BEND, HLMP–6505–021,12MM 50434 HLMP–6505–021 A9DS6 150–5008–00 DIODE,OPTO:LED,GRN,569NM,4.2MCD AT 10MA,28 DEG VIEW ANGL,YOKE LEAD BEND, HLMP–6505–021,12MM 50434 HLMP–6505–021 A9DS7 150–5008–00 DIODE,OPTO:LED,GRN,569NM,4.2MCD AT 10MA,28 DEG VIEW ANGL,YOKE LEAD BEND, HLMP–6505–021,12MM 50434 HLMP–6505–021 A9DS8 150–5008–00 DIODE,OPTO:LED,GRN,569NM,4.2MCD AT 10MA,28 DEG VIEW ANGL,YOKE LEAD BEND, HLMP–6505–021,12MM 50434 HLMP–6505–021 A9DS9 150–5008–00 DIODE,OPTO:LED,GRN,569NM,4.2MCD AT 10MA,28 DEG VIEW ANGL,YOKE LEAD BEND, HLMP–6505–021,12MM 50434 HLMP–6505–021 A9DS10 150–5008–00 DIODE,OPTO:LED,GRN,569NM,4.2MCD AT 10MA,28 DEG VIEW ANGL,YOKE LEAD BEND, HLMP–6505–021,12MM 50434 HLMP–6505–021 A9DS11 150–5008–00 DIODE,OPTO:LED,GRN,569NM,4.2MCD AT 10MA,28 DEG VIEW ANGL,YOKE LEAD BEND, HLMP–6505–021,12MM 50434 HLMP–6505–021 A9DS12 150–5008–00 DIODE,OPTO:LED,GRN,569NM,4.2MCD AT 10MA,28 DEG VIEW ANGL,YOKE LEAD BEND,HLMP–6505–021,12MM 50434 HLMP–6505–021 A9DS13 150–5008–00 DIODE,OPTO:LED,GRN,569NM,4.2MCD AT 10MA,28 DEG VIEW ANGL,YOKE LEAD BEND, HLMP–6505–021,12MM 50434 HLMP–6505–021 8–134 Serial no. effective Serial no. discont’d AM700 Audio Measurement Set Service Manual Replaceable Electrical Parts Replaceable electrical parts list (cont.) Component number Tektronix part number Serial no. effective Serial no. discont’d Name & description Mfr. code Mfr. part number A9DS14 150–5008–00 DIODE,OPTO:LED,GRN,569NM,4.2MCD AT 10MA,28 DEG VIEW ANGL,YOKE LEAD BEND, HLMP–6505–021,12MM 50434 HLMP–6505–021 A9DS15 150–5008–00 DIODE,OPTO:LED,GRN,569NM,4.2MCD AT 10MA,28 DEG VIEW ANGL,YOKE LEAD BEND, HLMP–6505–021,12MM 50434 HLMP–6505–021 A9DS16 150–5008–00 DIODE,OPTO:LED,GRN,569NM,4.2MCD AT 10MA,28 DEG VIEW ANGL,YOKE LEAD BEND, HLMP–6505–021,12MM 50434 HLMP–6505–021 A9DS17 150–5008–00 DIODE,OPTO:LED,GRN,569NM,4.2MCD AT 10MA,28 DEG VIEW ANGL,YOKE LEAD BEND, HLMP–6505–021,12MM 50434 HLMP–6505–021 A9DS18 150–5008–00 DIODE,OPTO:LED,GRN,569NM,4.2MCD AT 10MA,28 DEG VIEW ANGL,YOKE LEAD BEND, HLMP–6505–021,12MM 50434 HLMP–6505–021 A9DS19 150–5008–00 DIODE,OPTO:LED,GRN,569NM,4.2MCD AT 10MA,28 DEG VIEW ANGL,YOKE LEAD BEND, HLMP–6505–021,12MM 50434 HLMP–6505–021 A9DS20 150–5008–00 DIODE,OPTO:LED,GRN,569NM,4.2MCD AT 10MA,28 DEG VIEW ANGL,YOKE LEAD BEND, HLMP–6505–021,12MM 50434 HLMP–6505–021 A9DS21 150–5008–00 DIODE,OPTO:LED,GRN,569NM,4.2MCD AT 10MA,28 DEG VIEW ANGL,YOKE LEAD BEND, HLMP–6505–021,12MM 50434 HLMP–6505–021 A9DS22 150–5008–00 DIODE,OPTO:LED,GRN,569NM,4.2MCD AT 10MA,28 DEG VIEW ANGL,YOKE LEAD BEND, HLMP–6505–021,12MM 50434 HLMP–6505–021 A9DS23 150–5012–00 DIODE,OPTO:LED,YELLOW,585NM,NON–DIFFUSED,3. 6 MCD AT 10MA,28 DEG VIEW ANGLE,YOKE LEAD BEND, 50434 HLMP–6405–021 A9DS25 150–5008–00 DIODE,OPTO:LED,GRN,569NM,4.2MCD AT 10MA,28 DEG VIEW ANGL,YOKE LEAD BEND, HLMP–6505–021,12MM 50434 HLMP–6505–021 A9DS31 150–5012–00 DIODE,OPTO:LED,YELLOW,585NM,NON–DIFFUSED,3. 6 MCD AT 10MA,28 DEG VIEW ANGLE,YOKE LEAD BEND 50434 HLMP–6405–021 A9DS41 150–5000–00 DIODE,OPTO:LED,RED,628NM,LS S260–DO,SOT–23,8MM,TR 50579 LS–S260–DOGEGUR T A9DS42 150–5000–00 DIODE,OPTO:LED,RED,628NM,LS S260–DO,SOT–23,8MM,TR 50579 LS–S260–DOGEGUR T A9DS43 150–5000–00 DIODE,OPTO:LED,RED,628NM,LS S260–DO,SOT–23,8MM,TR 50579 LS–S260–DOGEGUR T A9DS44 150–5000–00 DIODE,OPTO:LED,RED,628NM,LS S260–DO,SOT–23,8MM,TR 50579 LS–S260–DOGEGUR T A9DS45 150–5000–00 DIODE,OPTO:LED,RED,628NM,LS S260–DO,SOT–23,8MM,TR 50579 LS–S260–DOGEGUR T A9DS50 150–5000–00 DIODE,OPTO:LED,RED,628NM,LS S260–DO,SOT–23,8MM,TR 50579 LS–S260–DOGEGUR T AM700 Audio Measurement Set Service Manual 8–135 Replaceable Electrical Parts Replaceable electrical parts list (cont.) Component number Tektronix part number Name & description Mfr. code Mfr. part number A9DS100 150–5008–00 DIODE,OPTO:LED,GRN,569NM,4.2MCD AT 10MA,28 DEG VIEW ANGL,YOKE LEAD BEND,HLMP–6505–021,12MM 50434 HLMP–6505–021 A9DS101 150–5008–00 DIODE,OPTO:LED,GRN,569NM,4.2MCD AT 10MA,28 DEG VIEW ANGL,YOKE LEAD BEND,HLMP–6505–021,12MM 50434 HLMP–6505–021 A9DS102 150–5008–00 DIODE,OPTO:LED,GRN,569NM,4.2MCD AT 10MA,28 DEG VIEW ANGL,YOKE LEAD BEND,HLMP–6505–021,12MM 50434 HLMP–6505–021 A9DS103 150–5008–00 DIODE,OPTO:LED,GRN,569NM,4.2MCD AT 10MA,28 DEG VIEW ANGL,YOKE LEAD BEND,HLMP–6505–021,12MM 50434 HLMP–6505–021 A9DS104 150–5008–00 DIODE,OPTO:LED,GRN,569NM,4.2MCD AT 10MA,28 DEG VIEW ANGL,YOKE LEAD BEND,HLMP–6505–021,12MM 50434 HLMP–6505–021 A9DS105 150–5008–00 DIODE,OPTO:LED,GRN,569NM,4.2MCD AT 10MA,28 DEG VIEW ANGL,YOKE LEAD BEND,HLMP–6505–021,12MM 50434 HLMP–6505–021 A9DS106 150–5008–00 DIODE,OPTO:LED,GRN,569NM,4.2MCD AT 10MA,28 DEG VIEW ANGL,YOKE LEAD BEND,HLMP–6505–021,12MM 50434 HLMP–6505–021 A9DS107 150–5008–00 DIODE,OPTO:LED,GRN,569NM,4.2MCD AT 10MA,28 DEG VIEW ANGL,YOKE LEAD BEND,HLMP–6505–021,12MM 50434 HLMP–6505–021 A9DS108 150–5008–00 DIODE,OPTO:LED,GRN,569NM,4.2MCD AT 10MA,28 DEG VIEW ANGL,YOKE LEAD BEND,HLMP–6505–021,12MM 50434 HLMP–6505–021 A9DS109 150–5008–00 DIODE,OPTO:LED,GRN,569NM,4.2MCD AT 10MA,28 DEG VIEW ANGL,YOKE LEAD BEND,HLMP–6505–021,12MM 50434 HLMP–6505–021 A9DS110 150–5008–00 DIODE,OPTO:LED,GRN,569NM,4.2MCD AT 10MA,28 DEG VIEW ANGL,YOKE LEAD BEND,HLMP–6505–021,12MM 50434 HLMP–6505–021 A9DS111 150–5008–00 DIODE,OPTO:LED,GRN,569NM,4.2MCD AT 10MA,28 DEG VIEW ANGL,YOKE LEAD BEND,HLMP–6505–021,12MM 50434 HLMP–6505–021 A9DS112 150–5008–00 DIODE,OPTO:LED,GRN,569NM,4.2MCD AT 10MA,28 DEG VIE