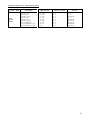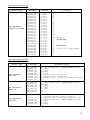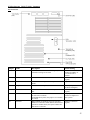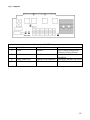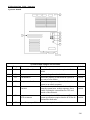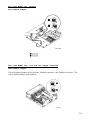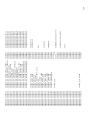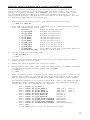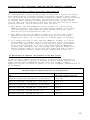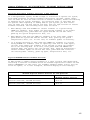
1
ALPHA Firmware Update Seminar By Wes Gulden Diagnose Before Dispatch Colorado Springs CSC [email protected] Version 6.1 Rev 3 10-March-2002 ii iii iv Revision History / Change List for Alpha Firmware Update Seminar. With every change to the document the title page will be modified to reflect current version and date. Page numbers listed on a specific revision may not be accurate on later versions of the document. 03-Mar-1999 - Version 5.3 Rev 1 28-Feb-1999 the printed doc and the 03-Mar-1999 electronic document are the same. 06-Mar-1999 - Version 5.3 Rev 2 Added V4.4 (vax7000_s0f) firmware version to VAX 7000 model 800 (page 10) 12-Mar-1999 - Version 5.3 Rev3 Added Revision History to document Defined –p, -s and –d switches. Removed –v switch. Changed set mode command on 7a. (page 93) Added load –f iso9660 command (pages 94, 234 and 237) Corrected SPDT address (page 211) Bolded EXAMINE 80DA32F8+80 command (page 215) Correct spelling of KZPSA_EDIT and reworded page (240) Removed space from DANGER::ES_DS_ALPHASERVER line (page 329) 21-Mar-1999 - Version 5.3 Rev 4 Added addition Blitz info (page 323) 26-Mar-1999 - Version 5.3 Rev 5 Changed V5.3 SRM console rev on AlphaServer 8x00 (page 7) Modified jumper tables (page 1 and 2) 04-Apr-1999 -- Version 5.3 Rev 5c Modified ES40 jumper tables (page 1) Added FailSafe Loader differences (page 273) Starting adding AlphaServer DS20 section Starting adding AlphaServer ES40 section 24-Apr-1999 -- Version 5.3 Rev 5d Modified ES40 jumper tables (page 1) Continue adding AlphaServer DS20 section Modified DS20 jumper tables Continue adding AlphaServer ES40 section Added ES40 jumper tables Added index marks to DS20 and ES40 sections 30-Apr-1999 – Version V5.4 Rev 1 Corrected ES40 jumper table (page 1) Added V5.4 info to revision tables (pages 3 – 13) Modified entire document to reflect V5.4 file names Added memory channel 2 firmware file CCMAB022.SYS thru document 01-May-1999 – Version V5.4 Rev 1 Updated document to include references to V5.4 Added Alpha System Websites section (page 345) 02-May-1999 – Version V5.4 Rev 1 Added J12 and J13 to ES40 CSB detail B jumper image (page 128) 06-May-1999 – Version V5.4 Rev 1 Modified AlphaServer 1200 floppy procedure to include the three floppy procedure. (page 56) Modified AlphaServer 4x00 floppy procedure to include the three floppy procedure. (page 79-80) Separated AlphaServer 8200/8400 and Compaq AlphaServer GS60/GS140 systems v 07-May-1999 – Version V5.4 Rev 1 Added Compaq AlphaServer DS20 section (pages 109-116) Added Compaq AlphaServer ES40 section (pages 117-122) 12-May-1999 – Version V5.4 Rev 1 Final revision. Printed copy of V5.4 Rev 1. 14-May-1999 – Version V5.4 Rev 2 Removed "on each CPU" from Build -e line on AlphaServer 1200 and 4100 (pages 61 and 85) Changed SRM version from 5.4-1 to 5.4-2 on the AlphaServer 1200 and 4x00 (pages 5 and 6) 15-May-1999 – Version V5.4 Rev 2 Modified GS140/GS60 file names for LFU boot (page 100) Added Blitz's TD 2651-CR and TD 2652 to Blitz Section (pages 354 and 357) Added Blitz's TD 2651-CR information (page 341) 16-May-1999 – Version V5.4 Rev 2 Added a 4100 Issues page (page 337) Added LFU floppy procedure for AlphaServer 8200/8400 (pages 91-93) Added LFU floppy procedure for Compaq AlphaServer GS460/GS140 (pages 105-107) 28-May-1999 – Version V5.4 Rev 2 Changed -1 to -l (L) on deposit commands (page 327) Document to be Published on ProSIC June 1999 CD 11-Jun-1999 – Version V5.4 Rev 3 Added new Blitz titles (pages 361-363, 365) 16-Jul-1999 – Version V5.4 Rev 4 Added new Blitz titles (pages 361-365) 30-Jul-1999 – Version V5.4 Rev 4 Modified Prosic URLs 31-Jul-1999 – Version V5.5 Rev 1 Updated document to include references to V5.5 07-Aug-1999 – Version V5.5 Rev 1 Continue updating document to include V5.5 filenames Add DS10 info 14-Aug-1999 – Version V5.5 Rev 1 Added Blitz's Modified tables to include GS60E (page 8) Modified page to include GS60E (page 349) Modified the Compaq Professional WorkStation XP1000 Section 28-Aug-1999 - Version V5.5 Rev 1 Modified notesfile locations Modified DS10, DS20 and ES40 sections 10-Sep-1999 - Version V5.5 Rev 1 Modified DS10, DS20 and ES40 sections (cont) 12-Sep-1999 - Version V5.5 Rev 1 Added hyperlinks to all URLs Modified XP1000 and Personal Workstation sections Add FFNEXT and FFAUTO sections Add section on environmental variables vi 17-Sep-1999 - Version V5.5 Rev 1 Completed section on environmental variables. Moved sections concerning environmental variable. 19-Sep-1999 - Version V5.5 Rev 1 Add wwidmgr sections 24-Sep-1999 - Version V5.5 Rev 1 Add ES40 and DS20 failsafe loader sections 26-Sep-1999 - Version V5.5 Rev 1 Added section on Galaxy environmental variables. 03-Oct-1999 - Version V5.5 Rev 1 Updated ES40 failsafe loader section 05-Oct-1999 - Version V5.5 Rev 1 Added DS10 failsafe loader section Corrected DS20 SW2 jumper settings Updated DS20 jumper section (page 1) 06-Oct-1999 - Version V5.5 Rev 1 Modified DS20 failsafe loader section. Modified environmental variable section Final revision. Printed copy of V5.5 Rev 1. 07-Oct-1999 - Version V5.5 Rev 2 Added ES40 Blitz 14-Oct-1999 - Version V5.5 Rev 2 Added ES40 Blitz Minor correction throughout document. 28-Oct-1999 - Version V5.5 Rev 2 Added GS60/GS140 Blitz Minor corrections throughout document. 14-Nov-1999 - Version V5.5 Rev 3 Modify GS60/GS140 section to remove AS8x00 references Added blitz’s Added several new ProSIC links 18-Dec-1999 - Version V5.6 Rev 1 Updated document to include references to V5.6 Added blitz’s 09-Jan-2000 - Version V5.6 Rev 1 Added AlphaStation 255 and AlphaServer/AlphaStation clear password pages. Continue V5.6 update 19-Feb-2000 - Version V5.6 Rev 1 Added firmware updates on Galaxy Modified DS10 FSB procedure Added problems with update and DE500 connected to active network Added KGPSA utility info 21-Feb-2000 - Version V5.6 Rev 1 Correct minor typo’s and add entries to Index vii 22-Feb-2000 - Version V5.6 Rev 1 Modify DS20 failsafe loader page 24-Feb-2000 - Version V5.6 Rev 1 Modify the Galaxy firmware update procedure page Add more to the Galaxy environmental variable definition page Modify the DS10 update using LFU 04-Mar-2000 - Version V5.6 Rev 1 Added ES40/RMC firmware page 10-Mar-2000 - Version V5.6 Rev 1 Modified ES40/RMC firmware page 14-Mar-2000 - Version V5.6 Rev 1 Added GS60/GS60E/GS140 Blitz TD 2766 17-Mar-2000 - Version V5.6 Rev 1 Added Wildfire notesfile information 24-Mar-2000 - Version V5.6 Rev 1 Added consvar info (page 255) Added DS20/DS20 to save_nvram and restore_nvram commands (page 273) List system without failsafe loader (page 343) General corrections and modifications throughout document in preparation for publishing 31-Mar-2000 - Version V5.6 Rev Added new AlphaServer 800 firmware floppy procedure ( page 363) Added CIXCD 4K firmware update section Added GS60/GS140 procedure to write CD with .iso file 04-Apr-2000 - Version V5.6 Rev 1 Modified DS20 page to remove HAL install section 14-Apr-2000 - Version V5.6 Rev 1 Modify XP1000 section to include VMS methods if using V5.6 firmware 14-Apr-2000 - Version V5.7 Rev 1 Start adding V5.7 info 15-Apr-2000 - Version V5.7 Rev 1 Modify floppy procedure on as800, as1200, as4x00, ds10 and ds20/ds20e 20-Apr-2000 - Version V5.7 Rev 1 Added 4100/DAC960 init issue with V5.7-4 console Made miscellaneous corrections preparing for publishing 20-Apr-2000 - Version V5.7 Rev 2 Added 4100/DAC960 Blitz Added to list of firmware Prosic pages 18-May-2000 - Version V5.7 Rev 2 Modified VAX 7000 firmware revision tables to include subversion for V4.4 firmware 16-Jun-2000 - Version V5.7 Rev 3 Added AlphaServer ES40 Blitz TD 2787-CR Added AlphaServer 1200/4x00 Blitz TD 2789 Added EV67 srm firmware file name to ES40 pages 15-Jul-2000 - Version V5.7 Rev 3 viii Started GS80/GS160/GS320 section 16-Jul-2000 - Version V5.7 Rev 3 Added lp_error_target variable to the Galaxy variable page. Continued modifying the GS80/GS160/GS320 section 01-Aug-2000 – Version V5.8 Rev 1 Added V5.8 versions to firmware tables 15-Aug-2000 – Version V5.8 Rev 2 Restored missing images and tables throughout the document 29-Aug-2000 – Version V5.8 Rev 2 Modified top and bottom margins from .7" to .5" 29-Aug-2000 – Version V5.8 Rev 2 Updated filenames and versions to reflect newer V5.8 files 15-Sep-2000 – Version V5.8 Rev 3 Updated BLITZ table Added info on XP1000 V5.8-4 firmware 19-Jan-2001 – Version V5.8 Rev 4 Restored missing images again. 26-Jan-2001 – Version V5.9 Rev 1 Added V5.9 versions to firmware tables 27-Jan-2001 – Version V5.9 Rev 1 Added V5.9 filenames and versions up to AlphaServer GS60/GS140 section. 10-Feb-2001 – Version V5.9 Rev 1 Completed V5.9 filenames and versions. Added Blitz’s and documentation references. Modified webpage addresses. 11-Feb-2001 – Version V5.9 Rev 1 Working on GS320 section. 16-Feb-2001 – Version V5.9 Rev 1 Converted four Heading 1 formatted lines to Subtitle. Working on GS320 section. Completed GS320 section. 07-Apr-2001 – Version V5.9 Rev 1 Adding ES40 upgrading CPUs section 13-Apr-2001 – Version V5.9 Rev 1 Update Blitz tables 04-May-2001 – Version V5.9 Rev 1 Update Blitz tables Modify GS80/GS160/GS320 SCM Update Section Add note to DS10 and DS20 concerning Netscape issues Added KGPSA update pages 04-May-2001 – Version V5.9 Rev 2 Minor corrections and cosmetic changes 19-May-2001 – Version V5.9 Rev 3 Rewrite KGPSA firmware update procedure on Wildfire systems. ix 24-May-2001 – Version V5.9 Rev 3 Modified Turbolaser build –e command. Added DS10 blitz 31-May-2001 – Version V6.0 Rev 1 Updated document to include the V6.0 filenames and versions 01-Jun-2001 – Version V6.0 Rev 1 Added ES45 to jumpers page Modified DEC3000-400 article concerning SROM V1.0 01-Jul-2001 – Version V6.0 Rev 1 Added Wildfire V6.0 update example Added ES45 Jumper pictures and definitions Changed all ProSIC references to prosic.inet.cpqcorp.net Added Wildfire firmware location on internet 21-Sep-2001 – Version V6.1Rev 1 Modified tables for V6.1 CD 04-Nov-2001 – Version V6.1Rev 1 Added V6.1 filenames Added ES45 section Modified URLs to point to Cybrary instead of ProSIC. 15-Feb-2002 – Version V6.1Rev 1 Added Blitz’s Added Turbolaser single CPU/V6.0 issue Finish ES40 and ES45 FSL sections 01-Mar-2002 – Version V6.1Rev 2 Modified Turbolaser single CPU/V6.0 issue Corrected ES40 pages concerning cl67srmrom.exe file name 10-Mar-2002 – Version V6.1Rev 3 Modified all links Corrected links to .dec.com Removed broken links x LIST OF ROM UPDATE JUMPERS, FSL UPDATE JUMPERS AND FSL SELECT JUMPERS ..............................1 LIST OF ROM UPDATE JUMPERS, FSL UPDATE JUMPERS AND FSL SELECT JUMPERS - CONT. ..............2 MINIMUM ACCEPTABLE FIRMWARE CD VERSIONS FOR RECENT OS VERSIONS .......................................3 WHAT VERSION FIRMWARE IS ON WHICH CD.........................................................................................................4 ALPHASERVER 300 THRU ALPHASERVER 800 SYSTEMS ...................................................................................................... 4 ALPHASERVER 1000 EV4 THRU ALPHASERVER 1000A EV4 SYSTEMS ............................................................................... 5 ALPHASERVER 1000A EV5 THRU ALPHASERVER 2X00 EV4 SYSTEMS .............................................................................. 6 ALPHASERVER 2X00 EV5 THRU ALPHASERVER 2100A EV5 SYSTEMS .............................................................................. 7 ALPHASERVER 4X00 THRU 8X00 SYSTEMS .......................................................................................................................... 8 COMPAQ ALPHASERVER DS10, DS20/DS20E AND COMPAQ ALPHASERVER GS60/GS60E/GS140 ................................... 9 COMPAQ ALPHASERVER GS80/GS160/GS320................................................................................................................... 10 ALPHASERVER ES40 .......................................................................................................................................................... 11 ALPHASERVER ES45 .......................................................................................................................................................... 11 DIGITAL PERSONAL WORKSTATION A/AU SERIES .............................................................................................................. 12 DIGITAL ULTIMATE WORKSTATION 533A2/533AU2 SERIES AND COMPAQ PROFESSIONAL WORKSTATION XP1000 ........ 12 ALPHASTATION 200 THRU ALPHASTATION 255 SYSTEMS ................................................................................................. 13 ALPHASTATION 400 THRU ALPHASTATION 600 SYSTEMS ................................................................................................. 14 ALPHASTATION 600A SYSTEMS ......................................................................................................................................... 15 DEC 2000 SYSTEMS ........................................................................................................................................................... 15 DEC 3000 SYSTEMS ........................................................................................................................................................... 16 DEC 3000 SYSTEMS CONT ................................................................................................................................................. 17 DEC 4000 SYSTEMS ........................................................................................................................................................... 18 DEC 7000/10000 SYSTEMS ................................................................................................................................................ 19 VAX 7000/10000 SYSTEMS ............................................................................................................................................... 19 ALPHA WINDOWS NT MATRIX..................................................................................................................................... 21 ALPHA SYSTEM FIRMWARE UPDATE PROCEDURES ........................................................................................... 23 ALPHASERVER 300 ........................................................................................................................................................... 25 METHOD 1 - LOAD THE CONSOLE FIRMWARE OFF A LOCAL CDROM............................................................................... 26 SRM Console ................................................................................................................................................................ 26 ARC Console ................................................................................................................................................................ 26 METHOD 2 - BOOT THE CONSOLE CD OFF OF AN INFOSERVER .......................................................................................... 27 METHOD 3 - BOOTING OFF THE NETWORK - OPENVMS..................................................................................................... 27 METHOD 4 - BOOT OFF OF A DISK - NON-SYSTEM DISK AND SYSTEM DISK USING OPENVMS......................................... 27 Non-System Disk .......................................................................................................................................................... 27 System Disk .................................................................................................................................................................. 28 METHOD 5 - BOOT OFF OF A BOOTABLE FLOPPY ............................................................................................................... 28 OpenVMS AXP ............................................................................................................................................................ 28 Digital UNIX................................................................................................................................................................. 28 Windows NT ................................................................................................................................................................. 29 METHOD 6 - BOOTP NETWORK UPGRADE - TRU64 UNIX ............................................................................................... 29 ALPHASERVER 300 JUMPERS ....................................................................................................................................... 33 MOTHERBOARD .................................................................................................................................................................. 33 ALPHASERVER 800 OR DIGITAL SERVER 3000 MODELS 3300/3305.................................................................... 35 METHOD 1 – LOAD THE CONSOLE FIRMWARE OFF A LOCAL CDROM .............................................................................. 36 SRM Console ................................................................................................................................................................ 36 AlphaBIOS Console...................................................................................................................................................... 36 METHOD 2 – BOOT THE CONSOLE CD OFF OF AN INFOSERVER.......................................................................................... 37 METHOD 3 – BOOTING OFF THE NETWORK – OPENVMS................................................................................................... 37 METHOD 4 - BOOT OFF OF A DISK - NON-SYSTEM DISK AND SYSTEM DISK USING OPENVMS......................................... 37 xi Non-System Disk .......................................................................................................................................................... 37 System Disk .................................................................................................................................................................. 38 METHOD 5 - BOOT OFF OF A BOOTABLE FLOPPY - V5.6 FIRMWARE OR EARLIER .............................................................. 38 OpenVMS AXP ............................................................................................................................................................ 38 Tru64 UNIX .................................................................................................................................................................. 39 Windows NT ................................................................................................................................................................. 40 METHOD 6 - BOOT OFF OF A BOOTABLE FLOPPY - V5.7 FIRMWARE OR LATER ................................................................. 40 Windows NT - PC......................................................................................................................................................... 40 Windows NT - Alpha or PC .......................................................................................................................................... 41 Tru64 UNIX - Alpha ..................................................................................................................................................... 41 METHOD 7 - BOOTP NETWORK UPGRADE - TRU64 UNIX ............................................................................................... 42 ALPHASERVER 800 JUMPERS ....................................................................................................................................... 45 MOTHERBOARD .................................................................................................................................................................. 45 CPU DAUGHTER CARD ...................................................................................................................................................... 46 J1 and J3 Settings .......................................................................................................................................................... 46 ALPHASERVER 1000/1000A ............................................................................................................................................. 47 METHOD 1 - LOAD THE CONSOLE FIRMWARE OFF A LOCAL CDROM............................................................................... 48 SRM Console ................................................................................................................................................................ 48 ARC/AlphaBIOS Console............................................................................................................................................. 48 METHOD 2 - BOOT THE CONSOLE CD OFF OF AN INFOSERVER .......................................................................................... 49 METHOD 3 - BOOTING OFF THE NETWORK - OPENVMS .................................................................................................... 49 METHOD 4 - BOOT OFF OF A DISK - NON-SYSTEM DISK AND SYSTEM DISK USING OPENVMS......................................... 49 Non-System Disk .......................................................................................................................................................... 49 System Disk .................................................................................................................................................................. 50 METHOD 5 - BOOT OFF OF A BOOTABLE FLOPPY ............................................................................................................... 50 OpenVMS AXP ............................................................................................................................................................ 50 Tru64 UNIX .................................................................................................................................................................. 51 Windows NT ................................................................................................................................................................. 52 METHOD 6 - BOOTP NETWORK UPGRADE - TRU64 UNIX ............................................................................................... 52 ALPHASERVER 1000/1000A JUMPERS ......................................................................................................................... 55 MOTHERBOARD .................................................................................................................................................................. 55 EV4 CPU ........................................................................................................................................................................... 56 J4, J3 and J1 Settings .................................................................................................................................................... 56 EV5/300 CPU .................................................................................................................................................................... 57 J3 and J4 Settings .......................................................................................................................................................... 57 EV5/333 CPU .................................................................................................................................................................... 58 J1 and J3 Settings .......................................................................................................................................................... 58 EV5/400 CPU .................................................................................................................................................................... 59 J1 and J3 Settings .......................................................................................................................................................... 59 ALPHASERVER 1200 OR DIGITAL SERVER 5000 MODELS 5300/5305 OR DIGITAL ULTIMATE WORKSTATION ................................................................................................................................................................. 61 METHOD 1 - LOAD THE CONSOLE FIRMWARE OFF A LOCAL CDROM............................................................................... 63 SRM Console ................................................................................................................................................................ 63 AlphaBIOS Console...................................................................................................................................................... 63 METHOD 2 - BOOT CONSOLE CD, FIRMWARE FLOPPY OR NETWORK DEVICE ................................................................... 63 CD ................................................................................................................................................................................. 63 Floppy ........................................................................................................................................................................... 64 Network......................................................................................................................................................................... 65 METHOD 3 - BOOT THE CONSOLE CD OFF OF AN INFOSERVER .......................................................................................... 65 METHOD 4 - BOOTING OFF THE NETWORK ......................................................................................................................... 65 METHOD 5 - BOOT OFF OF A DISK - NON-SYSTEM DISK AND SYSTEM DISK USING OPENVMS......................................... 66 Non-System Disk .......................................................................................................................................................... 66 System Disk .................................................................................................................................................................. 66 METHOD 6 – BOOT OFF OF A BOOTABLE FLOPPY - V5.2 FIRMWARE OR EARLIER ............................................................. 67 OpenVMS AXP ............................................................................................................................................................ 67 Tru64 UNIX .................................................................................................................................................................. 67 Windows NT ................................................................................................................................................................. 67 xii METHOD 7 – BOOT OFF OF A BOOTABLE FLOPPY - V5.3 FIRMWARE OR LATER ................................................................ 68 Windows NT ................................................................................................................................................................. 68 METHOD 8 - BOOTP NETWORK UPGRADE - TRU64 UNIX ............................................................................................... 68 ALPHASERVER 2000/2100/2100A .................................................................................................................................... 73 METHOD 1 - LOAD THE CONSOLE FIRMWARE OFF A LOCAL CDROM............................................................................... 74 SRM Console ................................................................................................................................................................ 74 ARC Console ................................................................................................................................................................ 74 METHOD 2 - BOOT THE CONSOLE CD OFF OF AN INFOSERVER .......................................................................................... 75 METHOD 3 - BOOTING OFF THE NETWORK - OPENVMS .................................................................................................... 75 METHOD 4 - BOOT OFF OF A DISK - NON-SYSTEM DISK AND SYSTEM DISK USING OPENVMS......................................... 75 Non-System Disk .......................................................................................................................................................... 75 System Disk .................................................................................................................................................................. 76 METHOD 5 - BOOT OFF OF A BOOTABLE FLOPPY ............................................................................................................... 76 OpenVMS AXP ............................................................................................................................................................ 76 Tru64 UNIX .................................................................................................................................................................. 77 Windows NT ................................................................................................................................................................. 78 METHOD 6 - BOOTP NETWORK UPGRADE - TRU64 UNIX ............................................................................................... 78 ALPHASERVER 2000/2100/2100A JUMPERS ................................................................................................................ 83 ALPHASERVER 2000........................................................................................................................................................... 83 BA720 Enclosure .......................................................................................................................................................... 83 ALPHASERVER 2100 AND 2100 RM ................................................................................................................................... 84 BA740/BA741 Enclosures ............................................................................................................................................ 84 ALPHASERVER 2100A ........................................................................................................................................................ 85 ALPHASERVER 2100A RM................................................................................................................................................. 85 ALPHASERVER 2100A LP .................................................................................................................................................. 86 ALPHASERVER 4000/4100 OR DIGITAL SERVER 7000 MODELS 7300/7305......................................................... 87 METHOD 1 - LOAD THE CONSOLE FIRMWARE OFF A LOCAL CDROM............................................................................... 88 SRM Console ................................................................................................................................................................ 88 AlphaBIOS Console...................................................................................................................................................... 89 METHOD 2 - BOOT CONSOLE CD, FIRMWARE FLOPPY OR NETWORK DEVICE ................................................................... 89 CD ................................................................................................................................................................................. 89 Floppy ........................................................................................................................................................................... 89 Network......................................................................................................................................................................... 90 METHOD 3 - BOOT THE CONSOLE CD OFF OF AN INFOSERVER .......................................................................................... 91 METHOD 4 - BOOTING OFF THE NETWORK ......................................................................................................................... 91 METHOD 5 - BOOT OFF OF A DISK - NON-SYSTEM DISK AND SYSTEM DISK USING OPENVMS......................................... 92 Non-System Disk .......................................................................................................................................................... 92 System Disk .................................................................................................................................................................. 92 METHOD 6 - BOOT OFF OF A BOOTABLE FLOPPY - V5.2 FIRMWARE OR EARLIER .............................................................. 92 OpenVMS AXP ............................................................................................................................................................ 92 Tru64 UNIX .................................................................................................................................................................. 93 Windows NT ................................................................................................................................................................. 93 METHOD 7 - BOOT OFF OF A BOOTABLE FLOPPY - V5.3 FIRMWARE OR LATER ................................................................. 93 Windows NT ................................................................................................................................................................. 93 METHOD 8 - BOOTP NETWORK UPGRADE - TRU64 UNIX ............................................................................................... 94 ALPHASERVER 4000/4100 JUMPERS ............................................................................................................................ 99 PCI/EISA MOTHERBOARD ................................................................................................................................................. 99 ALPHASERVER 4000/4100 LP JUMPERS ...................................................................................................................... 99 PCI/EISA MOTHERBOARD ................................................................................................................................................. 99 ALPHASERVER 8200/8400 .............................................................................................................................................. 101 METHOD 1 - BOOT THE CONSOLE CD OFF A LOCAL CDROM......................................................................................... 102 SRM Console .............................................................................................................................................................. 102 AlphaBIOS Console.................................................................................................................................................... 102 METHOD 2 - BOOT CONSOLE CD, FIRMWARE FLOPPY OR NETWORK DEVICE ................................................................. 102 CD ............................................................................................................................................................................... 102 xiii Floppy - NT................................................................................................................................................................. 103 Floppy - OpenVMS..................................................................................................................................................... 104 Network....................................................................................................................................................................... 105 METHOD 3 - BOOT THE CONSOLE CD OFF OF AN INFOSERVER ........................................................................................ 106 METHOD 4 - BOOTING OFF THE NETWORK ....................................................................................................................... 106 METHOD 5 - BOOT OFF OF A DISK - NON-SYSTEM DISK AND SYSTEM DISK USING OPENVMS....................................... 106 Non-System Disk ........................................................................................................................................................ 106 System Disk ................................................................................................................................................................ 107 METHOD 6 - BOOTP NETWORK UPGRADE - TRU64 UNIX ............................................................................................. 107 COMPAQ ALPHASERVER GS60/GS140 ...................................................................................................................... 115 METHOD 1 - BOOT THE CONSOLE CD OFF A LOCAL CDROM......................................................................................... 116 SRM Console .............................................................................................................................................................. 116 AlphaBIOS Console.................................................................................................................................................... 116 METHOD 2 - BOOT CONSOLE CD, FIRMWARE FLOPPY OR NETWORK DEVICE ................................................................. 116 CD ............................................................................................................................................................................... 116 Floppy - NT................................................................................................................................................................. 117 Floppy - OpenVMS..................................................................................................................................................... 118 Network....................................................................................................................................................................... 119 METHOD 3 - BOOT THE CONSOLE CD OFF OF AN INFOSERVER ........................................................................................ 119 METHOD 4 - CREATE A BOOTABLE CD USING A CD WRITER AND THE .ISO FIRMWARE FILE .......................................... 120 METHOD 5 - BOOTING OFF THE NETWORK ....................................................................................................................... 120 METHOD 6 - BOOT OFF OF A DISK - NON-SYSTEM DISK AND SYSTEM DISK USING OPENVMS....................................... 121 Non-System Disk ........................................................................................................................................................ 121 System Disk ................................................................................................................................................................ 121 METHOD 7 - BOOTP NETWORK UPGRADE - TRU64 UNIX ............................................................................................. 121 COMPAQ ALPHASERVER GS80/GS160/GS320 .......................................................................................................... 129 LFU FIRMWARE UPDATE PROCEDURE ............................................................................................................................. 129 METHOD 1 – LOAD THE CONSOLE FIRMWARE OFF A LOCAL CDROM ............................................................................ 131 SRM Console .............................................................................................................................................................. 131 METHOD 2 – BOOT THE CONSOLE CD OFF OF AN INFOSERVER........................................................................................ 131 METHOD 3 - CREATE A BOOTABLE CD USING A CD WRITER AND THE .ISO FIRMWARE FILE .......................................... 132 METHOD 4 - BOOTING OFF THE NETWORK - OPENVMS................................................................................................... 132 METHOD 5 - BOOT OFF OF A DISK - NON-SYSTEM DISK AND SYSTEM DISK USING OPENVMS....................................... 132 Non-System Disk ........................................................................................................................................................ 132 System Disk ................................................................................................................................................................ 133 METHOD 6 - BOOTP NETWORK UPGRADE - TRU64 UNIX ............................................................................................. 133 ERRORS ............................................................................................................................................................................ 139 METHOD 6 - SCM UPDATE .............................................................................................................................................. 140 Laptop system setup .................................................................................................................................................... 140 Keaterm setup ............................................................................................................................................................. 140 Powerterm 525 setup................................................................................................................................................... 141 SCM UPDATE FILES ......................................................................................................................................................... 141 SCM UPDATE – CONDITIONS OF NOTE WHEN USING THIS UPDATE METHOD.................................................................. 142 UPDATE PROCEDURE USING SCM..................................................................................................................................... 142 SCM Update Example ( PSM only) ............................................................................................................................ 144 ALPHASERVER DS10 AND PROFESSIONAL WORKSTATION XP900 ................................................................ 145 METHOD 1 – LOAD THE CONSOLE FIRMWARE OFF A LOCAL CDROM ............................................................................ 147 SRM Console .............................................................................................................................................................. 147 AlphaBIOS Console.................................................................................................................................................... 147 METHOD 2 – BOOT THE CONSOLE CD OFF OF AN INFOSERVER........................................................................................ 147 METHOD 3 - FIRMWARE FLOPPY FROM ALPHABIOS UPGRADE....................................................................................... 147 METHOD 4 - USING THE CONSOLE LFU COMMAND ......................................................................................................... 148 Floppy - CPU Firmware Only ..................................................................................................................................... 148 Floppy - CPU and IO Firmware.................................................................................................................................. 148 CD ............................................................................................................................................................................... 149 Network....................................................................................................................................................................... 150 METHOD 5 - BOOTING OFF THE NETWORK - OPENVMS .................................................................................................. 150 METHOD 6 - BOOT OFF OF A DISK - NON-SYSTEM DISK AND SYSTEM DISK USING OPENVMS....................................... 151 Non-System Disk ........................................................................................................................................................ 151 xiv System Disk ................................................................................................................................................................ 151 METHOD 7 - BOOTP NETWORK UPGRADE – TRU64 UNIX............................................................................................. 151 ALPHASERVER DS10 JUMPERS .................................................................................................................................. 153 MOTHERBOARD ................................................................................................................................................................ 153 ALPHASERVER DS20/DS20E ......................................................................................................................................... 155 METHOD 1 – LOAD THE CONSOLE FIRMWARE OFF A LOCAL CDROM ............................................................................ 157 SRM Console .............................................................................................................................................................. 157 AlphaBIOS Console.................................................................................................................................................... 157 METHOD 2 – BOOT THE CONSOLE CD OFF OF AN INFOSERVER........................................................................................ 157 METHOD 3 - FIRMWARE FLOPPY FROM ALPHABIOS UPGRADE....................................................................................... 157 METHOD 4 - USING THE CONSOLE LFU COMMAND ......................................................................................................... 158 Floppy ......................................................................................................................................................................... 158 CD ............................................................................................................................................................................... 159 Network....................................................................................................................................................................... 159 METHOD 5 - BOOTING OFF THE NETWORK - OPENVMS .................................................................................................. 161 METHOD 6 - BOOT OFF OF A DISK - NON-SYSTEM DISK AND SYSTEM DISK USING OPENVMS....................................... 161 Non-System Disk ........................................................................................................................................................ 161 System Disk ................................................................................................................................................................ 161 METHOD 7 - BOOTP NETWORK UPGRADE – TRU64 UNIX............................................................................................. 162 ALPHASERVER DS20 JUMPERS .................................................................................................................................. 165 MOTHERBOARD ................................................................................................................................................................ 165 COMPAQ ALPHASERVER ES40/TS40 ......................................................................................................................... 168 METHOD 1 – LOAD THE CONSOLE FIRMWARE OFF A LOCAL CDROM ............................................................................ 170 SRM Console .............................................................................................................................................................. 170 AlphaBIOS Console.................................................................................................................................................... 170 METHOD 2 – BOOT THE CONSOLE CD OFF OF AN INFOSERVER........................................................................................ 170 METHOD 3 - BOOTING OFF THE NETWORK - OPENVMS .................................................................................................. 170 METHOD 4 - BOOT OFF OF A FLOPPY................................................................................................................................ 171 NT ............................................................................................................................................................................... 171 Tru64 UNIX ................................................................................................................................................................ 173 METHOD 5 - OPENVMS - BOOT OFF OF A DISK - NON-SYSTEM DISK AND SYSTEM DISK ............................................... 175 METHOD 5 - OPENVMS - BOOT OFF OF A DISK - NON-SYSTEM DISK AND SYSTEM DISK ............................................... 175 Non-System Disk ........................................................................................................................................................ 175 System Disk ................................................................................................................................................................ 175 METHOD 6 - BOOTP NETWORK UPGRADE – TRU64 UNIX............................................................................................. 175 COMPAQ ALPHASERVER ES40 JUMPERS ............................................................................................................... 178 CSB - SYSTEM BACKPLANE ............................................................................................................................................. 178 COMPAQ ALPHASERVER ES45 ................................................................................................................................... 180 METHOD 1 – LOAD THE CONSOLE FIRMWARE OFF A LOCAL CDROM ............................................................................ 183 SRM Console .............................................................................................................................................................. 183 METHOD 2 – BOOT THE CONSOLE CD OFF OF AN INFOSERVER........................................................................................ 183 METHOD 3 - BOOTING OFF THE NETWORK - OPENVMS .................................................................................................. 183 METHOD 4 – USING THE CONSOLE LFU COMMAND ........................................................................................................ 184 Floppy ......................................................................................................................................................................... 184 METHOD 5 - OPENVMS - BOOT OFF OF A DISK - NON-SYSTEM DISK AND SYSTEM DISK ............................................... 185 Non-System Disk ........................................................................................................................................................ 185 System Disk ................................................................................................................................................................ 186 METHOD 6 - BOOTP NETWORK UPGRADE – TRU64 UNIX............................................................................................. 186 COMPAQ ALPHASERVER ES45 JUMPERS ............................................................................................................... 188 CSB - SYSTEM BACKPLANE ............................................................................................................................................. 188 ALPHASTATION 200/250 FULL FLASH SYSTEMS ................................................................................................... 190 METHOD 1 - BOOT THE CONSOLE CD OFF A LOCAL CDROM......................................................................................... 191 SRM Console .............................................................................................................................................................. 191 xv ARC Console .............................................................................................................................................................. 191 METHOD 2 - BOOT THE CONSOLE CD OFF OF AN INFOSERVER ........................................................................................ 192 METHOD 3 - BOOTING OFF THE NETWORK - OPENVMS .................................................................................................. 192 METHOD 4 - BOOT OFF OF A DISK - NON-SYSTEM DISK AND SYSTEM DISK USING OPENVMS....................................... 192 Non-System Disk ........................................................................................................................................................ 192 System Disk ................................................................................................................................................................ 193 METHOD 5 - BOOT OFF OF A BOOTABLE FLOPPY ............................................................................................................. 193 OpenVMS AXP .......................................................................................................................................................... 193 Tru64 UNIX ................................................................................................................................................................ 193 Windows NT ............................................................................................................................................................... 194 METHOD 6 – BOOTP NETWORK UPGRADE – TRU64 UNIX ............................................................................................ 194 ALPHASTATION 200 JUMPERS.................................................................................................................................... 198 MOTHERBOARD ................................................................................................................................................................ 198 ALPHASTATION 250 JUMPERS.................................................................................................................................... 200 MOTHERBOARD ................................................................................................................................................................ 200 ALPHASTATION 200/255 HALF FLASH SYSTEMS................................................................................................... 202 METHOD 1 - LOAD THE CONSOLE FIRMWARE OFF A LOCAL CDROM............................................................................. 203 SRM Console .............................................................................................................................................................. 203 ARC Console .............................................................................................................................................................. 203 METHOD 2 - BOOT THE CONSOLE CD OFF OF AN INFOSERVER ........................................................................................ 203 METHOD 3 - BOOTING OFF THE NETWORK - OPENVMS................................................................................................... 204 METHOD 4 - BOOT OFF OF A DISK - NON-SYSTEM DISK AND SYSTEM DISK USING OPENVMS....................................... 204 Non-System Disk ........................................................................................................................................................ 204 System Disk ................................................................................................................................................................ 204 METHOD 5 - BOOT OFF OF A BOOTABLE FLOPPY .............................................................................................................. 205 OpenVMS AXP .......................................................................................................................................................... 205 Tru64 UNIX ................................................................................................................................................................ 205 Windows NT ............................................................................................................................................................... 205 METHOD 6 – BOOTP NETWORK UPGRADE – TRU64 UNIX ............................................................................................ 206 ALPHASTATION 200 JUMPERS.................................................................................................................................... 210 MOTHERBOARD ................................................................................................................................................................ 210 ALPHASTATION 255 JUMPERS.................................................................................................................................... 212 MOTHERBOARD ................................................................................................................................................................ 212 ALPHASERVER 400 / ALPHASTATION 400 ............................................................................................................... 214 METHOD 1 – LOAD THE CONSOLE FIRMWARE OFF A LOCAL CDROM ............................................................................ 215 SRM Console .............................................................................................................................................................. 215 ARC Console .............................................................................................................................................................. 215 METHOD 2 - BOOT THE CONSOLE CD OFF OF AN INFOSERVER ........................................................................................ 216 METHOD 3 - BOOTING OFF THE NETWORK - OPENVMS................................................................................................... 216 METHOD 4 - BOOT OFF OF A DISK - NON-SYSTEM DISK AND SYSTEM DISK USING OPENVMS....................................... 216 Non-System Disk ........................................................................................................................................................ 216 System Disk ................................................................................................................................................................ 216 METHOD 5 - BOOT OFF OF A BOOTABLE FLOPPY ............................................................................................................. 217 OpenVMS AXP .......................................................................................................................................................... 217 Tru64 UNIX ................................................................................................................................................................ 217 Windows NT ............................................................................................................................................................... 218 METHOD 6 - BOOTP NETWORK UPGRADE - TRU64 UNIX ............................................................................................. 218 ALPHASERVER 400 JUMPERS ..................................................................................................................................... 222 MOTHERBOARD JUMPERS ................................................................................................................................................. 222 CPU JUMPERS .................................................................................................................................................................. 223 ALPHASTATION 400 JUMPERS.................................................................................................................................... 224 MOTHERBOARD JUMPERS ................................................................................................................................................. 224 CPU JUMPERS.................................................................................................................................................................... 225 xvi ALPHASTATION 500/600 ................................................................................................................................................ 226 METHOD 1 - LOAD THE CONSOLE FIRMWARE OFF A LOCAL CDROM............................................................................. 227 SRM Console .............................................................................................................................................................. 227 ARC Console .............................................................................................................................................................. 227 METHOD 2 - BOOT THE CONSOLE CD OFF OF AN INFOSERVER ........................................................................................ 227 METHOD 3 - BOOTING OFF THE NETWORK - OPENVMS .................................................................................................. 228 METHOD 4 - BOOT OFF OF A DISK - NON-SYSTEM DISK AND SYSTEM DISK USING OPENVMS....................................... 228 Non-System Disk ........................................................................................................................................................ 228 System Disk ................................................................................................................................................................ 228 METHOD 5 - BOOT OFF OF A BOOTABLE FLOPPY .............................................................................................................. 229 OpenVMS AXP .......................................................................................................................................................... 229 Tru64 UNIX ................................................................................................................................................................ 229 Windows NT ............................................................................................................................................................... 229 METHOD 6 - BOOTP NETWORK UPGRADE - TRU64 UNIX ............................................................................................. 230 ALPHASTATION 500 JUMPER LOCATIONS ............................................................................................................. 232 SYSTEM MODULE ............................................................................................................................................................. 232 ALPHASTATION 600 JUMPER LOCATIONS ............................................................................................................. 234 SYSTEM MODULE ............................................................................................................................................................. 234 ALPHASTATION 600A .................................................................................................................................................... 236 METHOD 1 - BOOT THE CONSOLE CD OFF A LOCAL CDROM......................................................................................... 237 SRM Console .............................................................................................................................................................. 237 ARC Console .............................................................................................................................................................. 237 METHOD 2 - BOOT THE CONSOLE CD OFF OF AN INFOSERVER ........................................................................................ 237 METHOD 3 - BOOTING OFF THE NETWORK - OPENVMS .................................................................................................. 238 METHOD 4 - BOOT OFF OF A DISK - NON-SYSTEM DISK AND SYSTEM DISK USING OPENVMS....................................... 238 Non-System Disk ........................................................................................................................................................ 238 System Disk ................................................................................................................................................................ 239 METHOD 5 - BOOT OFF OF A BOOTABLE FLOPPY .............................................................................................................. 239 OpenVMS AXP .......................................................................................................................................................... 239 Tru64 UNIX ................................................................................................................................................................ 240 Windows NT ............................................................................................................................................................... 240 METHOD 6 - BOOTP NETWORK UPGRADE - TRU64 UNIX ............................................................................................. 241 ALPHASTATION 600A JUMPERS................................................................................................................................. 244 CPU MODULE.................................................................................................................................................................... 245 DIGITAL PERSONAL WORKSTATION A/AU SERIES............................................................................................. 246 METHOD 1 - LOAD THE CONSOLE FIRMWARE OFF A LOCAL CDROM............................................................................. 248 SRM Console .............................................................................................................................................................. 248 ARC Console .............................................................................................................................................................. 248 METHOD 2 - BOOT THE CONSOLE CD OFF OF AN INFOSERVER ........................................................................................ 248 METHOD 3 - BOOTING OFF THE NETWORK - OPENVMS................................................................................................... 248 METHOD 4 - BOOT OFF OF A DISK - NON-SYSTEM DISK AND SYSTEM DISK USING OPENVMS....................................... 249 Non-System Disk ........................................................................................................................................................ 249 System Disk ................................................................................................................................................................ 249 METHOD 5 - BOOT OFF OF A BOOTABLE FLOPPY ............................................................................................................. 249 OpenVMS AXP .......................................................................................................................................................... 249 Tru64 UNIX ................................................................................................................................................................ 249 Windows NT ............................................................................................................................................................... 250 METHOD 6 - BOOTP NETWORK UPGRADE - TRU64 UNIX ............................................................................................. 250 COMPAQ PROFESSIONAL WORKSTATION XP1000 .............................................................................................. 254 METHOD 1 - LOAD THE CONSOLE FIRMWARE OFF A LOCAL CDROM............................................................................. 255 METHOD 2 - BOOT THE CONSOLE CD OFF OF AN INFOSERVER ........................................................................................ 255 METHOD 3 – BOOTING OFF THE NETWORK – NEED AN OPENVMS HOST ON NETWORK ................................................. 255 METHOD 4 - BOOT OFF OF A DISK - NON-SYSTEM DISK AND SYSTEM DISK USING OPENVMS....................................... 255 Non-System Disk ........................................................................................................................................................ 255 System Disk ................................................................................................................................................................ 256 xvii METHOD 5 - BOOT OFF OF A BOOTABLE FLOPPY ............................................................................................................. 256 Windows NT ............................................................................................................................................................... 256 TRU64 UNIX.............................................................................................................................................................. 256 OpenVMS AXP .......................................................................................................................................................... 256 METHOD 6 - BOOTP NETWORK UPGRADE – TRU64 UNIX............................................................................................ 257 DEC 2000 MODEL 300/500 AXP AND DECPC AXP150 .............................................................................................. 260 METHOD 1 - BOOT THE CONSOLE CD OFF A LOCAL CDROM ......................................................................................... 261 METHOD 2 - BOOT THE CONSOLE CD OFF OF AN INFOSERVER ........................................................................................ 261 METHOD 3 - BOOTING OFF THE NETWORK ...................................................................................................................... 261 OpenVMS ................................................................................................................................................................... 261 Tru64 UNIX or Ultrix ................................................................................................................................................. 262 METHOD 4 - BOOT OFF OF A DISK - NON-SYSTEM DISK AND SYSTEM DISK USING OPENVMS....................................... 262 Non-System Disk ........................................................................................................................................................ 262 System Disk ................................................................................................................................................................ 263 METHOD 5 - BOOT OFF OF A BOOTABLE FLOPPY ............................................................................................................. 263 OpenVMS AXP .......................................................................................................................................................... 263 Tru64 UNIX ................................................................................................................................................................ 263 Windows NT ............................................................................................................................................................... 263 METHOD 6 - BOOTP NETWORK UPGRADE - TRU64 UNIX ............................................................................................ 264 DEC 3000 - ALL MODELS ............................................................................................................................................... 266 METHOD 1 - BOOT THE CONSOLE CD OFF A LOCAL CDROM......................................................................................... 267 METHOD 2 - BOOT THE CONSOLE CD OFF OF AN INFOSERVER ........................................................................................ 267 METHOD 3 - BOOTING OFF THE NETWORK ....................................................................................................................... 267 VMS System ............................................................................................................................................................... 267 Ultrix ........................................................................................................................................................................... 268 METHOD 4 - BOOT OFF OF A DISK - NON-SYSTEM DISK AND SYSTEM DISK USING OPENVMS ...................................... 268 Non-System Disk ........................................................................................................................................................ 268 System Disk ................................................................................................................................................................ 268 METHOD 5 - BOOT OFF OF A BOOTABLE FLOPPY ............................................................................................................. 269 OpenVMS AXP .......................................................................................................................................................... 269 Tru64 UNIX ................................................................................................................................................................ 269 METHOD 6 - BOOTP NETWORK UPGRADE - TRU64 UNIX ............................................................................................. 270 DEC 3000 MODEL 300 JUMPERS .................................................................................................................................. 274 ROM UPDATE JUMPER ...................................................................................................................................................... 274 DEC 3000 MODEL 400, 600 AND 700 JUMPER LOCATION ..................................................................................... 274 ROM UPDATE JUMPER ..................................................................................................................................................... 274 DEC 3000 MODEL 500, 500S, 500X JUMPER LOCATIONS....................................................................................... 276 SYSTEM MODULE ............................................................................................................................................................. 276 I/O MODULE ..................................................................................................................................................................... 276 DEC 3000 MODEL 800 AND 900 ROM UPDATE JUMPER LOCATIONS ............................................................... 278 SYSTEM MODULE JUMPERS .............................................................................................................................................. 278 I/O MODULE JUMPERS...................................................................................................................................................... 279 DEC 4000 - MODELS 600 AND 700................................................................................................................................. 280 METHOD 1 - BOOT THE CONSOLE CD OFF A LOCAL CDROM ......................................................................................... 281 METHOD 2 - BOOT THE CONSOLE CD OFF OF AN INFOSERVER ........................................................................................ 281 METHOD 3 - BOOTING OFF THE NETWORK ....................................................................................................................... 281 VMS System ............................................................................................................................................................... 281 METHOD 4 - BOOT OFF OF A DISK -NON-SYSTEM DISK AND SYSTEM DISK USING OPENVMS........................................ 281 Non-System Disk ........................................................................................................................................................ 281 System Disk ................................................................................................................................................................ 282 METHOD 5 - BOOTP NETWORK UPGRADE - TRU64 UNIX ............................................................................................. 282 DEC 7000/10000.................................................................................................................................................................. 284 METHOD 1 - BOOT THE CONSOLE CD OFF A LOCAL CDROM......................................................................................... 285 xviii METHOD 2 - BOOT THE CONSOLE CD OFF OF AN INFOSERVER ........................................................................................ 285 METHOD 3 - BOOTING OFF THE NETWORK ....................................................................................................................... 285 METHOD 4 - BOOT OFF OF A DISK - NON-SYSTEM DISK AND SYSTEM DISK USING OPENVMS....................................... 285 Non-System Disk ........................................................................................................................................................ 285 System Disk ................................................................................................................................................................ 286 VAX 7000/10000 ................................................................................................................................................................. 290 METHOD 1 - BOOTING OFF A LOCAL CDROM................................................................................................................. 291 METHOD 2 - BOOTING OVER THE NETWORK .................................................................................................................... 291 METHOD 3 - BOOT THE CONSOLE CD OFF OF AN INFOSERVER ........................................................................................ 291 METHOD 4 - BOOT OFF OF A DISK - NON-SYSTEM DISK AND SYSTEM DISK USING OPENVMS....................................... 292 Non-System Disk ........................................................................................................................................................ 292 System Disk ................................................................................................................................................................ 293 A DESCRIPTION OF HALCODE AND PALCODE ..................................................................................................... 298 GENERIC POWERUP SEQUENCE TO LOAD CONSOLE FIRMWARE ................................................................ 300 DEFINITIONS OF ENVIRONMENTAL VARIABLES ................................................................................................ 302 DEFINITION OF GALAXY ENVIRONMENTAL VARIABLES ................................................................................ 308 HOW TO SET CUSTOMER DEFINED ENVIRONMENTAL VARIABLES............................................................. 310 HOW TO SET CUSTOMER DEFINED ENVIRONMENTAL VARIABLES ON A TURBOLASER ..................... 312 DESCRIPTION OF THE ENVIRONMENTAL VARIABLE BUS_PROBE_ALGORITHM.................................... 314 USING FFNEXT AND FFAUTO ENVIRONMENTAL VARIABLES ........................................................................ 316 BACKGROUND OF DEVICE STATES.................................................................................................................................... 316 Behavior of “Not Connected” Devices ...................................................................................................................... 316 Determining a “Not Connected” Device from an HSZ80 or HSG80 ......................................................................... 316 Determining a “Not Connected" Device from the SRM Console ............................................................................... 316 FORCING THE CONSOLE TO USE A "NOT CONNECTED" DEVICE ....................................................................................... 317 Using FFAUTO to Autoboot a "Not Connected" Devices .......................................................................................... 317 Using FFNEXT on "Not Connected" Devices ............................................................................................................ 318 LFU SCRIPTS AND CONSOLE COMMANDS AVAILABLE..................................................................................... 320 ALPHASTATION 600A ...................................................................................................................................................... 320 ALPHASERVER 1000 / 1000A ........................................................................................................................................... 320 ALPHASERVER 2X00 / 2X00A .......................................................................................................................................... 320 ONLINE COMMANDS FOR OSF/1,UNIX AND OPENVMS TO GET FIRMWARE AND CPU REV INFO ....... 322 UNIX ................................................................................................................................................................................. 322 UNIX AND OSF/1 .............................................................................................................................................................. 322 OPENVMS........................................................................................................................................................................ 324 WNT ................................................................................................................................................................................ 325 HOW TO DETERMINE FIRMWARE REVISION OF KZPBA-CA OR KZPBA-CB WITH OPENVMS V7.1 AND V7.2 ...................................................................................................................................................................................... 327 HOW TO BOOT RCU OFF OF THE FIRMWARE UPDATE CD .............................................................................. 333 HOW TO CREATE A RAID STANDALONE CONFIGURATION UTILITY [RCU] FLOPPY.............................. 335 PROCEDURE ...................................................................................................................................................................... 335 Utility Filename Definitions........................................................................................................................................ 335 Firmware Filenames Definitions ................................................................................................................................. 335 Windows 95 ................................................................................................................................................................ 335 Windows NT ............................................................................................................................................................... 336 Error if files on floppy are set read-only ..................................................................................................................... 337 xix RUNNING RCU FIRMWARE UPDATE ON AN ALPHASERVER 8200 / 8400........................................................ 339 OVERVIEW ........................................................................................................................................................................ 339 UTILITY FILENAME DEFINITIONS ...................................................................................................................................... 339 Filenames used up to the V3.8 CD.............................................................................................................................. 339 Filenames used from the V3.9 CD and later ............................................................................................................... 339 FIRMWARE FILENAMES DEFINITIONS................................................................................................................................ 339 PROCEDURE ...................................................................................................................................................................... 340 Terminal Setup ............................................................................................................................................................ 340 Console Setup ............................................................................................................................................................. 340 HOW TO RUN RCU FROM A SERIAL CONSOLE ................................................................................................................... 340 Floppy ......................................................................................................................................................................... 340 CD ............................................................................................................................................................................... 341 HOW TO RUN RCU FROM A GRAPHICS CONSOLE (ALPHABIOS) ....................................................................................... 341 Floppy ......................................................................................................................................................................... 341 CD ............................................................................................................................................................................... 342 HOW TO UPDATE FIRMWARE FROM FLOPPY ..................................................................................................................... 342 Serial Console ............................................................................................................................................................. 342 Use floppy with firmware update utility RA200FL.EXE V3.10A renamed to SWXCRFW.EXE ............................. 343 Graphics Console ........................................................................................................................................................ 343 WHEN YOU ARE DONE....................................................................................................................................................... 344 EISA CONFIGURATION UTILITY (ECU) COMMANDS .......................................................................................... 345 USING THE EISA CONFIGURATION UTILITY ..................................................................................................................... 345 BEFORE YOU RUN THE ECU............................................................................................................................................. 345 CONFIGURING EISA OPTIONS .......................................................................................................................................... 345 CONFIGURING ISA OPTIONS ............................................................................................................................................. 347 PROCEDURE TO UPDATE CIXCD WITH 4K PACKET FIRMWARE ................................................................... 349 OVERVIEW ........................................................................................................................................................................ 349 RESTRICTIONS .................................................................................................................................................................. 349 DIFFERENT FILES REQUIRED TO DO THE UPDATE ............................................................................................................. 349 UPDATE PROCEDURES ...................................................................................................................................................... 349 AlphaServer 8x00 and GS Series Machines................................................................................................................ 349 DEC7000/10000.......................................................................................................................................................... 350 VAX7000/10000 ......................................................................................................................................................... 351 VAX6000 and VAX9000............................................................................................................................................ 351 KGPSA FILES USED FOR FIRMWARE UPDATES.................................................................................................... 353 UPGRADING KGPSA FIRMWARE ON GS80/GS160/GS320 MACHINES .............................................................. 355 OVERVIEW ........................................................................................................................................................................ 355 FIRMWARE FILES AVAILABLE........................................................................................................................................... 355 CREATING A CDROM ...................................................................................................................................................... 355 To create a CD with the Option firmware Only. ......................................................................................................... 355 TO CREATE A CDROM USING THE FIRMWARE .ISO FILE................................................................................................. 356 EXAMPLE .......................................................................................................................................................................... 356 ERRORS ............................................................................................................................................................................ 359 UPGRADING KGPSA FIRMWARE ON TURBOLASERS OR GS60/GS60E/GS140 MACHINES ........................ 361 OVERVIEW ........................................................................................................................................................................ 361 FILES AVAILABLE ............................................................................................................................................................. 361 CREATING A CDROM ...................................................................................................................................................... 361 TERMINAL SETUP ............................................................................................................................................................. 362 CONSOLE SETUP AND RUNNING UTILITY .......................................................................................................................... 362 EXAMPLE .......................................................................................................................................................................... 363 UPGRADING KGPSA FIRMWARE FROM ALPHABIOS.......................................................................................... 365 OVERVIEW ........................................................................................................................................................................ 365 FILES AVAILABLE ............................................................................................................................................................. 365 CREATING A CDROM ...................................................................................................................................................... 365 PROCEDURE ...................................................................................................................................................................... 366 xx CDROM ...................................................................................................................................................................... 366 Floppy ......................................................................................................................................................................... 366 ERRORS ............................................................................................................................................................................ 367 PROBLEMS RUNNING LP6DUTIL.EXE ON A TURBOLASER OR GS60/60E/140 MACHINE .......................... 369 USING THE KZPSA UTIL_CLI.EXE FILE TO SET KZPSA PARAMETERS......................................................... 371 COMMAND SUMMARY............................................................................................................................................... 372 HELP or ?.................................................................................................................................................................... 372 EXIT SAVE ................................................................................................................................................................ 372 EXIT NO_SAVE ........................................................................................................................................................ 372 SELECT KZPSA <1-n>.............................................................................................................................................. 372 SHOW KZPSA ........................................................................................................................................................... 372 SHOW DEVICES ....................................................................................................................................................... 372 SHOW CONFIG ......................................................................................................................................................... 372 DEFAULTS ................................................................................................................................................................ 372 SET SCSI_ID <0-15> ................................................................................................................................................. 372 ENABLE / DISABLE FAST ...................................................................................................................................... 373 ENABLE / DISABLE TERMPOWER ....................................................................................................................... 373 ENABLE / DISABLE RESET_ON_BOOT ............................................................................................................... 373 ENABLE / DISABLE SYNC <0-15 | ALL> .............................................................................................................. 373 ENABLE / DISABLE WIDE <0-15 | ALL> .............................................................................................................. 373 ENABLE / DISABLE TAGGED_QUEUING <0-15 | ALL> .................................................................................... 373 ENABLE / DISABLE DISCONNECT <0-15 | ALL>................................................................................................ 373 RESET_SCSI_BUS .................................................................................................................................................... 373 LOGS .......................................................................................................................................................................... 373 TEST KZPSA [REPEAT] [HALT_ON_ERROR | CONTINUE_ON_ERROR | LOOP_ON_ERROR].................... 373 TEST DEVICES [REPEAT] [HALT_ON_ERROR | CONTINUE_ON_ERROR | LOOP_ON_ERROR] ............... 373 KZPSA_EDIT UTILITY ................................................................................................................................................... 377 WWIDMGR - WORLD WIDE ID MANAGER DESCRIPTION ................................................................................. 379 ALPHASERVER WITH HSJ’S MAY GET A HARD ERROR #8 ON INIT............................................................... 381 MISSING FILE MESSAGE FROM LFU FOR DEFPA FIRMWARE......................................................................... 383 OPTION FIRMWARE FAILS TO LOAD OFF OF FLOPPY ...................................................................................... 385 FIRMWARE UPGRADES WITH CONSOLE SECURE SET ...................................................................................... 387 HOW TO CLEAR THE SRM CONSOLE PASSWORD ON AN ALPHASTATION 500 / 600................................. 389 OVERVIEW ........................................................................................................................................................................ 389 OPENVMS........................................................................................................................................................................ 389 TRU64 UNIX.................................................................................................................................................................... 389 WINDOWS ......................................................................................................................................................................... 389 PROCEDURE ...................................................................................................................................................................... 390 HOW TO CLEAR THE SRM CONSOLE PASSWORD ON AN ALPHASTATION 255 .......................................... 391 HOW TO CLEAR THE CONSOLE PASSWORD ON AN ALPHASTATION/ALPHASERVER 400..................... 393 HOW TO CLEAR THE SRM CONSOLE PASSWORD ON A MIATA AND MIATA GL....................................... 395 AFTER FIRMWARE UPDATE, INIT GETS BAD VALUE - MOPV3_BOOT NOT MODIFIED........................... 397 RUNNING THE NT ARC OR ALPHABIOS CONSOLE .............................................................................................. 399 DIFFERENT ALPHASERVER'S GET `OPEN FAILURE" ON UPDATE................................................................. 401 xxi ALPHASERVER 1000/1000A EV5 FIRMWARE FROM V5.2 CD WON’T FIT ON FLOPPY................................ 403 ALPHASERVER 1000/1000A 5/300 CPU REQUIRES V5.23 ALPHABIOS ............................................................... 405 ALPHASERVER 1000/1000A LED CODE CB DUE TO WRONG FIRMWARE ON MOTHERBOARD .............. 407 HARDWARE METHOD ....................................................................................................................................................... 407 BOOTABLE FLOPPY USING OPENVMS ............................................................................................................................. 408 BOOTABLE FLOPPY USING A PC RUNNING WNT ............................................................................................................. 409 BOOTABLE FLOPPY USING WNT ON AN ALPHA ............................................................................................................... 409 BOOTABLE FLOPPY USING WNT WHEN YOU ALREADY HAVE A COPY OF MAKEBOOT.EXE ........................................... 410 DESCRIPTION OF THE DIFFERENT FAILSAFE LOADERS (FSL) AVAILABLE .............................................. 411 PROCEDURE TO MAKE A BOOTABLE FAILSAFE LOADER FLOPPY FOR MOST ALPHASTATION/ALPHASERVER SYSTEMS............................................................................................................ 413 BOOTABLE FLOPPY USING OPENVMS ............................................................................................................................. 413 BOOTABLE FLOPPY USING AN ALPHA RUNNING WNT..................................................................................................... 415 BOOTABLE FLOPPY USING A PC RUNNING WNT ............................................................................................................. 415 BOOTABLE FLOPPY USING WNT AND ALPHABIOS FIRMWARE ZIP FILE ........................................................................ 416 ALPHASERVER 800/DIGITAL SERVER 3000 MODEL 3300/3305 NEW FSL PROCEDURE .............................. 417 OVERVIEW ........................................................................................................................................................................ 417 NECESSARY FILES ............................................................................................................................................................ 417 CREATING A BOOTABLE FIRMWARE FLOPPY ..................................................................................................................... 417 PC - Windows NT....................................................................................................................................................... 417 Alpha - Windows NT .................................................................................................................................................. 418 Alpha - TRU64 UNIX................................................................................................................................................. 418 HOW TO BUILD AND USE A FSL FLOPPY ON AN ALPHASERVER 4000/4100/1200......................................... 421 OVERVIEW ........................................................................................................................................................................ 421 FSL FLOPPY INFORMATION .............................................................................................................................................. 421 HOW TO BUILD A FSL LOADER FLOPPY USING OPENVMS .............................................................................................. 421 HOW TO BUILD A FSL LOADER FLOPPY USING A PC RUNNING WNT ............................................................................ 422 HOW TO BUILD A FSL FLOPPY USING AN ALPHA RUNNING WNT.................................................................................... 422 PROCEDURE ...................................................................................................................................................................... 423 HOW TO BUILD AND USE A FSL FLOPPY ON AN DIGITAL SERVER 7000 MODEL 7300 AND 5000 MODEL 5300 ...................................................................................................................................................................................... 427 OVERVIEW ........................................................................................................................................................................ 427 FSL FLOPPY INFORMATION .............................................................................................................................................. 427 HOW TO BUILD A FSL LOADER FLOPPY USING OPENVMS .............................................................................................. 427 HOW TO BUILD A FSL LOADER FLOPPY USING A PC RUNNING WNT ............................................................................. 428 HOW TO BUILD A FSL FLOPPY USING AN ALPHA RUNNING WNT.................................................................................... 429 PROCEDURE ...................................................................................................................................................................... 429 MAKING A FAILSAFE LOADER FLOPPY FOR A COMPAQ ALPHASERVER ES40 ........................................ 433 OVERVIEW ........................................................................................................................................................................ 433 FILES ................................................................................................................................................................................ 433 HOW TO BUILD THE FSL FLOPPY USING THE CLSRMROM.SYS OR CLSRMROM.EXE SRM IMAGE ....................................... 433 WNT/W2K - PC (clsrmrom.sys ONLY)..................................................................................................................... 433 WNT - Alpha (clsrmrom.sys or clsrmrom.exe)........................................................................................................... 434 Tru64 UNIX (clsrmrom.exe ONLY)........................................................................................................................... 434 EXAMPLE OF AN UPDATE USING THE CLSRMROM.EXE AS THE FAILSAFE LOADER .............................................................. 434 HOW TO BUILD THE FSL FLOPPY USING THE LFU FIRMWARE UPDATE IMAGE .................................................................. 437 NT - PC or Alpha ........................................................................................................................................................ 437 Tru64 UNIX ................................................................................................................................................................ 437 EXAMPLE OF AN UPDATE USING THE CLU.EXE AS THE FAILSAFE LOADER ......................................................................... 438 MAKING A FAILSAFE LOADER FLOPPY FOR A COMPAQ ALPHASERVER ES45 ........................................ 441 OVERVIEW ........................................................................................................................................................................ 441 xxii HOW TO BUILD THE FLOPPY USING ES45FSL.EXE FILE WITH MKBOOT.EXE OR MAKEBOOT.EXE ......................................... 441 WNT/W2k - PC........................................................................................................................................................... 441 WNT - Alpha .............................................................................................................................................................. 441 UNIX – Alpha ............................................................................................................................................................. 442 UPDATING THE FAILSAFE BOOTER (FSB) ON A COMPAQ ALPHASERVER DS20 ....................................... 443 OVERVIEW ........................................................................................................................................................................ 443 PROCEDURE TO UPDATE FSB CODE .................................................................................................................................. 443 CD ............................................................................................................................................................................... 443 Floppy ......................................................................................................................................................................... 443 MAKING A FAILSAFE BOOTER FLOPPY FOR A COMPAQ ALPHASERVER DS20 ........................................ 445 OVERVIEW ........................................................................................................................................................................ 445 HOW TO BUILD THE FSL FLOPPY ...................................................................................................................................... 445 MAKING A FAILSAFE BOOTER FLOPPY FOR A COMPAQ ALPHASERVER DS10 ........................................ 447 OVERVIEW ........................................................................................................................................................................ 447 HOW TO BUILD THE FSL FLOPPY ...................................................................................................................................... 447 MAKING A FAILSAFE LOADER FLOPPY ON A DIGITAL PERSONAL WORKSTATION .............................. 449 OVERVIEW ........................................................................................................................................................................ 449 FIRMWARE RECOVERY PROCEDURE ................................................................................................................................. 449 Isolating POST Corruption.......................................................................................................................................... 449 Post (SROM) not corrupted......................................................................................................................................... 449 POST (SROM) corrupted............................................................................................................................................ 450 PROCEDURES TO BUILD THE FLOPPY ................................................................................................................................. 450 Make a Bootable Floppy Using OpenVMS ................................................................................................................ 450 Make a Bootable Floppy Using Tru64 UNIX ............................................................................................................. 451 Make a Bootable Floppy Using Windows 95 or Windows NT on an ALPHA.......................................................... 451 Make a Bootable Floppy Using DOS, Windows 3.1, Windows 95 or Windows NT on a PC. ................................... 451 Updating System Firmware......................................................................................................................................... 452 LOCATIONS FOR FIRMWARE ON THE INTERNET/INTRANET ............................................................................................... 453 CREATING A BOOTABLE FIRMWARE FLOPPY FOR THE ALPHASTATION 200, 250 AND 255.................. 455 ALPHASERVER 2100 "CPU TYPE NOT SUPPORTED" WITH B2041-AA 5/375 CPU ......................................... 457 PROCEDURE TO UPDATE FIRMWARE ON A 2100 ................................................................................................. 459 ALPHASERVER 2100 FAILSAFE LOADER (FSL) OVERVIEW AND FUNCTIONS ............................................ 461 OVERVIEW ........................................................................................................................................................................ 461 FAIL-SAFE LOADER FUNCTIONS ....................................................................................................................................... 461 AUTOMATIC ACTIVATION ................................................................................................................................................. 461 MANUAL ACTIVATION ...................................................................................................................................................... 462 WHEN DO YOU UPDATE THE FSL .................................................................................................................................... 462 HOW DO YOU UPDATE THE FSL ROM ............................................................................................................................ 462 Method 1 ..................................................................................................................................................................... 463 Example of Method 1 Update................................................................................................................................. 463 Method 2 ..................................................................................................................................................................... 465 Example of Method 2 Update................................................................................................................................. 465 UPDATING FIRMWARE FROM THE FAIL-SAFE LOADER................................................................................... 467 ALPHASERVER 2X00 FSL ISSUES AND PROBLEMS .............................................................................................. 469 UNABLE TO UPDATE BOTH SRM AND ARC FROM THE FSL CONSOLE .............................................................................. 469 2100 FSL_UPDATE GETS NOT = @ ADDRESS XX XX ................................................................................................... 469 UNABLE TO SET DATE AND TIME UNDER ARC AFTER REPLACING MODULE .......................................... 471 ALPHASERVER 1200/4100 ISSUES ............................................................................................................................... 473 xxiii CERTAIN ALPHASERVERS WITH V5.7-4 GETS CONSOLE DAC960 SIZING ERRORS .................................. 475 UPDATING CONSOLE FIRMWARE ON A SYSTEM CONFIGURED AS A GALAXY ........................................ 477 ALPHASERVER 8X00 IMPORTANT CAUTIONS BEFORE UPDATING FIRMWARE !!! .................................. 479 OPERATION WITH MIXED FIRMWARE REVISIONS IS NOT SUPPORTED............................................................................. 479 DO NOT ATTEMPT TO DOWN-REV THE FIRMWARE ON THE CPUS LISTED ...................................................................... 479 ALPHASERVER 8X00 SINGLE CPU MODULES FAIL WITH CONSOLE FIRMWARE V6.0 ............................ 481 COMPAQ ALPHASERVER GS60/GS60E/GS140 IMPORTANT CAUTIONS BEFORE UPDATING FIRMWARE !!! .......................................................................................................................................................................................... 483 OPERATION WITH MIXED FIRMWARE REVISIONS IS NOT SUPPORTED............................................................................. 483 REQUIRED MINIMUM CONSOLE FIRMWARE REVISION .................................................................................................. 483 ALPHASERVER GS60/GS140 FAILS TO BOOT FIRMWARE CD V5.4 .................................................................. 485 DS10 WITH 600MHZ CPU HAS NO DEFAULT BOOTFILE SELECTED WITH V5.9 CD ................................... 487 DS10/DS20 INVALID IMAGE WHEN UPDATING FROM FLOPPY ........................................................................ 489 UPGRADING ES40,ES40LP OR ES40CV TO 667MHZ OR 833MHZ CPUS............................................................. 491 ES40................................................................................................................................................................................. 491 ES40LP ............................................................................................................................................................................ 492 ES40CV ........................................................................................................................................................................... 493 ES40LP/ES40CV RMC FIRMWARE IS DIFFERENT THAN ON THE V5.6 FIRMWARE CD ............................. 497 OVERVIEW ........................................................................................................................................................................ 497 ES40 SYSTEMS DIFFERENCES........................................................................................................................................... 497 HOW TO BUILD A BOOTABLE FLOPPY ............................................................................................................................... 497 HOW TO UPDATE RMC FIRMWARE .................................................................................................................................. 498 EXAMPLE .......................................................................................................................................................................... 499 ALPHASERVER ES40’S CONFIGURED FOR GALAXY SHOULD NOT USE V6.0 FIRMWARE ...................... 503 ES40 & GS80/GS160/GS320 SYSTEMS MAY NOT BOOT UNIX V4.0G ................................................................... 505 DEC7000/10000 AND VAX 7000 - ISSUES WITH FIRMWARE UPGRADES........................................................... 507 DEC3000-400 SYSTEM HANGS AFTER UPGRADING CONSOLE FIRMWARE TO V6.1 .................................. 509 DEC3000 FIRMWARE MISMATCH BETWEEN SYSTEM AND I/O ROMS........................................................... 511 CONTENTS OF THE SYSTEM AND I/O ROMS ON A DEC 3000............................................................................. 513 SYSTEM ROM .................................................................................................................................................................... 513 I/O ROM ........................................................................................................................................................................... 513 FIRMWARE/CONSOLE RELATED BLITZ’S.............................................................................................................. 517 ALPHA SYSTEMS NOTESFILES................................................................................................................................... 527 ALPHA SYSTEMS WEBPAGES ..................................................................................................................................... 527 FIRMWARE DOCUMENT ON CYBRARY................................................................................................................... 528 FIRMWARE PAGES ON CYBRARY ............................................................................................................................. 528 FAILSAFE LOADER PROCEDURES...................................................................................................................................... 528 UPDATE PROCEDURES ...................................................................................................................................................... 528 xxiv UTILITIES/ADAPTERS........................................................................................................................................................ 528 FIRMWARE LOCATIONS ON THE INTERNET ........................................................................................................ 529 FIRMWARE LOCATIONS ONLINE.............................................................................................................................. 529 DOCUMENTATION SOURCES AND PAGE NUMBERS ........................................................................................... 530 INDEX ................................................................................................................................................................................. 533 xxv xxvi No Jumpers J18 - PCI Backplane No Jumpers No Jumpers J12/J13 pins 1-2 on CSB J24 2-3 on CSB (RMC) J19 pins 1-2 - CSB (SROM) J20 pins 1-2 - CSB (TIG) J7 2–3 - CSB (RMC) SW3 #8 off Motherboard PCI Backplane CPU CPU CSB Motherboard AlphaServer 1200 AlphaServer 4100 AlphaServer 8200/8400 AlphaServer GS60/GS140 AlphaServer ES40 (1) HPM J3 on PBM J60 on PSM J9 on STDIO J17 on or NVR variable SCM_FORCE_FSL SW3 #8 on SW2 #1 on No FSL Available Requests floppy when checksum fails Requests floppy when checksum fails CPU J1/J4 Position 7 CPU J1 Position 7 J5 pins 1-2 J2 pins 1-2 CPU J1 Position 7 CPU W3 - System J13 J5 pins 1-2 SW1 off, SW2 on J2 pins 1-2 The ES40/ES45 has 2 different FSL settings. A normal FSL and a TIG FSL HPM J2 off PBM PSM J7 off J50 - Motherboard Motherboard AlphaServer 1000/1000A HPM,PBM,PSM, XSROM,SDTIO (SCM and SRM) J50 - Motherboard Motherboard AlphaServer 800 AlphaServer GS80/160/320 J4 pins 1-2 CPU CPU Module AlphaServer 400 None J4 pins 1-2 Motherboard AlphaServer 300 Motherboard J50 - System Module System Module AlphaStation 600A AlphaServer DS10 W13 park on 2 System Module AlphaStation 600 Motherboard J18 pins 2-3 System System Module AlphaStation 500 AlphaServer DS20/DS20E J21/J23 pins 1-2, J22 pins 2-3 - CSB (FSL) J24 2-3 - CSB (TIG FSL) (1) J4 pins 1-2 CPU CPU Module AlphaStation 400 CSB Motherboard J20/J23 pins 1-2, J22 pins 2-3 - CSB (FSL) J21 2-3 - CSB (TIG FSL) (1) Switch 3 off Motherboard AlphaStation 255 AlphaServer ES45 No FSL Available J4 1-2 - Motherboard Motherboard AlphaStation 250 J2 pins 1-2 J6 1-2 - Motherboard Motherboard AlphaStation 200 Jumpers to Enable FSL ROM or Floppy Jumpers to Enable Flash ROM Writes ROM Location CPU Type List of ROM Update Jumpers, FSL Update Jumpers and FSL Select Jumpers 1 Top SW Right Left SW Down Backplane I/O Backplane AlphaServer 2100A AlphaServer 2100A RM J6 Off J6 Off Jumper W1 Pins 2-3 Rom Update Jumper (Labeled) Flash Enable Jumper IN on system and IO Update Jumper on IO Update Jumper on IO J20 enable (sys) / IO jumper (See #5 on page 7-5 of EK-FLSPC-SV) J20 enable (sys) / IO jumper (See #5 on page 7-5 of EK-FLSPC-SV) No Jumpers No Jumpers No Jumpers No Jumpers System I/O System I/O I/O System System I/O I/O CPU CPU DEC 3000-300 DEC 3000-400 DEC 3000-500 DEC 3000-600 DEC 3000-700 DEC 3000-800 DEC 3000-900 DEC 4000-600 DEC 4000-700 DEC 7000 VAX 7000 / 10000 and I/O and I/O and I/O Board Jumpers to Enable Flash ROM Writes Location of ROM W6 installed Right SW Down Bottom SW Right J5 On, J5 On, Enable FSL ROM Writes System Type AlphaServer 2100A LP N/A J6 ON Standard I/O AlphaServer 2100 Standard I/O J6 ON I/O Backplane AlphaServer 2000 2 Enable FSL ROM or Floppy ROM Location CPU Type List of ROM Update Jumpers, FSL Update Jumpers and FSL Select Jumpers - Cont. 2 Minimum Acceptable Firmware CD Versions for Recent OS Versions Operating System Digital UNIX Tru64 UNIX OpenVMS Windows NT OS Version Minimum Acceptable Firmware CD Version V3.0 V3.0B V3.2 V3.2A V3.2B V3.2C V3.2D V3.2E V4.0 V3.2F V3.2G V4.0 V4.0A V4.0B V4.0C V4.0D V4.0E FW FW FW FW FW FW FW FW FW FW FW FW FW FW FW FW FW CD CD CD CD CD CD CD CD CD CD CD CD CD CD CD CD CD V2.9 V3.0 V3.1 V3.1 V3.2 V3.3 V3.4 V3.5 V3.5 V3.6 V3.6 V3.5 V3.7 V3.8 V3.9 V5.0 V5.3 V4.0F V4.0G V5.0 V5.0A V5.1 V5.1A V5.2 FW FW FW FW FW FW FW CD CD CD CD CD CD CD V5.4 V5.9 V5.5 V5.6 V5.8 V5.9 V6.0 V6.1 V6.1-1H2 V6.2 V7.0 V6.2-1H2 V6.2-1H3 V7.1 V7.1-1H1 V7.1-2 V7.2 V7.2-1 V7.2-2 V7.3 FW FW FW FW FW FW FW FW FW FW FW FW FW CD CD CD CD CD CD CD CD CD CD CD CD CD V2.9 V3.0 V3.2 V3.4 V3.5 V3.6 V3.8 V5.0 V5.3 V5.3 V5.3 V6.0 V5.9 V3.5 V3.51 V4.0 FW CD V2.9 FW CD V3.3 FW CD V3.8 Note: V5.4 firmware contains OpenVMS Galaxy support for the AlphaServer 1200, AlphaServer 4000/4100 , AlphaServer 8200/8400 and the Compaq AlphaServer GS60/GS140 3 What Version Firmware is on Which CD AlphaServer 300 thru AlphaServer 800 Systems System Type AlphaServer 300 AlphaServer 400 AlphaServer 800 or Digital Server 3000 Model 3300/3305 (NT only) Filename SRM Fw Rev NT Fw Rev CD Ver as300_v7_0 as300_v7_0 as300_v7_0 as300_v7_0 as300_v7_0 as300_v7_0 as300_v7_0 as300_v7_0 as300_v6_9 as300_v6_8 as300_v6_7 as300_v6_6 as300_v6_5 as300_x6_2 7.0 7.0 7.0 7.0 7.0 7.0 7.0 7.0 6.9 6.8 6.7 6.6 6.5 6.2-165-1 4.58 4.58 4.58 4.58 4.58 4.58 4.58 4.58 4.57 4.56 4.56 4.53 4.49 4.49 6.1 6.0 5.9 5.8 5.7 5.6 5.5 5.4 5.3 5.2 5.1 5.0 4.0 3.9 asv400_v7_0 asv400_v7_0 asv400_v7_0 asv400_v7_0 asv400_v7_0 asv400_v7_0 asv400_v7_0 asv400_v7_0 asv400_v6_9 asv400_v6_8 asv400_v6_7 asv400_v6_6 asv400_v6_5 asv400_v5_9 asv400_v5_8 asv400_v5_7 asv400_v5_6 asv400_v5_5 as400_v5_1 as400_v5_0 7.0-9 7.0-9 7.0-9 7.0-9 7.0-9 7.0-9 7.0-9 7.0-9 6.9-4 6.8-2 6.7-2 6.6-1 6.5-2 6.4-1 6.3-2 5.7-1 4.5-0 5.2-30 5.2-29 5.0-30 4.58 4.58 4.58 4.58 4.58 4.58 4.58 4.58 4.57 4.56 4.56 4.53 4.53 4.49 4.49 4.49 4.45 4.41 4.41 4.37 6.1 6.0 5.9 5.8 5.7 5.6 5.5 5.4 5.3 5.2 5.1 5.0 4.0 3.9 3.8 3.7 3.6 3.5 3.4 3.3 as800_v5_8 as800_v5_8 as800_v5_8 as800_v5_8 as800_v5_7 as800_v5_6 as800_v5_5 as800_v5_4 as800_v5_3 as800_v5_2 as800_v5_1 as800_v5_0 as800_v4_9 as800_v4_8 5.8-16 5.8-16 5.8-16 5.8-16 5.7-86 5.6-112 5.5-78 5.4-113 5.3-101 5.2-113 5.1-202 5.0-104 4.9-167 4.8-77 5.70 5.70 5.70 5.70 5.70 5.70 5.69 5.68 5.66 5.64 5.64 5.30 5.30 5.28 6.1 6.0 5.9 5.8 5.7 5.6 5.5 5.4 5.3 5.2 5.1 5.0 4.0 3.9 4 AlphaServer 1000 EV4 thru AlphaServer 1000A EV4 Systems System Type AlphaServer 1000 EV4 AlphaServer 1000 EV5 AlphaServer 1000A EV4 Filename SRM Fw Rev NT Fw Rev CD Ver as1000_e4_v5_4 as1000_e4_v5_4 as1000_e4_v5_4 as1000_e4_v5_4 as1000_e4_v5_4 as1000_e4_v5_4 as1000_e4_v5_4 as1000_e4_v5_4 as1000_e4_v5_3 as1000_e4_v5_2 as1000_e4_v5_1 as1000_e4_v5_0 as1000_e4_v4_9 as1000_e4_v4_8 as1000_e4_v4_7 as1000_e4_v4_6 as1000_e4_v4_5 as1000_v5_5 as1000_v5_3 as1000_v5_1 as1000_v5_0 as1000_v4_0 5.4-101 5.4-101 5.4-101 5.4-101 5.4-101 5.4-101 5.4-101 5.4-101 5.3-89 5.2-101 5.1-190 5.0-92 4.9-155 4.8-65 4.7-160 4.6-218 4.5-69 3.1 3.0-19 3.0-15 3.0-12 2.0-3 4.58 4.58 4.58 4.58 4.58 4.58 4.58 4.58 4.57 4.56 4.56 4.54 4.54 4.52 4.49 4.47 4.47 4.44 4.42 4.26 4.26 4.1-19 6.1 6.0 5.9 5.8 5.7 5.6 5.5 5.4 5.3 5.2 5.1 5.0 4.0 3.9 3.8 3.7 3.6 3.5 3.4 3.3 3.2 3.1 as1000_e5_v5_4 as1000_e5_v5_4 as1000_e5_v5_4 as1000_e5_v5_4 as1000_e5_v5_4 as1000_e5_v5_4 as1000_e5_v5_4 as1000_e5_v5_4 as1000_e5_v5_3 as1000_e5_v5_2 as1000_e5_v5_1 as1000_e5_v5_0 as1000_e5_v4_9 as1000_e5_v4_8 as1000_e5_v4_7 as1000_e5_v4_6 as1000_e5_v4_5 5.4-104 5.4-104 5.4-104 5.4-104 5.4-104 5.4-104 5.4-104 5.4-104 5.3-92 5.2-104 5.1.193 5.0-95 4.9-158 4.8-68 4.7-163 4.6-221 4.5-78 5.68 5.68 5.68 5.68 5.68 5.68 5.68 5.68 5.66 5.64 5.64 5.31 5.31 5.28 5.23 5.21 5.13 6.1 6.0 5.9 5.8 5.7 5.6 5.5 5.4 5.3 5.2 5.1 5.0 4.0 3.9 3.8 3.7 3.6 as1000a_e4_v5_7 as1000a_e4_v5_7 as1000a_e4_v5_7 as1000a_e4_v5_7 as1000a_e4_v5_7 as1000a_e4_v5_6 as1000a_e4_v5_5 as1000a_e4_v5_4 as1000a_e4_v5_3 as1000a_e4_v5_2 as1000a_e4_v5_1 as1000a_e4_v5_0 as1000a_e4_v4_9 as1000a_e4_v4_8 as1000a_e4_v4_7 as1000a_e4_v4_6 as1000a_e4_v4_5 as1000a_v1_1 5.7-83 5.7-83 5.7-83 5.7-83 5.7-83 5.6-107 5.5-72 5.4-107 5.3-95 5.2-107 5.1.196 5.0-98 4.9-161 4.8-71 4.7-166 4.6-224 4.5-72 3.1-15 4.59 4.59 4.59 4.59 4.59 4.59 4.59 4.58 4.57 4.56 4.56 4.54 4.54 4.52 4.49 4.49 4.47 4.46 6.1 6.0 5.9 5.8 5.7 5.6 5.5 5.4 5.3 5.2 5.1 5.0 4.0 3.9 3.8 3.7 3.6 3.5 5 AlphaServer 1000A EV5 thru AlphaServer 2x00 EV4 Systems System Type AlphaServer 1000A EV5 AlphaServer 1200 or Digital Server 5000 Model 5300/5305 (NT only) AlphaServer 2x00 EV4 Filename SRM Fw Rev NT Fw Rev CD Ver as1000a_e5_v5_7 as1000a_e5_v5_7 as1000a_e5_v5_7 as1000a_e5_v5_7 as1000a_e5_v5_7 as1000a_e5_v5_6 as1000a_e5_v5_5 as1000a_e5_v5_4 as1000a_e5_v5_3 as1000a_e5_v5_2 as1000a_e5_v5_1 as1000a_e5_v5_0 as1000a_e5_v4_9 as1000a_e5_v4_8 as1000a_e5_v4_7 as1000a_e5_v4_6 as1000a_e5_v4_5 5.7-80 5.7-80 5.7-80 5.7-80 5.7-80 5.6-109 5.5-75 5.4-110 5.3-98 5.2-110 5.1.199 5.0-101 4.9-164 4.8-74 4.7-169 4.6-227 4.5-80 5.70 5.70 5.70 5.70 5.70 5.70 5.69 5.68 5.66 5.64 5.64 5.31 5.31 5.28 5.23 5.21 5.13 6.1 6.0 5.9 5.8 5.7 5.6 5.5 5.4 5.3 5.2 5.1 5.0 4.0 3.9 3.8 3.7 3.6 as1200_v6_0 as1200_v6_0 as1200_v5_9 as1200_v5_8 as1200_v5_7 as1200_v5_6 as1200_v5_5 as1200_v5_4 as1200_v5_3 as1200_v5_2 as1200_v5_1 as1200_v5_0 6.0-4 6.0-4 5.9-5 5.8-2 5.7-4 5.6-4 5.5-5 5.4-2 5.3-1 5.2-1 5.1.3 5.0-2 5.70 5.70 5.70 5.70 5.70 5.70 5.69 5.68 5.67-0 5.64-1 5.64-1 5.32 6.1 6.0 5.9 5.8 5.7 5.6 5.5 5.4 5.3 5.2 5.1 5.0 as2100_e4_v5_3 as2100_e4_v5_3 as2100_e4_v5_3 as2100_e4_v5_3 as2100_e4_v5_3 as2100_e4_v5_3 as2100_e4_v5_3 as2100_e4_v5_3 as2100_e4_v5_3 as2100_e4_v5_2 as2100_e4_v5_1 as2100_e4_v5_0 as2100_e4_v4_9 as2100_e4_v4_7 as2100_e4_v4_7 as2100_e4_v4_6 as2100_e4_v4_5 as2100_e4_v4_4 as2100_e4_v4_3 as2100_e4_v4_1 as2100_e4_v4_0 as2100_e4_v3_9 as2100_e4_v3_8 dec2100_v3_7 dec2100_v3_6 dec2100_v3_5 5.3-2 5.3-2 5.3-2 5.3-2 5.3-2 5.3-2 5.3-2 5.3-2 5.3-2 5.2-50 5.1-133 5.0-75 4.9-138 4.7-143 4.7-143 4.6-201 4.5-51 4.4-3 4.3-222 4.1-42 4.0-3 3.9-89 3.8-49 3.7-23 3.6.83 3.5-26 4.59 4.59 4.59 4.59 4.59 4.59 4.59 4.57-0 4.57-0 4.56-0 4.56-0 4.54-0 4.54-0 4.50-1 4.50-1 4.49 4.47-2 4.44 4.43-1 4.36 4.25 3.5-31 3.5-31 3.5-27 3.5-23 3.5-11 6.1 6.0 5.9 5.8 5.7 5.6 5.5 5.4 5.3 5.2 5.1 5.0 4.0 3.9 3.8 3.7 3.6 3.5 3.4 3.3 3.2 3.1 3.0 FIS 2.9 2.8 6 AlphaServer 2x00 EV5 thru AlphaServer 2100A EV5 Systems System Type Filename AlphaServer 2x00 EV5 AlphaServer 2100A AlphaServer 2100A EV4 EV5 SRM Fw Rev NT Fw Rev CD Ver as2100_e5_v5_3 as2100_e5_v5_3 as2100_e5_v5_3 as2100_e5_v5_3 as2100_e5_v5_3 as2100_e5_v5_3 as2100_e5_v5_3 as2100_e5_v5_3 as2100_e5_v5_3 as2100_e5_v5_2 as2100_e5_v5_1 as2100_e5_v5_0 as2100_e5_v4_9 as2100_e5_v4_7 as2100_e5_v4_7 as2100_e5_v4_6 as2100_e5_v4_5 as2100_e5_v4_4 as2100_e5_v4_3 as2100_e5_v4_1 as2100_e5_v4_0 5.3-6 5.3-6 5.3-6 5.3-6 5.3-6 5.3-6 5.3-6 5.3-6 5.3-6 5.2-54 5.1-138 5.0-80 4.9-143 4.7-148 4.7-148 4.6-206 4.5-55 4.4-7 4.3-226 4.1-46 4.0-7 4.59 4.59 4.59 4.59 4.59 4.59 4.59 4.57-0 4.57-0 4.56-0 4.56-0 4.54-0 4.54-0 4.51-1 4.51-1 4.49 4.47-2 4.44 4.43-1 4.34 4.30 6.1 6.0 5.9 5.8 5.7 5.6 5.5 5.4 5.3 5.2 5.1 5.0 4.0 3.9 3.8 3.7 3.6 3.5 3.4 3.3 3.2 as2100a_e4_v5_3 as2100a_e4_v5_3 as2100a_e4_v5_3 as2100a_e4_v5_3 as2100a_e4_v5_3 as2100a_e4_v5_3 as2100a_e4_v5_3 as2100a_e4_v5_3 as2100a_e4_v5_3 as2100a_e4_v5_2 as2100a_e4_v5_1 as2100a_e4_v5_0 as2100a_e4_v4_9 as2100a_e4_v4_7 as2100a_e4_v4_7 as2100a_e4_v4_6 as2100a_e4_v4_5 as2100a_e4_v4_4 as2100a_e4_v4_3 5.3-10 5.3-10 5.3-10 5.3-10 5.3-10 5.3-10 5.3-10 5.3-10 5.3-10 5.2-58 5.1-142 5.0-84 4.9-147 4.7-152 4.7-152 4.6-210 4.5-60 4.4-12 4.3-231 4.59 4.59 4.59 4.59 4.59 4.59 4.59 4.57-0 4.57-0 4.56-0 4.56-0 4.54-0 4.54-0 4.50-1 4.50-1 4.49 4.47-2 4.44 4.43-1 6.1 6.0 5.9 5.8 5.7 5.6 5.5 5.4 5.3 5.2 5.1 5.0 4.0 3.9 3.8 3.7 3.6 3.5 3.4 as2100a_e5_v5_3 as2100a_e5_v5_3 as2100a_e5_v5_3 as2100a_e5_v5_3 as2100a_e5_v5_3 as2100a_e5_v5_3 as2100a_e5_v5_3 as2100a_e5_v5_3 as2100a_e5_v5_3 as2100a_e5_v5_2 as2100a_e5_v5_1 as2100a_e5_v5_0 as2100a_e5_v4_9 as2100a_e5_v4_7 as2100a_e5_v4_7 as2100a_e5_v4_6 as2100a_e5_v4_5 as2100a_e5_v4_4 as2100a_e5_v4_3 5.3-14 5.3-14 5.3-14 5.3-14 5.3-14 5.3-14 5.3-14 5.3-14 5.3-14 5.2-62 5.1-147 5.0-89 4.9-152 4.7-157 4.7-157 4.6-215 4.5-64 4.4-16 4.3-225 4.59-0 4.59-0 4.59-0 4.59-0 4.59-0 4.59-0 4.59-0 4.57-0 4.57-0 4.56-0 4.56-0 4.54-0 4.54-0 4.51-1 4.51-1 4.49 4.47-2 4.44 4.43-1 6.1 6.0 5.9 5.8 5.7 5.6 5.5 5.4 5.3 5.2 5.1 5.0 4.0 3.9 3.8 3.7 3.6 3.5 3.4 7 AlphaServer 4x00 thru 8x00 Systems System Type AlphaServer 4000 / 4100 or Digital Server 7000 Model 7300/7305 (NT only) AlphaServer 8200 / 8400 * Filename SRM Fw Rev NT Fw Rev CD Ver as4x00_v6_0 as4x00_v6_0 as4x00_v5_9 as4x00_v5_8 as4x00_v5_7 as4x00_v5_6 as4x00_v5_5 as4x00_v5_4 as4x00_v5_3 as4x00_v5_2 as4x00_v5_1 as4x00_v5_0 as4x00_v4_9 as4x00_v4_8 as4x00_v3_0 as4x00_v2_0 as4x00_v1_2 6.0-4 6.0-4 5.9-5 5.8-2 5.7-4 5.6-4 5.5-5 5.4-2 5.3-1 5.2-1 5.1-3 5.0-2 4.9-1 4.8-5 3.0-6 2.0-0 1.2-3 5.70-0 5.70-0 5.70-0 5.70-0 5.70-0 5.70-0 5.69-0 5.68-0 5.67-0 5.64-1 5.64-1 5.32-0 5.32-0 5.28-0 5.24-0 5.21-1 5.12-3 6.1 6.0 5.9 5.8 5.7 5.6 5.5 5.4 5.3 5.2 5.1 5.0 4.0 3.9 3.8 3.7 3.6 as8000_v16 as8000_v16 as8000_v15 as8000_v14 as8000_v13 as8000_v12 as8000_v11 as8000_v10 as8000_v0f as8000_v0e as8000_v0d as8000_v0c as8000_v0b as8000_v0a as8000_v09 as8000_v08 as8000_v07 as8000_v06 as8000_v05 as8000_v03 as8000_v02 as8000_v01 as8000_t06 6.0-1 6.0-1 5.9-2 5.8-2 5.7-4 5.6-4 5.5 5.4-8 5.3-11 5.2-7 5.1-30 5.0-101 4.9-20 4.8-6 4.1-6 4.0-4 3.1-6 3.0-9 2.3-313 2.0-100 1.1-2 1.0-66 4.1-86 5.70c * 5.70c * 5.70c * 5.70c * 5.70 5.70 5.69 5.68 5.36 5.3-19b 5.3-19b 5.3-15 5.3-15 6.1 6.0 5.9 5.8 5.7 5.6 5.5 5.4 5.3 5.2 5.1 5.0 4.0 3.9 3.8 3.7 3.6 3.5 3.4 3.3 3.2 3.1 LFU will list version as V5.70-3 but it is actually 5.70-c 8 Compaq AlphaServer DS10, DS20/DS20E and Compaq AlphaServer GS60/GS60E/GS140 System Type DS10 DS20/DS20E GS60 GS60E GS140 * ** *** Filename SRM Fw Rev NT Fw Rev CD Ver ds10_v6_1 ds10_v6_0 ds10_v5_9 ds10_v5_8 ds10_v5_7 ds10_v5_6 ds10_v5_5 6.1-2 6.0-8 5.9-4 5.8-10 5.7-8 5.6-3 5.5-1 5.71 5.71 5.70 * 5.70 * 5.70 5.70 5.69 6.1 6.0 5.9 5.8 5.7 5.6 5.5 ds20_v6_1 ds20_v6_0 ds20_v5_9 ds20_v5_8 ds20_v5_7 ds20_v5_6 ds20_v5_5 ds20_v5_4 or pc264srm.rom / pc264nt.rom 6.1-2 6.0-8 5.9-4 5.8-10 5.7-8 5.6-3 5.5-82 5.4-19 5.71 5.71 5.70 * 5.70 5.70 5.70 5.70 * 5.68 6.1 6.0 5.9 5.8 5.7 5.6 ** 5.5 Network gs140_v60 gs140_v60 gs140_v59 gs140_v58 gs140_v57 gs140_v56_6 gs140_v56 gs140_v55_25 *** gs140_v55_23 gs140_v55_12 gs140_v54_21 gs140_v54_19 gs140_v54_15 gs140_v53_12 6.0-1 6.0-1 5.9-2 5.8-2 5.7-5 5.6-6 5.6-4 5.5-25 5.5-23 5.5-12 5.4-21 5.4-19 5.4-15 5.3-12 5.68 5.68 5.68 5.68 5.68 N/A 5.68 5.68 5.68 5.68 5.68 5.68 5.68 N/A 6.1 6.0 5.9 (DON’T USE) 5.8 5.7 Network 5.6 Network Network 5.5 Network Network 5.4 Network or CD (AG-RFCBB-BE) HAL revision G supports changes introduced in AlphaBIOS V5.70 for systems based on the Alpha 21264 CPU. This includes: Compaq AlphaServer DS20 (No longer supports Windows NT after 12-31-99) Compaq AlphaPC 264DP Compaq Professional Workstation XP1000 When AlphaBIOS V5.70 or newer is installed on one of these machines, HAL Revision G or newer must also be installed, or the system will not boot, but will hang at the blue-screen "kernel banner" message. HAL Revision G can be obtained from: http://www.compaq.com/support/files/alphant/firmware/index.html DS20 and DS20E are both supported with the V5.6 firmware or later. gd140_v55_25 - Minimum required version for the EV67 700 MHZ CPU E2067-DA 9 Compaq AlphaServer GS80/GS160/GS320 System GS80 GS160 GS320 Type Filename gs320_v61 gs320_v60 gs320_v59b gs320_v59 gs320_v58 gs320_v57p4 v57_wfupdate T57_wfupdate.sys V56_wfupdate.sys SRM Fw Rev 6.1-1011 6.0-514 5.9-331 5.9-111 5.8-251 5.8-124 5.8-121 5.8-21 5.8-1 Micro Fw Rev 6.1 6.0 5.9 5.9 5.8 5.7 5.7 5.7 5.6 CD Ver 6.1 6.0 Network 5.9 Network Network Network Network Network 10 AlphaServer ES40 System Type es40_v6_1 es40_v6_0 es40_v5_9 es40_v5_8 es40_v5_7 es40_v5_6 es40_v5_5 ES40 * There • • • • Filename SRM Fw Rev NT Fw Rev 6.1-3 6.0-31 5.9-24 5.8-43 5.7-84 5.6-102 5.5-68 T5.4-4 5.71*** 5.71*** 5.70** 5.70 5.70 5.70 5.70 5.68 SROM 2.12F 2.12F 2.12F 2.11F 2.10F 2.5F 2.2F RMC 2.7/2.8* 2.7 2.6 2.5 2.4 2.2 2.1 TIG 10 10 10 10 10 10 10 CD Ver 6.1 6.0 **** 5.9 5.8 5.7 5.6 5.5 Network are 4 versions of the RMC firmware on the V6.1 CD. V2.7 for the ES40. I2.7 for the ES40LP F2.8 for the ES40CV G2.8 for the TS40 This firmware is NOT interchangeable. ** HAL revision G supports changes introduced in AlphaBIOS V5.70 for systems based on the Alpha 21264 CPU. This includes: Compaq AlphaServer DS20 (No longer supports Windows NT after 12-31-99) Compaq AlphaPC 264DP Compaq Professional Workstation XP1000 When AlphaBIOS V5.70 or newer is installed on one of these machines, HAL Revision G or newer must also be installed, or the system will not boot, but will hang at the blue-screen "kernel banner" message. HAL Revision G can be obtained from: http://www.compaq.com/support/files/alphant/firmware/index.html *** Shows as 5.71-R1 in AlphaBIOS **** Do not use this version with a system configured as a Galaxy. AlphaServer ES45 System Type ES45 Filename es45_v6_1 SRM Fw Rev 6.1-3 SROM 2.18F RMC 1.9 TIG 2.6 CD Ver 6.1 11 Digital Personal WorkStation a/au Series System Type Digital Personal WorkStation a/au Series Filename digitalpw_v72_1 digitalpw_v72_1 digitalpw_v72_1 digitalpw_v72_1 digitalpw_v72_1 digitalpw_v71_3 digitalpw_v7_0 digitalpw_v7_0 digitalpw_v6_9 digitalpw_v6_8 digitalpw_v6_7 digitalpw_v6_6 digitalpw_v6_5 SRM Fw Rev 7.2-1 7.2-1 7.2-1 7.2-1 7.2-1 7.1-3 7.0-10 7.0-10 6.9-7 6.8-41 6.7-196 6.6-29 6.5-72 NT Fw Rev 5.70 5.70 5.70 5.70 5.70 5.70 5.68 5.68 5.67 5.65 5.64 5.33 5.31 SROM (POST) Rev CD Ver 5.90 5.90 5.90 5.90 5.90 5.90 5.90 5.90 5.90 5.90 5.70 4.45 4.40 6.1 6.0 5.9 5.8 5.7 5.6 5.5 5.4 5.3 5.2 5.1 5.0 4.0 Digital Ultimate WorkStation 533a2/533au2 Series and Compaq Professional WorkStation XP1000 Filename SRM Fw Rev NT Fw Rev CD Ver System Type Digital Ultimate WorkStation 533a2/au2 Compaq Professional WorkStation XP1000 * ** as1200_v6_0 as1200_v6_0 as1200_v5_9 as1200_v5_8 as1200_v5_7 as1200_v5_6 as1200_v5_5 as1200_v5_4 as1200_v5_3 as1200_v5_2 as1200_v5_1 as1200_v5_0 6.0-4 6.0-4 5.9-5 5.8-2 5.7-4 5.6-4 5.5-5 5.4-1 5.3-1 5.2-1 5.1.3 5.0-2 5.70 5.70 5.70 5.70 5.70 5.70 5.69-0 5.68-0 5.67-0 5.64-1 5.64-1 5.32 6.1 6.0 5.9 5.8 5.7 5.6 5.5 5.4 5.3 5.2 5.1 5.0 xp1000_v59_1 xp1000_v59_1 xp1000_v59_1 xp1000_v58_4 xp1000_nt_v58_4 * xp1000_v58_3 xp1000_nt_v58_3 xp1000_v57_1 xp1000_v56_11 xp1000_v55_7 xp1000_v5_4 xp1000_v116 5.9-1 5.9-1 5.9-1 5.8-3 5.8-3 5.8-3 5.8-3 5.7-1 5.6-11 5.5-7 5.4-7559 5.4-2935 5.70b 5.70b 5.70b 5.70b 5.70b 5.70b 5.70b 5.70 5.70 5.70 ** 5.68 5.68 6.1 6.0 5.9 Network only Network only 5.8 5.8 5.7 5.6 5.5 5.4 Net See Blitz TD 2822-cr for details on these files. HAL revision G supports changes introduced in AlphaBIOS V5.70 for systems based on the Alpha 21264 CPU. This includes: Compaq AlphaServer DS20 Compaq AlphaPC 264DP Compaq Professional Workstation XP1000 When AlphaBIOS V5.70 or newer is installed on one of these machines, HAL Revision G or newer must also be installed, or the system will not boot, but will hang at the blue-screen "kernel banner" message. HAL Revision G can be obtained from: http://www.compaq.com/support/files/alphant/firmware/index.html 12 AlphaStation 200 thru AlphaStation 255 Systems System AlphaStation 200 AlphaStation 250 AlphaStation 255 Type Filename SRM Fw Rev NT Fw Rev CD Ver as200_v7_0 as200_v7_0 as200_v7_0 as200_v7_0 as200_v7_0 as200_v7_0 as200_v7_0 as200_v7_0 as200_v6_9 as200_v6_8 as200_v6_7 as200_v6_6 as200_v6_5 as200_v5_9 as200_v5_8 as200_v5_7 as200_v5_6 as200_v5_5 as200_v5_1 as200_v5_0 as200_v4_2 as200_v2_9 as200_v2_8 7.0-9 7.0-9 7.0-9 7.0-9 7.0-9 7.0-9 7.0-9 7.0-9 6.9-4 6.8-2 6.7-2 6.6-1 6.5-2 6.4-1 6.3-4 6.2-2 6.1-2 6.0-943 5.2-29 5.0-29 4.2-2 3.9-1387 3.7-10895 4.58 4.58 4.58 4.58 4.58 4.58 4.58 4.58 4.57 4.56 4.56 4.53 4.53 4.49 4.49 4.49 4.45 4.45 4.41 4.37 4.28 4.1-22 3.5-13 6.1 6.0 5.9 5.8 5.7 5.6 5.5 5.4 5.3 5.2 5.1 5.0 4.0 3.9 3.8 3.7 3.6 3.5 3.4 3.3 3.2 3.1 3.0 as200_v7_0 as200_v7_0 as200_v7_0 as200_v7_0 as200_v7_0 as200_v7_0 as200_v7_0 as200_v7_0 as200_v6_9 as200_v6_8 as200_v6_7 as200_v6_6 as200_v6_5 as200_v5_9 as200_v5_8 as200_v5_7 as200_v5_6 as200_v5_5 as200_v5_1 as200_v5_0 7.0-9 7.0-9 7.0-9 7.0-9 7.0-9 7.0-9 7.0-9 7.0-9 6.9-4 6.8-2 6.7-2 6.6-1 6.5-2 6.4-1 6.3-4 6.2-2 6.1-2 6.0-943 5.2-29 5.0-29 4.58 4.58 4.58 4.58 4.58 4.58 4.58 4.58 4.57 4.56 4.56 4.53 4.53 4.49 4.49 4.49 4.45 4.45 4.41 4.37 6.1 6.0 5.9 5.8 5.7 5.6 5.5 5.4 5.3 5.2 5.1 5.0 4.0 3.9 3.8 3.7 3.6 3.5 3.4 3.3 as255_v8_1 as255_v8_1 as255_v8_1 as255_v8_1 as255_v8_1 as255_v8_1 as255_v8_1 as255_v8_1 as255_v8_0 as255_v7_9 as255_v7_8 as255_v7_7 as255_v7_6 as255_v7_5 as255_v7_4 as255_v7_3 as255_v7_2 as255_v6_9 7.0-9 7.0-9 7.0-9 7.0-9 7.0-9 7.0-9 7.0-9 7.0-9 6.9-4 6.8-2 6.7-2 6.6-1 6.5-2 6.4-1 6.3-4 6.2-2 6.1-2 6.0-943 5.68 5.68 5.68 5.68 5.68 5.68 5.68 5.68 5.66 5.65 5.64 5.30 5.30 5.21 5.12 5.12 5.12 5.10 6.1 6.0 5.9 5.8 5.7 5.6 5.5 5.4 5.3 5.2 5.1 5.0 4.0 3.9 3.8 3.7 3.6 3.5 13 AlphaStation 400 thru AlphaStation 600 Systems System AlphaStation 400 AlphaStation 500 AlphaStation 600 Type Filename SRM Fw Rev NT Fw Rev CD Ver as400_v72_1 as400_v72_1 as400_v72_1 as400_v72_1 as400_v72_1 as400_v7_1 as400_v7_0 as400_v7_0 as400_v6_9 as400_v6_8 as400_v6_7 as400_v6_6 as400_v6_5 as400_v5_9 as400_v5_8 as400_v5_7 as400_v5_6 as400_v5_5 as400_v5_1 as400_v5_0 as400_v4_2 as400_v2_9 as400_v2_8 7.2-1 7.2-1 7.2-1 7.2-1 7.2-1 7.1-2 7.0-9 7.0-9 6.9-4 6.8-2 6.7-2 6.6-1 6.5-2 6.4-1 6.3-4 6.2-2 6.1-2 6.0-943 5.2-29 5.0-29 4.2-2 3.9-1387 3.7-10895 4.58 4.58 4.58 4.58 4.58 4.58 4.58 4.58 4.57 4.56 4.56 4.53 4.53 4.49 4.49 4.49 4.45 4.45 4.41 4.37 4.28 4.1-22 3.5-13 6.1 6.0 5.9 5.8 5.7 5.6 5.5 5.4 5.3 5.2 5.1 5.0 4.0 3.9 3.8 3.7 3.6 3.5 3.4 3.3 3.2 3.1 3.0 as500_v72_2 as500_v72_2 as500_v72_2 as500_v72_2 as500_v72_2 as500_v7_0 as500_v7_0 as500_v7_0 as500_v6_9 as500_v6_8 as500_v6_7 as500_v6_6 as500_v6_5 as500_v6_4 as500_v6_3 as500_v6_2 as500_v6_0 as500_v5_0 as500_v1_0 7.2-2 7.2-2 7.2-2 7.2-2 7.2-2 7.0-10 7.0-10 7.0-10 6.9-5 6.8-2 6.7-2 6.6-2 6.5-1 6.4-1 6.3-5 6.2-1 5.0-13 5.0-13 1.01 4.58 4.58 4.58 4.58 4.58 4.58 4.58 4.58 4.57 4.56 4.56 4.53 4.53 4.52 4.49 4.49 4.45 4.45 4.43 6.1 6.0 5.9 5.8 5.7 5.6 5.5 5.4 5.3 5.2 5.1 5.0 4.0 3.9 3.8 3.7 3.6 3.5 3.4 as600_v72_2 as600_v72_2 as600_v72_2 as600_v72_2 as600_v72_2 as600_v7_0 as600_v7_0 as600_v7_0 as600_v6_9 as600_v6_8 as600_v6_7 as600_v6_6 as600_v6_5 as600_v6_4 as600_v6_3 as600_v6_2 as600_v6_0 as600_v5_0 as600_v4_1 as600_v1_1 7.2-2 7.2-2 7.2-2 7.2-2 7.2-2 7.0-10 7.0-10 7.0-10 6.9-5 6.8-2 6.7-2 6.6-2 6.5-1 6.4-1 6.3-5 6.2-1 5.0-13 5.0-13 4.1-1 1.1-3 4.58 4.58 4.58 4.58 4.58 4.58 4.58 4.58 4.57 4.56 4.56 4.53 4.53 4.52 4.49 4.49 4.45 4.45 4.43 4.24 6.1 6.0 5.9 5.8 5.7 5.6 5.5 5.4 5.3 5.2 5.1 5.0 4.0 3.9 3.8 3.7 3.6 3.5 3.4 3.3 14 AlphaStation 600A Systems System Type AlphaStation 600A Filename SRM Fw Rev as600a_e5_v5_6 as600a_e5_v5_6 as600a_e5_v5_6 as600a_e5_v5_6 as600a_e5_v5_6 as600a_e5_v5_6 as600a_e5_v5_5 as600a_e5_v5_4 as600a_e5_v5_3 as600a_e5_v5_2 as600a_e5_v5_1 as600a_e5_v5_0 as600a_e5_v4_9 as600a_e5_v4_8 5.6-114 5.6-114 5.6-114 5.6-114 5.6-114 5.6-114 5.5-80 5.4-115 5.3-103 5.2-114 5.1-204 5.0-106 4.9-169 4.8-79 NT Fw Rev CD Ver 5.70 5.70 5.70 5.70 5.70 5.70 5.69 5.68 5.66 5.64 5.64 5.30 5.30 5.28 6.1 6.0 5.9 5.8 5.7 5.6 5.5 5.4 5.3 5.2 5.1 5.0 4.0 3.9 DEC 2000 Systems System Type DEC 2x00 Models 300 and 500 Filename dec2000_v2_2 dec2000_v2_2 dec2000_v2_2 dec2000_v2_2 dec2000_v2_2 dec2000_v2_2 dec2000_v2_2 dec2000_v2_2 dec2000_v2_2 dec2000_v2_2 dec2000_v2_2 dec2000_v2_2 dec2000_v2_2 dec2000_v2_2 dec2000_v2_2 dec2000_v2_2 dec2000_v2_2 dec2000_v2_2 dec2000_v2_2 dec2000_v2_1 dec2000_v1_9 dec2000_v1_8 dec2000_v1_7 System FW Ver 370 370 370 370 370 370 370 370 370 370 370 370 370 370 370 370 370 370 370 36D 34A 335 32F ARC FW Version 4.31 4.31 4.31 4.31 4.31 4.31 4.31 4.31 4.31 4.31 4.31 4.31 4.31 4.31 4.31 4.31 4.31 4.31 CD Version 6.1 6.0 5.9 5.8 5.7 5.6 5.5 5.4 5.3 5.2 5.1 5.0 4.0 3.9 3.8 3.7 3.6 3.5 3.4 3.3 3.2 3.1 15 DEC 3000 Systems System Type DEC 3000 Model 300 DEC 3000 Models 400,600 and 700 Filename System FW Ver I/O FW Ver CD Ver m300_v7_0 m300_v7_0 m300_v7_0 m300_v7_0 m300_v7_0 m300_v7_0 m300_v7_0 m300_v7_0 m300_v7_0 m300_v7_0 m300_v7_0 m300_v7_0 m300_v7_0 m300_v7_0 m300_v6_9 m300_v6_8 m300_v6_7 m300_v6_5 m300_v6_4 m300_v6_2 m300_v6_1 m300_v6_0 m300_v5_2 m300_v5_1 m300_v3_3 7.0 7.0 7.0 7.0 7.0 7.0 7.0 7.0 7.0 7.0 7.0 7.0 7.0 7.0 6.9 6.8 6.7 6.5 6.4 6.2 6.1 6.0 5.2 5.1 3.3 7.0 7.0 7.0 7.0 7.0 7.0 7.0 7.0 7.0 7.0 7.0 7.0 7.0 7.0 6.9 6.8 6.7 6.5 6.4 6.2 6.1 6.0 5.2 5.1 3.3 6.1 6.0 5.9 5.8 5.7 5.6 5.5 5.4 5.3 5.2 5.1 5.0 4.0 3.9 3.8 3.7 3.6 3.5 3.4 3.3 3.2 3.1 3.0 2.9 2.8 m400_v7_0 m400_v7_0 m400_v7_0 m400_v7_0 m400_v7_0 m400_v7_0 m400_v7_0 m400_v7_0 m400_v7_0 m400_v7_0 m400_v7_0 m400_v7_0 m400_v7_0 m400_v7_0 m400_v6_9 m400_v6_8 m400_v6_7 m400_v6_5 m400_v6_4 m400_v6_2 m400_v6_1 m400_v6_0 m400_v5_2 m400_v5_1 m400_v3_3 7.0 7.0 7.0 7.0 7.0 7.0 7.0 7.0 7.0 7.0 7.0 7.0 7.0 7.0 6.9 6.8 6.7 6.5 6.4 6.2 6.1 6.0 5.2 5.1 3.3 7.0 7.0 7.0 7.0 7.0 7.0 7.0 7.0 7.0 7.0 7.0 7.0 7.0 7.0 6.9 6.8 6.7 6.5 6.4 6.2 6.1 6.0 5.2 5.1 3.3 6.1 6.0 5.9 5.8 5.7 5.6 5.5 5.4 5.3 5.2 5.1 5.0 4.0 3.9 3.8 3.7 3.6 3.5 3.4 3.3 3.2 3.1 3.0 2.9 2.8 16 DEC 3000 Systems cont System Type DEC 3000 Models 500, 800 and 900 Filename m500_v7_0 m500_v7_0 m500_v7_0 m500_v7_0 m500_v7_0 m500_v7_0 m500_v7_0 m500_v7_0 m500_v7_0 m500_v7_0 m500_v7_0 m500_v7_0 m500_v7_0 m500_v7_0 m500_v6_9 m500_v6_8 m500_v6_7 m500_v6_5 m500_v6_4 m500_v6_2 m500_v6_1 m500_v6_0 m500_v5_2 m500_v5_1 m500_v3_3 System FW Ver 7.0 7.0 7.0 7.0 7.0 7.0 7.0 7.0 7.0 7.0 7.0 7.0 7.0 7.0 6.9 6.8 6.7 6.5 6.4 6.2 6.1 6.0 5.2 5.1 3.3 I/O FW Ver 7.0 7.0 7.0 7.0 7.0 7.0 7.0 7.0 7.0 7.0 7.0 7.0 7.0 7.0 6.9 6.8 6.7 6.5 6.4 6.2 6.1 6.0 5.2 5.1 3.3 CD Ver 6.1 6.0 5.9 5.8 5.7 5.6 5.5 5.4 5.3 5.2 5.1 5.0 4.0 3.9 3.8 3.7 3.6 3.5 3.4 3.3 3.2 3.1 3.0 2.9 2.8 17 DEC 4000 Systems System Type DEC 4000 Models 600 and 700 Filename DecChip Ver Firmware Ver CD Ver cfw_v40_updp3 cfw_v40_updp3 cfw_v40_updp3 cfw_v40_updp3 cfw_v40_updp3 cfw_v40_updp3 cfw_v40_updp3 cfw_v40_updp3 cfw_v40_updp3 cfw_v40_updp3 cfw_v39_updp3 cfw_v39_updp3 cfw_v39_updp3 cfw_v39_updp3 cfw_v39_updp3 cfw_v38_updp3 cfw_v38_updp3 cfw_v37_updp3 cfw_v36_updp3 cfw_v35_updp3 cfw_v35_updp3 cfw_v35_updp3 cfw_v34_updp3 ? ? cfw_v33_updp3 cfw_v33_updp2 cfw_v28_ev4p3 cfw_v28_ev4p2 cfw_v23_e43 cfw_v25_ev4p2 cfw_v24_ev4p2 cfw_v23_e42 cfw_v23_e41 cfw_aug12_e42 cfw_aug12_e41 cfw_jul28_e42 cfw_jul28_e41 cfw_jun29_e42 cfw_jun29_e41 cfw_may22_e42 cfw_may22_e41 21064-3 21064-3 21064-3 21064-3 21064-3 21064-3 21064-3 21064-3 21064-3 21064-3 21064-3 21064-3 21064-3 21064-3 21064-3 21064-3 21064-3 21064-3 21064-3 21064-3 21064-3 21064-3 21064-3 4.0 4.0 4.0 4.0 4.0 4.0 4.0 4.0 4.0 4.0 3.9 3.9 3.9 3.9 3.9 3.8 3.8 3.7 3.6-1 3.5-5 3.5-5 3.5-5 3.4 ? ? 3.3 3.3 2.8 2.8 2.5-5744 2.5-5744 2.4-4074 2.3-2001 2.3-2001 T2.2-750 T2.2-750 T2.1-213 T2.1-213 T2.0-9381 T2.0-9381 T1.8-7283 T1.8-7293 6.1 6.0 5.9 5.8 5.7 5.6 5.5 5.4 5.3 5.2 5.1 5.0 4.0 3.9 3.8 3.7 3.6 3.5 3.4 3.3 3.2 3.1 3.0 2.9 2.8 2.7 2.7 -3 CPU 21064-3 21064-2 -2 CPU 21064-3 21064-2 21064-3 21064-2 21064-2 or -3 21064-2 21064-1 -1 CPU 21064-2 21064-1 21064-2 21064-1 21064-2 21064-1 21064-2 21064-1 cfw_v33_updp2 = Last version for -2 CPU and cfw_v23_e41 = Last version for -1 CPUs 18 DEC 7000/10000 Systems System Type DEC 7000/10000 Models 600 and 700 Filename axp7000_v18 axp7000_v18 axp7000_v18 axp7000_v18 axp7000_v18 axp7000_v18 axp7000_v18 axp7000_v18 axp7000_v17 axp7000_v17 axp7000_v17 axp7000_v17 axp7000_v17 axp7000_v16 axp7000_v15 axp7000_v14 axp7000_v13 axp7000_v12 axp7000_v11 axp7000_v10 axp7000_v0f axp7000_v0e axp7000_v0d axp7000_v0c axp7000_v0b axp7000_v0a axp7000_v09 axp7000_v08 Version 5.4-4819 5.4-4819 5.4-4819 5.4-4819 5.4-4819 5.4-4819 5.4-4819 5.4-4819 5.0-4814 5.0-4814 5.0-4814 5.0-4814 5.0-4814 4.9-4812 4.9-4812 4.8-4792 4.7-4792 4.6-4789 4.5-4779 4.4-4744 4.3-4740 4.2-4732 4.1-4697 4.0-4589 4.0-4589 3.2-4445 3.1-4324 3.0-4284 CD Version 6.1 6.0 5.9 5.8 5.7 5.6 5.5 5.4 5.3 5.2 5.1 5.0 4.0 3.9 3.8 3.7 Network Only 3.6 - DO NOT USE! 3.5 3.4 3.3 3.2 - DO NOT USE! 3.1 3.0 - Same as V2.9 except KFMSB 2.9 2.8 2.7 2.6 VAX 7000/10000 Systems System Type VAX 7000/10000 Model 600 VAX 7000/10000 Model 700 VAX 7000/10000 Model 800 Filename Firmware Version vax7000_s0e vax7000_v0c vax7000_v0b vax7000_v0a vax7000_v09 vax7000_v07_3 vax7000_v07_2 vax7000_v07_1 vax7000_v07 4.4-4857 Network 4.3-4842 4.2-4835 4.1-4820 4.0-4765 3.3 Network only 3.2 Network only 3.1 Network only 3.0 vax7000_s0e vax7000_v0c vax7000_v0b vax7000_v0a vax7000_v09 vax7700_v02 vax7700_v01 4.4-4857 Network only - power-e-bad messages. 4.3-4842 4.2-4835 4.1-4820 4.0-4765 1.1 1.0 vax7000_s10 4.4 Network only - multi-cpu 7800’s init issue (corrects corrupt v7000_s0f image) 4.4 Network only - multi-cpu 7800’s init issue 4.4-4857 Network only - power-e-bad messages. 4.3-4842 4.2-4835 4.1-4820 vax7000_s0f vax7000_s0e vax7000_v0c vax7000_v0b vax7000_v0a only - power-e-bad messages. - No XMI f/w - No XMI f/w - previously named vax7000_v08 19 20 Alpha Windows NT Matrix AXP 150 DEC 2000 AlphaXL 4/2xx 5/xxx PWS 433a 500a 600a AlphaStation 200 250 255 400 500 600 600a 1200 AlphaServer 300 400 800 1000 4/2xx 5/xxx 1000a 4/2xx 5/xxx 1200 2000 4/2xx 5/3xx 2100 4/2xx 5/3xx 2100a 4/2xx 5/3xx 4000 4100 8x00 1. 2. 3. 4. HAL 1,3 1,3 Firmware ARC AlphaBIOS 4.31 X 4.31 X SWXCR boot N N HSZ boot N N 3.51 Y Y 4.0 Y Y Y Y N N N Y N N N N Y Y N N N Y Y Y Y Y X X Y Y Y Y Y Y Y Y Y Y Y Y Y Y Y Y Y Y Y Y Y Y N N Y Y Y Y Y Y Y Y X Y Y Y Y Y Y Y Y N Y Y Y X Y Y Y Y Y Y Y Y X X Y Y Y Y Y Y Y Y N Y Y Y 1,3 2,3 4 4 4 4.56 5.65 5.65 5.65 5.65 X 1,3 1,3 2,3 1,3 1,3* 1,3 4 4# 4.56 4.56 5.64 4.56 4.56 4.56 5.65 5.65 X X 1,3 1,3 4 4.56 4.56 5.65 X X 1,3 2,4# 4.56 5.65 X 2,3 2,4# 4# 4.56 5.65 5.65 X 1,4# 1,4# 4.56 4.56 X X Y Y N N Y Y Y Y 1,4# 1,4# 4.56 4.56 X X Y Y N N Y Y Y Y 2,4# 2,4# 2,4# 2,4# 4# 4.56 4.56 5.64 5.64 5.35 X X Y Y Y Y Y N N Y Y Y Y Y Y Y N Y Y Y Y Y X X X X X X X X Uses HAL from 3.51 CD Needs special HAL for 3.51 Uses HAL from 4.0 CD Needs special HAL for 4.0 X X X * Identifies as an AlphaStation 600 # HAL is on the 4.0 CD but causes problems 21 22 Alpha System Firmware Update Procedures In order to perform a firmware upgrade successfully you need to follow these steps. • • • • • • • • • • • • • • Determine current firmware versions of the system (SRM, ARC/AlphaBIOS and SROM where pertinent) and options. Determine what firmware version you are updating to. Print and read the release notes for that version. Write down the environmental variable settings. Determine method to be used to do the update. If available you can save NVRAM data including ECU info by using the command SAVE_NVRAM at the >>> or the UPD> prompt depending on system type. • >>> or UPD> for the AlphaServer 1200, 4000, 4100, DS20 and DS20E • UPD> only for the AlphaServers 800/1000/1000A/2000/2100/2100A and the AlphaStation 600A. Boot the firmware. You will see either a UPD> , Apu-> , or Function? prompt depending on the system or file used. Depending on the prompt the commands display differently. • Apu-> prompt • Allows Updates of SRM or ARC/AlphaBIOS • Uses a separate option file for updates • Verify will only say successful but not list a version • UPD> prompt • Will allow a list to see current and update versions • Will allow updates of SRM or ARC/AlphaBIOS and certain options • Verify will list version number and if it Passed. • Function • Function? prompt • Has similar functionality found at the UPD> prompt. Execute an UPDATE command. • Update SRM, ARC/AlphaBIOS, SROM, DROM (depending on system) • Update Options as needed. May require booting a specific option firmware file If updating options may need to load a separate file with option firmware • PCI options on AlphaServer 300 and AlphaStation 200/250/255/400 • PCI_V1_4.EXE • PCI options on AlphaStation 500/600 and Digital Personal Workstation a/au • PCI_V6_2.EXE • Compaq Professional WorkStation XP1000 • PCI_V5_7.exe • TurboChannel options on the DEC 3000 • TC_V2_2.EXE After update ALWAYS do a verify After EXIT power cycle the machine Reset any console variables you have changed. Not all systems use the same variables. The main ones to be concerned with are • Auto_action • Boot_osflags • Bootdef_dev • Console • EW*0_mode • Os_type • Pk*0_host_id • Sys_model_num • Sys_serial_num Reboot OS 23 24 AlphaServer 300 The AlphaServer 300 system contains 4 flash roms on the CPU module. Two contain ARC console firmware for Windows NT and two contain SRM console firmware for Digital UNIX and OpenVMS. The ability to write to these roms is controlled by jumper J4 on the CPU motherboard. When ever the CPU motherboard is replaced the firmware will need to be updated. You will also need to do occasional console firmware upgrades to load the latest version of firmware that is available. There is also a failsafe loader floppy function. It is selected by jumper J2 on the motherboard. There are several ways to upgrade the firmware. All involve booting Loadable Firmware Utility (LFU). It can be booted one of the following ways. • • • • • • Off the Alpha AXP System Firmware Update Utility CD using the local CDROM. Off of an infoserver using the Alpha AXP System Firmware Update Utility CD. Over the network using the .SYS firmware file. Off of a disk that has a bootable version of the firmware file (filename.exe) on it (MCR WRITEBOOT may be required on that file to make it bootable). Off of a bootable floppy OpenVMS, Unix or NT. From the BOOTP server (Unix). The procedure to update the console firmware is as follows. • • • • • • • • • • • • Determine current console firmware revision by the power on display, SHOW commands or from online SDA with a CLUE CONFIG command. Record all console environmental variables by typing SHOW * at the >>>. Determine method and firmware version you will be using to do the update. Print the firmware release notes for that version and system. Determine if any option firmware will be upgraded. Verify the ROM Update Jumpers are in the correct positions. Boot the firmware file (LFU). Use the verify and update commands at the Apu-> prompt. When done exit from LFU. Reboot LFU using the device firmware file to update device firmware. Power off/on the machine to reload the new firmware. Reset any Environmental variables that were changed and reboot. 1. Get the current firmware revision at power on or with console show commands. Power on display ff.fe.fd.fc.fb.fa.f9.f8.f7.f6.f5. ef.df.ee.ed.ec.f4.eb.....ea.e9.e8.e7.e6.e5. 6.4-1, built on Feb 3 1997 at 16:20:48 >>> show version Version 6.4-1 Jul 18 1995 16:20:48 >>> show pal PAL VMS PALcode X5.48-107, OSF PALcode X1.35-76 >>> show config Firmware SRM Console: V6.4-1 ARC Console: 4.49 Serial ROM: V3.4 Diag ROM: V1.7 Processor DECchip (tm) 21064-2 166Mhz 512KB Cache 25 MEMORY 32 Meg Bank 0 Bank 1 Bank 2 PCI Bus Bus 00 of System Memory = 16 Mbytes(8 MB Per Simm) Starting at 0x0 = 16 Mbytes(8 MB Per Simm) Starting at 0x1000000 = No Memory Detected 810 Scsi Controller pka0.7.0.6.0 SCSI Bus ID 7 dka0.0.0.6.0 RZ26L dka400.4.0.6.0 RRD43 Bus 00 Slot 07: Intel SIO 82378 Bus 00 Slot 11: Digital ZLXp Graphics Controller Bus 00 Slot 12: Digital DE435 Network Controller ewa0.0.0.12.0 08-00-2B-E2-1C-25 ISA Slot 0 Device 0 1 2 3 4 5 Slot 06: NCR Name Type MOUSE Embedded KBD Embedded COM1 Embedded COM2 Embedded LPT1 Embedded FLOPPY Embedded Enabled Yes Yes Yes Yes Yes Yes BaseAddr 60 60 3f8 2f8 3bc 3f0 IRQ DMA 12 1 4 3 7 6 2 2 0 PCXBJ Singleport Yes 530 9 0 2. >>> show or show * to printout all the environmental variables. Check all customer set variables. Also verify the setting of the following variables. Bootdef_dev Boot_osflags Auto_action 3. Check that the ROM update jumper is enabled. Consult the Service Manual for its location and setting. It should be enabled by default. 4. Boot the firmware using one of the following six methods. Method 1 - Load the Console Firmware Off a Local CDROM SRM Console a. Insert the CD in the local CDROM. b. >>> Boot -fl 0,a0 DKA400 BOOTFILE:[alpha300]as300_v7_0.exe - for the AlphaServer 300 Note: These filenames will change with different console versions. Apu-> See step 5 below for update procedure. ARC Console a. Insert the CD in the local CDROM. b. Enter the ARC menu by typing ARC or initializing system if os_type = NT c. Select Supplementary Menu and Install new Firmware Caution If you are running the V4.49 ARC console you will not be able to use the "Install new Firmware" utility. The SRM firmware will need to be updated from the >>>. 26 Method 2 - Boot the Console CD Off of an Infoserver a. Insert CD in the Infoserver b. >>> boot ewa0 -file filename (leave off the .sys extension) Method 3 - Booting off the Network - OpenVMS a. Copy firmware.sys file to MOM$LOAD of an existing node in the cluster b. Set the attributes on the file with the following commands: $ set file/attr=(rfm:fix,lrl:512,mrs:512,rat:none) firmware.sys c. Enable service on that node from NCP $ MC NCP MC NCP> Show Known Circuit Characteristic Known Circuit Volatile Characteristics as of 12-FEB-1997 19:27:41 Circuit = BNA-0 - Circuit State = Service = Counter timer = Designated router = Cost = Maximum routers allowed = Router priority = Hello timer = Type = Adjacent node = Listen timer = name will change from system to system on disabled (if enabled skip to boot command) 65534 28.1023 (CXO28A) 4 33 64 15 Ethernet 28.1023 (CXO28A) 30 NCP> Set Circ BNA-0 State OFF - This step will stop network activity NCP> Set Circ BNA-0 Service Enable NCP> Set Circ BNA-0 State ON d. >>> b ewa0 -fi filename Leave off .SYS or node that services request will get an error - BAD MOP FID) Method 4 - Boot Off of a Disk - Non-System Disk and System Disk Using OpenVMS Non-System Disk a. Locate the firmware.exe file b. Set the attributes on the file and copy it contiguous to the target disk (non-system) and directory with the following commands: $ set file/attr=(rfm:fix,lrl:512,mrs:512,rat:none) firmware.exe $ copy/contiguous firmware.exe "non_system_disk":[directory] c. Use writeboot to make the disk bootable. Specify the disk, directory and filename of the firmware. Take the defaults for the other questions. $ MCR Writeboot Update VAX portion of boot block (default is Y): No Update Alpha portion of boot block (default is Y):Yes Target system device (and boot file if not VMB.EXE):$1$DUA5:[TEMP]as300_v6_9.exe d. >>> b -fl 0,0 dua5 27 System Disk a. Only steps a and b above are used. Do NOT execute writeboot step c. b. Specify the flags of 0,a0 and use "system_disk":[sys0.sysexe]filename for bootfile. >>> boot -fl 0,a0 dua0 bootfile: dua0:[sys0.sysexe]as300_v7_0.exe Method 5 - Boot Off of a Bootable Floppy OpenVMS AXP a. Init and mount floppy. Create a directory and copy the firmware to the floppy with the following commands. $ init/dens=HD/index=begin dva0: fwupdate $ mount dva0: fwupdate $ create/dir dva0:[ALPHA300] $ copy/contiguous as300_v7_0.exe dva0:[ALPHA300]fwupdate.exe b. MCR Writeboot Update VAX portion of boot block (default is Y): No Update Alpha portion of boot block (default is Y):Yes [enter AXP bootfile:] dva0:[ALPHA300]fwupdate.exe c. Dismount the disk and shutdown VMS. $ dismount dva0: d. Insert the floppy on the target system and boot it from the >>>. >>> boot dva0 Digital UNIX a. Go to http://ftp.digital.com/pub/Digital/Alpha/firmware/ b. Copy the firmware.exe file from the Alpha300 directory to your system and rename fwupdate.exe c. Download the file mkbootfirm.tar from the firmware website. ftp://ftp.digital.com/pub/Digital/Alpha/firmware/utilities/mkbootfirm.tar You can untar mkbootfirm on your target Tru64 UNIX system with the command: # tar xvf mkbootfirm.tar d. Make sure you have a floppy that has been low-level formatted. For example, to low-level format a floppy in drive 0: fddisk -fmt /dev/rfd0a e. Change default to directory with mkbootfirm.exe cd mkbootfirm f. Run mkbootfirm on the .exe firmware image that you downloaded. mkbootfirm uses a .exe firmware image to create a file that can be dd’d to floppy. The following will create a bootable floppy from a downloaded .exe firmware image: ./mkbootfirm fwupdate.exe | dd of=/dev/rfd0c bs=64k NOTE: Assumes mkbootfirm.exe is in current directory and floppy is in drive 0. g. Insert the floppy on the target system and boot it from the SRM console: >>> boot dva0 28 Windows NT a. Copy the firmware file to a FAT formatted floppy with the update image filename a:\fwupdate.exe. b. Shut down NT and from the ARC menu, select "Install new firmware". Caution If you are running the V4.49 ARC console you will not be able to use the "Install new Firmware" utility. The SRM firmware will need to be updated from the >>>. Method 6 - BOOTP Network Upgrade - Tru64 UNIX a. Mount the Firmware Update CD using the following command: # mount -rt cdfs -o noversion /dev/rz4c /mnt b. Modify or Create the Client Database in the /etc/bootptab File <host>:ht:<hw_type>:ha=<hw_addr>:bf=<filename>:ip=<ip_addr> where: host is the system name in /etc/hosts hw_type is the hardware type. Proteon is ht = 4. Ethernet is ht = 1. Regular token-ring (IEEE 802) is ht = 6. hw_addr is the hardware address: use the console command show device. filename is the name of the default bootfile image: ip_addr is the Internet protocol address of the system name in /etc/hosts. The following is an example of a bootptab file for the AlphaServer 300 bigsox:ht=1:ha=08002b236423:bf=/mnt/ALPHA300/as300_v7_0.EXE;1:ip=16.182.0.87 c. Modify the /etc/inetd.conf file. Uncommon the tftp and bootps process. It should look like the following example: tftp dgram udp wait root bootps dgram upd wait root /usr/sbin/tftpd /usr/sbin/bootpd tftpd /mnt bootpd d. Find the process /usr/sbin/inetd daemon: This step will stop network traffic # ps aux | grep ine # kill process# <ine process number> e. Restart the inetd daemon: # /usr/sbin/inetd Note The bootpd and tftp daemon will be removed if the system is rebooted. Refer to the manual pages: bootpd(8) or tftpd(8) for more information. Use Man bootpd and man tftpd f. Enter the following command to boot from the BOOTP server: >>> boot -p bootp ewa0 Should a boot file "pathname" need to be specified in must be in quotes >>> boot -p bootp ewa0 -file “/dir1/dir2/filename” 29 5. Update the firmware from the Apu-> prompt Apu-> update APU-I VERIFY LOADED ROM IMAGE APU-I VERIFY LOADED ROM IMAGE DONE APU-I VERIFY LOADED ROM IMAGE APU-I VERIFY LOADED ROM IMAGE DONE APU-I VERIFY LOADED ROM IMAGE APU-I VERIFY LOADED ROM IMAGE DONE APU-I *** ROMS 0,1 CONTENTS WILL BE DESTROYED *** APU-I ARE YOU READY TO PROGRAM DEVICE ? (Y/N )Y APU-I ROM SET NOT ERASED APU-I PRECHARGING DEVICE APU-I ERASING ROM DEVICE APU-I PROGRAMMING DEVICE APU-I ROM 0 VERIFYING ROM IMAGE APU-I PROGRAMMING COMPLETED SRM Rom Update Successful APU-I VERIFY LOADED ROM IMAGE APU-I VERIFY LOADED ROM IMAGE DONE APU-I ROM SET NOT ERASED APU-I PRECHARGING DEVICE APU-I ERASING ROM DEVICE APU-I PROGRAMMING DEVICE APU-I ROM 1 VERIFYING ROM IMAGE APU-I PROGRAMMING COMPLETED ARC Rom Update Successfull Apu-> 6. Verify that update was successful and exit Apu-> verify ARC Rom Verify Successful SRM Rom Verify Successful Apu-> exit Hard Reset or ...Cycle Power ... 7. Power cycle the machine to load console firmware. If you are updating device firmware, proceed to step 8. 8. Update the option firmware. There are only two PCI devices supported by this PCI Update Utility. The DEFPA (FDDI) and the KZPSA (SCSI). a. Boot the Option firmware file. >>> boot -fl 0,a0 DKA400 Bootfile:[ALPHA300]as300_pci_v1_4.exe for the AlphaServer 300 This filename may change with each new firmware release. *** PCI/EISA Loadable Firmware Update Utility V6.0 *** ----------------------------------------------------------Function Description ----------------------------------------------------------Display Exit List Displays the system’s configuration table. Done exit LFU (reset.) Lists the device, revision, firmware name, and update revision. Update Replaces current firmware with loadable data image. Verify Compares loadable and hardware images. ? or Help Scrolls this function table. ----------------------------------------------------------- 30 UPD> list Device fwa0 pka0 Current Revision 2.46 A06 Filename Update Revision dfxaa_fw kzpsa_fw 3.20 A12 UPD> update * or update Will update all LFU supported devices found in this system UPD> update pka0 - will update device PKA0 Confirm update on: pka0 [Y/(N)]Y WARNING: updates may take several minutes to complete for each device. DO NOT ABORT! pka0 Updating to A12... Verifying A12... PASSED. UPD> update fwa0 -path mopd1:new_firm/eza0 Will update the device named fwa0 with firmware NEW_FIRM from the network. UPD> verify fwa0 pka0 Verifying 3.20... PASSED. Verifying A12... PASSED. 9. Power cycle the machine to load console firmware then reset any environmental variables that changed, init and reboot. 31 32 AlphaServer 300 Jumpers Motherboard Jumper J1 J2 J3 J4 J7 J21 J25 J26 J27 J32 Pins (1 to 2) (2 to 3) (D) (1 to 2) (2 to 3) (D) Function Mini-console Jump to main console Boot floppy Normal (flashROM load) (1 to 2) (D) (2 to 3) (1 to 2) (D) (2 to 3) (1 to 2) (D) (2 to 3) (1 to 2) (3 to 4) (5 to 6) Reset Halt Interrupt Request Enables flashROM writes Disables writes 267 MHz CPU Not used Not used Hang off 1 (D) Hang off 3 (D) Hang off 5 (D) (1 to 2) (D) Removed (1 to 2) (D) Removed (1 to 2) 87332 Super I/O chip 87312 Super I/O chip 87332 Super I/O chip 87312 Super I/O chip Disables sensing for presence of external cable Hang off 1 (D) Enables sensing for presence of external SCSI cable (1 to 2) (D) (2 to 3) 267 MHz CPU Not used Description Leave at factory default. The DROM code uses J2 to determine whether an image from a floppy disk or the flashROM containing the console firmware should be loaded into memory and started. The front-panel push button can be set to cause either a Reset or a Halt Interrupt Request. Leave at factory default. Leave at factory default. Leave at factory default. Leave at factory default. Leave at factory default. J27 controls the automatic SCSI bus terminator. If an external SCSI cable is attached to the SCSI connector, the automatic SCSI terminator turns off. Therefore, the SCSI bus must be terminated at the end of the external bus. When sensing is disabled (J27 1 to 2 installed), an external SCSI terminator is always required, even if no external SCSI devices are present. Leave at factory default. (D) = Default setting. 33 34 AlphaServer 800 or Digital Server 3000 Models 3300/3305 The AlphaServer 800 system contains one flash rom on the motherboard that contains ARC console firmware for Windows NT and SRM console firmware for Tru64 UNIX and OpenVMS. When ever the motherboard is replaced the firmware may need to be updated. You will also need to do occasional console firmware upgrades to load the latest version of firmware that is available. Rom updates are enabled by jumper J50 on the motherboard. This machine also has a backup console called the failsafe loader. It is enabled for use by one jumper on the CPU daughter card. The failsafe loader floppy can be created from files over the Internet. Please note that option firmware is separated from the system firmware. There are extra procedures required to update options when not using the firmware update CD. There are several ways to upgrade the firmware. All involve booting Loadable Firmware Utility (LFU). It can be booted one of the following ways. • • • • • • Off the Alpha AXP System Firmware Update Utility CD using the local CDROM. Off of an infoserver using the Alpha AXP System Firmware Update Utility CD. Over the network using the .SYS firmware file. Off of a disk that has a bootable version of the firmware file (filename.exe) on it (MCR WRITEBOOT may be required on that file to make it bootable). Off of a bootable floppy OpenVMS, Unix or NT. From the BOOTP server (Unix). The procedure to update the console firmware is as follows. • • • • • • • • • • • Determine current console firmware revision by the power on display, SHOW commands or from online SDA with a CLUE CONFIG command. Record all console environmental variables by typing SHOW * at the >>>. Determine method and firmware version you will be using to do the update. Print the firmware release notes for that version and system. Determine if any option firmware will be upgraded. Verify the ROM Update Jumpers are in the correct positions. Boot the firmware file (LFU). Use the verify and update commands at the UPD> prompt. When done exit from LFU. Power off/on the machine to reload the new firmware. Reset any Environmental variables that were changed and reboot. 1. Get the current firmware revision at power on or with console show commands Power on display ff.fe.fd.fc.fb.fa.f9.f8.f7.f6.f5.ef.df.ee.f4. probing hose 0, PCI ed.ec.eb.....ea.e9.e8.e7.e6.e5.e4.e3.e2.e1.e0. V4.7-3046, built on Dec 4 1996 at 01:56:52 >>> show version Version V4.7-3046 Dec 4 1996 at 01:56:52 >>> show pal PAL VMS PALcode V1.19-2, OSF PALcode V1.19-2 35 >>> show config Firmware SRM Console: V4.7-3046 ARC Console: 4.49 PALcode: VMS PALcode V1.19-2, OSF PALcode V1.21-4 Serial ROM: 0.4 Processor DECchip - 21164A-2 400MHZ System Motherboard Revision: 0 MEMORY 64 Meg of System Memory Bank 0 = 64 Mbytes(16 MB Per Simm) Starting at 0x00000000 Bank 1 = No Memory Detected Slot Option 5 Qlogic ISP1020 a. 7 11 Slot 1 Slot 2 3 S3 Trio64/Trio32 Intel 82375eB DECchip 20140-AA Option DE425 Option Qlogic ISP1020 Qlogic ISP1020 Hose 0, Bus 0, pka0.7.0.5.0 dka0.0.0.5.0 dka400.4.0.5.0 ewb0.0.0.12.0 Hose 0, Bus 1, ewa0.0.1001.0 Hose 0, Bus 2, pkb0.7.0.2002.0 pkc0.7.0.2003.0 dkc0.0.0.2003.0 PCI SCSI Bus ID 7 RZ28 RRD43 Bridge to Bus 1, EISA 00-00-C0-33-E0-0D EISA 08-00-2B-3E-BC-B5 PCI SCSI Bus ID 7 SCSI Bus ID 7 RZ25 2. >>> show or show * to printout all the environmental variables. Check all customer set variables. Also verify the setting of the following variables. Bootdef_dev Boot_osflags Auto_action 3. Check that the ROM update jumper is enabled. Consult the Service Manual for its location and setting. It should be enabled by default. 4. Boot the firmware using one of the following six methods. Method 1 – Load the Console Firmware Off a Local CDROM SRM Console a. Insert the CD in the local CDROM. b. >>> Boot -fl 0,a0 DKA400 BOOTFILE: [alpha800]as800_v5_8.exe - for the AlphaServer 800 Note: These filenames will change with different console versions. Apu-> See step 5 below for update procedure. AlphaBIOS Console a. Insert the CD in the local CDROM. b. Enter the AlphaBIOS menu by typing ARC or AlphaBIOS or initializing the system when os_type = nt c. AlphaBIOS -Select F2 to go into Setup then select Upgrade AlphaBIOS 36 Method 2 – Boot the Console CD Off of an Infoserver a. Insert CD in the Infoserver b. >>> boot ewa0 –file filename (leave off the .sys extension) Method 3 – Booting Off the Network – OpenVMS a. Copy the firmware.sys file and the option firmware files to MOM$LOAD of an existing node in the cluster. (These versions are from the V5.9 CD) as800_v5_8.sys - System firmware as800fw.sys - This file tells the update utility which option files to load. ccmab022.sys - CCMAB firmware (PCI Memory channel 2 adapter) dfeaa130.sys - DEFEA firmware (EISA DEC FDDI controller. Pass 1 module only) dfeab320.sys - DEFEA firmware (EISA FDDI controller. All modules after pass 1) dfxaa320.sys - DEFPA/DEFEA firmware (PCI or EISA based DEC FDDI controller) kzpsaa12.sys - KZPSA firmware (Fast wide differential PCI-SCSI module) b. Set the VMS attributes on the file with the following command. $ set file/attr=(rfm:fix,lrl:512,mrs:512,rat:none) firmware.sys c. Enable service on that node from NCP $ MC NCP MC NCP> Show Known Circuit Characteristic Known Circuit Volatile Characteristics as of 12-FEB-1997 19:27:41 Circuit = BNA-0 - Circuit State = Service = Counter timer = Designated router = Cost = Maximum routers allowed = Router priority = Hello timer = Type = Adjacent node = Listen timer = name will change from system to system on disabled (if enabled skip to boot command) 65534 28.1023 (CXO28A) 4 33 64 15 Ethernet 28.1023 (CXO28A) 30 NCP> Set Circ BNA-0 State OFF - This step will stop network activity NCP> Set Circ BNA-0 Service Enable NCP> Set Circ BNA-0 State ON d. >>> b ewa0 –fi filename (Leave off .SYS will get an error - BAD MOP FID) Method 4 - Boot Off of a Disk - Non-System Disk and System Disk Using OpenVMS Non-System Disk a. Locate the firmware.exe file b. Set the attributes on the file and copy it contiguous to the target disk (non-system) and directory with the following commands: $ set file/attr=(rfm:fix,lrl:512,mrs:512,rat:none) firmware.exe $ copy/contiguous firmware.exe “non-system_disk”:[directory] c. Use writeboot to make the disk bootable. Specify the disk, directory and filename of the firmware. Take the defaults for the other questions. $ MCR Writeboot Update VAX portion of boot block (default is Y): No Update Alpha portion of boot block (default is Y):Yes Target system device (and boot file if not VMB.EXE):$1$dua5:[TEMP]filename.exe d. >>> b –fl 0,0 dua5 37 Note: Updating options via this method is only supported if the system disk is on the NCR810 SCSI bus (the on-board SCSI). e. To update the option firmware, first create an options directory. $ set def dua5:[000000] $ create/dir [.options] f. Copy the option firmware files to the options directory. as800fw.txt ccmab022.sys dfeaa130.sys dfeab320.sys dfxaa320.sys kzpsaa12.sys g. When booting the update utility enter the device name where the option firmware is located. System Disk a. Only steps a and b above are used. Do NOT execute writeboot step c. For the option firmware use the "system disk" as the disk device. b. Specify the flags of 0,a0 and use "system disk":[sys0.sysexe]filename for the bootfile. c. >>> b -fl 0,a0 dua0 bootfile: dua0:[sys0.sysexe]as800_v5_8.exe Method 5 - Boot Off of a Bootable Floppy - V5.6 Firmware or Earlier OpenVMS AXP a. Init and mount to floppy. Create a directory and copy the firmware to the floppy with the following commands. $ set file/attr=(rfm:fix,lrl:512,mrs:512,rat:none) as800_v5_6.exe $ init/dens=HD/index=begin dva0: fwupdate $ mount dva0: fwupdate $ create/dir dva0:[ALPHA800] $ copy/contiguous as800_v5_6.exe dva0:[ALPHA800]fwupdate.exe b. MCR Writeboot Update VAX portion of boot block (default is Y): No Update Alpha portion of boot block (default is Y):Yes [enter AXP bootfile:] dva0:[ALPHA800]fwupdate.exe c. Dismount the disk and shutdown VMS. $ dismount dva0: d. Insert the floppy on the target system and boot it from the >>>. >>> boot dva0 e. If you wish to update option firmware you must create a second floppy with option firmware on it. Download the following files from the Website. as800fw.txt ccmab022.sys dfeaa130.sys dfeab320.sys dfxaa320.sys kzpsaa12.sys 38 f. Enter the following commands to create the options floppy: $ init/dens=HD/index=begin dva0: optionfw $ mount dva0: optionfw $ create/dir dva0:[options] - Note:The directory name must be [options] $ copy as800fw.txt dva0:[options] $ copy ccmab022.sys dva0:[options] $ copy dfeaa130.sys dva0:[options] $ copy dfeab320.sys dva0:[options] $ copy dfxaa320.sys dva0:[options] $ copy kzpsaa12.sys dva0:[options] $ dismount dva0: g. Insert the floppy when it asks for the options firmware and enter the location. Tru64 UNIX a. Go to http://ftp.digital.com/pub/Digital/Alpha/firmware/ b. Copy the firmware.exe file from the Alpha800 directory to your system and rename it fwupdate.exe c. Download the file mkbootfirm.tar from the firmware website. ftp://ftp.digital.com/pub/Digital/Alpha/firmware/utilities/mkbootfirm.tar You can untar mkbootfirm on your target Tru64 UNIX system with the command: # tar xvf mkbootfirm.tar d. Make sure you have a floppy that has been low-level formatted. For example, to low-level format a floppy in drive 0: fddisk -fmt /dev/rfd0a e. Change default to directory with mkbootfirm.exe cd mkbootfirm f. Run mkbootfirm on the .exe firmware image that you downloaded. mkbootfirm uses a .exe firmware image to create a file that can be dd’d to floppy. The following will create a bootable floppy from a downloaded .exe firmware image: ./mkbootfirm fwupdate.exe | dd of=/dev/rfd0c bs=64k NOTE: Assumes mkbootfirm.exe is in current directory and floppy is in drive 0. g. Insert the floppy on the target system and boot it from the SRM console: >>> boot dva0 h. If you wish to update option firmware you must create a second floppy with option firmware on it. Go to the firmware website and follow this procedure. i. Download the file v39_options.dd. This file name changes with different console versions. j. Make sure you have a floppy that has been low-level formatted. For example, to low-level format a floppy in drive 0: fddisk -fmt /dev/rfd0a k. Enter the command: dd if=v39_options.dd of=/dev/rfd0c bs=64k NOTE: Assumes v39_options.dd is in current directory and floppy is in drive 0. l. After booting the firmware floppy created with mkbootfirm, the update utility will complain that it cannot find the options files on either CD or floppy, and will prompt for a device to look for the options files. Simply insert the options you created above, type the device name of the floppy (e.g. dva0) and hit > to load the options firmware. 39 Windows NT a. Copy the firmware file to a FAT formatted floppy with the update image filename a:\fwupdate.exe. b. Shut down NT and from the NT Console menu, select "Install new firmware". c. If you wish to update the options firmware, you must create a second floppy. Download the following files from the options directory at the firmware website. as800fw.txt ccmab022.sys dfeaa130.sys dfeab320.sys dfxaa320.sys kzpsaa12.sys d. FAT format a floppy and copy the files to the floppy. e. When the utility asks for the options floppy, insert it and tell the utility the device it is located on. Method 6 - Boot Off of a Bootable Floppy - V5.7 Firmware or Later Starting with the V5.7 firmware you can not fit all the firmware on one floppy. You must use a two disk method. Windows NT - PC a. Locate and copy to your system hard disk cru.exe, crarcrom.exe and mkboot.exe from interim directory of the firmware website at http://ftp.digital.com/pub/Digital/Alpha/firmware/interim/ b. Fat format two floppies. c. From a DOS prompt, change you default to the directory where the above files are located. d. Make the floppy bootable with the following DOS command C:\ mkboot cru.exe e. Copy crarcrom.exe to the second floppy. f. Insert the 1st floppy and type B DVA0. g. At the update prompt type exit and answer Y to the manual update question. >>> boot DVA0 UPD> exit Do you want to do a manual update? [y/(n)] y h. Execute the following command at the UPD> prompt to load SRM firmware. UPD> update srm i. Insert the floppy with the arc firmware and execute the following command UPD> update arc -path fat:\crarcrom.exe/dva0 ( can omit the " \ " ) j. Exit out of the utility and reset the machine to reload the console code. If you execute the verify command it will indicate file is missing for the AlphaBIOS firmware. 40 Windows NT - Alpha or PC a. Locate and save the following files to your Alpha or PC. Save them on the top level directory of any disk. makeboot.exe can be found on Cybrary at http://cybrary.inet.cpqcorp.net/DOWNLOAD/UTILITIES/SYSTEM/makeboot.zip • • • • makeboot.exe mkboot.exe cru.exe crarcrom.exe Alpha image to make a bootable disk PC/ALPHA NT image to make a bootable disk LFU and SRM firmware AlphaBIOS firmware b. Fat format two floppies c. From an MSDOS window execute the following command makeboot -f cru.exe or mkboot cru.exe d. Save the crarcrom.exe file to a second fat formatted floppy. e. The first floppy is bootable and will also function as a FSL floppy. Insert the floppy in the system and at the >>> type B DVA0. f. At the UPD> type exit and answer Y to the question Do you want to do a manual update. This will bring you back to the UPD> prompt. g. Now update SRM with the command UPD> UPDATE SRM h. To update AlphaBIOS, install the second floppy and type the command UPD> update arc -path fat:\crarcrom.exe/dva0 . If you execute the verify command it will indicate file is missing for the AlphaBIOS firmware. Tru64 UNIX - Alpha a. Locate and save the following files to your Alpha or PC. Save them on the top level directory of any disk. They can be found in the interim directory of the firmware website at http://ftp.digital.com/pub/Digital/Alpha/firmware/interim/ • • • • b. mkbootfirm.exe mkbootfirm.tar cru.exe crarcrom.exe Alpha/UNIX image to make a bootable disk Alpha/UNIX .exe image in tar format LFU and SRM firmware AlphaBIOS firmware If you loaded the .tar file you must untar it using the command # tar xvf mkbootfirm.tar. This will create a mkbootfirm directory. Make sure you save cru.exe to this directory. If you loaded the mkbootfirm image form the interim directory of the firmware webpage, you will need to set execute permissions on the file. Use the command # chmod 755 mkbootfirm or chmod +x mkbootfirm c. Insert floppy diskette 1. d. Change directory to where files were downloaded. Make sure mkbootfirm and cru.exe are in the same directory # cd [to directory with files] 41 e. Format the floppy. # fddisk -fmt /dev/rfd0a or With Tru64 UNIX V5.0 you can do one of the following # fddisk -fmt /dev/rdisk/floppy0a or # cd /dev # ./MAKEDEV fd0 # fddisk -fmt /dev/rfd0a f. From directory where files are located execute the following # ./mkbootfirm clu.exe |dd of=/dev/rfd0c bs=64k g. Insert floppy diskette 2. h. Create a soft link to /dev/fddrive with the following command # ln -s /dev/rfd0c /dev/fddrive i. Format the floppy. See step 5 for commands. j. Add a DOS format onto the floppy disk # /usr/bin/mtools/mformat -s 18 a: k. Use mwrite to low level copy UNIX to DOS the SRM and ARC firmware. # /usr/bin/mtools/mwrite clsrmrom.exe a:\clsrmrom.exe # /usr/bin/mtools/mwrite clarcrom.exe a:\clarcrom.exe l. Insert the first floppy in the system and at the >>> type b dva0. m. Answer Y to the "Do you want to do a manual update? [y/(n)]" question. This will bring you back to the UPD> prompt. n. At the UPD? prompt update SRM with the command UPD> update srm o. Now insert the second floppy. Upgrade AlphaBIOS firmware with the command UPD> update arc -path fat:\crarcrom.exe/dva0 Method 7 - BOOTP Network Upgrade - Tru64 UNIX a. Mount the Firmware Update CD using the following command: # mount -rt cdfs -o noversion /dev/rz4c /mnt b. Modify or Create the Client Database in the /etc/bootptab File <host>:ht:<hw_type>:ha=<hw_addr>:bf=<filename>:ip=<ip_addr> where: host is the system name in /etc/hosts hw_type is the hardware type. Proteon is ht = 4. Ethernet is ht = 1. Regular token-ring (IEEE 802) is ht = 6. hw_addr is the hardware address: use the console command show device. filename is the name of the default bootfile image: ip_addr is the Internet protocol address of the system name in /etc/hosts. The following is an example of a bootptab file for the AlphaServer 800 : bigsox:ht=1:ha=08002b236423:bf=/mnt/ALPHA800/AS800_V5_8.EXE;1:ip=16.182.0.87 42 c. Modify the /etc/inetd.conf file. Uncommon the tftp and bootps process. It should look like the following example: tftp dgram udp wait root /usr/sbin/tftpd tftpd /mnt bootps dgram upd wait root /usr/sbin/bootpd bootpd d. Find the process /usr/sbin/inetd daemon: This step will stop network traffic # ps aux | grep ine # kill process# <ine process number> e. Restart the inetd daemon: # /usr/sbin/inetd Note The bootpd and tftp daemon will be removed if the system is rebooted. Refer to the manual pages: bootpd(8) or tftpd(8) for more information. Use Man bootpd and man tftpd f. Enter the following command to boot from the BOOTP server: >>> boot -p bootp ewa0 Should a boot file "pathname" need to be specified in must be in quotes >>> boot -p bootp ewa0 -file “/dir1/dir2/filename” g. Currently there is no BOOTP support for updating option firmware. 5. At the UPD> prompt save contents of NVRAM to floppy using SAVE_NVRAM. 6. List the current firmware version. UPD> list Device ARC SRM pkc0 Current Revision v5.69 v5.5-78 A12 Filename arc_fw srm_fw kzpsa_fw dfeaa_fw dfeab_fw dfxaa_fw ccmab_fw Update Revision v5.70 v5.8-16 A12 1.3 3.20 3.20 22.0 7. Update the firmware from the UPD> prompt UPD> update Confirm update on: ARC SRM pkc0 [Y/(N)]y WARNING: updates may take several minutes to complete for each device. DO NOT ABORT! ARC SRM pkc0 UPD> Updating to v5.70... Verifying v5.70... PASSED. Updating to v5.8-16... Verifying v5.8-16... PASSED. Updating to A12... Verifying A12... PASSED. 43 8. Verify that update was successful and exit UPD> verify ARC SRM pkc0 Verifying v5.70... PASSED. Verifying v5.8-16... PASSED. Verifying A12... PASSED. UPD> exit Initializing.... 9. Power cycle the machine to load console firmware. Reboot firmware CD and execute a RESTORE_NVRAM if you saved it in step 5. If you are updating device firmware, proceed to step 10. If you are done reset any environmental variables that changed, init and reboot. 10. Update the option firmware. The V5.9 CD supports updates on the PCI options DEFPA (FDDI), KZPSA (SCSI) and the EISA option DEFEA (FDDI). a. Boot the firmware CD or use one of the above methods to load only options firmware. >>> boot -fl 0,a0 DKA400 UPD> list Device Current Revision fwa0 pka0 2.46 A06 Filename Update Revision dfxaa_fw kzpsa_fw 3.20 A12 UPD> update * or update Will update all LFU supported devices found in this system UPD> update pka0 - will update device PKA0 Confirm update on: pka0 [Y/(N)]Y WARNING: updates may take several minutes to complete for each device. DO NOT ABORT! pka0 Updating to A12... Verifying A12... PASSED. UPD> update fwa0 -path mopd1:new_firm/eza0 Will update the device named fwa0 with firmware NEW_FIRM from the network. UPD> verify fwa0 pka0 Verifying 3.20... PASSED. Verifying A12... PASSED. 11. Power cycle the machine to load console firmware then reset any environmental variables that changed, init and reboot. 44 AlphaServer 800 Jumpers Motherboard Jumper J16 Name Fan fail override J22 Remote Management Console (RMC) VGA Enable J27 J50 J51 Flash ROM VPP Enable SCSI Termination Description Allows the fan failure detection logic to be disabled to accommodate alternative enclosures Sets default values to the RMV NVRAM Default Setting This jumper is not installed on AlphaServer 800 systems Disabled When enabled the on-board VGA logic is activated Enabled for onboard VGA; Disabled if an EISA- or PCI-based VGA option is installed Jumper installed (enabled) Permits the 12V voltage needed to update the flash ROMs Allows the internal SCSI terminator to be disabled Enabled 45 CPU Daughter Card J1 and J3 Settings The figure above shows the settings for the J3 jumper depending on CPU speed. This jumper affects the clock speed and other critical system settings. Bank 0 1 2 3 4 5 6 7 J1 Jumper Setting Functions Standard boot setting Power up with backup cache disabled: Allows the system to run despite bad B-cache until a replacement CPU board is available Power up to the fail-safe loader with backup cache disabled Mini console setting (Internal use only) Mini console setting (Internal use only) Mini console setting (Internal use only) Mini console setting (Internal use only) Fail-safe loader setting: Attempt to boot from the fail-safe loader diskette at power-up 46 AlphaServer 1000/1000A The AlphaServer 1000/1000A systems have flash roms on the motherboard that contain ARC console firmware for Windows NT and SRM console firmware for Tru64 UNIX and OpenVMS. When ever the motherboard is replaced or the CPU’s are upgraded or downgraded between EV4 and EV5 CPU’s the firmware will need to be updated. You will also need to do occasional console firmware upgrades to load the latest version of firmware that is available. Writes to the flash ROM are enabled with jumper J50 on the motherboard. This machine also has a backup console called the failsafe loader. It is enabled for use by one jumper on the CPU daughter card. The failsafe loader will attempt to load firmware off of the firmware floppy. Please note that option firmware is separated from the system firmware. There are extra procedures required to update options when not using the firmware update CD. There are several ways to upgrade the firmware. All involve booting Loadable Firmware Utility (LFU). It can be booted one of the following ways. • • • • • • Off the Alpha AXP System Firmware Update Utility CD using the local CDROM. Off of an infoserver using the Alpha AXP System Firmware Update Utility CD. Over the network using the .SYS firmware file. Off of a disk that has a bootable version of the firmware file (filename.exe) on it (MCR WRITEBOOT may be required on that file to make it bootable). Off of a bootable floppy OpenVMS, Unix or NT. From the BOOTP server (Unix). The procedure to update the console firmware is as follows. • • • • • • • • • • • Determine current console firmware revision by the power on display, SHOW commands or from online SDA with a CLUE CONFIG command. Record all console environmental variables by typing SHOW * at the >>>. Determine method and firmware version you will be using to do the update. Print the firmware release notes for that version and system. Determine if any option firmware will be upgraded. Verify the ROM Update Jumpers are in the correct positions. Boot the firmware file (LFU). Use the verify and update commands at the UPD> prompt. When done exit from LFU. Power off/on the machine to reload the new firmware. Reset any Environmental variables that were changed and reboot. The 1000 and 1000A systems have several scripts available to help with firmware operations. Below is a list and description of the different ones available. Only use the scripts on CPUs with older Main Logic Boards 54-23499-01. Do not use on the newer 54-23499-02 logic boards. • • cpu_downgrade - loads an Use when cpu_upgrade loads an Use when EV4 SRM and ARC image into the flash roms. downgrading from an EV5 CPU to an EV4 CPU. EV5 SRM and ARC image into the flash roms. upgrading from an EV4 CPU to an EV5 CPU. 1. Get the current firmware revision at power on or with console show commands Power on display ff.fe.fd.fc.fb.fa.f9.f8.f7.f6.f5. ef.ee.ed.ec.eb.f4.ea.e9.e8.e7.e6.e5.e4. X4.6-218, built on Jul 18 1995 at 16:20:48 >>> show version Version X4.6-218 Sep 13 1995 16:20:48 >>> show pal PAL VMS PALcode X5.48-101, OSF PALcode X1.35-66 47 >>> show config Firmware SRM Console: X4.6-218 ARC Console: 4.49 PALcode: VMS PALcode X5.65-4, OSF PALcode X1.45-9 Serial ROM: V1.2 Processor DECchip (tm) 21064-2 MEMORY 64 Meg Bank 0 Bank 1 Bank 2 Bank 3 of System Memory = 64 Mbytes(16 MB Per Simm) Starting at 0x00000000 = No Memory Detected = No Memory Detected = No Memory Detected PCI Bus Bus 00 Slot 06: NCR 810 Scsi Controller pka0.7.0.6.0 dka0.0.0.6.0 dka400.4.0.6.0 SCSI Bus ID 7 RZ28 RRD43 Bus 00 Slot 07: Intel 8275EB PCI to EISA Bridge Bus 00 Slot 12: DECchip 21040 Network Controller ewa0.0.0.12.0 08-00-2B-E5-59-AE EISA Bus Modules (installed) Slot 2 CPQ3011 2. >>> show or show * to printout all the environmental variables. Check all customer set variables. Also verify the setting of the following variables. Bootdef_dev Boot_osflags Auto_action 3. Check that the ROM update jumper is enabled. Consult the Service Manual for its location and setting. It should be enabled by default. 4. Boot the firmware using one of the following six methods. Method 1 - Load the Console Firmware Off a Local CDROM SRM Console a. Insert the CD in the local CDROM. b. >>> Boot -fl 0,a0 DKA400 BOOTFILE:[alpha1000]as1000_e4_v5_4.exe - for the AlphaServer 1000 EV4 [alpha1000]as1000_e5_v5_4.exe - for the AlphaServer 1000 EV5 [alpha1000A]as1000a_e4_v5_7.exe -for the AlphaServer 1000A EV4 [alpha1000A]as1000a_e5_v5_7.exe -for the AlphaServer 1000A EV5 Note: These filenames will change with different console versions. Apu-> See step 5 below for update procedure. ARC/AlphaBIOS Console a. Insert the CD in the local CDROM. b. Enter the ARC or AlphaBIOS menu by typing ARC or AlphaBIOS or initialize the system when os_type = nt c. ARC - Select Supplementary Menu and Install new Firmware AlphaBIOS -Select F2 to go into Setup then select Upgrade AlphaBIOS 48 Method 2 - Boot the Console CD Off of an Infoserver a. Insert CD in the Infoserver b. >>> boot ewa0 -file filename (leave off the .sys extension) Method 3 - Booting Off the Network - OpenVMS a. Copy the firmware.sys file and the option firmware files to MOM$LOAD of an existing node in the cluster. (These versions are from the 5.9 CD and may change) as1000fw.sys ccmab022.sys dfeaa130.sys dfeab320.sys dfxaa320.sys kzpsaa12.sys – - This file is read first. It tells utility which files to load. CCMAB firmware (PCI Memory channel 2 adapter) DEFEA firmware (EISA DEC FDDI controller. Pass 1 module only) DEFEA firmware (EISA FDDI controller. All modules after pass 1) DEFPA/DEFEA firmware (PCI or EISA based DEC FDDI controller) KZPSA firmware (Fast wide differential PCI-SCSI module) b. Set the VMS attributes on the file with the following command. $ set file/attr=(rfm:fix,lrl:512,mrs:512,rat:none) firmware.sys c. Enable service on that node from NCP $ MC NCP MC NCP> Show Known Circuit Characteristic Known Circuit Volatile Characteristics as of 12-FEB-1997 19:27:41 Circuit = BNA-0 - Circuit State = Service = Counter timer = Designated router = Cost = Maximum routers allowed = Router priority = Hello timer = Type = Adjacent node = Listen timer = name will change from system to system on disabled (if enabled skip to boot command) 65534 28.1023 (CXO28A) 4 33 64 15 Ethernet 28.1023 (CXO28A) 30 NCP> Set Circ BNA-0 State OFF - This step will stop network activity NCP> Set Circ BNA-0 Service Enable NCP> Set Circ BNA-0 State ON d. >>> b ewa0 -fi filename (Leave off .SYS or will get error - BAD MOP FID) Method 4 - Boot Off of a Disk - Non-System Disk and System Disk Using OpenVMS Non-System Disk a. Locate the firmware.exe file b. Set the attributes on the file and copy it contiguous to the target disk (non-system) and directory with the following commands: $ set file/attr=(rfm:fix,lrl:512,mrs:512,rat:none) firmware.exe $ copy/contiguous firmware.exe "non-system_disk":[directory] c. Use writeboot to make the disk bootable. Specify the disk, directory and filename of the firmware. Take the defaults for the other questions. $ MCR Writeboot Update VAX portion of boot block (default is Y): No Update Alpha portion of boot block (default is Y):Yes Target system device (and boot file if not VMB.EXE):$1$dua5:[temp]filename.exe d. >>> b –fl 0,0 dua5 49 Note: Updating options via this method is only supported if the system disk is on the NCR810 SCSI bus (the on-board SCSI). e. To update the option firmware, first create an options directory. $ set def dua5:[000000] $ create/dir [.options] f. Copy the option firmware files to the options directory. as1000fw.txt ccmab022.sys dfeaa130.sys dfeab320.sys dfxaa320.sys kzpsaa12.sys g. When booting the update utility enter the device name where the option firmware is located. System Disk a. Only steps a and b above are used. Do NOT execute writeboot step c. For the option firmware use the "system disk" as the disk device. b. Specify the flags of 0,a0 a0 and use "system disk":[sys0.sysexe]filename for bootfile. >>> b -fl 0,a0 dua0 bootfile: dua0:[sys0.sysexe]as1000_e4_v5_4.exe Method 5 - Boot Off of a Bootable Floppy OpenVMS AXP a. Init and mount to floppy. Create a directory and copy the firmware to the floppy with the following commands. The commands shown are for the AlphaServer 1000 EV4. For all other systems use the directory and files listed in method 1. $ set file/attr=(rfm:fix,lrl:512,mrs:512,rat:none) as1000_e4_v5_4.exe $ init/dens=HD/index=begin dva0: fwupdate $ mount dva0: fwupdate $ create/dir dva0:[ALPHA1000] $ copy/contiguous as1000_e4_v5_4.exe dva0:[ALPHA1000]fwupdate.exe b. MCR Writeboot Update VAX portion of boot block (default is Y): No Update Alpha portion of boot block (default is Y):Yes [enter AXP bootfile:] dva0:[ALPHA1000]fwupdate.exe c. Dismount the disk and shutdown VMS. $ dismount dva0: d. Insert the floppy on the target system and boot it from the >>>. >>> boot dva0 e. If you wish to update option firmware you must create a second floppy with option firmware on it. Download the following files from the Website. as1000fw.txt ccmab022.sys dfeaa130.sys dfeab320.sys dfxaa320.sys kzpsaa12.sys 50 f. Enter the following commands to create the options floppy: $ init/dens=HD/index=begin dva0: optionfw $ mount dva0: optionfw $ create/dir dva0:[options] - Note:The directory name must be [options] $ copy as1000fw.txt dva0:[options] $ copy ccmab022.sys dva0:[options] $ copy dfeaa130.sys dva0:[options] $ copy dfeab320.sys dva0:[options] $ copy dfxaa320.sys dva0:[options] $ copy kzpsaa12.sys dva0:[options] $ dismount dva0: g. Insert the floppy when it asks for the options firmware and enter the location. Tru64 UNIX a. Go to the Digital Internet firmware site at http://ftp.digital.com/pub/Digital/Alpha/firmware/ b. Copy the firmware.exe file from the Alpha1000 or Alpha1000A directory to your system and rename it fwupdate.exe c. Download the file mkbootfirm.tar from the firmware website. ftp://ftp.digital.com/pub/Digital/Alpha/firmware/utilities/mkbootfirm.tar You can untar mkbootfirm on your target Tru64 UNIX system with the command: # tar xvf mkbootfirm.tar d. Make sure you have a floppy that has been low-level formatted. For example, to low-level format a floppy in drive 0: fddisk -fmt /dev/rfd0a e. Change default to directory with mkbootfirm.exe cd mkbootfirm f. Run mkbootfirm on the .exe firmware image that you downloaded. mkbootfirm uses a .exe firmware image to create a file that can be dd’d to floppy. The following will create a bootable floppy from a downloaded .exe firmware image: ./mkbootfirm fwupdate.exe | dd of=/dev/rfd0c bs=64k NOTE: Assumes mkbootfirm.exe is in current directory and floppy is in drive 0. g. Insert the floppy on the target system and boot it from the SRM console: >>> boot dva0 h. If you wish to update option firmware you must create a second floppy with option firmware on it. Go to the firmware website and follow this procedure. i. Download the file v39_options.dd. This file name changes with different console versions. j. Make sure you have a floppy that has been low-level formatted. For example, to low-level format a floppy in drive 0: fddisk -fmt /dev/rfd0a k. Enter the command: dd if=v39_options.dd of=/dev/rfd0c bs=64k NOTE: This assumes the v39_options.dd image file is in the current directory and that the floppy is in drive 0. l. After booting the firmware floppy created with mkbootfirm, the update utility will complain that it cannot find the options files on either CD or floppy, and will prompt for a device to look for the options files. Simply insert the options floppy you created above, type the device name of the floppy (e.g. dva0) and hit <return> to load the options firmware. 51 Windows NT a. Copy the firmware file to a FAT formatted floppy with the update image filename a:\fwupdate.exe. b. Shut down NT and from the NT Console menu, select "Install new firmware". c. If you wish to update the options firmware, you must create a second floppy. Download the following files from the options directory at the firmware website. as1000fw.txt ccmab022.sys dfeaa130.sys dfeab320.sys dfxaa320.sys kzpsaa12.sys d. FAT format a floppy and copy the files to the floppy. e. When the utility asks for the options floppy, insert it and tell the utility The device it is located on. Method 6 - BOOTP Network Upgrade - Tru64 UNIX a. Mount the Firmware Update CD using the following command: # mount -rt cdfs -o noversion /dev/rz4c /mnt b. Modify or Create the Client Database in the /etc/bootptab File <host>:ht:<hw_type>:ha=<hw_addr>:bf=<filename>:ip=<ip_addr> where: host is the system name in /etc/hosts hw_type is the hardware type. Proteon is ht = 4. Ethernet is ht = 1. Regular token-ring (IEEE 802) is ht = 6. hw_addr is the hardware address: use the console command show device. filename is the name of the default bootfile image: ip_addr is the Internet protocol address of the system name in /etc/hosts. The following is an example of a bootptab file for both the AlphaServer 1000 and 1000A EV4 and EV5 machines: bigsox:ht=1:ha=08002b236423:bf=/mnt/ALPHA1000/as1000_e4_v5_4.exe;1:ip=16.182.0.87 bigsox:ht=1:ha=08002b236423:bf=/mnt/ALPHA1000/as1000_e5_v5_4.exe;1:ip=16.182.0.87 bigsox:ht=1:ha=08002b236423:bf=/mnt/ALPHA1000A/as1000a_e4_v5_7.exe;1:ip=16.182.0.7 bigsox:ht=1:ha=08002b236423:bf=/mnt/ALPHA1000A/as1000a_e5_v5_7.exe;1:ip=16.182.0.7 c. Modify the /etc/inetd.conf file. Uncommon the tftp and bootps process. It should look like the following example: tftp dgram udp wait root bootps dgram upd wait root /usr/sbin/tftpd /usr/sbin/bootpd tftpd /mnt bootpd d. Find the process /usr/sbin/inetd daemon: This step will stop network traffic # ps aux | grep ine # kill process# <ine process number> e. Restart the inetd daemon: # /usr/sbin/inetd Note The bootpd and tftp daemon will be removed if the system is rebooted. Refer to the manual pages: bootpd(8) or tftpd(8) for more information. Use Man bootpd and man tftpd 52 f. Enter the following command to boot from the BOOTP server: >>> boot -p bootp ewa0 Should a boot file "pathname" need to be specified in must be in quotes >>> boot -p bootp ewa0 -file “/dir1/dir2/filename” g. Currently there is no BOOTP support for updating option firmware. 5. From the UPD> prompt save contents of NVRAM to floppy using SAVE_NVRAM. 6. List the current firmware version. UPD> list Device ARC SRM Current Revision v4.56 v5.2-101 Filename arc_fw srm_fw ccmab_fw dfeaa_fw dfeab_fw dfxaa_fw kzpsa_fw Update Revision v4.58 v5.4-101 22.0 1.3 3.20 3.20 A12 7. Update the firmware from the UPD> prompt UPD> update Confirm update on: ARC SRM [Y/(N)]y WARNING: updates may take several minutes to complete for each device. DO NOT ABORT! ARC SRM UPD> Updating to v4.58... Verifying v4.58... PASSED. Updating to v5.4-101... Verifying v5.4-101... PASSED. 8. Verify that update was successful and exit UPD> verify ARC Verifying v4.58... PASSED. SRM Verifying v5.4-101... PASSED. UPD> exit Initializing.... 9. Power cycle the machine to load console firmware. Reboot firmware CD and execute a RESTORE_NVRAM if you saved it in step 5. If you are updating device firmware, proceed to step 10. If you are done reset any environmental variables that changed, init and reboot. 10. Update the option firmware. The options supported for update in the V5.9 CD firmware versions are the PCI FDDI option - DEFPA, the PCI SCSI option –KZPSA, the PCI Memory Channel option, and the EISA FDDI options - DEFEA and DEFEB. UPD> list Device ARC SRM fwb0 Current Revision 4.49 v4.7-163 2.46 Filename arc_fw srm_fw ccmab_fw dfeaa_fw dfeab_fw dfxaa_fw kzpsa_fw Update Revision 4.58 v5.4-101 22.0 1.3 3.20 3.20 A12 UPD> update * or update Will update all LFU supported devices found in this system 53 UPD> update option-name or update pka0 - will update device PKA0 Confirm update on: pka0 [Y/(N)]Y WARNING: updates may take several minutes to complete for each device. DO NOT ABORT! pka0 Updating to A12... Verifying A12... UPD> verify fwb0 pka0 Verifying 3.20... PASSED. Verifying A12... PASSED. PASSED. 11. Power cycle the machine to load console firmware then reset any environmental variables that changed, init and reboot. 54 AlphaServer 1000/1000A Jumpers Motherboard Jumper Name Description Default Setting J27 VGA Enable When Enabled (as shown in above diagram), the on-board VGA logic is activated Enabled for on-board VGA; Disabled if an EISA- or PCI- based VGA is installed. J49 SCSI Termination Allows the internal SCSI Terminator to be disabled Enabled ( as shown in diagram ) J50 Flah ROM VPP Enable Permits the 12V voltage needed to update the Flash ROMs. Jumper Installed J52 Temperature Shutdown Allows for over Temp Shutdown Currently ships as Enabled. (as shown in diagram ) J53 Fan Shutdown Allows the software to shut down the system if a fan fails. Enabled ( as shown in diagram ) J55 Small Fan Allows the small fan to be disabled to accommodate the wide-tower enclosure. On RackMount Systems, this jumper is in to disable fan-2 fault. This jumper is NOT installed on Alphaserver 1000 systems. J56 Fan Fault When enabled, the hardware forces the system to shutdown if a fan fails. When disabled, the firmware generates a machine check; the system crashes and shuts down if a fan fails. Enabled ( as shown in diagram ) 55 EV4 CPU J4, J3 and J1 Settings Jumper J4 J3 J1 0 1 2 3 4 5 6 7 4/200 4/233 4/266 OFF OFF OFF ON ON OFF ON OFF ON OFF OFF OFF ON ON ON This jumper is never installed on any EV4 CPU Setting Standard Boot Setting (default) Mini-Console (Internal Use Only) SROM Cache Test: BCache test SROM BCache Test: BCache and MEM Test SROM Memtest: Mem test with BCache and DCache Disabled SROM Memtest Cache On: Mem test with BCache and DCache Enabled SROM BCache Tag Test: Backup Cache Tag Test Fail-Safe Loader setting: Selects fail-safe loader firmware 56 EV5/300 CPU J3 and J4 Settings J4 0 1 2 3 4 5 6 7 Setting Standard Boot Setting (AlphaServer 1000/1000A systems) Jumper can be in either 0 or 1. Default is in 0. Mini-console setting: Internal use only Mini-console setting: Internal use only Power up with no BCache: Power up with BCache disabled allows the system to run despite bad BCache until a replacement daughter board is available Mini-console setting: Internal use only Mini-console setting: Internal use only Fail-Safe Loader setting: Selects fail-safe loader firmware J3 setting OFF ON ON OFF OFF 57 EV5/333 CPU J1 and J3 Settings J1 0 1 2 3 4 5 6 7 J3 setting Setting Standard Boot Setting (AlphaServer 1000/1000A systems) Jumper can be in either 0 or 1. Default is in 0. Mini-console setting: Internal use only Mini-console setting: Internal use only Power up with no BCache: Power up with BCache disabled allows the system to run despite bad BCache until a replacement daughter board is available Mini-console setting: Internal use only Mini-console setting: Internal use only Fail-Safe Loader setting: Selects fail-safe loader firmware ON OFF ON OFF OFF 58 EV5/400 CPU J1 and J3 Settings J1 0 1 2 3 4 5 6 7 J3 setting Setting Standard Boot Setting (AlphaServer 1000/1000A systems) Jumper can be in either 0 or 1. Default is in 0. Mini-console setting: Internal use only Mini-console setting: Internal use only Power up with no BCache: Power up with BCache disabled allows the system to run despite bad BCache until a replacement daughter board is available Mini-console setting: Internal use only Mini-console setting: Internal use only Fail-Safe Loader setting: Selects fail-safe loader firmware ON ON OFF OFF OFF 59 60 AlphaServer 1200 or Digital Server 5000 Models 5300/5305 or Digital Ultimate WorkStation The console firmware on the AlphaServer 1200 system is located on the system motherboard in two FEPROMs. Whenever the motherboard is replaced, the firmware will most likely need to be upgraded. You will also need to do occasional console firmware upgrades to load the latest version of firmware that is available. This system also contains a failsafe loader. However on this machine the failsafe loader is not jumper selectable. When the SROM detects a checksum error in the firmware image it is supposed to load, it will request you to load a failsafe loader floppy to enable you to reflash the FEPROMs. There are several ways to upgrade the firmware. All involve booting Loadable Firmware Utility (LFU). It can be booted one of the following ways. • • • • • • • Off the Alpha AXP System Firmware Update Utility CD using the local CDROM. Off the CDROM, firmware floppy or over the network using LFU command. Off of an infoserver using the Alpha AXP System Firmware Update Utility CD. Over the network using the .SYS firmware file. Off of a disk that has a bootable version of the firmware file (filename.exe) on it (MCR WRITEBOOT may be required on that file to make it bootable). Off of a bootable floppy OpenVMS, Unix or NT. From the BOOTP server (Unix). The procedure to update the console firmware is as follows. • • • • • • • • • • • Determine current console firmware revision. Record all console environmental variables by typing SHOW * at the >>>. Determine method and firmware version that will be used to do the update. Print the firmware release notes for that version and system. Determine if any option firmware will be upgraded. Locate the appropriate RCU and ECU diskettes if required. Boot the firmware file (LFU). Use the list, update and verify commands at the UPD> prompt. When done exit from LFU. Init the machine and reboot. Run ECU and RCU as required. 1. Get the current firmware revision at power on or with console show or init commands. It is at the very bottom of the configuration map. Initializing... SROM V1.1 on cpu0 SROM V1.1 on cpu1 XSROM V5.0 on cpu0 XSROM V5.0 on cpu1 BCache testing complete on cpu0 BCache testing complete on cpu1 mem_pair0 64 MB mem_pair1 64 MB mem_pair2 64 MB mem_pair3 64 MB 20..20..21..21..23.. please wait 6 seconds for T24 to complete 24..24.. Memory testing complete on cpu0 Memory testing complete on cpu1 starting console on CPU 0 sizing memory 0 64 MB DIMM 1 64 MB DIMM 2 64 MB DIMM 3 64 MB DIMM 61 starting console on CPU 1 probing IOD1 hose 1 bus 0 slot 1 - NCR 53C810 bus 0 slot 4 - PCI-PCI Bridge probing PCI-PCI Bridge, bus 2 bus 2 slot 0 - QLogic ISP1020 probing IOD0 hose 0 bus 0 slot 1 - PCEB probing EISA Bridge, bus 1 bus 0 slot 2 - S3 Trio64/Trio32 bus 0 slot 3 - DECchip 21140-AA configuring I/O adapters... ncr0, hose 1, bus 0, slot 1 isp0, hose 1, bus 2, slot 0 floppy0, hose 0, bus 1, slot 0 tulip0, hose 0, bus 0, slot 3 System temperature is 27 degrees C AlphaServer 1200 Console V5.0-2, 17-SEP-1997 17:14:15 P00>>>sho version version V5.0-2, 17-SEP-1997 17:14:15 P00>>>sho pal pal OpenVMS PALcode V1.19-12, Digital UNIX PALcode V1.21-20 P00>>>sho config Digital Equipment Corporation AlphaServer 1200 Console V5.0-2 OpenVMS PALcode V1.19-12, Digital UNIX PALcode V1.21-20 Module System Motherboard Memory 64 MB DIMM Memory 64 MB DIMM Memory 64 MB DIMM Memory 64 MB DIMM CPU (4MB Cache) CPU (4MB Cache) Bridge (IOD0/IOD1) PCI Motherboard Type 0 0 0 0 0 3 3 600 a Rev 0000 0000 0000 0000 0000 0000 0000 0032 0003 Name mthrbrd0 mem0 mem1 mem2 mem3 cpu0 cpu1 iod0/iod1 saddle0 Bus 0 Slot 1 2 3 iod0 (PCI0) Option Name PCEB S3 Trio64/Trio32 DECchip 21140-AA Type 4828086 88115333 91011 Rev 0004 0054 0020 Name pceb0 vga0 tulip0 Bus 1 Slot pceb0 (EISA Bridge connected to iod0, slot 1) Option Name Type Rev Name Bus 0 Slot 1 4 iod1 (PCI1) Option Name NCR 53C810 PCI-PCI Bridge Bus 2 Slot 0 pcb0 (PCI-PCI Bridge connected to iod1, slot 4) Option Name Type Rev Name QLogic ISP1020 10201077 0002 isp0 Type 11000 11011 Rev 0002 0002 Name ncr0 pcb0 2. P00>>> show * to printout all the environmental variables. Check all customer set variables. Also verify the setting of the following variables. Bootdef_dev Boot_osflags Auto_action 3. Boot the firmware using one of the following methods. 62 Method 1 - Load the Console Firmware Off a Local CDROM SRM Console a. Insert the CD in the local CDROM. b. P00>>> boot DKA500 - You can also use the procedure c. BOOTFILE: [as1200]as1200_v6_0.exe - for the AlphaServer 1200 Note: These filenames will change with different console versions. Apu-> See step 5 below for update procedure. c. P00>>> lfu ***** Loadable Firmware Update Utility ***** Select firmware load device (cda0, dva0, ewa0), or Press <return> to bypass loading and proceed to LFU: cda0 Please enter the name of the firmware files list, or Press <return> to use the default filename [AS1200IO,(AS1200CP)]: as1200fw Copying Copying Copying Copying Copying Copying Copying Copying UPD> AS1200FW from DKA500.5.0.1.1 . [as1200]TCREADME from DKA500.5.0.1.1 . [as1200]TCSRMROM from DKA500.5.0.1.1 …........................ [as1200]TCARCROM from DKA500.5.0.1.1 …............ [options]CCMAB022 from DKA500.5.0.1.1 . [options]CIPCA420 from DKA500.5.0.1.1 . [options]DFXAA320 from DKA500.5.0.1.1 … [options]KZPSAA12 from DKA500.5.0.1.1 … See below for update steps AlphaBIOS Console a. Insert the CD in the local CDROM. b. Enter the AlphaBIOS menu by typing ARC or AlphaBIOS or initializing the system when os_type = nt c. AlphaBIOS -Select F2 to go into Setup then select Upgrade AlphaBIOS Method 2 - Boot Console CD, Firmware Floppy or Network Device CD a. Insert the CD in the local CDROM. b. Execute LFU command and select device cda0 for the CDROM and specify as1200fw. P00>>> lfu ***** Loadable Firmware Update Utility ***** Select firmware load device (cda0, dva0, ewa0), or Press <return> to bypass loading and proceed to LFU: cda0 Please enter the name of the firmware files list, or Press <return> to use the default filename [AS1200IO,(AS1200CP)]: as1200fw 63 Floppy a. Create a system and/or I/O firmware floppies using the following procedure. You will need up three floppies. Two for system firmware and one for I/O firmware. This is as of V5.4 . With V5.3 or earlier two floppies would work. b. Execute the following command file to create both floppies $! $! make_tcods2cp_1and2.com $! $ inquire ignore "Insert first blank HD floppy in DVA0, then continue" $ set verify $ set proc/priv=all $ init/density=hd/index=begin dva0: tcods2cp1 $ mount dva0: tcods2cp1 $ create/directory dva0:[as1200] $ copy as1200fw.sys dva0:[as1200]as1200fw.sys $ copy as1200cp.sys dva0:[as1200]as1200cp.sys $ copy tcreadme.sys dva0:[as1200]tcreadme.sys $ copy tcarcrom.sys dva0:[as1200]tcarcrom.sys $ dismount dva0: $ set noverify $ inquire ignore "Insert second blank HD floppy in DVA0, then continue" $ set verify $ set proc/priv=all $ init /density=hd/index=begin dva0: tcods2cp2 $ mount dva0: tcods2cp2 $ create/directory dva0:[as1200] $ copy tcsrmrom.sys dva0:[as1200]tcsrmrom.sys $ dismount dva0: $ set noverify $ exit If creating a diskette for updating your I/O option firmware only: $! $! make_tcods2io.com $! $ inquire ignore "Insert blank HD floppy in DVA0, then continue" $ set verify $ set proc/priv=all $ init/density=hd/index=begin dva0: tcods2io $ mount dva0: tcods2io $ create/directory dva0:[as1200] $ create/directory dva0:[options] $ copy as1200fw.sys dva0:[as1200]as1200fw.sys $ copy as1200io.sys dva0:[as1200]as1200io.sys $ copy tcreadme.sys dva0:[as1200]tcreadme.sys $ copy ccmab022.sys dva0:[options]ccmab022.sys $ copy cipca420.sys dva0:[options]cipca420.sys $ copy dfpaa320.sys dva0:[options]dfpaa320.sys $ copy kzpsaa12.sys dva0:[options]kzpsaa12.sys $ dismount dva0: $ set noverify $ exit c. Shutdown the OS and init the machine at the P00>>> prompt. 64 d. Execute LFU command and select device dva0 for the floppy device and the filenames as1200cp or as1200io depending if you want to update console or I/O firmware. If running console version V1.2 or greater you can specify as1200fw and it will load files off the console firmware floppy and then request you load the I/O firmware floppy. P00>>> lfu ***** Loadable Firmware Update Utility ***** Select firmware load device (cda0, dva0, ewa0), or Press <return> to bypass loading and proceed to LFU: dva0 Please enter the name of the firmware files list, or Press <return> to use the default filename [AS1200IO,(AS1200CP)]: as1200cp Network a. Copy the following files to MOM$LOAD of you local MOP server. as1200cp.sys as1200fw.sys as1200io.sys ccmab022.sys cipca420.sys dfpaa320.sys kzpsaa12.sys tcreadme.sys tcsrmrom.sys tcarcrom.sys tcreadme.sys b. Set the attributes for each file using the following OpenVMS command. $ set file/attr=rfm:fix,lrl:512,mrs:512,rat:none filename.sys c. Execute LFU command and select device EWA0 fir Digital PCI Ethernet or FWA0 for Digital PCI FDDI (DEFPA). Specify the files as1200fw, as1200cp or as1200io depending on what you want to update. P00>>> lfu ***** Loadable Firmware Update Utility ***** Select firmware load device (cda0, dva0, ewa0), or Press <return> to bypass loading and proceed to LFU: ewa0 Please enter the name of the firmware files list, or Press <return> to use the default filename [AS1200IO,(AS1200CP)]: as1200fw Method 3 - Boot the Console CD Off of an Infoserver a. Insert CD in the Infoserver b. P00>>> boot exa0 -file as1200_v6_0 (leave off the .sys extension) Method 4 - Booting Off the Network a. Copy firmware to MOM$LOAD of an existing node in the cluster b. Set the attributes on the file with the following commands: $ set file/attr=(rfm:fix,lrl:512,mrs:512,rat:none) as1200_v6_0.sys 65 c. Enable service on that node from NCP $ MC NCP MC NCP> Show Known Circuit Characteristic Known Circuit Volatile Characteristics as of 12-FEB-1997 19:27:41 Circuit = BNA-0 State Service Counter timer Designated router Cost Maximum routers allowed Router priority Hello timer Type Adjacent node Listen timer = = = = = = = = = = = on disabled (if enabled skip to boot command) 65534 28.1023 (CXO28A) 4 33 64 15 Ethernet 28.1023 (CXO28A) 30 NCP> Set Circ BNA-0 State OFF - This step will stop network activity NCP> Set Circ BNA-0 Service Enable NCP> Set Circ BNA-0 State ON d. P00>>> b -fl 0,0 EWA0 -fi as1200_v6_0 (Leave off .SYS or node that services request will get error - BAD MOP FID) Determine device name with SHOW DEVICE at >>> . DE4x0/DE500 = EWA0 FDDI = FWA0 Method 5 - Boot Off of a Disk - Non-System Disk and System Disk Using OpenVMS Non-System Disk a. Locate the as1200_v6_0.exe file b. Set the attributes on the file and copy it contiguous to the target disk (non-system) and directory with the following commands: $ set file/attr=(rfm:fix,lrl:512,mrs:512,rat:none) as1200_v6_0.exe $ copy/contiguous as1200_v6_0.exe "non_system_disk":[directory] c. Use writeboot to make the disk bootable. Specify the disk, directory and filename of the firmware. Take the defaults for the other questions. $ MCR Writeboot Update VAX portion of boot block (default is Y): No Update Alpha portion of boot block (default is Y):Yes Target system device (and boot file if not VMB.EXE):$1$dua5:[TEMP]as1200_v6_0.exe d. P00>>> b -fl 0,0 dua5 System Disk a. Only steps a and b above are used. Do NOT execute writeboot step c. b. Specify the flags of 0,a0 a0 and use "system disk":[sys0.sysexe]filename for bootfile. >>> b -fl 0,a0 dua0 bootfile: dua0:[sys0.sysexe]as1200_v6_0.exe 66 Method 6 – Boot Off of a Bootable Floppy - V5.2 Firmware or Earlier OpenVMS AXP a. Init and mount to floppy. Create a directory and copy the firmware to the Floppy with the following commands. $ init/dens=HD/index=begin dva0: fwupdate $ mount dva0: fwupdate $ create/dir dva0:[as1200] $ copy/contiguous as1200_v5_2.exe dva0:[as1200]fwupdate.exe b. MCR Writeboot Update VAX portion of boot block (default is Y): No Update Alpha portion of boot block (default is Y):Yes [enter AXP bootfile:] dva0:[as1200]fwupdate.exe c. Dismount the disk and shutdown VMS. $ dismount dva0: d. Insert the floppy on the target system and boot it from the >>>. >>> boot dva0 Tru64 UNIX a. Go to the Digital Internet firmware site at http://ftp.digital.com/pub/Digital/Alpha/firmware/ b. Copy the firmware.exe file from the As1200 directory to your system and rename it fwupdate.exe c. Download the file mkbootfirm.tar from the firmware website. ftp://ftp.digital.com/pub/Digital/Alpha/firmware/utilities/mkbootfirm.tar You can untar mkbootfirm on your target Tru64 UNIX system with the command: # tar xvf mkbootfirm.tar d. Make sure you have a floppy that has been low-level formatted. For example, to low-level format a floppy in drive 0: fddisk –fmt /dev/rfd0a e. Change default to directory with mkbootfirm.exe cd mkbootfirm f. Run mkbootfirm on the .exe firmware image that you downloaded. mkbootfirm uses a .exe firmware image to create a file that can be dd’d to floppy. The following will create a bootable floppy from a downloaded .exe firmware image: ./mkbootfirm fwupdate.exe | dd of=/dev/rfd0c bs=64k NOTE: Assumes mkbootfirm.exe is in current directory and floppy is in drive 0. g. Insert the floppy on the target system and boot it from the SRM console: P00>>> boot dva0 Windows NT a. Copy the firmware file to a FAT formatted floppy with the update image filename of a:\fwupdate.exe. b. Shut down NT and from the NT Console menu, select "Install new firmware". 67 Method 7 – Boot Off of a Bootable Floppy - V5.3 Firmware or Later Windows NT a. Fat format up to three floppies. To update system firmware you will need two floppies. However if you want to update IO firmware, you will need three floppies. A disk1.zip, disk2.zip and disk3.zip file are available on the firmware website. b. Locate and copy the following files to disk #1. • • • • as1200cp.sys as1200fw.sys tcreadme.sys tcarcrom.sys Two-Disk LFU file list Three-Disk LFU file list LFU text file AlphaBios/ARC firmware c. Locate and copy the following files to disk #2 to update SRM firmware: • tcsrmrom.sys SRM console firmware d. Locate and copy the following files to disk #3 to update I/O firmware. • • • • • • as1200.sys tcreadme.sys cipca315.sys dfxaa320.sys kzpsaa12.sys ccmab022.sys IO LFU update file LFU text file CIPCA firmware DFXAA firmware KZPSA firmware CCMAB firmware e. At the >>> type LFU and enter when it asks for the filename enter as1200cp (cpu firmware), as1200io (IO firmware) or as1200fw (system and IO firmware). f. I will prompt you to load the floppies in one at a time. When it has read all three floppies you will come to a UPD? prompt where you can update firmware. Note When Using Three Disks: After updating console firmware with disk1 and disk2, you can update I/O firmware from disk3 by re-invoking the LFU via LFU command at the UPD> prompt. When prompted for input, provide the alternate firmware files list filename. Method 8 - BOOTP Network Upgrade - Tru64 UNIX a. Mount the Firmware Update CD using the following command: # mount -rt cdfs -o noversion /dev/rz4c /mnt b. Modify or Create the Client Database in the /etc/bootptab File <host>:ht:<hw_type>:ha=<hw_addr>:bf=<filename>:ip=<ip_addr> where: host is the system name in /etc/hosts hw_type is the hardware type. Proteon is ht = 4. Ethernet is ht = 1. Regular token-ring (IEEE 802) is ht = 6. hw_addr is the hardware address: use the console command show device. filename is the name of the default bootfile image: ip_addr is the Internet protocol address of the system name in /etc/hosts. The following is an example of a bootptab file for the AlphaServer 1200: bigsox:ht=1:ha=08002b236423:bf=/mnt/as1200/as1200_v6_0.exe;1:ip=16.182.0.87 68 c. Modify the /etc/inetd.conf file. Uncommon the tftp and bootps process. It should look like the following example: tftp dgram udp wait root /usr/sbin/tftpd tftpd /mnt bootps dgram upd wait root /usr/sbin/bootpd bootpd d. Find the process /usr/sbin/inetd daemon: This step will stop network traffic # ps aux | grep ine # kill process# <ine process number> e. Restart the inetd daemon: # /usr/sbin/inetd Note The bootpd and tftp daemon will be removed if the system is rebooted. Refer to the manual pages: bootpd(8) or tftpd(8) for more information. Use Man bootpd and man tftpd f. Enter the following command to boot from the BOOTP server: >>> boot -p bootp ewa0 Should a boot file "pathname" need to be specified in must be in quotes >>> boot -p bootp ewa0 -file “/dir1/dir2/filename” 4. List the current version then Update the firmware at the UPD> prompt. Use update * or update *SRM*, or update al* or update kzpsa0 etc. Then verify the update before exiting. Starting Firmware Update Utility Unpacking firmware files as1200_readme adr = 1000020 len = a00(2560) readme adr = 1000c40 len = a00(2560) srmrom adr = 1001860 len = f2200(991744) arcrom adr = 10f3c80 len = 70000(458752) ccmab_fw adr = 11924a0 len = 80200 (524800) cipca_fw adr = 1163ea0 len = ce00(52736) dfxaa_fw adr = 12e3820 len = 38a00(231936) kzpsa_fw adr = 131c440 len = 74000(475136) ***** Loadable Firmware Update Utility ***** ---------------------------------------------------------------------------Function Description ---------------------------------------------------------------------------Display Displays the system’s configuration table. Exit Done exit LFU (reset). List Lists the device, revision, firmware name, and update revision. Lfu Restarts LFU. Readme Lists important release information. Update Replaces current firmware with loadable data image. Verify Compares loadable and hardware images. ? or Help Scrolls this function table. ---------------------------------------------------------------------------a. From the >>> or UPD> prompt save contents of NVRAM to floppy using the command SAVE_NVRAM. 69 b. UPD> list Device AlphaBIOS srmflash Current Revision V5.70-0 V5.8-2 Filename arcrom srmrom cipca_fw dfxaa_fw kzpsa_fw ccmab_fw Update Revision V5.70-0 V5.9-5 A420 3.20 A12 22.0 NOTE: If upgrading to V5.3 or later for the first time, or downgrading from V5.3 or 5.4 to a lower version, make sure you read the release notes. The correct update procedure is as follows. 1. 2. 3. 4. 5. Boot firmware CD Update SRM Exit and reboot firmware CD Update AlphaBIOS Exit c. UPD> update srm* - See NOTE above. WARNING: updates may take several minutes to complete for each device. Confirm update on: srmflash [Y/(N)] Y DO NOT ABORT! srmflash Updating to V5.9-5... Verifying V5.9-5... PASSED. d. UPD> up alp* WARNING: updates may take several minutes to complete for each device. Confirm update on: AlphaBIOS [Y/(N)] Y DO NOT ABORT! AlphaBIOS Updating to V5.70-0... Verifying V5.70-0... PASSED. Or to update all firmware with one command e. UPD> update * - Not valid if updating to or downgrading from V5.3. See Note above. WARNING: updates may take several minutes to complete for each device. Confirm update on AlphaBIOS AlphaBIOS DO NOT ABORT! Updating to V5.70-0... Verifying V5.70-0... Confirm update on srmflash srmflash f. UPD> verify AlphaBIOS srmflash [Y/(N)] Y PASSED. [Y/(N)] Y DO NOT ABORT! Updating to V5.9-5... Verifying V5.9-5... PASSED. Verifying V5.70-0... PASSED. Verifying V5.9-5... PASSED. g. UPD> exit Initializing... h. Starting with the V5.3 CD, if running Windows NT, do a build –e after 70 updating firmware. i. From the >>> restore the NVRAM contents with RESTORE_NVRAM or reboot the firmware CD and RESTORE_NVRAM if you did the SAVE_NVRAM in step b. Otherwise check and set the following environmental variables. P00>>> set Bootdef_dev set Boot_osflags set Auto_action j. P00>>> init 5. If ECU is required to be run you must use the AlphaBIOS. a. P00>>> AlphaBIOS b. Select Run ECU from Floppy. 6. If RCU is required to be run you must use the AlphaBIOS. a. P00>>> AlphaBIOS b. Select Run Maintenance Program c. In the Run Maintenance Program dialog box type \utility\swxcrmgr\swxcrmgr in the Program Name: field for V3.8 CD or less and \utility\swxcrmgr\ra200rcu for the V3.9 CD and later. 7. If the KZPSA Configuration Utility is required to be run you must use the AlphaBIOS. a. P00>>> AlphaBIOS b. Select Run Maintenance Program c. In the Run Maintenance Program dialog box type cnfgdiag.exe 8. You can also set up some controller parameters at the console using the PK*0 variables. There are different parameters depending on the controller type. Some you may see are • PKA0_DISCONNECT • PKA0_FAST Specifies mode of controller 0 = Normal 1 = Fast • PKA0_HOST_ID Specifies SCSI Host ID Range is 0-7. 7 is the Default. 71 • • PKA0_SOFT_TERM Enables or disables SCSI terminators. This environment variable applies to systems using the QLogic ISP1020 SCSI controller. The QLogic ISP1020 SCSI controller implements the 16-bit wide SCSI bus. The QLogic module has two terminators, one for the 8 low bits and one for the high 8 bits. There are five possible values: • off — Turns off both low 8 bits and high 8 bits. • low — Turns on low 8 bits and turns off high 8 bits. • high — Turns on high 8 bits and turns of low 8 bits. • on — Turns on both low 8 bits and high 8 bits. • diff — Places the bus in differential mode. PKA0_TERMPWR To change KZPSA SCSI termination power setting, enter the following console command: • • 0 = disable termpwr 1 = enable termpwr 72 AlphaServer 2000/2100/2100A The AlphaServer 2100 systems contain flash roms on the standard I/O that contain ARC console firmware for Windows NT and SRM console firmware for Tru64 UNIX and OpenVMS. The 2000 flash roms are on the I/O backplane and the 2100A flash roms are on the backplane module. When ever these modules are replaced or the CPU’s are upgraded or downgraded between EV4 and EV5 CPU’s the firmware will need to be updated. You will also need to do occasional console firmware upgrades to load the latest version of firmware that is available. These machine also have a backup console called the failsafe loader. It is enabled for use or writes by two jumpers on the standard I/O or I/O backplane of the 2100/2000 or two switches on the 2100A backplane. The failsafe loader needs to be updated anytime the standard I/O, I/O backplane or 2100A backplane is replaced or a CPU is upgraded or downgraded. Please note that option firmware is separated from the system firmware. There are extra procedures required to update options when not using the firmware update CD. There are several ways to upgrade the firmware. All involve booting Loadable Firmware Utility (LFU). It can be booted one of the following ways. • • • • • • Off the Alpha AXP System Firmware Update Utility CD using the local CDROM. Off of an infoserver using the Alpha AXP System Firmware Update Utility CD. Over the network using the .SYS firmware file. Off of a disk that has a bootable version of the firmware file (filename.exe) on it (MCR WRITEBOOT may be required on that file to make it bootable). Off of a bootable floppy OpenVMS, Unix or NT. From the BOOTP server (Unix). The procedure to update the console firmware is as follows. • • • • • • • • • • • • • • Determine current console firmware revision by the power on display, SHOW commands or from online SDA with a CLUE CONFIG command. Record all console environmental variables by typing SHOW * or SHOW at the >>>. Determine method and firmware version that will be used to do the update. Print the firmware release notes for that version and system. Determine if any option firmware will be upgraded. Verify the ROM Update Jumpers are in the correct positions. Boot the firmware file (LFU). Use the list, update and verify commands at the UPD> prompt. When done exit from LFU. Update the failsafe loader (FSL) if required. Power off/on the machine to reload the new firmware. Reset and Environmental variables that were changed. Update SWXCR firmware by running RCU if required Run Eisa Configuration Utility (ECU) as necessary. The 2x00 and 2100A systems have several scripts available to help with firmware operations. Below is a list and description of the different ones available. • • • • • read_rel_notes - allows you to read the firmware release notes from UPD> . cpu_downgrade - loads an EV4 SRM and ARC image into the flash roms. Use when downgrading from an EV5 CPU to an EV4 CPU. If booting from floppy you need the files sbsrmrom.exe, slsrmrom.exe and sbarcrom.exe. cpu_upgrade - loads an EV5 SRM and ARC image into the flash roms. Use when upgrading from an EV4 CPU to an EV5 CPU. If booting from floppy you need the files gmsrmrom.exe, glsrmrom.exe and gmarcrom.exe. make_dual_srm - loads EV5 SRM ROM image into bank 0 and EV4 SRM ROM image into bank 1 thereby returning a good I/O module to a state where it can be returned as a field spare. If booting from floppy you need the files sbsrmrom.exe and slsrmrom.exe. update_fsl - updates the failsafe loader. 73 1. Get the current firmware revision at power on or with Show commands >>> show version Version X3.6-83 May 23 1994 09:30:16 >>> show pal PAL VMS PALcode X5.48-33, OSF PALcode X1.35-23 >>> show config Console V3.6-83 VMS PALcode X5.48-33, OSF PALcode X1.35-23 Component CPU 0 CPU 1 Memory 0 Memory 1 Memory 2 Memory 3 IO Hose 0, PCI slot 0 slot 1 slot 2 Status P P P P P Module ID B2020-AA DECchip (tm) 21064-3 B2020-AA DECchip (tm) 21064-3 B2021-BA 64 MB B2021-BA 64 MB B2110-AA dva0.0.0.0.1 DECchip 21040-AA ewa0.0.0.0.0 NCR 53C810 dka0.0.0.1.0 dka600.6.0.1.0 pka0.7.0.1.0 Intel 82375EB RX26 08-00-2B-E1-03-67 RZ28 RRD43 SCSI Bus ID 7 2. >>> Show or Show * to printout all the environmental variables. Check all customer set variables. Also verify the setting of the following variables. Bootdef_dev Boot_osflags Auto_action 3. If updating the failsafe loader (FSL) check that the FSL update jumper/switch is enabled. Consult the Service Manual for its location and setting. 4. Boot the firmware using one of the following six methods. Method 1 - Load the Console Firmware Off a Local CDROM SRM Console a. Insert the CD in the local CDROM. b. boot -fl 0,a0 DKA400 - V3.7 CD or later it will select the correct file BOOTFILE:[alpha2100]as2100_e4_v5_4.exe - AlphaServer 2x00 EV4 [alpha2100]as2100_e5_v5_4.exe - AlphaServer 2x00 EV5 [alpha2100A]as2100a_e4_v5_4.exe - AlphaServer 2100A EV4 [alpha2100A]as2100a_e5_v5_4.exe - AlphaServer 2100A EV5 Note: These filenames will change with different console versions. UPD> See step 5 below for update procedure. ARC Console a. Insert the CD in the local CDROM. b. Enter the ARC menu by typing ARC or initializing system if os_type = NT c. Select Supplementary Menu and Install new Firmware 74 Method 2 - Boot the Console CD Off of an Infoserver a. Insert CD in the Infoserver b. >>> boot ewa0 -file filename (leave off the .sys extension) Method 3 - Booting Off the Network - OpenVMS a. Copy the firmware.sys file and the option firmware files to MOM$LOAD of an existing node in the cluster. (These versions are from the V5.9 CD and may change) as2x00fw.sys ccmab022.sys cipca420.sys dfeaa130.sys dfeab320.sys dfxaa320.sys kzpsaa12.sys - This file is read first. It tells utility which files to load. CCMAB firmware (PCI Memory channel 2 adapter) CIPCA firmware (PCI-CI module) DEFEA firmware (EISA DEC FDDI controller. Pass 1 module only) DEFEA firmware (EISA FDDI controller. All modules after pass 1) DEFPA/DEFEA firmware (PCI or EISA based DEC FDDI controller) KZPSA firmware (Fast wide differential PCI-SCSI module) b. Set the VMS attributes on the file with the following command. $ set file/attr=(rfm:fix,lrl:512,mrs:512,rat:none) firmware.sys c. Enable service on that node from NCP $ MC NCP MC NCP> Show Known Circuit Characteristic Known Circuit Volatile Characteristics as of 12-FEB-1997 19:27:41 Circuit = BNA-0 - Circuit name will change from system to system State Service Counter timer Designated router Cost Maximum routers allowed Router priority Hello timer Type Adjacent node Listen timer = = = = = = = = = = = on disabled (if enabled skip to boot command) 65534 28.1023 (CXO28A) 4 33 64 15 Ethernet 28.1023 (CXO28A) 30 NCP> Set Circ BNA-0 State OFF - This step will stop network activity NCP> Set Circ BNA-0 Service Enable NCP> Set Circ BNA-0 State ON d. >>> b ewa0 -fi filename (Leave off .SYS or node that services request will get an error - BAD MOP FID) Method 4 - Boot Off of a Disk - Non-System Disk and System Disk Using OpenVMS Non-System Disk a. Locate the firmware.exe file b. Set the attributes on the file and copy it contiguous to the target disk (non-system) and directory with the following commands: $ set file/attr=(rfm:fix,lrl:512,mrs:512,rat:none) firmware.exe $ copy/contiguous firmware.exe "non_system_disk":[directory] c. Use writeboot to make the disk bootable. Specify the disk, directory and filename of the firmware file. Take the defaults for the other questions. $ MCR Writeboot Update VAX portion of boot block (default is Y): No Update Alpha portion of boot block (default is Y):Yes 75 Target system device (and boot file if not VMB.EXE):$1$dua5:[TEMP]filename.exe d. >>> b -fl 0,0 dua5 Note: Updating options via this method is only supported if the system disk is on the NCR810 SCSI bus (the on-board SCSI). e. To update the option firmware using Method 4 first create an options directory. $ set def dua5:[000000] $ create/dir [.options] f. Copy the option firmware files to the options directory. as2x00fw.txt ccmab022.sys cipca420.sys dfeaa130.sys dfeab320.sys dfxaa320.sys kzpsaa12.sys g. When booting the update utility enter the device name where the option firmware is located. System Disk a. Only steps a and b above are used. Do NOT execute writeboot step c. For the option firmware use the "system disk" as the disk device. b. Specify the flags of 0,a0 and use "system disk":[sys0.sysexe]filename for the bootfile. >>> b -fl 0,a0 dua0 bootfile: dua0:[sys0.sysexe]as2100_e4_v5_4.exe Method 5 - Boot Off of a Bootable Floppy OpenVMS AXP a. Init and mount the floppy. Create a directory and copy the firmware to the Floppy with the following commands. The commands shown are for the AlphaServer 2x00 EV4. For all other systems use the directory and files listed in method 1. $ set file/attr=(rfm:fix,lrl:512,mrs:512,rat:none) as2100_e4_v5_4.exe $ init/dens=HD/index=begin dva0: fwupdate $ mount dva0: fwupdate $ create/dir dva0:[ALPHA2100] $ copy/contiguous as2100_e4_v5_4.exe dva0:[ALPHA2100]fwupdate.exe b. MCR Writeboot Update VAX portion of boot block (default is Y): No Update Alpha portion of boot block (default is Y):Yes [enter AXP bootfile:] dva0:[ALPHA2100]fwupdate.exe c. Dismount the disk and shutdown VMS. $ dismount dva0: d. Insert the floppy on the target system and boot it from the >>>. >>> boot dva0 76 e. If you wish to update option firmware you must create a second floppy with option firmware on it. Downline load the following files from the Website. as2x00fw.txt ccmab022.sys cipca420.sys dfeaa130.sys dfeab320.sys dfxaa320.sys kzpsaa12.sys f. Enter the following commands to create the options floppy: $ init/dens=HD/index=begin dva0: optionfw $ mount dva0: optionfw $ create/dir dva0:[options] – The directory name must be [options] $ copy as2x00fw.txt dva0:[options] $ copy ccmab022.sys dva0:[options] $ copy cipca420.sys dva0:[options] $ copy dfeaa130.sys dva0:[options] $ copy dfeab320.sys dva0:[options] $ copy dfxaa320.sys dva0:[options] $ copy kzpsaa12.sys dva0:[options] $ dismount dva0: g. Insert the floppy when it asks for the options firmware and enter the location. Tru64 UNIX a. Go to the Digital Internet http://ftp.digital.com/pub/Digital/Alpha/firmware/ b. Copy the firmware.exe file from the Alpha2100 directory to your system and rename it fwupdate.exe c. Download the file mkbootfirm.tar from the firmware website. ftp://ftp.digital.com/pub/Digital/Alpha/firmware/utilities/mkbootfirm.tar You can untar mkbootfirm on your target Tru64 UNIX system with the command: # tar xvf mkbootfirm.tar d. Make sure you have a floppy that has been low-level formatted. For example, to low-level format a floppy in drive 0: fddisk -fmt /dev/rfd0a e. Change default to directory with mkbootfirm.exe cd mkbootfirm f. Run mkbootfirm on the .exe firmware image that you downloaded. mkbootfirm uses a .exe firmware image to create a file that can be dd'd to floppy. The following will create a bootable floppy from a downloaded .exe firmware image: ./mkbootfirm fwupdate.exe | dd of=/dev/rfd0c bs=64k NOTE: Assumes mkbootfirm.exe is in current directory and floppy is in drive 0. g. Insert the floppy on the target system and boot it from the SRM console: >>> boot dva0 h. If you wish to update option firmware you must create a second floppy with option firmware on it. Go to the firmware website and follow this procedure. i. Download the file v39_options.dd. This file name changes with different console versions. j. Make sure you have a floppy that has been low-level formatted. For example, to low-level format a floppy in drive 0: fddisk -fmt /dev/rfd0a k. Enter the command: 77 dd if=v39_options.dd of=/dev/rfd0c bs=64k NOTE: This assumes the v39_options.dd image file is in the current directory and that the floppy is in drive 0. l. After booting the firmware floppy created with mkbootfirm, the update utility will complain that it cannot find the options files on either CD or floppy, and will prompt for a device to look for the options files. Simply insert the options floppy you created above, type the device name of the floppy (e.g. dva0) and hit <return> to load the options firmware. Windows NT a. Copy the firmware file to a FAT formatted floppy with the update image Filename of a:\fwupdate.exe. b. Shut down NT and from the NT Console menu, select "Install new firmware". c. If you wish to update the options firmware, you must create a second floppy. Download the following files from the options directory at the firmware website. as2x00fw.txt ccmab022.sys cipca420.sys dfeaa130.sys dfeab320.sys dfxaa320.sys kzpsaa12.sys d. FAT format a floppy and copy the files to the floppy. e. When the utility asks for the options floppy, insert it and tell the utility The device it is located on. Method 6 - BOOTP Network Upgrade - Tru64 UNIX a. Mount the Firmware Update CD using the following command: # mount -rt cdfs -o noversion /dev/rz4c /mnt b. Modify or Create the Client Database in the /etc/bootptab File <host>:ht:<hw_type>:ha=<hw_addr>:bf=<filename>:ip=<ip_addr> where: host is the system name in /etc/hosts hw_type is the hardware type. Proteon is ht = 4. Ethernet is ht = 1. Regular token-ring (IEEE 802) is ht = 6. hw_addr is the hardware address: use the console command show device. filename is the name of the default bootfile image: ip_addr is the Internet protocol address of the system name in /etc/hosts. The following is an example of a bootptab file for both the AlphaServer 2100 and 2100A EV4 and EV5 machines: bigsox:ht=1:ha=08002b236423:bf=/mnt/ALPHA2100/AS2100_E4_V5_4.EXE;1:ip=16.182.0.87 bigsox:ht=1:ha=08002b236423:bf=/mnt/ALPHA2100/AS2100_E5_V5_4.EXE;1:ip=16.182.0.87 bigsox:ht=1:ha=08002b236423:bf=/mnt/ALPHA2100A/AS2100A_E4_V5_4.EXE;1:ip=16.182.0.7 bigsox:ht=1:ha=08002b236423:bf=/mnt/ALPHA2100A/AS2100A_E5_V5_4.EXE;1:ip=16.182.0.7 c. Modify the /etc/inetd.conf file. Uncommon the tftp and bootps process. It should look like the following example: tftp dgram udp wait root /usr/sbin/tftpd tftpd /mnt bootps dgram upd wait root /usr/sbin/bootpd bootpd 78 d. Find the process /usr/sbin/inetd daemon: This step will stop network traffic # ps aux | grep ine # kill process# <ine process number> e. Restart the inetd daemon: # /usr/sbin/inetd Note The bootpd and tftp daemon will be removed if the system is rebooted. Refer to the manual pages: bootpd(8) or tftpd(8) for more information. Use Man bootpd and man tftpd f. Enter the following command to boot from the BOOTP server: >>> boot -p bootp ewa0 Should a boot file "pathname" need to be specified in must be in quotes >>> boot -p bootp ewa0 -file “/dir1/dir2/filename” g. Currently there is no BOOTP support for updating option firmware. 5. Check the console and option firmware levels. UPD> list Device arcflash pkb0 pkc0 srmflash Current Revision 4.36-0 A07 A07 4.2-18 Filename arcrom kzpsa_fw kzpsa_fw srmrom cipca_fw ccmab_fw dfeaa_fw dfeab_fw dfxaa_fw Update Revision 4.57-0 A12 A12 5.3-14 A420 22.0 1.3 3.20 3.20 UPD> 6. Save contents of NVRAM to a fat formatted floppy from the upd> prompt UPD> SAVE_NVRAM Save all NVRAM data to file fat:allnvram.sav/dva0.0.0.1000.0. If file already exists, first copy original to a .bak file. Please insert a write-UN-locked, FAT formatted floppy... ...and enter "y" to continue. y Checking for a FAT formatted floppy... ...Found it. Checking for existing fat:allnvram.sav/dva0.0.0.1000.0... ...Found one. Copying fat:allnvram.sav/dva0.0.0.1000.0 to .bak file... ...Succeeded. Copying all NVRAM to fat:allnvram.sav/dva0.0.0.1000.0... ...Succeeded. UPD> 7. Update the firmware from the UPD> prompt using update or update *srm* followed by update *arc* UPD> update - to update the SRM,ARC and option firmware Confirm update on: fra0 arcflash srmflash [Y/(N)] Y - Type Yes to proceed with the update WARNING: updates may take several minutes to complete for each device. srmflash arcflash DO NOT ABORT! Updating to 5.3-2... Verifying 5.3-2... PASSED. Updating to 4.57-0... Verifying 4.57-0... PASSED. 79 UPD> update srm* - To only update the SRM console Confirm update on: srmflash [Y/(N)] Y WARNING: updates may take several minutes to complete for each device. srmflash DO NOT ABORT! Updating to 5.3-2... Verifying 5.3-2... PASSED. UPD> update arc* - To only update the ARC console Confirm update on: arcflash [Y/(N)] Y WARNING: updates may take several minutes to complete for each device. arcflash DO NOT ABORT! Updating to 4.57-0... Verifying 4.57-0... PASSED. UPD> 8. Verify that update was successful. UPD> verify arcflash pkb0 srmflash Verifying 4.57-0... PASSED. Verifying A12... PASSED. Verifying 5.3-14... PASSED. 9. Exit utility and power cycle the machine to load console firmware. If you are updating the failsafe loader firmware, proceed to step 10 or 11. UPD> exit Do you want to do a manual update? [y/(n)]n - if not updating the FSL. loader. Please reset the system...... 10. The failsafe loader can be upgraded from the UPD> or P00>>> prompts. Step 11 will show the use of the script from the P00>>> prompt. a. Set the failsafe update jumper or switch b. Boot up LFU using one of the previous steps. c. At UPD> prompt type fsl_update UPD> update_fsl UPD> exit Do you want to do a manual update? [y/(n)]n d. Now power cycle the system 11. Or to use the FSL_UPDATE script a. Boot up LFU using one of the previous steps. b. At UPD> prompt type exit UPD> exit Do you want to do a manual update? [y/(n)]y - yes to update the failsafe loader. c. P00>>> update_fsl d. Now power cycle the system 12. At the >>> execute the CLEAR_ARC_NVRAM and CLEAR_SRM_NVRAM commands. 80 13. Run ECU and do a SAVE and EXIT. Also reset any console variables. If you executed the SAVE_NVRAM step 8 above you can also use RESTORE_NVRAM command from the UPD> prompt to restore the contents on NVRAM to floppy. See pages 199 and 200 for a description. This will write console variables, NT settings and ECU data to the floppy. Execute this command from LFU before doing the CLEAR_ARC_NVRAM and CLEAR_SRM_NVRAM commands. 81 82 AlphaServer 2000/2100/2100A Jumpers AlphaServer 2000 BA720 Enclosure • • • J3 – Power supply mode: When installed, dual power supplies operate in redundant mode J5 – Program voltage: Internal use only. When installed allows to program FSL ROM J6 – Fail-Safe: When installed, selects the fail-safe loader firmware 83 AlphaServer 2100 and 2100 RM BA740/BA741 Enclosures • • • J3 – Power supply mode: When installed, dual power supplies operate in redundant mode J5 – Program voltage: Internal use only. When installed allows to program FSL ROM J6 – Fail-Safe: When installed, selects the fail-safe loader firmware 84 AlphaServer 2100A • • Top switch to RIGHT – Enable FSL Use Bottom switch to RIGHT – Enable writes to FSL ROM AlphaServer 2100A RM • • Left switch DOWN – Enable writes to FSL ROM Right switch DOWN – Enable FSL Use 85 AlphaServer 2100A LP Caution: Do not perform console upgrades with the W6 jumper installed or the system firmware will be corrupted. 86 AlphaServer 4000/4100 or Digital Server 7000 Models 7300/7305 The console firmware on the AlphaServer 4000/4100 systems is located on the PCI backplane. The ability to write to the ROM is controlled by jumper J18 on the motherboard. Whenever the PCI backplane is replaced, the firmware will most likely need to be upgraded. You will also need to do occasional console firmware upgrades to load the latest version of firmware that is available. This system also contains a failsafe loader. However on this machine the failsafe loader is not jumper selectable. It is loaded off of a floppy disk. There are several ways to upgrade the firmware. All involve booting Loadable Firmware Utility (LFU). It can be booted one of the following ways. • • • • • • • Off the Alpha AXP System Firmware Update Utility CD using the local CDROM. Off the CDROM, Firmware floppy or over the network using LFU command. Off of an infoserver using the Alpha AXP System Firmware Update Utility CD. Over the network using the .SYS firmware file. Off of a disk that has a bootable version of the firmware file (filename.exe) on it (MCR WRITEBOOT may be required on that file to make it bootable). Off of a bootable floppy OpenVMS, Unix or NT. From the BOOTP server (Unix). The procedure to update the console firmware is as follows. • • • • • • • • • • • Determine current console firmware revision. Record all console environmental variables by typing SHOW * at the >>>. Determine method and firmware version that will be used to do the update. Print the firmware release notes for that version and system. Determine if any option firmware will be upgraded. Locate the appropriate RCU and ECU diskettes if required. Boot the firmware file (LFU). Use the list, update and verify commands at the UPD> prompt. When done exit from LFU. Init the machine and reboot. Run ECU and RCU as required. 1. Get the current firmware revision at power on or with console show or init commands. It is at the very bottom of the configuration map. Power on or init message SROM V1.1 on cpu0 SROM V1.1 on cpu1 XSROM V5.0 on cpu1 XSROM V5.0 on cpu0 BCache testing complete on cpu0 BCache testing complete on cpu1 mem_pair0 - 128 MB 20..20..20..21..21..21..20..21..23.. please wait 3 seconds for T24 to complete 24..24..24..24.. Memory testing complete on cpu0 Memory testing complete on cpu1 starting console on CPU 0 sizing memory 0 128 MB SYNC starting console on CPU 1 probing IOD1 hose 1 bus 0 slot 1 - NCR 53C810 bus 0 slot 2 - PCI-PCI Bridge probing PCI-PCI Bridge, bus 2 bus 2 slot 0 - QLogic ISP1020 bus 0 slot 3 - DECchip 21040-AA bus 0 slot 4 - DECchip 21140-AA bus 0 slot 5 - DEC KZPSA probing IOD0 hose 0 87 bus 0 slot 1 - PCEB probing EISA Bridge, bus 1 bus 0 slot 2 - DEC PCI MC bus 0 slot 3 - S3 Trio64/Trio32 bus 0 slot 5 - Mylex DAC960 configuring I/O adapters... ncr0, hose 1, bus 0, slot 1 isp0, hose 1, bus 2, slot 0 tulip0, hose 1, bus 0, slot 3 tulip1, hose 1, bus 0, slot 4 kzpsa0, hose 1, bus 0, slot 5 floppy0, hose 0, bus 1, slot 0 dac0, hose 0, bus 0, slot 5 mc0, hose 0, bus 0, slot 2 System temperature is 33 degrees C AlphaServer 4100 Console V5.0-2, 25-SEP-1997 12:42:27 P00>>> show version Version X1.0-1 1-APR-1996 13:59:28 P00>>> show pal PAL OpenVMS PALcode X1.17-9, Digital Unix PALcode X1.21-5 P00>>> AlphaBIOS - to get version of AlphaBIOS console 2. P00>>> show * to printout all the environmental variables. Check all customer set variables. Also verify the setting of the following variables. Bootdef_dev Boot_osflags Auto_action 3. Check that the ROM update jumper is enabled. Consult the Service Manual for its location and setting. It should be enabled by default. 4. Boot the firmware using one of the following methods. Method 1 - Load the Console Firmware Off a Local CDROM SRM Console a. Insert the CD in the local CDROM. b. P00>>> boot DKA500 - You can also use the procedure c. BOOTFILE: [AS4X00]as4x00_v6_0.exe - for the AlphaServer 4x00 Note: These filenames will change with different console versions. Apu-> See step 5 below for update procedure. c. P00>>> lfu ***** Loadable Firmware Update Utility ***** Select firmware load device (cda0, dva0, ewa0), or Press <return> to bypass loading and proceed to LFU: cda0 Please enter the name of the firmware files list, or Press <return> to use the default filename [AS4X00IO,(AS4X00CP)]: as4x00fw Copying AS4X00FW Copying RHREADME Copying RHSRMROM Copying RHARCROM Copying CCMAB022 Copying CIPCA420 Copying DFPAA320 Copying KZPSAA12 UPD> See below from DKA500.5.0.1.1 from DKA500.5.0.1.1 from DKA500.5.0.1.1 from DKA500.5.0.1.1 from DKA500.5.0.1.1 from DKA500.5.0.1.1 from DKA500.5.0.1.1 from DKA500.5.0.1.1 for update steps . . . ......................... ............... . . . . 88 AlphaBIOS Console a. Insert the CD in the local CDROM. b. Enter the AlphaBIOS menu by typing ARC or AlphaBIOS or initializing the system when os_type = nt c. AlphaBIOS -Select F2 to go into Setup then select Upgrade AlphaBIOS Method 2 - Boot Console CD, Firmware Floppy or Network Device CD a. Insert the CD in the local CDROM. b. Execute LFU command and select device cda0 for the CDROM and specify as4x00fw. P00>>> lfu ***** Loadable Firmware Update Utility ***** Select firmware load device (cda0, dva0, ewa0), or Press <return> to bypass loading and proceed to LFU: cda0 Please enter the name of the firmware files list, or Press <return> to use the default filename [AS4X00IO,(AS4X00CP)]: as4x00fw Floppy a. Create a system and/or I/O firmware floppies using the following procedure. You will need up three floppies. Two for system firmware and one for I/O firmware. This is as of V5.4 . With V5.3 or earlier two floppies would work. b. Execute the following command file to create both floppies $! $! make_rhods2cp_1and2.com $! $ inquire ignore "Insert first blank HD floppy in DVA0, then continue" $ set verify $ set proc/priv=all $ init/density=hd/index=begin dva0: rhods2cp1 $ mount dva0: rhods2cp1 $ create/directory dva0:[as4x00] $ copy as4x00fw.sys dva0:[as4x00]as4x00fw.sys $ copy as4x00cp.sys dva0:[as4x00]as4x00cp.sys $ copy rhreadme.sys dva0:[as4x00]rhreadme.sys $ copy rharcrom.sys dva0:[as4x00]rharcrom.sys $ dismount dva0: $ set noverify $ inquire ignore "Insert second blank HD floppy in DVA0, then continue" $ set verify $ set proc/priv=all $ init/density=hd/index=begin dva0: rhods2cp2 $ mount dva0: rhods2cp2 $ create/directory dva0:[as4x00] $ copy rhsrmrom.sys dva0:[as4x00]rhsrmrom.sys $ dismount dva0: $ set noverify $ exit 89 If creating a diskette for updating your I/O option firmware only: $! $! make_rhods2io.com $! $ inquire ignore "Insert blank HD floppy in DVA0, then continue" $ set verify $ set proc/priv=all $ init/density=hd/index=begin dva0: rhods2io $ mount dva0: rhods2io $ create/directory dva0:[as4x00] $ create/directory dva0:[options] $ copy as4x00fw.sys dva0:[as4x00]as4x00fw.sys $ copy as4x00io.sys dva0:[as4x00]as4x00io.sys $ copy rhreadme.sys dva0:[as4x00]rhreadme.sys $ copy ccmab022.sys dva0:[options]ccmab022.sys $ copy cipca420.sys dva0:[options]cipca420.sys $ copy dfpaa320.sys dva0:[options]dfpaa320.sys $ copy kzpsaa12.sys dva0:[options]kzpsaa12.sys $ dismount dva0: $ set noverify $ exit c. Shutdown the OS and init the machine at the P00>>> prompt. d. Execute LFU command and select device dva0 for the floppy device and the filenames as4x00cp or as4x00io depending if you want to update console or I/O firmware. If running console version V1.2 or greater you can specify as4x00fw and it will load files off the console firmware floppy and then request you load the I/O firmware floppy. P00>>> lfu ***** Loadable Firmware Update Utility ***** Select firmware load device (cda0, dva0, ewa0), or Press <return> to bypass loading and proceed to LFU: dva0 Please enter the name of the firmware files list, or Press <return> to use the default filename [AS4X00IO,(AS4X00CP)]: as4x00cp Network a. Copy the following files to MOM$LOAD of you local MOP server. as4x00cp.sys as4x00fw.sys as4x00io.sys ccmab022.sys cipca420.sys dfpaa320.sys kzpsaa12.sys rhreadme.sys rhsrmrom.sys rharcrom.sys rhreadme.sys b. Set the attributes for the file using the following OpenVMS command on each file. $ set file/attr=rfm:fix,lrl:512,mrs:512,rat:none as4x00_v6_0.sys 90 c. Execute LFU command and select device EWA0 fir Digital PCI Ethernet or FWA0 for Digital PCI FDDI (DEFPA). Specify the files as4x00fw, as4x00cp or as4x00io depending on what you want to update. P00>>> lfu ***** Loadable Firmware Update Utility ***** Select firmware load device (cda0, dva0, ewa0), or Press <return> to bypass loading and proceed to LFU: ewa0 Please enter the name of the firmware files list, or Press <return> to use the default filename [AS4X00IO,(AS4X00CP)]: as4x00fw Method 3 - Boot the Console CD Off of an Infoserver a. Insert CD in the Infoserver b. P00>>> boot exa0 -file as4x00_v6_0 (leave off the .sys extension) Method 4 - Booting Off the Network a. Copy firmware to MOM$LOAD of an existing node in the cluster b. Set the attributes on the file with the following commands: $ set file/attr=(rfm:fix,lrl:512,mrs:512,rat:none) as4x00_v6_0.sys c. Enable service on that node from NCP $ MC NCP MC NCP> Show Known Circuit Characteristic Known Circuit Volatile Characteristics as of 12-FEB-1997 19:27:41 Circuit = BNA-0 State Service Counter timer Designated router Cost Maximum routers allowed Router priority Hello timer Type Adjacent node Listen timer = = = = = = = = = = = on disabled (if enabled skip to boot command) 65534 28.1023 (CXO28A) 4 33 64 15 Ethernet 28.1023 (CXO28A) 30 NCP> Set Circ BNA-0 State OFF - This step will stop network activity NCP> Set Circ BNA-0 Service Enable NCP> Set Circ BNA-0 State ON d. P00>>> b -fl 0,0 EWA0 -fi as4x00_v6_0 (Leave off .SYS or node that services request will get an error - BAD MOP FID) Determine device name with SHOW DEVICE at >>> . FDDI = FWA0 DE4x0/DE500 = EWA0 91 Method 5 - Boot Off of a Disk - Non-System Disk and System Disk Using OpenVMS Non-System Disk a. Locate the as4x00_v6_0.exe file b. Set the attributes on the file and copy it contiguous to the target disk (non-system) and directory with the following commands: $ set file/attr=(rfm:fix,lrl:512,mrs:512,rat:none) as4x00_v6_0.exe $ copy/contiguous as4x00_v6_0.exe "non_system_disk":[directory] c. Use writeboot to make the disk bootable. Specify the disk, directory and filename of the firmware. Take the defaults for the other questions. $ MCR Update Update Target Writeboot VAX portion of boot block (default is Y): No Alpha portion of boot block (default is Y):Yes system device (and boot file if not VMB.EXE):$1$dua5:[TEMP]as4x00_v6_0.exe d. P00>>> b -fl 0,0 dua5 System Disk a. Only steps a and b above are used. Do NOT execute writeboot step c. b. S Specify the flags of 0,a0 and use "system disk":[sys0.sysexe]filename for the bootfile. >>> b -fl 0,a0 dua0 bootfile: dua0:[sys0.sysexe]as4x00_v6_0.exe Method 6 - Boot Off of a Bootable Floppy - V5.2 Firmware or Earlier OpenVMS AXP a. Init and mount to floppy. Create a directory and copy the firmware to the floppy with the following commands. $ init/dens=HD/index=begin dva0: fwupdate $ mount dva0: fwupdate $ create/dir dva0:[AS4x00] $ copy/contiguous as4x00_v5_2.exe dva0:[AS4x00]fwupdate.exe b. MCR Writeboot Update VAX portion of boot block (default is Y): No Update Alpha portion of boot block (default is Y):Yes [enter AXP bootfile:] dva0:[AS4x00]fwupdate.exe c. Dismount the disk and shutdown VMS. $ dismount dva0: d. Insert the floppy on the target system and boot it from the >>>. >>> boot dva0 92 Tru64 UNIX a. Go to the Digital Internet firmware site at http://ftp.digital.com/pub/Digital/Alpha/firmware/ b. Copy the firmware.exe file from the AS4x00 directory to your system and rename it fwupdate.exe c. Download the file mkbootfirm.tar from the firmware website. ftp://ftp.digital.com/pub/Digital/Alpha/firmware/utilities/mkbootfirm.tar You can untar mkbootfirm on your target Tru64 UNIX system with the command: # tar xvf mkbootfirm.tar d. Make sure you have a floppy that has been low-level formatted. For example, to low-level format a floppy in drive 0: fddisk -fmt /dev/rfd0a e. Change default to directory with mkbootfirm.exe cd mkbootfirm f. Run mkbootfirm on the .exe firmware image that you downloaded. mkbootfirm uses a .exe firmware image to create a file that can be dd’d to floppy. The following will create a bootable floppy from a downloaded .exe firmware image: ./mkbootfirm fwupdate.exe | dd of=/dev/rfd0c bs=64k NOTE: Assumes mkbootfirm.exe is in current directory and floppy is in drive 0 g. Insert the floppy on the target system and boot it from the SRM console: P00>>> boot dva0 Windows NT a. Copy the firmware file to a FAT formatted floppy with the update image filename of a:\fwupdate.exe. b. Shut down NT and from the NT Console menu, select "Install new firmware". Method 7 - Boot Off of a Bootable Floppy - V5.3 Firmware or Later Windows NT a. Fat format up to three floppies. To update system firmware you will need two floppies. However if you want to update IO firmware, you will need three floppies. A disk1.zip, disk2.zip and disk3.zip file are available on the firmware website. b. Locate and copy the following files to disk #1. • as4x00cp.sys Two-Disk LFU file list • as4x00fw.sys Three-Disk LFU file list • rhreadme.sys LFU text file • rharcrom.sys AlphaBios/ARC firmware c. Locate and copy the following files to disk #2 to update SRM firmware: • rhsrmrom.sys SRM console firmware 93 d. Locate and copy the following files to disk #3 to update I/O firmware. • • • • • • as4x00.sys rhreadme.sys cipca315.sys dfxaa320.sys kzpsaa12.sys ccmab022.sys IO LFU update file LFU text file CIPCA firmware DFXAA firmware KZPSA firmware CCMAB firmware e. At the >>> type LFU and enter when it asks for the filename enter as1200cp (cpu firmware), as1200io (IO firmware) or as1200fw (system and IO firmware). f. I will prompt you to load the floppies in one at a time. When it has read all three floppies you will come to a UPD? prompt where you can update firmware. Note When Using Three Disks: After updating console firmware with disk1 and disk2, you can update I/O firmware from disk3 by re-invoking the LFU via LFU command at the UPD> prompt. When prompted for input, provide the alternate firmware files list filename. Method 8 - BOOTP Network Upgrade - Tru64 UNIX a. Mount the Firmware Update CD using the following command: # mount -rt cdfs -o noversion /dev/rz4c /mnt b. Modify or Create the Client Database in the /etc/bootptab File <host>:ht:<hw_type>:ha=<hw_addr>:bf=<filename>:ip=<ip_addr> where: host is the system name in /etc/hosts hw_type is the hardware type. Proteon is ht = 4. Ethernet is ht = 1. Regular token-ring (IEEE 802) is ht = 6. hw_addr is the hardware address: use the console command show device. filename is the name of the default bootfile image: ip_addr is the Internet protocol address of the system name in /etc/hosts. The following is an example of a bootptab file for the AlphaServer 4000/4100: bigsox:ht=1:ha=08002b236423:bf=/mnt/AS4x00/as4x00_v6_0.EXE;1:ip=16.182.0.87 c. Modify the /etc/inetd.conf file. Uncommon the tftp and bootps process. It should look like the following example: tftp dgram udp wait root bootps dgram upd wait root /usr/sbin/tftpd /usr/sbin/bootpd tftpd /mnt bootpd d. Find the process /usr/sbin/inetd daemon: This step will stop network traffic # ps aux | grep ine # kill process# <ine process number> e. Restart the inetd daemon: # /usr/sbin/inetd Note The bootpd and tftp daemon will be removed if the system is rebooted. Refer to the manual pages: bootpd(8) or tftpd(8) for more information. Use Man bootpd and man tftpd 94 f. Enter the following command to boot from the BOOTP server: >>> boot -p bootp ewa0 Should a boot file "pathname" need to be specified in must be in quotes >>> boot -p bootp ewa0 -file “/dir1/dir2/filename” 5. List the current version then Update the firmware at the UPD> prompt. Use update * or update *SRM*, or update al* or update KZPSA0 etc. Then verify the update before exiting. Starting Firmware Update Utility Unpacking firmware files as4x00_readme adr = 1000020 len = 1e00(7680) srmrom adr = 1002040 len = ef800(980992) arcrom adr = 10f1a60 len = 70000(458752) ccmab_fw adr = 1192ca0 len = 80200 (524800) cipca_fw adr = 1161c80 len = ce00(52736) dfxaa_fw adr = 12ddc20 len = 38a00(231936) kzpsa_fw adr = 1316840 len = 74000(475136) ***** Loadable Firmware Update Utility ***** -----------------------------------------------------------------------------Function Description -----------------------------------------------------------------------------Display Displays the system’s configuration table. Exit Done exit LFU (reset). List Lists the device, revision, firmware name, and update revision. Lfu Restarts LFU. Readme Lists important release information. Update Replaces current firmware with loadable data image. Verify Compares loadable and hardware images. ? or Help Scrolls this function table. -----------------------------------------------------------------------------a. From the >>> or UPD> prompt save contents of NVRAM to floppy using SAVE_NVRAM. b. UPD> list Device AlphaBIOS kzpsa0 srmflash Current Revision V5.70-0 A12 V5.8-2 Filename arcrom kzpsa_fw srmrom cipca_fw dfxaa_fw Update Revision V5.70-0 A12 V5.9-5 A420 3.20 NOTE: If upgrading to V5.3 or later for the first time, or downgrading from V5.3 or 5.4 to a lower version, make sure you read the release notes. The correct update procedure is as follows. 1. 2. 3. 4. 5. Boot firmware CD Update SRM Exit and reboot firmware CD Update AlphaBIOS Exit c. UPD> update * - Not valid if updating to or downgrading from V5.3. See Note above. WARNING: updates may take several minutes to complete for each device. Confirm update on: AlphaBIOS [Y/(N)] y DO NOT ABORT! 95 AlphaBIOS Updating to V5.70-0... ....... Verifying V5.70-0... Confirm update on: kzpsa0 kzpsa0 srmflash d. UPD> verify AlphaBIOS kzpsa0 srmflash [Y/(N)] y DO NOT ABORT! Updating to A12 ... Confirm update on: srmflash PASSED. Verifying A12... PASSED. [Y/(N)] y DO NOT ABORT! Updating to V5.9-5............... Verifying V5.9-5...PASSED. Verifying V5.70-0... PASSED. Verifying A12... PASSED. Verifying V5.9-5... PASSED. e. UPD> exit Initializing... f. From the >>> restore the NVRAM contents with RESTORE_NVRAM or reboot the firmware CD and RESTORE_NVRAM if you did the SAVE_NVRAM in step b. Otherwise check and set the following environmental variables. P00>>> set Bootdef_dev set Boot_osflags set Auto_action g. P00>>> init h. Starting with the V5.3 CD, if running Windows NT, do a build –e after updating firmware. 6. If ECU is required to be run you must use the AlphaBIOS. a. P00>>> AlphaBIOS b. Select Run ECU from Floppy. 7. If RCU is required to be run you must use the AlphaBIOS. a. P00>>> AlphaBIOS b. Select Run Maintenance Program c. In the Run Maintenance Program dialog box type in the Program Name: field \utility\swxcrmgr\swxcrmgr for V3.8 CD or less or \utility\swxcrmgr\ra200rcu for any CD from V3.9 or later. 8. If the KZPSA Configuration Utility is required to be run you must use the AlphaBIOS. a. P00>>> AlphaBIOS b. Select Run Maintenance Program c. In the Run Maintenance Program dialog box type cnfgdiag.exe 96 9. You can also set up some controller parameters at the console using the PK*0 variables. There are different parameters depending on the controller type. Some you may see are • PKA0_DISCONNECT • PKA0_FAST Specifies mode of controller 0 = Normal 1 = Fast • PKA0_HOST_ID Specifies SCSI Host ID Range is 0-7. 7 is the Default. • PKA0_SOFT_TERM Enables or disables SCSI terminators. This environment variable applies to systems using the QLogic ISP1020 SCSI controller. The QLogic ISP1020 SCSI controller implements the 16-bit wide SCSI bus. The QLogic module has two terminators, one for the 8 low bits and one for the high 8 bits. There are five possible values: • • • • • • off—Turns off both low 8 bits and high 8 bits. low—Turns on low 8 bits and turns off high 8 bits. high—Turns on high 8 bits and turns of low 8 bits. on—Turns on both low 8 bits and high 8 bits. diff—Places the bus in differential mode. PKA0_TERMPWR To change KZPSA SCSI termination power setting, enter the following console command: • • 0 = disable termpwr 1 = enable termpwr 97 98 AlphaServer 4000/4100 Jumpers PCI/EISA Motherboard J18 Installed = Flash ROM writes enabled AlphaServer 4000/4100 LP Jumpers PCI/EISA Motherboard J18 Installed = Flash ROM writes enabled 99 100 AlphaServer 8200/8400 The console firmware on the AlphaServer 8200/8400 is located on the CPU module. All Cpu’s must run the same version of firmware. You can NOT have mixed versions and expect it to work. Any time a CPU module is added or replaced, the firmware will most likely need to be upgraded. You will also need to do occasional console firmware upgrades to load the latest version of firmware that is available. The firmware files used for the 8200/8400 and GS60/GS140 are different. Make sure you use the correct file. There are several ways to upgrade the firmware. All involve booting Loadable Firmware Utility (LFU). It can be booted one of the following ways. • • • • • • Off the Alpha AXP System Firmware Update Utility CD using the local CDROM. Off the CDROM, Firmware floppy or over the network using LFU command. Over the network using the .SYS firmware file. Off of an infoserver using the Alpha AXP System Firmware Update Utility CD. Off of a disk that has a bootable version of the firmware file (filename.exe) on it (MCR WRITEBOOT may be required on that file to make it bootable). From the BOOTP server (Unix). The procedure to update the console firmware is as follows. • • • • • • • • • • • • Determine current console firmware revision. Record all console environmental variables by typing SHOW * at the >>>. Determine which method and firmware version will be used to do the update. Print the firmware release notes for that version and system. Determine if any option firmware will be upgraded. Locate the appropriate RCU and ECU diskettes if required. Boot the firmware file (LFU). Use the verify and update commands at the UPD> prompt. When done exit from LFU. Execute a Build NVR and a Build EEPROM at the >>> for each CPU. Init the machine and reboot. Run ECU in required. 1. First type INIT at the >>> the see what the current version of console loaded is. It is at the very bottom of the configuration map. P02>>> init F E D C B A 9 8 A o . o . + . 7 M + . + . + . 6 . . . . . . . 5 . . . . . . . 4 . . . . . . . 3 . . . . . . . 2 . . . . . . . 1 P ++ EB ++ EB ++ EB 0 . . . . . . . NODE # TYP ST1 BPD ST2 BPD ST3 BPD . . . . + + + . + + + + + . + . + . + + C0 PCI + C1 PCI + . A0 . 256 . . . . . . . . . . . . . . ILV 256MB AlphaServer 8200 Console V4.1-6, SROM V3.1, 15-Nov-1996 13:25:28 2. P02>>> show * to printout all the environmental variables. Check all customer set variables. Also verify the setting of the following variables. Bootdef_dev Boot_osflags Auto_action 101 a. Set Auto_action to HALT P02>>> set Auto_action halt 3. Boot the firmware using one of the following methods. Method 1 - Boot the Console CD Off a Local CDROM SRM Console a. Insert the CD in the local CDROM. b. P02>>> boot -fl 0,a0 DKA600 Bootfile: [AS8x00]as8000_v16.exe UPD> See below for update steps - AlphaServer 8200/8400 AlphaBIOS Console Do NOT use this procedure with the V5.3 firmware on the AlphaServer 8200/8400 a. Insert the CD in the local CDROM. b. Enter the AlphaBIOS menu by typing ARC or AlphaBIOS or initializing the system when os_type = nt c. AlphaBIOS - Select F2 to go into Setup then select Upgrade AlphaBIOS d. LFU will boot. You must tell the firmware where it is loading from, CDA0 (CD) or Ewa0 (network). (DVA0 will not work since the firmware will not fit on a floppy) e. Then specify the filename to load. There are 3 choices. AS8X00FW (CPU and IO), AS8X00CP (CPU only) AS8X00AB (AlphaBIOS only) AS8X00IO (IO only Method 2 - Boot Console CD, Firmware Floppy or Network Device CD a. Insert the CD in the local CDROM. b. Execute LFU command and select device cda0 for the CDROM and specify as8x00fw. P00>>> lfu ***** Loadable Firmware Update Utility ***** Select firmware load device (cda0, dva0, ewa0), or Press <return> to bypass loading and proceed to LFU: cda0 Please enter the name of the firmware files list, or Press <return> to use the default filename [AS8X00IO,(AS8X00CP)]: as8x00fw 102 Floppy - NT a. Fat format 3 floppies. b. Copy the following files to floppy 1 • as8x00fw.sys • as8x00cp.sys • as8x00ab.sys • tlreadme.sys • tlsrmrom.sys c. Copy the following files to floppy 2 • tl56ab.sys d. Copy the following files to floppy • as8x00fw.sys • as8x00io.sys • tlreadme.sys • cipca420.sys • cixcd007.sys • defaa110.sys • demfa021.sys • demna094.sys • dfxaa320.sys • kcm44cfg.sys • kcm44031.sys • kdm70044.sys • kfmsb024.sys • kfmsb001.sys • kzmsa056.sys • kzpsaa12.sys • ccmab022.sys e. Execute LFU command and select device dva0 for the floppy device and the filenames as8x00cp or as8x00io depending if you want to update console or I/O firmware. You can also specify as8x00ab and load only AlphaBIOS code or select as8x00fw and load SRM, AlphaBIOS and option firmware. P00>>> lfu ***** Loadable Firmware Update Utility ***** Select firmware load device (cda0, dva0, ewa0), or Press <return> to bypass loading and proceed to LFU: dva0 Please enter the name of the firmware files list, or Press <return> to use the default filename [AS8X00IO,(AS8X00CP)]: as8x00cp 103 Floppy - OpenVMS a. Create a system and/or I/O firmware floppies using the following procedure. You will need up three floppies. Two for system firmware and one for I/O firmware. b. Execute the following command file to create both floppies $! $! make_tlodscp_1and2.com $! $ inquire ignore "Insert first blank HD floppy in DVA0, then continue" $ set verify $ set proc/priv=all $ init/density=hd/index=begin dva0: tlods2cp1 $ mount dva0: tlodscp1 $ create/directory dva0:[as8x00] $ copy as8x00fw.sys dva0:[as8x00]as8x00fw.sys $ copy as8x00cp.sys dva0:[as8x00]as8x00cp.sys $ copy as8x00ab.sys dva0:[as8x00]as8x00ab.sys $ copy tlreadme.sys dva0:[as8x00]tlreadme.sys $ copy tlsrmrom.sys dva0:[as8x00]tlsrmrom.sys $ dismount dva0: $ set noverify $ inquire ignore "Insert second blank HD floppy in DVA0, then continue" $ set verify $ set proc/priv=all $ init/density=hd/index=begin dva0: tlods2cp2 $ mount dva0: tlods2cp2 $ create/directory dva0:[as8x00] $ copy tl56ab.sys dva0:[as8x00]tl56ab.sys $ dismount dva0: $ set noverify $ exit If creating a diskette for updating your I/O option firmware only: $! $! make_tlods2io.com $! $ inquire ignore "Insert blank HD floppy in DVA0, then continue" $ set verify $ set proc/priv=all $ init/density=hd/index=begin dva0: tlods2io $ mount dva0: tlods2io $ create/directory dva0:[as8x00] $ create/directory dva0:[options] $ copy as8x00fw.sys dva0:[as8x00]as8x00fw.sys $ copy as8x00io.sys dva0:[as8x00]as8x00io.sys $ copy tlreadme.sys dva0:[as8x00]tlreadme.sys $ copy cipca420.sys dva0:[options]cipca420.sys $ copy cixcd007.sys dva0:[options]cixcd007.sys $ copy defaa110.sys dva0:[options]defaa110.sys $ copy demfa021.sys dva0:[options]demfa021.sys $ copy demna094.sys dva0:[options]demna094.sys $ copy dfxaa320.sys dva0:[options]dfxaa320.sys $ copy kcm44cfg.sys dva0:[options]kcm44cfg.sys $ copy kcm44031.sys dva0:[options]kcm44031.sys $ copy kdm70044.sys dva0:[options]kdm70044.sys $ copy kfmsb024.sys dva0:[options]kfmsb024.sys $ copy kfmsb001.sys dva0:[options]kfmsb001.sys $ copy kzmsa056.sys dva0:[options]kzmsa056.sys $ copy kzpsaa12.sys dva0:[options]kzpsaa12.sys $ copy ccmab022.sys dva0:[options]ccmab022.sys $ dismount dva0: $ set noverify $ exit c. Shutdown the OS and init the machine at the P00>>> prompt. 104 d. Execute LFU command and select device dva0 for the floppy device and the filenames as8x00cp or as8x00io depending if you want to update console or I/O firmware. You can also specify as8x00ab to load AlphaBIOS firmware only or as8x00fw and it will load system and I/O firmware. P00>>> lfu ***** Loadable Firmware Update Utility ***** Select firmware load device (cda0, dva0, ewa0), or Press <return> to bypass loading and proceed to LFU: dva0 Please enter the name of the firmware files list, or Press <return> to use the default filename [AS8X00IO,(AS8X00CP)]: as8x00cp Network a. Copy the following files to MOM$LOAD of you local MOP server. as8x00cp.sys as8x00ab.sys as8x00fw.sys as8x00io.sys tlreadme.sys tlsrmrom.sys tl56ab.sys cipca420.sys cixcd007.sys defaa110.sys demfa021.sys demna094.sys dfxaa320.sys kcm44cfg.sys kcm44031.sys kdm70044.sys kfmsb024.sys kfmsb001.sys kzmsa056.sys kzpsaa12.sys ccmab022.sys b. Set the attributes for the file using the following OpenVMS command on each file. $ set file/attr=rfm:fix,lrl:512,mrs:512,rat:none filename.sys c. Execute LFU command and select device EWA0 for Digital PCI Ethernet or FWA0 for Digital PCI FDDI (DEFPA). Specify the files as8x00fw, as8x00cp, as8x00ab or as8x00io depending on what you want to update. P00>>> lfu ***** Loadable Firmware Update Utility ***** Select firmware load device (cda0, dva0, ewa0), or Press <return> to bypass loading and proceed to LFU: ewa0 Please enter the name of the firmware files list, or Press <return> to use the default filename [AS8X00IO,(AS8X00CP)]: as8x00fw 105 Method 3 - Boot the Console CD Off of an Infoserver a. Insert CD in the Infoserver b. P02>>> boot exa0 -file as8000_v16 (leave off the .sys extension) Method 4 - Booting Off the Network a. Copy firmware.sys file to MOM$LOAD of an existing node in the cluster b. Set the attributes on the file with the following commands: $ set file/attr=(rfm:fix,lrl:512,mrs:512,rat:none) as8000_v16.sys c. Enable service on that node from NCP $ MC NCP MC NCP> Show Known Circuit Characteristic Known Circuit Volatile Characteristics as of 12-FEB-1997 19:27:41 Circuit = BNA-0 State = on Service = disabled (if enabled skip to boot command) Counter timer = 65534 Designated router = 28.1023 (CXO28A) Cost = 4 Maximum routers allowed = 33 Router priority = 64 Hello timer = 15 Type = Ethernet Adjacent node = 28.1023 (CXO28A) Listen timer = 30 NCP> Set Circ BNA-0 State OFF - This step will stop network activity NCP> Set Circ BNA-0 Service Enable NCP> Set Circ BNA-0 State ON d. P02>>> b -fl 0,0 EXA0 -fi as8000_v16 (Leave off .SYS or node that services request will get an error - BAD MOP FID) Determine device name with SHOW DEVICE at >>> . DEMNA = EXA0 , DE4x0/DE500 = EWA0, DEMFA = FXA0 , PCI FDDI - FWA0 Method 5 - Boot Off of a Disk - Non-System Disk and System Disk Using OpenVMS Non-System Disk a. Locate the as8000_v16.exe file b. Set the attributes on the file and copy it contiguous to the target disk (non-system) and directory with the following commands: $ set file/attr=(rfm:fix,lrl:512,mrs:512,rat:none) as8000_v16.exe $ copy/contiguous as8000_v16.exe "non_system_disk":[directory] c. Use writeboot to make the disk bootable. Specify the disk, directory and filename of the firmware. Take the defaults for the other questions. $ MCR Writeboot Update VAX portion of boot block (default is Y): No Update Alpha portion of boot block (default is Y):Yes Target system device (and boot file if not VMB.EXE):$1$dua5:[TEMP]as8000_v16.exe d. P02>>> b -fl 0,0 dua5 106 System Disk a. Only steps a and b above are used. Do NOT execute writeboot step c. b. Specify the flags of 0,a0 a0 and use "system disk":[sys0.sysexe]filename for bootfile. >>> b -fl 0,a0 dua0 bootfile: dua0:[sys0.sysexe]as8000_v16.exe Method 6 - BOOTP Network Upgrade - Tru64 UNIX a. Mount the Firmware Update CD using the following command: # mount -rt cdfs -o noversion /dev/rz4c /mnt b. Modify or Create the Client Database in the /etc/bootptab File <host>:ht:<hw_type>:ha=<hw_addr>:bf=<filename>:ip=<ip_addr> where: host is the system name in /etc/hosts hw_type is the hardware type. Proteon is ht = 4. ht = 1. Regular token-ring (IEEE 802) is ht = 6. hw_addr is the hardware address: use the console command show device. filename is the name of the default bootfile image: ip_addr is the Internet protocol address of the system name in /etc/hosts. The following is an example of a bootptab file for the AlphaServer 8200/8400: bigsox:ht=1:ha=08002b236423:bf=/mnt/AS8000/as8000_v16.EXE;1:ip=16.182.0.87 c. Modify the /etc/inetd.conf file. Uncommon the tftp and bootps process. It should look like the following example: tftp dgram udp wait root bootps dgram upd wait root /usr/sbin/tftpd /usr/sbin/bootpd tftpd /mnt bootpd d. Find the process /usr/sbin/inetd daemon: This step will stop network traffic # ps aux | grep ine # kill process# <ine process number> e. Restart the inetd daemon: # /usr/sbin/inetd Note The bootpd and tftp daemon will be removed if the system is rebooted. Refer to the manual pages: bootpd(8) or tftpd(8) for more information. Use Man bootpd and man tftpd f. Enter the following command to boot from the BOOTP server: >>> boot -p bootp ewa0 Should a boot file "pathname" need to be specified in must be in quotes >>> boot -p bootp ewa0 -file “/dir1/dir2/filename” 4. Update the firmware at the UPD> prompt. a. At the UPD prompt type list to see what versions are loaded (Current Revision) and what versions are available to update (Update Revision). UPD> list Device kn7cc-ab0_arc kn7cc-ab0 kzpsa0 Current Revision V5.70c V5.8-2 A12 Filename arcrom kn7cc_fw kzpsa_fw Update Revision V5.70c V5.9-2 A12 107 pfi0 3.20 dfxaa_fw ccmab_fw cipca_fw cixcd_fw defaa_fw demfa_fw demna_fw kcm44_fw kdm70_fw kfmsb_fw kzmsa_fw kzpsa_fw 3.20 22 A420 7 1.10 2.1 9.4 3.1 4.4 2.4 5.6 A12 b. Update the firmware using one of the following commands UPD> Update * or Update - Update all supported devices WARNING: updates may take several minutes to complete for each device. Confirm update on: kn7cc-ab0_arc kn7cc-ab0_arc DO NOT ABORT! Updating to V5.70c... Verifying V5.70c... Confirm update on: kn7cc-ab0 kn7cc-ab0 [Y/(N)] y PASSED. [Y/(N)] y DO NOT ABORT! Updating to V5.9-2... Verifying V5.9-2... Confirm update on: kzpsa0 [Y/(N)] n Confirm update on: pfi0 [Y/(N)] n PASSED. UPD> Update KN7CC* - Update all KN7CC CPUs. Can substitute a number for the * to update a specific CPU. Confirm update on: kn7cc-ab0_arc kn7cc-ab0_arc DO NOT ABORT! Updating to V5.70c... Verifying V5.70c... Confirm update on: kn7cc-ab0 kn7cc-ab0 [Y/(N)] y PASSED. [Y/(N)] y DO NOT ABORT! Updating to V5.9-2... Verifying V5.9-2... PASSED. UPD> Update PFI0 - Update DEC PCI FDDI (DEFPA) only. Can specify other devices. WARNING: updates may take several minutes to complete for each device. Confirm update on: pfi0 pfi0 [Y/(N)] y DO NOT ABORT! Updating to 3.20... Verifying 3.20... c. After you have updated the firmware type UPD> verify kn7cc-ab0_arc kn7cc-ab0 kzpsa0 pfi0 Verifying Verifying Verifying Verifying verify PASSED. to check the update V5.70c... PASSED. V5.9-2... PASSED. A12... PASSED. 3.20... PASSED. 108 d. Type Exit to leave the utility. UPD> exit Initializing... 5. After you have updated the firmware you MUST FORMAT THE EEPROMs to the new console firmware format. Note This process will require you to re-enter your default boot specifications and EWx0_mode EV settings after you have re-initialized. BE SURE TO RECORD THE CURRENT SETTINGS BY TYPING SHOW * BEFORE REFORMATTING THE EEPROMS. a. Show environmental variables using console SHOW command. P00>>> show * b. The build -e command is used to format the CPUs EEPROMs. Prior to console version V5.2 you will need to execute a SET CPU # ( # = cpu number) to each CPU before executing this command. With console version V5.2 all CPUs EEPROMs will be built using the build command once. If the SET CPU command fails, you will need to modify the console variables CPU_ENABLED and CPU_PRIMARY to select the specific CPU. These variables are a bit mask. One bit for each CPU. CPU 0 = bit 0, CPU 1 = bit 1 etc. Just clear bits of CPUs you want to disable and INIT. Set the variable back to FFFF when finished. All Turbolaser can use single or dual CPU modules. The CPUs are numbered based on the slot they are plugged into. CPU0/CPU1 CPU2/CPU3 CPU4/CPU5 CPU6/CPU7 CPU8/CPU9 CPU10/CPU11 CPU12/CPU13 Slot Slot Slot Slot Slot Slot Slot 0 1 2 3 4 5 6 P00>>> set cpu 0 P00>>> build -e Build EEPROM on kn7cc-ab0 ? [Y/N]> y EEPROM built on kn7cc-ab0 P00>>> set cpu 2 - note prompt changed to P02>>> to indicate CPU 2. P02>>> build -e Build EEPROM on kn7cc-ab2 ? [Y/N]> y EEPROM built on kn7cc-ab2 The build -e command may prompt you for a system serial number and module part number. P00>>> build -e Build EEPROM on kn7cc-ab0 ? [Y/N]> y Please input module information for CPU module in slot 0 Module Serial Number> AY80973463 Module Unified 2-5-2.4 Part Number> 00-E2065-DA.C02 EEPROM built on kn7cc-ab0 109 c. The build -n command is used to format the NVR (non-volatile RAM) . This command is not documented in the release notes. It is valid and may correct problems after the update. You must do this on each cpu. P00>>> build -n Build NVR on kn7cc-ab0 ? [Y/N]> y NVR built on kn7cc-ab0 d. Set console environmental variables back to original settings as necessary. P00>>> Set bootdef_dev dka0.0.0.1.0 P00>>> Set boot_osflags 0,0 P00>>> Set ewa0_mode twisted-pair e. P02>>> init 6. Before attempting to run these utilities make sure the following console environmental variables are set as follows: Console_mode Advanced - Defines MODE setting on INIT. Overrides SET MODE command after INIT. Arc_enable ON - Will make specific variable used below available to you. Variables like RCU, SWXCRMGR ECU and EEROMCFG are some. P00>>>sho console_mode console_mode BASIC P00>>>sho mode Console is in basic mode P00>>>sho arc_enable arc_enable ON P00>>> set console_mode advanced P00>>> show arc_enable arc_enable OFF P00>>> set arc_enable on P00>>> init a. On systems with an EISA bus you will need to run the EISA Configuration Utility (ECU) whenever the configuration is changed by adding, removing or moving EISA modules. There are 2 versions of the program. One version for WNT and one version for Alphas running OpenVMS or Tru64 UNIX. After a firmware upgrade if the configuration does not change you will need to run ECU and the Save and Exit. If you have OS_TYPE set to NT and run ECU it will attempt to load AlphaBIOS and run it from there. However if OS_TYPE is set to OpenVMS or UNIX it will start ECU without calling AlphaBIOS first. Certain minimum versions of ECU are required with specific console versions. ECU version 1.11 is available on Cybrary at http://Cybrary.inet.cpqcorp.net/DOWNLOAD/UTILITIES/SYSTEM/contents.html#ECU . P00>>>sho ecu ECU fat:cf.exe P00>>>runecu Loading image... Transferring control... 110 7. The RUN command has 4 options. Rcu - Run the RAID Configuration Utility swxcrfw - Update the firmware on the RAID controller eeromcfg – Run the ISP1020 EEPROM Configuration Utility (KFTIA and other ISP1020 Controllers i.e. KZPBA ) util_cli – Run the KZPSA Configuration Utility lp6ldr - KGPSA firmware update utility RCU and SWXCRFW are on floppy and require a floppy drive. RCU is also on the CD. EEROMCFG and UTIL_CLI are available on floppy or CD. a. If RCU P02>>> P02>>> P02>>> P02>>> P02>>> P02>>> is required to be run you must set ARC_ENABLE ON. set arc_enable on set console_mode advanced init run rcu –p 1 (-p 1 specifies PCI bus 1 ) or to update firmware run swxcrfw –p 1 –s “swxcrfwp.236” (V3.8 CD or less) run ra200fl –p 1 –s “swxcrfwp.242” (V3.9 CD) -p specifies the PCI bus -s specifies “parameter string” or file to load b. If the ISP1020 EEPROM Configuration Utility is required. P02>>> show device isp3 ! use SHOW DEVICE to find CD-ROM drive polling for units on isp3, slot 5, bus 0, hose0… dkd400.4.0.5.0 DKD400 RRD44 dkd500.5.0.5.0 DKD500 RZ26L 0064 440C P02>>> run eeromcfg –d dkd400 -p 0 -d dkd400 - specifies device where utility is located (CDROM) -p 0 - specifies PCI bus where option is installed Or P02>>> Run ISO9660:[utility]eeromcfg.exe -d dkd0 -p 0 On CDs V3.5 and earlier use P02>>> run iso9660:[CDROM.UTILITY] eeromcfg.exe -d dkd500 -p 0 Loading image... Transferring control... The screen is erased, followed by ---------------------------------------------------------------ISP1020 EEROM Configuration Utility V1.1 ---------------------------------------------------------------+============ Select ISP1020 ============+ | Bus Virtual Slot Address | | | |[ 0 0 01003000] | | 0 1 01002000 | | 0 4 01001000 | | 0 5 01000000 | |----------------------------------------| | < (O)K > < E(x)it > | +========================================+ c. If the KZPSA Configuration Utility is required to be run P02>>> set arc_enable on P02>>> set console_mode advanced P02>>> init P02>>> load –f iso9660 – load CDROM driver P02>>> run iso9660:[UTILITY]UTIL_CLI.EXE -d dkd500 -p 0 (specify CD loaded into DKD500 on PCI bus 0 ) On CDs V3.5 and earlier use P02>>> run iso9660:[CDROM.UTILITY]UTIL_CLI.EXE -d dkd500 -p 0 111 d. If updates to KGPSA firmware are required P02>>> set arc_enable on P02>>> set console_mode advanced P02>>> init P02>>> load –f iso9660 – load CDROM driver P02>>> run iso9660:[UTILITY]lp6ldr.exe -d dkd500 -p 0 (specify CD loaded into DKD500 on PCI bus 0 ) The utility lp6dutil will not properly function on the TurboLaser or GS series machine thru the serial port. You will see a repeating character problem. 8. You can also run KZSPA_EDIT from the console prompt to set up some KZPSA parameters. kzpsa_edit - Edit KZPSA FLASH parameters. OVERVIEW: The kzpsa_edit command permits the modification of KZPSA Flash parameters from the console. Individual bits can be set or cleared, or bytes can be set to a specific value. Entering kzpsa_edit without an option or target device will list these parameters for all KZPSA devices in the system. kzpsa_edit ( [busid] [<kzpsa_controller_name>] [fast] [termpwr] [-sd] [-offset n] [-value n] [-bit n] [-set] [-clear] ) [-p] COMMAND ARGUMENT(S): <kzpsa_controller_name> - KZPSA controller name. Only the parameters for this controller will be modified. COMMAND OPTION(S): -sd -offset n -value n -bit n -set -clear -p - Set defaults - Selects the byte offset to be modified - Gives the new byte value(s), valid only with -offset - Selects the bit to be modified, valid only with -offset - -value and -bit are mutually exclusive - The bit should be set, valid only with -bit - The bit should be clear, valid only with -bit -set and -clear are mutually exclusive - print flash contents COMMAND EXAMPLE(S): Find all KZPSA devices >>> show config kzpsa* Load the kzpsa support code >>> load -f kzpsa List all current FLASH parameters >>> kzpsa_edit Change the host Bus ID from 7 to 6 >>> kzpsa_edit busid kzpsa0 kzpsa0 bus id = 7, new bus id ? 6 112 Modify four bytes of parameters >>> kzpsa_edit -offset 0 -value 11223344 kzpsa0 Set one bit of the parameters >>> kzpsa_edit -offset 0 -bit 1 -set kzpsa0 Set all defaults >>> kzpsa_edit -sd kzpsa0 113 There is one other UNRECOMMENDED method for updating firmware from an existing CPU’s EEPROM. That is the use of the UPDATE command to copy one CPU’s EEPROM info to another CPU’s EEPROM area. The problem with this command is if the EEPROM format does not match the between the CPU’s it may render the new CPU useless. Forewarn any engineer who decides to do this. He may need another spare CPU module. NEVER Allow a customer to use this procedure! NOTE: Updating Firmware - Off existing CPU a. Get settings of the following Bootdef_dev Boot_osflags Auto_action (BEWARE - may render CPU’s unusable) b. P02>>> set CPU # , where # is the number of the CPU to update from. c. P02>>> update -f KN7cc# , where # is CPU to update d. P02>>> update -e KN7cc# , where # is CPU to update e. P02>>> set eeprom serial and environmental variables. Other Options available with the update command are • • • -c -p -r Updates only console section of flash. Update only pal section of flash. Updates only the flash rom recover program section of flash. 114 Compaq AlphaServer GS60/GS140 The console firmware on the Compaq AlphaServer GS60/GS140 systems is located on the CPU module. All Cpu’s must run the same version of firmware. You can NOT have mixed versions and expect it to work. Any time a CPU module is added or replaced, the firmware will most likely need to be upgraded. You will also need to do occasional console firmware upgrades to load the latest version of firmware that is available. The firmware files used for the 8200/8400 and GS60/GS140 are different. Make sure you use the correct file. There are several ways to upgrade the firmware. All involve booting Loadable Firmware Utility (LFU). It can be booted one of the following ways. • • • • • • • Off the Alpha AXP System Firmware Update Utility CD using the local CDROM. Off the CDROM, floppy or over the network using LFU command. Off CDROM using .iso file and burning your own CD Over the network using the .SYS firmware file. Off of an infoserver using the Alpha AXP System Firmware Update Utility CD. Off of a disk that has a bootable version of the firmware file (filename.exe) on it (MCR WRITEBOOT may be required on that file to make it bootable). From the BOOTP server (Unix). The procedure to update the console firmware is as follows. • • • • • • • • • • • • Determine current console firmware revision. Record all console environmental variables by typing SHOW * at the >>>. Determine which method and firmware version will be used to do the update. Print the firmware release notes for that version and system. Determine if any option firmware will be upgraded. Locate the appropriate RCU and ECU diskettes if required. Boot the firmware file (LFU). Use the verify and update commands at the UPD> prompt. When done exit from LFU. Execute a Build NVR and a Build EEPROM at the >>> for each CPU. Init the machine and reboot. Run ECU in required. 1. First type INIT at the >>> the see what the current version of console loaded is. It is at the very bottom of the configuration map. P00>>> init Initializing… ff.fe.fd.fc.fb.fa.f9.f8.f7.f6.f5.f3.f2.f1.f0. ef.ee.ed.f4 20.21.22.23.24.25.26.27.a2.a4.a5.a7.a8.a9.ec.eb.ea.e9.e8.e7.e6.e5.e3. F E D C B A 9 8 7 6 5 4 3 2 1 0 NODE # A . . . M . . . P TYP o . . . + . . . ++ ST1 . . . . . . . . EB BPD o . . . + . . . ++ ST2 . . . . . . . . EB BPD + . . . + . . . ++ ST3 . . . . . . . . EB BPD + . + . + . + . . + . . . . . . . C0 PCI + . + + + + + . . + C1 PCI + . . . . . . . . EISA + . . . . . . . . . . . . . . . . C2 . . . . . . . . . . . . . . . . C3 . . . . . 256 . . . . 256MB Compaq AlphaServer GS140 2-6/525, Console V5.3-12 15-JAN-1999 12:52:04 SROM V1.1, OpenVMS PALcode V1.44-9, Digital UNIX PALcode V1.41-8 System Serial = tl67, OS = OpenVMS, 15:17:13 February 19, 1999 Configuring I/O adapters. . . 115 2. P00>>> show * to printout all the environmental variables. Check all customer set variables. Also verify the setting of the following variables. Bootdef_dev Boot_osflags Auto_action a. Set Auto_action to HALT P00>>> set Auto_action halt 3. Boot the firmware using one of the following methods. Method 1 - Boot the Console CD Off a Local CDROM SRM Console a. Insert the CD in the local CDROM. Prior to V5.4 CD the GS60/GS140 had a separate CD that contained only GS firmware. b. P00>>> boot -fl 0,a0 DKA600 Bootfile: [gs140]gs140_v60.exe – Unsure of directory as of 05-06-99 UPD> See below for update steps AlphaBIOS Console Not valid for the GS Series prior to the V5.4 console version a. Insert the CD in the local CDROM. b. Enter the AlphaBIOS menu by typing ARC or AlphaBIOS or initializing the system when os_type = nt c. AlphaBIOS - Select F2 to go into Setup then select Upgrade AlphaBIOS d. LFU will boot. You must tell the firmware where it is loading from, CDA0 (CD) or Ewa0 (network). (DVA0 will not work since the firmware will not fit on a floppy) e. Then specify the filename to load. There are 3 choices. GS140FW (CPU and IO), GS140CP (CPU only) GS140AB (AlphaBIOS only) GS140IO (IO only) Method 2 - Boot Console CD, Firmware Floppy or Network Device CD a. Insert the CD in the local CDROM. b. Execute LFU command and select device cda0 for the CDROM and specify gs140fw. P00>>> lfu ***** Loadable Firmware Update Utility ***** Select firmware load device (cda0, dva0, ewa0), or Press <return> to bypass loading and proceed to LFU: cda0 Please enter the name of the firmware files list, or Press <return> to use the default filename [GS140IO,(GS140CP)]: GS140fw 116 Floppy - NT a. Fat format 3 floppies. b. Copy the following files to floppy 1 • gs140fw.sys • gs140cp.sys • gs140ab.sys • t6readme.sys • t6srmrom.sys c. Copy the following files to floppy 2 • tl6ab.sys d. Copy the following files to floppy • gs140fw.sys • gs140io.sys • t6readme.sys • cipca420.sys • cixcd007.sys • demfa021.sys • demna094.sys • dfxaa320.sys • kdm70044.sys • kfmsb024.sys • kzmsa056.sys • kzpsaa12.sys • ccmab022.sys e. Execute LFU command and select device dva0 for the floppy device and the filenames gs140cp or gs140io depending if you want to update console or I/O firmware. You can also specify gs140ab and load only AlphaBIOS code or select gs140fw and load SRM, AlphaBIOS and option firmware. P00>>> lfu ***** Loadable Firmware Update Utility ***** Select firmware load device (cda0, dva0, ewa0), or Press <return> to bypass loading and proceed to LFU: dva0 Please enter the name of the firmware files list, or Press <return> to use the default filename [GS140IO, (GS140CP)]: gs140cp 117 Floppy - OpenVMS a. Create a system and/or I/O firmware floppies using the following procedure. You will need up three floppies. Two for system firmware and one for I/O firmware. b. Execute the following command file to create both floppies $! $! make_gsodscp_1and2.com $! $ inquire ignore "Insert first blank HD floppy in DVA0, then continue" $ set verify $ set proc/priv=all $ init/density=hd/index=begin dva0: gsods2cp1 $ mount dva0: gsodscp1 $ create/directory dva0:[gs140] $ copy gs140fw.sys dva0:[gs140]gs140fw.sys $ copy gs140cp.sys dva0:[gs140]gs140cp.sys $ copy gs140ab.sys dva0:[gs140]gs140ab.sys $ copy t6readme.sys dva0:[gs140]t6readme.sys $ copy t6srmrom.sys dva0:[gs140]t6srmrom.sys $ dismount dva0: $ set noverify $ inquire ignore "Insert second blank HD floppy in DVA0, then continue" $ set verify $ set proc/priv=all $ init/density=hd/index=begin dva0: gsods2cp2 $ mount dva0: gsods2cp2 $ create/directory dva0:[gs140] $ copy tl6ab.sys dva0:[gs140]tl6ab.sys $ dismount dva0: $ set noverify $ exit If creating a diskette for updating your I/O option firmware only: $! $! make_gsods2io.com $! $ inquire ignore "Insert blank HD floppy in DVA0, then continue" $ set verify $ set proc/priv=all $ init/density=hd/index=begin dva0: gsods2io $ mount dva0: gsods2io $ create/directory dva0:[gs140] $ create/directory dva0:[options] $ copy gs140fw.sys dva0:[gs140]gs140fw.sys $ copy gs140io.sys dva0:[gs140]gs140io.sys $ copy t6readme.sys dva0:[gs140]t6readme.sys $ copy cipca420.sys dva0:[options]cipca420.sys $ copy cixcd007.sys dva0:[options]cixcd007.sys $ copy demfa021.sys dva0:[options]demfa021.sys $ copy demna094.sys dva0:[options]demna094.sys $ copy dfxaa320.sys dva0:[options]dfxaa320.sys $ copy kdm70044.sys dva0:[options]kdm70044.sys $ copy kfmsb024.sys dva0:[options]kfmsb024.sys $ copy kzmsa056.sys dva0:[options]kzmsa056.sys $ copy kzpsaa12.sys dva0:[options]kzpsaa12.sys $ copy ccmab022.sys dva0:[options]ccmab022.sys $ dismount dva0: $ set noverify $ exit c. Shutdown the OS and init the machine at the P00>>> prompt. 118 d. Execute LFU command and select device dva0 for the floppy device and the filenames gs140cp or gs140io depending if you want to update console or I/O firmware. If running console version V1.2 or greater you can specify gs140fw and it will load files off the console firmware floppy and then request you load the I/O firmware floppy. P00>>> lfu ***** Loadable Firmware Update Utility ***** Select firmware load device (cda0, dva0, ewa0), or Press <return> to bypass loading and proceed to LFU: dva0 Please enter the name of the firmware files list, or Press <return> to use the default filename [GS140IO,(GS140CP)]: gs140cp Network a. Copy the following files to MOM$LOAD of you local MOP server. gs1400cp.sys gs1400ab.sys gs1400fw.sys gs140io.sys t6readme.sys t6srmrom.sys tl6ab.sys cipca420.sys cixcd007.sys demfa021.sys demna094.sys dfxaa320.sys kdm70044.sys kfmsb024.sys kzmsa056.sys kzpsaa12.sys ccmab022.sys b. Set the attributes for the file using the following OpenVMS command on each file. $ set file/attr=rfm:fix,lrl:512,mrs:512,rat:none filename.sys c. Execute LFU command and select device EWA0 for Digital PCI Ethernet or FWA0 for Digital PCI FDDI (DEFPA). Specify the files gs140fw, gs140cp, gs140ab or gs140io depending on what you want to update. P00>>> lfu ***** Loadable Firmware Update Utility ***** Select firmware load device (cda0, dva0, ewa0), or Press <return> to bypass loading and proceed to LFU: ewa0 Please enter the name of the firmware files list, or Press <return> to use the default filename [GS140IO,(GS140CP)]: gs140fw Method 3 - Boot the Console CD Off of an Infoserver a. Insert CD in the Infoserver b. P00>>> boot exa0 –file gs140_v60 (leave off the .sys extension) 119 Method 4 - Create a Bootable CD Using a CD Writer and the .iso Firmware File Files in the Alpha Systems Firmware web site that have a ".iso" file type are ISO9660 image files and can be used to create bootable CD-ROMs. ZIP files that have "_iso" in the file name contain a ".iso" file which, when extracted, can be used to create a bootable CD-ROM. a. Make sure you have a CD writer and software package that is capable of creating a CD from an image file. b. Obtain the .iso firmware. This may not always be available from the firmware website. If you use ftp to download, be sure to use binary mode. If you use a browser to download, make sure the browser does not have .iso as a registered file type. If you download a .zip file, extract the .iso file. c. Write this image file to a blank CD. When writing the CD, ensure that the "close disk" or equivalent option is selected. Method 5 - Booting Off the Network a. Copy firmware.sys file to MOM$LOAD of an existing node in the cluster b. Set the attributes on the file with the following commands: $ set file/attr=(rfm:fix,lrl:512,mrs:512,rat:none) gs140_v60.sys c. Enable service on that node from NCP $ MC NCP MC NCP> Show Known Circuit Characteristic Known Circuit Volatile Characteristics as of 12-FEB-1997 19:27:41 Circuit = BNA-0 State = on Service = disabled (if enabled skip to boot command) Counter timer = 65534 Designated router = 28.1023 (CXO28A) Cost = 4 Maximum routers allowed = 33 Router priority = 64 Hello timer = 15 Type = Ethernet Adjacent node = 28.1023 (CXO28A) Listen timer = 30 NCP> Set Circ BNA-0 State OFF - This step will stop network activity NCP> Set Circ BNA-0 Service Enable NCP> Set Circ BNA-0 State ON d. P00>>> b -fl 0,0 EXA0 -fi gs140_v60 (Leave off .SYS or node that services request will get an error - BAD MOP FID) Determine device name with SHOW DEVICE at >>> . DEMNA = EXA0 , DE4x0/DE500 = EWA0, DEMFA = FXA0 , PCI FDDI - FWA0 120 Method 6 - Boot Off of a Disk - Non-System Disk and System Disk Using OpenVMS Non-System Disk a. Locate the gs140_v60.exe b. Set the attributes on the file and copy it contiguous to the target disk (non-system) and directory with the following commands: $ set file/attr=(rfm:fix,lrl:512,mrs:512,rat:none) gs140_v60.exe $ copy/contiguous gs140_v60.exe "non_system_disk":[directory] c. Use writeboot to make the disk bootable. Specify the disk, directory and filename of the firmware. Take the defaults for the other questions. $ MCR Update Update Target Writeboot VAX portion of boot block (default is Y): No Alpha portion of boot block (default is Y):Yes system device (and boot file if not VMB.EXE):$1$dua5:[TEMP]gs140_v60.exe d. P02>>> b -fl 0,0 dua5 System Disk a. Only steps a and b above are used. Do NOT execute writeboot step c. b. Specify the flags of 0,a0 a0 and use "system disk":[sys0.sysexe]filename for bootfile. >>> b -fl 0,a0 dua0 bootfile: dua0:[sys0.sysexe]gs140_v60.exe Method 7 - BOOTP Network Upgrade - Tru64 UNIX a. Mount the Firmware Update CD using the following command: # mount -rt cdfs -o noversion /dev/rz4c /mnt b. Modify or Create the Client Database in the /etc/bootptab File <host>:ht:<hw_type>:ha=<hw_addr>:bf=<filename>:ip=<ip_addr> where: host is the system name in /etc/hosts hw_type is the hardware type. Proteon is ht = 4. Ethernet is ht = 1. Regular token-ring (IEEE 802) is ht = 6. hw_addr is the hardware address: use the console command show device. filename is the name of the default bootfile image: ip_addr is the Internet protocol address of the system name in /etc/hosts. The following is an example of a bootptab file for the AlphaServer GS140: bigsox:ht=1:ha=08002b236423:bf=/mnt/GS140/gs140_v60.EXE;1:ip=16.182.0.87 c. Modify the /etc/inetd.conf file. Uncommon the tftp and bootps process. It should look like the following example: tftp dgram udp wait root bootps dgram upd wait root /usr/sbin/tftpd /usr/sbin/bootpd tftpd /mnt bootpd d. Find the process /usr/sbin/inetd daemon: This step will stop network traffic # ps aux | grep ine # kill process# <ine process number> 121 e. Restart the inetd daemon: # /usr/sbin/inetd Note The bootpd and tftp daemon will be removed if the system is rebooted. Refer to the manual pages: bootpd(8) or tftpd(8) for more information. Use Man bootpd and man tftpd f. Enter the following command to boot from the BOOTP server: >>> boot -p bootp ewa0 Should a boot file "pathname" need to be specified in must be in quotes >>> boot -p bootp ewa0 -file “/dir1/dir2/filename” 4. Update the firmware at the UPD> prompt. a. At the UPD prompt type list to see what versions are loaded (Current Revision) and what versions are available to update (Update Revision). UPD> list Device kn7cg-ab0_arc kn7cg-ab0 kzpsa0 pfi0 Current Revision V5.68 V5.7-5 A12 3.10 Filename arcrom kn7cg_fw kzpsa_fw dfxaa_fw ccmab_fw cipca_fw cixcd_fw demfa_fw demna_fw kdm70_fw kfmsb_fw kzmsa_fw Update Revision V5.68 V5.8-2 A12 3.20 22 A420 7 2.1 9.4 4.4 2.4 5.6 b. Update the firmware using one of the following commands. UPD> Update * or Update - Update all supported devices WARNING: updates may take several minutes to complete for each device. Confirm update on: kn7cg-ab0_arc kn7cg-ab0_arc DO NOT ABORT! Updating to V5.68... Verifying V5.68... Confirm update on: kn7cg-ab0 kn7cg-ab0 [Y/(N)] y PASSED. [Y/(N)] y DO NOT ABORT! Updating to V5.8-2... Verifying V5.8-2.. Confirm update on: kzpsa0 [Y/(N)] n Confirm update on: pfi0 [Y/(N)] n PASSED. UPD> Update KN7CG* - Update all KN7CG CPUs. Can substitute a number for the * to update a specific CPU. Confirm update on: kn7cg-ab0_arc kn7cg-ab0_arc DO NOT ABORT! Updating to V5.68... Verifying V5.68... Confirm update on: kn7cg-ab0 kn7cg-ab0 [Y/(N)] y PASSED. [Y/(N)] y DO NOT ABORT! Updating to V5.8-2... Verifying V5.8-2... PASSED. UPD> Update PFI0 - Update DEC PCI FDDI (DEFPA) only. Can specify other 122 devices. WARNING: updates may take several minutes to complete for each device. Confirm update on: pfi0 [Y/(N)] y DO NOT ABORT! Updating to 3.20... Verifying 3.20... pfi0 c. After you have updated the firmware type UPD> verify kn7cg-ab0_arc kn7cg-ab0 kzpsa0 pfi0 d. Type Verifying Verifying Verifying Verifying verify PASSED. to check the update V5.68... PASSED. V5.8-2... PASSED. A12... PASSED. 3.20... PASSED. Exit to leave the utility. UPD> exit Initializing... 5. After you have updated the firmware you MUST FORMAT THE EEPROMs to the new console firmware format. Note This process will require you to re-enter your default boot specifications and EWx0_mode EV settings after you have re-initialized. BE SURE TO RECORD THE CURRENT SETTINGS BY TYPING SHOW * BEFORE REFORMATTING THE EEPROMS. a. Show environmental variables using console SHOW command. P00>>> show * b. The build -e command is used to format the CPUs EEPROMs. Prior to console version V5.2 you will need to execute a SET CPU # ( # = cpu number) to each CPU before executing this command. With console version V5.2 all CPUs EEPROMs will be built using the build command once. If the SET CPU command fails, you will need to modify the console variables CPU_ENABLED and CPU_PRIMARY to select the specific CPU. These variables are a bit mask. One bit for each CPU. CPU 0 = bit 0, CPU 1 = bit 1 etc. Just clear bits of CPUs you want to disable and INIT. Set the variable back to FFFF when finished. All Compaq AlphaServer GS60/GS140 uses dual CPU modules. The CPUs are numbered based on the slot they are plugged into. CPU0/CPU1 CPU2/CPU3 CPU4/CPU5 CPU6/CPU7 CPU8/CPU9 CPU10/CPU11 CPU12/CPU13 Slot Slot Slot Slot Slot Slot Slot 0 1 2 3 4 5 6 P00>>> set cpu 0 P00>>> build -e Build EEPROM on kn7cg-ab0 ? [Y/N]> y EEPROM built on kn7cg-ab0 P00>>> set cpu 2 - note prompt changed to P02>>> to indicate CPU 2. 123 P02>>> build -e Build EEPROM on kn7cg-ab2 ? [Y/N]> y EEPROM built on kn7cg-ab2 The build -e command may prompt you for a system serial number and module part number. P00>>> build -e Build EEPROM on kn7cg-ab0 ? [Y/N]> y Please input module information for CPU module in slot 0 Module Serial Number> AY80973463 Module Unified 2-5-2.4 Part Number> 00-E2063-DA.C02 EEPROM built on kn7cg-ab0 c. The build -n command is used to format the NVR (non-volatile RAM) . This command is not documented in the release notes. It is valid and may correct problems after the update. You must do this on each cpu. P00>>> build -n Build NVR on kn7cg-ab0 ? [Y/N]> y NVR built on kn7cg-ab0 d. Set console environmental variables back to original settings as necessary. P00>>> Set bootdef_dev dka0.0.0.1.0 P00>>> Set boot_osflags 0,0 P00>>> Set ewa0_mode twisted-pair e. P02>>> init 6. Before attempting to run these utilities make sure the following console environmental variables are set as follows: Console_mode Advanced - Defines MODE setting on INIT. Overrides SET MODE command after INIT. Arc_enable ON - Will make specific variable used below available to you. Variables like RCU, SWXCRMGR ECU and EEROMCFG are some. P00>>>sho console_mode console_mode BASIC P00>>>sho mode Console is in basic mode P00>>>sho arc_enable arc_enable ON P00>>> set console_mode advanced P00>>> show arc_enable arc_enable OFF P00>>> set arc_enable on P00>>> init a. On systems with an EISA bus you will need to run the EISA Configuration Utility (ECU) whenever the configuration is changed by adding, removing or moving EISA modules. There are 2 versions of the program. One version for WNT and one version for Alphas running OpenVMS or Tru64 UNIX. After a firmware upgrade if the configuration does not change you will need to run ECU and the Save and Exit. Certain minimum versions of ECU are required with specific console versions. ECU version 1.10 is available on Cybrary at http://Cybrary.inet.cpqcorp.net/DOWNLOAD/UTILITIES/SYSTEM/contents.html#ECU. P00>>>sho ecu ECU P00>>>runecu Loading image... fat:cf.exe 124 Transferring control... 7. The RUN command has 4 options. Rcu - Run the RAID Configuration Utility swxcrfw - Update the firmware on the RAID controller eeromcfg – Run the ISP1020 EEPROM Configuration Utility (KFTIA and other ISP1020 Controllers i.e. KZPBA ) util_cli – Run the KZPSA Configuration Utility lp6ldr - KGPSA firmware update utility RCU and SWXCRFW are on floppy and require a floppy drive. RCU is also on the CD. EEROMCFG and UTIL_CLI are available on floppy or CD. a. If RCU P02>>> P02>>> P02>>> P02>>> P02>>> P02>>> is required to be run you must set ARC_ENABLE ON. set arc_enable on set console_mode advanced init run rcu –p 1 (-p 1 specifies PCI bus 1 ) or to update firmware run swxcrfw –p 1 –s “swxcrfwp.236” (V3.8 CD or less) run ra200fl –p 1 –s “swxcrfwp.242” (V3.9 CD) -p specifies the PCI bus -s specifies “parameter string” or file to load b. If the ISP1020 EEPROM Configuration Utility is required. P02>>> show device isp3 ! use SHOW DEVICE to find CD-ROM drive polling for units on isp3, slot 5, bus 0, hose0… dkd400.4.0.5.0 DKD400 RRD44 dkd500.5.0.5.0 DKD500 RZ26L 0064 440C P02>>> run eeromcfg –d dkd400 -p 0 -d dkd400 - specifies device where utility is located (CDROM) -p 0 - specifies PCI bus where option is installed Or P02>>> Run ISO9660:[utility]eeromcfg.exe -d dkd0 -p 0 Loading image... Transferring control... The screen is erased, followed by ---------------------------------------------------------------ISP1020 EEROM Configuration Utility V1.1 ---------------------------------------------------------------+============ Select ISP1020 ============+ | Bus Virtual Slot Address | | | |[ 0 0 01003000] | | 0 1 01002000 | | 0 4 01001000 | | 0 5 01000000 | |----------------------------------------| | < (O)K > < E(x)it > | On CDs V3.5 and earlier use P02>>> run iso9660:[CDROM.UTILITY] eeromcfg.exe -d dkd500 -p 0 c. If the KZPSA Configuration Utility is required to be run P02>>> set arc_enable on P02>>> set console_mode advanced P02>>> init P02>>> load –f iso9660 – load CDROM driver P02>>> run iso9660:[UTILITY]UTIL_CLI.EXE -d dkd500 -p 0 (specify CD loaded into DKD500 on PCI bus 0 ) 125 On CDs V3.5 and earlier use P02>>> run iso9660:[CDROM.UTILITY]UTIL_CLI.EXE -d dkd500 -p 0 d. If updates to KGPSA firmware are required P02>>> set arc_enable on P02>>> set console_mode advanced P02>>> init P02>>> load –f iso9660 – load CDROM driver P02>>> run iso9660:[UTILITY]lp6ldr.exe -d dkd500 -p 0 (specify CD loaded into DKD500 on PCI bus 0 ) The utility lp6dutil will not properly function on the TurboLaser or GS series machine thru the serial port. You will see a repeating character problem. 8. You can also run KZSPA_EDIT from the console prompt to set up some KZPSA parameters. kzpsa_edit - Edit KZPSA FLASH parameters. OVERVIEW: The kzpsa_edit command permits the modification of KZPSA Flash parameters from the console. Individual bits can be set or cleared, or bytes can be set to a specific value. Entering kzpsa_edit without an option or target device will list these parameters for all KZPSA devices in the system. kzpsa_edit ( [busid] [<kzpsa_controller_name>] [fast] [termpwr] [-sd] [-offset n] [-value n] [-bit n] [-set] [-clear] ) [-p] COMMAND ARGUMENT(S): <kzpsa_controller_name> - KZPSA controller name. Only the parameters for this controller will be modified. COMMAND OPTION(S): -sd -offset n -value n -bit n -set -clear -p - Set defaults - Selects the byte offset to be modified - Gives the new byte value(s), valid only with -offset - Selects the bit to be modified, valid only with -offset - -value and -bit are mutually exclusive - The bit should be set, valid only with -bit - The bit should be clear, valid only with -bit -set and -clear are mutually exclusive - print flash contents COMMAND EXAMPLE(S): Find all KZPSA devices >>> show config kzpsa* Load the kzpsa support code >>> load -f kzpsa List all current FLASH parameters >>> kzpsa_edit Change the host Bus ID from 7 to 6 126 >>> kzpsa_edit busid kzpsa0 kzpsa0 bus id = 7, new bus id ? 6 Modify four bytes of parameters >>> kzpsa_edit -offset 0 -value 11223344 kzpsa0 Set one bit of the parameters >>> kzpsa_edit -offset 0 -bit 1 -set kzpsa0 Set all defaults >>> kzpsa_edit -sd kzpsa0 127 128 Compaq AlphaServer GS80/GS160/GS320 The AlphaServer GS80/GS160/GS320 has an SRM console located on every standard I/O module in the PCI box/boxes. It also has five different micro firmwares on four different modu1es. All micros in the machine must be the same version. There are also failsafe loaders on the modules. These are only to be updated in the factory. You can NOT have mixed versions and expect it to work. Any time a module with micro firmware or SRM code is replaced, the firmware will most likely need to be upgraded. You will also need to do occasional console firmware upgrades to load the latest version of firmware that is available. There are several ways to upgrade the firmware. • • • • • • • Off CDROM using the Alpha Systems Firmware Update CD V5.9 minimum Off the CDROM using an Infoserver Off a CDROM created using the .iso firmware file and a CD R/W drive. Over the network using the .SYS firmware file. Off of a disk that has a bootable version of the firmware file (filename.exe) on it (MCR WRITEBOOT may be required on that file to make it bootable). From the BOOTP server (Unix). Using the SCM update command and using specific rom.hex files LFU Firmware Update Procedure • • • • • • • • • • • • • • • Determine current console firmware revision. o P00>>> SHOW FIRMWARE o SCM_E0> SHOW CSB Save the contents of all SRM console variables o >>> SHOW * Remove soft patritions if there are any. o >>> SET LP_COUNT 0 o >>> INIT Enter the SCM console using the escape sequence. If you do not know the sequence use the SRM command o >>> SCM SHOW STATUS SCM escape sequence : [ESC][ESC]scm or ^[^[scm o ^[^[scm From the SCM prompt show NVR and save contents. o SHOW NVR From the SCM prompt remove hard partitions o SET HP_COUNT 0 Disable SROM and XSROM diagnostics to shorten power up time. Be sure to restore these to FULL when finished. This step is NOT required. o SET SROM_MASK PARTIAL o SET XSROM_MASK PARTIAL Set the variable DIMM_READ_DIS to a 1 to shorten power up time. Be sure to restore this to 0 (zero) when finished. This step is NOT required. o SET DIMM_READ_DIS 1 Reset or Power OFF/ON the system to allow the new HP_COUNT value to take affect. o RESET Determine which method and firmware version will be used to do the update. Print the firmware release notes for that version. Determine if any option firmware will be upgraded. Boot the firmware file using one of the following methods. Use the list, update and verify commands at the UPD> prompt. Once the CD boots you will come to the UPD> prompt. You can type LIST to see current and update versions and UPDATE to update to the version you loaded. o UPD> LIST 129 o • • • • • UPD> UPDATE Answer "Y" to update all devices including SRM and micros When the update completes you will be at the SCM> prompt. Execute a BUILD EEPROM command from each SCM console. o SCM_E0> BUILD EEPROM o SLV_E1> BUILD EEPROM o etc. Reset SCM NVR settings to original settings. Power on the system Reset SRM console variable as necessary. Init the machine and reboot. 1. Determine the current firmware version by using the show firmware command from the >>> prompt or show csb from the SCM> prompt. This command is not available until SRM V5.8-121. P00>>> show firmware SRM Console PALcode Micro Firmware QBB0.PSM QBB0.CPU0 PBP0.SIO PBP0.SIO QBB1.PSM QBB1.CPU0 PBP1.SIO QBB2.PSM QBB2.CPU2 QBB3.PSM QBB3.CPU1 HSW4 V5.9-111, built OpenVMS PALcode V5.9 PSM V5.9|PSM FS SROM V6.0-7 SCM V5.9|SCM FS SCM V5.9|SCM FS PSM V5.9|PSM FS SROM V6.0-7 SCM V5.9|SCM FS PSM V5.9|PSM FS SROM V6.0-7 PSM V5.9|PSM FS SROM V6.0-7 HPM V5.7|HPM FS on Jan 9 2001 at 15:21:06 V1.90-1, Tru64 UNIX PALcode V1.86-1 V5.6|XSROM V5.9 V5.6|SRM V5.9-111 V5.6|SRM V5.9-111 V5.6|XSROM V5.9 V5.6|SRM V5.9-111 V5.6|XSROM V5.9 V5.6|XSROM V5.9 V5.6 SCM_E0> sho csb CSB Type Firmware Revision FSL Revision Power State 10 PBM 11 PBM 30 PSM NORMAL 30 XSROM C0 CPU0/SROM C0 IOR0 C1 IOR1 31 PSM NORMAL 31 XSROM C4 CPU0/SROM C4 IOR0 C5 IOR1 32 PSM NORMAL 32 XSROM CA CPU2/SROM 33 PSM NORMAL 33 XSROM CD CPU1/SROM 40 HPM E0 SCM MASTER E1 SCM SLAVE V05.9 V05.9 V05.9 (01.09/14:51) (01.09/14:51) (01.09/14:51) V5.6 (05.31) V5.6 (05.31) V5.6 (05.31) ON ON ON SrvSw: V05.9 V6.0-7 (01.09/13:37) V05.9 (01.09/14:51) V5.6 (05.31) ON ON ON ON SrvSw: V05.9 V6.0-7 (01.09/13:37) V05.9 (01.09/14:51) V5.6 (05.31) ON ON ON ON SrvSw: V05.9 V6.0-7 V05.9 (01.09/13:37) V5.6 (05.31) ON ON SrvSw: V05.9 V6.0-7 V05.7 V05.9 V05.9 (01.09/13:37) V5.6 (05.31) V5.6 (05.31) V5.6 (05.31) ON ON ON ON Eligible (01.09/14:51) (08.11/02:08) (01.09/14:52) (01.09/14:52) 130 2. P00>>> show * to printout all the SRM environmental variables. Check all customer set variables. Also verify the setting of the following variables. Bootdef_dev Boot_osflags Auto_action All the “lp” variables a. Set Auto_action to HALT P00>>> set Auto_action halt 3. Print out all SCM NVRAM console variables using the show nvr command from SCM>. SCM_E0> show nvr COM1_PRINT_EN 1 HP_COUNT 0 HP_QBB_MASK0 1 HP_QBB_MASK1 a HP_QBB_MASK2 0 HP_QBB_MASK3 0 HP_QBB_MASK4 0 HP_QBB_MASK5 0 HP_QBB_MASK6 0 HP_QBB_MASK7 0 SROM_MASK ff f XSROM_MASK ff ff ff ff ff ff ff ff eb 1 0 0 PRIMARY_CPU ff PRIMARY_QBB0 ff AUTO_QUIT_SCM 1 FAULT_TO_SYS 0 DIMM_READ_DIS 0 SCM_CSB_MASTER_ELIGIBLE 1 PERF_MON 0 SCM_FORCE_FSL 0 OCP_TEXT Uninitialized AUTO_FAULT_RESTART 1 SCM_SIZING_TIME 14 SYS_CPU_MASK FFFFFFFF SYS_MEM_MASK FFFFFFFF SYS_IOR_MASK FFFFFFFF SYS_PCI_MASK FFFF SYS_QBB_MASK FF 4. Set HP_COUNT and LP_COUNT to 0 and power off/on the machine P00>>> set lp_count 0 SCM_E0> set hp_count 0 SCM_E0> power off SCM_E0> power on 5. Boot the firmware using one of the following methods. Method 1 – Load the Console Firmware Off a Local CDROM SRM Console a. Insert the CD in the local CDROM. b. >>> Boot –fl 0,a0 DKA400 BOOTFILE: [gs320]gs320_v61.exe Note: These filenames will change with different console versions. UPD> See step 5 below for update procedure. Method 2 – Boot the Console CD Off of an Infoserver a. Insert CD in the Infoserver b. >>> boot eia0 –file filename (leave off the .sys extension) 131 Method 3 - Create a Bootable CD Using a CD Writer and the .iso Firmware File Files in the Alpha Systems Firmware web site that have a ".iso" file type are ISO9660 image files and can be used to create bootable CD-ROMs. ZIP files that have "_iso" in the file name contain a ".iso" file which, when extracted, can be used to create a bootable CD-ROM. a. Make sure you have a CD writer and software package that is capable of creating a CD from an image file. b. Obtain the .iso firmware from the interim website at http://ftp.digital.com/pub/Digital/Alpha/firmware/interim/gs320 If you use ftp to download, be sure to use binary mode. If you use a browser to download, make sure the browser does not have .iso as a registered file type. If you download a .zip file, extract the .iso file. c. Write this image file to a blank CD. When writing the CD, ensure that the "close disk" or equivalent option is selected. Method 4 - Booting off the Network - OpenVMS a. Copy firmware.sys file to MOM$LOAD of an existing node in the cluster b. Set the attributes on the file with the following commands: $ set file/attr=(rfm:fix,lrl:512,mrs:512,rat:none) firmware.sys c. Enable service on that node from NCP $ MC NCP MC NCP> Show Known Circuit Characteristic Known Circuit Volatile Characteristics as of 12-FEB-1997 19:27:41 Circuit = BNA-0 - Circuit State = Service = Counter timer = Designated router = Cost = Maximum routers allowed = Router priority = Hello timer = Type = Adjacent node = Listen timer = name will change from system to system on disabled (if enabled skip to boot command) 65534 28.1023 (CXO28A) 4 33 64 15 Ethernet 28.1023 (CXO28A) 30 NCP> Set Circ BNA-0 State OFF - This step will stop network activity NCP> Set Circ BNA-0 Service Enable NCP> Set Circ BNA-0 State ON d. >>> b eia0 -fi filename Leave off .SYS or node that services request will get an error - BAD MOP FID) Method 5 - Boot Off of a Disk - Non-System Disk and System Disk Using OpenVMS Non-System Disk a. Locate the firmware.exe file b. Set the attributes on the file and copy it contiguous to the target disk (non-system) and directory with the following commands: $ set file/attr=(rfm:fix,lrl:512,mrs:512,rat:none) firmware.exe $ copy/contiguous firmware.exe "non_system_disk":[directory] c. Use writeboot to make the disk bootable. Specify the disk, directory and filename of the firmware. Take the defaults for the other questions. $ MCR Writeboot 132 Update VAX portion of boot block (default is Y): No Update Alpha portion of boot block (default is Y):Yes Target system device (and boot file if not VMB.EXE):$1$DUA5:[TEMP]gs320_v61.exe d. >>> b -fl 0,0 dua5 System Disk a. Only steps a and b above are used. Do NOT execute writeboot step c. b. Specify the flags of 0,a0 and use "system_disk":[sys0.sysexe]filename for bootfile. >>> boot -fl 0,a0 dua0 bootfile: dua0:[sys0.sysexe]gs320_v61.exe Method 6 - BOOTP Network Upgrade - Tru64 UNIX a. Mount the Firmware Update CD using the following command: # mount -rt cdfs -o noversion /dev/rz4c /mnt b. Modify or Create the Client Database in the /etc/bootptab File <host>:ht:<hw_type>:ha=<hw_addr>:bf=<filename>:ip=<ip_addr> where: host is the system name in /etc/hosts hw_type is the hardware type. Proteon is ht = 4. Ethernet is ht = 1. Regular token-ring (IEEE 802) is ht = 6. hw_addr is the hardware address: use the console command show device. filename is the name of the default bootfile image: ip_addr is the Internet protocol address of the system name in /etc/hosts. The following is an example of a bootptab file for the AlphaServer 300 bigsox:ht=1:ha=08002b236423:bf=/mnt/GS320/gs320_v61.EXE;1:ip=16.182.0.87 c. Modify the /etc/inetd.conf file. Uncommon the tftp and bootps process. It should look like the following example: tftp dgram udp wait root bootps dgram upd wait root /usr/sbin/tftpd /usr/sbin/bootpd tftpd /mnt bootpd d. Find the process /usr/sbin/inetd daemon: This step will stop network traffic # ps aux | grep ine # kill process# <ine process number> e. Restart the inetd daemon: # /usr/sbin/inetd Note The bootpd and tftp daemon will be removed if the system is rebooted. Refer to the manual pages: bootpd(8) or tftpd(8) for more information. Use Man bootpd and man tftpd f. Enter the following command to boot from the BOOTP server: >>> boot -p bootp ewa0 Should a boot file "pathname" need to be specified in must be in quotes >>> boot -p bootp ewa0 -file “/dir1/dir2/filename” 133 6. At the UPD> prompt type list to see current and update versions. Then execute the update command. ***** Loadable Firmware Update Utility ***** ---------------------------------------------------------------------------Function Description ---------------------------------------------------------------------------Display Displays the system’s configuration table. Exit Done exit LFU (reset). List Lists the device, revision, firmware name, and update revision. Readme Lists important release information. Update Replaces current firmware with loadable data image. Verify Compares loadable and hardware images. ? or Help Scrolls this function table. ---------------------------------------------------------------------------UPD> list Device SRM18 SRM24 SRM8 SRM micro pua0 fwa0 pga0 pgb0 pgc0 pgd0 pge0 Current Revision v5.9-111 v5.9-111 v5.9-111 v5.9-111 V5.9(01.09/14:52) A420 3.20 SS3.03A1 SS3.03A1 SS3.03A1 DS3.03X2 DS3.03X2 Filename srm_fw srm_fw srm_fw srm_fw micro_fw cipca_fw dfxaa_fw kgpsa_7k_fw kgpsa_7k_fw kgpsa_7k_fw kgpsa_8k_fw kgpsa_8k_fw kzpsa_fw Update Revision v6.1-1011 v6.1-1011 v6.1-1011 v6.1-1011 V6.1(10.11/13:32) A420 3.20 SS3.03A1 SS3.03A1 SS3.03A1 DS3.81A4 DS3.81A4 A12 UPD> update * Confirm update on: SRM18 SRM24 SRM8 SRM fwa0 pga0 pgb0 pgc0 pgd0 pge0 pua0 micro [Y/(N)]y WARNING: updates may take several minutes to complete for each device. DO NOT ABORT! SRM18 Updating to v6.1-1011... Verifying v6.1-1011... PASSED. SRM24 Updating to v6.1-1011... Verifying v6.1-1011... PASSED. SRM8 Updating to v6.1-1011... Verifying v6.1-1011... PASSED. SRM Updating to v6.1-1011... Verifying v6.1-1011... PASSED. 134 fwa0 Updating to 3.20... Verifying 3.20... pga0 Updating to SS3.03A1... Verifying SS3.03A1... PASSED. pgb0 Updating to SS3.03A1... Verifying SS3.03A1... PASSED. pgc0 Updating to SS3.03A1... Verifying SS3.03A1... PASSED. pgd0 Updating to DS3.81A4... Verifying DS3.81A4... PASSED. pge0 Updating to SS3.03A1... Verifying SS3.03A1... PASSED. pua0 Updating to A420... micro Updating to V6.1(10.11/13:32)... Verifying A420... PASSED. PASSED. Updating SCM nodes E0,E1,E2,E3 Update Cmd processed Transferring hex file...........Flash ON........Flash ON........Flash ON........Flash ON........Flash ON. Initializing shared ram Modified SR init-SCM previously ON, 07 Shared RAM Initialized Master SCM Testing SCM EEPROM - Passed Initializing EVs SCM Selftest Passed Polling CSB............................SCM_E0> PS1 in PBP0 added PS2 in PBP0 added Remote IOR0 added to PBP0 Remote IOR1 added to PBP0 SCM_E0> PS1 in PBP1 added PS2 in PBP1 added Remote IOR0 added to PBP1 Remote IOR1 added to PBP1 SCM_E0> PS1 in PBP2 added PS2 in PBP2 added Remote IOR0 added to PBP2 Remote IOR1 added to PBP2 SCM_E0> PS1 in PBP3 added PS2 in PBP3 added Remote IOR0 added to PBP3 Remote IOR1 added to PBP3 SCM_E0> QBB0 Directory Module Added Power Supply-1 present in Subrack-1 Power Supply-2 present in Subrack-1 Power Supply-3 present in Subrack-1 QBB0 3.3V Main Power Converter present QBB0 3.3V AUX Converter present QBB0 GP added MEM0 added to QBB0 MEM1 added to QBB0 MEM2 added to QBB0 MEM3 added to QBB0 IOR01 added in QBB0 CPU0 added to QBB0 CPU1 added to QBB0 CPU2 added to QBB0 CPU3 added to QBB0 SCM_E0> QBB1 Directory Module Added Power Supply-1 present in Subrack-1 Power Supply-2 present in Subrack-1 Power Supply-3 present in Subrack-1 QBB1 3.3V Main Power Converter present QBB1 3.3V AUX Converter present QBB1 GP added 135 MEM0 added to QBB1 MEM1 added to QBB1 MEM2 added to QBB1 MEM3 added to QBB1 IOR01 added in QBB1 CPU0 added to QBB1 CPU1 added to QBB1 CPU2 added to QBB1 CPU3 added to QBB1 SCM_E0> QBB2 Directory Module Added Power Supply-1 present in Subrack-2 Power Supply-2 present in Subrack-2 Power Supply-3 present in Subrack-2 QBB2 3.3V Main Power Converter present QBB2 3.3V AUX Converter present QBB2 GP added MEM0 added to QBB2 MEM1 added to QBB2 MEM2 added to QBB2 MEM3 added to QBB2 IOR01 added in QBB2 CPU0 added to QBB2 CPU1 added to QBB2 CPU2 added to QBB2 CPU3 added to QBB2 SCM_E0> QBB3 Directory Module Added Power Supply-1 present in Subrack-2 Power Supply-2 present in Subrack-2 Power Supply-3 present in Subrack-2 QBB3 3.3V Main Power Converter present QBB3 3.3V AUX Converter present QBB3 GP added MEM0 added to QBB3 MEM1 added to QBB3 MEM2 added to QBB3 MEM3 added to QBB3 IOR01 added in QBB3 CPU0 added to QBB3 CPU1 added to QBB3 CPU2 added to QBB3 CPU3 added to QBB3 SCM_E0> PS1 in HS0 added PS2 in HS0 added GP0 Cable Present GP1 Cable Present GP2 Cable Present GP3 Cable Present SCM_E0> OCP will be inactive for first 20 seconds after micro reset ~E~ EEPROM VERSION MISMATCH. Execute Build EEPROM Cmd SCM_E0> Querying the modem port...no device detected SCM_E0> OCP switch is now active and operational Slave10 already ON or transitioning to ON Slave11 already ON or transitioning to ON Slave12 already ON or transitioning to ON Slave13 already ON or transitioning to ON Slave30 already ON or transitioning to ON Slave31 already ON or transitioning to ON Slave32 already ON or transitioning to ON Slave33 already ON or transitioning to ON Slave40 already ON or transitioning to ON SCM_E0> Returning to system COM1 port Updating XSROM nodes 30,31,32,33 136 Update Cmd processed Transferring hex file.................. ~I~ Flashing node 30 (please wait) ~I~ Flashing node 31 (please wait) ~I~ Flashing node 32 (please wait) ~I~ Flashing node 33 (please wait) CSB download of .Hex file complete Updating HPM node 40 Update Cmd processed Transferring hex file.................. CSB download of .Hex file complete Updating PSM nodes 30,31,32,33 Update Cmd processed Transferring hex file.......................... CSB download of .Hex file complete Updating PBM nodes 10,11,12,13 Update Cmd processed Transferring hex file................. CSB download of .Hex file complete The Master SCM will now finish the micro flash updates to each CSB node. After the update is complete, you will be returned to the SCM CLI. last flash packet to 30 last flash packet to 31 last flash packet to 32 last flash packet to 33 last flash packet to 10 last flash packet to 11 last flash packet to 12 last flash packet to 13 last flash packet to 40 Please wait. System will complete power off in approximately 20 seconds Local escape sequence verified SCM_E0> ~E~ CSB Node 40 connection lost ~E~ CSB Node 40 is no longer connected! SCM_E0> Remote IOR2 added to PBP0 Remote IOR3 added to PBP0 SCM_E0> Remote IOR2 added to PBP1 Remote IOR3 added to PBP1 SCM_E0> Remote IOR2 added to PBP2 Remote IOR3 added to PBP2 SCM_E0> Remote IOR2 added to PBP3 Remote IOR3 added to PBP3 SCM_E0> ~I~ CSB Node 40 connection added SCM_E0> ~I~ The SYSTEM will now power off Powering off PCI Box 0 Powering off PCI Box 1 Powering off PCI Box 2 Powering off PCI Box 3 Slave30 already OFF or transitioning to Slave31 already OFF or transitioning to Slave32 already OFF or transitioning to Slave33 already OFF or transitioning to Slave40 already OFF or transitioning to SCM_E0> . OFF OFF OFF OFF OFF 137 Firmware Update is now complete. If you require a partitioned system, please set your HP_COUNT and ’POWER ON -ALL’. For non-partitioned systems enter ’POWER ON’ 7. At the SCM prompt show the NVR variables and then execute the build eeprom command. SCM_E0> sho nvr SCM_E0> build eeprom Restoring EEPROM Defaults Maintaining local baud at 9600 Maintaining local flow at soft Maintaining modem baud at 9600 Maintaining modem flow at hard Maintaining COM1 baud at 9600 Maintaining COM1 flow at soft Maintaining HP_QBB_MASKs 8. Set any nvram variable that was reset or cleared and power on the machine SCM_E0> set hp_count # SCM_E0> power on 9. After SRM loads set the lp srm variables as necessary. P00>>> set lp_count # P00>>> init 138 Errors • If a firmware update is attempted with hp_count set to a value other than 0 (system hard partitioned), it will not load micros and you will get an error message. LFU micro updates are not supported when the system is hard partitioned. Please power down and unpartition first. ***** Loadable Firmware Update Utility ***** -----------------------------------------------------------------------------Function Description -----------------------------------------------------------------------------Display Displays the system’s configuration table. Exit Done exit LFU (reset). List Lists the device, revision, firmware name, and update revision. Update Replaces current firmware with loadable data image. Verify Compares loadable and hardware images. ? or Help Scrolls this function table. -----------------------------------------------------------------------------UPD> list Device Revision SRM Current Revision v5.8-1 Filename srm_fw cipca_fw dfxaa_fw kgpsa_7k_fw kgpsa_8k_fw kzpsa_fw Update v5.8-1 A420 3.20 SS2.20X2 DS3.02A1 A12 UPD> • You must reset of power cycle the machine after changing HP_COUNT to 0. If this is not done you may see an error message similar to the following. Checking dqa0.0.0.15.26 for the option firmware files. . . Copying DFXAA320 from dqa0.0.0.15.26. . . Copying KZPSAA12 from dqa0.0.0.15.26. . . Copying CIPCA420 from dqa0.0.0.15.26. . . Copying KG8302A1 from dqa0.0.0.15.26. . . Copying KG7220X2 from dqa0.0.0.15.26. . . Slave SCM E1 has no hose connection LFU micro updates are not supported when the system is in this condition. Verify with show system that all QBBs Par columns are (-) and that the switch shows "P" for all ports. You should not have a "V" in a non-partitioned system. • If lp_count is set to a non-zero value firmware updates will not continue. You can select the boorfile but then get the following message cannot load a new console on a partitioned system proceeding will cause the system to be unpartitioned automatically At this point the SRM console hangs and a system reset must be done. • If the EEPROM needs to be reset the follow message is printed out ~E~ EEPROM VERSION MISMATCH. Execute Build EEPROM Cmd 139 Method 6 - SCM Update Laptop system setup When the SCM update command is used, firmware update files are downloaded from some source to the master SCM module. To perform the update from a laptop, the COM1 port of the laptop must be set appropriately. the following table shows the settings for four versions of the Windows operating system. These Setting must be exact to function properly. COM1 Port Settings Accessing COM1 Port Settings Baud rate Data bits Parity Stop Bits Flow Control Advanced Settings Windows 95 and 98 Windows 2000 Windows NT V4.0 StartSettingsControlPanelSystemDeviceManagerPortCOM1PropertiesPort Settings StartSettingsControlPanelSystemHardwareDeviceManagerPortsCOM1PropertiesPort Settings StartSettingControlPanelPortsCOM1Settings 57600 8 None 1 Xon/Xoff Deselect “Use FIFO buffers” Disable “FIFO Enable” Note These setups must be followed exactly, any deveations and the flash update might fail. Depending on Keaterm version the following steps may change. Keaterm setup 1. 2. 3. 4. Start KEAterm. At the Session Template, select Serial, and click Next>. At Connection Type, select Serial, and click Next>. At Connection, select the General tab and set: Port name: Communications Port (COM1) Speed: 57600 5. Click Next>. 6. At Terminal Type, select VT400-8bit, and click Next>. 7. At File Transfer Protocol, select ASCII, and click Finish. 8. From the Options menu, select Connections. 9. From Connections, select the Options tab and in the Flow control section set: Data to host: Xon Xoff Data from host: Xon Xoff 10. Next select the Rate Limiting tab and deselect: Limit data rate during Paste and ASCII send Limit data rate during keyboard input and reporting 11. From the Options menu, select History and choose personal settings. 140 Powerterm 525 setup 1. 2. 3. 4. 5. Start Power Term. At the Connect dialog box, set: Session type COM Terminal type VT420-8 Baud Rate 57600 Stop Bits 1 Port Number 1 Parity 8/none Flow Control Xon/Xoff Click Connect. From the Communications menu, select File Transfer Setup, and set: Host Data Type 8-Bit (DOS – Ascii) PC Data Type 8-Bit (DOS – Ascii) Click OK. SCM Update Files Below is a table of the files that can be flashed using the update command. When the update command is run one or all of the files can be written into the flash ROM of the appropriate module. The firmware can be found on the Wildfire website. System Target flash ROM File name Firmware contents GS80/GS160/GS320 Standard I/O SCMROM.HEX SCM standard image GS80/GS160/GS320 PSM module PSMROM.HEX WF_XSROM.HEX PSM standard image CPU eXtended SROM image (XSROM) GS80/GS160/GS320 PBM module PBMROM.HEX PBM standard image GS160/GS320 HPM module HPMROM.HEX HPM standard image Note SROM, is a plugable chip (located on the CPU) that can only be upgraded, at this time, by replacing the chip. SROM contains the only firmware that is allowed to vary in revision from CPU to CPU. All other firmwares must be the same revision! 141 SCM update – Conditions of Note When Using This Update Method CAUTION! These allowable states may be risky. Engineering prefers that all firmware upgrades be done with the operating system down and the entire system powered off. • • • • • • A master and slave SCM may be updated using this method but a master SCM cannot update a slave. To update either a master or slave the device downloading the SCMROM.HEX file must be run connected physically to the target standard I/O local port. When updating the XSROM code, the entire system may be up and running operating systems but this is not recommended by Engineering at this time. A consequence of updates to any of the microprocessors (with the exception of the XSROM on the PSM) is that they immediately reset once the new firmware downloads. Therefore, you want to minimize the effect of the reset on the rest of the system by isolating the QBB/partition. When updating a PSM, the partition in which the PSM resides should be powered off. When updating a PBM, the PCI I/O subsystem in which the PBM resides must be removed from the resources available to an operating system. When updating an HPM, the system should be powered off. Update procedure using SCM • • • • • • • • • • Copy the appropriate hex files to your laptop. Set up your Keaterm or Powerterm emulators as described in the Terminal emulator setup above. Set up the COM1 port settings as described above in the Laptop system setup section above. Connect the laptop to the master console COM1 port. Save the contents of all console variables o >>> SHOW * Enter the SCM console using the escape sequence. If you do not know the sequence use the SRM command o >>> SCM SHOW STATUS SCM escape sequence : [ESC][ESC]scm or ^[^[scm o ^[^[scm From the SCM prompt obtain the NVR contents. These values will need to be reset when finished o SHOW NVR Set SROM and XSROM diagnostics to "PARTIAL" bypass full diagnostics. This will shorten power up time. Only use this step when updating the micros on the entire system. Be sure to restore these to "FULL" when finished. o SET SROM_MASK PARTIAL o SET XSROM_MASK PARTIAL Set the variable DIMM_READ_DIS to a "1" to disable the PSM reading the FRU data from all the DIMMs. This will shorten power up time. Only use this step when updating the micros on the entire system. Be sure to restore this to "0" (zero) when finished. o SET DIMM_READ_DIS 1 Set the variable AUTO_QUIT_SCM to a "0" to stop in SCM before entering SRM console. Only use this step when updating the micros on the entire system. Be sure to restore this to "1" (one) when finished. o SET AUTO_QUIT_SCM 0 142 • • • • • • • • • • • • • • • POWER OFF the system or specific partition in preparation for the firmware upgrade. o POWER OFF or o POWER OFF –part # Excute the SHOW CSB command to obtain the necessary CSB addresses o SHOW CSB Locate the ID of the SCM master and update it. o UPDATE –CSB E0 (if ID is E0) o Select the SCMROM.HEX file to load. This will load file, power on and init. Execute a BUILD EEPROM command. This will set the SROM_MASK and XSROM_MASK to full, these may be set to PARTIAL until the update is complete. o BUILD EEPROM Power off system to continue firmware upgrade. o POWER OFF Update the PSMs - There may be multiple PSMs in the system depending on the configuration. o UPDATE –CSB 30,31,32,33,34,35,36,37 o Select the PSMROM.HEX file to load. Update the PBMs- There may be multiple PBMs in the system depending on the configuration o UPDATE –CSB 10,11,12,13,14,15,16,17,18,19,1A,1B,1C,1D,1E,1F o Select the PBMROM.HEX file to load. Update the HPM o UPDATE –CSB 40 o Select the HPMROM.HEX file to load. Update the XSROMs- There may be multiple XSROMs in the system depending on the configuration o UPDATE –CSB 30,31,32,33,34,35,36,37 o Select the WF_XSROM.HEX file to load. Move laptop cable to each SCM and update them individually - There may be multiple SCMs in the system depending on the configuration o UPDATE –CSB E1 thru E7 After the updates are complete POWER ON the system o POWER ON Now INIT the system o INIT Reset NVR to original values Reset system or power OFF/ON Reset soft all console environmental variables original settings including LP_COUNT and init 143 SCM Update Example ( PSM only) SCM_E0> power off – part 0 SCM_E0> sho csb CSB Type Firmware Revision FSL Revision Power State 10 11 12 30 PBM PBM PBM PSM T05.5 T05.5 T05.5 T05.5 (05.04/02:07) (05.04/02:07) (05.04/02:07) (05.04/02:04) X4.3 X4.3 X4.3 T4.0 ON ON ON OFF 30 C0 C1 C2 C0 C1 C2 C3 31 31 C4 C5 C6 C7 C4 C5 40 E0 E1 E2 E6 XSROM CPU0/SROM CPU1/SROM CPU3/SROM IOR0 IOR1 IOR2 IOR3 PSM XSROM CPU0/SROM CPU1/SROM CPU0/SROM CPU1/SROM IOR0 IOR1 HPM SCM MASTER SCM SLAVE SCM SLAVE SCM SLAVE T05.5 V6.0-7 V6.0-7 V6.0-7 (05.04/03:37) T05.5 T05.5 V6.0-7 V6.0-7 V6.0-7 V6.0-7 (05.04/02:04) (05.04/03:37) T05.5 T05.5 T05.5 T05.5 T05.5 (05.04/02:09) (05.04/02:13) (05.04/02:13) (05.04/02:13) (05.04/02:13) (09.13) (09.13) (09.13) (07.06) OFF OFF OFF OFF OFF OFF OFF T4.0 (07.06) ON X4.1 X4.3 X4.3 X4.3 X4.3 (08.18) (09.13) (09.13) (09.13) (09.13) ON ON ON ON ON ON ON ON ON ON ON SrvSw: NORMAL SrvSw: NORMAL Ineligible Ineligible Ineligible SCM_E0> update –csb 30 Initiate HEX file transfer from host (press ESC-ESC to abort): Initiate transfer of the file PSMROM.HEX to the COM1 port For KEA term From the Tools menu goto File Transfer and select Send to Host Change the Files of type: to All Files (*.*) Browse for and select the file PSMROM.HEX. Click on OK. For PowerTerm 525 From the Communication menu select Send File… At Send File select the Ascii tab Browse for and select the file PSMROM.HEX by clicking on the browse button next to the File Name input box. Click OK. :????address Transferring hex file . . . . . . . . CSB download of .HEX file complete Flash Update complete. CSB Node 30 connection lost CSB Node 30 connection added SCM_E0> update –csb 31 . . 144 . AlphaServer DS10 and Professional WorkStation XP900 The AlphaServer DS10 and the Professional WorkStation XP900 systems contains one flash rom. It contains ARC console firmware for Windows NT and SRM console firmware for Tru64 UNIX and OpenVMS. When ever the motherboard is replaced the firmware may need to be updated. You will also need to do occasional console firmware upgrades to load the latest version of firmware that is available. The console firmware is NOT present on the V5.4 CD However it is on the V5.5 CD. There are several ways to upgrade the firmware. All involve booting Loadable Firmware Utility (LFU). It can be booted one of the following ways. • • • • • • • Off the Alpha AXP System Firmware Update Utility CD using the local CDROM. Off an infoserver using the Alpha AXP System Firmware Update Utility CD Off floppy from AlphaBIOS Upgrade Using console command LFU. Over the network using the .SYS firmware file. Off of a OpenVMS disk that has a bootable version of the firmware file (filename.exe) on it (MCR WRITEBOOT may be required on that file to make it bootable). From the BOOTP server (UNIX). The procedure to update the console firmware is as follows. • • • • • • • • • • • • Determine current console firmware revision by the power on display, SHOW commands or from online SDA with a CLUE CONFIG command. Record all console environmental variables by typing SHOW * at the >>>. Determine which method and firmware version will be used to do the update. Print the firmware release notes for that version and system. Determine if any option firmware will be upgraded. Verify the ROM Update switch is in the correct positions. Boot the firmware file (LFU). Use the verify and update commands at the UPD> prompt. When done exit from LFU. Reboot LFU using the device firmware file to update device firmware. Power off/on the machine to reload the new firmware. Reset any Environmental variables that were changed and reboot. 1. Get current firmware revision at power on or with console SHOW commands. 256 Meg of system memory probing hose 0, PCI probing PCI-to-ISA bridge, bus 1 probing PCI-to-PCI bridge, bus 2 bus 0, slot 9 -– ewa -– DE500-BA Network Controller bus 0, slot 11 -– ewb -– DE500-BA Network Controller bus 0, slot 13 –- dqa –- Acer Labs M1543C IDE bus 0, slot 14 -– vga –- DEC PowerStorm bus 2, slot 0 -- pka –- NCR 53C875 bus 2, slot 1 -- pkb –- NCR 53C875 bus 0, slot 16 -– pkc -– Qlogic ISP1020 bus 0, slot 17 -– dra -– Mylex DAC960 Testing the System Testing the Disks (read only) Testing the Network Compaq AlphaServer DS10 466 MHz Console V5.4 , Apr 1 1999 >>> P00>>> sho version version P00>>> show pal pal P00>>> sho config V5.5-1 Jun 21 1999 11:49:01 OpenVMS PALcode V1.59-43, Digital UNIX PALcode V1.51-50 145 AlphaServer DS10 466 MHz SRM Console: V54-2 PALcode: OpenVMS PALcode V1.56-45, Tru64 UNIX PALcode V1.50-48 Processors CPU 0 Alpha 21264-4 466 MHz SROM Revision: V1.8.208 Bcache size: 2 MB Core Logic Cchip DECchip 21272-CA Rev 2 Dchip DECchip 21272-DA Rev 2 Pchip 0 DECchip 21272-EA Rev 2 TIG Rev 2.1 Arbiter Rev 3.30 (0x7E) MEMORY Array # Size Base Addr ------- ---------- --------0 256 MB 000000000 Total Bad Pages = 0 Total Good Memory = 256 MBytes PCI Hose Bus Bus Bus 00 00 Slot 01: Acer Labs M1543C USB 00 Slot 03: Acer Labs M1543C PMU 00 Slot 07: Acer Labs M1543C Bridge to Bus 1, ISA Bus 00 Slot 09: DE500-BA Network Controller ewa0.0.0.9.0 Bus 00 Slot 11: DE500-BA Network Controller ewb0.0.0.11.0 Bus 00 Slot 13: Acer Labs M1543C IDE dqa.0.0.13.0 dqa1.1.0.13.0 Bus 00 Slot 14: DEC PowerStorm Bus 00 Slot 15: DECchip 21152-AA 08-00-2B-86-1B-BA 08-00-2B-86-1B-BB CD-532E Bridge to Bus 2, PCI Bus 00 Slot 16: QLogic ISP1020 pkc0.6.0.16.0 dkc0.0.0.16.0 dkc200.2.0.16.0 Bus 00 Slot 17: Mylex DAC960 dra.0.0.17.0 dra0.0.0.17.0 dra1.0.0.17.0 dra2.0.0.17.0 Bus 02 Slot 00: NCR 53C875 pka0.7.0.2000.0 dka100.1.0.2000.0 dka300.3.0.2000.0 dka500.5.0.2000.0 Bus 02 Slot 01: NCR 53C875 pkb0.7.0.2001.0 dkb0.0.0.2001.0 dkb200.2.0.2001.0 dkb400.4.0.2001.0 SCSI Bus ID 6 RZ1CB-BA RZ1CB-BA 1 Member JBOD 1 Member JBOD 1 Member JBOD SCSI Bus ID 7 RZ1CB-CA RZ1CB-CA RZ1EF-AB SCSI Bus ID 7 RZ1CB-CA RZ1DB-CS RZ1CB-CA ISA Slot Device Name Type Enabled BaseAddr IRQ DMA 0 0 MOUSE Embedded Yes 60 12 1 KBD Embedded Yes 60 1 2 COM1 Embedded Yes 3f8 4 3 COM2 Embedded Yes 2f8 3 4 LPT1 Embedded Yes 3bc 7 5 FLOPPY Embedded Yes 3f0 6 2 146 2. >>> show or show * to printout all the environmental variables. Check all customer set variables. Also verify the setting of the following variables. Bootdef_dev Boot_osflags Auto_action 3. Verify the motherboard switches are in the default position. The default position enables writes to the flash. 4. Boot the firmware using one of the following methods. Method 1 – Load the Console Firmware Off a Local CDROM SRM Console a. Insert the CD in the local CDROM. b. >>> Boot –fl 0,a0 DKA400 BOOTFILE: [ds10]ds10_v6_1.exe Note: These filenames will change with different console versions. UPD> See step 5 below for update procedure. AlphaBIOS Console a. Insert the CD in the local CDROM. b. Enter the AlphaBIOS menu by typing ARC or AlphaBIOS or initializing the system when os_type = nt c. AlphaBIOS –Select F2 to go into Setup then select Upgrade AlphaBIOS Method 2 – Boot the Console CD Off of an Infoserver a. Insert CD in the Infoserver b. >>> boot ewa0 –file filename (leave off the .sys extension) Method 3 - Firmware Floppy From AlphaBIOS Upgrade a. Copy the files pc264nt.rom and ds10srm.rom onto a FAT formatted floppy. b. At the >>> type ARC or AlphaBIOS. Then select F2 to go into SETUP. c. In the Setup menu, select AlphaBIOS Upgrade It will search the CD and then the floppy for pc264nt.rom d. First pc264nt.rom will load and you will receive a window that lists Old and New Versions of AlphaBIOS and display the following. Warning this will take several seconds . Do *NOT* reset or power-cycle the system before receiving notification that the update process has completed. You will be prompted to type F10 to continue or ESC to abort. Pressing F10 will display a window with writing progress and verifying progress bars. e. Next ds10srm.rom will load and you will receive a window that lists Old and New Versions of SRM and display the same warning listed above. You will be prompted to type F10 to continue or ESC to abort. Pressing F10 will display a window with writing progress and verifying progress bars. f. An UPGRADE COMPLETE box will appear with the text The updated version of AlphaBIOS 147 will now be executed. ENTER = Execute ESC = Continue g. ESC takes you back to AlphaBIOS setup menu h. ENTER will reset the system and reload the new AlphaBIOS/SRM image. Method 4 - Using the Console LFU Command Note: You may also have problems with files saved from Netscape. Either use Internet Explorer to download files or if using Netscape, get the files from the website at ftp://ftp.digital.com/pub/Digital/Alpha/firmware/. Floppy - CPU Firmware Only a. Copy the files ds10fw.txt, pc264nt.rom and ds10srm.rom onto a 1.44 MB FAT formatted floppy disk. b. Execute the LFU command. LFU first checks for options firmware on the CD-ROM, then the floppy drive. The user is then prompted for input. Select the location of the firmware files (dva0 or ewa0) and then <return> to select the default filename to continue the firmware update. The Loadable Firmware Update Utility Menu will then be displayed and the installation continues as usual. P00>>> lfu Checking dka500.5.0.2000.1 for the option firmware files. . . Checking dva0 for the option firmware files. . . Option firmware files were not found on CD or floppy. If you want to load the options firmware, please enter the device on which the files are located(ewa0), or just hit <return> to proceed with a standard console update: dva0 Please enter the name of the options firmware files list, or Hit <return> to use the default filename (ds10fw.txt) : <ds10fw.txt> Copying ds10fw.txt from dva0. . . Copying PC264NT.ROM from dva0. . . Copying ds10SRM.ROM from dva0. . . UPD> Floppy - CPU and IO Firmware a. Copy the files ds10fw.txt, pc264nt.rom and ds10srm.rom onto a 1.44 MB FAT formatted floppy disk. b. Copy the files ds10fw.txt, ccmab022.sys, dfxaa320.sys, kzpsaa12.sys and cipca420.sys onto a 1.44 MB FAT formatted floppy disk. c. Open the file ds10fw.txt. Every file you wish to load must be listed here. If the file is listed you must have it available on floppy. The standard file only has the filename for the SRM and NT console. You must add before the "!" all the file you want to load. 148 Example of the file PC264NT.ROM nt_fw DS10SRM.ROM srm_fw CCMAB022 ccmab_fw DFXAA320 NOTE: dfxaa_fw The bolded area are filenames that were added to the KZPSAA12 standard ds10fw.txt file to allow options firmware to load. kzpsa_fw CIPCA420 cipca_fw ! This file is a list of all the firmware for the system. The exclamation point above is the file terminator, so anything below it will not be seen by the update utility. Anything above the exclamation point must adhere to the existing format. The first line will contain the directory and filename as it appears on the update media, without the extension and in upper case. The following line will contain the name of the file to which the image will be copied on the console’s file system. Nothing else is allowed on either line and no lines should be skipped. For any new firmware images, there will be only two lines added to this file. d. At the >>> type LFU and select DVA0 as the device and ds10fw.txt as the filename. P00>>> lfu Checking dqa0.0.0.13.0 for the option firmware files. . . Checking dva0 for the option firmware files. . . Option firmware files were not found on CD or floppy. If you want to load the options firmware, please enter the device on which the files are located(ewa0), or just hit <return> to proceed with a standard console update: dva0 Please enter the name of the options firmware files list, or Hit <return> to use the default filename (ds10fw.txt) : <ds10fw.txt> Copying ds10fw.txt from dva0. . . Copying PC264NT.ROM from dva0. . . Copying ds10SRM.ROM from dva0. . . Please insert next floppy containing the options firmware, Hit <return> when ready. Or type DONE to abort. Copying ccmab022.sys from dva0. . . Copying cipca420.sys from dva0. . . Copying dfxaa320.sys from dva0. . . Copying kzpsaa12.sys from dva0. . . UPD> CD a. As of the V5.6 console, using the LFU console command and the CD will not work. According to engineering it is looking in the options directory for the file ds10fw.txt. It does not exist there and will fail. This will be corrected in a later version of the firmware. 149 Network a. Copy the following files to MOM$LOAD of you local MOP server. ds10fw.txt ds10srm.rom pc264nt.rom b. Set the attributes for the file using the following OpenVMS command on each file. $ set file/attr=rfm:fix,lrl:512,mrs:512,rat:none filename.sys c. Execute LFU command and select device EWA0 for Digital PCI Ethernet or FWA0 for Digital PCI FDDI (DEFPA). Specify ds10fw.txt P00>>> lfu Checking dqa0.0.0.13.0 for the option firmware files. . . Checking dva0 for the option firmware files. . . Option firmware files were not found on CD or floppy. If you want to load the options firmware, please enter the device on which the files are located(ewa0)ewa0 Please enter the name of the firmware files list, or Hit <return> to use the default filename (ds10fw.txt) : ds10fw.txt Copying ds10fw.txt from ewa0. . . Copying PC264NT.ROM from ewa0. . . Copying DS10SRM.ROM from ewa0. . . Method 5 - Booting Off the Network - OpenVMS a. Copy firmware.sys file to MOM$LOAD of an existing node in the cluster b. Set VMS attributes on the file with the following command. $ Set file/attr=(rfm:fix,lrl:512,mrs:512,rat:none) ds10_v6_1.sys c. Enable service on that node from NCP $ MC NCP MC NCP> Show Known Circuit Characteristic Known Circuit Volatile Characteristics as of 12-FEB-1997 19:27:41 Circuit = BNA-0 - Circuit State = Service = Counter timer = Designated router = Cost = Maximum routers allowed = Router priority = Hello timer = Type = Adjacent node = Listen timer = name will change from system to system on disabled (if enabled skip to boot command) 65534 28.1023 (CXO28A) 4 33 64 15 Ethernet 28.1023 (CXO28A) 30 NCP> Set Circ BNA-0 State OFF - This step will stop network activity NCP> Set Circ BNA-0 Service Enable NCP> Set Circ BNA-0 State ON d. >>> boot ewa0 -file ds10_v6_1 (Leave off .SYS or node that services request will get an error - BAD MOP FID) 150 Method 6 - Boot Off of a Disk - Non-System Disk and System Disk Using OpenVMS Non-System Disk a. Locate the firmware file ds10_v6_1.exe at the firmware website and copy to your system b. Set the VMS attributes on the file and copy it contiguous to the target disk (non-system) and directory with the following commands: $ set file/attr=(rfm:fix,lrl:512,mrs:512,rat:none) ds10_v6_1.exe $ copy/contiguous ds10_v6_1.exe "non_system_disk":[directory] c. Use writeboot to make the disk bootable. Specify the disk, directory and filename of the firmware. Take the defaults for the other questions. $ MCR Writeboot Update VAX portion of boot block (default is Y): No Update Alpha portion of boot block (default is Y):Yes Target system device (and boot file if not VMB.EXE):$1$dua5:[TEMP]ds10_v6_1.exe d. >>> boot -fl 0,0 dua5 System Disk a. Only steps a and b above are used. Do NOT execute writeboot step c. b. Specify the flags of 0,a0 and use "system disk":[sys0.sysexe]filename for the bootfile. >>> b -fl 0,a dua0 bootfile: dua0:[sys0.sysexe]ds10_v6_1.exe Method 7 - BOOTP Network Upgrade – Tru64 UNIX a. Mount the Firmware Update CD using the following command: # mount -rt cdf– -o noversion /dev/rz4c /mnt b. Modify or Create the Client Database in the /etc/bootptab File <host>:ht:<hw_type>:ha=<hw_addr>:bf=<filename>:ip=<ip_addr> where: host is the system name in /etc/hosts hw_type is the hardware type. Proteon is ht = 4. Ethernet is ht = 1. Regular token-ring (IEEE 802) is ht = 6. hw_addr is the hardware address: use the console command show device. filename is the name of the default bootfile image: ip_addr is the Internet protocol address of the system name in /etc/hosts. The following is an example of a bootptab file for the AlphaServer DS10: bigsox:ht=1:ha=08002b236423:bf=/mnt/DS20/ds10_v6_1.EXE;1:ip=16.182.0.87 c. Modify the /etc/inetd.conf file. Uncommon the tftp and bootps process. It should look like the following example: tftp dgram udp wait root /usr/sbin/tftpd tftpd /mnt bootps dgram upd wait root /usr/sbin/bootpd bootpd d. Find the process /usr/sbin/inetd daemon: This step will stop network traffic # ps aux | grep ine # kill process# <ine process number> e. Restart the inetd daemon: # /usr/sbin/inetd 151 Note The bootpd and tftp daemon will be removed if the system is rebooted. Refer to the manual pages: bootpd(8) or tftpd(8) for more information. Use Man bootpd and man tftpd f. Enter the following command to boot from the BOOTP server: >>> boot -p bootp ewa0 Should a boot file "pathname" need to be specified in must be in quotes >>> boot -p bootp ewa0 -file “/dir1/dir2/filename” 5. At the UPD> prompt type list to verify current and update versions. Then execute Update and Verify Note: If you are running with two CPU’s, you MAY have to disable one CPU before updating. ***** Loadable Firmware Update Utility ***** -----------------------------------------------------------------------------Function Description -----------------------------------------------------------------------------Display Displays the system’s configuration table. Exit Done exit LFU (reset). List Lists the device, revision, firmware name, and update revision. Readme Lists important release information. Update Replaces current firmware with loadable data image. Verify Compares loadable and hardware images. ? or Help Scrolls this function table. -----------------------------------------------------------------------------UPD> list Device nt srm Current Revision 5.70 5.8-10 Filename nt_fw srm_fw Update Revision 5.71 6.1-2 UPD> update * Confirm update on: nt srm [Y/(N)]y WARNING: updates may take several minutes to complete for each device. DO NOT ABORT! nt srm Updating to 5.71… Verifying 5.71… PASSED. Updating to 6.1-2… Verifying 6.1-2… PASSED. UPD> verify nt srm Verifying 5.71… PASSED. Verifying 6.1-2… PASSED. 152 AlphaServer DS10 Jumpers Motherboard Set SW3-8 ON to enable the FailSafe Loader 153 154 AlphaServer DS20/DS20E The AlphaServer DS20 system contains one flash rom. It contains ARC console firmware for Windows NT and SRM console firmware for Tru64 UNIX and OpenVMS. The ability to write to this rom is controlled by switch SW3 #8 on the motherboard. When ever the motherboard is replaced the firmware may need to be updated. You will also need to do occasional console firmware upgrades to load the latest version of firmware that is available. The console firmware is NOT present on the V5.4 CD However it is on the V5.5 CD. There are several ways to upgrade the firmware. All involve booting Loadable Firmware Utility (LFU). It can be booted one of the following ways. • • • • • • • Off the Alpha AXP System Firmware Update Utility CD using the local CDROM. Off an infoserver using the Alpha AXP System Firmware Update Utility CD Off floppy using AlphaBIOS Upgrade Using console command LFU. Over the network using the .SYS firmware file. Off of a OpenVMS disk that has a bootable version of the firmware file (filename.exe) on it (MCR WRITEBOOT may be required on that file to make it bootable). From the BOOTP server (UNIX). The procedure to update the console firmware is as follows. • • • • • • • • • • • • Determine current console firmware revision by the power on display, SHOW commands or from online SDA with a CLUE CONFIG command. Record all console environmental variables by typing SHOW * at the >>>. Determine which method and firmware version will be used to do the update. Print the firmware release notes for that version and system. Determine if any option firmware will be upgraded. Verify the ROM Update switch is in the correct positions. Boot the firmware file (LFU). Use the verify and update commands at the UPD> prompt. When done exit from LFU. Reboot LFU using the device firmware file to update device firmware. Power off/on the machine to reload the new firmware. Reset any Environmental variables that were changed and reboot. 1. Get current firmware revision at power on or with console SHOW commands. Initializing… 512 Meg of system memory probing hose 1, PCI probing PCI-to-PCI bridge, bus 2 bus 2, slot 0 -- pka -- NCR 53C875 bus 2, slot 1 -- pkb -- NCR 53C875 bus 2, slot 2 -- ewa -- DE500-AA Network Controller probing hose 0, PCI probing PCI-to-ISA bridge, bus 1 bus 0, slot 5, function 1 -- dqa -- Cypress 82C693 IDE bus 0, slot 5, function 2 -- dqb -- Cypress 82C693 IDE bus 0, slot 5, function 3 -- usba -- Cypress 82C693 USB bus 0, slot 6, function 0 -- pkc -- Adaptec AIC-7895 bus 0, slot 6, function 1 -- pkd -- Adaptec AIC-7895 bus 0, slot 7 -- vga -- DEC PowerStorm Testing the System Testing the Memory Testing the Disks (read only) Testing the Network System Temperature is 24 degrees C AlphaServer DS20 500 MHz Console T5.4-3, Dec 9 1998 11:49:01 155 P00>>> sho version version P00>>> show pal pal T5.4-3 Dec 9 1998 11:49:01 OpenVMS PALcode V1.48-37, Digital UNIX PALcode V1.44-40 P00>>> sho config AlphaServer DS20 500 MHz SRM Console: T5.4-3 PALcode: OpenVMS PALcode V1.48-37, Digital UNIX PALcode V1.44-40 Processors CPU 0 CPU 1 Alpha 21264-3 500 MHz Bcache size: 0 MB SROM Revision: X1.72 Alpha 21264-3 500 MHz Bcache size: 4 MB SROM Revision: X1.72 Core Logic Cchip Dchip Pchip 0 Pchip 1 DECchip 21272-CA Rev 2 DECchip 21272-DA Rev 2 DECchip 21272-EA Rev 2 DECchip 21272-EA Rev 2 TIG Arbiter Rev 4.11 Rev 2.8 (0x1) MEMORY Array # ------0 Size ---------512 MB Base Addr --------000000000 Total Bad Pages = 0 Total Good Memory = 512 Mbytes PCI Hose 00 Bus 00 Slot 05/0: Cypress 82C693 Bridge to Bus 1, ISA Bus 00 Bus 00 Bus 00 Bus 00 Bus 00 Bus 00 PCI Hose 01 Bus 00 Slot 05/1: Cypress 82C693 IDE dqa.0.0.105.0 Slot 05/2: Cypress 82C693 IDE dqb.0.1.205.0 Slot 05/3: Cypress 82C693 USB Slot 06/0: Adaptec AIC-7895 pkc0.7.0.6.0 Slot 06/1: Adaptec AIC-7895 pkd0.7.0.106.0 Slot 07: DEC PowerStorm SCSI Bus ID 7 SCSI Bus ID 7 Slot 07: DECchip 21152-AA Bridge to Bus 2, PCI Bus 02 Slot 00: NCR 53C875 pka0.7.0.2000.1 dka0.0.0.2000.1 dka100.1.0.2000.1 dka200.2.0.2000.1 dka500.5.0.2000.1 Bus 02 Slot 01: NCR 53C875 Bus 02 pkb0.7.0.2001.1 Slot 02: DE500-AA Network Controller SCSI Bus ID 7 RZ1CB-CS RZ1CB-CA RZ1CB-CS RRD46 SCSI Bus ID 7 156 ewa0.0.0.2002.1 ISA Slot 0 Device 0 1 2 3 4 Name Type MOUSE Embedded Yes KBD Embedded Yes COM1 Embedded Yes COM2 Embedded Yes LPT1 Embedded Yes 5 FLOPPY Embedded Enabled 60 60 3f8 2f8 3bc Yes 00-06-2B-00-0A-43 BaseAddr 12 1 4 3 7 3f0 6 IRQ DMA 2 2. >>> show or show * to printout all the environmental variables. Check all customer set variables. Also verify the setting of the following variables. Bootdef_dev Boot_osflags Auto_action 3. Verify the motherboard switches are in the default position. The default position enables writes to the flash. 4. Boot the firmware using one of the following methods. Method 1 – Load the Console Firmware Off a Local CDROM SRM Console a. Insert the CD in the local CDROM. b. >>> Boot –fl 0,a0 DKA400 BOOTFILE: [ds20]ds20_v6_1.exe Note: These filenames will change with different console versions. Apu-> See step 5 below for update procedure. AlphaBIOS Console a. Insert the CD in the local CDROM. b. Enter the AlphaBIOS menu by typing ARC or AlphaBIOS or initializing the system when os_type = nt c. AlphaBIOS –Select F2 to go into Setup then select Upgrade AlphaBIOS Method 2 – Boot the Console CD Off of an Infoserver a. Insert CD in the Infoserver b. >>> boot ewa0 –file filename (leave off the .sys extension) Method 3 - Firmware Floppy From AlphaBIOS Upgrade a. Copy the files pc264nt.rom and pc264srm.rom onto a 1.44 MB FAT formatted floppy disk. b. At the >>> type ARC or AlphaBIOS. Then select F2 to go into SETUP. c. In the Setup menu, select AlphaBIOS Upgrade It will search the CD and then the floppy for pc264nt.rom d. First pc264nt.rom will load and you will receive a window that lists Old and New Versions of AlphaBIOS and display the following. Warning this will take several seconds . Do *NOT* reset or power-cycle the system before receiving notification that the update process 157 has completed. You will be prompted to type F10 to continue or ESC to abort. Pressing F10 will display a window with writing progress and verifying progress bars. e. Next pc264srm.rom will load and you will receive a window that lists Old and New Versions of SRM and display the same warning listed above. You will be prompted to type F10 to continue or ESC to abort. Pressing F10 will display a window with writing progress and verifying progress bars. f. An UPGRADE COMPLETE box will appear with the text The updated version of AlphaBIOS will now be executed. ENTER = Execute ESC = Continue g. ESC takes you back to AlphaBIOS setup menu h. ENTER will reset the system and reload the new AlphaBIOS/SRM image. Method 4 - Using the Console LFU Command Note: You may also have problems with files saved from Netscape. Either use Internet Explorer to download files or if using Netscape, get the files from the website at ftp://ftp.digital.com/pub/Digital/Alpha/firmware/. Floppy a. You will need two FAT formatted floppies. Copy the following files onto the first floppy. pc264fw.txt pc264nt.sys pc264srm.sys b. Copy the following files to a second fat formatted floppy. pc264fsb.sys ccmab022.sys cipca420.sys dfxaa320.sys kzpsaa12.sys You will need to edit pc264fw.txt to reflect all the files you have loaded onto floppy. c. Execute the LFU command. LFU first checks for options firmware on the CD-ROM, then the floppy drive. The user is then prompted for input. Select the location of the firmware files (dva0 or ewa0) and then <return> to select the default filename to continue the firmware update. The Loadable Firmware Update Utility Menu will then be displayed and the installation continues as usual. P00>>> lfu Checking dka500.5.0.2000.1 for the option firmware files. . . Checking dva0 for the option firmware files. . . Option firmware files were not found on CD or floppy. If you want to load the options firmware, please enter the device on which the files are located(ewa0), or just hit <return> to proceed with a standard console update: dva0 Please enter the name of the options firmware files list, or Hit <return> to use the default filename (pc264fw.txt) : <return> 158 Copying Copying Copying Copying Copying Copying Copying Copying pc264fw.txt from dva0. . . PC264NT.SYS from dva0. . . PC264SRM.SYS from dva0. . . PC264FSB.SYS from dva0. . . ccmab022.sys from dva0. . . cipca420.sys from dva0. . . dfxaa320.sys from dva0. . . kzpsaa12.sys from dva0. . . UPD> CD a. Insert the CD in the local CDROM. b. Execute LFU command and if the firmware CD is loaded it will not ask any questions and will load the files. If you type LFU before you insert the CD, it will look for the files on CD and floppy. When it can’t find then it will prompt you for the location of the files. On one DS20 I had to enter DKA500 and not CDA0. On the DS20E I had to enter DQA0. c. It will now ask for the default filename. Press <return> to use the default. Network a. Copy the following files to the local mop server's MOP load area. pc264fw.txt pc264nt.sys pc264srm.sys pc264fsb.sys ccmab022.sys cipca420.sys dfxaa320.sys kzpsaa12.sys b. Execute the LFU command. LFU first checks for options firmware on the CD-ROM, then the floppy drive. The user is then prompted for input. Select the location of the firmware files (dva0 or ewa0) and then <return> to select the default filename to continue the firmware update. The Loadable Firmware Update Utility Menu will then be displayed and the installation continues as usual. P00>>> lfu Checking dka500.5.0.2000.1 for the option firmware files. . . Checking dva0 for the option firmware files. . . Option firmware files were not found on CD or floppy. If you want to load the options firmware, please enter the device on which the files are located(ewa0), or just hit <return> to proceed with a standard console update: ewa0 Please enter the name of the options firmware files list, or Hit <return> to use the default filename (pc264fw.txt) : <return> Copying pc264fw.txt from dva0. . . Copying PC264NT.SYS from dva0. . . Copying PC264SRM.SYS from dva0. . . Copying PC264FSB.SYS from dva0. . . Copying ccmab022.sys from dva0. . . Copying cipca420.sys from dva0. . . Copying dfxaa320.sys from dva0. . . Copying kzpsaa12.sys from dva0. . . UPD> 159 160 Method 5 - Booting Off the Network - OpenVMS a. Copy firmware.sys file to MOM$LOAD of an existing node in the cluster b. Set VMS attributes on the file with the following command. $ Set file/attr=(rfm:fix,lrl:512,mrs:512,rat:none) ds20_v6_1.sys c. Enable service on that node from NCP $ MC NCP MC NCP> Show Known Circuit Characteristic Known Circuit Volatile Characteristics as of 12-FEB-1997 19:27:41 Circuit = BNA-0 - Circuit State = Service = Counter timer = Designated router = Cost = Maximum routers allowed = Router priority = Hello timer = Type = Adjacent node = Listen timer = name will change from system to system on disabled (if enabled skip to boot command) 65534 28.1023 (CXO28A) 4 33 64 15 Ethernet 28.1023 (CXO28A) 30 NCP> Set Circ BNA-0 State OFF - This step will stop network activity NCP> Set Circ BNA-0 Service Enable NCP> Set Circ BNA-0 State ON d. >>> boot ewa0 -file ds20_v6_1 (Leave off .SYS or node that services request will get an error - BAD MOP FID) Method 6 - Boot Off of a Disk - Non-System Disk and System Disk Using OpenVMS Non-System Disk a. Locate the firmware file ds20_v6_1.exe at the firmware website and copy it to your system b. Set the VMS attributes on the file and copy it contiguous to the target disk (non-system) and directory with the following commands: $ set file/attr=(rfm:fix,lrl:512,mrs:512,rat:none) ds20_v6_1.exe $ copy/contiguous ds20_v6_1.exe "non_system_disk":[directory] c. Use writeboot to make the disk bootable. Specify the disk, directory and filename of the firmware. Take the defaults for the other questions. $ MCR Writeboot Update VAX portion of boot block (default is Y): No Update Alpha portion of boot block (default is Y):Yes Target system device (and boot file if not VMB.EXE):$1$dua5:[TEMP]ds20_v6_1.exe d. >>> boot -fl 0,0 dua5 System Disk a. Only steps a and b above are used. Do NOT execute writeboot step c. b. Specify the flags of 0,a0 and use "system disk":[sys0.sysexe]filename for the bootfile. >>> b -fl 0,a dua0 bootfile: dua0:[sys0.sysexe]ds20_v6_1.exe 161 Method 7 - BOOTP Network Upgrade – Tru64 UNIX a. Mount the Firmware Update CD using the following command: # mount -rt cdf– -o noversion /dev/rz4c /mnt b. Modify or Create the Client Database in the /etc/bootptab File <host>:ht:<hw_type>:ha=<hw_addr>:bf=<filename>:ip=<ip_addr> where: host is the system name in /etc/hosts hw_type is the hardware type. Proteon is ht = 4. Ethernet is ht = 1. Regular token-ring (IEEE 802) is ht = 6. hw_addr is the hardware address: use the console command show device. filename is the name of the default bootfile image: ip_addr is the Internet protocol address of the system name in /etc/hosts. The following is an example of a bootptab file for the AlphaServer DS20: bigsox:ht=1:ha=08002b236423:bf=/mnt/DS20/ds20_v6_1.EXE;1:ip=16.182.0.87 c. Modify the /etc/inetd.conf file. Uncommon the tftp and bootps process. It should look like the following example: tftp dgram udp wait root /usr/sbin/tftpd tftpd /mnt bootps dgram upd wait root /usr/sbin/bootpd bootpd d. Find the process /usr/sbin/inetd daemon: This step will stop network traffic # ps aux | grep ine # kill process# <ine process number> e. Restart the inetd daemon: # /usr/sbin/inetd Note The bootpd and tftp daemon will be removed if the system is rebooted. Refer to the manual pages: bootpd(8) or tftpd(8) for more information. Use Man bootpd and man tftpd f. Enter the following command to boot from the BOOTP server: >>> boot -p bootp ewa0 Should a boot file "pathname" need to be specified in must be in quotes >>> boot -p bootp ewa0 -file “/dir1/dir2/filename” 5. At the UPD> prompt type list to verify current and update versions. Then execute Update and Verify Note: If you are running with two CPU’s, you MAY have to disable one CPU before updating. 162 ***** Loadable Firmware Update Utility ***** -----------------------------------------------------------------------------Function Description -----------------------------------------------------------------------------Display Displays the system’s configuration table. Exit Done exit LFU (reset). List Lists the device, revision, firmware name, and update revision. Readme Lists important release information. Update Replaces current firmware with loadable data image. Verify Compares loadable and hardware images. ? or Help Scrolls this function table. ------------------------------------------------------------------------------ UPD> list Device nt srm Current Revision 5.70 5.8-10 Filename nt_fw srm_fw Update Revision 5.71 6.1-2 UPD> update * Confirm update on: nt srm [Y/(N)]y WARNING: updates may take several minutes to complete for each device. DO NOT ABORT! nt srm Updating to 5.71… Verifying 5.71… PASSED. Updating to 6.1-2… Verifying 6.1-2… PASSED. UPD> verify nt srm Verifying 5.71… PASSED. Verifying 6.1-2… PASSED. 163 164 AlphaServer DS20 Jumpers Motherboard SW2 Label Function Default 1 FSB - FailSafe Booter Tells the SROM to jump either to SRM or the FSB (currently the debug monitor) off * 2 CACHE_OFF_A off 3 CACHE_OFF_ B These two bits are currently assigned to different (faster/slower) memory timings 4 MINI_DEB The SROM jumps to the SROM Mini debugger off 5 TS_SPD0 Tsunami speed[0] on 6 TS_SPD1 Tsunami speed[1] on 7 TS_SPD2 Tsunami speed[2] off 8 PASS_BY Selects the debug monitor to output thru the debug port on the daughter card off Label Function Default 1 CON7 Not assigned off 2 CON6 SFD 0 (on) = 2 cycles 3 CON5 4 off SW3 (off) = 3 cycles off SED[1] 00 = 2 cycles 01 = 3 cycles off CON4 SED[0] 10 = 4 cycles 11 = 5 cycles off / on ** 5 CON3 Cpu 1 Clock forward preset off 6 CON2 Cpu 0 Clock forward preset off 7 Spare not used off 8 FLASH_WR Enables write to the Flash ROM off * Off is towards the PCI slots 165 ** SW3-4 default is listed as OFF but it needs to be ON in our lab 166 167 Compaq AlphaServer ES40/TS40 The Compaq AlphaServer ES40 clipper system backplane module (CSB) has 2 1MB flash roms that contain an Abios console firmware for AlphaBIOS and a SRM console firmware for Tru64 UNIX and OpenVMS. The system also has TIG, RMC and SROM code that gets loaded. The ability to write to these roms is controlled by setting jumpers J12 and J13 on the CSB to pins 1-2. When ever the system board is replaced the firmware will need to be updated. You will also need to do occasional console firmware upgrades to load the latest version of firmware that is available. RMC firmware may need to be loaded separately by specifying the proper RMC file at the bootfile prompt. There are several ways to upgrade the firmware. All involve booting Loadable Firmware Utility (LFU). It can be booted one of the following ways. • • • • • • Off the Alpha AXP System Firmware Update Utility CD using the local CDROM. Off an infoserver using the Alpha AXP System Firmware Update Utility CD Over the network using the .SYS firmware file. Off of a firmware floppy - Requires two floppies. Off of a disk that has a bootable version of the firmware file (filename.exe) on it (MCR WRITEBOOT may be required on that file to make it bootable). From the BOOTP server (UNIX). The procedure to update the console firmware is as follows. • • • • • • • • • • • • • Determine current console firmware revision by the power on display, SHOW commands or from online SDA with a CLUE CONFIG command. Record all console environmental variables by typing SHOW * at the >>>. Determine which method and firmware version will be used to do the update. Print the firmware release notes for that version and system. Determine if any option firmware will be upgraded. Verify the ROM Update Jumpers are in the correct positions. Boot the firmware file (LFU). Type exit and answer Y to enter manual update mode. Use the list, update and verify commands at the UPD> prompt. When done exit from LFU. Reboot LFU using the device firmware file to update device firmware. Power off/on the machine to reload the new firmware. Reset any Environmental variables that were changed and reboot. 1. Get current firmware revision at power on or with console SHOW commands. Power on display OpenVMS PALcode V1.52-2, Tru64 UNIX PALcode V1.47-9 starting console on CPU 0 initialized idle PCB initializing semaphores initializing heap initial heap 200c0 memory low limit = 146000 heap = 200c0, 17fc0 initializing driver structures initializing idle process PID initializing file system initializing hardware initializing timer data structures lowering IPL CPU 0 speed is 2.00 ns (500MHz) create dead_eater create poll create timer create powerup access NVRAM 168 Memory size 512 MB testing memory … probe I/O subsystem probing hose 1, PCI bus 0, slot 6 -- ewa -- DE500-BA Network Controller probing hose 0, PCI probing PCI-to-ISA bridge, bus 1 bus 0, slot 2 -- vga -- DEC PowerStorm bus 0, slot 4 -- pka -- NCR 53C895 bus 0, slot 15 -- dqa -- Acer Labs M1543C IDE bus 0, slot 15 -- dqb -- Acer Labs M1543C IDE starting drivers entering idle loop initializing keyboard starting console on CPU 1 initialized idle PCB initializing idle process PID lowering IPL CPU 1 speed is 2.00 ns (500MHz) create powerup os_type: UNIX - console CIPCA driver not started Memory Testing and Configuration Status Array Size Base Address --------- ---------- ---------------0 256Mb 0000000000000000 1 256Mb 0000000010000000 512 MB of System Memory Testing the System Testing the Disks (read only) Testing the Network initializing GCT/FRU at offset 176000 AlphaServer ES40 Console T5.4-4, built on Mar 8 1999 at 18:21:15 P00>>> show version version T5.4-4 Mar P00>>> show pal pal OpenVMS PALcode V1.52-2, Tru64 UNIX PALcode V1.47-9 8 1999 18:21:15 P00>>> show config Compaq Computer Corporation Compaq AlphaServer ES40 Firmware SRM Console: ARC Console: PALcode: Serial Rom: RMC Rom: RMC Flash Rom: T5.4-4 5.68 OpenVMS PALcode V1.52-2, Tru64 UNIX PALcode V1.47-9 t1.9-F V1.0 X1.D Processors CPU 0 CPU 1 Alpha 21264-4 500 MHz Alpha 21264-4 500 MHz Core Logic Cchip Dchip Pchip 0 Pchip 1 TIG DECchip DECchip DECchip DECchip Rev 10 Memory Array --------0 1 Size ---------256Mb 256Mb 21272-CA 21272-DA 21272-EA 21272-EA Rev Rev Rev Rev 4MB Bcache 4MB Bcache 9(C4) 2 2 2 Base Address ---------------0000000000000000 0000000010000000 169 Slot 2 4 512 MB of System Memory Option DEC PowerStorm NCR 53C895 7 15 Acer Labs M1543C Acer Labs M1543C IDE 19 Acer Labs M1543C USB Slot 6 P00>>> Hose 0, Bus 0, PCI pka0.7.0.4.0 dka0.0.0.4.0 dqa.0.0.15.0 dqb.0.1.15.0 dqa0.0.0.15.0 Option Floppy Hose 0, Bus 1, ISA dva0.0.0.1000.0 Option DE500-BA Network Con Hose 1, Bus 0, PCI ewa0.0.0.6.1 SCSI Bus ID 7 RZ2CA-LA Bridge to Bus 1, ISA TOSHIBA CD-ROM XM-* 00-00-F8-1B-2B-EE 2. >>> show or show* to printout all the environmental variables. Check all customer set variables. Also verify the setting of the following variables. Bootdef_dev Boot_osflags Auto_action 3. Check that the ROM update jumpers are enabled. Consult the service manual for their location and setting. It should be enabled by default. 4. Boot the firmware using one of the following methods. Method 1 – Load the Console Firmware Off a Local CDROM SRM Console a. Insert the CD in the local CDROM. b. >>> Boot –fl 0,a0 DQA0 BOOTFILE: [es40]es40_v6_1.exe Note: These filenames will change with different console versions. UPD> See step 5 below for update procedure. AlphaBIOS Console a. Insert the CD in the local CDROM. b. Enter the AlphaBIOS menu by typing ARC or AlphaBIOS or initializing the system when os_type = nt c. AlphaBIOS –Select F2 to go into Setup then select Upgrade AlphaBIOS Method 2 – Boot the Console CD Off of an Infoserver a. Insert CD in the Infoserver b. >>> boot ewa0 –file filename (leave off the .sys extension) Method 3 - Booting Off the Network - OpenVMS a. Copy the firmware to your system from the firmware website at http://ftp.digital.com/pub/Digital/Alpha/firmware/readmes/es40.html b. Copy es40_v6_1.sys file to MOM$LOAD of an existing node in the cluster c. Set VMS attributes on the file with the following command. 170 $ Set file/attr=(rfm:fix,lrl:512,mrs:512,rat:none) es40_v6_1.sys d. Enable service on that node from NCP $ MC NCP MC NCP> Show Known Circuit Characteristic Known Circuit Volatile Characteristics as of 12-FEB-1997 19:27:41 Circuit = BNA-0 - Circuit State = Service = Counter timer = Designated router = Cost = Maximum routers allowed = Router priority = Hello timer = Type = Adjacent node = Listen timer = name will change from system to system on disabled (if enabled skip to boot command) 65534 28.1023 (CXO28A) 4 33 64 15 Ethernet 28.1023 (CXO28A) 30 NCP> Set Circ BNA-0 State OFF - This step will stop network activity NCP> Set Circ BNA-0 Service Enable NCP> Set Circ BNA-0 State ON e. >>> boot ewa0 -file es40_v6_1 (Leave off .SYS or node that services request will get an error - BAD MOP FID) Method 4 - Boot Off of a Floppy NT This method requires two floppies. One with the LFU utility and the other with the system firmware. There are four different LFU files depending on the platform. They are: clu.exe ilu.exe flu.exe glu.exe ES40.zip ES40lp.zip ES40cv.zip TS20-TS40.zip a. Download appropiate zip file from the firmware websites directory at http://ftp.digital.com/pub/Digital/Alpha/firmware/. Extract the files to the same directory on your PC or Alpha. If MKBOOT.EXE does not work on the Alpha locate MAKEBOOT.EXE on Cybrary at http://Cybrary.inet.cpqcorp.net/DOWNLOAD/UTILITIES/SYSTEM/makeboot.zip b. Insert a FAT formatted floppy in the drive c. Bring up a DOS window and execute the MKBOOT command C:\mkboot clu.exe Bad command or file name mkboot V1.1: create a bootable floppy Please insert a formatted diskette into drive A: and press and key: <CR> Number of sectors per track for this disk is 18 Writing image to drive A:. Press ^C to abort. Track: 37 Head: 0 Sector: 10 Done. d. Copy the files clarcrom.exe, clsrmrom.exe for EV6 CPUs or cl67srmrom.exe for EV67 and EV68 CPUs to a second fat formatted floppy. Rename the cl67srmrom.exe file to cl67srm.exe. 171 e. Insert the first floppy in the ES40 DVA0 and boot it. At the UPD prompt type exit and answer Y for manual update >>> Boot DVA0 Checking dqa0.0.0.15.0 for the option firmware files. . . dqa0.0.0.15.0 has no media present or is disabled via the RUN/STOP switch dqa0.0.0.15.0 has no media present or is disabled via the RUN/STOP switch Checking dva0 for the option firmware files. . . If you have a floppy containing option firmware, Please insert it now and hit <return> when ready. <return> Option firmware not copied. . . . UPD> exit Do you want to do a manual update? [y/(n)] y ***** Loadable Firmware Update Utility ***** ---------------------------------------------------------------------------Function Description ---------------------------------------------------------------------------Display Displays the system’s configuration table. Exit Done exit LFU (reset). List Lists the device, revision, firmware name, and update revision. Readme Lists important release information. Update Replaces current firmware with loadable data image. Verify Compares loadable and hardware images. ? or Help Scrolls this function table. ---------------------------------------------------------------------------f. Insert floppy diskette 2. This has clsrmrom.exe and csarcrom.exe on it. UPD> update srm -path fat:clsrmrom.exe/dva0 for EV6 CPUs UPD> update srm -path fat:cl67srm.exe/dva0 for EV67 CPUs Confirm update on: SRM [Y/(N)]y WARNING: updates may take several minutes to complete for each device. DO NOT ABORT! SRM Updating to v5.7-84... Verifying v5.7-84... PASSED. UPD> update abios -path fat:clarcrom.exe/dva0 Confirm update on: Abios [Y/(N)]y WARNING: updates may take several minutes to complete for each device. DO NOT ABORT! Abios Updating to v5.70... Verifying v5.70... PASSED. UPD> exit 172 Tru64 UNIX This method requires two floppies. One with the LFU utility and the other with the system firmware. There are 4 different LFU utilities depending on the system type. a. Locate the following files and unzip them on a PC. They can be found on the firmware website at http://ftp.digital.com/pub/Digital/Alpha/firmware/ • clu.exe ilu.exe flu.exe glu.exe ES40.zip ES40lp.zip ES40cv.zip TS20-TS40.zip These file contain the SRM, AlphaBIOS, LFU image and mkbootfirm.exe files. b. Ftp the files to your UNIX server. Rename cl67srmrom.exe to cl67srm.exe. c. Insert floppy diskette 1. d. Change directory to where files were downloaded. # cd [to directory with files] e. You must set mkbootfirm file permissions to have execute permissions. # chmod 755 mkbootfirm f. Format the floppy. # fddisk -fmt /dev/rfd0a or With Tru64 UNIX V5.0 you can do one of the following # fddisk -fmt /dev/rdisk/floppy0a or # cd /dev # ./MAKEDEV fd0 # fddisk -fmt /dev/rfd0a g. From directory where files are located execute the following # ./mkbootfirm clu.exe |dd of=/dev/rfd0c bs=64k h. Insert floppy diskette 2. i. You need to create special device files for device fd0 if you have not already done this. # cd /dev # ./MAKEDEV fd0 j. Change directory to where files were downloaded. # cd [to directory with files] k. Create a soft link to /dev/fddrive with the following command # ln -s /dev/rfd0c /dev/fddrive l. Format the floppy. # fddisk -fmt /dev/rfd0a or With Tru64 UNIX V5.0 you can do one of the following # fddisk -fmt /dev/rdisk/floppy0a or # fddisk -fmt /dev/rfd0a m. Add a DOS format onto the floppy disk # /usr/bin/mtools/mformat -s 18 a: n. Use mwrite to low level copy UNIX to DOS the SRM and ARC firmware. # /usr/bin/mtools/mwrite clsrmrom.exe a:\clsrmrom.exe for EV6 CPUs # /usr/bin/mtools/mwrite cl67srmrom.exe a:\cl67srm.exe for EV67/EV68 CPUs # /usr/bin/mtools/mwrite clarcrom.exe a:\clarcrom.exe 173 o. Insert the first floppy in the ES40 DVA0 and boot it. At the UPD prompt type exit and answer Y for manual update >>> Boot DVA0 Checking dqa0.0.0.15.0 for the option firmware files. . . dqa0.0.0.15.0 has no media present or is disabled via the RUN/STOP switch dqa0.0.0.15.0 has no media present or is disabled via the RUN/STOP switch Checking dva0 for the option firmware files. . . If you have a floppy containing option firmware, Please insert it now and hit <return> when ready. <return> Option firmware not copied. . . . UPD> exit Do you want to do a manual update? [y/(n)] y ***** Loadable Firmware Update Utility ***** ---------------------------------------------------------------------------Function Description ---------------------------------------------------------------------------Display Displays the system’s configuration table. Exit Done exit LFU (reset). List Lists the device, revision, firmware name, and update revision. Readme Lists important release information. Update Replaces current firmware with loadable data image. Verify Compares loadable and hardware images. ? or Help Scrolls this function table. ---------------------------------------------------------------------------p. Insert floppy diskette 2. This has clsrmrom.exe and csarcrom.exe on it. UPD> update srm -path fat:clsrmrom.exe/dva0 UPD> update srm -path fat:cl67srm.exe/dva0 for EV6 CPUs for EV67 CPUs Confirm update on: SRM [Y/(N)]y WARNING: updates may take several minutes to complete for each device. DO NOT ABORT! SRM Updating to v5.7-84... Verifying v5.7-84... PASSED. UPD> update abios -path fat:clarcrom.exe/dva0 Confirm update on: Abios [Y/(N)]y WARNING: updates may take several minutes to complete for each device. DO NOT ABORT! Abios Updating to v5.70... Verifying v5.70... PASSED. UPD> exit 174 Method 5 - OpenVMS - Boot Off of a Disk - Non-System Disk and System Disk Non-System Disk a. Locate the firmware file es40_v6_1.exe at the firmware website and copy it to your system b. Set the VMS attributes on the file and copy it contiguous to the target disk (non-system) and directory with the following commands: $ set file/attr=(rfm:fix,lrl:512,mrs:512,rat:none) es40_v6_1.exe $ copy/contiguous es40_v6_1.exe "non_system_disk":[directory] c. Use writeboot to make the disk bootable. Specify the disk, directory and filename of the firmware. Take the defaults for the other questions. $ MCR Update Update Target Writeboot VAX portion of boot block (default is Y): No Alpha portion of boot block (default is Y):Yes system device (and boot file if not VMB.EXE):$1$dua5:[TEMP]es40_v6_1.exe d. >>> boot -fl 0,0 dua5 System Disk a. Only steps a and b above are used. Do NOT execute writeboot step c. b. Specify the flags of 0,a0 and use "system disk":[sys0.sysexe]filename for the bootfile. >>> b -fl 0,a dua0 bootfile: dua0:[sys0.sysexe] es40_v6_1.exe Method 6 - BOOTP Network Upgrade – Tru64 UNIX a. Mount the Firmware Update CD using the following command: # mount -rt cdf– -o noversion /dev/rz4c /mnt b. Modify or Create the Client Database in the /etc/bootptab File <host>:ht:<hw_type>:ha=<hw_addr>:bf=<filename>:ip=<ip_addr> where: host is the system name in /etc/hosts hw_type is the hardware type. Proteon is ht = 4. Ethernet is ht = 1. Regular token-ring (IEEE 802) is ht = 6. hw_addr is the hardware address: use the console command show device. filename is the name of the default bootfile image: ip_addr is the Internet protocol address of the system name in /etc/hosts. The following is an example of a bootptab file for the AlphaServer ES40: bigsox:ht=1:ha=08002b236423:bf=/mnt/ES40/es40_v6_1.exe;1:ip=16.182.0.87 c. Modify the /etc/inetd.conf file. Uncommon the tftp and bootps process. It should look like the following example: tftp dgram udp wait root /usr/sbin/tftpd tftpd /mnt bootps dgram upd wait root /usr/sbin/bootpd bootpd d. Find the process /usr/sbin/inetd daemon: This step will stop network traffic # ps aux | grep ine # kill process# <ine process number> e. Restart the inetd daemon: # /usr/sbin/inetd 175 Note The bootpd and tftp daemon will be removed if the system is rebooted. Refer to the manual pages: bootpd(8) or tftpd(8) for more information. Use Man bootpd and man tftpd f. Enter the following command to boot from the BOOTP server: >>> boot -p bootp ewa0 Should a boot file "pathname" need to be specified in must be in quotes >>> boot -p bootp ewa0 -file “/dir1/dir2/filename” 5. At the UPD> prompt type exit then answer Y to the question Do you want to do a manual update? This is required to update TIG and RMC firmware. UPD> exit Do you want to do a manual update [y/(n)]? Y 6. At the UPD> prompt type list to verify current and update versions. Then execute Update and Verify w AlphaBIOS ***** Loadable Firmware Update Utility ***** ---------------------------------------------------------------------------Function Description ---------------------------------------------------------------------------Display Displays the system’s configuration table. Exit Done exit LFU (reset). List Lists the device, revision, firmware name, and update revision. Readme Lists important release information. Update Replaces current firmware with loadable data image. Verify Compares loadable and hardware images. ? or Help Scrolls this function table. ---------------------------------------------------------------------------UPD> list Device Abios SRM rmc srom tig Current Revision 5.70 v5.8-43 v2.5 v2.11-F 10 Filename abios_fw srm_fw rmc_fw srom_fw tig_fw Update Revision 5.70 v5.9-24 v2.6 v2.12-F 10 UPD> update * Confirm update on: Abios SRM rmc srom tig [Y/(N)]y WARNING: updates may take several minutes to complete for each device. DO NOT ABORT! Abios Updating to 5.70... Verifying 5.70... PASSED. SRM Updating to v5.9-24... Verifying v5.9-24... PASSED. rmc Updating to V2.6... Verifying V2.6... PASSED. srom Updating to V2.12-F... Verifying V2.12-F... PASSED. tig update rev 10 is less than current rev f. Continue [Y/N] y tig Updating to 10... Verifying 10... PASSED. 176 177 Compaq AlphaServer ES40 Jumpers CSB - System Backplane CSB Jumper Position Function J21 1-2 2-3 1-2 2-3 Disable RMC Flash Update Enable RMC Flash Update Load TIG from Flash RAM Load TIG from Serial ROM J20 1-2 = “0” 2-3 = “1” FIR_FUNC2 FIR_FUNC Table J22 1-2 = “0” 2-3 = “1” FIR_FUNC1 J23 1-2 = “0” 2-3 = “1” FIR_FUNC0 000 = Normal 001 = Prevent FLASH Loads/Load from SROM 010 = Load from Floppy 111 = Lock Console 1-2 2-3 Enable Flash ROM Update Disable Flash ROM Update J24 J12 / J13 178 179 Compaq AlphaServer ES45 The Compaq AlphaServer ES45 privateer system backplane module (CSB) contains a flash ROM that holds a SRM console firmware for Tru64 UNIX and OpenVMS. The system also has TIG, RMC and SROM code that gets loaded. The ability to write to these roms is controlled by setting jumpers J7, J19 and J20 on the CSB to pins 1-2. When ever the system board is replaced the firmware will need to be updated. You will also need to do occasional console firmware upgrades to load the latest version of firmware that is available. There are several ways to upgrade the firmware. All involve booting Loadable Firmware Utility (LFU). It can be booted one of the following ways. • • • • • • Off the Alpha AXP System Firmware Update Utility CD using the local CDROM. Off an infoserver using the Alpha AXP System Firmware Update Utility CD Over the network using the .SYS firmware file. Off of a firmware floppy using LFU Off of a disk that has a bootable version of the firmware file (filename.exe) on it (MCR WRITEBOOT may be required on that file to make it bootable). From the BOOTP server (UNIX). The procedure to update the console firmware is as follows. • • • • • • • • • • • • • Determine current console firmware revision by the power on display, SHOW commands or from online SDA with a CLUE CONFIG command. Record all console environmental variables by typing SHOW * at the >>>. Determine which method and firmware version will be used to do the update. Print the firmware release notes for that version and system. Determine if any option firmware will be upgraded. Verify the ROM Update Jumpers are in the correct positions. Boot the firmware file (LFU). Type exit and answer Y to enter manual update mode. Use the list, update and verify commands at the UPD> prompt. When done exit from LFU. Reboot LFU using the device firmware file to update device firmware. Power off/on the machine to reload the new firmware. Reset any Environmental variables that were changed and reboot. 1. Get current firmware revision at power on or with console SHOW commands. Power on display SROM V2.18 CPU # 00 @ SROM program starting Reloading SROM 1000 SROM V2.18-F CPU # 00 @ System Bus Speed @ 0125 SROM program starting PCI66 bus speed check Reloading SROM MHz 1000 MHz MHz SROM V2.18-F CPU # 00 @ 1000 MHz System Bus Speed @ 0125 MHz SROM program starting PCI66 bus speed check Starting secondary on CPU #1 Starting secondary on CPU #2 Starting secondary on CPU #3 Bcache data tests in progress Bcache address test in progress CPU parity and ECC detection in progress Bcache ECC data tests in progress Bcache TAG lines tests in progress 180 Memory sizing in progress Memory configuration in progress Testing AAR1 Memory data test in progress Memory address test in progress Memory pattern test in progress Testing AAR0 Memory data test in progress Memory address test in progress Memory pattern test in progress Memory thrashing test in progress Memory initialization Loading console Code execution complete (transfer control) OpenVMS PALcode V1.93-37, Tru64 UNIX PALcode V1.88-28 starting console on CPU 0 initialized idle PCB initializing semaphores initializing heap initial heap 240c0 memory low limit = 1ec000 heap = 240c0, 17fc0 initializing driver structures initializing idle process PID initializing file system initializing timer data structures lowering IPL CPU 0 speed is 1000 MHz create dead_eater create poll create timer create powerup access NVRAM 1024 MB of System Memory Testing Memory ... probe I/O subsystem Hose 0 - PCI bus running at 33Mhz entering idle loop probing hose 0, PCI probing PCI-to-ISA bridge, bus 1 bus 0, slot 8 -- pka -- NCR 53C895 bus 0, slot 9 -- eia -- DE600-AA bus 0, slot 11 -- vga -- ELSA GLoria Synergy bus 0, slot 16 -- dqa -- Acer Labs M1543C IDE bus 0, slot 16 -- dqb -- Acer Labs M1543C IDE Hose 1 - PCI bus running at 33Mhz probing hose 1, PCI Hose 2 - PCI bus running at 66Mhz probing hose 2, PCI Hose 3 - PCI bus running at 66Mhz probing hose 3, PCI starting drivers initializing keyboard starting console on CPU 1 initialized idle PCB initializing idle process PID lowering IPL CPU 1 speed is 1000 MHz create powerup starting console on CPU 2 initialized idle PCB initializing idle process PID lowering IPL CPU 2 speed is 1000 MHz create powerup starting console on CPU 3 181 initialized idle PCB initializing idle process PID lowering IPL CPU 3 speed is 1000 MHz create powerup initializing GCT/FRU at 220000 initializing pka dqa dqb eia Memory Testing and Configuration Status Array Size Base Address --------- ---------- ---------------0 512Mb 0000000000000000 1 512Mb 0000000020000000 Intlv Mode ---------2-Way 2-Way 1024 MB of System Memory Testing the System Testing the Disks (read only) Testing the Network AlphaServer ES45 Console V6.1-3, built on Oct 15 2001 at 14:04:04 P00>>> show version version V6.1-3 Oct 15 2001 14:04:04 P00>>> show pal pal OpenVMS PALcode V1.93-37, Tru64 UNIX PALcode V1.88-28 P00>>> show config Compaq Computer Corporation Compaq AlphaServer ES45 Model 2 Firmware SRM Console: PALcode: Serial ROM: RMC ROM: RMC Flash ROM: V6.1-3 OpenVMS PALcode V1.93-37, Tru64 UNIX PALcode V1.88-28 V2.18-F V1.0 V1.9 Processors CPU 0 CPU 1 CPU 2 CPU 3 Alpha Alpha Alpha Alpha Core Logic Cchip Dchip PPchip 0 PPchip 1 TIG Rev Rev Rev Rev Rev Memory Array --------0 1 EV68CB EV68CB EV68CB EV68CB pass pass pass pass 2 2 2 2 or or or or 2.1 2.1 2.1 2.1 1000 1000 1000 1000 MHz MHz MHz MHz 8MB 8MB 8MB 8MB Bcache Bcache Bcache Bcache 17 17 17 17 2.6 Size ---------512Mb 512Mb Base Address ---------------0000000000000000 0000000020000000 Intlv Mode ---------1-Way 1-Way 1024 MB of System Memory Slot 7 8 9 11 12 16 Option Acer Labs M1543C NCR 53C895 DE600-AA ELSA GLoria Synergy Yukon PCI Hot-Plug C Acer Labs M1543C IDE Hose 0, Bus 0, PCI - 33 MHz Bridge to Bus 1, ISA pka0.7.0.8.0 SCSI Bus ID 7 dka0.0.0.8.0 COMPAQ BD018635CC dka100.1.0.8.0 COMPAQ BD018635CC eia0.0.0.9.0 00-50-8B-69-A3-A2 vga0.0.0.11.0 dqa.0.0.16.0 dqb.0.1.16.0 dqa0.0.0.16.0 Compaq CRD-8402B 182 Option Floppy Hose 0, Bus 1, ISA dva0.0.0.1000.0 Slot 6 Option Yukon PCI Hot-Plug C Hose 1, Bus 0, PCI - 33 MHz Slot 2 6 Option QSW ELan3 Yukon PCI Hot-Plug C Hose 3, Bus 0, PCI - 66 MHz 2. >>> show or show* to printout all the environmental variables. Check all customer set variables. Also verify the setting of the following variables. Bootdef_dev Boot_osflags Auto_action 3. Check that the ROM update jumpers are enabled. Consult the service manual for their location and setting. It should be enabled by default. 4. Boot the firmware using one of the following methods. Method 1 – Load the Console Firmware Off a Local CDROM SRM Console a. Insert the CD in the local CDROM. b. >>> Boot –fl 0,a0 DQA0 BOOTFILE: [es45]es45_v6_1.exe Note: These filenames will change with different console versions. UPD> See step 5 below for update procedure. Method 2 – Boot the Console CD Off of an Infoserver a. Insert CD in the Infoserver b. >>> boot eia0 –file filename (leave off the .sys extension) Method 3 - Booting Off the Network - OpenVMS a. Copy the firmware to your system from the firmware website at http://ftp.digital.com/pub/DEC/Alpha/firmware/readmes/es45.html b. Copy es45_v6_1.sys file to MOM$LOAD of an existing node in the cluster c. Set VMS attributes on the file with the following command. $ Set file/attr=(rfm:fix,lrl:512,mrs:512,rat:none) es45_v6_1.sys d. Enable service on that node from NCP $ MC NCP MC NCP> Show Known Circuit Characteristic Known Circuit Volatile Characteristics as of 12-FEB-1997 19:27:41 Circuit = BNA-0 - Circuit State = Service = Counter timer = Designated router = Cost = Maximum routers allowed = name will change from system to system on disabled (if enabled skip to boot command) 65534 28.1023 (CXO28A) 4 33 183 Router priority Hello timer Type Adjacent node Listen timer = = = = = 64 15 Ethernet 28.1023 (CXO28A) 30 NCP> Set Circ BNA-0 State OFF - This step will stop network activity NCP> Set Circ BNA-0 Service Enable NCP> Set Circ BNA-0 State ON e. >>> boot eia0 -file es45_v6_1 (Leave off .SYS or node that services request will get an error - BAD MOP FID) Method 4 – Using the Console LFU Command Floppy a. Obtain the ES45 disk1.zip file from the firmware website at http://ftp.digital.com/pub/DEC/Alpha/firmware/readmes/v6.1/es45/disk1.zip and save it to your PC. b. Insert a FAT formatted floppy in the drive c. Extract all the files from disk1.zip to the floppy. d. Insert the floppy in the ES45 DVA0 and at the P00>>> type LFU. e. The LFU utility is involked and it will indicate that Options firmware files were not found. It will prompt you for a device where the firmware is located. Type DVA0. f. When it asks for the default filename hit enter to take the default es45fw.txt. g. At the UPD> prompt type exit and answer Y to the question Do you want to do a manual update? [y/(n)] h. List will show current and update revisions. Update will load new firmware. i. Type verify to make sure the update was successful and then exit. P00>>>lfu Checking dqa0.0.0.16.0 for the option firmware files. . . dqa0.0.0.16.0 has no media present or is disabled via the RUN/STOP switch Checking dva0.0.0.1000.0 for the option firmware files. . . Option firmware files were not found on CD or floppy. If you want to load the options firmware, please enter the device on which the files are located(ewa0), or just hit <return> to proceed with a standard console update: dva0 Please enter the name of the options firmware files list, or Hit <return> to use the default filename (es45fw.txt) : Copying es45fw.txt from dva0. . . Copying PRSRMROM from dva0. . . Copying PRSROM from dva0. . . Copying PRTIGROM from dva0. . . Copying PRRMCROM from dva0. . . . . . UPD> exit Do you want to do a manual update? [y/(n)] y 184 ***** Loadable Firmware Update Utility ***** ---------------------------------------------------------------------------Function Description ---------------------------------------------------------------------------Display Displays the system’s configuration table. Exit Done exit LFU (reset). List Lists the device, revision, firmware name, and update revision. Readme Lists important release information. Update Replaces current firmware with loadable data image. Verify Compares loadable and hardware images. ? or Help Scrolls this function table. ---------------------------------------------------------------------------UPD> list Device SRM rmc srom tig Current Revision t5.9-4 T1.6 V2.14-F 2.6 Filename srm_fw rmc_fw srom_fw tig_fw Update Revision v6.1-3 V1.9 V2.18-F 2.6 UPD> update Confirm update on: SRM rmc srom tig [Y/(N)]y WARNING: updates may take several minutes to complete for each device. DO NOT ABORT! SRM rmc srom tig Updating Updating Updating Updating to to to to v6.1-3... Verifying v6.1-3... PASSED. V1.9... Verifying V1.9... PASSED. V2.18-F... Verifying V2.18-F... PASSED. 2.6... Verifying 2.6... PASSED. UPD> verify SRM rmc srom tig Verifying Verifying Verifying Verifying v6.1-3... PASSED. V1.9... PASSED. V2.18-F... PASSED. 2.6... PASSED. Method 5 - OpenVMS - Boot Off of a Disk - Non-System Disk and System Disk Non-System Disk a. Locate the firmware file es45_v6_1.exe at the firmware website and copy it to your system b. Set the VMS attributes on the file and copy it contiguous to the target disk (non-system) and directory with the following commands: $ set file/attr=(rfm:fix,lrl:512,mrs:512,rat:none) es45_v6_1.exe $ copy/contiguous es45_v6_1.exe "non_system_disk":[directory] c. Use writeboot to make the disk bootable. Specify the disk, directory and filename of the firmware. Take the defaults for the other questions. $ MCR Update Update Target Writeboot VAX portion of boot block (default is Y): No Alpha portion of boot block (default is Y):Yes system device (and boot file if not VMB.EXE):$1$dua5:[TEMP]es45_v6_1.exe 185 d. >>> boot -fl 0,0 dua5 System Disk a. Only steps a and b above are used. Do NOT execute writeboot step c. b. Specify the flags of 0,a0 and use "system disk":[sys0.sysexe]filename for the bootfile. >>> b -fl 0,a dua0 bootfile: dua0:[sys0.sysexe]es45_v6_1.exe Method 6 - BOOTP Network Upgrade – Tru64 UNIX a. Mount the Firmware Update CD using the following command: # mount -rt cdf– -o noversion /dev/rz4c /mnt b. Modify or Create the Client Database in the /etc/bootptab File <host>:ht:<hw_type>:ha=<hw_addr>:bf=<filename>:ip=<ip_addr> where: host is the system name in /etc/hosts hw_type is the hardware type. Proteon is ht = 4. Ethernet is ht = 1. Regular token-ring (IEEE 802) is ht = 6. hw_addr is the hardware address: use the console command show device. filename is the name of the default bootfile image: ip_addr is the Internet protocol address of the system name in /etc/hosts. The following is an example of a bootptab file for the AlphaServer ES45: bigsox:ht=1:ha=08002b236423:bf=/mnt/ES45/es45_v6_1.exe;1:ip=16.182.0.87 c. Modify the /etc/inetd.conf file. Uncommon the tftp and bootps process. It should look like the following example: tftp dgram udp wait root /usr/sbin/tftpd tftpd /mnt bootps dgram upd wait root /usr/sbin/bootpd bootpd d. Find the process /usr/sbin/inetd daemon: This step will stop network traffic # ps aux | grep ine # kill process# <ine process number> e. Restart the inetd daemon: # /usr/sbin/inetd Note The bootpd and tftp daemon will be removed if the system is rebooted. Refer to the manual pages: bootpd(8) or tftpd(8) for more information. Use Man bootpd and man tftpd f. Enter the following command to boot from the BOOTP server: >>> boot -p bootp eia0 Should a boot file "pathname" need to be specified in must be in quotes >>> boot -p bootp eia0 -file “/dir1/dir2/filename” 5. At the UPD> prompt type exit then answer Y to the question Do you want to do a manual update? This is required to update TIG and RMC firmware. UPD> exit Do you want to do a manual update [y/(n)]? Y 6. At the UPD> prompt type list to verify current and update versions. Then 186 execute Update and Verify ***** Loadable Firmware Update Utility ***** ---------------------------------------------------------------------------Function Description ---------------------------------------------------------------------------Display Displays the system’s configuration table. Exit Done exit LFU (reset). List Lists the device, revision, firmware name, and update revision. Readme Lists important release information. Update Replaces current firmware with loadable data image. Verify Compares loadable and hardware images. ? or Help Scrolls this function table. ---------------------------------------------------------------------------UPD> list Device SRM rmc srom tig Current Revision t5.9-4 T1.6 V2.14-F 2.6 Filename srm_fw rmc_fw srom_fw tig_fw Update Revision v6.1-3 V1.9 V2.18-F 2.6 UPD> update Confirm update on: SRM rmc srom tig [Y/(N)]y WARNING: updates may take several minutes to complete for each device. DO NOT ABORT! SRM rmc srom tig Updating Updating Updating Updating to to to to v6.1-3... Verifying v6.1-3... PASSED. V1.9... Verifying V1.9... PASSED. V2.18-F... Verifying V2.18-F... PASSED. 2.6... Verifying 2.6... PASSED. UPD> verify SRM rmc srom tig Verifying Verifying Verifying Verifying v6.1-3... PASSED. V1.9... PASSED. V2.18-F... PASSED 2.6... PASSED. 187 Compaq AlphaServer ES45 Jumpers CSB - System Backplane 188 CSB Jumper Position Function J20 1-2 2-3 1-2 2-3 1-2 2-3 Disable RMC Flash Update Enable RMC Flash Update (Normal) Enable TIG Flash ROM Update (Normal) Disable TIG Flash ROM Update Enable SROM Flash ROM Update (Normal) Disable SROM Flash ROM Update J21 1-2 = “0” 2-3 = “1” FIR_FUNC2 J22 1-2 = “0” 2-3 = “1” FIR_FUNC1 J23 1-2 = “0” 2-3 = “1” FIR_FUNC0 J24 1-2 2-3 Load TIG from flash ROM (Normnal) Failsafe – Load TIG from SROM J7 J19 FIR_FUNC Table 000 = Load from flash ROM (Normal) 001 = Load from SROM/Prevent FLASH Loads 010 = Load from Floppy 111 = Lock Console 189 AlphaStation 200/250 Full Flash Systems The AlphaStation 200 system comes in full and half flash configurations. Half flash systems contain only 2 roms and can not have both SRM and ARC console loaded at the same time. The AlphaStation 200 and 250 full flash systems contain 4 flash roms on the motherboard. Two contain ARC console firmware for Windows NT and two contain SRM console firmware for Tru64 UNIX and OpenVMS. The ability to write to these roms is controlled on the AlphaStation 200 by jumper J6 on the motherboard/system module and by jumper J4 for the AlphaStation 250. When ever the CPU module is replaced the firmware will need to be updated. You will also need to do occasional console firmware upgrades to load the latest version of firmware that is available. There are several ways to upgrade the firmware. All involve booting Loadable Firmware Utility (LFU). It can be booted one of the following ways. • • • • • • Off the Alpha AXP System Firmware Update Utility CD using the local CDROM. Off of an infoserver using the Alpha AXP System Firmware Update Utility CD. Over the network using the .SYS firmware file. Off of a disk that has a bootable version of the firmware file (filename.exe) on it (MCR WRITEBOOT may be required on that file to make it bootable). Off of a bootable floppy OpenVMS, Unix or NT. From the BOOTP server (UNIX). The procedure to update the console firmware is as follows. • • • • • • • • • • • • Determine current console firmware revision by the power on display, SHOW commands or from online SDA with a CLUE CONFIG command. Record all console environmental variables by typing SHOW * at the >>>. Determine which method and firmware version will be used to do the update. Print the firmware release notes for that version and system. Determine if any option firmware will be upgraded. Verify the ROM Update Jumpers are in the correct positions. Boot the firmware file (LFU). Use the verify and update commands at the Apu-> prompt. When done exit from LFU. Reboot LFU using the device firmware file to update device firmware. Power off/on the machine to reload the new firmware. Reset any Environmental variables that were changed and reboot. 1. Get current firmware revision at power on or with console SHOW commands. Power on display ff.fe.fd.fc.fb.fa.f9.f8.f7.f6.f5. ef.ee.ed.ec.eb.f4.ea.e9.e8.e7.e6.e5.e4. X5.0-29, built on Jul 18 1995 at 16:20:48 >>> show version Version X5.0-29 Jul 18 1995 16:20:48 >>> show pal PAL VMS PALcode X5.48-107, OSF PALcode X1.35-76 >>> show config Firmware SRM Console: X5.0-29 ARC Console: 4.37 PALcode: VMS PALcode X5.48-107, OSF PALcode X1.35-76 Serial ROM: V4.6 Diag ROM: V1.6 Processor DECchip (tm) 21064-2 166Mhz 512KB Cache 190 MEMORY 32 Meg Bank 0 Bank 1 Bank 2 of System Memory = 16 Mbytes(8 MB Per Simm) Starting at 0x0 = 16 Mbytes(8 MB Per Simm) Starting at 0x1000000 = No Memory Detected PCI Bus Bus 00 Slot 06: NCR 810 Scsi Controller pka0.7.0.6.0 dka0.0.0.6.0 dka400.4.0.6.0 SCSI Bus ID 7 RZ26L RRD43 Bus 00 Slot 07: Intel SIO 82378 Bus 00 Slot 11: Digital ZLXp Graphics Controller Bus 00 Slot 12: Digital DE435 Network Controller ewa0.0.0.12.0 08-00-2B-E2-1C-25 ISA Slot 0 2 Device 0 1 2 3 4 5 0 Name Type MOUSE Embedded KBD Embedded COM1 Embedded COM2 Embedded LPT1 Embedded FLOPPY Embedded PCXBJ Singleport Enabled Yes Yes Yes Yes Yes Yes Yes BaseAddr 60 60 3f8 2f8 3bc 3f0 530 IRQ 12 1 4 3 7 6 9 DMA 2 0 2. >>> show or show * to printout all the environmental variables. Check all customer set variables (alternate boot paths etc.). Also verify the following variables. Bootdef_dev Boot_osflags Auto_action 3. Check that the ROM update jumper is enabled. Consult the Service Manual for its location and setting. It should be enabled by default. 4. Boot the firmware using one of the following six methods. Method 1 - Boot the Console CD Off a Local CDROM SRM Console a. Insert the CD in the local CDROM. b. >>> boot -fl 0,a DKA400 BOOTFILE:[alpha200]as200_v7_0. exe - For the AlphaStation 200 or 250 Note: These filenames will change with different console versions. Apu-> See step 5 below for update procedure. ARC Console a. Insert the CD in the local CDROM. b. Enter the ARC menu by typing ARC or initializing system if os_type = NT c. Select Supplementary Menu and Install new Firmware 191 Method 2 - Boot the Console CD Off of an Infoserver a. Insert the CD in the Infoserver b. >>> boot ewa0 -file filename (leave off the .sys extension) Method 3 - Booting Off the Network - OpenVMS a. Copy firmware.sys file to MOM$LOAD of an existing node in the cluster b. Set VMS attributes on the file with the following command. $ Set file/attr=(rfm:fix,lrl:512,mrs:512,rat:none) firmware.sys c. Enable service on that node from NCP $ MC NCP MC NCP> Show Known Circuit Characteristic Known Circuit Volatile Characteristics as of 12-FEB-1997 19:27:41 Circuit = BNA-0 - Circuit State = Service = Counter timer = Designated router = Cost = Maximum routers allowed = Router priority = Hello timer = Type = Adjacent node = Listen timer = name will change from system to system on disabled (if enabled skip to boot command) 65534 28.1023 (CXO28A) 4 33 64 15 Ethernet 28.1023 (CXO28A) 30 NCP> Set Circ BNA-0 State OFF - This step will stop network activity NCP> Set Circ BNA-0 Service Enable NCP> Set Circ BNA-0 State ON d. >>> boot ewa0 -file filename (Leave off .SYS or node that services request will get an error - BAD MOP FID) Method 4 - Boot Off of a Disk - Non-System Disk and System Disk Using OpenVMS Non-System Disk a. Locate the firmware.exe file b. Set the VMS attributes on the file and copy it contiguous to the target disk (non-system) and directory with the following commands: $ set file/attr=(rfm:fix,lrl:512,mrs:512,rat:none) firmware.exe $ copy/contiguous firmware.exe "non_system_disk":[directory] c. Use writeboot to make the disk bootable. Specify the disk, directory and filename of the firmware. Take the defaults for the other questions. $ MCR Writeboot Update VAX portion of boot block (default is Y): No Update Alpha portion of boot block (default is Y):Yes Target system device (and boot file if not VMB.EXE):$1$dua5:[TEMP]as200_v7_0.exe d. >>> boot -fl 0,0–dua5 192 System Disk a. Only steps a and b above are used. Do NOT execute writeboot step c. b. Specify the flags of 0,a0 and use "system disk":[sys0.sysexe]filename for the bootfile. >>> b -fl 0,a dua0 bootfile: dua0:[sys0.sysexe]as200_v7_0.exe Method 5 - Boot Off of a Bootable Floppy OpenVMS AXP a. Init and mount to floppy. Create a directory and copy the firmware to the Floppy with the following commands. $ set file/attr=(rfm:fix,lrl:512,mrs:512,rat:none) as200_v7_0.exe $ init/dens=HD/index=begin dva0: fwupdate $ mount dva0: fwupdate $ create/dir dva0:[ALPHA200] $ copy/contiguous as200_v7_0.exe dva0:[ALPHA200]fwupdate.exe b. MCR Writeboot Update VAX portion of boot block (default is Y): No Update Alpha portion of boot block (default is Y):Yes [enter AXP bootfile:] dva0:[ALPHA200]fwupdate.exe c. Dismount the disk and shutdown VMS. $ dismount dva0: d. Insert the floppy on the target system and boot it from the >>>. >>> boot dva0 Tru64 UNIX a. Go to the Digital Internet firmware site at http://ftp.digital.com/pub/Digital/Alpha/firmware/ b. Copy the firmware.exe file from the Alpha200 directory to your system and Rename it fwupdate.exe c. Download the file mkbootfirm.tar from the firmware website. ftp://ftp.digital.com/pub/Digital/Alpha/firmware/utilities/mkbootfirm.tar You can untar mkbootfirm on your target Tru64 UNIX system with the command: # tar xvf mkbootfirm.tar d. Make sure you have a floppy that has been low-level formatted. For example, to low-level format a floppy in drive 0: fddisk -fmt /d–v/rfd0a e. Change default to directory with mkbootfirm.exe cd mkbootfirm f. Run mkbootfirm on the .exe uses a .exe firmware image The following command will firmware image: ./mkbootfirm fwupdate.exe | NOTE: Assumes mkbootfirm.exe firmware image that you downloaded. mkbootfirm to create a file that can be dd’d to floppy. create a bootable floppy from a downloaded .exe dd of=/dev/rfd0c bs=64k is in current directory and floppy is in drive 0. g. Insert the floppy on the target system and boot it from the SRM console: >>> boot dva0 193 Windows NT a. Copy the firmware file to a FAT formatted floppy with the update image filename of a:\fwupdate.exe. b. Shut down NT and from the NT Console menu, select "Install“ new firmware". Method 6 – BOOTP Network Upgrade – Tru64 UNIX a. Mount the Firmware Update CD using the following command: # mount -rt cdf– -o noversion /dev/rz4c /mnt b. Modify or Create the Client Database in the /etc/bootptab File <host>:ht:<hw_type>:ha=<hw_addr>:bf=<filename>:ip=<ip_addr> where: host is the system name in /etc/hosts hw_type is the hardware type. Proteon is ht = 4. Ethernet is ht = 1. Regular token-ring (IEEE 802) is ht = 6. hw_addr is the hardware address: use the console command show device. filename is the name of the default bootfile image: ip_addr is the Internet protocol address of the system name in /etc/hosts. The following is an example of a bootptab file for both the AlphaServer 200 and 250 machines: bigsox:ht=1:ha=08002b236423:bf=/mnt/ALPHA200/as200_v7_0.EXE;1:ip=16.182.0.87 c. Modify the /etc/inetd.conf file. Uncommon the tftp and bootps process. It should look like the following example: tftp dgram udp wait root /usr/sbin/tftpd tftpd /mnt bootps dgram upd wait root /usr/sbin/bootpd bootpd d. Find the process /usr/sbin/inetd daemon: This step will stop network traffic # ps aux | grep ine # kill process# <ine process number> e. Restart the inetd daemon: # /usr/sbin/inetd Note The bootpd and tftp daemon will be removed if the system is rebooted. Refer to the manual pages: bootpd(8) or tftpd(8) for more information. Use Man bootpd and man tftpd f. Enter the following command to boot from the BOOTP server: >>> boot -p boot– ewa0 Should a boot file "pathname" need to be specified in must be in quotes >>> boot -p boot– ewa0 -file “–dir1/dir2/filename” 194 5. Update the firmware from the Apu-> prompt Apu-> update APU-I ARE YOU READY TO PROGRAM (SRM ) ROM DEVICE ? (Y/N) y APU-I PRECHARGING (SRM ) ROM DEVICE APU-I ERASING (SRM ) ROM DEVICE APU-I PROGRAMMING (SRM ) ROM DEVICE APU-I VERIFY LOADED (SRM ) ROM IMAGE APU-I VERIFY LOADED (SRM ) ROM IMAGE DONE APU-I PROGRAMMING (SRM ) ROM COMPLETED APU-I PRECHARGING (ARC /AlphaBIOS) ROM DEVICE APU-I ERASING (ARC /AlphaBIOS) ROM DEVICE APU-I PROGRAMMING (ARC /AlphaBIOS) ROM DEVICE APU-I VERIFY LOADED (ARC /AlphaBIOS) ROM IMAGE APU-I VERIFY LOADED (ARC /AlphaBIOS) ROM IMAGE DONE APU-I PROGRAMMING (ARC /AlphaBIOS) ROM COMPLETED Apu-> Apu-> exit Hard Reset or ...Cycle Power ... 6. Verify that update was successful Apu-> verify SRM ROM verify successful ARC /AlphaBIOS ROM verify successful 7. Power cycle the machine to load console firmware. If you are updating device firmware, proceed to step 8. 8. Update the option firmware. The options supported for update in the V5.9 CD firmware version are the PCI options DEFPA (FDDI), KZPSA (SCSI) and the EISA option DEFEA (FDDI). a. Boot the Option firmware file. >>> boot -fl 0,a– DKA400 Bootfile:[ALPHA200]as200_pci_v1_4.exe for the AlphaStation 200 and 250 This filename will change with each new firmware release. *** PCI/EISA Loadable Firmware Update Utility V6.0 *** Function Description Display Displays the system’s configuration table. Exit Done exit LFU (reset.) List Lists the device, revision, firmware name, and update revision. Update Replaces current firmware with loadable data image. Verify Compares loadable and hardware images. ? or Help Scrolls this function table. UPD> list Device fwa0 pka0 Current Revision 2.46 A06 Filename dfxaa_fw kzpsa_fw Update Revision 3.20 A12 195 UPD> update * or update Will update all LFU supported devices found in this system UPD> update pka0 - will update device PKA0 Confirm update on: pka0 [Y/(N)]Y WARNING: updates may take several minutes to complete for each device. DO NOT ABORT! pka0 Updating to A12... Verifying A12... PASSED. UPD> update fwa0 -path m–pd1:new_firm/eza0 Will update the device named fwa0 with firmware NEW_FIRM from the network. UPD>verify fwa0 pka0 Verifying 3.20... PASSED. Verifying A12... PASSED. 9. Power cycle the machine to load console firmware then reset any environmental variables that changed, init and reboot. 196 197 AlphaStation 200 Jumpers Motherboard 198 Setting AlphaStation 200 Motherboard Jumper Function Description (1 to 2) Mini-console. (2 to 3) (D) Jump to main console. (1 to 2) Boot floppy. (2 to 3) (D) Normal (flashROM load). J3 (1 to 2) (D) (2 to 3) Reset. Halt Interrupt Request. The position of J1 determines whether the SROM code goes to the SROM mini-console (for manufacturing use) or passes control to the next stage of initialization, the DROM code. The DROM code uses J2 to determine whether an image from a floppy disk or the flashROM containing the console firmware should be loaded into memory and started. The front-panel push button can be set to cause either a Reset or a Halt Interrupt Request. J4 (1 to 2) and (3 to 4) PLL clock source. This jumper is used to select the clock source. Not installed (D) Oscillator clock The AlphaStation 200 Series system uses the oscillator as the clock source. J6 (1 to 2) (D) 2 to 3) Enables flashROM writes. Disables writes. The J6 jumper can be used to prevent writes to the flashROMs. Typically writes are enabled. J17 (1 to 2) (3 to 4) (5 to 6) Keyboard controller inputs. All are unused. (1 to 2) Disables sensing for presence of external cable. J21 controls the automatic SCSI bus terminator. If an external SCSI cable is attached to the SCSI connector, the automatic SCSI terminator turns off. The SCSI bus must be terminated at the end of the external bus. When sensing is disabled (J21 1 to 2 installed), an external SCSI terminator is required, even if no external SCSI devices are present. Hang Off (D) Enables sensing for the presence of an external SCSI cable. If a cable is present, the SCSI bus must be terminated at the end of the external bus. J22 (1 to 2) (D) Removed 87332 Super I/O chip. 87312 Super I/O chip. J22 is installed when the 87332 Super I/O chip is used. This chip supports enhanced parallel port operations. J24 (1 to 2) (D) Removed 87332 Super I/O chip. 87332 Super I/O chip. J24 is installed when the 87332 Super I/O chip is used. This chip supports enhanced parallel port operations. J30 (1 to 2) installed (1 to 2) removed (3 to 4) DO NOT INSTALL 233 MHZ 166 MHz Always removed (selects 2X clock) Jumper J1 J2 J21 199 AlphaStation 250 Jumpers Motherboard Jumper J1 J2 J3 J4 J7 J21 J25 J26 J27 J32 Pins (1 to 2) Function Mini-console (2 to 3) (D) Jump to main console (1 to 2) Boot floppy (2 to 3) (D) Normal (flashROM load) (1 to 2) (D) (2 to 3) (1 to 2) (D) Reset Halt Interrupt Request Enables flashROM writes (2 to 3) (1 to 2) (D) (2 to 3) (1 to 2) (3 to 4) (5 to 6) Disables writes 267 MHz CPU Not used Not used Hang off 1 (D) Hang off 3 (D) Hang off 5 (D) (1 to 2) (D) 87332 Super I/O chip Removed (1 to 2) (D) Removed (1 to 2) 87312 Super I/O chip 87332 Super I/O chip 87312 Super I/O chip Disables sensing for presence of external cable Hang off 1 (D) (1 to 2) (D) Enables sensing for presence of external SCSI cable 267 MHz CPU (2 to 3) Not used Description The position of J1 determines whether the SROM code goes to the SROM mini-console (for manufacturing use) or passes control to the next stage of initialization, the DROM code. The DROM code uses J2 to determine whether an image from a floppy disk or the flashROM containing the console firmware should be loaded into memory and started. The front-panel push button can be set to cause either a Reset or a Halt Interrupt Request. The J4 jumper can be used to prevent writes to the flasjROMs. Typically, writes are left enabled. The J7 as well as the J32 jumpers are used to set the CPU clock rate. J21 hold three jumpers Currently all are unused. The three jumper pin blocks are hung off pin 1, pin3 and pin5. J25 is installed when the 87332 Super I/O chip is used. This chop supports enhanced parallel port operations J26 is installed when the 87332 Super I/O chip is used. This chop supports enhanced parallel port operations J27 controls the automatic SCSI bus terminator. If an external SCSI cable is attached to the SCSI connector, the automatic SCSI terminator turns off. Therefore, the SCSI bus must be terminated at the end of the external bus. When sensing is disabled (J27 1 to 2 installed), an external SCSI terminator is always required, even if no external SCSI devices are present. The J32 as well as the J7 jumpers are used to set the CPU clock rate. (D) = Default setting 200 201 AlphaStation 200/255 Half Flash Systems The AlphaStation 200 system comes in full and half flash configurations. The AlphaStation 255 only comes in a half flash configuration. Half flash systems contain only 2 roms on the motherboard and can not have both SRM and ARC console loaded at the same time. The ability to write to these roms is controlled on the AlphaStation 200 by jumper J6 on the motherboard/system module and by switch 3 on the AlphaStation 255. When ever the CPU module is replaced the firmware will need to be updated. You will also need to do occasional console firmware upgrades to load the latest version of firmware that is available. There are several ways to upgrade the firmware. All involve booting Loadable Firmware Utility (LFU). It can be booted one of the following ways. • • • • • • Off the Alpha AXP System Firmware Update Utility CD using the local CDROM. Off of an infoserver using the Alpha AXP System Firmware Update Utility CD. Over the network using the .SYS firmware file. Off of a disk that has a bootable version of the firmware file (filename.exe) on it (MCR WRITEBOOT may be required on that file to make it bootable). Off of a bootable floppy OpenVMS, Unix or NT. From the BOOTP server (Unix). The procedure to update the console firmware is as follows. • • • • • • • • • • • • Determine current console firmware revision by the power on display, SHOW commands or from online SDA with a CLUE CONFIG command. Record all console environmental variables by typing SHOW * at the >>>. Determine the method and firmware version will be used to do the update. Print the firmware release notes for that version and system. Determine if any option firmware will be upgraded. Verify the ROM Update Jumpers are in the correct positions. Boot the firmware file (LFU). Use the verify and update commands at the Apu-> prompt. When done exit from LFU. Reboot LFU using the device firmware file to update device firmware. Power off/on the machine to reload the new firmware. Reset any Environmental variables that were changed and reboot. 1. Get current firmware revision at power on or with console SHOW commands. Power on display ff.fe.fd.fc.fb.fa.f9.f8.f7.f6.f5. ef.ee.ed.ec.eb.f4.ea.e9.e8.e7.e6.e5.e4. X6.3-4, built on Nov 20 1996 at 09:41:23 >>> show version Version X6.3-4 Nov 20 1996 09:41:23 >>> show pal PAL VMS PALcode X1.18-0, OSF PALcode X1.21-0 >>>show config Firmware SRM Console: X6.3-4 show_arc: ARC Console is not found PALcode: VMS PALcode X1.18-0, OSF PALcode X1.21-0 Serial ROM: V1.11 Diag ROM: V1.5 Processor DECchip (tm) 21064-2 Pass 4 232Mhz 1MByte Cache 202 MEMORY 128 Meg of System Memory Bank 0 = 128 Mbytes PCI Bus Bus 00 Slot 06: NCR 810 Scsi Controller pka0.7.0.6.0 dka0.0.0.6.0 dka400.4.0.6.0 SCSI Bus ID 7 RZ26L RRD43 Bus 00 Slot 07: Intel SIO 82378 Bus 00 Slot 11: Digital ZLXp Graphics Controller Bus 00 Slot 12: Digital DE435 Network Controller ewa0.0.0.12.0 08-00-2B-E2-1C-25 ISA Slot 0 2 Device 0 1 2 3 4 5 0 Name Type MOUSE Embedded KBD Embedded COM1 Embedded COM2 Embedded LPT1 Embedded FLOPPY Embedded PCXBJ Singleport Enabled Yes Yes Yes Yes Yes Yes Yes BaseAddr 60 60 3f8 2f8 3bc 3f0 530 IRQ 12 1 4 3 7 6 9 DMA 2 0 2. >>> show or show * to printout all the environmental variables. Check all customer set variables. Also verify the setting of the following variables. Bootdef_dev Boot_osflags Auto_action 3. Check that the ROM update jumper is enabled. Consult the Service Manual for its location and setting. It should be enabled by default. 4. Boot the firmware using one of the following six methods. Method 1 - Load the Console Firmware Off a Local CDROM SRM Console a. Insert the CD in the local CDROM. b. >>> boot -fl 0,a– DKA400 BOOTFILE:[alpha200]as200_v7_0.exe [alpha255]as255_v8_1.exe - for the AlphaStation 200 - for the AlphaStation 255 Note: These filenames will change with different console versions. Apu-> See step 5 below for update procedure. ARC Console a. Insert the CD in the local CDROM. b. Enter the ARC menu by typing ARC or initializing system if os_type = NT c. Select Supplementary Menu and Install new Firmware Method 2 - Boot the Console CD Off of an Infoserver a. Insert the CD in the Infoserver b. >>> boot ewa0 -file filename (leave off the .sys extension) 203 Method 3 - Booting off the Network - OpenVMS a. Copy firmware.sys file to MOM$LOAD of an existing node in the cluster b. Set the VMS attributes on the file with the following commands. $ set file/attr=(rfm:fix,lrl:512,mrs:512,rat:none) firmware.sys c. Enable service on that node from NCP $ MC NCP MC NCP> Show Known Circuit Characteristic Known Circuit Volatile Characteristics as of 12-FEB-1997 19:27:41 Circuit = BNA-0 - Circuit State = Service = Counter timer = Designated router = Cost = Maximum routers allowed = Router priority = Hello timer = Type = Adjacent node = Listen timer = name will change from system to system on disabled (if enabled skip to boot command) 65534 28.1023 (CXO28A) 4 33 64 15 Ethernet 28.1023 (CXO28A) 30 NCP> Set Circ BNA-0 State OFF - This step will stop network activity NCP> Set Circ BNA-0 Service Enable NCP> Set Circ BNA-0 State ON d. >>> boot ewa0 -file f–lename (Leave off .SYS or node that services request will get error - BAD MOP FID) Method 4 - Boot Off of a Disk - Non-System Disk and System Disk Using OpenVMS Non-System Disk a. Locate the firmware.exe file b. Set the VMS attributes on the file and copy it contiguous to the target disk (non-system) and directory with the following commands: $ set file/attr=(rfm:fix,lrl:512,mrs:512,rat:none) firmware.exe $ copy/contiguous firmware.exe "non_system_disk":[directory] c. Use writeboot to make the disk bootable. Specify the disk, directory and filename of the firmware. Take the defaults for the other questions. $ MCR Writeboot Update VAX portion of boot block (default is Y): No Update Alpha portion of boot block (default is Y):Yes Target system device (and boot file if not VMB.EXE):$1$dua5:[temp]as200_v7_0.exe as200_v7_0.exe for the AlphaStation 200, as255_v8_1.exe for the AlphaStation 255 d. >>> boot -fl 0,0 dua5 System Disk a. Only steps a and b above are used. Do NOT execute writeboot step c. b. Specify the flags of 0,a0 and use "system disk":[sys0.sysexe]filename for the bootfile. >>> b -fl 0,a– dua0 bootfile: dua0:[sys0.sysexe]as200_v7_0.exe 204 Method 5 - Boot Off of a bootable floppy OpenVMS AXP a. Init and mount to floppy. Create a directory and copy the firmware to the floppy with the following commands. The commands shown are for the AlphaStation 255. For the AlphaStation 200 use directory [ALPHA200] and file as200_v7_0.exe. $ $ $ $ $ Set file/attr=(rfm:fix,lrl:512,mrs:512,rat:none) as255_v8_1.exe init/dens=HD/index=begin dva0: fwupdate mount dva0: fwupdate create/dir dva0:[ALPHA255] copy/contiguous as255_v8_1.exe dva0:[ALPHA255]fwupdate.exe b. MCR Writeboot Update VAX portion of boot block (default is Y): No Update Alpha portion of boot block (default is Y):Yes [enter AXP bootfile:] dva0:[ALPHA255]fwupdate.exe c. Dismount the disk and shutdown VMS. $ dismount dva0: d. Insert the floppy on the target system and boot it from the >>>. >>> boot dva0 Tru64 UNIX a. Go to the Digital Internet firmware site at http://ftp.digital.com/pub/Digital/Alpha/firmware/ b. Copy the firmware.exe file from the Alpha200 or Alpha255 directory to your system and rename it fwupdate.exe c. Download the file mkbootfirm.tar from the firmware website. ftp://ftp.digital.com/pub/Digital/Alpha/firmware/utilities/mkbootfirm.tar You can untar mkbootfirm on your target Tru64 UNIX system with the command: # tar xvf mkbootfirm.tar d. Make sure you have a floppy that has been low-level formatted. For example, to low-level format a floppy in drive 0: fddisk -fmt /d–v/rfd0a e. Change default to directory with mkbootfirm.exe cd mkbootfirm f. Run mkbootfirm on the .exe firmware image that you downloaded. Mkbootfirm uses a .exe firmware image to create a file that can be dd’d to floppy. The following command will create a bootable floppy from a downloaded .exe firmware image: ./mkbootfirm fwupdate.exe | dd of=/dev/rfd0c bs=64k NOTE: Assumes mkbootfirm.exe is in current directory and floppy is in drive 0. g. Insert the floppy on the target system and boot it from the SRM console: >>> boot dva0 Windows NT a. Copy the firmware file to a FAT formatted floppy with the update image filename of a:\fwupdate.exe. b. Shutdown NT and from the NT Console menu, select "Install“ new firmware". 205 Method 6 – BOOTP Network Upgrade – Tru64 UNIX a. Mount the Firmware Update CD using the following command: # mount -rt cdf– -o noversion /dev/rz4c /mnt b. Modify or Create the Client Database in the /etc/bootptab File <host>:ht:<hw_type>:ha=<hw_addr>:bf=<filename>:ip=<ip_addr> where: host is the system name in /etc/hosts hw_type is the hardware type. Proteon is ht = 4. Ethernet is ht = 1. Regular token-ring (IEEE 802) is ht = 6. hw_addr is the hardware address: use the console command show device. filename is the name of the default bootfile image: ip_addr is the Internet protocol address of the system name in /etc/hosts. The following is an example of a bootptab file for both the AlphaStation 200 and 255 machines. bigsox:Ht=1:ha=08002b236423:bf=/mnt/ALPHA200/as200_v7_0.EXE;1:ip=16.182.0.87 bigsox:ht=1:ha=08002b236423:bf=/mnt/ALPHA255/as255_v8_1.EXE;1:ip=16.182.0.87 c. Modify the /etc/inetd.conf file. Uncommon the tftp and bootps process. It should look like the following example: tftp dgram udp wait root /usr/sbin/tftpd tftpd /mnt bootps dgram upd wait root /usr/sbin/bootpd bootpd d. Find the process /usr/sbin/inetd daemon: This step will stop network traffic # ps aux | grep ine # kill process# <ine process number> e. Restart the inetd daemon: # /usr/sbin/inetd Note The bootpd and tftp daemon will be removed if the system is rebooted. Refer to the manual pages: bootpd(8) or tftpd(8) for more information. Use Man bootpd and man tftpd f. Enter the following command to boot from the BOOTP server: >>> boot -p boot– ewa0 Should a boot file "pathname" need to be specified in must be in quotes >>> boot -p boot– ewa0 -file “–dir1/dir2/filename” 5. Update the firmware from the Apu-> prompt Apu-> update srm or update arc - below–is an example of Update SRM APU-I VERIFY LOADED ROM IMAGE APU-I VERIFY LOADED ROM IMAGE DONE APU-I VERIFY LOADED ROM IMAGE APU-I VERIFY LOADED ROM IMAGE DONE APU-I VERIFY LOADED ROM IMAGE APU-I VERIFY LOADED ROM IMAGE DONE APU-I *** ROMS 0,1 CONTENTS WILL BE DESTROYED *** APU-I ARE YOU READY TO PROGRAM DEVICE ? (Y/N )Y APU-I ROM SET NOT ERASED APU-I PRECHARGING DEVICE APU-I ERASING ROM DEVICE APU-I PROGRAMMING DEVICE APU-I ROM 0 VERIFYING ROM IMAGE APU-I PROGRAMMING COMPLETED SRM Rom Update Successful 206 Apu-> update arc - you can not do both, Only Update ARC or Update SRM APU-I VERIFY LOADED ROM IMAGE APU-I VERIFY LOADED ROM IMAGE DONE APU-I VERIFY LOADED ROM IMAGE APU-I VERIFY LOADED ROM IMAGE DONE APU-I VERIFY LOADED ROM IMAGE APU-I VERIFY LOADED ROM IMAGE DONE APU-I *** ROMS 0,1 CONTENTS WILL BE DESTROYED *** APU-I ARE YOU READY TO PROGRAM DEVICE ? (Y/N )Y APU-I ROM SET NOT ERASED APU-I PRECHARGING DEVICE APU-I ERASING ROM DEVICE APU-I PROGRAMMING DEVICE APU-I ROM 0 VERIFYING ROM IMAGE APU-I PROGRAMMING COMPLETED ARC Rom Update Successfull Apu-> Apu-> exit Hard Reset or …Cycle Power … 6. Verify that update was successful Apu-> verify ARC Rom Verify Successful - if ex–cuted on a Windows NT system. Apu-> verify SRM Rom Verify Successful - if ex–cuted on OpenVMS or Tru64 UNIX system. 7. Power cycle the machine to load console firmware. If you are updating device firmware, proceed to step 8. 8. Update the option firmware. The options supported for update in the V5.9 CD firmware version are the DEFPA (PCI FDDI), KZPSA (PCI SCSI) and DEFEA (EISA FDDI) a. Boot the Option firmware file. >>> boot -fl 0,a– DKA400 Bootfile:[ALPHA200]as200_pci_v1_4.exe for the AlphaStation 200 [ALPHA255]as255_pci_v1_4.exe for the AlphaStation 255 This filename will change with each new firmware release. *** PCI/EISA Loadable Firmware Update Utility V6.0 *** Function Description Display Displays the system’s configuration table. Exit Done exit LFU (reset.) List Lists the device, revision, firmware name, and update revision. Update Replaces current firmware with loadable data image. Verify Compares loadable and hardware images. ? or Help Scrolls this function table. UPD> list Device fwa0 pka0 Current Revision 2.46 A06 Filename dfxaa_fw kzpsa_fw Update Revision 3.20 A12 UPD> update * or update Will update all LFU supported devices found in this system 207 UPD> update pka0 - will update device PKA0 Confirm update on: pka0 [Y/(N)]Y WARNING: updates may take several minutes to complete for each device. DO NOT ABORT! pka0 Updating to A12… Verifying A12… PASSED. UPD> update fwa0 -path m–pd1:new_firm/eza0 Will update the device named fwa0 with firmware NEW_FIRM from the network. UPD> verify fwa0 pka0 Verifying 3.20… PASSED. Verifying A12… PASSED. 9. Power cycle the machine to load console firmware then reset any environmental variables that changed, init and reboot. 208 209 AlphaStation 200 Jumpers Motherboard 210 Setting AlphaStation 200 Motherboard Jumper Function Description (1 to 2) Mini-console. (2 to 3) (D) Jump to main console. (1 to 2) Boot floppy. (2 to 3) (D) Normal (flashROM load). J3 (1 to 2) (D) (2 to 3) Reset. Halt Interrupt Request. The position of J1 determines whether the SROM code goes to the SROM mini-console (for manufacturing use) or passes control to the next stage of initialization, the DROM code. The DROM code uses J2 to determine whether an image from a floppy disk or the flashROM containing the console firmware should be loaded into memory and started. The front-panel push button can be set to cause either a Reset or a Halt Interrupt Request. J4 (1 to 2) and (3 to 4) PLL clock source. This jumper is used to select the clock source. Not installed (D) Oscillator clock The AlphaStation 200 Series system uses the oscillator as the clock source. J6 (1 to 2) (D) 2 to 3) Enables flashROM writes. Disables writes. The J6 jumper can be used to prevent writes to the flashROMs. Typically writes are enabled. J17 (1 to 2) (3 to 4) (5 to 6) Keyboard controller inputs. All are unused. (1 to 2) Disables sensing for presence of external cable. J21 controls the automatic SCSI bus terminator. If an external SCSI cable is attached to the SCSI connector, the automatic SCSI terminator turns off. The SCSI bus must be terminated at the end of the external bus. When sensing is disabled (J21 1 to 2 installed), an external SCSI terminator is required, even if no external SCSI devices are present. Hang Off (D) Enables sensing for the presence of an external SCSI cable. If a cable is present, the SCSI bus must be terminated at the end of the external bus. J22 (1 to 2) (D) Removed 87332 Super I/O chip. 87312 Super I/O chip. J22 is installed when the 87332 Super I/O chip is used. This chip supports enhanced parallel port operations. J24 (1 to 2) (D) Removed 87332 Super I/O chip. 87332 Super I/O chip. J24 is installed when the 87332 Super I/O chip is used. This chip supports enhanced parallel port operations. J30 (1 to 2) installed (1 to 2) removed (3 to 4) DO NOT INSTALL 233 MHZ 166 MHz Always removed (selects 2X clock) Jumper J1 J2 J21 211 AlphaStation 255 Jumpers Motherboard Switch Setting Function OFF OFF Normal ON OFF Stop at SROM prompt OFF ON ON ON Boot from Floppy (including Fail-safe Loader) Reset RTC and NRAM 1-2 OFF ON OFF ON OFF 3 4 Write enabled (default) Writes disabled Halt interrupt request Reset Enable TC sound (Default) Diables TC sound 5 ON 6-8 On Off On Off On Off On Off On On Off Off On On Off Off On On On On Off Off Off Off 133 166 200 233 266 300 333 366 Description Switches 1 and 2 are the config switches. An adapter is required to communicate with the SROM code. To reset the RTC/NRAM: o Set 1 and 2 ON o Power On System to Console code o Power Off System o Set 1 and 2 Off o Power On System Switch 3 is the flashROM write protect switch. It should always be off. The Front-Panel push button can be set to cause either a RESET orHALT. Switch 5 controls the use of timer/counter (TC) generated sound. The default position (Off) is used when no sound driver is installed. There is no volume control for TC sound Switches 6 , 7 , 8, are used for to set the CPU clock rate. You can set the system to run on a slower rate. How ever, faster rates require an upgrade which replaces the interrupt PAL. 212 213 AlphaServer 400 / AlphaStation 400 The AlphaServer and AlphaStation 400 systems contain 4 flash roms on the CPU module. Two contain ARC console firmware for Windows NT and two contain SRM console firmware for Tru64 UNIX and OpenVMS. The ability to write to these roms is controlled by jumper J4 on the CPU module. When ever the CPU module is replaced the firmware will need to be updated. You will also need to do occasional console firmware upgrades to load the latest version of firmware that is available. There are several ways to upgrade the firmware. All involve booting Loadable Firmware Utility (LFU). It can be booted one of the following ways. • • • • • • Off the Alpha AXP System Firmware Update Utility CD using the local CDROM. Off of an infoserver using the Alpha AXP System Firmware Update Utility CD. Over the network using the .SYS firmware file. Off of a disk that has a bootable version of the firmware file (filename.exe) on it (MCR WRITEBOOT may be required on that file to make it bootable). Off of a bootable floppy OpenVMS, Unix or NT. From the BOOTP server (Unix). The procedure to update the console firmware is as follows. • • • • • • • • • • • • Determine current console firmware revision by the power on display, SHOW commands or from online SDA with a CLUE CONFIG command. Record all console environmental variables by typing SHOW * at the >>>. Determine which method and firmware version will be used to do the update. Print the firmware release notes for that version and system. Determine if any option firmware will be upgraded. Verify the ROM Update Jumpers are in the correct positions. Boot the firmware file (LFU). Use the verify and update commands at the Apu-> prompt. When done exit from LFU. Reboot LFU using the device firmware file to update device firmware. Power off/on the machine to reload the new firmware. Reset any Environmental variables that were changed and reboot. 1. Get current firmware revision at power on or with console show commands. Power on display ff.fe.fd.fc.fb.fa.f9.f8.f7.f6.f5. ef.ee.ed.ec.eb.f4.ea.e9.e8.e7.e6.e5.e4. X5.0-29, built on Jul 18 1995 at 16:20:48 >>> show version Version X5.0-29 Jul 18 1995 16:20:48 >>> show pal PAL VMS PALcode X5.48-107, OSF PALcode X1.35-76 >>> show config Firmware SRM Console: ARC Console: PALcode: Serial ROM: Diag ROM: X5.0-29 4.37 VMS PALcode X5.48-107, OSF PALcode X1.35-76 V3.4 V1.7 Processor DECchip (tm) 21064-2 166Mhz 512KB Cache 214 MEMORY 32 Meg Bank 0 Bank 1 Bank 2 of System Memory = 16 Mbytes(8 MB Per Simm) Starting at 0x0 = 16 Mbytes(8 MB Per Simm) Starting at 0x1000000 = No Memory Detected PCI Bus Bus 00 Slot 06: NCR 810 Scsi Controller pka0.7.0.6.0 dka0.0.0.6.0 dka400.4.0.6.0 SCSI Bus ID 7 RZ26L RRD43 Bus 00 Slot 07: Intel SIO 82378 Bus 00 Slot 11: Digital ZLXp Graphics Controller Bus 00 Slot 12: Digital DE435 Network Controller ewa0.0.0.12.0 08-00-2B-E2-1C-25 ISA Slot 0 Device 0 1 2 3 4 5 Name Type MOUSE Embedded KBD Embedded COM1 Embedded COM2 Embedded LPT1 Embedded FLOPPY Embedded Enabled Yes Yes Yes Yes Yes Yes BaseAddr 60 60 3f8 2f8 3bc 3f0 IRQ 12 1 4 3 7 6 DMA 2 2. >>> show or show * to printout all the environmental variables. Check all customer set variables. Also verify the setting of the following variables. Bootdef_dev Boot_osflags Auto_action 3. Check that the ROM update jumper is enabled. Consult the Service Manual for its location and setting. It should be enabled by default. 4. Boot the firmware using one of the following six methods. Method 1 – Load the Console Firmware Off a Local CDROM SRM Console a. Insert the CD in the local CDROM. b. >>>boot -fl 0,a DKA400 BOOTFILE:[alphasv400]asv400_v7_0.exe [alpha400]as400_v72_1.exe - for the AlphaServer 400 - for the AlphaStation 400 Note: These filenames will change with different console versions. Apu-> See step 5 below for update procedure. ARC Console a. Insert the CD in the local CDROM. b. Enter the ARC menu by typing >>> SET OS_TYPE NT and initializing. If os_type is already set to NT then it will come up into the ARC menu on powerup. c. Select Supplementary Menu and Install new Firmware 215 Method 2 - Boot the Console CD Off of an Infoserver a. Insert the CD in the Infoserver b. >>> boot ewa0 -file f–lename (leave off the .sys extension) Method 3 - Booting off the Network - OpenVMS a. Copy firmware.sys file to MOM$LOAD of an existing node in the cluster b. Set the attributes on the file with the following commands: $ set file/attr=(rfm:fix,lrl:512,mrs:512,rat:none) firmware.sys c. Enable service on that node from NCP $ MC NCP MC NCP> Show Known Circuit Characteristic Known Circuit Volatile Characteristics as of 12-FEB-1997 19:27:41 Circuit = BNA-0 - Circuit name will change from system to system State = on Service = disabled (if enabled skip to boot command) Counter timer = 65534 Designated router = 28.1023 (CXO28A) Cost = 4 Maximum routers allowed = 33 Router priority = 64 Hello timer = 15 Type = Ethernet Adjacent node = 28.1023 (CXO28A) Listen timer = 30 NCP> Set Circ BNA-0 State OFF - This step will stop network activity NCP> Set Circ BNA-0 Service Enable NCP> Set Circ BNA-0 State ON d. >>> boot ewa0 -fi filename (Leave off .SYS or will get error- BAD MOP FID) Method 4 - Boot Off of a Disk - Non-System Disk and System Disk Using OpenVMS Non-System Disk a. Locate the firmware.exe file b. Set the VMS attributes on the file and copy it contiguous to the target disk (non-system) and directory with the following commands: $ set file/attr=(rfm:fix,lrl:512,mrs:512,rat:none) firmware.exe $ copy/contiguous firmware.exe "non_system_disk":[directory] c. Use Writeboot to make the disk bootable. Specify the disk, directory and filename of the firmware. Take the defaults for the other questions. $ MCR Writeboot Update VAX portion of boot block (default is Y): No Update Alpha portion of boot block (default is Y):Yes Target system device (and boot file if not VMB.EXE):$1$DUA5:[TEMP]asv400_v7_0.exe asv400_v7_0.exe for the AlphaServer 400. as400_v72_1.exe for the AlphaStation 400 d. >>> boot -fl 0,0 dua5 System Disk a. Only steps a and b above are used. Do NOT execute writeboot step c. 216 b. Set the flags of 0,a0 and use "system disk":[sys0.sysexe]filename for the bootfile. >>> b -fl 0,a– dua0 bootfile: dua0:[sys0.sysexe]as400_v72_1.exe Method 5 - Boot Off of a Bootable Floppy OpenVMS AXP a. Init and mount to floppy. Create a directory and copy the firmware to the floppy with the following commands. The commands shown are for the AlphaServer 400. For the AlphaStation 400 use directory [ALPHA400] and file as400_v72_1.exe. $ $ $ $ $ Set file/attr=(rfm:fix,lrl:512,mrs:512,rat:none) asrv400_v6_9.exe init/dens=HD/index=begin dva0: fwupdate mount dva0: fwupdate create/dir dva0:[alphasv400] copy/contiguous asrv400_v6_9.exe dva0:[alphasv400]fwupdate.exe b. MCR Writeboot Update VAX portion of boot block (default is Y): No Update Alpha portion of boot block (default is Y):Yes [enter AXP bootfile:] dva0:[alphasv400]fwupdate.exe c. Dismount the disk and shutdown VMS. $ dismount dva0: d. Insert the floppy on the target system and boot it from the >>>. >>> boot dva0 Tru64 UNIX a. Go to the Digital Internet firmware site at http://ftp.digital.com/pub/Digital/Alpha/firmware/ b. Copy the firmware.exe file from the Alphasv400 or Alpha400 directory to your system and rename it fwupdate.exe c. Download the file mkbootfirm.tar from the firmware website. ftp://ftp.digital.com/pub/Digital/Alpha/firmware/utilities/mkbootfirm.tar You can untar mkbootfirm on your target Tru64 UNIX system with the command: # tar xvf mkbootfirm.tar d. Make sure you have a floppy that has been low-level formatted. For example, to low-level format a floppy in drive 0: fddisk -fmt /d–v/rfd0a e. Change default to directory with mkbootfirm.exe cd mkbootfirm f. Run mkbootfirm on the .exe firmware image that you downloaded. Mkbootfirm uses a .exe firmware image to create a file that can be dd’d to floppy. The following command will create a bootable floppy from a downloaded .exe firmware image: ./mkbootfirm fwupdate.exe | dd of=/dev/rfd0c bs=64k NOTE: Assumes mkbootfirm.exe is in current directory and floppy is in drive 0. g. Insert the floppy on the target system and boot it from the SRM console: >>> boot dva0 217 Windows NT a. Copy the firmware file to a FAT formatted floppy with the update image filename of a:\fwupdate.exe. b. Shutdown NT and from the NT Console menu, select "Install“ new firmware". Method 6 - BOOTP Network Upgrade - Tru64 UNIX a. Mount the Firmware Update CD using the following command: # mount -rt cdfs -o noversion /dev/rz4c /mnt b. Modify or Create the Client Database in the /etc/bootptab File <host>:ht:<hw_type>:ha=<hw_addr>:bf=<filename>:ip=<ip_addr> where: host is the system name in /etc/hosts hw_type is the hardware type. Proteon is ht = 4. Ethernet is ht = 1. Regular token-ring (IEEE 802) is ht = 6. hw_addr is the hardware address: use the console command show device. filename is the name of the default bootfile image: ip_addr is the Internet protocol address of the system name in /etc/hosts. The following is an example of a bootptab file for both the AlphaServer and AlphaStation 400 machines: bigsox:ht=1:ha=08002b236423:bf=/mnt/ALPHASV400/asv400_v7_0.EXE;1:ip=16.182.0.87 bigsox:ht=1:ha=08002b236423:bf=/mnt/ALPHA400/as400_v72_1.EXE;1:ip=16.182.0.87 c. Modify the /etc/inetd.conf file. Uncommon the tftp and bootps process. It Should look like the following example: tftp dgram udp wait root /usr/sbin/tftpd tftpd /mnt bootps dgram upd wait root /usr/sbin/bootpd bootpd d. Find the process /usr/sbin/inetd daemon: This step will stop network traffic # ps aux | grep ine # kill process# <ine process number> e. Restart the inetd daemon: # /usr/sbin/inetd Note The bootpd and tftp daemon will be removed if the system is rebooted. Refer to the manual pages: bootpd(8) or tftpd(8) for more information. Use Man bootpd and man tftpd f. Enter the following command to boot from the BOOTP server: >>> boot -p bootp ewa0 Should a boot file "pathname" need to be specified in must be in quotes >>> boot -p bootp ewa0 -file “/dir1/dir2/filename” 5. After booting the CD answer the following question The current platform type is "AlphaStation 400". Is this really an "AlphaServer 400"? [y/n] yes 218 6. Update the firmware from the Apu-> prompt Apu-> APU-I APU-I APU-I APU-I APU-I APU-I APU-I APU-I APU-I APU-I APU-I APU-I APU-I update ARE YOU READY TO PROGRAM (SRM ) ROM DEVICE ? (Y/N) y PRECHARGING (SRM ) ROM DEVICE ERASING (SRM ) ROM DEVICE PROGRAMMING (SRM ) ROM DEVICE VERIFY LOADED (SRM ) ROM IMAGE VERIFY LOADED (SRM ) ROM IMAGE DONE PROGRAMMING (SRM ) ROM COMPLETED PRECHARGING (ARC /AlphaBIOS) ROM DEVICE ERASING (ARC /AlphaBIOS) ROM DEVICE PROGRAMMING (ARC /AlphaBIOS) ROM DEVICE VERIFY LOADED (ARC /AlphaBIOS) ROM IMAGE VERIFY LOADED (ARC /AlphaBIOS) ROM IMAGE DONE PROGRAMMING (ARC /AlphaBIOS) ROM COMPLETED 7. Verify that update was successful and exit Apu-> verify SRM ROM verify successful ARC /AlphaBIOS ROM verify successful Apu-> exit ...Please Cycle System Power ... 8. Power cycle the machine to load console firmware. If you are updating device firmware, proceed to step 9. 9. Update the option firmware. The options supported for update in the V5.9 CD firmware version are the DEFPA (PCI FDDI), KZPSA (PCI SCSI) and DEFEA (EISA FDDI) a. Boot the Option firmware file. >>> boot -fl 0,a0 DKA400 Bootfile:[alphasv400]asv400_pci_v1_4.exe [alpha400]as400_pci_v7_2.exe for the AlphaServer 400 for the AlphaStation 400 This filename will change with each new firmware release. *** PCI/EISA Loadable Firmware Update Utility V6.0 *** ----------------------------------------------------------Function Description ----------------------------------------------------------Display Displays the system’s configuration table. Exit Done exit LFU (reset.) List Lists the device, revision, firmware name, and update revision. Update Replaces current firmware with loadable data image. Verify Compares loadable and hardware images. ? or Help Scrolls this function table. -----------------------------------------------------------\ UPD> list Device fwa0 pka0 Current Revision 2.46 A06 Filename dfxaa_fw kzpsa_fw Update Revision 3.20 A12 UPD> update * or update Will update all LFU supported devices found in this system UPD> update pka0 - will update device PKA0 Confirm update on: pka0 [Y/(N)]Y 219 WARNING: updates may take several minutes to complete for each device. DO NOT ABORT! pka0 Updating to A12... Verifying A12... PASSED. UPD> update fwa0 -path mopd1:new_firm/eza0 Will update the device named fwa0 with firmware NEW_FIRM from the network. UPD> verify fwa0 pka0 Verifying 3.20... PASSED. Verifying A12... PASSED. 10. Power cycle the machine to load console firmware then reset any environmental variables that changed, init and reboot. 220 221 AlphaServer 400 Jumpers Motherboard Jumpers Jumper J29 J32 J33 J34 J35 J39 J40 Motherboard Jumpers Pins 1 to 2 Pins 2 to 3 Function Clear CMOS Normal * Clear CMOS Clear Password Normal * Clear Password ** Color Mono * Display Type ** Recovery Mode Normal * Recovery mode ** Enable Disabled * BIOS upgrade ** Alpha AXP * Unsupported CPU selection Disable * Enable Reprogram boot Block ** * = default ** = These Functions are not used in the AlphaServer 400 Series 222 CPU Jumpers AlphaServer 400 CPU Jumpers Jumper Pins 1 to 2 Pins 2 to 3 J3 SROM mini-console Pass control to DROM* J4 Enable * Disable J5 Floppy loader (FSL) Reset * DROM Loads flashROM * Unsupported J6 Function Control whether the SROM code goes to the mini console (for manufacturing) or loads the DROM code. Enables/disables Writes to FlashROM Determines DROM Load Action Reset/Halt Selection * = default 223 AlphaStation 400 Jumpers Motherboard Jumpers Motherboard Jumpers Jumper J29 J32 Pins 1 to 2 Clear CMOS Clear Password Pins 2 to 3 Normal * Normal * Function Clear CMOS Clear Password ** J33 J34 J35 J39 J40 Color Recovery Mode Enable * Alpha AXP * Disable * Mono * Normal * Normal N/A Enable Display Type ** Recovery mode ** BIOS upgrade ** CPU selection Reprogram boot Block ** * = default ** = These Functions are not used in the AlphaStation 400 Series 224 Cpu Jumpers AlphaStation 400 CPU Jumpers Jumper J3 Pins 1 to 2 S-Port Pins 2 to 3 Normal * J4 Enable * Disable J5 J6 Floppy loader (FSL) Reset * DROM Loads flashROM * HALT Function Stay at SROM Prompt (MiniConsole) in S-Port Position Enables/disables Writes to FlashROM Determines DROM Load Action Reset/Halt Selection * = default 225 AlphaStation 500/600 The AlphaStation 500/600 systems contain 4 flash roms on the System module. Two contain ARC console firmware for Windows NT and two contain SRM console firmware for Tru64 UNIX and OpenVMS. The ability to write to these roms is controlled on the AlphaStation 500 by jumper J18 on the system module and on the AlphaStation 600 by jumper W13 on the system module. When ever the system module is replaced the firmware will need to be updated. You will also need to do occasional console firmware upgrades to load the latest version of firmware that is available. There are several ways to upgrade the firmware. All involve booting Loadable Firmware Utility (LFU). It can be booted one of the following ways. • • • • • • Off the Alpha AXP System Firmware Update Utility CD using the local CDROM. Off of an infoserver using the Alpha AXP System Firmware Update Utility CD. Over the network using the .SYS firmware file. Off of a disk that has a bootable version of the firmware file (filename.exe) on it (MCR WRITEBOOT may be required on that file to make it bootable). Off of a bootable floppy OpenVMS, Unix or NT. From the BOOTP server (Unix). The procedure to update the console firmware is as follows. • • • • • • • • • • • • Determine current console firmware revision by the power on display, SHOW commands or from online SDA with a CLUE CONFIG command. Record all console environmental variables by typing SHOW * at the >>>. Determine which method and firmware version will be used to do the update. Print the firmware release notes for that version and system. Determine if any option firmware will be upgraded. Verify the ROM Update Jumpers are in the correct positions. Boot the firmware file (LFU). Use the verify and update commands at the Apu-> prompt. When done exit from LFU. Reboot LFU using the device firmware file to update device firmware. Power off/on the machine to reload the new firmware. Reset any Environmental variables that were changed and reboot. 1. Get the current firmware revision at power on or with console show commands. Power on display ff.fe.fd.fc.fb.fa.f9.f8.f7.f6.f5. ef.ee.ed.ec.eb.f4.ea.e9.e8.e7.e6.e5.e4. Digital AlphaStation 500/600 Console V6.3-11 built on Nov 6 1996 at 14:48:02 >>> show version Version X6.3-11 Nov 6 1996 14:48:02 >>> show pal PAL VMS PALcode X1.18-0, OSF PALcode X1.21-0 >>> show config Firmware SRM Console: X6.3-11 ARC Console: 4.49 PALcode: VMS PALcode X1.18-0, OSF PALcode X1.21-0 Serial ROM: V1.2 Processor DECchip (tm) 21164-5 Pass 4 333Mhz 96 KBytes Cache 4 MB Cache 226 MEMORY Memory Size = 128Mb Bank -----00 Size/Sets ---------128Mb/1 Base Addr --------000000000 Speed ----Fast BCache Size = 4Mb Tested Memory = 128Mb PCI Bus Bus 00 Slot 06: DECchip 21040 Network Controller ewa0.0.0.6.0 00-00-FB-21-32-E8 Bus 00 Slot 07: Digital PV-PCI Graphics Controller Bus 00 Slot 09: ISP1020 Scsi Controller pka0.7.0.9.0 dka0.0.0.9.0 dka400.4.0.9.0 SCSI Bus ID 7 RZ25L RRD45 2. >>> show or show * to printout all the environmental variables. Check all customer set variables. Also verify the setting of the following variables. Bootdef_dev Boot_osflags Auto_action 3. Check that the ROM update jumper is enabled. Consult the Service Manual for its location and setting. It should be enabled by default. 4. Boot the firmware using one of the following methods. Method 1 - Load the Console Firmware Off a Local CDROM SRM Console a. Insert the CD in the local CDROM. b. >>> Boot -fl 0,a0 DKA400 BOOTFILE:[alpha500]as500_v72_2.exe [alpha600]as600_v72_2.exe - for the AlphaStation 500 - for the AlphaStation 600 Note: These filenames will change with different console versions. Apu-> See step 5 below for update procedure. ARC Console a. Insert the CD in the local CDROM. b. Enter the ARC menu by typing ARC or initializing system if os_type = NT c. Select “ Supplementary Menu and Install new Firmware Method 2 - Boot the Console CD Off of an Infoserver a. Insert CD in the Infoserver b. >>> boot ewa0 -file filename (leave off the .sys extension) 227 Method 3 - Booting Off the Network - OpenVMS a. Copy the firmware.sys file to MOM$LOAD of an existing node in the cluster b. Set the attributes on the file with the following commands: $ set file/attr=(rfm:fix,lrl:512,mrs:512,rat:none) firmware.sys c. Enable service on that node from NCP $ MC NCP MC NCP> Show Known Circuit Characteristic Known Circuit Volatile Characteristics as of 12-FEB-1997 19:27:41 Circuit = BNA-0 - Circuit State = Service = Counter timer = Designated router = Cost = Maximum routers allowed = Router priority = Hello timer = Type = Adjacent node = Listen timer = name will change from system to system on disabled (if enabled skip to boot command) 65534 28.1023 (CXO28A) 4 33 64 15 Ethernet 28.1023 (CXO28A) 30 NCP> Set Circ BNA-0 State OFF - This step will stop network activity NCP> Set Circ BNA-0 Service Enable NCP> Set Circ BNA-0 State ON d. >>> boot ewa0 -fi filename (Leave off .SYS or will get error- BAD MOP FID) Method 4 - Boot Off of a Disk - Non-System Disk and System Disk Using OpenVMS Non-System Disk a. Locate the firmware.exe file b. Set the attributes on the file and copy it contiguous to the target disk (non-system) and directory with the following commands: $ set file/attr=(rfm:fix,lrl:512,mrs:512,rat:none) firmware.exe $ copy/contiguous firmware.exe "non_system_disk":[directory] c. Use writeboot to make the disk bootable. Specify the disk, directory and filename of the firmware. Take the defaults for the other questions. $ MCR Writeboot Update VAX portion of boot block (default is Y): No Update Alpha portion of boot block (default is Y):Yes Target system device (and boot file if not VMB.EXE):$1$dua5:[TEMP]as500_v72_2.exe d. >>> boot -fl 0,0 dua5 System Disk a. Only steps a and b above are used. Do NOT execute writeboot step c. b. Specify the flags of 0,a0 and use "system disk":[sys0.sysexe]filename for the bootfile. >>> b -fl 0,a0 dua0 bootfile: dua0:[sys0.sysexe]as500_v72_2.exe 228 Method 5 - Boot Off of a bootable floppy OpenVMS AXP a. Init and mount to floppy. Create a directory and copy the firmware to the Floppy with the following commands $ set file/attr=(rfm:fix,lrl:512,mrs:512,rat:none) as500_v72_2.exe $ init/dens=HD/index=begin dva0: fwupdate $ mount dva0: fwupdate $ create/dir dva0:[AS500] $ copy/contiguous as500_v72_2.exe dva0:[AS500]fwupdate.exe b. MCR Writeboot Update VAX portion of boot block (default is Y): No Update Alpha portion of boot block (default is Y):Yes [enter AXP bootfile:] dva0:[AS500]fwupdate.exe c. Dismount the disk and shutdown VMS. $ dismount dva0: d. Insert the floppy on the target system and boot it from the >>>. >>> boot dva0 Tru64 UNIX a. Go to the Digital Internet firmware site at http://ftp.digital.com/pub/Digital/Alpha/firmware/ b. Copy the firmware.exe file from the Alpha500 or Alpha600 directory to your System and rename it fwupdate.exe c. Download the file mkbootfirm.tar from the firmware website. ftp://ftp.digital.com/pub/Digital/Alpha/firmware/utilities/mkbootfirm.tar You can untar mkbootfirm on your target Tru64 UNIX system with the command: # tar xvf mkbootfirm.tar d. Make sure you have a floppy that has been low-level formatted. For example, to low-level format a floppy in drive 0: fddisk -fmt /dev/rfd0a e. Change default to directory with mkbootfirm.exe cd mkbootfirm f. Run mkbootfirm on the .exe firmware image that you downloaded. Mkbootfirm uses a .exe firmware image to create a file that can be dd’d to floppy. The following command will create a bootable floppy from a downloaded .exe firmware image: ./mkbootfirm fwupdate.exe | dd of=/dev/rfd0c bs=64k NOTE: Assumes mkbootfirm.exe is in current directory and floppy is in drive 0. g. Insert the floppy on the target system and boot it from the SRM console: >>> boot dva0 Windows NT a. Copy the firmware file to a FAT formatted floppy with the update image filename of a:\fwupdate.exe. b. Shut down NT and from the NT Console menu, select "Install new firmware". 229 Method 6 - BOOTP Network Upgrade - Tru64 UNIX a. Mount the Firmware Update CD using the following command: # mount -rt cdfs -o noversion /dev/rz4c /mnt b. Modify or Create the Client Database in the /etc/bootptab File <host>:ht:<hw_type>:ha=<hw_addr>:bf=<filename>:ip=<ip_addr> where: host is the system name in /etc/hosts hw_type is the hardware type. Proteon is ht = 4. Ethernet is ht = 1. Regular token-ring (IEEE 802) is ht = 6. hw_addr is the hardware address: use the console command show device. filename is the name of the default bootfile image: ip_addr is the Internet protocol address of the system name in /etc/hosts. The following is an example of a bootptab file for the AlphaStation 500: bigsox:ht=1:ha=08002b236423:bf=/mnt/ALPHA500/as500_v72_2.EXE;1:ip=16.182.0.87 c. Modify the /etc/inetd.conf file. Uncommon the tftp and bootps process. It Should look like the following example: tftp dgram udp wait root bootps dgram upd wait root /usr/sbin/tftpd /usr/sbin/bootpd tftpd /mnt bootpd d. Find the process /usr/sbin/inetd daemon: This step will stop network traffic # ps aux | grep ine # kill process# <ine process number> e. Restart the inetd daemon: # /usr/sbin/inetd Note The bootpd and tftp daemon will be removed if the system is rebooted. Refer to the manual pages: bootpd(8) or tftpd(8) for more information. Use Man bootpd and man tftpd f. Enter the following command to boot from the BOOTP server: >>> boot -p bootp ewa0 Should a boot file "pathname" need to be specified in must be in quotes >>> boot -p bootp ewa0 -file “/dir1/dir2/filename” 5. Update the firmware from the Apu-> prompt Apu-> APU-I APU-I APU-I APU-I APU-I APU-I APU-I APU-I APU-I APU-I APU-I APU-I APU-I update ARE YOU READY TO PROGRAM (SRM ) ROM DEVICE ? (Y/N) y PRECHARGING (SRM ) ROM DEVICE ERASING (SRM ) ROM DEVICE PROGRAMMING (SRM ) ROM DEVICE VERIFY LOADED (SRM ) ROM IMAGE VERIFY LOADED (SRM ) ROM IMAGE DONE PROGRAMMING (SRM ) ROM COMPLETED PRECHARGING (ARC /AlphaBIOS) ROM DEVICE ERASING (ARC /AlphaBIOS) ROM DEVICE PROGRAMMING (ARC /AlphaBIOS) ROM DEVICE VERIFY LOADED (ARC /AlphaBIOS) ROM IMAGE VERIFY LOADED (ARC /AlphaBIOS) ROM IMAGE DONE PROGRAMMING (ARC /AlphaBIOS) ROM COMPLETED 230 6. Verify that update was successful and exit Apu-> verify SRM ROM verify successful ARC /AlphaBIOS ROM verify successful Apu-> exit …Please Cycle System Power … 7. Power cycle the machine to load console firmware. If you are updating device firmware, proceed to step 8. 8. Update the option firmware. The options supported for update in the V5.9 CD firmware version are the DEFPA (PCI FDDI), KZPSA (PCI SCSI) and DEFEA (EISA FDDI) a. Boot the Option firmware file. >>> boot -fl 0,a0 DKA400 Bootfile:as500_pci_v7_2.exe or as600_pci_v7_2.exe This filename will change with each new firmware release. *** PCI/EISA Loadable Firmware Update Utility V6.0 *** ----------------------------------------------------------Function Description ----------------------------------------------------------Display Exit List Displays the system's configuration table. Done exit LFU (reset.) Lists the device, revision, firmware name, and update revision. Update Replaces current firmware with loadable data image. Verify Compares loadable and hardware images. ? or Help Scrolls this function table. ----------------------------------------------------------UPD> list Device fwa0 pka0 Current Revision 2.46 A06 Filename dfxaa_fw kzpsa_fw Update Revision 3.20 A12 UPD> update * or update Will update all LFU supported devices found in this system UPD> update pka0 - will update device PKA0 Confirm update on: pka0 [Y/(N)]Y WARNING: updates may take several minutes to complete for each device. DO NOT ABORT! pka0 Updating to A12… Verifying A12… PASSED. UPD> update fwa0 -path mopd1:new_firm/eza0 Will update the device named fwa0 with firmware NEW_FIRM from the network. UPD> verify fwa0 pka0 Verifying 3.20… PASSED. Verifying A12… PASSED. 9. Power cycle the machine to load console firmware then reset any environmental variables that changed, init and reboot. 231 AlphaStation 500 Jumper Locations System Module Jumper J11 J12 J13 J14 J15 J16 J17 J19 System Module SROM Jumpers Position Function 0 Power Up (default) * 1 Mini Console 2 Floppy loader (Failsafe Loader) 3 MFG Memtest 4 Reserved 5 Reserved 6 MCHK Mini-Console 7 Noinit Mini-Console * Only one jumper can be used at a time. 232 System Board Jumpers Jumper J6 J9 J10 J18 J2, J20, J33. J35 Function Front panel button function Secure console Alternate console Controls 12 volts for the FROM Pins 1 to 2 Reset * Enabled Alternate console enabled FROM write protect Pin 2 to 3 Halt Disabled * Primary console enabled * FROM Write enabled * Ground reference jumpers (*) = Default position 233 AlphaStation 600 Jumper Locations System Module 234 System Board Jumpers W1-W8 Jumper Function W1 W2 W3 W4 W5 W6 W7 Normal power-up flow, SROM will default to floppy boot if Flash ROM is not loaded. Mini-console with initialized system interface Floppy Boot - Fail-safe loader Memory Test Normal power-up flow with only set 1 of Scache enabled Normal power-up flow with only set 2 of Scache enabled Normal power-up flow with only set 3 of Scache enabled Non-initialized mini-console with un-initialized system interface (requires user to type W8 uppercase U before any output is seen) Jumper W1-W8 are used to select boot or test code stored in the SROM. Only one jumper can be installed at a time. Jumper W9 W11 W13 W14 W15 W17 System Board Jumpers Function Pins 1 to 2 Fan2 fail detect (no jumper* to enable) Disabled N/A Fan fail detect FlashROM Write Secure console Remote OCP Alternate console Disabled Enabled* Disabled* N/A factory only Disabled* Enabled* Disabled Enabled N/A factory only Enabled Park on 2 (*) = Default Position 235 AlphaStation 600A The AlphaStation 600A systems contain flash roms on the System module. They contain ARC console firmware for Windows NT and SRM console firmware for Tru64 UNIX and OpenVMS. The ability to write to these roms is controlled on the AlphaStation 600A by jumper J50 on the system module. When ever the system module is replaced the firmware will need to be updated. You will also need to do occasional console firmware upgrades to load the latest version of firmware that is available. There are several ways to upgrade the firmware. All involve booting Loadable Firmware Utility (LFU). It can be booted one of the following ways. • • • • • • Off the Alpha AXP System Firmware Update Utility CD using the local CDROM. Off of an infoserver using the Alpha AXP System Firmware Update Utility CD. Over the network using the .SYS firmware file. Off of a disk that has a bootable version of the firmware file (filename.exe) on it (MCR WRITEBOOT may be required on that file to make it bootable). Off of a bootable floppy OpenVMS, Unix or NT. From the BOOTP server (Unix). The procedure to update the console firmware is as follows. • • • • • • • • • • • • Determine current console firmware revision by the power on display, SHOW commands or from online SDA with a CLUE CONFIG command. Record all console environmental variables by typing SHOW * at the >>>. Determine which method and firmware version will be used to do the update. Print the firmware release notes for that version and system. Determine if any option firmware will be upgraded. Verify the ROM Update Jumpers are in the correct positions. Boot the firmware file (LFU). Use the verify and update commands at the UPD> prompt. When done exit from LFU. Power off/on the machine to reload the new firmware. Reset any Environmental variables that were changed and reboot. Run ECU, RCU or any configuration programs as required. 1. Get the current firmware revision at power on or with console show commands. Power on display eb…..ea.e9.e8.e7.e6. Digital AlphaStation 600A Console V4.8-79 built on Nov 6 1996 at 14:48:02 >>> show version Version X6.3-11 Nov 6 1996 14:48:02 >>> show pal PAL VMS PALcode X1.18-0, OSF PALcode X1.21-0 >>> show config Firmware SRM Console: T4.7 ARC Console: 5.23 PALcode: VMS PALcode X1.19-3, OSF PALcode V2.21-5 Serial ROM: T1.1 Processor DECchip (tm) 21164A 500Mhz 4 MB Cache 236 Memory 64 Meg of System Memory Bank 0 = 64 Mbytes(16 MB Per Simm) Starting at 0x00000000 Bank 1 = No Memory Detected Bank 2 = No Memory Detected Bank 3 Slot Option Hose 0, Bus 0, PCI 5 Qlogic ISP1020 pka0.7.0.5.0 SCSI Bus ID 7 dka0.0.0.5.0 RZ28 dka400.4.0.5.0 RRD43 6 S3 Trio64/Trio32 7 Intel 82375eB Bridge to Bus 1, EISA 11 DECchip 20150-AA ewb0.0.0.11.0 08-00-2B-E5-CC-B1 Slot Option 1 ISA2000 Hose 0, Bus 1, EISA Slot Option 2 Qlogic ISP1020 3 Qlogic ISP1020 Hose 0, Bus 2, PCI pkb0.7.0.2002.0 pkc0.7.0.2003.0 dkc0.0.0.2003.0 Slot Option 0 DECchip 20140-AA Hose 0, Bus 3, ewa0.0.3000.0 SCSI Bus ID 7 SCSI Bus ID 7 RZ25 PCI 08-00-2B-E2-31-68 2. >>> show or show * to printout all the environmental variables. Check all customer set variables. Also verify the setting of the following variables. Bootdef_dev Boot_osflags Auto_action 3. Check that the ROM update jumper is enabled. Consult the Service Manual for its location and setting. It should be enabled by default. 4. Boot the firmware using one of the following methods. Method 1 - Boot the Console CD Off a Local CDROM SRM Console a. Insert the CD in the local CDROM b. >>> Boot -fl 0,a0 DKA400 BOOTFILE: [alpha600A]as600a_e5_v5_7.exe Note: These filenames will change with different console versions Apu-> See below for update steps ARC Console a. Insert the CD in the local CDROM. b. Enter the ARC menu by typing ARC or initializing system if os_type = NT c. Select “ Supplementary Menu and Install new Firmware Method 2 - Boot the Console CD Off of an Infoserver a. Insert CD in the Infoserver b. >>> boot ewa0 -file filename (leave off the .sys extension) 237 Method 3 - Booting Off the Network - OpenVMS a. Copy the firmware.sys file and the option firmware files to MOM$LOAD of an existing node in the cluster. (These versions are from the V5.9 CD and may change) as600a_e5_v5_6.exe – This is the system firmware as1000fw.sys - This file tells update utility which option files to load. dfeaa130.sys - DEFEA firmware (EISA DEC FDDI controller. Pass 1 module only) dfeab320.sys - DEFEA firmware (EISA FDDI controller. All modules after pass 1) dfxaa320.sys - DEFPA/DEFEA firmware (PCI and EISA based DEC FDDI controller) kzpsaa12.sys - KZPSA firmware (Fast wide differential PCI-SCSI module) b. Set the attributes on the file with the following commands: $ set file/attr=(rfm:fix,lrl:512,mrs:512,rat:none) firmware.sys c. Enable service on that node from NCP $ MC NCP MC NCP> Show Known Circuit Characteristic Known Circuit Volatile Characteristics as of 12-FEB-1997 19:27:41 Circuit = BNA-0 - Circuit State = Service = Counter timer = Designated router = Cost = Maximum routers allowed = Router priority = Hello timer = Type = Adjacent node = Listen timer = name will change from system to system on disabled (if enabled skip to boot command) 65534 28.1023 (CXO28A) 4 33 64 15 Ethernet 28.1023 (CXO28A) 30 NCP> Set Circ BNA-0 State OFF - This step will stop network activity NCP> Set Circ BNA-0 Service Enable NCP> Set Circ BNA-0 State ON d. >>> boot ewa0 -fi filename (Leave off .SYS or will get error- BAD MOP FID) Method 4 - Boot Off of a Disk - Non-System Disk and System Disk Using OpenVMS Non-System Disk a. Locate the firmware.exe file b. Set the attributes on the file and copy it contiguous to the target disk (non-system) and directory with the following commands: $ set file/attr=(rfm:fix,lrl:512,mrs:512,rat:none) firmware.exe $ copy/contiguous firmware.exe "non_system_disk":[directory] c. Use writeboot to make the disk bootable. Specify the disk, directory and filename of the firmware. Take the defaults for the other questions. $ MCR Writeboot Update VAX portion of boot block (default is Y): No Update Alpha portion of boot block (default is Y):Yes Target system device (and bootfile if not VMB.EXE):$1$dua5:[TEM]as600a_e5_v5_6.exe d. >>> boot -fl 0,0 dua5 Note: Updating options via this method is only supported if the system disk is on the NCR810 SCSI bus (the on-board SCSI). 238 e. To update the option firmware, first create an option directory. $ set def dua0:[000000] $ create/dir [.options] f. Copy the option firmware files to the options directory. as1000fw.txt dfeaa130.sys dfeab320.sys dfxaa320.sys kzpsaa12.sys g. When booting the update utility enter the device name where the option firmware is located. System Disk a. Only steps a and b above are used. Do NOT execute writeboot step c. b. Specify the flags of 0,a0 and use "system disk":[sys0.sysexe]filename for the bootfile. >>> b -fl 0,a0 dua0 bootfile: dua0:[sys0.sysexe]as600a_e5_v5_6.exe Method 5 - Boot Off of a bootable floppy OpenVMS AXP a. Init and mount to floppy. Create a directory and copy the firmware to the floppy with the following commands $ set file/attr=(rfm:fix,lrl:512,mrs:512,rat:none) as600a_e5_v5_6.exe $ init/dens=HD/index=begin dva0: fwupdate $ mount dva0: fwupdate $ create/dir dva0:[AS500] $ copy/contiguous as600a_e5_v5_6.exe dva0:[AS600a]fwupdate.exe b. MCR Writeboot Update VAX portion of boot block (default is Y): No Update Alpha portion of boot block (default is Y):Yes [enter AXP bootfile:] dva0:[AS600a]fwupdate.exe c. Dismount the disk and shutdown VMS. $ dismount dva0: d. Insert the floppy on the target system and boot it from the >>>. >>> boot dva0 e. If you wish to update option firmware you must create a second floppy with option firmware on it. Download the following files from the Website. as1000fw.txt dfeaa130.sys dfeab320.sys dfxaa320.sys kzpsaa12.sys f. Enter the following commands to create the options floppy: $ init/dens=HD/index=begin dva0: optionfw $ mount dva0: optionfw $ create/dir dva0:[options] Note:The directory name must be [options] $ copy as1000fw.txt dva0:[options] $ copy dfeaa130.sys dva0:[options] $ copy dfeab320.sys dva0:[options] $ copy dfxaa320.sys dva0:[options] $ copy kzpsaa12.sys dva0:[options] $ dismount dva0: g. Insert floppy when it asks for an options firmware and enter the location. 239 Tru64 UNIX a. Go to the Digital Internet firmware site at http://ftp.digital.com/pub/Digital/Alpha/firmware/ b. Copy the firmware.exe file from the Alpha600A directory to your system and rename it fwupdate.exe c. Download the file mkbootfirm.tar from the firmware website. ftp://ftp.digital.com/pub/Digital/Alpha/firmware/utilities/mkbootfirm.tar You can untar mkbootfirm on your target Tru64 UNIX system with the command: # tar xvf mkbootfirm.tar d. Make sure you have a floppy that has been low-level formatted. For example, to low-level format a floppy in drive 0: fddisk -fmt /dev/rfd0a e. Change default to directory with mkbootfirm.exe cd mkbootfirm f. Run mkbootfirm on the .exe firmware image that you downloaded. Mkbootfirm uses a .exe firmware image to create a file that can be dd’d to floppy. The following command will create a bootable floppy from a downloaded .exe firmware image: ./mkbootfirm fwupdate.exe | dd of=/dev/rfd0c bs=64k NOTE: Assumes mkbootfirm.exe is in current directory and floppy is in drive 0. g. Insert the floppy on the target system and boot it from the SRM console: >>> boot dva0 h. If you wish to update option firmware you must create a second floppy with option firmware on it. Go to the firmware website and follow this procedure. i. Download the file v39_options.dd. This file name changes with different console versions. j. Make sure you have a floppy that has been low-level formatted. For example, to low-level format a floppy in drive 0: fddisk -fmt /dev/rfd0a k. Enter the command: dd if=v39_options.dd of=/dev/rfd0c bs=64k NOTE: This assumes the v39_options.dd image file is in the current directory and that the floppy is in drive 0. l. After booting the firmware floppy created with mkbootfirm, the update utility will complain that it cannot find the options files on either CD or floppy, and will prompt for a device to look for the options files. Simply insert the options floppy you created above, type the device name of the floppy (e.g. dva0) and hit <return> to load the options firmware. Windows NT a. Copy the firmware file to a FAT formatted floppy with the update image filename of a:\fwupdate.exe. b. Shut down NT and from the NT Console menu, select "Install new firmware". 240 c. If you wish to update the options firmware, you must create a second floppy. Download the following files from the options directory at the firmware website. as1000fw.txt dfeaa130.sys dfeab320.sys dfxaa320.sys kzpsaa12.sys d. FAT format a floppy and copy the files to the floppy. e. When the utility asks for the options floppy, insert it and tell the utility the device it is located on. Method 6 - BOOTP Network Upgrade - Tru64 UNIX a. Mount the Firmware Update CD using the following command: # mount -rt cdfs -o noversion /dev/rz4c /mnt b. Modify or Create the Client Database in the /etc/bootptab File <host>:ht:<hw_type>:ha=<hw_addr>:bf=<filename>:ip=<ip_addr> where: host is the system name in /etc/hosts hw_type is the hardware type. Proteon is ht = 4. Ethernet is ht = 1. Regular token-ring (IEEE 802) is ht = 6. hw_addr is the hardware address: use the console command show device. filename is the name of the default bootfile image: ip_addr is the Internet protocol address of the system name in /etc/hosts. The following is an example of a bootptab file for the AlphaStation 600a: bigsox:ht=1:ha=08002b236423:bf=/mnt/ALPHA600a/as600a_e5_v5_6.EXE;1:ip=16.182.0.87 c. Modify the /etc/inetd.conf file. Uncommon the tftp and bootps process. It should look like the following example: tftp dgram udp wait root /usr/sbin/tftpd tftpd /mnt bootps dgram upd wait root /usr/sbin/bootpd bootpd d. Find the process /usr/sbin/inetd daemon: This step will stop network traffic # ps aux | grep ine # kill process# <ine process number> e. Restart the inetd daemon: # /usr/sbin/inetd Note The bootpd and tftp daemon will be removed if the system is rebooted. Refer to the manual pages: bootpd(8) or tftpd(8) for more information. Use Man bootpd and man tftpd f. Enter the following command to boot from the BOOTP server: >>> boot -p bootp ewa0 Should a boot file "pathname" need to be specified in must be in quotes >>> boot -p bootp ewa0 -file “/dir1/dir2/filename” g. Currently there is no BOOTP support for updating option firmware. 5. From the UPD> prompt save contents of NVRAM to floppy using SAVE_NVRAM. 241 6. Execute list at the UPD prompt to check current versions. UPD> list Device ARC SRM Current Revision 5.64 v5.2-115 Filename arc_fw srm_fw dfxaa_fw dfeaa_fw dfeab_fw kzpsa_fw Update Revision 5.70 v5.6-114 3.20 1.3 3.20 A12 7. Update the firmware from the UPD> prompt UPD> update Confirm update on: ARC SRM [Y/(N)]y WARNING: updates may take several minutes to complete for each device. DO NOT ABORT! ARC SRM Updating to v5.70… Verifying v5.70… PASSED. Updating to v5.6-114… Verifying v5.6-114… PASSED. or UPD> update pka0 - will update device PKA0 Confirm update on: pka0 [Y/(N)]Y WARNING: updates may take several minutes to complete for each device. DO NOT ABORT! pka0 Updating to A12… Verifying A12… PASSED. 8. Verify that update was successful and exit UPD> verify ARC SRM fwa0 pka0 Verifying Verifying Verifying Verifying v5.70… PASSED. v5.6-114… PASSED. 3.20… PASSED. A12… PASSED. UPD> exit Initializing…. 9. Power cycle the machine to load console firmware. Reboot firmware CD and execute a RESTORE_NVRAM if you saved them in step 5. 10. Power cycle the machine to load console firmware then reset any environmental variables that changed, init and reboot. 11. If ECU or RCU you need to run them from the AlphaBIOS menu. a. Select the Utilities Menu. b. Select Run ECU from floppy… to run ECU. c. Select Run Maintenance Program… to run RCU. 242 243 AlphaStation 600A Jumpers System Board Item 1 Jumper J50 2 3 J16 J53 4 J52 5 J56 6 7 J51 J25 System Module Jumpers and Locations Name Description FROM VPP enable Permits the 12 volts needed to update the Flash ROMs Fan Allows the large fan to be disabled. Fan shutdown Allows the software to shut down the system in the event of a fan failure. Temperature shutdown Allows the temperature chips to shut down the system in an orderly sequence. Allows hardware to detect a fan fault and shut Fan fault down the system in an orderly sequence. Set to disable if testing the system board or CPU card outside of the enclosure. Enables the on-board SCSI terminators. The SCSI terminator system specification requires that the SCSI bus be terminated at both ends. Note: This jumper J25 is not used in the AlphaStation 600A Default Enabled. Enabled. Enabled. Enabled. Enabled. Enabled. 244 Cpu Module Bank 0 1 CPU J1 Jumper Jumper Setting Function Standard boot setting Standard boot setting 2 Mini console setting (Internal use only) 3 Mini console setting (Internal use only) 4 Startup with no backup cache (Internal use only) 5 Mini console setting (Internal use only) 6 Mini console setting (Internal use only) 7 Fail-safe loader setting: selects fail-safe loader firmware Note The J1 jumper on the CPU card activates the SROM tests and the fail-safe loader. It is shown with its default setting. 245 Digital Personal WorkStation a/au Series The Digital Personal WorkStation a/au Systems contain a single 1MB flash Rom located on the motherboard. It contains ARC console firmware for Windows NT and SRM console firmware for Tru64 UNIX and OpenVMS. When ever the CPU motherboard is replaced the firmware will need to be updated. You will also need to do occasional console firmware upgrades to load the latest version of firmware that is available. There are several ways to upgrade the firmware. All involve booting Loadable Firmware Utility (LFU). It can be booted one of the following ways. • • • • • • Off the Alpha AXP System Firmware Update Utility CD using the local CDROM. Off of an infoserver using the Alpha AXP System Firmware Update Utility CD. Over the network using the .SYS firmware file. Off of a disk that has a bootable version of the firmware file (filename.exe) on it (MCR WRITEBOOT may be required on that file to make it bootable). Off of a bootable floppy OpenVMS, Unix or NT. From the BOOTP server (Unix). The procedure to update the console firmware is as follows. • • • • • • • • • Determine current console firmware revision by the power on display, SHOW commands or from online SDA with a CLUE CONFIG command. Record all console environmental variables by typing SHOW * at the >>>. Determine method and firmware version you will be using to do the update. Print the firmware release notes for that version and system. Determine if any option firmware will be upgraded. Boot the firmware file (LFU). Use the verify and update commands at the Apu-> prompt. When done exit from LFU. Reset any Environmental variables that were changed and reboot. 1. Get the current firmware revision at power on or with console show commands. Power on or init display ff.fe.fd.fc.fb.fa.f9.f8.f7.f6.f5.CPU 0 speed is 2.31 ns (433MHz) ef.ee.ed.ec.eb.f4.ea.e9.e8.e7.e6.e5.e4. Digital Personal WorkStation 433au Console V6.8-41 built on May 21 1998 at 16:03:04 >>> sho version version V6.8-41 May 21 1998 16:03:04 >>> sho pal pal VMS PALcode V1.20-14, OSF PALcode V1.22-17 >>>sho config Firmware SRM Console: ARC Console: PALcode: SROM Version: V6.8-41 5.65 VMS PALcode V1.20-14, OSF PALcode V1.22-17 v5.90 Processor DECchip (tm) 21164A-2 2 MB Bcache PYXIS ASIC Pass 257 Pass 433 MHz 96 Kbytes Scache 246 MEMORY Memory Size = 192Mb Bank -----0 1 Size/Sets ---------64Mb 128Mb Base Addr --------08000000 00000000 Bcache Size = 2Mb Tested Memory = 192Mbytes PCI Bus Bus 00 Slot 03: Digital Semiconductor 21143 Network Controller ewa0.0.0.3.0 00-00-F8-75-5F-2A Bus 00 Slot 04: PCI IDE pqa0.0.0.4.0 dka0.0.0.4.0 PCI EIDE TOSHIBA CD-ROM XM-57 Bus 00 Slot 07: Intel SIO 82378 Bus 00 Slot 12: Digital TGA2 Graphics Controller Bus 00 Slot 20: DECchip 21052 PCI to PCI Bridge Bus 01 Slot 08: DECchip 21041 Network Controller ewb0.0.0.1008.0 00-00-F8-06-5E-BF Bus 01 ISA Slot 0 7 Slot 09: ISP1040 Scsi Controller pkc0.7.0.1009.0 dkc0.0.0.1009.0 mkc600.6.0.1009.0 Device Name Type 0 1 2 3 4 5 6 MOUSE KBD COM1 COM2 LPT1 FLOPPY EIDE Embedded Embedded Embedded Embedded Embedded Embedded Embedded ES1888 Embedded Enabled Yes Yes Yes Yes Yes Yes Yes Yes 220 SCSI Bus ID 7 RZ1BB-BS TLZ07 BaseAddr 60 60 3f8 2f8 3bc 3f0 1f0 3f6 170 376 5 IRQ 12 1 4 3 7 6 14 15 DMA 2 1 2. >>> show or show * to printout all the environmental variables. Check all customer set variables. Also verify the setting of the following variables. Bootdef_dev Boot_osflags Auto_action 3. Boot the firmware using one of the following six methods. 247 Method 1 - Load the Console Firmware Off a Local CDROM SRM Console a. Insert the CD in the local CDROM. b. >>> Boot -fl 0,a0 DKA400 BOOTFILE:[digitalpw]digitalpw_v72_1.exe Note: These filenames will change with different console versions. Apu-> See step 5 below for update procedure. ARC Console a. Insert the CD in the local CDROM. b. Enter the ARC menu by typing ARC or initializing system if os_type = NT c. Select Supplementary Menu and Install new Firmware Caution If you are running the V4.49 ARC console you will not be able to use the "Install new Firmware" utility. The SRM firmware will need to be updated from the >>>. Method 2 - Boot the Console CD Off of an Infoserver a. Insert CD in the Infoserver b. >>> boot ewa0 -file filename (leave off the .sys extension) Method 3 - Booting off the Network - OpenVMS a. Copy firmware.sys file to MOM$LOAD of an existing node in the cluster b. Set the attributes on the file with the following commands: $ set file/attr=(rfm:fix,lrl:512,mrs:512,rat:none) firmware.sys c. Enable service on that node from NCP $ MC NCP MC NCP> Show Known Circuit Characteristic Known Circuit Volatile Characteristics as of 12-FEB-1997 19:27:41 Circuit = BNA-0 - Circuit State = Service = Counter timer = Designated router = Cost = Maximum routers allowed = Router priority = Hello timer = Type = Adjacent node = Listen timer = name will change from system to system on disabled (if enabled skip to boot command) 65534 28.1023 (CXO28A) 4 33 64 15 Ethernet 28.1023 (CXO28A) 30 NCP> Set Circ BNA-0 State OFF - This step will stop network activity NCP> Set Circ BNA-0 Service Enable NCP> Set Circ BNA-0 State ON d. >>> b ewa0 -fi filename Leave off .SYS or node that services request will get an error - BAD MOP FID) 248 Method 4 - Boot Off of a Disk - Non-System Disk and System Disk Using OpenVMS Non-System Disk a. Locate the firmware.exe file b. Set the attributes on the file and copy it contiguous to the target disk (non-system) and directory with the following commands: $ set file/attr=(rfm:fix,lrl:512,mrs:512,rat:none) firmware.exe $ copy/contiguous firmware.exe "non_system_disk":[directory] c. Use writeboot to make the disk bootable. Specify the disk, directory and filename of the firmware. Take the defaults for the other questions. $ MCR Writeboot Update VAX portion of boot block (default is Y): No Update Alpha portion of boot block (default is Y):Yes Target system device (and boot file if not VMB.EXE): $1$DUA5:[digitalpw]digitalpw_v72_1.exe d. >>> b -fl 0,0 dua5 System Disk a. Only steps a and b above are used. Do NOT execute writeboot step c. b. Specify the flags of 0,a0 and use "system disk":[sys0.sysexe]filename for bootfile. >>> boot -fl 0,a0 dua0 bootfile: dua0:[sys0.sysexe]digitalpw_v72_1.exe Method 5 - Boot Off of a Bootable Floppy OpenVMS AXP a. Init and mount floppy. Create a directory and copy the firmware to the floppy with the following commands. $ init/dens=HD/index=begin dva0: fwupdate $ mount dva0: fwupdate $ create/dir dva0:[digitalpw] $ copy/contiguous digitalpw_v72_1.exe dva0:[digitalpw]fwupdate.exe b. MCR Writeboot Update VAX portion of boot block (default is Y): No Update Alpha portion of boot block (default is Y):Yes [enter AXP bootfile:] dva0:[digitalpw]fwupdate.exe c. Dismount the disk and shutdown VMS. $ dismount dva0: d. Insert the floppy on the target system and boot it from the >>>. >>> boot dva0 Tru64 UNIX a. Go to http://ftp.digital.com/pub/Digital/Alpha/firmware/ b. Copy the firmware.exe file from the Alpha300 directory to your system and rename fwupdate.exe c. Download the file mkbootfirm.tar from the firmware website. ftp://ftp.digital.com/pub/Digital/Alpha/firmware/utilities/mkbootfirm.tar You can untar mkbootfirm on your target Tru64 UNIX system with the command: # tar xvf mkbootfirm.tar d. Make sure you have a floppy that has been low-level formatted. For example, to low-level format a floppy in drive 0: 249 fddisk -fmt /dev/rfd0a e. Change default to directory with mkbootfirm.exe cd mkbootfirm f. Run mkbootfirm on the .exe firmware image that you downloaded. mkbootfirm uses a .exe firmware image to create a file that can be dd’d to floppy. The following will create a bootable floppy from a downloaded .exe firmware image: ./mkbootfirm fwupdate.exe | dd of=/dev/rfd0c bs=64k NOTE: Assumes mkbootfirm.exe is in current directory and floppy is in drive 0. g. Insert the floppy on the target system and boot it from the SRM console: >>> boot dva0 Windows NT a. Copy the firmware file to a FAT formatted floppy with the update image filename a:\fwupdate.exe. b. Shut down NT and from the ARC menu, select "Install new firmware". Caution If you are running the V4.49 ARC console you will not be able to use the "Install new Firmware" utility. The SRM firmware will need to be updated from the >>>. Method 6 - BOOTP Network Upgrade - Tru64 UNIX a. Mount the Firmware Update CD using the following command: # mount -rt cdfs -o noversion /dev/rz4c /mnt b. Modify or Create the Client Database in the /etc/bootptab File <host>:ht:<hw_type>:ha=<hw_addr>:bf=<filename>:ip=<ip_addr> where: host is the system name in /etc/hosts hw_type is the hardware type. Proteon is ht = 4. Ethernet is ht = 1. Regular token-ring (IEEE 802) is ht = 6. hw_addr is the hardware address: use the console command show device. filename is the name of the default bootfile image: ip_addr is the Internet protocol address of the system name in /etc/hosts. The following is an example of a bootptab file for the Digital Personal WorkStation bigsox:ht=1:ha=08002b236423:bf=/mnt/digitalpw/digitalpw_v72_1.exe:ip=16.182.0.87 c. Modify the /etc/inetd.conf file. Uncommon the tftp and bootps process. It should look like the following example: tftp dgram udp wait root bootps dgram upd wait root /usr/sbin/tftpd /usr/sbin/bootpd tftpd /mnt bootpd d. Find the process /usr/sbin/inetd daemon: This step will stop network traffic # ps aux | grep ine # kill process# <ine process number> 250 e. Restart the inetd daemon: # /usr/sbin/inetd Note The bootpd and tftp daemon will be removed if the system is rebooted. Refer to the manual pages: bootpd(8) or tftpd(8) for more information. Use Man bootpd and man tftpd f. Enter the following command to boot from the BOOTP server: >>> boot -p bootp ewa0 Should a boot file "pathname" need to be specified in must be in quotes >>> boot -p bootp ewa0 -file “/dir1/dir2/filename” 5. Enter the update utility. The SHOW command will indicate current firmware version. Then execute the Update command. *** Digital Personal WorkStation 433au -- Firmware Update *** Use HELP or ? for help Update Verify List Show Debug Ndebug ? a. Apu-> show *** ROM: SRM Firmware = Version = *** ROM: ARC Firmware = Version = b. Apu-> APU-I APU-I APU-I APU-I APU-I APU-I APU-I APU-I APU-I APU-I APU-I APU-I APU-I APU-I APU-I APU-I MIATA_SRM v6.9 /AlphaBIOS MIATA_ARC 5.67 update ARE YOU READY TO PROGRAM (SRM ) ROM DEVICE ? (Y/N) y ERASING (SRM ) ROM DEVICE PROGRAMMING (SRM ) ROM DEVICE VERIFY LOADED (SRM ) ROM IMAGE VERIFY LOADED (SRM ) ROM IMAGE DONE PROGRAMMING (SRM ) ROM COMPLETED ERASING (ARC /AlphaBIOS) ROM DEVICE PROGRAMMING (ARC /AlphaBIOS) ROM DEVICE VERIFY LOADED (ARC /AlphaBIOS) ROM IMAGE VERIFY LOADED (ARC /AlphaBIOS) ROM IMAGE DONE PROGRAMMING (ARC /AlphaBIOS) ROM COMPLETED ERASING (SROM ) ROM DEVICE PROGRAMMING (SROM ) ROM DEVICE VERIFY LOADED (SROM ) ROM IMAGE VERIFY LOADED (SROM ) ROM IMAGE DONE PROGRAMMING (SROM ) ROM COMPLETED c. If your SROM is not at least Revision 4.45 then you must execute two update commands when using the flash update utility. Update and Update SROM. See example below. To see current version set to DEBUG mode and do a SHOW VERSION or SHOW CONFIG (see example above). Apu-> debug Debug :Apu-> 251 Debug :Apu-> verify Version = v7.2 Vendor = DEC Product = MIATA Firmware = MIATA_SRM Length = 0x72200 1024KB ROM present Version = v7.2 Vendor = DEC Product = MIATA Firmware = MIATA_SRM Length = 0x72200 Version = v7.2 Vendor = DEC Product = MIATA Firmware = MIATA_SRM Length = 0x72200 SRM ROM verify successful Version = 5.70 Vendor = DEC Product = MIATA Firmware = MIATA_ARC Length = 0x677ac Version = 5.70 Vendor = DEC Product = MIATA Firmware = MIATA_ARC Length = 0x677ac ARC /AlphaBIOS ROM verify successful Version = v5.90 Vendor = DEC Product = MIATA Firmware = MIATA_SROM Length = 0x3fff Version = v5.90 Å SROM Version Vendor = DEC Product = MIATA Firmware = MIATA_SROM Length = 0x3fff SROM ROM verify successful Debug :Apu-> Debug :Apu-> nodebug Apu-> Apu-> APU-I APU-I APU-I APU-I APU-I APU-I Apu-> update srom ARE YOU READY TO PROGRAM (SROM ) ROM DEVICE ? (Y/N) y ERASING (SROM ) ROM DEVICE PROGRAMMING (SROM ) ROM DEVICE VERIFY LOADED (SROM ) ROM IMAGE VERIFY LOADED (SROM ) ROM IMAGE DONE PROGRAMMING (SROM ) ROM COMPLETED 6. Verify that update was successful and exit Apu-> verify SRM ROM verify successful ARC /AlphaBIOS ROM verify successful SROM ROM verify successful Apu-> exit …Please Cycle System Power … 7. Update the option firmware. The V5.9 CD supports updates on the PCI options DEFPA (FDDI), KZPSA (SCSI), and the EISA option DEFEA (FDDI). a. Boot the Option firmware file. 252 >>> boot -fl 0,a0 DKA400 for the Personal WorkStation Bootfile: [digitalpw]digitalpw_pci_v7_2.exe This filename may change with each new firmware release. . . . Copying Copying Copying Copying DFEAA130 DFEAB320 DFXAA320 KZPSAA12 from from from from dqa0.0.0.107.0. dqa0.0.0.107.0. dqa0.0.0.107.0. dqa0.0.0.107.0. . . . . . . . . ***** Loadable Firmware Update Utility ***** ---------------------------------------------------------------------------Function Description ---------------------------------------------------------------------------Display Displays the system’s configuration table. Exit Done exit LFU (reset). List Lists the device, revision, firmware name, and update revision. Readme Lists important release information. Update Replaces current firmware with loadable data image. Verify Compares loadable and hardware images. ? or Help Scrolls this function table. ---------------------------------------------------------------------------UPD> b. Use the list command to see what devices are available to update. UPD> list Device pkb0 Current Revision A11 Filename kzpsa_fw dfeaa_fw dfeab_fw dfxaa_fw Update Revision A12 1.3 3.20 3.20 c. Enter the update command to update firmware. (In this example the kzpsa is the only updateable adapter present. If no updateable adapters are present, the message “not supported under LFU" will appear). UPD> update Confirm update on: pkb0 [Y/(N)]y WARNING: updates may take several minutes to complete for each device. DO NOT ABORT! pkb0 Updating to A12... Verifying A12... PASSED. UPD> 8. Power cycle the machine to load console firmware then reset any environmental variables that changed, init and reboot. 253 Compaq Professional Workstation XP1000 The Compaq Professional WorkStation XP1000 contains a single flash Rom located on the motherboard. It contains SROM code containing Power on Self Test(POST) , ARC console firmware for Windows NT and SRM console firmware for Tru64 UNIX. When ever the motherboard is replaced the firmware may need to be updated. You will also need to do occasional console firmware upgrades to load the latest version of firmware that is available. At this time there are limited ways to upgrade the firmware. The methods available are as follows • Off the Alpha AXP Systems Firmware Update Utility CD using the local CDROM. • Off of an InfoServer using the Alpha AXP Systems Firmware Update Utility CD. • Over the network using the .SYS firmware file. • Off of a disk that has a bootable version of the firmware file (filename.exe) on it (MCR WRITEBOOT may be required on that file to make it bootable). • Off of a bootable floppy OpenVMS, Unix or NT. • From the BOOTP server (Unix). Note The XP1000 system does not support OpenVMS until console version V5.6. In order to use any OpenVMS method if you have V5.5 SRM console version or earlier, you would need to have a OpenVMS system connected to the network with the XP1000 or have a disk that can be written from OpenVMS and then accessed by the XP1000. The procedure to update the console firmware is as follows. • • • • • • • • If running WNT you will need to update HAL and PAL before upgrading firmware. Determine current console firmware revision by the power on display, SHOW commands. Record all console environmental variables by typing SHOW * at the >>>. Print the firmware release notes for that version and system. Boot the firmware file (LFU). Use the verify and update commands at the prompt. When done exit from LFU. Reset any environmental variables that were changed and reboot. 1. First upgrade hal and pal code as follows. a. Go to the website at http://www.compaq.com/support/files/alphant/firmware/pwxp1000.html b. Copy the HAL OEM file to you system and unzip it. AB-Hal-XP1000-v570.zip is the current file as of August 1999. c. Copy all the files to a regular FAT formatted floppy disk d. Boot Windows NT V4.0. e. Insert the update floppy from this kit and invoke it by entering a:\update f. Answer the questions presented in the installation wizard. Compaq recommends that you allow the software to create an uninstall directory; this provides a backup of the older files. If you are asked whether to replace any files, answer "yes." g. At the end of this installation procedure, Windows NT will be rebooted automatically. 2. Use one of the following methods to update the firmware 254 Method 1 - Load the Console Firmware Off a Local CDROM a. Insert the CD in the local CDROM b. >>> boot -fl 0,a0 DKA400 BOOTFILE: [xp1000]xp1000_v59_1.exe The filename will change with different console versions. APU> See below for update steps Method 2 - Boot the Console CD Off of an InfoServer a. Insert the CD in the InfoServer b. >>> boot ewa0 -file filename (leave off the .sys extension) Method 3 – Booting Off the Network – Need an OpenVMS Host on Network a. Copy the firmware.sys file to an existing OpenVMS node on the network. b. Set the VMS attributes on the file with the following command. $ set file/attr=(rfm:fix,lrl:512,mrs:512,rat:none) firmware.sys c. Enable service on that node from NCP $ MC NCP MC NCP> Show Known Circuit Characteristic Known Circuit Volatile Characteristics as of 12-FEB-1997 19:27:41 Circuit = BNA-0 - Circuit State = Service = Counter timer = Designated router = Cost = Maximum routers allowed = Router priority = Hello timer = Type = Adjacent node = Listen timer = name will change from system to system on disabled (if enabled skip to boot command) 65534 28.1023 (CXO28A) 4 33 64 15 Ethernet 28.1023 (CXO28A) 30 NCP> Set Circ BNA-0 State OFF - This step will stop network activity NCP> Set Circ BNA-0 Service Enable NCP> Set Circ BNA-0 State ON d. >>> b ewa0 –fi filename (Leave off .SYS will get an error - BAD MOP FID) Method 4 - Boot Off of a Disk - Non-System Disk and System Disk Using OpenVMS Non-System Disk a. Locate the firmware.exe file b. Set the attributes on the file and copy it contiguous to the target disk (non-system) and directory with the following commands: $ set file/attr=(rfm:fix,lrl:512,mrs:512,rat:none) firmware.exe $ copy/contiguous firmware.exe “non-system_disk”:[directory] c. Use writeboot to make the disk bootable. Specify the disk, directory and filename of the firmware. Take the defaults for the other questions. $ MCR Writeboot Update VAX portion of boot block (default is Y): No Update Alpha portion of boot block (default is Y):Yes Target system device (and boot file if not VMB.EXE):$1$dua5:[TEMP]filename.exe 255 d. >>> b –fl 0,0 dua5 System Disk a. Only steps a and b above are used. Do NOT execute writeboot step c. b. Specify the flags of 0,a0 and use "system disk":[sys0.sysexe]filename for bootfile. >>> boot -fl 0,a0 dua0 bootfile: dua0:[sys0.sysexe]xp1000_v59_1.exe Method 5 - Boot Off of a Bootable Floppy Windows NT a. Copy the firmware file to a FAT formatted floppy with the update image filename a:\fwupdate.exe. b. Shut down NT and from the NT Console menu, select " Upgrade AlphaBIOS". TRU64 UNIX a. Go to the firmware website at http://ftp.digital.com:80/pub/Digital/Alpha/firmware/readmes/xp1000.html b. Copy the xp1000_v59_1.exe file from the above website to your system and rename it fwupdate.exe c. Download the file mkbootfirm.tar from the firmware website. ftp://ftp.digital.com/pub/Digital/Alpha/firmware/utilities/mkbootfirm.tar You can untar mkbootfirm on your target Tru64 UNIX system with the command: # tar xvf mkbootfirm.tar d. Make sure you have a floppy that has been low-level formatted. For example, to low-level format a floppy in drive 0: fddisk -fmt /dev/rfd0a e. Change default to directory with mkbootfirm.exe cd mkbootfirm f. Run mkbootfirm on the .exe firmware image that you downloaded. mkbootfirm uses a .exe firmware image to create a file that can be dd’d to floppy. The following will create a bootable floppy from a downloaded .exe firmware image: ./mkbootfirm fwupdate.exe | dd of=/dev/rfd0c bs=64k OpenVMS AXP a. Init and mount to floppy. Create a directory and copy the firmware to the floppy with the following commands. $ set file/attr=(rfm:fix,lrl:512,mrs:512,rat:none) xp1000_v59_1.exe $ init/dens=HD/index=begin dva0: fwupdate $ mount dva0: fwupdate $ create/dir dva0:[xp1000] $ copy/contiguous xp1000_v59_1.exe dva0:[xp1000]fwupdate.exe b. MCR Writeboot Update VAX portion of boot block (default is Y): No Update Alpha portion of boot block (default is Y):Yes [enter AXP bootfile:] dva0:[xp1000]fwupdate.exe 256 c. Dismount the disk and shutdown VMS. $ dismount dva0: d. Insert the floppy on the target system and boot it from the >>>. >>> boot dva0 Method 6 - BOOTP Network Upgrade – TRU64 UNIX a. Mount the Firmware Update CD using the following command: # mount -rt cdfs -o noversion /dev/rz4c /mnt b. Modify or Create the Client Database in the /etc/bootptab File <host>:ht:<hw_type>:ha=<hw_addr>:bf=<filename>:ip=<ip_addr> where: host is the system name in /etc/hosts hw_type is the hardware type. Proteon is ht = 4. Ethernet is ht = 1. Regular token-ring (IEEE 802) is ht = 6. hw_addr is the hardware address: use the console command show device. filename is the name of the default bootfile image: ip_addr is the Internet protocol address of the system name in /etc/hosts. The following is an example of a bootptab file for the XP1000 : bigsox:ht=1:ha=08002b236423:bf=/mnt/XP1000/XP1000_V59_1.EXE;1:ip=16.182.0.87 c. Modify the /etc/inetd.conf file. Uncommon the tftp and bootps process. It should look like the following example: tftp dgram udp wait root /usr/sbin/tftpd tftpd /mnt bootps dgram upd wait root /usr/sbin/bootpd bootpd d. Find the process /usr/sbin/inetd daemon: This step will stop network traffic # ps aux | grep ine # kill process# <ine process number> e. Restart the inetd daemon: # /usr/sbin/inetd Note The bootpd and tftp daemon will be removed if the system is rebooted. Refer to the manual pages: bootpd(8) or tftpd(8) for more information. Use Man bootpd and man tftpd f. Enter the following command to boot from the BOOTP server: >>> boot -p bootp ewa0 Should a boot file "pathname" need to be specified in must be in quotes >>> boot -p bootp ewa0 -file “/dir1/dir2/filename” 3. Type update at the Apu-> prompt to update SRM and AlphaBIOS. Apu-> update APU-I ARE YOU READY TO PROGRAM (SRM) ROM DEVICE ? (Y/N) y APU-I ERASING (SRM) ROM DEVICE APU-I PROGRAMMING (SRM) ROM DEVICE APU-I VERIFY LOADED (SRM) ROM IMAGE APU-I VERIFY LOADED (SRM) ROM IMAGE DONE APU-I PROGRAMMING (SRM) ROM COMPLETED APU-I ERASING (ARC/AlphaBIOS) ROM DEVICE APU-I PROGRAMMING (ARC/AlphaBIOS) ROM DEVICE APU-I VERIFY LOADED (ARC/AlphaBIOS) ROM IMAGE APU-I VERIFY LOADED (ARC/AlphaBIOS) ROM IMAGE DONE APU-I PROGRAMMING (ARC/AlphaBIOS) ROM COMPLETED 257 Apu-> 4. Type update SROM to update the POST code 5. After update is completed type exit. 6. Power cycle the machine to load console firmware then reset any environmental variables that changed, init and reboot. 7. Update the option firmware. The V5.9 CD supports updates on the PCI options DEFPA (FDDI), KZPSA (SCSI), CCMAB (Memory Channel) and the EISA option DEFEA (FDDI). a. Boot the Option firmware file. >>> boot -fl 0,a0 DKA400 Bootfile: [xp1000]xp1000_pci_v5_9.exe for the XP1000 This filename may change with each new firmware release. . <BLACK SCREEN FLASHES HERE> . . E8.E7.E5.E4. COMPAQ Professional Workstation XP1000 Console X5.4-10224 built on Mar 24 1999 at 11:50:48 Checking dqa0.0.0.107.0 for the option firmware files. . . Copying DFXAA320 from dqa0.0.0.107.0. . . Copying KZPSAA12 from dqa0.0.0.107.0. . . ***** Loadable Firmware Update Utility ***** ---------------------------------------------------------------------------Function Description ---------------------------------------------------------------------------Display Displays the system’s configuration table. Exit Done exit LFU (reset). List Lists the device, revision, firmware name, and update revision. Readme Lists important release information. Update Replaces current firmware with loadable data image. Verify Compares loadable and hardware images. ? or Help Scrolls this function table. ---------------------------------------------------------------------------UPD> b. Use the list command to see what devices are available to update. UPD> list Device pkb0 Current Revision A11 Filename kzpsa_fw dfxaa_fw Update Revision A12 3.20 c. Enter the update command to update firmware. (In this example the kzpsa is the only updateable adapter present. If no updateable adapters are present, the message “not supported under LFU" will appear). UPD> update Confirm update on: pkb0 [Y/(N)]y WARNING: updates may take several minutes to complete for each device. DO NOT ABORT! pkb0 Updating to A12... Verifying A12... PASSED. UPD> 8. Power cycle the machine to load console firmware then reset any environmental variables that changed, init and reboot. 258 259 DEC 2000 Model 300/500 AXP and DECpc AXP150 The DEC 2000 Model 300 (Jensen) / Model 500 (Culzean) and DECpc AXP 150 (Jensen) contain flash roms on the system backplane that contain ARC console firmware for Windows NT and SRM console firmware for Tru64 UNIX and OpenVMS. When ever this modules is replaced the firmware will need to be updated. You will also need to do occasional console firmware upgrades to load the latest version of firmware that is available. These machine also have a backup console called the failsafe loader. It is enabled for use or writes by two jumpers on the system backplane. The failsafe loader needs to be updated anytime the standard I/O is replaced. There are several ways to upgrade the firmware. All involve booting Loadable Firmware Utility (LFU). It can be booted one of the following ways. • • • • • • Off the Alpha AXP System Firmware Update Utility CD using the local CDROM. Off of an infoserver using the Alpha AXP System Firmware Update Utility CD. Over the network using the .SYS firmware file. Off of a disk that has a bootable version of the firmware file (filename.exe) on it (MCR WRITEBOOT may be required on that file to make it bootable). Off of a bootable floppy OpenVMS, Unix or NT. From the BOOTP server (Unix). The procedure to update the console firmware is as follows. • • • • • • • • • • • • Determine current console firmware revision. Record all console environmental variables by typing SHOW * at the >>>. Determine which method and firmware version will be used to do the update. Print the firmware release notes for that version and system. Determine if any option firmware will be upgraded. Locate the appropriate RCU and ECU diskettes if required. Set variable OS-TYPE to FLASH_UPDATE (flash will do). Power cycle machine. Boot LFU. Use the verify and update commands at the UPD> prompt then Exit LFU. Set OS_TYPE to VMS , UNIX or NT. Power cycle machine to load the new firmware. 1. Power on the system. The following will display. Alpha AXP System - ROM Version 2.1 (This is the ROM Version) Copyright © 1993 Digital Equipment Corporation. Alpha AXP SRM Firmware Version - 36d (This is the Firmware Version) System conducting power up tests --------------------------------------------------------------Devnam Devstat -----------CPU OK EV4 P2.1 6.6ns MEM OK 32MB NVR OK SCC OK IT OK KBD OK LPT OK VGA OK NI OK 08-00-2B-2E-31-18 DE422 SCSI OK --------------------------------------------------------------System power up OK. >>> 260 2. >>> show * to list all environmental variables. Check all customer set variables. Also verify the setting of the following variables. Bootdef_dev Boot_osflags Auto_action os_type >>> set os_type flash OS_TYPE = FLASH_UPDATE 3. Power cycle machine again. 4. Boot the firmware using one of the following methods Method 1 - Boot the Console CD Off a Local CDROM a. Insert the CD in the local CDROM. b. >>> b -fl 0,80 dka400 INIT-S-CPU… AUDIT_BOOT_STARTS … AUDIT_CHECKSUM_GOOD AUDIT_LOAD_BEGINS AUDIT_LOAD_DONE Bootfile: [dec2000]dec2000_v2_2.exe *** FIRMWARE UPDATE UTILITY V2.2 *** *** SYSTEM TYPE: DEC 2000 AXP *** UPDATE VERIFY LIST ? UPD>See step 5 below for update procedure. Method 2 - Boot the Console CD Off of an Infoserver a. Insert CD in the Infoserver b. >>> boot <device> -fi dec2000_v2_2 Method 3 - (leave off the .sys extension) Booting Off the Network OpenVMS a. Either obtain a copy of the firmware file over the network or from the Internet or load the console CD into a CDROM b. $ mount dka400 update_v39 (label will change depending on CD used) $ copy dka400:[SYS0.SYSEXE]dec2000_v2_2.sys mom$load: c. Set the attributes on the file with the following commands: $ set file/attr=(rfm:fix,lrl:512,mrs:512,rat:none) dec2000_v2_2.sys 261 d. Enable service on that node from NCP $ MC NCP MC NCP> Show Known Circuit Characteristic Known Circuit Volatile Characteristics as of 12-FEB-1997 19:27:41 Circuit = BNA-0 State = on Service = disabled (if enabled skip to boot command) Counter timer = 65534 Designated router = 28.1023 (CXO28A) Cost = 4 Maximum routers allowed = 33 Router priority = 64 Hello timer = 15 Type = Ethernet Adjacent node = 28.1023 (CXO28A) Listen timer = 30 NCP> Set Circ BNA-0 State OFF - This step will stop network activity NCP> Set Circ BNA-0 Service Enable NCP> Set Circ BNA-0 State ON e. >>> boot <device> -fi dec2000_v2_2 - or name of firmware file you use. Tru64 UNIX or Ultrix a. Copy the firmware file from the CD using the following commands. # mount -rt cdfs -o noversion /dev/rz4c /mnt # cp /mnt/DEC2000/dec2000_v2_2.sys b. Add the node using the ADDNODE command # addnode sys -h 08-00-2B-2E-31-81 -l dec2000_v2_2.sys To determine the hardware address enter show device at the >>> >>> show device BOOTDEV ADDR DEVTYPE RM/FX DEVNAM REV NUMBYTES ---------------------------------ERA0 08-00-2B-2E-31-81 c. Make sure the mop_mom process is running by issuing the following command # ps aux|grep mop d. If not running issue the following command to start it. # mop_mom e. >>> boot <device> -fi "dec2000_v2_2.sys" Method 4 - Boot Off of a Disk - Non-System Disk and System Disk Using OpenVMS Non-System Disk a. Locate the firmware.exe file b. Set the attributes on the file and copy it contiguous to the target disk (non-system) and directory with the following commands: $ set file/attr=(rfm:fix,lrl:512,mrs:512,rat:none) firmware.exe $ copy/contiguous firmware.exe "non_system_disk":[directory] c. Use writeboot to make the disk bootable. Specify the disk, directory and filename of the firmware. Take the defaults for the other questions. $ MCR Writeboot Update VAX portion of boot block (default is Y): No Update Alpha portion of boot block (default is Y):Yes Target system device (and boot file if not VMB.EXE):$1$dua5:[temp]filename.exe d. >>> b -fl 0,0 dua5 262 System Disk a. Only steps a and b above are used. Do NOT execute writeboot step c. b. Specify the flags of 0,a0 and use "system disk":[sys0.sysexe]filename for the bootfile. >>> b -fl 0,80 dua0 bootfile> dua0:[sys0.sysexe]dec2000_v2_2.exe Method 5 - Boot Off of a Bootable Floppy OpenVMS AXP a. Init and mount the floppy. Create a directory and copy the firmware to the floppy with the following commands. The commands shown are for the AlphaServer 2x00 EV4. For all other systems use the directory and files listed in method 1. $ set file/attr=(rfm:fix,lrl:512,mrs:512,rat:none) dec2000_v2_2.exe $ init/dens=HD/index=begin dva0: fwupdate $ mount dva0: fwupdate $ create/dir dva0:[DEC2000] $ copy/contiguous dec2000_v2_2.exe dva0:[DEC2100]fwupdate.exe b. MCR Writeboot Update VAX portion of boot block (default is Y): No Update Alpha portion of boot block (default is Y):Yes [enter AXP bootfile:] dva0:[DEC2000]fwupdate.exe c. Dismount the disk and shutdown VMS. $ dismount dva0: d. Insert the floppy on the target system and boot it from the >>>. >>> boot dva0 Tru64 UNIX a. Go to the Digital Internet http://ftp.digital.com/pub/Digital/Alpha/firmware/ b. Copy the firmware.exe file from the DEC2000 directory and rename it fwupdate.exe c. Download the file mkbootfirm.tar from the firmware website. ftp://ftp.digital.com/pub/Digital/Alpha/firmware/utilities/mkbootfirm.tar You can untar mkbootfirm on your target Tru64 UNIX system with the command: # tar xvf mkbootfirm.tar d. Make sure you have a floppy that has been low-level formatted. For example, to low-level format a floppy in drive 0: fddisk -fmt /dev/rfd0a e. Change default to directory with mkbootfirm.exe cd mkbootfirm f. Run mkbootfirm on the .exe firmware image that you downloaded. Mkbootfirm uses a .exe firmware image to create a file that can be dd’d to floppy. The following command will create a bootable floppy from a downloaded .exe firmware image: ./mkbootfirm fwupdate.exe | dd of=/dev/rfd0c bs=64k NOTE: Assumes mkbootfirm.exe is in current directory and floppy is in drive 0. g. Insert the floppy on the target system and boot it from the SRM console: >>> boot dva0 Windows NT 263 a. Copy the firmware file to a FAT formatted floppy with the update image filename of a:\fwupdate.exe. b. Shut down NT and from the NT Console menu, select "Install new firmware". Method 6 - BOOTP Network Upgrade - Tru64 UNIX a. Mount the Firmware Update CD using the following command: # mount -rt cdfs -o noversion /dev/rz4c /mnt b. Modify or Create the Client Database in the /etc/bootptab File <host>:ht:<hw_type>:ha=<hw_addr>:bf=dec2000_v2_2.btp:ip=<ip_addr> where: host is the system name in /etc/hosts hw_type is the hardware type. Proteon is ht = 4. Ethernet is ht = 1. Regular token-ring (IEEE 802) is ht = 6. hw_addr is the hardware address: use the console command show device. filename is the name of the default bootfile image: ip_addr is the Internet protocol address of the system name in /etc/hosts. The following is an example of a bootptab file for the DEC2000: bigsox:ht=1:ha=08002b236423:bf=/mnt/DEC2000/DEC2000_V2_2.BTP;1:ip=16.182.0.87 c. Modify the /etc/inetd.conf file. Uncommon the tftp and bootps process. It should look like the following example: tftp dgram udp wait root /usr/sbin/tftpd tftpd /mnt bootps dgram upd wait root /usr/sbin/bootpd bootpd d. Find the process /usr/sbin/inetd daemon: This step will stop network traffic # ps aux | grep ine # kill process# e. Restart the inetd daemon: # /usr/sbin/inetd Note The bootpd and tftp daemon will be removed if the system is rebooted. Refer to the manual pages: bootpd(8) or tftpd(8) for more information. Use Man bootpd and man tftpd f. Enter the following command from the DEC 2000 AXP system to boot from the BOOTP server: >>> boot ez0x - where x is either A or B. DEC 2000 AXP systems only support booting from the first two cards, either bus A or bus B. 264 5. Update the firmware at the UPD> prompt. UPD> update UPDATE SYSTEM ROM DEVICE UPD-I VERIFY LOADED ROM IMAGE …......................................................... …....................................... UPD-I VERIFY LOADED ROM IMAGE DONE FIRMWARE REVISION: V2.2 LENGTH: 0x100000 -> 1048576 BYTES CHECKSUM: 0x30 MANUFACTURER = AMD (0x01) DEVICE CODE = 28F010 (0x20) 128K x 8 UPD-I *** ROM CONTENTS WILL BE DESTROYED *** UPD-I ARE YOU READY TO PROGRAM DEVICE ? (Y/N ) Y UPD-I ROM DEVICE BLOCK ERASED AND PROGRAMMED 0 1 2 3 4 5 6 7 8 9 10 11 12 13 14 UPD-I PROGRAMMING COMPLETED …................................................. …................................................. …................................................. …................................................. SYSTEM ROM UPDATE SUCCESSFUL 15 6. Verify the Checksum UPD> verify VERIFY SYSTEM ROM DEVICE UPD-I VERIFY LOADED ROM IMAGE ….......................................................... ….............................................. UPD-I VERIFY LOADED ROM IMAGE DONE ….......................................................... ….............................................. ….......................................................... …....................................... SYSTEM ROM DEVICE EXPECT CHECKSUM 0x30 SYSTEM ROM DEVICE ACTUAL CHECKSUM 0X30 SYSTEM ROM DEVICE VERIFY SUCCESSFUL 7. Exit UPD> and OS_TYPE back to original setting and set keyboard type to US. UPD> exit ?05 HLT INSTR PC= 00000000.000004E4 PSL= 00000000.00001F00 >>> set os_type vms OS_TYPE = VMS >>> set keyboard us KEYBOARD = US 8. Power Cycle the machine and reboot. 265 DEC 3000 - All Models The console firmware on the DEC 3000 systems is located on the system module for the model 300, on the I/O for the models 400, 600 and 700 and on the system and I/O modules for the models 500, 800 and 900. The firmware must match between the system and I/O modules. They are each enabled with separate jumpers that allow the firmware to be updated. Anytime you replace a system or I/O module, the firmware will most likely need to be upgraded. You will also need to do occasional console firmware upgrades to load the latest version of firmware that is available. The 3000 has 3 firmware files. The firmware.exe which has firmware and a CD bootable header, the firmware.btp that is just the firmware and the firmware.sys file that is the firmware plus a mop header. There are several ways to upgrade the firmware. All involve booting Loadable Firmware Utility (LFU). It can be booted one of the following ways. • • • • • • • Off the Alpha AXP System Firmware Update Utility CD using the local CDROM. Off of an infoserver using the Alpha AXP System Firmware Update Utility CD. Over the network using the .SYS firmware file. Off of a non-system disk that has a bootable version of the firmware file (filename.BTP) on it (MCR WRITEBOOT may be required on that file to make it bootable) Off of the system disk using either the firmware.btp or firmware.exe on it. Off of a bootable floppy. From the BOOTP server (Unix). The procedure to update the console firmware is as follows. • • • • • • • • • • • Determine current console firmware revision by the power up display or with a >>>SHOW CONFIG command, or from online SDA with a CLUE CONFIG command. Record all console environmental variables by typing SHOW * at the >>>. Determine which method and firmware version will be used to do the update. Print the firmware release notes for that version and system. Determine if any option firmware will be upgraded. Verify the ROM Update Jumpers are in the correct positions Boot the firmware file (LFU). Use the verify and update commands at the UPD> prompt. When done exit from LFU. Init the machine and reboot. Update Turbochannel options at this time. 1. Power on the get console version info listed on the CPU line. DEC 3000 - M500 Digital Equipment Corporation System conducting power up tests -----------------------------------------------------------Devnam Devstat CPU OK KN15-AA -V2.4-S45E-I077-sV1.0-DECchip 21064 P3.0 ASIC OK MEM OK 224MB NVR OK CXT OK SCC OK ptr(0) = Present keybd(2) = Present NI OK Ethernet Address: 08-00-2B-33-93-14 , TENBT SCSI OK ISDN OK -----------------------------------------------------------CPU OK KN15-AA -V2.4-S45E-I077-sV1.0-DECchip 21064 P3.0 where: V2.4 = the Firmware revision, I077 = the I/O Rom Revision, Sv1.0 = the ROM revision. 266 2. >>> show * to printout all the environmental variables. Check all customer set variables. Also verify the setting of the following variables. Bootdef_dev Boot_osflags Auto_action 3. Check to ROM update jumpers. See the release notes Chapter 2. These show the location of the SYSTEM ROM update jumper. There is also one on the I/O module. Consult the Service Manual for its location and setting. 4. Boot the firmware using one of the following methods. Method 1 - Boot the Console CD Off a Local CDROM a. Insert the CD in the local CDROM b.>>> boot -fl 0,80 DKA400 BOOTFILE: Enter one of the files listed below. [DEC3000]m300_v7_0.exe - for a DEC 3000 Model [DEC3000]m400_v7_0.exe - for a DEC 3000 Model [DEC3000]m500_v7_0.exe - for a DEC 3000 Model UPD> See below for update steps They will change with each CD. 300/300L/300X/300LX 400/400S/600/600S/700 500/500S/500X/800/800S/900 Method 2 - Boot the Console CD Off of an Infoserver a. Insert CD in the Infoserver b. >>> boot esa0 -file filename (leave off the .sys extension) Method 3 - Booting Off the Network VMS System a. Copy the firmware.sys file to MOM$LOAD of an existing node in the cluster $ copy dka400:[dec3000]m300_v7_0.sys mom$load: - for Dec 3000 model 300 $ copy dka400:[turbochannel]tc_v2_2.sys mom$load - for turbochannel b. Set the attributes on the file with the following commands: $ set file/attr=(rfm:fix,lrl:512,mrs:512,rat:none) firmware.sys c. Enable service on that node from NCP $ MC NCP MC NCP> Show Known Circuit Characteristic Known Circuit Volatile Characteristics as of 12-FEB-1997 19:27:41 Circuit = BNA-0 State = on Service = disabled (if enabled skip to boot command) Counter timer = 65534 Designated router = 28.1023 (CXO28A) Cost = 4 Maximum routers allowed = 33 Router priority = 64 Hello timer = 15 Type = Ethernet Adjacent node = 28.1023 (CXO28A) Listen timer = 30 NCP> Set Circ BNA-0 State OFF - This step will stop network activity NCP> Set Circ BNA-0 Service Enable NCP> Set Circ BNA-0 State ON d. >>> b esa0 -fi m300_v7_0 or b esa0 -fi tc_v2_2 (Leave off .SYS or node that services request will get error - BAD MOP FID) 267 Ultrix a. Mount the Firmware Update CD using the following command: # mount -rt cdfs -o noversion /dev/rz4c /mnt b. Copy the appropriate firmware to the mop directory. # cp /mnt/DEC3000/filename /usr/lib/mop/filename The system firmware filename [DEC3000]m300_v7_0.sys - DEC [DEC3000]m400_v7_0.sys - DEC [DEC3000]m500_v7_0.sys - DEC is as follows: 3000 Model 300 AXP system (all types) 3000 Model 400/600/700 AXP system (all types) 3000 Model 500/800/900 AXP system (all types) The Turbochannel firmware filename is as follows: [TURBOCHANNEL]tc_v2_2.sys - for the turbochannel option firmware. c. Make sure the mom_mop process is running under Ultrix with the following command. # ps aux | grep mop d. If not running start it with the following command. # mop_mom e. >>> b esa0 -fi m300_v7_0 or b esa0 -fi tc_v2_2 Method 4 - Boot Off of a Disk - Non-System Disk And System Disk Using OpenVMS Non-System Disk a. Locate the firmware.btp file. The firmware.exe file may also work. b. Set the attributes on the file and copy it contiguous to the target disk (non-system) and directory with the following commands: $ set file/attr=(rfm:fix,lrl:512,mrs:512,rat:none) firmware.btp $ copy/contiguous firmware.btp "non_system_disk":[directory] c. Use writeboot to make the disk bootable. Specify the disk, directory and filename of the firmware. Take the defaults for the other questions. $ MCR Writeboot Update VAX portion of boot block (default is Y): No Update Alpha portion of boot block (default is Y):Yes Target system device (and boot file if not VMB.EXE):$1$dua5:[TEMP]m300_v7_0.btp d. >>> b -fl 0,0 dua5 System Disk a. Locate the firmware.exe, set the attributes but Do NOT execute writeboot step c. The firmware.btp MAY also work with this procedure. b. Specify the flags of 0,a0 and use "system disk":[sys0.sysexe]filename for the bootfile. >>> b -fl 0,80 dua0 bootfile> dua0:[sys0.sysexe]m300_v7_0.exe 268 Method 5 - Boot Off of a Bootable Floppy OpenVMS AXP a. Init and mount to floppy. Create a directory and copy the firmware to the floppy with the following commands $ set file/attr=(rfm:fix,lrl:512,mrs:512,rat:none) m300_v7_0.btp $ init/dens=HD/index=begin dva0: fwupdate $ mount dva0: fwupdate $ create/dir dva0:[DEC3000] $ copy/contiguous M300_v7_0.btp dva0:[dec3000]fwupdate.exe b. MCR Writeboot Update VAX portion of boot block (default is Y): No Update Alpha portion of boot block (default is Y):Yes [enter AXP bootfile:] dva0:[dec3000]fwupdate.exe c. Dismount the disk and shutdown VMS. $ dismount dva0: d. Insert the floppy on the target system and boot it from the >>>. >>> boot dva0 Tru64 UNIX a. Go to the Digital Internet firmware site at http://ftp.digital.com/pub/Digital/Alpha/firmware/ b. Copy the firmware.btp file from the DEC3000 directory to your system and rename it fwupdate.exe c. Download the file mkbootfirm.tar from the firmware website. ftp://ftp.digital.com/pub/Digital/Alpha/firmware/utilities/mkbootfirm.tar You can untar mkbootfirm on your target Tru64 UNIX system with the command: # tar xvf mkbootfirm.tar d. Make sure you have a floppy that has been low-level formatted. For example, to low-level format a floppy in drive 0: fddisk -fmt /dev/rfd0a e. Change default to directory with mkbootfirm.exe cd mkbootfirm f. Run mkbootfirm on the .exe firmware image that you downloaded. Mkbootfirm uses a .exe firmware image to create a file that can be dd’d to floppy. The following command will create a bootable floppy from a downloaded .exe firmware image: ./mkbootfirm fwupdate.exe | dd of=/dev/rfd0c bs=64k NOTE: Assumes mkbootfirm.exe is in current directory and floppy is in drive 0. g. Insert the floppy on the target system and boot it from the SRM console: >>> boot dva0 269 Method 6 - BOOTP Network Upgrade - Tru64 UNIX a. Mount the Firmware Update CD using the following command: # mount -rt cdfs -o noversion /dev/rz4c /mnt b. Modify or Create the Client Database in the /etc/bootptab File <host>:ht:<hw_type>:ha=<hw_addr>:bf=<filename>:ip=<ip_addr> where: host is the system name in /etc/hosts hw_type is the hardware type. Proteon is ht = 4. Ethernet is ht = 1. Regular token-ring (IEEE 802) is ht = 6. hw_addr is the hardware address: use the console command show device. filename is the name of the default bootfile image: ip_addr is the Internet protocol address of the system name in /etc/hosts. The following is an example of a bootptab file for the DEC3000: bigsox:ht=1:ha=08002b236423:bf=/mnt/DEC3000/M300_v7_0.BTP;1:ip=16.182.0.88 bigsox:ht=1:ha=08002b236423:bf=/mnt/DEC3000/M400_v7_0.BTP;1:ip=16.182.0.88 bigsox:ht=1:ha=08002b236423:bf=/mnt/DEC3000/M500_v7_0.BTP;1:ip=16.182.0.88 bigsox:ht=1:ha=08002b236423:bf=/mnt/DEC3000/tc_v2_2.btp;1:ip=16.182.0.88 c. Modify the /etc/inetd.conf file. Uncommon the tftp and bootps process. It should look like the following example: tftp dgram udp wait root /usr/sbin/tftpd tftpd /mnt bootps dgram upd wait root /usr/sbin/bootpd bootpd d. Find the process /usr/sbin/inetd daemon: This step will stop network traffic # ps aux | grep ine # kill process# <ine process number> e. Restart the inetd daemon: # /usr/sbin/inetd Note The bootpd and tftp daemon will be removed if the system is rebooted. Refer to the manual pages: bootpd(8) or tftpd(8) for more information. Use Man bootpd and man tftpd f. Enter the following command from the DEC 3000 AXP system to boot from the BOOTP server: >>> boot ez0 5. Update the system and I/O roms from the UPD> prompt UPD> update Read IO ROM Device ID UPD-I VERIFY LOADED ROM IMAGE …............................ UPD-I VERIFY LOADED ROM IMAGE DONE MANUFACTURER = INTEL (0x89) DEVICE CODE = 28F020 (0xbd) 256K x 8 UPDATE SYSTEM ROM DEVICE UPD-I VERIFY LOADED ROM IMAGE …............................. UPD-I VERIFY LOADED ROM IMAGE DONE FIRMWARE REVISION: V6.2 LENGTH: 0x35F50 -> 221008 BYTES CHECKSUM: 0x91 MANUFACTURER = INTEL (0x89) DEVICE CODE = 28F020 (0xbd) 256K x 8 UPD-I *** ROM CONTENTS WILL BE DESTROYED *** UPD-I ARE YOU READY TO PROGRAM DEVICE ? (Y/N)Y UPD-I PRECHARGING DEVICE …........................................................ 270 UPD-I ERASING ROM DEVICE …........................................................ UPD-I PROGRAMMING DEVICE …....................................................... UPD-I PROGRAMMING COMPLETED …............................. SYSTEM ROM UPDATE SUCCESSFUL UPDATE IO ROM DEVICE UPD-I VERIFY LOADED ROM IMAGE …............................ UPD-I VERIFY LOADED ROM IMAGE DONE FIRMWARE REVISION: V6.2 LENGTH: 0x35bd8 -> 220120 BYTES CHECKSUM: 0x43 MANUFACTURER = INTEL (0x89) DEVICE CODE = 28F020 (0xbd) 256K x 8 UPD-I PRECHARGING DEVICE …........................................................ UPD-I ERASING ROM DEVICE …........................................................ UPD-I PROGRAMMING DEVICE …....................................................... UPD-I PROGRAMMING COMPLETED …............................ IO ROM UPDATE SUCCESSFUL UPD> exit 6. Power cycle the machine to load the new firmware into memory. 7. Update the Turbochannel option firmware use the following steps. See methods 3 and 5 for network update a. Boot the firmware update CDROM. >>> boot -fl 0,80 dka400 >>> boot -fl 0,80 “2/dka400” - Boot off of DKA400 on Turbochannel slot 2. BOOTFILE:[TURBOCHANNEL]tc_v2_2.exe *** TURBOchannel Firmware Update Utility V2.1 *** UPDATE n REPAIR n VERIFY n SHOW n LIST HELP EXIT/QUIT TC_UPD> b. Type help to get info on turbochannel update commands. TC_UPD> help The help command displays a brief description of the update-related commands. The help commands are described in the following table: Command Description update n Updates the option ROM in TURBOchannel slot n. The module name in the adapter’s ROM header must match one of the loaded images. repair n Repairs (updates) an adapter ROM that is not properly recognized by the system. Use the repair command to modify the module name in the adapter ROM header. verify n Verifies the option ROM checksum in TURBOchannel slot n. If an option is already at the same revision as found in this Firmware Update Utility and the verify command is entered, prior to updating the option’s firmware, the verify command may report mismatched checksums. This is due to the method in which ROMs are loaded during the manufacturing process. 271 show n Shows the checksum and ROM revision for the slot n option ROM and its corresponding loaded image. list Displays the loaded images and flash memories supported. • Use the list command to show a list of memory-loaded images, plus a list of currently supported flash ROMs: c. Type list to see the supported options TC_UPD> list Image name --------AV300-AA KZTSA PMAF-FA PMAF-FD PMAF-FS PMAF-FU PMAGB-BA PMAGC-AA PMAGC-BA PMAT-AA PMAZB-AA PMAZC-AA PMAGD PMAGD-AA DGLTA-FA Revision -------V1.1 A11 V3.1A V3.1D V3.1S V3.1U V1.1 V1.2 V1.2 V2.8 V2.0 V2.3 BL2.1 BL2.1 V1.1 Flash memory devices supported: AMD:28F020 (256Kx8) Intel:28F512 (64Kx8), 28F010 (128Kx8), 28F020 (256Kx8) 28F256A, 28F256B, 28F256X d. Use the update command to update a specific turbochannel option by slot. TC_UPD> update 5 - update the turbochannel option in slot 5. UPDATE TURBOchannel slot 5 ROM …................. MANUFACTURER = AMD (0x01) DEVICE CODE = 28F020 (0x2a) 256K x 8 Slot 5 ROM: PMAGB-BA V1.0 Loaded image: PMAGB-BA V1.1 TC_UPD-I *** ROM CONTENTS WILL BE DESTROYED *** TC_UPD-I ARE YOU READY TO PROGRAM DEVICE (Y/N)? Y TC_UPD-I PRECHARGING DEVICE …......................... TC_UPD-I ERASING ROM DEVICE …......................... TC_UPD-I PROGRAMMING DEVICE …............. TC_UPD-I PROGRAMMING COMPLETED TC_UPD-I *** Slot 5 ROM update successful *** Note Slot 5 ROM: PMAGB-BA V1.0 indicates the current ROM revision. Loaded image: PMAGB-BA V1.1 indicates the new ROM revision. e. Use the show command to see the new version. TC_UPD> show 5 - Check the updated firmware version SHOW TURBOchannel slot 5 ROM Revision Slot 5 ROM: PMAGB-BA V1.1 Loaded image: PMAGB-BA V1.1 272 f. Use the repair command if one of the following occurs. • The system doesn’t recognize the adapter,or the adapter has an empty flash ROM. • The update command returns a failure message saying that a repair may be needed. • The information to be changed in the adapter flash ROM includes the name of the adapter (stored in the ROM header). • If a power failure occurs during the upgrade. TC_UPD> repair 5 TC_UPD-I *** REPAIR command entered *** select an image: Image name Revision ---------------AV300-AA V1.1 KZTSA A11 PMAF-FA V3.1A PMAF-FS V3.1S PMAF-FD V3.1D PMAF-FU V3.1U PMAGB-BA V1.1 PMAGC-AA V1.2 PMAGC-BA V1.2 PMAT-AA V2.8 PMAZB-AA V2.0 PMAZC-AA V2.3 PMAGD BL2.1 PMAGD-AA BL2.1 DGLTA-FA V1.1 Image name (Q to quit this function)? pmagb-ba ….................... MANUFACTURER = AMD (0X01) DEVICE CODE = 28F020 (0X2A) 256K X 8 Slot 5 ROM: - Not a valid ASCII stringLoaded image: PMAGB-BA V1.1 TC_UPD-I *** ROM CONTENTS WILL BE DESTROYED *** TC_UPD-I ARE YOU READY TO PROGRAM DEVICE (Y/N)? Y TC_UPD-I PRECHARGING DEVICE …........................ TC_UPD-I ERASING ROM DEVICE …........................ TC_UPD-I PROGRAMMING DEVICE …............. TC_UPD-I PROGRAMMING COMPLETED TC_UPD-I *** SLOT 5 ROM UPDATE SUCCESSFUL *** 273 DEC 3000 Model 300 Jumpers Rom Update Jumper DEC 3000 Model 400, 600 and 700 Jumper Location ROM Update Jumper The ROM update jumper has two positions. Disabled is position 1 and Enabled is position 2. The factory default setting is in the enabled. 274 275 DEC 3000 Model 500, 500S, 500X Jumper Locations System Module The following figure shows the location of jumpers and the serial ROM on the system module. The table below describes each location System Module Jumper Locations Feature 1 Description Components Default Setting Serial ROM Not used (500/500S) Reference only. Remote sense cable (500X) Must be installed All jumpers must be removed. Installed Serial ROM jumpers Not used (500/500S) Reference only. Jumper location 0 only. All jumpers must be removed. 200 MHz jumper (500X) Must be installed Enabled 5 Test pins Used by engineering - 6 Flash enable jumper In = Enabled / Out Disabled Disabled 2 3 4 I/O Module 276 The following figure shows the location of the jumpers, Enet address ROM chip, TOY/NVR chip and the flash ROM on the I/O module. The table below describes each location I/O Module Jumpers Feature 1 2 3 4 5 6 Description Park location Console secure jumper Enet address ROM chip TOY/NVR chip Flash ROM Flash ROM jumper Components Used to store unused jumpers In = Enabled / Out = Disabled In = Enabled / Out = Disabled Default Setting Disabled Enabled 277 DEC 3000 Model 800 and 900 ROM Update Jumper Locations System Module Jumpers The following figure shows the location of jumpers and the serial ROM on the system module. The table below describes each location Feature 1 2 3 4 5 6 System Module Jumpers Description Comments Test Pins Used by engineering Serial ROM jumpers Jumper location 0 only Serial ROM Serial ROM test port Clock divider jumpers Flash ROM update jumper J19 = Park J20 = Enable Default Setting Installed Installed Enabled 278 I/O Module Jumpers The following figure shows the location of the jumpers, Enet address ROM chip, TOY/NVR chip and the flash ROM on the I/O module. The picture shows the back of the I/O module. The table below describes each location I/O Module Jumpers Feature 1 2 3 4 5 6 7 Description Components Park location Used to store unused jumpers Active terminator enable In = Enabled (terminator ON) Out = Disabled Enet address ROM chip Socketed Flash ROM Flash ROM jumper In = Enabled / Out = Disabled TOY/NVR chip Socketed Console secure jumper In = Enabled / Out = Disabled Default Setting Enabled Enabled Disabled 279 DEC 4000 - Models 600 and 700 The console firmware on the DEC 4000 systems is located on the I/O modules. Anytime you replace an I/O module, the firmware will most likely need to be upgraded. You will also need to do occasional console firmware upgrades to load the latest version of firmware that is available. There are several ways to upgrade the firmware. All involve booting Loadable Firmware Utility (LFU). It can be booted one of the following ways. • • • • • Off the Alpha AXP System Firmware Update Utility CD using the local CDROM. Off of an infoserver using the Alpha AXP System Firmware Update Utility CD. Over the network using the .SYS firmware file. Off of a disk that has a bootable version of the firmware file (filename.exe) on it (MCR WRITEBOOT may be required on that file to make it bootable). From the BOOTP server. The procedure to update the console firmware is as follows. • • • • • • • • • Determine current console firmware revision by the power up display or with a >>>SHOW CONFIG command, or from online SDA with a CLUE CONFIG command. Record all console environmental variables by typing SHOW * at the >>>. Determine which method and firmware version will be used to do the update. Print the firmware release notes for that version and system. Determine if any option firmware will be upgraded. Boot the firmware file (LFU). Use the verify and update commands at the UPD> prompt. When done exit from LFU. Init the machine and reboot. 1. Type show config to get the current console version. Note the Console version on the first line and also the processor revision. This is the number on the second line after the 21064 value. In this example it is a 3. This determines which file you will use. For processor revision number 2 use [DEC4000]CFW_V**_UPDP2.EXE. For processor revision number 3 use [DEC4000]CFW_V**_UPDP3.EXE. >>> show config Console V3.6-1 CPU 0 P CPU 1 P Memory 0 P Memory 1 P Memory 2 P Memory 3 P Ethernet 0 P Ethernet 1 P A DSSI B DSSI C D E SCSI Futurebus+ System Status VMS PALcode X5.48A, OSF PALcode X1. B2001-BA DECchip (tm) 21064-3 B2001-BA DECchip (tm) 21064-3 B2002-DA 128 MB B2002-DA 128 MB B2002-CA 64 MB B2002-CA 64 MB 08-00-2B-3E-18-CC 08-00-2B-3E-18-CD ID 0 ID 1 ID 2 ID 3 ID 4 ID 5 ID 6 ----------------------------------------RF74 RF36 RF36 P P P P P RRD42 P Pass FBC0 Type b to boot 2. Set Auto_action to halt >>> set Auto_action halt 3. Boot the firmware using one of the following methods. 280 Method 1 - Boot the Console CD Off a local CDROM a. Insert the CD in the local CDROM b. >>> boot -fl 0,a0 DKE0 BOOTFILE: [dec4000]cfw_v40_updp3.exe The filename will change with different console versions. UPD> See below for update steps Method 2 - Boot the Console CD Off of an Infoserver a. Insert CD in the Infoserver b. >>> boot eza0 -file filename (leave off the .sys extension) Method 3 - Booting Off the Network VMS System a. Copy the firmware.sys file to MOM$LOAD of an existing node in the cluster b. Set the attributes on the file with the following commands: $ set file/attr=(rfm:fix,lrl:512,mrs:512,rat:none) cfw_v40_updp3.sys c. Enable service on that node from NCP $ MC NCP MC NCP> Show Known Circuit Characteristic Known Circuit Volatile Characteristics as of 12-FEB-1997 19:27:41 Circuit = BNA-0 State Service Counter timer Designated router Cost Maximum routers allowed Router priority Hello timer Type Adjacent node Listen timer = = = = = = = = = = = on disabled (if enabled skip to boot command) 65534 28.1023 (CXO28A) 4 33 64 15 Ethernet 28.1023 (CXO28A) 30 NCP> Set Circ BNA-0 State OFF - This step will stop network activity NCP> Set Circ BNA-0 Service Enable NCP> Set Circ BNA-0 State ON d. >>> b eza0 -fi CFW_V40_UPDP3 (Leave off .SYS or node that services request will get an error - BAD MOP FID) Method 4 - Boot Off of a Disk -Non-System Disk and System Disk Using OpenVMS Non-System Disk a. Locate the firmware.exe file b. Set the attributes on the file and copy it contiguous to the target disk (non-system) and directory with the following commands: $ set file/attr=(rfm:fix,lrl:512,mrs:512,rat:none) CFW_V40_UPDP3.exe $ copy/contiguous CFW_V40_UPDP3.exe "non_system_disk":[directory] 281 c. Use writeboot to make the disk bootable. Specify the disk, directory and filename of the firmware. Take the defaults for the other questions. $ MCR Update Update Target Writeboot VAX portion of boot block (default is Y): No Alpha portion of boot block (default is Y):Yes system device (and boot file if not VMB.EXE):$1$dua5:[TEM]CFW_V40_UPDP3.EXE d. >>> b -fl 0,0 dua5 System Disk a. Only steps a and b above are used. Do NOT execute writeboot step c. b. Specify the flags of 0,a0 and use "system disk":[sys0.sysexe]filename for the bootfile. >>> b -fl 0,80 dua0 bootfile> dua0:[sys0.sysexe]cfw_v40_updp3.exe Method 5 - BOOTP Network Upgrade - Tru64 UNIX a. Mount the Firmware Update CD using the following command: # mount -rt cdfs -o noversion /dev/rz4c /mnt b. Modify or Create the Client Database in the /etc/bootptab File <host>:ht:<hw_type>:ha=<hw_addr>:bf=<filename>:ip=<ip_addr> where: host is the system name in /etc/hosts hw_type is the hardware type. Proteon is ht = 4. Ethernet is ht = 1. Regular token-ring (IEEE 802) is ht = 6. hw_addr is the hardware address: use the console command show device. filename is the name of the default bootfile image: ip_addr is the Internet protocol address of the system name in /etc/hosts. The following is an example of a bootptab file for the DEC4000: bigsox:ht=1:ha=08002b236423:bf=/mnt/DEC4000/CFW-V39_UPDP3.EXE;1:ip=16.182.0.88 c. Modify the /etc/inetd.conf file. Uncommon the tftp and bootps process. It should look like the following example: tftp dgram udp wait root /usr/sbin/tftpd tftpd /mnt bootps dgram upd wait root /usr/sbin/bootpd bootpd d. Find the process /usr/sbin/inetd daemon: This step will stop network traffic # ps aux | grep ine # kill process# <ine process number> e. Restart the inetd daemon: # /usr/sbin/inetd Note The bootpd and tftp daemon will be removed if the system is rebooted. Refer to the manual pages: bootpd(8) or tftpd(8) for more information. Use Man bootpd and man tftpd f. Enter the following command from the DEC 3000 AXP system to boot from the BOOTP server: >>> boot ez0 282 4. Update the firmware from the UPD> prompt type update * or update IO. UPD> update * Confirm update on: fbc0 io [Y/(N)] Y WARNING: updates may take several minutes to complete for each device. DO NOT ABORT! fbc0 Updating to … Verifying … io Updating to 3.8… PASSED. Verifying 3.8… PASSED. To update only the console, enter the update io command. UPD> exit 5. Power cycle the machine to load the new firmware into memory. 283 DEC 7000/10000 The console firmware on the DEC 7000/10000 systems is located on the CPU module. All Cpu’s must run the same version of firmware. You can NOT have mixed versions and expect it to work. Any time a CPU module is added or replaced, the firmware will most likely need to be upgraded. You will also need to do occasional console firmware upgrades to load the latest version of firmware that is available. There are several ways to upgrade the firmware. All involve booting Loadable Firmware Utility (LFU). It can be booted one of the following ways. • • • • Off the Alpha AXP System Firmware Update Utility CD using the local CDROM. Off of an infoserver using the Alpha AXP System Firmware Update Utility CD. Over the network using the .SYS firmware file. Off of a disk that has a bootable version of the firmware file (filename.exe) on it (MCR WRITEBOOT may be required on that file to make it bootable). The procedure to update the console firmware is as follows. • • • • • • • • • • • Determine current console firmware revision. Record all console environmental variables by typing SHOW * at the >>>. Determine which method and firmware version will be used to do the update. Print the firmware release notes for that version and system. Determine if any option firmware will be upgraded. Locate the appropriate RCU and ECU diskettes if required. Boot the firmware file (LFU). Use the verify and update commands at the function? prompt. When done exit from LFU. Execute a Build NVR and a Build EEPROM at the >>> for each CPU. Init the machine and reboot. 1. First type INIT at the >>> the see what the current version of console loaded is. It is at the very bottom of the configuration map. >>> init F E D C B A 9 8 A o . o . + . 7 M + . + . + . 6 . . . . . . . 5 . . . . . . . 4 . . . . . . . 3 . . . . . . . 2 . . . . . . . 1 P + E + E + E 0 P + B + B + B NODE # TYP ST1 BPD ST2 BPD ST3 BPD + . . . + . . . . . . . + . . . . . . . + . . . . . . . . . . . . . . . . . . . . . . . . . . . + . . . . . . C0 XMI + C1 C2 C3 . A0 . 128 . . . . . . . . . . . . . . ILV 128MB . . . . . . . Firmware Rev = V3.2-4445 SROM Rev = V2.2-0 SYS SN = SG00000000 2. P00>>> show * to printout all the environmental variables. Check all customer set variables. Also verify the setting of the following variables. Bootdef_dev Boot_osflags Auto_action a. Set Auto_action to HALT P00>>> set Auto_action halt 3. Boot the firmware using one of the following methods. 284 Method 1 - Boot the Console CD Off a Local CDROM a. Insert the CD in the local CDROM b. P00>>> boot -fl 0,80 DKA600 Bootfile:[DEC7000]axp7000_v18.exe - for the DEC 7000 Bootfile:[DEC10000]axp7000_v18.exe - for the DEC 10000 Function? See below for update steps Method 2 - Boot the Console CD Off of an Infoserver a. Insert CD in the Infoserver b. P00>>> boot exa0 -file axp7000_v18 (leave off the .sys extension) Method 3 - Booting off the Network a. Copy the firmware.sys file to MOM$LOAD of an existing node in the cluster b. Set the attributes on the file with the following commands: $ set file/attr=(rfm:fix,lrl:512,mrs:512,rat:none) axp7000_v18.sys c. Enable service on that node from NCP $ MC NCP MC NCP> Show Known Circuit Characteristic Known Circuit Volatile Characteristics as of 12-FEB-1997 19:27:41 Circuit = BNA-0 State = on Service = disabled (if enabled skip to boot command) Counter timer = 65534 Designated router = 28.1023 (CXO28A) Cost = 4 Maximum routers allowed = 33 Router priority = 64 Hello timer = 15 Type = Ethernet Adjacent node = 28.1023 (CXO28A) Listen timer = 30 NCP> Set Circ BNA-0 State OFF - This step will stop network activity NCP> Set Circ BNA-0 Service Enable NCP> Set Circ BNA-0 State ON d. P00>>> boot -fl 0,0 EXA0 -fi axp7000_v18 (Leave off .SYS or node that services request will get error - BAD MOP FID) Function? DEMNA = EXA0 - Determine device name with SHOW DEVICE at >>> . DEMFA = FXA0 Method 4 - Boot Off of a Disk - Non-System Disk and System Disk Using OpenVMS Non-System Disk a. Locate the axp7000_v18.exe file b. Set the attributes on the file and copy it contiguous to the target disk (non-system) and directory with the following commands: $ set file/attr=(rfm:fix,lrl:512,mrs:512,rat:none) axp7000_v18.exe $ copy/contiguous axp7000_v18.exe "non_system_disk":[directory] c. Use writeboot to make the disk bootable. Specify the disk, directory 285 and filename of the firmware. Take the defaults for the other questions. $ MCR Writeboot Update VAX portion of boot block (default is Y): No Update Alpha portion of boot block (default is Y):Yes Target system device (and boot file if not VMB.EXE):$1$dua5:[TEMP]axp7000_v18.exe d. P00>>> b -fl 0,0 dua5 System Disk a. Only steps a and b above are used. Do NOT execute writeboot step c. b. Specify the flags of 0,a0 and use "system disk":[sys0.sysexe]filename for the bootfile. >>> b -fl 0,80 dua0 bootfile> dua0:[sys0.sysexe]axp7000_v18.exe 4. Update the firmware at the Function? prompt. Use Update * or Update KN7AA, CIXCD0, UNKNOWN0 etc. a. Function? update kn7aa0 - to update cpu kn7aa0 only. Confirm Update on: Kn7aa-ab0 [Y/N] Y WARNING: updates may take several minutes to complete for each device. kn7aa0 DO NOT ABORT! Updating to 4.9... Reading Device... Verifying 4.9... PASSED. Function? update * - to update all devices supported buy this version of LFU. Name Type Rev Mnemonic LSB 0+ 1+ 6+ 8+ KN7AA KN7AA MS7AA IOP (8001) (8001) (4000) (2000) 400D 400D 0000 0006 kn7aa0 kn7aa1 ms7aa0 iop0 CO XMI 3+ 8+ C+ E+ KZMSA DWLMA KDM70 DEMNA (0C36) (102A) (0C22) (0C03) 5142 0104 2811 0803 xmi0 kzmsa0 dwlma kdm700 demna0 FW Rev HW Rev M M 5.6 F01 4.4 9.4 Update ALL devices? [Y/(N)]Y WARNING: updates may take several minutes to complete for each device. DO NOT ABORT! kn7aa0 kn7aa1 Updating to 4.9... Reading Device... Verifying 4.9... PASSED. Updating to 4.9... Reading Device... Verifying 4.9... PASSED. ms7aa0 Not supported under LFU. iop0 Not supported under LFU dwlma0 Not supported under LFU. WARNING: Updates may take several minutes to complete for each device. kzmsa0 DO NOT ABORT! Updating to 5.6... Reading Device... Verifying 5.6... PASSED. WARNING: Updates may take several minutes to complete for each device. kdm700 DO NOT ABORT! Updating to 4.4... Reading Device... Verifying 4.4... PASSED. WARNING: Updates may take several minutes to complete for each device. 286 demna0 DO NOT ABORT! Updating to 9.4... Reading Device... Verifying 9.4... PASSED. WARNING: Updates may take several minutes to complete for each device. b. Function? exit System initializes now and prints configuration map. c. P00>>> build nvr d. P00>>> build eeprom Create new EEPROM image [Y/(N)]? y e. P00>>> set CPU # , where # is the other CPU numbers. Must do all CPUs. f. If you get the following message do a SET CONFIG at the >>>. System configuration has changed since last saved configuration! >>> set config - clears above error message g. The default console baud rate is set to 9600 . If needed change it now. P00>>> set baud 2400 baud set to 2400 h. P00>>> set set set set Bootdef_dev Boot_osflags Auto_action System_variant 1 (1 for a DEC 10000, 0 for a DEC 7000) i. P00>>> build seeprom * - initializes the SEEPROM for the DWLAA, DWLMA, IOP, MS7AA and MS7BB modules. The serial EEPROM holds module serial number, module part number, module firmware revision (not used) , TDD (test directed diagnosis) and SDD (symptom directed diagnosis) info Create new serial EEPROM image for ms7aa0 [Y/(N)]? Y Creating new serial EEPROM image for ms7aa0 Module Serial Number> sg1234567 Module Unified 2-5-2.4 Part Number> 20-E2043-AA.0000 Module Firmware Revision> xx please wait ~1 min, writing ms7aa0 Create new serial EEPROM image for iop0 [Y/(N)]?Y Creating new serial EEPROM image for iop0 Module Serial Number> sg1234567 Module Unified 2-5-2.4 Part Number> 20-E2044-AA.0000 Module Firmware Revision> xx please wait ~1 min, writing iop0 Create new serial EEPROM image for dwlma0 [Y/(N)? Y Creating new serial EEPROM image for dwlma0 Module Serial Number> sg1234567 Module Unified 2-5-2.4 Part Number> 20-T2028-AA.0000 Module Firmware Revision> xx please wait ~1 min, writing dwlma0 j. P00>>> init 287 There is one other UNRECOMMENDED method for updating firmware from an existing CPU’s EEPROM. That is the use of the UPDATE command to copy one CPU’s EEPROM info to another CPU’s EEPROM area. The problem with this command is if the EEPROM format does not match the between the CPU’s it may render the new CPU useless. Forewarn any engineer who decides to do this. He may need another spare CPU module. NEVER Allow a customer to use this procedure! NOTE: Updating Firmware - Off existing CPU (BEWARE - may render CPU’s unusable) a. Get settings of the following Bootdef_dev Boot_osflags Auto_action b. P00>>> set CPU # , where # is the number of the CPU to update from. c. P00>>> update -fl KN7aa# , where # is CPU to update d. P00>>> update -ee KN7aa# , where # is CPU to update e. P00>>> set eeprom serial and environmental variables. can also use set eeprom manufacturing 288 289 VAX 7000/10000 The console firmware on the VAX 7000/10000 systems is located on the CPU module. All Cpu’s must run the same version of firmware. You can NOT have mixed versions and expect it to work. Any time a CPU module is added or replaced, the firmware will most likely need to be upgraded. You will also need to do occasional console firmware upgrades to load the latest version of firmware that is available. There are several ways to upgrade the firmware. All involve booting Loadable Firmware Utility (LFU). It can be booted one of the following ways. • • • • Off the VAX 7000/10000 Console CD using a local CDROM. Over the network using the firmware.sys file. Off of an infoserver using the VAX 7000/10000 Console CD. Off of a disk that has a bootable version of the firmware file (filename.exe) on it (MCR WRITEBOOT may be required on that file to make it bootable). The procedure to update the console firmware is as follows. • • • • • • • • • • • Determine current console firmware revision. Record all console environmental variables by typing SHOW * at the >>>. Determine which method and firmware version will be used to do the update. Print the firmware release notes for that version and system. Determine if any option firmware will be upgraded. Locate the appropriate RCU and ECU diskettes if required. Boot the firmware file (LFU). Use the verify and update commands at the function? prompt. When done exit from LFU. Execute a Build NVR and a Build EEPROM at the >>> for each CPU. Init the machine and reboot. 1. First type INIT at the >>> the see what the current version of console loaded is. It is at the very bottom of the configuration map. >>> init F E D C B A 9 8 A o . o . + . 7 M + . + . + . 6 . . . . . . . 5 . . . . . . . 4 . . . . . . . 3 . . . . . . . 2 . . . . . . . 1 . . . . . . . 0 P + B + B + B NODE # TYP ST1 BPD ST2 BPD ST3 BPD + . . . + . . . . . . . + . . . . . . . + . . . . . . . . . . . . . . . . . . . . . . . . . . . + . . . . . . C0 XMI + C1 C2 C3 . A0 . 128 . . . . . . . . . . . . . . ILV 128MB . . . . . . . Firmware Rev = V4.0-4589 SROM Rev = V3.0-0 SYS SN = GA24627371 2. >>> show * to printout all the environmental variables. Check all customer set variables. Also verify the setting of the following variables. Bootdef_dev Boot_osflag Auto_action 3. Boot the firmware using one of the following methods. 290 Method 1 - Booting Off a Local CDROM Typically this procedure isn’t available since most VAX7000's don’t have a local CD. a. Insert the VAX 7000/10000 Console CD in the local CDROM drive. b. >>> boot -fl 0,0,0 -fi vax7000_v0c DKA600 Function? See below for update steps Method 2 - Booting Over the Network a. Copy the firmware.sys file to MOM$LOAD of an existing node in the cluster b. Set the attributes on the file with the following commands: $ set file/attr=(rfm:fix,lrl:512,mrs:512,rat:none) vax7000_v0c.sys c. Enable service on that node from NCP $ MC NCP MC NCP> Show Known Circuit Characteristic Known Circuit Volatile Characteristics as of 12-FEB-1997 19:27:41 Circuit = BNA-0 State Service Counter timer Designated router Cost Maximum routers allowed Router priority Hello timer Type Adjacent node Listen timer = = = = = = = = = = = on disabled (if enabled skip to boot command) 65534 28.1023 (CXO28A) 4 33 64 15 Ethernet 28.1023 (CXO28A) 30 NCP> Set Circ BNA-0 State OFF - This step will stop network activity NCP> Set Circ BNA-0 Service Enable NCP> Set Circ BNA-0 State ON d. >>> boot -fl 0,0,0 EXA0 -fi vax7000_v0c (Leave off .SYS or node that services request will get an error- BAD MOP FID) Function? See below for update steps DEMNA = EXA0 / DEMFA = FXA0 - Determine device name with SHOW DEVICE at >>> Method 3 - Boot the Console CD Off of an Infoserver a. Insert CD in the Infoserver b. >>> boot -flags 0,0,0 exa0 -file ISL_LVAX_V07 (the filename must be uppercase and changes with different console CD's) c. After INIT map will give you infoserver menus FUNCTION ID 1 2 3 4 - FUNCTION Display Menu Help Choose Service Select Options 291 5 - Stop Enter a function ID value: 3 - for Choose Service OPTION ID 1 2 OPTION - Find Services Enter known Service Name Enter an Option ID value: 1 - for Find Service Working Servers found:: 1 Service Name Format: Service Number Service Name Server Name Ethernet ID #1 SMC P9_ESS 08-00-2B-24-72-6B #2 6000_DIAG_H P9_ESS 08-00-2B-24-72-6B #3 VAX7000_V0C P9_ESS 08-00-2B-24-72-6B Enter a Service Number or <CR> for more: 3 = VAX7000_V0C firmware Copyright Digital Equipment Corporation 1991, 1993, 1994, 1995 All Rights Reserved. Loadable Environment Rev: V4.3-4842 Sep 12 1996 10:16:10 ***** Loadable Firmware Update Utility ***** Version 13.0 17-Oct-1995 Function? Method 4 - Boot Off of a Disk - Non-System Disk and System Disk Using OpenVMS Non-System Disk a. Locate the VAX7000_V0C.EXE file b. $ copy/contiguous vax7000_v0c.exe file to a current non-bootable disk. c. Use writeboot to make the disk bootable. Specify the disk, directory and filename of the firmware. Take the defaults for the other questions. $ MCR Writeboot Target system device (and boot file if not VMB.EXE):$1$dua5:[TEMP]vax7000_v0c.exe Enter VBN of boot file code (default is 1) : <CR> for default Enter load address of primary bootstrap in HEX (default is 200): <CR> d. >>> b -fl 0,0,0 dua5 292 System Disk a. Only steps a and b above are used. Do NOT execute writeboot step c. b. Specify the flags of 0,0,100 and use "system disk":[sys0.sysexe]filename for the bootfile. >>> b -fl 0,0,100 dua0 bootfile> dua0:[sys0.sysexe]vax7000_v0c.exe 4. Update the firmware at the Function? prompt. a. Function? update all or update KA7AA, update CIXCD0 etc. b. Function? exit c. >>> build nvr d. >>> build eeprom Create new EEPROM image [Y/(N)]? y e. >>> set CPU # - where # are the other CPU numbers. Repeat steps c. and d. for each CPU. f. If you get the following message do a SET CONFIG at the >>>. System configuration has changed since last saved configuration! >>> set config - clears above error message g. >>> set Bootdef_dev set Boot_osflags set Auto_action h. >>> build seeprom - initializes the SEEPROM for the DWLAA, DWLMA, IOP, MS7AA and MS7CC modules. i. >>> init 5. The environment variable COMPAT_MODE was implemented in Version 4.2 of the VAX7000/10000 console to allow running VAX VMS Version 5.5-2 on the VAX7000/10000 Model 800 CPU. COMPAT_MODE has three states which should be used as follows: • • • ON (default) - for use with VAX VMS V6.1, V6.2, V7.0 on all CPUs OFF - for use with future releases of VAX VMS V55 - for use with VAX VMS V5.5-2 on the Model 800 CPU The Model 600 fully supports VAX VMS V5.5-2, V6.1, V6.2, and V7.0 regardless of the setting of COMPAT_MODE. With COMPAT_MODE set to ON (default) the Model 700 supports running VAX VMS V6.1, V6.2 and V7.0. This CPU does not support running VAX VMS V5.5-2. With COMPAT_MODE set to ON (default) the Model 800 supports running VAX VMS V6.1, V6.2. and V7.0. These versions of the operating system will see the CPU as a Model 700. With COMPAT_MODE set to V55, VAX VMS V5.5-2 is supported on the Model 800, but the operating system will see the CPU as a Model 600 and all restrictions pertaining to running VAX VMS V5.5-2 on a Model 600 CPU will apply (i.e., 512Mb memory limit, no BI support, etc.). 293 There is one other UNRECOMMENDED method for updating firmware from an existing CPU’s EEPROM. That is the use of the UPDATE command to copy one CPU’s EEPROM info to another CPU’s EEPROM area. The problem with this command is if the EEPROM format does not match the between the CPU’s it may render the new CPU useless. Forewarn any engineer who decides to do this. He may need another spare CPU module. NEVER Allow a customer to use this procedure! NOTE: Updating Firmware - Off existing CPU (BEWARE - may render CPU’s unusable) a. Get settings of the following Bootdef_dev Boot_osflags Auto_action b. >>> set CPU # , where # is the number of the CPU to update from. c. >>> update -fl KA7aa# , where # is CPU to update d. >>> update -ee KA7aa# , where # is CPU to update e. >>> set eeprom serial or set eeprom manufacturing f. Set >>> >>> >>> environmental variables set Bootdef_dev set Boot_osflags set Auto_action 294 295 Alpha Firmware Issues 296 297 A Description of HALcode and PALcode What is HALcode The Windows NT hardware abstraction layer (HAL) refers to a layer of software that deals directly with your computer hardware. Because the HAL operates at a level between the hardware and the Windows NT executive services, applications and device drivers need not be aware of any hardware-specific information. The HAL provides routines that enable a single device driver to support a device on different hardware platforms, making device driver development much easier. It hides hardware dependent details such as I/O interfaces, interrupt controllers, and multiprocessor communication mechanisms. Applications and device drivers are no longer allowed to deal with hardware directly and must make calls to HAL routines to determine hardware specific information. Thus, through the filter provided by the HAL, different hardware configurations can be accessed in the same manner. Reference(s): Microsoft Windows NT "Resource Guide" What is PALcode Privileged Architecture Library (PALcode) is a set of subroutines that are specific to a particular Alpha AXP operating system implementation. These subroutines provide operating system primitives for context switching, interrupts, exceptions and memory management. Similar to BIOS in pc’s. Pal Subroutines are invoked by implementation hardware or by software CALL_PAL instructions. 298 299 Generic Powerup Sequence to Load Console Firmware This is a generic procedure describing the power on initialization and firmware code load on the Alpha CPU’s. The exact specifics vary from machine to machine. Check CPU specific manuals for exact sequence. However most will follow this routine. Failure during these routines will cause beep-codes, OCP error displays, console error displays, no display or hangs. Terms SROM - Serial ROM - Located on CPU . Starts initialization routine. FPROM - Flash Programable ROM FEPROM - Flash Eraseable Programable ROM DROM - Diagnostic Rom XSROM - Extended SROM EEPROM - Electrically Eraseable Programable ROM NVRAM - Non-Volatile RAM SRM - Alpha System Reference Manual console image ARC - Alpha Advanced RISC Computing console image AlphaBIOS - Alpha Basic Input/Output System FSL - Fail Safe Loader PALcode - Alpha AXP Privileged Architecture Library code HALcode - Hardware Abstraction Layer During power up or init the processor performs diagnostics to verify system operation, load system console code, test the CORE system ( CPU, mem, system board) including all boot path devices. 1. SROM code loaded into CPU I-cache 2. SROM code does the following a. Inits EV4 / EV5 CPU (including cache) b. Tests system bus interface. c. Tests PCI or EISA bridges d. Test onboard SCSI e. Size, configure, test and init a small portion of memory to load console Code into. f. Test path to FPROM, FEPROM, XSROM, DROM depending on system g. Load console code from the area to memory. h. Checksum the console code to verify its integrity. i. If checksum OK, pass control to console code.(SRM or ARC/AlphaBIOS console loaded depending on OS_TYPE Value) 3. Console code is started and performs the following. a. Perform complete check of system memory. Steps b thru d may be completed in parallel. b. Start the I/O drivers for mass storage disks and tapes. A complete check of the machine is made. After I/O drivers are started, the console program continuously polls the bus for devices (about every 20-30 sec) c. Check if EISA config info is present in NVRAM for each module detected. d. Run disk exercisers on devices seen. e. Enter console mode or boot operating system based on environmental variables Auto_Action and OS_Type. If OS_TYPE = NT will load ARC or AlphaBIOS. SRM • • • • • • • Console Consists of the following A Kernel Console Terminal Drivers Console Boot Drivers Various Port Drivers Alpha SRM Compliant Console Functionality Minimal Power Up Selftest X86 Emulator 300 301 Definitions of Environmental Variables The following are some of the environmental variable you will need to be concerned with. Some will not be available on every machine. You can view variables at the console by typing • Show * (to see all variables) • Show b* (to see all variables starting with the letter b) • Show variable (must spell out variable if you do not use wildcards (*)) From VMS you can see some variable using the following DCL command. • write sys$output f$getenv("auto_action") HALT • $ write sys$output f$getenv("bootdef_dev") scsi 0 5 0 5 500 ef00 10201077 On this system bootdef_dev was set to dkd500.5.0.5.0 The device numbers are printed backwards 0 5 0 5 500 The 10201077 is the type field for the ISP1020. From UNIX V4.0D or greater, you can use the consvar command to list, get and set variables • consvar -s bootdef_dev dsk0 Sets bootdef_dev to dka0 • consvar -l Lists console variables auto_action = HALT boot_dev = dsk3 bootdef_dev = dsk3 booted_dev = dsk3 boot_file = booted_file = boot_osflags = A booted_osflags = A boot_reset = ON dump_dev = enable_audit = ON license = MU char_set = language = 0x36 tty_dev = 0 com1_baud = 9600 com1_modem = OFF com1_flow = SOFTWARE com2_baud = 9600 com2_modem = OFF com2_flow = SOFTWARE secure = off logfail = 0 srm2dev_id = • consvar -g variable Get the setting of a console variable arc_enable Enables the console ARC interface, allowing booting of the ECU and other ARC utilities. Default value is off. auto_action The action the console should take following an error halt, power cycle, or system reset BOOT Attempt bootstrap HALT Halt, enter console I/O mode. RESTART Attempt restart. If restart fails then try boot. baud Sets the console terminal baud rate. boot_dev The device or device list from which booting is attempted. 302 This variable may be a boot search list. The console derives the value from the boot command if a device or string is specified, otherwise from the bootdef_dev variable. The value is preserved across warm bootstraps. boot_file The default fine name used for the primary bootstrap when no file name is specified in the boot command example: 1/boot/vmlinuz-2.2.5-16 (linux) boot_osflags Default additional parameters to be passed to the software during boot if none are specified in the boot command. OpenVMS Alpha root, additional flags (R5) (0,0) OpenVMS VAX R3,root,R5 (0,0,0) R3 is used for Phase 1 System disk shadowsets. TRU64 UNIX or Digital UNIX a Autoboot. Boots /vmunix and goes to multi-user mode. Use this for a system that should come up automatically after a power failure. s Single-User. Boots /vmunix to single-user mode and stops at the # (root) prompt. i Interactive. Request the name of the image to boot from the specified boot device D Full dump, implies "s" as well. By default, if UNIX panics it completes a partial memory dump. Specifying "D" forces a full dump at system panic. boot_reset Indicates whether a full system reset is performed in response to an error halt or BOOT command OFF warm boot, no full reset is performed (default) ON cold boot, a full reset is performed bootdef_dev The device or device list from which a boot is to attempted when no path is specified on the command line example: dra0.0.0.7.1 booted_dev The device from which booting actually occurred. (Read-only) booted_file The file name used for the primary bootstrap during the last boot. The value is NULL if boot_file is NULL and no bootstrap file name was specified by the boot command. booted_osflags Additional parameters, if any, specified by the last boot command that are to be interpreted by system software. bus_probe_algorithm Defines which algorithm to use for probing the PCI bus, and naming detected devices. Must be set to NEW when running OpenVMS V6.2 or later, or Digital Unix V3.0b or later. NEW (Default) Example dra0.0.0.1007.1 OLD dra0.0.0.7.1 console Specifies the default device for console input and output. GRAPHICS Specifies the VGA and Keyboard. SERIAL Specifies the terminal attached to COM1. console_mode Defines the MODE after INIT. Used on AlphaServer 8x00 and Compaq AlphaServer GS60 /GS140). 303 BASIC DIAG ADVANCED Normal operating mode Used when running console diagnostics Used when running utilities cpu_enabled A bitmask indicating which processors are enabled to run (leave console mode). If this variable is not defined, all available processors are considered enabled. cpu_mask A bitmask indicating which processors are enabled to run (leave console mode). cpu_primary A bitmask indicating which processors are eligible to be the next boot processor, following the next reset. dump_dev The complete device specification of the device or device list to which operating system dumps should be written. ew*0_mode Specifies the value for the Ethernet port mode when it is started. Allowed values are: Auto-Sensing AUI Fast Twisted-Pair Full Duplex, Twisted-Pair BNC FastFD (Full Duplex) Auto-Negotiate ew*0_protocols Determines which network protocols are enabled for booting and other functions. mop Sets the network protocol to mop: the setting typically used for systems using the OpenVMS operating system. bootp Sets the network protocol to bootp: the setting typically used for systems using the DEC OSF/1 operating system. bootp,mop When the settings are used in a list, the mop protocol is attempted first, followed by bootp. ffauto Allows booting from a disk that is in the "Not Connected" State. FFAUTO determines console behavior when the system is trying to autoboot. An autoboot is any boot other than a manual >>>boot command issued at the SRM console by a user. FFAUTO is stored in non-volatile memory therefore its state persists across system resets and power cycles. ON Console behavior is affected during an autoboot. When the console is trying to autoboot, the console attempts to boot from each “connected” device listed in bootdef_dev. If the console reaches the end of the bootdef_dev list without successfully booting, the console goes to the beginning of the bootdef_dev list and attempts booting again. Disks that are found in the “not connected” state are changed to the “connected state”, thereby enabling the console to access that device. OFF The default. Console behavior is not affected. 304 ffnext Allows booting from a disk that is in the "Not Connected" State. FFNEXT determines the console behavior of the next command issued to a “not connected” device. FFNEXT is a volatile environment variable and its value is temporary therefore does not propagate across a system reset or reboot. ON The console will change the next “not connected” device to a “connected” state for booting. n the ONstate, The FFNEXT state is automatically reset to OFF after the console changes device state from “not connected” to “connected”. Resetting FFNEXT to OFF protects the user from accidentally changing the state of disks. Stated in another way, FFNEXT is a one shot. It stays in effect until a "Not Connected" device is accessed. OFF The default. Console behavior is not affected. interleave Determines memory interleave specification. DEFAULT Memory configuration algorithm that attempts to maximize memory interleaving is used NONE No interleave Explicit interleave list (example SET INTERLEAVE 7+5:6) isp*_host_id Specifies the host ID of the KFTIA SCSI adapters. Valid values are 0 to 7, the default is 7. isp*_soft_term Enables or disables SCSI terminators. This environment variable applies to Turbolasers using the KFTIA Qlogic ISP1020 SCSI controller. There are four possible values: off Turns off both low 8 bits and high 8 bits. low Turns on low 8 bits and turns off high 8 bits. high Turns on high 8 bits and turns of low 8 bits. on Turns on both low 8 bits and high 8 bits. kzpsa*_fast Specifies the mode of the onboard SCSI adapter. 0 Normal SCSI mode. 1 Fast SCSI mode. kzpsa*_host_id Specifies the host ID of the KZPSA SCSI adapter. Valid values are 0 to 7, the default is 7. kzpsa*_termpwr KZPSA SCSI termination power setting 0 disable termpwr 1 enable termpwr memory_test Specifies the amount of memory tested during power-on self test on the Alphaserver 4x00 and 1200 systems. full (default) - test all memory If running OpenVMS, Tru64 UNIX or Digital UNIX set it to default. partial - test only the first 64MB of memory none - test no memory N1 N2 N3 N4 These four variables are set by using the wwidmgr -quicket or -set port commands. These commands will define an alias for a HSG80 port that a user wants devices to be seen on. In order for the device to be available at the console it must have a port configured using the wwidmgr command. The wwid0 thru wwid3 variables are also used with these variables to define devices seen on the HSG80 ports. Text string to be displayed in the OCP after power up ocp_text 305 os_type Specifies the OS that will be booted on the machine NT On reset, control is passed to ARC Firmware/AlphaBios. VMS Same as "OpenVMS". OpenVMS The default for most Alpha platforms. The only setting for which the firmware CIPCA driver will be started. OSF Same as "Unix". Unix The default for Alpha evaluation board products. pal Specifies the versions of OpenVMS and Digital Unix PALcode available in the firmware. The generic major and minor PALcode revisions are displayed along with the platformspecific variation. For example: OpenVMS PALcode V1.19-4, Digital UNIX PALcode V1.21-16 pci_parity Disables or enables parity checking on the PCI bus. ON Enables parity checking for all devices on the PCI. OFF Disables parity checking for all devices on the PCI. pk*0_disconnect Allows the target to disconnect from the SCSI bus while the target acts on a command. 1 target is allowed to disconnect from the SCSI bus while processing a command. 0 target retains control of the SCSI bus while acting on a command. pk*0_fast Specifies the mode of the onboard SCSI adapter. 0 Normal SCSI mode. 1 Fast SCSI mode. pk*0_host_id Specifies the host ID of the onboard SCSI adapter. Valid values are 0 to 7, the default is 7. pk*0_soft_term Enables or disables SCSI terminators. This environment variable applies to systems using the QLogic ISP1020 SCSI controller. The QLogic ISP1020 SCSI controller implements the 16-bit wide SCSI bus. The QLogic module has two terminators, one for the 8 low bits and one for the high 8 bits. There are five possible values: off Turns off both low 8 bits and high 8 bits. low Turns on low 8 bits and turns off high 8 bits. high Turns on high 8 bits and turns of low 8 bits. on Turns on both low 8 bits and high 8 bits. diff Places the bus in differential mode. pk*0_termpwr KZPSA SCSI termination power setting 0 disable termpwr 1 enable termpwr 306 simm_callout AlphaServer 8x00 and Compaq AlphaServer GS60/GS140 only; specifies that if any memory errors are detected during power-on self-test, the console should identify the failing SIMM. Defined values are: OFF (Default) ON identify failing SIMM. The "ON" value is pre-served across one system initialization only, then reset to "OFF". sys_model_num FIS process writes a model number to this variable. sys_serial_num FIS process writes a system serial number to this variable. sys_type FIS process writes a system type to this variable (AlphaServer 4x00/1200 only). Defined values are: Pedestal Rackmount tta0_baud Sets the console terminal port baud rate. version Specifies the version of the console code in the firmware. For instance, V3.5-26 MAR 31 1994 12:01:55. wwid0 wwid1 wwid2 wwid3 These four variables are set by using the wwidmgr -quicket or -set wwid commands. These commands will define an alias for a device connected to a KGPSA/HSG80. In order for the device to be available at the console it must be configured using the wwidmgr command. The N1 thru N4 variables are also used with these variables to define HSG80 ports the devices are seen on. 307 Definition of Galaxy Environmental Variables The following environmental variables are required for Galaxy setup. The values are dependent upon the system type and configuration. See the Compaq OpenVMS Alpha Galaxy Guide (AA-REZQB-TE) or STARS for further information on setup. These are used for OpenVMS. UNIX only uses these parameters on the AlphaServer 8200/8400 and AlphaServer GS60/GS140 machines. lp_count The number of Galaxy partitions or instances the console should expect. 0 - Galaxy console is OFF. Will boot traditional SMP configuration only. non-zero - The exact value represents the number of Galaxy partitions the console should expect. lp_cpu_mask* A bit mask that indicates which CPUs are initially assigned to the specified Galaxy partition or instance number. Requirements for this variable are as follows • AlphaServer 8x00/GS Series machines • Each instance must have an even numbered CPU as primary • AlphaServer ES40 and 4100 • CPU0 must be a part of partition 0 • CPU1 must be a part of partition 1 lp_io_mask* Assigns I/O modules by slot number to each partition or instance. 100 - Represents I/O module in slot 8 80 - Represents I/O module in slot 7 40 - Represents I/O module in slot 6 20 - Represents 4100 IOD1 10 - Represents 4100 IOD0 2 - Represents ES40 PCI1 1 - Represents ES40 PCI0 AlphaServer AlphaServer AlphaServer AlphaServer 8400 8200 4100 ES00 - only only only only valid valid valid valid values values values values are are are are 100, 80 and 40 100 and 80 10 and 20 1 and 2 Standards for this variable are as follows • AlphaServer 8x00/GS Series machines • IO module installed in slot 8 is assigned instance 0 • IO module installed in slot 7 is assigned instance 1 • IO module installed in slot 6 is assigned instance 2 • AlphaServer ES40 and 4100 • IOD0 or PCI0 is assigned to instance 0 • IOD1 or PCI1 is assigned to instance 1 lp_mem_mode Used by Tru64 UNIX on Turbolaser and GS60/GS140 only. Tells console to load into each partition Also needs to set interleave to none. isolate lp_mem_size * Allocates a specified amount of private memory for the specified instance or partition. lp_shared_mem_size Allocates memory for use as shared memory. Must be assigned in multiples of 8MB and are expressed in HEX bytes. Defines which instance’s primary CPU will • Get error information from the console • Create an entry in it’s errorlog * = partition, instance number or amount of memory. lp_error_target 308 309 How to Set Customer Defined Environmental Variables Customers can define site-specific console environmental variables for specialized booting. Originally you could create non-volatile variables with CREATE –NV commands that would hold variable contents over re-inits. This procedure does not appear to work. After setting the variables they clear on init. In order to set customer defined variables that will hold after an init you must define them in a power-up script so they are redefined on each init. In order to use them in a boot string you must precede them with a $ . i.e. >>> Boot $vms will use the contents of the variable VMS to boot. If you do not use the $ in front of the variable you will see the following error could not find controller for device vms device vms is invalid usage is boot <device> [-file <file>] [-flags <flags>] Procedure: 1. 2. 3. 4. 5. 6. Edit the powerup script by typing " edit nvram " Enter a line number followed by the command Exit the edit session Reinit. Cat nvram to see contents on powerup script If this is a boot string you must precede the variable with a $ for it to work. >>> Boot $vms Example: P00>>> edit nvram editing ‘nvram’ 0 bytes read in *10 set vms "-fl 0,0 dkb100.1.0.2000.1" *20 *exit (enter line number “ 10 “ and command) P00>>>cat nvram set vms "-fl 0,0 dkb100.1.0.2000.1" P00>>>init init map prints . . . environment variable vms created AlphaServer 4100 Console V5.1-3, 4-FEB-1998 16:40:08 P00>>>sho vms vms Show the variable you created -fl 0,0 dkb100.1.0.2000.1 P00>>>boot $vms Initializing... . . . Open VMS or Tru64 UNIX banner Issue boot $vms note it now works 310 311 How to Set Customer Defined Environmental Variables on a TurboLaser In order to set customer defined environmental variables on an AlphaServer 8200 or 8400 you will need to use one of the following procedures. 1. Create conv -nv and then set the value of the variable. a. P00>>> Create -nv conv b. P00>>> Set conv dkb0.0.0.0.0 -fl 0,1 (note flags is passed second) 2. Can do command on one line. a. P00>>> Create -nv conv dkb0.0.0.0.0 -fl 0,1 3. Create a powerup script a. P00>>> set mode advanced b. P00>>> edit ee_power *10 set conv "dkb0.0.0.0.0 -fl 0,1" *20 *^z or exit c. P00>>> set eeprom script power d. Power off/on machine. The variable will now load on every power off/on. 4. In order to use the new variable type the following P00>>> boot $conv note the $ before the variable you defined. 312 313 Description of the Environmental Variable Bus_Probe_Algorithm The Environmental variable bus_probe_algorithm changes the algorithm we use to probe buses. Bus_probe_algorithm must be set to NEW for the following operating systems. • • OpenVMS V6.2 or greater Digital Unix V3.0B or greater. OpenVMS will crash with an INCONSTATE bugcheck on boot if not set correctly Digital UNIX will halt on boot. When probing the PCI bus, if we find a PCI-to-EISA bridge it can either treat this new EISA bus as a child bus of the PCI (just like I do when I find a PCI-toPCI bridge), or it can treat it as a peer bus to the PCI. When it treats it as a child bus, it gets a sub-PCI bus number just like other sub-PCI buses. It would be hose 0 (the main PCI bus), bus 1. When it treats it as a peer bus, it gets a hose number just like the main PCI bus. It would be hose 1. bus_probe_algorithm determines which of the above options we select. "new" selects the more correct option; "old" selects the option used when the console was first written. Given the above, only EISA devices will see their names change. With BUS_PROBE_ALGORITHM = "OLD" With BUS_PROBE_ALGORITHM = "NEW" --> --> dra0.0.0.7.1 dra0.0.0.1007.1 These devices are on a KFESA which is an EISA device. However PCI devices will not reflect this change 314 315 Using FFNEXT and FFAUTO Environmental Variables This section describes how to use console environment variables FFAUTO and FFNEXT to force devices (e.g. disks) from a “not connected” state to a “connected” state to make them bootable. The console does not allow booting devices that are in the “not connected” state. FFAUTO and FFNEXT are used for situations and configurations where an operator needs to force the console to boot a “not connected” device. These console environment variables were introduced in console firmware V5.5 (August 1999). Background of Device States Behavior of “Not Connected” Devices HSZ8x disk array controllers or HSG8x array controllers may have their disks in a “connected” or “not connected” state. In MULTIBUS mode, a disk state of “not connected” is normal and correct. Because the console does not allow booting devices in the “not connected” state, attempted to boot a “not connected” disk produces the console error message below: P00>>>b dga40.1003 resetting all I/O buses VGA Bios failed, status = 1 (boot dga40.1003.0.6.0 -flags 0) dga40.1003.0.6.0 is not connected failed to open dga40.1003.0.6.0 Therefore, to successfully boot a disk, select either a “connected” disk or use the FFAUTO or FFNEXT command. Determining a “Not Connected” Device from an HSZ80 or HSG80 The HSZ8x or HSG8x console can help the operator determine where a disk device is connected. In this HSG80 console example below, the state of disk device d40 is ‘ONLINE to this controller’ therefore connected. HSG80> show d40 LUN Uses Used by ----------------------------------------------------------------------------D40 DISK50000 LUN ID: 6000-1FE1-0000-04A0-FFFF-FFFE-0005-0000 IDENTIFIER = 40 Switches: RUN NOWRITE_PROTECT READ_CACHE READAHEAD_CACHE MAXIMUM_CACHED_TRANSFER_SIZE = 32 Access: ALL State: ONLINE to this controller Not reserved NOPREFERRED_PATH Size: 4110480 blocks Geometry (C/H/S): ( 3045 / 16 / 85 ) Determining a “Not Connected" Device from the SRM Console There are a couple of methods: 1. The console error message at boot time, as previously shown, is one way to determine a "Not Connected" device. This console error message is also displayed when a console disk exerciser attempts to exercise a "Not Connected" device. 2. Using the WWIDMGR command, the console can also display the status of fibre channel devices controlled by an HSG8x. 316 P00>>>wwidmgr -show wwid -udid 40 –full [0] UDID:40 WWID:01000010:6000-1fe1-0000-04a0-ffff-fffe-0005-0000 (ev:wwid0) current_unit:40 current_col: 1 default_unit: 5901 via adapter via fc_nport Con DID Lun pga0.0.0.6.0 5000-1fe1-0000-04a2 Yes 210313 40 pga0.0.0.6.0 5000-1fe1-0000-04a1 Yes 210513 40 pga0.0.0.6.0 5000-1fe1-0000-04a4 No 210713 40 Forcing the Console to Use a "Not Connected" Device Using FFAUTO to Autoboot a "Not Connected" Devices FFAUTO determines console behavior when the system is trying to autoboot. An autoboot is any boot other than a manual >>>boot command issued at the SRM console by a user. FFAUTO can be set to ON or OFF. The default state is OFF where console behavior is not affected. FFAUTO is stored in non-volatile memory therefore its state persists across system resets and power cycles. >>> set FFAUTO ON In the ON state, console behavior is affected during an autoboot. When the console is trying to autoboot, the console attempts to boot from each “connected” device listed in bootdef_dev. If the console reaches the end of the bootdef_dev list without successfully booting, the console goes to the beginning of the bootdef_dev list and attempts booting again. Disks that are found in the “not connected” state are changed to the “connected state”, thereby enabling the console to access that device. 4.2.1.1 Example Using the FFAUTO Environment Variable P00>>>set FFAUTO ON P00>>>set bootdef_dev dga40.1003 P00>>>b (boot dga40.1003.0.6.0 -flags 0) dga40.1003.0.6.0 is not connected failed to open dga40.1003.0.6.0 P00>>>init VMS PALcode V5.56-7, OSF PALcode V1.45-12 starting console on CPU 0 CPU 0 booting (boot dga40.1003.0.6.0 -flags 0) dga40.1003.0.6.0 is not connected failed to open dga40.1003.0.6.0 Retrying, type ^C to abort... (boot dga40.1003.0.6.0 -flags 0) block 0 of dga40.1003.0.6.0 is a valid boot block reading 896 blocks from dga40.1003.0.6.0 bootstrap code read in base = 200000, image_start = 0, image_bytes = 70000 initializing HWRPB at 2000 initializing page table at 1ff0000 initializing machine state setting affinity to the primary CPU jumping to bootstrap code 317 Using FFNEXT on "Not Connected" Devices FFNEXT determines the console behavior of the next command issued to a “not connected” device. FFNEXT can be set to either OFF or ON. The default-state is OFF where console behavior is not affected. FFNEXT is a volatile environment variable and its value is temporary therefore does not propagate across a system reset or reboot. >>> set FFNEXT ON In the ON-state, the console will change the next “not connected” device to a “connected” state for booting. The FFNEXT state is automatically reset to OFF after the console changes device state from “not connected” to “connected”. Resetting FFNEXT to OFF protects the user from accidentally changing the state of disks. Stated in another way, FFNEXT is a one shot. It stays in effect until a "Not Connected" device is accessed. 4.2.2.1 EXAMPLE: FFNEXT P00>>>b dga40.1001 (boot dga40.1001.0.6.0 -flags 0) dga40.1001.0.6.0 is not connected failed to open dga40.1001.0.6.0 P00>>>set ffnext on P00>>>b dga40.1001 (boot dga40.1001.0.6.0 -flags 0) block 0 of dga40.1001.0.6.0 is a valid boot block reading 896 blocks from dga40.1001.0.6.0 bootstrap code read in base = 200000, image_start = 0, image_bytes = 70000 initializing HWRPB at 2000 initializing page table at 1ff0000 initializing machine state setting affinity to the primary CPU jumping to bootstrap code OpenVMS (TM) Alpha Operating System, Version X6PC-SSB halted CPU 0 halt code = 5 HALT instruction executed PC = ffffffff8b4e2ba4 P00>>>show ffnext ffnext OFF 318 319 LFU Scripts and Console Commands Available The following is a list of LFU scripts available on different platforms. Not every system uses these scripts. AlphaStation 600A The AlphaStation 600A uses the same motherboard as the AlphaServer 1000A. These scripts allow loading of the correct console code into the flash roms. • • 600A_to_1000A - Loads the 1000A console code into a 600A. 1000A_to_600A - Loads the 600A console code into a 1000A. Note: The 600A_to_1000A and 1000A_to_600A scripts were discontinued after the V5.0 CD’s. There are to be made available again on the V5.4 CD’s. Either use V5.0 CD’s or earlier or select the appropriate file name to change the firmware. AlphaServer 1000 / 1000A The Alphaserver 1000 and 1000A come in EV4 and EV5 versions. This script allows you to upgrade from EV4 to EV5 or downgrade from EV5 to EV4 firmware. Note: The cpu_upgrade and cpu_downgrade commands are only valid for AlphaServer 1000 and 1000A system which have the older Main Logic Board 54-23499-01. DO NOT USE THIS COMMAND ON systems with Main Logic Board 54-23499-02. • • cpu_downgrade - loads an EV4 SRM and ARC image into the flash roms. Use when downgrading from an EV5 CPU to an EV4 CPU. cpu_upgrade - loads an EV5 SRM and ARC image into the flash roms. Use when upgrading from an EV4 CPU to an EV5 CPU. AlphaServer 2x00 / 2x00A • • • • cpu_downgrade - loads an EV4 SRM and ARC image into the flash roms. Use when downgrading from an EV5 CPU to an EV4 CPU. If booting from floppy you need the files sbsrmrom.exe, slsrmrom.exe and sbarcrom.exe. cpu_upgrade - loads an EV5 SRM and ARC image into the flash roms. Use when upgrading from an EV4 CPU to an EV5 CPU. If booting from floppy you need the files gmsrmrom.exe, glsrmrom.exe and gmarcrom.exe. make_dual_srm - loads EV5 SRM ROM image into bank 0 and EV4 SRM ROM image into bank 1 thereby returning a good I/O module to a state where it can be returned as a field spare. If booting from floppy you need the files sbsrmrom.exe and slsrmrom.exe. update_fsl - updates the failsafe loader. AlphaServer 800/1000/1000A/1200/2000/2100/2100A/4000/4100/DS20/DS20E and AlphaStation 600A Save_nvram and restore_nvram available as of V3.9 CD. They have been temporarily removed starting at V5.1 . The are scheduled to return on the V5.4 CD. On the AlphaServer 1200/4000/4100/DS20/DS20E systems the SAVE_NVRAM and RESTORE_NVRAM scripts will work from the >>> or the UPD> prompt. The other systems require the firmware CD to be booted and the command executed from the UPD> prompt. • Save_NVRAM - Save the system NVRAM data from 8KB EEROM and last 50 TOY RAM 320 bytes onto a write-UN-locked FAT formatted floppy to a file. By default, if no script argument is specified, all NVRAM is saved to file ALLNVRAM.SAV. If the file already exists, then a copy of the original file is made to *.BAK. If that file exists, it is overwritten. Note, attempts to write to a writelocked floppy fail silently. Syntax save_nvram [{all,arc,srm,toy}] Arguments group Specifies the group of NVRAM data to be saved. One of • all : All of the 8KB EEROM and 50 bytes of TOY RAM are saved in file allnvram.sav. This is the default, if no argument is specified. • arc : ARC (AlphaBIOS) data in first 6KB of the 8KB EEROM is saved in file arcnvram.sav. • srm : SRM console data in last 2KB of the 8KB EEROM is saved in file srmnvram.sav. • toy : TOY console data in the 50 bytes of TOY RAM is saved in file toynvram.sav. • Restore_NVRAM - Restore the system NVRAM data to 8KB EEROM and/or last 50 TOY RAM bytes from a floppy containing the NVRAM save file(s). By default, if no script argument is specified, all NVRAM is restored from file ALLNVRAM.SAV. Syntax restore_nvram [{all,arc,srm,toy}] Arguments group - Specifies the group of NVRAM data to be restored. One of • all : All of the 8KB EEROM and 50 bytes of TOY RAM are restored from file allnvram.sav. This is the default, if no argument is specified. • arc : ARC (AlphaBIOS) data in first 6KB of the 8KB EEROM is restored from file arcnvram.sav. • srm : SRM console data in last 2KB of the 8KB EEROM is restored from file srmnvram.sav. • toy : TOY data in last 50 bytes of 64 bytes in TOY RAM is retorted from file toynvram.sav. NOTE The save_NVRAM and restore_NVRAM commands are available under the Loadable Firmware Utility or the >>> depending on system type. The commands save or restore NVRAM configuration data. This feature is useful if upgrading a system’s motherboard and you wish to restore the systems previous NVRAM context. To get to the UPD prompt, boot the Alpha Firmware CD and press the enter-key after the Bootfile: prompt. I have tested this feature and it restores console environmental variables, WNT boot selections and EISA configuration data. All Systems • read_rel_notes - allows you to read the firmware release notes from UPD> . 321 Online commands for OSF/1,Unix and OpenVMS to Get Firmware and CPU Rev Info Unix To get processor speed and EV version under Unix V4.0 $PWD> psrinfo -v Status of processor 0 as of: 03/07/97 01:30:42 Processor has been on-line since 03/06/97 19:23:09 The alpha EV5 (21164) processor operates at 291 MHz, and has an alpha internal floating point processor. Status of processor 1 as of: 03/07/97 01:30:42 Processor has been on-line since 03/06/97 19:23:09 The alpha EV5 (21164) processor operates at 291 MHz, and has an alpha internal floating point processor. Unix and OSF/1 To get console firmware version from errorlog on a OSF/1 or UNIX system check the startup errlog entry. You can also get startup entries from the messages file. $PWD> $PWD> $PWD> $PWD> /var/adm/messages tail -300 messages | more Messages file /usr/sbin/uerf -R -o full -r 300 - Uerf command /usr/sbin/dia -R -o full -i 300 - DIA command /usr/sbin/dia -R -o full –i cont - DIA command (control entries) Can also try osf_entry , swi or information ********************************* ENTRY 1.********************************* ----- EVENT INFORMATION ----EVENT CLASS OS EVENT TYPE SEQUENCE NUMBER OPERATING SYSTEM OCCURRED/LOGGED ON OCCURRED ON SYSTEM SYSTEM ID SYSTYPE MESSAGE 300. 0. OPERATIONAL EVENT SYSTEM STARTUP DEC OSF/1 Thu Mar 6 19:23:35 1997 pls001 x00050018 x00000000 Alpha boot: available memory from _0xfee000 to 0x1fffe000 Digital UNIX V4.0A (Rev. 464); Thu _Dec 5 15:44:27 EST 1996 physical memory = 512.00 megabytes. available memory = 496.07 megabytes. using 1958 buffers containing 15.29 _megabytes of memory Master cpu at slot 0. Firmware revision: 4.5 PALcode: OSF version 1.21 ibus0 at nexus AlphaServer 2100A 5/300 cpu 0 EV-5 4mb b-cache cpu 1 EV-5 4mb b-cache gpc0 at ibus0 pci0 at ibus0 slot 0 eisa0 at pci0 ace0 at eisa0 ace1 at eisa0 lp0 at eisa0 fdi0 at eisa0 fd0 at fdi0 unit 0 pci2000 at pci0 slot 3 psiop0 at pci2000 slot 1 Loading SIOP: script 1007800, reg 322 _81818000, data 406b37a8 scsi0 at psiop0 slot 0 rz0 at scsi0 target 0 lun 0 (LID=0) _(DEC RZ29B (C) DEC 0014) _(Wide16) rz1 at scsi0 target 1 lun 0 (LID=1) _(DEC RZ29B (C) DEC 0014) _(Wide16) rz2 at scsi0 target 2 lun 0 (LID=2) _(DEC RZ29B (C) DEC 0016) _(Wide16) rz6 at scsi0 target 6 lun 0 (LID=3) _(DEC RRD45 (C) DEC 1645) Initializing xcr0. Please wait.... xcr0 at pci2000 slot 6 re0 at xcr0 unit 0 (unit status = _ONLINE, raid level = 5) re1 at xcr0 unit 1 (unit status = _ONLINE, raid level = 5) psiop1 at pci2000 slot 7 Loading SIOP: script 1013800, reg _81818100, data 406b3ba8 scsi1 at psiop1 slot 0 rz8 at scsi1 target 0 lun 0 (LID=4) _(DEC RZ29B (C) DEC 0014) _(Wide16) rz9 at scsi1 target 1 lun 0 (LID=5) _(DEC RZ29B (C) DEC 0014) _(Wide16) rz10 at scsi1 target 2 lun 0 (LID=6) _(DEC RZ29B (C) DEC 0014) _(Wide16) tz12 at scsi1 target 4 lun 0 (LID=7) _(DEC TZ88 (C) DEC CC34) tz13 at scsi1 target 5 lun 0 (LID=8) _(DEC TLZ09 (C)DEC 0165) tu0: DECchip 21040-AA: Revision: 2.4 tu0 at pci2000 slot 8 tu0: DEC TULIP Ethernet Interface, _hardware address: 00-00-F8-22-38-E3 tu0: console mode: selecting 10BaseT _(UTP) port: half duplex fta0 DEC DEFPA FDDI Module, Hardware _Revision 0 fta0 at pci2000 slot 9 fta0: DMA Available. fta0: DEC DEFPA (PDQ) FDDI Interface, _Hardware address: 00-00-F8-40-DA-06 fta0: Firmware rev: 2.46 trio0 at pci0 slot 6 trio0: S3 Trio64 (SVGA) - Plug N’ Play _- 1.0 Mb 323 OpenVMS To find the console version on an OpenVMS AXP system running V6.1 use the following: SDA> CLUE CONFIG to get console version For systems running V7.2 you can access the FRU tables from a crash or online SDA. SDA> CLUE FRU SDA> exit $ diagnose clue$fru.sys - Shows FRU packets. Not available on all systems For systems running V6.2 and later the following commands are available SDA> CLUE SCSI/SUM to get disk/tape firmware info. SDA> CLUE SCSI/PORT to get KZPSA SCSI ID. $ Anal/sys SDA> Clue Config System Configuration: --------------------System Information: System Type DEC 4000 Model 720 Cycle Time 5.2 nsec (190 MHz) Memory Configuration: Cluster PFN Start #02 0 #03 251 #04 32767 PFN Count 251 32516 1 Per-CPU Slot Processor Information: CPU ID 00 CPU Type EV4 Pass 3 (21064) PAL Code 5.48 CPU Revision A100 Serial Number AY33692990 Console Vers V3.4-6 Primary CPU ID 00 Pagesize 8192 Byte Range (MByte) 0.0 MB 1.9 MB 1.9 MB 255.9 MB 255.9 MB 256.0 MB Usage Console System Console CPU State rc,pa,pp,cv,pv,pmv,pl Halt PC 00000000.20000000 Halt PS 00000000.00001F00 Halt Code 00000000.00000000 "Bootstrap or Powerfail" CPU ID 01 CPU State rc,pa,pp,cv,pv,pmv,pl System Configuration: --------------------CPU Type EV4 Pass 3 (21064) Halt PC 00000000.00000000 PAL Code 5.48 Halt PS 00000000.00001F00 CPU Revision A100 Halt Code 00000000.00000000 Serial Number AY34624309 "Bootstrap or Powerfail" Console Vers V3.4-6 Adapter Configuration: ---------------------TR Adapter ADP Hose Bus BusArrayEntry Node Device Name / HW-Id -- ----------- -------- ---- -------------------- ----------------------------1 KA0202 80C706C0 0 CBUS 80C70898 0 KA0202_IO 80C708D0 1 KA0202_CPU 80C70908 2 KA0202_CPU 80C70940 3 KA0202_MEM 80C709B0 5 KA0202_MEM 2 KA0202_LBUS 80C70A40 0 LBUS 80C70C18 PKA: 0 NCR 53C710 SCSI 80C70C50 PKB: 1 NCR 53C710 SCSI 80C70C88 PKC: 2 NCR 53C710 SCSI 80C70CF8 PKD: 4 NCR 53C710 SCSI 80C70D68 EZA: 6 DC253 80C70DD8 8 PCD8584 3 FBUS 80C70E40 1 FBUS 80C71018 0 0008002B.32304000 SDA> 324 WNT The following procedure allows you to determine the AlphaBIOS version when WNT is running. You need to check the Windows NT Diagnostic Menu Use one of the following methods. Go to the Start bar, Select Programs, then Administrative Tools (Common) and then select , Windows NT Diagnostics OR 1. Open an MSDOS window 2. Type winmsd to bring up the Windows NT Diagnostic Menu 3. Select SYSTEM. The BIOS information indicates the AlphaBIOS version. 325 326 FFFFFFFF.80D8F75C FFFFFFFF.80D8F760 FFFFFFFF.80D8F740 FFFFFFFF.80D8F744 FFFFFFFF.80D8F748 FFFFFFFF.80D8F74A FFFFFFFF.80D8F74B FFFFFFFF.80D8F74C FFFFFFFF.80D8F74E FFFFFFFF.80D8F750 FFFFFFFF.80D8F754 FFFFFFFF.80D8F758 SDA> for 80D8F740 SPDT$L_PORT_FLAGS SPDT$L_SCSI_PORT_ID SPDT$L_SCSI_BUS_ID SPDT$IS_SCSI_ID_NUM SPDT$Q_SCSI_ID_NUM SPDT$R_SCSI_ID_OVERLAY SPDT$L_FLINK SPDT$L_VERSION_CHECK SPDT$W_SIZE SPDT$B_TYPE SPDT$B_SUBTYP SPDT$W_SPDT_TYPE SPDT address 3. Format the SPDT Address data structure. 00000000 000206D7 80D893C0 00080B06 0540 79 0E 0007 0000 00000004 00000080 00000007 00000000 80DA3580 Queue Manager’s KPB Queue Manager’s SCDRP Driver SYS$PKQDRIVER 80D8F740 Port Type SCSI QLogic ISP1020 (This is a KZPBA adapter) 80D3E580 Adapter PCI 80DA2E80 Device QLOGIC 80D3E780 Port Host SCSI Id 7 synch,asynch,mapping_reg,dir_dma,luns,cmdq,port_aut online 0 Number of Events 0 0 Curr I/Os on all Ports 0 0 Curr I/Os on all Devices 0 0 Total Outstanding I/Os 0 0 80D48980 Port Wait Queue empty 00000000 Nonpg Pool FKB Que empty 80DA2E00 Bus Reset Waiters empty PKE0: SPDT Address ADP Address UCB Address Busarray Address Port Flags Port Device Status Port Dev Status at DIPL Target inited Bus Resets Retry Attempts Stray Interrupts Unexpected Interrupts Reselections CRAB Address Port CRAM Address Port IDB Address SCSI Port Descriptor (SPDT): SDA> CLUE SCSI/PORT 2. Execute the CLUE SCSI/PORT command. Look for the SCSI QLogic ISP1020 Port Type 1. Go into online SDA. $ ANAL/SYSTEM 327 This is the procedure to find out the firmware revision of a KZPBA-CA or KZPBA-CB running VMS version 7.1 or 7.2. The firmware for the KZPBA-CA or KZPBA-CB is loaded by the Alpha console on each system initialization. How to Determine Firmware Revision of KZPBA-CA or KZPBA-CB with OpenVMS V7.1 and V7.2 FFFFFFFF.80D8F764 FFFFFFFF.80D8F768 FFFFFFFF.80D8F76C FFFFFFFF.80D8F770 FFFFFFFF.80D8F774 FFFFFFFF.80D8F775 FFFFFFFF.80D8F778 FFFFFFFF.80D8F77C FFFFFFFF.80D8F77E FFFFFFFF.80D8F780 FFFFFFFF.80D8F784 FFFFFFFF.80D8F788 FFFFFFFF.80D8F78C FFFFFFFF.80D8F790 FFFFFFFF.80D8F794 FFFFFFFF.80D8F798 FFFFFFFF.80D8F79C FFFFFFFF.80D8F7A0 FFFFFFFF.80D8F7A4 FFFFFFFF.80D8F7A8 FFFFFFFF.80D8F7AC FFFFFFFF.80D8F7B0 FFFFFFFF.80D8F7B4 FFFFFFFF.80D8F7B8 FFFFFFFF.80D8F7BC FFFFFFFF.80D8F7C0 FFFFFFFF.80D8F7C4 FFFFFFFF.80D8F7C8 FFFFFFFF.80D8F7CC FFFFFFFF.80D8F7D0 FFFFFFFF.80D8F7D4 FFFFFFFF.80D8F7D8 FFFFFFFF.80D8F7DC FFFFFFFF.80D8F7E0 FFFFFFFF.80D8F7E4 FFFFFFFF.80D8F7E8 FFFFFFFF.80D8F7EC FFFFFFFF.80D8F7F0 FFFFFFFF.80D8F7F4 FFFFFFFF.80D8F7F8 FFFFFFFF.80D8F7FC FFFFFFFF.80D8F800 FFFFFFFF.80D8F804 FFFFFFFF.80D8F808 FFFFFFFF.80D8F80C FFFFFFFF.80D8F810 FFFFFFFF.80D8F814 FFFFFFFF.80D8F818 FFFFFFFF.80D8F81C FFFFFFFF.80D8F820 FFFFFFFF.80D8F824 FFFFFFFF.80D8F828 SPDT$PS_PK_ABORT_COMMAND SPDT$PS_PK_CMD_BUFFER_ALLOC SPDT$PS_PK_CMD_BUFFER_DEALLOC SPDT$PS_PK_CMD_WAIT_COMPLETION SPDT$PS_PK_CONNECT SPDT$PS_PK_CONNECTION_CHAR_SET SPDT$PS_PK_INIT_SPDT SPDT$PS_PK_INIT_STDT SPDT$PS_PK_NEGOTIATE_SYNCH SPDT$PS_PK_QUEUE_FLUSH SPDT$PS_PK_QUEUE_FREEZE SPDT$PS_PK_QUEUE_RELEASE SPDT$PS_PK_RESET_SCSI_BUS SPDT$PS_PK_SEND_COMMAND SPDT$PS_PK_GET_PATH_INFO SPDT$IS_CRCTX_SHIFT SPDT$IS_CRCTX_BWP_MASK SPDT$IS_SCSI_INT_MSK SPDT$L_MAXBYTECNT SPDT$L_TIMEOUT_COUNT SPDT$PS_CD_ABORT_COMMAND SPDT$PS_CD_BUFFER_MAP SPDT$PS_CD_BUFFER_UNMAP SPDT$PS_CD_CMD_BUFFER_ALLOC SPDT$PS_CD_CMD_BUFFER_DEALLOC SPDT$PS_CD_CONNECT SPDT$PS_CD_CONNECTION_CHAR_GET SPDT$PS_CD_CONNECTION_CHAR_SET SPDT$PS_CD_DISCONNECT SPDT$PS_CD_QUEUE_FLUSH SPDT$PS_CD_QUEUE_FREEZE SPDT$PS_CD_QUEUE_RELEASE SPDT$PS_CD_RESET_DEVICE SPDT$PS_CD_RESET_SCSI_BUS SPDT$PS_CD_SEND_COMMAND SPDT$PS_CD_INITIAL_PROCESSING SPDT$PS_CD_GET_PATH_INFO SPDT$PS_CD_SCSIPATH_CONNECT SPDT$PS_CD_GET_PORT_WWID SPDT$IS_SAVIPL SPDT$IW_ERL_TYPE SPDT$L_STS SPDT$L_DIPL_STS SPDT$IS_FLCK SPDT$L_DLCK SPDT$B_DIPL 00008001 00000000 0000003A 80D89C80 15 000000 00000000 0000 0000 0000000D 00001FFF 00000000 00020000 00000000 80CF88A0 80CF8A20 80CF89D0 80CF8B00 80CF8AE0 80CEFDC8 80CEF3B0 80CEF400 80CEF420 80CEF448 80CEF468 80CEF488 80CEF4C8 80CEF510 80CEF570 80CEFC78 00000000 80CEFDA8 00000000 00000000 00000000 80CF88A0 80CF8B00 80CF8AE0 80CF8948 80CEF728 80CEF728 80CEF728 80CEF728 80CF88B0 80CEF748 80CEF748 80CEF748 80CF8B20 80CF8988 00000000 00000000 00000000 SYS$PKQDRIVER+1DAA0 SYS$PKQDRIVER+1DD00 SYS$PKQDRIVER+1DCE0 SYS$PKQDRIVER+1DB48 SYS$PKQDRIVER+14928 SYS$PKQDRIVER+14928 SYS$PKQDRIVER+14928 SYS$PKQDRIVER+14928 SYS$PKQDRIVER+1DAB0 SYS$PKQDRIVER+14948 SYS$PKQDRIVER+14948 SYS$PKQDRIVER+14948 SYS$PKQDRIVER+1DD20 SYS$PKQDRIVER+1DB88 SYS$PKQDRIVER+14FA8 SYS$PKQDRIVER+1DAA0 SYS$PKQDRIVER+1DC20 SYS$PKQDRIVER+1DBD0 SYS$PKQDRIVER+1DD00 SYS$PKQDRIVER+1DCE0 SYS$PKQDRIVER+14FC8 SYS$PKQDRIVER+145B0 SYS$PKQDRIVER+14600 SYS$PKQDRIVER+14620 SYS$PKQDRIVER+14648 SYS$PKQDRIVER+14668 SYS$PKQDRIVER+14688 SYS$PKQDRIVER+146C8 SYS$PKQDRIVER+14710 SYS$PKQDRIVER+14770 SYS$PKQDRIVER+14E78 328 FFFFFFFF.80D8F82C FFFFFFFF.80D8F830 FFFFFFFF.80D8F834 FFFFFFFF.80D8F838 FFFFFFFF.80D8F83C FFFFFFFF.80D8F840 FFFFFFFF.80D8F844 FFFFFFFF.80D8F848 FFFFFFFF.80D8F84C FFFFFFFF.80D8F850 FFFFFFFF.80D8F854 FFFFFFFF.80D8F858 FFFFFFFF.80D8F85C FFFFFFFF.80D8F860 FFFFFFFF.80D8F864 FFFFFFFF.80D8F868 FFFFFFFF.80D8F86C FFFFFFFF.80D8F870 FFFFFFFF.80D8F874 FFFFFFFF.80D8F878 FFFFFFFF.80D8F87C FFFFFFFF.80D8F880 FFFFFFFF.80D8F884 FFFFFFFF.80D8F888 FFFFFFFF.80D8F88C FFFFFFFF.80D8F890 FFFFFFFF.80D8F894 FFFFFFFF.80D8F898 FFFFFFFF.80D8F89C FFFFFFFF.80D8F8A0 FFFFFFFF.80D8F8A4 FFFFFFFF.80D8F8A8 FFFFFFFF.80D8F8AC FFFFFFFF.80D8F8B0 FFFFFFFF.80D8F8B1 FFFFFFFF.80D8F8B4 FFFFFFFF.80D8F8B8 FFFFFFFF.80D8F8BC FFFFFFFF.80D8F8C0 FFFFFFFF.80D8F8C4 FFFFFFFF.80D8F8C8 FFFFFFFF.80D8F8CC FFFFFFFF.80D8F8D0 FFFFFFFF.80D8F8D4 FFFFFFFF.80D8F8D8 FFFFFFFF.80D8F8DC FFFFFFFF.80D8F8E0 FFFFFFFF.80D8F8E4 FFFFFFFF.80D8F8E8 FFFFFFFF.80D8F8EC FFFFFFFF.80D8F8F0 FFFFFFFF.80D8F8F4 SPDT$L_TQE_DELAY SPDT$B_TQE SPDT$L_PORT_WQFL SPDT$L_PORT_WQBL SPDT$L_WAITQFL SPDT$L_WAITQBL SPDT$PS_RESET_WAIT_LIST SPDT$L_ADP SPDT$PS_CRAB SPDT$PS_PORT_CRAM SPDT$L_PORT_IDB SPDT$L_PORT_UCB SPDT$PS_ERL_SCDT SPDT$L_SCSI_DEBUG SPDT$PS_QMAN_KPB SPDT$PS_CHIP_KPB SPDT$PS_ONDECK_KPB SPDT$PS_RL_CHECK_CMDQ_STATUS SPDT$PS_RL_CHECK_ONDECK_BLOCKED SPDT$PS_RL_CMD_SLOT_ALLOC SPDT$PS_RL_CMD_SLOT_DEALLOC SPDT$PS_RL_CREATE_PORT SPDT$PS_RL_POOL_ALLOC SPDT$PS_RL_POOL_ALLOC_PHYSICAL SPDT$PS_RL_POOL_DEALLOC SPDT$PS_RL_INIT_SCDRP SPDT$PS_RL_TIMEOUT_SETUP_TQE SPDT$PS_RL_QUEUE_RESET_DIPL SPDT$PS_RL_QUEUE_RESET_FORK SPDT$PS_RL_RESET_DETECTED_DIPL SPDT$PS_RL_RESET_DETECTED_FORK SPDT$PS_RL_RESET_DETECTED_WAIT 80CEF768 80CEF788 80CEF7A8 80CEF7F0 80CEF810 80CEFA00 80CEFA30 80CEFA70 80CEF9D8 80CEFC40 80CEFAA0 80CEFAE8 80CEFB28 80CEFB60 80CEFB08 00000000 00000000 80D8F870 80D8F870 00000000 00000000 00000000 80D51640 80D5BA80 00000000 80D89D00 80D89D80 00000000 00000000 80D57440 00000000 00000000 00000000 30 80D895 80D83F80 050F0040 80CEFCB0 00000000 00000000 80D8F740 FFFFFFFF 77E2C0C3 009D44E4 02FAF080 00000000 00000000 00000000 00000000 00000000 00000000 00000000 SPDT SYS$PKQDRIVER+14EB0 DECW$XMLIBSHR12+87895 QMAN_KPB PORT_UCB ADP SPDT+00130 SPDT+00130 SYS$PKQDRIVER+14968 SYS$PKQDRIVER+14988 SYS$PKQDRIVER+149A8 SYS$PKQDRIVER+149F0 SYS$PKQDRIVER+14A10 SYS$PKQDRIVER+14C00 SYS$PKQDRIVER+14C30 SYS$PKQDRIVER+14C70 SYS$PKQDRIVER+14BD8 SYS$PKQDRIVER+14E40 SYS$PKQDRIVER+14CA0 SYS$PKQDRIVER+14CE8 SYS$PKQDRIVER+14D28 SYS$PKQDRIVER+14D60 SYS$PKQDRIVER+14D08 329 FFFFFFFF.80D8F8F8 FFFFFFFF.80D8F8FC FFFFFFFF.80D8F900 FFFFFFFF.80D8F904 FFFFFFFF.80D8F908 FFFFFFFF.80D8F90C FFFFFFFF.80D8F910 FFFFFFFF.80D8F914 FFFFFFFF.80D8F918 FFFFFFFF.80D8F91C FFFFFFFF.80D8F920 FFFFFFFF.80D8F924 FFFFFFFF.80D8F928 FFFFFFFF.80D8F92C FFFFFFFF.80D8F930 FFFFFFFF.80D8F934 FFFFFFFF.80D8F938 FFFFFFFF.80D8F93C FFFFFFFF.80D8F940 FFFFFFFF.80D8F944 FFFFFFFF.80D8F948 FFFFFFFF.80D8F94C FFFFFFFF.80D8F950 FFFFFFFF.80D8F954 FFFFFFFF.80D8F958 FFFFFFFF.80D8F95C FFFFFFFF.80D8F960 FFFFFFFF.80D8F964 FFFFFFFF.80D8F968 FFFFFFFF.80D8F96C FFFFFFFF.80D8F970 FFFFFFFF.80D8F974 FFFFFFFF.80D8F978 FFFFFFFF.80D8F97C FFFFFFFF.80D8F980 FFFFFFFF.80D8F984 FFFFFFFF.80D8F988 FFFFFFFF.80D8F98C FFFFFFFF.80D8F990 FFFFFFFF.80D8F994 FFFFFFFF.80D8F998 FFFFFFFF.80D8F99C FFFFFFFF.80D8F9A0 FFFFFFFF.80D8F9A4 FFFFFFFF.80D8F9A8 FFFFFFFF.80D8F9AC FFFFFFFF.80D8F9B0 FFFFFFFF.80D8F9B4 FFFFFFFF.80D8F9B8 FFFFFFFF.80D8F9BC FFFFFFFF.80D8F9C0 FFFFFFFF.80D8F9C4 SPDT$PS_CMD_BASE SPDT$PS_CMD_SPDT SPDT$PS_CMDWTFL SPDT$PS_CMDWTBL SPDT$IL_CMD_BITS SPDT$L_DMA_BASE SPDT$L_SPTE_BASE SPDT$L_SPTE_SVAPTE SPDT$IS_EXTMAPREG SPDT$L_TARRST_CNT SPDT$L_RETRY_CNT SPDT$L_STRAY_INT_CNT SPDT$L_UNEXP_INT_CNT SPDT$L_NODISCON_CNT SPDT$IS_EVENT_CNT SPDT$IS_TOTAL_IO_COUNT SPDT$IS_PORT_IO_COUNT SPDT$IS_DEV_IO_COUNT SPDT$IS_QUEUE_SPINS SPDT$IS_QUEUE_EXITS SPDT$PS_STDT_HASH_TABLE SPDT$R_RESET_CLEANUP_FKB SPDT$R_RESET_FKB 80D0E038 80D0E038 3A080020 80CEFAD8 00000000 00000000 80D8F740 FFFFFFFF 80D0E038 80D0E038 3A080020 80CEFB50 80D8F740 FFFFFFFF 80D8F740 FFFFFFFF 00000000 00000000 00000000 00000002 00000000 00000000 00000000 00000000 00000000 00000000 00000000 00000000 00000000 00000CDB 00000CDB 80E1E900 00000000 00000000 80DF7AC0 80E1E340 00000000 00000000 00000000 00000000 00000000 00000000 00000000 00000000 00000000 00000000 00000000 00000000 80D8F740 80D8F9BC 80D8F9BC FFFFFFFF SPDT SPDT+0027C SPDT+0027C SPDT SYS$PKQDRIVER+14D50 SPDT SPDT SYS$PKQDRIVER+14CD8 330 SPDT$L_PORT_SPECIFIC SPDT$IW_MAX_BUS_WIDTH SPDT$L_SCSI_BUS_WIDTHS SPDT$IW_CONFIG_BUS_WIDTH SPDT$L_SCSI_AUTO_ID SPDT$L_RSVD_LONG 0010 00000000 00000000 00000000 00000000 00000000 FFFFFFFF FFFFFFFF FFFFFFFF FFFFFFFF FFFFFFFF FFFFFFFF FFFFFFFF 0010 Decimal = 557 UCB$L_CICMD+00001 The firmware for the KZPBA would be the decimal value 557. SDA> EVAL 0000022D Hex = 00000000.0000022D 5. Evaluate the data in the last longword (0000022D) to get the firmware revision. SDA> EXAMINE 80D8F9F8+80 FFFFFFFF.80D8FA78: 00000062.0000022D 4. Examine 80 off the last address (OpenVMS 7.2) or 50 off the last address (OpenVMS 7.1) FFFFFFFF.80D8F9E6 FFFFFFFF.80D8F9E8 FFFFFFFF.80D8F9EC FFFFFFFF.80D8F9F0 FFFFFFFF.80D8F9F4 FFFFFFFF.80D8F9F8 FFFFFFFF.80D8F9C8 FFFFFFFF.80D8F9CC FFFFFFFF.80D8F9D0 FFFFFFFF.80D8F9D4 FFFFFFFF.80D8F9D8 FFFFFFFF.80D8F9DC FFFFFFFF.80D8F9E0 FFFFFFFF.80D8F9E4 331 332 How to Boot RCU off of the firmware Update CD You can run the RCU utilities off of the CD. However you can not update firmware. To boot the CD, do the following. a. Determine the directory structure on the CD you are using. b. Get to the run a program selection of the ARC console. Run A Program CD:\utility\swxcrmgr\swxcrmgr - good from V3.6 to the V3.8 CD. CD:\utility\swxcrmgr\ra200rcu - good for the V3.9 CD and later. CD:\cdrom\utility\swxcrmgr\swxcrmgr - good up to the 3.5 CD You will get into the swxcr utility. You can change config and save to floppy but you can not update firmware. 333 334 How to Create a RAID Standalone Configuration Utility [RCU] Floppy Procedure In order to create a standalone Raid Array Software floppy (RCU) you will need a PC or Alpha with a CD-ROM and a floppy drive. You also need an Alpha Systems Firmware CD. The RCU files are located on the Alpha Systems Firmware CD. These files are located the following directories CD version V3.5 and earlier are located at \cdrom\utility\swxcrmgr\ CD versions V3.6 and later are located at \utility\swxcrmgr\ The utility has different names depending on which CD you use. The filenames are as follows Utility Filename Definitions Filenames used up to the V3.8 CD • SWXCRMGR.EXE Standalone SWXCRMGR utility • SWXCRFW.EXE SWXCR firmware update utility • SRLMGR.EXE SWXCR Serial utility The utility filenames • RA200RCU.EXE • RA200FL.EXE • RA200SRL.EXE changed as of the V3.9 CD. Standalone SWXCRMGR utility SWXCR firmware update utility SWXCR Serial utility Firmware Filenames Definitions The firmware and EISA configuration files as of the V5.2 Alpha Systems Firmware Update CD are as follows SWXCRFWP.242 SWXCRFWP.249 SWXCRFWP.270 SWXCRFWA.216 !MLX0075.CFG !MLX0077.CFG AMLX0075.CFG AMLX0077.CFG KZPAC/KZPSC PCI SWXCR firmware version 2.42 KZPAC/KZPSC PCI SWXCR firmware version 2.49 - Required for SWCC support KZPAC PCI SWXCR firmware version 2.70 KZESC EISA SWXCR firmware version 2.16 Windows NT EISA configuration file for the 3 channel EISA raid controller. Windows NT EISA configuration file for the 1 channel EISA raid controller. VMS/Digital UNIX EISA configuration file for the 3 channel EISA RAID controller. VMS/Digital UNIX EISA configuration file for the 1 channel EISA RAID controller. Windows 95 Copy the appropriate files from CD-ROM to Floppy diskette on a PC as described below. 1. Insert Firmware CD-ROM in drive 2. Insert formatted floppy diskette in drive A: 3. Select File Manager\ 4. Select Window 5. Select New Window 6. Select Tile Horizontally 7. Select CD-ROM drive in one window 8. Select Floppy drive in the other window 335 9. Select the directory \utility\swxcrmgr\ in cd window 10. Copy ALL files from the \utility\swxcrmgr\ directory to the floppy diskette except the Jensen directory, the .txt and the .1st files since there is not enough room on the floppy for them. e.g. \utility\swxcrmgr\*.* to A:\ If you have the 3.5 or earlier CD the directory structure is as follows \cdrom\utility\swxcrmgr\ 11. Select all the files in the directory including the following firmware files. swxcrfwa.216 (eisa) swxcrfwp.236 (PCI) (3.5 thru 3.8 CD) swxcrfwp.242 (PCI) (3.9 - 5.3 CD) swxcrfwp.249 (PCI) (5.2 – 5.6 CD) swxcrfwp.270 (PCI) (5.7 – 5.9 CD) 12. Go to the FILE pull down menu and select PROPERTIES 13. Clear the READ ONLY ATTRIBUTE isn't done - See errors section for result if this step 14. Exit the file manager 15. You now have a Standalone Raid Configuration Utility [RCU] floppy to upgrade RAID firmware. Windows NT Copy the appropriate files from CD-ROM to Floppy diskette on a PC or Alpha running Windows NT as described below. 1. Insert Firmware CD-ROM in drive 2. Insert formatted floppy diskette in drive A: 3. Select My Computer 4. Select CD-ROM drive in one window 5. Select Floppy drive in the other window 6. Select the directory \utility\swxcrmgr\ in cd window 7. Copy ALL files from the \utility\swxcrmgr\ directory to the floppy diskette except the Jensen directory, the .txt and the .1st files since there is not enough room on the floppy for them. e.g. \utility\swxcrmgr\*.* to A:\ If you have the 3.5 or earlier CD the directory structure is as follows \cdrom\utility\swxcrmgr\ 8. Select all the files in the directory including the following firmware files. swxcrfwa.216 (eisa) swxcrfwp.236 (PCI) (3.5 thru 3.8 CD) swxcrfwp.242 (PCI) (3.9 - 5.6 CD) swxcrfwp.249 (PCI) (5.2 - 5.6 CD) swxcrfwp.270 (PCI) (5.7 – 5.9 CD) 9. Go to the FILE pull down menu and select PROPERTIES 10. Clear the READ ONLY ATTRIBUTE isn't done - See errors section for result if this step 11. Close the floppy and CD window. 12. You now have a Standalone Raid Configuration Utility [RCU] floppy to upgrade RAID firmware 336 Error if files on floppy are set read-only This is an example of selecting firmware update with the file properties set to read-only. Run A Program> A:swxcrfw swxcrfwa.216 A:RA200FL –v249 EISA SWXCR PCI SWXCR ****************************************************************** * SWXCR Firmware Download Utility (V3.04, Mar 27, 1995) * ****************************************************************** * This utility is used to upgrade the firmware on the * * SWXCR controller. * ****************************************************************** SWXCR controller supporting 7 targets per channel found at slot 1 Hit any key to proceed.... Current firmware version = 1.99 ERROR : Failed to open, or encountered an error while reading the following files swxcrfwa.216 The Current SWXCR controller cannot be programmed Press 'q' to quit this program or any other key to continue upgrading the firmware on other SWXCR controllers present in the system Failed to program the first SWXCR controller. This is from Appendix D of the AlphaServer 2X00,2X00A release notes (with editing). There are also rcu zip files located at CSC32::ISG$COMMON:[SWXCR] called STANDALONE_RAID_ARRAY_200_V3-2_FOR_AXP.ZIP;1 STANDALONE_RAID_ARRAY_200_V2-2_INTEL.ZIP;1 STANDALONE_RAID_ARRAY_200_V308_JENSEN.ZIP;1 STANDALONE_RAID_ARRAY_230_PLUS_V1-0A.ZIP;1 RAID_ARRAY_200_V2-1_FOR_WIN_NT_AXP.ZIP;1 RAID_ARRAY_200_V2-1_FOR_WIN_NT_INTEL.ZIP;1 RAID_ARRAY_200_V3-0_FOR_INTEL_NETWARE.ZIP;1 RAID_ARRAY_230_PLUS_RCU_V1-0A.ZIP;1 RAID_ARRAY_230_PLUS_V1-0_FOR_WIN_NT_ALP.ZIP;1 RAID_ARRAY_200_210_230_NT_DRIVERS.ZIP;1 Also look at CYBRARY at http://Cybrary.inet.cpqcorp.net for ECU and RCU zip files. 337 338 Running RCU Firmware Update on an AlphaServer 8200 / 8400 WARNING! There is an issue with the firmware update utilities on the KZPSC and KZPAC SWXCR controllers when they are installed on AlphaServer 8200/8400 systems. See Blitz TD #2491 . Do NOT use RA200FL.EXE or SWXCRFW.EXE firmware update utilities from the V5.6 CD or earlier. There is a potential to corrupt the flash EEPROM and render the device unusable. You need to obtain a copy of RA200FL.EXE version 3.10A. The file will be available in .zip format on Cybrary. This file will also be available on the V5.7 Alpha Firmware CD and later. This version of the utility will allow you to safely upgrade firmware. It should also be available in the next revision of the RAID Array 230/Plus Subsystem Software Kit, V1.2A (QB-57UAA-SA) that is scheduled for an August 1998 release. Overview Normally the Raid Configuration Utility (RCU) is run from the ARC or AlphaBIOS console. However on the AlphaServer 8200 and 8400 systems they can be started from the console prompt without first going to the ARC or AlphaBIOS menu. The utility can be run from floppy or CD. Depending on which floppy or CD you have the file names will change. You can only do a firmware update off floppy but you can check and change a RCU configuration if booted off of the CD. The original file names were SWXCRMGR.EXE, SWXCRFW.EXE and SRLMGR.EXE . As of the V3.9 CD the file names changed to RA200RCU.EXE, RA200FL.EXE and RA200SRL.EXE. If using the floppy it will be connected off of the KFE70 or KFE72. Utility Filename Definitions Filenames used up to the V3.8 CD SWXCRMGR.EXE SWXCRFW.EXE SRLMGR.EXE Standalone SWXCRMGR utility SWXCR firmware update utility SWXCR Serial utility (see Warning above) Filenames used from the V3.9 CD and later The utility filenames changed as of the V3.9 CD. For some methods to work you may need to rename files to old names. RA200RCU.EXE RA200FL.EXE RA200SRL.EXE Standalone SWXCRMGR utility SWXCR firmware update utility SWXCR Serial utility (see Warning above) Firmware Filenames Definitions The firmware and EISA configuration files as of the V5.2 Alpha Systems Firmware Update CD are as follows SWXCRFWP.242 SWXCRFWP.249 SWXCRFWP.270 SWXCRFWA.216 !MLX0075.CFG !MLX0077.CFG AMLX0075.CFG AMLX0077.CFG KZPAC/KZPSC PCI SWXCR firmware version 2.42 KZPAC/KZPSC PCI SWXCR firmware version 2.49 - Required for SWCC support KZPAC PCI SWXCR firmware version 270 KZESC EISA SWXCR firmware version 2.16 Windows NT EISA configuration file for the 3 channel EISA raid controller. Windows NT EISA configuration file for the 1 channel EISA raid controller VMS/Digital UNIX EISA configuration file for the 3 channel EISA RAID controller. VMS/Digital UNIX EISA configuration file for the 1 channel EISA RAID controller. 339 Procedure Terminal Setup For correct operation you must use a VT320 or greater and the terminal characteristics should be set as follows: • • • • • Set to VTxxx Mode, 8 Bit Controls ( If you do not set 8-bit controls the arrow keys will not work) Set terminal ID to one of the following: VT300, VT320, VT330, VT420 Set to No Cursor mode or Text Cursor Invisible (Display setup) depending on the terminal type. Set the terminal to 9600 baud, 8-bits, no parity Set the ’ ~ key’ to equal ESC or use ’ Ctrl [ ’ (the Ctrl key should be held down while the ’ [ ’ key is pressed). Console Setup • Set the console to advanced mode. There is a variable called Console_mode. Console_mode will define the setting of mode on power up or init. It will override the SET MODE value on init. P00>>> set console_mode advanced P00>>> set mode advanced - will change to equal setting of console_mode if machine is init’d Console is in advanced mode • Set the environmental variable ARC_ENABLE to ON P00>>> set arc_enable on • Set the console to serial (VT) or graphics (AlphaBIOS). P00>>> Set console serial or P00>>> Set console graphics • Init the machine P00>>> init How to run RCU from a serial console Floppy 1. There are several console variables on the system that are preset. You will see them if ARC_ENABLED is set to ON. 2. Show the RCU variable. P00>>> sho rcu RCU fat:srlmgr.exe 3. Show the SWXCRFW and SXCRMGR variable to see how they are set. Note the later is misspelled. P00>>> show SWXCRFW SWXCRFW fat:swxcrfw.exe P00>>> show SXCRMGR SXCRMGR fat:sxcrmgr.exe 4. To see what files are located on the floppy do the following. P00>>> load fat - Load the FAT (floppy) driver P00>>> show device floppy polling for units on floppy0, slot 0, bus 1, hose1... dva0.0.0.1100.1 DVA0 RX26/RX23 5. P00>>> ls fat:*.*/dva0 - get directory of floppy ’fat:SWXCRFW.EXE/dva0.0.0.1100.1’ ’fat:_MLX0077.CFG/dva0.0.0.1100.1’ ’fat:00README.1ST/dva0.0.0.1100.1’ 340 ’fat:AMLX0075.CFG/dva0.0.0.1100.1’ ’fat:AMLX0077.CFG/dva0.0.0.1100.1’ ’fat:REL.TXT/dva0.0.0.1100.1’ ’fat:SRLMGR.EXE/dva0.0.0.1100.1’ ’fat:_MLX0075.CFG/dva0.0.0.1100.1’ ’fat:SWXCRFWA.216/dva0.0.0.1100.1’ ’fat:SWXCRFWP.242/dva0.0.0.1100.1’ ’fat:SWXCRMGR.EXE/dva0.0.0.1100.1’ 6. If the filename on floppy matches the environmental variables RCU or SWXCRFW you can use them. P00>>> run rcu -p 1 or you can specify a file -p 1 - specifies the PCI bus (hose) where the swxcr is installed (i.e. 0,1,2,3) 7. If the filenames on floppy do NOT match the environmental variables you can either rename the files on floppy to match the variables, reset to environmental variables to match the filenames on floppy or just specify the filename as it is on the floppy. P00>>> run fat:ra200srl.exe -p 1 - loads the serial RCU from floppy. 8. Use ESC or Ctrl [ to exit utility when done CD 1. Insert the system firmware CD in the local CDROM 2. Run the RCU utility from the console with one of the following commands. P00> run iso9660:[utility.swxcrmgr]ra200srl.exe -d dkd400 –p 0 (V3.9 CD and later) P00> run iso9660:[utility.swxcrmgr]srlmgr.exe -d dkd400 –p 0 (V3.6 CD - V3.8 CD) P00> run iso9660:[cdrom.utility.swxcrmgr]srlmgr.exe –d dkd400 -p 0 (V3.5 CD and earlier) -d dkd400 - specifies the CDROM device. Without this it will default to DVA0. -p 0 - specifies the PCI bus (hose) where the swxcr is installed (i.e. 0,1,2,3) 3. Use ESC or Ctrl [ to exit utility when done How to run RCU from a graphics console (AlphaBIOS) Floppy 1.Enter the AlphaBIOS menu by typing ARC at the P00>>> prompt. 2.Enter setup by typing function key F2 3.Select Utilities and Run Maintenance Program 4.At Program name type the program you want to run. You do not need the .exe extension but it works if you use it. Program Name: ra200rcu swxcrmgr 5.At Location select from the table where files are located. Location: A: A: or CD: 6.Press Enter and files will load. 7.Use ESC or Ctrl [ to exit utility when done 341 CD 1. Enter the AlphaBIOS menu by typing ARC 2. Enter setup by typing function key F2 3. Select Utilities and Run Maintenance Program 4. At Program name type the program you want to run. You do not need the .exe extension but it works if you use it. Program Name: \utility\swxcrmgr\ra200rcu.exe - V3.9 CD and later \utility\swxcrmgr\swxcrmgr - V3.6 thru V3.8 CD and earlier \cdrom\utility\swxcrmgr\swxcrmgr.exe - V3.5 CD and earlier 5. At Location select from the table where files are located. Location: CD: A: or CD: 6. Press Enter and files will load. 7. Use ESC or Ctrl [ to exit utility when done How to Update Firmware from floppy You can only update firmware from floppy. Below is the procedure to do the update from the serial or graphics console. The following files are used for firmware updates only. ra200fl - (Need new version or RA200FL.EXE - see Warning above) swxcrfw - (Only valid if you get new RA200FL.EXE and rename it - see Warning above) Warning! Please see warning at top of page before proceeding with this step. Failure to do so may corrupt the SWXCR EPROM’s. Serial Console Using a floppy with the firmware update utility RA200FL.EXE version 3.10A. 1. Locate the new firmware update utility from one of the following places. • • Alpha Systems Firmware Update V5.7 CD or later RA200FL.EXE version 3.10A located on Cybrary in the SWXCR_FW_PCI_and_EISA.zip file at http://Cybrary.inet.cpqcorp.net/DOWNLOAD/FIRMWARE/STORAGE/SCSI/ADAPTERS/DEC/#SWXCR • RAID Array 230/Plus Subsystem Software Kit, V1.2A QB-57UAA-SA – August 1998. 2. Copy the new RA200FL.EXE file to floppy. entire procedure to build floppy. See How to build an RCU floppy for 3. Copy the specific SWXCR firmware files to the floppy depending on your adapter type.. 4. Load the update utility with the following command. P00>>> run fat:ra200fl.exe -d dva0 -p 1 -s "swxcrfwp.249" -d dva0 - Specifies floppy device to load from. May not be necessary. -p 1 - specifies the PCI bus (hose) where the swxcr is installed (i.e. 0,1,2,3) -s "parameter string" - firmware file to load (must be enclosed in quotes). You can specify up to four filenames to do multiple controllers. P00>>> run fat:ra200fl.exe -d dva0 -p 1 -s "swxcrfwp.249 swxcrfwp.249" Updates first 2 PCI swxcr controllers on hose 1 with firmware 342 version 2.49 . 5. Press ENTER to proceed with the updates. 6. The update utility will start and allow you to update the swxcr’s. 7. Reset the system and reset system environment. See "When you are done" below. Use floppy with firmware update utility RA200FL.EXE V3.10A renamed to SWXCRFW.EXE 1. Copy the RA200FL.EXE V3.10A file to floppy and rename it SWXCRMGR.EXE. See section above for locations. See How to build an RCU floppy for entire procedure to build floppy. 2. Copy the specific SWXCR firmware files to the floppy depending on your adapter type.. 3. Show the SWXCRFW environmental variable to see how it is set. P00>>> show SWXCRFW SWXCRFW fat:swxcrfw.exe 4. There are several commands that you can use to update the SWXCR. run swxcrfw -p 1 -s "swxcrfwp.249" -d dva0 - Specifies floppy device to load from. May not be necessary. -p 1 - specifies the PCI bus where the swxcr is installed (0,1,2,3) -s "parameter string" - firmware file to load (must be enclosed in quotes). You can specify up to four filenames to do multiple controllers. run swxcrfw -p 1 -s "swxcrfwp.249 swxcrfwp.249" Updates first 2 PCI swxcr controllers on hose 1 with firmware version 2.49. 5. Press ENTER to proceed with the updates 6. The update utility will start and allow you to update the swxcr’s. 7. Reset the system and reset system environment. See "When you are done" below. Note: The -v option is not available when running RA200FL from the SRM console at this time. The documentation lists the -v 249 command but it is not used if you supply it. If you use -v please note there is a space between the -v and 249 version number. Graphics Console 1. Build the RCU floppy. See How to build an RCU floppy for entire procedure to build floppy. 2. Enter the AlphaBIOS menu by typing ARC at the P00>>> prompt. 3. Enter setup by typing function key F2 4. Select Utilities and Run Maintenance Program 343 5. At Program name type the program you want to run Program Name: ra200fl -v249 - This will update all controllers. There is NO space between the -v and 249, To specify specific controllers to update use the following format. Program Name: ra200fl wwww xxxx yyyy zzzz wwww is filename to load on first controller i.e. swxcrfwp.249 xxxx is filename to load on second controller yyyy is filename to load on third controller zzzz is filename to load on fourth controller To Update the first, third and fourth controllers but not the second use to command. Program Name: ra200fl swxcrfwp.249 xxxx swxcrfwp.249 swxcrfwp.249 6. At Location select from the table where files are located. A: Location: A: 7. Press Enter and the files will load and it will select and update the controllers of that type you specified. 8. The update utility will start and allow you to update the swxcr’s. 9. Reset the system and reset system environment. See "When you are done" below. When you are done 1. When you are finished with RCU use ESC or ’ CTRL [ ’ to exit the utility. 2. Reset any environmental variables back to original settings. i.e. Console , Console_mode, Arc_enable P00>>> set console_mode basic P00>>> set arc_enable off P00>>> init 3. Reset terminal setting back to original settings. 344 EISA Configuration Utility (ECU) Commands Using the EISA Configuration Utility Whenever you add, remove, or move an EISA or ISA module in your system, you need to run the EISA configuration utility (ECU). The ECU is a menu-based utility, run from the ARC menu interface, that provides on-line help to guide you through the configuration process. Each EISA or ISA module has a corresponding configuration file (CFG), which describes the characteristics and the system resources required for that option. The ECU uses the CFG to create a conflict-free configuration. The ECU is supplied on a diskette that is shipped with your system. Make a copy of the ECU diskette, and keep the original in a safe place. Use the backup copy when you are configuring the system. The ECU diskette must have the volume label SYSTEMCFG. NOTE The CFG files supplied with the option you want to install may not work if the option is not supported on this system. Before you install an option, check that your system supports the option. Before You Run the ECU CAUTION Make sure the system is turned off before you install options 1. Refer to the documentation that comes with your option module to determine if it is an EISA or ISA option. 2. Install EISA options. (You install ISA options after you run the ECU.) For information about installing a specific option, refer to the documentation for that option. 3. Familiarize yourself with the utility. You can find more information about the ECU by reading the ECU on-line help. To read the online help, start the ECU. On-line help for the ECU is located under Step 1, Important EISA Configuration Information. 4. Familiarize yourself with the configuration procedure for your system: If you are installing, moving, or removing an EISA option, refer to the section on Configuring EISA Options. If you are installing, moving, or removing an ISA option, refer to the section on Configuring ISA Options. 5. The ECU diskette is shipped in the accessories kit that accompanies your system. Make a copy of the diskette and keep the original in a safe place. Use the backup copy for configuring options. Configuring EISA Options EISA options are recognized and configured automatically. To configure an EISA bus that contains no ISA options, follow these steps: 1. Install, move, or remove the EISA option module. Use the instructions provided with the EISA option. 2. Invoke the console firmware. For systems running Windows NT: Shut down the operating system or power up to the console Boot menu. For systems running Tru64 UNIX or OpenVMS: Shut down the operating system and press the Halt switch. When the console prompt >>> is displayed, invoke the ECU, as described in Step 3. 345 3. Invoke the ECU as follows: For systems running Windows NT: a. From the Boot menu, select the Supplementary menu. b. From the Supplementary menu, select the Setup menu. Insert the ECU diskette for Windows NT into the diskette drive. c. From the Setup menu, select "Run EISA configuration utility from floppy." This initializes the ECU program. There may be a 10- to 20-second delay in system activity while the system recognizes the ECU. For systems running Tru64 UNIX or OpenVMS: a. Insert the ECU diskette for Tru64 UNIX or OpenVMS into the diskette drive. b. Enter the ecu command. The message loading ARC firmware displays. There may be a 10- to 20-second delay in system activity while the system recognizes the ECU. When the firmware has finished loading, the ECU program is initialized. If the ECU locates the required CFG configuration files, it displays the main menu. The CFG for the option may reside on a configuration diskette packaged with the option or may be included on the system configuration diskette. NOTE It is not necessary to run Step 2 of the ECU, Add or remove boards. EISA modules are recognized and configured automatically. 4. Change settings or resources (optional). This step is not required when you are using the board’s default settings. The View or Edit Details ECU option is used to change user-selectable settings or to change the resources allocated for these functions (for example, IRQs, DMA channels, and I/O ports). 5. Save your configuration. The Save and Exit ECU option saves your configuration information to the system’s NVRAM. 6. Return to the SRM console (Tru64 UNIX and OpenVMS systems only) and restart the system. For systems running Windows NT: Remove the ECU diskette from the diskette drive and initialize the operating system. For systems running Tru64 UNIX or OpenVMS: Return to the SRM console, as follows: a. From the Boot menu, select Supplementary menu. b. From the Supplementary menu, select Set up the systemm menu. c. From the Setup menu, select Switch to OpenVMS or Tru64 UNIX console. d. From your operating system; then press Enter on the Setup menu. e. When the message Power-cycle the system to implement the change is displayed, press the Reset button. Do not press the On/Off switch. After the console firmware is loaded and device drivers are initialized, can boot the operating system. 346 Configuring ISA Options To configure ISA options, follow these steps: 1. Start up the system and run the ECU. 2. Add the ISA card configuration file to the configuration list. Use the Add or Remove Boards ECU option to add the configuration file (CFG) for the ISA option and to select an acceptable slot for the option. In some cases, the CFG file for the ISA option may reside on a configuration diskette packaged with the option. If so, insert that diskette and follow its directions. For most ISA options, the CFG is not on a diskette. If it is not, you need To use the generic ISA adapter definition option on the ECU diskette. 3. Change settings or resources (optional). The View or Edit Details ECU option is used to change user-selectable Settings or to change the resources allocated for these functions (for example, IRQs, channels, and I/O ports). This step is not required when you are using the board’s default settings. 4. Examine and set required switches to match the displayed settings. 5. Save your configuration. The Save and Exit ECU option saves your configuration information to the system’s NVRAM. 6. Return to the SRM console (Tru64 UNIX and OpenVMS systems only) and restart the system. For Systems running Windows NT: Remove the ECU diskette from the drive and initialize the operating system. For systems running Tru64 UNIX or OpenVMS: Return to the SRM console, as follows: a. From the Supplementary menu, select Setup menu. b. From the Setup menu, select Switch to OpenVMS or Tru64 UNIX console. This option allows you to select your operating system console. c. Select your operating system; then press Enter on the Setup menu. d. When the message Power-cycle the system to implement the change is , displayed, press the Reset button. Do not press the On/Off switch. After the console firmware is loaded and device drivers are initialized, You can boot the operating system. 7. Install the ISA module and turn on the system. Use the instructions provided with the ISA option. 347 348 Procedure to Update CIXCD with 4K Packet Firmware NOTE See Blitz 2919 if using CIXCD with 4K packet firmware. Problems have been discovered under heavy load. Overview Firmware that supports 4K CI packet transmissions for the CIXCD is qualified and available. The firmware is available on the 5.6 firmware CD but it cannot be loaded using the normal console update procedures (for either VAX or Alpha). In order to support 4K Ci packet transmission you must have the correct firmware loaded. Both non-4K and 4K packet firmware will be included with future firmware CD releases (including CIXCD firmware for VAX). Non-4K firmware will be loaded by default when system firmware is updated. Care must be taken to reload the 4K firmware manually if necessary. There are four CI interfaces that transmit data in 4K packets: CIXCD, CIPCA, HSJ50 and HSJ80. 4K packet transmissions can only occur between these options. The CIXCD 4K packet firmware should be loaded and 4K packet transmissions enabled on these buses. Restrictions CIBCA-BA, HSJ40, HSC40, HSC70, HSC60, HSC65, HSC90 or HSC95 devices do not transmit 4K packets but are unaffected by 4K packet transmissions from other devices. Loading the CIXCD 4K packet firmware and enabling 4K packet transmissions will have no impact on these devices. 4K Packet transmissions are not allowed on CI rails with a HSC50, CIBCA-AA, CI750 or CI780 connected. Therefore do not load the CIXCD 4K packet firmware and do not enable HSJxx 4K packet transmissions on CI rails containing these devices. Different Files Required to do the Update Platform VAX6000/9000 VAX7000 DEC7000 AS8400/GS140 4k packet ver. cixcdv69.bin cixcdv69.sys cixcdd27.sys cixcdg27.sys non-4k packet ver. cixcdv49.bin cixcdv49.sys (loaded automatically by LFU) (loaded automatically by LFU) NOTE: If FTP is used to get the different cixcd.sys files to the system, ensure that you are in binary mode when you do the transfer. Also, if your FTP process goes through a UNIX system somewhere, the file should be zipped first. Update Procedures AlphaServer 8x00 and GS Series Machines There are references in other places (including the updating_firmware.txt file on the 5.6 cd in the cixcd directory) to a method of updating directly from the firmware CD. To our knowledge, this procedure has not been executed successfully. Use the following procedures to do a MOP load from another system on the network. 1. Mount the CDROM using the command $ mount/media=cd/over=id $1$DKxnnn (The /media switch is required to access the necessary files) 349 You can also access the files over the web at the firmware website. 2. Copy the appropriate firmware file to MOM$LOAD or MOM$SYSTEM on a node in the cluster that has service enabled with the following command $ copy $1$DKxnnn:[cixcd]cixcdg27.sys mom$load or $ copy $1$DKxnnn:[cixcd]cixcdg27.sys mom$system Note: The ’updating_firmware.txt’ file in the CIXCD directory of the firmware CD refers to the wrong file name of cixcd_v27_tl 3. Make sure service is enable on a node in the cluster. 4. On the system being updated you must enter the LFU utility by typing LFU at the >>>. The following update command must be customized for each configuration. It is necessary to select both the specific adapter to update and appropriate ethernet adapter in the command line. P00>>>lfu ***** Loadable Firmware Update Utility ***** Select firmware load device (cda0, dva0, ewa0), or Press <return> to bypass loading and proceed to LFU: <return> --------------------------------------------------------------------------Function Description --------------------------------------------------------------------------Display Displays the system’s configuration table. Exit Done exit LFU (reset). List Lists the device, revision, firmware name, and update revision. Lfu Restarts LFU. Readme Lists important release information. Create Make a custom Console Grom Image. Update Replaces current firmware with loadable data image. Verify Compares loadable and hardware images. ? or Help Scrolls this function table. WARNING Before upgrading the "ARC" (AlphaBIOS) section of the console, make sure that the HAL.DLL on WNT boot disk is compatible with the "ARC" section of the console. See release notes for details. ---------------------------------------------------------------------------Console ARC firmware ARCROM not found Console firmware kn7cc_fw not found UPD> update cixcd0 –path mopdl:cixcdgv27/exa0 DEC7000/10000 A MOP load from another system in the network is required. The firmware must be copied to the mom$system or mom$load directory on that node. On the system containing the update CD execute the following: 1. Mount the CD on an existing node in the cluster. $ mount/media=cd/over=id $1$DKxnnn (The /media switch is required to access the necessary files) 2. Copy the correct cixcdd27.sys filed to the MOM$LOAD or MOM$SYSTEM. $ copy $1$DKxnnn:[cixcd]cixcdd27.sys mom$system or $ copy $1$DKxnnn:[cixcd]cixcdd27.sys mom$load Note: The ’updating_firmware.txt’ file in the CIXCD directory of the firmware CD 350 refers to the wrong file name of cixcd_v27_tl 3. Ensure circuit service is enabled for this particular circuit. Have the system manager enable this if not. 4. On the system being updated execute the following console command P00>>> boot –fl 0,0 –fi CIXCDD27 exa0 VAX7000/10000 A MOP load from another system in the network is required. The firmware must be copied to the mom$system or mom$load directory on that node. On the system containing the update CD execute the following: 1. Mount the CD on an existing node in the cluster. $ mount/media=cd/over=id $1$DKxnnn (The /media switch is required to access the necessary files) 2. Copy the correct cixcdv69.sys filed to the MOM$LOAD or MOM$SYSTEM. $ copy $1$DKxnnn:[cixcd]cixcdv69.sys mom$system or $ copy $1$DKxnnn:[cixcd]cixcdv69.sys mom$load Note: The ’updating_firmware.txt’ file in the CIXCD directory of the firmware CD refers to the wrong file name of cixcd_v27_tl 3. Ensure circuit service is enabled for this particular circuit. Have the system manager enable this if not. 4. On the system being updated execute the following console command P00>>> boot –fl 0,0,0 –fi CIXCDv69 exa0 VAX6000 and VAX9000 The VAX diagnostic supervisor must be used to load the cixcd firmware on these platforms. The file is in the same directory on the firmware cd as for the other platforms, i.e. $1$dka500:[cixcd]cixcdv69.bin. This file must be moved to the same directory as the diagnostic supervisor. Each system has a different diagnostic supervisor. • • • • • VAX9000 VAX6600 VAX6500 VAX6400 VAX6200/6300 - EWSAA EXSAA EMSAA ERSAA ELSAA 1. Boot the diagnostic supervisor. VAX 9000 VAX 6x00 >>> Boot VDS Set bit 4 in the correct boot string. 2. At the DS> prompt run autsosizer and select all DS> set quick,trace DS> run evsba/section:self COMMAND? size DS> select all 3. Start the CI diagnostic evgea and select update. DS> run evgea/section:update The current CIXCD XMI node number is 0C Input the CIXCD BINARY filename to use [default= CIXCD.BIN]: cixcdv69.bin 351 352 KGPSA Files Used for Firmware Updates KGPSA firmware is available in several different formats to allow for updating firmware when the adapter is installed on different platforms. These filenames are subject to change with each new version of firmware. For a list of available firmware see the Cybrary download area. Successful updates may require renaming the files to be eight characters or less. 1. Firmware loaders with • AL381a4.exe • AL303x2.exe • lp8ldr • lp7ldr • lp6ldr • 303a1ldr.exe • lp7303a1ldr.exe the KGPSA firmware embedded. LP8000 loader and firmware version LP8000 loader and firmware version LP8000 with firmware embedded LP7000 with firmware embedded LP6000 with firmware embedded LP8000 loader and firmware version LP7000 loader and firmware version 3.81a4 embedded 3.03x2 embedded 3.03a1 embedded 3.03a1 embedded 2. Firmware loaders that require a firmware .awc update file to be provided • alphdnld.exe 3. Firmware .awc files require the use of the alphdnld.exe loader. • dd381a4.awc LP8000 KGPSA-CA V3.81a4 firmware • dd303x2.awc LP8000 KGPSA-CA V3.03x2 firmware • sf303a1.awc LP7000 KGPSA-CA V3.03a1 firmware • dd303a1.awc LP8000 KGPSA-CA V3.03a1 firmware 4. Firmware .sys files used on WildFire. first (LFU). • dd381a4.awc LP8000 KGPSA-CA • dd303x2.awc LP8000 KGPSA-CA • KG8303A1.SYS LP8000 firmware • KG7303A1.SYS LP7000 firmware Requires booting Wildfire firmware files V3.81a4 V3.03x2 version version firmware firmware 3.03a1 3.03a1 5. GS80/GS160/GS320 firmware update CD created from .iso file • GS320_V59B1.ISO V5.9B firmware CD with KGPSA V3.81a4 firmware included 353 354 Upgrading KGPSA Firmware on GS80/GS160/GS320 Machines CAUTION! The solution mentioned in Blitz TD2831 is now available in the Download directory on Cybrary. See the readme files before proceeding with an update. UNIX requires EMX driver V1.29 with firmware 381a4. UNIX requires EMX driver V1.22 with firmware 303a1or later. VMS requires patches to be installed. See Blitz TD2807-C for details Overview KGPSA firmware for the GS80/GS160/GS320 series systems is embedded within the LFU utility. When a newer version of firmware is available, it may not be available on the firmware update CD. The following procedure addresses how to update the KGPSA in those cases. The current version of KGPSA firmware being shipped with the V5.9b firmware is 381a4. This version addresses the issues discussed in Blitz TD2831. Newer version of the firrmware are available with the .awc extention. Older versions are avaliable with a .sys extention. These files are compatible and can be renamed to either extention. Firmware Files Available dd381a4.awc dd303x2.awc KG7303A1.SYS GS320_V59B1.ISO (LP8000 381a4) (LP8000 303x2) (LP7000 303a1) (V5.9B ISO image with LP8000 3.81a4 (makes a bootable CDROM) Creating a CDROM A firmware update CD can be created. The following procedure describes making a CDROM with the firmware that corrects the issues described in Blitz TD2831. The filenames are subject to change with later releases of the firmware. The procedure described uses Adaptec Easy CD Writer Software. The actual navigation will be different with different CDROM software. It is imperative that the file system type be set to ISO9660 and the MODE set to Single Session. To create a CD with the Option firmware Only. 1. Save the file DD381A4.AWC on a system with a CD-RW installed. 2. Using the Adaptec Easy CD Writer Software perform the following: • Select CD Layout properties from File Pulldown • In General Tab select the following: • File system: ISO9660 • Mode: Mode 1 CDROM (single session) • Save the settings • Move both files and options folder to be copied to CD Layout window • Click on Create CD • Select 4x speed • Select number of copies • Create CD 355 To Create a CDROM using the Firmware .ISO file 1. Copy the V5.9b .iso firmware file to your PC. 2. Use CD writer software, write this image file to a blank CD. When writing the CD, ensure that the "close disk" or equivalent option is selected. Updating KGPSA Firmware 1. Obtain the specific KGPSA firmware.sys or .awc file. It can be obtained from Cybrary or from Engineering. Create a CDROM using the method above. The .awc file can be renamed to .sys on this platform. 2. Obtain a bootable Wildfire firmware CD or create a CD using the .iso firmware file from the Alpha Systems Firmware interim website. V6.0 firmware is the current version as of May 14,2001. There are also firmware .iso files at the Engineering Wildfire page. Versions V5.6 thru V6.0 are available. 3. Boot the LFU from CD. 4. At the update prompt, replace the LFU firmware CD with the KGPSA firmware CD created in step 1. 5. Load the KGPSA firmware using one of the following commands. To load firmware off of a CD specify iso9660 for the CDROM and any directory structure there may be. UPD> update pga0 -path iso9660:[options]dd381a4.awc/dqa0 (load fw V3.81-A4 from the options folder on the CDROM) or update pga0 -path iso9660:kg7303a1.sys/dqa0 (load fw V3.03-A1 from the top level directory of the CDROM) 6. After the update completes, type exit and reset the system. Example P00>>>b dqa0 (boot dqa0.0.0.15.16 -flags A) block 0 of dqa0.0.0.15.16 is a valid boot block reading 1082 blocks from dqa0.0.0.15.16 bootstrap code read in base = 41e000, image_start = 0, image_bytes = 87400 initializing HWRPB at 2000 initializing page table at bffe4000 initializing machine state setting affinity to the primary CPU jumping to bootstrap code ----------------------------------------------------------------------------+++++++++++++++++++++++++++++++++++++++++++++++ June 2000 + Compaq AlphaServer GS80/160/320 Firmware + + README-First !!! + +++++++++++++++++++++++++++++++++++++++++++++++ 1. Latest Firmware Update Revisions The Firmware Update Bootfile "GS320_V56.EXE" on the AlphaServer GS80/160/320 Firmware CD V5.6, contains the initial shipping revisions of the firmware, which has been fully qualified for use on GS160 Systems and on Partitioned GS320 Systems with partitions containing no more than four QBBs. (There is also latent firmware support for GS80 Systems, non-partitioned GS320 Systems, and for all other valid GS320 configurations, although these have not been 356 fully qualified yet). The V5.6 firmware package has the following components Component --------SRM Console Location of Flash ROM Where Firmware Resides ---------------------SRM Flash (on STDIO) : Firmware Revision ----------------V5.8-1 Hit <RETURN> to scroll text, or <CTRL/C> to skip text. VMS PALcode UNIX PALcode ISP10x0 FW XSROM SCM Micro FW PSM Micro FW PBM Micro FW HPM Micro FW SRM SRM SRM PSM SCM PSM PBM HPM Flash Flash Flash Flash Flash Flash Flash Flash (on STDIO) (on STDIO) (on STDIO) (on STDIO) V1.81-1 V1.75-1 V5.57 V05.6 (05.31/05:03) V05.6 (05.31/02:23) V05.6 (05.31/02:11) V05.6 (05.31/02:16) V05.6 (05.31/02:20) For completeness, the following table lists the current revision of the SROM code, which resides in non-flashable ROM on the CPU modules in the system, and is NOT updateable via the firmware update program : Component --------SROM FW Location of ROM Where Firmware Resides ---------------------Serial ROM on CPU Firmware Revision ----------------V6.0-7 The update bootfile also contains the following PCI I/O Adapter firmware revisions : Hit <RETURN> to scroll text, or <CTRL/C> to skip text. Adapter ------CIPCA DEFPA KGPSA * KGPSA KZPSA * HW Variant ---------All variants All variants -BC -CA All variants Firmware Revision ----------------4.20 3.20 SS2.20X2 DS3.02A1 A12 * NOTE: Although the update program contains firmware images for KGPSA-BC and KZPSA, those adapters are NOT officially supported on GS80/160/320 Systems. Also note that CCMAB (Memory Channel) IS supported, but firmware update support is not currently provided or needed. 2. Firmware Enhancements and New Features This is the initial shipping release of the Firmware, for use on AlphaServer GS160 Systems. 3. Firmware Restrictions and Workarounds Hit <RETURN> to scroll text, or <CTRL/C> to skip text. For a complete list of firmware restrictions and workarounds, consult the AlphaServer GS80/160/320 Firmware Release Notes on this Firmware CD. 4. AlphaServer GS80/160/320 Firmware V5.6 Release Notes If you wish to read the complete Firmware Release Notes for the AlphaServer GS80/160/320, they can be found on this Firmware 357 CD, in the file named : \GS320\GS320_V56_FW_RELNOTE.PS \GS320\GS320_V56_FW_RELNOTE.PDF \GS320\GS320_V56_FW_RELNOTE.TXT (PS file) (PDF file) (Text file) ----------------------------------------------------------------------------Hit <RETURN> to scroll text, or <CTRL/C> to skip text. The default bootfile for this platform is [GS320]GS320_V56.EXE Hit <RETURN> at the prompt to use the default bootfile. Bootfile: <cr> OpenVMS PALcode V1.81-1, Tru64 UNIX PALcode V1.75-1 system = QBB 0 QBB 0 = CPU 0 2 + Mem 0 2 + Dir + IOP + PCA 0 1 micro firmware version is V5.6 shared RAM version is 1.4 hose 16 has a standard I/O module starting console on CPU 0 initialized idle PCB initializing semaphores initializing heap initial heap 300c0 memory low limit = 8ae000 heap = 300c0, 1ffc0 initializing driver structures initializing idle process PID initializing file system initializing timer data structures lowering IPL CPU 0 speed is 731 MHz create dead_eater create poll create timer create powerup access NVRAM QBB 0 memory, 3 GB total memory, 3 GB probe I/O subsystem probing hose 16, PCI probing PCI-to-PCI bridge, bus 2 probing PCI-to-ISA bridge, bus 1 bus 1, slot 0 -- dva -- Floppy bus 0, slot 1 -- pka -- QLogic ISP10x0 bus 2, slot 4 -- eia -- DE602-AA bus 2, slot 5 -- eib -- DE602-AA bus 0, slot 15 -- dqa -- Acer Labs M1543C IDE probing hose 17, PCI bus 0, slot 4 -- fwa -- DEFPA bus 0, slot 6 -- pua -- CIPCA bus 0, slot 7 -- pkb -- QLogic ISP10x0 probing hose 18, PCI bus 0, slot 1 -- mca -- DEC PCI MC probing hose 19, PCI bus 0, slot 5 -- pga -- KGPSA-B bus 0, slot 6 -- pgb -- KGPSA-B bus 0, slot 7 -- pkc -- QLogic ISP10x0 starting drivers entering idle loop initializing GCT/FRU at 8ae000 initializing pka pkb pkc fwa dqa eia eib pga Checking dqa0.0.0.15.16 for the option firmware files. . . (Hard Partition 2) + GP (Hard QBB 2) 358 Copying Copying Copying Copying Copying DFXAA320 KZPSAA12 CIPCA420 KG8302A1 KG7220X2 from from from from from dqa0.0.0.15.16. dqa0.0.0.15.16. dqa0.0.0.15.16. dqa0.0.0.15.16. dqa0.0.0.15.16. . . . . . . . . . . LFU micro updates are not supported when the system is hard partitioned. Please power down and unpartition first. ***** Loadable Firmware Update Utility ***** -----------------------------------------------------------------------------Function Description -----------------------------------------------------------------------------Display Displays the system’s configuration table. Exit Done exit LFU (reset). List Lists the device, revision, firmware name, and update revision. Update Replaces current firmware with loadable data image. Verify Compares loadable and hardware images. ? or Help Scrolls this function table. -----------------------------------------------------------------------------UPD> list Device Current Revision SRM v5.8-1 Filename srm_fw v5.8-1 fwa0 3.20 pga0 SS2.20X2 kgpsa_7k_fw SS2.20X2 pgb0 SS2.20X2 kgpsa_7k_fw SS2.20X2 pua0 A420 dfxaa_fw Update Revision cipca_fw 3.20 A420 kgpsa_8k_fw DS3.02A1 kzpsa_fw A12 UPD> update pgb0 -path iso9660:kg7303a1.sys/dqa0 Confirm update on: pgb0 [Y/(N)]y WARNING: updates may take several minutes to complete for each device. DO NOT ABORT! pgb0 Updating to SS3.03A1... Verifying SS3.03A1... PASSED. UPD> exit Errors 1. When LFU is booted with HP_COUNT SCM NVR variable set to a non-zero value, this message occurs. It will prevent micro updates but option firmware updates will work. LFU micro updates are not supported when the system is hard partitioned. Please power down and unpartition first. 359 2. After loading newer firmware than is on the CD, the verify command will fail because it is verifying the loaded firmware off the V5.6 CD and what is in the KGPSAs NVRAM. UPD> verify pga0 pga0 Verifying SS3.03A1... FAILED. 3. There are two versions of the KGPSA. A 64 bit option and a 32 bit option. They each have different firmware. If an attempt to load the wrong firmware is made the following message appears. UPD> update pga0 -path iso9660:kg8303a1.sys/dqa0 Confirm update on: pga0 [Y/(N)]y WARNING: updates may take several minutes to complete for each device. DO NOT ABORT! pga0 firmware filename ’iso9660:kg8303a1.sys/dqa0’ is bad 360 Upgrading KGPSA Firmware on Turbolasers or GS60/GS60E/GS140 Machines CAUTION! The solution mentioned in Blitz TD2831 is now available in the Download directory on Cybrary. See the readme files before proceeding with an update. UNIX requires EMX driver V1.29 with firmware 381a4. UNIX requires EMX driver V1.22 with firmware 303A1 or later. VMS requires patches to beinstalled. See Blitz TD2807-C for details Overview Upgrading KGPSA firmware, when the adapter is installed in a AlphaServer 8200, 8400, GS60 or GS140 system, requires the use of the console RUN command. The run command requires the firmware.exe file be supplied. Depending on the firmware version needed, AL381a4.exe, AL303x2.exe, LP6LDR.EXE, LP7LDR.EXE, LP8LDR.EXE, 303a1ldr.exe or lp7303a1ldr.exe can be used. The lp6ldr.exe utility is available on the Alpha Systems Firmware CD, V5.4 or later in the utility directory. Newer firmware files may not be available on the Alpha Systems Firmware CD. In that case a CDrom can be created. Files available AL381a4.exe AL303x2.exe lp6ldr.exe lp7ldr.exe lp8ldr.exe (LP8000/KGPSA-CA Loader/Firmware version 3.81A4) (LP8000/KGPSA-CA Loader/Firmware version 3.03X2) (LP6000/7000/ KGPSA-BC Loader plus firmware (LP7000/ KGPSA-BC Loader plus KGPSA LP7000 (LP8000/ KGPSA-CA Loader plus KGPSA LP8000 Creating a CDROM A firmware update CD can be created. The following procedure describes making a CDROM with the firmware that corrects the issues described in Blitz TD2831. The filenames are subject to change with later releases of the firmware. The procedure described uses Adaptec Easy CD Writer Software. The actual navigation will change with different CDROM software. It is imperative that the file system type be set to ISO9660. 1. Create an options folder on a source medium and copy the file AL381a4.exe into the root directory and DD381a4.AWC into the options directory. 2. Using the Adaptec Easy CD Writer Software perform the following: Select CD Layout properties from File Pulldown In General Tab select the following: File system: ISO9660 Mode: Mode 1 CDROM (single session) Save the settings Move both files and options folder to be copied to CD Layout window Click on Create CD Select 4x speed Select number of copies Create CD 361 Terminal Setup To boot the firmware executable on an Alpha Server 8000 series ARC emulator using a Digital VT420 Terminal, the following change is required to the VT420 setup. 1. 2. 3. 4. 5. 6. F3 enter setup Move to "COM" Select "XOFF at 128" Move to "Directory" Select "Save" Select "Exit" Console Setup and Running Utility To update KGPSA firmware on an AlphaServer 8200, 8400, GS60 or GS140 system, the console parameters must be set up properly and the RUN command, not ARC, is used to start the program. Be sure to set any variables back to original values and INIT before returning system to customer. 1. Insert the firmware CDROM in the drive or a CDROM that was created with the necessary files. The directory structure is subject to change based on the CD used. 2. Set the console to serial mode. P00>>> set console serial 3. Set the console_mode to advanced. Console_mode is what the MODE setting will be after init. P00>>> set console_mode advanced 4. Set arc_enable to ON. P00>>> set arc_enable on 5. Init the machine P00>>> init 6. At the P00>>> load the CDROM drivers (This step may not be required) P00>>> load -f iso9660 (load the CDROM drivers) 7. Use the RUN command to start the appropriate firmware update utility. P00>>> run iso9660:al381a4.exe -d dkd400 -p 0 or run iso9660:al303x2.exe -d dkd400 -p 0 or run iso9660:[utility]lp6ldr.exe -d dka400 -p 0 or run iso9660:[utility]lp7ldr.exe -d dka400 -p 0 or run iso9660:[utility]lp8ldr.exe -d dka400 -p 0 or run iso9660:[utility]lp7303a1ldr.exe -d dka400 -p 0 or run iso9660:[utility]303a1ldr.exe -d dka400 -p 0 -d dka400 -p 0 specifies the CDROM device to load the utility from specifies the PCI bus (hose) where the adapter is installed (i.e. 0,1,2,3) 362 Example P00>>> run iso9660:[utility]lp6ldr.exe -d dka400 -p 0 Loading image... Transferring control... WELCOME TO LP6DUTIL HOST DIAGNOSTIC UTILITY for Alpha V2.1-008 Firmware load only, Firmware revision: SS2.20X2 Copyright Digital Equipment Corporation and Emulex Corporation 1997. All rights reserved. Restricted Rights: Use, duplication, or disclosure by the U.S. Government is subject to restrictions as set forth in subparagraph (c) (1) (ii) of DFARS 252.227-7013, or in FAR 52.227-19, or in FAR 52.227-14 Alt. III, as applicable. The software is proprietary to and embodies the confidential technology of Digital Equipment Corporation and Emulex Corporation. Possession, use, or copying of this software and media is authorized only pursuant to a valid written license from Digital or an authorized sublicensor. Hit RETURN or ENTER key to continue <CR> LP6000/LP7000 Host Adapters found in the system: 1 Will update all appropriate controllers to firmware SS2.20X2 Enter ’C’ or ’c’ to continue and load, anything else to abort... Beginning Down Load Process for Host Adapter 1 Place Host Adapter 1 in Diagnostic Mode to do down loading. ( First reset may take a while ) Resetting Host Adapter 1 Host Adapter 1: POST Done. WARNING: Host Adapter 1 is in Diagnostic Mode. Diagnostic Firmware Loaded. Diagnostic Firmware Version 1.12 Start DOWN LOADING Absolute Firmware Image to Host Adapter 1 Finished Down-Loading Code for Host Adapter 1 Resetting Host Adapter 1 Host Adapter 1: POST Done. Host Adapter 1 is READY. Functional Firmware Loaded. Diagnostic Firmware Version 1.12 Functional Firmware Version SS2.20X2 JEDEC ID = 10020193 (LP7K) Hit RETURN or ENTER key to continue Initializing... System resets and update complete 363 364 Upgrading KGPSA Firmware From AlphaBIOS CAUTION! The solution mentioned in Blitz TD2831 is now available in the Download directory on Cybrary. See the readme files before proceeding with an update. UNIX requires EMX driver V1.29 with firmware 381a4. UNIX requires EMX driver V1.22 with firmware 303a1 or later. VMS requires pathes to be installed. See Blitz TD2807-C for details Overview KGPSA firmware can be upgraded on most AlphaServer Systems using AlphaBIOS. A floppy or a CDROM can be used to perform the update. If you create your own CDROM or floppy, the file name must be 8 characters or less plus the extension. Multiple floppies may be required due to the size of the files. There are LP8000 (KGPSA-CA) and LP7000 (KGPSA-BC) files available. The two adapters use different firmware. Files available If .exe files are used plus the extension. • AL381a4.exe • AL303x2.exe • 303a1ldr.exe • lp7303a1ldr.exe • lp6ldr.exe • lp7ldr.exe • lp8ldr.exe • alphdnld.exe • • • • dd381a4.awc dd303x2.awc sf303a1.awc dd303a1.awc on a CDROM, rename them so they are 8 characters or less (LP8000/KGPSA-CA Loader/Firmware version 3.81a4) (LP8000/KGPSA-CA Loader/Firmware version 3.03x2) (LP8000/KGPSA-CA Loader/Firmware version 3.03a1) (LP7000/KGPSA-BC Loader/Firmware version 3.03a1) (LP6000/7000 /KGPSA-BC Loader with embedded firmware) (LP7000/KGPSA-BC Loader with embedded firmware) (LP8000/KGPSA-CA Loader with embedded firmware) (firmware download utility - Firmware.awc files must be provided) Available on the Firmware CD in the Utility directory or on Cybrary (LP8000 KGPSA-CA V3.81a4 firmware) (LP8000 KGPSA-CA V3.03x2 firmware) (LP7000 KGPSA-BC V3.03a1 firmware) (LP8000 KGPSA-CA V3.03a1 firmware) Creating a CDROM A firmware update CD can be created. The following procedure describes making a CDROM with the firmware that corrects the issues described in Blitz TD2831. The filenames are subject to change with later releases of the firmware. The procedure described uses Adaptec Easy CD Writer Software. The actual navigation will be different with different CDROM software. It is imperative that the file system type be set to ISO9660. 1. Create an options folder on a source medium and copy the following files AL381A4.exe into the root directory and DD381a4.AWC into the options directory. 2. Using the Adaptec Easy CD Writer Software perform the following: • • • • • Select CD Layout properties from File Pulldown In General Tab select the following: File system: ISO9660 Mode: Mode 1 CDROM (single session) Save the settings 365 • • • • • Move both files and options folder to be copied to CD Layout window Click on Create CD Select 4x speed Select number of copies Create CD Procedure There are several ways of performing KGPSA firmware upgrades. The methods used will depends on the version of firmware required to be loaded. 1. The Alpha Systems Firmware Update CD can be used to update KGPSA with the version that is supplied on that CD. In this case LP6LDR, LP7LDR, LP8LDR or ALPHADNLD with the firmware.awc file can be used. The loaders are found in the UTILITY directory on the CD. 2. The Alpha Systems Firmware Update CD can be used to load the ALPHDNLDR.EXE loader and the firmware.awc can be supplied on a floppy or different CD. 3. A CD can be created to include the ALPHDNLD.EXE loader and any necessary .awc files 4. A CD can be created with one of the loaders that have embedded firmware. 5. A floppy can be created with the one of the loaders that have embedded firmware. CDROM 1. Bring the system up into AlphaBIOS by typing ARC at the P00>>> prompt. 2. Enter setup by hitting F2 (cntl-B) 3. Select Utilities 4. Select Run Maintenance Program 5. Select the filename and the location to load from Program Name: \al381a4.exe (file includes the loader and firmware 381a4) \al303x2.exe (file includes the loader and firmware 303x2) \77303ldr (renamed lp7303a1ldr.exe to 77303ldr) \utility\alphdnld(requires a firmware.awc file) \utility\lp7ldr (updates to the firmware version embedded in the file) Location: Select CD: Floppy 1. Fat format a 1.44 MB floppy. 2. Copy one of the following files to the floppy and rename it to 8 characters or less plus the extension. (i.e 7303a1ld.exe) al381a4.exe al303x2.exe 303a1ldr.exe lp7303a1ldr.exe (LP8000/KGPSA-CA (LP8000/KGPSA-CA (LP8000/KGPSA-CA (LP7000/KGPSA-BC Loader/381a4 firmware) Loader/303x2 firmware) Loader/303a1 firmware) Loader/Firmware) 3. Bring the system up into AlphaBIOS by typing ARC at the P00>>> prompt. 4. Enter setup by hitting F2 (cntl-B) 5. Select CMOS SETUP 6. Set the Floppy Drive A: to 3.5" 1.44 MB 366 7. ESC to exit to the main menu 8. Select Utilities 9. Select Run Maintenance Program 10. Now select A: for floppy and enter the filename on the floppy for the KGPSA firmware Program Name: al381a4 al303x2 alphdnld 77303ldr Location: Select A: (file includes the loader and firmware 381a4) (file includes the loader and firmware 303x2) (requires a firmware.awc file) (lp7303a1ldr.exe renamed 77303ldr) Errors When running KGPSA firmware update utilities there are several error messages that may be seen. • Attempts to load the wrong firmware into an adapter (LP8000 firmware into an LP7000) will give the following error message. Error: Program image is not compatible with the host adapter • When using ALPHDNLD.EXE it expects a firmware.awc file. If a firmware.exe file is supplied the following message occurs. Error: Image header checksum failed Image_header_hdr_cks = 0xF69180 generated cksum = 0xa1840491 367 368 Problems Running lp6dutil.exe on a Turbolaser or GS60/60E/140 Machine Attempts to run the KGPSA utility lp6dutil.exe on a Turbolaser or a GS60/60E/140 machine on the serial console port will fail with repeating characters. You may be able to hit a character and return to get thru some of the menus but in the example of a firmware update you must type the location of the firmware file. You are not able to type CD: etc. It just echos C’s and D’s The following will show the failure. On these machines you will need to run lp6ldr.exe instead. P00>>>run iso9660:[utility]lp6dutil.exe -d dka400 -p 0 Loading image... Transferring control... WELCOME TO LP6DUTIL HOST DIAGNOSTIC UTILITY for Alpha V2.1-007 Copyright Digital Equipment Corporation and Emulex Corporation 1997. All rights reserved. Restricted Rights: Use, duplication, or disclosure by the U.S. Government is subject to restrictions as set forth in subparagraph (c) (1) (ii) of DFARS 252.227-7013, or in FAR 52.227-19, or in FAR 52.227-14 Alt. III, as applicable. The software is proprietary to and embodies the confidential technology of Digital Equipment Corporation and Emulex Corporation. Possession, use, or copying of this software and media is authorized only pursuant to a valid written license from Digital or an authorized sublicensor. Hit RETURN or ENTER key to continue LP6000/LP7000 Host Adapters found in the system: 1 PRELIMINARY TESTING of Host Adapter 1 Host Adapter 1: PASS 0x1: Slim Memory Tests Host Adapter 1: PASS 0x2: Slim Memory Tests Host Adapter 1: PASS 0x1: BIU Registers Tests Host Adapter 1: PASS 0x2: BIU Registers Tests Host Adapter 1: PASS 0x1: BIU Configuration Registers Tests Host Adapter 1: PASS 0x2: BIU Configuration Registers Tests Host Adapter 1 PASSED PRELIMINARY TESTS Resetting Host Adapter 1 Host Adapter 1: POST Done. Host Adapter 1 is READY. Functional Firmware Loaded. Diagnostic Firmware Version 1.12 Functional Firmware Version SS2.20X2 JEDEC ID = 10020193 (LP7K) Hit RETURN or ENTER key to continue HOST ADAPTER 1 Resources Info pci_bus_num = 0 pci_dev_num = 0x1 slim_base_adr = 0x07F7F000 reg_mem_base_adr = 0x07F7CE00 reg_io_base_adr = 0x0000FE00 IRQ = 0x24 NOTE: Enter 0 in ’Option:’ prompt to display previous menu NOTE: All values entered are hexadecimal 1 2 3 4 5 6 - LP6DUTIL Main Menu (not currently supported) (not currently supported) Restart Host Adapters (not supported) Maintenance Show Host Adapters Info 369 7 - Quit Option: 55 Input value ’0x55’ out of range!!! 1 2 3 4 5 6 7 - LP6DUTIL Main Menu (not currently supported) (not currently supported) Restart Host Adapters (not supported) Maintenance Show Host Adapters Info Quit Option: 5 Maintenance 1 - Update Firmware 2 - Display Program Load List Option: 1 Enter Full Path to Firmware Image file (eg. a:\sf200.awc): cccccccccccdcccccccc 370 Using the KZPSA UTIL_CLI.EXE File to Set KZPSA Parameters To change the parameters on the KZPSA installed in a PCI bus on a Turbolaser you must run a utility located on the Alpha Systems Firmware Update CD-ROM. The parameters that can be changed are: SCSI_ID FAST TERMPOWER RESET_ON_BOOT SYNC WIDE TAGGED_QUEUING DISCONNECT The utility used is located at: iso9660:[UTILITY]UTIL_CLI.EXE on CD V3.6 and up It is located at iso9660:[CDROM.UTILITY]UTIL_CLI.EXE on CD V3.5 and lower. To run the utility insert the CD-ROM disk in the CD-ROM drive on your system then issue the command: run iso9660:[UTILITY]UTIL_CLI.EXE -d dkd500 -p 0 | | | ---PCI bus # | ----CD-ROM drive On CDs V3.5 and older use the following command run iso9660:[CDROM.UTILITY]UTIL_CLI.EXE -d dka500 -p n Example run: P08>>> set arc_enable on P08>>> init Initializing... F E D C B A 9 8 A o . o . + . 7 M + . + . + . 6 . . . . . . . 5 . . . . . . . 4 P ++ EB ++ EB ++ EB 3 . . . . . . . 2 . . . . . . . 1 . . . . . . . 0 . . . . . . . NODE # TYP ST1 BPD ST2 BPD ST3 BPD . . . . . + . . + . . + + . + . . + . . + . . + . + + + C0 PCI + C1 PCI + EISA + . A0 . . . . . . . ILV . 512 . . . . . . . 512MB AlphaServer 8200 Console V2.2-102, SROM V1.3, Sep 20 1995 18:02:50 P08>>> show config TLSB 4++ 7+ 8+ Name Type Rev KN7CC-AB MS7CC KFTIA 8014 5000 2020 0000 0000 0B02 C0 Internal PCI connected to kftia0 0+ ISP1020 10201077 0001 1+ ISP1020 10201077 0001 2+ DECchip 21040-AA 21011 0023 3+ DEC PCI FDDI F1011 0000 Mnemonic kn7cc-ab0 ms7cc0 kftia0 pci0 isp0 isp1 tulip0 pfi0 371 4+ 5+ 6+ 7+ ISP1020 ISP1020 DECchip 21040-AA PCI NVRAM 10201077 10201077 21011 71011 0001 0001 0023 0002 isp2 isp3 tulip1 pci_nvram0 C1 PCI connected to kftia0 0+ SIO 4828086 5+ KZPSA 81011 0004 0000 pci1 sio0 kzpsa0 0023 0000 0000 0000 sio0 tulip2 floppy0 kbd0 mouse0 0+ 1+ 2+ 3+ Controllers on SIO DECchip 21040-AA FLOPPY KBD MOUSE 1+ EISA connected to pci1 through sio0 EDAC960 77009835 0007 21011 2 3 4 eisa0 edac9600 P08>>> load –f iso9660 - load CDROM driver P08>>> run iso9660:[UTILITY]UTIL_CLI.EXE -d dkd400 -p 1 Loading image... Transferring control... Copyright Digital Equipment Corporation 1995. All rights reserved. Restricted Rights: Use, duplication, or disclosure by the U.S. Government is subject to restrictions as set forth in subparagraph (c) (1) (ii) of DFARS 252.227-7013, or in FAR 52.227-19, or in FAR 52.227-14 Alt. III, as applicable. The software is proprietary to and embodies the confidential technology of Digital Equipment Corporation. Possession, use, or copying of this software and media is authorized only pursuant to a valid written license from Digital or an authorized sublicensor. KZPSA Configuration and Diagnostic Utility (CLI Version 1.0) ============================================================ Type HELP For Command Summary Found 1 KZPSA(s) in your system: BUS SLOT HW REV KZPSA #1 0 5 L01 FW REV A08 SCSI ID 7 KZPSA #1 is currently selected. [KZPSA #1] help COMMAND SUMMARY HELP or ? displays this command summary. EXIT SAVE exits saving any changes made. EXIT NO_SAVE exits not saving any changes made. SELECT KZPSA <1-n> selects the KZPSA you want to configure and / or test. To see the available KZPSAs use the SHOW KZPSA command. SHOW KZPSA displays KSPSA(s) in a system including their hardware and firmware revisions, bus, and slot. SHOW DEVICES displays any devices connected to the KZPSA. SHOW CONFIG displays all parameter settings (including device specific parameters) for the selected KZPSA. DEFAULTS use the default values for all the configuration parameters. SET SCSI_ID <0-15> sets the KZPSAs SCSI ID to the value given. 372 Example: SET SCSI ID 7 The above example sets the KZPSAs SCSI ID to 7 ENABLE / DISABLE FAST enables or disables KZPSA fast SCSI mode. ENABLE / DISABLE TERMPOWER enables or disables the supply of termpower to the SCSI bus from the KZPSA. ENABLE / DISABLE RESET_ON_BOOT enables or disables a SCSI bus reset on boot-up by the KZPSA. ENABLE / DISABLE SYNC <0-15 | ALL> enables or disables synchronous negotiation to the SCSI device having the SCSI ID specified or all of the SCSI devices. ENABLE / DISABLE WIDE <0-15 | ALL> enables or disables wide negotiation to the SCSI device having the SCSI ID specified or all of the SCSI devices. ENABLE / DISABLE TAGGED_QUEUING <0-15 | ALL> enables or disables tagged queuing to the SCSI device having the SCSI ID specified or all of the SCSI devices. ENABLE / DISABLE DISCONNECT <0-15 | ALL> enables or disables disconnect to the SCSI device having the SCSI ID specified or all of the SCSI devices. RESET_SCSI_BUS resets the SCSI bus. LOGS puts the utility into Logs mode. From Logs the user can view the firmware and hardware error logs. TEST KZPSA [REPEAT] [HALT_ON_ERROR | CONTINUE_ON_ERROR | LOOP_ON_ERROR] runs a self test on the KZPSA. Selecting the REPEAT causes the test to continually repeat. You can also specify what action you want the test to take in the event of an error. TEST DEVICES [REPEAT] [HALT_ON_ERROR | CONTINUE_ON_ERROR | LOOP_ON_ERROR] runs SCSI device self tests. Selecting the REPEAT causes the test to continually repeat. You can also specify what action you want the test to take in the event of an error. [KZPSA #1] show config KZPSA #1: BUS: 0 HW REV: L01 TERMPOWER: Enabled SLOT: FW REV: FAST MODE: DEVICE SCSI ID 0 1 2 3 4 5 6 7 8 9 10 11 12 13 14 15 SYNCHRONOUS NEGOTIATION Enabled Enabled Enabled Enabled Enabled Enabled Enabled Enabled Enabled Enabled Enabled Enabled Enabled Enabled Enabled Enabled WIDE NEGOTIATION Enabled Enabled Enabled Enabled Enabled Enabled Enabled Enabled Enabled Enabled Enabled Enabled Enabled Enabled Enabled Enabled 5 A08 Enabled DISCONNECT Enabled Enabled Enabled Enabled Enabled Enabled Enabled Enabled Enabled Enabled Enabled Enabled Enabled Enabled Enabled Enabled SCSI ID: 7 TERMINATION: Absent RESET ON BOOT: Disabled TAGGED QUEUING Enabled Enabled Enabled Enabled Enabled Enabled Enabled Enabled Enabled Enabled Enabled Enabled Enabled Enabled Enabled Enabled [KZPSA #1] show devices (SCSI = 7, Fast) -------------------------------------------------------DEV PID VID REV SCSI DEV ======== ================= =========== ======= ======== dka0001 HSZ40 DEC V25Z DIR dka0002 HSZ40 DEC V25Z DIR dka0003 HSZ40 DEC V25Z DIR 373 [KZPSA #1] show kzpsa Found 1 KZPSA(s) in your system: BUS SLOT HW REV KZPSA #1 0 5 L01 KZPSA #1 is currently selected. FW REV A08 [KZPSA #1] set scsi_id 6 BUS: 0 SLOT: HW REV: L01 FW REV: TERMPOWER: Enabled FAST MODE: SCSI ID 7 5 SCSI ID: 6 TERMINATION: Absent RESET ON BOOT: Disabled A08 Enabled [KZPSA #1] exit save Initializing... F E D C B A 9 8 A o . o . + . 7 M + . + . + . 6 . . . . . . . 5 . . . . . . . 4 P ++ EB ++ EB ++ EB 3 . . . . . . . 2 . . . . . . . 1 . . . . . . . 0 . . . . . . . NODE # TYP ST1 BPD ST2 BPD ST3 BPD . . . . . + . . + . . + + . + . . + . . + . . + . + + + C0 PCI + C1 PCI + EISA + . A0 . . . . . . . ILV . 512 . . . . . . . 512MB AlphaServer 8200 Console V2.2-102, SROM V1.3, Sep 20 1995 18:02:50 P08>>> load –f iso9660 – Load CDROM driver P08>>> run iso9660:[UTILITY]UTIL_CLI.EXE -d dkd400 -p 1 Loading image... Transferring control... Copyright Digital Equipment Corporation 1995. All rights reserved. Restricted Rights: Use, duplication, or disclosure by the U.S. Government is subject to restrictions as set forth in subparagraph (c) (1) (ii) of DFARS 252.227-7013, or in FAR 52.227-19, or in FAR 52.227-14 Alt. III, as applicable. The software is proprietary to and embodies the confidential technology of Digital Equipment Corporation. Possession, use, or copying of this software and media is authorized only pursuant to a valid written license from Digital or an authorized sublicensor. KZPSA Configuration and Diagnostic Utility (CLI Version 1.0) ============================================================ Type HELP For Command Summary Found 1 KZPSA(s) in your system: BUS SLOT HW REV KZPSA #1 0 5 L01 FW REV A08 SCSI ID 6 KZPSA #1 is currently selected. [KZPSA #1] show config KZPSA #1: BUS: 0 HW REV: L01 TERMPOWER: Enabled SLOT: FW REV: FAST MODE: DEVICE SCSI ID 0 1 2 3 SYNCHRONOUS NEGOTIATION Enabled Enabled Enabled Enabled WIDE NEGOTIATION Enabled Enabled Enabled Enabled 5 A08 Enabled DISCONNECT Enabled Enabled Enabled Enabled SCSI ID: 6 TERMINATION: Absent RESET ON BOOT: Disabled TAGGED QUEUING Enabled Enabled Enabled Enabled 374 4 5 6 7 8 9 10 11 12 13 14 15 Enabled Enabled Enabled Enabled Enabled Enabled Enabled Enabled Enabled Enabled Enabled Enabled Enabled Enabled Enabled Enabled Enabled Enabled Enabled Enabled Enabled Enabled Enabled Enabled Enabled Enabled Enabled Enabled Enabled Enabled Enabled Enabled Enabled Enabled Enabled Enabled Enabled Enabled Enabled Enabled Enabled Enabled Enabled Enabled Enabled Enabled Enabled Enabled [KZPSA #1] test devices DEC KZPSA-BB A08 (SCSI = 6, Fast) ----------------------------------------------------------------DEV PID VID REV Self-test status ======== ================= =========== ======= ================== dka0001 HSZ40 DEC V25Z Passed dka0002 HSZ40 DEC V25Z Passed dka0003 HSZ40 DEC V25Z Passed [KZPSA #1] exit no_save Initializing... F E D C B A 9 8 A o . o . + . 7 M + . + . + . 6 . . . . . . . + + . . . . . . . A0 . . 512 . AlphaServer 8200 Console V2.2-102, SROM . . . 5 . . . . . . . 4 P ++ EB ++ EB ++ EB 3 . . . . . . . 2 . . . . . . . 1 . . . . . . . 0 . . . . . . . NODE # TYP ST1 BPD ST2 BPD ST3 BPD + + + + + + C0 PCI + + . . . . + C1 PCI + . . . . + EISA + . . . . . . ILV . . . . . . 512MB V1.3, Sep 20 1995 18:02:50 375 376 KZPSA_EDIT Utility You can run KZPSA_EDIT from the console prompt to set up some KZPSA parameters. This command is available on the TurboLaser. kzpsa_edit - Edit KZPSA FLASH parameters. OVERVIEW: The kzpsa_edit command permits the modification of KZPSA Flash parameters from the console. Individual bits can be set or cleared, or bytes can be set to a specific value. Entering kzpsa_edit without an option or target device will list these parameters for all KZPSA devices in the system. kzpsa_edit ( [busid] [<kzpsa_controller_name>] [fast] [termpwr] [-sd] [-offset n] [-value n] [-bit n] [-set] [-clear] ) [-p] COMMAND ARGUMENT(S): <kzpsa_controller_name> - KZPSA controller name. Only the parameters for this controller will be modified. COMMAND OPTION(S): -sd -offset n -value n -bit n -set -clear -p - Set defaults Selects the byte offset to be modified Gives the new byte value(s), valid only with -offset Selects the bit to be modified, valid only with -offset -value and -bit are mutually exclusive - The bit should be set, valid only with -bit - The bit should be clear, valid only with -bit -set and -clear are mutually exclusive - print flash contents COMMAND EXAMPLE(S): Find all KZPSA devices >>> show config kzpsa* Load the kzpsa support code >>> load -f kzpsa List all current FLASH parameters >>> kzpsa_edit Change the host Bus ID from 7 to 6 >>> kzpsa_edit busid kzpsa0 kzpsa0 bus id = 7, new bus id ? 6 Modify four bytes of parameters >>> kzpsa_edit -offset 0 -value 11223344 kzpsa0 Set one bit of the parameters >>> kzpsa_edit -offset 0 -bit 1 -set kzpsa0 Set all defaults >>> kzpsa_edit -sd kzpsa0 377 378 wwidmgr - World Wide ID Manager Description Wwidmgr command is used to configure devices connected to KGPSA/HSG80. It allows them to be seen at the console with a SHOW DEVICE command. It allows you to define alias names for fibre channel devices and associate them to the worldwide identifiers (WWIDs) for devices that will be used for booting or dumping. This command is needed to initially setup non-volatile storage with information the console will use later for booting, dumping and showing devices. It is available on the V5.5 Alpha Firmware CD in the doc directory. 1. The wwidmgr command would be used by the following NT Users • Do not use this command. Tru64 Unix Users • Tru64 Unix V5.0 users who want to boot a disk connected thru a KGPSA • If not booting via a KGPSA the wwidmgr command is not required. OpenVMS Users • OpenVMS users who want to use a disk connected thru a KGPSA as a boot or dump device. • If not booting via a KGPSA the wwidmgr command is not required. Diagnostic users and advanced users • Used on new installations to examine the topology and accessibility of fibre channel ports on the HSG80 and in gathering disk information. 2. The wwidmgr command would be used in the following instances. • • • • Initial setup of boot and dump devices The configuration changes and non-volatile information is not correct A new or additional boot or dump device is added A previously existing boot or dump device is deleted. 3. The wwidmgr command is invoked by the user to • • • • • • • Display the worldwide id’s (WWID) of the disk devices Display accessible disk devices Display connections to the fabric Display the unit IDENTIFIER defined at the HSG80 controller console Display topology information Set the console device name for the selected WWID into console non-volatile memory Set the desired path(s) through fibre channel connections to control accessibility 4. On the AlphaServer 8x00, 4x00 and 1200 the console must be in diagnostic mode for this command to work. On other platforms there is no such restriction. Use either set mode diag or set console_mode diag . If the console is not in diag mode on the AlphaServer 8x00, 4x00 and 1200 systems the console response is as follows. P00>>> wwidmgr -show wwid wwidmgr: No such command On all platforms when you enter the wwidmgr command you will be in wwidmgr mode until the system is initialized. After issuing the wwidmgr command booting is not allowed until the system is re-initialized. A system reset or initialization is the only mechanism to exit wwidmgr mode. 5. For more info see the wwidmgr_v10.pdf document at http://ftp.digital.com/pub/Digital/Alpha/firmware/readmes/v5.5/doc/ 379 380 AlphaServer With HSJ’s May Get a Hard Error #8 On INIT An Alpha Server system, that has a Tape Loader attached to an HSJ controller, reports a Hard Error #8 after power on. PROBLEM SYMPTOM: After power on, the console may report a Hard Error #8. The error will be pointing at a disk type device. Example: *** Hard Error - Error #8 Diagnostic Name ID Device Pass Test Hard/Soft exer_kid 000002e9 duc2.12.0.4.0 0 0 1 0 Buffer counts differ - buf1:0, buf2:512, location:2a00 *** End of Error *** 1-JAN-206 12:00:0 SOLUTION: The tape loader is identified as a pseudo disk device. When the console tries to exercise the disk device it doesn’t behave properly (from the console’s perspective). The Operating System knows how to identify and treat the pseudo disk device as a tape loader, such that usage is not impaired. In order to identify if your Hard Error #8 is related to a tape loader, please check the following: From the SRM: Show dev This command will show a device of type hsx2 if you have a pass through device. Please verify that the device indicated by the Hard Error #8 shows hsx2 in one of its fields. From HSJ console that the failing device is attached to: show pass This should show any pass through devices you have, and who uses it. show load This will show you devices of type loader. If the output of these commands show that the pass through device is used by a tape loader, then you can safely disregard the Hard Error #8. Example: P00>>>sho dev dqa0.0.0.15.0 dub951.29.0.6.1 duc2.12.0.4.0 dva0.0.0.1000.0 muc10.13.0.4.0 muc11.13.0.4.0 DQA0 TOSHIBA CD-ROM XM-6302B 1017 $54$DUA951 (R5HSJU) HSX0 $54$DUA2 (R5HSJC) HSX2 <-- This is it DVA0 $54$MUA10 (R5HSJD) TZ87 $54$MUA11 (R5HSJD) TZ87 R5HSJC>sho pass Name Storageset Uses Used by -------------------------------------------------------------------------P895 passthrough R5HSJC>sho load Name Type TL895 Port Targ Lun D2 Used by 381 -------------------------------------------------------------------------TL895 loader 1 0 0 P895 Notice how the loader from the show load command (TL895) is used by the pass through device P895. ADDITIONAL COMMENTS: Engineering is investigating methods for inhibiting this error report. For the time being there is no cause for concern because the system is behaving exactly as expected. See Blitz TD 2941 for details. 382 Missing File Message From LFU for DEFPA firmware When booting LFU on a TurboLaser the DEFPA firmware shows as “Missing file” if you do a list from the UPD prompt. UPD> list Device kn7cc-ab0 kn7cc-ab1 kn7cc-ab2 kn7cc-ab3 kzpsa0 kzpsa1 kzpsa2 kzpsa3 kzpsa4 kzpsa5 kzpsa6 pfi0 pfi1 Current Revision V4.0-4 V4.0-4 V4.0-4 V4.0-4 A10 A10 A10 A10 A10 A10 A10 2.46 2.46 Filename kn7cc_fw kn7cc_fw kn7cc_fw kn7cc_fw kzpsa_fw kzpsa_fw kzpsa_fw kzpsa_fw kzpsa_fw kzpsa_fw kzpsa_fw dfpaa_fw dfpaa_fw Update Revision V4.1-6 V4.1-6 V4.1-6 V4.1-6 A10 A10 A10 A10 A10 A10 A10 Missing file Missing file There was a filename change for the defpa firmware. Since the LFU drivers reside in the console you must first update the SRM console to a minimum of the V4.1 console off the V3.8 CD. Then you can reboot the CD again and it will load the DEFPA firmware and allow you to do the DEFPA update. 383 384 Option Firmware Fails to Load Off of Floppy After creating a console firmware floppy and an options floppy using the documented procedure for WNT I discovered the following problem. When attempting to create two NT firmware floppies to update an AlphaServer 2100A EV5 console and its options I could not get the option firmware to load. I used the following procedure as documented. 1. I formatted the floppies under NT and selected FAT format 2. I copied the firmware file AS2100A_e5_v4_7.exe from the web site to a floppy and called it FWUPDATE.EXE 3. I copied the option files as2X00fw.txt, cipca315.sys, dfeaa130.sys, dfeab246.sys, dfxaa246.sys and kzpsaa10.sys to the second floppy. 4. From the NT boot menu I select Supplementary Menu and the Update Firmware. 5. It reads the system firmware in and I can update without issue. 6. However it asks for the options floppy and when I install it, it reads and asks for the next option floppy. Then it asks to hit return or type DONE. When I type DONE I get a UPD> prompt. Now a list command from the UPD prompt says KZPSA - firmware file missing. The problem is with Windows 95 and WNT. We copy a .txt file to the floppy that defines the other files loaded on the floppy. Windows95 and NT add an extra carriage return to each line of the text file. So, for instance, when the LFU reads the first line of the text file, it now sees KZPSA<cr><cr><lf>. The LFU strips off <cr><lf> and then it looks for a file called KZPSA<cr>.SYS, which doesn’t exist. This will be corrected in the next console version. The next version will be robust enough to strip off whatever characters are added. Meanwhile, if someone actually needs to get the latest firmware for one of the adapters and their only means is from floppy, they can still "cat" the file from the floppy. UPD> exit >>> cat fat:kzpsaa10.sys/dva0 > kzpsa_fw >>> lfu NOTE: # go to manual mode # copy appropriate # firmware # return to the LFU I attempted this procedure 1x on our lab 2100 and it did NOT work. To see the contents of the .txt file type the following at the console >>> CAT FAT:AS2X00.TXT/DVA0 - to see the contents of the file. >>> CAT FAT:AS2X00.TXT/DVA0 | HD - to confirm how many <CR><LF> are at the end of each line of the file. 385 386 Firmware Upgrades with Console Secure Set With the new secure console capability ENABLED the firmware update will fail with this following message >>> console is secure - parameters are not allowed The firmware upgrade stops here and won’t continue. This is occurring because after entering bootfile name system does a reinit and loses the fact that you have already entered the password once to even start the upgrade. The only way we have found to get around this is to >>>clear password and then do firmware update then enable secure console again with same password or a new password. Example: >>> login please enter password:<15-30 characters> >>> boot -fl 0,a0 dka400 bootfile:[alpha400]as400_v5_6.exe system reinits itself, completes power-up selftest countdown eb...ea.e9.e8.e7.e5. v6.1-2 built on may 8 >>> console is secure - parameters are not allowed The firmware upgrade stops here and won’t continue. Workaround: >>> login please enter password:<15-30 characters> >>> clear password please enter password:<15-30 characters> >>> boot -fl 0,a0 dka400 bootfile:[alpha400]as400_v5_6.exe UPD> update UPD> verify UPD> exit To Re-enable the Password/Secure >>> set password please enter password:<15-30 characters> old password if wish please confirm password:<15-30 characters> old password if wish >>> set secure >>> login please enter password:<15-30 characters> Now the firmware updated should be completed and the console will be back in Secure mode. 387 388 How to Clear the SRM Console Password on an AlphaStation 500 / 600 Overview If a customer sets a console password on an AlphaStation 500 or AlphaStation 600, then forgets the password, it must be cleared before certain console commands and functions can be done. This page describes methods of creating a floppy to clear the password. There are procedures to build the floppy using OpenVMS, Tru64 UNIX and Windows. OpenVMS 1. Locate file clr_pwd.exe and copy the file to an OpenVMS system. The file is also located at one of the following two locations LEDDEV::DISK$PROJECT_DSK1:[ALCOR.TEST_RELEASE]CLR_PWD.EXE http://Cybrary.inet.cpqcorp.net/DOWNLOAD/UTILITIES/SYSTEM/clr_pwd.zip 2. Init and mount the floppy. Create a directory and copy clr_pwd.exe to the floppy with the following commands. $ set file/attr=(rfm:fix,lrl:512,mrs:512,rat:none) clr_pwd.exe $ init/dens=HD/index=begin dva0: clr_pwd $ mount dva0: clr_pwd $ copy/contiguous clr_pwd.exe dva0:[0,0] $ mcr writeboot Update VAX portion of boot block (default is Y): No Update Alpha portion of boot block (default is Y): Yes [enter AXP bootfile:] dva0:[0,0]clr_pwd.exe 3. Dismount the disk and shutdown VMS. $ dismount dva0: Tru64 UNIX 1. Locate file clr_pwd.exe and copy the file a Tru64 UNIX system. 2. Download the file mkbootfirm.tar available at: ftp://ftp.digital.com/pub/Digital/Alpha/firmware/utilities/mkbootfirm.tar 3. You can untar mkbootfirm on your target Tru64 UNIX system with the command: # tar xvf mkbootfirm.tar 4. Make sure you have a floppy that has been low-level formatted. to low-level a floppy in drive 0 type # fddisk -fmt /dev/rfd0c (or whatever floppy driver name) For example, 5. Change default to directory with mkbootfirm.exe # cd mkbootfirm 6. Run mkbootfirm on the .exe image that you downloaded. mkbootfirm uses a .exe image to create a file that can be dd’d to floppy. The following will create a bootable floppy to clear the console password. # ./mkbootfirm clr_pwd.exe | dd of=/dev/rfd0c bs=64k Windows 1. Locate file clr_pwd.exe and copy the file to a windows system. 2. Locate file makeboot.exe (Alpha) or mkboot.exe (Intel or Alpha) and copy the file to a windows system. (C: in this example). 3. Pull up a MSDOS window and use these two files to create bootable FSL floppy using the following procedure: 389 4. Insert writeable FAT formatted floppy (any data on this floppy will be erased). (Intel or Alpha) C:\ mkboot clr_pwd.exe (Alpha) C:\ makeboot clr_pwd.exe Procedure 1. Power down the system. 2. On the AlphaStation 500 move the jumper from J11 to J13 3. On the AlphaStation 600 move the jumper from W1 to W3. You can only select one of these jumpers at a time. Select the jumper link On Cybrary to see a picture of jumper location. 4. Insert the floppy into the AlphaStation and power it on. 5. This will boot the floppy and the console will print a message that the console password has been cleared. 6. Power off the system and move the jumper back to the original position. 7. Powerup system and the system will come up with the password cleared. 390 How to Clear the SRM Console Password on an AlphaStation 255 Overview If a customer sets a console password on an AlphaStation 255, then forgets the password, it must be cleared before certain console commands and functions can be done. This page describes methods to clear the password. If the user forgets the password, there is only one recovery mechanism. must: 1. 2. 3. 4. 5. 6. 7. 8. The user Power the system off. Open the system box. Set the configuration DIP switches to erase NVRAM (Switches 1 and 2 to ON). Power the system on and wait for the console to start. Power the system off. Reset the configuration dip switches to the original settings (1 and 2 OFF). Put the system top and side covers on and make them secure. Power the system on and console will now be in user mode In addition to clearing out the secure mode password, all environment variables will be cleared and must be reestablished by the user. For this reason the user should keep a list of any environment variables he set along with the values they were set to. That way the environment variables can be re-established if the user must clear the NVRAM to reset the console to user mode. 391 392 How to Clear the Console Password on an AlphaStation/AlphaServer 400 Overview If a customer sets a console password on an AlphaStation or AlphaServer 400, then forgets the password, it must be cleared before certain console commands and functions can be done. This page describes methods to clear the password. The motherboard can be replaced or the toy and nvram chips can be replaced. Console environmental variables will all have to be reset. The part numbers and locations of the chips on the motherboard are listed in the following table. System NVRAM Location/Partnumber TOY Location/Partnumber AlphaServer/AlphaStation 400 4/233 E8 / 21-29631-02 E42 / 21-39125-02 AlphaServer/AlphaStation 400 4/266 E56 / 21-29631-02 E42 / 21-39125-02 393 394 How to Clear the SRM Console Password on a Miata and Miata GL Overview If a customer sets a console password on the Miata Digital Personal Workstation, then forgets the password, it must be cleared before certain console commands and functions can be done. This page describes methods of creating a floppy to clear the password. Warning Running this program will reset all the site-specific environmental variables. You must have them written down so you can restore them to original values. This included SRM and AlphaBIOS variables. Procedure 1. 2. 3. 4. 5. 6. 7. 8. 9. 10. 11. Unzip the file miata_clear_password.zip file. Copy the file clrpswd.exe to a FAT floppy and place in drive A: Write down all console environmental variables including AlphaBIOS settings. Power off and unplug system to disconnect Aux +5V Remove the mother board. Remove the battery from its socket. Wait a minimum of two minutes. Replace Battery and install motherboard back into the system Powerup the system. During Miata powerup, hit F2 to enter the AlphaBIOS menu. From the AlphaBIOS main menu, select: Utilities Run Maintenance Program... Enter clrpswd in the program name dialog box Location: A: 12. The following output is displayed: Clear SRM PASSWORD Version 001 All SRM and AlphaBIOS environment variables will be destroyed. Are you really sure you want to do this: (Yes/[No]): Y If you answer "N" or simply hit return , you will go back to AlphaBIOS and the variable are untouched. 13. There will be an approximately 10 second pause. 14. The following output is displayed: [Pause]... 15. Press return to go back to the main screen. 16. From the AlphaBIOS main menu, select: CMOS Setup TAB to Select OS Select Tru64 UNIX as the operating system 17. Press f10 TWICE. 18. Press RETURN 19. When the Main Menu returns it is now safe to power cycle the system 20. At this point in time all of the environment variables for both the Digital UNIX console and AlphaBIOS have been destroyed. The next time power is applied to the system, the system defaults will be reset. Any variables you had in place prior to this will have to be reset. 395 396 After Firmware Update, Init Gets bad value - mopv3_boot not modified When attempting to update console firmware on an AlphaStation 500/266 to the V6.35 console off the V3.8 CD , you may get a message bad value - mopv3_boot not modified. When you boots the CD and selects the default firmware file of [ALPHA600]as600_V6_3.exe he also gets the following message Digital AlphaStation 500/600 Console V6.3-5 built on Nov 20 1996 at 16:01:42 bad value- invalid selections: ON OFF bad value - mopv3_boot not modified. Maverick Startup The MOPV3_BOOT variable had 4 valid values {0,1, ON, OFF } The 0,1 were removed from the valid values list. This was done to adhere to the srm standards. The error message occurs on every powerup because someone has edited the nvram powerup script and added the line >>> SET MOPV3_BOOT 1 To view if this is true use the following command. >>> cat nvram To edit the line to change the 1 to a ON use the following >>> edit nvram >>> set mopv3_boot on 397 398 Running the NT ARC or AlphaBIOS Console The SRM console has the ability to run the either the NT ARC or AlphaBIOS consoles without having to re-flash the system via the firmware update utility. When following the steps below, a temporary NT ARC or AlphaBIOS runtime environment will be created. The console environment will return to the normal SRM console following a power cycle of the system. This temporary NT ARC or AlphaBIOS environment can be used to boot the NT operating system or to run ARC or AlphaBIOS based utilities. To Start the NT ARC or AlphaBios Console Environment perform the following steps: a. Power on the system ff.fe.fd.fc.fb.fa.f9.f8.f7.f6.f5. ef.df.ee.ed.ec.f4.eb.....ea.e9.e8.e7.e6.e5. V6.4-1, built on Feb 1 1997 at 14:53:34 >>> b. Set the OS_TYPE to NT >>> set os_type nt c. Load the Firmware Update compact disc into the drive. d. Boot the CD using one of the following filenames at the bootfile prompt. >>> boot -fl 0,A0 dka400 Bootfile: Bootfiles for AlphaStation 200/400 Series Model AlphaStation 200,250 AlphaStation 255 AlphaStation 400 Bootfile [ALPHA200]ARCBOOT.EXE [ALPHA255]ABBOOT.EXE [ALPHA400]ARCBOOT.EXE Note: As of the V5.1 CD the files have been removed from the AlphaStation 400 directory. Use [ALPHA200] as the directory for the AlphaStation 400. If the system has never been run in the ARC or AlphaBIOS environment before, certain environment variables will need to be set up Typically the ARC console starting up in this temporary environment for The first time will require set up of its configuration tree and certain environment variables. To proceed with setup, follow these steps: o o o o Select Select Select Select language from the language setup screen Supplementary Menu Set up the System Set default environment variables To run RCU or some other utility select “Run a Program” “Set up the System” followed by In order to boot Windows NT you will need to enter the default media where Windows NT can be located, the scsi bus number, scsi id, and partition information. o Select Set default Configuration In this menu you will need to set up the monitor type, floppy drive 399 configuration, keyboard type, and scsi host id. o Select Supplementary menu, and save changes Note: If you do not wish to boot Windows NT but only need to execute a utility program, select "Run a program" from the Boot menu and then enter the proper path and file name. At this point you may be required to set up the boot device. If so Follow these remaining steps: o o o Select Supplementary menu again Select Set up the System Select Manage boot selection menu o Select Add a boot selection Identify the boot partition information, osloader directory, the operating system root directory, and finally a unique name for this boot selection. o o o Select Setup menu Select Supplementary menu, and save changes Select Boot menu At this point the system is ready to boot Windows NT. The setup information will remain intact any time you re-enter the ARC environment. Note: When the system is power cycled it will return to the SRM Console environment. At the console prompt (>>>), enter the following command >>> set os_type unix or set os_type vms AlphaBIOS Console Setup Typically the AlphaBIOS console starting up in this temporary environment for the first time will require some set up. If NT has never been run on the system the following message may appear: AlphaBios determines that the NVRAM data is not Valid o o o Press F2 to enter setup and configure the system. Select Utilities Select OS Selection Setup (see note) Enter Boot Name, Boot File, and OS Path partition information using The menu provided. Note Alternatively, if you wish to run a utility program select the "Run Maintenance Program" menu item from the "Utilities" menu and enter the path and filename info. 400 Different AlphaServer’s get ‘open failure" on Update Firmware updates may fail on AlphaServer 1000/1000A EV5, AlphaServer 2100, and possibly other Alpha systems with DE500’s installed. You will see an error message similar to the example below from an AlphaServer 1000. Alphaserver 1000 ‘open failure firmware filename ’srm_fw’‘ or Alphaserver 1000 ‘open failure firmware filename ’arc_fw’‘ This is caused when an "active" network is found. The update utility will sometimes attempt to find the file on the network and will not look elsewhere. In order to correct this, perform one of the following steps • disconnect the ethernet cable • remove the network device • perform the update from the ARC> Install new firmware prompt. 401 402 AlphaServer 1000/1000A EV5 Firmware From V5.2 CD Won’t Fit on Floppy The AlphaServer 1000 and 1000A EV5 firmware for the EV5 processors off of the V5.2 firmware CD is too large to fit on a 1.44 MB floppy. The files on the V5.3 CD will correct this issue. Initially files were placed I the interim directory, but since they have corrected this on later version the interim directory is no longer available for this issue. 403 404 AlphaServer 1000/1000A 5/300 CPU Requires V5.23 AlphaBIOS The AlphaServer 1000/1000A 5/300 CPUs required a minimum of V5.23 AlphaBIOS. This version is off the V3.8 CD. If you downgrade the console to a version prior to the V3.8 CD version you will have problems invoking the AlphaBIOS console. If you type AlphaBIOS at the >>> you will hang after the "ARC Firmware Loaded" message. This is due to a compatibility problem between AlphaBIOS V5.23 and earlier HALs. The updated HALs are on http://www.windows.digital.com and should fix this problem. To re-load V5.23 AlphaBIOS you’ll need to use the following procedure: 1. Make a bootable firmware update floppy using the V4.6A f/w file or later. (see http://ftp.digital.com/pub/DEC/Alpha/firmware/ for instructions) 2. If you have SRM V4.6-22x / AlphaBIOS V5.21 on the system, you can stop it from switching to the AlphaBIOS and hanging by holding in the HALT button while you reset the system. When you get the >>> prompt, insert the f/w floppy and type BOOT DVA0 to boot from it. If the SRM f/w on the system is older than V4.6-22x, you’ll have to enable fail-safe booter mode to bypass the hang. Jumper bank J4 on the CPU module (labeled "J4 SROM SELECT JUMPER") will have a jumper on the front-most (8th) pin pair; move this jumper to the rear-most (1st) pair, then power up the system with the firmware update floppy in the floppy drive. The firmware update utility will be booted automatically. 3. Type UPDATE to update the firmware. 4. If you used the fail-safe booter, power off the system and move the jumper on J4 back to its original position. 405 406 AlphaServer 1000/1000A Led Code CB Due to Wrong Firmware on Motherboard The AlphaServer 1000/1000A motherboard contains 1000 series machines do NOT have a dual-SRM like motherboards only come with EV4 firmware loaded. motherboard in a system with an EV5 cpu you will says SROM execution completed the console firmware. Since the the 2x00 series machines the If you install a replacement get an OCP code of CB. Led CB The system could hang here if EV4 console code is used with 5/xxx (EV5) systems. There are four methods to work around this problem. One involves getting an EV4 processor and then upgrading the firmware to EV5 and reinstalling the original CPU. The other methods involves booting the failsafe loader floppy that should be supplied with all new motherboards or creating your own floppy off the Digital website at http://ftp.digital.com/pub/DEC/Alpha/firmware/ Hardware Method a. After replacing the motherboard with a new spare, install a spare EV4 1000 or 1000A CPU depending on your configuration. b. Make sure that you have at least 5 memory SIMMs of the same size installed. The EV5 system only requires 4 SIMMs where the EV4 system requires 5 SIMMs. Four for data and one for ECC. c. Now when you power up you will not fail POST with a led CB. You will come to the >>> d. Boot the firmware update CD by typing the following command and one of the following bootfiles. >>> b -fl 0,A0 dka500 bootfile:[alpha1000]as1000_e4_v5_4.exe - for the 1000 bootfile:[alpha1000a]as1000a_e4_v5_6.exe - for the 1000A e. At the UPD prompt type CPU_UPGRADE to upgrade firmware from EV4 to EV5. The do a verify and exit. UPD> cpu_upgrade confirm update on: SRM: Yes confirm update on: ARC: Yes EXECUTING THIS SCRIPT WILL UPGRADE YOUR MODEL 4/AAA CONSOLE FIRMWARE TO MODEL 5/XXXX CONSOLE FIRMWARE UPD> verify UPD> exit f. Now power down the machine. Remove the EV4 CPU and reinstall the EV5 CPU. Return the system to its original memory configuration. Now when you power Back on you will have a motherboard running EV5 firmware to match the CPU. 407 Bootable Floppy Using OpenVMS a. Locate the console firmware from either the latest Firmware Update CD or access it over the web at one of the following locations. http://ftp.digital.com/pub/Digital/Alpha/firmware/ http://ftp.digital.com/pub/DEC/Alpha/firmware/ as1000_e5_v5_4.exe (for AlphaServer 1000 Model 5/xxx) as1000a_e5_v5_6.exe (for AlphaServer 1000A Model 5/xxx b. Make a Bootable Floppy Procedure - this example is for the 1000A. Insert blank floppy into floppy drive $ set file/attr=(rfm:fix,lrl:512,mrs:512,rat:none) as1000a_e5_v5_6.exe $ init/dens=hd/index=begin dva0: fwupdate $ mount dva0: fwupdate $ create/directory dva0:[as1000a] $ copy/contig as1000a_e5_v5_6.exe dva0:[as1000a]fwupdate.exe $ mcr writeboot Update VAX portion of boot block (default is Y) : No Update AXP portion of boot block (default is Y) : Yes Enter AXP boot file : dva0:[as1000a]fwupdate.exe $ dismount dva0: c. Move the CPU jumper to enable the Fail-Safe Loader to position 7. J1 position 0 to J1 position 7 for the AlphaServer 1000 EV4 J4 position 0 to J4 position 7 for the AlphaServer 1000/1000A 5/300 J1 position 0/1 to J1 position 7 for the AlphaServer 1000/1000A 5/333 or 5/400 (the last 2 setting may have the jumper on position 1 but 0 is the default) d. Insert the floppy in DVA0 and power the machine off/on. e. On power up the OCP will display "loading floppy" then "starting cpu". The console screen will then reset and then the UPD> prompt will appear. If you get no other display on the console it is because the module may have the environmental variable CONSOLE set to graphics. If so connect a VT and proceed with the update or set the variable to graphics and reset. f. Update the console code by typing the following commands. UPD> update update SRM: Yes update ARC: Yes UPD> verify UPD> exit g. Power off the system and set the fail-safe jumper back to its original position. h. Power on and you will now come to the >>> without the OCP led code CB. 408 Bootable Floppy Using a PC Running WNT a. Locate the console firmware from either the latest Firmware Update CD or access it from our Cybrary site or over the web at one of the following locations. http://Cybrary.inet.cpqcorp.net/DOWNLOAD/FIRMWARE/SYSTEMS/ALPHA/ Cybrary Online CDs http://ftp.digital.com/pub/Digital/Alpha/firmware/ Alpha Firmware Internet Readme http://ftp.digital.com/pub/DEC/Alpha/firmware/ Alpha Firmware Internet Readme b. Copy the firmware to your system. c. Locate mkboot.exe and put it on the disk (C: in this example) It is available at one of the following locations http://Cybrary.inet.cpqcorp.net/DOWNLOAD/UTILITIES/SYSTEM/mkboot.zip http://ftp.digital.com/pub/Digital/Alpha/firmware/utilities/ d. Copy the firmware to the same drive as mkboot and rename it to fwupdate.exe e. Pull up a MSDOS window and use these two files to create bootable FSL floppy using the following procedure: Insert writeable FAT formatted floppy C:\mkboot fwupdate.exe Bad command or file name mkboot V1.1: create a bootable floppy Please insert a formatted diskette into drive A: and press and key: <CR> Number of sectors per track for this disk is 18 Writing image to drive A:. Press ^C to abort. Track: 45 Head: 0 Sector: 16 Done. f. Insert the floppy in the drive with the failsafe loader jumper enabled and power up. You should now get to the UPD> prompt. Bootable Floppy Using WNT on an Alpha a. Locate the firmware at one of the locations listed in the previous step. b. You can also go to the WEBsite at http://www.compaq.com/support/files/alphant/ select Compaq/DIGITAL Alpha Systems Firmware and HALs select alphaserver 1000 or 1000a and cpu type EV4 or EV5 c. Pull down the file AlphaBIOS Firmware for the specified system. d. Unzip this file. The file fwupdate.exe will be created. You may also find makeboot.exe. If it is not in the zip file go to Cybrary or the firmware website at http://Cybrary.inet.cpqcorp.net/DOWNLOAD/UTILITIES/SYSTEM/makeboot.zip http://ftp.digital.com/pub/Digital/Alpha/firmware/utilities/ e. Pull up a MSDOS window and use these two files to create bootable FSL floppy using the following procedure. The MAKEBOOT command must be executed from an Alpha system. You can also use mkboot.exe on the Alpha insert writeable floppy C:\makeboot -f fwupdate warning this will overwrite data on floppy continue: Yes f. Insert the floppy in the drive with the failsafe loader jumper in the position 7 and power up. You should now get to the UPD> prompt. 409 Bootable Floppy Using WNT When You Already Have a Copy of Makeboot.Exe a. Locate the console firmware from either the latest Firmware Update CD or access it over the web at one of the following locations. http://ftp.digital.com/pub/Digital/Alpha/firmware/ http://ftp.digital.com/pub/DEC/Alpha/firmware/ b. Locate makeboot.exe and put on the disk (C: in this example) c. Copy the firmware to the floppy and rename fwupdate.exe. d. Pull up a MSDOS window and use these two files to create bootable FSL floppy using the following procedure: Insert writeable FAT formatted floppy C:\makeboot -f fwupdate.exe Warning this will overwrite data on floppy continue?: Yes e. Insert the floppy in the drive with the failsafe loader jumper enabled and powerup. You should now get to the UPD> prompt. The failsafe loader floppy can be ordered for the AS1000a 5/300. The part number is AK-QYTCB-CA. 410 Description of the Different FailSafe Loaders (FSL) Available The failsafe loader (FSL) the main console firmware would have to be replaced different implementations is a method used to reload good console firmware when image is corrupted. Without the use of a FSL, hardware if the console image is corrupted. There are several of the FailSafe Loader (FSL) available. 1. Jumper selects reading a FSL floppy on power up that has console firmware loaded on it. • AlphaServer 300, 400, 800, 1000, 1000A • AlphaStation 200, 250, 255, 400, 500, 600, 600A 2. Switch or jumper selects the FSL ROM which is pre-loaded with a console image that allows a limited console so you can boot the firmware media. • AlphaServer 2x00, 2100A 3. Console determines firmware is corrupt and requests a special FSL floppy. In this case the floppy contains a temporary SRM console that allows you to get to the >>> so you can boot the firmware. • AlphaServer 1200, 4x00 • Digital Server 7000 Model 7300 • Digital Server 5000 Model 5300 • Digital Ultimate Workstation 4. Console determines firmware is corrupt and with LED and BEEP codes indicates it requires a FSL floppy. This floppy will include console firmware and will load on power up. • Digital Personal Workstation a/au 5. Console determines firmware is corrupt and will attempt to load temporary console code from floppy on powerup. Can also request the FSL by enabling jumpers or switches. • Compaq AlphaServer ES40 • Compaq AlphaServer DS20 • Compaq AlphaServer DS10 6. The following systems do NOT have a failsafe loader available • DEC 3000 all models • DEC 4000 all models • VAX/DEC 7000 and 10000 • AlphaServer 8200/8400 • AlphaServer GS60/GS60E/GS140 411 412 Procedure to Make a Bootable FailSafe Loader Floppy For Most AlphaStation/AlphaServer Systems Bootable Floppy Using OpenVMS 1. Locate the console firmware from either the latest Firmware Update CD or access it from out Cybrary site or over the web at one of the following locations. http://Cybrary.inet.cpqcorp.net/DOWNLOAD/FIRMWARE/SYSTEMS/ALPHA - Cybrary http://ftp.digital.com/pub/Digital/Alpha/firmware/ -Alpha Firmware Internet Readme http://ftp.digital.com/pub/DEC/Alpha/firmware/ - Alpha Firmware Internet Readme 2. Copy one of the following firmware .exe files to your system. 3. Follow this procedure to make a Bootable Floppy (this example is for the AlphaServer 300): Insert blank write enabled floppy into the floppy drive. $ Set file/attr=(rfm:fix,lrl:512,mrs:512,rat:none) as300_v7_0.exe $ init/dens=hd/index=begin dva0: fwupdate $ mount dva0: fwupdate $ create/directory dva0:[as300] $ copy/contig as300_v7_0.exe dva0:[as300]fwupdate.exe $ mcr writeboot Update VAX portion of boot block (default is Y) : No Update AXP portion of boot block (default is Y) : Yes Enter AXP boot file : dva0:[as300]fwupdate.exe $ dismount dva0: 4. Move the jumper to activate the Fail-Safe Loader floppy load as follows. 413 System Type Failsafe loader Jumper Setting AlphaServer 300 System Board J2 pins 1-2 AlphaServer 400 CPU J5 pins 1-2 AlphaServer 800 * CPU J1 position 7 on AlphaServer 1000/1000A EV4/xxx CPU J1 position 7 on AlphaServer 1000/1000A 5/300 CPU J4 position 7 on AlphaServer 1000/1000A 5/333 CPU J1 position 7 on AlphaServer 1000/1000A 5/400 CPU J1 position 7 on AlphaStation 200 Motherboard J2 pins 1-2 AlphaStation 250 Motherboard J2 pins 1-2 AlphaStation 255 Motherboard Switch 1 off, Switch 2 on AlphaStation 400 CPU J5 pins 1-2 AlphaStation 500 System board J13 AlphaStation 600 System Board W3 AlphaStation 600A CPU J1 position 7 on * V5.7 requires 2 floppies for FSL. See procedure on starting on page 359 5. Insert the floppy in DVA0 and power the machine off/on. 6. Power up the system. • On the AlphaServer 800 you will hear 1 beep indicating the SROM has successfully passed control to the SRM console. The machine will continue initialization and load the firmware off of the floppy and bring you to a UPD> prompt. • On power up the 1000/1000a OCP will display "loading floppy" then "starting cpu". The console screen will then reset and then the UPD> prompt will appear. If you get no other display on the console it is because the module may have the environmental variable CONSOLE set to graphics. If so connect a VT and proceed with the update or set the variable to graphics and reset. • On other platforms the power on selftest will run and the floppy will be read. The console will then display the UPD> prompt. 7. Update the console code by typing the following commands. 414 UPD> update update SRM: Yes update ARC: Yes UPD> verify UPD> exit 8. Power off the system and set the fail-safe jumper back to its original position. 9. Power on an you will now come to the >>> and the new firmware will be loaded. Bootable Floppy Using an Alpha Running WNT 1. Locate the console firmware from either the latest Firmware Update CD or access it from out Cybrary site or over the web at one of the following locations. http://Cybrary.inet.cpqcorp.net/DOWNLOAD/FIRMWARE/SYSTEMS/ALPHA/ Cybrary Online CDs http://ftp.digital.com/pub/Digital/Alpha/firmware/ Alpha Firmware Internet Readme 2. Copy the firmware to your system. 3. Locate makeboot.exe and put it on the disk (C: in this example). You can also use mkboot.exe on the Alpha. 4. Copy the firmware to the same drive as makeboot and rename it to fwupdate.exe 5. Pull up a MSDOS window and use these two files to create bootable FSL floppy using the following procedure: Insert writeable FAT formatted floppy C:\makeboot -f fwupdate.exe or C:\mkboot fwupdate.exe Warning this will overwrite data on floppy continue?: Yes (The makeboot command defaults to drive a, to specify a different device use -d b:) 6. Insert the floppy in the drive with the failsafe loader jumper enabled and power up. 7. You should now get to the UPD> prompt. Bootable Floppy Using a PC Running WNT 1. Locate the console firmware from either the latest Firmware Update CD or access it from out Cybrary site or over the web at one of the following locations. http://Cybrary.inet.cpqcorp.net/DOWNLOAD/FIRMWARE/SYSTEMS/ALPHA/ Cybrary Online CDs http://ftp.digital.com/pub/Digital/Alpha/firmware/ Alpha Firmware Internet Readme http://ftp.digital.com/pub/DEC/Alpha/firmware/ Alpha Firmware Internet Readme 2. Copy the firmware to your system. 3. Locate mkboot.exe and put it on the disk (C: in this example) 4. Copy the firmware to the same drive as mkboot and rename it to fwupdate.exe 415 5. Pull up a MSDOS window and use these two files to create bootable FSL floppy using the following procedure: Insert writeable FAT formatted floppy C:\mkboot fwupdate.exe Bad command or file name mkboot V1.1: create a bootable floppy Please insert a formatted diskette into drive A: and press and key: <CR> Number of sectors per track for this disk is 18 Writing image to drive A:. Press ^C to abort. Track: 45 Head: 0 Sector: 16 Done. 6. Insert the floppy in the drive with the failsafe loader jumper enabled and power up. You should now get to the UPD> prompt. Bootable Floppy Using WNT and AlphaBIOS Firmware Zip File 1. Go to http://www.compaq.com/support/files/alphant/firmware/index.html. 2. Select the appropriate CPU type and speed. 3. Pull down the ARC or AlphaBIOS Firmware for that machine. 4. Unzip this file. The files fwupdate.exe and makeboot.exe will be created. Note: Not all platforms have the makeboot.exe file in them. Check the zip files at the website listed in step 1 or download Makeboot.exe from here in .zip format. You can also use mkboot.exe on the Alpha platform. 5. From an Alpha system running Windows NT, pull up a MSDOS window and use these two files to create bootable FSL floppy using the following procedure: Insert writeable FAT formatted floppy C:\makeboot -f fwupdate.exe Warning this will overwrite data on floppy continue: Yes (The makeboot command defaults to drive a, to specify a different drive use -d b: ) 6. Insert the floppy in the drive with the failsafe loader jumper enabled and power up. 7. You should now get to the UPD> prompt. 416 AlphaServer 800/Digital Server 3000 Model 3300/3305 New FSL Procedure Overview Starting with the V5.7 console firmware, two floppies will be needed to update console firmware. One floppy contains the LFU image and the SRM console firmware. The other floppy contains AlphaBIOS firmware. This procedure will be valid for creating a FSL floppy or a normal boot floppy. There will be methods listed to use a PC running NT or and Alpha running NT or UNIX. Necessary Files The following procedures require different files depending on the platform and/or operating system. • • • • • mkboot.exe makeboot.exe mkbootfirm.exe cru.exe crarcrom.exe Alpha/PC NT utility to make a bootable floppy Alpha NT utility to make a bootable floppy Alpha UNIX utility to make a bootable floppy LFU utility with SRM firmware embedded AlphaBIOS firmware These files are located either on Cybrary or on the firmware website at http://ftp.digital.com/pub/Digital/Alpha/firmware/interim/as800/. Creating a bootable firmware floppy PC - Windows NT 1. Locate and save the following files to your PC on the top level directory of any disk. • mkboot.exe PC/ALPHA NT image to make a bootable disk • cru.exe LFU and SRM firmware • crarcrom.exe AlphaBIOS firmware 2. Fat format two floppies 3. From an MSDOS window execute the following command mkboot cru.exe 4. Save the crarcrom.exe file to a second fat formatted floppy. 5. The first floppy is bootable and will also function as a FSL floppy. Insert the floppy in the system and at the >>> type B DVA0. 6. At the UPD> type exit and answer Y to the question Do you want to do a manual update. This will bring you back to the UPD> prompt. 7. Now update SRM with the command UPD> UPDATE SRM 8. To update AlphaBIOS, install the second floppy and type the command UPD> update arc -path fat:\crarcrom.exe/dva0 . If you execute the verify command it will indicate file is missing for the AlphaBIOS firmware. 417 Alpha - Windows NT 1. Locate and save the following files to your Alpha. Save them on the top level directory of any disk. • makeboot.exe Alpha image to make a bootable disk • mkboot.exe PC/ALPHA NT image to make a bootable disk • cru.exe LFU and SRM firmware • crarcrom.exe AlphaBIOS firmware 2. Fat format two floppies 3. From an MSDOS window execute the following command makeboot -f cru.exe or mkboot cru.exe 4. Save the crarcrom.exe file to a second fat formatted floppy. 5. The first floppy is bootable and will also function as a FSL floppy. Insert the floppy in the system and at the >>> type B DVA0. 6. At the UPD> type exit and answer Y to the question Do you want to do a manual update. This will bring you back to the UPD> prompt. 7. Now update SRM with the command UPD> UPDATE SRM 8. To update AlphaBIOS, install the second floppy and type the command UPD> update arc -path fat:\crarcrom.exe/dva0 . If you execute the verify command it will indicate file is missing for the AlphaBIOS firmware. Alpha - TRU64 UNIX 1. Locate and save the following files to your Alpha. • mkbootfirm.exe Alpha/UNIX image to make a bootable disk • mkbootfirm.tar Alpha/UNIX .exe image in tar format • cru.exe LFU and SRM firmware • crarcrom.exe AlphaBIOS firmware 2. If you loaded the .tar file you must untar it using the command # tar xvf mkbootfirm.tar. This will create a mkbootfirm directory. Make sure you save cru.exe to this directory. If you loaded the mkbootfirm image form the interim directory of the firmware webpage, you will need to set execute permissions on the file. Use the command # chmod 755 mkbootfirm or chmod +x mkbootfirm 3. Insert floppy diskette 1. 4. Change directory to where files were downloaded. Make sure mkbootfirm and cru.exe are in the same directory # cd [to directory with files] 5. Format the floppy. # fddisk -fmt /dev/rfd0a or With Tru64 UNIX V5.0 you can do one of the following # fddisk -fmt /dev/rdisk/floppy0a or # cd /dev # ./MAKEDEV fd0 418 # fddisk -fmt /dev/rfd0a 6. From directory where files are located execute the following # ./mkbootfirm clu.exe |dd of=/dev/rfd0c bs=64k 7. Insert floppy diskette 2. 8. Create a soft link to /dev/fddrive with the following command # ln -s /dev/rfd0c /dev/fddrive 9. Format the floppy. See step 5 for commands. 10. Add a DOS format onto the floppy disk # /usr/bin/mtools/mformat -s 18 a: 11. Use mwrite to low level copy UNIX to DOS the SRM and ARC firmware. # /usr/bin/mtools/mwrite clsrmrom.exe a:\clsrmrom.exe # /usr/bin/mtools/mwrite clarcrom.exe a:\clarcrom.exe 12. Insert the first floppy in the system and at the >>> type b dva0. 13. Answer Y to the "Do you want to do a manual update? [y/(n)]" question. This will bring you back to the UPD> prompt. 14. At the UPD> prompt update SRM with the command UPD> update srm 15. Now insert the second floppy. Upgrade AlphaBIOS firmware with the command UPD> update arc -path fat:\crarcrom.exe/dva0 419 420 How to Build and Use a FSL Floppy on An AlphaServer 4000/4100/1200 Overview The fail-safe loader is a software routine that loads the SRM console image from floppy. Once the is running you will want to run LFU to update FEPROM 0 with a new image. FEPROM 0 contains images of the SROM, XSROM, PAL, decompression, and SRM console code. If the fail-safe loader loads, the following conditions exist on the machine: • • • The SROM has passed its tests and successfully unloaded the XSROM. If the SROM fails to unload both copies of XSROM, it reports the failure to the control panel display and COM1 if possible, and the system hangs. The XSROM has completed its B-cache and memory tests but has failed to unload the PALcode in FEPROM 0 sector 1 or the SRM console code. The XSROM reports the errors encountered and loads the fail-safe loader. FSL floppy Information The AlphaServer 4000/4100/1200 systems do not have a jumper to enable the failsafe loader. Instead if the console is corrupt you will be asked to insert a FSL floppy. This will allow a temporary console to be loaded so you can type LFU and upgrade the firmware from CD, floppy or over the network. The following article describes three methods of building the floppy and procedures on how to use it. There are also pointers to documentation and the rhboot.exe , mkboot.exe and makeboot.exe images you will need. You can order a FSL floppy - part number QZ-00WAA.HC.5.0 or you can build one using the following procedure. How to Build a FSL loader Floppy Using OpenVMS You need to obtain the console file rhboot.exe file from Cybrary. It is located at http://Cybrary.inet.cpqcorp.net/DOWNLOAD/UTILITIES/SYSTEM/rhboot_v5.exe . You can also locate it inside the following .zip files on Cybrary at http://Cybrary.inet.cpqcorp.net/DOWNLOAD/UTILITIES/SYSTEM/mkboot_rhboot.zip http://Cybrary.inet.cpqcorp.net/DOWNLOAD/UTILITIES/SYSTEM/makeboot_rhboot.zip This will give you a zip file with the rhboot.exe and either mkboot.exe (PC/ALPHA image) or makeboot.exe (Alpha image) You can also find the rhboot.exe file internally by going to Harmny::firm03:[rawhide.prerelease.fsl.v50] . HARMNY::FIRM03:[RAWHIDE.PRERELEASE.FSL.V50] $README.TXT;3 FSL_RELNOTE.PS;1 MAKE_FSL_FLOPPY.COM;2 RHBOOT.EXE;1 Filename $README.TXT FSL_RELNOTE.PDF MAKE_FSL_FLOPPY.COM RHBOOT_V5.EXE 3 60 2 1629 26-SEP-1997 26-SEP-1997 26-SEP-1997 17-SEP-1997 10:43:56.00 16:21:56.00 10:49:02.00 17:51:39.00 Description V5.0 Fail Safe Loader Readme file AlphaServer Fail Safe Loader Release Note (PDF) AV-R1FZB-TE .Com file to make a FSL floppy with OpenVMS V5.0 AlphaServer 1200 / 4x00 Recovery Console Image The latest rhboot.exe image (version 5 - 09/17/97) in this area will work for recovering corrupt consoles of revision v1.2-4, as well as all future versions. The following command procedure will build an FSL floppy. This procedure needs to run on an Alpha VMS system. The file will prompt the user for the .exe file to write to the floppy. The rhboot.exe file is located at may30::firm03:[rawhide.prerelease.fsl.v50]rhboot.exe. The procedure will always format the floppy first (which takes a couple minutes). 421 The command procedure for building the FSL floppy diskette follows: $! $! make_rawhide_floppy.com $! $! P1 = Alpha firmware EXE file to be writebooted to a floppy $! $ if P1 .eqs. "" then inquire P1 "Firmware file to writeboot" $ inquire ignore "Insert blank HD floppy in DVA0, then continue" $ set verify $ init /density=hd/index=begin dva0: rhboot $ mount dva0: rhboot $ create /directory dva0:[as4x00] $ copy /contig ’P1’ dva0:[as4x00]rhboot.exe $ mcr writeboot n y dva0:[as4x00]rhboot.exe $ dismount dva0: $ set noverify $ exit How to Build a FSL Loader Floppy Using a PC Running WNT 1. Obtain the rhboot.exe and mkboot.exe files. This is a zip file that has rhboot.exe, mkboot.exe and mkboot.txt. 2. Format a floppy diskette 3. Go to the DOS prompt create a FSL floppy by typing the following. C:\> mkboot rhboot.exe Bad command or file name mkboot V1.1: create a bootable floppy Please insert a formatted diskette into drive A: and press and key: <CR> Number of sectors per track for this disk is 18 Writing image to drive A:. Press ^C to abort. Track: 45 Head: 0 Sector: 16 Done. 4. Insert the floppy in the system with corrupt firmware and init. 5. At the LP00>>> prompt type LFU and update firmware from CD, another floppy or over ethernet. How to Build a FSL floppy Using an Alpha running WNT 1. Obtain the rhboot.exe and makeboot.exe files. This is a zip file that has rhboot.exe and makeboot.exe. 2. Format a floppy diskette 3. Go to the DOS prompt create a FSL floppy by typing the following. C:\> makeboot -f rhboot.exe makeboot utility, version 002. Executable file rhboot.exe, size 834048 <bytes> 1629 blocks. Warning: All data on the floppy will be overwritten. Continue? [Yes/No <default>]: yes 422 Geometry for Drive a: Media Type 3.5, 1.44 MB, 512 bytes/sector Cylinders 80 Tracks/Cylinder 2 Sectors/Track 18 Writing floppy 100 % done Note: The makeboot command defaults to drive a, to specify a different device use d b: Insert the floppy in the system with corrupt firmware and init. 4. At the LP00>>> prompt type LFU and update firmware from CD, another floppy or over ethernet. Procedure 1. On init the console reports a problem with the console code and requests you insert the FSL floppy and reset the system SROM V1.1 on cpu0 SROM V1.1 on cpu1 XSROM V4.9 on cpu1 XSROM V4.9 on cpu0 Bcache testing complete on cpu1 Bcache testing complete on cpu0 mem_pair0 64 MB mem_pair1 64 MB mem_pair2 64 MB mem_pair3 64 MB 20..20..21..21..23.. please wait 6 seconds for T24 to complete 24..24.. Memory testing complete on cpu0 Memory testing complete on cpu1 Sctr 3 CONSLE code CHKSM fail FSL V2.0 on cpu0 FSL failed Insert FSL floppy Reset system Note: With only a graphics terminal you will not see the above console messages. The OCP will show FSL V2.0 on cpu0 Load FSL floppy If you want to see the console output connect a serial terminal to the COM1 port of the AlphaServer 4100 or AlphaServer 1200. 2. Insert the FSL floppy and reset the system. The system will load the fsl console and give you and LP00>>> prompt. SROM V1.1 on cpu0 SROM V1.1 on cpu1 XSROM V4.9 on cpu1 XSROM V4.9 on cpu0 Bcache testing complete on cpu1 Bcache testing complete on cpu0 mem_pair0 64 MB mem_pair1 64 MB mem_pair2 64 MB mem_pair3 64 MB 20..20..21..21..23.. please wait 6 seconds for T24 to complete 24..24.. Memory testing complete on cpu0 Memory testing complete on cpu1 423 Sctr 3 CONSLE code CHKSM fail ................................................ starting console on CPU 0 sizing memory 3 64 MB DIMM 3 64 MB DIMM 3 64 MB DIMM 3 64 MB DIMM Secondary CPU1 failed to join probing IOD1 hose 1 bus 0 slot 1 NCR 53C810 bus 0 slot 4 PCI-PCI Bridge probing PCI-PCI Bridge, bus 2 bus 2 slot 0 Qlogic ISP1020 probing IOD0 hose 0 bus 0 slot 1 PCEB probing EISA Bridge, bus 1 bus 0 slot 2 S3 Trio64/Trio32 bus 0 slot 3 DECchip 21140-AA configuring I/O adapters ncr0, hose 1, bus 0, slot 1 isp0, hose 1, bus 2, slot 0 floppy0, hose 0, bus 1, slot 0 tulip0, hose 0, bus 0, slot 3 System temperature is 28 degrees C AlphaServer 1200 Console V5.0-2, 17-SEP-1997 17:51:33 Power-up tests have detected a problem with your system! Reset the system and observe the OCP display and/or type SHOW CONFIG and SHOW POWER to obtain more information. LP00>>> 3. The FSL console has been loaded. You can now update the console by going into LFU and selecting firmware from CD (cda0), another floppy (dva0) or the network (ewa0). LP00>>>lfu ***** Loadable Firmware Update Utility ***** Select firmware load device (cda0, dva0, ewa0), or Press <return> to bypass loading and proceed to LFU: cda0 Please enter the name of the firmware files list, or Press <return> to use the default filename [AS1200FW]: <CR> Copying Copying Copying Copying Copying Copying Copying AS1200FW from DKA500.5.0.1.1 . [as1200]TCREADME from DKA500.5.0.1.1 . [as1200]TCSRMROM from DKA500.5.0.1.1 ......................... [as1200]TCARCROM from DKA500.5.0.1.1 ............ [options]CIPCA420 from DKA500.5.0.1.1 . [options]DFXAA320 from DKA500.5.0.1.1 . [options]KZPSAA12 from DKA500.5.0.1.1 . ---------------------------------------------------------------------------Function Description ---------------------------------------------------------------------------Display Displays the system’s configuration table. Exit Done exit LFU (reset). List Lists the device, revision, firmware name, and update revision. Lfu Restarts LFU. Readme Lists important release information. Update Replaces current firmware with loadable data image. Verify Compares loadable and hardware images. ? or Help Scrolls this function table. ---------------------------------------------------------------------------- 424 4. A list here shows the srmflash console is corrupt UPD> list Device AlphaBIOS srmflash Current Revision Filename V5.32-0 arcrom (56377.31685-4294951srmrom cipca_fw dfxaa_fw kzpsa_fw Update Revision V5.32-0 V5.0-2 A420 3.10 A12 5. Update the firmware UPD> update WARNING: updates may take several minutes to complete for each device. Confirm update on: AlphaBIOS [Y/(N)] y DO NOT ABORT! Updating to V5.32-0... ....... Verifying V5.32-0... AlphaBIOS PASSED. Confirm update on: srmflash [Y/(N)] y srmflash update rev V5.0-2 is less than current rev (56377.31685-4294951774. Continue [Y/(N)] y srmflash V5.0-2... DO NOT ABORT! Updating to V5.0-2... ................ Verifying PASSED. 6. Verify the update UPD> verify AlphaBIOS srmflash Verifying V5.32-0... PASSED. Verifying V5.0-2... PASSED. 7. Exit and after re-init the console is no longer corrupt UPD> exit Initializing... SROM V1.1 on cpu0 SROM V1.1 on cpu1 XSROM V5.0 on cpu0 XSROM V5.0 on cpu1 BCache testing complete on cpu0 BCache testing complete on cpu1 mem_pair0 64 MB mem_pair1 64 MB mem_pair2 64 MB mem_pair3 64 MB 20..20..21..21..23.. please wait 6 seconds for T24 to complete 24..24.. Memory testing complete on cpu1 Memory testing complete on cpu0 starting console on CPU 0 sizing memory 0 64 MB DIMM 1 64 MB DIMM 2 64 MB DIMM 3 64 MB DIMM starting console on CPU 1 probing IOD1 hose 1 bus 0 slot 1 - NCR 53C810 bus 0 slot 4 - PCI-PCI Bridge probing PCI-PCI Bridge, bus 2 bus 2 slot 0 - QLogic ISP1020 425 probing IOD0 hose 0 bus 0 slot 1 - PCEB probing EISA Bridge, bus 1 bus 0 slot 2 - S3 Trio64/Trio32 bus 0 slot 3 - DECchip 21140-AA configuring I/O adapters... ncr0, hose 1, bus 0, slot 1 isp0, hose 1, bus 2, slot 0 floppy0, hose 0, bus 1, slot 0 tulip0, hose 0, bus 0, slot 3 System temperature is 28 degrees C AlphaServer 1200 Console V5.0-2, 25-SEP-1997 12:42:27 P00>>> 426 How to Build and Use a FSL Floppy on An Digital Server 7000 Model 7300 and 5000 model 5300 Overview The Digital Server 7300 is an NT ONLY version of the AlphaServer 4100 and the Digital Server is an NT ONLY version of the AlphaServer 1200. The Digital Server 7300 is essentially an AlphaServer 4100 and the Digital Server 5300 is essentially an AlphaServer 1200. The following procedures are valid on either platforms however you will need to do the OpenVMS procedure on a different system to create this floppy.. The examples show an AlphaServer 1200, however the same files and procedures are used on both the Digital Servers and AlphaServers The fail-safe loader is a software routine that loads the SRM console image from floppy. Once the console is running you will want to run LFU to update FEPROM 0 with a new image. FEPROM 0 contains images of the SROM, XSROM, PAL, decompression, and SRM console code. If the fail-safe loader loads, the following conditions exist on the machine: • • • The SROM has passed its tests and successfully unloaded the XSROM. If the SROM fails to unload both copies of XSROM, it reports the failure to the control panel display and COM1 if possible, and the system hangs. The XSROM has completed its B-cache and memory tests but has failed to unload the PALcode in FEPROM 0 sector 1 or the SRM console code. The XSROM reports the errors encountered and loads the fail-safe loader. FSL floppy Information The Digital Server 7000 Model 7300 and 5000 Model 5300 systems do not have a jumper to enable the failsafe loader. Instead if the console is corrupt you will be asked to insert a FSL floppy. This will allow a temporary console to be loaded so you can type LFU and upgrade the firmware from CD, floppy or over the network. The following article describes three methods of building the floppy and procedures on how to use it. There are also pointers to documentation and the rhboot.exe, mkboot.exe and makeboot.exe images you will need. You can order a FSL floppy - part number QZ-00WAA.HC.5.0 or you can build one using the following procedure. How to Build a FSL loader Floppy Using OpenVMS You will need to do the OpenVMS procedure on a different platform to create the failsafe loader floppy since the Digital Servers are NT only machines. You need to obtain the console file rhboot.exe file from Cybrary. It is located at http://Cybrary.inet.cpqcorp.net/DOWNLOAD/UTILITIES/SYSTEM/rhboot_v5.exe . You can also locate it inside the following .zip files on Cybrary at http://Cybrary.inet.cpqcorp.net/DOWNLOAD/UTILITIES/SYSTEM/mkboot_rhboot.zip http://Cybrary.inet.cpqcorp.net/DOWNLOAD/UTILITIES/SYSTEM/makeboot_rhboot.zip This will give you a zip file with the rhboot.exe and either mkboot.exe (PC or ALPHA image) or makeboot.exe (Alpha image) You can also find the rhboot.exe file internally by going to Harmny::firm03:[rawhide.prerelease.fsl.v50] . HARMNY::FIRM03:[RAWHIDE.PRERELEASE.FSL.V50] $README.TXT;3 FSL_RELNOTE.PS;1 MAKE_FSL_FLOPPY.COM;2 RHBOOT.EXE;1 3 60 2 1629 26-SEP-1997 26-SEP-1997 26-SEP-1997 17-SEP-1997 10:43:56.00 16:21:56.00 10:49:02.00 17:51:39.00 427 Filename Description $README.TXT V5.0 Fail Safe Loader Readme file FSL_RELNOTE.PDF AlphaServer Fail Safe Loader Release Note (PDF) AV-R1FZB-TE MAKE_FSL_FLOPPY.COM .Com file to make a FSL floppy with OpenVMS RHBOOT_V5.EXE V5.0 Digital Server 7000 Model 7300 and 5000 Model 5300 Recovery Console Image The latest rhboot.exe image (version 5 - 09/17/97) in this area will work for recovering corrupt consoles of revision v1.2-4, as well as all future versions. The following command procedure will build an FSL floppy. This procedure needs to run on an Alpha VMS system. The file will prompt the user for the .exe file to write to the floppy. The rhboot.exe file is located at may30::firm03:[rawhide.prerelease.fsl.v50]rhboot.exe. The procedure will always format the floppy first (which takes a couple minutes). The command procedure for building the FSL floppy diskette follows: $! $! make_rawhide_floppy.com $! $! P1 = Alpha firmware EXE file to be writebooted to a floppy $! $ if P1 .eqs. "" then inquire P1 "Firmware file to writeboot" $ inquire ignore "Insert blank HD floppy in DVA0, then continue" $ set verify $ init /density=hd/index=begin dva0: rhboot $ mount dva0: rhboot $ create /directory dva0:[as4x00] $ copy /contig ’P1’ dva0:[as4x00]rhboot.exe $ mcr writeboot n y dva0:[as4x00]rhboot.exe $ dismount dva0: $ set noverify $ exit How to Build a FSL Loader Floppy Using a PC Running WNT Obtain the rhboot.exe and mkboot.exe files. This is a zip file that has rhboot.exe, mkboot.exe and mkboot.txt. 1. Format a floppy diskette 2. Go to the DOS prompt create a FSL floppy by typing the following. C:\> mkboot rhboot.exe Bad command or file name mkboot V1.1: create a bootable floppy Please insert a formatted diskette into drive A: and press and key: <CR> Number of sectors per track for this disk is 18 Writing image to drive A:. Press ^C to abort. Track: 45 Head: 0 Sector: 16 Done. 3. Insert the floppy in the system with corrupt firmware and init. 4. At the LP00>>> prompt type LFU and update firmware from CD, another floppy or over ethernet. 428 How to Build a FSL floppy Using an Alpha running WNT Obtain the rhboot.exe and makeboot.exe files. This is a zip file that has rhboot.exe and makeboot.exe. 1. Format a floppy diskette 2. Go to the DOS prompt create a FSL floppy by typing the following. C:\> makeboot -f rhboot.exe makeboot utility, version 002. Executable file rhboot.exe, size 834048 <bytes> 1629 blocks. Warning: All data on the floppy will be overwritten. Continue? [Yes/No <default>]: yes Geometry for Drive a: Media Type 3.5, 1.44 MB, 512 bytes/sector Cylinders 80 Tracks/Cylinder 2 Sectors/Track 18 Writing floppy... 100 % done Note: The makeboot command defaults to drive a, to specify a different device use -d b 3. Insert the floppy in the system with corrupt firmware and init. 4. At the LP00>>> prompt type LFU and update firmware from CD, another floppy or over ethernet. Procedure 1. On init the console reports a problem with the console code and requests you insert the FSL floppy and reset the system SROM V1.1 on cpu0 SROM V1.1 on cpu1 XSROM V4.9 on cpu1 XSROM V4.9 on cpu0 BCache testing complete on cpu1 BCache testing complete on cpu0 mem_pair0 64 MB mem_pair1 64 MB mem_pair2 64 MB mem_pair3 64 MB 20..20..21..21..23.. please wait 6 seconds for T24 to complete 24..24.. Memory testing complete on cpu0 Memory testing complete on cpu1 Sctr 3 -CONSLE code CHKSM fail FSL V2.0 on cpu0 FSL failed -- Insert FSL floppy -- Reset system Note: With only a graphics terminal you will not see the above console messages. Instead the OCP will show FSL V2.0 on cpu0 Load FSL floppy If you want to see the console output connect a serial terminal to the COM1 port on the DigitalServer 7300 or DigitalServer 5300. 429 2. Insert the FSL floppy and reset the system. The system will load the fsl console and give you and LP00>>> prompt. SROM V1.1 on cpu0 SROM V1.1 on cpu1 XSROM V4.9 on cpu1 XSROM V4.9 on cpu0 BCache testing complete on cpu1 BCache testing complete on cpu0 mem_pair0 64 MB mem_pair1 64 MB mem_pair2 64 MB mem_pair3 64 MB 20..20..21..21..23.. please wait 6 seconds for T24 to complete 24..24.. Memory testing complete on cpu0 Memory testing complete on cpu1 Sctr 3 -CONSLE code CHKSM fail ................................................... starting console on CPU 0 sizing memory 0 64 MB DIMM 1 64 MB DIMM 2 64 MB DIMM 3 64 MB DIMM Secondary CPU1 failed to join probing IOD1 hose 1 bus 0 slot 1 - NCR 53C810 bus 0 slot 4 - PCI-PCI Bridge probing PCI-PCI Bridge, bus 2 bus 2 slot 0 - QLogic ISP1020 probing IOD0 hose 0 bus 0 slot 1 - PCEB probing EISA Bridge, bus 1 bus 0 slot 2 - S3 Trio64/Trio32 bus 0 slot 3 - DECchip 21140-AA configuring I/O adapters... ncr0, hose 1, bus 0, slot 1 isp0, hose 1, bus 2, slot 0 floppy0, hose 0, bus 1, slot 0 tulip0, hose 0, bus 0, slot 3 System temperature is 28 degrees C AlphaServer 1200 Console V5.0-2, 17-SEP-1997 17:51:33 Power-up tests have detected a problem with your system! Reset the system and observe the OCP display and/or type SHOW CONFIG and SHOW POWER to obtain more information. LP00>>> 3. The FSL console has been loaded. You can now update the console by going into LFU and selecting firmware from CD (cda0), another floppy (dva0) or the network (ewa0). LP00>>>lfu ***** Loadable Firmware Update Utility ***** Select firmware load device (cda0, dva0, ewa0), or Press <return> to bypass loading and proceed to LFU: cda0 Please enter the name of the firmware files list, or Press <return> to use the default filename [AS1200FW]: <CR> Copying Copying Copying Copying AS1200FW from DKA500.5.0.1.1 . [as1200]TCREADME from DKA500.5.0.1.1 . [as1200]TCREADME from DKA500.5.0.1.1 . [as1200]TCSRMROM from DKA500.5.0.1.1 ........................... 430 Copying Copying Copying Copying [as1200]TCARCROM from DKA500.5.0.1.1 ............... [options]CIPCA420 from DKA500.5.0.1.1 . [options]DFXAA320 from DKA500.5.0.1.1 ... [options]KZPSAA12 from DKA500.5.0.1.1 ... ---------------------------------------------------------------------------Function Description ---------------------------------------------------------------------------Display Displays the system’s configuration table. Exit Done exit LFU (reset). List Lists the device, revision, firmware name, and update revision. Lfu Restarts LFU. Readme Lists important release information. Update Replaces current firmware with loadable data image. Verify Compares loadable and hardware images. ? or Help Scrolls this function table. ---------------------------------------------------------------------------4. A list here shows the srmflash console is corrupt UPD> list Device AlphaBIOS srmflash Current Revision Filename V5.32-0 arcrom (56377.31685-4294951srmrom cipca_fw dfxaa_fw kzpsa_fw Update Revision V5.32-0 V5.0-2 A420 3.10 A12 5. Update the firmware UPD> update WARNING: updates may take several minutes to complete for each device. Confirm update on: AlphaBIOS AlphaBIOS PASSED. [Y/(N)] y DO NOT ABORT! Updating to V5.32-0... ....... Verifying V5.32-0... Confirm update on: srmflash [Y/(N)] y srmflash update rev V5.0-2 is less than current rev (56377.31685-4294951774. Continue [Y/(N)] y srmflash V5.0-2... DO NOT ABORT! Updating to V5.0-2... ................ Verifying PASSED. 6. Verify the update UPD> verify AlphaBIOS srmflash Verifying V5.32-0... PASSED. Verifying V5.0-2... PASSED. 431 7. Exit and after re-init the console is no longer corrupt UPD> exit Initializing... SROM V1.1 on cpu0 SROM V1.1 on cpu1 XSROM V5.0 on cpu0 XSROM V5.0 on cpu1 BCache testing complete on cpu0 BCache testing complete on cpu1 mem_pair0 64 MB mem_pair1 64 MB mem_pair2 64 MB mem_pair3 64 MB 20..20..21..21..23.. please wait 6 seconds for T24 to complete 24..24.. Memory testing complete on cpu1 Memory testing complete on cpu0 starting console on CPU 0 sizing memory 0 64 MB DIMM 1 64 MB DIMM 2 64 MB DIMM 3 64 MB DIMM starting console on CPU 1 probing IOD1 hose 1 bus 0 slot 1 - NCR 53C810 bus 0 slot 4 - PCI-PCI Bridge probing PCI-PCI Bridge, bus 2 bus 2 slot 0 - QLogic ISP1020 probing IOD0 hose 0 bus 0 slot 1 - PCEB probing EISA Bridge, bus 1 bus 0 slot 2 - S3 Trio64/Trio32 bus 0 slot 3 - DECchip 21140-AA configuring I/O adapters... ncr0, hose 1, bus 0, slot 1 isp0, hose 1, bus 2, slot 0 floppy0, hose 0, bus 1, slot 0 tulip0, hose 0, bus 0, slot 3 System temperature is 28 degrees C AlphaServer 1200 Console V5.0-2, 25-SEP-1997 12:42:27 P00>>> 432 Making a FailSafe Loader Floppy for a Compaq AlphaServer ES40 Overview The Compaq AlphaServer ES40’s failsafe loader can be invoked automatically when the console determines the firmware is corrupt or manually by putting jumpers J22 on pins 2-3. This will force the floppy to be read on power up. This procedure requires three floppies. One will contain SRM firmware to bring the system to a >>>. Floppy two will contain the LFU firmware image to bring the system to the UPD> prompt. The third floppy will contain SRM and AlphaBIOS firmware images. You can also use the LFU floppy as the FSL disk. It will bring you to the LFU> prompt instead of the >>>. From there you can use the third floppy to update firmware and rescue the systems. Every ES40 ships with a failsafe loader floppy. You can order a floppy from LOS. The part number is QC-081AA-HC. Files clsrmrom.sys cl67srmrom.sys clsrmrom.exe cl67srmrom.exe clarcrom.exe clu.exe ile.exe flu.exe glu.exe mkboot.exe mkbootfirm EV6 SRM firmware .sys file EV67/EV68 SRM firmware .sys file EV6 SRM firmware .exe file EV67/EV68 SRM firmware .exe file AlphaBIOS image ES40 LFU image ES40lp LFU image ES40cv LFU image TS20/TS40 LFU image PC image to make bootable floppies Unix image to make bootable floppies Obtain the necessary files depending on system type from the firmware website at http://ftp.digital.com/pub/Digital/Alpha/firmware/readmes/. the files can also be obtained from Cybrary at http://cybrary.cxo.cpqcorp.net/HW/SYS/ALPHA/ES40/es40_fsl.html How to build the FSL floppy using the clsrmrom.sys or clsrmrom.exe SRM image WNT/W2K - PC (clsrmrom.sys ONLY) a. Locate the clsrmrom.sys and mkboot.exe files and copy them to a disk on your PC. b. Fat format a floppy diskette. d. From an MSDOS window execute the command mkboot clsrmrom.sys This will make the firmware update utility bootable. For EV67 firmware rename the file ev67srm.sys before executing the mkboot command. e. Insert the floppy into the system with the corrupt firmware and power up the system. During init it will read the floppy and execute the code. It will stop at the >>> prompt. f. At the >>> prompt you can now boot firmware off of the CD to reload the console firmware. 433 WNT - Alpha (clsrmrom.sys or clsrmrom.exe) a. Locate the files clsrmrom.sys and mkboot.exe or clsrmrom.exe and makeboot.exe. For EV67/EV68 CPUs use the cl67srmrom files. b. Copy the files to a disk on your Alpha. c. Fat format a floppy diskette. d. If using EV67/EV68 SRM firmware rename the files cl67srm.exe or cl67srm.sys. e. From an MSDOS window one of the following commands. makeboot -f clsrmrom.exe for EV6 CPUs makeboot -f cl67srmrom.exe for EV67/EV68 CPUs mkboot clsrmrom.sys This will make the firmware update utility bootable. f. Insert the floppy into the system with the corrupt firmware and power up the system. During init it will read the floppy and execute the code. It will stop at the >>> prompt. g. At the >>> prompt you can now boot firmware off of the CD to reload the console firmware. Tru64 UNIX (clsrmrom.exe ONLY) a. Download the following files to a directory on your Tru64 UNIX system. They can be found on the firmware website interim directory at http://ftp.digital.com/pub/DEC/Alpha/firmware/readmes/v6.1/es40/es40.zip • mkbootfirm - Used to create a bootable floppy under Tru64Unix • clsrmrom.exe - EV6 SRM console image. • cl67srmrom.exe - EV67 SRM console image. b. Insert a floppy diskette. c. Change directory to where files were downloaded. # cd [to directory with files] d. You must set mkbootfirm file permissions to have execute permissions. # chmod 755 mkbootfirm e. Format the floppy. # fddisk -fmt /dev/rfd0a or With Tru64 UNIX V5.0 you can do one of the following # fddisk -fmt /dev/rdisk/floppy0a or # cd /dev # ./MAKEDEV fd0 # fddisk -fmt /dev/rfd0a f. From directory where files are located execute the following # ./mkbootfirm clsrmrom.exe |dd of=/dev/rfd0c bs=64k for EV6 CPUs # ./mkbootfirm cl67srmrom.exe |dd of=/dev/rfd0c bs=64k for EV67 CPUs Example of an update using the clsrmrom.exe as the failsafe loader SROM V1.0 CPU # 00 @ SROM program starting Reloading SROM SROM V2.2-F CPU # 00 @ SROM program starting 0500 0500 MHz <---- System Powerup or reset MHz 434 Starting secondary on CPU #1 Starting secondary on CPU #2 Starting secondary on CPU #3 Bcache data tests in progress Bcache address test in progress CPU parity and ECC detection in progress Bcache ECC data tests in progress Bcache TAG lines tests in progress Memory sizing in progress Memory configuration in progress Memory data test in progress Memory address test in progress Memory pattern test in progress Memory thrashing test in progress Memory initialization loading program from floppy ................... Code execution complete (transfer control) <---- Reads FSL floppy OpenVMS PALcode V1.61-2, Tru64 UNIX PALcode V1.54-2 starting console on CPU 0 initialized idle PCB initializing semaphores initializing heap initial heap 200c0 memory low limit = 166000 heap = 200c0, 17fc0 initializing driver structures initializing idle process PID initializing file system initializing hardware initializing timer data structures lowering IPL CPU 0 speed is 500 MHz create dead_eater create poll create timer create powerup access NVRAM Memory size 512 MB testing memory ... probe I/O subsystem probing hose 1, PCI bus 0, slot 6 -- ewa -- DE500-BA Network Controller probing hose 0, PCI probing PCI-to-PCI bridge, bus 2 probing PCI-to-ISA bridge, bus 1 bus 0, slot 2 -- vga -- DEC PowerStorm bus 2, slot 0 -- pka -- QLogic ISP10x0 bus 0, slot 4 -- pkb -- NCR 53C895 bus 0, slot 15 -- dqa -- Acer Labs M1543C IDE bus 0, slot 15 -- dqb -- Acer Labs M1543C IDE starting drivers entering idle loop initializing keyboard starting console on CPU 1 initialized idle PCB initializing idle process PID lowering IPL CPU 1 speed is 500 MHz create powerup starting console on CPU 2 initialized idle PCB initializing idle process PID lowering IPL CPU 2 speed is 500 MHz create powerup 435 starting console on CPU 3 initialized idle PCB initializing idle process PID lowering IPL CPU 3 speed is 500 MHz create powerup os_type: UNIX - console CIPCA driver not started Memory Testing and Configuration Status Array Size Base Address --------- ---------- ---------------0 256Mb 0000000000000000 1 256Mb 0000000010000000 512 MB of System Memory Testing the System Testing the Disks (read only) Testing the Network Partition 0, Memory base: 000000000, size: 020000000 initializing GCT/FRU at 1a4000 AlphaServer ES40 Console V5.5-68, built on Jul 21 1999 at 17:02:39 P00>>> <--- Stops at >>> 436 How to build the FSL floppy using the LFU firmware update image NT - PC or Alpha a. Go to the ES40 directory on the firmware website at http://ftp.digital.com/pub/Digital/Alpha/firmware/ b. Locate the appropriate zip file. It will include the correct LFU.exe image and firmware files for the system. All the examples are for an ES40. Other platforms will use flu.exe, glu.exe or ilu.exe Copy the file clu.exe, clsrmrom.exe for EV6 CPUs or cl67srmrom.exe for EV67 CPUs, clarcrom.exe and mkboot.exe to a disk on your PC or Alpha. You can also use makeboot.exe (Alpha Only) It is available on Cybrary at http://cybrary.inet.cpqcorp.net/DOWNLOAD/UTILITIES/SYSTEM/makeboot.zip c. Fat format three floppy diskettes d. From an MSDOS window execute the command mkboot clu.exe or makeboot -f clu.exe. This will make the firmware update utility bootable. e. Copy clsrmrom.exe or cl67srmrom.exe and clarcrom.exe each to one floppy. If you are using CL67srmrom.exe be sure to rename it to cl67srm.exe. f. Insert the floppy with clu.exe into the system with the corrupt firmware and power up the system. It will read the floppy and boot to the UPD prompt. g. At the UPD> prompt type exit and the answer Y to the question Do you want to do a manual update? [y/(n)] h. This will bring you back to the UPD> prompt. At the UPD prompt update rmc, srom and tig firmwares. These are include in the *lu.exe file i. Now insert the floppy with the file EV6 clsrmrom.exe or EV67 cl67srm.exe and execute one of the commands UPD> update srm -path fat:clsrmrom.exe/dva0 for EV6 CPUs UPD> update srm -path fat:cl67srm.exe/dva0 for EV67 CPUs j. When the update completes insert the floppy with the file clarcrom.exe and execute the command UPD> update abios -path fat:clarcrom.exe/dva0 k. Exit and reset the machine. If you moved jumpers return them to original position. Firmware has been upgraded. Tru64 UNIX This method requires two floppies. One with the LFU utility and the other with the system firmware. a. Download the following files to a directory on your Tru64 UNIX system. They can be found on the firmware website interim directory at http://ftp.digital.com/pub/Digital/Alpha/firmware/interim/es40 or the ES40 directory located at http://ftp.digital.com/pub/Digital/Alpha/firmware/readmes/v6.1/es40/ • • • • • mkbootfirm clu.exe clsrmrom.exe Cl67srmrom.exe clarcrom.exe - Used to create a bootable floppy under Tru64Unix Loadable Firmware Utility plus RMC firmware. EV6 SRM console image. EV67 SRM console image. AlphaBIOS console image. b. Insert floppy diskette 1. 437 c. Change directory to where files were downloaded. # cd [to directory with files] d. You must set mkbootfirm file permissions to have execute permissions. # chmod 755 mkbootfirm e. Format the floppy. # fddisk -fmt /dev/rfd0a or With Tru64 UNIX V5.0 you can do one of the following # fddisk -fmt /dev/rdisk/floppy0a or # cd /dev # ./MAKEDEV fd0 # fddisk -fmt /dev/rfd0a f. From directory where files are located execute the following # ./mkbootfirm clu.exe |dd of=/dev/rfd0c bs=64k g. Insert floppy diskette 2. h. You need to create special device files for device fd0 if you have not already done this. # cd /dev # ./MAKEDEV fd0 i. Change directory to where files were downloaded. # cd [to directory with files] j. Create a soft link to /dev/fddrive with the following command # ln -s /dev/rfd0c /dev/fddrive k. Format the floppy. # fddisk -fmt /dev/rfd0a or With Tru64 UNIX V5.0 you can do one of the following # fddisk -fmt /dev/rdisk/floppy0a or # fddisk -fmt /dev/rfd0a l. Add a DOS format onto the floppy disk # /usr/bin/mtools/mformat -s 18 a: m. Use mwrite to low level copy UNIX to DOS the SRM and ARC firmware. # /usr/bin/mtools/mwrite clsrmrom.exe a:\clsrmrom.exe EV6 CPUs # /usr/bin/mtools/mwrite cl67srmrom.exe a:\cl67srmrom.exe EV67 CPUs # /usr/bin/mtools/mwrite clarcrom.exe a:\clarcrom.exe Example of an update using the clu.exe as the failsafe loader SROM V1.0 CPU # 00 @ SROM program starting Reloading SROM 0500 MHz SROM V2.2-F CPU # 00 @ 0500 MHz SROM program starting Starting secondary on CPU #1 Starting secondary on CPU #2 Starting secondary on CPU #3 Bcache data tests in progress Bcache address test in progress CPU parity and ECC detection in progress Bcache ECC data tests in progress Bcache TAG lines tests in progress Memory sizing in progress Memory configuration in progress Memory data test in progress Memory address test in progress Memory pattern test in progress 438 Memory thrashing test in progress Memory initialization loading program from floppy ...................... Code execution complete (transfer control) OpenVMS PALcode V1.61-4, Tru64 UNIX PALcode V1.54-4 starting console on CPU 0 initialized idle PCB initializing semaphores initializing heap initial heap 200c0 memory low limit = 5c0000 heap = 200c0, 17fc0 initializing driver structures initializing idle process PID initializing file system initializing hardware initializing timer data structures lowering IPL CPU 0 speed is 500 MHz create dead_eater create poll create timer create powerup access NVRAM Memory size 512 MB testing memory ... probe I/O subsystem probing hose 1, PCI bus 0, slot 6 -- ewa -- DE500-BA Network Controller probing hose 0, PCI probing PCI-to-PCI bridge, bus 2 probing PCI-to-ISA bridge, bus 1 bus 0, slot 2 -- vga -- DEC PowerStorm bus 2, slot 0 -- pka -- QLogic ISP10x0 bus 0, slot 4 -- pkb -- NCR 53C895 bus 0, slot 15 -- dqa -- Acer Labs M1543C IDE bus 0, slot 15 -- dqb -- Acer Labs M1543C IDE starting drivers entering idle loop initializing keyboard *** Last RMC shutdown reason - CTERM AC input available from Power Supply AC input available from Power Supply AC input available from Power Supply starting console on CPU 1 initialized idle PCB initializing idle process PID lowering IPL CPU 1 speed is 500 MHz create powerup starting console on CPU 2 initialized idle PCB initializing idle process PID lowering IPL CPU 2 speed is 500 MHz create powerup starting console on CPU 3 initialized idle PCB initializing idle process PID lowering IPL CPU 3 speed is 500 MHz create powerup os_type: UNIX - console CIPCA driver failure *** 0 at last shutdown 1 at last shutdown 2 at last shutdown not started 439 Checking dqa0.0.0.15.0 for the option firmware files. . . dqa0.0.0.15.0 has no media present or is disabled via the RUN/STOP switch dqa0.0.0.15.0 has no media present or is disabled via the RUN/STOP switch Checking dva0 for the option firmware files. . . If you have a floppy containing option firmware, Please insert it now and hit <return> when ready. <return> Option firmware not copied. ***** Loadable Firmware Update Utility ***** -----------------------------------------------------------------------------Function Description -----------------------------------------------------------------------------Display Displays the system’s configuration table. Exit Done exit LFU (reset). List Lists the device, revision, firmware name, and update revision. Readme Lists important release information. Update Replaces current firmware with loadable data image. Verify Compares loadable and hardware images. ? or Help Scrolls this function table. -----------------------------------------------------------------------------UPD> exit Do you want to do a manual update? [y/(n)] y ***** Loadable Firmware Update Utility ***** -----------------------------------------------------------------------------Function Description -----------------------------------------------------------------------------Display Displays the system’s configuration table. Exit Done exit LFU (reset). List Lists the device, revision, firmware name, and update revision. Readme Lists important release information. Update Replaces current firmware with loadable data image. Verify Compares loadable and hardware images. ? or Help Scrolls this function table. -----------------------------------------------------------------------------UPD> update srm -path fat:clsrmrom.exe/dva0 for EV6 CPUs UPD> update srm -path fat:cl67srm.exe/dva0 for EV67 CPUs Confirm update on: SRM [Y/(N)]y WARNING: updates may take several minutes to complete for each device. DO NOT ABORT! SRM Updating to v5.5-107... Verifying v5.5-107... PASSED. UPD> update abios -path fat:clarcrom.exe/dva0 Confirm update on: Abios [Y/(N)]y WARNING: updates may take several minutes to complete for each device. Abios DO NOT ABORT! Updating to v5.70... Verifying v5.70... PASSED. UPD> exit 440 Making a FailSafe Loader Floppy for a Compaq AlphaServer ES45 Overview The Compaq AlphaServer ES45’s failsafe loader can be invoked automatically when the console determines the firmware is corrupt or manually by putting jumpers J22 on pins 2-3. This will force the floppy to be read on power up. There is a zip file available on the firmware website that has all the necessary file. How to build the floppy using es45fsl.exe file with mkboot.exe or makeboot.exe WNT/W2k - PC a. Obtain the es45fsl.zip file from the firmware website at http://ftp.digital.com/pub/DEC/Alpha/firmware/readmes/v6.1/es45/es45fsl.zip. b. Unzip the archize and copy the files to your PC. c. FAT format a floppy. d. Open a DOS window and use the MKBOOT command to create the floppy C:\ mkboot es45_fsl.exe mkboot V1.1: create a bootable floppy Please insert a formatted diskette into drive A: and press any key : <CR> Number of sectors per track for this disk is 18 Writing image to drive A:. Press ^C to abort. Track: 43 Head: 0 Sector: 13 Done. e. Insert the floppy into the system and on power up it will read the FSL image. f. Exit and reset the machine. If you moved jumpers return them to original position. Firmware has been upgraded. If TIG firmware was upgraded power cycle the machine. WNT - Alpha a. Locate the files clsrmrom.sys and mkboot.exe or clsrmrom.exe and makeboot.exe. b. Copy the files to a disk on your Alpha. c. Fat format a floppy diskette. d. From an MSDOS window issue one of the following commands. makeboot -f es45_fsl.exe mkboot es45_fsl.exe This will make the firmware update utility bootable. e. Insert the floppy into the system with the corrupt firmware and power up the system. During init it will read the floppy and execute the code. It will stop at the >>> prompt. f. At the >>> prompt you can now boot firmware off of the CD to reload the console firmware or type B DVA0 to load firmware off the floppy. g. Select the default bootfile of ES45FW.TXT h. At UPD type exit then Y to enter manual mode. i. Update all firmwares. 441 UNIX – Alpha a. Obtain the es45fsl.zip file from the firmware website at http://ftp.digital.com/pub/DEC/Alpha/firmware/readmes/v6.1/es45/es45fsl.zip. b. Unzip the archize and copy the es45fsl.exe file to your Alpha. c. Also locate the amkeboot.exe program. Download the following files to a directory on your Tru64 UNIX system. They can be found on the firmware website interim directory at http://ftp.digital.com/pub/Digital/Alpha/firmware/interim/es40 or the ES40 directory located at http://ftp.digital.com/pub/Digital/Alpha/firmware/readmes/v6.1/es40/ • • mkbootfirm es45fsl.exe - Used to create a bootable floppy under Tru64Unix ES45 FSL console image. b. Insert a floppy diskette. c. Change directory to where files were downloaded. # cd [to directory with files] d. You must set mkbootfirm file permissions to have execute permissions. # chmod 755 mkbootfirm e. Format the floppy. # fddisk -fmt /dev/rfd0a or With Tru64 UNIX V5.0 you can do one of the following # fddisk -fmt /dev/rdisk/floppy0a or # cd /dev # ./MAKEDEV fd0 # fddisk -fmt /dev/rfd0a f. From directory where files are located execute the following # ./mkbootfirm es45fsl.exe |dd of=/dev/rfd0c bs=64k 442 Updating the FailSafe Booter (FSB) on a Compaq AlphaServer DS20 Overview In order for the failsafe booter code to work on the DS20/DS20E, new FSB code must first be loaded. The FSB code must be at least rev 3.2 to properly work. The FSB code is part of the V5.6 firmware update. The code can be loaded off CD or from floppy. You will need to execute a UPDATE FSB or UPDATE * command at the UPD> prompt. Procedure to update FSB code CD 1. Boot the V5.6 firmware update CD. 2. Execute a list command at the UPD> prompt. FSB_FW may or may not show up at this time. 3. Update the SRM, AlphaBIOS and any options. If the FSB_FW file doesn’t show up you must exit and reboot the CD. If it does show up you can execute an UPDATE FSB command. 4. If you must reboot the firmware CD, you should see FSB_FW when you do a list. Execute the UPDATE FSB command. 5. exit Floppy The files supplied from the firmware website will require 2 floppies unless you edit the pc264fw.txt file. 1. Copy the files ds20srm.zip and ds20opt.zip to your system or go to the DS20 directory of the Firmware Website to get them. 2. Open the zip files and extract all the files to two fat formatted floppies. 3. Insert the 1st floppy in the drive and execute the LFU command 4. When it asks for file name enter pc264fw.txt or return 5. When it asks for the options floppy insert it. 6. At the UPD> prompt type list 7. Then update SRM, AlphaBIOS, options and FSB 8. Finally type verify to see if update was successful and exit If you want to modify the pc264fw.txt file to include SRM, AlphaBIOS and FSB you can do the update with one floppy. 443 444 Making a FailSafe Booter Floppy for a Compaq AlphaServer DS20 Overview The Compaq AlphaServer DS20’s failsafe booter can be invoked automatically when the console determines the firmware is corrupt or manually by setting switch S2-1 to on. This will cause the floppy to be read during init and the console code will be loaded into memory and executed. The system will come to a >>>. From here you should be able to boot the firmware CD and update the console firmware. It will search the floppy for a list of filenames and attempt to load them in. How to build the FSL floppy a. Copy the file pc264srm.rom onto a 1.44 MB FAT formatted floppy disk and rename it to dp264srm.rom or fwupdate.exe. b. Power up the machine with the floppy inserted into DVA0. c. The floppy will search for the following files Filename DP264srm.rom DP264srm.sys DP264nt.rom DP264nt.cmp DP264dbm.cmp DP264dbm.rom fwupdate.exe OCP output srm.rom srm.sys nt.rom nt.cmp dbm.cmp dbm.rom fwupdate.exe d. When it finds one of these files it will be read into memory and executed. If the correct image is provided you will come to a >>>. e. Now you should be able to boot the console CD and update firmware. 445 446 Making a FailSafe Booter Floppy for a Compaq AlphaServer DS10 Overview The Compaq AlphaServer DS10’s failsafe booter can be invoked automatically when the console determines the firmware is corrupt or manually by setting switch SW3 #8 to on. This will cause the floppy to be read during init and the console code will be loaded into memory and executed. The system will come to a >>>. From here you should be able to boot the firmware CD and update the console firmware. How to build the FSL floppy a. Copy the file pc264srm.rom onto a 1.44 MB FAT formatted floppy disk and rename it fwupdate.exe. b. Power up the machine with the floppy inserted into DVA0. c. The floppy will be read and the system will execute the code and come to a >>>. d. Now you should be able to boot the console CD and update firmware. 447 448 Making a FailSafe Loader Floppy on a Digital Personal WorkStation Overview This document contains the procedure for repairing a Digital Personal Workstation A or AU series workstation (433a/au, 500a/au, 600a/au, etc) which is unable to function due to corrupted firmware in the MLB (main logic board) flash ROM. Flash ROMs can be corrupted by: • • • System power outage or glitch during a firmware upgrade. Cord kicked out, reset pressed, power hiccup from utility, etc). Upgrading with incorrect or corrupt firmware. (bad FTP download, use of wrong utility, etc) In rare cases, updating from extremely old or unreleased firmware to very new firmware. Firmware Recovery Procedure Corrupted POST code will generally result in no activity on the MLB LEDs after power on. This is the most serious corruption and must be recovered by replacing the Motherboard (MLB). If there are MLB LEDs lit but upper level firmware (AlphaBIOS or SRM) does not start, look up the LED code in the service guide to determine the cause. Also, listen for beep codes. On older MLB and riser combinations, the beep codes are difficult to hear unless you place your ear near the speaker. This is a hardware design flaw which was corrected sometime after first shipment. If any LED or beep codes are present, POST is probably not corrupted, but attempting recovery is not harmful. Isolating POST Corruption Corrupted AlphaBIOS or SRM firmware can result in any one or more of the following: • • • LED code of 1100 1101 (1=on), and SRM or AlphaBIOS won’t start. Beep code sequence of 1-1-4 (listen carefully at lower front of box a few seconds after power on) indicating corrupt firmware. The floppy drive LED illuminating after several seconds (the POST code has detected corrupt firmware and is trying to load new firmware from a recovery diskette). This type of corruption can generally be recovered without having to install the recovery SROM on the MLB. In any of the cases above, to repair corrupt firmware, follow these steps: Post (SROM) not corrupted 1. Create a bootable firmware recovery diskette using one of the procedures below. 2. Insert the floppy into the target system and power on the system. 3. The recovery SROM loads the firmware update image from the recovery diskette you created. The floppy drive light will remain lit until the firmware load is complete. It may take a minute or two to load. 4. The firmware update utility will begin executing after it has loaded, and will appear on the target system’s VGA monitor. It may take 10-20 seconds for your monitor to display the update utility’s menu. You will need to use the target system's keyboard for input. 5. Update the firmware. 449 POST (SROM) corrupted 1. If POST code is corrupted, then replace the MLB and return the bad MLB with a note saying the SROM is corrupt. Miata Main Logic Board with EV5 CPU Miata a/au Main Logic Board with EV5 CPU Chilled Miata Main Logic Board Miata GL Main Logic Board (EV56) Miata GL Main Logic Board (EV56) Miata GL Main Logic Board (EV56) 433MHz 500MHz 400MHz 500MHz 600MHz 54-24767-01 54-24767-02 54-25222-05 54-25222-01 54-25222-02 54-25222-03 2. Create a bootable firmware recovery diskette using one of the procedures below. 3. Insert the floppy into the target system. 4. The recovery SROM loads the firmware update image from the recovery diskette you created. The floppy drive light will remain lit until the firmware load is complete. It may take a minute or two to load. 5. The firmware update utility will begin executing after it has loaded, and will appear on the target system’s VGA monitor. It may take 10-20 seconds for your monitor to display the update utility’s menu. You will need to use the target system's keyboard for input. 6. Update the firmware. IMPORTANT: It is best to consult the release notes for the firmware update utility you downloaded and read them before proceeding. The release notes will contain a matrix of supported operating system versions along with minimum required firmware revision. There will also be specific instructions for operating the firmware update utility. In many cases it may be essential that NT HAL be updated along with the AlphaBIOS firmware. Failure to do so will render NT unbootable. Procedures to build the floppy Make a Bootable Floppy Using OpenVMS 1. 2. 3. Locate the firmware.exe file on CD or on the WEB. See Pointer at bottom of this page. Rename the downloaded file to fwupdate.exe. The following example assumes the floppy is called DVA0. Enter the following commands in the directory containing fwupdate.exe to make a bootable floppy. You will need system privileges. $ $ $ $ $ $ set file/attr=(rfm:fix,lrl:512,mrs:512,rat:none) fwupdate.exe init/dens=HD/index=begin dva0: fwupdate mount dva0: fwupdate create/dir dva0:[digitalpw] copy/contiguous fwupdate.exe dva0:[digitalpw] mcr writeboot Update VAX portion of boot block (default is Y) : No Update AXP portion of boot block (default is Y) : Yes [enter AXP bootfile:] dva0:[digitalpw]fwupdate.exe $ dismount dva0: 450 Make a Bootable Floppy Using Tru64 UNIX 1. 2. 3. 4. 5. 6. 7. Locate the firmware.exe file on CD or on the WEB. See Pointer at bottom of this page. Copy the firmware.exe file from the appropriate directory to your system and rename it fwupdate.exe Download the file mkbootfirm.tar from Cybrary. It is also available at the firmware website. ftp://ftp.digital.com/pub/Digital/Alpha/firmware/utilities/mkbootfirm.tar You can untar mkbootfirm on your target Tru64 UNIX system with the command: # tar xvf mkbootfirm.tar Make sure you have a floppy that has been low-level formatted. For example, to low-level format a floppy in drive zero type # fddisk -fmt /dev/rfd0c Change default to directory with mkbootfirm.exe # cd mkbootfirm Run mkbootfirm on the .exe firmware image that you downloaded. mkbootfirm uses a .exe firmware image to create a file that can be dd’d to floppy. The following will create a bootable floppy from a downloaded .exe firmware image: # ./mkbootfirm fwupdate.exe | dd of=/dev/rfd0c bs=64k Note: Assumes mkbootfirm.exe is in current directory and floppy is in drive zero Make a Bootable Floppy Using 2. 3. 4. 5. 6. Windows 95 or Windows NT on an ALPHA. 1. Locate the firmware.exe file on CD or on the WEB. See Pointers at bottom of this page. Copy the firmware to your system. Locate makeboot.exe and put it on the disk (C: in this example). You can also use mkboot.exe on the Alpha. Copy the firmware to the same drive as makeboot and rename it to fwupdate.exe Pull up a MSDOS window and use these two files to create bootable FSL floppy. Insert a writeable FAT formatted floppy in the drive and execute the following command in the MSDOS window.. C:\makeboot -f fwupdate.exe Warning this will overwrite data on floppy continue?: Yes The makeboot command defaults to drive a, to specify a different device use -d b: Make a Bootable Floppy Using DOS, Windows 3.1, Windows 95 or Windows NT on a PC. 1. 2. 3. 4. 5. 6. Locate the firmware.exe file on CD or on the WEB. See Pointer at bottom of this page. Copy the firmware.exe file from the appropriate directory to your system and rename it fwupdate.exe Locate mkboot.exe and put it on the disk (C: in this example) Copy the firmware to the same drive as mkboot and rename it to fwupdate.exe Pull up a MSDOS window and use these two files to create bootable FSL floppy. Insert a writeable FAT formatted floppy in the drive and execute the following command in the MSDOS window.. C:\mkboot fwupdate.exe Bad command or file name mkboot V1.1: create a bootable floppy Please insert a formatted diskette into drive A: and press and key: <CR> Number of sectors per track for this disk is 18 Writing image to drive A:. Press ^C to abort. Track: 45 Head: 0 Sector: 16 Done. 451 Updating System Firmware 1. Once the update utility has started, something similar to the following will be displayed on the target system’s monitor: (boot pmem:180000 -flags unit=1) bootstrap code read in base = 180000, image_start = 0, image_bytes = 800000 initializing HWRPB at 2000 initializing page table at 7c8000 initializing machine state setting affinity to the primary CPU jumping to bootstrap code *** Digital Personal WorkStation 433au -- Firmware Update *** Use HELP or ? for help Update Verify List Show DEbug NDebug ? Apu-> 2. To recover the SRM and AlphaBIOS firmware, type UPDATE. The following information will be displayed as the firmware is being updated. The actual information may change between versions. Apu-> APU-I APU-I APU-I APU-I APU-I APU-I APU-I APU-I APU-I APU-I APU-I APU-I APU-I APU-I APU-I APU-I update ARE YOU READY TO PROGRAM (SRM ) ROM DEVICE ? (Y/N) y ERASING (SRM ) ROM DEVICE PROGRAMMING (SRM ) ROM DEVICE VERIFY LOADED (SRM ) ROM IMAGE VERIFY LOADED (SRM ) ROM IMAGE DONE PROGRAMMING (SRM ) ROM COMPLETED ERASING (ARC /AlphaBIOS) ROM DEVICE PROGRAMMING (ARC /AlphaBIOS) ROM DEVICE VERIFY LOADED (ARC /AlphaBIOS) ROM IMAGE VERIFY LOADED (ARC /AlphaBIOS) ROM IMAGE DONE PROGRAMMING (ARC /AlphaBIOS) ROM COMPLETED ERASING (SROM ) ROM DEVICE PROGRAMMING (SROM ) ROM DEVICE VERIFY LOADED (SROM ) ROM IMAGE VERIFY LOADED (SROM ) ROM IMAGE DONE PROGRAMMING (SROM ) ROM COMPLETED 3. Alternatively, you may choose to recover only SRM or AlphaBIOS, and not both. This may be the best option if the customer wishes to retain an older version of firmware which did not get corrupted. In this case, specify which one you’d like to recover after the update command. For example, “update alphabios” or “update srm”. 4. To recover the POST code, type “update srom”. Depending on the console version this step may not be necessary.. Apu-> update SROM APU-I Are you ready to Program Device? (y/n)y APU-I Programming SROM device APU-I Programming SROM device completed Apu-> 452 5. Your same each • • target system’s firmware is now recovered. Restore your system to the configuration it was in before you began this recovery operation. Follow step below if applicable to restore your system: Remove the recovery floppy from the target system. Power machine on, and verify proper operation. Locations For Firmware on the Internet/Intranet http://cybrary.inet.cpqcorp.net/DOWNLOAD/FIRMWARE/SYSTEMS/ALPHA/default.html http://ftp.digital.com/pub/Digital/Alpha/firmware/ ftp://ftp.digital.com/pub/Digital/Alpha/firmware/ http://ftp.digital.com/pub/DEC/Alpha/firmware/ ftp://ftp.digital.com/pub/DEC/Alpha/firmware/ http://www.workstation.digital.com/firmware.html http://www.compaq.com/support/files/alphant/firmware/index.html 453 454 Creating a Bootable Firmware Floppy For the AlphaStation 200, 250 and 255 Overview Attempting to switch consoles on half-flash machines (all AlphaStation 255’s and some AlphaStation 200’s) can be difficult without the firmware update CD. This article will provide a .zip file that will allow you use an Intel PC to build a bootable firmware update floppy to switch from the SRM console used by OpenVMS and Tru64 UNIX to the ARC console which is used by Windows NT. Background Most Alpha machines can have both the SRM and ARC consoles loaded in ROMs at the same time. However all AlphaStation 255’s and some AlphaStation 200’s have only 2 flash ROMs and these machine BOTH consoles loaded at the same time. You must select either the SRM console for OpenVMS and Tru64 UNIX or the ARC console NT. If you need to switch between the 2 consoles you must do so by reloading the appropriate firmware. The half-flash being resold by Onsale, Web Auction and others. These machines will come with the SRM console loaded. If the user wants to will need to load and ARC console. Usually the customer does not have the firmware CD or systems running OpenVMS or Tru64 UNIX in create bootable floppies. The following procedure will allow the customer/engineer to make a bootable floppy using an Intel PC. the flash can not have for Windows machines are run NT they order to Description of the Files The .zip files allow you to make bootable floppies using an Intel based PC. following files are available on Cybrary. as200fw.zip as200fw.dd dd.exe readme.txt as200fw_readme.txt as255fw.zip as255fw.dd dd.exe readme.txt as255fw_readme.txt ddfordos.zip dd.exe dd.man The AlphaStation 200/250 Readme AlphaStation 255 Readme dd program for DOS (Intel) How the files were created The firmware files for the AlphaStation 200/250 and the AlphaStation 255 V5.2 CD were used to create a bootable unix floppy using the procedures documented on the firmware pages. Once the floppy was created the UNIX dd command was used to create the as200fw.dd and as255fw.dd files. This file was then zipped with a DOS version on the dd utility. By executing the dd command on a DOS Intel platform you can copy the bootable UNIX disk image to a fat formatted floppy so you can boot the firmware update utility from the >>>. Procedure for creating the floppy 1. Fat format a 1.44 MB floppy using an Intel PC. 2. Unzip the appropriate file for the system you are working on. as200fw.zip for the AlphaStation 200 and 250 as255fw.zip for the AlphaStation 255 3. Copy the contents of the zip files to the same disk and directory 4. Pull up a MSDOS window and execute the following command C:\> dd if=as255fw.dd of=a: bs=36b count=80 455 5. Place the floppy in the systems floppy drive and boot it. >>> boot dva0 6. At the APU> prompt update the ARC console firmware Apu-> update arc 7. Exit the power cycle the machine. 8. You will now come up into the ARC console to allow building or booting Windows NT. 456 AlphaServer 2100 "Cpu Type Not Supported" with B2041-AA 5/375 CPU Problem: After upgrading a AlphaServer 2100 to a 5/375 B2041-AA processor, you get a message "cpu type not supported" when booting Digital UNIX 3.2D-1. This occurred on SRM 5.0-80 and SRM 5.2. The install guide which comes with the cpu modules AS2x00 Series CPU Upgrade (EK-KN4xx-AA) list an nvram patch procedure, however the user guide is talking about DIGITAL UNIX 3.2C minimum or 3.2F the recommended. The install guide does not reference DIGITAL UNIX 3.2D-1. DIGITAL UNIX 3.2d-1 doesn’t know what the KN490-AA (B2041-AA) is and dumps the error "unsupported cpu type." Solution: In order to use 3.2D-1 with the new 375 MHz cpu’s (B2041-AA), the following locations must be modified in the nvram patch document that is shipped with the AS2x00 series upgrade guide. First upgrade the SRM firmware to 5.2, then change the following NVRAM addresses. Original address deposits: -------------------------P00>> edit nvram *1000 echo "Applying KN490 patch" *1010 d -p -l 2270 5 5 *1020 d -p -l 24f0 5 5 *1030 d -p -l 2770 5 5 *1040 d -p -l 29f0 5 5 *exit P00>> init new deposits -----------2230 24b0 2730 29b0 Note: If you upgrade to a later version of Digital UNIX then remove this patch. P00>> edit nvram editing ’nvram’ 184 bytes read in *list *1000 echo "Applying KN490 patch" *1010 d -p -l 2230 5 5 *1020 d -p -l 24b0 5 5 *1030 d -p -l 2730 5 5 *1040 d -p -l 29b0 5 5 *10 *20 *30 *40 *50 *exit 0 bytes written out to nvram 457 458 Procedure to Update Firmware on a 2100 When an engineer replaces a B2110-AA module it doesn’t have ARC firmware loaded. They will need to load firmware and update the SRM and ARC consoles. When doing the update then can corrupt the firmware if the following procedure is not followed. What happens is they boot LFU off CD and tell it UPDATE SRM. They get a message that says the firmware on the module was greater than on the CD. Are you sure? They have been answering NO here then doing an UPDATE ARC. They now have a version of SRM that is not compatible with the version of ARC. I have been told you can insert an EV5 CPU in place of the EV4 CPU in this example and get it to come up to a point where you can correct the firmware. Otherwise you must replace the standard I/O module. Basic steps to be followed: - Install J5 Jumper on module Install module Power up system Install CD-ROM Invoke LFU Update Firmware Power down Remove J5 jumper (for fail-safe loader) How to Upgrade Firmware For AlphaServer 2x00 Model 4/2XX Systems P00>>> boot -fl 0,a0 dka600 Bootfile: [alpha2100]as2100_e4_v5_4.exe (depends on CD and CPU type) UPD> update *srm* At the confirmation prompt, enter Y Confirm update on: [Y/(N)]: Y Caution: The update will take several minutes. Do not terminate update Failure to do so may result in an inoperable system. Note You may get a message indicating that the version of SRM is greater than the version on the CD. It will ask you if you want to continue with the upgrade (Not sure of exact statement). Let it downgrade the version. Failure to do so may render the module inoperative. UPD> update *arc* At the confirmation prompt, enter Y Confirm update on: sbarcflash [Y/(N)]: Y Caution: The update will take several minutes. Do not terminate update Failure to do so may result in an inoperable system. UPD> exit Answer Yes to the following to update the fail-safe loader: Do you want to do a manual update [y/(n)] y AlphaServer 2100 Console V5.3-2 , built on May 1 1998 at 19:39:34 P00>>> update fsl or update -path sbfslrom -target sbfslflash (update -path sbfslrom -target sbfslflash) new: 5.3-2 old: 4.1-21 New image has a smaller version than existing image 459 Consistency checks failed, continuing anyway. FEPROM UPDATE UTILITY -----> CAUTION <----EXECUTING THIS PROGRAM WILL CHANGE YOUR CURRENT ROM Do you really want to continue [Y/N] ? : y DO NOT ATTEMPT TO INTERRUPT PROGRAM EXECUTION! DOING SO MAY RESULT IN LOSS OF OPERABLE STATE. The program will take at most several minutes. Setting to all 0s... Setting to all 1s... Programming... Verifying... Update successful P00>>> lfu P00>>> exit Do you want to do a manual update? [y/(n)] y Setting to all 1s... Programming... Verifying... Update successful Please reset the system...... Press the DC ON/OFF button to off then on to reset the system. 460 AlphaServer 2100 FailSafe Loader (FSL) Overview and Functions Overview The fail-safe loader (FSL) is redundant or backup console that allows you to update or restore the SRM console if it is corrupted. The AlphaServer 2000, 2100 and 2100A systems utilize a ROM on either the standard I/O, motherboard or backplane module, depending on system type, to store the failsafe loader console. As long as the fail-safe loader is intact you will get to an ash> prompt on the console and an OCP display of FAIL I/O_00 0004 when the FSL has been activated. I have also seen FAIL I/O_00 04 and FAIL I/O_04 documented. The FSL is activated under the following circumstances. • • • • • • SRM console firmware is corrupted during upgrade (power failure, load failed) Error in the nonvolatile nvram file Hardware failure during power-up prevents the console firmware from loading. A configuration error, such as an incorrect environment variable setting. Driver error (console driver) FSL enable switch is activated. If you are at the ash> prompt you can restore the corrupt console from CD. If you are unable to get to the ash> prompt, the FSL is NOT intact and the module that houses the firmware will need to be replaced. Note Booting from the CD was not supported in FSL versions before V3.6 . If you have an older version of the FSL console you will need to boot firmware from a floppy. Fail-Safe Loader Functions From the FSL program, you can: • • • Edit the nvram file (using the edit command) Assign a correct value to an environment variable (using the show and set commands) Start individual drivers using the init -driver ew command to start the MOP driver or init -driver dv to start the floppy driver. The init -driver 6 command in FSL mode starts all available drivers. Note The nonvolatile file, nvram, is shipped from the factory with no contents. The customer can use the edit command to create a customized script or command file that is executed as the last step of every power-up. Automatic Activation If the SRM console firmware is corrupted, the fail-safe loader is automatically loaded into memory. The system power-up display appears, followed by the fail-safe loader ash> prompt: AlphaServer 2100 Console V4.3-111, built on Sep 12 1995 at 15:38:55 ash> Also, the power-up/diagnostic display on the operator control panel displays a FAIL I/O_00 0004 message. At the ash> prompt, reinstall the console firmware files, using your latest firmware update media. 461 Manual Activation If necessary, you can activate the FSL manually as follows: • • • • • • • Make sure the system power is off. Locate the FSL jumpers (AlphaServer 2000/2100) or switches (AlphaServer 2100A) Enable the FSL as follows depending on system type Install jumper J6 on the AlphaServer 2000 Backplane Install jumper J6 on the AlphaServer 2100/2100A LP Standard IO Move the FSL enable switch (top switch) on the backplane module to the right (enabled). (2100A) Move the FSL enable switch (right switch) on the backplane module down (enabled). (2100A RM) Power on the system. You will come to an ash> prompt. Perform limited commands from the FSL console, as described in the next section. When you have finished, power down the system and return the jumpers or switches to their original position. The FSL permits you to get to a console, with limited functionality, when one of the following is the cause of a problem getting to the console program under normal power-up: • • • • A power failure or accidental power down during a firmware upgrade An error in the nonvolatile nvram file An incorrect environment variable setting A driver error Note The FSL for the 2100 and 2100A are not compatible. The same is true for the FSL loader for the EV4 and EV5 CPUs. When Do You Update the FSL The FSL ROM does NOT need to updated everytime you upgrade firmware. As long as you have a valid FSL console loaded you normally do not need to update it. These systems can use either EV4 or EV5 CPUs. The console code for these CPUs are different. If you replace the module or backplane on a system that houses the FSL ROM you will get a module that is loaded at the factory with both the EV4 and EV5 code so that module will work regardless of which CPU you use. In this case the first thing you will need to do is load firmware AND update the FSL. The following are the reasons you will need to update the FSL. • • • • When you upgrade from EV4 to EV5 CPUs When you downgrade from EV5 to EV4 CPUs When you replace the Standard IO, Backplane or Motherboard/Backplane Module If you do not get an ash> when the FSL is manually activated How Do You Update The FSL ROM The AlphaServer 2000/2100/2100A fail-safe loader code is resident on a ROM on either the standard I/O, motherboard or backplane module depending on system type. If you need to update the FSL ROMs for any of the above reasons you will need to follow one of the following methods. You can update them from the UPD> prompt or from the P00>>> after telling it you want to do a manual update. The manual update allows you to run LFU scripts from the P00>>> prompt. Some of the scripts available are fsl_update, cpu_upgrade, cpu_downgrade, make_dual_srm. 462 Method 1 1. Power off the machine. 2. Set the jumper or switch to enable failsafe ROM writes. 3. Boot the firmware CD P00>>> boot -fl 0,a0 dka600 4. Select the firmware file you desire Bootfile: [alpha2100]as2100_e4_v5_4.exe 5. At the UPD> prompt type exit UPD> exit 6. Answer Y to manual update Do you want to do a manual update? [y/(n)] y 7. Type update_fsl at the console prompt P00>>> update_fsl update_fsl is equivalent to "update -path fslrom -target fslflash -i" 8. Power off the system 9. Return all jumpers or switches to original position 10. Power up Example of Method 1 Update P00>>> b dka600 (boot dka500.5.0.1.0 -flags a) block 0 of dka500.5.0.1.0 is a valid boot block reading 1082 blocks from dka500.5.0.1.0 bootstrap code read in base = 200000, image_start = 0, image_bytes = 87400 initializing HWRPB at 2000 initializing page table at 1ff0000 initializing machine state setting affinity to the primary CPU jumping to bootstrap code . . The default bootfile for this platform is [ALPHA2100]AS2100_E4_V5_4.EXE Hit <RETURN> at the prompt to use the default bootfile. Bootfile: <RETURN> VMS PALcode V5.56-7 , OSF PALcode V1.45-12 starting console on CPU 0 initialized idle PCB initializing semaphores initializing heap initial heap 1c0c0 memory low limit = 208000 heap = 1c0c0, 13fc0 initializing driver structures initializing idle process PID XDELTA not enabled initializing file system initializing timer data structures lowering IPL CPU 0 speed is 4.29 ns (233MHz) create dead_eater create poll create timer 463 create powerup access NVRAM entering idle loop Starting Memory Diagnostics Memory Diagnostics completed probing hose 0, PCI probing PCI-to-EISA bridge, bus 1 bus 0, slot 0 -- ewa -- DECchip 21040-AA bus 0, slot 1 -- pka -- NCR 53C810 bus 1, slot 7 -- dra -- Mylex DAC960 bus 1, slot 8 -- vga -- Compaq Qvision bus 0, slot 8 -- ewb -- DECchip 21041-AA initializing keyboard Checking dka500.5.0.1.0 for the option firmware files. . . Copying DFEAA130 from dka500.5.0.1.0. . . Copying DFEAB320 from dka500.5.0.1.0. . . Copying DFXAA320 from dka500.5.0.1.0. . . Copying KZPSAA12 from dka500.5.0.1.0. . . Copying CIPCA420 from dka500.5.0.1.0. . . ***** Loadable Firmware Update Utility ***** -----------------------------------------------------------------------------Function Description -----------------------------------------------------------------------------Display Displays the system’s configuration table. Exit Done exit LFU (reset). List Lists the device, revision, firmware name, and update revision. Readme Lists important release information. Update Replaces current firmware with loadable data image. Verify Compares loadable and hardware images. ? or Help Scrolls this function table. -----------------------------------------------------------------------------UPD> verify arcflash srmflash Verifying 4.57-0... PASSED. Verifying 5.3-2... PASSED. UPD> exit Do you want to do a manual update? [y/(n)] y AlphaServer 2100 Console V5.3-2, built on May 11 1998 at 21:34:08 P00>>> update_fsl (update -path fslrom -target fslflash) new: 5.3-2 old: 1402905435.2076479324-3788064224 Signatures don’t match New image has a smaller version than existing image Consistency checks failed, continuing anyway. FEPROM UPDATE UTILITY -----> CAUTION <----EXECUTING THIS PROGRAM WILL CHANGE YOUR CURRENT ROM! Do you really want to continue [Y/N] ? : y DO NOT ATTEMPT TO INTERRUPT PROGRAM EXECUTION! DOING SO MAY RESULT IN LOSS OF OPERABLE STATE. The program will take at most several minutes. Setting to all 0s... Setting to all 1s... Programming... Verifying... Update successful 464 Method 2 1. Power off the machine 2. Set the jumper or switch to enable failsafe ROM writes. 3. Boot the firmware CD P00>>> boot -fl 0,a0 dka600 4. Select the firmware file you desire Bootfile: [alpha2100]as2100_e4_v5_4.exe 5. At the UPD> prompt type update_fsl UPD> update_fsl update_fsl is equivalent to "update -path fslrom -target fslflash -i" 6. At the UPD> prompt type exit UPD> exit 7. Answer n to manual update Do you want to do a manual update? [y/(n)] n 8. Power off the system 9. Return all jumpers or switches to original position 10. Power up Example of Method 2 Update P00>>> b dka600 (boot dka500.5.0.1.0 -flags a) block 0 of dka500.5.0.1.0 is a valid boot block reading 1082 blocks from dka500.5.0.1.0 bootstrap code read in base = 200000, image_start = 0, image_bytes = 87400 initializing HWRPB at 2000 initializing page table at 1ff0000 initializing machine state setting affinity to the primary CPU jumping to bootstrap code . . The default bootfile for this platform is [ALPHA2100]AS2100_E4_V5_4.EXE Hit <RETURN> at the prompt to use the default bootfile. Bootfile: <RETURN> VMS PALcode V5.56-7 , OSF PALcode V1.45-12 starting console on CPU 0 initialized idle PCB initializing semaphores initializing heap initial heap 1c0c0 memory low limit = 208000 heap = 1c0c0, 13fc0 initializing driver structures initializing idle process PID XDELTA not enabled initializing file system initializing timer data structures lowering IPL CPU 0 speed is 4.29 ns (233MHz) create dead_eater create poll 465 create timer create powerup access NVRAM entering idle loop Starting Memory Diagnostics Memory Diagnostics completed probing hose 0, PCI probing PCI-to-EISA bridge, bus 1 bus 0, slot 0 -- ewa -- DECchip 21040-AA bus 0, slot 1 -- pka -- NCR 53C810 bus 1, slot 7 -- dra -- Mylex DAC960 bus 1, slot 8 -- vga -- Compaq Qvision bus 0, slot 8 -- ewb -- DECchip 21041-AA initializing keyboard Checking dka500.5.0.1.0 for the option firmware files. . . Copying DFEAA130 from dka500.5.0.1.0. . . Copying DFEAB320 from dka500.5.0.1.0. . . Copying DFXAA320 from dka500.5.0.1.0. . . Copying KZPSAA12 from dka500.5.0.1.0. . . Copying CIPCA420 from dka500.5.0.1.0. . . ***** Loadable Firmware Update Utility ***** -----------------------------------------------------------------------------Function Description -----------------------------------------------------------------------------Display Displays the system’s configuration table. Exit Done exit LFU (reset). List Lists the device, revision, firmware name, and update revision. Readme Lists important release information. Update Replaces current firmware with loadable data image. Verify Compares loadable and hardware images. ? or Help Scrolls this function table. -----------------------------------------------------------------------------UPD> verify arcflash srmflash Verifying 4.57-0... PASSED. Verifying 5.3-2... PASSED. UPD> update_fsl (update -path fslrom -target fslflash) new: 5.3-2 old: 5.1-172 FEPROM UPDATE UTILITY -----> CAUTION <----EXECUTING THIS PROGRAM WILL CHANGE YOUR CURRENT ROM! Do you really want to continue [Y/N] ? : y DO NOT ATTEMPT TO INTERRUPT PROGRAM EXECUTION! DOING SO MAY RESULT IN LOSS OF OPERABLE STATE. The program will take at most several minutes. Setting to all 0s... Setting to all 1s... Programming... Verifying... Update successful UPD> exit Do you want to do a manual update? [y/(n)] n Please reset the system...... 466 Updating Firmware from the Fail-safe Loader The fail-safe loader on a 2x00 system is activated automatically when the SRM console is corrupt. You will need to follow these steps to update the firmware. Note If attempting to update firmware with the fail-safe loader manually enabled via a switch or jumper, just do the update *srm* command and exit. I have seen the second update command corrupt the first ROM that was updated. I have also seen the fail-safe loader get corrupted when updating firmware from the manually activated fail-safe loader console. The verify command will show you the failed ROM firmware. 1. If your console prompt is ash> and the ocp says fail-safe loader is active. FAIL_IO 00 0004 then the 2. From the ash> prompt you need to load a specific driver or all device drivers to see the devices at the console. ash> init -driver {device} or ash> init -driver 6 - to load all drivers 3. Boot the firmware CD ash> boot dka600 - May need -fl 0,a0 in the boot command if before CD V3.7. 4. Select the firmware file you desire Bootfile: [alpha2100]as2100_e4_v5_4.exe Update the console firmware UPD> update *srm* - See note above. If SRM and ARC show same version, update SRM only, then reboot the firmware CD from the P00>>> prompt and do a full firmware upgrade. (Both SRM and ARC) UPD> update *arc* UPD> verify - See note above and Issues and Problems below. 5. UPD> exit 6. Answer n to manual update question. Do you want to do a manual update? [y/(n)] n 7. Power off/on the system 8. Reboot the firmware CD 9. At the UPD> prompt do an UPDATE * to update all firmware. Make sure you do both ARC and SRM even if it says you have a later version. UPD> update * UPD> verify UPD> exit 467 468 AlphaServer 2x00 FSL Issues and Problems Unable to update both SRM and ARC from the FSL console With the fail-safe loader manually enabled with the jumper or switch I have noticed problems with the update corrupting one of the ROMs. I have not seen this with a system that enters the fail-safe loader automatically. The symptom you will see is after booting the CD from the ash> prompt the second ROM that is updated corrupts the 1st. If you do ARC and then SRM, ARC will show the same version as SRM and ARC will be corrupt. If you do SRM and then ARC, both SRM and ARC will reflect ARCs version with the SRM saying failed. If this is happening you must update SRM only, exit to the P00>>>, reboot LFU and then do a full update of ARC and SRM before the system is usable. 2100 FSL_UPDATE Gets NOT = @ address xx xx When doing the firmware update on an AlphaServer 2100 CPU, the release notes say to do an update_fsl at the UPD> prompt after you have upgraded the SRM and ARC firmware. If jumper J5 is not installed on the standard I/O module (B2110) before updating the fail-safe loader [FSL] you will get the following message repeated on the console and corrupt the FSL. Message will scroll for over 1/2 hour. Init will stop and the system is functional but without a FSL. NOT = @ address XX XX. - repeating message with an incrementing address . . A total of 1001830 bits did not verify. Update encountered errors. At this point if you install J6 and power up the system to attempt to load the failsafe loader you get the OCP display FAIL IO0 04 . You must do the following to correct it. At this point if you install J6 and power up the system to attempt to load the failsafe loader you get the OCP display FAIL IO0 04 . You must do the following to correct it. a. Install J5. b. Boot LFU c. UPD> exit d. Do you want to do a manual update [y/n] Y e. >>> update_FSL f. When finished remove J5 and reboot. On the 2100A this will not happen. If you attempt to update the FSL without the switch in the correct position it will hang after saying Setting to all 0’s... without corrupting the failsafe loader. You just need to power off and reset the switch to the enable position and redo the update. UPD> update_FSL Do you want to do a manual update [y/n] Y FEPROM UPDATE UTILITY -----> CAUTION <----EXECUTING THIS PROGRAM WILL CHANGE YOUR CURRENT ROM! Do you really want to continue [Y/N] ? : y DO NOT ATTEMPT TO INTERRUPT PROGRAM EXECUTION! DOING SO MAY RESULT IN LOSS OF OPERABLE STATE. The program will take at most several minutes. Setting to all 0's…... 469 470 Unable to Set Date and Time under ARC After Replacing Module After replacing the module that houses the firmware on AlphaServer and possibly AlphaStation systems you are unable to set the Time/Date under ARC. It is set to 0/0/2000. If you attempt to enter the correct date it returns "illegal date/time entered". There appears to be a problem with ARC version 4.56 and 4.57 when the TOY clock has been set to zeroes. It appears that this is the case with new modules coming from manufacturing or repair. There are two possible workarounds. For all systems: a. b. c. Load and update the console firmware off the V5.0 CD Set the time under ARC. Reload the latest firmware off the V5.2 CD For the 2x00 Series: a. b. c. d. >>> d -b -n c toy:0 ff >>> init press cold reboot button >>> init This command sequence will write binary ones across the TOY clock. The result will be that the date in ARC is set to 1/1/2000, and then the correct date and time can be entered. Do not do this procedure on the AlphaServer 1000/1000A . You may render the system unusable. 471 472 AlphaServer 1200/4100 Issues 1. When upgrading to V5.3 or later for the first time you must follow a two step process to upgrade the firmware. Starting with the V5.3 console the AlphaBIOS image was relocated into a different area of flash ROM. In order for the new firmware to work you must update firmware as follows. • • • • • • Boot CD Update SRMflash Exit Boot CD a second time Update AlphaBios Exit Failure to upgrade in this order will cause the system to hang or crash on init when going into AlphaBIOS. If you downgrade from V5.3 or later you must also do it in a 2 step process. Once you have upgraded to a minimum 5.3 using the 2 step process, you can update both SRM and AlphaBIOS to later versions at the same time without booting twice. 2. In order to upgrade to V5.4 your system must be at a minimum 5.2 SRM console version. If you are at an earlier version it will hang during the SRMflash update. 3. Always reset the system after an operating system shutdown before attempting a firmware upgrade 4. Starting with Version 5.4 you will need 3 floppy disks to perform system and IO firmware updates. The SRM and AlphaBIOS firmware will no longer fit on one floppy. 473 474 Certain AlphaServers With V5.7-4 Gets Console DAC960 Sizing Errors AlphaServer 4100/1200 , DigitalServer 7000/5000 and Digital Ultimate Workstation’s updated to V5.7-4 SRM console code have problems with the SWXCR controllers during initialize. You will see the following error. Configuring IO ... Dev_table_add: device Mylex Dac960 or bus PCI not found Dev_table_add: device Mylex Dac1100 or bus PCI not found Dev_table_add: device Mylex Dac1200 or bus PCI not found dac0, hose0 , bus0, slot4 Dev_table_remove: device Mylex Dac960 or bus PCI not found Dev_table_remove: device Mylex Dac1100 or bus PCI not found Dev_table_remove: device Mylex Dac1200 or bus PCI not found The overlay file for DAC960 was not updated with some newer device name information. Blitz 2781 was issued for this problem. Firmware version V5.7-5 corrects the problem. 475 476 Updating Console Firmware on a System Configured as a Galaxy Firmware on systems configured as a Galaxy node can not be updated until the system is first powered up in non-Galaxy mode (monolithic mode). You can not safely run utilities like ECU, RCU, EEROMCFG, etc. when in Galaxy mode either. The following steps are required to update the firmware successfully or run console based utilities. See page 267 for information on each variable. They are set differently depending on the system type. 1. Obtain the current Galaxy console environmental variable settings. >>> show * or show lp* Write down the following values. Depending on your configuration and system type, some variables may not be used. • lp_count Number or Galaxy instances • lp_cpu_mask0 CPU mask for partition 0 • lp_cpu_mask1 CPU mask for partition 1 • lp_cpu_mask2 CPU mask for partition 2 • lp_io_mask0 IO mask for partition 0 • lp_io_mask1 IO mask for partition 1 • lp_io_mask2 IO mask for partition 2 • lp_mem_size0 Memory size for partition 0 • lp_mem_size1 Memory size for partition 1 • lp_mem_size2 Memory size for partition 2 • lp_mem_mode Tells UNIX to load into each memory partition • lp_shared_mem_size Amount of shared memory 2. Set the system into non-Galaxy mode. >>> set lp_count 0 >>> init 3. You can now run console based utilities or boot the Alpha Systems Firmware Update CD version V5.4 or later. 4. Update the console firmware and verify the update. 5. On AlphaServer 8200, 8400, GS60, GS60E and GS140 execute the build -e command as required during any firmware update and then init. >>> build -e >>> init 6. Reset the Galaxy console variable to the values they were set to prior to the update. This example is for a GS140. The lp_cpu_mask* and lp_io_mask* values will be different on AlphaServer ES40 and 4100’s than shown in this example The following example is for a GS140 system with 6 CPUs, 3 4gb memories and 3 IO modules. These commands may not be required on the AlphaServer ES40 and 4100 because a build -e command is not required. P00>>> P00>>> P00>>> P00>>> P00>>> P00>>> P00>>> P00>>> P00>>> P00>>> P00>>> P00>>> Do you create create create create create create create create create create create init REALLY -nv -nv -nv -nv -nv -nv -nv -nv -nv -nv -nv lp_count 3 lp_cpu_mask0 3 lp_cpu_mask1 c lp_cpu_mask2 30 lp_io_mask0 100 lp_io_mask1 80 lp_io_mask2 40 lp_mem_size0 100000000 lp_mem_size1 100000000 lp_mem_size2 80000000 lp_shared_mem 80000000 (CPU0 and 1 - node 0) (CPU2 and 3 - node 1) (CPU4 and 5 - node 2) (IO slot 8) (IO slot 7) (IO slot 6) (4GB memory) (4GB memory) (2GB memory) (2GB shared memory) want to reset all partitions? (Y/N)Y 477 478 AlphaServer 8X00 IMPORTANT CAUTIONS BEFORE UPDATING FIRMWARE !!! Operation With Mixed Firmware Revisions is NOT Supported In a multiprocessor system, do NOT attempt to initialize or operate the system, with mixed-revisions of console firmware installed on the CPUs. Always insure that the CPUs all have the same revision of Console Firmware, before initializing or powering-up the system. Otherwise, the system may hang, or some CPUs may not operate. When replacing or adding CPUs to your system, you must insure that all CPUs (the old ones and the new ones) have the same revision of console firmware installed. The following three cases are noted : 1. When adding a CPU with HIGHER rev console firmware to a system having LOWER rev firmware, first update the existing CPU firmware to the higher rev. Following that, power-down the system and add the new CPU. Then, power-up the system and proceed to boot, etc. 2. When adding a CPU with the SAME rev firmware as the other CPUs, simply power-down the system and add the new CPU. Then, power-up the system and proceed to boot, etc. In this case, no firmware update is necessary. 3. If it became necessary to add a CPU with LOWER rev firmware to a system having HIGHER rev firmware (such as replacing a CPU with an older spare), you must first update the firmware on the new CPU to match the firmware rev of the existing CPUs. To do this, first power-down and REMOVE the existing CPUs, and install only the new CPU. Then, power-up and perform a console firmware update on the new CPU. Then, power-down and re-install the existing CPUs. Finally, power-up again, and proceed to boot, etc. Do NOT Attempt to Down-Rev the Firmware on the CPUs Listed Do NOT attempt to update console firmware to a lower revision than shown in Table 1-3. Installing a revision of firmware below the minimum required will render the CPU module INOPERABLE (in some cases, the Loadable Firmware Update utility will not allow the update, if it were attempted, and would give an error message). Minimum Required Console Revision for CPU Operation CPU Minimum Console Revision E2056-CA (Single CPU, 300 MHZ Rev. H and above) V2.2-102 E2056-DA (Dual CPU, 300 MHZ Rev. P and above) V2.2-102 E2061-CA (Single CPU, 350 MHZ Rev. A and above) V3.0-9 E2061-DA (Dual CPU, 350 MHZ Rev. A and above) V3.0-9 E2062-DA (Dual CPU, 440 MHZ All Rev.’s) V4.0-4 E2065-DA (Dual CPU, 625 MHZ All Rev.’s) T5.1-18 479 480 AlphaServer 8X00 Single CPU Modules Fail With Console Firmware V6.0 There is a problem with single CPU Turbolaser modules (300/350 MHZ) and firmware version V6.0. If a single CPU card is upgraded to V6.0 the CPU will either hang during selftest of the selftest LED will not come on. The CPU will not show up at the console either. There is a workaround available on EV5/EV56 Turbolaser systems (not available for EV6 or EV67). If a CPU is hanging during selftest, placing the key/switch in the secure position during power up will disable diagnostics from running and allow system to come to the >>>. The CPU will show up at the >>> and the selftest lite will be on. This will allow you to boot the firmware and reload non V6.0 firmware. A few things we discovered in testing. 1. On the 8200, the light on the secure switch does not immediately illuminate when pressed in during power on. It comes on after about a minute. 2. If a single CPU module with V6.0 firmware is in the backplane by itself, placing the key/switch in secure during power up will allow the system to come to the >>>. The CPU will show up at the >>> and the selftest lite will be on. 3. If a working CPU is in slot 0 and the bad CPU is in another slot, the system will come to the >>> with all CPUs showing passed and the selftest light on. 4. If the bad CPU is in slot 0 and a good CPU is in another slot, the console will start on the good CPU and the bad CPU selftest light will not come on. Also the suspect CPU will not show up at the >>> with a show config command. 5. Once at the prompt update the firmware using either V5.9 or V6.1 firmware. The problem is corrected with the V6.1 firmware that is currently available on the firmware website in the interim directory at http://ftp.digital.com/pub/Digital/Alpha/firmware/interim/as8x00/ The slot numbers listed are for the 8400 platform. For the 8200 replace slot 0 above with slot 4. 481 482 Compaq AlphaServer GS60/GS60E/GS140 IMPORTANT CAUTIONS BEFORE UPDATING FIRMWARE !!! Operation With Mixed Firmware Revisions is NOT Supported In a multiprocessor system, do NOT attempt to initialize or operate the system, with mixed-revisions of console firmware installed on the CPUs. Always insure that the CPUs all have the same revision of Console Firmware, before initializing or powering-up the system. Otherwise, the system may hang, or some CPUs may not operate. When replacing or adding CPUs to your system, you must insure that all CPUs (the old ones and the new ones) have the same revision of console firmware installed. The following three cases are noted : 1. When adding a CPU with HIGHER rev console firmware to a system having LOWER rev firmware, first update the existing CPU firmware to the higher rev. Following that, power-down the system and add the new CPU. Then, power-up the system and proceed to boot, etc. 2. When adding a CPU with the SAME rev firmware as the other CPUs, simply power-down the system and add the new CPU. Then, power-up the system and proceed to boot, etc. In this case, no firmware update is necessary. 3. If it became necessary to add a CPU with LOWER rev firmware to a system having HIGHER rev firmware (such as replacing a CPU with an older spare), you must first update the firmware on the new CPU to match the firmware rev of the existing CPUs. To do this, first power-down and REMOVE the existing CPUs, and install only the new CPU. Then, power-up and perform a console firmware update on the new CPU. Then, power-down and re-install the existing CPUs. Finally, power-up again, and proceed to boot, etc. Required MINIMUM Console Firmware Revision Do NOT attempt to update console firmware to a lower revision than shown below. Installing a revision of firmware below the minimum required will render the CPU module INOPERABLE (in some cases, the Loadable Firmware Update utility will not allow the update, if it were attempted, and would display an error message). Minimum Required Console Revision for CPU Operation CPU Minimum Console Revision E2063-DA (Dual CPU, 525 MHZ All Revs) V5.3-12 E2067-DA (Dual CPU, 700 MHZ All Revs) V5.5-25 483 484 AlphaServer GS60/GS140 Fails to Boot Firmware CD V5.4 Following the standard procedure to boot the Alpha Systems Firmware Update CD V5.4 on AlphaServer GS60 and GS140 systems may intermittently fail. PROBLEM SYMPTOM: After booting the CD and after the program reports "Starting new console, Please wait a minute..." an error message like the following example may sometimes be reported: *** Console Error, CPU 4, Restarting *** halt code = 2, PC = 1a730 SOLUTION: If this occurs on your system, you can use the CD to perform the firmware update, by using the following workaround procedure: 1) Re-initialize the system via the "init" console command. 2) Enter the "lfu" command at the console prompt, and respond to the prompts as shown in the following example : P00>>>lfu ***** Loadable Firmware Update Utility ***** Select firmware load device (cda0, dva0, ewa0), or Press to bypass loading and proceed to LFU: cda0 Please enter the name of the firmware files list, or Press to use the default filename [GS140FW]: Copying GS140FW from DKB400.4.0.6.1 . Copying [gs140]T6README from DKB400.4.0.6.1 . Copying [gs140]T6SRMROM from DKB400.4.0.6.1 .. . . . UPD> 3) From this point on, you can run the update program in the normal manner. ADDITIONAL COMMENTS: The problem will be corrected in the next release. 485 486 DS10 With 600MHZ CPU Has No Default Bootfile Selected with V5.9 CD When an attempt is made to upgrade a DS10 system with the 6/600 MHZ CPU using the V5.9 Alpha Systems Firmware Update CD, no default bootfile will be selected. The user will need to enter the directory and filename in order to load firmware off the CD. The firmware CD uses a file called smttable.txt that defines what default bootfile that is used for each platform. The DS10 6/600 CPU was not added to the file on the V5.9 CD. If you attempt to update by hitting <CR> at the filename prompt you will get a “file not found” error followed by a secondary bootstrap failure. You need to enter [DS10]DS10_V5_9.EXE as the filename if you are using the V5.9 CD. This will be corrected in the next CD release. 487 488 DS10/DS20 Invalid Image When Updating From Floppy In order to update firmware from floppy on the DS10 and DS20 platforms you need to copy platform specific firmware.sys files to a system and save them to a floppy. When attempting to update the firmware the SRM and/o AlphaBIOS images my indicate Invalid Image fom LFU when executing a list command. This nomally happens when Netscape is used to download the files. The workarounds are to either use Internet Explore to download the files of go to ftp://ftp.digital.com/pub/Digital/Alpha/firmware/ to obtain the specific firmware files. You will need to navigate thru the directories to find the appropriate files. See the DS10 section for instructions on creating a LFU firmware floppy. 489 490 Upgrading ES40,ES40LP or ES40CV to 667MHz or 833MHz CPUs Upgrading ES40 systems to faster processors requires loading the correct console firmware to support the faster CPUs. The 833 MHZ CPUs require SRM V5.9-24 and SROM V2.12F in order to properly function. The EV67 CPUs also require a different PALcode than the EV6 CPUs. The firmware must be updated before the CPUs are replaced. All CPUs must also be the same speed. You can not MIX different speed CPUs in the same box. There are two different motherboards available on the ES40. The faster CPUs require specific revision motherboards for proper operation. • • If the motherboard is a 54-25385-02 revision A01 or higher, no replacement is required. If the motherboard is a 54-25385-01, the revision of the System Motherboard needs to be verified. The upgrade requires a minimum Rev E0* system motherboard (54-25385-01). The Revision Sticker is on the System Motherboard between the CPU0 and CPU1 slots. If the revision is D0* or lower, the System Motherboard MUST be replaced before performing the upgrade. If a replacement is needed, perform FCO # 00-ES40-F002 EQ-01772-01. There are three models of the ES40. They are the ES40, ES40LP and ES40CV. Specific procedures for each model is listed below. The differences are with the RMC versions. ES40 1. Leave the system’s current CPU’s installed 2. Boot the Alpha Systems Firmware Update V5.9 CD and select the default es40 firmware file "ES40_V5_9.exe” P00>>> boot dqa0 bootfile: <CR> 3. At the UPD> prompt select exit to enter manual mode. UPD> exit Do you want to go to Manual Mode? 4. [y/n]: Y At the UPD> prompt enter the update command for all the system firmware. This includes ABIOS, SRM, SROM, TIG and RMC. SRM V5.9-24 and SROM V2.12F are required for the 833 MHZ CPU support. The RMC firmware V2.5 is the normal ES40 RMC firmware version. UPD> update abios Abios Updating to 5.70... Verifying 5.70... PASSED. UPD> update srm SRM Updating to V5.9-24... Verifying V5.9-24... PASSED. UPD> update srom srom Updating to V2.2-F... Verifying V2.12-F... PASSED. UPD> update rmc rmc Updating to V2.5... Verifying V2.5... PASSED. UPD> update tig tig Updating to 10... Verifying 10... PASSED. 5. When the update is complete type verify and if they all pass exit. UPD> verify UPD> exit 491 6. Remove original CPUs and install the new 667MHz or 833MHz CPUs. This will allow console control because the correct SRM and SROM code is loaded. The correct PALcode must now be loaded. There are 2 versions of PALcode. • • 7. PALcode for EV6 500MHz cpu’s is in the format of Vx.yy-z PALcode for EV67 667MHz or EV68 833MHz cpu’s is in the format of Vx.yy-zzz Boot the Alpha Systems Firmware Update V5.9 CD and select the default es40 firmware file file "ES40_V5_9.exe” and update the SRM firmware one more time with the new cpu modules installed to ensure that the correct version of PALcode optimized for the particular CPU Type is loaded. P00>>> boot dqa0 bootfile: <CR> UPD> update SRM UPD> exit 8. Verify the correct PALcode version is loaded P00>>> show pal 9. Clear the central error repository and display status of the new CPUs. P00>>> clear_error all P00>>> show config 10. The ES40 should now have functioning 667MHz or 833MHz cpu's ES40LP 1. Leave the system's current CPU's installed 2. Boot the Alpha Systems Firmware Update V5.9 CD and select the default es40 firmware file "ES40_V5_9.exe” P00>>> boot dqa0 bootfile: <CR> 3. At the UPD> prompt select exit to enter manual mode. UPD> exit Do you want to go to Manual Mode? 4. [y/n]: Y At the UPD> prompt enter the update command for all the system firmware. This includes ABIOS, SRM, SROM and TIG. The SRM V5.9-24 and SROM V2.12F is required for the 833 MHZ CPU support. The RMC firmware I2.5 is the ES40LP version. Caution: DO NOT upgrade the RMC using the RMC firmware loaded by default. The ES40LP uses the RMC version I2.5 which is loaded from a seperate firmware file. UPD> update abios Abios Updating to 5.70... Verifying 5.70... PASSED. UPD> update srm SRM Updating to V5.9-24... Verifying V5.9-24... PASSED. UPD> update srom srom Updating to V2.2-F... Verifying V2.12-F... PASSED. UPD> update tig tig Updating to 10... Verifying 10... PASSED. 492 5. When the update is complete type verify and if they all pass exit. Beware the RMC firmware mail say failed. This is because the ES40LP uses a different version than what is loaded from the default ES40 firmware file. UPD> verify UPD> exit 6. Remove original CPUs and install the new 667MHz or 833MHz CPUs. This will allow console control because the correct SRM and SROM code is loaded. The correct PALcode and RMC firmware must now be loaded. There are 2 versions of PALcode. • PALcode for EV6 500MHz cpu’s is in the format of Vx.yy-z • PALcode for EV67 667MHz or EV68 833MHz cpu’s is in the format of Vx.yy-zzz 7. Boot the Alpha Systems Firmware Update V5.9 CD and select the es40lp RMC firmware file es40lp_i25.exe. Enter manual mode and then update the RMC firmware P00>>> boot dqa0 bootfile: [es40]es40lp_i25.exe UPD> exit Do you want to go to Manual Mode? [y/n]: Y UPD> update rmc rmc Updating to i2.5... Verifying i2.5... PASSED. UPD> exit 8. Boot the Alpha Systems Firmware Update V5.9 CD and select the default es40 firmware file file "ES40_V5_9.exe” and update the SRM firmware one more time with the new cpu modules installed to ensure that the correct version of PALcode optimized for the particular CPU type is loaded. P00>>> boot dqa0 bootfile: <CR> UPD> update SRM UPD> exit 9. Verify the correct PALcode version is loaded P00>>> show pal 10. Clear the central error repository and display status of the new CPUs. P00>>> clear_error all P00>>> show config 11. The ES40 should now have functioning 667MHz or 833MHz cpu's ES40CV 1. Leave the system's current CPU's installed 2. Boot the Alpha Systems Firmware Update V5.9 CD and select the default es40 firmware file "ES40_V5_9.exe” P00>>> boot dqa0 bootfile: <CR> 3. At the UPD> prompt select exit to enter manual mode. UPD> exit Do you want to go to Manual Mode? [y/n]: Y 493 4. At the UPD> prompt enter the update command for all the system firmware except the RMC. This includes ABIOS, SRM, SROM and TIG. The SRM V5.9-24 and SROM V2.12F is required for the 833 MHZ CPU support. The RMC firmware F2.5 is the ES40CV version. Caution: DO NOT upgrade the RMC using the RMC firmware loaded by default. The ES40CV uses the RMC version F2.5 which is loaded from a seperate firmware file. UPD> update abios Abios Updating to 5.70... Verifying 5.70... PASSED. UPD> update srm SRM Updating to V5.9-24... Verifying V5.9-24... PASSED. UPD> update srom srom Updating to V2.2-F... Verifying V2.12-F... PASSED. UPD> update tig tig Updating to 10... Verifying 10... PASSED. 5. When the update is complete type verify and if they all pass exit. Beware the RMC firmware mail say failed. This is because the ES40CV uses a different version than what is loaded from the default ES40 firmware file. UPD> verify UPD> exit 6. Remove original CPUs and install the new 667MHz or 833MHz CPUs. This will allow console control because the correct SRM and SROM code is loaded. The correct PALcode and RMC firmware must now be loaded. There are 2 versions of PALcode. • PALcode for EV6 500MHz cpu’s is in the format of Vx.yy-z • PALcode for EV67 667MHz or EV68 833MHz cpu’s is in the format of Vx.yy-zzz 7. Boot the Alpha Systems Firmware Update V5.9 CD and select the es40lp RMC firmware file es40lp_f25.exe. Enter manual mode and then update the RMC firmware P00>>> boot dqa0 bootfile: [es40]es40lp_f25.exe UPD> exit Do you want to go to Manual Mode? [y/n]: Y UPD> update rmc rmc Updating to f2.5... Verifying f2.5... PASSED. UPD> exit 8. Boot the Alpha Systems Firmware Update V5.9 CD and select the default es40 firmware file file "ES40_V5_9.exe” and update the SRM firmware one more time with the new cpu modules installed to ensure that the correct version of PALcode optimized for the particular CPU type is loaded. P00>>> boot dqa0 bootfile:<CR> UPD> update SRM UPD> exit 9. Verify the correct PALcode version is loaded P00>>> show pal 494 10. Clear the central error repository and display status of the new CPUs. P00>>> clear_error all P00>>> show config 11. The ES40 should now have functioning 667MHz or 833MHz cpu’s 495 496 ES40LP/ES40CV RMC Firmware is Different Than on the V5.6 Firmware CD Overview There are three different models of the ES40. They are the Corporate Clipper (ES40), the Flying Clipper (ES40CV), and the Ironsides (ES40LP). Each uses a different version of the RMC firmware. The V5.6 Alpha Systems Firmware CD only has RMC firmware for the Corporate Clipper. If you load the wrong RMC firmware into a system it will indicate fan failures. The Ironsides - ES40LP will complain about fan 6. The Flying Clipper - ES40 CV would complain about fans 1 and 2. The ES40CV and the ES40LP RMC will fail VERIFY from the UPD> prompt when booted off the Alpha Systems Firmware CD. If you execute a list you will see the current version. They are as follows. Note that the versions are subject to change. System type ES40 ES40LP ES40CV RMC Version V2.2 I2.2 F2.2 ES40 Systems Differences Corporate Clipper - ES40 This is the Standard Clipper. It has six fans, 1 thru 6, and it uses the regular RMC firmware image version V2.2 . This version is part of the Alpha Systems Firmware CD. Flying Clipper - ES40CV The Flying Clipper is based on the Clipper box, but has been modified to shorten the chassis. This box only has four fans. It has fans 5 and 6 for the CPUs and fans 3 and 4 for the PCI. The are NO fans 1 and 2. There are two power supplies that are fully redundant. This model uses the RMC firmware image version F2.2. This version is NOT available on the V5.6 Alpha Systems Firmware CD. Ironsides - ES40LP Ironsides is a low profile rack mount system. It has four CPU fans (1 thru 4) and a critical PCI fan (5). It does not have a fan 6. There is one external power supply plugged into the rear. This box also has 7 PCI slots and embedded SCSI and Ethernet controllers. This model uses the RMC firmware image version I2.2. This version is NOT available on the V5.6 Alpha Systems Firmware CD. How to Build a Bootable Floppy a. Locate the RMC firmware you need in the .zip file on Cybrary or obtain the file from Engineering. Save that file to your hard disk. If using mkboot you must rename the file to eight characters or less not counting the .exe extension. The .zip contains RMC firmware for the ES40CV and ES40LP es40cv_f22.exe is for the Flying Clipper - ES40CV iron_i22.exe is for the Ironsides - ES40LP Alpha Systems Firmware Update CD V5.6 for the Corporate Clipper - ES40 b. Locate the mkboot.exe or makeboot.exe on Cybrary mkboot.exe - Image to make a bootable floppy on a PC or Alpha running NT makeboot.exe - Image to make a bootable floppy on an Alpha running NT c. Fat format a floppy diskette d. From an MSDOS window execute one of the following commands to make a bootable floppy. mkboot iron_i22.exe or makeboot -f es40cv_f22.exe 497 Tru64 UNIX This method requires one floppy. One with the LFU utility and the other with the system firmware. a. Download mkbootfirm.tar from Cybrary to your UNIX system. b. Extract the RMC firmware from the Cybrary. There are two files located in the Download directory. Copy it to the same directory as mkbootfirm.tar. Three methods to get the firmware are • You can copy the es40_rmc_fw.zip file to an NT system and unzip it there. Then copy the files from you PC to the UNIX box. • You can copy the es40_rmc_fw.zip file to your UNIX box. Then download the zip_tar.gz file from Cybrary. This is the UNIX zip/unzip utility. You can use it to unzip the winzip firmware file. c. Change directory to where files were downloaded. # cd [to directory with files] d. Untar the mkbootfirm.tar file on your target Digital UNIX system with the command # tar xvf mkbootfirm.tar e. You may need to set mkbootfirm.exe file permissions to have execute permissions. # chmod 755 mkbootfirm or chmod +x mkbootfirm f. Format the floppy. # fddisk -fmt /dev/rfd0a or With Tru64 UNIX V5.0 you can do one of the following # fddisk -fmt /dev/rdisk/floppy0a or # cd /dev # ./MAKEDEV fd0 # fddisk -fmt /dev/rfd0a g. From directory where files are located execute the following command. This is an example using the Ironside RMC image. # ./mkbootfirm iron_i22.exe |dd of=/dev/rfd0c bs=64k How to Update RMC Firmware Floppy a. Insert the floppy in the system and boot it >>> Boot dva0 b. At the UPD> prompt type exit and then answer "Y" to the question about manual update. UPD> exit Do you want to do a manual update? [y/(n)]Y c. This will bring you back to the UPD> prompt. the RMC firmware update. UPD> list UPD> update rmc UPD> verify Now list, update and verify d. exit and reset the machine. UPD> exit 498 Network and OpenVMS a. Copy the RMC firmware.sys file to MOM$LOAD of an existing node in the cluster $ Copy es40cv_f22.sys mom$load for the Flying Clipper or $ Copy iron_i22.sys mom$load for the Ironsides b. Set the VMS attributes on the file with the following command. $ Set file/attr=(rfm:fix,lrl:512,mrs:512,rat:none) es40cv_f22.sys or $ Set file/attr=(rfm:fix,lrl:512,mrs:512,rat:none) iron_i22.sys c. Enable service on that node from NCP $ MC NCP MC NCP> Show Known Circuit Characteristic Known Circuit Volatile Characteristics as of 12-FEB-1997 19:27:41 Circuit = BNA-0 - Circuit name will change from system to system State = on Service = disabled - if enabled skip to boot command Counter timer = 65534 Designated router = 28.1023 (CXO28A) Cost = 4 Maximum routers allowed = 33 Router priority = 64 Hello timer = 15 Type = Ethernet Adjacent node = 28.1023 (CXO28A) Listen timer = 30 NCP> NCP> NCP> Set Circ BNA-0 State OFF Set Circ BNA-0 Service Enable Set Circ BNA-0 State ON d. Boot from the >>> using the following command >>> b ewa0 -file es40cv_f22 for the Flying Clipper >>> b ewa0 -file iron_i22 for the Ironsides e. At the UPD> prompt type exit and then answer "Y" to the question about manual update. UPD> exit Do you want to do a manual update? [y/(n)]Y f. This will bring you back to the UPD> prompt. the RMC firmware update. UPD> list UPD> update rmc UPD> verify Now list, update and verify If you booted off the firmware CD you can load the RMC firmware over the network at the UPD> prompt if the file is in MOM$LOAD with the command UPD> update rmc -p mopdl:es40cv_f22/ewa0 for the Flying Clipper or UPD> update rmc -p mopdl:iron_i22/ewa0 for the Ironsides g. Exit and reset the machine. UPD> exit Example P00>>> sho config Compaq Computer Corporation Compaq AlphaServer ES40 Firmware SRM Console: ARC Console: PALcode: Serial Rom: RMC Rom: RMC Flash Rom: T5.6-68 v5.70 OpenVMS PALcode V1.69-2, Tru64 UNIX PALcode V1.62-1 V2.8-F V1.0 I2.3 499 Processors CPU 0 CPU 1 CPU 2 CPU 3 Alpha Alpha Alpha Alpha Core Logic Cchip Dchip Pchip 0 Pchip 1 TIG DECchip DECchip DECchip DECchip Rev 10 Memory Array --------0 1 2 3 Size ---------512Mb 512Mb 512Mb 512Mb EV6 EV6 EV6 EV6 pass pass pass pass 2.3 2.3 2.3 2.3 21272-CA 21272-DA 21272-EA 21272-EA 500 500 500 500 Rev Rev Rev Rev MHz MHz MHz MHz 4MB 4MB 4MB 4MB Bcache Bcache Bcache Bcache 9(C4) 2 2 2 Base Address ---------------0000000000000000 0000000020000000 0000000040000000 0000000060000000 Intlv Mode ---------4-Way 4-Way 4-Way 4-Way 2048 MB of System Memory Slot 7 15 Option Acer Labs M1543C Acer Labs M1543C IDE 19 Acer Labs M1543C USB Slot 4 5 Hose 0, Bus 0, PCI Bridge to Bus 1, ISA dqa.0.0.15.0 dqb.0.1.15.0 dqa0.0.0.15.0 Option Floppy Hose 0, Bus 1, ISA dva0.0.0.1000.0 Option NCR 53C895 DE500-BA Network Con Hose 1, Bus 0, PCI pka0.7.0.4.1 ewa0.0.0.5.1 CD-224E SCSI Bus ID 7 08-00-2B-86-1A-72 P00>>> boot dva0 (boot dva0.0.0.1000.0 -flags A) block 0 of dva0.0.0.1000.0 is a valid boot block reading 1306 blocks from dva0.0.0.1000.0 bootstrap code read in base = 200000, image_start = 0, image_bytes = a3400 initializing HWRPB at 2000 initializing page table at 3ffb4000 initializing machine state setting affinity to the primary CPU jumping to bootstrap code OpenVMS PALcode V1.75-2, Tru64 UNIX PALcode V1.68-2 Istream prefetching is being turned off (i_ctl.sbe = 0) on all CPUs starting console on CPU 0 initialized idle PCB initializing semaphores initializing heap initial heap 240c0 memory low limit = 5c0000 heap = 240c0, 17fc0 initializing driver structures initializing idle process PID initializing file system initializing hardware initializing timer data structures lowering IPL CPU 0 speed is 500 MHz create dead_eater create poll 500 create timer create powerup access NVRAM Memory size 2048 MB testing memory ... probe I/O subsystem probing hose 1, PCI bus 0, slot 4 -- pka -- NCR 53C895 bus 0, slot 5 -- ewa -- DE500-BA Network Controller probing hose 0, PCI probing PCI-to-ISA bridge, bus 1 bus 0, slot 15 -- dqa -- Acer Labs M1543C IDE bus 0, slot 15 -- dqb -- Acer Labs M1543C IDE starting drivers entering idle loop Istream prefetching is being turned off (i_ctl.sbe = 0) on all CPUs starting console on CPU 1 initialized idle PCB initializing idle process PID lowering IPL CPU 1 speed is 500 MHz create powerup Istream prefetching is being turned off (i_ctl.sbe = 0) on all CPUs starting console on CPU 2 initialized idle PCB initializing idle process PID lowering IPL CPU 2 speed is 500 MHz create powerup Istream prefetching is being turned off (i_ctl.sbe = 0) on all CPUs starting console on CPU 3 initialized idle PCB initializing idle process PID lowering IPL CPU 3 speed is 500 MHz create powerup initializing pka ewa dqa dqb Checking dqa0.0.0.15.0 for the option firmware files. . . dqa0.0.0.15.0 has no media present or is disabled via the RUN/STOP switch Checking dva0.0.0.1000.0 for the option firmware files. . . If you have a floppy containing option firmware, Please insert it now and hit <return> when ready. Option firmware not copied. ***** Loadable Firmware Update Utility ***** -----------------------------------------------------------------------------Function Description -----------------------------------------------------------------------------Display Displays the system’s configuration table. Exit Done exit LFU (reset). List Lists the device, revision, firmware name, and update revision. Readme Lists important release information. Update Replaces current firmware with loadable data image. Verify Compares loadable and hardware images. ? or Help Scrolls this function table. -----------------------------------------------------------------------------UPD> exit Do you want to do a manual update? [y/(n)] y ***** Loadable Firmware Update Utility ***** -----------------------------------------------------------------------------Function Description 501 -----------------------------------------------------------------------------Display Displays the system’s configuration table. Exit Done exit LFU (reset). List Lists the device, revision, firmware name, and update revision. Readme Lists important release information. Update Replaces current firmware with loadable data image. Verify Compares loadable and hardware images. ? or Help Scrolls this function table. -----------------------------------------------------------------------------UPD> list Device Current Revision Filename Update Revision Abios v5.70 abios_fw SRM t5.6-68 srm_fw rmc I2.2 srom Missing file rmc_fw V2.8-F tig Missing file I2.3 srom_fw 10 tig_fw V2.8-F 10 UPD> UPD> update rmc Confirm update on: rmc [Y/(N)]y WARNING: updates may take several minutes to complete for each device. DO NOT ABORT! rmc Updating to I2.3... Verifying I2.3... PASSED. UPD> exit Initializing.... SROM V2.0 CPU # 00 @ SROM program starting Reloading SROM 0500 MHz 502 AlphaServer ES40’s Configured for Galaxy Should Not Use V6.0 Firmware AlphaServer ES40 systems that are configured for Galaxy, (soft partitions) must not be upgraded using the V6.0 console firmware. If this firmware is loaded partiton 1 will display an access violation. Until new firmware is released use the V5.9 console firmware on the ES40 when configured for Galaxy partitioning. See Blitz TD 2943-CR for details. 503 504 ES40 & GS80/GS160/GS320 Systems May Not Boot Unix V4.0G When running the wwidmgr or a non-powerup system test, the SRM on ES40 and GS80/160/320 systems may expand the console heap beyond what the operating system needs to boot. Once the heap expands, the new value continues to be used until it is changed. Due to a boundary condition in V4.0G, failure to reset the heap_expand environment variable after running the system test or wwidmgr can prevent the system from booting. The error message in this situation is similar to the following: Bootstrap address collision, image loading aborted panic (cpu0): HWRPB overran system space To avoid boot problems after running the wwidmgr or a non-powerup system test, V4.0G users on ES40 and GS80/160/320 systems should do the following: - Check the value of the heap_expand environment variable: P00>>> show heap_expand If the heap_expand value is NONE, no further action is necessary. If heap_expand is something other than NONE, users should take the next two steps. 1. Set the heap_expand environment variable value to none: P00>>> set heap_expand none 2. "init" the console The SRM chooses the correct value for boot. If more heap is needed, the SRM cycles through crash/reboot sequences until the heap is expanded enough to boot. The panic is removed from the Tru64 UNIX 5.1 stream. See Blitz TD 2942 for details. 505 506 DEC7000/10000 and VAX 7000 - Issues With Firmware Upgrades 1. Sometimes the 7000 console will "run away" due to a problem in a powerup script (an INIT command placed in it) or due to a continuous machine check loop. You can’t get to a >>> when this happens. Use this procedure to corrupt the console EEPROM. During the init sequence when the "map" is being printed there is a pause about 2/3 of the way thru the "map". If you type the console command: To corrupt the EEPROM on: dep -u F3800000 0 VAX7600 and VAX7700 (first EEPROM address) To corrupt the EEPROM on: dep -u 3F3800000 0 DEC7600 and DEC7700 (first EEPROM address) It will corrupt the eeprom and will cause it to halt after the "map". You then can do a "build eeprom" and reset the params...... 2. You may notice that environmental variable will not hold after an init or power off/on, or the BOOTDEF_DEV and BOOT_OSFLAGS variables are not even there. You may also get the following message on init. file open failed for eeprom0. Environmental variables cleared or missing This could indicate that EEPROMs are corrupt. Build EEPROM from the >>> should correct it. If it doesn’t it is possible that you have a CPU problem. 3. On upgrades from a VAX 7000/10000 to a DEC 7000/10000 or when a new CIXCD module from stock is installed into a DEC 7000 it shows as unknown0 from the console. The CIXCD comes preloaded with VAX 7000 microcode. If it is installed in a DEC 7000/10000 it must have ALPHA firmware loaded into it. Below is the procedure to follow. Name LSB 0+ 7+ 8+ Type Rev Mnemonic KN7AA MS7AA IOP (8001) (4000) (2000) 4000 0000 0006 kn7aa0 ms7aa0 iop0 C0 XMI 8+ DWLMA A+ DEMNA E+ ????? (102A) (0C03) (0C05) 0105 0803 4611 xmi0 dwlma0 demna0 unknown0 (F/W ver 70 d (46x) 11 = H/W rev A01) >>>Boot LFU Function? Update Device? unknown0 - Device name as seen by LFU Device Name? cixcd - The type of firmware you want to load into the module unknown0 DO NOT ABORT updating to 3.0...reading device...verifying 3.0...passed Function? exit >>> show configuration Name Type LSB 0+ KN7AA (8001) 7+ MS7AA (4000) 8+ IOP (2000) Rev Mnemonic 4000 0000 0006 kn7aa0 ms7aa0 iop0 C0 XMI xmi0 8+ DWLMA (102A) 0105 dwlma0 A+ DEMNA (0C03) 0803 demna0 E+ CIXCD (0C2F) 0311 cixcd0 4. The KCM44 is a XMI tape controller that uses one of the KDM70 modules. After 507 replacing this module the KCM44 will show up as a KDM70. To correct this do the following. >>>Boot LFU Function? MODIFY KDM70# Change ID on this KDM70 to KCM44? [Y/(N)] Y Are you sure? [Y/(N)] Y Changing ID from to KCM44.... Function? exit 5. If updating from an Infoserver the file name MUST be uppercase (ISL_LVAX_V07). There is also an issue booting off of an RRD43. It will timeout and not boot. You will need to use a different CD type (i.e.RRD42). >>> boot -fl 0,0,0 exa0 -fi ISL_LVAX_V07 Initializing... Booting... Connecting to boot device exa0 Created device exa0.0.0.1.0 Requesting MOP Assistance Volunteer..... MOP Assistance Volunteer found. Loading... .. Load completed! ... ... jumping to bootstrap at 144400 Network Initial System Load Function Version 1.1 FUNCTION ID 1 2 3 4 5 - FUNCTION Display Menu Help Choose Service Select Options Stop Enter a function ID value: OPTION ID 1 2 3 OPTION - Find Services Enter known Service Name Enter an Option ID value: 1 Working Servers found:: ... #1 VAX7000_V07 1 08-00-2B-A4-37-10 ENTER A SERVICE NUMBER: 1 CPU:0 Console entry reason: HALT instruction in kernel mode Entry PC: 00147481 boot failure Entry PSL:041F0600 508 DEC3000-400 System Hangs After Upgrading Console Firmware to V6.1 SYMPTOM: After upgrading the console firmware on the DEC3000 model 400 that has a V1.0 SROM to V6.1 console from the Update CD V3.2 (PN AG_PTMWP-BE), the system hangs on boot with no VGA output. The serial console port shows a machine check message. SYSTEM MACHINE CHECK ABORT HAS OCCURRED PC=000680. NOTE: This same symptom may be seen upon upgrading the console firmware to V6.2 also. SOLUTION: A BLITZ (TD 1888) gives the following solution: The SROM needs to be at REV sV2.1(aka 6.1). SROM is 23-333E7-00. The part number for the REV sV2.1 However, it has been observed that sometimes this alone has not resolved the problem. Replacing the SROM on the system module and the I/O module (54-21813-01) appears to resolve the problem. To check the SROM firmware version issue the command >>>SHOW CONFIG CPU OK KN15-AA-V6.1-S45E-I077-sV2.1-DECchip 21064 P3.0 |____ good rom rev or higher – If sV1.0, do NOT upgrade firmware before replacing the chip NOTE: If the upgrade is done and the system hangs you will no longer be able to issue the command >>>SHOW CONFIG. There is a warning listed on the ERRATA SHEET (AV-QMECA-TE) for CD V3.2. Later versions of firmware may not successfully update with the sV1.0 SROM chip. The update may not report a failure but will not successfully update until the SROM chip is replaced. 509 510 DEC3000 Firmware Mismatch Between System and I/O Roms The DEC3000 has firmware ROMS on the system and I/O modules. If you replace one or both of these modules or if you do a firmware upgrade and do not have both the system and io update jumpers enabled you may get an error message at powerup complaining about a firmware mismatch. Mismatch Firmware, SYS 4.0 / I/O 6.1 The system may fail all IO tests (NI, SCSI etc) and because of this be unable to boot. At that point you may not get to a >>> because some power on self tests may fail or you may not be able to boot. >>> boot -fl 0,80 dka400 INIT-S-CPU INIT-S-RESET-TC INIT-S-ASIC INIT-S-MEM INIT-S-NVR INIT-S-CXT - It may hang at this spot. It should continue on as listed below INIT-S-SCC INIT-S-NI INIT-S-SCSI INIT-S-ISDN INIT-S-TC0 AUDIT_BOOT_STARTS... AUDIT_CHECKSUM_GOOD AUDIT_LOAD_BEGINS AUDIT_LOAD_DONE BOOTFILE: There are 2 possible reasons for failing to boot. 1. If we are hanging on boot due to device specific init routines failing try the following. This command prevents device specific init routines from running. >>> Set BOOT_RESET off Power cycle the system >>> Reload firmware so they match. Power off/on . At >>> set BOOT_RESET on . Init and reboot 2. The CD boot might be failing because the console is not giving the CD drive enough time to settle down after it gets a bus reset. It may hang at the INIT-S-SCSI line. You might try setting SCSI RESET as follows. You should • 1 or • 3 or • 4,5, set the SCSI_RESET value to: 2 for hard disk boot 4 for floppy or CD boot or 6 for Tape boot >>> set SCSI_RESET 3 >>> set BOOT_RESET on 511 512 Contents of The System and I/O Roms on a DEC 3000 On the DEC 3000 there are System and I/O roms that contain the following. System Rom PALcode Console Program Serial Communications Controller Driver (SCC) SCSI Driver Graphics Port Driver ASIC Selftest NVR Selftest Shareable Routine (PROM$ Routine) Console Service routine Device Configuration Data Ethernet driver I/O Rom SCSI Selftest Utilities Ethernet Selftest Utilities ISDN/Audio Selftest Utilities SCC Selftest Memory Selftest MIPS Emulator 513 514 Firmware/Console Related Blitz’s 515 516 Firmware/Console Related Blitz’s AlphaServers • TD 2941 Hard Error #8 on Alpha Servers with an HSJ controller AlphaServer 300 • [TD 2518-A] ASTN & ASRV w/ SRM V6.8 and the PCI ATMworks350 Errors AlphaServer 400 • [TD 2518-A] ASTN & ASRV w/ SRM V6.8 and the PCI ATMworks350 Errors AlphaServer 800 • [TD 2603-CR] AlphaServer 800 UltraSCSI Operation • [TD 2592-A] AlphaServer 800 PCI 64-bit Operation & Multi-port Option Support • [TD 2494-B] KZPCM Supported on AS800 with DUNIX, OpenVMS or Windows NT AlphaServer 1000/1000A • [TD 2720-CR] AlphaServer 1000A EV4 Firmware V5.5 Upgrade Problem • [TD 2197] AlphaServer 1000 & 1000A Model 5/xxx May Hang • [TD 2147] AlphaServers - ALPHABIOS 5.23 & new HAL code • [TD 1882_A] KZPSA Data Corruption Seen in System Configurations • [TD 1914] NVRAM Chip & Ethernet ID ROM Chip on Alphaserver • [TD 1755] Service Strategy for NVRAM chip on Alphaserver AlphaServer 1200 • [TD 2789] AS4x00 and AS1200 V5.7-5 firmware fails SHOW DEVICE for RAID • [TD 2781] AS4x00 and AS1200 V5.7-4 firmware fails on RAID configurations • [TD 2668] V5.4 LFU Update Methods Failure on AS4x00 and AS1200 Statement • [TD 2602] AS1200 & AS4x00 DEGPA-SA System Requirements • [TD 2537] Digital UNIX PALcode 1.21-24 SRM firmware V5.2-1 Incorrect • [TD 2440] AlphaServer 1200/4100 System and ECU Faults • [TD 2429] Alpha Server 1200 with AlphaBIOS V5.62 and Older • [TD 2332] AlphaBIOS Version 5.32 AlphaServer 2000/2100/2100A • [TD 2512] Replacement AS2X00 FRUs May Fail POST Due to SRM Firmware • [TD 2185] Windows NT 4.0 requires NEW HAL on 2xxxx server • [TD 2148-A] AlphaServer 2xxx Systems with 120ns NVRAM • [TD 2133] AlphaSrvr 2xxx SRM V4.6/ARC V4.49 May Cause Prob • [TD 2089-A] AlphaServer 2100/2100A Model 5/xxx Multiprcsr • [TD 2087] AlphaServer 2100/2100A Model 5/xxx Multiprocesr • [TD 2083] AlphaServer 2100/2100A Powerup Diags Exceed Dynamic Memory • [TD 2060] Corrections to the Sable to Lynx Upgrade • [TD 1989] AlphaServer 2100A File Names Missing From Release Notes • [TD 1914] NVRAM Chip & Ethernet ID ROM Chip on Alphaserver • [TD 1892-2] (Update) on replacing a B2110-AA B2111-AA • [TD 1885] MS451-DA Memory Module Initialization Problem • [TD 1882_A] KZPSA Data Corruption Seen in System Configurations • [TD 1876] EISA Prestoserve Option - Data Corruption of EISA SCSI Disks on AlphaServer 2x00 Systems • [TD 1755] Service Strategy for NVRAM chip on Alphaserver 517 AlphaServer 4000/4100 • [TD 2789] AS4x00 and AS1200 V5.7-5 firmware fails SHOW DEVICE for RAID • [TD 2781] AS4x00 and AS1200 V5.7-4 firmware fails on RAID configurations • [TD 2778] DS20E EV67 CPU Upgrade and SFM Revision • [TD 2668] V5.4 LFU Update Methods Failure on AS4x00 and AS1200 Statement • [TD 2654] OpenVMS Alpha Galaxy configuration support info for OpenVMS V7.2 • [TD 2602] AS1200 & AS4x00 DEGPA-SA System Requirements • [TD 2562] SRM Console Firmware V5.3-1 Update Changes • [TD 2537] Digital UNIX PALcode 1.21-24 SRM firmware V5.2-1 Incorrect • [TD 2440] AlphaServer 1200/4100 System and ECU Faults • [TD 2431] Correct Firmware for BA3050-AA on AlphaServer 4100/4000 • [TD 2429] Alpha Server 1200 with AlphaBIOS V5.62 and Older • [TD 2332] AlphaBIOS Version 5.32 • [TD 2328] Alpha Server 4100 - CPU Module Family - REISSUE • [TD 2312] Alpha Server 4100 - Windows NT 4.0 • [TD 2251] Alpha Server 4100 - SRM V4.8-6, 466 MHz CPU’s • [TD 2248] Alpha Server 4100 - V4.0 FRU Table and DECevent • [TD 2247] AlphaServer 4100 - Memory Test Environment Var • [TD 2240] Alpha Server 4100 - SRM V4.8-5, Memory Test EV • [TD 2235] Alpha Server 4100 - SRM Console Version 4.8-5 • [TD 2232-A] AlphaServer 4000/4100 Minimum Rev Support • [TD 2227] Alpha Server 4100 - CPU Module B3004-BA • [TD 2226] Alpha Server 4100 - SRM Console V4.8-3 • [TD 2222] Alpha Server 4100 - SRM bootdef_dev • [TD 2221] Alpha Server 4100 - AlphaBIOS V5.28 • [TD 2220] Alpha Server 4100 - Windows NT Install Failure • [TD 2210] Alpha Server 4100 - Windows NT 3.51 HAL Rev. C • [TD 2188] Alpha Server 4100 - 2 GByte Memory Option • [TD 2170] AlphaServer 4100 Loosing CPU’s between SRM & AB • [TD 2164] AlphaServer 4100 - AlphaBIOS V5.24 Web Location • [TD 2161] Alpha Server 4100 - Windows NT Version 4.0A HAL • [TD 2160] Alpha Server 4100 - AlphaBIOS V5.24 • [TD 2158] AlphaServer 4000/4100 Digital UNIX memory prob • [TD 2151] Alpha Server 4100 - Windows NT 4.0 Installation • [TD 2150] Alpha Server 4100 - SRM Console V2.0-3 • [TD 2127] Alpha Server 4100 TEST Command & RAID Adapters • [TD 2126] Alpha Server 4100 - Environmental Status Events • [TD 2116] Alpha Server 4100 - AlphaBios 5.21, NT4.0 • [TD 2111] Alpha Server 4100 - Windows NT V3.51 HAL • [TD 2110] Alpha Server 4100 - B3050 Field Spares • [TD 2104] Alpha Server 4100 - AlphaBIOS 5.21 Release • [TD 2088] Alpha Server 4100 SWXCR Utilities • [TD 2068] Alpha Server 4100 Minimum Firmware Revision AlphaServer 8200/8400 • [TD 2962] ASRV GS60,GS140; Galaxy Secondary Partitions Hang • [TD 2732] ARC Utilities Failing During Run Command • [TD 2664-A] UPDATE ON AlphaBIOS & HAL Incompatibilities w/Firmware • [TD 2654] OpenVMS Alpha Galaxy configuration support info for OpenVMS V7.2 • [TD 2596] AlphaServer 8200/8400 LFU for V5.3 Console, XMI Adapters • [TD 2567-A] EISA Configuration Utility (ECU) on AlphaServer 8200/8400 • [TD 2510] AlphaBIOS for AlphaServer 8x00 WindowsNT With Console V5.2 • [TD 2491] New Firmware Loader for KZPSC and KZPAC Controllers • [TD 2451] CIXCD V5 Firmware Recall • [TD 2449] Alpha Server 8200/8400 Configuration Problems • [TD 2346] AS8400/8200 Reqs. for KN7CE-AB Rev.E01/E02 & MS7CC-GA Mem Mod • [TD 2262] AlphaServer 8200/8400, System Hang/Checklist 518 • • • • • • • • • • • • • [TD [TD [TD [TD [TD [TD [TD [TD [TD [TD [TD [TD [TD 2252] AlphaServer 8400/8200 platforms - possible hang 2234] Recalling CIXCD V8 firmware 2192] AlphaServer 8400/8200 & V4.1-6 Console firmware 2086] AlphaServer 8200/8400 may fail 2085] AlphaServer 8200/8400 w/KZPAA & OpenVMS V6.2-1H3 2080] LASER MODULE FIRMWARE MATCHING 2063] DWLPA/54-24721-01 Console Requirement 1987] TURBOlaser Uniprocessor Upgrade 1950] AlphaServer 8x00; Mixing Console & CPU Revisions 1896] PCI Ethernet Problems on AlphaServer 8200/8400 1882_A] KZPSA Data Corruption Seen in System Configurations 1874] AlphaServer 8400 LFU Updates to CIXCD Modules 1873] AlphaServer 8200/8400 Problem with KZPSA Utility AlphaServer DS10/ Professional WorkStation XP900 • [TD 2965-CR] DS10/10L, XP900, DS20/20E & ES40 EnVar Data Loss • [TD 2953-CR] DS10/DS10L Console Firmware V6.0-8 Problem • [TD 2933-CR] Alpha Firmware Not Booting On DS10 600MHz System • [TD 2893] DS10-Euro-Supercluster Power Supply • [TD 2829] WEBES/Compaq Analyze - Op Sys/Patches Requirements • [TD 2714] DS10/XP900 Benchmarq TOY Clock Parameter Loss Professional WorkStation XP1000/XP1000G • [TD 2822-CR] XP1000 Firmware Update Problems (V5.8-3) • [TD 2692] USB Issue with Alpha V5.5 Firmware on XP1000 & XP1000G AlphaServer DS20/DS20E • [TD 2965-CR] DS10/10L, XP900, DS20/20E & ES40 EnVar Data Loss • [TD 2916] DS20/DS20E Reports Wrong Speed On Power Up • [TD 2892] DS20/DS20E V5.9-4 Firmware Reports System Event At Powerup • [TD 2829] WEBES/Compaq Analyze - Op Sys/Patches Requirements • [TD 2639-CR] AlphaServer DS20 Firmware Reqs - 3 GB Memory or > • [TD 2622-CR} UNIX Workaround for PAL Code Error Compaq • [TD • [TD • [TD • [TD • [TD • [TD • [TD • [TD • [TD • [TD AlphaServer ES40 2965-CR] DS10/10L, XP900, DS20/20E & ES40 EnVar Data Loss 2957-CR] ES40; V6.0A Console Firmware Required for PBXDA-AC Rev. F 2943-CR] ES40 V6.0 Firmware; Do Not Use In Galaxy Environment 2942] UNIX V4.0G ES40 & GS80/GS160/GS320 Systems May Not Boot 2867] ES40 Firmware CD QC-086AA-HC CPU Upgrade Kit Is Obsolete 2829] WEBES/Compaq Analyze - Op Sys/Patches Requirements 2787-CR] AlphaServer ES40 PALcode Correction with Firmware Update 2706-CR] AlphaServer ES40 Firmware Update Procedure 2703-CR] New Console Firmware for AlphaServer ES40 2622-CR} UNIX Workaround for PAL Code Error Compaq • [TD • [TD • [TD • [TD • [TD • [TD • [TD AlphaServer GS60/GS60E/GS140 2962] ASRV GS60,GS140; Galaxy Secondary Partitions Hang 2887-A] GS140, GS60, Firmware V5.9-2 Console Problem 2868] GS60,GS140, Alphserver8200/8400 VGA graphics 2766] AlphaServer GS60/GS60E/GS140 System Hangs/Console V5.6-6 2732] ARC Utilities Failing During Run Command 2712] AlphaServer GS60/GS140 Systems Firmware V5.5-23 2701] AlphaServer GS60/GS140 Systems Firmware V5.5-17 519 • • • • • • [TD [TD [TD [TD [TD [TD Compaq • [TD • [TD • [TD • [TD • [TD • [TD 2678] Firmware Upgrade for AlphaServer GS60/GS140 Systems 2651-CR] AlphaServer GS60/GS140 Console Upgrade /Firmware CD V5.4 2622-CR} UNIX Workaround for PAL Code Error 2610-CR-B] Update on Errors from Oracle 8.0.4.x w/DUNIX & EV6 2594] AlphaServer GS60/GS140 Mandatory Console Firmware Upgrade 2578] Compaq AlphaServer GS60/GS140 Problems and Solutions AlphaServer GS80/GS160/GS320 2942] UNIX V4.0G ES40 & GS80/GS160/GS320 Systems May Not Boot 2921] GS80/160/320 SRM INIT Heap Expand Loop Explanation 2917] GS80/GS160/GS320 To Enable PCI Drawer Power Redundancy 2909] Q-Vet For GS80/160/320 Included On Alpha Sys Firmware Upd CD 2883-A]GS80/160/320 Systems Problem With WWIDMGR; Updated SOLUTION 2859] GS80/160/320 Possible Global Port Faults/Memory ECC Errors Digital Server 3300 • [TD 2503] DIGITAL Server BIOS Doesn’t Contain SCU • [TD 2457] Important DIGITAL Server Cluster Information Digital Server 5300 • [TD 2781] AS4x00 and AS1200 V5.7-4 firmware fails on RAID configurations • [TD 2668] V5.4 LFU Update Methods Failure on AS4x00 and AS1200 Statement • [TD 2537] Digital UNIX PALcode 1.21-24 SRM firmware V5.2-1 Incorrect • [TD 2503] DIGITAL Server BIOS Doesn’t Contain SCU • [TD 2457] Important DIGITAL Server Cluster Information • [TD 2440] AlphaServer 1200/4100 System and ECU Faults • [TD 2429] Alpha Server 1200 with AlphaBIOS V5.62 and Older Digital Server 7300 • [TD 2781] AS4x00 and AS1200 V5.7-4 firmware fails on RAID configurations • [TD 2668] V5.4 LFU Update Methods Failure on AS4x00 and AS1200 Statement • [TD 2537] Digital UNIX PALcode 1.21-24 SRM firmware V5.2-1 Incorrect • [TD 2503] DIGITAL Server BIOS Doesn’t Contain SCU AlphaStation 200 • [TD 2518-A] ASTN & ASRV w/ SRM V6.8 and the PCI ATMworks350 Errors • [TD 2084] Corrupted ISA configuration data stored in NVR AlphaStation 250 • [TD 2518-A] ASTN & ASRV w/ SRM V6.8 and the PCI ATMworks350 Errors • [TD 2133] AlphaSrvr 2xxx SRM V4.6/ARC V4.49 May Cause Prob AlphaStation 255 • [TD 2518-A] ASTN & ASRV w/ SRM V6.8 and the PCI ATMworks350 Errors • [TD 2371] KZPBA-CA UltraSCSI Adapter • [TD 2193] Alphastation 255 KZPSC Problem AlphaStation 400 • [TD 2518-A] ASTN & ASRV w/ SRM V6.8 and the PCI ATMworks350 Errors AlphaStation 500 • [TD 2658-CR-A] AS500 Firmware Upgrade Problem with AS500_7_0.EXE, .SYS • [TD 2371] KZPBA-CA UltraSCSI Adapter 520 • [TD 2321] AS500 w/SRM V6.4-5 hangs w/KZPSA-BB option AlphaStation 600 • [TD 1963] New Version Firmware Available for Alphastation 600 • [TD 2371] KZPBA-CA UltraSCSI Adapter • [TD 2275] AS600 with SRM V6.4-5 hangs w/ KZPSA-BB option • [TD 2054] Open APX VMS V6.2 boot problem on AS600 FIS • [TD 1944_A] Firmware for AlphaStation 600 Available Soon AlphaStation 600A • [TD 2371] KZPBA-CA UltraSCSI Adapter Digital Personal WorkStation a/au Series • [TD 2474] Minimum Revisions for Modules on MIATA GL UNIX Systems • [TD 2436] Unexpected Machine Checks on DWPS with Bcache • [TD 2371] KZPBA-CA UltraSCSI Adapter Digital Personal WorkStation - Miata GL • [TD 2474] Minimum Revisions for Modules on MIATA GL UNIX Systems • [TD 2436] Unexpected Machine Checks on DWPS with Bcache • [TD 2371] KZPBA-CA UltraSCSI Adapter Digital Personal WorkStation – KryoTech 767A • [TD 2474] Minimum Revisions for Modules on MIATA GL UNIX Systems • [TD 2436] Unexpected Machine Checks on DWPS with Bcache • [TD 2371] KZPBA-CA UltraSCSI Adapter Digital Ultimate Personal WorkStation • [TD 2781] AS4x00 and AS1200 V5.7-4 firmware fails on RAID configs • [TD 2668] V5.4 LFU Update Methods Failure on AS4x00 and AS1200 Statement • [TD 2562] SRM Console Firmware V5.3-1 Update Changes • [TD 2537] Digital UNIX PALcode 1.21-24 SRM firmware V5.2-1 Incorrect • [TD 2440] AlphaServer 1200/4100 System and ECU Faults • [TD 2429] Alpha Server 1200 with AlphaBIOS V5.62 and Older • [TD 2332] AlphaBIOS Version 5.32 DEC 3000-400 • [TD 1888] DEC3000-400, SROM rev 6.1 Needed, when Upgrading Firmware to V6.1 DEC 3000-500 • [TD 1696] ALPHA AXP DEC3000 MODEL 500/500X/800/900 SYSTEM & I/O ROM MATRIX • [TD 1658] INCOMPATIBILITY FIRMWARE PROBLEM ALPHA AXP • [TD 1329] FW update info on DEC 3000Model 500 DEC 3000-800 • [TD 1696] ALPHA AXP DEC3000 MODEL 500/500X/800/900 SYSTEM & I/O ROM MATRIX • [TD 1658] INCOMPATIBILITY FIRMWARE PROBLEM ALPHA AXP DEC 3000-900 • [TD 1696] ALPHA AXP DEC3000 MODEL 500/500X/800/900 SYSTEM & I/O ROM MATRIX 521 DEC 4000-600 • [TD 1585] MS430-FA (B2011-AA, 512MB)/DEC 4000 Model 6xx / 7xx Series • [TD 1338] PROBLEMS ENCOUNTERED WHEN INSTALLING DEC 4000 MODEL 610 CPU DEC 7000 / 10000 • [TD 2832] KZPCC-CE Configs, Drive Failure/Removal Causes System Crash • [TD 2015] DEC7000 Console V4.5 Problem w/ Single CI Path to HSJ40 • [TD 1947] VAX7000 & DEC7000 Memory Configuration Restrictions • [TD 1865] DEC7000/10000 Console V4.2 Has a Serious Problem • [TD 1732] DEC7000 with >2GB mem,CIXCD,run. VMS may crash • [TD 1559 DEC 7000 and VAX 7000 MOP Booting Problem • [TD 2451] CIXCD V5 Firmware Recall • [TD 2234] Recalling CIXCD V8 firmware • [TD 2080] LASER MODULE FIRMWARE MATCHING • [TD 1858_A] VAX7000, DEC7000 Using wrong LFU => CPU unusable • [TD 1752-A] OpenVMS AXP and DEC7000 Crash Dump Problems • [TD 1336] CIXCD Microcode on Alpha/VAX VMSclusters • [TD 1311] VAX 7000/10000, DEC 7000/10000 AXP LFU Utility VAX 7000 / 10000 • [TD 2557] CIXCD Firmware for VAX Systems • [TD 1974] VAX7000 Console V4.1 & Show Power • [TD 1959] VAX7000-8XX Initialization Problem • [TD 1763] DEMNA Firmware Problem • [TD 1651] VAX 7000/10000 - HSD05 - Reboot Problem • TD 1566 VAX 7000/10000 - HSJ40 - Single Path Booting Problem • TD 1559 DEC 7000 and VAX 7000 MOP Booting Problem • [TD 1858_A] VAX7000, DEC7000 Using wrong LFU => CPU unusable • [TD 1363] VAX7000/VAX10000 Console V2.6 • [TD 1348] VAX7000 and VAX10000 systems running in an SMP environment • [TD 1311] VAX 7000/10000, DEC 7000/10000 AXP LFU Utility Controllers / Adapters • [TD 2919] CIXCD 4K Firmware may cause VC loss and Port Timeout • [TD 2884-CR] New DS-KGPSA-CB/CY Firmware For WNT 4.0 & Windows 2000 • [TD 2871] DS-KZPCC-CE Can Allow Data Inconsistency • [TD 2831] DS-KGPSA-xx Limited Risk of Data Inconsistency • [TD 2807-C] xx-KGPSA-xx, SF303a1.zwc, & DD303a1.awc Firmware Rev Rel • [TD 2675] KGPSA Firmware Revision SF220x2.awc Released • [TD 2656-CR] "WWIDMGR User’s Guide" Can’t Be Located On Firmware V5.4 CD • [TD 2652] KZESC and KZPSC RAID Controllers Not Supported on UNIX 5.x • [TD 2602] AS1200 & AS4x00 DEGPA-SA System Requirements • [TD 2557] CIXCD Firmware for VAX Systems • [TD 2497] TSZ07 Tape Drive Cannot Be Seen at Console Prompt • [TD 2494-B] KZPCM Supported on AS800 with DUNIX, OpenVMS or Windows NT • [TD 2491] New Firmware Loader for KZPSC and KZPAC Controllers • [TD 2419] Enabling Active Negation on KZPSC RAID Controllers • [TD 2402-A] TLZ09 Firmware Update for Q-Logic SCSI Controllers • [TD 2371] KZPBA-CA UltraSCSI Adapter • [TD 2298-A] Alpha Server 4100 - SCSI Bus & Related Errors • [TD 2223] Alpha Server 4100 - Raid Initialization Times • [TD 2127] Alpha Server 4100 TEST Command & RAID Adapters • [TD 2088] Alpha Server 4100 SWXCR Utilities • [TD 2048] KZPSC with large cache (MS100-xx) fail w/21164 • [TD 1882_A] KZPSA Data Corruption Seen in System Configurations • [TD 1874] AlphaServer 8400 LFU Updates to CIXCD Modules 522 • [TD 1873] AlphaServer 8200/8400 Problem with KZPSA Utility 523 524 References 525 526 • • • • • • • • GS80/160/320 Bulletin Board Engineering Tools Website AlphaServer Engineering webpage AlphaServer-Inside DS20 (Goldrush) webpage DS20 (Goldrush) webpage AlphaServer 1200 (Tincup) webpage ES40 Clipper PVT page 527 Subject Moderator if Restricted AlphaStations AlphaStation500 AlphaServer 800 ( Add entry danger::notes$library:corelle ) AlphaServer 1000/1000A HS111,HS121,HS211,HS221,HS241,SWXNA (Alphaserver 1000 based) Goldrush (DS20), Clipper (ES40), and Web Brick (DS10) Wildfire (GS80, GS160 and GS320) AlphaServer 4100 Rawhide - Restricted (send mail to POBOXB::DUNCAN) AlphaServer 8200/8400 TurboLaser Specifications - Restricted (send mail to DANGER::HARTWELL) Jensen Demi-Sable Notes - Restricted (send mail to DUENDE::FLORES) Demi-Sable Specifications - Restricted (send mail to DUENDE::FLORES) SABLE Windows NT for DEC2100 Model A500 SABLE_NOTES - Restricted (send mail to DUENDE::FLORES) SABLE_QUAL - Restricted (send mail to DUENDE::FLORES) SABLE SPECIFICATIONS - Restricted (send mail to DUENDE::FLORES) DEC 3000 Platform DEC 3000-300 - Restricted (send mail to DANGER::SYSTEM) DEC3000 M400/500/500/600/700/800/90 - Restricted (send mail to DANGER::SYSTEM) VAX 7000/10000 and DEC 7000/10000 Laser Specifications Conference http://ecs2.mro.cpqcorp.net/gsbb http://webshooter2.mro.cpqcorp.net/ddt_tools/index.html http://frodo.mro.cpqcorp.net/ http://frodo.mro.cpqcorp.net/alphaserver-inside/ http://rwhid1.mro.cpqcorp.net/goldrush/ http://webshooter2.mro.cpqcorp.net/DS20E/ http://webshooter2.mro.cpqcorp.net/tincup/index.html http://webshooter2.mro.cpqcorp.net/clipper_pvt/index.html Alpha Systems WebPages Notesfile Name DANGER::ALPHASTATION DANGER::ALPHASTATION500 DANGER::CORELLE DANGER::MIKASA SSDEVO::HS1XX_PRODUCT DANGER::ES_DS_ALPHASERVERS KRYSTL::WILDFIRE DANGER::ALPHASERVER_4100 POBOXA::RAWHIDE DANGER::TURBOLASER DANGER::TLASER_SPECS COZMO::JENSEN MVBLAB::DEMISABLE_NOTES MVBLAB::DEMISABLE_SPECS AFW1::SABLE DECWET::SABLE-NT DUFFY::SABLE_NOTES DUFFY::SABLE_QUAL DUFFY::SABLE_SPECS DANGER::DEC3000 DANGER::PELICAN DANGER::FLAMINGO PROXY::LASER PROXY::LASER_SPECS Note: Some of these notesfile may no longer be available. Alpha Systems Notesfiles http://cybrary.inet.cpqcorp.net/ARCHIVE/PUBS/USERS/ALPHA-FIRMWARE-UPDATE-V61.pdf http://Cybrary.inet.cpqcorp.net/SYSTEMS/ALPHA/FIRMWARE/firmware_procedures.html http://Cybrary.inet.cpqcorp.net:/SYSTEMS/ALPHA/failsafe_loader.html http://Cybrary.inet.cpqcorp.net:/SYSTEMS/ALPHA/fsl_update.html http://Cybrary.inet.cpqcorp.net/SYSTEMS/ALPHA/as800_floppy.html http://Cybrary.inet.cpqcorp.net/SYSTEMS/ALPHA/ASRV2000/2x00_fsl.html http://Cybrary.inet.cpqcorp.net/SYSTEMS/ALPHA/ASRV4000/4x00_fsl_update.html http://Cybrary.inet.cpqcorp.net:/SYSTEMS/ALPHA/ES40/es40_fsl.html http://Cybrary.inet.cpqcorp.net/SYSTEMS/ALPHA/DS20/ds20_fsl.html http://Cybrary.inet.cpqcorp.net:/SYSTEMS/ALPHA/DS10/ds10_fsl.html http://Cybrary.inet.cpqcorp.net/SYSTEMS/ALPHA/dsrv_fsl_update.html http://Cybrary.inet.cpqcorp.net/SYSTEMS/ALPHA/dpws_fsl_update.html • • • Failsafe loader Description AlphaServer/AlphaStation FSL AlphaServer 800 Floppy Procedure AlphaServer 2x00 FSL AlphaServer 4x00 FSL AlphaServer ES40 FSL AlphaServer DS20 FSL AlphaServer DS10 FSL Digital Server FSL Digital Personal Workstation FSL V6.1 doc in PDF format http://Cybrary.inet.cpqcorp.net/STORAGE/FIBRE/ADAPTERS/COMPAQ/KGPSA/kgpsa_fw_update_intro.htm KGPSA Update Procedures http://Cybrary.inet.cpqcorp.net/SYSTEMS/ALPHA/ASRV8400/rcu.html RCU on TurboLaser http://Cybrary.inet.cpqcorp.net/SYSTEMS/ALPHA/FIRMWARE/turbo_utility.html Utilities on Turbolaser 528 http://Cybrary.inet.cpqcorp.net/SYSTEMS/ALPHA/FIRMWARE/fw_update_methods.html AlphaServer/AlphaStation http://Cybrary.inet.cpqcorp.net/SYSTEMS/ALPHA/as800_floppy.html AlphaServer 800 Floppy Procedure AlphaServer ES40 RMC Update http://Cybrary.inet.cpqcorp.net/SYSTEMS/ALPHA/FIRMWARE/es40_rmc_update.html http://Cybrary.inet.cpqcorp.net/SYSTEMS/ALPHA/FIRMWARE/turbo_update_methods.html Turbolaser http://Cybrary.inet.cpqcorp.net/SYSTEMS/ALPHA/FIRMWARE/gs_update_methods.html GS60/GS140 http://Cybrary.inet.cpqcorp.net/SYSTEMS/ALPHA/FIRMWARE/wf_firmware_update.html GS80/GS160/GS320 http://Cybrary.inet.cpqcorp.net/SYSTEMS/ALPHA/3000-500/3000_update.html DEC 3000 http://Cybrary.inet.cpqcorp.net:/SYSTEMS/ALPHA/FIRMWARE/dec7000_firmware.html DEC 7000 VAX 7000 http://Cybrary.inet.cpqcorp.net:/SYSTEMS/ALPHA/FIRMWARE/vax7000_firmware.html Utilities/Adapters • • • • • • • • • Update Procedures • • • • • • • • • • FailSafe Loader Procedures • Firmware Pages on Cybrary • Firmware Document on Cybrary http://Cybrary.inet.cpqcorp.net http://Cybrary.inet.cpqcorp.net/DOWNLOAD/FIRMWARE/SYSTEMS/ALPHA http://ftp.digital.com/pub/DEC/Alpha/firmware/ Digital’s Firmware website http://ftp.digital.com/pub/Digital/Alpha/firmware/ ftp://ftp.digital.com/pub/DEC/Alpha/firmware/ ftp://ftp.digital.com/pub/Digital/Alpha/firmware/ http://ecs2.mro.cpqcorp.net/wf/ Wildfire firmware location http://16.129.13.229/wildfire/ Wildfire firmware location http://www.compaq.com/support/files/alphant/index.html See PROXY::LASER note 674 for info on VAX7000/10000 firmware ISG$COMMON:[LASER.VAX7000]LFU_VAX_BOOT_PROCEDURE.TXT;42 CSC32::ISG$COMMON:[LASER.VAX7000.UCODE] See PROXY::LASER note 673 for info on AXP7000/10000 firmware ISG$COMMON:[LASER.DEC7000]LFU_DEC_BOOT_PROCEDURE.TXT CSC32::ISG$COMMON:[LASER.DEC7000.UCODE] Firmware Locations Online • • • • • • • • • Firmware Locations On The Internet 529 .E01) .PRE) .A01) .B01) .A01) .B01) .A01) .A01) .A01) .A01) .A01) Part Number (EK-PCDTA-UI (EK-PCDSA-TI (EK-PCCTA-UI (EK-VLLXA-UI (EK-PCDSA-CI (EK-PCDSA-UI (EK-ALPH5-UI (EK-AS800-UI (EK-AL655-UI (EK-AS300-UG (EK-ASV80-SG Page Numbers C7 - C9, Appendix E 2-13 to 2-17 C7 to C9, Appendix E B10 to B13, Appendix D 1-5 Appendix E C10 to C12, Appendix E Chapter 6 pages 59-62 C10 - C12, Appendix E 4-26, 7-7 - 7-10 A4 - A6 2-4 to 2-5, 2-21 to 2-23, 7-27, Appendix A C8 to C9, Appendix E 7-4, 8-18 to 8-19 2-17 to 2-18 8-19 to 8-20, 9-12 to 9-15 2-30 to 2-34, Appendix A 3-28 to 3-46 530 400 Series User Information (EK-PCSVA-UI .A01) 1000 Owners Guide (EK-DTLSV-OG .B01) 1000 Service Guide (EK-DTLSV-SV .B01) 1000A Owners Guide (EK-ALPSV-OG .A01) 1000A Service Guide (EK-ALPSV-SV .B01) 1200 Users Guide (EK-AS120-UG .A01) 1200/DIGITAL Ultimate Workstation 533 Service Manual (EK–AS120–SV. A01) 2-24, Appendix A AlphaServer 2000/2100/2100 RM/2100 CAB Series Service Guide (EK-KN450-SV .B01) 2-18 to 2-21 Digital 2100 Server Model 500MP-R Series Installation/Owners (EK-KN450-RM .A01) 5-28 to 5-30 AlphaServer 2100A Owners (EK-2100A-OP .A01) 4-9 to 4-11 AlphaServer 2100A RM Series Installation/Owners (EK-2100A-RM .A01) 6-11 AlphaServer 2100A/2100A RM/2100A Cab Series Service Guide (EK-2100A-SV .A01) 2-18 to 2-22 AlphaServer 4100 Service Manual (EK-4100A-SV .A01) Appendix A AlphaServer 4100 Central Office System Installation/Owners/ Service Guide (EK-410CO-IN .A01) 1-7, Appendix D AlphaServer 8200/8400 Service Manual - Part 2 (EK-T8030-SV2.A01) Chapter 6 AlphaServer GS60/140 and 8200/8400 Operations Manual (EK-T8030-OP .C01) Appendix B AlphaServer DS/ES Systems Maintenance Course Guide (EY-Z417E-SG-0001) Chapter 6 AlphaServer DS10 / DS10L AlphaStation DS10 Console Reference (EK-DS10S-CR .C01) 1-24 to 1-35 AlphaServer DS20 Service Manual (EK-AS140-SV .A01) Appendix C Compaq AlphaServer DS20 User’s Guide (EK-AS140-UG .A01) 3-26 to 3-44, Chapters 4 and 5 Compaq AlphaServer ES40 and AlphaStation ES40 Service Guide (EK-ES240-SV .B02) 2-12, 3-30 to 3-33 AlphaServer ES40 Owner’s Guide (EK-ES240-UG .B01) Chapter 6 AlphaServer ES40 and AlphaStation ES40 Owner's Guide (EK-ES240-OG .B01) Chapter 6 AlphaServer GS80/GS160/GS320 Level 2 Support Technical Advisory Chapter 8 AlphaServer GS80/160/320 AlphaServer GS Series Service Manual(EK-GS320-SV .C01) Appendix D AlphaServer GS80/160/320 Firmware Reference Manual (EK-GS320-RM .C01) Appendix B DEC 3000 Model 300 Series AXP Hardware Reference Manual (EK-PELCN-OG .C01) 1-14 to 1-15 DEC 3000 Models 400/400S AXP Technical Summary (EK-SNDPR-TM .B01) 1-12 DEC 3000 Models 500/500S AXP Service info (EK-FLAMI-SV .C01) 2-3 to 2-5, Appendix A DEC 3000 Models 500X AXP Service info (EK-HOTPI-SV .A01) 2-2 to 2-3, Appendix A DEC 3000 Models 600/600S and 800/800S AXP Service Info (EK-FLSPC-SV .A01) 2-2, 2-7, 7-3 to 7-5 DEC 3000 AXP Systems and TURBOchannel Options Update Utility Procedures (Release Notes) AlphaServer AlphaServer AlphaServer AlphaServer AlphaServer AlphaServer AlphaServer Document Title AlphaStation 200 Series User Information AlphaStation 200/400 Series Technical Information AlphaStation 250 Series User Information AlphaStation 255 Series User Information AlphaStation 400 Series CPU Module Information AlphaStation 400 Series User Information AlphaStation 500 Series User Information Maverick System Spec AlphaStation 600 Series User Information AlphaStation 600A Series User Information AlphaServer 300 User Guide AlphaServer 800 Service Guide Documentation Sources and Page Numbers 531 532 Index A Alpha Windows NT Matrix .................................................................................................................................................... 21 B Blitz’s .................................................................................................................................................................................... 513 E ECU - EISA Configuration Utility ....................................................................................................................................... 343 Environmental Variables Bus Probe Algorithm ....................................................................................................................................................... 311 Definitions ....................................................................................................................................................................... 299 arc_enable ................................................................................................................................................................... 299 auto_action .................................................................................................................................................................. 299 baud............................................................................................................................................................................. 299 boot_dev...................................................................................................................................................................... 299 boot_file ...................................................................................................................................................................... 300 boot_osflags ................................................................................................................................................................ 300 boot_reset .................................................................................................................................................................... 300 bootdef_dev................................................................................................................................................................. 300 booted_dev .................................................................................................................................................................. 300 booted_file .................................................................................................................................................................. 300 booted_osflags ............................................................................................................................................................ 300 bus_probe_algorithm................................................................................................................................................... 300 console ........................................................................................................................................................................ 300 console_mode.............................................................................................................................................................. 300 cpu_enabled ................................................................................................................................................................ 301 cpu_mask .................................................................................................................................................................... 301 cpu_primary ................................................................................................................................................................ 301 dump_dev.................................................................................................................................................................... 301 ew*0_mode ................................................................................................................................................................. 301 ew*0_protocols ........................................................................................................................................................... 301 ffauto ........................................................................................................................................................................... 301 ffnext ........................................................................................................................................................................... 302 interleave..................................................................................................................................................................... 302 isp*_host_id ................................................................................................................................................................ 302 isp*_soft_term............................................................................................................................................................. 302 kzpsa*_fast.................................................................................................................................................................. 302 kzpsa*_host_id............................................................................................................................................................ 302 kzpsa*_termpwr .......................................................................................................................................................... 302 memory_test................................................................................................................................................................ 302 ocp_text....................................................................................................................................................................... 302 os_type ........................................................................................................................................................................ 303 pal................................................................................................................................................................................ 303 pci_parity .................................................................................................................................................................... 303 pk*0_disconnect.......................................................................................................................................................... 303 pk*0_fast..................................................................................................................................................................... 303 pk*0_host_id ............................................................................................................................................................... 303 pk*0_soft_term ........................................................................................................................................................... 303 pk*0_termpwr ............................................................................................................................................................. 303 simm_callout ............................................................................................................................................................... 304 sys_model_num........................................................................................................................................................... 304 sys_serial_num............................................................................................................................................................ 304 sys_type....................................................................................................................................................................... 304 tta0_baud..................................................................................................................................................................... 304 533 version......................................................................................................................................................................... 304 FFAUTO and FFNEXT ................................................................................................................................................... 313 Galaxy Definitions ........................................................................................................................................................... 305 lp_count....................................................................................................................................................................... 305 lp_io_mask .................................................................................................................................................................. 305 lp_mem_size ............................................................................................................................................................... 305 lp_shared_mem_size ................................................................................................................................................... 305 How to Set Customer Defined Variables ......................................................................................................................... 307 How to Set Customer Defined Variables on a Turbolaser ............................................................................................... 309 mopv3_boot ..................................................................................................................................................................... 395 Errors AlphaServer 1000/1000A Led Code CB.......................................................................................................................... 405 AlphaServer 2100 5/375 "Cpu Type Not Supported....................................................................................................... 455 AlphaServer 2x00/2100A, FAIL I/O 00 04 ..................................................................................................................... 459 AlphaServer 2x00/2100A, FAIL I/O 04 .......................................................................................................................... 459 AlphaServer 2x00/2100A, FAIL I/O_00 0004 ................................................................................................................ 459 AlphaServer DS10 6/600 MHZ CPU - No Default Bootfile Selected ............................................................................. 485 AlphaServer DS10/DS20 - Invalid Image........................................................................................................................ 487 bad value - mopv3_boot not modified ............................................................................................................................ 395 console is secure - parameters are not allowed ................................................................................................................ 385 DAC960 initialize issues with V5.7-4 console on AlphaServer 4x00 systems................................................................ 473 DEC 3000-400, SYSTEM MACHINE CHECK ABORT HAS OCCURRED PC=000680............................................ 507 illegal date/time entered ................................................................................................................................................... 469 Missing file ...................................................................................................................................................................... 381 RCU - Failed to open, or encountered an error while reading the following files ........................................................... 335 Unable to Set Date/Time Under ARC.............................................................................................................................. 469 F FailSafe Booter Compaq AlphaServer DS10............................................................................................................................................. 445 Compaq AlphaServer DS20..................................................................................................................................... 441, 443 FailSafe Loader........................................................................................................................................... See FailSafe Booter FailSafe Loader AlphaServer 2x00, FSL Issues and Problems .................................................................................................................. 467 AlphaServer 2x00, Overview and Functions ................................................................................................................... 459 AlphaServer 2x00, Updating Firmware from .................................................................................................................. 465 AlphaServer 4000/4100/1200 .......................................................................................................................................... 419 AlphaServer 800/Digital Server 3000 Model 3300/3305................................................................................................. 415 AlphaStation/AlphaServer ............................................................................................................................................... 411 Compaq AlphaServer ES40 ............................................................................................................................................. 431 Compaq AlphaServer ES45 ............................................................................................................................................. 439 Digital Personal WorkStation .......................................................................................................................................... 447 Digital Server 5000 Model5300....................................................................................................................................... 425 Digital Server 7000 Model 7300...................................................................................................................................... 425 FailSafe Loader Differences ............................................................................................................................................ 409 Firmware Minimum Acceptable Firmware Versions for Recent OS Versions .................................................................................... 3 Firmware Update Procedures AlphaServer 1000/1000A .................................................................................................................................................. 47 AlphaServer 1200 .............................................................................................................................................................. 61 AlphaServer 2000/2100/2100A ......................................................................................................................................... 73 AlphaServer 300 ................................................................................................................................................................ 25 AlphaServer 400 / AlphaStation 400 ............................................................................................................................... 211 AlphaServer 4000/4100 ..................................................................................................................................................... 87 AlphaServer 800 ................................................................................................................................................................ 35 AlphaServer 8200/8400 ................................................................................................................................................... 101 AlphaStation 200/250 Full Flash ..................................................................................................................................... 187 AlphaStation 200/255 Half Flash..................................................................................................................................... 199 534 AlphaStation 500/600 ...................................................................................................................................................... 223 AlphaStation 600A........................................................................................................................................................... 233 CIXCD ............................................................................................................................................................................. 347 Compaq AlphaServer DS10 and Professional WorkStation XP900 ................................................................................ 145 Compaq AlphaServer DS20/DS20E ................................................................................................................................ 155 Compaq AlphaServer ES40 - RMC ................................................................................................................................. 495 Compaq AlphaServer ES40/TS40 ................................................................................................................................... 165 Compaq AlphaServer ES45 ............................................................................................................................................. 177 Compaq AlphaServer GS60/GS140................................................................................................................................. 115 Compaq AlphaServer GS80/GS160/GS320..................................................................................................................... 129 Compaq Professional WorkStation XP1000 .................................................................................................................... 251 DEC 2000 Models 300/500.............................................................................................................................................. 257 DEC 3000 ........................................................................................................................................................................ 263 DEC 4000 Models 600 and 700 ....................................................................................................................................... 277 DEC 7000/10000 ............................................................................................................................................................. 281 DECpc AXP150............................................................................................................................................................... 257 Digital Personal WorkStation a/au Series ........................................................................................................................ 243 Digital Server 3000 Models 3300/3305 ............................................................................................................................. 35 Digital Server 5000 Models 5300/5305 ............................................................................................................................. 61 Digital Server 7000 Models 7300/7305 ............................................................................................................................. 87 Digital Ultimate WorkStation ............................................................................................................................................ 61 KGPSA - GS60/GS60E/GS140 or Turbolasers ............................................................................................................... 359 KGPSA - GS80/GS160/GS320........................................................................................................................................ 353 KGPSA using AlphaBIOS ............................................................................................................................................... 363 VAX 7000/10000............................................................................................................................................................. 287 Firmware Versions AlphaServer 1000 EV5 thru AlphaServer 1200 Systems .................................................................................................... 5 AlphaServer 2100A EV5 thru AlphaServer 8x00 Systems.................................................................................................. 7 AlphaServer 2x00 EV4 thru AlphaServer 2100A EV4 Systems ......................................................................................... 6 AlphaServer 300 thru AlphaServer 1000 EV4..................................................................................................................... 4 AlphaStation 200 thru AlphaStation 255 ........................................................................................................................... 13 AlphaStation 400 thru AlphaStation 600A ........................................................................................................................ 14 Compaq AlphaServer DS10 thru Compaq AlphaServer GS60/GS60E/GS140 ................................................................... 9 DEC 2000 Systems ............................................................................................................................................................ 15 DEC 3000 Systems ............................................................................................................................................................ 16 DEC 4000 Systems ............................................................................................................................................................ 21 DEC 7000/10000 Systems ................................................................................................................................................. 19 Digital Personal WorkStation a/au Series .......................................................................................................................... 12 Digital Ultimate WorkStation 533a2/533au2 Series and Compaq Professional WorkStation XP1000............................. 12 VAX 7000/10000 Systems................................................................................................................................................. 19 FSL ............................................................................................................................................................. See FailSafe Loader G Galaxy Environmental Variables .................................................................................................................. See Galaxy Definitions Firmware updates on........................................................................................................................................................ 475 H HALcode .............................................................................................................................................................................. 295 I Issues .................................................................................................................................................................................... 293 J Jumpers AlphaServer 1000/1000 , CPU EV4 .................................................................................................................................. 56 535 AlphaServer 1000/1000A, CPU EV5/300 ......................................................................................................................... 57 AlphaServer 1000/1000A, Motherboard............................................................................................................................ 55 AlphaServer 1000A, CPU EV5/333 .................................................................................................................................. 58 AlphaServer 1000A, CPU EV5/400 .................................................................................................................................. 59 AlphaServer 2000, BA720 Enclosure ................................................................................................................................ 83 AlphaServer 2100 .............................................................................................................................................................. 85 AlphaServer 2100 LP......................................................................................................................................................... 86 AlphaServer 2100/2100RM, BA740/BA741 Enclosures................................................................................................... 84 AlphaServer 2100A RM .................................................................................................................................................... 85 AlphaServer 300, Motherboard.......................................................................................................................................... 33 AlphaServer 400, CPU..................................................................................................................................................... 220 AlphaServer 400, Motherboard........................................................................................................................................ 219 AlphaServer 4000/4100 LP, PCI/EISA Motherboard........................................................................................................ 99 AlphaServer 4000/4100, PCI/EISA Motherboard ............................................................................................................. 99 AlphaServer 800, Motherboard.......................................................................................................................................... 45 AlphaServer DS20 , Motherboard.................................................................................................................................... 163 AlphaServers and AlphaStations ..................................................................................................................................... 1, 2 AlphaStation 200, Motherboard..................................................................................................................... 195–96, 207–8 AlphaStation 250. Motherboard....................................................................................................................................... 197 AlphaStation 255, Motherboard................................................................................................................................. 209–10 AlphaStation 400, CPU.................................................................................................................................................... 222 AlphaStation 400, Motherboard....................................................................................................................................... 221 AlphaStation 500, System Module ............................................................................................................................ 229–30 AlphaStation 600, System Module ............................................................................................................................ 231–32 AlphaStation 600A, CPU................................................................................................................................................. 242 AlphaStation 600A, System Board .................................................................................................................................. 241 Compaq AlphaServer DS10, MotherBoard ..................................................................................................................... 153 Compaq AlphaServer ES40, CSB - System Backplane ................................................................................................... 175 Compaq AlphaServer ES45, CSB - System Backplane ................................................................................................... 185 DEC 3000 Model 300, Rom Update ................................................................................................................................ 271 DEC 3000 Model 400/600/700, ROM Update................................................................................................................. 271 DEC 3000 Models 500/500S/500X, I/O Module............................................................................................................. 273 DEC 3000 Models 500/500S/500X, System Module ...................................................................................................... 272 DEC 3000 Models 800/800, I/O Module......................................................................................................................... 275 DEC 3000 Models 800/900, System Module................................................................................................................... 274 VAX and DEC machines ..................................................................................................................................................... 2 P PALcode ............................................................................................................................................................................... 295 Password Clearing SRM Console Password on an AlphaStation 500/600 ...................................................................... 387, 389, 391 Clearing SRM Password on a Miata/Miata GL ............................................................................................................... 393 Powerup Sequence................................................................................................................................................................ 297 R RCU Booting off CD ................................................................................................................................................................ 331 Creating RCU floppy ....................................................................................................................................................... 333 Running RCU on a TurboLaser ....................................................................................................................................... 337 References ............................................................................................................................................................................ 523 Alpha System Webpages ................................................................................................................................................. 525 Documentation................................................................................................................................................................. 528 Firmware Locations on the Internet ................................................................................................................................. 525 Firmware Locations Online ............................................................................................................................................. 527 Firmware Pages on ProSIC .............................................................................................................................................. 526 Notesfile Locations .......................................................................................................................................................... 525 536 S Scripts ................................................................................................................................................................................... 317 1000A_to_600A............................................................................................................................................................... 317 600A_to_1000A............................................................................................................................................................... 317 cpu_downgrade ................................................................................................................................................................ 317 cpu_upgrade..................................................................................................................................................................... 317 make_dual_srm ................................................................................................................................................................ 317 read_rel_notes.................................................................................................................................................................. 318 restore_nvram .................................................................................................................................................................. 318 save_nvram ................................................................................................................................................................ 317–18 update_fsl......................................................................................................................................................................... 317 Switches.................................................................................................................................................................. See Jumpers U Utilities clr_pwd, AlphaStation 500/600 ....................................................................................................................................... 387 cnfgdiag.exe, KZPSA .................................................................................................................................................. 71, 96 ECU .........................................................................................................................................................................See ECU eeromcfg.exe, ISP1020,KZPBA .............................................................................................................................. 111, 125 KZPSA_EDIT, KZPSA ................................................................................................................................... 112, 126, 375 lp6dutil.exe, KGPSA ....................................................................................................................................................... 367 lp6ldr.exe, KGPSA .................................................................................................................................. 112, 126, 353, 359 miata_clear_password...................................................................................................................................................... 393 RCU ........................................................................................................................................................................ See RCU UTIL_CLI, KZPSA ......................................................................................................................................... 111, 125, 369 W wwidmgr Description....................................................................................................................................................................... 377 Using................................................................................................................................................................................ 377 537 538