1
AlphaServer 4100/4000
Firmware Release Notes
For Compaq Tru64
UNIX, DIGITAL UNIX and
OpenVMS Customers
Revised September, 2001
SRM Console Version: V6.0-4
These release notes are for the V6.0-4 SRM console, and include documented
restrictions in V6.0-4. Firmware update instructions and other useful
information is also provided.
Firmware release notes for Windows NT AlphaServer 4100/4000 customers
are available separately. Information about where to obtain AlphaBIOS
console release notes is provided in Section 1.7 of this document.
IMPORTANT NOTE: Beginning with SRM V5.3 console firmware, the
AlphaBIOS console was relocated to a different sector in the flash rom to
accomodate Windows NT serviceability. Please read the update procedures
information, found in Chapter 2, carefully for the details on this change and
what new steps are required for updating firmware. These changes apply to
all systems and are independent of what operating system is in use.
January, 2001
The information in this publication is subject to change without notice.
COMPAQ, the Compaq log, DEC, the DEC logo, AlphaServer and VMS registered
in U.S. Patent and Trademark office. OpenVMS, Tru64, are trademarks of Compaq
Information Technologies Group, L.P. in the United States and/or countries. Microsoft
and Windows NT are trademarks of Microsoft Corporation in the United States
and/or other countries. Unix is a trademark of The Open Group in the United States
and/or other countries. PostScript is a registered trademark of Adobe Systems, Inc.
MEMORY CHANNEL is a trademark of Encore Computer. All other product names
mentioned herein may be trademarks or registered trademarks of their respective
companies.
Confidential computer software. Valid license from Compaq required for possession,
use or copying. Consistent with FAR 12.211 and 12.212, Commercial Computer
Software, Computer Software Documentation, and Technical Data for Commercial
Items are licensed to the U.S. Government under vendor’s standard commercial
license.
Compaq shall not be liable for technical or editorial errors or omissions contained
herein. The information in this document is subject to change without notice.
The limited warranties for Compaq products are exclusively set forth in the
documentation accompanying such products. Nothing herein should be
construed as constituting a further or additional warranty.
Copyright © Compaq Computer Corporation, 2001. All Rights Reserved.
FCC NOTICE: The equipment described in this manual generates, uses, and may
emit radio frequency energy. The equipment has been type tested and found to
comply with the limits for a Class A computing device pursuant to Subpart J of Part
15 of FCC Rules, which are designed to provide reasonable protection against such
radio frequency interference when operated in a commercial environment. Operation
of this equipment in a residential area may cause interference, in which case the user
at his own expense may be required to take measures to correct the interference.
Contents
PREFACE
CHAPTER 1 FIRMWARE UPDATE INFORMATION
v
1–1
1.1
FIRMWARE AND OPERATING SYSTEM REVISION MATRIX
1–2
1.2
CONSOLE FIRMWARE COMPONENTS AND REVISION
INFORMATION
1–3
PCI I/O OPTION FIRMWARE COMPONENTS - REVISION
INFORMATION
1–4
1.4
CONFIGURATION UTILITY KIT AND VERSION INFORMATION
1–4
1.5
ALPHA SYSTEMS FIRMWARE QUARTERLY UPDATE KIT
1–5
1.6
ACCESSING FIRMWARE OVER THE INTERNET
1.6.1
Proper Transfer Types For Use With FAT-Format Floppy
Updates
1–5
1–6
1.7
FIRMWARE RELEASE NOTES FOR WINDOWS NT CUSTOMERS
1–6
1.8
ALPHASERVER 4100 DOCUMENTATION
1–6
1.3
CHAPTER 2 FIRMWARE UPDATE INSTRUCTIONS
2–1
2.1
UPDATING YOUR SYSTEM FIRMWARE
2–1
2.2
PREPARING FOR THE UPDATE
2.2.1
LFU command changes
2.2.2
Updating Using the Alpha Systems Firmware Update V6.0
CD
2–2
2–2
2–3
iii
Contents
2.2.3
2.2.4
2.2.5
2.3
Updating Using a FAT-Formatted Floppy Diskette
Updating Using an ODS2-Formatted Floppy Diskette
Updating Off Network Via Your Local MOP Server
2.2.5.1
Updating Off Network via BOOT command • 2–5
2.2.5.2
Updating Off Network via LFU command • 2–5
PERFORMING THE UPDATE
CHAPTER 3 THINGS YOU SHOULD KNOW THE FIRST TIME YOU
POWER ON YOUR MACHINE
2–6
3–1
3.1
MEMORY TESTS CAN TAKE A VERY LONG TIME!
3–1
3.2
SELECTING WHICH CONSOLE IS LOADED AND YOUR DISPLAY
DEVICE
3–1
3.3
CONFIGURING YOUR MACHINE PRIOR TO BOOTING
3–2
3.4
SRM CONSOLE FIRMWARE SUPPORTED BOOT DEVICES
3–4
3.5
NEW FEATURES, CHANGES AND BUGS FIXED IN THE V6.0 SRM
CONSOLE
3–4
3.6
SRM CONSOLE FIRMWARE BUGS AND RESTRICTIONS
3–5
3.7
WINDOWS NT SERVICEABILITY INFORMATION
3.7.1
Software requirements
3.7.2
Effects of Window NT Serviceability support on the update
process
3.7.3
EEPROM commands for Windows NT error logging
3.7.3.1
Build eeprom • 3–6
3.7.3.2
Show eeprom • 3–6
3.7.3.3
Clear eeprom • 3–6
3–5
3–5
3.8
3.9
iv
2–3
2–4
2–5
3–6
3–6
ADDITIONAL NOTES FOR KZPSA CHANGES IMPLEMENTED WITH
THE V5.1 RELEASE
3–7
DIGITAL FAST ETHERWORKS PCI 10/100 (DE500) ADAPTERS AND
AUTO-NEGOTIATION
3–7
Contents
3.9.1
3.9.2
3.10
Set EW*0_Mode Auto-Negotiate
Behavior Note on Systems with Multiple DE500’s
NOTE ON UNIX INSTALLATIONS
CHAPTER 4 RUNNING EISA, RAID, AND OTHER CONFIGURATION
UTILITIES
3–8
3–8
3–9
4–1
4.1
SETTING UP YOUR SYSTEM TO RUN ARC-BASED UTILITIES
4–1
4.2
USING A SERIAL LINE INTERFACE TO RUN ARC-BASED UTILITIES
4–1
4.3
RESTRICTIONS WHEN RUNNING KZPSA UTILITIES
4–2
APPENDIX A RESTORE_NVRAM AND SAVE_NVRAM
A–1
A.1
SAVE NVRAM DATA IN EEROM/TOY TO A FLOPPY FILE.
A–1
A.2
RESTORE NVRAM DATA TO EEROM/TOY FROM A FLOPPY FILE.
A–2
AlphaServer 4100 Firmware/Software Revision Matrix
V6.0-4 SRM Console Firmware Components and Revisions
Fail-safe Loader Kit content
I/O Module Firmware Revision Matrix
Configuration Utility Revisions
Orderable Documentation for the AlphaServer 4100
Supported Boot Devices (SRM Console V4.8 or above)
KZPSA CNFGDIAG.EXE (V1.5) Issues/Bugs With SCSI Options
1–2
1–3
1–3
1–4
1–5
1–6
3–4
4–2
TABLES
1–1
1–2
1–3
1–4
1–5
1–6
3–1
4–1
v
Preface
Purpose of These Release Notes
These release notes are intended for users of the AlphaServer 4100 and
AlphaServer 4000 cabinet- and pedestal-style systems. Henceforth in
these notes, "4100" will be used to refer to both the model 4100 and model
4000. These release notes also support the DIGITAL Server 7000 Models
7300, 7305 and 7310.
This document provides release note information for the following items:
•
SRM Console - system FEPROM0, sectors 3 - 15
•
Loadable Firmware Update (LFU) Utility - built into SRM console
•
OpenVMS Alpha PALcode - system FEPROM0, sector 1
•
DIGITAL UNIX PALcode - system FEPROM0, sector 1
•
Extended SROM (XSROM) - system FEPROM0 sectors 0 and 2
•
Fail-safe Loader (FSL) - aforementioned XSROM sectors
•
EISA Configuration Utility (ECU) - floppy diskette
•
RAID Configuration Utility (RCU) - floppy and Alpha FW CD
•
KZPSA Configuration/Diagnostic Utilities - Alpha FW CD
•
PCI I/O Adapter Firmware for ISP1020 - shipped in SRM console
image
•
PCI I/O Adapter Firmware for KZPSA, DEFPA, and CIPCA - Alpha
FW CD
AlphaBIOS, which resides in system FEPROM1 and is used to boot
and support Windows NT on the AlphaServer 4100, ships release notes
separately. See Section 1.7 for information about where to find AlphaBIOS
release notes.
AlphaBIOS is also used to run ECU, RCU, and various other ARCbased utilities which ship on floppy and/or the Alpha Firmware CD.
See Chapter 4 of these release notes and the AlphaServer 4100 System
Drawer User’s Guide for instructions on how to use AlphaBIOS and run
ARC-based utilities.
System flash parts (FEPROM0 and FEPROM1) reside on the PCI
motherboard and logically hang off the EISA/XBUS.
See Table 1–1 for current revision information.
v
Preface
Conventions Used in This Guide
This document uses the following conventions:
vi
KEY
Indicates a key on your keyboard.
CTRL/key
Indicates control characters. For example, Control C is
shown as CTRL/C and indicates that both the CTRL and
the C must be pressed simultaneously.
1
Firmware Update Information
This chapter provides firmware and utility revision information, as well as
information on where to find firmware update images and documentation
for your AlphaServer 4100 system.
Firmware updates are performed using the SRM console’s built-in LFU
utility. Bootable LFU images are also supported, e.g. when booting the
firmware update CD. LFU supports multiple update devices: local SCSI
CD-ROM (CDA0), local floppy (DVA0), and local network (EWA0). Other
devices are supported for the advanced user. Refer to Chapter 2 and the
AlphaServer 4100 System Drawer User’s Guide for more information about
LFU and other console commands, environment variables to set when
performing updates off a network device, and firmware update procedures
and examples.
The SRM and AlphaBIOS consoles, and associated firmware files such as
I/O option firmware, are available via customer update kits (CD-ROM). For
order information of the customer update kit please reference the Release
Notes Overview booklet included in the firmware CD kit. A pointer to
the World Wide Web (WWW) pages, which can be used to obtain interim
firmware releases of AlphaServer 4100 firmware, is available later in this
chapter.
1–1
Firmware Update Information
1.1
Firmware and Operating System Revision Matrix
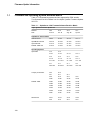
Table 1–1 lists operating system versions supported by SRM console.
The firmware from this release is on the Alpha Systems Firmware Update
V6.0 CD.
Table 1–1 AlphaServer 4100 Firmware/Software Revision Matrix
Alpha Systems Firmware Update CD
Release
V6.0
V5.9
V5.8
V5.7
Date
June-01
Jan.-01
Aug.-00
Apr.-00
SRM Firmware
V6.0-4
V5.9-5
V5.8-2
V5.7-4
AlphaBIOS Firmware
V5.70-0
V5.70-0
V5.70-0
V5.70-0
OpenVMS PAL
V1.21-2
V1.21-2
V1.21-2
V1.21-2
DIGITAL UNIX PAL
V1.23-2
V1.23-2
V1.23-2
V1.23-2
V7.3
V7.3
V7.2-1
V7.2-1
V7.2-1
V7.2-1
V7.2
V7.2
V7.2
V7.2
V7.1-2
V7.1-2
V7.1-2
V7.1-2
V7.1-1H1
V7.1-1H1
V7.1-1H1
V7.1-1H1
V7.1
V7.1
V7.1
V7.1
V6.2-1H3
V6.2-1H3
V6.2-1H3
V6.2-1H3
V5.2
V5.2
V5.1
V5.1
V5.1
V5.0
V5.0
V5.0
V5.0
V4.0F
V4.0F
V4.0F
V4.0F
V4.0E
V4.0E
V4.0E
V4.0E
V4.0D
V4.0D
V4.0D
V4.0D
V4.0B
V4.0B
V4.0B
V4.0B
V4.0A
V4.0A
V4.0A
V4.0A
V3.2G
V3.2G
V3.2G
V3.2G
V3.2F
V3.2F
V3.2F
V3.2F
V3.51
V3.51
V3.51
V3.51
V4.0
V4.0
V4.0
V4.0
AlphaServer 4x00 Firmware
Operating Systems
OpenVMS
Compaq Tru64 UNIX
DIGITAL UNIX
Windows NT
1–2
Firmware Update Information
1.2
Console Firmware Components and Revision Information
The AlphaServer 4100 is shipped with two console images - the SRM
console for Compaq Tru64 UNIX, DIGITAL UNIX and OpenVMS Alpha
customers and the AlphaBIOS console for Windows NT customers
and for running ARC-based utilities. The SRM console update image
(RHSRMROM.SYS) is a compressed file which contains the following
individual firmware images:
Table 1–2 V6.0-4 SRM Console Firmware Components and Revisions
Component
Revision Information
SRM Console
V6.0-4
OpenVMS Alpha PALcode
V1.21-2
DIGITAL UNIX PALcode
V1.23-2
Extended SROM (XSROM)
V6.0
Qlogic ISP1020 Firmware
V5.57.
A World Wide Web (WWW) site is provided for firmware updates. Once
the Alpha Systems Firmware Update V6.0 CD-ROM becomes available,
update firmware for the AlphaServer 4100 will be available via this update
CD. At that time, a /V6.0 directory will be created on the World Wide Web
(see Section 1.6 for details).
Serial ROM (SROM) ships in a socketed part on each AlphaServer 4100
CPU. It is reponsible for initializing and testing enough of the machine to
load Extended SROM (XSROM) from system flash ROM. The latest SROM
revision for all AlphaServer 4100 CPU types/revisions is V3.0. Versions
V1.1 and V2.0 SROMs can be used on all CPU types/revisions unless you
will be bypassing the embedded remote console function and connecting to
a high speed modem, in which case, the minimum version needed is V2.0
SROMs for alternate (non-9600) COM1 baud rate support.
XSROM is reponsible for loading the SRM console and associated PAL
code. If SROM determines that the firmware image it is supposed to load
is corrupt (checksum fails), it attempts to load the system Fail-Safe Loader
(FSL) from flash ROM. The FSL is a simple floppy loader that can be used
to load an SRM console from a floppy diskette. This loaded console can
then be used to run the AlphaServer 4100 update utility (LFU). A kit with
the FSL diskette and release notes is available. The V5.0 kit contents are
listed in Table 1–3.
Table 1–3 Fail-safe Loader Kit content
Part Number
Description
QZ-00WAA-HC.5.0
AlphaServer FSL V5.0 RX23 KIT
AK-R1FYB-CA
AlphaServer FSL V5.0 RX23
AV-R1FZB-TE
AlphaServer Fail Safe REL NTE
The AlphaBIOS console is loaded and started by the SRM console if the
SRM console’s OS_TYPE environment variable is set to "NT" or if the
1–3
Firmware Update Information
user enters the SRM console ALPHABIOS command at the SRM console
prompt. AlphaBIOS is a separate, compressed image and is separately
updatable using LFU.
In general, both the SRM and AlphaBIOS consoles should be updated at
the same time since the two images which ship on the update CD-ROM
are typically qualified against one another.
1.3
PCI I/O Option Firmware Components - Revision Information
You can also flash update firmware on certain PCI I/O options supported
by the AlphaServer 4100 using LFU. Version V6.0-4 of the SRM console
provides support for updating the following devices’ firmware:
Table 1–4 I/O Module Firmware Revision Matrix
Name
Firmware Rev
Update File Used By LFU
CIPCA
A420
CIPCA420.SYS
DEFPA
V3.20
DFXAA320.SYS
KZPSA
A12
KZPSAA12.SYS
KZPDA
V5.57
RHSRMROM.SYS, ships with SRM Console
1
KZPBA
V5.57
RHSRMROM.SYS, ships with SRM Console
1
1
On a power-up/reset, the SRM console loads adapter firmware from console’s system
flash ROM into NVRAM on the I/O module for all Qlogic ISP1020-based PCI options
such as the KZPDA and KZPBA. One updates SRM console firmware to update
ISP1020-based PCI option firmware. V6.0-4 console ships with V5.57 firmware for
ISP1020-based adapters. Note that this only applies for SRM console booting, i.e. for
customers running DIGITAL UNIX and/or OpenVMS Alpha.
Other options, such as the KZPSC RAID controller also provide firmware
update capability. However, LFU does not support KZPSC or KZPAC
firmware updates. Refer to the Controller Installation and Standalone
Utility User’s Guide for your particular StorageWorks RAID Array
subsystem should you need to update your RAID subsystem’s firmware.
1.4
Configuration Utility Kit and Version Information
The EISA Configuration Utility (ECU) is available on separate media
(floppy disks) for use on AlphaServer 4100 systems. The RAID
Configuration Utility (RCU) ships on both floppy and the Alpha Firmware
CD. The KZPSA Configuration Utility ships on the Alpha Firmware CD.
For compatibility with this firmware release, the minimum revisions of the
configuration utilities given in Table 1–5 must be used if required.
1–4
Firmware Update Information
Table 1–5 Configuration Utility Revisions
Utility
Kit No.
Part No.
Minimum Rev.
ECU (VMS/UNIX)
QA-01YAA-HC
AK-Q2CRH-CA
V1.9
RCU
QB-2XHAH-SB
–
V3.2
KZPSA Utilities
- FWUPDATE.EXE
V1.4
1
- CNFGDIAG.EXE
V1.5
1
1
Using earlier versions of the KZPSA utilities on your AlphaServer 4100 will
corrupt your KZPSA adapter’s NVRAM and render your system unusable!
1.5
Alpha Systems Firmware Quarterly Update Kit
The Alpha Systems Firmware Update Kit ships on a CD-ROM. For
ordering information please reference the Release Notes Overview booklet
included in the firmware CD kit.
All the binary update images and release notes for the AlphaServer
4100 platform will be released in the [AS4X00], [OPTIONS], and [DOC]
directories of the Alpha Systems Firmware Update V6.0 CD-ROM.
1.6
Accessing Firmware Over the Internet
Many customers rely upon the Customer Firmware Kit quarterly update
service (includes Alpha Firmware Update CD-ROM) for their firmware
updates. Firmware updates can also be obtained via the Internet, at the
following address:
ftp://ftp.digital.com/pub/Digital/Alpha/firmware/readme.html
Using a World Wide Web browser, use the following URLs:
http://ftp.digital.com/pub/Digital/Alpha/firmware/readme.html
http://ftp.digital.com/pub/Digital/Alpha/firmware/v6.0/as4x00
http://ftp.digital.com/pub/Digital/Alpha/firmware/v6.0/options
http://ftp.digital.com/pub/Digital/Alpha/firmware/v6.0/doc
The Web pages are organized for the CD release for each platform. There
are directories for each AlphaServer platform as well as a common options
area for I/O option firmware. In addition, a /interim page is maintained
for products such as the AlphaServer 4100 which ship between Alpha
Firmware CD releases. Watch for firmware updates in the /interim/as4x00
directory as well as future CD-ROM releases.
Console firmware update images and associated files are located in the
/as4x00 directory. I/O option firmware files are accessible via the /options
directory. Release notes are accessible via the /doc directory.
1–5
Firmware Update Information
The above-mentioned readme.html file describes the overall firmware
directory structure and how the files can be downloaded and used.
Note: Make sure you copy all of the necessary files when downloading
firmware images. If updating via network (MOP), you will need
to modify the copied files’ attributes before they can be used
in a MOP server environment. See Chapter 2 for details on
downloading firmware and performing firmware updates.
1.6.1
Proper Transfer Types For Use With FAT-Format Floppy Updates
When copying files, via ftp, to be used for update via FAT-Formatted floppy
diskette you must use the ascii transfer type for the .txt files and the
binary transfer type for the .sys files. For example:
•
Prior to copying the .txt files issue the ascii command at the ftp
prompt:
ftp> ascii
200 TYPE set to ASCII
ftp>
•
Prior to copying the .sys files issue the bin command at the ftp prompt:
ftp> bin
200 TYPE set to IMAGE
ftp>
1.7
Firmware Release Notes for Windows NT Customers
Release notes for the AlphaBIOS console are shipped separately on the
Alpha Firmware CD in the DOC directory. The AlphaBIOS release notes
can also be found on the at the follwing URL:
http://www.compaq.com/support/files/alphant/index.html
1.8
AlphaServer 4100 Documentation
These release notes do not describe how to use the console or other
firmware. For further information about using and updating the firmware
on your machine, please refer to the orderable documentation listed in
Table 1–6.
Table 1–6 Orderable Documentation for the AlphaServer 4100
1–6
Document Title
Initial Part Number
AlphaServer 4100/4000 Configuration and Installation
Guide
EK-4100A-CG
AlphaServer 4000 System Drawer User’s Guide
EK-4000A-UG
AlphaServer 4100 System Drawer User’s Guide
EK-4100A-UG
AlphaServer 4100 Service Manual (hard copy)
EK-4100A-SV
AlphaServer 4100 Service Manual (diskette)
AK-QXBJA-CA
2
Firmware Update Instructions
The following sections provide instructions for updating your system
firmware.
2.1
Updating Your System Firmware
The SRM console’s built-in loadable firmware update utility (LFU) is used
to update your console firmware (SRM and AlphaBIOS consoles). LFU
can also be booted as a monolithic image off an update CD (e.g. using the
Alpha Firmware Systems Update CD-ROM).
IMPORTANT NOTE:
Beginning with SRM V5.3 console firmware the AlphaBIOS image was
relocated to a different sector in flash ROM. Use of the built-in LFU
required that the update procedure be repeated a second time to ensure
the AlphaBIOS was properly relocated in flash ROM. Executing the update
twice applies to SRM V5.4 or later console firmware if updating from a
version of console earlier than V5.3. If updating from SRM V5.3 console
firmware then the update does not need to be executed twice. Please read
on for more details on the update changes listed in this chapter.
Note: The LFU update method to update SRM firmware to V5.4 or later
requires the system being updated to be at or above SRM firmware
version V5.2. LFU updates from a system with SRM firmware
version V5.1 or earlier will fail to update properly and should
not be attempted. There is no problem with the Boot command
methods of update (eg. booting the CD).
The SRM firmware V5.3 files are posted to the /interim webpage
for users that do not have access to the Alpha Systems Update
Firmware CD and are updating a system, running SRM V5.1 or
earlier, via the LFU update method.
The LFU utility can also be used to update KZPSA, DEFPA, and CIPCA
firmware. Mylex DAC960 RAID options such as KZPSC and KZPAC are
not supported by LFU. Refer to the Controller Installation and Standalone
Utility User’s Guide for your particular StorageWorks RAID Array
subsystem should you need to update your RAID subsystem’s firmware.
LFU supports multiple update devices: local SCSI CD-ROM (CDA0), local
floppy (DVA0), and local network - Ethernet (EWA0) and FDDI (FWA0).
Other load devices are supported for the advanced user. Refer to the
AlphaServer 4100 System Drawer User’s Guide for more information about
LFU and other console commands, environment variables to set when
performing updates off a network device, and update procedures.
Over time, you may wish to update to newer firmware versions as features
are added, new I/O option support is added, and bug fixes are made.
Updates are typically issued about once per quarter.
2–1
Firmware Update Instructions
2.2
Preparing For The Update
If you don’t have access to the Alpha Systems Firmware Update CD, you’ll
need to copy the appropriate firmware files to a local computer system.
You will first need to locate the appropriate firmware update files. Look in
http://ftp.digital.com/pub/Digital/Alpha/firmware/V6.0 for the /as4x00,
/options, and /doc subdirectories for the files you’ll need. The list of files
required is provided below.
The SRM console’s SHOW VERSION command can be used to determine
your SRM console version. The AlphaBIOS console’s version can be
determined either by starting the AlphaBIOS console via the ALPHABIOS
command or by starting LFU via the SRM console’s LFU command. You
can then bypass the update file load sequence by pressing RETURN when
LFU asks you to specify a load device. A LIST command at the UPD>
prompt will display the current revision of AlphaBIOS (and SRM) console
firmware.
If you’ll be updating via floppy, you’ll need either a PC with a 1.44MB
compatible floppy drive or an OpenVMS machine with access to a 1.44MB
floppy drive. If you’ll be updating via network (local MOP server), you’ll
need to copy the appropriate files to your local MOP server’s MOM$LOAD
area with appropriate file protection to allow your AlphaServer 4100
system to be served by the local MOP server. You will also need to modify
the file attributes of the downloaded files. See Section 2.2.5 for more
details.
Refer to Section 1.6 for pointers to the DIGITAL Web pages for firmware
release and update information.
2.2.1
LFU command changes
Beginning with V5.3 SRM console AlphaBIOS was relocated to a new
sector in flash ROM. This relocation change affects updates via the LFU
command. Use of the "LFU" command for updates from either CD-ROM,
floppy or the network will require the process to be executed twice if
updating a system running any SRM firmware version prior to V5.3. If 5.3
or later then the LFU need only be executed once.
Note: The LFU update method will fail to properly update to V5.4 or
later on systems running firmare versions V5.1 or earlier and
must be updated to V5.3 first. Please read the information under
Section 2.1 for more details.
For console firmware updates on systems running firmware prior to V5.3
the basic steps required are as follows:
2–2
1
Run LFU
2
Update SRM
3
Exit LFU
4
Run LFU
Firmware Update Instructions
5
Update AlphaBIOS
6
Exit LFU
If you update via the "BOOT" command from either the CD-ROM, (eg.
"P00>>>boot dka500") or from your local MOP server’s MOM$LOAD
directory (e.g. "P00>>>boot ewa0 -fi as4100_V6_0 -fl 0,0"), then it will not
be necessary to run the update twice.
NOTE:: A downgrade to any previous version of firmware will require
performing the update procedure twice for all methods of update.
2.2.2
Updating Using the Alpha Systems Firmware Update V6.0 CD
If you have a copy of the V6.0 (or greater) CD-ROM, simply insert it into
your AlphaServer 4100’s/4000’s local CD-ROM drive. To run the update
utility, boot the CD directly by typing "BOOT DKA500" (or equivalent
CD-ROM device name).
Alternatively, you can type "LFU" at the SRM console prompt and answer
"CDA0" and "AS4X00FW"; then perform the desired update(s).
NOTE:: The update procedure must be done twice if using the LFU
command method of update and updating a system running
firmware prior to V5.3. Please view the information under
Section 2.2.1.
A readme file is provided for your convenience. If booting the CD-ROM
directly, the readme is automatically displayed. If using console’s LFU
command, the readme is only displayed upon typing "README" at the
LFU update prompt (UPD> ).
2.2.3
Updating Using a FAT-Formatted Floppy Diskette
For version V5.4 or above, the console images no longer fit on one 1.44
MB floppy diskette. Depending upon what you wish to update, you’ll need
either one, two or three 1.44MB floppy diskettes. If you wish to update
I/O option firmware only, you’ll need only a single diskette. If you wish
to update console firmware only, you’ll need two diskettes. If you wish to
update both console and I/O firmware, you’ll need three separate diskettes.
Proper transfer type must be used when files are copied via ftp. Reference
Section 1.6.1 for copying files, via ftp, that are to be used for FAT-format
floppy updates.
If you’ll be using a FAT-formatted diskette or diskettes, perform the
following steps on your PC:
•
Insert a 1.44MB FAT-formatted diskette in your floppy drive.
•
Copy the following files to diskette #1:
as4x00cp.sys
as4x00fw.sys
rhreadme.sys
rharcrom.sys
2–3
Firmware Update Instructions
•
Copy the following files to diskette #2:
rhsrmrom.sys
•
Copy the following files to diskette #3 if you’ll be updating I/O option
firmware:
as4x00io.sys
rhreadme.sys
cipca420.sys
dfxaa320.sys
kzpsaa12.sys
Be sure to copy all of the aforementioned files for the diskette(s) you
need. Once created your diskettes can then be used to update firmware by
invoking the update utility via the LFU command.
2.2.4
Updating Using an ODS2-Formatted Floppy Diskette
For V5.4 or above, the console images no longer fit on one 1.44 MB floppy
diskette. Depending upon what you wish to update, you’ll need either one,
two or three 1.44MB floppy diskettes. If you wish to update I/O option
firmware only, you’ll need only a single diskette. If you wish to update
console firmware only, you’ll need two diskettes. If you wish to update
both console and I/O firmware, you’ll need three separate diskettes.
If you will be using an ODS2-formatted diskette or diskettes, use
the following OpenVMS command procedure(s) to create your floppy
diskette(s):
If creating a diskette for updating your console only:
$!
$! make_rhods2cp_1and2.com
$!
$ inquire ignore "Insert first blank HD floppy in DVA0, then continue"
$ set verify
$ set proc/priv=all
$ init /density=hd/index=begin dva0: rhods2cp1
$ mount dva0: rhods2cp1
$ create /directory dva0:[as4x00]
$ copy as4x00fw.sys dva0:[as4x00]as4x00fw.sys
$ copy as4x00cp.sys dva0:[as4x00]as4x00cp.sys
$ copy rhreadme.sys dva0:[as4x00]rhreadme.sys
$ copy rharcrom.sys dva0:[as4x00]rharcrom.sys
$ dismount dva0:
$ set noverify
$ inquire ignore "Insert second blank HD floppy in DVA0, then continue"
$ set verify
$ set proc/priv=all
$ init /density=hd/index=begin dva0: rhods2cp2
$ mount dva0: rhods2cp2
$ copy rhsrmrom.sys dva0:[as4x00]rhsrmrom.sys
$ dismount dva0:
$ set noverify
$ exit
2–4
Firmware Update Instructions
If creating a diskette for updating your I/O option firmware only:
$!
$! make_rhods2io.com
$!
$ inquire ignore "Insert blank HD floppy in DVA0, then continue"
$ set verify
$ set proc/priv=all
$ init /density=hd/index=begin dva0: rhods2io
$ mount dva0: rhods2io
$ create /directory dva0:[as4x00]
$ create /directory dva0:[options]
$ copy as4x00fw.sys dva0:[as4x00]as4x00fw.sys
$ copy as4x00io.sys dva0:[as4x00]as4x00io.sys
$ copy rhreadme.sys dva0:[as4x00]rhreadme.sys
$ copy cipca420.sys dva0:[options]cipca420.sys
$ copy dfxaa320.sys dva0:[options]dfxaa320.sys
$ copy kzpsaa12.sys dva0:[options]kzpsaa12.sys
$ dismount dva0:
$ set noverify
$ exit
Once created your diskettes can then be used to update firmware by
invoking the update utility via the LFU command. Please read Section 2.1
for details on the LFU update method for systems being update from
version V5.1 or earlier.
2.2.5
Updating Off Network Via Your Local MOP Server
Use one of the following methods for Network updates.
2.2.5.1
Updating Off Network via BOOT command
Copy the following file to your local MOP server’s MOM$LOAD directory,
for using the BOOT command, e.g. "P00>>>boot ewa0 -fi as4100_V6_0 -fl
0,0":
as4100_V6_0.sys
2.2.5.2
Updating Off Network via LFU command
Copy all of the following files to your local MOP server’s MOM$LOAD
directory, if using the LFU command, e.g. "P00>>>lfu". Answer the
update utility questions for your load device with the network controller,
eg. "ewa0" and for the firmware files list with the default filename, eg.
"as4x00fw". Please read Section 2.1 for details on the LFU update method
for systems being update from version V5.1 or earlier.
as4x00cp.sys
as4x00fw.sys
as4x00io.sys
cipca420.sys
dfxaa320.sys
kzpsaa12.sys
rharcrom.sys
rhreadme.sys
rhsrmrom.sys
2–5
Firmware Update Instructions
Make sure the files will be accessible via your target AlphaServer 4100
system. Also, be sure not to change the names of any files if using the
SRM console LFU command update method. Downloaded files require an
additional step for MOP loads; the file attributes must be modified to a
proper VMS fixed-record format. Use the following OpenVMS command on
each downloaded file before using the files for MOP booting.
$ set file/attr=(rfm:fix,lrl:512,mrs:512,rat:none) *.sys
2.3
Performing The Update
If your machine is currently running an operating system, issue the
appropriate shutdown command to gracefully shut down your operating
system. You may need to use the front-panel Halt button (depressed, so
Halt LED is on) and a subsequent system reset to halt your machine at
the SRM console.
If running Compaq Tru64 UNIX, DIGITAL UNIX or OpenVMS Alpha, once
halted at the SRM console, reset the machine and wait for console to come
back up. Firmware updates may not work following an operating system
shutdown without a subsequent system reset. Always reset the machine
following a UNIX/VMS shutdown if you plan on performing a firmware
update. At the SRM console prompt, issue the appropriate BOOT or LFU
command to start the update process.
If running Windows NT, either select the "Update AlphaBIOS" menu item
in the Setup menu to run LFU automatically or select the SRM console
( UNIX or OpenVMS operating system) and then reset your machine to
manually start LFU via the SRM BOOT or LFU command.
The LFU command will ask you to specify a load device - the device from
which LFU will load the console and/or I/O option firmware update files.
•
If local CD-ROM, answer "CDA0".
•
If floppy, answer "DVA0".
•
If network, answer "EWA0" if DIGITAL PCI Ethernet or "FWA0" if
DIGITAL PCI FDDI (DEFPA).
LFU will then prompt for a firmware files list file name. Use the following
guide to ensure that you have provided the appropriate response:
•
If local CD-ROM, answer "AS4X00FW".
•
If floppy, answer "AS4X00CP" or "AS4X00IO" depending upon whether
you wish to update only console or only I/O option firmware. You must
have the diskette with the corresponding files list in your drive.
Note: if using three diskettes, after updating off one floppy, you can
perform remaining updates off diskette #3 by re-invoking LFU via
the LFU command at the utility’s UPD> prompt and providing the
alternate firmware files list file name when requested for input.
2–6
Firmware Update Instructions
•
If network, answer "AS4X00FW", "AS4X00CP", or "AS4X00IO"
depending upon whether you want to update all firmware (console
+ I/O option), only console, or only I/O option, respectively.
NOTE:: For firmware updates, via the LFU command update method, on
a system running any version of firmware prior to V5.3, you must
perform the update procedure twice. The first update for the
SRM console firmware and the second update for the AlphaBIOS
firmware.
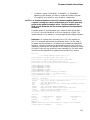
A sample session is provided below of an update of SRM console from
V5.3-1 to V5.4-1 and AlphaBIOS V5.67-0 to AlphaBIOS V5.68-0. The
update method, in this example, is using images copied to floppy diskettes.
Reminder: On systems with firmware prior to V5.3 the updates via
this LFU command method must be performed twice. The first time is
to update the SRM firmware. The second time to update the AlphaBIOS
firmware. I/O option firmware can be updated at either time. Failure to
update the SRM and then the AlphaBIOS will leave the AlphaBIOS image
as invalid. Users will not be able to invoke AlphaBIOS or run ARC-based
utilities until the AlphaBIOS is updated from the SRM V5.3 console.
P00>>>lfu
***** Loadable Firmware Update Utility *****
Select firmware load device (cda0, dva0, ewa0), or
Press <return> to bypass loading and proceed to LFU: dva0
Please enter the name of the firmware files list, or
Press <return> to use the default filename [AS4X00IO,(AS4X00CP)]:
Copying AS4X00CP from DVA0 .
Copying RHREADME from DVA0 .
Copying RHREADME from DVA0 .
Copying RHARCROM from DVA0 .................
Copying RHSRMROM from DVA0
Please insert next floppy containing the firmware,
Press <return> when ready. Or type DONE to abort.
Copying RHSRMROM from DVA0 ...............................
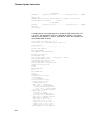
-----------------------------------------------------------------------------Function
Description
-----------------------------------------------------------------------------Display
Displays the system’s configuration table.
Exit
Done exit LFU (reset).
List
Lists the device, revision, firmware name, and update revision.
Lfu
Restarts LFU.
Readme
Lists important release information.
Update
Replaces current firmware with loadable data image.
Verify
Compares loadable and hardware images.
? or Help
Scrolls this function table.
-----------------------------------------------------------------------------UPD> list
Device
AlphaBIOS
srmflash
Current Revision
V5.67-0
V5.3-1
Filename
arcrom
srmrom
Update Revision
V5.68-0
V5.4-1
UPD> up al
WARNING: updates may take several minutes to complete for each device.
Confirm update on: AlphaBIOS
[Y/(N)] y
2–7
Firmware Update Instructions
AlphaBIOS
DO NOT ABORT!
Updating to V5.68-0... ........ Verifying V5.68-0...
PASSED.
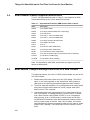
UPD> up srm*
WARNING: updates may take several minutes to complete for each device.
Confirm update on: srmflash
srmflash
[Y/(N)] y
DO NOT ABORT!
Updating to V5.4-1... .......... Verifying V5.4-1...
PASSED.
UPD> exit
Initializing...
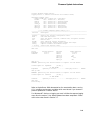
A sample session is provided below of an update of SRM console from V5.31 to V5.4-1 and AlphaBIOS V5.67-0 to AlphaBIOS V5.68-0. The update
method, in this example, is a BOOT command of a MOP file located in the
local MOM$LOAD directory.
P00>>>b ewb0 -fi as4x00_v5_4 -fl 0,0
(boot ewb0.0.0.5.0 -file as4x00_v5_4 -flags 0,0)
Trying MOP boot.
..............................................
Network load complete.
Host name: XXXXXX
Host address: xx-xx-xx-xx-xx-xx
bootstrap code read in
Building FRU table
base = 200000, image_start = 0, image_bytes = 2b7000
initializing HWRPB at 2000
initializing page table at 1f2000
initializing machine state
setting affinity to the primary CPU
jumping to bootstrap code
012345
677789
P01>>>START 6000
P01>>>
P02>>>START 6000
P02>>>
9876543210
starting console on CPU 0
sizing memory
0
2048 MB EDO
starting console on CPU 1
starting console on CPU 2
probing IOD1 hose 1
bus 0 slot 1 - NCR 53C810
bus 0 slot 2 - PCI-PCI Bridge
probing PCI-PCI Bridge, bus 2
bus 2 slot 0 - QLogic ISP1020
bus 0 slot 3 - DECchip 21140-AA
probing IOD0 hose 0
bus 0 slot 1 - PCEB
probing EISA Bridge, bus 1
bus 0 slot 2 - S3 Trio64/Trio32
bus 0 slot 5 - DECchip 21041-AA
configuring I/O adapters...
ncr0, hose 1, bus 0, slot 1
isp0, hose 1, bus 2, slot 0
tulip0, hose 1, bus 0, slot 3
floppy0, hose 0, bus 1, slot 0
tulip1, hose 0, bus 0, slot 5
System temperature is 28 degrees C
2–8
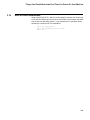
Firmware Update Instructions
Starting Firmware Update Utility
Copying source: to 1243000 from 3110200 size 1a6e00(1732096)
Unpacking firmware files
as4x00_readme adr = 1000020 len = 1600(5632)
readme
adr = 1001840 len = 1600(5632)
srmrom
adr = 1003060 len = 10f800(1112064)
arcrom
adr = 1112a80 len = 80000(524288)
ccmab_fw
adr = 1192ca0 len = 80200(524800)
cipca_fw
adr = 12130c0 len = cf40(53056)
dfxaa_fw
adr = 13e9e20 len = 38a00(231936)
kzpsa_fw
adr = 1422a40 len = 74000(475136)
***** Loadable Firmware Update Utility *****
-----------------------------------------------------------------------------Function
Description
-----------------------------------------------------------------------------Display
Displays the system’s configuration table.
Exit
Done exit LFU (reset).
List
Lists the device, revision, firmware name, and update revision.
Lfu
Restarts LFU.
Readme
Lists important release information.
Update
Replaces current firmware with loadable data image.
Verify
Compares loadable and hardware images.
? or Help
Scrolls this function table.
-----------------------------------------------------------------------------UPD> list
Device
AlphaBIOS
srmflash
Current Revision
V5.67-0
V5.3-1
Filename
arcrom
srmrom
ccmab_fw
cipca_fw
dfxaa_fw
kzpsa_fw
Update Revision
V5.68-0
V5.4-1
22
A420
3.10
A11
UPD> up al
WARNING: updates may take several minutes to complete for each device.
Confirm update on: AlphaBIOS
AlphaBIOS
[Y/(N)] y
DO NOT ABORT!
Updating to V5.68-0... ........ Verifying V5.68-0...
PASSED.
UPD> up srm*
WARNING: updates may take several minutes to complete for each device.
Confirm update on: srmflash
srmflash
[Y/(N)] y
DO NOT ABORT!
Updating to V5.4-1... .......... Verifying V5.4-1...
PASSED.
UPD> exit
Initializing...
Refer to AlphaServer 4100 documentation for more details about running
LFU, including environment variables which must be set if you choose to
perform updates off a network device.
For Windows NT fatal error logging you must initialize the eeprom logging
area, after the version 5.4 or above updates have been completed. Please
refer to the notes found in Section 3.7.
2–9
3
Things You Should Know the First Time You Power On
Your Machine
It is recommended that you read this section in its entirety prior to using
your AlphaServer 4100 machine.
3.1
Memory Tests Can Take a Very Long Time!
Memory is tested by each CPU each time you power on or reset your
machine. These tests can take upwards of several minutes on very large
memory, single-CPU machines. The XSROM firmware responsible for
testing memory prints a rotating asterisk as part of the operator control
panel (OCP) display during the memory march test (Test 24). The rotating
asterisk stops once testing has completed. Additionally, beginning with
V3.0 SRM console, if both the CONSOLE environment variable is set to
serial and the MEMORY_TEST environment variable is set to full an
estimated test time will be printed.
Note: If running OpenVMS, Compaq Tru64 UNIX or DIGITAL UNIX,
the MEMORY_TEST environment variable must be set to FULL
(default). PARTIAL and NONE are not supported.
3.2
Selecting Which Console Is Loaded and Your Display Device
Your system likely came pre-configured to run a particular operating
system. There are two SRM console environment variables that play a
key role in determining which console will be the final console loaded on a
power-on/reset (SRM console or AlphaBIOS console) and to which display
device (VT-type terminal or graphics device) the console will default. These
two environment variables (EVs) are the OS_TYPE and CONSOLE EVs,
respectively.
If OS_TYPE is set to "NT", the SRM console will automatically load
and start the AlphaBIOS console from system flash ROM during poweron/reset. If OS_TYPE is set to "OpenVMS" or "UNIX", the SRM console
will not load AlphaBIOS. If OS_TYPE is set to "NT", you can depress the
front panel Halt button (LED on) and then reset the machine to force the
SRM console to not load AlphaBIOS. In this situation, the SRM console
will stop at the SRM console prompt. Not only will it not load AlphaBIOS
if OS_TYPE=NT, but it will also not allow booting until the Halt button
has been restored to the out position.
If CONSOLE is set to "SERIAL", the SRM console will power-on in serial
mode and will print power-up display information to COM1 (assuming
a VT-like device is connected at the other end). If CONSOLE is set
to "GRAPHICS", the SRM console expects to find a VGA card in PCI0
and will attempt to print to the VGA monitor after PCI sizing and
configuration has completed.
3–1
Things You Should Know the First Time You Power On Your Machine
Note: you will not see any console display output on your VT or VGA
display if CONSOLE is set to "GRAPHICS" until power-up testing and
sizing has completed *and* VGA initialization has completed. This
can take upwards of several minutes depending upon your system
configuration. With CONSOLE set to "GRAPHICS", you will only see
display output on your operator control panel (OCP) display until the PCIs
have been (and more specifically, the VGA has been) initialized, at which
point you should see output to the console terminal display device (in this
case, VGA).
Once console has fully initialized the system, if OS_TYPE is not set to
"NT", the SRM console will allow logins at either the VT or graphics
device, irrespective of the CONSOLE EV setting. This assumes the SRM
console’s TT_ALLOW_LOGIN environment variable is set to "1". For
example, on a machine configured with CONSOLE set to "GRAPHICS",
pressing Return or Enter at the keyboard of a connected VT device should
return a console prompt at the VT device (i.e. over COM1). Console will
only honor this login attempt if OS_TYPE is not set to "NT" and only
after console has fully initialized the system and attempted to return the
console prompt on the graphics display device.
The same holds true in the reverse situation where CONSOLE is set to
"SERIAL", but the user wishes to log in at a connected and properly cabled
and configured graphics display device.
3.3
Configuring Your Machine Prior to Booting
There are several SRM console environment variables and built-in utilities
that you may need to use to set up your system prior to booting the
OpenVMS Alpha or DIGITAL UNIX operating system. Examples include:
•
Setting EWn0_MODE and EWn0_PROTOCOLS environment variables
(EVs) for your Ethernet network device.
•
Setting pkn0_host_id, pkn0_fast, pkn0_soft_term, and pkn0_disconnect
EVs to configure your PCI SCSI controllers. With the V5.1 release
a new driver was implemented for KZPSA devices which eliminated
the KZPSAn_XXXX EVs for setting up KZPSA parameters. Use the
pkn0_host_id, pkn0_fast and pkn0_termpwr EVs for setting up KZPSA
parameters. [The ARC-based KZPSA utilities can also be used for
these purposes. The SRM console KZPSA_EDIT command has been
removed with the use of a new driver for the KZPSA controller. See
Section 3.8 for related information.]
•
Configuring your KFPSA and DSSI subsystem using the SET HOST
-DUP command and/or CDP command.
You may also need to run one or more of the following ARC-based utilities
before booting your operating system:
3–2
•
EISA Configuration Utility (ECU)
•
RAID Configuration Utility (RCU)
•
KZPSA Configuration Utility (or use the SRM console’s pk*_XXXX
environment variables to configure host id and fast mode)
Things You Should Know the First Time You Power On Your Machine
Refer to the AlphaServer 4100 System Drawer User’s Guide for more
details about configuring your machine prior to booting. Chapter 4 also
provides a brief overview on running ARC-based utilities.
3–3
Things You Should Know the First Time You Power On Your Machine
3.4
SRM Console Firmware Supported Boot Devices
The PCI I/O options/devices listed in Table 3–1 are supported as SRM
console boot devices by the V4.8 or above SRM console:
Table 3–1 Supported Boot Devices (SRM Console V4.8 or above)
Name
Description
KFPSA
(PCI NCR825 DSSI)
KZPDA
(PCI Qlogic ISP1020 FWSE SCSI / PPB bridge)
KZPSA
(PCI FWD SCSI)
KZPSC
(PCI RAID 1- and 3-port FWSE SCSI)
KZPAC
(PCI RAID 1- and 3-port FWSE SCSI)
KZPBA
(PCI Qlogic ISP1020 16b FWD SCSI)
KZPAA
(PCI NCR810 SE SCSI)
CIPCA
(PCI CI)
DE435
(PCI Ethernet, MOP and BOOTP)
DE450
(PCI Ethernet, MOP and BOOTP)
DE500
(PCI Fast Ethernet, MOP and BOOTP)
DEFPA
(PCI FDDI and CDDI single- and dual-attach, MOP and BOOTP)
FLOPPY
(Local RX23 1.44 MB Floppy)
CD-ROM
(Local NCR810 SCSI CD-ROM)
Note: the AlphaServer 4100 SRM console does not support any EISA
options as boot devices.
3.5
New Features, Changes and Bugs Fixed in the V6.0 SRM Console
The following changes, since the V5.9 SRM console release, are part of the
V6.0 SRM console.
3–4
1
Release notes have been revised since the V6.0 release. The KZPCC
option is not to be supported on the AlphaServer 4x00 systems so
references to this option and associated pages have been removed.
2
The driver code was modified to fix a problem where the system would
hang when multiple nodes respond to a MOP request when MOP
booting via an FDDI controller.
3
Code changes have been implemented to fix a probe timeout failure
on KGPSA devices. A message containing "probe timeout" indicates
that a fibre channel node (HSG80, KGPSA) is in an unresponsive
state and may, prior to V6.0 firmware, prevent access to the disks
for WWIDMGR commands, show device commands, booting a disk or
writing a crash dump to the disk. With V6.0 firmware, the console
skips attempting to access unresponsive nodes but will report a "probe
timeout retry" message. There should be no loss of access to online
disks.
Things You Should Know the First Time You Power On Your Machine
3.6
4
Code changes have been implemented to correct a problem where crash
dumps written to disks connected via a CIPCA adapter would fail to
complete. Prior to V6.0 firmware, on clusters with heavy I/O loads a
crash dump to a CIPCA connected disk may fail with the following
messages being reported: MSCP: Attempting to reestablish connection
MCSP: Continuing device * no longer valid
5
Update firmware (CCMAB) for the Memory Channel adapter is no
longer supplied nor supported with firmware releases. The LFU utility
cannot properly update new revisions of the hardware.
SRM Console Firmware Bugs and Restrictions
The following are known bugs and restrictions with AlphaServer 4100
SRM console firmware version V6.0.
1
Configuring an HSD30 at a higher DSSI node ID than that of the
KFPSA will result in the SRM console not seeing devices when a
console SHOW DEVICE command is issued.
2
If running OpenVMS or DIGITAL UNIX, the MEMORY_TEST
environment variable must be set to FULL (default). PARTIAL and
NONE are not yet supported.
3
SRM console V4.8-6 or above supports mixing of the B3002-AB (5/300
2-MB CPU) and B3004-BA CPUs within a system. If you mix modules,
you must configure the system such that a B3002-AB is the primary
CPU. NOTE: Systems running OpenVMS (V6.2-1H3 or V7.1) require a
patch image (ALPCPU1601_071) to support the B3002 and B3004 in
mixed configurations.
4
VGAs configured as console display devices must be in PCI0.
5
The system must be reset prior to running LFU from console. Booting
the LFU off CD-ROM does not require a system reset.
6
Updating to SRM console V5.4 requires running the update procedure
twice if not using the BOOT command update method for updates or if
updating from any version of console prior to V5.3.
7
Downgrading from SRM console to a version prior to V5.3 requires the
update procedure be run twice.
3.7
Windows NT serviceability information
3.7.1
Software requirements
Software revision information, for Windows NT serviceability support and
files can be found at the following URLs.
http://www.compaq.com/support/files/alphant/index.html
•
N.T. 4.0 HAL OEM Revision E (includes PAL V2.2)
DECevent NT Version 3.2 or greater.
•
http://www.service.digital.com/decevent/
3–5
Things You Should Know the First Time You Power On Your Machine
3.7.2
Effects of Window NT Serviceability support on the update process
One of the most important changes, resulting from the implementation of
Windows NT serviceability support, is the relocation of the AlphaBIOS to a
different sector in flash ROM. This relocation was required to accomodate
the space requirements for fatal error logging. All update methods, from
a system running firmware prior to V5.3, with the exception of a BOOT
command update of the 5.3 or later image, will require the update process
to be executed twice. The first time to update the SRM firmware and the
second time to update the AlphaBIOS firmware. Failure to execute the
process twice will leave the AlphaBIOS as an invalid image and prevent
access to AlphaBIOS. View the information in Chapter 2 for update
changes.
3.7.3
EEPROM commands for Windows NT error logging
The SRM V5.3 or later firmware uses a sector of flash (designated as an
eeprom error logging area) for the support of Windows NT fatal error
logging. Space for two halt error logs per CPU has been allocated. SRM
eeprom commands have been included to initialize the logging area and to
allow viewing of halt error log information. The error log viewing feature
is a supplement to the Windows NT support.
3.7.3.1
Build eeprom
A new SRM command, build -eeprom, has been implemented to initialize
and setup the eeprom error logging area. Initialization and setup of the
eeprom logging area will be required after an update of firmware has been
performed.
The following example shows the build -eeprom command.
P00>>>bu -e
Build EEPROM ? [Y/N]> y
.
EEPROM built
P00>>>
3.7.3.2
Show eeprom
This example shows the eeprom halt area information displayed via the
show eeprom halt command.
No errors have been logged.
P00>>>show eeprom halt
Halt Data Logging is enabled
Logging Control Field valure = 0000
Actions logged = 0
P00>>>
3.7.3.3
Clear eeprom
The clear eeprom halt command is used to clear the eeprom halt logging
area.
P00>>>clear eeprom halt
.P00>>>
3–6
Things You Should Know the First Time You Power On Your Machine
3.8
Additional notes for KZPSA changes implemented with the V5.1
release
The driver code used for KZPSA adapters was changed resulting in the
controller being represented as "pks" and no longer represented as "kzpsa".
Several changes to command usage change with use of this PKS driver.
•
LFU updates under the V5.1 SRM console or later will no longer use
the UPD>UPDATE KZPSA* command but will use UPD>UPDATE
PKS* command.
•
For showing devices attached to the KZPSA adapters use the command
P00>>SHOW DEVICE PKS*
Below is an example of the new naming and previous naming output that
would be displayed for the KZPSA adapter and attached devices.
Examples
SRM console output line for KZPSA obtained from P00>>>show config command.
--------------------------------------------------------------------------For version V5.1 SRM console or later:
Slot
Option Name
Type
5
DEC KZPSA
81011
Rev
0000
For SRM console verisons V5.0 or earlier:
Slot
Option Name
Type
Rev
5
DEC KZPSA
81011
0000
Name
pks0
Name
kzpsa0
SRM console output line for KZPSA obtained from P00>>>show device
------------------------------------------------------------------For version V5.1 SRM console or later use P00>>>SHOW DEVICE PKS*
polling pks0 (DEC KZPSA) slot 5, bus 0 PCI, hose 1
PKc.7.0.5.1
dkc
TPwr 1 Fast 1 Bus ID 7
P01 A11
dkc100.1.0.5.1
DKc100
RZ28D 0010
dkc200.2.0.5.1
DKc200
RZ28D 0010
For SRM console verisons V5.0 or earlier use SHOW DEVICE KZPSA*
polling kzpsa0 (DEC KZPSA) slot 5, bus 0 PCI, hose 1 TPwr 1 Fast 1 Bus ID 7
kzpsa0.7.0.5.1
dkc
TPwr 1 Fast 1 Bus ID 7
P01 A11
dkc100.1.0.5.1
DKc100
RZ28D 0010
dkc200.2.0.5.1
DKc200
RZ28D 0010
3.9
DIGITAL Fast EtherWORKS PCI 10/100 (DE500) Adapters and
Auto-negotiation
The console supports the DIGITAL Fast EtherWORKS PCI 10/100-TX
Adapters (DE500-AA and DE500-BA). These adapters support
auto-negotiation which is a mechanism to advertise, to detect, and to
negotiate line speed abilities of auto-negotiation supported devices on an
ethernet wire. In auto-negotiate mode the user does not need to know the
3–7
Things You Should Know the First Time You Power On Your Machine
line speed of auto-negotiation supported devices on the other end of an
ethernet wire.
Important: Auto-negotiate mode is NOT RECOMMENDED if you know the
speed of your ethernet because of possible considerable delay
when booting or when restarting the operating system. This is
because the operating system will start/stop device drivers three
times before the operating system is on-line when booting or
before the operating system relinquishes control to the console on
a shutdown..
Use auto-negotiation ONLY if the DE500-*A is connected to
an ethernet which supports auto-negotiation. Otherwise the
DE500-*A will respond with the default setting of 100Base TX
full-duplex.
3.9.1
Set EW*0_Mode Auto-Negotiate
Example to set the DE500-AA or DE500-BA into auto-negotiation mode:
P00>>> set ewa0_mode auto-negotiate
The DE500-*A then advertises its abilities on the ethernet wire by sending
a link code word on the ethernet wire. If the DE500-*A does not get
a response (a link code word from another auto-negotiation supported
device) the DE500-*A will set its line speed to 100BaseTx full-duplex. It
will take several seconds before you see the SRM console P00>>> prompt
to get the DE500-*A into auto-negotiate mode.
Below is an example of setting the adapter mode to auto-negotiate on a
system where the Ethernet does not support auto-negotiation or there is
no response from the Ethernet. From the console, you see the following
display:
P00>>> set ewc0_mode auto-negotiate (Note:this takes several seconds)
ewc0: link failed : Using 100BaseTX full duplex
In the above case change ewc0_mode to Twisted to use the DE500-*A in a
10BaseTx environment.
3.9.2
Behavior Note on Systems with Multiple DE500’s
Auto-negotiation mode is NOT RECOMMENDED on DIGITAL UNIX
or OpenVMS systems with more than one DE500 because of possible
considerable delay when booting or when restarting the operating system.
This is because the operating system will start/stop drivers several times
during a boot or reboot. It is recommended that you set the DE500-*A to
the line speed of the ethernet wire instead of using auto-negotiate mode.
3–8
Things You Should Know the First Time You Power On Your Machine
3.10
Note on UNIX installations
When installing DIGITAL UNIX from the graphics console, the screen may
scroll past the following instructions to set console environmental variables
and to boot the operating system. If you experience this symptom do the
following to continue with the installation:
P00>>> set boot_osflags a
P00>>> set bootdef_dev <your boot disk>
P00>>> boot
3–9
4
Running EISA, RAID, and Other Configuration Utilities
NOTE:Relocation of AlphaBIOS to a different sector in flash ROM was
implemented in the 5.3 release. Please ensure you have read Chapter 2.
Of particular importance is the change for updating the SRM and
AlphaBIOS firmware. Failure to have followed the procedure properly
will invalid the AlphaBIOS image. This invalid image problem is corrected
by excuting the LFU a second time and updating the AlphaBIOS.
To help configure an AlphaServer 4100 system, various utilities may need
to be run before booting your operating system. The ECU, RCU, and
KZPSA Configuration utilities are examples - these utilities run on top of
the AlphaBIOS console since they use ARC-based callbacks based on the
Advanced RISC Computing (ARC) Specification developed by Microsoft.
4.1
Setting Up Your System to Run ARC-based Utilities
To invoke one or more of these utilities, you must first bring up the
AlphaBIOS console. Do so by entering the ALPHABIOS command at
the SRM console prompt or by setting the SRM console’s OS_TYPE
environment variable (EV) to "NT" and then resetting your machine.
If you have a graphics display device installed in your machine, you may
wish to set the CONSOLE EV to "GRAPHICS" before invoking AlphaBIOS
since it and the associated utilities are graphically oriented. [They do
support serial line mode, however. See Section 4.2 for more details.]
4.2
Using a Serial line Interface to Run ARC-based Utilities
These utilities can be run either in graphics or serial mode. The SRM
console’s CONSOLE environment variable controls which mode AlphaBIOS
runs in at the time it is loaded by the SRM console.
To run AlphaBIOS and ARC-based utilities in serial mode, CONSOLE
must be set SERIAL and the terminal must be a VT320 or greater with
the following settings:
•
8-bit character mode.
•
’~’ key set to send ESC.
Refer to your user documentation (e.g., AlphaServer 4100 System Drawer
User’s Guide) for details about running utilities such as ECU, RCU, and
other ARC-based utilities.
4–1
Running EISA, RAID, and Other Configuration Utilities
4.3
Restrictions When Running KZPSA Utilities
You must use V1.4 of the KZPSA Firmware Update Utility
(FWUPDATE.EXE) if you wish to use it rather than LFU to update
your KZPSA firmware. Note: running earlier versions of the KZPSA
FWUPDATE.EXE utility will corrupt the NVRAM on your KZPSA and
disable the module and your system!
Restrictions also exist if using the KZPSA CNFGDIAG.EXE utility. For
one, you must use version V1.5 or greater on an AlphaServer 4100 system.
The following release notes apply to V1.5 of the CNFGDIAG.EXE utility:
Table 4–1 KZPSA CNFGDIAG.EXE (V1.5) Issues/Bugs With SCSI
Options
4–2
Reset SCSI Bus
The bus will be reset, but an error message will be displayed
after a timeout of about 1 minute on any subsequent reset
attempts.
List devices
If the KZPSA SCSI ID is 15, the screen will clear rather than
wait for ’any key’.
A
RESTORE_NVRAM and SAVE_NVRAM
A.1
Save NVRAM data in EEROM/TOY to a floppy file.
Save the system NVRAM data from 8KB EEROM and last 50 TOY
RAM bytes onto a write-UN-locked FAT formatted floppy to a file. By
default, if no script argument is specified, all NVRAM is saved to file
ALLNVRAM.SAV. If the file already exists, then a copy of the original file
is made to *.BAK. If that file exists, it is overwritten. Note, attempts to
write to a write-locked floppy fail silently.
Syntax
save_nvram
{all,arc,srm,toy}
Arguments
group
Specifies the group of NVRAM data to be saved. One of the following:
•
all : All of the 8KB EEROM and 50 bytes of TOY RAM are saved in
file allnvram.sav. This is the default, if no argument is specified.
•
arc : ARC (AlphaBIOS) data in first 6KB of the 8KB EEROM is saved
in file arcnvram.sav.
•
srm : SRM console data in last 2KB of the 8KB EEROM is saved in
file srmnvram.sav.
•
toy : TOY console data in the 50 bytes of TOY RAM is saved in file
toynvram.sav.
Examples
To save all the system NVRAM to an image on floppy:
>>> save_nvram
Save all NVRAM data to file fat:allnvram.sav/dva0.0.0.1000.0.
If file already exists, first copy original to a .bak file.
Please insert a write-UN-locked, FAT formatted floppy...
...and enter "y" and press Return to continue.
y
Checking for a FAT formatted floppy...
...Found it.
Checking for existing fat:allnvram.sav/dva0.0.0.1000.0...
...Found one.
Copying fat:allnvram.sav/dva0.0.0.1000.0 to .bak file...
...Succeeded.
Copying all NVRAM to fat:allnvram.sav/dva0.0.0.1000.0...
...Succeeded.
>>>
A–1
RESTORE_NVRAM and SAVE_NVRAM
A.2
Restore NVRAM data to EEROM/TOY from a floppy file.
Restore the system NVRAM data to 8KB EEROM and/or last 50 TOY
RAM bytes from a floppy containing the NVRAM save file(s). By default,
if no script argument is specified, all NVRAM is restored from file
ALLNVRAM.SAV.
Syntax
restore_nvram
{all,arc,srm,toy}
Arguments
group
Specifies the group of NVRAM data to be restored.
One of the following:
•
all : All of the 8KB EEROM and 50 bytes of TOY RAM are restored
from file allnvram.sav. This is the default, if no argument is specified.
•
arc : ARC (AlphaBIOS) data in first 6KB of the 8KB EEROM is
restored from file arcnvram.sav.
•
srm : SRM console data in last 2KB of the 8KB EEROM is restored
from file srmnvram.sav.
•
toy : TOY data in last 50 bytes of 64 bytes in TOY RAM is restored
from file toynvram.sav.
Examples
To restore a previously saved ARC NVRAM image:
>>>restore_nvram arc
Restore arc NVRAM data from the file fat:arcnvram.sav/dva0.0.0.1000.0.
Please insert the floppy containing this file...
...and enter "y" and press Return to continue.
y
Looking for file fat:arcnvram.sav/dva0.0.0.1000.0...
...Found it.
Restoring system NVRAM data...
...Succeeded.
>>>
A–2