1
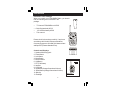
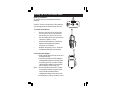
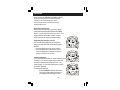
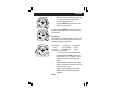
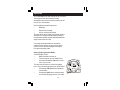
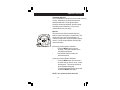
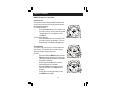
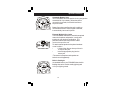
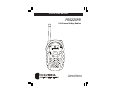
OPERATIONS MANUAL
FRS22SPR
22 Channel 2-Way Radios
S CA N
UP
MENU
LOC K
DN
CA LL
COLUMBIA
Owners Manual
and Instructions
FCC Warnings
ADJUSTMENT: REPLACEMENT or substitution of transistors, regular
diodes or other parts of a unique nature, with parts other than those
recommended by Columbia, may cause a violation of the technical
regulations of part 95 of the FCC Rules, or violation of Type Acceptance
requirements of Part 2 of the Rules.
NOTE: This equipment has been tested and found to comply with the
limits for a Class B digital device, pursuant to Part 15 of the FCC Rules
These limits are designed to provide reasonable protection against
harmful interference in a residential installation. This equipment
generates, uses and can radiate radio frequency energy and, if not
installed and used in accordance with the instructions, may cause
harmful interference to radio communications. However, there is no
guarantee that interference will not occur in a particular installation. If
this equipment does cause harmful interference to radio or television
reception, which can be determined by turning the equipment off and
on, the user is encouraged to try to correct the interference by one or
more of the following measures:
•
•
•
Reorient or relocate the receiving antenna.
Increase the separation between the equipment and receiver.
Consult the dealer or an experienced radio/TV technician for
help.
This device complies with Part 15 of the FCC Rules. Operation is subject
to the following condition: this device must accept any interference
received, including interference that may cause undesired operation.
2
Contents
FCC Warnings .................................................... 2
Contents .............................................................. 3
Introduction ........................................................ 4
Controls and displays ...................................... 4
Component Guide .............................................. 5
Setting Up Your FRS/GMRS Radio ................... 6
Battery Installation .......................................... 6
Battery Meter .................................................. 7
Low Battery Indicator ........................................ 7
Operation ............................................................. 9
Turning on your Device.................................... 9
Communication ................................................. 9
Receiving communications ................................. 9
Respond prompt tone ...................................... 10
Channel selection ............................................ 10
Frequencies .................................................... 11
To speak directly to another radio .................... 11
Range ............................................................. 11
Calling (Paging) another radio ......................... 12
Special Features ................................................ 13
Automatic Squelch ........................................... 13
Monitor .......................................................... 13
Channel Lock .................................................. 14
Channel Scan .................................................. 14
Automatic Battery Save .................................... 15
External Mic/Spk/Chg Jacks ............................ 15
Built-in flashlight......................................................15
Customer Support ............................................. 16
Channel Frequencies and Code Charts ............ 17
Warranty ............................................................ 18
3
Introduction
Included In Your Package
When you unpack your FRS/GMRS Radio, you should
find the following items enclosed in the
package:
• 22-channel FRS/GMRS unit-2PCS
• • Belt-Clip (attached)-2PCS
• 1.5V AAA size battery-8PCS
• This manual
S CA N
UP
MENU
LOCK
DN
CALL
Please check for these Items carefully. If any items
are missing, call Columbia Telecommunications
Customer support at 1-800-889-7434 between 9am
and 5pm EST (Eastern Standard Time).
AAA AAA AAA A AA
Controls and Displays
1. Speaker/Mic/Charge jack
2. Power Button
3. Lock Button
4. Menu Button
5. Monitor Button
6. Call Button
7. PTT(Talk Button)
8. Antenna
9. LCD Panel
10. Up Button (Change Channel and Volume)
11. Down Button (Change Channel and Volume)
12. Belt clip
13. Flashlight
4
FRS14-SPR
SCA N
UP
M ENU
L OCK
DN
CA L L
COLUMBIA
Component Guide
Transmit
Symbol
Channel
Number
Receive
Symbol
Scan
Batter y
Level
Volume
Lock
1. Speaker/Mic/charge jack
8. Antenna
9. LCD Panel
2. Power Button
13.FlashLight
7. PTT(Talk Button)
SCAN
4. MENU Button
5. Monitor Button
3. Lock Button
UP
MENU
LOC K
DN
6. Call Button
10. Up Button
11. Down Button
CA LL
5
12. Belt clip
Setting
SettingUp
UpYour
Your/GMRSRadio
FRS/GMRS Radio
Battery Installation
To use the radio, you must install 4 AAA size
batteries.
Caution: incorrect positioning of the batteries
can damage both the batteries and the unit.
To install the batteries:
•
Remove the belt clip by pulling the
tab on the top of the belt clip back,
and sliding it up and off of the unit.
•
Pull the battery door lock tab down to
release the battery cover.
•
lnsert four AAA batteries. Position the
batteries according to the polarity
markings on the plastic.
•
Replace the battery cover. Snap the
lock tab and belt clip back into place.
connecting the adaptor
Lift the rubber flap on the top of the unit
to expose the jack.
To use the unit with an AC/DC Adaptor
rechargeable batteries insert the round
connector (OD 2.5mm) of the7.5V DC/
100mA AC/DC adaptor* into the SPK/
MIC/CHG jack on top of the unit.
Note The unit should be turned OFF in order
to charge the batteries properly.If the
unit is turned ON and placed for
charging the charge current is too low
for the battery to charge up as the unit is
6
Setting Up Your FRS Radio
Setting Up Your FRS/GMRS Radio
still using power.There is no charge
indicator during charging at OFF mode.It
takes approximately 7 to 10 hours to fully
charge the batteries if they are at the their
lowest lever.
WARNING
DO NOT CHARGE THIS UNIT USING AN AC/DC
ADAPTOR* WITH REGULAR AAA ALKALINE
BATTERIES INSTALLED.USE ONLY THE AC/DC
ADAPTOR WITH AAA RECHARGEABLE
BATTERIES
•
Do not mix old and new batteries.
•
Do not mix alkaline, standard
(carbon-zinc), or rechargeable
batteries.
* The AC/DC adaptor and rechargeable batteries
are sold separately.
SCAN
UP
MENU
LOC K
CA LL
DN
Battery Meter
The battery meter is located in the bottom left
corner of the LCD display panel on the unit. It looks
like a battery with vertical bar inside. As the power
is used up, the bar will disappear.
Low Battery Indicator
When the batteries need to be changed, the battery
vertical bar inside will disappear. To ensure
uninterrupted communication, replace the batteries
7
Setting Up Your FRS/GMRS Radio
as soon as possible.
Note:
Always use alkaline batteries for replacements.
If you store your radio for long periods of time,
always remove the batteries. Batteries may
corrode and leak when left unused over long
periods of time, and permanently damage your
radio.
DO NOT PUT BATTERIES INTO FIRE OR
EXPOSE TO HIGH HEAT. THEY MAY
EXPLODE.
8
Operation
S CA N
UP
M E NU
LOC K
DN
CA LL
Communication with FRS/GMRS Radio
You can communicate two ways with your new
FRS/GMRS radio. There are 22channels available to
you, You can either talk directly to others and
hear their response, or you can call or page
them with an audible tone.
The FRS/GMRS radios can only communicate when
either the TALK button (for speach), or the
CALL button (for paging) is pressed. The
unit can only receive when both buttons are
fully released.
S CA N
UP
ME NU
LOC K
CA LL
DN
SCAN
UP
MENU
LOC K
CA LL
Turning On This Device
Push & hold the Power button for at least 2
seconds to turn the FRS/GMRS radio ON or OFF. The
unit will beep, the LCD panel will display
information about your radio, and the panel will
be illuminated by a green light for several
seconds.
DN
Receiving Communications
When your FRS/GMRS unit is turned on and is not being
used to transmit voice communication or pages, it
is always in the listening mode.
You cannot receive any transmissions when the
TALK or CALL buttons are pressed, even if you
aren’ t saying anything. Pressing these buttons
automatically overrides and turns off the receive
mode.
When you are using the unit in conversation, you
9
Operation
must release the TALK and/or CALL buttons
to hear the responses of the other people.
Failure to do so will keep your unit in
transmission mode, preventing you from
hearing other units.
Respond Prompt Tone
When the person talking to you from another
radio finishes speaking and releases his TALK
button, you will hear a tone from your unit. This
means that the other radio is now in receive
mode, and you can begin your transmission.
Adjusting the Speaker Volume
The Up and Dn(DOWN) Buttons control the
volume, change channels, codes and program
the FRS.
. Press the UP button to increase volume.
. Press the DN button to decrease volume.
. The LCD displays the volume level by the
number of bars on the screen.
Channel selection
Your FRS/GMRS operates on one of fourteen preset
channels. You can only talk to other radios that
are set to the same channel as your unit. The
chart on page 17 gives the frequencies on which
your radio operates.
To change the channel:
•
Press the MENU (Channel Set) button.
The large 2-digit channel number on
the display panel will begin to flash.
10
SCAN
UP
ME NU
LOC K
DN
CA L L
SCAN
UP
MENU
LO C K
DN
CA LL
SCAN
UP
MENU
LO C K
CA L L
DN
Operation
•
S CAN
UP
MENU
LOC K
DN
CA LL
If you do not press MENU the second time, The
unit will automatically return to normal operation
in ten seconds.
S CA N
UP
ME NU
LOC K
DN
CA LL
SCA N
UP
MENU
L OC K
C A LL
•
While the number is flashing, press the
up or down arrow buttons until you
reach the desired channel.
Press the MENU (Channel Set) button
again to set the channel.
DN
Frequencies
Other FRS radio models may have only 2 channels.
If you want to communicate with these units, you
must set the channels as follows:
22-ch radios
Frequency
2-ch radios
Chan 8
467.5625 MHz
Chan 1
Chan 12
467.6625 MHz
Chan 2
To speak to Another Radio
•
Turn the volume up to an audible level.
•
Press and hold the TALK button on the
left side of the unit. The signal transmitting waves on the LCD display will
appear.
•
While pressing on the talk button, speak
into the microphone with your mouth 2 to
3 inches from the unit.
•
When you finish speaking, release the
TALK button immediately to hear the
response.
Range
11
Operation
Your FRS/GMRS unit has a range of up to 2 miles.
This range can be decreased by certain
atmospheric and environmental conditions at the
time of your conversation.
Some conditions that affect range are:
•
Buildings
•
Dense trees or foliage
•
Hilly or mountainous terrain
The best range will be in flat, open terrain, without
obstructions. Using the MON (monitor) button to
override the automatic squelch will help extend the
range to the maximum limits.
Your range is also dependent on the battery
condition of the radio, the type of terrain where
you are located, and the strength of the signal
from the transmitting radio.
Calling (Paging) Another Radio
To send a page, or CALL
•
Make sure both units are on.
•
Turn the volume up to an audible level.
•
Press and release the Call button on the
front of your radio.
The other unit will make a 2 second call (page)
tone. They can then respond to your call by either:
•
Pressing the TALK button and speaking
into the radio.
•
Pressing the Call button, which activates
a 2 second call (page) tone on your radio.
12
SCAN
UP
MENU
LOC K
CA LL
DN
Special Features
Automatic Squelch
Your FRS/GMRS is equipped with automatic squelch
circuitry, which filters out weak transmissions
and unwanted noise. These signals may be
picked up as background static, and are usually
caused by terrain conditions, or if you have
reached the limit of your range.
SCAN
UP
MENU
Monitor
This feature turns off the Automatic Squelch
feature, either momentarily or continuously. This
allows your unit to receive all signals to it’ s
maximum range, but it may pick up static signals
as well. You can set the speaker volume by the
noise of the static.
LOC K
CA LL
DN
Momentary monitor feature activation:
•
Press the MON button for up to 4
seconds. The monitor signals on the
LCD display will appear.
•
Release the button to restore the
automatic squelch
Continuous monitor feature activation:
•
Press the MON button for more than 5
seconds until you hear a “beep” sound
and release it. The monitor signals on
the LCD display will appear.
•
To restore automatic squelch, press and
release the MON button again.
NOTE: You cannot transmit when the
13
Special Features
MONITOR feature is activated.
Channel Lock
This feature locks the channel adjustment buttons
on the front to the unit so that the channel cannot
be changed accidentally.
To Lock the channel:
•
Press the Lock button for 5 seconds until
you hear a “beep “sound. The lock symbol
- shaped like a key - will appear on the
LCD display.
To Unlock the channel:
•
Press the Lock button for 5 seconds until
you hear a “beep “sound again. The lock
symbol in the LCD display will disappear.
Channel Scan
Your radio can scan across it’ s 22 channels for
any activity. This allows you find other radios
without having to change channels.
To scan:
•
Press and hold the MENU button and the
DN button at the same time for 2 seconds.
•
The channel display will change as it scans
through the channels.
•
When a signal is detected, the unit will
pause and listen for 4 seconds.
•
Press the TALK button to stop the scan
and communicate, or the DN button to
continue.
•
To stop the scanning operation, press
the MENU button again.
14
SCAN
UP
MENU
LOC K
DN
CA LL
SCAN
UP
MENU
LOC K
DN
CA LL
SCAN
UP
MENU
LOC K
CA LL
DN
Special Features
Automatic Battery Save
Your FRS/GMRS unit has special circuitry designed to
extend the life of your battery. When the radio is
not used for 4 seconds, it will switch itself into a
low power mode.
S CA N
UP
MENU
Battery Save does not affect the radio’ s ability to
receive transmissions. When a signal is detected,
it automatically returns to full power.
LOCK
DN
CA LL
External Mic/Spk/Chg Jacks
Your FRS/GMRS radio can be used with an optional
external microphone and speaker*, usually sold
together in a ear bud/mic combination. The
jacks are located under the protective rubber
cover on the top of the unit.
To attach external speaker/microphone headsets
or ear bud/mic*.
•
Lift the rubber flap on the top of the unit
to expose the jack.
•
Insert the appropriate plug into the
correct jack.
*The external microphone and speaker ear
bud mic are sold spparately.
Built-in flashlight
As an added feature, your FRS/GMRS has a built-in
flashligt that can be used in sending light signals
or for your lighting needs.
S CA N
UP
ME NU
LOC K
CA LL
DN
15
Customer Support
Customer Support
Thank you for purchasing the Columbia FRS/GMRS 2-way
Radio. This is a high-quality communications device
that can give you many years of reliable service. Please
read these instructions carefully.
Should you encounter any problems with the
product or not understand its many features,
please refer to this owner’ s manual. If after
referring to the manual, you still need help,
call Customer Service at 1-800-889-7434 between 9am
and 5pm EST (Eastern Standard Time).
Service
For your own protection, retain your original sales
receipt indicating the date and place where you
purchased this product. We will not be able to service
your FRS unit without a copy of this receipt.
Also, as previously suggested, retain all packing
materials In case you should need to ship your unit for
servicing. This product is covered by a ONE YEAR
LIMITED WARRANTY.
16
Channel Frequencies and Code Charts
FRS/GMRS Channel Frequencies
Channel Frequency (MHz)
Channel
1
2
3
4
5
6
7
8
9
10
11
462.5625
462.5875
462.6125
462.6375
462.6625
462.6875
462.7125
467.5625
467.5875
467.6125
467.6375
12
13
14
15
16
17
18
19
20
21
22
Frequency (MHz)
467.6625
467.6875
467.7125
462.5500
462.5750
462.6000
462.6250
462.6500
462.6750
462.7000
462.7250
How to Obtain a GMRS License?
You must obtain an FCC license (or be an immediate family member of
someone who is already licensed) before you may transmit with a GMRS radio.
To apply for a GMRS license, you must complete an return a Form 605 to the
FCC. You can obtain a copy of the FCC Form 605 and its instructions by
calling:1-800-Call-FCC. You can also obtain a copy from the FCC's Web Site:\\
www.fcc.gov/formpage.html. You can also apply for a GMRS license directly on
the Web. Applicants must also submit an FCC Form 159(Remittance Advice).
It is available from the same sources mentioned above.
As of September 2000, the cost of obtaining an FCC license in the GMRS is $
85. This includes a $50 application fee, and a usage fee of $35($7 per year for
the five-year license). This $85 fee total must be submitted along with the
application.
17
FCC Warning Statement
To maintain compliance with the FCC's RF exposure guidelines hold the transmitter and ANTENNA
at least 1 inch (2.5cm) from your face and speak in a normal voice, with the ANTENNA
pointed up and away from the face. If you wear the handset on your body while using
the headset accessory, use only the supplied belt clip for this product and when
transmitting,take it out of the belt to ensure that the ANTENNA is a least 1 inch (2.5cm)
Use the only supplied ANTENNA. Unauthorized ANTENNAS, modificaitons, or
attachments could damage the transmitter and may violate FCC regulations.
Please use the shipping address below for the authorized Warranty Service center:
COLUMBIA TELECOMMUNICATIONS INC.
174 Milbar Blvd.
Farmingdale, NY 11735
18
19
20