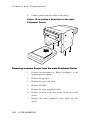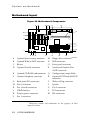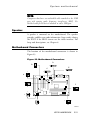
1
Apricot LS SERIES Owner’s Handbook APRICOT LS SERIES OWNER’S HANDBOOK MINITOWER (LY) EDITION Microsoft, MS-DOS, Windows and Windows NT are registered trademarks of Microsoft Corporation in the US and other countries. LOC Technology is a trademark of Apricot Computers Limited. Other trademarks mentioned within this document and not listed above are the properties of their respective owners. Information contained in this document is subject to change without notice and does not represent a commitment on the part of Apricot Computers Limited. Any software described in this manual is furnished under a license agreement. The software may be used or copied only in accordance with the terms of this agreement. It is against the law to copy any disk supplied for any purpose other than the purchaser’s personal use. No part of this manual may be reproduced or transmitted in any form or by any means electronic or mechanical including photocopying and recording, for any purpose, without the express written permission of the publishers. Copyright © Apricot Computers Limited 1997. All rights reserved. Published by: Apricot Computers Limited 3500 Parkside Birmingham Business Park Birmingham, England B37 7YS http://www.mitsubishi-computers.com Printed in the United Kingdom Safety & regulatory notices SAFETY AND REGULATORY NOTICES General Electrical The computer uses a safety ground and must be earthed. The system unit AC power cord is its ‘disconnect device’. Ensure that the system unit is positioned close to the AC power outlet and that the plug is easily accessible. The power cord packed with the computer complies with the safety standards applicable in the country in which it is first sold. Use only this power cord. Do not substitute a power cord from any other equipment. To prevent fire and electric shock, do not expose any part of the computer to rain or moisture. Turn off the computer and unplug all power cords before moving or cleaning the system unit, or removing the system unit covers. Battery This product contains a lithium battery. Do not use a metal or other conductive implement to remove the battery. If a short-circuit is made between its positive and negative terminals the battery may explode. Replace a discharged battery with one of the same type; another type may explode or ignite. Follow the instructions contained in the Owner’s Handbook to replace the battery. Dispose of a discharged battery promptly and in accordance with the battery manufacturer’s recommended instructions. Do not recharge, disassemble or incinerate the discharged battery. Keep away from children. Laser products Any CD-ROM drive fitted in this system is classified as a CLASS 1 LASER PRODUCT according to IEC825 Radiation Safety of Laser Products (Equipment Classification: Requirements and User's Guide). The CLASS 1 LASER PRODUCT label is located on the underside of the system unit. The CD-ROM drive contains a laser system which is harmful to the eyes if exposed. Do not attempt to disassemble the CD-ROM drive; if a fault occurs, call an authorised maintainer. i Safety & regulatory notices Use the CD-ROM drive only as described in this manual. Failure to do so may result in exposure to hazardous radiation. Ergonomic When positioning the system unit, monitor and keyboard, take into account any local or national regulations relating to ergonomic requirements. Anti-static precautions WARNING Static electricity can cause permanent damage to electronic components. You should be aware of this risk, and take precautions against the discharge of static electricity into the computer. The computer is at risk from static discharge while any of the covers are off. This is because the electronic components of the motherboard are exposed. Memory modules, expansion cards and replacement processors are examples of electrostatic sensitive devices (ESSDs). All work that involves removing the cover must be done in an area completely free of static electricity. We recommend using a Special Handling Area (SHA) as defined by EN 100015-1: 1992. This means that working surfaces, floor coverings and chairs must be connected to a common earth reference point, and you should wear an earthed wrist strap and anti-static clothing. It is also a good idea to use an ionizer or humidifier to remove static from the air. When installing any upgrade, be sure you understand what the installation procedure involves before you start. This will enable you to plan your work, and so minimise the amount of time that sensitive components are exposed. Do not remove the system unit cover, nor the anti-static bag or wrapping of any upgrade, until you need to. Handle static-sensitive items with extreme care. Hold expansion cards and add-on components only by their edges, avoiding their electrical contacts. Never touch the components or electrical contacts on the motherboard or on expansion cards. In general, do not handle static-sensitive items unnecessarily. Keep all conductive material, and food and drink, away from your work area and the open computer. Thermalcote bonding compound The thermal bonding compound used between the system processor and its heat sink can cause skin irritation and stain clothing. Avoid prolonged ii Safety & regulatory notices or repeated contact with skin. Wash thoroughly with soap and water after handling. Avoid contact with eyes and inhalation of fumes. Do not ingest. Maintenance Switch off and disconnect all cables before attempting to clean the computer. Do not use sprays, solvents or abrasives that might damage the system unit surface. Do not use cleaning fluids or sprays near air vents, ports, or the diskette and CD-ROM drives. Occasionally wipe the system unit with a soft, slightly damp, lint-free cloth. Occasionally wipe over the air vents on the rear and sides of the system unit. Dust and fluff can block the vents and limit the airflow. Occasionally clean the diskette and CD-ROM drives using a proprietary head cleaner. Occasionally wipe the monitor with a soft, slightly damp, lint-free cloth. It is best to use anti-static glass cleaner on the monitor screen, but do not spray glass cleaner directly onto the screen; it could run down inside the case and damage the circuitry. Transporting Use common sense when handling the computer; hard disks in particular can be damaged if the computer is dropped or handled roughly. As a precaution, back up the contents of the hard disks to tape or diskettes before moving the computer. Switch off and disconnect all cables before attempting to move the computer, In particular, do not try to move the computer while it is plugged into the AC power supply. When lifting and carrying the computer, use the metal sides of the system unit and never attempt to lift the system unit with a monitor still on top. If you need to transport the computer any great distance, use the original packing materials. If you are planning to use the computer in another country, it may not be suitable, check with your supplier, particularly on the availability of the correct AC power cords. NOTE Any existing maintenance or warranty agreement may not be supportable in another country. The system may have to be returned to the supplier. iii Safety & regulatory notices Standards Safety This product complies with the International safety standard IEC950 and the European safety standard EN60950 which will, when applicable, include the national deviations for the country in which it is sold. Electro-magnetic Compatibility (EMC) This product complies with the following European EMC standards: Emissions EN50022 Class B Immunity EN50082-1 This product also complies with the following International EMC standards: VCCI Level 1 (Japan) Notes All interconnecting cables (for example, signal and communication cables) should be less than 2 metres in length. If cable extensions are used, ensure adequate earth connections are provided and screened cables are used. If any metal casework components are removed, during upgrade work for example, ensure that all metal parts are correctly re-assembled and all internal and external screws are re-fitted and correctly tightened. Legalities This equipment complies with the relevant clauses of the following European Directives (and all subsequent amendments): Low Voltage Directive 73/23/EEC EMC Directive 89/336/EEC Telecommunications Directive 91/263/EEC CE Marking Directive 93/68/EEC IMPORTANT This system complies with the CE Marking Directive and its strict legal requirements. Use only parts tested and approved by Mitsubishi Electric PC Division. Failure to do so may result in invalidating both the compliance and your warranty. All expansion cards, drives and peripherals must carry the CE mark to ensure continued compliance. iv Safety & regulatory notices Power Connection Typical AC plugs E E L 125V 250V 250V N N N L 250V L N E L 250V E BS1363A SHUCO NEMA 5-15P SRAF 1962/DB16/87 ASE 1011 U. K. Austria Belgium Taiwan Denmark Switzerland Finland France Thailand Italy Germany Japan Sweden Norway USA Holland Canada Checking the AC power supply When this product is delivered, it is ready for the commercial AC power supply generally available in the country in which it is first sold. It has been set for the correct voltage range, and is supplied with an AC power cord and plug which comply with the relevant safety standards. Before using the product in a country other than that in which it was originally sold, you must check the voltage and frequency of that country’s AC power supply, and the type of power cord required there. Check the power rating labels on the rear of the computer’s system unit and its monitor to ensure that they are compatible with the AC power supply. The computer can function within two alternative AC power supply ranges, according to the position of the voltage selection switch on the rear of the system unit: Switch setting AC power supply (voltage and frequency) 115 100 - 120 volt AC, 50 - 60 Hz 230 200 - 240 volt AC, 50 - 60 Hz The voltage setting of the monitor must always be the same as the voltage setting of the system unit. See the User’s Guide that accompanies the monitor or consult your supplier to find out how to change the voltage setting. CAUTION It is imperative that the computer is set to the correct voltage range before use. If not, the machine may be irreparably damaged. v Safety & regulatory notices Connecting to the AC power supply IMPORTANT Any peripheral equipment that requires an AC power cord must be earthed. Use the following guidance to connect the components together. It is important that you take each step in the order indicated. 1. Before connecting any components, ensure that the AC power supply is switched off or disconnected, and that the system unit, the monitor, and any peripherals are turned off. 2. Connect the component signal cables to their respective ports on the system unit: keyboard, mouse, monitor, audio (where appropriate) and any other peripherals. ◊ Where appropriate, connect the computer to the network. 3. Connect the component power cords: system unit, monitor to system, plus any other peripherals to nearby, grounded AC power outlets. (Never substitute a power cord from any other appliance). Then switch on or connect the AC power supply. 4. Turn on the system unit first, then the monitor, then other peripherals. Power Cable Connections - UK ONLY This equipment is supplied with an AC power cord that has a nonremovable plug. Always replace the fuse with one of the same type and rating which is BSI or ASTA approved to BS1362. Always refit the fuse cover, never use the plug with the fuse cover omitted. External Speakers (where supplied) Always switch off or disconnect the AC supply before disconnecting any of the speaker leads, whether audio or power. Disconnect the AC supply from the speaker power unit when not in use for any period of time. To prevent the risk of electric shock, do not remove speaker covers. Connecting the speaker power cord to any other cords or joining cords together can cause fire and risk of electric shock. vi CONTENTS Safety and Regulatory Notices General Standards Legalities Power connection information 1 System Description and Installation Feature Summary Dimensions Front Panel Controls and Indicators Back Panel Connectors and Features Selecting a Site Power Supply Before Installing Optional Items 2 1/1 1/1 1/2 1/3 1/4 1/4 1/6 Chassis and Components Before You Begin Chassis Covers Add-in Cards Peripheral Carriers and Devices Installing Hard Disk Drives Installing Full-width Devices Other Chassis Components 3 i iv iv v 2/1 2/2 2/8 2/12 2/16 2/21 2/23 System Motherboard Motherboard Layout Configuration Modes PCI/IDE Peripheral Interface I/O Features CMOS Battery USB Interface Support Speaker LS700 HANDBOOK 3/2 3/3 3/7 3/7 3/9 3/10 3/11 CONTENTS/1 Contents Motherboard Connectors Audio Subsystem Hardware Monitor Option Front Panel Connections Motherboard Resources 4 Upgrading Processor How to Install Memory How to Remove Memory 5 6 4/1 4/6 4/9 BIOS and Setup Overview of the BIOS Setup Program Maintenance Menu Main Menu Advanced Menu Security Menu Exit Menu 5/1 5/3 5/3 5/6 5/11 5/16 Note Down Your Settings for Reference 5/17 Troubleshooting Problems when Starting Troubleshooting Checklist The System’s Disk Drives Error Messages 2/CONTENTS 3/11 3/14 3/15 3/15 3/17 LS700 HANDBOOK 6/1 6/4 6/5 6/6 Contents Figures/Illustrations chapter/page 1. 2. 3. 4. 5. 6. 7. 8. 9. 10. Front Panel Controls and Indicators Back Panel Connectors and Features Selecting the Input Voltage Setting Removing the Top Cover Removing the Access Side Cover Removing the Non-access Side Cover Removing the Bezel Removing the Expansion Slot Cover Bracket Removing an Expansion Slot Cover Installing an Add-in Card 1/2 1/3 1/5 2/3 2/4 2/6 2/7 2/8 2/9 2/11 11. 12. 13. 14. 15. 16. 17. 18. 19. 20. Removing the Carrier Removing the Main Peripheral Carrier Removing the Floppy Diskette Drive Installing a Hard Drive in the Carrier Installing a Hard Drive behind the Power Supply Installing a Hard Drive in the Main Peripheral Carrier Install/remove a Full-width Peripheral Device Removing the Fan/card Guide Module Removing the Power Supply Motherboard Components 2/12 2/14 2/15 2/17 2/18 2/20 2/22 2/23 2/25 3/2 21. 22. 23. 24. 25. 26. 27. 28. 29. 30. Back Panel I/O Connectors Location of the Configuration Jumper Block Motherboard Connectors Front panel Connections Removing the Heatsink Support Top Bar and the Processor Installing the Processor Retention Mechanism Installing the Processor Installing the Heatsink Support Top Bar Location of DIMM Sockets Installing a DIMM 3/3 3/4 3/11 3/15 4/2 4/4 4/5 4/6 4/7 4/8 LS700 HANDBOOK CONTENTS/3 1 SYSTEM DESCRIPTION AND INSTALLATION This chapter provides a basic description of the LS700, along with simple installation information. Feature Summary ♦ A removable carrier with bays that can accommodate one of the following variations: ◊ Three half-height full-width peripherals ◊ One full-height and one half-height full-width peripherals ◊ Two half-height full-width peripherals and one narrow peripheral ♦ A removable carrier with bays that can hold one floppy diskette drive and one narrow hard disk drive. ♦ A non-removable bay that can hold one narrow hard disk drive. ♦ 200 watt (peak) ATX power supply switchable between 115 and 230 volts AC. ♦ Seven slots for add-in cards. ♦ Padlock hole. Dimensions The weight includes the complete chassis assembly with the power supply and the optional fan. Width 22.7 cm Height (feet installed) 37.5 cm Depth 43.2 cm Weight (chassis only) 7.97 kg LS700 HANDBOOK 1/1 System description and installation Front Panel Controls and Indicators Figure 1. Front Panel Controls and Indicators A B E C D F A. Power on/off light. Turns on when the power is on. B. Hard disk light. Turns on when the computer reads or writes data to an IDE hard disk. C. Floppy diskette drive. D. Bay for full-width devices, shown here with an optional CD-ROM drive installed. E. Power control button. Press to turn on the computer. F. Bays for other full-width devices, shown with two plastic filler panels in place. 1/2 LS700 HANDBOOK System description and installation Back Panel Connectors and Features Figure 2 shows a typical configuration including a power supply and external motherboard I/O connectors. Figure 2. Back Panel Connectors and Features C D A B E A. Power supply fan vent holes. B. Socket for AC power cord. C. Add-in card slots. D. Typical motherboard I/O connectors. motherboard section for further information. See the LS700 HANDBOOK 1/3 E. Input voltage select switch. System description and installation Selecting a Site Choose a site that is: ♦ Clean and as dust free as possible. ♦ Well ventilated and away from sources of heat including direct sunlight. ♦ Well away from sources of water or damp. ♦ Stable and protected from sources of vibration or physical shock. ♦ Isolated from strong electromagnetic fields produced by electrical devices, such as large air-conditioning units. ♦ Equipped with a properly earthed power outlet within easy reach. ♦ In regions that are susceptible to electrical storms, it may also be advisable to plug your system into a surge suppresser. ◊ Disconnect telecommunication lines to any modem during an electrical storm. Power Supply Checking the Input Voltage Setting A 200 watt (peak) power supply is integrated into the chassis to provide power for the motherboard, add-in cards, and peripheral devices. A switch on the back panel can be used to set the power supply to operate at: ♦ 115 V AC (in the range of 100 - 120 V AC), or ♦ 230 V AC (in the range of 200 - 240 V AC) To verify that your system has the correct setting for your environment, check the input power selection switch. This should already be correctly set for the country of sale. 1/4 LS700 HANDBOOK System description and installation Figure 3. Select the Input Voltage Setting 230 115 WARNING The power cable shipped with the system is correct for the country of supply. If you wish to use the computer in another country, it may not be suitable, contact your Apricot dealer for information. AC Input Voltage (50/60 Hz) Current 115 V (100-120 V) 3.5 A 230 V (200-240 V) 2.0 A WARNING To avoid damage to the motherboard or power supply, do not exceed a total of 160 watts of continuous power draw, or a 200 watt surge for a maximum of 12 seconds. LS700 HANDBOOK 1/5 System description and installation Power Supply Output DC Voltage Current (Max. continuous) +12 V 6.0 A +5 V 18.0 A +5V Standby 0.01 A +3.3 V 14.0 A -5 V 0.3 A -12 V 0.8 A NOTE Due to load sharing among the power supply outputs, the maximum continuous current outputs of all voltages cannot be achieved simultaneously. Before Installing Optional Items Before installing other items, such as drives, add-in cards, etc., connect a keyboard and a monitor to the system, switch on and let the power-on self test (POST) run. This will be followed by initialisation of the pre-installed Operating System software, during which you will be asked to enter personal registration details. Once this has been fully completed, you can shut down the operating software, turn the power off, then install any drives, add-in cards, or upgrades, the instructions for which are given in the following chapters. This is to allow ‘Plug and Play’ add-in cards and their special features to be correctly detected and configured. 1/6 LS700 HANDBOOK 2 CHASSIS AND COMPONENTS This chapter describes how to take apart and reassemble the chassis and the major components. Before You Begin ♦ Be sure to do each procedure in the correct order. ♦ Set up an equipment log to record the computer’s model and serial numbers, all installed options, and other information about the computer. If you need this information, it will be easier to consult the log than to open up and examine the computer. ♦ Observe antistatic precautions at all times whenever any cover is removed and while handling any components. ◊ Information and guidance on antistatic precautions can be found in the appendix at the rear of this handbook. ♦ You will need a Phillips (#2 bit) and a flatblade screwdriver. ♦ Turn the computer power off by pressing the power control button. ♦ Unplug the AC power cord from the back of the chassis. ♦ Turn off and disconnect all peripheral devices connected to the computer, e.g. printer or modem. LS700 HANDBOOK 2/1 Chassis and Components WARNING The power supply in this computer contains no user-serviceable parts. To avoid personal injury or damage to your equipment, refer repair or replacement of the power supply to qualified technical personnel only. Chassis Covers Removing the Top Cover 1. Observe the precautions in ‘Before You Begin’, at the beginning of this chapter. 2. If you are removing the cover for the first time, you may need to remove the plastic plug in the padlock hole (see Figure 4). Save it for re-installation. ◊ If you installed a padlock on the chassis, unlock the padlock and remove it. 2/2 3. Grasp the top cover at the rear of the chassis. 4. Slide the cover towards the rear of the chassis until it stops (just over 1cm). 5. Lift the cover away from the chassis. LS700 HANDBOOK Chassis and Components Figure 4. Removing the Top Cover Installing the Top Cover 1. Observe the precautions in ‘Before You Begin’, at the beginning of this chapter. 2. Check that you have not left any tools or loose parts inside the chassis. Check that everything is properly installed and tightened. 3. Lay the cover on top of the chassis so the plastic tabs on the inside of the cover match up with the holes in the top of the chassis. 4. Slide the cover towards the front of the chassis as far as it will go. 5. For security, you can install a padlock to prevent future unauthorised removal of the cover. If you do not install a padlock, reinstall the plastic plug. 6. Reconnect all cables to the computer. LS700 HANDBOOK 2/3 Chassis and Components Removing the Access Side Cover The access side is the right side of the chassis when viewed from the front. 1. Observe the precautions in ‘Before You Begin’, at the beginning of this chapter. 2. Remove the top cover. 3. Slide the two locking tabs at the rear of the chassis up as far as they will go. (See Figure 5). 4. Grasping the back edge of the side cover, swing it away from the chassis and pull it free. WARNING Observe antistatic precautions at all times when the covers are removed. Figure 5. Removing the Access Side Cover 2/4 LS700 HANDBOOK Chassis and Components Installing the Access Side Cover 1. Observe the precautions in ‘Before You Begin’, at the beginning of this chapter. 2. Check that you have not left any tools or loose parts inside the chassis. Check that everything is properly installed and tightened. 3. Holding the side cover at a slight angle, insert the tabs at the front of the cover into their slots. Swing the cover snugly against the chassis. 4. Slide the tabs at the rear of the cover down as far as they will go. It may be necessary to apply pressure against the side cover in order to properly seat the tabs. Removing the Non-Access Side Cover The non-access side is the left side of the chassis when viewed from the front. 1. Observe the precautions in ‘Before You Begin’, at the beginning of this chapter. 2. Remove the top cover. 3. Lay the chassis temporarily on the access side. 4. Release the plastic tab on the top of the cover (see Figure 6). 5. Release the two plastic tabs on the bottom of the side cover then carefully pull the rear end of the cover away from the chassis and unhook it from the front bezel. ◊ You may have to use a little pressure to overcome snap-in fixings under the side cover. LS700 HANDBOOK 2/5 Chassis and Components Figure 6. Removing the Non-Access Side Cover Installing the Non-Access Side Cover 1. Observe the precautions in “Before You Begin.” 2. Holding the side cover at a slight angle, insert the tabs at the front of the cover into their slots. Swing the cover snugly against the chassis. 3. Press the top tab into its slot. 4. Press against the middle and bottom of the side cover to properly seat the rest of the tabs. Removing the Bezel 2/6 1. Observe the precautions in ‘Before You Begin’, at the beginning of this chapter. 2. Remove the top cover. 3. Remove the access side cover. LS700 HANDBOOK Chassis and Components 4. Release the fan/card guide module (see Figure 7) by pressing the two tabs on the long edge of the module and pulling until you can swing the module away from the front of the chassis. ◊ You may have to remove some add-in cards to move the module. 5. Release the two tabs holding the bezel to the chassis by pressing them outward. (See Figure 7). 6. Lift the front of the chassis slightly, and pull the bezel away. 7. Press the fan/card guide module back into place. CAUTION Do not use excessive force to remove plastic components as it may cause damage to fixing tabs etc. Figure 7. Removing the Bezel LS700 HANDBOOK 2/7 Chassis and Components Installing the Bezel 1. Observe the precautions in ‘Before You Begin’, at the beginning of this chapter. 2. Lift the front of the chassis slightly and align the bezel with the chassis. You may find it easier to place the chassis on its back when aligning the bezel. 3. Press the top of the bezel against the chassis until the tabs click into place. Add-in Cards The following procedures tell how to remove and install slot covers and add-in cards. Removing an Expansion Slot Cover 1. Observe the precautions in ‘Before You Begin’, at the beginning of this chapter. 2. Remove the top cover. 3. Remove the access side cover. 4. Remove the two screws that hold the slot cover bracket to the chassis (Figure 8, A). 5. Swing the bracket away from the chassis and remove it (Figure 8, B). Figure 8. Removing the Expansion Slot Cover Bracket B A 2/8 LS700 HANDBOOK Chassis and Components 6. Insert a flat blade screwdriver into a hole of the slot cover you wish to remove. (See Figure 9). 7. Move the screwdriver up and down until the slot cover breaks away from the chassis. Lift the slot cover out of the chassis. Figure 9. Removing an Expansion Slot Cover Installing an Expansion Slot Cover 1. Observe the precautions in ‘Before You Begin’, at the beginning of this chapter. 2. Using a standard metal slot cover, insert the cover into the slot. 3. Hold the slot cover bracket at an angle to the chassis and line the holes in the bracket up with the tabs on the chassis. 4. Pivot the bracket so the screw holes in the bracket and the chassis line up (see Figure 8, A). 5. Secure the bracket to the chassis with two screws. LS700 HANDBOOK 2/9 Chassis and Components NOTE Covers must be installed in all vacant slots to maintain the electromagnetic emissions characteristics of the chassis and to ensure proper cooling. Installing an Add-in Card NOTE The bottom slot will not accommodate a full length add-in card 2/10 1. Observe the precautions in ‘Before You Begin’, at the beginning of this chapter. 2. Remove the slot cover from the slot you wish to use. 3. Remove the card from its wrapper and place it on a grounded, static-free surface. 4. Set any jumpers or switches on the card according to the manufacturer’s instructions. 5. Hold the card by the edges only and firmly press it into the connector on the motherboard (see Figure 10). 6. Connect cables (if any are needed) to the installed card. 7. Replace the slot cover bracket (see Figure 8). LS700 HANDBOOK Chassis and Components Figure 10. Installing an Add-in Card Removing an Add-in Card 1. Observe the precautions in ‘Before You Begin’, at the beginning of this chapter. 2. Disconnect any cables attached to the add-in card you are removing. 3. Remove the two screws that hold the slot cover bracket to the chassis. 4. Swing the slot cover bracket away from the chassis and remove it. 5. Hold the card at each end and carefully rock it back and forth until the edge connectors pull free. 6. Store the card in an antistatic wrapper. 7. If you disconnected cables from the card and you are not reinstalling this card or one like it, remove the cables from the computer. 8. Install an expansion slot cover over the vacant slot. LS700 HANDBOOK 2/11 Chassis and Components Peripheral Carriers and Devices Removing the Floppy Diskette Drive Carrier 1. Observe the precautions in ‘Before You Begin’, at the beginning of this chapter. 2. Remove the top cover. 3. Remove the access side cover. 4. Disconnect the power cables and the ribbon data cables from any peripherals in the carrier. 5. Remove the screws (see Figure 11) that secures the carrier to the main peripheral carrier. 6. Slide the carrier back until the tabs hit their stops. 7. Lift the carrier up and remove it from the chassis. Figure 11. Removing the Carrier A 2/12 LS700 HANDBOOK Chassis and Components Installing the Floppy Diskette Drive Carrier 1. Observe the precautions in ‘Before You Begin’, at the beginning of this chapter. 2. Insert the tabs on the carrier into their slots on the main peripheral carrier. 3. Slide the carrier all the way forward until the screw holes in both carriers line up. 4. Insert and tighten the screws that hold the two carriers together. 5. If there is a drive in the carrier, attach the power cable and the ribbon cable to the drive. Removing the main Peripheral Carrier 1. Observe the precautions in ‘Before You Begin’, at the beginning of this chapter. 2. Remove the top cover. 3. Remove the access side cover. 4. Remove the bezel. 5. Remove the floppy diskette drive carrier. 6. If there is an EMI shield installed for the bottom bay, remove it. 7. Disconnect the power cables and the ribbon data cables from any drives in the carrier. 8. Remove the two screws that secure the carrier to the front of the chassis. (See Figure 12). 9. Place the chassis on its back and remove the two screws that secure the carrier to the bottom of the chassis. 10. Lift the carrier up and remove it from the chassis. LS700 HANDBOOK 2/13 Chassis and Components Figure 12. Removing the main Peripheral Carrier A Installing the main Peripheral Carrier 2/14 1. Observe the precautions in ‘Before You Begin’, at the beginning of this chapter. 2. Place the chassis on its back. 3. Slide the peripheral carrier into the chassis. 4. Insert and tighten the two screws that secure the carrier to the bottom of the chassis. 5. Place the chassis on its feet. 6. Insert and tighten the two screws that secure the carrier to the front of the chassis. 7. If needed, install an EMI shield in the bottom carrier. LS700 HANDBOOK Chassis and Components Removing the floppy Diskette Drive 1. Observe the precautions in ‘Before You Begin’, at the beginning of this chapter. 2. Remove the drive carrier. 3. Remove the three screws holding the diskette drive to the carrier (see Figure 13). 4. Slide the drive out of the carrier. 5. If you are not replacing the drive you just removed, and there are no other diskette drives on the same data cable, disconnect the cable from the motherboard. NOTE A diskette drive or a suitable blanking insert must be installed in this bay to preserve the electromagnetic emissions characteristics of the chassis and to ensure proper cooling of the computer components. 6. Install the drive carrier back into the chassis. Figure 13. Removing the floppy Diskette Drive A LS700 HANDBOOK 2/15 Chassis and Components Installing a floppy Diskette Drive 1. Observe the precautions in ‘Before You Begin’, at the beginning of this chapter. 2. Remove the diskette drive carrier. 3. Remove the diskette drive from its protective wrapper and place it on an antistatic surface. 4. Set any jumpers or switches on the drive according to the manufacturer’s instructions. 5. Slide the diskette drive into the drive carrier. Line the holes on the carrier up with the screw holes on the drive. 6. Insert and tighten three screws of the appropriate type and length (not supplied). 7. Install the drive carrier back into the chassis. 8. Attach the power cable and the data cable to the drive. Installing Hard Disk Drives Installing a hard disk drive in the floppy Drive Carrier 2/16 1. Observe the precautions in ‘Before You Begin’, at the beginning of this chapter. 2. Remove the floppy drive carrier. 3. Remove the drive from its protective wrapper and place it on an antistatic surface. 4. Set any jumpers, switches, or terminating resistors on the drive according to the manufacturer’s instructions. 5. Slide the drive into the drive carrier. Line the holes on the carrier up with the screw holes on the drive. (See Figure 14). 6. Insert and tighten three screws of the appropriate type and length (not supplied). 7. Install the drive carrier back into the chassis. 8. Attach the power cable and the data cable to the drive. LS700 HANDBOOK Chassis and Components Figure 14. Installing a Hard Drive in the Carrier A Removing a Hard Drive from the Diskette Drive Carrier 1. Observe the precautions in ‘Before You Begin’, at the beginning of this chapter. 2. Remove the floppy diskette drive carrier. 3. Remove the three screws holding the drive to the carrier. 4. Slide the drive out of the carrier and place it on an antistatic surface. 5. Install the drive carrier back into the chassis. Installing a Hard Drive Behind the Power Supply WARNING This procedure should be done only by qualified technical personnel. Unplug the computer before doing the procedures described here. LS700 HANDBOOK 2/17 Chassis and Components 1. Observe the precautions in ‘Before You Begin’, at the beginning of this chapter. 2. Remove the non-access side panel. 3. Remove the power supply (see later in this chapter). 4. Remove the drive from its protective wrapper and place it on an antistatic surface. 5. Set any jumpers, switches, or terminating resistors on the drive according to the manufacturer’s instructions. 6. Slide the drive into position. Line the screw holes on the drive up with the holes on the chassis. (See Figure 15). 7. Insert and tighten three screws of the appropriate type and length (not supplied). 8. Attach the power cable and the data cable to the drive. 9. Reinstall the power supply. Figure 15. Installing a Hard Drive Behind the Power Supply A 2/18 LS700 HANDBOOK Chassis and Components Removing a Hard Drive from Behind the Power Supply WARNING This procedure should be done only by qualified technical personnel. Unplug the computer before doing the procedures described here. 1. Observe the precautions in ‘Before You Begin’, at the beginning of this chapter. 2. Remove the non-access side panel. 3. Remove the power supply (see later in this chapter). 4. Disconnect the power cables and the ribbon data cables from the drive. 5. Remove the three screws holding the drive to the chassis. 6. Slide the drive out of the chassis and place it on an antistatic surface. 7. Reinstall the power supply. Installing a narrow Device in the main Peripheral Carrier 1. Observe the precautions in ‘Before You Begin’, at the beginning of this chapter. 2. Remove the main peripheral carrier as previously described. 3. Remove the drive from its protective wrapper and place it on an antistatic surface. 4. Set any jumpers, switches, or terminating resistors on the drive according to the manufacturer’s instructions. 5. Slide the drive into position. Line the screw holes on the drive up with the holes on the carrier. 6. Insert and tighten four screws of the appropriate type and length (not supplied). 7. Replace the peripheral carrier back into the chassis. LS700 HANDBOOK 2/19 Chassis and Components 8. Connect power and data cables to the device. Figure 16. Installing a Hard Drive in the main Peripheral Carrier Removing a narrow Device from the main Peripheral Carrier 2/20 1. Observe the precautions in ‘Before You Begin’, at the beginning of this chapter. 2. Remove the top cover. 3. Remove the access side cover. 4. Remove the bezel. 5. Remove the main peripheral carrier. 6. Remove the four screws that secure the device to the carrier. 7. Replace the main peripheral carrier back into the chassis. LS700 HANDBOOK Chassis and Components Installing Full-width Devices Installing a Full-width Device NOTE A magnetic Phillips screwdriver will be useful for this procedure, but keep it well clear of any loose floppy disks or tape cartridges. 1. Observe the precautions in ‘Before You Begin’, at the beginning of this chapter. 2. Switch off the computer and remove the power cable. 3. Remove the top cover. 4. Remove the access side cover. 5. Remove the non-access side cover. 6. Remove the plastic filler panel from the desired bay. 7. Remove the EMI shield from the desired bay. 8. Remove the device from its protective wrapper and place it on an antistatic surface. 9. Set any jumpers or switches on the device according to the manufacturer’s instructions. 10. Connect the data cable to the motherboard (if required) if it is not already connected. 11. Slide the device into the bay and secure it with four screws (not supplied). 12. Connect power and data cables to the device. 13. If you do not need access to the front of the device, replace the EMI shield and the plastic filler panel. LS700 HANDBOOK 2/21 Chassis and Components Figure 17. Install/remove a full-width Peripheral Device A Removing a Full-width Device 1. Observe the precautions in ‘Before You Begin’, at the beginning of this chapter. 2. Switch off the computer and remove the power cable. 3. Remove the top and both side covers. 4. If the device is not accessible from the front, remove the plastic filler panel and EMI shield. 5. Disconnect the data and power cables from the device. ◊ If the data cable is no longer required, disconnect the other end and completely remove the cable from the system. 2/22 6. Remove the four screws that secure the device to the bay. 7. Slide the device out of the bay. 8. Replace the EMI shield and filler panel. LS700 HANDBOOK Chassis and Components Other Chassis Components Removing the Fan/card Guide Module 1. Observe the precautions in ‘Before You Begin’, at the beginning of this chapter. 2. Remove any add-in cards that block the module. 3. If there is a fan installed in the module, disconnect the fan’s power cable from the motherboard. 4. Swing the module away from the non-access side of the chassis by squeezing the long edge to release the tabs and pulling on it. 5. Swing the module out until the module comes free from the chassis. ◊ Do not use excessive force as it may damage the mounting tabs. Figure 18. Removing the Fan/Card Guide Module Installing the Fan/Card Guide Module 1. Observe the precautions in ‘Before You Begin’, at the beginning of this chapter. LS700 HANDBOOK 2/23 Chassis and Components 2. Hook the bent plastic tabs on the module in the holes in the front of the chassis. 3. Swing the module against the chassis and secure it by pressing the plastic clips on the module into their slots in the chassis. Removing the Power Supply WARNING This procedure should be done only by qualified technical personnel. The power supply in this product contains no userserviceable parts. Refer servicing only to qualified technical personnel. 2/24 1. Observe the precautions in ‘Before You Begin’, at the beginning of this chapter. 2. Label and disconnect power cable from the computer and all peripheral devices. 3. Label and disconnect the power cable from the motherboard. 4. Remove the four screws securing the power supply to the chassis. 5. Lift the power supply out of the chassis. LS700 HANDBOOK Chassis and Components Figure 19. Removing the Power Supply A Installing the Power Supply WARNING This procedure should be done only by qualified technical personnel. Observe the precautions in ‘Before You Begin’, at the beginning of this chapter. 1. Place the power supply in the chassis. 2. Insert and tighten the four screws that secure the power supply to the chassis. (See Figure 19). 3. Connect the power cable to the motherboard. 4. Connect power cables to any peripheral devices. LS700 HANDBOOK 2/25 3 SYSTEM MOTHERBOARD This chapter describes the features of the system motherboard, setting jumpers and other relevant information. Microprocessor This motherboard supports 233 MHz, 266 MHz and 300 MHz Intel Pentium II processors with MMX technology and 512 KB secondary (L2) cache. The Pentium II processor is packaged in a Single Edge Contact (S.E.C.) cartridge that mounts in the Slot 1 processor connector on the motherboard. Main Memory (SDRAM) The motherboard supports up to 384MB of SDRAM. SDRAM is implemented through three 168-pin DIMM sockets. The motherboard contains three DIMM sockets. To add memory to the motherboard, see Chapter 4. For the motherboard’s main memory map, see the ‘Motherboard Resources’ section later in this chapter. Memory error checking and correction is supported with parity or ECC DIMMs. Parity or ECC DIMMs are automatically detected. However, For ECC operation to be available, all installed memory must be ECC and the user must enter Setup to configure DIMMs for either parity or ECC operation. Parity memory will detect single-bit errors. ECC memory will detect multi-bit errors and correct singlebit errors. Errors may be generated by a defective memory module, mixing different speed memory modules, or by DMA or memory conflicts. LS700 HANDBOOK 3/1 System motherboard Motherboard layout Figure 20. Motherboard Components A B CD E F G H W V U I J K L T S R Q A Optional chassis security connector B P O N M OM06239 M Floppy drive connector Optional Wake on LAN connector N IDE connectors C Battery O Front panel connector D Optional Line In connector P Accelerated Graphics Port (AGP) connector E Optional CD-ROM audio connector Q Configuration jumper block F Optional telephony connector R Optional SCSI hard disk LED connector G Back-panel I/O connectors S Wake on Ring connector H Slot 1 connector T Speaker II Fan 3 header connector U Fan 2 connector J DIMM sockets V PCI connectors K Primary power connector W ISA connectors L Fan 1 connector 1 1 Third-party brands and trademarks are the property of their respective owners. 3/2 LS700 HANDBOOK System motherboard Connectors Figure 21. Back Panel I/O Connectors A B D E F C G H I J A. PS/2 connector (mouse or keyboard) F. Serial port 1 connector B. Parallel port connector G. Serial port 2 connector C. MIDI/game port connector H. Audio line out jack D. PS/2 connector (mouse or keyboard) I. Audio line in jack E. USB connectors J. Audio mic in jack Configuration Modes CAUTION To avoid bending or breaking pins, use caution when removing or installing a jumper. The setup program has three configuration modes: ♦ Normal mode for normal operations ♦ Configure mode for configuring the processor speed and clearing passwords ♦ Recovery mode for recovering the BIOS data LS700 HANDBOOK 3/3 System motherboard Figure 22 shows the location of the configuration jumper block on the motherboard. The jumper is set to normal mode at the factory. Figure 22. Location of the Configuration Jumper Block 1 3 J8B2 OM06681 The following table shows jumper settings for the different Setup modes. These modes configure Setup for normal operations, maintenance options, or recovering the BIOS. Function Jumper (J8B2) Description Normal 1-2 BIOS uses current configuration and passwords for booting. Configure 2-3 After the POST runs, Setup starts and displays the Maintenance menu. This menu displays options for setting the processor speed and clearing passwords. See Chapter 5 for information on the Maintenance menu. Recovery None BIOS recovers data from a recovery diskette. See Chapter 5 for information on recovering the BIOS data during an upgrade. 3/4 LS700 HANDBOOK System motherboard How to Set the Processor Speed Set the processor speed after you have installed or upgraded the processor. This procedure assumes that the motherboard is installed in the computer and the configuration jumper block is set to normal mode. 1. Observe the precautions in ‘Before You Begin’ (Chapter 2). 2. Turn off all peripheral devices connected to the computer. 3. Turn off the computer and unplug the power cable. 4. Remove the computer top and access covers. 5. Find the configuration jumper block (see Figure 22). 6. Place the jumper on pins 2-3 as shown below. J8B2 1 3 OM06240B 7. Replace the cover, turn on the computer, and allow it to boot. 8. The computer starts the Setup program. Setup displays the Maintenance menu. 9. Use the arrow keys to select the Processor Speed feature and press <Enter>. Setup displays a popup screen with the available processor speeds. 10. Use the arrow keys to select the processor speed. For example, select 266 for a 266 MHz Pentium II processor. Press <Enter> to confirm the speed. This Maintenance menu reappears again. 11. Press <F10> to save the current values and exit Setup. 12. Turn off the computer. LS700 HANDBOOK 3/5 System motherboard 13. Remove the computer top and access covers. 14. To restore normal operation, place the jumper on pins 1-2 as shown below. 3 1 J8B2 OM06240A 15. Replace the cover and turn on the computer. 16. Verify the processor speed during POST. How to Clear the Passwords This procedure assumes that the motherboard is installed in the computer and the configuration jumper block is set to normal mode. 1. Observe the precautions in ‘Before You Begin’ (Chapter 2). 2. Turn off all peripheral devices connected to the computer. 3. Turn off the computer and unplug the power cable. 4. Remove the computer top and access covers. 5. Find the configuration jumper block (see Figure 22). 6. Place the jumper on pins 2-3 as shown below. J8B2 1 3 OM06240B 3/6 6. Replace the cover, turn on the computer, and allow it to boot. 7. The computer starts the Setup program. Setup displays the Maintenance menu. LS700 HANDBOOK System motherboard 8. Use the arrow keys to select Clear Passwords. Press <Enter> and Setup displays a pop-up screen requesting that you confirm clearing the password. Select Yes and press <Enter>. Setup displays the Maintenance menu again. 9. Press <F10> to save the current values and exit Setup. 10. Turn off the computer. 11. Remove the computer top and access covers. 12. To restore normal operation, place the jumper on pins 1-2 as shown below. 3 1 J8B2 OM06240A 13. Replace the cover and turn on the computer. PCI/IDE Peripheral Interface The motherboard has a high-speed, 32-bit PCI/IDE interface that supports the following: ♦ Up to four PCI/IDE hard drives on the PCI bus ♦ PIO Mode 4 and Bus Master IDE ♦ Logical block addressing (LBA) of hard drives larger than 528 MB ♦ Extended Cylinder Head Sector (ECHS) translation modes ♦ ATAPI devices (such as CD-ROMs) I/O Features The I/O controller integrates the functions for the serial ports, parallel port, diskette drive, and keyboard. This component provides: LS700 HANDBOOK 3/7 System motherboard ♦ Multimode bidirectional parallel port: ◊ Standard mode: Centronics-compatible operation ◊ High-speed mode: support for enhanced capabilities port (ECP) and enhanced parallel port (EPP) ♦ Two RS-232C (16550-compatible) 9-pin serial ports ♦ Integrated real-time clock with an accuracy of ±13 minutes/year at 25 °C and 5 V ♦ Integrated 8042-compatible keyboard controller ♦ Flexible IRQ and DMA mapping to support Windows 95 ♦ Support for an IrDA or Consumer IR compatible infrared interface. The infrared interface supports data transfer rates of up to 115 K baud with either half- or full-duplex operation ♦ Industry standard diskette drive controller that supports 720 KB, 1.44 MB, and 2.88 MB floppy drives (at 135 tracks per inch); and the older 360 KB and 1.2 MB drives. BIOS Features The BIOS, from American Megatrends Inc. (AMI), provides ISA and PCI compatibility. The BIOS is contained in a Flash memory device soldered to the motherboard. The BIOS provides the POST, the Setup program, a PCI and IDE auto-configuration utility, and BIOS recovery code. For full information see the ‘BIOS and Setup’ chapter. PCI Auto-configuration The PCI auto-configuration utility works in conjunction with the Setup program to support using PCI add-in cards in the computer. When you turn on the power after installing a PCI card, the BIOS automatically configures interrupts, DMA channels, and I/O space. 3/8 LS700 HANDBOOK System motherboard Since PCI add-in cards use the same interrupt resources as ISA add-in cards, you must specify the interrupts used by ISA cards in the Setup program. Expansion Slots The motherboard has one dedicated 16-bit ISA/AT-compatible and three dedicated PCI-compatible expansion slots. Another expansion slot is a combination slot that can be used for either a PCI or an ISA card. This allows you to install a maximum of five add-in cards. Real-time Clock and CMOS RAM The I/O controller provides a real-time clock and CMOS RAM. You can set the time for the clock and the CMOS values by using the Setup program described in the BIOS Chapter. This will need to be carried out if there is a requirement to change the CMOS battery, as detailed over. CMOS Battery A battery on the motherboard keeps the clock and values in CMOS RAM current when your computer is turned off. The battery should last about seven years. When the battery begins to die, it loses voltage; when the voltage drops below a certain level, the Setup program settings stored in CMOS RAM (for example, the date and time) might not be accurate. Replace the battery with an equivalent one. WARNING The CMOS battery is a lithium type. Do not use a metal tool to remove the battery. An accidental short circuit may cause the battery to explode. Dispose of the battery according to the battery manufacturers recommendations. LS700 HANDBOOK 3/9 System motherboard To replace the battery: 1. Observe the precautions in ‘Before You Begin’ (Chapter 2). 2. Turn off all peripheral devices connected to the computer. 3. Turn off the computer and unplug the power cable. 4. Remove the computer top and access covers. 5. With your fingers, gently pry the battery free from its socket. Note the "+" and "-" orientation of the battery. 6. Install the new battery in the socket, orienting the “+” and “-” correctly. 7. Replace the computer cover. USB Interface Support The USB ports permit the direct connection of two USB peripherals without an external hub. If more devices are required, an external hub can be connected to either of the built-in ports. The motherboard supports the standard universal host controller interface (UHCI) and uses standard software drivers that are UHCI-compatible. Features of the USB include: 3/10 ♦ Support for self-identifying, hot-pluggable peripherals ♦ Automatic device configuration ♦ Support for synchronous and asynchronous transfers over the same set of wires ♦ Support for up to 127 physical devices ♦ Bandwidth and low latencies appropriate for telephony, audio, and other applications ♦ Error handling and fault recovery built into protocol LS700 HANDBOOK System motherboard NOTE Computers that have an unshielded cable attached to the USB port risk causing radio frequency interference (RFI). Use shielded cable for all devices attached to either USB port. Speaker A speaker is mounted on the motherboard. The speaker provides audible error code information (beep codes) during the POST if the BIOS cannot use the video interface. For beep code descriptions, see Chapter 6. Motherboard Connectors The location of the motherboard connectors is shown in Figure 23. Figure 23. Motherboard Connectors D 3 B 1 1 4 E C 1 1 4 1 4 A 1 F J 1 1 I 2 1 3 1 2 H G OM06680 LS700 HANDBOOK 3/11 System motherboard A Chassis security connector F Fan 3 connector B Wake on LAN connector G Fan 1 connector C ATAPI CD-ROM audio connector H SCSI hard drive LED input connector D ATAPI-style telephony connector I Wake on Ring connector E ATAPI-style line in connector J Fan 2 connector The connection details for these connectors is shown in the following tables. Chassis Security Connector (J2B1) Pin Signal Name 2 3 Ground CHS_SEC Wake on LAN Connector (J1C1) Pin Signal Name 1 2 3 +5 VSB Ground WOL ATAPI CD-ROM Audio Connector (J1F1) Pin Signal Name 1 2 3 4 CD_IN-Left Ground Ground CD_IN-Right ATAPI-Style Telephony Connector (J2F1) 3/12 Pin Signal Name 1 2 3 4 Audio Out (monaural) Ground Ground Audio In (monaural) LS700 HANDBOOK System motherboard ATAPI-Style Line In Connector (J2F2) Pin Signal Name 1 2 3 4 Left Line In Ground Ground Right Line In (monaural) Fan 3 Connector (J5L1) (Active Heatsink Fan) Pin Signal Name 1 2 3 Ground +12V Ground Fan 1 Connector (J8M1) Pin Signal Name 1 2 3 Ground FAN_CTRL (+12 V) FAN_SEN* * If the optional management extension hardware is not available, pin 3 is ground. SCSI Hard Drive LED Input Connector (J8B1) Pin Signal Name 1 2 DRV_ACT# No connect Wake on Ring Connector (J8A1) Pin Signal Name 1 2 Ground RINGA LS700 HANDBOOK 3/13 System motherboard Fan 2 Connector (J3F1) Pin Signal Name 1 2 Ground FAN_CTRL (+12 V) 3 FAN_SEN* * If the optional management extension hardware is not available, pin 3 is ground. Audio Subsystem The onboard audio subsystem is based on the Yamaha OPL family of single-chip audio controllers (YM 715). The audio subsystem provides the digital audio and analog mixing functions needed for recording and playing sound on personal computers. The subsystem features: 3/14 ♦ Line and microphone level inputs ♦ MIDI/Game port ♦ 3-D enhanced stereo ♦ Full digital control of all mixer and volume control functions ♦ Full duplex operation ♦ Sound Blaster Pro, Windows Sound System, Roland MPU-401, AdLib, and Multimedia PC Level 2 (MPCII) compatibility ♦ Onboard Yamaha YM 704 wavetable synthesizer (optional) ♦ Wavetable upgrade connector ♦ CD-ROM audio connector ♦ Telephony connectors LS700 HANDBOOK System motherboard Hardware Monitor Option The hardware monitor option features the following: ♦ An integrated temperature sensor ♦ Fan speed sensors ♦ Power supply voltage monitor ♦ POST test result and error code storage ♦ Support for Intel LANDesk Client Manager ♦ Connector for external chassis security feature These features are implemented by an integrated hardware monitor device Front Panel Connections The motherboard has connectors for controls and indicators typically located on the front panel of the computer. A jumper on pins 26/27 connects the on-board speaker. Figure 24. Front Panel Connections A B C D E F G 1 27 24 22 20 16 J9D1 11 6 4 2 LS700 HANDBOOK 3/15 System motherboard Connector A. Speaker 1 B. Reset switch Pin Signal Name 27 SPKR_HDR 26 PIEZO_IN 25 Key 24 Ground 23 SW_RST 22 Ground Key C. Power LED 20 +5 V 19 Key 18 Ground Key D. Hard drive LED 16 +5 V 15 HD Active# 14 Key 13 +5 V 11 CONIR (consumer IR) 10 IrTX (transmit) 9 Ground 8 IrRX (receive) 7 Key 6 +5 V Key E. Infrared Key F. Sleep switch G. Power switch 1 3/16 4 +5 V 3 SLEEP 2 Ground 1 SW_ON# A jumper on pins 26-27 enables the onboard speaker LS700 HANDBOOK System motherboard Motherboard Resources Memory Map Address Range (Decimal) Address Range (hex) Size Description 1024K-393216K 100000-18000000 383MB Extended memory 1008K-1024K FC000-FFFFF 16K Boot Block 1000K-1008K FA000-FBFFF 8K ESCD (Plug and Play configuration and DMI) 996K-1000K F9000-F9FFF 4K Reserved for BIOS 992K-996K F8000-F8FFF 4K OEM Logo/Scan User Flash 928K-992K E8000-F7FFF 64K POST BIOS 896K - 928K E0000 - E7FFF 32K POST BIOS (Available as UMB) 800K-896K C8000-DFFFF 96K Available high DOS memory (open to ISA and PCI bus) 640K-800K A0000-C7FFF 160K Video memory and BIOS 639K-640K 9FC00-9FFFF 1K Extended BIOS Data (moveable by memory management software) 512K-639K 80000-9FBFF 127K Extended conventional memory 0K-512K 00000-7FFFF 512K Conventional memory I/O Map Address (hex) 0000 - 000F 0020 - 0021 002E - 002F 0040 - 0043 0048 - 004B 0060 0061 0064 Size 16 bytes 2 bytes 2 bytes 4 bytes 4 bytes 1 byte 1 byte 1 byte Description PIIX4 - DMA 1 PIIX4 - Interrupt Controller 1 SuperI/O Controller Config. Reg. PIIX4 - Timer 1 PIIX4 - Timer 2 Keyboard Controller Byte - Reset IRQ PIIX4 - NMI, speaker control Keyboard Controller, CMD/STAT Byte LS700 HANDBOOK 3/17 System motherboard Address (hex) 0070, bit 7 0070, bits 6:0 0071 0078 0079 0080 - 008F 00A0 - 00A1 Size 1 bit 7 bits 1 byte 1 byte 1 byte 16 bytes 2 bytes Description PIIX4 - Enable NMI PIIX4 - Real Time Clock, Address PIIX4 - Real Time Clock, Data Reserved - Brd. Config. Reserved - Brd. Config. PIIX4 - DMA Page Registers PIIX4 - Interrupt Controller 2 00B2 - 00B3 2 bytes APM Control 00C0 - 00DE 31 bytes PIIX4 - DMA 2 00F0 1 byte Reset Numeric Error 0170 - 0177 8 bytes Secondary IDE Channel 01F0 - 01F7 8 bytes Primary IDE Channel 0201 1 byte Audio/Game Port 0220 - 022F 16 bytes Audio 0228 - 022F 8 bytes Parallel Port 3 0240 - 024F 16 bytes Audio 0278 - 027F 8 bytes Parallel Port 2 0290 - 0297 8 bytes Management Extension Hardware 02E8 - 02EF 8 bytes Serial Port 4/Video (8514A) 02F8 - 02FF 8 bytes Serial Port 2 0300 - 0301 2 bytes MPU-401 (MIDI) 0330 - 0331 2 bytes MPU-401 (MIDI) 0332 - 0333 2 bytes MPU-401 (MIDI) 0334 - 0335 2 bytes MPU-401 (MIDI) 0376 1 byte Sec. IDE Chan. Cmd. Port 0377 1 byte Floppy Chan. 2 Cmd. 0377, bit 7 1 bit Floppy Disk Change, Channel 2 0377, bits 6:0 7 bits Sec. IDE Channel Status Port 0378 - 037F 8 bytes Parallel Port 1 0388 - 038D 6 bytes FM Synthesizer 3/18 LS700 HANDBOOK System motherboard Address (hex) 03B4 - 03B5 Size 2 bytes Description VGA 03BA 1 byte VGA 03C0 - 03CA 11 bytes VGA 03CC 1 byte VGA 03CE - 03CF 2 bytes VGA 03D4 - 03D5 2 bytes VGA 03DA 1 byte VGA 03E8 - 03EF 8 bytes Serial Port 3 03F0 - 03F5 6 bytes Floppy Channel 1 03F6 1 byte Primary IDE Channel Command Port 03F7 (Write) 1 byte Floppy Channel1 Command 03F7, bit 7 1 bit Floppy Disk Change Channel 1 03F7, bits 6:0 7 bits Primary IDE Channel Status Port 03F8 - 03FF 8 bytes Serial Port 1 04D0 - 04D1 2 bytes Edge/level triggered PIC 0530 - 0537 8 bytes Windows Sound System 0604 - 060B 8 bytes Windows Sound System LPTn + 400h 8 bytes ECP port, LPTn base address + 400h 0CF8 - 0CFB * 4 bytes PCI Configuration Address Register 0CF9 ** 1 byte Turbo & Reset Control Register 0CFC - 0CFF 4 bytes PCI Configuration Data Register 0E80 - 0E87 8 bytes Windows Sound System 0F40 - 0F47 8 bytes Windows Sound System 0F86 - 0F87 2 bytes Yamaha OPL3-SA Configuration FF00 - FF07 8 bytes IDE Bus Master Register FFA0 - FFA7 8 bytes Pri. Bus Master IDE Registers FFA8 - FFAF 8 bytes Sec. Bus Master IDE Registers * Only by DWORD accesses. ** Only by Byte accesses. LS700 HANDBOOK 3/19 System motherboard PCI Configuration Space Map Bus Device Function Description Number Number Number (hex) (hex) (hex) 00 00 00 Intel 82440LX (PAC) 00 01 00 Intel 82371AB (PIIX4) AGP Bus 00 07 00 Intel 82371AB (PIIX4) PCI/ISA Bridge 00 07 01 Intel 82371AB (PIIX4) IDE Bus Master 00 07 02 Intel 82371AB (PIIX4) USB 00 07 03 Intel 82371AB (PIIX4) Power Management 00 0D 00 PCI Expansion Slot 1 (J4D2) 00 0E 00 PCI Expansion Slot 2 (J4D1) 00 0F 00 PCI Expansion Slot 3 (J4C1) 00 10 00 PCI Expansion Slot 4 (J4B1) DMA Channels DMA Data Width System Resource 0 8- or 16-bits Audio 1 8- or 16-bits Audio if present, else parallel port 2 8- or 16-bits Floppy drive 3 8- or 16-bits Audio if present, else parallel port (for ECP/EPP configuration) 4 16-bits Reserved - Cascade Channel 5 16-bits Available 6 16-bits Available 7 16-bits Available 3/20 LS700 HANDBOOK System motherboard Interrupts IRQ System Resource NMI 0 1 2 3 4 5 6 7 8 9 10 11 12 13 14 15 I/O channel check Reserved, interval timer Reserved, ke board buffer full Reserved, cascade interrupt from slave PIC 1 Serial Port 2 1 Serial Port 1 Parallel Port 2 (Plug and Pla option) Flopp drive 1 Parallel Port 1 Real-time clock Reserved User available 1 Audio if present, else user available Onboard mouse port if present, else user available Reserved, math coprocessor Primar IDE if present, else user available Secondar IDE if present, else user available 1 Default, but can be changed to another IRQ LS700 HANDBOOK 3/21 4 UPGRADING Processor This computer uses the Intel Pentium®II processor, which is supplied as a module complete with heatsink. At the time of writing processors rated at 233MHz, 266MHz and 300MHz are available. Remove the Installed Processor To remove the installed processor, follow these steps: 1. Observe the precautions in ‘Before You Begin’ (Chapter 2). 2. Turn off all peripheral devices connected to the computer. Turn off the computer. 3. Remove the computer cover. 4. Remove the motherboard from the computer chassis. 5. Place the motherboard on a flat work surface and remove any components that block access to the installed processor. 6. Remove the top bar of the heatsink support from the base as shown in Figure 25. Press in on the latches to release the top bar. LS700 HANDBOOK 4/1 Upgrading Figure 25. Removing the Heatsink Support Top Bar and the Processor B B A A Heatsink support top bar B Latches OM06230 CAUTION Pressing on the motherboard or components while removing the processor can cause damage. If necessary, you can safely press on the motherboard’s plastic connectors to gain leverage while removing the processor. 7. 4/2 Remove the processor by pressing in on the latches and pulling the processor straight up as shown in Figure 25. Place the processor module carefully into an antistatic container. LS700 HANDBOOK Upgrading How to Install a Processor To install a processor, follow these steps: 1. Install the retention mechanism. 2. Install the processor. 3. Set the processor speed. Detailed instructions for each of these procedures follow. NOTE If you are installing a boxed Intel Pentium II processor, see the instructions on page 4/6. Install the Retention Mechanism NOTE To install the retention mechanism, you need a Phillips (#2 bit) manual torque screwdriver capable of a 6.0 in.-lb. ± 1.0 in.-lb. (0.678 N-m ± 0.113 N-m) setting. The screwdriver also must have a shaft longer than 2 inches. To install the retention mechanism, follow these steps: 1. Observe the precautions in ‘Before You Begin’ (Chapter 2). 2. Locate the Slot 1 connector and the four attachment studs. LS700 HANDBOOK 4/3 Upgrading Figure 26. Installing the Processor Retention Mechanism E C B A D 3. OM06225 A Slot 1 connector D Connector tab B Attachment studs E Captive nuts C Retention mechanism To position the mechanism, orient it as shown in Figure 26. The connector tab fits into a notch in the base of the mechanism. When properly seated, the base of the mechanism is flush with the motherboard. CAUTION Overtightening the captive nuts on the retention mechanism can damage the motherboard. Tighten the captive nuts to no more than 6.0 in.-lb. ± 1.0 in.-lb. (0.678 N-m ± 0.113 N-m). 4/4 4. Finger tighten all four captive nuts to make sure they start correctly on the threads of the attachment studs. 5. To secure the mechanism, tighten the captive nuts with the torque screwdriver to no more than 6.0 in.-lb. ± 1.0 in.-lb. (0.678 N-m ± 0.113 N-m). LS700 HANDBOOK Upgrading Install the Processor To install the processor, follow these steps: 1. Insert the processor in the retention mechanism. 2. Press down on the processor until it is firmly seated in the Slot 1 connector and the latches on the processor lock into place. Figure 27. Installing the Processor B B A 3. A Retention mechanism B Latches OM06228 Slide the top heatsink support bar onto the retaining pins of the support’s base as shown in Figure 27. LS700 HANDBOOK 4/5 Upgrading Figure 28. Installing the Heatsink Support Top Bar A B A Heatsink support bar B Retaining pins OM06229 Set the Processor Speed After you install the processor and install the motherboard, set the processor speed by using the Setup program. See Chapter 3 for details on how to set processor speed. How to Install Memory You can install from 8 MB to 384 MB of memory in the motherboard DIMM sockets. The board has DIMM sockets arranged as banks 0, 1, and 2 (See Figure 29). The motherboard supports the following memory features: ♦ 168-pin 3.3 V DIMMs with gold-plated contacts ♦ 66 MHz unbuffered SDRAM ♦ Non-ECC (64-bit) or ECC (72-bit) memory ♦ 8 MB, 16 MB, 32 MB, 64 MB, and 128 MB modules When adding memory, follow these guidelines: 4/6 LS700 HANDBOOK Upgrading ♦ You can install DIMMs of any size in any of the three banks. ♦ The BIOS detects the size and type of installed memory. ♦ For ECC operation to be available, all installed memory must be ECC and you must enable the ECC Configuration feature in the Setup program. Figure 29. Location of DIMM Sockets 2 1 0 OM06223 To install DIMMs, follow these steps: 1. Observe the precautions in ‘Before You Begin’ (Chapter 2). 2. Turn off all peripheral devices connected to the computer. 3. Turn off the computer and remove the power cable. 4. Remove the computer top and access covers. 5. Holding the DIMM by the edges, remove it from its antistatic package. 6. Make sure the clips at either end of the socket are pushed away from the socket. LS700 HANDBOOK 4/7 Upgrading 7. Position the DIMM above the socket. Align the two small notches in the bottom edge of the DIMM with the keys in the socket. 8. Insert the bottom edge of the DIMM into the socket. 9. When the DIMM is seated, push down on the top edge of the DIMM until the retaining clips snap into place. Make sure the clips are firmly in place. 10. Replace the computer cover. 11. If you installed a DIMM with ECC memory, turn on the computer and use the ECC Configuration feature in Setup to enable ECC. Figure 30. Installing a DIMM OM06224 4/8 LS700 HANDBOOK Upgrading How to Remove Memory To remove a DIMM, follow these steps: 1. Observe the precautions in ‘Before You Begin’ (Chapter 2). 2. Turn off all peripheral devices connected to the computer. 3. Turn off the computer and remove the power cable. 4. Remove the computer top and access covers. 5. Gently spread the retaining clips at each end of the socket. The DIMM pops out of the socket. 6. Hold the DIMM by the edges, lift it away from the socket, and store it in an antistatic package. 7. Reinstall and reconnect any parts you removed or disconnected to reach the DIMM sockets. CAUTION Electrostatic discharge (ESD) can destroy components or severely limit their working life. Follow the recommended antistatic precautions as given in the appendix. LS700 HANDBOOK 4/9 5 BIOS AND SETUP This chapter explains how to use the BIOS Setup program. You can use the Setup program to change the computer’s configuration information and boot-up sequence. Setup information is stored in CMOS random access memory (RAM) and is backed up by a battery on the motherboard when power to the computer is off. Overview of the BIOS Setup Program To enter the Setup program, turn the computer on and press <F2> when you see the message: Press <F2> Key if you want to run SETUP You have about five seconds to press <F2> before the boot process continues. NOTE For reference purposes, you should write down the current Setup settings on the space provided at the end of this chapter. When you make changes to the settings, update this record. When you enter the Setup program, you will see the Main screen. Listed along the top of the display are three other screens: Advanced, Security, and Exit. Select a screen by pressing the left or right arrow keys. Use the up or down arrow keys to select items within a screen. Use the <Enter> key to select an item you want to change. For some items, pressing <Enter> brings up a subscreen. After you have selected an item, use the arrow keys to change the setting. The following table provides first an overview of function keys in the Setup program, then gives an overview of the menu screens and subscreens in the Setup program. LS700 HANDBOOK 5/1 BIOS and setup Setup Key Description <F1> or <Alt-H> Brings up a help screen for the current item <Esc> Exits the menu <Enter> Selects the current item or option ↑ Selects the previous item or option ↓ Selects the next item or option ← → Selects a different menu screen <Home> or <End> Moves the cursor to the top or bottom of the window <PgUp> or <PgDn> Moves the cursor to the top or bottom of the window <F5> or <-> Selects the previous value for a field <F6> or <+> or Selects the next value for a field <Space> <F9> Loads the default configuration values for the current menu <F10> Exits while saving changes Setup Menu Description Maintenance Specifies the processor speed and clears the setup passwords. This is only available in configure mode. See the Configuration Modes section in Chapter 3. Main Allocates resources for hardware components Advanced Specifies advanced features available through the chipset Security Specifies passwords and security features Power Specifies power management features Boot Specifies boot options and power supply controls Exit Saves or discards changes to the Setup program options 5/2 LS700 HANDBOOK BIOS and setup Maintenance Menu Use this menu to specify the processor speed and clear the Setup passwords. Setup displays this menu only in configure mode. See the Configuration Modes section on page 3 of Chapter 3. Feature Options Description Processor Speed • 200 • 233 • 266 • 300 No options Specifies the processor speed in MHz Clear all passwords Clears the user and supervisor passwords Main Menu This menu reports processor and memory information. Use it to configure the system date, system time, floppy options, and IDE devices. Feature Options Description Processor Type No options Displays processor type. Processor Speed No options Displays processor speed. Cache RAM No options Displays size of second-level cache. Total Memory No options Displays the total amount of RAM on the motherboard. BIOS Version No options Displays the version of the BIOS. Language English (US) Specifies the default language used by the BIOS. System Time Hour, minute, and second Specifies the current time. System Date Month, day, and year Specifies the current date. Floppy Options, submenu No options When selected, displays the Floppy Options submenu. LS700 HANDBOOK 5/3 BIOS and setup Feature Options Description Primary IDE Master, submenu No options Reports the type of connected IDE device. When selected, this option displays the Primary IDE Master submenu. Primary IDE Slave, submenu No options Reports the type of connected IDE device. When selected, this option displays the Primary IDE Slave submenu. Secondary IDE Master, submenu No options Reports the type of connected IDE device. When selected, this option displays the Secondary IDE Master submenu. Secondary IDE Slave, submenu No options Reports the type of connected IDE device. When selected, this option displays the Secondary IDE Slave submenu. Floppy Options Submenu Use this submenu to configure floppy drives. Feature Options Description Diskette A: • • • • • Specifies the capacity and physical size of diskette drive A. Diskette B: Floppy Write Protect 5/4 • • • • • • • • • Disabled 360 KB, 5¼″ 1.2 MB, 5¼″ 720 KB, 3½″ 1.44/1.25 MB, 3½″ (default) 2.88 MB, 3½″ Disabled (default) 360 KB, 5¼″ 1.2 MB, 5¼″ 720 KB, 3½″ 1.44/1.25 MB, 3½″ 2.88 MB, 3½″ Disabled (default) Enabled LS700 HANDBOOK Specifies the capacity and physical size of diskette drive B. Disables or enables write protect for the diskette drive(s). BIOS and setup Primary/Secondary IDE Master/Slave Configuration Submenu Use this submenu to configure IDE devices. Feature Options Description Type • • • • • Cylinders 1 to XXXX Specifies the IDE configuration mode for IDE devices. User enables the cylinders, heads, and sectors fields to be set manually. Auto automatically fills in the values for the cylinders, heads, and sectors fields. Specifies the number of disk cylinders. Heads 1 to 16 Specifies the number of disk heads. Sectors 1 to 64 Specifies the number of disk sectors. Maximum Capacity No options Reports the maximum capacity for the hard disk. Value calculated from number of cylinders, heads, and sectors. Multi-Sector Transfers • • • • • Specifies the number of sectors per block for transfers from the hard drive to memory. Check your hard drive’s specifications for the optimum setting. LBA Mode Control None ATAPI Removable CD-ROM User Auto (default) Disabled 2 Sectors 4 Sectors 8 Sectors 16 Sectors (default) • Disabled • Enabled (default) Enables or disables logical block addressing (LBA) in place of the Cylinders, Heads, and Sectors fields. CAUTION Changing the LBA Mode Control after a hard drive has been formatted can corrupt data on the drive. LS700 HANDBOOK 5/5 BIOS and setup Feature Options Description Transfer Mode • • • • • Specifies the method for transferring data between the hard drive and system memory. Ultra DMA • • • • Standard Fast PIO 1 Fast PIO 2 Fast PIO 3 Fast PIO 4 (default) Disabled (default) Mode 0 Mode 1 Mode 2 Specifies the ultra DMA mode for the hard drive. Advanced Menu This section describes the Setup options in the Advanced menu screen. If you select some options from the Advanced screen (for example, Peripheral Configuration), Setup displays a subscreen for the selected option. Subscreens are described in the sections following the description of the Advanced screen options. Some of the following are reporting only, there are no options available. Feature Options Description Plug & Play O/S • No • Yes (default) Reset Configuration Data • • • • • • Specifies if a Plug and Play operating system is being used. No lets the BIOS configure all devices. Yes lets the operating system configure Plug and Play devices. Not required with a Plug and Play operating system. Clears the BIOS configuration data on the next boot. Memory Cache ECC Configuration 5/6 No (default) Yes Disabled Enabled (default) Non-ECC (default) ECC LS700 HANDBOOK Enables or disables the memory cache. Specifies ECC memory operation. BIOS and setup Feature Options Description Resource Configuration, submenu No options Configures memory blocks and IRQs for legacy ISA devices. When selected, this option displays the Resource Configuration submenu. Peripheral Configuration, submenu No options Configures peripheral ports and devices. When selected, this option displays the Peripheral Configuration submenu. Keyboard Features, submenu No options Configures keyboard features. When selected, this option displays the Keyboard Features submenu. Video Configuration, submenu No options Configures video features. When selected, this option displays the Video Configuration submenu. DMI Events Logging, submenu No options Configures DMI Events Logging. When selected, this option displays the DMI Events Logging submenu. Resource Configuration Submenu Use this submenu to configure the memory and interrupts. Feature Options Memory Reservation • • • • • • • C800 - CBFF CC00- CFFF D000 - D3FF D400 - D7FF D800 - DBFF DC00 - DFFF Memory hole Description Available (default) | Reserved Available (default) | Reserved Available (default) | Reserved Available (default) | Reserved Available (default) | Reserved Available (default) | Reserved Disabled (default) | Conventional | Extended Reserves specific upper memory blocks for use by legacy ISA devices. Memory hole frees address space in RAM for an legacy ISA boards. LS700 HANDBOOK 5/7 BIOS and setup Feature Options IRQ Reservation • • • • • • IRQ3 IRQ4 IRQ5 IRQ7 IRQ10 IRQ11 Description Available (default) | Reserved Available (default) | Reserved Available (default) | Reserved Available (default) | Reserved Available (default) | Reserved Available (default) | Reserved Reserves specific IRQs for use by legacy ISA devices. An * (asterisk) displayed next to an IRQ indicates an IRQ conflict. Peripheral Configuration Submenu Use this submenu to configure the computer peripherals. Feature Options Description Serial port A • Disabled • Enabled • Auto (default) Serial port B • Disabled • Enabled • Auto (default) Configures serial port A. Auto assigns the first free COM port, normally COM1, the address 3F8h and the interrupt IRQ4. An * (asterisk) displayed next to an address indicates a conflict with another device. Configures serial port B. Auto assigns the first free COM port, normally COM2, the address 2F8h and the interrupt IRQ3. An * (asterisk) displayed next to an address indicates a conflict with another device. If either serial port address is set, that address will not appear in the list of options for the other serial port. 1 1 If an ATI mach32 † or an ATI mach64 video controller is active as an add-in 1 Third-party brands and trademarks are the property of their respective owners. 5/8 LS700 HANDBOOK BIOS and setup Feature Mode Parallel port Mode Options • Normal (default) • IrDA • ASK-IR • Disabled • Enabled • Auto (default) • Output Only • Bi-directional (default) • EPP • ECP Description card, the COM4, 2E8h address will not appear in the list of options for either serial port. Selects the mode for Serial Port B for normal (COM 2) or infrared applications. Configures the parallel port. Auto assigns LPT1 the address 378h and the interrupt IRQ7. An * (asterisk) displayed next to an address indicates a conflict with another device. Selects the mode for the parallel port. Output Only operates in AT-compatible mode. Bi-directional operates in bi-directional PS/2-compatible mode. EPP is Extended Parallel Port mode, a high-speed bi-directional mode. ECP is Enhanced Capabilities Port mode, a high-speed bi-directional mode. Floppy disk controller IDE controller Audio Legacy USB Support • Disabled • Enabled (default) • Disabled • Primary • Secondary • Both (default) • Disabled • Enabled (default) • Disabled (default) • Enabled Configures the floppy disk controller. Configures the IDE controller. Both specifies that both the primary and secondary channels are used. Enables or disables the onboard audio subsystem. Enables support for legacy universal serial bus devices. LS700 HANDBOOK 5/9 BIOS and setup Keyboard Features Submenu Use this submenu to set keyboard features. Feature Options Description Numlock • Auto (default) • On • Off Selects the power on state of the Num Lock feature on the numeric keypad of the keyboard. Key Click • • • • • • • • • • • • • • Enables the key click option. Keyboard autorepeat rate Keyboard autorepeat delay Disabled (default) Enabled 30/sec (default) 26.7/sec 21.8/sec 18.5/sec 13.3/sec 10/sec 6/sec 2/sec ¼ sec ½ sec (default) ¾ sec 1 sec Selects the key repeat rate. Selects the delay before key repeat. Video Configuration Submenu Use this submenu to configure video features. Feature Options Palette Snooping • Disabled (default) Controls the ability of a primary PCI graphics controller to share • Enabled a common palette with an ISA add-in video card. 5/10 LS700 HANDBOOK Description BIOS and setup DMI Event Logging Submenu Use this submenu to control the DMI event logging features. Feature Options Description Event log capacity No options Reports if there is space available in the event log. Event log validity No options Reports if the contents of the event log are valid. View DMI event log No options Enables viewing of DMI event log. Clear all DMI event logs • No (default) • Yes • Disabled • Enabled (default) • Disabled (default) • Enabled No options Clears the DMI Event Log after rebooting. Event Logging ECC Event Logging Mark DMI events as read Enables logging of DMI events. Enables logging of ECC events. Marks all DMI events as read. Security Menu The Security screen enables you to set passwords for two access modes: administrative and user. Administrative mode allows the administrative user to view and change all Setup program options while user mode limits access to Setup program options. User mode access to the Setup program is set in administrative mode by the Enter Password and User Privilege Level options. Setting a user privilege level enables system administrators to restrict who can view or change options in the Setup program. If you set the administrative password only, you can gain user mode access to the Setup program by pressing the <Enter> key at the password prompt. To restrict who can boot the computer, set the user password. The computer will prompt the user for this password before LS700 HANDBOOK 5/11 BIOS and setup booting. If you set the administrative password only, the computer will boot without prompting the user for a password. If both passwords are set, a user can enter either the administrative or user password to boot the computer. The following table shows how the passwords work together. Feature Options Description User Password Is: No options Reports if there is a user password set. Supervisor Password Is: No options Reports if there is a supervisor password set. Set User Password Password can be up to seven alphanumeric characters. Specifies the user password. Set Supervisor Password Password can be up to seven alphanumeric characters. Specifies the supervisor password. Unattended Start • Disabled (default) • Enabled Enables the unattended start feature. With this enabled, the computer boots, but the keyboard is locked. The user must enter a password to unlock the computer or boot from a floppy diskette. Power Management Configuration Submenu Use this menu to set power management features Feature Options Description Power Management • Disabled • Enabled (default) • No • Yes (default) Enables or disables the BIOS power management feature. Fan Always On 5/12 LS700 HANDBOOK Forces fans connected to the onboard fan connectors to remain on when the computer is in a power management state. BIOS and setup Feature Options Description Inactivity Timer • • • • • • • • • • Specifies the amount of time before the computer enters standby mode. Off (default) 1 Minute 2 Minutes 4 Minutes 6 Minutes 8 Minutes 12 Minutes 16 Minutes Disabled Enabled (default) • Disabled • Enabled (default) Hard Drive 2 VESA † Video Power Down Enables power management for hard disks during standby and suspend modes. Enables power management for video during standby and suspend modes. Boot Options Submenu Use this menu to specify the boot features and the boot sequence. Feature Options Description Restore on AC/Power Loss • Stay Off • Last State (default) • Power On Specifies how the computer responds following a power failure. Stay Off keeps power off until power button is pressed. Last State restores previous power state before a power failure. Power On restores power without restoring previous power state. 2 Third-party brands and trademarks are the property of their respective owners. LS700 HANDBOOK 5/13 BIOS and setup Feature Options On Modem Ring Specifies how the computer • Stay Off • Power On (default) responds to an incoming call on an installed modem when the power is off. On LAN Specifies how the computer • Stay Off • Power On (default) responds to a LAN wakeup event when the power is off. On PME Specifies how the computer • Stay Off • Power On (default) responds to a PCI power management enable event when the power is off. QuickBoot Mode • Enabled • Disabled (default) Enables the computer to boot without running certain POST tests. Scan User Flash Area • Disabled (default) • Enabled Enables the BIOS to scan the flash memory for user binary files that are executed at boot time. First Boot Device • Removable devices • Hard Drive • ATAPI CD-ROM Drive • Network boot Specifies the boot sequence from the available devices. To specify boot sequence: Second Boot Device Third Boot Device Fourth Boot Device 5/14 LS700 HANDBOOK Description 1. Select the boot device with <↑> or <↓>. 2. Press <+> to move the device up the list or <> to move the device down the list. The operating system assigns a drive letter to each boot device in the order listed. Changing the order of the devices changes the drive lettering. BIOS and setup Feature Options Description Hard Drive, submenu No options Lists available hard drives. When selected, this option displays the Hard Drive submenu. Removable Devices, submenu No options Lists available removable devices. When selected, this option displays the Removable Devices submenu. Hard Drive Submenu Options Use this submenu to configure the boot sequence for hard drives. Description • Installed hard drive • Bootable ISA Cards Specifies the boot sequence for the hard drives attached to the computer. To specify boot sequence: 1. 2. Select the boot device with <↑> or <↓>. Press <+> to move the device up the list or <-> to move the device down the list. The operating system assigns a drive letter to each device in the order listed. Changing the order of the devices changes the drive lettering. LS700 HANDBOOK 5/15 BIOS and setup Removable Devices Submenu Use this submenu to configure the boot sequence for removable devices. Options Description • Legacy Floppy Drives Specifies the boot sequence for the removable devices attached to the computer. To specify boot sequence: 1. 2. Select the boot device with <↑> or <↓>. Press <+> to move the device up the list or <-> to move the device down the list. The operating system assigns a drive letter to each device in the order listed. Changing the order of the devices changes the drive lettering. Exit Menu Use this menu to exit the Setup program, save changes, load defaults, and save defaults. Feature Description Exit Saving Changes Exits and saves the changes in CMOS RAM. Exit Discarding Changes Exits without saving any changes made in Setup. Load Setup Defaults Loads the default values for all the Setup options. Load Custom Defaults Loads the custom defaults for Setup options. Save Custom Defaults Saves the current values as custom defaults. Normally, the BIOS reads the Setup values from flash memory. If this memory is corrupted, the BIOS reads the custom defaults. If no custom defaults are set, the BIOS reads the factory defaults. Discard Changes Discards changes without exiting Setup. The values present when the computer was turned on are used. 5/16 LS700 HANDBOOK BIOS and setup Note down your settings for reference Use this area to make a note of your BIOS settings as they are when you first use the system. LS700 HANDBOOK 5/17 6 TROUBLESHOOTING This chapter offers advice if you suspect a fault with your computer. It is concerned mainly with problems caused by the computer itself, if there are problems with software, read the software guide or contact the software supplier. Make a note of any symptoms, error codes, or display messages before calling your supplier or maintenance provider Problems when starting If you suspect a blown fuse In the United Kingdom, and some other countries, AC plugs contain fuses. If the fuse in the AC plug blows when you turn on the computer, this may be caused by an AC power surge, but may be a symptom of problems with the computer or its peripherals. Follow these steps: 1. Turn off the computer and unplug all power cables and unplug and disconnect all peripherals. 2. If no cause is apparent, replace the blown fuse with one of the same rating, reconnect the system unit power cable and try to turn it on again. 3. If the replacement fuse blows, call your supplier or maintenance provider. 4. If the replacement fuse does not blow, reconnect one peripheral at a time and switch it on. Repeat this step for each peripheral in turn. Power-on self-test (POST) Whenever the computer is turned on, the power-on self-test (POST) routine tests hardware components, including memory, and compares the actual configuration of the LS700 HANDBOOK 6/1 Troubleshooting computer with that recorded in configuration (CMOS) memory. During this time, BIOS sign-on and POST messages are displayed. If POST detects a hardware fault, one or more POST error codes and messages are displayed. Your first action should be to turn off the computer, wait at least 30 seconds, and then turn it on again to see if the error is transitory or persistent. Persistent POST errors may indicate a fault in the system. ◊ Check that all external cables are securely connected. ◊ Try running the BIOS Setup utility to reconfigure the system. ◊ Open up the system unit and check that all internal signal and power cables are securely connected. If the problem persists, call your supplier or authorised maintainer. Failure to boot On completion of POST, the computer attempts to boot from a system diskette or bootable hard disk. Some of the messages that might appear during the boot sequence: Boot failure message Explanation Non-system disk or disk The diskette drive contains a non-system diskette. error Replace it with a system diskette and press F1. Diskette read failure The diskette is either not formatted or defective. Replace it with a system diskette and press F1. No boot sector on fixed The hard disk has no active, bootable partition or is not disk formatted. Insert a system diskette, press F1, and format the hard disk as described in your operating system manuals. 6/2 LS700 HANDBOOK Troubleshooting Boot failure message Explanation Fixed disk read failure The hard disk may be defective. Press F1 to retry. Make sure the drive is correctly specified in the BIOS setup utility. If the problem persists, insert a system diskette, press F1, backup the data held on the defective hard disk and try reformatting it. No boot device available This may indicate a fault in the diskette or hard disk drive, or perhaps a damaged system diskette. Make sure that the Startup Device options are correctly specified with the BIOS Setup utility. If the problem persists contact your supplier or authorised maintainer. Beep Codes The computer uses special audio beep codes to signal certain hardware faults. One long beep followed by several short beeps indicates a video problem. There may be no display on the screen. Beeps 1 80h Code B4h Description One short beep before boot 1-2 98h Search for option ROMs 1-2-2-3 16h BIOS ROM checksum 1-3-1-1 20h Test DRAM refresh 1-3-1-3 22h Test keyboard controller 1-3-4-1 2Ch RAM failure on address line xxxx 1-3-4-3 2Eh RAM failure on data bits xxxx of low byte of memory bus 1-4-1-1 30h RAM failure on data bits xxxx of high byte of memory bus 2-1-2-3 46h Check ROM copyright notice 2-2-3-1 58h Test for unexpected interrupts LS700 HANDBOOK 6/3 Troubleshooting Troubleshooting Checklist If you encounter a problem with the computer the following sections suggest checks to make before you alert your dealer, authorised maintainer or support organisation. The checks listed cover the causes of common problems. Connections Check that all power and signal cables are securely connected to the correct port on the computer. The two serial ports appear identical. If you have a problem, make sure that the cable is connected to the port you are trying to use. Power Check that the AC power supply is switched on, and that the fuse in the AC plug (if any) has not blown. If the system still does not seem to be getting power, obtain another power cord from your supplier. Monitor If there is no display check that the monitor is turned on, and the brightness and contrast controls are not too low. Expansion Cards If an expansion card does not work, check that all internal cables are securely connected, that the card is configured correctly, that its use of system resources does not conflict another card or motherboard component, and that legacy resources (if it is an ISA card) are properly declared in the BIOS setup utility. Check also that the software which drives or uses the card is correctly configured. 6/4 LS700 HANDBOOK Troubleshooting System BIOS Check finally the system BIOS to ensure that it has not been disturbed from the original settings. An area is provided within Chapter 5 (System BIOS and Setup) to make a note of your current or original BIOS settings. If the settings appear to have altered, there may be a fault with the CMOS battery. See Chapter 3 (System Motherboard) and Chapter 5 (System BIOS and Setup). The System’s Disk Drives Floppy Disk Drive If you have problems accessing a diskette or floppy disk, check that it is inserted correctly, that it has been correctly formatted, that it is not write-protected, and that the permissions assigned by the BIOS allow the intended access. Some application software also may not allow you to read or write to floppy disks during certain other operations, or until you are about to exit the programme. Optional CD-ROM drive If you have problems accessing a CD, check that you have allowed a few seconds for the disk to spin up to full speed, that the disk is the correct way up in the drive, printed side upwards, and that it is a data CD. Remember that with a conventional CD-ROM drive you cannot write to a CD. Hard Disk Drive If you encounter problems accessing any IDE hard disk drive, use the BIOS Setup utility to check that the drive is correctly specified, and that the drive’s controller is enabled. Check also that the disk has been correctly formatted, and LS700 HANDBOOK 6/5 Troubleshooting that the permission assigned by the operating system allow the intended access. SCSI Drives If you have just fitted a new SCSI drive, or device, check that you have used a valid ‘ID’ that does not conflict with other SCSI drives or devices is the system. Look in any documentation for information. On boot up, just after POST, a list is displayed of the devices attached to the SCSI interface, which shows the device, its parameters and the set ‘ID’. Error Messages Some of these messages may indicate a serious fault with the system and may cause the POST to halt. If the message persists, make a note of it and call your supplier or authorised maintainer. PCI Configuration Error Messages The following PCI messages are displayed as a group with bus, device and function information. Message Explanation Bad PnP Serial ID Checksum The Serial ID checksum of a Plug and Play card was invalid. Floppy Disk Controller Resource Conflict The floppy disk controller has requested a resource that is already in use. NVRAM Checksum Error, NVRAM Cleared The ESCD data was reinitialized because of an NVRAM checksum error. Try rerunning the ICU. NVRAM Cleared By Jumper The “CMOS Clear” jumper has been moved to the “Clear” position and CMOS RAM has been cleared. 6/6 LS700 HANDBOOK Troubleshooting Message Explanation NVRAM Data Invalid, NVRAM Cleared Invalid entry in the ESCD. Parallel Port Resource Conflict The parallel port has requested a resource that is already in use. PCI Error Log is Full This message is displayed when more than 15 PCI conflict errors are detected. No additional PCI errors can be logged. PCI I/O Port Conflict Two devices requested the same resource, resulting in a conflict. PCI IRQ Conflict Two devices requested the same resource, resulting in a conflict. PCI Memory Conflict Two devices requested the same resource, resulting in a conflict. Primary Boot Device Not Found The designated primary boot device (hard disk drive, diskette drive, CD-ROM drive, or network) could not be found. Primary IDE Controller Resource Conflict The primary IDE controller has requested a resource that is already in use. Primary Input Device Not Found The designated primary input device (keyboard, mouse, or other, if input is redirected) could not be found. Secondary IDE Controller Resource Conflict The secondary IDE controller has requested a resource that is already in use. Serial Port 1 Resource Conflict Serial port 1 has requested a resource that is already in use. Serial Port 2 Resource Conflict Serial port 2 has requested a resource that is already in use. Static Device Resource Conflict A non Plug and Play ISA card has requested a resource that is already in use. System Device Resource Conflict A non Plug and Play ISA card has requested a resource that is already in use. LS700 HANDBOOK 6/7 Troubleshooting BIOS Error Messages Error Message Explanation Diskette drive A error or Diskette drive B error Drive A: or B: is present but fails the POST diskette tests. Check that the drive is defined with the proper diskette type in Setup and that the diskette drive is installed correctly. Extended RAM Failed at offset: nnnn Extended memory not working or not configured properly at offset nnnn. Failing Bits: nnnn The hex number nnnn is a map of the bits at the RAM address (System, Extended, or Shadow memory) that failed the memory test. Each 1 in the map indicates a failed bit. Fixed Disk 0 Failure or Fixed Disk 1 Failure or Fixed Disk Controller Failure Fixed disk is not working or not configured properly. Check to see if fixed disk is installed properly. Run Setup be sure the fixed-disk type is correctly identified. Incorrect Drive A type - run SETUP Type of floppy drive for drive A: not correctly identified in Setup. Invalid NVRAM media type Problem with NVRAM (CMOS) access. Keyboard controller error The keyboard controller failed test. Try replacing the keyboard. Keyboard error Keyboard not working. Keyboard error nn BIOS discovered a stuck key and displays the scan code nn for the stuck key. Keyboard locked - Unlock key switch Unlock the system to proceed. Monitor type does not match Monitor type not correctly identified in Setup. CMOS - Run SETUP Operating system not found 6/8 LS700 HANDBOOK Operating system cannot be located on either drive A: or drive C:. Enter Setup and see if fixed disk and drive A: are properly identified. Troubleshooting Error Message Explanation Parity Check 1 Parity error found in the system bus. BIOS attempts to locate the address and display it on the screen. If it cannot locate the address, it displays ????. Parity Check 2 Parity error found in the I/O bus. BIOS attempts to locate the address and display it on the screen. If it cannot locate the address, it displays ????. Press <F1> to resume, <F2> to Setup Displayed after any recoverable error message. Press <F1> to start the boot process or <F2> to enter Setup and change any settings. Real time clock error Real-time clock fails BIOS test. May require motherboard repair. Shadow RAM Failed at offset: nnnn Shadow RAM failed at offset nnnn of the 64 KB block at which the error was detected. System battery is dead Replace and run SETUP The CMOS clock battery indicator shows the battery is dead. Replace the battery and run Setup to reconfigure the system. System cache error - Cache disabled RAM cache failed the BIOS test. BIOS disabled the cache. System CMOS checksum bad - run SETUP System CMOS RAM has been corrupted or modified incorrectly, perhaps by an application program that changes data stored in CMOS. Run Setup and reconfigure the system either by getting the default values and/or making your own selections. System RAM Failed at offset: System RAM failed at offset nnnn of the 64 KB nnnn block at which the error was detected. System timer error The timer test failed. Requires repair of system motherboard. LS700 HANDBOOK 6/9 Troubleshooting ISA NMI Messages ISA NMI Message Explanation Memory Parity Error at xxxxx Memory failed. If the memory location can be determined, it is displayed as xxxx. If the memory location cannot be determined, the message is: Memory Parity Error ????. I/O Card Parity Error at xxxxx An expansion card failed. If the address can be determined, it is displayed as xxxxx. If the address cannot be determined the message is: I/O Card Parity Error ????. DMA Bus Time-out A device has driven the bus signal for more than 7.8 microseconds. 6/10 LS700 HANDBOOK EQUIPMENT LOG Use this equipment log to record information about your PC. You may wish to cut it out and keep it in a safe place. Manufacturer’s data You should record the model codes and serial numbers of the system components. You can update this with information about any expansion cards fitted. Model Serial number System unit Monitor Keyboard Mouse Speakers Sub-woofer OWNER’S HANDBOOK LOG/1 Equipment log Expansion cards Manufacturer Description Serial number 1 2 3 4 5 Other information It may be useful to note any additional information here such as date of purchase, supplier, etc., along with the phone number of your maintenance provider. LOG/2 OWNER’S HANDBOOK http://www.mitsubishi-computers.com MITSUBISHI ELECTRIC PC DIVISION Apricot Computers Limited 3500 Parkside Birmingham Business Park Birmingham B37 7YS United Kingdom MITSUBISHI ELECTRIC PC DIVISION Apricot Computers Limited Niederlassung Deutschland Gothaer Strasse 27 40880 Ratingen Germany Tel +44 (0) 121 717 7171 Fax +44 (0) 121 717 7799 Tel +49 (0) 2102 4556 Fax +49 (0) 2102 455700