1
USER'S
..
••
.~
•
MANUAL
»
l-.Il~
SOTEe
PHG-
l
PUC-16
GUIDE TO OPERATIONS
Copyright 1985,
KOHJINSUA Corporation. All rights reserved.
No
part of this publication may be reproduced or translated into any
language without prior written permission of KOHJINSHA Corporation.
hS is a trademark of Microsoft Corporation.
IBM is a trademark of International Business Machines
Corporation.
1-2-3 is a trademark of Lotus Development Corporation.
wordS tar is a registered trademark of Micropro International
Corporation.
i-l
"WARNING:
THIS EQUIPMENT HAS BEEN CERTIFIED TO COMPLY WITH THE
LIMITS FOR A CLASS B COMPUTING DEVICE. PURSUANT TO SUBPART J OF
PAWl' 15 OF FCC RULES, ONLY PERIP!lERALS (CmlPUTER INPUT/OUTPUT
DEVICES) CERTIFIED TO COMPLY WITH THE CLASS B LIMITS MAY BE
ATTACHED TO THIS COMPUTER.
OPERATION WITH NON CERTIFIED
PEIUPIlEIU\LS IS LIKELY TO RESULT IN INTERFERENCE TO RADIO AND TV
EECEPTION."
"This equipment generates and uses radio frequency and if not
installed and used properly, that is, in strict accordance with
the manufacturer"s instruction, may cause interference to radio
and television reception.
It has been tested and found to comply
with the limits for a Class B computing device in accordance with
the specification in Subpart J of Part 15 of FCC Rules, which are
designed to provide reasonable protection against such
interference in a residential installation.
However, there is no
guarantee that interference will not occur in a particular
installation.
If this equipment does cause interference to
radio and/or television reception, which can be determined by
turning the equipment off and on, the user is encouraged to try
to correct the interference by one or more of the following
measures:
Meeting PHC-16
Welcome to PHC-16, the world"s first truly personal computer.
PIIC-16 is a full-featured TUM-compatible business
It comes with:
computer.
*
256K of memory, expandable to 1280K.
*
5-1/4 inch physical (diskette) drive
and
3.5
inch physical (diskette) drive plus a unique
internal electronic RAM drive with up to 360K memory.
*
Optional add-on physical
(diskette) drive.
*
Full 80 column, 25 line LCD screen.
*
RS-232 serial and parallel printer connections.
*
RGB and composite ports for optional monitors.
*
Reorient the receiving antenna
*
Optional built-in modem.
*
Eelocate the cOlllPuter with respect to the' receiver
*
Optional add-on expansion unit.
*
~love
*
Reads from and writes to a 3.5 inch floppy disk.
*
PI ug the computer into a dif feren\: out I ('t so that the
computer and receiver arc on different hranch circuits.
the computer away from the recL'ivl'r
If necessary the user should consul t the dealer or an ('xperienced
radio/television technician for additional sugqestiot1s.
The user
may find the following booklet prepared by the Feder"l
Communications Commission helpful:
"!low to Identify and Eesolve Eadio-TV Interference ProbleIlls"
Printers should be attached with approved FCC shielded cable to
IlIaintain FCC cOilipliance.
With all these features, you.might expect a desktop full of
equ1pment.
Instead, PHC-16 1S as portable as a briefcase.
It"s
compact design, low weight, (only 12 pounds), and optional
battery pack, make it an ideal companion for the business person
on the go.
Use it on a plane, train, boat, taxi, bus, or in your
hotel room.
Take it home for the evening, or take it around the
world.
It"s always ready.
Best of all, PHC-16 is easy to use.
It uses Microsoft DOS and
runs most programs written for the IBM PC.
Add your favorite
application software, and you"re off and running.
This manual, the PHC-16 Guide to Operations, gives you
instructions for setting up and operating your PHC-16.
If you
have never operated a computer before, a section for the first
time user introduces you to a few helpful basics.
It is beyond the scope of this manual to tell you everything you
may need to know about computers, MS-DOS, BASIC, and application
programs.
Since there are many books available for the IBM PC,
we have tried to give you a quick primer on PC operations while
concentrating only on those items that differ from IBM PC
operations.
i-2
'i
I,
l
l ·
i-3
simultaneously and continue to use A as the defa~lt drive.
Or,
you can change the default drive to B.
Here are some examples:
rAST START
1.
This section is only for those who have already opened their
PHC-16, are experienced using IBM PC or compatible computers and
Follow these few steps
PC or MS-DOS, and hate to read manuals.
to get off to a fast start:
1.
Press the keyboard release latch to detach the keyboard.
2.
Install batteries in the keyboard.
Press any key and make
sure the light in the upper right corner comes on.
The
keyboard is wireless, but needs a clear path between the
keyboard and computer.
3.
Insert the AC adapter into the computer.
adapter switch on.
4.
Press the screen release latch and adjust the screen angle.
s.
Insert the DOS diskette from the DOS manual, or any bootable
diskette, into the PHC-16"s physical (diskette) drive.
~lAKE SURE TllE LABEL ON THE DI SKETTE FACES TOWAIW Tf!), REAR UF
THe cmlPUTEE AND TilE NOTCII IS UP.
Push the diskette into
the slot until it clicks.
Pn'ss in the button labeled
"PUSll" i1t the top of the drive until it clicks.
COpy *.* B:
Remove the word processor diskette and insert the data
diskette in the physical drive.
Swap drive designations by
pressing CTRL, ALT, and 0 at the same time.
The RAM drive
(your word processor) is now A and the physical drive (your
data) is now B.
Load your word processor (for Wordstar, for
example, type WS and press ENTER) and operate as you would
on any two-drive system.
Turn the AC
6.
Turn ON the PHC-16 power switch at the bClck and lower right of
the computer.
Press in the left side of the switch so the
red line on the right side of the switch is showing.
7.
Depending on the intcrni11 switch settings, the PllC-l6
either:
Automi1tically S('ts up a RAM drive i1S IJrive E, i1ncl
installs DOS, or
Displays a screen that lets you set up a RAM clrive.
Follow the instructions on the screen.
Your word processor programs are on one diskette and your
data is on another.
Insert your word processor program
diskette in the physical drive and copy the files to the RAM
drive like this:
2.
Your spreadsheet is copy protected and won"t copy to the RAM
drive.
Instead, copy your data (or only the files you need)
to the RAM drive, and use the spreadsheet program diskette
in the physical drive.
REMEMBER TO COPY YOUR DATA BACK TO
YOUR DATA DISKETTE WHEN YOU"RE THROUGH, BEFORE TURNING OFF
THE PHC-16!
3.
Your filer system is on one diskette and your data is on
another.
But once the filer programs load, that diskette is
never read. Insert the filer system diskette in the physical
drive and load it as you would normally.
Swap drive
designations, remove the program diskette, and insert your
data diskette in the physical drive.
To display the help screen showing switch settings and keyboard
options press the CTRL, Left Shift, and 'I' (for Teach) keys at the
same time.
CAUTION:
BE SURE TO ALLOCATE ALL 360K TO TilE RAM DRIVE BEFORE
USING THE DISKCOPY COMMAND!
Al though it appears that DOS has
copied the entire 360K disk, it has not and may result in missing
data or produce unpredictable results!
You arc now up and running!
USING THE RAM DRIVE FOR A TWO DElVE SYSTEM
The HAM drive enables the PllC-16 to work like a two-clrive
system. Since the RAM drive is much faster than the physical
diskette clrive, we recommend that you load your application
software program diskette onto the RAM drive and use the physical
drive for your data.
Since the default drive is A, you Ci1n
toggle the clrive designations of A and B between the physical and
RAM drives by pressing the CTRL, Left Shift, and 0 keys
i-4
i-S
Table of Contents
Fast Start
Chapter 1:
Getting Started
Unpacking . . . . . . . . . . . . . . . . . . . . . . . . . . . . . . . . . . . . . . . 1- 1
Setting Up . . . . . . . . . . . . . . . . . . . . . . . . . . . . . . . . . . . . . . 1- 2
A Quick Tour of PHC-16 . . . . . . . . . . . . . . . . . . . . . . . . . . 1- 4
For the First Time User . . . . . . . . . . . . . . . . . . . . . . . . . 1- 6
Turning the Power ON and OFF . . . . . . . . . . . . . . . . . . . . 1-12
Start up . . . . . . . . . . . . . . . . . . . . . . . . . . . . . . . . . . . . . . . . 1-13
Chapter 2:
customizing Your PHC-16
Help When You Need It . . . . . . . . . . . . . . . . . . . . . . . . . . . 2Switches . . . . . . . . . . . . . . . . . . . . . . . . . . . . . . . . . . . . . . . . 2Audio Feedback . . . . . . . . . . . . . . . . . . . . . . . . . . . . . . . . . . 2Screen Adjustments . . . . . . . . . . . . . . . . . . . . . . . . . . . . . . . 2World Clock . . . . . . . . . . . . . . . . . . . . . . . . . . . . . . . . . . . . . 2Using PHC-16 as a Remote (Dumb) Terminal . . . . . . . . 2Chapter 3:
Traveling with PHC-16
Carrying Case . . . . . . . . . . . . . . . . . . . . . . . . . . . . . . . . . . . 3The Battery Pack . . . . . . . . . . . . . . . . . . . . . . . . . . . . . . . . 3Battery Indicator . . . . . . . . . . . . . . . . . . . . . . . . . . . . . . . 3Traveling Hints and Suggestions . . . . . . . . . . . . . . . . . 3Chapter 4:
2
5
6
7
9
1
1
2
3
Operations
Using DOS . . . . . . . . . . . . . . . . . . . . . . . . . . . . . . . . . . . . . . . 4- 1
About the DOS Keyboard . . . . . . . . . . . . . . . . . . . . . . . . . . 4- 2
Summary of DOS Commands . . . . . . . . . . . . . . . . . . . . . . . . . 4- 3
~laking a Backup Copy . . . . . . . . . . . . . . . . . . . . . . . . . . . . 4- 9
Using the RAM Drive . . . . . . . . . . . . . . . . . . . . . . . . . . . . . 4-12
Using BASIC . . . . . . . . . . . . . . . . . . . . . . . . . . . . . . . . . . ··· 4-13
Chapter 5:
Problem Solving
Check These Things First . . . . . . . . . . . . . . . . . . . . . . . . 5- I
Memory Test . . . . . . . . . . . . . . . . . . . . . . . . . . . . . . . . . . . . . 5- 2
Chapter 6:
Options
Add-On Physical (Diskette) Drive . . . . . . . . . . . . . . . . 6Modem . . . . . . . . . . . . . . . . . . . . . . . . . . . . . . . . . . . . . . . . . . . 6Expansion Unit . . . . . . . . . . . . . . . . . . . . . . . . . . . . . . . . . . 6Expanding Memory . . . . . . . . . . . . . . . . . . . . . . . . . . . . . . . . 6Color or Composite Monitor . . . . . . . . . . . . . . . . . . . . . . 6Carrying Case . . . . . . . . . . . . . . . . . . . . . . . . . . . . . . . . . . . 6Ca r Adilptor . . . . . . . . . . . . . . . . . . . . . . . . . . . . . . . . . . . . . 6Keyboard Cable . . . . . . . . . . . . . . . . . . . . . . . . . . . . . . . . . . 6lIigh Performance Components . . . . . . . . . . . . . . . . . . . . . 6-
I
2
3
3
5
5
6
7
7
Chapter 1
A.
Getting Started
Unpacking
You probably have already unpacked your PHC-16 computer box,
but check this list of items you should have found there:
The PHC-16 Computer
The AC Power Pack
Four AA batteries for the keyboard
Remember to save your box and the packing material to use
if you ever need to ship your PHC-16.
WARNING:
Transporting the PHC-16 without the cardboard
insert (or a scratch diskette) installed in the physical
(diskette) drive and the release button pushed in may invalidate
the physical (diskette) drive warranty.
1-1
B.
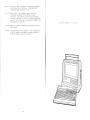
Setting Up
I.
The Keyboard
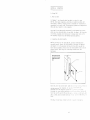
To release the keyboard, find the keyboard release latch and
press down.
The keyboard is completely detachable.
Remove it
and place it in front of your PlIC-16.
Pmss down on the keyboard
release lalch to detach the
keyboard,
Keyboard Release Latch
Press any key and the red light on the keyboard should come on.
If it doesn't come on now, or at any time you use your PHC-16,
the batteries are dead and must be repl'aced.
We recommend
standard AA batteries available at most convenience stores.
Always replace all four batteries at the same time.
An optional keyboard cable is available to physically connect the
keyboard tG the computer if you wish to do so.
This cable is
coiled and can be extended to ten feet.
You still need working
batteries to power the keyboard;
the cable replaces the infrared
beam.
Tips for better computing with your infrared light beam:
The keyboard has two elevation feet on the back.
if you want your keyboard tilted slightly.
*
Don't let anything block the beam when you are using
the keys.
*
Don't turn the keyboard at too great an angle. The
infrared beam will not make proper contact with the
PHC-16.
*
Sometimes a key may appear to be stuck.
This is rare
and happens if the computer senses when the key is
pressed, but not when it is released.
This is not a
mechanical error, but may occur because of some
interference between the keyboard and the computer.
If
this happens, reposition the keyboard and press the key
that seems stuck again.
Pull them out
PHC-16 keyboard is not attached to the rest of the computer.
The Keyboard sends signals to the computer by infrared light beam.
The illustration below shows how this infrared light works.
K"p the keyboard in lront of
your computer and don't let
anything obstruct the light
bBam.
2.
'fhe Screen
Find the screen release latch and PHESS IT IN lightly.
You can
feel it release.
Now, pull the screen out until it's in
the best position for you.
Pmss the screen release latch
and adjust the angle of the
scre8n.
Screen Re,lease Lalen
The keyboard is powered by four standard AA batteries.
The
battery compartment is located in the upper left corner of the
keyboard.
Find the small cover just above the gray function keys
and slide it off.
Install the batteries included in your PHC-16
box, following the diagram on the inside of the battery
compartment.
Replace the cover.
1-2
Caution:
Make sure the screen panel is not forced up beyond it's
limit.
Also, never lift or move the computer by
grasping the screen panel.
1-3
C.
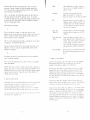
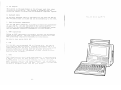
A Quick Tour of PHC-16
Now that your PHC-16 is set up, let"s take a quick look at all
the external switches and plugs. We"ll talk about each of these
in different places in this Guide to Operations.
But this
illustration lets you find your way around PHC-16 and can help
as a quick reference later.
XT Type
5.25" Type
3.5" Type
',llh-1 ';i:PPY-".k D,'"
II
Jill
"jl~-"·
, 1111
,.1
'jill".
_-1111-
-Fl,ppy-".kD,' ..
;',ppy-'''k D,'"
[~Dll1kReleaBBButton
D'.k R.l .... " ' ' ' ,
[!)
Ruet Button
_
i
In, ,
11I_1~~~_;
" . . . Slo'
.1
1 __
!Il'-'
.-ACSOcket
(Un atated
yoH·leonly.)
ContrOl Ke}'s
--------~~-~~----
=-::"--==--::-====~.-=.~ ::-~:~ .:.~~::~-:
"---- -::...----~.~
-
11__
-
_
Add-On Floppy BUB
-r-I
F.~t}n~
j~~Ef-~1~~~=
Power:; ... ltch
Co,"poftlteConnectof
Printer Connector
RGDl Connectof
Serial Connector
1-4
1-5
D>Ok " " . " " " , '
'-:::"'-"'k D,,..
AC Adaptor Plug
3.5",5.25" Type
-r-:~
,
o
111-:11
--+--
Reset Button
'<I]
_
1
.I.e Adaptor Phlg
Dhk Release Button
XT Type
",my Sl" _ _
1r~1-1
ReBet Button
D. For the First Time User
2. Software
If PHC-16 is the first microcomputer you have used, this section
introduces you to a few basics.
You t' CU'"i'U ter system is ca 11 cd hardware and the ins tructions tha t
tell t.he computer what to do are called software.
These
.
i ",; t r (wt ions are grouped together in programs to do a certaln
JIJI"
I ike word processing, and are usually called application
We don't want to bore you with the history of computers or bury
you with technical computerese.
But we do want you to understand
enough about how your PHC-16 works so that you can logically
work your way through new situations and use your computer more
efficiently.
If you are already familiar with computers, you may
want to skip this section.
1.
j
I)
(HJ
r
illllS.
'1'1" ."(' are some other software programs that make the computer
"l,;\em work, called system software.
The most important system
';"Itware you will use is the operating system.
The operating
';ystem manages your data and instructions for application
,;ortware as they move through the computer system.
How Your Computer Works
Your PHC-16, like any computer, has a single puqJOS(': to
,nanipulate data.
A computer is not very smart--it S llIath('mCltical
ability is no better than that of a pre-school chi Ie!.
!Jut it is
so astonishingly fast that i t can process in seconds what might
take humans days or weeks.
And i t can store dillil mor<'
conveniently and compactly than we have traditionill Iy done with
paper.
These attributes, and its portability, mak,' the I'IIC-16 a
very powerful and productive business tool.
Every computer system is built around the Centl<ll I'loc('ssing Unit
'I'his is the box, big or little, that holds tt'l' l'r<W(>,;,;inq chips
and electronic circuits.
The Central Processin(l linit:, as the naml
implies, does the processing or computing.
Your body is like a computer system.
Your hrilin rl,(,I'iv('s
information from your senses, analyzes it and sf'lHic; iw;Llllctions
to your muscles.
In this way you communicate wLth Y(lUI
environment.
In a simi lar manner, your computer sy.';t('m !l('cds
devices to comlTlunicate with you, to receive inst! lwt ,"n,; (lnei data
from you and to send the results back to you in il IOI'" Y()U ('<In
understand.
These device's are call peripherals.
II(',("S il ,;implc
diagram of a computer system:
Most computer systems consists of these parts.
1/' 1'{II:one
3. How Data is Stored
Inside the computer is an area called internal memory where data
is stored while the computer manipulates the data.
'I'he computer
can transfer data into and out of internal memory very quickly.
This is called reading and writing.
But your computer's internal memory is limited.
You need a way
to store large amounts of data.
Your PHC-16 uses diskettes.
These are sometimes called floppy disks. Diskettes store data
permanently, and you can use as many diskettes as necessary to
store your data.
Other computers use cassette tapes or hard
disks.
Duta storage capacity is measured in kilobytes or K.
A byte is
one character of data.
One kilobyte, or K, equals not 1000 bytes
or characters as the name "kilo" implies, but 1024 bytes.
The internal memory of your computer is divided into two sections.
One area is reserved for portions of the operating system and
hardware ins t ructions.
'I'hi s area is ca II ed Read On 1 y ~lemory, or
ROM.
The other section of memory is a working storage area where
the computer stores instructions and data.
This area is called
Random l\ccess ~lemory or I<AM.
EA~I in your PllC-16 can be
subdivided, or partitioned, into working storage EAM and a EAM
drive.
Your PHC-16 has two bui 1 t- in per iphera 1 s: a kcyhll(l,d r or you to
enter data and a screen for you to see the results.
Yllll can add
a printer to print the results on paper, and you C<ln <ldd i1 modem
so your PlIC-16 can exchange information with ot h,'r ('Ollll'lIt('rs
over telephone lines.
With a modem, for eXillllpl,', 'iu" could
compose lIlelliOS or write reports in your hote I ['()()'" dlld send them
by telephone to your home office thousands of miles dW<ly.
1-6
1-7
~.
"1'1"
11'1"
I () I';"()W [\bout the Keys
'1'llIlIk "I y()ur keyboard as a sophisticated typewriter.
It has
"II II", 1f''lLllar keys, plus some others.
Most of the keys work
Ill,,1 Ilk(' d typlewriter, but there are a few exceptions.
I\,'y"
t
I'dt Look I\like
t YI,,'wri ters, the letter 0 and the
Illlllll)('r zero are interchangable.
Not
!;() wit h computers.
~Iake sure you type
t h,' right character in commands and
I lie names.
On your keyboard and on
your screen the zero has a diagonal
line through it.
(Ill
The computer also knows the difference
between a lower-case L and the number 1.
Sometimes the computer requires you to
enter only numbers or only letters. Be
careful to use the right key.
The Spacebar
Find the spacebar on your keyboard.
The
spacebar works like one on a regular
typewriter, but it also has special functions.
Blanks are important to a computer and
the spacebar is used to enter those
blanks.
The Shift and Caps Lock Keys
PHC-l6 has two shift keys marked with up
arrows and located about where you would
find them on a regular typewriter.
Use
either shift key to type upper-case letters
or to type the symbols in the upper portion
of the number keys.
Use the Left Shift key
with the CTRL key to perform special features.
The Caps Lock key is located just below the
right shift key and works like the
It lets you
shift lock key on a typewriter.
type only capital letters until you press it
again.
Unlike a typewriter, it only affects
letter keys.
You still have to press the
shift key to use the symbols in the upper
portion of the number keys.
To turn off the
Caps Lock, press the key again.
]-8
The Function Keys
Notice the darker gray keys across the top left side of your
keyboard. These keys take on different "functions" epending
on the software you are using on your computer.
IT)IW IDID 10IUIlJ I0 IDID]
The Arrow Keys and Numeric Keypad
The medium gray keys in the upper
right corner of your keyboard serve two
functions.
The four keys marked with arrows
are called the Up, Down, Left, and Right
Arrow keys, and allow you to move the cursor
around your screen.
When you press the key
numeric keypad is ON.
the number keys in the
your keyboard become a
similar to the keys on
the NUM LOCK key again
keypad OFF.
marked NUM LOCK, the
This means that
upper right corner of
numeric keypad,
a calculator.
Press
to turn the numeric
The ENTER Key
The large key on the right side of your
keyboard is used when you have finished
typing a command.
I\fter you press EN'I'EP,
the computer starts proceSS1IHj th,' cOlllllland you
just typed. The ENTEP key also works 1 ike a
carriage return on a typewriter.
For this
reason it"s called the RETURN key on sOllle
computers.
5.
About Diskettes and the Physical Drive
The PHC-16 uses 5-1/4 inch diskettes.
Diskettes are
sometimes called floppy disks.
PHC-16 uses double-sided, double
density diskettes.
A permanent, protective black jacket holds the diskette.
I\nd diskettes are stored in paper envelopes that provide
additional protection.
1-9
,It,d );()Itwdre, the instructions to the computer, are
Lc's.
The computer can read the existing data
<11';\("11,', or you can add more data in unused space on the
l,iI""'I.,1 ,,,"
);111'
,'d "" <I ,,;k,'1
"" Ii,,'
d I ';1,"1 I,'
II,"
I",
"II'
information is stored on diskettes, they must
Follow these cautions:
While the RAM drive (discussed in the next section) is
electronic, the diskette drive is mechanical.
To avoid confusion
between the two drives, this manual always calls the diskette
drive the physical drive.
11I1>("IiI[\(
,",I"I'I"d.
'I'll
insert the diskette in the physical drive, follow these steps:
Il[) not try to remove the permanent black jacket.
1.
not touch the exposed surface of the diskette (see
illustration).
It is important that this surface stay
clean.
A speck of dust or a fingerprint could destroy
data.
Press the release button (labeled PUSH) at the top of
the physical drive.
Then remove the white cardboard
protector from the PHC-16 physical drive.
Grasp the
flap and pull it out.
2.
Hold the diskette with the LABEL FACING THE BACK OF THE
COMPUTER AND THE NOTCH UP, and slide it into the
physical drive.
3.
When it is all the way in the slot you will hear a
faint click.
4.
Press the release button (labeled PUSH) at the top of the
physical drive until you hear another click.
This is
like closing the door to the physical drive.
IJ(J
*
Always return your diskettes to the paper envelopes.
This helps protect them.
*
Store all diskettes away from heat and magnetic
field sources such as telephones and dictating
equipment.
*
Always make copies of your diskettes for additional
protection.
These are called back-up copies.
Instructions for making backup copies are found in
Chapter 4:
Operations.
*
Always label your diskettes with a f,'lt-tlpped pen.
Pencils or pens could damage the diskette'.
Usc the
adhesive labels that come with a box of di)"kettes.
*
Do not leave diskettes in a parked ca r on ,1 very hot
day or expose them to temperatures ]w]ow ',() F (10 C).
*
lJo not bend diskettes.
To use a diskette, insert it in the PHC-16 physicill (diskette)
drive with the notch up and the label facing ilWdY frutll you.
The
drive is the slot on the ri(jht side of your cOIllI",LI'r
--------,
SlidB thB disk.ff8 into thB disk
drive until ;r cliCKS. Then press
thB IlrrtB square buffon until rl
clicks,
6. An Electronic Drive -- The HAM Drive
PIIC-16 includes a built-in electronic drive that works just like
the mechanical diskette drive, and gives you the versatility and
convenience of a two-drive system.
This electronic drive is
called a HAM drive because it uses a portion of RAM.
PHC-16
lets you set aside up to 360K of RAM to use to store programs and
elata, just like the diskette drive.
When you start up, PllC-16
asks you to designate how much RAM to allocate to the HAM drive.
You may assign from 0 to 360K in BK increments.
Or, you can turn
switch SW2-1 ON so that PHC-16 will automatically allocate the
full 360K to the RAM drive whenever you start up.
When using the RA1<l drive, remember to always copy any data you
want saved to a diskette before you turn the power off.
All HAM
(!leIllory, including the RAM drive, is lost when power is turned
olE.
,'aution:
Be sure to allocate ell] 360K to the HAM drive before
IIsing the DISKCUPY command.
UsinCj LlISKC()PY to copy to a RAM
(Iriv~ of less than 360K may cause data loss or unpredictable
(";u] ts .
I",l[' detai led instructions on usi nCj the
"Using the RA~l Drive" in Chapter 4:
"II
1-] 0
1-11
dri ve, see the section
Uperations.
F1\~1
1-:.
'1'11111111'1
11"loJ
I Ii, I I
I II.'
f;.",-"
111111 ','''111
III<'
Power ON and OFF
,)""1
,111<1
1'11(-] 6 is unpacked and set up, and you've learned
';()IIIf' important terms and concepts, you're ready to
l'lll'-JG on and put it to work.
J)llt'·_] h ope-rates on either household AC electricity, or with
I I •. I I I " I Y j>ack.
The AC power pack is standard equipment and was
.1111'1"''] with your PHC-16.
The battery power pack is optional.
'I'll\ll
I.
2.
Remove any diskette in the physical drive.
3.
Turn the on/off switch on the back of the PHC-16 OFF.
4.
Turn the power pack switch OFF.
5.
Find the gray button just to the left of the power pack
and press it.
The power pack should pop out of its
slot part way.
6.
If nothing happens, use your other hand to press in
slightly on the power pack while you press the gray
button. This releases the pressure on the catch and it
should pop out part way .
7.
Pull the power pack the rest of the way out.
111';I'rt ing the Power Source
11,>1 Ii the AC pack and the optional battery pack are inserted in
•'x""t.] Y the same place and in the same way:
l.
Make sure the on/off switch on the back of the PHC-16 i,
OFF (press down on the right side of the switch so the
red line does not show).
It should come shipped turned
OFF, but check to make sure.
2.
Insert the power pack (either battery or AC) into the
power slot located on the left side of PHC-16. The
If it doesn't
power pack can only be put in one way.
go in at first, flip it over.
3.
Push the power pack all the way in until you hear it
click.
4.
Turn the power pack switch ON.
Remove any diskenes and tum
Ihe Dalavue power
Press the release bunon 10
release Ihe power pack and
slide It a/l the way oul.
0".
Slide the power pack al/ the
way into the slol on the left
side oflhe Datavue un#! It
clicks.
F. Start Up
PHC-16 is easy to turn on.
2. Removing the Power Pack
Follow these steps:
1.
Install either the AC adapter or the battery power pack
as described in the steps above.
If you are using the
AC adapter, plug it into an electrical outlet.
2.
Turn the on/off switch on the power pack ON.
3.
Turn the on/off switch on the hack of PIlC-16 ON (press
in on the left side of the switch so that the red line
on the right is showing).
To take out either the standard AC pack or the optional battery
power pack, follow these steps:
1.
If you have been using the computer, make sure all data
has been saved, and that any data on files in the RAM
drive has been copied back to a diskette.
1-12
1-13
II Y"'1r 1'11<'-11> lId'> less than 768K,
<11"101",,' Ilk" this on your screen:
you should immediately see a
----~---------------------------,
11'1
TilE
Review the steps outlined above to make sure you did
everything right.
*
Be sure the computer is plugged in.
KEYS TO INCREASE OR DECREASE RAM DISK MEMORY
~IEMI)RY IS RE-ASSIGNED IN 3K INCRUIENTS
1111 IHE ENTER KEY [above the PrtSc key] WHEN THE SETUO IS CORRECT
<-
AND
*
-->
MfllN MEMORY
If you are still having trouble, turn to Chapter 5:
Problem Solving for more things to check.
I. The PHC-16 Memory Screen
~======================
•••
screen you see when you firs t turn on your computer allows
you to allocate a portion of RAM (up to 360K) to the RAM drive.
This procedure is called partitioning memory.
'I'll<'
•
~EPRESENTS 8K OF MAIN MEMORY
REF'RE:;ENTS 3K OF EXTENDED MEMORY
MAIN MEMORY = 448K
EXTENDED t1EMORY
OK
64K MIN]
[640K ~IAX]
[IK
=
•
•
PEPRSENTS 8K OF RAM DISK MEMORY
REPRESENTS 8K OF RE~,EPVED MEMORY
RAM DISf; MEMORY
RESERVED MEMORY
OK
[2f;OY- MAX)
2JK
[24K t1AX)
1024 BYTES)
If you already know how you want to divide up the memory, use
the right and left arrow keys.
The plus symbol indicates 8K
increments of RAM allocated to the RAM drive.
To increase RAM
drive memory (and decrease working storage), press the Left Arrow
key.
The plus symbols increase from right to left.
To decrease
RAM drive memory (and increase working storage) press the Right
Arrow key.
Oil TE: 10-02-1985
8Arr~RY
If you are using PHC-16 for the first time, you do not have to
partition memory right now.
You can skip the rest of this
section and come back to it later when you have a better idea of
how you want to use your computer.
Peturn to this section when
you're ready to set up your RAM drive.
LEVEL
=
100 7.
2. Managing Memory
Depending on how you bought your PHC-16, the amount of memory in
your computer is one of the following:
If this message does not appear:
*
CheckthesettingofswitchSW2-1.
11;1
screen displays for only a few seconds.
*
Sit down in front of your computer <tnt! dd 1";\
of the screen.
*
Press the CTEL, Left Shift, and S k,'y:; ,II \ Ii" ' ; , j l l l ( ' tilile
to adjust the LCD palette and alter II", ;!II",,:;;I), of
different parts of the display.
Ci}()o:;, , \ I", (J!l(' Lililt: 1 S
best.
*
Press the
time
Press till'
some time
same
;';(IN,
\ Ii"
this
256K
768K
1280K
\ ilL
CTPL, Left Shift, and lJp A! I ,,\v kc'y,; "t the
to increase the contrdst Ull till' ';('] t'C'Il.
CTHL, Left Shi ft, and [lown AI I "w k,'ys Ilt the
to decrease the contrast Ull t!J(' :;cr('t'n.
Anything over
The first 640K of memory is called !twain" memory.
For practical purposes, both
640K is called "extended" memory.
may be considered PAM, or "working stoIZ)(jC'. "
You'll see two lines across the middle of your screen.
One is
made of squares and the other is mild" of diamonds.
Each square
indicates 81\ of main memory and ""eh djilliloncl indicates 81\ of
Ilxpanded memory.
As you allocate RAM to a HAM drive, these
:;quares or diamonds will be replaced by [Jlus symbols, and the
.llilounts of memory allocated will be displayed on the summary
I ines below.
can, and certainly will want to, reserve some RAM [or a RAM
ive.
The RAM drive turns your PIlC-16 into a much more
I:;iltile, two-drive computer.
Ylll!
dl
1-14
1-15
Chapter 2
Customizing Your PHC-16
PllC-16 lets you tailor your computer to your own needs, through
switches (also called DIP switches) and features used by pressing
the CTHL key, the Left Shift key, and another key, all at the
same time.
Switches are also used to tell PHC-16 what optional
equipment you have installed.
This chapter explains the switch settings and the customizing
features available.
A.
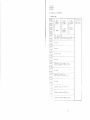
Help When You Need It
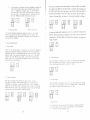
PHC-16 offers a unique help (teach) screen that gives a summary
of all the customizing features and a diagram of the factory switch
settings.
To see this help screen, press the CTRL, Left Shift, and T (for
Teach) keys at the same time.
The following screen appears.
SWl-l
SWl-2
swl-3
S\,]-4
SWl-5
S\,]-6
swl-7
SWI-8
SW2-]
SW2-2
SW2-3
SW2-4
OFF SW2-5
5W2-6
SW2-7
5\,2-8
5\,3-]
ON
5\,3-2
1
1
OFF
OFF]
ON
ON
256K RAM
OFF 512K RAM
ON
640K RAM OR MORE
ON
ON
OFF
ON=NO 8087 COPROCESSOR INSTALLED
ON] NO
OFFJ40x25
ON ]80X25
OFF180x25
ON
MONITOR
ON
COLOR
OFF COLOH
OFFJ B/W
ON] I DISK
OFF]2 DISK
ON J3 DISK OFF] 4 DISK
ON
DRIVE
ON
DRIVES
OFF
DRIVES
OFF
DRIVES
Vv 2
ON=AUTO BOOT MAXIMUM RAM DISK [360K OR 72 OK ~!AX I
ON=MAKE RAM DISK I\CTIVE
ON=DO HOH l\ND HM! CJlECKS [USE OF LCD IS FORCED I
ON=lJSC: 1':xn:HNl\J. VIJ1U) C/\RDS IN EXPANSION I/O UNIT
ON=KEEP 24K OF "II;" RAM FOR C'l'RL-L SHIFT FUNCTIONS
ON=72I1K HM! illSK FOHf!I\'i'. OFF=360K HAM DISK FORMAT
RESEHVEll
!<1':SlmVEIJ
HESI':HVEI)
ON=ENlIllLE I'()["':H ~;l\V I NG MOllE ON FLOPPY DISK DHIVE
S~'-J3-3 ON=2NlJ FI.OI'I'Y IJ!:;K 11ilIVI,: [S INTEJ{Nl\L
OFF SW3-4 ON=IN'l'EIlNl\1. VII1I:() J{MI IS BEING USED [BBOOO-BFFFFI
S\-13-5 ON] USl\
OFF]'J'YI'E 2
(IN J'l'YPE 3
OFF]TYPE 4
DIP SWITCH SETTINGS
SW3-6 ON
FONT UN
FON'J'
IWF FONT
OPF FONT
SW3-7 ON=INTEHN/\1. HMI 11:;EIl [401l1l0-7FFFFI, CWF=EXTERNl\L
SW3-8 ON=IN'l'EIUI/\1. IUd,! 1I,;I':U [HO()OO-AFF!'F), OFF=EXTEHNl\L
FACTOJ{Y SETTING
L _ _I_F_Il_H_2_5_6_K_U_N_I_1_'1
____________I'_H_E_';_S_I\,_N_Y Kl: Y TU CONT I NU E
s
2-1
1'1"';., d!ly
key
to display the second screen:
iH'W 'I'll Uc;E TilE CTRL KEY WITII THE LEFT SHIFT KEY TO ALTER THE SYSTEr,1
("j'J< I. 1.1:1"1' ~:)II FT
(''l'P l. I,ll"
SIIIF'I'
('Till. 1.1:1,
SIIIF'I'
l'TJi!. 1.1,:1 T ~;II I FT
{'),1\[. U:F I' SIlIFT
1'1( I, 1.1':1,"1' SII[FT
"I ']'1'1, 1.1:1'']' -- SHIFT
I '1'1<1. 1.1':[<,']' SIlIFT
(''I'HL LEFT SIlIFT
{"]'I(J, I.E 1''1' SIlIFT
-CTHL LEFT SHIFT
("I'HL U:FT SIlIFT
('THL LEFT- SIlIFT
'I'
+ and
-
D
S
I
C
W
H
5
9 6 3
0
H
B
TO TEI\CII IIOW TO SETUP I\ND USE THE CmlPUTEH
TO INCREI\SE I\ND DECREI\SE KEYBOI\RD I\UIJIO FEEIJIlI\CK
TO Sm<l' IJIUVI': 1\: 1'0 11IUVI:: Il: [I\ND BI\CK I\Gl\lNJ
TO CIIANGE TilE LCD COLOR PI\LETTE ON TilE SCREEN
TO INVERT TilE BLI\CK/WIlITE ON TilE LCD
TO TOGGLE B~rWEEN UNDERLINE I\ND BLOCK CURSORS
TO SEE TilE WOHLD CLOCK
TO I\CT1VI\'l'E TilE RE~10TE TERHINAL HOllE
TO INCHEASE, PIIESET, OR DI':CIIEI\SE SCI<I':EN CON'l'HI\ST
[IN TIlE KEYPAD] FOR HACKLTGIIT lIl', MIDDLE, DOWN
TO TOGGLI BACKLIGHT ON/OFF
TO SELECT THE LCD OR EXTEIINA], HON1TOil DTSPLI\Y
TO ClIECK TilE BATTEIIY LEVEL
I
B. Switches
There are three switch blocks, each containing eight slider
switches, located in the modem compartment on the left side of
the computer:
Remove the cover to see the switches:
These switches are set at the factory, and won't need to be
changed if you"re just starting to use your PHC-16.
After you
become familiar with your PHC-16 and want to tailor it to your
needs, or to add options, you may want to change some settings.
To change a switch, use a pencil, ball[>oint [>en, bent paper clip,
or other pointed object.
Always move the switch (jently, slidin(j
it up for ON or down for OFF.
The rest of this section shows the factory settings for each
switch block, and explains what each switch does.
PRESS ANY KEY TO RETURN ---
Tilis screen provides:
Switch Block 1
*
a summary of all the customizing ["eltures discussed ir
the previous section.
*
a diagram of all the switches and a list of what each
switch does.
You can see this screen whenever you want, eVI'[1 if you are usin(
application software.
When you are through usinq the help
screen, press ENTER.
Caution:
The switch settings shown on this S('I""n arC' FACTORY
SETTINGS.
They may not match the actual settin'),; of your
switches.
To see the actual settings, remove> tile' cover from th'
modem compartment and look at the switchc,,;. YO(Jr actual setting
will be displayed.
1
J..
OFF
2 : 3 .4 5 6 7 B
l' l' l' l' J.. l' l'
[Factory setting]
ON
A. MEMORY INSTALLED
SWITCH
1
2
3
256K
512K
OFF
ON
ON
OFF
OFF
ON
640K
Or ~lore
UN
ON
OFF
B. COPROCESSOR INSTALLEIJ?
SWITCH
4
YES
NO
OFF
ON
C. MONITOR TYPE & INITIAL SET-UP NUIJE
SWITCH
5
6
NONE
COLOR
40x25
COLOH
80x25
MUNO
80X25
ON
ON
OFF
ON
ON
OFF
OFF
OFF
2-3
2-2
Switch Block 3
D. NUMBER OF PHYSICAL DRIVES INSTALLED
SWlTCH
7
8
1
3*
4*
ON
OFF
OFF
OFF
2
ON
ON
OFF
ON
OFF
12345678
l' l' ..I.- l' l' l' l' l'
[Factory setti ngj
ON
(* Not available at this time)
---------------------------------------------------------------------
OFF
ON
SWITCH
--------------------------------------------------------------------1 Not used
---------------------------------------------------------------------
Switch Block 2
12345678
l' ..I.- ..I.- l' ..I.- l' l'
OFF
[Factory setting]
..I.-
Supplies power to physical drive
all the time.
May be required for
some software.
2 Only supplies power to physical
drive when needed.
Saves
battery power .
--------------------------------------------------------------------Second physical drive is external.
3 Second physical drive is
internal.*
'------------------_.
------
---------------------------------------------------------------------
Internal video RAM is not being
used (external must be available).
4 Internal video RAM is being
used.
---------------------_._----------------------------------------------
SWITCH
ON
01"1"
FONT SELECTION
1 Automatically take maximum RAM
for RAM drive (up to 360K)
Display memory allocation screen
on start up for manual allocation.
2 Allow RAM drive to be used.
Turn RAM drive OFF.
3 Do ROM & RAM check during
start up and display on LCD.
Skip ROM & HAM checking during
start up (saves time).
4 Use external video cards in
the expansion unit.
Use monitor throuqh I'IIC-16 LCD
or RGB & composit.e> jilCks.
5 Keep 24K of high RAM to save
last screen while performing
CTRL-Left Shift features.
Do not reserve HAM.
H('turn from
CTRL-Left Shift fC'iltlne',; to a
blank screen.
--------------------------------------------------------------------
6 720K RAM drive format *
360K RAM drive format.
--------------------------------------------------------------------
USA
5
6
ON
ON
TYPE 2
TYPE 3*
TYPE 4*
ON
OFF
OFF
ON
OFF
OFF
-------------------------------------
SWITCH
OFF
ON
--------------------------------------------------------------------
7 First optional bank of
internal RAM is being used.
External RAM is being used instead.
8 Second optional bank of
internal RAM is being used.
External RAM is being used instead.
(* Not available at this time)
7 Not used
c.
8 Not used
(* Not available at this time)
2-4
Audio I"eedback
Audio feedback is a beep that sounds whenever you press a key.
You can vary the volume of the beep from a clearly audible sound
to none at all.
To adjust the audio feedback follow these steps:
1.
Press the CTRL, Left Shift, and Plus Sign keys at the
same time and hold them down.
2.
You can hear a beep sound that increases in volume as
you hold the three keys down.
3.
Release all three keys and press any of the keys on
your keyboard. The beep you hear is called the audio
feedback.
If you decide you don't like this feedback,
you can decrease the sound again.
2-5
4.
To decrease or eliminate the audio feedback, repeat the
steps above except press the key marked with a minus
siyn (-) instead of the plus sign.
In other words,
press the CTRL, Left Shift, and the minus (-) keys at
the same time.
The beep decreases.
Release the keys
when the feedback reaches the volume you want.
You can also adjust the screen contrast. Press the CTRL, Left Shift
the numeric pad 9keye at the same time to increase the contrast. Pr,
the CTRL, Left Shift, and the numeric pad 3keys at the same time to
decrease the contrast. Press the CTRL, Left Shift, and the numeric
6keys at the same time to return to the default (middle: setting.
To Decrease Beep
To Increase Beep
This audio feedback adjustment works any time you are using
PIIC-16, no matter what kind of software you are using.
The
audio feedback setting is stored in the PHC-16 and remains the
same until you change it.
To turn the back-light completely on or off, press the C1'RL, Left S
and the numeric pad Okeys at thesame time. Every time you press thi
combination, the back-light will switch from being on to being off
being on again.
D. Screen Adjustments
1. LCD Palette
There are six LCD palettes, or settings, for character intensity.
Application software displays different shadcs and intensities
depending on how it's programmed and the characteristics of the
monitor used.
The palette adjustment lets you s('lcct the best
display for your PHC-16 LCD screen.
Keep pressiny CTRL, Left
Shift, and S to cycle through the palettes until you find the
best one for your software.
2.
3. Inverse Video
Press the CTRL, Left Shift, and I keys at the same time to switch
dark and light on your screen.
This is called inverse video.
Press these same keys again to switch it back.
Screen Contrast
You can also adjust the contrast on your screen.
Press
the CTRL, Left Shift, and Up Arrow keys at the same time to
increase the contrast.
Press the CTRL, Left Shift, and Down
Arrow keys at the same time to decrease thc~ contrast.
Press the
CTRL, Left Shift, and 5 (on the numeric kcypad) kcys at the same
time to return to the default (middle) settiny.
4. Cursor ShafJc'
Press the CTRL, Left Shift, and C keys at the same time to change
Press these
toe cursor from a blinking line to a blinking block.
keys again to change the cursor bclCk to aline.
I:.
\'Jorld Clock
\'iorld Clock lets you select and display, besides Greenwich
Time (G~lT), any 23 cities or locations in the world wlth
111"i c current dat.e and 24-hour time.
'I'll"
H",lll
2-6
2-7
YOll (' il()o,; I' ilnel se t your home time zone date and time, and def ine
II I IH'dt ; OilS as a plus or minus difference from GMT.
Choose
1111',11 ;""'; which are meaningful for you, such as places you do
)){':;; ll",;:;
or where friends or relatives live.
You must make any
"d Ill';IIII!'nl s [or Daylight Savings time changes.
The year is g.lven
,," lUll! diyits to allow for use into the 21st century.
I', "';'; 1 ill' C'I'I<L, Left Shift, and W keys at the same time to
dJ:;I,L,y the world clock screen.
For example:
d
I
[{"f] lE]
O]J
IGM'I')
1-01-1986
1-01-1986
1-01-1986
1-01-1986
1-01-198 6
1-01-1986
1-01-1986
1-01-1986
1-01-1986
1-01-1986
1-01-1986
1-01-1986
1-01-1986
1-01-1986
1-01-1986
DATE:
DATE:
DATE:
DATE:
DATE:
PAHIS
CAIR.O
t-l0SCOW
HAlJRITIUS
DATE:
DATE:
Kl\Hl\CIII
BOt'-lBl\Y
DACCA
I3ANGKOK
DI\'l'I:::
DATE;
[)A'l'l:::
PEKING
DNl'E:
YOKOHAMA
r.1ELBOlJPNE
Dl\TE:
DATE:
KlJR I L ISLANDS
DATE:
i\UCKLAND
DATE:
SIV10[l,
l!otJ()]'ULU
I\rJCIIOIl:1\GE
SAN F!U\tJI"": 1 seQ
[))':NVl::H
CHICAGO
ATLANTA
H[O DE ,JANEIRO
TU HE'l'UIW,
t
DATE:
12-31-1985
DATE:
DATI:::
12-JI-1985
12-]1-1985
12-11-1985
Di\'!'C:
DATE:
TINE:
TIME:
Tlr-1E:
TIM!::::
TIME:
'1'11-1E:
'1'ulE:
TIME:
Press ESC to return to the World Clock display.
7:00:UO
8:00:00
9,00,00
10,00,00
TlI'-IE: 11,00,00
TIt-IE: 12,00,00
TIME: 13,00,00
TIt-IE: 14,00,00
1'11'11::: 15,00,00
TH1E: 16,00,00
Tlf'.lE: 17,00,00
TIME: 18,00,00
TIHE: 19,00,00
Tlf'.lE: 20,01),00
1'J ME: 21:00:00
F. Using PHC-16 as a Remote (Dumb) Terminal
TH-IE:
'I'll-IE:
'rIrvlE:
12-11-19~5
12-31-1985
12-31-1985
12-31-1985
12- 31 ~ 19 8 S
TIME:
OR ~ '1'0 ALTI';I{ THE IIO)\1E TIME ZONE,
!lATE:
[l1l'i'E:
DfiTE:
The PHC-16 can be used as a remote, or "dumb" terminal, to
communicate with:
*
*
*
22:00:00
S TO
~;
L:: '1' THE
CLOCK
Press ESC to return where you were.
Press the Up or Down Arrow
keys to ch~nge the home location, indicated by the reverse video
bar.
To change lhe time or locations, press S and this screen appears:
I G"T I
LONDON
+ 1: 00
+ 2: 00
KARfIC!lI
BUMur\ y
+ 5:00
MEr.BOUI~NE
KUHIL ISLANDS
AUCKLJ\ND
Si'\/-HV\
IIClN()LULU
ANCHCHilGE
SAN FHANCISCO
[)I-:NV£R
CII1 ClIGLl
AT[,;\~JTA
BE:l~f'.tU[JA
RIO DI:: JANEIRO
MENU FOR SETTING THE WOHLD
0:00
+ 0: 0 0
t
Pl\PIS
Cl\lHO
MOSCOW
MAUIUTIUS
DACCA
Bl\NCKOK
PEKING
YOKOIJAt·1A
As you cycle through this list, the cursor moves to the
information to be changed.
If you want to return all items to the default values, press the
FlO key.
1,00,00
1,00,00
2,00,00
3: 00: () 0
4: 00: 00
5,00,00
6,00,00
6,30,00
TIME:
IlATE:
BJ:JH-l!JDA
ESC
Reset home time zone date and time.
Redefine city names
Redefine time difference from GMT
Use the Right and Left Arrow keys to change numeric values; type
in the location name.
Press ENTER to move to the next item to
update.
LONDON
PHE:SS
Press FI to cycle through the three things you can change.
These
are listed at the bottom right of the screen, and the active one
is highlighted:
3,00
4,00
+ 5: 30
+ 6:00
+ 7:00
DATE,
ESC . . . . . . . . RETUHNS
+ 8: 0 0
+ 9:00
Pl. • • . • • . . .
+ 1 0: 00
+ 11: 00
+12:00
~
-11,00
-10:00
- 9,00
- 8,00
- 7,00
- 6 00
- 5 aa
- 4 00
- 3 00
12-31-1985
MOVES
TO
TilE
TU1E:
CLOCK
A data retrieval service, such as the Source.
A mainframe computer.
Another PHC-16 or other microcomputer.
You must add the optional internal modem or an external modem
plugged into the serial port.
If you communicate with another
PHC-16 or compatible computer using a cable and not
telephone lines, you don't need a modem.
Press the CTRL, Left Shift, and R keys at the same time to
display the Remote Terminal screen:
COPY TO PRlNTER OFF
B/\UIJ
HATE
PARI'l'Y
1200
NONE
20:0():OO
STUP
Brl'(S)
WOIW
LENGTH
SEllll\L
PUUT
8 BITS
COM2 :
COPY OUTPUT
TO SCHJo;E:N
YES
YES
PIIESS
~ OH
~
TO CII(){)SF ]'l\Pl\I·1FTI H:~ j'(l!! ;;I:TTING
PHeSS TIlE SPl\CI':i1A!t TO CIll\Nl;l: Till': I'l\HAHJ,'I'I:I<~;
PRESS TIlE
RETURN KEY TO START CUl'lf'.llJNICA'I'lmJS
PRESS TilE
P
KEY TO TOGGLE COPY TO 'I'IIE I'HINTEH
ON/OFF
WOHLD CLUCK
TO TilE NEXT SECTION
RETURN •.••. MOVES TO TilE NEXT
Fl
PRESS THE
PRESS THE
PRESS THE
AND"7 ..•• ALTER VALUES
F2
FlO
DEFAULT VALUES
KEY TO l:X I '1' 'I'll I S PIWCHA)\l AND NOT [ll\NG UP
KEY TO EXIT TillS Pf{(lCHl\M AND HANG UP
KEY TO SEND A OREAK CODE
[ COt-lMONLY USED VALUES ARE, )
I'I'EH FOH UPDATING
FlO ....•... RESETS ALL PARAMETEHS '1'0 TIlE
BAUD
RI\TE
PARITY
1200
NONE
STOP
BITiS)
I
WU!W
Sl:H 1 AL
LENGTH
p()ln
8 BITS
COr-t2:
ZONE DATE AND TIME
REIJCflNE CITY NAMES
REDEfINE TIME DIfFERENCE FROM GMT [TOP CLOCK POSITION}
HeSET HO)\lE 'fum
2-8
LFIC!I FOB
HECEl vr-:D UATA
2-9
LFICH FOR
HECEI VtlJ DATA
YES
COPY UUTPUT
TU SCHEl:N
YES
Chapter 3
Traveling With PHC-16
PIIC-16 is a good traveling companion.
with the optional battery
power pack installed, it weighs only 14 pounds and is small
enough to take almost anywhere.
In addition, the optional built-in modem (see Chapter 6: Options) lets
you stay in touch with other computers when you are on the road.
This section gives you a few suggestions and cautions
traveling with the PHC-16 easy and efficient.
to make
A. Carrying Case
When you"re on the go with PHC-16, the optional carrying case
provides protection for the computer and makes it easier for you
to carry.
The convenient shoulder strap leaves your hands free.
Also, the
carrying case is designed with an outside pocket to carry
batteries or other equipment securely.
B. The Battery Pack
A battery power pack can be purchased as an option for PlIC-16.
It is installed exactly the same way as the AC power pack.
Caution:
Be sure to recharge the battery as soon as the red LED
light flashes.
If the battery discharges totally, you will not
be able to fully recharge it again.
To recharge the battery power pack, use the charger adapter clip
that comes with the battery power pack and the AC power pack that
comes standard with PHC-16.
The cilarqer adajJter clip connects
the battery pack to the lIC power [ldck.
You can fully recharqe the battery while in the PIIC-16 only when the
computer is turned off.
To recharqe the battery pack while it is in the computer, follow
these steps:
1.
Put the battery pack in tile PIIC-16 exactly the same
way as the AC power pack.
2.
Pluq one end of the Charqcr Clip into the computer on
the side to the right of the screen.
Clip the other
end onto the AC power pack.
3.
Plug the AC power pack into an electrical outlet.
3-1
*
WhilB thB baffBry pack is in thB
comput8r, charg. ft this way.
Plug the AC adapter or auto adapter into a power source
and the charge clip into the side of the computer.
Operate in this manner or exchange the discharged
battery for a fully charged battery and disconnect the
adapter.
OR:
*
D.
Save your data, turn the computer off and insert a new
battery.
Traveling Hints and Suggestions
*
When traveling with PHC-16 or moving it, always insert
the white cardboard protector in the physical drive.
This protects the physical drive from any damage.
Or, insert a scratch diskette turned 90 degrees.
When the battery power pack is not in the PHC-16 follow these
steps to recharge the battery:
1.
Put the clip on the battery and plug the other end of
the clip into the AC power pack.
2.
Plug the AC Power Pack into an electrical outlet.
While tho baffery pack is out of
the computer, charge ff this
way.
Cllr1l91"
*
When you travel by plane, carry PIlC-16 with you.
NEVER CHECK IT IN BAGGAGE CLAIM!
*
Don~t leave PHC-16 in a parked car for long periods if
the temperature is either very hot or very cold.
The
screen display llIay not work if i t has been in extreme
temperatures.
If this happens, let the computer return to
normal room
telllperature (which might take about an
hour) before using it.
*
If you need to ship PIIC-16, pack it in the box that it
came from the factory in, if possible.
*
Dropping the PHC-16 or hitting it sharply may damage
the LCD screen or ,,!lys i (',1 I elr i ve alignment.
Your
warranty will not cover ilbuse.
ClI{.J
Cl'''-----
- - - - - - -------------_._--It takes about three hours to recharge tIl(' I>dll ,'ry pack.
If you are
recharging the battery while it~s in the 1'11("-1("
you can charge
to only 85% of capacity.
It is best to let t)", IJdltery discharge
to 10-15% of power capacity frequently ber()),· ,"chil)qing.
C. Battery Indicator
Immediately under the LCD screen is a SIlIil11 r,'d indicator light.
The light begins to blink when the batt"ry i" low.
Press the
CTEL, Left Shift, and B keys at the Selllle tilll(' to see the
percentage of power capacity relllaininq.
There are two ways to keep your data safe elS power declines:
3-2
3-3
CHAPTEE 4:
OPEEATIONS
======================
A.
Using DOS
1. What is DOS?
In Chapter
you learned about how data is stor0d in your
PHC-16. From your viewpoint, your data is handled quickly and
efficiently. However, keeping track of hundreds of thousands of
characters is no easy task. Tile operating systern nllist Illanage both
data and data transfer in the computer.
Your PHC-16 uses Microsoft Corporation"s Disk
which is also called MS-DOS, or just DOS, for
of several lJrograms which allow you to manage
run software written for the MS-DOS Operating
2.
Operating System,
short. DOS consists
your elata and to
System.
Inserting the DOS Diskette
Before you begin to use your PHC-16, you must load DOS into
internal memory. Remove the DOS diskette from your DOS manual,
and insert i t in the physical drive with the notch up and the
label [acing backward. Notice that the DOS diskette has no write
protect notch. This keeps i t from being written over and
destroyed.
Slide the diskeffe into the disk
drive unlil it clicks. Then press
the lillie square buffon unlil it
clicks.
Turn the.' !'owC'r un zlnd DUS will luad into ;llt"III,11 1I1"lIl(lty. Thi
is
called sta,ting the computer. It is "I c;U ('" I I I,d hUIII; nq.
Starting WIth the computer turned off I,; ('"II('d " ('!)leI huut.
Pressing the reset button performs ,1 ('(lid I)()II( \vitil()UI Itdving to
turn the on/off switch OFF and UN aqCllll.
IJurJll1j d ('(lld iJoot, all
data in 1-<.[\["'1, which includes workiTlq :-~t()1 '](j( ,llld ! 11(' !<!\H drive, is
lost.
You may, at any time,
restart with til(' "(llllpuLec runnillq by
4-1
pressing CTRL, ALT and DEL simultaneously. This is called a
warm boot. Caution: restart only when necessary because you
will loose any data in working storage; you will not, however,
loose any data in the RAM drive.
,
backspace
After a few seconds, DOS loads and displays the date and time.
DOS takes these from the PHC-16 internal clock.
If you want
to change the date and time, change them through the World Clock,
or using the Clock Tests option from the Diagnostics diskette.
You can't change them in DOS.
Press ENTER when you finish typing
line
(such as a command) and want
send it to DOS.
ENTER
%
a
to
This key will erase what you have
typed, one character at a time, by
moving the cursor left over what you typed.
ESC
When you make an error while typing a
response,
press ESCape to cancel
the
line and start over. DOS will display a
/ on the canceled line and go to a new
line for your response.
CTRL and
NUM LOCK
Use these keys to stop the screen from
scrolling the file when using the TYPE
command.
Right Shift and
PRT SC
Press these keys at the same time to
print whatever text is displaying on the
screen. Your printer must be connected
to your PHC-16, turned on, and online. This DOS function will work with
many application software programs too.
DOS displays this prompt:
A>
This is called the
physical drive) is
This is called the
Drive A unless you
A prompt. It means that Drive A (your
the drive that DOS will read from or write to.
default drive because DOS will work from
tell it otherwise.
The ">" in the prompt means that DOS is waiting for you to enter
a command or file name following the >.
You may change the default drive from the physical drive to the
RAM drive. At the A>, type B: and press ENTER. DOS will then
display the B prompt:
B>
This means that DOS will read from and write to the RAM drive,
until instructed otherwise.
You'll learn more about why this is useful later in the chapter
under DOS Commands.
CAUTION: Before you continue to work with DOS, make a working, or
backup, copy. Then, if you accidently damage your diskette, your
DOS master will still be intact. See the section "Making a Backup
Copy of Your DOS Diskett~e" toward the end of this chapter for
step-by-step instructions.
C'l'RL and BREAK
Press these keys at the same time to end
the current operation and return you to
the A>.
C. Summary of DOS Commands
Earlier in this chapter you learned that DOS is a data manager.
DOS organizes data into files. You name the file, and DOS
assigns storage space in memory or on a diskette.
DOS organizes your data in a way similar to the way you would
organize data in a filing cabinet. Each drawer contains file
folders that contain your data--sometimes a )la'll' or two, and
sometimes many pages. You organize the folders in some logical
way, and label each file folder and file drawer so you can find
your data easily.
B. About the DOS keyboard
UsuallYA'ou~will
use the standard keyboi'lrd functions for DOS that
you learned aJ)()ut in Chapter 1. Tili s i nclu(k,; t il,' kl'YS for
letters, numbers and special charltctcrs.
DUS
dO('SII't
differentiate between upper or lower case lett('rs
and file names, so you may use ei ther and 'If't lh"
lIere are some of the special keys you will
DOS manual for a complete list.
4- L
DOS puts your data into computer files and stores them in a
logical fashion either in memory or on a disk('tt('. DOS maintains
a directory on each so it can casily retrievl' your data.
US"
for
SillllL'
with
cOll1llldnds
resu I ts.
I)()~;.
Sr'e your
Every file must have a name. On a diskl'tt(', or in memory, no two
f i 1 es can have the same name. Two f i 1 es ,"ay have the same name,
however, if they are on different diskettl's, or on one diskette
and in memory. In your file cabinet, for exa!ll[,je, two files
call cd ((miscellaneous (( would be OK i ( on,- werl' in the drawer for
household expenses, and another was in the drawer for business
expenses. If they \-Jere in the same drawer, however, you couldn't
tell" them apart.
4-3
The nLlme you give to a file in DOS must follow this format:
FOm'lA'l'
xxxxxxxx.yyy
where xxxxxxxx is the filename from 1-8 characters, Llnd
yyy
is the extension from 1-3 characters.
Tile filename and extension may consist of
Before you can use a diskette, DOS
and tracks, and set up a directory
writes on the diskette. The FORMAT
The l"OHf'IAT cOlllmand must be in this
FOHMAT ld: ]I/S]1/8]l/v]I/B]
o the letters of the alphabet
() th" numbers 0 through 9
o these special characters: $ & @
%
)
-
{
'rhe filename and extension may not contain blanks and must be
separated by a period. For example, NEW-1'lEMU.DOC is valid while
NEW MEMO DOC is not.
Evcrything in brackets is optional, but allows you several
options in formatting. Here"s what they mean:
d:
Drive designation of the diskette you want
formatted. With a one-drive system, this will
always be A (the RAM drive is formatted
automatically). Leave this option out if you are
working from the A>.
IS
This option will copy th,' ,3ystem files (the files
DOS uses to start your PHC-16) onto the formatted
diskette. This is very helpful when you are using
application software, like a word processor. If
you copy the application programs onto a diskette
formatted with the system files, the diskette
becomes self-starting. This means that you don"t
have to start with the I)US diskette and tlien take
the DOS diskette out and put the application
diskette in, because everything you need will be
on the same diskette.
18 or 18
If you don"t usc th,'s" options, l)(lS will format
the diskette with 'J sectors, or l60K tot,,!
capacity. Howevrt, if you tricd to u"e these disks
with DOS 1.0 or I. I, th,',;e carl irr versions of DOS
couldn"t rt'ilcl the di,,;k,'t-t-e. IJsinq 18 or III tells
DUS to forIllClt th(> cli'3kt'tt-(, with oilly e ,;('ctors.
'['his 1 imi ts stord,!" (,"I'ilf'i ty to 3201<, but allows
the diskette to he rr'<HI hy <Hly vt'rsion of DOS.
IV
This option allows y()U tu ,'nt,'r an 1 I-character
volume nZlme for the di,;k"ttc', providing you format
the diskette for 'J s('ctors.
1. DOS Commands
Al though your DOS manual discusses the DOS cOIllmClnds in detail,
here are some of the common commands that you"l I use often:
FORMAT DIR -
sets up a diskette so i t is ready to receive files.
list all the files on a diskette or on the RAM disk.
DISKCOPY and COpy -
copy a
file or files from one location to another.
ERASE - erases a file or files from a diskette or the HAM disk.
TYPE -
displays the contents of a
must divide i t jnto sectors
so it can find the files it
command tells DOS to do this.
fOrlll:
file on your screen.
The following [Ji"JC'S briefly describe
()ption~; drc' ~;hown in brackets. These
but provic1,> flexibility in usinlj the
cOInmunly u:-'I..?d options arf~ discussed;
complete description.
how to usc these commands.
options arc not required,
cOillillands. Only the most
see your DOS manual for a
Al though til,> names of the commands arc printed here in caps so
they stilnd out on the page, you may type them in either upper or
lower cae;" It,ttct's. lJptions are shown in brackets to indicate
they arc !lot required. \~hen you ty[Je the cOIllIIlilnd, do not enclose
the option c; in brackets!
Leave a space between the command and
options, but don"t leave spaces between options. Finally, after
you type the" cUIl1I1lZlnd and options, be sure to press ENTlm.
For example, entering, at the A>, F(ll,~I/\'I' I,;/Il will format a
wi th ci'lht sectors and '<Ii 11 COIlt.1 i II the> Systl'Il1 file's.
di~;kette
When you usc a file name with a command, you may spC'cify a
specific file, or you may specify a series of files by
substituting a special character for illl or a portion of the
filename and extension. These special characters are cal led
wildcard". The most commonly used wiJdcLlrd is the asterisk (*).
You"ll see how to use this character in the next few pages.
4-4
1\- 5
DISKCOPY [d:]
DIE
d:
The DIE or directory command displays the names of all the files
stored on a diskette or on the RAM drive. The DIR command has
several handy options:
DiP [d:] [filename[ .ext]] [/W]
Typing DIE alone lists all the file names on the diskette or on
the HAM drive, in a single column.
d:
[d:]
The first d: is the drive you are copying from,
or the source drive. The second d: is the
drive you are copying to, or the target drive. If
you are using Drive A for both, omit these options.
COpy copies one file, or using wildcards, a series of files, from
one diskette to another. Although there are many options that can
be used with COPY, the most commonly-used format is:
COpy [d:] [filename[ .ext]]
d:
d:
filename [.ext]
/1,/
[d:]
specifies a drive other than the default drive.
allows you to display specific file names,
or, by using a wildcard, specific groups of
file names.
For example, DiP *.BAS would
list all file names with an extension of BAS,
and DIR JAN*.* would list all file names
starting with JAN.
is the drive you are copying from. Omit it if
you are copying from the default drive.
filename[ .ext]
is the name of the file you are copying. You
may name a specific file to be copied, such as
MEMO. DOC. You may select a series of files to be
copied, such as *.BAS (all files with the
extension of BAS). Or, you may copy all files by
using *.* as the filename and extension.
lists all file name's in five columns across
the screen. This lets you display a large
directory on a single screen.
d:
is the drive you are copying to, or the
target drive.
DISKCOPY and COpy
These commands copy files from one location to another. With a
PHC-16 with one physical drive, you can copy from a diskette to
a diskette, fr~om a diskette to the RAM drive, or from the RAM
drive to a diskette'.
Copying is one of the most frequently performed tasks you will do
with DOS. Backing up your data and your application programs is
critical. Your data is always subject to accidental loss, and
diskettes may be damaged and eventually will wear out.
Copying files also allows you to keep one copy of a data file as
a master file, and use another copy as a work file. And, copying
allows you to organize files on diskettes to meet your own individual
needs.
DISKCOPY copies the contents of one diskette (or the RAM drive) to
anotiler diskette, exactly as they are on the first.
Since
IHSKC()PY fOrITlilte3 as it copies, it era~;cs all data on the diskette
(or RAM drive) you are copying to.
Be careful!
Using the COpy command can get complicated and confusing. If you
have any doubts about what you want to do, see your DOS manual
before you try it!
EEASE
EEASE (or DEL) removes files from your disk. The format is:
ERASE [d:][filename[ .ext]]
d:
is the drive where the file you want to erase is
located. Omit it, and DOS will look on the default
drive.
filename[ .ext] is the name of tile file you want to delete.
As with other comlllilnds, you may use a wildcard to
erase a series of fi les, but use extreme caution!
For example, typing ~lEH()*. * will erase all memo
files, but there 111<1y he a ~lE~lO file" you wanted to
keep, and you may not realize it until it"s too late.
Use DISKCOPY to backup your data files at the end of each work
session.
When copying to the RAM Drive, you must have
allocated a full 360K to the RAM drive for DISKCOPY to work
properly.
Use the format:
4-6
4-7
D. Making a Backup Copy of DOS
'l'YI'/<:
'J'Yl'lo
of
~
TY!'J':
[d:] [filename[ .ext]]
Now that you have read about several DOS commands, you are ready
to use these commands to make a working, or backup, copy of your
DOS diskette. Follow these steps, and besides making a copy of
DOS, you can practice using the commands and see how DOS prompts
you to swap diskettes into and out of the physical drive.
d:
Use the DISKCOPY command to copy your DOS diskette.
i.s i't very useful command, because it displays the contents
file. Use the form:
is the drive on which the file is located.
filename[ .ext] is the name of the file you want to display.
1. At the A>, type DISKCOPY.
The file scrolls from beginning to end automatically. Use the
C'J'FL and NUM LOCK keys together to stop the file [Tom scrolling.
Press any key to continue.
2. DOS prompts you with this message:
A Final Word About DOS Commands
3. The DOS diskette is the source diskette. Place it in the
physical drive if it is not already there. Press any key.
I[ you look at the directory of the DOS diskette, you"ll see a
list of filenames that match the commands discussed in the
previous pages. These files contain programs thi'tt perform the
functions described under the commands.
4. DOS displays this message to let you know it"s copying:
Insert source diskette in drive A:
Strike any key when ready
Copying 2 side(s), 9 sectors per track
5. After a few seconds, DOS prompts you again:
DOS commands are of two types: resident and non-resident, or
externa l. When you start the s ys tem with the DOS di sket te, some
of the commands, or program files, are loaded into memory. These
are called resident commands, because they reside in memory and
will run without having the DOS diskette in the physical drive,
or loaded onto the RAM drive.
DIR, COPY, ERASE, and TYPE are all
resident commands.
Other DOS commands are called external because they are not in
memory and will run only if you have the DOS diskette in the
physical drive, or have the program file loaded into the PAM
drive. ~ORMAT and DISKCOPY are external co~nands.
Insert destination diskette in drive A
Strike any key when ready
6. Remove the DOS diskette from the physical drive, and insert a
new diskette in the drive. The new diskette is the destination
diskette. Press any key.
7. DOS displays another status lIlE'ssage:
Formatting tarqct while' copying
Since you are using il rll'W d ",kt'tte, DOS must format it before
copying files onto it.
8. lIfter a few seconds, LJue;
pnllllpLs
you again:
Insert source diskett,· in clrivl' A:
Strike any key when rl'ilciy
Y. FC'lllove' the new di~;kctt<' fl()lll t~I[(' jJhy,;icul drive and insert
the DUS diskette. Press <lily k,'y·
10. After a few seconds, !JUS
InulllpL"
y()U
again:
Insert destination diskette' in drive A
Strike any kc'y when reacly
11.
neIllOV(~'
the
4-8
n~w
the DOS diskette frolll the physical drive and insert
diskette. Press any key.
4-9
12. Alt"1
tit
i.'-;
il
few seconds, DOS finishes the DISKCOPY and displays
Illl'SsClge:
('()py complete
('opy another disk (YIN)?
I l. 'I'YI'"
n ilnd DOS returns to the A>.
'I'" IIlolk,' sure that the new diskette is good, compare the two
d l,;k"ttE'S with the DISKCOMP command:
I. At the A>, type DISKCOMP and press ENTER. DOS displays
this prompt:
Insert first diskette in drive A:
Strike any key when ready
The DISKCOMP may find errors in certain tracks and sectors
your new diskette. If this happens~ use the FORMAT command
reformat the new diskette. If DOS finds bad sectors, throw
diskette away and FORMAT a new diskette until you find one
formats without bad sectors. Then repeat the DISKCOPY and
DISKCOMP steps above.
on
to
the
that
Making a Working Copy DOS diskette - Alternate Method
Another way to make a working copy of your DOS diskette is to use
the RAM drive (full 360K) as an intermediate repository. This
means you must first copy the DOS diskette to the RAM drive and
then copy to the new diskette, but it reduces the diskette
swapping required by only using the physical drive. Here"s how it
works:
1. At the A>, type DISKCOPY A: B: and press ENTER.
2. Insert the DOS diskette in the physical drive and press any key.
2. DOS prompts you with this message:
3. DOS displays this message:
Comparing 2 side(s), 9 sectors per track
Insert source diskette in drive A:
Insert destination diskette in drive B:
Strike any key when ready
4. After a few seconds, DOS prompts you again:
3. Insert the DOS diskette in the physical drive and press any key.
Insert second diskette in drive A:
Strike any key when ready
5. Remove the DOS diskette from the physical drive and insert
the new diskette. Press any key.
4. DOS displays this message to let you know it"s copying:
Copying 2 side(s), 9 sectors per track
When DOS finishes copying, it will display this message:
6. After a few seconds, DOS prompts you again:
Copy complete
Insert first diskette in drive A:
Strike any key when ready
7. Remove the new diskette from the physical drive and insert
the DOS diskette. Press any key.
Copy another disk (YIN)?
5. Type N and DOS returns to the A>.
6. Type 13: and press ENTER to "h<111,)"
t)w
default drive to B.
8. After a few seconds, DOS tells you that it's finished:
7. At the B>, type DISKCOPY ll: A: ilnd press [eNTER.
Diskettes compare ok
8. DOS prompts you with this
ll]('SS""l":
Compare another disk (YIN)?
9. Type n and DOS returns to the A>.
This new diskette nO\-1 becomes your ,'1orking Copy IJ()'; d iskotte. Put
the master DOS diskette back in the DOS 1lI"nu<11 i1llel kr'cp it in a
safe place.
4-10
Insert sourco diskette in drlV,' l\:
Insert destination diskette in drive A:
Strike any key when ready
9. Remove the DOS diskette from the physical drive, insert a new
diskette, and press any key.
4-11
III.
1111:
cil"I,I"y"
""1,',,111'1
\,.11"11
III
I:;
this message to let you know it's copying:
2 side(s),
Iinishes,
<)
sectors per track
i t displays this message:
F.
Using BASIC (Not Included with PHC-16)
BASIC is a programming language that lets you write your own
programs. If you want to use BASIC to write programs, skip this
section and go directly to the optional Microsoft BASIC manual.
BASIC for the IBM and COMPAQ computers will not run on the
PHC-16.
You must buy GWBASIC, Better BASIC, or some other
generic BASIC that does not depend on BIOS ROM code for
identification or support routines.
('''I'Y ,lnother disk (YIN)?
I I. 'I'YI" - N and DOS wi 11 return to the B>.
I.'.
'I'Y!'" !\: and press ENTER to change the default drive to A.
'I'll I.' ('Ollip I etes the copy ing phase. Follow the 01 SKCOMP
I II:; I I'ue t ions above to make sure your new worki ng copy of DOS is
(Jk.
I:.
Ih;inq the PAM Drive
l'IIC-16 RAM drive works like a second physical drive, so you
a two-drive system. We sUCJCJest that, when
yuu run normal application programs, you follow these steps:
There will be times, however, when you may want to run BASIC
programs that are already written. This section introduces you to
BASIC and shows you how to load and run BASIC programs.
Caution: Before you begin using BASIC, be sure to make a back-up
or working copy of your BASIC diskette.
To use BASIC, start the PHC-16 with DOS. Pemove the DOS diskette
from the physical drive and insert your working copy of the
BASIC diskette. At the A> prompt type BASICA and press ENTER. This
screen appears:
Ildve tile versatility of
I.
L.
l.
4.
5.
G.
7.
8.
LOiH] D()S into the PHC-16.
Rcmov" the DUS diskette.
Put thee application diskette in the pilysical drive.
Copy the proCJrams into the RAM drive usinq COpy or DISKCOPY.
Remove the application diskette from the ~hysical drive.
Put the data diskette in the physical drive.
ChanCJe til(' default drive designation to B, the R!\~l drjve.
You are now ready to start.
GW-BASIC 2.02
(C) Copyright Microsoft 1983, 1984
xxxxx Bytes free
OK
Tilis puts your application programs on tile R!\~l drl VII where they
will run faster and allows the PHC-16 to read illHI write your
data to the diskette.
\'iilen you arc a,;ked for r i 1 e names by the a[!pl I c" 1'1 Oil program, be
sure to include the drive desiynation as ['drt or tllf- filename.
For example, suppose your word processor is ill IJrive- B (the EflM
drive) and your data diskette is in DriVE' A (Ill<' pilYc;ical drive.)
Your word processor asks you what file you Willli ICl ,-clil:. The file
you want is called ~ll-:~lO.DOC and is on your dald dlskl,tte. Type
!\:MEMO.DOC.
Caution:
Your application [)royram 'rnay be CUI}Y-PI ull'ctcd to
prevent piracy. This will usually prevent YUll I IllIII usiltcJ the HA~l
drive as we have just described. Always [o11uw til<' In,;til1lation
instructions that corne with your applici1tloll I,roqlilili.
ILIST 2RUN<
OSCEEEN
3LOAD" 4SAVE" SCONT<
6,"1.PT1
7THON<
8TROFF<
9KEY
Notice that the DOS 1'1> prompt no lon<]cr il[>[>cars. BASIC has it's OWll
prompt to tell you it"s ready for your response. The BASIC prompt
is OK with the cursor on the line below it. Make sure you begin
typing at the BASIC prompt.
Lllok at the numbers at the bottom of the screen. These numbers
,'ur I('spond to the function keys, and show the BASIC commands that
011"
programmed for each function key. The only function keys you
ll,-,-d tll load and run BASIC programs are F2 and F3, RUN and LOAD.
4-12
4-13
1{"III"V"
(1.11" d
I
t 11<' BASIC diskette from the physical drive and insert your
sb'Lle containing the BASIC program you want to run.
~;I1f'I'():;"
it's a game with the file name FUN.BAS. Before you can
At the BASIC prompt, type
].()j\IJ"I"IIN and press ENTER. BASIC will load the program and
, , ' t l l t l l to the BASIC prompt.
Or, if you want to use the function
k,'y:;, cit tl!,c 13ASIC prompt, press F3. BASIC will reply with
].(1/11)" dIll1 the cursor will be after the ". Type FUN and press
lUll
til(' program you must load it.
1':NTI':1< •
CHAPT·ER5
T() run the program, type RUN and press ENTER or press F2.
IIIISIC will run your program. When you exit your program, BASIC
I,'turns to the BASIC prompt.
Wl!0n you are through using BASIC, put the BASIC diskette back in
till' physical drive. Type SYSTEM at the BASIC prompt and press
ENTEF.
BASIC returns to the DOS A> prompt.
Some programs, especially games, use 40-column displays rather
than SO-column. When you exit the BASIC program and return to the
13ASIC prompt, you may see a large OK and no function key commands
listed at the bottom of the screen. This means you are still in
thC' 40-column display mode.
But you can continue to use BASIC
commands and function keys as with the BASIC screen, even though
the function key identifiers do not appear at the bottom of the
screen.
If this happens, and you want to return to the BASIC
screen, insert the BASIC diskette in the physical drive, if it is
not already there, type SYSTEM and press ENTER to return to the
A) prompt, and type BASICA and press ENTER to reload BASIC.
For more information on BASIC, see your BASIC manual.
4-14
Pro 11 I e rr,
Sol
'I
n 9
Chapter 5
Problem Solving
PHC-16 is a solidly constructed and thoroughly tested computer
that should give you years of trouble free operation.
However,
as with any equipment, things can go wrong.
If your PHC-16 is
not operating properly, you can check a number of functions
yourself.
A. Check These Things First
If your PHC-16 fails to turn on, check these things first:
*
Is your computer plugged into an electrical outlet?
*
Are both the on/off swi.tch on the back of the
and the switch on the power pack turned ON?
*
Is the memory board plugged securely into the connection?
The black part of the plug must completely cover the
gold-colored prongs.
Sometimes you have to press hard.
*
Is the screen adjusted so you can see the memory
partition screen?
*
Is tile palette boin') used visible? Pre'ss the' CTRL,
Left Shift, and S keys at the same time to cycle
through the palettes and choose the best one.
*
Is the PHC-16 in til" C'xte'rnal monitor mode? Press the
CTRL, Left Shift, and M keys at the' same time to turn
the external monitor mode on or off.
PHC-16
If your PHC-16 has been operating and suddenly stops, che'ck
these things first:
*
Is the k€'yboard infrarl'cl
the cornpu tc r '?
*
If you arc using i1 iJattery f,()wer [Jilek, has the battery
run down? The li'jht on YO\lr computer just under the
screen comes on to warn you tllilt the battery is low.
*
If the red light on til(' keyboard does not come on when
you press a key, th(~ keyboard batteries need to be'
rq)laced.
Follow the instructions and diagrams in
Chapter 1 for installing batteries.
*
Sometimes application software will "lock up."
Press
CTRL and BREAK keys at the same time.
This should
return you to the A) prompt.
b"illll
still pointE'd directly at
If this doesn"t work, restart by pressing the CTRL, ALT,
and DEL keys at the same time.
Make sure you have a
5-1
DOS diskette or self-starting application diskette in the
physical drive before you restart.
This erases
everything in working storage but keeps all data on the
RAM drive.
Return to your application and continue.
If this doesn't work either, press the reset button.
This returns you to the memory allocation screen, but
erases everything in both working storage and the RAM
drive.
CHA.Pl~EF:::6
B. Memory Test
This is a special
ROM or RAM memory
Turn switch SW2-3
This screen shows
test that allows you to see if any of the
chips in your PHC-16 are not working properly.
ON and the tests will be run during start up.
the condition of your memory chips:
* * * * * BIOS ROM USERS ION BPII * * * * *
* * * * * ROM TEST PASSED ··RAM TEST IS NEXT * * * * •
• * SET DIP SWITCH SW2-3 OFF TO SKIP TIIESE TESTS * •
* * * * * * PRESS THE 'ESC' KEY IF YOU WANT TO RESET
ALL SYSTEM PARAMETERS * • * •••
• * * * * * * PRESS ANY KEY TO CONTINUE. * * • * * •
SELECT THE RAM CONFIGURAION PRESENTLY INSTALLED
o~
256K
1~
512K
2 ~ 768K
3 ~l024~
4 ~1280K
2561{ OF
J{A~l
J{A~l
ON Till,:
~I'\IN
!l()I\IW
MUST 13E EXI\CTLY AS CIIOWN!'
Since this test takes considerable time, you may want to use it
only when you suspect your memory may be malfunctioning.
Keep
switch SW2-3 OFF for normal use.
5-2
Opt
on'. . .
Chapter 6 Options
A number of options are designed specifically for use with the
PIlC-16. These are described briefly here, but specific
instructions for installing and operating them come with
the individual options.
Also, PHC-16 is completely compatible with the IBM PC.
Printers
or
"mice" designed for use with the IBM PC can also be used with
the PHC-16.
A. Add-On Physical
(Diskette) Drive
PHC-16 has an optional second 360K byte physical drive that
attaches directly to the back of PHC-16.
with the add-on drive
your system becomes a two physical drive system.
Affach the second disk drive
like this. Don't target to
change swrlch SW2·5 to ON.
1. How it Ivorks
To attach the add-on physi.cal c1r';v(',
follow these steps:
1.
I\tLach the connc(;tor ],1 <It (' 1.0 the back of the PIIC-16 by
putting the hooks on til<' plat<' into the slots on the
back of the PHC-16 case.
2.
Attach the add-on physical drive to the plate with the
knobs on Lhe plate anc1 th" slots on the back of the
add-on.
6-1
\.
4.
'I'dkc the connector that is attached to the add-on
1>11 y" i ca 1 dr i ve and insert i t into the expans ion port on
til(' back of the PHC-16.
Chdnye these switch settings:
Switch SWl-7 must be OFF
Switch Swl-8 must he ON
Switch Sw3-3 must be OFF
However, if you buy the 512K expansion (768K total I. you may want
to add memory at some time.
You must use 256K chips, and must
add memory in banks of 256K at a time.
N()w wlH'n you use any software, the add-on physical drive can be
u'i"d and identified as the C drive.
For example, if you put a
wurd processing program in the A drive, you could put another
dic;k!'tte i.n the add-on physical drive and instruct PHC-16 to
,:reate your text files on the diskette in the add-on physical
drive.
Identify the add-on as the C drive.
Il.
If you buy additional memory, it will be located on an expansion
memory board in the memory compartment on the left side of the
PHC-16.
If you buy the full 1024K expansion (for a fully-loaded
PllC-16 of 1280K, or 1.25 MEG, total) you will probably never
need to remove the memory board.
Open the cover to the memory board compartment on the left side
of the computer:
~---------------------
Modem
PHC-16 offers an optional internal modem that is Bell 212A
Standard.
It can communicate at either 300 or 1200 baud.
It
features auto-dial, auto-answer and re-dial.
It accepts Hayestype commands and is bundled with the co~nunications software
Crosstalk XVI.
The PflC-16 built-in modem is easy to usC'.
Install it in the
modem cOlll[Jartment on the left side of your computer (just below
the memory slot).
It adds little weight to the PHC-16.
C.
.-
__
- -_._--- . . _ - - - - - - - - - '
Expdnsion unit
The
optional
expansion unit allows you to use up to three IBM PC
compatible expansion boards, and can be purchased with or without
a 10 megabyte hard drive.
If you use the expansion unit to run a monitor, be sure to turn
switch S\,2-4 UN.
If you use the expansion uni t to add mC'mory,
switch SW3-7 or SW3-8 (or both) UFF.
To remove the memory board and install more memory chips,
these steps:
1.
Turn OFF all power to thC' PflC-16.
2.
After ol?eniny the cover, disconnect the board
by gulllny the wilill' l'lc1stic tab a little to your left.
You 11 be able to tel I when the board plug lS
disconnected.
3.
Now,
be ''In!' to turn
slide the whull' I1ll'llIC)ry board out.
When the: J /0 box if; w"-'d t.o "up!'l Y )l()wel' to 1/1(: I'f1C-l6, makE'
Caution:
sure the power adaptor has been disconncct.ed. Vai 1\11'" to do so is
dangerous and may cause damage to the pOWl'!' ",i"pt.Ul'. J r the: adaptur is
dE'mcged bue to this negligence, the maker- if; !Cut. l'e<Jpow;ible for
replacement, even if the damage occurs during thc warranty period.
lJ.
Expi1ndiny i lelllory
I'IIC-1G cOllies with 256K bytes of I1lC'11l0t-y altC'ddy instill lcd, but
tilis can be expanded to 1280K.
You can buy your PHC-16 with an
additional 768K or l024K.
6-2
follow
6- 3
Tilt, 11I""1<J! Y [)(",rd really contains two individual boards bolted
t'''I"tll''I.
If you bought 512K of additional memory, the lower
1)().lId will be filled with chips and the upper board will be
'·"'I.ty.
'I'hl' empty chip sockets are in two rows and are numbered
I·fj .lIld
'J~16.
H·'",,'lY 'iln only be increased in 256K increments by filling
up a
wllt,[ ,. row o[ eight sockets at a time.
Be sure to use only 256K
"h i I"'·
1 nstall the first row of chips in sockets 1~8.
If you
"iso install a second set, use sockets 9~16.
'1'0
install new chips, follow these steps:
1.
2.
Here"s a summary of possible memory combinations and appropriate
switch settings:
The pins on your new chips are usually spread apart a
little too much.
Before inserting, press the
pins in slightly.
Now, insert the chip on the board in the correct slot
as shown in this illustration.
Pr8SS th8 chip on th6 board in
th8 d8sir8d slot. Mak8 sur8
that th8 chips aro all ins8rt8d
facing th8 sam8 dir8c~on. Th8
tops (8nd wffh notch) ar8 all to
b8 facing upwards. as aro th8
standard RAM chips alr8ady in·
S8rt8d into th8 board.
System Board
256K
Lower board sockets 1-8
Empty
256K
Lower board sockets 9-16
Empty
Empty
256K
Upper board sockets 1-8
Empty
Empty
Empty
256K
Upper board sockets 9-16
Empty
Empty
Empty
Empty
256K
TOTAL MEMOHY
256K
S12K
768K
l024K
1280K
SWITCHES:
swl-l
SWl-2
Swl-3
orr
ON
ON
ON
ON
OFF
E. Color or Composite Monitor
PHC-16
contains all the circuitry necessary to use a color or
composite monitor.
Plug a color monitor into the HGB jack or a
composite monitor into the cOlllPosite (HCA type) jack.
Both jacks
are on the back of the PHC-16.
Make sure you set switches Swl-5 and SWl-6 for your monitor.
These settings will be different for different monitors.
You can switch back and forth between the monitor and the PHC-16
LCD by pressing the CTRL, Left Shift, and M keys at the same
time.
F. Carrying Case
3.
Make sure that all the chips are inserted f ,wi Ill) the
same direction.
The tops (the end with th., norch)
should all be facing up, as are the chips thilt wcr'e
installed in your PHC~16 at the factory.
4.
After you have installed'the extra 1I1('lIl<lty <'ilil'';' insert
the board back into the slot.
Not i c:" t h,' t I-,l<:ks tha t the
upper board should slide into.
5.
PI ug in the connector.
A carrying case designed specificillly for the PHC-16 is
available in a sturdy, canvas-like cloth.
'l'he carrying case features an (lutr;icJc pocket for storing extra
batteries, the PHC-16 Guide to Operations, or other
supplies.
If you bought the PHC~16 with the 51LK 11I('III<)ry "I"J'ilc]" installed,
the switches should be set correctly, ilnd arc t.!H' Sdlll" for all
total memory over 640K.
6~4
6- 5
GLOSSARY
ASCII -
Acronym for American Standard Code for Information
Interchange, the standard set of characters used by
your computer and printer.
This includes letters,
numbers, punctuation, and a few special characters
such as a carriage return.
3ASIC -
Abbreviation for Beginner's All-pun;,ose Symbolic
Instruction Code.
BASIC is a popular, easy-to-Iearn
programming language.
3i t
The smallest unit of storage in a computer's memory.
Eight bits equal one byte.
A bit is an electrical
pulse in a microcomputer's chip that represents the
one or zero of computer binary language.
-
3yte -
A single character or number (see Bit).
::hip -
A small slice of silicon crystal etched with
electrical circuits.
The chip has allowed computers
to become smaller in size while they have increased
in storage capacity.
The two most common types of
chips are the microprocessor, or the computer's
"brain", and the memory chip.
Circuit Board - See Expansion unit.
Cursor -
A flashing bar or block that lIIOVC>S around on the
screen and shows you wlll're to enter infonnation.
Default - A value,
option,
or disk drive that is assurned by
the cOlllputer when notl(' is s[)('ci[ied.
Disk -
See Diskette or lIanl ilrive.
Disk Drive - See Physical IJrive or
Ildtd
IJrive.
Diskette -A circular sheet of fl(>xi!Jl" plastic treated to store
electomagnetic chilnJ(>s ilnel ,,,,,'d by a computer to
permanently store datil.
The PllC-16 uses double-sided,
double-density 5-1/4 inch diskettes which hold 360K of
c](ltil.
Diskette Drive - See Physical Drive
DOS -
see HS-DOS.
G-I
EX!,dIlc;ion Hoard - A board containing circuits and electronic
components which expand the features of a computer.
Expansion boards can be installed in PHC-16 optional
oxpansion unit. The most common expansion boards add
IlIcclllory or produce graphics. See Expansion Unit.
Soe Expansion Unit.
XIJdIlsion Unit - PHC-16 optional chassis which plugs into the
expansion bus on the back of the PHC-16 and which has
expansion slots for adding IBM PC compatible expansion
boards.
~ixcd
Disk - See Hard Drive.
~Ioi'py
Microprocessor - See Chip.
Modem -
A device allowing a computer to send and receive
information to and from another computer over
telephone lines.
MS-DOS -
The most widely used operating system for
microcomputers, and included with the PHC-16.
Operating System - 11 software program that allows the computer
and its peripherals to [unction as a system.
MS-DOS is an operating system.
Disk - See Diskette.
Function Keys - Keys on the keyboard that allow the computer to
perform specific tasks and functions, such as moving
the cursor or deleting characters.
Hardware - The computer system itself, made up of the CPU, the
physical drive, keyboard, and screen.
Hard Disk - See Hard Drive.
liard Drive - 11 mechanical unit containing a rigid disk (hard
disk) treated to store electromagnetic charges and
used by a crnnputer to permanently store data.
Hard
drives for the PIlC-16 must be mounted in the expansion
unit or externally mounted in their own case and
attached to the expansion unit.
Unlike diskettes,
hard disks are usually not removable.
Because of
their construction, hard disks hold much more data
(usually 10 or 20 megabytes) and arc much faster than
diskettes.
K -
Microcomputer - A computer that uses a microprocessor as its
central processor.
The term microcomputer includes
personal, desktop, home, and portable computers.
Palette - A combination of shades of gray on your LCD.
Six
palettes are available on the PHC-16 to compensate for
the different ways application software displays on
the screen.
Peripherals - Computer components that are not part of the
computer itself, such as physical drives and printers,
but that the computer controls.
Peripherals help the
computer process information.
Physical Drive - the mechanical unit that reads, writes, and
stores data on a diskette.
Port -
A computer or peripheral device"s input/output
connections.
Printer - A machine that prints output on paper.
Dot matrix
printers form characters, numb0rs or graphics with a
collection of dots.
Til" chclrilctcrs on 10tter-quality
printers rescmbl e ty[!ewr'j ter characters.
Abbreviation of Kilobyte.
Program - The computer illstructiolls rc('oldc'cl on clisks that make
Keyboard - Thc' collection of keys and controls used for typing
information into a computer.
the corn[Juter
lIint-e,ll iq('nt"
(lnd
(lh1c~
to perform
different functions c;ucil as accounting and word
processing.
Kilobyte - Fouyhly 1()()O bytes, abbreviated as K·
actually 1,024
bytes.
The PIIC-16 standard 256K of memory equals
262,144 byte's.
Programming - The process of writLll'l ill,;tructions for a
computer.
~1c'gabyte
IU\~l
Memory ~l('nu
-
- Foughly one IIlillion bytes, abbreviated as MH.
Actually 1,024,000 bytes.
The area in which programs and information are stored
in the computer.
Drive - lin electronic "driv('" IIld! r(,'ads, writes, and stores
data like a physical drive, but is temporary, and loses
data when [Jower is shut of r.
Uata is stored in
a portion of RAM and is controlled by software built
into the PHC-16.
The PIIC-16 Hl\M dri ve can be from 0
to 360K.
Like a menu in a restaurant, a list of choices you can
sE'lect frolll to perform desired functions, such as
edit, delete, or print.
G-2
G-3
PandOl1i Access Memory (RAM) - A computer's read and wri te memory,
which allows the CPU to receive, record and store
information when the machine is on.
\{(""\ Only nemory (ROM) - This permanent memory stores the
information necessary for the machine's daily
operations.
The computer can only read information
from POM.
ROM memory is never lost, whereas RAM memory
can be if the information is not stored on diskette and
the computer is turned off.
Scratch Diskette - A diskette containing data you don't want or
need anymore.
Software - Programs that tell the computer to store and process.
It is the software that makes the computer capable of
doing the tasks you want it to perform.
G-4
c:
E
APPENDIX
Technical Information
A.
1. Hemory Hap
FFF FF
FCOCO
F8FFF
F3001J
F7FFF
F4COO
F3FFF
FOOC:O
EFFFF
EOOOO
DFFFF
S
T
A
o
1'1
D
R
A
0
C)
11
p
POI! 1
:liK8nes
U72~6)
T
I
BLANK
F,'(li1
2
16K8'Jt p s
2
8lflK 'wi td,ed PAM
Up te· 64CK >: ar, be,ddres<pd in th i s 64~ 8re'l
( (1 p tic> n a I)
:) p" b I '. w f'lr '" i t chi n gin f ('.
0
['0000
- - - - ---------------_._----
CFFFF
CGOOQ
C8FFF
(,8001]
__
.
. - - - - - - - - - - - - - - - - - - - _ . _ . _ - - - - - _.. _. __._-_.
C7F FF
8(:000
.
_--Bf:FFF
__..
~-
..
-.--~-
-_.
__ .... _-----_._--
16"8ytes for color gniph,cs
In t ern ,ll s t OJ n dar d (e ,: t e r nll
..
_-_._----_.-
vide)
I' P t ion)
[:8000
ElF FF
f: 40 [I IJ
----/--------_._._---_ .._ - - - - - - -
8:JFFF
f:I]COIJ
-
--~
(\ f
18~8ytes for monochrrlme
d~(i '3d·)rtJ?r (~I,ternal
Vi
rlfjt
jon)
---------------
FFF
i':1 n11 0
'Ii
r FF
- : I:!' 1111
I ,I f f f -
'[ . _
i"lllll
--~------.-----
256KBytp-; En.ar,'3 i on
--
I
II
- - - - - - - - - - , - - - -..
- - -.----..
R,O,r]
-- -------.
(Opt, (;I,'
--------,-~,--~~---
f
"I
A-]
F0r
Clr'ti(rn~)
111
d7Jt.l
in
th:1t He 1 "
relri 1)'- FFH
2. IWM
3. HAM
You ("<Ill [lut programs into a 27128 or 27256 ROM and have these
"t"qtilll"; always present for use.
Memory can be increased from 256K (standard) to l280K (1.25
megabytes) in 256K increments.
Wllr'll
tile BIOS is booting, it checks from C8000H to F7FFFH at 2K
i tWtr'tllf'nts (C80001f, C8800H, ... ) looking for 1I115511.
This is ttl(?
,L,t" code that tells the system that a program is present in ROM.
'1'11(' third byte is the number of
5l2-byte blocks contained in the
routille.
Checksums are not calculated.
The system then does a
far" c,>11 to the fourth byte on that boundary (for example,
C8003H).
This allows the ROM code to do its own initialization,
if needed, or to take over the system and run its own software.
This allows some interesting possibilities.
Word processors,
communications software, dedicated industrial controllers, etc.
can be implemented without the need for disk-based software.
lis viewed from the modem door, ROM 1 is the upper ROM, ROM 2 is
the lower ROM.
Be sure to turn off the computer and pay close
attention to the direction of the notch on the ROM when inserting
ROM chips.
Most of the routines that can be called using the CTRL Left Shift
keyboard sequence can also be called from within a program by
using a far call to OFOOO:OFEA8H with AL=ROUTINE to call.
The maximum system RAM is 640K.
Sections of this can be enabled
internally or externally to allow the use of memory cards or
other devices in the ex~ansion interface box.
For the 768K configuration, the 128K portion that exceeds the
640K limit can be used as a HAM drive.
This l28K resides in the
This is done by bank switching in
64K area from EOOOOH to EFFFFH.
64K blocks of HAM.
For a 1024K (1 megabyte) configuration, the system memory is 640K
and 360K of the 384K over that can be used as a RAM drive.
The remaining 24K can be used by the system for CTHL-1,eft Shift
functions to store the screen image and as a buffer:
xxx
AL=O
AL=l
AL=2
AL=3
AL=4
A1,=5
AL=6
A1.=7
AL=8
Show battery level
Show date and time (cursor is moved to home position)
Invert black/white on the LCD
Toggle between LCD and RGB or composite monitor
Cycle through the 6 palette choices
Toggle between block and underline cursor
Enter the dumb terminal program
Enter the help screen program
Enter the world clock program
Writing to Clnd reading from CMOS RAM is done throuCjIl ,In l / l l port
and is rather complicated.
To make the use of C~10C; HIIM easier,
the following BIOS calls are available:
Set the address you want to read from or write to into
the DX register.
Wri te:
Set the data you want to wri t f' i nt" the AL or AX
rcgic;tcr.
Do Cl far call to the clc'3in'd routine.
Head:
Do a far Cil J 1 to the desired routine.
read is returned in the AL or AX re(::li;~ter .
FOOO:FF60
FOOO:FF64
FOOO:FF68
FOOO:FF6C
HEAD BYTE
WHITE BYTE
HEAD WOIW
WHITE \'iOHD
[AL
[AL
[IIX
[IIX
HAS
HAS
HIlS
HAS
A-2
TilE BYTE HEAD]
'1'1lE E Y'I'l; TO WHITE]
TilE WUIW HEAD 1
THE WORD TO WRITEJ
The data
*
16K of the high HAM is used to store the current screen
when any of the CTRL-Left Shift functions are called.
*
8K is used as a data buffer for the dumb terminal program.
For a l280K (1.25 megabyte) system, the upper 2S6K is free for
use.
Bank switching of the RAM is done through control ~ort 77H (write
only).
The data pattern written to this port controls HAM as
follows:
-----------------------------------------
I
D7
I
D6
I
D5
I
D4
I
D3
I
D2
I
III
I
DO
I
-----------------------------------------
X
X
X
X
X
X
X
X
X
X
X
X
X
X
X
X
X
X
X
X
X
X
X
X
X
X
X
X
X
X
X
X
X
X
X
X
X
X
X
X
X
X
X
X
X
()
(J
IJ
()
()
(J
()
1
(J
1
1
(J
()
()
X
0
0
0
0
0
0
1
0
0
0
()
0
()
1
X
X
()
1
1
1
1
I
X
()
X
X
X
X
1
1
X
X
X
X
X
X
X
()
(J
0
1
1
1
1
X
1
X
X
X
X
0
0
()
1
(J
1
I
Don't care
1\-3
Bank
Bilnk
Bilnk
Bunk
Bank
Bank
Bank
B:lnk
Hank
Bank
#0
#1
#2
#3
#4
#5
#6
#7
#8
#lJ
HAM
RAM
RIIM
HAN
HAM
()~en RAM
O~en HAM
Open RAM
Open RAM
Open HAM
Open
Open
Open
Open
Open
C 1()'; C' I<AM Window
C1
PAM Window
,,,;c'
I<AM Window
C] ,,,;" I<AM Window
Clos(' HAM Window
C 1 ()~:;(~ HI\M Window
C]()c;('
Window
Window
Window
Window
Window
Window
Window
Window
Window
Window
with the RAM window closed, any external drive wishing to use the
are" from I':OOOOH to EFFFFH can do so.
To make it easier, there are two routines in the system BIOS ROM
that when called will do a read/write to the CMOS RAM area.
4. Battery Backup CMOS RAM
How to use:
2K bytes are standard and 8K bytes are optional.
Set the address you want to read from or write to into the OX
register.
To upgrade from 2K to 8K, turn the power off, remove the 6 screws
that hold the front and back of the case together, and remove the
socketed RAM chip (M5M51l7P or equivalent) on the I/O board and
replace it with an 8K RAM chip (M5M5l65P or equivalent).
When installing a 2K memory chip (24 pins) in the CMOS RAM socket
(28 pins), be sure that the end that is not notched is even with
the end of the socket:
Lower RAM locations (lK) are used by the system to store setup
parameters.
This allows the system to power up in the same mode
as when it powered down.
Write:
Set the data you want to write into the AL or AX
register.
Do a far call to the desired routine.
Read:
Do a far call to the desired routine.
read is returned in the AL or AX register.
FODD:FF6D
FOOO:FF64
FOOO:FF68
FOOO:FF6C
READ BYTE
WRITE BYTE
READ WORD
WRITE WOHD
(AL
(AL
(AX
(AX
HAS
HAS
liAS
HAS
THE
THE
THE
THE
BYTE
BYTE
WORD
WORD
The data
READ)
TO WRITE)
READ)
TO WRITE)
RAM locations 0400H to 07FFH are free for the programmer (2K
standard).
RAM locations 0400H to 3FFFII are free for the
programmer when the optional 8K is installed.
The backup battery may run down if the computer is not used for
45 days or more (NICAD type).
If this happens, it may be
necessary to set switch 2-3 ON to force the computer to boot up
using the LCD display when no RGH is attached.
This memory is addressed through I/O port addresses 27BH, 37FH,
and 370H - 377H.
5. DIP Switches
See Chapter 2: Customizing Your PHC-16 for the location and use
of the dip switches.
This section provides technical information
about the switches.
The procedure is to first set address lines All, A12 via the
port 27BH.
The data on the LSB 01, DO lines are latched (00)All,Dl-)A12).
Then set address lines A3 to AIO through port 37FH.
D7-)AIO) .
(DO-)A3,
...
Switch 1 is read through an 8255 chip having ports 60H, 6lH, 62H,
and 63H:
* Port 60H is used as a read only port.
8 bytes of data can now be read/written directly from/to the CMOS
RAM by reading/writing any of ports 37011 to 37711.
* Port 61H is used as a control port and can be written
to
or read from.
Example:
Write the number 55 to location 37 in the RAM.
37 DECIMAL ~ 25 HEX ~ 100101
* Port 6211 is used as a read only port.
This corresponds to putting the following pattern on the address
bus:
A12
o
All
o
MOV
~10V
OUT
~10V
MOV
OUT
~IOV
MOV
OUT
AIO
o
A'J
A8
0
DX,27BI!
AL,O
DX,AL
DX,37FII
AL,OOOOOlOOI3
DX,AL
DX,375H
AL,55
DX,AL
o
A7
o
A6
0
AS
A4
A3
A2
1
0
0
I
Al
o
* Port 63H is the 8255 chip control port and is used to set
up ports 60H - 6211.
AO
I
;SET A 12, All
;SET AIO TO A3
;A2, AI, AD PA'l'Tl.;I{N IS 1018
;370H+5
375!l
5
~
A-4
A-5
The relationship between ports 6011, 61H, 62H, the SWI-I to Swl-8
settings, and the data that is read at ports 60H and 62H are as
follows:
This allows a programmer to select these options from a program
if desired.
6. CRT Video and LCD Video
POET 60H
DATA BIT
DO
01
02
D3
D4
05
D6
D7
PORT 61H D7=0
PORT 6lH 07=1
The PIIC-16 has RBG and composite video connectors out the
back.
The HBG pinout is the same as the "industry standard".
KEYBOAHO
KEYBOARD
KEYBOAHD
KEYBOARD
KEYBOAHD
KEYBOARD
KEYBOARD
KEYBOARD
DO
01
D2
D3
D4
D5
D6
07
1
SWl-4
1
I
SWl-5
Swl-6
SWI-7
SWl-8
PORT 621l
PORT 6lH D2=0
DO
01
02
03
swl-3
o
I
I
1
sWI-l
SWI-2
The CRT video and LCD video are controlled by a V6355 controller
chip.
The selection of a CRT monitor or the LCD screen is done
by reprogramming the chip and by writing to port 72H (write
only) .
Port 72H also controls the reverse video and contrast on the LCD
screen.
DO=l
01=1
02=1
03=1
D4=1
05
D6
D7
PORT 61H D2=!
1
CAUTION:
Some software does direct read/write without using the
system BIOS routines.
This software may not work correctly
unless Sw3-2 is ON.
A 5.25 inch floppy (lisk drive can be attilchecl to til(' back of the
case.
In this configuration, it is necessary to distinguish
between Drive 13 being internal or external.
After power on, the
internal/external Drive B selections can be made by setLillg D2 of
port 731l to 1 or O.
SW3-S and SW3-6 can be usecl to select
and 4 fonts are currently undefined.
differc~nt
fOllts.
Type 3
The V6355 chip has 16 palettes.
Each one can be reprogrammed to
give any of an 8 level gray scale on the screen.
All "colors"
can be made the same, or they can be set as desired.
The CTRL-Left Shift-S command rotates through six different
palette settings to make the LCD screen readable for a variety of
color combinations.
The first five settings are fixed.
The
sixth setting is user selectable;
however, the desired values
must be written to CMOS RAM.
PALETTE
°I
2
Port 731l (write only) is iJ control port~ uS0d to "I1<1ill(' or disable
the functions s('l ected by di P switch SW3-2 to S\'I\-H.
Tile
following are the data bit settings:
])0=0
])1=0
02=0
])3=0
04=0
])5=0
lJ6=0
07=0
Used to turn power to the backlit LCll (wl),'n installed) ON or OFF.
Always supply [lower to til", floppy disk dJ i V('s
(OFF saves battery power).
The 2nd floppy disk drive is internal.
Internal video RAM is being used (B8000-B~VVV).
Selects
04=1
Selects
04=0
Selects
])4=1
Selects
USA font
05=0
Type 2 font
lJ5=1
Type 3 font
DS=1
Type 4 font
Internal RAM is being used (40000-7VVFV), OFF [or external cards.
Internal RAM is being used (80000-BFFFF), OFF for external cards.
A-6
Lower the contrast.
Raise the contrast.
Set the contrast to a mid-range value.
Select a CRT monitor (D3=O selects the LCD).
Reverse the black and white on the LCD screen.
Not used.
Not used.
Not used.
3
4
5
General use.
Enables the intensity bit f()r WorclstiJr type programs.
Reverses the usc of thc' illtc'",;iry hit.
Gives an 8-level gri1y sCdlc' in t('xt mocle.
For composite vid('o output.
User definable.
Til" d('fdlll t Vill U('S (liv" the same
effect as inverse video Oll til<' LCD scrc'(>n (the values
Clrc the reverse of pill ('t t" l).
1<13G output will not be affected by tile' 1'>1I"tt" selection.
1l<'fClult Palette 5 values are:
o() H , 7 011, 00 II, 6 OIl, 00 Il ,SOil, 0 () II, 4 () II
OOIl,30H,OOIl,20H,OOH,IOH,OOII,OOH
[)OIl,70!l,OOIl,601I,OOH,SOII,OOII,40!l
OOH,30H,OOH,20H,OOH,IOH,OOH,OOH
/1-7
7. 8087 Coprocessor
Paralle Port Pin Chart
Pin NO.
When SWl-4 is OFF, an 8087 coprocessor can be used.
8. CTRL-Left Shift Functions
rg
The CTRL-Left Shift functions are explained in Chapter 2:
Customizing Your PHC-l6.
)0
0
00
0 00
00
00
00
00
00
00
00
0
In addition:
*
Only one function can be active at a time
*
The remote (dumb) terminal program is used for communication
purposes.
It can go through either COM 1 or COM2.
It is menu
driven for ease of use.
At present, there is no checking of
the clear to send or data set ready.
*
Data is received through an interrupt driven routine.
If
24K of RAM is saved for the the CTRL-Left Shift functions,
then the last 8K is used as a data buffer.
If not, the last
8K of video RAM is used as a buffer.
If the buffer is
overrun, an error message occurs and the system prompts the
user.
Further data is lost, however.
# I
# 2
# 3
# 4
# 5
# 6
# 7
# 8
# 9
#10
# 11
#12
#1 3
#14
#15
#16
#17
#18
#19
#20
#21
#22
#23
#24
#25
13
14
25
g
9. Technical Notes
1.
2.
To conserve power, the PHC-l6 uses CMOS parts wherever
possible including the printer port. If the computer is
turned off before the printer, garbage may be printed as the
printer circuit loses power.
Turn the printer off first.
Some software continually refreshes the screen during certain
displays.
The video chip for LCD, HGll, and composite video
is built such that it is never necessary to disilbl(~ video to
refresh the screen.
Certeli n softwelre ilSSUf((C'S a CWl' ilnd
waits for VSYNC, turns off video, then ul'eldtes til(' ,L,tel.
When done, it enablC's video <"jilin.
For' d CH'I', the' lir"ot few
raster scans arc not shown (ll1d till' picture' is UK.
Sirial Port Pin Chart
Pin NO.
14
#
# 2
# 3
# 4
# '}
# 6
# 7
# 8
For an
LCD, all rastC'rs ilrt' sh()wn.
'l'hi,,, imel timing dilfC'rences
cause about [ive raster 1 inles el t the top el nd t he middle to
be missing from the LCD.
#\6
#20
#2 J
25
A-8
Strobe
Data 0
Dota 1
Data 2
Data 3
Data 4
Data 5
Data 6
Data 7
ACK
Busy
PE
SLCT
N/C (no connect)
N/C
init
N/C
ground GND
ground GND
ground GND
ground GND
ground GND
ground GND
ground GND
ground GND
1\-9
FG (frome ground)
TKD Transmit Dilta
PXU Pec('ive Datil
PST Pequest to send
CTS Clear to send
IJSP Deltil set ready
signill ground
CIl (carrier detect)
+ ~)
Il'l'P (data terminal ready)
PI (ring indicator)
I,,; I\J
Externai Bus Port Pin Chart
Chart
pill
Pin NO.
1<,
~~?jOOt9~
'i==--
#
#
#
#
#
#
#
#
#
ground GND
ground GND
R
G
B
2
3
4
5
6
7
I
Pin NO.
1--
8
~····....
•• I
non connect
HSYNC
VSYNC
9
O~_1
· . II
COlnposite Pin Chart
Pin NO.
(9)="."
# 1
# 2
GND1
~lodeIll
VIDEO OUT
ground GND
Bus Port Pin Chart
Pin NO.
~-~Tl
fi8-1
~~
I.
I' \
.
U~
U'l-
I
•
h
i-.J'
D C~J
H
DH
U :.:--1
i.
'D
~f
ft'lT
.)
, .
\
-~'
33
.
(.
~
# 1
# 2
# 3
# 4
# 5
# 6
# 7
# 8
# 9
#10
#11
#12
#1 3
#I 4
#15
34
#16
#17
1\-10
Pin NO.
#18
#19
#20
#21
IBI\4
-15V
I BI\ 3
-1 ''V
#22
llll\?
NODE~ICS-N
#2 I
IBD5
NC
IBD4
IBI\7
TBD3
IBI\6
J8D2
1111\ S
J BDI
#2~
I BI\I':NIW
T1\1\ I
# 2',
+ r)v
# )(;
IIlI\O
NI)
11l1()W-N
CNI)
I III ()J\- N
,;NII
Ill') I
eNI)
I;NI)
f5v
IHQ4
IBD7
1BFmSET
IBD6
~1()D 1':~1
I BIIO
#)/
#)H
# ) 'I
# '.11
II II
(II' N- N
II 1/
#I I
#I~
61-
~()~f
61
#
#
#
#
1
3
5
7
# 9
# 11
# 13
#15
#1 7
#19
#21
#23
#25
#27
#29
#31
#33
#35
#37
#39
# 41
#43
#45
#47
#49
#51
#53
#55
#57
#59
#61
Pin NO.
+5V
D7
D6
D5
D4
D3
])2
Dl
DO
I/OCIIIWY
1BI\ENBHD
181\ 18
IBA19
181\17
1BI\16
IBA15
IBA14
IBA13
IBI\12
I Ill\] ]
IBAI0
IBA9
IBA8
IBA7
1BA6
lIll\5
1131\4
IBA3
1131\2
1131\1
1131\0
C;
A-11
# 2
# 4
# 6
# 8
#10
#] 2
#14
#16
#18
#20
#22
#24
#26
#28
#30
#32
#34
#36
#38
#40
#42
#44
#46
#48
#')0
#52
#54
#56
#58
#60
#62
I/OCHCK-N
EXREST
+5V
lRQ2
NC
DWJ
-15V
DIR
+1.2V
GND
IBME~IW-N
IBMEMR-N
IB10W-N
IBIOJ\-N
IBDACK3-N
DRQ3
IBDACKI-N
DRQl
IBDI\CKO-N
EXCRK
lRQ7
IRQ6
IRQ5
JRQ4
IRQ3
IBDI\CK2-N
I8TIC
I8AENBRD
+5V
()SC
C;ND
I\Sl'1 I
Chart
ASCII
value
000
001
002
003
004
005
006
007
008
009
010
011
012
013
014
015
016
017
018
019
020
021
022
023
024
025
026
027
028
029
030
031
ASCII Chart
NO.1
Character
(null)
Q
e
..
•
+
+
(beep)
D
(tab)
(line feed)
(home)
(form feed)
(carriage return)
n
~
~
...
ASCII
value
NUL
SOH
STX
ETX
EOT
ENO
ACK
BEL
BS
HT
LF
VT
FF
CR
SO
SI
DLE
032
033
034
035
036
037
038
039
040
041
042
043
044
045
046
047
048
049
050
051
052
053
054
055
056
057
058
059
OGO
061
062
063
DCl
!!
'If
§
i
(cursor
(cursor
(cursor
(cursor
Control
character
right)
left)
up)
down)
DC2
DC3
DC4
NAK
SYN
ETB
CAN
EM
SUB
ESC
FS
GS
RS
US
A-12
Character
(space)
!
#
$
01
10
&
•
+
0
1
2
3
4
5
6
7
8
9
<
>
?
NO.2
ASCII
value
064
065
066
067
068
069
070
071
072
073
074
075
076
077
078
079
080
081
082
083
084
085
08G
087
088
089
090
091
092
093
094
095
ASCII
value
Character
@
K
L
M
N
096
097
098
099
100
101
102
103
104
105
106
107
108
109
110
0
III
P
112
113
114
115
116
117
118
119
120
121
122
123
124
125
126
127
A
B
C
D
E
F
G
H
J
0
R
S
T
U
V
W
X
Y
Z
[
\
1
1\
1\-13
Character
a
b
c
d
9
h
j
k
m
n
a
p
q
u
w
x
Y
Q
ASCII Chart
I\SClI Chart
NO.3
ASCII
ASCII
value
128
129
130
131
132
133
134
135
136
137
138
139
140
141
142
143
144
145
146
147
148
149
150
151
152
153
154
155
156
157
158
159
Character
value
<;
160
161
162
163
164
165
166
167
168
169
170
171
172
173
174
175
176
177
178
179
180
181
182
183
184
185
186
187
188
189
190
191
ii
~
A
e
A
11
E
<e
A:
A
0
0
(;
A
u
U
Y
0
U
¢
£
f
Pt
f
1\-14
NO.4
ASCII
ASCII
Character
,)
U
n
N
e
0-
----,
y,
Y.
«
»
::::::::
r::::::;
-l
=j
--11
'"
~I
"il
dJ
Jl
....
value
192
193
194
1%
1!)G
197
19B
199
200
201
202
203
204
205
206
207
20a
209
210
211
212
213
214
215
216
217
218
219
220
221
222
223
Character
L
-'-
,
I·
+
I~
If
LL
Or
~L
'ir
If
~L
"C
.L
=r
vollue
Character
224
225
226
227
228
229
230
231
232
23]
234
235
236
237
238
239
2·10
2'11
Cf
iJ
I'
"L
if
J-1
T
Q
-&
!i
C,
OJ
0
(
n
2·12
2,13
2'14
LL
b
2,15
F
2,11)
2·17
2·1(]
2,1,)
if
+
.J
'"
2~0
-•
2~)
1
.J
2~)2
I
253
I
-
1\-15
2!)·1
•
2S5
ilJidllk 'FF')
I'iAHIiAN'l'Y
1'..
Yi,lI'I'an ty Provtsi ons
1hc Kohjjnsha Co., Ltd.
warrants this product to be in good working
ureler for a period of one hundred eighty (180) days from the clcde of
I~rchasc
as a new product.
Should this product fail
to perform properly
any time within that one hundred eighty (180) day perioel, Kohjinsha Co.,
I,td. will, at its option, repair or repl<lce this product. at no cost
except as set :forth in this warranty.
will
Replacemcnt P,ll't" or' products
be furnished un c'n exchange basis only.
Replaced parts and/or
products become the property of Kohjinsha Co., Ltd.
expressed or irnpljecl Lor products damDged by
w;llTanty is
N()
accjd{~lIt,
:JlllJ~;(~,
mi.suse,
natural or r.ersonal disaster, or unauthorjzed III0cliJi"dl.iull.
Warranty service described herejn lTIay be Ol1Ll i lwd hy ell'l i vct' ing this
procluct, cluril'2- tI,e one hundr"cl eighty (180) <!dY \';,1l1':llll.y pcriod, to
Kohjinscw Co.,
?31
c~
Japan.
Ltd.
located at 2-7-21 Mat<;ukdl',"
When delivering to the factory,
proof of purchase date.
o\'-.'ner <lErees to insure
tlde; product,
DncJ
to prepay all
If shipped by
fIlai
1
[I:Jk;J--ku,
1'111),
pt',)(I,w
(ll'
accept all ] j abi Ii t.y t
;!11Y
shipping char!',(,,;, ,Illd
II)
carrier,
('urrlllluJl
I I):;.';
(If'
Y"kohnr""
I,,, accompanied
!111I:;
II:;,'
(H'
cl~lmage
to
:;llil'l'iIiE
contajl)("l' equivalent to original packaging.
B. Warranty Lirllii,ations
I,ll \'JiHTanties for this product expressed or illll'li"Ii,
merchantabiljty and fitness for a purpose, ar'c
cluration frOlil date of purchase, and no warralltil'" ,
~jll
illllllliilJE
I filii II'"
I"
IHCJ d"Y'3
(lXI'I"",:;,,d (It' jlllpJif:(
apply after that period.
If this product does not perforll) ali
remedy shall
will Kohjinsha Co., Ltd.
revenue,
lost wages,
damages.
Il(;f'l'
ilJ , "WIl("!' s sole
lost savings, or any other'
£'1'0111
purcha~;e,
In no event
;dlllV".
be Ijable to any put'C/"";CI'
consequential damages ari sj ng
this product,
~'ilITatlt(:cJ
be repair or replacement as provid('d
rill'
cJillllages,
ilJcjri(,Ilta]
lost
or
usc or i Ilabi 1 i ty to use
even if PHC-16 has been advised of the possibility of such