1
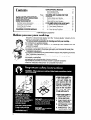
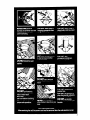
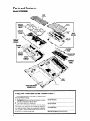
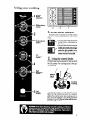
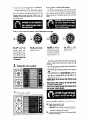
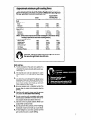
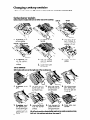
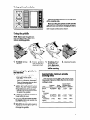
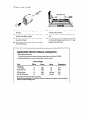
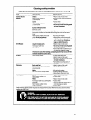
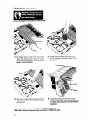
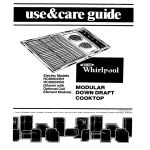
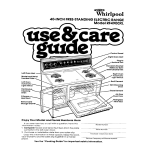
Gas Model
SC8900EMH
I
MODULAR
DOWN DRAFT
COOKTOP
,:rs,
Freezers,
Refrigerator-Freezers,
Ice Makers.
Dishwashers,
Butt-In
Ovens
and Surface
Unlls.
Ranges,
Mlcrarave
Ovens,
Trash Compactors,
Room Air Condllmners,
Oehumldtl
I
Contents
BEFORE YOU USE YOUR COOKTOP
IMPORTANT SAFETY INSTRUCTIONS
PARTS AND FEATURES
USING YOUR COOKTOP
Surface Burner Indicators
Using the Control Knobs
Using the Vent System
Using the Grill
CHANGING COOKTOP MODULES
2
2
4
5
5
5
6
6
a
USING OPTIONAL MODULES
Using the Griddle
Using the Rotisserie
CLEANING AND CARING FOR YOUR
COOKTOP
Control Panel and Knobs
Cleaning
Cooktop Modules
Cleaning
the Vent System
IF YOU NEED SERVICE OR ASSISTANCE
1. Before Calling for Assistance
2. If You Need Assistance
3. If You Need Service
4. If You Have a Problem
9
9
IO
12
12
13
14
15
15
15
15
15
P
,61984 Whirlpool
Corporation
Before you use your cooktop
Read this “Use and Care Guide” and the “Cooking
Guide” carefully
for important use and safety information,
You are personally
responsible
for making sure that your cooktop...
l
is installed by a qualified
installer.
l
is properly
installed
and leveled
in a countertop
and cabinet
that can
support the weight.
l
is installed in an area protected
from the weather.
l is properly
connected
to the proper gas supply and checked for leaks. [See
“Installation Instructions:‘)
l
is properly connected
to the correct electric supply and properly grounded.
(See “Installation
Instructions”.)
l
is vented according
to manufacturer’s
instructions, with no restrictions.
l
is properly
maintained.
l
is used only for jobs expected
of home cooktops.
l
is not used by children or anyone unable to operate it properly.
l
See the “Installation
Instructions” for complete
information,
DO NOT STORE OR
USE GASOLINE
OR
OTHER FLAMMABLE
VAPORS AND LIQUIDS IN THE VICINITY
OF THIS OR ANY
OTHER APPLIANCE.
. FOR YOUR SAFETY.
IF YOU SMELL GAS:
1. OPEN WINDOWS.
2. DON’T TOUCH ELECTRICAL SWITCHES.
3. EXTINGUISH
ANY
OPEN FLAMES.
4. IMMEDIATELY CALL
YOURGASSUPPLIER.
Parts and features
Model
SC8900EMH
VENT
I
GRATE
SURFACE
SURFACE
BURNER
MODULE
I BURNER
I
REAR ‘\\v
COOKTOP
MODEL AND SE
Copy your Model and Serial Numbers
If you need service or call with a question, have
this information
ready:
1. Complete
Model and Serial Number [under
the left module on the left wall).
2. Purchase date from sales slip.
Copy this information
in these spaces. Keep
this book, your warranty and sales slip together
in a handy place. There is no warranty registration to return. Proof-of-purchase
is all that is required for in-warranty
service,
4
here.. .
Model
Serial
Number
Number
Purchase
Service
Date
Company
Phone Number
Using your cooktop
A
Surface
Burner
lndlcators
-
Rear
Surtace
Control
Burner
1. Surface
burner
indicators
Surface burner indicators
burner or module
operated
knob.
-
Front
Surface
Control
Burner
0
-
2.
/
Using the control
knobs
Control knobs must be pushed in, then turned to
the LITE position. The clicking sound is the ignition sparking.
i4
-
. The solid dot shows the surface
burner that is controlled
by
that knob.
l The solid box shows the burner
inside the burner pan that is
controlled
by that knob. To operate the grill, griddle
or rotisserie, both burner control
knobs must be turned ON.
Em
0
Lett
g;;tri;:ner
show the surface
by that control
Riqht
Grill Burner
Control
- 3 Z$ern
Control
To stop the clicking
sound after the burner
lights, turn the control knob back to a desired
setting. The control knob has markings
for HI,
MED and LOW, however it can be set anywhere
between HI and OFF. Do not cook with the control in the LITE position.
5
In case of a prolonged
power
failure
Using the surface burners
Surface burners can be manually
lighted.
Hold a lighted match neara burnerand
slowly
turn the control
counterclockwise
until the
burner lights. Since the vent system WIII not
operate, smoke and steam will not be vented
out of the room.
For best cooking
results, set the flame size
halfway
between the center and the edge of
the cooking
utensil bottom. A covered
utensil
retains heat so a smaller flame size can be
used.
Until You get used to the settings,
as a guide.
Use LITE to light the
burner.
After
the
burner
lights,
turn
control back to a desired setting to stop
the clicking
of the ignition. Do not cook
use the following
Use HI to start foods
cooking
or to bring
liquids to a boil.
Use MED to continue
cooking
or to fry
chicken or pancakes;
for gravy, puddings
and icing or to cook
large
amounts
of
vegetables.
Use LOW to keep
foods
warm
until
ready to serve.
with the control in the
LITE position.
3.
Using the vent system
The built-in exhaust fan removes most cooking
vapors, odors and smoke from foods during
cooking.
l Turn the exhaust
fan control knob clockwise to
turn the fan ON.
l Turn the knob counterclockwise
to turn the fan
OFF.
l The exhaust
fan will automatically
come on
and stay on whenever the grill, griddle or rotisserie is turned on.
FILTERS MUST BE IN PLACE FOR PROPER SAFE
OPERATION.
THE EXHAUST FAN SHOULD BE ON FOR MOST
COOKING OPERATIONS.
DO NOT PUT HANDS IN VENT BOX WHEN FAN IS
ON. INJURY COULD RESULT.
4. Using the grill
Before using the grill for the first time:
A. Wash, rinse and dry grill.
l
l
B.
Use warm sudsy water.
DO NOT use metal scouring
pads or
abrasive
cleanser.
They will damage
the
non-stick
coating
on the grill.
Lightly wipe with cooking
oil to prevent
meat from sticking.
6
the
Approximate
minimum
grill cooking
times
Both burners must be ON to get proper grilling results. Preheat the
grill for 10 minutes on HI, then set control to MED before placing food
on grills. This helps avoid excessive
flare-ups.
Food
Cook
Setting
Approximate
Cooklng
Time
Side 2
Side 1
Beef
Steak (%“-3/4”)
Rare
Medium
Well Done
MED
MED
MED
5 Min.
6 Min.
7 Min.
4 Min.
6 Min.
7 Min.
Steak (l-l%“)
Rare
Medium
Well Done
MED
MED
MED
5-6 Min.
9-l 0 Min.
12-13 Min.
5 Min.
10 Min.
12 Min.
Others
(These foods must be turned and rearranged
cooking to provide the most even cooking
Smoked Sausage (2(lbs.)
Med to Well
MED
Hamburgers
MED
Ham Slice
MED
Pork Sausage
MED
Pork Chops
MED
Hot Dogs
MED
Chicken
Pieces
MED
as necessary
results.)
7 Min.
10 Min.
15 Min.
4 Min.
15 Min.
4 Min.
25 Min.
during
5 Min.
10 Min.
10 Min.
3 Min.
10 Min.
3 Min.
20 Min.
CAUTION: The use of metal forks and tongs can scratch
the non-stick grill finish. Use with care.
Hints and tips:
4. Be sure grease pan is installed
under the
burner pan to catch fat drippings
during
grilling.
5. Take the grill apart to clean and to remove
and store. Do not stack when storing.
6.
Do not cover the grill completely
with meat.
Leave space between the food items to allow proper smoke and steam removal.
7. Use only nylon or plastic utensils. Metal can
scratch the non-stick finish.
8.
Do not grill with the controls on the HI setting.
Excessive smoke and flare-up could result.
9. If meat begins to cook too quickly, turn the
grill control knob to a lower setting.
Changing cooktop modules
Make
sure all controls
Surface
Surface
burner
burner
module
are OFF and the cooktop
parts
are cool
before
removing
them.
modules
will work on either
side of the cooktop.
Or,,,cet
Venturi
\
1.
To remove,
liftzff
surface grates.
2.
Lift slightly
handle.
1.
To replace,
line
up the venturi
with the burner
orifices.
2.
Push the module
until it’s seated
properly.
Lower front with
the handle.
Grill
3.
module
Grill module
will work on the right side of the cooktop
1.
To remove,
grills.
lift off
2.
Lift front end of
burner
pan and
pull toward you.
1.
To replace,
insert
the grease
pan.
Do not use the grill
module unless the
grease
pan is in
place.
2.
Line up the venturi
with the burner
orifices.
8
3.
3.
the
only.
With both hands,
pull module
toward you to clear
orifices. Lift out.
4. Install
“surface
grates.
A
With both hands,
lift burner pan out
and set aside.
- 4.
place
while lowering burner pan.
All grill parts must be cleaned
after each use to avoid
flate-ups,
fat spoilage
and odors. See page 13.
Lift out the grease
pan, being careful not to spill fat
drippings.
burners.
excessive
smoke,
Using optional
modules
3
3
Optional
modules will work on the right side
of the cooktop
only.
Make sure the grill controls are OFF, and the
grill parts are cool before changing
modules.
Grill module
controls
are as shown.
Using the griddle
NOTE: Make sure the grill controls are OFF and the grill is cool
before InstallIng grlddle.
1.
To Install,
the grills.
remove
2.
Before using the griddle
the first time:
1. Wash, rinse and dry griddle.
l
l
2.
Replace
the grills.
griddle and set
aside. Make sure
the griddle is cool
before removing.
for
Approximate
minimum
cooking times
Use warm sudsy water.
DO NOT use metal scouring
pads or abrasive
cleansers.
They will damage
the non-stick
coating on the griddle.
Food
Bacon
Pancakes
Pork
Preheat
Time
Cook
Settlng
Approximate
Cooklng
Time
Slde 1 - Side 2
3 Min.
t Min.
No Preheat
3 Min.
MED
MED
3 Min.
1 % Min.
No Preheat
No Preheat
MED
MED
4 Min. 3% Min.
1 Min.
1% Min.
3 Min.
MED
3 Min.
3 Min.
3 Min.
MED
3 Min.
3 Min.
Sausage
Patty
Eggs
Grilled
Sandwich
French
Toast
Preheat on HI, then turn control to a
lower setting to cook.
4. Add food. Use only nylon or plastic utensils. Metal can scratch the
non-stick coating.
5. Turn off the burners when cooking
is finished. Leaving them ON can
damage
the griddle.
griddle
Both burners must be ON to get proper cooking results. Preheat on HIGH, then turn to a lower
setting to cook.
2. Lightly wipe with cooking
oil to
season. You don’t have to grease
the griddle every time you use it.
l DO NOT use shortening
or butter
to season the griddle.
3.
1. Toremove,liftout
Place
griddle
over burners with
drain slot in front.
L
9
Using the rotisserie
NOTE: Make
rotisserie.
sure the grill controls
are OFF, and the grill is cool
before
installing
the
Power
Cord
1.
To install,
the grills.
remove
1. To remove,
lift rotisserie
motor off
the rack and set
aside.
10
2.
Set in rotisserie
rack.
2. Remove the rack
and set aside.
3.
Install
rotisserie
motor as shown.
To put meat on spit
1. Put fork on the spit pointing
5.
2.
6.
3.
4.
away from the
handle.
Push spit through meat so the weight is balanced around the center,
Put the second
fork on the spit pointing
toward the meat.
Push both forks into the meat and tighten
7.
Push the pointed end of the spit all the
into the motor socket.
Put the handle end of the spit into the
slot.
Plug in and turn on the rotisserie motor.
on the Grill Module. See below
for
- gested
cooking
way
rack
Turn
sug-
times.
the thumbscrews.
Approximate
minimum
rotisserie
cooking
times
No preheat required.
The individual
burner controls help provide extra heat control. HUMED
combination
settings can be used for best cooking results
Food
Beef Roast
Well-done
Pork Loin Roast
Leg of Lamb
Chicken,
med.
COI nish Game Hen
Control
Right
Burner
HI
HI
HI
HI
HI
Settings
Left
Burner
MED
MED
MED
MED
MED
Minutes/
Pound
Internal
Temperature
45
65
45
120 Total
60 Total
170
185
180
190
190
Be sure grills are removed during rotissing.
Roasts of approximately
3-31/z pounds are the most suitable
greatly increase cooking
times.
for rotissing.
F
F
F
F
F
Larger
roasts will
11
Cleaning and caring
for your cooktop
Control
panel and knobs
1. First make sure knobs are set on OFF, then
2.
4.
3.
pull knob straight off.
Lift off the control panel.
Wash knobs in warm
well and dry.
soapy
water.
Rinse
5.
6.
Use warm soapy water and a soft cloth to
wipe the panel. Rinse and wipe dry.
Replace the control panel.
Push the knobs straight back
they point to OFF.
on. Make sure
Burners
Occasionally
check the burner flames for proper size and shape as shown below.
If flames da not burn properly, you may need to clean the burners (see page 13) or call
a qualified technician
for adjustment.
TYPICAL GRILL BURNER FLAME
TYPICAL TOP BURNER FLAME
Cleaning
Make
sure
all controls
PART
Surface
Module
Burner
are
OFF and
cook-top
modules
the cooktop
parts
are
HOW TO CLEAN
Grates
Warm soapy
a dishwasher
Cover
Warm soapy
a dishwasher.
Wash, rinse and dry well.
Use scouring pads for stubborn
areas.
l Clean
often.
l Wash, rinse
and dry well.
8 Do not use metal scouring pads
or harsh cleansers.
l
water
or
water
or
All grill module parts
Hot soapy water or a
dishwasher.
If turned
moisture
Griddle
cleaning.
WHAT TO USE
l
Burners with Burner Pan
Remove cover:
To remove the cover from the module.
then push in buttons on the sides while
time.
l
Warm soapy water and a soft
cloth. Do not put surface
9
burner pan in dishwasher.
Grill Module
cool before
on soon atter washing,
inside the burner dries.
Worm soapy
Remove module from cooktop,
lifting the cover at the same
Do not put in water.
Wipe clean with a damp, soft
cloth. If ports are clogged,
clean
with a straight pin. Do not enlarge or distort the ports.
l Wash, rinse
and dry well.
9 Do not use metal scouring pads
or harsh cleansers.
l Use a soft brush
or plastic scouring pad for stubborn areas.
a popping
sound may occur until the
Clean after each use.
Wash, rinse and dry well.
l Do not use metal
scouring pads
or harsh cleansers.
. Use plastic scouring pads, if
needed.
water.
l
l
Rotisserie
Rack and Spit
Warm soapy water and plastic
scouring pad.
Motor
Soft cloth; warm soapy water.
l
l
l
l
l
Vent System
Under normal use the blower
months with SAE 20 oil.
Cover
Warm soapy water or a
dishwasher.
Filters
Hot soapy water or a dishwasher.
Vent Box
Warm soapy water and a
cloth or sponge.
requires
no oiling
Wash, rinse and dry well.
Clean after each use.
Do not put in water.
Unplug before cleaning.
Wipe clean after each use.
. Wash, rinse and dry well.
Clean often.
l
Wash,
Clean
l Wipe
cloth.
9 Clean
l
l
rinse and dry well.
often.
out grease residue with a
Sponge out spills.
often.
for the first year. After the first year, oil every
three
Cleaning
Before
1.
the vent system
cleaning
the vent system,
turn the fan OFF.
To clean,
remove
vent cover and wipe
clean with damp cloth or wash in warm
soapy water. Do not use metal scouring
pads or harsh cleansers.
3. Be sure fan is turned OFF. Wipe the vent box
with a damp cloth to clean. Spills should be
sponged
out.
2. Lift filter and turn slightly to remove. They
can be cleaned
in hot soapy water or in a
dishwasher.
4. Install filters, being sure they are angled
over the exhaust fan and touching at the center. Filters must be in place for safe proper
operation.
Replacement
filters can be ordered
from a Whirlpool
Dealer or
TECH-CARE a Service Company.
Order part number 786220 (one pair).
14
lf you need service or
assistance, we suggest
you follow these
four steps:
1. Before calling for assistance..
Performance
problems often result from little
things you can find and fix yourself without
tools of any kind.
If nothing operates:
l
Is the cooktop
properly
connected
to gas
and electrical
supplies?
(See Installation
Instructions.)
l
Have you checked
the main fuse or circuit
breaker box?
l Is the flow of combustion
and/or ventilation air
to the unit obstructed?
Do not obstruct
air
flow to and around the unit.
If burner fails to light:
l
Is the unit connected
to electrical
power?
l
Have you checked
the main fuse or circuit
breaker box?
l Are burner
ports clogged?
(See page 13.)
If burner flames are uneven:
l
Are burner ports clogged?
(See page 13 .)
If burner flames lift off ports, are yellow, or
are noisy when turned off:
l The air/gas
mixture may be incorrect. (Call
for service.)
If burners make a popping
noise when ON:
. Is the burner wet from washing? Let dry.
If a control knob or knobs will not turn:
l
Did you push in before trying to turn?
If cooking
results aren’t what you expected:
Surface burners
l
Is the cooktop level?
l Are the pans the size called
for in the recipe?
l
Does the flame size fit the cooking
utensil
being used? [See page 6.)
Grill
l
Did you leave
space
between
the food
items?
l
Was the grill preheated
forthe proper amount
of time?
l
Was food partially frozen or very cold before
grilling? Cooking time will be longer.
If venting results aren’t what you expected:
l
Is the exhaust fan turned ON?
l Are the cooktop
surface burners and module parts clean? They must be cleaned
after
each use.
l Are the vent filters clean
and in place?
l
Is the vent duct or outside opening
blocked?
l
Is there a draft in the room where the cooktop is installed?
l
Has the meat fat been well trimmed?
2.
If you need assistance*.
..
Call the Whirlpool
COOL-LINE,B service assistance telephone
number. Dial free from:
Contlnental
U.S. . . . . . . . . . (800)253-1301
Michigan..
. . . . . . . . . . . . . . (800)632-2243
. . . . . . . . (800)253-1121
Alaska & Hawaii
.
and talk with one of our trained Consultants.
The Consultant
can instruct you in how to obtain satisfactory
operation
from your appliance or, if service is necessary,
recommend
a
qualified
service company
in your area.
If you need service*.
3.
..
Whirlpool
has a
nationwide
network
of franchised
TECHService
Companies.
TECHCARE service
technicians
are trained
FRANCHISED
SERVICE
) to fulfill the product
warranty
and provide after-warranty
service, anywhere
in the
United States. To locate
TECH-CARE service
in your area, call our COOL-LINE service assistance telephone
number (see Step 2) or look
in your telephone
directory
Yellow Pages
under:
APPLIANCES-HOUSEHOLDMAJORSERVICE 8 REPAIR
ELECTRICAL
APPLIANCESMAJORREPAIRING
8 PARTS
OR
WHIRLPOOLAPPLIANCES
FRANCHISEDTECH CARESERVICt
IIHIRLPOOLAPPLIANCES
FRANCHISEOTECH CAAESERVlCt
StiHl’l(‘E
XYZSERVICECO
123Mapie
.SEfiI~I(‘E
XYZSERVICECO
123 Maple
(‘0 VP’1 .\IES
333 9999
(‘OWP4
.VlE
333 9999
OR
WASHING
MACHINES.
DRYERS
& IRONERS-SERVICING
WHIRLPOOL APPLIANCES
FRANCHISEDTECH
CARESERVICE
Yt:HI~I(‘t.
XYZSERVICE CO
123 Maple
4.
(‘0
VP?
VIE.5
393 9999
If you have a problem*.
..
Call our COOL-LINE service assistance
telephone number (see Step 2) and talk with one
of our Consultants, or if you prefer, write to:
Mr. Robert F.Gunts, Vice President
Whirlpool Corporation
Administrative
Center
2000 US-33 North
Benton Harbor, Ml 49022
-If you must call or write, please provide: model
number, serial number, date of purchase,
and
a complete
description
of the problem.
This
information
is needed
in order to better respond to your request for assistance.
0
FSP
&
FSP IS a reglstered trademark of Whtrlpool
Corporation
for quality parts Look for this symbol
of quality whenever you need a replacement
part for yout Whirlpool appliance
FSP
replacement
parts WIII fit right and work right..
because they are made to the same exacting
speclhcatlons
used to bulld every new
WhIrlpool appliance
15
Home .% Appliances
Making your world a little easier.
Printed in U.S.A.
Part No. 63922/X%105
Rev. A
01984 Whirlpool Corporation
:e Makers,
DIshwashers.
Rullt-In
Ovens
and Surlace
Unrts.
Ranges,
Mrcrowave
Ovens,
Trash Compactors,
Roam AN Condrlroners,
Oehumidifrers,
Aulomatrc
Washers.
Clothes
t