1
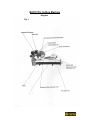
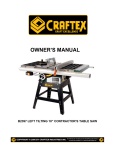
OWNERS MANUAL B2470-10” TILE CUTTING SAW B2470 – Table of Contents General Safety Instructions Page 3 Safety Warning Page 4 Grounding Instructions Page 5 Features Page 6 Assembly Page 7 Changing/Installing the Blade Page 7 Water Supply Page 8 Operation Page 8 Cutting Tile Page 9 Parallel Guide Page 9 Angle Guide Page 10 Maintenance Page 10 Diagram Page 11 Parts List Page 12 Parts List Page 13 Exploded View Page 14 Warranty Page 15 2 GENERAL SAFETY INSTRUCTIONS EXTREME CAUTION SHOULD BE USED IN OPERATING ALL POWER TOOLS. KNOW YOUR POWER TOOL, BE FAMILIAR WITH ITS OPERATION. READ THE OWNER’S MANUAL AND PRACTICE SAFE USAGE PROCEDURES AT ALL TIMES. CONNECT your machine ONLY to the matched and specified power source. WEAR SAFETY GLASSES, RESPIRATORS, HEARING PROTECTION and SAFETY SHOES when operating heavy machinery. Always wear safety glasses. DO NOT wear loose clothing or jewellery when operating machinery. A Safe Environment is important. Keep the area free of dust, dirt and other debris in the immediate vicinity of the machine. BE ALERT! Do Not Use prescription or other drugs that may affect your ability or judgement to safely use this machine. DISCONNECT the power source when changing tool bits and or any equipment. NEVER leave an operating tool unattended. ALWAYS keep blades, knives or bits sharp and properly aligned. ALWAYS keep all safety guards in place and ensure their proper function. ALWAYS make sure that any tools used for adjustments are removed before operating the machine. ALWAYS secure your work with the appropriate clamps or vices. ALWAYS keep bystanders safely away while operating machinery. THINK SAFETY. WORK SAFELY. Never attempt a procedure if it does not feel safe or comfortable. 3 SAFETY WARNING There are many dusts born chemicals in the air when we are sanding, drilling, sawing and grinding. Many of these contain chemicals known to cause cancer, birth defects and other reproductive harm. To help reduce the risk from these chemicals you should always work with approved safety equipment, dust masks that are designed to filter out microscopic particles and always work in a well-ventilated area. Some of the chemicals you can find are arsenic and chromium in pressure treated lumber, lead from paints and crystalline silica from bricks and other masonry products. Please be careful and work safely. 4 GROUNDING INSTRUCTIONS This appliance must be grounded, if it should malfunction or breakdown, grounding provides a path of least resistance for electric current to reduce the risk of electric shock. This appliance is equipped with a cord having equipmentground conductor and grounding plug. The plug must be inserted into an appropriate outlet that is properly installed and grounded in accordance with all local codes and ordinances. WARNING – Improper connection of the equipment-grounding conductor can result in a risk of electric shock. Check with a qualified electrician or service person if you are in doubt as to whether the outlet is properly grounded. Do not modify the plug provided with the appliance – if it will not fit the outlet have a proper outlet installed by a qualified electrician. For grounded, cord – connected appliances: This appliance is for use on a circuit having a normal rating more than 120volt and is factory – equipped with a specific electric cord and plug to permit connection to a proper electric circuit. Make sure that the appliance is connected to an outlet having the same configuration as the plug. No adapter should be used with this appliance. If the appliance must be reconnected for use on a different circuit, qualified service personnel should make the reconnection. For permanently connected appliance: This appliance must be connected to a ground metal, permanent wiring system; or an equipment – grounding conductor must be run with the circuit conductors and connected to the equipment grounding terminal or lead on the appliance. 5 B2470 Tile Saw As part of the growing line of Craftex equipment, we are proud to offer the B2470 2.5 HP 10” Tile Saw. The Craftex name guarantees Craft Excellence. By following the instructions and procedures laid out in this owner’s manual, you will receive years of excellent service and satisfaction. The B2470 is a professional tool and like all power tools, proper care and safety procedures should be adhered to. Features: Motor: 2.5 HP, Single Phase, 3450 RPM. Pump max. flow: 10-12 liters per minute. Blade: Continuous rim blade, 0.05” thick, metal bonded diamonds. Cut Capacity: Blade size: 10” Rip capacity: 24” Diagonal cut: 16” Depth of cut: 3” Water tray dimensions: 35 ¼” x 18 ½” x 3” D (outside). Table Dimensions: 16 3/8” x 11 1/8”. Overall dimensions: 39 ¾”L x 21”W x 48 ¾”H. Weight: 117 lbs. 6 B2470 Tile Saw Assembly 1. Slide the water tank through the slot in the machine frame so that the entire tank rests inside the machine frame. 2. Mount the motor to the machine frame by connecting the supporting frame to the machine frame at the point shown in the assembly diagram on page 14. Secure using two bolts, washers and big flat washers as shown. 3. Next attach the blade guard to the motor using the locking knob and the flat washer provided. 4. Plug the pump into the back if the back of the motor and attach the pump to the water tank using the four suction feet on the bottom of the pump. 5. Slide the table holder through the middle of the rail cover and fit the two inserts over the ends of the cover to prevent the table holder from slipping out. 6. Attach the rail and table assembly you created to the frame using two sets of bolts, flat washers and teeth washers as shown in the assembly diagram. 7. Before operating this tile saw it must be mounted to the stand or securely mounted onto a flat level surface capable of supporting the weight of the tile saw in addition to the weight of all work pieces. Changing /Installing the Blade 1. Power cord must be unplugged from its power source. 2. Loosen the locking knob located on the side of the blade guard and raise guard. Tighten the knob to lock the guard in and up position. 3. Depress the brake shaft button (see Fig. 1 Page 11) while turning the blade (or spindle if you have not yet installed the blade) with your hand until the shaft button depresses fully. This will prevent the spindle from spinning and allow you to unscrew the nut and outer flange. 4. Slide the new blade over the spindle, and refasten the outer flange and nut. Be sure to tighten the nut fully before use. 5. Lower the blade guard and tighten the locking knob. Note: Refer to page 11 for physical machine layout. 7 B2470 Tile Saw Installing the Water Supply To prevent excessive wear on the blade be sure to maintain a continuous flow of water over the blade while cutting. Never cut anything if the water flow is not continuous. 1. Attach the pump as described in step 4, “ Assembly”. Position the pump so it will not interfere with the motion of the table while cutting. 2. Fill water tank with enough water so that the pump is completely submerged but not so much water that the tank overflows. Note: When using the tile saw extreme care must be taken to insure that the saw’s power cord is positioned to remain dry and free from water at all times. Severe personal injury or death can occur it the power cord or the operator of this tool should become wet at any time while this tool is in use. Care and common sense must be used in planning a safe work area. Operation Preparing to Cut: 1. Place your marked tile to the side for a moment. 2. Fill tank with water as described in Installing the water supply above. 3. Plug the pump’s power cord into power unit. Make sure the pump power cord is positioned so it will remain in a dry location once the machine is in use. 4. When it is safe to do so, plug the power unit cord into the appropriate power source. 5. Put on approved eye protection. 6. Flip the power switch located on the front of the motor to the on position. 7. Before operating the tile saw let the motor run for approximately one minute. Make sure the blade is operating at full speed and there are no unusual noises. If you feel the unit is not operating properly do not use. 8 B2470 Tile Saw Cutting Tile 1. Place your marked tile on the table and brace it against the upturned edge (fence) on the back of the table. Align the cut mark with the blade. 2. Once the tile saw has been turned on allow the blade to spin up to full speed. Make sure the pump is supplying a continuous flow of water to the blade. 3. Keeping your hands clear of the blade move the table and the tile underneath the blade. Feed the tile underneath the blade very slowly. Do not force it. If the rotation feed of the blade slows down significantly then your are forcing the tile. 4. While cutting watch to be sure that the blade remains wet. If it runs dry check the action of the pump and the water level of the tub. 5. If the motor stops suddenly flip the power switch to the off position. Wait approximately 15 minutes remove the circuit breaker cap located directly above the power switch and push the reset button. Parallel Guides If you have to cut a number of tile to the same dimension using the Parallel guide may save you a significant amount of time. 1. Mark the first tile to the correct dimensions allowing space for grout. 2. With the motor turned off place the marked tile on the table against the fence. Align the cut mark with the blade. 3. Loosen the locking knob on the parallel guide. Place the hooked portion of the guide over the upturned edge of the table on the side of the cutting groove where you have placed the part of the marked tile that you intend to keep and use after cutting. The parallel guide will be parallel to the tile and perpendicular to the fence. 4. Slide the parallel guide along the fence until it meets the tile making sure that the mark on your tile remains in line with the blade. 5. Tighten the locking knob on the parallel guide. 6. When you are satisfied that the tile is aligned with the blade and the guide is in place and it is safe to do so, turn on the power switch. Cut the tile as described in previous instructions. 7. Once the cut is finished make sure the tile has been cut to the correct dimensions before you cut any more tiles. 9 B2470 Tile Saw Using the Angle Guide Use the angle guide for cutting angled edges on your tiles 1. Attach the angle guide to the fence as you did that parallel guide using the two locking knobs to hold the guide in place. 2. Use the cutting groove in the middle of the table to brace the edge of your tile as you slide the tile and the table underneath the blade. Maintenance As with all tools, unplug the power cord before attempting and servicing and before performing any maintenance. General Maintenance 1. Regularly inspect the diamond saw blade. The use of a dull blade will cause excessive wear on the motor and will not produce a good cut. Replace as required.( Model # B2470B). 2. Inspect the mounting screw on all safety covers and the arbor nut on the cutting wheel shaft. Tighten any that appear loose. 3. Protect the motor and electrical components from prolonged or excessive exposure to water or wet conditions. Wipe dry as needed. 4. Periodically apply a light lubricant to the rail cover. Note: The pump is non-serviceable. If it should fail first try clearing the intake of debris and be sure the hole is not plugged. If the pump still will not work then it must be replaced. 10 B2470 Tile Cutting Machine Diagram Fig. 1 11 B2470 Tile Cutting Machine 12 B2470 Tile Cutting Machine 13 B2470 Tile Cutting Machine 14 WARRANTY CRAFTEX 2 YEAR LIMITED WARRANTY Craftex warrants every product to be free from defects in materials and agrees to correct such defects where applicable. This warranty covers two years for parts and 90 days for labour (unless specified otherwise), to the original purchaser from the date of purchase but does not apply to malfunctions arising directly or indirectly from misuse, abuse, improper installation or assembly, negligence, accidents, repairs or alterations or lack of maintenance. Proof of purchase is necessary. All warranty claims are subject to inspection of such products or part thereof and Craftex reserves the right to inspect any returned item before a refund or replacement may be issued. This warranty shall not apply to consumable products such as blades, bits, belts, cutters, and chisels, punches etceteras. Craftex shall in no event be liable for injuries, accidental or otherwise, death to persons or damage to property or for incidental contingent, special or consequential damages arising from the use of our products. RETURNS, REPAIRS AND REPLACEMENTS To return, repair, or replace a Craftex product, you must visit the appropriate Busy Bee Tools showroom. Craftex is a brand of equipment that is exclusive to Busy Bee Tools. For replacement parts directly from Busy Bee Tools, for this machine, please call 1-800-461BUSY(2879), and have your credit card and part number handy. • All returned merchandise will be subject to a minimum charge of 15% for re-stocking and handling with the following qualifications. • Returns must be pre-authorized by us in writing. • We do not accept collect shipments. • Items returned for warranty purposes must be insured and shipped pre-paid to the nearest warehouse (see locations on inside back cover of this manual). • Returns must be accompanied with a copy of your original invoice as proof of purchase. Returns must be in an un-used condition and shipped in their original packaging a letter explaining your reason for the return. Incurred shipping and handling charges are not refundable. • Busy Bee will repair or replace the item at our discretion and subject to our inspection. • Repaired or replaced items will be returned to you pre-paid by our choice of carriers. • Busy Bee reserves the right to refuse reimbursement or repairs or replacement if a third party without our prior authorization has carried out repairs to the item. • Repairs made by Busy Bee are warranted for 30 days on parts and labour. • Any unforeseen repair charges will be reported to you for acceptance prior to making the repairs. • The Busy Bee Parts & Service Departments are fully equipped to do repairs on all products purchased from us with the exception of some products that require the return to their authorized repair depots. A Busy Bee representative will provide you with the necessary information to have this done. • For faster service it is advisable to contact the nearest Busy Bee location for parts availability prior to bringing your product in for repairs. For more information, call Toll Free 1-800-461-BUSY(2879) or visit www.busybeetools.com 15 16