1
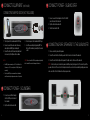
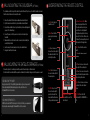
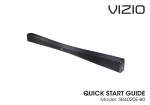
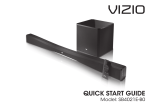
5.1 SURROUND SOUND HOME THEATER
WITH WIRELESS SUBWOOFER
VHT510 - quick start guide
1
Package Contents
• VIZIO High Definition Soundbar
• Wireless Subwoofer
• Satellite Speakers with 20 foot speaker cable (2)
• Power adapter for Soundbar
• Power cable for subwoofer
• Remote control and battery
• Soundbar stands & screws (pre-installed) (2)
• RCA stereo cable
• User Manual
• Quick Start Guide
1
Remove the plastic tab
from the remote
2
Pairing
The Soundbar operates in unison with the Wireless Subwoofer and they come paired from the factory. Follow the Pairing
procedure in the User Manual if pairing is needed.
1
3
Connect Equipment
3
Connect Equipment (CONTINUED)
Digital Connection
- Best Quality
For best performance, use the OPTICAL
jack on your Soundbar if your TV, Set-top
Box, DVD Player, Home Theater System,
etc. has an Optical digital audio output.
1. Turn off power to the Soundbar and the
device.
2. Connect one end of the Optical (S/PDIF) cable
(sold separately) to the digital audio output on
the device.
3. Connect the other end of the Optical (S/PDIF)
cable to the OPTICAL jack on the Soundbar.
4. Turn on power to the Soundbar and the
device.
5. Select the optical input by pressing INPUT on
the top of the Soundbar or pressing OPTICAL
on the remote control.
2
OPTICAL (S/PDIF)
Back of TV
analog Connection
- Good Quality
1. Turn off power to the Soundbar and the
device.
L
R
Back of TV
2. Connect one end of the audio cable (white
and red connectors) to the analog audio
output on the device.
3. Connect the other end of the audio cable
(white and red connectors) to the IN jacks
on the Soundbar.
4. Turn on power to the Soundbar and the
device.
5. Select the associated input by pressing
INPUT on the top of the Soundbar or
pressing IN on the remote control.
3
3
Connect Equipment (CONTINUED)
5
Connect Power - Subwoofer
Connecting an iPod Dock (not included)
1. Connect one end of the AC adapter into the 100-240V AC
jack on the back of the Subwoofer
2. Plug the other end into a wall outlet.
3. Turn the Power Switch to ON.
L
1. Turn off power to the Soundbar and the MP3 Player.
4. Turn on the power to the Soundbar and MP3 Player.
2. Connect one end of the audio cable to the analog
audio output on the MP3 player docking unit.
5. Select the associated input by pressing INPUT on
the top of the Soundbar or pressing IN on the remote
control.
3. Connect the other end of the audio cable (white and
red connectors) to the IN jacks on the Soundbar.
NOTES:
4
R
•
Most MP3 players commonly use a 1/8” Stereo Mini-Jack. In
this case, use a 1/8” stereo mini-jack-to- RCA (AV) cable (sold
separately).
•
Refer to your MP3 Player user manual for more information
about the audio output settings and connections of the product.
6
Connecting rear speakers to the subwoofer
1. Choose a location for your satellite speakers.
2. Connect the cable from the left satellite speaker to the left connector on the back of the subwoofer.
CAUTION: Do not connect the MP3 Player headphone output directly
to the Soundbar. This can result in damage to the devices.
3. Connect the cable from the right satellite speaker to the right connector on the back of the subwoofer.
NOTES: For best results, place the satellite speakers behind the primary listening position. If it is desired to put all the
speakers in the front of the room, the front facing mode should be selected on the soundbar. Any length speaker wires
can be used. Refer to the User Manual to add longer speaker wire.
Connect Power - Soundbar
Cable
Cable
1. Connect one end of the AC adapter
into the 24V DC jack on the back of
the Soundbar.
2. Plug the other end into a wall outlet.
4
Left satellite speaker Subwoofer
Right satellite speaker
5
7
Wall Mounting the SoundBar (optional)
understanding the remote control
The Soundbar can either be kept on the stand or mounted on the wall. If you choose to mount the Soundbar on the wall,
follow the instructions below for removing the stand.
1. Remove the stands from their original configuration as shown in Figure 1.
3. Connect Audio and Video Cables to your Sound Bar (see Connecting Equipment
on page 15 for detailed steps).
4. Connect the power cord to the power cord connector on the back of your
Sound Bar.
Figure 1
5. Mark and drill holes in the desired location. Use anchors (not included) if you
are not drilling into studs.
6. Insert screws (not included), leaving room for your Sound Bar stands.
7. Hang your Sound Bar on the screws.
Figure 2
8
Play/Pause/Previous/Next: When
music is being played from an iPod
on the optional wireless dock, press
these buttons to control playback. If
a 3rd party audio application is being
used on the iPod Touch or iPhone (such
as Pandora), these transport keys do not
control playback of the application.
Power: Press to turn your
Soundbar on or off.
2. Flip the stand over and re-attach to your Sound Bar as shown in Figure 2.
Volume: Press to turn the
speaker system volume up
or down.
Mute: Press to turn the sound on
and off.
Sub: Press to increase or
decrease the volume output of
the subwoofer relative to the
overall system volume.
NOTE: this will not mute any connected
headphones.
Wall Mounting the Satellite Speakers (optional)
You have two options for mounting your satellite speakers to the wall: keyhole or threaded insert.
Follow the instructions included with the speaker mount bracket (not included) to hang your satellite speakers on a wall.
Treb: Press to increase or decrease the
treble output of the overall system.
Bass: Press to increase or
decrease the bass output of
the overall system.
Rear: Press to increase or decrease the
volume of the satellite speakers relative
to the overall system volume.
VIZIO BLU-RAY™ PLAYER
Bring your movies to life! 1080p Full HD playback delivers crystal clear images with
lifelike detail and High Definition Audio puts you in the center of the action. Visit www.VIZIO.com for more details.
VIZIO HIGH DEFINITION TVs
SRS TVOL: Press to control
the level of audio output to
prevent commercials from
being louder than the volume
of the program being viewed.
Center: Press to increase or decrease
the volume of the center channel
volume.
In, Optical, iPod: Press
these buttons to select the
desired input.
SRS TSHD: Press to turn SRS
TruSurround HD or SRS WOW HD on
or off.
VIZIO offers the latest in HDTV technologies. From 1080p to 240Hz, you are guaranteed
the best picture and audio quality. Visit www.VIZIO.com for more details.
6
7
help topics
No power
• Press the Power button on the remote control or the top of the Soundbar.
• Make sure power cords are securely connected to the electrical outlet and on the back of the Soundbar
and Subwoofer.
• Make sure the power LEDs on the power adapters are glowing green.
• Plug another electrical device to the power outlet to verify that the outlet is working.
No Sound
• Press the Volume + (Up) button on the remote control or the top of the Soundbar.
• Press MUTE on the remote to make sure the Soundbar is not muted.
• Press IN, OPTICAL, or iPod on the remote control or INPUT on top of the Soundbar to select a different input
source.
No sound in
Optical In
The data contains an unsupported format or there is an error in the data stream. Select a supported format
such as AC3 or PCM.
The sound is
reversed from the
satellite speakers
The right and left rear channels may be plugged in backwards. Switch the connections on the back of the
subwoofer and then try again.
Buzzing or
humming
• Make sure that both ends of the audio cables are connected securely.
• Test on an alternate device or replace the audio cable.
• Test the device and cable on an alternate input on the Soundbar.
Telephone & Technical Support
VIZIO
Address:
39 Tesla
Irvine, CA 92618, USA
Phone: (877) 698-4946
Fax: (949) 585-9563
Email: [email protected]
Web: www.vizio.com
8
Hours of operation: Monday - Friday: 6 am to 9 pm (PST)
Saturday - Sunday: 8 am to 4pm (PST)
Please have your VIZIO model number, serial number,
and date of purchase available before your call.
TRADEMARKS SHOWN ARE THE PROPERTY OF THEIR RESPECTIVE OWNERS. IMAGES USED ARE FOR ILLUSTRATION PURPOSES ONLY. VIZIO, THE V LOGO, WHERE VISION MEETS VALUE AND
OTHER VIZIO TRADEMARKS ARE THE INTELLECTUAL PROPERTY OF VIZIO INC. PRODUCT FEATURES AND SPECIFICATIONS ARE SUBJECT TO CHANGE WITHOUT NOTICE.
10
© 2010 VIZIO INC. ALL RIGHTS RESERVED.