1
Cisco IOS XR Routing Configuration Guide
Cisco IOS XR Software Release 3.5
Americas Headquarters
Cisco Systems, Inc.
170 West Tasman Drive
San Jose, CA 95134-1706
USA
http://www.cisco.com
Tel: 408 526-4000
800 553-NETS (6387)
Fax: 408 527-0883
Text Part Number: OL-12285-01
THE SPECIFICATIONS AND INFORMATION REGARDING THE PRODUCTS IN THIS MANUAL ARE SUBJECT TO CHANGE WITHOUT NOTICE. ALL
STATEMENTS, INFORMATION, AND RECOMMENDATIONS IN THIS MANUAL ARE BELIEVED TO BE ACCURATE BUT ARE PRESENTED WITHOUT
WARRANTY OF ANY KIND, EXPRESS OR IMPLIED. USERS MUST TAKE FULL RESPONSIBILITY FOR THEIR APPLICATION OF ANY PRODUCTS.
THE SOFTWARE LICENSE AND LIMITED WARRANTY FOR THE ACCOMPANYING PRODUCT ARE SET FORTH IN THE INFORMATION PACKET THAT
SHIPPED WITH THE PRODUCT AND ARE INCORPORATED HEREIN BY THIS REFERENCE. IF YOU ARE UNABLE TO LOCATE THE SOFTWARE LICENSE
OR LIMITED WARRANTY, CONTACT YOUR CISCO REPRESENTATIVE FOR A COPY.
The Cisco implementation of TCP header compression is an adaptation of a program developed by the University of California, Berkeley (UCB) as part of UCB’s public
domain version of the UNIX operating system. All rights reserved. Copyright © 1981, Regents of the University of California.
NOTWITHSTANDING ANY OTHER WARRANTY HEREIN, ALL DOCUMENT FILES AND SOFTWARE OF THESE SUPPLIERS ARE PROVIDED “AS IS” WITH
ALL FAULTS. CISCO AND THE ABOVE-NAMED SUPPLIERS DISCLAIM ALL WARRANTIES, EXPRESSED OR IMPLIED, INCLUDING, WITHOUT
LIMITATION, THOSE OF MERCHANTABILITY, FITNESS FOR A PARTICULAR PURPOSE AND NONINFRINGEMENT OR ARISING FROM A COURSE OF
DEALING, USAGE, OR TRADE PRACTICE.
IN NO EVENT SHALL CISCO OR ITS SUPPLIERS BE LIABLE FOR ANY INDIRECT, SPECIAL, CONSEQUENTIAL, OR INCIDENTAL DAMAGES, INCLUDING,
WITHOUT LIMITATION, LOST PROFITS OR LOSS OR DAMAGE TO DATA ARISING OUT OF THE USE OR INABILITY TO USE THIS MANUAL, EVEN IF CISCO
OR ITS SUPPLIERS HAVE BEEN ADVISED OF THE POSSIBILITY OF SUCH DAMAGES.
CCVP, the Cisco logo, and Welcome to the Human Network are trademarks of Cisco Systems, Inc.; Changing the Way We Work, Live, Play, and Learn is a service mark of
Cisco Systems, Inc.; and Access Registrar, Aironet, Catalyst, CCDA, CCDP, CCIE, CCIP, CCNA, CCNP, CCSP, Cisco, the Cisco Certified Internetwork Expert logo,
Cisco IOS, Cisco Press, Cisco Systems, Cisco Systems Capital, the Cisco Systems logo, Cisco Unity, Enterprise/Solver, EtherChannel, EtherFast, EtherSwitch, Fast Step,
Follow Me Browsing, FormShare, GigaDrive, HomeLink, Internet Quotient, IOS, iPhone, IP/TV, iQ Expertise, the iQ logo, iQ Net Readiness Scorecard, iQuick Study,
LightStream, Linksys, MeetingPlace, MGX, Networkers, Networking Academy, Network Registrar, PIX, ProConnect, ScriptShare, SMARTnet, StackWise, The Fastest Way
to Increase Your Internet Quotient, and TransPath are registered trademarks of Cisco Systems, Inc. and/or its affiliates in the United States and certain other countries.
All other trademarks mentioned in this document or Website are the property of their respective owners. The use of the word partner does not imply a partnership relationship
between Cisco and any other company. (0711R)
Any Internet Protocol (IP) addresses used in this document are not intended to be actual addresses. Any examples, command display output, and figures included in the
document are shown for illustrative purposes only. Any use of actual IP addresses in illustrative content is unintentional and coincidental.
Cisco IOS XR Routing Configuration Guide
© 2007 Cisco Systems, Inc. All rights reserved.
CONTENTS
Preface
xiii
Changes to This Document
xiii
Obtaining Documentation, Obtaining Support, and Security Guidelines
Implementing BGP on Cisco IOS XR Software
Contents
xiii
RC-1
RC-2
Prerequisites for Implementing BGP on Cisco IOS XR Software
RC-2
Information About Implementing BGP on Cisco IOS XR Software RC-2
BGP Functional Overview RC-3
BGP Router Identifier RC-4
BGP Default Limits RC-4
BGP Next Hop Tracking RC-5
Autonomous System Number Formats in BGP RC-7
BGP Configuration RC-7
No Default Address Family RC-19
Routing Policy Enforcement RC-20
Table Policy RC-21
Update Groups RC-22
BGP Cost Community RC-22
BGP Best Path Algorithm RC-27
Administrative Distance RC-30
Multiprotocol BGP RC-32
Route Dampening RC-33
BGP Routing Domain Confederation RC-34
BGP Route Reflectors RC-34
Default Address Family for show Commands RC-37
Distributed BGP RC-37
MPLS VPN Carrier Supporting Carrier RC-39
BGP Keychains RC-39
IPv6/IPv6 VPN Provider Edge Transport over MPLS RC-39
VPNv4/VPNv6 over the IP Core Using L2TPv3 Tunnels RC-40
How to Implement BGP on Cisco IOS XR Software RC-43
Enabling BGP Routing RC-44
Configuring a Routing Domain Confederation for BGP RC-47
Resetting eBGP Session Immediately Upon Link Failure RC-49
Cisco IOS XR Routing Configuration Guide
iii
Contents
Logging Neighbor Changes RC-49
Adjusting BGP Timers RC-50
Changing the BGP Default Local Preference Value RC-51
Configuring the MED Metric for BGP RC-52
Configuring BGP Weights RC-54
Tuning the BGP Best-Path Calculation RC-55
Indicating BGP Back-door Routes RC-57
Configuring Aggregate Addresses RC-59
Redistributing iBGP Routes into IGP RC-60
Redistributing Prefixes into Multiprotocol BGP RC-62
Configuring BGP Route Dampening RC-64
Applying Policy When Updating the Routing Table RC-69
Setting BGP Administrative Distance RC-71
Configuring a BGP Neighbor Group and Neighbors RC-72
Configuring a Route Reflector for BGP RC-75
Configuring BGP Route Filtering by Route Policy RC-77
Configuring BGP Next Hop Trigger Delay RC-79
Disabling Next-hop Processing on BGP Updates RC-81
Configuring BGP Community and Extended-Community Advertisements
Configuring the BGP Cost Community RC-84
Configuring Software to Store Updates from a Neighbor RC-89
Configuring Distributed BGP RC-91
Configuring a VPN Routing and Forwarding Instance in BGP RC-94
Configuring Keychains for BGP RC-112
Configuring an MDT Address Family Session in BGP RC-113
Disabling a BGP Neighbor RC-116
Resetting Neighbors Using BGP Dynamic Inbound Soft Reset RC-118
Resetting Neighbors Using BGP Outbound Soft Reset RC-118
Resetting Neighbors Using BGP Hard Reset RC-119
Clearing Caches, Tables, and Databases RC-120
Displaying System and Network Statistics RC-121
Displaying BGP Process Information RC-123
Monitoring BGP Update Groups RC-124
Configuration Examples for Implementing BGP on Cisco IOS XR Software
Enabling BGP: Example RC-125
Displaying BGP Update Groups: Example RC-127
BGP Neighbor Configuration: Example RC-127
BGP Confederation: Example RC-128
BGP Route Reflector: Example RC-129
BGP MDT Address Family Configuration: Example RC-130
Cisco IOS XR Routing Configuration Guide
iv
RC-82
RC-125
Contents
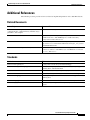
Where to Go Next
RC-130
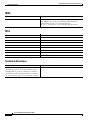
Additional References RC-131
Related Documents RC-131
Standards RC-131
MIBs RC-132
RFCs RC-132
Technical Assistance RC-132
Implementing EIGRP on Cisco IOS XR Software
Contents
RC-133
RC-133
Prerequisites for Implementing EIGRP on Cisco IOS XR Software
Restrictions for Implementing EIGRP on Cisco IOS XR Software
RC-134
RC-134
Information About Implementing EIGRP on Cisco IOS XR Software RC-134
EIGRP Functional Overview RC-135
EIGRP Features RC-135
EIGRP Components RC-136
EIGRP Configuration Grouping RC-137
EIGRP Configuration Modes RC-137
EIGRP Interfaces RC-138
Redistribution for an EIGRP Process RC-138
Metric Weights for EIGRP Routing RC-139
Percentage of Link Bandwidth Used for EIGRP Packets RC-140
Floating Summary Routes for an EIGRP Process RC-140
Split Horizon for an EIGRP Process RC-142
Adjustment of Hello Interval and Hold Time for an EIGRP Process RC-142
Stub Routing for an EIGRP Process RC-143
Route Policy Options for an EIGRP Process RC-144
EIGRP Layer 3 VPN PE-CE Site-of-Origin RC-145
IPv6 and IPv6 VPN Provider Edge Support over MPLS and IP RC-145
How to Implement EIGRP on Cisco IOS XR Software RC-146
Enabling EIGRP Routing RC-146
Configuring Route Summarization for an EIGRP Process RC-148
Redistributing Routes for EIGRP RC-150
Creating a Route Policy and Attaching It to an EIGRP Process RC-152
Configuring Stub Routing for an EIGRP Process RC-155
Configuring EIGRP as a PE-CE Protocol RC-156
Redistributing BGP Routes into EIGRP RC-158
Monitoring EIGRP Routing RC-160
Configuration Examples for Implementing EIGRP on Cisco IOS XR Software
RC-163
Cisco IOS XR Routing Configuration Guide
v
Contents
Configuring a Basic EIGRP Configuration: Example RC-163
Configuring an EIGRP Stub Operation: Example RC-164
Configuring an EIGRP PE-CE Configuration with Prefix-Limits: Example
RC-164
Additional References RC-165
Related Documents RC-165
Standards RC-165
MIBs RC-165
RFCs RC-165
Technical Assistance RC-166
Implementing IS-IS on Cisco IOS XR Software
Contents
RC-167
RC-168
Prerequisites for Implementing IS-IS on Cisco IOS XR Software
Restrictions for Implementing IS-IS on Cisco IOS XR Software
RC-168
RC-168
Information About Implementing IS-IS on Cisco IOS XR Software RC-168
IS-IS Functional Overview RC-169
Key Features Supported in the Cisco IOS XR IS-IS Implementation RC-170
IS-IS Configuration Grouping RC-170
IS-IS Configuration Modes RC-170
IS-IS Interfaces RC-171
Multitopology Configuration RC-171
IPv6 Routing and Configuring IPv6 Addressing RC-171
Limit LSP Flooding RC-172
Maximum LSP Lifetime and Refresh Interval RC-172
Overload Bit Configuration During Multitopology Operation RC-173
Single-Topology IPv6 Support RC-173
Multitopology IPv6 Support RC-173
IS-IS Authentication RC-173
Nonstop Forwarding RC-174
Multi-Instance IS-IS RC-175
Multiprotocol Label Switching Traffic Engineering RC-175
Overload Bit on Router RC-175
Default Routes RC-176
Attached Bit on an IS-IS Instance RC-176
IS-IS Support for Route Tags RC-176
Multicast-Intact Feature RC-176
Multicast Topology Support Using IS-IS RC-177
MPLS Label Distribution Protocol IGP Synchronization RC-177
Label Distribution Protocol IGP Auto-configuration RC-178
MPLS TE Forwarding Adjacency RC-178
Cisco IOS XR Routing Configuration Guide
vi
Contents
MPLS TE Interarea Tunnels
IP Fast Reroute RC-179
RC-179
How to Implement IS-IS on Cisco IOS XR Software RC-179
Enabling IS-IS and Configuring Level 1 or Level 2 Routing RC-180
Configuring Single Topology for IS-IS RC-182
Configuring Multitopology for IS-IS RC-186
Controlling LSP Flooding for IS-IS RC-187
Configuring Nonstop Forwarding for IS-IS RC-191
Configuring Authentication for IS-IS RC-193
Configuring Keychains for IS-IS RC-195
Configuring MPLS Traffic Engineering for IS-IS RC-197
Tuning Adjacencies for IS-IS RC-200
Setting SPF Interval for a Single-Topology IPv4 and IPv6 Configuration
Customizing Routes for IS-IS RC-205
Configuring MPLS LDP IS-IS Synchronization RC-208
Enabling Multicast-Intact RC-210
Tagging IS-IS Interface Routes RC-211
Setting the Priority for Adding Prefixes to the RIB RC-213
Configuring IP Fast Reroute Loop-free Alternate RC-215
RC-203
Configuration Examples for Implementing IS-IS on Cisco IOS XR Software RC-216
Configuring Single-Topology IS-IS for IPv6: Example RC-217
Configuring Multitopology IS-IS for IPv6: Example RC-217
Redistributing IS-IS Routes Between Multiple Instances: Example RC-217
Tagging Routes: Example RC-218
Where to Go Next
RC-218
Additional References RC-219
Related Documents RC-219
Standards RC-219
MIBs RC-220
RFCs RC-220
Technical Assistance RC-220
Implementing OSPF on Cisco IOS XR Software
Contents
RC-221
RC-222
Prerequisites for Implementing OSPF on Cisco IOS XR Software
RC-222
Information About Implementing OSPF on Cisco IOS XR Software RC-223
OSPF Functional Overview RC-223
Key Features Supported in the Cisco IOS XR OSPF Implementation RC-224
Comparison of Cisco IOS XR OSPFv3 and OSPFv2 RC-225
Cisco IOS XR Routing Configuration Guide
vii
Contents
OSPF Hierarchical CLI and CLI Inheritance RC-225
OSPF Routing Components RC-226
OSPF Process and Router ID RC-229
Supported OSPF Network Types RC-229
Route Authentication Methods for OSPF RC-230
Neighbors and Adjacency for OSPF RC-231
Designated Router (DR) for OSPF RC-231
Default Route for OSPF RC-231
Link-State Advertisement Types for OSPF Version 2 RC-231
Link-State Advertisement Types for OSPFv3 RC-232
Virtual Link and Transit Area for OSPF RC-233
Route Redistribution for OSPF RC-234
OSPF Shortest Path First Throttling RC-234
Nonstop Forwarding for OSPF Version 2 RC-235
Graceful Restart for OSPFv3 RC-236
Multicast-Intact Support for OSPF RC-238
Load Balancing in OSPF Version 2 and OSPFv3 RC-239
Multi-Area Adjacency for OSPF Version 2 RC-239
Label Distribution Protocol IGP Auto-configuration for OSPF RC-240
OSPF Authentication Message Digest Management RC-240
GTSM TTL Security Mechanism for OSPF RC-241
Path Computation Element for OSPFv2 RC-241
How to Implement OSPF on Cisco IOS XR Software RC-242
Enabling OSPF RC-242
Configuring Stub and Not-so-Stubby Area Types RC-244
Configuring Neighbors for Nonbroadcast Networks RC-247
Configuring Authentication at Different Hierarchical Levels for OSPF Version 2 RC-252
Controlling the Frequency that the Same LSA Is Originated or Accepted for OSPF RC-255
Creating a Virtual Link with MD5 Authentication to Area 0 for OSPF RC-257
Summarizing Subnetwork LSAs on an OSPF ABR RC-261
Redistributing Routes from One IGP into OSPF RC-263
Configuring OSPF Shortest Path First Throttling RC-266
Configuring Cisco-Specific Nonstop Forwarding for OSPF Version 2 RC-269
Configuring OSPF Version 2 for MPLS Traffic Engineering RC-271
Configuring OSPFv3 Graceful Restart RC-275
Enabling Multicast-Intact for OSPFv2 RC-278
Associating Interfaces to a VRF RC-279
Configuring OSPF as a Provider Edge to Customer Edge (PE-CE) Protocol RC-281
Creating Multiple OSPF Instances (OSPF Process and a VRF) RC-284
Configuring Multi-Area Adjacency RC-286
Cisco IOS XR Routing Configuration Guide
viii
Contents
Configuring Label Distribution Protocol IGP Auto-Configuration for OSPF RC-287
Configuring Authentication Message Digest Management for OSPF RC-288
Configuring Generalized TTL Security Mechanism (GTSM) for OSPF RC-292
Verifying OSPF Configuration and Operation RC-295
Configuration Examples for Implementing OSPF on Cisco IOS XR Software RC-296
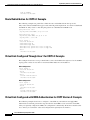
Cisco IOS XR for OSPF Version 2 Configuration: Example RC-296
CLI Inheritance and Precedence for OSPF Version 2: Example RC-298
MPLS TE for OSPF Version 2: Example RC-299
ABR with Summarization for OSPFv3: Example RC-299
ABR Stub Area for OSPFv3: Example RC-299
ABR Totally Stub Area for OSPFv3: Example RC-299
Route Redistribution for OSPFv3: Example RC-300
Virtual Link Configured Through Area 1 for OSPFv3: Example RC-300
Virtual Link Configured with MD5 Authentication for OSPF Version 2: Example RC-300
Where to Go Next
RC-301
Additional References RC-301
Related Documents RC-301
Standards RC-302
MIBs RC-302
RFCs RC-302
Technical Assistance RC-302
Implementing and Monitoring RIB on Cisco IOS XR Software
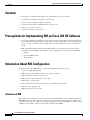
Contents
RC-303
RC-304
Prerequisites for Implementing RIB on Cisco IOS XR Software
RC-304
Information About RIB Configuration RC-304
Overview of RIB RC-304
RIB Data Structures in BGP and Other Protocols RC-305
RIB Administrative Distance RC-305
RIB Support for IPv4 and IPv6 RC-306
RIB Statistics RC-306
IPv6 and IPv6 VPN Provider Edge Transport over MPLS RC-306
IP Fast Reroute RC-307
RIB Quarantining RC-307
How to Deploy and Monitor RIB RC-308
Verifying RIB Configuration Using the Routing Table RC-308
Verifying Networking and Routing Problems RC-309
Disabling RIB Next-hop Dampening RC-310
Configuration Examples for RIB Monitoring
RC-311
Cisco IOS XR Routing Configuration Guide
ix
Contents
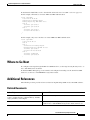
Output of show route Command: Example RC-312
Output of show route backup Command: Example RC-312
Output of show route best-local Command: Example RC-312
Output of show route connected Command: Example RC-313
Output of show route local Command: Example RC-313
Output of show route longer-prefixes Command: Example RC-313
Output of show route next-hop Command: Example RC-313
Where to Go Next
RC-314
Additional References RC-314
Related Documents RC-315
Standards RC-315
MIBs RC-316
RFCs RC-316
Technical Assistance RC-316
Implementing RIP on Cisco IOS XR Software
Contents
RC-317
RC-317
Information About Implementing RIP on Cisco IOS XR Software RC-318
Prerequisites for Implementing RIP on Cisco IOS XR Software RC-318
RIP Functional Overview RC-318
Split Horizon for RIP RC-319
Route Timers for RIP RC-319
Route Redistribution for RIP RC-320
Default Administrative Distances for RIP RC-320
Routing Policy Options for RIP RC-321
How to Implement RIP on Cisco IOS XR Software
Enabling RIP RC-322
Customize RIP RC-323
Control Routing Information RC-326
Creating a Route Policy for RIP RC-328
RC-321
Configuration Examples for Implementing RIP on Cisco IOS XR Software RC-331
Configuring a Basic RIP Configuration: Example RC-331
Configuring RIP on the Provider Edge: Example RC-332
Adjusting RIP Timers for each VRF Instance: Example RC-332
Configuring Redistribution for RIP: Example RC-333
Configuring Route Policies for RIP: Example RC-333
Configuring Passive Interfaces and Explicit Neighbors for RIP: Example RC-334
Controlling RIP Routes: Example RC-334
Additional References
Cisco IOS XR Routing Configuration Guide
x
RC-334
Contents
Related Documents RC-335
Standards RC-335
MIBs RC-335
RFCs RC-335
Technical Assistance RC-336
Implementing Routing Policy on Cisco IOS XR Software
Contents
RC-337
RC-338
Prerequisites for Implementing Routing Policy on Cisco IOS XR Software
Information About Implementing Routing Policy on Cisco IOS XR Software
Routing Policy Language RC-338
Routing Policy Language Overview RC-339
Routing Policy Configuration Basics RC-347
Policy Definitions RC-347
Parameterization RC-348
Semantics of Policy Application RC-349
Policy Statements RC-354
Attach Points RC-358
Attached Policy Modification RC-390
Nonattached Policy Modification RC-390
RC-338
RC-338
How to Implement Routing Policy on Cisco IOS XR Software RC-392
Defining a Route Policy RC-393
Attaching a Routing Policy to a BGP Neighbor RC-394
Modifying a Routing Policy Using a Text Editor RC-396
Configuration Examples for Implementing Routing Policy on Cisco IOS XR Software RC-397
Routing Policy Definition: Example RC-398
Simple Inbound Policy: Example RC-398
Modular Inbound Policy: Example RC-399
Translating Cisco IOS Route Maps to Cisco IOS XR Routing Policy Language: Example RC-400
Additional References RC-400
Related Documents RC-400
Standards RC-401
MIBs RC-401
RFCs RC-401
Technical Assistance RC-401
Implementing Static Routes on Cisco IOS XR Software
Contents
RC-403
RC-404
Prerequisites for Implementing Static Routes on Cisco IOS XR Software
Information About Implementing Static Routes on Cisco IOS XR Software
RC-404
RC-404
Cisco IOS XR Routing Configuration Guide
xi
Contents
Static Route Functional Overview RC-404
Default Administrative Distance RC-405
Directly Connected Routes RC-405
Recursive Static Routes RC-406
Fully Specified Static Routes RC-406
Floating Static Routes RC-407
Default VRF RC-407
IPv4 and IPv6 Static VRF Routes RC-407
IPv6/IPv6 VPN Provider Edge Transport over MPLS
RC-407
How to Implement Static Routes on Cisco IOS XR Software RC-408
Configuring a Static Route RC-408
Configuring a Floating Static Route RC-409
Configuring Static Routes Between PE-CE Routers RC-411
Changing the Maximum Number of Allowable Static Routes RC-413
Associating a VRF with a Static Route RC-414
Configuration Examples RC-416
Configuring Traffic Discard: Example RC-416
Configuring a Fixed Default Route: Example RC-416
Configuring a Floating Static Route: Example RC-416
Configuring a Static Route Between PE-CE Routers: Example
Where to Go Next
RC-417
Additional References RC-417
Related Documents RC-417
Standards RC-417
MIBs RC-418
RFCs RC-418
Technical Assistance RC-418
Index
Cisco IOS XR Routing Configuration Guide
xii
RC-416
Preface
The Cisco IOS XR Routing Configuration Guide preface contains the following sections:
•
Changes to This Document, page xiii
•
Obtaining Documentation, Obtaining Support, and Security Guidelines, page xiii
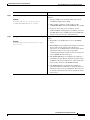
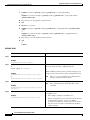
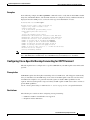
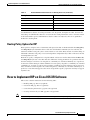
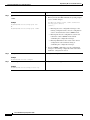
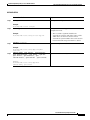
Changes to This Document
Table 1 lists the technical changes made to this document since it was first printed.
Table 1
Changes to This Document
Revision
Date
Change Summary
OL-12285-01
June 2007
Initial release of this document.
Obtaining Documentation, Obtaining Support, and Security
Guidelines
For information on obtaining documentation, obtaining support, providing documentation feedback,
security guidelines, and also recommended aliases and general Cisco documents, see the monthly
What’s New in Cisco Product Documentation, which also lists all new and revised Cisco technical
documentation, at:
http://www.cisco.com/en/US/docs/general/whatsnew/whatsnew.html
Cisco IOS XR Routing Configuration Guide
xiii
Preface
Obtaining Documentation, Obtaining Support, and Security Guidelines
Cisco IOS XR Routing Configuration Guide
xiv
Implementing BGP on Cisco IOS XR Software
Border Gateway Protocol (BGP) is an Exterior Gateway Protocol (EGP) that allows you to create
loop-free interdomain routing between autonomous systems. An autonomous system is a set of routers
under a single technical administration. Routers in an autonomous system can use multiple Interior
Gateway Protocols (IGP) to exchange routing information inside the autonomous system and an EGP to
route packets outside the autonomous system.
This module provides the conceptual and configuration information for BGP on Cisco IOS XR software.
Note
For more information about BGP on the Cisco IOS XR software and complete descriptions of the BGP
commands listed in this module, you can see the “Related Documents” section of this module. To locate
documentation for other commands that might appear while performing a configuration task, search
online in the Cisco IOS XR software master command index.
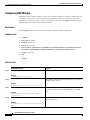
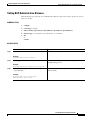
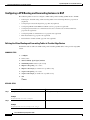
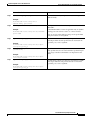
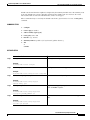
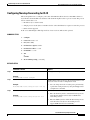
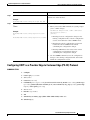
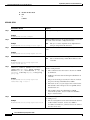
Feature History for Implementing BGP on Cisco IOS XR Software
Release
Modification
Release 2.0
This feature was introduced on the Cisco CRS-1.
Release 3.0
No modification.
Release 3.2
Support was added for the Cisco XR 12000 Series Router.
Release 3.3.0
VPN routing and forwarding (VRF) support was added, including
information on VRF command modes and command syntax.
BGP cost community information was added.
Cisco IOS XR Routing Configuration Guide
RC-1
Implementing BGP on Cisco IOS XR Software
Contents
Release 3.4.0
Release 3.5.0
The following features were supported:
•
Four-byte autonomous system (AS) number
•
Carrier supporting carrier (CSC) for BGP was added. See
Cisco IOS XR Multiprotocol Label Switching Protocol Configuration
Guide for information
•
Key chains
The following features were supported:
•
IPv6 Provider Edge and IPv6 VPN Provider Edge over Multiprotocol
Label Switching
•
Neighbor-specific VRF IPv6 address family configurations
•
Address family group-specific VPNv6 configurations
•
VPN4/VPNv6 over IP Core using L2TPv3 Tunnels
•
Multicast Distribution Tree (MDT) Subaddress Family Identifier
Information (SAFI) support for Multicast VPN (MVPN)
Contents
•
Prerequisites for Implementing BGP on Cisco IOS XR Software, page RC-2
•
Information About Implementing BGP on Cisco IOS XR Software, page RC-2
•
How to Implement BGP on Cisco IOS XR Software, page RC-43
•
Configuration Examples for Implementing BGP on Cisco IOS XR Software, page RC-125
•
Where to Go Next, page RC-130
•
Additional References, page RC-131
Prerequisites for Implementing BGP on Cisco IOS XR Software
You must be in a user group associated with a task group that includes the proper task IDs for BGP
commands. For detailed information about user groups and task IDs, see the Configuring AAA Services
on Cisco IOS XR Software module of Cisco IOS XR System Security Configuration Guide.
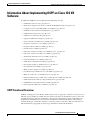
Information About Implementing BGP on Cisco IOS XR Software
To implement BGP, you need to understand the following concepts:
•
BGP Functional Overview, page RC-3
•
BGP Router Identifier, page RC-4
•
BGP Default Limits, page RC-4
•
BGP Next Hop Tracking, page RC-5
•
Autonomous System Number Formats in BGP, page RC-7
•
BGP Configuration, page RC-7
Cisco IOS XR Routing Configuration Guide
RC-2
Implementing BGP on Cisco IOS XR Software
Information About Implementing BGP on Cisco IOS XR Software
•
No Default Address Family, page RC-19
•
Routing Policy Enforcement, page RC-20
•
Table Policy, page RC-21
•
Update Groups, page RC-22
•
BGP Best Path Algorithm, page RC-27
•
Administrative Distance, page RC-30
•
Administrative Distance, page RC-30
•
Multiprotocol BGP, page RC-32
•
Route Dampening, page RC-33
•
BGP Routing Domain Confederation, page RC-34
•
BGP Route Reflectors, page RC-34
•
Default Address Family for show Commands, page RC-37
•
Distributed BGP, page RC-37
•
MPLS VPN Carrier Supporting Carrier, page RC-39
•
BGP Keychains, page RC-39
•
IPv6/IPv6 VPN Provider Edge Transport over MPLS, page RC-39
•
VPNv4/VPNv6 over the IP Core Using L2TPv3 Tunnels, page RC-40
BGP Functional Overview
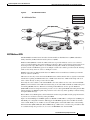
BGP uses TCP as its transport protocol. Two BGP routers form a TCP connection between one another
(peer routers) and exchange messages to open and confirm the connection parameters.
BGP routers exchange network reachability information. This information is mainly an indication of the
full paths (BGP autonomous system numbers) that a route should take to reach the destination network.
This information helps construct a graph that shows which autonomous systems are loop free and where
routing policies can be applied to enforce restrictions on routing behavior.
Any two routers forming a TCP connection to exchange BGP routing information are called peers or
neighbors. BGP peers initially exchange their full BGP routing tables. After this exchange, incremental
updates are sent as the routing table changes. BGP keeps a version number of the BGP table, which is
the same for all of its BGP peers. The version number changes whenever BGP updates the table due to
routing information changes. Keepalive packets are sent to ensure that the connection is alive between
the BGP peers and notification packets are sent in response to error or special conditions.
Note
For information on configuring BGP to distribute Multiprotocol Label Switching (MPLS) Layer 3
virtual private network (VPN) information, see Cisco IOS XR Multiprotocol Label Switching
Configuration Guide.
Note
For information on BGP support for Bidirectional Forwarding Detection (BFD), see Cisco IOS XR
Interface and Hardware Configuration Guide and Cisco IOS XR Interface and Hardware Command
Reference.
Cisco IOS XR Routing Configuration Guide
RC-3
Implementing BGP on Cisco IOS XR Software
Information About Implementing BGP on Cisco IOS XR Software
BGP Router Identifier
For BGP sessions between neighbors to be established, BGP must be assigned a router ID. The router
ID is sent to BGP peers in the OPEN message when a BGP session is established.
BGP attempts to obtain a router ID in the following ways (in order of preference):
•
By means of the address configured using the bgp router-id command in router configuration mode.
•
By using the highest IPv4 address on a loopback interface in the system if the router is booted with
saved loopback address configuration.
•
By using the primary IPv4 address of the first loopback address that gets configured if there are not
any in the saved configuration.
If none of these methods for obtaining a router ID succeeds, BGP does not have a router ID and cannot
establish any peering sessions with BGP neighbors. In such an instance, an error message is entered in
the system log, and the show bgp summary command displays a router ID of 0.0.0.0.
After BGP has obtained a router ID, it continues to use it even if a better router ID becomes available.
This usage avoids unnecessary flapping for all BGP sessions. However, if the router ID currently in use
becomes invalid (because the interface goes down or its configuration is changed), BGP selects a new
router ID (using the rules described) and all established peering sessions are reset.
Note
We strongly recommend that the bgp router-id command is configured to prevent unnecessary changes
to the router ID (and consequent flapping of BGP sessions).
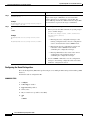
BGP Default Limits
Cisco IOS XR BGP imposes maximum limits on the number of neighbors that can be configured on the
router and on the maximum number of prefixes that are accepted from a peer for a given address family.
This limitation safeguards the router from resource depletion caused by misconfiguration, either locally
or on the remote neighbor. The following limits apply to BGP configurations:
•
The default maximum number of peers that can be configured is 4000. The default can be changed
using the bgp maximum neighbor command. The limit range is 1 to 15000. Any attempt to
configure additional peers beyond the maximum limit or set the maximum limit to a number that is
less than the number of peers currently configured will fail.
•
To prevent a peer from flooding BGP with advertisements, a limit is placed on the number of
prefixes that are accepted from a peer for each supported address family. The default limits can be
overridden through configuration of the maximum-prefix limit command for the peer for the
appropriate address family. The following default limits are used if the user does not configure the
maximum number of prefixes for the address family:
– 512K (524,288) prefixes for IPv4 unicast.
– 128K (131,072) prefixes for IPv4 multicast.
– 128K (131,072) prefixes for IPv6 unicast.
– 128K (131,072) prefixes for IPv6 multicast
– 512K (524,288) prefixes for VPNv4 unicast
– 512K (524,288) prefixes for VPNv6 unicast
Cisco IOS XR Routing Configuration Guide
RC-4
Implementing BGP on Cisco IOS XR Software
Information About Implementing BGP on Cisco IOS XR Software
A cease notification message is sent to the neighbor and the peering with the neighbor is terminated
when the number of prefixes received from the peer for a given address family exceeds the maximum
limit (either set by default or configured by the user) for that address family.
It is possible that the maximum number of prefixes for a neighbor for a given address family has been
configured after the peering with the neighbor has been established and a certain number of prefixes have
already been received from the neighbor for that address family. A cease notification message is sent to
the neighbor and peering with the neighbor is terminated immediately after the configuration if the
configured maximum number of prefixes is fewer than the number of prefixes that have already been
received from the neighbor for the address family.
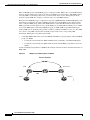
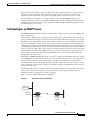
BGP Next Hop Tracking
BGP receives notifications from the Routing Information Base (RIB) when next-hop information
changes (event-driven notifications). BGP obtains next-hop information from the RIB to:
•
Determine whether a next hop is reachable.
•
Find the fully recursed IGP metric to the next hop (used in the best-path calculation).
•
Validate the received next hops.
•
Calculate the outgoing next hops.
•
Verify the reachability and connectedness of neighbors.
BGP is notified when any of the following events occurs:
Note
•
Next hop becomes unreachable
•
Next hop becomes reachable
•
Fully recursed IGP metric to the next hop changes
•
First hop IP address or first hop interface change
•
Next hop becomes connected
•
Next hop becomes unconnected
•
Next hop becomes a local address
•
Next hop becomes a nonlocal address
Reachability and recursed metric events trigger a best-path recalculation.
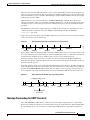
Event notifications from the RIB are classified as critical and noncritical. Notifications for critical and
noncritical events are sent in separate batches. However, a noncritical event is sent along with the critical
events if the noncritical event is pending and there is a request to read the critical events.
•
Critical events are related to the reachability (reachable and unreachable), connectivity (connected
and unconnected), and locality (local and nonlocal) of the next hops. Notifications for these events
are not delayed.
•
Noncritical events include only the IGP metric changes. These events are sent at an interval of 3
seconds. A metric change event is batched and sent 3 seconds after the last one was sent.
The next-hop trigger delay for critical and noncritical events can be configured to specify a minimum
batching interval for critical and noncritical events using the nexthop trigger-delay command. The
trigger delay is address family dependent.
Cisco IOS XR Routing Configuration Guide
RC-5
Implementing BGP on Cisco IOS XR Software
Information About Implementing BGP on Cisco IOS XR Software
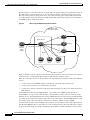
The BGP next-hop tracking feature allows you to specify that BGP routes are resolved using only next
hops whose routes have the following characteristics:
•
To avoid the aggregate routes, the prefix length must be greater than a specified value.
•
The source protocol must be from a selected list, ensuring that BGP routes are not used to resolve
next hops that could lead to oscillation.
This route policy filtering is possible because RIB identifies the source protocol of route that resolved a
next hop as well as the mask length associated with the route. The nexthop route-policy command is
used to specify the route-policy.
For information on route policy filtering for next hops using the next-hop attach point, see the
Implementing Routing Policy Language on Cisco IOS XR Software module of Cisco IOS XR Routing
Configuration Guide.
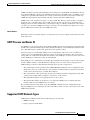
Scoped IPv4/VPNv4 Table Walk
To determine which address family to process, a next-hop notification is received by first dereferencing
the gateway context associated with the next hop, then looking into the gateway context to determine
which address families are using the gateway context. The IPv4 unicast and VPNv4 unicast address
families share the same gateway context, because they are registered with the IPv4 unicast table in the
RIB. As a result, both the global IPv4 unicast table and the VPNv4 table are processed when an IPv4
unicast next-hop notification is received from the RIB. A mask is maintained in the next hop, indicating
whether the next hop belongs to IPv4 unicast or VPNv4 unicast, or both. This scoped table walk localizes
the processing in the appropriate address family table.
Reordered Address Family Processing
The Cisco IOS XR software walks address family tables based on the numeric value of the address
family. When a next-hop notification batch is received, the order of address family processing is
reordered to the following order:
•
IPv4 tunnel
•
VPNv4 unicast
•
VPNv6 unicast
•
IPv4 labeled unicast
•
IPv4 unicast
•
IPv4 MDT
•
IPv4 multicast
•
IPv6 unicast
•
IPv6 multicast
•
IPv6 labeled unicast
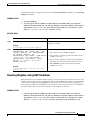
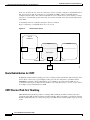
New Thread for Next-Hop Processing
The critical-event thread in the spkr process handles only next-hop, Bidirectional Forwarding Detection
(BFD), and fast-external-failover (FEF) notifications. This critical-event thread ensures that BGP
convergence is not adversely impacted by other events that may take a significant amount of time.
Cisco IOS XR Routing Configuration Guide
RC-6
Implementing BGP on Cisco IOS XR Software
Information About Implementing BGP on Cisco IOS XR Software
show, clear, and debug Commands
The show bgp nexthops command provides statistical information about next-hop notifications, the
amount of time spent in processing those notifications, and details about each next hop registered with
the RIB. The clear bgp nexthop performance-statistics command ensures that the cumulative statistics
associated with the processing part of the next-hop show command can be cleared to help in monitoring.
The clear bgp nexthop registration command performs an asynchronous registration of the next hop
with the RIB. See the BGP Commands on Cisco IOS XR Software module of Cisco IOS XR Routing
Commands for information on the next-hop show and clear commands.
The debug bgp nexthop command displays information on next-hop processing. The out keyword
provides debug information only about BGP registration of next hops with RIB. The in keyword displays
debug information about next-hop notifications received from RIB. The out keyword displays debug
information about next-hop notifications sent to the RIB. See BGP Debug Commands on Cisco IOS XR
Software.
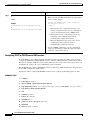
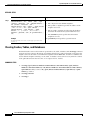
Autonomous System Number Formats in BGP
Autonomous system numbers (ASNs) are globally unique identifiers used to identify autonomous
systems (ASs) and enable ASs to exchange exterior routing information between neighboring ASs. A
unique ASN is allocated to each AS for use in BGP routing.
Currently, ASNs are encoded as 2-byte numbers in BGP. The 2-byte range is 1 to 65535. To prepare for
the eventual exhaustion of 2-byte ASNs, BGP has the capability to support 4-byte ASNs. The 4-byte
range is 1.0 to 65535.65535 and the format is high-order 16-bit value in decimal . low-order 16-bit value
in decimal. The BGP 4-byte ASN capability is used to propagate 4-byte-based AS path information
across BGP speakers that do not support 4-byte AS numbers. This capability allows for the gradual
transition from 2-byte ASNs to 4-byte ASNs. See draft-ietf-idr-as4bytes-12.txt for information on
increasing the size of an ASN from 2 bytes to 4 bytes.
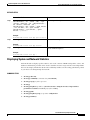
BGP Configuration
Cisco IOS XR BGP follows a neighbor-based configuration model that requires that all configurations
for a particular neighbor be grouped in one place under the neighbor configuration. Peer groups are not
supported for either sharing configuration between neighbors or for sharing update messages. The
concept of peer group has been replaced by a set of configuration groups to be used as templates in BGP
configuration and automatically generated update groups to share update messages between neighbors.
BGP configurations are grouped into four major categories:
•
Router Configuration Mode, page RC-8
•
Router Address Family Configuration Mode, page RC-8
•
Neighbor Configuration Mode, page RC-8
•
Neighbor Address Family Configuration Mode, page RC-8
•
VRF Configuration Mode, page RC-8
•
VRF Address Family Configuration Mode, page RC-8
•
VRF Neighbor Configuration Mode, page RC-8
•
VRF Neighbor Address Family Configuration Mode, page RC-9
Cisco IOS XR Routing Configuration Guide
RC-7
Implementing BGP on Cisco IOS XR Software
Information About Implementing BGP on Cisco IOS XR Software
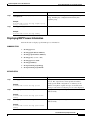
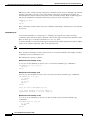
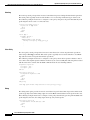
Configuration Modes
The following sections show how to enter some of the configuration modes. From a mode, you can enter
the ? command to display the commands available in that mode.
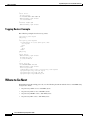
Router Configuration Mode
The following example shows how to enter router configuration mode:
RP/0/RP0/CPU0:router# configuration
RP/0/RP0/CPU0:router(config)# router bgp 140
RP/0/RP0/CPU0:router(config-bgp)#
Router Address Family Configuration Mode
The following example shows how to enter router address family configuration mode:
RP/0/RP0/CPU0:router(config)# router bgp 112
RP/0/RP0/CPU0:router(config-bgp)# address-family ipv4 multicast
RP/0/RP0/CPU0:router(config-bgp-af)#
Neighbor Configuration Mode
The following example shows how to enter neighbor configuration mode:
RP/0/RP0/CPU0:router(config)# router bgp 140
RP/0/RP0/CPU0:router(config-bgp)# neighbor 10.0.0.1
RP/0/RP0/CPU0:router(config-bgp-nbr)#
Neighbor Address Family Configuration Mode
The following example shows how to enter neighbor address family configuration mode:
RP/0/RP0/CPU0:router(config)# router bgp 112
RP/0/RP0/CPU0:router(config-bgp)# neighbor 10.0.0.1
RP/0/RP0/CPU0:router(config-bgp-nbr)# address-family ipv4 unicast
RP/0/RP0/CPU0:router(config-bgp-nbr-af)#
VRF Configuration Mode
The following example shows how to enter VPN routing and forwarding (VRF) configuration mode:
RP/0/RP0/CPU0:router(config)# router bgp 140
RP/0/RP0/CPU0:router(config-bgp)# vrf vrf_A
RP/0/RP0/CPU0:router(config-bgp-vrf)#
VRF Address Family Configuration Mode
The following example shows how to enter VRF address family configuration mode:
RP/0/RP0/CPU0:router(config)# router bgp 112
RP/0/RP0/CPU0:router(config-bgp)# vrf vrf_A
RP/0/RP0/CPU0:router(config-bgp-vrf)# address-family ipv4 unicast
RP/0/RP0/CPU0:router(config-bgp-vrf-af)#
VRF Neighbor Configuration Mode
The following example shows how to enter VRF neighbor configuration mode:
RP/0/RP0/CPU0:router(config)# router bgp 140
RP/0/RP0/CPU0:router(config-bgp)# vrf vrf_A
Cisco IOS XR Routing Configuration Guide
RC-8
Implementing BGP on Cisco IOS XR Software
Information About Implementing BGP on Cisco IOS XR Software
RP/0/RP0/CPU0:router(config-bgp-vrf)# neighbor 11.0.1.2
RP/0/RP0/CPU0:router(config-bgp-vrf-nbr)#
VRF Neighbor Address Family Configuration Mode
The following example shows how to enter VRF neighbor address family configuration mode:
RP/0/RP0/CPU0:router(config)# router bgp 112
RP/0/RP0/CPU0:router(config-bgp)# vrf vrf_A
RP/0/RP0/CPU0:router(config-bgp-vrf)# neighbor 11.0.1.2
RP/0/RP0/CPU0:router(config-bgp-vrf-nbr)# address-family ipv4 unicast
RP/0/RP0/CPU0:router(config-bgp-vrf-nbr-af)#
VPNv4 Address Family Configuration Mode
The following example shows how to enter VPNv4 address family configuration mode:
RP/0/RP0/CPU0:router(config)# router bgp 152
RP/0/RP0/CPU0:router(config-bgp)# address-family vpnv4 unicast
RP/0/RP0/CPU0:router(config-bgp-af)#
VPNv6 Address Family Configuration Mode
The following example shows how to enter VPNv6 address family configuration mode:
RP/0/RP0/CPU0:router(config)# router bgp 150
RP/0/RP0/CPU0:router(config-bgp)# address-family vpnv6 unicast
RP/0/RP0/CPU0:router(config-bgp-af)#
Neighbor Submode
Cisco IOS XR BGP uses a neighbor submode to make it possible to enter configurations without having
to prefix every configuration with the neighbor keyword and the neighbor address:
•
Cisco IOS XR software has a submode available for neighbors in which it is not necessary for every
command to have a “neighbor x.x.x.x” prefix:
In Cisco IOS XR software, the configuration is as follows:
RP/0/RP0/CPU0:router(config-bgp)# neighbor 192.23.1.2
RP/0/RP0/CPU0:router(config-bgp-nbr)# remote-as 2002
RP/0/RP0/CPU0:router(config-bgp-nbr)# address-family ipv4 multicast
•
An address family configuration submode inside the neighbor configuration submode is available
for entering address family-specific neighbor configurations. In Cisco IOS XR, the configuration is
as follows:
RP/0/RP0/CPU0:router(config-bgp)# neighbor 2002::2
RP/0/RP0/CPU0:router(config-bgp-nbr)# remote-as 2023
RP/0/RP0/CPU0:router(config-bgp-nbr)# address-family ipv6 unicast
RP/0/RP0/CPU0:router(config-bgp-nbr-af)# next-hop-self
RP/0/RP0/CPU0:router(config-bgp-nbr-af)# route-policy one in
•
You must enter neighbor-specific IPv4, IPv6, VPNv4, or VPNv6 commands in neighbor
address-family configuration submode. In Cisco IOS XR software, the configuration is as follows:
RP/0/RP0/CPU0:router(config)# router bgp 109
RP/0/RP0/CPU0:router(config-bgp)# neighbor 192.168.40.24
RP/0/RP0/CPU0:router(config-bgp-nbr)# remote-as 1
RP/0/RP0/CPU0:router(config-bgp-nbr)# address-family ipv4 unicast
RP/0/RP0/CPU0:router(config-bgp-nbr-af)# maximum-prefix 1000
Cisco IOS XR Routing Configuration Guide
RC-9
Implementing BGP on Cisco IOS XR Software
Information About Implementing BGP on Cisco IOS XR Software
•
You must enter neighbor-specific IPv4 and IPv6 commands in VRF neighbor address-family
configuration submode. In Cisco IOS XR software, the configuration is as follows:
RP/0/RP0/CPU0:router(config)# router bgp 110
RP/0/RP0/CPU0:router(config-bgp)# vrf vrf_A
RP/0/RP0/CPU0:router(config-bgp-vrf)# neighbor 11.0.1.2
RP/0/RP0/CPU0:router(config-bgp-vrf-nbr)# address-family ipv4 unicast
RP/0/RP0/CPU0:router(config-bgp-vrf-nbr-af)# route-policy pass all in
Configuration Templates
The af-group, session-group, and neighbor-group configuration commands provide template support
for the neighbor configuration in Cisco IOS XR software:
The af-group command is used to group address family-specific neighbor commands within an IPv4,
IPv6, VPNv4, or VPNv6 address family. Neighbors that have the same address family configuration are
able to use the address family group (af-group) name for their address family-specific configuration. A
neighbor inherits the configuration from an address family group by way of the use command. If a
neighbor is configured to use an address family group, the neighbor (by default) inherits the entire
configuration from the address family group. However, a neighbor does not inherit all of the
configuration from the address family group if items are explicitly configured for the neighbor. The
address family group configuration is entered under the BGP router configuration mode. The following
example shows how to enter address family group configuration mode.
RP/0/RP0/CPU0:router(config)# router bgp 140
RP/0/RP0/CPU0:router(config-bgp)# af-group afmcast1 address-family ipv4 multicast
RP/0/RP0/CPU0:router(config-bgp-afgrp)#
The session-group command allows you to create a session group from which neighbors can inherit
address family-independent configuration. A neighbor inherits the configuration from a session group
by way of the use command. If a neighbor is configured to use a session group, the neighbor (by default)
inherits the entire configuration of the session group. A neighbor does not inherit all of the configuration
from a session group if a configuration is done directly on that neighbor. The following example shows
how to enter session group configuration mode:
RP/0/RP0/CPU0:router(config)# router bgp 140
RP/0/RP0/CPU0:router(config-bgp)# session-group session1
RP/0/RP0/CPU0:router(config-bgp-sngrp)#
The neighbor-group command helps you apply the same configuration to one or more neighbors.
Neighbor groups can include session groups and address family groups and can comprise the complete
configuration for a neighbor. After a neighbor group is configured, a neighbor can inherit the
configuration of the group using the use command. If a neighbor is configured to use a neighbor group,
the neighbor inherits the entire BGP configuration of the neighbor group.
The following example shows how to enter neighbor group configuration mode:
RP/0/RP0/CPU0:router(config)# router bgp 123
RP/0/RP0/CPU0:router(config-bgp)# neighbor-group nbrgroup1
RP/0/RP0/CPU0:router(config-bgp-nbrgrp)#
The following example shows how to enter neighbor group address family configuration mode:
RP/0/RP0/CPU0:router(config)# router bgp 140
RP/0/RP0/CPU0:router(config-bgp)# neighbor-group nbrgroup1
RP/0/RP0/CPU0:router(config-bgp-nbrgrp)# address-family ipv4 unicast
RP/0/RP0/CPU0:router(config-bgp-nbrgrp-af)#
Cisco IOS XR Routing Configuration Guide
RC-10
Implementing BGP on Cisco IOS XR Software
Information About Implementing BGP on Cisco IOS XR Software
•
However, a neighbor does not inherit all of the configuration from the neighbor group if items are
explicitly configured for the neighbor. In addition, some part of the configuration of the neighbor
group could be hidden if a session group or address family group was also being used.
Configuration grouping has the following effects in Cisco IOS XR software:
•
Commands entered at the session group level define address family-independent commands (the
same commands as in the neighbor submode).
•
Commands entered at the address family group level define address family-dependent commands
for a specified address family (the same commands as in the neighbor-address family configuration
submode).
•
Commands entered at the neighbor group level define address family-independent commands and
address family-dependent commands for each address family (the same as all available neighbor
commands), and define the use command for the address family group and session group commands.
Template Inheritance Rules
In Cisco IOS XR software, BGP neighbors or groups inherit configuration from other configuration
groups.
For address family-independent configurations:
•
Neighbors can inherit from session groups and neighbor groups.
•
Neighbor groups can inherit from session groups and other neighbor groups.
•
Session groups can inherit from other session groups.
•
If a neighbor uses a session group and a neighbor group, the configurations in the session group are
preferred over the global address family configurations in the neighbor group.
For address family-dependent configurations:
•
Address family groups can inherit from other address family groups.
•
Neighbor groups can inherit from address family groups and other neighbor groups.
•
Neighbors can inherit from address family groups and neighbor groups.
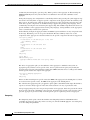
Configuration group inheritance rules are numbered in order of precedence as follows:
1.
If the item is configured directly on the neighbor, that value is used. In the example that follows, the
advertisement interval is configured both on the neighbor group and neighbor configuration and the
advertisement interval being used is from the neighbor configuration:
RP/0/RP0/CPU0:router(config)# router bgp 140
RP/0/RP0/CPU0:router(config-bgp)# neighbor-group AS_1
RP/0/RP0/CPU0:router(config-bgp-nbrgrp)# advertisement-interval 15
RP/0/RP0/CPU0:router(config-bgp-nbrgrp)# exit
RP/0/RP0/CPU0:router(config-bgp)# neighbor 10.1.1.1
RP/0/RP0/CPU0:router(config-bgp-nbr)# remote-as 1
RP/0/RP0/CPU0:router(config-bgp-nbr)# use neighbor-group AS_1
RP/0/RP0/CPU0:router(config-bgp-nbr)# advertisement-interval 20
The following output from the show bgp neighbors command shows that the advertisement interval
used is 20 seconds:
RP/0/RP0/CPU0:router# show bgp neighbors 10.1.1.1
BGP neighbor is 10.1.1.1, remote AS 1, local AS 140, external link
Remote router ID 0.0.0.0
BGP state = Idle
Last read 00:00:00, hold time is 180, keepalive interval is 60 seconds
Cisco IOS XR Routing Configuration Guide
RC-11
Implementing BGP on Cisco IOS XR Software
Information About Implementing BGP on Cisco IOS XR Software
Received 0 messages, 0 notifications, 0 in queue
Sent 0 messages, 0 notifications, 0 in queue
Minimum time between advertisement runs is 20 seconds
For Address Family: IPv4 Unicast
BGP neighbor version 0
Update group: 0.1
eBGP neighbor with no inbound or outbound policy; defaults to 'drop'
Route refresh request: received 0, sent 0
0 accepted prefixes
Prefix advertised 0, suppressed 0, withdrawn 0, maximum limit 524288
Threshold for warning message 75%
Connections established 0; dropped 0
Last reset 00:00:14, due to BGP neighbor initialized
External BGP neighbor not directly connected.
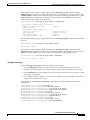
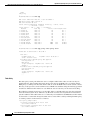
2.
Otherwise, if the neighbor uses a session group or address family group, the configuration value is
obtained from the session group or address family group. If the address family group or session
group has a parent and an item is configured on the parent, the parent configuration is used. If the
item is not configured on the parent but is configured on the parent of the parent, the configuration
of the parent of the parent is used, and so on. In the example that follows, the advertisement interval
is configured on a neighbor group and a session group and the advertisement interval value being
used is from the session group:
RP/0/RP0/CPU0:router(config)# router bgp 140
RP/0/RP0/CPU0:router(config-bgp)# session-group AS_2
RP/0/RP0/CPU0:router(config-bgp-sngrp)# advertisement-interval 15
RP/0/RP0/CPU0:router(config-bgp-sngrp)# exit
RP/0/RP0/CPU0:router(config-bgp)# neighbor-group AS_1
RP/0/RP0/CPU0:router(config-bgp-nbrgrp)# advertisement-interval 20
RP/0/RP0/CPU0:router(config-bgp-nbrgrp)# exit
RP/0/RP0/CPU0:router(config-bgp)# neighbor 192.168.0.1
RP/0/RP0/CPU0:router(config-bgp-nbr)# remote-as 1
RP/0/RP0/CPU0:router(config-bgp-nbr)# use session-group AS_2
RP/0/RP0/CPU0:router(config-bgp-nbr)# use neighbor-group AS_1
The following output from the show bgp neighbors command shows that the advertisement interval
used is 15 seconds:
RP/0/RP0/CPU0:router# show bgp neighbors 192.168.0.1
BGP neighbor is 192.168.0.1, remote AS 1, local AS 140, external link
Remote router ID 0.0.0.0
BGP state = Idle
Last read 00:00:00, hold time is 180, keepalive interval is 60 seconds
Received 0 messages, 0 notifications, 0 in queue
Sent 0 messages, 0 notifications, 0 in queue
Minimum time between advertisement runs is 15 seconds
For Address Family: IPv4 Unicast
BGP neighbor version 0
Update group: 0.1
eBGP neighbor with no inbound or outbound policy; defaults to 'drop'
Route refresh request: received 0, sent 0
0 accepted prefixes
Prefix advertised 0, suppressed 0, withdrawn 0, maximum limit 524288
Threshold for warning message 75%
Connections established 0; dropped 0
Last reset 00:03:23, due to BGP neighbor initialized
External BGP neighbor not directly connected.
Cisco IOS XR Routing Configuration Guide
RC-12
Implementing BGP on Cisco IOS XR Software
Information About Implementing BGP on Cisco IOS XR Software
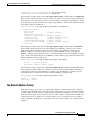
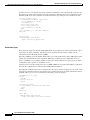
3.
Otherwise, if the neighbor uses a neighbor group and does not use a session group or address family
group, the configuration value can be obtained from the neighbor group either directly or through
inheritance. In the example that follows, the advertisement interval from the neighbor group is used
because it is not configured directly on the neighbor and no session group is used:
RP/0/RP0/CPU0:router(config)# router bgp 150
RP/0/RP0/CPU0:router(config-bgp)# session-group AS_2
RP/0/RP0/CPU0:router(config-bgp-sngrp)# advertisement-interval 20
RP/0/RP0/CPU0:router(config-bgp-sngrp)# exit
RP/0/RP0/CPU0:router(config-bgp)# neighbor-group AS_1
RP/0/RP0/CPU0:router(config-bgp-nbrgrp)# advertisement-interval 15
RP/0/RP0/CPU0:router(config-bgp-nbrgrp)# exit
RP/0/RP0/CPU0:router(config-bgp)# neighbor 192.168.1.1
RP/0/RP0/CPU0:router(config-bgp-nbr)# remote-as 1
RP/0/RP0/CPU0:router(config-bgp-nbr)# use neighbor-group AS_1
The following output from the show bgp neighbors command shows that the advertisement interval
used is 15 seconds:
RP/0/RP0/CPU0:router# show bgp neighbors 192.168.1.1
BGP neighbor is 192.168.2.2, remote AS 1, local AS 140, external link
Remote router ID 0.0.0.0
BGP state = Idle
Last read 00:00:00, hold time is 180, keepalive interval is 60 seconds
Received 0 messages, 0 notifications, 0 in queue
Sent 0 messages, 0 notifications, 0 in queue
Minimum time between advertisement runs is 15 seconds
For Address Family: IPv4 Unicast
BGP neighbor version 0
Update group: 0.1
eBGP neighbor with no outbound policy; defaults to 'drop'
Route refresh request: received 0, sent 0
Inbound path policy configured
Policy for incoming advertisements is POLICY_1
0 accepted prefixes
Prefix advertised 0, suppressed 0, withdrawn 0, maximum limit 524288
Threshold for warning message 75%
Connections established 0; dropped 0
Last reset 00:01:14, due to BGP neighbor initialized
External BGP neighbor not directly connected.
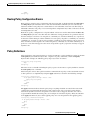
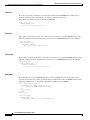
To illustrate the same rule, the following example shows how to set the advertisement interval to 15
(from the session group) and 25 (from the neighbor group). The advertisement interval set in the
session group overrides the one set in the neighbor group. The inbound policy is set to POLICY_1
from the neighbor group.
RP/0/RP0/CPU0:router(config)# router bgp 140
RP/0/RP0/CPU0:router(config-bgp)# session-group ADV
RP/0/RP0/CPU0:router(config-bgp-sngrp)# advertisement-interval 15
RP/0/RP0/CPU0:router(config-bgp-sngrp)# exit
RP/0/RP0/CPU0:router(config-bgp)# neighbor-group ADV_2
RP/0/RP0/CPU0:router(config-bgp-nbrgrp)# advertisement-interval 25
RP/0/RP0/CPU0:router(config-bgp-nbrgrp)# address-family ipv4 unicast
RP/0/RP0/CPU0:router(config-bgp-nbrgrp-af)# route-policy POLICY_1 in
RP/0/RP0/CPU0:router(config-bgp-nbrgrp-af)# exit
RP/0/RP0/CPU0:router(config-bgp-nbrgrp)# exit
RP/0/RP0/CPU0:router(config-bgp)# exit
RP/0/RP0/CPU0:router(config-bgp)# neighbor 192.168.2.2
RP/0/RP0/CPU0:router(config-bgp-nbr)# remote-as 1
Cisco IOS XR Routing Configuration Guide
RC-13
Implementing BGP on Cisco IOS XR Software
Information About Implementing BGP on Cisco IOS XR Software
RP/0/RP0/CPU0:router(config-bgp-nbr)# use session-group ADV
RP/0/RP0/CPU0:router(config-bgp-nbr)# use neighbor-group TIMER
The following output from the show bgp neighbors command shows that the advertisement interval
used is 15 seconds:
RP/0/RP0/CPU0:router# show bgp neighbors 192.168.2.2
BGP neighbor is 192.168.2.2, remote AS 1, local AS 140, external link
Remote router ID 0.0.0.0
BGP state = Idle
Last read 00:00:00, hold time is 180, keepalive interval is 60 seconds
Received 0 messages, 0 notifications, 0 in queue
Sent 0 messages, 0 notifications, 0 in queue
Minimum time between advertisement runs is 15 seconds
For Address Family: IPv4 Unicast
BGP neighbor version 0
Update group: 0.1
eBGP neighbor with no inbound or outbound policy; defaults to 'drop'
Route refresh request: received 0, sent 0
0 accepted prefixes
Prefix advertised 0, suppressed 0, withdrawn 0, maximum limit 524288
Threshold for warning message 75%
Connections established 0; dropped 0
Last reset 00:02:03, due to BGP neighbor initialized
External BGP neighbor not directly connected.
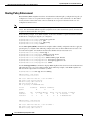
4.
Otherwise, the default value is used. In the example that follows, neighbor 10.0.101.5 has the
minimum time between advertisement runs set to 30 seconds (default) because the neighbor is not
configured to use the neighbor configuration or the neighbor group configuration:
RP/0/RP0/CPU0:router(config)# router bgp 140
RP/0/RP0/CPU0:router(config-bgp)# neighbor-group AS_1
RP/0/RP0/CPU0:router(config-bgp-nbrgrp)# remote-as 1
RP/0/RP0/CPU0:router(config-bgp-nbrgrp)# exit
RP/0/RP0/CPU0:router(config-bgp)# neighbor-group adv_15
RP/0/RP0/CPU0:router(config-bgp-nbrgrp)# remote-as 10
RP/0/RP0/CPU0:router(config-bgp-nbrgrp)# advertisement-interval 15
RP/0/RP0/CPU0:router(config-bgp-nbrgrp)# exit
RP/0/RP0/CPU0:router(config-bgp)# neighbor 10.0.101.5
RP/0/RP0/CPU0:router(config-bgp-nbr)# use neighbor-group AS_1
RP/0/RP0/CPU0:router(config-bgp-nbr)# exit
RP/0/RP0/CPU0:router(config-bgp)# neighbor 10.0.101.10
RP/0/RP0/CPU0:router(config-bgp-nbr)# use neighbor-group adv_15
The following output from the show bgp neighbors command shows that the advertisement interval
used is 30 seconds:
RP/0/RP0/CPU0:router# show bgp neighbors 10.0.101.5
BGP neighbor is 10.0.101.5, remote AS 1, local AS 140, external link
Remote router ID 0.0.0.0
BGP state = Idle
Last read 00:00:00, hold time is 180, keepalive interval is 60 seconds
Received 0 messages, 0 notifications, 0 in queue
Sent 0 messages, 0 notifications, 0 in queue
Minimum time between advertisement runs is 30 seconds
For Address Family: IPv4 Unicast
BGP neighbor version 0
Update group: 0.2
eBGP neighbor with no inbound or outbound policy; defaults to 'drop'
Cisco IOS XR Routing Configuration Guide
RC-14
Implementing BGP on Cisco IOS XR Software
Information About Implementing BGP on Cisco IOS XR Software
Route refresh request: received 0, sent 0
0 accepted prefixes
Prefix advertised 0, suppressed 0, withdrawn 0, maximum limit 524288
Threshold for warning message 75%
Connections established 0; dropped 0
Last reset 00:00:25, due to BGP neighbor initialized
External BGP neighbor not directly connected.
The inheritance rules used when groups are inheriting configuration from other groups are the same
as the rules given for neighbors inheriting from groups.
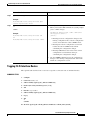
Template Inheritance
You can use the following show commands described to monitor BGP inheritance information:
•
show bgp neighbors, page RC-15
•
show bgp af-group, page RC-16
•
show bgp session-group, page RC-17
•
show bgp neighbor-group, page RC-18
show bgp neighbors
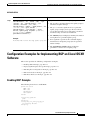
Use the show bgp neighbors command to display information about the BGP configuration for
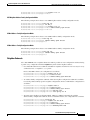
neighbors.
•
Use the configuration keyword to display the effective configuration for the neighbor, including any
settings that have been inherited from session groups, neighbor groups, or address family groups
used by this neighbor.
•
Use the inheritance keyword to display the session groups, neighbor groups, and address family
groups from which this neighbor is capable of inheriting configuration .
The show bgp neighbors command examples that follow are based on the sample configuration:
RP/0/RP0/CPU0:router(config)# router bgp 142
RP/0/RP0/CPU0:router(config-bgp)# af-group GROUP_3 address-family ipv4 unicast
RP/0/RP0/CPU0:router(config-bgp-afgrp)# next-hop-self
RP/0/RP0/CPU0:router(config-bgp-afgrp)# route-policy POLICY_1 in
RP/0/RP0/CPU0:router(config-bgp-afgrp)# exit
RP/0/RP0/CPU0:router(config-bgp)# session-group GROUP_2
RP/0/RP0/CPU0:router(config-bgp-sngrp)# advertisement-interval 15
RP/0/RP0/CPU0:router(config-bgp-sngrp)# exit
RP/0/RP0/CPU0:router(config-bgp)# neighbor-group GROUP_1
RP/0/RP0/CPU0:router(config-bgp-nbrgrp)# use session-group GROUP_2
RP/0/RP0/CPU0:router(config-bgp-nbrgrp)# ebgp-multihop 3
RP/0/RP0/CPU0:router(config-bgp-nbrgrp)# address-family ipv4 unicast
RP/0/RP0/CPU0:router(config-bgp-nbrgrp-af)# weight 100
RP/0/RP0/CPU0:router(config-bgp-nbrgrp-af)# send-community-ebgp
RP/0/RP0/CPU0:router(config-bgp-nbrgrp-af)# exit
RP/0/RP0/CPU0:router(config-bgp-nbrgrp)# address-family ipv4 multicast
RP/0/RP0/CPU0:router(config-bgp-nbrgrp-af)# default-originate
RP/0/RP0/CPU0:router(config-bgp-nbrgrp-af)# exit
RP/0/RP0/CPU0:router(config-bgp-nbrgrp)# exit
RP/0/RP0/CPU0:router(config-bgp)# neighbor 192.168.0.1
RP/0/RP0/CPU0:router(config-bgp-nbr)# remote-as 2
RP/0/RP0/CPU0:router(config-bgp-nbr)# use neighbor-group GROUP_1
RP/0/RP0/CPU0:router(config-bgp-nbr)# address-family ipv4 unicast
RP/0/RP0/CPU0:router(config-bgp-nbr-af)# use af-group GROUP_3
RP/0/RP0/CPU0:router(config-bgp-nbr-af)# weight 200
Cisco IOS XR Routing Configuration Guide
RC-15
Implementing BGP on Cisco IOS XR Software
Information About Implementing BGP on Cisco IOS XR Software
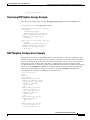
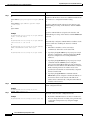
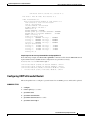
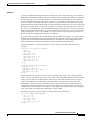
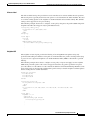
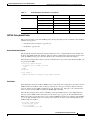
The following example displays sample output from the show bgp neighbors command using the
inheritance keyword. The example shows that the neighbor inherits session parameters from neighbor
group GROUP_1, which in turn inherits from session group GROUP_2. The neighbor inherits IPv4
unicast parameters from address family group GROUP_3 and IPv4 multicast parameters from neighbor
group GROUP_1:
RP/0/RP0/CPU0:router# show bgp neighbors 192.168.0.1 inheritance
Session:
n:GROUP_1 s:GROUP_2
IPv4 Unicast:
a:GROUP_3
IPv4 Multicast: n:GROUP_1
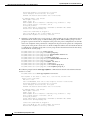
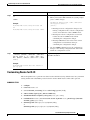
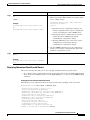
The following example displays sample output from the show bgp neighbors command using the
configuration keyword. The example shows from where each item of configuration was inherited, or if
it was configured directly on the neighbor (indicated by [ ]). For example, the ebgp-multihop 3
command was inherited from neighbor group GROUP_1 and the next-hop-self command was inherited
from the address family group GROUP_3:
RP/0/RP0/CPU0:router# show bgp neighbors 192.168.0.1 configuration
neighbor 192.168.0.1
remote-as 2
advertisement-interval 15
ebgp-multihop 3
address-family ipv4 unicast
next-hop-self
route-policy POLICY_1
in
weight 200
address-family ipv4 multicast
default-originate
[]
[n:GROUP_1 s:GROUP_2]
[n:GROUP_1]
[]
[a:GROUP_3]
[a:GROUP_3]
[]
[n:GROUP_1]
[n:GROUP_1]
show bgp af-group
Use the show bgp af-group command to display address family groups:
•
Use the configuration keyword to display the effective configuration for the address family group,
including any settings that have been inherited from address family groups used by this address
family group.
•
Use the inheritance keyword to display the address family groups from which this address family
group is capable of inheriting configuration.
•
Use the users keyword to display the neighbors, neighbor groups, and address family groups that
inherit configuration from this address family group.
The show bgp af-group sample commands that follow are based on this sample configuration:
RP/0/RP0/CPU0:router(config)# router bgp 140
RP/0/RP0/CPU0:router(config-bgp)# af-group GROUP_3 address-family ipv4 unicast
RP/0/RP0/CPU0:router(config-bgp-afgrp)# remove-private-as
RP/0/RP0/CPU0:router(config-bgp-afgrp)# route-policy POLICY_1 in
RP/0/RP0/CPU0:router(config-bgp-afgrp)# exit
RP/0/RP0/CPU0:router(config-bgp)# af-group GROUP_1 address-family ipv4 unicast
RP/0/RP0/CPU0:router(config-bgp-afgrp)# use af-group GROUP_2
RP/0/RP0/CPU0:router(config-bgp-afgrp)# maximum-prefix 2500 75 warning-only
RP/0/RP0/CPU0:router(config-bgp-afgrp)# default-originate
RP/0/RP0/CPU0:router(config-bgp-afgrp)# exit
RP/0/RP0/CPU0:router(config-bgp)# af-group GROUP_2 address-family ipv4 unicast
RP/0/RP0/CPU0:router(config-bgp-afgrp)# use af-group GROUP_3
RP/0/RP0/CPU0:router(config-bgp-afgrp)# send-community-ebgp
RP/0/RP0/CPU0:router(config-bgp-afgrp)# send-extended-community-ebgp
RP/0/RP0/CPU0:router(config-bgp-afgrp)# capability orf prefix both
Cisco IOS XR Routing Configuration Guide
RC-16
Implementing BGP on Cisco IOS XR Software
Information About Implementing BGP on Cisco IOS XR Software
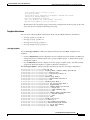
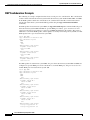
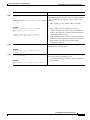
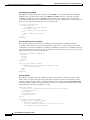
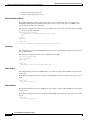
The following example displays sample output from the show bgp af-group command using the
configuration keyword. This example shows from where each configuration item was inherited. The
default-originate command was configured directly on this address family group (indicated by [ ]). The
remove-private-as command was inherited from address family group GROUP_2, which in turn
inherited from address family group GROUP_3:
RP/0/RP0/CPU0:router# show bgp af-group GROUP_1 configuration
af-group GROUP_1 address-family ipv4 unicast
capability orf prefix-list both
[a:GROUP_2]
default-originate
[]
maximum-prefix 2500 75 warning-only
[]
route-policy POLICY_1 in
[a:GROUP_2 a:GROUP_3]
remove-private-AS
[a:GROUP_2 a:GROUP_3]
send-community-ebgp
[a:GROUP_2]
send-extended-community-ebgp
[a:GROUP_2]
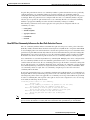
The following example displays sample output from the show bgp af-group command using the users
keyword:
RP/0/RP0/CPU0:router# show bgp af-group GROUP_2 users
IPv4 Unicast: a:GROUP_1
The following example displays sample output from the show bgp af-group command using the
inheritance keyword. This shows that the specified address family group GROUP_1 directly uses the
GROUP_2 address family group, which in turn uses the GROUP_3 address family group:
RP/0/RP0/CPU0:router# show bgp af-group GROUP_1 inheritance
IPv4 Unicast: a:GROUP_2 a:GROUP_3
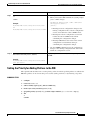
show bgp session-group
Use the show bgp session-group command to display session groups:
•
Use the configuration keyword to display the effective configuration for the session group,
including any settings that have been inherited from session groups used by this session group.
•
Use the inheritance keyword to display the session groups from which this session group is capable
of inheriting configuration.
•
Use the users keyword to display the session groups, neighbor groups, and neighbors that inherit
configuration from this session group.
The output from the show bgp session-group command is based on the following session group
configuration:
RP/0/RP0/CPU0:router(config)# router bgp 113
RP/0/RP0/CPU0:router(config-bgp)# session-group GROUP_1
RP/0/RP0/CPU0:router(config-bgp-sngrp)# use session-group GROUP_2
RP/0/RP0/CPU0:router(config-bgp-sngrp)# update-source Loopback 0
RP/0/RP0/CPU0:router(config-bgp-sngrp)# exit
RP/0/RP0/CPU0:router(config-bgp)# session-group GROUP_2
RP/0/RP0/CPU0:router(config-bgp-sngrp)# use session-group GROUP_3
RP/0/RP0/CPU0:router(config-bgp-sngrp)# ebgp-multihop 2
RP/0/RP0/CPU0:router(config-bgp-sngrp)# exit
RP/0/RP0/CPU0:router(config-bgp)# session-group GROUP_3
RP/0/RP0/CPU0:router(config-bgp-sngrp)# dmz-link-bandwidth
Cisco IOS XR Routing Configuration Guide
RC-17
Implementing BGP on Cisco IOS XR Software
Information About Implementing BGP on Cisco IOS XR Software
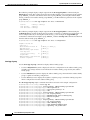
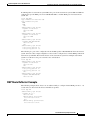
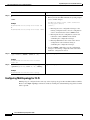
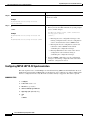
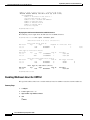
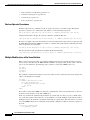
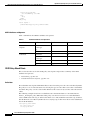
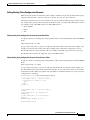
The following is sample output from the show bgp session-group command with the configuration
keyword in EXEC mode:
RP/0/RP0/CPU0:router# show bgp session-group GROUP_1 configuration
session-group GROUP_1
ebgp-multihop 2
[s:GROUP_2]
update-source Loopback0 []
dmz-link-bandwidth
[s:GROUP_2 s:GROUP_3]
The following is sample output from the show bgp session-group command with the inheritance
keyword showing that the GROUP_1 session group inherits session parameters from the GROUP_3 and
GROUP_2 session groups:
RP/0/RP0/CPU0:router# show bgp session-group GROUP_1 inheritance
Session: s:GROUP_2 s:GROUP_3
The following is sample output from the show bgp session-group command with the users keyword
showing that both the GROUP_1 and GROUP_2 session groups inherit session parameters from the
GROUP_3 session group:
RP/0/RP0/CPU0:router# show bgp session-group GROUP_3 users
Session: s:GROUP_1 s:GROUP_2
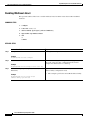
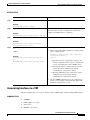
show bgp neighbor-group
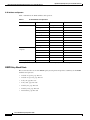
Use the show bgp neighbor-group command to display neighbor groups:
•
Use the configuration keyword to display the effective configuration for the neighbor group,
including any settings that have been inherited from neighbor groups used by this neighbor group.
•
Use the inheritance keyword to display the address family groups, session groups, and neighbor
groups from which this neighbor group is capable of inheriting configuration.
•
Use the users keyword to display the neighbors and neighbor groups that inherit configuration from
this neighbor group.
The examples are based on the following group configuration:
RP/0/RP0/CPU0:router(config)# router bgp 140
RP/0/RP0/CPU0:router(config-bgp)# af-group GROUP_3 address-family ipv4 unicast
RP/0/RP0/CPU0:router(config-bgp-afgrp)# remove-private-as
RP/0/RP0/CPU0:router(config-bgp-afgrp)# soft-reconfiguration inbound
RP/0/RP0/CPU0:router(config-bgp-afgrp)# exit
RP/0/RP0/CPU0:router(config-bgp)# af-group GROUP_2 address-family ipv4 unicast
RP/0/RP0/CPU0:router(config-bgp-afgrp)# use af-group GROUP_3
RP/0/RP0/CPU0:router(config-bgp-afgrp)# send-community-ebgp
RP/0/RP0/CPU0:router(config-bgp-afgrp)# send-extended-community-ebgp
RP/0/RP0/CPU0:router(config-bgp-afgrp)# capability orf prefix both
RP/0/RP0/CPU0:router(config-bgp-afgrp)# exit
RP/0/RP0/CPU0:router(config-bgp)# session-group GROUP_3
RP/0/RP0/CPU0:router(config-bgp-sngrp)# timers 30 90
RP/0/RP0/CPU0:router(config-bgp-sngrp)# exit
RP/0/RP0/CPU0:router(config-bgp)# neighbor-group GROUP_1
RP/0/RP0/CPU0:router(config-bgp-nbrgrp)# remote-as 1982
RP/0/RP0/CPU0:router(config-bgp-nbrgrp)# use neighbor-group GROUP_2
RP/0/RP0/CPU0:router(config-bgp-nbrgrp)# address-family ipv4 unicast
RP/0/RP0/CPU0:router(config-bgp-nbrgrp-af)# exit
RP/0/RP0/CPU0:router(config-nbrgrp)# exit
RP/0/RP0/CPU0:router(config-bgp)# neighbor-group GROUP_2
RP/0/RP0/CPU0:router(config-bgp-nbrgrp)# use session-group GROUP_3
RP/0/RP0/CPU0:router(config-bgp-nbrgrp)# address-family ipv4 unicast
Cisco IOS XR Routing Configuration Guide
RC-18
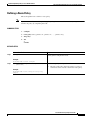
Implementing BGP on Cisco IOS XR Software
Information About Implementing BGP on Cisco IOS XR Software
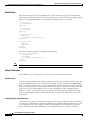
RP/0/RP0/CPU0:router(config-bgp-nbrgrp-af)# use af-group GROUP_2
RP/0/RP0/CPU0:router(config-bgp-nbrgrp-af)# weight 100
The following is sample output from the show bgp neighbor-group command with the configuration
keyword. The configuration setting source is shown to the right of each command. In the output shown
previously, the remote autonomous system is configured directly on neighbor group GROUP_1, and the
send community setting is inherited from neighbor group GROUP_2, which in turn inherits the setting
from address family group GROUP_3:
RP/0/RP0/CPU0:router# show bgp neighbor-group GROUP_1 configuration
neighbor-group GROUP_1
remote-as 1982
timers 30 90
address-family ipv4 unicast
capability orf prefix-list both
remove-private-AS
send-community-ebgp
send-extended-community-ebgp
soft-reconfiguration inbound
weight 100
[]
[n:GROUP_2 s:GROUP_3]
[]
[n:GROUP_2 a:GROUP_2]
[n:GROUP_2 a:GROUP_2 a:GROUP_3]
[n:GROUP_2 a:GROUP_2]
[n:GROUP_2 a:GROUP_2]
[n:GROUP_2 a:GROUP_2 a:GROUP_3]
[n:GROUP_2]
The following is sample output from the show bgp neighbor-group command with the inheritance
keyword. This output shows that the specified neighbor group GROUP_1 inherits session (address
family-independent) configuration parameters from neighbor group GROUP_2. Neighbor group
GROUP_2 inherits its session parameters from session group GROUP_3. It also shows that the
GROUP_1 neighbor group inherits IPv4 unicast configuration parameters from the GROUP_2 neighbor
group, which in turn inherits them from the GROUP_2 address family group, which itself inherits them
from the GROUP_3 address family group:
RP/0/RP0/CPU0:router# show bgp neighbor-group GROUP_1 inheritance
Session:
n:GROUP-2 s:GROUP_3
IPv4 Unicast: n:GROUP_2 a:GROUP_2 a:GROUP_3
The following is sample output from the show bgp neighbor-group command with the users keyword.
This output shows that the GROUP_1 neighbor group inherits session (address family-independent)
configuration parameters from the GROUP_2 neighbor group. The GROUP_1 neighbor group also
inherits IPv4 unicast configuration parameters from the GROUP_2 neighbor group:
RP/0/RP0/CPU0:router# show bgp neighbor-group GROUP_2 users
Session:
n:GROUP_1
IPv4 Unicast: n:GROUP_1
No Default Address Family
BGP does not support the concept of a default address family. An address family must be explicitly
configured under the BGP router configuration for the address family to be activated in BGP. Similarly,
an address family must be explicitly configured under a neighbor for the BGP session to be activated
under that address family. It is not required to have any address family configured under the BGP router
configuration level for a neighbor to be configured. However, it is a requirement to have an address
family configured at the BGP router configuration level for the address family to be configured under a
neighbor.
Cisco IOS XR Routing Configuration Guide
RC-19
Implementing BGP on Cisco IOS XR Software
Information About Implementing BGP on Cisco IOS XR Software
Routing Policy Enforcement
External BGP (eBGP) neighbors must have an inbound and outbound policy configured. If no policy is
configured, no routes are accepted from the neighbor, nor are any routes advertised to it. This added
security measure ensures that routes cannot accidentally be accepted or advertised in the case of a
configuration omission error.
Note
This enforcement affects only eBGP neighbors (neighbors in a different autonomous system than this
router). For internal BGP (iBGP) neighbors (neighbors in the same autonomous system), all routes are
accepted or advertised if there is no policy.
In the following example, for an eBGP neighbor, if all routes should be accepted and advertised with no
modifications, a simple pass-all policy is configured:
RP/0/RP0/CPU0:router(config)# route-policy pass-all
RP/0/RP0/CPU0:router(config-rpl)# pass
RP/0/RP0/CPU0:router(config-rpl)# end-policy
RP/0/RP0/CPU0:router(config)# commit
Use the route-policy (BGP) command in the neighbor address-family configuration mode to apply the
pass-all policy to a neighbor. The following example shows how to allow all IPv4 unicast routes to be
received from neighbor 192.168.40.42 and advertise all IPv4 unicast routes back to it:
RP/0/RP0/CPU0:router(config)# router bgp 1
RP/0/RP0/CPU0:router(config-bgp)# neighbor 192.168.40.24
RP/0/RP0/CPU0:router(config-bgp-nbr)# remote-as 21
RP/0/RP0/CPU0:router(config-bgp-nbr)# address-family ipv4 unicast
RP/0/RP0/CPU0:router(config-bgp-nbr-af)# route-policy pass-all in
RP/0/RP0/CPU0:router(config-bgp-nbr-af)# route-policy pass-all out
RP/0/RP0/CPU0:router(config-bgp-nbr-af)# commit
Use the show bgp summary command to display eBGP neighbors that do not have both an inbound and
outbound policy for every active address family. In the following example, such eBGP neighbors are
indicated in the output with an exclamation (!) mark:
RP/0/RP0/CPU0:router# show bgp all all summary
Address Family: IPv4 Unicast
============================
BGP
BGP
BGP
BGP
BGP
router identifier 10.0.0.1, local AS number 1
generic scan interval 60 secs
main routing table version 41
scan interval 60 secs
is operating in STANDALONE mode.
Process
Speaker
RecvTblVer
41
Neighbor
10.0.101.1
10.0.101.2
Spk
0
0
bRIB/RIB
41
SendTblVer
41
AS MsgRcvd MsgSent
1
919
925
2
0
0
TblVer
41
0
Address Family: IPv4 Multicast
==============================
BGP router identifier 10.0.0.1, local AS number 1
BGP generic scan interval 60 secs
BGP main routing table version 1
Cisco IOS XR Routing Configuration Guide
RC-20
InQ OutQ Up/Down St/PfxRcd
0
0 15:15:08
10
0
0 00:00:00 Idle
Implementing BGP on Cisco IOS XR Software
Information About Implementing BGP on Cisco IOS XR Software
BGP scan interval 60 secs
BGP is operating in STANDALONE mode.
Process
Speaker
RecvTblVer
1
bRIB/RIB
1
SendTblVer
1
Some configured eBGP neighbors do not have both inbound and
outbound policies configured for IPv4 Multicast address family.
These neighbors will default to sending and/or receiving no
routes and are marked with ’!’ in the output below. Use the
’show bgp neighbor <nbr_address>’ command for details.
Neighbor
10.0.101.2
Spk
0
AS MsgRcvd MsgSent
2
0
0
TblVer
0
InQ OutQ Up/Down St/PfxRcd
0
0 00:00:00 Idle!
Address Family: IPv6 Unicast
============================
BGP
BGP
BGP
BGP
BGP
router identifier 10.0.0.1, local AS number 1
generic scan interval 60 secs
main routing table version 2
scan interval 60 secs
is operating in STANDALONE mode.
Process
Speaker
RecvTblVer
2
Neighbor
2222::2
2222::4
Spk
0
0
bRIB/RIB
2
SendTblVer
2
AS MsgRcvd MsgSent
2
920
918
3
0
0
TblVer
2
0
InQ OutQ Up/Down St/PfxRcd
0
0 15:15:11
1
0
0 00:00:00 Idle
Address Family: IPv6 Multicast
==============================
BGP
BGP
BGP
BGP
BGP
router identifier 10.0.0.1, local AS number 1
generic scan interval 60 secs
main routing table version 1
scan interval 60 secs
is operating in STANDALONE mode.
Process
Speaker
RecvTblVer
1
bRIB/RIB
1
SendTblVer
1
Some configured eBGP neighbors do not have both inbound and
outbound policies configured for IPv6 Multicast address family.
These neighbors will default to sending and/or receiving no
routes and are marked with ’!’ in the output below. Use the
’show bgp neighbor <nbr_address>’ command for details.
Neighbor
2222::2
2222::4
Spk
0
0
AS MsgRcvd MsgSent
2
920
918
3
0
0
TblVer
0
0
InQ OutQ Up/Down St/PfxRcd
0
0 15:15:11
0
0
0 00:00:00 Idle!
Table Policy
The table policy feature in BGP allows you to configure traffic index values on routes as they are
installed in the global routing table. This feature is enabled using the table-policy command and
supports the BGP policy accounting feature.
Cisco IOS XR Routing Configuration Guide
RC-21
Implementing BGP on Cisco IOS XR Software
Information About Implementing BGP on Cisco IOS XR Software
BGP policy accounting uses traffic indices that are set on BGP routes to track various counters. See
Implementing Routing Policy on Cisco IOS XR Software for details on table policy use. See the Cisco
Express Forwarding Commands on Cisco IOS XR Software module in Cisco IOS XR IP Addresses and
Services Command Reference for details on BGP policy accounting.
Table policy also provides the ability to drop routes from the RIB based on match criteria. This feature
can be useful in certain applications and should be used with caution as it can easily create a routing
‘black hole’ where BGP advertises routes to neighbors that BGP does not install in its global routing
table and forwarding table.
Update Groups
The BGP Update Groups feature contains an algorithm that dynamically calculates and optimizes update
groups of neighbors that share outbound policies and can share the update messages. The BGP Update
Groups feature separates update group replication from peer group configuration, improving
convergence time and flexibility of neighbor configuration.
To use this feature, you must understand the following concepts:
•
BGP Update Generation and Update Groups, page RC-22
•
BGP Update Group, page RC-22
BGP Update Generation and Update Groups
The BGP Update Groups feature separates BGP update generation from neighbor configuration. The
BGP Update Groups feature introduces an algorithm that dynamically calculates BGP update group
membership based on outbound routing policies. This feature does not require any configuration by the
network operator. Update group-based message generation occurs automatically and independently.
BGP Update Group
When a change to the configuration occurs, the router automatically recalculates update group
memberships and applies the changes.
For the best optimization of BGP update group generation, we recommend that the network operator
keeps outbound routing policy the same for neighbors that have similar outbound policies. This feature
contains commands for monitoring BGP update groups. For more information about the commands, see
the “Monitoring BGP Update Groups” section on page RC-124.
BGP Cost Community
The BGP cost community is a nontransitive extended community attribute that is passed to internal BGP
(iBGP) and confederation peers but not to external BGP (eBGP) peers. The cost community feature
allows you to customize the local route preference and influence the best-path selection process by
assigning cost values to specific routes. The extended community format defines generic points of
insertion (POI) that influence the best-path decision at different points in the best-path algorithm.
The cost community attribute is applied to internal routes by configuring the set extcommunity cost
command in a route policy. See the Routing Policy Language Commands on Cisco IOS XR Software
module of Cisco IOS XR Routing Command Reference for information on the set extcommunity cost
command. The cost community set clause is configured with a cost community ID number (0–255) and
cost community number (0–4294967295). The cost community number determines the preference for
Cisco IOS XR Routing Configuration Guide
RC-22
Implementing BGP on Cisco IOS XR Software
Information About Implementing BGP on Cisco IOS XR Software
the path. The path with the lowest cost community number is preferred. Paths that are not specifically
configured with the cost community number are assigned a default cost community number of
2147483647 (the midpoint between 0 and 4294967295) and evaluated by the best-path selection process
accordingly. When two paths have been configured with the same cost community number, the path
selection process prefers the path with the lowest cost community ID. The cost-extended community
attribute is propagated to iBGP peers when extended community exchange is enabled.
The following commands can be used to apply the route policy that is configured with the cost
community set clause:
•
route-policy
•
default-originate
•
aggregate-address
•
redistribute
•
network
How BGP Cost Community Influences the Best Path Selection Process
The cost community attribute influences the BGP best-path selection process at the point of insertion
(POI). By default, the POI follows the Interior Gateway Protocol (IGP) metric comparison. When BGP
receives multiple paths to the same destination, it uses the best-path selection process to determine which
path is the best path. BGP automatically makes the decision and installs the best path in the routing table.
The POI allows you to assign a preference to a specific path when multiple equal cost paths are available.
If the POI is not valid for local best-path selection, the cost community attribute is silently ignored.
Cost communities are sorted first by POI then by community ID. Multiple paths can be configured with
the cost community attribute for the same POI. The path with the lowest cost community ID is
considered first. In other words, all cost community paths for a specific POI are considered, starting with
the one with the lowest cost community. Paths that do not contain the cost community cost (for the POI
and community ID being evaluated) are assigned the default community cost value (2147483647). If the
cost community values are equal, then cost community comparison proceeds to the next lowest
community ID for this POI.
To select the path with the lower cost community, simultaneously walk through the cost communities of
both paths. This is done by maintaining two pointers to the cost community chain, one for each path, and
advancing both pointers to the next applicable cost community at each step of the walk for the given POI,
in order of community ID, and stop when a best path is chosen or the comparison is a tie. At each step
of the walk, the following checks are done:
If neither pointer refers to a cost community,
Declare a tie;
Elseif a cost community is found for one path but not for the other,
Choose the path with cost community as best path;
Elseif the Community ID from one path is less than the other,
Choose the path with the lesser Community ID as best path;
Elseif the Cost from one path is less than the other,
Choose the path with the lesser Cost as best path;
Else Continue.
Note
Paths that are not configured with the cost community attribute are considered by the best-path selection
process to have the default cost value (half of the maximum value [4294967295] or 2147483647).
Cisco IOS XR Routing Configuration Guide
RC-23
Implementing BGP on Cisco IOS XR Software
Information About Implementing BGP on Cisco IOS XR Software
Applying the cost community attribute at the POI allows you to assign a value to a path originated or
learned by a peer in any part of the local autonomous system or confederation. The cost community can
be used as a “tie breaker” during the best-path selection process. Multiple instances of the cost
community can be configured for separate equal cost paths within the same autonomous system or
confederation. For example, a lower cost community value can be applied to a specific exit path in a
network with multiple equal cost exit points, and the specific exit path is preferred by the BGP best-path
selection process. See the scenario described in the “Influencing Route Preference in a Multiexit IGP
Network” section on page RC-25.
Note
The cost community comparison in BGP is enabled by default. Use the bgp bestpath cost-community
ignore command to disable the comparison.
See the “BGP Best Path Algorithm” section on page RC-27 for information on the BGP best-path
selection process.
Cost Community Support for Aggregate Routes and Multipaths
The BGP cost community feature supports aggregate routes and multipaths. The cost community
attribute can be applied to either type of route. The cost community attribute is passed to the aggregate
or multipath route from component routes that carry the cost community attribute. Only unique IDs are
passed, and only the highest cost of any individual component route is applied to the aggregate for each
ID. If multiple component routes contain the same ID, the highest configured cost is applied to the route.
For example, the following two component routes are configured with the cost community attribute
using an inbound route policy:
•
10.0.0.1
– POI=IGP
– cost community ID=1
– cost number=100
•
192.168.0.1
– POI=IGP
– cost community ID=1
– cost number=200
If these component routes are aggregated or configured as a multipath, the cost value 200 is advertised,
because it has the highest cost.
If one or more component routes do not carry the cost community attribute or the component routes are
configured with different IDs, then the default value (2147483647) is advertised for the aggregate or
multipath route. For example, the following three component routes are configured with the cost
community attribute using an inbound route policy. However, the component routes are configured with
two different IDs.
•
10.0.0.1
– POI=IGP
– cost community ID=1
– cost number=100
•
172.16.0.1
– POI=IGP
Cisco IOS XR Routing Configuration Guide
RC-24
Implementing BGP on Cisco IOS XR Software
Information About Implementing BGP on Cisco IOS XR Software
– cost community ID=2
– cost number=100
•
192.168.0.1
– POI=IGP
– cost community ID=1
– cost number=200
The single advertised path includes the aggregate cost communities as follows:
{POI=IGP, ID=1, Cost=2147483647} {POI-IGP, ID=2, Cost=2147483647}
Influencing Route Preference in a Multiexit IGP Network
Figure 1 shows an IGP network with two autonomous system boundary routers (ASBRs) on the edge.
Each ASBR has an equal cost path to network 10.8/16.
ISP2 PE1
Multiexit Point IGP Network
ASBR2
172.19.20/24
ASBR1
ISP1 PE1
10.8/16
ISP2 PE2
ISP1 PE2
172.19.20/24
10.8/16
89045
Figure 1
Both paths are considered to be equal by BGP. If multipath loadsharing is configured, both paths to the
routing table are installed and are used to balance the load of traffic. If multipath load balancing is not
configured, the BGP selects the path that was learned first as the best path and installs this path to the
routing table. This behavior may not be desirable under some conditions. For example, the path is
learned from ISP1 PE2 first, but the link between ISP1 PE2 and ASBR1 is a low-speed link.
The configuration of the cost community attribute can be used to influence the BGP best-path selection
process by applying a lower-cost community value to the path learned by ASBR2. For example, the
following configuration is applied to ASBR2:
RP/0/RP0/CPU0:router(config)# route-policy ISP2_PE1
RP/0/RP0/CPU0:router(config-rpl)# set extcommunity cost (1:1)
The preceding route policy applies a cost community number of 1 to the 10.8.0.0 route. By default, the
path learned from ASBR1 is assigned a cost community number of 2147483647. Because the path
learned from ASBR2 has a lower-cost community number, the path is preferred.
Cisco IOS XR Routing Configuration Guide
RC-25
Implementing BGP on Cisco IOS XR Software
Information About Implementing BGP on Cisco IOS XR Software
BGP Cost Community Support for EIGRP MPLS VPN PE-CE with Back-door Links
Back-door links in an EIGRP MPLS VPN topology is preferred by BGP if the back-door link is learned
first. (A back-door link, or route, is a connection that is configured outside of the VPN between a remote
and main site; for example, a WAN leased line that connects a remote site to the corporate network.)
The “prebest path” point of insertion (POI) in the BGP cost community feature supports mixed EIGRP
VPN network topologies that contain VPN and back-door links. This POI is applied automatically to
EIGRP routes that are redistributed into BGP. The “prebest path” POI carries the EIGRP route type and
metric. This POI influences the best-path calculation process by influencing BGP to consider the POI
before any other comparison step. No configuration is required. This feature is enabled automatically for
EIGRP VPN sites when Cisco IOS XR software is installed on a PE, CE, or back-door router.
For information about configuring EIGRP MPLS VPNs, see Cisco IOS XR Multiprotocol Label
Switching Configuration Guide.
Figure 2 shows how cost community can be used to support backdoor links in a network.
Figure 2
CE3
Network Showing How Cost Community Can be Used to Support Backdoor Links
PE1
PE2
CE4
MBGP
CE1
CE2
10.1.1.0/24
210085
Back door
The following sequence of events happens in PE1:
1.
PE1 learns IPv4 prefix 10.1.1.0/24 from CE1 through EIGRP running a virtual routing and
forwarding (VRF) instance. EIGRP selects and installs the best path in the RIB. It also encodes
the cost-extended community and adds the information to the RIB.
2.
The route is redistributed into BGP (assuming that IGP-to-BGP redistribution is configured).
BGP also receives the cost-extended community from the route through the redistribution
process.
3.
After BGP has determined the best path for the newly redistributed prefix, the path is advertised
to PE peers (PE2).
4.
PE2 receives the BGP VPNv4 prefix route_distinguisher:10.1.1.0/24 along with the cost
community. It is likely that CE2 advertises the same prefix (because of the back-door link
between CE1 and CE2) to PE2 through EIGRP. PE2 BGP would have already learned the CE
route through the redistribution process along with the cost community value.
5.
PE2 has two paths within BGP: one with cost community cost1 through multipath BGP (PE1)
and another with cost community cost2 through the EIGRP neighbor (CE2).
6.
PE2 runs the enhanced BGP best-path calculation.
7.
PE2 installs the best path in the RIB passing the appropriate cost community value.
8.
PE2 RIB has two paths for 10.1.1.0/24: one with cost community cost2 added by EIGRP and
another with the cost community cost1 added by BGP. Because both the route paths have cost
community, RIB compares the costs first. The BGP path has the lower cost community, so it is
selected and downloaded to the RIB.
Cisco IOS XR Routing Configuration Guide
RC-26
Implementing BGP on Cisco IOS XR Software
Information About Implementing BGP on Cisco IOS XR Software
9.
10.
PE2 RIB redistributes the BGP path into EIGRP with VRF. EIGRP runs a diffusing update
algorithm (DUAL) because there are two paths, and selects the BGP-redistributed path.
PE2 EIGRP advertises the path to CE2 making the path the next hop for the prefix to send the
traffic over the MPLS network.
Adding Routes to the Routing Information Base
If a nonsourced path becomes the best path after the best-path calculation, BGP adds the route to the
Routing Information Base (RIB) and passes the cost communities along with the other IGP extended
communities.
When a route with paths is added to the RIB by a protocol, RIB checks the current best paths for the
route and the added paths for cost extended communities. If cost-extended communities are found, the
RIB compares the set of cost communities. If the comparison does not result in a tie, the appropriate best
path is chosen. If the comparison results in a tie, the RIB proceeds with the remaining steps of the
best-path algorithm. If a cost community is not present in either the current best paths or added paths,
then the RIB continues with the remaining steps of the best-path algorithm. See the “BGP Best Path
Algorithm” section on page RC-27 for information on the BGP best-path algorithm.
BGP Best Path Algorithm
BGP routers typically receive multiple paths to the same destination. The BGP best-path algorithm
determines the best path to install in the IP routing table and to use for forwarding traffic. This section
describes the Cisco IOS XR implementation of BGP best-path algorithm, as specified in Section 9.1 of
the Internet Engineering Task Force (IETF) Network Working Group draft-ietf-idr-bgp4-24.txt
document.
The BGP best-path algorithm implementation is in three parts:
Note
•
Part 1—Compares two paths to determine which is better.
•
Part 2—Iterates over all paths and determines which order to compare the paths to select the overall
best path.
•
Part 3—Determines whether the old and new best paths differ enough so that the new best path
should be used.
The order of comparison determined by Part 2 is important because the comparison operation is not
transitive; that is, if three paths, A, B, and C exist, such that when A and B are compared, A is better,
and when B and C are compared, B is better, it is not necessarily the case that when A and C are
compared, A is better. This nontransitivity arises because the multi exit discriminator (MED) is
compared only among paths from the same neighboring autonomous system (AS) and not among all
paths.
Comparing Pairs of Paths
The following steps are completed to compare two paths and determine the better path:
1.
If either path is invalid (for example, a path has the maximum possible MED value or it has an
unreachable next hop), then the other path is chosen (provided that the path is valid).
2.
If the paths have unequal pre-bestpath cost communities, the path with the lower pre-bestpath cost
community is selected as the best path.
Cisco IOS XR Routing Configuration Guide
RC-27
Implementing BGP on Cisco IOS XR Software
Information About Implementing BGP on Cisco IOS XR Software
Note
Note
See the “BGP Cost Community” section on page RC-22 for details on how cost communities are
compared.
3.
If the paths have unequal weights, the path with the highest weight is chosen. Note: the weight is
entirely local to the router, and can be set with the weight command or using a routing policy.
4.
If the paths have unequal local preferences, the path with the higher local preference is chosen. Note:
If a local preference attribute was received with the path or was set by a routing policy, then that
value is used in this comparison. Otherwise, the default local preference value of 100 is used. The
default value can be changed using the bgp default local-preference command.
5.
If one of the paths is a redistributed path, which results from a redistribute or network command,
then it is chosen. Otherwise, if one of the paths is a locally generated aggregate, which results from
an aggregate-address command, it is chosen.
Step 1 through Step 4 implement the “Degree of Preference” calculation from Section 9.1.1 of
draft-ietf-idr-bgp4-24.txt.
6.
If the paths have unequal AS path lengths, the path with the shorter AS path is chosen. This step is
skipped if bgp bestpath as-path ignore command is configured. Note: when calculating the length
of the AS path, confederation segments are ignored, and AS sets count as 1. (See Section 9.1.2.2a
of draft-ietf-idr-bgp4-24.txt.)
7.
If the paths have different origins, the path with the lower origin is selected. Interior Gateway
Protocol (IGP) is considered lower than EGP, which is considered lower than INCOMPLETE. (See
Section 9.1.2.2b of draft-ietf-idr-bgp4-24.txt.)
8.
If appropriate, the MED of the paths is compared. If they are unequal, the path with the lower MED
is chosen.
A number of configuration options exist that affect whether or not this step is performed. In general,
the MED is compared if both paths were received from neighbors in the same AS; otherwise the
MED comparison is skipped. However, this behavior is modified by certain configuration options,
and there are also some corner cases to consider. (See Section 9.1.2.2c of draft-ietf-idr-bgp4-24.txt.)
If the bgp bestpath med always command is configured, then the MED comparison is always
performed, regardless of neighbor AS in the paths. Otherwise, MED comparison depends on the AS
paths of the two paths being compared, as follows:
a. If a path has no AS path or the AS path starts with an AS_SET, then the path is considered to
be internal, and the MED is compared with other internal paths
b. If the AS path starts with an AS_SEQUENCE, then the neighbor AS is the first AS number in
the sequence, and the MED is compared with other paths that have the same neighbor AS
c. If the AS path contains only confederation segments or starts with confederation segments
followed by an AS_SET, then the MED is not compared with any other path unless the bgp
bestpath med confed command is configured. In that case, the path is considered internal and
the MED is compared with other internal paths.
d. If the AS path starts with confederation segments followed by an AS_SEQUENCE, then the
neighbor AS is the first AS number in the AS_SEQUENCE, and the MED is compared with
other paths that have the same neighbor AS.
Note: if no MED attribute was received with the path, then the MED is considered to be 0 unless the
bgp bestpath med missing-as-worst command is configured. In that case, if no MED attribute was
received, the MED is considered to be the highest possible value.
Cisco IOS XR Routing Configuration Guide
RC-28
Implementing BGP on Cisco IOS XR Software
Information About Implementing BGP on Cisco IOS XR Software
9.
If one path is received from an external peer and the other is received from an internal (or
confederation) peer, the path from the external peer is chosen. (See Section 9.1.2.2d of
draft-ietf-idr-bgp4-24.txt.)
10. If the paths have different IGP metrics to their next hops, the path with the lower IGP metric is
chosen. (See Section 9.1.2.2e of draft-ietf-idr-bgp4-24.txt.)
11. If the paths have unequal IP cost communities, the path with the lower IP cost community is selected
as the best path.
Note
See the “BGP Cost Community” section on page RC-22 for details on how cost communities are
compared.
12. If all path parameters in Step 1 through Step 10 are the same, then the router IDs are compared. If
the path was received with an originator attribute, then that is used as the router ID to compare;
otherwise, the router ID of the neighbor from which the path was received is used. If the paths have
different router IDs, the path with the lower router ID is chosen. Note: where the originator is used
as the router ID, it is possible to have two paths with the same router ID. It is also possible to have
two BGP sessions with the same peer router, and therefore receive two paths with the same router
ID. (See Section 9.1.2.2f of draft-ietf-idr-bgp4-24.txt.)
13. If the paths have different cluster lengths, the path with the shorter cluster length is selected. If a
path was not received with a cluster list attribute, it is considered to have a cluster length of 0.
14. Finally, the path received from the neighbor with the lower IP address is chosen. Locally generated
paths (for example, redistributed paths) are considered to have a neighbor IP address of 0. (See
Section 9.1.2.2g of draft-ietf-idr-bgp4-24.txt.)
Order of Comparisons
The second part of the BGP best-path algorithm implementation determines the order in which the paths
should be compared. The order of comparison is determined as follows:
1.
The paths are partitioned into groups such that within each group the MED can be compared among
all paths. The same rules as in the “Comparing Pairs of Paths” section on page RC-27 are used to
determine whether MED can be compared between any two paths. Normally, this comparison results
in one group for each neighbor AS. If the bgp bestpath med always command is configured, then
there is just one group containing all the paths.
2.
The best path in each group is determined. Determining the best path is achieved by iterating through
all paths in the group and keeping track of the best one seen so far. Each path is compared with the
best-so-far, and if it is better, it becomes the new best-so-far and is compared with the next path in
the group.
3.
A set of paths is formed containing the best path selected from each group in Step 2. The overall
best path is selected from this set of paths, by iterating through them as in Step 2.
Best Path Change Suppression
The third part of the implementation is to determine whether the best-path change can be suppressed or
not—whether the new best path should be used, or continue using the existing best path. The existing
best path can continue to be used if the new one is identical to the point at which the best-path selection
algorithm becomes arbitrary (if the router-id is the same). Continuing to use the existing best path can
avoid churn in the network.
Cisco IOS XR Routing Configuration Guide
RC-29
Implementing BGP on Cisco IOS XR Software
Information About Implementing BGP on Cisco IOS XR Software
Note
This suppression behavior does not comply with the IETF Networking Working Group
draft-ietf-idr-bgp4-24.txt document, but is specified in the IETF Networking Working Group
draft-ietf-idr-avoid-transition-00.txt document.
The suppression behavior can be turned off by configuring the bgp bestpath compare-routerid
command. If this command is configured, the new best path is always preferred to the existing one.
Otherwise, the following steps are used to determine whether the best-path change can be suppressed:
1.
If the existing best path is no longer valid, the change cannot be suppressed.
2.
If either the existing or new best paths were received from internal (or confederation) peers or were
locally generated (for example, by redistribution), then the change cannot be suppressed. That is,
suppression is possible only if both paths were received from external peers.
3.
If the paths were received from the same peer (the paths would have the same router-id), the change
cannot be suppressed. The router ID is calculated using rules in the “Comparing Pairs of Paths”
section on page RC-27.
4.
If the paths have different weights, local preferences, origins, or IGP metrics to their next hops, then
the change cannot be suppressed. Note that all of these values are calculated using the rules in the
“Comparing Pairs of Paths” section on page RC-27.
5.
If the paths have different-length AS paths and the bgp bestpath as-path ignore command is not
configured, then the change cannot be suppressed. Again, the AS path length is calculated using the
rules in the “Comparing Pairs of Paths” section on page RC-27.
6.
If the MED of the paths can be compared and the MEDs are different, then the change cannot be
suppressed. The decision as to whether the MEDs can be compared is exactly the same as the rules
in the “Comparing Pairs of Paths” section on page RC-27, as is the calculation of the MED value.
7.
If all path parameters in Step 1 through Step 6 do not apply, the change can be suppressed.
Administrative Distance
An administrative distance is a rating of the trustworthiness of a routing information source. In general,
the higher the value, the lower the trust rating. For information on specifying the administrative distance
for BGP, see the BGP Commands on Cisco IOS XR Software module of Cisco IOS XR Routing Command
Reference.
Normally, a route can be learned through more than one protocol. Administrative distance is used to
discriminate between routes learned from more than one protocol. The route with the lowest
administrative distance is installed in the IP routing table. By default, BGP uses the administrative
distances shown in Table 2.
Table 2
BGP Default Administrative Distances
Distance
Default Value
Function
External
20
Applied to routes learned from eBGP.
Internal
200
Applied to routes learned from iBGP.
Local
200
Applied to routes originated by the router.
Cisco IOS XR Routing Configuration Guide
RC-30
Implementing BGP on Cisco IOS XR Software
Information About Implementing BGP on Cisco IOS XR Software
Distance does not influence the BGP path selection algorithm, but it does influence whether
BGP-learned routes are installed in the IP routing table.
In most cases, when a route is learned through eBGP, it is installed in the IP routing table because of its
distance (20). Sometimes, however, two ASs have an IGP-learned back-door route and an eBGP-learned
route. Their policy might be to use the IGP-learned path as the preferred path and to use the
eBGP-learned path when the IGP path is down. See Figure 3.
Figure 3
Back Door Example
AS 200
160.10.0.0
AS 100
150.10.0.0
IGP
Router A
Router B
2.2.2.2
3.3.3.3
eBGP
eBGP
AS 300
170.10.0.0
2.2.2.1
3.3.3.1
149547
Note
Router C
In Figure 3, Routers A and C and Routers B and C are running eBGP. Routers A and B are running an
IGP (such as Routing Information Protocol [RIP], Interior Gateway Routing Protocol [IGRP], Enhanced
IGRP, or Open Shortest Path First [OSPF]). The default distances for RIP, IGRP, Enhanced IGRP, and
OSPF are 120, 100, 90, and 110, respectively. All these distances are higher than the default distance of
eBGP, which is 20. Usually, the route with the lowest distance is preferred.
Router A receives updates about 160.10.0.0 from two routing protocols: eBGP and IGP. Because the
default distance for eBGP is lower than the default distance of the IGP, Router A chooses the
eBGP-learned route from Router C. If you want Router A to learn about 160.10.0.0 from Router B (IGP),
establish a BGP back door. See “Indicating BGP Back-door Routes” section on page RC-57.
In the following example, a network back-door is configured:
RP/0/RP0/CPU0:router(config)# router bgp 100
RP/0/RP0/CPU0:router(config-bgp)# address-family ipv4 unicast
RP/0/RP0/CPU0:router(config-bgp-af)# network 160.10.0.0/16 backdoor
Router A treats the eBGP-learned route as local and installs it in the IP routing table with a distance of
200. The network is also learned through Enhanced IGRP (with a distance of 90), so the Enhanced IGRP
route is successfully installed in the IP routing table and is used to forward traffic. If the Enhanced
IGRP-learned route goes down, the eBGP-learned route is installed in the IP routing table and is used to
forward traffic.
Although BGP treats network 160.10.0.0 as a local entry, it does not advertise network 160.10.0.0 as it
normally would advertise a local entry.
Cisco IOS XR Routing Configuration Guide
RC-31
Implementing BGP on Cisco IOS XR Software
Information About Implementing BGP on Cisco IOS XR Software
Multiprotocol BGP
Multiprotocol BGP is an enhanced BGP that carries routing information for multiple network layer
protocols and IP multicast routes. BGP carries two sets of routes, one set for unicast routing and one set
for multicast routing. The routes associated with multicast routing are used by the Protocol Independent
Multicast (PIM) feature to build data distribution trees.
Multiprotocol BGP is useful when you want a link dedicated to multicast traffic, perhaps to limit which
resources are used for which traffic. Multiprotocol BGP allows you to have a unicast routing topology
different from a multicast routing topology providing more control over your network and resources.
In BGP, the only way to perform interdomain multicast routing was to use the BGP infrastructure that
was in place for unicast routing. Perhaps you want all multicast traffic exchanged at one network access
point (NAP). If those routers were not multicast capable, or there were differing policies for which you
wanted multicast traffic to flow, multicast routing could not be supported without multiprotocol BGP.
Note
It is possible to configure BGP peers that exchange both unicast and multicast network layer reachability
information (NLRI), but you cannot connect multiprotocol BGP clouds with a BGP cloud. That is, you
cannot redistribute multiprotocol BGP routes into BGP.
Figure 4 illustrates simple unicast and multicast topologies that are incongruent, and therefore are not
possible without multiprotocol BGP.
Autonomous systems 100, 200, and 300 are each connected to two NAPs that are FDDI rings. One is
used for unicast peering (and therefore the exchange of unicast traffic). The Multicast Friendly
Interconnect (MFI) ring is used for multicast peering (and therefore the exchange of multicast traffic).
Each router is unicast and multicast capable.
Figure 4
Incongruent Unicast and Multicast Routes
FDDI
FDDI
Unicast
MFI
AS 200
AS 300
ISP A
ISP B
ISP C
12238
AS 100
Figure 5 is a topology of unicast-only routers and multicast-only routers. The two routers on the left are
unicast-only routers (that is, they do not support or are not configured to perform multicast routing). The
two routers on the right are multicast-only routers. Routers A and B support both unicast and multicast
routing. The unicast-only and multicast-only routers are connected to a single NAP.
Cisco IOS XR Routing Configuration Guide
RC-32
Implementing BGP on Cisco IOS XR Software
Information About Implementing BGP on Cisco IOS XR Software
In Figure 5, only unicast traffic can travel from Router A to the unicast routers to Router B and back.
Multicast traffic could not flow on that path, so another routing table is required. Multicast traffic uses
the path from Router A to the multicast routers to Router B and back.
Figure 5 illustrates a multiprotocol BGP environment with a separate unicast route and multicast route
from Router A to Router B. Multiprotocol BGP allows these routes to be incongruent. Both of the
autonomous systems must be configured for internal multiprotocol BGP (IMBGP) in the figure.
A multicast routing protocol, such as PIM, uses the multicast BGP database to perform Reverse Path
Forwarding (RPF) lookups for multicast-capable sources. Thus, packets can be sent and accepted on the
multicast topology but not on the unicast topology.
Figure 5
Multicast BGP Environment
Router B
AS 200
Unicast
router
IMBGP
Multicast
router
NAP
Unicast
router
IMBGP
Multicast
router
AS 100
Unicast route
Router A
11754
Multicast route
Route Dampening
Route dampening is a BGP feature that minimizes the propagation of flapping routes across an
internetwork. A route is considered to be flapping when it is repeatedly available, then unavailable, then
available, then unavailable, and so on.
For example, consider a network with three BGP autonomous systems: autonomous system 1,
autonomous system 2, and autonomous system 3. Suppose the route to network A in autonomous system
1 flaps (it becomes unavailable). Under circumstances without route dampening, the eBGP neighbor of
autonomous system 1 to autonomous system 2 sends a withdraw message to autonomous system 2. The
border router in autonomous system 2, in turn, propagates the withdrawal message to autonomous
system 3. When the route to network A reappears, autonomous system 1 sends an advertisement message
Cisco IOS XR Routing Configuration Guide
RC-33
Implementing BGP on Cisco IOS XR Software
Information About Implementing BGP on Cisco IOS XR Software
to autonomous system 2, which sends it to autonomous system 3. If the route to network A repeatedly
becomes unavailable, then available, many withdrawal and advertisement messages are sent. Route
flapping is a problem in an internetwork connected to the Internet, because a route flap in the Internet
backbone usually involves many routes.
Minimizing Flapping
The route dampening feature minimizes the flapping problem as follows. Suppose again that the route
to network A flaps. The router in autonomous system 2 (in which route dampening is enabled) assigns
network A a penalty of 1000 and moves it to history state. The router in autonomous system 2 continues
to advertise the status of the route to neighbors. The penalties are cumulative. When the route flaps so
often that the penalty exceeds a configurable suppression limit, the router stops advertising the route to
network A, regardless of how many times it flaps. Thus, the route is dampened.
The penalty placed on network A is decayed until the reuse limit is reached, upon which the route is once
again advertised. At half of the reuse limit, the dampening information for the route to network A is
removed.
Note
No penalty is applied to a BGP peer reset when route dampening is enabled, even though the reset
withdraws the route.
BGP Routing Domain Confederation
One way to reduce the iBGP mesh is to divide an autonomous system into multiple subautonomous
systems and group them into a single confederation. To the outside world, the confederation looks like
a single autonomous system. Each autonomous system is fully meshed within itself and has a few
connections to other autonomous systems in the same confederation. Although the peers in different
autonomous systems have eBGP sessions, they exchange routing information as if they were iBGP peers.
Specifically, the next hop, MED, and local preference information is preserved. This feature allows the
you to retain a single IGP for all of the autonomous systems.
BGP Route Reflectors
BGP requires that all iBGP speakers be fully meshed. However, this requirement does not scale well
when there are many iBGP speakers. Instead of configuring a confederation, you can reduce the iBGP
mesh by using a route reflector configuration.
Figure 6 illustrates a simple iBGP configuration with three iBGP speakers (routers A, B, and C). Without
route reflectors, when Router A receives a route from an external neighbor, it must advertise it to both
routers B and C. Routers B and C do not readvertise the iBGP learned route to other iBGP speakers
because the routers do not pass on routes learned from internal neighbors to other internal neighbors,
thus preventing a routing information loop.
Cisco IOS XR Routing Configuration Guide
RC-34
Implementing BGP on Cisco IOS XR Software
Information About Implementing BGP on Cisco IOS XR Software
Figure 6
Three Fully Meshed iBGP Speakers
Fully meshed
autonomous
system
Router C
Routes
Router A
Routes
advertised
External
BGP
speaker
Routes not
advertised
Router A
Routes
S4217
Router B
With route reflectors, all iBGP speakers need not be fully meshed because there is a method to pass
learned routes to neighbors. In this model, an iBGP peer is configured to be a route reflector responsible
for passing iBGP learned routes to a set of iBGP neighbors. In Figure 7, Router B is configured as a route
reflector. When the route reflector receives routes advertised from Router A, it advertises them to
Router C, and vice versa. This scheme eliminates the need for the iBGP session between routers A
and C.
Figure 7
Simple BGP Model with a Route Reflector
Partially meshed autonomous system
Routes
Router A
Router C
External
BGP
speaker
Routes
Reflected
routes
S4219
Router A
Router B
Route
reflector
Cisco IOS XR Routing Configuration Guide
RC-35
Implementing BGP on Cisco IOS XR Software
Information About Implementing BGP on Cisco IOS XR Software
The internal peers of the route reflector are divided into two groups: client peers and all other routers in
the autonomous system (nonclient peers). A route reflector reflects routes between these two groups.
The route reflector and its client peers form a cluster. The nonclient peers must be fully meshed with
each other, but the client peers need not be fully meshed. The clients in the cluster do not communicate
with iBGP speakers outside their cluster.
Figure 8
More Complex BGP Route Reflector Model
Partially meshed
autonomous system
Nonclient
Router G
Route reflector
Router A
Routes
advertised
Nonclient
Router F
Router A
External
BGP
speaker
Nonclient
Cluster
S4218
Router E
Router B
Client
Router C
Client
Router D
Client
Figure 8 illustrates a more complex route reflector scheme. Router A is the route reflector in a cluster
with routers B, C, and D. Routers E, F, and G are fully meshed, nonclient routers.
When the route reflector receives an advertised route, depending on the neighbor, it takes the following
actions:
•
A route from an external BGP speaker is advertised to all clients and nonclient peers.
•
A route from a nonclient peer is advertised to all clients.
•
A route from a client is advertised to all clients and nonclient peers. Hence, the clients need not be
fully meshed.
Along with route reflector-aware BGP speakers, it is possible to have BGP speakers that do not
understand the concept of route reflectors. They can be members of either client or nonclient groups,
allowing an easy and gradual migration from the old BGP model to the route reflector model. Initially,
you could create a single cluster with a route reflector and a few clients. All other iBGP speakers could
be nonclient peers to the route reflector and then more clusters could be created gradually.
An autonomous system can have multiple route reflectors. A route reflector treats other route reflectors
just like other iBGP speakers. A route reflector can be configured to have other route reflectors in a client
group or nonclient group. In a simple configuration, the backbone could be divided into many clusters.
Cisco IOS XR Routing Configuration Guide
RC-36
Implementing BGP on Cisco IOS XR Software
Information About Implementing BGP on Cisco IOS XR Software
Each route reflector would be configured with other route reflectors as nonclient peers (thus, all route
reflectors are fully meshed). The clients are configured to maintain iBGP sessions with only the route
reflector in their cluster.
Usually, a cluster of clients has a single route reflector. In that case, the cluster is identified by the router
ID of the route reflector. To increase redundancy and avoid a single point of failure, a cluster might have
more than one route reflector. In this case, all route reflectors in the cluster must be configured with the
cluster ID so that a route reflector can recognize updates from route reflectors in the same cluster. All
route reflectors serving a cluster should be fully meshed and all of them should have identical sets of
client and nonclient peers.
By default, the clients of a route reflector are not required to be fully meshed and the routes from a client
are reflected to other clients. However, if the clients are fully meshed, the route reflector need not reflect
routes to clients.
As the iBGP learned routes are reflected, routing information may loop. The route reflector model has
the following mechanisms to avoid routing loops:
•
Originator ID is an optional, nontransitive BGP attribute. It is a 4-byte attributed created by a route
reflector. The attribute carries the router ID of the originator of the route in the local autonomous
system. Therefore, if a misconfiguration causes routing information to come back to the originator,
the information is ignored.
•
Cluster-list is an optional, nontransitive BGP attribute. It is a sequence of cluster IDs that the route
has passed. When a route reflector reflects a route from its clients to nonclient peers, and vice versa,
it appends the local cluster ID to the cluster-list. If the cluster-list is empty, a new cluster-list is
created. Using this attribute, a route reflector can identify if routing information is looped back to
the same cluster due to misconfiguration. If the local cluster ID is found in the cluster-list, the
advertisement is ignored.
Default Address Family for show Commands
Most of the show commands provide address family (AFI) and subaddress family (SAFI) arguments (see
RFC 1700 and RFC 2858 for information on AFI and SAFI). The Cisco IOS XR software parser provides
the ability to set the afi and safi so that it is not necessary to specify them while running a show
command. The parser commands are:
•
set default-afi {ipv4 | ipv6 | all}
•
set default-safi {unicast | multicast | all}
The parser automatically sets the default afi value to ipv4 and default safi value to unicast. It is
necessary to use only the parser commands to change the default afi value from ipv4 or default safi value
from unicast. Any afi or safi keyword specified in a show command overrides the values set using the
parser commands. Use the following command to check the currently set value of the afi and safi:
•
show default-afi-safi-vrf
Distributed BGP
Distributed BGP splits BGP functionality into three process types:
•
BGP process manager—Responsible for verifying configuration changes and for calculating and
publishing the distribution of neighbors among BGP speaker processes.
There is a single instance of this process.
Cisco IOS XR Routing Configuration Guide
RC-37
Implementing BGP on Cisco IOS XR Software
Information About Implementing BGP on Cisco IOS XR Software
•
bRIB process—Responsible for performing the best-path calculation of routes (receives partial best
paths from the speaker). The best route is installed into the bRIB and is advertised back to all
speakers. See “BGP Best Path Algorithm” section on page RC-27 for information on best-path
calculation. The bRIB process is also responsible for installing routes in the RIB, and for handling
routes redistributed from the RIB. To accommodate route leaking from one RIB to another, bRIB
may register for redistribution from multiple RIB routes into a single route in the bRIB process.
There is a single instance of this process for each address family.
•
BGP speaker process—Responsible for handling all BGP connections to peers. The speaker stores
received paths in the RIB and performs a partial best-path calculation, advertising the partial best
paths to the bRIB (limited best-path calculation). Speakers perform a limited best-path calculation
because to compare Multi Exit Discriminators (MEDs), paths need to be compared from the same
AS but may not be received on the same speaker. Because BGP speakers do not have access to the
entire BGP local RIB, BGP speakers can perform only a limited best-path calculation. (These are
Step 1 through Step 7 in the “BGP Best Path Algorithm” section on page RC-27.) Only the best
paths are advertised to the bRIB to reduce speaker/bRIB interprocess communications (IPC) and to
reduce the number of paths to be processed in the bRIB. BGP speakers can only mark a path as active
only after learning the result of the full best-path calculation from the bRIB. Neighbor import and
export policies are imposed by the speaker.
If the bgp bestpath med always command is enabled, complete best-path calculation happens
inside speaker process. When the bgp bestpath med always command is not enabled, speakers
calculate partial best paths only (performs the best-path steps up to the MED comparison) and send
them to bRIB. bRIB calculates the final best path (performs all the steps in the best-path
calculation). When the bgp bestpath med always command is enabled, speakers can compare the
MED across all ASs, allowing the speaker to calculate a single best path to send it to bRIB. bRIB is
the ultimate process that calculates the final best path, but when the bgp bestpath med always
command is enabled, the speakers send a single best path instead of potentially sending multiple
partial best paths.
There are multiple instances of this process in which each instance is responsible for a subset of BGP
peer connections.
Up to a total 15 speakers for all address families and one bRIB for each address family (IPv4, IPv6, and
VPNv4) are supported.
Distributed BGP is used to reduce the impact that a fault in one address family has on another address
family. For example, you can have one speaker with only IPv6 neighbors (peering to IPv6 addresses) and
a separate speaker with only IP v4 neighbors (peering to IPv4 addresses), and yet another speaker with
only VPNv4 provider edge (PE) or customer edge (CE) neighbors (peering to IPv4 addresses distinct
from the non-VPN neighbors). In this scenario, there is no overlap in processes (bgp, brib, and rib)
between IPv4, IPv6, and VPNv4. Therefore, a bgp, brib, or rib process crash affects only one address
family. Distributed BGP also allows more CPU capacity for receiving, computing, and sending BGP
routing updates. When in distributed BGP mode, you can control the number of distributed speakers that
are enabled, as well as which neighbors are assigned to each speaker. If no distributed speakers are
enabled, BGP operates in standalone mode. If at least one distributed speaker is enabled, BGP operates
in distributed mode.
Cisco IOS XR Routing Configuration Guide
RC-38
Implementing BGP on Cisco IOS XR Software
Information About Implementing BGP on Cisco IOS XR Software
MPLS VPN Carrier Supporting Carrier
Carrier supporting carrier (CSC) is a term used to describe a situation in which one service provider
allows another service provider to use a segment of its backbone network. The service provider that
provides the segment of the backbone network to the other provider is called the backbone carrier. The
service provider that uses the segment of the backbone network is called the customer carrier.
A backbone carrier offers Border Gateway Protocol and Multiprotocol Label Switching (BGP/MPLS)
VPN services. The customer carrier can be either:
•
An Internet service provider (ISP) (By definition, an ISP does not provide VPN service.)
•
A BGP/MPLS VPN service provider
You can configure a CSC network to enable BGP to transport routes and MPLS labels between the
backbone carrier provider edge (PE) routers and the customer carrier customer edge (CE) routers using
multiple paths. The benefits of using BGP to distribute IPv4 routes and MPLS label routes are:
•
BGP takes the place of an Interior Gateway Protocol (IGP) and Label Distribution Protocol (LDP)
in a VPN routing and forwarding (VRF) table. You can use BGP to distribute routes and MPLS
labels. Using a single protocol instead of two simplifies the configuration and troubleshooting.
•
BGP is the preferred routing protocol for connecting two ISPs, mainly because of its routing policies
and ability to scale. ISPs commonly use BGP between two providers. This feature enables those
ISPs to use BGP.
For detailed information on configuring MPLS VPN CSC with BGP, see the Implementing MPLS
Layer 3 VPNs on Cisco IOS XR Software module of Cisco IOS XR Multiprotocol Label Switching
Configuration Guide.
BGP Keychains
BGP keychains enable keychain authentication between two BGP peers. The BGP endpoints must both
comply with draft-bonica-tcp-auth-05.txt and a keychain on one endpoint and a password on the other
endpoint does not work.
See Cisco IOS XR System Security Guide for information on keychain management.
BGP is able to use the keychain to implement hitless key rollover for authentication. The key rollover
specification is time based, and in the event of clock skew between the peers, the rollover process is
impacted. The configurable tolerance specification allows for the accept window to be extended (before
and after) by that margin. This accept window facilitates a hitless key rollover for applications (for
example, routing and management protocols).
The key rollover does not impact the BGP session, unless there is a keychain configuration mismatch at
the endpoints resulting in no common keys for the session traffic (send or accept).
IPv6/IPv6 VPN Provider Edge Transport over MPLS
IPv6 Provider Edge (6PE) and IPv6 VPN Provider Edge (6VPE) leverages the existing Multiprotocol
Label Switching (MPLS) IPv4 core infrastructure for IPv6 transport. 6PE and 6VPE enables IPv6 sites
to communicate with each other over an MPLS IPv4 core network using MPLS label switched paths
(LSPs). This feature relies on multiprotocol Border Gateway Protocol (BGP) extensions in the IPv4
network configuration on the provider edge (PE) router, to exchange IPv6 reachability information in
Cisco IOS XR Routing Configuration Guide
RC-39
Implementing BGP on Cisco IOS XR Software
Information About Implementing BGP on Cisco IOS XR Software
addition to an MPLS label for each IPv6 address prefix to be advertised. Edge routers are configured to
be dual stack running both IPv4 and IPv6, and use the IPv4-mapped IPv6 address for IPv6 prefix
reachability exchange.
Note
This feature is supported on Cisco XR 12000 Series Routers.
For detailed information on configuring 6PE and 6VPE over MPLS, see Cisco IOS XR Multiprotocol
Label Switching Configuration Guide.
IPv6 Provider Edge Multipath
Internal and external BGP multipath for IPv6 allows the IPv6 router to load balance between several
paths (for example, same neighboring autonomous system [AS] or sub-AS, or the same metric) to reach
its destination. The 6PE multipath feature uses multiprotocol internal BGP (MP-iBGP) to distribute IPv6
routes over the MPLS IPv4 core network and to attach an MPLS label to each route.
When MP-iBGP multipath is enabled on the 6PE router, all labeled paths are installed in the forwarding
table with MPLS information (label stack) when MPLS information is available. This functionality
enables 6PE to perform load balancing.
VPNv4/VPNv6 over the IP Core Using L2TPv3 Tunnels
The Layer 2 Tunnel Protocol version 3 (L2TPv3) feature defines the L2TP protocol for tunneling Layer 2
traffic over an IP core network using Layer 2 VPNs. Benefits of this feature include:
Note
•
Simplifies deployment of VPNs
•
Does not require Multiprotocol Label Switching (MPLS)
•
Supports Layer 2 tunneling over IP for any traffic
•
Supports data encapsulation directly over IP (IP protocol number 115), not using User Datagram
Protocol (UDP)
•
Supports point-to-point sessions, not point-to-multipoint or multipoint-to-point sessions
•
Supports sessions between the same Layer 2 protocols, for example Frame Relay to Frame Relay or
ATM to ATM
This feature is supported on Cisco XR 12000 Series Routers.
When an RFC 4364-based IP VPN service is deployed (see RFC 4364), VPN traffic is typically
transported across the core network between service provider edge (PE) routers using MPLS label
switched paths (LSPs). Native IP L3VPNs eliminate the need for MPLS between the participating core
routers by relying on scalable tunnel encapsulation over IP. These tunnels can be used instead of, or with,
MPLS to transport VPN traffic between participating edge routers.
A native IP L3VPN allows service providers to use an IP backbone to provide VPN services. BGP is
used to distribute VPN routing information across the provider backbone.
Figure 9 shows edge routers participating in switching IPv4 and IPv6 traffic over a tunnel using IP as
the transport.
Cisco IOS XR Routing Configuration Guide
RC-40
Implementing BGP on Cisco IOS XR Software
Information About Implementing BGP on Cisco IOS XR Software
Figure 9
IP L3VPN with L2TPv3
IPv4 Core
L2TPv3
VPN Label
VPN IP (from CE)
IP L3VPN w/L2TPv3
BGP (RFC 4364)
VPN green
PE2
CE-g2
VPN green
CE-g1
PE1
VPN pink
PE3
CE-p2
VPN pink
CE-p1
VPN green
CE-g3
211300
IP Network
BGP Multicast VPN
The BGP Multicast VPN feature introduces the IPv4 multicast distribution tree (MDT) subaddress
family identifier (SAFI) in Border Gateway Protocol (BGP).
Multicast VPN (MVPN) extends the VPN architecture to provide multicast services over a shared
service provider backbone using native multicast technology. This is achieved using virtual connections
between provider edge (PE) routers in each VPN and using native multicast forwarding inside the
provider network. An MDT may span across multiple customer sites and the provider network, allowing
traffic to flow freely from one source to multiple receivers.
MVPN is supported on VPN networks based on MPLS and on networks based on IP Layer 2 Tunnel
Protocol version 3 (L2TPv3).
PE routers are the only routers that must be MVPN-aware and that must be able to signal to remote PEs
information regarding the MVPN. Therefore, all PE routers must have a BGP relationship with each
other—either directly or using a route reflector (RR).
Generally the source address of the default MDT is the same address used to source the internal BGP
(IBGP) sessions with the remote PE routers that belong to the same VPN and multicast VPN routing and
forwarding (MVRF) instance. When Protocol Independent Multicast–Source Specific Multicast
(PIM–SSM) is used for transport inside the provider core, it is through the BGP relationship that the PEs
indicate that they are MVPN-capable and provide for source discovery. This capability is indicated using
the updated BGP message.
When a PE receives a BGP update, which includes the rendezvous point (RP) and the group information,
it joins the root of that tree, thereby joining the MDT.
Figure 10 shows Multiprotocol IBGP updates for MVPN. On PE1, PE2 is configured as its IBGP peer.
This BGP peer configuration within a VRF triggers the MP-IBGP updates that send PE1 local VPN
routes to PE2. BGP process on PE2 receives the VPN updates and installs VPN routes in the Routing
Information Base (RIB) VRF table. When PIM looks up a VRF source or rendezvous point address that
is reachable through the provider core, it receives an MP-IBGP route from the RIB.
Cisco IOS XR Routing Configuration Guide
RC-41
Implementing BGP on Cisco IOS XR Software
Information About Implementing BGP on Cisco IOS XR Software
When an MVPN-specific default MDT group is configured on PE1, PIM creates a virtual MDT tunnel
interface with the tunnel source address the same as the BGP local peering address. This MDT interface
is used by PIM to send VPN packets to the provider network and to receive VPN packets from the
provider network. PIM also exchanges control messages over this MDT interface.
Each time a default MDT group is configured for a specific VRF, BGP builds an MDT SAFI update, with
network layer reachability information (NLRI) containing the local PE BGP peering address and the
newly configured MDT group address (The NLRI format is 8-byte-RD:IPv4-address followed by the
MDT group address). This update is sent to all the BGP peers including PE2. The BGP process on PE2
receives this MDT update and notifies PIM. If the group is a PIM–SSM group, PIM on PE2 begins
sending SSM joins to the BGP peering address on PE1 to establish an SSM tree in the core. This SSM
tree is used to carry PIM control traffic and multicast data traffic in the corresponding VRF.
In summary, PIM requires the following from BGP:
•
A new BGP MDT SAFI, which carries the VRF RD and BGP local peering address and default MDT
group in its NLRI.
– A notification mechanism from BGP to PIM about the availability of the MDT SAFI update.
– A notification mechanism from PIM to BGP about the default MDT group address and source
address.
See Internet Engineering Task Force (IETF) draft-nalawade-idr-mdt-safi-03 for detailed information on
MDT SAFI.
Figure 10
Multiprotocol IBGP Updates for MVPN
Service Provider
MP-iBGP
VPN
VPN routes
PE1
PE2
P-joins
SSM
P-joins
Receive
CE
Cisco IOS XR Routing Configuration Guide
RC-42
CE
211301
Send
Implementing BGP on Cisco IOS XR Software
How to Implement BGP on Cisco IOS XR Software
How to Implement BGP on Cisco IOS XR Software
This section contains instructions for the following tasks:
•
Enabling BGP Routing, page RC-44 (required)
•
Configuring a Routing Domain Confederation for BGP, page RC-47 (optional)
•
Resetting eBGP Session Immediately Upon Link Failure, page RC-49 (optional)
•
Logging Neighbor Changes, page RC-49 (optional)
•
Adjusting BGP Timers, page RC-50 (optional)
•
Changing the BGP Default Local Preference Value, page RC-51 (optional)
•
Configuring the MED Metric for BGP, page RC-52 (optional)
•
Configuring BGP Weights, page RC-54 (optional)
•
Tuning the BGP Best-Path Calculation, page RC-55 (optional)
•
Indicating BGP Back-door Routes, page RC-57 (optional)
•
Configuring Aggregate Addresses, page RC-59 (optional)
•
Redistributing iBGP Routes into IGP, page RC-60 (optional)
•
Redistributing Prefixes into Multiprotocol BGP, page RC-62 (optional)
•
Configuring BGP Route Dampening, page RC-64 (optional)
•
Applying Policy When Updating the Routing Table, page RC-69 (optional)
•
Setting BGP Administrative Distance, page RC-71 (optional)
•
Configuring a BGP Neighbor Group and Neighbors, page RC-72 (required)
•
Configuring a Route Reflector for BGP, page RC-75 (optional)
•
Configuring BGP Route Filtering by Route Policy, page RC-77 (optional)
•
Configuring BGP Next Hop Trigger Delay, page RC-79 (optional)
•
Disabling Next-hop Processing on BGP Updates, page RC-81 (optional)
•
Configuring BGP Community and Extended-Community Advertisements, page RC-82 (optional)
•
Configuring the BGP Cost Community, page RC-84 (optional)
•
Configuring Software to Store Updates from a Neighbor, page RC-89 (optional)
•
Configuring Distributed BGP, page RC-91 (optional)
•
Configuring a VPN Routing and Forwarding Instance in BGP, page RC-94 (optional)
•
Configuring Keychains for BGP, page RC-112 (optional)
•
Configuring an MDT Address Family Session in BGP, page RC-113 (optional)
•
Disabling a BGP Neighbor, page RC-116 (optional)
•
Resetting Neighbors Using BGP Dynamic Inbound Soft Reset, page RC-118 (optional)
•
Resetting Neighbors Using BGP Outbound Soft Reset, page RC-118 (optional)
•
Resetting Neighbors Using BGP Hard Reset, page RC-119 (optional)
•
Clearing Caches, Tables, and Databases, page RC-120 (optional)
•
Displaying System and Network Statistics, page RC-121 (optional)
Cisco IOS XR Routing Configuration Guide
RC-43
Implementing BGP on Cisco IOS XR Software
How to Implement BGP on Cisco IOS XR Software
•
Displaying BGP Process Information, page RC-123 (optional)
•
Monitoring BGP Update Groups, page RC-124 (optional)
Enabling BGP Routing
Perform this task to enable BGP routing and establish a BGP routing process. Configuring BGP
neighbors is included as part of enabling BGP routing.
Note
At least one neighbor and at least one address family must be configured to enable BGP routing. At least
one neighbor with both a remote AS and an address family must be configured globally using the
address family and remote as commands.
Prerequisites
BGP must be able to obtain a router identifier (for example, a configured loopback address). At least,
one address family must be configured in the BGP router configuration and the same address family must
also be configured under the neighbor.
Restrictions
If the neighbor is configured as an external BGP (eBGP) peer, you must configure an inbound and
outbound route policy on the neighbor using the route-policy command.
SUMMARY STEPS
1.
configure
2.
route-policy route-policy-name
3.
end-policy
4.
end
or
commit
5.
configure
6.
router bgp as-number
7.
bgp router-id ip-address
8.
address-family {ipv4 unicast | ipv4 multicast | ipv4 tunnel | ipv4 mdt | ipv6 unicast | ipv6
multicast | vpnv4 unicast | vpnv6 unicast}
9.
exit
10. neighbor ip-address
11. remote-as as-number
12. address-family {ipv4 unicast | ipv4 multicast | ipv4 labeled-unicast | ipv4 tunnel | ipv4 mdt |
ipv6 unicast | ipv6 multicast | ipv6 labeled-unicast | vpnv4 unicast | vpnv6 unicast}
13. route-policy route-policy-name {in | out}
Cisco IOS XR Routing Configuration Guide
RC-44
Implementing BGP on Cisco IOS XR Software
How to Implement BGP on Cisco IOS XR Software
14. end
or
commit
DETAILED STEPS
Step 1
Command or Action
Purpose
configure
Enters global configuration mode.
Example:
RP/0/RP0/CPU0:router# configure
Step 2
route-policy route-policy-name
(Optional) Defines a route policy and enters route policy
configuration mode.
Example:
RP/0/RP0/CPU0:router(config)# route-policy
drop-as-1234
RP/0/RP0/CPU0:router(config-rpl)# if as-path
passes-through '1234' then
RP/0/RP0/CPU0:router(config-rpl)# apply
check-communities
RP/0/RP0/CPU0:router(config-rpl)# else
RP/0/RP0/CPU0:router(config-rpl)# pass
RP/0/RP0/CPU0:router(config-rpl)# endif
Step 3
end-policy
(Optional) Ends the definition of a route policy and exits
route policy configuration mode.
Example:
RP/0/RP0/CPU0:router(config-rpl)# end-policy
Step 4
end
or
Saves configuration changes.
commit
When you issue the end command, the system prompts
you to commit changes:
Example:
Uncommitted changes found, commit them before
exiting(yes/no/cancel)?
[cancel]:
•
RP/0/RP0/CPU0:router(config)# end
or
– Entering yes saves configuration changes to the
RP/0/RP0/CPU0:router(config)# commit
running configuration file, exits the configuration
session, and returns the router to EXEC mode.
– Entering no exits the configuration session and
returns the router to EXEC mode without
committing the configuration changes.
– Entering cancel leaves the router in the current
configuration session without exiting or
committing the configuration changes.
•
Use the commit command to save the configuration
changes to the running configuration file and remain
within the configuration session.
Cisco IOS XR Routing Configuration Guide
RC-45
Implementing BGP on Cisco IOS XR Software
How to Implement BGP on Cisco IOS XR Software
Step 5
Command or Action
Purpose
configure
Enters global configuration mode.
Example:
RP/0/RP0/CPU0:router# configure
Step 6
router bgp as-number
Enters BGP configuration mode, allowing you to configure
the BGP routing process.
Example:
RP/0/RP0/CPU0:router(config)# router bgp 120
Step 7
bgp router-id ip-address
Configures the local router with a specified router ID.
Example:
RP/0/RP0/CPU0:router(config-bgp)# bgp router-id
192.168.70.24
Step 8
address-family {ipv4 unicast | ipv4 multicast |
ipv4 tunnel | ipv4 mdt | ipv6 unicast | ipv6
multicast | vpnv4 unicast | vpnv6 unicast}
Enters global address family configuration mode for the
specified address family.
Example:
RP/0/RP0/CPU0:router(config-bgp)#
address-family ipv4 unicast
Step 9
Exits the current configuration mode.
exit
Example:
RP/0/RP0/CPU0:router(config-bgp-af)# exit
Step 10
neighbor ip-address
Example:
Places the router in neighbor configuration mode for BGP
routing and configures the neighbor IP address as a BGP
peer.
RP/0/RP0/CPU0:router(config-bgp)# neighbor
172.168.40.24
Step 11
remote-as as-number
Creates a neighbor and assigns a remote autonomous
system number to it.
Example:
RP/0/RP0/CPU0:router(config-bgp-nbr)# remote-as
2002
Step 12
address-family {ipv4 unicast | ipv4 multicast |
ipv4 labeled-unicast | ipv4 tunnel | ipv4 mdt |
ipv6 unicast | ipv6 multicast | ipv6
labeled-unicast | vpnv4 unicast | vpnv6
unicast}
Example:
RP/0/RP0/CPU0:router(config-bgp-nbr)#
address-family ipv4 unicast
Cisco IOS XR Routing Configuration Guide
RC-46
Enters address family configuration mode for the specified
address family.
Implementing BGP on Cisco IOS XR Software
How to Implement BGP on Cisco IOS XR Software
Step 13
Command or Action
Purpose
route-policy route-policy-name {in | out}
(Optional) Applies the specified policy to inbound IPv4
unicast routes.
Example:
RP/0/RP0/CPU0:router(config-bgp-nbr-af)#
route-policy drop-as-1234 in
Step 14
Saves configuration changes.
end
or
commit
When you issue the end command, the system prompts
you to commit changes:
Example:
Uncommitted changes found, commit them before
exiting(yes/no/cancel)?
[cancel]:
•
RP/0/RP0/CPU0:router(config-bgp-nbr-af)# end
or
– Entering yes saves configuration changes to the
RP/0/RP0/CPU0:router(config-bgp-nbr-af)# commit
running configuration file, exits the configuration
session, and returns the router to EXEC mode.
– Entering no exits the configuration session and
returns the router to EXEC mode without
committing the configuration changes.
– Entering cancel leaves the router in the current
configuration session without exiting or
committing the configuration changes.
•
Use the commit command to save the configuration
changes to the running configuration file and remain
within the configuration session.
Configuring a Routing Domain Confederation for BGP
Perform this task to configure the routing domain confederation for BGP. This includes specifying a
confederation identifier and autonomous systems that belong to the confederation.
Configuring a routing domain confederation reduces the internal BGP (iBGP) mesh by dividing an
autonomous system into multiple autonomous systems and grouping them into a single confederation.
Each autonomous system is fully meshed within itself and has a few connections to another autonomous
system in the same confederation. The confederation maintains the next hop and local preference
information, and that allows you to retain a single Interior Gateway Protocol (IGP) for all autonomous
systems. To the outside world, the confederation looks like a single autonomous system.
SUMMARY STEPS
1.
configure
2.
router bgp as-number
3.
bgp confederation identifier as-number
4.
bgp confederation peers as-number
5.
end
or
commit
Cisco IOS XR Routing Configuration Guide
RC-47
Implementing BGP on Cisco IOS XR Software
How to Implement BGP on Cisco IOS XR Software
DETAILED STEPS
Step 1
Command or Action
Purpose
configure
Enters global configuration mode.
Example:
RP/0/RP0/CPU0:router# configure
Step 2
router bgp as-number
Enters BGP configuration mode, allowing you to configure
the BGP routing process.
Example:
RP/0/RP0/CPU0:router(config)# router bgp 120
Step 3
bgp confederation identifier as-number
Example:
RP/0/RP0/CPU0:router(config-bgp)# bgp
confederation identifier 5
Cisco IOS XR Routing Configuration Guide
RC-48
Specifies a BGP confederation identifier.
Implementing BGP on Cisco IOS XR Software
How to Implement BGP on Cisco IOS XR Software
Step 4
Command or Action
Purpose
bgp confederation peers as-number
Specifies that the BGP autonomous systems belong to a
specified BGP confederation identifier.
Example:
RP/0/RP0/CPU0:router(config-bgp)#
confederation peers 1091
RP/0/RP0/CPU0:router(config-bgp)#
confederation peers 1092
RP/0/RP0/CPU0:router(config-bgp)#
confederation peers 1093
RP/0/RP0/CPU0:router(config-bgp)#
confederation peers 1094
RP/0/RP0/CPU0:router(config-bgp)#
confederation peers 1095
RP/0/RP0/CPU0:router(config-bgp)#
confederation peers 1096
Step 5
bgp
bgp
bgp
bgp
bgp
bgp
Saves configuration changes.
end
or
commit
When you issue the end command, the system prompts
you to commit changes:
Example:
Uncommitted changes found, commit them before
exiting(yes/no/cancel)?
[cancel]:
•
RP/0/RP0/CPU0:router(config-bgp)# end
or
– Entering yes saves configuration changes to the
RP/0/RP0/CPU0:router(config-bgp)# commit
running configuration file, exits the configuration
session, and returns the router to EXEC mode.
– Entering no exits the configuration session and
returns the router to EXEC mode without
committing the configuration changes.
– Entering cancel leaves the router in the current
configuration session without exiting or
committing the configuration changes.
•
Use the commit command to save the configuration
changes to the running configuration file and remain
within the configuration session.
Resetting eBGP Session Immediately Upon Link Failure
Immediately resetting BGP sessions of any directly adjacent external peers if the link used to reach them
goes down is enabled by default. Use the bgp fast-external-fallover disable command to disable
automatic resetting. The no bgp fast-external-fallover disable command can also be used to turn the
automatic reset back on.
Logging Neighbor Changes
Logging neighbor changes is enabled by default. Use the log neighbor changes disable command to
turn off logging. The no log neighbor changes disable command can also be used to turn logging back
on if it has been disabled.
Cisco IOS XR Routing Configuration Guide
RC-49
Implementing BGP on Cisco IOS XR Software
How to Implement BGP on Cisco IOS XR Software
Adjusting BGP Timers
Perform this task to set the timers for BGP neighbors.
BGP uses certain timers to control periodic activities, such as the sending of keepalive messages and the
interval after which a neighbor is assumed to be down if no messages are received from the neighbor
during the interval. The values set using the timers bgp command in router configuration mode can be
overridden on particular neighbors using the timers command in the neighbor configuration mode.
SUMMARY STEPS
1.
configure
2.
router bgp as-number
3.
timers bgp keepalive hold-time
4.
neighbor ip-address
5.
timers keepalive hold-time
6.
end
or
commit
DETAILED STEPS
Step 1
Command or Action
Purpose
configure
Enters global configuration mode.
Example:
RP/0/RP0/CPU0:router# configure
Step 2
router bgp as-number
Enters BGP configuration mode, allowing you to configure
the BGP routing process.
Example:
RP/0/RP0/CPU0:router(config)# router bgp 123
Step 3
timers bgp keepalive hold-time
Sets a default keepalive time and a default hold time for all
neighbors.
Example:
RP/0/RP0/CPU0:router(config-bgp)# timers bgp 30
90
Step 4
neighbor ip-address
Example:
RP/0/RP0/CPU0:router(config-bgp)# neighbor
172.168.40.24
Cisco IOS XR Routing Configuration Guide
RC-50
Places the router in neighbor configuration mode for BGP
routing and configures the neighbor IP address as a BGP
peer.
Implementing BGP on Cisco IOS XR Software
How to Implement BGP on Cisco IOS XR Software
Step 5
Command or Action
Purpose
timers keepalive hold-time
(Optional) Sets the keepalive timer and the hold-time timer
for the BGP neighbor.
Example:
RP/0/RP0/CPU0:router(config-bgp-nbr)# timers 60
220
Step 6
Saves configuration changes.
end
or
commit
When you issue the end command, the system prompts
you to commit changes:
Example:
Uncommitted changes found, commit them before
exiting(yes/no/cancel)?
[cancel]:
•
RP/0/RP0/CPU0:router(config-bgp-nbr)# end
or
– Entering yes saves configuration changes to the
RP/0/RP0/CPU0:router(config-bgp-nbr)# commit
running configuration file, exits the configuration
session, and returns the router to EXEC mode.
– Entering no exits the configuration session and
returns the router to EXEC mode without
committing the configuration changes.
– Entering cancel leaves the router in the current
configuration session without exiting or
committing the configuration changes.
•
Use the commit command to save the configuration
changes to the running configuration file and remain
within the configuration session.
Changing the BGP Default Local Preference Value
Perform this task to set the default local preference value for BGP paths.
SUMMARY STEPS
1.
configure
2.
router bgp as-number
3.
bgp default local-preference value
4.
end
or
commit
Cisco IOS XR Routing Configuration Guide
RC-51
Implementing BGP on Cisco IOS XR Software
How to Implement BGP on Cisco IOS XR Software
DETAILED STEPS
Step 1
Command or Action
Purpose
configure
Enters global configuration mode.
Example:
RP/0/RP0/CPU0:router# configure
Step 2
router bgp as-number
Enters BGP configuration mode, allowing you to configure
the BGP routing process.
Example:
RP/0/RP0/CPU0:router(config)# router bgp 120
Step 3
bgp default local-preference value
Example:
Sets the default local preference value from the default of
100, making it either a more preferable path (over 100) or
less preferable path (under 100).
RP/0/RP0/CPU0:router(config-bgp)# bgp default
local-preference 200
Step 4
Saves configuration changes.
end
or
commit
When you issue the end command, the system prompts
you to commit changes:
Example:
Uncommitted changes found, commit them before
exiting(yes/no/cancel)?
[cancel]:
•
RP/0/RP0/CPU0:router(config-bgp)# end
or
– Entering yes saves configuration changes to the
RP/0/RP0/CPU0:router(config-bgp)# commit
running configuration file, exits the configuration
session, and returns the router to EXEC mode.
– Entering no exits the configuration session and
returns the router to EXEC mode without
committing the configuration changes.
– Entering cancel leaves the router in the current
configuration session without exiting or
committing the configuration changes.
•
Use the commit command to save the configuration
changes to the running configuration file and remain
within the configuration session.
Configuring the MED Metric for BGP
Perform this task to set the multi exit discriminator (MED) to advertise to peers for routes that do not
already have a metric set (routes that were received with no MED attribute).
SUMMARY STEPS
1.
configure
2.
router bgp as-number
3.
default-metric value
Cisco IOS XR Routing Configuration Guide
RC-52
Implementing BGP on Cisco IOS XR Software
How to Implement BGP on Cisco IOS XR Software
4.
end
or
commit
DETAILED STEPS
Step 1
Command or Action
Purpose
configure
Enters global configuration mode.
Example:
RP/0/RP0/CPU0:router# configure
Step 2
router bgp as-number
Enters BGP configuration mode, allowing you to configure
the BGP routing process.
Example:
RP/0/RP0/CPU0:router(config)# router bgp 120
Step 3
default-metric value
Example:
RP/0/RP0/CPU0:router(config-bgp)# default
metric 10
Step 4
end
or
Sets the default metric, which is used to set the MED to
advertise to peers for routes that do not already have a
metric set (routes that were received with no MED
attribute).
Saves configuration changes.
commit
When you issue the end command, the system prompts
you to commit changes:
Example:
Uncommitted changes found, commit them before
exiting(yes/no/cancel)?
[cancel]:
•
RP/0/RP0/CPU0:router(config-bgp)# end
or
– Entering yes saves configuration changes to the
RP/0/RP0/CPU0:router(config-bgp)# commit
running configuration file, exits the configuration
session, and returns the router to EXEC mode.
– Entering no exits the configuration session and
returns the router to EXEC mode without
committing the configuration changes.
– Entering cancel leaves the router in the current
configuration session without exiting or
committing the configuration changes.
•
Use the commit command to save the configuration
changes to the running configuration file and remain
within the configuration session.
Cisco IOS XR Routing Configuration Guide
RC-53
Implementing BGP on Cisco IOS XR Software
How to Implement BGP on Cisco IOS XR Software
Configuring BGP Weights
Perform this task to assign a weight to routes received from a neighbor. A weight is a number that you
can assign to a path so that you can control the best-path selection process. If you have particular
neighbors that you want to prefer for most of your traffic, you can use the weight command to assign a
higher weight to all routes learned from that neighbor.
Restrictions
The clear bgp command must be used for the newly configured weight to take effect.
SUMMARY STEPS
1.
configure
2.
router bgp as-number
3.
neighbor ip-address
4.
remote-as as-number
5.
address-family {ipv4 unicast | ipv4 multicast | ipv4 labeled-unicast | ipv4 tunnel | ipv4 mdt |
ipv6 unicast | ipv6 multicast | ipv6 labeled-unicast | vpnv4 unicast | vpnv6 unicast}
6.
weight weight-value
7.
end
or
commit
DETAILED STEPS
Step 1
Command or Action
Purpose
configure
Enters global configuration mode.
Example:
RP/0/RP0/CPU0:router# configure
Step 2
router bgp as-number
Enters BGP configuration mode, allowing you to configure
the BGP routing process.
Example:
RP/0/RP0/CPU0:router(config)# router bgp 120
Step 3
neighbor ip-address
Example:
Places the router in neighbor configuration mode for BGP
routing and configures the neighbor IP address as a BGP
peer.
RP/0/RP0/CPU0:router(config-bgp)# neighbor
172.168.40.24
Step 4
remote-as as-number
Example:
RP/0/RP0/CPU0:router(config-bgp-nbr)# remote-as
2002
Cisco IOS XR Routing Configuration Guide
RC-54
Creates a neighbor and assigns a remote autonomous
system number to it.
Implementing BGP on Cisco IOS XR Software
How to Implement BGP on Cisco IOS XR Software
Step 5
Command or Action
Purpose
address-family {ipv4 unicast | ipv4 multicast |
ipv4 labeled-unicast | ipv4 tunnel | ipv4 mdt |
ipv6 unicast | ipv6 multicast | ipv6
labeled-unicast | vpnv4 unicast | vpnv6
unicast}
Enters neighbor address family configuration mode for the
specified address family.
Example:
RP/0/RP0/CPU0:router(config-bgp-nbr)#
address-family ipv4 unicast
Step 6
weight weight-value
Assigns a weight to all routes learned through the neighbor.
Example:
RP/0/RP0/CPU0:router(config-bgp-nbr-af)# weight
41150
Step 7
Saves configuration changes.
end
or
commit
When you issue the end command, the system prompts
you to commit changes:
Example:
Uncommitted changes found, commit them before
exiting(yes/no/cancel)?
[cancel]:
•
RP/0/RP0/CPU0:router(config-bgp-nbr-af)# end
or
– Entering yes saves configuration changes to the
RP/0/RP0/CPU0:router(config-bgp-nbr-af)# commit
running configuration file, exits the configuration
session, and returns the router to EXEC mode.
– Entering no exits the configuration session and
returns the router to EXEC mode without
committing the configuration changes.
– Entering cancel leaves the router in the current
configuration session without exiting or
committing the configuration changes.
•
Use the commit command to save the configuration
changes to the running configuration file and remain
within the configuration session.
Tuning the BGP Best-Path Calculation
Perform this task to change the default BGP best-path calculation behavior.
SUMMARY STEPS
1.
configure
2.
router bgp as-number
3.
bgp bestpath med missing-as-worst
4.
bgp bestpath med always
5.
bgp bestpath med confed
6.
bgp bestpath as-path ignore
Cisco IOS XR Routing Configuration Guide
RC-55
Implementing BGP on Cisco IOS XR Software
How to Implement BGP on Cisco IOS XR Software
7.
bgp bestpath compare-routerid
8.
end
or
commit
DETAILED STEPS
Step 1
Command or Action
Purpose
configure
Enters global configuration mode.
Example:
RP/0/RP0/CPU0:router# configure
Step 2
router bgp as-number
Enters BGP configuration mode, allowing you to configure
the BGP routing process.
Example:
RP/0/RP0/CPU0:router(config)# router bgp 126
Step 3
bgp bestpath med missing-as-worst
Example:
Directs the BGP software to consider a missing MED
attribute in a path as having a value of infinity, making this
path the least desirable path.
RP/0/RP0/CPU0:router(config-bgp)# bgp bestpath
med missing-as-worst
Step 4
bgp bestpath med always
Example:
RP/0/RP0/CPU0:router(config-bgp)# bgp bestpath
med always
Step 5
bgp bestpath med confed
Configures the BGP speaker in the specified autonomous
system to compare MEDs among all the paths for the prefix,
regardless of the autonomous system from which the paths
are received.
Enables BGP software to compare MED values for paths
learned from confederation peers.
Example:
RP/0/RP0/CPU0:router(config-bgp)# bgp bestpath
med confed
Step 6
bgp bestpath as-path ignore
Example:
RP/0/RP0/CPU0:router(config-bgp)# bgp bestpath
as-path ignore
Cisco IOS XR Routing Configuration Guide
RC-56
Configures the BGP software to ignore the autonomous
system length when performing best-path selection.
Implementing BGP on Cisco IOS XR Software
How to Implement BGP on Cisco IOS XR Software
Step 7
Command or Action
Purpose
bgp bestpath compare-routerid
Configure the BGP speaker in the autonomous system to
compare the router IDs of similar paths.
Example:
RP/0/RP0/CPU0:router(config-bgp)# bgp bestpath
compare-routerid
Step 8
Saves configuration changes.
end
or
commit
When you issue the end command, the system prompts
you to commit changes:
Example:
Uncommitted changes found, commit them before
exiting(yes/no/cancel)?
[cancel]:
•
RP/0/RP0/CPU0:router(config-bgp)# end
or
– Entering yes saves configuration changes to the
RP/0/RP0/CPU0:router(config-bgp)# commit
running configuration file, exits the configuration
session, and returns the router to EXEC mode.
– Entering no exits the configuration session and
returns the router to EXEC mode without
committing the configuration changes.
– Entering cancel leaves the router in the current
configuration session without exiting or
committing the configuration changes.
•
Use the commit command to save the configuration
changes to the running configuration file and remain
within the configuration session.
Indicating BGP Back-door Routes
Perform this task to set the administrative distance on an external Border Gateway Protocol (eBGP) route
to that of a locally sourced BGP route, causing it to be less preferred than an Interior Gateway Protocol
(IGP) route.
SUMMARY STEPS
1.
configure
2.
router bgp as-number
3.
address-family {ipv4 unicast | ipv4 multicast | ipv6 unicast | ipv6 multicast}
4.
network {ip-address /prefix-length | ip-address mask} backdoor
5.
end
or
commit
Cisco IOS XR Routing Configuration Guide
RC-57
Implementing BGP on Cisco IOS XR Software
How to Implement BGP on Cisco IOS XR Software
DETAILED STEPS
Step 1
Command or Action
Purpose
configure
Enters global configuration mode.
Example:
RP/0/RP0/CPU0:router# configure
Step 2
router bgp as-number
Enters BGP configuration mode, allowing you to configure
the BGP routing process.
Example:
RP/0/RP0/CPU0:router(config)# router bgp 120
Step 3
address-family {ipv4 unicast | ipv4 multicast |
ipv6 unicast | ipv6 multicast}
Enters address family configuration mode for the specified
address family.
Example:
RP/0/RP0/CPU0:router(config-bgp)#
address-family ipv4 unicast
Step 4
network {ip-address / prefix-length | ip-address
mask} backdoor
Configures the local router to originate and advertise the
specified network.
Example:
RP/0/RP0/CPU0:router(config-bgp-af)# network
172.20.0.0/16
Step 5
Saves configuration changes.
end
or
commit
When you issue the end command, the system prompts
you to commit changes:
Example:
Uncommitted changes found, commit them before
exiting(yes/no/cancel)?
[cancel]:
•
RP/0/RP0/CPU0:router(config-bgp-af)# end
or
– Entering yes saves configuration changes to the
RP/0/RP0/CPU0:router(config-bgp-af)# commit
running configuration file, exits the configuration
session, and returns the router to EXEC mode.
– Entering no exits the configuration session and
returns the router to EXEC mode without
committing the configuration changes.
– Entering cancel leaves the router in the current
configuration session without exiting or
committing the configuration changes.
•
Cisco IOS XR Routing Configuration Guide
RC-58
Use the commit command to save the configuration
changes to the running configuration file and remain
within the configuration session.
Implementing BGP on Cisco IOS XR Software
How to Implement BGP on Cisco IOS XR Software
Configuring Aggregate Addresses
Perform this task to create aggregate entries in a BGP routing table.
SUMMARY STEPS
1.
configure
2.
router bgp as-number
3.
address-family {ipv4 unicast | ipv4 multicast | ipv6 unicast | ipv6 multicast}
4.
aggregate-address address/mask-length [as-set] [as-confed-set] [summary-only] [route-policy
route-policy-name]
5.
end
or
commit
DETAILED STEPS
Step 1
Command or Action
Purpose
configure
Enters global configuration mode.
Example:
RP/0/RP0/CPU0:router# configure
Step 2
router bgp as-number
Enters BGP configuration mode, allowing you to configure
the BGP routing process.
Example:
RP/0/RP0/CPU0:router(config)# router bgp 120
Step 3
address-family {ipv4 unicast | ipv4 multicast |
| ipv6 unicast | ipv6 multicast}
Enters address family configuration mode for the specified
address family.
Example:
RP/0/RP0/CPU0:router(config-bgp)#
address-family ipv4 unicast
Cisco IOS XR Routing Configuration Guide
RC-59
Implementing BGP on Cisco IOS XR Software
How to Implement BGP on Cisco IOS XR Software
Step 4
Command or Action
Purpose
aggregate-address address/mask-length [as-set]
[as-confed-set] [summary-only] [route-policy
route-policy-name]
Creates an aggregate address. The path advertised for this
route is an autonomous system set consisting of all elements
contained in all paths that are being summarized.
•
The as-set keyword generates autonomous system set
path information and community information from
contributing paths.
•
The as-confed-set keyword generates autonomous
system confederation set path information from
contributing paths.
•
The summary-only keyword filters all more specific
routes from updates.
•
The route-policy route-policy-name keyword and
argument specify the route policy used to set the
attributes of the aggregate route.
Example:
RP/0/RP0/CPU0:router(config-bgp-af)#
aggregate-address 10.0.0.0/8 as-set
Step 5
Saves configuration changes.
end
or
commit
When you issue the end command, the system prompts
you to commit changes:
Example:
Uncommitted changes found, commit them before
exiting(yes/no/cancel)?
[cancel]:
•
RP/0/RP0/CPU0:router(config-bgp-af)# end
or
– Entering yes saves configuration changes to the
RP/0/RP0/CPU0:router(config-bgp-af)# commit
running configuration file, exits the configuration
session, and returns the router to EXEC mode.
– Entering no exits the configuration session and
returns the router to EXEC mode without
committing the configuration changes.
– Entering cancel leaves the router in the current
configuration session without exiting or
committing the configuration changes.
•
Use the commit command to save the configuration
changes to the running configuration file and remain
within the configuration session.
Redistributing iBGP Routes into IGP
Perform this task to redistribute iBGP routes into an Interior Gateway Protocol (IGP), such as
Intermediate System-to-Intermediate System (IS-IS) or Open Shortest Path First (OSPF).
Note
Caution
Use of the bgp redistribute-internal command requires the clear route * command to be issued to
reinstall all BGP routes into the IP routing table.
Redistributing iBGP routes into IGPs may cause routing loops to form within an autonomous system.
Use this command with caution.
Cisco IOS XR Routing Configuration Guide
RC-60
Implementing BGP on Cisco IOS XR Software
How to Implement BGP on Cisco IOS XR Software
SUMMARY STEPS
1.
configure
2.
router bgp as-number
3.
bgp redistribute-internal
4.
end
or
commit
DETAILED STEPS
Step 1
Command or Action
Purpose
configure
Enters global configuration mode.
Example:
RP/0/RP0/CPU0:router# configure
Step 2
router bgp as-number
Enters BGP configuration mode, allowing you to configure
the BGP routing process.
Example:
RP/0/RP0/CPU0:router(config)# router bgp 120
Step 3
bgp redistribute-internal
Allows the redistribution of iBGP routes into an IGP, such
as IS-IS or OSPF.
Example:
RP/0/RP0/CPU0:router(config-bgp)# bgp
redistribute-internal
Step 4
end
or
Saves configuration changes.
commit
When you issue the end command, the system prompts
you to commit changes:
Example:
Uncommitted changes found, commit them before
exiting(yes/no/cancel)?
[cancel]:
•
RP/0/RP0/CPU0:router(config-bgp)# end
or
– Entering yes saves configuration changes to the
RP/0/RP0/CPU0:router(config-bgp)# commit
running configuration file, exits the configuration
session, and returns the router to EXEC mode.
– Entering no exits the configuration session and
returns the router to EXEC mode without
committing the configuration changes.
– Entering cancel leaves the router in the current
configuration session without exiting or
committing the configuration changes.
•
Use the commit command to save the configuration
changes to the running configuration file and remain
within the configuration session.
Cisco IOS XR Routing Configuration Guide
RC-61
Implementing BGP on Cisco IOS XR Software
How to Implement BGP on Cisco IOS XR Software
Redistributing Prefixes into Multiprotocol BGP
Perform this task to redistribute prefixes from another protocol into multiprotocol BGP.
Redistribution is the process of injecting prefixes from one routing protocol into another routing
protocol. This task shows how to inject prefixes from another routing protocol into multiprotocol BGP.
Specifically, prefixes that are redistributed into multiprotocol BGP using the redistribute command are
injected into the unicast database, the multicast database, or both.
SUMMARY STEPS
1.
configure
2.
router bgp as-number
3.
address-family {ipv4 unicast | ipv4 multicast | ipv6 unicast | ipv6 multicast}
4.
redistribute connected [metric metric-value] [route-policy route-policy-name]
or
redistribute eigrp process-id [match {external | internal}] [metric metric-value] [route-policy
route-policy-name]
or
redistribute isis process-id [level {1 | 1-inter-area | 2}] [metric metric-value] [route-policy
route-policy-name]
or
redistribute ospf process-id [match {external [1 | 2] | internal | nssa-external [1 | 2]]} [metric
metric-value] [route-policy route-policy-name]
or
redistribute ospfv3 process-id [match {external [1 | 2] | internal | nssa-external [1 | 2]]} [metric
metric-value] [route-policy route-policy-name]
or
redistribute rip [metric metric-value] [route-policy route-policy-name]
or
redistribute static [metric metric-value] [route-policy route-policy-name]
5.
end
or
commit
DETAILED STEPS
Step 1
Command or Action
Purpose
configure
Enters global configuration mode.
Example:
RP/0/RP0/CPU0:router# configure
Step 2
router bgp as-number
Example:
RP/0/RP0/CPU0:router(config)# router bgp 120
Cisco IOS XR Routing Configuration Guide
RC-62
Enters BGP configuration mode, allowing you to configure
the BGP routing process.
Implementing BGP on Cisco IOS XR Software
How to Implement BGP on Cisco IOS XR Software
Step 3
Command or Action
Purpose
address-family {ipv4 unicast | ipv4 multicast |
| ipv6 unicast | ipv6 multicast}
Enters address family configuration mode for the specified
address family.
Example:
RP/0/RP0/CPU0:router(config-bgp)#
address-family ipv4 unicast
Step 4
redistribute connected [metric metric-value]
[route-policy route-policy-name]
or
Causes routes from the specified instance to be redistributed
into BGP.
redistribute eigrp process-id [match {external
| internal}] [metric metric-value]
[route-policy route-policy-name]
or
redistribute isis process-id [level {1 |
1-inter-area | 2}] [metric metric-value]
[route-policy route-policy-name]
or
redistribute ospf process-id [match {external
[1 | 2] | internal | nssa-external [1 | 2]]}
[metric metric-value] [route-policy
route-policy-name]
or
redistribute ospfv3 process-id [match {external
[1 | 2] | internal | nssa-external [1 | 2]]}
[metric metric-value] [route-policy
route-policy-name]
or
redistribute rip [metric metric-value]
[route-policy route-policy-name]
or
redistribute static [metric metric-value]
[route-policy route-policy-name]
Example:
RP/0/RP0/CPU0:router(config-bgp-af)#
redistribute ospf 110
Cisco IOS XR Routing Configuration Guide
RC-63
Implementing BGP on Cisco IOS XR Software
How to Implement BGP on Cisco IOS XR Software
Step 5
Command or Action
Purpose
end
Saves configuration changes.
or
commit
When you issue the end command, the system prompts
you to commit changes:
Example:
Uncommitted changes found, commit them before
exiting(yes/no/cancel)?
[cancel]:
•
RP/0/RP0/CPU0:router(config-bgp-af)# end
or
– Entering yes saves configuration changes to the
RP/0/RP0/CPU0:router(config-bgp-af)# commit
running configuration file, exits the configuration
session, and returns the router to EXEC mode.
– Entering no exits the configuration session and
returns the router to EXEC mode without
committing the configuration changes.
– Entering cancel leaves the router in the current
configuration session without exiting or
committing the configuration changes.
•
Use the commit command to save the configuration
changes to the running configuration file and remain
within the configuration session.
Configuring BGP Route Dampening
Perform this task to configure and monitor BGP route dampening.
SUMMARY STEPS
1.
configure
2.
router bgp as-number
3.
address-family {ipv4 unicast | ipv4 multicast | ipv6 unicast | ipv6 multicast}
4.
bgp dampening [half-life [reuse suppress max-suppress-time] | route-policy route-policy-name]
5.
end
or
commit
6.
show bgp [ipv4 {unicast | multicast | labeled-unicast | all} | ipv6 {unicast | multicast | all |
labeled-unicast} | all {unicast | multicast | all | labeled-unicast} | vpnv4 unicast [rd rd-address]
| vrf {vrf-name | all} [ipv4 {unicast | labeled-unicast} | ipv6 unicast] | vpvn6 unicast [rd
rd-address]] flap-statistics
7.
show bgp [ipv4 {unicast | multicast | labeled-unicast | all} | ipv6 {unicast | multicast | all |
labeled-unicast} | all {unicast | multicast | all | labeled-unicast} | vpnv4 unicast [rd rd-address]
| vrf {vrf-name | all} [ipv4 {unicast | labeled-unicast} | ipv6 unicast] | vpnv6 unicast [rd
rd-address]] flap-statistics regexp regular-expression
8.
show bgp [ipv4 {unicast | multicast | labeled-unicast | all} | ipv6 {unicast | multicast | all |
labeled-unicast} | all {unicast | multicast | all | labeled-unicast} | vpnv4 unicast [rd rd-address]
| vrf {vrf-name | all} [ipv4 {unicast | labeled-unicast} | ipv6 unicast] | vpnv6 unicast [rd
rd-address]] flap-statistics route-policy route-policy-name
Cisco IOS XR Routing Configuration Guide
RC-64
Implementing BGP on Cisco IOS XR Software
How to Implement BGP on Cisco IOS XR Software
9.
show bgp [ipv4 {unicast | multicast | labeled-unicast | all} | ipv6 {unicast | multicast | all |
labeled-unicast} | all {unicast | multicast | all | labeled-unicast} | vpnv4 unicast [rd rd-address]
| vrf {vrf-name | all} [ipv4 {unicast | labeled-unicast} | ipv6 unicast] | vpnv6 unicast [rd
rd-address]] flap-statistics {ip-address {mask | /prefix-length}}
10. show bgp [ipv4 {unicast | multicast | labeled-unicast | all} | ipv6 {unicast | multicast | all |
labeled-unicast} | all {unicast | multicast | all | labeled-unicast} | vpnv4 unicast [rd rd-address]
| vrf {vrf-name | all} [ipv4 {unicast | labeled-unicast} | ipv6 unicast] | vpnv6 unicast [rd
rd-address]] flap-statistics {ip-address [{mask | /prefix-length} [longer-prefixes]]}
11. clear bgp {ipv4 {unicast | multicast | labeled-unicast | all} | ipv6 {unicast | multicast | all |
labeled-unicast} | all {unicast | multicast | all | labeled-unicast} | vpnv4 unicast | vrf {vrf-name
| all} {ipv4 {unicast | labeled-unicast} | ipv6 unicast} | vpnv6 unicast} flap-statistics
12. clear bgp {ipv4 {unicast | multicast | labeled-unicast | all} | ipv6 {unicast | multicast | all |
labeled-unicast} | all {unicast | multicast | all | labeled-unicast} | vpnv4 unicast | vrf {vrf-name
| all} {ipv4 {unicast | labeled-unicast} | ipv6 unicast} | vpnv6 unicast} flap-statistics regexp
regular-expression
13. clear bgp {ipv4 {unicast | multicast | labeled-unicast | all} | ipv6 {unicast | multicast | all |
labeled-unicast} | all {unicast | multicast | all | labeled-unicast} | vpnv4 unicast | vrf {vrf-name
| all} {ipv4 {unicast | labeled-unicast} | ipv6 unicast} | vpnv6 unicast} flap-statistics
route-policy route-policy-name
14. clear bgp {ipv4 {unicast | multicast | labeled-unicast | all} | ipv6 {unicast | multicast | all |
labeled-unicast} | all {unicast | multicast | all | labeled-unicast} | vpnv4 unicast | vrf {vrf-name
| all} {ipv4 {unicast | labeled-unicast} | ipv6 unicast} | vpnv6 unicast} flap-statistics
network/mask-length
15. clear bgp {ipv4 {unicast | multicast | labeled-unicast | all} | ipv6 {unicast | multicast | all |
labeled-unicast} | all {unicast | multicast | all | labeled-unicast} | vpnv4 unicast | vrf {vrf-name
| all} {ipv4 {unicast | labeled-unicast} | ipv6 unicast} | vpnv6 unicast} flap-statistics
ip-address/mask-length
16. show bgp [ipv4 {unicast | multicast | labeled-unicast | all} | ipv6 {unicast | multicast | all |
labeled-unicast} | all {unicast | multicast | all | labeled-unicast} | vpnv4 unicast [rd rd-address]
| vrf {vrf-name | all} [ipv4 {unicast | labeled-unicast} | ipv6 unicast] | vpnv6 unicast [rd
rd-address]] dampened-paths
17. clear bgp {ipv4 {unicast | multicast | labeled-unicast | all} | ipv6 {unicast | multicast | all |
labeled-unicast} | all {unicast | multicast | all | labeled-unicast} | vpnv4 unicast | vrf {vrf-name
| all} {ipv4 {unicast | labeled-unicast} | ipv6 unicast} | vpnv6 unicast} dampening
[ip-address/mask-length]
DETAILED STEPS
Step 1
Command or Action
Purpose
configure
Enters global configuration mode.
Example:
RP/0/RP0/CPU0:router# configure
Step 2
router bgp as-number
Enters BGP configuration mode, allowing you to configure
the BGP routing process.
Example:
RP/0/RP0/CPU0:router(config)# router bgp 120
Cisco IOS XR Routing Configuration Guide
RC-65
Implementing BGP on Cisco IOS XR Software
How to Implement BGP on Cisco IOS XR Software
Step 3
Command or Action
Purpose
address-family {ipv4 unicast | ipv4 multicast |
| ipv6 unicast | ipv6 multicast}
Enters address family configuration mode for the specified
address family.
Example:
RP/0/RP0/CPU0:router(config-bgp)#
address-family ipv4 unicast
Step 4
bgp dampening [half-life [reuse suppress
max-suppress-time] | route-policy
route-policy-name]
Configures BGP dampening for the specified address
family.
Example:
RP/0/RP0/CPU0:router(config-bgp-af)# bgp
dampening 30 1500 10000 120
Step 5
Saves configuration changes.
end
or
commit
When you issue the end command, the system prompts
you to commit changes:
Example:
Uncommitted changes found, commit them before
exiting(yes/no/cancel)?
[cancel]:
•
RP/0/RP0/CPU0:router(config-bgp-af)# end
or
– Entering yes saves configuration changes to the
RP/0/RP0/CPU0:router(config-bgp-af)# commit
running configuration file, exits the configuration
session, and returns the router to EXEC mode.
– Entering no exits the configuration session and
returns the router to EXEC mode without
committing the configuration changes.
– Entering cancel leaves the router in the current
configuration session without exiting or
committing the configuration changes.
•
Step 6
show bgp [ipv4 {unicast | multicast |
labeled-unicast | all} | ipv6 {unicast |
multicast | all | tunnel} | all {unicast |
multicast | all | labeled-unicast} | vpnv4
unicast [rd rd-address] | vrf {vrf-name | all}
[ipv4 {unicast | labeled-unicast} | ipv6
unicast] | vpnv6 unicast [rd rd-address]]
flap-statistics
Example:
RP/0/RP0/CPU0:router# show bgp flap statistics
Cisco IOS XR Routing Configuration Guide
RC-66
Use the commit command to save the configuration
changes to the running configuration file and remain
within the configuration session.
Displays BGP flap statistics.
Implementing BGP on Cisco IOS XR Software
How to Implement BGP on Cisco IOS XR Software
Step 7
Command or Action
Purpose
show bgp [ipv4 {unicast | multicast |
labeled-unicast | all} | ipv6 {unicast |
multicast | all | labeled-unicast} | all
{unicast | multicast | all | labeled-unicast} |
vpnv4 unicast [rd rd-address] | vrf { vrf-name |
all} [ipv4 {unicast | labeled-unicast} | ipv6
unicast] | vpnv6 unicast [rd rd-address]]
flap-statistics regexp regular-expression
Displays BGP flap statistics for all paths that match the
regular expression.
Example:
RP/0/RP0/CPU0:router# show bgp flap-statistics
regexp _1$
Step 8
show bgp [ipv4 {unicast | multicast |
labeled-unicast | all} | ipv6 {unicast |
multicast | all | labeled-unicast} | all
{unicast | multicast | all | labeled-unicast} |
vpnv4 unicast [rd rd-address] | vrf { vrf-name |
all} [ipv4 {unicast | labeled-unicast} | ipv6
unicast] | vpnv6 unicast [rd rd-address]]
flap-statistics route-policy route-policy-name
Displays BGP flap statistics for the specified route policy.
Example:
RP/0/RP0/CPU0:router(config)# show bgp
flap-statistics route-policy policy_A
Step 9
show bgp [ipv4 {unicast | multicast |
labeled-unicast | all} | ipv6 {unicast |
multicast | all | labeled-unicast} | all
{unicast | multicast | all | labeled-unicast} |
vpnv4 unicast [rd rd-address] | vrf { vrf-name |
all} [ipv4 {unicast | labeled-unicast} | ipv6
unicast] | vpnv6 unicast [rd rd-address]]
flap-statistics {ip-address {mask |
/prefix-length}}
Displays BGP flap for the specified prefix.
Example:
RP/0/RP0/CPU0:router# show bgp flap-statistics
172.20.1.1
Step 10
show bgp [ipv4 {unicast | multicast |
labeled-unicast | all} | ipv6 {unicast |
multicast | all | labeled-unicast} | all
{unicast | multicast | all | labeled-unicast} |
vpnv4 unicast [rd rd-address] | vrf { vrf-name |
all} [ipv4 {unicast | labeled-unicast] | ipv6
unicast] | vpnv6 unicast [rd rd-address]]
flap-statistics {ip-address [{mask |
/prefix-length} [longer-prefixes]]}
Displays BGP flap statistics for more specific entries for the
specified IP address.
Example:
RP/0/RP0/CPU0:router# show bgp flap-statistics
172.20.1.1 longer-prefixes
Cisco IOS XR Routing Configuration Guide
RC-67
Implementing BGP on Cisco IOS XR Software
How to Implement BGP on Cisco IOS XR Software
Step 11
Command or Action
Purpose
clear bgp {ipv4 {unicast | multicast |
labeled-unicast | all} | ipv6 {unicast |
multicast | all | labeled-unicast} | all
{unicast | multicast | all | labeled-unicast} |
vpnv4 unicast | vrf {vrf-name | all} {ipv4
{unicast | labeled-unicast} | ipv6 unicast} |
vpnv6 unicast} flap-statistics
Clears BGP flap statistics for all routes.
Example:
RP/0/RP0/CPU0:router# clear bgp all all
flap-statistics
Step 12
clear bgp {ipv4 {unicast | multicast |
labeled-unicast | all} | ipv6 {unicast |
multicast | all | labeled-unicast} | all
{unicast | multicast | all | labeled-unicast} |
vpnv4 unicast | vrf {vrf-name | all} {ipv4
{unicast | labeled-unicast} | ipv6 unicast} |
vpnv6 unicast} flap-statistics regexp
regular-expression
Clears BGP flap statistics for all paths that match the
specified regular expression.
Example:
RP/0/RP0/CPU0:router# clear bgp ipv4 unicast
flap-statistics regexp _1$
Step 13
clear bgp {ipv4 {unicast | multicast |
labeled-unicast | all} | ipv6 {unicast |
multicast | all | labeled-unicast} | all
{unicast | multicast | all | labeled-unicast} |
vpnv4 unicast | vrf {vrf-name | all} {ipv4
{unicast | labeled-unicast} | ipv6 unicast} |
vpnv6 unicast} flap-statistics route-policy
route-policy-name
Clears BGP flap statistics for the specified route policy.
Example:
RP/0/RP0/CPU0:router# clear bgp ipv4 unicast
flap-statistics route-policy policy_A
Step 14
clear bgp {ipv4 {unicast | multicast |
labeled-unicast | all} | ipv6 {unicast |
multicast | all | labeled-unicast} | all
{unicast | multicast | all | labeled-unicast} |
vpnv4 unicast | vrf {vrf-name | all} {ipv4
{unicast | labeled-unicast} | ipv6 unicast} |
vpnv6 unicast} flap-statistics
network/mask-length
Example:
RP/0/RP0/CPU0:router# clear bgp ipv4 unicast
flap-statistics 192.168.40.0/24
Cisco IOS XR Routing Configuration Guide
RC-68
Clears BGP flap statistics for the specified network.
Implementing BGP on Cisco IOS XR Software
How to Implement BGP on Cisco IOS XR Software
Step 15
Command or Action
Purpose
clear bgp {ipv4 {unicast | multicast |
labeled-unicast | all} | ipv6 {unicast |
multicast | all | labeled-unicast} | all
{unicast | multicast | all | labeled-unicast} |
vpnv4 unicast | vrf {vrf-name | all} {ipv4
{unicast | labeled-unicast} | ipv6 unicast} |
vpnv6 unicast} flap-statistics
ip-address/mask-length
Clears BGP flap statistics for routes received from the
specified neighbor.
Example:
RP/0/RP0/CPU0:router# clear bgp ipv4 unicast
flap-statistics 172.20.1.1
Step 16
show bgp [ipv4 {unicast | multicast |
labeled-unicast | all} | ipv6 {unicast |
multicast | all | labeled-unicast} | all
{unicast | multicast | all | labeled-unicast} |
vpnv4 unicast [rd rd-address] | vrf { vrf-name |
all} [ipv4 {unicast | labeled-unicast} | ipv6
unicast] | vpnv6 unicast [rd rd-address]]
dampened-paths
Displays the dampened routes, including the time
remaining before they are unsuppressed.
Example:
RP/0/RP0/CPU0:router# show bgp dampened paths
Step 17
clear bgp {ipv4 {unicast | multicast |
labeled-unicast | all} | ipv6 {unicast |
multicast | all | labeled-unicast} | all
{unicast | multicast | all | labeled-unicast} |
vpnv4 unicast | vrf {vrf-name | all} {ipv4
{unicast | labeled-unicast} | ipv6 unicast} |
vpnv6 unicast} dampening
[ip-address/mask-length]
Clears route dampening information and unsuppresses the
suppressed routes.
Example:
RP/0/RP0/CPU0:router# clear bgp dampening
Applying Policy When Updating the Routing Table
Perform this task to apply a routing policy to routes being installed into the routing table.
Prerequisites
See the Implementing Routing Policy on Cisco IOS XR Software module of Cisco IOS XR Routing
Configuration Guide for a list of the supported attributes and operations that are valid for table policy
filtering.
SUMMARY STEPS
1.
configure
2.
router bgp as-number
3.
address-family {ipv4 unicast | ipv4 multicast | ipv6 unicast | ipv6 multicast}
Cisco IOS XR Routing Configuration Guide
RC-69
Implementing BGP on Cisco IOS XR Software
How to Implement BGP on Cisco IOS XR Software
4.
table-policy policy-name
5.
end
or
commit
DETAILED STEPS
Step 1
Command or Action
Purpose
configure
Enters global configuration mode.
Example:
RP/0/RP0/CPU0:router# configure
Step 2
router bgp as-number
Enters BGP configuration mode, allowing you to configure
the BGP routing process.
Example:
RP/0/RP0/CPU0:router(config)# router bgp 120.6
Step 3
address-family {ipv4 unicast | ipv4 multicast |
| ipv6 unicast | ipv6 multicast}
Enters address family configuration mode for the specified
address family.
Example:
RP/0/RP0/CPU0:router(config-bgp)#
address-family ipv4 unicast
Step 4
table-policy policy-name
Applies the specified policy to routes being installed into
the routing table.
Example:
RP/0/RP0/CPU0:router(config-bgp-af)#
table-policy tbl-plcy-A
Step 5
Saves configuration changes.
end
or
commit
When you issue the end command, the system prompts
you to commit changes:
Example:
Uncommitted changes found, commit them before
exiting(yes/no/cancel)?
[cancel]:
•
RP/0/RP0/CPU0:router(config-bgp-af)# end
or
– Entering yes saves configuration changes to the
RP/0/RP0/CPU0:router(config-bgp-af)# commit
running configuration file, exits the configuration
session, and returns the router to EXEC mode.
– Entering no exits the configuration session and
returns the router to EXEC mode without
committing the configuration changes.
– Entering cancel leaves the router in the current
configuration session without exiting or
committing the configuration changes.
•
Cisco IOS XR Routing Configuration Guide
RC-70
Use the commit command to save the configuration
changes to the running configuration file and remain
within the configuration session.
Implementing BGP on Cisco IOS XR Software
How to Implement BGP on Cisco IOS XR Software
Setting BGP Administrative Distance
Perform this task to specify the use of administrative distances that can be used to prefer one class of
route over another.
SUMMARY STEPS
1.
configure
2.
router bgp as-number
3.
address-family {ipv4 unicast | ipv4 multicast | ipv6 unicast | ipv6 multicast}
4.
distance bgp external-distance internal-distance local-distance
5.
end
or
commit
DETAILED STEPS
Step 1
Command or Action
Purpose
configure
Enters global configuration mode.
Example:
RP/0/RP0/CPU0:router# configure
Step 2
router bgp as-number
Enters BGP configuration mode, allowing you to configure
the BGP routing process.
Example:
RP/0/RP0/CPU0:router(config)# router bgp 120
Step 3
address-family {ipv4 unicast | ipv4 multicast |
| ipv6 unicast}
Enters address family configuration mode for the specified
address family.
Example:
RP/0/RP0/CPU0:router(config-bgp)#
address-family ipv4 unicast
Cisco IOS XR Routing Configuration Guide
RC-71
Implementing BGP on Cisco IOS XR Software
How to Implement BGP on Cisco IOS XR Software
Step 4
Command or Action
Purpose
distance bgp external-distance
internal-distance local-distance
Sets the external, internal, and local administrative
distances to prefer one class of routes over another. The
higher the value, the lower the trust rating.
Example:
RP/0/RP0/CPU0:router(config-bgp-af)# distance
bgp 20 20 200
Step 5
Saves configuration changes.
end
or
commit
When you issue the end command, the system prompts
you to commit changes:
Example:
Uncommitted changes found, commit them before
exiting(yes/no/cancel)?
[cancel]:
•
RP/0/RP0/CPU0:router(config-bgp-af)# end
or
– Entering yes saves configuration changes to the
RP/0/RP0/CPU0:router(config-bgp-af)# commit
running configuration file, exits the configuration
session, and returns the router to EXEC mode.
– Entering no exits the configuration session and
returns the router to EXEC mode without
committing the configuration changes.
– Entering cancel leaves the router in the current
configuration session without exiting or
committing the configuration changes.
•
Use the commit command to save the configuration
changes to the running configuration file and remain
within the configuration session.
Configuring a BGP Neighbor Group and Neighbors
Perform this task to configure BGP neighbor groups and apply the neighbor group configuration to a
neighbor. A neighbor group is a template that holds address family-independent and address
family-dependent configurations associated with the neighbor.
After a neighbor group is configured, each neighbor can inherit the configuration through the use
command. If a neighbor is configured to use a neighbor group, the neighbor (by default) inherits the
entire configuration of the neighbor group, which includes the address family-independent and address
family-dependent configurations. The inherited configuration can be overridden if you directly
configure commands for the neighbor or configure session groups or address family groups through the
use command.
You can configure an address family-independent configuration under the neighbor group. An address
family-dependent configuration requires you to configure the address family under the neighbor group
to enter address family submode.
From neighbor group configuration mode, you can configure address family-independent parameters for
the neighbor group. Use the address-family command when in the neighbor group configuration mode.
After specifying the neighbor group name using the neighbor group command, you can assign options
to the neighbor group.
Cisco IOS XR Routing Configuration Guide
RC-72
Implementing BGP on Cisco IOS XR Software
How to Implement BGP on Cisco IOS XR Software
Note
All commands that can be configured under a specified neighbor group can be configured under a
neighbor.
SUMMARY STEPS
1.
configure
2.
router bgp as-number
3.
address-family {ipv4 unicast | ipv4 multicast | ipv4 tunnel | ipv4 mdt | ipv6 unicast | ipv6
multicast |vpnv4 unicast | vpnv6 unicast}
4.
exit
5.
neighbor-group name
6.
remote-as as-number
7.
address-family {ipv4 unicast | ipv4 multicast | ipv4 labeled-unicast | ipv4 tunnel | ipv4 mdt |
ipv6 unicast | ipv6 multicast | ipv6 labeled-unicast | vpnv4 unicast | vpnv6 unicast}
8.
route-policy route-policy-name {in | out}
9.
exit
10. exit
11. neighbor ip-address
12. use neighbor-group group-name
13. remote-as as-number
14. end
or
commit
DETAILED STEPS
Step 1
Command or Action
Purpose
configure
Enters global configuration mode.
Example:
RP/0/RP0/CPU0:router# configure
Step 2
router bgp aa-number
Enters BGP configuration mode, allowing you to configure
the BGP routing process.
Example:
RP/0/RP0/CPU0:router(config)# router bgp 120
Step 3
address-family {ipv4 unicast | ipv4 multicast |
ipv4 tunnel | ipv4 mdt | ipv6 unicast | ipv6
multicast | vpnv4 unicast | vpnv6 unicast}
Enters neighbor group address family configuration mode
for the specified address family.
Example:
RP/0/RP0/CPU0:router(config-bgp)#
address-family ipv4 unicast
Cisco IOS XR Routing Configuration Guide
RC-73
Implementing BGP on Cisco IOS XR Software
How to Implement BGP on Cisco IOS XR Software
Step 4
Command or Action
Purpose
exit
Exits the current configuration mode.
Example:
RP/0/RP0/CPU0:router(config-bgp-af)# exit
Step 5
neighbor-group name
Places the router in neighbor group configuration mode.
Example:
RP/0/RP0/CPU0:router(config-bgp)#
neighbor-group nbr-grp-A
Step 6
remote-as as-number
Creates a neighbor and assigns a remote autonomous
system number to it.
Example:
RP/0/RP0/CPU0:router(config-bgp-nbrgrp)#
remote-as 2002
Step 7
address-family {ipv4 unicast | ipv4 multicast |
ipv4 labeled-unicast | ipv4 tunnel | ipv4 mdt |
ipv6 unicast | ipv6 multicast | ipv6
labeled-unicast | vpnv4 unicast | vpnv6
unicast}
Enters neighbor group address family configuration mode
for the specified address family.
Example:
RP/0/RP0/CPU0:router(config-bgp-nbrgrp)#
address-family ipv4 unicast
Step 8
route-policy route-policy-name {in | out}
(Optional) Applies the specified policy to inbound IPv4
unicast routes.
Example:
RP/0/RP0/CPU0:router(config-bgp-nbrgrp-af)#
route-policy drop-as-1234 in
Step 9
Exits the current configuration mode.
exit
Example:
RP/0/RP0/CPU0:router(config-bgp-nbrgrp-af)#
exit
Step 10
Exits the current configuration mode.
exit
Example:
RP/0/RP0/CPU0:router(config-bgp-nbrgrp)# exit
Step 11
neighbor ip-address
Example:
Places the router in neighbor configuration mode for BGP
routing and configures the neighbor IP address as a BGP
peer.
RP/0/RP0/CPU0:router(config-bgp)# neighbor
172.168.40.24
Step 12
use neighbor-group group-name
Example:
RP/0/RP0/CPU0:router(config-bgp-nbr)# use
neighbor-group nbr-grp-A
Cisco IOS XR Routing Configuration Guide
RC-74
(Optional) Specifies that the BGP neighbor inherit
configuration from the specified neighbor group.
Implementing BGP on Cisco IOS XR Software
How to Implement BGP on Cisco IOS XR Software
Step 13
Command or Action
Purpose
remote-as as-number
Creates a neighbor and assigns a remote autonomous
system number to it.
Example:
RP/0/RP0/CPU0:router(config-bgp-nbr)# remote-as
2002
Step 14
Saves configuration changes.
end
or
commit
When you issue the end command, the system prompts
you to commit changes:
Example:
Uncommitted changes found, commit them before
exiting(yes/no/cancel)?
[cancel]:
•
RP/0/RP0/CPU0:router(config-bgp-nbr)# end
or
– Entering yes saves configuration changes to the
RP/0/RP0/CPU0:router(config-bgp-nbr)# commit
running configuration file, exits the configuration
session, and returns the router to EXEC mode.
– Entering no exits the configuration session and
returns the router to EXEC mode without
committing the configuration changes.
– Entering cancel leaves the router in the current
configuration session without exiting or
committing the configuration changes.
•
Use the commit command to save the configuration
changes to the running configuration file and remain
within the configuration session.
Configuring a Route Reflector for BGP
Perform this task to configure a route reflector for BGP.
All the neighbors configured with the route-reflector-client command are members of the client group,
and the remaining iBGP peers are members of the nonclient group for the local route reflector.
Together, a route reflector and its clients form a cluster. A cluster of clients usually has a single route
reflector. In such instances, the cluster is identified by the software as the router ID of the route reflector.
To increase redundancy and avoid a single point of failure in the network, a cluster can have more than
one route reflector. If it does, all route reflectors in the cluster must be configured with the same 4-byte
cluster ID so that a route reflector can recognize updates from route reflectors in the same cluster. The
bgp cluster-id command is used to configure the cluster ID when the cluster has more than one route
reflector.
SUMMARY STEPS
1.
configure
2.
router bgp as-number
3.
bgp cluster-id cluster-id
4.
neighbor ip-address
5.
remote-as as-number
Cisco IOS XR Routing Configuration Guide
RC-75
Implementing BGP on Cisco IOS XR Software
How to Implement BGP on Cisco IOS XR Software
6.
address-family {ipv4 unicast | ipv4 multicast | ipv4 labeled-unicast | ipv4 tunnel | ipv4 mdt |
ipv6 unicast | ipv6 multicast | ipv6 labeled-unicast | vpnv4 unicast | vpnv6 unicast}
7.
route-reflector-client
8.
end
or
commit
DETAILED STEPS
Step 1
Command or Action
Purpose
configure
Enters global configuration mode.
Example:
RP/0/RP0/CPU0:router# configure
Step 2
router bgp as-number
Enters BGP configuration mode, allowing you to configure
the BGP routing process.
Example:
RP/0/RP0/CPU0:router(config)# router bgp 120
Step 3
bgp cluster-id cluster-id
Example:
Configures the local router as one of the route reflectors
serving the cluster. It is configured with a specified cluster
ID to identify the cluster.
RP/0/RP0/CPU0:router(config-bgp)# bgp
cluster-id 192.168.70.1
Step 4
neighbor ip-address
Example:
Places the router in neighbor configuration mode for BGP
routing and configures the neighbor IP address as a BGP
peer.
RP/0/RP0/CPU0:router(config-bgp)# neighbor
172.168.40.24
Step 5
remote-as as-number
Creates a neighbor and assigns a remote autonomous
system number to it.
Example:
RP/0/RP0/CPU0:router(config-bgp-nbr)# remote-as
2003
Step 6
address-family {ipv4 unicast | ipv4 multicast |
ipv4 labeled-unicast | ipv4 tunnel | ipv4 mdt |
ipv6 unicast | ipv6 multicast | ipv6
labeled-unicast | vpnv4 unicast | vpnv6
unicast}
Example:
RP/0/RP0/CPU0:router(config-bgp-nbr)#
address-family ipv4 unicast
Cisco IOS XR Routing Configuration Guide
RC-76
Enters neighbor address family configuration mode for the
specified address family.
Implementing BGP on Cisco IOS XR Software
How to Implement BGP on Cisco IOS XR Software
Step 7
Command or Action
Purpose
route-reflector-client
Configures the router as a BGP route reflector and
configures the neighbor as its client.
Example:
RP/0/RP0/CPU0:router(config-bgp-nbr-af)#
route-reflector-client
Step 8
Saves configuration changes.
end
or
commit
When you issue the end command, the system prompts
you to commit changes:
Example:
Uncommitted changes found, commit them before
exiting(yes/no/cancel)?
[cancel]:
•
RP/0/RP0/CPU0:router(config-bgp-nbr-af)# end
or
– Entering yes saves configuration changes to the
RP/0/RP0/CPU0:router(config-bgp-nbr-af)# commit
running configuration file, exits the configuration
session, and returns the router to EXEC mode.
– Entering no exits the configuration session and
returns the router to EXEC mode without
committing the configuration changes.
– Entering cancel leaves the router in the current
configuration session without exiting or
committing the configuration changes.
•
Use the commit command to save the configuration
changes to the running configuration file and remain
within the configuration session.
Configuring BGP Route Filtering by Route Policy
Perform this task to configure BGP routing filtering by route policy.
Prerequisites
See the Implementing Routing Policy on Cisco IOS XR Software module of Cisco IOS XR Routing
Configuration Guide for a list of the supported attributes and operations that are valid for inbound and
outbound neighbor policy filtering.
SUMMARY STEPS
1.
configure
2.
route-policy name
3.
end-policy
4.
router bgp as-number
5.
neighbor ip-address
6.
address-family {ipv4 unicast | ipv4 multicast | ipv4 labeled-unicast | ipv4 tunnel | ipv4 mdt |
ipv6 unicast | ipv6 multicast | ipv6 labeled-unicast | vpnv4 unicast | vpnv6 unicast}
7.
route-policy route-policy-name {in | out}
Cisco IOS XR Routing Configuration Guide
RC-77
Implementing BGP on Cisco IOS XR Software
How to Implement BGP on Cisco IOS XR Software
8.
end
or
commit
DETAILED STEPS
Step 1
Command or Action
Purpose
configure
Enters global configuration mode.
Example:
RP/0/RP0/CPU0:router# configure
Step 2
route-policy name
(Optional) Defines a route policy and enters route policy
configuration mode.
Example:
RP/0/RP0/CPU0:router(config)# route-policy
drop-as-1234
RP/0/RP0/CPU0:router(config-rpl)# if as-path
passes-through '1234' then
RP/0/RP0/CPU0:router(config-rpl)# apply
check-communities
RP/0/RP0/CPU0:router(config-rpl)# else
RP/0/RP0/CPU0:router(config-rpl)# pass
RP/0/RP0/CPU0:router(config-rpl)# endif
Step 3
end-policy
(Optional) Ends the definition of a route policy and exits
route policy configuration mode.
Example:
RP/0/RP0/CPU0:router(config-rpl)# end-policy
Step 4
router bgp as-number
Enters BGP configuration mode, allowing you to configure
the BGP routing process.
Example:
RP/0/RP0/CPU0:router(config)# router bgp 120
Step 5
neighbor ip-address
Example:
Places the router in neighbor configuration mode for BGP
routing and configures the neighbor IP address as a BGP
peer.
RP/0/RP0/CPU0:router(config-bgp)# neighbor
172.168.40.24
Step 6
address-family {ipv4 unicast | ipv4 multicast |
ipv4 labeled-unicast | ipv4 tunnel | ipv4 mdt |
ipv6 unicast | ipv6 multicast | ipv6
labeled-unicast | vpnv4 unicast | vpnv6
unicast}
Example:
RP/0/RP0/CPU0:router(config-bgp-nbr)#
address-family ipv4 unicast
Cisco IOS XR Routing Configuration Guide
RC-78
Enters neighbor address family configuration mode for the
specified address family.
Implementing BGP on Cisco IOS XR Software
How to Implement BGP on Cisco IOS XR Software
Step 7
Command or Action
Purpose
route-policy route-policy-name {in | out}
Applies the specified policy to inbound routes.
Example:
RP/0/RP0/CPU0:router(config-bgp-nbr-af)#
route-policy drop-as-1234 in
Step 8
Saves configuration changes.
end
or
commit
When you issue the end command, the system prompts
you to commit changes:
Example:
Uncommitted changes found, commit them before
exiting(yes/no/cancel)?
[cancel]:
•
RP/0/RP0/CPU0:router(config-bgp-nbr-af)# end
or
– Entering yes saves configuration changes to the
RP/0/RP0/CPU0:router(config-bgp-nbr-af)# commit
running configuration file, exits the configuration
session, and returns the router to EXEC mode.
– Entering no exits the configuration session and
returns the router to EXEC mode without
committing the configuration changes.
– Entering cancel leaves the router in the current
configuration session without exiting or
committing the configuration changes.
•
Use the commit command to save the configuration
changes to the running configuration file and remain
within the configuration session.
Configuring BGP Next Hop Trigger Delay
Perform this task to configure BGP next-hop trigger delay. The Routing Information Base (RIB)
classifies the dampening notifications based on the severity of the changes. Event notifications are
classified as critical and noncritical. This task allows you to specify the minimum batching interval for
the critical and noncritical events.
SUMMARY STEPS
1.
configure
2.
router bgp as-number
3.
address-family {ipv4 unicast | ipv4 multicast | ipv4 tunnel | ipv4 mdt | ipv6 unicast | ipv6
multicast |vpnv4 unicast | vpnv6 unicast}
4.
nexthop trigger-delay {critical delay | non-critical delay}
5.
end
or
commit
Cisco IOS XR Routing Configuration Guide
RC-79
Implementing BGP on Cisco IOS XR Software
How to Implement BGP on Cisco IOS XR Software
DETAILED STEPS
Step 1
Command or Action
Purpose
configure
Enters global configuration mode.
Example:
RP/0/RP0/CPU0:router# configure
Step 2
router bgp as-number
Enters BGP configuration mode, allowing you to configure
the BGP routing process.
Example:
RP/0/RP0/CPU0:router(config)# router bgp 120
Step 3
address-family {ipv4 unicast | ipv4 multicast |
ipv4 tunnel | ipv4 mdt | ipv6 unicast | ipv6
multicast | vpnv4 unicast | vpnv6 unicast}
Enters address family configuration mode for the specified
address family.
Example:
RP/0/RP0/CPU0:router(config-bgp)#
address-family ipv4 unicast
Step 4
nexthop trigger-delay {critical delay |
non-critical delay}
Sets the critical next-hop trigger delay.
Example:
RP/0/RP0/CPU0:router(config-bgp-af)# nexthop
trigger-delay critical 15000
Step 5
Saves configuration changes.
end
or
commit
When you issue the end command, the system prompts
you to commit changes:
Example:
Uncommitted changes found, commit them before
exiting(yes/no/cancel)?
[cancel]:
•
RP/0/RP0/CPU0:router(config-bgp-af)# end
or
– Entering yes saves configuration changes to the
RP/0/RP0/CPU0:router(config-bgp-af)# commit
running configuration file, exits the configuration
session, and returns the router to EXEC mode.
– Entering no exits the configuration session and
returns the router to EXEC mode without
committing the configuration changes.
– Entering cancel leaves the router in the current
configuration session without exiting or
committing the configuration changes.
•
Cisco IOS XR Routing Configuration Guide
RC-80
Use the commit command to save the configuration
changes to the running configuration file and remain
within the configuration session.
Implementing BGP on Cisco IOS XR Software
How to Implement BGP on Cisco IOS XR Software
Disabling Next-hop Processing on BGP Updates
Perform this task to disable next-hop calculation for a neighbor and insert your own address in the
next-hop field of BGP updates. Disabling the calculation of the best next hop to use when advertising a
route causes all routes to be advertised with the network device as the next hop.
Note
Next-hop processing can be disabled for address family group, neighbor group, or neighbor address
family.
SUMMARY STEPS
1.
configure
2.
router bgp as-number
3.
neighbor ip-address
4.
remote-as as-number
5.
address-family{ipv4 unicast | ipv4 multicast | ipv4 labeled-unicast | ipv4 tunnel | ipv4 mdt |
ipv6 unicast | ipv6 multicast | ipv6 labeled-unicast | vpnv4 unicast | vpnv6 unicast}
6.
next-hop-self
7.
end
or
commit
DETAILED STEPS
Step 1
Command or Action
Purpose
configure
Enters global configuration mode.
Example:
RP/0/RP0/CPU0:router# configure
Step 2
router bgp as-number
Enters BGP configuration mode, allowing you to configure
the BGP routing process.
Example:
RP/0/RP0/CPU0:router(config)# router bgp 120
Step 3
neighbor ip-address
Example:
Places the router in neighbor configuration mode for BGP
routing and configures the neighbor IP address as a BGP
peer.
RP/0/RP0/CPU0:router(config-bgp)# neighbor
172.168.40.24
Step 4
remote-as as-number
Creates a neighbor and assigns a remote autonomous
system number to it.
Example:
RP/0/RP0/CPU0:router(config-bgp-nbr)# remote-as
206
Cisco IOS XR Routing Configuration Guide
RC-81
Implementing BGP on Cisco IOS XR Software
How to Implement BGP on Cisco IOS XR Software
Step 5
Command or Action
Purpose
address-family {ipv4 unicast | ipv4 multicast |
ipv4 labeled-unicast | ipv4 tunnel | ipv4 mdt |
ipv6 unicast | ipv6 multicast | ipv6
labeled-unicast | vpnv4 unicast | vpnv6
unicast}
Enters neighbor address family configuration mode for the
specified address family.
Example:
RP/0/RP0/CPU0:router(config-bgp-nbr)#
address-family ipv4 unicast
Step 6
RP/0/RP0/CPU0:router(config-bgp-nbr-af)#
next-hop-self
Sets the next-hop attribute for all routes advertised to the
specified neighbor to the address of the local router.
Disabling the calculation of the best next hop to use when
advertising a route causes all routes to be advertised with
the local network device as the next hop.
end
Saves configuration changes.
next-hop-self
Example:
Step 7
or
commit
When you issue the end command, the system prompts
you to commit changes:
Example:
Uncommitted changes found, commit them before
exiting(yes/no/cancel)?
[cancel]:
•
RP/0/RP0/CPU0:router(config-bgp-nbr-af)# end
or
– Entering yes saves configuration changes to the
RP/0/RP0/CPU0:router(config-bgp-nbr-af)# commit
running configuration file, exits the configuration
session, and returns the router to EXEC mode.
– Entering no exits the configuration session and
returns the router to EXEC mode without
committing the configuration changes.
– Entering cancel leaves the router in the current
configuration session without exiting or
committing the configuration changes.
•
Use the commit command to save the configuration
changes to the running configuration file and remain
within the configuration session.
Configuring BGP Community and Extended-Community Advertisements
Perform this task to specify that community attributes should be sent to an eBGP neighbor.
Perform this task to specify that community/extended-community attributes should be sent to an eBGP
neighbor. These attributes are not sent to an eBGP neighbor by default. By contrast, they are always sent
to iBGP neighbors. This section provides examples on how to enable sending community attributes. The
send-community-ebgp keyword can be replaced by the send-extended-community-ebgp keyword to
enable sending extended-communities.
Note
If the send-community-ebgp command is configured for a neighbor group or address family group, all
neighbors using the group inherit the configuration. Configuring the command specifically for a
neighbor overrides inherited values.
Cisco IOS XR Routing Configuration Guide
RC-82
Implementing BGP on Cisco IOS XR Software
How to Implement BGP on Cisco IOS XR Software
Note
BGP community and extended-community filtering cannot be configured for iBGP neighbors.
Communities and extended-communities are always sent to iBGP neighbors
SUMMARY STEPS
1.
configure
2.
router bgp as-number
3.
neighbor ip-address
4.
remote-as as-number
5.
address-family {ipv4 unicast | ipv4 multicast | ipv4 labeled-unicast | ipv4 tunnel | ipv4 mdt |
ipv6 unicast | ipv6 multicast | ipv6 labeled-unicast | vpnv4 unicast | vpnv6 unicast}
6.
send-community-ebgp
7.
end
or
commit
DETAILED STEPS
Step 1
Command or Action
Purpose
configure
Enters global configuration mode.
Example:
RP/0/RP0/CPU0:router# configure
Step 2
router bgp as-number
Enters BGP configuration mode, allowing you to configure
the BGP routing process.
Example:
RP/0/RP0/CPU0:router(config)# router bgp 120
Step 3
neighbor ip-address
Example:
Places the router in neighbor configuration mode for BGP
routing and configures the neighbor IP address as a BGP
peer.
RP/0/RP0/CPU0:router(config-bgp)# neighbor
172.168.40.24
Step 4
remote-as as-number
Creates a neighbor and assigns a remote autonomous
system number to it.
Example:
RP/0/RP0/CPU0:router(config-bgp-nbr)# remote-as
2002
Cisco IOS XR Routing Configuration Guide
RC-83
Implementing BGP on Cisco IOS XR Software
How to Implement BGP on Cisco IOS XR Software
Step 5
Command or Action
Purpose
address-family {ipv4 unicast | ipv4 multicast |
ipv4 labeled-unicast | ipv4 tunnel | ipv4 mdt |
ipv6 unicast | ipv6 multicast | ipv6
labeled-unicast | vpnv4 unicast | vpnv6
unicast}
Enters neighbor address family configuration mode for the
specified address family.
Example:
RP/0/RP0/CPU0:router(config-bgp-nbr)#
address-family ipv4 unicast
Step 6
send-community-ebgp
Example:
Specifies that the router send community attributes (which
are disabled by default for eBGP neighbors) to a specified
eBGP neighbor.
RP/0/RP0/CPU0:router(config-bgp-nbr-af)#
send-community-ebgp
Step 7
Saves configuration changes.
end
or
commit
When you issue the end command, the system prompts
you to commit changes:
Example:
Uncommitted changes found, commit them before
exiting(yes/no/cancel)?
[cancel]:
•
RP/0/RP0/CPU0:router(config-bgp-nbr-af)# end
or
– Entering yes saves configuration changes to the
RP/0/RP0/CPU0:router(config-bgp-nbr-af)# commit
running configuration file, exits the configuration
session, and returns the router to EXEC mode.
– Entering no exits the configuration session and
returns the router to EXEC mode without
committing the configuration changes.
– Entering cancel leaves the router in the current
configuration session without exiting or
committing the configuration changes.
•
Use the commit command to save the configuration
changes to the running configuration file and remain
within the configuration session.
Configuring the BGP Cost Community
Perform this task to configure the BGP cost community.
BGP receives multiple paths to the same destination and it uses the best-path algorithm to decide which
is the best path to install in RIB. To enable users to determine an exit point after partial comparison, the
cost community is defined to tie-break equal paths during the best-path selection process.
SUMMARY STEPS
1.
configure
2.
route-policy name
3.
set extcommunity cost {cost-extcommunity-set-name | cost-inline-extcommunity-set} [additive]
4.
end-policy
Cisco IOS XR Routing Configuration Guide
RC-84
Implementing BGP on Cisco IOS XR Software
How to Implement BGP on Cisco IOS XR Software
5.
router bgp as-number
6.
default-information originate
or
address-family {ipv4 unicast | ipv4 multicast | ipv4 tunnel | ipv4 mdt | ipv6 unicast | ipv6
multicast | vpnv4 unicast | vpnv6 unicast}
aggregate-address address/mask-length [as-set] [as-confed-set] [summary-only] [route-policy
route-policy-name]
or
address-family {ipv4 unicast | ipv4 multicast | ipv4 tunnel | ipv4 mdt | ipv6 unicast | ipv6
multicast | vpnv4 unicast | vpnv6 unicast}
redistribute connected [metric metric-value] [route-policy route-policy-name]
or
address-family {ipv4 unicast | ipv4 multicast | ipv4 tunnel | ipv4 mdt | ipv6 unicast | ipv6
multicast | vpnv4 unicast | vpnv6 unicast}
redistribute eigrp process-id [match {external | internal}] [metric metric-value] [route-policy
route-policy-name]
or
address-family {ipv4 unicast | ipv4 multicast | ipv4 tunnel | ipv4 mdt | ipv6 unicast | ipv6
multicast | vpnv4 unicast | vpnv6 unicast}
redistribute isis process-id [level {1 | 1-inter-area | 2}] [metric metric-value] [route-policy
route-policy-name]
or
address-family {ipv4 unicast | ipv4 multicast | ipv4 tunnel | ipv4 mdt | ipv6 unicast | ipv6
multicast | vpnv4 unicast | vpnv6 unicast}
redistribute ospf process-id [match {external [1 | 2] | internal | nssa-external [1 | 2]}] [metric
metric-value] [route-policy route-policy-name]
or
address-family {ipv4 unicast | ipv4 multicast | ipv4 tunnel | ipv4 mdt | ipv6 unicast | ipv6
multicast | vpnv4 unicast | vpnv6 unicast}
redistribute ospfv3 process-id [match {external [1 | 2] | internal | nssa-external [1 | 2]}] [metric
metric-value] [route-policy route-policy-name]
or
address-family {ipv4 unicast | ipv4 multicast | ipv4 tunnel | ipv4 mdt | ipv6 unicast | ipv6
multicast | vpnv4 unicast | vpnv6 unicast}
redistribute rip [metric metric-value] [route-policy route-policy-name]
or
Cisco IOS XR Routing Configuration Guide
RC-85
Implementing BGP on Cisco IOS XR Software
How to Implement BGP on Cisco IOS XR Software
address-family {ipv4 unicast | ipv4 multicast | ipv4 tunnel | ipv4 mdt | ipv6 unicast | ipv6
multicast | vpnv4 unicast | vpnv6 unicast}
redistribute static [metric metric-value] [route-policy route-policy-name]
or
address-family {ipv4 unicast | ipv4 multicast | ipv4 tunnel | ipv4 mdt | ipv6 unicast | ipv6
multicast | vpnv4 unicast | vpnv6 unicast}
network {ip-address/prefix-length | ip-address mask} [route-policy route-policy-name]
or
neighbor ip-address
remote-as as-number
address-family {ipv4 unicast | ipv4 multicast | ipv4 labeled-unicast | ipv4 tunnel | ipv4 mdt |
ipv6 unicast | ipv6 multicast | ipv6 labeled-unicast | vpnv4 unicast | vpnv6 unicast}
route-policy route-policy-name {in | out}
7.
end
or
commit
8.
show bgp [vrf vrf-name] ip-address
DETAILED STEPS
Step 1
Command or Action
Purpose
configure
Enters global configuration mode.
Example:
RP/0/RP0/CPU0:router# configure
Step 2
route-policy name
Enters route policy configuration mode and specifies the
name of the route policy to be configured.
Example:
RP/0/RP0/CPU0:router(config)# route-policy
costA
Step 3
set extcommunity cost
{cost-extcommunity-set-name |
cost-inline-extcommunity-set} [additive]
Specifies the BGP extended community attribute for cost.
Example:
RP/0/RP0/CPU0:router(config)# set extcommunity
cost cost_A
Step 4
end-policy
Example:
RP/0/RP0/CPU0:router(config)# end-policy
Cisco IOS XR Routing Configuration Guide
RC-86
Ends the definition of a route policy and exits route policy
configuration mode.
Implementing BGP on Cisco IOS XR Software
How to Implement BGP on Cisco IOS XR Software
Step 5
Command or Action
Purpose
router bgp as-number
Enters BGP configuration mode allowing you to configure
the BGP routing process.
Example:
RP/0/RP0/CPU0:router(config)# router bgp 120
Step 6
default-information originate
or
Applies the cost community to the attach point (route
policy).
aggregate-address address/mask-length [as-set]
[as-confed-set] [summary-only] [route-policy
route-policy-name]
or
address-family {ipv4 unicast | ipv4 multicast |
ipv4 tunnel | ipv4 mdt | ipv6 unicast | ipv6
multicast | vpnv4 unicast | vpnv6 unicast}
redistribute connected [metric metric-value]
[route-policy route-policy-name]
or
address-family {ipv4 unicast | ipv4 multicast |
ipv4 tunnel | ipv4 mdt | ipv6 unicast | ipv6
multicast | vpnv4 unicast | vpnv6 unicast}
redistribute eigrp process-id [match {external
| internal}] [metric metric-value]
[route-policy route-policy-name]
or
address-family {ipv4 unicast | ipv4 multicast |
ipv4 tunnel | ipv4 mdt | ipv6 unicast | ipv6
multicast | vpnv4 unicast | vpnv6 unicast}
redistribute isis process-id [level {1 |
1-inter-area | 2}] [metric metric-value]
[route-policy route-policy-name]
or
address-family {ipv4 unicast | ipv4 multicast |
ipv4 tunnel | ipv4 mdt | ipv6 unicast | ipv6
multicast | vpnv4 unicast | vpnv6 unicast}
redistribute ospf process-id [match {external
[1 | 2] | internal | nssa-external [1 | 2]}]
[metric metric-value] [route-policy
route-policy-name]
or
Cisco IOS XR Routing Configuration Guide
RC-87
Implementing BGP on Cisco IOS XR Software
How to Implement BGP on Cisco IOS XR Software
Command or Action
address-family {ipv4 unicast | ipv4 multicast |
ipv4 tunnel | ipv4 mdt | ipv6 unicast | ipv6
multicast | vpnv4 unicast | vpnv6 unicast}
redistribute ospfv3 process-id [match {external
[1 | 2] | internal | nssa-external [1 | 2]}]
[metric metric-value] [route-policy
route-policy-name]
or
address-family {ipv4 unicast | ipv4 multicast |
ipv4 tunnel | ipv4 mdt | ipv6 unicast | ipv6
multicast | vpnv4 unicast | vpnv6 unicast}
redistribute rip [metric metric-value]
[route-policy route-policy-name]
or
address-family {ipv4 unicast | ipv4 multicast |
ipv4 tunnel | ipv4 mdt | ipv6 unicast | ipv6
multicast | vpnv4 unicast | vpnv6 unicast}
redistribute static [metric metric-value]
[route-policy route-policy-name]
or
address-family {ipv4 unicast | ipv4 multicast |
ipv4 tunnel | ipv4 mdt | ipv6 unicast | ipv6
multicast | vpnv4 unicast | vpnv6 unicast}
network {ip-address/prefix-length | ip-address
mask} [route-policy route-policy-name]
or
neighbor ip-address
remote-as as-number
address-family {ipv4 unicast | ipv4 multicast |
ipv4 labeled-unicast | ipv4 tunnel | ipv4 mdt |
ipv6 unicast | ipv6 multicast | ipv6
labeled-unicast | vpnv4 unicast | vpnv6
unicast}
route-policy route-policy-name {in | out}
or
Example:
RP/0/RP0/CPU0:router(config-bgp)#
default-information originate
Cisco IOS XR Routing Configuration Guide
RC-88
Purpose
Implementing BGP on Cisco IOS XR Software
How to Implement BGP on Cisco IOS XR Software
Step 7
Command or Action
Purpose
end
Saves configuration changes.
or
commit
When you issue the end command, the system prompts
you to commit changes:
Example:
Uncommitted changes found, commit them before
exiting(yes/no/cancel)?
[cancel]:
•
RP/0/RP0/CPU0:router(config-bgp-af)# end
or
– Entering yes saves configuration changes to the
RP/0/RP0/CPU0:router(config-bgp-af)# commit
running configuration file, exits the configuration
session, and returns the router to EXEC mode.
– Entering no exits the configuration session and
returns the router to EXEC mode without
committing the configuration changes.
– Entering cancel leaves the router in the current
configuration session without exiting or
committing the configuration changes.
•
Step 8
show bgp [vrf vrf-name] ip-address
Use the commit command to save the configuration
changes to the running configuration file and remain
within the configuration session.
Displays the cost community in the following format:
Cost:<POI>:<cost community ID>:<cost number>
Example:
RP/0/RP0/CPU0:router# show bgp 172.168.40.24
Configuring Software to Store Updates from a Neighbor
Perform this task to configure the software to store updates received from a neighbor.
The soft-reconfiguration inbound command causes a route refresh request to be sent to the neighbor if
the neighbor is route refresh capable. If the neighbor is not route refresh capable, the neighbor must be
reset to relearn received routes using the clear bgp soft command. See the “Resetting Neighbors Using
BGP Dynamic Inbound Soft Reset” section on page RC-118.
Note
Storing updates from a neighbor works only if either the neighbor is route refresh capable or the
soft-reconfiguration inbound command is configured. Even if the neighbor is route refresh capable and
the soft-reconfiguration inbound command is configured, the original routes are not stored unless the
always option is used with the command. The original routes can be easily retrieved with a route refresh
request. Route refresh sends a request to the peer to resend its routing information. The
soft-reconfiguration inbound command stores all paths received from the peer in an unmodified form
and refers to these stored paths during the clear. Soft reconfiguration is memory intensive.
SUMMARY STEPS
1.
configure
2.
router bgp as-number
3.
neighbor ip-address
Cisco IOS XR Routing Configuration Guide
RC-89
Implementing BGP on Cisco IOS XR Software
How to Implement BGP on Cisco IOS XR Software
4.
address-family {ipv4 unicast | ipv4 multicast | ipv4 labeled-unicast | ipv4 tunnel | ipv4 mdt |
ipv6 unicast | ipv6 multicast | ipv6 labeled-unicast | vpnv4 unicast | vpnv6 unicast}
5.
soft-reconfiguration inbound [always]
6.
end
or
commit
DETAILED STEPS
Step 1
Command or Action
Purpose
configure
Enters global configuration mode.
Example:
RP/0/RP0/CPU0:router# configure
Step 2
router bgp as-number
Enters BGP configuration mode, allowing you to configure
the BGP routing process.
Example:
RP/0/RP0/CPU0:router(config)# router bgp 120
Step 3
neighbor ip-address
Example:
Places the router in neighbor configuration mode for BGP
routing and configures the neighbor IP address as a BGP
peer.
RP/0/RP0/CPU0:router(config-bgp)# neighbor
172.168.40.24
Step 4
address-family {ipv4 unicast | ipv4 multicast |
ipv4 labeled-unicast | ipv4 tunnel | ipv4 mdt |
ipv6 unicast | ipv6 multicast | ipv6
labeled-unicast vpnv4 unicast | vpnv6 unicast}
Example:
RP/0/RP0/CPU0:router(config-bgp-nbr)#
address-family ipv4 unicast
Cisco IOS XR Routing Configuration Guide
RC-90
Enters neighbor address family configuration mode for the
specified address family.
Implementing BGP on Cisco IOS XR Software
How to Implement BGP on Cisco IOS XR Software
Step 5
Command or Action
Purpose
soft-reconfiguration inbound [always]
Configures the software to store updates received from a
specified neighbor. Soft reconfiguration inbound causes the
software to store the original unmodified route in addition
to a route that is modified or filtered. This allows a “soft
clear” to be performed after the inbound policy is changed.
Example:
RP/0/RP0/CPU0:router(config-bgp-nbr-af)#
soft-reconfiguration inbound always
Soft reconfiguration enables the software to store the
incoming updates before apply policy if route refresh is not
supported by the peer (otherwise a copy of the update is not
stored). The always keyword forces the software to store a
copy even when route refresh is supported by the peer.
Step 6
Saves configuration changes.
end
or
commit
When you issue the end command, the system prompts
you to commit changes:
Example:
Uncommitted changes found, commit them before
exiting(yes/no/cancel)?
[cancel]:
•
RP/0/RP0/CPU0:router(config-bgp-nbr-af)# end
or
– Entering yes saves configuration changes to the
RP/0/RP0/CPU0:router(config-bgp-nbr-af)# commit
running configuration file, exits the configuration
session, and returns the router to EXEC mode.
– Entering no exits the configuration session and
returns the router to EXEC mode without
committing the configuration changes.
– Entering cancel leaves the router in the current
configuration session without exiting or
committing the configuration changes.
•
Use the commit command to save the configuration
changes to the running configuration file and remain
within the configuration session.
Configuring Distributed BGP
Perform this task to configure distributed BGP. Configuring distributed BGP includes starting the speaker
process and allocating the speaker process to a neighbor.
Restrictions
If BGP is running in standalone mode, the clear bgp current-mode or clear bgp vrf all * command
must be used to switch from standalone mode to distributed mode.
SUMMARY STEPS
1.
configure
2.
router bgp as-number
3.
distributed speaker id
4.
commit
Cisco IOS XR Routing Configuration Guide
RC-91
Implementing BGP on Cisco IOS XR Software
How to Implement BGP on Cisco IOS XR Software
5.
address-family {ipv4 unicast | ipv4 multicast | ipv4 tunnel | ipv4 mdt | ipv6 unicast | ipv6
multicast | vpnv4 unicast | vpnv6 unicast}
6.
exit
7.
neighbor ip-address
8.
remote-as as-number
9.
speaker-id id
10. address-family {ipv4 unicast | ipv4 multicast | ipv4 labeled-unicast | ipv4 tunnel | ipv4 mdt |
ipv6 unicast | ipv6 multicast | ipv6 labeled-unicast | vpnv4 unicast | vpnv6 unicast}
11. end
12. clear bgp current-mode
DETAILED STEPS
Step 1
Command or Action
Purpose
configure
Enters global configuration mode.
Example:
RP/0/RP0/CPU0:router# configure
Step 2
router bgp as-number
Enters BGP configuration mode, allowing you to configure
the BGP routing process.
Example:
RP/0/RP0/CPU0:router(config)# router bgp 120
Step 3
distributed speaker id
Specifies the speaker process to start.
Example:
RP/0/RP0/CPU0:router(config-bgp)# distributed
speaker 2
Step 4
commit
Example:
Saves the configuration changes to the running
configuration file and remains within the configuration
session.
RP/0/RP0/CPU0:router(config-bgp)# commit
Step 5
address-family {ipv4 unicast | ipv4 multicast |
ipv4 tunnel | ipv4 mdt | ipv6 unicast | ipv6
multicast | vpnv4 unicast | vpnv6 unicast}
Enters neighbor address family configuration mode for the
specified address family.
Example:
RP/0/RP0/CPU0:router(config-bgp)#
address-family ipv4 unicast
Step 6
Exits address family mode.
exit
Example:
RP/0/RP0/CPU0:router(config-bgp-af)# exit
Cisco IOS XR Routing Configuration Guide
RC-92
Implementing BGP on Cisco IOS XR Software
How to Implement BGP on Cisco IOS XR Software
Step 7
Command or Action
Purpose
neighbor ip-address
Places the router in neighbor configuration mode for BGP
routing and configures the neighbor IP address as a BGP
peer.
Example:
RP/0/RP0/CPU0:router(config-bgp)# neighbor
172.168.40.24
Step 8
remote-as as-number
Creates a neighbor and assigns a remote autonomous
system number to it.
Example:
RP/0/RP0/CPU0:router(config-bgp-nbr)# remote-as
2002
Step 9
speaker-id id
Allocates a neighbor to a specified speaker process.
Example:
RP/0/RP0/CPU0:router(config-bgp-nbr)#
speaker-id 2
Step 10
address-family {ipv4 unicast | ipv4 multicast |
ipv4 labeled-unicast | ipv4 tunnel | ipv4 mdt |
ipv6 unicast | ipv6 multicast | ipv6
labeled-unicast | vpnv4 unicast | vpnv6
unicast}
Enters neighbor address family configuration mode for the
specified address family.
Example:
RP/0/RP0/CPU0:router(config-bgp-nbr)#
address-family ipv4 unicast
Step 11
end
Saves configuration changes.
•
Example:
RP/0/RP0/CPU0:router(config-bgp-nbr-af)# end
When you issue the end command, the system prompts
you to commit changes:
Uncommitted changes found, commit them before
exiting(yes/no/cancel)?
[cancel]:
– Entering yes saves configuration changes to the
running configuration file, exits the configuration
session, and returns the router to EXEC mode.
– Entering no exits the configuration session and
returns the router to EXEC mode without
committing the configuration changes.
– Entering cancel leaves the router in the current
configuration session without exiting or
committing the configuration changes.
Step 12
clear bgp current-mode
Switches from standalone mode to distributed mode.
Example:
RP/0/RP0/CPU0:router# clear bgp current-mode
Cisco IOS XR Routing Configuration Guide
RC-93
Implementing BGP on Cisco IOS XR Software
How to Implement BGP on Cisco IOS XR Software
Configuring a VPN Routing and Forwarding Instance in BGP
The following tasks are used to configure a VPN routing and forwarding (VRF) instance in BGP:
•
Defining the Virtual Routing and Forwarding Tables in Provider Edge Routers, page RC-94
(required)
•
Configuring the Route Distinguisher, page RC-96 (required)
•
Configuring PE-PE or PE-RR Interior BGP sessions, page RC-98 (optional)
•
Configuring Route Reflector to Hold Routes that have a Defined Set of RT Communities,
page RC-101 (optional)
•
Configuring BGP as a PE-CE Protocol, page RC-103 (optional)
•
BGP Load Balancing, page RC-107 (optional)
•
Redistribution of IGPs to BGP, page RC-109 (optional)
Defining the Virtual Routing and Forwarding Tables in Provider Edge Routers
Perform this task to define the VPN routing and forwarding (VRF) tables in the provider edge (PE)
routers.
SUMMARY STEPS
1.
configure
2.
vrf vrf-name
3.
address-family {ipv4 | ipv6} unicast
4.
maximum prefix maximum [threshold]
5.
import route-policy policy-name
6.
import route-target [as-number:nn | ip-address:nn]
7.
export route-policy policy-name
8.
export route-target [as-number:nn | ip-address:nn]
9.
end
or
commit
DETAILED STEPS
Step 1
Command or Action
Purpose
configure
Enters global configuration mode.
Example:
RP/0/RP0/CPU0:router# configure
Step 2
vrf vrf-name
Example:
RP/0/RP0/CPU0:router(config)# vrf vrf_pe
Cisco IOS XR Routing Configuration Guide
RC-94
Configures a VRF instance.
Implementing BGP on Cisco IOS XR Software
How to Implement BGP on Cisco IOS XR Software
Step 3
Command or Action
Purpose
address-family {ipv4 | ipv6} unicast
Enters address family configuration mode for the specified
address family.
Example:
RP/0/RP0/CPU0:router(config-vrf)#
address-family ipv4 unicast
Step 4
maximum prefix maximum [threshold]
Configures a limit to the number of prefixes allowed in a
VRF table.
Example:
A maximum number of routes is applicable only to dynamic
routing protocols and not to static or connected routes.
RP/0/RP0/CPU0:router(config-vrf-af)# maximum
prefix 2300
Step 5
import route-policy policy-name
Example:
You can specify a threshold percentage of the prefix limit
using the mid-threshold argument.
Provides finer control over what gets imported into a VRF.
This import filter discards prefixes that do not match the
specified policy-name argument.
RP/0/RP0/CPU0:router(config-vrf-af)# import
route-policy policy_a
Step 6
import route-target [as-number:nn |
ip-address:nn]
Example:
Specifies a list of route target (RT) extended communities.
Only prefixes that are associated with the specified import
route target extended communities are imported into the
VRF.
RP/0/RP0/CPU0:router(config-vrf-af)# import
route-target 234:222
Step 7
export route-policy policy-name
Example:
Provides finer control over what gets exported into a VRF.
This export filter discards prefixes that do not match the
specified policy-name argument.
RP/0/RP0/CPU0:router(config-vrf-af)# export
route-policy policy_b
Cisco IOS XR Routing Configuration Guide
RC-95
Implementing BGP on Cisco IOS XR Software
How to Implement BGP on Cisco IOS XR Software
Step 8
Command or Action
Purpose
export route-target [as-number:nn |
ip-address:nn]
Specifies a list of route target extended communities.
Export route target communities are associated with
prefixes when they are advertised to remote PEs. The
remote PEs import them into VRFs which have import RTs
that match these exported route target communities.
Example:
RP/0/RP0/CPU0:router(config-vrf-af)# export
route-target 123;234
Step 9
Saves configuration changes.
end
or
commit
When you issue the end command, the system prompts
you to commit changes:
Example:
Uncommitted changes found, commit them before
exiting(yes/no/cancel)?
[cancel]:
•
RP/0/RP0/CPU0:router(config-vrf-af)# end
or
– Entering yes saves configuration changes to the
RP/0/RP0/CPU0:router(config-vrf-af)# commit
running configuration file, exits the configuration
session, and returns the router to EXEC mode.
– Entering no exits the configuration session and
returns the router to EXEC mode without
committing the configuration changes.
– Entering cancel leaves the router in the current
configuration session without exiting or
committing the configuration changes.
•
Use the commit command to save the configuration
changes to the running configuration file and remain
within the configuration session.
Configuring the Route Distinguisher
The route distinguisher (RD) makes prefixes unique across multiple VPN routing and forwarding (VRF)
instances.
Perform this task to configure the RD.
SUMMARY STEPS
1.
configure
2.
router bgp as-number
3.
bgp router-id ip-address
4.
vrf vrf-name
5.
rd {as-number:nn | ip-address:nn | auto}
6.
end
or
commit
Cisco IOS XR Routing Configuration Guide
RC-96
Implementing BGP on Cisco IOS XR Software
How to Implement BGP on Cisco IOS XR Software
DETAILED STEPS
Step 1
Command or Action
Purpose
configure
Enters global configuration mode.
Example:
RP/0/RP0/CPU0:router# configure
Step 2
router bgp as-number
Enters BGP configuration mode allowing you to configure
the BGP routing process.
Example:
RP/0/RP0/CPU0:router(config)# router bgp 120
Step 3
bgp router-id ip-address
Configures a fixed router ID for the BGP-speaking router.
Example:
RP/0/RP0/CPU0:router(config-bgp)# bgp router-id
10.0.0.0
Step 4
vrf vrf-name
Configures a VRF instance.
Example:
RP/0/RP0/CPU0:router(config-bgp)# vrf vrf_pe
Step 5
rd {as-number:nn | ip-address:nn | auto}
Configures the route distinguisher.
Example:
Use the auto keyword if you want the router to
automatically assign a unique RD to the VRF.
RP/0/RP0/CPU0:router(config-bgp-vrf)# rd
345:567
Automatic assignment of RDs is possible only if a router ID
is configured using the bgp router-id command in router
configuration mode. This allows you to configure a globally
unique router ID that can be used for automatic RD
generation. The router ID for the VRF does not need to be
globally unique, and using the VRF router ID would be
incorrect for automatic RD generation. Having a single
router ID also helps in checkpointing RD information for
BGP graceful restart, because it is expected to be stable
across reboots.
Cisco IOS XR Routing Configuration Guide
RC-97
Implementing BGP on Cisco IOS XR Software
How to Implement BGP on Cisco IOS XR Software
Step 6
Command or Action
Purpose
end
Saves configuration changes.
or
commit
When you issue the end command, the system prompts
you to commit changes:
Example:
Uncommitted changes found, commit them before
exiting(yes/no/cancel)?
[cancel]:
•
RP/0/RP0/CPU0:router(config-bgp-vrf)# end
or
– Entering yes saves configuration changes to the
RP/0/RP0/CPU0:router(config-bgp-vrf)# commit
running configuration file, exits the configuration
session, and returns the router to EXEC mode.
– Entering no exits the configuration session and
returns the router to EXEC mode without
committing the configuration changes.
– Entering cancel leaves the router in the current
configuration session without exiting or
committing the configuration changes.
•
Use the commit command to save the configuration
changes to the running configuration file and remain
within the configuration session.
Configuring PE-PE or PE-RR Interior BGP sessions
To enable BGP to carry VPN reachability information between provider edge (PE) routers you must
configure the PE-PE interior BGP (IBGP) sessions. A PE uses VPN information carried from the remote
PE router to determine VPN connectivity and the label value to be used so the remote (egress) router can
demultiplex the packet to the correct VPN during packet forwarding.
The PE-PE, PE-route reflector (RR) IBGP sessions are defined to all PE and RR routers that participate
in the VPNs configured in the PE router.
Perform this task to configure PE-PE IBGP sessions and to configure global VPN options on a PE.
SUMMARY STEPS
1.
configure
2.
router bgp as-number
3.
address-family {vpnv4 unicast | vpnv6 unicast}
4.
bgp dampening [half-life [reuse suppress max-suppress-time] | route-policy route-policy-name]
5.
bgp client-to-client reflection disable
6.
exit
7.
neighbor ip-address
8.
remote-as as-number
9.
description text
10. password {clear | encrypted} password
11. shutdown
12. timers keepalive hold-time
Cisco IOS XR Routing Configuration Guide
RC-98
Implementing BGP on Cisco IOS XR Software
How to Implement BGP on Cisco IOS XR Software
13. update-source interface-type interface-number
14. address-family {vpnv4 unicast | vpnv6 unicast}
15. route-policy route-policy-name in
16. route-policy route-policy-name out
17. end
or
commit
DETAILED STEPS
Step 1
Command or Action
Purpose
configure
Enters global configuration mode.
Example:
RP/0/RP0/CPU0:router# configure
Step 2
router bgp as-number
Enters BGP configuration mode, allowing you to configure
the BGP routing process.
Example:
RP/0/RP0/CPU0:router(config)# router bgp 120
Step 3
address-family {vpnv4 unicast | vpnv6 unicast}
Enters VPN address family configuration mode.
Example:
RP/0/RP0/CPU0:router(config-bgp)#
address-family vpvn4 unicast
Step 4
bgp dampening [half-life [reuse suppress
max-suppress-time] | route-policy
route-policy-name]
Enables BGP route dampening.
Example:
RP/0/RP0/CPU0:router(config-bgp-af)# bgp
dampening 15 1200 110 96
Step 5
bgp client-to-client reflection disable
Disables reflection of routes between route reflection
clients using a BGP route reflector.
Example:
RP/0/RP0/CPU0:router(config-bgp-af)# bgp
client-to-client reflection disable
Step 6
exit
Exits the current configuration mode.
Example:
RP/0/RP0/CPU0:router(config-bgp-af)# exit
Step 7
neighbor ip-address
Configures a PE IBGP neighbor.
Example:
RP/0/RP0/CPU0:router(config-bgp)# neighbor
172.16.1.1
Cisco IOS XR Routing Configuration Guide
RC-99
Implementing BGP on Cisco IOS XR Software
How to Implement BGP on Cisco IOS XR Software
Step 8
Command or Action
Purpose
remote-as as-number
Assigns the neighbor a remote autonomous system number.
Example:
RP/0/RP0/CPU0:router(config-bgp-nbr)# remote-as
1
Step 9
description text
Example:
(Optional) Provides a description of the neighbor. The
description is used to save comments and does not affect
software function.
RP/0/RP0/CPU0:router(config-bgp-nbr)#
description neighbor 172.16.1.1
Step 10
password {clear | encrypted} password
Enables Message Digest 5 (MD5) authentication on the
TCP connection between the two BGP neighbors.
Example:
RP/0/RP0/CPU0:router(config-bgp-nbr)# password
encrypted 123abc
Step 11
shutdown
Terminates any active sessions for the specified neighbor
and removes all associated routing information.
Example:
RP/0/RP0/CPU0:router(config-bgp-nbr)# shutdown
Step 12
timers keepalive hold-time
Set the timers for the BGP neighbor.
Example:
RP/0/RP0/CPU0:router(config-bgp-nbr)# timers
12000 200
Step 13
update-source interface-type interface-number
Example:
Allows IBGP sessions to use the primary IP address from a
specific interface as the local address when forming an
IBGP session with a neighbor.
RP/0/RP0/CPU0:router(config-bgp-nbr)#
update-source gigabitEthernet 0/1/5/0
Step 14
address-family {vpnv4 unicast | vpnv6 unicast}
Enters VPN neighbor address family configuration mode.
Example:
RP/0/RP0/CPU0:router(config-bgp-nbr)#
address-family vpvn4 unicast
Step 15
route-policy route-policy-name in
Example:
RP/0/RP0/CPU0:router(config-bgp-nbr-af)#
route-policy pe-pe-vpn-in in
Cisco IOS XR Routing Configuration Guide
RC-100
Specifies a routing policy for an inbound route. The policy
can be used to filter routes or modify route attributes.
Implementing BGP on Cisco IOS XR Software
How to Implement BGP on Cisco IOS XR Software
Step 16
Command or Action
Purpose
route-policy route-policy-name out
Specifies a routing policy for an outbound route. The policy
can be used to filter routes or modify route attributes.
Example:
RP/0/RP0/CPU0:router(config-bgp-nbr-af)#
route-policy pe-pe-vpn-out out
Step 17
Saves configuration changes.
end
or
commit
When you issue the end command, the system prompts
you to commit changes:
Example:
Uncommitted changes found, commit them before
exiting(yes/no/cancel)?
[cancel]:
•
RP/0/RP0/CPU0:router(config-bgp-nbr-af)# end
or
– Entering yes saves configuration changes to the
RP/0/RP0/CPU0:router(config-bgp-nbr-af)# commit
running configuration file, exits the configuration
session, and returns the router to EXEC mode.
– Entering no exits the configuration session and
returns the router to EXEC mode without
committing the configuration changes.
– Entering cancel leaves the router in the current
configuration session without exiting or
committing the configuration changes.
•
Use the commit command to save the configuration
changes to the running configuration file and remain
within the configuration session.
Configuring Route Reflector to Hold Routes that have a Defined Set of RT Communities
A provider edge (PE) needs to hold the routes that match the import route targets (RTs) of the VPNs
configured on it. The PE router can discard all other VPNv4 (Cisco XR 12000 Series Router and
Cisco CRS-1) and VPNv6 (Cisco XR 12000 Series Router only) routes. But, a route reflector (RR) must
retain all VPNv4 and VPNv6 routes, because it might peer with PE routers and different PEs might
require different RT-tagged VPNv4 and VPNv6 routes (making RRs non-scalable). You can configure
an RR to only hold routes that have a defined set of RT communities. Also, a number of the RRs can be
configured to service a different set of VPNs (thereby achieving some scalability). A PE is then made to
peer with all RRs that service the VRFs configured on the PE. When a new VRF is configured with an
RT for which the PE does not already hold routes, the PE issues route refreshes to the RRs and retrieves
the relevant VPN routes.
Note
Note that this process can be more efficient if the PE-RR session supports extended community outbound
route filter (ORF).
Perform this task to configure a reflector to retain routes tagged with specific RTs.
SUMMARY STEPS
1.
configure
2.
router bgp as-number
Cisco IOS XR Routing Configuration Guide
RC-101
Implementing BGP on Cisco IOS XR Software
How to Implement BGP on Cisco IOS XR Software
3.
address-family {vpnv4 unicast | vpnv6 unicast}
4.
retain route-target {all | route-policy route-policy-name}
5.
end
or
commit
DETAILED STEPS
Step 1
Command or Action
Purpose
configure
Enters global configuration mode.
Example:
RP/0/RP0/CPU0:router# configure
Step 2
router bgp as-number
Enters BGP configuration mode, allowing you to configure
the BGP routing process.
Example:
RP/0/RP0/CPU0:router(config)# router bgp 120
Step 3
address-family {vpnv4 unicast | vpnv6 unicast}
Enters VPN address family configuration mode.
Example:
RP/0/RP0/CPU0:router(config-bgp)#
address-family vpvn4 unicast
Step 4
retain route-target {all | route-policy
route-policy-name}
Example:
RP/0/RP0/CPU0:router(config-bgp-af)# retain
route-target route-policy rr_ext-comm
Cisco IOS XR Routing Configuration Guide
RC-102
Configures a reflector to retain routes tagged with particular
RTs. Use the route-policy-name argument for the policy
name that lists the extended communities that a path should
have in order for the RR to retain that path.
Note
The all keyword is not required, because this is the
default behavior of a route reflector.
Implementing BGP on Cisco IOS XR Software
How to Implement BGP on Cisco IOS XR Software
Step 5
Command or Action
Purpose
end
Saves configuration changes.
or
commit
When you issue the end command, the system prompts
you to commit changes:
Example:
Uncommitted changes found, commit them before
exiting(yes/no/cancel)?
[cancel]:
•
RP/0/RP0/CPU0:router(config-bgp-nbr-af)# end
or
– Entering yes saves configuration changes to the
RP/0/RP0/CPU0:router(config-bgp-nbr-af)# commit
running configuration file, exits the configuration
session, and returns the router to EXEC mode.
– Entering no exits the configuration session and
returns the router to EXEC mode without
committing the configuration changes.
– Entering cancel leaves the router in the current
configuration session without exiting or
committing the configuration changes.
•
Use the commit command to save the configuration
changes to the running configuration file and remain
within the configuration session.
Configuring BGP as a PE-CE Protocol
Perform this task to configure BGP on the PE and establish PE-CE communication using BGP.
SUMMARY STEPS
1.
configure
2.
router bgp as-number
3.
vrf vrf-name
4.
bgp router-id ip-address
5.
label-allocation-mode per-ce
6.
address-family {ipv4 | ipv6} unicast
7.
network {ip-address/prefix-length | ip-address mask}
8.
aggregate-address address/mask-length
9.
exit
10. neighbor ip-address
11. remote-as as-number
12. password {clear | encrypted} password
13. ebgp-multihop [ttl-value]
14. address-family {ipv4 {unicast | labeled-unicast} | ipv6 unicast}
15. site-of-origin [as-number:nn | ip-address:nn]
16. as-override
17. allowas-in [as-occurrence-number]
Cisco IOS XR Routing Configuration Guide
RC-103
Implementing BGP on Cisco IOS XR Software
How to Implement BGP on Cisco IOS XR Software
18. route-policy route-policy-name in
19. route-policy route-policy-name out
20. end
or
commit
DETAILED STEPS
Step 1
Command or Action
Purpose
configure
Enters global configuration mode.
Example:
RP/0/RP0/CPU0:router# configure
Step 2
router bgp as-number
Enters BGP configuration mode, allowing you to configure
the BGP routing process.
Example:
RP/0/RP0/CPU0:router(config)# router bgp 120
Step 3
vrf vrf-name
Enables BGP routing for a particular VRF on the PE router.
Example:
RP/0/RP0/CPU0:router(config-bgp)# vrf vrf_pe_2
Step 4
bgp router-id ip-address
Configures a fixed router ID for a BGP-speaking router.
Example:
RP/0/RP0/CPU0:router(config-bgp-vrf)# bgp
router-id 172.16.9.9
Step 5
label-allocation-mode per-ce
Example:
RP/0/RP0/CPU0:router(config-bgp-vrf)#
label-allocation-mode per-ce
Step 6
address-family {ipv4 | ipv6} unicast
Example:
RP/0/RP0/CPU0:router(config-bgp-vrf)#
address-family ipv4 unicast
Cisco IOS XR Routing Configuration Guide
RC-104
Configures the per-CE label allocation mode to avoid an
extra lookup on the PE router and conserve label space
(per-prefix is the default label allocation mode). In this
mode, the PE router allocates one label for every immediate
next-hop (in most cases, this would be a CE router). This
label is directly mapped to the next hop, so there is no VRF
route lookup performed during data forwarding. However,
the number of labels allocated would be one for each CE
rather than one for each VRF. Because BGP knows all the
next hops, it assigns a label for each next hop (not for each
PE-CE interface). When the outgoing interface is a
multiaccess interface and the media access control (MAC)
address of the neighbor is not known, Address Resolution
Protocol (ARP) is triggered during packet forwarding.
Enters VPN address family configuration mode.
Implementing BGP on Cisco IOS XR Software
How to Implement BGP on Cisco IOS XR Software
Step 7
Command or Action
Purpose
network {ip-address/prefix-length | ip-address
mask}
Originates a network prefix in the address family table in
the VRF context.
Example:
RP/0/RP0/CPU0:router(config-bgp-vrf-af)#
network 172.16.5.5
Step 8
aggregate-address address/mask-length
Example:
RP/0/RP0/CPU0:router(config-bgp-vrf-af)#
aggregate-address 10.0.0.0/24
Step 9
exit
Configures aggregation in the VRF address family context
to summarize routing information to reduce the state
maintained in the core. This summarization introduces
some inefficiency in the PE edge, because an additional
lookup is required to determine the ultimate next hop for a
packet. When configured, a summary prefix is advertised
instead of a set of component prefixes, which are more
specifics of the aggregate. The PE advertises only one label
for the aggregate. Because component prefixes could have
different next hops to CEs, an additional lookup has to be
performed during data forwarding.
Exits the current configuration mode.
Example:
RP/0/RP0/CPU0:router(config-bgp-vrf-af)# exit
Step 10
neighbor ip-address
Configures a CE neighbor. The ip-address argument must
be a private address.
Example:
RP/0/RP0/CPU0:router(config-bgp-vrf)# neighbor
10.0.0.0
Step 11
remote-as as-number
Configures the remote AS for the CE neighbor.
Example:
RP/0/RP0/CPU0:router(config-bgp-vrf-nbr)#
remote-as 2
Step 12
password {clear | encrypted} password
Enable Message Digest 5 (MD5) authentication on a TCP
connection between two BGP neighbors.
Example:
RP/0/RP0/CPU0:router(config-bgp-vrf-nbr)#
password encrypted 234xyz
Step 13
ebgp-multihop [ttl-value]
Example:
Configures the CE neighbor to accept and attempt BGP
connections to external peers residing on networks that are
not directly connected.
RP/0/RP0/CPU0:router(config-bgp-vrf-nbr)#
ebgp-multihop 55
Step 14
address-family {ipv4 {unicast |
labeled-unicast} | ipv6 unicast}
Enables an address family for the CE peer.
Example:
RP/0/RP0/CPU0:router(config-bgp-vrf-nbr)#
address-family ipv4 unicast
Cisco IOS XR Routing Configuration Guide
RC-105
Implementing BGP on Cisco IOS XR Software
How to Implement BGP on Cisco IOS XR Software
Step 15
Command or Action
Purpose
site-of-origin [as-number:nn | ip-address:nn]
Configures the site-of-origin (SoO) extended community.
Routes that are learned from this CE neighbor are tagged
with the SoO extended community before being advertised
to the rest of the PEs. SoO is frequently used to detect loops
when as-override is configured on the PE router. If the
prefix is looped back to the same site, the PE detects this
and does not send the update to the CE.
Example:
RP/0/RP0/CPU0:router(config-bgp-vrf-nbr-af)#
site-of-origin 234:111
Step 16
as-override
Configures AS override on the PE router. This causes the PE
router to replace the CE’s ASN with its own (PE) ASN.
Example:
Note
RP/0/RP0/CPU0:router(config-bgp-vrf-nbr-af)#
as-override
Step 17
allowas-in [as-occurrence-number]
Allows an AS path with the PE autonomous system number
(ASN) a specified number of times.
Example:
Hub and spoke VPN networks need the looping back of
routing information to the HUB PE through the HUB CE.
When this happens, due to the presence of the PE ASN, the
looped-back information is dropped by the HUB PE. To
avoid this, use the allowas-in command to allow prefixes
even if they have the PEs ASN up to the specified number
of times.
RP/0/RP0/CPU0:router(config-bgp-vrf-nbr-af)#
allowas-in 5
Step 18
route-policy route-policy-name in
Example:
RP/0/RP0/CPU0:router(config-bgp-vrf-nbr-af)#
route-policy pe_ce_in_policy in
Cisco IOS XR Routing Configuration Guide
RC-106
This loss of information could lead to routing loops;
to avoid loops caused by as-override, use it in
conjunction with site-of-origin.
Specifies a routing policy for an inbound route. The policy
can be used to filter routes or modify route attributes.
Implementing BGP on Cisco IOS XR Software
How to Implement BGP on Cisco IOS XR Software
Step 19
Command or Action
Purpose
route-policy route-policy-name out
Specifies a routing policy for an outbound route. The policy
can be used to filter routes or modify route attributes.
Example:
RP/0/RP0/CPU0:router(config-bgp-vrf-nbr-af)#
route-policy pe_ce_out_policy out
Step 20
Saves configuration changes.
end
or
commit
When you issue the end command, the system prompts
you to commit changes:
Example:
Uncommitted changes found, commit them before
exiting(yes/no/cancel)?
[cancel]:
•
RP/0/RP0/CPU0:router(config-bgp-vrf-nbr-af)# en
d
– Entering yes saves configuration changes to the
or
running configuration file, exits the configuration
session, and returns the router to EXEC mode.
RP/0/RP0/CPU0:router(config-bgp-vrf-nbr-af)#
commit
– Entering no exits the configuration session and
returns the router to EXEC mode without
committing the configuration changes.
– Entering cancel leaves the router in the current
configuration session without exiting or
committing the configuration changes.
•
Use the commit command to save the configuration
changes to the running configuration file and remain
within the configuration session.
BGP Load Balancing
Perform this task to enable BGP multipath load sharing for external BGP (EBGP), interior BGP (IBGP),
and EIBGP and to enable BGP to carry link bandwidth attribute of the DMZ link.
When the PE router includes the link bandwidth extended community in its updates to the remote PE
through the Multiprotocol Interior BGP (MP-IBGP) session (either IPv4 or VPNv4), the remote PE
automatically does load balancing if the maximum-paths command is enabled.
SUMMARY STEPS
1.
configure
2.
router bgp as-number
3.
vrf vrf-name
4.
address-family {ipv4 | ipv6} unicast
5.
maximum-paths {ebgp | ibgp | eibgp} maximum [unequal-cost]
6.
exit
7.
neighbor ip-address
8.
dmz-link-bandwidth
Cisco IOS XR Routing Configuration Guide
RC-107
Implementing BGP on Cisco IOS XR Software
How to Implement BGP on Cisco IOS XR Software
9.
end
or
commit
DETAILED STEPS
Step 1
Command or Action
Purpose
configure
Enters global configuration mode.
Example:
RP/0/RP0/CPU0:router# configure
Step 2
router bgp as-number
Enters BGP configuration mode, allowing you to configure
the BGP routing process.
Example:
RP/0/RP0/CPU0:router(config)# router bgp 120
Step 3
vrf vrf-name
Enables BGP routing for a particular VRF on the PE router.
Example:
RP/0/RP0/CPU0:router(config-bgp)# vrf vrf_a
Step 4
address-family {ipv4 | ipv6} unicast
Enters VPN address family configuration mode.
Example:
RP/0/RP0/CPU0:router(config-bgp-vrf)#
address-family ipv4 unicast
Step 5
maximum-paths {ebgp | ibgp | eibgp} maximum
[unequal-cost]
Configures the maximum number of parallel routes that
BGP installs in the routing table.
•
ebgp maximum: Consider only EBGP paths for
multipath.
•
ibgp maximum [unequal-cost]: Consider load
balancing between IBGP learned paths.
•
eibgp: Consider both EBGP and IBGP learned paths
for load balancing. EIBGP load balancing always does
unequal-cost load balancing.
Example:
RP/0/RP0/CPU0:router(config-bgp-vrf-af)#
maximum-paths ebgp 3
When EIBGP is applied, EBGP or IBGP load balancing
cannot be configured. EBGP and IBGP load balancing can
coexist.
Step 6
Exits the current configuration mode.
exit
Example:
RP/0/RP0/CPU0:router(config-bgp-vrf-af)# exit
Step 7
neighbor ip-address
Example:
RP/0/RP0/CPU0:router(config-bgp-vrf)# neighbor
10.0.0.0
Cisco IOS XR Routing Configuration Guide
RC-108
Configures a CE neighbor. The ip-address argument must
be a private address.
Implementing BGP on Cisco IOS XR Software
How to Implement BGP on Cisco IOS XR Software
Step 8
Command or Action
Purpose
dmz-link-bandwidth
Originates a demilitarized-zone (DMZ) link-bandwidth
extended community for the link to an EBGP neighbor.
Example:
RP/0/RP0/CPU0:router(config-bgp-vrf-nbr)#
dmz-link-bandwidth
Step 9
Saves configuration changes.
end
or
commit
When you issue the end command, the system prompts
you to commit changes:
Example:
Uncommitted changes found, commit them before
exiting(yes/no/cancel)?
[cancel]:
•
RP/0/RP0/CPU0:router(config-bgp-vrf-nbr)# end
or
– Entering yes saves configuration changes to the
RP/0/RP0/CPU0:router(config-bgp-vrf-nbr)#
commit
running configuration file, exits the configuration
session, and returns the router to EXEC mode.
– Entering no exits the configuration session and
returns the router to EXEC mode without
committing the configuration changes.
– Entering cancel leaves the router in the current
configuration session without exiting or
committing the configuration changes.
•
Use the commit command to save the configuration
changes to the running configuration file and remain
within the configuration session.
Redistribution of IGPs to BGP
Perform this task to configure redistribution of a protocol into the VRF address family.
Even if Interior Gateway Protocols (IGPs) are used as the PE-CE protocol, the import logic happens
through BGP. Therefore, all IGP routes have to be imported into the BGP VRF table.
SUMMARY STEPS
1.
configure
2.
router bgp as-number
3.
vrf vrf-name
4.
address-family {ipv4 | ipv6} unicast
5.
redistribute connected [metric metric-value] [route-policy route-policy-name]
or
redistribute eigrp process-id [match {external | internal}] [metric metric-value] [route-policy
route-policy-name]
or
redistribute isis process-id [level {1 | 1-inter-area | 2}] [metric metric-value] [route-policy
route-policy-name]
or
Cisco IOS XR Routing Configuration Guide
RC-109
Implementing BGP on Cisco IOS XR Software
How to Implement BGP on Cisco IOS XR Software
redistribute ospf process-id [match {external [1 | 2] | internal | nssa-external [1 | 2]}] [metric
metric-value] [route-policy route-policy-name]
or
redistribute ospfv3 process-id [match {external [1 | 2] | internal | nssa-external [1 | 2]}] [metric
metric-value] [route-policy route-policy-name]
or
redistribute rip [metric metric-value] [route-policy route-policy-name]
or
redistribute static [metric metric-value] [route-policy route-policy-name]
6.
end
or
commit
DETAILED STEPS
Step 1
Command or Action
Purpose
configure
Enters global configuration mode.
Example:
RP/0/RP0/CPU0:router# configure
Step 2
router bgp as-number
Enters BGP configuration mode, allowing you to configure
the BGP routing process.
Example:
RP/0/RP0/CPU0:router(config)# router bgp 120
Step 3
vrf vrf-name
Enables BGP routing for a particular VRF on the PE router.
Example:
RP/0/RP0/CPU0:router(config-bgp)# vrf vrf_a
Step 4
address-family {ipv4 | ipv6} unicast
Example:
RP/0/RP0/CPU0:router(config-bgp-vrf)#
address-family ipv4 unicast
Cisco IOS XR Routing Configuration Guide
RC-110
Enters VPN address family configuration mode.
Implementing BGP on Cisco IOS XR Software
How to Implement BGP on Cisco IOS XR Software
Step 5
Command or Action
Purpose
redistribute connected [metric metric-value]
[route-policy route-policy-name]
Configures redistribution of a protocol into the VRF address
family context.
or
redistribute eigrp process-id [match {external
| internal}] [metric metric-value]
[route-policy route-policy-name]
or
redistribute isis process-id [level {1 |
1-inter-area | 2}] [metric metric-value]
[route-policy route-policy-name]
The redistribute command is used if BGP is not used
between the PE-CE routers. If BGP is used between PE-CE
routers, the IGP that is used has to be redistributed into BGP
to establish VPN connectivity with other PE sites.
Redistribution is also required for inter-table import and
export.
or
redistribute ospf process-id [match {external
[1 | 2] | internal | nssa-external [1 | 2]}]
[metric metric-value] [route-policy
route-policy-name]
or
redistribute ospfv3 process-id [match {external
[1 | 2] | internal | nssa-external [1 | 2]}]
[metric metric-value] [route-policy
route-policy-name]
or
redistribute rip [metric metric-value]
[route-policy route-policy-name]
or
redistribute static [metric metric-value]
[route-policy route-policy-name]
Example:
RP/0/RP0/CPU0:router(config-bgp-vrf-af)#
redistribute eigrp 23
Step 6
end
or
Saves configuration changes.
commit
When you issue the end command, the system prompts
you to commit changes:
Example:
Uncommitted changes found, commit them before
exiting(yes/no/cancel)?
[cancel]:
•
RP/0/RP0/CPU0:router(config-bgp-vrf-af)# end
or
– Entering yes saves configuration changes to the
RP/0/RP0/CPU0:router(config-bgp-vrf-af)# commit
running configuration file, exits the configuration
session, and returns the router to EXEC mode.
– Entering no exits the configuration session and
returns the router to EXEC mode without
committing the configuration changes.
– Entering cancel leaves the router in the current
configuration session without exiting or
committing the configuration changes.
•
Use the commit command to save the configuration
changes to the running configuration file and remain
within the configuration session.
Cisco IOS XR Routing Configuration Guide
RC-111
Implementing BGP on Cisco IOS XR Software
How to Implement BGP on Cisco IOS XR Software
Configuring Keychains for BGP
Keychains provide secure authentication by supporting different MAC authentication algorithms and
provide graceful key rollover. Perform this task to configure keychains for BGP. This task is optional.
Note
If a keychain is configured for a neighbor group or a session group, a neighbor using the group inherits
the keychain. Values of commands configured specifically for a neighbor override inherited values.
SUMMARY STEPS
1.
configure
2.
router bgp as-number
3.
neighbor ip-address
4.
remote-as as-number
5.
keychain name
6.
end
or
commit
DETAILED STEPS
Step 1
Command or Action
Purpose
configure
Enters global configuration mode.
Example:
RP/0/RP0/CPU0:router# configure
Step 2
router bgp as-number
Enters BGP configuration mode, allowing you to configure
the BGP routing process.
Example:
RP/0/RP0/CPU0:router(config)# router bgp 120
Step 3
neighbor ip-address
Example:
Places the router in neighbor configuration mode for BGP
routing and configures the neighbor IP address as a BGP
peer.
RP/0/RP0/CPU0:router(config-bgp)# neighbor
172.168.40.24
Step 4
remote-as as-number
Example:
RP/0/RP0/CPU0:router(config-bgp-nbr)# remote-as
2002
Cisco IOS XR Routing Configuration Guide
RC-112
Creates a neighbor and assigns a remote autonomous
system number to it.
Implementing BGP on Cisco IOS XR Software
How to Implement BGP on Cisco IOS XR Software
Step 5
Command or Action
Purpose
keychain name
Configures keychain-based authentication.
Example:
RP/0/RP0/CPU0:router(config-bgp-nbr)# keychain
kych_a
Step 6
Saves configuration changes.
end
or
commit
When you issue the end command, the system prompts
you to commit changes:
Example:
Uncommitted changes found, commit them before
exiting(yes/no/cancel)?
[cancel]:
•
RP/0/RP0/CPU0:router(config-bgp-nbr)# end
or
– Entering yes saves configuration changes to the
RP/0/RP0/CPU0:router(config-bgp-nbr)# commit
running configuration file, exits the configuration
session, and returns the router to EXEC mode.
– Entering no exits the configuration session and
returns the router to EXEC mode without
committing the configuration changes.
– Entering cancel leaves the router in the current
configuration session without exiting or
committing the configuration changes.
•
Use the commit command to save the configuration
changes to the running configuration file and remain
within the configuration session.
Configuring an MDT Address Family Session in BGP
Perform this task to configure an IPv4 multicast distribution tree (MDT) subaddress family identifier
(SAFI) session in BGP.
Note
The MDT address-family session is configured on provider edge (PE) routers to establish VPN peering
sessions with customer edge (CE) routers and to establish inter-AS multicast VPN peering sessions. The
MDT address family must be configured on each participating PE router.
The MDT SAFI is a transitive, multicast-capable connector attribute that is defined as an IPv4 address
family in BGP. The MDT SAFI is designed to support inter-autonomous system (inter-AS) VPN peering
sessions.
SUMMARY STEPS
1.
configure
2.
router bgp as-number
3.
address-family {ipv4 unicast | ipv4 multicast | ipv4 tunnel | ipv6 unicast | ipv6 multicast | vpnv4
unicast | vpnv6 unicast}
4.
exit
Cisco IOS XR Routing Configuration Guide
RC-113
Implementing BGP on Cisco IOS XR Software
How to Implement BGP on Cisco IOS XR Software
5.
address-family ipv4 mdt
6.
exit
7.
neighbor ip-address
8.
remote-as as-number
9.
address-family {ipv4 unicast | ipv4 multicast | ipv4 labeled-unicast | ipv4 tunnel | ipv4 mdt |
ipv6 unicast | ipv6 multicast | ipv6 labeled-unicast | vpnv4 unicast | vpnv6 unicast}
10. route-policy route-policy-name {in | out}
11. exit
12. address-family ipv4 mdt
13. route-policy route-policy-name {in | out}
14. end
or
commit
DETAILED STEPS
Step 1
Command or Action
Purpose
configure
Enters global configuration mode.
Example:
RP/0/RP0/CPU0:router# configure
Step 2
router bgp as-number
Enters BGP configuration mode, allowing you to configure
the BGP routing process.
Example:
RP/0/RP0/CPU0:router(config)# router bgp 120
Step 3
address-family {ipv4 unicast | ipv4 multicast |
ipv4 tunnel | ipv6 unicast | ipv6 multicast |
vpnv4 unicast | vpnv6 unicast}
Enters address family configuration mode for the specified
address family.
Example:
RP/0/RP0/CPU0:router(config-bgp)#
address-family ipv4 unicast
Step 4
Exits the current configuration mode.
exit
Example:
RP/0/RP0/CPU0:router(config-bgp-af)# exit
Step 5
address-family ipv4 mdt
Example:
RP/0/RP0/CPU0:router(config-bgp)#
address-family ipv4 mdt
Cisco IOS XR Routing Configuration Guide
RC-114
Specifies the multicast distribution tree (MDT) address
family.
Implementing BGP on Cisco IOS XR Software
How to Implement BGP on Cisco IOS XR Software
Step 6
Command or Action
Purpose
exit
Exits the current configuration mode.
Example:
RP/0/RP0/CPU0:router(config-bgp-af)# exit
Step 7
neighbor ip-address
Example:
Places the router in neighbor configuration mode for BGP
routing and configures the neighbor IP address as a BGP
peer.
RP/0/RP0/CPU0:router(config-bgp)# neighbor
172.168.40.24
Step 8
remote-as as-number
Creates a neighbor and assigns a remote autonomous
system number to it.
Example:
RP/0/RP0/CPU0:router(config-bgp-nbr)# remote-as
2002
Step 9
address-family {ipv4 unicast | ipv4 multicast |
ipv4 labeled-unicast | ipv4 tunnel | ipv6
unicast | ipv6 multicast | ipv6 labeled-unicast
| vpnv4 unicast | vpnv6 unicast}
Enters neighbor address family configuration mode for the
specified address family.
Example:
RP/0/RP0/CPU0:router(config-bgp-nbr)#
address-family ipv4 unicast
Step 10
route-policy route-policy-name {in | out}
Specifies a routing policy for an outbound route. The policy
can be used to filter routes or modify route attributes.
Example:
RP/0/RP0/CPU0:router(config-bgp-af)#
route-policy pe_ce_out_policy out
Step 11
exit
Exits the current configuration mode.
Example:
RP/0/RP0/CPU0:router(config-bgp-af)# exit
Step 12
address-family ipv4 mdt
Specifies the multicast distribution tree (MDT) address
family.
Example:
RP/0/RP0/CPU0:router(config-bgp)#
address-family ipv4 mdt
Cisco IOS XR Routing Configuration Guide
RC-115
Implementing BGP on Cisco IOS XR Software
How to Implement BGP on Cisco IOS XR Software
Step 13
Command or Action
Purpose
route-policy route-policy-name {in | out}
Specifies a routing policy for an outbound route. The policy
can be used to filter routes or modify route attributes.
Example:
RP/0/RP0/CPU0:router(config-bgp-af)#
route-policy pe_ce_out_policy out
Step 14
Saves configuration changes.
end
or
commit
When you issue the end command, the system prompts
you to commit changes:
Example:
Uncommitted changes found, commit them before
exiting(yes/no/cancel)?
[cancel]:
•
RP/0/RP0/CPU0:router(config-bgp-af)# end
or
– Entering yes saves configuration changes to the
RP/0/RP0/CPU0:router(config-bgp-af)# commit
running configuration file, exits the configuration
session, and returns the router to EXEC mode.
– Entering no exits the configuration session and
returns the router to EXEC mode without
committing the configuration changes.
– Entering cancel leaves the router in the current
configuration session without exiting or
committing the configuration changes.
•
Use the commit command to save the configuration
changes to the running configuration file and remain
within the configuration session.
Disabling a BGP Neighbor
Perform this task to administratively shut down a neighbor session without removing the configuration.
SUMMARY STEPS
1.
configure
2.
router bgp as-number
3.
neighbor ip-address
4.
shutdown
5.
end
or
commit
Cisco IOS XR Routing Configuration Guide
RC-116
Implementing BGP on Cisco IOS XR Software
How to Implement BGP on Cisco IOS XR Software
DETAILED STEPS
Step 1
Command or Action
Purpose
configure
Enters global configuration mode.
Example:
RP/0/RP0/CPU0:router# configure
Step 2
router bgp as-number
Enters BGP configuration mode, allowing you to configure
the BGP routing process.
Example:
RP/0/RP0/CPU0:router(config)# router bgp 127
Step 3
neighbor ip-address
Example:
Places the router in neighbor configuration mode for BGP
routing and configures the neighbor IP address as a BGP
peer.
RP/0/RP0/CPU0:router(config-bgp)# neighbor
172.168.40.24
Step 4
shutdown
Disables all active sessions for the specified neighbor.
Example:
RP/0/RP0/CPU0:router(config-bgp-nbr)# shutdown
Step 5
end
or
Saves configuration changes.
commit
When you issue the end command, the system prompts
you to commit changes:
Example:
Uncommitted changes found, commit them before
exiting(yes/no/cancel)?
[cancel]:
•
RP/0/RP0/CPU0:router(config-bgp-nbr)# end
or
– Entering yes saves configuration changes to the
RP/0/RP0/CPU0:router(config-bgp-nbr)# commit
running configuration file, exits the configuration
session, and returns the router to EXEC mode.
– Entering no exits the configuration session and
returns the router to EXEC mode without
committing the configuration changes.
– Entering cancel leaves the router in the current
configuration session without exiting or
committing the configuration changes.
•
Use the commit command to save the configuration
changes to the running configuration file and remain
within the configuration session.
Cisco IOS XR Routing Configuration Guide
RC-117
Implementing BGP on Cisco IOS XR Software
How to Implement BGP on Cisco IOS XR Software
Resetting Neighbors Using BGP Dynamic Inbound Soft Reset
Perform this task to trigger an inbound soft reset of the specified address families for the specified group or
neighbors. The group is specified by the *, ip-address, as-number, or external keywords and arguments.
Resetting neighbors is useful if you change the inbound policy for the neighbors or any other
configuration that affects the sending or receiving of routing updates. If an inbound soft reset is
triggered, BGP sends a REFRESH request to the neighbor if the neighbor has advertised the
ROUTE_REFRESH capability. To determine whether the neighbor has advertised the
ROUTE_REFRESH capability, use the show bgp neighbors command.
SUMMARY STEPS
1.
show bgp neighbors
2.
clear bgp {ipv4 {unicast | multicast | labeled-unicast | all | tunnel | mdt} | ipv6 {unicast |
multicast | all | labeled-unicast} | all {unicast | multicast | all | labeled-unicast | mdt | tunnel} |
vpnv4 unicast | vrf {vrf-name | all} {ipv4 {unicast | labeled-unicast} | ipv6 unicast} | vpnv6
unicast} {* | ip-address | as as-number | external} soft [in [prefix-filter] | out]
DETAILED STEPS
Step 1
Command or Action
Purpose
show bgp neighbors
Verifies that received route refresh capability from the
neighbor is enabled.
Example:
RP/0/RP0/CPU0:router# show bgp neighbors
Step 2
clear bgp {ipv4 {unicast | multicast |
labeled-unicast | all | tunnel | mdt} | ipv6
{unicast | multicast | all | labeled-unicast} |
all {unicast | multicast | all |
labeled-unicast | mdt | tunnel} | vpnv4 unicast
| vrf {vrf-name | all} {ipv4 {unicast |
labeled-unicast} | ipv6 unicast} | vpnv6
unicast} {* | ip-address | as as-number |
external} soft [in [prefix-filter] | out]
Example:
RP/0/RP0/CPU0:router# clear bgp ipv4 unicast
10.0.0.1 soft in
Soft resets a BGP neighbor.
•
The * keyword resets all BGP neighbors.
•
The ip-address argument specifies the address of the
neighbor to be reset.
•
The as-number argument specifies that all neighbors
that match the autonomous system number be reset.
•
The external keyword specifies that all external
neighbors are reset.
Resetting Neighbors Using BGP Outbound Soft Reset
Perform this task to trigger an outbound soft reset of the specified address families for the specified group
or neighbors. The group is specified by the *, ip-address, as-number, or external keywords and
arguments.
Resetting neighbors is useful if you change the outbound policy for the neighbors or any other
configuration that affects the sending or receiving of routing updates.
If an outbound soft reset is triggered, BGP resends all routes for the address family to the given
neighbors.
Cisco IOS XR Routing Configuration Guide
RC-118
Implementing BGP on Cisco IOS XR Software
How to Implement BGP on Cisco IOS XR Software
To determine whether the neighbor has advertised the ROUTE_REFRESH capability, use the show bgp
neighbors command.
SUMMARY STEPS
1.
show bgp neighbors
2.
clear bgp {ipv4 {unicast | multicast | labeled-unicast | all | tunnel | mdt} | ipv6 {unicast |
multicast | all | labeled-unicast} | all {unicast | multicast | all | labeled-unicast | mdt | tunnel} |
vpnv4 unicast | vrf {vrf-name | all} {ipv4 {unicast | labeled-unicast} | ipv6 unicast} | vpnv6
unicast} {* | ip-address | as as-number | external} soft out
DETAILED STEPS
Step 1
Command or Action
Purpose
show bgp neighbors
Verifies that received route refresh capability from the
neighbor is enabled.
Example:
RP/0/RP0/CPU0:router# show bgp neighbors
Step 2
clear bgp {ipv4 {unicast | multicast |
labeled-unicast | all | tunnel | mdt} | ipv6
{unicast | multicast | all | labeled-unicast} |
all {unicast | multicast | all |
labeled-unicast | mdt | tunnel} | vpnv4 unicast
| vrf {vrf-name | all} {ipv4 {unicast |
labeled-unicast} | ipv6 unicast} | vpnv6
unicast} {* | ip-address | as as-number |
external} soft out
Soft resets a BGP neighbor.
•
The * keyword resets all BGP neighbors.
•
The ip-address argument specifies the address of the
neighbor to be reset.
•
The as-number argument specifies that all neighbors
that match the autonomous system number be reset.
•
The external keyword specifies that all external
neighbors are reset.
Example:
RP/0/RP0/CPU0:router# clear bgp ipv4 unicast
10.0.0.2 soft out
Resetting Neighbors Using BGP Hard Reset
Perform this task to reset neighbors using a hard reset. A hard reset removes the TCP connection to the
neighbor, removes all routes received from the neighbor from the BGP table, and then re-establishes the
session with the neighbor. If the graceful keyword is specified, the routes from the neighbor are not
removed from the BGP table immediately, but are marked as stale. After the session is re-established,
any stale route that has not been received again from the neighbor is removed.
SUMMARY STEPS
1.
clear bgp {ipv4 {unicast | multicast | labeled-unicast | all | tunnel | mdt} | ipv6 {unicast |
multicast | all | labeled-unicast} | all {unicast | multicast | all | labeled-unicast | mdt | tunnel} |
vpnv4 unicast | vrf {vrf-name | all} {ipv4 {unicast | labeled-unicast} | ipv6 unicast} | vpnv6
unicast} {* | ip-address | as as-number | external} [graceful] soft [in [prefix-filter] | out]
Cisco IOS XR Routing Configuration Guide
RC-119
Implementing BGP on Cisco IOS XR Software
How to Implement BGP on Cisco IOS XR Software
DETAILED STEPS
Step 1
Command or Action
Purpose
clear bgp {ipv4 {unicast | multicast |
labeled-unicast | all | tunnel | mdt} | ipv6
{unicast | multicast | all | labeled-unicast} |
all {unicast | multicast | all |
labeled-unicast | mdt | tunnel} | vpnv4 unicast
| vrf {vrf-name | all} {ipv4 {unicast |
labeled-unicast} | ipv6 unicast} | vpnv6
unicast} {* | ip-address | as as-number |
external} [graceful] soft [in [prefix-filter] |
out]
Clears a BGP neighbor.
Example:
The graceful keyword specifies a graceful restart.
•
The * keyword resets all BGP neighbors.
•
The ip-address argument specifies the address of the
neighbor to be reset.
•
The as-number argument specifies that all neighbors
that match the autonomous system number be reset.
•
The external keyword specifies that all external
neighbors are reset.
RP/0/RP0/CPU0:router# clear bgp ipv4 unicast
10.0.0.3
Clearing Caches, Tables, and Databases
Perform this task to remove all contents of a particular cache, table, or database. The clear bgp command
resets the sessions of the specified group of neighbors (hard reset); it removes the TCP connection to the
neighbor, removes all routes received from the neighbor from the BGP table, and then re-establishes the
session with the neighbor. Clearing a cache, table, or database can become necessary when the contents
of the particular structure have become, or are suspected to be, invalid.
SUMMARY STEPS
1.
clear bgp {ipv4 {unicast | multicast | labeled-unicast | all | tunnel | mdt} | ipv6 {unicast |
multicast | all | labeled-unicast} | all {unicast | multicast | all | labeled-unicast | mdt | tunnel} |
vpnv4 unicast | vrf {vrf-name | all} {ipv4 {unicast | labeled-unicast} | ipv6 unicast} | vpnv6
unicast} ip-address
2.
clear bgp external
3.
clear bgp *
Cisco IOS XR Routing Configuration Guide
RC-120
Implementing BGP on Cisco IOS XR Software
How to Implement BGP on Cisco IOS XR Software
DETAILED STEPS
Step 1
Command or Action
Purpose
clear bgp {ipv4 {unicast | multicast |
labeled-unicast | all | tunnel | mdt} | ipv6
{unicast | multicast | all | labeled-unicast} |
all {unicast | multicast | all |
labeled-unicast | mdt | tunnel} | vpnv4 unicast
| vrf {vrf-name | all} {ipv4 {unicast |
labeled-unicast} | ipv6 unicast} | vpnv6
unicast} ip-address
Clears a specified neighbor.
Example:
RP/0/RP0/CPU0:router# clear bgp ipv4 172.20.1.1
Step 2
clear bgp external
Clears all external peers.
Example:
RP/0/RP0/CPU0:router# clear bgp external
Step 3
Clears all BGP neighbors.
clear bgp *
Example:
RP/0/RP0/CPU0:router# clear bgp *
Displaying System and Network Statistics
Perform this task to display specific statistics, such as the contents of BGP routing tables, caches, and
databases. Information provided can be used to determine resource usage and solve network problems.
You can also display information about node reachability and discover the routing path that the packets
of your device are taking through the network.
SUMMARY STEPS
1.
show bgp cidr-only
2.
show bgp community community-list [exact-match]
3.
show bgp regexp regular-expression
4.
show bgp
5.
show bgp neighbors ip-address [advertised-routes | dampened-routes | flap-statistics |
performance-statistics | received prefix-filter | routes]
6.
show bgp paths
7.
show bgp neighbor-group group-name configuration
8.
show bgp summary
Cisco IOS XR Routing Configuration Guide
RC-121
Implementing BGP on Cisco IOS XR Software
How to Implement BGP on Cisco IOS XR Software
DETAILED STEPS
Step 1
Command or Action
Purpose
show bgp cidr-only
Displays routes with nonnatural network masks (classless
interdomain routing [CIDR]) routes.
Example:
RP/0/RP0/CPU0:router# show bgp cidr-only
Step 2
show bgp community community-list [exact-match]
Displays routes that match the specified BGP community.
Example:
RP/0/RP0/CPU0:router# show bgp community 1081:5
exact-match
Step 3
show bgp regexp regular-expression
Displays routes that match the specified autonomous
system path regular expression.
Example:
RP/0/RP0/CPU0:router# show bgp regexp "^3 "
Step 4
show bgp
Displays entries in the BGP routing table.
Example:
RP/0/RP0/CPU0:router# show bgp
Step 5
show bgp neighbors ip-address
[advertised-routes | dampened-routes |
flap-statistics | performance-statistics |
received prefix-filter | routes]
Example:
RP/0/RP0/CPU0:router# show bgp neighbors
10.0.101.1
Step 6
show bgp paths
Example:
RP/0/RP0/CPU0:router# show bgp paths
Cisco IOS XR Routing Configuration Guide
RC-122
Displays information about the BGP connection to the
specified neighbor.
•
The advertised-routes keyword displays all routes the
router advertised to the neighbor.
•
The dampened-routes keyword displays the dampened
routes that are learned from the neighbor.
•
The flap-statistics keyword displays flap statistics of
the routes learned from the neighbor.
•
The performance-statistics keyword displays
performance statistics relating to work done by the
BGP process for this neighbor.
•
The received prefix-filter keyword and argument
display the received prefix list filter.
•
The routes keyword displays routes learned from the
neighbor.
Displays all BGP paths in the database.
Implementing BGP on Cisco IOS XR Software
How to Implement BGP on Cisco IOS XR Software
Step 7
Command or Action
Purpose
show bgp neighbor-group group-name
configuration
Displays the effective configuration for a specified neighbor
group, including any configuration inherited by this
neighbor group.
Example:
RP/0/RP0/CPU0:router# show bgp neighbor-group
group_1 configuration
Step 8
show bgp summary
Displays the status of all BGP connections.
Example:
RP/0/RP0/CPU0:router# show bgp summary
Displaying BGP Process Information
Perform this task to display specific BGP process information.
SUMMARY STEPS
1.
show bgp process
2.
show bgp ipv4 unicast summary
3.
show bgp vpnv4 unicast summary
4.
show bgp vrf {vrf-name | all}
5.
show bgp process detail
6.
show bgp summary
7.
show placement program bgp
8.
show placement program brib
DETAILED STEPS
Step 1
Command or Action
Purpose
show bgp process
Displays status and summary information for the BGP
process. The output shows various global and address
family-specific BGP configurations. A summary of the
number of neighbors, update messages, and notification
messages sent and received by the process is also displayed.
Example:
RP/0/RP0/CPU0:router# show bgp process
Step 2
show bgp ipv4 unicast summary
Displays a summary of the neighbors for the IPv4 unicast
address family.
Example:
RP/0/RP0/CPU0:router# show bgp ipv4 unicast
summary
Step 3
show bgp vpnv4 unicast summary
Displays a summary of the neighbors for the VPNv4 unicast
address family.
Example:
RP/0/RP0/CPU0:router# show bgp vpnv4 unicast
summary
Cisco IOS XR Routing Configuration Guide
RC-123
Implementing BGP on Cisco IOS XR Software
How to Implement BGP on Cisco IOS XR Software
Step 4
Command or Action
Purpose
show bgp vrf (vrf-name | all}
Displays BGP VPN virtual routing and forwarding (VRF)
information.
Example:
RP/0/RP0/CPU0:router# show bgp vrf vrf_A
Step 5
show bgp process detail
Displays detailed process information including the
memory used by each of various internal structure types.
Example:
RP/0/RP0/CPU0:router# show bgp processes detail
Step 6
show bgp summary
Displays the status of all BGP connections.
Example:
RP/0/RP0/CPU0:router# show bgp summary
Step 7
show placement program bgp
Displays BGP program information.
•
If a program is shown as having ‘rejected locations’
(for example, locations where program cannot be
placed), the locations in question can be viewed using
the show placement program bgp command.
•
If a program has been placed but not started, the amount
of elapsed time since the program was placed is
displayed in the Waiting to start column.
Example:
RP/0/RP0/CPU0:router# show placement program
bgp
Step 8
show placement program brib
Displays bRIB program information.
•
If a program is shown as having ‘rejected locations’
(for example, locations where program cannot be
placed), the locations in question can be viewed using
the show placement program bgp command.
•
If a program has been placed but not started, the amount
of elapsed time since the program was placed is
displayed in the Waiting to start column.
Example:
RP/0/RP0/CPU0:router# show placement program
brib
Monitoring BGP Update Groups
This task displays information related to the processing of BGP update groups.
SUMMARY STEPS
1.
show bgp [ipv4 {unicast | multicast | labeled-unicast | all | tunnel | mdt} | ipv6 {unicast |
multicast | all | labeled-unicast} | all {unicast | multicast | all | labeled-unicast | mdt | tunnel} |
vpnv4 unicast | vrf {vrf-name | all} {ipv4 {unicast | labeled-unicast} | ipv6 unicast} | vpnv6
unicast] update-group [neighbor ip-address | process-id.index [summary |
performance-statistics]]
Cisco IOS XR Routing Configuration Guide
RC-124
Implementing BGP on Cisco IOS XR Software
Configuration Examples for Implementing BGP on Cisco IOS XR Software
DETAILED STEPS
Step 1
Command or Action
Purpose
show bgp [ipv4 {unicast | multicast |
labeled-unicast | all | tunnel | mdt} | ipv6
{unicast | all | labeled-unicast} | all
{unicast | multicast | all | mdt |
labeled-unicast | tunnel} | vpnv4 unicast | vrf
{vrf-name | all} [ipv4 {unicast |
labeled-unicast} | ipv6 unicast] | vpvn6
unicast] update-group [neighbor ip-address |
process-id.index [summary |
performance-statistics]]
Displays information about BGP update groups.
Example:
RP/0/RP0/CPU0:router# show bgp update-group 0.0
•
The ip-address argument displays the update groups to
which that neighbor belongs.
•
The process-id.index argument selects a particular
update group to display and is specified as follows:
process ID (dot) index. Process ID range is from 0 to
254. Index range is from 0 to 4294967295.
•
The summary keyword displays summary information
for neighbors in a particular update group.
•
If no argument is specified, this command displays
information for all update groups (for the specified
address family).
•
The performance-statistics keyword displays
performance statistics for an update group.
Configuration Examples for Implementing BGP on Cisco IOS XR
Software
This section provides the following configuration examples:
•
Enabling BGP: Example, page RC-125
•
Displaying BGP Update Groups: Example, page RC-127
•
BGP Neighbor Configuration: Example, page RC-127
•
BGP Confederation: Example, page RC-128
•
BGP Route Reflector: Example, page RC-129
Enabling BGP: Example
The following shows how to enable BGP.
prefix-set static
2020::/64,
2012::/64,
10.10.0.0/16,
10.2.0.0/24
end-set
route-policy pass-all
pass
end-policy
route-policy set_next_hop_agg_v4
set next-hop 10.0.0.1
end-policy
Cisco IOS XR Routing Configuration Guide
RC-125
Implementing BGP on Cisco IOS XR Software
Configuration Examples for Implementing BGP on Cisco IOS XR Software
route-policy set_next_hop_static_v4
if (destination in static) then
set next-hop 10.1.0.1
else
drop
endif
end-policy
route-policy set_next_hop_agg_v6
set next-hop 2003::121
end-policy
route-policy set_next_hop_static_v6
if (destination in static) then
set next-hop 2011::121
else
drop
endif
end-policy
router bgp 65000
bgp fast-external-fallover disable
bgp confederation peers
65001
65002
bgp confederation identifier 1
bgp router-id 1.1.1.1
address-family ipv4 unicast
aggregate-address 10.2.0.0/24 route-policy set_next_hop_agg_v4
aggregate-address 10.3.0.0/24
redistribute static route-policy set_next_hop_static_v4
address-family ipv4 multicast
aggregate-address 10.2.0.0/24 route-policy set_next_hop_agg_v4
aggregate-address 10.3.0.0/24
redistribute static route-policy set_next_hop_static_v4
address-family ipv6 unicast
aggregate-address 2012::/64 route-policy set_next_hop_agg_v6
aggregate-address 2013::/64
redistribute static route-policy set_next_hop_static_v6
address-family ipv6 multicast
aggregate-address 2012::/64 route-policy set_next_hop_agg_v6
aggregate-address 2013::/64
redistribute static route-policy set_next_hop_static_v6
neighbor 10.0.101.60
remote-as 65000
address-family ipv4 unicast
address-family ipv4 multicast
neighbor 10.0.101.61
remote-as 65000
address-family ipv4 unicast
address-family ipv4 multicast
neighbor 10.0.101.62
remote-as 3
address-family ipv4 unicast
route-policy pass-all in
route-policy pass-all out
address-family ipv4 multicast
route-policy pass-all in
route-policy pass-all out
neighbor 10.0.101.64
remote-as 5
update-source Loopback0
address-family ipv4 unicast
route-policy pass-all in
route-policy pass-all out
address-family ipv4 multicast
route-policy pass-all in
Cisco IOS XR Routing Configuration Guide
RC-126
Implementing BGP on Cisco IOS XR Software
Configuration Examples for Implementing BGP on Cisco IOS XR Software
route-policy pass-all out
Displaying BGP Update Groups: Example
The following is sample output from the show bgp update-group command run in EXEC mode:
RP/0/RP0/CPU0:router# show bgp update-group
Update group for IPv4 Unicast, index 0.1:
Attributes:
Outbound Route map:rm
Minimum advertisement interval:30
Messages formatted:2, replicated:2
Neighbors in this update group:
10.0.101.92
Update group for IPv4 Unicast, index 0.2:
Attributes:
Minimum advertisement interval:30
Messages formatted:2, replicated:2
Neighbors in this update group:
10.0.101.91
BGP Neighbor Configuration: Example
The following example shows how BGP neighbors on an autonomous system are configured to share
information. In the example, a BGP router is assigned to autonomous system 109, and two networks are
listed as originating in the autonomous system. Then the addresses of three remote routers (and their
autonomous systems) are listed. The router being configured shares information about networks
131.108.0.0 and 192.31.7.0 with the neighbor routers. The first router listed is in a different autonomous
system; the second neighbor and remote-as commands specify an internal neighbor (with the same
autonomous system number) at address 131.108.234.2; and the third neighbor and remote-as
commands specify a neighbor on a different autonomous system.
route-policy pass-all
pass
end-policy
router bgp 109
address-family ipv4 unicast
network 131.108.0.0 255.0.0.0
network 192.31.7.0 255.0.0.0
neighbor 131.108.200.1
remote-as 167
exit
address-family ipv4 unicast
route-policy pass-all in
route-policy pass-out out
neighbor 131.108.234.2
remote-as 109
exit
address-family ipv4 unicast
neighbor 150.136.64.19
remote-as 99
exit
address-family ipv4 unicast
route-policy pass-all in
route-policy pass-all out
Cisco IOS XR Routing Configuration Guide
RC-127
Implementing BGP on Cisco IOS XR Software
Configuration Examples for Implementing BGP on Cisco IOS XR Software
BGP Confederation: Example
The following is a sample configuration that shows several peers in a confederation. The confederation
consists of three internal autonomous systems with autonomous system numbers 6001, 6002, and 6003.
To the BGP speakers outside the confederation, the confederation looks like a normal autonomous
system with autonomous system number 666 (specified using the bgp confederation identifier
command).
In a BGP speaker in autonomous system 6001, the bgp confederation peers command marks the peers
from autonomous systems 6002 and 6003 as special eBGP peers. Hence, peers 171.69.232.55 and
171.69.232.56 get the local preference, next hop, and MED unmodified in the updates. The router at
160.69.69.1 is a normal eBGP speaker, and the updates received by it from this peer are just like a normal
eBGP update from a peer in autonomous system 666.
router bgp 6001
bgp confederation identifier 666
bgp confederation peers
6002
6003
exit
address-family ipv4 unicast
neighbor 171.69.232.55
remote-as 6002
exit
address-family ipv4 unicast
neighbor 171.69.232.56
remote-as 6003
exit
address-family ipv4 unicast
neighbor 160.69.69.1
remote-as 777
In a BGP speaker in autonomous system 6002, the peers from autonomous systems 6001 and 6003 are
configured as special eBGP peers. Peer 170.70.70.1 is a normal iBGP peer, and peer 199.99.99.2 is a
normal eBGP peer from autonomous system 700.
router bgp 6002
bgp confederation identifier 666
bgp confederation peers
6001
6003
exit
address-family ipv4 unicast
neighbor 170.70.70.1
remote-as 6002
exit
address-family ipv4 unicast
neighbor 171.69.232.57
remote-as 6001
exit
address-family ipv4 unicast
neighbor 171.69.232.56
remote-as 6003
exit
address-family ipv4 unicast
neighbor 199.99.99.2
remote-as 700
exit
address-family ipv4 unicast
route-policy pass-all in
route-policy pass-all out
Cisco IOS XR Routing Configuration Guide
RC-128
Implementing BGP on Cisco IOS XR Software
Configuration Examples for Implementing BGP on Cisco IOS XR Software
In a BGP speaker in autonomous system 6003, the peers from autonomous systems 6001 and 6002 are
configured as special eBGP peers. Peer 200.200.200.200 is a normal eBGP peer from autonomous
system 701.
router bgp 6003
bgp confederation identifier 666
bgp confederation peers
6001
6002
exit
address-family ipv4 unicast
neighbor 171.69.232.57
remote-as 6001
exit
address-family ipv4 unicast
neighbor 171.69.232.55
remote-as 6002
exit
address-family ipv4 unicast
neighbor 200.200.200.200
remote-as 701
exit
address-family ipv4 unicast
route-policy pass-all in
route-policy pass-all out
The following is a part of the configuration from the BGP speaker 200.200.200.205 from autonomous
system 701 in the same example. Neighbor 171.69.232.56 is configured as a normal eBGP speaker from
autonomous system 666. The internal division of the autonomous system into multiple autonomous
systems is not known to the peers external to the confederation.
router bgp 701
address-family ipv4 unicast
neighbor 171.69.232.56
remote-as 666
exit
address-family ipv4 unicast
route-policy pass-all in
route-policy pass-all out
exit
address-family ipv4 unicast
neighbor 200.200.200.205
remote-as 701
BGP Route Reflector: Example
The following example shows how to use an address family to configure internal BGP peer 10.1.1.1 as
a route reflector client for both unicast and multicast prefixes:
router bgp 140
address-family ipv4 unicast
neighbor 10.1.1.1
remote-as 140
address-family ipv4 unicast
route-reflector-client
exit
address-family ipv4 multicast
route-reflector-client
Cisco IOS XR Routing Configuration Guide
RC-129
Implementing BGP on Cisco IOS XR Software
Where to Go Next
BGP MDT Address Family Configuration: Example
The following example shows how to configure an MDT address family in BGP:
router bgp 10
bgp router-id 10.0.0.2
address-family vpnv4 unicast
!
address-family ipv4 mdt
!
neighbor 1.1.1.1
remote-as 11
address-family vpnv4 unicast
route-policy pass-all in
route-policy pass-all out
!
address-family ipv4 mdt
route-policy pass-all in
route-policy pass-all out
!
!
!
Where to Go Next
For detailed information about BGP commands, see Cisco IOS XR Routing Command Reference
document.
Cisco IOS XR Routing Configuration Guide
RC-130
Implementing BGP on Cisco IOS XR Software
Additional References
Additional References
The following sections provide references related to implementing BGP for Cisco IOS XR software.
Related Documents
Related Topic
Document Title
BGP commands: complete command syntax, command Cisco IOS XR Routing Command Reference, Release 3.5
modes, command history, defaults, usage guidelines,
and examples
Cisco Express Forwarding (CEF) commands: complete Cisco IOS XR IP Addresses and Services Command Reference,
command syntax, command modes, command history, Release 3.5
defaults, usage guidelines, and examples
MPLS VPN configuration information.
Cisco IOS XR Multiprotocol Label Switching Configuration Guide,
Release 3.5
Bidirectional Forwarding Detection (BFD)
Cisco IOS XR Interface and Hardware Configuration Guide,
Release 3.5 and Cisco IOS XR Interface and Hardware Command
Reference, Release 3.5
Task ID information.
Configuring AAA Services on Cisco IOS XR Software module of
Cisco IOS XR System Security Configuration Guide, Release 3.5
Standards
Standards
Title
draft-bonica-tcp-auth-05.txt
Authentication for TCP-based Routing and Management Protocols,
by R. Bonica, B. Weis, S. Viswanathan, A. Lange, O. Wheeler
draft-ietf-idr-bgp4-26.txt
A Border Gateway Protocol 4, by Y. Rekhter, T.Li, S. Hares
draft-ietf-idr-bgp4-mib-15.txt
Definitions of Managed Objects for the Fourth Version of Border
Gateway Protocol (BGP-4), by J. Hass and S. Hares
draft-ietf-idr-cease-subcode-05.txt
Subcodes for BGP Cease Notification Message, by Enke Chen, V.
Gillet
draft-ietf-idr-avoid-transition-00.txt
Avoid BGP Best Path Transitions from One External to Another, by
Enke Chen, Srihari Sangli
draft-ietf-idr-as4bytes-12.txt
BGP Support for Four-octet AS Number Space, by Quaizar Vohra,
Enke Chen
draft-nalawade-idr-mdt-safi-03.txt
MDT SAFI, by Gargi Nalawade and Arjun Sreekantiah
Cisco IOS XR Routing Configuration Guide
RC-131
Implementing BGP on Cisco IOS XR Software
Additional References
MIBs
MIBs
MIBs Link
—
To locate and download MIBs using Cisco IOS XR software, use the
Cisco MIB Locator found at the following URL and choose a
platform under the Cisco Access Products menu:
http://cisco.com/public/sw-center/netmgmt/cmtk/mibs.shtml
RFCs
RFCs
Title
RFC 1700
Assigned Numbers
RFC 1997
BGP Communities Attribute
RFC 2385
Protection of BGP Sessions via the TCP MD5 Signature Option
RFC 2439
BGP Route Flap Damping
RFC 2545
Use of BGP-4 Multiprotocol Extensions for IPv6 Inter-Domain
Routing
RFC 2796
BGP Route Reflection - An Alternative to Full Mesh IBGP
RFC 2858
Multiprotocol Extensions for BGP-4
RFC 2918
Route Refresh Capability for BGP-4
RFC 3065
Autonomous System Confederations for BGP
RFC 3392
Capabilities Advertisement with BGP-4
RFC 4271
A Border Gateway Protocol 4 (BGP-4)
RFC 4364
BGP/MPLS IP Virtual Private Networks (VPNs)
RFC 4724
Graceful Restart Mechanism for BGP
Technical Assistance
Description
Link
The Cisco Technical Support website contains
http://www.cisco.com/techsupport
thousands of pages of searchable technical content,
including links to products, technologies, solutions,
technical tips, and tools. Registered Cisco.com users
can log in from this page to access even more content.
Cisco IOS XR Routing Configuration Guide
RC-132
Implementing EIGRP on Cisco IOS XR Software
The Enhanced Interior Gateway Routing Protocol (EIGRP) is an enhanced version of IGRP developed
by Cisco. EIGRP uses distance vector routing technology, which specifies that a router need not know
all the router and link relationships for the entire network. Each router advertises destinations with a
corresponding distance and upon receiving routes, adjusts the distance and propagates the information
to neighboring routes.
This module describes the concepts and tasks you need to implement basic EIGRP configuration using
Cisco IOS XR software.
For EIGRP configuration information related to the following features, see the “Related Documents”
section of this module.
Note
•
Multiprotocol Label Switching (MPLS) Layer 3 Virtual Private Network (VPN)
•
Site of Origin (SoO) Support
For more information about EIGRP on the Cisco IOS XR software and complete descriptions of the
EIGRP commands listed in this module, see the “Related Documents” section of this module. To locate
documentation for other commands that might appear while executing a configuration task, search online
in the Cisco IOS XR software master command index.
Feature History for Implementing EIGRP on Cisco IOS XR Software
Release
Modification
Release 3.3.0
This feature was introduced on the Cisco CRS-1 and
Cisco XR 12000 Series Router.
Release 3.4.0
Four-byte autonomous system (AS) number support was added.
Release 3.5.0
IPv6 address family and IPv6 VPN routing and forwarding (VRF) address
family support was added.
IPv6 Provider Edge and IPv6 VPN Provider Edge Transport over
Multiprotocol Label Switching Infrastructure support was added.
Contents
•
Prerequisites for Implementing EIGRP on Cisco IOS XR Software, page RC-134
•
Restrictions for Implementing EIGRP on Cisco IOS XR Software, page RC-134
•
Information About Implementing EIGRP on Cisco IOS XR Software, page RC-134
Cisco IOS XR Routing Configuration Guide
RC-133
Implementing EIGRP on Cisco IOS XR Software
Prerequisites for Implementing EIGRP on Cisco IOS XR Software
•
How to Implement EIGRP on Cisco IOS XR Software, page RC-146
•
Configuration Examples for Implementing EIGRP on Cisco IOS XR Software, page RC-163
•
Additional References, page RC-165
Prerequisites for Implementing EIGRP on Cisco IOS XR Software
The following are prerequisites for implementing EIGRP on Cisco IOS XR software:
•
You must be in a user group associated with a task group that includes the proper task IDs for EIGRP
commands. For detailed information about user groups and task IDs, see the Configuring AAA
Services on Cisco IOS XR Software module of the Cisco IOS XR System Security Configuration
Guide.
Restrictions for Implementing EIGRP on Cisco IOS XR Software
The following restrictions are employed when running EIGRP on this version of
Cisco IOS XR software:
•
Only one instance of an EIGRP process is supported.
•
Bidirectional Forwarding Detection (BFD) feature and the Simple Network Management Protocol
(SNMP) MIB are not supported.
•
Interface static routes are not automatically redistributed into EIGRP, because there are no network
commands.
•
Metric configuration (either through the default-metric command or a route policy) is required for
redistribution of connected and static routes.
•
Auto summary is disabled by default.
•
Stub leak maps are not supported.
•
Authentication is not supported.
Information About Implementing EIGRP on Cisco IOS XR
Software
To implement EIGRP, you need to understand the following concepts:
•
EIGRP Functional Overview, page RC-135
•
EIGRP Features, page RC-135
•
EIGRP Components, page RC-136
•
EIGRP Configuration Grouping, page RC-137
•
EIGRP Configuration Modes, page RC-137
•
Metric Weights for EIGRP Routing, page RC-139
•
Percentage of Link Bandwidth Used for EIGRP Packets, page RC-140
•
Floating Summary Routes for an EIGRP Process, page RC-140
Cisco IOS XR Routing Configuration Guide
RC-134
Implementing EIGRP on Cisco IOS XR Software
Information About Implementing EIGRP on Cisco IOS XR Software
•
Split Horizon for an EIGRP Process, page RC-142
•
Adjustment of Hello Interval and Hold Time for an EIGRP Process, page RC-142
•
Stub Routing for an EIGRP Process, page RC-143
•
Route Policy Options for an EIGRP Process, page RC-144
•
EIGRP Layer 3 VPN PE-CE Site-of-Origin, page RC-145
•
IPv6 and IPv6 VPN Provider Edge Support over MPLS and IP, page RC-145
EIGRP Functional Overview
Enhanced Interior Gateway Routing Protocol (EIGRP) is an interior gateway protocol suited for many
different topologies and media. EIGRP scales well and provides extremely quick convergence times with
minimal network traffic.
EIGRP has very low usage of network resources during normal operation. Only hello packets are
transmitted on a stable network. When a change in topology occurs, only the routing table changes are
propagated and not the entire routing table. Propagation reduces the amount of load the routing protocol
itself places on the network. EIGRP also provides rapid convergence times for changes in the network
topology.
The distance information in EIGRP is represented as a composite of available bandwidth, delay, load
utilization, and link reliability with improved convergence properties and operating efficiency. The
fine-tuning of link characteristics achieves optimal paths.
The convergence technology that EIGRP uses is based on research conducted at SRI International and
employs an algorithm referred to as the Diffusing Update Algorithm (DUAL). This algorithm guarantees
loop-free operation at every instant throughout a route computation and allows all devices involved in a
topology change to synchronize at the same time. Routers that are not affected by topology changes are
not involved in recomputations. The convergence time with DUAL rivals that of any other existing
routing protocol.
EIGRP Features
EIGRP offers the following features:
•
Fast convergence—The DUAL algorithm allows routing information to converge as quickly as any
currently available routing protocol.
•
Partial updates—EIGRP sends incremental updates when the state of a destination changes, instead
of sending the entire contents of the routing table. This feature minimizes the bandwidth required
for EIGRP packets.
•
Neighbor discovery mechanism—This is a simple hello mechanism used to learn about neighboring
routers. It is protocol independent.
•
Variable-length subnet masks (VLSMs).
•
Arbitrary route summarization.
•
Scaling—EIGRP scales to large networks.
The following lists key features supported in the Cisco IOS XR implementation:
•
Support for IPv4 and IPv6 address families.
Cisco IOS XR Routing Configuration Guide
RC-135
Implementing EIGRP on Cisco IOS XR Software
Information About Implementing EIGRP on Cisco IOS XR Software
•
Provider Edge (PE)-Customer Edge (CE) protocol support with Site of Origin (SoO) and Border
Gateway Protocol (BGP) cost community support.
•
PECE protocol support for MPLS and L2TPv3-based-IP L3VPNs.
EIGRP Components
EIGRP has the following four basic components:
•
Neighbor discovery of neighbor recovery
•
Reliable transport protocol
•
DUAL finite state machine
•
Protocol-dependent modules
Neighbor discovery or neighbor recovery is the process that routers use to dynamically learn of other
routers on their directly attached networks. Routers must also discover when their neighbors become
unreachable or inoperative. Neighbor discovery or neighbor recovery is achieved with low overhead by
periodically sending small hello packets. As long as hello packets are received, the
Cisco IOS XR software can determine that a neighbor is alive and functioning. After this status is
determined, the neighboring routers can exchange routing information.
The reliable transport protocol is responsible for guaranteed, ordered delivery of EIGRP packets to all
neighbors. It supports intermixed transmission of multicast and unicast packets. Some EIGRP packets
must be sent reliably and others need not be. For efficiency, reliability is provided only when necessary.
For example, on a multiaccess network that has multicast capabilities (such as Ethernet) it is not
necessary to send hello packets reliably to all neighbors individually. Therefore, EIGRP sends a single
multicast hello with an indication in the packet informing the receivers that the packet need not be
acknowledged. Other types of packets (such as updates) require acknowledgment, which is indicated in
the packet. The reliable transport has a provision to send multicast packets quickly when
unacknowledged packets are pending. This provision helps to ensure that convergence time remains low
in the presence of various speed links.
The DUAL finite state machine embodies the decision process for all route computations. It tracks all
routes advertised by all neighbors. DUAL uses the distance information (known as a metric) to select
efficient, loop-free paths. DUAL selects routes to be inserted into a routing table based on feasible
successors. A successor is a neighboring router used for packet forwarding that has a least-cost path to
a destination that is guaranteed not to be part of a routing loop. When there are no feasible successors
but there are neighbors advertising the destination, a recomputation must occur. This is the process
whereby a new successor is determined. The amount of time required to recompute the route affects the
convergence time. Recomputation is processor intensive; it is advantageous to avoid unneeded
recomputation. When a topology change occurs, DUAL tests for feasible successors. If there are feasible
successors, it uses any it finds to avoid unnecessary recomputation.
The protocol-dependent modules are responsible for network layer protocol-specific tasks. An example
is the EIGRP module, which is responsible for sending and receiving EIGRP packets that are
encapsulated in IP. It is also responsible for parsing EIGRP packets and informing DUAL of the new
information received. EIGRP asks DUAL to make routing decisions, but the results are stored in the IP
routing table. EIGRP is also responsible for redistributing routes learned by other IP routing protocols.
Cisco IOS XR Routing Configuration Guide
RC-136
Implementing EIGRP on Cisco IOS XR Software
Information About Implementing EIGRP on Cisco IOS XR Software
EIGRP Configuration Grouping
Cisco IOS XR software groups all EIGRP configuration under router EIGRP configuration mode,
including interface configuration portions associated with EIGRP. To display EIGRP configuration in its
entirety, use the show running-config router eigrp command. The command output displays the
running configuration for the configured EIGRP instance, including the interface assignments and
interface attributes.
EIGRP Configuration Modes
The following examples show how to enter each of the configuration modes. From a mode, you can enter
the ? command to display the commands available in that mode.
Router Configuration Mode
The following example shows how to enter router configuration mode:
RP/0/RP0/CPU0:router# configuration
RP/0/RP0/CPU0:router(config)# router eigrp 100
RP/0/RP0/CPU0:router(config-eigrp)#
VRF Configuration Mode
The following example shows how to enter VRF configuration mode:
RP/0/RP0/CPU0:router# configuration
RP/0/RP0/CPU0:router(config)# router eigrp 100
RP/0/RP0/CPU0:router(config-eigrp)# vrf customer1
RP/0/RP0/CPU0:router(config-eigrp-vrf)#
IPv4 Address Family Configuration Mode
The following example shows how to enter IPv4 address family configuration mode:
RP/0/RP0/CPU0:router# configuration
RP/0/RP0/CPU0:router(config)# router eigrp 100
RP/0/RP0/CPU0:router(config-eigrp)# address-family ipv4
RP/0/RP0/CPU0:router(config-eigrp-af)#
IPv6 Address Family Configuration Mode
The following example shows how to enter IPv6 address family configuration mode:
RP/0/RP0/CPU0:router# configuration
RP/0/RP0/CPU0:router(config)# router eigrp 100
RP/0/RP0/CPU0:router(config-eigrp)# address-family ipv6
RP/0/RP0/CPU0:router(config-eigrp-af)#
IPv4 VRF Address Family Configuration Mode
The following example shows how to enter IPv4 VRF address family configuration mode:
RP/0/RP0/CPU0:router# configuration
RP/0/RP0/CPU0:router(config)# router eigrp 100
RP/0/RP0/CPU0:router(config-eigrp)# vrf customer1
RP/0/RP0/CPU0:router(config-eigrp-vrf)# address-family ipv4
RP/0/RP0/CPU0:router(config-eigrp-vrf-af)#
IPv6 VRF Address Family Configuration Mode
The following example shows how to enter IPv6 VRF address family configuration mode:
RP/0/RP0/CPU0:router# configuration
Cisco IOS XR Routing Configuration Guide
RC-137
Implementing EIGRP on Cisco IOS XR Software
Information About Implementing EIGRP on Cisco IOS XR Software
RP/0/RP0/CPU0:router(config)# router eigrp 100
RP/0/RP0/CPU0:router(config-eigrp)# vrf customer1
RP/0/RP0/CPU0:router(config-eigrp-vrf)# address-family ipv6
RP/0/RP0/CPU0:router(config-eigrp-vrf-af)#
Interface Configuration Mode
The following example shows how to enter interface configuration mode in IPv4 address family
configuration mode:
RP/0/RP0/CPU0:router# configuration
RP/0/RP0/CPU0:router(config)# router eigrp 100
RP/0/RP0/CPU0:router(config-eigrp)# address-family ipv4
RP/0/RP0/CPU0:router(config-eigrp-af)# interface POS0/3/0/0
RP/0/RP0/CPU0:router(config-eigrp-af-if)#
The following example shows how to enter interface configuration mode in IPv6 VRF configuration
mode:
RP/0/RP0/CPU0:router# configuration
RP/0/RP0/CPU0:router(config)# router eigrp 100
RP/0/RP0/CPU0:router(config-eigrp)# vrf customer1
RP/0/RP0/CPU0:router(config-eigrp-vrf)# address-family ipv6
RP/0/RP0/CPU0:router(config-eigrp-vrf-af)# interface POS0/5/0/0
RP/0/RP0/CPU0:router(config-eigrp-vrf-af-if)#
EIGRP Interfaces
EIGRP interfaces can be configured as either of the following types:
•
Active—Advertises connected prefixes and forms adjacencies. This is the default type for interfaces.
•
Passive—Advertises connected prefixes but does not form adjacencies. The passive command is
used to configure interfaces as passive. Passive interfaces should be used sparingly for important
prefixes, such as loopback addresses, that need to be injected into the EIGRP domain. If many
connected prefixes need to be advertised, then the redistribution of connected routes with the
appropriate policy should be used instead.
Redistribution for an EIGRP Process
Routes from other protocols can be redistributed into EIGRP. A route policy can be configured along
with the redistribute command. A metric is required, configured either through the default-metric
command or under the route policy configured with the redistribute command to import routes into
EIGRP.
A route policy allows the filtering of routes based on attributes such as the destination, origination
protocol, route type, route tag, and so on. When redistribution is configured under a VRF, EIGRP
retrieves extended communities attached to the route in the routing information base (RIB). The SoO is
used to filter out routing loops in the presence of MPSL VPN backdoor links.
Cisco IOS XR Routing Configuration Guide
RC-138
Implementing EIGRP on Cisco IOS XR Software
Information About Implementing EIGRP on Cisco IOS XR Software
Metric Weights for EIGRP Routing
EIGRP uses the minimum bandwidth on the path to a destination network and the total delay to compute
routing metrics. You can use the metric weights command to adjust the default behavior of EIGRP
routing and metric computations. For example, this adjustment allows you to tune system behavior to
allow for satellite transmission. EIGRP metric defaults have been carefully selected to provide optimal
performance in most networks.
By default, the EIGRP composite metric is a 32-bit quantity that is a sum of the segment delays and
lowest segment bandwidth (scaled and inverted) for a given route. For a network of homogeneous media,
this metric reduces to a hop count. For a network of mixed media (FDDI, Ethernet, and serial lines
running from 9600 bits per second to T1 rates), the route with the lowest metric reflects the most
desirable path to a destination.
Mismatched K Values
Mismatched K values (EIGRP metrics) can prevent neighbor relationships from being established and
can negatively impact network convergence. The following example explains this behavior between two
EIGRP peers (ROUTER-A and ROUTER-B).
The following error message is displayed in the console of ROUTER-B because the K values are
mismatched:
RP/0/RP0/CPU0:Mar 13 08:19:55:eigrp[163]:%ROUTING-EIGRP-5-NBRCHANGE:IP-EIGRP(0) 1:Neighbor
11.0.0.20 (GigabitEthernet0/6/0/0) is down: K-value mismatch
Two scenarios occur in which this error message can be displayed:
•
The two routers are connected on the same link and configured to establish a neighbor relationship.
However, each router is configured with different K values.
The following configuration is applied to ROUTER-A. The K values are changed with the metric
weights command. A value of 2 is entered for the k1 argument to adjust the bandwidth calculation.
The value of 1 is entered for the k3 argument to adjust the delay calculation.
hostname ROUTER-A!
interface GigabitEthernet0/6/0/0
ipv4 address 10.1.1.1 255.255.255.0
router eigrp 100
metric weights 0 2 0 1 0 0
interface GigabitEthernet0/6/0/0
The following configuration is applied to ROUTER-B. However, the metric weights command is
not applied and the default K values are used. The default K values are 1, 0, 1, 0, and 0.
hostname ROUTER-B!
interface GigabitEthernet0/6/0/1
ipv4 address 10.1.1.2 255.255.255.0
router eigrp 100
interface GigabitEthernet0/6/0/1
The bandwidth calculation is set to 2 on ROUTER-A and set to 1 (by default) on ROUTER-B. This
configuration prevents these peers from forming a neighbor relationship.
•
The K-value mismatch error message can also be displayed if one of the two peers has transmitted
a “goodbye” message and the receiving router does not support this message. In this case, the
receiving router interprets this message as a K-value mismatch.
Cisco IOS XR Routing Configuration Guide
RC-139
Implementing EIGRP on Cisco IOS XR Software
Information About Implementing EIGRP on Cisco IOS XR Software
The Goodbye Message
The goodbye message is a feature designed to improve EIGRP network convergence. The goodbye
message is broadcast when an EIGRP routing process is shut down to inform adjacent peers about
the impending topology change. This feature allows supporting EIGRP peers to synchronize and
recalculate neighbor relationships more efficiently than would occur if the peers discovered the
topology change after the hold timer expired.
The following message is displayed by routers that run a supported release when a goodbye message
is received:
RP/0/RP0/CPU0:Mar 13 09:13:17:eigrp[163]:%ROUTING-EIGRP-5-NBRCHANGE: IP-EIGRP(0) 1:
Neighbor 10.0.0.20 (GigabitEthernet0/6/0/0) is down: Interface Goodbye received
A Cisco router that runs a software release that does not support the goodbye message can
misinterpret the message as a K-value mismatch and display the following message:
RP/0/RP0/CPU0:Mar 13 09:13:17:eigrp[163]:%ROUTING-EIGRP-5-NBRCHANGE: IP-EIGRP(0) 1:
Neighbor 10.0.0.20 (GigabitEthernet0/6/0/0) is down: K-value mismatch
Note
The receipt of a goodbye message by a non supporting peer does not disrupt normal network operation.
The non supporting peer terminates the session when the hold timer expires. The sending and receiving
routers reconverge normally after the sender reloads.
Percentage of Link Bandwidth Used for EIGRP Packets
By default, EIGRP packets consume a maximum of 50 percent of the link bandwidth, as configured with
the bandwidth interface configuration command. You might want to change that value if a different level
of link utilization is required or if the configured bandwidth does not match the actual link bandwidth
(it may have been configured to influence route metric calculations).
Floating Summary Routes for an EIGRP Process
You can also use a floating summary route when configuring the summary-address command. The
floating summary route is created by applying a default route and administrative distance at the interface
level. The following scenario illustrates the behavior of this enhancement.
Figure 11 shows a network with three routers, Router-A, Router-B, and Router-C. Router-A learns a
default route from elsewhere in the network and then advertises this route to Router-B. Router-B is
configured so that only a default summary route is advertised to Router-C. The default summary route
is applied to interface 0/1 on Router-B with the following configuration:
RP/0/RP0/CPU0:router(config)# router eigrp 100
RP/0/RP0/CPU0:router(config-eigrp)# address-family ipv4
RP/0/RP0/CPU0:router(config-eigrp-af)# interface POS0/3/0/0
RP/0/RP0/CPU0:router(config-eigrp-af-if)# summary-address 100.0.0.0 0.0.0.0
Cisco IOS XR Routing Configuration Guide
RC-140
Implementing EIGRP on Cisco IOS XR Software
Information About Implementing EIGRP on Cisco IOS XR Software
Figure 11
Floating Summary Route Is Applied to Router-B
10.1.1.0/24
0.0.0.0/0
Router-A
Router-C
Router-B
address-family ipv4
interface POS0/3/0/0
summary-address 0.0.0.0/0 25
150000
RP/0/RP0/CPU0:router-B# show route
. . . .
0.0.0.0/0 via <Router-A> (489765/170)
RP/0/RP0/CPU0:router-C# show route
. . . .
0.0.0.0/0 via <Router-B> (489765/90)
The configuration of the default summary route on Router-B sends a 0.0.0.0/0 summary route to
Router-C and blocks all other routes, including the 10.1.1.0/24 route, from being advertised to Router-C.
However, this configuration also generates a local discard route on Router-B, a route for 0.0.0.0/0 to the
null 0 interface with an administrative distance of 5. When this route is created, it overrides the EIGRP
learned default route. Router-B is no longer able to reach destinations that it would normally reach
through the 0.0.0.0.0/0 route.
This problem is resolved by applying a floating summary route to the interface on Router-B that connects
to Router-C. The floating summary route is applied by relating an administrative distance to the default
summary route on the interface of Router-B with the following statement:
RP/0/RP0/CPU0:router(config-if)# summary-address 100 0.0.0.0 0.0.0.0 250
The administrative distance of 250, applied in the above statement, is now assigned to the discard route
generated on Router-B. The 0.0.0.0/0, from Router-A, is learned through EIGRP and installed in the
local routing table. Routing to Router-C is restored.
If Router-A loses the connection to Router-B, Router-B continues to advertise a default route to
Router-C, which allows traffic to continue to reach destinations attached to Router-B. However, traffic
destined for networks to Router-A or behind Router-A is dropped when the traffic reaches Router-B.
Figure 12 shows a network with two connections from the core: Router-A and Router-D. Both routers
have floating summary routes configured on the interfaces connected to Router-C. If the connection
between Router-E and Router-C fails, the network continues to operate normally. All traffic flows from
Router-C through Router-B to the hosts attached to Router-A and Router-D.
Cisco IOS XR Routing Configuration Guide
RC-141
Implementing EIGRP on Cisco IOS XR Software
Information About Implementing EIGRP on Cisco IOS XR Software
Figure 12
Floating Summary Route Applied for Dual-Homed Remotes
10.1.1.0/24
0.0.0.0/0
0.0.0.0/0
Router-A
Router-C
Router-B
0.0.0.0/0
Router-E
158001
Router-D
0.0.0.0/0
address-family ipv4
interface POS03/0/0
summary-address 0.0.0.0/0 250
RP/0/RP0/CPU0:router# show route
. . . .
0.0.0.0/0 via <Router-A> (489765/170)
However, if the link between Router-D and Router-E fails, the network may dump traffic into a black
hole because Router-E continues to advertise the default route (0.0.0.0/0) to Router-C, as long as at least
one link (other than the link to Router-C) to Router-E is still active. In this scenario, Router-C still
forwards traffic to Router-E, but Router-E drops the traffic creating the black hole. To avoid this
problem, you should configure the summary address with an administrative distance on only
single-homed remote routers or areas in which only one exit point exists between the segments of the
network. If two or more exit points exist (from one segment of the network to another), configuring the
floating default route can cause a black hole to form.
Split Horizon for an EIGRP Process
Split horizon controls the sending of EIGRP update and query packets. When split horizon is enabled on
an interface, update and query packets are not sent for destinations for which this interface is the next
hop. Controlling update and query packets in this manner reduces the possibility of routing loops.
By default, split horizon is enabled on all interfaces.
Split horizon blocks route information from being advertised by a router on any interface from which
that information originated. This behavior usually optimizes communications among multiple routing
devices, particularly when links are broken. However, with nonbroadcast networks (such as Frame Relay
and SMDS), situations can arise for which this behavior is less than ideal. For these situations, including
networks in which you have EIGRP configured, you may want to disable split horizon.
Adjustment of Hello Interval and Hold Time for an EIGRP Process
You can adjust the interval between hello packets and the hold time.
Cisco IOS XR Routing Configuration Guide
RC-142
Implementing EIGRP on Cisco IOS XR Software
Information About Implementing EIGRP on Cisco IOS XR Software
Routing devices periodically send hello packets to each other to dynamically learn of other routers on
their directly attached networks. This information is used to discover neighbors and learn when
neighbors become unreachable or inoperative. By default, hello packets are sent every 5 seconds.
You can configure the hold time on a specified interface for a particular EIGRP routing process
designated by the autonomous system number. The hold time is advertised in hello packets and indicates
to neighbors the length of time they should consider the sender valid. The default hold time is three times
the hello interval, or 15 seconds.
Stub Routing for an EIGRP Process
The EIGRP Stub Routing feature improves network stability, reduces resource usage, and simplifies stub
router configuration.
Stub routing is commonly used in a hub-and-spoke network topology. In a hub-and-spoke network, one
or more end (stub) networks are connected to a remote router (the spoke) that is connected to one or more
distribution routers (the hub). The remote router is adjacent only to one or more distribution routers. The
only route for IP traffic to follow into the remote router is through a distribution router. This type of
configuration is commonly used in WAN topologies in which the distribution router is directly connected
to a WAN. The distribution router can be connected to many more remote routers. Often, the distribution
router is connected to 100 or more remote routers. In a hub-and-spoke topology, the remote router must
forward all nonlocal traffic to a distribution router, so it becomes unnecessary for the remote router to
hold a complete routing table. Generally, the distribution router need not send anything more than a
default route to the remote router.
When using the EIGRP Stub Routing feature, you need to configure the distribution and remote routers
to use EIGRP and configure only the remote router as a stub. Only specified routes are propagated from
the remote (stub) router. The stub router responds to all queries for summaries, connected routes,
redistributed static routes, external routes, and internal routes with the message “inaccessible.” A router
that is configured as a stub sends a special peer information packet to all neighboring routers to report
its status as a stub router.
Any neighbor that receives a packet informing it of the stub status does not query the stub router for any
routes, and a router that has a stub peer does not query that peer. The stub router depends on the
distribution router to send the proper updates to all peers.
Figure 13 shows a simple hub-and-spoke configuration.
Figure 13
Simple Hub-and-Spoke Network
Internet
Remote
router
(spoke)
46094
Distribution
router
(hub)
10.1.1.0/24
Corporate
network
Cisco IOS XR Routing Configuration Guide
RC-143
Implementing EIGRP on Cisco IOS XR Software
Information About Implementing EIGRP on Cisco IOS XR Software
The stub routing feature by itself does not prevent routes from being advertised to the remote router. In
the example in Figure 13, the remote router can access the corporate network and the Internet through
the distribution router only. Having a full route table on the remote router, in this example, would serve
no functional purpose because the path to the corporate network and the Internet would always be
through the distribution router. The larger route table would only reduce the amount of memory required
by the remote router. Bandwidth and memory can be conserved by summarizing and filtering routes in
the distribution router. The remote router need not receive routes that have been learned from other
networks because the remote router must send all nonlocal traffic, regardless of destination, to the
distribution router. If a true stub network is desired, the distribution router should be configured to send
only a default route to the remote router. The EIGRP Stub Routing feature does not automatically enable
summarization on the distribution router. In most cases, the network administrator needs to configure
summarization on the distribution routers.
Without the stub feature, even after the routes that are sent from the distribution router to the remote
router have been filtered or summarized, a problem might occur. If a route is lost somewhere in the
corporate network, EIGRP could send a query to the distribution router, which in turn sends a query to
the remote router even if routes are being summarized. If there is a problem communicating over the
WAN link between the distribution router and the remote router, an EIGRP stuck in active (SIA)
condition could occur and cause instability elsewhere in the network. The EIGRP Stub Routing feature
allows a network administrator to prevent queries from being sent to the remote router.
Route Policy Options for an EIGRP Process
Route policies comprise series of statements and expressions that are bracketed with the route-policy
and end-policy keywords. Rather than a collection of individual commands (one for each line), the
statements within a route policy have context relative to each other. Thus, instead of each line being an
individual command, each policy or set is an independent configuration object that can be used, entered,
and manipulated as a unit.
Each line of a policy configuration is a logical subunit. At least one new line must follow the then, else,
and end-policy keywords. A new line must also follow the closing parenthesis of a parameter list and
the name string in a reference to an AS path set, community set, extended community set, or prefix set
(in the EIGRP context). At least one new line must precede the definition of a route policy or prefix set.
A new line must appear at the end of a logical unit of policy expression and may not appear anywhere
else.
This is the command to set the EIGRP metric in a route policy:
RP/0/RP0/CPU0:router(config-rpl)# set eigrp-metric bandwidth delay reliability loading mtu
This is the command to provide EIGRP offset list functionality in a route policy:
RP/0/RP0/CPU0:router(config-rpl)# add eigrp-metric bandwidth delay reliability loading mtu
A route policy can be used in EIGRP only if all the statements are applicable to the particular EIGRP
attach point. The following commands accept a route policy:
•
default-information allowed—Match statements are allowed for destination. No set statements are
allowed.
•
route-policy—Match statements are allowed for destination, next hop, and tag. Set statements are
allowed for eigrp-metric and tag.
•
redistribute—Match statements are allowed for destination, next hop, source-protocol, tag and
route-type. Set statements are allowed for eigrp-metric and tag.
The range for setting a tag is 0 to 255 for internal routes and 0 to 4294967295 for external routes.
Cisco IOS XR Routing Configuration Guide
RC-144
Implementing EIGRP on Cisco IOS XR Software
Information About Implementing EIGRP on Cisco IOS XR Software
EIGRP Layer 3 VPN PE-CE Site-of-Origin
The EIGRP MPLS and IP VPN PE-CE Site-of-Origin (SoO) feature introduces the capability to filter
Multiprotocol Label Switching (MPLS) and IP Virtual Private Network (VPN) traffic on a per-site basis
for EIGRP networks. SoO filtering is configured at the interface level and is used to manage MPLS and
IP VPN traffic and to prevent transient routing loops from occurring in complex and mixed network
topologies.
Router Interoperation with the Site-of-Origin Extended Community
The configuration of the SoO extended community allows routers that support this feature to identify the
site from which each route originated. When this feature is enabled, the EIGRP routing process on the
PE or CE router checks each received route for the SoO extended community and filters based on the
following conditions:
•
A received route from BGP or a CE router contains a SoO value that matches the SoO value on the
receiving interface:
– If a route is received with an associated SoO value that matches the SoO value that is configured
on the receiving interface, the route is filtered out because it was learned from another PE router
or from a backdoor link. This behavior is designed to prevent routing loops.
•
A received route from a CE router is configured with a SoO value that does not match:
– If a route is received with an associated SoO value that does not match the SoO value that is
configured on the receiving interface, the route is accepted into the EIGRP topology table so
that it can be redistributed into BGP.
– If the route is already installed in the EIGRP topology table but is associated with a different
SoO value, the SoO value from the topology table is used when the route is redistributed into
BGP.
•
A received route from a CE router does not contain a SoO value:
– If a route is received without a SoO value, the route is accepted into the EIGRP topology table,
and the SoO value from the interface that is used to reach the next-hop CE router is appended
to the route before it is redistributed into BGP.
When BGP and EIGRP peers that support the SoO extended community receive these routes, they also
receive the associated SoO values and pass them to other BGP and EIGRP peers that support the SoO
extended community. This filtering is designed to prevent transient routes from being relearned from the
originating site, which prevents transient routing loops from occurring.
In conjunction with BGP cost community, EIGRP, BGP, and the RIB ensure that paths over the MPLS
VPN core are preferred over backdoor links.
For MPLS and IP VPN and SoO configuration information, see Implementing MPLS Layer 3 VPNs in
Cisco IOS XR Multiprotocol Label Switching Configuration Guide.
IPv6 and IPv6 VPN Provider Edge Support over MPLS and IP
IPv6 Provider Edge (6PE) and IPv6 VPN Provider Edge (6VPE) uses the existing IP and Multiprotocol
Label Switching (MPLS) IPv4 core infrastructure for IPv6 transport. 6PE and 6VPE enable IPv6 sites
to communicate with each other over an IP and MPLS IPv4 core network using MPLS label switched
paths (LSPs).
Cisco IOS XR Routing Configuration Guide
RC-145
Implementing EIGRP on Cisco IOS XR Software
How to Implement EIGRP on Cisco IOS XR Software
Note
This feature is supported on Cisco XR 12000 Series Routers.
EIGRP is an Interior Gateway Protocol (IGP) that supports the 6PE or 6VPE provider edge-to-customer
edge protocol by supporting the configuration of IPv6 address families in EIGRP VRF and exchanging
IPv6 routing updates in the L3VPN environment
For detailed information on configuring 6PE and 6VPE over MPLS and IP, see Cisco IOS XR
Multiprotocol Label Switching Configuration Guide.
How to Implement EIGRP on Cisco IOS XR Software
This section contains instructions for the following tasks:
Note
•
Enabling EIGRP Routing, page RC-146 (required)
•
Configuring Route Summarization for an EIGRP Process, page RC-148 (optional)
•
Redistributing Routes for EIGRP, page RC-150 (optional)
•
Creating a Route Policy and Attaching It to an EIGRP Process, page RC-152 (optional)
•
Configuring Stub Routing for an EIGRP Process, page RC-155 (optional)
•
Configuring EIGRP as a PE-CE Protocol, page RC-156 (optional)
•
Redistributing BGP Routes into EIGRP, page RC-158 (optional)
•
Monitoring EIGRP Routing, page RC-160 (optional)
•
Monitoring EIGRP Routing, page RC-160 (optional)
To save configuration changes, you must commit changes when the system prompts you.
Enabling EIGRP Routing
This task enables EIGRP routing and establishes an EIGRP routing process.
Prerequisites
Although you can configure EIGRP before you configure an IP address, no EIGRP routing occurs until
at least one IP address is configured.
SUMMARY STEPS
1.
configure
2.
router eigrp as-number
3.
address-family {ipv4 | ipv6}
4.
router-id id
5.
default-metric bandwidth delay reliability loading mtu
6.
distance internal-distance external-distance
Cisco IOS XR Routing Configuration Guide
RC-146
Implementing EIGRP on Cisco IOS XR Software
How to Implement EIGRP on Cisco IOS XR Software
7.
interface type instance
8.
holdtime seconds
9.
bandwidth-percent percent
10. end
or
commit
DETAILED STEPS
Step 1
Command or Action
Purpose
configure
Enters global configuration mode.
Example:
RP/0/RP0/CPU0:router# configure
Step 2
router eigrp as-number
Configures an EIGRP routing process.
Example:
RP/0/RP0/CPU0:router(config)# router eigrp 100
Step 3
address-family {ipv4 | ipv6}
Enters an address family configuration mode.
Example:
RP/0/RP0/CPU0:router(config-eigrp)#
address-family ipv4
Step 4
router-id id
(Optional) Configures a router-id for an EIGRP process.
Note
Example:
RP/0/RP0/CPU0:router(config-eigrp)# router-id
172.20.1.1
Step 5
default-metric bandwidth delay reliability
loading mtu
It is good practice to use the router-id command to
explicitly specify a unique 32-bit numeric value for
the router ID. This action ensures that EIGRP can
function regardless of the interface address
configuration.
(Optional) Sets metrics for an EIGRP process.
Example:
RP/0/RP0/CPU0:router(config-eigrp-af)#
default-metric 1000 100 250 100 1500
Step 6
distance internal-distance external-distance
Example:
(Optional) Allows the use of two administrative
distances—internal and external—that could be a better
route to a node.
RP/0/RP0/CPU0:router(config-eigrp-af)# distance
80 130
Step 7
interface type instance
Defines the interfaces on which the EIGRP routing protocol
runs.
Example:
RP/0/RP0/CPU0:router(config-eigrp-af)#
interface pos 0/1/0/0
Cisco IOS XR Routing Configuration Guide
RC-147
Implementing EIGRP on Cisco IOS XR Software
How to Implement EIGRP on Cisco IOS XR Software
Step 8
Command or Action
Purpose
holdtime seconds
(Optional) Configures the hold time for an interface.
Note
Example:
RP/0/RP0/CPU0:router(config-eigrp-af-if)#
holdtime 30
Step 9
bandwidth-percent percent
To ensure nonstop forwarding during RP failovers,
as the number of neighbors increase, a higher
holdtime than the default value is recommended.
With 256 neighbors across all VRFs, we
recommend 60 seconds.
(Optional) Configures the percentage of bandwidth that
may be used by EIGRP on an interface.
Example:
RP/0/RP0/CPU0:router(config-eigrp-af-if)#
bandwidth-percent 75
Step 10
Saves configuration changes.
end
or
commit
•
When you issue the end command, the system prompts
you to commit changes:
Uncommitted changes found, commit them before
exiting(yes/no/cancel)?
[cancel]:
Example:
RP/0/RP0/CPU0:router(config-eigrp-af-if)# end
or
– Entering yes saves configuration changes to the
RP/0/RP0/CPU0:router(config-eigrp-af-if)#
commit
running configuration file, exits the configuration
session, and returns the router to EXEC mode.
– Entering no exits the configuration session and
returns the router to EXEC mode without
committing the configuration changes.
– Entering cancel leaves the router in the current
configuration session without exiting or
committing the configuration changes.
•
Use the commit command to save the configuration
changes to the running configuration file and remain
within the configuration session.
Configuring Route Summarization for an EIGRP Process
This task configures route summarization for an EIGRP process.
You can configure a summary aggregate address for a specified interface. If any more specific routes are
in the routing table, EIGRP advertises the summary address from the interface with a metric equal to the
minimum of all more specific routes.
Restrictions
You should not use the summary-address summarization command to generate the default route
(0.0.0.0) from an interface. This command creates an EIGRP summary default route to the null 0
interface with an administrative distance of 5. The low administrative distance of this default route can
cause this route to displace default routes learned from other neighbors from the routing table. If the
Cisco IOS XR Routing Configuration Guide
RC-148
Implementing EIGRP on Cisco IOS XR Software
How to Implement EIGRP on Cisco IOS XR Software
default route learned from the neighbors is displaced by the summary default route or the summary route
is the only default route present, all traffic destined for the default route does not leave the router;
instead, this traffic is sent to the null 0 interface, where it is dropped.
The recommended way to send only the default route from a given interface is to use a route-policy
command.
SUMMARY STEPS
1.
configure
2.
router eigrp as-number
3.
address-family {ipv4 | ipv6}
4.
route-policy name out
5.
interface type instance
6.
summary-address ip-address {/length | mask} [admin-distance]
7.
end
or
commit
DETAILED STEPS
Step 1
Command or Action
Purpose
configure
Enters global configuration mode.
Example:
RP/0/RP0/CPU0:router# configure
Step 2
router eigrp as-number
Configures an EIGRP routing process.
Example:
RP/0/RP0/CPU0:router(config)# router eigrp 100
Step 3
address-family {ipv4 | ipv6}
Enters an address family configuration mode.
Example:
RP/0/RP0/CPU0:router(config-eigrp)#
address-family ipv4
Step 4
route-policy name out
Applies a routing policy to updates advertised to or received
from an EIGRP neighbor.
Example:
RP/0/RP0/CPU0:router(config-eigrp-af)#
route-policy FILTER_DEFAULT out
Step 5
interface type instance
Defines the interfaces on which the EIGRP routing protocol
runs.
Example:
RP/0/RP0/CPU0:router(config-eigrp-af)#
interface pos 0/1/0/0
Cisco IOS XR Routing Configuration Guide
RC-149
Implementing EIGRP on Cisco IOS XR Software
How to Implement EIGRP on Cisco IOS XR Software
Step 6
Command or Action
Purpose
summary-address ip-address {/length | mask}
[ admin-distance]
Configures a summary aggregate address for the specified
EIGRP interface.
Example:
RP/0/RP0/CPU0:router(config-eigrp-af-if)#
summary-address 192.168.0.0/16 95
Step 7
Saves configuration changes.
end
or
commit
•
When you issue the end command, the system prompts
you to commit changes:
Uncommitted changes found, commit them before
exiting(yes/no/cancel)?
[cancel]:
Example:
RP/0/RP0/CPU0:router(config-eigrp-af-if)# end
or
– Entering yes saves configuration changes to the
RP/0/RP0/CPU0:router(config-eigrp-af-if)#
commit
running configuration file, exits the configuration
session, and returns the router to EXEC mode.
– Entering no exits the configuration session and
returns the router to EXEC mode without
committing the configuration changes.
– Entering cancel leaves the router in the current
configuration session without exiting or
committing the configuration changes.
•
Use the commit command to save the configuration
changes to the running configuration file and remain
within the configuration session.
Redistributing Routes for EIGRP
This task explains how to redistribute routes, apply limits on the number of routes, and set timers for
nonstop forwarding.
SUMMARY STEPS
1.
configure
2.
router eigrp as-number
3.
address-family{ipv4 | ipv6}
4.
redistribute {{bgp | connected | isis | ospf | ospfv3 | rip | static} [as-number]} [route-policy name]
5.
redistribute maximum-prefix maximum [threshold] [[dampened] [reset-time minutes] [restart
minutes] [restart-count number] | [warning-only]]
6.
timers nsf route-hold seconds
7.
maximum paths maximum
8.
maximum-prefix maximum [threshold] [[dampened] [reset-time minutes] [restart minutes]
[restart-count number] | [warning-only]]
Cisco IOS XR Routing Configuration Guide
RC-150
Implementing EIGRP on Cisco IOS XR Software
How to Implement EIGRP on Cisco IOS XR Software
9.
end
or
commit
DETAILED STEPS
Step 1
Command or Action
Purpose
configure
Enters global configuration mode.
Example:
RP/0/RP0/CPU0:router# configure
Step 2
router eigrp as-number
Configures an EIGRP routing process.
Example:
RP/0/RP0/CPU0:router(config)# router eigrp 100
Step 3
address-family {ipv4 | ipv6}
Enters an address family configuration mode.
Example:
RP/0/RP0/CPU0:router(config-eigrp)#
address-family ipv4
Step 4
redistribute {{bgp | connected | isis | ospf |
ospfv3 | rip | static} [as-number]}
[route-policy name]
Injects routes from one routing domain into EIGRP.
Example:
RP/0/RP0/CPU0:router(config-eigrp-af)#
redistribute bgp 100
Step 5
redistribute maximum-prefix maximum
[threshold] [[dampened] [reset-time minutes]
[restart minutes] [restart-count number] |
[warning-only]]
Limits the number of prefixes redistributed into an EIGRP
process.
Example:
RP/0/RP0/CPU0:router(config-eigrp-af)#
redistribute maximum-prefix 5000 95
warning-only
Step 6
timers nsf route-hold seconds
Sets the timer that determines how long an NSF-aware
EIGRP router holds routes for an inactive peer.
Example:
RP/0/RP0/CPU0:router(config-eigrp-af)# timers
nsf route-hold 120
Step 7
maximum paths maximum
Controls the maximum number of parallel routes that the
EIGRP can support.
Example:
RP/0/RP0/CPU0:router(config-eigrp-af)# maximum
paths 10
Cisco IOS XR Routing Configuration Guide
RC-151
Implementing EIGRP on Cisco IOS XR Software
How to Implement EIGRP on Cisco IOS XR Software
Step 8
Command or Action
Purpose
maximum-prefix maximum [threshold] [[dampened]
[reset-time minutes] [restart minutes]
[restart-count number] | [warning-only]]
Limits the number of prefixes that are accepted under an
address family by EIGRP.
Example:
RP/0/RP0/CPU0:router(config-eigrp-af)#
maximum-prefix 50000
Step 9
Saves configuration changes.
end
or
commit
•
When you issue the end command, the system prompts
you to commit changes:
Uncommitted changes found, commit them before
exiting(yes/no/cancel)?
[cancel]:
Example:
RP/0/RP0/CPU0:router(config-eigrp-af)# end
or
– Entering yes saves configuration changes to the
RP/0/RP0/CPU0:router(config-eigrp-af)# commit
running configuration file, exits the configuration
session, and returns the router to EXEC mode.
– Entering no exits the configuration session and
returns the router to EXEC mode without
committing the configuration changes.
– Entering cancel leaves the router in the current
configuration session without exiting or
committing the configuration changes.
•
Use the commit command to save the configuration
changes to the running configuration file and remain
within the configuration session.
Creating a Route Policy and Attaching It to an EIGRP Process
This task defines a route policy and shows how to attach it to an EIGRP process.
A route policy definition consists of the route-policy command and name argument followed by a
sequence of optional policy statements, and then closed with the end-policy command.
A route policy is not useful until it is applied to routes of a routing protocol.
SUMMARY STEPS
1.
configure
2.
route-policy name
3.
set eigrp-metric bandwidth delay reliability load mtu
4.
end-policy
5.
end
or
commit
6.
configure
7.
router eigrp as-number
Cisco IOS XR Routing Configuration Guide
RC-152
Implementing EIGRP on Cisco IOS XR Software
How to Implement EIGRP on Cisco IOS XR Software
8.
address-family {ipv4 | ipv6}
9.
route-policy route-policy-name {in | out}
10. end
or
commit
DETAILED STEPS
Step 1
Command or Action
Purpose
configure
Enters global configuration mode.
Example:
RP/0/RP0/CPU0:router# configure
Step 2
route-policy name
Defines a route policy and enters route-policy configuration
mode.
Example:
RP/0/RP0/CPU0:router(config)# route-policy
IN-IPv4
Step 3
set eigrp-metric bandwidth delay reliability
load mtu
(Optional) Sets the EIGRP metric attribute.
Example:
RP/0/RP0/CPU0:router(config-rpl)# set eigrp
metric 42 100 200 100 1200
Step 4
end-policy
Ends the definition of a route policy and exits route-policy
configuration mode.
Example:
RP/0/RP0/CPU0:router(config-rpl)# end-policy
Step 5
end
or
commit
Saves configuration changes.
•
When you issue the end command, the system prompts
you to commit changes:
Uncommitted changes found, commit them before
exiting(yes/no/cancel)?
[cancel]:
Example:
RP/0/RP0/CPU0:router(config-rpl)# end
or
– Entering yes saves configuration changes to the
RP/0/RP0/CPU0:router(config-rpl)# commit
running configuration file, exits the configuration
session, and returns the router to EXEC mode.
– Entering no exits the configuration session and
returns the router to EXEC mode without
committing the configuration changes.
– Entering cancel leaves the router in the current
configuration session without exiting or
committing the configuration changes.
•
Use the commit command to save the configuration
changes to the running configuration file and remain
within the configuration session.
Cisco IOS XR Routing Configuration Guide
RC-153
Implementing EIGRP on Cisco IOS XR Software
How to Implement EIGRP on Cisco IOS XR Software
Step 6
Command or Action
Purpose
configure
Enters global configuration mode.
Example:
RP/0/RP0/CPU0:router# configure
Step 7
router eigrp as-number
Configures an EIGRP routing process.
Example:
RP/0/RP0/CPU0:router(config)# router eigrp 100
Step 8
address-family {ipv4 | ipv6}
Enters an address family configuration mode.
Example:
RP/0/RP0/CPU0:router(config-eigrp)#
address-family ipv4
Step 9
route-policy route-policy-name {in | out}
Applies a routing policy to updates advertised to or received
from an EIGRP neighbor.
Example:
RP/0/RP0/CPU0:router(config-eigrp-af)#
route-policy IN-IPv4 in
Step 10
end
or
commit
Saves configuration changes.
•
When you issue the end command, the system prompts
you to commit changes:
Uncommitted changes found, commit them before
exiting(yes/no/cancel)?
[cancel]:
Example:
RP/0/RP0/CPU0:router(config-eigrp-af)# end
or
– Entering yes saves configuration changes to the
RP/0/RP0/CPU0:router(config-eigrp-af)# commit
running configuration file, exits the configuration
session, and returns the router to EXEC mode.
– Entering no exits the configuration session and
returns the router to EXEC mode without
committing the configuration changes.
– Entering cancel leaves the router in the current
configuration session without exiting or
committing the configuration changes.
•
Cisco IOS XR Routing Configuration Guide
RC-154
Use the commit command to save the configuration
changes to the running configuration file and remain
within the configuration session.
Implementing EIGRP on Cisco IOS XR Software
How to Implement EIGRP on Cisco IOS XR Software
Configuring Stub Routing for an EIGRP Process
This task configures the distribution and remote routers to use an EIGRP process for stub routing.
Restrictions
EIGRP stub routing should be used only on remote routers. A stub router is defined as a router connected
to the network core or distribution layer through which core transit traffic should not flow. A stub router
should not have any EIGRP neighbors other than distribution routers. Ignoring this restriction causes
undesirable behavior.
SUMMARY STEPS
1.
configure
2.
router eigrp as-number
3.
address-family {ipv4 | ipv6}
4.
stub [receive-only | {[connected] [redistributed] [static] [summary]}]
5.
end
or
commit]
6.
show eigrp [ipv4 | ipv6] [vrf {vrf-name | all}] neighbors [as-number] [detail] [interface-type
interface-instance | static]
DETAILED STEPS
Step 1
Command or Action
Purpose
configure
Enters global configuration mode.
Example:
RP/0/RP0/CPU0:router# configure
Step 2
router eigrp as-number
Configures an EIGRP routing process.
Example:
RP/0/RP0/CPU0:router(config)# router eigrp 100
Step 3
address-family {ipv4 | ipv6}
Enters an address family configuration mode.
Example:
RP/0/RP0/CPU0:router(config-eigrp)#
address-family ipv6
Step 4
stub [receive-only | {[connected]
[redistributed] [static] [summary]}]
Configures a router as a stub for EIGRP.
Example:
RP/0/RP0/CPU0:router(config-eigrp-af)# stub
receive-only
Cisco IOS XR Routing Configuration Guide
RC-155
Implementing EIGRP on Cisco IOS XR Software
How to Implement EIGRP on Cisco IOS XR Software
Step 5
Command or Action
Purpose
end
or
commit
Saves configuration changes.
•
When you issue the end command, the system prompts
you to commit changes:
Uncommitted changes found, commit them before
exiting(yes/no/cancel)?
[cancel]:
Example:
RP/0/RP0/CPU0:router(config-eigrp-af)# end
or
– Entering yes saves configuration changes to the
RP/0/RP0/CPU0:router(config-eigrp-af)# commit
running configuration file, exits the configuration
session, and returns the router to EXEC mode.
– Entering no exits the configuration session and
returns the router to EXEC mode without
committing the configuration changes.
– Entering cancel leaves the router in the current
configuration session without exiting or
committing the configuration changes.
•
Step 6
show eigrp [ipv4 | ipv6] [vrf {vrf-name |
all}] neighbors [as-number] [detail]
[interface-type interface-instance | static]
Use the commit command to save the configuration
changes to the running configuration file and remain
within the configuration session.
Verifies that a remote router has been configured as a stub
router with EIGRP.
The last line of the output shows the stub status of the
remote or spoke router.
Example:
RP/0/RP0/CPU0:router# show eigrp neighbors
detail
Configuring EIGRP as a PE-CE Protocol
Perform this task to configure EIGRP on the provider edge (PE) and establish provider edge-to-customer
edge (PE-CE) communication using EIGRP.
SUMMARY STEPS
1.
configure
2.
router eigrp as-number
3.
vrf vrf-name
4.
address-family {ipv4 | ipv6}
5.
router-id router-id
6.
autonomous-system as-number
7.
redistribute {{bgp | connected | isis | ospf | ospfv3 | rip | static} [as-number | instance-name]}
[route-policy name]
8.
interface type instance
9.
site-of-origin {as-number:number | ip-address:number}
Cisco IOS XR Routing Configuration Guide
RC-156
Implementing EIGRP on Cisco IOS XR Software
How to Implement EIGRP on Cisco IOS XR Software
10. end
or
commit
DETAILED STEPS
Step 1
Command or Action
Purpose
configure
Enters global configuration mode.
Example:
RP/0/RP0/CPU0:router# configure
Step 2
router eigrp as-number
Configures an EIGRP routing process.
Example:
RP/0/RP0/CPU0:router(config)# router eigrp 100
Step 3
vrf vrf-name
Configures a VPN routing and forwarding (VRF) instance.
Example:
RP/0/RP0/CPU0:router(config-eigrp)# vrf vrf_A
Step 4
address-family {ipv4 | ipv6}
Enters a VRF address family configuration mode.
Example:
RP/0/RP0/CPU0:router(config-eigrp-vrf)#
address-family ipv4
Step 5
router-id router-id
Configures a router ID for the EIGRP process.
Example:
RP/0/RP0/CPU0:router(config-eigrp-vrf-af)#
router-id 33
Step 6
autonomous-system as-number
Configures an EIGRP routing process to run within the VRF
instance.
Example:
RP/0/RP0/CPU0:router(config-eigrp-vrf-af)#
autonomous-system 2
Step 7
redistribute {{bgp | connected | isis | ospf |
ospfv3 | rip | static} [as-number]}
[route-policy name]
Injects routes from one routing domain into EIGRP.
Example:
RP/0/RP0/CPU0:router(config-eigrp-vrf-af)#
redistribute bgp 100
Step 8
interface type instance
Configures the interface on which EIGRP the routing
protocol runs.
Example:
RP/0/RP0/CPU0:router(config-eigrp-vrf-af)#
interface gigabitEthernet 0/1/5/0
Cisco IOS XR Routing Configuration Guide
RC-157
Implementing EIGRP on Cisco IOS XR Software
How to Implement EIGRP on Cisco IOS XR Software
Step 9
Command or Action
Purpose
site-of-origin {as-number:number |
ip-address:number}
Configures the site-of-origin (SoO) filtering on the EIGRP
interface.
Example:
RP/0/RP0/CPU0:router(config-eigrp-vrf-af-if)#
site-of-origin 3:4
Step 10
Saves configuration changes.
end
or
commit
•
When you issue the end command, the system prompts
you to commit changes:
Uncommitted changes found, commit them before
exiting(yes/no/cancel)?
[cancel]:
Example:
RP/0/RP0/CPU0:router(config-eigrp-vrf-af-if)#
end
or
– Entering yes saves configuration changes to the
running configuration file, exits the configuration
session, and returns the router to EXEC mode.
RP/0/RP0/CPU0:router(config-eigrp-vrf-af-if)#
commit
– Entering no exits the configuration session and
returns the router to EXEC mode without
committing the configuration changes.
– Entering cancel leaves the router in the current
configuration session without exiting or
committing the configuration changes.
•
Use the commit command to save the configuration
changes to the running configuration file and remain
within the configuration session.
Redistributing BGP Routes into EIGRP
Perform this task to redistribute BGP routes into EIGRP.
Typically, EIGRP routes are redistributed into BGP with extended community information appended to
the route. BGP carries the route over the VPN backbone with the EIGRP-specific information encoded
in the BGP extended community attributes. After the peering customer site receives the route, EIGRP
redistributes the BGP route then extracts the BGP extended community information and reconstructs the
route as it appeared in the original customer site.
When redistributing BGP routes into EIGRP, the receiving provider edge (PE) EIGRP router looks for
BGP extended community information. If the information is received, it is used to recreate the original
EIGRP route. If the information is missing, EIGRP uses the configured default metric value.
If the metric values are not derived from the BGP extended community and a default metric is not
configured, the route is not advertised to the customer edge (CE) router by the PE EIGRP. When BGP is
redistributed into BGP, metrics may not be added to the BGP prefix as extended communities; for
example, if EIGRP is not running on the other router. In this case, EIGRP is redistributed into BGP with
a “no-metrics” option.
SUMMARY STEPS
1.
configure
2.
router eigrp as-number
Cisco IOS XR Routing Configuration Guide
RC-158
Implementing EIGRP on Cisco IOS XR Software
How to Implement EIGRP on Cisco IOS XR Software
3.
vrf vrf-name
4.
address-family {ipv4 | ipv6}
5.
redistribute {{bgp | connected | isis | ospf | ospfv3 | rip | static} [as-number | instance-name]}
[route-policy name]
6.
route-policy route-policy-name {in | out}
7.
default-metric bandwidth delay reliability loading mtu
8.
end
or
commit
DETAILED STEPS
Step 1
Command or Action
Purpose
configure
Enters global configuration mode.
Example:
RP/0/RP0/CPU0:router# configure
Step 2
router eigrp as-number
Configures an EIGRP routing process.
Example:
RP/0/RP0/CPU0:router(config)# router eigrp 100
Step 3
vrf vrf-name
Configures a VRF instance.
Example:
RP/0/RP0/CPU0:router(config-eigrp)# router
eigrp 100
Step 4
address-family {ipv4 | ipv6}
Enters a VRF address family configuration mode.
Example:
RP/0/RP0/CPU0:router(config-eigrp-vrf)#
address-family ipv4
Step 5
redistribute {{bgp | connected | isis | ospf |
ospfv3 | rip | static} [as-number]}
[route-policy name]
Injects routes from one routing domain into EIGRP.
Example:
RP/0/RP0/CPU0:router(config-eigrp-vrf-af)#
redistribute bgp 100
Step 6
route-policy route-policy-name {in | out}
Applies a routing policy to updates advertised to or received
from an EIGRP neighbor.
Example:
RP/0/RP0/CPU0:router(config-eigrp-vrf-af)#
route-policy policy_A in
Cisco IOS XR Routing Configuration Guide
RC-159
Implementing EIGRP on Cisco IOS XR Software
How to Implement EIGRP on Cisco IOS XR Software
Step 7
Command or Action
Purpose
default-metric bandwidth delay reliability
loading mtu
Configures metrics for EIGRP.
Example:
RP/0/RP0/CPU0:router(config-eigrp-vrf-af)#
default-metric 1000 100 250 100 1500
Step 8
Saves configuration changes.
end
or
commit
•
When you issue the end command, the system prompts
you to commit changes:
Uncommitted changes found, commit them before
exiting(yes/no/cancel)?
[cancel]:
Example:
RP/0/RP0/CPU0:router(config-eigrp-vrf-af)# end
or
– Entering yes saves configuration changes to the
RP/0/RP0/CPU0:router(config-eigrp-vrf-af)#
commit
running configuration file, exits the configuration
session, and returns the router to EXEC mode.
– Entering no exits the configuration session and
returns the router to EXEC mode without
committing the configuration changes.
– Entering cancel leaves the router in the current
configuration session without exiting or
committing the configuration changes.
•
Use the commit command to save the configuration
changes to the running configuration file and remain
within the configuration session.
Monitoring EIGRP Routing
The commands in this section are used to log neighbor adjacency changes, monitor the stability of the
routing system, and help detect problems.
SUMMARY STEPS
1.
configure
2.
router eigrp as-number
3.
address-family [ipv4 | ipv6]
4.
log-neighbor-changes
5.
log-neighbor-warnings
6.
end
or
commit
7.
clear eigrp [as-number] [vrf {vrf | all}] [ipv4 | ipv6] neighbors [ip-address | interface-type
interface-instance]
8.
clear eigrp [as-number] [vrf {vrf | all}] [ipv4 | ipv6] topology [prefix mask] [prefix/length]
9.
show eigrp [as-number] [vrf {vrf | all}] [ipv4 | ipv6] accounting
Cisco IOS XR Routing Configuration Guide
RC-160
Implementing EIGRP on Cisco IOS XR Software
How to Implement EIGRP on Cisco IOS XR Software
10. show eigrp [as-number] [vrf {vrf | all}] [ipv4 | ipv6] interfaces [type instance] [detail]
11. show eigrp [as-number] [vrf {vrf | all}] [ipv4 | ipv6]neighbors [detail] [interface-type
interface-instance | static]
12. show protocols eigrp [vrf vrf-name]
13. show eigrp [as-number] [vrf {vrf | all}] [ipv4 | ipv6] topology [ip-address mask] [active | all-links
| detail-links | pending | summary | zero-successors]
14. show eigrp [as-number] [vrf {vrf | all}] [ipv4 | ipv6] traffic
DETAILED STEPS
Step 1
Command or Action
Purpose
configure
Enters global configuration mode.
Example:
RP/0/RP0/CPU0:router# configure
Step 2
router eigrp as-number
Configures an EIGRP routing process.
Example:
RP/0/RP0/CPU0:router(config)# router eigrp 100
Step 3
address-family [ipv4 | ipv6]
Enters an address family configuration mode.
Example:
RP/0/RP0/CPU0:router(config-eigrp)#
address-family ipv4
Step 4
log-neighbor-changes
Enables the logging of changes in EIGRP neighbor
adjacencies.
Example:
RP/0/RP0/CPU0:router(config-eigrp-af)#
log-neighbor-changes
Step 5
log-neighbor-warnings
Enables the logging of EIGRP neighbor warning messages.
Example:
RP/0/RP0/CPU0:router(config-eigrp-af)#
log-neighbor-warnings
Cisco IOS XR Routing Configuration Guide
RC-161
Implementing EIGRP on Cisco IOS XR Software
How to Implement EIGRP on Cisco IOS XR Software
Step 6
Command or Action
Purpose
end
or
commit
Saves configuration changes.
•
When you issue the end command, the system prompts
you to commit changes:
Uncommitted changes found, commit them before
exiting(yes/no/cancel)?
[cancel]:
Example:
RP/0/RP0/CPU0:router(config-eigrp-af)# end
or
– Entering yes saves configuration changes to the
RP/0/RP0/CPU0:router(config-eigrp-af)# commit
running configuration file, exits the configuration
session, and returns the router to EXEC mode.
– Entering no exits the configuration session and
returns the router to EXEC mode without
committing the configuration changes.
– Entering cancel leaves the router in the current
configuration session without exiting or
committing the configuration changes.
•
Step 7
clear eigrp [as-number] [vrf {vrf | all}] [ipv4
| ipv6] neighbors [ip-address | interface-type
interface-instance]
Use the commit command to save the configuration
changes to the running configuration file and remain
within the configuration session.
Deletes EIGRP and VPN neighbor entries from the
appropriate table.
Example:
RP/0/RP0/CPU0:router# clear eigrp 20 neighbors
pos 0/1/0/0
Step 8
clear eigrp [as-number] [vrf {vrf | all}] [ipv4
| ipv6] topology [prefix mask] [ prefix/length]
Deletes EIGRP and VRF topology entries from the
appropriate tab.
Example:
RP/0/RP0/CPU0:router# clear eigrp topology
Step 9
show eigrp [as-number] [vrf {vrf | all}] [ipv4
| ipv6] accounting
Displays prefix accounting information for EIGRP
processes.
Example:
RP/0/RP0/CPU0:router# show eigrp all accounting
Step 10
show eigrp [as-number] [vrf {vrf | all}] [ipv4
| ipv6] interfaces [type instance] [detail]
Example:
RP/0/RP0/CPU0:router# show eigrp interfaces
detail
Cisco IOS XR Routing Configuration Guide
RC-162
Displays information about interfaces configured for
EIGRP.
Implementing EIGRP on Cisco IOS XR Software
Configuration Examples for Implementing EIGRP on Cisco IOS XR Software
Step 11
Command or Action
Purpose
show eigrp [as-number] [vrf {vrf | all}] [ipv4
| ipv6] neighbors [detail] [interface-type
interface-instance | static]
Displays the neighbors discovered by EIGRP.
Example:
RP/0/RP0/CPU0:router# show eigrp neighbors 20
detail static
Step 12
show protocols eigrp [vrf vrf-name]
Displays information about the EIGRP process
configuration.
Example:
RP/0/RP0/CPU0:router# show protocols eigrp
Step 13
show eigrp [as-number] [vrf {vrf | all}] [ipv4
| ipv6] topology [ip-address mask] [ active |
all-links | detail-links | pending | summary |
zero-successors]
Displays entries in the EIGRP topology table.
Example:
RP/0/RP0/CPU0:router# show eigrp topology
10.0.0.1 253.254.255.255 summary
Step 14
show eigrp [as-number] [vrf {vrf | all}] [ipv4
| ipv6] traffic
Displays the number of EIGRP packets sent and received.
Example:
RP/0/RP0/CPU0:router# show eigrp traffic
Configuration Examples for Implementing EIGRP on
Cisco IOS XR Software
This section provides the following configuration examples:
•
Configuring a Basic EIGRP Configuration: Example, page RC-163
•
Configuring an EIGRP Stub Operation: Example, page RC-164
•
Configuring an EIGRP PE-CE Configuration with Prefix-Limits: Example, page RC-164
Configuring a Basic EIGRP Configuration: Example
The following example shows how to configure EIGRP with a policy that filters incoming routes. This
is a typical configuration for a router that has just one neighbor, but advertises other connected subnets.
router eigrp 144
address-family ipv4
metric maximum-hops 20
router-id 102.10.9.4
route-policy GLOBAL_FILTER_POLICY in
log-neighbor-changes
log-neighbor-warnings
interface Loopback0
!
Cisco IOS XR Routing Configuration Guide
RC-163
Implementing EIGRP on Cisco IOS XR Software
Configuration Examples for Implementing EIGRP on Cisco IOS XR Software
interface POS0/2/0/0
passive-interface
!
interface GigabitEthernet0/6/0/0
hello-interval 8
hold-time 30
summary-address 10.0.0.0 255.255.0.0
!
!
!
Configuring an EIGRP Stub Operation: Example
The following example shows how to configure an EIGRP stub. Stub operation allows only connected,
static, and summary routes to be advertised to neighbors.
router eigrp 200
address-family ipv4
stub connected static summary
router-id 172.16.82.22
log-neighbor-changes
log-neighbor-warnings
redistribute connected route-policy CONN_POLICY
interface GigabitEthernet0/6/0/0
passive-interface
neighbor 10.0.0.31
!
interface GigabitEthernet0/6/0/1
passive-interface
neighbor 10.0.1.21
!
!
!
Configuring an EIGRP PE-CE Configuration with Prefix-Limits: Example
The following example shows how to configure EIGRP to operate as a PE-CE protocol on a PE router.
The configuration is under VRF CUSTOMER_1. A maximum prefix is typically configured to ensure
that one set of customer routes do not overwhelm the EIGRP process.
router eigrp 500
vrf CUSTOMER_1
address-family ipv4
timers nsf route-hold 300
router-id 172.16.6.11
maximum-prefix 450 70
default-metric 200000 10000 195 10 1500
log-neighbor-changes
log-neighbor-warnings
redistribute maximum-prefix 350 70
redistribute bgp 1.65500 route-policy SITE_1_POLICY
interface POS0/4/0/5
neighbor 10.22.1.1
!
!
!
Cisco IOS XR Routing Configuration Guide
RC-164
Implementing EIGRP on Cisco IOS XR Software
Additional References
Additional References
The following sections provide references related to implementing EIGRP on Cisco IOS XR software.
Related Documents
Related Topic
Document Title
EIGRP commands: complete command syntax,
command modes, command history, defaults, usage
guidelines, and examples
Cisco IOS XR Routing Command Reference, Release 3.5
MPLS VPN support for EIGRP feature information
Implementing MPLS Layer 3 VPNs module and Implementing MPLS
Layer 2 VPNs module in the Cisco IOS XR Multiprotocol Label
Switching Configuration Guide, Release 3.5
Site of Origin (SoO) support for EIGRP feature
information
Implementing MPLS Traffic Engineering on Cisco IOS XR Software
module in the Cisco IOS XR Multiprotocol Label Switching
Configuration Guide, Release 3.5
Standards
Standards
Title
No new or modified standards are supported by this
—
feature, and support for existing standards has not been
modified by this feature.
MIBs
MIBs
MIBs Link
—
To locate and download MIBs using Cisco IOS XR software, use the
Cisco MIB Locator found at the following URL and choose a
platform under the Cisco Access Products menu:
http://cisco.com/public/sw-center/netmgmt/cmtk/mibs.shtml
RFCs
RFCs
Title
—
No new or modified RFCs are supported by this
feature, and support for existing standards has not been
modified by this feature.
Cisco IOS XR Routing Configuration Guide
RC-165
Implementing EIGRP on Cisco IOS XR Software
Additional References
Technical Assistance
Description
Link
The Cisco Technical Support website contains
http://www.cisco.com/techsupport
thousands of pages of searchable technical content,
including links to products, technologies, solutions,
technical tips, and tools. Registered Cisco.com users
can log in from this page to access even more content.
Cisco IOS XR Routing Configuration Guide
RC-166
Implementing IS-IS on Cisco IOS XR Software
Integrated Intermediate System-to-Intermediate System (IS-IS), Internet Protocol Version 4 (IPv4), is a
standards-based Interior Gateway Protocol (IGP).
Cisco IOS XR implements the IP routing capabilities described in International Organization for
Standardization (ISO)/International Engineering Consortium (IEC) 10589 and RFC 1995, and adds the
standard extensions for single topology and multitopology IS-IS for IP Version 6 (IPv6).
This module describes the new and revised tasks you need to implement IS-IS (IPv4 and IPv6) on your
Cisco IOS XR network.
Note
For more information about IS-IS on Cisco IOS XR software and complete descriptions of the IS-IS
commands listed in this module, you can refer to the “Related Documents” section of this module. To
locate documentation for other commands that might appear while of executing a configuration task,
search online in the Cisco IOS XR software master command index.
Feature History for Implementing IS-IS on Cisco IOS XR Software
Release
Modification
Release 2.0
This feature was introduced on the Cisco CRS-1.
Release 3.0
No modification.
Release 3.2
Support was added for the Cisco XR 12000 Series Router. The ability to
configure a broadcast medium connecting two networking devices as a
point-to-point link was added.
Release 3.3.0
LDP IGP synchronization support was added for IPv4 unicast address
families. See the “MPLS Label Distribution Protocol IGP Synchronization”
section on page RC-177 and “Configuring MPLS LDP IS-IS
Synchronization” section on page RC-208 for more information.
The ispf startup-delay command was removed from the “Setting SPF
Interval for a Single-Topology IPv4 and IPv6 Configuration” section on
page RC-203.
Cisco IOS XR Routing Configuration Guide
RC-167
Implementing IS-IS on Cisco IOS XR Software
Contents
Release 3.4.0
Release 3.5.0
Support was added for the following features:
•
MPLS TE forwarding adjacency
•
MPLS TE interarea tunnels
•
Multicast topology
Support was added for the following features:
•
IS-IS keychain support for hello and LSP authentication and hitless key
rollover
•
IP fast reroute loop-free alternates computation
•
Label Distribution Protocol (LDP) Interior Gateway Protocol (IGP)
auto-configuration
Contents
•
Prerequisites for Implementing IS-IS on Cisco IOS XR Software, page RC-168
•
Restrictions for Implementing IS-IS on Cisco IOS XR Software, page RC-168
•
Information About Implementing IS-IS on Cisco IOS XR Software, page RC-168
•
How to Implement IS-IS on Cisco IOS XR Software, page RC-179
•
Configuration Examples for Implementing IS-IS on Cisco IOS XR Software, page RC-216
•
Where to Go Next, page RC-218
•
Additional References, page RC-219
Prerequisites for Implementing IS-IS on Cisco IOS XR Software
You must be in a user group associated with a task group that includes the proper task IDs for IS-IS
commands. For detailed information about user groups and task IDs, see the Configuring AAA Services
on Cisco IOS XR Software module of Cisco IOS XR System Security Configuration Guide.
Restrictions for Implementing IS-IS on Cisco IOS XR Software
When multiple instances of IS-IS are being run, an interface can be associated with only one instance
(process). Instances may not share an interface.
Information About Implementing IS-IS on Cisco IOS XR Software
To implement IS-IS you need to understand the following concepts:
•
IS-IS Functional Overview, page RC-169
•
Key Features Supported in the Cisco IOS XR IS-IS Implementation, page RC-170
•
IS-IS Configuration Grouping, page RC-170
•
IS-IS Configuration Modes, page RC-170
Cisco IOS XR Routing Configuration Guide
RC-168
Implementing IS-IS on Cisco IOS XR Software
Information About Implementing IS-IS on Cisco IOS XR Software
•
Multitopology Configuration, page RC-171
•
IPv6 Routing and Configuring IPv6 Addressing, page RC-171
•
Limit LSP Flooding, page RC-172
•
Maximum LSP Lifetime and Refresh Interval, page RC-172
•
Overload Bit Configuration During Multitopology Operation, page RC-173
•
Single-Topology IPv6 Support, page RC-173
•
Multitopology IPv6 Support, page RC-173
•
IS-IS Authentication, page RC-173
•
Nonstop Forwarding, page RC-174
•
Multi-Instance IS-IS, page RC-175
•
Multiprotocol Label Switching Traffic Engineering, page RC-175
•
Overload Bit on Router, page RC-175
•
Default Routes, page RC-176
•
Attached Bit on an IS-IS Instance, page RC-176
•
IS-IS Support for Route Tags, page RC-176
•
Multicast-Intact Feature, page RC-176
•
Multicast Topology Support Using IS-IS, page RC-177
•
MPLS Label Distribution Protocol IGP Synchronization, page RC-177
•
Label Distribution Protocol IGP Auto-configuration, page RC-178
•
MPLS TE Forwarding Adjacency, page RC-178
•
MPLS TE Interarea Tunnels, page RC-179
•
IP Fast Reroute, page RC-179
IS-IS Functional Overview
Small IS-IS networks are typically built as a single area that includes all routers in the network. As the
network grows larger, it may be reorganized into a backbone area made up of the connected set of all
Level 2 routers from all areas, which is in turn connected to local areas. Within a local area, routers know
how to reach all system IDs. Between areas, routers know how to reach the backbone, and the backbone
routers know how to reach other areas.
The IS-IS routing protocol supports the configuration of backbone Level 2 and Level 1 areas and the
necessary support for moving routing information between the areas. Routers establish Level 1
adjacencies to perform routing within a local area (intra-area routing). Routers establish Level 2
adjacencies to perform routing between Level 1 areas (interarea routing).
For Cisco IOS XR software, each IS-IS instance can support either a single Level 1 or Level 2 area, or
one of each. By default, all IS-IS instances automatically support Level 1 and Level 2 routing. You can
change the level of routing to be performed by a particular routing instance using the is-type command.
Cisco IOS XR Routing Configuration Guide
RC-169
Implementing IS-IS on Cisco IOS XR Software
Information About Implementing IS-IS on Cisco IOS XR Software
Key Features Supported in the Cisco IOS XR IS-IS Implementation
The Cisco IOS XR implementation of IS-IS conforms to the IS-IS Version 2 specifications detailed in
RFC 1195 and the IPv6 IS-IS functionality based on the Internet Engineering Task Force (IETF) IS-IS
Working Group draft-ietf-isis-ipv6.txt document.
The following list outlines key features supported in the Cisco IOS XR implementation:
Note
•
Single topology IPv6
•
Multitopology
•
Nonstop forwarding (NSF), both Cisco proprietary and IETF
•
Three-way handshake
•
Mesh groups
•
Multiple IS-IS instances
•
Configuration of a broadcast medium connecting two networking devices as a point-to-point link
•
Fast-flooding with different threads handling flooding and shortest path first (SPF).
For information on IS-IS support for Bidirectional Forwarding Detection (BFD), see Cisco IOS XR
Interface and Hardware Configuration Guide and Cisco IOS XR Interface and Hardware Command
Reference.
IS-IS Configuration Grouping
Cisco IOS XR groups all of the IS-IS configuration in router IS-IS configuration mode, including the
portion of the interface configurations associated with IS-IS. To display the IS-IS configuration in its
entirety, use the show running router isis command. The command output displays the running
configuration for all configured IS-IS instances, including the interface assignments and interface
attributes.
IS-IS Configuration Modes
The following sections show how to enter each of the configuration modes. From a mode, you can enter
the ? command to display the commands available in that mode.
Router Configuration Mode
The following example shows how to enter router configuration mode:
RP/0/RP0/CPU0:router# configuration
RP/0/RP0/CPU0:router(config)# router isis isp
RP/0/RP0/CPU0:router(config-isis)#
Router Address Family Configuration Mode
The following example shows how to enter router address family configuration mode:
RP/0/RP0/CPU0:router(config)# router isis isp
RP/0/RP0/CPU0:router(config-isis)# address-family ipv6 unicast
RP/0/RP0/CPU0:router(config-isis-af)#
Cisco IOS XR Routing Configuration Guide
RC-170
Implementing IS-IS on Cisco IOS XR Software
Information About Implementing IS-IS on Cisco IOS XR Software
Interface Configuration Mode
The following example shows how to enter interface configuration mode:
RP/0/RP0/CPU0:router(config)# router isis isp
RP/0/RP0/CPU0:router(config-isis)# interface POS0/3/0/0
RP/0/RP0/CPU0:router(config-isis-if)#
Interface Address Family Configuration Mode
The following example shows how to enter interface address family configuration mode:
RP/0/RP0/CPU0:router(config)# router isis isp
RP/0/RP0/CPU0:router(config-isis)# interface POS0/3/0/0
RP/0/RP0/CPU0:router(config-isis-if)# address-family ipv4 unicast
RP/0/RP0/CPU0:router(config-isis-if-af)#
IS-IS Interfaces
IS-IS interfaces can be configured as one of the following types:
•
active—advertises connected prefixes and forms adjacencies. This is the default for interfaces.
•
passive—advertises connected prefixes but does not form adjacencies. The passive command is
used to configure interfaces as passive. Passive interfaces should be used sparingly for important
prefixes such as loopback addresses that need to be injected into the IS-IS domain. If many
connected prefixes need to be advertised then the redistribution of connected routes with the
appropriate policy should be used instead.
•
suppressed—does not advertise connected prefixes but forms adjacencies. The suppress command
is used to configure interfaces as suppressed.
•
shutdown—does not advertise connected prefixes and does not form adjacencies. The shutdown
command is used to disable interfaces without removing the IS-IS configuration.
Multitopology Configuration
Cisco IOS XR software supports multitopology for IPv6 IS-IS unless single topology is explicitly
configured in IPv6 address-family configuration mode.
Note
IS-IS supports IP routing and not Open Systems Interconnection (OSI) Connectionless Network Service
(CLNS) routing.
IPv6 Routing and Configuring IPv6 Addressing
By default, IPv6 routing is disabled in the Cisco IOS XR software. To enable IPv6 routing, you must
assign IPv6 addresses to individual interfaces in the router using the ipv6 enable or ipv6 address
command. See the Network Stack IPv4 and IPv6 Commands on Cisco IOS XR Software module of
Cisco IOS XR IP Addresses and Services Command Reference.
Cisco IOS XR Routing Configuration Guide
RC-171
Implementing IS-IS on Cisco IOS XR Software
Information About Implementing IS-IS on Cisco IOS XR Software
Limit LSP Flooding
Limiting link-state packets (LSP) may be desirable in certain “meshy” network topologies. An example
of such a network might be a highly redundant one such as a fully meshed set of point-to-point links over
a nonbroadcast multiaccess (NBMA) transport. In such networks, full LSP flooding can limit network
scalability. One way to restrict the size of the flooding domain is to introduce hierarchy by using multiple
Level 1 areas and a Level 2 area. However, two other techniques can be used instead of or with hierarchy:
Block flooding on specific interfaces and configure mesh groups.
Both techniques operate by restricting the flooding of LSPs in some fashion. A direct consequence is
that although scalability of the network is improved, the reliability of the network (in the face of failures)
is reduced because a series of failures may prevent LSPs from being flooded throughout the network,
even though links exist that would allow flooding if blocking or mesh groups had not restricted their use.
In such a case, the link-state databases of different routers in the network may no longer be synchronized.
Consequences such as persistent forwarding loops can ensue. For this reason, we recommend that
blocking or mesh groups be used only if specifically required, and then only after careful network
design.
Flood Blocking on Specific Interfaces
With this technique, certain interfaces are blocked from being used for flooding LSPs, but the remaining
interfaces operate normally for flooding. This technique is simple to understand and configure, but may
be more difficult to maintain and more error prone than mesh groups in the long run. The flooding
topology that IS-IS uses is fine-tuned rather than restricted. Restricting the topology too much (blocking
too many interfaces) makes the network unreliable in the face of failures. Restricting the topology too
little (blocking too few interfaces) may fail to achieve the desired scalability.
To improve the robustness of the network in the event that all nonblocked interfaces drop, use the
csnp-interval command in interface configuration mode to force periodic complete sequence number
PDUs (CSNPs) packets to be used on blocked point-to-point links. The use of periodic CSNPs enables
the network to become synchronized.
Mesh Group Configuration
Configuring mesh groups (a set of interfaces on a router) can help to limit flooding. All routers reachable
over the interfaces in a particular mesh group are assumed to be densely connected with each router
having at least one link to every other router. Many links can fail without isolating one or more routers
from the network.
In normal flooding, a new LSP is received on an interface and is flooded out over all other interfaces on
the router. With mesh groups, when a new LSP is received over an interface that is part of a mesh group,
the new LSP is not flooded over the other interfaces that are part of that mesh group.
Maximum LSP Lifetime and Refresh Interval
By default, the router sends a periodic LSP refresh every 15 minutes. LSPs remain in a database for
20 minutes by default. If they are not refreshed by that time, they are deleted. You can change the LSP
refresh interval or maximum LSP lifetime. The LSP interval should be less than the LSP lifetime or else
LSPs time out before they are refreshed. In the absence of a configured refresh interval, the software
adjusts the LSP refresh interval, if necessary, to prevent the LSPs from timing out.
Cisco IOS XR Routing Configuration Guide
RC-172
Implementing IS-IS on Cisco IOS XR Software
Information About Implementing IS-IS on Cisco IOS XR Software
Overload Bit Configuration During Multitopology Operation
Because the overload bit applies to forwarding for a single topology, it may be configured and cleared
independently for IPv4 and IPv6 during multitopology operation. For this reason, the overload is set
from the router address family configuration mode. If the IPv4 overload bit is set, all routers in the area
do not use the router for IPv4 transit traffic. However, they can still use the router for IPv6 transit traffic.
Single-Topology IPv6 Support
Single-topology IPv6 support on Cisco IOS XR software allows IS-IS for IPv6 to be configured on
interfaces along with an IPv4 network protocol. All interfaces must be configured with the identical set
of network protocols, and all routers in the IS-IS area (for Level 1 routing) or the domain (for Level 2
routing) must support the identical set of network layer protocols on all interfaces.
When single-topology support for IPv6 is used, only narrow link metrics, also known as old-style type,
length, and value (TLV) arguments, may be employed. During single-topology operation, one shortest
path first (SPF) computation for each level is used to compute both IPv4 and IPv6 routes. Using a single
SPF is possible because both IPv4 IS-IS and IPv6 IS-IS routing protocols share a common link topology.
Multitopology IPv6 Support
Multitopology IPv6 support on Cisco IOS XR software for IS-IS assumes that multitopology support is
required as soon as it detects interfaces configured for both IPv6 and IPv4 within the IS-IS stanza.
Because multitopology is the default behavior in the software, you must explicitly configure IPv6 to use
the same topology as IPv4 to enable single-topology IPv6. Configure the single-topology command in
IPv6 router address family configuration submode of the IS-IS router stanza.
IS-IS Authentication
Authentication is available to limit the establishment of adjacencies by using the hello-password
command, and to limit the exchange of LSPs by using the lsp-password command.
IS-IS supports plain-text authentication, which does not provide security against unauthorized users.
Plain-text authentication allows you to configure a password to prevent unauthorized networking devices
from forming adjacencies with the router. The password is exchanged as plain text and is potentially
visible to an agent able to view the IS-IS packets.
When an HMAC-MD5 password is configured, the password is never sent over the network and is
instead used to calculate a cryptographic checksum to ensure the integrity of the exchanged data.
IS-IS stores a configured password using simple encryption. However, the plain-text form of the
password is used in LSPs, sequence number protocols (SNPs), and hello packets, which would be visible
to a process that can view IS-IS packets. The passwords can be entered in plain text (clear) or encrypted
form.
To set the domain password, configure the lsp-password command for Level 2; to set the area password,
configure the lsp-password command for Level 1.
Cisco IOS XR Routing Configuration Guide
RC-173
Implementing IS-IS on Cisco IOS XR Software
Information About Implementing IS-IS on Cisco IOS XR Software
The keychain feature allows IS-IS to reference configured keychains. IS-IS key chains enable hello and
LSP keychain authentication. Keychains can be configured at the router level (in the case of the
lsp-password command) and at the interface level (in the case of the hello-password command) within
IS-IS. These commands reference the global keychain configuration and instruct the IS-IS protocol to
obtain security parameters from the global set of configured keychains.
IS-IS is able to use the keychain to implement hitless key rollover for authentication. The key rollover
specification is time based, and in the event of clock skew between the peers, the rollover process is
impacted. The configurable tolerance specification allows for the accept window to be extended (before
and after) by that margin. This accept window facilitates a hitless key rollover for applications (for
example, routing and management protocols).
See Cisco IOS XR System Security Guide for information on keychain management.
Nonstop Forwarding
On Cisco IOS XR software, NSF minimizes the amount of time a network is unavailable to its users
following a route processor (RP) failover. The main objective of NSF is to continue forwarding IP
packets and perform a graceful restart following an RP failover.
When a router restarts, all routing peers of that device usually detect that the device went down and then
came back up. This transition results in what is called a routing flap, which could spread across multiple
routing domains. Routing flaps caused by routing restarts create routing instabilities, which are
detrimental to the overall network performance. NSF helps to suppress routing flaps in NSF-aware
devices, thus reducing network instability.
NSF allows for the forwarding of data packets to continue along known routes while the routing protocol
information is being restored following an RP failover. When the NSF feature is configured, peer
networking devices do not experience routing flaps. Data traffic is forwarded through intelligent line
cards while the standby RP assumes control from the failed active RP during a failover. The ability of
line cards to remain up through a failover and to be kept current with the Forwarding Information Base
(FIB) on the active RP is key to NSF operation.
When the Cisco IOS XR router running IS-IS routing performs an RP failover, the router must perform
two tasks to resynchronize its link-state database with its IS-IS neighbors. First, it must relearn the
available IS-IS neighbors on the network without causing a reset of the neighbor relationship. Second,
it must reacquire the contents of the link-state database for the network.
The IS-IS NSF feature offers two options when configuring NSF:
•
IETF NSF
•
Cisco NSF
If neighbor routers on a network segment are NSF aware, meaning that neighbor routers are running a
software version that supports the IETF Internet draft for router restartability, they assist an IETF NSF
router that is restarting. With IETF NSF, neighbor routers provide adjacency and link-state information
to help rebuild the routing information following a failover.
In Cisco IOS XR software, Cisco NSF checkpoints (stores persistently) all the state necessary to recover
from a restart without requiring any special cooperation from neighboring routers. The state is recovered
from the neighboring routers, but only using the standard features of the IS-IS routing protocol. This
capability makes Cisco NSF suitable for use in networks in which other routers have not used the IETF
standard implementation of NSF.
Cisco IOS XR Routing Configuration Guide
RC-174
Implementing IS-IS on Cisco IOS XR Software
Information About Implementing IS-IS on Cisco IOS XR Software
Note
If you configure IETF NSF on the Cisco IOS XR router and a neighbor router does not support IETF
NSF, the affected adjacencies flap, but nonstop forwarding is maintained to all neighbors that do support
IETF NSF. A restart reverts to a cold start if no neighbors support IETF NSF.
Multi-Instance IS-IS
You may configure as many IS-IS instances as system resources (memory and interfaces) allow. Each
interface may be associated with only a single IS-IS instance, and MPLS may be enabled for only a
single IS-IS instance. Cisco IOS XR software prevents the double-booking of an interface by two
instances at configuration time—two instances of MPLS configuration causes an error.
Because the Routing Information Base (RIB) treats each of the IS-IS instances as equal routing clients,
you must be careful when redistributing routes between IS-IS instances. The RIB does not know to prefer
Level 1 routes over Level 2 routes. For this reason, if you are running Level 1 and Level 2 instances, you
must enforce the preference by configuring different administrative distances for the two instances.
Multiprotocol Label Switching Traffic Engineering
The MPLS TE feature enables an MPLS backbone to replicate and expand the traffic engineering
capabilities of Layer 2 ATM and Frame Relay networks. MPLS is an integration of Layer 2 and Layer 3
technologies.
For IS-IS, MPLS TE automatically establishes and maintains MPLS TE label-switched paths across the
backbone by using Resource Reservation Protocol (RSVP). The route that a label-switched path uses is
determined by the label-switched paths resource requirements and network resources, such as
bandwidth. Available resources are flooded by using special IS-IS TLV extensions in the IS-IS. The
label-switched paths are explicit routes and are referred to as traffic engineering (TE) tunnels.
Overload Bit on Router
The overload bit is a special bit of state information that is included in an LSP of the router. If the bit is
set on the router, it notifies routers in the area that the router is not available for transit traffic. This
capability is useful in four situations:
1.
During a serious but nonfatal error, such as limited memory.
2.
During the startup and restart of the process. The overload bit can be set until the routing protocol
has converged. However, it is not employed during a normal NSF restart or failover because doing
so causes a routing flap.
3.
During a trial deployment of a new router. The overload bit can be set until deployment is verified,
then cleared.
4.
During the shutdown of a router. The overload bit can be set to remove the router from the topology
before the router is removed from service.
Cisco IOS XR Routing Configuration Guide
RC-175
Implementing IS-IS on Cisco IOS XR Software
Information About Implementing IS-IS on Cisco IOS XR Software
Default Routes
You can force a default route into an IS-IS routing domain. Whenever you specifically configure
redistribution of routes into an IS-IS routing domain, the Cisco IOS XR software does not, by default,
redistribute the default route into the IS-IS routing domain. The default-information originate
command generates a default route into IS-IS, which can be controlled by a route policy. You can use
the route policy to identify the level into which the default route is to be announced, and you can specify
other filtering options configurable under a route policy. You can use a route policy to conditionally
advertise the default route, depending on the existence of another route in the routing table of the router.
Attached Bit on an IS-IS Instance
The attached bit is set in a router that is configured with the is-type command and level-1-2 keyword.
The attached bit indicates that the router is connected to other areas (typically through the backbone).
This functionality means that the router can be used by Level 1 routers in the area as the default route to
the backbone. The attached bit is usually set automatically as the router discovers other areas while
computing its Level 2 SPF route. The bit is automatically cleared when the router becomes detached
from the backbone.
Note
If the connectivity for the Level 2 instance is lost, the attached bit in the Level 1 instance LSP would
continue sending traffic to the Level 2 instance and cause the traffic to be dropped.
To simulate this behavior when using multiple processes to represent the level-1-2 keyword
functionality, you would manually configure the attached bit on the Level 1 process.
IS-IS Support for Route Tags
The IS-IS Support for route tags feature provides the capability to associate and advertise a tag with an
IS-IS route prefix. Additionally, the feature allows you to prioritize the order of installation of route
prefixes in the RIB based on a tag of a route. Route tags may also be used in route policy to match route
prefixes (for example, to select certain route prefixes for redistribution).
Multicast-Intact Feature
The multicast-intact feature provides the ability to run multicast routing (PIM) when IGP shortcuts are
configured and active on the router. Both OSPFv2 and IS-IS support the multicast-intact feature. MPLS
TE and IP multicast coexistence is supported in Cisco IOS XR software by using the mpls traffic-eng
multicast-intact IS-IS or OSPF router command.
You can enable multicast-intact in the IGP when multicast routing protocols (PIM) are configured and
IGP shortcuts are configured on the router. IGP shortcuts are MPLS tunnels that are exposed to IGP. The
IGPs route the IP traffic over these tunnels to destinations that are downstream from the egress router of
the tunnel (from an SPF perspective). PIM cannot use IGP shortcuts for propagating PIM joins because
reverse path forwarding (RPF) cannot work across a unidirectional tunnel.
Cisco IOS XR Routing Configuration Guide
RC-176
Implementing IS-IS on Cisco IOS XR Software
Information About Implementing IS-IS on Cisco IOS XR Software
When you enable multicast-intact on an IGP, the IGP publishes a parallel or alternate set of equal-cost
next-hops for use by PIM. These next-hops are called mcast-intact next-hops. The mcast-intact
next-hops have the following attributes:
•
They are guaranteed not to contain any IGP shortcuts.
•
They are not used for unicast routing but are used only by PIM to look up an IPv4 next-hop to a PIM
source.
•
They are not published to the FIB.
•
When multicast-intact is enabled on an IGP, all IPv4 destinations that were learned through
link-state advertisements are published with a set equal-cost mcast-intact next-hops to the RIB. This
attribute applies even when the native next-hops have no IGP shortcuts.
•
In IS-IS, the max-paths limit is applied by counting both the native and mcast-intact next-hops
together. (In OSPFv2, the behavior is slightly different.)
Multicast Topology Support Using IS-IS
Multicast topology support allows for the configuration of IS-IS multicast topologies for IPv4 or IPv6
routing. IS-IS maintains a separate topology for multicast and runs a separate Shortest Path First (SPF)
over the multicast topology. IS-IS multicast inserts routes from the IS-IS multicast topology into the
multicast-unicast Routing Information Base (muRIB) table in the RIB for the corresponding address
family. Since PIM uses the muRIB, PIM uses routes from the multicast topology instead of routes from
the unicast topology.
MPLS Label Distribution Protocol IGP Synchronization
Multiprotocol Label Switching (MPLS) Label Distribution Protocol (LDP) Interior Gateway Protocol
(IGP) Synchronization ensures that LDP has completed label exchange before the IGP path is used for
switching. MPLS traffic loss can occur in the following two situations:
•
When an IGP adjacency is established, the router begins forwarding packets using the new
adjacency before LDP has exchanged labels with peers on that link.
•
When an LDP session closes, the router continues to forward traffic using the link associated with
the LDP peer rather than using an alternate path with an established LDP session.
This feature provides a mechanism to synchronize LDP and IS-IS to minimize MPLS packet loss. The
synchronization is accomplished by changing the link metric for a neighbor IS-IS link-state packet
(LSP), based on the state of the LDP session.
When an IS-IS adjacency is established on a link but the LDP session is lost or LDP has not yet
completed exchanging labels, IS-IS advertises the maximum metric on that link. In this instance, LDP
IS-IS synchronization is not yet achieved.
Note
In IS-IS, a link with a maximum wide metric (0xFFFFFF) is not considered for shortest path first (SPF).
Therefore, the maximum wide metric of -1 (0XFFFFFE) is used with MPLS LDP IGP synchronization.
When LDP IS-IS synchronization is achieved, IS-IS advertises a regular (configured or default) metric
on that link.
Cisco IOS XR Routing Configuration Guide
RC-177
Implementing IS-IS on Cisco IOS XR Software
Information About Implementing IS-IS on Cisco IOS XR Software
MPLS LDP-IGP Synchronization Compatibility with LDP Graceful Restart
LDP graceful restart protects traffic when an LDP session is lost. If a graceful restart-enabled LDP
session fails, MPLS LDP IS-IS synchronization is still achieved on the interface while it is protected by
graceful restart. MPLS LDP IGP synchronization is eventually lost under the following circumstances:
•
LDP fails to restart before the LDP graceful restart reconnect timer expires.
•
The LDP session on the protected interface fails to recover before the LDP graceful restart recovery
timer expires.
MPLS LDP-IGP Synchronization Compatibility with IGP Nonstop Forwarding
IS-IS nonstop forwarding (NSF) protects traffic during IS-IS process restarts and route processor (RP)
failovers. LDP IS-IS synchronization is supported with IS-IS NSF only if LDP graceful restart is also
enabled over the interface. If IS-IS NSF is not enabled, the LDP synchronization state is not retained
across restarts and failovers.
Label Distribution Protocol IGP Auto-configuration
Label Distribution Protocol (LDP) Interior Gateway Protocol (IGP) auto-configuration simplifies the
procedure to enable LDP on a set of interfaces used by an IGP instance. LDP IGP auto-configuration can
be used on a large number interfaces (for example, when LDP is used for transport in the core) and on
multiple IGP instances simultaneously.
This feature supports the IPv4 address family for the default VPN routing and forwarding (VRF)
instance.
LDP IGP auto-configuration can also be explicitly disabled on individual interfaces under LDP using the
igp auto-config disable command. This allows LDP to receive all IGP interfaces except the ones
explicitly disabled.
See Cisco IOS XR Multiprotocol Label Switching Configuration Guide for information on configuring
LDP IGP auto-configuration.
MPLS TE Forwarding Adjacency
MPLS TE forwarding adjacency allows a network administrator to handle a traffic engineering, label
switch path (LSP) tunnel as a link in an Interior Gateway Protocol (IGP) network, based on the Shortest
Path First (SPF) algorithm. A forwarding adjacency can be created between routers in the same IS-IS
level. The routers can be located multiple hops from each other. As a result, a TE tunnel is advertised as
a link in an IGP network, with the cost of the link associated with it. Routers outside of the TE domain
see the TE tunnel and use it to compute the shortest path for routing traffic throughout the network.
MPLS TE forwarding adjacency is considered in IS-IS SPF only if a two-way connectivity check is
achieved. This is possible if the forwarding adjacency is bidirectional or the head end and tail end routers
of the MPLS TE tunnel are adjacent.
The MPLS TE forwarding adjacency feature is supported by IS-IS. For details on configuring MPLS TE
forwarding adjacency, see Cisco IOS XR Multiprotocol Label Switching Configuration Guide.
Cisco IOS XR Routing Configuration Guide
RC-178
Implementing IS-IS on Cisco IOS XR Software
How to Implement IS-IS on Cisco IOS XR Software
MPLS TE Interarea Tunnels
MPLS TE interarea tunnels allow you to establish MPLS TE tunnels that span multiple IGP areas (Open
Shorted Path First [OSPF]) and levels (IS-IS), removing the restriction that required that both the tunnel
headend and tailend routers be in the same area. The IGP can be either IS-IS or OSPF. See the
“Configuring MPLS Traffic Engineering for IS-IS” section on page RC-197 for information on
configuring MPLS TE for IS-IS.
For details on configuring MPLS TE interarea tunnels, see Cisco IOS XR Multiprotocol Label Switching
Configuration Guide.
IP Fast Reroute
The IP Fast Reroute (IPFRR) loop-free alternate (LFA) computation provides protection against link
failure. Locally computed repair paths are used to prevent packet loss caused by loops that occur during
network reconvergence after a failure. See IETF draft-ietf-rtgwg-ipfrr-framework-06.txt and
draft-ietf-rtgwg-lf-conv-frmwk-00.txt for detailed information on IPFRR LFA.
Note
IPFRR is supported on the Cisco CRS-1 router.
IPFRR LFA is different from Multiprotocol Label Switching (MPLS) as it is applicable to networks
using conventional IP routing and forwarding. See Multiprotocol Label Switching Configuration Guide
for information on configuring MPLS IPFRR.
How to Implement IS-IS on Cisco IOS XR Software
This section contains the following procedures:
•
Enabling IS-IS and Configuring Level 1 or Level 2 Routing, page RC-180 (required)
•
Configuring Single Topology for IS-IS, page RC-182 (optional)
•
Configuring Multitopology for IS-IS, page RC-186 (optional)
•
Controlling LSP Flooding for IS-IS, page RC-187 (optional)
•
Configuring Nonstop Forwarding for IS-IS, page RC-191 (optional)
•
Configuring Authentication for IS-IS, page RC-193 (optional)
•
Configuring Keychains for IS-IS, page RC-195 (optional)
•
Configuring MPLS Traffic Engineering for IS-IS, page RC-197 (optional)
•
Tuning Adjacencies for IS-IS, page RC-200 (optional)
•
Setting SPF Interval for a Single-Topology IPv4 and IPv6 Configuration, page RC-203 (optional)
•
Customizing Routes for IS-IS, page RC-205 (optional)
•
Configuring MPLS LDP IS-IS Synchronization, page RC-208 (optional)
•
Enabling Multicast-Intact, page RC-210 (optional)
•
Tagging IS-IS Interface Routes, page RC-211 (optional)
Cisco IOS XR Routing Configuration Guide
RC-179
Implementing IS-IS on Cisco IOS XR Software
How to Implement IS-IS on Cisco IOS XR Software
Note
•
Setting the Priority for Adding Prefixes to the RIB, page RC-213 (optional)
•
Configuring IP Fast Reroute Loop-free Alternate, page RC-215 (optional)
To save configuration changes, you must commit changes when the system prompts you.
Enabling IS-IS and Configuring Level 1 or Level 2 Routing
This task explains how to enable IS-IS and configure the routing level for an area.
Note
Configuring the routing level in Step 4 is optional, but is highly recommended to establish the proper
level of adjacencies.
Prerequisites
Although you can configure IS-IS before you configure an IP address, no IS-IS routing occurs until at
least one IP address is configured.
SUMMARY STEPS
1.
configure
2.
router isis instance-id
3.
net network-entity-title
4.
is-type {level-1 | level-1-2 | level-2-only}
5.
end
or
commit
6.
show isis [instance instance-id] protocol
DETAILED STEPS
Step 1
Command or Action
Purpose
configure
Enters global configuration mode.
Example:
RP/0/RP0/CPU0:router# configure
Step 2
router isis instance-id
Example:
RP/0/RP0/CPU0:router(config)# router isis isp
Cisco IOS XR Routing Configuration Guide
RC-180
Enables IS-IS routing for the specified routing instance, and
places the router in router configuration mode.
•
By default, all IS-IS instances are automatically
Level 1 and Level 2. You can change the level of
routing to be performed by a particular routing instance
by using the is-type router configuration command.
Implementing IS-IS on Cisco IOS XR Software
How to Implement IS-IS on Cisco IOS XR Software
Step 3
Command or Action
Purpose
net network-entity-title
Configures network entity titles (NETs) for the routing
instance.
Example:
•
Specify a NET for each routing instance if you are
configuring multi-instance IS-IS.
•
This example configures a router with area ID
47.0004.004d.0001 and system ID 0001.0c11.1110.00.
•
To specify more than one area address, specify
additional NETs. Although the area address portion of
the NET differs, the systemID portion of the NET must
match exactly for all of the configured items.
RP/0/RP0/CPU0:router(config-isis)# net
47.0004.004d.0001.0001.0c11.1110.00
Step 4
is-type {level-1 | level-1-2 | level-2-only}
Example:
(Optional) Configures the system type (area or backbone
router).
•
By default, every IS-IS instance acts as a level-1-2
router.
•
The level-1 keyword configures the software to perform
Level 1 (intra-area) routing only. Only Level 1
adjacencies are established. The software learns about
destinations inside its area only. Any packets
containing destinations outside the area are sent to the
nearest level-1-2 router in the area.
•
The level-2-only keyword configures the software to
perform Level 2 (backbone) routing only, and the router
establishes only Level 2 adjacencies, either with other
Level 2-only routers or with level-1-2 routers.
•
The level-1-2 keyword configures the software to
perform both Level 1 and Level 2 routing. Both Level 1
and Level 2 adjacencies are established. The router acts
as a border router between the Level 2 backbone and its
Level 1 area.
RP/0/RP0/CPU0:router(config-isis)# is-type
level-2-only
Cisco IOS XR Routing Configuration Guide
RC-181
Implementing IS-IS on Cisco IOS XR Software
How to Implement IS-IS on Cisco IOS XR Software
Step 5
Command or Action
Purpose
end
Saves configuration changes.
or
commit
When you issue the end command, the system prompts
you to commit changes:
Example:
Uncommitted changes found, commit them before
exiting(yes/no/cancel)?
[cancel]:
•
RP/0/RP0/CPU0:router(config-isis)# end
or
– Entering yes saves configuration changes to the
RP/0/RP0/CPU0:router(config-isis)# commit
running configuration file, exits the configuration
session, and returns the router to EXEC mode.
– Entering no exits the configuration session and
returns the router to EXEC mode without
committing the configuration changes.
– Entering cancel leaves the router in the current
configuration session without exiting or
committing the configuration changes.
•
Step 6
show isis [instance instance-id] protocol
Use the commit command to save the configuration
changes to the running configuration file and remain
within the configuration session.
(Optional) Displays summary information about the IS-IS
instance.
Example:
RP/0/RP0/CPU0:router# show isis protocol
Configuring Single Topology for IS-IS
After an IS-IS instance is enabled, it must be configured to compute routes for a specific network
topology.
This task explains how to configure the operation of the IS-IS protocol on an interface for an IPv4 or
IPv6 topology.
Restrictions
To enable the router to run in single-topology mode, configure each of the IS-IS interfaces with all of
the address families enabled and “single-topology” in the address-family IPv6 unicast in the IS-IS router
stanza. You can use either the IPv6 address family or both IPv4 and IPv6 address families, but your
configuration must represent the set of all active address families on the router. Additionally, explicitly
enable single-topology operation by configuring it in the IPv6 router address family submode.
Two exceptions to these instructions exist:
1.
If the address-family stanza in the IS-IS process contains the adjacency-check disable command,
then an interface is not required to have the address family enabled.
2.
The single-topology command is not valid in the ipv4 address-family submode.
The default metric style for single topology is narrow metrics. However, you can use either wide metrics
or narrow metrics. How to configure them depends on how single topology is configured. If both IPv4
and IPv6 are enabled and single topology is configured, the metric style is configured in the
Cisco IOS XR Routing Configuration Guide
RC-182
Implementing IS-IS on Cisco IOS XR Software
How to Implement IS-IS on Cisco IOS XR Software
address-family ipv4 stanza. You may configure the metric style in the address-family ipv6 stanza, but
it is ignored in this case. If only IPv6 is enabled and single topology is configured, then the metric style
is configured in the address-family ipv6 stanza.
SUMMARY STEPS
1.
configure
2.
interface type number
3.
ipv4
or
ipv6
or
ipv6
or
ipv6
address address mask
address ipv6-prefix/prefix-length [eui-64]
address ipv6-address {/prefix-length | link-local}
enable
4.
exit
5.
router isis instance-id
6.
net network-entity-title
7.
address-family ipv6 [unicast]
8.
single-topology
9.
exit
10. interface type instance
11. circuit-type {level-1 | level-1-2 | level-2-only}
12. address-family {ipv4 | ipv6} [unicast | multicast]
13. end
or
commit
14. show isis [instance instance-id] interface [type instance] [detail] [level {1 | 2}]
15. show isis [instance instance-id] topology [systemid system-id] [level {1 | 2}] [summary]
DETAILED STEPS
Step 1
Command or Action
Purpose
configure
Enters global configuration mode.
Example:
RP/0/RP0/CPU0:router# configure
Step 2
interface type number
Enters interface configuration mode.
Example:
RP/0/RP0/CPU0:router(config)# interface POS
0/1/0/3
Cisco IOS XR Routing Configuration Guide
RC-183
Implementing IS-IS on Cisco IOS XR Software
How to Implement IS-IS on Cisco IOS XR Software
Step 3
Command or Action
Purpose
ipv4 address address mask
ipv6 address ipv6-prefix/prefix-length [eui-64]
Defines the IPv4 address for the interface. An IP address is
required on all interfaces in an area enabled for IS-IS if any
one interface is configured for IS-IS routing.
or
or
ipv6 address ipv6-address {/prefix-length
| link-local}
Specifies an IPv6 network assigned to the interface and
enables IPv6 processing on the interface with the eui-64
keyword.
or
or
ipv6 enable
or
Example:
RP/0/RP0/CPU0:router(config-if)# ipv4 address
10.0.1.3 255.255.255.0
or
Specifies an IPv6 address assigned to the interface and
enables IPv6 processing on the interface with the link-local
keyword.
or
RP/0/RP0/CPU0:router(config-if)# ipv6 address
3ffe:1234:c18:1::/64 eui-64
or
RP/0/RP0/CPU0:router(config-if)# ipv6 address
FE80::260:3EFF:FE11:6770 link-local
Automatically configures an IPv6 link-local address on the
interface while also enabling the interface for IPv6
processing.
•
The link-local address can be used only to
communicate with nodes on the same link.
•
Specifying the ipv6 address ipv6-prefix/prefix-length
interface configuration command without the eui-64
keyword configures site-local and global IPv6
addresses.
•
Specifying the ipv6 address ipv6-prefix/prefix-length
command with the eui-64 keyword configures
site-local and global IPv6 addresses with an interface
ID in the low-order 64 bits of the IPv6 address. Only the
64-bit network prefix for the address needs to be
specified; the last 64 bits are automatically computed
from the interface ID.
•
Specifying the ipv6 address command with the
link-local keyword configures a link-local address on
the interface that is used instead of the link-local
address that is automatically configured when IPv6 is
enabled on the interface.
or
RP/0/RP0/CPU0:router(config-if)# ipv6 enable
Step 4
Exits interface configuration mode, and returns the router to
global configuration mode.
exit
Example:
RP/0/RP0/CPU0:router(config-if)# exit
Step 5
router isis instance-id
Example:
RP/0/RP0/CPU0:router(config)# router isis isp
Cisco IOS XR Routing Configuration Guide
RC-184
Enables IS-IS routing for the specified routing instance, and
places the router in router configuration mode.
•
By default, all IS-IS instances are Level 1 and Level 2.
You can change the level of routing to be performed by
a particular routing instance by using the is-type
command.
Implementing IS-IS on Cisco IOS XR Software
How to Implement IS-IS on Cisco IOS XR Software
Step 6
Command or Action
Purpose
net network-entity-title
Configures NETs for the routing instance.
•
Specify a NET for each routing instance if you are
configuring multi-instance IS-IS. You can specify a
name for a NET and for an address.
•
This example configures a router with area ID
47.0004.004d.0001 and system ID 0001.0c11.1110.00.
•
To specify more than one area address, specify
additional NETs. Although the area address portion of
the NET differs, the system ID portion of the NET must
match exactly for all of the configured items.
Example:
RP/0/RP0/CPU0:router(config-isis)# net
47.0004.004d.0001.0001.0c11.1110.00
Step 7
address-family ipv6 [unicast]
Example:
Specifies the IPv6 address family and enters router address
family configuration mode.
•
This example specifies the unicast IPv6 address family.
RP/0/RP0/CPU0:router(config-isis)#
address-family ipv6 unicast
Step 8
single-topology
Example:
(Optional) Configures the link topology for IPv4 when IPv6
is configured.
•
The single-topology command is valid only in IPv6
submode. The command instructs IPv6 to use the single
topology rather than the default configuration of a
separate topology in the multitopology mode.
•
See the “Single-Topology IPv6 Support” section on
page RC-173 for more information.
RP0/0/RP0/CPU0:router(config-isis-af)#
single-topology
Step 9
exit
Exits router address family configuration mode, and returns
the router to router configuration mode.
Example:
RP/0/RP0/CPU0:router(config-isis-af)# exit
Step 10
interface type instance
Enters interface configuration mode.
Example:
RP/0/RP0/CPU0:router(config-isis)# interface
POS 0/1/0/3
Step 11
circuit-type {level-1 | level-1-2 |
level-2-only}
Example:
RP/0/RP0/CPU0:router(config-isis-if)#
circuit-type level-1-2
Step 12
address-family {ipv4 | ipv6} [unicast |
multicast]
(Optional) Configures the type of adjacency.
•
The default circuit type is the configured system type
(configured through the is-type command).
•
Typically, the circuit type must be configured when the
router is configured as only level-1-2 and you want to
constrain an interface to form only level-1 or
level-2-only adjacencies.
Specifies the IPv4 or IPv6 address family, and enters
interface address family configuration mode.
•
Example:
This example specifies the unicast IPv6 address family
on the interface.
RP/0/RP0/CPU0:router(config-isis-if)#
address-family ipv6 unicast
Cisco IOS XR Routing Configuration Guide
RC-185
Implementing IS-IS on Cisco IOS XR Software
How to Implement IS-IS on Cisco IOS XR Software
Step 13
Command or Action
Purpose
end
Saves configuration changes.
or
commit
When you issue the end command, the system prompts
you to commit changes:
Example:
Uncommitted changes found, commit them before
exiting(yes/no/cancel)?
[cancel]:
•
RP/0/RP0/CPU0:router(config-isis-if-af)# end
or
– Entering yes saves configuration changes to the
RP/0/RP0/CPU0:router(config-isis-if-af)# commit
running configuration file, exits the configuration
session, and returns the router to EXEC mode.
– Entering no exits the configuration session and
returns the router to EXEC mode without
committing the configuration changes.
– Entering cancel leaves the router in the current
configuration session without exiting or
committing the configuration changes.
•
Step 14
show isis [instance instance-id] interface
[type instance] [detail] [level {1 | 2}]
Use the commit command to save the configuration
changes to the running configuration file and remain
within the configuration session.
(Optional) Displays information about the IS-IS interface.
Example:
RP/0/RP0/CPU0:router# show isis interface
POS0/1/0/1
Step 15
show isis [instance instance-id] topology
[systemid system-id] [level {1 | 2}] [summary]
(Optional) Displays a list of connected routers in all areas.
Example:
RP/0/RP0/CPU0:router# show isis topology
Configuring Multitopology for IS-IS
Multitopology is configured in the same way as the single topology for IPv4 and IPv6 address families.
However, the single- topology command is omitted, invoking the default multitopology behavior. This
task is optional.
Cisco IOS XR Routing Configuration Guide
RC-186
Implementing IS-IS on Cisco IOS XR Software
How to Implement IS-IS on Cisco IOS XR Software
Controlling LSP Flooding for IS-IS
Flooding of LSPs can limit network scalability. You can control LSP flooding by tuning your LSP
database parameters on the router globally or on the interface. This task is optional.
Many of the commands to control LSP flooding contain an option to specify the level to which they
apply. Without the option, the command applies to both levels. If an option is configured for one level,
the other level continues to use the default value. To configure options for both levels, use the command
twice. For example:
RP/0/RP0/CPU0:router(config-isis)# lsp-refresh-interval 1200 level 2
RP/0/RP0/CPU0:router(config-isis)# lsp-refresh-interval 1100 level 1
SUMMARY STEPS
1.
configure
2.
router isis instance-id
3.
lsp-refresh-interval seconds [level {1 | 2}]
4.
lsp-check-interval seconds [level {1 | 2}]
5.
lsp-gen-interval {[initial-wait initial | secondary-wait secondary | maximum-wait maximum]
...}[level {1 | 2}]
6.
lsp-mtu bytes [level {1 | 2}]
7.
max-lsp-lifetime seconds [level {1 | 2}]
8.
ignore-lsp-errors disable
9.
interface type instance
10. lsp-interval milliseconds [level {1 | 2}]
11. csnp-interval seconds [level {1 | 2}]
12. retransmit-interval seconds [level {1 | 2}]
13. retransmit-throttle-interval milliseconds [level {1 | 2}]
14. mesh-group {number | blocked}
15. end
or
commit
16. show isis interface [type instance | level {1 | 2}] [brief]
17. show isis [instance instance-id] database [level {1 | 2}] [detail | summary | verbose] [* | lsp-id]
18. show isis [instance instance-id] lsp-log [level {1 | 2}]
19. show isis database-log [level {1 | 2}]
Cisco IOS XR Routing Configuration Guide
RC-187
Implementing IS-IS on Cisco IOS XR Software
How to Implement IS-IS on Cisco IOS XR Software
DETAILED STEPS
Step 1
Command or Action
Purpose
configure
Enters global configuration mode.
Example:
RP/0/RP0/CPU0:router# configure
Step 2
Enables IS-IS routing for the specified routing instance, and
places the router in router configuration mode.
router isis instance-id
•
Example:
RP/0/RP0/CPU0:router(config)# router isis isp
Step 3
lsp-refresh-interval seconds [level {1 | 2}]
(Optional) Sets the time between regeneration of LSPs that
contain different sequence numbers
•
Example:
RP/0/RP0/CPU0:router(config-isis)#
lsp-refresh-interval 10800
Step 4
lsp-check-interval seconds [level {1 | 2}]
Example:
Step 5
lsp-gen-interval { [initial-wait initial
secondary-wait secondary | maximum-wait
maximum ] ...} [ level { 1 | 2 }]
|
Example:
lsp-mtu bytes [level {1 | 2}]
This operation is costly in terms of CPU and so should
be configured to occur infrequently.
(Optional) Reduces the rate of LSP generation during
periods of instability in the network. Helps reduce the CPU
load on the router and number of LSP transmissions to its
IS-IS neighbors.
•
RP/0/RP0/CPU0:router(config-isis)#
lsp-gen-interval maximum-wait 15 initial-wait 5
Step 6
The refresh interval should always be set lower than the
max-lsp-lifetime command.
(Optional) Configures the time between periodic checks of
the entire database to validate the checksums of the LSPs in
the database.
•
RP/0/RP0/CPU0:router(config-isis)#
lsp-check-interval 240
You can change the level of routing to be performed by
a particular routing instance by using the is-type router
configuration command.
During prolonged periods of network instability,
repeated recalculation of LSPs can cause an increased
CPU load on the local router. Further, the flooding of
these recalculated LSPs to the other Intermediate
Systems in the network causes increased traffic and can
result in other routers having to spend more time
running route calculations.
(Optional) Sets the maximum transmission unit (MTU) size
of LSPs.
Example:
RP/0/RP0/CPU0:router(config-isis)# lsp-mtu 1300
Step 7
max-lsp-lifetime seconds [level {1 | 2}]
Example:
RP/0/RP0/CPU0:router(config-isis)#
max-lsp-lifetime 11000
Cisco IOS XR Routing Configuration Guide
RC-188
(Optional) Sets the initial lifetime given to an LSP
originated by the router.
•
This is the amount of time that the LSP persists in the
database of a neighbor unless the LSP is regenerated or
refreshed.
Implementing IS-IS on Cisco IOS XR Software
How to Implement IS-IS on Cisco IOS XR Software
Step 8
Command or Action
Purpose
ignore-lsp-errors disable
(Optional) Sets the router to purge LSPs received with
checksum errors.
Example:
RP/0/RP0/CPU0:router(config-isis)#
ignore-lsp-errors disable
Step 9
interface type instance
Enters interface configuration mode.
Example:
RP/0/RP0/CPU0:router(config-isis)# interface
POS 0/1/0/3
Step 10
lsp-interval milliseconds [level {1 | 2}]
(Optional) Configures the amount of time between each
LSP sent on an interface.
Example:
RP/0/RP0/CPU0:router(config-isis-if)#
lsp-interval 100
Step 11
csnp-interval seconds [level {1 | 2}]
Example:
(Optional) Configures the interval at which periodic CSNP
packets are sent on broadcast interfaces.
•
Sending more frequent CSNPs means that adjacent
routers must work harder to receive them.
•
Sending less frequent CSNP means that differences in
the adjacent routers may persist longer.
RP/0/RP0/CPU0:router(config-isis-if)#
csnp-interval 30 level 1
Step 12
retransmit-interval seconds [level {1 | 2}]
Example:
(Optional) Configures the amount of time that the sending
router waits for an acknowledgment before it considers that
the LSP was not received and subsequently resends.
RP/0/RP0/CPU0:router(config-isis-if)#
retransmit-interval 60
Step 13
retransmit-throttle-interval milliseconds
[level {1 | 2}]
(Optional) Configures the amount of time between
retransmissions on each LSP on a point-to-point interface.
•
Example:
RP/0/RP0/CPU0:router(config-isis-if)#
retransmit-throttle-interval 1000
Step 14
mesh-group {number | blocked}
Example:
RP/0/RP0/CPU0:router(config-isis-if)#
mesh-group blocked
This time is usually greater than or equal to the
lsp-interval command time because the reason for lost
LSPs may be that a neighboring router is busy. A longer
interval gives the neighbor more time to receive
transmissions.
(Optional) Optimizes LSP flooding in NBMA networks
with highly meshed, point-to-point topologies.
•
This command is appropriate only for an NBMA
network with highly meshed, point-to-point topologies.
Cisco IOS XR Routing Configuration Guide
RC-189
Implementing IS-IS on Cisco IOS XR Software
How to Implement IS-IS on Cisco IOS XR Software
Step 15
Command or Action
Purpose
end
Saves configuration changes.
or
commit
When you issue the end command, the system prompts
you to commit changes:
Example:
Uncommitted changes found, commit them before
exiting(yes/no/cancel)?
[cancel]:
•
RP/0/RP0/CPU0:router(config-isis-if)# end
or
– Entering yes saves configuration changes to the
RP/0/RP0/CPU0:router(config-isis-if)# commit
running configuration file, exits the configuration
session, and returns the router to EXEC mode.
– Entering no exits the configuration session and
returns the router to EXEC mode without
committing the configuration changes.
– Entering cancel leaves the router in the current
configuration session without exiting or
committing the configuration changes.
•
Step 16
show isis interface [type instance | level {1 |
2}] [brief]
Use the commit command to save the configuration
changes to the running configuration file and remain
within the configuration session.
(Optional) Displays information about the IS-IS interface.
Example:
RP/0/RP0/CPU0:router# show isis interface
POS0/1/0/1 brief
Step 17
show isis [instance instance-id] database
[level {1 | 2}] [detail | summary | verbose] [*
| lsp-id]
(Optional) Displays the IS-IS LSP database.
Example:
RP/0/RP0/CPU0:router# show isis database
level 1
Step 18
show isis [instance instance-id] lsp-log [level
{1 | 2}]
(Optional) Displays LSP log information.
Example:
RP/0/RP0/CPU0:router# show isis lsp-log
Step 19
show isis database-log [level {1 | 2}]
Example:
RP/0/RP0/CPU0:router# show isis database-log
level 1
Cisco IOS XR Routing Configuration Guide
RC-190
(Optional) Display IS-IS database log information.
Implementing IS-IS on Cisco IOS XR Software
How to Implement IS-IS on Cisco IOS XR Software
Configuring Nonstop Forwarding for IS-IS
This task explains how to configure your router with NSF that allows the Cisco IOS XR software to
resynchronize the IS-IS link-state database with its IS-IS neighbors after a process restart. The process
restart could be due to an:
•
RP failover (for a warm restart)
•
Simple process restart (due to an IS-IS reload or other administrative request to restart the process)
•
IS-IS software upgrade
In all cases, NSF mitigates link flaps and loss of user sessions. This task is optional.
SUMMARY STEPS
1.
configure
2.
router isis instance-id
3.
nsf {cisco | ietf}
4.
nsf interface-expires number
5.
nsf interface-timer seconds
6.
nsf lifetime seconds
7.
end
or
commit
8.
show running-config [command]
DETAILED STEPS
Step 1
Command or Action
Purpose
configure
Enters global configuration mode.
Example:
RP/0/RP0/CPU0:router# configure
Step 2
router isis instance-id
Example:
Enables IS-IS routing for the specified routing instance, and
places the router in router configuration mode.
•
RP/0/RP0/CPU0:router(config)# router isis isp
Step 3
nsf {cisco | ietf}
You can change the level of routing to be performed by
a particular routing instance by using the is-type router
configuration command.
Enables NSF on the next restart.
•
Enter the cisco keyword to run IS-IS in heterogeneous
networks that might not have adjacent NSF-aware
networking devices.
•
Enter the ietf keyword to enable IS-IS in homogeneous
networks where all adjacent networking devices
support IETF draft-based restartability.
Example:
RP/0/RP0/CPU0:router(config-isis)# nsf ietf
Cisco IOS XR Routing Configuration Guide
RC-191
Implementing IS-IS on Cisco IOS XR Software
How to Implement IS-IS on Cisco IOS XR Software
Step 4
Command or Action
Purpose
nsf interface-expires number
Configures the number of resends of an acknowledged
NSF-restart acknowledgment.
Example:
•
RP/0/RP0/CPU0:router(config-isis)# nsf
interface-expires 1
Step 5
nsf interface-timer seconds
If the resend limit is reached during the NSF restart, the
restart falls back to a cold restart.
Configures the number of seconds to wait for each restart
acknowledgment.
Example:
RP/0/RP0/CPU0:router(config-isis) nsf
interface-timer 15
Step 6
nsf lifetime seconds
Example:
Configures the maximum route lifetime following an NSF
restart.
•
This command should be configured to the length of
time required to perform a full NSF restart because it is
the amount of time that the Routing Information Base
(RIB) retains the routes during the restart.
•
Setting this value too high results in stale routes.
•
Setting this value too low could result in routes purged
too soon.
RP/0/RP0/CPU0:router(config-isis)# nsf lifetime
20
Step 7
Saves configuration changes.
end
or
commit
When you issue the end command, the system prompts
you to commit changes:
Example:
Uncommitted changes found, commit them before
exiting(yes/no/cancel)?
[cancel]:
•
RP/0/RP0/CPU0:router(config-isis)# end
or
– Entering yes saves configuration changes to the
RP/0/RP0/CPU0:router(config-isis)# commit
running configuration file, exits the configuration
session, and returns the router to EXEC mode.
– Entering no exits the configuration session and
returns the router to EXEC mode without
committing the configuration changes.
– Entering cancel leaves the router in the current
configuration session without exiting or
committing the configuration changes.
•
Step 8
show running-config [command]
Example:
(Optional) Displays the entire contents of the currently
running configuration file or a subset of that file.
•
Verify that “nsf” appears in the IS-IS configuration of
the NSF-aware device.
•
This example shows the contents of the configuration
file for the “isp” instance only.
RP/0/RP0/CPU0:router# show running-config
router isis isp
Cisco IOS XR Routing Configuration Guide
RC-192
Use the commit command to save the configuration
changes to the running configuration file and remain
within the configuration session.
Implementing IS-IS on Cisco IOS XR Software
How to Implement IS-IS on Cisco IOS XR Software
Configuring Authentication for IS-IS
This task explains how to configure authentication for IS-IS. This task is optional.
SUMMARY STEPS
1.
configure
2.
router isis instance-id
3.
lsp-password {hmac-md5 | text} {clear | encrypted} password [level {1 | 2}] [send-only] [snp
send-only]
4.
interface type instance
5.
hello-password {hmac-md5 | text} {clear | encrypted} password [level {1 | 2}] [send-only]
6.
end
or
commit
DETAILED STEPS
Step 1
Command or Action
Purpose
configure
Enters global configuration mode.
Example:
RP/0/RP0/CPU0:router# configure
Step 2
router isis instance-id
Example:
RP/0/RP0/CPU0:router(config)# router isis isp
Enables IS-IS routing for the specified routing instance, and
places the router in router configuration mode.
•
You can change the level of routing to be performed by
a particular routing instance by using the is-type
command.
Cisco IOS XR Routing Configuration Guide
RC-193
Implementing IS-IS on Cisco IOS XR Software
How to Implement IS-IS on Cisco IOS XR Software
Step 3
Command or Action
Purpose
lsp-password {hmac-md5 | text} {clear |
encrypted} password [level {1 | 2}] [send-only]
[snp send-only]
Configures the LSP authentication password.
Example:
RP/0/RP0/CPU0:router(config-isis)# lsp-password
hmac-md5 clear password1 level 1
Step 4
interface type instance
Example:
RP/0/RP0/CPU0:router(config-isis)# interface
POS 0/1/0/3
Cisco IOS XR Routing Configuration Guide
RC-194
•
The hmac-md5 keyword specifies that the password is
used in HMAC-MD5 authentication.
•
The text keyword specifies that the password uses
cleartext password authentication.
•
The clear keyword specifies that the password is
unencrypted when entered.
•
The encrypted keyword specifies that the password is
encrypted using a two-way algorithm when entered.
•
The level 1 keyword sets a password for authentication
in the area (in Level 1 LSPs and Level SNPs).
•
The level 2 keywords set a password for authentication
in the backbone (the Level 2 area).
•
The send-only keyword adds authentication to LSP and
sequence number protocol data units (SNPs) when they
are sent. It does not authenticate received LSPs or
SNPs.
•
The snp send-only keyword adds authentication to
SNPs when they are sent. It does not authenticate
received SNPs.
Note
To disable SNP password checking, the snp
send-only keywords must be specified in the
lsp-password command.
Enters interface configuration mode.
Implementing IS-IS on Cisco IOS XR Software
How to Implement IS-IS on Cisco IOS XR Software
Step 5
Command or Action
Purpose
hello-password {hmac-md5 | text} {clear |
encrypted} password [level {1 | 2}] [send-only]
Configures the authentication password for an IS-IS
interface.
Example:
RP/0/RP0/CPU0:router(config-isis-if)#
hello-password text clear mypassword
Step 6
Saves configuration changes.
end
or
commit
When you issue the end command, the system prompts
you to commit changes:
Example:
Uncommitted changes found, commit them before
exiting(yes/no/cancel)?
[cancel]:
•
RP/0/RP0/CPU0:router(config-isis-if)# end
or
– Entering yes saves configuration changes to the
RP/0/RP0/CPU0:router(config-isis-if)# commit
running configuration file, exits the configuration
session, and returns the router to EXEC mode.
– Entering no exits the configuration session and
returns the router to EXEC mode without
committing the configuration changes.
– Entering cancel leaves the router in the current
configuration session without exiting or
committing the configuration changes.
•
Use the commit command to save the configuration
changes to the running configuration file and remain
within the configuration session.
Configuring Keychains for IS-IS
This task explains how to configure keychains for IS-IS. This task is optional.
Keychains can be configured at the router level (lsp-password command) and at the interface level
(hello-password command) within IS-IS. These commands reference the global keychain configuration
and instruct the IS-IS protocol to obtain security parameters from the global set of configured keychains.
The router-level configuration (lsp-password command) sets the keychain to be used for all IS-IS LSPs
generated by this router, as well as for all Sequence Number Protocol Data Units (SN PDUs). The
keychain used for HELLO PDUs is set at the interface level, and may be set differently for each interface
configured for IS-IS.
SUMMARY STEPS
1.
configure
2.
router isis instance-id
3.
lsp-password keychain keychain-name [level {1 | 2}] [send-only] [snp send-only]
4.
interface type instance
5.
hello-password keychain keychain-name [level {1 | 2}] [send-only]
Cisco IOS XR Routing Configuration Guide
RC-195
Implementing IS-IS on Cisco IOS XR Software
How to Implement IS-IS on Cisco IOS XR Software
6.
end
or
commit
DETAILED STEPS
Step 1
Command or Action
Purpose
configure
Enters global configuration mode.
Example:
RP/0/RP0/CPU0:router# configure
Step 2
router isis instance-id
Example:
RP/0/RP0/CPU0:router(config)# router isis isp
Step 3
lsp-password keychain keychain-name [level {1 |
2}] [send-only] [snp send-only]
Enables IS-IS routing for the specified routing instance, and
places the router in router configuration mode.
•
You can change the level of routing to be performed by
a particular routing instance by using the is-type
command.
Configures the keychain.
Example:
RP/0/RP0/CPU0:router(config-isis)# lsp-password
keychain isis_a level 1
Step 4
interface type instance
Example:
RP/0/RP0/CPU0:router(config-isis)# interface
POS 0/1/0/3
Cisco IOS XR Routing Configuration Guide
RC-196
Enters interface configuration mode.
Implementing IS-IS on Cisco IOS XR Software
How to Implement IS-IS on Cisco IOS XR Software
Step 5
Command or Action
Purpose
hello-password keychain keychain-name [level {1
| 2}] [send-only]
Configures the authentication password for an IS-IS
interface.
Example:
RP/0/RP0/CPU0:router(config-isis-if)#
hello-password keychain isis_b
Step 6
Saves configuration changes.
end
or
commit
When you issue the end command, the system prompts
you to commit changes:
Example:
Uncommitted changes found, commit them before
exiting(yes/no/cancel)?
[cancel]:
•
RP/0/RP0/CPU0:router(config-isis-if)# end
or
– Entering yes saves configuration changes to the
RP/0/RP0/CPU0:router(config-isis-if)# commit
running configuration file, exits the configuration
session, and returns the router to EXEC mode.
– Entering no exits the configuration session and
returns the router to EXEC mode without
committing the configuration changes.
– Entering cancel leaves the router in the current
configuration session without exiting or
committing the configuration changes.
•
Use the commit command to save the configuration
changes to the running configuration file and remain
within the configuration session.
Configuring MPLS Traffic Engineering for IS-IS
This task explains how to configure IS-IS for MPLS TE. This task is optional.
For a description of the MPLS TE tasks and commands that allow you to configure the router to support
tunnels, configure an MPLS tunnel that IS-IS can use, and troubleshoot MPLS TE, see Implementing
MPLS Traffic Engineering on Cisco IOS XR Software.
Prerequisite
Your network must support the MPLS Cisco IOS XR software feature before you enable MPLS TE for
IS-IS on your router.
Note
You must enter the commands in the following task list on every IS-IS router in the traffic-engineered
portion of your network.
Restrictions
MPLS traffic engineering currently does not support routing and signaling of LSPs over unnumbered IP
links. Therefore, do not configure the feature over those links.
Cisco IOS XR Routing Configuration Guide
RC-197
Implementing IS-IS on Cisco IOS XR Software
How to Implement IS-IS on Cisco IOS XR Software
SUMMARY STEPS
1.
configure
2.
router isis instance-id
3.
address-family {ipv4 | ipv6} [unicast | multicast]
4.
mpls traffic-eng level {1 | 2}
5.
mpls traffic-eng router-id {ip-address | interface-name interface-instance}
6.
metric-style wide [level {1 | 2}]
7.
end
or
commit
8.
show isis [instance instance-id] mpls traffic-eng tunnel
9.
show isis [instance instance-id] mpls traffic-eng adjacency-log
10. show isis [instance instance-id] mpls traffic-eng advertisements
DETAILED STEPS
Step 1
Command or Action
Purpose
configure
Enters global configuration mode.
Example:
RP/0/RP0/CPU0:router# configure
Step 2
router isis instance-id
Example:
Enables IS-IS routing for the specified routing instance, and
places the router in router configuration mode.
•
RP/0/RP0/CPU0:router(config)# router isis isp
Step 3
address-family {ipv4 | ipv6} [unicast |
multicast]
You can change the level of routing to be performed by
a particular routing instance by using the is-type router
configuration command.
Specifies the IPv4 or IPv6 address family, and enters router
address family configuration mode.
•
This example specifies the unicast IPv6 address family.
Example:
RP/0/RP0/CPU0:router(config-isis)#
address-family ipv6 unicast
Step 4
mpls traffic-eng level {1 | 2}
Configures a router running IS-IS to flood MPLS TE link
information into the indicated IS-IS level.
Example:
RP/0/RP0/CPU0:router(config-isis-af)# mpls
traffic-eng level 1
Step 5
mpls traffic-eng router-id {ip-address |
interface-name interface-instance}
Example:
RP/0/RP0/CPU0:router(config-isis-af)# mpls
traffic-eng router-id loopback0
Cisco IOS XR Routing Configuration Guide
RC-198
Specifies that the MPLS TE router identifier for the node is
the given IP address or an IP address associated with the
given interface.
Implementing IS-IS on Cisco IOS XR Software
How to Implement IS-IS on Cisco IOS XR Software
Step 6
Command or Action
Purpose
metric-style wide [level {1 | 2}]
Configures a router to generate and accept only wide link
metrics in the Level 1 area.
Example:
RP/0/RP0/CPU0:router(config-isis-af)#
metric-style wide level 1
Step 7
end
or
Saves configuration changes.
commit
When you issue the end command, the system prompts
you to commit changes:
Example:
Uncommitted changes found, commit them before
exiting(yes/no/cancel)?
[cancel]:
•
RP/0/RP0/CPU0:router(config-isis-af)# end
or
– Entering yes saves configuration changes to the
RP/0/RP0/CPU0:router(config-isis-af)# commit
running configuration file, exits the configuration
session, and returns the router to EXEC mode.
– Entering no exits the configuration session and
returns the router to EXEC mode without
committing the configuration changes.
– Entering cancel leaves the router in the current
configuration session without exiting or
committing the configuration changes.
•
Step 8
show isis [instance instance-id] mpls
traffic-eng tunnel
Use the commit command to save the configuration
changes to the running configuration file and remain
within the configuration session.
(Optional) Displays MPLS TE tunnel information.
Example:
RP/0/RP0/CPU0:router# show isis instance isp
mpls traffic-eng tunnel
Step 9
show isis [instance instance-id] mpls
traffic-eng adjacency-log
(Optional) Displays a log of MPLS TE IS-IS adjacency
changes.
Example:
RP/0/RP0/CPU0:router# show isis instance isp
mpls traffic-eng adjacency-log
Step 10
show isis [instance instance-id] mpls
traffic-eng advertisements
(Optional) Displays the latest flooded record from MPLS
TE.
Example:
RP/0/RP0/CPU0:router# show isis instance isp
mpls traffic-eng advertisements
Cisco IOS XR Routing Configuration Guide
RC-199
Implementing IS-IS on Cisco IOS XR Software
How to Implement IS-IS on Cisco IOS XR Software
Tuning Adjacencies for IS-IS
This task explains how to enable logging of adjacency state changes, alter the timers for IS-IS adjacency
packets, and display various aspects of adjacency state. Tuning your IS-IS adjacencies increases network
stability when links are congested. This task is optional.
For point-to-point links, IS-IS sends only a single hello for Level 1 and Level 2, which means that the
level modifiers are meaningless on point-to-point links. To modify hello parameters for a point-to-point
interface, omit the specification of the level options.
The options configurable in the interface submode apply only to that interface. By default, the values are
applied to both Level 1 and Level 2.
The hello-password command can be used to prevent adjacency formation with unauthorized or
undesired routers. This ability is particularly useful on a LAN, where connections to routers with which
you have no desire to establish adjacencies are commonly found.
SUMMARY STEPS
1.
configure
2.
router isis instance-id
3.
log adjacency changes
4.
interface type number
5.
hello-padding {disable | sometimes} [level {1 | 2}]
6.
hello-interval seconds [level {1 | 2}]
7.
hello-multiplier multiplier [level {1 | 2}]
8.
hello-password {hmac-md5 | text} {clear | encrypted} password [level {1 | 2}] [send-only]
9.
end
or
commit
10. show isis [instance instance-id] adjacency [interface-type interface-instance] [detail] [systemid
system-id]
11. show isis adjacency-log
12. show isis [instance instance-id] interface [type instance] [brief | detail] [level {1 | 2}]
13. show isis [instance instance-id] neighbors [interface-type interface-instance] [summary] [detail]
[systemid system-id]
Cisco IOS XR Routing Configuration Guide
RC-200
Implementing IS-IS on Cisco IOS XR Software
How to Implement IS-IS on Cisco IOS XR Software
DETAILED STEPS
Step 1
Command or Action
Purpose
configure
Enters global configuration mode.
Example:
RP/0/RP0/CPU0:router# configure
Step 2
router isis instance-id
Example:
Enables IS-IS routing for the specified routing instance,
and places the router in router configuration mode.
•
RP/0/RP0/CPU0:router(config)# router isis isp
Step 3
log adjacency changes
You can change the level of routing to be performed
by a particular routing instance by using the is-type
command.
Generates a log message when an IS-IS adjacency
changes state (up or down).
Example:
RP/0/RP0/CPU0:router(config-isis)# log adjacency
changes
Step 4
interface type number
Enters interface configuration mode.
Example:
RP/0/RP0/CPU0:router(config-isis)# interface POS
0/1/0/3
Step 5
hello-padding {disable | sometimes} [level {1 |
2}]
Configures padding on IS-IS hello PDUs for an IS-IS
interface on the router.
•
Example:
Hello padding applies to only this interface and not
to all interfaces.
RP/0/RP0/CPU0:router(config-isis-if)# hello-paddi
ng sometimes
Step 6
hello-interval seconds [level {1 | 2}]
Specifies the length of time between hello packets that
the software sends.
Example:
RP/0/RP0/CPU0:router(config-isis-if)#
hello-interval 6
Step 7
hello-multiplier multiplier [level {1 | 2}]
Example:
RP/0/RP0/CPU0:router(config-isis-if)#
hello-multiplier 10
Specifies the number of IS-IS hello packets a neighbor
must miss before the router should declare the adjacency
as down.
•
A higher value increases the networks tolerance for
dropped packets, but also may increase the amount
of time required to detect the failure of an adjacent
router.
•
Conversely, not detecting the failure of an adjacent
router can result in greater packet loss.
Cisco IOS XR Routing Configuration Guide
RC-201
Implementing IS-IS on Cisco IOS XR Software
How to Implement IS-IS on Cisco IOS XR Software
Step 8
Command or Action
Purpose
hello-password {hmac-md5 | text} {clear |
encrypted} password [level {1 | 2}] [send-only]
Specifies that this system include authentication in the
hello packets and requires successful authentication of
the hello packet from the neighbor to establish an
adjacency.
Example:
RP/0/RP0/CPU1:router(config-isis-if)#
hello-password text clear mypassword
Step 9
Saves configuration changes.
end
or
commit
When you issue the end command, the system
prompts you to commit changes:
Example:
Uncommitted changes found, commit them before
exiting(yes/no/cancel)?
[cancel]:
•
RP/0/RP0/CPU0:router(config-isis-if)# end
or
– Entering yes saves configuration changes to the
RP/0/RP0/CPU0:router(config-isis-if)# commit
running configuration file, exits the
configuration session, and returns the router to
EXEC mode.
– Entering no exits the configuration session and
returns the router to EXEC mode without
committing the configuration changes.
– Entering cancel leaves the router in the current
configuration session without exiting or
committing the configuration changes.
•
Step 10
show isis [instance instance-id] adjacency
[interface-type interface-instance] [detail]
[systemid system-id]
Use the commit command to save the configuration
changes to the running configuration file and remain
within the configuration session.
(Optional) Displays IS-IS adjacencies.
Example:
RP/0/RP0/CPU0:router# show isis instance isp
adjacency ipv4
Step 11
show isis adjacency-log
Example:
RP/0/RP0/CPU1:router# show isis adjacency-log
Cisco IOS XR Routing Configuration Guide
RC-202
(Optional) Displays a log of the most recent adjacency
state transitions.
Implementing IS-IS on Cisco IOS XR Software
How to Implement IS-IS on Cisco IOS XR Software
Step 12
Command or Action
Purpose
show isis [instance instance-id] interface [type
instance] [brief | detail] [level {1 | 2}]
(Optional) Displays information about the IS-IS
interface.
Example:
RP/0/RP0/CPU0:router# show isis interface POS
0/1/0/1 brief
Step 13
show isis [instance instance-id] neighbors
[interface-type interface-instance] [summary]
[detail] [systemid system-id]
(Optional) Displays information about IS-IS neighbors.
Example:
RP/0/RP0/CPU0:router# show isis neighbors summary
Setting SPF Interval for a Single-Topology IPv4 and IPv6 Configuration
This task explains how to make adjustments to the SPF calculation to tune router performance. This task
is optional.
Because the SPF calculation computes routes for a particular topology, the tuning attributes are located
in the router address family configuration submode. SPF calculation computes routes for Level 1 and
Level 2 separately.
When IPv4 and IPv6 address families are used in a single-topology mode, only a single SPF for the IPv4
topology exists. The IPv6 topology “borrows” the IPv4 topology; therefore, no SPF calculation is
required for IPv6. To tune the SPF calculation parameters for single-topology mode, configure the
address-family ipv4 unicast command.
The incremental SPF algorithm can be enabled separately. When enabled, the incremental shortest path
first (ISPF) is not employed immediately. Instead, the full SPF algorithm is used to “seed” the state
information required for the ISPF to run. The startup delay prevents the ISPF from running for a
specified interval after an IS-IS restart (to permit the database to stabilize). After the startup delay
elapses, the ISPF is principally responsible for performing all of the SPF calculations. The reseed
interval enables a periodic running of the full SPF to ensure that the iSFP state remains synchronized.
SUMMARY STEPS
1.
configure
2.
router isis instance-id
3.
address-family {ipv4 | ipv6} [unicast | multicast]
4.
spf-interval {[initial-wait initial | secondary-wait secondary | maximum-wait maximum]
...}[level {1 | 2}]
5.
ispf [level {1 | 2}]
6.
end
or
commit
7.
show isis [instance instance-id] [[ipv4 | ipv6 | afi-all] [unicast | multicast | safi-all]] spf-log [level
{1 | 2}] [ispf | fspf | prc | nhc] [detail | verbose] [last number | first number]
Cisco IOS XR Routing Configuration Guide
RC-203
Implementing IS-IS on Cisco IOS XR Software
How to Implement IS-IS on Cisco IOS XR Software
DETAILED STEPS
Step 1
Command or Action
Purpose
configure
Enters global configuration mode.
Example:
RP/0/RP0/CPU0:router# configure
Step 2
router isis instance-id
Example:
Enables IS-IS routing for the specified routing instance, and
places the router in router configuration mode.
•
RP/0/RP0/CPU0:router(config)# router isis isp
Step 3
address-family {ipv4 | ipv6} [unicast |
multicast]
You can change the level of routing to be performed by
a particular routing instance by using the is-type router
configuration command.
Specifies the IPv4 or IPv6 address family, and enters router
address family configuration mode.
•
This example specifies the unicast IPv6 address family.
Example:
RP/0/RP0/CPU0:router(config-isis)#
address-family ipv6 unicast
Step 4
spf-interval { [initial-wait initial |
secondary-wait secondary | maximum-wait
maximum] ...} [level {1 | 2}]
(Optional) Controls the minimum time between successive
SPF calculations.
•
This value imposes a delay in the SPF computation
after an event trigger and enforces a minimum elapsed
time between SPF runs.
•
If this value is configured too low, the router can lose
too many CPU resources when the network is unstable.
•
Configuring the value too high delays changes in the
network topology that result in lost packets.
•
The SPF interval does not apply to the running of the
ISPF because that algorithm runs immediately on
receiving a changed LSP.
Example:
RP/0/RP0/CPU0:router(config-isis-af)#
spf-interval initial-wait 10 maximum-wait 30
Step 5
ispf [level {1 | 2}]
Example:
RP/0/RP0/CPU0:router(config-isis-af)# ispf
Cisco IOS XR Routing Configuration Guide
RC-204
(Optional) Configures incremental IS-IS ISPF to calculate
network topology.
Implementing IS-IS on Cisco IOS XR Software
How to Implement IS-IS on Cisco IOS XR Software
Step 6
Command or Action
Purpose
end
Saves configuration changes.
or
commit
When you issue the end command, the system prompts
you to commit changes:
Example:
Uncommitted changes found, commit them before
exiting(yes/no/cancel)?
[cancel]:
•
RP/0/RP0/CPU0:router(config-isis-af)# end
or
– Entering yes saves configuration changes to the
RP/0/RP0/CPU0:router(config-isis-af)# commit
running configuration file, exits the configuration
session, and returns the router to EXEC mode.
– Entering no exits the configuration session and
returns the router to EXEC mode without
committing the configuration changes.
– Entering cancel leaves the router in the current
configuration session without exiting or
committing the configuration changes.
•
Step 7
show isis [instance instance-id] [[ipv4 | ipv6
| afi-all] [unicast | multicast | safi-all]]
spf-log [level {1 | 2}] [ispf | fspf | prc |
nhc] [detail | verbose] [last number | first
number]
Use the commit command to save the configuration
changes to the running configuration file and remain
within the configuration session.
(Optional) Displays how often and why the router has run a
full SPF calculation.
Example:
RP/0/RP0/CPU0:router# show isis instance 1
spf-log ipv6
Customizing Routes for IS-IS
This task explains how to perform route functions that include injecting default routes into your IS-IS
routing domain and redistributing routes learned in another IS-IS instance. This task is optional.
SUMMARY STEPS
1.
configure
2.
router isis instance-id
3.
set-overload-bit [on-startup {delay | wait-for-bgp}] [level {1 | 2}]
4.
address-family {ipv4 | ipv6} [unicast | multicast]
5.
default-information originate [route-policy route-policy-name]
6.
redistribute isis instance [level-1 | level-2 | level-1-2] [metric metric] [metric-type {internal |
external}] policy policy-name]
7.
summary-prefix address/prefix-length [level {1 | 2}]
or
summary-prefix ipv6-prefix/prefix-length [level {1 | 2}]
Cisco IOS XR Routing Configuration Guide
RC-205
Implementing IS-IS on Cisco IOS XR Software
How to Implement IS-IS on Cisco IOS XR Software
8.
maximum-paths route-number
9.
distance weight [address/prefix-length [route-list-name]]
10. set-attached-bit
11. end
or
commit
DETAILED STEPS
Step 1
Command or Action
Purpose
configure
Enters global configuration mode.
Example:
RP/0/RP0/CPU0:router# configure
Step 2
router isis instance-id
Example:
Enables IS-IS routing for the specified routing process, and
places the router in router configuration mode.
•
RP/0/RP0/CPU0:router(config)# router isis isp
Step 3
set-overload-bit [ on-startup { delay |
wait-for-bgp }] [level {1 | 2}]
By default, all IS-IS instances are automatically
Level 1 and Level 2. You can change the level of
routing to be performed by a particular routing instance
by using the is-type command.
(Optional) Sets the overload bit.
Note
Example:
The configured overload bit behavior does not apply
to NSF restarts because the NSF restart does not set
the overload bit during restart.
RP/0/RP0/CPU0:router(config-isis)#
set-overload-bit
Step 4
address-family {ipv4 | ipv6} [unicast |
multicast]
Specifies the IPv4 or IPv6 address family, and enters router
address family configuration mode.
•
This example specifies the unicast IPv6 address family.
Example:
RP/0/RP0/CPU0:router(config-isis)#
address-family ipv6 unicast
Step 5
default-information originate [route-policy
route-policy-name]
(Optional) Injects a default IPv4 or IPv6 route into an IS-IS
routing domain.
•
The route-policy keyword and route-policy-name
argument specify the conditions under which the IPv4
or IPv6 default route is advertised.
•
If the route-policy keyword is omitted, then the IPv4 or
IPv6 default route is unconditionally advertised at
Level 2.
Example:
RP/0/RP0/CPU0:router(config-isis-af)#
default-information originate
Step 6
redistribute isis instance [level-1 | level-2 |
level-1-2] [metric metric] [metric-type
{internal | external}] [policy policy-name]
(Optional) Redistributes routes from one IS-IS instance into
another instance.
•
Example:
RP/0/RP0/CPU0:router(config-isis-af)#
redistribute isis 2 level-1
Cisco IOS XR Routing Configuration Guide
RC-206
In this example, an IS-IS instance redistributes Level 1
routes from another IS-IS instance.
Implementing IS-IS on Cisco IOS XR Software
How to Implement IS-IS on Cisco IOS XR Software
Step 7
Command or Action
Purpose
summary-prefix address/prefix-length [level {1
| 2}]
(Optional) Allows a Level 1-2 router to summarize Level 1
IPv4 and IPv6 prefixes at Level 2, instead of advertising the
Level 1 prefixes directly when the router advertises the
summary.
or
summary-prefix ipv6-prefix/prefix-length [level
{1 | 2}]
Example:
RP/0/RP0/CPU0:router(config-isis-af)#
summary-prefix 10.1.0.0/16 level 1
•
or
•
This example specifies an IPv6 prefix, and the
command must be in the form documented in RFC 2373
in which the address is specified in hexadecimal using
16-bit values between colons.
•
Note that IPv6 prefixes must be configured only in the
IPv6 router address family configuration submode, and
IPv4 prefixes in the IPv4 router address family
configuration submode.
or
RP/0/RP0/CPU0:router(config-isis-af)#
summary-prefix 3003:xxxx::/24 level 1
Step 8
maximum-paths route-number
This example specifies an IPv4 address and mask.
(Optional) Configures the maximum number of parallel
paths allowed in a routing table.
Example:
RP/0/RP0/CPU0:router(config-isis-af)#
maximum-paths 16
Step 9
distance weight [address/prefix-length
[route-list-name]]
(Optional) Defines the administrative distance assigned to
routes discovered by the IS-IS protocol.
•
Example:
A different administrative distance may be applied for
IPv4 and IPv6.
RP/0/RP0/CPU0:router(config-isis-af)# distance
90
Cisco IOS XR Routing Configuration Guide
RC-207
Implementing IS-IS on Cisco IOS XR Software
How to Implement IS-IS on Cisco IOS XR Software
Step 10
Command or Action
Purpose
set-attached-bit
(Optional) Configures an IS-IS instance with an attached bit
in the Level 1 LSP.
Example:
RP/0/RP0/CPU0:router(config-isis-af)#
set-attached-bit
Step 11
Saves configuration changes.
end
or
commit
When you issue the end command, the system prompts
you to commit changes:
Example:
Uncommitted changes found, commit them before
exiting(yes/no/cancel)?
[cancel]:
•
RP/0/RP0/CPU0:router(config-isis-af)# end
or
– Entering yes saves configuration changes to the
RP/0/RP0/CPU0:router(config-isis-af)# commit
running configuration file, exits the configuration
session, and returns the router to EXEC mode.
– Entering no exits the configuration session and
returns the router to EXEC mode without
committing the configuration changes.
– Entering cancel leaves the router in the current
configuration session without exiting or
committing the configuration changes.
•
Use the commit command to save the configuration
changes to the running configuration file and remain
within the configuration session.
Configuring MPLS LDP IS-IS Synchronization
This task explains how to enable Multiprotocol Label Switching (MPLS) Label Distribution Protocol
(LDP) IS-IS synchronization. MPLS LDP synchronization can be enabled for an address family under
interface configuration mode. Only IPv4 unicast address family is supported. This task is optional.
SUMMARY STEPS
1.
configure
2.
router isis instance-id
3.
interface type instance
4.
address-family ipv4 unicast
5.
mpls ldp sync [level {1 | 2}]
6.
end
or
commit
Cisco IOS XR Routing Configuration Guide
RC-208
Implementing IS-IS on Cisco IOS XR Software
How to Implement IS-IS on Cisco IOS XR Software
DETAILED STEPS
Step 1
Command or Action
Purpose
configure
Enters global configuration mode.
Example:
RP/0/RP0/CPU0:router# configure
Step 2
router isis instance-id
Example:
Enables IS-IS routing for the specified routing process, and
places the router in router configuration mode.
•
RP/0/RP0/CPU0:router(config)# router isis isp
Step 3
interface type number
By default, all IS-IS instances are automatically
Level 1 and Level 2. You can change the level of
routing to be performed by a particular routing instance
by using the is-type command.
Enters interface configuration mode.
Example:
RP/0/RP0/CPU0:router(config-isis)# interface
POS 0/1/0/3
Step 4
address-family ipv4 unicast
Specifies the IPv4 address family and enters router address
family configuration mode.
Example:
RP/0/RP0/CPU0:router(config-isis-if)#
address-family ipv4 unicast
Step 5
mpls ldp sync [level {1 | 2}]
Enables MPLS LDP synchronization for the IPv4 address
family under interface POS 0/1/0/3.
Example:
RP/0/RP0/CPU0:router(config-isis-if-af)# mpls
ldp sync level 1
Step 6
end
or
Saves configuration changes.
commit
When you issue the end command, the system prompts
you to commit changes:
Example:
Uncommitted changes found, commit them before
exiting(yes/no/cancel)?
[cancel]:
•
RP/0/RP0/CPU0:router(config-isis-if-af)# end
or
– Entering yes saves configuration changes to the
RP/0/RP0/CPU0:router(config-isis-if-af)# commit
running configuration file, exits the configuration
session, and returns the router to EXEC mode.
– Entering no exits the configuration session and
returns the router to EXEC mode without
committing the configuration changes.
– Entering cancel leaves the router in the current
configuration session without exiting or
committing the configuration changes.
•
Use the commit command to save the configuration
changes to the running configuration file and remain
within the configuration session.
Cisco IOS XR Routing Configuration Guide
RC-209
Implementing IS-IS on Cisco IOS XR Software
How to Implement IS-IS on Cisco IOS XR Software
Enabling Multicast-Intact
This optional task describes how to enable multicast-intact for IS-IS routes that use IPv4 and IPv6
addresses.
SUMMARY STEPS
1.
configure
2.
router isis instance-id
3.
address-family {ipv4 | ipv6} [unicast | multicast]
4.
mpls traffic-eng multicast-intact
5.
end
or
commit
DETAILED STEPS
Step 1
Command or Action
Purpose
configure
Enters global configuration mode.
Example:
RP/0/RP0/CPU0:router# configure
Step 2
router isis instance-id
Example:
Enables IS-IS routing for the specified routing process, and
places the router in router configuration mode. In this
example, the IS-IS instance is called isp.
RP/0/RP0/CPU0:router(config)# router isis isp
Step 3
address-family {ipv4 | ipv6} [unicast |
multicast]
Specifies the IPv4 or IPv6 address family, and enters router
address family configuration mode.
•
Example:
RP/0/RP0/CPU0:router(config-isis)#
address-family ipv6 unicast
Cisco IOS XR Routing Configuration Guide
RC-210
This example specifies the unicast IPv6 address family.
Implementing IS-IS on Cisco IOS XR Software
How to Implement IS-IS on Cisco IOS XR Software
Step 4
Command or Action
Purpose
mpls traffic-eng multicast-intact
Enables multicast-intact.
Example:
RP/0/RP0/CPU0:router(config-isis-af)# mpls
traffic-eng multicast-intact
Step 5
Saves configuration changes.
end
or
commit
When you issue the end command, the system prompts
you to commit changes:
Example:
Uncommitted changes found, commit them before
exiting(yes/no/cancel)?
[cancel]:
•
RP/0/RP0/CPU0:router(config-isis-af)# end
or
– Entering yes saves configuration changes to the
RP/0/RP0/CPU0:router(config-isis-af)# commit
running configuration file, exits the configuration
session, and returns the router to EXEC mode.
– Entering no exits the configuration session and
returns the router to EXEC mode without
committing the configuration changes.
– Entering cancel leaves the router in the current
configuration session without exiting or
committing the configuration changes.
•
Use the commit command to save the configuration
changes to the running configuration file and remain
within the configuration session.
Tagging IS-IS Interface Routes
This optional task describes how to associate a tag with a connected route of an IS-IS interface.
SUMMARY STEPS
1.
configure
2.
router isis instance-id
3.
address-family {ipv4 | ipv6} [unicast | multicast]
4.
metric-style wide [transition] [level {1 | 2}]
5.
exit
6.
interface type number
7.
address-family {ipv4 | ipv6} [unicast | multicast]
8.
tag tag
9.
end
or
commit
10. show isis [ipv4 | ipv6 | afi-all] [unicast | multicast | safi-all] route [detail]
Cisco IOS XR Routing Configuration Guide
RC-211
Implementing IS-IS on Cisco IOS XR Software
How to Implement IS-IS on Cisco IOS XR Software
DETAILED STEPS
Step 1
Command or Action
Purpose
configure
Enters global configuration mode.
Example:
RP/0/RP0/CPU0:router# configure
Step 2
router isis instance-id
Example:
Enables IS-IS routing for the specified routing process, and
places the router in router configuration mode. In this
example, the IS-IS instance is called isp.
RP/0/RP0/CPU0:router(config)# router isis isp
Step 3
address-family {ipv4 | ipv6} [unicast |
multicast]
Specifies the IPv4 or IPv6 address family, and enters router
address family configuration mode.
•
This example specifies the unicast IPv6 address family.
Example:
RP/0/RP0/CPU0:router(config-isis)#
address-family ipv6 unicast
Step 4
metric-style wide [transition] [level {1 | 2}]
Configures a router to generate and accept only wide link
metrics in the Level 1 area.
Example:
RP/0/RP0/CPU0:router(config-isis-af)#
metric-style wide level 1
Step 5
Exits router address family configuration mode, and returns
the router to router configuration mode.
exit
Example:
RP/0/RP0/CPU0:router(config-isis-af)# exit
Step 6
interface type number
Enters interface configuration mode.
Example:
RP/0/RP0/CPU0:router(config-isis)# interface
POS 0/1/0/3
Step 7
address-family {ipv4 | ipv6} [unicast |
multicast]
Specifies the IPv4 or IPv6 address family, and enters
address family configuration mode.
•
This example specifies the unicast IPv6 address family.
Example:
RP/0/RP0/CPU0:router(config-isis-if)#
address-family ipv6 unicast
Step 8
tag tag
Example:
RP/0/RP0/CPU0:router(config-isis-if-af)# tag 3
Cisco IOS XR Routing Configuration Guide
RC-212
Sets the value of the tag to associate with the advertised
connected route.
Implementing IS-IS on Cisco IOS XR Software
How to Implement IS-IS on Cisco IOS XR Software
Step 9
Command or Action
Purpose
end
Saves configuration changes.
or
commit
When you issue the end command, the system prompts
you to commit changes:
Example:
Uncommitted changes found, commit them before
exiting(yes/no/cancel)?
[cancel]:
•
RP/0/RP0/CPU0:router(config-isis-if-af)# end
or
– Entering yes saves configuration changes to the
RP/0/RP0/CPU0:router(config-isis-if-af)# commit
running configuration file, exits the configuration
session, and returns the router to EXEC mode.
– Entering no exits the configuration session and
returns the router to EXEC mode without
committing the configuration changes.
– Entering cancel leaves the router in the current
configuration session without exiting or
committing the configuration changes.
•
Step 10
show isis [ ipv4 | ipv6 | afi-all] [ unicast
multicast | safi-all] route [detail]
|
Use the commit command to save the configuration
changes to the running configuration file and remain
within the configuration session.
Displays tag information. Verify that all tags are present in
the RIB.
Example:
RP/0/RP0/CPU0:router(config-isis-if-af)# show
isis ipv6 detail
Setting the Priority for Adding Prefixes to the RIB
This optional task describes how to set the priority (order) for which specified prefixes are added to the
RIB. The prefixes can be chosen using an access list (ACL), prefix list, or by matching a tag value.
SUMMARY STEPS
1.
configure
2.
router isis instance-id
3.
address-family {ipv4 | ipv6} [unicast | multicast]
4.
metric-style wide [transition] [level {1 | 2}]
5.
spf prefix-priority [level {1 | 2}] {critical | high | medium} {access-list-name | tag tag}
6.
end
or
commit
Cisco IOS XR Routing Configuration Guide
RC-213
Implementing IS-IS on Cisco IOS XR Software
How to Implement IS-IS on Cisco IOS XR Software
DETAILED STEPS
Step 1
Command or Action
Purpose
configure
Enters global configuration mode.
Example:
RP/0/RP0/CPU0:router# configure
Step 2
router isis instance-id
Example:
Enables IS-IS routing for the specified routing process, and
places the router in router configuration mode. In this
example, the IS-IS instance is called isp.
RP/0/RP0/CPU0:router(config)# router isis isp
Step 3
address-family {ipv4 | ipv6} [unicast |
multicast]
Specifies the IPv4 or IPv6 address family, and enters router
address family configuration mode.
•
This example specifies the unicast IPv6 address family.
Example:
RP/0/RP0/CPU0:router(config-isis)#
address-family ipv6 unicast
Step 4
metric-style wide [transition] [level {1 | 2}]
Configures a router to generate and accept only wide link
metrics in the Level 1 area.
Example:
RP/0/RP0/CPU0:router(config-isis-af)#
metric-style wide level 1
Step 5
spf prefix-priority [level {1 | 2}] {critical |
high | medium} {access-list-name | tag tag}
Installs all routes tagged with the value 3 first.
Example:
RP/0/RP0/CPU0:router(config-isis-af)# spf
prefix-priority high tag 3
Step 6
Saves configuration changes.
end
or
commit
When you issue the end command, the system prompts
you to commit changes:
Example:
Uncommitted changes found, commit them before
exiting(yes/no/cancel)?
[cancel]:
•
RP/0/RP0/CPU0:router(config-isis-af)# end
or
– Entering yes saves configuration changes to the
RP/0/RP0/CPU0:router(config-isis-af)# commit
running configuration file, exits the configuration
session, and returns the router to EXEC mode.
– Entering no exits the configuration session and
returns the router to EXEC mode without
committing the configuration changes.
– Entering cancel leaves the router in the current
configuration session without exiting or
committing the configuration changes.
•
Cisco IOS XR Routing Configuration Guide
RC-214
Use the commit command to save the configuration
changes to the running configuration file and remain
within the configuration session.
Implementing IS-IS on Cisco IOS XR Software
How to Implement IS-IS on Cisco IOS XR Software
Configuring IP Fast Reroute Loop-free Alternate
This optional task describes how to enable the IP fast reroute (IPFRR) loop-free alternate (LFA)
computation to converge traffic flows around link failures.
Note
To enable node protection on broadcast links, IPFRR and bidirectional forwarding detection (BFD) must
be enabled on the interface under IS-IS.
Restrictions
IPFRR is supported on the Cisco CRS-1 router only. IPv4 address families and single-level interfaces
are supported.
Multiprotocol Label Switching (MPLS) FRR and IPFRR cannot be configured on the same interface
simultaneously.
SUMMARY STEPS
1.
configure
2.
router isis instance-id
3.
interface type instance
4.
circuit-type {level-1 | level-2-only}
5.
address-family ipv4 [unicast]
6.
ipfrr lfa {level {1 | 2}}
7.
end
or
commit
DETAILED STEPS
Step 1
Command or Action
Purpose
configure
Enters global configuration mode.
Example:
RP/0/RP0/CPU0:router# configure
Step 2
router isis instance-id
Example:
Enables IS-IS routing for the specified routing process, and
places the router in router configuration mode. In this
example, the IS-IS instance is called isp.
RP/0/RP0/CPU0:router(config)# router isis isp
Step 3
interface type instance
Enters interface configuration mode.
Example:
RP/0/RP0/CPU0:router(config-isis)# interface
POS 0/1/0/3
Cisco IOS XR Routing Configuration Guide
RC-215
Implementing IS-IS on Cisco IOS XR Software
Configuration Examples for Implementing IS-IS on Cisco IOS XR Software
Step 4
Command or Action
Purpose
circuit-type {level-1 | level-2-only}
(Optional) Configures the type of adjacency.
Example:
RP/0/RP0/CPU0:router(config-isis-if)#
circuit-type level-1
Step 5
address-family ipv4 [unicast]
Specifies the IPv4 address family, and enters router address
family configuration mode.
•
Example:
This example specifies the unicast IPv6 address family.
RP/0/RP0/CPU0:router(config-isis-if)#
address-family ipv6 unicast
Step 6
ipfrr lfa {level {1 | 2}}
Specifies the IP fast reroute loop-free alternate computation
on link or node failures.
Example:
RP/0/RP0/CPU0:router(config-isis-if-af)# ipfrr
lfa level 1
Step 7
Saves configuration changes.
end
or
commit
When you issue the end command, the system prompts
you to commit changes:
Example:
Uncommitted changes found, commit them before
exiting(yes/no/cancel)?
[cancel]:
•
RP/0/RP0/CPU0:router(config-isis-if-af)# end
or
– Entering yes saves configuration changes to the
RP/0/RP0/CPU0:router(config-isis-af)# commit
running configuration file, exits the configuration
session, and returns the router to EXEC mode.
– Entering no exits the configuration session and
returns the router to EXEC mode without
committing the configuration changes.
– Entering cancel leaves the router in the current
configuration session without exiting or
committing the configuration changes.
•
Use the commit command to save the configuration
changes to the running configuration file and remain
within the configuration session.
Configuration Examples for Implementing IS-IS on Cisco IOS XR
Software
This section provides the following configuration examples:
•
Configuring Single-Topology IS-IS for IPv6: Example, page RC-217
•
Configuring Multitopology IS-IS for IPv6: Example, page RC-217
•
Redistributing IS-IS Routes Between Multiple Instances: Example, page RC-217
•
Tagging Routes: Example, page RC-218
Cisco IOS XR Routing Configuration Guide
RC-216
Implementing IS-IS on Cisco IOS XR Software
Configuration Examples for Implementing IS-IS on Cisco IOS XR Software
Configuring Single-Topology IS-IS for IPv6: Example
The following example shows single-topology mode being enabled. An IS-IS instance is created, the
NET is defined, IPv6 is configured along with IPv4 on an interface, and IPv4 link topology is used for
IPv6.
This configuration allows POS interface 0/3/0/0 to form adjacencies for both IPv4 and IPv6 addresses.
router isis isp
net 49.0000.0000.0001.00
address-family ipv6 unicast
single-topology
interface POS0/3/0/0
address-family ipv4 unicast
!
address-family ipv6 unicast
!
exit
!
interface POS0/3/0/0
ipv4 address 10.0.1.3 255.255.255.0
ipv6 address 2001::1/64
Configuring Multitopology IS-IS for IPv6: Example
The following example shows multitopology IS-IS being configured in IPv6.
router isis isp
net 49.0000.0000.0001.00
interface POS0/3/0/0
address-family ipv6 unicast
metric-style wide level 1
exit
!
interface POS0/3/0/0
ipv6 address 2001::1/64
Redistributing IS-IS Routes Between Multiple Instances: Example
The following example shows usage of the set-attached-bit and redistribute commands. Two instances,
instance “1” restricted to Level 1 and instance “2” restricted to Level 2, are configured.
The Level 1 instance is propagating routes to the Level 2 instance using redistribution. Note that the
administrative distance is explicitly configured higher on the Level 2 instance to ensure that Level 1
routes are preferred.
Attached bit is being set for the Level 1 instance since it is redistributing routes into the Level 2 instance.
Therefore, instance “1” is a suitable candidate to get from the area to the backbone.
router isis 1
is-type level-2-only
net 49.0001.0001.0001.0001.00
address-family ipv4 unicast
distance 116
redistribute isis 2 level 2
!
interface POS0/3/0/0
address-family ipv4 unicast
!
Cisco IOS XR Routing Configuration Guide
RC-217
Implementing IS-IS on Cisco IOS XR Software
Where to Go Next
!
router isis 2
is-type level-1
net 49.0002.0001.0001.0002.00
address-family ipv4 unicast
set-attached-bit
!
interface POS0/1/0/0
address-family ipv4 unicast
Tagging Routes: Example
The following example show how to tag routes.
route-policy isis-tag-55
end-policy
!
route-policy isis-tag-555
if destination in (5.5.5.0/24 eq 24) then
set tag 555
pass
else
drop
endif
end-policy
!
router static
address-family ipv4 unicast
0.0.0.0/0 2.6.0.1
5.5.5.0/24 Null0
!
!
router isis uut
net 00.0000.0000.12a5.00
address-family ipv4 unicast
metric-style wide
redistribute static level-1 route-policy isis-tag-555
spf prefix-priority critical tag 13
spf prefix-priority high tag 444
spf prefix-priority medium tag 777
Where to Go Next
To implement more IP routing protocols, see the following document modules in Cisco IOS XR Routing
Configuration Guide:
•
Implementing OSPF on Cisco IOS XR Software
•
Implementing BGP on Cisco IOS XR Software
•
Implementing EIGRP on Cisco IOS XR Software
•
Implementing RIP on Cisco IOS XR Software
Cisco IOS XR Routing Configuration Guide
RC-218
Implementing IS-IS on Cisco IOS XR Software
Additional References
Additional References
The following sections provide references related to implementing IS-IS on Cisco IOS XR software.
Related Documents
Related Topic
Document Title
IS-IS commands: complete command syntax,
command modes, command history, defaults, usage
guidelines, and examples
Cisco IOS XR Routing Command Reference, Release 3.5
MPLS TE feature information
Implementing MPLS Traffic Engineering on Cisco IOS XR Software
module in the Cisco IOS XR Multiprotocol Label Switching
Configuration Guide, Release 3.5
IS-IS TLVs
Intermediate System-to-Intermediate System (IS-IS) TLVs at:
http://www.cisco.com/en/US/tech/tk365/technologies_tech_note09
186a0080094bbd.shtml
Bidirectional Forwarding Detection (BFD)
Cisco IOS XR Interface and Hardware Configuration Guide,
Release 3.5 and Cisco IOS XR Interface and Hardware Command
Reference, Release 3.5
Standards
Standards
Title
Draft-ietf-isis-ipv6-05.txt
Routing IPv6 with IS-IS, by Christian E. Hopps
Draft-ietf-isis-wg-multi-topology-06.txt
M-ISIS: Multi Topology (MT) Routing in IS-IS, by Tony Przygienda,
Naiming Shen, and Nischal Sheth
Draft-ietf-isis-traffic-05.txt
IS-IS Extensions for Traffic Engineering, by Henk Smit and Toni Li
Draft-ietf-isis-restart-04.txt
Restart Signalling for IS-IS, by M. Shand and Les Ginsberg
Draft-ietf-isis-igp-p2p-over-lan-05.txt
Point-to-point operation over LAN in link-state routing protocols, by
Naiming Shen
Draft-ietf-rtgwg-ipfrr-framework-06.txt
IP Fast Reroute Framework, by M. Shand and S. Bryant
Draft-ietf-rtgwg-lf-conv-frmwk-00.txt
A Framework for Loop-free Convergence, by M. Shand and S.
Bryant
Cisco IOS XR Routing Configuration Guide
RC-219
Implementing IS-IS on Cisco IOS XR Software
Additional References
MIBs
MIBs
MIBs Link
—
To locate and download MIBs using Cisco IOS XR software, use the
Cisco MIB Locator found at the following URL and choose a
platform under the Cisco Access Products menu:
http://cisco.com/public/sw-center/netmgmt/cmtk/mibs.shtml
RFCs
RFCs
Title
RFC 1142
OSI IS-IS Intra-domain Routing Protocol
RFC 1195
Use of OSI IS-IS for Routing in TCP/IP and Dual Environments
RFC 2763
Dynamic Hostname Exchange Mechanism for IS-IS
RFC 2966
Domain-wide Prefix Distribution with Two-Level IS-IS
RFC 2973
IS-IS Mesh Groups
RFC 3277
IS-IS Transient Blackhole Avoidance
RFC 3373
Three-Way Handshake for IS-IS Point-to-Point Adjacencies
RFC 3567
IS-IS Cryptographic Authentication
Technical Assistance
Description
Link
http://www.cisco.com/techsupport
The Cisco Technical Support website contains
thousands of pages of searchable technical content,
including links to products, technologies, solutions,
technical tips, and tools. Registered Cisco.com users
can log in from this page to access even more content.
Cisco IOS XR Routing Configuration Guide
RC-220
Implementing OSPF on Cisco IOS XR Software
Open Shortest Path First (OSPF) is an Interior Gateway Protocol (IGP) developed by the OSPF working
group of the Internet Engineering Task Force (IETF). Designed expressly for IP networks, OSPF
supports IP subnetting and tagging of externally derived routing information. OSPF also allows packet
authentication and uses IP multicast when sending and receiving packets.
Implementing OSPF version 3 (OSPFv3) expands on OSPF Version 2, to provide support for IPv6
routing prefixes.
This module describes the concepts and tasks you need to implement both versions of OSPF on your
Cisco IOS XR router. The term “OSPF” implies both versions of the routing protocol, unless otherwise
noted.
Note
For more information about OSPF on the Cisco IOS XR software and complete descriptions of the OSPF
commands listed in this module, see the “Related Documents” section of this module. To locate
documentation for other commands that might appear during execution of a configuration task, search
online in the Cisco IOS XR software master command index.
Feature History for Implementing OSPF on Cisco IOS XR Software
Release
Modification
Release 2.0
This feature was introduced on the Cisco CRS-1.
Release 3.0
No modification.
Release 3.2
Support was added for the Cisco XR 12000 Series Router.
Release 3.2.2
Support was added for OSPFv3 Graceful Restart.
Release 3.3.0
Support was added for the following features:
Release 3.4.0
•
Multicast-Intact for OSPFv2
•
Interface Association to a VRF
•
OSPF Provider Edge to Customer Edge (PE-CE) Protocol
•
Multiple OSPF Instances (OSPF Process and a VRF)
•
RPL-based Type 3 Filtering
•
LSA Pacing
Support was added for the following features:
•
OSPF Forwarding Adjacency
•
OSPF SNMP Trap MIB
Cisco IOS XR Routing Configuration Guide
RC-221
Implementing OSPF on Cisco IOS XR Software
Contents
Release 3.4.1
Support was added for the multi-area adjacency feature.
Release 3.5.0
Support was added for the following features:
•
Label Distribution Protocol IGP Auto-configuration for OSPF
•
OSPF Authentication Message Digest Management
•
GTSM TTL Security Mechanism for OSPF
•
Path Computation Element for OSPFv2
•
OSPF Warm Standby
Contents
•
Prerequisites for Implementing OSPF on Cisco IOS XR Software, page RC-222
•
Information About Implementing OSPF on Cisco IOS XR Software, page RC-223
•
How to Implement OSPF on Cisco IOS XR Software, page RC-242
•
Configuration Examples for Implementing OSPF on Cisco IOS XR Software, page RC-296
•
Where to Go Next, page RC-301
•
Additional References, page RC-301
Prerequisites for Implementing OSPF on Cisco IOS XR Software
The following are prerequisites for implementing OSPF on Cisco IOS XR Software:
•
You must be in a user group associated with a task group that includes the proper task IDs for OSPF
commands. Task IDs for commands are listed in the Cisco IOS XR Task ID Reference Guide. For
detailed information about user groups and task IDs, see the Configuring AAA Services on Cisco IOS
XR Software module of the Cisco IOS XR System Security Configuration Guide.
•
Configuration tasks for OSPFv3 assume that you are familiar with IPv6 addressing and basic
configuration. See the Implementing Network Stack IPv4 and IPv6 on Cisco IOS XR Software
module of the Cisco IOS XR IP Addresses and Services Configuration Guide for information on IPv6
routing and addressing.
•
Before you enable OSPFv3 on an interface, you must perform the following tasks:
– Complete the OSPF network strategy and planning for your IPv6 network. For example, you
must decide whether multiple areas are required.
– Enable IPv6 on the interface.
•
Configuring authentication (IP Security) is an optional task. If you choose to configure
authentication, you must first decide whether to configure plain text or Message Digest 5 (MD5)
authentication, and whether the authentication applies to an entire area or specific interfaces.
Cisco IOS XR Routing Configuration Guide
RC-222
Implementing OSPF on Cisco IOS XR Software
Information About Implementing OSPF on Cisco IOS XR Software
Information About Implementing OSPF on Cisco IOS XR
Software
To implement OSPF you need to understand the following concepts:
•
OSPF Functional Overview, page RC-223
•
Key Features Supported in the Cisco IOS XR OSPF Implementation, page RC-224
•
Comparison of Cisco IOS XR OSPFv3 and OSPFv2, page RC-225
•
OSPF Hierarchical CLI and CLI Inheritance, page RC-225
•
OSPF Routing Components, page RC-226
•
OSPF Process and Router ID, page RC-229
•
Supported OSPF Network Types, page RC-229
•
Route Authentication Methods for OSPF, page RC-230
•
Neighbors and Adjacency for OSPF, page RC-231
•
Designated Router (DR) for OSPF, page RC-231
•
Default Route for OSPF, page RC-231
•
Link-State Advertisement Types for OSPF Version 2, page RC-231
•
Link-State Advertisement Types for OSPFv3, page RC-232
•
Virtual Link and Transit Area for OSPF, page RC-233
•
Route Redistribution for OSPF, page RC-234
•
OSPF Shortest Path First Throttling, page RC-234
•
Nonstop Forwarding for OSPF Version 2, page RC-235
•
Graceful Restart for OSPFv3, page RC-236
•
Multicast-Intact Support for OSPF, page RC-238
•
Load Balancing in OSPF Version 2 and OSPFv3, page RC-239
•
Multi-Area Adjacency for OSPF Version 2, page RC-239
•
Label Distribution Protocol IGP Auto-configuration for OSPF, page RC-240
•
OSPF Authentication Message Digest Management, page RC-240
•
GTSM TTL Security Mechanism for OSPF, page RC-241
•
Path Computation Element for OSPFv2, page RC-241
OSPF Functional Overview
OSPF is a routing protocol for IP. It is a link-state protocol, as opposed to a distance-vector protocol. A
link-state protocol makes its routing decisions based on the states of the links that connect source and
destination machines. The state of the link is a description of that interface and its relationship to its
neighboring networking devices. The interface information includes the IP address of the interface,
network mask, type of network to which it is connected, routers connected to that network, and so on.
This information is propagated in various types of link-state advertisements (LSAs).
Cisco IOS XR Routing Configuration Guide
RC-223
Implementing OSPF on Cisco IOS XR Software
Information About Implementing OSPF on Cisco IOS XR Software
A router stores the collection of received LSA data in a link-state database. This database includes LSA
data for the links of the router. The contents of the database, when subjected to the Dijkstra algorithm,
extract data to create an OSPF routing table. The difference between the database and the routing table
is that the database contains a complete collection of raw data; the routing table contains a list of shortest
paths to known destinations through specific router interface ports.
OSPF is the IGP of choice because it scales to large networks. It uses areas to partition the network into
more manageable sizes and to introduce hierarchy in the network. A router is attached to one or more
areas in a network. All of the networking devices in an area maintain the same complete database
information about the link states in their area only. They do not know about all link states in the network.
The agreement of the database information among the routers in the area is called convergence.
At the intradomain level, OSPF can import routes learned using Intermediate System-to-Intermediate
System (IS-IS). OSPF routes can also be exported into IS-IS. At the interdomain level, OSPF can import
routes learned using Border Gateway Protocol (BGP). OSPF routes can be exported into BGP.
Unlike Routing Information Protocol (RIP), OSPF does not provide periodic routing updates. On
becoming neighbors, OSPF routers establish an adjacency by exchanging and synchronizing their
databases. After that, only changed routing information is propagated. Every router in an area advertises
the costs and states of its links, sending this information in an LSA. This state information is sent to all
OSPF neighbors one hop away. All the OSPF neighbors, in turn, send the state information unchanged.
This flooding process continues until all devices in the area have the same link-state database.
To determine the best route to a destination, the software sums all of the costs of the links in a route to
a destination. After each router has received routing information from the other networking devices, it
runs the shortest path first (SPF) algorithm to calculate the best path to each destination network in the
database.
The networking devices running OSPF detect topological changes in the network, flood link-state
updates to neighbors, and quickly converge on a new view of the topology. Each OSPF router in the
network soon has the same topological view again. OSPF allows multiple equal-cost paths to the same
destination. Since all link-state information is flooded and used in the SPF calculation, multiple equal
cost paths can be computed and used for routing.
On broadcast and nonbroadcast multiaccess (NBMA) networks, the designated router (DR) or backup
DR performs the LSA flooding. On point-to-point networks, flooding simply exits an interface directly
to a neighbor.
OSPF runs directly on top of IP; it does not use TCP or User Datagram Protocol (UDP). OSPF performs
its own error correction by means of checksums in its packet header and LSAs.
In OSPFv3, the fundamental concepts are the same as OSPF Version 2, except that support is added for
the increased address size of IPv6. New LSA types are created to carry IPv6 addresses and prefixes, and
the protocol runs on an individual link basis rather than on an individual IP-subnet basis.
OSPF typically requires coordination among many internal routers: Area Border Routers (ABRs), which
are routers attached to multiple areas, and Autonomous System Border Routers (ASBRs) that export
reroutes from other sources (for example, IS-IS, BGP, or static routes) into the OSPF topology. At a
minimum, OSPF-based routers or access servers can be configured with all default parameter values, no
authentication, and interfaces assigned to areas. If you intend to customize your environment, you must
ensure coordinated configurations of all routers.
Key Features Supported in the Cisco IOS XR OSPF Implementation
The Cisco IOS XR implementation of OSPF conforms to the OSPF Version 2 and OSPF Version 3
specifications detailed in the Internet RFC 2328 and RFC 2740, respectively.
The following key features are supported in the Cisco IOS XR implementation:
Cisco IOS XR Routing Configuration Guide
RC-224
Implementing OSPF on Cisco IOS XR Software
Information About Implementing OSPF on Cisco IOS XR Software
•
Hierarchy—CLI hierarchy is supported.
•
Inheritance—CLI inheritance is supported.
•
Stub areas—Definition of stub areas is supported.
•
NSF—Nonstop forwarding is supported.
•
SPF throttling—Shortest path first throttling feature is supported.
•
LSA throttling—LSA throttling feature is supported.
•
Fast convergence—SPF and LSA throttle timers are set, configuring fast convergence. The OSPF
LSA throttling feature provides a dynamic mechanism to slow down LSA updates in OSPF during
network instability. LSA throttling also allows faster OSPF convergence by providing LSA rate
limiting in milliseconds.
•
Route redistribution—Routes learned using any IP routing protocol can be redistributed into any
other IP routing protocol.
•
Authentication—Plain text and MD5 authentication among neighboring routers within an area is
supported.
•
Routing interface parameters—Configurable parameters supported include interface output cost,
retransmission interval, interface transmit delay, router priority, router “dead” and hello intervals,
and authentication key.
•
Virtual links—Virtual links are supported.
•
Not-so-stubby area (NSSA)—RFC 1587 is supported.
•
OSPF over demand circuit—RFC 1793 is supported.
Comparison of Cisco IOS XR OSPFv3 and OSPFv2
Much of the OSPFv3 protocol is the same as in OSPFv2. OSPFv3 is described in RFC 2740.
The key differences between the Cisco IOS XR OSPFv3 and OSPFv2 protocols are as follows:
•
OSPFv3 expands on OSPFv2 to provide support for IPv6 routing prefixes and the larger size of IPv6
addresses.
•
When using an NBMA interface in OSPFv3, users must manually configure the router with the list
of neighbors. Neighboring routers are identified by the link local address of the attached interface
of the neighbor.
•
Unlike in OSPFv2, multiple OSPFv3 processes can be run on a link.
•
LSAs in OSPFv3 are expressed as “prefix and prefix length” instead of “address and mask.”
•
The router ID is a 32-bit number with no relationship to an IPv6 address.
OSPF Hierarchical CLI and CLI Inheritance
Cisco IOS XR software introduces new OSPF configuration fundamentals consisting of hierarchical CLI
and CLI inheritance.
Hierarchical CLI is the grouping of related network component information at defined hierarchical levels
such as at the router, area, and interface levels. Hierarchical CLI allows for easier configuration,
maintenance, and troubleshooting of OSPF configurations. When configuration commands are displayed
together in their hierarchical context, visual inspections are simplified. Hierarchical CLI is intrinsic for
CLI inheritance to be supported.
Cisco IOS XR Routing Configuration Guide
RC-225
Implementing OSPF on Cisco IOS XR Software
Information About Implementing OSPF on Cisco IOS XR Software
With CLI inheritance support, you need not explicitly configure a parameter for an area or interface. In
Cisco IOS XR, the parameters of interfaces in the same area can be exclusively configured with a single
command, or parameter values can be inherited from a higher hierarchical level—such as from the area
configuration level or the router ospf configuration levels.
For example, the hello interval value for an interface is determined by this precedence “IF” statement:
If the hello interval command is configured at the interface configuration level, then use the
interface configured value, else
If the hello interval command is configured at the area configuration level, then use the area
configured value, else
If the hello interval command is configured at the router ospf configuration level, then use the
router ospf configured value, else
Use the default value of the command.
Tip
Understanding hierarchical CLI and CLI inheritance saves you considerable configuration time. See the
“Configuring Authentication at Different Hierarchical Levels for OSPF Version 2” section on page 252
to understand how to implement these fundamentals. In addition, Cisco IOS XR examples are provided
in the “Configuration Examples for Implementing OSPF on Cisco IOS XR Software” section on
page 296.
OSPF Routing Components
Before implementing OSPF, you must know what the routing components are and what purpose they
serve. They consist of the autonomous system, area types, interior routers, ABRs, and ASBRs.
Figure 14 illustrates the routing components in an OSPF network topology.
Cisco IOS XR Routing Configuration Guide
RC-226
Implementing OSPF on Cisco IOS XR Software
Information About Implementing OSPF on Cisco IOS XR Software
Figure 14
OSPF Routing Components
OSPF Domain
(BGP autonomous
system 109)
Area 0
backbone
R3
Area 2
stub area
Area 1
ABR 2
ABR 1
R1
R2
ASBR 1
Area 3
ASBR 2
88721
OSPF Domain
(BGP autonomous
system 65200)
Autonomous Systems
The autonomous system is a collection of networks, under the same administrative control, that share
routing information with each other. An autonomous system is also referred to as a routing domain.
Figure 14 shows two autonomous systems: 109 and 65200. An autonomous system can consist of one or
more OSPF areas.
Areas
Areas allow the subdivision of an autonomous system into smaller, more manageable networks or sets
of adjacent networks. As shown in Figure 14, autonomous system 109 consists of three areas: Area 0,
Area 1, and Area 2.
OSPF hides the topology of an area from the rest of the autonomous system. The network topology for
an area is visible only to routers inside that area. When OSPF routing is within an area, it is called
intra-area routing. This routing limits the amount of link-state information flood into the network,
reducing routing traffic. It also reduces the size of the topology information in each router, conserving
processing and memory requirements in each router.
Also, the routers within an area cannot see the detailed network topology outside the area. Because of
this restricted view of topological information, you can control traffic flow between areas and reduce
routing traffic when the entire autonomous system is a single routing domain.
Backbone Area
A backbone area is responsible for distributing routing information between multiple areas of an
autonomous system. OSPF routing occurring outside of an area is called interarea routing.
Cisco IOS XR Routing Configuration Guide
RC-227
Implementing OSPF on Cisco IOS XR Software
Information About Implementing OSPF on Cisco IOS XR Software
The backbone itself has all properties of an area. It consists of ABRs, routers, and networks only on the
backbone. As shown in Figure 14, Area 0 is an OSPF backbone area. Any OSPF backbone area has a
reserved area ID of 0.0.0.0.
Stub Area
A stub area is an area that does not accept or detailed network information external to the area. A stub
area typically has only one router that interfaces the area to the rest of the autonomous system. The stub
ABR advertises a single default route to external destinations into the stub area. Routers within a stub
area use this route for destinations outside the area and the autonomous system. This relationship
conserves LSA database space that would otherwise be used to store external LSAs flooded into the area.
In Figure 14, Area 2 is a stub area that is reached only through ABR 2. Area 0 cannot be a stub area.
Not-so-Stubby Area
A Not-so-Stubby Area (NSSA) is similar to the stub area. NSSA does not flood Type 5 external LSAs
from the core into the area, but can import autonomous system external routes in a limited fashion within
the area.
NSSA allows importing of Type 7 autonomous system external routes within an NSSA area by
redistribution. These Type 7 LSAs are translated into Type 5 LSAs by NSSA ABRs, which are flooded
throughout the whole routing domain. Summarization and filtering are supported during the translation.
Use NSSA to simplify administration if you are a network administrator that must connect a central site
using OSPF to a remote site that is using a different routing protocol.
Before NSSA, the connection between the corporate site border router and remote router could not be
run as an OSPF stub area because routes for the remote site could not be redistributed into a stub area,
and two routing protocols needed to be maintained. A simple protocol like RIP was usually run and
handled the redistribution. With NSSA, you can extend OSPF to cover the remote connection by defining
the area between the corporate router and remote router as an NSSA. Area 0 cannot be an NSSA.
Routers
The OSPF network is composed of ABRs, ASBRs, and interior routers.
Area Border Routers
An area border routers (ABR) is a router with multiple interfaces that connect directly to networks in
two or more areas. An ABR runs a separate copy of the OSPF algorithm and maintains separate routing
data for each area that is attached to, including the backbone area. ABRs also send configuration
summaries for their attached areas to the backbone area, which then distributes this information to other
OSPF areas in the autonomous system. In Figure 14, there are two ABRs. ABR 1 interfaces Area 1 to
the backbone area. ABR 2 interfaces the backbone Area 0 to Area 2, a stub area.
Autonomous System Boundary Routers (ASBR)
An autonomous system boundary router (ASBR) provides connectivity from one autonomous system to
another system. ASBRs exchange their autonomous system routing information with boundary routers
in other autonomous systems. Every router inside an autonomous system knows how to reach the
boundary routers for its autonomous system.
Cisco IOS XR Routing Configuration Guide
RC-228
Implementing OSPF on Cisco IOS XR Software
Information About Implementing OSPF on Cisco IOS XR Software
ASBRs can import external routing information from other protocols like BGP and redistribute them as
AS-external (ASE) Type 5 LSAs to the OSPF network. If the Cisco IOS XR router is an ASBR, you can
configure it to advertise VIP addresses for content as autonomous system external routes. In this way,
ASBRs flood information about external networks to routers within the OSPF network.
ASBR routes can be advertised as a Type 1 or Type 2 ASE. The difference between Type 1 and Type 2
is how the cost is calculated. For a Type 2 ASE, only the external cost (metric) is considered when
multiple paths to the same destination are compared. For a Type 1 ASE, the combination of the external
cost and cost to reach the ASBR is used. Type 2 external cost is the default and is always more costly
than an OSPF route and used only if no OSPF route exists.
Interior Routers
The interior routers (such as R1 in Figure 14) attached to one area (for example, all the interfaces reside
in the same area).
OSPF Process and Router ID
An OSPF process is a logical routing entity running OSPF in a physical router. This logical routing entity
should not be confused with the logical routing feature that allows a system administrator (known as the
Cisco IOS XR Owner) to partition the physical box into separate routers.
A physical router can run multiple OSPF processes, although the only reason to do so would be to
connect two or more OSPF domains. Each process has its own link-state database. The routes in the
routing table are calculated from the link-state database. One OSPF process does not share routes with
another OSPF process unless the routes are redistributed.
Each OSPF process is identified by a router ID. The router ID must be unique across the entire routing
domain. OSPFv2 obtains a router ID from the following sources, in order of decreasing preference:
OSPF attempts to obtain a router ID in the following ways (in order of preference):
•
The 32-bit numeric value specified by the OSPF router-id command in router configuration mode.
(This value can be any 32-bit value. It is not restricted to the IPv4 addresses assigned to interfaces
on this router and need not be a routable IPv4 address.)
•
The 32-bit numeric value specified by the router-id command in global configuration mode. (This
value must be an IPv4 address assigned to an interface on this router.)
•
The highest IPv4 address on a loopback interface in the system.
•
The primary IPv4 address of an interface over which this OSPF process is running. The first
interface address in the OSPF interface is selected.
We recommend that the router ID be set by the router-id command in router configuration mode.
Separate OSPF processes could share the same router ID, in which case they cannot reside in the same
OSPF routing domain.
Supported OSPF Network Types
OSPF classifies different media into the following types of networks:
•
NBMA networks
•
Point-to-point networks (POS)
Cisco IOS XR Routing Configuration Guide
RC-229
Implementing OSPF on Cisco IOS XR Software
Information About Implementing OSPF on Cisco IOS XR Software
•
Broadcast networks (Gigabit Ethernet)
•
Point-to-multipoint
You can configure your Cisco IOS XR network as either a broadcast or an NBMA network. Using this
feature, you can configure broadcast networks as NBMA networks when, for example, you have routers
in your network that do not support multicast addressing.
Route Authentication Methods for OSPF
OSPF Version 2 supports two types of authentication: plain text authentication and MD5 authentication.
By default, no authentication is enabled (referred to as null authentication in RFC 2178).
OSPV Version 3 supports all types of authentication except key rollover.
Plain Text Authentication
Plain text authentication (also known as Type 1 authentication) uses a password that travels on the
physical medium and is easily visible to someone that does not have access permission and could use the
password to infiltrate a network. Therefore, plain text authentication does not provide security. It might
protect against a faulty implementation of OSPF or a misconfigured OSPF interface trying to send
erroneous OSPF packets.
MD5 Authentication
MD5 authentication provides a means of security. No password travels on the physical medium. Instead,
the router uses MD5 to produce a message digest of the OSPF packet plus the key, which is sent on the
physical medium. Using MD5 authentication prevents a router from accepting unauthorized or
deliberately malicious routing updates, which could compromise your network security by diverting
your traffic.
Note
MD5 authentication supports multiple keys, requiring that a key number be associated with a key.
Also see “OSPF Authentication Message Digest Management” section on page 240
Authentication Strategies
Authentication can be specified for an entire process or area, or on an interface or a virtual link. An
interface or virtual link can be configured for only one type of authentication, not both. Authentication
configured for an interface or virtual link overrides authentication configured for the area or process.
If you intend for all interfaces in an area to use the same type of authentication, you can configure fewer
commands if you use the authentication command in the area configuration submode (and specify the
message-digest keyword if you want the entire area to use MD5 authentication). This strategy requires
fewer commands than specifying authentication for each interface.
Key Rollover
To support the changing of an MD5 key in an operational network without disrupting OSPF adjacencies
(and hence the topology), a key rollover mechanism is supported. As a network administrator configures
the new key into the multiple networking devices that communicate, some time exists when different
devices are using both a new key and an old key. If an interface is configured with a new key, the software
sends two copies of the same packet, each authenticated by the old key and new key. The software tracks
Cisco IOS XR Routing Configuration Guide
RC-230
Implementing OSPF on Cisco IOS XR Software
Information About Implementing OSPF on Cisco IOS XR Software
which devices start using the new key, and the software stops sending duplicate packets after it detects
that all of its neighbors are using the new key. The software then discards the old key. The network
administrator must then remove the old key from each the configuration file of each router.
Neighbors and Adjacency for OSPF
Routers that share a segment (Layer 2 link between two interfaces) become neighbors on that segment.
OSPF uses the hello protocol as a neighbor discovery and keep alive mechanism. The hello protocol
involves receiving and periodically sending hello packets out each interface. The hello packets list all
known OSPF neighbors on the interface. Routers become neighbors when they see themselves listed in
the hello packet of the neighbor. After two routers are neighbors, they may proceed to exchange and
synchronize their databases, which creates an adjacency. On broadcast and NBMA networks all
neighboring routers have an adjacency.
Designated Router (DR) for OSPF
On point-to-point and point-to-multipoint networks, the Cisco IOS XR software floods routing updates
to immediate neighbors. No DR or backup DR (BDR) exists; all routing information is flooded to each
router.
On broadcast or NBMA segments only, OSPF minimizes the amount of information being exchanged on
a segment by choosing one router to be a DR and one router to be a BDR. Thus, the routers on the
segment have a central point of contact for information exchange. Instead of each router exchanging
routing updates with every other router on the segment, each router exchanges information with the DR
and BDR. The DR and BDR relay the information to the other routers. On broadcast network segments
the number of OSPF packets is further reduced by the DR and BDR sending such OSPF updates to a
multicast IP address that all OSPF routers on the network segment are listening on.
The software looks at the priority of the routers on the segment to determine which routers are the DR
and BDR. The router with the highest priority is elected the DR. If there is a tie, then the router with the
higher router ID takes precedence. After the DR is elected, the BDR is elected the same way. A router
with a router priority set to zero is ineligible to become the DR or BDR.
Default Route for OSPF
Type 5 (ASE) LSAs are generated and flooded to all areas except stub areas. For the routers in a stub
area to be able to route packets to destinations outside the stub area, a default route is injected by the
ABR attached to the stub area.
The cost of the default route is 1 (default) or is determined by the value specified in the default-cost
command.
Link-State Advertisement Types for OSPF Version 2
Each of the following LSA types has a different purpose:
•
Router LSA (Type 1)—Describes the links that the router has within a single area, and the cost of
each link. These LSAs are flooded within an area only. The LSA indicates if the router can compute
paths based on quality of service (QoS), whether it is an ABR or ASBR, and if it is one end of a
virtual link. Type 1 LSAs are also used to advertise stub networks.
Cisco IOS XR Routing Configuration Guide
RC-231
Implementing OSPF on Cisco IOS XR Software
Information About Implementing OSPF on Cisco IOS XR Software
•
Network LSA (Type 2)—Describes the link state and cost information for all routers attached to a
multiaccess network segment. This LSA lists all the routers that have interfaces attached to the
network segment. It is the job of the designated router of a network segment to generate and track
the contents of this LSA.
•
Summary LSA for ABRs (Type 3)—Advertises internal networks to routers in other areas (interarea
routes). Type 3 LSAs may represent a single network or a set of networks aggregated into one prefix.
Only ABRs generate summary LSAs.
•
Summary LSA for ASBRs (Type 4)—Advertises an ASBR and the cost to reach it. Routers that are
trying to reach an external network use these advertisements to determine the best path to the next
hop. ABRs generate Type 4 LSAs.
•
Autonomous system external LSA (Type 5)—Redistributes routes from another autonomous system,
usually from a different routing protocol into OSPF.
•
Autonomous system external LSA (Type 7)—Provides for carrying external route information
within an NSSA. Type 7 LSAs may be originated by and advertised throughout an NSSA. NSSAs
do not receive or originate Type 5 LSAs. Type 7 LSAs are advertised only within a single NSSA.
They are not flooded into the backbone area or into any other area by border routers.
•
Intra-area-prefix LSAs (Type 9)—A router can originate multiple intra-area-prefix LSAs for every
router or transit network, each with a unique link-state ID. The link-state ID for each
intra-area-prefix LSA describes its association to either the router LSA or network LSA and contains
prefixes for stub and transit networks.
•
Area local scope (Type 10)—Opaque LSAs are not flooded past the borders of their associated area.
•
Link-state (Type 11)—The LSA is flooded throughout the AS. The flooding scope of Type 11 LSAs
are equivalent to the flooding scope of AS-external (Type 5) LSAs. Similar to Type 5 LSAs, the LSA
is rejected if a Type 11 opaque LSA is received in a stub area from a neighboring router within the
stub area. Type 11 opaque LSAs have these attributes:
– LSAs are flooded throughout all transit areas.
– LSAs are not flooded into stub areas from the backbone.
– LSAs are not originated by routers into their connected stub areas.
Link-State Advertisement Types for OSPFv3
Each of the following LSA types has a different purpose:
•
Router LSA (Type 1)—Describes the link state and costs of a the router link to the area. These LSAs
are flooded within an area only. The LSA indicates whether the router is an ABR or ASBR and if it
is one end of a virtual link. Type 1 LSAs are also used to advertise stub networks. In OSPFv3, these
LSAs have no address information and are network protocol independent. In OSPFv3, router
interface information may be spread across multiple router LSAs. Receivers must concatenate all
router LSAs originated by a given router before running the SPF calculation.
•
Network LSA (Type 2)—Describes the link state and cost information for all routers attached to a
multiaccess network segment. This LSA lists all OSPF routers that have interfaces attached to the
network segment. Only the elected designated router for the network segment can generate and track
the network LSA for the segment. In OSPFv3, network LSAs have no address information and are
network-protocol-independent.
Cisco IOS XR Routing Configuration Guide
RC-232
Implementing OSPF on Cisco IOS XR Software
Information About Implementing OSPF on Cisco IOS XR Software
•
Interarea-prefix LSA for ABRs (Type 3)—Advertises internal networks to routers in other areas
(interarea routes). Type 3 LSAs may represent a single network or set of networks aggregated into
one prefix. Only ABRs generate Type 3 LSAs. In OSPFv3, addresses for these LSAs are expressed
as “prefix and prefix length” instead of “address and mask.” The default route is expressed as a
prefix with length 0.
•
Interarea-router LSA for ASBRs (Type 4)—Advertises an ASBR and the cost to reach it. Routers
that are trying to reach an external network use these advertisements to determine the best path to
the next hop. ABRs generate Type 4 LSAs.
•
Autonomous system external LSA (Type 5)—Redistributes routes from another autonomous system,
usually from a different routing protocol into OSPF. In OSPFv3, addresses for these LSAs are
expressed as “prefix and prefix length” instead of “address and mask.” The default route is expressed
as a prefix with length 0.
•
Autonomous system external LSA (Type 7)—Provides for carrying external route information
within an NSSA. Type 7 LSAs may be originated by and advertised throughout an NSSA. NSSAs
do not receive or originate Type 5 LSAs. Type 7 LSAs are advertised only within a single NSSA.
They are not flooded into the backbone area or into any other area by border routers.
•
Link LSA (Type 8)—Has link-local flooding scope and is never flooded beyond the link with which
it is associated. Link LSAs provide the link-local address of the router to all other routers attached
to the link or network segment, inform other routers attached to the link of a list of IPv6 prefixes to
associate with the link, and allow the router to assert a collection of Options bits to associate with
the network LSA that is originated for the link.
•
Intra-area-prefix LSAs (Type 9)—A router can originate multiple intra-area-prefix LSAs for every
router or transit network, each with a unique link-state ID. The link-state ID for each
intra-area-prefix LSA describes its association to either the router LSA or network LSA and contains
prefixes for stub and transit networks.
An address prefix occurs in almost all newly defined LSAs. The prefix is represented by three fields:
Prefix Length, Prefix Options, and Address Prefix. In OSPFv3, addresses for these LSAs are expressed
as “prefix and prefix length” instead of “address and mask.” The default route is expressed as a prefix
with length 0.
Inter-area-prefix and intra-area-prefix LSAs carry all IPv6 prefix information that, in IPv4, is included
in router LSAs and network LSAs. The Options field in certain LSAs (router LSAs, network LSAs,
interarea-router LSAs, and link LSAs) has been expanded to 24 bits to provide support for OSPF in IPv6.
In OSPFv3, the sole function of link-state ID in interarea-prefix LSAs, interarea-router LSAs, and
autonomous system external LSAs is to identify individual pieces of the link-state database. All
addresses or router IDs that are expressed by the link-state ID in OSPF Version 2 are carried in the body
of the LSA in OSPFv3.
Virtual Link and Transit Area for OSPF
In OSPF, routing information from all areas is first summarized to the backbone area by ABRs. The same
ABRs, in turn, propagate such received information to their attached areas. Such hierarchical
distribution of routing information requires that all areas be connected to the backbone area (Area 0).
Occasions might exist for which an area must be defined, but it cannot be physically connected to Area 0.
Examples of such an occasion might be if your company makes a new acquisition that includes an OSPF
area, or if Area 0 itself is partitioned.
Cisco IOS XR Routing Configuration Guide
RC-233
Implementing OSPF on Cisco IOS XR Software
Information About Implementing OSPF on Cisco IOS XR Software
In the case in which an area cannot be connected to Area 0, you must configure a virtual link between
that area and Area 0. The two endpoints of a virtual link are ABRs, and the virtual link must be
configured in both routers. The common nonbackbone area to which the two routers belong is called a
transit area. A virtual link specifies the transit area and the router ID of the other virtual endpoint (the
other ABR).
A virtual link cannot be configured through a stub area or NSSA.
Figure 15 illustrates a virtual link from Area 3 to Area 0.
Figure 15
Virtual Link to Area 0
OSPF Domain (BGP autonomous system 109)
Area 0
Backbone
Area 1
ABR 2
ABR 1
Area 3
ABR 3
Transit Area
ASBR 1
Router ID 4.4.4.4
ASBR 2
88722
Router ID 5.5.5.5
Route Redistribution for OSPF
Redistribution allows different routing protocols to exchange routing information. This technique can be
used to allow connectivity to span multiple routing protocols. It is important to remember that the
redistribute command controls redistribution into an OSPF process and not from OSPF. See the
“Configuration Examples for Implementing OSPF on Cisco IOS XR Software” section on page 296 for
an example of route redistribution for OSPF.
OSPF Shortest Path First Throttling
OSPF SPF throttling makes it possible to configure SPF scheduling in millisecond intervals and to
potentially delay SPF calculations during network instability. SPF is scheduled to calculate the Shortest
Path Tree (SPT) when there is a change in topology. One SPF run may include multiple topology change
events.
Cisco IOS XR Routing Configuration Guide
RC-234
Implementing OSPF on Cisco IOS XR Software
Information About Implementing OSPF on Cisco IOS XR Software
The interval at which the SPF calculations occur is chosen dynamically and based on the frequency of
topology changes in the network. The chosen interval is within the boundary of the user-specified value
ranges. If network topology is unstable, SPF throttling calculates SPF scheduling intervals to be longer
until topology becomes stable.
SPF calculations occur at the interval set by the timers throttle spf command. The wait interval
indicates the amount of time to wait until the next SPF calculation occurs. Each wait interval after that
calculation is twice as long as the previous interval until the interval reaches the maximum wait time
specified.
The SPF timing can be better explained using an example. In this example, the start interval is set at
5 milliseconds (ms), initial wait interval at 1000 ms, and maximum wait time at 90,000 ms.
timers spf 5 1000 90000
Figure 16 shows the intervals at which the SPF calculations occur as long as at least one topology change
event is received in a given wait interval.
SPF Calculation Intervals Set by the timers spf Command
5 ms
2000 ms
1000 ms
4000 ms
8000 ms
32000 ms
16000 ms
88278
Figure 16
90000 ms
64000 ms
Notice that the wait interval between SPF calculations doubles when at least one topology change event
is received during the previous wait interval. After the maximum wait time is reached, the wait interval
remains the same until the topology stabilizes and no event is received in that interval.
If the first topology change event is received after the current wait interval, the SPF calculation is
delayed by the amount of time specified as the start interval. The subsequent wait intervals continue to
follow the dynamic pattern.
If the first topology change event occurs after the maximum wait interval begins, the SPF calculation is
again scheduled at the start interval and subsequent wait intervals are reset according to the parameters
specified in the timers throttle spf command. Notice in Figure 17 that a topology change event was
received after the start of the maximum wait time interval and that the SPF intervals have been reset.
Figure 17
Timer Intervals Reset After Topology Change Event
64000 ms
90000 ms
1000 ms
5 ms
2000 ms
4000 ms
88279
Topology change event
16000 ms
8000 ms
90000 ms
SPF scheduled at
start interval
Nonstop Forwarding for OSPF Version 2
Cisco IOS XR NSF for OSPF Version 2 allows for the forwarding of data packets to continue along
known routes while the routing protocol information is being restored following a failover. With NSF,
peer networking devices do not experience routing flaps. During failover, data traffic is forwarded
Cisco IOS XR Routing Configuration Guide
RC-235
Implementing OSPF on Cisco IOS XR Software
Information About Implementing OSPF on Cisco IOS XR Software
through intelligent line cards while the standby Route Processor (RP) assumes control from the failed
RP. The ability of line cards to remain up through a failover and to be kept current with the Forwarding
Information Base (FIB) on the active RP is key to Cisco IOS XR NSF operation.
Routing protocols, such as OSPF, run only on the active RP or DRP and receive routing updates from
their neighbor routers. When an OSPF NSF-capable router performs an RP failover, it must perform two
tasks to resynchronize its link-state database with its OSPF neighbors. First, it must relearn the available
OSPF neighbors on the network without causing a reset of the neighbor relationship. Second, it must
reacquire the contents of the link-state database for the network.
As quickly as possible after an RP failover, the NSF-capable router sends an OSPF NSF signal to
neighboring NSF-aware devices. This signal is in the form of a link-local LSA generated by the
failed-over router. Neighbor networking devices recognize this signal as a cue that the neighbor
relationship with this router should not be reset. As the NSF-capable router receives signals from other
routers on the network, it can begin to rebuild its neighbor list.
After neighbor relationships are re-established, the NSF-capable router begins to resynchronize its
database with all of its NSF-aware neighbors. At this point, the routing information is exchanged
between the OSPF neighbors. After this exchange is completed, the NSF-capable device uses the routing
information to remove stale routes, update the RIB, and update the FIB with the new forwarding
information. OSPF on the router and the OSPF neighbors are now fully converged.
Graceful Restart for OSPFv3
In the current release, various restart scenarios in the control plane of an IPv6-enabled router can disrupt
data forwarding. The OSPFv3 Graceful Restart feature can preserve the data plane capability in the
following circumstances:
•
RP failure, resulting in a switchover to the backup processor
•
Planned OSPFv3 process restart, such as software upgrade or downgrade
•
Unplanned OSPFv3 process restart, such as a process crash
This feature supports nonstop data forwarding on established routes while the OSPFv3 routing protocol
is restarting. (Therefore, this feature enhances high availability of IPv6 forwarding.)
Modes of Graceful Restart Operation
The two operational modes that a router can be in for this feature are restart mode and helper mode.
Restart mode occurs when the OSPFv3 process is doing a graceful restart. Helper mode refers to the
neighbor routers that continue to forward traffic on established OSPFv3 routes while OSPFv3 is
restarting on a neighboring router.
Restart Mode
When the OSPFv3 process starts up, it determines whether it must attempt a graceful restart. The
determination is based on whether graceful restart was previously enabled. (OSPFv3 does not attempt a
graceful restart upon the first-time startup of the router.) When OSPFv3 graceful restart is enabled, it
changes the purge timer in the RIB to a nonzero value. See Configuring OSPFv3 Graceful Restart,
page RC-275, for descriptions of how to enable and configure the Graceful Restart feature.
During a graceful restart, the router does not populate OSPFv3 routes in the RIB. It tries to bring up full
adjacencies with the fully-adjacent neighbors that OSPFv3 had before the restart. Eventually, the
OSPFv3 process indicates to the RIB that it has converged, either for the purpose of terminating the
graceful restart (for any reason) or because it has completed the graceful restart.
Cisco IOS XR Routing Configuration Guide
RC-236
Implementing OSPF on Cisco IOS XR Software
Information About Implementing OSPF on Cisco IOS XR Software
The following are general details about restart mode. More detailed information on behavior and certain
restrictions and requirements appears in the Graceful Restart Requirements and Restrictions section.
•
If OSPFv3 attempts a restart too soon after the most recent restart, the OSPFv3 process is most likely
crashing repeatedly, so the new graceful restart stops running. To control the period between
allowable graceful restarts, use the graceful-restart interval command.
•
When OSFPv3 starts a graceful restart with the first interface that comes up, a timer starts running
to limit the duration (or lifetime) of the graceful restart. You can configure this period with the
graceful-restart lifetime command. On each interface that comes up, a grace LSA (type 11) is
flooded to indicate to the neighboring routers that this router is attempting graceful restart. The
neighbors enter into helper mode.
•
The designated router and backup designated router check of the hello packet received from the
restarting neighbor is bypassed, because it might not be valid.
Helper Mode
Helper mode is enabled by default. When a (helper) router receives a grace LSA (type 11) from a router
that is attempting a graceful restart, the following events occur:
•
If helper mode has been disabled through the graceful-restart helper disable command, the router
drops the LSA packet.
•
If helper mode is enabled, the router enters helper mode if all of the following conditions are met:
– The local router itself is not attempting a graceful restart.
– The local (helping) router has full adjacency with the sending neighbor.
– The value of lsage (link state age) in the received LSA is less than the requested grace period.
– The sender of the grace LSA is the same as the originator of the grace LSA.
•
Upon entering helper mode, a router performs its helper function for a specific period of time. This
time period is the lifetime value from the router that is in restart mode—minus the value of lsage in
the received grace LSA. If the graceful restart succeeds in time, the helper’s timer is stopped before
it expires. If the helper’s timer does expire, the adjacency to the restarting router is brought down,
and normal OSPFv3 functionality resumes.
•
The dead timer is not honored by the router that is in helper mode.
•
A router in helper mode ceases to perform the helper function in any of the following cases:
– The helper router is able to bring up a FULL adjacency with the restarting router.
– The local timer for the helper function expires.
Graceful Restart Requirements and Restrictions
The requirements for supporting the Graceful Restart feature include:
•
Cooperation of a router’s neighbors during a graceful restart. In relation to the router on which
OSPFv3 is restarting, each router is called a helper.
•
All neighbors of the router that does a graceful restart must be capable of doing a graceful restart.
•
A graceful restart does not occur upon the first-time startup of a router.
•
OSPFv3 neighbor information and database information are not check-pointed.
•
An OSPFv3 process rebuilds adjacencies after it restarts.
Cisco IOS XR Routing Configuration Guide
RC-237
Implementing OSPF on Cisco IOS XR Software
Information About Implementing OSPF on Cisco IOS XR Software
•
To ensure consistent databases after a restart, the OSPFv3 configuration must be identical to the
configuration before the restart. (This requirement applies to self-originated information in the local
database.) A graceful restart can fail if configurations change during the operation. In this case, data
forwarding would be affected. OSPFv3 resumes operation by regenerating all its LSAs and
resynchronizing its database with all its neighbors.
•
Although IPv6 FIB tables remain unchanged during a graceful restart, these tables eventually mark
the routes as stale through the use of a holddown timer. Enough time is allowed for the protocols to
rebuild state information and converge.
•
The router on which OSPFv3 is restarting must send OSPFv3 hellos within the dead interval of the
process restart. Protocols must be able to retain adjacencies with neighbors before the adjacency
dead timer expires. The default for the dead timer is 40 seconds. If hellos do not arrive on the
adjacency before the dead timer expires, the router takes down the adjacency. The OSPFv3 Graceful
Restart feature does not function properly if the dead timer is configured to be less than the time
required to send hellos after the OSPFv3 process restarts.
•
Simultaneous graceful restart sessions on multiple routers are not supported on a single network
segment. If a router determines that multiple routers are in restart mode, it terminates any local
graceful restart operation.
•
This feature utilizes the available support for changing the purge time of existing OSPFv3 routes in
the Routing Information Base (RIB). When graceful restart is enabled, the purge timer is set to 90
seconds by default. If graceful restart is disabled, the purge timer setting is 0.
•
This feature has an associated grace LSA. This link-scope LSA is type 11.
•
According to the RFC, the OSPFv3 process should flush all old, self-originated LSAs during a
restart. With the Graceful Restart feature, however, the router delays this flushing of unknown
self-originated LSAs during a graceful restart. OSPFv3 can learn new information and build new
LSAs to replace the old LSAs. When the delay is over, all old LSAs are flushed.
•
If graceful restart is enabled, the adjacency creation time of all the neighbors is saved in the system
database (SysDB). The purpose for saving the creation time is so that OSPFv3 can use the original
adjacency creation time to display the uptime for that neighbor after the restart.
Multicast-Intact Support for OSPF
The multicast-intact feature provides the ability to run multicast routing (PIM) when IGP shortcuts are
configured and active on the router. Both OSPFv2 and IS-IS support the multicast-intact feature.
You can enable multicast-intact in the IGP when multicast routing protocols (PIM) are configured and
IGP shortcuts are configured on the router. IGP shortcuts are MPLS tunnels that are exposed to IGP. The
IGP routes IP traffic over these tunnels to destinations that are downstream from the egress router of the
tunnel (from an SPF perspective). PIM cannot use IGP shortcuts for propagating PIM joins, because
reverse path forwarding (RPF) cannot work across a unidirectional tunnel.
When you enable multicast-intact on an IGP, the IGP publishes a parallel or alternate set of equal-cost
next hops for use by PIM. These next hops are called mcast-intact next hops. The mcast-intact next hops
have the following attributes:
•
They are guaranteed not to contain any IGP shortcuts.
•
They are not used for unicast routing but are used only by PIM to look up an IPv4 next-hop to a PIM
source.
•
They are not published to the FIB.
Cisco IOS XR Routing Configuration Guide
RC-238
Implementing OSPF on Cisco IOS XR Software
Information About Implementing OSPF on Cisco IOS XR Software
•
When multicast-intact is enabled on an IGP, all IPv4 destinations that were learned through
link-state advertisements are published with a set equal-cost mcast-intact next hops to the RIB. This
attribute applies even when the native next hops have no IGP shortcuts.
In OSPF, the max-paths (number of equal-cost next hops) limit is applied separately to the native and
mcast-intact next hops. The number of equal cost mcast-intact next hops is the same as that configured
for the native next hops.
Load Balancing in OSPF Version 2 and OSPFv3
When a router learns multiple routes to a specific network by using multiple routing processes (or
routing protocols), it installs the route with the lowest administrative distance in the routing table.
Sometimes the router must select a route from among many learned by using the same routing process
with the same administrative distance. In this case, the router chooses the path with the lowest cost (or
metric) to the destination. Each routing process calculates its cost differently; the costs may need to be
manipulated to achieve load balancing.
OSPF performs load balancing automatically. If OSPF finds that it can reach a destination through more
than one interface and each path has the same cost, it installs each path in the routing table. The only
restriction on the number of paths to the same destination is controlled by the maximum-paths (OSPF)
command. The default number of maximum paths is 32 for Cisco CRS-1 routers and 16 for
Cisco XR 12000 Series Routers. The range is from 1 to 32 for Cisco CRS-1 routers and 1 to 16 for
Cisco XR 12000 Series Routers.
Multi-Area Adjacency for OSPF Version 2
The multi-area adjacency feature for OSPFv2 allows a link to be configured on the primary interface in
more than one area so that the link could be considered as an intra-area link in those areas and configured
as a preference over more expensive paths.
This feature establishes a point-to-point unnumbered link in an OSPF area. A point-to-point link
provides a topological path for that area, and the primary adjacency uses the link to advertise the link
consistent with draft-ietf-ospf-multi-area-adj-06.
The following are multi-area interface attributes and limitations:
•
Exists as a logical construct over an existing primary interface for OSPF; however, the neighbor state
on the primary interface is independent of the multi-area interface.
•
Establishes a neighbor relationship with the corresponding multi-area interface on the neighboring
router. A mixture of multi-area and primary interfaces is not supported.
•
Advertises an unnumbered point-to-point link in the router link state advertisement (LSA) for the
corresponding area when the neighbor state is full.
•
Created as a point-to-point network type and is not configurable.
•
Created only on native point-to-point interfaces, such as Packet-over-SONET (PoS) or serial.
•
Inherits the Bidirectional Forwarding Detection (BFD) characteristics from its primary interface.
BFD is not configurable under a multi-area interface; however, it is configurable under the primary
interface.
Cisco IOS XR Routing Configuration Guide
RC-239
Implementing OSPF on Cisco IOS XR Software
Information About Implementing OSPF on Cisco IOS XR Software
The multi-area interface inherits the interface characteristics from its primary interface, but some
interface characteristics can be configured under the multi-area interface configuration mode as shown
below:
RP/0/RP0/CPU0:router(config-ospf-ar)# multi-area-interface POS 0/1/0/3
RP/0/RP0/CPU0:router(config-ospf-ar-mif)# ?
authentication
Enable authentication
authentication-key
Authentication password (key)
commit
Commit the configuration changes to running
cost
Interface cost
database-filter
Filter OSPF LSA during synchronization and flooding
dead-interval
Interval after which a neighbor is declared dead
describe
Describe a command without taking real actions
distribute-list
Filter networks in routing updates
do
Run an exec command
exit
Exit from this submode
hello-interval
Time between HELLO packets
message-digest-key
Message digest authentication password (key)
mtu-ignore
Enable/Disable ignoring of MTU in DBD packets
no
Negate a command or set its defaults
packet-size
Customize size of OSPF packets upto MTU
pwd
Commands used to reach current submode
retransmit-interval Time between retransmitting lost link state advertisements
root
Exit to the global configuration mode
show
Show contents of configuration
transmit-delay
Estimated time needed to send link-state update packet
RP/0/RP0/CPU0:router(config-ospf-ar-mif)#
Label Distribution Protocol IGP Auto-configuration for OSPF
Label Distribution Protocol (LDP) Interior Gateway Protocol (IGP) auto-configuration simplifies the
procedure to enable LDP on a set of interfaces used by an IGP instance, such as OSPF. LDP IGP
auto-configuration can be used on a large number of interfaces (for example, when LDP is used for
transport in the core) and on multiple OSPF instances simultaneously.
This feature supports the IPv4 unicast address family for the default VPN routing and forwarding (VRF)
instance.
LDP IGP auto-configuration can also be explicitly disabled on an individual interface basis under LDP
using the igp auto-config disable command. This allows LDP to receive all OSPF interfaces minus the
ones explicitly disabled.
See Cisco IOS XR Multiprotocol Label Switching Configuration Guide for information on configuring
LDP IGP auto-configuration.
OSPF Authentication Message Digest Management
All OSPF routing protocol exchanges are authenticated and the method used can vary depending on how
authentication is configured. When using cryptographic authentication, the OSPF routing protocol uses
the Message Digest 5 (MD5) authentication algorithm to authenticate packets transmitted between
neighbors in the network. For each OSPF protocol packet, a key is used to generate and verify a message
digest that is appended to the end of the OSPF packet. The message digest is a one-way function of the
OSPF protocol packet and the secret key. Each key is identified by the combination of interface used and
the key identification. An interface may have multiple keys active at any time.
Cisco IOS XR Routing Configuration Guide
RC-240
Implementing OSPF on Cisco IOS XR Software
Information About Implementing OSPF on Cisco IOS XR Software
To manage the rollover of keys and enhance MD5 authentication for OSPF, you can configure a container
of keys called a keychain with each key comprising the following attributes: generate/accept time, key
identification, and authentication algorithm.
GTSM TTL Security Mechanism for OSPF
OSPF is a link state protocol that requires networking devices to detect topological changes in the
network, flood Link State Advertisement (LSA) updates to neighbors, and quickly converge on a new
view of the topology. However, during the act of receiving LSAs from neighbors, network attacks can
occur, because there are no checks that unicast or multicast packets are originating from a neighbor that
is one hop away or multiple hops away over virtual links.
For virtual links, OSPF packets travel multiple hops across the network; hence, the TTL value can be
decremented several times. For these type of links, a minimum TTL value must be allowed and accepted
for multiple-hop packets.
To filter network attacks originating from invalid sources traveling over multiple hops, the Generalized
TTL Security Mechanism (GTSM), RFC 3682, is used to prevent the attacks. GTSM filters link-local
addresses and allows for only one-hop neighbor adjacencies through the configuration of TTL value 255.
The TTL value in the IP header is set to when OSPF packets are originated and checked on the received
OSPF packets against the default GTSM TTL value 255 or the user configured GTSM TTL value,
blocking unauthorized OSPF packets originated from TTL hops away.
Path Computation Element for OSPFv2
A PCE is an entity (component, application, or network node) that is capable of computing a network
path or route based on a network graph and applying computational constraints.
PCE is accomplished when a PCE address and client is configured for MPLS-TE. PCE communicates
its PCE address and capabilities to OSPF then OSPF packages this information in the PCE Discovery
type-length-value (TLV) (Type 2) and re originates the RI LSA. OSPF also includes the Router
Capabilities TLV (Type 1) in all its RI LSAs. The PCE Discovery TLV contains the PCE address
sub-TLV (Type 1) and the Path Scope Sub-TLV (Type 2).
The PCE Address Sub-TLV specifies the IP address that must be used to reach the PCE. It should be a
loop-back address that is always reachable, this TLV is mandatory, and must be present within the PCE
Discovery TLV. The Path Scope Sub-TLV indicates the PCE path computation scopes, which refers to
the PCE ability to compute or participate in the computation of intra-area, inter-area, inter-AS or
inter-layer TE LSPs.
PCE extensions to OSPFv2 include support for the Router Information Link State Advertisement
(RI LSA). OSPFv2 is extended to receive all area scopes (LSA Types 9, 10, and 11). However, OSPFv2
originates only area scope Type 10.
For detailed information for the Path Computation Element feature see the “Implementing MPLS Traffic
Engineering on Cisco IOS XR software” module of the Cisco IOS XR MPLS Configuration Guide,
Release 3.5, and the following IETF drafts:
•
draft-ietf-ospf-cap-09
•
draft-ietf-pce-disco-proto-ospf-00
Cisco IOS XR Routing Configuration Guide
RC-241
Implementing OSPF on Cisco IOS XR Software
How to Implement OSPF on Cisco IOS XR Software
How to Implement OSPF on Cisco IOS XR Software
This section contains the following procedures:
•
Enabling OSPF, page RC-242 (required)
•
Configuring Stub and Not-so-Stubby Area Types, page RC-244 (optional)
•
Configuring Neighbors for Nonbroadcast Networks, page RC-247 (optional)
•
Configuring Authentication at Different Hierarchical Levels for OSPF Version 2, page RC-252
(optional)
•
Controlling the Frequency that the Same LSA Is Originated or Accepted for OSPF, page RC-255
(optional)
•
Creating a Virtual Link with MD5 Authentication to Area 0 for OSPF, page RC-257 (optional)
•
Summarizing Subnetwork LSAs on an OSPF ABR, page RC-261 (optional)
•
Redistributing Routes from One IGP into OSPF, page RC-263 (optional)
•
Configuring OSPF Shortest Path First Throttling, page RC-266 (optional)
•
Configuring Cisco-Specific Nonstop Forwarding for OSPF Version 2, page RC-269 (optional)
•
Configuring OSPF Version 2 for MPLS Traffic Engineering, page RC-271 (optional)
•
Configuring OSPFv3 Graceful Restart, page RC-275 (optional)
•
Enabling Multicast-Intact for OSPFv2, page RC-278 (optional)
•
Associating Interfaces to a VRF, page RC-279 (optional)
•
Configuring OSPF as a Provider Edge to Customer Edge (PE-CE) Protocol, page RC-281 (optional)
•
Creating Multiple OSPF Instances (OSPF Process and a VRF), page RC-284 (optional)
•
Configuring Multi-Area Adjacency, page RC-286 (optional)
•
Configuring Label Distribution Protocol IGP Auto-Configuration for OSPF, page RC-287 (optional)
•
Configuring Authentication Message Digest Management for OSPF, page RC-288 (optional)
•
Configuring Generalized TTL Security Mechanism (GTSM) for OSPF, page RC-292 (optional)
•
Verifying OSPF Configuration and Operation, page RC-295 (optional)
Enabling OSPF
This task explains how to perform the minimum OSPF configuration on your router that is to enable an
OSPF process with a router ID, configure a backbone or nonbackbone area, and then assign one or more
interfaces on which OSPF runs.
Prerequisites
Although you can configure OSPF before you configure an IP address, no OSPF routing occurs until at
least one IP address is configured.
Cisco IOS XR Routing Configuration Guide
RC-242
Implementing OSPF on Cisco IOS XR Software
How to Implement OSPF on Cisco IOS XR Software
SUMMARY STEPS
1.
configure
2.
router ospf process-name
or
router ospfv3 process-name
3.
router-id {router-id}
4.
area area-id
5.
interface type instance
6.
Repeat Step 5 for each interface that uses OSPF.
7.
log adjacency changes [detail] [enable | disable]
8.
end
or
commit
DETAILED STEPS
Step 1
Command or Action
Purpose
configure
Enters global configuration mode.
Example:
RP/0/RP0/CPU0:router# configure
Step 2
router ospf process-name
or
router ospfv3 process-name
Example:
Enables OSPF routing for the specified routing process and
places the router in router configuration mode.
or
Enables OSPFv3 routing for the specified routing process
and places the router in router ospfv3 configuration mode.
RP/0/RP0/CPU0:router(config)# router ospf 1
or
Note
The process-name argument is any alphanumeric
string no longer than 40 characters.
RP/0/RP0/CPU0:router(config)# router ospfv3 1
Step 3
router-id {router-id}
Configures a router ID for the OSPF process.
Note
Example:
We recommend using a stable IP address as the
router ID.
RP/0/RP0/CPU0:router(config-ospf)# router-id
192.168.4.3
Step 4
area area-id
Example:
RP/0/RP0/CPU0:router(config-ospf)# area 0
Enters area configuration mode and configures an area for
the OSPF process.
•
Backbone areas have an area ID of 0.
•
Nonbackbone areas have a nonzero area ID.
•
The area-id argument can be entered in dotted-decimal
or IPv4 address notation, such as area 1000 or
area 0.0.3.232. However, you must choose one form or
the other for an area. We recommend using the IPv4
address notation.
Cisco IOS XR Routing Configuration Guide
RC-243
Implementing OSPF on Cisco IOS XR Software
How to Implement OSPF on Cisco IOS XR Software
Step 5
Command or Action
Purpose
interface type instance
Enters interface configuration mode and associates one or
more interfaces for the area configured in Step 4.
Example:
RP/0/RP0/CPU0:router(config-ospf-ar)# interface
POS 0/1/0/3
Step 6
Repeat Step 5 for each interface that uses OSPF.
—
Step 7
log adjacency changes [detail] [enable |
disable]
(Optional) Requests notification of neighbor changes.
Example:
•
By default, this feature is enabled.
•
The messages generated by neighbor changes are
considered notifications, which are categorized as
severity Level 5 in the logging console command. The
logging console command controls which severity
level of messages are sent to the console. By default, all
severity level messages are sent.
RP/0/RP0/CPU0:router(config-ospf-ar-if)# log
adjacency changes detail
Step 8
Saves configuration changes.
end
or
commit
When you issue the end command, the system prompts
you to commit changes:
Example:
Uncommitted changes found, commit them before
exiting(yes/no/cancel)?
[cancel]:
•
RP/0/RP0/CPU0:router(config-ospf-ar-if)# end
or
– Entering yes saves configuration changes to the
RP/0/RP0/CPU0:router(config-ospf-ar-if)# commit
running configuration file, exits the configuration
session, and returns the router to EXEC mode.
– Entering no exits the configuration session and
returns the router to EXEC mode without
committing the configuration changes.
– Entering cancel leaves the router in the current
configuration session without exiting or
committing the configuration changes.
•
Use the commit command to save the configuration
changes to the running configuration file and remain
within the configuration session.
Configuring Stub and Not-so-Stubby Area Types
This task explains how to configure the stub area and the NSSA for OSPF.
SUMMARY STEPS
1.
configure
2.
router ospf process-name
or
router ospfv3 process-name
3.
router-id {router-id}
Cisco IOS XR Routing Configuration Guide
RC-244
Implementing OSPF on Cisco IOS XR Software
How to Implement OSPF on Cisco IOS XR Software
4.
area area-id
5.
stub [no-summary]
or
nssa [no-redistribution] [default-information-originate] [no-summary]
6.
stub
or
nssa
7.
default-cost cost
8.
end
or
commit
9.
Repeat this task on all other routers in the stub area or NSSA.
DETAILED STEPS
Step 1
Command or Action
Purpose
configure
Enters global configuration mode.
Example:
RP/0/RP0/CPU0:router# configure
Step 2
router ospf process-name
or
router ospfv3 process-name
Example:
Enables OSPF routing for the specified routing process and
places the router in router configuration mode.
or
Enables OSPFv3 routing for the specified routing process
and places the router in router ospfv3 configuration mode.
RP/0/RP0/CPU0:router(config)# router ospf 1
or
Note
RP/0/RP0/CPU0:router(config)# router ospfv3 1
Step 3
router-id {router-id}
The process-name argument is any alphanumeric
string no longer than 40 characters.
Configures a router ID for the OSPF process.
Note
Example:
We recommend using a stable IP address as the
router ID.
RP/0/RP0/CPU0:router(config-ospf)# router-id
192.168.4.3
Step 4
area area-id
Example:
RP/0/RP0/CPU0:router(config-ospf)# area 1
Enters area configuration mode and configures a
nonbackbone area for the OSPF process.
•
The area-id argument can be entered in dotted-decimal
or IPv4 address notation, such as area 1000 or
area 0.0.3.232. However, you must choose one form or
the other for an area. We recommend using the IPv4
address notation.
Cisco IOS XR Routing Configuration Guide
RC-245
Implementing OSPF on Cisco IOS XR Software
How to Implement OSPF on Cisco IOS XR Software
Step 5
Command or Action
Purpose
stub [no-summary]
Defines the nonbackbone area as a stub area.
or
•
See the “Configuring Stub and Not-so-Stubby Area
Types” section on page 244.
•
Specify the no-summary keyword to further reduce the
number of LSAs sent into a stub area. This keyword
prevents the ABR from sending summary link-state
advertisements (Type 3) in the stub area.
nssa [no-redistribution]
[default-information-originate] [no-summary]
Example:
RP/0/RP0/CPU0:router(config-ospf-ar)# stub no
summary
or
or
RP/0/RP0/CPU0:router(config-ospf-ar)# nssa
no-redistribution
Defines an area as an NSSA.
•
Step 6
(Optional) Turns off the options configured for stub and
NSSA areas.
stub
or
nssa
•
If you configured the stub and NSSA areas using the
optional keywords (no-summary, no-redistribution,
default-information-originate, and no-summary) in
Step 5, you must now reissue the stub and nssa
commands without the keywords—rather than using
the no form of the command.
•
For example, the no nssa
default-information-originate form of the command
changes the NSSA area into a normal area that
inadvertently brings down the existing adjacencies in
that area.
Example:
RP/0/RP0/CPU0:router(config-ospf-ar)# stub
or
RP/0/RP0/CPU0:router(config-ospf-ar)# nssa
Step 7
default-cost cost
Example:
(Optional) Specifies a cost for the default summary route
sent into a stub area or an NSSA.
•
Use this command only on ABRs attached to the NSSA.
Do not use it on any other routers in the area.
•
The default cost is 1.
RP/0/RP0/CPU0:router(config-ospf-ar)#
default-cost 15
Cisco IOS XR Routing Configuration Guide
RC-246
See the “Configuring Stub and Not-so-Stubby Area
Types” section on page 244.
Implementing OSPF on Cisco IOS XR Software
How to Implement OSPF on Cisco IOS XR Software
Step 8
Command or Action
Purpose
end
Saves configuration changes.
or
commit
When you issue the end command, the system prompts
you to commit changes:
Example:
Uncommitted changes found, commit them before
exiting(yes/no/cancel)?
[cancel]:
•
RP/0/RP0/CPU0:router(config-ospf-ar)# end
or
– Entering yes saves configuration changes to the
RP/0/RP0/CPU0:router(config-ospf-ar)# commit
running configuration file, exits the configuration
session, and returns the router to EXEC mode.
– Entering no exits the configuration session and
returns the router to EXEC mode without
committing the configuration changes.
– Entering cancel leaves the router in the current
configuration session without exiting or
committing the configuration changes.
•
Step 9
Use the commit command to save the configuration
changes to the running configuration file and remain
within the configuration session.
Repeat this task on all other routers in the stub area or —
NSSA.
Configuring Neighbors for Nonbroadcast Networks
This task explains how to configure neighbors for a nonbroadcast network. This task is optional.
Prerequisites
Configuring NBMA networks as either broadcast or nonbroadcast assumes that there are virtual circuits
from every router to every router or fully meshed network.
SUMMARY STEPS
1.
configure
2.
router ospf process-name
or
router ospfv3 process-name
3.
router-id {router-id}
4.
area area-id
5.
network {broadcast | non-broadcast | {point-to-multipoint [non-broadcast] | point-to-point}}
6.
dead-interval seconds
7.
hello-interval seconds
8.
interface type instance
Cisco IOS XR Routing Configuration Guide
RC-247
Implementing OSPF on Cisco IOS XR Software
How to Implement OSPF on Cisco IOS XR Software
9.
neighbor ip-address [priority number] [poll-interval seconds] [cost number]
or
neighbor ipv6-link-local-address [priority number] [poll-interval seconds] [cost number]
[database-filter [all]]
10. Repeat Step 9 for all neighbors on the interface.
11. exit
12. interface type instance
13. neighbor ip-address [priority number] [poll-interval seconds][cost number] [database-filter
[all]]
or
neighbor ipv6-link-local-address [priority number] [poll-interval seconds][cost number]
[database-filter [all]]
14. Repeat Step 13 for all neighbors on the interface.
15. end
or
commit
DETAILED STEPS
Step 1
Command or Action
Purpose
configure
Enters global configuration mode.
Example:
RP/0/RP0/CPU0:router# configure
Step 2
router ospf process-name
or
router ospfv3 process-name
Example:
Enables OSPF routing for the specified routing process and
places the router in router configuration mode.
or
Enables OSPFv3 routing for the specified routing process
and places the router in router ospfv3 configuration mode.
RP/0/RP0/CPU0:router(config)# router ospf 1
Note
or
The process-name argument is any alphanumeric
string no longer than 40 characters.
RP/0/RP0/CPU0:router(config)# router ospfv3 1
Step 3
router-id {router-id}
Configures a router ID for the OSPF process.
Note
Example:
We recommend using a stable IP address as the
router ID.
RP/0/RP0/CPU0:router(config-ospf)# router-id
192.168.4.3
Step 4
area area-id
Example:
RP/0/RP0/CPU0:router(config-ospf)# area 0
Cisco IOS XR Routing Configuration Guide
RC-248
Enters area configuration mode and configures an area for
the OSPF process.
•
The example configures a backbone area.
•
The area-id argument can be entered in dotted-decimal
or IPv4 address notation, such as area 1000 or
area 0.0.3.232. However, you must choose one form or
the other for an area. We recommend using the IPv4
address notation.
Implementing OSPF on Cisco IOS XR Software
How to Implement OSPF on Cisco IOS XR Software
Step 5
Command or Action
Purpose
network {broadcast | non-broadcast |
{point-to-multipoint [non-broadcast] |
point-to-point}}
Configures the OSPF network type to a type other than the
default for a given medium.
•
The example sets the network type to NBMA.
Example:
RP/0/RP0/CPU0:router(config-ospf-ar)# network
non-broadcast
Step 6
dead-interval seconds
(Optional) Sets the time to wait for a hello packet from a
neighbor before declaring the neighbor down.
Example:
RP/0/RP0/CPU0:router(config-ospf-ar)#
dead-interval 40
Step 7
hello-interval seconds
(Optional) Specifies the interval between hello packets that
OSPF sends on the interface.
Example:
RP/0/RP0/CPU0:router(config-ospf-ar)#
hello-interval 10
Step 8
interface type instance
Example:
RP/0/RP0/CPU0:router(config-ospf-ar)# interface
POS 0/2/0/0
Enters interface configuration mode and associates one or
more interfaces for the area configured in Step 4.
•
In this example, the interface inherits the nonbroadcast
network type and the hello and dead intervals from the
areas because the values are not set at the interface
level.
Cisco IOS XR Routing Configuration Guide
RC-249
Implementing OSPF on Cisco IOS XR Software
How to Implement OSPF on Cisco IOS XR Software
Step 9
Command or Action
Purpose
neighbor ip-address [priority number]
[poll-interval seconds][cost number]
Configures the IPv4 address of OSPF neighbors
interconnecting to nonbroadcast networks.
or
neighbor ipv6-link-local-address [priority
number] [poll-interval seconds][cost number]
[database-filter [all]]
or
Configures the link-local IPv6 address of OSPFv3
neighbors.
•
The ipv6-link-local-address argument must be in the
form documented in RFC 2373 in which the address is
specified in hexadecimal using 16-bit values between
colons.
•
The priority keyword notifies the router that this
neighbor is eligible to become a DR or BDR. The
priority value should match the actual priority setting
on the neighbor router. The neighbor priority default
value is zero. This keyword does not apply to
point-to-multipoint interfaces.
•
The poll-interval keyword does not apply to
point-to-multipoint interfaces. RFC 1247 recommends
that this value be much larger than the hello interval.
The default is 120 seconds (2 minutes).
•
Neighbors with no specific cost configured assumes the
cost of the interface, based on the cost command. On
point-to-multipoint interfaces, cost number is the only
keyword and argument combination that works. The
cost keyword does not apply to NBMA networks.
•
The database-filter keyword filters outgoing LSAs to
an OSPF neighbor. If you specify the all keyword,
incoming and outgoing LSAs are filtered. Use with
extreme caution since filtering may cause the routing
topology to be seen as entirely different between two
neighbors, resulting in ‘black-holing’ of data traffic or
routing loops.
Example:
RP/0/RP0/CPU0:router(config-ospf-ar-if)#
neighbor 10.20.20.1 priority 3 poll-interval 15
or
RP/0/RP0/CPU0:router(config-ospf-ar-if)#
neighbor fe80::3203:a0ff:fe9d:f3fe
Step 10
Repeat Step 9 for all neighbors on the interface.
—
Step 11
exit
Enters area configuration mode.
Example:
RP/0/RP0/CPU0:router(config-ospf-ar-if)# exit
Step 12
interface type instance
Example:
RP/0/RP0/CPU0:router(config-ospf-ar)# interface
POS 0/3/0/1
Cisco IOS XR Routing Configuration Guide
RC-250
Enters interface configuration mode and associates one or
more interfaces for the area configured in Step 4.
•
In this example, the interface inherits the nonbroadcast
network type and the hello and dead intervals from the
areas because the values are not set at the interface
level.
Implementing OSPF on Cisco IOS XR Software
How to Implement OSPF on Cisco IOS XR Software
Step 13
Command or Action
Purpose
neighbor ip-address [priority number]
[poll-interval seconds][cost number]
[database-filter [all]]
Configures the IPv4 address of OSPF neighbors
interconnecting to nonbroadcast networks.
or
or
neighbor ipv6-link-local-address [priority
number] [poll-interval seconds][cost number]
[database-filter [all]]
Configures the link-local IPv6 address of OSPFv3
neighbors.
•
The ipv6-link-local-address argument must be in the
form documented in RFC 2373 in which the address is
specified in hexadecimal using 16-bit values between
colons.
•
The priority keyword notifies the router that this
neighbor is eligible to become a DR or BDR. The
priority value should match the actual priority setting
on the neighbor router. The neighbor priority default
value is zero. This keyword does not apply to
point-to-multipoint interfaces.
•
The poll-interval keyword does not apply to
point-to-multipoint interfaces. RFC 1247 recommends
that this value be much larger than the hello interval.
The default is 120 seconds (2 minutes).
•
Neighbors with no specific cost configured assumes the
cost of the interface, based on the cost command. On
point-to-multipoint interfaces, cost number is the only
keyword and argument combination that works. The
cost keyword does not apply to NBMA networks.
•
The database-filter keyword filters outgoing LSAs to
an OSPF neighbor. If you specify the all keyword,
incoming and outgoing LSAs are filtered. Use with
extreme caution since filtering may cause the routing
topology to be seen as entirely different between two
neighbors, resulting in ‘black-holing’ or routing loops.
Example:
RP/0/RP0/CPU0:router(config-ospf-ar)# neighbor
10.34.16.6
or
RP/0/RP0/CPU0:router(config-ospf-ar)# neighbor
fe80::3203:a0ff:fe9d:f3f
Cisco IOS XR Routing Configuration Guide
RC-251
Implementing OSPF on Cisco IOS XR Software
How to Implement OSPF on Cisco IOS XR Software
Command or Action
Purpose
Step 14
Repeat Step 13 for all neighbors on the interface.
—
Step 15
end
Saves configuration changes.
or
commit
When you issue the end command, the system prompts
you to commit changes:
Example:
Uncommitted changes found, commit them before
exiting(yes/no/cancel)?
[cancel]:
•
RP/0/RP0/CPU0:router(config-ospf-ar)# end
or
– Entering yes saves configuration changes to the
RP/0/RP0/CPU0:router(config-ospf-ar)# commit
running configuration file, exits the configuration
session, and returns the router to EXEC mode.
– Entering no exits the configuration session and
returns the router to EXEC mode without
committing the configuration changes.
– Entering cancel leaves the router in the current
configuration session without exiting or
committing the configuration changes.
•
Use the commit command to save the configuration
changes to the running configuration file and remain
within the configuration session.
Configuring Authentication at Different Hierarchical Levels for OSPF Version 2
This task explains how to configure MD5 (secure) authentication on the OSPF router process, configure
one area with plain text authentication, and then apply one interface with clear text (null) authentication.
Note
Authentication configured at the interface level overrides authentication configured at the area level and
the router process level. If an interface does not have authentication specifically configured, the interface
inherits the authentication parameter value from a higher hierarchical level. See the “OSPF Hierarchical
CLI and CLI Inheritance” section on page 225 for more information about hierarchy and inheritance.
Prerequisites
If you choose to configure authentication, you must first decide whether to configure plain text or MD5
authentication, and whether the authentication applies to all interfaces in a process, an entire area, or
specific interfaces. See the “Route Authentication Methods for OSPF” section on page 230 for
information about each type of authentication and when you should use a specific method for your
network.
SUMMARY STEPS
1.
configure
2.
router ospf process-name
3.
router-id {router-id}
4.
authentication [message-digest | null]
Cisco IOS XR Routing Configuration Guide
RC-252
Implementing OSPF on Cisco IOS XR Software
How to Implement OSPF on Cisco IOS XR Software
5.
message-digest-key key-id md5 {key | clear key | encrypted key}
6.
area area-id
7.
interface type instance
8.
Repeat Step 7 for each interface that must communicate, using the same authentication.
9.
exit
10. area area-id
11. authentication [message-digest | null]
12. interface type instance
13. Repeat Step 12 for each interface that must communicate, using the same authentication.
14. interface type instance
15. authentication [message-digest | null]
16. end
or
commit
DETAILED STEPS
Step 1
Command or Action
Purpose
configure
Enters global configuration mode.
Example:
RP/0/RP0/CPU0:router# configure
Step 2
router ospf process-name
Enables OSPF routing for the specified routing process and
places the router in router configuration mode.
Example:
Note
RP/0/RP0/CPU0:router(config)# router ospf 1
Step 3
router-id {router-id}
The process-name argument is any alphanumeric
string no longer than 40 characters.
Configures a router ID for the OSPF process.
Example:
RP/0/RP0/CPU0:router(config-ospf)# router-id
192.168.4.3
Step 4
authentication [message-digest | keychain
keychain] | null]
Enables MD5 authentication for the OSPF process.
•
Example:
This authentication type applies to the entire router
process unless overridden by a lower hierarchical level
such as the area or interface.
RP/0/RP0/CPU0:router(config-ospf)#
authentication message-digest
Step 5
message-digest-key key-id md5 {key | clear key
| encrypted key}
Specifies the MD5 authentication key for the OSPF process.
•
The neighbor routers must have the same key identifier.
Example:
RP/0/RP0/CPU0:router(config-ospf)#
message-digest-key 4 md5 yourkey
Cisco IOS XR Routing Configuration Guide
RC-253
Implementing OSPF on Cisco IOS XR Software
How to Implement OSPF on Cisco IOS XR Software
Step 6
Command or Action
Purpose
area area-id
Enters area configuration mode and configures a backbone
area for the OSPF process.
Example:
RP/0/RP0/CPU0:router(config-ospf)# area 0
Step 7
interface type instance
Example:
Enters interface configuration mode and associates one or
more interfaces to the backbone area.
•
RP/0/RP0/CPU0:router(config-ospf-ar)# interface
POS 0/1/0/3
All interfaces inherit the authentication parameter
values specified for the OSPF process (Step 4, Step 5,
and Step 6).
Step 8
Repeat Step 7 for each interface that must
communicate, using the same authentication.
—
Step 9
exit
Enters area OSPF configuration mode.
Example:
RP/0/RP0/CPU0:router(config-ospf-ar)# exit
Step 10
area area-id
Example:
Enters area configuration mode and configures a
nonbackbone area 1 for the OSPF process.
•
RP/0/RP0/CPU0:router(config-ospf)# area 1
Step 11
authentication [message-digest | null]
Example:
Enables Type 1 (plain text) authentication that provides no
security.
•
RP/0/RP0/CPU0:router(config-ospf-ar)#
authentication
Step 12
interface type instance
Example:
RP/0/RP0/CPU0:router(config-ospf-ar)# interface
POS 0/1/0/0
The area-id argument can be entered in dotted-decimal
or IPv4 address notation, such as area 1000 or
area 0.0.3.232. However, you must choose one form or
the other for an area. We recommend using the IPv4
address notation.
The example specifies plain text authentication (by not
specifying a keyword). Use the authentication-key
command in interface configuration mode to specify
the plain text password.
Enters interface configuration mode and associates one or
more interfaces to the nonbackbone area 1 specified in
Step 7.
•
All interfaces configured inherit the authentication
parameter values configured for area 1.
Step 13
Repeat Step 12 for each interface that must
communicate, using the same authentication.
—
Step 14
interface type instance
Enters interface configuration mode and associates one or
more interfaces to a different authentication type.
Example:
RP/0/RP0/CPU0:router(config-ospf-ar)# interface
POS 0/3/0/0
Cisco IOS XR Routing Configuration Guide
RC-254
Implementing OSPF on Cisco IOS XR Software
How to Implement OSPF on Cisco IOS XR Software
Step 15
Command or Action
Purpose
authentication [message-digest | keychain
keychain] | null]
Specifies no authentication on POS interface 0/3/0/0,
overriding the plain text authentication specified for area 1.
•
Example:
RP/0/RP0/CPU0:router(config-ospf-ar-if)#
authentication null
Step 16
By default, all of the interfaces configured in the same
area inherit the same authentication parameter values of
the area.
Saves configuration changes.
end
or
commit
When you issue the end command, the system prompts
you to commit changes:
Example:
Uncommitted changes found, commit them before
exiting(yes/no/cancel)?
[cancel]:
•
RP/0/RP0/CPU0:router(config-ospf-ar-if)# end
or
– Entering yes saves configuration changes to the
RP/0/RP0/CPU0:router(config-ospf-ar-if)# commit
running configuration file, exits the configuration
session, and returns the router to EXEC mode.
– Entering no exits the configuration session and
returns the router to EXEC mode without
committing the configuration changes.
– Entering cancel leaves the router in the current
configuration session without exiting or
committing the configuration changes.
•
Use the commit command to save the configuration
changes to the running configuration file and remain
within the configuration session.
Controlling the Frequency that the Same LSA Is Originated or Accepted for
OSPF
This task explains how to tune the convergence time of OSPF routes in the routing table when many
LSAs need to be flooded in a very short time interval.
SUMMARY STEPS
1.
configure
2.
router ospf process-name
or
router ospfv3 process-name
3.
router-id {router-id}
4.
Perform Step 5 or Step 6 or both to control the frequency that the same LSA is originated or
accepted.
5.
timers lsa gen-interval seconds
6.
timers lsa min-arrival seconds
Cisco IOS XR Routing Configuration Guide
RC-255
Implementing OSPF on Cisco IOS XR Software
How to Implement OSPF on Cisco IOS XR Software
7.
timers lsa group-pacing seconds
8.
end
or
commit
DETAILED STEPS
Step 1
Command or Action
Purpose
configure
Enters global configuration mode.
Example:
RP/0/RP0/CPU0:router# configure
Step 2
or
Enables OSPF routing for the specified routing process and
places the router in router configuration mode.
router ospfv3 process-name
or
router ospf process-name
Example:
Enables OSPFv3 routing for the specified routing process
and places the router in router ospfv3 configuration mode.
RP/0/RP0/CPU0:router(config)# router ospf 1
Note
or
The process-name argument is any alphanumeric
string no longer than 40 characters.
RP/0/RP0/CPU0:router(config)# router ospfv3 1
Step 3
router-id {router-id}
Configures a router ID for the OSPF process.
Note
Example:
We recommend using a stable IP address as the
router ID.
RP/0/RP0/CPU0:router(config-ospf)# router-id
192.168.4.3
Step 4
Perform Step 5 or Step 6 or both to control the
—
frequency that the same LSA is originated or accepted.
Step 5
timers lsa gen-interval seconds
Example:
Changes the minimum interval between the same OSPF
LSAs that the router originates.
•
The default is 5 seconds for both OSPF and OSPFv3.
RP/0/RP0/CPU0:router(config-ospf)# timers lsa
gen-interval 10
Step 6
timers lsa min-arrival seconds
Example:
RP/0/RP0/CPU0:router(config-ospf)# timers lsa
min-arrival 2
Cisco IOS XR Routing Configuration Guide
RC-256
Limits the frequency that new processes of any particular
OSPF Version 2 LSA can be accepted during flooding.
•
The default is 1 second.
Implementing OSPF on Cisco IOS XR Software
How to Implement OSPF on Cisco IOS XR Software
Step 7
Command or Action
Purpose
timers lsa group-pacing seconds
Changes the interval at which OSPF link-state LSAs are
collected into a group for flooding.
•
Example:
The default is 240 seconds.
RP/0/RP0/CPU0:router(config-ospf)# timers lsa
group-pacing 1000
Step 8
Saves configuration changes.
end
or
commit
When you issue the end command, the system prompts
you to commit changes:
Example:
Uncommitted changes found, commit them before
exiting(yes/no/cancel)?
[cancel]:
•
RP/0/RP0/CPU0:router(config-ospf)# end
or
– Entering yes saves configuration changes to the
RP/0/RP0/CPU0:router(config-ospf)# commit
running configuration file, exits the configuration
session, and returns the router to EXEC mode.
– Entering no exits the configuration session and
returns the router to EXEC mode without
committing the configuration changes.
– Entering cancel leaves the router in the current
configuration session without exiting or
committing the configuration changes.
•
Use the commit command to save the configuration
changes to the running configuration file and remain
within the configuration session.
Creating a Virtual Link with MD5 Authentication to Area 0 for OSPF
This task explains how to create a virtual link to your backbone (area 0) and apply MD5 authentication.
You must perform the steps described on both ABRs, one at each end of the virtual link. To understand
virtual links, see the “Virtual Link and Transit Area for OSPF” section on page 233.
Note
After you explicitly configure area parameter values, they are inherited by all interfaces bound to that
area—unless you override the values and configure them explicitly for the interface. An example is
provided in the “Virtual Link Configured with MD5 Authentication for OSPF Version 2: Example”
section on page 300.
Prerequisites
The following prerequisites must be met before creating a virtual link with MD5 authentication to area 0:
•
You must have the router ID of the neighbor router at the opposite end of the link to configure the
local router. You can execute the show ospf or show ospfv3 command on the remote router to get
its router ID.
Cisco IOS XR Routing Configuration Guide
RC-257
Implementing OSPF on Cisco IOS XR Software
How to Implement OSPF on Cisco IOS XR Software
•
For a virtual link to be successful, you need a stable router ID at each end of the virtual link. You
do not want them to be subject to change, which could happen if they are assigned by default (See
the “OSPF Process and Router ID” section on page 229 for an explanation of how the router ID is
determined.) Therefore, we recommend that you perform one of the following tasks before
configuring a virtual link:
– Use the router-id command to set the router ID. This strategy is preferable.
– Configure a loopback interface so that the router has a stable router ID.
•
Note
Before configuring your virtual link for OSPF Version 2, you must decide whether to configure plain
text authentication, MD5 authentication, or no authentication (which is the default). Your decision
determines whether you need to perform additional tasks related to authentication.
If you decide to configure plain text authentication or no authentication, see the authentication
command provided in the OSPF Commands on Cisco IOS XR Software module in the Cisco IOS XR
Routing Command Reference.
SUMMARY STEPS
1.
show ospf [process-name]
or
show ospfv3 [process-name]
2.
configure
3.
router ospf process-name
or
router ospfv3 process-name
4.
router-id {router-id}
5.
area area-id
6.
virtual link router-id
7.
authentication message-digest
8.
message-digest-key key-id md5 {key | clear key | encrypted key}
9.
Repeat all the steps in this task on the ABR that is at the other end of the virtual link. Specify the
same key ID and key that you specified for the virtual link on this router.
10. end
or
commit
11. show ospf [process-name] [area-id] virtual-links
or
show ospfv3 [process-name] virtual-links
Cisco IOS XR Routing Configuration Guide
RC-258
Implementing OSPF on Cisco IOS XR Software
How to Implement OSPF on Cisco IOS XR Software
DETAILED STEPS
Step 1
Command or Action
Purpose
show ospf [process-name]
(Optional) Displays general information about OSPF
routing processes.
or
show ospfv3 [process-name]
•
Example:
The output displays the router ID of the local router.
You need this router ID to configure the other end of the
link.
RP/0/RP0/CPU0:router# show ospf
or
RP/0/RP0/CPU0:router# show ospfv3
Step 2
configure
Enters global configuration mode.
Example:
RP/0/RP0/CPU0:router# configure
Step 3
router ospf process-name
or
router ospfv3 process-name
Example:
Enables OSPF routing for the specified routing process and
places the router in router configuration mode.
or
Enables OSPFv3 routing for the specified routing process
and places the router in router ospfv3 configuration mode.
RP/0/RP0/CPU0:router(config)# router ospf 1
or
Note
The process-name argument is any alphanumeric
string no longer than 40 characters.
RP/0/RP0/CPU0:router(config)# router ospfv3 1
Step 4
router-id {router-id}
Configures a router ID for the OSPF process.
Note
Example:
We recommend using a stable IPv4 address as the
router ID.
RP/0/RP0/CPU0:router(config-ospf)# router-id
192.168.4.3
Step 5
area area-id
Example:
Enters area configuration mode and configures a
nonbackbone area for the OSPF process.
•
RP/0/RP0/CPU0:router(config-ospf)# area 1
Step 6
virtual-link router-id
Defines an OSPF virtual link.
•
Example:
The area-id argument can be entered in dotted-decimal
or IPv4 address notation, such as area 1000 or
area 0.0.3.232. However, you must choose one form or
the other for an area. We recommend using the IPv4
address notation.
See the “Virtual Link and Transit Area for OSPF”
section on page 233.
RP/0/RP0/CPU0:router(config-ospf-ar)# virtual
link 10.3.4.5
Step 7
authentication message-digest
Selects MD5 authentication for this virtual link.
Example:
RP/0/RP0/CPU0:router(config-ospf-ar-vl)#
authentication message-digest
Cisco IOS XR Routing Configuration Guide
RC-259
Implementing OSPF on Cisco IOS XR Software
How to Implement OSPF on Cisco IOS XR Software
Step 8
Command or Action
Purpose
message-digest-key key-id md5 {key | clear key
| encrypted key}
Defines an OSPF virtual link.
Example:
RP/0/RP0/CPU0:router(config-ospf-ar-vl)#
message-digest-key 4 md5 yourkey
•
See the “Virtual Link and Transit Area for OSPF”
section on page 233 to understand a virtual link.
•
The key-id argument is a number in the range from 1 to
255. The key argument is an alphanumeric string of up
to 16 characters. The routers at both ends of the virtual
link must have the same key identifier and key to be
able to route OSPF traffic.
•
The authentication-key key command is not supported
for OSPFv3.
•
Once the key is encrypted it must remain encrypted.
Step 9
Repeat all of the steps in this task on the ABR that is
at the other end of the virtual link. Specify the same
key ID and key that you specified for the virtual link
on this router.
—
Step 10
end
Saves configuration changes.
or
commit
When you issue the end command, the system prompts
you to commit changes:
Example:
Uncommitted changes found, commit them before
exiting(yes/no/cancel)?
[cancel]:
•
RP/0/RP0/CPU0:router(config-ospf-ar-vl)# end
or
– Entering yes saves configuration changes to the
RP/0/RP0/CPU0:router(config-ospf-ar-vl)# commit
running configuration file, exits the configuration
session, and returns the router to EXEC mode.
– Entering no exits the configuration session and
returns the router to EXEC mode without
committing the configuration changes.
– Entering cancel leaves the router in the current
configuration session without exiting or
committing the configuration changes.
•
Step 11
show ospf [process-name] [area-id]
virtual-links
or
show ospfv3 [process-name] virtual-links
Example:
RP/0/RP0/CPU0:router# show ospf 1 2
virtual-links
or
RP/0/RP0/CPU0:router# show ospfv3 1
virtual-links
Cisco IOS XR Routing Configuration Guide
RC-260
Use the commit command to save the configuration
changes to the running configuration file and remain
within the configuration session.
(Optional) Displays the parameters and the current state of
OSPF virtual links.
Implementing OSPF on Cisco IOS XR Software
How to Implement OSPF on Cisco IOS XR Software
Examples
In the following example, the show ospfv3 virtual links EXEC command verifies that the OSPF_VL0
virtual link to the OSPFv3 neighbor is up, the ID of the virtual link interface is 2, and the IPv6 address
of the virtual link endpoint is 2003:3000::1.
RP/0/RP0/CPU0:router# show ospfv3 virtual-links
Virtual Links for OSPFv3 1
Virtual Link OSPF_VL0 to router 10.0.0.3 is up
Interface ID 2, IPv6 address 2003:3000::1
Run as demand circuit
DoNotAge LSA allowed.
Transit area 0.1.20.255, via interface POS 0/1/0/1, Cost of using 2
Transmit Delay is 5 sec, State POINT_TO_POINT,
Timer intervals configured, Hello 10, Dead 40, Wait 40, Retransmit 5
Hello due in 00:00:02
Adjacency State FULL (Hello suppressed)
Index 0/2/3, retransmission queue length 0, number of retransmission 1
First 0(0)/0(0)/0(0) Next 0(0)/0(0)/0(0)
Last retransmission scan length is 1, maximum is 1
Last retransmission scan time is 0 msec, maximum is 0 msec
Check for lines:
Virtual Link OSPF_VL0 to router 10.0.0.3 is up
Adjacency State FULL (Hello suppressed)
State is up and Adjacency State is FULL
Summarizing Subnetwork LSAs on an OSPF ABR
If you configured two or more subnetworks when you assigned your IP addresses to your interfaces, you
might want the software to summarize (aggregate) into a single LSA all of the subnetworks that the local
area advertises to another area. Such summarization would reduce the number of LSAs and thereby
conserve network resources. This summarization is known as interarea route summarization. It applies
to routes from within the autonomous system. It does not apply to external routes injected into OSPF by
way of redistribution.
This task configures OSPF to summarize subnetworks into one LSA, by specifying that all subnetworks
that fall into a range are advertised together. This task is performed on an ABR only.
SUMMARY STEPS
1.
configure
2.
router ospf process-name
or
router ospfv3 process-name
3.
router-id {router-id}
4.
area area-id
5.
range ip-address mask [advertise | not-advertise]
or
range ipv6-prefix/prefix-length [advertise | not-advertise]
6.
interface type instance
Cisco IOS XR Routing Configuration Guide
RC-261
Implementing OSPF on Cisco IOS XR Software
How to Implement OSPF on Cisco IOS XR Software
7.
end
or
commit
DETAILED STEPS
Step 1
Command or Action
Purpose
configure
Enters global configuration mode.
Example:
RP/0/RP0/CPU0:router# configure
Step 2
router ospf process-name
or
router ospfv3 process-name
Example:
Enables OSPF routing for the specified routing process and
places the router in router configuration mode.
or
Enables OSPFv3 routing for the specified routing process
and places the router in router ospfv3 configuration mode.
RP/0/RP0/CPU0:router(config)# router ospf 1
Note
or
The process-name argument is any alphanumeric
string no longer than 40 characters.
RP/0/RP0/CPU0:router(config)# router ospfv3 1
Step 3
router-id {router-id}
Configures a router ID for the OSPF process.
Note
Example:
We recommend using a stable IPv4 address as the
router ID.
RP/0/RP0/CPU0:router(config-ospf)# router-id
192.168.4.3
Step 4
area area-id
Example:
Enters area configuration mode and configures a
nonbackbone area for the OSPF process.
•
RP/0/RP0/CPU0:router(config-ospf)# area 0
Step 5
range ip-address mask [advertise |
not-advertise]
or
range ipv6-prefix/prefix-length [advertise |
not-advertise]
Example:
Consolidates and summarizes OSPF routes at an area
boundary.
•
The advertise keyword causes the software to advertise
the address range of subnetworks in a Type 3 summary
LSA.
•
The not-advertise keyword causes the software to
suppress the Type 3 summary LSA, and the
subnetworks in the range remain hidden from other
areas.
•
In the first example, all subnetworks for network
192.168.0.0 are summarized and advertised by the ABR
into areas outside the backbone.
•
In the second example, two or more IPv4 interfaces are
covered by a 192.x.x network.
RP/0/RP0/CPU0:router(config-ospf-ar)# range
192.168.0.0 255.255.0.0 advertise
or
Example:
RP/0/RP0/CPU0:router(config-ospf-ar)# range
4004:f000::/32 advertise
Cisco IOS XR Routing Configuration Guide
RC-262
The area-id argument can be entered in dotted-decimal
or IPv4 address notation, such as area 1000 or
area 0.0.3.232. However, you must choose one form or
the other for an area. We recommend using the IPv4
address notation.
Implementing OSPF on Cisco IOS XR Software
How to Implement OSPF on Cisco IOS XR Software
Step 6
Command or Action
Purpose
interface type instance
Enters interface configuration mode and associates one or
more interfaces to the area.
Example:
RP/0/RP0/CPU0:router(config-ospf-ar)# interface
POS 0/2/0/3
Step 7
Saves configuration changes.
end
or
commit
When you issue the end command, the system prompts
you to commit changes:
Example:
Uncommitted changes found, commit them before
exiting(yes/no/cancel)?
[cancel]:
•
RP/0/RP0/CPU0:router(config-ospf-ar)# end
or
– Entering yes saves configuration changes to the
RP/0/RP0/CPU0:router(config-ospf-ar)# commit
running configuration file, exits the configuration
session, and returns the router to EXEC mode.
– Entering no exits the configuration session and
returns the router to EXEC mode without
committing the configuration changes.
– Entering cancel leaves the router in the current
configuration session without exiting or
committing the configuration changes.
•
Use the commit command to save the configuration
changes to the running configuration file and remain
within the configuration session.
Redistributing Routes from One IGP into OSPF
This task redistributes routes from an IGP (could be a different OSPF process) into OSPF.
Prerequisites
For information about configuring routing policy, see the Implementing Routing Policy on Cisco IOS XR
Software module.
SUMMARY STEPS
1.
configure
2.
router ospf process-name
or
router ospfv3 process-name
3.
router-id {router-id}
4.
redistribute protocol [process-id] {level-1 | level-1-2 | level-2} [metric metric-value] [metric-type
type-value] [match {internal | external [1 | 2} | nssa-external [1 | 2}] [tag tag-value] [route-map
map-tag | route-policy policy-tag]
Cisco IOS XR Routing Configuration Guide
RC-263
Implementing OSPF on Cisco IOS XR Software
How to Implement OSPF on Cisco IOS XR Software
5.
summary-prefix address mask [not-advertise] [tag tag]
or
summary-prefix ipv6-prefix/prefix-length [not-advertise] [tag tag]
6.
end
or
commit
DETAILED STEPS
Step 1
Command or Action
Purpose
configure
Enters global configuration mode.
Example:
RP/0/RP0/CPU0:router# configure
Step 2
or
Enables OSPF routing for the specified routing process and
places the router in router configuration mode.
router ospfv3 process-name
or
router ospf process-name
Example:
Enables OSPFv3 routing for the specified routing process
and places the router in router ospfv3 configuration mode.
RP/0/RP0/CPU0:router(config)# router ospf 1
Note
or
The process-name argument is any alphanumeric
string no longer than 40 characters.
RP/0/RP0/CPU0:router(config)# router ospfv3 1
Step 3
router-id {router-id}
Configures a router ID for the OSPF process.
Note
Example:
RP/0/RP0/CPU0:router(config-ospf)# router-id
192.168.4.3
Cisco IOS XR Routing Configuration Guide
RC-264
We recommend using a stable IPv4 address as the
router ID.
Implementing OSPF on Cisco IOS XR Software
How to Implement OSPF on Cisco IOS XR Software
Step 4
Command or Action
Purpose
redistribute protocol [process-id] {level-1 |
level-1-2 | level-2} [metric metric-value]
[metric-type type-value] [match {internal |
external [1 | 2} | nssa-external [1 | 2}] [tag
tag-value] [route-map map-tag | policy
policy-tag]
Redistributes OSPF routes from one routing domain to
another routing domain.
Example:
RP/0/RP0/CPU0:router(config-ospf)# redistribute
bgp 1 level-1
or
RP/0/RP0/CPU0:router(config-router)#
redistribute bgp 1 level-1-2 metric-type 1
or
Redistributes OSPFv3 routes from one routing domain to
another routing domain.
•
This command causes the router to become an ASBR
by definition.
•
OSPF tags all routes learned through redistribution as
external.
•
The protocol and its process ID, if it has one, indicate
the protocol being redistributed into OSPF.
•
The metric is the cost you assign to the external route.
The default is 20 for all protocols except BGP, whose
default metric is 1.
•
The OSPF example redistributes BGP autonomous
system 1, Level 1 routes into OSPF as Type 2 external
routes.
•
The OSPFv3 example redistributes BGP autonomous
system 1, Level 1 and 2 routes into OSPF. The external
link type associated with the default route advertised
into the OSPFv3 routing domain is the Type 1 external
route.
Note
RPL is not supported for OSPFv3.
Cisco IOS XR Routing Configuration Guide
RC-265
Implementing OSPF on Cisco IOS XR Software
How to Implement OSPF on Cisco IOS XR Software
Step 5
Command or Action
Purpose
summary-prefix address mask [not-advertise]
[tag tag]
(Optional) Creates aggregate addresses for OSPF.
or
or
summary-prefix ipv6-prefix/prefix-length
[not-advertise] [tag tag]
(Optional) Creates aggregate addresses for OSPFv3.
Example:
•
This command provides external route summarization
of the non-OSPF routes.
•
External ranges that are being summarized should be
contiguous. Summarization of overlapping ranges from
two different routers could cause packets to be sent to
the wrong destination.
•
This command is optional. If you do not specify it, each
route is included in the link-state database and
advertised in LSAs.
•
In the OSPFv2 example, the summary address 10.1.0.0
includes address 10.1.1.0, 10.1.2.0, 10.1.3.0, and so on.
Only the address 10.1.0.0 is advertised in an external
LSA.
•
In the OSPFv3 example, the summary address
2010:11:22::/32 has addresses such as
2010:11:22:0:1000::1, 2010:11:22:0:2000:679:1, and
so on. Only the address 2010:11:22::/32 is advertised in
the external LSA.
RP/0/RP0/CPU0:router(config-ospf)#
summary-prefix 10.1.0.0 255.255.0.0
or
RP/0/RP0/CPU0:router(config-router)#
summary-prefix 2010:11:22::/32
Step 6
Saves configuration changes.
end
or
commit
When you issue the end command, the system prompts
you to commit changes:
Example:
Uncommitted changes found, commit them before
exiting(yes/no/cancel)?
[cancel]:
•
RP/0/RP0/CPU0:router(config-ospf)# end
or
– Entering yes saves configuration changes to the
RP/0/RP0/CPU0:router(config-ospf)# commit
running configuration file, exits the configuration
session, and returns the router to EXEC mode.
– Entering no exits the configuration session and
returns the router to EXEC mode without
committing the configuration changes.
– Entering cancel leaves the router in the current
configuration session without exiting or
committing the configuration changes.
•
Use the commit command to save the configuration
changes to the running configuration file and remain
within the configuration session.
Configuring OSPF Shortest Path First Throttling
This task explains how to configure SPF scheduling in millisecond intervals and potentially delay SPF
calculations during times of network instability. This task is optional.
Cisco IOS XR Routing Configuration Guide
RC-266
Implementing OSPF on Cisco IOS XR Software
How to Implement OSPF on Cisco IOS XR Software
Prerequisites
See the “OSPF Shortest Path First Throttling” section on page 234 for information about OSPF SPF
throttling.
SUMMARY STEPS
1.
configure
2.
router ospf process-name
or
router ospfv3 process-name
3.
router-id {router-id}
4.
timers throttle spf spf-start spf-hold spf-max-wait
5.
area area-id
6.
interface type instance
7.
end
or
commit
8.
show ospf [process-name]
or
show ospfv3 [process-name]
DETAILED STEPS
Step 1
Command or Action
Purpose
configure
Enters global configuration mode.
Example:
RP/0/RP0/CPU0:router# configure
Step 2
or
Enables OSPF routing for the specified routing process and
places the router in router configuration mode.
router ospfv3 process-name
or
router ospf process-name
Example:
Enables OSPFv3 routing for the specified routing process
and places the router in router ospfv3 configuration mode.
RP/0/RP0/CPU0:router(config)# router ospf 1
or
Note
The process-name argument is any alphanumeric
string no longer than 40 characters.
RP/0/RP0/CPU0:router(config)# router ospfv3 1
Step 3
router-id {router-id}
Configures a router ID for the OSPF process.
Note
Example:
We recommend using a stable IPv4 address as the
router ID.
RP/0/RP0/CPU0:router(config-ospf)# router-id
192.168.4.3
Cisco IOS XR Routing Configuration Guide
RC-267
Implementing OSPF on Cisco IOS XR Software
How to Implement OSPF on Cisco IOS XR Software
Step 4
Command or Action
Purpose
timers throttle spf spf-start spf-hold
spf-max-wait
Sets SPF throttling timers.
Example:
RP/0/RP0/CPU0:router(config-ospf)# timers
throttle spf 10 4800 90000
Step 5
Enters area configuration mode and configures a backbone
area.
area area-id
•
Example:
RP/0/RP0/CPU0:router(config-ospf)#
Step 6
area 0
interface type instance
The area-id argument can be entered in dotted-decimal
or IPv4 address notation, such as area 1000 or
area 0.0.3.232. However, you must choose one form or
the other for an area. We recommend using the IPv4
address notation.
Enters interface configuration mode and associates one or
more interfaces to the area.
Example:
RP/0/RP0/CPU0:router(config-ospf-ar)# interface
POS 0/1/0/3
Step 7
Saves configuration changes.
end
or
commit
When you issue the end command, the system prompts
you to commit changes:
Example:
Uncommitted changes found, commit them before
exiting(yes/no/cancel)?
[cancel]:
•
RP/0/RP0/CPU0:router(config-ospf-ar-if)# end
or
– Entering yes saves configuration changes to the
RP/0/RP0/CPU0:router(config-ospf-ar-if)# commit
running configuration file, exits the configuration
session, and returns the router to EXEC mode.
– Entering no exits the configuration session and
returns the router to EXEC mode without
committing the configuration changes.
– Entering cancel leaves the router in the current
configuration session without exiting or
committing the configuration changes.
•
Step 8
show ospf [process-name]
or
show ospfv3 [process-name]
Example:
RP/0/RP0/CPU0:router# show ospf 1
or
RP/0/RP0/CPU0:router# show ospfv3 2
Cisco IOS XR Routing Configuration Guide
RC-268
Use the commit command to save the configuration
changes to the running configuration file and remain
within the configuration session.
(Optional) Displays SPF throttling timers.
Implementing OSPF on Cisco IOS XR Software
How to Implement OSPF on Cisco IOS XR Software
Examples
In the following example, the show ospf EXEC command is used to verify that the initial SPF schedule
delay time, minimum hold time, and maximum wait time are configured correctly. Additional details are
displayed about the OSPF process, such as the router type and redistribution of routes.
RP/0/RP0/CPU0:router# show ospf 1
Routing Process "ospf 1" with ID 192.168.4.3
Supports only single TOS(TOS0) routes
Supports opaque LSA
It is an autonomous system boundary router
Redistributing External Routes from,
ospf 2
Initial SPF schedule delay 5 msecs
Minimum hold time between two consecutive SPFs 100 msecs
Maximum wait time between two consecutive SPFs 1000 msecs
Minimum LSA interval 5 secs. Minimum LSA arrival 1 secs
Number of external LSA 0. Checksum Sum 00000000
Number of opaque AS LSA 0. Checksum Sum 00000000
Number of DCbitless external and opaque AS LSA 0
Number of DoNotAge external and opaque AS LSA 0
Number of areas in this router is 1. 1 normal 0 stub 0 nssa
External flood list length 0
Non-Stop Forwarding enabled
Note
For a description of each output display field, see the show ospf command in the OSPF Commands on
Cisco IOS XR Software module in the Cisco IOS XR Routing Command Reference document.
Configuring Cisco-Specific Nonstop Forwarding for OSPF Version 2
This task explains how to configure Cisco- specific OSPF NSF on your NSF-capable router. This task is
optional.
Prerequisites
OSPF NSF requires that all neighbor networking devices be NSF aware, which happens automatically
after you install the Cisco IOS XR image on the router. If an NSF-capable router discovers that it has
non-NSF-aware neighbors on a particular network segment, it disables NSF capabilities for that
segment. Other network segments composed entirely of NSF-capable or NSF-aware routers continue to
provide NSF capabilities.
See the “Nonstop Forwarding for OSPF Version 2” section on page 235 for conceptual information.
Restrictions
The following are restrictions when configuring nonstop forwarding:
•
OSPF Cisco NSF for virtual links is not supported.
•
Neighbors must be NSF aware.
Cisco IOS XR Routing Configuration Guide
RC-269
Implementing OSPF on Cisco IOS XR Software
How to Implement OSPF on Cisco IOS XR Software
SUMMARY STEPS
1.
configure
2.
router ospf process-name
3.
router-id {router-id}
4.
nsf cisco
or
nsf cisco enforce global
5.
nsf interval seconds
6.
end
or
commit
DETAILED STEPS
Step 1
Command or Action
Purpose
configure
Enters global configuration mode.
Example:
RP/0/RP0/CPU0:router# configure
Step 2
router ospf process-name
Enables OSPF routing for the specified routing process and
places the router in router configuration mode.
Example:
Note
RP/0/RP0/CPU0:router(config)# router ospf 1
Step 3
router-id {router-id}
The process-name argument is any alphanumeric
string no longer than 40 characters.
Configures a router ID for the OSPF process.
Note
Example:
We recommend using a stable IPv4 address as the
router ID.
RP/0/RP0/CPU0:router(config-ospf)# router-id
192.168.4.3
Step 4
nsf cisco
or
Enables Cisco NSF operations for the OSPF process.
•
Use the nsf cisco command without the optional
enforce and global keywords to abort the NSF restart
mechanism on the interfaces of detected non-NSF
neighbors and allow NSF neighbors to function
properly.
•
Use the nsf cisco command with the optional enforce
and global keywords if the router is expected to
perform NSF during restart. However, if non-NSF
neighbors are detected, NSF restart is canceled for the
entire OSPF process.
nsf cisco enforce global
Example:
RP/0/RP0/CPU0:router(config-ospf)# nsf cisco
enforce global
Cisco IOS XR Routing Configuration Guide
RC-270
Implementing OSPF on Cisco IOS XR Software
How to Implement OSPF on Cisco IOS XR Software
Step 5
Command or Action
Purpose
nsf interval seconds
Sets the minimum time between NSF restart attempts.
Note
Example:
RP/0/RP0/CPU0:router(config-ospf)# nsf interval
120
Step 6
When you use this command, the OSPF process
must be up for at least 90 seconds before OSPF
attempts to perform an NSF restart.
Saves configuration changes.
end
or
commit
When you issue the end command, the system prompts
you to commit changes:
Example:
Uncommitted changes found, commit them before
exiting(yes/no/cancel)?
[cancel]:
•
RP/0/RP0/CPU0:router(config-ospf)# end
or
– Entering yes saves configuration changes to the
RP/0/RP0/CPU0:router(config-ospf)# commit
running configuration file, exits the configuration
session, and returns the router to EXEC mode.
– Entering no exits the configuration session and
returns the router to EXEC mode without
committing the configuration changes.
– Entering cancel leaves the router in the current
configuration session without exiting or
committing the configuration changes.
•
Use the commit command to save the configuration
changes to the running configuration file and remain
within the configuration session.
Configuring OSPF Version 2 for MPLS Traffic Engineering
This task explains how to configure OSPF for MPLS TE. This task is optional.
For a description of the MPLS TE tasks and commands that allow you to configure the router to support
tunnels, configure an MPLS tunnel that OSPF can use, and troubleshoot MPLS TE, see the Implementing
MPLS Traffic Engineering Configuration Guide.
Prerequisites
Your network must support the following Cisco IOS XR features before you enable MPLS TE for OSPF
on your router:
Note
•
MPLS
•
IP Cisco Express Forwarding (CEF)
You must enter the commands in the following task on every OSPF router in the traffic-engineered
portion of your network.
Cisco IOS XR Routing Configuration Guide
RC-271
Implementing OSPF on Cisco IOS XR Software
How to Implement OSPF on Cisco IOS XR Software
SUMMARY STEPS
1.
configure
2.
router ospf process-name
3.
router-id {router-id}
4.
mpls traffic-eng router-id {ip-address | interface-type interface-instance}
5.
area area-id
6.
mpls traffic-eng
7.
interface type instance
8.
end
or
commit
9.
show ospf [process-name] [area-id] mpls traffic-eng {link | fragment}
DETAILED STEPS
Step 1
Command or Action
Purpose
configure
Enters global configuration mode.
Example:
RP/0/RP0/CPU0:router# configure
Step 2
router ospf process-name
Enables OSPF routing for the specified routing process and
places the router in router configuration mode.
Example:
Note
RP/0/RP0/CPU0:router(config)# router ospf 1
Step 3
router-id {router-id}
The process-name argument is any alphanumeric
string no longer than 40 characters.
Configures a router ID for the OSPF process.
Note
Example:
We recommend using a stable IPv4 address as the
router ID.
RP/0/RP0/CPU0:router(config-ospf)# router-id
192.168.4.3
Step 4
mpls traffic-eng router-id {ip-address |
interface-type interface-instance}
Example:
•
This IP address is flooded to all nodes in TE LSAs.
RP/0/RP0/CPU0:router(config-ospf)# mpls
traffic-eng router-id loopback 0
•
For all traffic engineering tunnels originating at other
nodes and ending at this node, you must set the tunnel
destination to the traffic engineering router identifier of
the destination node because that is the address that the
traffic engineering topology database at the tunnel head
uses for its path calculation.
•
We recommend that loopback interfaces be used for
MPLS TE router ID because they are more stable than
physical interfaces.
Cisco IOS XR Routing Configuration Guide
RC-272
(Optional) Specifies that the traffic engineering router
identifier for the node is the IP address associated with a
given interface.
Implementing OSPF on Cisco IOS XR Software
How to Implement OSPF on Cisco IOS XR Software
Step 5
Command or Action
Purpose
area area-id
Enters area configuration mode and configures an area for
the OSPF process.
Example:
•
RP/0/RP0/CPU0:router(config-ospf)# area 0
Step 6
mpls traffic-eng
The area-id argument can be entered in dotted-decimal
or IPv4 address notation, such as area 1000 or
area 0.0.3.232. However, you must choose one form or
the other for an area.
Configures the MPLS TE under the OSPF area.
Example:
RP/0/RP0/CPU0:router(config-ospf)# mpls
traffic-eng
Step 7
interface type instance
Enters interface configuration mode and associates one or
more interfaces to the area.
Example:
RP/0/RP0/CPU0:router(config-ospf-ar)# interface
interface loopback0
Step 8
end
or
Saves configuration changes.
commit
When you issue the end command, the system prompts
you to commit changes:
Example:
Uncommitted changes found, commit them before
exiting(yes/no/cancel)?
[cancel]:
•
RP/0/RP0/CPU0:router(config-ospf-ar-if)# end
or
– Entering yes saves configuration changes to the
RP/0/RP0/CPU0:router(config-ospf-ar-if)# commit
running configuration file, exits the configuration
session, and returns the router to EXEC mode.
– Entering no exits the configuration session and
returns the router to EXEC mode without
committing the configuration changes.
– Entering cancel leaves the router in the current
configuration session without exiting or
committing the configuration changes.
•
Step 9
show ospf [process-name] [area-id] mpls
traffic-eng {link | fragment}
Use the commit command to save the configuration
changes to the running configuration file and remain
within the configuration session.
(Optional) Displays information about the links and
fragments available on the local router for MPLS TE.
Example:
RP/0/RP0/CPU0:router# show ospf 1 0 mpls
traffic-eng link
Cisco IOS XR Routing Configuration Guide
RC-273
Implementing OSPF on Cisco IOS XR Software
How to Implement OSPF on Cisco IOS XR Software
Examples
This section provides the following output examples:
•
Sample Output for the show ospf Command Before Configuring MPLS TE, page RC-274
•
Sample Output for the show ospf mpls traffic-eng Command, page RC-274
•
Sample Output for the show ospf Command After Configuring MPLS TE, page RC-275
Sample Output for the show ospf Command Before Configuring MPLS TE
In the following example, the show route ospf EXEC command verifies that POS interface 0/3/0/0 exists
and MPLS TE is not configured:
RP/0/RP0/CPU0:router# show route ospf 1
O
O
O
11.0.0.0/24 [110/15] via 0.0.0.0, 3d19h, tunnel-te1
192.168.0.12/32 [110/11] via 11.1.0.2, 3d19h, POS0/3/0/0
192.168.0.13/32 [110/6] via 0.0.0.0, 3d19h, tunnel-te1
RP/0/RP0/CPU0:router#
Sample Output for the show ospf mpls traffic-eng Command
In the following example, the show ospf mpls traffic-eng EXEC command verifies that the MPLS TE
fragments are configured correctly:
RP/0/RP0/CPU0:router# show ospf 1 mpls traffic-eng fragment
OSPF Router with ID (192.168.4.3) (Process ID 1)
Area 0 has 1 MPLS TE fragment. Area instance is 3.
MPLS router address is 192.168.4.2
Next fragment ID is 1
Fragment 0 has 1 link. Fragment instance is 3.
Fragment has 0 link the same as last update.
Fragment advertise MPLS router address
Link is associated with fragment 0. Link instance is 3
Link connected to Point-to-Point network
Link ID :55.55.55.55
Interface Address :192.168.50.21
Neighbor Address :192.168.4.1
Admin Metric :0
Maximum bandwidth :19440000
Maximum global pool reservable bandwidth :25000000
Maximum sub pool reservable bandwidth
:3125000
Number of Priority :8
Global pool unreserved BW
Priority 0 : 25000000 Priority 1 : 25000000
Priority 2 : 25000000 Priority 3 : 25000000
Priority 4 : 25000000 Priority 5 : 25000000
Priority 6 : 25000000 Priority 7 : 25000000
Sub pool unreserved BW
Priority 0 :
3125000 Priority 1 :
3125000
Priority 2 :
3125000 Priority 3 :
3125000
Priority 4 :
3125000 Priority 5 :
3125000
Priority 6 :
3125000 Priority 7 :
3125000
Affinity Bit :0
In the following example, the show ospf mpls traffic-eng EXEC command verifies that the MPLS TE
links on area instance 3 are configured correctly:
RP/0/RP0/CPU0:router# show ospf mpls traffic-eng link
Cisco IOS XR Routing Configuration Guide
RC-274
Implementing OSPF on Cisco IOS XR Software
How to Implement OSPF on Cisco IOS XR Software
OSPF Router with ID (192.168.4.1) (Process ID 1)
Area 0 has 1
MPLS TE links. Area instance is 3.
Links in hash bucket 53.
Link is associated with fragment 0. Link instance is 3
Link connected to Point-to-Point network
Link ID :192.168.50.20
Interface Address :192.168.20.50
Neighbor Address :192.168.4.1
Admin Metric :0
Maximum bandwidth :19440000
Maximum global pool reservable bandwidth :25000000
Maximum sub pool reservable bandwidth
:3125000
Number of Priority :8
Global pool unreserved BW
Priority 0 : 25000000 Priority 1 : 25000000
Priority 2 : 25000000 Priority 3 : 25000000
Priority 4 : 25000000 Priority 5 : 25000000
Priority 6 : 25000000 Priority 7 : 25000000
Sub pool unreserved BW
Priority 0 :
3125000 Priority 1 :
3125000
Priority 2 :
3125000 Priority 3 :
3125000
Priority 4 :
3125000 Priority 5 :
3125000
Priority 6 :
3125000 Priority 7 :
3125000
Affinity Bit :0
Sample Output for the show ospf Command After Configuring MPLS TE
In the following example, the show route ospf EXEC command verifies that the MPLS TE tunnels
replaced POS interface 0/3/0/0 and that configuration was performed correctly:
RP/0/RP0/CPU0:router# show route ospf 1
O E2 192.168.10.0/24 [110/20] via 0.0.0.0, 00:00:15, tunnel2
O E2 192.168.11.0/24 [110/20] via 0.0.0.0, 00:00:15, tunnel2
O E2 192.168.1244.0/24 [110/20] via 0.0.0.0, 00:00:15, tunnel2
O
192.168.12.0/24 [110/2] via 0.0.0.0, 00:00:15, tunnel2
Configuring OSPFv3 Graceful Restart
This task explains how to configure a graceful restart for an OSPFv3 process. This task is optional.
SUMMARY STEPS
1.
configure
2.
router ospfv3 process-name
3.
graceful-restart
4.
graceful-restart lifetime
5.
graceful-restart interval <seconds>
6.
graceful-restart helper
Cisco IOS XR Routing Configuration Guide
RC-275
Implementing OSPF on Cisco IOS XR Software
How to Implement OSPF on Cisco IOS XR Software
7.
end
or
commit
8.
show ospfv3 [process-name [area-id]] database grace
DETAILED STEP
Step 1
Command or Action
Purpose
configure
Enters global configuration mode.
Example:
RP/0/RP0/CPU0:router# configure
Step 2
router ospfv3 process-name
Example:
RP/0/RP0/CPU0:router(config)# router ospfv3
test
Step 3
graceful-restart
Enters router configuration mode for OSPFv3. The process
name is a WORD that uniquely identifies an OSPF routing
process. The process name is any alphanumeric string no
longer than 40 characters without spaces.
Enables graceful restart on the current router.
Example:
RP/0/RP0/CPU0:router(config-ospfv3)#graceful-re
start
Step 4
graceful-restart lifetime
Example:
RP/0/RP0/CPU0:router(config-ospfv3)#
graceful-restart lifetime 120
Step 5
Step 6
graceful-restart interval <seconds>
•
The default lifetime is 95 seconds.
•
The range is 90 to 3600 seconds.
Specifies the interval (minimal time) between graceful
restarts on the current router.
Example:
•
The default value for the interval is 90 seconds.
RP/0/RP0/CPU0:router(config-ospfv3)#
graceful-restart interval 120
•
The range is 90 to 3600 seconds.
graceful-restart helper
Example:
RP/0/RP0/CPU0:router(config-ospfv3)#
graceful-restart helper disable
Cisco IOS XR Routing Configuration Guide
RC-276
Specifies a maximum duration for a graceful restart.
Disables the helper capability.
Implementing OSPF on Cisco IOS XR Software
How to Implement OSPF on Cisco IOS XR Software
Step 7
Command or Action
Purpose
end
Saves configuration changes.
or
commit
When you issue the end command, the system prompts
you to commit changes:
Example:
Uncommitted changes found, commit them before
exiting(yes/no/cancel)?
[cancel]:
•
RP/0/RP0/CPU0:router(config-ospfv3)# end
or
– Entering yes saves configuration changes to the
RP/0/RP0/CPU0:router(config-ospfv3)# commit
running configuration file, exits the configuration
session, and returns the router to EXEC mode.
– Entering no exits the configuration session and
returns the router to EXEC mode without
committing the configuration changes.
– Entering cancel leaves the router in the current
configuration session without exiting or
committing the configuration changes.
•
Step 8
show ospfv3 [process-name [area-id]] database
grace
Use the commit command to save the configuration
changes to the running configuration file and remain
within the configuration session.
Displays the state of the graceful restart link.
Example:
RP/0/RP0/CPU0:router# show ospfv3 1 database
grace
Displaying Information About Graceful Restart
This section describes the tasks you can use to display information about a graceful restart.
•
To see if the feature is enabled and when the last graceful restart ran, use the show ospf command.
To see details for an OSPFv3 instance, use the show ospfv3 process-name [area-id] database grace
command.
Displaying the State of the Graceful Restart Feature
The following screen output shows the state of the graceful restart capability on the local router:
RP/0/RP0/CPU0:router# show ospfv3 1 database grace
Routing Process “ospfv3 1” with ID 2.2.2.2
Initial SPF schedule delay 5000 msecs
Minimum hold time between two consecutive SPFs 10000 msecs
Maximum wait time between two consecutive SPFs 10000 msecs
Initial LSA throttle delay 0 msecs
Minimum hold time for LSA throttle 5000 msecs
Maximum wait time for LSA throttle 5000 msecs
Minimum LSA arrival 1000 msecs
LSA group pacing timer 240 secs
Interface flood pacing timer 33 msecs
Retransmission pacing timer 66 msecs
Maximum number of configured interfaces 255
Number of external LSA 0. Checksum Sum 00000000
Cisco IOS XR Routing Configuration Guide
RC-277
Implementing OSPF on Cisco IOS XR Software
How to Implement OSPF on Cisco IOS XR Software
Number of areas in this router is 1. 1 normal 0 stub 0 nssa
Graceful Restart enabled, last GR 11:12:26 ago (took 6 secs)
Area BACKBONE(0)
Number of interfaces in this area is 1
SPF algorithm executed 1 times
Number of LSA 6. Checksum Sum 0x0268a7
Number of DCbitless LSA 0
Number of indication LSA 0
Number of DoNotAge LSA 0
Flood list length 0
RP/0/RP0/CPU0:router#
Displaying Graceful Restart Information for an OSPFv3 Instance
The following screen output shows the link state for an OSPFv3 instance:
RP/0/RP0/CPU0:router# show ospfv3 1 database grace
OSPFv3 Router with ID (2.2.2.2) (Process ID 1)
ADV Router
1.1.1.1
2.2.2.2
Router Link States (Area 0)
Age
Seq#
Fragment ID
1949
0x8000000e
0
2007
0x80000011
0
Link (Type-8) Link States (Area 0)
ADV Router
Age
Seq#
Link ID
1.1.1.1
180
0x80000006
1
2.2.2.2
2007
0x80000006
1
Link count
Bits
1
1
None
None
Interface
PO0/2/0/0
PO0/2/0/0
ADV Router
1.1.1.1
2.2.2.2
Intra Area Prefix Link States (Area 0)
Age
Seq#
Link ID
180
0x80000006
0
2007
0x80000006
0
Ref-lstype Ref-LSID
0x2001
0
0x2001
0
ADV Router
2.2.2.2
Grace (Type-11) Link States (Area 0)
Age
Seq#
Link ID
2007
0x80000005
1
Interface
PO0/2/0/0
RP/0/RP0/CPU0:router#
Enabling Multicast-Intact for OSPFv2
This optional task describes how to enable multicast-intact for OSPFv2 routes that use IPv4 addresses.
Summary Steps
1.
configure
2.
router ospf instance-id
3.
mpls traffic-eng multicast-intact
4.
end
or
commit
Cisco IOS XR Routing Configuration Guide
RC-278
Implementing OSPF on Cisco IOS XR Software
How to Implement OSPF on Cisco IOS XR Software
DETAILED STEPS
Step 1
Command or Action
Purpose
configure
Enters global configuration mode.
Example:
RP/0/RP0/CPU0:router# configure
Step 2
router ospf instance-id
Example:
Enables OSPF routing for the specified routing process, and
places the router in router configuration mode. In this
example, the OSPF instance is called isp.
RP/0/RP0/CPU0:router(config)# router ospf isp
Step 3
mpls traffic-eng multicast-intact
Enables multicast-intact.
Example:
RP/0/RP0/CPU0:router(config-isis)# mpls
traffic-eng multicast-intact
Step 4
Saves configuration changes.
end
or
commit
When you issue the end command, the system prompts
you to commit changes:
Example:
Uncommitted changes found, commit them before
exiting(yes/no/cancel)?
[cancel]:
•
RP/0/RP0/CPU0:router(config-isis-af)# end
or
– Entering yes saves configuration changes to the
RP/0/RP0/CPU0:router(config-isis-af)# commit
running configuration file, exits the configuration
session, and returns the router to EXEC mode.
– Entering no exits the configuration session and
returns the router to EXEC mode without
committing the configuration changes.
– Entering cancel leaves the router in the current
configuration session without exiting or
committing the configuration changes.
•
Use the commit command to save the configuration
changes to the running configuration file and remain
within the configuration session.
Associating Interfaces to a VRF
This task explains how to associate an interface with a VPN Routing and Forwarding (VRF) instance.
SUMMARY STEPS
1.
configure
2.
router ospf process-name
3.
vrf vrf-name
4.
interface type instance
Cisco IOS XR Routing Configuration Guide
RC-279
Implementing OSPF on Cisco IOS XR Software
How to Implement OSPF on Cisco IOS XR Software
5.
ipv4 address ip-address mask
6.
ipv6 address ipv6-prefix/prefix-length [eui-64]
7.
ipv4 mtu mtu
8.
end
or
commit
DETAILED STEPS
Step 1
Command or Action
Purpose
configure
Enters global configuration mode.
Example:
RP/0/RP0/CPU0:router# configure
Step 2
router ospf process-name
Enables OSPF routing for the specified routing process and
places the router in router configuration mode.
Example:
Note
RP/0/RP0/CPU0:router(config)# router ospf 1
Step 3
vrf vrf-name
The process-name argument is any alphanumeric
string no longer than 40 characters.
Creates a VRF instance and enters VRF configuration
mode.
Example:
RP/0/RP0/CPU0:router(config-ospf)# vrf vrf1
Step 4
interface type instance
Enters interface configuration mode and associates one or
more interfaces to the VRF.
Example:
RP/0/RP0/CPU0:router(config-ospf-vrf)#
interface POS 0/0/0/0
Step 5
ipv4 address ip-address mask
Assigns an IP address and subnet mask to the interface.
Example:
RP/0/RP0/CPU0:router(config-if)# ipv4 address
172.18.189.38 255.255.255.224
Step 6
ipv6 address ipv6-prefix/prefix-length [eui-64]
Example:
RP/0/RP0/CPU0:router(config-if)# ipv6 address
2001:0DB8:C18:1::64
Cisco IOS XR Routing Configuration Guide
RC-280
Specifies the IPv6 address assigned to the interface and
enables IPV6 processing on the interface.
•
A slash-mark (/) must preceed the prefix-length
argument, and there is no space between the ipv6-prefix
argument and the slash.
Implementing OSPF on Cisco IOS XR Software
How to Implement OSPF on Cisco IOS XR Software
Step 7
Command or Action
Purpose
ipv4 mtu mtu
Sets the maximum transmission unit (MTU) size of IPv4
packets sent on the interface.
Example:
RP/0/RP0/CPU0:router(config-if)# ipv4 mtu 300
Step 8
Saves configuration changes.
end
or
commit
•
When you issue the end command, the system prompts
you to commit changes:
Uncommitted changes found, commit them before
exiting(yes/no/cancel)?
[cancel]:
Example:
RP/0/RP0/CPU0:router(config-ospf-ar-if)# end
or
– Entering yes saves configuration changes to the
RP/0/RP0/CPU0:router(config-ospf-ar-if)# commit
running configuration file, exits the configuration
session, and returns the router to EXEC mode.
– Entering no exits the configuration session and
returns the router to EXEC mode without
committing the configuration changes.
– Entering cancel leaves the router in the current
configuration session without exiting or
committing the configuration changes.
•
Use the commit command to save the configuration
changes to the running configuration file and remain
within the configuration session.
Configuring OSPF as a Provider Edge to Customer Edge (PE-CE) Protocol
SUMMARY STEPS
1.
configure
2.
router ospf process-name
3.
vrf vrf-name
4.
router-id {router-id}
5.
redistribute protocol [process-id] {level-1 | level-1-2 | level-2} [metric metric-value] [metric-type
type-value] [match {internal | external [{1 | 2} | nssa-external {1 | 2}] [tag tag-value] [route-map
map-tag | route-policy policy-tag]
6.
area area-id
7.
interface type instance
8.
exit
9.
domain-id [secondary] type {0005 | 0105 | 0205 | 8005} value value
10. domain-tag tag
Cisco IOS XR Routing Configuration Guide
RC-281
Implementing OSPF on Cisco IOS XR Software
How to Implement OSPF on Cisco IOS XR Software
11. disable-dn-bit-check
12. end
or
commit
DETAILED STEPS
Step 1
Command or Action
Purpose
configure
Enters global configuration mode.
Example:
RP/0/RP0/CPU0:router# configure
Step 2
router ospf process-name
Enables OSPF routing for the specified routing process and
places the router in router configuration mode.
Example:
Note
RP/0/RP0/CPU0:router(config)# router ospf 1
Step 3
vrf vrf-name
The process-name argument is any alphanumeric
string no longer than 40 characters.
Creates a VRF instance and enters VRF configuration
mode.
Example:
RP/0/RP0/CPU0:router(config-ospf)# vrf vrf1
Step 4
router-id {router-id}
Configures a router ID for the OSPF process.
Note
Example:
We recommend using a stable IPv4 address as the
router ID.
RP/0/RP0/CPU0:router(config-ospf-vrf)#
router-id 192.168.4.3
Step 5
redistribute protocol [process-id] {level-1 |
level-1-2 | level-2} [metric metric-value]
[metric-type type-value] [match {internal |
external [{1 | 2} | nssa-external {1 | 2}] [tag
tag-value] [route-map map-tag | route-policy
policy-tag]
Example:
RP/0/RP0/CPU0:router(config-ospf-vrf)#
redistribute bgp 1 level-1
Step 6
area area-id
Example:
RP/0/RP0/CPU0:router(config-ospf-vrf)# area 0
Cisco IOS XR Routing Configuration Guide
RC-282
Redistributes OSPF routes from one routing domain to
another routing domain.
•
This command causes the router to become an ASBR
by definition.
•
OSPF tags all routes learned through redistribution as
external.
•
The protocol and its process ID, if it has one, indicate
the protocol being redistributed into OSPF.
•
The metric is the cost you assign to the external route.
The default is 20 for all protocols except BGP, whose
default metric is 1.
•
The example shows the redistribution of BGP
autonomous system 1, Level 1 routes into OSPF as
Type 2 external routes.
Enters area configuration mode and configures an area for
the OSPF process.
•
The area-id argument can be entered in dotted-decimal
or IPv4 address notation, such as area 1000 or
area 0.0.3.232. However, you must choose one form or
the other for an area.
Implementing OSPF on Cisco IOS XR Software
How to Implement OSPF on Cisco IOS XR Software
Step 7
Command or Action
Purpose
interface type instance
Enters interface configuration mode and associates one or
more interfaces to the VRF.
Example:
RP/0/RP0/CPU0:router(config-ospf-vrf)#
interface POS 0/0/0/0
Step 8
exit
Exits interface configuration mode.
Example:
RP/0/RP0/CPU0:router(config-if)# exit
Step 9
domain-id [secondary] type {0005 | 0105 | 0205
| 8005} value value
Specifies the OSPF VRF domain ID.
•
The value argument is a six-octet hex number.
Example:
RP/0/RP0/CPU0:router(config-ospf-vrf)#
domain-id 0105 1AF234
Step 10
domain-tag tag
Specifies the OSPF VRF domain tag.
•
The valid range for tag is 0 to 4294967295.
Example:
RP/0/RP0/CPU0:router(config-0spf-vrf)#
domain-tag 234
Step 11
disable-dn-bit-check
Specifies that down bits should be ignored.
Example:
RP/0/RP0/CPU0:router(config-ospf-vrf)#
disable-dn-bit-check
Step 12
end
or
Saves configuration changes.
commit
When you issue the end command, the system prompts
you to commit changes:
Example:
Uncommitted changes found, commit them before
exiting(yes/no/cancel)?
[cancel]:
•
RP/0/RP0/CPU0:router(config-ospf-vrf)# end
or
– Entering yes saves configuration changes to the
RP/0/RP0/CPU0:router(config-ospf-vrf)# commit
running configuration file, exits the configuration
session, and returns the router to EXEC mode.
– Entering no exits the configuration session and
returns the router to EXEC mode without
committing the configuration changes.
– Entering cancel leaves the router in the current
configuration session without exiting or
committing the configuration changes.
•
Use the commit command to save the configuration
changes to the running configuration file and remain
within the configuration session.
Cisco IOS XR Routing Configuration Guide
RC-283
Implementing OSPF on Cisco IOS XR Software
How to Implement OSPF on Cisco IOS XR Software
Creating Multiple OSPF Instances (OSPF Process and a VRF)
This task explains how to create multiple OSPF instances. In this case, the instances are a normal OSPF
instance and a VRF instance.
SUMMARY STEPS
1.
configure
2.
router ospf process-name
3.
area area-id
4.
interface type instance
5.
exit
6.
vrf vrf-name
7.
area area-id
8.
interface type instance
9.
end
or
commit
DETAILED STEPS
Step 1
Command or Action
Purpose
configure
Enters global configuration mode.
Example:
RP/0/RP0/CPU0:router# configure
Step 2
router ospf process-name
Enables OSPF routing for the specified routing process and
places the router in router configuration mode.
Example:
Note
RP/0/RP0/CPU0:router(config)# router ospf 1
Step 3
Enters area configuration mode and configures a backbone
area.
area area-id
•
Example:
RP/0/RP0/CPU0:router(config-ospf)#
Step 4
area 0
interface type instance
Example:
RP/0/RP0/CPU0:router(config-ospf-ar)# interface
POS 0/1/0/3
Cisco IOS XR Routing Configuration Guide
RC-284
The process-name argument is any alphanumeric
string no longer than 40 characters.
The area-id argument can be entered in dotted-decimal
or IPv4 address notation, such as area 1000 or
area 0.0.3.232. However, you must choose one form or
the other for an area. We recommend using the IPv4
address notation.
Enters interface configuration mode and associates one or
more interfaces to the area.
Implementing OSPF on Cisco IOS XR Software
How to Implement OSPF on Cisco IOS XR Software
Step 5
Command or Action
Purpose
exit
Enters OSPF configuration mode.
Example:
RP/0/RP0/CPU0:router(config-ospf-ar)# exit
Step 6
vrf vrf-name
Creates a VRF instance and enters VRF configuration
mode.
Example:
RP/0/RP0/CPU0:router(config-ospf)# vrf vrf1
Step 7
area area-id
Example:
Enters area configuration mode and configures an area for a
VRF instance under the OSPF process.
•
RP/0/RP0/CPU0:router(config-ospf-vrf)# area 0
Step 8
interface type instance
The area-id argument can be entered in dotted-decimal
or IPv4 address notation, such as area 1000 or
area 0.0.3.232. However, you must choose one form or
the other for an area.
Enters interface configuration mode and associates one or
more interfaces to the VRF.
Example:
RP/0/RP0/CPU0:router(config-ospf-vrf)#
interface POS 0/0/0/0
Step 9
end
or
Saves configuration changes.
commit
When you issue the end command, the system prompts
you to commit changes:
Example:
Uncommitted changes found, commit them before
exiting(yes/no/cancel)?
[cancel]:
•
RP/0/RP0/CPU0:router(config-ospf-ar-if)# end
or
– Entering yes saves configuration changes to the
RP/0/RP0/CPU0:router(config-ospf-ar-if)# commit
running configuration file, exits the configuration
session, and returns the router to EXEC mode.
– Entering no exits the configuration session and
returns the router to EXEC mode without
committing the configuration changes.
– Entering cancel leaves the router in the current
configuration session without exiting or
committing the configuration changes.
•
Use the commit command to save the configuration
changes to the running configuration file and remain
within the configuration session.
Cisco IOS XR Routing Configuration Guide
RC-285
Implementing OSPF on Cisco IOS XR Software
How to Implement OSPF on Cisco IOS XR Software
Configuring Multi-Area Adjacency
This task explains how to create multiple areas on an OSPF primary interface.
Restrictions
Multiple areas are created only on native point-to-point interfaces, such as Packet-over-SONET (PoS)
or serial.
SUMMARY STEPS
1.
configure
2.
router ospf process-name
3.
area area-id
4.
interface type instance
5.
area area-id
6.
multi-area-interface type instance
7.
end
or
commit
DETAILED STEPS
Step 1
Command or Action
Purpose
configure
Enters global configuration mode.
Example:
RP/0/RP0/CPU0:router# configure
Step 2
router ospf process-name
Enables OSPF routing for the specified routing process and
places the router in router configuration mode.
Example:
Note
RP/0/RP0/CPU0:router(config)# router ospf 1
Step 3
Enters area configuration mode and configures a backbone
area.
area area-id
•
Example:
RP/0/RP0/CPU0:router(config-ospf)#
Step 4
area 0
interface type instance
Example:
RP/0/RP0/CPU0:router(config-ospf-ar)# interface
POS 0/1/0/3
Cisco IOS XR Routing Configuration Guide
RC-286
The process-name argument is any alphanumeric
string no longer than 40 characters.
The area-id argument can be entered in dotted-decimal
or IPv4 address notation, such as area 1000 or
area 0.0.3.232. However, you must choose one form or
the other for an area. We recommend using the IPv4
address notation.
Enters interface configuration mode and associates one or
more interfaces to the area.
Implementing OSPF on Cisco IOS XR Software
How to Implement OSPF on Cisco IOS XR Software
Step 5
Command or Action
Purpose
area area-id
Enters area configuration mode and configures an area used
for multiple area adjacency.
•
Example:
RP/0/RP0/CPU0:router(config-ospf)#
Step 6
area 1
multi-area-interface type instance
The area-id argument can be entered in dotted-decimal
or IPv4 address notation, such as area 1000 or
area 0.0.3.232. However, you must choose one form or
the other for an area. We recommend using the IPv4
address notation.
Enables multiple adjacencies for different OSPF areas and
enters multi-area interface configuration mode
Example:RP/0/RP0/CPU0:router(config-ospf)#
multi-area-interface POS 0/1/0/3
Step 7
Saves configuration changes.
end
or
commit
When you issue the end command, the system prompts
you to commit changes:
Example:
Uncommitted changes found, commit them before
exiting(yes/no/cancel)?
[cancel]:
•
RP/0/RP0/CPU0:router(config-ospf-ar-if-mif)# end
or
– Entering yes saves configuration changes to the
RP/0/RP0/CPU0:router(config-ospf-ar-if-mif)#
commit
running configuration file, exits the configuration
session, and returns the router to EXEC mode.
– Entering no exits the configuration session and
returns the router to EXEC mode without
committing the configuration changes.
– Entering cancel leaves the router in the current
configuration session without exiting or
committing the configuration changes.
•
Use the commit command to save the configuration
changes to the running configuration file and remain
within the configuration session.
Configuring Label Distribution Protocol IGP Auto-Configuration for OSPF
This task explains how to configure LDP auto-configuration for an OSPF instance.
Optionally, you can configure this feature for an area of an OSPF instance.
SUMMARY STEPS
1.
configure
2.
router ospf process-name
3.
mpls ldp auto-config
4.
end
or
commit
Cisco IOS XR Routing Configuration Guide
RC-287
Implementing OSPF on Cisco IOS XR Software
How to Implement OSPF on Cisco IOS XR Software
DETAILED STEPS
Step 1
Command or Action
Purpose
configure
Enters global configuration mode.
Example:
RP/0/RP0/CPU0:router# configure
Step 2
router ospf process-name
Enables OSPF routing for the specified routing process and
places the router in router configuration mode.
Example:
Note
RP/0/RP0/CPU0:router(config)# router ospf 1
Step 3
Enables LDP IGP interface auto-configuration for an OSPF
instance.
mpls ldp auto-config
•
Example:
RP/0/RP0/CPU0:router(config-ospf)#
auto-config
Step 4
The process-name argument is any alphanumeric
string no longer than 40 characters.
mpls ldp
Optionally, this command can be configured for an area
of an OSPF instance.
Saves configuration changes.
end
or
commit
When you issue the end command, the system prompts
you to commit changes:
Example:
Uncommitted changes found, commit them before
exiting(yes/no/cancel)?
[cancel]:
•
RP/0/RP0/CPU0:router(config-ospf)# end
or
– Entering yes saves configuration changes to the
RP/0/RP0/CPU0:router(config-ospf)# commit
running configuration file, exits the configuration
session, and returns the router to EXEC mode.
– Entering no exits the configuration session and
returns the router to EXEC mode without
committing the configuration changes.
– Entering cancel leaves the router in the current
configuration session without exiting or
committing the configuration changes.
•
Use the commit command to save the configuration
changes to the running configuration file and remain
within the configuration session.
Configuring Authentication Message Digest Management for OSPF
This task explains how to manage authentication of a keychain on the OSPF interface.
Prerequisites
A valid keychain must be configured before this task can be attempted.
To learn how to configure a keychain and its associated attributes, see the “Implementing Key Chain
Management on Cisco IOS XR Software” module of Cisco IOS XR System Security Configuration
Guide.
Cisco IOS XR Routing Configuration Guide
RC-288
Implementing OSPF on Cisco IOS XR Software
How to Implement OSPF on Cisco IOS XR Software
SUMMARY STEPS
1.
configure
2.
router ospf process-name
3.
router-id {router-id}
4.
area area-id
5.
interface type instance
6.
authentication message-digest keychain keychain
7.
end
or
commit
DETAILED STEPS
Step 1
Command or Action
Purpose
configure
Enters global configuration mode.
Example:
RP/0/RP0/CPU0:router# configure
Step 2
router ospf process-name
Enables OSPF routing for the specified routing process
and places the router in router configuration mode.
Example:
Note
RP/0/RP0/CPU0:router(config)# router ospf 1
Step 3
router-id {router-id}
Configures a router ID for the OSPF process.
Note
Example:
The process-name argument is any alphanumeric
string no longer than 40 characters.
We recommend using a stable IPv4 address as the
router ID.
RP/0/RP0/CPU0:router(config-ospf)# router id
192.168.4.3
Step 4
area area-id
Example:
RP/0/RP0/CPU0:router(config-ospf)# area 1
Step 5
interface type instance
Enters area configuration mode.
The area-id argument can be entered in dotted-decimal or
IPv4 address notation, such as area 1000 or
area 0.0.3.232. However, you must choose one form or
the other for an area. We recommend using the IPv4
address notation.
Enters interface configuration mode and associates one or
more interfaces to the area.
Example:
RP/0/RP0/CPU0:router(config-ospf-ar)# interface
GigabitEthernet0/4/0/1
Cisco IOS XR Routing Configuration Guide
RC-289
Implementing OSPF on Cisco IOS XR Software
How to Implement OSPF on Cisco IOS XR Software
Step 6
Command or Action
Purpose
authentication message-digest keychain keychain
Configures an MD5 keychain.
In the example, the ospf_intl keychain must be
configured before you attempt this step.
Note
Example:
RP/0/RP0/CPU0:router(config-ospf-ar-if)#
authentication message-digest keychain ospf_int1
Step 7
Saves configuration changes.
end
or
commit
When you issue the end command, the system
prompts you to commit changes:
Example:
Uncommitted changes found, commit them before
exiting(yes/no/cancel)?
[cancel]:
•
RP/0/RP0/CPU0:router(config-ospf-ar-if)# end
or
– Entering yes saves configuration changes to the
RP/0/RP0/CPU0:router(config-ospf-ar-if)# commit
running configuration file, exits the
configuration session, and returns the router to
EXEC mode.
– Entering no exits the configuration session and
returns the router to EXEC mode without
committing the configuration changes.
– Entering cancel leaves the router in the current
configuration session without exiting or
committing the configuration changes.
•
Use the commit command to save the configuration
changes to the running configuration file and remain
within the configuration session.
Examples
The following example shows how to configure the keychain ospf_intf_1 that contains five key IDs. Each
key ID is configured with different send-lifetime values; however, all key IDs specify the same text
string for the key.
key chain ospf_intf_1
key 1
send-lifetime 11:30:30 May 1
cryptographic-algorithm MD5T
key-string clear ospf_intf_1
key 2
send-lifetime 11:40:30 May 1
cryptographic-algorithm MD5
key-string clear ospf_intf_1
key 3
send-lifetime 11:50:30 May 1
cryptographic-algorithm MD5
key-string clear ospf_intf_1
key 4
send-lifetime 12:00:30 May 1
cryptographic-algorithm MD5
key-string clear ospf_intf_1
key 5
send-lifetime 12:10:30 May 1
cryptographic-algorithm MD5
key-string clear ospf_intf_1
Cisco IOS XR Routing Configuration Guide
RC-290
2007 duration 600
2007 duration 600
2007 duration 600
2007 duration 600
2007 duration 600
Implementing OSPF on Cisco IOS XR Software
How to Implement OSPF on Cisco IOS XR Software
The following example shows that keychain authentication is enabled on the Gigabit Ethernet 0/4/0/1
interface:
RP/0/RP0/CPU0:router# show ospf 1 interface GigabitEthernet0/4/0/1
GigabitEthernet0/4/0/1 is up, line protocol is up
Internet Address 100.10.10.2/24, Area 0
Process ID 1, Router ID 2.2.2.1, Network Type BROADCAST, Cost: 1
Transmit Delay is 1 sec, State DR, Priority 1
Designated Router (ID) 2.2.2.1, Interface address 100.10.10.2
Backup Designated router (ID) 1.1.1.1, Interface address 100.10.10.1
Timer intervals configured, Hello 10, Dead 40, Wait 40, Retransmit 5
Hello due in 00:00:02
Index 3/3, flood queue length 0
Next 0(0)/0(0)
Last flood scan length is 2, maximum is 16
Last flood scan time is 0 msec, maximum is 0 msec
Neighbor Count is 1, Adjacent neighbor count is 1
Adjacent with neighbor 1.1.1.1 (Backup Designated Router)
Suppress hello for 0 neighbor(s)
Keychain-based authentication enabled
Key id used is 3
Multi-area interface Count is 0
The following example shows output for configured keys that are active:
RP/0/RP0/CPU0:router# show key chain ospf_intf_1
Key-chain: ospf_intf_1/ Key 1 -- text "0700325C4836100B0314345D"
cryptographic-algorithm -- MD5
Send lifetime:
11:30:30, 01 May 2007
Accept lifetime: Not configured
Key 2 -- text "10411A0903281B051802157A"
cryptographic-algorithm -- MD5
Send lifetime:
11:40:30, 01 May 2007
Accept lifetime: Not configured
Key 3 -- text "06091C314A71001711112D5A"
cryptographic-algorithm -- MD5
Send lifetime:
11:50:30, 01 May 2007
Accept lifetime: Not configured
Key 4 -- text "151D181C0215222A3C350A73"
cryptographic-algorithm -- MD5
Send lifetime:
12:00:30, 01 May 2007
Accept lifetime: Not configured
Key 5 -- text "151D181C0215222A3C350A73"
cryptographic-algorithm -- MD5
Send lifetime:
12:10:30, 01 May 2007
Accept lifetime: Not configured
- (Duration) 600
- (Duration) 600
- (Duration) 600
[Valid now]
- (Duration) 600
- (Duration) 600
RP/0/RP0/CPU0:router#
Cisco IOS XR Routing Configuration Guide
RC-291
Implementing OSPF on Cisco IOS XR Software
How to Implement OSPF on Cisco IOS XR Software
Configuring Generalized TTL Security Mechanism (GTSM) for OSPF
This task explains how to set the security time-to-live mechanism on an interface for GTSM.
SUMMARY STEPS
1.
configure
2.
router ospf process-name
3.
router-id {router-id}
4.
log adjacency changes [detail] [disable]
5.
nsf {cisco [enforce global] | ietf [helper disable]}
6.
timers throttle spf spf-start spf-hold spf-max-wait
7.
area area-id
8.
interface type instance
9.
security ttl [disable | hops hop-count]
10. end
or
commit
11. show ospf [process-name] [vrf vrf-name] [area-id] interface [type instance]
DETAILED STEPS
Step 1
Command or Action
Purpose
configure
Enters global configuration mode.
Example:
RP/0/RP0/CPU0:router# configure
Step 2
router ospf process-name
Enables OSPF routing for the specified routing process and
places the router in router configuration mode.
Example:
Note
RP/0/RP0/CPU0:router(config)# router ospf 1
Step 3
router-id {router-id}
The process-name argument is any alphanumeric
string no longer than 40 characters.
Configures a router ID for the OSPF process.
Note
Example:
We recommend using a stable IPv4 address as the
router ID.
RP/0/RP0/CPU0:router(config-ospf)# router id
100.100.100.100
Step 4
log adjacency changes [detail] [enable | disable]
Example:
RP/0/RP0/CPU0:router(config-ospf-ar-if)# log
adjacency changes detail
Cisco IOS XR Routing Configuration Guide
RC-292
(Optional) Requests notification of neighbor changes.
•
By default, this feature is enabled.
•
The messages generated by neighbor changes are
considered notifications, which are categorized as
severity Level 5 in the logging console command. The
logging console command controls which severity
level of messages are sent to the console. By default, all
severity level messages are sent.
Implementing OSPF on Cisco IOS XR Software
How to Implement OSPF on Cisco IOS XR Software
Step 5
Command or Action
Purpose
nsf {cisco [enforce global] | ietf [helper
disable]}
(Optional) Configures NSF OSPF protocol.
The example enables graceful restart.
Example:
RP/0/RP0/CPU0:router(config-ospf)# nsf ietf
Step 6
timers throttle spf spf-start spf-hold
spf-max-wait
(Optional) Sets SPF throttling timers.
Example:
RP/0/RP0/CPU0:router(config-ospf)# timers
throttle spf 500 500 10000
Step 7
area area-id
Example:
RP/0/RP0/CPU0:router(config-ospf)# area 1
Step 8
interface type instance
Enters area configuration mode.
The area-id argument can be entered in dotted-decimal or
IPv4 address notation, such as area 1000 or area 0.0.3.232.
However, you must choose one form or the other for an area.
We recommend using the IPv4 address notation.
Enters interface configuration mode and associates one or
more interfaces to the area.
Example:
RP/0/RP0/CPU0:router(config-ospf-ar)# interface
GigabitEternet0/5/0/0
Step 9
security ttl [disable | hops hop-count]
Sets the security TTL value in the IP header for OSPF
packets.
Example:
RP/0/RP0/CPU0:router(config-ospf-ar-if)# security
ttl hopes 2
Cisco IOS XR Routing Configuration Guide
RC-293
Implementing OSPF on Cisco IOS XR Software
How to Implement OSPF on Cisco IOS XR Software
Step 10
Command or Action
Purpose
end
Saves configuration changes.
or
commit
When you issue the end command, the system prompts
you to commit changes:
Example:
Uncommitted changes found, commit them before
exiting(yes/no/cancel)?
[cancel]:
•
RP/0/RP0/CPU0:router(config-ospf-ar-if)# end
or
– Entering yes saves configuration changes to the
RP/0/RP0/CPU0:router(config-ospf-ar-if)# commit
running configuration file, exits the configuration
session, and returns the router to EXEC mode.
– Entering no exits the configuration session and
returns the router to EXEC mode without
committing the configuration changes.
– Entering cancel leaves the router in the current
configuration session without exiting or
committing the configuration changes.
•
Step 11
show ospf [process-name] [vrf vrf-name] [area-id]
interface [type instance]
Use the commit command to save the configuration
changes to the running configuration file and remain
within the configuration session.
Displays OSPF interface information.
Example:
RP/0/RP0/CPU0:router# show ospf 1 interface
GigabitEthernet0/5/0/0
Examples
The following is sample output that displays the GTSM security TTL value configured on an OSPF
interface:
RP/0/RP0/CPU0:router# show ospf 1 interface GigabitEthernet0/5/0/0
GigabitEthernet0/5/0/0 is up, line protocol is up
Internet Address 120.10.10.1/24, Area 0
Process ID 1, Router ID 100.100.100.100, Network Type BROADCAST, Cost: 1
Transmit Delay is 1 sec, State BDR, Priority 1
TTL security enabled, hop count 2
Designated Router (ID) 102.102.102.102, Interface address 120.10.10.3
Backup Designated router (ID) 100.100.100.100, Interface address 120.10.10.1
Flush timer for old DR LSA due in 00:02:36
Timer intervals configured, Hello 10, Dead 40, Wait 40, Retransmit 5
Hello due in 00:00:05
Index 1/1, flood queue length 0
Next 0(0)/0(0)
Last flood scan length is 1, maximum is 4
Last flood scan time is 0 msec, maximum is 0 msec
Neighbor Count is 1, Adjacent neighbor count is 1
Adjacent with neighbor 102.102.102.102 (Designated Router)
Suppress hello for 0 neighbor(s)
Multi-area interface Count is 0
RP/0/RP0/CPU0:router#
Cisco IOS XR Routing Configuration Guide
RC-294
Implementing OSPF on Cisco IOS XR Software
How to Implement OSPF on Cisco IOS XR Software
Verifying OSPF Configuration and Operation
This task explains how to verify the configuration and operation of OSPF.
SUMMARY STEPS
1.
show {ospf | ospfv3} [process-name]
2.
show {ospf | ospfv3} [process-name] border-routers [router-id]
3.
show {ospf | ospfv3}[process-name] database
4.
show {ospf | ospfv3} [process-name] [area-id] flood-list interface type instance
5.
show {ospf | ospfv3} [process-name] [vrf vrf-name] [area-id] interface [type instance]
6.
show {ospf | ospfv3} [process-name] [area-id] neighbor [interface-type interface-instance]
[neighbor-id] [detail]
7.
clear {ospf | ospfv3}[process-name] process
8.
clear {ospf | ospfv3}[process-name] statistics [neighbor [interface-type interface-instance]
[ip-address]]
DETAILED STEPS
Step 1
Command or Action
Purpose
show {ospf | ospfv3} [process-name]
(Optional) Displays general information about OSPF
routing processes.
Example:
RP/0/RP0/CPU0:router# show ospf group1
Step 2
show {ospf | ospfv3} [process-name]
border-routers [router-id]
(Optional) Displays the internal OSPF routing table entries
to an ABR and ASBR.
Example:
RP/0/RP0/CPU0:router# show ospf group1
border-routers
Step 3
show {ospf | ospfv3} [process-name] database
Example:
RP/0/RP0/CPU0:router# show ospf group2 database
Step 4
show {ospf | ospfv3} [process-name] [area-id]
flood-list interface type instance
(Optional) Displays the lists of information related to the
OSPF database for a specific router.
•
The various forms of this command deliver information
about different OSPF LSAs.
(Optional) Displays a list of OSPF LSAs waiting to be
flooded over an interface.
Example:
RP/0/RP0/CPU0:router# show ospf 100 flood-list
interface pos 0/3/0/0
Step 5
show {ospf | ospfv3} [process-name] [vrf
vrf-name] [area-id] interface [type instance]
(Optional) Displays OSPF interface information.
Example:
RP/0/RP0/CPU0:router# show ospf 100 interface
pos 0/3/0/0
Cisco IOS XR Routing Configuration Guide
RC-295
Implementing OSPF on Cisco IOS XR Software
Configuration Examples for Implementing OSPF on Cisco IOS XR Software
Step 6
Command or Action
Purpose
show {ospf | ospfv3}[process-name] [area-id]
neighbor [interface-type interface-instance]
[neighbor-id] [detail]
(Optional) Displays OSPF neighbor information on an
individual interface basis.
Example:
RP/0/RP0/CPU0:router# show ospf 100 neighbor
Step 7
clear {ospf | ospfv3}[process-name] process
(Optional) Resets an OSPF router process without stopping
and restarting it.
Example:
RP/0/RP0/CPU0:router# clear ospf 100 process
Step 8
clear {ospf | ospfv3}[process-name] statistics
[neighbor [interface-type interface-instance]
[ip-address]]
(Optional) Clears the OSPF statistics of neighbor state
transitions.
Example:
RP/0/RP0/CPU0:router# clear ospf 100 statistics
Configuration Examples for Implementing OSPF on Cisco IOS XR
Software
This section provides the following configuration examples:
•
Cisco IOS XR for OSPF Version 2 Configuration: Example, page RC-296
•
CLI Inheritance and Precedence for OSPF Version 2: Example, page RC-298
•
MPLS TE for OSPF Version 2: Example, page RC-299
•
ABR with Summarization for OSPFv3: Example, page RC-299
•
ABR Stub Area for OSPFv3: Example, page RC-299
•
ABR Totally Stub Area for OSPFv3: Example, page RC-299
•
Route Redistribution for OSPFv3: Example, page RC-300
•
Virtual Link Configured Through Area 1 for OSPFv3: Example, page RC-300
Cisco IOS XR for OSPF Version 2 Configuration: Example
The following example shows how an OSPF interface is configured for an area in
Cisco IOS XR software.
In Cisco IOS XR software, area 0 must be explicitly configured with the area command and all
interfaces that are in the range from 10.1.2.0 to 10.1.2.255 are bound to area 0. Interfaces are configured
with the interface command (while the router is in area configuration mode) and the area keyword is
not included in the interface statement.
Cisco IOS XR Software Configuration
interface POS 0/3/0/0
ip address 10.1.2.1 255.255.255.255
negotiation auto
Cisco IOS XR Routing Configuration Guide
RC-296
Implementing OSPF on Cisco IOS XR Software
Configuration Examples for Implementing OSPF on Cisco IOS XR Software
!
router ospf 1
router-id 10.2.3.4
area 0
interface POS 0/3/0/0
!
!
The following example shows how OSPF interface parameters are configured for an area in
Cisco IOS XR software.
In Cisco IOS XR software, OSPF interface-specific parameters are configured in interface configuration
mode and explicitly defined for area 0. In addition, the ip ospf keywords are no longer required.
Cisco IOS XR Software Configuration
interface POS 0/3/0/0
ip address 10.1.2.1 255.255.255.0
negotiation auto
!
router ospf 1
router-id 10.2.3.4
area 0
interface POS 0/3/0/0
cost 77
mtu-ignore
authentication message-digest
message-digest-key 1 md5 0 test
!
!
The following example shows the hierarchical CLI structure of Cisco IOS XR software:
In Cisco IOS XR software, OSPF areas must be explicitly configured, and interfaces configured under
the area configuration mode are explicitly bound to that area. In this example, interface 10.1.2.0/24 is
bound to area 0 and interface 10.1.3.0/24 is bound to area 1.
Cisco IOS XR Software Configuration
interface POS 0/3/0/0
ip address 10.1.2.1 255.255.255.0
negotiation auto
!
interface POS 0/3/0/1
ip address 10.1.3.1 255.255.255.0
negotiation auto
!
router ospf 1
router-id 10.2.3.4
area 0
interface POS 0/3/0/0
!
area 1
interface POS 0/3/0/1
!
!
Cisco IOS XR Routing Configuration Guide
RC-297
Implementing OSPF on Cisco IOS XR Software
Configuration Examples for Implementing OSPF on Cisco IOS XR Software
CLI Inheritance and Precedence for OSPF Version 2: Example
The following example configures the cost parameter at different hierarchical levels of the OSPF
topology, and illustrates how the parameter is inherited and how only one setting takes precedence.
According to the precedence rule, the most explicit configuration is used.
The cost parameter is set to 5 in router configuration mode for the OSPF process. Area 1 sets the cost to
15 and area 6 sets the cost to 30. All interfaces in area 0 inherit a cost of 5 from the OSPF process because
the cost was not set in area 0 or its interfaces.
In area 1, every interface has a cost of 15 because the cost is set in area 1 and 15 overrides the value 5
that was set in router configuration mode.
Area 4 does not set the cost, but POS interface 01/0/2 sets the cost to 20. The remaining interfaces in
area 4 have a cost of 5 that is inherited from the OSPF process.
Area 6 sets the cost to 30, which is inherited by POS interfaces 0/1/0/3 and 0/2/0/3. POS interface 0/3/0/3
uses the cost of 1, which is set in interface configuration mode.
router ospf 1
router-id 10.5.4.3
cost 5
area 0
interface POS 0/1/0/0
!
interface POS 0/2/0/0
!
interface POS 0/3/0/0
!
!
area 1
cost 15
interface POS 0/1/0/1
!
interface POS 0/2/0/1
!
interface POS 0/3/0/1
!
!
area 4
interface POS 0/1/0/2
cost 20
!
interface POS 0/2/0/2
!
interface POS 0/3/0/2
!
!
area 6
cost 30
interface POS 0/1/0/3
!
interface POS 0/2/0/3
!
interface POS 0/3/0/3
cost 1
!
!
Cisco IOS XR Routing Configuration Guide
RC-298
Implementing OSPF on Cisco IOS XR Software
Configuration Examples for Implementing OSPF on Cisco IOS XR Software
MPLS TE for OSPF Version 2: Example
The following example shows how to configure the OSPF portion of MPLS TE. However, you still need
to build an MPLS TE topology and create an MPLS TE tunnel. See the Cisco IOS XR MPLS
Configuration Guide for information.
In this example, loopback interface 0 is associated with area 0 and MPLS TE is configured within area 0:
interface Loopback 0
address 10.10.10.10 255.255.255.0
!
interface POS 0/2/0/0
address 10.1.2.2 255.255.255.0
!
router ospf 1
router-id 10.10.10.10
nsf
auto-cost reference-bandwidth 10000
mpls traffic-eng router-id Loopback 0
area 0
mpls traffic-eng
interface POS 0/2/0/0
interface Loopback 0
ABR with Summarization for OSPFv3: Example
The following example shows the prefix range 2300::/16 summarized from area 1 into the backbone:
router ospfv3 1
router-id 192.168.0.217
area 0
interface POS 0/2/0/1
area 1
range 2300::/16
interface POS 0/2/0/0
ABR Stub Area for OSPFv3: Example
The following example shows that area 1 is configured as a stub area:
router ospfv3 1
router-id 10.0.0.217
area 0
interface POS 0/2/0/1
area 1
stub
interface POS 0/2/0/0
ABR Totally Stub Area for OSPFv3: Example
The following example shows that area 1 is configured as a totally stub area:
router ospfv3 1
router-id 10.0.0.217
area 0
interface POS 0/2/0/1
area 1
Cisco IOS XR Routing Configuration Guide
RC-299
Implementing OSPF on Cisco IOS XR Software
Configuration Examples for Implementing OSPF on Cisco IOS XR Software
stub no-summary
interface POS 0/2/0/0
Route Redistribution for OSPFv3: Example
The following example uses prefix lists to limit the routes redistributed from other protocols.
Only routes with 9898:1000 in the upper 32 bits and with prefix lengths from 32 to 64 are redistributed
from BGP 42. Only routes not matching this pattern are redistributed from BGP 1956.
ipv6 prefix-list list1
seq 10 permit 9898:1000::/32 ge 32 le 64
ipv6 prefix-list list2
seq 10 deny 9898:1000::/32 ge 32 le 64
seq 20 permit ::/0 le 128
router ospfv3 1
router-id 10.0.0.217
redistribute bgp 42
redistribute bgp 1956
distribute-list prefix-list list1 out bgp 42
distribute-list prefix-list list2 out bgp 1956
area 1
interface POS 0/2/0/0
Virtual Link Configured Through Area 1 for OSPFv3: Example
This example shows how to set up a virtual link to connect the backbone through area 1 for the OSPFv3
topology that consists of areas 0 and 1 and virtual links 10.0.0.217 and 10.0.0.212:
ABR 1 Configuration
router ospfv3 1
router-id 10.0.0.217
area 0
interface POS 0/2/0/1
area 1
virtual-link 10.0.0.212
interface POS 0/2/0/0
ABR 2 Configuration
router ospfv3 1
router-id 10.0.0.212
area 0
interface POS 0/3/0/1
area 1
virtual-link 10.0.0.217
interface POS 0/2/0/0
Virtual Link Configured with MD5 Authentication for OSPF Version 2: Example
The following examples show how to configure a virtual link to your backbone and apply MD5
authentication. You must perform the steps described on both ABRs at each end of the virtual link.
After you explicitly configure the ABRs, the configuration is inherited by all interfaces bound to that
area—unless you override the values and configure them explicitly for the interface.
Cisco IOS XR Routing Configuration Guide
RC-300
Implementing OSPF on Cisco IOS XR Software
Where to Go Next
To understand virtual links, see the “Virtual Link and Transit Area for OSPF” section on page 233.
In this example, all interfaces on router ABR1 use MD5 authentication:
router ospf ABR1
router-id 10.10.10.10
authentication message-digest
message-digest-key 100 md5 0 cisco
area 0
interface pos 0/2/0/1
interface pos 0/3/0/0
area 1
interface pos 0/3/0/1
virtual-link 10.10.5.5
!
!
In this example, only area 1 interfaces on router ABR3 use MD5 authentication:
router ospf ABR2
router-id 10.10.5.5
area 0
area 1
authentication message-digest
message-digest-key 100 md5 0 cisco
interface pos 0/9/0/1
virtual-link 10.10.10.10
area 3
interface Loopback 0
interface pos 0/9/0/0
!
Where to Go Next
To configure route maps through the RPL for OSPF Version 2, see the Implementing Routing Policy on
Cisco IOS XR Software document.
To build an MPLS TE topology, create tunnels, and configure forwarding over the tunnel for OSPF
Version 2; see the Cisco IOS XR MPLS Configuration Guide.
Additional References
The following sections provide references related to implementing OSPF on Cisco IOS XR software.
Related Documents
Related Topic
Document Title
OSPF and OSPFv3 commands: complete command
syntax, command modes, command history, defaults,
usage guidelines, and examples
Cisco IOS XR Routing Command Reference, Release 3.5
MPLS TE feature information
Implementing MPLS Traffic Engineering on Cisco IOS XR Software
module in Cisco IOS XR MPLS Configuration Guide, Release 3.5
Cisco IOS XR Routing Configuration Guide
RC-301
Implementing OSPF on Cisco IOS XR Software
Additional References
Standards
Standards
Title
No new or modified standards are supported by this
—
feature, and support for existing standards has not been
modified by this feature.
MIBs
MIBs
MIBs Link
—
To locate and download MIBs using Cisco IOS XR software, use the
Cisco MIB Locator found at the following URL and choose a
platform under the Cisco Access Products menu:
http://cisco.com/public/sw-center/netmgmt/cmtk/mibs.shtml
RFCs
RFCs
Title
RFC 1587
Not so Stubby Area (NSSA)
RFC 1793
OSPF over demand circuit
RFC 2328
OSPF Version 2
RFC 2740
OSPFv3
RFC 3623
Graceful OSPF Restart (OSPFv2)
Technical Assistance
Description
Link
http://www.cisco.com/techsupport
The Cisco Technical Support website contains
thousands of pages of searchable technical content,
including links to products, technologies, solutions,
technical tips, and tools. Registered Cisco.com users
can log in from this page to access even more content.
Cisco IOS XR Routing Configuration Guide
RC-302
Implementing and Monitoring RIB on
Cisco IOS XR Software
Routing Information Base (RIB) is a distributed collection of information about routing connectivity
among all nodes of a network.
Each router maintains a RIB containing the routing information for that router. RIB stores the best routes
from all routing protocols that are running on the system.
This module describes the tasks you need to perform to implement and monitor RIB on your
Cisco IOS XR network.
Note
For more information about RIB on the Cisco IOS XR software and complete descriptions of RIB
commands listed in this module, see the “Related Documents” of this module. To locate documentation
for other commands that might appear during the execution of a configuration task, search online in the
Cisco IOS XR software master command index.
Feature History for Implementing and Monitoring RIB on Cisco IOS XR Software
Release
Modification
Release 2.0
This feature was introduced on the Cisco CRS-1.
Release 3.0
No modification.
Release 3.2
Support was added for the Cisco XR 12000 Series Router.
Release 3.3.0
VPN routing and forwarding (VRF) support was added to the command
syntax.
Release 3.4.0
RIB statistics support was added using the show rib statistics command.
Disabling RIB next-hop dampening was supported.
Release 3.5.0
The following features were supported:
•
IP fast reroute loop-free alternates computation
•
IPv6 Provider Edge and IPv6 VPN Provider Edge over Multiprotocol
Label Switching
•
RIB quarantining
Cisco IOS XR Routing Configuration Guide
RC-303
Implementing and Monitoring RIB on Cisco IOS XR Software
Contents
Contents
•
Prerequisites for Implementing RIB on Cisco IOS XR Software, page RC-304
•
Information About RIB Configuration, page RC-304
•
How to Deploy and Monitor RIB, page RC-308
•
Configuration Examples for RIB Monitoring, page RC-311
•
Where to Go Next, page RC-314
•
Additional References, page RC-314
Prerequisites for Implementing RIB on Cisco IOS XR Software
•
To use this command, you must be in a user group associated with a task group that includes the
proper task IDs. For detailed information about user groups and task IDs, see the Configuring AAA
Services on Cisco IOS XR Software module of the Cisco IOS XR System Security Configuration
Guide.
•
RIB is distributed with the base Cisco IOS XR software; as such, it does not have any special
requirements for installation. The following are the requirements for base software installation:
– Router
– Cisco IOS XR software
– Base package
Information About RIB Configuration
To implement the Cisco RIB feature, you must understand the following concepts:
•
Overview of RIB, page RC-304
•
RIB Data Structures in BGP and Other Protocols, page RC-305
•
RIB Administrative Distance, page RC-305
•
RIB Support for IPv4 and IPv6, page RC-306
•
RIB Statistics, page RC-306
•
IPv6 and IPv6 VPN Provider Edge Transport over MPLS, page RC-306
•
IP Fast Reroute, page RC-307
•
RIB Quarantining, page RC-307
Overview of RIB
Each routing protocol selects its own set of best routes and installs those routes and their attributes in
RIB. RIB stores these routes and selects the best ones from among all routing protocols. Those routes
are downloaded to the line cards for use in forwarding packets. The acronym RIB is used both to refer
to RIB processes and the collection of route data contained within RIB.
Cisco IOS XR Routing Configuration Guide
RC-304
Implementing and Monitoring RIB on Cisco IOS XR Software
Information About RIB Configuration
Within a protocol, routes are selected based on the metrics in use by that protocol. A protocol downloads
its best routes (lowest or tied metric) to RIB. RIB selects the best overall route by comparing the
administrative distance of the associated protocol.
RIB Data Structures in BGP and Other Protocols
RIB uses processes and maintains data structures distinct from other routing applications, such as Border
Gateway Protocol (BGP) and other unicast routing protocols, or multicast protocols, such as Protocol
Independent Multicast (PIM) or Multicast Source Discovery Protocol (MSDP). However, these routing
protocols use internal data structures similar to what RIB uses, and may internally refer to the data
structures as a RIB. For example, BGP routes are stored in the BGP RIB (BRIB), and multicast routes,
computed by multicast routing protocols such as PIM and MSDP, are stored in the Multicast RIB
(MRIB). RIB processes are not responsible for the BRIB and MRIB, which are handled by BGP and
multicast processes, respectively.
The table used by the line cards and RP to forward packets is called the Forwarding Information Base
(FIB). RIB processes do not build the FIBs. Instead, RIB downloads the set of selected best routes to the
FIB processes, by the Bulk Content Downloader (BCDL) process, onto each line card. FIBs are then
constructed.
RIB Administrative Distance
Forwarding is done based on the longest prefix match. If you are forwarding a packet destined to
10.0.2.1, you prefer 10.0.2.0/24 over 10.0.0.0/16 because the mask /24 is longer (and more specific) than
a /16.
Routes from different protocols that have the same prefix and length are chosen based on administrative
distance. For instance, the Open Shortest Path First (OSPF) protocol has an administrative distance of
110, and the Intermediate System-to-Intermediate System (IS-IS) protocol has an administrative
distance of 115. If IS-IS and OSPF both download 10.0.1.0/24 to RIB, RIB would prefer the OSPF route
because OSPF has a lower administrative distance. Administrative distance is used only to choose
between multiple routes of the same length.
The default administrative distances for the common protocols are shown in Table 3.
Table 3
Default Administrative Distances
Protocol
Administrative Distance Default
Connected or local routes
0
Static routes
1
External BGP routes
20
OSPF routes
110
IS-IS routes
115
Internal BGP routes
200
The administrative distance for some routing protocols (for instance IS-IS, OSPF, and BGP) can be
changed. See the protocol-specific documentation for the proper method to change the administrative
distance of that protocol.
Cisco IOS XR Routing Configuration Guide
RC-305
Implementing and Monitoring RIB on Cisco IOS XR Software
Information About RIB Configuration
Note
Changing the administrative distance of a protocol on some but not all routers can lead to routing loops
and other undesirable behavior. Doing so is not recommended.
RIB Support for IPv4 and IPv6
In Cisco IOS XR software, RIB tables support multicast and unicast routing.
The default routing table for Cisco IOS XR RIB are the unicast and the multicast-unicast RIB tables for
IPv4 and IPv6 routing, respectively. For multicast routing, routing protocols insert unicast routes into
the multicast-unicast RIB table. Multicast protocols then use the information to build multicast routes
(which in turn are stored in the MRIB). See the multicast documentation for more information on using
and configuring multicast.
RIB processes ipv4_rib and ipv6_rib run on the RP card. If process placement functionality is available
and supported by multiple RPs in the router, RIB processes can be placed on any available node.
RIB Statistics
RIB supports statistics for messages (requests) flowing between the RIB and its clients. Protocol clients
send messages to the RIB (for example, route add, route delete, and next-hop register, and so on). RIB
also sends messages (for example, redistribute routes, advertisements, next-hop notifications, and so on).
These statistics are used to gather information about what messages have been sent and the number of
messages that have been sent. These statistics provide counters for the various messages that flow
between the RIB server and its clients. The statistics are displayed using the show rib statistics
command.
RIB maintains counters for all requests sent from a client including:
•
Route operations
•
Table registrations
•
Next-hop registrations
•
Redistribution registrations
•
Attribute registrations
•
Synchronization completion
RIB also maintains counters for all requests sent by the RIB. The configuration will disable the RIB
next-hop dampening feature. As a result, RIB notifies client immediately when a next hop that client
registered for is resolved or unresolved.
RIB also maintains the results of the requests.
IPv6 and IPv6 VPN Provider Edge Transport over MPLS
IPv6 Provider Edge (6PE) and IPv6 VPN Provider Edge (6VPE) leverages the existing Multiprotocol
Label Switching (MPLS) IPv4 core infrastructure for IPv6 transport. 6PE and 6VPE enables IPv6 sites
to communicate with each other over an MPLS IPv4 core network using MPLS label switched paths
(LSPs).
Cisco IOS XR Routing Configuration Guide
RC-306
Implementing and Monitoring RIB on Cisco IOS XR Software
Information About RIB Configuration
RIB supports 6PE and 6VPE by providing 6VPE next hops. The next-hop information is stored in an
opaque database in RIB, which is populated by protocol clients with data to be sent to the Forwarding
Information Base (FIB).
For detailed information about configuring 6PE and 6VPE over MPLS, see Cisco IOS XR Multiprotocol
Label Switching Configuration Guide.
IP Fast Reroute
The IP Fast Reroute (IPFRR) loop-free alternate (LFA) computation provides protection against link
failure. Locally computed repair paths are used to prevent packet loss caused by loops that occur during
network reconvergence after a failure. For information about IPFRR see Implementing IS-IS on
Cisco IOS XR Software in Cisco IOS XR Routing Configuration Guide.
Note
IPFRR is supported on the Cisco CRS-1 router.
RIB Quarantining
RIB quarantining solves the problem in the interaction between routing protocols and the RIB. The
problem is a persistent oscillation between the RIB and routing protocols that occurs when a route is
continuously inserted and then withdrawn from the RIB, resulting in a spike in CPU use until the
problem is resolved. If there is no damping on the oscillation, then both the protocol process and the RIB
process have high CPU use, affecting the rest of the system as well as blocking out other protocol and
RIB operations. This problem occurs when a particular combination of routes is received and installed
in the RIB. This problem typically happens as a result of a network misconfiguration. However, because
the misconfiguration is across the network, it is not possible to detect the problem at configuration time
on any single router.
The quarantining mechanism detects mutually recursive routes and quarantines the last route that
completes the mutual recursion. The quarantined route is periodically evaluated to see if the mutual
recursion has gone away. If the recursion still exists, the route remains quarantined. If the recursion has
gone away, the route is released from its quarantine.
The following steps are used to quarantine a route:
1.
RIB detects when a particular problematic path is installed.
2.
RIB sends a notification to the protocol that installed the path.
3.
When the protocol receives the quarantine notification about the problem route, it marks the route
as being “quarantined.” If it is a BGP route, BGP does not advertise reachability for the route to its
neighbors.
4.
Periodically, RIB tests all its quarantined paths to see if they can now safely be installed (moved
from quarantined to "Ok to use" state). A notification is sent to the protocol to indicate that the path
is now safe to use.
Cisco IOS XR Routing Configuration Guide
RC-307
Implementing and Monitoring RIB on Cisco IOS XR Software
How to Deploy and Monitor RIB
How to Deploy and Monitor RIB
To deploy and monitor RIB, you must understand the following concepts:
•
Verifying RIB Configuration Using the Routing Table, page RC-308 (required)
•
Verifying Networking and Routing Problems, page RC-309 (required)
•
Disabling RIB Next-hop Dampening, page RC-310 (optional)
Verifying RIB Configuration Using the Routing Table
Perform this task to verify the RIB configuration to ensure that RIB is running on the RP and functioning
properly by checking the routing table summary and details.
SUMMARY STEPS
1.
show route [vrf {vrf-name | all}] [afi-all | ipv4 | ipv6] [unicast | multicast | safi-all] summary
[detail] [standby]
2.
show route [vrf {vrf-name | all}] [afi-all | ipv4 | ipv6] [unicast | multicast | safi-all] [protocol
[instance] | ip-address [mask] | ip-address/prefix-length] [standby] [detail]
DETAILED STEPS
Step 1
Command or Action
Purpose
show route [vrf {vrf-name | all}] [afi-all |
ipv4 | ipv6] [unicast | multicast | safi-all]
summary [detail] [standby]
Displays route summary information about the specified
routing table.
•
Example:
The default table summarized is the IPv4 unicast
routing table.
RP/0/RP0/CPU0:router# show route summary
Step 2
show route [vrf {vrf-name | all}] [afi-all |
ipv4 | ipv6] [unicast | multicast | safi-all]
[ protocol [ instance ] | ip-address mask]
[standby] [detail]
Example:
RP/0/RP0/CPU0:router# show route ipv4 unicast
Cisco IOS XR Routing Configuration Guide
RC-308
Displays more detailed route information about the
specified routing table.
•
This command is usually issued with an IP address or
other optional filters to limit its display. Otherwise, it
displays all routes from the default IPv4 unicast routing
table, which can result in an extensive list, depending
on the configuration of the network.
Implementing and Monitoring RIB on Cisco IOS XR Software
How to Deploy and Monitor RIB
Verifying Networking and Routing Problems
Perform this task to verify the operation of routes between nodes.
SUMMARY STEPS
1.
show route [vrf {vrf-name | all}] [afi-all | ipv4 | ipv6] [unicast | multicast | safi-all] [protocol
[instance] | ip-address mask] [standby] [detail]
2.
show route [vrf {vrf-name | all}] [afi-all | ipv4 | ipv6] [unicast | multicast | safi-all] backup
[ip-address] [standby]
3.
show route [vrf {vrf-name | all}] [ipv4 | ipv6] [unicast | multicast | safi-all] best-local ip-address
[standby]
4.
show route [vrf {vrf-name | all}] [afi-all | ipv4 | ipv6] [unicast | multicast | safi-all] connected
[standby]
5.
show route [vrf {vrf-name | all}] [afi-all | ipv4 | ipv6] [unicast | multicast | safi-all] local
[interface] [standby]
6.
show route [vrf {vrf-name | all}] [ipv4 | ipv6] [unicast | multicast | safi-all] longer-prefixes
{ip-address mask | ip-address/prefix-length} [standby]
7.
show route [vrf {vrf-name | all}] [ipv4 | ipv6] [unicast | multicast | safi-all] next-hop [ip-address]
[standby]
DETAILED STEPS
Step 1
Command or Action
Purpose
show route [vrf {vrf-name | all}] [afi-all |
ipv4 | ipv6] [unicast | multicast | safi-all]
[protocol [instance] | ip-address mask]
[standby] [detail]
Displays the current routes in RIB.
Example:
RP/0/RP0/CPU0:router# show route list list1 bgp
aspo ipv4 unicast 192.168.111/8
Step 2
show route [vrf {vrf-name | all}] [afi-all |
ipv4 | ipv6] [unicast | multicast | safi-all]
backup [ip-address] [standby]
Displays backup routes in RIB.
Example:
RP/0/RP0/CPU0:router# show route ipv4 unicast
backup 192.168.111/8
Step 3
show route [vrf { vrf-name | all}] [ipv4 | ipv6]
[unicast | multicast | safi-all] best-local
ip-address [standby]
Displays the best-local address to use for return packets
from the given destination.
Example:
RP/0/RP0/CPU0:router# show route ipv4 unicast
best-local 192.168.111/8
Cisco IOS XR Routing Configuration Guide
RC-309
Implementing and Monitoring RIB on Cisco IOS XR Software
How to Deploy and Monitor RIB
Step 4
Command or Action
Purpose
show route [vrf {vrf-name | all}] [afi-all |
ipv4 | ipv6] [unicast | multicast | safi-all]
connected [standby]
Displays the current connected routes of the routing table.
Example:
RP/0/RP0/CPU0:router# show route ipv4 unicast
connected
Step 5
show route [vrf {vrf-name | all}] [afi-all |
ipv4 | ipv6] [unicast | multicast | safi-all]
local [interface] [standby]
Displays local routes for receive entries in the routing table.
Example:
RP/0/RP0/CPU0:router# show route ipv4 unicast
local
Step 6
show route [vrf {vrf-name | all}] [ipv4
[unicast | multicast | safi-all]
longer-prefixes {ip-address mask |
ip-address/prefix-length} [standby]
| ipv6]
Displays the current routes in RIB that share a given
number of bits with a given network.
Example:
RP/0/RP0/CPU0:router# show route ipv4 unicast
192.168.111/8 longer-prefixes
Step 7
show route [vrf { vrf-name | all}] [ipv4 | ipv6]
[unicast | multicast | safi-all] next-hop
ip-address [standby]
Displays the next-hop gateway or host to a destination
address.
Example:
RP/0/RP0/CPU0:router# show route ipv4 unicast
next-hop 192.168.1.34
Disabling RIB Next-hop Dampening
Perform this task to disable RIB next-hop dampening.
SUMMARY STEPS
1.
router rib
2.
address-family {ipv4 | ipv6} next-hop dampening disable
3.
end
or
commit
Cisco IOS XR Routing Configuration Guide
RC-310
Implementing and Monitoring RIB on Cisco IOS XR Software
Configuration Examples for RIB Monitoring
DETAILED STEPS
Step 1
Command or Action
Purpose
router rib
Enters RIB configuration mode.
Example:
RP/0/RP0/CPU0:router# route rib
Step 2
address-family {ipv4 | ipv6} next-hop dampening
disable
Disables next-hop dampening for IPv4 address families.
Example:
RP/0/RP0/CPU0:router(config-rib)# address
family ipv4 next-hop dampening disable
Step 3
Saves configuration changes.
end
or
commit
When you issue the end command, the system prompts
you to commit changes:
Example:
Uncommitted changes found, commit them before
exiting(yes/no/cancel)?
[cancel]:
•
RP/0/RP0/CPU0:router(config-rib)# end
or
– Entering yes saves configuration changes to the
RP/0/RP0/CPU0:router(config-rib)# commit
running configuration file, exits the configuration
session, and returns the router to EXEC mode.
– Entering no exits the configuration session and
returns the router to EXEC mode without
committing the configuration changes.
– Entering cancel leaves the router in the current
configuration session without exiting or
committing the configuration changes.
•
Use the commit command to save the configuration
changes to the running configuration file and remain
within the configuration session.
Configuration Examples for RIB Monitoring
RIB is not configured separately for the Cisco IOS XR system. RIB computes connectivity of the router
with other nodes in the network based on input from the routing protocols. RIB may be used to monitor
and troubleshoot the connections between RIB and its clients, but it is essentially used to monitor routing
connectivity between the nodes in a network. This section contains displays from the show commands
used to monitor that activity. The following sample output is provided:
•
Output of show route Command: Example, page RC-312
•
Output of show route backup Command: Example, page RC-312
•
Output of show route best-local Command: Example, page RC-312
•
Output of show route connected Command: Example, page RC-313
•
Output of show route local Command: Example, page RC-313
Cisco IOS XR Routing Configuration Guide
RC-311
Implementing and Monitoring RIB on Cisco IOS XR Software
Configuration Examples for RIB Monitoring
•
Output of show route longer-prefixes Command: Example, page RC-313
•
Output of show route next-hop Command: Example, page RC-313
Output of show route Command: Example
The following is sample output from the show route command when entered without an address:
RP/0/RP0/CPU0:router# show route
Codes: C - connected, S - static, R - RIP, M - mobile, B - BGP
D - EIGRP, EX - EIGRP external, O - OSPF, IA - OSPF inter area
N1 - OSPF NSSA external type 1, N2 - OSPF NSSA external type 2
E1 - OSPF external type 1, E2 - OSPF external type 2, E - EGP
i - ISIS, L1 - IS-IS level-1, L2 - IS-IS level-2
ia - IS-IS inter area, su - IS-IS summary null, * - candidate default
U - per-user static route, o - ODR, L - local
Gateway of last resort is 172.23.54.1 to network 0.0.0.0
C
L
C
L
C
L
S
10.2.210.0/24 is directly connected, 1d21h, Ethernet0/1/0/0
10.2.210.221/32 is directly connected, 1d21h, Ethernet0/1/1/0
172.20.16.0/24 is directly connected, 1d21h, ATM4/0.1
172.20.16.1/32 is directly connected, 1d21h, ATM4/0.1
10.6.100.0/24 is directly connected, 1d21h, Loopback1
10.6.200.21/32 is directly connected, 1d21h, Loopback0
192.168.40.0/24 [1/0] via 172.20.16.6, 1d21h
Output of show route backup Command: Example
The following is sample output from the show route backup command:
RP/0/RP0/CPU0:router# show route backup
Codes: C - connected, S - static, R - RIP, M - mobile, B - BGP
D - EIGRP, EX - EIGRP external, O - OSPF, IA - OSPF inter area
N1 - OSPF NSSA external type 1, N2 - OSPF NSSA external type 2
E1 - OSPF external type 1, E2 - OSPF external type 2, E - EGP
i - ISIS, L1 - IS-IS level-1, L2 - IS-IS level-2
ia - IS-IS inter area, su - IS-IS summary null, * - candidate default
U - per-user static route, o - ODR, L - local
S
172.73.51.0/24 is directly connected, 2d20h, POS4/0/0/1
Backup O E2 [110/1] via 10.12.12.2, POS3/0/0/1
Output of show route best-local Command: Example
The following is sample output from the show route best-local command:
RP/0/RP0/CPU0:router# show route best-local 10.12.12.1
Routing entry for 10.12.12.1/32
Known via "local", distance 0, metric 0 (connected)
Routing Descriptor Blocks
10.12.12.1 directly connected, via POS3/0
Route metric is 0
Cisco IOS XR Routing Configuration Guide
RC-312
Implementing and Monitoring RIB on Cisco IOS XR Software
Configuration Examples for RIB Monitoring
Output of show route connected Command: Example
The following is sample output from the show route connected command:
RP/0/RP0/CPU0:router# show route connected
C
C
C
10.2.210.0/24 is directly connected, 1d21h, Ethernet0
172.20.16.0/24 is directly connected, 1d21h, ATM4/0.1
10.6.100.0/24 is directly connected, 1d21h, Loopback1
Output of show route local Command: Example
The following is sample output from the show route local command:
RP/0/RP0/CPU0:router# show route local
L
L
L
L
L
10.10.10.1/32 is directly connected, 00:14:36, Loopback0
10.91.36.98/32 is directly connected, 00:14:32, Ethernet0/0
172.22.12.1/32 is directly connected, 00:13:35, POS3/0
192.168.20.2/32 is directly connected, 00:13:27, GigabitEthernet2/0
10.254.254.1/32 is directly connected, 00:13:26, GigabitEthernet2/2
Output of show route longer-prefixes Command: Example
The following is sample output from the show route longer-prefixes command:
RP/0/RP0/CPU0:router# show route ipv4 172.16.0.0/8 longer-prefixes
Codes: C - connected, S - static, I - IGRP, R - RIP, M - mobile, B - BGP
O - OSPF, IA - OSPF inter area, N1 - OSPF NSSA external type 1
N2 - OSPF NSSA external type 2, E1 - OSPF external type 1
E2 - OSPF external type 2, E - EGP, i - ISIS, L1 - IS-IS level-1
L2 - IS-IS level-2, ia - IS-IS inter area
su - IS-IS summary null, * - candidate default
U - per-user static route, o - ODR, L - local
Gateway of last resort is 172.23.54.1 to network 0.0.0.0
S
172.16.2.0/32 is directly connected, 00:00:24, Loopback0
S
172.16.3.0/32 is directly connected, 00:00:24, Loopback0
S
172.16.4.0/32 is directly connected, 00:00:24, Loopback0
S
172.16.5.0/32 is directly connected, 00:00:24, Loopback0
S
172.16.6.0/32 is directly connected, 00:00:24, Loopback0
S
172.16.7.0/32 is directly connected, 00:00:24, Loopback0
S
172.16.8.0/32 is directly connected, 00:00:24, Loopback0
S
172.16.9.0/32 is directly connected, 00:00:24, Loopback0
Output of show route next-hop Command: Example
The following is sample output from the show route resolving-next-hop command:
RP/0/RP0/CPU0:router# show route resolving-next-hop 10.0.0.1
Nexthop matches 0.0.0.0/0
Known via "static", distance 200, metric 0, candidate default path
Installed Aug 18 00:59:04.448
Directly connected nexthops
172.29.52.1, via MgmtEth0/RP0/CPU0/0
Route metric is 0
Cisco IOS XR Routing Configuration Guide
RC-313
Implementing and Monitoring RIB on Cisco IOS XR Software
Where to Go Next
172.29.52.1, via MgmtEth0/RP1/CPU0/0
Route metric is 0
Where to Go Next
For additional information on the protocols that interact with RIB, you may want to see the following
publications:
•
Implementing MPLS Layer 3 VPNs in Cisco IOS XR Multiprotocol Label Switching Configuration
Guide.
•
Implementing BGP on Cisco IOS XR Software in Cisco IOS XR Routing Configuration Guide.
•
Implementing EIGRP on Cisco IOS XR Software in Cisco IOS XR Routing Configuration Guide.
•
Implementing IS-IS on Cisco IOS XR Software in Cisco IOS XR Routing Configuration Guide.
•
Implementing OSPF on Cisco IOS XR Software in Cisco IOS XR Routing Configuration Guide.
•
Implementing RIP on Cisco IOS XR Software in Cisco IOS XR Routing Configuration Guide.
•
RIB Commands on Cisco IOS XR Software in Cisco IOS XR Routing Command Reference.
Additional References
The following sections provide references related to implementing RIB on Cisco IOS XR software:
Cisco IOS XR Routing Configuration Guide
RC-314
Implementing and Monitoring RIB on Cisco IOS XR Software
Additional References
Related Documents
Related Topic
Document Title
Routing Information Base commands: complete
RIB Commands on Cisco IOS XR Software in Cisco IOS XR Routing
command syntax, command modes, command history, Command Reference, Release 3.5
defaults, usage guidelines, and examples
BGP commands: complete command syntax, command BGP Commands on Cisco IOS XR Software, in Cisco IOS XR
modes, command history, defaults, usage guidelines,
Routing Command Reference, Release 3.5
and examples
IS-IS commands: complete command syntax,
command modes, command history, defaults, usage
guidelines, and examples
IS-IS Commands on Cisco IOS XR Software in Cisco IOS XR
Routing Command Reference, Release 3.5
OSPF commands: complete command syntax,
command modes, command history, defaults, usage
guidelines, and examples
OSPF Commands on Cisco IOS XR Software in Cisco IOS XR
Routing Command Reference, Release 3.5
OSPFv3 commands: complete command syntax,
command modes, command history, defaults, usage
guidelines, and examples
OSPFv3 Commands on Cisco IOS XR Software in Cisco IOS XR
Routing Command Reference, Release 3.5
EIGRP commands: complete command syntax,
command modes, command history, defaults, usage
guidelines, and examples
EIGRP Commands on Cisco IOS XR Software in Cisco IOS XR
Routing Command Reference, Release 3.5
RIP commands: complete command syntax, command RIP Commands on Cisco IOS XR Software in Cisco IOS XR Routing
modes, command history, defaults, usage guidelines,
Command Reference, Release 3.5
and examples
Multicast commands: complete command syntax,
command modes, command history, defaults, usage
guidelines, and examples
Cisco IOS XR Multicast Command Reference, Release 3.5
Multicast configuration: configuration concepts, task,
and examples
Cisco IOS XR Multicast Configuration Guide, Release 3.5
MPLS Layer 3 VPN configuration: configuration
concepts, task, and examples
Implementing MPLS Layer 3 VPNs in Cisco IOS XR Multiprotocol
Label Switching Configuration Guide, Release 3.5
Standards
Standards
Title
Draft-ietf-rtgwg-ipfrr-framework-06.txt
IP Fast Reroute Framework, by M. Shand and S. Bryant
Draft-ietf-rtgwg-lf-conv-frmwk-00.txt
A Framework for Loop-free Convergence, by M. Shand and S.
Bryant
Cisco IOS XR Routing Configuration Guide
RC-315
Implementing and Monitoring RIB on Cisco IOS XR Software
Additional References
MIBs
MIBs
MIBs Link
—
To locate and download MIBs using Cisco IOS XR software, use the
Cisco MIB Locator found at the following URL and choose a
platform under the Cisco Access Products menu:
http://cisco.com/public/sw-center/netmgmt/cmtk/mibs.shtml
RFCs
RFCs
Title
No new or modified RFCs are supported by this
feature, and support for existing RFCs has not been
modified by this feature.
—
Technical Assistance
Description
Link
The Cisco Technical Support website contains
http://www.cisco.com/techsupport
thousands of pages of searchable technical content,
including links to products, technologies, solutions,
technical tips, and tools. Registered Cisco.com users
can log in from this page to access even more content.
Cisco IOS XR Routing Configuration Guide
RC-316
Implementing RIP on Cisco IOS XR Software
The Routing Information Protocol (RIP) is a classic distance vector Interior Gateway Protocol (IGP)
designed to exchange information within an autonomous system (AS) of a small network.
This module describes the concepts and tasks you need to implement basic RIP routing on your router.
Cisco IOS XR software supports a standard implementation of RIP Version 2 (RIPv2) that supports
backward compatibility with RIP Version 1 (RIPv1) as specified by RFC2453.
For RIP configuration information related to the following features, see the “Related Documents”
section of this module.
Note
•
Multiprotocol Label Switching (MPLS) Layer 3 Virtual Private Network (VPN)
•
Site of Origin (SoO) Support
For more information about RIP on the Cisco IOS XR software and complete descriptions of the RIP
commands listed in this module, see the “Related Documents” section of this module. To locate
documentation for other commands that might appear while performing a configuration task, search
online in the Cisco IOS XR software master command index.
Feature History for Implementing RIP on Cisco IOS XR Software
Release
Modification
Release 3.3.0
This feature was introduced on the Cisco CRS-1 and
Cisco XR 12000 Series Router.
Release 3.4.0
No modification.
Release 3.5.0
Four-byte autonomous system (AS) number support was added.
Contents
•
Information About Implementing RIP on Cisco IOS XR Software, page RC-318
•
How to Implement RIP on Cisco IOS XR Software, page RC-321
•
Configuration Examples for Implementing RIP on Cisco IOS XR Software, page RC-331
•
Additional References, page RC-334
Cisco IOS XR Routing Configuration Guide
RC-317
Implementing RIP on Cisco IOS XR Software
Information About Implementing RIP on Cisco IOS XR Software
Information About Implementing RIP on Cisco IOS XR Software
•
Prerequisites for Implementing RIP on Cisco IOS XR Software, page RC-318
•
RIP Functional Overview, page RC-318
•
Split Horizon for RIP, page RC-319
•
Route Timers for RIP, page RC-319
•
Route Redistribution for RIP, page RC-320
•
Default Administrative Distances for RIP, page RC-320
•
Routing Policy Options for RIP, page RC-321
Prerequisites for Implementing RIP on Cisco IOS XR Software
The following prerequisite must be met for implementing RIP on Cisco IOS XR software. You must be
in a user group associated with a task group that includes the proper task IDs for RIP commands. For
detailed information about user groups and task IDs, see the Configuring AAA Services on
Cisco IOS XR Software module of the Cisco IOS XR System Security Configuration Guide.
RIP Functional Overview
RIP Version 1 (RIP v1) is a classful, distance-vector protocol that is considered the easiest routing
protocol to implement. Unlike OSPF, RIP broadcasts User Datagram Protocol (UDP) data packets to
exchange routing information in internetworks that are flat rather than hierarchical. Network complexity
and network management time is reduced. However, as a classful routing protocol, RIP v1 allows only
contiguous blocks of hosts, subnets or networks to be represented by a single route, severely limiting its
usefulness.
RIP v2 allows more information carried in RIP update packets, such as support for:
•
Route summarization
•
Classless interdomain routing (CIDR)
•
Variable-length subnet masks (VLSMs)
•
Autonomous systems and the use of redistribution
•
Multicast address 224.0.0.9 for RIP advertisements
The metric that RIP uses to rate the value of different routes is hop count. The hop count is the number
of routers that can be traversed in a route. A directly connected network has a metric of zero; an
unreachable network has a metric of 16. This small range of metrics makes RIP an unsuitable routing
protocol for large networks.
Routing information updates are advertised every 30 seconds by default, and new updates discovered
from neighbor routers are stored in a routing table.
Only RIP Version 2 (RIP v2), as specified in RFC 2453, is supported on Cisco IOS XR software and, by
default, the software only sends and receives RIP v2 packets. However, you can configure the software
to send, or receive, or both, only Version 1 packets or only Version 2 packets or both version type packets
per interface.
Cisco IOS XR Routing Configuration Guide
RC-318
Implementing RIP on Cisco IOS XR Software
Information About Implementing RIP on Cisco IOS XR Software
Here are some good reasons to use RIP:
•
Compatible with diverse network devices
•
Best for small networks, because there is very little overhead, in terms of bandwidth used,
configuration, and management time.
•
Support for legacy host systems
Because of RIP’s ease of use, it is implemented in networks worldwide.
Split Horizon for RIP
Normally, routers that are connected to broadcast-type IP networks and that use distance-vector routing
protocols employ the split horizon mechanism to reduce the possibility of routing loops. Split horizon
blocks information about routes from being advertised by a router out of any interface from which that
information originated. This behavior usually optimizes communications among multiple routers,
particularly when links are broken.
If an interface is configured with secondary IP addresses and split horizon is enabled, updates might not
be sourced by every secondary address. One routing update is sourced per network number unless split
horizon is disabled.
Note
The split horizon feature is enabled by default. In general, we recommend that you do not change the
default state of split horizon unless you are certain that your operation requires the change in order to
properly advertise routes.
Route Timers for RIP
RIP uses several timers that determine such variables as the frequency of routing updates, the length of
time before a route becomes invalid, and other parameters. You can adjust these timers to tune routing
protocol performance to better suit your internetwork needs, by making the following timer adjustments
to:
•
The rate (time in seconds between updates) at which routing updates are sent
•
The interval of time (in seconds) after which a route is declared invalid
•
The interval (in seconds) during which routing information regarding better paths is suppressed
•
The amount of time (in seconds) that must pass before a route is removed from the RIP topology
table
•
The amount of time delay between RIP update packets
The first four timer adjustments are configurable by the timers basic command. The output-delay
command changes the amount of time delay between RIP update packets. See the “Customize RIP”
section on page RC-323 for configuration details.
It also is possible to tune the IP routing support in the software to enable faster convergence of the
various IP routing algorithms and quickly drop back to redundant routers, if necessary. The total result
is to minimize disruptions to end users of the network in situations in which quick recovery is essential.
Cisco IOS XR Routing Configuration Guide
RC-319
Implementing RIP on Cisco IOS XR Software
Information About Implementing RIP on Cisco IOS XR Software
Route Redistribution for RIP
Redistribution is a feature that allows different routing domains, to exchange routing information.
Networking devices that route between different routing domains are called boundary routers, and it is
these devices that inject the routes from one routing protocol into another. Routers within a routing
domain only have knowledge of routes internal to the domain unless route redistribution is implemented
on the boundary routers.
When running RIP in your routing domain, you might find it necessary to use multiple routing protocols
within your internetwork and redistribute routes between them. Some common reasons are:
•
To advertise routes from other protocols into RIP, such as static, connected, OSPF and BGP.
•
To migrate from RIP to a new Interior Gateway Protocol (IGP) such as EIGRP.
•
To retain routing protocol on some routers to support host systems, but upgrade routers for other
department groups.
•
To communicate among a mixed-router vendor environment. Basically, you might use a protocol
specific to Cisco in one portion of your network and use RIP to communicate with devices other than
Cisco devices.
Further, route redistribution gives a company the ability to run different routing protocols in work groups
or areas in which each is particularly effective. By not restricting customers to using only a single routing
protocol, Cisco IOS XR route redistribution is a powerful feature that minimizes cost, while maximizing
technical advantage through diversity.
When it comes to implementing route redistribution in your internetwork, it can be very simple or very
complex. An example of a simple one-way redistribution is to log into a router on which RIP is enabled
and use the redistribute static command to advertise only the static connections to the backbone
network to pass through the RIP network. For complex cases in which you must consider routing loops,
incompatible routing information, and inconsistent convergence time, you must determine why these
problems occur by examining how Cisco routers select the best path when more than one routing
protocol is running administrative cost.
Default Administrative Distances for RIP
Administrative distance is used as a measure of the trustworthiness of the source of the IP routing
information. When a dynamic routing protocol such as RIP is configured, and you want to use the
redistribution feature to exchange routing information, it is important to know the default administrative
distances for other route sources so that you can set the appropriate distance weight. See Table 4 for a
list of the default administrative distances.
Table 4
Default Administrative Distances of Routing Protocols
Routing Protocols
Administrative Distance Value
Connected interface
0
Static route out an interface
0
Static route to next hop
1
EIGRP Summary Route
5
External BGP
20
Internal EIGRP
90
OSPF
110
Cisco IOS XR Routing Configuration Guide
RC-320
Implementing RIP on Cisco IOS XR Software
How to Implement RIP on Cisco IOS XR Software
Table 4
Default Administrative Distances of Routing Protocols (continued)
Routing Protocols
Administrative Distance Value
IS-IS
115
RIP version 1 and 2
120
External EIGRP
170
Internal BGP
200
Unknown
255
An administrative distance is an integer from 0 to 255. In general, the higher the value, the lower the
trust rating. An administrative distance of 255 means the routing information source cannot be trusted
at all and should be ignored. Administrative distance values are subjective; there is no quantitative
method for choosing them.
Routing Policy Options for RIP
Route policies comprise series of statements and expressions that are bracketed with the route-policy
and end-policy keywords. Rather than a collection of individual commands (one for each line), the
statements within a route policy have context relative to each other. Thus, instead of each line being an
individual command, each policy or set is an independent configuration object that can be used, entered,
and manipulated as a unit.
Each line of a policy configuration is a logical subunit. At least one new line must follow the then, else,
and end-policy keywords. A new line must also follow the closing parenthesis of a parameter list and
the name string in a reference to an AS path set, community set, extended community set, or prefix set.
At least one new line must precede the definition of a route policy, AS path set, community set, extended
community set, or prefix set. One or more new lines can follow an action statement. One or more new
lines can follow a comma separator in a named AS path set, community set, extended community set, or
prefix set. A new line must appear at the end of a logical unit of policy expression and may not appear
anywhere else.
How to Implement RIP on Cisco IOS XR Software
This section contains instructions for the following tasks:
Note
•
Enabling RIP, page RC-322 (required)
•
Customize RIP, page RC-323 (optional)
•
Control Routing Information, page RC-326 (optional)
•
Creating a Route Policy for RIP, page RC-328 (optional)
To save configuration changes, you must commit changes when the system prompts you.
Cisco IOS XR Routing Configuration Guide
RC-321
Implementing RIP on Cisco IOS XR Software
How to Implement RIP on Cisco IOS XR Software
Enabling RIP
This task enables RIP routing and establishes a RIP routing process.
Prerequisites
Although you can configure RIP before you configure an IP address, no RIP routing occurs until at least
one IP address is configured.
SUMMARY STEPS
1.
configure
2.
router rip
3.
neighbor ip-address
4.
broadcast-for-v2
5.
interface type instance
6.
receive version {1 | 2 | 1 2}
7.
send version {1 | 2 | 1 2}
8.
end
or
commit
DETAILED STEPS
Step 1
Command or Action
Purpose
configure
Enters global configuration mode.
Example:
RP/0/RP0/CPU0:router# configure
Step 2
router rip
Configures a RIP routing process.
Example:
RP/0/RP0/CPU0:router(config)# router rip
Step 3
neighbor ip-address
(Optional) Defines a neighboring router with which to
exchange RIP protocol information.
Example:
RP/0/RP0/CPU0:router(config-rip)# neighbor
172.160.1.2
Step 4
broadcast-for-v2
Example:
RP/0/RP0/CPU0:router(config-rip)#
broadcast-for-v2
Cisco IOS XR Routing Configuration Guide
RC-322
(Optional) Configures RIP to send only Version 2 packets to
the broadcast IP address rather than the RIP v2 multicast
address (224.0.0.9). This command can be applied at the
interface or global configuration level.
Implementing RIP on Cisco IOS XR Software
How to Implement RIP on Cisco IOS XR Software
Step 5
Command or Action
Purpose
interface type instance
(Optional) Defines the interfaces on which the RIP routing
protocol runs.
Example:
RP/0/RP0/CPU0:router(config-rip)# interface pos
0/1/0/0
Step 6
Step 7
receive version {1 | 2 | 1 2}
Example:
•
Only RIP v1
RP/0/RP0/CPU0:router(config-rip-if)# receive
version 1 2
•
Only RIP v2
•
Both RIP v1 and RIP v2
send version {1 | 2 | 1 2}
Example:
RP/0/RP0/CPU0:router(config-rip-if)# send
version 1 2
Step 8
(Optional) Configures an interface to accept packets that
are:
(Optional) Configures an interface to send packets that are:
•
Only RIP v1
•
Only RIP v2
•
Both RIP v1 and RIP v2
Saves configuration changes.
end
or
commit
•
When you issue the end command, the system prompts
you to commit changes:
Uncommitted changes found, commit them before
exiting(yes/no/cancel)?
[cancel]:
Example:
RP/0/RP0/CPU0:router(config-rip-if)# end
or
– Entering yes saves configuration changes to the
RP/0/RP0/CPU0:router(config-rip-if)# commit
running configuration file, exits the configuration
session, and returns the router to EXEC mode.
– Entering no exits the configuration session and
returns the router to EXEC mode without
committing the configuration changes.
– Entering cancel leaves the router in the current
configuration session without exiting or
committing the configuration changes.
•
Use the commit command to save the configuration
changes to the running configuration file and remain
within the configuration session.
Customize RIP
This task describes how to customize RIP for network timing and the acceptance of route entries.
SUMMARY STEPS
1.
configure
2.
router rip
3.
auto-summary
4.
timers basic update invalid holddown flush
Cisco IOS XR Routing Configuration Guide
RC-323
Implementing RIP on Cisco IOS XR Software
How to Implement RIP on Cisco IOS XR Software
5.
output-delay delay
6.
nsf
7.
interface type instance
8.
metric-zero-accept
9.
split-horizon disable
10. poison-reverse
11. end
or
commit
DETAILED STEPS
Step 1
Command or Action
Purpose
configure
Enters global configuration mode.
Example:
RP/0/RP0/CPU0:router# configure
Step 2
router rip
Configures a RIP routing process.
Example:
RP/0/RP0/CPU0:router(config)# router rip
Step 3
auto-summary
Example:
RP/0/RP0/CPU0:router(config-rip)# auto-summary
Step 4
timers basic update invalid holddown flush
(Optional) Enables automatic route summarization of
subnet routes into network-level routes.
•
Note
By default, auto-summary is disabled.
If you have disconnected subnets, use the no
keyword to disable automatic route
summarization and permit software to send
subnet and host routing information across
classful network boundaries.
(Optional) Adjusts RIP network timers.
Note
Example:
To view the current and default timer values,
view output from the show rip command.
RP/0/RP0/CPU0:router(config-rip)# timers basic 5
15 15 30
Step 5
output-delay delay
(Optional) Changes the interpacket delay for the RIP
updates sent.
Example:
Note
RP/0/RP0/CPU0:router(config-rip)# output-delay 10
Step 6
(Optional) Configures NSF on RIP routes after a RIP
process shutdown or restart.
nsf
Example:
RP/0/RP0/CPU0:router(config-rip)# nsf
Cisco IOS XR Routing Configuration Guide
RC-324
Use this command if you have a high-end router
sending at high speed to a low-speed router that
might not be able to receive at that fast a rate.
Implementing RIP on Cisco IOS XR Software
How to Implement RIP on Cisco IOS XR Software
Step 7
Command or Action
Purpose
interface type instance
(Optional) Defines the interfaces on which the RIP
routing protocol runs.
Example:
RP/0/RP0/CPU0:router(config-rip)# interface pos
0/1/0/0
Step 8
metric-zero-accept
Example:
(Optional) Allows the networking device to accept route
entries received in update packets with a metric of zero
(0). The received route entry is set to a metric of one (1).
RP/0/RP0/CPU0:router(config-rip-if)#
metro-zero-accept
Step 9
split-horizon disable
Example:
RP/0/RP0/CPU0:router(config-rip-if)#
split-horizon disable
Step 10
poison-reverse
(Optional) Disables the split horizon mechanism.
•
By default, split horizon is enabled.
•
In general, we do not recommend changing the state
of the default for the split-horizon command,
unless you are certain that your application requires
a change to properly advertise routes. If split
horizon is disabled on a serial interface (and that
interface is attached to a packet-switched network),
you must disable split horizon for all networking
devices in any relevant multicast groups on that
network.
Enables poison reverse processing of RIP router updates.
Example:
RP/0/RP0/CPU0:router(config-rip-if)#
poison-reverse
Step 11
end
or
commit
Saves configuration changes.
•
When you issue the end command, the system
prompts you to commit changes:
Uncommitted changes found, commit them before
exiting(yes/no/cancel)?
[cancel]:
Example:
RP/0/RP0/CPU0:router(config-rip-if)# end
or
– Entering yes saves configuration changes to the
RP/0/RP0/CPU0:router(config-rip-if)# commit
running configuration file, exits the
configuration session, and returns the router to
EXEC mode.
– Entering no exits the configuration session and
returns the router to EXEC mode without
committing the configuration changes.
– Entering cancel leaves the router in the current
configuration session without exiting or
committing the configuration changes.
•
Use the commit command to save the configuration
changes to the running configuration file and remain
within the configuration session.
Cisco IOS XR Routing Configuration Guide
RC-325
Implementing RIP on Cisco IOS XR Software
How to Implement RIP on Cisco IOS XR Software
Control Routing Information
This task describes how to control or prevent routing update exchange and propagation.
Some reasons to control or prevent routing updates are:
•
To slow or stop the update traffic on a WAN link—If you do not control update traffic on an
on-demand WAN link, the link remains up constantly. By default, RIP routing updates occur every
30 seconds.
•
To prevent routing loops—If you have redundant paths or are redistributing routes into another
routing domain, you may want to filter the propagation of one of the paths.
•
To filter network received in updates — If you do not want other routers from learning a particular
device’s interpretation of one or more routes, you can suppress that information.
•
To prevent other routers from processing routes dynamically— If you do not want to process routing
updates entering the interface, you can suppress that information.
•
To preserve bandwidth—You can ensure maximum bandwidth availability for data traffic by
reducing unnecessary routing update traffic.
1.
configure
2.
router rip
3.
neighbor ip-address
4.
interface type instance
5.
passive-interface
6.
exit
7.
interface type instance
8.
route-policy {in | out}
9.
end
or
commit
SUMMARY STEPS
DETAILED STEPS
Step 1
Command or Action
Purpose
configure
Enters global configuration mode.
Example:
RP/0/RP0/CPU0:router# configure
Step 2
router rip
Example:
RP/0/RP0/CPU0:router(config)# router rip
Cisco IOS XR Routing Configuration Guide
RC-326
Configures a RIP routing process.
Implementing RIP on Cisco IOS XR Software
How to Implement RIP on Cisco IOS XR Software
Step 3
Command or Action
Purpose
neighbor ip-address
(Optional) Defines a neighboring router with which to
exchange RIP protocol information.
Example:
RP/0/RP0/CPU0:router(config-rip)# neighbor
172.160.1.2
Step 4
interface type instance
(Optional) Defines the interfaces on which the RIP
routing protocol runs.
Example:
RP/0/RP0/CPU0:router(config-rip)# interface pos
0/1/0/0
Step 5
passive-interface
(Optional) Suppresses the sending of RIP updates on an
interface, but not to explicitly configured neighbors.
Example:
RP/0/RP0/CPU0:router(config-rip-if)#
passive-interface
Step 6
exit
(Optional) Returns the router to the next higher
configuration mode.
Example:
RP/0/RP0/CPU0:router(config-rip-if)# exit
Step 7
interface type instance
(Optional) Defines the interfaces on which the RIP
routing protocol runs.
Example:
RP/0/RP0/CPU0:router(config-rip)# interface pos
0/2/0/0
Cisco IOS XR Routing Configuration Guide
RC-327
Implementing RIP on Cisco IOS XR Software
How to Implement RIP on Cisco IOS XR Software
Step 8
Command or Action
Purpose
route-policy {in | out}
(Optional) Applies a routing policy to updates advertised
to or received from a RIP neighbor.
Example:
RP/0/RP0/CPU0:router(config-rip-if)# route-policy
out
Step 9
Saves configuration changes.
end
or
commit
•
When you issue the end command, the system
prompts you to commit changes:
Uncommitted changes found, commit them before
exiting(yes/no/cancel)?
[cancel]:
Example:
RP/0/RP0/CPU0:router(config-rip-if)# end
or
– Entering yes saves configuration changes to the
RP/0/RP0/CPU0:router(config-rip-if)# commit
running configuration file, exits the
configuration session, and returns the router to
EXEC mode.
– Entering no exits the configuration session and
returns the router to EXEC mode without
committing the configuration changes.
– Entering cancel leaves the router in the current
configuration session without exiting or
committing the configuration changes.
•
Use the commit command to save the configuration
changes to the running configuration file and remain
within the configuration session.
Creating a Route Policy for RIP
This task defines a route policy and shows how to attach it to an instance of a RIP process. Route policies
can be used to:
•
Control routes sent and received
•
Control which routes are redistributed
•
Control origination of the default route
A route policy definition consists of the route-policy command and name argument followed by a
sequence of optional policy statements, and then closes with the end-policy command.
A route policy is not useful until it is applied to routes of a routing protocol.
SUMMARY STEPS
1.
configure
2.
route-policy name
3.
set rip-metric number
4.
end-policy
Cisco IOS XR Routing Configuration Guide
RC-328
Implementing RIP on Cisco IOS XR Software
How to Implement RIP on Cisco IOS XR Software
5.
end
or
commit
6.
configure
7.
router rip
8.
route-policy route-policy-name {in | out}
9.
end
or
commit]
DETAILED STEPS
Step 1
Command or Action
Purpose
configure
Enters global configuration mode.
Example:
RP/0/RP0/CPU0:router# configure
Step 2
route-policy name
Defines a route policy and enters route-policy configuration
mode.
Example:
RP/0/RP0/CPU0:router(config)# route-policy
IN-IPv4
Step 3
set rip-metric number
RP/0/RP0/CPU0:router(config-rpl)# set rip
metric 42
(Optional) Sets the RIP metric attribute.
Step 4
end-policy
Ends the definition of a route policy and exits route-policy
configuration mode.
Example:
RP/0/RP0/CPU0:router(config-rpl)# end-policy
Cisco IOS XR Routing Configuration Guide
RC-329
Implementing RIP on Cisco IOS XR Software
How to Implement RIP on Cisco IOS XR Software
Step 5
Command or Action
Purpose
end
or
commit
Saves configuration changes.
•
When you issue the end command, the system prompts
you to commit changes:
Uncommitted changes found, commit them before
exiting(yes/no/cancel)?
[cancel]:
Example:
RP/0/RP0/CPU0:router(config-rpl)# end
or
– Entering yes saves configuration changes to the
RP/0/RP0/CPU0:router(config-rpl)# commit
running configuration file, exits the configuration
session, and returns the router to EXEC mode.
– Entering no exits the configuration session and
returns the router to EXEC mode without
committing the configuration changes.
– Entering cancel leaves the router in the current
configuration session without exiting or
committing the configuration changes.
•
Step 6
configure
Use the commit command to save the configuration
changes to the running configuration file and remain
within the configuration session.
Enters global configuration mode.
Example:
RP/0/RP0/CPU0:router# configure
Step 7
router rip
Example:
RP/0/RP0/CPU0:router(config)# router rip
Cisco IOS XR Routing Configuration Guide
RC-330
Configures a RIP routing process.
Implementing RIP on Cisco IOS XR Software
Configuration Examples for Implementing RIP on Cisco IOS XR Software
Step 8
Command or Action
Purpose
route-policy route-policy-name {in | out}
Applies a routing policy to updates advertised to or received
from an RIP neighbor.
Example:
RP/0/RP0/CPU0:router(config-rip)# route-policy
IN in
Step 9
Saves configuration changes.
end
or
commit
•
When you issue the end command, the system prompts
you to commit changes:
Uncommitted changes found, commit them before
exiting(yes/no/cancel)?
[cancel]:
Example:
RP/0/RP0/CPU0:router(config-rip)# end
or
– Entering yes saves configuration changes to the
RP/0/RP0/CPU0:router(config-rip)# commit
running configuration file, exits the configuration
session, and returns the router to EXEC mode.
– Entering no exits the configuration session and
returns the router to EXEC mode without
committing the configuration changes.
– Entering cancel leaves the router in the current
configuration session without exiting or
committing the configuration changes.
•
Use the commit command to save the configuration
changes to the running configuration file and remain
within the configuration session.
Configuration Examples for Implementing RIP on Cisco IOS XR
Software
This section provides the following configuration examples:
•
Configuring a Basic RIP Configuration: Example, page RC-331
•
Configuring RIP on the Provider Edge: Example, page RC-332
•
Adjusting RIP Timers for each VRF Instance: Example, page RC-332
•
Configuring Redistribution for RIP: Example, page RC-333
•
Configuring Route Policies for RIP: Example, page RC-333
•
Configuring Passive Interfaces and Explicit Neighbors for RIP: Example, page RC-334
•
Controlling RIP Routes: Example, page RC-334
Configuring a Basic RIP Configuration: Example
The following example shows two Gigabit Ethernet interfaces configured with RIP.
interface GigabitEthernet0/6/0/0
ipv4 address 172.16.0.1 255.255.255.0
!
Cisco IOS XR Routing Configuration Guide
RC-331
Implementing RIP on Cisco IOS XR Software
Configuration Examples for Implementing RIP on Cisco IOS XR Software
interface GigabitEthernet0/6/0/2
ipv4 address 172.16.2.12 255.255.255.0
!
router rip
interface GigabitEthernet0/6/0/0
!
interface GigabitEthernet0/6/0/2
!
!
Configuring RIP on the Provider Edge: Example
The following example shows how to configure basic RIP on the PE with two VPN routing and
forwarding (VRF) instances.
router rip
interface GigabitEthernet0/6/0/0
!
vrf vpn0
interface GigabitEthernet0/6/0/2
!
!
vrf vpn1
interface GigabitEthernet0/6/0/3
!
!
!
Adjusting RIP Timers for each VRF Instance: Example
The following example shows how to adjust RIP timers for each VPN routing and forwarding (VRF)
instance.
For VRF instance vpn0, the timers basic command sets updates to be broadcast every 10 seconds. If a
router is not heard from in 30 seconds, the route is declared unusable. Further information is suppressed
for an additional 30 seconds. At the end of the flush period (45 seconds), the route is flushed from the
routing table.
For VRF instance vpn1, timers are adjusted differently: 20, 60, 60, and 70 seconds.
The output-delay command changes the interpacket delay for RIP updates to 10 milliseconds on vpn1.
The default is that interpacket delay is turned off.
router rip
interface GigabitEthernet0/6/0/0
!
vrf vpn0
interface GigabitEthernet0/6/0/2
!
timers basic 10 30 30 35
!
vrf vpn1
interface GigabitEthernet0/6/0/3
!
timers basic 20 60 60 70
output-delay 10
!
!
Cisco IOS XR Routing Configuration Guide
RC-332
Implementing RIP on Cisco IOS XR Software
Configuration Examples for Implementing RIP on Cisco IOS XR Software
Configuring Redistribution for RIP: Example
The following example shows how to redistribute Border Gateway Protocol (BGP) and static routes into
RIP.
The RIP metric used for redistributed routes is determined by the route policy. If a route policy is not
configured or the route policy does not set RIP metric, the metric is determined based on the redistributed
protocol. For VPNv4 routes redistributed by BGP, the RIP metric set at the remote PE router is used, if
valid.
In all other cases (BGP, IS-IS, OSPF, EIGRP, connected, static), the metric set by the default-metric
command is used. If a valid metric cannot be determined, then redistribution does not happen.
route-policy ripred
set rip-metric 5
end-policy
!
router rip
vrf vpn0
interface GigabitEthernet0/6/0/2
!
redistribute connected
default-metric 3
!
vrf vpn1
interface GigabitEthernet0/6/0/3
!
redistribute bgp 100 route-policy ripred
redistribute static
default-metric 3
!
!
Configuring Route Policies for RIP: Example
The following example shows how to configure inbound and outbound route policies that are used to
control which route updates are received by a RIP interface or sent out from a RIP interface.
prefix-set pf1
10.1.0.0/24
end-set
!
prefix-set pf2
150.10.1.0/24
end-set
!
route-policy policy_in
if destination in pf1 then
pass
endif
end-policy
!
route-policy pass-all
pass
end-policy
!
Cisco IOS XR Routing Configuration Guide
RC-333
Implementing RIP on Cisco IOS XR Software
Additional References
route-policy infil
if destination in pf2 then
add rip-metric 2
pass
endif
end-policy
!
router rip
interface GigabitEthernet0/6/0/0
route-policy policy_in in
!
interface GigabitEthernet0/6/0/2
!
route-policy infil in
route-policy pass-all out
Configuring Passive Interfaces and Explicit Neighbors for RIP: Example
The following example shows how to configure passive interfaces and explicit neighbors. When an
interface is passive, it only accepts routing updates. In other words, no updates are sent out of an
interface except to neighbors configured explicitly.
router rip
interface GigabitEthernet0/6/0/0
passive-interface
!
interface GigabitEthernet0/6/0/2
!
neighbor 172.17.0.1
neighbor 172.18.0.5
!
Controlling RIP Routes: Example
The following example shows how to use the distance command to install RIP routes in the Routing
Information Base (RIB). The maximum-paths command controls the number of maximum paths
allowed per RIP route.
router rip
interface GigabitEthernet0/6/0/0
route-policy polin in
!
distance 110
maximum-paths 8
!
Additional References
The following sections provide references related to implementing RIP on Cisco IOS XR software.
Cisco IOS XR Routing Configuration Guide
RC-334
Implementing RIP on Cisco IOS XR Software
Additional References
Related Documents
Related Topic
Document Title
RIP commands: complete command syntax, command Cisco IOS XR Routing Command Reference, Release 3.5
modes, command history, defaults, usage guidelines,
and examples
MPLS VPN support for RIP feature information
Implementing MPLS Traffic Engineering on Cisco IOS XR Software
module in Cisco IOS XR Multiprotocol Label Switching
Configuration Guide, Release 3.5
Site of Origin (SoO) support for RIP feature
information
Implementing MPLS Traffic Engineering on Cisco IOS XR Software
module in Cisco IOS XR Multiprotocol Label Switching
Configuration Guide, Release 3.5
Cisco CRS-1 router getting started material
Cisco CRS-1 Carrier Routing System Getting Started Guide,
Release 3.5
Information about user groups and task IDs
Configuring AAA Services on Cisco IOS-XR Software module of
Cisco IOS XR System Security Configuration Guide, Release 3.5
Standards
Standards
Title
No new or modified standards are supported by this
—
feature, and support for existing standards has not been
modified by this feature.
MIBs
MIBs
MIBs Link
—
To locate and download MIBs using Cisco IOS XR software, use the
Cisco MIB Locator found at the following URL and choose a
platform under the Cisco Access Products menu:
http://cisco.com/public/sw-center/netmgmt/cmtk/mibs.shtml
RFCs
RFCs
Title
RFC 2453
RIP Version 2
Cisco IOS XR Routing Configuration Guide
RC-335
Implementing RIP on Cisco IOS XR Software
Additional References
Technical Assistance
Description
Link
The Cisco Technical Support website contains
http://www.cisco.com/techsupport
thousands of pages of searchable technical content,
including links to products, technologies, solutions,
technical tips, and tools. Registered Cisco.com users
can log in from this page to access even more content.
Cisco IOS XR Routing Configuration Guide
RC-336
Implementing Routing Policy on Cisco IOS XR
Software
A routing policy instructs the router to inspect routes, filter them, and potentially modify their attributes
as they are accepted from a peer, advertised to a peer, or redistributed from one routing protocol to
another. Routing protocols make decisions to advertise, aggregate, discard, distribute, export, hold,
import, redistribute and otherwise modify routes based on configured routing policy.
The routing policy language (RPL) has been designed to provide a single, straightforward language in
which all routing policy needs can be expressed. RPL was designed to support large-scale routing
configurations. It greatly reduces the redundancy inherent in previous routing policy configuration
methods. RPL has been designed to streamline routing policy configuration, to reduce system resources
required to store and process these configurations, and to simplify troubleshooting.
Note
For more information about routing policy on the Cisco IOS XR software and complete descriptions of
the routing policy commands listed in this module, see the “Related Documents” section of this module.
To locate documentation for other commands that might appear during execution of a configuration task,
search online in the Cisco IOS XR software master command index.
Feature History for Implementing Routing Policy on Cisco IOS XR Software
Release
Modification
Release 2.0
This feature was introduced on the Cisco CRS-1.
Release 3.0
No modification.
Release 3.2
Support was added for the Cisco XR 12000 Series Router.
Release 3.3.0
Support was added for EIGRP, RIP policy, clear-policy, debug, OSPF
area-in, and OSPF area-out attach points.
Release 3.4.0
Support was added for the BGP next-hop attach point. Support was also
added for null sets and global parameterization.
Release 3.5.0
The following features were added:
•
GNU Nano text editor for editing RPL policies.
•
Enhanced prefix match functionality.
•
Parameterization at attach points
•
New ‘done’ disposition policy statement type
Cisco IOS XR Routing Configuration Guide
RC-337
Implementing Routing Policy on Cisco IOS XR Software
Contents
Contents
•
Prerequisites for Implementing Routing Policy on Cisco IOS XR Software, page RC-338
•
Information About Implementing Routing Policy on Cisco IOS XR Software, page RC-338
•
How to Implement Routing Policy on Cisco IOS XR Software, page RC-392
•
Configuration Examples for Implementing Routing Policy on Cisco IOS XR Software,
page RC-397
•
Additional References, page RC-400
Prerequisites for Implementing Routing Policy on Cisco IOS XR
Software
The following are prerequisites for implementing Routing Policy on Cisco IOS XR Software:
•
To use this command, you must be in a user group associated with a task group that includes the
proper task IDs. For detailed information about user groups and task IDs, see the Configuring AAA
Services on Cisco IOS XR Software module of the Cisco IOS XR System Security Configuration
Guide.
•
Border Gateway Protocol (BGP), integrated Intermediate System-to-Intermediate System (IS-IS),
or Open Shortest Path First (OSPF) must be configured in your network.
Information About Implementing Routing Policy on Cisco IOS XR
Software
To implement RPL, you need to understand the following concepts:
•
Routing Policy Language, page RC-338
•
Routing Policy Configuration Basics, page RC-347
•
Policy Definitions, page RC-347
•
Parameterization, page RC-348
•
Semantics of Policy Application, page RC-349
•
Policy Statements, page RC-354
•
Attach Points, page RC-358
•
Attached Policy Modification, page RC-390
•
Nonattached Policy Modification, page RC-390
Routing Policy Language
This section contains the following information:
•
Routing Policy Language Overview, page RC-339
•
Routing Policy Language Structure, page RC-339
Cisco IOS XR Routing Configuration Guide
RC-338
Implementing Routing Policy on Cisco IOS XR Software
Information About Implementing Routing Policy on Cisco IOS XR Software
•
Routing Policy Language Components, page RC-344
•
Routing Policy Language Usage, page RC-345
Routing Policy Language Overview
RPL was developed to support large-scale routing configurations. RPL has several fundamental
capabilities that differ from those present in configurations oriented to traditional route maps, access
lists, and prefix lists. The first of these capabilities is the ability to build policies in a modular form.
Common blocks of policy can be defined and maintained independently. These common blocks of policy
can then be applied from other blocks of policy to build complete policies. This capability reduces the
amount of configuration information that needs to be maintained. In addition, these common blocks of
policy can be parameterized. This parameterization allows for policies that share the same structure but
differ in the specific values that are set or matched against to be maintained as independent blocks of
policy. For example, three policies that are identical in every way except for the local preference value
they set can be represented as one common parameterized policy that takes the varying local preference
value as a parameter to the policy.
The policy language introduces the notion of sets. Sets are containers of similar data that can be used in
route attribute matching and setting operations. Four set types exist: prefix-sets, community-sets,
as-path-sets, and extcommunity-sets. These sets hold groupings of IPv4 or IPv6 prefixes, community
values, AS path regular expressions, and extended community values, respectively. Sets are simply
containers of data. Most sets also have an inline variant. An inline set allows for small enumerations of
values to be used directly in a policy rather than having to refer to a named set. Prefix lists, community
lists, and AS path lists must be maintained even when only one or two items are in the list. An inline set
in RPL allows the user to place small sets of values directly in the policy body without having to refer
to a named set.
Decision making, such as accept and deny, is explicitly controlled by the policy definitions themselves.
RPL combines matching operators, which may use set data, with the traditional Boolean logic operators
and, or, and not into complex conditional expressions. All matching operations return a true or false
result. The execution of these conditional expressions and their associated actions can then be controlled
by using simple if then, elseif, and else structures, which allow the evaluation paths through the policy
to be fully specified by the user.
Routing Policy Language Structure
This section describes the basic structure of RPL.
Names
The policy language provides two kinds of persistent, namable objects: sets and policies. Definition of
these objects is bracketed by beginning and ending command lines. For example, to define a policy
named test, the configuration syntax would look similar to the following:
route-policy test
[ . . . policy statements . . . ]
end-policy
Legal names for policy objects can be any sequence of the upper- and lowercase alphabetic characters;
the numerals 0 to 9; and the punctuation characters period, hyphen, and underscore. A name must begin
with a letter or numeral.
Cisco IOS XR Routing Configuration Guide
RC-339
Implementing Routing Policy on Cisco IOS XR Software
Information About Implementing Routing Policy on Cisco IOS XR Software
Sets
In this context, the term set is used in its mathematical sense to mean an unordered collection of unique
elements. The policy language provides sets as a container for groups of values for matching purposes.
Sets are used in conditional expressions. The elements of the set are separated by commas. Null (empty)
sets are allowed.
In the following example:
prefix-set backup-routes
# currently no backup routes are defined
end-set
a condition such as:
if destination in backup-routes then
evaluates as FALSE for every route, because there is no match-condition in the prefix set that it satisfies.
Five kinds of sets exist: as-path-set, community-set, extcommunity-set, prefix-set, and rd-set. You may
want to perform comparisons against a small number of elements, such as two or three community
values, for example. To allow for these comparisons, the user can enumerate these values directly. These
enumerations are referred to as inline sets. Functionally, inline sets are equivalent to named sets, but
allow for simple tests to be inline. Thus, comparisons do not require that a separate named set be
maintained when only one or two elements are being compared. See the set types described in the
following sections for the syntax. In general, the syntax for an inline set is a comma-separated list
surrounded by parentheses as follows: (element-entry,element-entry,element-entry, ...element-entry),
where element-entry is an entry of an item appropriate to the type of usage such as a prefix or a
community value.
The following is an example using an inline community set:
route-policy sample-inline
if community matches-any ([10..15]:100) then
set local-preference 100
endif
end-policy
The following is an equivalent example using the named set test-communities:
community-set test-communities
10:100,
11:100,
12:100,
13:100,
14:100,
15:100
end-set
route-policy sample
if community matches-any test-communities then
set local-preference 100
endif
end-policy
Both of these policies are functionally equivalent, but the inline form does not require the configuration
of the community set just to store the six values. You can choose the form appropriate to the
configuration context. In the following sections, examples of both the named set version and the inline
form are provided where appropriate.
Cisco IOS XR Routing Configuration Guide
RC-340
Implementing Routing Policy on Cisco IOS XR Software
Information About Implementing Routing Policy on Cisco IOS XR Software
as-path-set
An AS path set comprises operations for matching an AS path attribute. The only matching operation is
a regular expression match.
Named Set Form
The named set form uses the ios-regex keyword to indicate the type of regular expression and requires
single quotation marks around the regular expression.
The following is a sample definition of a named AS path set:
as-path-set aset1
ios-regex ’_42$’,
ios-regex ’_127$’
end-set
This AS path set comprises two elements. When used in a matching operation, this AS path set matches
any route whose AS path ends with either the autonomous system (AS) number 42 or 127.
To remove the named AS path set, use the no as-path-set aset1 command-line interface (CLI) command.
Inline Set Form
The inline set form is a parenthesized list of comma-separated expressions, as follows:
(ios-regex '_42$', ios-regex '_127$')
This set matches the same AS paths as the previously named set, but does not require the extra effort of
creating a named set separate from the policy that uses it.
community-set
A community-set holds community values for matching against the BGP community attribute. A
community is a 32-bit quantity. Integer community values must be split in half and expressed as two
unsigned decimal integers in the range from 0 to 65535, separated by a colon. Single 32-bit community
values are not allowed. The following is the named set form:
Named Set Form
community-set cset1
12:34,
12:56,
12:78,
internet
end-set
Inline Set Form
(12:34, 12:56, 12:78)
($as:34, $as:$tag1, 12:78, internet)
The inline form of a community-set also supports parameterization. Each 16-bit portion of the
community may be parameterized. See the “Parameterization” section on page RC-348 for more
information.
RPL provides symbolic names for the standard well-known community values: internet is 0:0, no-export
is 65535:65281, no-advertise is 65535:65282, and local-as is 65535:65283.
Cisco IOS XR Routing Configuration Guide
RC-341
Implementing Routing Policy on Cisco IOS XR Software
Information About Implementing Routing Policy on Cisco IOS XR Software
RPL also provides a facility for using wildcards in community specifications. A wildcard is specified by
inserting an asterisk (*) in place of one of the 16-bit portions of the community specification; the
wildcard indicates that any value for that portion of the community matches. Thus, the following policy
matches all communities in which the autonomous system part of the community is 123:
community-set cset3
123:*
end-set
Every community set must contain at least one community value. Empty community sets are invalid and
are rejected.
extcommunity-set
An extended community-set is analogous to a community-set except that it contains extended
community values instead of regular community values. It also supports named forms and inline forms.
There are three types of extended community sets: cost, soo, and rt.
As with community sets, the inline form supports parameterization within parameterized policies. Either
portion of the extended community value can be parameterized.
Note
Wildcards are not supported in extended communities.
Every extended community-set must contain at least one extended community value. Empty extended
community-sets are invalid and rejected.
The following are syntactic examples:
Named Form for Extcommunity-set Cost
A cost set is an extcommunity set used to store cost extended community type communities:
extcommunity-set cost a_cost_set
IGP:1:10
end-set
Named Form for Extcommunity-set RT
An rt set is an extcommunity set used to store route target extended community type communities:
extcommunity-set rt a_rt_set
1.2.3.4:666
1234:666,
1.2.3.4:777,
4567:777
end-set
Inline Set Form for Extcommunity-set RT
(1.2.3.4:666, 1234:666, 1.2.3.4:777, 4567:777)
($ipadrr:666, 1234:$tag, 1.2.3.4:777, $tag2:777)
Named Form for Extcommunity-set Soo
A soo set is an extcommunity set used to store Site-of-Origin (SoO) extended community type
communities:
extcommunity-set soo a_soo_set
1.1.1.1:100,
100:200
end-set
Cisco IOS XR Routing Configuration Guide
RC-342
Implementing Routing Policy on Cisco IOS XR Software
Information About Implementing Routing Policy on Cisco IOS XR Software
prefix-set
A prefix-set holds IPv4 or IPv6 prefix match specifications, each of which has four parts: an address, a
mask length, a minimum matching length, and a maximum matching length. The address is required, but
the other three parts are optional. The address is a standard dotted-decimal IPv4 or colon-separated
hexadecimal IPv6 address. The mask length, if present, is a nonnegative decimal integer in the range
from 0 to 32 (0 to 128 for IPv6) following the address and separated from it by a slash. The optional
minimum matching length follows the address and optional mask length and is expressed as the keyword
ge (mnemonic for greater than or equal to), followed by a nonnegative decimal integer in the range from
0 to 32 (0 to 128 for IPv6). The optional maximum matching length follows the rest and is expressed by
the keyword le (mnemonic for less than or equal to), followed by yet another nonnegative decimal integer
in the range from 0 to 32 (0 to 128 for IPv6). A syntactic shortcut for specifying an exact length for
prefixes to match is the eq keyword (mnemonic for equal to).
If a prefix match specification has no mask length, then the default mask length is 32 for IPv4 and 128
for IPv6. The default minimum matching length is the mask length. If a minimum matching length is
specified, then the default maximum matching length is 32 for IPv4 and 128 for IPv6. Otherwise, if
neither minimum nor maximum is specified, the default maximum is the mask length.
The prefix-set itself is a comma-separated list of prefix match specifications. The following are
examples:
prefix-set legal-ipv4-prefix-examples
10.0.1.1,
10.0.2.0/24,
10.0.3.0/24 ge 28,
10.0.4.0/24 le 28,
10.0.5.0/24 ge 26 le 30,
10.0.6.0/24 eq 28
10.0.7.2/32 ge le 24,
10.0.8.0/26 ge 8 le 16
end-set
prefix-set legal-ipv6-prefix-examples
2001:0:0:1::/64,
2001:0:0:2::/64 ge 96,
2001:0:0:2::/64 ge 96 le 100,
2001:0:0:2::/64 eq 100
end-set
The first element of the prefix-set matches only one possible value, 10.0.1.1/32 or the host address
10.0.1.1. The second element matches only one possible value, 10.0.2.0/24. The third element matches
a range of prefix values, from 10.0.3.0/28 to 10.0.3.255/32. The fourth element matches a range of
values, from 10.0.4.0/24 to 10.0.4.240/28. The fifth element matches prefixes in the range from
10.0.5.0/26 to 10.0.5.252/30. The sixth element matches any prefix of length 28 in the range from
10.0.6.0/28 through 10.0.6.240/28. The seventh element matches any prefix of length 32 in the range
10.0.[0..255].2/32 (from 10.0.0.2/32 to 10.0.255.2). The eighth element matches any prefix of length 26
in the range 10.[0..255].8.0/26 (from 10.0.8.0/26 to 10.255.8.0/26).
The following prefix-set consists entirely of invalid prefix match specifications:
prefix-set ILLEGAL-PREFIX-EXAMPLES
10.1.1.1 ge 16,
10.1.2.1 le 16,
10.1.3.0/24 le 23,
10.1.4.0/24 ge 33,
10.1.5.0/25 ge 29 le 28
end-set
Cisco IOS XR Routing Configuration Guide
RC-343
Implementing Routing Policy on Cisco IOS XR Software
Information About Implementing Routing Policy on Cisco IOS XR Software
Neither the minimum length nor maximum length is valid without a mask length. The maximum length
must be at least the mask length. For IPv4, the minimum length must be less than 32, the maximum
length of an IPv4 prefix. For IPv6, the minimum length must be less than 128, the maximum length of
an IPv6 prefix. The maximum length must be equal to or greater than the minimum length.
rd-set
An rd-set is used to create a set with route distinguisher (RD) elements. An RD set is a 64-bit value
prepended to an IPv4 address to create a globally unique Border Gateway Protocol (BGP) VPN IPv4
address.
You can define RD values with the following commands:
•
a.b.c.d:m:*—BGP VPN RD in IPv4 format with a wildcard character. For example,
10.0.0.2:255.255.0.0:*.
•
a.b.c.d/m:n—BGP VPN RD in IPv4 format with a mask. For example, 10.0.0.2:255.255.0.0:666.
•
a.b.c.d:* —BGP VPN RD in IPv4 format with a wildcard character. For example,
10.0.0.2:255.255.0.0.
•
a.b.c.d:n— BGP VPN RD in IPv4 format. For example, 10.0.0.2:666.
•
asn:*— BGP VPN RD in ASN format with a wildcard character. For example, 10002:255.255.0.0.
•
asn:n—BGP VPN RD in ASN format. For example, 10002:666.
The following is an example of an rd-set:
rd-set rdset1
10.0.0.0/8:*,
10.0.0.0/8:777,
10.0.0.0:*,
10.0.0.0:777,
65000:*,
65000:777
end-set
Routing Policy Language Components
Four main components in the routing policy language are involved in defining, modifying, and using
policies: the configuration front end, policy repository, execution engine, and policy clients themselves.
The configuration front end (CLI) is the mechanism to define and modify policies. This configuration is
then stored on the router using the normal storage means and can be displayed using the normal
configuration show commands.
The second component of the policy infrastructure, the policy repository, has several responsibilities.
First, it compiles the user-entered configuration into a form that the execution engine can understand.
Second, it performs much of the verification of policies; and it ensures that defined policies can actually
be executed properly. Third, it tracks which attach points are using which policies so that when policies
are modified the appropriate clients are properly updated with the new policies relevant to them.
The third component is the execution engine. This component is the piece that actually runs policies as
the clients request. The process can be thought of as receiving a route from one of the policy clients and
then executing the actual policy against the specific route data.
Cisco IOS XR Routing Configuration Guide
RC-344
Implementing Routing Policy on Cisco IOS XR Software
Information About Implementing Routing Policy on Cisco IOS XR Software
The fourth component is the policy clients (the routing protocols). This component calls the execution
engine at the appropriate times to have a given policy be applied to a given route, and then perform some
number of actions. These actions may include deleting the route if policy indicated that it should be
dropped, passing along the route to the protocol decision tree as a candidate for the best route, or
advertising a policy modified route to a neighbor or peer as appropriate.
Routing Policy Language Usage
This section provides basic routing policy language usage examples. See the “How to Implement
Routing Policy on Cisco IOS XR Software” section on page RC-392 for detailed information on how to
implement routing policy language.
The pass policy
The following example shows how the policy accepts all presented routes without modifying the routes.
route-policy quickstart-pass
pass
end-policy
The drop everything policy
The following example shows how the policy explicitly rejects all routes presented to it. This type of
policy is used to ignore everything coming from a specific peer.
route-policy quickstart-drop
drop
end-policy
Ignore routes with specific AS numbers in the path
The following example shows the policy definition in three parts. First, the as-path-set command
defines three regular expressions to match against an AS path. Second, the route-policy command
applies the AS path set to a route. If the AS path attribute of the route matches the regular expression
defined with the as-path-set command, the protocol refuses the route. Third, the route policy is attached
to BGP neighbor 10.0.1.2. BGP consults the policy named ignore_path_as on routes received (imported)
from neighbor 10.0.1.2.
as-path-set ignore_path
ios-regex '_11_',
ios-regex '_22_',
ios-regex '_33_'
end-set
route-policy ignore_path_as
if as-path in ignore_path then
drop
else
pass
endif
end-policy
router bgp 2
neighbor 10.0.1.2 address-family ipv4 unicast policy ignore_path_as in
Cisco IOS XR Routing Configuration Guide
RC-345
Implementing Routing Policy on Cisco IOS XR Software
Information About Implementing Routing Policy on Cisco IOS XR Software
Set community based on MED
The following example shows how the policy tests the MED of a route and modifies the community
attribute of the route based on the value of the MED. If the MED value is 127, the policy adds the
community 123:456 to the route. If the MED value is 63, the policy adds the value 123:789 to the
community attribute of the route. Otherwise, the policy removes the community 123:123 from the route.
In any case, the policy instructs the protocol to accept the route.
route-policy quickstart-med
if med eq 127 then
set community (123:456) additive
elseif med eq 63 then
set community (123:789) additive
else
delete community in (123:123)
endif
pass
end-policy
Set local preference based on community
The following example shows how the community-set named quickstart-communities defines
community values. The route policy named quickstart-localpref tests a route for the presence of the
communities specified in the quickstart-communities community set. If any of the community values are
present in the route, the route policy sets the local preference attribute of the route to 31. In any case, the
policy instructs the protocol to accept the route.
community-set quickstart-communities
987:654,
987:543,
987:321,
987:210
end-set
route-policy quickstart-localpref
if community matches-any quickstart-communities then
set local-preference 31
endif
pass
end-policy
Persistent Remarks
The following example shows how comments are placed in the policy to clarify the meaning of the
entries in the set and the statements in the policy. The remarks are persistent, meaning they remain
attached to the policy. For example, remarks are displayed in the output of the show running-config
command. Adding remarks to the policy makes the policy easier to understand, modify at a later date,
and troubleshoot if an unexpected behavior occurs.
prefix-set rfc1918
# These are the networks defined as private in RFC1918 (including
# all subnets thereof)
10.0.0.0/8 ge 8,
172.16.0.0/12 ge 12,
192.168.0.0/16 ge 16
end-set
route-policy quickstart-remarks
# Handle routes to RFC1918 networks
if destination in rfc1918 then
# Set the community such that we do not export the route
set community (no-export) additive
Cisco IOS XR Routing Configuration Guide
RC-346
Implementing Routing Policy on Cisco IOS XR Software
Information About Implementing Routing Policy on Cisco IOS XR Software
endif
end-policy
Routing Policy Configuration Basics
Route policies comprise series of statements and expressions that are bracketed with the route-policy
and end-policy keywords. Rather than a collection of individual commands (one for each line), the
statements within a route policy have context relative to each other. Thus, instead of each line being an
individual command, each policy or set is an independent configuration object that can be used, entered,
and manipulated as a unit.
Each line of a policy configuration is a logical subunit. At least one new line must follow the then, else,
and end-policy keywords. A new line must also follow the closing parenthesis of a parameter list and
the name string in a reference to an AS path set, community set, extended community set, or prefix set.
At least one new line must precede the definition of a route policy, AS path set, community set, extended
community set, or prefix set. One or more new lines can follow an action statement. One or more new
lines can follow a comma separator in a named AS path set, community set, extended community set, or
prefix set. A new line must appear at the end of a logical unit of policy expression and may not appear
anywhere else.
Policy Definitions
Policy definitions create named sequences of policy statements. A policy definition consists of the CLI
route-policy keyword followed by a name, a sequence of policy statements, and the end-policy
keyword. For example, the following policy drops any route it encounters:
route-policy drop-everything
drop
end-policy
The name serves as a handle for binding the policy to protocols. To remove a policy definition, issue the
no route-policy name command.
Policies may also refer to other policies such that common blocks of policy can be reused. This reference
to other policies is accomplished by using the apply statement, as shown in the following example:
route-policy check-as-1234
if as-path passes-through ‘1234.5’ then
apply drop-everything
else
pass
endif
end-policy
The apply statement indicates that the policy drop-everything should be executed if the route under
consideration passed through autonomous system 1234.5 before it is received. If a route that has
autonomous system 1234.5 in its AS path is received, the route is dropped; otherwise, the route is
accepted without modification. This policy is an example of a hierarchical policy. Thus, the semantics
of the apply statement are just as if the applied policy were cut and pasted into the applying policy:
route-policy check-as-1234-prime
if as-path passes-through '1234.5' then
drop
else
pass
endif
end-policy
Cisco IOS XR Routing Configuration Guide
RC-347
Implementing Routing Policy on Cisco IOS XR Software
Information About Implementing Routing Policy on Cisco IOS XR Software
You may have as many levels of hierarchy as desired. However, many levels may be difficult to maintain
and understand.
Parameterization
In addition to supporting reuse of policies using the apply statement, policies can be defined that allow
for parameterization of some of the attributes. The following example shows how to define a
parameterized policy named param-example. In this case, the policy takes one parameter, $mytag.
Parameters always begin with a dollar sign and consist otherwise of any alphanumeric characters.
Parameters can be substituted into any attribute that takes a parameter.
In the following example, a 16-bit community tag is used as a parameter:
route-policy param-example ($mytag)
set community (1234:$mytag) additive
end-policy
This parameterized policy can then be reused with different parameterization, as shown in the following
example. In this manner, policies that share a common structure but use different values in some of their
individual statements can be modularized. For details on which attributes can be parameterized, see the
individual attribute sections.
route-policy origin-10
if as-path originates-from ‘10.5’ then
apply param-example(10.5)
else
pass
endif
end-policy
route-policy origin-20
if as-path originates-from ‘20.5’ then
apply param-example(20.5)
else
pass
endif
end-policy
The parameterized policy param-example provides a policy definition that is expanded with the values
provided as the parameters in the apply statement. Note that the policy hierarchy is always maintained,
Thus, if the definition of param-example changes, then the behavior of origin_10 and origin_20 changes
to match.
The effect of the origin-10 policy is that it adds the community 1234:10 to all routes that pass through
this policy and have an AS path indicating the route originated from autonomous system 10. The
origin-20 policy is similar except that it adds to community 1234:20 for routes originating from
autonomous system 20.
Parameterization at Attach Points
In addition to supporting parameterization using the apply statement described in the “Parameterization”
section on page RC-348, policies can also be defined that allow for parameterization of some of the
attributes at attach points. Parameterization at BGP neighbor inbound and neighbor outbound attach
points is supported.
Cisco IOS XR Routing Configuration Guide
RC-348
Implementing Routing Policy on Cisco IOS XR Software
Information About Implementing Routing Policy on Cisco IOS XR Software
In the example below, we define a parameterized policy "param-example". In this example, the policy
takes two parameters "$mymed" and “$prefixset”. Parameters always begin with a dollar sign, and
consist otherwise of any alphanumeric characters. Parameters can be substituted into any attribute that
takes a parameter. In this example we are passing a MED value and prefix set name as parameters.
route-policy param-example ($mymed, $prefixset)
if destination in $prefixset then
set med $mymed
endif
end-policy
This parameterized policy can then be reused with different parameterizations as shown in the example
below. In this manner, policies that share a common structure but use different values in some of their
individual statements can be modularized. For details on which attributes can be parameterized, see the
individual attributes for each protocol.
router bgp 2
neighbor 10.1.1.1
remote-as 3
address-family ipv4 unicast
route-policy param-example(10, prefix_set1)
route-policy param-example(20, prefix_set2)
The parameterized policy param-example provides a policy definition that is expanded with the values
provided as the parameters in the neighbor route-policy in and out statement.
Global Parameterization
RPL supports the definition of systemwide global parameters that can be used inside policy definition.
Global parameters can be configured as follows:
Policy-global
glbpathtype ‘ebgp’
glbtag ‘100’
end-global
The global parameter values can be used directly inside a policy definition similar to the local parameters
of parameterized policy. In the following example, the globalparam argument, which makes use of the
global parameters gbpathtype and glbtag, is defined for a nonparameterized policy.
route-policy globalparam
if path-type is $glbpathtype then
set tag $glbtag
endif
end-policy
When a parameterized policy has a parameter name “collision” with a global parameter name,
parameters local to policy definition take precedence, effectively masking off global parameters. In
addition, a validation mechanism is in place to prevent the deletion of a particular global parameter if it
is referred by any policy.
Semantics of Policy Application
This section discusses how routing policies are evaluated and applied. The following concepts are
discussed:
•
Boolean Operator Precedence, page RC-350
•
Multiple Modifications of the Same Attribute, page RC-350
Cisco IOS XR Routing Configuration Guide
RC-349
Implementing Routing Policy on Cisco IOS XR Software
Information About Implementing Routing Policy on Cisco IOS XR Software
•
When Attributes Are Modified, page RC-351
•
Default Drop Disposition, page RC-351
•
Control Flow, page RC-352
•
Policy Verification, page RC-352
Boolean Operator Precedence
Boolean expressions are evaluated in order of operator precedence, from left to right. The highest
precedence operator is not, followed by and, and then or. The following expression:
med eq 10 and not destination in (10.1.3.0/24) or community matches-any ([10..25]:35)
if fully parenthesized to display the order of evaluation, would look like this:
(med eq 10 and (not destination in (10.1.3.0/24))) or community matches-any ([10..25]:35)
The inner not applies only to the destination test; the and combines the result of the not expression with
the Multi Exit Discriminator (MED) test; and the or combines that result with the community test. If the
order of operations are rearranged:
not med eq 10 and destination in (10.1.3.0/24) or community matches-any ([10..25]:35)
then the expression, fully parenthesized, would look like the following:
((not med eq 10) and destination in (10.1.3.0/24)) or community matches-any ([10..25]:35)
Multiple Modifications of the Same Attribute
When a policy replaces the value of an attribute multiple times, the last assignment wins because all
actions are executed. Because the MED attribute in BGP is one unique value, the last value to which it
gets set to wins. Therefore, the following policy results in a route with a MED value of 12:
set
set
set
set
med
med
med
med
9
10
11
12
This example is trivial, but the feature is not. It is possible to write a policy that effectively changes the
value for an attribute. For example:
set med 8
if community matches-any cs1 then
set local-preference 122
if community matches-any cs2 then
set med 12
endif
endif
The result is a route with a MED of 8, unless the community list of the route matches both cs1 and cs2,
in which case the result is a route with a MED of 12.
In the case in which the attribute being modified can contain only one value, it is easy to think of this
case as the last statement wins. However, a few attributes can contain multiple values and the result of
multiple actions on the attribute is cumulative rather than as a replacement. The first of these cases is the
use of the additive keyword on community and extended community evaluation. Consider a policy of
the form:
route-policy community-add
set community (10:23)
Cisco IOS XR Routing Configuration Guide
RC-350
Implementing Routing Policy on Cisco IOS XR Software
Information About Implementing Routing Policy on Cisco IOS XR Software
set community (10:24) additive
set community (10:25) additive
end-policy
This policy sets the community string on the route to contain all three community values: 10:23, 10:24,
and 10:25.
The second of these cases is AS path prepending. Consider a policy of the form:
route-policy prepend-example
prepend as-path 2.5 3
prepend as-path 666.5 2
end-policy
This policy prepends 666.5 666.5 2.5 2.5 2.5 to the AS path. This prepending is a result of all actions
being taken and to the AS path being an attribute that contains an array of values rather than a simple
scalar value.
When Attributes Are Modified
A policy does not modify route attribute values until all tests have been completed. In other words,
comparison operators always run on the initial data in the route. Intermediate modifications of the route
attributes do not have a cascading effect on the evaluation of the policy. Take the following example:
if
med eq 12 then
set med 42
if med eq 42 then
drop
endif
endif
This policy never executes the drop statement because the second test (med eq 42) sees the original,
unmodified value of the MED in the route. Because the MED has to be 12 to get to the second test, the
second test always returns false.
Default Drop Disposition
All route policies have a default action to drop the route under evaluation unless the route has been
modified by a policy action or explicitly passed. Applied (nested) policies implement this disposition as
though the applied policy were pasted into the point where it is applied.
Consider a policy to allow all routes in the 10 network and set their local preference to 200 while
dropping all other routes. You might write the policy as follows:
route-policy two
if destination in (10.0.0.0/8 ge 8 le 32) then
set local-preference 200
endif
end-policy
route-policy one
apply two
end-policy
It may appear that policy one drops all routes because it neither contains an explicit pass statement nor
modifies a route attribute. However, the applied policy does set an attribute for some routes and this
disposition is passed along to policy one. The result is that policy one passes routes with destinations in
network 10, and drops all others.
Cisco IOS XR Routing Configuration Guide
RC-351
Implementing Routing Policy on Cisco IOS XR Software
Information About Implementing Routing Policy on Cisco IOS XR Software
Control Flow
Policy statements are processed sequentially in the order in which they appear in the configuration.
Policies that hierarchically reference other policy blocks are processed as if the referenced policy blocks
had been directly substituted inline. For example, if the following policies are defined:
route-policy one
set weight 100
end-policy
route-policy two
set med 200
end-policy
route-policy three
apply two
set community (2:666) additive
end-policy
route-policy four
apply one
apply three
pass
end-policy
Policy four could be rewritten in an equivalent way as follows:
route-policy four-equivalent
set weight 100
set med 200
set community (2:666) additive
pass
end-policy
Note
The pass statement is not required and can be removed to represent the equivalent policy in another way.
Policy Verification
Several different types of verification occur when policies are being defined and used.
Range Checking
As policies are being defined, some simple verifications, such as range checking of values, is done. For
example, the MED that is being set is checked to verify that it is in a proper range for the MED attribute.
However, this range checking cannot cover parameter specifications because they may not have defined
values yet. These parameter specifications are verified when a policy is attached to an attach point. The
policy repository also verifies that there are no recursive definitions of policy, and that parameter
numbers are correct. At attach time, all policies must be well formed. All sets and policies that they
reference must be defined and have valid values. Likewise, any parameter values must also be in the
proper ranges.
Incomplete Policy and Set References
As long as a given policy is not attached at an attach point, the policy is allowed to refer to nonexistent
sets and policies, which allows for freedom of workflow. You can build configurations that reference sets
or policy blocks that are not yet defined, and then can later fill in those undefined policies and sets,
thereby achieving much greater flexibility in policy definition. Every piece of policy you want to
Cisco IOS XR Routing Configuration Guide
RC-352
Implementing Routing Policy on Cisco IOS XR Software
Information About Implementing Routing Policy on Cisco IOS XR Software
reference while defining a policy need not exist in the configuration. Thus, a user can define a policy
sample that references the policy bar using an apply statement even if the policy bar does not exist.
Similarly, a user can enter a policy statement that refers to a nonexistent set.
However, the existence of all referenced policies and sets is enforced when a policy is attached. If you
attempt to attach the policy sample with the reference to an undefined policy bar at an inbound BGP
policy using the neighbor 1.2.3.4 address-family ipv4 unicast policy sample in command, the
configuration attempt is rejected because the policy bar does not exist.
Likewise, you cannot remove a route policy or set that is currently in use at an attach point because this
removal would result in an undefined reference. An attempt to remove a route policy or set that is
currently in use results in an error message to the user.
A condition exists that is referred to as a null policy in which the policy bar exists but has no statements,
actions, or dispositions in it. In other words, the policy bar does exist as follows:
route-policy bar
end-policy
This is a valid policy block. It effectively forces all routes to be dropped because it is a policy block that
never modifies a route, nor does it include the pass statement. Thus, the default action of drop for the
policy block is followed.
Attached Policy Modification
Policies that are in use do, on occasion, need to be modified. Traditionally, configuration changes are
done by completely removing the relevant configuration and then re-entering it. However, this allows for
a window of time in which no policy is attached and the default action takes place. RPL provides a
mechanism for an atomic change so that if a policy is redeclared, or edited using a text editor, the new
configuration is applied immediately—which allows for policies that are in use to be changed without
having a window of time in which no policy is applied at the given attach point.
Verification of Attribute Comparisons and Actions
The policy repository knows which attributes, actions, and comparisons are valid at each attach point.
When a policy is attached, these actions and comparisons are verified against the capabilities of that
particular attach point. Take, for example, the following policy definition:
route-policy bad
set med 100
set level level-1-2
set ospf-metric 200
end-policy
This policy attempts to perform actions to set the BGP attribute med, IS-IS attribute level, and OSPF
attribute cost. The system allows you to define such a policy, but it does not allow you to attach such a
policy. If you had defined the policy bad and then attempted to attach it as an inbound BGP policy using
the BGP configuration statement neighbor 1.2.3.4 address-family ipv4 unicast route-policy bad in the
system would reject this configuration attempt. This rejection results from the verification process
checking the policy and realizing that while BGP could set the MED, it has no way of setting the level
or cost as the level and cost are attributes of IS-IS and OSPF, respectively. Instead of silently omitting
the actions that cannot be done, the system generates an error to the user. Likewise, a valid policy in use
at an attach point cannot be modified in such a way as to introduce an attempt to modify a nonexistent
attribute or to compare against a nonexistent attribute. The verifiers test for nonexistent attributes and
reject such a configuration attempt.
Cisco IOS XR Routing Configuration Guide
RC-353
Implementing Routing Policy on Cisco IOS XR Software
Information About Implementing Routing Policy on Cisco IOS XR Software
Policy Statements
Four types of policy statements exist: remark, disposition (drop and pass), action (set), and if
(comparator).
Remark
A remark is text attached to policy configuration but otherwise ignored by the policy language parser.
Remarks are useful for documenting parts of a policy. The syntax for a remark is text that has each line
prepended with a pound sign (#):
# This is a simple one-line remark.
#
#
#
#
This
is a remark
comprising multiple
lines.
In general, remarks are used between complete statements or elements of a set. Remarks are not
supported in the middle of statements or within an inline set definition.
Unlike traditional !-comments in the CLI, RPL remarks persist through reboots and when configurations
are saved to disk or a TFTP server and then loaded back onto the router.
Disposition
If a policy modifies a route, by default the policy accepts the route. RPL provides a statement to force
the opposite—the drop statement. If a policy matches a route and executes a drop, the policy does not
accept the route. If a policy does not modify the route, by default the route is dropped. To prevent the
route from being dropped, the pass statement is used.
The drop statement indicates that the action to take is to discard the route. When a route is dropped, no
further execution of policy occurs. For example, if after executing the first two statements of a policy the
drop statement is encountered, the policy stops and the route is discarded.
Note
All policies have a default drop action at the end of execution.
The pass statement allows a policy to continue executing even though the route has not been modified.
When a policy has finished executing, any route that has been modified in the policy or any route that
has received a pass disposition in the policy, successfully passes the policy and completes the execution.
If route policy B_rp is applied within route policy A_rp, execution continues from policy A_rp to policy
B_rp and back to policy A_rp provided prefix is not dropped by policy B_rp.
route-policy A_rp
set community (10:10)
apply B_rp
end-policy
!
route-policy B_rp
if destination in (121.23.0.0/16 le 32, 155.12.0.0/16 le 32) then
set community (121:155) additive
endif
end-policy
!
Cisco IOS XR Routing Configuration Guide
RC-354
Implementing Routing Policy on Cisco IOS XR Software
Information About Implementing Routing Policy on Cisco IOS XR Software
By default, a route is dropped at the end of policy processing unless either the policy modifies a route
attribute or it passes the route by means of an explicit pass statement. For example, if route-policy B is
applied within route-policy A, then execution continues from policy A to policy B and back to policy A,
provided the prefix is not dropped by policy B.
route-policy A
if as-path neighbor-is '123' then
apply B
policy statement N
end-policy
Whereas the following policies pass all routes that they evaluate.
route-policy PASS-ALL
pass
end-policy
route-policy SET-LPREF
set local-preference 200
end-policy
In addition to being implicitly dropped, a route may be dropped by an explicit drop statement. Drop
statements cause a route to be dropped immediately so that no further policy processing is done. Note
also that a drop statement overrides any previously processed pass statements or attribute modifications.
For example, the following policy drops all routes. The first pass statement is executed, but is then
immediately overridden by the drop statement. The second pass statement never gets executed.
route-policy DROP-EXAMPLE
pass
drop
pass
end-policy
When one policy applies another, it is as if the applied policy were copied into the right place in the
applying policy, and then the same drop-and-pass semantics are put into effect. For example, policies
ONE and TWO are equivalent to policy ONE-PRIME:
route-policy ONE
apply two
if as-path neighbor-is '123' then
pass
endif
end-policy
route-policy TWO
if destination in (10.0.0.0/16 le 32) then
drop
endif
end-policy
route-policy ONE-PRIME
if destination in (10.0.0.0/16 le 32) then
drop
endif
if as-path neighbor-is '123' then
pass
endif
end-policy
Cisco IOS XR Routing Configuration Guide
RC-355
Implementing Routing Policy on Cisco IOS XR Software
Information About Implementing Routing Policy on Cisco IOS XR Software
Because the effect of an explicit drop statement is immediate, routes in 10.0.0.0/16 le 32 are dropped
without any further policy processing. Other routes are then considered to see if they were advertised by
autonomous system 123. If they were advertised, they are passed; otherwise, they are implicitly dropped
at the end of all policy processing.
The done statement indicates that the action to take is to stop executing the policy and accept the route.
When encountering a done statement, the route is passed and no further policy statements are executed.
All modifications made to the route prior to the done statement are still valid.
Action
An action is a sequence of primitive operations that modify a route. Most actions, but not all, are
distinguished by the set keyword. In a route policy, actions can be grouped together. For example, the
following is a route policy comprising three actions:
route-policy actions
set med 217
set community (12:34) additive
delete community in (12:56)
end-policy
If
In its simplest form, an if statement uses a conditional expression to decide which actions or dispositions
should be taken for the given route. For example:
if as-path in as-path-set-1 then
drop
endif
The example indicates that any routes whose AS path is in the set as-path-set-1 are dropped. The contents
of the then clause may be an arbitrary sequence of policy statements.
The following example contains two action statements:
if origin is igp then
set med 42
prepend as-path 73.5 5
endif
The CLI provides support for the exit command as an alternative to the endif command.
The if statement also permits an else clause, which is executed if the if condition is false:
if med eq 8 then
set community (12:34) additive
else
set community (12:56) additive
endif
The policy language also provides syntax, using the elseif keyword, to string together a sequence of tests:
if med eq 150 then
set local-preference
elseif med eq 200 then
set local-preference
elseif med eq 250 then
set local-preference
else
set local-preference
endif
Cisco IOS XR Routing Configuration Guide
RC-356
10
60
110
0
Implementing Routing Policy on Cisco IOS XR Software
Information About Implementing Routing Policy on Cisco IOS XR Software
The statements within an if statement may themselves be if statements, as shown in the following
example:
if community matches-any (12:34,56:78) then
if med eq 150 then
drop
endif
set local-preference 100
endif
This policy example sets the value of the local preference attribute to 100 on any route that has a
community value of 12:34 or 56:78 associated with it. However, if any of these routes has a MED value
of 150, then these routes with either the community value of 12:34 or 56:78 and a MED of 150 are
dropped.
Boolean Conditions
In the previous section describing the if statement, all of the examples use simple Boolean conditions
that evaluate to either true or false. RPL also provides a way to build compound conditions from simple
conditions by means of Boolean operators.
Three Boolean operators exist: negation (not), conjunction (and), and disjunction (or). In the policy
language, negation has the highest precedence, followed by conjunction, and then by disjunction.
Parentheses may be used to group compound conditions to override precedence or to improve
readability.
The following simple condition:
med eq 42
is true only if the value of the MED in the route is 42, otherwise it is false.
A simple condition may also be negated using the not operator:
not next-hop in (10.0.2.2)
Any Boolean condition enclosed in parentheses is itself a Boolean condition:
(destination in prefix-list-1)
A compound condition takes either of two forms. It can be a simple expression followed by the and
operator, itself followed by a simple condition:
med eq 42 and next-hop in (10.0.2.2)
A compound condition may also be a simpler expression followed by the or operator and then another
simple condition:
origin is igp or origin is incomplete
An entire compound condition may be enclosed in parentheses:
(med eq 42 and next-hop in (10.0.2.2))
The parentheses may serve to make the grouping of subconditions more readable, or they may force the
evaluation of a subcondition as a unit.
In the following example, the highest-precedence not operator applies only to the destination test, the
and operator combines the result of the not expression with the community test, and the or operator
combines that result with the MED test.
med eq 10 or not destination in (10.1.3.0/24) and community matches-any
([12..34]:[56..78])
Cisco IOS XR Routing Configuration Guide
RC-357
Implementing Routing Policy on Cisco IOS XR Software
Information About Implementing Routing Policy on Cisco IOS XR Software
With a set of parentheses to express the precedence, the result is the following:
med eq 10 or ((not destination in (10.1.3.0/24)) and community matches-any
([12..34]:[56..78])
The following is another example of a complex expression:
(origin is igp or origin is incomplete or not med eq 42) and next-hop in (10.0.2.2)
The left conjunction is a compound condition enclosed in parentheses. The first simple condition of the
inner compound condition tests the value of the origin attribute; if it is Interior Gateway Protocol (IGP),
then the inner compound condition is true. Otherwise, the evaluation moves on to test the value of the
origin attribute again, and if it is incomplete, then the inner compound condition is true. Otherwise, the
evaluation moves to check the next component condition, which is a negation of a simple condition.
apply
As discussed in the sections on policy definitions and parameterization of policies, the apply command
executes another policy (either parameterized or unparameterized) from within another policy, which
allows for the reuse of common blocks of policy. When combined with the ability to parameterize
common blocks of policy, the apply command becomes a powerful tool for reducing repetitive
configuration.
Attach Points
Policies do not become useful until they are applied to routes, and for policies to be applied to routes
they need to be made known to routing protocols. In BGP, for example, there are several situations where
policies can be used, the most common of these is defining import and export policy. The policy attach
point is the point in which an association is formed between a specific protocol entity, in this case a BGP
neighbor, and a specific named policy. It is important to note that a verification step happens at this point.
Each time a policy is attached, the given policy and any policies it may apply are checked to ensure that
the policy can be validly used at that attach point. For example, if a user defines a policy that sets the
IS-IS level attribute and then attempts to attach this policy as an inbound BGP policy, the attempt would
be rejected because BGP routes do not carry IS-IS attributes. Likewise, when policies are modified that
are in use, the attempt to modify the policy is verified against all current uses of the policy to ensure that
the modification is compatible with the current uses.
Each protocol has a distinct definition of the set of attributes (commands) that compose a route. For
example, BGP routes may have a community attribute, which is undefined in OSPF. Routes in IS-IS have
a level attribute, which is unknown to BGP. Routes carried internally in the RIB may have a tag attribute.
When a policy is attached to a protocol, the protocol checks the policy to ensure the policy operates using
route attributes known to the protocol. If the protocol uses unknown attributes, then the protocol rejects
the attachment. For example, OSPF rejects attachment of a policy that tests the values of BGP
communities.
The situation is made more complex by the fact that each protocol has access to at least two distinct route
types. In addition to native protocol routes, for example BGP or IS-IS, some protocol policy attach points
operate on RIB routes, which is the common central representation. Using BGP as an example, the
protocol provides an attach point to apply policy to routes redistributed from the RIB to BGP. An attach
point dealing with two different kinds of routes permits a mix of operations: RIB attribute operations for
matching and BGP attribute operations for setting.
Cisco IOS XR Routing Configuration Guide
RC-358
Implementing Routing Policy on Cisco IOS XR Software
Information About Implementing Routing Policy on Cisco IOS XR Software
Note
The protocol configuration rejects attempts to attach policies that perform unsupported operations.
The following sections describe the protocol attach points, including information on the attributes
(commands) and operations that are valid for each attach point.
•
BGP Policy Attach Points, page RC-359
•
OSPF Policy Attach Points, page RC-379
•
OSPFv3 Policy Attach Points, page RC-381
•
IS-IS Policy Attach Points, page RC-382
•
EIGRP Policy Attach Points, page RC-384
•
RIP Policy Attach Points, page RC-387
See Cisco IOS XR Routing Command Reference for more information on the attributes and operations.
BGP Policy Attach Points
This section describes each of the BGP policy attach points and provides a summary of the BGP
attributes and operators.
•
Aggregation, page RC-359
•
Dampening, page RC-360
•
Default Originate, page RC-361
•
Neighbor Export, page RC-361
•
Neighbor Import, page RC-362
•
Network, page RC-362
•
Redistribute, page RC-363
•
Show BGP, page RC-363
•
Table Policy, page RC-364
•
Import, page RC-365
•
Export, page RC-365
•
Retain Route-Target, page RC-366
•
Allocate-Label, page RC-367
•
Neighbor-ORF, page RC-367
•
Next-hop, page RC-368
•
Clear-Policy, page RC-368
•
Debug, page RC-368
Aggregation
The aggregation attach point generates an aggregate route to be advertised based on the conditional
presence of subcomponents of that aggregate. Policies attached at this attach point are also able to set
any of the valid BGP attributes on the aggregated routes. For example, the policy could set a community
value or a MED on the aggregate that is generated. The specified aggregate is generated if any routes
Cisco IOS XR Routing Configuration Guide
RC-359
Implementing Routing Policy on Cisco IOS XR Software
Information About Implementing Routing Policy on Cisco IOS XR Software
evaluated by the named policy pass the policy. More specifics of the aggregate are filtered using the
suppress-route keyword. Any actions taken to set attributes in the route affect attributes on the
aggregate.
In the policy language, the configuration is controlled by which routes pass the policy. The suppress map
was used to selectively filter or suppress specific components of the aggregate when the summary-only
flag is not set. In other words, when the aggregate and more specific components are being sent, some
of the more specific components can be filtered using a suppress map. In the policy language, this is
controlled by selecting the route and setting the suppress flag. The attribute-map allowed the user to set
specific attributes on the aggregated route. In the policy language, setting attributes on the aggregated
route is controlled by normal action operations.
In the following example, the aggregate address 10.0.0.0/8 is generated if there are any component routes
in the range 10.0.0.0/8 ge 8 le 25 except for 10.2.0.0/24. Because summary-only is not set, all
components of the aggregate are advertised. However, the specific component 10.1.0.0 are suppressed.
route-policy sample
if destination in (10.0.0.0/8 ge 8 le 25) then
set community (10:33)
endif
if destination in (10.2.0.0/24) then
drop
endif
if destination in (10.1.0.0/24) then
suppress-route
endif
end-policy
router bgp 2
address-family ipv4
aggregate-address 10.0.0.0/8 route-policy sample
.
.
.
The effect of aggregation policy on the attributes of the aggregate is cumulative. Every time an
aggregation policy matches a more specific route, the set operations in the policy may modify the
aggregate. The aggregate in the following example has a MED value that varies according to the number
of more specific routes that comprise the aggregate.
route-policy bumping-aggregation
set med +5
end-policy
If there are three matching more specific routes, the MED of the aggregate is the default plus 15; if there
are seventeen more specific routes, the MED of the aggregate is the default plus 85.
The order that the aggregation policy is applied to prefix paths is deterministic but unspecified. That is,
a given set of routes always appears in the same order, but there is no way to predict the order.
A drop in aggregation policy does not prevent generation of an aggregate, but it does prevent the current
more specific route from contributing to the aggregate. If another more specific route gives the route a
pass, the aggregate is generated. Only one more specific pass is required to generate an aggregate.
Dampening
The dampening attach point controls the default route-dampening behavior within BGP. Unless
overridden by a more specific policy on the associate peer, all routes in BGP apply the associated policy
to set their dampening attributes.
Cisco IOS XR Routing Configuration Guide
RC-360
Implementing Routing Policy on Cisco IOS XR Software
Information About Implementing Routing Policy on Cisco IOS XR Software
The following policy sets dampening values for BGP IPv4 unicast routes. Those routes that are more
specific than a /25 take longer to recover after they have been dampened than routes that are less specific
than /25.
route-policy sample_damp
if destination in (0.0.0.0/0 ge 25) then
set dampening halflife 30 others default
else
set dampening halflife 20 others default
endif
end-policy
router bgp 2
address-family ipv4 unicast
bgp dampening route-policy sample_damp
.
.
.
Default Originate
The default originate attach point allows the default route (0.0.0.0/0) to be conditionally generated and
advertised to a peer, based on the presence of other routes. It accomplishes this configuration by
evaluating the associated policy against routes in the Routing Information Base (RIB). If any routes pass
the policy, the default route is generated and sent to the relevant peer.
The following policy generates and sends a default-route to the BGP neighbor 10.0.0.1 if any routes that
match 10.0.0.0/8 ge 8 le 32 are present in the RIB.
route-policy sample-originate
if rib-has-route in (10.0.0.0/8 ge 8 le 32) then
pass
endif
end-policy
router bgp 2
neighbor 10.0.0.1
remote-as 3
address-family ipv4 unicast
default-originate policy sample-originate
.
.
.
Neighbor Export
The neighbor export attach point selects the BGP routes to send to a given peer or group of peers. The
routes are selected by running the set of possible BGP routes through the associated policy. Any routes
that pass the policy are then sent as updates to the peer or group of peers. The routes that are sent may
have had their BGP attributes altered by the policy that has been applied.
The following policy sends all BGP routes to neighbor 10.0.0.5. Routes that are tagged with any
community in the range 2:100 to 2:200 are sent with a MED of 100 and a community of 2:666. The rest
of the routes are sent with a MED of 200 and a community of 2:200.
route-policy sample-export
if community matches-any (2:[100-200]) then
set med 100
set community (2:666)
else
set med 200
set community (2:200)
Cisco IOS XR Routing Configuration Guide
RC-361
Implementing Routing Policy on Cisco IOS XR Software
Information About Implementing Routing Policy on Cisco IOS XR Software
endif
end-policy
router bgp 2
neighbor 10.0.0.5
remote-as 3
address-family ipv4 unicast
route-policy sample-export out
.
.
.
Neighbor Import
The neighbor import attach point controls the reception of routes from a specific peer. All routes that are
received by a peer are run through the attached policy. Any routes that pass the attached policy are passed
to the BGP Routing Information Base (BRIB) as possible candidates for selection as best path routes.
When a BGP import policy is modified, it is necessary to rerun all the routes that have been received
from that peer against the new policy. The modified policy may now discard routes that were previously
allowed through, allow through previously discarded routes, or change the way the routes are modified.
A new configuration option in BGP (bgp auto-policy-soft-reset) that allows this modification to happen
automatically in cases for which either soft reconfiguration is configured or the BGP route-refresh
capability has been negotiated.
The following example shows how to receive routes from neighbor 10.0.0.1. Any routes received with
the community 3:100 have their local preference set to 100 and their community tag set to 2:666. All
other routes received from this peer have their local preference set to 200 and their community tag set to
2:200.
route-policy sample_import
if community matches-any (3:100) then
set local-preference 100
set community (2:666)
else
set local-preference 200
set community (2:200)
endif
end-policy
router bgp 2
neighbor 10.0.0.1
remote-as 3
address-family ipv4 unicast
route-policy sample_import in
.
.
.
Network
The network attach point controls the injection of routes from the RIB into BGP. A route policy attached
at this point is able to set any of the valid BGP attributes on the routes that are being injected.
The following example shows a route policy attached at the network attach point that sets the well-known
community no-export for any routes more specific than /24:
route-policy NetworkControl
if destination in (0.0.0.0/0 ge 25) then
set community (no-export) additive
endif
end-policy
Cisco IOS XR Routing Configuration Guide
RC-362
Implementing Routing Policy on Cisco IOS XR Software
Information About Implementing Routing Policy on Cisco IOS XR Software
router bgp 2
address-family ipv4 unicast
network 172.16.0.5/27 route-policy NetworkControl
Redistribute
The redistribute attach point allows routes from other sources to be advertised by BGP. The policy
attached at this point is able to set any of the valid BGP attributes on the routes that are being
redistributed. Likewise, selection operators allow a user to control what route sources are being
redistributed and which routes from those sources.
The following example shows how to redistribute all routes from OSPF instance 12 into BGP. If OSPF
were carrying a default route, it is dropped. Routes carrying a tag of 10 have their local preference set
to 300 and the community value of 2:666 and no-advertise attached. All other routes have their local
preference set to 200 and a community value of 2:100 set.
route-policy sample_redistribute
if destination in (0.0.0.0/0) then
drop
endif
if tag eq 10 then
set local-preference 300
set community (2:666, no-advertise)
else
set local-preference 200
set community (2:100)
endif
end-policy
router bgp 2
address-family ipv4 unicast
redistribute ospf 12 route-policy sample_redistribute
.
.
Show BGP
The show bgp attach point allows the user to display selected BGP routes that pass the given policy. Any
routes that are not dropped by the attached policy are displayed in a manner similar to the output of the
show bgp command.
In the following example, the show bgp route-policy command is used to display any BGP routes
carrying a MED of 5:
route-policy sample-display
if med eq 5 then
pass
endif
end-policy
!
show bgp route-policy sample-display
A show bgp policy route-policy command also exists, which runs all routes in the RIB past the named
policy as if the RIB were an outbound BGP policy. This command then displays what each route looked
like before it was modified and after it was modified, as shown in the following example:
RP/0/RP0/CPU0:router# show rpl route-policy test2
route-policy test2
if (destination in
set med 333
(10.0.0.0/8 ge 8 le 32)) then
Cisco IOS XR Routing Configuration Guide
RC-363
Implementing Routing Policy on Cisco IOS XR Software
Information About Implementing Routing Policy on Cisco IOS XR Software
endif
end-policy
!
RP/0/RP0/CPU0:router# show bgp
BGP router identifier 10.0.0.1, local AS number 2
BGP main routing table version 11
BGP scan interval 60 secs
Status codes:s suppressed, d damped, h history, * valid, > best
i - internal, S stale
Origin codes:i - IGP, e - EGP, ? - incomplete
Network
Next Hop
Metric LocPrf Weight Path
*> 10.0.0.0
10.0.1.2
10
0 3 ?
*> 10.0.0.0/9
10.0.1.2
10
0 3 ?
*> 10.0.0.0/10
10.0.1.2
10
0 3 ?
*> 10.0.0.0/11
10.0.1.2
10
0 3 ?
*> 10.1.0.0/16
10.0.1.2
10
0 3 ?
*> 10.3.30.0/24
10.0.1.2
10
0 3 ?
*> 10.3.30.128/25
10.0.1.2
10
0 3 ?
*> 10.128.0.0/9
10.0.1.2
10
0 3 ?
*> 10.255.0.0/24
10.0.101.2
1000
555
0 100 e
*> 10.255.64.0/24
10.0.101.2
1000
555
0 100 e
....
RP/0/RP0/CPU0:router# show bgp policy route-policy test2
10.0.0.0/8 is advertised to 10.0.101.2
Path info:
neighbor:10.0.1.2
neighbor router id:10.0.1.2
valid external best
Attributes after inbound policy was applied:
next hop:10.0.1.2
MET ORG AS
origin:incomplete neighbor as:3 metric:10
aspath:3
Attributes after outbound policy was applied:
next hop:10.0.1.2
MET ORG AS
origin:incomplete neighbor as:3 metric:333
aspath:2 3
...
Table Policy
The table policy attach point allows the user to configure traffic-index values on routes as they are
installed into the global routing table. This attach point supports the BGP policy accounting feature.
BGP policy accounting uses the traffic indexes that are set on the BGP routes to track various counters.
This way, router operators can select different sets of BGP route attributes using the matching operations
and then set different traffic indexes for each different class of route they are interested in tracking.
The following example shows how to set the traffic index to 10 in IPv4 unicast routes that originated
from autonomous system 10.33. Likewise, any IPv4 unicast routes that originated from autonomous
system 11.60 have their traffic index set to 11 when they are installed into the FIB. These traffic indexes
are then used to count traffic being forwarded on these routes inline cards by enabling the BGP policy
accounting counters on the interfaces of interest.
route-policy sample-table
if as-path originates-from ‘10.33’ then
set traffic-index 10
elseif as-path originates-from ‘11.60’ then
set traffic-index 11
Cisco IOS XR Routing Configuration Guide
RC-364
Implementing Routing Policy on Cisco IOS XR Software
Information About Implementing Routing Policy on Cisco IOS XR Software
endif
end-policy
router bgp 2
address-family ipv4 unicast
table-policy sample-table
.
.
.
Import
The import attach point provides control over the import of routes from the global VPN IPv4 table to a
particular VPN routing and forwarding (VRF) instance.
For Layer 3 VPN networks, provider edge (PE) routers learn of VPN IPv4 routes through the
Multiprotocol Internal Border Gateway Protocol (MP-iBGP) from other PE routers and automatically
filters out route announcements that do not contain route targets that match any import route targets of
its VRFs.
This automatic route filtering happens without RPL configuration; however, to provide more control
over the import of routes in a VRF, you can configure a VRF import policy.
The following example shows how to perform matches based on a route target extended community and
then sets the next hop. If the route has route target value 10:91, then the next hop is set to 206.0.0.1. If
the route has route target value 11:92, then the next hop is set to 206.0.0.2. If the route has Site-of-Origin
(SoO) value 10:111111 or 10:111222, then the route is dropped. All other non-matching routes are
dropped.
route-policy bgpvrf_import
if extcommunity rt matches-any (10:91) then
set next-hop 206.0.0.1
elseif extcommunity rt matches-every (11:92) then
set next-hop 206.0.0.2
elseif extcommunity soo matches-any (10:111111, 10:111222) then
pass
endif
end-policy
vrf vrf_import
address-family ipv4 unicast
import route-policy bgpvrf_import
.
.
.
Export
The export attach point provides control over the export of routes from a particular VRF to a global VPN
IPv4 table.
For Layer 3 VPN networks, export route targets are added to the VPN IPv4 routes when VRF IPv4 routes
are converted into VPN IPv4 routes and advertised through the MP-iBGP to other PE routers (or flow
from one VRF to another within a PE router).
A set of export route targets is configured with the VRF without RPL configuration; however, to set route
targets conditionally, you can configure a VRF export policy.
The following example shows some match and set operations supported for the export route policy. If a
route matches 206.92.1.0/24 then the route target extended community is set to 10:101, and the weight
is set to 211. If the route does not match 206.921.0/24 but the origin of the route is egp, then the local
Cisco IOS XR Routing Configuration Guide
RC-365
Implementing Routing Policy on Cisco IOS XR Software
Information About Implementing Routing Policy on Cisco IOS XR Software
preference is set to 212 and the route target extended community is set to 10:101. If the route does not
match those specified criteria, then the route target extended community 10:111222 is added to the route.
In addition, RT 10:111222 is added to the route that matches any of the previous conditions as well.
route-policy bgpvrf_export
if destination in (206.92.1.0/24) then
set extcommunity rt (10:101)
set weight 211
elseif origin is egp then
set local-preference 212
set extcommunity rt (10:101)
endif
set extcommunity rt (10:111222) additive
end-policy
vrf vrf-export
address-family ipv4 unicast
export route-policy bgpvrf-export
.
.
.
Retain Route-Target
The retain route target attach point within BGP allows the specification of match criteria based only on
route target extended community. The attach point is useful at the route reflector (RR) or at the
Autonomous System Boundary Router (ASBR).
Typically, an RR has to retain all IPv4 VPN routes to peer with its PE routers. These PEs might require
routers tagged with different route target IPv4 VPN routes resulting in non-scalable RRs. You can
achieve scalability if you configure an RR to retain routes with a defined set of route target extended
communities, and a specific set of VPNs to service.
Another reason to use this attach point is for an ASBR. ASBRs do not require that VRFs be configured,
but need this configuration to retain the IPv4 VPN prefix information.
The following example shows how to configure the route policy retainer and apply it to the retain route
target attach point. The route is accepted if the route contains route target extended communities 10:615,
10:6150, and 15.15.15.15.15:15. All other non-matching routes are dropped.
extcommunity-set rt rtset1
0:615,
10:6150,
15.15.15.15.15:15
end-set
route-policy retainer
if extcommunity rt matches-any rtset1 then
pass
endif
end-policy
router bgp 2
address-family vpnv4 unicast
retain route-target route-policy retainer
.
.
.
Cisco IOS XR Routing Configuration Guide
RC-366
Implementing Routing Policy on Cisco IOS XR Software
Information About Implementing Routing Policy on Cisco IOS XR Software
Allocate-Label
The allocate-label attach point provides increased control based on various attribute match operations.
This attach point is typically used in inter-AS option C to decide whether the label should be allocated
or not when sending updates to the neighbor for the IPv4 labeled unicast address family. The attribute
setting actions supported are for pass and drop.
The following example shows how to configure a route policy that passes the prefix 0.0.0.0 with prefix
length 0. Label allocation happens only if prefix 0.0.0.0 exists.
route-policy label_policy
if destination in (0.0.0.0/0) then
pass
endif
end-policy
router bgp 2
vrf vrf1
rd auto
address-family ipv4 unicast
allocate-label route-policy label-policy
.
.
.
Neighbor-ORF
The neighbor-orf attach point provides the filtering of incoming BGP route updates using only
prefix-based matching. In addition to using this as an inbound filter, the prefixes and disposition (drop
or pass) are sent to upstream neighbors as an Outbound Route Filter (ORF) to allow them to perform
filtering.
The following example shows how to configure a route policy orf-preset and apply it to the neighbor
ORF attach point. The prefix of the route is dropped if it matches any prefix specified in orf-preset
(211.105.1.0/24, 211.105.5.0/24, 211.105.11.0/24). In addition to this inbound filtering, BGP also sends
these prefix entries to the upstream neighbor with a permit or deny so that the neighbor can filter updates
before sending them on to their destination.
prefix-set orf-preset
211.105.1.0/24,
211.105.5.0/24,
211.105.11.0/24
end-set
route-policy policy-orf
if orf prefix in orf-preset then
drop
endif
if orf prefix in (211.105.3.0/24, 211.105.7.0/24, 211.105.13.0/24) then
pass
endif
router bgp 2
neighbor 1.1.1.1
remote-as 3
address-family ipv4 unicast
orf route-policy policy-orf
.
.
.
Cisco IOS XR Routing Configuration Guide
RC-367
Implementing Routing Policy on Cisco IOS XR Software
Information About Implementing Routing Policy on Cisco IOS XR Software
Next-hop
The next-hop attach point provides increased control based on protocol and prefix-based match operations.
The attach point is typically used to decide whether to act on a next-hop notification (up or down) event.
The following example shows how to configure a route policy that passes the prefix 20.0.0.0 only with
prefix length 8 and is a static or connected route.
.route-policy nxthp_policy_A
if protocol in bgp then
drop
elseif
pass
endif
router bgp 2
neighbor 10.0.0.1
remote-as 3
address-family ipv4 unicast
nexthop route-policy nxthp_policy_A
.
.
.
Clear-Policy
The clear-policy attach point provides increased control based on various AS path match operations
when using a clear bgp command. This attach point is typically used to decide whether to clear BGP
flap statistics based on AS-path-based match operations.
The following example shows how to configure a route policy where the in operator evaluates to true if
one or more of the regular expression matches in the set my-as-set successfully match the AS path associated
with the route. If it is a match, then the clear command clears the associated flap statistics.
as-path-set my-as-set
ios-regex '_12$',
ios-regex '_13$'
end-set
route-policy policy_a
if as-path in my-as-set then
pass
else
drop
endif
end-policy
clear bgp ipv4 unicast flap-statistics route-policy policy_a
Debug
The debug attach point provides increased control based on prefix-based match operations. This attach
point is typically used to filter debug output for various BGP commands based on the prefix of the route.
The following example shows how to configure a route policy that will only pass the prefix 20.0.0.0 with
prefix length 8; therefore, the debug output shows up only for that prefix.
route-policy policy_b
if destination in (20.0.0.0/8) then
pass
else
drop
Cisco IOS XR Routing Configuration Guide
RC-368
Implementing Routing Policy on Cisco IOS XR Software
Information About Implementing Routing Policy on Cisco IOS XR Software
endif
end-policy
debug bgp update policy_b
BGP Attributes and Operators
Table 5 summarizes the BGP attributes and operators.
Table 5
BGP Attributes and Operators
Attach Point
Attribute
Match
Set
aggregation
as-path
in
is-local
length
neighbor-is
originates-from
passes-through
unique-length
n/a
as-path-length
is, ge, le, eq
n/a
as-path-unique-length
is, ge, le, eq
n/a
community
is-empty
matches-any
matches-every
set
set additive
delete in
delete not in
delete all
destination
in
n/a
extcommunity cost
n/a
set
set additive
med
is, eg, ge, le
set
set +
set -
next-hop
in
set
origin
is
set
source
in
n/a
suppress-route
n/a
suppress-route
weight
n/a
set
Cisco IOS XR Routing Configuration Guide
RC-369
Implementing Routing Policy on Cisco IOS XR Software
Information About Implementing Routing Policy on Cisco IOS XR Software
Table 5
BGP Attributes and Operators (continued)
Attach Point
Attribute
Match
Set
allocate-label
as-path
in
is-local
length
neighbor-is
originates-from
passes-through
unique-length
n/a
as-path-length
is, ge, le, eq
n/a
as-path-unique-length
is, ge, le, eq
n/a
community
is-empty
matches-any
matches-every
n/a
destination
in
n/a
label
n/a
set
med
is, eg, ge, le
n/a
next-hop
in
n/a
origin
is
n/a
source
in
n/a
as-path
in
is-local
length
neighbor-is
originates-from
passes-through
unique-length
n/a
clear-policy
Cisco IOS XR Routing Configuration Guide
RC-370
Implementing Routing Policy on Cisco IOS XR Software
Information About Implementing Routing Policy on Cisco IOS XR Software
Table 5
BGP Attributes and Operators (continued)
Attach Point
Attribute
Match
Set
dampening
as-path
in
is-local
length
neighbor-is
originates-from
passes-through
unique-length
n/a
as-path-length
is, ge, le, eq
n/a
as-path-unique-length
is, ge, le, eq
n/a
community
is-empty
matches-any
matches-every
n/a
dampening
n/a/
set dampening...
to set values that control
the dampening (see
Dampening,
page RC-360)
destination
in
n/a
med
is, eg, ge, le
n/a
next-hop
in
n/a
origin
is
n/a
source
in
n/a
debug
destination
in
n/a
default originate
med
n/a
set
set +
set -
rib-has-route
rib-has-route
n/a
Cisco IOS XR Routing Configuration Guide
RC-371
Implementing Routing Policy on Cisco IOS XR Software
Information About Implementing Routing Policy on Cisco IOS XR Software
Table 5
BGP Attributes and Operators (continued)
Attach Point
Attribute
Match
Set
export
as-path
in
is-local
length
neighbor-is
originates-from
passes-through
unique-length
n/a
as-path-length
is, ge, le, eq
n/a
as-path-unique-length
is, ge, le, eq
n/a
community
is-empty
matches-any
matches-every
n/a
community
n/a
set
set additive
delete in
delete not in
delete all
destination
in
n/a
extcommunity rt
is-empty
matches-any
matches-every
set
additive
delete-in
delete-not-in
delete-all
extcommunity soo
is-empty
matches-any
matches-every
n/a
local-preference
n/a
set
med
is, eg, ge, le
n/a
next-hop
in
n/a
origin
is
n/a
source
in
n/a
weight
n/a
set
Cisco IOS XR Routing Configuration Guide
RC-372
Implementing Routing Policy on Cisco IOS XR Software
Information About Implementing Routing Policy on Cisco IOS XR Software
Table 5
BGP Attributes and Operators (continued)
Attach Point
Attribute
Match
Set
import
as-path
in
is-local
length
neighbor-is
originates-from
passes-through
unique-length
n/a
as-path-length
is, ge, le, eq
n/a
as-path-unique-length
is, ge, le, eq
n/a
community
is-empty
matches-any
matches-every
n/a
destination
in
n/a
extcommunity rt
is-empty
matches-any
matches-every
n/a
extcommunity soo
is-empty
matches-any
matches-every
n/a
local-preference
n/a
set
med
is, eg, ge, le
n/a
next-hop
in
set
set peer address
set destination vrf
origin
is
n/a
source
in
n/a
Cisco IOS XR Routing Configuration Guide
RC-373
Implementing Routing Policy on Cisco IOS XR Software
Information About Implementing Routing Policy on Cisco IOS XR Software
Table 5
BGP Attributes and Operators (continued)
Attach Point
Attribute
Match
Set
neighbor-in
as-path
in
is-local
length
neighbor-is
originates-from
passes-through
unique-length
prepend
prepend most-recent
replace
as-path-length
is, ge, le, eq
n/a
as-path-unique-length
is, ge, le, eq
n/a
community
community with
‘peeras’
is-empty
matches-any
matches-every
set
set additive
delete in
delete not in
delete all
destination
in
n/a
extcommunity cost
n/a
set
set additive
extcommunity rt
is-empty
matches-any
matches-every
set
additive
delete-in
delete-not-in
delete-all
extcommunity soo
is-empty
matches-any
matches-every
n/a
med
is, eg, ge, le
set
set +
set -
next-hop
in
set
set peer address
origin
is
set
path-type
is
n/a
source
in
n/a
vpn-distinguisher
is
n/a
weight
n/a
set
Cisco IOS XR Routing Configuration Guide
RC-374
Implementing Routing Policy on Cisco IOS XR Software
Information About Implementing Routing Policy on Cisco IOS XR Software
Table 5
BGP Attributes and Operators (continued)
Attach Point
Attribute
Match
Set
neighbor-out
as-path
in
is-local
length
neighbor-is
originates-from
passes-through
unique-length
prepend
prepend most-recent
replace
as-path-length
is, ge, le, eq
n/a
as-path-unique-length
is, ge, le, eq
n/a
community
community with
‘peeras’
is-empty
matches-any
matches-every
set
set additive
delete in
delete not in
delete all
destination
in
n/a
extcommunity cost
n/a
set
set additive
extcommunity rt
is-empty
matches-any
matches-every
set
additive
delete-in
delete-not-in
delete-all
extcommunity soo
is-empty
matches-any
matches-every
n/a
med
is, eg, ge, le
set
set +
set -
next-hop
in
set
set self
origin
is
set
path-type
is
n/a
source
in
n/a
unsuppress-route
n/a
unsuppress-route
vpn-distinguisher
n/a
set
orf-prefix
in
n/a
neighbor-orf
Cisco IOS XR Routing Configuration Guide
RC-375
Implementing Routing Policy on Cisco IOS XR Software
Information About Implementing Routing Policy on Cisco IOS XR Software
Table 5
BGP Attributes and Operators (continued)
Attach Point
Attribute
Match
Set
network
as-path
n/a
prepend
community
n/a
set
set additive
delete in
delete not in
delete all
extcommunity cost
n/a
set
set additive
med
n/a
set
set +
set -
next-hop
n/a
set
weight
n/a
set
destination
in
set
protocol
is
in
n/a
as-path
n/a
prepend
community
n/a
set
set additive
delete in
delete not in
delete all
extcommunity cost
n/a
set
set additive
med
n/a
set
set +
set -
next-hop
n/a
set
origin
n/a
set
route-has-label
route-has-label
n/a
route-type
is
n/a
tag
is, eq, ge, le
n/a
weight
n/a
set
extcommunity rt
is-empty
matches-any
matches-every
n/a
next-hop
redistribute
retain-rt
Cisco IOS XR Routing Configuration Guide
RC-376
Implementing Routing Policy on Cisco IOS XR Software
Information About Implementing Routing Policy on Cisco IOS XR Software
Table 5
BGP Attributes and Operators (continued)
Attach Point
Attribute
Match
Set
show
as-path
in
is-local
length
neighbor-is
originates-from
passes-through
unique-length
n/a
as-path-length
is, ge, le, eq
n/a
as-path-unique-length
is, ge, le, eq
n/a
community
is-empty
matches-any
matches-every
n/a
destination
in
n/a
extcommunity rt
is-empty
matches-any
matches-every
n/a
extcommunity soo
is-empty
matches-any
matches-every
n/a
med
is, eg, ge, le
n/a
next-hop
in
n/a
origin
is
n/a
source
in
n/a
Cisco IOS XR Routing Configuration Guide
RC-377
Implementing Routing Policy on Cisco IOS XR Software
Information About Implementing Routing Policy on Cisco IOS XR Software
Table 5
BGP Attributes and Operators (continued)
Attach Point
Attribute
Match
Set
table-policy
as-path
in
is-local
length
neighbor-is
originates-from
passes-through
unique-length
n/a
as-path-length
is, ge, le, eq
n/a
as-path-unique-length
is, ge, le, eq
n/a
community
is-empty
matches-any
matches-every
n/a
destination
in
n/a
med
is, eg, ge, le
n/a
next-hop
in
n/a
origin
is
n/a
rib-metric
n/a
set
source
in
n/a
tag
n/a
set
traffic-index
n/a
set
Some BGP route attributes are inaccessible from some BGP attach points for various reasons. For
example, the set med igp-cost only command makes sense when there is a configured igp-cost to
provide a source value. Table 6 summarizes which operations are valid and where they are valid.
Table 6
Restricted BGP Operations by Attach Point
import
export
aggregation
redistribution
prepend as-path
eBGP only
eBGP only
n/a
n/a
prepend as-path
most-recent
eBGP only
eBGP only
n/a
n/a
replace as-path
eBGP only
eBGP only
n/a
n/a
set med igp-cost
forbidden
eBGP only
forbidden
forbidden
set weight
n/a
forbidden
n/a
n/a
suppress
forbidden
forbidden
n/a
forbidden
Cisco IOS XR Routing Configuration Guide
RC-378
Implementing Routing Policy on Cisco IOS XR Software
Information About Implementing Routing Policy on Cisco IOS XR Software
OSPF Policy Attach Points
This section describes each of the OSPF policy attach points and provides a summary of the OSPF
attributes and operators.
•
Default-Information Originate, page RC-379
•
Redistribute, page RC-379
•
Area-in, page RC-380
•
Area-out, page RC-380
Default-Information Originate
The default-information originate attach point allows the user to conditionally inject the default route
0.0.0.0/0 into the OSPF link-state database, which is done by evaluating the attached policy. If any routes
in the local RIB pass the policy, then the default route is inserted into the link-state database.
The following example shows how to generate a default route if any of the routes that match 10.0.0.0/8
ge 8 le 25 are present in the RIB:
route-policy ospf-originate
if rib-has-route in (10.0.0.0/8 ge 8 le 25) then
pass
endif
end-policy
router ospf 1
default-information originate policy ospf-originate
.
.
.
Redistribute
The redistribute attach point within OSPF injects routes from other routing protocol sources into the
OSPF link-state database, which is done by selecting the routes it wants to import from each protocol.
It then sets the OSPF parameters of cost and metric type. The policy can control how the routes are
injected into OSPF by using the set metric-type or set ospf-metric command.
The following example shows how to redistribute routes from IS-IS instance instance_10 into OSPF
instance 1 using the policy OSPF-redist. The policy sets the metric type to type-2 for all redistributed
routes. IS-IS routes with a tag of 10 have their cost set to 100, and IS-IS routes with a tag of 20 have
their OSPF cost set to 200. Any IS-IS routes not carrying a tag of either 10 or 20 are not be redistributed
into the OSPF link-state database.
route-policy OSPF-redist
set metric-type type-2
if tag eq 10 then
set ospf cost 100
elseif tag eq 20 then
set ospf cost 200
else
drop
endif
end-policy
router ospf 1
redistribute isis instance_10 policy OSPF-redist
.
.
.
Cisco IOS XR Routing Configuration Guide
RC-379
Implementing Routing Policy on Cisco IOS XR Software
Information About Implementing Routing Policy on Cisco IOS XR Software
Area-in
The area-in attach point within OSPF allows you to filter inbound OSPF type-3 summary link-state
advertisements (LSAs). The attach point provides prefix-based matching and hence increased control for
filtering type-3 summary LSAs.
The following example shows how to configure the prefix for OSPF summary LSAs. If the prefix
matches any of 111.105.3.0/24, 111.105.7.0/24, 111.105.13.0/24, it is accepted. If the prefix matches
any of 111.106.3.0/24, 111.106.7.0/24, 111.106.13.0/24, it is dropped.
route-policy OSPF-area-in
if destination in (111.105.3.0/24, 111.105.7.0/24, 111.105.13.0/24) then
drop
endif
if destination in (111.106.3.0/24, 111.106.7.0/24, 111.106.13.0/24) then
pass
endif
end-policy
router ospf 1
area 1
route-policy OSPF-area-in in
Area-out
The area-out attach point within OSPF allows you to filter outbound OSPF type-3 summary LSAs. The
attach point provides prefix-based matching and, hence, increased control for filtering type-3 summary
LSAs.
The following example shows how to configure the prefix for OSPF summary LSAs. If the prefix
matches any of 211.105.3.0/24, 211.105.7.0/24, 211.105.13.0/24, it is announced. If the prefix matches
any of .105.3.0/24, 212.105.7.0/24, 212.105.13.0/24, it is dropped and not announced.
route-policy OSPF-area-out
if destination in (211.105.3.0/24, 211.105.7.0/24, 211.105.13.0/24) then
drop
endif
if destination in (212.105.3.0/24, 212.105.7.0/24, 212.105.13.0/24) then
pass
endif
end-policy
router ospf 1
area 1
route-policy OSPF-area-out out
OSPF Attributes and Operators
Table 7 summarizes the OSPF attributes and operators.
Table 7
OSPF Attributes and Operators
Attach Point
Attribute
Match
Set
default-information
originate
ospf-metric
metric-type
tag
n/a
set
rib-has-route
in
n/a
Cisco IOS XR Routing Configuration Guide
RC-380
Implementing Routing Policy on Cisco IOS XR Software
Information About Implementing Routing Policy on Cisco IOS XR Software
Table 7
OSPF Attributes and Operators (continued)
Attach Point
Attribute
Match
Set
redistribute
destination
in
n/a
metric-type
n/a
set
route-type
is
n/a
tag
eq, ge, le
n/a
area-in
destination
in
n/a
area-out
destination
in
n/a
OSPFv3 Policy Attach Points
This section describes each of the OSPFv3 policy attach points and provides a summary of the OSPFv3
attributes and operators.
•
Default-Information Originate, page RC-381
•
Redistribute, page RC-381
Default-Information Originate
The default-information originate attach point allows the user to conditionally inject the default route
0::/0 into the OSPFv3 link-state database, which is done by evaluating the attached policy. If any routes
in the local RIB pass the policy, then the default route is inserted into the link-state database.
The following example shows how to generate a default route if any of the routes that match 2001::/96
are present in the RIB:
route-policy ospfv3-originate
if rib-has-route in (2001::/96) then
pass
endif
end-policy
router ospfv3 1
default-information originate policy ospfv3-originate
.
.
Redistribute
The redistribute attach point within OSPFv3 injects routes from other routing protocol sources into the
OSPFv3 link-state database, which is done by selecting the route types it wants to import from each
protocol. It then sets the OSPFv3 parameters of cost and metric type. The policy can control how the
routes are injected into OSPFv3 by using the metric type command.
The following example shows how to redistribute routes from BGP instance 15 into OSPF instance 1
using the policy OSPFv3-redist. The policy sets the metric type to type-2 for all redistributed routes.
BGP routes with a tag of 10 have their cost set to 100, and BGP routes with a tag of 20 have their OSPFv3
cost set to 200. Any BGP routes not carrying a tag of either 10 or 20 are not be redistributed into the
OSPFv3 link-state database.
route-policy OSPFv3-redist
set metric-type type-2
if tag eq 10 then
set extcommunity cost 100
Cisco IOS XR Routing Configuration Guide
RC-381
Implementing Routing Policy on Cisco IOS XR Software
Information About Implementing Routing Policy on Cisco IOS XR Software
elseif tag eq 20 then
set extcommunity cost 200
else
drop
endif
end-policy
router ospfv3 1
redistribute bgp 15 policy OSPFv3-redist
.
.
.
OSPFv3 Attributes and Operators
Table 8 summarizes the OSPFv3 attributes and operators.
Table 8
OSPFv3 Attributes and Operators
Attach Point
Attribute
Match
Set
default-information
originate
cost
metric-type
tag
n/a
set
rib-has-route
in
n/a
destination
in
n/a
cost
metric-type
n/a
set
route-type
is
n/a
tag
eq, ge, le
n/a
redistribute
IS-IS Policy Attach Points
This section describes each of the IS-IS policy attach points and provides a summary of the IS-IS
attributes and operators.
•
Redistribute, page RC-382
•
Default-Information Originate, page RC-383
Redistribute
The redistribute attach point within IS-IS allows routes from other protocols to be readvertised by IS-IS.
The policy is a set of control structures for selecting the types of routes that a user wants to redistribute
into IS-IS. The policy can also control which IS-IS level the routes are injected into and at what metric
values.
The following example shows how to redistribute routes from IS-IS instance 1 into IS-IS instance
instance_10 using the policy ISIS-redist. This policy sets the level to level-1-2 for all redistributed
routes. OSPF routes with a tag of 10 have their metric set to 100, and IS-IS routes with a tag of 20 have
their IS-IS metric set to 200. Any IS-IS routes not carrying a tag of either 10 or 20 are not be redistributed
into the IS-IS database.
route-policy ISIS-redist
set level level-1-2
if tag eq 10 then
Cisco IOS XR Routing Configuration Guide
RC-382
Implementing Routing Policy on Cisco IOS XR Software
Information About Implementing Routing Policy on Cisco IOS XR Software
set metric 100
elseif tag eq 20 then
set metric 200
else
drop
endif
end-policy
router isis instance_10
address-family ipv4 unicast
redistribute ospf 1 policy ISIS-redist
.
.
.
Default-Information Originate
The default-information originate attach point within IS-IS allows the default route 0.0.0.0/0 to be
conditionally injected into the IS-IS route database.
The following example shows how to generate an IPv4 unicast default route if any of the routes that
match 10.0.0.0/8 ge 8 le 25 is present in the RIB. The cost of the IS-IS route is set to 100 and the level
is set to level-1-2 on the default route that is injected into the IS-IS database.
route-policy isis-originate
if rib-has-route in (10.0.0.0/8 ge 8 le 25) then
set metric 100
set level level-1-2
endif
end-policy
router isis instance_10
address-family ipv4 unicast
default-information originate policy isis_originate
.
.
.
Inter-area-propagate
The inter-area-propagate attach point within IS-IS allows the prefixes to be conditionally propagated
from one level to another level within the same IS-IS instance.
The following example shows how to allow prefixes to be leaked from the level 1 LSP into the level 2
LSP if any of the prefixes match 10.0.0.0/8 ge 8 le 25.
route-policy isis-propagate
if destination in (10.0.0.0/8 ge 8 le 25) then
pass
endif
end-policy
router isis instance_10
address-family ipv4 unicast
propagate level 1 into level 2 policy isis-propagate
.
.
.
Cisco IOS XR Routing Configuration Guide
RC-383
Implementing Routing Policy on Cisco IOS XR Software
Information About Implementing Routing Policy on Cisco IOS XR Software
IS-IS Attributes and Operators
Table 9 summarizes the IS-IS attributes and operators.
Table 9
IS-IS Attributes and Operators
Attach Point
Attribute
Match
Set
redistribution
tag
is, le, ge
n/a
route-type
is
n/a
destination
in
n/a
next-hop
in
n/a
route-has-label
n/a
level
n/a
set
isis-metric
n/a
set
metric
n/a
set
metric-type
n/a
set
rib-has-route
in
n/a
level
n/a
set
isis-metric
n/a
set
metric
n/a
set
tag
n/a
set
destination
in
n/a
mpls-label
default-information
originate
inter-area-propagate
1
1. The mpls-label attribute is implicit in the conditional syntax; it is implied by the route-has-label operator.
EIGRP Policy Attach Points
This section describes each of the EIGRP policy attach points and provides a summary of the EIGRP
attributes and operators.
•
Default-Accept-In, page RC-385
•
Default-Accept-Out, page RC-385
•
Policy-In, page RC-385
•
Policy-Out, page RC-386
•
If-Policy-In, page RC-386
•
If-Policy-Out, page RC-386
•
Redistribute, page RC-386
Cisco IOS XR Routing Configuration Guide
RC-384
Implementing Routing Policy on Cisco IOS XR Software
Information About Implementing Routing Policy on Cisco IOS XR Software
Default-Accept-In
The default-accept-in attach point allows you to set and reset the conditional default flag for EIGRP
routes by evaluating the attached policy.
The following example shows a policy that sets the conditional default flag for all routes that match
10.0.0.0/8 and longer prefixes up to 10.0.0.0/25:
route-policy eigrp-cd-policy-in
if destination in (10.0.0.0/8 ge 8 le 25) then
pass
endif
end-policy
!
router eigrp 100
address-family ipv4
default-information allowed in route-policy eigrp-cd-policy-in
.
.
.
Default-Accept-Out
The default-accept-out attach point allows you to set and reset the conditional default flag for EIGRP
routes by evaluating the attached policy.
The following example shows a policy that sets the conditional default flag for all routes that match
100.10.0.0/16:
route-policy eigrp-cd-policy-out
if destination in (200.10.0.0/16) then
pass
endif
end-policy
!
router eigrp 100
address-family ipv4
default-information allowed out route-policy eigrp-cd-policy-out
.
.
.
Policy-In
The policy-in attach point allows you to filter and modify inbound EIGRP routes. This policy is applied
to all interfaces for which there is no interface inbound route policy.
The following example shows the command under EIGRP:
router eigrp 100
address-family ipv4
route-policy global-policy-in in
.
.
.
Cisco IOS XR Routing Configuration Guide
RC-385
Implementing Routing Policy on Cisco IOS XR Software
Information About Implementing Routing Policy on Cisco IOS XR Software
Policy-Out
The policy-out attach point allows you to filter and modify outbound EIGRP routes. This policy is
applied to all interfaces for which there is no interface outbound route policy.
The following example shows the command under EIGRP:
router eigrp 100
address-family ipv4
route-policy global-policy-out out
.
.
.
If-Policy-In
The if-policy-in attach point allows you to filter routes received on a particular EIGRP interface. The
following example shows an inbound policy for Packet-over-SONET/SDH (POS) interface 0/2/0/3:
router eigrp 100
address-family ipv4
interface POS0/2/0/3
route-policy if-filter-policy-in in
.
.
.
If-Policy-Out
The if-policy-out attach point allows you to filter routes sent out on a particular EIGRP interface. The
following example shows an outbound policy for Packet-over-SONET/SDH (POS) interface 0/2/0/3:
router eigrp 100
address-family ipv4
interface POS0/2/0/3
route-policy if-filter-policy-out out
.
.
.
Redistribute
The redistribute attach point in EIGRP allows you to filter redistributed routes from other routing
protocols and modify some routing parameters before installing the route in the EIGRP database. The
following example shows a policy filter redistribution of RIP routes into EIGRP.
router-policy redistribute-rip
if destination in (100.1.1.0/24) then
set eigrp-metric 5000000 4000 150 30 2000
else
set tag 200
endif
end-policy
router eigrp 100
address-family ipv4
redistribute rip route-policy redistribute-rip
.
.
.
Cisco IOS XR Routing Configuration Guide
RC-386
Implementing Routing Policy on Cisco IOS XR Software
Information About Implementing Routing Policy on Cisco IOS XR Software
EIGRP Attributes and Operators
Table 10 summarizes the EIGRP attributes and operators.
Table 10
EIGRP Attributes and Operators
Attach Point
Attribute
Match
Set
default-accept-in
destination
in
n/a
default-accept-out
destination
in
n/a
if-policy-in
destination
next-hop
in
n/a
eigrp-metric
n/a
add, set
tag
is, eq, ge, le
set
destination
next-hop
in
n/a
protocol
is, in
n/a
eigrp-metric
n/a
add, set
tag
is, eq, ge, le
set
destination
next-hop
in
n/a
eigrp-metric
n/a
add, set
tag
is, eq, ge, le
set
destination
next-hop
in
n/a
protocol
is, in
n/a
eigrp-metric
n/a
add, set
tag
is, eq, ge, le
set
destination
next-hop
in
n/a
protocol
is, in
n/a
eigrp-metric
n/a
add, set
route-type
is
n/a
tag
is, eq, ge, le
set
if-policy-out
policy-in
policy-out
redistribute
RIP Policy Attach Points
This section describes each of the RIP policy attach points and provides a summary of the RIP attributes
and operators.
•
Default-Information Originate, page RC-388
•
Redistribute, page RC-388
•
Global-Inbound, page RC-388
•
Global-Outbound, page RC-388
Cisco IOS XR Routing Configuration Guide
RC-387
Implementing Routing Policy on Cisco IOS XR Software
Information About Implementing Routing Policy on Cisco IOS XR Software
•
Interface-Inbound, page RC-389
•
Interface-Outbound, page RC-389
Default-Information Originate
The default-information originate attach point allows you to conditionally inject the default route
0.0.0.0/0 into RIP updates by evaluating the attached policy. If any routes in the local RIB pass the
policy, then the default route is inserted.
The following example shows how to generate a default route if any of the routes that match 10.0.0.0/8
ge 8 le 25 are present in the RIB:
route-policy rip-originate
if rib-has-route in (10.0.0.0/8 ge 8 le 25) then
pass
endif
end-policy
router rip
default-information originate route-policy rip-originate
Redistribute
The redistribution attach point within RIP allows you to inject routes from other routing protocol sources
into the RIP database.
The following example shows how to inject OSPF routes into RIP:
route-policy redist-ospf
set rip-metric 5
end-policy
router rip
redistribute ospf 1 route-policy redist-ospf
Global-Inbound
The global-inbound attach point for RIP allows you to filter or update inbound RIP routes that match a
route policy.
The following example shows how to filter the inbound RIP routes that match the route policy named
rip-in:
router rip
route-policy rip-in in
Global-Outbound
The global-outbound attach point for RIP allows you to filter or update outbound RIP routes that match
a route-policy.
The following example shows how to filter the outbound RIP routes that match the route policy named
rip-out:
router rip
route-policy rip-out out
Cisco IOS XR Routing Configuration Guide
RC-388
Implementing Routing Policy on Cisco IOS XR Software
Information About Implementing Routing Policy on Cisco IOS XR Software
Interface-Inbound
The interface-inbound attach point allows you to filter or update inbound RIP routes that match a route
policy for a specific interface.
The following example shows how to filter inbound RIP routes that match the route policy for interface
0/1/0/1:
router rip
interface GigabitEthernet0/1/0/1
route-policy rip-in in
Interface-Outbound
The interface-outbound attach point allows you to filter or update outbound RIP routes that match a route
policy for a specific interface.
The following example shows how to filter outbound RIP routes that match the route policy for interface
0/2/0/1:
router rip
interface GigabitEthernet0/2/0/1
route-policy rip-out out
RIP Attributes and Operators
Table 11 summarizes the RIP attributes and operators.
Table 11
RIP Attributes and Operators
Attach Point
Attribute
Match
Set
default-information
originate
next-hop
rip-metric
rip-tag
n/a
set
rib-has-route
in
n/a
destination
next-hop
in
n/a
protocol
is, in
n/a
rip-metric
n/a
add
destination
in
n/a
rip-metric
n/a
add
destination
next-hop
in
n/a
protocol
is, in
n/a
rip-metric
n/a
add
destination
in
n/a
rip-metric
n/a
add
global-inbound
global-outbound
interface-inbound
interface-outbound
Cisco IOS XR Routing Configuration Guide
RC-389
Implementing Routing Policy on Cisco IOS XR Software
Information About Implementing Routing Policy on Cisco IOS XR Software
Table 11
RIP Attributes and Operators (continued)
Attach Point
Attribute
Match
Set
redistribute
destination
in
n/a
next-hop
rip-metric
rip-tag
n/a
set
tag
is, eq, ge, le
set
Attached Policy Modification
Policies that are in use do, on occasion, need to be modified. In the traditional configuration model, a
policy modification would be done by completely removing the policy and re-entering it. However, this
model allows for a window of time in which no policy is attached and default actions to be used, which
is an opportunity for inconsistencies to exist. To close this window of opportunity, you can modify a
policy in use at an attach point by respecifying it, which allows for policies that are in use to be changed,
without having a window of time in which no policy is applied at the given attach point.
Note
A route policy or set that is in use at an attach point cannot be removed because this removal would result
in an undefined reference. An attempt to remove a route policy or set that is in use at an attach point
results in an error message to the user.
Nonattached Policy Modification
As long as a given policy is not attached at an attach point, the policy is allowed to refer to nonexistent
sets and policies. Configurations can be built that reference sets or policy blocks that are not yet defined,
and then later those undefined policies and sets can be filled in. This method of building configurations
gives much greater flexibility in policy definition. Every piece of policy you want to reference while
defining a policy need not exist in the configuration. Thus, you can define a policy sample1 that
references a policy sample2 using an apply statement even if the policy sample2 does not exist. Similarly,
you can enter a policy statement that refers to a nonexistent set.
However, the existence of all referenced policies and sets is enforced when a policy is attached. Thus, if
a user attempts to attach the policy sample1 with the reference to an undefined policy sample2 at an
inbound BGP policy using the statement neighbor 1.2.3.4 address-family ipv4 unicast policy sample1
in, the configuration attempt is rejected because the policy sample2 does not exist.
Cisco IOS XR Routing Configuration Guide
RC-390
Implementing Routing Policy on Cisco IOS XR Software
Information About Implementing Routing Policy on Cisco IOS XR Software
Editing Routing Policy Configuration Elements
RPL is based on statements rather than on lines. That is, within the begin-end pair that brackets policy
statements from the CLI, a new line is merely a separator, the same as a space character.
The CLI provides the means to enter and delete route policy statements. RPL provides a means to edit
the contents of the policy between the begin-end brackets, using a text editor. The following text editors
are available on Cisco IOS XR software for editing RPL policies:
•
Nano (default)
•
Emacs
•
Vim
Editing Routing Policy Configuration Elements Using the Nano Editor
To edit the contents of a routing policy using the Nano editor, use the following CLI command in EXEC
mode:
edit route-policy name nano
A copy of the route policy is copied to a temporary file and the editor is launched. After editing, enter
Ctrl-X to save the file and exit the editor. The available editor commands are displayed on screen.
Detailed information on using the Nano editor is available at this URL: http://www.nano-editor.org/.
Not all Nano editor features are supported on Cisco IOS XR software.
Editing Routing Policy Configuration Elements Using the Emacs Editor
To edit the contents of a routing policy using the Emacs editor, use the following CLI command in EXEC
mode:
edit route-policy name emacs
A copy of the route policy is copied to a temporary file and the editor is launched. After editing, save
the editor buffer by using the Ctrl-X and Ctrl-S keystrokes. To save and exit the editor, use the Ctrl-X
and Ctrl-C keystrokes. When you quit the editor, the buffer is committed. If there are no parse errors, the
configuration is committed:
RP/0/RP0/CPU0:router# edit route-policy policy_A
---------------------------------------== MicroEMACS 3.8b () == rpl_edit.139281 ==
if destination in (2001::/8) then
drop
endif
end-policy
!
== MicroEMACS 3.8b () == rpl_edit.139281 ==
Parsing.
83 bytes parsed in 1 sec (82)bytes/sec
Committing.
1 items committed in 1 sec (0)items/sec
Updating.
Updated Commit database in 1 sec
RP/0/RP0/CPU0:router#
Cisco IOS XR Routing Configuration Guide
RC-391
Implementing Routing Policy on Cisco IOS XR Software
How to Implement Routing Policy on Cisco IOS XR Software
If there are parse errors, you are asked whether editing should continue:
RP/0/RP0/CPU0:router#edit route-policy policy_B
== MicroEMACS 3.8b () == rpl_edit.141738
route-policy policy_B
set metric-type type_1
if destination in (2001::/8) then
drop
endif
end-policy
!
== MicroEMACS 3.8b () == rpl_edit.141738 ==
Parsing.
105 bytes parsed in 1 sec (103)bytes/sec
% Syntax/Authorization errors in one or more commands.!! CONFIGURATION
FAILED DUE TO SYNTAX/AUTHORIZATION ERRORS
set metric-type type_1
if destination in (2001::/8) then
drop
endif
end-policy
!
Continue editing? [no]:
If you answer yes, the editor continues on the text buffer from where you left off. If you answer no, the
running configuration is not changed and the editing session is ended.
Editing Routing Policy Configuration Elements Using the Vim Editor
Editing elements of a routing policy with Vim (Vi IMproved) is similar to editing them with Emacs
except for some feature differences such as the keystrokes to save and quit. To write to a current file and
exit, use the :wq or :x or ZZ keystrokes. To quit and confirm, use the :q keystrokes. To quit and discard
changes, use the :q! keystrokes.
You can reference detailed online documentation for Vim at this URL: http://www.vim.org/
Editing Routing Policy Configuration Elements Using the CLI
The CLI allows you to enter and delete route policy statements. You can complete a policy configuration
block by entering applicable commands such as end-policy or end-set. Alternatively, the CLI interpreter
allows you to use the exit command to complete a policy configuration block. The abort command is
used to discard the current policy configuration and return to global configuration mode.
How to Implement Routing Policy on Cisco IOS XR Software
This section contains the following procedures:
•
Defining a Route Policy, page RC-393 (required)
•
Attaching a Routing Policy to a BGP Neighbor, page RC-394 (required)
•
Modifying a Routing Policy Using a Text Editor, page RC-396 (optional)
Cisco IOS XR Routing Configuration Guide
RC-392
Implementing Routing Policy on Cisco IOS XR Software
How to Implement Routing Policy on Cisco IOS XR Software
Defining a Route Policy
This task explains how to define a route policy.
Note
If you want to modify an existing routing policy using the command-line interface (CLI), you must
redefine the policy by completing this task.
SUMMARY STEPS
1.
configure
2.
route-policy name [parameter1, parameter2, . . . , parameterN]
3.
end-policy
4.
end
or
commit
DETAILED STEPS
Step 1
Command or Action
Purpose
configure
Enters global configuration mode.
Example:
RP/0/RP0/CPU0:router# configure
Step 2
route-policy name [parameter1, parameter2, . .
. , parameterN]
Enters route-policy configuration mode.
•
After the route-policy has been entered, a group of
commands can be entered to define the route-policy.
Example:
RP/0/RP0/CPU0:router(config)# route-policy
sample1
Cisco IOS XR Routing Configuration Guide
RC-393
Implementing Routing Policy on Cisco IOS XR Software
How to Implement Routing Policy on Cisco IOS XR Software
Step 3
Command or Action
Purpose
end-policy
Ends the definition of a route policy and exits route-policy
configuration mode.
Example:
RP/0/RP0/CPU0:router(config-rpl)# end-policy
Step 4
Saves configuration changes.
end
or
commit
When you issue the end command, the system prompts
you to commit changes:
Example:
Uncommitted changes found, commit them before
exiting(yes/no/cancel)?
[cancel]:
•
RP/0/RP0/CPU0:router(config)# end
or
– Entering yes saves configuration changes to the
RP/0/RP0/CPU0:router(config)# commit
running configuration file, exits the configuration
session, and returns the router to EXEC mode.
– Entering no exits the configuration session and
returns the router to EXEC mode without
committing the configuration changes.
– Entering cancel leaves the router in the current
configuration session without exiting or
committing the configuration changes.
Use the commit command to save the configuration
changes to the running configuration file and remain within
the configuration session.
Attaching a Routing Policy to a BGP Neighbor
This task explains how to attach a routing policy to a BGP neighbor.
Prerequisites
A routing policy must be preconfigured and well defined prior to it being applied at an attach point. If a
policy is not predefined, an error message is generated stating that the policy is not defined.
SUMMARY STEPS
1.
configure
2.
router bgp as-number
3.
neighbor ip-address
4.
address-family {ipv4 unicast | ipv4 multicast | ipv4 labeled-unicast | ipv4 tunnel | ipv4 mdt |
ipv6 unicast | ipv6 multicast | ipv6 labeled-unicast | vpnv4 unicast | vpnv6 unicast}
5.
route-policy route-policy-name {in | out}
6.
end
or
commit
Cisco IOS XR Routing Configuration Guide
RC-394
Implementing Routing Policy on Cisco IOS XR Software
How to Implement Routing Policy on Cisco IOS XR Software
DETAILED STEPS
Step 1
Command or Action
Purpose
configure
Enters global configuration mode.
Example:
RP/0/RP0/CPU0:router# configure
Step 2
router bgp as-number
Example:
RP/0/RP0/CPU0:router(config)# router bgp 125
Step 3
neighbor ip-address
Configures a BGP routing process and enters router
configuration mode.
•
The as-number argument identifies the
autonomous system in which the router resides.
Valid values are from 0 to 65535. Private
autonomous system numbers that can be used in
internal networks range from 64512 to 65535.
Specifies a neighbor IP address.
Example:
RP/0/RP0/CPU0:router(config-bgp)# neighbor
10.0.0.20
Step 4
address-family {ipv4 unicast | ipv4 multicast |
ipv4 labeled-unicast | ipv4 tunnel | ipv4 mdt |
ipv6 unicast | ipv6 multicast | ipv6
labeled-unicast | vpnv4 unicast | vpnv6 unicast}
Specifies the address family.
Example:
RP/0/RP0/CPU0:router(config-bgp-nbr)#
address-family ipv4 unicast
Cisco IOS XR Routing Configuration Guide
RC-395
Implementing Routing Policy on Cisco IOS XR Software
How to Implement Routing Policy on Cisco IOS XR Software
Step 5
Command or Action
Purpose
route-policy policy-name {in | out}
Attaches the route-policy, which must be well formed
and predefined.
Example:
RP/0/RP0/CPU0:router(config-bgp-nbr-af)#
route-policy example1 in
Step 6
Saves configuration changes.
end
or
commit
When you issue the end command, the system
prompts you to commit changes:
Example:
Uncommitted changes found, commit them
before exiting(yes/no/cancel)?
[cancel]:
•
RP/0/RP0/CPU0:router(config-bgp-nbr-af)# end
or
– Entering yes saves configuration changes to
RP/0/RP0/CPU0:router(config-bgp-nbr-af)# commit
the running configuration file, exits the
configuration session, and returns the router
to EXEC mode.
– Entering no exits the configuration session
and returns the router to EXEC mode without
committing the configuration changes.
– Entering cancel leaves the router in the
current configuration session without exiting
or committing the configuration changes.
Use the commit command to save the configuration
changes to the running configuration file and remain
within the configuration session.
Modifying a Routing Policy Using a Text Editor
This task explains how to modify an existing routing policy using a text editor. See the “Editing Routing
Policy Configuration Elements” section on page RC-391 for information on text editors.
SUMMARY STEPS
1.
edit {route-policy | prefix-set | as-path-set | community-set | extcommunity-set | policy-global |
rd-set} name [nano | emacs | vim]
2.
show rpl route-policy [name [detail] | states | brief]
3.
show rpl prefix-set [name | states | brief]
Cisco IOS XR Routing Configuration Guide
RC-396
Implementing Routing Policy on Cisco IOS XR Software
Configuration Examples for Implementing Routing Policy on Cisco IOS XR Software
DETAILED STEPS
Step 1
Command or Action
Purpose
edit {route-policy | prefix-set | as-path-set |
community-set | extcommunity-set |
policy-global | rd-set} name [nano | emacs |
vim]
Identifies the route policy, prefix set, AS path set,
community set, or extended community set name to be
modified.
•
A copy of the route policy, prefix set, AS path set,
community set, or extended community set is copied to
a temporary file and the Emacs editor is launched.
•
After editing with Nano, save the editor buffer and exit
the editor by using the Ctrl-X keystroke.
•
After editing with Emacs, save the editor buffer by
using the Ctrl-X and Ctrl-S keystrokes. To save and exit
the editor, use the Ctrl-X and Ctrl-C keystrokes.
•
After editing with Vim, to write to a current file and exit
use the :wq or :x or ZZ keystrokes. To quit and confirm,
use the :q keystrokes. To quit and discard changes, use
the :q! keystrokes.
Example:
RP/0/RP0/CPU0:router# edit route-policy sample1
Step 2
show rpl route-policy [name [detail] | states |
brief]
(Optional) Displays the configuration of a specific named
route policy.
•
Use the detail keyword to display all policies and sets
that a policy uses.
•
Use the states keyword to display all unused, inactive,
and active states.
•
Use the brief keyword to list the names of all extended
community sets without their configurations.
Example:
RP/0/RP0/CPU0:router# show rpl route-policy
sample2
Step 3
show rpl prefix-set [name | states | brief]
(Optional) Displays the contents of a named prefix set.
•
Example:
RP/0/RP0/CPU0:router# show rpl prefix-set
prefixset1
To display the contents of a named AS path set,
community set, or extended community set, replace the
prefix-set keyword with as-path-set, community-set,
or extcommunity-set, respectively.
Configuration Examples for Implementing Routing Policy on
Cisco IOS XR Software
This section provides the following configuration examples:
•
Routing Policy Definition: Example, page RC-398
•
Simple Inbound Policy: Example, page RC-398
•
Modular Inbound Policy: Example, page RC-399
•
Translating Cisco IOS Route Maps to Cisco IOS XR Routing Policy Language: Example,
page RC-400
Cisco IOS XR Routing Configuration Guide
RC-397
Implementing Routing Policy on Cisco IOS XR Software
Configuration Examples for Implementing Routing Policy on Cisco IOS XR Software
Routing Policy Definition: Example
In the following example, a BGP route policy named sample1 is defined using the route-policy name
command. The policy compares the network layer reachability information (NLRI) to the elements in
the prefix set test. If it evaluates to true, the policy performs the operations in the then clause. If it
evaluates to false, the policy performs the operations in the else clause, that is, sets the MED value to
200 and adds the community 2:100 to the route. The final steps of the example commit the configuration
to the router, exit configuration mode, and display the contents of route policy sample1.
configure
route-policy sample1
if destination in test then
drop
else
set med 200
set community (2:100) additive
endif
end-policy
end
show config running route-policy sample1
Building configuration...
route-policy sample1
if destination in test then
drop
else
set med 200
set community (2:100) additive
endif
end-policy
Simple Inbound Policy: Example
The following policy discards any route whose network layer reachability information (NLRI) specifies
a prefix longer than /24, and any route whose NLRI specifies a destination in the address space reserved
by RFC 1918. For all remaining routes, it sets the MED and local preference, and adds a community to
the list in the route.
For routes whose community lists include any values in the range from 101:202 to 106:202 that have a
16-bit tag portion containing the value 202, the policy prepends autonomous system number 2 twice, and
adds the community 2:666 to the list in the route. Of these routes, if the MED is either 666 or 225, then
the policy sets the origin of the route to incomplete, and otherwise sets the origin to IGP.
For routes whose community lists do not include any of the values in the range from 101:202 to 106:202,
the policy adds the community 2:999 to the list in the route.
prefix-set too-specific
0.0.0.0/0 ge 25 le 32
end-set
prefix-set rfc1918
10.0.0.0/8 le 32,
172.16.0.0/12 le 32,
192.168.0.0/16 le 32
end-set
route-policy inbound-tx
if destination in too-specific or destination in rfc1918 then
drop
Cisco IOS XR Routing Configuration Guide
RC-398
Implementing Routing Policy on Cisco IOS XR Software
Configuration Examples for Implementing Routing Policy on Cisco IOS XR Software
endif
set med 1000
set local-preference 90
set community (2:1001) additive
if community matches-any ([101..106]:202) then
prepend as-path 2.30 2
set community (2:666) additive
if med is 666 or med is 225 then
set origin incomplete
else
set origin igp
endif
else
set community (2:999) additive
endif
end-policy
router bgp 2
neighbor 10.0.1.2 address-family ipv4 unicast route-policy inbound-tx in
Modular Inbound Policy: Example
The following policy example shows how to build two inbound policies, in-100 and in-101, for two
different peers. In building the specific policies for those peers, the policy reuses some common blocks
of policy that may be common to multiple peers. It builds a few basic building blocks, the policies
common-inbound, filter-bogons, and set-lpref-prepend.
The filter-bogons building block is a simple policy that filters all undesirable routes, such as those from
the RFC 1918 address space. The policy set-lpref-prepend is a utility policy that can set the local
preference and prepend the AS path according to parameterized values that are passed in. The
common-inbound policy uses these filter-bogons building blocks to build a common block of inbound
policy. The common-inbound policy is used as a building block in the construction of in-100 and in-101
along with the set-lpref-prepend building block.
This is a simple example that illustrates the modular capabilities of the policy language.
prefix-set bogon
10.0.0.0/8 ge 8 le 32,
0.0.0.0,
0.0.0.0/0 ge 27 le 32,
192.168.0.0/16 ge 16 le 32
end-set
!
route-policy in-100
apply common-inbound
if community matches-any ([100..120]:135) then
apply set-lpref-prepend (100,100,2)
set community (2:1234) additive
else
set local-preference 110
endif
if community matches-any ([100..666]:[100..999]) then
set med 444
set local-preference 200
set community (no-export) additive
endif
end-policy
!
route-policy in-101
apply common-inbound
if community matches-any ([101..200]:201) then
Cisco IOS XR Routing Configuration Guide
RC-399
Implementing Routing Policy on Cisco IOS XR Software
Additional References
apply set-lpref-prepend(100,101,2)
set community (2:1234) additive
else
set local-preference 125
endif
end-policy
!
route-policy filter-bogons
if destination in bogon then
drop
else
pass
endif
end-policy
!
route-policy common-inbound
apply filter-bogons
set origin igp
set community (2:333)
end-policy
!
route-policy set-lpref-prepend($lpref,$as,$prependcnt)
set local-preference $lpref
prepend as-path $as $prependcnt
end-policy
Translating Cisco IOS Route Maps to Cisco IOS XR Routing Policy Language:
Example
RPL performs the same functions as route-maps. See Converting Cisco IOS Configurations to
Cisco IOS XR Configurations.
Additional References
The following sections provide references related to implementing RPL.
Related Documents
Related Topic
Document Title
Routing policy language commands: complete
Routing Policy Language Commands on Cisco IOS XR Software,
command syntax, command modes, command history, Release 3.5
defaults, usage guidelines, and examples
Regular expression syntax
Cisco IOS XR Routing Configuration Guide
RC-400
“Understanding Regular Expressions, Special Characters and
Patterns” appendix in the Cisco IOS XR Getting Started Guide
Implementing Routing Policy on Cisco IOS XR Software
Additional References
Standards
Standards
Title
No new or modified standards are supported by this
—
feature, and support for existing standards has not been
modified by this feature.
MIBs
MIBs
MIBs Link
—
To locate and download MIBs using Cisco IOS XR software, use the
Cisco MIB Locator found at the following URL and choose a
platform under the Cisco Access Products menu:
http://cisco.com/public/sw-center/netmgmt/cmtk/mibs.shtml
RFCs
RFCs
Title
RFC 1771
A Border Gateway Protocol 4 (BGP-4)
RFC 4360
BGP Extended Communities Attribute
Technical Assistance
Description
Link
http://www.cisco.com/techsupport
The Cisco Technical Support website contains
thousands of pages of searchable technical content,
including links to products, technologies, solutions,
technical tips, and tools. Registered Cisco.com users
can log in from this page to access even more content.
Cisco IOS XR Routing Configuration Guide
RC-401
Implementing Routing Policy on Cisco IOS XR Software
Additional References
Cisco IOS XR Routing Configuration Guide
RC-402
Implementing Static Routes on Cisco IOS XR
Software
Static routes are user-defined routes that cause packets moving between a source and a destination to
take a specified path. Static routes can be important if the Cisco IOS XR software cannot build a route
to a particular destination. They are useful for specifying a gateway of last resort to which all unroutable
packets are sent.
This module describes the tasks you need to implement static routes on your Cisco IOS XR network.
Note
For more information about static routes on the Cisco IOS XR software and complete descriptions of the
static routes commands listed in this module, see the “Related Documents” section of this module. To
locate documentation for other commands that might appear while executing a configuration task, search
online in the Cisco IOS XR software master command index.
Feature History for Implementing Static Routes on Cisco IOS XR Software
Release
Modification
Release 2.0
This feature was introduced on the Cisco CRS-1.
Release 3.0
No modification.
Release 3.2
Support was added for the Cisco XR 12000 Series Router.
Release 3.3.0
Support for configuring static routes in static router configuration mode
was added.
The route command was replaced with the router static command.
The route maximum command was replaced with the maximum path
command.
VPN routing and forwarding (VRF) support was added to the command
syntax.
Release 3.4.0
No modification.
Release 3.5.0
IPv6 Provider Edge and IPv6 VPN Provider Edge over Multiprotocol Label
Switching support was added.
Cisco IOS XR Routing Configuration Guide
RC-403
Implementing Static Routes on Cisco IOS XR Software
Contents
Contents
•
Prerequisites for Implementing Static Routes on Cisco IOS XR Software, page RC-404
•
Information About Implementing Static Routes on Cisco IOS XR Software, page RC-404
•
How to Implement Static Routes on Cisco IOS XR Software, page RC-408
•
Configuration Examples, page RC-416
•
Where to Go Next, page RC-417
•
Additional References, page RC-417
Prerequisites for Implementing Static Routes on Cisco IOS XR
Software
You must be in a user group associated with a task group that includes the proper task IDs for static
routing commands. For detailed information about user groups and task IDs, see the Configuring AAA
Services on Cisco IOS XR Software module of Cisco IOS XR System Security Configuration Guide.
Information About Implementing Static Routes on Cisco IOS XR
Software
To implement static routes you need to understand the following concepts:
•
Static Route Functional Overview, page RC-404
•
Default Administrative Distance, page RC-405
•
Directly Connected Routes, page RC-405
•
Recursive Static Routes, page RC-406
•
Fully Specified Static Routes, page RC-406
•
Floating Static Routes, page RC-407
•
Default VRF, page RC-407
•
IPv4 and IPv6 Static VRF Routes, page RC-407
•
IPv6/IPv6 VPN Provider Edge Transport over MPLS, page RC-407
Static Route Functional Overview
Static routes are entirely user configurable and can point to a next-hop interface, next-hop IP address, or
both. In Cisco IOS XR software, if an interface was specified, then the static route is installed in the
Routing Information Base (RIB) if the interface is reachable. If an interface was not specified, the route
is installed if the next-hop address is reachable. The only exception to this configuration is when a static
route is configured with the permanent attribute, in which case it is installed in RIB regardless of
reachability.
Cisco IOS XR Routing Configuration Guide
RC-404
Implementing Static Routes on Cisco IOS XR Software
Information About Implementing Static Routes on Cisco IOS XR Software
Networking devices forward packets using route information that is either manually configured or
dynamically learned using a routing protocol. Static routes are manually configured and define an
explicit path between two networking devices. Unlike a dynamic routing protocol, static routes are not
automatically updated and must be manually reconfigured if the network topology changes. The benefits
of using static routes include security and resource efficiency. Static routes use less bandwidth than
dynamic routing protocols, and no CPU cycles are used to calculate and communicate routes. The main
disadvantage to using static routes is the lack of automatic reconfiguration if the network topology
changes.
Static routes can be redistributed into dynamic routing protocols, but routes generated by dynamic
routing protocols cannot be redistributed into the static routing table. No algorithm exists to prevent the
configuration of routing loops that use static routes.
Static routes are useful for smaller networks with only one path to an outside network and to provide
security for a larger network for certain types of traffic or links to other networks that need more control.
In general, most networks use dynamic routing protocols to communicate between networking devices
but may have one or two static routes configured for special cases.
Note
For information on configuring static routes to distribute Multiprotocol Label Switching (MPLS)
Layer 3 virtual private network (VPN) information, see Cisco IOS XR Multiprotocol Label Switching
Configuration Guide.
Default Administrative Distance
Static routes have a default administrative distance of 1. A low number indicates a preferred route. By
default, static routes are preferred to routes learned by routing protocols. Therefore, you can configure
an administrative distance with a static route if you want the static route to be overridden by dynamic
routes. For example, you could have routes installed by the Open Shortest Path First (OSPF) protocol
with an administrative distance of 120. To have a static route that would be overridden by an OSPF
dynamic route, specify an administrative distance greater than 120.
Directly Connected Routes
The routing table considers the static routes that point to an interface as “directly connected.” Directly
connected networks are advertised by IGP routing protocols if a corresponding interface command is
contained under the router configuration stanza of that protocol.
In directly attached static routes, only the output interface is specified. The destination is assumed to be
directly attached to this interface, so the packet destination is used as the next hop address. The following
example shows how to specify that all destinations with address prefix 2001:0DB8::/32 are directly
reachable through interface GigabitEthernet 0/5/0/0:
RP/0/RP0/CPU0:router(config)# router static
RP/0/RP0/CPU0:router(config-static)# address-family ipv6 unicast
RP/0/RP0/CPU0:router(config-static-afi)# 2001:0DB8::/32 gigabitethernet 0/5/0/0
Directly attached static routes are candidates for insertion in the routing table only if they refer to a valid
interface; that is, an interface that is both up and has IPv4 or IPv6 enabled on it.
Cisco IOS XR Routing Configuration Guide
RC-405
Implementing Static Routes on Cisco IOS XR Software
Information About Implementing Static Routes on Cisco IOS XR Software
Recursive Static Routes
In a recursive static route, only the next hop is specified. The output interface is derived from the next
hop. The following example shows how to specify that all destinations with address prefix
2001:0DB8::/32 are reachable through the host with address 2001:0DB8:3000::1:
RP/0/RP0/CPU0:router(config)# router static
RP/0/RP0/CPU0:router(config-static)# address-family ipv6 unicast
RP/0/RP0/CPU0:router(config-static-afi)# 2001:0DB8::/32 2001:0DB8:3000::1
A recursive static route is valid (that is, it is a candidate for insertion in the routing table) only when the
specified next hop resolves, either directly or indirectly, to a valid output interface, provided the route
does not self-recurse, and the recursion depth does not exceed the maximum IPv6 forwarding recursion
depth.
A route self-recurses if it is itself used to resolve its own next hop. If a static route becomes
self-recursive, RIB sends a notification to static routes to withdraw the recursive route.
Assuming a BGP route 2001:0DB8:3000::0/16 with next hop of 2001:0DB8::0104, the following static
route would not be inserted into the IPv6 RIB because the BGP route next hop resolves through the static
route and the static route resolves through the BGP route making it self-recursive:
RP/0/RP0/CPU0:router(config)# router static
RP/0/RP0/CPU0:router(config-static)# address-family ipv6 unicast
RP/0/RP0/CPU0:router(config-static-afi)# 001:0DB8::/32 2001:0DB8:3000::1
This static route is not inserted into the IPv6 routing table because it is self-recursive. The next hop of
the static route, 2001:0DB8:3000:1, resolves through the BGP route 2001:0DB8:3000:0/16, which is
itself a recursive route (that is, it only specifies a next hop). The next hop of the BGP route,
2001:0DB8::0104, resolves through the static route. Therefore, the static route would be used to resolve
its own next hop.
It is not normally useful to manually configure a self-recursive static route, although it is not prohibited.
However, a recursive static route that has been inserted in the routing table may become self-recursive
as a result of some transient change in the network learned through a dynamic routing protocol. If this
occurs, the fact that the static route has become self-recursive will be detected and it will be removed
from the routing table, although not from the configuration. A subsequent network change may cause
the static route to no longer be self-recursive, in which case it will be re-inserted in the routing table.
Fully Specified Static Routes
In a fully specified static route, both the output interface and next hop are specified. This form of static
route is used when the output interface is multiaccess and it is necessary to explicitly identify the next
hop. The next hop must be directly attached to the specified output interface. The following example
shows a definition of a fully specified static route:
RP/0/RP0/CPU0:router(config)# router static
RP/0/RP0/CPU0:router(config-static)# address-family ipv6 unicast
RP/0/RP0/CPU0:router(config-static-afi)# 2001:0DB8::/32 Gigethernet0/0/0/0
2001:0DB8:3000::1
A fully specified route is valid (that is, a candidate for insertion into the routing table) when the specified
interface, IPv4 or IPv6, is enabled and up.
Cisco IOS XR Routing Configuration Guide
RC-406
Implementing Static Routes on Cisco IOS XR Software
Information About Implementing Static Routes on Cisco IOS XR Software
Floating Static Routes
Floating static routes are static routes that are used to back up dynamic routes learned through configured
routing protocols. A floating static route is configured with a higher administrative distance than the
dynamic routing protocol it is backing up. As a result, the dynamic route learned through the routing
protocol is always preferred to the floating static route. If the dynamic route learned through the routing
protocol is lost, the floating static route is used in its place. The following example shows how to define
a floating static route:
RP/0/RP0/CPU0:router(config)# router static
RP/0/RP0/CPU0:router(config-static)# address-family ipv6 unicast
RP/0/RP0/CPU0:router(config-static-afi)# 2001:0DB8::/32 2001:0DB8:3000::1 210
Any of the three types of static routes can be used as a floating static route. A floating static route must
be configured with an administrative distance that is greater than the administrative distance of the
dynamic routing protocol because routes with smaller administrative distances are preferred.
Note
By default, static routes have smaller administrative distances than dynamic routes, so static routes are
preferred to dynamic routes.
Default VRF
A static route is always associated with a VPN routing and forwarding (VRF) instance. The VRF can be
the default VRF or a specified VRF. Specifying a VRF, using the vrf vrf-name command, allows you to
enter VRF configuration mode for a specific VRF where you can configure a static route. If a VRF is not
specified, a default VRF static route is configured.
IPv4 and IPv6 Static VRF Routes
An IPv4 or IPv6 static VRF route is the same as a static route configured for the default VRF. The IPv4
and IPV6 address families are supported in each VRF.
IPv6/IPv6 VPN Provider Edge Transport over MPLS
IPv6 Provider Edge (6PE) and IPv6 VPN Provider Edge (6VPE) leverages the existing Multiprotocol
Label Switching (MPLS) IPv4 core infrastructure for IPv6 transport. 6PE and 6VPE enables IPv6 sites
to communicate with each other over an MPLS IPv4 core network using MPLS label switched paths
(LSPs).
Note
This feature is supported on Cisco XR 12000 Series Routers.
Static routes can be configured under the default VRF for 6PE functionality and under IPv6 VPN routing
and forwarding (VRF) instances for 6VPE functionality.
For detailed information about configuring 6PE and 6VPE over MPLS, see Cisco IOS XR Multiprotocol
Label Switching Configuration Guide.
Cisco IOS XR Routing Configuration Guide
RC-407
Implementing Static Routes on Cisco IOS XR Software
How to Implement Static Routes on Cisco IOS XR Software
How to Implement Static Routes on Cisco IOS XR Software
This section contains the following procedures:
•
Configuring a Static Route, page RC-408 (required)
•
Configuring a Floating Static Route, page RC-409 (optional)
•
Configuring Static Routes Between PE-CE Routers, page RC-411 (optional)
•
Changing the Maximum Number of Allowable Static Routes, page RC-413 (optional)
•
Associating a VRF with a Static Route, page RC-414 (optional)
Configuring a Static Route
This task explains how to configure a static route.
SUMMARY STEPS
1.
configure
2.
router static
3.
vrf vrf-name
4.
address-family {ipv4 | ipv6} {unicast | multicast}
5.
prefix mask [vrf vrf-name] {ip-address | interface-type interface-instance} [distance] [description
text] [tag tag] [permanent]
6.
end
or
commit
DETAILED STEPS
Step 1
Command or Action
Purpose
configure
Enters global configuration mode.
Example:
RP/0/RP0/CPU0:router# configure
Step 2
router static
Enters static route configuration mode.
Example:
RP/0/RP0/CPU0:router(config)# router static
Step 3
vrf vrf-name
(Optional) Enters VRF configuration mode.
Example:
If a VRF is not specified, the static route is configured under
the default VRF.
RP/0/RP0/CPU0:router(config-static)# vrf vrf_A
Cisco IOS XR Routing Configuration Guide
RC-408
Implementing Static Routes on Cisco IOS XR Software
How to Implement Static Routes on Cisco IOS XR Software
Step 4
Command or Action
Purpose
address-family {ipv4 | ipv6} {unicast |
multicast}
Enters address family mode.
Example:
RP/0/RP0/CPU0:router(config-static-vrf)# addres
s family ipv4 unicast
Step 5
prefix mask [vrf vrf-name] {ip-address |
interface-type interface-instance} [distance]
[description text] [tag tag] [permanent]
Configures an administrative distance of 110.
•
Example:
This example shows how to route packets for network
10.0.0.0 through to a next hop at 172.20.16.6 if
dynamic information with administrative distance less
than 110 is not available.
RP/0/RP0/CPU0:router(config-static-vrf-afi)# 10
.0.0.0/8 172.20.16.6 110
Step 6
Saves configuration changes.
end
or
commit
When you issue the end command, the system prompts
you to commit changes:
Example:
Uncommitted changes found, commit them before
exiting(yes/no/cancel)?
[cancel]:
•
RP/0/RP0/CPU0:router(config-static-vrf-afi)# en
d
– Entering yes saves configuration changes to the
or
running configuration file, exits the configuration
session, and returns the router to EXEC mode.
RP/0/RP0/CPU0:router(config-static-vrf-afi)#
commit
– Entering no exits the configuration session and
returns the router to EXEC mode without
committing the configuration changes.
– Entering cancel leaves the router in the current
configuration session without exiting or
committing the configuration changes.
•
Use the commit command to save the configuration
changes to the running configuration file and remain
within the configuration session.
Configuring a Floating Static Route
This task explains how to configure a floating static route.
SUMMARY STEPS
1.
configure
2.
router static
3.
vrf vrf-name
4.
address-family {ipv4 | ipv6} {unicast | multicast}
5.
prefix mask [vrf vrf-name] {ip-address | interface-type interface-instance} [distance] [description
text] [tag tag] [permanent]
Cisco IOS XR Routing Configuration Guide
RC-409
Implementing Static Routes on Cisco IOS XR Software
How to Implement Static Routes on Cisco IOS XR Software
6.
end
or
commit
DETAILED STEPS
Step 1
Command or Action
Purpose
configure
Enters global configuration mode.
Example:
RP/0/RP0/CPU0:router# configure
Step 2
router static
Enters static route configuration mode.
Example:
RP/0/RP0/CPU0:router(config)# router static
Step 3
vrf vrf-name
(Optional) Enters VRF configuration mode.
Example:
If a VRF is not specified, the static route is configured under
the default VRF.
RP/0/RP0/CPU0:router(config-static)# vrf vrf_A
Step 4
address-family {ipv4 | ipv6} {unicast |
multicast}
Example:
RP/0/RP0/CPU0:router(config-static-vrf)# addres
s family ipv6 unicast
Cisco IOS XR Routing Configuration Guide
RC-410
Enters address family mode.
Implementing Static Routes on Cisco IOS XR Software
How to Implement Static Routes on Cisco IOS XR Software
Step 5
Command or Action
Purpose
prefix mask [vrf vrf-name] {ip-address |
interface-type interface-instance} [distance]
[description text] [tag tag] [permanent]
Configures an administrative distance of 201.
Example:
RP/0/RP0/CPU0:router(config-static-vrf-afi)# 20
01:0DB8::/32 2001:0DB8:3000::1 201
Step 6
Saves configuration changes.
end
or
commit
When you issue the end command, the system prompts
you to commit changes:
Example:
Uncommitted changes found, commit them before
exiting(yes/no/cancel)?
[cancel]:
•
RP/0/RP0/CPU0:router(config-static-vrf-afi)# en
d
– Entering yes saves configuration changes to the
or
running configuration file, exits the configuration
session, and returns the router to EXEC mode.
RP/0/RP0/CPU0:router(config-static-vrf-afi)#
commit
– Entering no exits the configuration session and
returns the router to EXEC mode without
committing the configuration changes.
– Entering cancel leaves the router in the current
configuration session without exiting or
committing the configuration changes.
•
Use the commit command to save the configuration
changes to the running configuration file and remain
within the configuration session.
Configuring Static Routes Between PE-CE Routers
This task explains how to configure static routing between PE-CE routers.
Note
VRF fallback is not supported with IPv6 VPN Provider Edge (6VPE).
SUMMARY STEPS
1.
configure
2.
router static
3.
vrf vrf-name
4.
address-family {ipv4 | ipv6} {unicast | multicast}
5.
prefix mask [vrf vrf-name] {ip-address | interface-type interface-instance} [distance] [description
text] [tag tag] [permanent]
6.
end
or
commit
Cisco IOS XR Routing Configuration Guide
RC-411
Implementing Static Routes on Cisco IOS XR Software
How to Implement Static Routes on Cisco IOS XR Software
DETAILED STEPS
Step 1
Command or Action
Purpose
configure
Enters global configuration mode.
Example:
RP/0/RP0/CPU0:router# configure
Step 2
router static
Enters static route configuration mode.
Example:
RP/0/RP0/CPU0:router(config)# router static
Step 3
vrf vrf-name
(Optional) Enters VRF configuration mode.
Example:
If a VRF is not specified, the static route is configured under
the default VRF.
RP/0/RP0/CPU0:router(config-static)# vrf vrf_A
Step 4
address-family {ipv4 | ipv6} {unicast |
multicast}
Enters address family mode.
Example:
RP/0/RP0/CPU0:router(config-static-vrf)# addres
s family ipv6 unicast
Step 5
prefix mask [vrf vrf-name] {ip-address |
interface-type interface-instance} [distance]
[description text] [tag tag] [permanent]
Configures an administrative distance of 201.
Example:
RP/0/RP0/CPU0:router(config-static-vrf-afi)# 20
01:0DB8::/32 2001:0DB8:3000::1 201
Step 6
Saves configuration changes.
end
or
commit
When you issue the end command, the system prompts
you to commit changes:
Example:
Uncommitted changes found, commit them before
exiting(yes/no/cancel)?
[cancel]:
•
RP/0/RP0/CPU0:router(config-static-vrf-afi)# en
d
– Entering yes saves configuration changes to the
or
running configuration file, exits the configuration
session, and returns the router to EXEC mode.
RP/0/RP0/CPU0:router(config-static-vrf-afi)#
commit
– Entering no exits the configuration session and
returns the router to EXEC mode without
committing the configuration changes.
– Entering cancel leaves the router in the current
configuration session without exiting or
committing the configuration changes.
•
Cisco IOS XR Routing Configuration Guide
RC-412
Use the commit command to save the configuration
changes to the running configuration file and remain
within the configuration session.
Implementing Static Routes on Cisco IOS XR Software
How to Implement Static Routes on Cisco IOS XR Software
Changing the Maximum Number of Allowable Static Routes
This task explains how to change the maximum number of allowable static routes.
Restrictions
The number of static routes that can be configured on a router for a given address family is limited by
default to 4000. The limit can be raised or lowered using the maximum path command. Note that if you
use the maximum path command to reduce the configured maximum allowed number of static routes
for a given address family below the number of static routes currently configured, the change is rejected.
In addition, understand the following behavior: If you commit a batch of routes that would, when
grouped, push the number of static routes configured above the maximum allowed, the first n routes in
the batch are accepted. The number previously configured is accepted, and the remainder are rejected.
The n argument is the difference between the maximum number allowed and number previously
configured.
SUMMARY STEPS
1.
configure
2.
router static
3.
maximum path {ipv4 | ipv6} value
4.
end
or
commit
DETAILED STEPS
Step 1
Command or Action
Purpose
configure
Enters global configuration mode.
Example:
RP/0/RP0/CPU0:router# configure
Step 2
router static
Enters static route configuration mode.
Example:
RP/0/RP0/CPU0:router(config)# router static
Cisco IOS XR Routing Configuration Guide
RC-413
Implementing Static Routes on Cisco IOS XR Software
How to Implement Static Routes on Cisco IOS XR Software
Step 3
Command or Action
Purpose
maximum path {ipv4 | ipv6} value
Changes the maximum number of allowable static routes.
Example:
RP/0/RP0/CPU0:router(config-static)# maximum
path ipv4 10000
Step 4
•
Specify IPv4 or IPv6 address prefixes.
•
Specify the maximum number of static routes for the
given address family. The range is from 1 to 140000.
•
This example sets the maximum number of static IPv4
routes to 10000.
Saves configuration changes.
end
or
commit
When you issue the end command, the system prompts
you to commit changes:
Example:
Uncommitted changes found, commit them before
exiting(yes/no/cancel)?
[cancel]:
•
RP/0/RP0/CPU0:router(config-static)# end
or
– Entering yes saves configuration changes to the
RP/0/RP0/CPU0:router(config-static)# commit
running configuration file, exits the configuration
session, and returns the router to EXEC mode.
– Entering no exits the configuration session and
returns the router to EXEC mode without
committing the configuration changes.
– Entering cancel leaves the router in the current
configuration session without exiting or
committing the configuration changes.
•
Use the commit command to save the configuration
changes to the running configuration file and remain
within the configuration session.
Associating a VRF with a Static Route
This task explains how to associate a VRF with a static route.
SUMMARY STEPS
1.
configure
2.
router static
3.
vrf vrf-name
4.
address-family {ipv4 | ipv6} {unicast | multicast}
5.
prefix mask [vrf vrf-name] {ip-address | interface-type interface-instance} [distance] [description
text] [tag tag] [permanent]
6.
end
or
commit
Cisco IOS XR Routing Configuration Guide
RC-414
Implementing Static Routes on Cisco IOS XR Software
How to Implement Static Routes on Cisco IOS XR Software
DETAILED STEPS
Step 1
Command or Action
Purpose
configure
Enters global configuration mode.
Example:
RP/0/RP0/CPU0:router# configure
Step 2
router static
Enters static route configuration mode.
Example:
RP/0/RP0/CPU0:router(config)# router static
Step 3
vrf vrf-name
Enters VRF configuration mode.
Example:
RP/0/RP0/CPU0:router(config-static)# vrf vrf_A
Step 4
address-family {ipv4 | ipv6} {unicast |
multicast}
Enters address family mode.
Example:
RP/0/RP0/CPU0:router(config-static-vrf)#
address family ipv6 unicast
Step 5
prefix mask [vrf vrf-name] {ip-address |
interface-type interface-instance} [distance]
[description text] [tag tag] [permanent]
Configures an administrative distance of 201.
Example:
RP/0/RP0/CPU0:router(config-static-vrf-afi)# 20
01:0DB8::/32 2001:0DB8:3000::1 201
Step 6
end
or
Saves configuration changes.
commit
When you issue the end command, the system prompts
you to commit changes:
Example:
Uncommitted changes found, commit them before
exiting(yes/no/cancel)?
[cancel]:
•
RP/0/RP0/CPU0:router(config-static-vrf-afi)# en
d
– Entering yes saves configuration changes to the
or
running configuration file, exits the configuration
session, and returns the router to EXEC mode.
RP/0/RP0/CPU0:router(config-static-vrf-afi)#
commit
– Entering no exits the configuration session and
returns the router to EXEC mode without
committing the configuration changes.
– Entering cancel leaves the router in the current
configuration session without exiting or
committing the configuration changes.
•
Use the commit command to save the configuration
changes to the running configuration file and remain
within the configuration session.
Cisco IOS XR Routing Configuration Guide
RC-415
Implementing Static Routes on Cisco IOS XR Software
Configuration Examples
Configuration Examples
This section provides the following configuration examples:
•
Configuring Traffic Discard: Example
•
Configuring a Fixed Default Route: Example
•
Configuring a Floating Static Route: Example
•
Configuring a Static Route Between PE-CE Routers: Example
Configuring Traffic Discard: Example
Configuring a static route to point at interface null 0 may be used for discarding traffic to a particular
prefix. For example, if it is required to discard all traffic to prefix 2001:0DB8:42:1/64, the following
static route would be defined:
configure
router static
address-family ipv6 unicast
2001:0DB8:42:1::/64 null 0
end
Configuring a Fixed Default Route: Example
A default static route is often used in simple router topologies. In the following example, a route is
configured with an administrative distance of 110.
configure
router static
address-family ipv4 unicast
0.0.0.0/0 2.6.0.1 110
end
Configuring a Floating Static Route: Example
A floating static route is often used to provide a backup path if connectivity fails. In the following
example, a route is configured with an administrative distance of 201.
configure
router static
address-family ipv6 unicast
2001:0DB8::/32 2001:0DB8:3000::1 201
end
Configuring a Static Route Between PE-CE Routers: Example
In the following example, a static route between PE and CE routers is configured, and a VRF is
associated with the static route:
configure
router static
vrf vrf_A
address-family ipv4 unicast
Cisco IOS XR Routing Configuration Guide
RC-416
Implementing Static Routes on Cisco IOS XR Software
Where to Go Next
0.0.0.0/0 2.6.0.2 120
end
Where to Go Next
For additional information about static routes, routing protocols, and RIB, consult the following
publications:
•
Implementing and Monitoring RIB on Cisco IOS XR Software in Cisco IOS XR Routing
Configuration Guide
•
Implementing BGP on Cisco IOS XR Software in Cisco IOS XR Routing Configuration Guide
•
Implementing EIGRP on Cisco IOS XR Software in Cisco IOS XR Routing Configuration Guide
•
Implementing IS-IS on Cisco IOS XR Software in Cisco IOS XR Routing Configuration Guide
•
Implementing MPLS Layer 3 VPN on Cisco IOS XR Software in Cisco IOS XR Multiprotocol Label
Switching Configuration Guide
•
Implementing OSPF on Cisco IOS XR Software in Cisco IOS XR Routing Configuration Guide
•
Implementing OSPFv3 on Cisco IOS XR Software in Cisco IOS XR Routing Configuration Guide
•
RIB Commands on Cisco IOS XR Software in Cisco IOS XR Routing Command Reference
•
Implementing RIP on Cisco IOS XR Software in Cisco IOS XR Routing Configuration Guide
Additional References
The following sections provide references related to implementing static routes on Cisco IOS XR
software.
Related Documents
Related Topic
Document Title
Static routes commands: complete command syntax,
command modes, command history, defaults, usage
guidelines, and examples
Static Routing Commands on Cisco IOS XR Software, Release 3.5
MPLS Layer 3 VPN configuration: configuration
concepts, task, and examples
Cisco IOS XR Multiprotocol Label Switching Configuration Guide,
Release 3.5
Standards
Standards
Title
No new or modified standards are supported by this
—
feature, and support for existing standards has not been
modified by this feature.
Cisco IOS XR Routing Configuration Guide
RC-417
Implementing Static Routes on Cisco IOS XR Software
Additional References
MIBs
MIBs
MIBs Link
—
To locate and download MIBs using Cisco IOS XR software, use the
Cisco MIB Locator found at the following URL and choose a
platform under the Cisco Access Products menu:
http://cisco.com/public/sw-center/netmgmt/cmtk/mibs.shtml
RFCs
RFCs
Title
No new or modified RFCs are supported by this
feature, and support for existing RFCs has not been
modified by this feature.
—
Technical Assistance
Description
Link
The Cisco Technical Support website contains
http://www.cisco.com/techsupport
thousands of pages of searchable technical content,
including links to products, technologies, solutions,
technical tips, and tools. Registered Cisco.com users
can log in from this page to access even more content.
Cisco IOS XR Routing Configuration Guide
RC-418
INDEX
autonomous system number format
HC
Cisco IOS XR Interface and Hardware Component
Configuration Guide
IC
Cisco IOS XR IP Addresses and Services Configuration Guide
MCC
Cisco IOS XR Multicast Configuration Guide
MNC
Cisco IOS XR System Monitoring Configuration Guide
MPC
Cisco IOS XR MPLS Configuration Guide
B
QC
Cisco IOS XR Modular Quality of Service Configuration
Guide
backbone area
RC
Cisco IOS XR Routing Configuration Guide
bandwidth-percent command
SBC
Cisco IOS XR Session Border Controller Configuration Guide
SC
Cisco IOS XR System Security Configuration Guide
SMC
Cisco IOS XR System Management Configuration Guide
autonomous systems
RC-7
RC-227
auto-summary command
RC-324
RC-227
bestpath algorithm
RC-148
RC-27
BGP (Border Gateway Protocol)
autonomous system number format
bestpath algorithm
A
BGP keychains
address family command
address-family command (IS-IS)
address-family ipv4 command
adjacencies, tuning
allowas-in command
description
area command
RC-228
IPv6 provider edge multipath
RC-40
MPLS VPN carrier supporting carrier
RC-106
attached bit on an IS-IS instance
multicast VPN
RC-176
multiprotocol
authentication
RC-32
RC-4
policy attach points
RC-230
allocate label
RC-230
authentication, configuring (OSPFv2)
authentication command (OSPFv2)
RC-39
RC-41
neighbors, maximum limits on
RC-230
route, key rollover (OSPFv2)
strategies
RC-15
IPv6 and IPv6 VPN provider edge transport over
MPLS RC-39
RC-243
MD5 (OSPFv2)
RC-3
inheritance, monitoring
RC-358
as-override command
RC-37
functional overview
RC-60, RC-105
RC-37
RC-1
distributed BGP
RC-405
RC-106
Area Border Routers (ABRs)
RC-11
default address family
RC-305
aggregate-address command
RC-3
RC-9
inheriting
RC-114
administrative distance, static routes
apply command
grouping
RC-147
RC-200
administrative distance
RC-39
configuration
RC-185
address-family ipv4 mdt command
RC-27
bidirectional forwarding detection
RC-8, RC-170
RC-7
clear policy
RC-252
dampening
RC-253
authentication message-digest command
debug
RC-259
Autonomous System Boundary Routers (ASBRs)
RC-228
RC-367
RC-368
RC-360
RC-368
default originate
RC-361
Cisco IOS XR Routing Configuration Guide
RC-419
Index
export
RC-365
distance bgp command
import
RC-365
network command
RC-72
RC-58
neighbor export
RC-361
redistribute command
neighbor import
RC-362
See address family command
neighbor-orf
network
table-policy command
RC-367
next-hop self command
RC-368
redistribute
route-policy command
RC-366
table policy
RC-9
bgp neighbor group submode
bgp neighbor submode
VPNv4 and VPNv6 over the IP core using L2TPv3
tunnels RC-40
bgp address family submode
bgp dampening command
keychain command
RC-113
password command
RC-100
shutdown command
timers command
RC-102
bgp bestpath as-path ignore command
RC-56
bgp bestpath med confed command
RC-56
bgp bestpath med missing-as-worst command
bgp client-to-client reflection disable command
bgp confederation identifier command
bgp confederation peers command
RC-48
RC-49
RC-22
RC-66, RC-99
bgp default local-preference command
bgp global address family submode
aggregate-address command
use command
RC-57
bgp bestpath med always command
RC-52
RC-8
RC-60
RC-66
RC-100, RC-117
RC-100
update-source command
RC-56
bgp bestpath compare-routerid command
RC-115
See bgp neighbor command
RC-99
retain route-target command
bgp dampening command
RC-8, RC-9, RC-171
route-policy command
bgp client-to-client reflection disable
command RC-99
bgp dampening command
RC-10, RC-74
See neighbor-group command
RC-22
RC-127
bgp cost community
RC-100
RC-74
bgp redistribute-internal command
bgp router-id command
RC-56
RC-99
bgp router submode
RC-61
RC-97, RC-104
RC-8, RC-170
address-family ipv4 mdt command
Cisco IOS XR Routing Configuration Guide
RC-114
bgp bestpath as-path ignore command
RC-56
bgp bestpath compare-routerid command
RC-57
bgp bestpath med always command
RC-56
bgp bestpath med confed command
RC-56
bgp bestpath med missing-as-worst command
bgp confederation identifier command
bgp confederation peers command
RC-48
RC-49
bgp default local-preference command
bgp redistribute-internal command
RC-420
RC-91
RC-55
bgp neighbor command
RC-20
update groups
example
RC-84
soft-reconfiguration inbound always command
RC-4
weight command
description
RC-77
send-community-ebgp command
RC-359
routing policy
enforcing
RC-47, RC-74, RC-100
See neighbor address family command
RC-364
policy attach points, aggregation
router identifier
RC-79
route-reflector-client command
RC-363
RC-8, RC-171
RC-82
route-policy (BGP) command
RC-363
retain route target
show bgp
RC-70
bgp neighbor address family submode
RC-362
next-hop
RC-63
RC-52
RC-61
RC-56
Index
bgp router-id command
RC-97
default-metric command
C
RC-53
See router bgp command
circuit-type command
timers bgp command
clear bgp flap-statistics command
RC-50
bgp session group submode
bgp VPNv4 address family submode
RC-9
clear bgp soft in command
bgp VPNv6 address family submode
RC-9
clear bgp soft out command
RC-119
export route-policy command
RC-95
clear eigrp topology command
import route-policy command
RC-95
clear ospf command
import route-target command
RC-95
clear ospfv3 command
maximum-paths command
redistribute command
RC-162
RC-162
RC-296
RC-296
configuring
RC-95
OSPFv3
RC-8
aggregate-address command
RC-68
RC-118
clear eigrp neighbors command
BGP vrf address family submode
bgp vrf address family submode
RC-68
clear bgp flap-statistics route-policy command
RC-127
maximum prefix command
RC-68
clear bgp flap-statistics reexp command
RC-10
BGP update groups example
RC-185, RC-215, RC-216
graceful restart
RC-105
cost community, BGP
RC-108
RC-275
RC-22
csnp-interval command
RC-111
RC-189
BGP VRF neighbor address family submode
as-override command
RC-106
route-policy command
D
RC-106
site-of-origin command
dampening, route
RC-106
bgp VRF neighbor address family submode
RC-9
bgp vrf neighbor address family submode
allowas-in command
RC-106
BGP VRF neighbor submode
ebgp-multihop command
bgp VRF neighbor submode
bgp vrf submode
RC-249
default address family
RC-19
default-cost command
RC-246
default-metric command
RC-105
distance bgp command
RC-8
distance command
distributed BGP
RC-105
BGP vrf submode
rd command
dead interval command
default-information originate command
bgp vrf neighbor submode
password command
RC-33
RC-53, RC-147
RC-72
RC-147, RC-207
RC-37
draft-bonica-tcp-auth-05.txt
RC-131
RC-97
draft-ietf-idr-as4bytes-12.txt
RC-8
draft-ietf-idr-avoid-transition-00.txt
bgp router-id command
draft-ietf-idr-bgp4-24.txt, BGP
RC-104
label-allocation-mode per-ce command
bidirectional forwarding detection
broadcast-for-v2 command
RC-322
RC-3
RC-104
RC-206
RC-131
RC-131
RC-131
draft-ietf-idr-bgp4-mib-15.txt, BGP
draft-ietf-idr-cease-subcode-05.txt
RC-131
RC-131
draft-ietf-isis-igp-p2p-over-lan-05.txt, Point-to-point
operation over LAN RC-219
draft-ietf-isis-ipv6-05.txt, Routing IPv6 with
IS-IS RC-219
Cisco IOS XR Routing Configuration Guide
RC-421
Index
draft-ietf-isis-restart-04.txt, Restart Signalling for
IS-IS RC-219
clear bgp soft out command
clear eigrp neighbors command
draft-ietf-isis-traffic-05.txt, IS-IS Extensions for Traffic
Engineering RC-219
edit command
Draft-ietf-rtgwg-ipfrr-framework-06.txt, IP fast
reroute RC-219, RC-315
draft-ietf-rtgwg-lf-conv-frmwk-00,txt
draft-nalawade-idr-mdt-safi-03.txt
RC-219, RC-315
RC-131
RC-162
RC-296
clear ospfv3 command
RC-219
RC-162
clear eigrp topology command
clear ospf command
draft-ietf-isis-wg-multi-topology-06.txt, M-ISIS
Multi Topology (MT) Routing in IS-IS
RC-119
RC-296
RC-397
show bgp af-group command
RC-16, RC-17
show bgp cidr-only command
RC-122, RC-123
show bgp community command
RC-122, RC-123, RC-124
show bgp count-only command
RC-123
show bgp flap-statistics command
E
RC-66
show bgp flap statistics reexp command
ebgp-multihop command
edit command
show bgp flap statistics route-policy command
RC-105
show bgp inheritance command
RC-397
show bgp neighbor command
EIGRP ()
EIGRP (Enhanced Interior Gateway Routing Protocol)
features
RC-135
hello interval and hold time
overview
default-accept-out
policy-in
show bgp reexp command
RC-122
RC-123
RC-162
show eigrp neighbors command
RC-156
show isis command
RC-163
RC-163
RC-182
show isis database command
RC-190
show isis database-log command
RC-386
show isis interface command
RC-155
routing policy options
RC-162
show eigrp interfaces command
show eigrp traffic command
RC-386
RC-386
redistribute
RC-122
show eigrp topology command
RC-385
policy-out
restrictions
RC-385
RC-386
if-policy-out
show bgp paths command
show eigrp accounting command
policy attach points
show isis lsp-log command
RC-144
RC-18, RC-123
RC-122
show bgp summary command
RC-143
RC-135
if-policy-in
RC-15
show bgp neighbors command
RC-385
RC-190
RC-203
RC-190
split horizon
RC-142
show isis mpls command
stub routing
RC-143
show isis mpls traffic-eng adjacency-log
command RC-199
end-policy command
EXEC mode
RC-45
clear bgp flap statistics command
RC-68
clear bgp flap statistics reexp command
show isis neighbors command
RC-68
clear bgp flap statistics route-policy command
clear bgp soft in command
RC-118
Cisco IOS XR Routing Configuration Guide
RC-422
RC-199
show isis mpls traffic-eng advertisements
command RC-199
RC-17, RC-163
show isis spf-log command
RC-68
RC-67
RC-16
show bgp neighbor-group command
policy attach points
default-accept-in
RC-67
RC-203
RC-205
show isis topology command
show protocols eigrp command
RC-186
RC-163
Index
show rpl route-policy command
RC-397
show running-config command
RC-192
configurations (BGP)
monitoring
RC-15
export route-policy command
RC-95
interarea tunnels
export route-target command
RC-96
interface command
F
RC-179
RC-147, RC-323
interior routers
RC-229
IP Fast Reroute
RC-307
IP fast reroute
forwarding adjacency
RC-179
loop-free alternate
RC-178
RC-11
RC-219, RC-315
ipv4 address command
10 Gigabit Ethernet
G
RC-280
IPv6
Generalized TTL Security Mechanism (GTSM)
configuring virtual links
RC-241
Generalized TTL Security Mechanism (GTSM), RFC 3682
TTL value
graceful restart
RC-275
graceful-restart helper command
RC-237
graceful-restart interval command
RC-237
graceful-restart lifetime command
RC-237
hello-interval (IS-IS) command
RC-201
hello interval (OSPF) command
RC-249
RC-201
RC-201
hello-password command
holdtime command
RC-173
RC-306
RC-171
IPv6 and IPv6 VPN provider edge transport over
MPLS RC-39, RC-306, RC-407
IPv6 provider edge multipath
RC-195, RC-197, RC-202
RC-148
RC-200
attached bit on an instance
RC-176
authentication, configuring
RC-193, RC-195
Cisco IOS and Cisco IOS XR software differences,
configuration
grouped
RC-170
configuration
grouped configuration
restrictions
RC-168
customizing routes
default routes
ipv4 address command
RC-280
description
ignore-lsp-errors command
RC-189
enabling
RC-182
RC-205
RC-176
RC-167
RC-180
import route-policy command
RC-95
enabling multicast-intact
import route-target command
RC-95
functional overview
inheritance
RC-180
RC-186
single topology
if submode
RC-170
Level 1 or Level 2 routing
multitopology
I
RC-40
IS-IS (Intermediate System-to-Intermediate System)
adjacencies, tuning
H
hello-multiplier command
RC-173
single-topology
routing
RC-349
hello-padding command
multitopology
RIB support
RC-241
global parameters
IS-IS support
grouped configuration
RC-210
RC-169
RC-170
Cisco IOS XR Routing Configuration Guide
RC-423
Index
IP fast reroute
RC-215
IPv6 routing
L
RC-171
Level 1 or Level 2 routing, configuration
L2TPv3 tunnels
RC-40
label-allocation-mode per-ce command
LSP flooding
controlling
RC-172
RC-172
MPLS LDP IS-IS synchronization
RC-208
OSPFv2
RC-231
OSPFv3
RC-232, RC-238
log adjacency changes command
log-neighbor-changes command
MPLS TE
RC-197
log-neighbor-warnings command
description
RC-175
loop-free alternate
multitopology, configuring
nonstop forwarding
configuring
controlling
RC-174
policy attach points
redistribute
set SPF interval
RC-213
configuring
RC-203
single-topology
RC-173
tagging IS-IS interface routes
IS-IS address family submode
RC-188
RC-194, RC-196
lsp-refresh-interval command
RC-188
M
RC-182
IPv6 support
RC-189
RC-168
single topology
RC-211
RC-170
RC-204
is-type command
RC-188
lsp-password command
RC-382
priority for prefixes added to RIB
ispf command
lsp-gen-interval command
lsp-mtu command
RC-383
RC-181
maximum paths command
RC-151
maximum-paths command
RC-108, RC-207
maximum prefix command
RC-95
maximum-prefix command
RC-152
max-lsp-lifetime command
RC-188
mesh-group command
RC-189
Message Digest 5 (MD5) authentication
message-digest-key command
message statistics
K
keychains
RC-113
RC-39
RC-253
metro-zero-accept command
RC-199, RC-212, RC-214
RC-325
MPLS LDP IGP synchronization
MPLS LDP IS-IS synchronization
Cisco IOS XR Routing Configuration Guide
RC-424
RC-240
RC-306
metric-style wide command
keychain command
RC-172
RC-172
lsp-interval command
RC-383
restrictions, configuring
RC-172
on specific interfaces
RC-175
inter-area-propagate
RC-172
mesh group configuration
RC-173
default originate
RC-187
lifetime maximum
RC-191
limiting
on router
RC-188
LSP flooding
RC-186
overload bit
configuring
RC-161
RC-179, RC-219, RC-307, RC-315
lsp-check-interval command
RC-175
RC-201, RC-244, RC-292
RC-161
configuring
multi-instance IS-IS
RC-104
link-state advertisement (LSA)
RC-187
lifetime maximum
limiting
RC-180
RC-177
RC-208
Index
mpls ldp sync command
network command
RC-209
MPLS TE (Multiprotocol Label Switching traffic
engineering) configuring
IS-IS
RC-197
OSPFv2
RC-58, RC-249
next-hop-self command
nonstop forwarding, configuring (OSPFv2)
not-so-stubby area
RC-271
nsf command
MPLS TE forwarding adjacency
MPLS TE interarea tunnels
RC-178
mpls traffic-eng command
RC-191, RC-324
nsf interface-timer command
RC-273
RC-198
mpls traffic-engineering multicast-intact
command RC-211
mpls traffic-eng router-id command
RC-269
RC-228
nsf interface-expires command
RC-179
mpls traffic-eng area command
RC-82
RC-192
nsf interval command
RC-271
nsf lifetime command
RC-192
nssa command
RC-192
RC-246
RC-198, RC-272
MPLS VPN carrier supporting carrier
RC-39
O
multi-area adjacency
configuring
ospf area configuration submode
RC-286
interface attributes and limitations
overview
multicast-intact
RC-238
multicast VPN
RC-249
RC-246
RC-262
RC-246
ospf area submode
RC-32
authentication message-digest command
multitopology
configuring
example
network command
stub command
RC-175
RC-249
RC-244
range command
RC-41
multiprotocol BGP
RC-246
interface command
nssa command
RC-177
multi-instance IS-IS
RC-249
hello interval command
RC-286
RC-176
multicast topology
dead-interval command
default-cost command
RC-239
multi-area-interface command
OSPFv2
RC-239
virtual-link command
RC-186
RC-259
RC-259
ospf interface configuration submode
RC-217
log adjacency changes
neighbor command
N
RC-244, RC-292
RC-250
OSPFv2 (Open Shortest Path First Version 2)
NBMA networks
authentication, configuring
RC-229
neighbor address family command
neighbor command
RC-8, RC-171
RC-8, RC-171, RC-322
neighbor command (OSPFv2, OSPFv3)
neighbor-group command
RC-74
neighbors
adjacency (OSPFv2)
RC-231
maximum limits (BGP)
net command
RC-181
RC-4
RC-252
Cisco IOS XR OSPFv3 and OSPFv2
differences RC-225
CLI (command-line interface) inheritance
RC-250
RC-225
configuration
MPLS TE
RC-271
neighbors, nonbroadcast networks
RC-247
configuration and operation, verifying
RC-295
default route
description
RC-231
RC-221
Cisco IOS XR Routing Configuration Guide
RC-425
Index
Designate Router (DR)
enabling
transit area
RC-231
OSPFv2 (Open Shortest Path First version 2)
RC-242
functional overview
enabling multicast-intact
RC-223
instance and router ID
controlling the frequency
on an OSPF ABR
RC-255
RC-261
MD5 authentication
Cisco IOS XR OSPFv3 and OSPFv2
differences RC-225
CLI inheritance
RC-225
neighbors, adjacency
neighbors, nonbroadcast networks
RC-230
MPLS TE, configuring
RC-271
SPF throttling
nonstop forwarding
default route
description
enabling
RC-221
RC-242
RC-269
functional overview
description
RC-235
graceful restart
load balancing
redistribute
route authentication methods
MD5
RC-229
RC-239
controlling frequency
RC-379
RC-379, RC-381
key rollover
RC-275
LSA
RC-380
default originate
RC-223
instance and router ID
RC-380
on an OSPF ABR
types
RC-255
RC-261
RC-232
neighbors
RC-230
nonbroadcast networks, configuring
RC-230
plain text
RC-230
strategies
RC-230
policy attach points
default originate
RC-381
route redistribution
redistribute
configuring
RC-263
routes, redistribute
description
RC-234
SPF (Shortest Path First) throttling
configuring RC-266
Shortest Path First (SPF) throttling
configuring
RC-266
description
RC-234
RC-229
RC-257
dead-interval command
hello interval command
Cisco IOS XR Routing Configuration Guide
RC-249
RC-246
RC-249
interface command
RC-244
network command
RC-249
nssa command
RC-426
RC-233
ospfv3 area configuration submode
default-cost command
RC-229
virtual link
creating
RC-263
virtual link, description
supported OSPF network types
point to point networks
RC-379, RC-381
stub and not-so-stubby area types,
configuring RC-244
stub and not-so-stubby area types,
configuring RC-244
NBMA networks
RC-295
RC-231
configuring
policy attach points
RC-247
RC-266
configuration and operation, verifying
RC-231
neighbors, nonbroadcast networks,
configuring RC-247
area-out
RC-266
configuration
RC-231
area-in
RC-278
OSPFv3 (Open Shortest Path First Version 3)
RC-229
LSA
types
RC-233
RC-246
RC-247
Index
range command
RFC 1195, Use of OSI IS-IS for Routing in TCP/IP and
Dual Environments RC-220
RC-262
stub command
RC-246
OSPFv3 Graceful Restart feature
adjacency
RFC 1587, Not So Stubby Area (NSSA)
RC-236
RFC 1700, Assigned Numbers
RC-237
displaying information
RFC 1771
RC-278
log adjacency changes
RC-244, RC-292
neighbor command
RC-250
output-delay command
RC-324
RC-401
on router
RFC 2385, Protection of BGP Sessions via the TCP MD5
Signature Option RC-132
RC-173
RFC 2453, RIP Version 2
RC-175
RFC 2740, OSPFv3
RFC 2740 OSPFv3
passive-interface command
RC-100, RC-105
point-to-point networks
RC-229
poison-reverse command
RC-302
RC-224
RFC 2796, BGP Route Reflection - An Alternative to Full
Mesh IBGP RC-132
RC-241
RC-176
RC-325
RFC 2858, Multiprotocol Extensions for BGP-4
RC-132
RFC 2918, Route Refresh Capability for BGP-4
RC-132
RFC 2966, Domain-wide Prefix Distribution with
Two-Level IS-IS RC-220
policy, modifying
RC-390
nonattached
RC-318, RC-335
RFC 2763, Dynamic Hostname Exchange Mechanism for
IS-IS RC-220
RC-327
PCE extensions to OSPFv2
attached
RC-132
RFC 2545, Use of BGP-4 Multiprotocol Extensions for
IPv6 Inter-Domain Routing RC-132
P
password command
RC-132
RC-224, RC-302
RFC 2439, BGP Route Flap Damping
configuration
RC-302
RFC 1997, BGP Communities Attribute
RFC 2328, OSPF Version 2
overload bit
PIM
RC-132
RFC 1793, OSPF over demand circuit
ospfv3 interface configuration submode
RC-302
RFC 2973, IS-IS Mesh Groups
RC-390
RC-220
RFC 3065, Autonomous System Confederations for
BGP RC-132
RFC 3277, IS-IS Transient Blackhole Avoidance
R
RFC 3373, Three-Way Handshake for IS-IS Point-to-Point
Adjacencies RC-220
range command
rd command
RC-220
RC-262
RFC 3392, Capabilities Advertisement with
BGP-4 RC-132
RC-97
receive version command
redistribute command
RC-323
RFC 3567, IS-IS Cryptopgraphic Authentication
RC-63, RC-111, RC-151, RC-157, RC-159,
RC-265
redistribute isis command
RC-206
redistribute maximum-prefix command
RC-151
RFC 3623, OSPFv3
RFC 4271
RC-132
RFC 4360
RC-401
RC-220
RC-302
retain route-target command
RC-102
RFC 4364, BGP/MPLS IP Virtual Private Networks
(VPNs) RC-132
retransmit-interval command
RC-189
RFC 4724, Graceful Restart Mechanisms for BGP
retransmit-throttle-interval command
RC-189
RFC 1142, OSI IS-IS Intra-domain Routing
Protocol RC-220
RC-132
RIB (Routing Information Base)
administrative distance
RC-305
data structures in BGP and other protocols
RC-305
Cisco IOS XR Routing Configuration Guide
RC-427
Index
deploying
route-policy command
RC-308
description
examples
RC-45, RC-78, RC-100, RC-106, RC-115,
RC-149, RC-153, RC-328, RC-329, RC-393
RC-303
route-policy configuration submode
RC-311
functional overview
IPv4 and IPv6 support
monitoring
set rip-metric command
RC-306
RC-304
RIB quarantining
RC-307
route policy submode
router bgp command
global-inbound
RC-388
administrative distance
route-reflector-client command
RC-326
route reflectors
RC-319
filter network updates
RC-326
RC-326
global-inbound
RC-388
RC-388
interface-inbound
RC-389
router eigrp command
RC-151, RC-157, RC-159
RC-151
RC-147
router eigrp configuration mode
RC-328
route-policy command
RC-319
RC-149
router eigrp configuration submode
RC-326
address-family ipv4 command
RC-321
split horizon, enabling IP
interface command
RC-319
VLSMs (variable-length subnet masks)
RC-318
RC-147
bandwidth-percent command
holdtime command
RC-318
RC-33
route-policy (BGP) command
RC-147
router eigrp interface configuration submode
RC-326
RIP v2 supported features
RC-152
timers nsf route-hold command
RC-320
routing policy options
RC-161
redistribute maximum-prefix command
RC-388
route policy creation
RC-148
summary-address command
router-id command
RC-47, RC-74, RC-79
router identifier
RC-148
RC-150
RC-243
RC-4
router isis address family submode
Cisco IOS XR Routing Configuration Guide
RC-428
RC-161
RC-151
maximum-prefix command
redistribute command
RC-389
interface-outbound
route dampening
RC-147
maximum paths command
default-information originate
WAN link
RC-147
log-neighbor-warnings command
policy attach points
routing loops
default-metric command
log-neighbor-changes command
RC-318
route timers
RC-77
RC-34
distance command
RC-318
redistribution
RC-234
router eigrp address family configuration
submode RC-155
RC-318
redistribute
RC-10
route redistribution (OSPFv2, OSPFv3)
RC-320
control or prevent routing updates
metrics
RC-8, RC-170
address family command
RIP (Routing Information Protocol)
hop count
RC-45
router bgp neighbor group address family configuration
mode
policy attach points
CIDR
RC-20
See route-policy command
RIP (Routing Information Protocol )
benefits
RC-329
RC-45
end-policy command
RC-306
bandwidth
RC-153
route-policy pass-all command
RC-308
prerequisites
RIB statistics
set eigrp-metric command
RC-304
RC-151
Index
default-information originate command
distance command
ispf command
RC-206
hello-padding command
RC-207
maximum-paths command
RC-207
metric-style wide command
mpls ldp sync command
RC-199, RC-212, RC-214
RC-209
mpls traffic-eng command
RC-198
mpls traffic-eng multicast-intact command
mpls traffic-eng router-id command
redistribute isis command
RC-206
set-attached-bit command
RC-208
single-topology command
RC-185
RC-198
RC-189
RC-201
RC-188
RC-188
RC-194, RC-196
lsp-refresh-interval command
max-lsp-lifetime command
RC-188
RC-188
RC-192
RC-192
RC-192
set-overload-bit command
RC-206
router isis interface address family submode
RC-189
retransmit-interval command
RC-189
router isis interface configuration submode
address-family command
RC-189
RC-189
RC-243
router ospf configuration submode
RC-243
RC-243
RC-253
RC-253
mpls traffic-eng area command
RC-273
nsf interval command
RC-271
redistribute command
RC-265
router-id command
RC-185
RC-185, RC-215, RC-216
RC-272
RC-243
RC-266
timers lsa gen-interval command
timers lsa group-pacing command
timers lsa min-interval command
RC-256
RC-257
RC-256
RC-268, RC-293
RC-243
router ospfv3 configuration submode
area command
RC-243
redistribute command
router-id command
RC-265
RC-243
summary-prefix command
RC-266
timers lsa gen-interval command
RC-212
circuit-type command
mesh-group command
router ospfv3 command
nsf interface-timer command
tag command
RC-189
timers throttle spf command
nsf interface-expires command
nsf lifetime command
lsp-interval command
summary-prefix command
RC-188
RC-191
RC-184
mpls traffic-eng router-id command
lsp-gen-interval command
nsf command
ipv6 enable command
message-digest-key command
RC-185
lsp-check-interval command
RC-181
RC-184
authentication command
log adjacency changes command
net command
ipv6 address command
area command
RC-181
lsp-password command
RC-184
router ospf command
router isis configuration submode
ignore-lsp-errors command
ipv4 address command
mesh-group command
RC-207
address-family command
RC-211
RC-195, RC-197, RC-202
router isis interface submode
RC-214
summary-prefix command
lsp-mtu command
RC-201
retransmit-throttle-interval command
RC-204
spf prefix-priority command
is-type command
RC-201
hello-password command
RC-204
spf-interval command
hello-multiplier command
timers lsa group-pacing command
timers lsa min-interval command
timers throttle spf command
csnp-interval command
RC-189
router rib command
hello-interval command
RC-201
router rib configuration submode
RC-256
RC-257
RC-256
RC-268, RC-293
RC-311
Cisco IOS XR Routing Configuration Guide
RC-429
Index
address-family command
router rip command
attaching to BGP neighbor
RC-311
configuration elements, editing
RC-322
router rip configuration submode
auto-summary command
defining
enforcing, BGP
RC-322
interface command
RC-323
neighbor command
RC-322
RC-398
RC-20
implementing
prerequisites
RC-338
inbound (example)
RC-324
RC-398
output-delay command
RC-324
modifying
timers basic command
RC-324
modular inbound (example)
router rip interface configuration submode
metro-zero-accept command
passive-interface command
RC-325
RC-327
action
elseif
receive version command
RC-323
if
RC-328
send version command
RC-323
RC-356
RC-325
Boolean operators, types
components
RC-413
overview
RC-357
RC-344
RC-339
policy
RC-205
attributes
default
IS-IS
modification
RC-176
OSPFv2
redistribute IS-IS routes example
RC-263
RC-217
routing components
RC-228
Autonomous System Boundary Routers
(ASBRs) RC-228
autonomous systems
RC-227
RC-227
Designated Router (DR)
interior routers
configuration basics
statements, types
RC-352
RC-354
RC-352
structure
as-path-set, named set form
RC-341
RC-341
community-set, inline set form
RC-228
community-set, named set form
RC-228
routing domain confederation
RC-351
RC-347
statement processing
verification
RC-350
RC-347
as-path-set, inline set form
RC-231
RC-229
not-so-stubby area
routing policy
Boolean operator precedence
definitions
Area Border Routers (ABRs)
stub area
RC-348
default drop disposition
RC-176
backbone area
RC-350
parameterization
RC-231
redistribute (OSPFv2, OSPFv3)
RC-341
RC-341
extended community set, inline form
RC-34
RC-20
Cisco IOS XR Routing Configuration Guide
RC-430
RC-354
RPL (routing policy language)
routes
route tags
RC-354
RC-356
remark
split-horizon disable command
customizing (IS-IS)
RC-399
RC-356
disposition
RC-325
route-policy command
RC-396
statements
poison-reverse command
router static command
RC-391
RC-393
defining (example)
RC-324
broadcast-for-v2 command
nsf command
RC-394
extended community set, named form
names
RC-339
RC-342
RC-342
Index
prefix-set
sets
show isis mpls traffic-eng adjacency-log
command RC-199
RC-343
RC-340
show isis mpls traffic-eng advertisements
command RC-199
show isis neighbors command
S
show isis spf-log command
security ttl command
RC-293
RC-84
show ospf command
RC-323
RC-208
set eigrp-metric command
RC-153
set-overload-bit command
RC-206
RC-16, RC-17
show bgp cidr-only command
RC-122, RC-123
show bgp count-only command
RC-123
show bgp flap-statistics command
RC-15
RC-122
show bgp reexp command
RC-122
RC-123
RC-162
RC-162
show eigrp neighbors command
RC-156, RC-163
RC-163
RC-313
RC-182
RC-190
show isis database-log command
show isis interface command
show isis lsp-log command
show isis mpls command
RC-190
RC-203
RC-190
RC-199
RC-203
RC-106
soft-reconfiguration inbound always command
spf-interval command
RC-91
RC-204
RC-214
SPF throttling, configuring
OSPFv2 (Open Shortest Path First Version 2)
RC-266
RC-325
address-family command
RC-408, RC-410, RC-412,
RC-415
maximum path command
vrf command
RC-414
RC-408, RC-410, RC-412, RC-415
static routes
administrative distance
associating with VRF
RC-163
show ip route connected command
show isis database command
RC-173
static router submode
RC-17
show eigrp interfaces command
show isis command
RC-217
split-horizon disable command
show bgp session-group command
show eigrp accounting command
configuring example
spf prefix-priority command
RC-18, RC-123
RC-122
show bgp paths command
RC-185
site-of-origin command
RC-67
RC-16
show bgp neighbor-group command
RC-192
RC-100, RC-117
set SPF interval
RC-67
show bgp flap-statistics route-policy command
show eigrp traffic command
RC-397
IPv6 support
RC-66
show bgp flap-statistics reexp command
show eigrp topology command
show rpl route-policy command
command
RC-122, RC-123, RC-124
show bgp summary command
RC-163
single-topology
show bgp community command
show bgp neighbors command
show protocols eigrp command
shutdown command
show bgp af-group command
show bgp neighbor command
RC-259
show running-config command
RC-329
show bgp inheritance command
RC-186
RC-259
show ospfv3 command
set-attached-bit command
set rip-metric command
RC-205
show isis topology command
send-community-ebgp command
send version command
RC-203
connected
RC-405
RC-414
RC-405
defined
RC-404
floating
RC-407, RC-409, RC-411
maximum number of routes
MPLS layer 3 VPN
recursive
RC-406
specified
RC-406
RC-413
RC-405
Cisco IOS XR Routing Configuration Guide
RC-431
Index
stub area
VPNv6 address family command
RC-228
stub area types, configuring (OSPFv3)
stub command
RC-244
summary-prefix command
export route-target command
RC-150
RC-207, RC-266
synchronization
VRF command
RC-8
VRF neighbor command
RC-177
T
W
table-policy command
weight command
RC-70
RC-212
task group prerequisite
RC-318
timers basic command
RC-324
timers bgp command
timers command
RC-50
RC-100
timers lsa gen-interval command
RC-256
timers lsa group-pacing command
timers lsa min-interval command
timers nsf route-hold command
timers throttle spf command
RC-257
RC-256
RC-151
RC-268, RC-293
U
update groups
BGP configuration
RC-22
BGP update generation
monitor
RC-22
RC-124
update-source command
use command
RC-100
RC-74
V
virtual link
transit area (OSPFv2)
virtual-link command
RC-233
RC-259
VPNv4 address family command
RC-9
VPNv4 and VPNv6 over the IP core using L2TPv3
tunnels RC-40
Cisco IOS XR Routing Configuration Guide
RC-432
RC-96
VRF neighbor address family command
MPLS LDP IGP
tag command
RC-8
vrf address family submode
RC-155, RC-246
summary-address command
VRF address family command
RC-9
RC-55
RC-8
RC-9