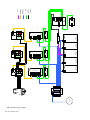
1
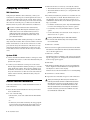
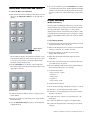
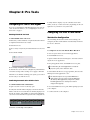
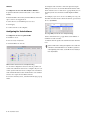
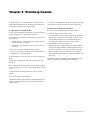
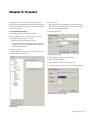
MC Installation Guide Legal Notices This guide is copyrighted ©2011 by Avid Technology, Inc., with all rights reserved. Under copyright laws, this guide may not be duplicated in whole or in part without the written consent of Avid. 003, 96 I/O, 96i I/O, 192 Digital I/O, 192 I/O, 888|24 I/O, 882|20 I/O, 1622 I/O, 24-Bit ADAT Bridge I/O, AudioSuite, Avid, Avid DNA, Avid Mojo, Avid Unity, Avid Unity ISIS, Avid Xpress, AVoption, Axiom, Beat Detective, Bomb Factory, Bruno, C|24, Command|8, Control|24, D-Command, D-Control, D-Fi, D-fx, D-Show, D-Verb, DAE, Digi 002, DigiBase, DigiDelivery, Digidesign, Digidesign Audio Engine, Digidesign Intelligent Noise Reduction, Digidesign TDM Bus, DigiDrive, DigiRack, DigiTest, DigiTranslator, DINR, DV Toolkit, EditPack, Eleven, HD Core, HD I/O, HD MADI, HD OMNI, HD Process, Hybrid, Impact, Interplay, LoFi, M-Audio, MachineControl, Maxim, Mbox, MediaComposer, MIDI I/O, MIX, MultiShell, Nitris, OMF, OMF Interchange, PRE, ProControl, Pro Tools, Pro Tools|HD, QuickPunch, Recti-Fi, Reel Tape, Reso, Reverb One, ReVibe, RTAS, Sibelius, Smack!, SoundReplacer, Sound Designer II, Strike, Structure, SYNC HD, SYNC I/O, Synchronic, TL Aggro, TL AutoPan, TL Drum Rehab, TL Everyphase, TL Fauxlder, TL In Tune, TL MasterMeter, TL Metro, TL Space, TL Utilities, Transfuser, Trillium Lane Labs, Vari-Fi, Velvet, X-Form, and XMON are trademarks or registered trademarks of Avid Technology, Inc. Xpand! is Registered in the U.S. Patent and Trademark Office. All other trademarks are the property of their respective owners. Product features, specifications, system requirements, and availability are subject to change without notice. Guide Part Number 9329-65131-00 REV A 08/11 Documentation Feedback We are always looking for ways to improve our documentation. If you have comments, corrections, or suggestions regarding our documentation, email us at [email protected]. Contents Chapter 1. Hardware Connections and MC Client Setup . . . . . . . . . . . . . . . . . . . . . . . . . . . . . . . . . . . . . . . . . . . . . . 1 Connecting the MC . . . . . . . . . . . . . . . . . . . . . . . . . . . . . . . . . . . . . . . . . . . . . . . . . . . . . . . . . . . . . . . . . . . . . . . . . . . . 1 Configuring the Network . . . . . . . . . . . . . . . . . . . . . . . . . . . . . . . . . . . . . . . . . . . . . . . . . . . . . . . . . . . . . . . . . . . . . . . . 2 EUCON Software Installation . . . . . . . . . . . . . . . . . . . . . . . . . . . . . . . . . . . . . . . . . . . . . . . . . . . . . . . . . . . . . . . . . . . . . 2 Workstation Connection and Control . . . . . . . . . . . . . . . . . . . . . . . . . . . . . . . . . . . . . . . . . . . . . . . . . . . . . . . . . . . . . . . . 3 Display Switching . . . . . . . . . . . . . . . . . . . . . . . . . . . . . . . . . . . . . . . . . . . . . . . . . . . . . . . . . . . . . . . . . . . . . . . . . . . . . 3 Configuring DAW Software for the MC . . . . . . . . . . . . . . . . . . . . . . . . . . . . . . . . . . . . . . . . . . . . . . . . . . . . . . . . . . . . . . . 4 Chapter 2. Pro Tools . . . . . . . . . . . . . . . . . . . . . . . . . . . . . . . . . . . . . . . . . . . . . . . . . . . . . . . . . . . . . . . . . . . . . . . . . . . . . . 5 Configuring Pro Tools 9 and Higher . . . . . . . . . . . . . . . . . . . . . . . . . . . . . . . . . . . . . . . . . . . . . . . . . . . . . . . . . . . . . . . . . 5 Configuring Pro Tools 8.x and Lower . . . . . . . . . . . . . . . . . . . . . . . . . . . . . . . . . . . . . . . . . . . . . . . . . . . . . . . . . . . . . . . . 5 Chapter 3. Steinberg Nuendo . . . . . . . . . . . . . . . . . . . . . . . . . . . . . . . . . . . . . . . . . . . . . . . . . . . . . . . . . . . . . . . . . . . . . . 7 Chapter 4. Apple Logic Pro . . . . . . . . . . . . . . . . . . . . . . . . . . . . . . . . . . . . . . . . . . . . . . . . . . . . . . . . . . . . . . . . . . . . . . . . 9 Chapter 5. Pyramix . . . . . . . . . . . . . . . . . . . . . . . . . . . . . . . . . . . . . . . . . . . . . . . . . . . . . . . . . . . . . . . . . . . . . . . . . . . . . . 11 Appendix A. Troubleshooting . . . . . . . . . . . . . . . . . . . . . . . . . . . . . . . . . . . . . . . . . . . . . . . . . . . . . . . . . . . . . . . . . . . . . 13 Support . . . . . . . . . . . . . . . . . . . . . . . . . . . . . . . . . . . . . . . . . . . . . . . . . . . . . . . . . . . . . . . . . . . . . . . . . . . . . . . . . . . 13 Troubleshooting . . . . . . . . . . . . . . . . . . . . . . . . . . . . . . . . . . . . . . . . . . . . . . . . . . . . . . . . . . . . . . . . . . . . . . . . . . . . . 13 Common Issues and Solutions . . . . . . . . . . . . . . . . . . . . . . . . . . . . . . . . . . . . . . . . . . . . . . . . . . . . . . . . . . . . . . . . . . . 13 Appendix B. DAW Parts Lists and Schematics . . . . . . . . . . . . . . . . . . . . . . . . . . . . . . . . . . . . . . . . . . . . . . . . . . . . . . 15 Contents iii iv MC Installation Guide Chapter 1: Hardware Connections and MC Client Setup Schematics and parts are listed for each DAW setup in Appendix B, “DAW Parts Lists and Schematics.” Connecting the MC To connect the MC: Unpack the MC from its packaging and select a place to put it. The MC should go on a hard flat surface in order to allow proper ventilation. (System 5-MC has its own frame for the MC and CM408T modules). The MC and CM408T modules require sufficient ventilation space on the bottom. The MC has detachable feet for standalone users without a System 5 frame, but the CM408T modules do not. If you do not use a System 5 frame, you must have at least 1 inch of clearance under the CM408T modules and MC or damage to the units may occur. Use the following diagram as a guide to connecting the MC to its components. 1 2 3 4 5 6 7 8 MC back panel 1 VGA 5 LAN 2 Keyboard 6 Footswitch 3 USB 7 Headphone 4 Talkback Mic Output 8 DC In Plug the power supply into the DC In port on the right side as you look at the back panel. Be careful plugging this in as the connector has pins that can be bent easily. When the pins are seated, twist the ring on the connector’s side until it locks. Do not turn on the MC yet; network configuration must be completed first. Attach the power supply to the MC before plugging it into an AC outlet, or the unit may be damaged. Chapter 1: Hardware Connections and MC Client Setup 1 Configuring the Network MC Standalone Using the RJ-45 Ethernet cables (included), connect your workstations to the LAN ports on the Netgear RP614 router (or other router included with your MC system). Then connect the MC to one of the other LAN ports on the router. Because the router has four LAN ports, you must use an additional Ethernet switch if you have more than three workstations. You have created a small local area network (LAN) comprised of just the MC and your workstations. If you want to have access to an outside network, such as a studio facility LAN or the Internet, connect the WAN port on the router to your studio’s network switch, or to your cable/DSL modem. The MC ships with DHCP enabled, allowing it to automatically obtain an IP address. The router has a DHCP server and hands out IP addresses to the devices connected to its LAN ports (the MC and your workstations). This allows for easy plug-and-play network configuration. For this reason, the router must be turned on before the MC and your workstations. System 5-MC 1 Connect the MC and CM408T modules to LAN ports on the SonicWALL 1260 router (or other router included with your System 5-MC system). 2 Connect your workstations to LAN ports on the router. The MC ships with DHCP enabled, allowing it to automatically obtain an IP address. The router has a DHCP server and hands out IP addresses to the MC, CM408T modules, and your workstations. For this reason the router must be turned on before the MC, CM408T modules, and your workstations. EUCON Software Installation Follow these instructions to install the EUCON Software on each workstation: 1 Insert the MC Software Installation disc in your worksta- tion’s CD/DVD drive. 2 Do one of the following: • On Mac OS X, locate and double-click the EUCONWS package. – or – • In Windows, if AutoRun is enabled, the setup program starts from the CD automatically. If AutoRun is not enabled, locate and double-click the EuConWS.exe file. 2 MC Installation Guide 3 Click Next and choose a directory to install the software. • The default Mac OS X directory is the Applications folder. • The default Windows directory is C:\Program Files\Euphonix\EuCon. 4 For Windows installations, click Next to customize the soft- ware components to install. EUCON Workstation Core is automatically selected (this is the basic software used to communicate with the MC). Select further options according to your DAW: • For Nuendo workstations, select only the EUCON adapter for Nuendo and VST plug-in layouts for Nuendo options. • For Pyramix, select only the EUCON adapter for Pyramix option. • For all other DAWs, select the Studio Monitor Express or Studio Monitor Pro 2 option. Running Studio Monitor Express and Studio Monitor Pro 2 on the same machine may cause conflicts and is not recommended. 5 Click Next to continue. 6 Select locations for application shortcuts in the Start menu. The default is a EUCON folder in the Start menu with shortcuts to the MC applications. 7 Click Next to continue. The Wizard displays a summary of all options selected during the setup process. To change them, click Back until the desired setup option appears. 8 Click Install. 9 The Windows installer may ask you about two Euphonix drivers: Euphonix Virtual MIDI Driver and Euphonix Virtual Keyboard. Click Continue Anyway. Windows detects the new hardware. Do not click anything. 10 Click Finish to exit the Wizard. 11 Repeat the above installation steps for each workstation. When first running the MC Client, the Windows Firewall may ask whether to block or unblock MC Client and EUCON Discovery from accessing the Internet or local area network. Because all communication between the MC Client and the MC occurs through the workstation’s network connection, you must select Unblock or it will not communicate with the MC. Workstation Connection and Control To connect the MC to your workstations: 1 Make sure the MC Client is running on all workstations, and 6 To control a workstation, press the Workstation key to which you assigned that workstation. The MC right-hand trackball (which acts as the mouse) and keyboard should now function just as if they were connected directly to your workstation. then press the Strip Control Setup key on the right side of the MC. Display Switching (Multiple Workstations) Home MC Nudge Nudge Bank Bank On MC systems with multiple workstations, you can switch display and keyboard control between workstations. The MC uses a Keyspan USB-to-serial adapter to control a KVM (keyboard/video/mouse) switch with a serial connector. This setup will allow relay switching of up to four inputs to a single output on a DVI/KVM switcher (such as the Gefen eX-Tend-It series). To set up display switching: 1 Download the latest KeySpan drivers for Windows XP from the KeySpan website onto your MC Pro. Setup Setup Strip Control Setup key 2 Make sure the Keyspan device is connected to the back USB connector on the MC Pro or frame on S5-MC. 3 Open Device Manager on the MC Pro and locate the Keyspan USB Serial adapter. The Touchscreen displays all workstations available on the network in the right pane. There are two choices: None/Disconnect and Your Workstation (showing computer name, user name, and operating system). 2 Touch a Workstation key on the left of the Touchscreen. These buttons map to the physical Workstation keys on the upper right of the MC. 4 Right-click the KeySpan USB Serial adapter and select Update Driver. 5 Follow the on-screen instructions to install the driver that you downloaded to the system. 6 In Device Manager, Right-click on the KeySpan USB Serial device and select Properties > Port Settings. 7 Set the following values: Workstation • Bits per second: 192000 • Data Bits: 8 • Parity: None 1 2 • Stop Bits: 1 • Flow Control: None 8 Click the Advanced button. 3 4 9 In the Advanced Settings, change the Com port to: Com 28 10 Click OK to close the Advanced Settings window. Workstation keys 3 Touch the Workstation name in the list to assign it to the se- lected number. 4 Repeat Steps 2 and 3 for each workstation to assign them to Workstation keys. 5 Press the Strip Control Setup key again to exit Workstation assignment mode. 11 Click OK to close the Keyspan device Properties window and reboot the MC Pro. 12 Connect the video outputs of your workstations to the KVM inputs. 13 Connect the KVM video output to your main display. 14 Connect the Keyspan USB-to-serial adapter to the KVM serial port. Chapter 1: Hardware Connections and MC Client Setup 3 When a Workstation key is pressed, the MC sends a switch command to the KVM and changes your display to reflect that KVM input. Since the MC does not know the order your workstations were connected to the KVM, we recommend assigning the workstation attached to KVM input 1 to Workstation key 1, the workstation attached to KVM input 2 to Workstation key 2, etc. Otherwise the MC will not control the desired workstation when the display is switched. Configuring DAW Software for the MC After connecting your MC to your workstation. Proceed to the chapter of this installation guide for your DAW software to configure it to work with the MC. If your MC did not connect properly, or a step failed, see Appendix A, “Troubleshooting.” 4 MC Installation Guide Chapter 2: Pro Tools Configuring Pro Tools 9 and Higher Pro Tools 9.0 and higher is fully EUCON-aware. For versions of Pro Tools lower than 9.0, see “Configuring Pro Tools 8.x and Lower” on page 5. 3 Verify that the displays on your controllers show track names, location, or other session data, depending on the configuration of your MC Pro or System 5 MC. Configuring Pro Tools 8.x and Lower Enabling EUCON in Pro Tools To enable EUCON control in Pro Tools: 1 Make sure you have installed (or updated) EUCON software as explained in the MC Pro User Guide. Workstation Configuration After installing the EUCON software and restarting your computer, the MC Client launches automatically and allows Pro Tools to function. 2 Launch Pro Tools. 3 Choose Setup > Peripherals, and click the Ethernet Controllers tab. 4 Select Enable EUCON. Mac To configure Pro Tools to work with the MC on Mac OS X: 1 Choose System Preferences from the Apple menu. 2 Click EUCON Preferences. 3 Open a Finder window and navigate to the folder contain- ing the Pro Tools application. 4 Drag the application into the EUCON Preferences pane. Pro Tools Setup > Peripherals > Ethernet Controllers You must drag the actual application icon into the preferences pane, not a shortcut or alias. 5 Click OK. You do not need to configure any other Ethernet Controllers settings. These settings do not apply to EUCON. 5 Select HUI from the Protocol pop-up menu, and select the MIDI ports for the application to use. When Pro Tools finishes scanning your system, your controllers are ready to use with Pro Tools. Confirming Communication with Pro Tools To confirm installation and communication: 1 Open a session if one is not already open. 2 Verify that the Mix window displays a border around the names of the Pro Tools tracks that are currently displayed on the MC Pro Surface. (The number of tracks under simultaneous control varies with MC Pro/System 5 MC configuration.) The EUCON software sets up a virtual MIDI driver with 32 ports. Pro Tools can use up to four MIDI ports (the limit for HUI applications). Keep track of which EUCON application uses which ports in order to configure them properly. 6 Close the EUCON Preferences pane. When prompted, restart your computer. 7 Connect the MC to the computer. Track name color indicating control by MC Pro Chapter 2: Pro Tools 5 Windows To configure Pro Tools to work with the MC on Windows: 1 Open the EUCON Control Panel (Start > Control Panel > EUCON). 2 In the EUCON Control Panel, click the ADD button and nav- igate to the Pro Tools application. 3 Select the Protocol and MIDI ports to be used. 5 Configure each controller to have the input and output MIDI ports set for Pro Tools in the EUCON Preferences Pane. Click on the Receive From and Send To pop-up menus, choose Predefined, then select from the available Euphonix MIDI ports. For example, if you set Pro Tools to use MIDI ports 1–4, your first HUI controller’s Receive From and Send To ports should be set to EphMIDIEP1. 4 Click Apply. 5 Connect the MC to the computer. Configuring Pro Tools Software Choosing a MIDI port in the Pro Tools Peripherals dialog To configure Pro Tools to recognize the MC: 1 Launch Pro Tools. 2 Choose Setup > Peripherals. 3 Click the MIDI Controllers tab. 6 Select 8 from the # Ch’s pop-up menu as the number of channels for each controller. 7 Click OK. The MC updates the channel and track information. System 5-MC owners with joystick panners can set the last controller to Surround Panner to use the MC's joysticks to control panning in Pro Tools. See the MC Pro User Guide for more information. MIDI Controllers tab of the Pro Tools Peripherals dialog Pro Tools has configuration boxes for the four possible controllers. MC standalone users need to configure only one controller. System 5-MC users need to configure one controller for each CM408T module because the MC mirrors one CM408T and does not require an extra HUI controller. 4 For each controller you use, select HUI from the Type pop-up menu. 6 MC Installation Guide Chapter 3: Steinberg Nuendo To enable Nuendo to work with the MC, you must obtain a Nuendo EUCON Adapter license fromAvid and download it to your Nuendo USB protection device (dongle): For Nuendo to communicate with the MC, Nuendo’s EUCON device must be added in the Nuendo Device Setup dialog: To add the device in the Device Setup dialog: To enable Nuendo to work with the MC: 1 Close all open applications. Make sure your Syncrosoft USB dongle is plugged into your Nuendo workstation. 2 Start the Syncrosoft License Control Center by doing one of the following: • On Mac, Navigate to the Applications > Syncrosoft folder and run License Control Center. • In Windows, click Start Menu > Syncrosoft > License Control Center. 3 Choose License Download from the Wizards menu. Choose License Transfer to transfer an existing Nuendo EUCON license to a new USB dongle. 4 When prompted, enter the activation code for Nuendo EU- CON. 5 Make sure you are downloading the correct license, then 1 Choose Device Setup from Nuendo’s Devices menu. 2 Click the + button (add) on the top left. A pop-up menu of devices appears. EUCON should appear near the top of the list. If not, check that you have successfully downloaded the license for the EUCON Adapter to your USB dongle using the License Control Center. 3 Select EUCON from the pop-up menu. The EUCON device is added and the MC surface immediately updates with the Nuendo default Application Set to reflect the open Nuendo project. For the System 5-MC, the MC auto-assigns the Nuendo channels to the CM408T strips, beginning with channel 1 on the first CM408T’s leftmost strip. Steinberg has created a default Nuendo Application Set with the most commonly used functions and commands. click Next. 6 If you have more than one Syncrosoft USB dongle attached to your workstation, select one to download the license. Click Next. 7 Click Download to transfer the license onto your USB dongle. 8 Close the wizard and open Nuendo. The Nuendo EUCON Adapter must be installed during the EuConWS software installation. Note that this is the MC Client’s Nuendo adapter. Chapter 3: Steinberg Nuendo 7 8 MC Installation Guide Chapter 4: Apple Logic Pro Logic Pro (version 7.2.1 and higher) has EUCON support and connectivity built into the application. With the MC Client running on your Macintosh, load Logic Pro, and the MC automatically connects to the application and displays the Logic Pro application set. Versions of Logic prior to 7.2.1 do not have EUCON support. However, the updates for Logic are part of Apple’s Software Update program, so simply check for new updates (Apple Menu > System Preferences > Software Update), download, and install the Logic 7.2.1 update. Then re-open Logic and the MC will connect. You have now successfully set up the MC to operate with your Logic Pro workstation. • See the MC Pro User Guide to learn about the MC’s application sets, touchscreens, and any other information. • Viist www.avid.com for technical bulletins, product support notices, and new software releases. • Please register your MC by filling out the online registration form at www.avid.com/registration. Registration is required to download software updates. Chapter 4: Apple Logic Pro 9 10 MC Installation Guide Chapter 5: Pyramix To enable the use of the MC with Pyramix, the EUCON adapter for Pyramix checkbox must be selected during the MC Client software installation. Then add the MC as an installed controller in Pyramix. 4 Click Controller. To enable the MC with Pyramix: 5 Click the Add button. The right pane shows any installed controllers. However, at this point the pane is empty unless other interface controllers have been installed previously. 1 Launch the Pyramix Virtual Studio software. 2 Press the Pref key on the top bank of the MC Soft Keys. The bank changes to show two options: • Home: Restores the first bank of soft keys • Show Settings: Opens the Pyramix Settings dialog box (alternatively, choose All Settings from the Settings menu in Pyramix Virtual Studio). 3 Click Show Settings. A dialog appears showing a list of the various types of adjustable settings on the left side. Controller Properties dialog 6 Type a name for the MC in the Name field. 7 Select the Enable checkbox. 8 Choose OASIS from the Driver pop-up menu. 9 Click the Properties button next to the Driver pop-up menu. OASIS Configuration Properties dialog Pyramix settings Chapter 5: Pyramix 11 10 Select EUCON from the Transport pop-up menu. If EUCON is not in the menu, it is probably because the MC Client is not running. Check that the MC Client menu tray icon is present. If not, launch the MC Client using the shortcuts in the Start menu or the Euphonix folder. Leave the Station ID at its default setting of 1 unless you have multiple controllers, in which case simply increment the setting (i.e., if two controllers are installed, set the Station ID = 3 for the MC). 11 Click OK to exit that dialog, click OK on the Controller Properties dialog and click OK on the General Settings dialog. 12 Close Pyramix, restart the workstation, and then open Pyramix Virtual Studio. The MC will load the default Pyramix Application Set if a project is open. Otherwise, the Application Set will not be loaded, but the Soft Keys at the top-left illuminate to show that EUCON communication is enabled. 12 MC Installation Guide Appendix A: Troubleshooting The MC is a professional control surface engineered with industrial-grade components, and it should operate reliably in your studio setup. It is, however, a complex device and issues can arise due to environmental or other factors. If you are having trouble with your MC, these sections can either resolve the problem or provide useful troubleshooting information for our technical support personnel. Both the workstation and MC must have the same version of the EUCON software. To further troubleshoot this issue, we recommend using a cross-over cable between the MC and one workstation, to remove network variables from the equation. Once this setup is working, re-connect the MC and workstation(s) to the switch/router, and verify proper operation. The MC does not connect to Nuendo. Support Support is available on the Avid website: http://www.avid.com/support/ You must sign up for a user account to download new versions of the EUCON software. Troubleshooting If you are having problems with your MC or System-5 MC: 1 Look for a solution in the Common Issues and Solutions sec- tion below. 2 Search the online Knowledgebase on the Avid website. 3 If you still are unable to solve your issue, contact your VAR (if applicable) or Avid for support. Common Issues and Solutions The MC does not turn on. Make sure the MC’s power connector is securely connected. Push on it lightly to seat it, twist the outer ring to lock it onto the MC, and make sure the power supply is plugged securely into the power source. The Nuendo EUCON Adapter must also be installed when installing the EUCON software on your workstation. Make sure Studio Monitor Pro is not installed on the same computer, as SME is not compatible with Nuendo. Make sure your Nuendo license includes EUCON connectivity, and that you have added the EUCON device in Nuendo Device Setup. Make sure the MC is properly connected to the workstation. The MC’s Main Touchscreen should display the network name of your workstation in the upper left-hand corner. The MC does not connect to Pyramix. The Pyramix EUCON Adapter must also be installed when installing the EUCON software on your workstation. Make sure Studio Monitor Pro is not installed on the same computer, as SME is not compatible with Pyramix. Verify that the Pyramix connection procedure has been properly executed, and that the MC is properly connected to the workstation. The talkback mic does not produce any audio. The talkback mic is a condenser microphone and the XLR output is at mic level, so it must be connected to a pre-amp with +48V phantom power. The MC cannot connect to a workstation; the workstation does not appear in the MC's Workstation Setup screen. Make sure the MC Client is installed on the workstation, and that the Windows Firewall is not blocking the MC Client and EUCON Discovery applications. The MC, CM408T modules, and workstation must be connected to the same network segment (router/switch): the Netgear RP614 or SonicWALL 1260. Appendix A: Troubleshooting 13 14 MC Installation Guide Appendix B: DAW Parts Lists and Schematics 1 32-Fader System 5 MC 1 Sonic Wall Pro 1260 DHCP Router/Ethernet Switch 1 Apple 20" Cinema Display 1 Euphonix USB Relay Box (included with Euphonix packout) 1 Euphonix RJ45 Control Cable (included with Euphonix packout) 1 DVI Cable Male-to-Male (included with Cinema Display packout) 6 Ethernet Cable 1 USB Memory Stick (for app sets and configuration data) 1 Pro Tools: Apple Workstation with: 1 Avid Pro Tools 1 002 Rack 1 Gefen DVI Detective 2 DVI Cable Male-to-Male (1 included with Gefen packout) 1 Firewire Cable 1 Ethernet Cable Audio Cables to Pro Tools Audio Input(s) 1 Nuendo: PC Audio Labs (or equivalent) Workstation with: 1 Nuendo V3.2.1 (PC Version) 1 Euphonix Nuendo EUCON License 1 Euphonix Studio Monitor Pro V1.0 1 RME Fireface 400 1 Gefen DVI Detective 1 DVI Cable Male-to-Male (1 included with Gefen packout) 1 Firewire Cable 1 Ethernet Cable Audio Cables for Speakers 1 Logic: Apple Workstation with: 1 Apple Logic Pro (V7.2 or higher) 1 Apogee Ensemble Audio Interface 1 Gefen DVI Detective 2 DVI Cable Male-to-Male (1 included with Gefen packout) 1 Firewire Cable 1 Ethernet Cable Audio Cables to Logic Audio Input(s) Appendix B: DAW Parts Lists and Schematics 15 Legend: 1 USB IN USB IN USB IN GEFEN 4 x 2 DVI SW USB USB OUT DVI OUT APPLE CINEMA DISPLAY DVI IN 2 USB IN DVI IN DVI IN DVI IN DVI IN 3 1 2 3 4 4 REMOTE DVI IN RJ45 EUPHONIX SYSTEM 5MC FADERS 1-8 USB RELAY BOX (supplied) DVI OUT USB EUPHONIX SYSTEM 5MC FADERS 9-16 EUPHONIX MC CONTROLLER DVI IN EUPHONIX SYSTEM 5MC FADERS 17-24 EUPHONIX SYSTEM 5MC FADERS 25-32 DVI IN NET GEFEN DVI DETECTIVE DVI OUT PC AUDIO LABS NUENDO 3.2 NET 2 SPDIF OUT ADAT OUT LINE OUT RME FIREFACE 400 FW400 USB USB USB PCI DVI OUT 1 MIC IN INST IN LINE IN ADAT IN SPDIFIN FIRE WIRE 2 1 NET NET NET USB 2 1 4 3 2 1 4 3 2 NET 1 NET 2 1 2 1 2 3 4 5 6 7 8 NET 1 DVI OUT NET APPLE G5 LOGIC PRO GEFEN DVI DETECTIVE USB NET 2 NET 1 GEFEN DVI DETECTIVE APPLE G5 Protools LE USB PCIe USB DVI OUT USB APOGEE ENSEMBLE WC OUT LINE OUT FW400 USB FW400 Digidesign 002 Rack LINE OUT LINE IN USB PCIe MIC IN DVI OUT 1 2 1 2 3 4 1 2 3 4 WC IN FW-400 1 2 3 4 5 7 6 8 14 SONIC WALL 1260 ROUTER/SWITCH 13 16 1 24 24 23 22 21 20 19 18 17 15 2 3 5 WAN 4 7 6 8 9 10 11 12 WAN 16 MC Installation Guide ANALOG 1 2 3 4 5 6 7 8 1 2 R Sub DVI MIC IN LINE IN FW-400 Rs NETWORK FIREWIRE USB 1 2 3 4 1 2 3 4 1 2 S5-MC (32-Fader) Connection Diagram LAN PORTS L C Studio Monitor Pro V1.0 LAN PORTS Ls Euphonix EUCON License Avid Technical Support (USA) Product Information 2001 Junipero Serra Boulevard Daly City, CA 94014-3886 USA Visit the Online Support Center at www.avid.com/support For company and product information, visit us on the web at www.avid.com