1
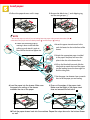
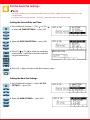
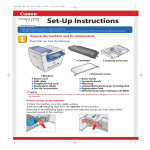
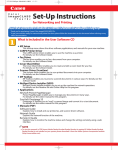
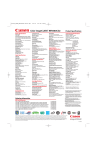
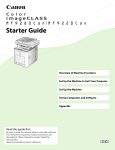
Set-Up Sheet
for the Machine
Thank you for purchasing the Canon imageCLASS 2300.
To get your machine ready for use, please follow the instructions in this sheet before referring to any other documentation.
Unpack the machine and its components.
Check that you have the following:
● Machine
with cabinet stand
●
Toner cartridge (in carton)
●
Stamp cartridge and tweezers
●
Paper size notice cards (2)
●
Paper size plates (2)
●
Destination labels for one-touch
speed dialing keys (2)
●
Paper size labels (2)
Power cord
Telephone cable
●
●
●
●
Documentation
Set-Up Sheet for the Machine (This Document)
Refer to this document first to install and set up your new machine.
●
Set-Up Sheet for Networking and Printing*
Refer to this document to set up the machine for network and print functions.
●
Basic Guide
This manual explains the basic operations of all functions of the machine. Keep this guide handy for easy reference.
●
Reference Guide
This manual covers machine settings, common operations, maintenance, and troubleshooting.
●
Copying Guide
This manual explains the copy function of the machine.
●
Facsimile Guide
This manual explains the fax function of the machine.
●
Sending Guide*
This manual explains the I-Fax function of the machine.
●
●
●
●
●
Registration Card
Limited Warranty Note
CD-ROM*
imageCLASS 2300 Driver Software
imageCLASS 2300 Network User Software
NOTE
An asterisk (*) denotes the item only supplied with the Network Model.
● Printer and network cables are not included.
●
Remove the shipping materials.
1 Remove all the shipping tape and foam blocks
on the outside of the machine.
7 Pull out the left cover and
remove the tape on the inside.
2 Remove the clear protective
sheet on the LCD display.
3 Lift the feeder and remove
the lining material on the
platen glass.
4 Remove the shipping tape
on the right side and
unscrew the metal pin on
the underside of the
machine.
6 Open the stack bypass and remove
the tape holding the auxiliary tray
and the tray extension.
5 Keep the metal pin in the
pin slot on the black panel
behind the front cover.
IMPORTANT
●
When you transport the machine, you need to screw the metal pin back into the underside of the machine.
Install the stamp cartridge.
2 Open the black inner cover.
1 Pull up the latch to
open the feeder cover.
3 Use the supplied tweezers to align the small stubs on
the side of the stamp cartridge with the indentations
on the stamp receptacle, and push down the stamp
until it snaps into place. Close the inner cover and
the feeder cover.
Install the toner cartridge.
1 Open the stack bypass.
2 Slide out the left cover of the stack bypass.
3 Remove the toner cartridge from the bag.
Keep the bag in a safe place.
4 Hold the cartridge with both hands and slowly
shake it sideways 1 and then back and forth
2 to distribute the toner inside the cartridge.
1
2
1
5 Hold the cartridge on a flat stable surface with
one hand, and pull out the seal completely
with the other hand.
6 Remove the tape holding the orange
protective cover, and pull the release tabs on
the cover to detach it from the cartridge.
IMPORTANT
●
Do not touch the blue-green drum surface inside
the toner cartridge.
Tabs
Protective cover
7 Hold the cartridge by its handles (marked with
blue) and insert it in the machine horizontally
as far as it will go.
1
8 Close the left cover and the stack bypass.
Load paper.
1 Pull out the paper drawer until it stops.
2 Remove the black wire 1 and shipping tag,
and the orange tape 2.
1
2
NOTE
●
You can skip steps 3, 6 and 7 if you are loading letter size paper in the portrait orientation (LTR
●
Note that some paper sizes have both portrait (
) and landscape (
3 Detach the blue end guide by
moving it down to the left then
pulling up, and attach it again at
the mark for the desired paper size.
).
) settings.
4 Insert the paper size notice card in the
card slot located on the inside front of the
drawer.
5 Attach the appropriate paper size label
to the paper size plate, and insert the
plate in the slot at the drawer front.
LTR
6 Lift up the blue lock lever and slide the
side guide to match the size of the paper
you are loading. Lower the lever again to
lock the side guide.
Unlock
Lock
3
U2 U
U1
MT
ST
R TR
LT L
L 11X17
G
L
5
B5 B
A5 B4
7 Set the paper size detector lever to match
the size of the paper you are loading.
A4 A4
A3
8 Load the paper into the drawer. Make sure
the paper size setting of the drawer
matches the size of the paper.
9 Even out the edges of the paper stack.
Make sure the height of the paper stack
does not exceed the limit mark
.
10 Push the paper drawer back into the machine. Repeat the steps above for the bottom drawer
as well.
Connect the telephone cable and the power cord.
Connect the phone cable 1 and the power cord 2. Turn on the machine’s power by pressing the power
switch 3 to ON (“I” side). The power switch is located on the right side of the machine.
3 Power Switch
1 Phone Cable
2 Power Cord
Using the operation panel
Use the following keys on the operation panel to set up the machine for the fax function as explained
on the following pages.
Display Contrast
Collate
Reduce
1
Energy Saver
Monitor
COPY
FAX
Directory
Special Features
Reset
Additional Functions
Enlarge
2
Interrupt
Two Page Separation Frame Erase
3
4
F1
F2
Coded
Dial
F3
@.
ABC
DEF
Clear
1
2
3
C
GHI
JKL
MNO
4
5
6
PRS
TUV
WXY
7
F4
BACK
8
9
OPER
SYMBOLS
OK
0
In Use Memory
Tone
Line/Mail Direct TX
Stop
01
02
03
04
05
06
07
08
09
10
11
12
13
14
15
16
17
18
19
20
Power
Additional Functions
Interrupt
F3
F4
BACK
OK
BACK key
Press to go back to the
previous screen.
Function keys (F1 to F4)
Select options that appear
on the LCD display.
LCD display
Displays selections, text, numbers,
and names when registering
information.
21
ID
Alarm
Reset
F2
Pause/
Redial
Start
43~63
Reset key
Press to return to the Basic
Features screen.
F1
Hook
PRINT
22~42
Clear key
Press to delete the numbers or
letters entered.
@.
ABC
DEF
1
2
3
GHI
JKL
MNO
4
5
6
PRS
TUV
WXY
7
8
9
OPER
SYMBOLS
0
Clear
C
ID
Numeric keys
Press to enter the numbers or letters.
Additional Functions key
Press to enter the Additional Functions menu.
OK key
Press to set a mode or function.
Set the basic fax settings.
NOTE
●
●
For details on setting up the machine for the fax function, see Chapter 1,“Before You Use the Fax Functions,” in the
Facsimile Guide.
For details on how to input characters, see Chapter 2,“Basic Operations,” in the Reference Guide.
Setting the Current Date and Time:
Additional Functions
1 Press [Additional Functions] ➝ [F3] ( ) or [F4] (
to select <05 TIMER SETTINGS> ➝ press [OK].
)
F3
F4
OK
2 Select <01 DATE/TIME SETTING> ➝ press [OK].
F3
F4
OK
3 Press [F2] ( ) or [F3] ( ) to select the month, day,
year, and time ➝ enter the current date and time
using the numeric keys.
F2
F3
@.
ABC
1
2
3
GHI
JKL
MNO
DEF
4
5
6
PRS
TUV
WXY
7
8
9
OPER
SYMBOLS
0
OK
4 Press [OK] ➝ [Reset] to return to the Basic Features screen.
Reset
Setting the Basic Fax Settings:
Additional Functions
1 Press [Additional Functions] ➝ select <03 FAX
SETTINGS> ➝ press [OK].
F3
F4
OK
F3
F4
OK
2 Select <01 USER SETTINGS> ➝ press [OK].
3 Select <01 TEL LINE SETTINGS> ➝ press [OK].
F3
F4
OK
4 Select <01 USER TEL NO.> ➝ press [OK].
F3
F4
OK
@.
ABC
1
2
3
GHI
JKL
MNO
DEF
4
5
6
PRS
TUV
WXY
7
8
9
OPER
SYMBOLS
5 Enter your fax number using the numeric keys ➝
press [OK].
0
OK
6 Press [BACK] ➝ select <02 UNIT NAME> ➝ press
[OK].
BACK
F3
F4
OK
@.
ABC
1
2
3
GHI
JKL
MNO
DEF
4
5
6
PRS
TUV
WXY
7
8
9
OPER
SYMBOLS
7 Enter the unit’s name using the numeric keys ➝
press [OK].
0
OK
Reset
8 Press [Reset] to return to the Basic Features screen.
Congratulations! You have now completed setting up your
machine.
Where to go from here...
Once you have completed all steps in this sheet, see the Basic Guide for basic operation instructions of
all functions of your machine.
If after reading the Basic Guide you require more detailed information, see the corresponding sections in
the other manuals provided.
If you have the Network Model of this machine, see the Set-Up Sheet for Networking and Printing to set
up the machine for network and printer functions.
Part no. FA7-4556-020
©2003 Canon Inc.
Canon and imageCLASS are trademarks of Canon Inc.
All other products and brand names are registered
trademarks or trademarks of their respective owners.
Specifications subject to change without notice.
PRINTED IN U.S.A.