1
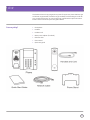
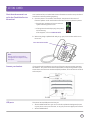
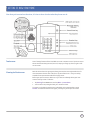
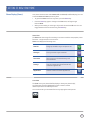
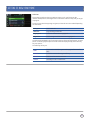
POLYCOM VVX500.
USER GUIDE.
WHAT’S IN THIS GUIDE.
Set up
Got everything?
Getting started
Turn it over
Set the position of your phone
Get everything connected Check that the automatic set up
for the Cloud Voice Service has worked
Connect your headset
USB ports
3
4
4
4
5
5
5
Getting to know your phone
Touchscreen6
Cleaning the Touchscreen
6
Phone display (views)
7
Home view
7
Lines view
7
Calls view
8
Using your phone
Time and Date
9
Making Calls
9
Answering Calls
9
Transferring Calls
9
Ending Calls
9
Conference Calls
9
Do Not Disturb (DND)
10
Favourites10
Recent Calls List
10
Contact Directory
10
Changing Ring Tone
11
Update Configuration
11
Listening to Voicemail
11
General information12
NEED
HELP?
If you have any problems setting
up or using your Polycom IP
Phone, contact the IP Comms
Service Hub on 0800 389 0537
999 or 112 emergency calls.
EMERGENCY
CALLS.
Your BT Cloud Voice phone number is
registered to a specific address, so when
you make a 999 or 112 call from your
phone number, that’s the address the
emergency services will see. If you use
your BT Cloud Voice service at a different
address, the registered address does not
automatically change. So if your work
location changes let your BT Cloud Voice
service administrator know as they might
also need to change your registered
address.
You might not be able to make 999 or
112 calls when there’s a power or
network failure or if using the service
through an app on a mobile device.
SET UP.
This booklet is here to help you get the very best from your new phone. We know you
will be keen to get started, but before we go into detail on all the things it can do for
you, you will need to set it up. It won’t take long, just follow the simple instructions
below or have a look at the quick start guide instead.
Got everything?
• IP telephone
• Handset
• Handset cord
• Mains power adapter (if ordered)
• Ethernet cable
• Phone stand
• Quick start guide
3
GETTING STARTED.
Turn it over.
Unpack the phone and turn it upside down to see the ports underneath.
Set the position of your phone.
Insert the phone stand into one of the slots on the back of the phone.
The slot you choose determines the angle of the phone.
Get everything connected.
4
GETTING STARTED.
Check that the automatic set
up for the Cloud Voice Service
has worked.
Your handset will be pre-loaded with all the information it needs to set up the Cloud
Voice Service without you doing anything.
1.Once the phone is connected to the network, the phone will do a series of
firmware updates. It will need a little bit of time to do this, so please be patient.
• Everything is complete and correct once this
symbol is showing on the screen
•If things haven’t worked properly, this symbol
will be showing.
If this happens, call us on 0800 389 0537
2.When everything is updated and ready to go, your phone number will show on
the screen.
Your cloud voice number
Note:
During any future upgrades or
changes the same sequence may
take place.
Connect your headset.
If you need to add a headset to your phone, follow the instructions that come with
the headset. Your phone works with wired headsets, usually through the RJ-9 port
shown above, and electronic hookswitch (EHS) headsets, which tend to use the RJ-9
and serial port.
USB ports.
This phone has two USB ports which let you:
•Attach a USB flash drive so you can record calls, update the background picture
on your phone, set up a screen saver, or use your phone as a digital picture frame.
• Attach a USB headset.
5
GETTING TO KNOW YOUR PHONE.
Now that you’ve sorted out the wires, it’s time to have a look at what the phone can do.
Touchscreen.
One of the key features of the VVX 500 is its touch-sensitive screen. Tap the screen to
select the function that you need; to scroll, swipe your finger up, down, right or left
on the screen.
Cleaning the Touchscreen.
With all the hard work it’s going to be doing, the touchscreen might need a bit of a
clean sometimes. Do this with a dirt-free, dry microfibre cloth — they are widely
available from supermarkets and office supply stores.
Before you wipe the screen, disable it, so you don’t accidentally delete your best
contact while you clean. To do this:
•Tap Settings from Home view, and tap Basic > Screen Clean.
• You are safe to wipe the glass with your microfibre cloth.
To answer a call while the touchscreen is disabled, pick up the handset or press
Answer. To enable the touchscreen again, press any key on the phone console.
6
GETTING TO KNOW YOUR PHONE.
Phone Display (Views).
Your phone has three main views: Home, Calls, and Lines (the default display). You can
access the Home and Lines views at any time.
• To get to the Home view from any menu, press the Home key.
•Press the Home key again to change to the Lines view, and again to get
back to Home.
•When you are making or receiving a call you will also see the Calls view. You can
toggle between all three screens using the Home key.
Home View
The Home view has a range of icons that you can use to reach the most popular phone
functions – simply touch an icon to access it.
Home view displays the following icons:
New Call
Brings up the Dialler so you can place a call.
Messages
Gives you access to your voicemail.
Directories
Takes you to your Contact Directory and
Recent Calls list.
Settings
Lets you change your phone features and
customise ring tones etc.
Applications
Contains a menu of custom applications.
Lines View
The Lines view is your phone’s default display. It shows your phone line(s),
any Favourites you have highlighted from your contacts, and the
different options for the soft key functions.
You can also access your voicemail from here by tapping the envelope icon.
7
GETTING TO KNOW YOUR PHONE
Calls View
This is what you will see when you make or receive a call. It will show you the
number called/received, the length of the conversation and how many calls you’ve got
in progress.
To help you see what’s happening at a glance, all the calls are colour coded depending
on their status:
Dark green
Your active call.
Dark blue
Any incoming or held calls.
Bright green
An active call that’s been highlighted.
Bright blue
An incoming or held call that’s been highlighted.
You will need to highlight a call if you want to use any of the soft key features, as listed
below. To do this, you just tap the call and look at the display directly above each key
for your options.
The soft keys will let you:
Hold
Place a call on hold (the system will supply default music for
this)
End Call
Finish the current call using the soft key
Transfer
Pass the call to another extension
Confrnc
Include your call in a conference
8
USING YOUR PHONE.
Time and Date.
The time and date is set by the Cloud Voice Service, but you can change the format
by going to Settings and updating your phone preferences there.
Making Calls.
When you’re ready to dial, pick up the handset, press the Speakerphone key or if
you are using a headset press the Headset key.
Enter the phone number, and tap the New Call key.
If you’re in the Lines view: Tap the phone line, enter the number and press New Call.
If you’re in the Home view: Tap New Call, enter the number and press New Call.
Answering Calls.
T o pick up an incoming call, press the Speakerphone key or tap the Answer soft key
and pick up the handset, or if you are using a headset press the Headset key.
If you’re already on a call when another one comes in, tap the Answer soft key and
the current call will be put on hold. Both calls will appear on your display, showing
which one is on hold. You can return to the first call by selecting that call and pressing
the Resume soft key.
Transferring Calls.
To transfer a call, first press the Transfer soft key.
Then dial the number the call is being transferred to and press the Send soft key.
E ither press the Transfer soft key immediately to forward the call straight away, or
wait until the the receiver is picked up so you can announce the call before you press
Transfer to connect it.
Ending Calls.
T here are four ways to end an active call. You can either replace the handset, press
Speakerphone, press the Headset key if you’re using one or use the End Call soft key.
To end a held call, navigate to Calls view and highlight the held call. Press Resume
then press End Call.
Conference Calls.
To set up a conference call, dial and connect with your first number then tap the
Confrnc soft key.
Do the same with the second party and press the Confrnc soft key again.
Note:
Whilst on a conference call from the Lines or Calls view, you can:
• Press Hold soft key to place everyone on hold.
• Press End Call soft key to remove yourself from the call, but keep the others
connected.
• Press Split soft key to end the conference and place all participants on hold.
9
USING YOUR PHONE
Do Not Disturb (DND).
When you need a few minutes without interruptions, you can use DND to send callers
straight to voicemail, then you can catch up with any messages when you’re ready.
To activate DND – go to the Home view, tap Settings, Features then Do Not Disturb,
and press the Enable soft key.
To disable DND – go to the Home view, tap Settings, Features then Do Not Disturb,
and press the Disable soft key.
Favourites.
Your Favourites are the people that you call most often. Their number will show in
your Favourites list and in the Lines view, and they will also come up when you tap
the phone line in the Home view.
To view your Favourites list - Choose New Call from Home view, and tap Favourites.
T o make a contact a Favourite - Go to your Contact Directory and select the contact.
Tap Add to Favourites, then Yes to confirm.
To dial a Favourite – Just tap the contact details from Lines view or your Favourites list.
To reorder your Favourites - Update the contact’s Favourite Index number in the
Contact Directory to move them up or down the list.
Recent Calls List.
To view your latest calls , tap New Call from Home view, then choose Recent.
Once you’re in the Recent list, you can tap the Sort & Order key to sort and order
calls, tap the Order Calls key to display only certain calls, or tap a call record to speak
to the person.
Alternatively, you can use the Recent Calls key from the Home, Lines, or Calls view.
Saving Recent Callers to your Directory
If you want to save a new number from your recent calls, tap next to the call record
and Save. Enter any additional contact information and Save again.
Contact Directory.
Your contact directory is managed via the portal – please refer to the User Feature
Guide for details.
You can also manage your contacts from your handset. To do this, tap Directories
from Home view and choose Contact Directory.
To add a contact, tap the Add soft key . Type in the details and Save.
To include them in your Favourites list, enter a Favourite Index number.
I f you need to update any information, select the contact you want, tap the Edit soft
key, change the details then Save.
To delete a contact, highlight the contact, tap the Delete soft key and choose Yes
to confirm.
T o search within the Contact Directory, press the Search soft key. Enter your criteria,
and press Search To dial a contact from your directory, tap the phone number from
their information screen.
T o call a contact from the directory, highlight their details using the Select key
and press Dial.
10
USING YOUR PHONE
Changing Ring Tone.
If you would like to change your incoming call ringtone, tap Settings from Home
view, and go to Basic > Ring Type. Decide on the ringtone you want.
To set a ringtone for a particular contact, choose them from your Contact Directory,
tap the Edit soft key, update the ringtone, and press Save.
Update Configuration.
Sometimes you might be asked to update your phone configuration. To do this:
•Tap Settings from Home view, and choose Basic > Update Configuration.
• The message Are you sure? will come up.
• To go ahead, choose Yes.
Be aware that your phone may restart, depending on the phone settings that have
been changed.
Listening to Voicemail.
When you see the envelope icon on your screen, it means you have voicemail.
To access your messages, tap Messages from Home view, then choose Message
Centre and you will see how many messages you have in your mail box. To listen to
them, tap Connect and follow the prompts.
11
GENERAL INFORMATION
999 or 112 emergency calls
Product disposal instructions
•Your BT Cloud Voice phone number is registered to a specific
address, so when you make a 999 or 112 call from your phone
number, that’s the address the emergency services will see. If
you use your BT Cloud Voice service at a different address, the
registered address does not automatically change. So if your
work location changes let your BT Cloud Voice service
administrator know as they might also need to change your
registered address.
The symbol shown here and on the product means
that the product is classed as Electrical or
Electronic Equipment and should not be disposed
with other household or commercial waste at the
end of its working life.
•You might not be able to make 999 or 112 calls when there’s a
power or network failure or if using the service through an app
on a mobile device.
Headset compatibility
The VVX 500 IP Phone supports the following Jabra and
Plantronic headsets:
Jabra
Corded Headsets:
GN2000 and Jabra BIZ 2400 headsets with GN 1200 Quick
Disconnect Cable – setting 1.
Cordless Headsets:
Jabra Pro 920 with Jabra Polycom EHS Adapter
Plantronics
Corded Headsets:
SupraPlus HW251N / HW261N and EncorePro HW291N /
HW301N
Cordless Headsets:
CS504A Convertible Dect with APP-51 (Polycom EHS Cable)
Safety information
•Do not open the handset or the base. This could expose you to
high voltages or other risks. Contact the IP Comms Service Hub
on 0800 389 0537 for all repairs.
Cleaning
•Clean the handset and base with a damp (not wet) cloth, or an
anti-static wipe. Never use household polish as this will
damage the product. Never use a dry cloth as this may cause a
static shock.
The Waste of Electrical and Electronic Equipment
(WEEE) Directive (2002/96/EC) has been put in place to recycle
products using best available recovery and recycling techniques to
minimize the impact on the environment, treat any hazardous
substances and avoid the increasing landfill.
Business users should contact their suppliers and check the terms
and conditions of the purchase contract and ensure that this
product is not mixed with other commercial waste for disposal.
Guarantee
Your IP Phone is guaranteed for a period of 12 months from the
date of purchase.
Subject to the terms listed below, the guarantee will provide for
the repair of, or at BT’s or its agent’s discretion, the optionto
replace the Phone or any component thereof, (other than
batteries), which is identified as faulty or below standard, or as a
result of inferior workmanship or materials. Products over 28 days
old from the date of purchase may be replaced with a refurbished
or repaired product.
The conditions of this guarantee are:
•The guarantee shall only apply to defects that occur within the
12-month guarantee period
•Proof of purchase is provided
•The equipment is returned to BT or its agent as instructed
•This guarantee does not cover any faults or defects caused by
accidents, misuse, fair wear and tear, neglect, tampering with
the equipment, or any attempt at adjustment or repair other
than through approved agents
•This guarantee does not affect your statutory rights.
Environmental
• Do not expose to direct sunlight
•Do not stand your product on carpets or other surfaces which
generate fibres, or place it in locations preventing the free flow
of air over its surfaces
•Do not submerge any part of your product in water and do not
use it in damp or humid conditions, such as bathrooms
•Do not expose your product to fire, explosive or other
hazardous conditions
•There is a slight chance your phone could be damaged by an
electrical storm.
12
Offices Worldwide
The services described in this publication are subject to availability and may be modified from time to time. Services and equipment are provided subject to British Telecommunications plc’s respective standard
conditions of contract. Nothing in this publication forms any part of any contract. © British Telecommunications plc 2014. Registered office: 81 Newgate Street, London EC1A 7AJ. Registered in England No. 1800000.
PHME 72017