1
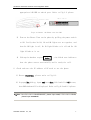
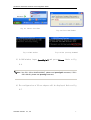
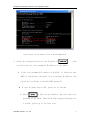
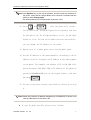
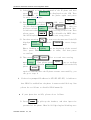
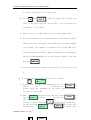
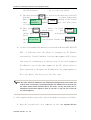
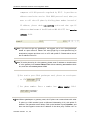
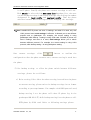
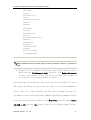
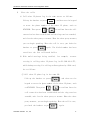
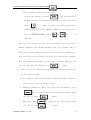
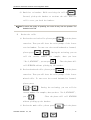
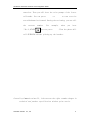
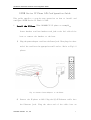
ATCOM AT-323 Series IP Phone LAN Configuration Guide
ATCOM Series IP Phone LAN Configuration Guide
This guide supplies a step-by-step operation on how to install and
configure ATCOM Series IP Phone in LAN.
1
Install the IP Phone (Take PA168B/C/E IP phone as example):
Insert handset cord into handset cord jack at the left side of the
base to connect the handset to the base.
1) Plug the power adapter cord into the Power Jack. Then plug the other
end of the cord into the appropriate wall outlet. Refer to Fig 1.2
please.
Power Adapter
Switch
Power Jack
Wall Outlet
Fig 1.2 Connect Power Adapter to the Phone
2) Connect the IP phone to LAN: Plug the RJ-45 Ethernet cable into
the Ethernet Jack. Plug the other end of the cable into an
Shenzhen ATCOM Co., Ltd.
1
ATCOM AT-323 Series IP Phone LAN Configuration Guide
appropriate LAN HUB or switch port. Refer to Fig 1.3 please.
HUB or Switch
Ethernet cable
RJ-45 Jack
Fig 1.3 Connect the Phone into the LAN
3) Turn on the Phone: Turn on the phone by pulling the power switch
to ON. Verify that No.18, 19 and 20 lights are on together, and
then No.18 light is off; No.19 light blinks or is off and No. 20
light blinks or is on.
4) Pick up the handset or press
Speaker
, the dialed tone indicates
that the phone starts successfully and is ready for call.
2
Check and note the IP address of PC used to set the phone.
1) Choose Start>Run, please refer to Fig 2.1.
2) In popup Run dialog, input cmd into Open field and click OK button,
then DOS window will be displayed. Refer to Fig 2.2 and 2.3 please.
Note If the PC’s OS is WinXP/2000/NT, please input cmd; if PC’s OS is Win9X,
please input command。
Shenzhen ATCOM Co., Ltd.
2
ATCOM AT-323 Series IP Phone LAN Configuration Guide
Fig 2.1 Choose Start>Run
Fig 2.2 Enter DOS Window
Fig 2.3 DOS window
Fig 2.4 Run ipconfig Command
3) In DOS window, input ipconfig/all and press Return. Refer to Fig
2.4.
Note If the PC’s OS is WinXP/2000/NT, please use ipconfig/all command; if PC’s
OS is Win9X, please use ipconfig command。
4) The configuration of PC net adapter will be displayed. Refer to Fig
2.5
Shenzhen ATCOM Co., Ltd.
3
ATCOM AT-323 Series IP Phone LAN Configuration Guide
Fig2.5 Check the IP address of PC on WinXp/2000/NT OS
3
Check the configured states of the IP phone: PressLocal
IP
, then
you will hear the voice prompted IP address of the phone.
If the voice prompted IP address is 0.0.0.0, it indicates that
DHCP is enabled but the phone is not assigned IP address. Now
please do as follows to disable DHCP manually.
● If your IP phone has no LCD, please do as follows:
1) Press
Speaker
or pick up the handset, and then input the
password of the phone. When No 18 light begins blinking once
a second, please go to the next step.
Shenzhen ATCOM Co., Ltd.
4
ATCOM AT-323 Series IP Phone LAN Configuration Guide
Note Press Speaker key or pick up the handset, and then input the password of
the phone. Verify that No 18 light blinks once a second. It indicates that the
phone is under setting mode
The default password of ATCOM series IP phone is 1234.
2) Press
0
and
Local IP
, then the phone will restart.
Verify that No.18, 19 and 20 lights are on together, and then
No.18 light is off; No.19 light blinks or is off ; No. 20 light
blinks or is on. As soon as the phone restarts successfully,
you can change the IP address of the phone.
3) Repeat step 1) to make phone enter setting mode again.
4) Set the IP address of the phone manually: According to the IP
address of the PC, designate an IP address on the same segment
to the phone. For example, the address of PC is 192.168.1.10;
please designate 192.168.1.100 as IP address of the phone by
pressing 192*168*1*100 keys on the keypad orderly, and then
pressing
Local IP
.
5) As soon as the phone restarts successfully, please go to step
4.
Note Please verify that the IP address designated to ATCOMB/C/E IP phone is not
used by other device in the same LAN.
● If your IP phone has LCD, please do as follows:
Shenzhen ATCOM Co., Ltd.
5
ATCOM AT-323 Series IP Phone LAN Configuration Guide
1) Using keypad to input the password of the IP phone and then
Password:
press # , till
is displayed on the LCD. Then
please input the password of the phone again and press
to enter setting mode.
network
Speaker
2) When settings is displayed on the LCD, press
to
Vol+
enter submenu. Then press
to turn over the menu, once
the LCD displays ip tyep
, press Speaker
, then you
1[dhcp] at the beginning of the second line.
will see a cursor flashing
It indicates that you can change the setting of this item. Then
0
Local IP
please press
and
to disable the DHCP. Once
the LCD displays
, go to next step please.
3) Continue pressing
displays local ip
XXX.XX.X.X
mode.
Vol+
to turn over the menu until the LCD
, press
to enter change
Local IP
ip type
0[static]
When a flashing cursor
appears at the beginning of the second
line, press 192*168*1*100 keys in order, and then press
to confirm.
4) Then press
Redial
Speaker
thrice to reach save setting
save
menu settings . Then please press Speaker
key to confirm
the change. When the menu save
is displayed on the LCD,
Are you sure?
press
Speaker
again to confirm. Once the IP phone restart successfully, you
can go to step 4.
If the voice prompted IP address is 255.255.255.255, it indicates
that PPPoE is enabled but the phone is unsuccessful Dial-up. Now
please do as follows to disable PPPoE manually.
If your phone has no LCD, please do as follows:
1) Press
Speaker
or pick up the handset, and then input the
password of the phone. When No 18 light begins blinking once
Shenzhen ATCOM Co., Ltd.
6
ATCOM AT-323 Series IP Phone LAN Configuration Guide
a second, please go to the next step.
2) Press
0
and
Local IP
, then the phone will restart. As
soon as the phone restarts successfully, you can change the
IP address of the phone.
3) Repeat step 1) to make phone enter setting mode again.
4) Set the IP address of the phone manually: According to the IP
address of the PC, designate an IP address on the same segment
to the phone. For example, the address of PC is 192.168.1.10;
you can designate 192.168.1.100 as IP address of the phone by
pressing 192*168*1*100 keys on the keypad orderly, and then
pressing
Local IP
.
5) As soon as the phone restarts successfully, please go to step
4.
● If your IP phone has LCD, please do as follows:
Password:
#
1) Using keypad to input the password of the IP phone and then
Speaker
press
, till
is displayed on the LCD. Then
please input the password of the phone again and press
to enter setting mode.
network is displayed on the LCD, press
2) When
to
Speaker
settings
enter submenu. Then press
to turn over the menu, once
the LCD displays
, press
, then you
Vol+
will see a cursor flashing at the beginning of the second line.
ip type
It indicates that you
can change the setting
of this item. Then
Local IP
2[pppoe]
please press
and
to disable the PPPoE. Once
7
Shenzhen ATCOM Co., Ltd.
0
Speaker
ATCOM AT-323 Series IP Phone LAN Configuration Guide
the LCD displays
, go to next step please.
3) Continue pressing Vol+
to turn over the menu until the LCD
displays
, press
to enter change mode.
When a flashing
local ip cursor appears at the beginning of the second
Local IP
line, press
192*168*1*100 keys in order, and then press
XXX.XX.X.X
to confirm.
4) Then press Redial
thrice to reach save save
setting
Speaker
settings
menu
. Then please press
key to confirm the
change. When the menu
is displayed on the LCD,
Speaker
press
save
Speaker
again toAreconfirm.
you sure? Once the IP phone restart successfully, you
can go to step 4.
If the voice prompted IP address is neither 0.0.0.0 nor 255.255.255.
255, it indicates that the phone is assigned an IP address
successfully. If the IP address is at the same segment of PC, please
take a note of it and then go to the next step. If the voice prompted
IP address is not at the same segment of the PC, please refer to
above operation to designate an IP address at the same segment of
PC to the phone, and then go to the next step.
Note The same means IP address of two Ethernet devices get same net number and
subnet mask. In brief with it, if head three digits of IP address of two devises with
the same subnet mask (255.255.255.0) are same, we say that those two IP
address are at the same segment. Such as 192.168.1.1 and 192.168.1.33 are at
the same segment.
4
Have completed above operation, please configure the phone as follows:
1) Open the setting tool: on a computer in the same segment with the
Shenzhen ATCOM Co., Ltd.
8
ATCOM AT-323 Series IP Phone LAN Configuration Guide
phone, double click
icon to open the PalmTool. Then input IP address
of the phone into local IP address field (such as 192.168.1.100),
then click phone setting button.
Note If you have not installed PalmTool, please download it by visiting
http://www.aredfox.com/download/tools/PalmTool.zip
Note From version1.24, when Debug set as 0[disable], PalmTool can not connect to
the IP phone directly. Then please set Debug as other value. When use above
mentioned two methods to set PA168F,PA168FB,PA168FS or PA168S IP
phone, please use super password 19750407 to login to the configuration page.
If this password is invalid, please ask phone provider for a valid one.
2) Set protocol service: according to different protocol, set
different service. Refer to following context to get detailed
operation:
Note When PA168B/C/E/F IP phone uses different protocol, its program should be
changed into the corresponding one by rewriting the program into the phone;
when PA168S IP phone uses different protocol, its protocol setting should be
changed by selecting the corresponding one in protocol dropdown list.
a) H323 protocol:When H323 protocol is used, the relevant parameters
are use service,
service addr, service port and phone number.
① Set protocol service: With H323 protocol used, the protocol
service refers to login the gatekeeper. Gatekeeper is the key
Shenzhen ATCOM Co., Ltd.
9
ATCOM AT-323 Series IP Phone LAN Configuration Guide
component of H.323 protocols regulated by ITU-T. It provides an
address translation service. With H323 protocol used, when you
want to call other IP phone by dialing phone number instead of
IP address, please check use service option and then type IP
address or domain name of the GK (such as 203.93.9.57) into service
address field.
Note If you have not got any gatekeeper, we suggest you to run a free gatekeeper
based on open resource. Please visit www.gnugk.org or www.openh323.org to
download a program and then run it on a PC with public IP. Please take a note of
the IP address of this PC.
Note To let the phone log in voice gateway, please enter IP address or domain name
of voice gateway into service address field without selecting use service check
box, and then set service port as 1720.
② Set service port: With gatekeeper used, please set serviceport
as 1719
③ Set phone number: Enter a number into phone number field.
Note Without gatekeeper or gateway used, the IP phone can communicate with other
IP phone or H323 terminal (such as Microsoft Netmeeting 3.01) with public IP
address. The operation are as follows: Pick up the handset or press Speaker, and
then use the keypad to enter the IP address of the other party. Please use”*”to
Shenzhen ATCOM Co., Ltd.
10
ATCOM AT-323 Series IP Phone LAN Configuration Guide
replace “.”. For example, the IP address of the device you wish to call is
166.111.19.88, please press 166*111*19*98 in order on the keyboard, and then
press Call or # to place the call. Once the call connection has been established
and the ring tone has sounded, wait for the other party to answer.
b) MGCP protocol:With MGCP protocol used, the relevant parameters are
use service, service address, service port, register port, id and
account.
① Set protocol service: With MGCP protocol used, the protocol
service refers to the Call Agent. The Call Agent controls the
terminal and gateway. Once the user pick up the handset or dial
a number, the CA will receive the signal and specify the means
of the signal and then send out the action. Please check the use
service option and then fill the IP address or domain name of the
CA into service address field (such as 211.98.66.43).
② Set receive port of Call Agent:the default port is 2727;so please
set service port as 2727。
③ Set information send port: the default port is 2427;so please
set
register port as 2427。
④ Set EndpointID:EndpointID is used to identify gateway and port
of gateway. It includes two parts: Local name and Domain name.
Local name used to identify different ports of one gateway; while
Shenzhen ATCOM Co., Ltd.
11
ATCOM AT-323 Series IP Phone LAN Configuration Guide
Domain name used to identify gateway, it could be string or IP
address of gateway. “ LocalName @ DomainName ” consists an
EndpointID。Please type the Local name and Domain name into account
and pin fields respectively.
⑤ Set phone number: Enter a number into phone number field.
c) SIP protocol:With SIP protocol used, the relevant parameters are
use service, service address, service port and register port.
① Set protocol service: with SIP protocol used, the protocol service
refers to Proxy Server. Proxy server is a bridge between two
clients. When the setting of a client is changed, the change will
register to the Proxy Server directly. Please check use service
option and then enter the IP address or domain name of SIP proxy
server according to system into the service address field.
② Set service port: enter the default port 5060 into service port
field.
③ Set register port: enter the default port 5060 into register port
field.
④ Fill local name into phone number field.
Shenzhen ATCOM Co., Ltd.
12
ATCOM AT-323 Series IP Phone LAN Configuration Guide
Note RTP port should be an even number.
d) Net2phone protocol : With Net2phone private protocol used, the
relevant parameters are use service, service address, service port,
prepaid card, account and pin.
① Set protocol service: with Net2phone private protocol used, the
phone should login the designated server. Please check use service
option and then type IP address (216.53.3.52; 4.43.114.39;
205.228.245.8
or
4.43.114.38)
or
domain
name
(call1.net2phone.com;call2.net2phone.com;skip1.net2phone.com
or skip2.net2phone.com) of server into service address field.
② Set servieport: fill the default number 6801 into serviceport
field.
③ Set prepaid card: select net2phone from prepaid card dropdown
list.
④ Set account: fill the account (such as 13801038908) into account
field.
⑤ Set pin: fill the pin (such as 7085) into pin field.
Have completed above settings, click
button to confirm. If
the phone gets a public IP, then the phone can communicate with other
Shenzhen ATCOM Co., Ltd.
13
ATCOM AT-323 Series IP Phone LAN Configuration Guide
IP phone according to the requirement of the server. If the IP phone
gets a private IP, then please go to step 3 to set the proxy according
to the requirement of the server.
Note Public IP is a unique IP address assigned by IANA, such as 202.106.192.118.
Private IP, also called virtual IP is the IP address reserved by IANA for Private
network. ( 10.0.0.1-10.255.255.255;
172.16.0.1-172.31.255.255 ) ,
(192.168.0.1-192.168. 255.255), such as 192.168.1.188.
3) Set proxy server: if the phone gets a private IP, please refer to
following steps to set proxy server after above operation:
● Not use: Not use proxy. When the IP phone and the protocol server
are at the same segment, please select this option.
● Use: Select use in use proxy drop down list, then the program will
use the share resource online to find the dynamic proxy.
● Citron: With H323 protocol used, when the phone login the supported
Gnu GK, please use Citron private protocol by selecting citron
option in use proxy dropdown list.
Note With Citron private protocol used, the phone can only log in the GnuGK supporting
Call Routed, for example our test GK 203.93.9.57. Then please set the signal port, ras
port, control port and rtp port as infamous port without port mapping.
● Auvtech: Select auvtech in use proxy dropdown list to use Auvtech
private protocol system.
Note Auvtech protocol should be used with H323 and the special account system.
Complete the proxy configuration, the IP phone with private IP can
communicate with other IP phone according to the server’s requirement.
4) Enable multi-settings: From released version 1.08, the setting of
IP phone is changed. More than one setting of parameters can be saved
Shenzhen ATCOM Co., Ltd.
14
ATCOM AT-323 Series IP Phone LAN Configuration Guide
in an IP phone. Usually the phone uses current settings to call out.
With switch is selected from use inner line dropdown list, the user
can use backup settings 1 and backup settings 2 by dialing the number
designated in local prefix and nonlocal prefix. Then the phone
switches between multi-settings without changing the settings.
Note PA168E/C/E/F IP phone can save 21 settings, and when it is used, only with
H323 protocol used, multi-settings is effective. It allowed you to use different
prepaid card or gatekeeper. For example, the current setting is using
gatekeeper while backup 1 setting is using eTalk card. PA168S IP phone can
save 5 settings, and when it is used, multi-settings allows you to switch
between different protocol. For example, the current setting is using H323
protocol, while backup setting 1 is using Net2phone setting.
Save
current
settings:
click
button
to
confirm
the
configuration. Once the phone restarts auto, current setting is saved into
the phone.
5) Set backup setting: to allow the phone switch between different
settings, please do as follows:
a) Write setting files: After the above setting is saved into the phone
as current setting, please write the backup settings in txt format
according to your requirement. For example: with H323 protocol used,
backup setting 1 set the phone call other IP phone log in the
gatekeeper 203.93.9.57; while backup setting 2 set the phone to call
PSTN phone by eTalk card. Refer to following settings please:
Shenzhen ATCOM Co., Ltd.
15
ATCOM AT-323 Series IP Phone LAN Configuration Guide
[SETTING1]
service=1
serviceport=1719
proxy=2
serviceaddr=203.93.9.57
dialplan=0
prepaid=0
[SETTING2]
service=1
serviceport=1719
proxy=0
serviceaddr=202.91.230.91
dialplan=2
dialnumber=00
innerline=0
serviceid=ETNSGK
prepaid=2
account=0117ETNS
pin=586095682629
Note Parameters here are same with the telnet command. Letters in “[]”should be
capital.
b) Update files: In PalmTool index page, input the IP address of the
phone into the IP address in chip, and then click Update Alternate
button, then please select the saved setting files (such as
setting.txt) in following window to update.
After updating, the backup settings cannot be seen in PalmTool. To check
and change the backup setting, please use load, store and set command in
Telnet. Now, let’s take changing the dial rule in backup setting 2 as
an example to learn how to use Telnet command. Enter Telnet command firstly:
on the PC connecting with the phone, click Start>Run, and then input telnet
192.168.1.100 into the Run dialog. Refers to following images please:
Shenzhen ATCOM Co., Ltd.
16
ATCOM AT-323 Series IP Phone LAN Configuration Guide
Fig4.4 Select Start>Run
Fig4.5 Input Telnet command
In Telnet window, load backup setting 3 to the current position by using
load and then check the setting with get command as follows:
PA168S V1.25 settings
Password: ********
Input super password
P:\>load 3
Load backup setting 3 to current position
P:\>get
Check current setting
iptype 0[static]
ip 192.168.1.178
subnetmask 255.255.255.0 router 192.168.1.254
dns 202.106.196.152
dns2 202.106.196.115
mac 00-09-45-65-a3-e6
protocol 0[h323]
proxy 2[citron]
Then you can change the setting with set command as follows:
upgradeaddr [empty]
ntsip 210.59.157.10
daylight 0[disable]
timezone 20[(GMT-03:00)Greenland]
P:\>set dialplan 1
Enable dial rule
P:\>set iddcode 86
Set country code
P:\>set iddprefix 00
Set country code prefix
P:\>set dddprefix 0
Set long distance code prefix
P:\>set dddcode 10
Set long distance code
P:\>store 3
Save current setting to backup setting 3
P:\>write
Confirm change
5
Usage of the phone
Shenzhen ATCOM Co., Ltd.
17
ATCOM AT-323 Series IP Phone LAN Configuration Guide
1)
Place the calls:
a) Call other IP phones log in the same server as follows:
Pick up the handset or press
, and then use the keypad
Speaker
to enter the phone number of the other IP phone, such as
87452356. Then press
#
or
Cal
to confirm. Once the call
connection has been established and the ring tone has sounded,
wait for the other party to answer. When the other party answers,
you can begin speaking. When the call is over, put back the
handset or press
Speaker
again. The dialed number has been
saved into the last calls made buffer.
b) With multi-settings being enabled, for example, current
setting is calling other IP phone log in GK (203.93.9.57);
while backup setting 1 is calling ordinary phone by eTalk card,
do as follows:
① Call other IP phone log in the same GK:
Pick up the handset or press
Speaker
, and then use the
keypad to enter the phone number of the other IP phone, such
as 87452356. Then press
#
or
Cal
to confirm. Once the
call connection has been established and the ring tone has
sounded, wait for the other party to answer. When the other
party answers, you can begin speaking. When the call is over,
put back the handset or pressSpeaker
Shenzhen ATCOM Co., Ltd.
again.
18
ATCOM AT-323 Series IP Phone LAN Configuration Guide
Speaker
② Call ordinary phone by eTalk card:
Pick up the handset or press
Speaker
, and then switch to
backup setting 1 by pressing the designated nonlocal prefix
code, such9 as
. Once you hear the eTalk card balance
prompt, please dial the complete number of the other party,
such as 00861082378008, and then #press
Cal
or
to
confirm.
Once the call connection has been established, you will hear a
number prompting the allowed speaking time. For example, 240, it
means that you can communicate with the other party for 240 minutes.
When the ring tone has sounded, wait for the other party to answer.
When the other party answers, you can begin speaking. When the call
Speaker
is over, put back the handset or press
2)
again.
Receive the calls: When the phone rings, you can receive the call
by following methods:
a) Use handset: Pick up the handset and begin speaking. When the
call is over, put the handset back.
b) Handset to hand free: While receiving call with handset, press
Speaker
on the keypad and then put down the handset. When
Speaker
the call is over, press
c) Hand free: Press
Speaker
Speaker
the call is over, press
Shenzhen ATCOM Co., Ltd.
again.
to speak to the other party. When
again.
19
ATCOM AT-323 Series IP Phone LAN Configuration Guide
d) Hand free to handset: While receiving the call withSpeaker
the
Pressed, pick up the handset to continue the call. When the
call is over, put back the handset.
Note To assure the quality of speaking; do not be far way from the speaker. The
limitation is 40 CM.
3)
Review the calls:
a) Review the received calls: please press
with the phone
Play
turned on. Then you will hear the voice prompt of the latest
received number. To turn over the record backward or forward,
please press
Vol+
or
Vol-
. During the reviewing, you can
call the current nubmer. For example, when you hear
“No.2 ,87452356”, you can press #
.Then the phone will
call 87452356 without picking up the handset.
b) Review the missed calls: please press
Record
with the phone
turned on. Then you will hear the voice prompt of the latest
missed calls. To turn over the record backward or forward,
please press
Vol+
or
Vol-
. During the reviewing, you can call the
current number. For example, when you hear “No.2 ,87452356”,
you can #press
.Then the phone will call 87452356
without picking up the handset.
c) Review the made calls: please press
Delete
with the phone
20
Shenzhen ATCOM Co., Ltd.
Vol+
Vol-
ATCOM AT-323 Series IP Phone LAN Configuration Guide
turned on. Then you will hear the voice prompt of the latest
calls made. You can press
or
to turn over the
record backward or forward. During the reviewing, you can call
the
current
number.
For
example,
# you can press
“No.2 ,87452356”,
when
you
hear
.Then the phone will
call 87452356 without picking up the handset.
Centrality Communications CO., Ltd reserves the right to make changes in
technical and product specification without prior notice.
Shenzhen ATCOM Co., Ltd.
21
ATCOM AT-323 Series IP Phone LAN Configuration Guide
ATCOM Series IP Phone LAN Configuration Guide
Copyright© 2003, Beijing Centrality Communications Co., Ltd
All rights reserved
Shenzhen ATCOM Co., Ltd.
22