1
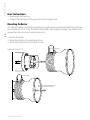
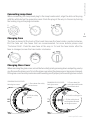
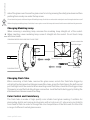
ProHead
User´s Guide
Profoto ProHead
2
www.profoto.com
Profoto ProHead
Thank you for choosing Profoto.
Thanks for showing us your confidence by investing in a D1 unit. For more
than four decades we have sought the perfect light. What pushes us is
our conviction that we can offer even better tools for the most demanding
photographers.
Before our products are shipped we have them pass an extensive and
strict testing program. We check that each individual product comply
with specified performance, quality and safety. For this reason our flash
equipment is widely used in rental studios and rental houses worldwide,
from Paris, London, Milan, New York, Tokyo to Cape Town.
Some photographers can tell just from seeing a picture, if Profoto
equipment has been used
Professional photographers around the world have come to value Profoto’s
expertise in lighting and light-shaping. Our extensive range of Light
Shaping Tools offers photographers unlimited possibilities for creating
and adjusting their own light.
Every single reflector and accessory creates its special light and the unique
Profoto focusing system offers you the possibility to create your own light
with only a few different reflectors.
Enjoy your Profoto product!
www.profoto.com
3
Profoto ProHead
Safety instructions
SAFETY PRECAUTIONS!
Do not operate the equipment before studying the instruction manual and the accompanying safety. Make
sure that Profoto Safety Instructions is always accompanied the equipment! Profoto products are intended
for professional use! Generator, lamp heads and accessories are only intended for indoor photographic
use. Do not place or use the equipment where it can be exposed to moisture, extreme electromagnetic
fields or in areas with flammable gases or dust! Do not expose the equipment to dripping or splashing.
Do not place any objects filled with liquids, such as vases, on or near the equipment. Do not expose the
equipment to hasty temperature changes in humid conditions as this could lead to condensation water
in the unit. Do not connect this equipment to flash equipment from other brands. Do not use flash heads
without supplied protective glass covers or protective grids. Glass covers shall be changed if it has
become visibly damaged to such an extent that their effectiveness is impaired, for example by cracks
or deep scratches. Lamps shall be changed if they are damaged or thermally deformed. When placing
a lamp into the holder ensure not to touch the bulb with bare hands. Equipment must only be serviced,
modified or repaired by authorized and competent service personnel! Warning - The terminals marked
with the flash symbol are hazardous live.
4
WARNING – Electrical Shock – High Voltage!
Mains powered generator shall always be connected to a mains socket outlet with a protective earthing
connection! Only use Profoto extension cables! Do not open or disassemble generator or lamp head!
Equipment operates with high voltage. Generator capacitors are electrically charged for a considerable
time after being turned off. Do not touch modeling lamp or flash tube when mounting umbrella metal
shaft in its reflector hole. Disconnect lamp head cable between generator and lamp head when changing
modeling lamp or flash tube! The mains plug or appliance coupler is used as disconnect device. The
disconnect device shall remain readily operable. Batteries (battery pack or batteries installed) shall not
be exposed to excessive heat such as sunshine, fire or the like.
Caution – Burn Hazard – Hot Parts!
Do not touch hot parts with bare fingers! Modeling lamps, flash tubes and certain metal parts emit
strong heat when used! Do not point modeling lamps or flash tubes too close to persons. All lamps may
on rare occasions explode and throw out hot particles! Make sure that rated voltage for modeling lamp
corresponds with technical data of user guide regarding power supply! The unit will be HOT especially
if non fan cooled heads used. It is advisable not to leave it with the modeling lamp switched on for long
periods, especially with the iris in the closed position. Always operate the iris by holding the plastic handle.
Always hold the top plastic handle when adjusting the position and allow the unit to cool before attempting
to remove it from the flash head.
NOTICE
NOTICE – Equipment Overheating Risk!
Remove transport cap from lamp head before use! Do not obstruct ventilation by placing filters, diffusing
materials, etc. over inlets and outlets of the equipment ventilation or directly over glass cover, modeling
lamp or flash tube!
Note about RF!
This equipment makes use of the radio spectrum and emits radio frequency energy. Proper care should
be taken when the device is integrated in systems. Make sure that all specifications within this document
are followed, especially those concerning operating temperature and supply voltage range. Make sure the
device is operated according to local regulations. The frequency spectrum this device is using is shared
with other users. Interference can not be ruled out.
Final Disposal
Equipment contains electrical and electronic components that could be harmful to the environment.
Equipment may be returned to Profoto distributors free of charge for recycling according to WEEE. Follow
local legal requirements for separate disposal of waste, for instance WEEE directive for electrical and
electronic equipment on the European market, when product life has ended!
www.profoto.com
Profoto ProHead
Table of Contents
Brief Instructions.......................................................................................................6
Mounting Reflector....................................................................................................6
Connecting Lamp Head..............................................................................................7
Changing Fuse...........................................................................................................7
Changing Glass Cover................................................................................................7 5
Changing Modeling Lamp..........................................................................................8
Changing Flash Tube..................................................................................................8
Color Control and Consistency...................................................................................8
Compatibility.............................................................................................................9
Warranty....................................................................................................................9
Accessories...............................................................................................................9
Technical Data.........................................................................................................10
Declaration of Conformity........................................................................................11
www.profoto.com
Profoto ProHead
Brief Instructions
• Remove protecting cap.
• Connect the ProHead to the generator lamp head socket.
Mounting Reflector
6
The unique rubber collar fastening system provides secure and rapid handling and allows
the reflectors to fit all of the Profoto flashes, HMI’s and Tungsten heads. The rubber collar
allows the reflectors to be handled when hot.
• Unlock the clasp.
• Slide the reflector into desired position.
• Secure the reflector by locking the clasp.
MOUNTING REFLECTOR
Unlock clasp
Lock clasp
Adjust reflector to desired
position before locking
www.profoto.com
When connecting the lamp head plug to the lamp head socket, align the dots on the plug
with the white dot on the generator panel. Push the plug all the way in. Secure by turning
the locking ring on the plug clockwise.
Profoto ProHead
Connecting Lamp Head
7
Changing Fuse
The fuse is placed at the back of the head. Unscrew the fuse holder counterclockwise.
Pull the fuse out. Use fuses that are recommended, for more details please read
“Technical Data”. Push the new fuse all the way in. To lock the fuse holder after the
fuse is changed, screw the fuse holder clockwise.
Fuse
Changing Glass Cover
When removing the glass cover, unlock the two safety pins by pressing down and pulling, one by
one. Remove the glass cover.To lock the glass cover when the glass cover or lamps are changed,
fit the glass cover carefully and make sure the safety pins fit properly in the existing holes on each
CHANGING GLASS COVER
Unlock glass cover
1: Press down the safety
pin to release
2: Pull the safety
pin out
CHANGING GLASS COVER
Lock glass cover
3: Press down the
safety pin and fit under
the screw to lock
2: Push the safety pin in
1: Fit the safety pins in
existing holes located
on the glass cover
www.profoto.com
Profoto ProHead
side of the glass cover. Secure the glass cover to lock by pressing the safety pins down and then
pushing them one by one under the top screw.
Do not touch hot parts with bare fingers! Modeling lamps, flash tubes and certain metal parts emit strong heat when used!
When changing modeling lamp, flash tube, fuse or glass cover the lamp cable must be disconnected from the generator.
Changing Modeling Lamp
When removing a modeling lamp, unscrew the modeling lamp straight out of the socket.
8 When inserting a new modeling lamp, screw it straight into the socket. Do not touch lamp
with bare hands.
CHANGING MODELING LAMP AND FLASH TUBE
Unlock and lock the
flash tube trigger
Clasp
Modeling Lamp
CHANGING FUSE
Flash Tube
Changing Flash Tube
When removing a flash tube, remove the glass cover, unlock the flash tube trigger by
unfolding the stainless steel ribbons around the clasp, grasp the flash tube in the bottom and
pull it straight out of the sockets.When inserting a new flash tube, check that the trigger clasp
fit properly around the flash tube trigger connection. Lock the flash tube trigger by folding the
stainless steel ribbons around the clasp.
Color Control and Consistency
The flash tube is made of high quality color stable hard glass making it suitable for
demanding digital and analog photography with a high level of f-stop and color stability
from flash to flash. In order to change the color temperature of the the head, Profoto offer
a range of different coated glass covers.
www.profoto.com
Profoto ProHead
Glass Covers
• Clear, uncoated
• Frosted, uncoated
• Clear, UV-coated, -300 K
• Frosted, UV-coated, -300 K
• Frosted, extra UV-coated, -600 K
Compatibility
The ProHead can be used with Pro and D4 generators.
9
Warranty
All Profoto generators and heads are individually tested before they leave the company
and guaranteed for a period of two years with the exception of flash tubes, glass covers,
modeling lamps and cables. Profoto is not responsible for technical malfunctions created
by improper use or accessories made by other companies. If you have any technical
problems please get in contact with an authorized Profoto service station.
Accessories
Please consult with your local dealer or distributor for specific information.
www.profoto.com
Profoto ProHead
Technical Data
Specifications
10
Flash Capacity:
4.7– 2400 Ws
Modeling Light:
12 0V max 500W high efficient halogen lamp
Flash Tube:
Hard Glass, max 600 J
Glass Cover
Frosted UV-coated
Fan:
Yes, thermostatically controlled 2 speed fan
Cable Length:
4m
Fuse:
T 6.3 AH/250 V
Measurements
Diameter:
10 cm (4”)
Size:
27 cm depth (10.5”)
Weight: 2.2 kg (4.8 lbs)
www.profoto.com
Profoto ProHead
Declaration of Conformity
We, Profoto AB of
PO Box 2023
SE-128 21 Skarpnäck, Sweden
hereby declare that the following product Profoto ProHead to which this declaration relates
is in conformity with the appropriate standards IEC 60598-2-9/17 and IEC 60065, following
the provisions of, EMC Directive 89/336/EEC, and Low Voltage Directive 73/23/EEC.
Stockholm, September 2009
Anders Hedebark
Managing Director of Profoto AB
www.profoto.com
11
334010-1-302. Specifications are subject to change without notice. Printed in Sweden.
Profoto AB
P.O. Box 2023
SE-128 21 Skarpnäck
SWEDEN
Phone +46 8 447 53 00
[email protected]
www.profoto.com