1
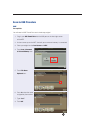
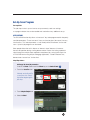
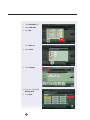
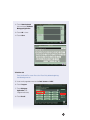
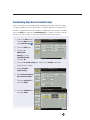
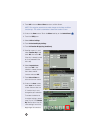
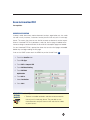
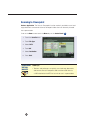
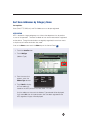
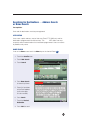
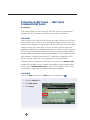
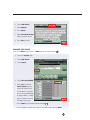
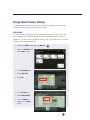
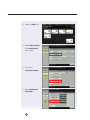
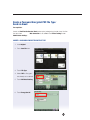
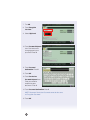
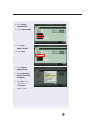
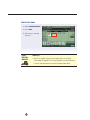
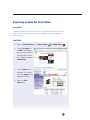
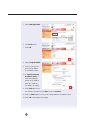
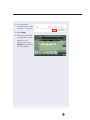
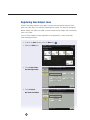
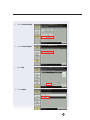
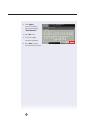
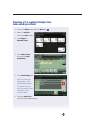
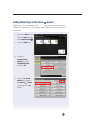
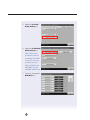
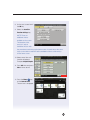
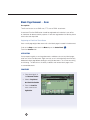
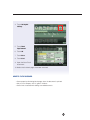
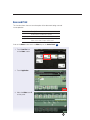
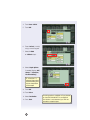
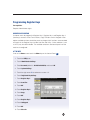
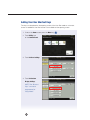
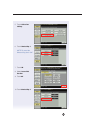
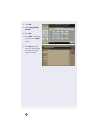
MFX-C2280/C2880/C3680
SCAN
Feature Overview
MFX-C2880
MFX-C2280
MFX-C3680
Business-Class Document Solutions
MK3243
table of contents
Enable Scan-to-USB . . . . . . . . . . . . . . . . . . . . . . . . . . . . . . . . . . . . . . . . . . . . . . . 1
How to Enable Scan-to-USB “External Memory Function Settings” . . . . . . . . . 2
Scan-to-USB Procedure . . . . . . . . . . . . . . . . . . . . . . . . . . . . . . . . . . . . . . . . . . . . 3
Set-Up Scan Program . . . . . . . . . . . . . . . . . . . . . . . . . . . . . . . . . . . . . . . . . . . . . 5
Customizing Scan Screen Function Keys . . . . . . . . . . . . . . . . . . . . . . . . . . . . . . . 9
Scan-to-PDF/A . . . . . . . . . . . . . . . . . . . . . . . . . . . . . . . . . . . . . . . . . . . . . . . . . . 11
Scan-to-Linearized PDF . . . . . . . . . . . . . . . . . . . . . . . . . . . . . . . . . . . . . . . . . . . 13
Scanning to Powerpoint . . . . . . . . . . . . . . . . . . . . . . . . . . . . . . . . . . . . . . . . . . . 14
Sort Scan Addresses by Category Name . . . . . . . . . . . . . . . . . . . . . . . . . . . . . 15
Display Addresses by List or Button Images . . . . . . . . . . . . . . . . . . . . . . . . . . . 16
Searching for Destinations — Address Search or Name Search . . . . . . . . . . . . 17
Name Search . . . . . . . . . . . . . . . . . . . . . . . . . . . . . . . . . . . . . . . . . . . . . . . . . 17
Address Search . . . . . . . . . . . . . . . . . . . . . . . . . . . . . . . . . . . . . . . . . . . . . . . . 18
Setting Up LDAP Server for LDAP Search from the MFP . . . . . . . . . . . . . . . . . . 19
Performing an LDAP Search — LDAP Search & Advanced LDAP Search . . . . . 22
LDAP Search . . . . . . . . . . . . . . . . . . . . . . . . . . . . . . . . . . . . . . . . . . . . . . . . . . 22
Advanced LDAP Search . . . . . . . . . . . . . . . . . . . . . . . . . . . . . . . . . . . . . . . . . 23
Change Default Scanner Settings . . . . . . . . . . . . . . . . . . . . . . . . . . . . . . . . . . . . 25
Real Time Preview and Editing of Scan Job . . . . . . . . . . . . . . . . . . . . . . . . . . . . 28
Create a Password Encrypted PDF File Type/Send via Email . . . . . . . . . . . . . . . 31
Create a Password Encrypted PDF File Type . . . . . . . . . . . . . . . . . . . . . . . . . 31
Send File via Email . . . . . . . . . . . . . . . . . . . . . . . . . . . . . . . . . . . . . . . . . . . . . . 34
Registering an Email One Touch Button through PageScope Web Connection .35
Registering Scan Subject Lines . . . . . . . . . . . . . . . . . . . . . . . . . . . . . . . . . . . . . 38
Selecting a Pre-registered Subject Line when sending an Email . . . . . . . . . . . . 41
Adding Menu Keys to the Home
Screen . . . . . . . . . . . . . . . . . . . . . . . . . . . 43
Blank Page Removal — Scan . . . . . . . . . . . . . . . . . . . . . . . . . . . . . . . . . . . . . . . 46
Save and Print . . . . . . . . . . . . . . . . . . . . . . . . . . . . . . . . . . . . . . . . . . . . . . . . . . 49
Multiple File Attachment to Email using the Attachment Method Function . . . . . 51
Programming Register Keys . . . . . . . . . . . . . . . . . . . . . . . . . . . . . . . . . . . . . . . . 53
Adding User Box Shortcut Keys . . . . . . . . . . . . . . . . . . . . . . . . . . . . . . . . . . . . . 54
bizhub C754 Series/C554 Series/C364 Series/754 Series
Scan Job Shops
Enable Scan-to-USB
WHAT & WHY
“Scan-to-USB” feature allows you to scan your originals to your USB device
through the MFP.
It is a fast and easy way of converting your hard copies to electronic format
and store them.
PRECAUTIONS
Scanned data is stored directly to external memory.
System setting changes required to support this function.
Compatible External Memory
• USB Memory formatted as FAT32 required.
• Use devices that draw up to the rated power consumption (0.5A)
in the USB Port.
USB Hard Disks are NOT supported
• Cannot use devices that draw more than the rated power consumption.
Protective Function
• If USB device draws more power than the USB port, system protective
function will disable USB functions.
Prohibited actions
• Do not remove external memory while data is being saved (or printed).
• Do not use 2 USB memory devices at the same time.
• Do not use a USB hub.
APPLICATION
Your customer travels constantly to attend meetings. During these meetings, several
printed reports are distributed to participants. The weight of the reports is too much
for carry-on luggage. Transfering the reports to digital format will allow your customer
to easily carry everything back to their home office.
1
bizhub C754 Series/C554 Series/C364 Series/754 Series
Scan Job Shops
How to Enable Scan-to-USB “External Memory Function Settings”
Pre-requisites
You will need a USB Thumb Drive and a hard copy original.
1. Press the Utility icon on the LCD Home Screen (Press the Menu key
to set the Home Screen if necessary).
2. Touch #3 Administrator Setting.
3. Enter the administrator password: 1234567812345678.
4. Press OK.
5. Touch #1 System Settings tab.
6. Touch #0 User Box Settings tab.
7. Touch #7 External Memory Function Settings.
8. Touch Save Document tab. (This will allow you to Scan‑to-USB).
Other Options here are:
Print Document (this will allow you to print from the USB thumb drive)
External Memory Document Scan (this will allow you to take a document
from a USB thumb drive and save it in a User Box on the MFP).
9. Touch ON.
10.Touch OK.
11.Close until you return to the Home screen.
Legal
Vertical
Markets
2
Useful Tips:
• For the legal professional who obtain hard copies on a daily basis,
and often need to carry these documents home, being able
to scan documents on the go onto a USB drive is a good feature.
bizhub C754 Series/C554 Series/C364 Series/754 Series
Scan Job Shops
Scan-to-USB Procedure
HOW
Pre-requisites
You will need a USB Thumb Drive and a hard copy original.
1. Plug in your USB Thumb Drive into the USB port on the front right corner
of the MFP.
2. An icon comes up on the MFP that tells you an external memory is connected.
3. Place your original on the Dual Scanner or RADF.
4. Touch Save a Document
to External Memory icon.
5. Touch File Name
Keyboard icon.
6. Press C to clear the name
assigned by the machine.
7. Type “test.”
8. Touch OK.
3
bizhub C754 Series/C554 Series/C364 Series/754 Series
Scan Job Shops
9. Touch File Type tab.
10.Select JPEG as file type.
11.Touch OK. 12.Press Start button to
scan your document
to the USB Thumb drive.
Device will overwrite
the USB document with the scanned document if they have the same name.
Selling Points
• No laptop boot up required.
• Can I have that file? — quick print.
• Load files on thumb drive –
go to meeting – download
at device – no PC required.
• Real Estate – upload house
to prospect.
• Financial/Mortgage – Loan
Documents, supporting
documentation, capture info,
electronic file.
• Legal – in the courtroom – print
necessary documents on the spot
from files on USB, no need to recess
and reconvene just for documentation
– reduces court costs.
• Medical vertical – Multiple MFPs
not networked, different domains,
Scan-Print.
4
• From USB, Microsoft Briefcase
to synch files on thumb drive.
• Local Mom/Pop Stores, UPS stores,
PFP applications.
• Me Too!! Toshiba, Sharp etc.
already have it.
• Hardcopy to USB for file distribution.
• After a product launch in Ramsey,
Scan-to-USB will keep my luggage
under the airline 50 lb. max.
• No Scan-to-USB in high
security area.
• Carry large print files from office
to office.
• Portable backup of important job.
• To make it difficult for thieves, when
public user is ON – external memory
must be OFF.
bizhub C754 Series/C554 Series/C364 Series/754 Series
Scan Job Shops
Set-Up Scan Program
Pre-requisites
This job shop instructs you on how to set up commonly used scan settings
as a program button that can be recalled and used without any additional set-up.
APPLICATIONS
The PROGRAM functionality allows a “one touch” key to be programmed for frequently
used job parameters. These “one touch” keys can then be given “job names” for easy
future access. This feature promotes a “user friendly office environment” for the endusers. Up to 30 job programs can be stored.
Sales people often refer to this feature as “demo in a box” because it increases
the ease of operation during a selling demonstration. Rather than taking a potential
client through the multiple steps required to complete a job, saving these steps into
a PROGRAM and naming the job “Mortgage Application,” “Student Records” etc,
demonstrates “ease of use” for the client.
Steps/Keystrokes:
Setting up the Scan job parameters
If not on the Home screen touch the Menu key on the Control Panel
.
1. Touch the Scan/Fax icon.
If already on the Scan/Fax
screen press the “Reset”
Key before beginning this
job shop.
2. Touch Simplex/Duplex tab.
3. Select 2-Sided.
5
bizhub C754 Series/C554 Series/C364 Series/754 Series
Scan Job Shops
4. Touch Resolution tab.
5. Select 300 x 300.
6. Touch OK.
7. Touch Color tab.
8. Select Black.
9. Touch Program.
10.Touch any key labeled
Not Registered.
11.Touch New.
6
bizhub C754 Series/C554 Series/C364 Series/754 Series
Scan Job Shops
12.Touch Name keyboard
icon and input Job Name
Mortgage Application.
13.Touch OK 2 times.
14.Touch Close.
To Retrieve Job
From the Scan/Fax screen Press the “Reset” Key before beginning
the following exercise.
15.Insert multi-page document on the Dual Scanner or RADF.
16.Touch Program.
17.Touch Mortgage
Application (PreProgrammed Job).
18.Touch Recall.
7
bizhub C754 Series/C554 Series/C364 Series/754 Series
Scan Job Shops
19.Select a desired scan
location example:
Email address or
Scan‑to-SMB location.
20.Touch Start.
Deleting a Pre-Programmed Job
Press the “Reset” Key before beginning the following exercise.
21.Touch Program.
22.Touch the Pre‑Registered
Copy Program (in this case
Mortgage Application).
23.Touch Delete.
24.Touch Yes when
prompted “Are you
sure you want to delete
this copy program?”
25.Touch Close.
SELLING POINTS
• Frequently used job parameters can be retrieved quickly and easily.
• Easy access to specific job parameters increases productivity.
• User Friendly.
8
bizhub C754 Series/C554 Series/C364 Series/754 Series
Scan Job Shops
Customizing Scan Screen Function Keys
All of the function keys that appear along the bottom of the Copy and Scan screens
can be arranged to the user’s preferences. The ability to do this is disabled when
the MFP is shipped and has to be turned on. To determine if this function is enabled,
touch the Utility key and then the Custom Display key. If options #4 and #5 are not
present, then start at step 1. If those keys are present, then start at step 10.
1. If not on the Home screen
Touch the Menu hard key
.
on the Control Panel
2. Touch the Utility icon.
3. Touch the #3
Administrator
Settings key, enter
1234567812345678
and touch OK.
4. Touch the #1 System Settings key and press the Forward arrow twice
to get to the 3/3 screen.
5. Select #4 Custom
Display Settings.
6. Select #5 Function Display
Key Permission Settings.
7. Touch the Copy/Print key
and select Allow.
8. Touch the Send/Save key
and select Allow.
9
bizhub C754 Series/C554 Series/C364 Series/754 Series
Scan Job Shops
9. Touch OK twice and Close 4 times to return to Main Screen.
NOTE: This only gives permission to make changes to the Copy and Scan
function keys. The actual customization is done from another screen.
10.If not on the Home screen Touch the Menu hard key on the Control Panel
11.Touch the Utility icon.
12.Select #2 User Settings.
13.Touch #2 Custom Display Settings.
14.Touch #5 Function Display Key (Send/Save).
15.Scroll to screen 2/2 and
select Function Key 7 and
touch ON, then touch OK.
If the Key is already turned
on, then proceed to the
next step.
16.Select Separate Scan,
then touch OK. If that
selection is already chosen,
then select another
function and touch OK.
17.Touch Close 4 times to
return to the main screen.
18.If not on the Scan screen,
touch Scan on the home
screen. Observe that the
#7 function key is now
changed to your selection.
To restore the device to
its original settings, repeat
steps 10–16. Turn Function
Key 7 off or return it to the
same setting it was at the
beginning of this exercise.
10
.
bizhub C754 Series/C554 Series/C364 Series/754 Series
Scan Job Shops
Scan-to-PDF/A
Pre-requisites:
Requires LK-102v3 i-Option License Kit and UK-204 i-Option Memory Upgrade.
Application
Creating PDF/A files is critical to customers who need to maintain the integrity
of a PDF file. PDF/A is a popular PDF format file type that is desired for long-term
digital archiving. This file format is a document management standard ISO 19005
established by the ISO (International Organization for Standardization) in an effort
to address the increasing need to maintain the integrity of electronic documents over
long periods of time.
If not on the Home screen touch the Menu key on the Control Panel
.
1. Touch the Scan/Fax icon.
2. Touch File Type.
3. Touch PDF or Compact PDF.
4. Touch PDF Detail Setting.
5. Touch PDF/A.
6. Touch ON.
7. Touch PDF/A-1a
(or PDF/A-1b).
8. Touch OK 3x.
9. Select destination.
10.Press START.
Legal
Vertical
Markets
Useful Tips:
• Lawyers, paralegals, court officers, judges and other legal
representatives can rest assured that any law documents, evidence
or files that exist in a PDF format have preserved all information
associated with the file even over extended periods of time.
continued
11
bizhub C754 Series/C554 Series/C364 Series/754 Series
Scan Job Shops
Legal
Vertical
Markets
continued
• The PDF/A file format standard was established to preserve
the visual appearance of the electronic document over the course
of time and to enable future access to these files regardless
of the technology to come. The information that needs to be
accessible includes content (text, raster images vector graphics),
fonts and color.
• To ensure compatibility in the future and the “self-containment”
of the file, the ISO 19005 standard stipulates that 1) Metadata
must be embedded about the electronic document and
2) The logical structure and semantic properties of the electronic
document must be defined.
• Federal Courts are moving to PDF/A filings in an effort to maintain
the integrity of the document.
PDF/A provides the following two compliance levels:
PDF/A-1b: Stipulates that the same visual quality should be assured even if a PDF file
is displayed using any hardware or software product and also that meta-data should
be embedded in a PDF file. This level restricts functions such as encryption, LZW
compression, and use of a transparent text.
PDF/A-1a: Stipulates that tags should be set to describe a logical structure
of a document and also that fonts should be embedded in a PDF file as well
as the requirements defined in PDF/A-1b.
A PDF/A-based PDF file created on this machine is subject to the following restrictions:
• Not possible to encrypt a PDF file.
• Not possible to add an electronic signature to a PDF file.
• Not possible to create a searchable PDF file.
• Not possible to use Stamp Combine in multiple languages.
12
bizhub C754 Series/C554 Series/C364 Series/754 Series
Scan Job Shops
Scan-to-Linearized PDF
Pre-requisites:
Requires LK-102 v3 i-Option License Kit and UK-204 i-Option Memory Upgrade.
Business Application
In today’s world, almost every work environment, business, organization, etc. has a web
site and in many instances, customers have to post files that only exist in hard copy
format. This means they have to scan the file to create an electronic version to post.
When a Linearized PDF file is posted on a web site, the first page is loaded so the
viewer can begin to read and review the file while the subsequent pages are loaded.
If a non-Linearized PDF file is posted, the viewer has to wait until all pages are loaded
before they can begin reading the first page.
If not on the HOME screen touch the MENU key on the Control Panel
.
1. Touch the Scan/Fax icon.
2. Touch File Type.
3. Touch PDF or Compact PDF.
4. Touch PDF Detail Setting.
5. Touch PDF Web
Optimization.
6. Touch OK 2x.
7. Select Destination.
8. Press Start.
Educational Useful Tips:
Vertical
• Teachers have older text books and other resource materials
Markets
that only exist in hard copy format. They are able to scan
these documents and post them on their web site for student
or parent access.
13
bizhub C754 Series/C554 Series/C364 Series/754 Series
Scan Job Shops
Scanning to Powerpoint
Business Application: The Scan to Powerpoint function makes it possible to scan hard
copy documents and convert them to Powerpoint slides than can be easily inserted
into a presentation.
If not on the Home screen touch the Menu key on the Control Panel
.
1. Touch the Scan/Fax icon.
2. Touch File Type.
3. Select PPTX.
4. Touch OK.
5. Select Destination.
6. Press Start.
Educational Useful Tips:
Vertical
• Teachers and professors can quickly scan hard copy documents
Markets
and convert them to Powerpoint slides and then send them to
a USB attached to the MFP for last-minute use in a presentation.
14
bizhub C754 Series/C554 Series/C364 Series/754 Series
Scan Job Shops
Sort Scan Addresses by Category Name
Pre-requisites:
Scan (Email, FTP, SMB, etc.) and Fax Addresses must be pre-registered.
Application
MFP is located in a large workgroup or a visitor to the department has to perform
a scan or fax operation. There are hundreds of scan and fax destinations registered
on the device. Though the destinations are logically organized, the end user wants
a simple way to find the destination they need.
If not on the Home screen touch the Menu key on the Control Panel
.
1. Touch the Scan/Fax icon.
2. Touch Add Type
(Address Type).
3. From the menu that
appears, touch the
Address Type desired.
All
Email
FTP
Group
Box
WebDAV
Fax
SMB
4. Touch Email to display
all Email addresses
stored on the MFP (or touch Fax, Box, SMB, FTP, etc.).
Only the addresses that match the Address Type selected will be displayed.
If you select ALL, then all the destinations that have been registered on the
MFP, regardless of type, will be displayed.
15
bizhub C754 Series/C554 Series/C364 Series/754 Series
Scan Job Shops
Display Addresses by List or Button Images
Pre-requisites:
Scan (Email, FTP, SMB, etc.) and Fax Addresses must be pre-registered.
Application
MFP is located in a large workgroup or a visitor to the department has to perform
a scan or fax operation. There are hundreds of scan and fax destinations registered
on the device. Though the destinations are logically organized, the end user wants
a simple way to find the destination they need. Some users prefer to view the registered
destinations in list form and others in button or one-touch key form.
If not on the Home screen touch the Menu key on the Control Panel
1. Touch the Scan/Fax icon.
icon
2. Touch the
to view the addresses
in list form.
icon
3. Touch the
to view the button images
(one-touch key layout).
You can select the
desired destination
from either display.
4. Press Start.
16
.
bizhub C754 Series/C554 Series/C364 Series/754 Series
Scan Job Shops
Searching for Destinations — Address Search
or Name Search
Pre-requisites:
Scan and fax destinations must be pre-registered.
Application
Users want a quick and easy way to find scan (Email, FTP, SMB, etc.) and fax
destinations programmed in one-touch keys. The bizhub MFP offers two ways
to quickly search for destinations that have been programmed. Users can search
by address or by name.
Name Search
If not on the Home screen touch the Menu key on the Control Panel
.
1. Touch the Scan/Fax icon.
2. Touch Addr. Search.
3. Touch Search.
4. Press Name Search
to search by Name.
5. Enter first few letters
of the Email address
(or first few digits
of a fax number).
6. Press Search.
7. Touch the Desired
Destination.
8. Press Start to send.
17
bizhub C754 Series/C554 Series/C364 Series/754 Series
Scan Job Shops
Address Search
If not on the Home screen touch the Menu key on the Control Panel
1. Touch the Scan/Fax icon.
2. Touch Addr. Search.
3. Touch Search.
4. Press Address Search to search by Address.
5. Enter first few letters of
the Email address (or first
few digits of fax number).
6. Press Search.
7. Touch the Desired
Destination.
8. Press Start to send.
18
.
bizhub C754 Series/C554 Series/C364 Series/754 Series
Scan Job Shops
Setting Up LDAP Server for LDAP Search from the MFP
Pre-requisites:
LDAP Administrator or IT Representative knowledgeable about the LDAP Server
must set up the Konica Minolta MFP to integrate with the LDAP Server(s).
To use the LDAP function of an Active Directory server, you must register the DNS
server that synchronizes the Active Directory on the MFP before starting the procedure.
To use the LDAP function of the Active Directory server, you must match the date
and time of the MFP and Active Directory.
Application
Users want to access Email Addresses or Fax Numbers via the LDAP Server
so that they don’t need to manually input (direct input) or access one-touch (requires
registration/programming address) keys to distribute information as an Email or a Fax.
By accessing the LDAP Server for destination information, users don’t have to worry
about updating one-touch address information or looking up email addresses or fax
numbers for direct input operations. As people come and go, IT is responsible for
keeping the LDAP Server up to date.
When a directory server such as an LDAP
Server or Active Directory is used to manage
users, you can search for a destination (E-mail
address or fax number) from the server.
LDAP Settings will vary depending
on customer requirements and
network environment.
When you use SSL to encrypt a communication with the server; you can make
communications more secure. The use of the SSL Protocol is up to each customer.
If not on the Home screen touch the Menu key on the Control Panel
.
1. Touch the Utility icon.
2. Touch Administrator Settings.
3. Enter Password (Default is 1234567812345678).
4. Touch Network Settings.
5. Touch LDAP Settings.
6. Touch Enabling LDAP.
7. Touch ON.
19
bizhub C754 Series/C554 Series/C364 Series/754 Series
Scan Job Shops
8. Touch OK.
9. Touch Setting Up LDAP.
10.Touch a Non-Registered Key.
11.Touch Server Name and input Server Name.
12.Enter LDAP Settings.
a. Max. Search Results (5-1000).
b. Timeout (5-300 Seconds).
c. Initial Search Settings.
i. Touch Name and select OR, AND, STARTS WITH or ENDS WITH.
ii. Touch Email and select OR, AND, STARTS WITH or ENDS WITH.
iii. Touch Fax Number and select OR, AND, STARTS WITH or ENDS WITH.
iv. Touch Last Name and select OR, AND, STARTS WITH or ENDS WITH.
v. Touch First Name and select OR, AND, STARTS WITH or ENDS WITH.
d. Press Forward ( 33) Arrow to access screen 2/2.
i. Touch Copy and select OR, AND, STARTS WITH or ENDS WITH.
ii. Touch Company Name and select OR, AND, STARTS WITH or ENDS WITH.
iii. Touch Department and select OR, AND, STARTS WITH or ENDS WITH.
e. Press OK.
f. Touch Change Search Name Attribute and select Name or Nickname.
g. Touch OK.
h. Touch Search and touch ON or OFF.
i. Touch Forward ( 33) Arrow to advance to screen 2/8.
i. Touch Server Address and input LDAP Server IP Address (you can enter
an IPv4 or IPv6 Address or Host Name).
ii. Touch OK.
iii. Touch Search Base and enter Search Base.
iv. Touch OK.
20
bizhub C754 Series/C554 Series/C364 Series/754 Series
Scan Job Shops
j. Touch Forward ( 33) Arrow to advance to screen 3/8.
i. Select SSL Setting (default is OFF; press ON if required).
OR
ii. Press Input (Port Number Section) to enter Port #.
OR
iii. Press Input (Port Number SSL Section) to enter Port #.
k. Touch Forward ( 33) Arrow to advance to screen 4/8.
i. Select Certificate Verification Level Settings and touch desired setting
for each item.
Expiration Date
Confirm
Do Not Confirm
Key Usage
Confirm
Do Not Confirm
Chain
Confirm
Do Not Confirm
Expiration Date Confirmation
Confirm
Do Not Confirm
CN
Confirm
Do Not Confirm
l. Touch Forward ( 33) Arrow to advance to screen 5/8.
i. Select Authentication Type (Anonymous, Digest-MD5, NTLM v1, Simple,
GSS-SPNEG0, NTLMv2).
m. Touch Forward ( 33) Arrow to advance screen 6/8.
i. From Server Authentication Method Menu select Use Settings, Use User
Authentication or Dynamic Authentication.
ii. From the Select Referral Setting Menu select ON or OFF.
n. Touch Forward ( 33) Arrow to advance screen 7/8.
i. Touch Login and enter Login Name.
ii. Touch Password and enter Password.
iii. Touch Domain Name and enter Domain Name.
o. Touch Forward ( 33) Arrow to advance screen 8/8 (proceed to this step
if Search Attributes and Authentication have been set).
13.Touch OK.
14.Touch Close 5x.
NOTE: LDAP Service can also be set up using
PageScope Web Connection.
21
bizhub C754 Series/C554 Series/C364 Series/754 Series
Scan Job Shops
Performing an LDAP Search — LDAP Search
& Advanced LDAP Search
Pre-requisites:
LDAP Server Settings must be set on MFP and LDAP Server must be configured
to recognize MFP. This requires LDAP Administrator and/or IT intervention.
Application
When using the LDAP server or Active Directory of Windows Server, the LDAP search
function allows users to search for an E-mail address through the server. Users want
to access Email Addresses or Fax Numbers via the LDAP Server so that they don’t
need to manually input (direct input) or access one-touch (requires registration/
programming address) keys to distribute information as an Email or a Fax. By accessing
the LDAP Server for destination information, users don’t have to worry about updating
one-touch address information or looking up email addresses or fax numbers for direct
input operations. As people come and go, IT is responsible for keeping the LDAP
Server up to date, not the end user, key operator or system administrator.
There are two ways to perform an LDAP Search. First, you can use Address Search
whereby an Email address or a fax number is searched by a single keyword. Second
you can use the Advanced LDAP Search in which an Email Address or fax number
is searched by a combination of keywords from different categories.
LDAP Search
If not on the Home screen touch the Menu key on the Control Panel
1. Touch the Scan/Fax icon.
2. Touch Addr. Search.
3. Touch Search.
22
.
bizhub C754 Series/C554 Series/C364 Series/754 Series
Scan Job Shops
4. Touch LDAP Search.
5. Enter Keyword.
6. Press Search.
7. Select Desired Destination
from the search results.
8. Press Start to send.
Advanced LDAP Search
If not on the Home screen touch the Menu key on the Control Panel
.
1. Touch the Scan/Fax icon.
2. Touch Addr. Search.
3. Touch Search.
4. Touch Adv. Search (LDAP).
5. Enter text in desired
Search Criteria (you can
search by Name, Email,
Fax Number, Last Name,
etc. or using a combination
of search criteria — Name
and City, Name, City and
Company Name, etc.).
• Touch Name and name field will be checked
.
• Touch keyboard symbol (to the right of the field name) and enter Name.
23
bizhub C754 Series/C554 Series/C364 Series/754 Series
Scan Job Shops
6. Touch OK.
7. Press Search.
8. Select the Destination from the search result.
9. Press Start to send.
24
bizhub C754 Series/C554 Series/C364 Series/754 Series
Scan Job Shops
Change Default Scanner Settings
This exercise demonstrates how users can customize their default scanner settings
on the MFP Control Panel to fit their business needs.
Application
This law firm scans large color files that need to be compact in size but must also
be scanned at 300 x 300 dpi to ensure the courts will accept the quality of these
image files. The owner wants her bizhub always set to scan in color at 300 x 300 dpi
and with the File Type Compact PDF.
1. If not on the Home screen press the Menu key
.
2. Select the Scan/Fax icon
on the Home screen.
3. Touch Resolution tab.
4. Select 300 x 300.
5. Touch OK.
6. Touch File Type tab.
7. Select Compact PDF.
8. Press the Menu key
to return to the Home
screen.
25
bizhub C754 Series/C554 Series/C364 Series/754 Series
Scan Job Shops
9. Select the Utility icon.
10.Select #2 User Settings
on the Control Panel
touch screen.
11.Then select
#4 Scan/Fax Settings.
12.Select Default Scan/
Fax Settings.
26
bizhub C754 Series/C554 Series/C364 Series/754 Series
Scan Job Shops
13.Select Current Setting.
14.Select OK twice. Then
select Close twice.
15.Press Reset.
16.Notice that your
scanner defaults have
changed to Resolution,
300 x 300 and File Type,
Compact PDF.
27
bizhub C754 Series/C554 Series/C364 Series/754 Series
Scan Job Shops
Real Time Preview and Editing of Scan Job
Business application: Allows the user to preview and edit a scan job before sending and
to add more pages if desired.
Pre-requisite
A one touch Email or SMB button should be registered on the device in your office
or showroom for demonstration purposes. If none are registered on the device,
please refer to the Job shop titled:
“Registering an Email One Touch Button through Pagescope Web Connection”
You will need a 6 page original document size (8.5" x 11").
If not on the Home screen touch the Menu key on the Control Panel
Touch the Scan/Fax icon.
1. Place 4 Originals in the Document Feeder.
2. Select a Registered One
Touch Destination.
The file can be sent as
an SMB scan, FTP scan
or EMAIL attachment.
3. Press the Preview
button on the side
of the Control Panel.
28
.
bizhub C754 Series/C554 Series/C364 Series/754 Series
Scan Job Shops
4. Select the icon that
matches the direction
of the originals that are
in the document feeder.
5. Touch Start on the Touch
Panel or press the Start
button. Observe that
the image on the screen
is the 4 originals that
were just scanned.
Scroll through the
pages on the screen.
6. Touch View Page.
7. Touch the Zoom key
.
8. Touch Delete Page.
9. Select Page 2 and
touch OK.
10.Confirm that you want
to delete the page
by touching YES
when prompted.
11.Place 2 More Pages in the Document Feeder.
12.Touch Start Scan on the Touch Panel. Scroll to view the new pages
that are now visible on the screen.
13.Touch View Page.
14.Touch the Zoom key
.
15.Touch Rotate Page.
29
bizhub C754 Series/C554 Series/C364 Series/754 Series
Scan Job Shops
16.Select Page 4.
17.Select the Rotation Angle as 90° Clockwise.
18.Touch OK.
19.Touch Send Now or press the Start button to send the document as previewed
on the panel.
Legal
Vertical
Markets
30
Useful Tips:
• The legal professional spends an abundant amount of time
scanning documents at the MFP and being able to preview
the important documents before they go to court or to other
attorney’s offices would be a time saver and being able
to add/delete pages at the MFP is great.
bizhub C754 Series/C554 Series/C364 Series/754 Series
Scan Job Shops
Create a Password Encrypted PDF File Type/
Send via Email
Pre-requisites:
Create an Email Destination One-Touch button prior to beginning the job shop. Confirm
that print from PageScope Web Connection is set to Yes in the Printer Settings under
Administrator Settings.
CREATE A PASSWORD ENCRYPTED PDF FILE TYPE
1. Load Original.
2. Press Scan/Fax icon.
3. Touch File Type.
4. Select PDF as file type if
not already set as default.
5. Touch PDF Detail Setting.
6. Touch Encryption Off.
31
bizhub C754 Series/C554 Series/C364 Series/754 Series
Scan Job Shops
7. Turn ON.
8. Touch Encryption
Low Level.
9. Select High Level.
10.Touch Password Keyboard
icon. Enter document
changing permissions
password. Enter X.
11.Touch Password
Confirmation. Enter X.
12.Touch OK.
13.Touch Permissions
Password Keyboard icon.
Enter password for
recipient to open
document. Enter Y.
14.Touch Password Confirmation. Enter Y.
NOTE: Document Permission Password cannot be the same
as Encryption Password.
15.Touch OK.
32
bizhub C754 Series/C554 Series/C364 Series/754 Series
Scan Job Shops
16.Touch Printing
Allowed Restrict.
17.Select Low Resolution.
18.Touch Copy
Contents Restrict.
19.Select Allow.
20.Touch Changes
Allowed Restrict.
21.Select Commenting,
Filling in Form Fields
and Signing.
22.Touch OK 3x until
you’re back at
the Scan/Fax
address screen.
33
bizhub C754 Series/C554 Series/C364 Series/754 Series
Scan Job Shops
SEND FILE VIA EMAIL
23.Select Email Destination.
24.Press Start.
25.Document is scanned
and sent.
Legal
Vertical
Markets
34
Useful Tips:
• Security is of great concern for the legal industry and having
a Password Encrypted PDF File Type would ensure the document
is secure and give peace of mind for the legal professional.
bizhub C754 Series/C554 Series/C364 Series/754 Series
Scan Job Shops
Registering an Email One Touch Button
through PageScope Web Connection
Pre-requisites:
For Scan‑to-Email to work the device must be configured to allow Scan‑to-Email.
Please verify this has been set up with the installing technician or appropriate
office personnel.
Procedure:
1. Open an Internet Browser i.e.… Internet Explorer
or Mozilla Firefox
.
2. Enter the IP Address of
the MFP in the address
bar you desire to add the
Email one touch button
to. IP Address example
192.168.1.230.
3. Press the Enter key on
keyboard. This will take
you to the general PSWC
page of that device.
4. Select the Store
Address tab.
35
bizhub C754 Series/C554 Series/C364 Series/754 Series
Scan Job Shops
5. Select New Registration.
6. Click Email button.
7. Select OK.
8. Select Use Open Number.
9. Enter the name of the
person to be added
to the Address Book.
10.In “Specify a keyword
for address search…”
select the dropdown
portion of the address
book you would like
the address to appear.
11.Check Main box for the
new address to appear on the Home screen for Scan/Fax.
12.Enter the Email address to the person being added to the address book.
13.Select OK at the bottom of the page.
36
bizhub C754 Series/C554 Series/C364 Series/754 Series
Scan Job Shops
14.You will receive a
message “Address Book
registration is complete.”
15.Select Return.
16.Walk to the MFP where
you registered the Email
address into the
Address Book. Touch
Scan/Fax icon and locate
your Email address.
37
bizhub C754 Series/C554 Series/C364 Series/754 Series
Scan Job Shops
Registering Scan Subject Lines
A Real Estate office employs many agents and they need to communicate with their
clients on a daily basis in an efficient and productive manner. The ability to pre-register
default subject lines allows the realtor to store commonly used subject lines and retrieve
them in an instant.
Up to 10-Email subjects can be registered. Once registered, it is easily accessible
when sending and Email.
1. If not on the Home screen press the Menu key
2. Select the Utility icon.
3. Touch #1 One-Touch/
User Box Registration.
4. Touch #1 Create
One-Touch Destination.
38
.
bizhub C754 Series/C554 Series/C364 Series/754 Series
Scan Job Shops
5. Touch #4 Email Settings.
6. Touch #1 Email Subject.
7. Touch New.
8. Touch Subject.
39
bizhub C754 Series/C554 Series/C364 Series/754 Series
Scan Job Shops
9. Enter Subject,
up to 64 characters
can be entered (type
“Title Documents”).
10.Press OK twice.
11.The Email subject
has been registered.
12.Press Close until you
return to the main screen.
40
bizhub C754 Series/C554 Series/C364 Series/754 Series
Scan Job Shops
Selecting a Pre-registered Subject Line
when sending an Email
1. If not on the Home screen press the Menu key
.
2. Select the Scan/Fax
icon on the Home screen.
3. Load Original in
Document Feeder.
4. Touch Address Book
and select an Email
destination(s).
5. Touch Email Settings tab.
NOTE: The Document
Name, Subject, From
and Body fields appear.
The default document
name and default subject
line appear in their
respective fields.
6. Touch the Subject Line
icon (next to the keyboard icon).
41
bizhub C754 Series/C554 Series/C364 Series/754 Series
Scan Job Shops
7. Highlight the desired
subject (“Title
Documents”).
8. Touch OK.
NOTE: The registered
subject selected in the
previous step will appear
in the subject line (and
the selected subject will
appear in the subject
line of the received Email
message).
9. Touch OK.
10.Press Start to send the Email.
42
bizhub C754 Series/C554 Series/C364 Series/754 Series
Scan Job Shops
Adding Menu Keys to the Home
Screen
Application Icons can be placed on the bizhub’s main screen to allow quick access
to frequently used functions. These are the steps to add a scan function key to the
home screen.
1. If not on the Home screen
Touch the Menu hard key
on the Control Panel
.
2. Touch the Utility icon.
3. Touch the
#3 Administrator
Settings key, enter
1234567812345678
and touch OK.
4. Touch the #1 System
Settings key and press
the Forward ( 33) Arrow
twice to get to the 3/3
screen.
43
bizhub C754 Series/C554 Series/C364 Series/754 Series
Scan Job Shops
5. Select the #4 Custom
Display Settings key.
6. Select the #1 Main Menu
Default Settings key.
NOTE: There are 20
possible keys that can
be added to the HOME
screen. The first 3 keys
by default are set to
COPY, SCAN/FAX and
USER BOX. DO NOT
CHANGE THESE KEYS.
7. Touch any unassigned
Main Menu Key.
44
bizhub C754 Series/C554 Series/C364 Series/754 Series
Scan Job Shops
8. On the next screen touch
the ON key.
9. Select the Scan/Fax
Function Settings key.
NOTE: There are
additional choices
available on the screen.
The intention of this
exercise is only to
familiarize the user with
the procedure to add a key to the home screen. In practical use the same
steps can be taken to add ANY of the available functions as Menu Keys
on the home screen.
10.Select one of the scan
functions displayed.
Example: Simplex/Duplex.
11.Press OK twice and press
Close 4 times to exit.
key
12.Press the Menu
on the Control Panel.
The new icon is displayed.
45
bizhub C754 Series/C554 Series/C364 Series/754 Series
Scan Job Shops
Blank Page Removal — Scan
Pre-requisite:
The file can be sent as an SMB scan, FTP scan or EMAIL attachment.
A one-touch Email or SMB button should be registered on the device in your office
or showroom for demonstration purposes. If none are registered on the device, please
refer to the Job shop titled
Registering an Email One Touch Button through Pagescope Web Connection
Have a multi-page original document with a few blank pages inserted in the document
If not on the Home screen touch the Menu key on the Control Panel
Touch the Scan/Fax icon
.
Application
Your prospect regularly scans large documents and does not want any blank pages
to be sent in the final document. Right now they scan it to their desktop and manually
delete each blank page before sending or saving the document. This is time consuming
and irritating. The bizhub has the ability to detect and remove blank pages from
a scanned document.
PROCEDURE
1. Place the originals in
the Document Feeder.
2. Select a Registered
One-Touch Destination.
3. From the Scan/Fax
main screen touch
Application.
46
bizhub C754 Series/C554 Series/C364 Series/754 Series
Scan Job Shops
4. Touch No Original
Settings.
5. Touch Blank
Page Removal.
6. Touch OK.
7. Touch Close.
8. Touch Start.
9. Open the file or Email
attachment.
10.Notice that the blank pages have been removed.
BENEFITS TO THE CUSTOMER
• Saves paper by eliminating blank pages when the document is printed.
• May assist a company with its “green” initiatives.
• Saves time associated with editing scanned documents.
47
bizhub C754 Series/C554 Series/C364 Series/754 Series
Scan Job Shops
Legal
Vertical
Markets
Qualifying Questions:
• Do you have legal documents that have blank pages inserted
as section separators instead of tabs and you would like to make
2-sided copies without the blank pages?
• Do you receive documents from other law firms with many blank
pages at the end of a section and you prefer to have them
eliminated when you make copies to save on paper?
• Do you have or receive copies/originals that have a mixed
sequence of single and double-sided sheets and you do not want
any blank pages?
Useful Tips:
• Law firms often produce and receive large amount of documents
that are 1-sided or 2-sided with blank pages or a mixed of both
1-sided or 2-sided pages and to save on paper, the Blank Page
Removal feature would be very useful.
48
bizhub C754 Series/C554 Series/C364 Series/754 Series
Scan Job Shops
Save and Print
This function allows the user to make copies of the document being scanned
in one operation.
Parameter
Description
Copies
Use the keypad to type in the number of copies to be printed.
A number between 1 and 9999 can be specified.
Simplex/Duplex
Select whether a single-sided or double-sided copy is to be printed.
Staple
Select whether or not the prints will be stapled. If they will be
stapled, select the number of staples and the position.
If not on the Home screen touch the Menu key on the Control Panel
.
1. Touch Scan/Fax icon
on the Home screen.
2. Touch Application.
3. Move the Slider touch E
on the panel.
49
bizhub C754 Series/C554 Series/C364 Series/754 Series
Scan Job Shops
4. Touch Save & Print.
5. Touch ON.
6. Enter # of Sets (1-9999)
using numeric keypad.
7. Select 1-Sided
or 2-Sided output.
8. Select Staple Options
if needed (Staple: “Off,”
“Corner,” “2-Position,
“Position Setting”).
If “2-Position” is
selected, then select
Position Setting and
choose the position
of the staple.
9. Touch OK.
10.Touch Close.
11.Select Destination.
12.Press Start.
50
Finishing options available will vary based
on how the bizhub MFP is configured.
If a finisher is not attached, you will not
be able to staple output.
bizhub C754 Series/C554 Series/C364 Series/754 Series
Scan Job Shops
Multiple File Attachment to Email
using the Attachment Method Function
WHAT & WHY
Send separate, multiple documents to an Email destination with the bizhub.
The Multiple File Attachment feature using the Attachment Method function enables
users to scan several documents, attach the documents as separate files, and send
them all via one Email. Multiple data arrangements circumvent the need to combine
very different documents into one file or send multiple Emails to keep the documents
separate.
FUNCTION DESCRIPTION
Multi Page – Select to combine all scanned original data and save
as a single file. This setting cannot be selected if “JPEG” or “PPTX”
is selected for the file type.
Page Separation – Select to divide the scanned data at a specified
page. Using the keypad, enter the number of pages to be saved
in a file. (Notice that this number appears on the Scan Setting screen
in the File Type box.)
Email Attachment Method – Specify the method for attaching a file
to an Email when Page Separation is selected.
All Files Sent as (1) Email – Attaches all files to one Email.
qFile attachment maximum to one Email is 300. If the file count
exceeds 300, files are split and sent as multiple Email messages.
One (1) File per Email – Attaches one file to one Email.
NOTE: When saving a document in a User Box, it is saved with [Multi Page]
while Page Separation is specified. Page Separation is enabled when sending
by Email, SMB, or FTP.
51
bizhub C754 Series/C554 Series/C364 Series/754 Series
Scan Job Shops
APPLICATION
An office coordinator needs to send a copy of an expense report, time sheet, and travel
directions to a colleague at a remote location. The coordinator wishes to scan the hard
copy documents and send them via Email. However, sending these separate files via
one Email with a single attachment really isn’t an option; how will her colleague retrieve
and file all the separate documents without manipulating the attached file? Sending
each document as a separate Email would just be wasting time. You’ve indicated that
using the Attachment Method function on the bizhub provides multiple options for
sending separate, multiple files via one Email. The office coordinator has asked you
to show them how to enable this function.
PROCEDURE
If not on the Home screen touch the Menu key on the Control Panel
1. Press Scan/Fax icon on the Home screen.
2. Touch File Type.
3. Touch Page Separation.
NOTE: This will enable
the Email Attachment
Method area.
4. Select how your Email
attachments should be
configured:
a. All Files Sent
as one (1) Email.
b. One (1) File per Email.
5. Press OK 2x.
6. Select Destination(s).
7. Press Start.
52
.
bizhub C754 Series/C554 Series/C364 Series/754 Series
Scan Job Shops
Programming Register Keys
Pre-requisites:
Requires Administrator rights.
Business Application
Customer wants to program the Register Key 1, Register Key 2 and Register Key 3
(hard keys) to access Scan/Fax functions, Copy Functions and 10 Keypad. Other
options available to them should they want to change which functions are associated
with each of the Register Keys include User Box and Utility. Other selections (such
as APP) may also be available. The available selections are based upon how the
machine is configured.
At the MFP
If not on the Home screen touch the Menu key on the Control Panel
.
1. Touch the Utility icon.
2. Touch Administrator Settings.
3. Enter Password (default is 1234567812345678) and touch OK.
4. Touch System Settings.
5. Touch the right arrow 33 to advance to screen 2/3.
6. Touch Registered Key Settings.
7. Touch Register Key 1.
8. Touch Scan/Fax.
9. Touch OK.
10.Touch Register Key 2.
11.Touch Copy.
12.Touch OK.
13.Touch Register Key 3.
14.Touch 10 Keypad.
15.Touch OK.
16.Touch Close 4x.
53
bizhub C754 Series/C554 Series/C364 Series/754 Series
Scan Job Shops
Adding User Box Shortcut Keys
Two keys can be placed on the opening screen of the User Box mode as a shortcut
to over 10 additional User Box functions not available on the opening screen.
1. If not on the Home screen press the Menu key
2. Touch Utility icon
on the Control Panel.
3. Touch #2 User Settings.
4. Touch #2 Custom
Display Settings.
NOTE: Two “Shortcut
Keys” can also be
programmed for
“Copy Mode”
54
.
bizhub C754 Series/C554 Series/C364 Series/754 Series
Scan Job Shops
5. Touch #3 User Box
Settings.
6. Touch Shortcut Key 1.
NOTE: To cancel the
Shortcut Key, touch “Off”
7. Touch ON.
8. Select Secure Print
User Box.
9. Touch OK.
10.Touch Shortcut Key 2.
55
bizhub C754 Series/C554 Series/C364 Series/754 Series
Scan Job Shops
11.Touch ON.
12.Select Encrypted PDF
User Box.
13.Touch OK.
14.Press Close 4 times until
you return to the Home
screen.
15.Touch Box and verify
that the 2 shortcut keys
are visible on the left
side of the screen.
56
notes


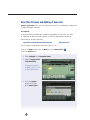
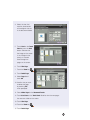


![Identifying Embeded Web Servers - [media.blackhat.com]](http://vs1.manualzilla.com/store/data/005833288_1-dd26f65aacb79f754f7b5aa134b8197a-150x150.png)