1
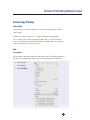
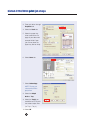
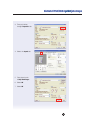
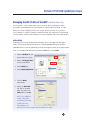
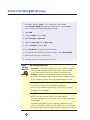
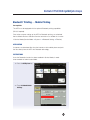
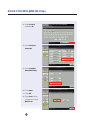
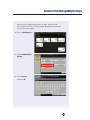
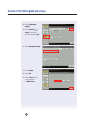
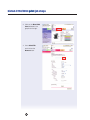
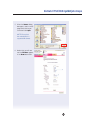
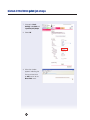
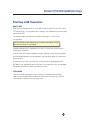
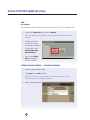
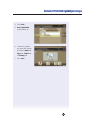
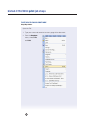
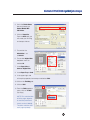
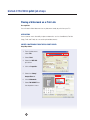
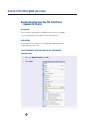
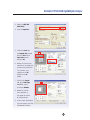
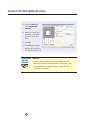
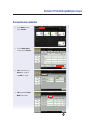
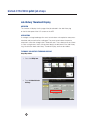
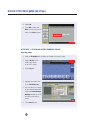
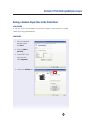
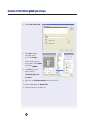
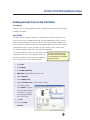
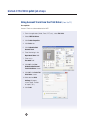
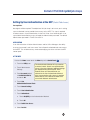
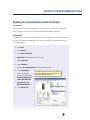
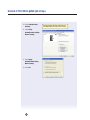
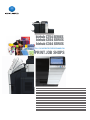
bizhub C754 SERIES
bizhub C554 SERIES
bizhub C364 SERIES
FULL COLOUR PRINTER/COPIER/SCANNER/FAX
PRINT JOB SHOPS
table of contents
Carbon Copy Printing . . . . . . . . . . . . . . . . . . . . . . . . . . . . . . . . . . . . . . . . . . . . . 1
Blank Page Removal . . . . . . . . . . . . . . . . . . . . . . . . . . . . . . . . . . . . . . . . . . . . . . 4
Changing the ICC Profile of the MFP (PostScript Driver Only) . . . . . . . . . . . . . . . 7
Printing on Tabs . . . . . . . . . . . . . . . . . . . . . . . . . . . . . . . . . . . . . . . . . . . . . . . . . 9
Inserting Tabs into a Print Job . . . . . . . . . . . . . . . . . . . . . . . . . . . . . . . . . . . . . 11
Bluetooth™ Printing — Mobile Printing . . . . . . . . . . . . . . . . . . . . . . . . . . . . . . . 13
PageScope Web Connection Direct Print . . . . . . . . . . . . . . . . . . . . . . . . . . . . . 19
Print from a USB Thumb Drive . . . . . . . . . . . . . . . . . . . . . . . . . . . . . . . . . . . . . 23
Multi Page Tri-fold Creation — PCL Print Driver . . . . . . . . . . . . . . . . . . . . . . . . 27
Secure Print — PCL Print Driver . . . . . . . . . . . . . . . . . . . . . . . . . . . . . . . . . . . . 31
Retrieving a Secure Print at the bizhub MFP . . . . . . . . . . . . . . . . . . . . . . . . . . 34
Placing a Watermark on a Print Job . . . . . . . . . . . . . . . . . . . . . . . . . . . . . . . . . 36
Booklet Creation from the PCL Print Driver — Booklet Legal FS-534 . . . . . . . 38
Banner Printing via Emperon Controller . . . . . . . . . . . . . . . . . . . . . . . . . . . . . . 41
Access the Eco-Indicator . . . . . . . . . . . . . . . . . . . . . . . . . . . . . . . . . . . . . . . . . 45
Job History Thumbnail Display . . . . . . . . . . . . . . . . . . . . . . . . . . . . . . . . . . . . . 46
Saving a Custom Paper Size in the Print Driver . . . . . . . . . . . . . . . . . . . . . . . . 49
Setting Up Account Track at the MFP . . . . . . . . . . . . . . . . . . . . . . . . . . . . . . . 51
Enabling Account Track via the Print Driver . . . . . . . . . . . . . . . . . . . . . . . . . . . 53
Using Account Track from the Print Driver (From the PC) . . . . . . . . . . . . . . . . . 54
Setting Up User Authentication at the MFP (Restrict Public Access) . . . . . . . . 55
Enabling User Authentication via the Print Driver . . . . . . . . . . . . . . . . . . . . . . . 57
Using User Authentication from the Print Driver (from the PC) . . . . . . . . . . . . . 59
bizhub C754/C654 print job shops
Carbon Copy Printing
APPLICATION
Your customer has electronic order forms that need to be printed on multiple
colour pages.
Example: The Company gets a Yellow page, shipping and receiving gets
the Pink page, and customer would get the Blue Page. This feature will allow
for this one document to be printed on different coloured papers as to simulate
carbon copy form they currently purchase.
HOW
Pre-requisites
You will need an electronic order form (MS Word, excel or PDF) before beginning
this job shop. Preload yellow paper, pink paper and blue paper in paper trays.
1. Open the form
to be printed.
2. Select File Print.
1
bizhub C754/C654 print job shops
3. Enter print driver through
Properties tab.
4. Select the Basic tab.
5. Select the paper tray
to be used for the first
page of your document
example White Paper
(you cannot leave the
paper tray field on Auto).
6. Select Cover tab.
7. Select Carbon Copy.
NOTE: The tray you
selected first will be
grayed out.
8. Select the Output
Order as Tray.
9. Select the Tray(s) you
would like to use to print
the carbon copies from
(i.e. Tray 2, Tray 3).
10. Select OK.
2
bizhub C754/C654 print job shops
11. Select OK.
12. Select OK.
SELLING POINTS
• Widely used in all companies to facilitate document workflow to easily identify
each departments documents.
• Provides customer with an alternative to purchasing expensive pre-printed forms.
• Allows for Print On Demand Forms reproduction when forms are changed.
Eliminates the waste of unused forms.
3
bizhub C754/C654 print job shops
Blank Page Removal
APPLICATION
Your customer has electronic files that need to be printed. However, they have files
with blank pages in them. The Skip Blank Page function will allow them to send
the entire file and the file will be printed without printing the blank pages.
HOW
Pre-requisite
You will need an electronic file (MS Word or PDF) with blank pages before beginning
this job shop.
1. Open File with
blank pages.
2. Select File Print.
4
bizhub C754/C654 print job shops
3. Enter print driver
through Properties tab.
4. Select the Layout tab.
5. Place check mark
in Skip Blank Pages.
6. Select OK.
7. Select OK.
5
bizhub C754/C654 print job shops
LEGAL
VERTICAL
MARKETS
Qualifying Questions:
• Do you receive electronic files via email, FTP site, and cloud
based server or on a CD that may contain blank pages?
• Did you know that our bizhub’s have a feature to eliminate
blank pages?
Useful Tips:
• Law firms receive a large amount of electronic files that have
blank pages and this would be a very useful feature to discuss
with the firm.
• Law firms consume a large amount of paper and many firms
are concerned about the environment and are seeking green
initiatives.
6
bizhub C754/C654 print job shops
Changing the ICC Profile of the MFP (PostScript Driver Only)
An ICC profile is a file that describes how a particular device reproduces colour.
ICC profiles are created for three types of devices: a display device (monitor), an input
device (a scanner or digital camera), or an output device (a printer). So, in essence,
an ICC profile is a “recipe” for optimum colour based on how a device is manufactured.
The ICC profiles of Konica Minolta devices can be changed to affect their colour output.
APPLICATION
A company prints a lot of Powerpoint presentations and is not happy with their colour
quality. The bizhub PostScript print driver has several preloaded alternate ICC profiles
preloaded into it that can be applied to a print job to change the quality of the colour output.
Open a multi-page color document and from the File menu, select Print.
1. Select a PCL Driver for the
bizhub and print a copy.
2. Select a PostScript driver
for the same device.
3. Select Quality tab.
4. Select Quality Adjustment.
5. Click the Detail
radio button.
6. Select the ICC Profile
tab, look in the drop
down and select the
sRGB profile. Click OK.
NOTE: The sRGB ICC
profile is designed
to optimize the printing
of MS Office files.
Depending on the
document, the color change could be dramatic or subtle.
7
bizhub C754/C654 print job shops
7. Click OK.
8. If necessary, select Print Range, Number of Copies, etc.
9. Click OK.
8
bizhub C754/C654 print job shops
Printing on Tabs
It is recommended that this be done on Punched, Single Reverse or Reverse Collated,
5 Print On Tabs. Otherwise tabs will have to be manually reversed before printing.
The MFP will not punch holes in a print job when tabs are inserted so the entire job
must be punched with a separate device for insertion into a binder.
The MFP will only pull tabs from the Bypass Tray and pulls from the top, so the tabs
must be ordered with Tab 1 towards the front of the MFP, Tab 2 next from the front
of the MFP, Tab 3 next and so on.
AT THE DEVICE
1. From the Copy screen touch Paper Settings.
2. Select the Bypass Tray.
3. Touch Change Tray Setting.
4. Select Index Paper.
5. Touch Close.
6. Load Tab Paper in the Bypass Tray with the tabs facing Out.
Multiple Sets can be printed at one time.
FROM THE COMPUTER
1. Create a blank Word document with the number of pages equaling the number
of TABS to be printed.(Example 5 tabs equals 5 blank pages).
2. Click File and Print.
3. Click on Properties and go to the Basic tab on the print driver.
4. Select the Original Size as A4 Tab
.
A Confirm Settings Change dialog box will open asking to change settings
to Paper Type = Tab and Print type = 1 Sided. Click Yes.
5. Select the Cover Mode tab on the print driver and select Per Page Settings.
6. Click on Edit List and select a List. It can be renamed if desired. The settings
will stay in the print driver until changed or deleted.
9
bizhub C754/C654 print job shops
7. The Default Setting is 5 Tabs in a set. If other than 5 are required,
select Tab Paper Settings and select the number of tabs in the dropdown
menu. The driver will automatically position the tabs.
8. Select Add.
9. Assign the Page 1 to the first Tab.
10. Select Print Type as Print Insert.
11. Select the Paper Tray to be the Bypass Tray.
12. Click on Tab Paper and select Use.
13. In the Text On Tab area, type the name of the Tab.
14. To change the font, orientation or colour of the text, select Tab Text Details
.
15. Repeat steps 8 through 14 until finished.
16. Click OK 3 times to send the print job to the MFP.
Type of Document Generated:
LEGAL
VERTICAL • Legal Briefs – A legal brief is a document used to submit an argument
MARKETS
to a court. Briefs are generally written by lawyers and are intended
to persuade the court to rule in your favour on a particular issue.
• Pleadings – pleading is a formal written statement filed with a court
by parties in a civil action, which states what claims and defenses are
at issue, pleadings establish the issues to be decided by the court
Qualifying Questions:
• Are you buying Tabs to use for legal briefs or pleadings?
• Are you using a vendor to outsource the Tabs that your firm needs
for legal briefs and pleadings?
Useful Tips:
• MFP that can print Tabs are a big win in the legal industry.
• Law firms that argue cases in court often times use Tabs for legal briefs
and pleadings.
• Legal briefs and pleadings contain supporting evidence for a case
such as: police reports, medical records, affidavits (i.e. sworn testimony
of witnesses), expert reports and Tabs separate the evidence into sections.
10
bizhub C754/C654 print job shops
Inserting Tabs into a Print Job
It is recommended that this be done on Single Reverse or Reverse Collated, 5 Print
On Tabs. Otherwise tabs will have to be manually reversed before printing.
The MFP will not punch holes in a print job when tabs are inserted so the entire job
must be punched with a separate device for insertion into a binder.
The MFP will only pull tabs from the Bypass Tray and pulls from the top, so the tabs
must be ordered with Tab 1 towards the front of the MFP, Tab 2 next from the front
of the MFP, Tab 3 next and so on.
AT THE DEVICE
1. From the Copy screen touch Paper Settings.
2. Select the Bypass Tray.
3. Touch Change Tray Setting.
4. Select Index Paper.
5. Touch Close.
6. Load Tab Paper in the Bypass Tray with the tabs facing Out.
Multiple Sets can be printed at one time.
FROM THE COMPUTER
1. When Tabs will be inserted as part of a multipage print job.
2. Once document is ready to print, if it is required that the first tab come
before page 1 of the document, a blank page must be inserted at the front
of the document.
3. To create a 25 page test document, open Microsoft Word and type
=rand(101,20). Go to the very front of the document and insert a blank page.
4. Click File and Print.
5. Click on Properties. On My Tab or the Layout Tab select 1 Sided.
6. Select the Cover Mode tab on the print driver and select Per Page Settings.
11
bizhub C754/C654 print job shops
7. Click on Edit List and select a List. It can be renamed if desired. The settings
will stay in the print driver until changed or deleted.
8. The Default Setting is 5 Tabs in a set. If other than 5 are required,
select Tab Paper Settings and select the number of tabs in the dropdown
menu. The driver will automatically position the tabs.
9. Select Add.
10. Assign the page 1 to the first Tab. This will place the Tab after page 1 (the blank
page) so that it is before the printed pages in the document. For the remaining
Tabs, the MFP will insert the Tab After the page number specified.
11. Select Print Type as Insert Blank Sheet.
12. A dialog box will open asking to confirm settings change. Click Yes. This will
change the Paper Tray to the Bypass Tray
13. Click on Tab Paper and select Use.
14. In the Text on Tab area, type the name of the Tab To change the font,
orientation or colour of the text, select Tab Text Details
.
15. Repeat steps 5 through 9 until finished. Insert subsequent tabs after pages
5,12,16 and 20. (Tabs will be pages 2,6,13,17,21 in the document).
16. Click Ok 3 times to send the print job to the MFP.
12
bizhub C754/C654 print job shops
Bluetooth™ Printing — Mobile Printing
Pre-requisites
The MFP must be equipped with the optional Bluetooth printing capabilities
(EK-605 required).
Prior to the customer setting up the MFP for Bluetooth printing, an authorized
Konica Minolta Business Solutions Service technician must enable this function
in Service Mode (Service Mode , System 2 , Bluetooth Setting , Effective).
APPLICATION
Customers can download files from the internet on their mobile phone and print
the files directly from the MFP with Bluetooth technology.
INSTRUCTIONS
Once the Bluetooth function has been enabled in Service Mode, it needs
to be enabled via Administrator Mode.
1a. Press the Utility Icon key.
2a. Touch #3 Administrator
Settings.
13
bizhub C754/C654 print job shops
3a Enter Password
and touch OK.
4a. Touch #9 System
Connection.
5a. Touch #5 Cellular
Phone/PDA Setting.
6a. Touch Allow.
7a. Touch OK.
8a. Touch Close 3 times
until you return to the
Main Screen.
14
bizhub C754/C654 print job shops
Now that you’ve programmed the MFP to “allow” communication
with a cell phone or PDA, we have to enable Bluetooth communication
via the Administrator Mode.
1b. Press the Utility Icon key.
2b. Touch #3 Administrator
Settings.
3b. Enter Password
and touch OK.
15
bizhub C754/C654 print job shops
4b. Touch #5 Network
Settings.
5b. Touch Forward ( 33)
Arrow to advance
to second screen (3/3).
6b. Touch Bluetooth Setting.
7b. Touch Enable.
8b. Touch OK.
9b. Touch Close 3 times
until you return
to Main Screen.
16
bizhub C754/C654 print job shops
PRINTING VIA BLUETOOTH COMMUNICATION
1c. Press Box Icon.
2c. Touch System.
3c. Touch Mobile/PDA.
4c. Select Print List.
NOTE: Prior to printing,
you can check the
selected printer settings
(Colour, Paper Size and
Duplex/Combine).
5c. Pair your cellular phone
or PDA with the MFP.
Your phone should autodiscover the MFP.
NOTE: If you need to
access a file at a later
date, you can “Save
to User Box” instead
of printing the file.
NOTE: Your phone/PDA must support Bluetooth printing not just Bluetooth
technology for a headset.
NOTE: You must be within 25 feet of the MFP for your device to discover
the MFP.
6c. Enter PIN Code into your phone/PDA.
17
bizhub C754/C654 print job shops
7c. Continue the print/send process to the MFP for your particular device.
NOTE: If you want to send multiple files leave the MFP set on the PIN Code
screen and do not exit out.
LEGAL
VERTICAL
MARKETS
Useful Tips:
• Attorneys can download documents from a popular site such
as www.dropbox.com where documents are held or any other
internets site and print them on the MFP
• Attorneys who have multiple offices that they travel to can benefit
from Bluetooth Printing.
18
bizhub C754/C654 print job shops
PageScope Web Connection Direct Print
OVERVIEW SUMMARY APPLICATION
The PageScope Web Connection Direct Print function is a convenience feature that
allows users to surf into the MFP and print documents without having to launch the
application and open the selected document; or use File Print to open the print driver.
Users have immediate printing access, which can be enhanced with a number of Basic
Settings. The following procedure steps you through the selection of the necessary
settings using the web-based access to output documents using Direct Print.
APPLICATION
Your prospect is a small stencil-making company who prints instructional product
inserts on a regular basis for their packaging. These documents rarely change and are
stored with a PDF file extension on their server. The graphic design manager at this
company wishes to print these documents on demand without having to launch any
application. You’ve suggested using PageScope Web Connection Direct Print. Since
this seems like a good idea to your prospect has asked you to show them how.
HOW
Pre-requisites
System Requirements
• The bizhub MFP must be networked.
• Must have a PC that will access the bizhub MFP and allow access to the
PageScope Web Connection Utility using a PostScript standard web browser.
Job Requirements
• Any digitized document that has the following file formats: XPS, PDF v1.6,
TIFF, PS, PCL, JPEG, Text, OOXML, PPML.
• Note: Microsoft Documents are native only to Microsoft and will not print using
the Direct Print function. i.e. Word, Excel, PowerPoint, Publisher Documents,
Visio Documents.
1. Launch Internet Explorer or Firefox.
2. Type in the IP Address of the bizhub MFP you want to print to.
19
bizhub C754/C654 print job shops
3. Click on the Direct Print
Icon indicated in the
graphic to the right.
4. Go to Select File
and click on the
Browse button.
20
bizhub C754/C654 print job shops
5. When the Browse dialog
box opens, select a multipage file by clicking on
it and then click Open.
NOTE: Ensure that
the selected file is a
supported file format.
6. Notice that you will now
see the File Name appear
in the Browse text field.
21
bizhub C754/C654 print job shops
7. Change the Basic
Settings to 2-sided and
1-position (left) Staple.
8. Select OK.
9. When the window
appears indicating the
file has printed, click
on OK to return to the
Direct Print menu.
22
bizhub C754/C654 print job shops
Print from a USB Thumb Drive
WHAT & WHY
Once you have stored your files in your USB Thumb Drive you can print PDF, JPEG,
TIFF and XPS files – all you need to do is to plug in your USB device in the front right
corner of the MFP.
This function allows you to print files without accessing a PC. Data is now
very portable.
PRECAUTIONS: Double-sided printing, punching, and stapling of JPEG
and XPS format files is not possible.
If double-sided printing is selected for PDF and TIFF format files, then these will
be printed as left bound.
If two or more sets of double-sided printing with stapling, or punching are selected,
then the binding direction can be specified in the settings to specify the staple and
punch location.
A maximum of 255 files of a format that can be printed can be displayed within
the folder in the specified file path. If there are 256 or more files within a single folder,
then display of the file list screen may become slower.
APPLICATION
Your client will be traveling to his client’s office for a meeting where he knows
there is a Konica Minolta MFP. He does not want to carry the print-outs with him.
He asked you whether he can print them there.
23
bizhub C754/C654 print job shops
HOW
Pre-requisites
You will need a USB Thumb Drive that contains your PDF, JPEG, TIFF and XPS files.
1. Plug in your Thumb Drive into the MFP’s USB Port.
Note: The USB port is located at the upper right side of the device towards
the front.
2. A screen comes up
on the MFP that tells
you an external memory
is connected. Touch
Print Document from
External Memory.
3. Files on your Thumb
Drive will appear on
the MFP’s screen.
EXTERNAL MEMORY PRINTING — OPERATING PROCEDURE
1. Touch the desired folder (or file).
2. Touch Open (if you Select a folder).
NOTE: If it is a file you can print, touch the Print tab on the right. Only files
in a format that can be printed are displayed.
3. Select desired original file.
24
bizhub C754/C654 print job shops
4. Touch Print.
5. Basic & Application
screen comes up.
6. If necessary, specify
any other print settings
by touching Colour tab,
Paper tab, 2-Sided tab
or Finishing tab.
7. Press Start.
25
bizhub C754/C654 print job shops
SELLING POINTS
•
•
•
•
•
•
•
•
•
•
•
•
•
•
•
The ability to print documents from any source.
Enable print shop environments to handle versatile media to generate output.
No laptop boot up required.
Can I have that file? — quick print.
Load files on thumb drive – go to meeting – download at device
– no PC required.
Real Estate – upload house to prospect.
Financial/Mortgage – Loan documents, supporting documentation, capture
information, electronic file.
Legal – in the courtroom, print necessary documents on the spot from
files on USB. No need to recess and reconvene just for documentation
– reduces court costs.
Medical vertical – Multiple MFPs not networked, different domains, Scan-Print.
Local Mom/Pop Stores, UPS stores, PFP applications.
Me Too!! Toshiba, Sharp etc. already has it.
Carry large print files from office to office.
Portable backup of important job.
With our high-speed scanner – convenience.
To make it difficult for unauthorized personnel, when public user is ON
– external memory must be off.
LEGAL
VERTICAL
MARKETS
Useful Tips:
• Legal Professionals travel to court, their other offices, client
offices, etc. and having the ability to print documents from
a USB is useful.
EDUCATIONAL Useful Tips:
VERTICAL
• Quickly and easily print out JPEGs PDF and TIFF files for class
MARKETS
last minute by simply plugging your USB drive into the MFP.
26
bizhub C754/C654 print job shops
Multi Page Tri-fold Creation — PCL Print Driver
Pre-requisites
The tri-fold function is available with optional FS-534 or optional FS-535.
The FS-534, with optional SD-511 and FS-535 with optional SD-512 finishers
are capable of tri-folding a maximum of 3 pages at a time.
NOTE: The tri-fold function cannot be specified when the staple, punch, or saddle
stitch function is specified
APPLICATION
Sometimes an end user will have a multi page document prepared for folding such
as a A4 or A4 with a flyer or a rebate special, etc. They may want to print this
document, either single-sided or double-sided and apply a tri-fold to finish the
document for placing in envelopes. They want to place the image(s) of their digital
file on A4 Size Paper.
PROCEDURE
Open or create a 3-page original document; the page size must be A4.
Paper must be installed in one of the drawers or the Bypass Tray Landscaped (SEF).
TO SET UP A TRI-FOLD IN PRINT MODE
NOTE: You can specify the procedure for adjusting the binding position
for duplex printing.
If “Prioritize Arranging Papers” is selected, all pages can be processed to a suitable
quality by this machine because the binding position is adjusted after all the print data
is received. If “Prioritize Productivity” is selected, the printing process is performed
efficiently because the binding position is adjusted while the data is printed
simultaneously as it is being received. If you want to increase the print efficiency,
select “Prioritize Productivity.”
27
bizhub C754/C654 print job shops
TO SET UP A TRI-FOLD IN PRINT MODE
Steps/Keystrokes:
Open the File:
1. Type your name and some text on every page of the document.
2. From the Dropdown
menu, choose File
and Print.
28
bizhub C754/C654 print job shops
3. Go to the Printer Name
box and choose the
Konica Minolta MFP
PCL Printer.
4. Click on Properties.
From the Basic tab, you
will create your finishing
and output choices.
5. Ensure that the
Orientation is set
to Portrait.
6. Ensure that Original Size
dropdown menu to
indicate A4.
7. Leave Paper Size on
Same as Original Size.
8. Leave Paper Tray on Auto.
9. In the upper right side
of the print properties; leave output method on Print.
10. Click on the Finishing tab.
11. Click on Fold.
12. From the Fold dropdown
menu, click on Tri-fold
(By Copy).
NOTE: This selection folds
all of the pages together
at one time (maximum 3
sheets can be tri-folded).
The other selections fold
each page separately.
29
bizhub C754/C654 print job shops
13. Leave Paper Arrangement Field at the Prioritize Arranging Papers default.
14. Click on OK.
15. Click OK.
16. Go to the bizhub MFP to retrieve your document.
30
bizhub C754/C654 print job shops
Secure Print — PCL Print Driver
SECURE PRINT
A user selects Secure Print at the print driver when the user needs to print a document
that only they must retrieve from the MFP output tray. The document will be “printed”
to a secure User Box and cannot be accessed, printed, or even viewed without first
entering its authentication data at the MFP.
Secure Print is a very powerful feature as it allows security control of a document
“on the fly.” The security data is imposed on the document in the print driver as
a one-time function that applies only to that specific printing of that specific document
at that specific time. No prior programming is required to use Secure Print.
‘OPTIONAL’ PRE-REQUISITES
NOTE: The ID and password that is required for “Secure Print” in the print driver
can be pre-registered by clicking the [User Settings] button under “Output Method”
in the Basic tab. If the ID and password are already registered, the dialog box to enter
the ID and password does not appear when “Secure Print” is selected. When password
rules are enabled on the bizhub MFP, the passwords that can be used for secured
printing are limited and the jobs are deleted when a password that does not comply
with the password rule is entered. For the password rules, refer to the User’s Guide
[Copy Operations].
APPLICATION
Your end user has a document prepared and wants to print the document
to the bizhub MFP. However, they do not plan on retrieving the document until
later in the day. They need to have the document safeguarded from other people
in the organization being able to view or retrieve it.
31
bizhub C754/C654 print job shops
PROCEDURE
TO SET UP A “SECURE PRINT” IN PRINT MODE
Steps/Keystrokes:
Open the File (in this case a new Word document):
1. Type your name on the document.
2. From the Dropdown
menu, choose File,
and Print.
3. Go to the Printer Name
box and choose the
Konica Minolta MFP
PCL Printer.
4. Click on Properties.
32
bizhub C754/C654 print job shops
5. From the Basic tab,
confirm Original
Orientation indicates
Portrait.
6. Leave Paper Size
on Same as Original Size.
7. Leave Zoom on Auto.
8. Confirm Paper Tray
on Auto.
9. On the upper right side of
the Basic tab you will see the Output Method dropdown menu; change
the output method from Print to Secure Print (2nd field listed).
10. A User Settings dialog box will open.
11. Enter Secure as
the Secure Print I.D.
and x as the Password.
12. Click OK three times.
“Output Method” menu is
where you designate your
document to be printed
in “Secure Document”
mode.
EDUCATIONAL Useful Tips:
VERTICAL
• Protect student data and information by printing to a secure
MARKETS
User Box that cannot be accessed, printed or viewed without
entering its authentication data at the MFP. secure User Box
and cannot be accessed, printed, or even viewed.
33
bizhub C754/C654 print job shops
Retrieving a Secure Print at the bizhub MFP
NOTE: Secured documents are automatically deleted as soon as they are printed,
or after a set length of time after they are registered. The default setting is specified
as “1 day”. The setting can be specified in the administrator mode so that it can be set
to best meet the customer’s needs. For details, refer to “To specify the ‘Secure Print
Document Delete Time Setting’ parameter” on page 10-34 of the Print Operations
User’s Guide.
A secure document that was printed can be deleted manually in the Administrator
mode. For details, refer to “To delete secure print documents” on page 10-33
of the Print Operations User’s Guide.
For details on specifying a setting for “Secure Document Access Method,” refer
to Copy Operations User’s Guide.
1. Press the Box icon on the Home Screen.
2. Select System.
3. Select Secure Print.
34
bizhub C754/C654 print job shops
4. Type in the Document ID
that you entered in the
print driver – (in this
case, Secure).
5. Type in the password
for the ‘Secure Print
Document’ – (in this
case, x), touch OK.
6. Select the document by
touching the Thumbnail
and touch Print.
7. Press the Start key
in the control panel
(To cancel printing
the job, touch Cancel).
8. The document is printed.
If necessary, the print
conditions can be changed.
35
bizhub C754/C654 print job shops
Placing a Watermark on a Print Job
Pre-requisites
You will need a Word document or any document ready to print from your PC.
APPLICATION
Your customer wants the ability to place watermarks such as Confidential, Do Not
Copy, Draft and Proof, etc. on certain printed documents.
CREATE A WATERMARK FROM THE PCL PRINT DRIVER
Steps/Keystrokes:
1. From the document
select File.
2. Select Print.
3. Select the MFP PCL
print driver.
4. Click on Properties.
5. Select the Stamp/
Composition tab.
6. Check Watermark.
7. Select TOP SECRET from
the dropdown menu.
36
bizhub C754/C654 print job shops
8. Select Edit under
Watermark.
9. Under Text Colour
select Black.
10. Under Angle type 45.
11. Click OK.
12. Click OK.
13. Click OK.
LEGAL
VERTICAL
MARKETS
Qualifying Questions:
• Do you have legal documents that you want to mark:
Confidential, Draft, Do Not Copy, and Attorney’s Eyes Only?
Useful Tips:
• Attorneys work on legal cases and draft up pleadings, briefs
and many legal documents that are not ready to be distributed
and are marked as Confidential, Draft, etc.
37
bizhub C754/C654 print job shops
Booklet Creation from the PCL Print Driver
— Booklet A3 FS-534
Pre-requisites
You will need an eight page, A4 Word document with text. In addition,
you must load legal size A3 paper in one of the paper trays.
APPLICATION
Your customer has to create an A3 stapled and folded booklet from
a word document that is A4.
TO SET UP BOOKLET CREATION FROM THE PCL PRINT DRIVER
Steps/Keystrokes:
1. From your Word Document select File.
2. Select Print.
38
bizhub C754/C654 print job shops
3. Select the MFP PCL
Print Driver.
4. Click on Properties.
5. Under the Basic tab
the Original Size should
be set to A4 and the
Paper Size should
be set to A3.
6. Notice the view of your
selection in the upper left
corner of the print driver.
This confirms your
selection of an A4
original to an A3
output.
7. Click on the Layout
tab, go to Print Type
dropdown menu
and select Booklet.
8. Notice the view of
your selections in
the upper left corner
of the print driver.
9. It now shows the original
size, the output size, and
the booklet selection.
39
bizhub C754/C654 print job shops
10. Under the Finish tab,
select Center Staple
and Fold.
11. Notice the view of your
selections in the upper
left corner of the print
driver.
12. Click OK.
13. Click OK again and your
booklet will be delivered
to the booklet output tray.
EDUCATIONAL Useful Tips:
VERTICAL
• Create custom marketing materials, newsletters and other
MARKETS
brochures to market and promote events, keep parents and
the local community informed of recent and relevant news
at schools or universities.
40
bizhub C754/C654 print job shops
Banner Printing via Emperon Controller
Pre-requisites
You will need one banner size original with text or graphics in digital format. If you don’t
already have a file, Powerpoint is the easiest program for creating a banner and doesn’t
require a change to the system settings of the print driver. You will also need banner
sized paper to feed into the bypass tray.
CREATE A BANNER
1. Open a blank
Powerpoint Document.
2. Click File and Page Setup.
3. Select Landscape as
the Slide Orientation.
4. Select Original Size
and select Custom
Size Settings.
5. Enter the Width as 210mm
and the Length as 1200mm
.
6. Check OK.
41
bizhub C754/C654 print job shops
7. Add pictures and/or text
to customize your banner.
AT THE MFP
1. Touch the Utility icon on the Home Screen.
2. Touch Banner Printing.
3. Touch Allow.
4. Touch OK.
5. Place banner paper
in the bypass of the MFP
(be careful to adjust the
paper guides precisely
to the correct setting).
42
bizhub C754/C654 print job shops
PRINTING THE BANNER
1. Open your banner original.
2. Click File/Print.
3. Choose the Konica Minolta MFP Printer.
4. Click Properties.
NOTE: The proper size of the banner paper is not displayed at this time if you
are starting at this point. Steps 5 through 10 are a review of the steps covered
in the “Create a Banner” section of this Job Shop.
5. Click Original Size. Remember your original document should be
in banner format.
6. Scroll down to Custom Size.
7. Click Custom Size – a dialogue box will open.
8. Enter the Width and Length of the banner paper (in this case 210mm wide
x 1200mm long).
9. Click OK. A dialog box will appear to Confirm Setting Changes. Click Yes.
NOTE: Banner Printing can only be done on Thick 1 paper. The printer driver
will automatically choose this setting.
10. Click OK.
NOTE: The size of the banner is now properly displayed in the Preview window.
11. Click OK. The MFP may display the message; “Correctly position the paper
in the bypass tray”. If so, pull the paper out and reset it. Make sure the paper
is resting on the paper sensor on the bypass tray. When the Complete key
activates, the MFP is ready to print. Touch Complete.
12. Exit Banner Mode when the print job is complete.
13. Touch Yes to confirm.
NOTE: It is necessary that banner pages in excess of 20 inches be “fed” into
the bypass. If one person is doing the printing, the paper may be inserted
after the print job is sent. However, the programming for banner Printing must
be performed at the onset of the operation.
43
bizhub C754/C654 print job shops
SELLING POINTS
• Allows Party Stores to create banners for all occasions, providing a highly
viable added source of income.
• Enables various departments within a company to create signs
for different events.
• Enables all customers to create their own form of advertising
or announcements.
EDUCATIONAL Useful Tips:
VERTICAL
• Enable departments and schools to create signs and advertising
MARKETS
for school/university events.
44
bizhub C754/C654 print job shops
Access the Eco-Indicator
1. At the Home screen
touch Counter.
2. On the Meter Count
screen touch Eco Info.
3. Tab 1 indicates how
Green the usage of
the MFP has been.
4. Tab 2 provides Power
Mode information.
45
bizhub C754/C654 print job shops
Job History Thumbnail Display
OVERVIEW
This function will display the first page of the job selected in the Job History log
on the left-side pane of the LCD screen on the MFP.
APPLICATION
A manager at a large brokerage firm wants to track down who copied an anonymous
hate letter and passed it off to a colleague. They want to track down the precise
computer it came from to begin their IT detective work. They called you to see if there
is a time saving feature, which will help them identify the document in the Job History
Log. You tell them about Job History Thumbnail Display, and how to enable it.
TO ENABLE JOB HISTORY THUMBNAIL DISPLAY
Steps/Keystrokes:
1. Press the Utility Icon.
2. Touch #3 Administrator
Settings...
46
bizhub C754/C654 print job shops
...and enter
1234567812345678.
3. Touch OK.
4. Touch #0 Security
Settings.
5. Touch #4 Security Details.
6. Touch Down Arrow !
in the lower left and
scroll to page 3 of 3.
7. Select Job History
Thumbnail Display.
47
bizhub C754/C654 print job shops
8. Select ON.
9. Touch OK 2 times and
Close 3 times until you are
back at the Basic screen.
AT THE MFP — TO VIEW JOB HISTORY THUMBNAIL DISPLAY
Steps/Keystrokes:
1. Load an A4 Original into the document feeder and make a copy.
2. Select Job List in the
upper right corner
of the LCD screen.
3. Touch Log tab.
4. Highlight your job in the
in the Job History Log.
5. You will see the first page
of the selected document
under the Scanned Image
Heading located on the far
left side of the control
panel.
6. Touch Close to exit
48
bizhub C754/C654 print job shops
Saving a Custom Paper Size in the Print Driver
APPLICATION
A user can set up a custom paper size and have it appear in the print driver as a paper
choice for printing specialized jobs.
PROCEDURE
1. From the computer
desktop screen
click Start.
2. Click on Printers
and Faxes.
3. Find the MFP and
right click and
select Properties.
4. Click on the Settings tab.
49
bizhub C754/C654 print job shops
5. Select Save Custom Size.
6. Click Add and type
the paper name:
in this case Banner.
7. Type in the dimensions
of the paper: width 210mm
and length 1200mm.
8. Click OK twice to exit
printer settings.
To verify the paper size
is in driver.
9. Right click on Printing Preferences for the same MFP.
10. Click the dropdown for Original Size.
11. Scroll to find the new paper size.
50
bizhub C754/C654 print job shops
Setting Up Account Track at the MFP
Pre-requisites:
No originals will be required. The objective of this job shop is to instruct you in setting
up Account Track at the MFP. Account Track must be enabled at the MFP in order
to use the Account Track via the Print Driver (instructions provided in a separate Job
Shop). It is also necessary to enable Account Track in the Print Driver (instructions
provided in a separate Job Shop).
APPLICATION
The ability to track usage by end-user is a requirement in those environments that
wish to track costs or chargeback the end user and/or department. When Account
Track has been enabled on the device, the user will need the proper credentials
to print to the device in order for the prints to be applied against the limit that has
been established for them. If no limit has been set, then account track is used
to track the number of copies and/or prints that have been generated
AT THE MFP
If not on the Home screen touch the Menu key on the Control Panel
.
1. Touch the Utility icon.
2. Touch Administrator Settings.
3. Enter Password (default is 1234567812345678) and touch OK.
4. Touch User Authentication/Account Track.
5. Touch General Settings.
6. Touch Account Track.
7. Touch ON.
8. Touch Account Track Input Method.
9. Touch Account Name & Password (Password Only selection is also available).
10. Press ! to program “When # of Jobs Reach Maximum” setting.
a. Touch Stop Job ( when user reaches their established job limit, their jobs
will cease printing).
b. Touch OK.
51
bizhub C754/C654 print job shops
11. When prompted “Are you sure you want to clear all data?”, press Yes.
12. Touch OK and you will get a message indicating that the data is being
processed. When the message clears, proceed with the next step.
13. Touch Account Track Settings.
14. Touch Account Track Registration.
15. Select available Registration Key 001-1000. Select 001 (pick a different
registration key if this one is not available).
16. Touch Edit.
17. Touch Account Name and enter Marketing.
18. Touch OK.
19. Touch Password and enter test.
20. Touch Password Confirmation and enter test.
21. Touch OK.
22. Touch Close 5x.
EDUCATIONAL Useful Tips:
VERTICAL
• Track printing and copying by department and users with
MARKETS
account tracking you can set up accounts with usernames
and passwords by department, school, teacher or user and
track copy limits, set printing limits and colour printing capabilities.
52
bizhub C754/C654 print job shops
Enabling Account Track via the Print Driver
Pre-requisites:
Account Track must be enabled at the MFP in order to use the Account Track feature
available in the driver.
APPLICATION
The ability to track usage by end-user is a requirement in those environments that
wish to track costs or chargeback the end user and/or department. When Account
Track has been enabled on the device, the user will need the proper credentials to
print to the device in order for the prints to be applied against the limit that has been
established for them. If no limit has been set, then account track is used to track
the number of copies and/or prints that have been generated.
This setting allows the user to set the account track
information in the Print Driver Properties screen so
that the user doesn’t have to enter their credentials
every time they send a print job to the device.
The steps required to access
the Printer (and Fax) Settings
will vary based on the Windows
operating System.
1. Click Start.
2. Click Settings.
3. Click Printers And Faxes.
4. Right Click on desired bizhub MFP Printer.
5. Select Properties.
6. Select Configure Tab.
7. Highlight Account Track in Device Option window.
8. In the Setting Menu,
select Enable (If Account
Track has been enabled
at the MFP, this setting
will already be enabled
in the Print Driver).
9. Click OK.
10. Exit from Printer
and Faxes.
53
bizhub C754/C654 print job shops
Using Account Track from the Print Driver (From the PC)
Pre-requisite:
Account Track must be enabled at the MFP.
1. From the application (Word, Excel, PPT, etc.), select File Print.
2. Select MFP PCL Driver.
3. Click Printer Properties.
4. Click Basic tab.
5. Click Authentication/
Account Track.
6. Enter Marketing in the
Department Name field.
7. Enter test in
Password field.
8. Click OK in the User
Authentication/Account
Track Print Driver screen.
9. Click OK in the Basic Tab
Print Driver screen.
10. Make desired Print
Settings (All pages,
current page, number
of copies, etc.).
11. Click Print.
54
bizhub C754/C654 print job shops
Setting Up User Authentication at the MFP (Restrict Public Access)
Pre-requisites:
No originals will be required. The objective of this job shop is to instruct you in setting
up an authorized user to provide them access to the MFP. This step is required
in order to access User Authentication via the Print Driver. User Authentication is set
up via Administrator Setting so you will need the Administrator password. The default
Administrator password is 1234567812345678.
APPLICATION
User Authentication will allow Administrators and/or Office Managers the ability
to set up “passwords” and “user names” that will permit authorized end-users access
to the MFP. This will eliminate any unwarranted copying use of the unit from the MFP
control panel.
AT THE MFP
If not on the Home screen touch the Menu key on the Control Panel
1. Touch the Utility icon.
2. Touch Administrator
Settings.
3. Enter Password (default
is 1234567812345678)
and touch OK.
.
The Authentication Method will vary based on
customer’s needs. Overall, user authentication
set up is the same. However, additional settings
are required when External Server, MFP +
External Server or Enhanced Server are
selected as the User Authentication Method
since communication with a server is required.
Please refer to User’s Manual for details and
consult with Network Administrator.
4. Touch User
Authentication/Account Track.
5. Touch General Settings.
6. Touch User Authentication.
7. Touch Authenticate.
a. Touch ON (MFP) as the Authentication Method.
b. Touch OK.
8. Touch Public User Access.
9. Select Restrict.
55
bizhub C754/C654 print job shops
10. Touch OK.
11. When prompted “Are you sure you want to clear all data?”, press Yes.
12. Touch OK and you will get a message indicating that the data is being
processed. When the message clears, proceed with the next step.
13. Touch User Authentication Settings.
14. Touch User Registration.
15. Select available Registration Key 001-1000. Select 001 (pick a different
registration key if this one is not available).
16. Touch Edit.
17. Touch User Name and enter Mark.
18. Touch OK.
19. Touch Password and enter KMBS.
20. Touch Password Confirmation and enter KMBS.
21. Touch Email and enter Email Address (i.e. [email protected]).
22. Touch OK.
23. Touch Function Permission and enter Function Permission Settings.
24. Touch OK.
25. Touch OK.
26. Continue with steps #15-#25 until all authorized users have been registered.
27. Touch Close 5x.
56
bizhub C754/C654 print job shops
Enabling User Authentication via the Print Driver
Pre-requisites:
User Authentication must be enabled at the MFP and in the Printer Driver Properties
Menu in order to use the User Authentication feature available in the driver.
APPLICATION
The ability to restrict access to authorized users is a requirement in those environments
that want to prevent unauthorized users from using the MFP or keep track of who
is using the device.
1. Click Start.
2. Click Settings.
3. Click Printers And Faxes.
4. Right Click on desired bizhub MFP Printer.
5. Select Properties.
6. Select Configure.
7. Highlight User Authentication in Device Option window.
8. In the Setting Menu,
select the desired
Authentication Method:
ON (MFP), ON (External
Server), ON (MFP)+ON
(External Server) or
ON (Enhanced Server).
The steps required to access the Printer
(and Fax) Settings will vary based on the
Windows Operating System.
9. Click Settings Tab.
57
bizhub C754/C654 print job shops
10. Click Authentication
Settings.
11. Click Verify
Authentication Settings
Before Printing.
12. Click Popup
Authentication Dialog
When Printing.
13. Click OK.
58
Authentication Settings selected will
vary depending on customer’s needs.
bizhub C754/C654 print job shops
Using User Authentication from the Print Driver (from the PC)
Pre-requisite:
User Authentication must be enabled at the MFP.
1. From the application (Word, Excel, PPT, etc.), select File Print.
2. Select MFP PCL Driver.
3. Click Printer Properties.
4. Click Basic tab.
5. Click Authentication/
Account Track.
6. Enter Marketing in
the User Name field.
7. Enter test in
Password field.
8. Click Verify to ensure that
the MFP recognizes you
as an authorized user.
If the verification process
is not successful, it alerts
you that something is
not set up correctly
and prevents you from
walking up to the device
to find out your print job
did not print.
9. Click OK in the User
Authentication/Account
Track Print Driver screen.
10. Click OK in the Basic Tab Print Driver screen.
11. Make desired Print Settings (All pages, current page, number of copies, etc.).
12. Press OK.
59
notes
Konica Minolta
Business Solutions Australia Pty Ltd
Free Call 1800 789 389
konicaminolta.com.au
New South Wales
4 Drake Avenue
Macquarie Park NSW 2113
(02) 8026 2222
Victoria
21-29 Moray Street
Southbank VIC 3006
(03) 8699 0777
Queensland
64 Brookes Street
Bowen Hills QLD 4006
(07) 3872 9100
ACT
Unit 1, Ground Floor
55 Wentworht Avenue
Kingston, ACT 2604
(02) 6206 6500
South Australia
255 Gilbert Street
Adelaide SA 5000
(08) 8231 2911
Western Australia
GF/ 140 Hay St.,
Subfiaco, WA, 6008
(08) 9479 6600
The Konica Minolta logo and the symbol mark, are registered trademarks or trademarks of
Konica Minolta Holdings, Inc. bizhub, PageScope, Simitri and the Emperon logo are registered
trademarks or trademarks of KONICA MINOLTA BUSINESS TECHNOLOGIES, INC.
Windows is registered trademark of Miscrosoft Corporation in the United States and other countries.
Adobe and PostScript are registered trademarks or trademarks of Adobe Systems Incorporated.
All other brand and product names are registered trademarks or trademarks of their respective owners.